Embed Size (px)
Citation preview

Page 1
Car Security Installation Guide
Car Electronics Resource Center
In This Guide: Vehicle security sys-tem installation requires knowledge of vehicle electrical systems, electronic components (such as relays, diodes and resistors), and data interface modules. This guide provides impor-tant information on how to prepare for a security system installation, general installation and connections steps, and helpful resources to guide you through the process. Phillips Screwdriver
or Allen Wrenches
Wire Cutters(Crimpers)
Cordless Drill w/ Drill Bits or Step Drill Bit
Digital Multimeter (DMM)
Tools and Supplies Needed:
Difficulty Level: Difficult Average Installation Time: 5-10 Hours
Wire Strippers
Before You BeginImportant
This content has not been verified by Amazon for accuracy, completeness, or otherwise. Consult your vehicle’s owner’s manual and the product’s manual before attempting an installation. Contact the product’s manufacturer or consult a Mobile Electronics Certified Professional installer if you are uncertain about how to properly install your product. Amazon attempts to be as accurate as possible, however, because of the number of vehicles and products available to consumers, it is not possible to provide detailed installation steps that apply universally to all vehicles and products. Amazon does not warrant that product descriptions or other content of this site is accurate, complete, reliable, current, or error-free. Further, Amazon disclaims any warranties, express or implied, as further set forth in the ‘Conditions of Use’ for Amazon.com.
Read all instructions carefully Disconnect the negative battery cable Protect interior surfaces
Note: Additional accessories such as wiring harness adapters, data interface modules, transponder interface modules, external sensors, and entry point switches may be required to complete the installation and are available for purchase on Amazon.com.
1 2
� ���
��
����
��
��
��
�
�
��� �����
����� ����
����
Electrical Tape
3
Blue Painter’s Tape(protects dash surfaces)
Towel(protects console)
Product Owner’s ManualInstallation Manual(s)
Zip Ties
Utility Knife
Sockets or Open End Wrenches
Panel Removal Tools
Cordless Soldering Iron
Butt Crimp Connectors
Security System

Car Electronics Resource CenterPage 2
Car Security Installation Guide
Direct Wire-to-Wire ConnectionThis installation method involves direct wire-to-wire connections between a security system’s wire harness and the vehicle’s wiring. Direct wire-to-wire connection is com-monly used in vehicles without on-board engine and body control computers (typically vehicles manufactured pre-1980s). Still, some security system input and output wiring configurations are not compatible with all vehicles and may require additional electronic components.
The security system inputs control the ‘triggers’ that respond to events, such as a door opening or ignition system activating. The security system outputs control how the se-curity system responds to triggers, such as sounding the siren, flashing the parking lights, engaging a starter interrupt, or activating the power door locks. Input wiring is typi-cally more straightforward to connect than output wiring because it only needs to match the vehicle’s circuit polarity (+12 volts or chassis ground). The outputs of a vehicle security system must provide the same polarity and electrical current to activate the vehicle’s circuits. Examples of this include the power door locks circuit and parking lights circuit, which security systems often control.
Security System Architecture – What You Need To KnowThere are two types of security system installations. One requires direct wire-to-wire connections and additional components, such as relays, diodes, and resistors, to interface with the vehicle’s electrical system. The second type of installation uses a data interface module that connects to and interfaces with the vehicle’s on-board computer control network.
Soldered Direct Wire-to-Wire Connection Example
Crimped Direct Wire-to-Wire Connection Example
Factory Wiring
Factory Wiring
Security System Input and Output Wires
Security System Input or Output Wire
Security SystemControl Unit

Car Electronics Resource CenterPage 3
Car Security Installation Guide
Security System Architecture – What You Need To Know (Continued)
Common Installation Parts
SPDT (Bosch Type) Automotive Relay
Silicon Diode (1N4001 1amp is commonly used)
Carbon Film 1/2 Watt Resistor (values of resistance vary by application)
Using Relays, Diodes, and ResistorsWhen the security system’s wire harness and the vehicle wiring are not configured for a direct wire-to-wire connection, electrical components such as diodes, relays, and resistors may be required.
• Relays – A relay serves as an electrical intermediary between the vehicle’s circuits and the security system’s input or output, which allows it to change the electrical polarity of a given function from positive (+) to negative (-) or vice versa. Relays also provide the ability to increase current capacity. For example, a 300mA output combined with a relay can safely provide up to 20 amps of current.
As an example, a security system may provide a positive (+) 12 volt output for a given function, like the parking lights, but the vehicle circuit may use a switched chassis ground to complete the circuit path, instead of switching +12 volts. In order to make the parking lights flash on/off, the +12 volt positive security system output needs to be ‘switched’ in electrical polarity from positive to negative.
• Diodes – These devices are used to isolate circuits from electrical connections to other circuits, and direct electrical current to flow in only one direction. Diodes allow multiple vehicle circuits to feed into a single security system wire without connecting all the vehicle circuits together.
As an example, a diode on each door trigger wire is used to ensure that each doors’ courtesy light is unaffected (not turned on) when other doors are open.
• Resistors – These devices limit current and, thus, reduce voltage. They are used to take a +12 volt positive or chas-sis ground signal and reduce the voltage delivered to the vehicle circuit. This is often required for +9, +7 and +5 volt vehicle circuits that are commonly used in year model 2000 and newer ‘computer equipped’ vehicles.
As an example, a resistor is typically used for low voltage circuits, such as when +5 volts, instead of +12 volts, is required to turn on parking lights or trigger door locks.
Keep in mind that installing relays, diodes, and resistors requires advanced knowledge in electronics. These compo-nents are available for purchase on Amazon.com.

Car Electronics Resource CenterPage 4
Car Security Installation Guide
Data Interface ModulesFor vehicles with on-board computers and communication networks, aftermarket security system manufacturers offer devices called data interface modules. These devices ‘talk to’ the vehicle’s communication network and process input triggers and output commands between the security system and the vehicle. Using a data interface module can simplify an otherwise complex installation; however, this method requires a vehicle-specific data interface module that connects to the vehicle’s on-board computer network wires.
With the exception of the main security system power and chassis ground, this approach eliminates the requirement for direct wire-to-wire connections to the vehicle. Still, some input or output functionality may not operate through a data interface module. If the data interface module does not recognize certain vehicle data (or there is an unexplained electronic conflict), hard wiring the circuit with a direct wire-to-wire connection from the security system to the vehicle may be necessary. This may be required for a door trigger input or ignition input.
Data interface modules are vehicle specific and apply only to vehicles with on-board computers. Data interface modules are often used in vehicles with Controller Area Network (CAN) data bus systems; this includes most 2008 or newer cars and light trucks sold in the US. However, data interface modules do not operate with every vehicle, including some with on-board computers.
Security System Architecture – What You Need To Know (Continued)
When to Consider Professional Installation: Before attempting any DIY security system installation, assess your comfort level disassembling vehicle interior panels, reading vehicle-wiring schematics, and testing electrical circuits with a Digital Multimeter (DMM). Also ensure you have the recommended tools for the job. Many independent retail installation shops welcome jobs with products purchased on Amazon.com. Always look for a Mobile Electronics Certified Professional (MECP) installation technician to handle your most challenging installation needs.
Data Interface Module Examples
Security System
Vehicle Data Network
Data +
Data -Data Interface
Module
Factory Data Network Wiring
Security System Input and Output Wires

Car Electronics Resource CenterPage 5
Car Security Installation Guide
Identify Vehicle Circuits Identify the vehicle electrical circuits to determine whether a direct wire-to-wire installation is necessary or if a data interface module connection is possible. Depending on the vehicle’s electrical circuit polarity and voltage, and whether the security system has the ability to configure the input or output electrical characteristics, additional electronic components such as relays, diodes and/or resistors may be required for direct wire-to-wire connections. Vehicle-specific automotive wiring schematic resources are located on www.eAutoRepair.com, www.AllDataDIY.com and aftermarket web re-sources like The12volt, Installogy, Modified Life and Commando Security.
The circuits you need to identify and later test with a Digital Multimeter (DMM) include:• Parking Light Circuit • Ignition Circuit• Door Lock/Unlock Circuit • Starter Circuit• Door Open/Dome Light Circuit • Trunk/Hatch Open Circuit• Hood Open Circuit (if aftermarket pin switch is not used)
General Pre-Installation InformationThis section contains general information about vehicle security system installation, online resources, and connecting security system inputs and outputs.
Review the Security System Installation Manual(s) Always review the entire security system installation manual before beginning the installation. An understanding of the security system’s input and output wiring, along with the vehicle’s specific wiring information (including circuit polarity and connection locations), is necessary to install the security system safely and correctly.
• Security systems often require additional components such as single pole, double throw (SPDT) automotive relays, silicon diodes, and resistors to correctly interface into vehicle circuits.
• Websites such as WireSheet or The12volt include tutorials on the use and application of these electronic components.
• Plan each connection in advance to determine the components needed and the best method to make a given connec-tion between the vehicle wiring and the security system.
When using a data interface module, review its installation manual and pay close attention to each wire connection. Data connections may not completely eliminate the need for all hard wired connections in every case. Therefore, even with a data interface module, you must determine which hard-wired connections are required by reviewing the specific installation instructions and technical notes available on the module interface manufacturer’s website. Also note any vehicle-specific limitations that require wired connections for specific features such as flashing parking lights or a hood pin switch. Main (+) 12 volt power and chassis ground connections for the data interface module can also be used for the security system. Data interface module connections to vehicle wiring should always be soldered.
AllData and eAutoRepair vehicle wiring schematics provide detailed
information about the vehicle circuits into which a security system connects.
Security System Installation Manual(s)
Review the security system installation manual(s), along with each wire, to identify which wires need to connect in your installation. Not all security system wires are always connected in every installation.

Car Electronics Resource CenterPage 6
Car Security Installation Guide
Power and Chassis GroundAll security systems rely on a secure, constant +12 volt power and chassis ground connection. Power connections should be made at the battery or at the large-gauge wired input to the factory fuse/relay panel, usually found under the hood near the battery. Chassis ground connections should be made to a solid metal part of the car body, rather than in the dash area. This ensures a good electrical connection. The kick panel area is often a good ground area because of its proximity to the security system control unit, which is often installed under the driver’s side dash area.
Ignition PowerSecurity systems require +12 volt ignition power that is switched by the vehicle’s key. This lets the security system ‘know’ when the car is on and being started (or attempting to be started). When the security system is armed, this becomes a trigger point for the alarm. This must be a ‘true ignition’ source, not an accessory power source like that used for in-dash receiver installations. The difference is that a true ignition source stays powered while the engine is cranking, whereas an accessory source loses power while the engine is cranking. The true ignition source is an important input for detecting ‘hot wiring’ or other car theft methods that bypass starting the car with a key. Security systems are usually configured to only accept a positive polarity ignition input. Some systems allow configuration of negative polarity ignition inputs.
Security System InputsAlways refer to the security system’s installation manual to determine the electrical polarity (positive or negative) of an input, as well as whether it is configurable to the ve-hicle wiring.
Vehicle Entry Points - DoorsThe door trigger inputs of a security system connect to the same door pin switch circuit(s) that trigger interior lighting. A pin switch is an electrical device that uses a ‘plunger’ that moves in and out to complete or break an electrical circuit. Depending on the vehicle, there may be a single connection available that electrically con-nects with all doors or each door may require its own connection. Since the security system only provides one door trigger input, when multiple doors are individually wired, diodes must be used on each connection to isolate each circuit from the other doors. This individual door trigger circuit is found in vehicles with ‘door ajar’ indicators and information messages, or courtesy lighting for the specific zones that activate when a specific door is opened. The security system is generally configurable to accept positive or negative polar-ity door triggers.
Ignition power is usually found in larger gauge wiring in the area of the key
switch
Ignition power is active in the “ON” and “START” key positions
Factory door pin switches are usually located in the door jambs or at the ends
of the dash
Vehicles with isolated door pin switches often have a dash indicator or ‘DOOR
OPEN’ message for each individual door
If diodes are required for each door pin switch connection, use Silicon
Diodes, part number 1N4001 with a 1amp
capacity

Car Electronics Resource CenterPage 7
Car Security Installation Guide
SensorsThese devices use electronic components with solid state logic circuitry to detect a specific action such as an impact to the vehicle (utilizing a piezo-electric transduc-er) or the sound of breaking glass (utilizing an interior-mounted microphone). Based on stimulus, such as impact to the vehicle, the logic circuitry determines if the sensitivity threshold is exceeded and, if so, sends a trigger to the security system.
Regardless of sensor type, the wired connections are similar. The sensor has at least three wires to connect. Those wires include +12 volt power, chassis ground, a negative trigger, and (in some cases) a warning trigger for smaller disturbances not intended to trigger the full alarm cycle. Many sensors come pre-wired with ‘plug in’ connectors that attach to the main security system control unit and do not require additional connections. Some security systems have basic impact sensors built in to the main control unit and do not require additional wire connections.
Review the Car Security Basics Buying Guide for details about the function of each sensor type and their intended uses.
Security System Inputs (Continued)
Vehicle Entry Points - Trunk/HatchThe trunk/hatch trigger is easily connected to courtesy lighting that illuminates when the trunk or hatch is open. The trunk/hatch circuit should be a separate circuit that does not trigger other interior lighting. An aftermarket pin switch can be added if the vehicle lacks trunk lighting or an isolated switch. The security system is usually preset to accept only negative polarity trunk/hatch triggers.
Vehicle Entry Points - HoodIt is often easier to install an aftermarket pin switch to monitor the hood, even if a factory hood pin switch is present. Standard pin switches are typically included with the security system for this reason. Weather-resistant and sealed pin switches are ideal for this application and are available on Amazon.com. The pin switch attaches to a metal part of the vehicle where the hood closes, such as the radiator core support, and provides a negative trigger to the security system when the hood is opened. The security system is usually preset to accept only negative polarity hood pin switch triggers, so the connection is direct and requires no additional electronic components or modules if an aftermarket pin switch is used.
Impact Sensor with pre-warning trigger and plug in harnessAngled and Straight Pin Switch Examples
A trunk courtesy light or indicator in the dash area confirms the presence of a
factory trunk switch
Angled Bracket for Straight Pin
Switch

Car Electronics Resource CenterPage 8
Car Security Installation Guide
Flashing Parking LightsFlashing the parking lights is a visual deterrent when the alarm is activated, but it is also a visual indicator of receiving (and responding to) remote control commands from the vehicle owner. This is a convenient way to confirm the armed or disarmed status of the security system without having to check the LED status indicator inside the vehicle.
Vehicle parking light circuits can be positive or negative polarity. In year 2000 and newer models, it may be a low voltage +5 volts DC circuit, instead of +12 volts DC. Low voltage lighting trigger circuits are common in vehicles with automatic headlamps that turn on when it is dark. Security systems are usually configurable to output positive or negative polarity flashing parking light commands. Low voltage car circuits may require one or more resistors to drop the security system’s output volt-age to match the vehicle’s circuit operational voltage. Some security systems allow high current outputs (up to 10a) for direct connection to +12 volt triggered parking light circuits.
Security System OutputsAlways refer to the security system’s installation manual to determine the electrical polarity (positive or negative) of the output, as well as whether it is configurable to suit the vehicle wiring. In cases where direct wire-to-wire connections are used, the output must also support adequate current to supply the circuit.
Door Lock/UnlockMost security systems can be wired to control power door locks. If the vehicle lacks power door locks, they can be added using retrofit power door lock kits available for purchase on Amazon.com.
Vehicle power door lock circuits can be positive or negative polarity, reverse ‘rest at ground’ polarity, or (in year 2000 and newer models) may use low voltage +5 volts DC for lock and +3 volts DC for unlock on the same wire, instead of +12 volts DC on separate lock and unlock wires. Low voltage door lock trigger circuits are common in vehicles with factory remote keyless entry and push button ignition systems. Security systems are usually configurable to output positive or negative polarity door lock/unlock commands. Positive switching and reverse polarity circuits often require relays because the current requirement exceeds the security system outputs. Low voltage circuits require resistors (possibly one or more SPDT relays).
The headlight switch area is usually the location where the security system’s flashing parking light
output (or relay) connects
Power door locks can be added to a vehicle with complete retrofit kits, including vehicles with newer cable driven locks
as shown in this example

Car Electronics Resource CenterPage 9
Car Security Installation Guide
Starter InterruptThis function prevents the vehicle from being started. This usually requires you to cut a specific wire near the vehicle’s ignition switch which triggers the starter circuit when the key is turned to the ‘START’ posi-tion. Connecting a relay (either on-board the security system or externally mounted) to the cut wires enables or disables the circuit operation, and becomes the gateway to control the circuit of this feature. When the security system is sounding, the starter is disabled to prevent ‘hot wiring.’
Vehicle starter circuits can be positive or negative polarity. Most often they are positive polarity. In year 2000 and newer models, starter circuits may be low voltage such as +5 volts DC, instead of +12 volts DC, or a dedicated starter wire may be absent (such as in certain push button ignition vehicles). Refer to the vehicle’s wiring diagram to determine which wire controls the starter circuit. In some manual transmis-sion vehicles, the security system manufacturer may suggest interrupting the clutch switch, if no dedicated starter wire is present. Any starter interrupt connec-tions to vehicle wiring should be soldered. Follow the specific security system installation instructions for connection of a starter interrupt relay.
Security System Outputs (Continued)
Siren, LED, and Valet SwitchThe siren should install under the hood facing downward so it does not collect water. The security system provides a positive or negative output to power the siren. The siren has two wires. One connects to the output of the system; the other connects to the opposite polarity of the output (see below):
• If the system provides a positive siren output, connect to the positive siren wire. The re-maining siren wire must connect to chassis ground.
• If the system provides a negative siren output, connect to the negative siren wire. The remaining siren wire must connect to the same source of +12 volts as the main security system power.
The LED status indicator light is a theft-deterrent feature that confirms the armed/disarmed status of the security system. The LED can be built into an extended range antenna that attaches to the windshield or it can stand-alone by mounting it through a small hole drilled in a dash panel. The LED should be vis-ible from both sides of the vehicle. A stand-alone LED has two wires and usually has a specific plug-in connector to the security system control unit for straight-forward connection. Follow the specific security system installation instructions for mounting and connecting the LED.
Many systems include a valet switch that, when combined with the use of the ignition key, temporarily bypasses the security system. Install the valet switch within reach of the driver’s left hand, while seated. If the valet switch is built into an extended range RF antenna, additional wired connections are not needed.
Security System Siren
LED indicators should be mounted in switch blanks or other panels that can
be replaced
Valet switch location under the left of driver’s side dash

Car Electronics Resource CenterPage 10
Car Security Installation Guide
Beginning the InstallationPrepare Security System Wire HarnessFollow these instructions to prepare the wiring harness for the security system:
1) Place the security system control unit on a workbench or stable surface.
2) Plug all wiring harnesses into the control unit, except sensors with pre-terminated plug-in connections.
3) Separate the wires into groups based on where the wires will be routed and the location of the control unit (typi-cally under the driver’s side dash). Common examples of wire groups are:
a. Wires routed under the hood – siren, main +12 volt power, hood pin switch
b. Wires routed to the ignition switch harness area – primary ignition and starter interrupt
c. Wires routed to the kick panel area – flashing lights, door pin trigger(s), door lock/unlock, chassis ground for the security system
d. Wires routed to the trunk – trunk pin switch, possibly other door triggers (such as side doors in a van or iso-lated doors in a 4 door vehicle)
4) Every six inches, tape or zip tie the wires together to keep the wiring organized. You can wrap wires in a group with electrical tape to completely hide the wire colors and give them a factory-like appearance.
5) The wire length supplied with the security system is typically sufficient to make connections in and around the dash area where the control unit is installed. For wiring extending into the engine compartment or the rear of the vehicle, security system harness wires can be extended by soldering or crimping extra wire, 18 AWG or larger (available on Amazon.com), as needed. The length required can be estimated with a measuring tape between the dash area and the final connection point of the extended wire(s).
Separate wires into groups that route to specific areas where they will connect to vehicle wiring
Additional wiring needs depend on the specific security system but may include:• LED (generally placed in the center of the dash area)• Valet Switch (generally placed under the dash near the driver’s side kick panel) • Extended Range RF Antenna (generally placed on the windshield, if present)• External Sensors (refer to the sensor installation manual for suggested placement and wiring)

Car Electronics Resource CenterPage 11
Car Security Installation Guide
Beginning the Installation (Continued)
Disassembly GuidelinesObserve these guidelines when removing panels under the dash, kick panels, door sill panels, ‘A-pillar’ windshield trim and/or trim panels on the dashboard:
• Clear and unobstructed access to the area under the dash (below the steering wheel) is required to make most connections. This often requires removal of plastic or leather cosmetic panels, as well as metal sub-dash structural panels.
• Always use a plastic pry tool to remove panels. Wedge the pry tool into the panel seam and gently pry to release the panel clip(s).
• Do not use screwdrivers to pry off plastic or upholstered panels. This will scratch or gouge the panels.
• If there are multiple panels that interlock, determine which panel is underneath, or on top, or if the panels are fit together with hidden clips. Look for seams between panels where one panel ends and another begins. This may require disassembly of one or more surrounding panels before you can remove the main dash panel(s).
• Look for hidden hardware behind switch panels, ashtrays, or in A/C vents. When prying the panel off, be aware of any panel areas that are still attached. There may be hidden screws in place.
• After removal, use plastic storage bags or containers to keep all hardware organized.
To locate basic disassembly information on your specific vehicle, visit www.scosche.com. Many vehicle service manuals with disassembly information, such as Haynes or Chilton, are available on Amazon.com.
Vehicle service manuals such as those produced by Haynes and Chilton provide many disassembly procedures for areas of the vehicle where security system
components are installed and connected
Plastic pry tools allow safe removal of ‘clipped in’ dash panels required to gain access to the driver’s
side under dash area
You may need to remove cosmetic (plastic) and structural (metal) panels under the dash to view and connect to vehicle wiring.

Car Electronics Resource CenterPage 12
Car Security Installation Guide
Place Security System Control UnitOnce the lower dash area is disassembled, place the security system control unit under the dash and secure it to existing wiring harnesses or non-moving parts with zip ties. Ensure that the control unit and wiring harness are not in the way of moving parts, such as the steering column, brake, or clutch pedal.
InstallationSecurity system installation typically involves mounting the main control unit, routing the wire harness to various locations, and making the requisite connections. At some of those connection points, an additional component such as a pin switch, siren, fuse holder, or specific electronic component (relay, resistor or diode) may need to be installed to complete the task.
Route Wires to Connection PointsRoute the grouped wires to the appropriate locations to make the necessary connections to the vehicle. Zip tie all wires neatly every six inches, and avoid any moving parts or heat sources on wire routing paths.
For wiring routed into the engine compartment:1) Pass the wire group from the interior through an existing rubber grommet by
making a small incision with a utility knife along the unused part of the exist-ing grommet (cut away from factory wires).
a. Use a scrap length of wire or an unfolded wire hanger as a ‘pull-through’ tool when routing wires from the interior into the engine compartment.
b. Temporarily attach the wires to the pull-through tool with electrical tape. Once the wires have been pulled through the grommet, remove the excess electrical tape.
2) If a suitable hole does not exist, you will need to drill a hole in the vehicle’s firewall to route the wire group from the interior into the engine compartment. Check for obstructions on both sides of the firewall BEFORE drilling. After drill-ing, place a plastic snap grommet or rubber grommet in the newly cut hole to protect the wire insulation from any sharp metal edges.
3) After routing the wires into the engine compartment, ensure the hole is well sealed with silicone sealant or water-resistant material.
Placing the Security System control unit and using zip ties to secure to
factory wires under the driver’s side dash area
Note: Cut off the excess length from the end of the zip tie after mounting
Engine compartment side after wires pass through
Interior factory grommet side before wires pass through
These examples show the factory grommet, where wires pass from the interior into the
engine compartment, as a path for running your security system wires under the hood
Car Electronics Resource CenterPage 13
Car Security Installation Guide
Installation (Continued)
Connect Wiring to Vehicle or DeviceOnce the grouped wiring is routed to each location, connect individual wires to the appropriate device (such as an added pin switch, the siren, or main power wire’s fuse holder) or required electronic component (such as a relay, resistor, or diode), if not a direct wire-to-wire connection. Then, connect the device or component to vehicle wiring. Follow the security system manufacturer’s specific instructions for each wired connection, including vehicle-specific requirements for added relays, resistors, and/or diodes.
Data interface modules require minimal connections to vehicle wiring. The most important wired connections are to the vehicle’s data wires, usually located at the vehicle’s On Board Diagnostics (OBD-II) plug connector. The data interface module installation instructions indicate the exact connection point of data wires. Solder these connections to ensure long-term reliability.
Use these guidelines when making security system connections that ‘tap in’ to the vehicle’s wiring:
Soldered wiretap connections:1) Strip 1/2” to 3/4” of insulation from the security
system’s wire end. 2) Strip a 1/2” section of insulation from the middle
of the vehicle wire. Do not cut the wire.3) Separate the copper strands on two sides of the
vehicle wire, creating an opening through which the security system’s wire can be inserted.
4) Insert the security system’s wire into the vehicle wire opening.
5) Wrap the end of the security system wire around the exposed vehicle wire.
6) Solder this connection.7) Use electrical tape to cover the connection when complete.
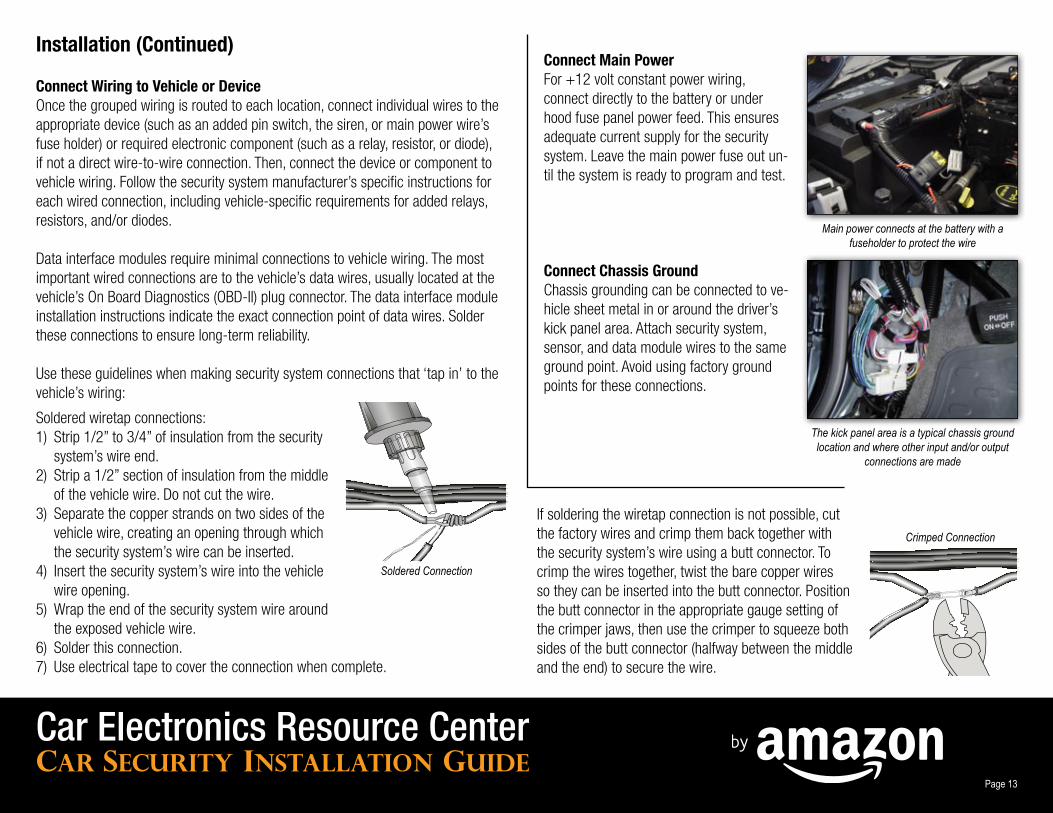
Connect Main PowerFor +12 volt constant power wiring, connect directly to the battery or under hood fuse panel power feed. This ensures adequate current supply for the security system. Leave the main power fuse out un-til the system is ready to program and test.
Connect Chassis GroundChassis grounding can be connected to ve-hicle sheet metal in or around the driver’s kick panel area. Attach security system, sensor, and data module wires to the same ground point. Avoid using factory ground points for these connections.
Soldered Connection
Crimped Connection
Main power connects at the battery with a fuseholder to protect the wire
The kick panel area is a typical chassis ground location and where other input and/or output
connections are made
If soldering the wiretap connection is not possible, cut the factory wires and crimp them back together with the security system’s wire using a butt connector. To crimp the wires together, twist the bare copper wires so they can be inserted into the butt connector. Position the butt connector in the appropriate gauge setting of the crimper jaws, then use the crimper to squeeze both sides of the butt connector (halfway between the middle and the end) to secure the wire.

Car Electronics Resource CenterPage 14
Car Security Installation Guide
Programming and TestingWhen all connections are complete, insert the fuse in the main power wire. Have the remote key fobs close at hand as some systems power up in ‘alarm sounding’ mode. Press the disarm (or unlock) button to disarm the system and prepare for programming. Most security systems have numerous programming steps, and the installation manu-al provides essential information on the following:
• Duration of siren sounding • Active or Passive (self) arming • Learning multiple transmitters (also called ‘pairing transmitters’)• Electrical polarity of inputs and/or outputs • Pulse duration of outputs to mimic factory electronics (such as double pulse unlock)
Programming the SystemMany security systems require programming to configure the input and output wiring’s electrical behavior with vehicle wiring connections. This allows the system to operate properly. Main power and ground connections, as well as ignition power and a valet (or ‘programming’) switch, must be connected because entering the programming se-quence often involves turning the ignition and pressing or holding a programming button (either the valet switch in the vehicle or a designated remote transmitter button) with a specific sequence or time duration. Read and follow the specific instructions provided by the manufacturer’s installation manual to complete this step.
Enter the programming mode and complete the programming of the system according to manufacturer instructions.

Car Electronics Resource CenterPage 15
Car Security Installation Guide
ReassemblyReassemble any parts of the vehicle removed during the security system installation. Verify that all wiring is tied down securely with zip ties and routed away from moving parts or heat sources.
Wherever possible, camouflage under-dash and under-hood wiring with split loom tubing for a more factory-like appearance.
Split loom tubing hides multi-colored wires and provides a more factory-like appearance to a security system
installation
Testing the SystemOnce programming is complete, the security system is ready to test. Many systems have a ‘testing’ or ‘diagnostic’ mode that allow you to test the security system’s inputs without arming and triggering the alarm for each entry point and sensor. Review the security system user’s manual to determine if this capability exists. The default method of testing a security system involves testing each trigger point in real time and checking that responses, such as the siren and lights flashing, function as intended.
1) Doors – Arm the system and open each door one at a time. If power door locks are connected and lock upon arming, you may need to manually unlock the door with the key to open the door. As each door opens, the alarm should sound.
2) Hood – Sit in the vehicle, arm the system, and open the hood with the hood release lever. The alarm should sound.
3) Hatch or Trunk – Arm the system and open the trunk or hatch. Like the doors, this may require the key to first manually unlock the entry point. The alarm should sound.
4) Impact Sensor – Arm the system. The impact sensor should respond to a hit on the vehicle’s windshield. Use the heel of the hand or the side of a closed fist on a window rather than a body panel. Adjust sensors to respond to appropriate impact levels to avoid frequently or unintentionally triggering the alarm.
5) Output Responses – Ensure that when the alarm is sounding the siren works as intended and parking lights flash (if connected).
6) Power Door Lock/Unlock – Ensure that if power door locks are connected, the doors lock and unlock along with arm/disarm commands.
7) Test Auxiliary Disarm Mode – The valet switch can often function as a secondary method of disarming with the ignition key. This is useful if the remote transmitter bat-teries die. Follow the manufacturer’s instructions to test this function as the alarm is sounding.
Review the security system user’s manual for any additional features or functions specific to your system and test them to verify correct operation.
Programming and Testing (Continued)
Add split loom tubing to all wires run under the hood


![De Transporter · 2009-03-21 · Transporter[ 2007[3] 1/15/07 6:02 PM Pagina 7. Car Electronics Car Electronics voor de Volkswagen Transporter Carkit en telefoonconsole Het gemak](https://img.dokumen.tips/doc/110x75/5f6f74028cd2fd4c5d5938e4/de-transporter-2009-03-21-transporter-20073-11507-602-pm-pagina-7-car-electronics.jpg)