Embed Size (px)
Citation preview

CAPXDocumenting Your Work with Robert Chase Heishman

1 /
2 /
3 /
4 /
Getting to Know the Camera
Setting the Stage
Post Production Process
Additional Information
How to best set up equipment and your artwork to get an amazing photo
Utilizing Adobe Photoshop, covers how to create a false gallery wall and remain true to your work’s look
Further resources and information to keep in mind
CONTENTS Covers camera basics, terminology, and
general preparatory tips

Getting to Know the Camera
What is White Balance? It controls the amount of white that is displayed in your work. This effects the way colors show up .
The type of lighting makes a big different when figuring out white balance
Type of Light and White Balance Setting
This chart is a guide for the various kinds of light and depending on their warmth or coolness, what number you can set your white balance to.
Temperature of light is measured by the Kelvin Scale
On digital SLR cameras, they can do this automatically.
May take several test shots to see what white balance setting you feel match your work best.
Best to photograph in RAW files, you’ll find out more why later. Can tell your digital camera to do so in the Settings.
Be careful if you use umbrellas or reflecting panels as there could be a chance you over expose your work with too much light

2 Career + CO-OP Center
Exposer TriangleA great graphic to explain the upcoming camera settings we will be going over like ISO, Shutter Speed and Aperture. The outside images correlate with what each type of setting controls.
ApertureControls the depth of field
How much over distance can your eye can focus on at once?
See the whole landscape clearly or just what is in the foreground
Shutter SpeedControls how quickly the image is captured
Even with very subtle movements, how much detail is retained?
Even your breathing and heartbeat can
effect the movement of the camera and
quality of image.
ISOControls the how sensitive to light the camera is.
The more sensitive, the more noise or grain your photo will have.
3
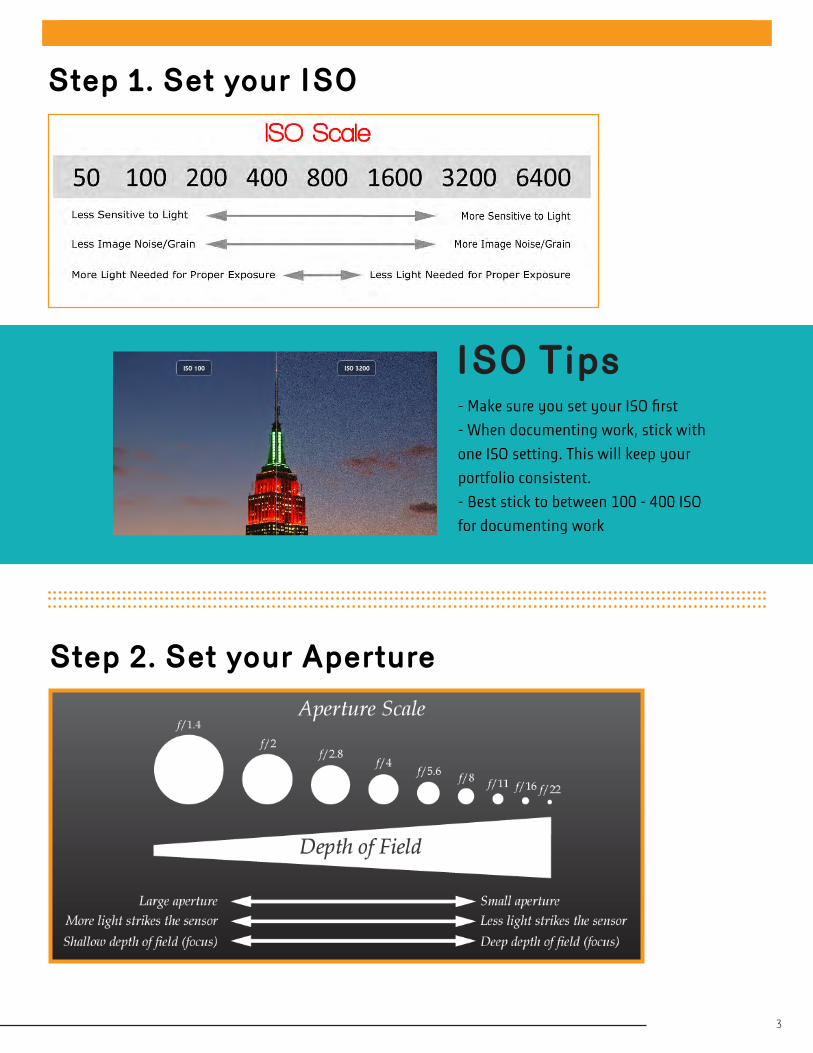
Step 1. Set your ISO
ISO Tips- Make sure you set your ISO first- When documenting work, stick with one ISO setting. This will keep your portfolio consistent. - Best stick to between 100 - 400 ISO for documenting work
Step 2. Set your Aperture
4 Career + CO-OP Center
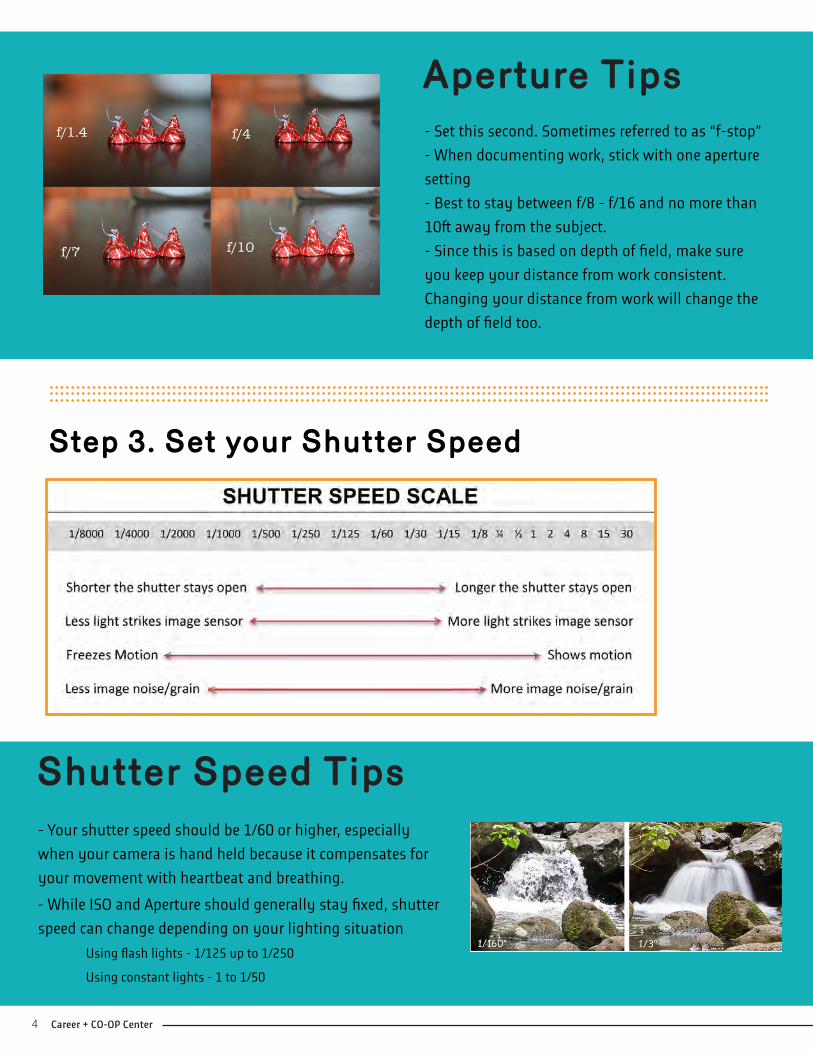
Aperture Tips- Set this second. Sometimes referred to as “f-stop”- When documenting work, stick with one aperture setting - Best to stay between f/8 - f/16 and no more than 10ft away from the subject. - Since this is based on depth of field, make sure you keep your distance from work consistent. Changing your distance from work will change the depth of field too.
Step 3. Set your Shutter Speed
Shutter Speed Tips- Your shutter speed should be 1/60 or higher, especially when your camera is hand held because it compensates for your movement with heartbeat and breathing. - While ISO and Aperture should generally stay fixed, shutter speed can change depending on your lighting situation Using flash lights - 1/125 up to 1/250
Using constant lights - 1 to 1/50

5
Make Sure to Remember!
Your file format should be set to RAW. This is the most pure and flexible image before compression. In this format you have more image information to work from when you download it off the camera.
When shooting the photo it is best to set a timer with the lights, so that way the camera does not move when the photo is being taken
Do a “soft click” to auto focus on the subject by pressing down the shutter release button halfway down before clicking down all the way.
Remember to take some test shots to gauge more specific settings for your type of work and aesthetic you are trying to achieve.
6 Career + CO-OP Center
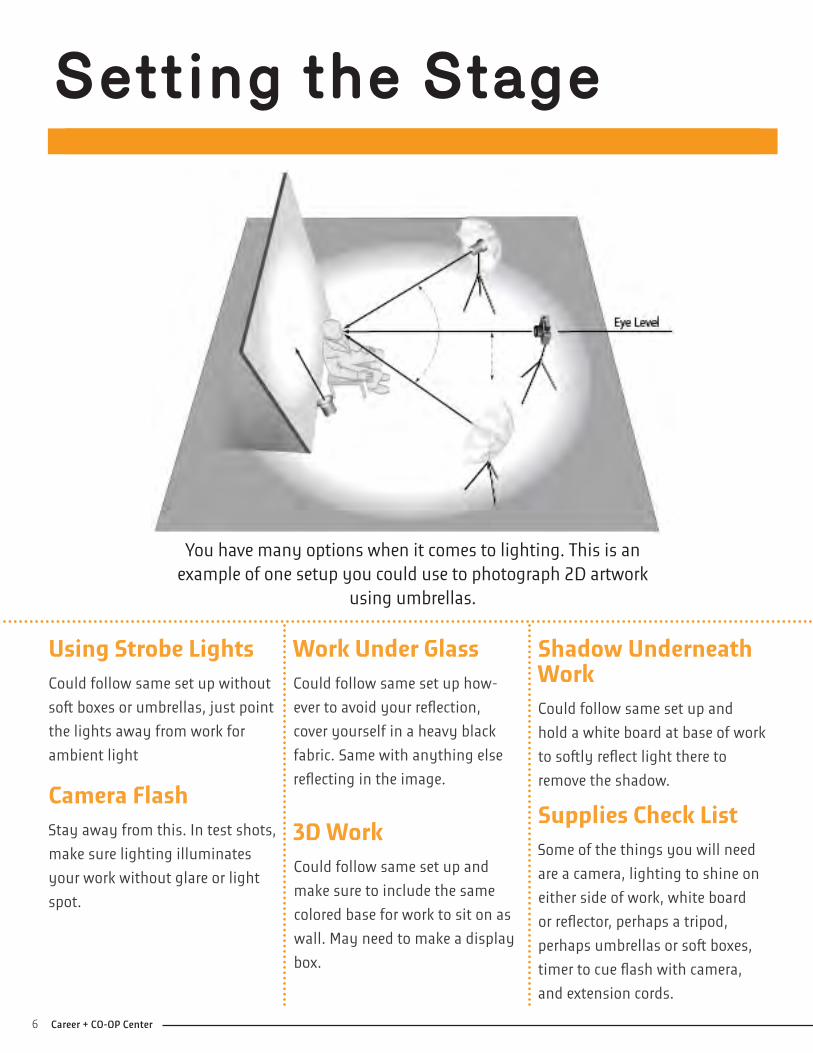
Setting the Stage
You have many options when it comes to lighting. This is an example of one setup you could use to photograph 2D artwork
using umbrellas.
Using Strobe LightsCould follow same set up without soft boxes or umbrellas, just point the lights away from work for ambient light
Camera FlashStay away from this. In test shots, make sure lighting illuminates your work without glare or light spot.
Work Under GlassCould follow same set up how-ever to avoid your reflection, cover yourself in a heavy black fabric. Same with anything else reflecting in the image.
3D WorkCould follow same set up and make sure to include the same colored base for work to sit on as wall. May need to make a display box.
Shadow Underneath WorkCould follow same set up and hold a white board at base of work to softly reflect light there to remove the shadow.
Supplies Check ListSome of the things you will need are a camera, lighting to shine on either side of work, white board or reflector, perhaps a tripod, perhaps umbrellas or soft boxes, timer to cue flash with camera, and extension cords.

7
Post Production Process
55
Step 1. Open PhotosOpen your RAW photo files with your SD card reader. You will be prompted first to identify your photo settings. (See image to left) Then open files in Adobe Photoshop.
Robert’s Cheat SheetThis is assuming you kept the camera’s ISO between 100 - 400, aperture between f5.6
-f11,and shutter speed between 1/125 - 1/250
Step 2. Image Boarder ConsiderationWill you crop image to boarders of the work? Will you keep the image as is? Or will you need to create a crisp white
“false” wall for your image to be outlined by?
Creating A Wall
Create your own wall when you’re unable to find a clean white
wall to document your work on or next to.

8 Career + CO-OP Center
Using Adobe Photoshop
Then carefully select your object around the perim-eter. After object is selected, hit command + C then command + V to create new layer with object only.
Delete background layer with the old wall. (This is the original image you started with) Then create a new layer to make the background by choosing the icon the arrow is pointing to. Make sure this layer is underneath your first layer, this will insure everything you do happens behind your object.
Then select the Paint Bucket Tool on the left hand tool bar.
Begin by selecting the Polygonal Lasso Tool

9 9 Career + CO-OP Center
Select an off-white color for your wall, preferably in the yellow color range.
The base color may change based on which one would look best with your work. Whether you choose the yellow color range or something different, it should be the same for all of your photos.
Select Layer > Layer style > Pattern Overlay to add texture to your wall.
Your pattern overlay should mimic these specifications for a natural looking texture.

10 Career + CO-OP Center
Next, select your top layer (subject / object being documented). Then select Layer > Layer Style > Drop Shadow from the drop down menu.
See below for general distance of white space around your work. Keep it around or below 10”
Also, best to angle your shadow towards the bottom of the painting for the most believable appearance.
Include shadow to make your work like it is hanging on a wall. May not want to include this based on your ultimate goal for these images.

11
Additional Information
1) The School of the Art Institute of Chicago Media CenterHere you will soon find instructional videos on how to use light kits and digital cameras. Also available through this link is the workshop and authorization schedule, including further documenting your work workshops and authorization on more powerful lights to photograph work. https://saic.instructure.com/courses/1530147
2) AdoramaCamera store to buy new and used equipment. Also covers photography / film tutorials and offers printing services. http://www.adorama.com/
3) B&H This is an electronics store that covers everything from computers, cameras, audio, mobile devices, etc. http://www.bhphotovideo.com/
4) The Luminous LandscapeAn on-line magazine that includes artists, articles, videos, rants from film/video professionals, and workshops http://luminous-landscape.com/
5) Midwest Photo Exchange Light Kit SuggestionA film / video store with a highlighted recommendation for you, if you decide to purchase your own light kit and equipment to document work http://mpex.com/strobist-starving-2-light-kit.html

Robert Chase Heishman is an artist living and working in Chicago, Illinois. He completed his BFA from the Kansas City Art Institute in 2008 and his MFA from Northwestern University in 2012. He has collaborated with the Merce Cunningham Dance Company as a Décor artist on the work, Split-Sides, provided artwork for Icelandic band Sigur Rós’ album BA BA TI KI DI DO, and exhibits both nationally and internationally. His work is held in the col-lections of the Nelson-Atkins Museum of Art and the Walker Art Center. Together with Emily Kay Henson, he owns and operates the art documentation company RCH | EKH Documentation.
www.rchekh.com
Robert Chase Heishman