Embed Size (px)
Citation preview

1
Campaign Finance Software Instructions
CF Solutions Making Campaign Finance Easy

2
Contents
I STALLI G THE CAMPAIG FI A CE SOFTWARE ............................................................... 5
SYSTEM REQUIREMENTS .......................................................................................................................... 5 INSTALLING FROM THE INTERNET ............................................................................................................ 5
SOFTWARE SETUP.............................................................................................................................. 10
RUNNING THE CFS PROGRAM ................................................................................................................ 10 CHANGING SYSTEM PREFERENCES......................................................................................................... 10
SETTI G UP A COMMITTEE............................................................................................................ 15
CHA GI G COMMITTEE I FORMATIO ................................................................................... 16
CHA GI G THE FILER IDE TIFICATIO UMBER ............................................................... 17
WORKI G WITH MORE THA O E COMMITTEE................................................................... 18
DELETI G A COMMITTEE............................................................................................................... 19
CLEARI G ALL DATA ....................................................................................................................... 20
EXPORTI G A D IMPORTI G AMES ........................................................................................ 22
EXPORTING NAMES ................................................................................................................................ 22 IMPORTING NAMES ................................................................................................................................. 22
CHA GI G ELECTIO CYCLES..................................................................................................... 25
TRANSFERRING A COMMITTEE’S PREVIOUS SURPLUS ........................................................................... 25 TRANSFERRING PREVIOUS DEBT ............................................................................................................ 26 TRANSFERRING PREVIOUS LOANS.......................................................................................................... 28
BACKI G UP A D RESTORI G DATA.......................................................................................... 29
BACKING UP YOUR DATA ...................................................................................................................... 29 RESTORING BACK UP DATA ................................................................................................................... 30
VIEWI G A D EDITI G ACCOU T E TRIES ............................................................................ 31
VIEWING ACCOUNTS AND THEIR BALANCES ......................................................................................... 31 VIEWING TRANSACTIONS IN AN ACCOUNT............................................................................................ 32 DELETING A TRANSACTION ................................................................................................................... 33 EDITING TRANSACTIONS ........................................................................................................................ 35
VIEWI G A D EDITI G THE AMES LIST................................................................................. 37
VIEWING NAMES..................................................................................................................................... 37 EDITING NAMES...................................................................................................................................... 37 DELETING NAMES................................................................................................................................... 38 ADDING NAMES ...................................................................................................................................... 40

3
REPORTI G .......................................................................................................................................... 41
PRINTING AN AMENDED STATEMENT OF ORGANIZATION...................................................................... 41
CREATI G PERIOD REPORTS......................................................................................................... 42
ELECTRONICALLY FILING REPORTS ....................................................................................................... 42 PRINTING OR SAVING PRE-DEFINED REPORTS ....................................................................................... 43 CUSTOM REPORTS .................................................................................................................................. 44 PRINTING THE REPORT............................................................................................................................ 45 PREVIEWING THE REPORT ...................................................................................................................... 45
E TERI G COMMO TRA SACTIO S........................................................................................ 49
ENTERING TRANSACTIONS FOR A PREVIOUS PERIOD ............................................................................ 49 RECEIVING CONTRIBUTIONS .................................................................................................................. 51
Contributions From Individuals ....................................................................................................... 52 Contributions From Committees....................................................................................................... 54 Small (Aggregate) Contributions (Of $25 or Less)........................................................................... 56 In-Kind Contributions....................................................................................................................... 57 Recording In-Kind Contributions ..................................................................................................... 57
PRI TI G A D PREVIEWI G ACCOU TS LISTS ..................................................................... 60
RECEIPTS OTHER THA CO TRIBUTIO S ............................................................................... 62
RECEIVING INTEREST AND DIVIDENDS .................................................................................................. 62 OTHER RECEIPTS .................................................................................................................................... 63
REFU DI G CO TRIBUTIO S ....................................................................................................... 65
REFUNDS TO INDIVIDUALS ..................................................................................................................... 65 REFUNDS TO COMMITTEES..................................................................................................................... 66 REFUNDING QUALIFYING CONTRIBUTIONS............................................................................................ 67
EXPE SES, PAYME TS, A D CREDITS........................................................................................ 68
PAYING FOR AN EXPENSE AS IT IS INCURRED (RECORD EXPENDITURE) .............................................. 68 ENTERING BILLS ..................................................................................................................................... 70 PAYING BILLS ......................................................................................................................................... 71 PAYING DEBTS FROM THE PREVIOUS COMMITTEE................................................................................. 72 RECEIVING CREDIT FROM A VENDOR..................................................................................................... 73 EXPENDING IN-KIND CONTRIBUTIONS ................................................................................................... 74 INDEPENDENT EXPENDITURES................................................................................................................ 75
CO TRIBUTI G TO OTHER COMMITTEES................................................................................ 78
OTHER DISBURSEME TS................................................................................................................. 80
LOA S, REPAYME TS A D I TEREST........................................................................................ 82
RECEIVING CANDIDATE LOANS.............................................................................................................. 82 REPAYING CANDIDATE LOANS............................................................................................................... 84 ACCRUING INTEREST FOR CANDIDATE LOANS ...................................................................................... 85 RECEIVING NON-CANDIDATE (OTHER) LOANS ...................................................................................... 86 REPAYING NON-CANDIDATE (OTHER) LOANS ....................................................................................... 88

4
ACCRUING INTEREST FOR NON-CANDIDATE OTHER LOANS ................................................................. 89 MAKING COMMITTEE LOANS ................................................................................................................. 90
TRA SFERS OF FU DS...................................................................................................................... 92
TRANSFERS TO ANOTHER COMMITTEE .................................................................................................. 92 TRANSFERS FROM ANOTHER COMMITTEE ............................................................................................. 94
GETTI G HELP.................................................................................................................................... 96

5
Installing the Campaign Finance Software
System Requirements � At least 13 megabytes of available hard drive storage space � Windows 98 or above � 64 megabytes of RAM � Printer
Installing from the Internet NOTE: Some images may differ from what is shown, depending on what version of windows your computer uses. Open your Internet browser (Microsoft Internet Explorer, AOL, Netscape, etc). Go to the CF Solutions Software page at:
http://cfsaz.com/PimaSoftware.htm Read the End User License Agreement, and if you agree and wish to use the software, click “Accept” to download it. If you do not agree to the End User License Agreement, you must not use the software.

6
Depending on your version of Windows, a pop-up window will show options for “Open”, “Run”, “Install from Internet” or “Cancel” Choose “Open”, “Run” or “Install from Internet”
Do not “Save” or “Save to disk”
To continue the installation click ext
Read the license agreement and select “I accept the license agreement” Click ext

7
Enter your user information and click Next:

8
Select the folder location to install to (we suggest using the default that the installer provides). Click Next:
On the next screen, click Install:
9
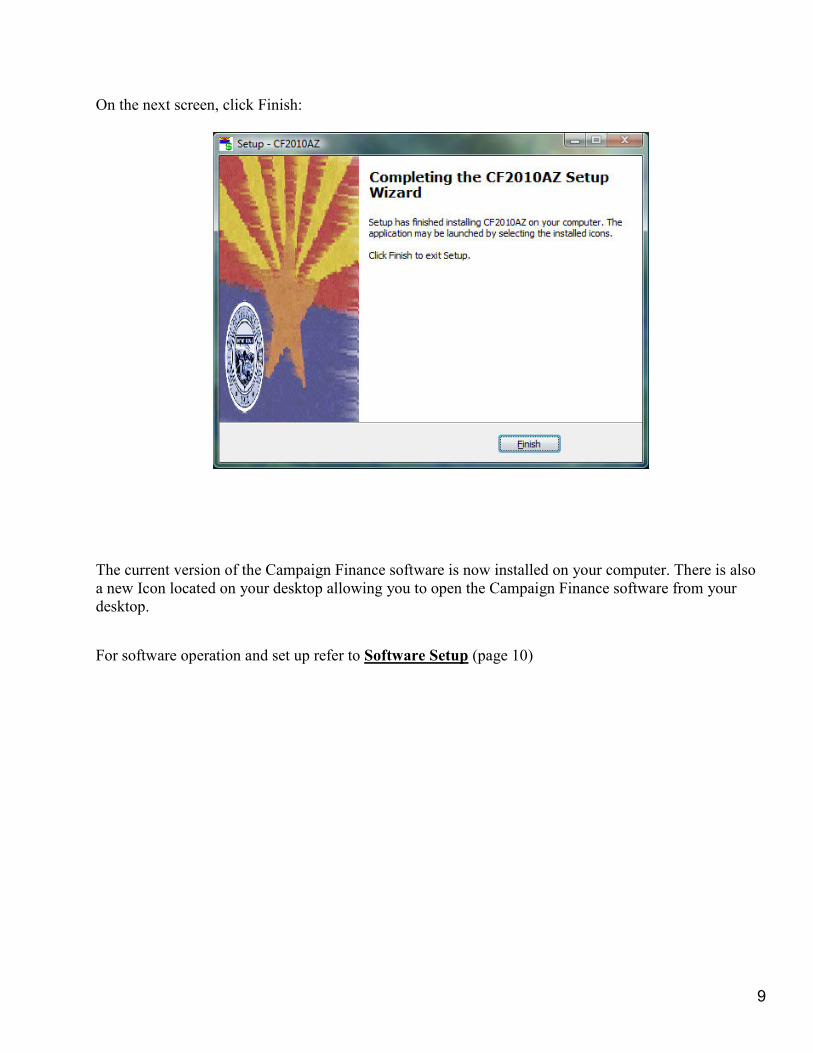
On the next screen, click Finish:
The current version of the Campaign Finance software is now installed on your computer. There is also a new Icon located on your desktop allowing you to open the Campaign Finance software from your desktop.
For software operation and set up refer to Software Setup (page 10)

10
Software Setup
Running the CFS Program Double-click on the CFS AZ icon on your desktop.
This is the main window.
Your committee name will not be shown on the title bar unless you have set up your committee. See the section entitled Setting Up a Committee for instructions.
Changing System Preferences All system preferences are changed in the Preferences window. In the main window, click on File, Preferences.

11
The Preferences dialogue box appears.
Changing General Options Click on the General tab of the preference window.
The General options appear.
Options:
Showing/Hiding The Status Bar
The status bar shows useful period information on the bottom of the screen. You may need to set the current period to get it to display period information. To show the status bar, check the box marked Show Status Bar by clicking on it. To hide the status bar, uncheck the box by clicking on it again.

12
Showing Balances
Balances columns can be displayed for the accounts list, and in individual account windows, if desired. To show balances in individual account windows, check the box that says Show Balances in Transaction Lists. To show balances in the accounts list, check the box that says Show Balances in Account Lists.
Confirmation Sounds
Sounds confirm transactions by an audio beep. Putting a check in this box will enable this feature. Leaving it blank will prevent a beep when confirming a transaction.
Changing the System Printer Reports other than period reports are automatically routed to the printer selected in the Preferences window. Follow these steps to select a printer: Click on the Printers tab of the preference window.
The Printer options appear
The Default Printer options appear. If the name of your printer is not shown, select by clicking on the
drop down arrow and selecting the correct printer.
Click OK.
If you don’t see the printer you wish to use, you may need to install it first. Consult the documentation for your operating system for instructions on how to do this.

13
Changing Startup Options Click on the Startup tab of the preference window.
The Startup options appear
Options: Splash Screen
If you wish to view a splash screen that shows the version number of the software while waiting for the software to load, click the box that says Show Splash Screen.
Window Restore
When you close and re-open the software, the program is capable of remembering which windows you have open, along with their size and position. If you would like to turn on this option, click on the box that says Restore size and position of windows.

14
Enabling and Disabling Warning Click on the Warnings tab of the Preferences window.
The Warnings options appear
Options: Turn On / Off Limit Checking
Checking for limit violations helps a committee discover excessive contributions as they are entered. If a committee is using the software in an election cycle subsequent to the release of the software, or for a local jurisdiction, the committee may need to disable the limit checking in order to enter contributions. For regular use it is strongly recommended that this check remains enabled. To disable limit checking, click on and check the box that is labeled Disable warning if transaction will go over limit. To enable limit checking, uncheck the box by clicking on it again.
Turn On / Off Period Checking
Period checking is a safety feature to help avoid invalid transactions. It is strongly recommended that if you turn off the period checking for data entry purposes, you restore it as soon as you are done with data entry. To disable period checking, check the box that says Disable period check on transaction entry by clicking on it. To restore it, uncheck the box.
Turn On / Off Limit Checking on exit
The software performs a limit check upon closing of the software. This is a good way for the user to check that the data entered so far is within contribution limits. For regular use it is strongly recommended that the check remains enabled. To disable limit checking when exiting the software, click on and check the box that is labeled Disable campaign limit violations check on exit. To enable limit checking, uncheck the box by clicking on it again.

15
Setting Up a Committee
OTE: We suggest you have your committee’s Statement of Organization in front of you when
setting up your committee in the software.
Start the software if it is not already running. In the main window, click on File, ew Committee. The Committee Properties window appears.
Begin setting up your committee by entering the Filer ID # assigned to you when you registered your Statement of Organization at the Arizona Secretary of State’s office.
Use the pull-down arrow for Type to select your committee type.
Continue to fill out the rest of the form, using the TAB key to move between fields on the form. Click on Continued tab.
Fill in the fields for the section, then continuing to the next sections; Chairman, Treasurer and Designee. Complete all screens until you have all the information from the Statement of Organization in the sections pertaining to your committee. Click Finish when you are done.

16
Changing Committee Information At some point you may need to change some of the information regarding your committee. If your committee files with the Secretary of State, then changing this information is a two-step process: 1) change the information in your database using the CF software. 2) print and file an amended Statement of Organization. The CF software will print out a completed Statement of Organization for you. See Printing an Amended Statement of Organization (page 41) for instructions. In the main window, click File, Committee Properties The Committee Properties window appears
Select the tab that holds the information you want to change. For example, click on the Treasurer tab to change the treasurer’s address. Type in the changes in the appropriate fields, and when you are done Click Finish.

17
Changing The Filer Identification umber The filer ID cannot be changed in the committee information window. In the main window click on File, Committee Actions, Correct FilerID The Correct FilerID window will appear
Type in the corrected filer identification number Click OK

18
Working With More Than One Committee Treasurers that work on behalf of more than one committee may wish to record transactions and report from just one computer. The campaign finance software facilitates record keeping for multiple committees.
Setting Up Subsequent Committees
Follow the instructions in the section entitled Setting Up a Committee (page 15) for each committee you wish to set up.
Switching Between Committees The software has only one ACTIVE committee at a time. This is the committee whose name appears on the title bar of the main window. To switch the attention of the software to a different committee: In the main window click on File Open Committee The Committee Select window appears
Double-click the committee that you wish to make active
The selected committee now becomes the active committee. The active committee name appears on the blue title bar. All changes, transactions and reports will regard only the active committee. You may switch between committees at any time you wish.

19
Deleting a Committee Deleting a committee is a non-reversible action. Make sure that you back up the final version of the committee information for your records before you delete a committee. See the section called Backing Up Your Data (on page 29) for instructions. In the main window click on File, Delete Committee The Committee Select window appears
Double-click on the committee you wish to delete A Confirm window appears
Click Yes

20
Clearing All Data It is strongly recommended that you backup your existing data before clearing it. To find out how to do this, consult the section entitled Backing Up Your Data (page 29) for instructions.
Clearing All Transactions This function clears all the transactions currently in the database, without clearing any names. In the main window click File, Committee Actions, Clear All Transactions A confirm window appears
Click Yes
If you have already backed up your data click o. Otherwise, backup your data now by clicking Yes

21
Clearing All ames And Transactions All names in the database can be cleared at the same time as the transactions. In the main window click on File, Committee Actions, Clear All ames & Transactions. A confirm window appears
Click Yes
If you have already backed up your data click o. Otherwise, backup your data now by clicking Yes.

22
Exporting And Importing ames
Exporting ames In the main window, click on File, Committee Actions, Export, ames The Export data window appears
Choose where you would like to store the export file Click Save
Importing ames Name lists can be imported from text files. Use an Exported Names file as a template for importing names. Once a data file has been created, it may be imported into the CFS database. It is strongly recommended that you back up your data before importing data. See the Backing Up Your Data (page 29) section for instructions. In the main window, click File, Committee Actions, Import, Import ames

23
Import Tab Delimited Names File window appears
Click on Browse
The Restore data file window appears
Select the drive the prepared file is on by clicking the “Look in:” pull down arrow
Double-click on folders and sub-folders in the window, following the path to the prepared file Double-click the name of the prepared file

24
Click Import
A prompt appears asking if you want to back up your data. If you have already backed up your data click o. Otherwise, backup your data now by clicking Yes.
The import function protects against duplicate names. If a name in the import file already exists in the software, the function will produce a window that asks whether or not you would like to replace the existing name with the new name or just discard the new name. When the import is complete Click Close

25
Changing Election Cycles
Applicable laws: A.R.S. § 16-905(H) Contribution Limitations; civil penalty, complaint A.R.S. § 16-915(A) Contents of campaign finance reports A.R.S. § 16-915.01(A)(1)&(C) Disposal of surplus monies; transfer of debt
If a candidate committee or an exploratory committee is to continue operations in a subsequent election cycle, the committee may choose to:
� Pay off all loans and debts owed by the committee � Collect all loans and debts due the committee � Open a new committee for the new election cycle � Transfer surplus money to the new committee � Terminate the previous committee
The names list can be exported from the old committee and imported into the new committee in order to avoid re-entering information. See the section Exporting And Importing ames (page 22) for instructions. If the old committee does not have enough cash on hand to retire the debts, the debts can be transferred to the new committee as allowed by A.R.S. § 16-915.01(C). Alternatively, the committee may remain active until it receives funds to retire the debts and can then terminate. In this case, either:
A) Campaign finance reports must be filed in a timely manner for the committee as required by A.R.S. § 16-913(B or C) until the committee is terminated,
Or B) Pursuant to A.R.S. § 16-913(E), a candidate committee may file an Annual No
Activity Statement by January 31 of the election year. If this option is exercised, the committee does not report until the next year, unless a contribution or expenditure is made.
Transferring a Committee’s Previous Surplus
A ote About Previous Surplus
The surplus from a committee’s previous election cycle will be the amount of cash the previous committee had on hand at the end of the last reporting period of the previous election cycle. You can find this amount on line 7 on the first page of the final period report from the previous election cycle. Surplus from Previous Campaign account (account #620) is the internal account that holds the surplus

26
from the previous campaign. Entries to this account can be viewed and edited. See the section on Viewing and Editing Account Entries (page 31) for instructions.
Recording Previous Surplus In the main window, click Transactions, Previous Committee, Set Previous Campaign Surplus. The Enter Surplus From Previous Campaign window opens.
Enter the surplus amount Enter the date the surplus was transferred
Click OK
Transferring Previous Debt
A ote About Previous Debt
Outstanding Debt from Previous Campaign account (account #630) is an internal account in the software that holds the debt carried over from the previous committee and payments on those debts. Entries to this account can be viewed and edited. See the section on Viewing and Editing Account Entries (page 31) for instructions. Note: Outstanding loans from the previous election cycle are recorded as previous debt in the current cycle.
Recording Previous Debt In the main window, click Transactions, Previous Committee, Enter Previous Debt(s) The Enter Transferred Debt From Previous Committee window opens.

27
If the committee has been previously used, select the committee name from the list by clicking the pull-
down arrow at the From box. Otherwise, add the committee:
Type the committee name in the From box
An Information window appears asking if you would like to add the committee to a list
Click OK
The Vendor window appears
Fill out the boxes in the window, pressing the TAB key between fields Click OK

28
The entity is now added to the appropriate list, and the Enter Transferred Debt From Previous Committee window is once again active. Finish filling in the Enter Transferred Debt From Previous Committee window, pressing the TAB key between fields.
Click OK
Transferring Previous Loans
A note about Transferring Previous Loans
Outstanding loans become debts as the election cycle changes. Follow the instructions for Transferring Previous Debt (page 26) to transfer any outstanding loans. To repay the loans, see the section titled Loans, Repayments and Interest (page82).

29
Backing Up And Restoring Data
Backing Up Your Data A backup can be done at any time, and can never be done too often. It is important to safeguard your data against accidental erasure, hardware failures, and any other unforeseen dangers. Backing up often ensures that you always have a current copy to fall back on, should anything happen to the original data. Backing up is easy, and only takes a few moments. You may wish to give the backup file a meaningful name. Including the date of the backup or the committee name in the name of the file may help you locate the file later. Backup files from the CF software have a file extension of .cfb. Most commonly, a backup file would be stored on a removable magnetic media such as diskette or zip cartridge. Other options would include CD-RWs or CD burners, Jump drives, network drives and secondary hard drives. In the main window, click File, Database, Backup The Backup data file window appears
Click on the Save in pull down arrow
Click on the drive you wish to store the backup file in (in this case, the A: drive is used)
If you wish to store the file in a folder or subfolder on the drive, double click that folder in the window
Enter an appropriate name in File name
Click Save

30
Restoring Back Up Data Restoring replaces all data that is currently in the database with data that has been backed up previously. In the main menu, click File, Database, Restore A Confirm window appears
Click Yes
The Restore data file window appears
Click on the Look in pull down arrow
Click on the drive that the backup file is in (in this case, the A: drive) If the file is in a folder or subfolder on the drive, double click those folders in the window Double-click on the backup file to restore the data

31
Viewing and Editing Account Entries
Viewing Accounts and Their Balances Transactions are entered into the database using techniques described in the section entitled Entering Common Transactions (page 49). Each transaction increases or decreases the balance of one or more accounts, or lists of transactions in a particular category. In the main window, click on Lists, Accounts The Accounts List window appears
The window shows the account number, name and type. It may also show the current balance for each account if the option is selected in the Preferences window. See the section entitled Changing System Preferences (page 10) for instructions.

32
Viewing Transactions In An Account In the main window, click Lists, Accounts
The Accounts List window appears
Double click on the account to be viewed in the Accounts List Window. A window specific to that account appears.

33
Deleting A Transaction In the main window, click Lists, Accounts The Account Window Appears

34
Double-click on the account that holds the transaction you wish to delete. For example, if you have erroneously entered an invoice and need to delete the entry, double-click on Accounts Payable (shown below).
When the transaction window appears, click on the transaction you wish to delete to highlight it Click Delete
A confirmation window appears
Click OK

35
Editing Transactions In the main window, click Lists, Accounts The Account Window Appears

36
Double-click on the account that holds the transaction you wish to edit. For example, if you have received an amended invoice and need to edit the original invoice entry, double-click on Accounts Payable (shown below).
When the transaction window appears, double-click on the transaction you wish to edit Enter Bill for Goods or Services window appears
Update the applicable information Click OK

37
Viewing and Editing The ames List
Viewing ames
While transactions are entered using techniques described in the section entitled Entering Common Transactions (page 49), names are being added to the database. In the main window, click Lists, ames The Names List window appears. Note the tabs across the top.
By default the All Names page is selected and shows all the names in the database and their type. The total number of names is shown at the bottom. If you would like the list to show only names from a certain category, click on the tab with that category name.
Editing ames Names are not stored with transactions. Rather, a pointer to a name is stored; thus many transactions may have pointers to a single name. Once a name or information about a name is changed, it is changed for all transactions that have pointers to that name. This is a very convenient arrangement compared to changing information for a name in every single transaction in which it occurs. However, this situation implies that a name cannot be deleted if it is used in one or more transactions, because those transactions would then be left without a name attached to them.

38
In the Names List window, double-click on the name you wish to edit
The appropriate information window appears. For instance, if you click on an individual, the individual window appears. Click on the information you wish to change, then type in the new information. Click OK
Deleting ames In the Names List window, double-click on the name you wish to delete
Click Delete

39
If the name is not used in any transactions, the Confirm window appears
Click Yes

40
Adding ames
In the Names List window, click Add at the bottom of the page
The Select Name Type Window appears
Select the Name Type of the name that you would like to add.
Click OK
The appropriate window will appear so that identification information can be entered for that entity. For example, if you select individual in the Select Name Type window, the Individual window will appear.
Fill in the information in the window, pressing the TAB key between fields.
Click OK

41
Reporting
Printing an Amended Statement of Organization To find out how to record changes in committee information, read the section called Changing Committee Information (page 16). After making changes, print out the amended Statement of Organization. In the main window, click on Reports, Statement of Organization A window opens to select the printer
Click Print

42
Creating Period Reports In the main window, click on Reports, Report for Filing
The Report Selection window appears
Electronically Filing Reports
In the Report Selection window, click File Electronically. After performing a check for any limit violations, the Filing Credentials window will appear.
Enter the User Name and Password that was previously arranged with the county, and click OK.. A confirmation screen appears:

43
Click Send Filing, and you will either receive a filing confirmation indicating success or an error screen.
Printing or Saving Pre-defined Reports
With the Pre-Defined Report radio button selected, select the report from the list supplied by double-clicking on it. The Report Setup screen appears:
On this screen you can either chose to send the report to a printer, to the screen to preview it, or save it to a file on your computer. If you want to change the printer that is displayed at the top of the screen, click the Setup button on the right.

44
Custom Reports
Select a custom report by clicking the button for custom reports. The Report Selection window changes to look like this:
Enter the first day of the election cycle. Transactions from this date forward will be included in the report, on a cumulative basis if they occur before the period of the report. Enter the first and last day of the reporting period, and a report name and Filing Period description if any, pressing the TAB key between fields. Click Run
The Period Report Setup window appears

45
Printing the Report
If you do not see the printer that you wish to use in the window, click the Pull-down arrow and select the printer from the list by clicking on it.
Click Print
The report begins printing immediately
Previewing the Report In the Period Report Setup window
Click Preview

46
The Period Report Preview window appears.
Click on the buttons described above to navigate and view the report. When done, click Exit

47

48

49
Entering Common Transactions
Recording Transactions According to Law
A.R.S. § 16-904 outlines the duties of the committee treasurer and A.R.S. § 16-915 defines the contents of campaign finance reports. These two laws provide the need and method of reporting the transactions found in this section. If you have questions about what transactions to report or why you should report a transaction, please refer to Title 16, Chapter 6 of the Arizona Revised Statutes.
Entering Transactions For A Previous Period You are attempting to enter data outside of the current period if you see this warning:
There are two ways to gain access to periods beyond the current period: 1) change the current period or 2) turn off the period checking. See the section entitled Enabling and Disabling Warnings in Changing System Preferences (page 10) for instruction on how to disable period checking.

50
Setting the Current Period Sometimes committees will need to amend previous reports and enter transactions that were omitted or incorrectly entered in a previous filing period. This should be avoided whenever possible. In the main window, click on File, Set Current Period The Period Selection window appears
Double-click on the period of the transaction you wish to amend
Add or amend the transaction
Change back to the current period using the technique above If a report has already been filed for the period that you have changed, an amended report should be transmitted to the filing office

51
Receiving Contributions
A ote About Receiving Contributions
There are limits to how much individuals or committees may contribute to a committee. See the contribution limit chart in this handbook or go to the Secretary of State web page at http://www.azsos.gov/cfs/library.htm for updated contribution limits as defined by A.R.S. § 16-905.
If a check is drawn on a joint account, the contributor is the person who signed the check. A.R.S. § 16-904(F) defines this, with the exception: “unless specified by the contributor(s) to the contrary”.
Enter the date that the contribution was received by the committee.

52
Contributions From Individuals
otes About Individual Contributions
If your committee is a ballot measure committee, all “single source” contributions as defined in A.R.S. § 16-914.01(E) will be entered here. If a contributor donates $25 or less, and they may contribute again later in this election cycle, record their contribution using the “Contributions from Individuals/Personal/Family contributions”. When you know the contributor will only be contributing once, record their contribution using “Small (Aggregate $25 or less)”. The cumulative total of contributions made by every individual must be recorded per A.R.S. § 16-904(E). Keep track of who has contributed how much is to record them as contributions from individuals.
If a married couple makes a contribution, make two entries. Ask what each person’s share is of the contribution. In the software, there is an internal account (account #210) for contributions from individuals and refunds of those contributions. Entries to this account can be viewed and edited; see the section on Viewing and Editing Account Entries (page 31) for instructions on how to do this.
Recording Individual Contributions
Information Recorded: Individual Contributions more than $25 Contributions of $25 or less from individuals who may contribute again Single source contributions (for ballot measure committees) Contributions by a candidate’s family member Contributions of a candidate’s personal monies Contributions from a married couple
In the main window, click on Transactions, Contributions, Individual/Personal/Family
Contribution, Receive
The Receive Individual/Personal/Family Contribution window appears

53
If the contributor is already in the names list click the pull down arrow in the From box and choose the name If this is a new contributor, a confirmation window appears to find out if you would like to add the individual to the list of contributors.
Click OK
A window appears to record the individual’s information pursuant to A.R.S. § 16-915
Fill out the required information, pressing the TAB key between fields If this is a contribution from a candidate or a family member, make sure to toggle the appropriate button.
Click on OK

54
Back in the Receive Individual Contribution window, enter the date and the amount of the contribution, and any other information in the memo line. Click OK
Contributions From Committees
otes About Committee Contributions
A.R.S. § 16-905(H) mandates that candidate committees and exploratory committees may not make contributions to other candidate or exploratory committees. There are two different contribution limits for two distinct types of committees. A committee that is commonly referred to as a “PAC” (Political Action Committee) is actually a non-candidate committee, as defined in statute and gives at the lower limit. A “Super PAC” is a PAC certified by the Secretary of State to give at the upper limit. See A.R.S. § 16-905(A)(B) for contribution limits. The Secretary of State adjusts these limits biennially. The requirements needed by a committee to be a Super PAC are listed in § 16-905(I). Copies of a Super PAC’s certification from the Secretary of State must accompany any contributions from those committees. In the software, there is an internal account (account #220) for contributions from committees and refunds of those contributions. Entries to this account can be viewed and edited; see the section on Viewing and Editing Account Entries (page 31) for instructions.
Recording Committee Contributions In the main window, click on Transactions, Contributions, Committee, Receive
The Receive Political Committee Contribution window appears

55
If the contributor is already in the names list click the pull down arrow in the From box and choose the name If this is a new contributor, a confirmation window appears to find out if you would like to add the committee to the list of contributors
Click OK
A window appears to record the committee’s information pursuant to A.R.S. § 16-915
Fill out the required information, pressing the TAB key between fields.
Click OK
Back in the Receive Political Committee Contribution window, enter the date and the amount of the contribution, and any other information for that transaction.
Click OK

56
Small (Aggregate) Contributions (Of $25 or Less)
A ote About Small Contributions
If a committee is to receive small contributions from several individuals, the total sum of contributions from all of the individuals can be recorded here. Examples of this would be entering the total revenue from a fundraising dinner or a T-shirt sale where the cost of the items or service is $25 or less. When using this function, it is important to document the transaction in the memo line so that the committee can explain the contributions if asked to do so. For example, the committee may note “100 T-shirts @ $15.00 per shirt.” A.R.S. § 16-904(E)(2) mandates that the treasurer of a committee must keep identification records for all contributors, no matter how small the contribution. For small contributions, this is usually done with a 2-part receipt book or a separate journal. Keep in mind that these records, although not reported to the filing office with period reports, may be requested at any time. This function is used to record contributions of $25 or less from contributors whose cumulative contributions are $25 or less. If a contributor will contribute to a committee on more than one occasion, these contributions should be recorded as Contributions from Individuals or Contributions from Committees, not small contributions. This is an easier way for the committee to ensure that the aggregate sum of contributions received from that contributor has not exceeded the $25 limit. Cumulative reporting is required for contributions. In the software, there is an internal account (account #200) for contributions of $25 or less. Entries to this account can be viewed and edited; see the section on Viewing and Editing Account Entries (page 31) for instructions.
Recording Small Contributions In the main window, click on Transactions, Contributions, Small (Aggregate $25 or less)
The Receive Contributions of $25 or Less window appears
Enter the date the contribution was received, the aggregate amount of the contribution, and any remarks, pressing the TAB key between fields.
Click OK

57
In-Kind Contributions
A ote About In-Kind Contributions and Expenditures
Pursuant to A.R.S. § 16-901(15), in-kind contribution means a contribution of goods or services or anything of value and not a monetary contribution. In-kind contributions must be reported at the fair market value, or the amount that the general public would pay for the same goods or services. Contribution limits as described in A.R.S. § 16-905 apply to in-kind contributions. Keep in mind that the Secretary of State adjusts the limits and levels in this statute biennially. Consult the Campaign Finance Web page at http://www.azsos.gov/cfs/library.htm for current limits.
In the software, there is an internal account (account #500) for in-kind contributions. This account holds all of the in-kind contributions received in the current election cycle. There is a sister account (account #510) that holds all the expenditures of in-kind contributions. Receiving an in-kind contribution is actually a two-part process, f the contribution is received, and then it is expended. It may be expended as soon as it is received (e.g.: limousine ride during current reporting period), or it may be expended in part or in whole in some upcoming reporting period (e.g.: a contributor gives something that cannot be used until the next reporting period). Either way, there are at least two separate entries to be made: One for the contribution in account #500, and one or more for the expenditure in account #510. Both of these entries can be made at the same time by checking the box in the Receive In-Kind Contribution window that says Expend Immediately. To find out how to expend an in-kind contribution at some point in the future, see the section titled Expending In-Kind Contributions (page74) for instructions.
Recording In-Kind Contributions In the main window, click on Transactions, Contributions, In-Kind The Receive In-Kind Contribution window appears
If the contributor is already in the names list click the pull down arrow in the From box and choose the name. Otherwise, add the contributor:

58
Type the contributor name in the From box An Information window appears asking if you would like to add the contributor to a list.
Click OK
The Select Name Type Window appears
Click the button next to the type of contributor Click OK
The appropriate window will appear so that identification information can be entered for that entity. For example, if you select individual in the Select Name Type window, the Individual window will appear. Fill out the boxes in the window, pressing the TAB key between fields Click OK

59
The contributor is now added to the appropriate list, and the Receive In-Kind Contribution window is once again active. Finish filling in the Receive In-Kind Contribution window, pressing the TAB key between fields. If you wish for an entry to be made to the in-kind expenditures account at the same time, make sure the Expend Immediately check box is checked. Click OK

60
Printing and Previewing Accounts Lists All accounts can be previewed and or printed, except the names list. In the main window, click on Lists, Accounts
The Accounts List window appears
Double click on the account to be previewed or printed in the Accounts List Window. A window specific to that account appears

61
Option shown permits all names, dates, and transactions to be printed The screen below gives a preview of the account to be printed WAR I G: DO NOT SAVE
From this window you may choose to preview, print a single page, all pages

62
Receipts Other Than Contributions Receipts in this section appear on line 7 of the Detailed Summary Page of the campaign finance report. See the section on Creating Period Reports (page42) for instructions.
Receiving Interest And Dividends This is where to receive interest or dividends on the committee account. An entry using this function will increase the Committee Equity account (account #100) and the Interest and Dividends account (account #230). Entries to these accounts can be viewed and edited; see the section on Viewing and Editing Account Entries (page 31) for instructions. In the main window, click on Transactions, Interest
The Receive Dividends or Interest window appears
If the bank is already in the names list, click the pull-down arrow in the From box and select the name of the bank by clicking on it.
If the bank is not in the names list, enter their name in the From box An Information window appears
Click OK

63
The Bank window appears
Fill out the information regarding your bank, pressing the TAB key between fields Click OK
Back in the Receive Dividends or Interest window, enter in the date and amount of the transaction Click OK
Other Receipts This function records any receipts that are not contributions and are not interest. These transactions increase the Other Receipts account (account #240) and the Committee Equity account (account #100). Entries to these accounts can be viewed and edited; see the section on Viewing and Editing Account Entries (page 31) for instructions. In the main window, click on Transactions, Other, Receipts
The Other Receipts window appears
If the contribution is from an entity that is already in the names list, click the pull-down arrow in the From box and select the name of the giver by clicking on it. If the giver is not in the names list, enter their name in the From box.

64
An Information window appears
Click OK
The Select Name Type window appears
.
Select the type of entity for the giver by clicking on the button next to it
Click OK
The appropriate window will appear to record information about that particular type of entity. For instance, for an individual the Individual window will appear. Fill out the form, pressing the TAB key between fields. Click OK
Back in the Other Receipts window, enter the date, amount, and description of the receipt, pressing the TAB key between fields.

65
Refunding Contributions Applicable Laws: A.R.S. § 16-905
A ote About Refunding Contributions
If a committee receives a non-acceptable contribution from an entity, they should immediately refund the contribution (or the part of it that causes it to be non-acceptable). Refunds are stored in the same accounts as their corresponding contributions. They can be viewed and edited. See the section on Viewing and Editing Account Entries (page 31) for instructions.
Refunds To Individuals
In the main window, click on Transactions, Contributions, Individual/Personal/Family Contribution, Refund.
The Refund Contribution from an Individual window appears
Select the contribution that is to be refunded by clicking on it Enter the date, amount, and reason for the refund in the Memo field
Click Process

66
Refunds To Committees
otes About Refunding Committee Contributions
In the software, refunds of committee contributions are stored in Contributions from Committees account (account #220). Entries to this account can be viewed and edited; see the section on Viewing and Editing Account Entries (page 31) for instructions.
Recording Refunds To Committees In the main window, click on Transactions, Contributions, Committee Contribution, Refund. The Refund Committee Contribution window appears
Select the contribution that is to be refunded by clicking on it
Enter the date, amount, and reason for the refund in the Memo field
Click Process

67
Refunding Qualifying Contributions In the main window, click on Transactions, Contributions, Qualifying Contributions, Refund The Refund Qualifying Contributions window appears
Select the contribution that is to be refunded by clicking on it Enter the date, amount, and reason for the refund in the Memo field Click Process

68
Expenses, Payments, and Credits When a committee purchases goods or services, an expense is incurred. When expenses are incurred, the Operating Expenses account (account #700) increases. If the expense is paid for at the time it is incurred, the Committee Equity account (account #100) decreases. If the goods or services are purchased on credit, the Accounts Payable account (account #400) increases. Entries to these accounts can be viewed and edited; see the section on Viewing and Editing Account Entries (page 31) for instructions.
Paying For An Expense As It Is Incurred (Record Expenditure) To record an expense and debit the committee equity account at the same time, use the Record Expenditure function. This function is only used to record payments made when goods and services are received, not to pay on bills for goods and services that have been received on credit and previously recorded with the Enter Bills function. This function increases the Operating Expenditures account (account #700) and reduces the Committee Equity account (account #100) at the same time. If you pay for goods or services with cash, you can still use this function to record the transaction. In this case, do not enter a check number.
In the main window, click on Transactions, Expenditures, Record Expenditure.
The Record Expenditure window appears
Record a check number if applicable Enter the date
If this payment is going to an existing vendor, click the pull down arrow in the Payee box and select a vendor by clicking on it If this payment is going to a new vendor, type in the vendor name

69
An information window appears if this is a new vendor
Click OK
A Vendor information window appears
Fill out the required information Click OK
Back in the Record Expenditure window record the amount. Enter a description of the expense in the memo box.
Click OK

70
Entering Bills This function is only used to record Expenditures made on credit. It increases the Operating Expenditures account (account #700) and Accounts Payable (account #400) at the same time. In the main window, click on Transactions, Expenditures, Enter Bills The Enter Bills for Goods or Services window appears
If this payment is going to an existing vendor, click the pull down arrow in the From box and select a vendor by clicking on it. If this payment is going to a new vendor, type in the vendor name An information window appears if this is a new vendor
Click OK
A Vendor information window appears

71
Fill out the required information Click OK
In the Enter Bills for Goods or Services window, enter the date, bill amount, and a description of the goods or service purchased, pressing the TAB key between fields. Click OK
Paying Bills This function is used to record payments against bills recorded in the Enter Bills function. It reduces the Accounts Payable account (account #400) and the Committee Equity account (account #100) at the same time. In the main window, click on Transactions, Expenditures, Pay Bill The Pay Bill window appears
Highlight the debt you wish to pay on by clicking on it Enter the date, amount, and check number (if any), pressing the TAB key between fields. Click Pay

72
Paying Debts from the Previous Committee In the main window, click on Transactions, Previous Committee, and Pay on Previous Debt(s)
The Pay Transferred Debt window appears
Highlight the debt you wish to pay on by clicking on it Enter the date and amount of the payment, and the check number if any
Click Pay

73
Receiving Credit from a Vendor If a credit note is issued from a vendor before the original bill from that vendor is paid, it is entered here. This is for credits issued for overcharges or contract revisions or other reasons that are not intended for just this particular committee. Credits that are “special treatment” for this committee should be recorded as in-kind contributions. This function decreases the Accounts Payable account (account #400) and the Operating Expenditures account (account #700). In the main window, click on Transactions, Expenditures, Receive Credit from vendor The Receive Credit window appears
Highlight the bill you wish to apply the credit to by clicking on it Enter the date, the amount and the reason for the credit, pressing the TAB key between fields
Click Process

74
Expending In-Kind Contributions Some in-kind contributions are expended as soon as they are received. See the section titled In-Kind Contributions (page 57) for instruction. To record the use of in-kind contributions that were not expended immediately, will be recorded here. In the main window, click on Transactions, Expenditures, In-Kind Expenditure The In-Kind Contributions Not Expended Yet window appears
Highlight the in-kind contribution you wish to expend by clicking on it Enter date goods or services expended Click Expend

75
Independent Expenditures Independent expenditures are defined in A.R.S. § 16-901(14). Committees other than exploratory committees, candidate committees, or $500 threshold committees may record independent expenditures using the software. Independent expenditures increase the Independent Expenditures account (account #410) and decrease the Committee Equity account (account #100). Entries to these accounts can be viewed and edited; see the section on Viewing and Editing Account Entries (page 31) for instructions. In the main window, click on Transactions, Independent Expenditure
The Independent Expenditures window appears
If this purchase is from an existing vendor, click the pull down arrow in the Vendor box and select a vendor by clicking on it If this payment is going to a new vendor, type in the vendor name An information window appears
Click OK

76
The Vendor information window appears
Fill in the information Click OK
Back in the Independent Expenditures window, enter the date, amount, and a description of the goods or service purchased, pressing the TAB key between fields.
Click the button next to Benefited or Opposed, depending on if the expenditure benefited or opposed the candidate.
If this is not a new candidate, click the pull-down arrow in the ame box from the pull-down list If this is a new candidate, type in the candidate name An Information window appears
Click OK
77
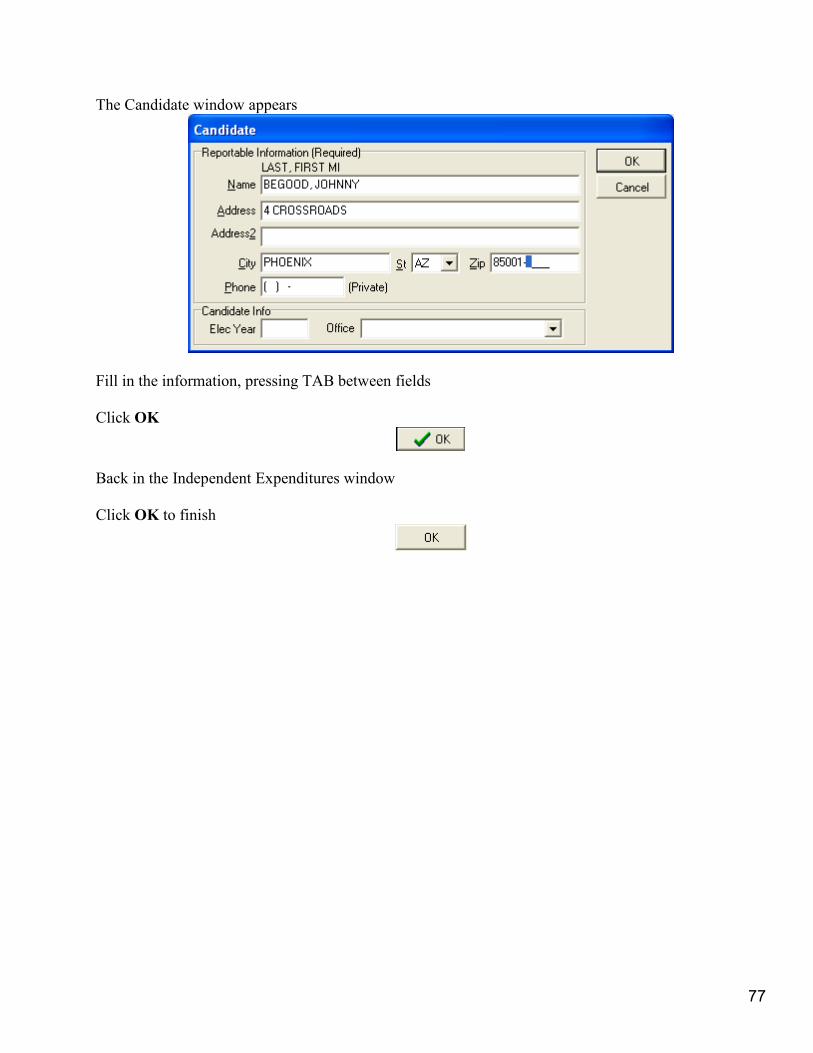
The Candidate window appears
Fill in the information, pressing TAB between fields
Click OK
Back in the Independent Expenditures window Click OK to finish

78
Contributing To Other Committees
Contribution limits apply to contributions to other committees
There are two different contribution limits for two distinct types of committees. A committee that is commonly referred to as a “PAC” (Political Action Committee) is actually a non-candidate committee, and gives at the lower limit. A “Super PAC” is a non-candidate committee certified by the Secretary of State to give at the upper limit. See A.R.S. § 16-905(A)(B) for contribution limits. The Secretary of State adjusts these limits biennially.
The requirements needed by a committee to be a Super PAC are listed in A.R.S. § 16-905(I). Copies
of a Super PAC’s certification from the Secretary of State must accompany any contributions to other
committees. Contributions to other committees increase the Other Disbursements account (account #440). Entries to this account can be viewed and edited; see the section on Viewing and Editing Account Entries for instructions on how to accomplish this.
Recording Contributions To Other Committees, Including Candidate
Committees In the main window, click on Transactions, Contributions, Contribute to
The Other Disbursements window appears
If you have paid this entity before, click the pull-down arrow in the From box and select the entity name by clicking on it If this is a new entity, type in the entity name An Information window appears

79
Click OK
The Select Name Type window appears
Select the type of entity by clicking on the button next to it
Click OK
The appropriate window will appear to record information about that particular type of entity. For instance, for an individual the Individual window will appear. Fill out the form, pressing the TAB key between fields Click OK
Back in the Other Disbursements window, enter the date, amount, and description of the disbursement, pressing the TAB key between fields
Click OK

80
Other Disbursements Use this function to record disbursements that are not operating Expenditures. Examples of these disbursements may include non-essential goods or services received by the committee. This function increases the Other Disbursements account (account #440) and decreases the Committee Equity account (account #100). Entries to this account can be viewed and edited; see the section on Viewing and Editing Account Entries (page 31) for instructions. In the main window, click on Transactions, Other, Disbursements
The Other Disbursements window appears
If you have paid this entity before, click the pull-down arrow in the From box and select the entity name by clicking on it If this is a new entity, type in the entity name An Information window appears
Click OK

81
The Select Name Type window appears
Select the type of entity by clicking on the button next to it
Click OK
The appropriate window will appear to record information about that particular type of entity. For instance, for an individual the Individual window will appear. Fill out the form, pressing the TAB key between fields Click OK
Back in the Other Disbursements window, enter the date, amount, and description of the disbursement, pressing the TAB key between fields
Click OK

82
Loans, Repayments and Interest According to A.R.S. § 16-906, loans are contributions to the extent that they are unpaid. Therefore, loans made to the committee by persons other than the candidate or his/her family members are subject to contribution limits as defined by A.R.S. § 16-905. Loans made to the committee by the candidate or his/her family members are subject to personal monies notification levels as outlined in A.R.S. § 16-905. The Secretary of State adjusts the limits and levels in this statute biennially. Consult the Campaign Finance Web page at http://www.azsos.gov/cfs/library.htm for current limits. In the software there are four internal accounts that hold loan information. Loans from Candidate account (account #300), Loans from Other Sources account (account #310), Loans Made by Reporting Committee account (account #320), and Loan Interest account (account #420). Entries to these accounts can be viewed and edited; see the section on Viewing and Editing Account Entries (page 31) for instructions.
Receiving Candidate Loans
A note about candidate loans
This is where to record loans made by a candidate to their exploratory or candidate committee. Other types of committees should not use this function. Entries of candidate loans increase the Loans from Candidate account (account #300) and the Committee Equity account (account #100).
Recording Candidate loans In the main window, click on Transactions, Loans, Candidate Loan, Receive Candidate Loan

83
The Receive Candidate Loans window appears
If this is not the first time you have referenced this candidate, click the pull-down arrow in the From box and click the candidate name. If this is the first time you have used this function, enter the candidate name in the From box An Information window appears
Click OK
The Candidate window appears
Fill out the form, pressing the TAB key between fields

84
Click OK
Back in the Receive Candidate Loan window, enter the date and amount of the loan, pressing the TAB key between fields.
Click OK
Repaying Candidate Loans
A note about repaying candidate loans
Repayments of candidate loans decrease the Loans from Candidate account (account #300) and the Committee Equity account (account #100).
Recording repayment of candidate loans In the main window, click on Transactions, Loans, Candidate Loan, Repay Candidate Loan The Repay Candidate Loan window appears
Select the loan that you wish to make a payment on by clicking on it Enter the date and amount of the payment, pressing the TAB key between fields
Click Process

85
Accruing Interest For Candidate Loans In the main window, go to Transactions, Loans, Candidate Loans, Accrue Interest on Candidate
Loans
The Enter Accrued Interest for Loan window appears
Select the loan that you wish to accrue interest by clicking on it Enter the date and amount of interest along with any comment on memo line Click Process

86
Receiving on-Candidate (Other) Loans
A note about non-candidate loans
Entries of non-candidate loans increase the Loans from Other Sources account (account #310) and the Committee Equity account (account #100).
Recording non-candidate loans In the main window, click on Transactions, Loans, Other Loan, Receive Other Loan.
The Receive Other Loans window appears
If this is not the first time you have received loans from this lender, click the pull-down arrow in the From box and click on the lender name
If this is the first time you have received loans from this lender, enter the lender name in the From box An Information window appears
Click OK

87
The Select Name Type window appears
Select the type of entity for the lender by clicking on the button next to it
Click OK
The appropriate window will appear to record information about that particular type of entity. For instance, for an individual the Individual window will appear. Fill out the form, pressing the TAB key between fields Click OK
Back in the Receive Other Loans window, enter the date and amount of the loan, pressing the TAB key between fields
Click OK

88
Repaying on-Candidate (Other) Loans
A note about repaying non-candidate loans
Repayments of non-candidate loans decrease the Loans from Other Sources account (account #310) and the Committee Equity account (account #100).
Recording repayment of non-candidate loans In the main window, click on Transactions, Loans, Other Loan, Repay Other Loan The Repay Other Loan window appears
Select the loan that you wish to make a payment on by clicking on it Enter the date and amount of the payment, pressing the TAB key between fields
Click Process

89
Accruing Interest For on-Candidate Other Loans In the main window, click on Transaction, Loans, Other Loans, Accrue Interest, Other Loan The Enter Accrued Interest For Loan window appears
Select the loan that you wish to make a payment on by clicking on it Enter the date and amount of the payment, pressing the TAB key between fields Click Process

90
Making Committee Loans Candidate or exploratory committees must not make loans to other candidate or exploratory committees, with exceptions described in A.R.S. § 16-905(H). Loans made by the committee increase the Loans Made by Reporting Committee account (account #320) and decrease the Committee Equity account (account #100). In the main window, click on Transactions, Loans, Committee Loan, Make Loan The Loans Made By Committee window appears
If the recipient is already in the names list, click the pull-down arrow in the From box and click the recipient name on the pull-down list If the recipient is not in the names list, enter the recipient name in the From box An Information window appears
Click OK

91
The Select Name Type window appears
Select the type of entity for the recipient by clicking on the button next to it
Click OK
The appropriate window will appear to record information about that particular type of entity. For instance, for an individual the Individual window will appear. Fill out the form, pressing the TAB key between fields Click OK
Back in the Loans Made By Committee window, enter the date and amount of the loan, pressing the TAB key between fields Click OK.

92
Transfers of Funds These transfer functions record transfers of funds from one committee to another that are not contributions. For instance, a committee may wish to transfer funds from a previous committee to a subsequent committee at any time during the election cycle, or two or more committees may host a joint fundraising effort and need to split the proceeds later. Prompts in the transfer functions will ask the operator for the committee ID of the sending or receiving committee. If the committee does not have an ID issued by the Secretary of State, enter the ID issued by a local jurisdiction. There are two accounts that hold transactions regarding transfers of funds: transfer to another committee account (account #600) and transfer from another committee account (account #610). Entries to these accounts can be viewed and edited; see the section on Viewing and Editing Account Entries (page 31) for instructions.
Transfers To Another Committee This function decreases the Committee Equity account (account #100) and increases the Transfer To Another Committee account (account #600). In the main window, click on Transactions, Transfers, To Another Committee ID The Transfer to Another Committee window appears
If the receiving committee is already in the names list, click the pull-down arrow in the From box and click on the name of the receiving committee If the receiving committee is not in the names list, enter the committee name in the From box An Information window appears

93
Click OK
The Political Committee window appears
Fill out the form, pressing the TAB key between fields
Click OK
Back in the Transfer To Another Committee window, enter the date and amount of the transfer, along with any remarks, pressing the TAB key between fields Click OK

94
Transfers From Another Committee This function increases the Committee Equity account (account #100) and the Transfer from Another Committee account (account #610). In the main window, click on Transactions, Transfers, and From Another Committee ID The Receive Transfer From Another Committee window appears
If the sending committee is already in the names list, click the pull-down arrow in the From box and click on the name of the sending committee If the sending committee is not in the names list, enter the committee name in the From box An Information window appears
Click OK
The Political Committee window appears

95
Fill out the form, pressing the TAB key between fields
Click OK
Back in the Receive Transfer From Another Committee window, enter the date and amount of the transfer, along with any remarks, pressing the TAB key between fields.
Click OK.
OTE: Also see section on Transfer Previous Committee Surplus

96
Getting Help Of course, we can’t help you with legal advice or any interpretation of statute, law, code or rule. But we know Campaign Finance Software inside and out, and can assist you with the installation and operation of this software product. Most questions can be answered by reading this manual. However, if you have an issue you can’t resolve, or if you’ve found a problem with the software, feel free to email us at: [email protected] Your CF Solutions Support Team


![FN3092: CORPORATE FINANCE [“CF”] INTRODUCTIONsim.ascentiz.com/CF/notes/1S-CF-C1.pdf · FN3092: CORPORATE FINANCE [“CF”] ... here we turn to corporate finance issues, ... M](https://img.dokumen.tips/doc/110x75/5ac556477f8b9ae06c8db579/fn3092-corporate-finance-cf-corporate-finance-cf-here-we-turn.jpg)