Embed Size (px)
Citation preview
Camera Scans – Using a Digital Camera as a Film Scanner Peter Krogh; Author, The DAM Book, Digital Asset Management for Photographers; Kensington, MD, USA
Abstract Individual photographers and institutions are struggling with
large film archives that require digitizing. Digital cameras can fill an important gap in the scanning environment, enabling large collections to be scanned on-site with low-cost equipment and easily-trained operators. Digital camera scans can now produce very high-quality images, suitable for nearly any kind of reproduction. This paper will discuss the issues surrounding implementation of camera scanning systems, including scan quality, hardware, software and workflow considerations.
In addition to an outline of the technical processes, this paper will discuss how the dramatic cost reductions provided by camera scanning shifts the resource allocation in the workflow, repositioning highest-skilled work from the start of the workflow to the end.
Challenges of conventional scanning While conventional scanning tools such as drum scanners and
high-end desktop scanners such as the Imacon produce very good digitized version of images, they do so at a high cost. Whether the scans are created in-house or through outsourcing, the cost of the equipment and the skilled operator come at a high price per image. Because the cost is high, the process must be front-loaded with an even more valuable resource – the time and attention of the collection curator, who must carefully evaluate image collections to determine what to scan (Figure 1). This bottleneck insures that large portions of any collection will remain unavailable through digital means.
Low-quality scans have been available for some time, but they often come with unacceptable trade-offs. Some services require outsourcing the scanning operations overseas, which will be undesirable or impossible for many collections. And many other inexpensive options do not produce a scan suitable for reproduction, ensuring that a re-scanning process must take place at some point for a large portion of the collection.
Figure 1 Traditional Scanning requires the work of the curator and the imaging specialist – the most expensive parts of the process – to be at the start of the workflow.
The Camera Scan Solution The use of a digital camera as a scanning device offers a new
way to approach the digitization of large collections in a way that addresses the drawbacks of a conventional scanning solution. • The equipment is very low-cost compared to dedicated film
scanners. The DSLR cameras that we have been testing are a
fraction of the cost of good dedicated film scanners. A scanning set-up can be put in place for less than $5000 - and even less if the equipment is already owned by the institution.
• The low cost of the equipment allows scanning to take place on-site, reducing handling and transportation costs.
• We have found that DSLR cameras can produce scans that are equal in quality to nearly any scan, depending on the size of the original.
• Camera Scan set-ups can produce very high throughput, even with low-cost equipment and relatively unskilled operators. We have achieved up to 1600 scanned images per day.
• The work that must be done by the trained imaging expert comes at the end of the process, only for images that require the work.
• Because the process enables the scanning of vastly more images, the work of the curator can come after the digitization process, rather than before. (Figure 2)
• Storage of camera scans in DNG format can reduce size requirements by more than 60% with no loss in quality.
Figure 2 With low-cost scanning, the skilled work comes at the end of the process, rather than at the beginning.
The Benefits of Non-destructive Imaging Commonly available software tools work with digital cameras
to create a non-destructive workflow. The use of a parametric image editing environment enables workflow where images only require enough processing work to enable the next stage of the editing process. This lets the camera scanned collection manager allocate processing resources only to images that require subsequent handling. In a traditional scanning workflow, it’s much more important to get everything right at the beginning, because each handling step is either a destructive process, or it generates a very large storage and management overhead.
The Benefits of a Digitized Collection In addition to the obvious cost-savings that camera scanning
can provide, there is an added benefit that collection owners and managers can realize. Instead of depending on a single collection curator to identify the images of greatest value (and therefore the images that the imaging specialist should spend the most time on), a digitized collection can take advantage of crowdsourcing options (Figure 3).
Figure3 When large parts of a collection can be digitized, it’s possible to get input from different sources as to which images in a collection are valuable, and indeed, additional input in the annotation process. This can enable more effective use of the imaging specialist.
Camera Scan Quality All of the benefits of camera scanning depend on the ability to
create a high-quality file from the process. Our testing has shown that the camera scanning process produces equivalent results to conventional scanning when used with high-megapixel DSLR cameras (16+ megapixels). • We have found that 35mm scans are fully the equivalent of
any high-quality scans. At this resolution, both methods are able to resolve film grain with excellent detail.
• Medium and large format film may be rendered in finer detail with the highest quality conventional scanners, but the differences in the image quality are not apparent unless the image is enlarged to a very high degree, and reproduced with high-quality reproduction processes. Of course, the best way to determine quality is to actually
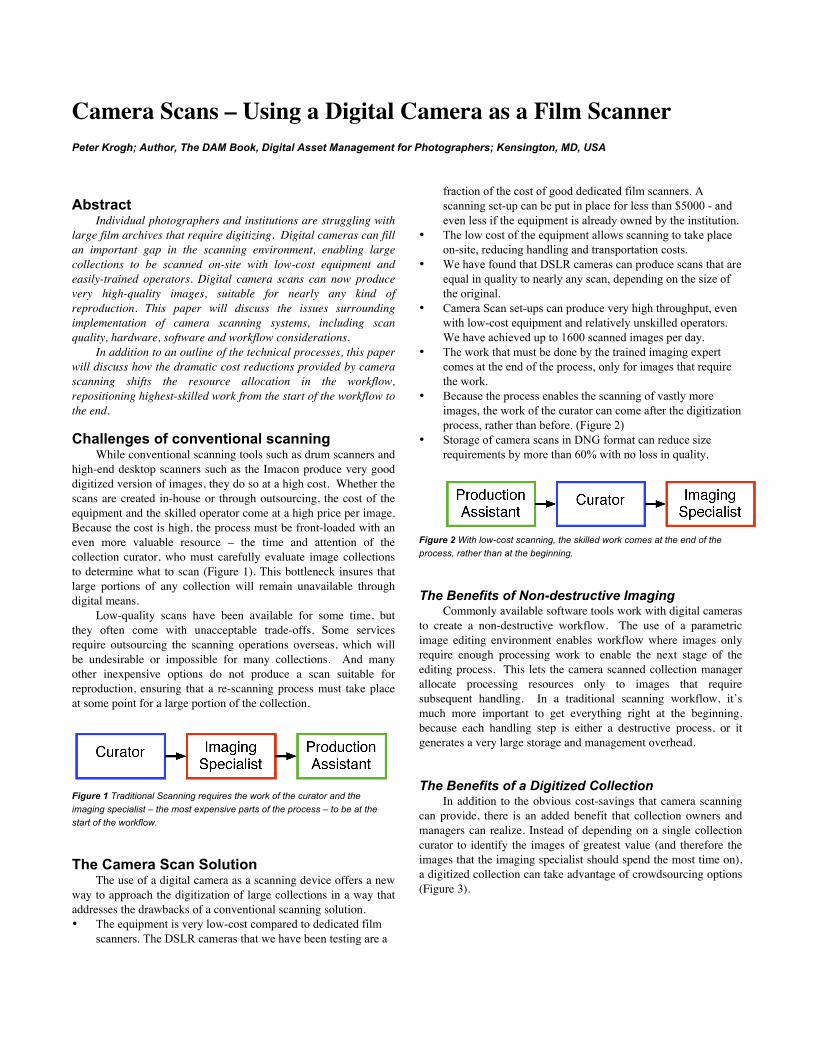
inspect the scans. We have posted sample scans made with several different devices for download at www.theDAMbook.com/scans. These scans include ones made with several different resolution digital cameras, as well as a Nikon 8000 film scanner, Imacon Scanner and a drum scan. Details from two scans are reproduced in this paper. (Figures 4 and 5)
We have found that, with a good-enough camera, the judgement about which image is “best” has more to do with the subjective choices made by the scanner operator than it does with the device itself. Sharpening, contrast and tonal choices make the largest differences.
Practical Issues with Different Film Types Different film types present both opportunities and challenges
for camera scanning. In general, we have found that camera scanning is extremely well-suited to black and white negatives, very good for color transparency, and least useful (currently, for reproduction purposes) for color negative.
Figure 4 Here’s a sample from a Nikon 8000 scanner created at 4000 PPI resolution.
Figure 5 Here’s the same image scanned with a Canon 1DsMkIII camera.
Neither of these images have been sharpened.
Black and White Film Black and white film is very well-served by the camera
scanning process. There are several reasons for this. • Black and white negatives are likely to be stored in multiple
frame strips, and this makes it more problematic to pull individual frames for scanning than with transparency film.
• Black and white negatives only require tonal corrections to be made ready for reproduction, and are easy to correct in this adapted process.
• Because black and white film was generally shot with little or no exposure bracketing, it’s more likely that the collection owner will want a large percentage of the collection scanned.
Color Transparency Film We found camera scanning color transparency film to work
very well. While transparencies are more likely to be segregated into smaller groups (and thus more efficiently grouped for more expensive scanning), there are a large number of collections that comprise many thousand transparencies to scan.
We found that color fidelity was easy to maintain with transparency film.
Color Negative Film Color negative film is often stored in multi-frame strips like
black and white negatives, but the color transformation has proven to be more difficult than either black and white negatives or color transparency. We continue to work on this issue as outlined in the software section below.
Hardware While the cameras and lenses used in the camera scanning
process are commonplace, the rest of the hardware is a bit more difficult to source. Our research on several different hardware types is presented below. In all cases, we were looking for a way to simply create a film stage co-planar to the camera’s sensor. We found several acceptable device configurations.
Camera and Lens Combinations Our testing showed that current DSLR cameras all offered
excellent results, provided that a suitable macro lens was used. The major manufacturers all offer macro-optimized lenses. Additionally, some hardware configurations offered the option of using enlarger-style lenses, which also work well.
Note that this is a particularly demanding technical usage of a digital camera, and any imperfections in the imaging pipeline can show up here. In particular, we found that diffraction limitations showed up when stopped down too much. This had to balanced against the fact that the film was not being held perfectly flat. We found acceptable compromises in the range of f/8 that had no apparent depth of field issues, nor was diffraction limitation observed.
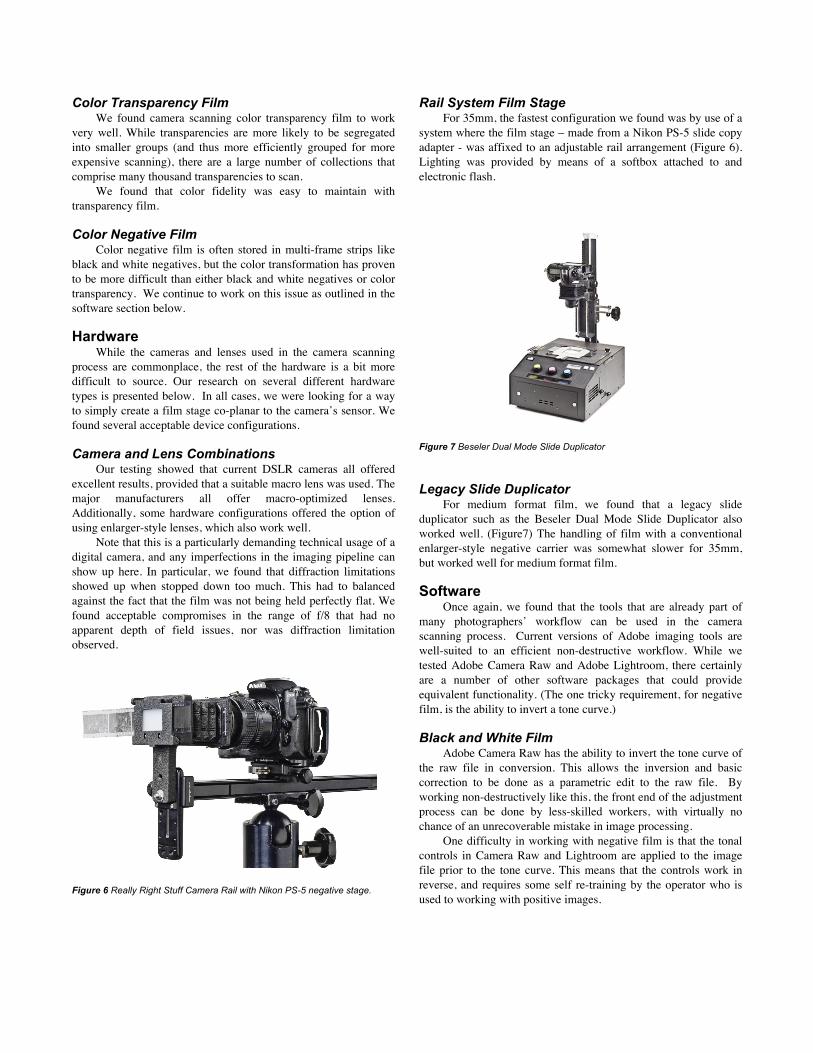
Figure 6 Really Right Stuff Camera Rail with Nikon PS-5 negative stage.
Rail System Film Stage For 35mm, the fastest configuration we found was by use of a
system where the film stage – made from a Nikon PS-5 slide copy adapter - was affixed to an adjustable rail arrangement (Figure 6). Lighting was provided by means of a softbox attached to and electronic flash.
Figure 7 Beseler Dual Mode Slide Duplicator
Legacy Slide Duplicator For medium format film, we found that a legacy slide
duplicator such as the Beseler Dual Mode Slide Duplicator also worked well. (Figure7) The handling of film with a conventional enlarger-style negative carrier was somewhat slower for 35mm, but worked well for medium format film.
Software Once again, we found that the tools that are already part of
many photographers’ workflow can be used in the camera scanning process. Current versions of Adobe imaging tools are well-suited to an efficient non-destructive workflow. While we tested Adobe Camera Raw and Adobe Lightroom, there certainly are a number of other software packages that could provide equivalent functionality. (The one tricky requirement, for negative film, is the ability to invert a tone curve.)
Black and White Film Adobe Camera Raw has the ability to invert the tone curve of
the raw file in conversion. This allows the inversion and basic correction to be done as a parametric edit to the raw file. By working non-destructively like this, the front end of the adjustment process can be done by less-skilled workers, with virtually no chance of an unrecoverable mistake in image processing.
One difficulty in working with negative film is that the tonal controls in Camera Raw and Lightroom are applied to the image file prior to the tone curve. This means that the controls work in reverse, and requires some self re-training by the operator who is used to working with positive images.
Transparency Film The software options for transparency film are larger than
those for negative film, since all parametric image editors are suited to working with positive images. We found good results with every package we tried.
One of the trickiest areas of any transparency reproduction is differentiation of shadow detail. Transparency film has a long toe, and the naked eye can see detail that is very difficult to translate into printed form. The tools for parametric image editing offer an excellent workflow here, since they commonly offer local contrast enhancement. (This is called Fill Light in Camera Raw, and Shadows in Aperture). We have found this to put capable shadow detail enhancement within reach of even a relatively unskilled user.
Color Negative Film The most difficult film-type to convert is clearly color
negative film. While it’s relatively easy to correct for the film base color, and flip the image to positive, getting good color out of a color negative has proved difficult. We have been working with Adobe to create new Camera Raw profiles to provide a better starting point, but as of this writing, they are not complete. Please consult the web page, www.theDAMbook.com/neg for updates on this process.
Storage Format Another significant advantage that camera scanning can offer
is a great savings in the cost of storage for a large imaging project. Bayer pattern digital original files are roughly one-third the size of their 8-bit TIFF counterparts. When compared to 16-bit TIFF files, digital camera originals saved as DNG files can be up to 5/6 smaller. For instance, as Canon 1DS MKIII file (23 MP) produces a DNG file at about 22 megabytes and a 16-bit TIFF of 120 MB. This economy adds to the camera scan’s ability to facilitate large scanning projects.
Storing as DNG files Digital camera originals can be stored as DNG files for
maximum flexibility and efficiency. A DNG file contains both the source image file (in this case the bayer-pattern camera raw image) as well as rendered version of the corrected file. The embedded preview image that is currently created by Adobe software is a #7 JPEG, which is appropriate for many different uses of the image, such as screen display and web distribution, as well as many kinds of less-exacting print reproduction.
Because the DNG file contains all the raw data, it’s possible to reinterpret images at any time, and re-embed the preview in the file. This allows image collections to be digitized and archived with only minimal work by an imaging specialist. As images are identified for high-value reproduction needs, the raw data may be accessed and more carefully manipulated to achieve a desired output.
While Adobe software will currently write a #7 JPEG as an embedded preview, the DNG spec provides for embedded previews that are uncompressed and saved in 16 bits.
Case Studies We have produced several large-scale digitization projects
using the camera scanning techniques, and have achieved excellent
results. One example here was for an institutional client, and the other was for a personal archive.
Centerstage Theater Richard Anderson studio recently completed a project
digitizing 56,997 black and white 35mm negatives representing the 20-year photographic history of the Centerstage Theater in Baltimore, MD. Before proceeding, he created scanned tests using an Imacon scanner, as well as a Canon 1DS Mark II camera.
The Imacon scanner was set to a resolution of 8000 PPI, with a final pixel dimension of 10800x7920. The 1DS MkII provided a file that measured 4992x3328 pixels. Although the size difference was enormous, the resulting image from the Canon was more pleasing, and had all the apparent resolution, even in high-quality continuous tone prints more than 24 inches tall.
It was decided that the camera scan process would be sufficient for the entire digitization process, and the project commenced. The entire process, including set-up, archiving, initial image adjustment and addition of metadata to the images took 599 employee hours to complete, for a sustained throughput of 95 images per hour. The entire archive, nearly 57,000 images fits comfortably on a single terabyte hard drive. The equivalent number of full resolution Imacon scans would require more than 20 terabytes.
Peter Krogh Personal Archive Over the last two summers, I have also had my own personal
archive of black and white 35mm negatives scanned, more than 45,000 images. These images were scanned with a Nikon D2x camera. The entire process took a studio assistant about 500 hours to complete, including preliminary image processing, renaming, archive and backup of the images. Storage requirement for the finished scans is about 500 GB.
New Film Drive Wanted Perhaps the most time consuming part of the camera scanning
process is film-handling. Some parts of this, such as pulling and returning film to storage are unavoidable. Other parts, such as the advancement of film strips through the film stage, could be automated. It possible that a film drive system from a minilab could be adapted to a camera scanning setup and greatly expedite the process.
Author Biography Peter Krogh is a professional photographer, author, instructor,
consultant and software designer. His book The DAM Book, Digital Asset Management for Photographers (O’Reilly 2005 and 2009) has helped photographers and collection managers worldwide get control over their image collections
He is on the board of directors of the America Society of Media Photographers, and has been working for the last year on an NDIIPP award project on image management and workflow.
Thanks to Richard Anderson, photographer of Baltimore, MD for his assistance in the development of these techniques and of this paper. Thanks also to Dan Stack and Matthew Yake for their testing of the system.


![INSTRUCTION MANUALcontent.etilize.com/User-Manual/1018832053.pdfDWC-PTZ10x [Mini SPEED DOME CAMERA] 6/49 8 Groups are memorized to repeat a series of Presets, Patterns, and Scans](https://img.dokumen.tips/doc/110x75/5e9650e1424c7d0ad96b6721/instruction-dwc-ptz10x-mini-speed-dome-camera-649-8-groups-are-memorized-to-repeat.jpg)