Embed Size (px)
Citation preview

CAL2: Computer AidedLearning in ComputerArchitecture Laboratory
JOVAN DJORDJEVIC,1 BOSKO NIKOLIC,1 TANJA BOROZAN,1 ALEKSANDAR MILENKOVIC2
1Computer Engineering Department, Faculty of Electrical Engineering, University of Belgrade, Belgrade, Serbia
2Electrical and Computer Engineering Department, The University of Alabama in Huntsville, Huntsville, Alabama
Received 6 October 2006; accepted 27 December 2006
ABSTRACT: Computer architecture courses are crucial core courses in computer
engineering, electrical engineering, and computer science programs. Dramatic changes in
technology, markets, and computer applications create a quite unique and challenging
arena for computer architecture instructors and students. The goal is to provide learning
environments that will offer hands-on experience and nurture rapid learning, yet be intuitive
and interesting to students. In this paper we discuss the challenges in teaching such
courses and present a very flexible educational environment for teaching and learning of
computer architecture and organization (CAL2). The CAL2 encompasses a number of software
tools that are used both in laboratory settings and at home during self-study. The CAL2 allows
students to write and execute their own assembly language programs, ‘experience’ program
execution through graphic simulation and animation, inspect implementation details down to
the register transfer level, display timing diagrams, and test their knowledge. In addition, the
CAL2 offers a number of features that help instructors define, configure, manage, and
administer the laboratory exercises.� 2008 Wiley Periodicals, Inc. Comput Appl Eng Educ; Published
online in Wiley InterScience (www.interscience.wiley.com); DOI 10.1002/cae.20141
Keywords: computer architecture; educational software; simulation; visualization and
computer graphics; computer uses in classrooms
INTRODUCTION
For barely more than a half of a century computer
systems have changed almost every aspect of human
life—the way people live, work, and communicate.
Spurred by the continual semiconductor technology
advancement, the computer systems have spread
from a few highly sophisticated research laboratories
to virtually all offices, homes, and classrooms.
Microprocessors, the brains of each computer system,
have evolved from an integrated circuit with
2,300 transistors in 1970 to the one with almost a
billion of transistors on a single chip in 2005. The
unprecedented growth in computer system perfor-
mance and their commoditization allowed computerCorrespondence to B. Nikolic ([email protected]).
� 2008 Wiley Periodicals Inc.
1

applications we could not dream of or afford just a
decade ago. Recent trends toward intertwining of
computer engineering with other disciplines, such as
communications, television, transportation, sensors,
security, medicine, will lead to ‘‘smart’’ homes,
‘‘smart’’ cars, ‘‘smart’’ appliances, and ubiquitous
health monitoring systems. The computer systems
will become more diverse and application-specific,
requiring more skilled computer engineers. To meet
this challenge, higher education institutions should
develop new educational environments that provide
hands-on experience and nurture rapid learning
processes, exposing the students early to the basics
of computer engineering.
Courses in computer architecture and organiza-
tion are crucial core courses in Computer Engineer-
ing, Computer Science, and Electrical Engineering
programs. In addition, some forms of such courses
are also present in other academic programs such as
Information Management, Business Administration,
Economy, etc. Introductory courses in Computer
Archtecture usually focus on computer systems
architecture, typical of what can be found in a
present day desktop computer with three main
components: processor(s), main memory, and I/O
subsystem. A recent trend at computer science and
engineering schools has been to expose the students to
such a course early in their education, typically at the
freshmen level. The introductory courses usually
follow the organization of computer systems intro-
ducing basic principles of assembly language pro-
gramming, processor architecture and organization,
main memory, I/O subsystem, and buses. Topics in
processor architecture include the programmable
registers, data types, instruction formats, addressing
modes, instruction types and interrupt mechanism,
while the processor organization covers various
techniques for realizing the processor. Topics in
memory include memory organization, memory
hierarchies, and important metrics such as latency
and bandwidth. Topics in input/output subsystems
cover the structure of the peripheral devices’ con-
trollers, without and with direct memory access, as
well as the input/output techniques. Bus consider-
ations include bus organization, arbitration, and bus
transactions (Fig. 1).
One of the most challenging questions for
educators is how to efficiently teach computer
architecture and demystify the magic surrounding
the operation of modern computer systems and show
the students how binary instructions and simple gates
can lead to useful computation. Computer systems
contain many high-complexity integrated circuits that
communicate at very high speeds, making them one of
the most advanced human-engineered structures. To
manage extreme complexity engineers and designers
have relied on levels of abstraction separated
with well-defined interfaces. Educators use a similar
approach in teaching computer architecture uncover-
ing layers of abstractions as shown in Figure 2.
However, the problem of cognitive leap from black-
board description and computer system utilization
remains an open issue. Another problem is that
introductory courses in computer architecture usually
have large enrolments, making it impossible to
accommodate all of the students’ questions and
Figure 1 Organization of a present-day computer system.
[Color figure can be viewed in the online issue, which is
available at www.interscience.wiley.com.]
Figure 2 Computer system architectures: A layered view
with interfaces; proposed by Glenford Myers (1982). [Color
figure can be viewed in the online issue, which is available at
www.interscience.wiley.com.]
2 DJORDJEVIC ET AL.

concerns, and putting additional strains to often
limited educational resources.
To address above mentioned issues we have
developed an integrated computer architecture labo-
ratory called CAL2 that features a flexible, hierarch-
ical, graphical simulator of an educational computer
system (SimECS) and a web-based software system
for Computer Architecture Learning and Self-Testing
(CALKAS). The educational computer system (ECS)
is designed to demonstrate a broad spectrum of
topics typically taught in lower-division computer
architecture courses. The graphical simulator supports
animation of instruction execution down to the clock
cycle level and hierarchical visual presentation from a
block level down to the standard combinational and
sequential circuits. The CALKAS system serves to
help learning in computer architecture, knowledge
assessment, and laboratory exercise management.
The rest of the paper is organized as follows. The
Background and Motivation section gives a short
overview of the existing tools proposed and used in
computer architecture education and provides a
rational behind our decision to develop SimECS and
CALKAS. The Educational Computer System (ECS)
section describes architecture and organization of the
proposed educational computer system. The SimECS
Visual Simulator section describes software simulator
functionality and its user interface. The Laboratory
Exercises section presents a set of possible laboratory
exercises that demonstrate SimECS capabilities. The
Computer Architecture Laboratory Session section
describes a typical laboratory session. Finally, a
Conclusions section closes the paper.
BACKGROUND AND MOTIVATION
Computer architecture laboratories often rely on
software simulators of pedagogical computer systems.
A number of software tools targeting teaching
and learning in introductory courses in computer
architecture have been proposed and developed. They
differ greatly in scope and complexity (rudimentary,
medium, complex), type of instruction set (commer-
cial or custom), simulation presentation (text, graph-
ical), simulation granularity (program, instruction,
clock), and level of details. The representative
simulators are DLXview [1], ESCAPE [2], Rudimen-
tary Machine (RM) [3], ASF [4], HASE [5], EasyCPU
[6], SimpleScalar [7], ANT [8], RSIM [9], and
DigLC2 [10].
Educators developing an educational computer
system simulator face a number of different, often
contradictory requirements. Allowing students to ex-
perience and see intricacies of a computer system and
its inner workings can significantly improve their
learning experience and help them to grasp sometimes
difficult concepts of computer engineering. Ideally,
the simulators would satisfy the most of the following
requirements.
(1) Support practical examples for a wide range of
relevant topics.
(2) Allow students to write their own assembly
and/or high-level programming language pro-
grams and translate them.
(3) Allow students to follow program or instruc-
tion execution by means of graphical simu-
lation and visualization.
(4) Allow students to see how a certain part of the
system is actually implemented.
(5) Allow students to engage in on-line active
learning.
(6) Allow students to test their knowledge and
observe the progress in the course.
(7) Allow instructors easy preparation of labo-
ratory experiments and assignments.
(8) Allow instructors easy administering of the
laboratory experiments and monitoring of
student’s progress in the course.
Table 1 gives an overview of the existing
systems and their characteristics with the respect to
the above-mentioned requirements.
As a result of a critical analysis of the existing
simulators we found that none of them meets entirely
the above stated requirements. Some of them, like
HASE and ASF, do not show the computer system at
the level of combinational and sequential circuits,
while the others, like ESCAPE, RM, EasyCPU, and
DigLC2, do not cover all the topics lectured.
Simulators like ANT, and ASF are the non-graphic
ones and do not present the functioning of the
computer system in the form suitable to follow, and
those like RSIM and DLXview do not demonstrate the
basic but very sophisticated issues. Consequently, we
decided to venture into the development of a system
for computer-aided learning in computer architecture
laboratory (CAL2). We have developed several
generations of the CAL2 system, varying the type
and organization of the educational computer system;
type and implementation of the processor, memory
system, and I/O peripherals; functionality of visual
simulators; and user interface [11,12]. However,
the educational systems presented earlier in [11,12]
are typically tailored for more advanced courses in
Electrical and Computer Engineering programs, and
COMPUTER AIDED LEARNING 3

often are not suitable for introductory courses due to
their complexity.
In this paper we describe an educational com-
puter system (ECS), graphical software simulator for
it (SimECS), and a Web-based system for learning and
knowledge assessment (CALKAS). The educational
computer system is designed to closely follow
common topics in introductory computer architecture
courses and includes a whole computer system—
processor, memory, I/O subsystem, and bus arbitrator.
For each component, a detailed register transfer level
(RTL) description is provided. Figure 3 illustrates the
computer system hierarchy, starting from the system
components, via the register transfer level description,
down to the gate-level description.
A Chinese proverb says ‘‘I hear, I forget; I see, I
remember; I do, I understand.’’ In this spirit, the
SimECS simulator supports animation of instruction
execution and allows students to write their own
assembly programs, translate them, interactively
initialize processor’s registers, run the simulation,
and examine timing diagrams of selected signals,
values of registers, and memory locations. The
simulator gives graphical presentation of all parts of
the computer system, both at the level of computer
system modules (Fig. 3, left top) and at the register
transfer level (Fig. 3, top right). A simulation run
can be done at the level of a clock, an instruction, or a
complete program.
The web-based system for learning and knowl-
edge assessment—CALKAS [13] is developed due to
the following reasons. A large number of students
taking the laboratory exercises imposed the need for a
software package, which would automate the assess-
ment of students’ knowledge and keep evidence about
each laboratory exercise for each student. In addition
to that, this software package had to offer the pos-
sibility of self-learning of various topics in computer
architecture and organization as a help in the process
of preparation for the laboratory exercises and the
exam itself. Finally, the software package had to be
open for its integration with the visual simulator and
the student database maintained for the whole college.
The practical work with the educational system
takes place in the laboratory where the students carry
out a set of laboratory exercises. The students prepare
for each laboratory exercise at home by studying the
design of a particular part of the computer system
from the reference manual and online materials
(Fig. 4); using a self-testing feature of the CALKAS
system, they can test their knowledge before taking
a laboratory exercise. A typical laboratory session
starts with a laboratory test; this test is designed
to determine whether students are prepared for
the laboratory or not. In each laboratory exercise
the students are asked to solve practical problems
by following the functioning of the computer
system using the simulator and the accompanying
tools. Concurrently using CALKAS they answer the
Table 1 Assessment of the Existing Educational Computer Systems for Their Pedagogical Value
1 2 3 4 5 6 7 8System
DLXview High High High Medium Low Low High Low
ESCAPE Medium High High Medium Low Low High Low
RM Low High High High Low Low High Low
ASF Low High Low Low Low Low Low Low
HASE High Low High Medium High Low Medium Low
EasyCPU Low Low High High Low Low High Low
ANT High High Low Low Low Low High Low
SimpleScalar High High Low High Low Low Medium Low
RSIM High High Low Medium Low Low Low Low
DigLC2 Medium High High High Low Low High Low
Requirement
Figure 3 Computer system hierarchy. [Color figure can be
viewed in the online issue, which is available at www.
interscience.wiley.com.]
4 DJORDJEVIC ET AL.
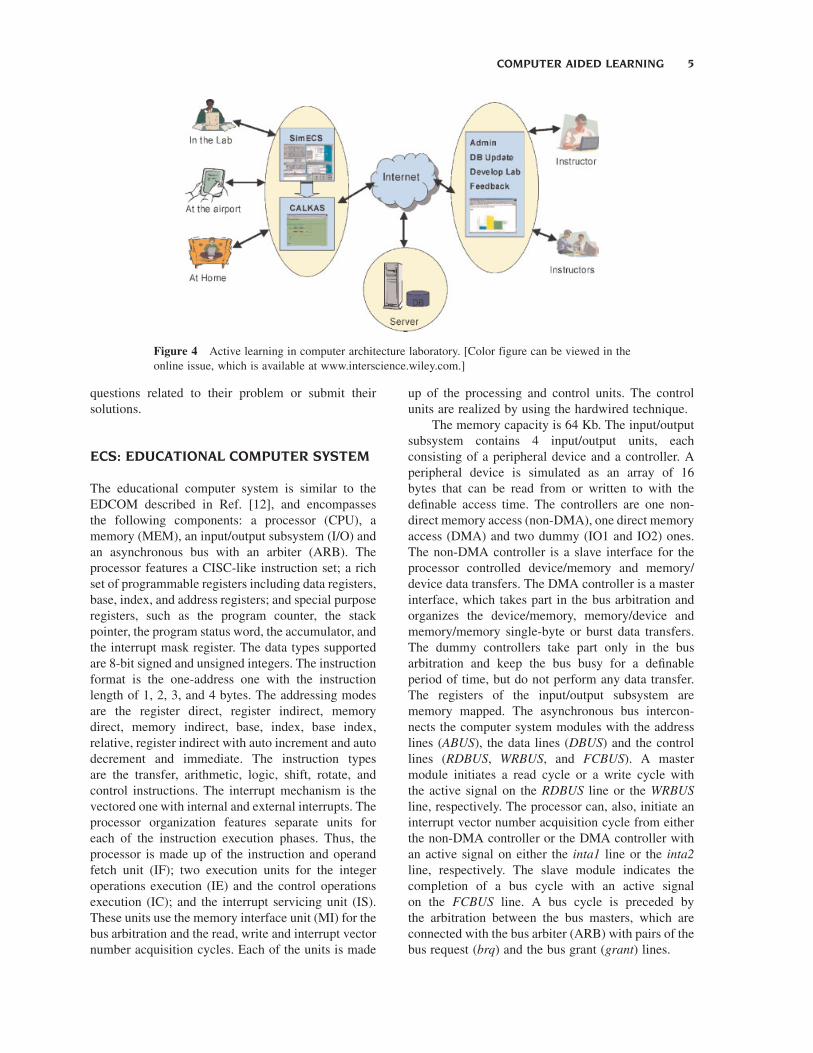
questions related to their problem or submit their
solutions.
ECS: EDUCATIONAL COMPUTER SYSTEM
The educational computer system is similar to the
EDCOM described in Ref. [12], and encompasses
the following components: a processor (CPU), a
memory (MEM), an input/output subsystem (I/O) and
an asynchronous bus with an arbiter (ARB). The
processor features a CISC-like instruction set; a rich
set of programmable registers including data registers,
base, index, and address registers; and special purpose
registers, such as the program counter, the stack
pointer, the program status word, the accumulator, and
the interrupt mask register. The data types supported
are 8-bit signed and unsigned integers. The instruction
format is the one-address one with the instruction
length of 1, 2, 3, and 4 bytes. The addressing modes
are the register direct, register indirect, memory
direct, memory indirect, base, index, base index,
relative, register indirect with auto increment and auto
decrement and immediate. The instruction types
are the transfer, arithmetic, logic, shift, rotate, and
control instructions. The interrupt mechanism is the
vectored one with internal and external interrupts. The
processor organization features separate units for
each of the instruction execution phases. Thus, the
processor is made up of the instruction and operand
fetch unit (IF); two execution units for the integer
operations execution (IE) and the control operations
execution (IC); and the interrupt servicing unit (IS).
These units use the memory interface unit (MI) for the
bus arbitration and the read, write and interrupt vector
number acquisition cycles. Each of the units is made
up of the processing and control units. The control
units are realized by using the hardwired technique.
The memory capacity is 64 Kb. The input/output
subsystem contains 4 input/output units, each
consisting of a peripheral device and a controller. A
peripheral device is simulated as an array of 16
bytes that can be read from or written to with the
definable access time. The controllers are one non-
direct memory access (non-DMA), one direct memory
access (DMA) and two dummy (IO1 and IO2) ones.
The non-DMA controller is a slave interface for the
processor controlled device/memory and memory/
device data transfers. The DMA controller is a master
interface, which takes part in the bus arbitration and
organizes the device/memory, memory/device and
memory/memory single-byte or burst data transfers.
The dummy controllers take part only in the bus
arbitration and keep the bus busy for a definable
period of time, but do not perform any data transfer.
The registers of the input/output subsystem are
memory mapped. The asynchronous bus intercon-
nects the computer system modules with the address
lines (ABUS), the data lines (DBUS) and the control
lines (RDBUS, WRBUS, and FCBUS). A master
module initiates a read cycle or a write cycle with
the active signal on the RDBUS line or the WRBUS
line, respectively. The processor can, also, initiate an
interrupt vector number acquisition cycle from either
the non-DMA controller or the DMA controller with
an active signal on either the inta1 line or the inta2
line, respectively. The slave module indicates the
completion of a bus cycle with an active signal
on the FCBUS line. A bus cycle is preceded by
the arbitration between the bus masters, which are
connected with the bus arbiter (ARB) with pairs of the
bus request (brq) and the bus grant (grant) lines.
Figure 4 Active learning in computer architecture laboratory. [Color figure can be viewed in the
online issue, which is available at www.interscience.wiley.com.]
COMPUTER AIDED LEARNING 5

SimECS VISUAL SIMULATOR
The visual simulator features tools for simulator
initialization and simulation run. The introductory
SimECS screen allows initialization, resumption of
an earlier stopped simulation, or a new simulation
start (Fig. 5a). The initialization allows the user to
define the clock rates for the system modules and
the access times of the peripheral devices and the
memory, examine and set the values of memory
locations and registers of the processor and input/
output units, and select signals for which the timing
diagrams will be drawn. In order to allow instructors
flexibility in preparing examples, the initialization
step can be carried out in several ways: as a complete
initialization from a predefined file—for example,
by selecting one of seven exercises (Fig. 5b), as a
partial initialization from a file—separately for each
component of the ECS (Fig. 5c), or as an interactive
initialisation—by direct change of values of registers
and memory locations (Fig. 6a). There is also a
possibility to write a program in the assembly
language, translate it and load into the memory. Once
the values of either the registers in the processor or in
the input/output units or the memory locations have
been manually changed, the new simulation state
can be saved in a file and later used for the partial
initialization from files. There are also separate
screens for a manual specification of the clock rates
of the computer system modules and a selection of
signals for which the timing diagrams should be
drawn (Fig. 6b).
The simulator supports the simulation of instruc-
tion execution at the level of a clock, an instruction, or
a complete program with the visual presentation of all
components of the computer system. The simulation
screen consists of four windows (Fig. 7): The clock
signals window (left top part of the screen), the global
presentation window (left middle), the detailed
presentation window (right top and middle), and the
info and command window (bottom).
The clock signals window shows a few cycles of
the computer system modules’ clock signals, follow-
ing the last clock signal that has occurred. The red
vertical line points out to the first next clock signal
that will occur in one of the computer system
modules. On the right hand side of the red line are
shown a few clock signals of the computer system
modules in the order of their occurrence. This allows
one to locate where the next clock signals are going
to occur and examine the values of the appropriate
signals before the clock signals occur and produce the
change of their values.
The global presentation window gives either the
block structure of the computer system, if in the
detailed presentation window is shown any other
module except the processor (Fig. 7), or the block
structure of the processor, if in the detailed presenta-
tion window is shown the processor (Fig. 8). The
blocks are in both cases realized as buttons, offering
the users possibility to navigate through the modules
of the computer system. The switchover from the
block structure at the level of the computer system’s
modules (Fig. 7) to the block structure at the level
of the processors’s units (Fig. 8) can be realized by
mouse click on the CPU button. The opposite
switchover can be realized by clicking button X in
the upper left hand corner.
The detailed presentation window gives the
detailed structure of the currently active computer
system’s module: MEM, ARB, DMA, non-DMA,
IO1, and IO2 (Fig. 7); or the processors’s units, IF, MI,
IE, IC, and IS (Fig. 8). The computer system’s
modules and the processor’s units that are not active
are closed and shown as buttons with the names of the
modules or the units, respectively. If a user clicks at
Figure 5 Simulator start and initialization. (a) Main Window; (b) complete initialization; (c)
partial initialization. [Color figure can be viewed in the online issue, which is available at
www.interscience.wiley.com.]
6 DJORDJEVIC ET AL.

Figure 6 (a) Interactive examination and change of values of the processor’s registers and saving
in a file; (b) specification of the clock rates of the computer system’s modules. [Color figure can be
viewed in the online issue, which is available at www.interscience.wiley.com.]
Figure 7 A SimECS simulation screen. The global simulation window shows the block structure at
the level of the computer system’s modules. [Color figure can be viewed in the online issue, which is
available at www.interscience.wiley.com.]
COMPUTER AIDED LEARNING 7

one of these buttons, the detailed presentation of
the corresponding computer system’s module or the
processor’s unit opens. The detailed presentation
of any of the computer system’s module or the
processor’s unit can be closed and shown as a button
by clicking button X in the upper right hand corner.
This offers another possibility to navigate through
parts of the computer system. In addition to that, the
detailed presentations of the computer system’s
modules or the processor’s units are opened and
closed during the simulation in the same order as an
instruction goes through them for various phases of its
execution. The levels of details are sequential and
combinational modules presented as blocks with input
and output signals. A single signal is presented with a
thin line in blue, red, or green depending on whether
the signal on the line is inactive, active, or in the state
of high impedance. Groups of signals are presented
with thick lines in green, if they are in the state of high
impedance and in gray and hexadecimal values
otherwise. When the scheme of the computer system’s
module or processor’s unit presented in the detailed
presentation window contains too many elements
that can not be shown on the screen, the detailed
presentation window has the vertical and horizontal
scrollbars that allow users to move around the scheme.
The info and command window gives information
about the state of simulation (on the left hand side)
and makes it possible to examine the result of the
simulation and control the simulation (the right hand
side). The info window contains the sequence window
and the status buttons. The sequence window gives the
values of the control unit step counter, the control
signals generated in that step and a brief explanation
of the microoperations that are going to be executed in
that step. The status buttons PC, T and Tclk show the
current values of the program counter, the control
unit step counter and the number of processor’s clocks
elapsed, respectively. The command window contains
the simulation, miscellaneous, and start/exit com-
mand buttons. The simulation buttons Clkþ, Insþ,
and Prgþ facilitate the continuation of the simulation
for one clock or as many clocks as is needed to
execute the current instruction or the complete
program, respectively. The miscellaneous buttons
are Show, Clear and Help. The Show button opens
the window from where one can further select of one
of the windows that facilitate the interactive exami-
nation and change of values of the processor’s
registers, the input/output units’ registers (Fig. 6a)
and the memory locations and the drawing of timing
diagrams of selected signals (Fig. 9a). The Clear
button returns the simulation to the beginning. The
Help button activates the help system which gives all
information about the computer system and the visual
simulator (Fig. 9b). The Start/Exit buttons are Start
and Exit. The Start button simulates the start of the
computer system when either the power is turned on
or the system reset button pressed. The Exit button
completes the simulation with the possibility to save
Figure 8 Block structure at the level of the processor’s units. [Color figure can be viewed in the
online issue, which is available at www.interscience.wiley.com.]
8 DJORDJEVIC ET AL.

the current state of the simulation in a file and use the
file later to carry out the complete initialization from
that file and resume the simulation.
LABORATORY EXERCISES
The practical work with the visual simulator of the
computer system is organized through laboratory
exercises. They are made up of simple programs
carefully prepared to demonstrate the characteristics
of interest. The students execute the programs and
answer questions related to some typical situations of
the topic covered by the particular laboratory exercise.
In addition to that in some cases the students are given
problems, which they solve independently, write a
program using the software tools and test it using
the simulator. All laboratory exercises cover four
major areas in the field of computer architecture
and organization: the processor architecture and
organization, the interrupt, the bus and the input/
output. Their brief description is given in the
following.
Processor Architecture and Organization
The processor architecture is demonstrated with a
number of exercises that illustrate programmable
registers, data types, instructions formats, addressing
modes, and instruction types. The interrupts do not
appear in these exercises, since they are treated in a
separate group of exercises. The instructions are
executed at the clock level and all processor units
are involved. This allows one to follow the details of
the processor organization by going through the
sequence of control signals generated by the control
units and examining the values of all signals generated
by the combinational and sequential circuits of the
processing units. There are two groups of exercises
aimed at demonstrating all addressing modes and
algorithms of operations of all instruction types. The
exercises in the first group include the instructions
with simple algorithms of operations and all address-
ing modes available. They are the transfer instruc-
tions, the arithmetic addition, subtraction, increment,
decrement and compare instructions, the logic AND,
OR, XOR, and NOT instructions, the shift and rotate
instructions and the unconditional and conditional
jump instructions. The addressing modes included are
the short literal, register direct, register indirect,
memory direct and memory indirect, then the base,
index, base index and relative with 8- and 16-bit
displacements and the register indirect with auto
increment and auto decrement and immediate. The
exercises in the second group include the instructions
with complicated algorithms of operations and simple
addressing modes. They include the multiplication
and division with unsigned and signed integers, the
push on and the pop from the stack, and the jump to
and the return from the subroutine.
Interrupt
The interrupt is demonstrated with a number of
exercises, where simple programs are executed both at
the clock and the instruction levels. The clock level is
used to demonstrate the sequences of control signals
for the interrupt handling phase of an instruction and
the execution phase of the return from interrupt
instruction. Within the interrupt handling phase of any
instruction, the program counter and the program
status word registers are saved on the stack and the
starting address of the interrupt routine found and
loaded into the program counter. The effect is a jump
Figure 9 (a) Timing diagram of signals; (b) HELP system. [Color figure can be viewed in the
online issue, which is available at www.interscience.wiley.com.]
COMPUTER AIDED LEARNING 9

to the interrupt routine. The return from interrupt
instruction restores the values of the program status
word register and the program counter with the values
from the stack. The effect is the return to the main
program. The instruction level is used to demonstrate
topics such as the selective and complete masking of
interrupt requests coming from the input/output units,
the servicing of multiple interrupt requests, the
nesting of interrupt requests, the mode of operation
when a jump to the interrupt routine is being made
after every instruction executed, the execution of the
interrupt instruction, etc. It is also demonstrated how
the starting address of an interrupt routine can be
found by using the approaches with the interrupt
vector table, the polling of the input/output units and
the combination of both.
Bus
The exercises in this group are organized to
demonstrate two types of operation: the bus arbitra-
tion and the bus cycles. They are carried out at the
clock level. The students are requested to follow the
relevant signals, draw their timing diagrams and
compare them with those obtained from the simulator.
The bus arbitration is demonstrated with two
exercises, where as the bus masters appear the dummy
controllers. In the first exercise a single bus master
participates in the arbitration. This makes it possible
to demonstrate how the bus master sends the bus
request, the arbiter returns the bus grand, the bus
master keeps the bus busy during the bus cycle, the
bus master abolishes the bus request and the arbiter
abolishes the bus grant. In the second exercise two bus
masters participate in the arbitration. The exchange of
signals between the bus masters and the arbiter is
very similar to the one in the previous exercise. The
difference is that one of them has to wait to obtain
the bus grant and perform the bus cycle until the other
one completes its cycle on the bus. The bus cycles
demonstrated in the exercise are the read and write
cycles between the processor as the bus master and the
memory as the bus slave and the interrupt vector
number acquisition cycle between the processor as the
bus master and the input/output unit as the bus slave.
The exercise shows how the address, data and control
signals are exchanged between a bus master and a bus
slave for each of the cycles.
Input/Output
The exercises in this group are made up of simple
programs chosen to demonstrate the internal structure
of the non-DMA and DMA controllers, the way they
are initialized, started and stopped and how the
transfers of data take place with both the non-DMA
and the DMA controllers. In the first part the students
are requested to follow the example programs. At the
beginning the programs are executed at the clock
level, which makes it possible to follow the inner
working of the controllers. Later the programs are
executed at the instruction level, which allows one to
see the specifics of transferring data using the non-
DMA and the DMA controllers, the polling and
interrupt techniques, the cycle stealing and burst
transfers etc. In the second part the students are
requested to write, test and successfully run their own
programs.
COMPUTER ARCHITECTURELABORATORY SESSION
A computer architecture laboratory session with the
simulator is preceded by two steps carried out with the
CALKAS system.
The first step is not compulsory since the students
use the CALKAS system in the Self Learning mode to
study the relevant topic (Fig. 10) and in the Self Test
mode to assess their knowledge. This step is repeated
a number of times until the students are satisfied
with their knowledge. In the Self Learning mode a
students specify the topic and subtopic. At the first
level a student can select one of the following
topics: Processor Architecture, Processor Organiza-
tion, Input/Output, Bus, and Hierarchical Memory
System. At the second level the student can select
one of the possible subtopics. By activating the
corresponding pointer the students get the appropriate
part of the HTML version of the book intended for
learning Computer Architecture and Organization.
The main purpose of the Self Test mode is to
provide facilities, which would allow the students
to prepare for the Lab Test and assess their own
knowledge. The steps of this mode and the facilities
offered are similar to those available in the Lab Test
mode. The student answers the questions and submits
the test using the Self Test Exercise window similar to
the one given in Figure 11. The CALKAS system
checks the correctness of the answers given and
generates a report specifying the number of correct
and incorrect answers. At any time the Explain option
can be activated which invokes the CALKAS system
to give the correct answer to the current question. In
the case when the question is a theoretical one, the
answer is given in the form of detailed explanations.
In the case when the question is related to some
specific details of the computer system, a pointer to
10 DJORDJEVIC ET AL.

the appropriate part of the HTML version of the
computer system reference manual containing the
required descriptions is given.
The second step is compulsory since the students
use the CALKAS system in the Lab Test mode as an
entry check to find out whether they are familiar with
the topic of a particular laboratory exercise to such
an extent that the work with the simulator can be
allowed. After successful login, the CALKAS
system randomly generates the predefined number
of questions with offered answers from the database
with questions and begins to count down the time
remaining for giving the answers. The student answers
the questions by activating the appropriate check
boxes in front of the answers deemed to be correct
(Fig. 11a). The students can view all the questions
generated, give answers, modify the answers already
given and review the answers given. The CALKAS
system checks the correctness of the answers given
and based on the predefined knowledge threshold
generates a message whether the test has been carried
out successfully or unsuccessfully. The information
concerning the knowledge assessment completed,
such as the student’s identification number, the
date, the time, the laboratory exercise identification
number, the questions generated, the answers given
etc. are saved in the appropriate database tables. This
makes it possible to obtain at any time during the
course of laboratory exercises all relevant information
concerning all knowledge assessments taken by any
student. When a student has completed the Lab Test
he can get the Lab Test Report (Fig. 11b). This report
contains the score and the table with all questions
from the test, the answers offered for each question,
the answer given by the student marked with the
asterisk and the correct answer colored in red.
Finally, the work with the simulator begins with
the starting screen (Fig. 7a), which is used to choose
the complete initialization. The next step is the
selection of one of the predefined exercises from
the complete initialization from a file screen (Fig. 5b).
The simulation itself starts with the block structure
at the level of the processor’s units screen (Fig. 8).
The typical use of the simulator in the laboratory
is given in more detail for one part of one of the
laboratory exercises in which one follows the
execution of the SUB (subtraction) instruction
realized in three phases in the processor’s units IF,
IE, and IS.
The execution of the SUB instruction begins in
the IF unit where the instruction is fetched and loaded
in the instruction register, the address of the operand is
formed and the operand is read. The instruction is then
transferred from the IF unit into the IE unit. In the IE
unit the operand is subtracted from the contents of the
accumulator, the result is loaded into the accumulator
and the program status word flags are set according to
the result obtained. Finally, the instruction is trans-
ferred from the IE unit into the IS unit. In the IS unit a
check whether there is an interrupt is carried out.
Since the result of the check shows that there is not an
interrupt, there is no need to do anything in the IS unit
and the IF unit is activated again. Each instruction
goes through the steps described in a similar way.
During the execution of an instruction the IF, IE, and
IS units activate the MI unit when there is a need to
either read from or write into the main memory. In
order to do that the MI unit sends the bus request to the
Figure 10 Self Learning: Start Window. [Color figure can be viewed in the online issue, which is
available at www.interscience.wiley.com.]
COMPUTER AIDED LEARNING 11

arbiter and performs the memory read or write
operation when it receives the bus grant.
The instruction fetch begins when the contents of
the IF unit’s PCIF counter (1,000 h) is sent on the
parallel inputs of the MI unit’s MAR register and
signals ldMAR and incPC are generated (Fig. 8).
Therefore, the windows of the IF and MI units are
opened in the detailed presentation window, and the
block structure of the processor at the level of units is
given in the global presentation window. On the next
clock value 1,000 h is loaded into the MAR register
and the contents of the PCIF counter incremented.
Then signal readf is generated initiating in the MI unit
the reading of the first byte of the SUB instruction.
The MI unit sends to the arbiter bus request signal
brq_cpu and, since there is no other bus requests,
receives bus grant signal grant_cpu (Fig. 12). There-
fore, the windows of the MI unit and the ARB module
are opened in the detailed presentation window, and
the block structure of the computer system at the level
of modules is given in the global presentation window.
Then the contents of the MI unit’s MAR register
(1,000 h) is sent on the ABUS bus address lines and
the RDBUS bus control signal generated causing the
start of the read operation in the memory module
(Fig. 9). Therefore, the windows of the IF unit and the
MEM module are opened in the detailed presentation
window, and the block structure of the computer
system at the level of modules is given in the global
presentation window. When the memory module
completes the read operation, the data read (31 h)
are sent on the DBUS bus data lines and loaded into
Figure 11 Lab Test Exercise Window (a) and Lab Test Report Window (b). [Color figure can be
viewed in the online issue, which is available at www.interscience.wiley.com.]
12 DJORDJEVIC ET AL.

the MI unit’s MDR register. From this register
the data are transferred into the IF unit’s IRIF
instruction register. These steps provide the first
byte of the SUB instruction. In order to complete the
fetching of this instruction, the length of which is
three bytes, these steps are repeated for the second and
third bytes.
The following steps provide the calculation of the
address of the operand and the reading of the operand.
The contents of the specified base register BR0 (0001
h) and the displacement from the IRIF instruction
register (02 h) are led to the inputs of the ADD adder.
The effective address of the operand (0003 h), which
appears at the outputs of the ADD adder, is led to the
parallel inputs of the MI unit’s MAR address register
(Fig. 13). The loading of value 0003 h into the MAR
register, the arbitration in the arbiter module and
the reading of the one byte operand in the memory
Figure 12 Bus arbitration. [Color figure can be viewed in the online issue, which is available at
www.interscience.wiley.com.]
Figure 13 Base addressing with 8-bit displacement. [Color figure can be viewed in the online
issue, which is available at www.interscience.wiley.com.]
COMPUTER AIDED LEARNING 13

module are realized in a similar way as the reading of
bytes from the memory during the instruction fetch.
The final steps in the IF unit provide the transfer
of the SUB instruction from the IF unit into the IE
unit. Therefore in the Global presentation window are
at the same time opened relevant parts of both units
(Fig. 14). In one of these steps the contents from the IF
unit’s IR0IF and IR1IF registers (3,150 h) is brought at
the inputs of the IE unit’s IRIE instruction register and
signal ldIRIE generated. Therefore, on the next clock
value 3,150 h, which among other things contains the
operation code, is loaded into the IRIE register. In the
same way all other information needed for further
execution of the instruction in the IE or IS units, such
as the operand read, the program counter, the program
status word etc., are transferred from the IF unit into
the IE unit.
In the IE unit, where the instruction execution
phase is performed, the operand from the BL register
is subtracted from the AL register, the result obtained
loaded into the AL register and flags V (overflow),
C (carry), Z (zero) and N (negative) of the PSW
program status register set in accordance with the
result obtained (Fig. 15). Therefore, the contents of
the AL register (E7 h) is led to the A inputs of the
ADD adder, the first complement (44 h) of the
contents of the BL register (BBh) to the B inputs of
the ADD adder and value 1 to the C0 input. The result
(4 Ah), formed at the outputs of the ADD adder, is led
to the inputs of the AL register. At the same time the
values of the overflow, which is VSUB¼ 0, and the
borrow, which is the complement of C8¼ 0, formed
according to the result obtained (4 Ah), are led to the
inputs of the V and C flags, respectively. Since in the
same step are generated active values of signals ldAL,
ldV and ldC, on the next clock values 4 Ah is loaded
into the AL register and values 0 and 1 into the V and
C flags, respectively. In the next step, based on
value 4 Ah of the AL register, are formed values
ALZ¼ 0 and AL7¼ 0 to set the Z and N flags,
respectively. Since in the same step are generated
active values of signals ldZ and ldN, on the next clock
value 0 is loaded into the V and C flags.
The final steps in the IE unit provide the transfer
of the SUB instruction from the IE unit into the IS
unit. This is done in the way similar to the one when
the instruction was transferred from the IF unit
into the IE unit (Fig. 14). In the IS unit a check
whether there is an interrupt is carried out (Fig. 16).
Since signal int is inactive, which is the indication
that there is not an interrupt, there is no need for the
interrupt handling in the IS unit. Therefore, the final
steps in the IS unit provide the transfer of data needed
to start the execution of the next instruction from the
IS unit into the IF unit. This is done in the way similar
to the one when the instruction was transferred from
the IF unit into the IE unit (Fig. 14). In this way the
execution of the SUB instruction is completed and the
execution of the next instruction begins.
In a similar way the execution of the remaining
instructions of the exercise is followed. At the com-
pletion of the exercise the students submit written
reports containing answers to questions related to
some typical situations being demonstrated.
Figure 14 Transfer of the SUB instruction from the IF unit into the IE unit. [Color figure can be
viewed in the online issue, which is available at www.interscience.wiley.com.]
14 DJORDJEVIC ET AL.

CONCLUSIONS
Dramatic changes in technology, markets, and com-
puter applications create a quite unique and challeng-
ing arena for computer architecture instructors and
students. The goal is to provide learning environments
that will provide hands-on experience and nurture
rapid learning, yet be intuitive and interesting to
students. This paper presents one educational environ-
ment for learning and teaching of introductory
computer courses in computer architecture, a core
course in electrical and computer engineering, and
computer science programs. The environment in-
cludes an educational computer system, a graphical
Figure 15 Subtraction and setting of flags in PSW. [Color figure can be viewed in the online issue,
which is available at www.interscience.wiley.com.]
Figure 16 IS unit. [Color figure can be viewed in the online issue, which is available at
www.interscience.wiley.com.]
COMPUTER AIDED LEARNING 15

simulator of an educational computer system
(SimECS) and a web-based software system for
Computer Architecture Learning and Self-Testing
(CALKAS).
The computer architecture and organization
laboratory described in the paper has been used with
success for a few years at the College of Electrical
Engineering, Belgrade, the College of Economics,
Valjevo, and the College of Business, Blace, Serbia.
This laboratory engaged students in active learning
and allowed them to ‘experience’ inner workings of
computer systems though graphical representation
and animation. In addition to the laboratory, the
majority of students used the SimECS for self-study
at home. We found that CALKAS system had been
a crucial in providing a feedback to both the students
(through self-testing) and instructors (analyzing
results for potential subjects that are more difficult
for students).
REFERENCES
[1] Y. Zhang and G. Adams, An interactive visual
simulator for the DLX pipeline, IEEE Comput Soc
Tech Committee Comput Archit Newslett (1997),
9�12.
[2] P. Verplaetse and J. Campenhout, ESCAPE: Environ-
ment for the Simulation of Computer Architecture for
the Purpose of Education. Proceedings of the Work-
shop on Computer Architecture Education, Barcelona,
Spain, 1998.
[3] E. Pastor, F. Sanchez, and A. Corral, A Rudimentary
Machine: Experiences in the Design of a Pedagogic
Computer. Proceedings of the Workshop on Computer
Architecture Education, Barcelona, Spain, 1998.
[4] J. Bechennec, A Teaching and Research Object-
oriented Simulation Tool for Computer Architecture
Design and Performance Evaluation. Proceedings of
the Workshop on Computer Architecture Education,
Barcelona, Spain, 1998.
[5] R. N. Ibbett, HASE DLX simulation model, IEEE
Micro Special Issue Comput Archit Educ 20 (2000),
38�47.
[6] C. Yehezkel, W. Yurcik, and M. Pearson, Teaching
computer architecture with a computer-aided learning
environment: State-of-the-art simulators. Proceedings
2001 International Conference on Simulation and
Multimedia in Engineering Education (ICSEE), Soci-
ety for Computer Simulation (SCS) Press, Phoenix,
2001.
[7] T. Austin, E. Larson, and D. Ernst, Simplescalar: ‘‘An
Infrastructure for Computer System Modeling’’, IEEE
Comput 35 (2002), 59�67.
[8] D. Ellard, D. Holland, N. Murphy, and M. Seltzer, On
the design of a new CPU architecture for pedagogical
purposes. Proceedings of the Workshop on Computer
Architecture Education, Anchorage, AK, 2002.
[9] C. Hughes, V. Pai, P. Ranganathan, and S. Adve,
RSIM: Simulating shared-memory multiprocessors
with ILP processors, IEEE Comput 35 (2002), 40�49.
[10] A. Cohen and O. Temam, Digital LC-2: From bits &
gates to a little computer. Proceedings of the Workshop
on Computer Architecture Education, Anchorage, AK,
2002.
[11] J. Djordjevic, A. Milenkovic, and N. Grbanovic, An
integrated environment for teaching computer archi-
tecture, IEEE Micro 20 (2000), 66�74.
[12] J. Djordjevic, B. Nikolic, and A. Milenkovic, Flexible
web-based educational system for teaching computer
architecture and organization, IEEE Trans Educ
48 (2005), 264�273.
[13] J. Djordjevic, A. Milenkovic, I. Todorovic, and D.
Marinov, CALKAS: A computer architecture learning
and knowledge assessment system, IEEE Comput Soc
Tech Committee Comput Archit Newslett (2000),
28�30.
BIOGRAPHIES
Jovan Djordjevic received the BSc degree in
electrical engineering from the University of
Belgrade, Serbia, and the MS and PhD
degrees in computer science from the
University of Manchester, United Kingdom.
He is currently a professor of computer
engineering in the Faculty of Electrical
Engineering, University of Belgrade. His
research interests include computer architec-
ture and organization, fault tolerant computer systems, parallel
computer systems, computer networks, digital systems simulation,
and distance learning.
Bosko Nikolic received his Dipl Ing, MSc,
and PhD degrees in computer engineering
and science from the University of Belgrade,
Serbia, in 1996, 2001, and 2005, respec-
tively. He is currently an assistant professor
of computer engineering in the Faculty
of Electrical Engineering, University of
Belgrade. His research interests include
Internet programming, the programming
language Java, digital systems simulation, distance learning,
computer architecture, and organization.
16 DJORDJEVIC ET AL.

Tanja Borozan received the BSc and MS
degrees in electrical engineering from
the University of Belgrade, Serbia. She is
currently working as chief project leader for
geographic information system implementa-
tion (GIS) in Telekom Srbija a.d. in Belgrade.
Her professional interests include architec-
ture of GIS platforms, spatial data manage-
ment, geospatial analyses, web mapping,
implementation of OGC standards, and GIS platforms
interoperability.
Aleksandar Milenkovic is an associate
professor in the Department of Electrical
and Computer Engineering at the University
of Alabama in Huntsville. He currently
directs the LaCASA Laboratory (http://
www.ece.uah.edu/�lacasa/). His research
interests include advanced architectures for
the next generation computer systems,
embedded systems, low-power VLSI, recon-
figurable computing, and wireless sensor networks. Dr. Milenkovic
received his Dipl Ing, MSc, and PhD degrees in computer
engineering and science from the University of Belgrade, Serbia,
in 1994, 1997, and 1999, respectively.
COMPUTER AIDED LEARNING 17