Embed Size (px)
Citation preview

CafeRomaticaManual and user tipsCoffee/Espresso machine
A passion for coffee.
NICR7..
!

1
A
B
CD
E
P
S
O
N
R
H
F
GM
K
L
Q
T
U
J /
Display (main menu)
Left hand rotary control
Right hand rotary control
Display adjustments
Height-adjustable coffee spout
Cover for water tank
Cover for coffee bean container
On/off switch
Cup rack
Cup heating rack (use of thermal discharge of heater)
Service door
Lid of ground coffee chute
Drip tray
Used coffee container (inside)
Cover
Back rollers (at the back)
Foaming appliance parts
Type label (inside, remove drip tray)
Power cord bay (at the back)
Milk container (nur Modell 788)
A
B
L
H
C
M
D
N
J
E
O
K
F
P
G
Q
R
S
T
U
62 63! !

Dear Customer,
Congratulations and thank you very much for choosing a quality product by NIVONA.
To best enjoy your new NIVONA appliance, please read this manual carefully and pay attention to the safety tips before !rst use.
Please keep this manual safe. You can use it for reference and hand it over to a future owner should you ever wish to part with your NIVONA appliance.
An App for your NIVONA appliance is available in the Google Play Store or Apple App Store which will allow you to control and operate the primary functions of the appliance. The “BLUETOOTH” menu enables you to connect or disconnect your smart phone to your appliance (see 3.10).
Enjoy your coffee and the top-quality appliance by NIVONA.
2
5
8
11
b
a
3
6
9
12
4
7
10
64 65! !
Purchased at
Location, date

1. Safety information• This appliance may only be used for its intended purpose (domestic use only). It
is not intended for commercial use (see guarantee). Warranty claims will become void if this appliance is used for other than its intended purpose.
• It is imperative that appliance voltage and mains voltage are identical. Please check the type label/sticker on the appliance (see !g. 1/S).
• Do not use the appliance if the power cable or the casing is damaged. The power cable must never come into contact with any hot surfaces.
• Always pull the plug, not the power cable, when unplugging the appliance from the wall socket.
• Please adhere to the cleaning and decalcifying instructions at all times! Non-compliance will render warranty claims void.
• Please make sure that the appliance is switched off and unplugged before clean-ing and servicing.
• Avoid spillage on the connector.• Place the appliance on a "at and stable surface and only use it indoors. Never
place the appliance on hot surfaces or near an open !re.• This appliance may be used by children from the age of 8 as well as by persons
with reduced physical, sensory or mental capabilities, or lack of experience and knowledge, as long as they are being supervised or have been given instructions for the safe use of the appliance, hence understanding the possible dangers. Children must not play with the appliance. Cleaning and user maintenance must not be undertaken by children without supervision, unless 8 or older and supervised. The appliance and its mains connections must be kept away from children under the age of 8.
• Always unplug the appliance from the mains if you are away for a few days. • Do not leave the appliance on unnecessarily. Never immerse the appliance in water.• Do not clean the appliance, or any parts thereof, in a dishwasher. Non-compli-
ance will render warranty claims void.• If the appliance shows any defect, unplug it immediately by pulling out the plug. • The manufacturer will not be liable for possible damage to the appliance caused
by incorrect, improper use or unquali!ed repair works. In these cases warranty claims become void.
1. SAFETY INFORMATION ......................................................................................................67
2. INITIAL START-UP .............................................................................................................68 2.1 Getting started .............................................................................................................68 2.2 The most important controls ..........................................................................................69 2.3 Filling with water and beans ..........................................................................................69 2.4 Switching appliance on and performing initial start ..........................................................69 2.5 Switching the appliance on during operation ...................................................................71 2.6 ECO mode ...................................................................................................................71
3. SETTING/ADJUSTING BASIC SETTINGS .............................................................................71 3.1 Setting the appliance for use with or without !lter ...........................................................72 3.2 Setting the water hardness level .....................................................................................72 3.3 Adjusting the temperature .............................................................................................72 3.4 Adjusting the aroma (not model 758) .............................................................................72 3.5 Select language ............................................................................................................73 3.6 Set automatic switch-off time ........................................................................................73 3.7 Switch-off rinsing ........................................................................................................73 3.8 Factory settings ............................................................................................................73 3.9 View statistics ..............................................................................................................73 3.10 Bluetooth ...................................................................................................................74
4. PREPARING COFFEE SPECIALITIES ...................................................................................74 4.1 Preparing individual drinks each time .............................................................................75 4.2 Adjusting standard settings for drinks without milk (ESPRESSO, CAFE CREME, CAFE LUNGO and CAFFÈ AMERICANO) .................................................................................... 75 4.3 Adjusting standard settings for drinks with milk (CAPPUCCINO, CAFFÈ LATTE, LATTE MACCHIATO, WARM MILK, MILK FROTH)............................................................77 4.4 Adjusting standard settings for hot water (e.g. tea) ...........................................................79 4.5 “My coffee” for me and others according to taste.............................................................80 4.6 Adjusting the degree of grinding.....................................................................................81 4.7 Making ground coffee (e.g. for decaffeinated coffee) ........................................................81
5. CLEANING AND MAINTENANCE .........................................................................................82 5.1 Rinsing the milk frother ................................................................................................82 5.2 System rinsing .............................................................................................................82 5.3 Cleaning frother ............................................................................................................82 5.4 System cleaning ...........................................................................................................83 5.5 Descaling .....................................................................................................................84 5.6 Regular manual cleaning ...............................................................................................85 5.7 Cleaning the brew unit ..................................................................................................85 5.8 Changing the !lter ........................................................................................................86 5.9 Maintenance status ......................................................................................................86
6. SYSTEM REPORTS .............................................................................................................87
7. PROBLEM SOLVING ...........................................................................................................88
8. REPLACEMENT PARTS/ACCESSORIES ................................................................................89
9. CUSTOMER SERVICE, GUARANTEE, ENVIRONMENTAL PROTECTION ...................................89
10. TECHNICAL DATA ............................................................................................................90
66 67! !
Contents 1. Safety information

• Please use the integrated coffee grinder for roasted and untreated beans only, never for other foodstuffs! Please make sure there are no foreign substances among the coffee beans – failing this warranty claims will become void.
• If a repair is necessary (including replacement of the power cable), please !rst contact the central telephone support or the retailer where you bought the appliance – upon consultation and in accordance with item 9. of this manual send the appliance to NIVONA Zentralkundendienst, Südwestpark 90, D-90449 Nürnberg
• If the appliance’s power cable is damaged, it must be replaced by the manufac-turer, its customer service or a similarly quali!ed person to avoid danger.
Attention: Repairs to electrical appliances must only be undertaken by a pro-fessional! Improper repairs may result in severe danger for the user! Should the appliance be used or maintained improperly or incorrect, the warranty shall become void! Attention: Using the on/off switch (!g.1/J) during the brewing process may damage the appliance! Turn the appliance off only after it has !nished the job. Attention: Risk of burning! When drawing steam or hot water, a shot of hot water may spray from the coffee spout. Allow the spout to cool down before you touch it.
2. Initial start-up2.1. Getting started
£ Unpack the appliance and all items belonging to it with care.
The following are included in the package:
• User Manual • Warranty card• Measuring spoon with assembly assistance for !lter insert• Two cleaning tabs• One Claris !lter• One testing strip for water hardness• One milk container incl. connecting tube (only model 788)
Note: In case of customer service being required, the appliance should be shipped in its original pack-aging. Please keep this safe, including the polystyrene parts.
£ Place the appliance on a "at, dry and suitable surface. £ Plug the power cord into a professionally installed mains socket. £ Your appliance has a power cord bay – if the cable is too long, place the excess length in the
power cord bay at the back (!g. 1/T)
2.2. The most important controlsYour NIVONA appliance offers a speciality of options to brew coffee according to your individual needs. The main controls and how to use them are identical for most of the coffee specialities.
• Left Rotary-Push-Turn-Switch (short: left rotary control) (!g. 1/B): The left rotary control alters strength and volume of your coffee. By turning the left rotary control in the main menu the vol-ume is adjusted (in ml). By pressing the left rotary control in the main menu the coffee strength is altered (bean symbol, !g. 1/D). The more beans displayed, the stronger the coffee. By pushing the left rotary control in any sub menu you leave that menu and move back one menu level.
• Right Rotary-Push-Turn-Switch (short: right rotary control) (!g. 1/C): By turning the right rotary control you select a drink or menu point in the display. By pushing the right rotary control, the drink shown in the display will be brewed, or you access the selected menu item.
• Height-adjustable spout(!g. 1/E): The spout can be adjusted to the height of your cups and glasses by pushing it up or down. Hold the spout with thumb and index !nger and move it up or down.
• Milk container (model 788 only): Fill the milk container with fresh, low-fat and cold milk. Close the lid and connect one end of the connecting tube to the container and the other to the spout.
2.3. Filling with water and beans £ Open the cover on the left (!g. 1/F) and remove the water tank (!g. 2). Clean it with clear, cold
tap water. £ Re!ll the water tank to above the minimum mark (0.5 l) and insert it back into the appliance.
Make sure the tank is safely locked in place. £ Close the cover on the left (!g. 1/F).
Attention: Only use clear, cold water for the water tank! Never use sparkling water or any other liquids! Non-compliance will render warranty claims void.
£ Open the cover of the bean container (!g. 1/G and 3). £ Fill with untreated, roasted coffee beans only. £ Close the cover again and make sure it !ts correctly.
Attention: Never use beans that have been treated during or after roasting with supplements such as sugar or similar. This may damage the mill. Resulting repairs are not covered by the warranty.
2.4. Switching appliance on and performing initial start £ Switch the appliance on with the on/off switch (!g. 1/H).
Please set the following basic settings before you start brewing your !rst coffee:
Setting the language
£ Turn the right rotary control to select your language. £ Press the right rotary control to con!rm your setting.
The display will now ask “INSERT FILTER?”
2.4.1. Using the appliance with !lterIncluded in the package is a Claris !lter. When using this !lter, the appliance needs to be descaled less frequently as it softens the water.
£ Turn the right rotary control to “YES” and press for the appliance to recognize that a !lter is in use. £ Display shows “INSERT FILTER”. £ Empty the water tank (!g. 1/F and 2) and carefully screw the !lter into the respective slot in the
water tank, using the integrated tool at the end of the measuring spoon (!g. 4).
Attention: Do not overtighten or break.
£ Fill the tank with fresh water to above the minimum mark (0.5 l) and insert it back into the appliance. £ Close the cover on the left (!g. 1/F)
68 69! !
1. Safety information / 2. Initial start-up 2. Initial start-up

£ Place a suf!ciently large bowl (minimum contents 0.5 l) underneath the spout (!g. 1/E) and press the right rotary control.
The system is now being "ushed. The display shows “FILTER FLUSHES”.
£ Wait until no more water emerges from the spout. £ The display shows “PLEASE Flush”. £ Press the right rotary control. The display shows “SYSTEM FLUSHES”.
Once the system has reached operating temperature, the main menu will appear in the display to show that the appliance is ready for use.
The !rst cup: When you prepare your !rst cup of coffee the grinder will be empty. It is possible that after the initial grinding the display will show “REFILL BEANS” and no coffee is produced.
£ If that happens, please follow the display’s instruction and press the right rotary control again.
The process will then be repeated.
Note: If you are using a !lter and programmed the system to “FILTER INSERTED? YES”, the internal water softening is automatically set to water hardness level 1. The appliance needs descaling less frequently – but always descale when asked to do so and always with FILTER REMOVED.
The !lter will need to be changed after approx. 50 l of water have been drawn (changing !lter see 3.1).
Attention: Even if the display does not indicate “PLEASE CHANGE FILTER“, the !lter needs changing after a maximum of two months if the appliance is not used regularly (see 5.8.).
2.4.2. Using the appliance without !lterIf you prefer to use the appliance without !lter, the !lter setting “FILTER INSERTED? NO” needs to be set. This is important because depending on the water hardness the appliance needs to be descaled more often (ex-factory the appliance comes with the setting “FILTER INSERTED? NO”!).
£ Turn right rotary control to “FILTER INSERTED? NO” and press to con!rm.
The display shows the level of water hardness.
Note: Due to production reasons the internal pipes may be empty when setting the appliance up for the !rst time. The appliance will show this as follows: On the display it says “PLEASE FILL”, once the appliance has been switched on with the On/Off switch (!g. 1/H).
£ Place a suf!ciently large bowl (minimum contents 0.5 l) underneath the spout. £ Press the right rotary control.
The system is now being !lled with water which may emerge from the spout (!g. 1/E).
Once the system has reached operating temperature, the display shows “PLEASE FILL”.
£ Press the right rotary control.
The system is now being !lled with water.
2.4.3. Adjusting the water hardnessDepending on the water hardness in your area, the appliance needs to be descaled every now and then. For the system to be able to indicate that this is necessary, you need to set the correct water hardness prior to !rst use.
Level 3 is the ex-factory pre-set level.
First test the water quality with the enclosed test strip:
£ Dip the test strip into the water and shake it lightly. £ After about one minute you will be able to read the result by counting the red dots on the test strip. £ The different levels are listed as follows and can be adjusted:
Test strip 1 red dot / 1–7° = LEVEL 1
2 red dots / 8–14° = LEVEL 2 3 red dots / 15–21° = LEVEL 3 4 red dots / >21° = LEVEL 4
Note: If the test strip does not show any red dots, please set up level 1.
How to set up the water hardness:
£ Turn the right rotary control onto the correct degree of hardness and press it to con!rm.
The display shows “PLEASE FILL”.
£ Press the right rotary control. The display shows “SYSTEM IS FILLING”.
The system is now being !lled with water and heated up.
The display shows “PLEASE RINSE”.
£ Press the right rotary control. The display shows “SYSTEM RINSES”.
Once the appliance is ready for use the main menu is shown on the display.
The !rst cup: When you prepare your !rst cup of coffee the grinder will be empty. It is possible that after the initial grinding the display will show “REFILL BEANS”, and no coffee is produced.
£ Follow the display and press the right rotary control again.
The process will then be repeated.
2.5. Switching the appliance on during operationWhen you have started the appliance for the !rst time (see 2.4), proceed as follows for all other start-ups:
£ Switch the appliance on using the on/off switch (!g. 1/H).
The display shows “NIVONA, SYSTEM IS HEATING UP”.
Once production temperature has been reached, the display shows “PLEASE RINSE”.
£ Press the right rotary control.
The system is now being rinsed. The display shows “SYSTEM RINSES”. Afterwards the appliance is operational. The display shows the main menu (!g. 1/A).
Note: If you do not use the appliance for a prolonged period of time (e.g. holidays), switch it off using the on/off switch (!g. 1/H) and unplug it from the mains.
Note: Ex-factory the machine has a pre-programmed setting for each coffee speciality. This means that you can brew your !rst coffee straight away (see 4.). However, we do recommend making the neces-sary adjustments according to your preferences before you do so (see 3.)
2.6. ECO modeIf you do not use the rotary or the touch screen for a prolonged period of time, the appliance will automatically revert to ECO mode. The display shows “Saving energy”.
£ Press the right rotary control to leave ECO mode.
The display shows the main menu.
3. Setting/adjusting basic settings Note: The machine has a pre-programmed ex-factory setting for each coffee speciality. This means that you can brew your !rst coffee straightaway (see 4.). However, we do recommend making the necessary adjustments according to your preferences before you do so.
£ To adjust the basic settings in the main menu turn the right rotary control to “SETTINGS”. £ Enter the “SETTINGS” menu by pressing the right rotary control. £ Select the menu item that you want to adjust by turning the right rotary control. £ Enter the chosen menu item by pressing the right rotary control. £ Turning the right rotary control adjusts the setting.
70 71! !
2. Initial start-up 2. Initial start-up / 3. Setting/adjusting basic settings

72 73! !

£ Press the right rotary control to con!rm the selected setting. £ By selecting “EXIT” and then pressing the right rotary control you move up one menu level: from
the selected setting to “SETTINGS” to the main menu.
3.1. Setting the appliance for use with or without !lter £ To adjust the mode turn the right rotary control in the main menu to “SETTINGS” and press it. £ Select “FILTER” from menu “SETTINGS” by turning the right rotary control.
Using the appliance with !lter: please follow the procedure in 2.4.1.
Using the appliance without !lter: please follow the procedure in 2.4.2.
£ You can adjust the other settings directly from here or leave the menu by choosing “EXIT” and then press the right rotary control.
3.2. Setting the water hardness level £ To adjust the water hardness turn the right rotary control in the main menu to the “SETTINGS”
menu and then press it. £ Enter “SETTINGS” and select “WATER HARDNESS” by pressing the right rotary control.
Then follow the procedure in 2.4.3
£ You can adjust the other settings directly from here or leave the menu by choosing “EXIT” and then press the right rotary control.
3.3. Adjusting the temperatureYou can adjust the temperature as required for coffee, milk and hot water to “NORMAL”, “HIGH”, “MAXIMUM” or “INDIVIDUAL”. The ex-factory setting is “HIGH”. If the temperature has been adjusted as outlined below this applies to all coffee varieties.
You can however set the temperature for each coffee speciality as “INDIVIDUAL” (see 4. below.) Adjust the temperature settings in the “INDIVIDUAL” menu as follows:
£ Turn the right rotary control in the main menu to “SETTINGS” and press it. £ Turn the right rotary control to “TEMPERATURE” and press it. £ Turn the right rotary control to “INDIVIDUAL”. £ Press the right rotary control to con!rm your setting. £ You can adjust the other settings directly from here or leave the menu by choosing “EXIT” and
then press the right rotary control.
3.4. Adjusting the aroma (not model 758)
You can adjust the aroma of your coffee according to taste. To do so, use one of the three pro!les for varying water pressure in the “AROMA” menu. The “DYNAMIC” pro!le delivers dynamic percolation, “CONSTANT” stands for a constant and “INTENSE” for an intense percolation. The ex-factory setting is “INDIVIDUAL”, which means that you can select your preferred aroma selection for each coffee recipe. Should you however opt for a pre-select aroma pro!le of 1,2 or 3, this will be applied to all coffee specialities.
Tip: Test your preferred aroma selection on one drink.
£ To change the aroma settings turn the right rotary control in the main menu to “SETTINGS” and then press it.
£ Turn the right rotary control to “AROMA“ and press it. £ Turn the right rotary control to select the aroma pro!le of your choice. £ Press the right rotary control to con!rm your choice. £ You can adjust the other settings directly from here or leave the menu by choosing “EXIT” and
then press the right rotary control.
3.5. Select language £ To change the language turn the right rotary control in the main menu to “SETTINGS” and press it. £ In “SETTINGS” turn the right rotary control to “LANGUAGE” and press it. £ By turning the right rotary control you change the language. £ Press the right rotary control to con!rm the chosen language. £ You can adjust the other settings directly from here or leave the menu by choosing “EXIT” and
then press the right rotary control.
3.6. Set automatic switch-off timeThis function allows you to determine the automatic switch-off time after the last use. The ex-factory setting is after “10 MINUTES”.
£ To change settings turn the right rotary control in the main menu to “SETTINGS” and press it. £ Turn the right rotary control to “APPLIANCE AUTO-OFF” and press it.
The display shows the possible switch-off times.
£ Turn the right rotary control to the requested selection. £ Press the right rotary control to con!rm your choice.
Your appliance will now automatically shut down after use according to the switch-off time.
£ You can adjust the other settings directly from here or leave the menu by choosing “EXIT” and then press the right rotary control.
3.7. Switch-off rinsing Ex-factory the automatic switch-on rinsing function is permanently installed. Every time the appliance is switched on after an inactive state, it will heat the water up and ask for a rinse to ensure that fresh water is always used.
This request is shown in the display and needs to be started manually by pressing the right rotary control.
Ex-factory the switch-off rinsing is set on “ON”.
Optionally the automatic switch-off rinsing function can be de-activated after the appliance has been switched off:
£ Turn the right rotary control in the main menu to “SETTINGS” and press it. £ Turn the right rotary control to “SWITCH-OFF RINSING” and press it. £ Turn the right rotary control to “ON” or “OFF” and press it.
The display shows the other optional settings.
£ You can adjust the other settings directly from here or leave the menu by choosing “EXIT” and then press the right rotary control.
Note: Even if the switch-off rinse is set on “ON”, it will only be performed if at least one drink has been prepared.
3.8. Factory settingsAll changes made in the settings and all recipes can be reset in “FACTORY SETTINGS”.
£ Turn the right rotary control in the main menu to “SETTINGS” and press it. £ Turn the right rotary control to “FACTORY SETTINGS” and press it. £ Turn the right rotary control to “RESET RECIPES” or “RESET SETTINGS”. £ Press the right rotary control to con!rm. £ You can adjust the other settings directly from here or leave the menu by choosing “EXIT” and
then press the right rotary control.
3.9. View statisticsThe menu item “STATISTICS” details how many drinks and functions have been prepared/used since
74 75! !
3. Setting/adjusting basic settings 3. Setting/adjusting basic settings

the appliance’s initial start-up.
£ Turn the right rotary control to “SETTINGS” and press it. £ Turn the right rotary control to “STATISTICS” and press it. £ Turn the right rotary control to view the statistics available. £ To close press the right rotary control.
The display shows the other settings.
£ You can adjust the other settings directly from here or leave the menu by choosing “EXIT” and then press the right rotary control.
3.10. BluetoothAn App for your NIVONA appliance is available in the Google Play Store or Apple App Store which will allow you to control and operate the primary functions of the appliance. The “BLUETOOTH” menu enables you to connect or disconnect your smart phone to your appliance.
£ Turn the right rotary control in the main menu to “SETTINGS” and press it. £ Turn the right rotary control to “BLUETOOTH” and press it. £ Turn the right rotary control to “CONNECT” to establish a connection to you smartphone. Follow
the instructions on your smartphone. £ Turn the right rotary control to “DEACTIVATE” and press it to disconnect or to generally disallow
connection. £ Press the right rotary control to con!rm. £ You can adjust the other settings directly from here or leave the menu by choosing “EXIT” and
then press the right rotary control.
4. Preparing coffee specialities Your NIVONA appliance offers a speciality of options to prepare coffee specialities according to your individual taste. The most important control elements and their basic functions are generally identical:
• Left Rotary-Push-Turn-Switch (in short: left rotary control) (!g. 1/B): By turning the left rotary control you change the strength and volume of your coffee. By turning the left rotary control in the main menu the volume in ml is changed. By pressing the left rotary control in the main menu the coffee strength is adjusted (bean symbol, !g. 1/D). The more beans in the display, the stronger the coffee. By pressing the left rotary control in a sub menu you go back one menu level.
• Right Rotary-Push-Turn-Switch (in short: right rotary) (!g. 1/B): By turning the right rotary control you select a drink or menu item in the display. By pushing the right rotary control, the drink shown in the display will be brewed, or you access the selected menu item.
• Height-adjustable spout (!g. 1/E): The spout can be adjusted to the height of your cups and glasses by pushing it up or down. Hold the spout with thumb and index !nger and move it up or down.
• Milk container (model 788 only): Fill the milk container with fresh, low-fat and cold milk. Close the cover and connect one end of the connecting tube to the container and the other to the spout.
Note: In the bottom line the display shows the current settings of the chosen coffee speciality. Strength on the left, volume on the right.
Each coffee speciality can be made in two separate ways:
a) Either you change the setting for each coffee individually as outlined in 4.1. In this case the standard settings are preserved.
b) Or you adopt the standard settings from “DRINKS RECIPES” in the “SETTINGS” menu. Pre-set-tings have been recorded ex-factory; you can adjust them as outlined from 4.2. to 4.5. according to your personal preference.
The !rst cup: When making your !rst coffee, the grinder box is still empty. It can therefore happen that the display will show “FILL BEANS” after the !rst grinding and the appliance will not make any coffee.
£ Follow the instructions on the display and press the rotary control again.
The process will be repeated.
Special requirements when preparing two cups:
Note: 2 cups can only be prepared simultaneously when the drink does not require milk. Drinks with milk can only be prepared individually.
£ Start brewing by pressing the right rotary control. £ To brew two cups one directly after the other, press the right rotary control twice in quick succession.
When brewing two cups at the same time, the grinder will automatically do two rounds. In case there is not enough water, the bean container runs empty or the trays need emptying during the two grind-ing cycles, the respective symbols will show on the display. In that case the second cup will not be brewed.
£ Follow the display and press the right rotary control only once for the second cup.
4.1. Preparing individual drinks each timeRegardless of the standard setting in the menu item “SETTINGS”, “DRINKS RECIPES” each brewing process can be customised.
£ Turn the right rotary control in the main menu to your preferred drink option (e.g. “LATTE MAC-CHIATO”).
Note: In the bottom line the display shows the current settings of the chosen coffee speciality. Strength on the left, aroma pro!le in the centre (model 788 only) and volume on the right.
£ Turn the left rotary control to adjust the volume. £ Turn the left rotary control to adjust the strength.
Note: This way you can change all settings shown in the display’s top line before you brew your drink, apart from the aroma pro!le.
£ Start the brewing process by pressing the right rotary control.
Your settings are adopted if no other changes take place. Note: The settings only apply for the current brewing process and will not be stored.
Note: Pay attention if you prepare one or two cups and place the cups accordingly under the spout (!g. 5 and 6).
Note: Should you have initiated the brewing process incidentally or too early, it is possible to change a few parameters while making the coffee. A blinking display will show you which.
£ While the symbol blinks, turn the left rotary control onto the required setting.
After the bean symbol for the aroma, the display will highlight the ml-indicator for the volume.
This way you can react at any given time.
£ If you want to stop the process, simply press the right rotary control once (!g. 1/D).
The display shows “ABORTED”. The appliance cancels the process and returns to the main menu.
4.2 Adjusting standard settings for drinks without milk (ESPRESSO, CAFE CREME, CAFE LUNGO and CAFFÈ AMERICANO)
Ex-factory the standard setting is
• for Espresso: standard strength, aroma pro!le 3, quantity 40ml, the display shows “ooo III 40ml”, model m758 “oo 40ml”
• for Café Crème: standard strength, aroma pro!le 2, quantity 120ml, the display shows “ooo II 120ml”, model 758 “oo 120 ml
• for Caffè Lungo: standard strength, aroma pro!le 1, quantity 180ml, the display shows “ooo I 180ml”, model 758 “oo 180 ml.
76 77! !
3. Setting/adjusting basic settings / 4. Preparing coffee specialities 4. Preparing coffee specialities

• for Caffè Americano: standard strength, aroma pro!le 2, quantity 120ml, the display shows “ooo II 120ml”, model 758 “oo 120 ml.
£ Place a cup underneath the spout (!g. 5). £ Turn the right rotary control to the drink of your choice (e.g. Espresso) and press it.
Note: In the bottom line the display shows the current settings of the chosen coffee speciality. Strength on the left, aroma pro!le in the centre and volume on the right.
Note: Pay attention if you prepare one or two cups and place the cups accordingly under the spout (!g. 5 and 6).
£ Press the right rotary control again to start brewing.
The cup light switches on (not model 758). The appliance is preparing a cup of your chosen drink in the standard setting.
Brewing two cups
£ To brew two cups one directly after the other, press the right rotary control immediately after the start of the process.
£ If you want to stop the process, simply press the right rotary control again.
The display shows “ABORTED”. The appliance cancels the process and returns to the main menu.
The standard setting can be altered in two different ways:
4.2.1. Live programmingYou can change and save the standard setting during the brewing process as follows.
£ Turn the right rotary control in the main menu to “SETTINGS” and press it. £ Turn the right rotary control to “DRINK RECIPES” and press it. £ Turn the right rotary control to the drink of your choice (e.g. “ESPRESSO”) and press it. £ Turn the right rotary control to “LIVE PROGRAMMING”. £ Place a cup underneath the spout (!g. 5). £ To change the standard setting now press the right rotary control.
The display shows “SELECT STRENGTH”.
£ Turn the left rotary control to select your preferred strength (left for weaker, right for stronger coffee). £ Press the right rotary control to con!rm your choice.
The display shows “SELECT AROMA PROFILE” (not model 758).
£ Turn the left rotary control to select your preferred aroma pro!le (see 3.3.). £ Press the right rotary control to con!rm your aroma choice.
The display shows “PLEASE WAIT”. The appliance grinds, heats up and then starts the preparation.
The display shows “STOP COFFEE?”
£ Press the right rotary control once the required amount of coffee is reached.
The standard setting for the drink of your choice (e.g. Espresso) has now been changed and saved. The display shows “RECIPE SAVED” for a short time and will then switch back to the main menu with the new standard settings.
4.2.2. Manual programmingYou can also change and save the standard settings manually.
£ Turn the right rotary control in the main menu to “SETTINGS” and press it. £ Turn the right rotary control to “DRINK RECIPES” and press it. £ Turn the right rotary control to the drink of your choice (e.g. “ESPRESSO”) and press it.
Select strength
£ Turn the right rotary control to “STRENGTH” and press it.
£ Turn the right rotary control to select the strength of your choice (left for weaker, right for stronger coffee). Press the right rotary control to con!rm the setting.
Select aroma (not model 758)
£ Turn the right rotary control to “AROMA” and press it. £ Turn the right rotary control to select the aroma of your choice (see 3.3.). Press the right rotary
control to con!rm the setting.
Select quantity
£ Turn the right rotary control to “COFFEE QUANTITY” and press it. £ Turn the right rotary control to select the quantity of your choice (from 20ml to 240ml) and press it.
Note: Make sure that your cups !t.
Select temperature (if “SETTINGS”, “TEMPERATURE”, “COFFFE” (see 3.4.) “INDIVIDUAL” is set in the menu).
£ Turn the right rotary control to “TEMPERATURE” and press it. £ Turn the right rotary control to the temperature of your choice (STANDARD, HIGH, MAXIMUM)
and press it to con!rm the setting. £ To exit a menu level turn the right rotary control to “EXIT” in each level. Then press it. Or press
the left rotary to go back one menu level. £ Repeat until you are back in the main menu.
Note: If no changes are made to the settings for some time, the appliance switches back to the main menu automatically.
4.3. Adjusting standard settings for drinks with milk (CAPPUCCINO, CAFFÈ LATTE, LATTE MACCHIATO, WARM MILK, MILK FROTH)
Ex-factory the standard settings are
• for Cappuccino: strength standard, aroma pro!le 2, quantity 200ml, the display shows “ooo II 200ml”, model 758 “oo 200ml”
• for Latte Macchiato: strength standard, aroma pro!le 2, quantity 300ml, the display shows “ooo II 300ml”, model 758 “oo 300ml”
• for warm milk: quantity 150ml, the display shows “150ml”.
Using the special frother you can draw milk directly from the carton or any other container and pour it straight into a cup or glass.
£ Connect the suction hose to the height-adjustable spout (!g.7). £ Connect the other end of the hose to the milk container (only model 788) or immerse it straight
into the carton or another container.
Attention: Dried milk residue is dif!cult to remove. Please clean thoroughly as soon as it has cooled off! Always follow the display instruction “CLEAN FROTHER”.
£ Place a cup or a glass under the spout (!g. 5). £ Turn the right rotary control to the drink of your choice (e.g. “LATTE MACCHIATO”) and press it.
Note: In the bottom line the display shows the current settings of the chosen coffee speciality. Strength on the left, volume on the right.
£ Turn the right rotary control to start brewing.
The cup light switches on (not model 758). The appliance is preparing a cup or glass of the selected drink in the standard setting.
Brewing two cups:
Note: 2 cups can only be prepared simultaneously when the drink does not require milk. Drinks with milk can only be prepared individually.
78 79! !
4. Preparing coffee specialities 4. Preparing coffee specialities

£ If you want to stop the process, press the right rotary again.
The display shows “ABORTED”. The appliance stops the process and returns to main menu.
The standard setting can be altered in two different ways:
4.3.1. Live programmingYou can change and save the standard setting during the brewing process as follows.
£ Turn the right rotary control in the main menu to “SETTINGS” and press it. £ Turn the right rotary control to “DRINK RECIPES” and press it. £ Turn the right rotary control to the drink of your choice (e.g. “LATTE MACCHIATO”) and press it. £ Turn the right rotary control to “LIVE PROGRAMMING”. £ To change the standard setting, now press the right rotary control.
Cappuccino and Latte Macchiato:
The display shows “SELECT STRENGTH”.
£ Turn the left rotary control to select the strength of your choice (left for weaker, right for stronger coffee).
£ Press the right rotary control to con!rm your choice of strength.
The display shows “SELECT AROMA” (not model 758).
£ Turn the left rotary control to select the aroma of your choice (see 3.3.). £ Press the right rotary control to con!rm your aroma choice.
The display shows “PLEASE WAIT”. The appliance heats up and will start the preparation.
Latte Macchiato and warm milk:
The milk will be prepared !rst.
The display shows “STOP MILK?”
£ Press the right rotary control when the required amount of milk is reached.
All drinks with milk:
The froth is made next.
The display shows “STOP FROTH?”
£ Press the right rotary control when the required quantity of froth is reached.
Cappuccino and Latte Macchiato:
Finally the coffee is brewed.
The display shows “STOP COFFEE?”
£ Press the right rotary control when the required quantity of coffee is reached.
The standard setting for the drink of your choice (e.g. Latte Macchiato) has now been altered and saved. The display shows “RECIPE SAVED” for a short time and will then switch back to the main menu with the new standard settings.
4.3.2. Manual programmingYou can also change the standard settings manually as follows.
£ Turn the right rotary control in the main menu to “SETTINGS” and press it. £ Turn the right rotary control to “DRINK RECIPES” and press it. £ Turn the right rotary control to the drink of your choice (e.g. “LATTE MACCHIATO”) and press it.
Select strength (Cappuccino and Latte Macchiato)
£ Turn the right rotary control to “STRENGTH” and press it. £ Turn the right rotary control to select the strength of your choice (left for weaker, right for stronger
coffee). Press the right rotary control to con!rm the setting.
Select aroma (Cappuccino and Latte Macchiato) (not model 758)
£ Turn the right rotary control to “AROMA” and press it. £ Turn the right rotary control to select the aroma of your choice (see 3.3. for information about the
aroma pro!les). Press the right rotary control to con!rm the setting.
Select coffee quantity (Cappuccino and Latte Macchiato)
£ Turn the right rotary control to “COFFEE QUANTITY” and press it. £ Turn the right rotary control to select the quantity of your choice and press it.
Note: Make sure that your cups or glasses !t.
Select milk quantity (Latte Macchiato and warm milk)
£ Turn the right rotary control to “MILK QUANTITY” and press it. £ Turn the right rotary control to select the quantity of your choice and press it.
Note: Make sure that your cups or glasses !t.
Select froth quantity (Cappuccino, Latte Macchiato, warm milk)
£ Turn the right rotary control to “FROTH QUANTITY” and press it. £ Turn the right rotary control to select the quantity of your choice and press it.
Note: Make sure that your cups or glasses !t.
Select total quantity (all drinks with milk).
Note: By changing this setting all previous settings will be adjusted accordingly. This way the relation of all drinks components (milk, coffee, froth) remains identical even if the volume changes.
£ Turn the right rotary control to “TOTAL QUANTITY” and press it. £ Turn the right rotary control to the quantity of your choice. Press the right rotary control to con-
!rm your setting.
Note: Make sure that your cups or glasses !t.
Select temperature (if “TEMPERATURE”, see 3.4., “INDIVIDUAL” is set in the menu “SETTINGS”)
£ Turn the right rotary control to “TEMPERATURE” and press it. £ Turn the right rotary control to the temperature of your choice (STANDARD, HIGH, MAXIMUM)
and press it to con!rm the setting. £ To exit a menu level turn the right rotary control in each level to “EXIT”. Then press the right
rotary control. Or press the left rotary to go back one menu level. £ Repeat this until you are back in the main menu.
Note: If no changes are made to the settings for some time, the appliance switches back to the main menu automatically.
4.4. Adjusting standard settings for hot water (e.g. tea)Ex-factory the standard setting for hot water is 150ml.
The display shows: “150ml”
£ Place a cup underneath the spout (!g. 5). £ Turn the right rotary control to “HOT WATER” and press it.
The cup light switches on (not model 758). The appliance prepares hot water in the standard setting.
The standard setting can be altered in two different ways:
4.4.1. Live programming You can change and save the standard setting during the brewing process as follows.
£ Turn the right rotary control in the main menu to “SETTINGS” and then press it. £ Turn the right rotary control to “DRINK RECIPES” and press it. £ Turn the right rotary control to “HOT Water” and press it.
80 81! !
4. Preparing coffee specialities 4. Preparing coffee specialities
£ Turn the right rotary control to “LIVE PROGRAMMING”. £ To change the standard setting now press the right rotary control.
The display shows “PLEASE WAIT”. The appliance heats up and will start the preparation.
The display shows “STOP HOT WATER?”
£ Press the right rotary control when the required quantity of hot water is reached.
The standard setting has now been altered and saved. The display shows “RECIPE SAVED” for a short time and will then switch back to the main menu with the new standard settings.
4.4.2. Manual programmingYou can also change the standard settings manually as follows.
£ Turn the right rotary control in the main menu to “SETTINGS” and press it. £ Turn the right rotary control to “DRINK RECIPES” and press it. £ Turn the right rotary control to “HOT WATER” and press it.
Select water quantity
£ Turn the right rotary control to “WATER QUANTITY” and press it. £ Turn the right rotary control to select the quantity of your choice (from 50ml to 500ml). Press the
right rotary control to con!rm the setting.
Note: Make sure that your cups or glasses !t.
Select temperature (if “TEMPERATURE” “INDIVIDUAL”, see 3.4., is set in the menu “SETTINGS”)
£ Turn the right rotary control to “TEMPERATURE” and press it. £ Turn the right rotary control to the temperature of your choice (STANDARD, HIGH, MAXIMUM)
and press to con!rm the setting. £ To exit a menu level turn the right rotary control to “EXIT” in each level. Then press it. Or press
the left rotary to go back one menu level. £ Repeat until main menu appears.
Note: If no changes are made to the settings for some time, the appliance switches back to the main menu automatically.
4.5. “My coffee” for me and others according to tasteYour appliance allows you to prepare coffee according to taste (model 758 for up to 5 persons or drink varieties).
Ex-factory one drink without milk is programmed with the standard setting for “MY COFFEE”: Strength standard, aroma pro!le 2, quantity 120ml.
The display shows “ooo II 120ml”, model 758 “oo 120ml”.
You can also change the standard setting manually as follows.
£ Turn the right rotary control in the main menu to “SETTINGS” and press it. £ Turn the right rotary control to “DRINK RECIPES” and press it. £ Turn the right rotary control to “MY COFFEE” and press it.
You can now alter an existing recipe or create a new one.
4.5.1. Adjust recipe £ Turn the right rotary control to “EDIT” and press it. £ Turn the right rotary control to the recipe that you wish to adjust. Ex-factory only one recipe is set
under “MY COFFEE”. Press the right rotary control.
Under the menu item “CHANGE RECIPE” you can change the settings as described in 4.2. to 4.4.
Under the menu item “CHANGE DRINK” you can additionally change recipe and drink settings as described in 4.2. to 4.4.
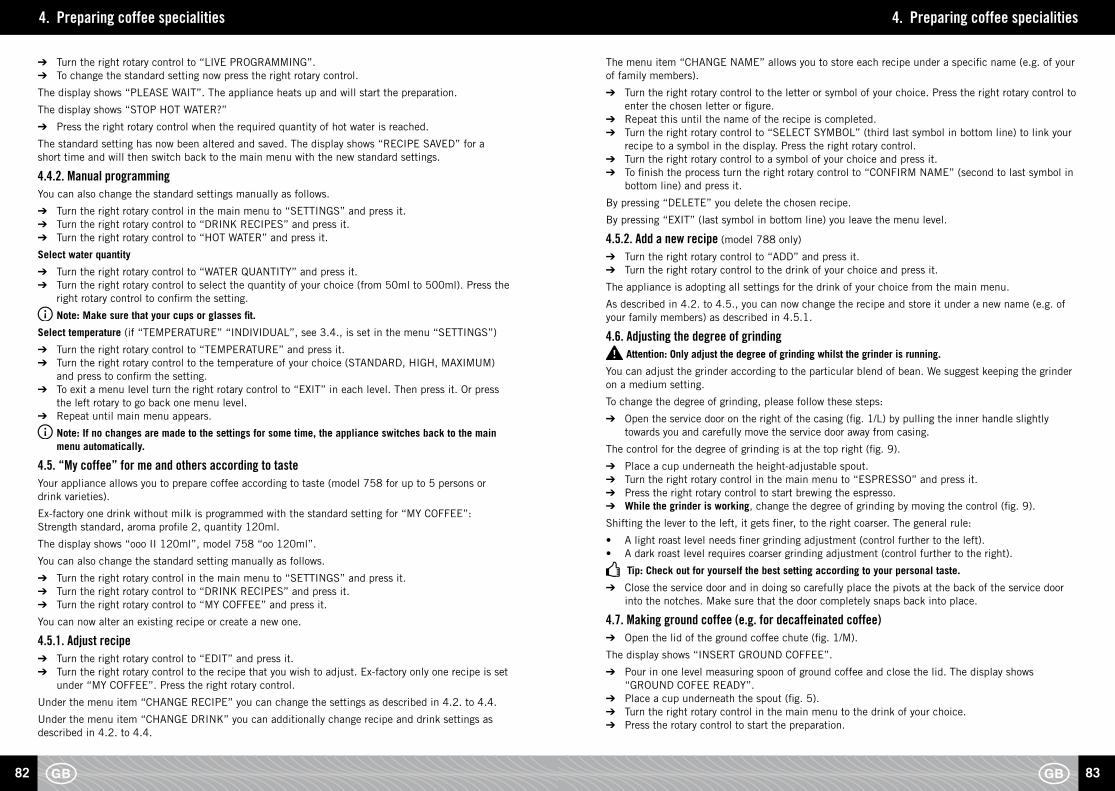
The menu item “CHANGE NAME” allows you to store each recipe under a speci!c name (e.g. of your of family members).
£ Turn the right rotary control to the letter or symbol of your choice. Press the right rotary control to enter the chosen letter or !gure.
£ Repeat this until the name of the recipe is completed. £ Turn the right rotary control to “SELECT SYMBOL” (third last symbol in bottom line) to link your
recipe to a symbol in the display. Press the right rotary control. £ Turn the right rotary control to a symbol of your choice and press it. £ To !nish the process turn the right rotary control to “CONFIRM NAME” (second to last symbol in
bottom line) and press it.
By pressing “DELETE” you delete the chosen recipe.
By pressing “EXIT” (last symbol in bottom line) you leave the menu level.
4.5.2. Add a new recipe (model 788 only)
£ Turn the right rotary control to “ADD” and press it. £ Turn the right rotary control to the drink of your choice and press it.
The appliance is adopting all settings for the drink of your choice from the main menu.
As described in 4.2. to 4.5., you can now change the recipe and store it under a new name (e.g. of your family members) as described in 4.5.1.
4.6. Adjusting the degree of grinding Attention: Only adjust the degree of grinding whilst the grinder is running.
You can adjust the grinder according to the particular blend of bean. We suggest keeping the grinder on a medium setting.
To change the degree of grinding, please follow these steps:
£ Open the service door on the right of the casing (!g. 1/L) by pulling the inner handle slightly towards you and carefully move the service door away from casing.
The control for the degree of grinding is at the top right (!g. 9).
£ Place a cup underneath the height-adjustable spout. £ Turn the right rotary control in the main menu to “ESPRESSO” and press it. £ Press the right rotary control to start brewing the espresso. £ While the grinder is working, change the degree of grinding by moving the control (!g. 9).
Shifting the lever to the left, it gets !ner, to the right coarser. The general rule:
• A light roast level needs !ner grinding adjustment (control further to the left).• A dark roast level requires coarser grinding adjustment (control further to the right).
Tip: Check out for yourself the best setting according to your personal taste.
£ Close the service door and in doing so carefully place the pivots at the back of the service door into the notches. Make sure that the door completely snaps back into place.
4.7. Making ground coffee (e.g. for decaffeinated coffee) £ Open the lid of the ground coffee chute (!g. 1/M).
The display shows “INSERT GROUND COFFEE”.
£ Pour in one level measuring spoon of ground coffee and close the lid. The display shows “GROUND COFEE READY”.
£ Place a cup underneath the spout (!g. 5). £ Turn the right rotary control in the main menu to the drink of your choice. £ Press the rotary control to start the preparation.
82 83! !
4. Preparing coffee specialities 4. Preparing coffee specialities

Note: Should you have started the process accidentally or too early, you can change the quantity dur-ing preparation.
£ When the “ml” display is blinking, turn the left rotary control to the required position. £ If you want to stop the process, press the right rotary control again.
Note: If you have opened the lid of the ground coffee chute accidentally or did not press the right rotary control after having poured in the ground coffee, the appliance will automatically start rinsing for a minute once the lid is closed (!g. 1/E). It will then be operational again.
Attention: The ground coffee chute is not a storage container. Therefore never pour in more than one portion of coffee and only use fresh or vacuum-packed coffee ground from coffee beans. Do not use water-soluble instant coffee!
5. Cleaning and maintenanceYour NIVONA appliance will ask you for some of the cleaning and maintenance programmes listed below (e.g. “RINSE FROTHER”). They are shown in the display.
£ If a cleaning or maintenance call appears, turn the right rotary control in the main menu to the “hand symbol with raised index !nger”. Press the right rotary control.
The appliance will start the required cleaning or maintenance process and the display will inform you if further action is required.
£ Follow the instructions in the display. If in doubt check in the following 5.1. to 5.9.
5.1. Rinsing the milk frother Attention: Do not disrupt the running programme!
You should rinse the frother after each drink for which milk was used, but de!nitely when the display asks you to do so.
£ Turn the right rotary control to “MAINTENANCE” and press it. £ Turn the right rotary control to “RINSE FROTHER” and press it.
The display shows “HOSE ON SPOUT AND IN DRIP TRAY”.
£ Connect the hose provided to one end of the height-adjustable spout (!g. 7). £ Connect the other end to the back of the drip tray on the right (!g. 10). £ Place a suf!ciently large bowl (at least 0.5 l) underneath the height-adjustable spout. £ Press the right rotary control.
The display shows “RINSING FROTHER, DO NOT REMOVE HOSE”. The appliance starts the clean-ing process. Once the cleaning cycle is !nished the appliance reheats and is ready for use. The display shows the main menu.
5.2. System rinsingFrom time to time the system should be rinsed. Proceed as follows
£ Turn the right rotary control to “MAINTENANCE” and press it. £ Turn the right rotary control to “SYSTEM RINSING” and press it.
The display shows “RINSING SYSTEM”.
Once the rinsing cycle is !nished, the appliance reheats and is ready for use. The display shows the main menu.
5.3. Cleaning frother Attention: Do not disrupt the running programme!
Note: When it is required the display will show “PLEASE CLEAN FROTHER”.
Proceed as follows:
£ Turn the right rotary control to “MAINTENANCE” and press it. £ Turn the right rotary control to “CLEAN FROTHER” and press it.
The display alternately shows “EMPTY TRAYS” and “FILL WATER”.
£ Remove the drip tray and the used coffee container (!g. 1/N and 1/O) and empty both. £ If necessary re!ll the water tank with fresh water. Reinsert the water tank !rst, followed by drip
tray and the used coffee container.
The display shows “HOSE ON SPOUT AND IN CLEANER”.
£ Connect one end of the hose to the height-adjustable spout (!g. 7). £ Put some detergent (available as an optional accessory, see 8.) and water in a container, amount-
ing to at least 0.3l. For the correct mix ratio follow the detergent manufacturer’s instructions. £ Dip the other end of the hose into the cleaning solution. £ Place a suf!ciently large bowl (at least 0.5 l) underneath the height-adjustable spout. £ Press the right rotary control.
The display shows “START CLEANING”.
£ Press the right rotary control.
The appliance starts the cleaning process. The display shows “CLEANING FROTHER. DO NOT REMOVE HOSE”.
After a short while the display shows “HOSE ON SPOUT AND IN DRIP TRAY”
£ Connect one end of the hose to the height-adjustable spout (!g. 7) and the other end to the drip tray (!g. 10).
£ Press the right rotary control.
The display shows “CLEANING FROTHER, DO NOT REMOVE HOSE”.
Once the cleaning cycle is !nished, the appliance starts heating up and is again ready for use.
£ Empty the drip tray and used coffee container (!g. 1/N and 1/O) and reinsert them when cleaned.
The display shows the main menu.
5.4. System cleaning Note: If the appliance needs cleaning, the display will show “PLEASE CLEAN SYSTEM”. You can continue making coffee, but we recommend starting the cleaning programme as soon as possible. Otherwise your warranty could be compromised.
Attention: Do not disrupt the cleaning process. Insert cleaning tablet only when the appliance asks for it.
£ Turn the right rotary control to “MAINTENANCE” and press it. £ Turn the right rotary control to “CLEAN SYSTEM” and press it.
The display alternately shows “EMPTY TRAYS” and “FILL WATER”.
£ If necessary re!ll the water tank with fresh water. Reinsert the water tank. £ Remove the drip tray and used coffee container (!g. 1/N and 1/O), empty both and reinsert them.
The appliance rinses twice. The display shows “CLEANING SYSTEM”.
The display then shows “CLEANING TAB IN GROUND COFFEE CHUTE”.
£ Place a suf!ciently large bowl (at least 0.5 l) underneath the spout (!g. 1/E). £ Open the lid of the ground coffee chute (!g. 1/M). £ Place a cleaning tablet in the chute and close both lids.
The display shows “START CLEANING”.
£ Press the right rotary control.
84 85! !
4. Preparing coffee specialities / 5. Cleaning and maintenance 5. Cleaning and maintenance

The appliance starts the cleaning process. The display shows “CLEANING SYSTEM”. The process is fully automated and takes approximately 10 minutes.
Note: Should a message appear during the cleaning process, follow the indicated steps. The appliance will continue with the cleaning automatically afterwards.
Once the cleaning process is !nished, the display shows “EMPTY TRAYS“
£ Remove the drip tray and the used coffee container (!g. 1/N and 1/O) and reinsert them both when cleaned.
£ If necessary re!ll the water tank with fresh water.
The appliance reheats and is again ready for use. The display shows the main menu.
5.5. DescalingIf the appliance needs descaling, the display shows “PLEASE DESCALE SYSTEM”.
You can also start the descaling programme manually at any time.
Attention: Please make sure to follow each step exactly as outlined below! You can continue making cof-fee, but we recommend starting the descaling programme as soon as possible. Otherwise your warranty could be compromised.
Attention: Do not disrupt the descaling programme. Never use vinegar or vinegar-based agents, but only standard liquid products speci!cally recommended for automatic coffee machines.
Attention: Before starting the descaling programme remove the !lter from the water tank.
£ Turn the right rotary control to “MAINTENANCE” and press it. £ Turn the right rotary control to “DESCALING SYSTEM” and press it.
The display shows “EMPTY TRAYS”.
£ Remove the drip tray and the used coffee container (!g. 1/N and 1/O), and empty both. £ Reinsert the drip tray and used coffee container.
The display shows “REMOVE WATER TANK”.
£ Remove the water tank
The display alternately shows “FILL WATER TANK TO 0.5 L MARK” and “INSERT DESCALER AND ADD TANK”.
£ Remove the !lter. Fill the water tank to the 0.5 l mark with fresh water and reinsert it.
Attention: Always add water !rst to the 0.5 l mark and then the descaling agent. Never vice versa! Please follow the manufacturer’s instructions on how to use the descaler.
£ Only now add the descaler.
The display shows “HOSE ON SPOUT AND IN DRIP TRAY”.
£ Connect one end of the hose to the height-adjustable spout (!g. 7). £ Connect the other end of the hose to the back of the drip tray on the right (!g. 10). £ Press the right rotary control.
The display shows “START DESCALING”.
£ Place a suf!ciently large bowl (at least 0.5 l) underneath the spout (!g. 1/E). £ Press the right rotary control.
The appliance starts the descaling process. The display shows “SYSTEM DESCALING, DO NOT REMOVE HOSE”. The descaling process is automatic and takes approximately 30 minutes. The descaling solution is passed at intervals through the system.
Once the cycle is completed, the display shows “EMPTY TRAYS”.
£ Remove the drip tray and the used coffee container (!g. 1/N and 1/O) and empty both. £ Reinsert the drip tray and used coffee container.
£ Remove water tank and rinse it with fresh water. £ Reinsert !lter into the water tank if required. £ Fill the water tank with fresh water and reinsert it.
The display shows “HOSE ON SPOUT AND IN DRIP TRAY”.
£ Connect the hose with one end to the height-adjustable spout (!g. 7). £ Connect the other end of the hose to the back of the drip tray on the right (!g. 10). £ Place a suf!ciently large bowl (at least 0.5 l) underneath the spout (!g. 1/E). £ Press the right rotary control.
The display shows “PLEASE RINSE”.
£ Press the right rotary control to start the rinsing process.
The display shows “SYSTEM RINSING, DO NOT REMOVE HOSE”. The automatic cleaning process is started and lasts for approximately three minutes. Once the cycle is !nished, the display shows “EMPTY TRAYS”.
£ Empty drip tray and used coffee container (!g. 1/N and 1/O) and reinsert both.
The appliance reheats and is ready for use. The display shows the main menu.
Attention: Please immediately remove any descaler residues from the casing with a damp cloth.
5.6. Regular manual cleaning Note: Please follow these cleaning instructions. Working with foodstuffs demands the highest stand-ards of cleanliness.
Attention: Never immerse the appliance in water! Do not use abrasive cleaning agents.
£ Only use a soft, damp cloth without any detergent for cleaning the casing inside and out. £ Empty the drip tray (!g. 1/N) and used coffee container (!g. 1/O) at the latest when this is
indicated on the display (only when the appliance is switched on because only then can the ap-pliance register that the trays have been emptied).
Note: Occasionally use a little soapy water when cleaning the drip tray (!g. 1/N).
£ The water tank should be rinsed daily with clear water and then be re-!lled daily with fresh cool water.
Note: Dried milk residue is dif!cult to remove.
£ Therefore clean frother, hose and spout regularly.
Note: From time to time (ideally when the appliance will not be used for a while, but at any rate at regular intervals!) the frother needs to be completely dismantled and thoroughly cleaned under running water.
£ Remove the cover (!g. 1/P) at the bottom of the height-adjustable spout. £ Pull the frother down and out (!g. 11) and dismantle it completely (!g. 1/R). £ Clean the components (!g. 1/R) thoroughly and reassemble the frother. £ Reinsert the assembled frother into the height-adjustable spout (!g. 11). £ Replace the cover on the height-adjustable spout (!g. 1/P)
Note: Your appliance is equipped with back rollers (!g. 1/Q). They allow you to move the appliance on a "at working top. This way, you can also clean the space underneath the appliance.
5.7. Cleaning the brew unit Attention: Remove the brew unit only when the appliance is switched off.
Attention: Clean the brew unit after each cleaning cycle, but at least once a month. Otherwise your war-ranty could be compromised.
When necessary the brew unit can be removed and cleaned under cold, running water. Never use
86 87! !
5. Cleaning and maintenance 5. Cleaning and maintenance

cleaning agent, clear, cold water only! For reasons of hygiene we recommend the removal and clean-ing of the unit thoroughly after each run of the cleaning programme (see 5.4.).
£ Open the service door on the right of the casing (!g. 1/L) by pulling the inner handle slightly towards you and carefully move the service door away from casing.
£ Remove the brew unit by pressing the red switch upward and turning the handle all the way to the left until it snaps into place (!g. 12).
£ Carefully remove the brew unit using the handle. £ Clean the brew unit under running water and let it dry. £ Reinsert the brew unit carefully and lock it by pressing down the red switch and turning the handle. £ Close the service door and in doing so carefully place the pivots at the back of the door into the
notches. Make sure that the door (!g. 1/L) completely snaps back into place.
5.8. Changing the !lterThe !lter will need to be changed after about 50 l of water have been drawn. The display shows “CHANGE FILTER”.
You can still make coffee, but we recommend changing the !lter immediately.
£ Turn the right rotary control to “SETTINGS” and press it. £ Turn the right rotary control to “FILTER” and press it. £ Turn the right rotary control to “INSERT FILTER? YES”, so the appliance recognizes the new !lter. £ Empty the water tank (!g. 1/F and 2) and unscrew the !lter carefully, using the integrated tool at
the end of the measuring spoon (!g. 4). £ Discard the !lter. £ Press the right rotary control.
The display shows “INSERT FILTER” or “FILTER INSERTED” in case the !lter has already been replaced.
£ Screw the new !lter into the dedicated slot in the water tank, using the integrated tool at the end of the measuring spoon (!g. 4).
Attention: Do not overtighten or bend the !lter.
£ Fill the tank with fresh water and insert it back into the appliance. £ Place a suf!ciently large bowl (at least 0.5 l) underneath the spout (!g. 1/E) and press the right
rotary control.
The system is being rinsed. The display shows “FILTER RINSES”.
£ Wait a short while until no more water is dispersed from the spout.
The system reheats. The appliance is ready for use again. The display shows the main menu.
Attention: The !lter needs changing after a maximum of two months if the appliance is not in regular use. The display will show no status message. Use the dial (by the month) at the top of the !lter to select the date of change.
5.9. Maintenance statusThe appliance will indicate if cleaning or descaling are imminent.
£ Turn the right rotary control to “MAINTENANCE” and press it. £ Turn the right rotary control to “MAINTENANCE STATUS” and press it.
The display shows:
“CLEANING SYSTEM”
“CLEANING LATER”
“DESCALING”
“CHANGE FILTER”
The respective bar will show you if cleaning or descaling are imminent. The further to the right it progresses, the sooner one or both need to be done.
£ Press the right rotary control to exit “MAINTENANCE STATUS”.
Attention: Please clean and descale regularly, at the latest when the display asks you to! Otherwise your warranty could be compromised.
6. System reportsReport Cause Solution
Fill system Re!ll pipe system £ Press right rotary control
Filter possibly defect £ Remove or replace !lter
Fill water Water tank is empty £ Fill water tank
Water tank not inserted or inserted incorrectly
£ Insert water tank correctly (see 2.3.)
Fill beans No beans £ Fill beans (see 2.3.)
Beans stuck in container £ Stir beans with a spoon £ Clean bean container with a cloth
Note: The display ”FILL BEANS” will only go off after the next coffee request!
Empty trays Drip tray and/or used coffee container are full
£ Empty drip tray and/or used coffee container
No trays No drip tray with used coffee container or incorrectly inserted
£ Insert drip tray with used coffee container
Cleaning necessary System cleaning necessary £ Clean system (see 5.4.)
Descaling necessary System descaling necessary £ Descale system (see 5.5.)
Change !lter Filter exhausted £ Change !lter (see 5.8.)
Brew unit removed Brew unit !tted incorrectly £ Fit brew unit correctly and snap into place (see 5.7.)
88 89! !
5. Cleaning and maintenance 6. System reports

7. Problem solvingFault Cause Solution
No hot water or steam Blocked frother (!g. 11) £ Dismantle and thoroughly clean frother (!g. 11)
Not enough milk froth or liquid froth
System may need descaling
£ Please descale with a high dosage (see 5.5.)
Unsuitable milk £ Use cold milkBlocked frother (!g. 11) £ Dismantle and thoroughly
clean frother (!g. 11)
Coffee only drips System may need descaling £ Please descale with a high dosage (see 5.5.)
Coffee is too !nely ground £ Set the grinder on a coarser degree (see 4.6.)
Ground coffee too !ne £ Change to coarser ground coffee
No froth on the coffee System may need descaling £ Please descale with a high dosage (see 5.5.)
Unsuitable coffee variety £ Change coffee variety
Beans may be too old £ Use fresh beans
Loud noise from coffee grinder Degree of grinding not adjusted to beans
£ Optimize degree of grinding
Foreign matter in grinder, e.g. small stones
£ Call service hotline, ground coffee can still be made
The display shows error 8 Service-Tel
Incorrectly !tted brew unit £ Dismantle brew unit and clean (see 5.7.)
In the event of a fault or an error report which you cannot correct yourself, contact your retailer or go to the service area at www.nivona.com.
If the system detects any errors, the display will show an error report.
Attention: Make a note of the error report. Switch the appliance off and unplug it. Contact your retailer by quoting the model type, serial number (see type label !g. 1/S) and error number.
8. Replacement parts/AccessoriesFresh water !lters NIRF 700: New fresh water !lters are available from well-stocked local dealers or directly from us.
Cleaning tablets NIRT 701: New cleaning tablets are available from well-stocked local dealers or directly from us.
Descaling agent NIRK 703: New descaling agents are available from well-stocked local dealers or directly from us.
Special milk residue cleaner NICC 705: Special milk residue cleaner is available from well-stocked local dealers or directly from us.
MilkCooler NICT 500: The top-quality stainless steel milk cooler keeps milk ”fridge cold“ for a long time and delivers the best frothing results.
MilkContainer NIMC 900: Milk Container is made from transparent synthetic material to show the !lling level at a glance.
9. Customer service, guarantee, environmental protectionCustomer service NIVONA products are manufactured to the highest quality standards. Should any question arise with regards to your appliance, please do not hesitate to write to us. Only with your active support will we be able to improve our products and further develop them, so that they will fully satisfy your needs.
Drying the appliance In the event that you need to ship your faulty appliance, please make sure that no water remains in the system:
£ Switch the appliance on using the main switch (!g. 1/H). £ Follow the instructions on the display. £ Turn the right rotary control in the main menu to “MAINTENANCE” and press it. £ Turn the right rotary control to “EMPTY SYSTEM” and press it.
The display shows “REMOVE WATER TANK”.
£ Remove the water tank (!g. 2).
The display shows “HOSE ON SPOUT AND IN DRIP TRAY”.
£ Connect one end of the hose to the height-adjustable spout (!g. 7). £ Connect the other end of the hose to the back of the drip tray on the right (!g. 10). £ Place a suf!ciently large bowl (at least 0.5 l) underneath the spout (!g 1/E). £ Press the right rotary control.
The display shows “STEAMING OFF DO NOT REMOVE HOSE”.
The appliance is now steaming off and will switch off automatically.
£ Remove the drip tray and the used coffee container (!g. 1/N and 1/O), and empty both. £ Reinsert empty water tank, drip tray and used coffee container.
Your appliance is now ready for shipment.
Note: Please make sure that you pack the appliance very carefully before shipping, ideally in the origi-nal packaging. The manufacturer will assume no liabilities for damage in transit.
Guarantee and customer service terms and conditions Please !nd detailed information about guarantee and customer service terms and conditions in the accompanying document.
Please dispose of !lters with domestic waste.
90 91! !
7. Problem solving 8. Replacement parts/Accessories / 9. Customer service, guarantee, ...

Disposal of your old appliance and packaging Please keep the original packaging. It will serve as protection should you need to ship the appliance in the event of a customer service issue. Electrical and electronic appliances often contain valuable, but sometimes also environmentally damaging material and should therefore not be disposed of as normal household waste. They may damage human health and harm the environment when handled or left among residual waste. Therefore please drop your old or irreparably damaged appliance at your local community waste collection/recycling centre.
Further information is available from the dealer where you bought the appliance, your town hall or waste collector.
10. Technical dataVoltage 220 – 240V AC, 50/60 Hz Power consumption 1455 W
NIVONA Apparate GmbH Südwestpark 90 D-90449 Nürnberg www.nivona.com
© 2016 by NIVONA
92 93! !
9. Customer service, guarantee, ... / 10. Technical data