Embed Size (px)
Citation preview

CA GREEN BOOKS
CA IT Client Manager/ Unicenter Desktop and Server Management
Securing the Web Admin Console
Communication Using SSL

LEGAL NOTICE
This publication is based on current information and resource allocations as of its date of publication and
is subject to change or withdrawal by CA at any time without notice. The information in this publication
could include typographical errors or technical inaccuracies. CA may make modifications to any CA
product, software program, method or procedure described in this publication at any time without
notice.
Any reference in this publication to non-CA products and non-CA websites are provided for convenience
only and shall not serve as CA’s endorsement of such products or websites. Your use of such products,
websites, and any information regarding such products or any materials provided with such products or
at such websites shall be at your own risk.
Notwithstanding anything in this publication to the contrary, this publication shall not (i) constitute
product documentation or specifications under any existing or future written license agreement or
services agreement relating to any CA software product, or be subject to any warranty set forth in any
such written agreement; (ii) serve to affect the rights and/or obligations of CA or its licensees under
any existing or future written license agreement or services agreement relating to any CA software
product; or (iii) serve to amend any product documentation or specifications for any CA software
product. The development, release and timing of any features or functionality described in this
publication remain at CA’s sole discretion.
The information in this publication is based upon CA’s experiences with the referenced software
products in a variety of development and customer environments. Past performance of the software
products in such development and customer environments is not indicative of the future performance of
such software products in identical, similar or different environments. CA does not warrant that the
software products will operate as specifically set forth in this publication. CA will support only the
referenced products in accordance with (i) the documentation and specifications provided with the
referenced product, and (ii) CA’s then-current maintenance and support policy for the referenced
product.
Certain information in this publication may outline CA’s general product direction. All information in this
publication is for your informational purposes only and may not be incorporated into any contract. CA
assumes no responsibility for the accuracy or completeness of the information. To the extent permitted
by applicable law, CA provides this document “AS IS” without warranty of any kind, including, without
limitation, any implied warranties of merchantability, fitness for a particular purpose, or non-
infringement. In no event will CA be liable for any loss or damage, direct or indirect, from the use of
this document, including, without limitation, lost profits, lost investment, business interruption, goodwill
or lost data, even if CA is expressly advised of the possibility of such damages.
COPYRIGHT LICENSE AND NOTICE:
This publication may contain sample application programming code and/or language which illustrate
programming techniques on various operating systems. Notwithstanding anything to the contrary
contained in this publication, such sample code does not constitute licensed products or software under
any CA license or services agreement. You may copy, modify and use this sample code for the
purposes of performing the installation methods and routines described in this document. These
samples have not been tested. CA does not make, and you may not rely on, any promise, express or
implied, of reliability, serviceability or function of the sample code.
Copyright © 2008 CA. All rights reserved. All trademarks, trade names, service marks and logos
referenced herein belong to their respective companies. Microsoft product screen shots reprinted with
permission from Microsoft Corporation.
TITLE AND PUBLICATION DATE:
CA IT Client Manager/Unicenter Desktop and Server Management Securing the Web Admin Console
Communication Using SSL
Publication Date: February 6, 2009

ACKNOWLEDGEMENTS
Principal Authors
Akanksha Mohapatra
Anupama Botta
The principal authors and CA would like to thank all of the team members who participated
in the publication of this document:
CA Services
Development
Marketing
QA
Support
SWAT
Technical Information
Technical Sales
CA PRODUCT REFERENCES This document references the following CA products:
CA Desktop and Server Management r11.2
CA IT Client Manager r12
THIRD PARTY ACKNOWLEDGEMENTS
Microsoft product screen shots reprinted with permission from Microsoft Corporation (March
28, 2008). Microsoft and Windows are registered trademarks of Microsoft Corporation in the
United States and other countries.
FEEDBACK Please email us at [email protected] to share your feedback on this CA Green Publication. Please include the title of this Green Publication in the subject of your email
response. For technical assistance with a CA product, please contact CA Technical Support at http://ca.com/support.


Contents 5
Contents
Preface 7
Chapter 1: Introduction 9 Configure SSL for the Web Server .................................................................................. 10 Configure Client Certificates .......................................................................................... 10 Certificate Services in Microsoft Windows Server .............................................................. 11 Requirements, Concepts, and Terminology ...................................................................... 12
Requirements ........................................................................................................... 12 Points to Be Noted .................................................................................................... 12 Important Concepts and Terminology .......................................................................... 13
Chapter 2: Server Authentication 15 Client Browser to WAC Login Page .................................................................................. 16
Create a Certificate Request in IIS .............................................................................. 16 Submit Certificate Request ......................................................................................... 19 Issue/Authorize a Certificate ...................................................................................... 20 Download the Certificate ............................................................................................ 21 Install the Certificate in IIS ........................................................................................ 21 Install the Certificate Authority (CA) Certificate............................................................. 24 Configure SSL in IIS .................................................................................................. 26 Validate the Certificate in IIS ...................................................................................... 27
WAC Login Page to Web Services ................................................................................... 28
Chapter 3: Client Authentication 29 Browser to WAC Login Page .......................................................................................... 29
Submit Client Certificate Request ................................................................................ 29 Issue/Authorize the Client Certificate ........................................................................... 30 Download and Install the Certificate ............................................................................ 30 Enable Client Authentication on IIS ............................................................................. 31 Test the Certificate in IIS ........................................................................................... 32
Chapter 4: Conclusion 33


Preface 7
Preface
CA IT Client Manager is a new comprehensive solution that replaces the stand-alone products within CA Client
Management Solution. CA IT Client Manager combines the following former products into one fully functional solution:
■ CA Asset Management
■ CA Asset Intelligence
■ CA Software Delivery
■ CA Remote Control
■ CA Patch Management
■ CA Desktop Migration Manager
This document focuses on various components of the new CA IT Client Manager solution, and therefore has used the old
product names when addressing these functional areas.


Introduction 9
Chapter 1: Introduction
In a network environment, the security of data that flows between client workstations and servers is
paramount. Secure Socket Layer (SSL) is considered the most practical way to communicate through the
Internet.
CA IT Client Manager (also known as Desktop and Server Management or DSM) provides a browser-based
user interface called the DSM Web Console (WAC), which exploits the DSM Web Services. Thus arises the
need to configure SSL on the DSM Web Console and DSM Web Services.
The following is an architectural diagram of a DSM WAC setup:
Here the green line—from Machine M1 where the browser is installed to Machine M0 where WAC, IIS, and
Web Services are installed—indicates where SSL may be used between the components at a high level.
Broadly speaking, there are two authentication configurations to choose from:
■ Server side authentication only
In this case a certificate is applied to the Internet Information Services (IIS) web server, and from that
point the clients (browsers) “trust” the server. The server cannot necessarily trust the clients.
■ Client and server side authentication
In this case a certificate is applied to the IIS web server and to any clients that wish to communicate.
After this, the clients “trust” the server and the server can trust the clients.

10
Configure SSL for the Web Server
You configure SSL for the web server in two steps:
1. Send a certificate request to a certificate authority and install the response file received on the web
server.
A web browser makes a request to access WAC when you type the URL,
https://<YourWebServerName>/wac. The web server (here IIS) accepts this request and authenticates
itself by sending back the certificate. The client browser maps this certificate with its list of certificates
in the Trusted Root Certification Authorities list. If the certificate is not present, it gets a security
prompt for an option to view the certificate. Once the client trusts the certificate, it can view the WAC
login page.
2. Use the keytool utility to import the certificate reply that you received from the certificate authority into
a store called “cacerts.” The keystore contains the keys and certificates for the server. Thus a
certificate chain is constructed using the certificate reply and trusted certificates that are already
available in the keystore or in the "cacerts" keystore file where you imported the reply.
Now when the client submits the valid credentials in the WAC Login Page, DSM Web Services performs the
necessary validation and, if successful, establishes a session with the internal components.
Configure Client Certificates
For mutual authentication to happen, SSL is configured to have client certificates that restrict access to
various areas of a web site or the whole web site. Here client authentication takes place only between the
browser and the DSM WAC.
When the client browser requests access to DSM WAC, IIS on the web server requests a certificate from the
client. The WAC login page appears only if the certificate furnished by the client is recognized by the server
as a valid certificate obtained from a certificate authority present in the Trusted Authority List of the server.
Client authentication from the DSM WAC to Web Services does not exist.

Introduction 11
The following is a pictorial representation of the SSL process used to establish secure communications:
As you can see in the above diagram, there are two types of certificates exchanged—server and client
certificates.
■ Server certificates are sent by the web server to prove the server’s identity during server
authentication.
■ Client certificates are sent by the user to a server to prove the user’s identity during client
authentication.
This document focuses on SSL configuration for DSM WAC and DSM Web Services on Microsoft Windows
Server using Microsoft-provided Certificate Services.
Certificate Services in Microsoft Windows Server
How can you trust that a certificate that passes for authentication has not been forged? There are some
trusted authorities who issue valid certificates. If you look at your Microsoft Internet Explorer browser, for
example, you can find a long list of trusted root certificate authorities. Microsoft includes a toolkit called
Certificate Services in Windows 2000 Server and Windows Server 2003.

12
The Microsoft provided certificate service contains two main interfaces:
■ Certificate Authority (CA)—Tool for issuing and signing certificates
■ Certificate Server—Web application for requesting and retrieving certificates
As mentioned earlier, there are two types of certificates that can be requested—server and client
certificates.
■ Server certificates are sent by the web server to prove the server’s identity.
■ Client certificates are sent by the user to a server to prove the user’s identity.
After the certificate is requested, it must be approved, or issued, by the Certificate Authority (CA). After the
Certificate Authority (CA) issues the certificate, it must be installed into IIS in order to establish SSL
security on the site.
Requirements, Concepts, and Terminology
Requirements
Unicenter DSM r11.2 only: Windows 2000 Server, Advanced Server or Professional, with Internet
Information Services version 5.0 and Microsoft Certificate Server version 2.0 installed and configured.
Unicenter DSM r11.2 or CA IT Client Manager r12: Windows Server 2003 Standard Edition, Windows
Server 2003 Enterprise Edition, computer with Internet Information Services version 6.0 and Certificate
Services installed and configured.
Points to Be Noted
■ Before installing the Microsoft Certificate Service, IIS must be installed. The Certificate Authority (CA)
depends on IIS and its ability to process ASP code. Windows will allow installing certificate authority
without IIS first, but the certificate authority will not work.
■ Once you install the Certificate Services, you cannot rename the server and join or remove it from a
domain.
■ Use of third-party certificates is beyond the scope of this document.
■ Client authentication does not exist from the WAC to Web Services.

Introduction 13
Important Concepts and Terminology
DSM Web Console
CA Desktop and Server Manager (DSM) Web Console (WAC) enables a roaming administrator to do the
following:
■ Have a comprehensive view of the DSM-related information stored in a Management Database (MDB),
like Computers, Groups, User Accounts, Software Packages, Jobs, Queries, etc.
■ Manage software jobs that enable the installation, removal, and reconfiguration of software packages
on managed end systems.
■ Launch the CA Service Desk application in the context of a ticket (issue) that has been raised because
of a policy violation or software job failure.
How the Web Console Works
The server side of the Web Admin Console (web server) can run on the same machine as a DSM manager,
or the Web Admin Console software can be installed on a remote machine where the web server is installed,
in which case the appropriate manager must be network accessible.
To access the web server and run the WAC application, the administrator simply opens a web browser and
enters the following URL in the address bar:
http://<YourWebServerName>/wac
Note: When SSL is enabled “http://” becomes “https://”.
YourWebServerName is the DNS name, host name, or IP address of the computer on which the Web Admin
Console is installed.
No DSM software needs to be installed on the administrator's workstation.
SSL (Secure Socket Layer)
Secure Socket Layer is a protocol that uses cryptographic tools to provide secure communication on the
Internet (web browsing, e-mail, chats, file transfers, etc.). It makes sure that the data is not modified
before it reaches the recipient when two machines communicate. SSL identifies the sender through a
certificate used to validate the sender. These certificates are digitally-signed documents that contain the
holder’s public key, expiration date, general information about the holder, and a digital signature of the
Certificate Authority (CA) who issued the certificate. Thus certificates ensure that a web site you are talking
to is indeed the web site you think it is and who it says it is. In order to prevent hacking of data sent
between the two parties, SSL uses encrypted data by using encryption algorithms that are unreadable
unless decoded with a key.


Server Authentication 15
Chapter 2: Server Authentication
A server certificate is required to provide a secure communication on the site which provides service.
Managing server certificates has become easier through the use of the IIS Certificate Wizard provided with
Internet Information Services (IIS) 5.x and 6.x.
The first step is to generate a certificate request, which is a .txt file containing necessary information and a
public key for the site. This request file is later sent to a certificate authority for processing. The certificate
response file received from the online authority is installed on the web server. A client browser can even
successfully connect to the site without trusting the authority who issued the server certificate. However, if
the client browser does not trust the authority, a security prompt appears each time the client connects,
saying "The security certificate was issued by a company you have not chosen to trust. View the certificate
to determine whether you want to trust the certifying authority." The client is given the option to continue
or view the certificate at this point. Therefore, we recommend that you install the certificate in the Trusted
Root Certification Authorities list of the client browser. Once SSL gets enabled in IIS, you can use https://
to test connectivity to the site.
Additionally, the certificate reply (self-signed certificate) can be imported and thereby replaced with a
certificate chain. This chain is the one constructed using the certificate reply and trusted certificates that
are already available in the keystore or in the "cacerts" keystore file where the reply is imported.
The WAC application involves enabling server authentication between:
A. Client browser and WAC
B. WAC and Web Services

16
Client Browser to WAC Login Page
Create a Certificate Request in IIS
1. From the Administrative Tool in the Control Panel, run Internet Information Service (IIS) Manager
(Start->Run->type “inetmgr”).
2. Expand the “Server Name” tree (here SWAT) to see all the web sites in the Web Sites folder.
3. Right-click the Default Web Site folder and then select Properties.
The Default Web Site Properties dialog appears.

Server Authentication 17
4. Click the Directory Security tab.
5. Click the Server Certificate button under Secure communications.
This starts the IIS Certificate Wizard.
6. Click Next to continue.
7. Choose the “Create a new certificate” option, and click Next.
8. Choose the “Prepare the request now, but send it later” option, and then click Next.
9. Enter a name for the new certificate in the Friendly Name text box. It is recommended that you stay
with the default value of 1024 bit key. Click Next to continue.
10. Enter your company name and department, respectively, in the Organization Name and Organizational
Unit text boxes, and then click Next.
11. Enter the common name (CN) for your site. This should be the same name that the user will input
when requesting your web site. For example, if you input http://<YourWebServerName>/wac to access
WAC, then your common name would be your web server name. When complete, click Next.
12. Enter your location information, and then click Next.
13. Enter the path and file name where you want to save your certificate information. This file will contain
all the information created here and a public key for the site. The default name for the file is
“Certreq.txt”. When you have finished this step, click Next.

18
14. Verify the information that you have entered, and then click Next to complete the process.
15. On the Completing the Web Server Certificate Wizard dialog, click Finish.
16. Click OK to close the Default Web Site Properties dialog.
Points to Be Noted
■ Do not include non-alphanumeric characters while creating the certificate request.
■ Do not perform any of the following actions between the creation of the certificate request file (that is,
completing the steps in this section) and installing the certificate:
> Apply service packs or security patches.
> Change the computer name or web site bindings.
> Change encryption levels (that is, apply the high encryption pack).
> Change any of the web site's Secure Communications properties.
> Delete the pending certificate request.

Server Authentication 19
Submit Certificate Request
1. Using the Web browser on the web server machine, enter http://<CertificateServerName>/certsrv/ in
the Address text box and press Enter.
CertificateServerName is the name or IP Address of the Certificate Server where the Certificate
Authority (CA) is installed.
2. Select the “Request a certificate” task.
3. Click the Advanced Certificate Request link.
4. Select the second option, “Submit a certificate request by using a base-64-encoded CMC.”
5. Open the certificate request file that you created in the first procedure section, "Create Certificate
Request in IIS."

20
6. Copy the contents of the document. The contents look similar to the following:
7. Paste the contents of the document in the Base64 Encoded Certificate Request text box of the web
form. Click Submit.
8. If the Certificate Server is configured to automatically issue certificates, you are immediately directed
to the Certificate Issued page.
The address bar reads “http://<YourWebServerName>/certsrv/certfnsh.asp.”
Click the Install this certificate link. The Certificate Installed dialog appears with the message, “Your
new certificate has been successfully installed.”
Note: You can skip the next procedure section, “Issue/Authorize a Certificate.”
9. If the Certificate Server is not configured to issue certificates automatically, a Certificate Pending page
appears with a unique Request ID, requesting that you wait for an administrator to issue the certificate
that was requested.
Important! This "pending request" must not be deleted. Later, when your certificate is issued, you
must install the certificate to this exact pending request or the certificate will not be functional.
Issue/Authorize a Certificate
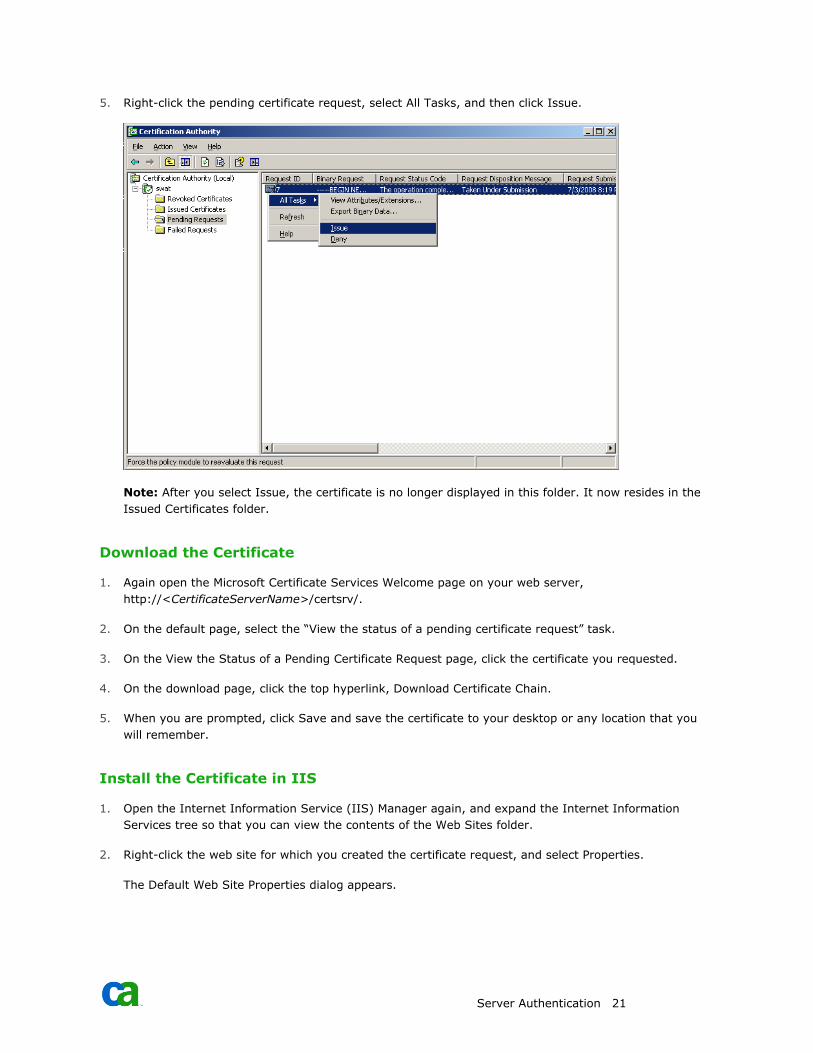
1. Go to the Certificate Server machine where the certificate authority is installed.
2. Open the Certification Authority snap-in (Start -> Programs ->Administrative Tools -> Certification
Authority).
3. Expand the Certification Authority node.
4. Click the Pending Requests folder. Your pending certificate requests appear in the right pane.
-----BEGIN NEW CERTIFICATE REQUEST-----
MIIDNDCCAp0CAQAwWTELMAkGA1UEBhMCSU4xCzAJBgNVBAgTAkFQMQwwCgYDVQQH EwNIWUQxCzAJBgNVBAoTAkNBMQwwCgYDVQQLEwNCU00xFDASBgNVBAMTC2JzbXN3 YXQtY20zMIGfMA0GCSqGSIb3DQEBAQUAA4GNADCBiQKBgQDh+1XdbqrG6dx51eg5 O4jUcc876kD7bZ1yJbSOJLCI3WJVwGJ1tzt91BEBYy3Wj17kwHaal9ywA1ApKoH1 CVRU4yhMZOr6ehyyuUljo5HAavOsOR6qFaPqrBqoYhC5K9ROzSfr4OReXZ+hFkqv M1EfXGYeuGExpv2LYzc8iBndeQIDAQABoIIBmTAaBgorBgEEAYI3DQIDMQwWCjUu
Mi4zNzkwLjIwewYKKwYBBAGCNwIBDjFtMGswDgYDVR0PAQH/BAQDAgTwMEQGCSqG SIb3DQEJDwQ3MDUwDgYIKoZIhvcNAwICAgCAMA4GCCqGSIb3DQMEAgIAgDAHBgUr DgMCBzAKBggqhkiG9w0DBzATBgNVHSUEDDAKBggrBgEFBQcDATCB/QYKKwYBBAGC Nw0CAjGB7jCB6wIBAR5aAE0AaQBjAHIAbwBzAG8AZgB0ACAAUgBTAEEAIABTAEMA aABhAG4AbgBlAGwAIABDAHIAeQBwAHQAbwBnAHIAYQBwAGgAaQBjACAAUAByAG8A dgBpAGQAZQByA4GJAAAAAAAAAAAAAAAAAAAAAAAAAAAAAAAAAAAAAAAAAAAAAAAA
AAAAAAAAAAAAAAAAAAAAAAAAAAAAAAAAAAAAAAAAAAAAAAAAAAAAAAAAAAAAAAAA AAAAAAAAAAAAAAAAAAAAAAAAAAAAAAAAAAAAAAAAAAAAAAAAAAAAAAAAAAAAAAAA AAAAAAAwDQYJKoZIhvcNAQEFBQADgYEAPY8mmucBz5J7iYiIn4Xee+JwZf2uiyk2 n+p6eOAoX1ogdZBRBxCoaTLwNQbCC+Jr4w4kz1+oK2Krf6Sb7M97ls6a0h0xAiDH /XkMvjga8jrzTQVPyDx3PT0ytntFO54XIAWYR09ZJHYqpEBPdkQNDgqS8frvlf96 uRvlZ3xUwYs= -----END NEW CERTIFICATE REQUEST-----
Server Authentication 21
5. Right-click the pending certificate request, select All Tasks, and then click Issue.
Note: After you select Issue, the certificate is no longer displayed in this folder. It now resides in the
Issued Certificates folder.
Download the Certificate
1. Again open the Microsoft Certificate Services Welcome page on your web server,
http://<CertificateServerName>/certsrv/.
2. On the default page, select the “View the status of a pending certificate request” task.
3. On the View the Status of a Pending Certificate Request page, click the certificate you requested.
4. On the download page, click the top hyperlink, Download Certificate Chain.
5. When you are prompted, click Save and save the certificate to your desktop or any location that you
will remember.
Install the Certificate in IIS
1. Open the Internet Information Service (IIS) Manager again, and expand the Internet Information
Services tree so that you can view the contents of the Web Sites folder.
2. Right-click the web site for which you created the certificate request, and select Properties.
The Default Web Site Properties dialog appears.

22
3. Select the Directory Security tab.
4. Click the Server Certificate button under Secure communications.
The IIS Certificate Wizard starts.
5. Click Next to continue.
Server Authentication 23
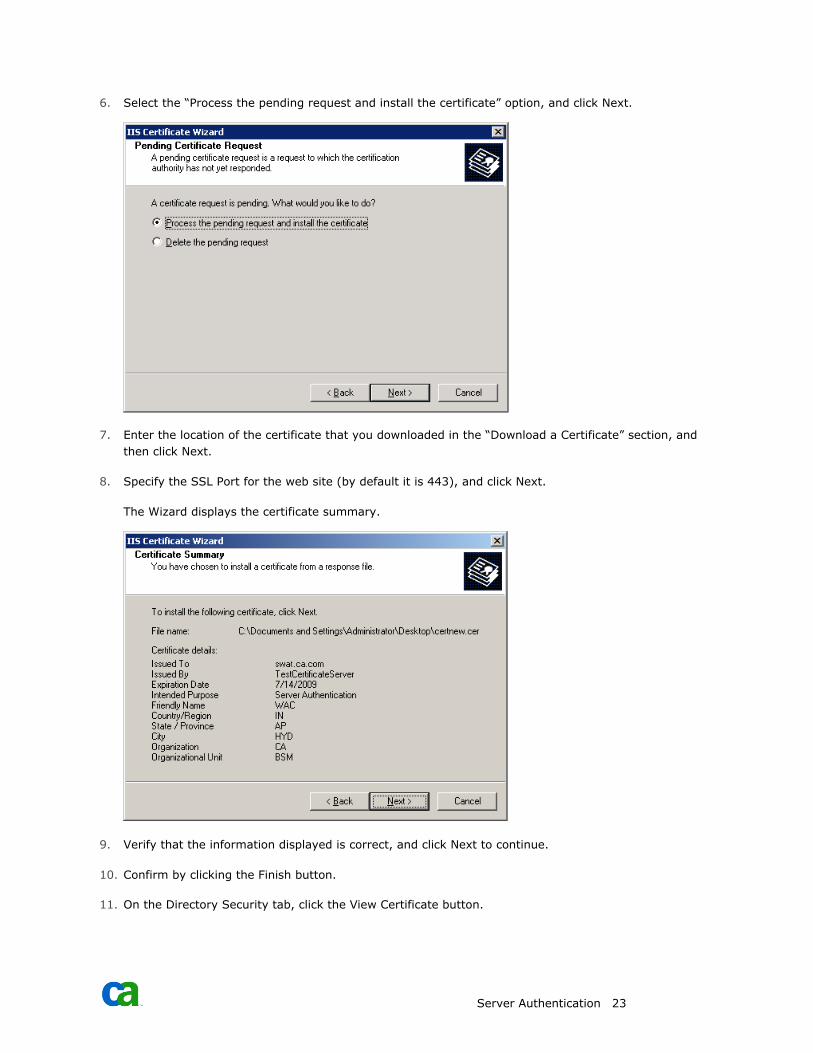
6. Select the “Process the pending request and install the certificate” option, and click Next.
7. Enter the location of the certificate that you downloaded in the “Download a Certificate” section, and
then click Next.
8. Specify the SSL Port for the web site (by default it is 443), and click Next.
The Wizard displays the certificate summary.
9. Verify that the information displayed is correct, and click Next to continue.
10. Confirm by clicking the Finish button.
11. On the Directory Security tab, click the View Certificate button.

24
12. In the Certificate dialog, click the General tab.
Notice that there is a red “X” on the certificate at the top of the dialog.
13. Click on the Certification Path tab.
Notice that there is a red “X” on the root Certificate Authority (CA). This indicates that the certificate of
the root Certificate Authority (CA) is not in the Trusted Root Certification Authorities list on the web
server. You will fix this problem in the next procedure.
14. Click OK in the Certificate dialog and in the Default Web Site Properties dialog.
Install the Certificate Authority (CA) Certificate
You need to install the root Certificate Authority (CA) certificate in the Trusted Root Certification Authorities
store on the web server machine. This allows the web server to trust the web site certificate installed on the
IIS web site.
Perform the following steps to install the root Certificate Authority (CA) certificate into the machine’s
certificate store:
1. Click Start and select the Run command.
2. In the Run dialog, enter mmc in the Open text box and click OK.
3. In the Console1 window, click the File menu and then select the Add/Remove Snap-in command.
4. In the Add/Remove Snap-in dialog, click the Add button.
5. In the Add Standalone Snap-in dialog, select the “Certificates” option in the Available Standalone Snap-
ins dialog and click Add.
6. On the Certificates snap-in page, select the “Computer account” option and click Next.

Server Authentication 25
7. On the Select Computer page, select the “Local computer” option and click Finish.
8. Click Close in the Add Standalone Snap-in dialog.
9. Click OK in the Add/Remove Snap-in dialog.
10. Expand the Certificates node and then expand the Trusted Root Certification Authorities node. Right-
click the Certificates node, select All Tasks and click Import.
11. Click Next on the Welcome to the Certificate Import Wizard page.
12. On the File to Import page, click the Browse button and locate the certnew.p7b file you downloaded
from the Web enrollment site. Click Next.
13. On the Certificate Store page, accept the default setting, “Place all certificates in the following store.”
Click Next.
14. Click Finish on the Completing the Certificate Import page.
15. Click OK in the Certificate Import Wizard dialog informing you that the import was successful.

26
Configure SSL in IIS
1. Open the Internet Information Service (IIS) Manager, and then expand the Internet Information
Service tree so that you can view the Default Web Site folder.
2. Right-click the web site for which you created the certificate request, and then select Properties.
The Default Web Site Properties dialog appears.
3. Click the Directory Security tab.
4. To configure the web site to require secure connections, click Edit.
The Secure Communications dialog appears.
5. Select “Require secure channel (SSL),” and then click OK.
6. Click Apply and then OK to close the Properties window.
7. Restart IIS.

Server Authentication 27
Validate the Certificate in IIS
1. On any client browser, locate the site and verify that it works by navigating to the WAC URL,
https://<YourWebServerName>/wac.
You might get a Security Alert message: “The security certificate was issued by a company you have
not chosen to trust.” As no Third Party Certificate Authorities have been used, you must install the root
certification authority certificate in the local computer’s Trusted Root Certification Authorities certificate
store.
Note: Here the browser referenced is Microsoft Internet Explorer (IE).
2. On the Directory Security tab, click View Certificate.
3. In the Certificate dialog, click the Certification Path tab. Click on the Root certificate in the Certification
path tree. Again click View Certificate.
4. Click the Install Certificate button to start the Certificate Import wizard. Click Next to continue.
5. Select the “Place all certificates in the following store” option.
6. Click Browse, select “Trusted Root Certification Authorities,” and then click Next.
7. Verify the settings, and confirm by clicking the Finish button.
28
8. A security warning appears asking, “Do you want to install this certificate?” Click Yes.
You will receive the following message: “The import was successful.”
Note: After installing the root certificate, you do not get the security message warning because the root
certificate validates the server certificate at the client side.
WAC Login Page to Web Services
Use the keytool utility to import the certificate reply that you received from the Certificate Authority (CA)
into a store called “cacerts.”
1. Execute the following command to import the root certificate into the cacerts file:
Keytool -import –v -trustcacerts -alias wac -file certnew.cer -keystore “C:\Program
Files\CA\SC\JRE\1.4.2_06\lib\security\cacerts” -keypass changeit –storepass changeit
Note that certnew.cer is the root certificate and changeit is the default cacerts password.
You will be asked, “Trust this certificate?” Press Y.
2. Update the WACConfig.properties file (using the above example):
SSL_Enabled=TRUE
TrustStoreFileFullPath= (cacerts file path)
”C:\\ProgramFiles\\CA\\SC\\JRE\\1.4.2_06\\lib\\security\\cacerts”
TrustStorePassword=changeit
3. In the WEBSERVICE_URL property, change the protocol from http to https.
For example, change http to https in the following:
http://<YourWebServerName>/UDSM_R11_Webservice/mod_gsoap.dll.
4. Stop and restart the tomcat services using the “caf stop tomcat” and “caf start tomcat” commands.
5. Now test if you can access the web server and run the WAC application by providing the following URL
in the address bar of your browser:
https://<YourWebServerName>/wac
6. Provide the required user name and password to log into WAC.

Client Authentication 29
Chapter 3: Client Authentication
A web server needs to verify who is at the other end of the browser by requesting a certificate. SSL client
certificates are used to restrict access to various areas of websites or the whole website. Normally, any web
server supports three levels of client authentication:
■ Ignore client certificates—Allows users to access its site without being prompted for a client certificate.
■ Accept client certificates—Allows users with or without client certificates to access its site.
■ Require client certificates—Allows only users with a valid client certificate to connect. Select the
“Require secure channel (SSL)” option for implementing this option.
Browser to WAC Login Page
Submit Client Certificate Request
First you need to request a client certificate from the Certificate Authority (CA).
1. Open the Microsoft Certificate Services Welcome page on the client browser machine where you want to
install the certificate, https://<YourWebServerName>/certsrv/.
2. Select the “Request a Certificate” option.
3. Click Advanced Certificate Request.
4. Select the “Create and Submit a request to this CA” option.
5. Fill in the required information, like Name, E-mail, Company, Department, City, State and Country,
under “Identifying Information.”
6. Select Client Authentication Certificate from the Type of certificate needed drop-down list box.
7. Select the “Mark keys as exportable” option.

30
8. Leave the remaining options with their default values and click Submit.
9. You will get a warning message. Click Yes.
The Certificate Pending page appears with a unique Request ID.
Issue/Authorize the Client Certificate
10. Go to the Certificate Server machine where the certificate authority is installed.
11. Open the Certification Authority snap-in (Start -> Programs ->Administrative Tools -> Certification
Authority).
12. Expand the Certification Authority node.
13. Click the Pending Requests folder. Your pending certificate requests appear in the right pane.
14. Right-click the pending certificate request, select All Tasks, and then click Issue.
Note: After you select Issue, the certificate is no longer displayed in this folder. It now resides in the
Issued Certificates folder.
Download and Install the Certificate
1. Open the Microsoft Certificate Services Welcome page on the client browser,
https://<YourWebServerName>/certsrv/.
2. On the default page, select the “View the status of a pending certificate request” task.
3. Select your pending certificate in the View the Status of a Pending Certificate Request page.
4. Click the Install the certificate link.
5. You will get a warning message. Click Yes to trust the web site.
The Certificate Installed page appears.

Client Authentication 31
Enable Client Authentication on IIS
1. Open the Internet Information Service (IIS) Manager in your web server machine, and expand the tree
so that you can view the Default Web Site folder.
2. Right-click the UDSM_R11_WebConsole node, and then select Properties.
3. Click the Directory Security tab.
4. To set the web site to require secure connections, click Edit.
The Secure Communications dialog appears.
5. Select the “Require client certificates” option.
6. Restart IIS.
32
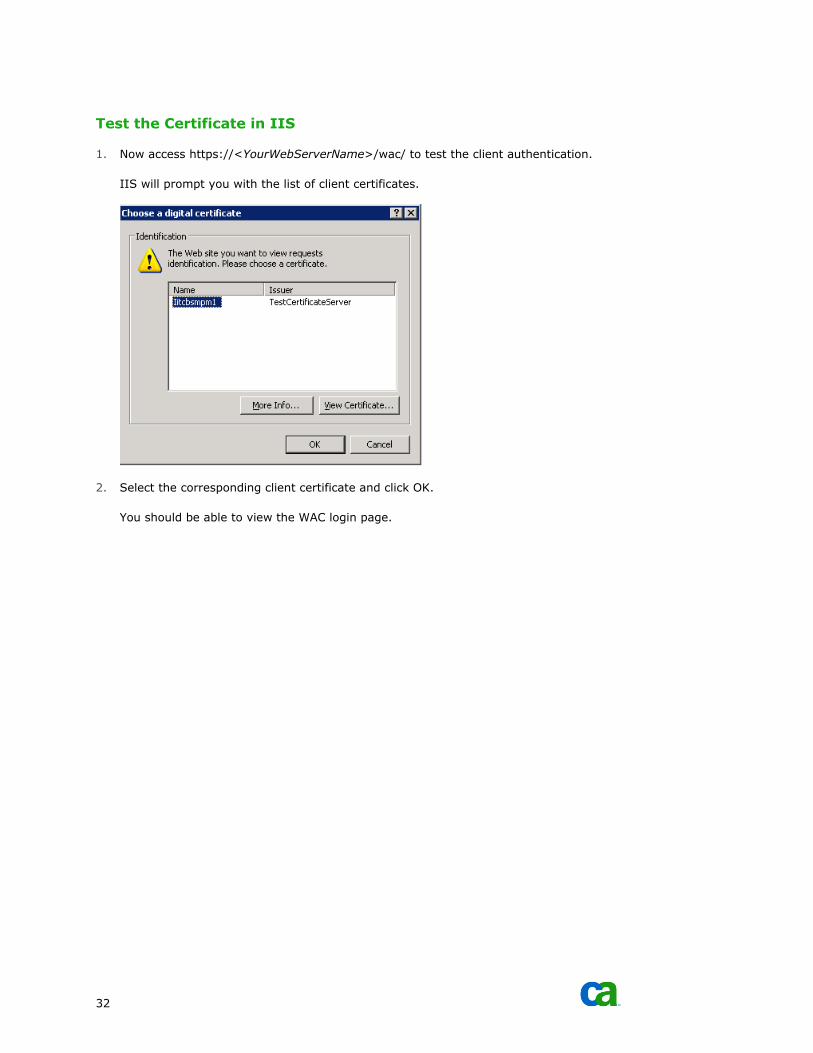
Test the Certificate in IIS
1. Now access https://<YourWebServerName>/wac/ to test the client authentication.
IIS will prompt you with the list of client certificates.
2. Select the corresponding client certificate and click OK.
You should be able to view the WAC login page.

Conclusion 33
Chapter 4: Conclusion
Proper caution must be taken while issuing and installing certificates on various machines. We strongly
recommend that this procedure be first carried out in a testing environment because, if wrongly applied, it
will prevent access to the Web Admin Console and could also affect access to other Web-based applications.
The procedures in this document cover SSL configuration only on Microsoft Windows Server using Microsoft-
provided Certificate Services.
We recommend that you verify that you are able to connect and log into WAC after completion of a
procedure, and operation must be suspended until all issues are addressed.