Embed Size (px)
Citation preview

CopyrightThis manual is copyrighted by Canon Computer Systems, Inc. (CCSI) with all rightsreserved. Under the copyright laws, this manual may not be reproduced in any form, inwhole or part, without the prior written consent of CCSI.
© 1999 Canon Computer Systems, Inc.
DisclaimerCanon Computer Systems, Inc. has reviewed this manual thoroughly in order that it will be an easy to use guide to your Canon BJC-6000 Series Color Bubble Jet Printer.All statements, technical information, and recommendations in this manual and in anyguides or related documents are believed reliable, but the accuracy and completenessthereof are not guaranteed or warranted, and they are not intended to be, nor should theybe understood to be, representations or warranties concerning the products described.
Your printer and the software media included with your printer have been sold to yousubject to the limited warranties set forth in the warranty card and license agreementenclosed with the respective product. All software is licensed AS IS, as described in thelicense agreement enclosed with the software media. Further, CCSI reserves the right tomake changes in the specifications of the products described in this manual at any timewithout notice and without obligation to notify any person of such changes.
TrademarksCanon, BJ and BJC are registered trademarks and BCI, Bubble Jet, Drop ModulationTechnology, PhotoRealism, and “See What We Mean” are trademarks of Canon Inc.
All other product and brand names are registered trademarks, trademarks, or servicemarks of their respective owners.
ENERGY STAR® COMPLIANT
As an ENERGY STAR® Partner, Canon U.S.A., Inc. has determined that this product meetsthe ENERGY STAR® guidelines for energy efficiency.
ii

iii
Using Your Documentation
The following documentation is supplied with the Canon BJC-6000 Series Color BubbleJet™ Printer to help you efficiently use your new printer.
Quick Start GuideThis sheet describes the steps you follow to unpack and set up your printer, and install theBJ Printer Driver that allows your printer to communicate with your computer. You canfollow the steps illustrated in the booklet to start printing in minutes.
User’s ManualThis manual offers detailed information on how to operate your printer. It includesprinting operations, maintenance, troubleshooting, and specifications. Read this manualto master basic operations and when you need to know the specifications of the printer.
ConventionsThis User’s Manual uses the following conventions to alert you to informationthat will help you operate the printer correctly and safely.
Notes provide advice or suggestions regarding the use of the printer.
Cautions alert you to operations that could cause damage to your hardware orsoftware, or cause injury to yourself.
Distinctive typefaces identify the printer buttons you press, the lights on theoperator panel, and any commands you enter at your computer.
■ The buttons you press appear in this typeface: POWER button.
■ The lights on your printer appear in this typeface: POWER light.
■ When you type something on your computer, it appears in this typeface:DIR/P .
■ When you press a Windows button, it appears in bold: Click OK.

iv

v
1 Introduction ........................................................................................................... 1-1Supplies and Accessories ......................................................................................... 1-1
BJ Cartridges and BJ Tanks .............................................................................. 1-2Canon Specialty Papers .................................................................................... 1-3
Customer Care Center ............................................................................................ 1-4Servicing the Printer ......................................................................................... 1-5
2 Using the Printer With Windows ..................................................................... 2-1Using a Printer Driver.............................................................................................. 2-1Printing a Document .............................................................................................. 2-2Printer Setup Within Windows 98 and Windows 95 ............................................. 2-3
Opening the Printer Properties Dialog Box in Windows 98 and Windows 95 ................................................................................................... 2-3
Using the Printer Driver in Windows 98 and Windows 95 ............................ 2-3Printer Setup Within Windows 3.1 ........................................................................ 2-4
Accessing the Printing Options......................................................................... 2-4The Windows Tabs .................................................................................................. 2-5
The General Tab ................................................................................................ 2-5The Details Tab ................................................................................................. 2-6The Main Tab .................................................................................................... 2-7The Paper Tab ................................................................................................... 2-8The Features Tab ............................................................................................... 2-9The Maintenance Tab ....................................................................................... 2-10Specifying Your Printing Options on the Windows Tabs ............................... 2-11
Recommended Print Mode Settings ...................................................................... 2-11Customizing the Print Mode ................................................................................... 2-13
The Quality Tab ................................................................................................ 2-13The Color Tab ................................................................................................... 2-14The Save Tab ..................................................................................................... 2-15
Using the BJ Printer Status Monitor ....................................................................... 2-16Printing Speed Versus Color ................................................................................... 2-17
Ways to Improve Print Speed in Windows ..................................................... 2-17
3 Paper Handling ....................................................................................................... 3-1Selecting Paper Types............................................................................................... 3-1
Paper Guidelines ............................................................................................... 3-4Printer Settings for Various Print Media ................................................................ 3-5Loading Paper........................................................................................................... 3-6
Automatically Feeding Paper............................................................................. 3-6Auto Feed Guidelines......................................................................................... 3-7Manually Feeding Paper .................................................................................... 3-8
Printing on Envelopes .............................................................................................. 3-10
Contents

vi
Using Canon’s Specialty Papers .............................................................................. 3-13Specialty Paper Guidelines ............................................................................... 3-13Printing and Uncurling Back Print Film ......................................................... 3-14Using the Cleaning Sheet for High Resolution Paper .................................... 3-15Printing on Fabric Sheets ................................................................................. 3-16Printing on Banner Paper ................................................................................. 3-18Loading Glossy Photo Paper ............................................................................ 3-21Loading Glossy Photo Cards ............................................................................ 3-22
4 Maintaining the Printer ..................................................................................... 4-1Printer Guidelines ................................................................................................... 4-2Cleaning the Printer ................................................................................................ 4-3Performing Maintenance ........................................................................................ 4-4Printing the Nozzle Check Pattern ......................................................................... 4-5Cleaning the Print Heads ........................................................................................ 4-7
Normal Print Head Cleaning ........................................................................... 4-7Deep Cleaning the Print Heads ....................................................................... 4-9
BJ Cartridge Guidelines .......................................................................................... 4-10BJ Cartridge and BJ Tank Maintenance .......................................................... 4-10Replacing BJ Tanks and BJ Cartridges ............................................................. 4-11
Replacing a BJ Tank in a BJ Cartridge ................................................................... 4-12Replacing a BJ Cartridge ......................................................................................... 4-16Aligning the Print Heads ........................................................................................ 4-20
Aligning the Print Heads Automatically .......................................................... 4-21Aligning the Print Heads Manually ................................................................. 4-22
Storing a BJ Cartridge ............................................................................................. 4-25Transporting the Printer ......................................................................................... 4-26
5 Troubleshooting .................................................................................................... 5-1Identifying Your Printer Problem ........................................................................... 5-1Basic Problems ......................................................................................................... 5-2Clearing Paper Jams ................................................................................................ 5-16Using the Operator Panel ....................................................................................... 5-17
Appendix A Specifications .................................................................................... A-1Printing Specifications ............................................................................................ A-1Printable Area .......................................................................................................... A-3BJ Cartridges ............................................................................................................ A-5General ..................................................................................................................... A-5Hardware and Software Requirements .................................................................. A-6
Glossary ......................................................................................................................... G-1
Index ............................................................................................................................... I-1
FCC Regulations ...........................................................................................................FCC-1
Chapter 1 Introduction 1-1
Intr
oduc
tion
Congratulations on your purchase of the Canon BJC-6000 Series Color Bubble Jet Printer.We appreciate your choosing this printer to meet your printing needs.
The BJC-6000 Series printers offer excellent print quality and fast print speed using both color and black inks. We are certain you will be satisfied with this advanced Bubble Jet technology.
This chapter:
■ Lists the supplies and accessories you can purchase for the printer
■ Describes Canon’s customer support services
Supplies and Accessories
Your BJC-6000 Series printer supports excellent and unique print media options that willallow you to produce dazzling, professional, and fun presentations. All of these printmedia are specially designed and manufactured to work with your Canon color printer soyou can produce the finest output possible.
Canon has an extensive dealer network equipped to offer you supplies as you need them.To find a dealer near you, call the Canon Referral Service at 1-800-848-4123.
If supplies are not available from your local dealer, you can order directly from Canon bycalling 1-800-385-2155.
Introduction

1-2 Introduction Chapter 1
BJ® Cartridges and BJ TanksYou can use the following BJ cartridges with the BJC-6000 Series printers:
■ BC-30 Black BJ Cartridge ■ BC-31 Color BJ Cartridge ■ BC-32 Photo BJ Cartridge
You can purchase the following BJ tanks for use in the BJ cartridges:
■ For the BC-30 Black BJ Cartridge • BCI-3BK Black BJ Tank
■ For the BC-31 Color BJ Cartridge• BCI-3C Cyan BJ Tank• BCI-3M Magenta BJ Tank• BCI-3Y Yellow BJ Tank
■ For the BC-32 Photo BJ Cartridge • BCI-3PBK Photo Black
BJ Tank• BCI-3PC Photo Cyan BJ Tank• BCI-3PM Photo Magenta BJ Tank
The BJ cartridges for this printer contain the Bubble Jet print head only. Youinstall the BJ tanks into the BJ cartridges after you install the cartridge print headunit in the printer.
The BJ tanks contain ink only.
The BJ cartridges that come with your printer depend on the model.
BJ TANK
BJ TANKS
BJ TANKS
BJ CARTRIDGE
BJ CARTRIDGE
BJ CARTRIDGE

Chapter 1 Introduction 1-3
Intr
oduc
tion
Canon has more engineers dedicated to creating quality ink for providing thebest results for output on Bubble Jet printers than any other organization. Canondoes not prohibit the use of third-party inks and the use of third-party inks doesnot invalidate the product’s limited warranty. However, Canon cannot guaranteethe quality or performance of your printer when you are using inks from othersuppliers.
Canon’s limited warranty does not cover damage caused to Canon’s Bubble Jetproducts that is attributable to the use of third party parts or supplies, includinginks. The limited warranty remains in effect for its life once that particulardamage has been properly repaired.
For optimum printing results, Canon recommends that you use Canon BJ cartridges.
Canon Specialty PapersCanon manufactures numerous specialty papers, including:
■ Bubble Jet Paper
■ Brilliant White Paper
■ Banner Paper
■ High Gloss Photo Film
■ Glossy Photo Paper
■ Glossy Photo Cards
■ High Resolution Paper
■ T-Shirt Transfers
■ Greeting Cards
■ LetterPlus Letterhead Paper
■ Fabric Sheet
■ Back Print Film
■ Transparencies
See Chapter 3, Paper Handling, for details on Canon’s Specialty Papers.

Customer Care Center
Canon Computer Systems, Inc. offers a full range of customer technical support* optionsincluding:
■ 24-hour, 7-day-a-week, toll-free automated support for troubleshooting issues onmost current products (1-800-423-2366)
■ Speak to a technician free of service charge (currently Monday– Friday,8:00 a.m.–10:00 p.m. EST, excluding holidays) for products still under warranty**(1-757-413-2848)
■ Speak to a technician (currently $24.99) during holidays and days/hours not listedabove regarding urgent product questions or for products no longer underwarranty (1-800-423-2366)
Or for a charge of $2.50 per minute, to a maximum of $25.00 per call (1-900-246-1200)
■ To find out about all Canon products and accessories, to download the latestdrivers, and to explore all your technical support options including e-mailsupport, visit the Canon Computer Systems, Inc. Web site (www.ccsi.canon.com)
■ 24-hour, toll-free Fax Retrieval System (1-800-526-4345)
■ To download the latest printer driver using your modem, 24-hour Bulletin BoardService (1-757-420-2000)
Canon CanadaWithin Canada, 24 hours a day, 7 days a week* (1-800-263-1121).
*Support program specifics subject to change without notice.**Refer to individual product information for warranty details.
In other countries, please contact your Canon dealer.
1-4 Introduction Chapter 1

Servicing the PrinterThe Canon BJC-6000 Series Color Bubble Jet Printer is designed with the latesttechnology to provide trouble-free operation. The Warranty Card that comeswith the printer describes Canon’s limited warranty for your Bubble Jet printer.Be sure to read the warranty information to find out about the different serviceoptions available to you.
Save your sales receipt for proof of purchase. In the event that your printerneeds service, you will need your proof of purchase to obtain warranty service.
If you feel your BJC-6000 Series Color Bubble Jet Printer needs servicing, contactCanon on the World Wide Web (www.ccsi.canon.com) to locate the CanonAuthorized Service Facility (ASF) nearest you. If you do not have access to theWeb, you can call Canon (see page 1-4).
Chapter 1 Introduction 1-5
Intr
oduc
tion

1-6 Introduction Chapter 1

Chapter 2 Using the Printer With Windows 2-1
Usi
ng th
e P
rinte
rW
ith W
indo
ws
This chapter describes how to use the printer with your Windows® applications. Itincludes:
■ Using a printer driver
■ Printing a document
■ Printer setup within Windows 98 and Windows 95
■ Printer setup within Windows 3.1
■ The Windows tabs
■ Recommended Print Mode settings
■ Customizing the Print Mode
■ Using the BJ Printer Status Monitor
■ Printing speed versus color
Using a Printer Driver
Before you can use any type of printer with your computer, you must install software thatallows the printer and computer to communicate; this software is called a printer driver.The printer driver tells the computer what kind of a printer you are using. The printerdriver also controls the various settings, such as print quality and paper type. You definethese settings within the printer driver, and the printer driver then communicates thesettings to both the computer and the printer.
You must install the BJC-6000 Series Printer Driver for Windows before you canuse the printer with your computer. See your Quick Start Guide for instructions.
Using the Printer With Windows

2-2 Using the Printer With Windows Chapter 2
Printing a Document
This procedure describes the general steps required for printing from various Windowsapplications. The exact steps for printing a document may vary depending on theapplication program you are using. Refer to your software application’s documentationfor the exact printing procedure.
Start your application.
Start the program you are using to create the document, and open the documentyou want to print.
Make sure the CanonBJC-6000 is selected as your default printer.
Choose Print or Print Setupfrom the File menu. You willsee a screen similar to this:
Click on the Properties (orSetup) button if you want tomake any adjustments asappropriate for printing yourdocument. (See Printer SetupWithin Windows 98 andWindows 95 or Printer SetupWithin Windows 3.1 fordetails.)
After making any necessarychanges to the printingoptions, select OK to start theprint job.
CLICK HERETO CHANGEYOUR PRINTSETTINGS
CLICK HERETO STARTPRINTING

Chapter 2 Using the Printer With Windows 2-3
Usi
ng th
e P
rinte
rW
ith W
indo
ws
Printer Setup Within Windows 98 and Windows 95
You can use the printer with all your Windows 98 and Windows 95 applications.
Opening the Printer Properties Dialog Box in Windows 98 and Windows 95
You can open the Properties dialog box in one of the following ways:
■ From within any Windows application, you can select the Print or PrintSetup command.
■ From the Printers folder, you can select the printer and then select theProperties command from the File menu.
■ From the Printers folder, you can select the printer, click the right mousebutton, and then select Properties from the drop down list.
Using the Printer Driver in Windows 98 and Windows 95The printing options are displayed on the following Windows 98 and Windows95 tabs: General, Details, Main, Paper, Features, and Maintenance. See TheWindows Tabs section (page 2-5) for details. (You may also see a Sharing tab ifyour printer is being shared by a Network.)
For detailed information on any of the printing options, you can use theWindows 98 and Windows 95 online Help:
■ Use the right mouse button to click an item on the screen; then click the What’s This? command.
■ Click ? and then click an item.
■ Press F1.
Printer Setup Within Windows 3.1
You can use the printer with all your Windows 3.1 applications.
Accessing the Printing OptionsYou can access the printing options from the Printers dialog box in the ControlPanel, or you can select the Print Setup option available from the File menu ofmost applications that run in Windows.
If the Print Setup option does not appear in the File menu for your application,refer to the user’s manual supplied with the application. It should provideinformation about changing the printer setup parameters.
In Windows 3.1, the printing options are displayed on these tabs: Main, Paper,Features, and Maintenance. See the next section, The Windows Tabs, for details.
2-4 Using the Printer With Windows Chapter 2

The Windows Tabs
The BJC-6000 Series Printer Driver for Windows has several tabs from which you canselect your printing options. Be sure to use the Windows help features to learn moreabout using these settings.
The General Tab This tab allows you to add comments regarding the printer driver and print a testpage or a separator page. (You see this tab in Windows 98 and Windows 95 onlyand only when you open the Properties dialog box from the Printers folder, notfrom within a Windows application.)
Usi
ng th
e P
rinte
rW
ith W
indo
ws
Chapter 2 Using the Printer With Windows 2-5
ADDCOMMENTSHERE
PRINT ASEPARATORPAGE
PRINT A TESTPAGE

2-6 Using the Printer With Windows Chapter 2
The Details TabThis tab allows you to specify printer port settings, spool settings, and time-outsettings. (You see this tab in Windows 98 and Windows 95 only and only whenyou open the Properties dialog box from the Printers folder, not from within aWindows application.)
DEFINE THEPRINTER’SPORT
SPECIFY THEPRINTERDRIVER
SPECIFYTIMEOUTSETTINGS
SPECIFYPORTSETTINGS
SPECIFYSPOOLSETTINGS

The Main TabThis tab allows you to select your Print Mode and specify your Media Type.(The printing options on this tab are the same for Windows 98, Windows 95,and Windows 3.1.)
Usi
ng th
e P
rinte
rW
ith W
indo
ws
Chapter 2 Using the Printer With Windows 2-7
SELECT YOUR PRINT MODE,WHICH INCLUDES PRINT QUALITYAND COLOR SETTINGS
ILLUSTRATES THECURRENT PAPERSETTINGS
CLICK HERE TOPRINT COLOR DATAAS GRAYSCALE
CLICK HERE TO CREATEA CUSTOMIZED PRINTMODE SETTING. (SEEPAGE 2-13 FOR DETAILS)
SPECIFY THE TYPEOF BJ CARTRIDGESINSTALLED
SELECT YOURMEDIA TYPE
RESTOREDEFAULTSETTINGS

The Paper TabThis tab allows you to specify paper size and page orientation. (The printing options on this tab are the same for Windows 98, Windows 95,and Windows 3.1.)
2-8 Using the Printer With Windows Chapter 2
SPECIAL PRINTINGFEATURES:• SCALED—TURN ON
TO ENLARGE OR REDUCE PRINTING
• PAGE LAYOUT—TURN ON TO PRINT 2 OR 4 PAGES ON A SINGLE SHEET
• BANNER—TURN ON FOR BANNER PRINTING
SPECIFY PAGEORIENTATION (HOWDOCUMENT PRINTSON A PAGE)
FOR SCALED OR PAGELAYOUT PRINTING, SPECIFYSIZE OF PAPER IN PRINTER
RESTORE DEFAULTSETTINGS
SPECIFY YOURPAPER SIZE

The Features TabThis tab allows you to specify background printing features, which includemultiple copies and page layout. (The printing options on this tab are the same for Windows 98, Windows 95, and Windows 3.1.)
Usi
ng th
e P
rinte
rW
ith W
indo
ws
Chapter 2 Using the Printer With Windows 2-9
ENABLE OR DISABLEBACKGROUNDPRINTING FEATURES
SPECIFY NUMBER OFCOPIES TO PRINT
ENABLE PRINTING INREVERSE ORDER(LAST PAGE TO FRONT PAGE)
ENABLE COLLATINGFOR MULTIPLECOPIES
PRINT BORDERS TOSEPARATE PAGES
ENABLE TO PRINT2 OR 4 PAGES ON A SINGLE SHEET
CLICK TO VIEWOR CHANGE THESTAMP SETTINGS
RESTOREDEFAULTSETTINGS
SPECIFY A GRAPHICSTAMP TO BE PRINTEDON YOUR DOCUMENT(DRAFT, CONFIDENTIAL,URGENT, ETC.)

The Maintenance TabThis tab allows you to initiate print head cleaning, roller cleaning, and test prints.You can also turn the printer on or off and start the BJ Printer Status Monitor.(The printing options on this tab are the same for Windows 98, Windows 95, andWindows 3.1.)
2-10 Using the Printer With Windows Chapter 2
CLEAN THE PRINT HEAD• CUSTOM CLEANING• DEEP CLEANING
ALLOWS YOU TO SELECTSPECIAL FEATURES
START THE BJ PRINTERSTATUS MONITOR(SEE PAGE 2-16)
PERFORM TEST PRINTS• NOZZLE CHECK PATTERN• PRINT HEAD ALIGNMENT
POWER THE PRINTER ON OR OFF
CLICK ON THE BOX NEXT TO THESETTING TO ENABLE (CHECK) ORDISABLE (NO CHECK) THE SETTING.WHEN THE CURSOR IS OVER THESETTING, A DESCRIPTION OF THESETTING IS DISPLAYED AT THEBOTTOM OF THE SCREEN.

Specifying Your Printing Options on the Windows TabsBe sure to use your online help to find out about the settings available for eachprinting option.
■ To move between the Windows tabs, click on any of the tabs.
■ To save the settings and exit, click the OK button.
■ To cancel your setting selections on a tab, click the Cancel button.
■ To save your settings without exiting, click the Apply button.
■ To access helpful information about the printer and the printer driver, clickon the Help button.
■ To find out about a setting, click the question mark ? in the upper rightcorner. Move the larger question mark to the setting you are interested in andclick again.
Recommended Print Mode Settings
You select the Print Mode options on the Main tab to achieve the specified results.
Usi
ng th
e P
rinte
rW
ith W
indo
ws
Chapter 2 Using the Printer With Windows 2-11

The Print Mode you select optimizes the printer’s settings for print quality, media, paperfeed method, and color adjustment.
Select one of the following Print Modes on the Main tab:
TextOptimum setting for printing text. Use the BC-30 Black and BC-31 Color BJ Cartridges with this setting.
SuperPhotoOptimum settings for natural color in photos. Use the BC-31 Color and BC-32 Photo BJ Cartridges with this setting.
AutoOptimum setting for combined text, illustrations, tables, graphs, and photos.Use the BC-30 Black and BC-31 Color BJ Cartridges with this setting.
DraftOptimum setting for test printing; emphasizes speed rather than quality. Usethe BC-30 Black and BC-31 Color BJ Cartridges with this setting.
PhotoOptimum setting for printing photographs. Use the BC-30 Black and BC-31Color BJ Cartridges with this setting.
GraphicsOptimum setting for printing graphic images. Use the BC-30 Black and BC-31 Color BJ Cartridges with this setting.
CameraOptimum setting for digital camera images. Use the BC-31 Color and BC-32Photo BJ Cartridges with this setting.
Click on the Advanced button to customize any of these settings. (See the next section for details.)
2-12 Using the Printer With Windows Chapter 2
Customizing the Print Mode
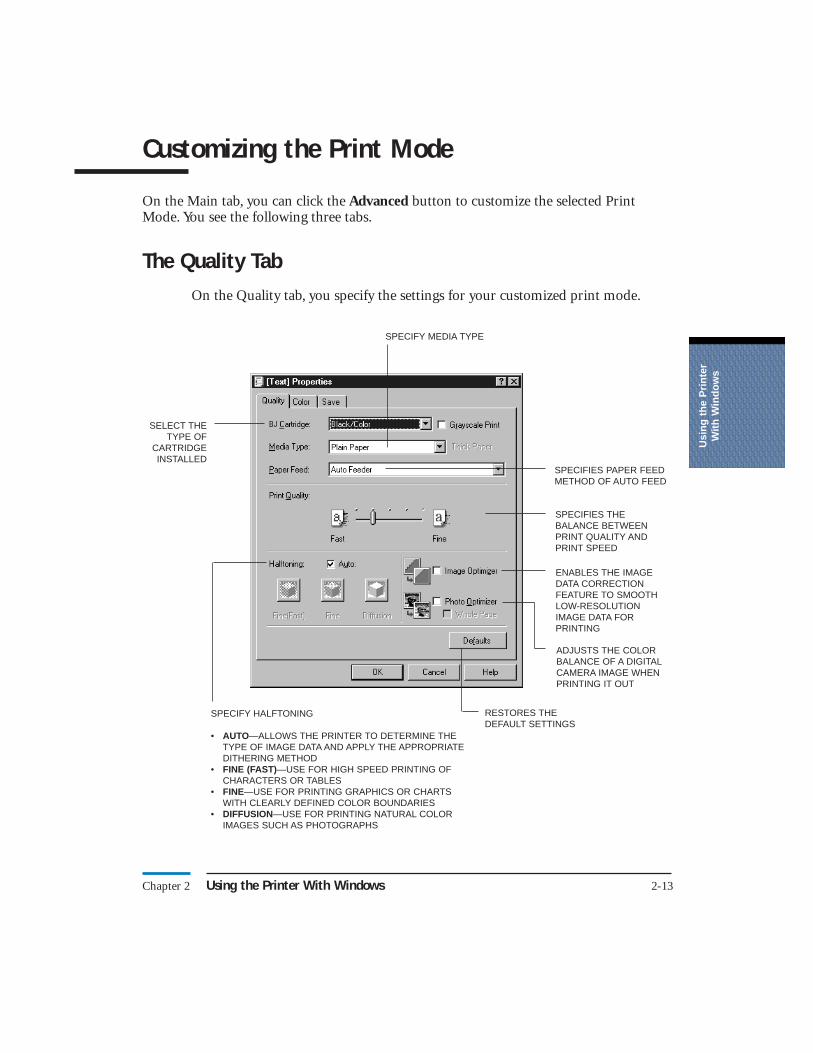
On the Main tab, you can click the Advanced button to customize the selected PrintMode. You see the following three tabs.
The Quality TabOn the Quality tab, you specify the settings for your customized print mode.
Usi
ng th
e P
rinte
rW
ith W
indo
ws
Chapter 2 Using the Printer With Windows 2-13
SPECIFIES THEBALANCE BETWEENPRINT QUALITY ANDPRINT SPEED
SPECIFY HALFTONING
• AUTO—ALLOWS THE PRINTER TO DETERMINE THETYPE OF IMAGE DATA AND APPLY THE APPROPRIATEDITHERING METHOD
• FINE (FAST)—USE FOR HIGH SPEED PRINTING OFCHARACTERS OR TABLES
• FINE—USE FOR PRINTING GRAPHICS OR CHARTSWITH CLEARLY DEFINED COLOR BOUNDARIES
• DIFFUSION—USE FOR PRINTING NATURAL COLORIMAGES SUCH AS PHOTOGRAPHS
SPECIFY MEDIA TYPE
SPECIFIES PAPER FEEDMETHOD OF AUTO FEED
SELECT THETYPE OF
CARTRIDGEINSTALLED
ENABLES THE IMAGEDATA CORRECTIONFEATURE TO SMOOTHLOW-RESOLUTIONIMAGE DATA FORPRINTING
RESTORES THEDEFAULT SETTINGS
ADJUSTS THE COLORBALANCE OF A DIGITALCAMERA IMAGE WHENPRINTING IT OUT

The Color TabOn the Color tab, you can adjust the color and intensity settings for yourcustomized print mode.
2-14 Using the Printer With Windows Chapter 2
ENABLE ORDISABLE COLORADJUSTMENT(USING COLORADJUSTMENTREDUCESPRINTING SPEED)
RESTORES THEDEFAULT SETTINGS
ADJUSTS THELUMINOSITY OF THEFOUR COLOR INKS
SPECIFIES WHETHERPRINTED OUTPUTEMPHASIZES INTER-MEDIATE TONES ORBRIGHT, SHARP BASICCOLORS
ADJUSTS THE PRINTINTENSITY TO MAKETHE OVERALLPRINTED OUTPUTDARKER OR LIGHTER
ADJUSTS THECONTRASTAMONGINTERMEDIATETONES THAT FALLBETWEEN BLACKAND WHITE
SPECIFIESHOW TOPROCESSCOLOR VALUESSO THEY BESTAPPROXIMATETHE ORIGINAL

The Save TabYou use the Save tab to save your customized print mode.
Be sure to save your new setting if you want to use it in the future.U
sing
the
Prin
ter
With
Win
dow
s
Chapter 2 Using the Printer With Windows 2-15
DISPLAYS CURRENTPRINT MODES
SPECIFY A NEWNAME FOR THISPRINT MODE
SPECIFY A NEW ICONFOR THIS PRINTMODE SETTING
SAVE THE NEWPRINT MODESETTING
CHANGES THE ORDER OFTHE ICONS; MOVES THESELECTED ICON
DESCRIBES THENEW PRINT MODE

Using the BJ Printer Status Monitor
The BJ Printer Status Monitor shows the printer status and the progress of documentsprinting in Windows.
The BJ Printer Status Monitor is automatically enabled; therefore, you will see thefollowing screen whenever you initiate a print operation. You can also start the BJ PrinterStatus Monitor by clicking the Start Status Monitor button on the Maintenance tab (seepage 2-10).
2-16 Using the Printer With Windows Chapter 2
Printing Speed Versus Color
The BJC-6000 Series Printer Driver for Windows can interpret and translate the fullspectrum of colors, up to 16.7 million colors. When printing in color, there is asignificant increase in the amount of information that the driver has to interpret andtranslate. When printing black ink only, the driver has only one color to interpret.
By decreasing the amount of colors that the printer driver has to interpret, you cansignificantly decrease the time needed to translate the information. This will speed up the overall printing process.
Ways to Improve Print Speed in WindowsTo improve printing speed, you can try the following:
■ Turn off the Print Manager in the Windows Control Panel(Windows 3.1 only)This avoids the extra step of sending the print file to the Print Manager andmay increase your printing speed by as much as 25%, depending on thecomputer you are using.
■ Add a permanent swap file in Windows 3.1Under the 386 Enhanced icon in the Windows Control Panel, add or create apermanent swap file that is from 4 MB to 9 MB. The computer will be able toprepare the print file faster. See your Windows documentation forinstructions.
■ Avoid diffusion halftonesChoose Diffusion for Halftoning only when printing final output orphotographic images. To specify Halftoning, click the Advanced button onthe Main tab in the printer driver and then click the Quality tab. Choosing aHalftoning setting of Fine/Fast allows documents to print as much as 20%faster because the computer does not need to compute to “best possibleposition” for each dot.
■ Avoid color adjustmentIn the Color tab, disable the Color Adjustment option. This feature takeslonger to process in the computer because it requires special information.(To disable Color Adjustment, click the Advanced button on the Main tab in the printer driver and then click the Color tab.)
Usi
ng th
e P
rinte
rW
ith W
indo
ws
Chapter 2 Using the Printer With Windows 2-17

■ Free up your memoryUse only one software program at a time and unload any screen saving utilitiesor programs stored in Windows background; this frees up more memory forWindows processing.
■ Use the Draft setting for Print ModeIf you will be printing text in black ink only, choose a Print Mode of Draft orText. Use Draft mode to emphasize speed rather than quality. In Draft mode,the printer will need to disperse fewer dots.
■ Limit the number of colors on each pageThe computer will need to calculate and transmit fewer dots. Too many colorscan make the image confusing and less effective as well as cause the printspeed to slow down.
■ Use primary colors when printing presentation graphicsUse black, yellow, blue, green, and red when possible. The computer will needto calculate and transfer less dot information.
■ Use Plain Paper as the Media TypeThe print head will make one or two passes for each printed line.
■ Use smaller graphics and more white space in your documentsThe computer will be able to prepare the print file faster.
■ Add RAM to your computerThe computer will be able to prepare the print file faster.
■ Use a computer with a faster processorThe computer will be able to prepare the print file faster.
2-18 Using the Printer With Windows Chapter 2

Pap
er H
andl
ing
Chapter 3 Paper Handling 3-1
This chapter describes how to use the printer for all your printing operations. It includes:
■ Selecting paper types
■ Printer settings for various print media
■ Loading paper
■ Printing on envelopes
■ Using Canon Specialty Papers
To ensure the best performance of your printer, you’ll want to select the best paper andload it correctly. You can stack paper in the sheet feeder to load it automatically, or youcan manually feed one sheet at a time.
Selecting Paper Types
One of the most important things you can do to assure the best possible performance ofyour Bubble Jet printer is to select the correct paper. Your printer produces letter qualityprint on most plain bond papers, including cotton bond and photocopying papers; it doesnot require special ink jet papers. However, the print quality varies with different papertypes. Be sure to test a type of paper before you purchase a large quantity.
Plain PaperThe printer supports paper sizes of letter, letter plus, legal, A4, and A4 plus inportrait orientation. You can use regular copier paper, cotton bond papers, andtypical letterhead. Always use paper without curls, folds, staples, or damagededges. Copier paper has a preferred side for printing. Look at the label on thepackage to see which side to print on first.
High Gloss Photo FilmThe Canon High Gloss Photo Film features a bright white finish that lendsstriking visual power to charts, graphs, and photographic images. Use this film tomake your presentation materials and graphics look professional. When printingon this film, use the BC-32 Photo and BC-31 Color BJ Cartridges. In the printerdriver, select the appropriate Print Mode and select High Gloss Photo Film forthe Media Type.
Paper Handling

3-2 Paper Handling Chapter 3
Glossy Photo PaperCanon Glossy Photo Paper is a high gloss, thicker paper that produces the lookand feel of a photograph. Use this paper with the BC-32 Photo and BC-31 ColorBJ Cartridges to produce photo-quality prints from your printer. In the printerdriver, select Super Photo for the Print Mode and select Glossy Photo Paper forthe Media Type.
Glossy Photo CardsUse Canon’s Glossy Photo Card media when printing a 4" × 6" image. These cardsare the same stock as Canon’s Glossy Photo Paper and have perforations aroundthe printable area. You can print beyond the perforation and then tear off themargins; this allows you to fill the entire card with an image or color. In theprinter driver, select Glossy Photo Cards for the Media Type. Be sure to read theinstructions that come with the Glossy Photo Cards.
Banner PaperCanon’s Banner Paper is specifically designed for printing one continuous sheetin a banner format. The connected sheets are divided by a perforation. You canprint from two to six sheets at one time. In the printer driver, you select BannerPrinting on the Paper tab.
Brilliant White PaperCanon’s unique paper formulation gives you a bright white printing surface thatproduces incredibly brilliant colors and dark, crisp black text. This paper worksgreat for everyday use, as well as proposals, color presentations, color charts andgraphs, flyers, and newsletters. You can print on both sides of the sheet. In theprinter driver, select Plain Paper for the Media Type when you load this paper.
High Resolution PaperCanon’s High Resolution Paper is designed to produce photo-realistic qualityoutput with sharp and vivid graphics. For best results, use the BC-32 Photo and BC-31 Color BJ Cartridges to produce images comparable to your favoritephotographs. In the printer driver, be sure to select High Resolution Paper for the Media Type.
T-Shirt TransfersUse Canon’s popular T-Shirt Transfers to create and personalize T-shirts,sweatshirts, aprons, tablecloths, napkins, tote bags, and anything else yourimagination allows! Use on any cotton or cotton/poly blend fabric. Your image isprinted in mirror image (when you select T-Shirt Transfer for the Media Type inthe printer driver) so when you iron it onto the T-shirt, the image is viewedcorrectly. Be sure to use the BC-30 Black and BC-31 Color BJ Cartridges whenprinting T-Shirt Transfers.

Chapter 3 Paper Handling 3-3
Pap
er H
andl
ing
Bubble Jet Paper (water resistant)The Canon Bubble Jet Paper has been developed for high quality printing withminimal or no smearing or running when in contact with water or dampsurfaces, making it a good choice for damp or rainy environments. The paper isspecially coated and printable on both sides. (In the printer driver, select PlainPaper for the Media Type when you load this paper.)
Greeting CardsGet the most out of your Canon Creative or other card making software withCanon Greeting Cards. These cards give your unique, personalized cards the lookand feel of professional cards. You can create cards, invitations, announcements,and more. These cards come in regular size and half-fold. In the printer driver,select Other Paper for the Media Type.
LetterPlus Letterhead PaperThis paper is 9 × 13.3 inches so you can print edge to edge and catch all yourcreativity on the page. Design your document to 8.5 × 11 inches with edge-to-edge color; then just remove the perforated margins for beautiful graphics andcrisp, dark text. This paper is perfect for company letterhead, proposal covers, orany full-bleed design. (In your printer driver, select Plain Paper for the MediaType and Letter+ for Page Size when you load this paper. Make sure the settingsin your software application match these settings.)
Fabric SheetsUse Fabric Sheets for Canon Bubble Jet printers to print banners, pillow covers,scarves, flags, and other textile items. Use these sheets for appliqués and othercraft and sewing projects. Fabric sheets are 9.5 × 14 inches. In the printer driver,select the appropriate Print Mode and select Fabric Sheet for the Media Type.
TransparenciesCanon Transparencies are recommended. These transparencies produce excellentcontrast, sharpness, and color. In the printer driver, select Transparency for theMedia Type.
Back Print FilmCanon Back Print Film has been specially developed for Canon Color Bubble Jetprinters. The film is designed to deliver brilliant, high-intensity color imagessuitable for business presentations, design work, or professional reports. Backprint film is printed on the back (matte nonglossy) side of the film in mirrorimage and then viewed from the front or glossy side using a backlighting device.Be sure to select Back Print Film as your Media Type in the printer driver. Formore details, ask a Canon Authorized Dealer for information or refer to themanual supplied with the film.

3-4 Paper Handling Chapter 3

Chapter 3 Paper Handling 3-5
Pap
er H
andl
ing
Assorted Paper Starter KitIf you would like to try some of the papers described above, look for Canon’sStarter Kit. It contains an assortment of five paper types.
If you are printing in an application outside Windows, your software applicationor printer driver must support mirror image printing in order to use Back PrintFilm or T-Shirt Transfers.
Paper GuidelinesWhen selecting or loading paper, please remember the following:
■ Attempting to print on damp, curled, wrinkled, or torn paper can cause paperjams and poor print quality.
■ Use cut-sheet paper only. You cannot use multipart paper.
■ Whenever possible, hold the paper by the edges and avoid touching the printside. Any scratching or soiling of the print side will adversely affect the printquality.
■ When storing paper, put the paper back in its original package and avoidlocations that are exposed to direct sunlight or that are subject to hightemperatures or humidity. To avoid bending or wrinkling the paper, store thepackage on a flat surface.
■ After printing, do not touch the print side until the ink is dry. If water gets onthe printed media, do not touch the print side until the media is dry.
■ When using graph paper, the lines may not match because the 1/6-inch linespacing of the printer is slightly less than that of graph paper.
■ If the print density of your page is very high, light paper stock may curlslightly due to the large amount of ink. If you need to print dense graphics,try printing on thicker paper.
■ Do not use thick papers that do not meet the specifications for this printer.Printing with a paper that is thick enough to come in contact with the printhead nozzles may damage the BJ cartridges.

3-6 Paper Handling Chapter 3
Printer Settings for Various Print Media
Paper Paper FeedMedia thickness lever Method Limit (Sheets)
Plain paper Up Auto Approx. 130
High Gloss Film Up Auto 1
Glossy Photo Paper Up Auto 10 (with Loading Support Sheet A)
Glossy Photo Cards Up Auto 10
Banner Paper Up Auto 1 (2 to 6 sheets in length)
Brilliant White Paper Up Auto Approx. 130
High Resolution Paper Up Auto Approx. 100
T-Shirt Transfers Down Auto 1
Bubble Jet Paper Up Auto Approx. 130
Greeting Cards Down Auto 1
LetterPlus Letterhead Up Auto 1Paper
Fabric Sheets Down Auto 1
Transparencies Up Auto 30
Back Print Film Up Auto 10
Other heavier-weight print media Down Manual 1 (max. thickness-0.6 mm)
Envelopes
Single Down Auto 1Stack Down Auto 15
PAPERSUPPORT
PAPERTHICKNESSLEVER
PAPER OUTPUT TRAYAND EXTENSION
.B
Loading Paper
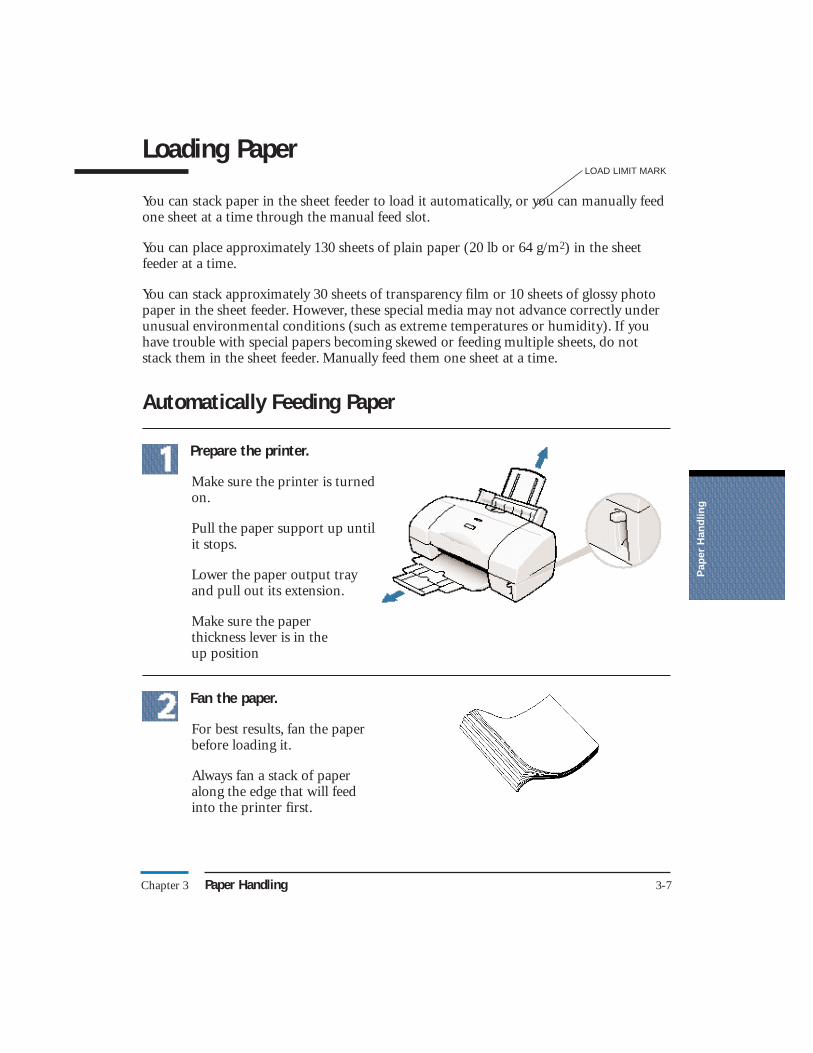
You can stack paper in the sheet feeder to load it automatically, or you can manually feedone sheet at a time through the manual feed slot.
You can place approximately 130 sheets of plain paper (20 lb or 64 g/m2) in the sheetfeeder at a time.
You can stack approximately 30 sheets of transparency film or 10 sheets of glossy photopaper in the sheet feeder. However, these special media may not advance correctly underunusual environmental conditions (such as extreme temperatures or humidity). If youhave trouble with special papers becoming skewed or feeding multiple sheets, do notstack them in the sheet feeder. Manually feed them one sheet at a time.
Automatically Feeding Paper
Prepare the printer.
Make sure the printer is turnedon.
Pull the paper support up untilit stops.
Lower the paper output trayand pull out its extension.
Make sure the paper thickness lever is in the up position
Fan the paper.
For best results, fan the paperbefore loading it.
Always fan a stack of paperalong the edge that will feedinto the printer first.
Pap
er H
andl
ing
Chapter 3 Paper Handling 3-7
LOAD LIMIT MARK

Load the stack of paper.
Slide the stack of paper intothe sheet feeder until it stops.
Align the edge of the paperwith the right edge of the sheetfeeder.
Secure the stack with the paperguide.
Make sure the stack does notexceed the limit mark.
Start your print operation.
Make sure that the printer is turned on.
Use the printer driver to set any necessary print properties; for example, you needto change the settings in the printer driver if you are printing photos or usingspecial paper.
Auto Feed GuidelinesWhen automatically feeding stacks of paper, follow these guidelines:
■ Do not open the front cover while printing. This will cause the printer topause.
■ Do not leave paper stacked in the printer for long periods of time; longersheets of paper may become bent or curled over time. This may cause thepaper to misfeed or jam.
■ If your printed page contains lots of graphics, the ink on the page may bedamp due to the print density. Remove the page right away and allow the inkto dry.
■ The capacity of the paper output tray is 130 sheets of paper. To reduce paperjams, remove paper from the output tray before the count reaches 130.
3-8 Paper Handling Chapter 3
D

■ If paper curls after printing, remove it immediately; otherwise, paper jamsmay occur.
■ Depending on the density of your printed pages, the ink may need time todry. Within two to three seconds, the ink becomes smudge resistant. Afterdrying for several minutes, the ink becomes water resistant.
■ Do not try to load paper into the sheet feeder beyond the paper limit mark ( ) or the tab on the right side of the sheet feeder; stacking too much papermay cause paper feeding or printing problems.
■ Make sure there are no gaps between the stack of paper and the paper guidenor the right edge of the sheet feeder.
Manually Feeding PaperYou use the manual feed function when printing on heavier-weight print media(17 lb to 143 lb, 64 g/m2 to 500 g/m2, or paper thickness up to 0.6 mm).
Prepare the printer.
Make sure the printer is turnedon.
Press the paper thickness lever down to the envelopesposition A.
Pap
er H
andl
ing
Chapter 3 Paper Handling 3-9

Set up your print operation.
If you are using Windows, you must select Manual Feed inthe printer driver for theprinter to accept manually fedpaper.
On the Main tab, click on theAdvanced button. Then in theQuality tab, select ManualFeed for the Paper Feed type.
Insert the single sheet.
With the print side up, alignthe left edge of the sheet withthe left side of the manual feedslot on the back of the printer.
Insert the sheet into themanual feed slot until it stopsand hold it in place for aboutone second until it feedspartially into the printer.
3-10 Paper Handling Chapter 3

Printing on Envelopes
You can stack up to 15 envelopes in the sheet feeder or you can manually feed envelopesone at a time.
U.S. Commercial number 10 (COM10) envelopes, and European DL envelopes arerecommended. You may be able to stack envelopes of other sizes in the sheet feeder;however, Canon cannot guarantee consistent performance on envelope sizes other thanCOM10 and DL.
The following envelopes are not recommended because they may cause jams or smears,or may damage your printer.
■ Envelopes with windows, holes, perforations, cutouts, and double flaps.
■ Envelopes made with special coated paper or deeply embossed paper.
■ Envelopes using peel-off sealing strips.
■ Envelopes in which letters have been enclosed.
When you are ready to print on envelopes, follow these steps to stack envelopes in thesheet feeder. (You can also manually feed envelopes one at a time.)
Pap
er H
andl
ing
Chapter 3 Paper Handling 3-11
PRESS DOWNFIRMLY ON THEEDGES OF THEFLAP

Prepare the printer.
Make sure the printer is turnedon.
Make sure the paper thicknesslever is pressed down to theposition for envelopes A.
Pull out the paper output trayand extension.
3-12 Paper Handling Chapter 3
PRINT SIDE (ADDRESS SIDE)
PAPER OUTPUT TRAYAND EXTENSION

Prepare the envelopes.
Arrange the stack of envelopeson a firm surface and pressdown firmly on the edges tomake the folds crisp.
Press all the way around theenvelopes to remove any curlsand to expel air from inside theenvelopes.
To remove curling fromenvelopes, hold the edges of theenvelopes diagonally and bendgently.
Make sure any curls areremoved from the flap of eachenvelope.
Use a pen or similar object to flatten the flaps.
Pap
er H
andl
ing
Chapter 3 Paper Handling 3-13

Load the envelopes.
Load the top edge of theaddress side (flap side down)into the sheet feeder.
Align the stack with the rightside of the sheet feeder.
Insert the stack of envelopesinto the sheet feeder until itstops.
Align the edge of the paperguide with the left edge of thestack of envelopes.
Start your print operation.
Make sure the printer is turned on.
Set the envelope properties in the printer driver if necessary.
Normally you specify the envelope settings in your software application.
Remove each envelope.
Remove each printed envelopeas it is ejected from the printer.
3-14 Paper Handling Chapter 3

Using Canon’s Specialty Papers
This section provides guidelines for printing on some of Canon’s Specialty Papers.
Specialty Paper GuidelinesBe sure to read any instructions that come with your Canon specialty paper.These instructions provide important information regarding how to achieve thehighest print quality with these papers.
Follow these guidelines:
■ When automatically feeding transparencies or back print film, it is a goodidea to remove each sheet after it is delivered. You may not want film sheets tostack up.
■ Let the printed sheets of film or paper dry completely before storing them.
Paper type Drying time (approx.)
Canon High Gloss Photo Film 10 minutesCanon Glossy Photo Paper or Cards 2 minutesCanon Fabric Sheet 1 hourCanon Back Print Film 15 minutesCanon Transparencies 15 minutes
■ When a sheet of film has dried completely, cover its printed side with a sheetof plain (not coated) paper before storing it; this is recommended even if youplace the sheets of film in a clear file or plastic holder.
■ Before loading transparencies or back print film, insert one sheet of plainpaper as the last sheet in the stack.
■ Do not leave the film in the sheet feeder for long periods of time. Dust anddirt may accumulate on the film resulting in spotty printing.
Pap
er H
andl
ing
Chapter 3 Paper Handling 3-15

■ To avoid smudging caused by fingerprints, handle film by holding the edgesonly.
■ To avoid fading, do not expose the printed film to prolonged sunlight.
■ Store unused papers and films flat. Do not remove papers from theirprotective packaging until you are ready to use them.
■ Store unused film at temperatures between 59°F to 86°F (15°C to 30°C). Therelative humidity should be between 10% and 70%.
Printing and Uncurling Back Print FilmBe sure to print on the back (matte nonglossy) side of the film. Your data isprinted in mirror image so it can be viewed from the front or glossy side using aback lighting device.
If Back Print Film becomes curled, follow these steps to uncurl it:
Cover the non-glossy side of the film with a sheet ofplain paper.
Roll the film and paper up in the direction oppositethe curl.
Do not roll the film too tight.
The film and paper rolledtogether should be about oneinch (2.5 cm) in diameter.
Keep the film rolled up for about five minutes.
You may want to fasten the rollwith a small piece of tape.
3-16 Paper Handling Chapter 3
PAPERSUPPORT
PAPER THICKNESSLEVER
PAPER OUTPUT TRAYAND EXTENSION

Using the Cleaning Sheet for High Resolution PaperCanon’s High Resolution Paper is designed for high quality printing. This paperis specially coated to produce delicate color output.
After using a package of High Resolution Paper (100 sheets), you need to use thecleaning sheet enclosed with the paper to remove paper dust from the printer’srollers; this will help prevent paper feed problems.
Set up the printer.
Make sure the paper support and paper output trays are extended.
Insert the cleaning sheet.
Remove the two pieces of tapefrom the sheet.
Insert the sheet with the stickyside out (toward you) anddown (going into the sheetfeeder).
Adjust the paper guide to theedge of the cleaning sheet.
Feed the sheet.
Make sure the printer is on.
Press and hold the RESUME button.
The printer beeps once slowly. Continue to hold down the RESUME button untilyou hear two more beeps. Then release the button.
The printer feeds the sheet and then ejects it.
Use a cleaning sheet once only.
Pap
er H
andl
ing
Chapter 3 Paper Handling 3-17
OPEN END PLAINPAPER
PRINT SIDE(CLOTH SIDE )

Printing on Fabric SheetsThe Fabric Sheets for Canon printers come with a booklet that describes specialhandling procedures. Be sure to look through this booklet for special informationregarding the Fabric Sheets. This section describes specific steps for using FabricSheets with the printer.
Be sure to follow these guidelines:
■ To avoid paper jams, smearing, and other problems, do not open the printer’scover during printing.
■ Use the fixing agent that comes with the Fabric Sheet.
■ Do not touch newly printed fabric sheets until the ink is completely dry. Thistakes about one hour.
■ Do not remove the film from the back of the sheet until after printing.
Set up the printer.
Make sure the printer is turnedon.
Make sure the paper supportand paper output tray areextended.
Press the paper thickness lever down to the envelopesposition A.
3-18 Paper Handling Chapter 3

Load the fabric sheet.
Insert the sheet with the clothside out (toward you) and theopen end up (away from thesheet feeder).
Align the right edge of thesheet with the right side of thesheet feeder.
Adjust the paper guide to theedge of the fabric sheet.
Set up the printer driver.
In the Main tab, select Fabric Sheet for Media Type.
In the Paper tab, select Letter or A4 for the Page Size.
Close the printer driver and start the print operation from your Windowsapplication.
Dry and then wash the fabric sheet.
Remove the fabric sheet as it is ejected from the printer.
Let the printed fabric sheet set for about one hour to allow the ink to completely dry.
Do not touch the printed side until the ink is completely dry.
When dry, peel the film backing from the printed fabric sheet.
Wash the printed fabric sheet for about three minutes under lukewarm runningwater to remove extra ink.
Hang the fabric sheet up to dry it again.
Iron the dried fabric sheet with a clothes iron.
Pap
er H
andl
ing
Chapter 3 Paper Handling 3-19
PAPER THICKNESSLEVER
PAPER OUTPUT TRAYAND EXTENSION
PRINT SIDE UP
.B

See the booklet that comes with the fabric sheets for details on drying and washing.
Printing on Banner PaperFor best results, use Canon Banner Paper.
To set up a print job on banner paper, you must decide on the number of sheetsyou need. You can print banners from 2 to 6 sheets in length.
Always leave an extra sheet at the end of the banner—just in case thetype/graphic runs over to the next page.
Printing on banner paper requires quite a bit of ink. Check the BJ tanks inyour BJ cartridges to make sure they have enough ink before you start the printoperation.
For best print results on banner paper, use light design patterns.
To prevent ink from running over the edges of the sheet, print within thespecified margins. (See page A-5 for details.)
To prevent the ink from smearing, do not allow the printed sheets to fold andstack on one another after they are ejected from the printer.
See Appendix A, Specifications, for the recommended printing area of bannerpaper.
3-20 Paper Handling Chapter 3

Prepare the printer.
Make sure the printer is turnedon.
Make sure the paper support isnot extended.
Make sure the paper thicknesslever is pressed to the upposition
Pull out the paper output trayand its extension.
Prepare the banner paper.
Cut the banner at a crease accordingto the length you need.
The minimum length is two sheets.
The maximum length you can use issix sheets (66 inches or 1676 mm).
Always leave an extra sheet atthe end of the banner—just incase the type runs over.
Load the first sheet.
Align the first sheet of thepaper with the right edge ofthe sheet feeder and slide itinto the printer until it stops.
Adjust the paper guide to theleft side of the sheet.
Fold the banner paper.
Pap
er H
andl
ing
Chapter 3 Paper Handling 3-21

Gently fold the paper at the perforationsbetween the first and second sheet.
Neatly fold the paper behind the printer;don’t allow it to hang over the edge ofthe table.
Adjust the printer location.
Make sure there is enough space in frontof the printer so each sheet is supportedas it comes out of the printer and thenallowed to hang over the edge of thetable.
A dense print will require more time todry so make sure that wet ink does notstain the desk or the floor.
Set up the Printer Driver.
Open the Windows application you aregoing to use to print. From the File menu, select Print. Then select your printoptions using the BJC-6000 Series Printer Driver for Windows.
• For Media Type, select Plain Paper.
• For the Page size, select Letter or A4.
• On the Paper tab, select Banner Printing.
• See your application software instructions for other options.
3-22 Paper Handling Chapter 3

Start printing.
Click OK or Print to start theprint job.
Clear enough space in front ofthe printer for at least onesheet of paper to rest afterprinting.
As the sheets print, allow theprinted sheets to hang over the edge of the desk or work table.
Loading Glossy Photo PaperWhen you load Glossy Photo Paper in the printer, always use the LoadingSupport Sheet A provided with the package.
Prepare the sheets.
Hold the sheets of GlossyPhoto Paper with the whitersides (print sides) up and placethem on top of the LoadingSupport Sheet.
You can load up to 10 sheets ofGlossy Photo Paper in the sheetfeeder.
Stack the sheets.
Tap the stack against a flatsurface to align the edges of theGlossy Photo Paper and theLoading Support Sheet A.
Pap
er H
andl
ing
Chapter 3 Paper Handling 3-23
WHITER GLOSSY SIDE UP

3-24 Paper Handling Chapter 3
Mai
ntai
ning
the
Prin
ter
Chapter 4 Maintaining the Printer 4-1
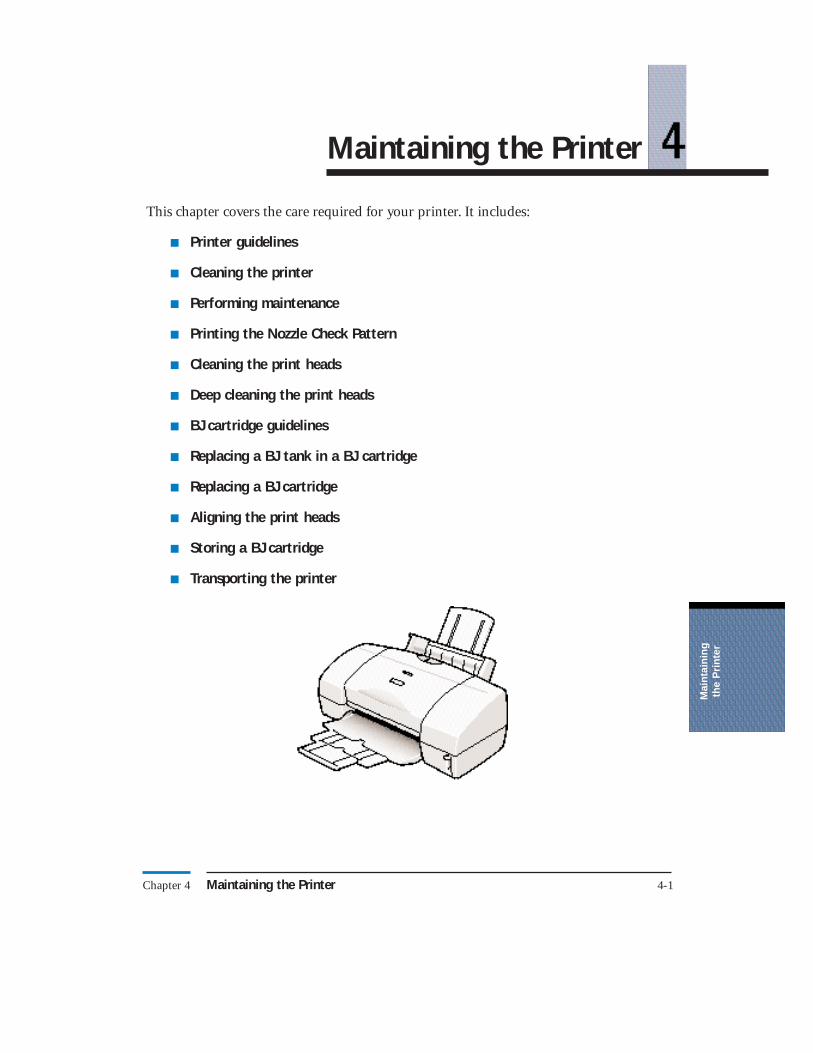
This chapter covers the care required for your printer. It includes:
■ Printer guidelines
■ Cleaning the printer
■ Performing maintenance
■ Printing the Nozzle Check Pattern
■ Cleaning the print heads
■ Deep cleaning the print heads
■ BJ cartridge guidelines
■ Replacing a BJ tank in a BJ cartridge
■ Replacing a BJ cartridge
■ Aligning the print heads
■ Storing a BJ cartridge
■ Transporting the printer
Maintaining the Printer

Printer Guidelines
Follow these guidelines to avoid damage to your printer and harm to you or others:
■ Set the printer on a stable surface. Do not use an angled printer stand. Avoidsetting the printer in direct sunlight.
■ Keep the front cover closed when printing.
■ Do not set anything on top of the printer.
■ Make sure the power is off any time you connect or disconnect the power cord orinterface cable.
■ Do not unplug the power cord unnecessarily.
■ When you unplug the power cord, grasp the plug itself. Do not pull on the cord.
■ Do not place the printer too close to a fluorescent lamp. Allow at least six inches(15 cm) clearance between the printer and any fluorescent lamp. Fluorescentlamps generate electrical noise that may cause printer malfunctions.
■ Do not unplug the printer or turn off a power strip to which the printer isattached when the printer’s power is turned on. This may prevent the print headunits from returning to the home position on the right and being capped, whichmay cause the print heads to dry out. This is critical. If left uncapped, the printhead units may clog and may need to be replaced.
■ Do not move the mechanism that holds the BJ cartridges. Attempting to move theBJ cartridge holders may damage delicate mechanical parts.
■ It’s a good idea to use a power surge protector. However, never turn off the printerusing the power strip. Always use the POWER button on the printer.
4-2 Maintaining the Printer Chapter 4

Cleaning the Printer
Your printer requires little routine maintenance. Perform the followingmaintenance, as necessary, to keep your printer in good operating condition.
Before cleaning the printer, be sure to turn off the printer and unplug the powercord.
Do not clean the exterior of the printer with volatile liquids such as thinners,benzene, or any spray-type or chemical cleaners; doing so will damage the surface of the printer.
When cleaning the printer, avoid the area near the print head on the BJcartridges. Do not touch the print heads. Ink may leak out and cause stains.
Clean the printer regularly to avoid printing problems. Remove any ink mist orpaper debris from the interior of the printer using a soft cloth moistened withwater.
Clean the exterior of the printer with a soft cloth moistened with water. Clean away smudges and dust.
Do not use paper products (such as paper towels or tissues) to clean the inside of the printer.
Mai
ntai
ning
the
Prin
ter
Chapter 4 Maintaining the Printer 4-3

Performing Maintenance
If your printed output appears streaked or blurred, open the printer’s front cover andvisually check the level of the ink in all the BJ tanks. If a BJ tank is low or has run out ofink, replace it.
When a BJ tank runs out of ink, the printer beeps four times and the BJ PrinterStatus Monitor opens and displays a message to warn you that a BJ tank has runout of ink.
After you replace the BJ tank(s), if there are still signs of poor quality in your printing,follow these procedures.
4-4 Maintaining the Printer Chapter 4
NOZZLE CHECK PATTERN POOR
NOZZLE CHECK PATTERN POOR
NOZZLE CHECK PATTERN POOR
PRINT A NOZZLE CHECK PATTERN
CLEAN THE PRINT HEADS
PRINT A NOZZLE CHECK PATTERN
REPLACE BJ CARTRIDGE
AND
EXECUTE PRINT HEAD ALIGNMENT
EXECUTE DEEP CLEANING
PRINT A NOZZLE CHECK PATTERN

Printing the Nozzle Check Pattern
The Nozzle Check Pattern confirms whether the inks are being correctly ejected from theprint head nozzles and whether the print heads on the two BJ cartridges are correctlyaligned. Perform a Nozzle Check Pattern when your printouts are streaked or the colortones on your printout are not correct.
You use the Test Prints option on the Maintenance tab in your BJC-6000 Series PrinterDriver to print a Nozzle Check Pattern. Before selecting the Test Prints option, make surepaper is properly loaded in the sheet feeder (see Automatically Feeding Paper starting onpage 3-6) and the printer is turned on.
Start the printer driver.
In Windows 98 and Windows 95—Click the Start button, select Settings, andthen click Printers. Right click Canon BJC-6000 and then select Properties.
In Windows 3.1—Click the Main group in the Program Manager. Then click theControl Panel, and click Printers. Make sure Canon BJC-6000 is highlighted andclick Setup.
Click on the Maintenance tab.
Then click the Test Prints icon on the left.
Mai
ntai
ning
the
Prin
ter
Chapter 4 Maintaining the Printer 4-5
CLICK HERE TO PRINTTHE NOZZLECHECKPATTERN

Click OK to print the Nozzle Check Pattern.
You can also start the NozzleCheck Pattern with the RESUME
button. Press and hold theRESUME button until you heartwo beeps, and then release it.
Check the results of the Nozzle Check Pattern.
The Nozzle Check Pattern looks like this when the BC-30 Black and BC-31 Color BJ Cartridges are installed.
Look at the Nozzle CheckPattern for each BJ cartridge.If any colors are missing or if any horizontal lines arebroken or missing, performprint head cleaning procedure(see the next section for details).
In the alignment head pattern,if the lines are not perfectlyoverlapped, align the printheads (see page 4-20).
4-6 Maintaining the Printer Chapter 4
BC-30 BLACK BJ CARTRIDGE
BC-31 COLOR BJ CARTRIDGE
ALIGNMENTCHECKPATTERNFOR BOTH BJCARTRIDGES
NOZZLECHECKPATTERN
CLICKHERE

Cleaning the Print Heads
Your printer is equipped with two print head cleaning functions to ensure constant highquality printing. Always execute normal print head cleaning first. If this does not correctthe problem, execute deep print head cleaning.
The printer automatically performs normal print head cleaning each time you turn it on.
Cleaning the print heads consumes ink, so clean the print heads only whennecessary.
Normal Print Head CleaningIf you are using Windows, you can execute print head cleaning from theMaintenance tab in the BJC-6000 Series Printer Driver.
Start the printer driver and click the Maintenance tab.
Now click the first Print HeadCleaning icon.
Mai
ntai
ning
the
Prin
ter
Chapter 4 Maintaining the Printer 4-7
CLICKHERE

Click one of the option buttons.
To clean the print heads on bothBJ cartridges, select All Colors.
To clean only the print heads ofthe Black BJ Cartridge, chooseBlack.
To clean only the print heads of the Color BJ Cartridge,select Color.
Click Execute and follow theinstructions on the screen.
When print head cleaningbegins, the POWER light startsflashing. Print head cleaningrequires about 30 seconds tocomplete. Wait for the POWER
light to stop flashing before youresume normal operation.
To check the print head performance, print the Nozzle Check Pattern (see page 4-5).
If the results of the Nozzle Check Pattern are not satisfactory, check the BJ Printer Status Monitor for a low ink warning or remove the BJ tanks and visually checkthe ink levels in the tanks. If there is ink in all of the BJ tanks, execute print headdeep cleaning (see page 4-9).
You can also start print head cleaning with the RESUME button on the printer.Press and hold the RESUME button until you hear one beep and then release it.This cleans the print heads of all colors at one time.
Perform the print head cleaning only when you encounter a print qualityproblem. Unnecessary and repetitious cleaning will waste ink.
If you execute the print head cleaning while paper is manually loaded, the printerwill eject the paper and then perform the cleaning.
4-8 Maintaining the Printer Chapter 4
CLICKHERE

Follow the instructions on the screen.
A message appears warning you NOT to start another operation until deep printhead cleaning is finished. Click the OK button.
The BJ Printer Status Monitor displays a message during deep print headcleaning.
The POWER light flashes during print head deep cleaning and then lights againwhen deep cleaning is complete.
Deep print head cleaning takes about one to two minutes.
To check the print heads, print the Nozzle Check Pattern (see page 4-5).
If the problem has not been corrected after deep cleaning the print head four orfive times, it’s time to replace the BJ cartridge.
BJ Cartridge Guidelines
The printer’s cartridge holder holds two BJ cartridges. The BC-31 Color BJ Cartridge is installed on the right side at all times. In the left slot, you can install the BC-30 Black BJ Cartridge or a BC-32 Photo BJ Cartridge.
BJ Cartridge and BJ Tank MaintenanceThe most important thing you can do to extend the life of your printer and toensure optimum print quality is take care of the BJ cartridges.
Spilled ink can stain any surface. Open BJ cartridges and BJ tanks carefully, andfollow the guidelines presented here to protect against spilled ink.
■ When a BJ tank runs out of ink, replace it immediately. Do not leave an emptyBJ tank in a BJ cartridge installed in the printer.
■ Protect all surrounding surfaces (such as floors, furniture, and clothing) beforeopening any BJ cartridge or BJ tank.
■ To avoid spilling ink, do not drop or shake BJ cartridges or BJ tanks.
4-10 Maintaining the Printer Chapter 4

■ Make sure you store any opened BJ cartridge (that is not being used in theprinter) in the SB-30 Ink Cartridge Storage Box.
■ Keep BJ cartridges and BJ tanks in their sealed containers until you are readyto use them.
■ Do not remove the BJ tank(s) from the BJ cartridge unnecessarily. This maycause the ink to clog.
■ If spilled, the ink is difficult to remove. Therefore, it’s a good idea to keep theBJ cartridges and BJ tanks out of the reach of children.
■ Do not touch the print head area on the BJ cartridges. Ink may leak out andcause stains.
■ Use the SB-30 Ink Cartridge Storage Box for the BJ cartridges.
Hold the BJ cartridges on the sides only. Do not touch the print head area on thebottom of a BJ cartridge or the circuit area on the side. The print head area maybecome hot during printing.
Replacing BJ Tanks and BJ CartridgesThe actual amount of ink that you use will vary depending on the print densityof a page. If the majority of your output is graphics, you may need to changecartridges or tanks more often than when you are printing text only. SeeAppendix A, Specifications, for details on the life expectancy of the BJ cartridgesand BJ tanks.
You may need to replace the BJ cartridge or a BJ tank if you are experiencingpoor print quality. If you notice a deterioration in the quality of printed pages,perform a test print and clean the print heads before you decide to replace the BJ cartridge.
It’s a good idea to replace the BC-30 Black BJ Cartridge if it has been in use formore than one year.
Mai
ntai
ning
the
Prin
ter
Chapter 4 Maintaining the Printer 4-11
HOLD HERE

Replacing a BJ Tank in a BJ Cartridge
When a BJ tank runs out of ink, the printer will beep four times and the POWER light willflash orange.
When you purchase extra BJ tanks, make sure you get the correct BJ tanks for each BJ cartridge.
■ For BC-30 Black BJ CartridgeBCI-3BK Black BJ Tank
■ For BC-31 Color BJ CartridgeBCI-3C Cyan BJ Tank BCI-3M Magenta BJ Tank BCI-3Y Yellow BJ Tank
■ For BC-32 Photo Color BJ CartridgeBCI-3PBK Photo Black BJ Tank BCI-3PC Photo Cyan BJ Tank BCI-3PM Photo Magenta BJ Tank
If you need to replace more than one ink tank, remove and replace one BJ tank ata time to ensure that each new BJ tank is inserted in the correct slot. Colors willnot print correctly if you insert a BJ tank in the wrong slot.
To avoid interfering with the ink supply, do not touch the opening on a BJ tank.
Leave the BJ cartridge in the printer when replacing a BJ tank. Make sure the printer’spower is on.
Make sure you insert the BJ tank in the correct slot. The key below shows the correctorder of BJ tanks in the BJ cartridges.
4-12 Maintaining the Printer Chapter 4
STANDARD COLOR SET PHOTO COLOR SET
BC-30 BLACK BC-31 COLOR BC-32 PHOTO BC-31 COLORBJ CARTRIDGE BJ CARTRIDGE BJ CARTRIDGE BJ CARTRIDGE
BC
I-3BK
(BLA
CK
)
BC
I-3PB
K P
HO
TO
(BLA
CK
)
BC
I-3PC
PH
OT
O(C
YA
N)
BC
I-3PM
PH
OT
O(M
AG
EN
TA)
BC
I-3C(C
YA
N)
BC
I-3M(M
AG
EN
TA)
BC
I-3Y(Y
ELLO
W)
BC
I-3C(C
YA
N)
BC
I-3M(M
AG
EN
TA)
BC
I-3Y(Y
ELLO
W)

Open the front cover.
The printer beeps andmoves the cartridgeholder to the center ofthe printer.
The POWER lightblinks while thecartridge holder ispositioned to thecenter of the printer.
Remove the empty BJ tank.
The color cartridge is onthe right.
Press in on the release taband then lift the BJ tank upand out of its slot.
Dispose of the BJ tank properly.You may want to place it in a plastic bag to keep from spilling any residual ink.
Handle the used BJ tank with care to avoid spilling ink on your hands, floor, furniture, orclothing. Empty color BJ tankscannot be refilled. Always discard them immediately.
Mai
ntai
ning
the
Prin
ter
Chapter 4 Maintaining the Printer 4-13

Prepare the new BJ tank.
Remove the new BJ tank fromits package.
Pull the orange tape up andagainst the perforations to open the package film.
Remove the film carefully soyou do not remove the labelfrom the BJ tank. You will needthe label to match the BJ tankwith the correct slot of the BJ cartridge. (Also, if the label isremoved, air can get into the BJtank, which will cause the ink toevaporate very quickly.)
Remove the film by pulling onthe orange tape. Do not attemptto remove the film before youremove the orange tape.
Twist the orange protective cap in the direction shown by thearrow and remove it.
Never attempt to reattach aprotective cap to a BJ tank.
Discard the protective cap andprotective tape according to thelocal laws and regulationsregarding disposal ofconsumables.
4-14 Maintaining the Printer Chapter 4
PROTECTIVE CAP

Insert the BJ tank.
Hold the new ink tank at a slight angle, align it with the correct slot,then press down gently on top of the ink tank until it locks in place.
To lock the ink tank in place,press down on the circle markon top of the ink tank.
Press down until you hear theink tank lock in place.
Close the printer cover.
The printer automatically startscleaning the print heads andthe POWER light blinks. Thiswill take about two minutes.After print head cleaning isfinished, the POWER light stayson and the printer is ready foroperation.
Perform another test print to make sure the new color BJ tanks are functioningnormally.
Mai
ntai
ning
the
Prin
ter
Chapter 4 Maintaining the Printer 4-15

Replacing a BJ Cartridge
If the print quality of your output remains poor even after replacing the BJ tanks andcleaning the print heads, the print heads are worn out and you must replace the BJcartridge.
The following procedure describes how to replace a BJ cartridge.
When switching from the BC-30 Black BJ Cartridge to the BC-32 Photo BJ Cartridge (or vice versa), be sure to replace the entire unit. Also, be sure to place the BJ cartridge you are removing in the Ink Cartridge Storage Box. See page 4-25 for details.
The BC-31 Color BJ Cartridge must be installed in the right slot of the cartridge holder.The BC-30 Black or BC-32 Photo BJ Cartridge must be installed in the left slot of thecartridge holder.
Before starting, make sure the printer is turned on.
Open the front cover.
The printer beeps andmoves the cartridgeholder to the centerof the printer.
If the print head is hot, it may not move until it has cooled down. Never attemptto force the cartridge holder manually. Wait a few minutes for the print head tocool down; the cartridge holder will then move to the center of the printer.
4-16 Maintaining the Printer Chapter 4

Unlock the BJ cartridge.
Raise the cartridge lock lever tounlock the BJ cartridge.
If you are replacing the BC-30Black BJ Cartridge or BC-32Photo BJ Cartridge, raise theleft cartridge lock lever. If youare replacing the BC-31 ColorBJ Cartridge, raise the rightcartridge lock lever.
Make sure you raise the leverall the way up.
The illustrations here showhow to replace the BC-30 BlackBJ Cartridge.
Remove the BJ cartridge.
Remove the entire BJ cartridgewith the ink tank in place.
If you are removing a partiallyused BJ cartridge, store it in theSB-30 Ink Cartridge StorageBox. (See page 4-25 for details.)
Always hold a BJ cartridge by the circles embossed on the left and right sides of the BJ cartridge. Never touch the metal contacts or the print head on a BJ cartridge.
If you are discarding a used BJ cartridge, do so immediately.
Handle the used BJ cartridge with care to avoid spilling ink on your hands orclothing.
Mai
ntai
ning
the
Prin
ter
Chapter 4 Maintaining the Printer 4-17

Remove the new BJ cartridge from its package.
Remove the orange protectivecap then slowly remove theorange protective tape.
Do not attempt to reattach thetape or cap to a BJ cartridge.
To avoid poor print quality, donot touch the print head on aBJ cartridge.
Insert the new BJ cartridge.
Set the BJ cartridge into thecartridge holder then lower theblue cartridge lock lever until itlocks in place.
Remove the protective tank inside the new BJ cartridge.
Press the tab on theprotective tank and remove it.
The protective tank protects the BJ cartridge and cannot be used for printing.Discard this tank as soon as you remove it; do not attempt to re-attach it to theBJ cartridge.
4-18 Maintaining the Printer Chapter 4
PROTECTIVE CAPPROTECTIVETAPE
PROTECTIVETANK
TAB

Insert the BJ tank(s) into the new BJ cartridge.
You can use new BJ tanks oryou can use the BJ tanks thatwere in the worn BJ cartridge.
Install a BJ tank immediatelyafter removing it from the wornBJ cartridge or from its package.If a BJ tank remains exposed fora long period, it may run out ofink quickly after it is installed.
Close the front cover.
The cartridge holder returns to the home position and print head cleaning startsautomatically.
Do not open the front coverduring print head cleaning.
After you replace a BJ cartridge, always align the print heads to ensureoptimum print quality.
Do not attempt to start anyother operation until the POWER light stops flashing.
Be sure to align the print headsafter replacing or switching BJ cartridges. See the nextsection for details.
Mai
ntai
ning
the
Prin
ter
Chapter 4 Maintaining the Printer 4-19

Aligning the Print Heads
Important! Every time you replace a BJ cartridge or switch BJ cartridges for a specialprint job, you must align the print heads to ensure optimum printing.
Make sure paper is loaded and start the printer driver.
Windows 98 and Windows 95:
Click Start, point to Settings, and click Printers.
Right click the Canon BJC-6000 icon and then choose Properties from the pop-up window.
Click the Maintenance tab.
Windows 3.1:
In the Program Manager double-click in this order: the Main group, ControlPanel, and Printers icon.
Click the Control button.
In the printer driver, click the Maintenance tab.
Then click the secondicon to the right of theTest Prints.
4-20 Maintaining the Printer Chapter 4
CLICKHERE

Simply follow the instructions on the screens.
The driver performs either an automatic or manual print head alignment. Thedefault setting is to automatically align the print heads. However, you can requestthat the driver align the print heads manually through the Custom Setting optionon the Maintenance tab (see page 2-10 for details).
Aligning the Print Heads AutomaticallyIf your printer driver is set up to align the print heads automatically (this is thedefault), you simply start print head alignment from the Maintenance tab.
■ A confirmation screen will ask you if you want to perform automatic printhead alignment. Read the screen and click OK.
■ Another screen warns you not to start any other operation until thealignment is complete; again simply click OK.
The BJ Printer Status Monitor displays the Printer Status. The driverautomatically aligns the print heads and displays this alignment pattern.(This pattern prints shades of blue and black only.)
Mai
ntai
ning
the
Prin
ter
Chapter 4 Maintaining the Printer 4-21

Aligning the Print Heads ManuallyIf your printer driver is set up to align the print heads manually, follow thesesteps.
Follow the instructions on each screen.
Read each screen and click OKas needed to continue.
Check the line patterns on thetest print. For each pattern, notethe number where the linesperfectly overlap and appear asone line.
Enter the necessary adjustments.
In the Print Head Alignmentbox, click the arrows on theboxes to enter the numbers foreach alignment.
When you are finished, clickthe OK button.
4-22 Maintaining the Printer Chapter 4

Follow the instructions on each screen.
Read each screen and click OKas needed to continue.
Check the line patterns againand note the number of thepattern where the lines perfectlyoverlap and appear as one line.
Enter the necessary adjustments.
Click the arrows on the boxesto enter the numbers for eachalignment.
When you are finished, clickthe OK button.
Complete the alignment.M
aint
aini
ngth
e P
rinte
r
Chapter 4 Maintaining the Printer 4-23

Print the Nozzle Check Pattern.
On the Maintenance tab, clickthe first icon next to TestPrints.
The Nozzle Check Pattern looks like this (see page 4-6 for details).
4-24 Maintaining the Printer Chapter 4
CLICK THISICON

Storing a BJ Cartridge
Whenever you unwrap a BJ cartridge, you must either install it in the printer or store it in the SB-30 Ink Cartridge Storage Box to prevent the print head from drying andclogging.
The storage box is for the BC-30 Black BJ Cartridge or BC-32 Photo BJ Cartridge only.The BC-31 Color BJ Cartridge is always in the printer.
Open the Ink Cartridge Storage Box.
When opening the Ink Cartridge Storage Box, press in on the release tab thatlocks the cover in place.
Carefully set the cartridge in the storage box.
You must insert thecartridge correctly or thestorage box will not close.
The protective cap must beremoved from the cartridgebefore you set it in thestorage box.
Close the storage box.
Be sure the lid snaps closed.
Whenever you remove a BJ cartridge from the printer, store the cartridge in thestorage box (unless you are disposing it).
Mai
ntai
ning
the
Prin
ter
Chapter 4 Maintaining the Printer 4-25

Transporting the Printer
If you plan to move the printer from one location to another, or if you want to store it,follow these steps.
Turn off the printer.
Make sure the print head is in the home position on the right side of the printer.
Remove any paper from the sheet feeder.
Detach the interface cable and power cord.
Close the paper support and output tray.
Press down the paper support.
Press in the paper output trayextension and push the paperoutput tray up against the frontof the printer.
Tape the printer.
Reattach the packing materials to thepaper feed slot of the sheet feederand the paper output slot on the front of the printer.
Insert the printer into its plastic bag.
4-26 Maintaining the Printer Chapter 4
PACKINGMATERIAL

Pack the printer.
Pack the printer in its originalbox with the packing supports.
Make sure the box is markedFRAGILE or HANDLE WITHCARE.
Do not remove the BJ cartridges from the printer or ship a BJ cartridge or a BJ tank from which you have removed the protective cap. An opened BJ cartridge or BJ tank that is not installed in the printer (or in the Ink CartridgeStorage Box) may leak, and the print head may dry out.
Mai
ntai
ning
the
Prin
ter
Chapter 4 Maintaining the Printer 4-27

4-28 Maintaining the Printer Chapter 4

Trou
bles
hoot
ing
Chapter 5 Troubleshooting 5-1
Due to today’s rapidly changing computer environment, we have placed troubleshootinginformation in a variety of places to ensure that the most accurate information possible isavailable. The best way to find current information is through our online support servicesand through our Fax Retrieval System. Online services include the World Wide Web andour BBS.
This chapter also contains information to help you solve printer problems. It covers a fewbasic problems and describes how to clear a paper jam. For complete problem solvinginformation, be sure to use our support services.
See Canon Customer Care Center in Chapter 1 (page 1-4) for details on Canon’s customertechnical support options.
Identifying Your Printer Problem
Before contacting Canon, identify your printer problem and make sure you have thefollowing information:
■ Product name—BJC-6000
■ Serial number
■ Place of purchase
■ Nature of problem
■ Steps you have taken to solve the problem and the results
Troubleshooting

The serial number is located on the label on the back of the printer:
Attempting to repair the printer yourself may void the limited warranty as to that repair. See the limited warranty information that came with your printer for details.
Basic Problems
This section describes these basic problems:
■ Cannot install the printer driver
■ Paper does not feed from the sheet feeder
■ An error message appears
■ Printing halts
■ Printout is unsatisfactory
■ Printer beeps and the POWER light flashes orange
For all other problems, be sure to use Canon’s support services described on page 1-4.
5-2 Troubleshooting Chapter 5

The BJ Printer Status Monitor uses messages and pictures to display the printing progressand the status of the printer while it is printing. When the ink or paper runs out or apaper jam occurs, the BJ Printer Status Monitor automatically appears.
■ Look at the messages and pictures to determine what type of error has occurred.
■ Click the Guide tab and proceed as directed by the messages shown. Printingresumes once you resolve the error.
Trou
bles
hoot
ing
Chapter 5 Troubleshooting 5-3

Cannot Install the Printer Driver
Installation was Install the printer driverinterrupted Refer to the Quick Start Guide and install the printer
driver using the correct procedure. If you are reinstallingthe printer driver, remove the installed BJ printer driverand then install the printer driver again.
To uninstall the printer driver, select Programs fromthe Windows Start menu. Then select BJ Printer andclick Uninstall. Follow the on-screen instructions. Fordetails about installing the printer driver, see the QuickStart Guide.
Other application Quit other programsprograms are running Quit any other application programs that are running
and start the installation again.
The CD ROM drive is Check your CD ROM drivenot specified correctly Windows 98 or Windows 95:
Double-click My Computer and then double-click theCD ROM icon in the new window. Refer to the QuickStart Guide and proceed with the installation.
Windows 3.1:Follow the installation instructions in the Quick Start Guide.
Problem with the Verify your CD ROM driveCD ROM You may need to reduce the speed of your CD ROM.
To lower the speed/cache for the CD ROM drive, followthese steps: Right-click on the My Computer icon onthe desktop, and click on Properties. Select the DeviceManager tab; double-click on CD ROM, and note thetype of CD ROM driver that is being used. Select thePerformance tab. Click on the File System button at thebottom left of the dialog box. Select the CD-ROM tab.Change “Supplemental Cache Size” to Small and“Optimize access pattern for” to Double Speed Drive.Click on OK, and OK again. Click on Start and ShutDown. Restart the Computer. Install Canon Creative.Install applications individually.
Check that the Windows Explorer can successfully readthe CD. If the CD is unreadable, call the CanonCustomer Care Center (see page 1-4).
5-4 Troubleshooting Chapter 5

Paper Does Not Feed From Sheet Feeder
Paper is too thick Feed manuallyPaper within the range of 17 to 24 lb (64 to 105 g/m2)can be loaded in the sheet feeder. Thicker paper mustbe fed manually one at a time from the back of theprinter. The printer does not support paper thickerthan 0.6 mm.
Sheet feeder Check sheet feeder capacityoverloaded Check that you do not exceed the sheet feeder capacity.
Paper will not feed correctly if you exceed the specifiednumber of sheets. (See page 3-5.)
Paper support not Raise the paper supportraised The paper support should be raised unless you are
loading envelopes. If the paper support is not raised,the media will not slide fully into the paper feed slotand will not feed into the printer correctly.
Paper wrinkled or Check that you are using appropriate mediacurled Paper that is folded, curled, or crumpled will not feed
into the printer correctly, and may also cause paperjams.
Auto Feeder not Select Auto Feederselected in the Open the Printer Properties dialog box. On the printer driver Main tab, click the Advanced button. On the Quality
tab, click the Paper Feed down-arrow and select AutoFeeder from the pull-down list.
See page 5-16 for details on clearing a paper jam.
Trou
bles
hoot
ing
Chapter 5 Troubleshooting 5-5

An Error Message AppearsPrinting does not start due to an error writing to LPT1
Printer is not on Check the POWER lightThe POWER light should be green. If the POWER light isflashing, the printer is warming up.
Printer cable not Check the parallel cableconnected correctly Make sure the parallel cable is securely fastened to the
computer and the printer. See the Quick Start Guide fordetails.
Printer cable fault Try to use another printer cableMake sure the cable is an IEEE 1284-compatibleparallel interface cable.
Another device is Check the LPT1 portconnected to LPT1 Make sure the printer is connected to LPT1.
Switching device or Check the switching device or external bufferexternal buffer fault Disconnect the switching device or external buffer and
print with the printer connected directly to thecomputer. If you can then print normally, the fault isprobably in the switching device or external buffer.Consult the switching device or external buffersupplier.
5-6 Troubleshooting Chapter 5

Print spool is not Change the spool settingoperating correctly Open the printer Properties dialog box. On the Details
tab, click Spool Settings and then select “Print datadirectly to the printer.”
Printer port LPT1: fault Check the status of the printer port LPT1Click on Start, Settings, and Control Panel. Double-click on the System icon. On the Device Manager tab,double-click Ports (COM & LPT1). Double-clickCanon BJ ECP Printer Port (LPT1). The Device statusshould read “This device is working properly.”
Installed printer driver Remove the installed BJ printer driver and then not operating correctly install the printer driver again
To uninstall the printer driver, select Programs fromthe Windows Start menu. Then select BJ Printer andclick Uninstall. Follow the on-screen instructions. Fordetails about installing the printer driver, see the QuickStart Guide.
A Windows Printing Change the WPS driver port setting to FILE or System (WPS) driver delete the WPS driveris installed on the To change the port setting, open the WPS Driver computer Properties window. In the Details tab, select FILE in
the “Print to Port” setting.
To delete the WPS driver, select Programs from theWindows Start menu. Then select Windows PrintingSystem and click Uninstaller. Follow the on-screeninstructions.
To continue using the WPS printer, install a secondparallel port.
Trou
bles
hoot
ing
Chapter 5 Troubleshooting 5-7

Printing does not start due to an application error or General Protection Fault
Printing from a Windows 3.1 Change applicationsapplication A Windows 3.1 application installed on a Windows 98
or Windows 95 system may cause this problem. Printfrom a Windows 98 or Windows 95 softwareapplication.
Multiple software Quit other programsapplications running Quit any other application programs you are running
and try printing again.
Sufficient memory Check your memorynot available for the Refer to the manual for your software application and software application check that the required amount of memory is allocated
to the application.
If there is not enough memory installed, install morememory. Refer to the documentation for yourcomputer for information on installing additionalmemory.
Sufficient space not Clean up your hard diskavailable on hard disk Delete any unnecessary files to make more space
available.
5-8 Troubleshooting Chapter 5

Internal file or Rebuild the document and print it againapplication software If there is no problem with the new document, the problem original file was probably faulty. If the same problem
occurs with the new file, visit Canon’s Web site or call the Canon Customer Care Center for help (seepage 1-4).
Installed printer driver Reinstall the printer drivernot operating correctly Remove the installed BJ printer driver and then install
the printer driver again.
To uninstall the printer driver, select Programs fromthe Windows Start menu. Then select BJ Printer and click Uninstall. Follow the on-screen instructions.
Printing Halts
The print job may Check the POWER lightbe a finely detailed If the POWER light is slowly flashing, then the printer is photograph or operating normally. The printer requires more time to illustration process a finely detailed illustration or photograph.
Printer has been Allow the printer to cool downoperating for Interrupt printing at a convenient point, turn the a long time printer off and wait for at least 15 minutes for the
printer to cool.
The print heads may occasionally overheat during along print job. If the print heads overheat, printing willpause at the end of a pass across the page to allow timefor the print heads to cool and then will re-start after abrief interval.
To avoid minor burns, do not touch the print heads or the surrounding area.
Trou
bles
hoot
ing
Chapter 5 Troubleshooting 5-9

Printout Is UnsatisfactoryMeaningless characters or symbols are printing
NORMAL PRINTOUT MEANINGLESS CHARACTERS
Previous print job was Restart print operationcancelled before it was Turn off the printer and computer, turn them on finished again, and try printing again.
Not using the correct Restart print operationprinter driver Start the print procedure again and make sure Canon
BJC-6000 is the selected printer driver.
Parallel cable not Check parallel cableconnected correctly Make sure the parallel cable is securely fastened to the
computer and printer. See Quick Start Guide for details.
Parallel cable fault Try to use another printer cableMake sure you are using an IEEE 1284-compatibleparallel interface cable.
Switching device or Disconnect the switching device or external bufferexternal buffer fault Try printing with the printer directly connected to the
computer. If you can then print normally, the fault isprobably in the switching device or external buffer.Consult the switching device or external buffer supplier.
Internal file or application Rebuild the document and print it againsoftware problem If there is no problem with the new document, the
original file was probably faulty. If the same problemrecurs with the new file, call the Canon Customer Care Center for help (see page 1-4).
5-10 Troubleshooting Chapter 5

Printout faint or colors are wrong
Print head nozzles in Print a Nozzle Check Patternone of the BJ cartridges Check the status of the print heads (see page 4-5).are clogged or one of Clean the print heads (see page 4-7). Replace the the inks has run out BJ tanks as necessary (see page 4-12).
Protective cap or tape Remove the protective cap and tapehave been reattached Install the BJ cartridge again (see page 4-16) and clean to the BJ cartridge the print heads (see page 4-7).
Not printing on correct Reload the print mediaside of the media Make sure that you load the media with the correct
print side up.
The last part of print job is not printing
Paper used for printing Specify the paper size you are using in the driver differs from the paper Page Size settingsize specified in the If your software application allows you to specify thesoftware application paper size in the page setup, ensure that the Page Size and printer driver settings in the software application and the printer
driver are the same.
Parallel cable not Check the parallel cableconnected correctly Make sure the parallel cable is securely fastened to the
computer and printer. See the Quick Start Guide fordetails.
Printer cable fault Try to use another printer cableMake sure you are using an IEEE 1284-compatibleparallel interface cable.
Switching device or Disconnect the switching device or external bufferexternal buffer fault Print with the printer directly connected to the
computer. If you can then print normally, the fault is probably in the switching device or external buffer. Consult the switching device or external buffer supplier.
Trou
bles
hoot
ing
Chapter 5 Troubleshooting 5-11

Windows Printing System Change the WPS driver port setting to FILE or (WPS) driver is installed delete the WPS driveron the computer. You may To change the port setting, open the WPS Driver not be able to print Properties window. In the Details tab, select FILE incorrectly with a WPS the “Print to Port” setting.printer driver installedon your computer. To delete the WPS driver, select Programs from the
Windows Start menu. Then select Windows PrintingSystem and click Uninstaller. Follow the on-screeninstructions.
Printed and on-screen colors do not match
The color reproduction methods used by monitors differ from those used by printers. Inaddition, the printed color tones may not perfectly match those on the monitor becausethe colors vary depending on the circumstances in which the monitor is viewed and themonitor’s color calibration settings. For example, objects that appear blue on the screenare printed purple, and objects that appear pale green on the screen are printed darkgreen. However, if the differences are extreme, check the items below.
Print head nozzles in the Print a Nozzle Check PatternBJ cartridges are clogged Check the status of the print heads (see page 4-5).or ink has run out Clean the print heads (see page 4-7). Replace the BJ
tanks as necessary (see page 4-12).
Printer driver settings are Check the printer driver settingsnot correct To print a photo, select the correct print media icon for
the document you are printing (such as SuperPhoto).Check also that the BJ Cartridge and Media Typesettings match the BJ cartridge and media you areactually using. See page 2-7.
5-12 Troubleshooting Chapter 5

Printed pages curled/warped/wrinkled
Excess ink is being Check your media typeabsorbed by the paper If you are printing on very thin paper, try a different
paper type. Print on special print media such as HighResolution Paper or Glossy Photo Paper.
Print density is set Reduce the print intensity in the printer drivertoo high To change this setting, open the Printer Properties
dialog box. On the Main tab, click the Advancedbutton and then click the Color tab. Move theintensity slider to the left to lower the print intensity.
Printer Beeps and the POWER Light Flashes OrangeWhen certain errors occur, the POWER light will light or flash and the printer will beep.Count the number of beeps and identify the problem below.
2 Paper out, paper Set the paper correctlyjam, or paper feed If paper has jammed in the printer, remove the error jam and press the RESUME button. See page 5-16.
3 Paper jam Remove the jammed paperIf paper has jammed in the printer, remove thejam and press the RESUME button. See page 5-16.
4 BJ cartridge out Replace the empty ink tankof ink See page 4-12.
5 BJ cartridge Make sure each BJ cartridge is installed in thenot installed correct locationcorrectly The BC-30 Black BJ Cartridge or the BC-32 Photo
BJ Cartridge must be installed in the left slot ofthe cartridge holder; the BC-31 Color BJ Cartridge must be installed in the right slot.
Trou
bles
hoot
ing
Chapter 5 Troubleshooting 5-13

6 BJ cartridge Install two BJ cartridgesnot installed Make sure each BJ cartridge is installed in the
correct location. The BC-30 Black BJ Cartridge orthe BC-32 Photo BJ Cartridge must be installed inthe left slot of the cartridge holder; the BC-31Color BJ Cartridge must be installed in the rightslot.
7 BJ cartridge Check each BJ cartridgedefective Remove each BJ cartridge and make sure the
contacts on the BJ cartridge and cartridge holderare clean. Make sure the orange protective tape hasbeen removed from the print head then install theBJ cartridge again. See page 4-16.
8 Waste ink tank Continue printing and call Canonnearly full Press the RESUME button to skip the error so you
can continue printing. Call the Canon Customer The printer has a built- Care Center to find out how to have the waste ink in waste ink tank that tank replaced immediately.holds the ink used byprint head cleaning. When the waste ink tank becomes full, the printerWhen you hear the will beep 10 times, the POWER light will flash six printer beep eight times, times, and printing will no longer be possible.the waste ink tank is nearly full.
9 Automatic Change the position of the printer and print head try againalignment failed A BJ tank has run out of ink, the print head
nozzles are clogged, or strong light has entered thepaper output slot and prevented correct print headalignment.
If print head alignment fails again, manually alignthe print heads. For details on aligning the printheads manually, see page 4-22.
5-14 Troubleshooting Chapter 5

10 Service error Turn off the printerSwitch the printer off, unplug the power cordfrom the power outlet, and wait a few minutes.Plug the power in again, turn the printer on andtry again.
If the error occurs again, count the number oftimes the POWER light flashes. If the light flashesseven or nine times, remove the BJ cartridges.Re-insert the BJ cartridges and try your printoperation again. If necessary, replace the BJ cartridges.
If the error continues to occur, count the numberof beeps and flashes and call the Canon CustomerCare Center (see page 1-4). You may be asked forthis information.
Trou
bles
hoot
ing
Chapter 5 Troubleshooting 5-15

Clearing Paper Jams
When a paper jam occurs, the POWER light flashes orange and the printer beeps two orthree times. If possible, remove the jammed sheet. Slowly pull the paper out either fromthe paper feed side or the paper output side, whichever is easier. Now press RESUME.
If the paper tears off inside the printer, turn off the printer. Open the printer’s cover, andremove the paper left inside the printer.
If you cannot remove the jammed paper, press the POWER button twice for one second toeject the jammed paper automatically. Start the print job and try again.
If you are printing high density graphics when a paper jam occurs, feed at leasttwo sheets of paper through the printer to clean the rollers.
5-16 Troubleshooting Chapter 5

Using the Operator Panel
■ POWER buttonPress to switch the printer on and off.
■ POWER lightIndicates the status of the printer:
• Off—Printer power off• On—Standby and ready for operation• Flashes green—Print job in progress• Flashes orange—Error; remove cause of error before you resume printing
■ RESUME buttonAfter you have removed the cause of a printer error, press to resume printing.
Press and hold the RESUME button for the required number of beeps and thenrelease to perform these special tasks:
• 1 Beep—Print head cleaning• 2 Beeps—Printing Nozzle Check Pattern• 3 Beeps—Cleaning the feed rollers
You can also initiate these tasks using the printer driver.
Trou
bles
hoot
ing
Chapter 5 Troubleshooting 5-17
OPERATOR PANEL POWERLIGHT
POWERBUTTON
RESUMEBUTTON

5-18 Troubleshooting Chapter 5

Sheet Feeder Capacity—auto feed onlyMaximum thickness of stacked paper: 0.5 inches (13 mm)Plain paper (20 lb or 64 g/m2) Approx. 130 sheets (0.5" stack)High gloss photo film 1 sheetGlossy photo paper 10 sheets (with Loading Support Sheet A)Glossy photo cards 10 cardsBanner paper 1 (2 to 6 sheets)Brilliant White paper Approx. 130 sheetsHigh resolution paper Approx. 100 sheets (0.5" stack)T-shirt transfers 1 sheetBubble Jet Paper Approx. 130 sheetsGreeting Cards 1 cardLetterPlus Letterhead paper 1 sheetFabric sheets 1 sheetBack print film 10 sheetsTransparencies 30 sheetsEnvelopes 15 envelopes (U.S. Com #10 or European DL)
Spe
cific
atio
ns
Appendix Specifications A-1
Printing Specifications
Specifications
Printing MethodBubble Jet ink on-demand
Print Resolution1440 × 720 (horizontal × vertical) dpi
on Canon Specialty Paper
Print SpeedBC-30 Black BJ Cartridge: 8 ppm*BC-31 Color BJ Cartridge: 5 ppm*
*High Speed Draft Mode—Printspeed will vary depending on systemconfiguration, software, documentcomplexity, print mode, and pagecoverage.
Print DirectionBi-directional
Receive Buffer128KB
Print WidthMaximum: 8.5 inches (218 mm)
Line Feed Speed4 inches/second
Paper HandlingAutomatic feedManual feed
Paper WeightAutomatic feed
17 to 24 lb (64 to 105 g/m2) Manual feed
17 to 143 lb (64 to 500 g/m2)Up to 0.6 mm thick

Manual feedThick paper 0.2 in (0.6 mm) max.
Paper SizeLetter 8.5 in. × 11 in.Letter+ (Full Bleed) 9 in. × 13.3 in.Legal 8.5 in. × 14 in.A4 210 mm × 297 mmA5 148 mm × 210 mmB5 182 mm × 257 mmA4+ 223.5 mm × 355.6 mmGlossy photo cards 119.6 mm × 215.9 mm (with borders)
101.6 mm × 152.4 mm (final size without borders)U.S. Commercial
number 10 envelope 9.5 in. × 4.1 in.European DL envelope 220 mm × 110 mmCanon envelope 4 in. × 6 in.Custom
Minimum (W×H) 3.94 in. × 3.94 in. (100 mm × 100 mm)Maximum (W×H) 9.5 in. × 23.9 in. (241.3 mm × 584.2 mm)
Canon Specialty PapersCanon High Gloss Photo Film Canon Glossy Photo Paper Canon Glossy Photo CardsCanon High Resolution Paper Canon T-Shirt Transfers Fabric Sheet for Canon Bubble Jet printersCanon Greeting CardsCanon LetterPlus Letterhead PaperCanon Back Print Film Canon TransparenciesCanon Banner PaperEnvelopes: U.S. Commercial number 10, Canon, or European DL
A-2 Specifications Appendix

Printable Area
The printable area includes the recommended printing area and the actual printable area.
Recommended Printing Area Canon recommends that you print within this area.
Printable Area The area in which it is possible to print. However, printing in this area can adverselyaffect the print quality or the paper feed precision.
A4, A5, B5Printable Area (width x length)
A4 203.2 mm × 287.0 mmA5 141.2 mm × 200.0 mmB5 175.2 mm × 247.0 mm
Letter, LegalPrintable Area (width x length)
Letter 8" × 10.6"Legal 8" × 13.6"
Glossy Photo Cards, LetterPlusPrintable Area (width x length)
Glossy Photo Cards 4.3" × 6.3"LetterPlus paper 8.6" × 11.1"
Spe
cific
atio
ns
Appendix Specifications A-3

Fabric SheetsPrintable Area (width x length)
Fabric Sheet Letter: 8" × 10.6"A4: 203.2 mm × 287.0 mm
U.S. Commercial No. 10 EnvelopePrintable Area (width x length)
U.S. Commercial #10 8" × 3.6"
European DL EnvelopePrintable Area (width x length)
European DL 220 mm × 110 mm
Banner PaperWhen you print on Banner Paper, the maximum length is 6 sheets.
Printable Area (width x length)
Banner Paper 203.2 mm × 1779.0 mm (A4)8" × 65.9" (Letter)
A-4 Specifications Appendix

BJ Cartridges
BC-30 Black BJ CartridgePrint head 160 nozzlesInk Black Yield* Approx. 500 sheets
(1500 characters per page, normal text)Print head life Approx. 5000 pages
BC-31 Color BJ Cartridge
Print head 48 nozzles per color Ink Cyan, Magenta, YellowYield* Approx. 280 pages (at 7.5% coverage per page)Print head life Approx. 3000 pages
BC-32 Photo BJ CartridgePrint head 48 nozzles per color Ink Photo Black, Photo Cyan, Photo MagentaYield* Approx. 280 pages (at 7.5% coverage per page)Print head life Approx. 3000 pages
* Based on the number of pages per BJ tank over the printable area.
General
InterfaceIEEE 1284-compatible parallel interface
Acoustic Noise Level Approx. 48 dB(A) per ISO 9296
Operating EnvironmentTemperature 41° F to 95° F (5° C to 35° C)Humidity 10% to 90% RH (no condensation)
Storing EnvironmentTemperature 32° F to 95° F (0° C to 35° C)Humidity 5% to 90% RH (no condensation)
Spe
cific
atio
ns
Appendix Specifications A-5

Power SourceUSA/Canada AC 120 V, 60 Hz, 0.65 A
Power ConsumptionStandby Approx. 5.5 wattsPrinting Approx. 35 wattsOff Approx. 3.2 watts
Dimensions18.7 in. (475 mm) W × 12.8 in. (325 mm) D × 8.1 in. (205 mm) HPaper support and paper output trays closed
WeightApprox. 13.0 lb (5.9 kg)
Hardware and Software Requirements
These are the minimum requirements for the computer setup.
■ IBM® PC or compatible computer with a 486 PC processor or better (Pentium®
processor recommended)
■ Microsoft® Windows® 98, Windows 95, Windows 3.1, or Windows NT
■ 8 megabytes (MB) of RAM(16 MB or more recommended for high resolution printing)
■ 40 MB hard disk space
■ Bi-directional Centronics®-compatible parallel cable (IEEE 1284-compliant); acable less than 6.6 feet in length is recommended
■ CD ROM drive (2x or better)(If you do not have a CD ROM drive, you can download the printer driver fromCanon’s Web site or BBS, or call the Canon Customer Care Center to order thePrinter Setup on diskettes for a small shipping and handling fee. See the CanonCustomer Care Center information on page 1-4 for numbers.)
■ Canon Creative Pro has additional requirements(See the Canon Creative Pro Quick Start Guide for details.)
A-6 Specifications Appendix

Glo
ssar
y
Glossary G-1
Automatic feedRefers to one way in which paper can be fed into the printer when the sheet feeder is used.
BJ cartridgeThe printing mechanism that contains the print head unit and BJ tanks.
Bubble Jet printingAn ink jet type of printing that heats the ink to a boiling point in a nozzle to form abubble. When the bubble expands, there is no room left in the nozzle for the ink and theink is projected onto paper.
CMYKAcronym for cyan, magenta, yellow, and black; the four colors used in the standard colormodel of the printing industry. Refers to a method of specifying color using CMYK colorvalues. (K is used for black because B is used to represent blue in RGB.)
cpiCharacters per inch. A unit of measurement relevant to a fixed-space font. Because allcharacters have the same width, you can calculate the number of characters printed per inch.
cplCharacters per line. A unit of measurement that indicates the number of charactersprinted per line.
cpsCharacters per second. A unit of measurement that indicates the printer’s speed.
dB(A)Stands for decibel level (a decibel being a unit of measurement for the intensity of thesound coming from the printer), adjusted for background noise.
dpiDots per inch. A unit of measurement for indicating a printer’s resolution. Your printercan produce a resolution up to 1440 dpi (horizontal) depending on the Media Typesetting in your printer driver and the media you are using.
FontA complete set of characters of the same size and style; a particular implementation of atypeface. For example, 12-point, Courier bold.
Glossary

Form feedA printer function that automatically ejects the current page and advances the printer tothe top of the next page.
GrayscaleRepresenting color in black and white as a result of different intensities of color. Differentcolors and intensities of colors appear as different shades of gray.
HalftoneUsing this method, the printer produces shades of gray or of colors by mapping dots to beprinted. For color printing, different colored dots of ink are placed closely together tocreate illusions of other colors.
HueA color in the color spectrum. Examples are red, green, and violet.
Ink Cartridge Storage BoxA box for storing a BJ cartridge. A BJ cartridge removed from the printer must be storedinside this container to prevent the print head of the cartridge from drying and clogging.
IntensityThe amount of color. More intense or more saturated colors are more pure. Less intenseor less saturated colors are less vivid.
InterfaceThe connection between two devices that makes it possible for them to communicate witheach other. This printer features a parallel interface, which makes it compatible with IBMand similar personal computers.
Landscape orientationRefers to printing across the length of the page (as opposed to portrait orientationprinting across the width of the page). The term landscape is derived from pictures of thelandscape, which are usually horizontal in format.
Manual feedA method of feeding paper to the printer one sheet at a time.
Noise levelSee dB(A).
Page orientationRefers to the direction of print on the page. Printing across the width of a page is calledportrait orientation. Printing across the length of a page is called landscape orientation.
G-2 Glossary
Parallel interfaceAn interface that transmits multiple bits simultaneously (usually in one-byte segments).Your printer has a built-in, Centronics-type parallel interface with bi-directionalcapability. See also Interface.
PitchRefers to the number of characters per inch that can be composed using a fixed space font.
PlatenPrinter component that holds the paper in position during ink transfer.
Point sizeCharacter height is defined in points; one point is 1/72 inch. For instance, this text isprinted using a 10-point font.
Portrait orientationRefers to printing across the width of the page (letter style). This is the opposite oflandscape orientation, which is printing across the length of the page.
Print headThe printing mechanism that contains print nozzles and ejects the ink for printing.
Print head cappingAn automatic protection function that prevents the print head unit and ink cartridgesfrom drying out or becoming clogged with dust.
Printable areaThe area of a sheet of paper on which a printer can reproduce text or graphics (theprinting area is smaller than the paper). On this printer, the printing area variesdepending on the type of paper being used.
Printer driverSoftware that sends printing instructions to a printer. The printer driver keeps track ofthe attributes of a printer and the codes the program must send to access those attributes.
RAMRandom Access Memory. Printer memory that is used for temporary storage ofinformation you want to print and downloaded fonts.
Glo
ssar
y
Glossary G-3

ResolutionThe density of dots for any given output device. Expressed in terms of dots per inch (dpi).Low resolution causes font characters and graphics to have a jagged appearance. Higherresolution means smoother curves and angles as well as a better match to traditionaltypeface designs. Resolution values are represented by horizontal data and vertical data,for example, 360 × 360 dpi. This printer can produce output with resolutions up to 1440 × 720 dpi precision on specialty paper.
RGBAn acronym for Red, Green, and Blue; the three primary colors used in the additiveprocess to form a wide spectrum of colors.
TrueType fontThe scalable font technology built into Microsoft Windows. It offers you the same fontimages both on computer displays and printer outputs.
G-4 Glossary

Inde
x
486 PC processor: A-6
AA4, A4+, A5, B5 paper sizes: A-2–3Accessories: 1-1–2Acoustic noise level: A-5Advanced button, Main tab: 2-7Aligning print heads: 2-10, 4-20–24Alignment pattern: 4-21–24Application error: 5-8Assorted Paper Starter Kit: 3-4Authorized Service Facility: 1-5Auto feed guidelines: 3-7–8Auto halftoning: 2-13Auto mode: 2-12Automatic feed: A-1Automatically feeding paper: 3-6–7
BBack Print Film: 1-3, 3-3–5, 3-13–14,
A-1–2Background printing settings: 2-9Backlighting device: 3-3Banner Paper: 1-3, 3-2, 3-5, 3-18–21,
A-1–2preparing: 3-19printable area: A-4printing: 2-8, 3-18–21
Basic problems: 5-2–15BBS: 1-4, 5-1BC-30 Black BJ Cartridge: 1-2, 4-10–12,
4-16–17, 4-25, A-1, A-5See also BJ cartridges
BC-31 Color BJ Cartridge: 1-2, 4-10–12,4-16–17, 4-25, A-1, A-5See also BJ cartridges
BC-32 Photo BJ Cartridge: 1-2, 4-10–12,4-16–17, 4-25, A-5See also BJ cartridges
BCI tanks: See BJ tanksBi-directional cable: A-5–6BJ cartridges: 1-2–3, 4-4, 4-8, 5-11
cleaning print heads: 4-7–10defective: 5-14guidelines: 4-10–11holders: 4-2maintenance: 4-10–11not installed: 5-13–14out of ink: 5-13setting: 2-7, 2-13specifications: A-5standard configuration: 4-12storage box: 4-11, 4-16, 4-25, 4-27storing: 4-25yield: A-5
BJ Printer Status Monitor: 4-4, 4-21, 5-3starting: 2-10using: 2-16
BJ tanks: 1-2–3, 4-10–15maintenance: 4-10–11replacing: 4-11–15
Borders, printing: 2-9Brightness setting: 2-14Brilliant White Paper: 1-3, 3-2, 3-5, A-1Bubble Jet Paper: 1-3, 3-3, 3-5, A-1Bubble Jet print head: 1-2
See also Print head(s)Bulletin Board Service: 1-4, 5-1
CCamera mode: 2-12Canadian Radio Interference
Regulations: FCC-1Cannot install printer driver: 5-4
Index I-1
Index

Canon Authorized Service Facility: 1-5Bulletin Board Service: 1-4, 5-1Canada: 1-4Creative Pro: A-6Customer Care Center: 1-4–5, 5-1dealer: 1-1, 1-4Fax Retrieval System: 1-4, 5-1help: 1-4, 5-1Referral Service: 1-1Specialty Papers: 1-3, 3-1–5,
3-13–23, A-2Cartridges: See BJ cartridgesCD ROM drive: A-6
problem: 5-4Centronics cable: A-6Cleaning
print heads: 2-10, 4-7–10printer: 4-3
Cleaning sheet, High Resolution Paper: 3-15
Clearing paper jams: 5-16Collating, copies: 2-9Color
using: 2-18versus print speed: 2-17–18wrong: 5-11–12
Color adjustment: 2-17setting: 2-14
Color balance setting: 2-14Color tab, printer driver: 2-14COM10 envelopes: 3-10, A-1–2, A-4Computer, processor: 2-18, A-6Contrast setting: 2-14Conventions, documentation: iiiCopies, printing: 2-9Curled pages: 5-13Custom cleaning, print heads: 2-10Custom Setting dialog box: 2-10Customer Care Center: 1-4–5, 5-1Customer support: 1-4, 5-1Customizing, print mode: 2-13–15Cut-sheet paper: 3-4
DDeep cleaning, print heads: 2-10, 4-9–10Details tab, Windows: 2-6Diffusion halftoning: 2-13, 2-17Digital camera image: 2-12–13Dimensions, printer: A-6DL envelopes: 3-10, A-1–2, A-4Document, printing: 2-2Documentation: iiidpi: A-1Draft
mode: 2-12setting: 2-18
EECP
mode: 2-10printer port: 2-6
Envelopes: 3-5, A-1–2COM10: 3-10, A-1–2, A-4DL: 3-10, A-1–2, A-4loading: 3-12preparing: 3-11printable area: A-4printing: 3-10–12
Environment: 3-14Error message appears: 5-6–9Error writing to LPT1: 5-6–7European DL envelopes: 3-10, A-1–2, A-4External buffer: 5-6, 5-10–11
FFabric Sheet: 1-3, 3-3, 3-5, 3-13, A-1–2
drying: 3-17printable area: A-4printing: 3-16–17washing: 3-17
Fanning paper: 3-6Fast mode: 2-13Fax Retrieval System: 1-4, 5-1
I-2 Index

Inde
x
FCC regulations: FCC-1Features tab, printer driver: 2-9Feed rollers, cleaning: 3-15, 5-17Feeding paper
automatically: 3-6–7manually: 3-8–9
Fine (fast) halftoning: 2-13Fine halftoning: 2-13Fine mode: 2-13Fluorescent lamp: 4-2
GGeneral protection fault: 5-8General specifications: A-5–6General tab, Windows: 2-5Glossy Photo Cards: 1-3, 3-2, 3-5,
3-13, A-1–2loading: 3-22–23printable area: A-3
Glossy Photo Paper: 1-3, 3-2, 3-5–6,3-13, A-1–2loading: 3-21–22
Graph paper: 3-4Graphic stamps: 2-9Graphics: 2-12Grayscale printing: 2-7Guidelines
auto feed: 3-7–8BJ cartridges: 4-10–11paper: 3-4printer: 4-2specialty paper: 3-13–14
HHalftoning settings: 2-13Hardware requirements: A-6Heavier-weight print media: 3-5, 3-8Help
Canon: 1-4printer driver: 2-3
High Gloss Photo Film: 1-3, 3-1, 3-5,3-13, A-1–2
High Resolution Paper: 1-3, 3-2, 3-5,3-15, A-1–2cleaning sheet: 3-15
High-speed printing: 2-10Humidity: 3-14, A-5
IIBM PC compatible: A-6IEEE 1284-compliant cable: A-5–6Image optimizer: 2-13Ink: 1-2–3, 4-14, A-5Ink Cartridge Storage Box: 4-11, 4-16,
4-25, 4-27Ink tank: See BJ tanksInstallation, problem: 5-4Intensity setting: 2-14Interface cable: 4-2, A-5–6
JJammed, paper: 5-13
LLegal paper size: A-2–3Letter paper size: A-2–3LetterPlus Letterhead Paper:
1-3, 3-3, 3-5, A-1–3Limit mark: 3-7–8Limited warranty: 5-2Line feed speed: A-1Loading
envelopes: 3-12paper: 3-6–9specialty papers: 3-13–23
Loading Support Sheet A: 3-21LPT1 problem: 5-6–7
MMain tab, printer driver: 2-7, 2-11–12,
3-17, 3-20Maintaining, printer: 4-1–27
Index I-3

MaintenanceBJ cartridges and tanks: 4-10–11performing: 4-4printer: 4-1–27
Maintenance tab, printer driver: 2-10,4-5, 4-7, 4-9, 4-20–21, 4-24
Manual feed setting: 3-9slot: 3-9specifications: A-2
Manually feeding paper: 3-8–9Margins: A-3–4Meaningless characters: 5-10Media Type setting: 2-7, 2-13, 2-18,
3-1–3, 3-5, 3-17, 3-20, 3-22–23Memory: 2-18, A-6Microsoft Windows: A-6
See also WindowsMirror image printing: 3-3
NNormal print head cleaning: 4-7–8Nozzle Check Pattern: 2-10, 4-4, 4-8,
4-10, 4-24, 5-11–12operator panel: 4-6, 5-17printing: 4-5–6
OOnline
help: 2-11support: 1-4, 5-1
Operating environment: A-5Operator panel, using: 5-17Output style setting: 2-14
PPage layout: 2-8
settings: 2-9Page Orientation settings: 2-8Page size: 3-17, 3-20, 3-23
Paper does not feed: 5-5fanning: 3-6feeding problems: 5-5guidelines: 3-4handling: 3-1–33, A-1jammed: 5-13jams, clearing: 5-16loading: 3-6–9out: 5-13settings: 2-7size: A-2thickness: 3-8types, selecting: 3-1–4weight: A-1
Paper feed limit: 3-5method: 3-5setting: 2-13
Paper guide: 3-7–8, 3-12Paper output tray: 3-6–7, 3-10Paper Size settings: 2-8Paper support: 3-6Paper tab, printer driver: 2-8, 3-20Paper thickness lever: 3-5, 3-8, 3-10,
3-16, 3-19Parallel cable: A-5–6Pentium processor: A-6Performing maintenance: 4-4Photo
mode: 2-12optimizer: 2-13
Photo color set, BJ cartridges: 4-12Plain paper: 2-18, 3-1, 3-5–6, A-1
setting: 2-18Port settings: 2-6Power
consumption: A-6cord: 4-2on/off: 2-10source: A-6strip: 4-2surge protector: 4-2
I-4 Index

Inde
x
POWER button: 5-17POWER light: 5-16–17
flashes orange: 5-13–15Primary colors: 2-18Print
density: 3-4, 3-8direction: A-1resolution: A-1setup: 2-2speed: A-1spool problem: 5-7width: A-1
Print head(s): 4-11, 4-25aligning: 4-20–24cleaning: 4-7–10deep cleaning: 4-9–10life: A-5specifications: A-5
Print head alignment: 2-10, 4-4, 4-20–24adjustments: 4-22–23automatic: 4-21failed: 5-14manual: 4-22–24
Print head cleaning: 2-10, 4-7–10operator panel: 4-8, 5-17
Print job, not printing: 5-11Print Manager, Windows 3.1: 2-17Print mode(s): 2-12, 2-18
setting: 2-7settings, recommended: 2-11–12customizing: 2-13–15
Print quality: 2-7setting: 2-13
Printable areaenvelopes: A-4paper: A-3–4
Printed pages, curled/warped/wrinkled:5-13
Printer beeps, light flashes: 5-13–15cable problem: 5-6, 5-10–11cleaning: 4-3guidelines: 4-2maintaining: 2-10, 4-1–27
Printer (continued)port: 2-6problem, identifying: 5-1–2properties: 2-2servicing: 1-5setup: 2-3–4software: 2-1stands: 4-2status: 2-16transporting: 4-26–27using with Windows: 2-1–10
Printer driver: 3-17, 3-20, 4-5, 4-20cannot install: 5-4help: 2-3printer maintenance: 4-5, 4-7problem: 5-7using: 2-1, 2-3
Printing back print film: 3-14banner paper: 3-18–21borders: 2-9copies: 2-9document: 2-2envelopes: 3-10–12fabric sheet: 3-16–17halts: 5-9method: A-1specifications: A-1–2speed versus color: 2-17–18stamps: 2-9test print: 4-5
Printing options: 2-4–15specifying: 2-11
Printout faint: 5-11unsatisfactory: 5-10–13
Problems, basic: 5-2–15Processor, computer: 2-18, A-6Properties
printer: 2-2Windows: 2-3
QQuality tab, printer driver: 2-13, 3-9
Index I-5

RRAM: 2-18, A-6Receive buffer: A-1Recommended print mode settings:
2-11–12Replacing
BJ cartridges: 4-11, 4-16–19BJ tanks: 4-11–15
RESUME button: 3-15, 4-8, 5-16–17Reverse order printing: 2-9
SSales receipt: 1-5Save tab, printer driver: 2-15Saving, customized print mode: 2-15Scaled printing: 2-8Serial number, printer: 5-2Service error: 5-15Servicing, printer: 1-5Sheet feeder: 3-7, 3-12
capacity: A-1Smudge resistant: 3-8Software
printer: 2-1requirements: A-6
Specialty papers: 1-3, 3-1–5, 3-13–23guidelines: 3-13–14
Specifications: A-1–6Spilled ink: 4-10Spool settings: 2-6Stamps, printing: 2-9Standard color set, BJ cartridges: 4-12Starter kit, paper: 3-4Status Monitor: See BJ Printer
Status MonitorStorage box, BJ cartridges: 4-11, 4-16,
4-25, 4-27Storing
BJ cartridge: 4-25environment: A-5
SuperPhoto mode: 2-12Supplies: 1-1–2Support, Canon: 1-4, 5-1
Swap file, Windows 3.1: 2-17Switching device: 5-6, 5-10–11System memory: 2-18, A-6
TTabs, Windows: 2-5–15Technical support: 1-4, 5-1Temperature: 3-14, A-5Test prints: 2-5, 2-10, 4-5, 4-20Text mode: 2-12Thick paper: 3-4, 3-8Timeout settings: 2-6Transparencies: 1-3, 3-3, 3-5–6, 3-13,
A-1–2Transporting, printer: 4-26–27Troubleshooting: 5-1–17T-Shirt Transfers: 1-3, 3-2–5, A-1–2
UU.S. Commercial number 10 envelopes:
3-10, A-1–2, A-4Uncurling, back print film: 3-14Unsatisfactory printout: 5-10–13
WWarped pages: 5-13Warranty: 1-3, 4-14, 5-2Washing, fabric sheet: 3-17Waste ink tank: 5-14Water resistant: 3-8Weight, printer: A-6Windows
tabs: 2-5–15using printer: 2-1–10
Windows 3.1: 2-17, A-6Print Manager: 2-17printer setup: 2-4
Windows 98/95: A-6printer setup: 2-3
Windows Printing System: 5-7, 5-12World Wide Web: 1-4–5, 5-1Wrinkled pages: 5-13
I-6 Index

FCC Regulations FCC-1
FCC Regulations
This equipment has been tested and found to comply with the limits for a Class B digitaldevice, pursuant to Part 15 of the FCC Rules. These limits are designed to providereasonable protection against harmful interference in a residential installation. Thisequipment generates, uses and can radiate radio frequency energy and, if not installedand used in accordance with the instructions, may cause harmful interference to radiocommunications. However, there is no guarantee that interference will not occur in aparticular installation. If this equipment does cause harmful interference to radio ortelevision reception, which can be determined by turning the equipment off and on, theuser is encouraged to try to correct the interference by one or more of the followingmeasures:
■ Reorient or relocate the receiving antenna.
■ Increase the separation between the equipment and receiver.
■ Connect the equipment into an outlet on a circuit different from that to whichthe receiver is connected.
■ Consult the dealer or an experienced radio/TV technician for help.
Do not make any changes or modifications to the equipment unless otherwise specified inthe manual. If such changes or modifications should be made, you could be required tostop operation of the equipment.
Use of shielded cable is required to comply with Class B limits in Subpart B of Part 15 ofFCC Rules.
Canadian Radio Interference Regulations
This digital apparatus does not exceed the Class B limits for radio noise emissions fromdigital apparatus as set out in the interference-causing equipment standard entitled“Digital Apparatus,” ICES-003 of the Industry and Science Canada.
Cet appareil numérique respecte les limites de bruits radio électriques applicables auxappareils numériques de Classe B prescrites dans la norme sur le matériel brouilleur:“Appareils Numériques,” NMB-003 édictée par l’Industrie et Sciences Canada.

FCC-2 FCC Regulations


![Windows UFR II/UFRII LT/LIPSLX/CARPS2/PCL6 V4 Printer ...gdlp01.c-wss.com/gds/9/0300026539/06/UFRII_V4... · - For "PCL6 V4 Printer Driver ": [PCL6 (V4)] (or [PCL6]) The device is](https://img.dokumen.tips/doc/110x75/5f68f3cdc776d74708262b04/windows-ufr-iiufrii-ltlipslxcarps2pcl6-v4-printer-gdlp01c-wsscomgds9030002653906ufriiv4.jpg)


