Embed Size (px)
Citation preview

C54RU Conceptronic Wireless 54Mbps USB Adapter
Manual
Rev. 04072901
Contents
PACKAGE CONTENTS............................................................................. 1 INTRODUCTION................................................................................... 2 PRODUCT FEATURES............................................................................. 2 FIRST TIME SETUP − WINDOWS 2000, 98, NT, AND ME...................................... 4 INSTALLING THE DRIVERS AND WLAN UTILITY .................................................. 4 BEFORE YOU START.............................................................................. 4 GETTING STARTED − FIRST PART ............................................................... 5 INSTALLATION OF YOUR C54RU − SECOND PART .............................................. 8 CONFIGURING YOUR C54RU − WINDOWS 2000, 98, ME, OR NT .......................... 10
Authentication Modes.....................................................................11 Setting the IP Address and Proxy Server ...............................................12 Enabling the Profile Settings ............................................................12 Using a Proxy Server ......................................................................14 Checking the C54RU’s Status ............................................................15 Options ......................................................................................16 Selecting the Connection Type ..........................................................17 Disabling the Radio........................................................................17 Advance Settings...........................................................................17 About ........................................................................................18
FIRST TIME SETUP − WINDOWS XP............................................................ 19 INSTALLING THE DRIVERS AND WLAN UTILITY ................................................ 19 BEFORE YOU START............................................................................ 20 INSTALLING THE WLAN DRIVER ONLY IN WINDOWS XP ...................................... 21
Updating a WLAN Driver in Windows XP ...............................................24 CONFIGURING THE WLAN ADAPTER IN WINDOWS XP ........................................ 29
Setting Up a Connection ..................................................................29 Selecting a Wireless Network............................................................29 Select a Wireless Network Type.........................................................30 Network SSID and WEP Encryption ......................................................31 IP Address Assignment ....................................................................32
ENABLING THE C54RU WLAN UTILITY FOR WINDOWS XP .................................. 35 If you install the supplied C54RU WLAN Utility ......................................35
WLAN NETWORKING BASICS .................................................................. 37 TROUBLESHOOTING ............................................................................ 43 TECHNICAL SPECIFICATIONS ................................................................... 48

Conceptronic Wireless 54Mbps USB Adapter
Package Contents
Contents of Package:
• C54RU Wireless 54Mpbs USB Adapter
• Manual and Drivers on CD
• Hardware Installation Guide
If any of the above items is missing, please contact your reseller.
System Requirements:
• A computer with an available USB slot
• Windows XP, Windows 2000, Windows ME, or Windows 98 SE
• At least 32 MB of memory and a 300 MHz processor or higher
• An 802.11g Access Point for Infrastructure Mode or another 802.11g wireless adapter for Ad-Hoc mode.
1

Conceptronic Wireless 54Mbps USB Adapter
Introduction
The C54RU Wireless 54Mbps USB Adapter is an advanced IEEE 802.11b/g compatible, high performance, wireless card that supports data transfer speeds of up to 54 Mbps in 802.11g mode.
The C54RU comes with software drivers for the most popular Microsoft Windows operating systems and can be integrated into a larger network, running Windows XP, Windows 2000, Windows ME, or Windows 98SE, in either Ad Hoc mode (without an Access Point) or Infrastructure mode (with an Access Point).
This manual provides a quick introduction to wireless technology and its application as it relates to networking. Take a moment to read through this manual and get acquainted with wireless technology.
Product Features
• Compatible with IEEE 802.11b standard to provide wireless Ethernet data rates of up to11Mbps data rate
• Compatible with IEEE 802.11g high data-rate standard to provide up to a 54Mbps wireless data rate
• Operation at dual 2.4 GHz frequency bands to meet worldwide regulations
• Dynamic date rate scaling at 1, 2, 5.5, and 11Mbps for IEEE 802.11b
• Dynamic date rate scaling at 6, 9, 12, 18, 24, 36, 48, 54Mbps for IEEE 802.11g
• Maximum reliability, throughput and connectivity with automatic data rate switching
• Supports wireless data encryption with 64-, and 128 bit WEP for security
• Supports infrastructure networks via Access Point and ad-hoc network via peer-to-peer communication
• Built-in antenna for reduction of interference in a multi-path environment
• Supports AES enhanced security
• Requires an available USB slot.
• User-friendly configuration and diagnostic utilities
• Drivers to support Windows 98SE, ME, 2000, and XP
2

Conceptronic Wireless 54Mbps USB Adapter
LEDs
Your new C54RU has two LEDs on the antenna housing, so they can be seen when the C54RU into a USB slot in your desktop computer.
The two LEDs operate in concert to inform you about the status and activity of your C54RU.
When the two LEDs flash alternately, the C54RU is searching for a wireless network connection − either to an Access Point or to another WLAN NIC.
When both LEDs flash in unison, there is a valid wireless network connection, and there is activity over the link (data is being transferred). If the C54RU has established a valid wireless network connection, but there is no activity, the two LEDs will flash in unison, but much more dimly.
When the C54RU is disabled, only the Link LED flashes.
The following chart describes the full functions of the two LEDs.
The two LEDs are labeled Link and Act (Activity), as shown below.
What the LEDs are doing
What that means
LEDs are flashing alternatively
The C54RU is searching for a wireless network connection.
LEDs are flashing in unison
The C54RU has made a valid wireless network connection, and there is activity on the link.
LEDs are flashing in unison, but dimly
The C54RU has made a valid wireless network connection, but there is no activity on the link. This could be caused by an Access Point that is functioning, but not connected to the wired network.
Only the Link LED is flashing
The C54RU has been disabled.
Only the Link LED is flashing, but slowly
The C54RU has entered its Power Save Mode.
3
Link
A
ct

Conceptronic Wireless 54Mbps USB Adapter
First Time Setup − Windows 2000, 98, NT, and ME
You must install the provided drivers andthe WLAN utility for your C54RU before youinstall the card itself. Installation is a two-step process − firstinstall the drivers and WLAN utility andreboot your PC. Then install the C54RU inan available slot. The drivers and WLANutility will then be automatically activated.
Installing the drivers and WLAN utility
Wm
Before y
•
•
•
The installation software provided with your new C54RUincludes a Utility to configure and manage a WLAN link.The WLAN utility is not required for Windows XP,because Windows XP has WLAN support built-in. The C54RU Driver and Utility Installation software willinstall the WLAN utility software even if you haveWindows XP installed on your PC. You can choose touse either the Windows XP built-in WLAN software or the
LAN Utility software provided with your C54RU toanage your WLAN link
ou start
You will need a computer with an available USB slot to install your C54RU.
If you want to use the Wireless Encryption Protocol (WEP) to authenticate access to your wireless network, you will need the WEP keys that are in use for your network. WEP keys are generally entered into a Wireless Access Point (AP) before configuring a wireless client (such as a notebook/desktop PC with a C54RU installed).
You should have a general idea of how your wired network (usually referred to as a LAN) will provide a connection to the Internet (sometimes called the WAN) and the point your C54RU will connect to your LAN. In general, there are two methods to provide wireless access to the LAN and then to the WAN − Infrastructure and Ad-hoc. Please see the section titled Wireless Networking Basics, below.
4

Conceptronic Wireless 54Mbps USB Adapter
Getting Started − First Part
Turn on your computer and insert the C54RU Driver CD into your CD-ROM drive. If you have the Autorun feature enabled in Windows, the Install screen will appear, as shown below. If the CD Autorun function is not enabled on your computer, open My Computer and right-click on the icon for your CD-ROM drive. Select Explore from the drop-down menu, and then double-click on the file setup.exe.
Click the Auto-Install driver & Utility (before Card Inserted) link. This will start the C54RU.
Click Next.
5

Conceptronic Wireless 54Mbps USB Adapter
You can choose a destination folder for the Conceptronic 54Mbps Wireless Utility, or simply accept the default location. If you want the software to be installed in a location that is different from the default, click the Browse button to select a folder. Otherwise. accept the default location and click Next.
You can then choose a Program Folder that the Wizard can add program icons to. You can enter the name of folder that is different from the default name or accept the default name of the folder, as shown on the screen above.
Click Next.
6

Conceptronic Wireless 54Mbps USB Adapter
Click Yes to install C54RU Driver. A Microsoft digital signature is not required for the proper operation of your new C54RU or the supplied software.
Click Next.
This completes the first part your C54RU installation.
Click Finish and restart your computer.
Once your computer has restarted, you can begin the second part of the installation by simply inserting the C54RU into an available USB slot.
7

Conceptronic Wireless 54Mbps USB Adapter
Installation of Your C54RU − Second Part
Insert your new C54RU into an available USB slot of your PC.
When you install the C54RU into your computer, the Found New Hardware Wizard will begin by showing the screen below.
Depending upon the version of Windows installed in your PC, and the software that may have been installed for previous USB adapters, etc., the following screen may appear once or several times − for the installation of several different pieces of software.
Click Yes to install C54RU Utility software. A Microsoft digital signature is not required for the proper operation of your new C54RU for the supplied software.
8

Conceptronic Wireless 54Mbps USB Adapter
Once you have completed the Found New Hardware wizard, you will see the WLAN utility icon in the task tray (at the bottom right-hand corner of your screen), as shown below.
C54RU WLAN Utility icon
If the signal-strength indicator to the right of the antenna appears a steady green, then your C54RU has been successfully installed and has contacted your Wireless Access Point. You are now ready to configure your C54RU.
Double-click the Utility icon to use the configuration utility.
9

Conceptronic Wireless 54Mbps USB Adapter
Configuring your C54RU − Windows 2000, 98, ME, or NT
If you are using Windows 2000, 98, ME, or NT, the Configuration Utility program for the C54RU is called Conceptronic 54Mbps Wireless Utility. Once you have installed WLAN Utility (the configuration utility), you can read this section of the manual to find out how to connect to a wireless network using WLAN Utility. Screenshots for this section have been taken in Windows 2000.
To access WLAN Utility once it has been installed, just right-click on the WLAN Monitor icon in the taskbar, as shown below.
C54RU WLAN Utility icon
The pop-up window shown below will appear. Click Wireless Network.
Alternatively, you can simply double-click the WLAN Utility icon in the task tray to open the Conceptronic 54Mbps Wireless Utility, as shown below.
10
Conceptronic Wireless 54Mbps USB Adapter
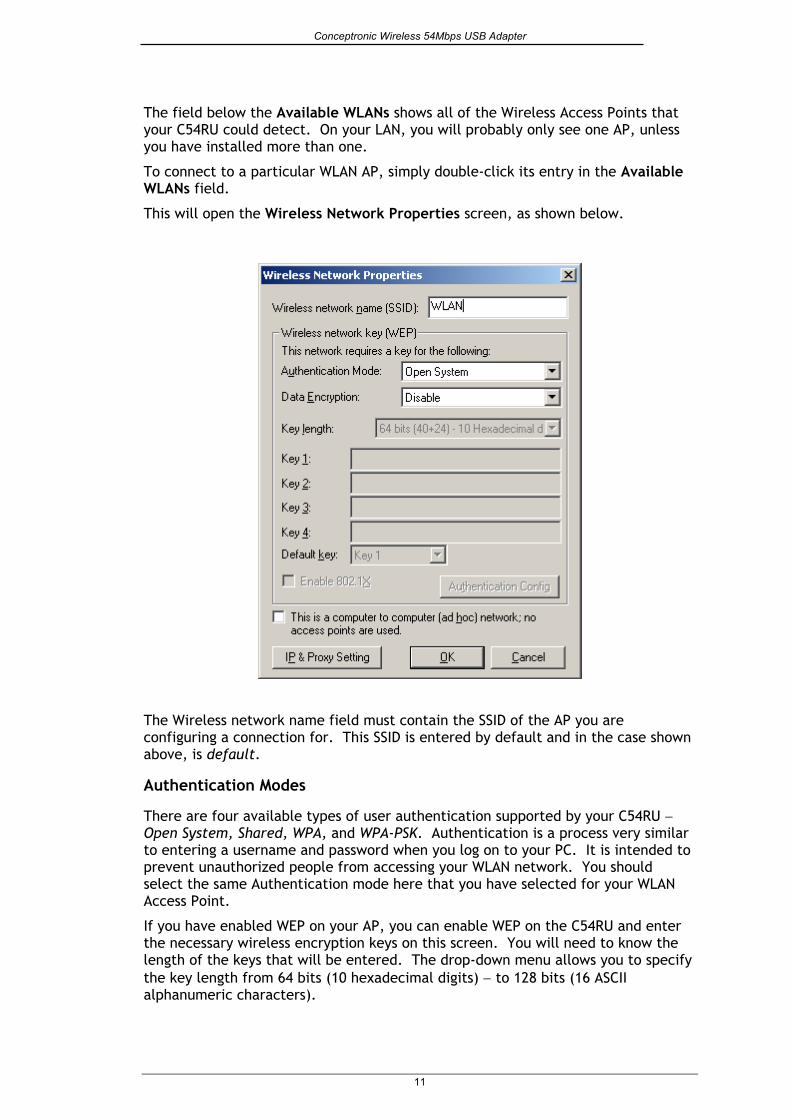
The field below the Available WLANs shows all of the Wireless Access Points that your C54RU could detect. On your LAN, you will probably only see one AP, unless you have installed more than one.
To connect to a particular WLAN AP, simply double-click its entry in the Available WLANs field.
This will open the Wireless Network Properties screen, as shown below.
The Wireless network name field must contain the SSID of the AP you are configuring a connection for. This SSID is entered by default and in the case shown above, is default.
Authentication Modes
There are four available types of user authentication supported by your C54RU − Open System, Shared, WPA, and WPA-PSK. Authentication is a process very similar to entering a username and password when you log on to your PC. It is intended to prevent unauthorized people from accessing your WLAN network. You should select the same Authentication mode here that you have selected for your WLAN Access Point.
If you have enabled WEP on your AP, you can enable WEP on the C54RU and enter the necessary wireless encryption keys on this screen. You will need to know the length of the keys that will be entered. The drop-down menu allows you to specify the key length from 64 bits (10 hexadecimal digits) − to 128 bits (16 ASCII alphanumeric characters).
11

Conceptronic Wireless 54Mbps USB Adapter
You must enter the encryption keys − including specifying the default key − exactly as you entered them into your Access Point. If you have any difficultly making a connection between your C54RU and your Access Point, disable WEP and verify that the connection can be made without any encryption. Then re-enter the WEP keys into your Access Point and your C54RU such that they are exactly the same.
You must enter the encryption keys − including specifying the default key − exactly as you entered them into your Access Point. If you have any difficultly making a connection between your C54RU and your Access Point, disable WEP and verify that the connection can be made without any encryption. Then re-enter the WEP keys into your Access Point and your C54RU such that they are exactly the same.
If your WLAN network will not use the Infrastructure mode (using an Access Point), but will use the peer-to-peer (Ad-hoc) mode, you can click the This is a computer to computer (ad hoc) network; no access points are used click-box.
If your WLAN network will not use the Infrastructure mode (using an Access Point), but will use the peer-to-peer (Ad-hoc) mode, you can click the This is a computer to computer (ad hoc) network; no access points are used click-box.
Setting the IP Address and Proxy Server Setting the IP Address and Proxy Server
The C54RU’s WLAN Utility allows you to make IP address and proxy server settings for each of the WLAN links you want to connect to. This allows you to have multiple IP address and proxy server settings for multiple WLAN Access Points. For example, if you have an Wireless Access Point at work, you will need one set of IP address and proxy server settings to connect to your companies LAN. If you also have a Wireless Access Point at home, you will need a different set of settings to connect to that Access Point. For each of the WLAN links that are listed in the Preferred WLANs field of the Configuration page, you can enter a different set of IP address and proxy server settings. Each time that link is established, the settings saved for use with that link will become active.
The C54RU’s WLAN Utility allows you to make IP address and proxy server settings for each of the WLAN links you want to connect to. This allows you to have multiple IP address and proxy server settings for multiple WLAN Access Points. For example, if you have an Wireless Access Point at work, you will need one set of IP address and proxy server settings to connect to your companies LAN. If you also have a Wireless Access Point at home, you will need a different set of settings to connect to that Access Point. For each of the WLAN links that are listed in the Preferred WLANs field of the Configuration page, you can enter a different set of IP address and proxy server settings. Each time that link is established, the settings saved for use with that link will become active.
Enabling the Profile Settings Enabling the Profile Settings
In order to make use of the IP address and proxy server settings for each WLAN link you want to configure, you will need to enable this on the Options page. Clicking the Option tab will open the following page.
In order to make use of the IP address and proxy server settings for each WLAN link you want to configure, you will need to enable this on the Options page. Clicking the Option tab will open the following page.
Click Enable IP Setting and Proxy Setting in Profile
12

Conceptronic Wireless 54Mbps USB Adapter
Under the General Setting field, click the Enable IP Setting and Proxy Setting in Profile click-box. This will allow you to use the IP address and proxy server settings that are associated with each WLAN profile to be used. If this box is unchecked, the IP address and proxy server settings made in the Windows networking dialog boxes will be used. If you check this box, the IP address and proxy server settings that were in use before (the Windows settings) will be saved. The IP address and proxy server settings you entered for this WLAN profile will be used for the connection. When you terminate the WLAN link, the saved IP address and proxy server settings will be restored to their previous values.
Click the Apply button to make the settings current.
You can now make the IP address and proxy server settings required for each of the WLAN links you want to make.
Click the Configuration tab to open the Configuration page. Select a WLAN link by double-clicking the link in the Available WLANs field. This will open the Wireless Network Properties page. Now click on the IP & Proxy Setting button to open the following page.
If your WLAN AP for this WLAN link is configured to use the Dynamic Host Configuration Protocol (DHCP) to assign IP addresses, subnet masks, default gateway address, and DNS server address to PCs on your network, you can check
13
Conceptronic Wireless 54Mbps USB Adapter
the Obtain an IP address automatically click-box. You can also click the Obtain DNS server address automatically click-box.
Click on IP & Proxy Setting to set the IP address, Subnet mask, and Default gateway manually instead of obtaining the IP address automatically through the Dynamic Configuration Host Protocol (DCHP) server. You may also set the DNS server address settings and WINS address settings.
If the network you are using is a computer-to-computer (or ad-hoc) network, no access points are used. You may check the box This is a computer to computer (ad-hoc) network; no access points are used to enable this option.
Using a Proxy Server
Some LAN networks will establish a proxy server to handle the downloading of web pages, etc. and storing them temporarily so other users on the LAN can access them without having to reload the web page from the Internet each time. This allows for some saving of the available bandwidth in the connection between the Internet (WAN) and the LAN.
If your LAN has such a server, you will need to configure your C54RU to be able to connect to it. You will need to obtain the necessary connection information from your network administrator.
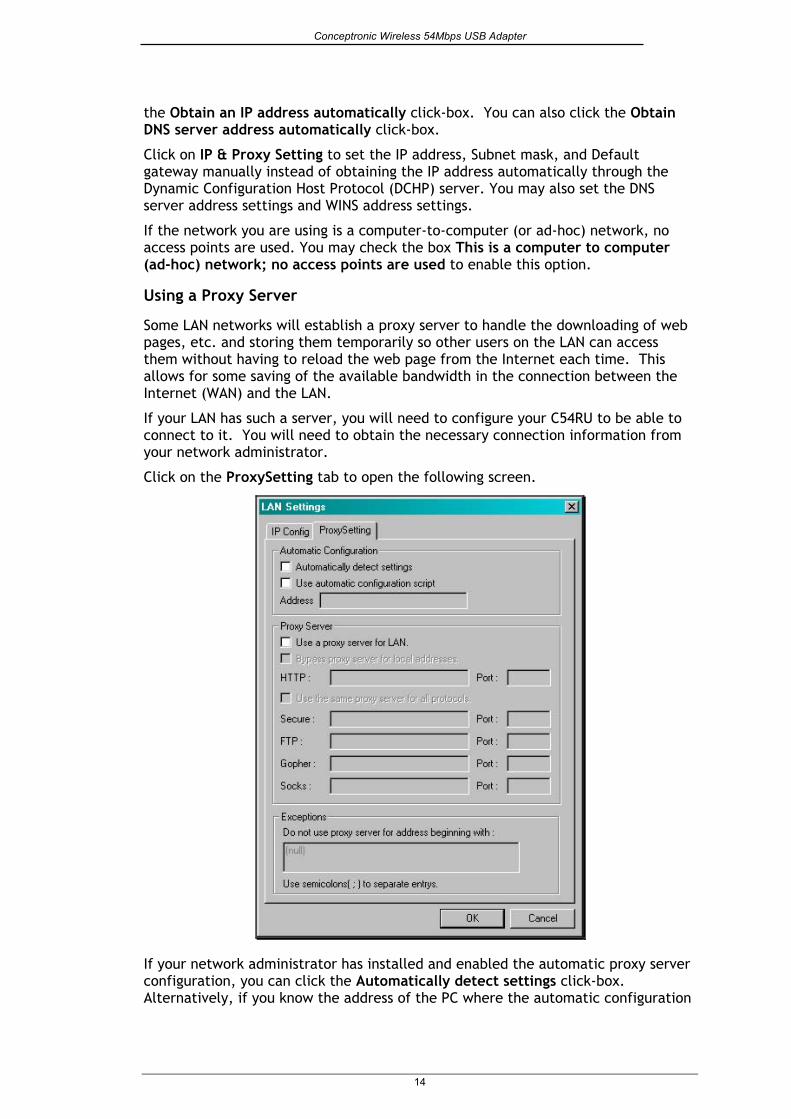
Click on the ProxySetting tab to open the following screen.
If your network administrator has installed and enabled the automatic proxy server configuration, you can click the Automatically detect settings click-box. Alternatively, if you know the address of the PC where the automatic configuration
14
Conceptronic Wireless 54Mbps USB Adapter
script is stored, you can click the Use automatic configuration script click-box and enter the address in the Address field.
Otherwise, you can click the Use a proxy server for LAN click-box. This will allow you to enter the IP addresses and port numbers for the various proxy servers that may exist on your LAN. You will need to ask your network administrator to determine the proxy server settings for your network.
Once you have entered the appropriate proxy settings, you will need to click the Apply button on the lower right-hand corner of the main menu, to make the settings current.
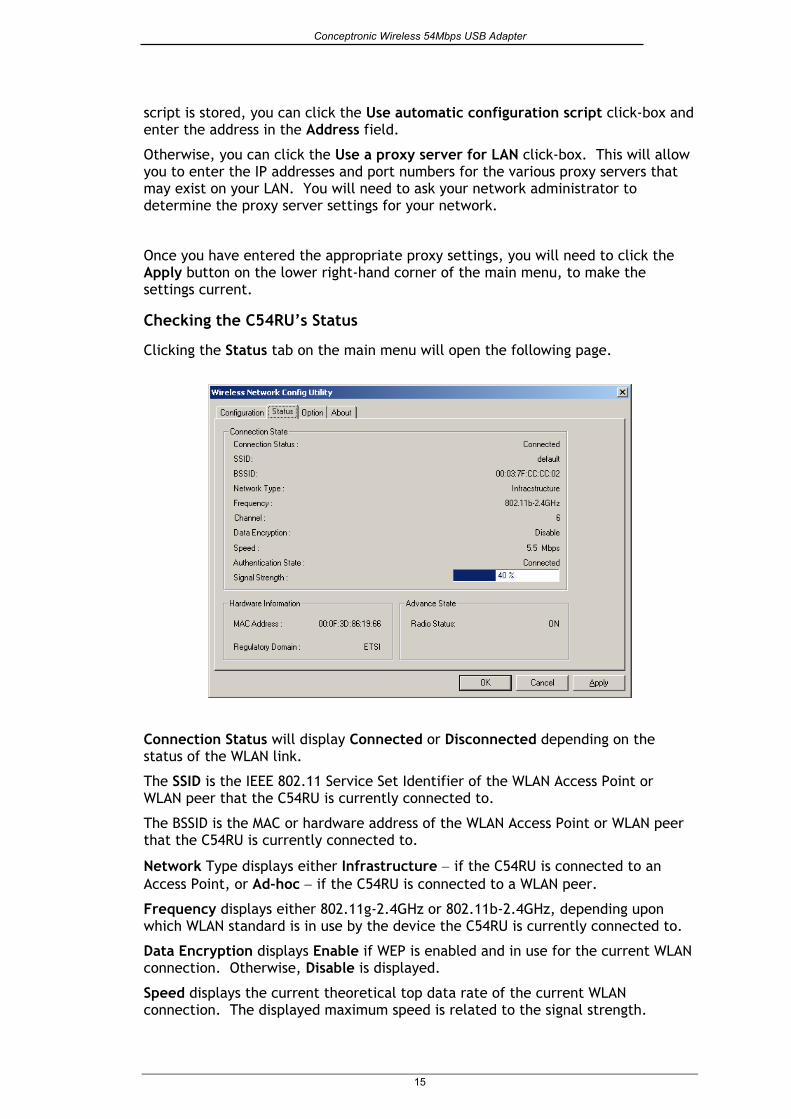
Checking the C54RU’s Status
Clicking the Status tab on the main menu will open the following page.
Connection Status will display Connected or Disconnected depending on the status of the WLAN link.
The SSID is the IEEE 802.11 Service Set Identifier of the WLAN Access Point or WLAN peer that the C54RU is currently connected to.
The BSSID is the MAC or hardware address of the WLAN Access Point or WLAN peer that the C54RU is currently connected to.
Network Type displays either Infrastructure − if the C54RU is connected to an Access Point, or Ad-hoc − if the C54RU is connected to a WLAN peer.
Frequency displays either 802.11g-2.4GHz or 802.11b-2.4GHz, depending upon which WLAN standard is in use by the device the C54RU is currently connected to.
Data Encryption displays Enable if WEP is enabled and in use for the current WLAN connection. Otherwise, Disable is displayed.
Speed displays the current theoretical top data rate of the current WLAN connection. The displayed maximum speed is related to the signal strength.
15

Conceptronic Wireless 54Mbps USB Adapter
Authentication State will display Connected if you have provided either the correct authentication information, or if authentication is disabled on the current WLAN link.
Signal Strength displays a bar graph representation of the relative strength of the signal used to maintain the current WLAN link. Maximum data rates are achieved only when a maximum signal strength exists on the WLAN link.
Hardware Information displays the C54RU’c MAC address and the Regulatory Domain (the region of the world that issues the radio use regulations) that it is currently configured for.
Advance State displays whether the radio is on or off and whether the Turbo Mode is enabled or not.
Click OK to exit the WLAN Utility. Clicking Cancel will not exit the WLAN Utility.
Options
Clicking the Option tab will open the following page.
Under the General Setting field, there are several useful options. Auto launch when Windows start up will automatically start the WLAN utility every time you start your PC. Enable IP Setting and Proxy Setting in Profile will allow you to use the IP address and proxy server settings that are associated with each WLAN profile to be used. If this box is unchecked, the IP address and proxy server settings made in the Windows networking dialog boxes will be used. If you check this box, the IP address and proxy server settings that were in use before (the Windows settings) will be saved. The IP address and proxy server settings you entered for this WLAN profile will be used for the connection. When you terminate the WLAN link, the saved IP address and proxy server settings will be restored to their previous values.
16
Conceptronic Wireless 54Mbps USB Adapter
Selecting the Connection Type
Clicking the Automatically connect to non-preferred networks click-box will allow your C54RU to attempt to connect to any WLAN network it detects. Of course, if the WLAN network is password protected or using WEP encryption and you do not have the proper password or WEP keys, the C54RU will not be able to connect to this network.
Under the WLAN type to connect heading, you can select the type of WLAN networks you would prefer to connect to. Infrastructure WLAN networks use a WLAN Access Point, while ad hoc networks use only WLAN network adapters to establish a peer-to-peer network.
Disabling the Radio
Clicking the Disable Radio click-box and then clicking the Apply or OK button will disable the C54RU − and stop the WLAN link without having to remove the C54RU from your PC.
Advance Settings
Under the Advance Setting heading, you can select the operating standard the C54RU will use to connect to WLAN networks. You can choose between using both the IEEE 802.11b and 802.11g standard or just the 802.11b standard.
You can also select other operating parameters such as automatic or dedicated selection of a radio channel for ad hoc networks, how the C54RU will react to the power saving settings in your notebook PC, and the amount of power used to transmit the radio signal that maintains the WLAN link.
17

Conceptronic Wireless 54Mbps USB Adapter
About
The About tab displays the driver and utility version number of the software provided with your C54RU.
18

Conceptronic Wireless 54Mbps USB Adapter
First Time Setup − Windows XP
Yti IiraWa
Installing the dr
Wm
ou must install the provided drivers andhe WLAN utility for your C54RU before younstall the card itself.
nstallation is a two-step process − firstnstall the drivers and WLAN utility andeboot your PC. Then install the C54RU inn available USB slot. The drivers andLAN utility will then be automatically
ctivated.
ivers and WLAN utility
The installation software provided with your new C54RUincludes a Utility to configure and manage a WLAN link.The WLAN utility is not required for Windows XP,because Windows XP has WLAN support built-in. The C54RU Driver and Utility Installation software willinstall the WLAN utility software even if you haveWindows XP installed on your PC. You can choose touse either the Windows XP built-in WLAN software or the
LAN Utility software provided with your C54RU toanage your WLAN link
19

Conceptronic Wireless 54Mbps USB Adapter
Before you start
• You will need a computer with an available USB slot to install your C54RU.
• If you want to use the Wireless Encryption Protocol (WEP) to authenticate access to your wireless network, you will need the WEP keys that are in use for your network. WEP keys are generally entered into a Wireless Access Point (AP) before configuring a wireless client (such as a notebook PC with a C54RU installed).
• Windows XP includes built-in WLAN support software. Your new C54RU is also supplied with a WLAN Utility. You can choose which method you would like to use to manage your WLAN link. If you choose to use the Windows XP built-in WLAN management software, you should uninstall the WLAN Utility provided with your C54RU.
• If you know you want to use the Windows XP built-in WLAN support software, do not install the WLAN Utility provided with your C54RU. Do this − start your PC, install the C54RU, allow the Windows Found new hardware wizard to locate the drivers for your C54RU (located on the provided install CD), as shown below.
• If you want to use the WLAN Utility provided with your C54RU, or you are not sure which software you want to use, follow the instructions for installing the driver and WLAN Utility given for Windows 2000 (and other Windows versions) given in the sections above. You will then need to review the section titled Enabling the C54RU WLAN Utility in Windows XP, below.
• You should have a general idea of how your wired network (usually referred to as a LAN) will provide a connection to the Internet (sometimes called the WAN) and the point your C54RU will connect to your LAN. In general, there are two methods to provide wireless access to the LAN and then to the WAN − Infrastructure and Ad-hoc. Please see the section titled Wireless Networking Basics, below.
Install the C54RU WLAN driver from the WLAN USB adapter Installation Disk (the WLAN Utility is not necessary for Windows XP). You can then begin the driver installation procedure.
20

Conceptronic Wireless 54Mbps USB Adapter
Installing the WLAN Driver Only in Windows XP
Note: Follow these instructions to install the driver software Windows XP needs to allow your C54RU to function. This will not install the WLAN Utility provided on the C54RU install CD, and you will need to use the Windows XP built-in WLAN support software to configure and manage your WLAN link.
Note: If you want to use the WLAN Utility provided with your C54RU to configure and manage your WLAN link, follow the instructions for installing your C54RU for Windows 2000 (and other Windows versions) given in the sections above. You will then need to review the section titled Enabling the WLAN Utilities in Windows XP, below.
Start your PC normally.
Insert the C54RU into an available USB slot and put the Installation CD into your computer’s CD-ROM drive. You can then follow the instructions in the Found New Hardware Wizard, as shown below, to install your C54RU on a computer with the Windows XP operating system.
When you install the C54RU into your computer, the Found New Hardware Wizard will begin by showing the screen below.
21
Conceptronic Wireless 54Mbps USB Adapter
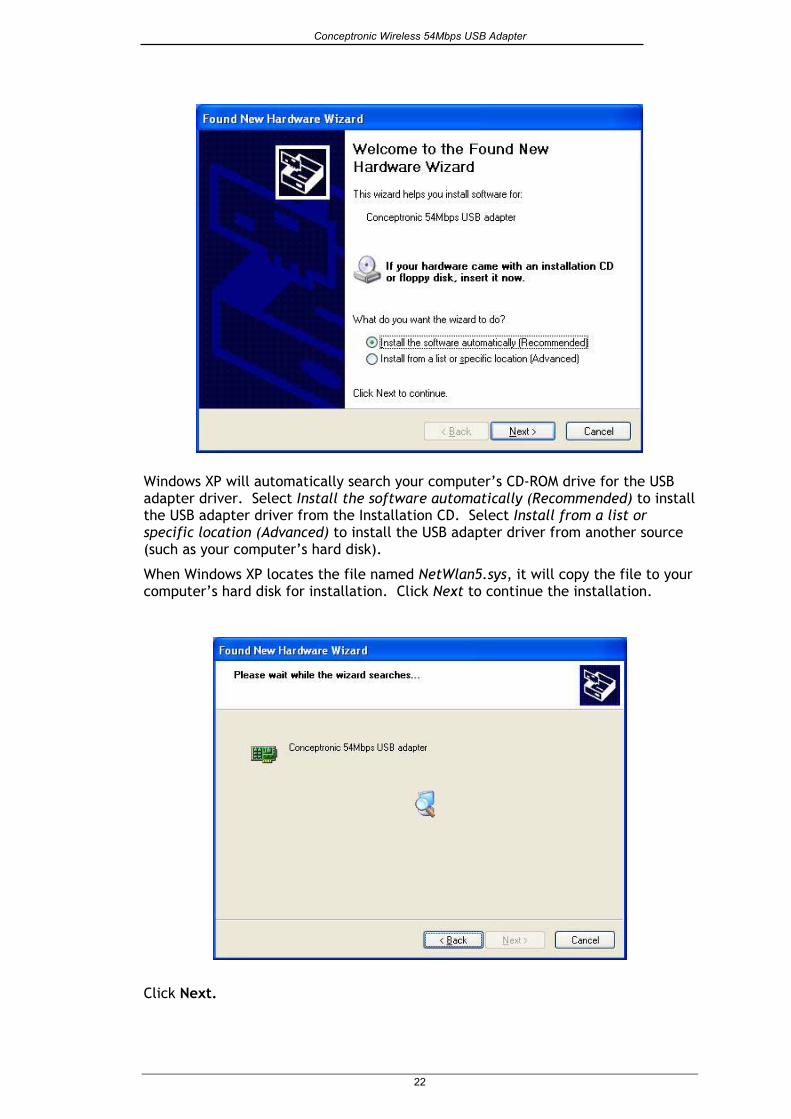
Windows XP will automatically search your computer’s CD-ROM drive for the USB adapter driver. Select Install the software automatically (Recommended) to install the USB adapter driver from the Installation CD. Select Install from a list or specific location (Advanced) to install the USB adapter driver from another source (such as your computer’s hard disk).
When Windows XP locates the file named NetWlan5.sys, it will copy the file to your computer’s hard disk for installation. Click Next to continue the installation.
Click Next.
22

Conceptronic Wireless 54Mbps USB Adapter
Click Continue Anyway to install the C54RU driver software. A Microsoft digital signature is not required for the proper operation of your new C54RU or the supplied software.
When Windows XP has completed the USB adapter driver installation the Completing the Found New Hardware Wizard screen appears as shown below.
23

Conceptronic Wireless 54Mbps USB Adapter
Click Finish to complete the installation of the USB adpater driver for Windows XP.
Updating a WLAN Driver in Windows XP
To update an existing WLAN driver in Windows XP:
Click the LAN Connection icon in the Windows XP Task Tray. The Wireless Connection Status window will open.
24
Conceptronic Wireless 54Mbps USB Adapter
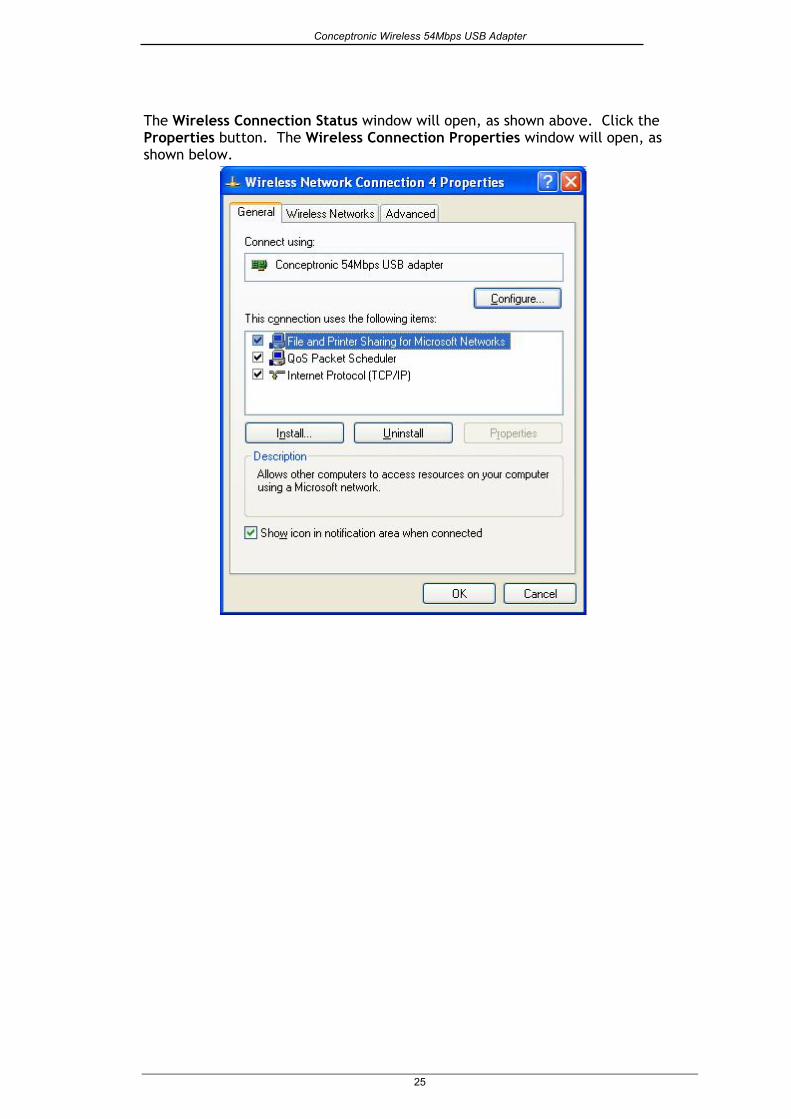
The Wireless Connection Status window will open, as shown above. Click the Properties button. The Wireless Connection Properties window will open, as shown below.
25

Conceptronic Wireless 54Mbps USB Adapter
Click on the Configure button. The Wireless LAN USB adapter Properties Window will open, as shown below.
26

Conceptronic Wireless 54Mbps USB Adapter
Click on the Driver tab.
27

Conceptronic Wireless 54Mbps USB Adapter
Click on the Update Driver button. This will open the Hardware Update Wizard − the first screen of which is shown below.
Follow the instruction given by the Hardware Update Wizard to install an updated Windows XP driver for you USB adapter.
28
Conceptronic Wireless 54Mbps USB Adapter
Configuring the WLAN Adapter in Windows XP
Setting Up a Connection
Note: Windows XP contains support for the management of Wireless LAN cards such as your new C54RU. The WLAN Utility supplied with your USB adapter are intended for previous versions of Windows and do not have to be installed if you are using Windows XP.
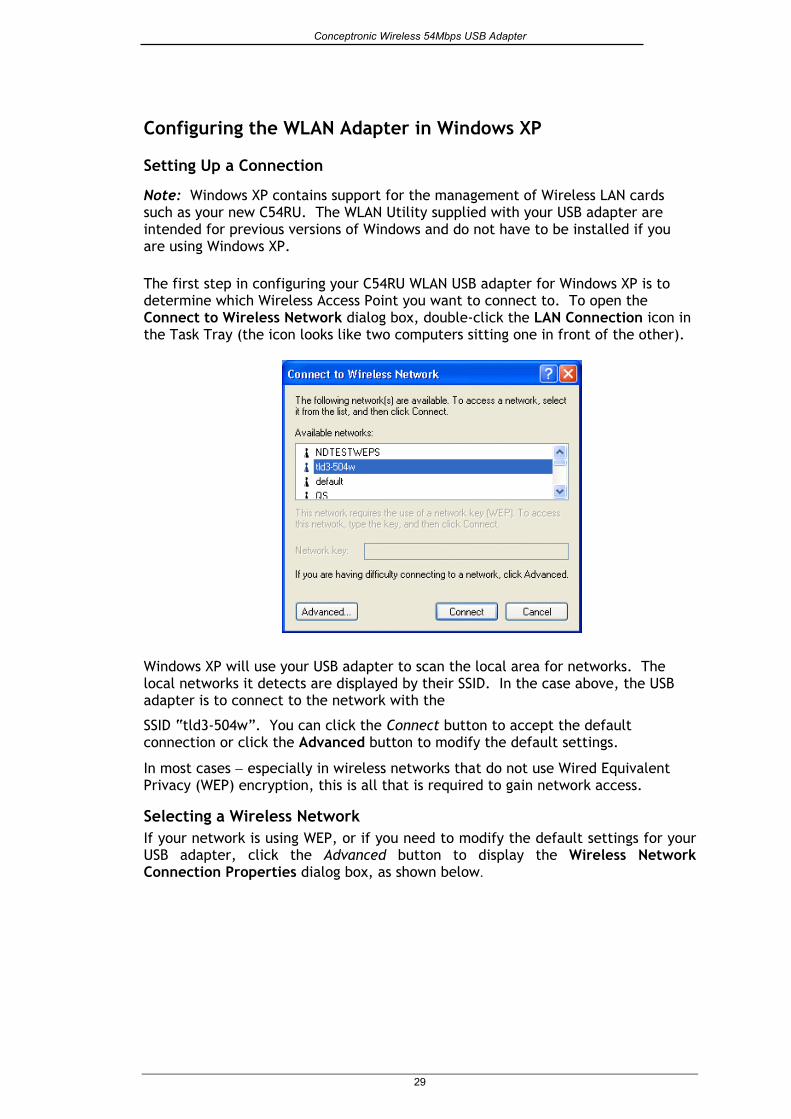
The first step in configuring your C54RU WLAN USB adapter for Windows XP is to determine which Wireless Access Point you want to connect to. To open the Connect to Wireless Network dialog box, double-click the LAN Connection icon in the Task Tray (the icon looks like two computers sitting one in front of the other).
Windows XP will use your USB adapter to scan the local area for networks. The local networks it detects are displayed by their SSID. In the case above, the USB adapter is to connect to the network with the
SSID “tld3-504w”. You can click the Connect button to accept the default connection or click the Advanced button to modify the default settings.
In most cases − especially in wireless networks that do not use Wired Equivalent Privacy (WEP) encryption, this is all that is required to gain network access.
Selecting a Wireless Network If your network is using WEP, or if you need to modify the default settings for your USB adapter, click the Advanced button to display the Wireless Network Connection Properties dialog box, as shown below.
29

Conceptronic Wireless 54Mbps USB Adapter
Windows XP again shows you the wireless networks it has been able to detect in the local area.
Select a Wireless Network Type
Clicking the Advanced button opens the following dialog box, which allows you to select the type of wireless network you want to connect your USB adapter to.
The Advanced dialog box allows you to choose the type of WLAN connection you need.
Any available network (access point preferred) will attempt to make a connection to an Access Point first, but will allow a 802.11 Ad Hoc peer to peer connection if no Access Point is within range of the USB adapter.
Access point (infrastructure) networks only will allow a connection to an Access Point only.
Computer-to-computer (ad hoc) networks only will allow only an 802.11 Ad Hoc peer-to-peer connection.
30
Conceptronic Wireless 54Mbps USB Adapter
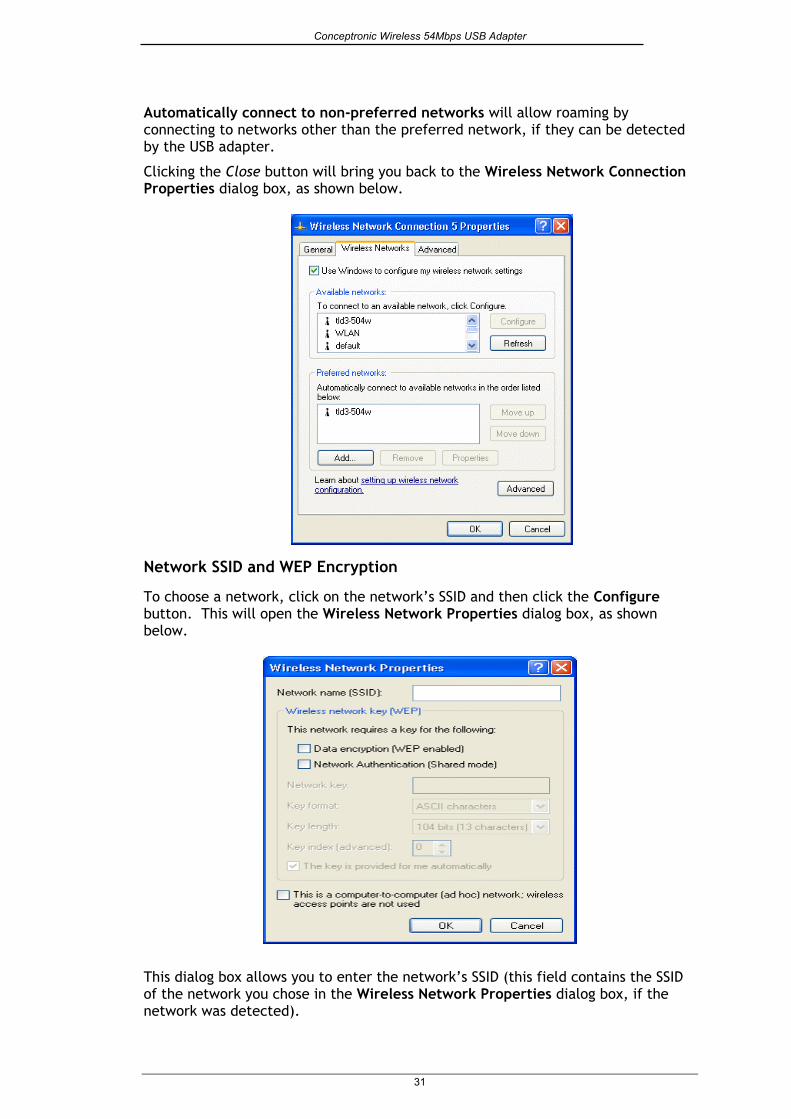
Automatically connect to non-preferred networks will allow roaming by connecting to networks other than the preferred network, if they can be detected by the USB adapter.
Clicking the Close button will bring you back to the Wireless Network Connection Properties dialog box, as shown below.
Network SSID and WEP Encryption
To choose a network, click on the network’s SSID and then click the Configure button. This will open the Wireless Network Properties dialog box, as shown below.
This dialog box allows you to enter the network’s SSID (this field contains the SSID of the network you chose in the Wireless Network Properties dialog box, if the network was detected).
31

Conceptronic Wireless 54Mbps USB Adapter
WEP can also be configured by clicking the Data encryption (WEP enabled) check box. If your WEP configuration uses a shared key, click the Network Authentication (Shared mode) click box. To enter the actual WEP key, unclick the The key is provided for me automatically check box, and enter the key in the Network key: field. The Key format: field allows the choice of ASCII characters (normal numbers and letters) or Hexadecimal digits (0 through 9 and letters A through F). The Key length: field allows you to specify the length of the key.
If you connecting to an 802.11 Ad Hoc peer-to-peer network, click the This is a computer-to-computer (ad hoc) network; wireless access points are not used check box.
Clicking the OK or the Cancel button will take you back to the Wireless Network Connection Properties dialog box, as shown below.
IP Address Assignment
Your C54RU needs to be assigned an IP address, subnet mask, and default gateway before connecting to a LAN.
The default setting is to use the Dynamic Host Configuration Protocol (DHCP) to obtain the appropriate network addressing information. If your network has a DHCP server that can be reached from a wireless Access Point, your C54RU will automatically contact the server and be assigned an IP address, subnet mask, and the IP address of the default gateway. If your network does not have a DHCP server, you will need to configure the USB adapter manually.
To configure the USB adapter’s IP address manually, click the General tab on the Wireless Network Connection Properties dialog box to open the following dialog box.
32
Conceptronic Wireless 54Mbps USB Adapter
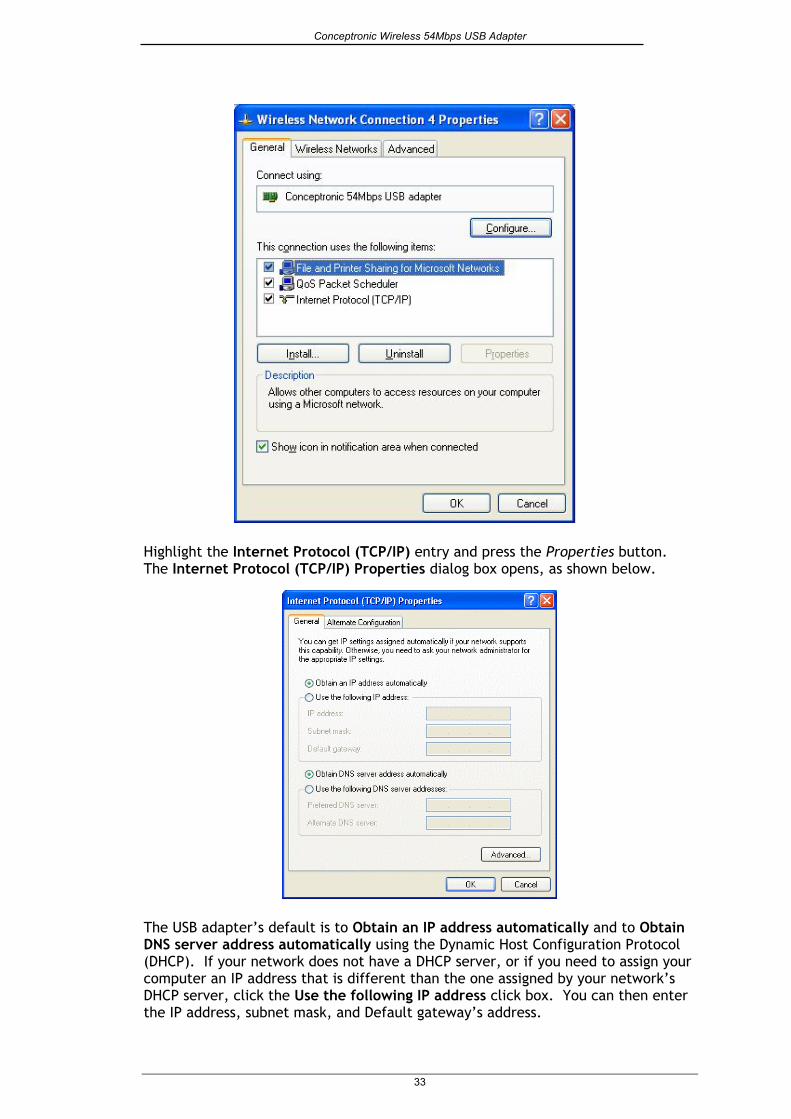
Highlight the Internet Protocol (TCP/IP) entry and press the Properties button. The Internet Protocol (TCP/IP) Properties dialog box opens, as shown below.
The USB adapter’s default is to Obtain an IP address automatically and to Obtain DNS server address automatically using the Dynamic Host Configuration Protocol (DHCP). If your network does not have a DHCP server, or if you need to assign your computer an IP address that is different than the one assigned by your network’s DHCP server, click the Use the following IP address click box. You can then enter the IP address, subnet mask, and Default gateway’s address.
33
Conceptronic Wireless 54Mbps USB Adapter
If you enter an IP address manually, you will also need to enter the address of a DNS server (an alternative DNS server is not required).
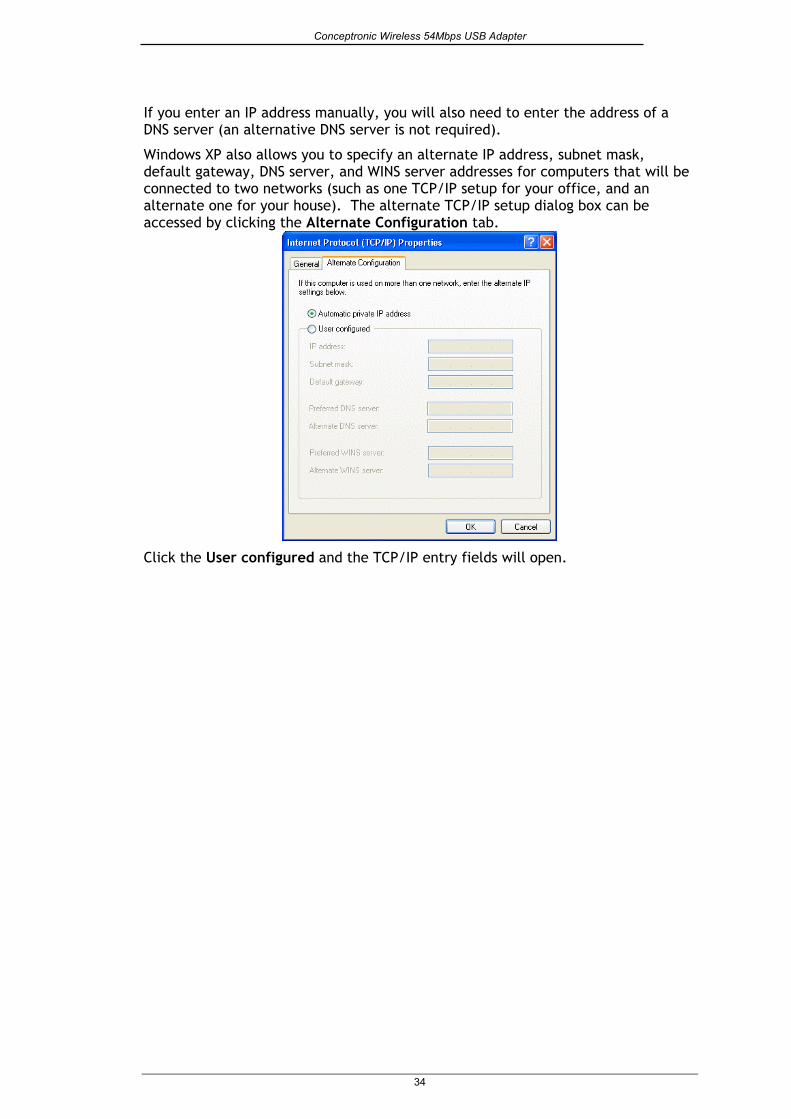
Windows XP also allows you to specify an alternate IP address, subnet mask, default gateway, DNS server, and WINS server addresses for computers that will be connected to two networks (such as one TCP/IP setup for your office, and an alternate one for your house). The alternate TCP/IP setup dialog box can be accessed by clicking the Alternate Configuration tab.
Click the User configured and the TCP/IP entry fields will open.
34
Conceptronic Wireless 54Mbps USB Adapter
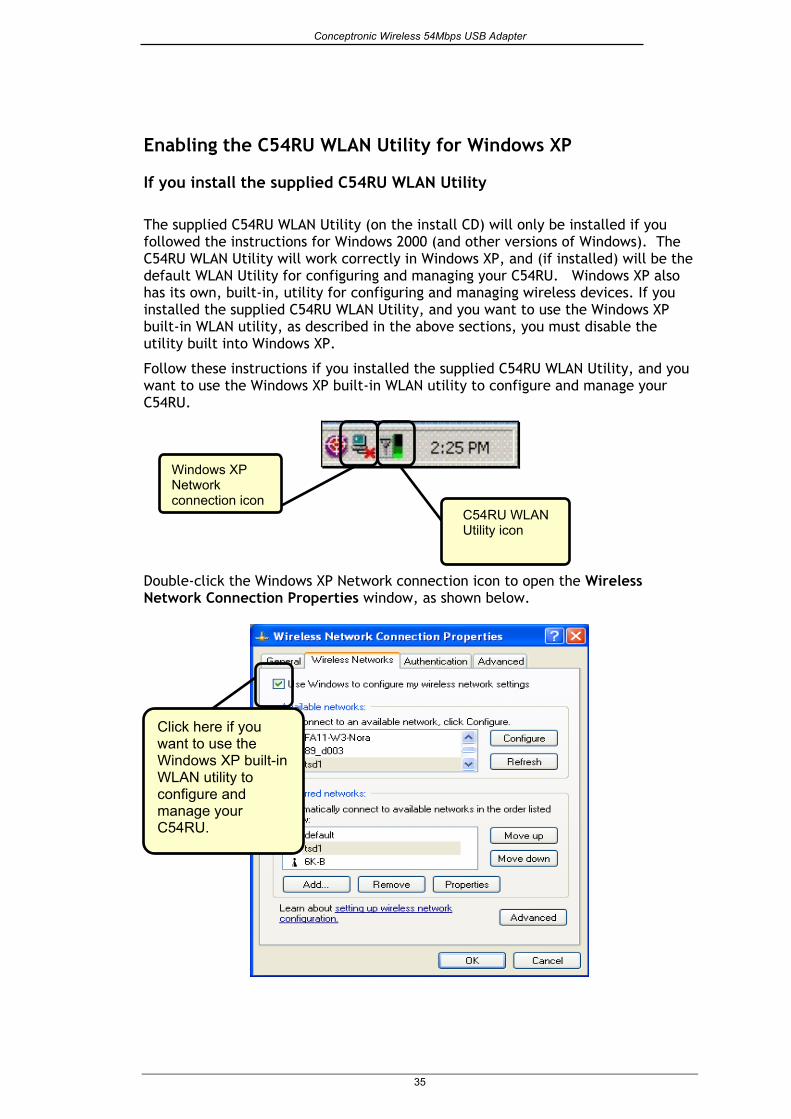
Enabling the C54RU WLAN Utility for Windows XP
If you install the supplied C54RU WLAN Utility
The supplied C54RU WLAN Utility (on the install CD) will only be installed if you followed the instructions for Windows 2000 (and other versions of Windows). The C54RU WLAN Utility will work correctly in Windows XP, and (if installed) will be the default WLAN Utility for configuring and managing your C54RU. Windows XP also has its own, built-in, utility for configuring and managing wireless devices. If you installed the supplied C54RU WLAN Utility, and you want to use the Windows XP built-in WLAN utility, as described in the above sections, you must disable the utility built into Windows XP.
Follow these instructions if you installed the supplied C54RU WLAN Utility, and you want to use the Windows XP built-in WLAN utility to configure and manage your C54RU.
Windows XP Network connection icon
C54RU WLAN Utility icon
Double-click the Windows XP Network connection icon to open the Wireless Network Connection Properties window, as shown below.
Click here if you want to use the Windows XP built-in WLAN utility to configure and manage your C54RU.
35

Conceptronic Wireless 54Mbps USB Adapter
If you click the Use Windows to configure my wireless network settings click-box (if it is checked) you then will use the Windows XP utility for wireless devices. If you have installed the supplied C54RU WLAN Utility, and this box is unchecked, then the C54RU WLAN Utility will be used to configure and manage your C54RU.
Follow the instructions given for the C54RU WLAN Utility under Windows 2000.
36

Conceptronic Wireless 54Mbps USB Adapter
WLAN Networking Basics
To begin, select the type of wireless network you will be building.
We will discuss the following types of networks in this section:
• A Home Internet Network with A Residential Gateway/Router
• A Home Internet Network with Multiple IP Addresses
• An Ad Hoc Network
• An Ad Hoc Network with Internet Sharing
Please select, from the four types of networks described above, the type of network that is appropriate for your needs. Please follow the instructions in the corresponding section that follows.
1. A Home Internet Network with A Residential Gateway/Router
(Network administrators with Dynamic IPs can also follow these instructions.)
If you have two or more computers (laptops or desktops) and want to share files, printers, and Internet access using a DHCP-capable Residential Gateway/Router – or - if you want to connect to an Ethernet network that uses Dynamic (DHCP) IP addresses, then follow the instructions on the next page.
DHCP stands for Dynamic Host Configuration Protocol. It is a protocol for assigning dynamic IP addresses “automatically.” With a DHCP-capable gateway, there is no need to manually assign an IP address.
Requirements: A Residential Gateway/Router connected with an Ethernet (CAT5) cable to an 802.11g Access Point.
37

Conceptronic Wireless 54Mbps USB Adapter
This type of installation requires that you provide a dynamic IP address for each computer on your network. You will need a DHCP-capable Residential Gateway/Router for your network.
To complete the installation, please follow these steps:
1. Connect the Router/Gateway to a Broadband connection (e.g., a Cable modem or a DSL modem.)
2. Connect the 802.11g Access Point to the router.
3. Install the C54RU Wireless 54Mbps USB adapter into a laptop or desktop computer on your wireless network
4. Check the Device Manager to confirm that the wireless adapter is installed correctly. Please refer to the Networking Basics section in this manual entitled, Checking the Installation of the Drivers for the Wireless Adapter.
5. By default, the wireless adapter is set to obtain a Dynamic IP Address. If you are having difficulty connecting, check to make sure that the IP Address of the wireless adapter is within the IP address range of your network. Please refer to the Networking Basics section in this manual entitled, “Checking the IP Address.”
2. A Home Internet Network with Multiple IP Addresses
(Network administrators with Static IPs can also follow these instructions.)
If you have two or more computers (laptops or desktops) and want to share files, printers, and Internet access using multiple IP addresses that you have purchased from your Internet Service Provider -or- you want to connect to an Ethernet network that uses Static IP Addresses, then follow the instructions on the next page. When you have completed your network, it should look similar to this:
38
Conceptronic Wireless 54Mbps USB Adapter
Please note that this type of installation requires that your ISP (Internet Service Provider) provide you a static IP address for each computer and the Access Point on your network. Please refer to the manual that came with your Access Point to determine its configuration.
Please follow these steps to complete the installation:
1. Connect the Wireless Access Point to a Broadband connection (i.e., a Cable modem or a DSL modem.)
2. Install the C54RU Wireless 54Mbps USB adapter in the computer(s) on your wireless network
3. Check the Device Manager to confirm that the wireless adapter is installed correctly. Please refer to the Networking Basics section in this manual entitled, “Checking the Installation of the Drivers for the Wireless Adapter.”
4. Set the Static IP Address of the wireless adapters if Multiple Dynamic IP are not used.
Note: The IP Address for all computers must be in the same IP Address range, and the Subnet Mask must be the same for all the computers on the network. For example, if the first computer is assigned an IP Address of 10.0.0.2 with a Subnet Mask of 255.0.0.0, then the second computer can be assigned an IP Address of 10.0.0.3 with a Subnet Mask of 255.0.0.0, etc.
Note: If you are using a PPPoE client (Point to Point Protocol over Ethernet), please contact your ISP (Internet Service Provider) for further instructions regarding connecting to the Internet.
3. An Ad Hoc Network
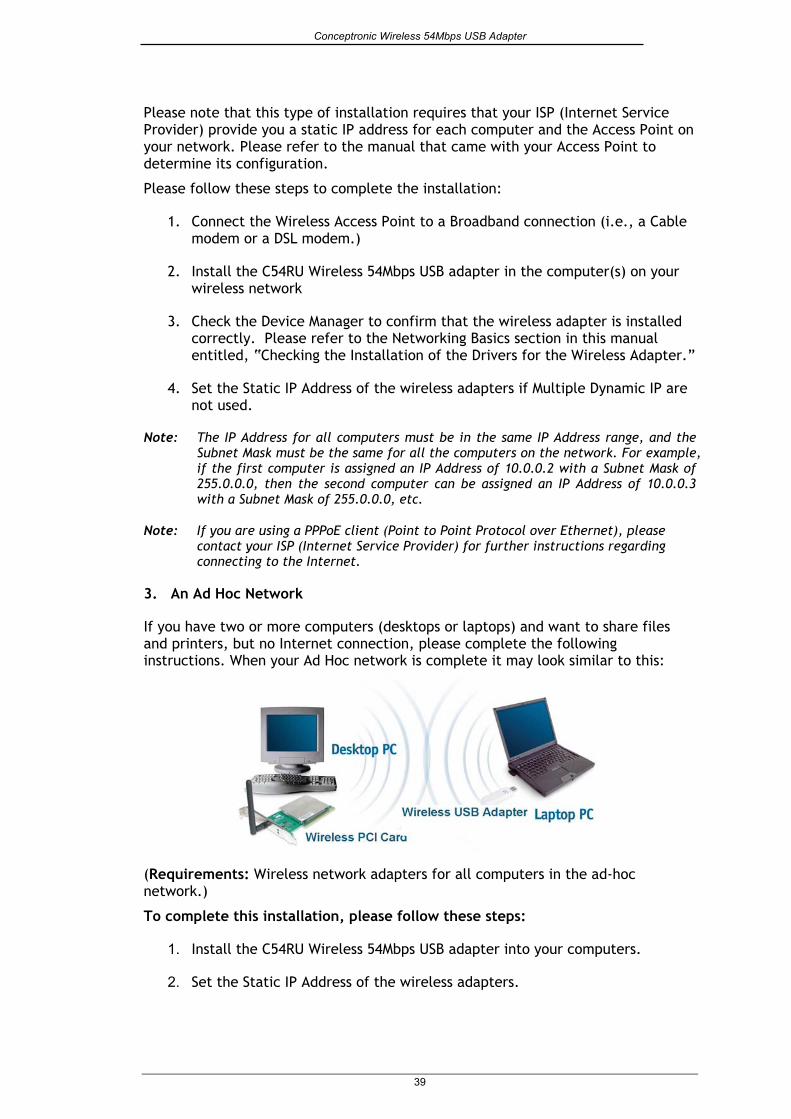
If you have two or more computers (desktops or laptops) and want to share files and printers, but no Internet connection, please complete the following instructions. When your Ad Hoc network is complete it may look similar to this:
(Requirements: Wireless network adapters for all computers in the ad-hoc network.)
To complete this installation, please follow these steps:
1. Install the C54RU Wireless 54Mbps USB adapter into your computers.
2. Set the Static IP Address of the wireless adapters.
39

Conceptronic Wireless 54Mbps USB Adapter
Note: The IP Address for all computers must be in the same IP Address range, and the Subnet Mask must be the same for all computers on your network. For example, if the first computer is assigned an IP Address of 10.0.0.2 with a Subnet Mask of 255.0.0.0, then the second computer can be assigned an IP Address of 10.0.0.3 with a Subnet Mask of 255.0.0.0, etc.
3. Check the Device Manager to confirm that the wireless adapter is installed correctly. Please refer to the Networking Basics section in this manual entitled, “Checking the Installation of the Drivers for the Wireless Adapter.”
4. Check the Wireless Configuration for each wireless adapter. Please refer to the Networking Basics section in this manual entitled, “Checking the Wireless Configuration.”
5. Learn to share printers and files. Please refer to the Networking Basics section in this manual entitled, “Adding and Sharing Printers in Windows XP.”
40

Conceptronic Wireless 54Mbps USB Adapter
4. An Ad Hoc Network with Internet Sharing
If you have two or more computers (desktops or laptops) and want to share files, printers, and Internet access using one computer or laptop as an Internet Server, then follow the instructions below. When you have completed your network, it should look similar to this:
To share an Internet connection with Internet Sharing software you will need to purchase Internet Sharing software or use the Internet Connection Sharing (ICS) utility provided with Windows XP, Windows 2000, Windows ME or Windows 98SE.
Please follow your software documentation to properly configure the Internet sharing software after you install your wireless networking adapters. To install your wireless network adapter follow the instructions on the next page.
If the Internet Sharing Software will be installed on the same computer into which you are installing the C54RU, then follow these steps:
1. Install the wireless card into the computer.
2. Check the Device Manager to confirm that your adapter is installed correctly.
3. Install your Internet Sharing Software.
4. If required by the software, set the static IP Address for the wireless adapter.
Note: The IP Address for all the computers on the network must be in the same IP Address range, and the Subnet Mask must be the same for all the computers on the network. For example, if the first computer is assigned an IP Address of 10.0.0.2 with a Subnet Mask of 255.0.0.0, then the second computer can be assigned an IP address of 10.0.0.3 with a Subnet Mask of 255.0.0.0, etc.
41

Conceptronic Wireless 54Mbps USB Adapter
If the Internet Sharing Software will be installed on a computer other than the one in which you are installing the C54RU Wireless 54Mbps USB Adapter, then follow these steps:
1. Install the C54RU into the computer.
2. Check the IP Address for the wireless adapter. Please make certain that all the computers on your network are in the same IP Address range.
Note: By default, the wireless adapter is set to obtain a Dynamic IP Address, automatically.
42
Conceptronic Wireless 54Mbps USB Adapter
Troubleshooting
This chapter provides solutions to problems that can occur during the installation and operation of your C54RU. Read the following descriptions if you are having problems.
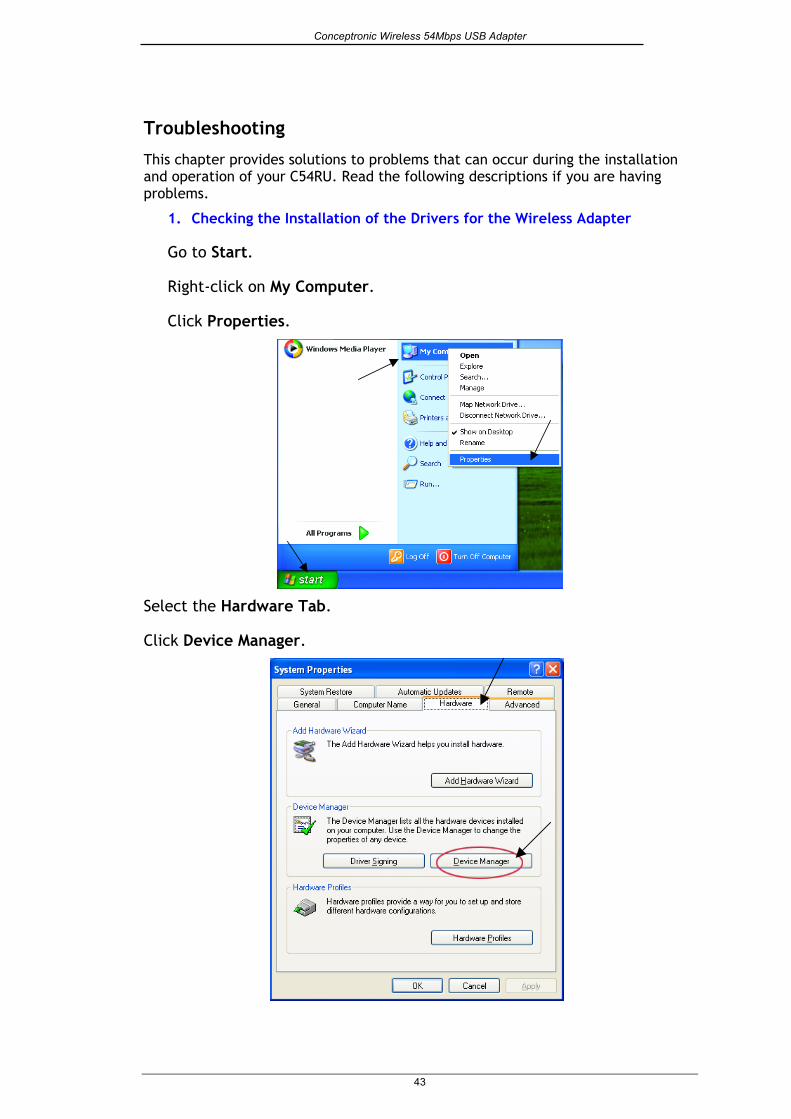
1. Checking the Installation of the Drivers for the Wireless Adapter
Go to Start.
Right-click on My Computer.
Click Properties.
Select the Hardware Tab.
Click Device Manager.
43
Conceptronic Wireless 54Mbps USB Adapter
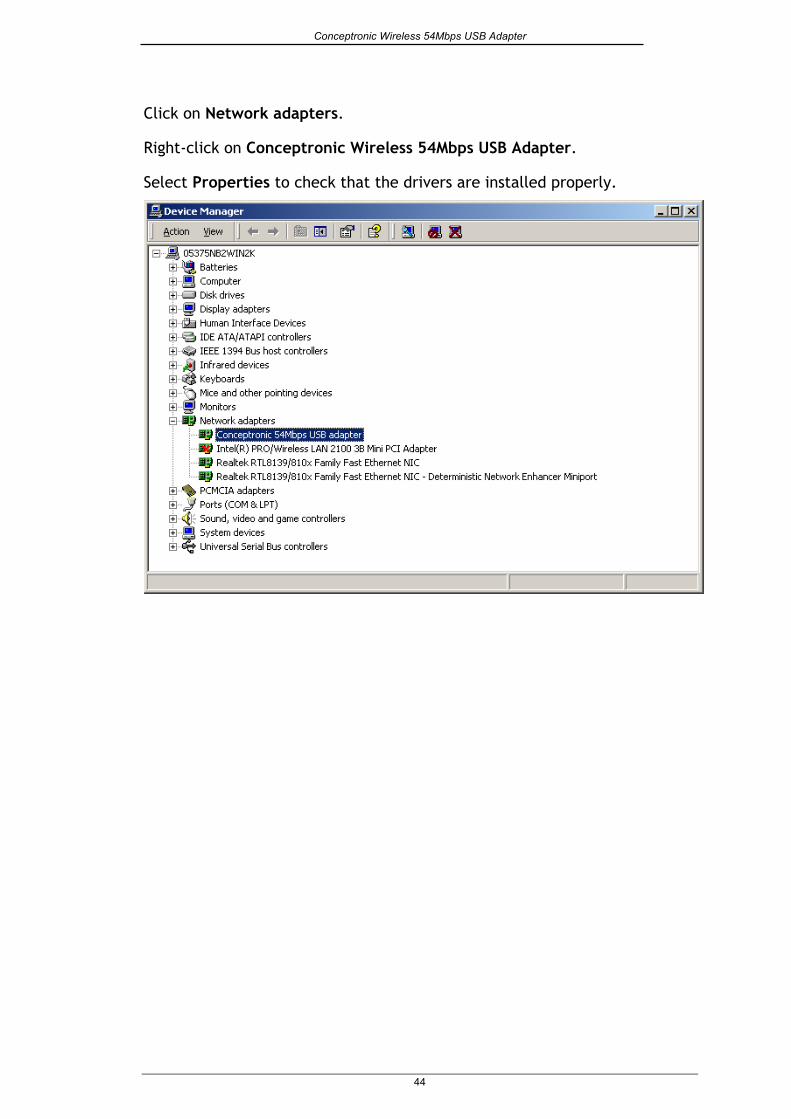
Click on Network adapters.
Right-click on Conceptronic Wireless 54Mbps USB Adapter.
Select Properties to check that the drivers are installed properly.
44

Conceptronic Wireless 54Mbps USB Adapter
Look under Device Status to check that the device is working properly.
Click OK.
2. The computer does not recognize the C54RU.
• Make sure that C54RU is properly seated in the computer’s USB slot.
• If Windows does not detect the C54RU upon insertion of the Adapter make sure to completely remove drivers that were previously installed. To remove the drivers, do the following:
A. Under Tools, select Folder Options…>View> Hidden files and folders>Show hidden files and folders.
B. Uncheck Hide extension for known file types and then click Apply.
C. Search for the files CRTUSB.sys and CRTUSB.inf. Remove these files from the INF and SYSTEM32 (DRIVERS) folders in the Windows directory. Note: Windows XP and Windows 2000 will rename CRTUSB.inf that have not received certification into oem.inf files (e.g., oem1.inf.) Therefore, please also remove all oem*.inf and oem*.PNF files in inf folder of WIN NT.
45
Conceptronic Wireless 54Mbps USB Adapter
3. C54RU does not work properly after the driver is installed.
• Restart the computer. (In some cases, it will be necessary to restart the computer after installing the drivers.)
• In Windows XP, go to Start>Control Panel>System>Hardware tab> click on the Device Manager tab> click on Network Cards> double-click on Conceptronic Wireless 54Mbps USB adapter > make sure that “This device is working properly” is displayed under Device Status under the General tab.
• If the device is not working properly and a yellow exclamation mark is displayed, then there is probably a resource conflict. In this case, make sure the computer system has a free IRQ and if necessary, uninstall the drivers, restart the system, and repeat the driver installation procedure.
4. The wireless client cannot access the Internet in the Infrastructure mode.
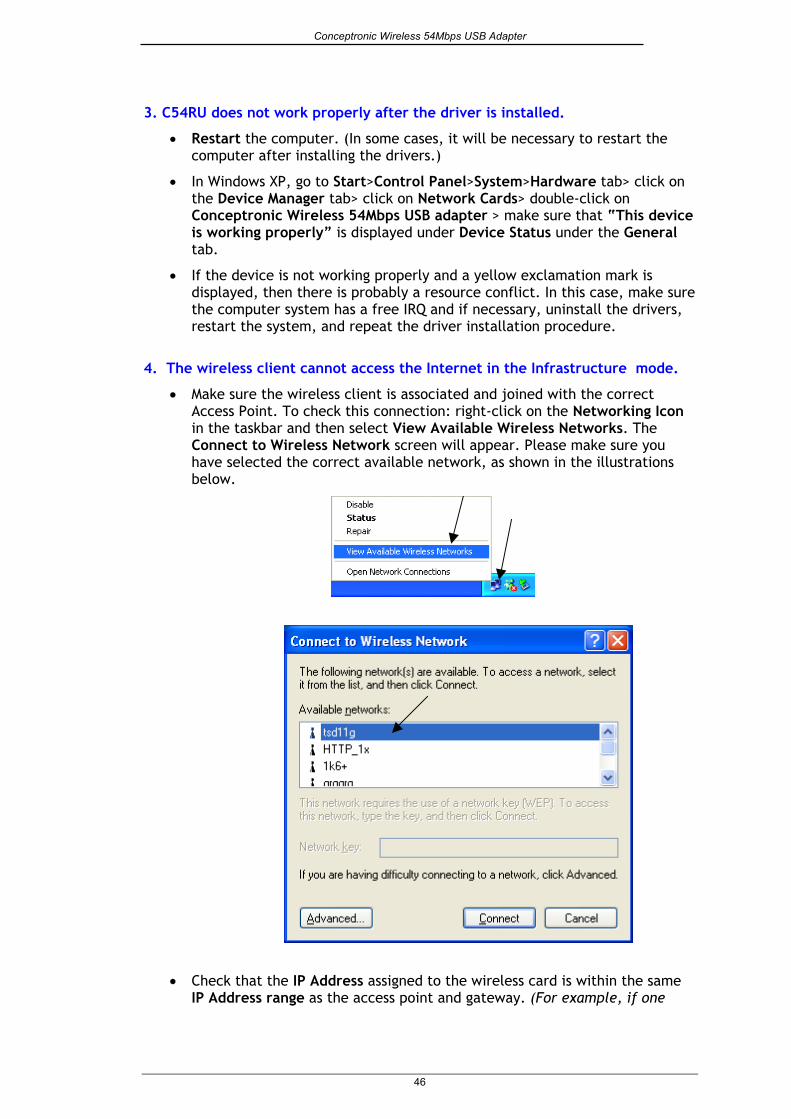
• Make sure the wireless client is associated and joined with the correct Access Point. To check this connection: right-click on the Networking Icon in the taskbar and then select View Available Wireless Networks. The Connect to Wireless Network screen will appear. Please make sure you have selected the correct available network, as shown in the illustrations below.
• Check that the IP Address assigned to the wireless card is within the same IP Address range as the access point and gateway. (For example, if one
46

Conceptronic Wireless 54Mbps USB Adapter
computer has an IP Address of 10.0.0.2, the other computers should have IP Addresses that are sequential, like 10.0.0.3 and 10.0.0.4. The subnet mask must be the same for all the computers on the network.) To check the IP Address assigned to the wireless card, double-click on the Network Connection icon in the taskbar and then select the Support tab. The IP Address will be displayed.
If you are entering a DNS Server Address, you must also enter the Default Gateway Address. (Remember that if you have a DHCP-capable router, you will not need to assign a Static IP Address.)
47

Conceptronic Wireless 54Mbps USB Adapter
Technical Specifications
Standards • IEEE 802.11b (up to 11 Mbps) • IEEE 802.11g (up to 54 Mbps)
Card Type
• High Speed USB 2.0 Supported OS
• Windows XP • Windows 2000 • Windows ME • Windows 98SE
Frequency Range • 2400-2497 MHz ISM band (IEEE 802.11b) • 2400-2497 MHz Ism band (IEEE 802.11g)
Data Rates
• 1, 2, 5.5, 11 Mbps (IEEE 802.11b) • 6, 9, 12, 18, 24, 36, 48, 54 Mbps (IEEE 802.11g)
Modulation Techniques IEEE 802.11g
• BPSK • QPSK • 16 QAM • 64 QAM • OFDM IEEE 802.11b • DQPSK • DBPSK • DSSS • CCK
Data Security • 64, 128-bit WEP (Wired Equivalent Privacy) Encryption
Media Access Control
• CSMA/CA with ACK Diagnostic LED
• LinkLED blink: Transmit data • Activity LED on: Link with Access Point
Power Consumption
• 330 mA at continuous transmit mode • 300 mA at continuous receive mode
Operating Voltage • 5V± -10%
48
Conceptronic Wireless 54Mbps USB Adapter
49
Network Architecture
• Ad-Hoc Mode (Peer-to-Peer without Access Point) • Infrastructure Mode (Communications to wired networks via Access
Points with Roaming) Antenna Type
• Integrated dual-chip antennas Available Channels:
• Thirteen channels for European countries (IEEE 802.11b) • Thirteen channels for European countries (IEEE 802.11g)
MTBF (Mean Time Between Failure)
• 30,000 hours Temperature
• Operating: 0ºC to 40ºC • Storing: -20ºC to 75ºC
Humidity: • 20%-80%, non-condensing (operating) • 5%-95%, non-condensing (non-operating)
Regulatory Requirements:
• EMC: EN 300 328, EN 300 826, EN 60950