Embed Size (px)
Citation preview

C++ Starting Kit Project - GuideDocumentation
Release 0.0.1
Will Alvidi
Oct 31, 2017


Contents
1 Follow the Guide 1
2 Indices and tables 41
i

ii

CHAPTER 1
Follow the Guide
Author
Introduction
I am pretty happy to welcome you to this project and I sincerely hope that you will find here what you were lookingfor.
Before to start I will just talk a bit about the genesis of this project to help you understand how and why things arestructured as they are.
First of all I am not a developer, I never touched any programming language before this project.
Everything you can see about this project, from the C++ Starting Kit plugin to its documentation was realized fromscratch with no prior knowledge.
Secondly, if you encounter strange structures in my english syntax it is mainly because I am not a native englishspeaker. I try to keep things as simple as possible to avoid mistakes in that sense.
That said, here is the story.
I want to learn a programming language because I would love to develop tools for 2D and 3D graphic designers. I amnot a student and I prefer to do it by myself.
I chose C++ because I love its history and its philosophy, then I had to find my primary tool.
I didn’t want to use a complete IDE because even if I’m sure that they are amazing for productivity I’m also sure thatthey automate and hide a lot of crucial steps necessary for a deep understanding of the language.
Then I encountered Sublime Text which really seduced me by its elegance and its functionalities but the C++ syntaxsupport was really poor.
So I decided to start this project.
From the very beginning I really wanted to make it as a starting kit for beginners with not just a language definitionbut also every single useful tool and tip I experienced to make the learning of C++ with Sublime Text a real pleasure.
1

C++ Starting Kit Project - Guide Documentation, Release 0.0.1
I sincerely hope I made it and I also hope to go further by introducing as regularly possible as possible the best toolsand tips that I can give you.
Enjoy.
Will Alvidi
Project
Features
The C++ Starting Kit Project is a minimal set of useful tools and tips for C++ and Sublime Text beginners. Itprovides :
• The C++ Starting Kit Plugin
– C, C++ and C++11 combined and improved syntax definition for Sublime Text.
– A convenient C++ syntax definition for custom syntax highlighting.
– Custom build system for g++ compiler.
• The Oasis Theme Plugin
– A color scheme compatible with the C++ Starting Kit plugin
– A recommended minimal environment.
• The C++ Starting Kit Guide
– An accessible and structured documentation for a quick start.
– A procedure for the integration of Git and other Linux Shell functionalities. (Windows 7 users only)
Documentation
Structure
This documentation is a guide for Sublime Text 3 users under Windows 7.
Its structure and concepts are easily adaptable to other systems and previous version of Sublime Text.
It is oriented for people who are really new in programming and want to start their learning of C++ with SublimeText.
As a beginner, if you follow everything, from top to bottom, step by step, you will be able to get up and runningquickly.
Don’t expect advanced topics, everything is presented as a real starting point with the minimal procedures to makeyour tools functional.
If you are an advanced user you may find tips or tools to enhance your workflow.
2 Chapter 1. Follow the Guide

C++ Starting Kit Project - Guide Documentation, Release 0.0.1
Windows 7
Presentation
This section provides required and optional steps to set up Windows 7 before the installation and the usage of SublimeText and the C++ Starting Kit plugin.
Prerequisite
Required
Customization
Show Hidden Elements
Why do you have to do it
Show hidden elements will allow you to see and access hidden and protected system files and folders.
A lot of programs and system preferences will be unlocked and accessible.
How to do it
Access
Folder Options
• Open the Start Menu
• Inside the Search Bar search for
Folder Options
• Open it
Edit
Show hidden elements
• Go to the View tab
• Check :
– Show hidden files, folders, or drives
• Uncheck :
– Hide empty drives in the Computer folder
– Hide extensions for known file types
– Hide protected operating system files
1.4. Windows 7 3

C++ Starting Kit Project - Guide Documentation, Release 0.0.1
Note: Don’t hesistate to spend a bit of time on the other options.
Tip: Do you want to click 2 times less ?
• With the same window open
• Go to the General tab
• Check
– Single-click to open an item
Manage the Environment Variables
Why do you have to do it
Sometimes you need to allow your programs to communicate between each other but by default this behavior doesn’texist.
The only link between all your programs is your system.
If you want to make a program visible to other programs you have to specify it to your system.
That’s what the environment variables does.
You can specify a group with the paths to the programs you want to be accessible and your system allow the connection.
How to do it
Access
Environment Variables
• Open the Start Menu
• Right-Click on Computer
• Choose Properties
• Click on Advanced system settings
• Click on Environment Variables
Edit
Manage the Environment Variables
Add path for all users
• Inside the System variable section
• Find the Path variable
4 Chapter 1. Follow the Guide

C++ Starting Kit Project - Guide Documentation, Release 0.0.1
• Click to Edit
• Inside Variable value add a ;
• Then add your path
• Click OK to validate your changes
Add path for the current user
• Inside the User variable for <YourUserName> section
• Click New...
• Inside Variable name type Path
• Then add your path
• Click OK to validate your changes
Apply the changes
• Log off or Restart your computer.
Warning: Be very careful if you use the Add path to all users method. Paths inside this field are critical for yoursystem to work.
Warning: Notice the ; between each paths.
Tip: Safest way to manipulate those fields
• Copy Paste the content of those fields in a blank file inside your text editor
• Make the changes inside this file then Copy them
• Paste your changes inside you environment variables
Tip: It is recommended to use the Add path for the current user method.
Utility
Archive Manager
Why do you have to use it
A lot of downloadable contents from the Internet are archived in formats like *.zip, *.rar, *.tar and otherspecific archiving formats.
You need specific programs to use and manage them.
1.4. Windows 7 5

C++ Starting Kit Project - Guide Documentation, Release 0.0.1
Recommended
Download and install
• Winrar
• 7Zip
File Association Manager
Why do you have to use it
All the operating systems allow the user to assign a default program to launch a specific file type.
Softwares are available on the market to simplify this process.
Recommended
See the presentation
Types
Presentation
Type allow the management of the file association by the Right-Click menu.
Installation
Prerequisite
Download the installer
From the homepage.
Procedure
Launch the installer and follow the installation procedure.
Post
No specific post installation requirements.
6 Chapter 1. Follow the Guide

C++ Starting Kit Project - Guide Documentation, Release 0.0.1
Usage
Change the File Association
• Right-Click on a file
• Choose Edit file type
• Go to the Action tab
• Select Open or Edit
• Or add a new action to perform if it doesn’t exist by clicking on the green cross and naming it Open or Edit
• Click on the Folder at the bottom right
• Browse to your program installation and specify its launcher (*.exe file in most cases)
• Just close the program to apply the changes
Recommandation
No specific recommandation for this software.
Optional
Customization
Relocate Users Folders
Why do you have to do it
User Folders in Windows 7 like My Documents and Public Documents may contain program preferences or caches.
Relocate in a different partition prevent data loss if your system fails and you have to perform a restoration or acomplete reinstall.
How to do it
Access
Users Folders
My Documents
C:\Users\<YourUserName>\Documents
Public Documents
C:\Users\Public\Documents
1.4. Windows 7 7

C++ Starting Kit Project - Guide Documentation, Release 0.0.1
Edit
Relocate the Users Folders
• Right-Click on the folder
• Choose Properties
• Go to the Location tab
• Click on Move...
• Set your new path
• Click Apply and close the window
Warning: If you have to reinstall your system, before to reinstall your programs, backup your preferences.
This extra step is necessary because the new installations will overwrite the previous working setttings.
A simple workaround is to create a Backup folder (the name doesn’t really matter) inside those folders andDrag`n`Drop inside your previous working preferences.
When your programs will be reinstalled, just Copy Paste the previous working preferences from the Backupfolders to your User Folders.
Note: Some programs store their preferences in other specific locations.
For those exceptions, to keep your program preferences centralized, read the documentation of your program andrelocate everything inside your relocated user folders.
Organize the Start Menu
Why do you have to do it
One advantage of your systems is that you always have many ways to do the same thing and at the end you take theone you prefer.
The problem is that it is the same for the developers who can drop things here and there without really affecting thefunctionalities but after you loose your time to understand how things are organized and where, for example, are storedyour preferences.
Organize the Start Menu is one way to clean and structure your system.
How to do it
Access
Open the Start Menu Structure
8 Chapter 1. Follow the Guide

C++ Starting Kit Project - Guide Documentation, Release 0.0.1
For all users
C:\ProgramData\Microsoft\Windows\Start Menu
For the current user
C:\Users\<YourUserName>\AppData\Roaming\Microsoft\Windows\Start Menu
Note: Programs only stored For the current user are not available For all users.
Edit
A way to organize the Start Menu Structure
Tip: If you want a very clean environment do the following steps from a fresh install because when you start to addprograms this place become quickly unmanageable.
• Open the Start Menu Structure For all users
• Open the Start Menu Structure For the current user
• Create inside the Start Menu For all users a folder called Windows
• Drag`n`Drop all the available programs from the 2 locations to the Windows folder
• Inside the Start Menu For all user, besides the Windows folder, create folders like Utility, Development,Graphics...
• This will help you to structure your Start Menu and store your future programs
Add Keyboard Shortcut
Why do you have to do it
Have you ever experienced the feeling that you have lost a good idea because your mouse moves and your doubleclicks to open folders and programs took you too many time...?
Definitely yes ! And you know why ?
Because you don’t have keyboard shortcuts to your favorite programs !
Nothing goes faster than a keyboard shortcuts except the light and... your ideas.
1.4. Windows 7 9

C++ Starting Kit Project - Guide Documentation, Release 0.0.1
How to do it
Access
Shortcut Properties
• Right-Click on a shortcut
• Choose Properties
• Go to the Shortcut tab
Edit
Assign a keyboard shortcut to a program
• Access the Shortcut Properties
• Inside the Shortcut key field press a letter
• Click Apply to apply the changes
• Close the window
Note: This will assign a keyboard shortcut with Ctrl + Alt as base, following by the key you pressed.
Tip: Backspace inside the Shortcut key field to go back to the default value
Warning: Few programs need to be inside the Start Menu before to be accessible by a keyboard shortcut.
Warning: If you encounter the WinError06 when you are trying to build a C++ project this is because yourenamed and/or your added a keyboard shortcut to your Sublime Text 3 shortcut.
This issue happens on the Sublime Text 3 portable version. Not sure if with the installer it does the same.
This issue is a bit annoying and I didn’t find a solution yet.
If someone find a solution to this issue and see this S.O.S. please send me and email at :
Tip: You don’t need to add keyboard shortcut to every single program. If you plan to be a developer for example justadd a quick access to your terminal, your text editor, your web browser and your media player because sometimes itsaves your life.
10 Chapter 1. Follow the Guide

C++ Starting Kit Project - Guide Documentation, Release 0.0.1
Utility
Color Picker
Why do you have to use it
If you are a graphic designer you have, everyday, to deal with colors and need a tool to efficiently pick colors, generateand manage color collections.
Better if this the tool displays color definition in HSV, RGB, CMYK and Hexadecimal.
Recommended
Download and install
• Pixeur
Sublime Text
Presentation
“Sublime Text is a sophisticated text editor for code, markup and prose. You’ll love the slick user interface, extraordi-nary features and amazing performance.”
Presentation from the official website.
Installation
Prerequisite
Install Python
Why do you have to do it
Sublime Text 2 is based on Python 2.6 (also compatible with higher versions but inferior to the version 3) andSublime Text 3 on Python 3 (or higher).
By default Python is not installed on Windows systems and if you want to take the best of Sublime Text, especiallythe plugin ecosystem, you need to have the right dedicated version of Python installed.
How to do it
Installation
Download
• Download the appropriate version of Python depending on your Sublime Text version.
1.5. Sublime Text 11

C++ Starting Kit Project - Guide Documentation, Release 0.0.1
Install
• Launch the installer and follow the installation procedure.
Post Installation
Add Python to the environment variables
• Add Python to the environment variables
• The path you will have to add is
<YourDrive>:\PathToPython\
Add Python scripts to the environment variables
• Add Python scripts to the environment variables
• The path you will have to add is
<YourDrive>:\PathToPython\Scripts
Tip: Multiple versions of Python can be installed and each path must be added to the environment variables.
If you then plan to program in Python and want to use a specific version you can create multiple custom build systeminside Sublime Text and specify explicitly their path.
Procedure
Launch the installer and follow the installation procedure.
Post
Nothing specific to do in post installation.
Usage
Preferences
Presentation
Manage your Preferences in Sublime Text 3 is a crucial step to enhance your workflow.
To understand the Preferences management you must understand that each component of Sublime Text, from the texteditor itself to the external plugins, has 2 files which compose its settings, both in JSON language : a Default Settingsfile and a User Settings file.
The Default Settings file sets the default settings and provides by including comments a reference for the UserSettings file.
12 Chapter 1. Follow the Guide

C++ Starting Kit Project - Guide Documentation, Release 0.0.1
All the User Settings files are stored in the User Packages folder.
Usage
Access
Default Settings for the Text Editor
• Go to the Preferences menu
• Choose Settings - Default
Note: This will open the Preferences.sublime-settings file which includes Default Settings.
User Settings for the Text Editor
From Sublime Text
• Go to the Preferences menu
• Choose Settings - User
Note: This will open the Preferences.sublime-settings file which includes the User Settings.
From a path
SublimeText\Data\Packages\User\Preferences.sublime-settings
User Packages
From Sublime Text
• Go to the Preferences menu
• Choose Browse Packages...
• Open the User folder
From a path
SublimeText\Data\Packages\User\
1.5. Sublime Text 13

C++ Starting Kit Project - Guide Documentation, Release 0.0.1
Edit
Define User Settings
Introduction
To modify a setting you have to edit the related User Settings file and Copy Paste to it the necessary chunks ofcode from the related Default Settings file.
For Example
Modify a setting of the text editor
• Open the Default Settings for the text editor
• Open the User Settings for the text editor
Tip: If your User Settings file is blank add those lines
{
}
Note: Between those brackets your will add your User Settings.
• Locate inside the Default Settings file something you want to change and Copy it
• For the example we want to change the font size specified as follow
"font_size": 10,
• Paste it to your User Settings file
• Change the setting to something else
• For the example we will use 12 as setting for the "font_size" parameter
• Your User Settings file must look like this
{"font_size": 12,
}
• To apply the changes Save the file
Warning: In some cases you may need to restart Sublime Text to see the changes.
14 Chapter 1. Follow the Guide

C++ Starting Kit Project - Guide Documentation, Release 0.0.1
Color Scheme
Presentation
A Color Scheme allow your code to be colored depending on your current syntax.
Usage
Access
• Go to the Preferences menu
• Then Color Scheme
• then select your desired color scheme
Edit
Not detailed yet.
Syntax
Presentation
A Syntax is the complete language definition of a specific programming language ant it allows your code to commu-nicate with the Sublime Text’s internal and external tools.
Usage
Access
• Go to the View menu
• Choose Syntax
Set temporarily a syntax for the current extension
• From Syntax
• Select the appropriate syntax
Set permanently a syntax for the current extension
• From Syntax
• Choose Open all with current extension as...
• Select the appropriate syntax
1.5. Sublime Text 15

C++ Starting Kit Project - Guide Documentation, Release 0.0.1
Edit
Not detailed yet
Build System
Presentation
A Build System is specific to a language and allows Sublime Text and an accessible external tool to compile and buildyour code.
Usage
Access
Change the Build System
• Go to the Tools menu
• Choose Build System
• Select the appropriate build system
Edit
Understand the C++ Starting Kit Build System
Not detailed yet
Project
Presentation
A Project is a collection of folders and files.
Create a Project creates 2 files which define your Project
• *.sublime-project Mainly contains included elements in your project and can handle extra settings forinternal tools and plugins
• *.sublime-workspace Mainly keeps track of your layout
Note: A Project can include multiple folders and files from multiple locations.
16 Chapter 1. Follow the Guide

C++ Starting Kit Project - Guide Documentation, Release 0.0.1
Usage
Access
Create a Project
• Go to the Project menu
• Choose Save Project As...
Note: This will create a *.sublime-project and *.sublime-workspace with the name you specified asbase.
Tip: If you open the Side Bar
• Go to the View menu
• Then Side bar
• Select Show Side Bar
This will open the Side Bar to the left side of your Sublime Text window.
You can then Drag`n`Drop files and folders from your explorer to quickly add them to your project.
Open a Project
• Go to the Project menu
• Choose Open Project...
• Browse to your ‘Project‘_ location
• Double-Click on the related *.sublime-project file
Edit
Minimal settings for a Project
• Open the Side Bar
• Create a Project
• Open the *.sublime-project file located to your Project location
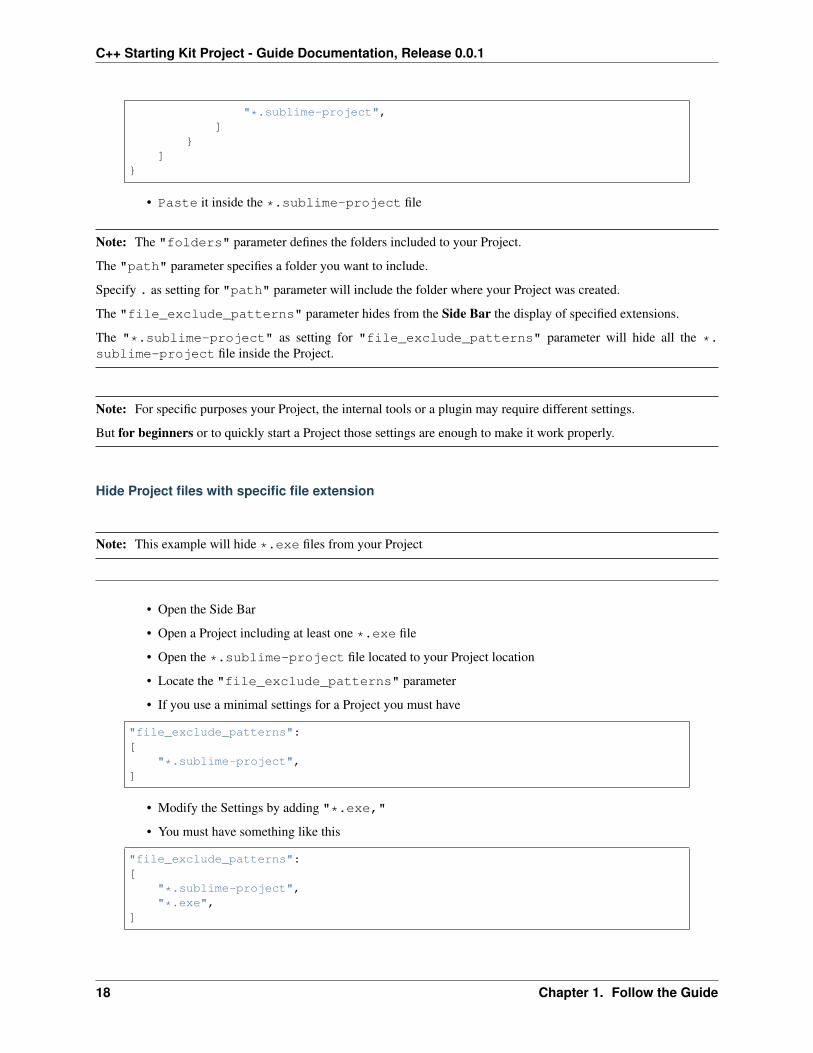
• Copy the following
{"folders":[
{"path": ".","file_exclude_patterns":[
1.5. Sublime Text 17
C++ Starting Kit Project - Guide Documentation, Release 0.0.1
"*.sublime-project",]
}]
}
• Paste it inside the *.sublime-project file
Note: The "folders" parameter defines the folders included to your Project.
The "path" parameter specifies a folder you want to include.
Specify . as setting for "path" parameter will include the folder where your Project was created.
The "file_exclude_patterns" parameter hides from the Side Bar the display of specified extensions.
The "*.sublime-project" as setting for "file_exclude_patterns" parameter will hide all the *.sublime-project file inside the Project.
Note: For specific purposes your Project, the internal tools or a plugin may require different settings.
But for beginners or to quickly start a Project those settings are enough to make it work properly.
Hide Project files with specific file extension
Note: This example will hide *.exe files from your Project
• Open the Side Bar
• Open a Project including at least one *.exe file
• Open the *.sublime-project file located to your Project location
• Locate the "file_exclude_patterns" parameter
• If you use a minimal settings for a Project you must have
"file_exclude_patterns":[
"*.sublime-project",]
• Modify the Settings by adding "*.exe,"
• You must have something like this
"file_exclude_patterns":[
"*.sublime-project","*.exe",
]
18 Chapter 1. Follow the Guide

C++ Starting Kit Project - Guide Documentation, Release 0.0.1
Note: This will hide the *.exe files from the Side Bar.
Recommandation
Install Package Control
Why do you have to do it
Package Control is the easiest way to install and manage plugin packages inside Sublime Text.
How to do it
Installation
From the official website follow the Package Control installation.
Usage
Access
Package Control
• Press Ctrl + Shift + P
Edit
Install a plugin package from Package Control
• Access Package Control
• Type the name of the package you want to use
Package Control
• Followed by what you want to perform, in this case an installation
Install Package
• Select Package Control : Install Package
Note: This will open a list of available plugin packages.
• Search for the plugin you want to install
• Press Enter to launch the download and install processes
1.5. Sublime Text 19

C++ Starting Kit Project - Guide Documentation, Release 0.0.1
Warning: You may need to restart Sublime Text after the installation.
Warning: Most of the time the maintainer of the package left a post installation message : A file will open withsome instructions after the installation.
Please take the time to read them, they always have critical informations about the package like the link to thedocumentation, the post installation processes, the usage or/and the known issues.
99.999999999... % of the time this will avoid you to waste your time and ask questions on forums or issue trackersthat already have an answer.
Tip: Fuzzy searching
As the Control Panel uses, like other searching tools in Sublime Text, a fuzzy searching, you don’t have to enter theentire words or expressions to obtain the good result, as well as the order doesn’t matter.
You can type what follows and still see the good result appear :
install packagecontrol installpack instinst packpa in
Visit the Sublime Text Unofficial Documentation
Sublime Text Unofficial Documentation Home page.
C++ Starting Kit Plugin
Presentation
For more information about the C++ Starting Kit plugin please refer to the introduction and features sections.
Installation
Prerequisite
Install MinGW
Why do you have to do it
C++ source code must be compiled before to be executable.
MinGW is a compiler which uses g++ tools to compile C++.
This guide will allow you to install MinGW -w64 to compile C and C++, compatible with C++11, for x86 and x64cross platform development.
20 Chapter 1. Follow the Guide

C++ Starting Kit Project - Guide Documentation, Release 0.0.1
How to do it
Install MinGW with the installer from the Project Page
Installation
Download
From the project page
• From the MinGW w64 project page
• Go to Download on the right side
• Scroll-down until you see Mingw-builds project - native toolchains using trunk
• There is a column called Installation
• Click on the SourceForge link and wait for your download
Note: This last step should give you an installer : mingw-w64-install.exe.
Install
• Launch the installer
• When the Settings window appears follow this setup
Version Choose the latestArchitecture x64Threads posixException sehBuild revision choose the latest
Post Installation
Add MinGW bin folder to the environment variables
• Add MinGW bin folder to the environment variables
• The path you will have to add is
<YourDrive>:\Path\To\MinGW\bin
Note: You can install multiple version of MinGW and specify explicitly later to Sublime Text the path of the compileryou want to use.
Tip: If you encouter issues with the installer install MinGW manually
1.6. C++ Starting Kit Plugin 21

C++ Starting Kit Project - Guide Documentation, Release 0.0.1
Install manually MinGW From SourceForge
Installation
Download
From Sourceforge
• Go to MinGW w64 project on SourceForge
• From Here browse to :
– Toolchains targetting Win64
– Personal Builds
– mingw-builds
– <Select latest version>
– threads-posix
– seh
– <Select the latest version>
Note: Wait for your download and save it.
Install
Note: After the download you will have to extract the archive, rename it if you want, and place it to your desiredpath.
Post Installation
Add MinGW bin folder to the environment variables
• Add MinGW bin folder to the environment variables.
• The path you will have to add is
<YourDrive>:\Path\To\MinGW\bin
Note: You can install multiple version of MinGW and specify explicitly later to Sublime Text the path of the compileryou want to use.
Warning: To finish the installation you must add MinGW bin folder path to your environment variables. Itshould looks like follow :
22 Chapter 1. Follow the Guide

C++ Starting Kit Project - Guide Documentation, Release 0.0.1
<YourDrive>:\Path\To\MinGW\bin
Procedure
Install C++ Starting Kit plugin
Use Package Control to install this plugin.
Post
C++ Starting Kit Post Installation
Restart Sublime Text
• To apply the changes Close and Restart Sublime Text
Avoid package conflicts
Warning: This step avoid Sublime Text native C and C++ syntaxes to conflict with the C++ Starting kit pluginsyntaxes.
• Open the User Settings for the text editor
• Locate the following line
"ignored_packages": ["Vintage"]
• Add C and C++ syntaxes to the "ignored_packages" parameter
• You must have something like this
"ignored_packages": ["Vintage", "C", "C++"]
Define C++ Starting Kit syntax as default syntax
• With a C or C++ file open
• Go to the View menu
– Then Syntax
– Then Open all with current extension as...
– Then C++ Starting Kit
– Then choose the appropriate syntax
* C
1.6. C++ Starting Kit Plugin 23

C++ Starting Kit Project - Guide Documentation, Release 0.0.1
* C++
Define C++ Starting Kit build system as default build system
• Go to the Tools menu
– Then Build System
– Then C++ Starting Kit
Understand the C++ Starting Kit build system
Usage
Recommandation
Install Oasis Theme
Why do you have to do it
Oasis Theme is part of the C++ Starting Kit project.
Combine with the Soda Theme and the Consolas font it offers a very clean dark interface for C++ development insideSublime Text.
Visit the Oasis Theme Homepage.
How to do it
Install Oasis Theme
Use Package Control to install this plugin.
Install Cppcheck
Why do you have to do it
Cppcheck is a code linter, it will detect your code errors and highlight them.
Warning: By itself it will do nothing inside Sublime Text, you will have to set it up for Sublime Text first.
How to do it
Installation
Download
24 Chapter 1. Follow the Guide

C++ Starting Kit Project - Guide Documentation, Release 0.0.1
From the Project Page
• Download Cppcheck.
Install
• Launch the installer and follow the instructions.
Post Installation
• Set Cppcheck path to your environment variables
• The path you have to add is
<YouDrive>:\Path\To\Cppcheck
Install Sublime Linter
• Install Sublime Linter from Package Control.
Warning: Be sure to install Sublime Linter before Sublime Linter - cppcheck.
Install Sublime Linter - cppcheck
• Install Sublime Linter - cppcheck from Package Control.
How to test it
Minimal set up for Sublime Linter - Cppcheck
Warning: The following steps assume that you strictly followed the set up Cppcheck for Sublime Text section.
Open Sublime Linter preferences
• Go the Preferences menu
– Then Package Settings
– Then Sublime Linter
– Choose Settings - User
– Locate the following lines
1.6. C++ Starting Kit Plugin 25

C++ Starting Kit Project - Guide Documentation, Release 0.0.1
"linters": {"cppcheck": {
"@disable": true,"args": [],"enable": "style","excludes": [],"std": []
}
Enable Sublime Linter - cppcheck
• Replace true by false for the "@disable" parameter
• You must have something like this
"@disable": false,
Specify a standard syntax to Sublime Linter - cppcheck
• Add "c++11" for the "std" parameter
• You must have something like this
"std": ["c++11"]
Tip: Now Sublime Linter - cppcheck has its minimal setup.
It must work at this point but if you want to be sure follow the testing process section
Test Sublime Linter - cppcheck
Warning: The following steps assume that you strictly followed the set up Cppcheck for Sublime Text and theminimal set up for Sublime Linter - cppcheck sections.
Create a testing file
• Open Sublime Text
• Create a new file called test.cpp
• Copy Paste the following lines inside the test.cpp file
#include <iostream>
using namespace std;
int main(){
cout << "it works" << endl;
26 Chapter 1. Follow the Guide

C++ Starting Kit Project - Guide Documentation, Release 0.0.1
return 0;
Warning: This chunk of code contains voluntarily an error.
A } must be added after return 0; if you want your program to work correctly.
But this is not what you need to test Sublime Linter - ccpcheck.
If the set up of Sublime Linter - cppcheck is correct
• You must see
– before the line numbers
– at line 6
– A huge white dot
Note: This huge white dot notice you that Sublime Linter - cppcheck detects an error to this specific line.
If your set up is correct and you correct the error by adding a } after the return 0;, this huge white dotmust disappear.
Console 2
Presentation
Philosophy
The Linux Shell is an amazing, fantastic, tremendous productivity tool.
It allows you to control a lot of daily local and remote tasks more efficiently and smoothly than the standard Windows7 mouse based workflow.
If you follow this guide from the beginning you installed MinGW -w64 without Msys.
It means that you only have the GCC compiler tools but you don’t have a Linux shell.
Git for Windows, in addition to Git commands, contains a Linux shell.
This part of the guide will help you to set up Console 2 as a front end terminal and use it to login automatically to theGit for Windows Linux shell.
You will be able to use more efficiently MinGW -w64 and take the benefit of the other integrated Linux Shell func-tionalities.
Goals
• Access your terminal from everywhere
• Use your terminal inside Sublime Text
1.7. Console 2 27

C++ Starting Kit Project - Guide Documentation, Release 0.0.1
• Open softwares from your terminal
• Open files with specific software from your terminal
• Launch Linux and Windows scripts from your terminal
Warning: This part of the guide is not
• A full integration of the Linux Shell
• A course on the Linux Shell
• A course on gcc tools usage
• A course on Git for Windows usage
Tip: If you are a beginner in Linux Shell usage follow strictly this part of the guide and use your freshly buildterminal to learn the basis of
• Linux Shell commands
• gcc tools commands (MinGW -w64)
• git commands
Invest time in learning those tools is far to be a waste of time.
Installation
Prerequisite
Softwares
Git for Windows
Why do you have to do it
Git for Windows is the Windows version of the open source Git.
It is a very powerful and popular version control system allowing you to manage efficiently your local and remoterepositories.
For more informations please visit the Git for Windows official website
How to do it
Installation
Download
From the project page
• Download Git for Windows.
28 Chapter 1. Follow the Guide
C++ Starting Kit Project - Guide Documentation, Release 0.0.1
Install
• Launch the installer and follow the instructions.
Post Installation
• You have to add Git for Windows to your environment variables.
• This is the path you have to add
<YourDrive>:\Path\to\GitforWindows\bin\
Sublime Text 3 plugin
Terminal
Why do you have to do it
Terminal is a Sublime Text plugin which allow to smoothly integrate a terminal to your Sublime Text environment.
For more information visit Sublime Text Terminal home page
How to do it
Install Terminal plugin
Installation
• Install this plugin from Package Control
Setup Terminal to open Console 2 inside Sublime Text 3
• Open your Terminal Settings - User
– Go to the Preferences menu
– Then Package Settings
– Then Terminal
– Then Settings - User
Note: This will open Terminal.sublime-settings
• Copy Paste the following lines to the Terminal.sublime-settings file
1.7. Console 2 29

C++ Starting Kit Project - Guide Documentation, Release 0.0.1
{"terminal": "","parameters": []
}
• Add your path to Console 2 to the "terminal" parameter
• You must have something like this
"terminal": "<YourDrive>:/Path/To/Console2/console2.exe",
Add a Keyboard Shortcut to open Console 2 inside Sublime Text 3
• Open your Terminal Key Bindings - User
– Go to the Preferences menu
– Then Package Settings
– Then Terminal
– Then Key Bindings - User
– Replace the keyboard shortchut(s) you want to change.
Tip: If you desire you can also override native commands like Build or/and Run.
Note: If your Terminal Key Bindings - User are blank, open the Terminal Key Bindings - Default and CopyPaste its contents inside your key bindings preferences.
Recap
Path list
Warning: This section recaps all the paths required in your environment variables from the beginning of thisguide.
Python Required Paths
<YourDrive>:\Path\to\Python\
<YourDrive>:\Path\to\Python\Scripts\
MinGW Required Path
<YourDrive>:\Path\to\MinGW\bin\
30 Chapter 1. Follow the Guide

C++ Starting Kit Project - Guide Documentation, Release 0.0.1
Cppcheck Required Path
<YouDrive>:\Path\to\Cppcheck\
Git for Windows Required Path
<YourDrive>:\Path\to\GitforWindows\bin\
Sublime Text 3 Required Path
<YourDrive>:\Path\to\SublimeText\
Note: Add the path to Sublime Text will allow you later to open a files inside Sublime Text from your terminal.
Your Web Browser Required Path
<YourDrive>:\Path\to\YourWebBrowser\
Note: Add the path to Your Web Browser will allow you later to open paths and addresses inside Your Web Browserfrom your terminal.
Procedure
Install Console2
Download
From its home page
• Download Console2
Console2 Installation
• Launch the installer and follow the instructions.
Post
Create a .profile file
1.7. Console 2 31

C++ Starting Kit Project - Guide Documentation, Release 0.0.1
Why do you have to do it
Create a .profile file to your Home folder will allow you to communicate with Console 2 and manage aliases (userdefined commands).
How to do it
Open your home folder
From your terminal
• Type
cd ~
From a path
• Go to the following path
c:\Users\<YourUserName>
Create a .profile file
• Type from your terminal
touch .profile
Warning: This step can’t be directly done from the Explorer you must use the terminal.
Note: You now have an editable .profile file.
Create a Shortcut folder
Why do you have to do it
The concept of this Shortcut folder is to allow your terminal to communicate with Windows 7.
You have to add this Shortcut folder to the environment variables and everything inside will be accessible by yourterminal.
Inside this path you will put your Windows program shortcuts, Windows scripts, terminal messages then add aliasesand shell scripts to execute your newly defined commands.
Note: There are many ways to configure Console 2 and set your aliases but this solution is for me the simplest.
32 Chapter 1. Follow the Guide

C++ Starting Kit Project - Guide Documentation, Release 0.0.1
How to do it
Create a Shortcut folder
Note: It is recommended to create the Shortcut folder inside a partition other than the C Drive.
Add your Shortcut folder to the environment variables
• Add your Shortcut folder to the environment variables
Usage
Set up Console 2 to automatically login to the Git for Windows Shell
• Open Console 2
• Go to the Edit menu
– Then Settings...
– From the hierarchy on the left select Console
– Inside the Shell field type
sh --login -i
Note: This command will automatically log you to the Git for Windows Shell when Console 2 starts.
Tip: If for any reason you mess up with this field and Console 2 doesn’t want to reopen you can edit the configurationconsole.xml file inside the installation folder.
Warning: Don’t put anything inside the Startup Dir field or you will encounter undesirable behaviors with theother specific functionalities you will have to set up in this guide.
Add Open Console 2 inside the current directory from the Right-Click menu
• Create a file called OpenConsoleHere.reg
• Copy Paste the following lines inside the OpenConsoleHere.reg file
Windows Registry Editor Version 5.00[HKEY_CLASSES_ROOT\Directory\shell\Console2]@="Open Console Here"[HKEY_CLASSES_ROOT\Directory\shell\Console2\command]@="C:\\Path\\To\\Console\\2\\Console2.exe"[HKEY_CLASSES_ROOT\Directory\Background\shell\Console2]@="Open Console Here"
1.7. Console 2 33

C++ Starting Kit Project - Guide Documentation, Release 0.0.1
[HKEY_CLASSES_ROOT\Directory\Background\shell\Console2\command]@="C:\\Path\\To\\Console\\2\\Console2.exe"
Note: This registry tweak will add an option called "Open Console Here" to your Right-Click menu.
• Line 5 and 9 where you have
@="<YourDrive>:\\Path\\To\\Console\\2\\Console2.exe"
• Replace the paths by your own. Be sure to point to your Console 2 launcher (*.exe file).
• When it’s done Save the file
• Double-Click on OpenConsoleHere.reg file to add your new functionalities.
• Accept the warning message.
Note: Now you should be able to open Console2 from everywhere in your system and it will open it in the currentdirectory.
Open Console 2 from a keyboard shortcut
Warning: This won’t open Console 2 inside the current directory but inside its installation folder.
• You need to add a shortcut of Console 2 inside the Start Menu
• Then specify a keyboard shortcut to open it.
Create aliases for Console 2
Warning: This section assumes that you strictly follow the post installation procedures : you created a .profilefile to your Home folder and you have a Shortcut folder available.
Presentation
Why do you have to do it
An alias is a command which contains a shell script.
Aliases allow you to accelerate repetitive tasks by using your defined commands from the terminal.
34 Chapter 1. Follow the Guide

C++ Starting Kit Project - Guide Documentation, Release 0.0.1
How to do it
Create an alias
• Edit your .profile file
• Type
alias <YourAliasName>="YourShellScript"
Alias to refresh the .profile file
Why do you have to do it
Refresh your .profile file is something you have to do everytime you make changes inside your .profile fileand you want to apply the changes.
To accelerate this repetitive task it is recommended to create an alias to do it.
How to do it
• Edit your .profile file
• Type
alias <YourAliasName>="source ~/.profile"
Note: alias is the internal command you call to create an alias.
<YourAliasName> is the name of the alias you wan to create.
source is the command to refresh and apply the changes.
~/.profile is the path of your .profile file.
~ which stands for your Home directory.
Warning: The first time you edit the .profile file and you add this refresh fonctionality you need to refresh itmanually before to be able to use the alias you created.
To do it just type
source ~/.profile
How to add a message inside the terminal
Why do you have to do it
If you added the refresh .profile file to your aliases you may need to insert a message at the end of the process tomention you that eveything goes right.
1.7. Console 2 35

C++ Starting Kit Project - Guide Documentation, Release 0.0.1
How to do it
Create the message
• Go to your Shortcut folder
• Create a folder called Message
• Open the Message folder
• Create a file called Refresh Profile.txt
• Enter your message, the following for example
You successfully updated your profile !
Create the alias
• Edit your .profile file
• To add a message to the refresh .profile file
alias <YourAliasName>="source ~/.profile && cat <YourDrive>:/Path/to/the/→˓Message/folder/Refresh\ Profile.txt"
• Refresh and apply your changes
Alias to open a specific directory inside the Windows Explorer
How to do it
• Edit your .profile file
• Type
alias <YourAliasName> = "start <YourDrive>:/Specific/Path"
• Refresh and apply your changes
Tip: For example to open your Program Files folder create an alias like this
alias <YourAliasName>="start c:/Program\ Files"
The space between Program and Files is specified by \ (an antislash) followed by a space.
Warning: Don’t use \ to separate your folders inside your paths but /.
36 Chapter 1. Follow the Guide

C++ Starting Kit Project - Guide Documentation, Release 0.0.1
Alias to open a program
Warning: This manipulation just open your program, it doesn’t open a file with this specific program.
Add your program to your Shortcut folder
Create a shortcut of your program
• Go to your installation folder
• Right-Click on your program launcher
Note: Most a the time a *.exe file
• Choose Send to
• Then Desktop
Note: It creates a shortcut to your program on your Desktop
• Go to your Desktop
• Copy your shortcut
• Paste it to your Shortcut folder
Create the alias to open your program
• Edit your .profile file
• Type
alias <YourAliasName>="start <YourProgramName>"
• Refresh and apply your changes
Tip: Rename your shortcuts and avoid spaces.
Alias to open a file with a specific program
How do do it
Note: If you follow this guide from the beginning you added Your Web Browser to the environment variables.
1.7. Console 2 37
C++ Starting Kit Project - Guide Documentation, Release 0.0.1
This is what we will use as an example but you can do it with other programs.
Warning: Minimize the number of programs you add to your environment variables.
Tip: Only add your very commomly used programs to your environment variables like your text editor and your webbrowser.
Create an alias to open a file with a specific program
• Edit your .profile file
• Type
alias <YourAliasName>="<YourProgram>"
• Refresh and apply your changes
Note: Give the name of your program launcher, most of the time a YourProgram.exe file, without the extension
For Firefox for example
alias fx="Firefox"
Note: To open a web page from your terminal
Note: By following this example you can now launch google home page from your terminal by typing
fx www.google.com
Recommandation
Enable Make
Why do you have to do it
Make is known and used by Linux users as the make command.
To use it you as such in Windows 7 you need a make.exe file available to your environment variables.
MinGW -w64 included this tool but by default its name is mingw32-make.exe.
38 Chapter 1. Follow the Guide

C++ Starting Kit Project - Guide Documentation, Release 0.0.1
How to do it
Note: This step assumes that you have MinGW -w64 installed.
Use mingw32-make from MinGW -w64 as make
• Go to your MinGW -w64 bin folder
<YourDrive>:\Path\To\MinGW\bin
• Locate mingw32-make.exe file
• Rename it to make.exe
1.7. Console 2 39

C++ Starting Kit Project - Guide Documentation, Release 0.0.1
40 Chapter 1. Follow the Guide

CHAPTER 2
Indices and tables
• genindex
• modindex
• search
41