Embed Size (px)
Citation preview
C editing with VIM HOWTO
Siddharth Heroor
Revision History
Revision v1.0 Jan 14, 2001 Revised by: sh
Second Revision. Corrected some typos.
Revision v0.1 Dec 04, 2000 Revised by: sh
First Revision. I would love to have your feedback
This document gives an introduction to editing C and other language files, whose syntax is similar, like C++and Java in vi/VIM.

Table of Contents
1. Introduction.....................................................................................................................................................1
2. Moving around................................................................................................................................................22.1. w, e and b keystrokes........................................................................................................................22.2. {, }, [[ and ]] keystrokes...................................................................................................................32.3. % keystroke.......................................................................................................................................6
3. Jumping to random positions in C files........................................................................................................73.1. ctags..................................................................................................................................................73.2. marks.................................................................................................................................................83.3. gd keystroke......................................................................................................................................9
4. Auto−Completing Words.............................................................................................................................11
5. Formating automatically..............................................................................................................................135.1. Restricting column width................................................................................................................135.2. Automatically indent code..............................................................................................................135.3. Comments.......................................................................................................................................13
6. Multi−file editing...........................................................................................................................................15
7. Quickfix..........................................................................................................................................................16
8. Copyright.......................................................................................................................................................20
9. References......................................................................................................................................................21
C editing with VIM HOWTO
i

1. IntroductionThe purpose of this document is to introduce the novice VIM user to the editing options available in VIM forC files. The document introduces some commands and keystrokes which will help in improving theproductivity of programmers using VIM to edit C files.
The scope of the document is to describe how one can edit C files with VIM. However most of what isdescribed is also applicable for vi. Plus what is mentioned here about editing C files is more or less applicableto C++, Java and other similar languages.
1. Introduction 1

2. Moving around.
2.1. w, e and b keystrokes
One can use the w, e and b keys to move around a file. VIM is capable of recognizing the different tokenswithin a C expression.
Consider the following C code
Figure 1. A C snippet
... if(( NULL == x ) 38;38; y > z ) ...
Assume that the cursor is positioned at the beginning of the if statement. By pressing w once the cursor jumpsto the first (. By typing w again the cursor moves to NULL. Next time the cursor will move to the == token.Further keystrokes will take you as follows. x... )... &&... y... >... z... and finally )...
e is similar to w only that it takes you to the end of the current word and not to the beginning of the nextword.
b does the exact opposite of w. It moves the cursor in the opposite direction. So you can moving backwards
2. Moving around. 2

using the b keystroke.
2.2. {, }, [[ and ]] keystrokes
The { and } keys are used to move from paragraph to paragraph. When editing C files these keys have aslightly different meaning. Here a paragraph is taken as a bunch of lines separated by an empty line.
For Example
Figure 2. Another C snippet
The above snippet shows two paragraphs. One can easily move from the beginning of one to the other, byusing the { and } keys. { will take the cursor to the paragraph above and } will take the cursor to the paragraphbelow.
Many people have the coding style where a logical set of statements are grouped together and separated byone or more blank lines.
For Example
Figure 3. Another C snippet
C editing with VIM HOWTO
2.2. {, }, [[ and ]] keystrokes 3

The { and } keys are very useful in such situations. One can very easily move from one "paragraph" toanother.
Another set of keys which are useful are the [[ and ]] keys. These keys allow you to jump to the previous { ornext { in the first column.
For Example
Figure 4. The next snippet of C code
C editing with VIM HOWTO
2.2. {, }, [[ and ]] keystrokes 4

Lets say you were editing foo() and now you want to edit bar(). Just type ]] and the cursor will take you to theopening { of the bar() function. The reverse is slightly different. If you were in the middle of bar() and youtype [[ the cursor will move to the first { above i.e. the beginning of bar() itself. One has to type [[ again tomove to the beginning of foo(). The number of keystrokes can be minimized by typing 2[[ to take the cursorto the beginning of the previous function.
Another set of similar keystrokes are the ][ and [] keystrokes. ][ takes the cursor to next } in the first column.If you were editing foo() and wanted to go to the end of foo() then ][ will take you there. Similarly if youwere editing bar() and wanted to go to the end of foo() then [] would take the cursor there.
The way to remember the keystrokes is by breaking them up. The first keystroke will indicated whether tomove up or down. [ will move up and ] will move down. The next keystroke indicates the type of brace tomatch. If it same same as the previous keystroke then the cursor will move to {. If the keystroke is differentthen the cursor will move to }.
One caveat of the ]], ][, [[ and [] keystrokes is that they match the braces which are in the first column. If onewants to match all braces upwards and downwards regardless of whether its in the first column or not is notpossible. The VIM documentation has a workaround. One has to map the keystrokes to find the braces.Without spending too much time on mapping, the suggested mappings are
:map [[ ?{<CTRL−VCTRL−M>w99[{
:map ][ /}<CTRL−VCTRL−M>b99]}
:map ]] j0[[%/{<CTRL−VCTRL−M>
C editing with VIM HOWTO
2.2. {, }, [[ and ]] keystrokes 5

:map [] k$][%?}<CTRL−VCTRL−M>
2.3. % keystroke
The % is used to match the item under the cursor. The item under the cursor can be a parenthesis, a curlybracket or a square bracket. By pressing the % key the cursor will jump to the corresponding match.
Amongst other things, the % keystroke can be used to match #if, #ifdef, #else #elif and #endif also.
This keystroke is very useful in validating code that one has written. For Example
Figure 5. The next snippet of C code
Checking the above code will involve checking the correctness of the parenthesis. The % can be used tojump from one ( to its corresponding ) and vice versa. Thus, one can find which opening parenthesiscorresponds to which closing parenthesis and use the information to validate the code.
Similarly the % can also be used to jump from a { to its corresponding }.
C editing with VIM HOWTO
2.3. % keystroke 6

3. Jumping to random positions in C files
3.1. ctags
A Tag is a sort of placeholder. Tags are very useful in understanding and editing C. Tags are a set ofbook−marks to each function in a C file. Tags are very useful in jumping to the definition of a function fromwhere it is called and then jumping back.
Take the following example.
Figure 6. Tags Example
Lets say that you are editing the function foo() and you come across the function bar(). Now, to see whatbar() does, one makes uses of Tags. One can jump to the definition of bar() and then jump back later. If needbe, one can jump to another function called within bar() and back.
To use Tags one must first run the program ctags on all the source files. This creates a file called tags. Thisfile contains pointers to all the function definitions and is used by VIM to take you to the function definition.
The actual keystrokes for jumping to and fro are CTRL−] and CTRL−T. By hitting CTRL−] in foo() at theplace where bar() is called, takes the cursor to the beginning of bar(). One can jump back from bar() to foo()by just hitting CTRL−T.
3. Jumping to random positions in C files 7

ctags are called by
$ ctags options file(s)
To make a tags file from all the *.c files in the current directory all one needs to say is
$ ctags *.c
In case of a source tree which contains C files in different sub directories, one can call ctags in the rootdirectory of the source tree with the −R option and a tags file containing Tags to all functions in the sourcetree will be created. For Example.
$ ctags −R *.c
There are many other options to use with ctags. These options are explained in the man file for ctags.
3.2. marks
Marks are place−holders like Tags. However, marks can be set at any point in a file and is not limited to onlyfunctions, enums etc.. Plus marks have be set manually by the user.
By setting a mark there is no visible indication of the same. A mark is just a position in a file which isremembered by VIM. Consider the following code
Figure 7. The marks example
C editing with VIM HOWTO
3.2. marks 8
Suppose you are editing the line x++; and you want to come back to that line after editing some other line.You can set a mark on that line with the keystroke m' and come back to the same line later by hitting ''.
VIM allows you to set more than one mark. These marks are stored in registers a−z, A−Z and 1−0. To set amark and store the same in a register say j, all one has to hit is mj. To go back to the mark one has to hit 'j.
Multiple marks are really useful in going back and fro within a piece of code. Taking the same example, onemight want one mark at x++; and another at y=x; and jump between them or to any other place and then jumpback.
Marks can span across files. To use such marks one has to use upper−case registers i.e. A−Z. Lower−caseregisters are used only within files and do not span files. That's to say, if you were to set a mark in a file foo.cin register "a" and then move to another file and hit 'a, the cursor will not jump back to the previous location.If you want a mark which will take you to a different file then you will need to use an upper−case register.For example, use mA instead of ma. I'll talk about editing multiple files in a later section.
3.3. gd keystroke
Consider the following piece of code.
Figure 8. The third example
C editing with VIM HOWTO
3.3. gd keystroke 9

For some reason you've forgotten what y and z are and want to go to their declaration double quick. One wayof doing this is by searching backwards for y or z. VIM offers a simpler and quicker solution. Thegd keystroke stands for Goto Declaration. With the cursor on "y" if you hit gd the cursor will take you to thedeclaration :− struct Y y;.
A similar keystroke is gD. This takes you to the global declaration of the variable under the cursor. So if onewant to go to the declaration of x, then all one needs to do is hit gD and the cursor will move to thedeclaration of x.
C editing with VIM HOWTO
3.3. gd keystroke 10
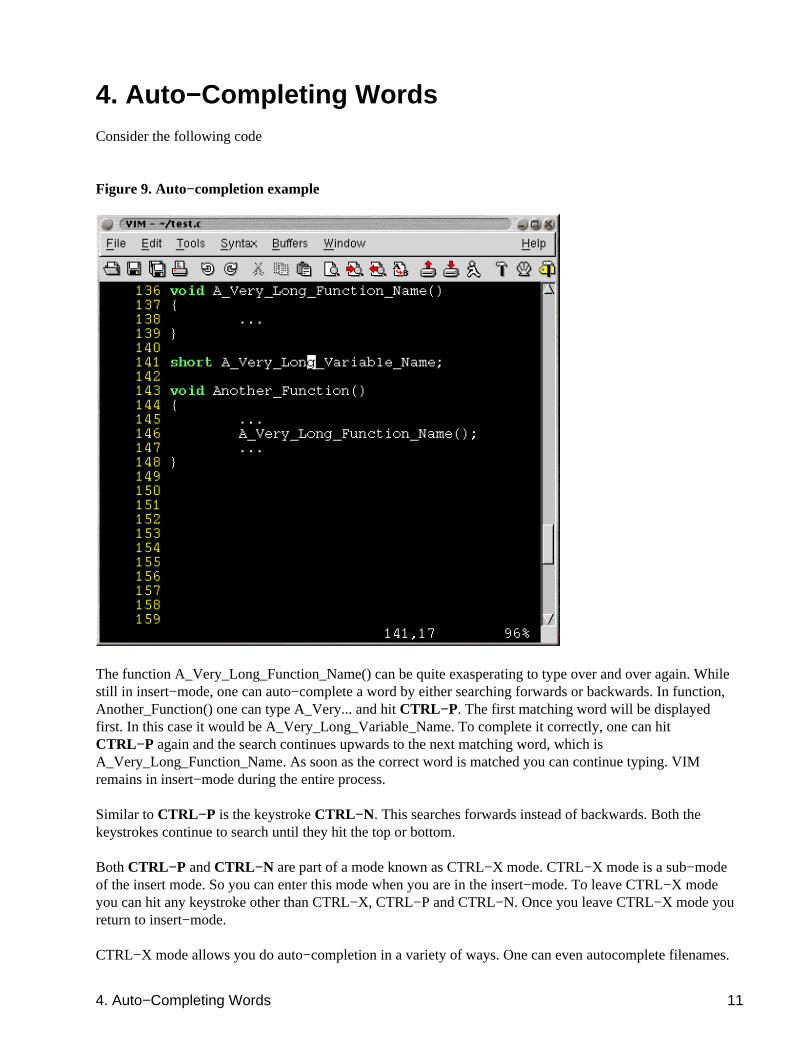
4. Auto−Completing WordsConsider the following code
Figure 9. Auto−completion example
The function A_Very_Long_Function_Name() can be quite exasperating to type over and over again. Whilestill in insert−mode, one can auto−complete a word by either searching forwards or backwards. In function,Another_Function() one can type A_Very... and hit CTRL−P. The first matching word will be displayedfirst. In this case it would be A_Very_Long_Variable_Name. To complete it correctly, one can hitCTRL−P again and the search continues upwards to the next matching word, which isA_Very_Long_Function_Name. As soon as the correct word is matched you can continue typing. VIMremains in insert−mode during the entire process.
Similar to CTRL−P is the keystroke CTRL−N. This searches forwards instead of backwards. Both thekeystrokes continue to search until they hit the top or bottom.
Both CTRL−P and CTRL−N are part of a mode known as CTRL−X mode. CTRL−X mode is a sub−modeof the insert mode. So you can enter this mode when you are in the insert−mode. To leave CTRL−X modeyou can hit any keystroke other than CTRL−X, CTRL−P and CTRL−N. Once you leave CTRL−X mode youreturn to insert−mode.
CTRL−X mode allows you do auto−completion in a variety of ways. One can even autocomplete filenames.
4. Auto−Completing Words 11

This is particularly useful when you have to include header files. Using CTRL−X mode you can include a filefoo.h using the following mechanism.
#include "f CTRL−X CTRL−F"
That's CTRL−X CTRL−F. I know... I know... Its sounds like emacs ;−). There are other things you can do inthe CTRL−X mode. One of them is dictionary completion. Dictionary completion allows one to specify a filecontaining a list of words which are used for completion. By default the dictionary option is not set. Thisoption is set by the command :set dictionary=file. Typically one can put in C keywords, typedefs, #definesin the dictionary file. C++ and Java programmers may be interested in adding class names as well.
The format of a dictionary file is simple. Just put a word you want in line by itself. So a C dictionary filewould look something like this.
Figure 10. A sample dictionary file
To use the dictionary completion, one needs to hit CTRL−X CTRL−K. The completion is similar to theCTRL−P and CTRL−N keystrokes. So... to type "typedef" all one needs to do is t CTRL−X CTRL−K andpoof... the name completed.
C editing with VIM HOWTO
4. Auto−Completing Words 12

5. Formating automatically
5.1. Restricting column width
One often has to restrict the column width to 80 or 75 or whatever. One can set this quite easily by using thecommand
:set textwidth=80
To do this automatically just put the command in your .vimrc.
In addition to textwidth you may want the text to wrap at a certain column. Often such choices are dictated bythe terminal one is using or it could just be by choice. The command for such a case is
:set wrapwidth=60
The above command makes the text wrap at 60 columns.
5.2. Automatically indent code
While coding in C, one often indents inner−blocks of code. To do this automatically while coding, VIM hasan option called cindent. To set this, just use the command
:set cindent
By setting cindent, code is automatically beautified. To set this command automatically, just add it to your.vimrc
5.3. Comments
VIM also allows you to auto−format comments. You can split comments into 3 stages: The first part, themiddle part and the end part. For example your coding style requirements may require comments to be in thefollowing style
/* * This is the comment */
In such a case the following command can be used
:set comments=sl:/*,mb:*,elx:*/
Let me decipher the command for you. The commands has three parts. The first part is sl:/*. This tells VIM
5. Formating automatically 13

that three piece comments begin with /*. The next part tells VIM that the middle part of the comment is *.The last part of the command tells vim a couple of things. One that the command should end with */ and thatit should automatically complete the comment when you hit just /.
Let me give another example. Lets say your coding guidelines are as follows
/* ** This is the comment */
In such a situation you can use following command for comments
:set comments=sl:/*,mb:**,elx:*
to insert a comment just type /* and hit enter. The next line will automatically contain the **. After you'vefinished the comment just hit enter again and another ** will be inserted. However to end the comment youwant a */ and not **/. VIM is quite clever here. You don't need to delete the last * and replace it with /.Instead, just hit / and VIM will recognise it as the end of the comment and will automatically change the linefrom ** to */.
For more info hit :h comments
C editing with VIM HOWTO
5. Formating automatically 14

6. Multi−file editingOne often needs to edit more than one file at a time. For example one maybe editing a header file and asource file at the same time. To edit more than one file at a time, invoke VIM using the following command
$ vim file1 file2 ...
Now you can edit the first file and move onto the next file using the command
:n
You can jump back using the command
:e#
It may be useful while coding if you could see both the files at the same time and switch between the two. Inother words, it would be useful if the screen was split and you could see the header file at the top and thesource file at the bottom. VIM has such a command to split the screen. To invoke i, simply say :split
The same file will be displayed in both the windows. Whatever command is invoked, will affect only thewindow in focus. So one can edit another file in another window by using the command :e file2
After executing that command, you'll find that there are two files visible. One window shows the first file andthe other shows the second file. To switch between the files one has to use the keystroke CTRL−WCTRL−W. To learn more about split windows, just run help on it.
6. Multi−file editing 15

7. QuickfixWhen coding in C one often has a edit−compile−edit cycle. Typically you would edit C file using some thethings I've mentioned earlier, save the file, compile the code and go to the error(s) and start editing again.VIM helps save the cycle time slightly using a mode called quickfix. Basically, one has to save the compilererrors in a file and open the file with VIM using the command
$ vim −q compiler_error_file
VIM automatically opens the file containing the error and positions the cursor at the location of the first error.
There is a shortcut to the cycle. Using the command "make", one can automatically compile code and gotothe position where the first error occurs. To invoke the make command type the following
:make
Basically, this command calls make in a shell and goes to the first error. However, if you are not compilingusing make and are compiling using a command such as cc, then you have to set a variable called makeprg tothe command you want invoked when you use the make command. For eg. :set makeprg=cc\ foo.c
After setting makeprg, you can just call the make command and quickfix will come into play.
After you have corrected the first error, the next thing to do would be go to the next error and correct that.The following command is used go to the next error. :cn
To go back, you can use the command :cN
Let me demonstrate this using an example. Consider the following code
Figure 11. Quickfile Program Listing
7. Quickfix 16

As you can see there is an error on line number 5. The file is saved as test.c and makeprg is set using thecommand
:set makeprg=gcc\ test.c
Next the make command is invoked using the command :make. gcc gives an error and the output of the makecommand is something like this
Figure 12. :make error
C editing with VIM HOWTO
7. Quickfix 17

On pressing RETURN, the cursor moves to line number 6.
Now, the command :cn will move the cursor to the line number 4.
To move back to the previous error, one can use the command :cN and the cursor will move back to the line6.
After correcting the error on line 5 and adding "return 1;", one can run :make again and the output will be
Figure 13. No Error
C editing with VIM HOWTO
7. Quickfix 18

That was just a small example. You can use quickfix to solve your compile time problems and hopefullyreduce the edit−compile−edit cycle.
C editing with VIM HOWTO
7. Quickfix 19

8. CopyrightCopyright (c) 2000,2001 Siddharth Heroor.
Permission is granted to copy, distribute and/or modify this document under the terms of the GNU FreeDocumentation License, Version 1.1 or any later version published by the Free Software Foundation; with noInvariant Sections, with no Front−Cover Texts, and with no Back−Cover Texts. A copy of the license can befound at http://www.gnu.org/copyleft/fdl.html
8. Copyright 20

9. ReferencesYou can get more information on VIM and download it at http://www.vim.org
9. References 21