Embed Size (px)
Citation preview

BusinessObjects XI R2 WebIntelligence Getting Started Guide 1
BusinessObjects XI R2 WebIntelligenceGetting Started Guide
This document provides you with the fundamentals of BusinessObjects XI R2 and the SYSCO Business Intelligence (BI) Enterprise Data Warehouse (eDW).
Accessing eDWAccessing Business Intelligence eDW requires the use of Internet Explorer version 6.0 or higher. When you log on to InfoView, you also access eDW.
Tip! Contact the Customer Support Group (CSG) at 281‐584‐1190 if issues arise when accessing eDW.
Logging On to InfoView
To log on to InfoView:
1. Open Internet Explorer.
2. In the Address field, type:
http://bi.na.sysco.net
Note: Best business practice dictates that you add this address to your browser favorites for future use.
The SYSCO Business Intelligence eDW page (Figure 1) displays.
3. In the User name field, type your network login user ID.
4. In the Password field, type your network password.
5. Click Log On or press Enter. The BusinessObjects XI home page (Figure 2) dis‐plays.
Figure 1 SYSCO Business Intelligence eDW Page
Describing Toolbars
2 January 2008
Header panel Acts as your main menu within InfoView. Table 1 on page 3 describes the options available on this panel. The buttons do not change as you move through the different pages of the portal.
Navigation panel Consists of expandable folders or categories that contain other folders or objects, referred to as documents in this training guide. For a complete list of docu‐ments that InfoView can store, see Figure 15 on page 12.This panel also contains a toolbar for organizing folders and categories. The My Fold‐ers expandable folder, contains a Favorites folder and your Inbox.
Expandable Folder Opens folders and allows you to view other folders or folder content. Click the + sign to open the folder, and click on the folder name to view its contents in the Workspace panel.
Workspace panel Displays documents connected to a selected class (folder) or classes in the Workspace panel. The Workspace panel also contains options to organize, delete and filter documents.
Logging Off of InfoView
To log off of InfoView, click the lock icon located in the upper right hand corner of the main toolbar as see in Figure 2.
Describing ToolbarsInfoView, the BusinessObjects interface for eDW, supplies three sets of toolbars. Each toolbar contains buttons you use to perform different functions.
• Use the Header panel toolbar to change your view, search, create, and send reports.
• Use the Navigation panel toolbar to work with folders and categories.
• Use the Workspace panel toolbars to work with documents.
If you place your mouse over a toolbar button, InfoView displays the name of the button.
Figure 2 BusinessObjects XI home page
Navigation toolbarand expandable
folders
Workspacepanel
Header panel
Log Off
Navigation panel
Page control toolbar
Describing Toolbars
BusinessObjects XI R2 WebIntelligence Getting Started Guide 3
Using Header Panel Toolbar
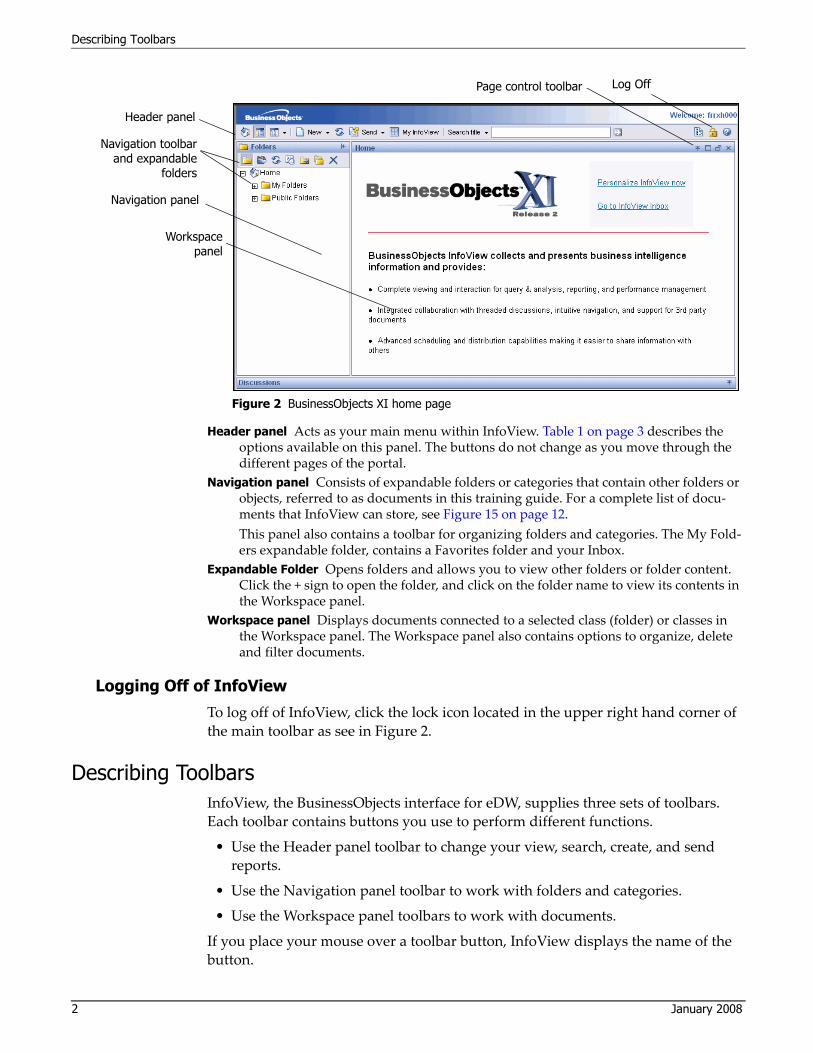
The Header panel toolbar displays across all pages and does not change as you move from one page to another. Table 1 describes the Header panel toolbar but‐tons.
Table 1 Header Panel Toolbar Buttons
Button Mouse Over Name Description
HomeDisplays the Business Objects XI home Page (Figure 2 on page 2) or your dashboard, depending on our rights.
Toggle Navigation Hides and displays the Navigation panel.
Applications Not currently used. In the future, may access a data-base dictionary.
Create an item Creates a new folder, category, or document.
Refresh Refreshes the Workspace panel.
Send a document Sends documents to a file location, to your Inbox, to an FTP location, or to a user in an email.
My InfoView
Provides the ability to create a dashboard, a custom-ized view that contains the documents (for example, reports, documents, and websites) you view on a reg-ular basis.
Search Options Searches all documents based on your entry.
Preference Allows you to set up defaults and information values.
Log Off Logs you off InfoView and eDW.
Help Displays online help for InfoView.
Describing Toolbars
4 January 2008
Using the Navigation Panel Toolbar
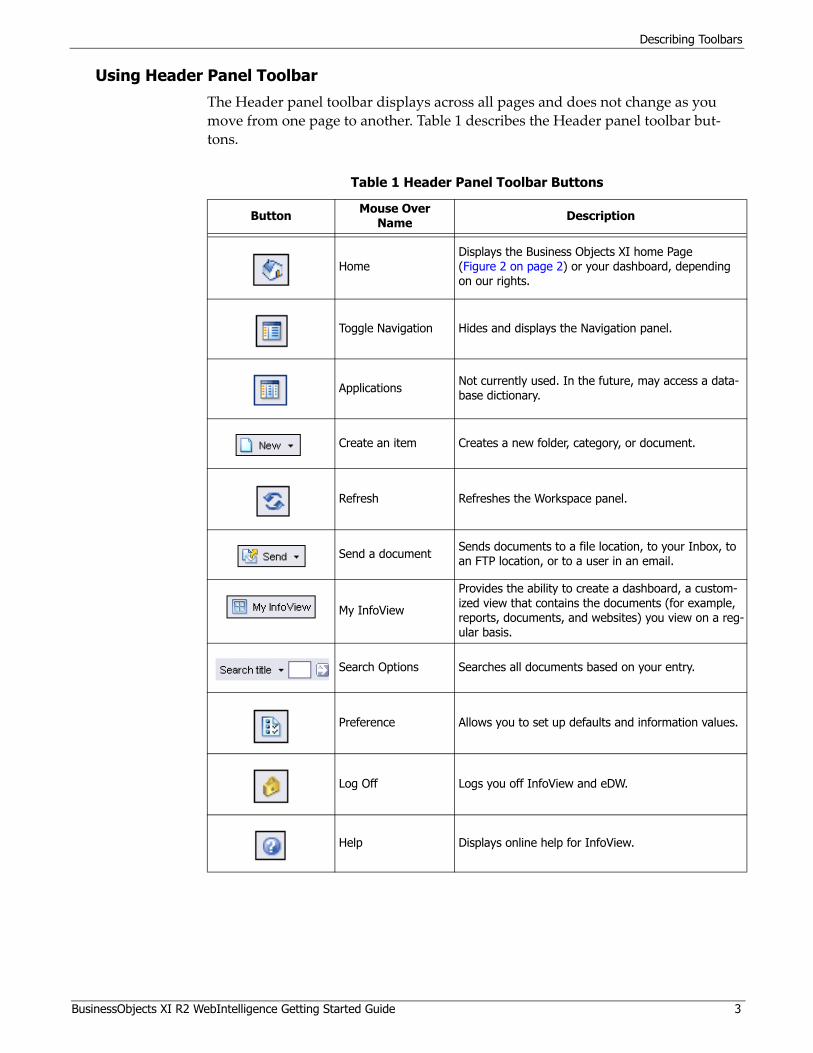
The Navigation panel toolbar displays at the top of the Navigation panel. Use these buttons to navigate and manage your folders and toggle between folder and cate‐gory views. Table 2 describes the Navigation panel toolbar buttons.
Note: For authorized users, buttons with an asterisk (*) apply to both personal and Public Folders and categories. For other users, buttons with an asterisk apply only to personal folders.
Table 2 Navigation Panel Toolbar Buttons
Button Mouse OverName Description
Show Folders Displays the available folders in the Navigation panel.
Show Categories Toggles from folder view to category view.
Refresh Refreshes the Navigation panel.
* Properties Sets properties for the selected folders or categories.
* Move Moves the selected folder or category.
Copy Copies the selected folder to a folder you specify. This button does not display when in category view.
* Delete
Deletes the selected folders and all its contents. For cat-egories, deletes the selected categories and deletes the category assignment for all documents linked to the cat-egory.
Describing Toolbars
BusinessObjects XI R2 WebIntelligence Getting Started Guide 5
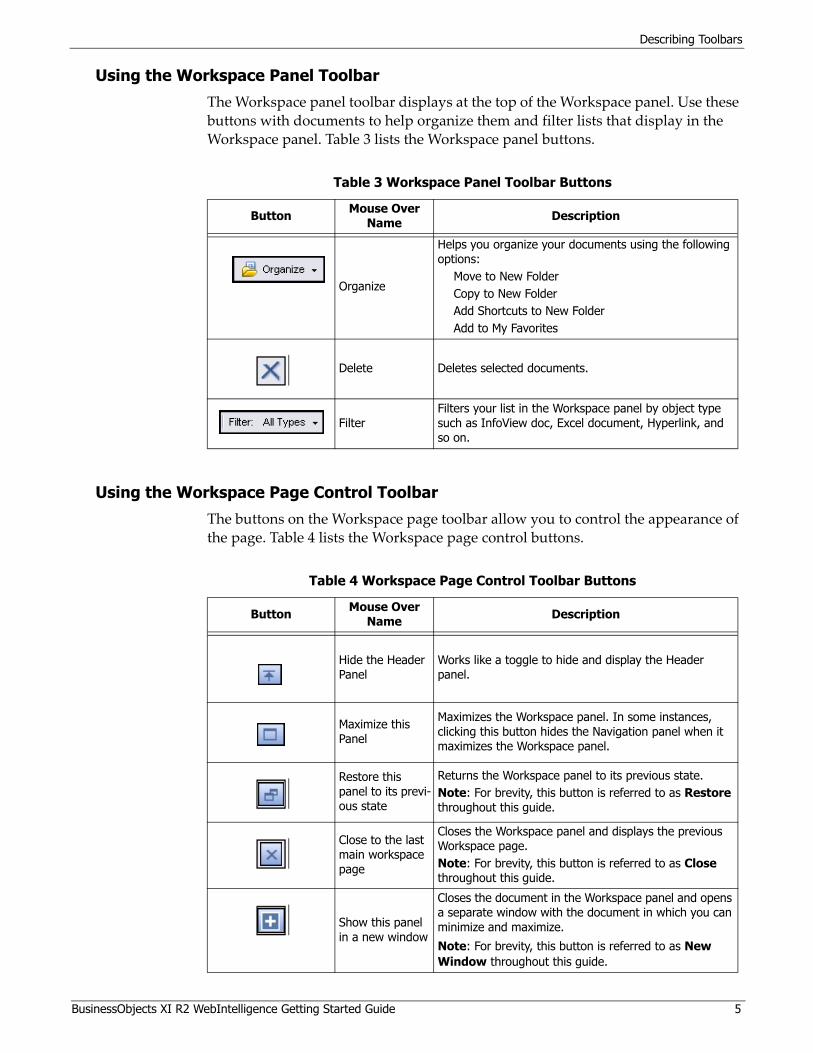
Using the Workspace Panel Toolbar
The Workspace panel toolbar displays at the top of the Workspace panel. Use these buttons with documents to help organize them and filter lists that display in the Workspace panel. Table 3 lists the Workspace panel buttons.
Using the Workspace Page Control Toolbar
The buttons on the Workspace page toolbar allow you to control the appearance of the page. Table 4 lists the Workspace page control buttons.
Table 3 Workspace Panel Toolbar Buttons
Button Mouse OverName Description
Organize
Helps you organize your documents using the following options:
Move to New FolderCopy to New FolderAdd Shortcuts to New FolderAdd to My Favorites
Delete Deletes selected documents.
FilterFilters your list in the Workspace panel by object type such as InfoView doc, Excel document, Hyperlink, and so on.
Table 4 Workspace Page Control Toolbar Buttons
Button Mouse OverName Description
Hide the Header Panel
Works like a toggle to hide and display the Header panel.
Maximize this Panel
Maximizes the Workspace panel. In some instances, clicking this button hides the Navigation panel when it maximizes the Workspace panel.
Restore this panel to its previ-ous state
Returns the Workspace panel to its previous state. Note: For brevity, this button is referred to as Restore throughout this guide.
Close to the last main workspace page
Closes the Workspace panel and displays the previous Workspace page. Note: For brevity, this button is referred to as Close throughout this guide.
Show this panel in a new window
Closes the document in the Workspace panel and opens a separate window with the document in which you can minimize and maximize.
Note: For brevity, this button is referred to as New Window throughout this guide.

Using the Navigation Panel
6 January 2008
Using the Navigation PanelThe Navigation panel consists of a tree structure that gives you access to folders. Folders expand when you click + next to the folder to display subfolders or docu‐ments.
Documents include WebIntelligence documents, shortcuts, hyperlinks, URLs, Excel, PDF, and Word documents. See Figure 15 on page 12 for a complete list of document types.
By default InfoView displays the folder view but also provides a category view. You assign categories to documents which help to further organize documents. Navigating categories is identical to navigating folders.
Describing Folders
By default, InfoView provides two groups of folders as seen in Figure 3: My Folder (also called personal folders) and Public Folders.
My Folders contains your personal documents. Within My Folders resides a Favor‐ites folder for your frequently used documents, as well as an Inbox folder for docu‐ments sent to you by others. InfoView stores these documents on the eDW server in a space reserved for your own use. Other users cannot see your documents in any of these folders.
Additionally, InfoView provides you with access to Public Folders, which contain public documents published by a controlled group of authorized BusinessObjects users. You cannot edit public documents, but you can copy, view, and run docu‐ments in Public Folders.
Note: In the My Folders group, a document cannot reside in more than one folder. Create a new subfolder only under Favorites.
Figure 3 Navigation panel: Folder structure
ShowFoldersbutton

Using the Navigation Panel
BusinessObjects XI R2 WebIntelligence Getting Started Guide 7
Expanding FoldersWhen you expand a folder, the folder opens to display other folders that you can expand or documents that display in the Workspace panel. Expand folders by clicking on the + next to the folder name. The + sign changes to a – minus when you expand a folder. The + sign no longer displays when you reach the last level.
To expand to the Merchandising–Inventory folder:
1. Click + next to Public Folders. The Corporate BI Training subfolder displays.
2. Click + next to Public Folders. A number of subfolders display, depending on your authorization.
3. Click + next to Merchandising–Inventory. No + sign or subfolders display.
4. Click Merchandising–Inventory (on the name of the folder). InfoView high‐lights the folder name. A Merchandising–Inventory screen (Figure 4) displays a list of documents in the Workspace panel.
Note: From the Navigation panel toolbar, click Show Folders if folders do not display in the Navigation panel.
5. From the Navigation panel toolbar, click Properties. A Properties information screen (Figure 5) displays in the Workspace panel. Since this is a Public Folder, you cannot make changes to this screen.
6. In the Navigation panel, click Merchandising–Inventory. The Properties screen closes and the Merchandising–Inventory screen (Figure 4) displays again.
7. From the Navigation panel, click the – sign next to Public Folders. All subfold‐ers collapse.
Figure 4 Merchandising–Inventory screen
Show Foldersbutton
Folder contentsdisplay in
Workspace panel
Properties button
Figure 5 Properties information screen
Using the Navigation Panel
8 January 2008
Creating FoldersCreate additional folders, if needed, to help you organize your documents. You can only create folders for Favorites, not for your Inbox or Public Folders.
To create a folder:
1. From the Navigation panel, expand My Folders, if not already expanded.
2. Click Favorites. Any documents in the folder display in the Workspace panel.
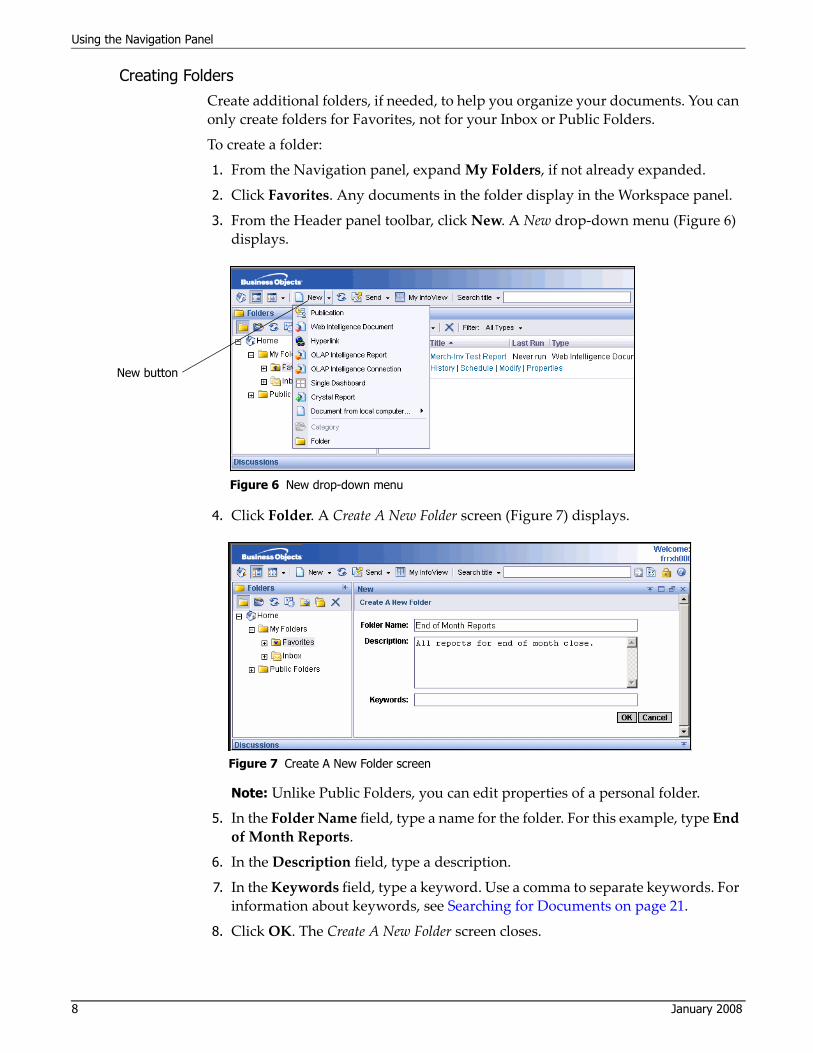
3. From the Header panel toolbar, click New. A New drop‐down menu (Figure 6) displays.
4. Click Folder. A Create A New Folder screen (Figure 7) displays.
Note: Unlike Public Folders, you can edit properties of a personal folder.
5. In the Folder Name field, type a name for the folder. For this example, type End of Month Reports.
6. In the Description field, type a description.
7. In the Keywords field, type a keyword. Use a comma to separate keywords. For information about keywords, see Searching for Documents on page 21.
8. Click OK. The Create A New Folder screen closes.
Figure 6 New drop-down menu
New button
Figure 7 Create A New Folder screen

Using the Navigation Panel
BusinessObjects XI R2 WebIntelligence Getting Started Guide 9
9. Expand My Folders > Favorites. The End of Month Reports folder displays under Favorites in the Navigation panel.
10. Click End of Month Reports. InfoView highlights the folder denoting selection.
11. Repeat steps 3 through 8 to create another folder, using the name Sales Reports.
12. Navigate to and expand End of Month Reports. Your Navigation panel should look like Figure 8.
Describing Categories
InfoView provides you with a way to further organize your documents using cate‐gories. By creating categories, you create a filing system in which each category contains documents related to a specific aspect of your business.
You can assign a document to more than one category unlike folders where docu‐ments can reside in only one folder.
By default, InfoView provides two categories: personal and corporate.
• Personal categories organize and classify your personal documents. Other users cannot see documents assigned to your personal categories. You can create additional personal categories.
• Corporate categories classify public documents. You cannot create subcate‐gories for corporate categories.
Note: Enter a ticket and route it to the Business Intelligence Group to suggest cre‐ation of other corporate categories.
Creating a Category
Create categories to help you organize your documents. You can only create addi‐tional personal categories, not corporate categories.
To create a category:
1. From the Navigation panel toolbar, click Show Categories (if in folder view).
2. Expand Personal Categories. Any existing personal categories display.
3. Click Personal Categories. InfoView highlights the name denoting selection.
Figure 8 Expanded Navigation panel

Using the Navigation Panel
10 January 2008
4. From the Header panel toolbar, click New. A New drop‐down menu (Figure 9) displays.
5. Click Category. A Create A New Category screen (Figure 10) displays.
6. Click OK. The new Training Exercise category (Figure 11) displays.
Figure 9 New drop-down menu
New button
Figure 10 Create a New Category screen
Figure 11 Navigation panel displaying Training Exercise category

Using the Navigation Panel
BusinessObjects XI R2 WebIntelligence Getting Started Guide 11
Moving Folders and Categories
Since you can only move folders or categories up or down levels, folder contents and category assignments remain unchanged. The steps for moving a folder and a category are the same.
Note: This procedure moves the Sales Reports folder up one level to Favorites.
To move the Sales Reports folder up one level to Favorites:
1. Click Show Folders to return to folder view if you are still in category view.
2. From the Navigation panel, navigate to and click Favorites. InfoView high‐lights your selection.
3. From the Navigation panel toolbar, click Move. A Move screen (Figure 12) dis‐plays.
4. Navigate to and click End of Month Reports.
5. Click OK. The Sales Reports folder now displays under Favorites (Figure 13).
Figure 12 Move screen
Figure 13 Navigation panel displaying new folders
Managing Lists and Documents
12 January 2008
Deleting Folders and Categories
You can delete personal folders and categories only. When you delete a folder, Info‐View deletes all documents in the folder. When you delete a category, InfoView removes the category assignments from all documents assigned to the category. The process to delete a folder and a category is identical.
Using the same example, to delete the Sales Reports folder you created:
1. Navigate to and click Sales Reports. InfoView highlights the selection.
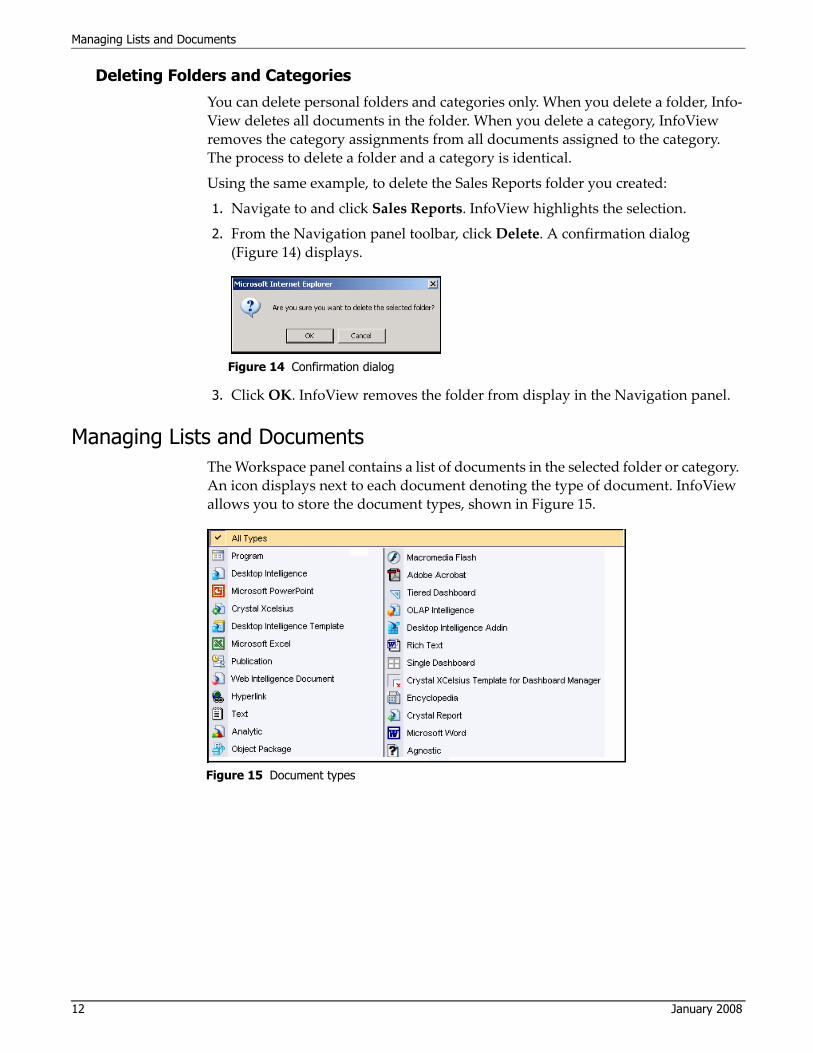
2. From the Navigation panel toolbar, click Delete. A confirmation dialog (Figure 14) displays.
3. Click OK. InfoView removes the folder from display in the Navigation panel.
Managing Lists and Documents The Workspace panel contains a list of documents in the selected folder or category. An icon displays next to each document denoting the type of document. InfoView allows you to store the document types, shown in Figure 15.
Figure 14 Confirmation dialog
Figure 15 Document types

Managing Lists and Documents
BusinessObjects XI R2 WebIntelligence Getting Started Guide 13
Organizing the List
InfoView provides a way to organize the list for locating documents quickly and easily. These ways include sorting the list and filtering the list.
Sorting a ListBy default InfoView sorts documents alphabetically by title in ascending order. You can reverse this order, or you can sort the list by last run date, type, or owner.
To sort a list:
1. In the Workspace panel, click Type. The list sorts by document type (Figure 16).
2. Click Type again. The documents sort by type but in descending order rather than ascending order which is the default.
3. Click Arrow. This toggles the display of the document description and links.
Filtering a ListBy default, all documents you can access display in your folder and category views. To quickly locate specific types of documents, apply a filter. When you apply a fil‐ter, only documents of that type display in the list.
To filter a list:
1. Expand Public Folders > Corporate BI Training > Sample Reports.
2. Click Merchandising–Inventory. A list of documents displays in the work‐space.
Figure 16 Sorting the list
Use columnheaders for
sorting
Arrow button

Managing Lists and Documents
14 January 2008
3. From the Workspace toolbar, click Filter and select Microsoft Excel as seen in Figure 17. Only Excel documents display.
4. Click Filter and select All Types. All document types display.
Organizing Documents
You can organize documents by moving them to different folders, copying docu‐ments from public folders, adding documents to your favorites, and deleting docu‐ments. Before performing these functions, select one or more documents by clicking the selection box.
Copying DocumentsUse this feature to copy documents from the public folders for the purpose of mak‐ing modifications. When you copy a document, InfoView provides the option of creating a new folder for the copied document.
To copy a document:
1. Expand Public Folders > Corporate BI Training > Sample Reports.
2. Click Merchandising–Inventory. A list of documents displays in the Work‐space panel.
Figure 17 Filter document types
Managing Lists and Documents
BusinessObjects XI R2 WebIntelligence Getting Started Guide 15
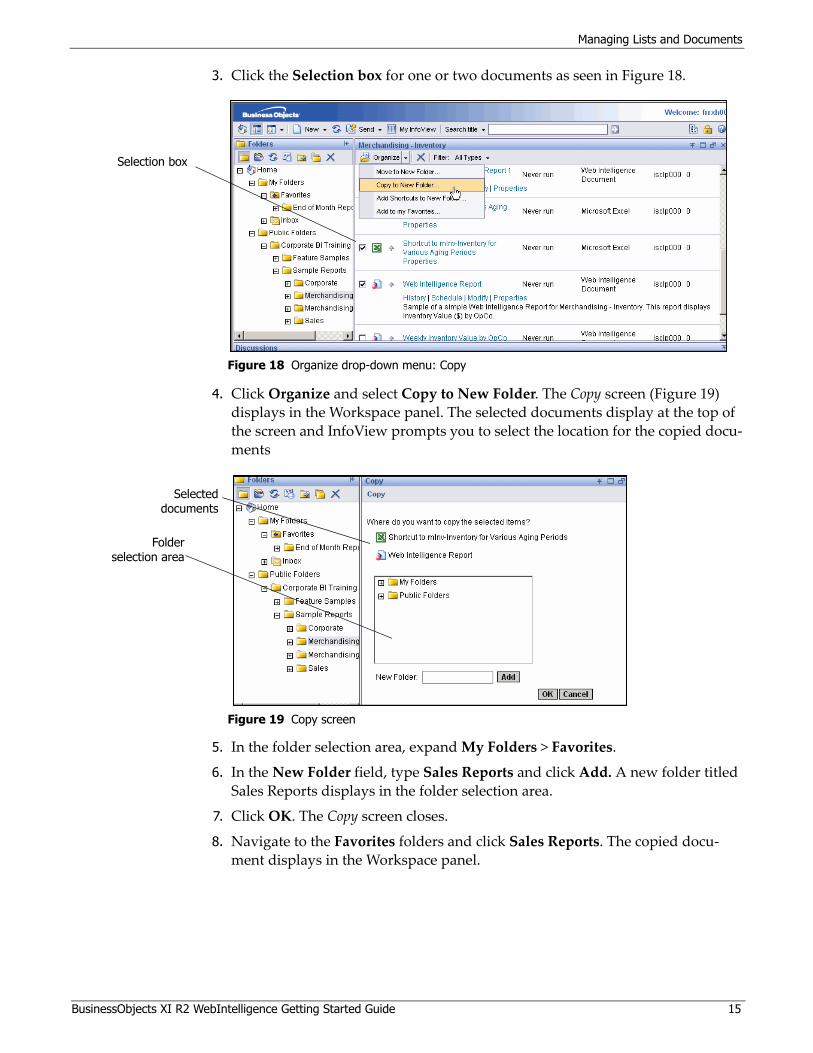
3. Click the Selection box for one or two documents as seen in Figure 18.
4. Click Organize and select Copy to New Folder. The Copy screen (Figure 19) displays in the Workspace panel. The selected documents display at the top of the screen and InfoView prompts you to select the location for the copied docu‐ments
5. In the folder selection area, expand My Folders > Favorites.
6. In the New Folder field, type Sales Reports and click Add. A new folder titled Sales Reports displays in the folder selection area.
7. Click OK. The Copy screen closes.
8. Navigate to the Favorites folders and click Sales Reports. The copied docu‐ment displays in the Workspace panel.
Figure 18 Organize drop-down menu: Copy
Selection box
Figure 19 Copy screen
Selecteddocuments
Folderselection area
Managing Lists and Documents
16 January 2008
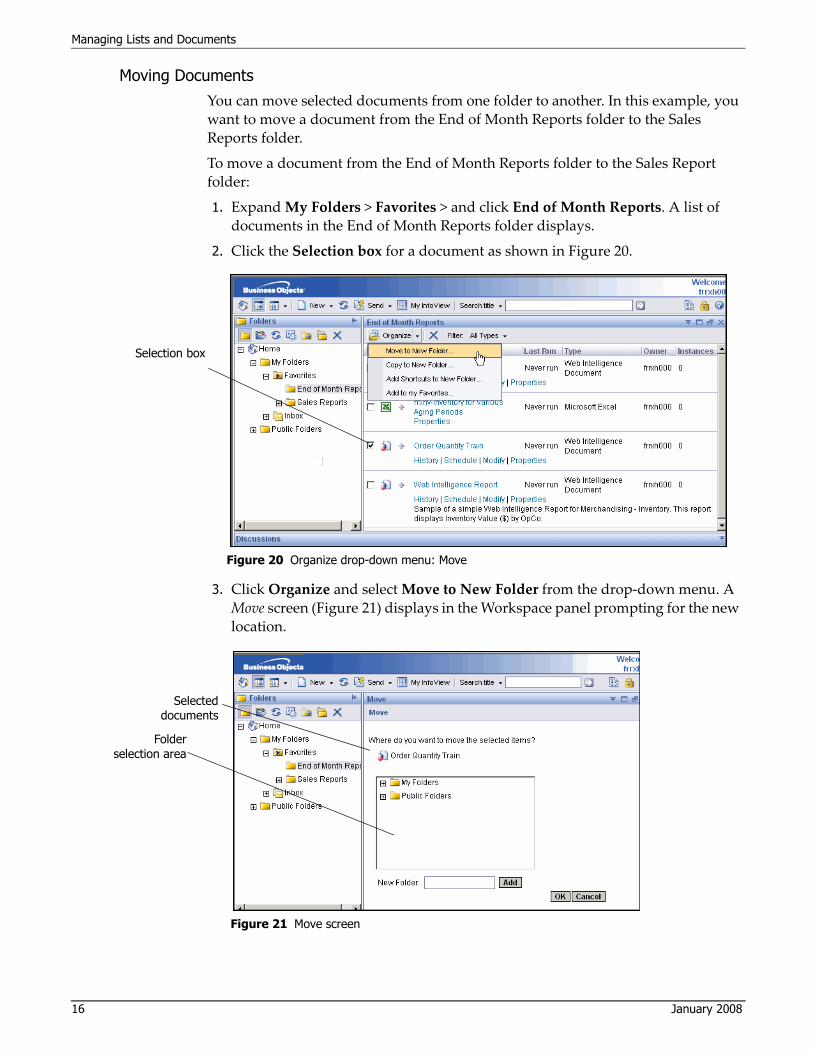
Moving DocumentsYou can move selected documents from one folder to another. In this example, you want to move a document from the End of Month Reports folder to the Sales Reports folder.
To move a document from the End of Month Reports folder to the Sales Report folder:
1. Expand My Folders > Favorites > and click End of Month Reports. A list of documents in the End of Month Reports folder displays.
2. Click the Selection box for a document as shown in Figure 20.
3. Click Organize and select Move to New Folder from the drop‐down menu. A Move screen (Figure 21) displays in the Workspace panel prompting for the new location.
Figure 20 Organize drop-down menu: Move
Selection box
Figure 21 Move screen
Selecteddocuments
Folderselection area

Managing Lists and Documents
BusinessObjects XI R2 WebIntelligence Getting Started Guide 17
4. In the folder selection area, expand My Folders > Favorites.
5. Click Sales Reports.
Note: As with copying a folder, you can create a folder for the document by typing a folder name and clicking Add.
6. Click OK.
Creating Shortcuts for a DocumentShortcuts make navigating to reports easier. A shortcut points to another document in a different folder. Create shortcuts instead of copying or moving documents from one folder to another.
Note: If the shortcut points to a report in the public folders, you cannot modify the report unless you have privilege, or unless you are the public folder owner.
To create a shortcut for a document:
1. From the Navigation panel, navigate to and click Merchandising–Inventory. A list of documents in that folder displays.
2. Click the Selection box next to a document as seen in Figure 22.
Figure 22 Organize drop-down menu: Move
Selection box
Managing Lists and Documents
18 January 2008
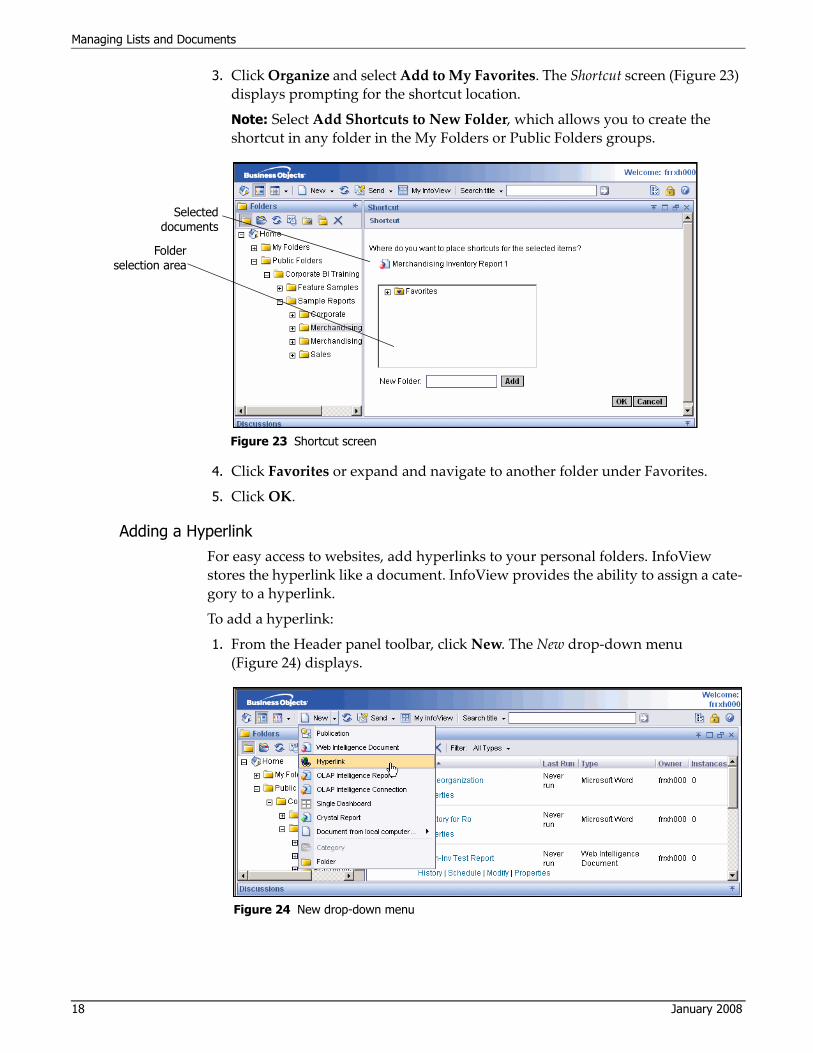
3. Click Organize and select Add to My Favorites. The Shortcut screen (Figure 23) displays prompting for the shortcut location.
Note: Select Add Shortcuts to New Folder, which allows you to create the shortcut in any folder in the My Folders or Public Folders groups.
4. Click Favorites or expand and navigate to another folder under Favorites.
5. Click OK.
Adding a HyperlinkFor easy access to websites, add hyperlinks to your personal folders. InfoView stores the hyperlink like a document. InfoView provides the ability to assign a cate‐gory to a hyperlink.
To add a hyperlink:
1. From the Header panel toolbar, click New. The New drop‐down menu (Figure 24) displays.
Figure 23 Shortcut screen
Selecteddocuments
Folderselection area
Figure 24 New drop-down menu

Managing Lists and Documents
BusinessObjects XI R2 WebIntelligence Getting Started Guide 19
2. Click Hyperlink. The Create a new hyperlink screen (Figure 25) displays.
3. In the Title field, type a name to help identify the hyperlink when seen in a list. For this example, type SYSCO Documentation Website.
4. In the Description field, type a description.
5. In the URL field, type the URL. Best practice dictates that you copy the URL address and paste. For this example, type http://intranet2.sysco.com/documen‐tation/.
6. In the Location selection area, navigate to where you want the hyperlink to reside. For this example, expand Favorites and click Sales Reports.
7. Click OK.
8. Navigate to and the folder where you added the URL. The hyperlink entered in step 3 (SYSCO Documentation) displays in the list of documents.
Assigning a Category to a DocumentAssigning a category to a document provides another way to quickly locate docu‐ments using the category view.
To assign a category to a document:
1. From the Navigation panel, navigate to and click Sales Reports. A list of docu‐ments contained in that folder displays in the Workspace panel.
2. Click the Selection box next to a document.
Figure 25 Create a new hyperlink screen
Managing Lists and Documents
20 January 2008
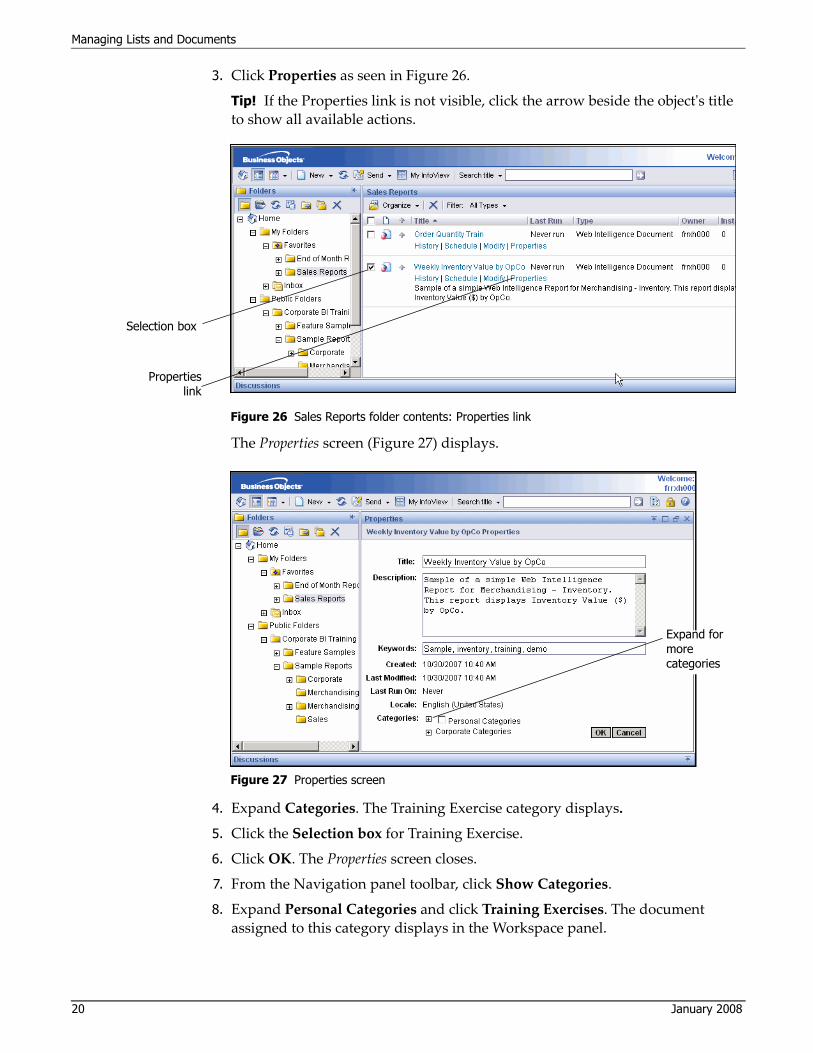
3. Click Properties as seen in Figure 26.
Tip! If the Properties link is not visible, click the arrow beside the objectʹs title to show all available actions..
The Properties screen (Figure 27) displays.
4. Expand Categories. The Training Exercise category displays.
5. Click the Selection box for Training Exercise.
6. Click OK. The Properties screen closes.
7. From the Navigation panel toolbar, click Show Categories.
8. Expand Personal Categories and click Training Exercises. The document assigned to this category displays in the Workspace panel.
Figure 26 Sales Reports folder contents: Properties link
Selection box
Propertieslink
Figure 27 Properties screen
Expand for more categories
Searching for Documents
BusinessObjects XI R2 WebIntelligence Getting Started Guide 21
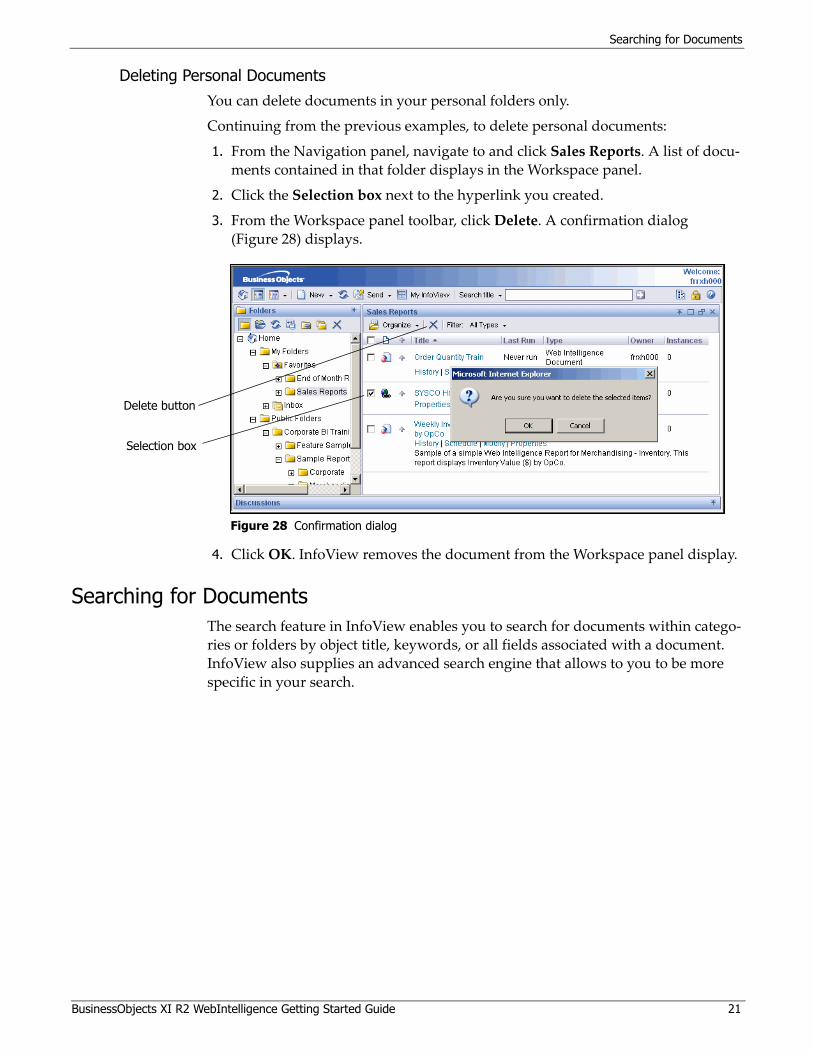
Deleting Personal DocumentsYou can delete documents in your personal folders only.
Continuing from the previous examples, to delete personal documents:
1. From the Navigation panel, navigate to and click Sales Reports. A list of docu‐ments contained in that folder displays in the Workspace panel.
2. Click the Selection box next to the hyperlink you created.
3. From the Workspace panel toolbar, click Delete. A confirmation dialog (Figure 28) displays.
4. Click OK. InfoView removes the document from the Workspace panel display.
Searching for DocumentsThe search feature in InfoView enables you to search for documents within catego‐ries or folders by object title, keywords, or all fields associated with a document. InfoView also supplies an advanced search engine that allows to you to be more specific in your search.
Figure 28 Confirmation dialog
Selection box
Delete button

Searching for Documents
22 January 2008
Performing a Quick Search
When you perform a quick search, InfoView searches all folders. This example shows how to quickly search for documents in InfoView:
1. From the Header panel toolbar, in the Search title field (Figure 29), type inven‐tory.
Note: The search function defaults to Search title. Click Search title to view other search options.
2. Press Enter or click Execute Search. A Search Results: title contains “inventory” screen displays in the Workspace panel with a list of found documents.
Performing an Advanced Search
Advanced searching limits the search to specific folders or categories, a specific document type, as well as other fields.
To perform an advanced search:
1. From the Header panel toolbar, click Search title. The Search title drop‐down menu (Figure 29) displays.
Figure 29 Search tools
Search titledrop-down
menu
Execute Searchbutton
Searching for Documents
BusinessObjects XI R2 WebIntelligence Getting Started Guide 23
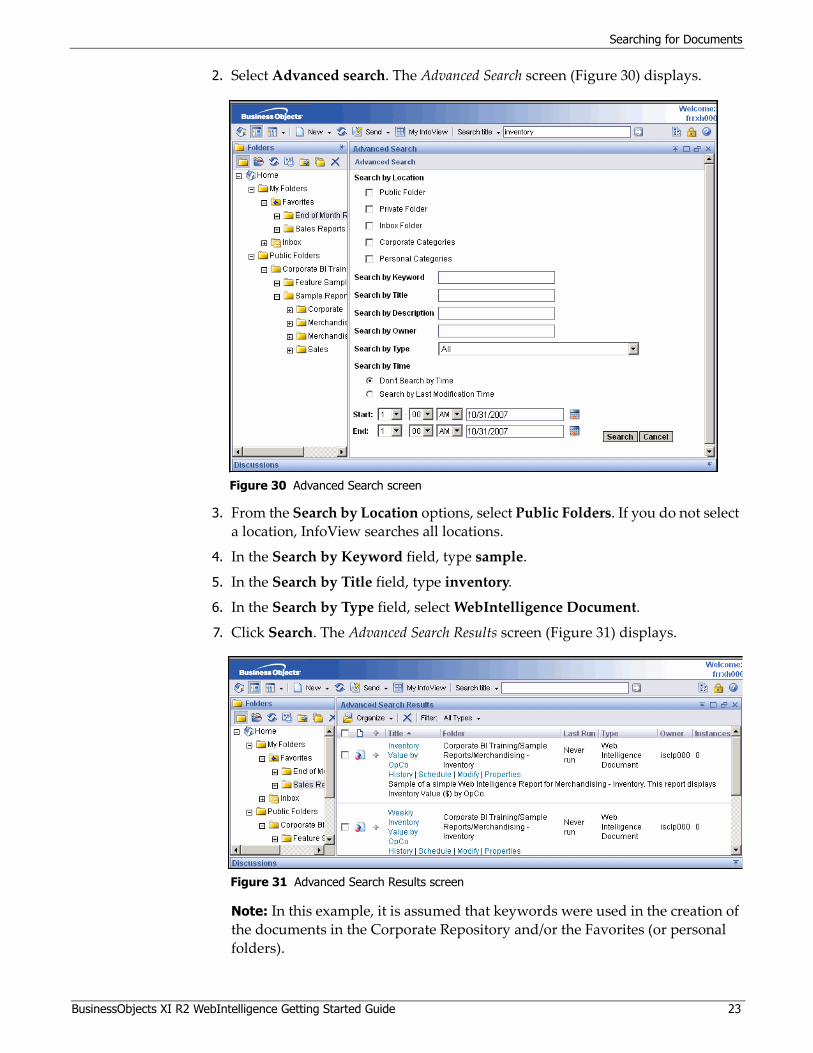
2. Select Advanced search. The Advanced Search screen (Figure 30) displays.
3. From the Search by Location options, select Public Folders. If you do not select a location, InfoView searches all locations.
4. In the Search by Keyword field, type sample.
5. In the Search by Title field, type inventory.
6. In the Search by Type field, select WebIntelligence Document.
7. Click Search. The Advanced Search Results screen (Figure 31) displays.
Note: In this example, it is assumed that keywords were used in the creation of the documents in the Corporate Repository and/or the Favorites (or personal folders).
Figure 30 Advanced Search screen
Figure 31 Advanced Search Results screen

Working with a WebIntelligence Document
24 January 2008
Working with a WebIntelligence DocumentUsing InfoView, you view documents created using BusinessObjects WebIntelli‐gence or other documents such as Microsoft Word, Adobe PDFs, and so on. This guide deals with WebIntelligence documents only.
Using InfoView, you can:
• Open and view a document
• Refresh the data
• Print the document
Viewing Documents
If you enable a document set to refresh when opened, the query underlying the report automatically submits to the database and updates as soon as the document opens. If this is the case, the page may take a little time to load, depending on the size and complexity of the query associated with the document.
Note: The following example shows how to view a document in InfoView. The folders and documents shown in this document are fictitious and do not reflect what is available to you.
To view a document in InfoView:
1. Expand Public Folders > Corporate BI Training > Sample Reports and click Merchandising–Inventory. A list of documents display in the Workspace panel.
2. Click Inventory Value by OpCo (the document name). The report (Figure 32) displays in the Workspace panel. .
Figure 32 Opened document
ToggleNavigation
button
Working with a WebIntelligence Document
BusinessObjects XI R2 WebIntelligence Getting Started Guide 25
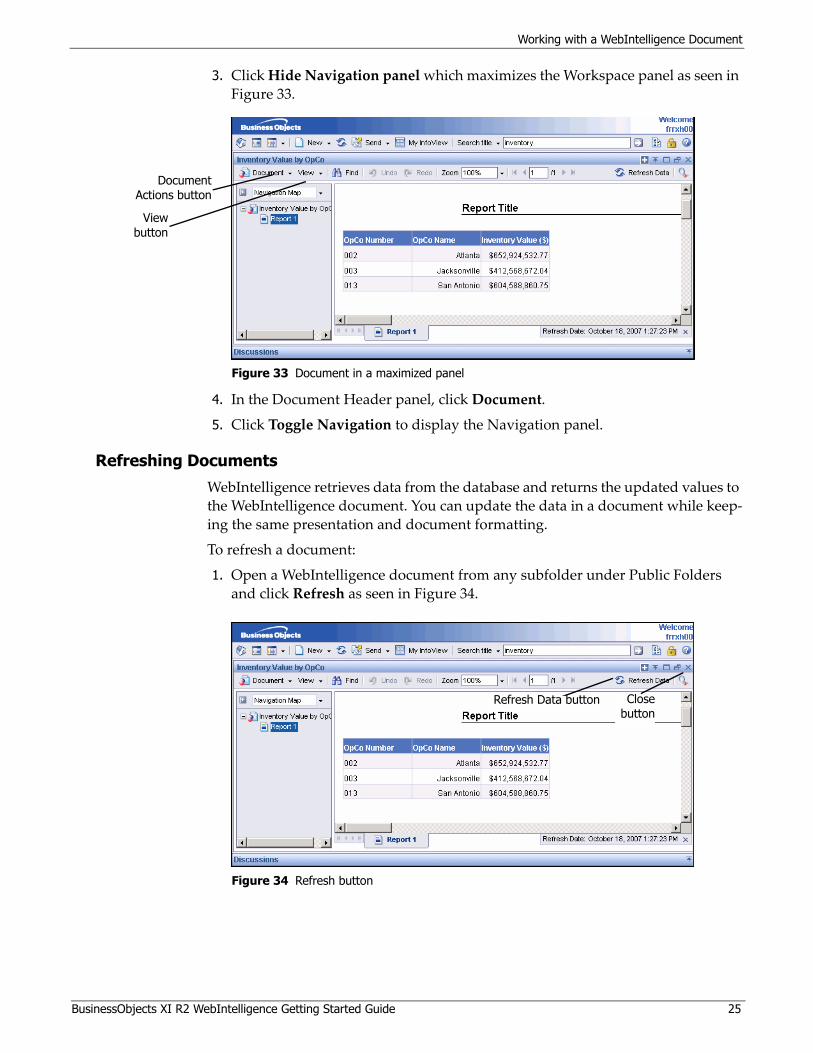
3. Click Hide Navigation panel which maximizes the Workspace panel as seen in Figure 33.
4. In the Document Header panel, click Document.
5. Click Toggle Navigation to display the Navigation panel.
Refreshing Documents
WebIntelligence retrieves data from the database and returns the updated values to the WebIntelligence document. You can update the data in a document while keep‐ing the same presentation and document formatting.
To refresh a document:
1. Open a WebIntelligence document from any subfolder under Public Folders and click Refresh as seen in Figure 34.
Figure 33 Document in a maximized panel
DocumentActions button
Viewbutton
Figure 34 Refresh button
Closebutton
Refresh Data button
Working with a WebIntelligence Document
26 January 2008
The Please Wait Refreshing Data dialog (Figure 35) displays. After InfoView refreshes the data, the dialog closes and the report displays in the Workspace panel.
2. From the Documents drop‐down menu, click Close. The document closes and the list displays in the Workspace panel.
Note: Clicking any folder or category in the Navigation panel immediately replaces the open document with a list of documents in the selected folder or category, effectively closing the document.
Using the Document Save Options
InfoView provides two save options: Save as and Save to my computer as. The first option saves the document within InfoView while the latter saves the document as a different file type to your computer.
Using the Save As OptionSave the document with a new name to a specific location or category.
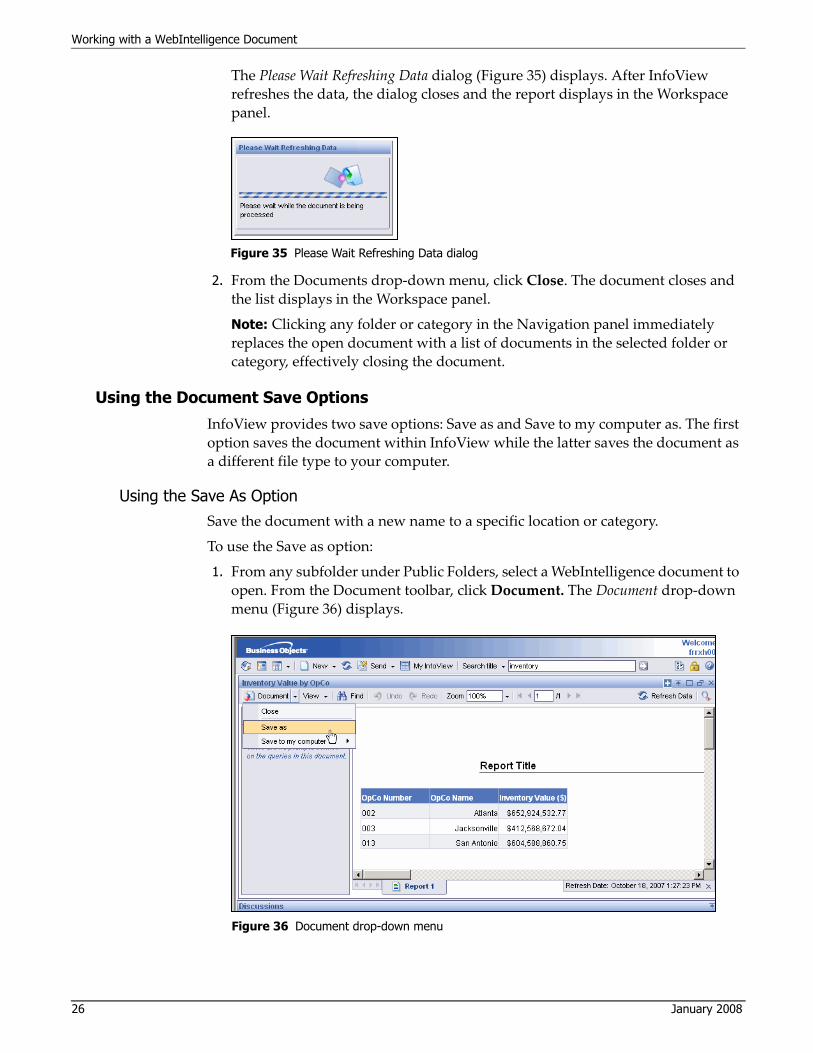
To use the Save as option:
1. From any subfolder under Public Folders, select a WebIntelligence document to open. From the Document toolbar, click Document. The Document drop‐down menu (Figure 36) displays.
Figure 35 Please Wait Refreshing Data dialog
Figure 36 Document drop-down menu

Working with a WebIntelligence Document
BusinessObjects XI R2 WebIntelligence Getting Started Guide 27
2. Click Save as. The Save Document screen (Figure 37) displays.
3. From the Location selection area, select a personal folder.
4. Click expand My Folders > Favorites. InfoView highlights the current location.
Caution: If you try to save in a public folder, InfoView displays an error mes‐sage preventing you from saving to a public folder if you do not have permis‐sion.
5. Expand Categories and select a category to assign to the document, if war‐ranted.
Tip! Best practice dictates that you do not select Refresh on an open document, as it could slow down opening documents based on the complexity of the query.
6. Click OK. The Save Document screen closes.
Figure 37 Save Document screen
Working with a WebIntelligence Document
28 January 2008
Saving the Document to your ComputerInfoView allows you to save the document in a different format to your computer. The process is the same regardless of the file format you select.
To save the document:
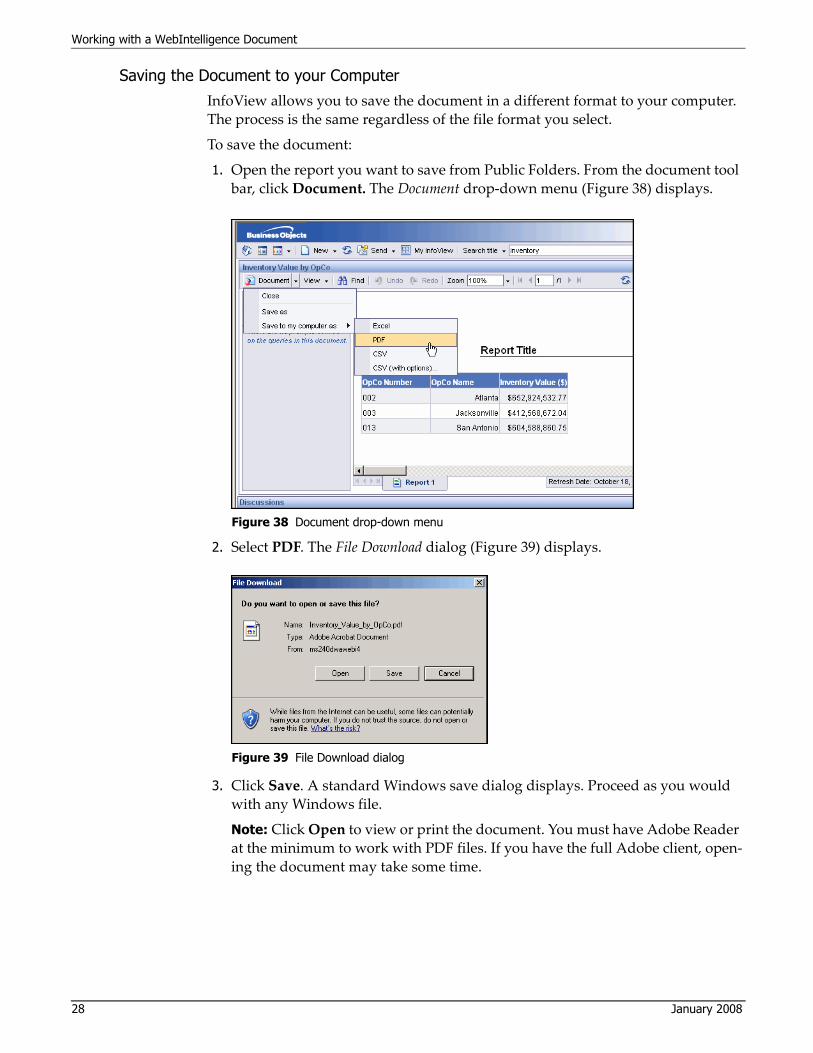
1. Open the report you want to save from Public Folders. From the document tool bar, click Document. The Document drop‐down menu (Figure 38) displays.
2. Select PDF. The File Download dialog (Figure 39) displays.
3. Click Save. A standard Windows save dialog displays. Proceed as you would with any Windows file.
Note: Click Open to view or print the document. You must have Adobe Reader at the minimum to work with PDF files. If you have the full Adobe client, open‐ing the document may take some time.
Figure 38 Document drop-down menu
Figure 39 File Download dialog
Working with a WebIntelligence Document
BusinessObjects XI R2 WebIntelligence Getting Started Guide 29
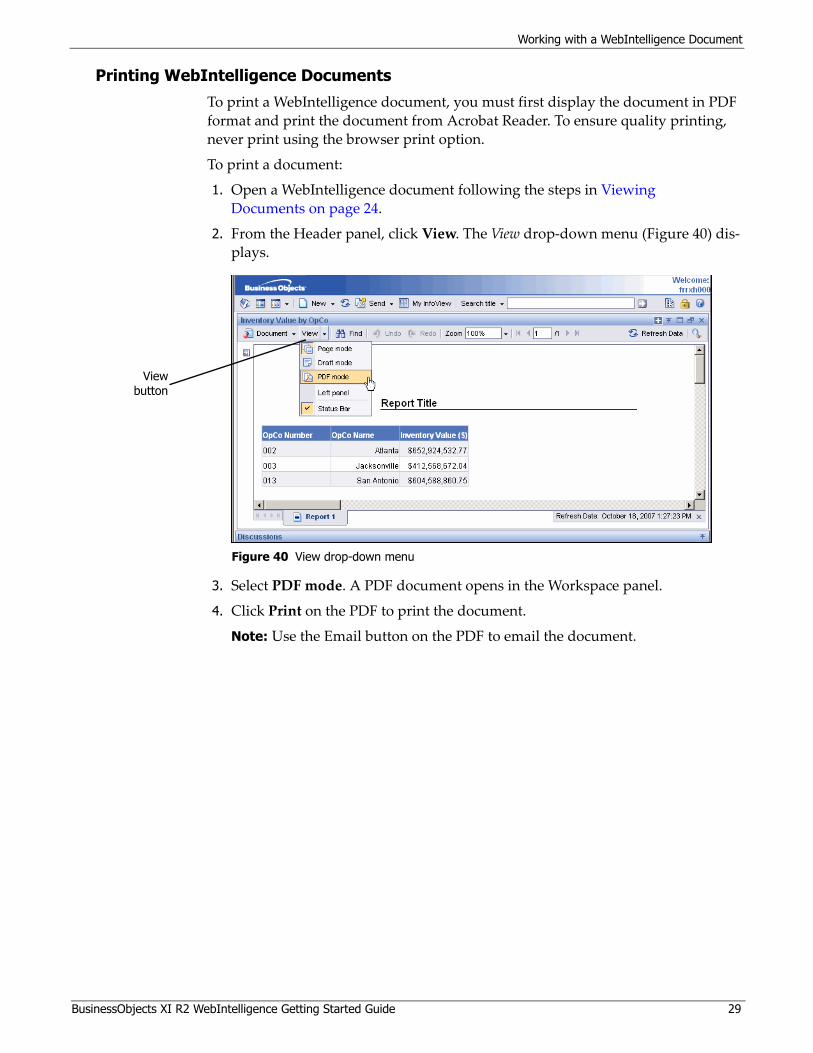
Printing WebIntelligence Documents
To print a WebIntelligence document, you must first display the document in PDF format and print the document from Acrobat Reader. To ensure quality printing, never print using the browser print option.
To print a document:
1. Open a WebIntelligence document following the steps in Viewing Documents on page 24.
2. From the Header panel, click View. The View drop‐down menu (Figure 40) dis‐plays.
3. Select PDF mode. A PDF document opens in the Workspace panel.
4. Click Print on the PDF to print the document.
Note: Use the Email button on the PDF to email the document.
Figure 40 View drop-down menu
Viewbutton
Accessing Online Help
30 January 2008
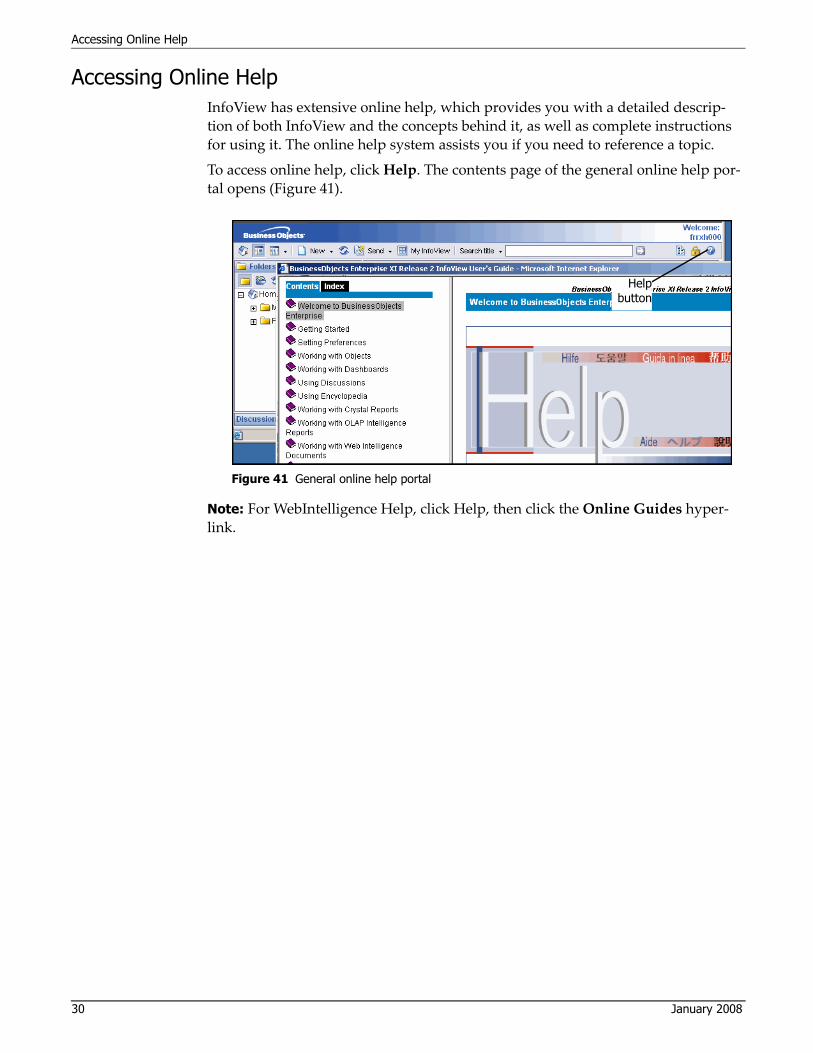
Accessing Online HelpInfoView has extensive online help, which provides you with a detailed descrip‐tion of both InfoView and the concepts behind it, as well as complete instructions for using it. The online help system assists you if you need to reference a topic.
To access online help, click Help. The contents page of the general online help por‐tal opens (Figure 41).
Note: For WebIntelligence Help, click Help, then click the Online Guides hyper‐link.
Figure 41 General online help portal
Helpbutton


![BusinessObjects Enterprise™ XI Release 2 InfoView …1].pdfWelcome to BusinessObjects Enterprise 1 About this guide 10 BusinessObjects Enterprise XI Release 2 InfoView User’s Guide](https://img.dokumen.tips/doc/110x75/5aac7cb97f8b9a2e088d0cc1/businessobjects-enterprise-xi-release-2-infoview-1pdfwelcome-to-businessobjects.jpg)