Embed Size (px)
Citation preview

Build a Web Application with JDeveloper 10g Using EJB, JPA, and JavaServer Faces
Purpose
In this tutorial, you use Oracle JDeveloper (10.1.3.1.0 or 10.1.3.2.0) to build a web application. EJB 3.0 and Java Persistence API (JPA) are used to build the data model. For the web client, JSF (JavaServer Faces) is used to build the user interface, which will include a master-detail page and an edit page.
Time to Complete
1 hour
Topics
The tutorial covers the following topics:
OverviewScenarioPrerequisitesCreating a Database Connection Building the Data Model using EJB 3.0 Creating the Page Flow Creating a Master-Detail JSF Page Creating an Edit PageRunning the ApplicationCustomizing the LayoutSummary
Viewing Screenshots
Place the cursor over this icon to load and view all the screenshots for this tutorial. (Caution: This action loads all screenshots simultaneously, so response time may be slow depending on your Internet connection.)
Note: Alternatively, you can place the cursor over an individual icon in the following steps to load and view only the screenshot associated with that step. You can hide an individual screenshot by clicking it.
Overview

The application reflects the Model-View-Controller architecture. The model is provided by EJB Components, while the view and controller are provided by JavaServer Faces.We will be using the ADF Faces set of JSF compatible component to build a richer web user interface.
You will first build the data model portion of the application. The Java Persistence API (JPA) provides a POJO persistence model for object-relational mapping. The Java Persistence API was developed by the EJB 3.0 software expert group as part of JSR 220, but its use is not limited to EJB software components. It can also be used directly by web applications and application clients, and even outside the Java EE platform, for example, in Java SE applications.
Enterprise JavaBeans (EJB) technology is the server-side component architecture for Java Platform, Enterprise Edition (Java EE) that encapsulates business logic. EJB technology enables rapid and simplified development of distributed, transactional, secure and portable applications based on Java technology.
The Java Persistence API is the standard API for the management of persistence and object/relational mapping. It provides an object/relational mapping facility for application developers using a Java domain model to manage a relational database. The Java Persistence API is part of the Java EE platform. It can also be used in Java SE environments.
In the tutorial, you implement a persistence model by developing Session and Entity beans. These beans use the EJB 3.0 annotations and JPA for model persistence.
EJB 3.0 entities represent persistent data from the database, such as a row in a customer table or an employee record in an employee table. Entities are also sharable across multiple clients. You use the Entity Manager API to create, update, delete and query the persistence model.
Session beans perform a distinct, decoupled task such as checking credit history for a customer.
You will then create a master-detail form for viewing Departments and Employees information. Following this basic master-detail page creation, you will create an edit page for the selected employee.
While developing and testing the application, you will use JDeveloper's embedded Java EE application server.
Back to Topic List
Scenario
You need to create persistence objects for the DEPARTMENTS and EMPLOYEES tables. The persistence objects are implemented as Entity Beans. Default getter and setter methods are created for department and employee data. These methods are implemented as part of a session bean. Then you create a Master Detail JSF page based on Department and related Employees, and an Edit JSF page allowing the update of employee's data.

Back to Topic List
Prerequisites
Before starting the tutorial, you should:
1. Have access to or have installed Oracle JDeveloper (10.1.3.1.0 or 10.1.3.2.0) Production. You can download it from Oracle Technology Network.
2. Have access to or have installed Oracle Database 10g (Release 2 or Release 1). You can
download it from Oracle Technology Network (http://www.oracle.com/technology/software/products/database/oracle10g/index.html).
Alternatively, you can install the free Oracle XE database. You can download it from Oracle Technology Network (http://www.oracle.com/technology/products/database/xe/index.html).
3. Have access to or have installed the Oracle Sample Schemas, included with Oracle Database
10g.
The tutorial uses the HR schema. Specifically, the pages work with the DEPARTMENT and EMPLOYEES tables.
Instructions for installing the HR schema and creating a connection to it in JDeveloper are available online at:
http://www.oracle.com/technology/obe/obe1013jdev/common/OBEConnection.htm4. Start JDeveloper. Double-click the JDeveloper executable jdeveloper.exe found in the root
directory (<jdev_home>) where you unzipped it.
If the Migrate User Settings dialog box opens, click NO.

Close the Tip of the Day window.
5. The JDeveloper IDE should now be displayed.
Back to Topic List
Creating a Database Connection
Java Database Connectivity (JDBC) is a standard API that is used for connecting a Java application to relational databases. JDeveloper uses a connection navigator to maintain connection information for your application. The connection navigator makes it easy to create, manage, and test database connections.
If you haven't already established a connection to the database, then do so by performing the following steps:

1. Click the Connections tab on the Applications Navigator. If the Connections tab is not showing, choose View > Connection Navigator from the JDeveloper main menu.
2. Right-click the Database node and choose New Database Connection from the context menu.
3. In the Create Database Connection Wizard, review the information on the Welcome page and then click Next.

4. In the Connection Name field, enter hrconn. Click Next to continue.

5. On the Authentication page: enter hr in the Username field and hr in the Password field. Select
Deploy password.
Note: It is secure to deploy the password since it gets encrypted.

Click Next to continue.
6. On the Connections page, the default values for the connection should be the following:
Driver: thin
Host name: localhost
JDBC Port: 1521
SID: ORCL
Leave the fields set to these default values. Notice that if you are using Oracle XE then the SID value should be XE.

Click Next to continue.
7. Click Test Connection.
If the database is available and the connection details are correct, you see the word Success! displayed in the Status window.
If an error occurs, verify the connection settings, click Back to make any necessary changes, and then retest the connection.
If the connection is successful, click Finish to complete the connection.

You have just created a connection to the database that will supply data for the application you
build in this tutorial.
The next section uses this connection.
Back to Topic List
Building the Data Model with EJB 3.0
The data model provides data access and validation for an application. The data is always validated by the model, regardless of the client implementation. This cleanly separates the validation and business rules from the user interface.
In the next few steps, you create an application in JDeveloper and create a data model for your application.
Create a New Application and ProjectsCreate the Persistence Model Create the Data Model
Back to Topic List

Create a New Application and Projects
In JDeveloper, you always work with projects contained in an application. The application is the highest point in the control structure.
A JDeveloper project is an organization structure used to logically group related files You can add multiple projects to your application to easily organize, access, modify, and reuse your source code. In the Applications Navigator, projects are displayed as the second level in the hierarchy, under the application.
It is considered best practice to use projects to separate the model code from the code written for the view. In this tutorial, we will create one project for the EJB Components model, and a second one for the JSF views.
Before you create any components, you must first create the application and projects. To do this, perform the following steps:
1. Click the Applications tab to go back to the Applications Navigator.
Right-click the Applications node and select New Application from the context menu.
2. In the Create Application dialog box, enter the Application Name HR_EJB_App. Notice that as
you enter the application name, the directory name changes automatically.
Enter oracle as the Application Package Prefix.
Select the Web Application[JSF, EJB] value from the Application Template drop-down list.
Click the Manage Templates... button.

3. In the Application Templates tree, for the Web Application [JSF, EJB] node, select View and
Controller. In the View and Controller pane, set Project Name to UserInterface.jpr and Default Package to view.

4. In the Applications Templates tree, for the Web Application [JSF, EJB] node, select Data Model
and in the Data Model pane, set Project Name to EJBModel.jpr and Default Package to datamodel.

Click OK.
5. Back in the Create Application dialog, click OK to create the application.
6. Click Save All on the toolbar to save your work. Alternatively, you can select File | Save All
from the menu.
The Applications Navigator should look like the image below.

You are now ready to create application components for the tutorial. In the next few steps, you create a model for your application.
Back to Topic
Back to Topic List
Creating the Persistence Model
In this section of the tutorial, you create the persistence model for departments and employees using EJB 3.0 entity beans.To create EJB 3.0 entity beans, perform the following steps:
1. In the Applications Navigator, right-click the EJBModel node and choose the New option.
2. In the New Gallery dialog box, expand the Business Tier node in Categories. Click EJB in the
Items list, then select Entities from Tables (JPA/EJB 3.0).

Click OK.
3. On the Welcome page of the wizard click Next to skip the page.

4. In Step 1 of 4 of the Create Entities from Tables wizard, select hrconn as the connection name.

Click Next.
5. In step 2 of 4, for the HR Schema and the Tables Objects Types, click the Query button. Then
select the Departments and Employees tables from the Available list and shuttle them to the Selected list.

Click Next.
6. In step 3 of 4, make sure the package name is datamodel. Notice that you can choose between
List, Collection or Set as the type of collection to implement the relationship fields. Select java.util.List.

Click Next.
7. Click Next in step 4 of 4 and then Finish to create the entity beans.
Click the Save All icon to save your work.
The Applications Navigator should look like this:

8. Double-click the Departments.java node in the Applications Navigator to open it in the source
editor.
Note: What makes these objects different from other Java files are the annotations that identify them as EJB entities. A key feature of EJB 3.0 and JPA is the ability to create entities that contain object-relational mappings by using metadata annotations rather than deployment descriptors as in earlier versions.
9. Named queries enable you to define queries at design time and then use them at run time. A
NamedQuery metadata statement has been created by default. It retrieves all rows from the

departments table.
@NamedQuery(name = "Departments.findAll", query = "select o from Departments o")
Note: Any symbol in Java code beginning with @ is known as an annotation. The use of annotations allows you to add metadata to your objects. Examples of annotations follow:
Annotation Description@Entity Identifies the file as an EJB 3.0 entity@NamedQuery A query that can be used at run time to retrieve data@Table Specifies the primary table for the entity@Id Can define which property is the identifier for the entity @Column Specifies a mapped column for a persistent property or field@ManyToOne Specifies a type of foreign key relationship between tables
@JoinColumn Specifies the join column and referenced column for a foreign key relationship
10. Right-click the EJBModel node in the Applications Navigator and choose the Make option to
compile your Java classes.
11. Make sure that the Message - Log window does not report any error.
Back to Topic
Back to Topic List
Creating the Data Model

A session facade presents client objects with a unified interface to the underlying EJBs (Enterprise JavaBeans). The client interacts only with the facade, which resides on the server and invokes the appropriate EJB methods. As a result, dependencies and communication between clients and EJBs are reduced. If you are performing remote access without a session facade, numerous remote calls are needed for the clients to access EJB 3.0 entities directly over the network. This results in a large amount of network traffic that negatively affects performance. In addition, without a facade the client depends directly on the implementation of the business objects, so that if the interface of an EJB changes, client objects have to be changed as well.
In this section, you create a session bean that implements a method to find employee and department records.
1. Right-click the EJBModel project node in the Applications Navigator, and select the New option from the context menu.
Open the Business Tier | EJB category and choose the Session Bean item.

Click OK.
2. Click Next on the Welcome page of the Create Enterprise JavaBean wizard. In step 1 of 4, enter
HRFacade as the EJB name. Leave the options unchanged, and then click Next.

3. In Step 2 of 4, make sure all entity methods are selected, then click Next.
Any entities in this project appear as a node in the tree control. You can select the checkbox to include all entity methods this entity exposes, or expand the nodes and select a subset of methods. Notice that the named query appear as exposable methods.

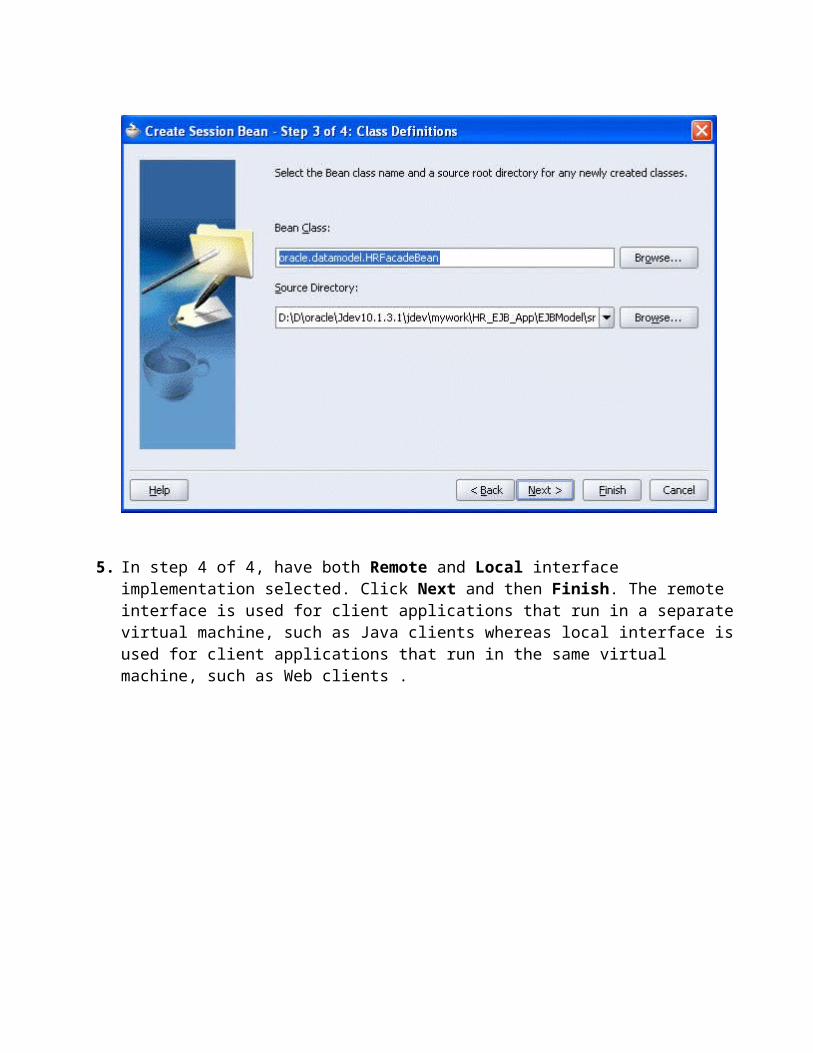
4. In Step 3 of 4, make sure that the full name for Bean Class is
oracle.datamodel.HRFacadeBean, and then click Next.

5. In step 4 of 4, have both Remote and Local interface implementation selected. Click Next and
then Finish. The remote interface is used for client applications that run in a separate virtual machine, such as Java clients whereas local interface is used for client applications that run in the same virtual machine, such as Web clients .

6. The Applications Navigator should look like this:
If not, select the EJBModel node and select the Refresh option from the View menu option (View | Refresh).
7. The session bean is made up of two files: HRFacadeBean - contains the session bean code. HRAppFacade - describes the capabilities of the bean for remote clients.
Open the Structure pane (View | Structure) and in the Applications Navigator select the HRFacadeBean. In the Structure pane expand the Sources node. The Structure pane should look like this:
Notice that JDeveloper provides a way to test the EJB by creating a sample client (to do so, right click the HRFacadeBean and select New Sample Java Client from context), then you can run it.
8. We are now going to expose the EJB as a data control for the Oracle ADF framework. This will
simplify the way that we can bind user interfaces to the EJB. To learn more about the ADF Framework visit:http://oracle.com/technology/products/adf
Right-click the HRFacadeBean node in the Applications Navigator and select Create Data Controls from context.

9. In the Choose EJB Interface dialog, select Local, and click OK.
Click the Save All icon to save your work.

10. Right-click the EJBModel project and select the Make option to compile your project. Verify that the Messages - Log window does not report any error.
11. The Applications Navigator should now look like this:
Back to Topic
Back to Topic List
Creating the Page Flow
You are going to use JDeveloper's JSF Navigation Modeler to diagrammatically plan and create your application's pages, and the navigation between them.
1. When you created the application for this tutorial, you created it with two projects: EJBModel and UserInterface. The EJBModel project contains the data controls that serve as the business model for your application. The UserInterface project will include the View portion of your application, which defines the User Interface components.
Collapse the EJBModel project node and expand the UserInterface project:

2. In the Applications Navigator, right-click the UserInterface node and select Open JSF Navigation.
3. The empty diagram opens. Notice the Component Palette to the right of the diagram editor.
You use this to create components for the JSF Navigation Model.

4. In the JSF Navigation Diagram page of the Component Palette, select JSF Page, and click where you want the page to appear in the diagram. Rename the page deptEmployees
5. From the Component Palette, drag and drop a JSF Page next to the previous one. Rename the
page editEmployee.

6. Select JSF Navigation Case in the Component Palette. Click the icon for the source JSF page (deptEmployees), and then click the icon for the destination JSF page (editEmployee) for the navigation case.
7. Modify the default label, 'success', by clicking it and typing edit over it.
8. JDeveloper gives you three views of the jsf-config.xml file. We used the diagram view, but the
same information is also accessible through a declarative dialog as well as the source directly.
Click the Overview tab at the bottom of the screen. Click Navigation Rules in the left-hand table. Notice that the rule you just created in the diagram is listed in the table.
Click now the Source tab at the bottom of the screen. The <from-view-id> tag identifies the source page, and the <to-view-id> tag identifies the destination page. The wavy lines under the page names remind you that the pages have not yet been created.

9. Switch back to the diagram view, and select JSF Navigation Case in the Component Palette.
Click the icon for the source JSF page (editEmployee), and then click the icon for the destination JSF page (deptEmployees) for the navigation case.
10. Modify the default label, 'success', by clicking it and typing commit over it.
11. Your diagram should now look something like the image below.

12. Save the diagram.
Back to Topic List
Creating a Master-Detail JavaServer Faces Page
In the next few steps, you create an ADF Faces for the Department Employees Master Detail page.
1. On the Page Flow diagram, double-click the deptEmployees icon to launch the Create JSF JSP wizard.
2. Click Next to skip the Welcome page and in Step1 select the JSP Document (*.jspx) button.

Click Next to continue.
3. On the next page, Component Binding, select the Automatically Expose UI Components
option, leave other default values and click Next.

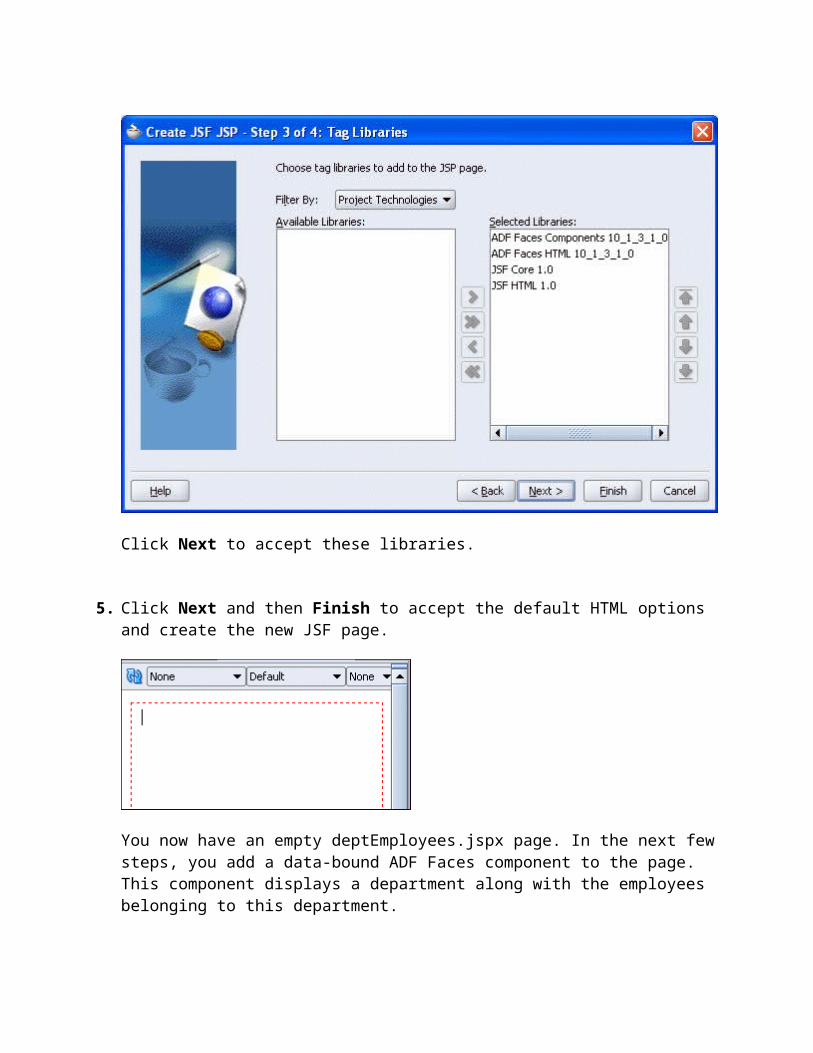
4. If necessary, select some libraries in the available libraries window and use the right arrow button to shuttle them in the Selected Libraries section to make sure the libraries included are:
JSF Core 1.0JSF HTML 1.0ADF Faces ComponentsADF Faces HTML

Click Next to accept these libraries.
5. Click Next and then Finish to accept the default HTML options and create the new JSF page.
You now have an empty deptEmployees.jspx page. In the next few steps, you add a data-bound ADF Faces component to the page. This component displays a department along with the employees belonging to this department.
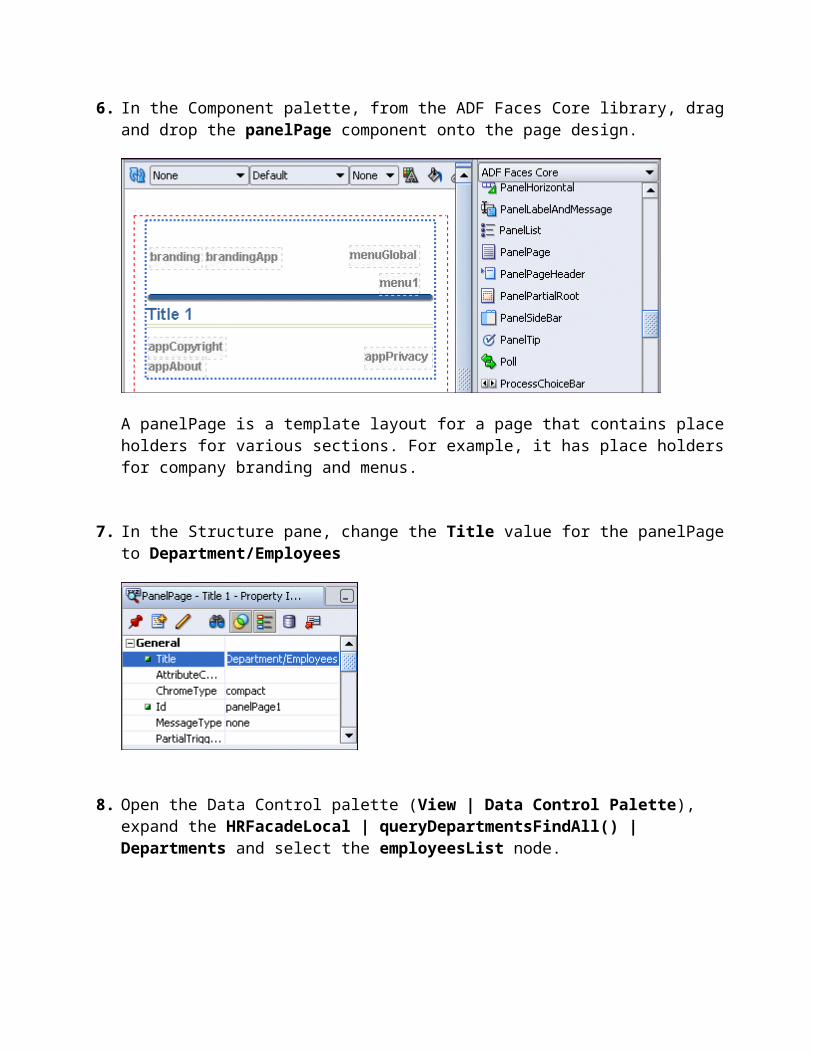
6. In the Component palette, from the ADF Faces Core library, drag and drop the panelPage
component onto the page design.

A panelPage is a template layout for a page that contains place holders for various sections. For example, it has place holders for company branding and menus.
7. In the Structure pane, change the Title value for the panelPage to Department/Employees
8. Open the Data Control palette (View | Data Control Palette), expand the HRFacadeLocal |
queryDepartmentsFindAll() | Departments and select the employeesList node.
The employeesList node represents the collection of records in a master-detail relationship with the departments. The data binding automatically synchronizes the employees that work in a specific department.
9. Drag and drop the departmentCollection on the page, and from the dynamic menu select the Create Master-Details | ADF Master Form, Detail Table.
Click OK on the Client Project Libraries Added dialog. The page should now look like this:
The Master form is populated with default navigation buttons and the Detail table has a default Submit button.
10. Select the Submit button and in the Property pane, change the Text value to Edit. Use the dropdown list for the Action and select edit.

11. In the Structure pane, underneath the af:panelGroup, select the first af:panelHeader component and in the Property pane set the Text attribute to Department. Repeat the operation by selecting the second af:panelHeader component and in the Property pane set the Text attribute to Department Employees List.
12. You now have a complete JSF page that is databound to your FacadeBean. Back on the page
flow diagram, right click the deptEmployees.jspx icon and select Run from the context menu.
13. The Master Detail layout displays in your default browser.

14. Try the Navigation buttons to navigate to different rows. Then close your browser window.
Back to Topic List
Creating an Employee Edit JavaServer Faces Page
In the next few steps, you use ADF Faces to build the Employees Edit page.
1. Switch back to the Page Flow diagram, and double-click the editEmployee icon to launch the page wizard.
2. Click Next to skip the Welcome page and in Step1 select the JSP Document button.
3. On the Component Binding page, select the Automatically Expose UI Components option.
Leave other default values and click Next.

4. In the Selected Libraries section make sure that the libraries included are:
JSF Core 1.0JSF HTML 1.0ADF Faces ComponentsADF Faces HTML
Click Next to accept these libraries.
5. Click Next then Finish to accept the default HTML options and create the new JSPX.
You now have an empty editEmployee.jspx page displayed in the design editor.

. 6. In the Component palette, Drag and Drop the panelPage component from the ADF Faces Core
library onto the page design.
7. In the property pane, change the Title value for the panelPage to Employee Details
8. Open the Data Control palette (View | Data Control Palette) and select the employeesList node
expanding the HRFacadeLocal | QueryDepartmentsFindAll() | Departments nodes.

9. Drag and drop the employeesList on the page and, from the dynamic menu, select the Create Forms | ADF Form.
In the Edit Form Fields dialog, click the Include Submit button check box and click OK. Note that at this stage you could customize your Form, removing/adding fields and define the appearance order.

10. Your page should now look like this:

The Detail table has a default Submit button that you want to use as a commit action.
11. In the Data Controls palette, select the mergeEntity(Object) node corresponding to a commit
action performed on an updated row. Notice that the mergeEntity(Object) method is corresponding to a commit action performed on an updated row. It accepts as a parameter the row on which to perform the action. We'll bind this method to the submit button that is currently on our page.

Drag and drop the mergeEntity on the Submit button and in the dialog select the Bind Existing CommandButton option.
12. In the Action Binding Editor, double-click the Value field to display the edit button.
Click the edit Button to open the Variables dialog.

13. In the Variables dialog, expand the ADF Bindings | bindings | employeesListIterator |
currentRow and select dataProvider. Then use the arrow to shuttle it into the expression pane.
Click OK.

Back in the Action Binding Editor, click OK.
14. Back on the page, select the button and in the property pane, change the Text to Commit and the
Action to commit from the dropdown list.
15. Your page should now look like this:

Back to Topic List
Running the JSF Pages
Now that you have built your application, you need to test it. JDeveloper makes it easy to test JSF through a built-in application server. The server is automatically launched when you test a page from within JDeveloper.
The next few steps take you through the testing process.
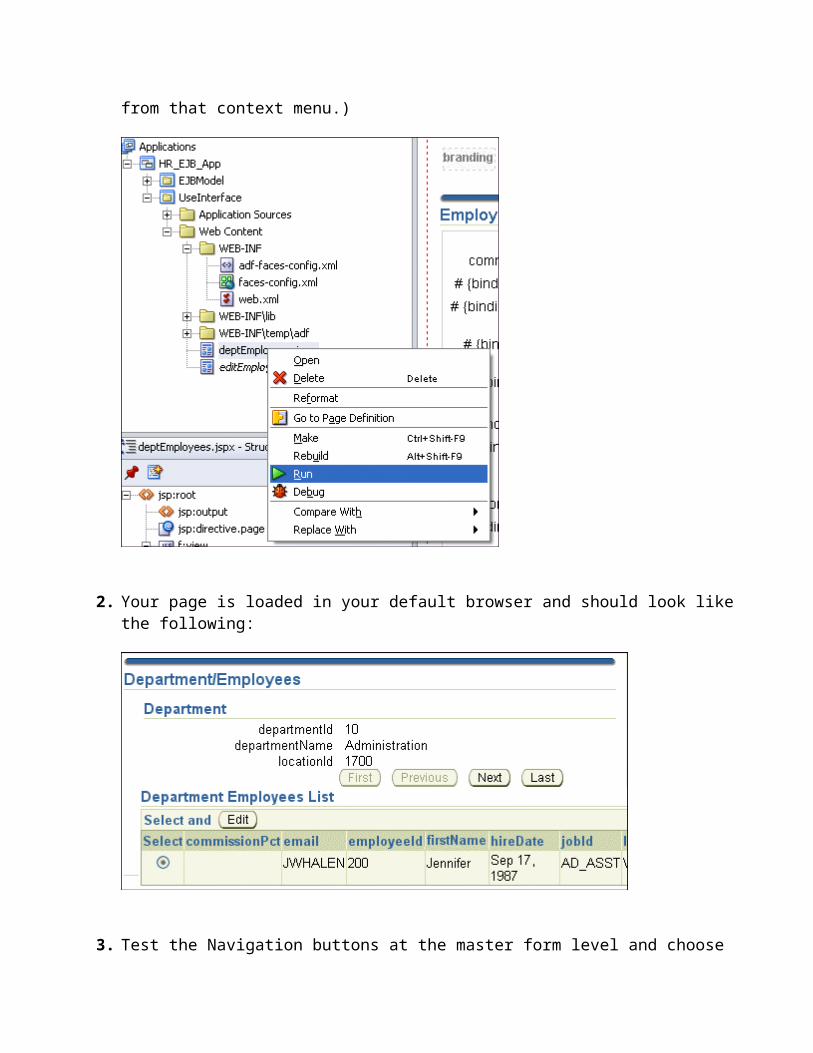
1. To test the page, right-click detEmployees.jspx in the Applications Navigator and select Run from the context menu. (You can also right-click in the visual editor and select Run from that context menu.)

2. Your page is loaded in your default browser and should look like the following:
3. Test the Navigation buttons at the master form level and choose a department with more than one employee.

4. In the Employees list, select one employee and click the Edit button.
5. The Employee Details page should now be displayed. Modify a property for the employee and
click the Commit button.

6. Back on the Master Detail page, the new value for the employee is now reflected in the Master
Detail view.
7. When you are finished, close the browser window.
Back to Topic List
Customizing the Layout
Your JSF pages were generated using "by default" options. Now you use some options to customize the layout of a page.
The next few steps take you through the layout customization process.
1. Double click the detEmployees.jspx node in the Applications Navigator to open the page.
2. In the Structure pane expand the h:form | af:panelPage | af:panelGroup | af:panelHeader Department Employees List, right click the af:table - table1 node and select Properties from context.

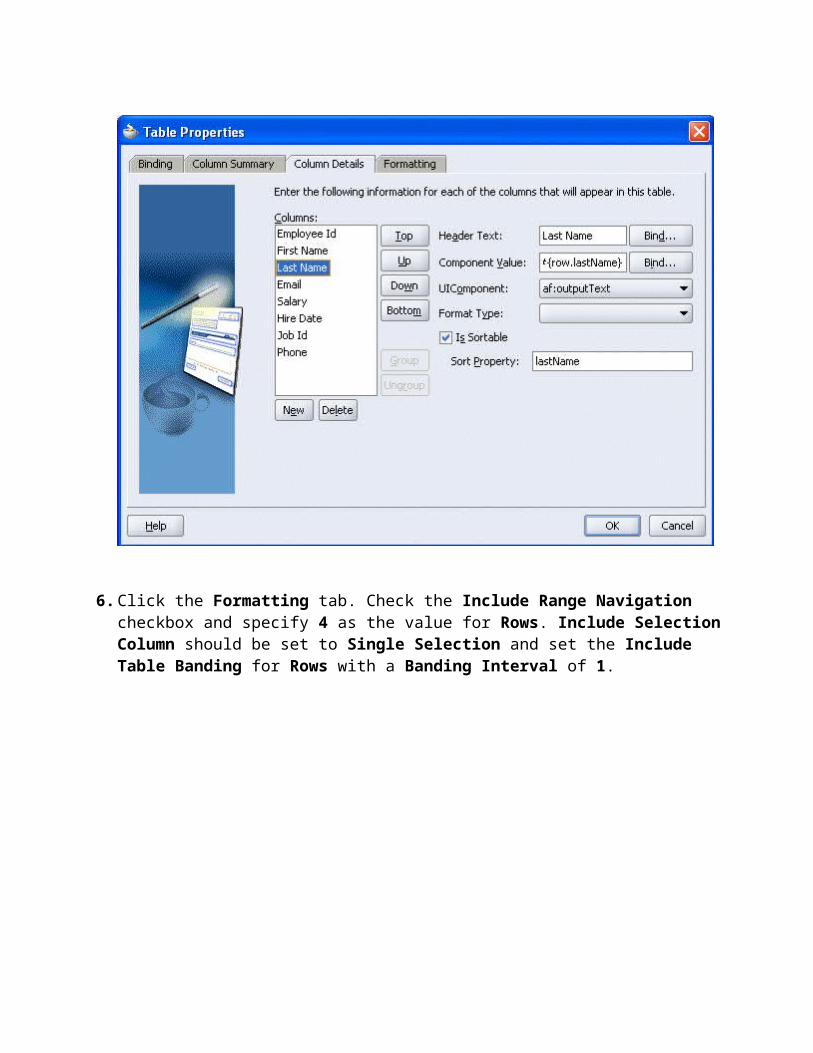
3. In the Table Properties dialog, click the Column Summary tab. Delete the {row.commissionPct} column and using the Top, Up,Down, Bottom buttons, reorder remaining columns as follow:
employeeId, firstName, lastName, email, salary, hireDate, jobId, phoneNumber.

4. Change the header for each column to the following values: Employee Id, First Name, Last
Name, Email, Salary, Hire Date, Job Id, Phone.

You can also click the Edit button and fill the Header Text field to specify the header label.

5. Click the Column Details tab. Notice that you could also have changed the column header using
this tab. Set the Is Sortable option for columns Last Name and Salary.

6. Click the Formatting tab. Check the Include Range Navigation checkbox and specify 4 as the
value for Rows. Include Selection Column should be set to Single Selection and set the Include Table Banding for Rows with a Banding Interval of 1.

Click OK.
7. In the Structure pane, expand the af:panelHeader | af:panelForm and select the first
af:inputText. In the Property Inspector set the Label to Department. Repeat the operation for the other two inputText, setting the Label respectively to Name and Location.

8. The deptEmployees page should now look like the following in the Design editor.
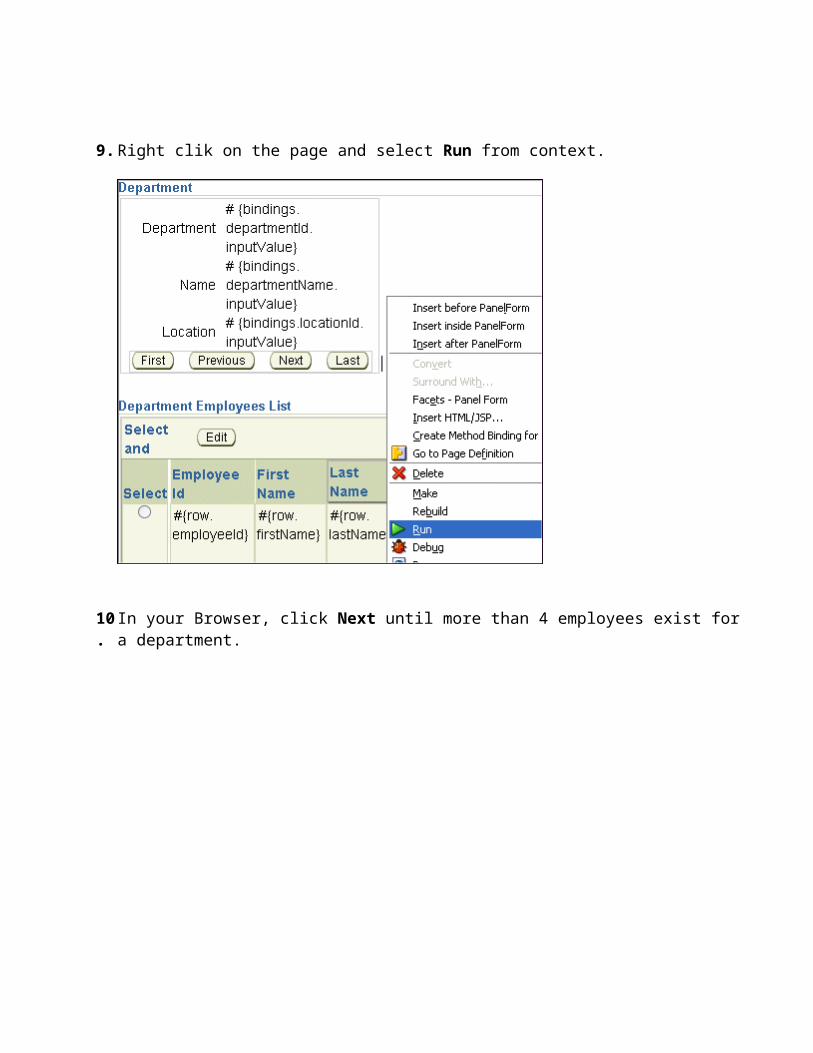
9. Right clik on the page and select Run from context.
10.
In your Browser, click Next until more than 4 employees exist for a department.

Notice that Employee rows are displayed by range of 4. You can also notice that every other employee row is highlighted.
11.
Experiment ascending and descending sorting on the Last Name column by clicking within the column header.

12.
Experiment ascending and descending sorting on the Salary column by clicking within the column header.
13.
Close your browser window. You've successfully completed this OBE.
Back to Topic List
Summary
In this tutorial, you created an end-to-end application by using Oracle JDeveloper, EJB 3.0, JPA, and JSF pages. You learned how to:
Create a Database Connection Build the Data Model using EJB 3.0 Create the Page Flow Create a Master-Detail JSF Page Create an Edit PageRun the ApplicationCustomize the page Layout


![Java EE Programming [EJB 3.0 and JPA] Using Eclipse and JBoss](https://img.dokumen.tips/doc/110x75/5567731cd8b42a4f528b5102/java-ee-programming-ejb-30-and-jpa-using-eclipse-and-jboss.jpg)

