Embed Size (px)
Citation preview

Build 6 in-expensive activated carbon air filters from parts readily available at any hardware store! Introduction to Activated Carbon Types of carbon and effective depth: The use of special manufacturing techniques results in highly porous charcoals that have surface areas of 300-2,000 square meters per gram. These so-called active, or activated, charcoals are widely used to adsorb odorous or colored substances from gases or liquids. Activated charcoal or activated carbon is an amorphous form of carbon. This means that it has no regular atomic structure, unlike the other forms (allotropes) of elemental carbon: diamond, graphite, fullerenes or annotates. General – How we ask for it? Charcoal is silken, black, shining, irregularly–shaped fragments of charred wood or bone, with no further elaboration. This type of carbon is of limited use in aquariums. It is good only for fresh water tanks, with a minimum of fish load. It is sold as aquarium carbon or filter carbon. However, charcoal has been replaced by “Activated Carbon” (AC for short) during the last years. Different kinds of carbon can be produced which can then be used for removing different kinds of impurities. The secret of AC power lies in its elaboration. For example, when acids are used during the activation procedure, the result is a carbon with an extremely porous structure. This kind of carbon is mainly used for air filters. Different kinds of carbon can be made if carbon is subjected to high temperatures and pressure. It always becomes a very porous medium, but the size of its pores depends on the gases used during activation and the inorganic salts (copper, phosphates, sulfates, silicates or zinc salts) that were added before the activation procedure. Thus, we can now produce activated carbon with very specific properties. Anybody can find special AC for aquarium use, which has been activated at 2.000 ºC in vacuum, not washed with acids, etc. It is sold as activated carbon or “super” activated carbon. Function AC works in two different ways. It can remove organic substances by absorbing them inside its sponge-like structure and/or by adsorbing them with chemical bonds.
Absorption is based on the vast number of pores. You can imagine it as a material with too many pockets (very tiny pockets, the smaller the better), which can be filled with small things (molecules). It could be referred to as a very fine mechanical filter, which can absorb things the size of a molecule. Thus, it is important to keep those pockets functional for as long as possible. In this aspect, a good mechanical filtration is essential before water reaches the activated carbon part of your filter, otherwise carbon will be clogged very quickly. The word adsorb is important here. When a material adsorbs something, it means that it attaches to it by chemical attraction. The huge surface area of activated charcoal gives it countless bonding sites. When certain chemicals pass next to the carbon surface they attach to the surface and are trapped. Activated charcoal is good at trapping other carbon-based impurities ("organic" chemicals), as well as things like chlorine. Many other chemicals are not attracted to carbon at all - sodium, nitrates, etc. - so they pass right through it. This means that an activated charcoal filter will remove certain impurities while ignoring others. It also means that, once all of the bonding sites are filled, an activated charcoal filter stops working. At that point you must replace the filter. Adsorption relies on the polarity of the various molecules. Polar molecules have two “poles” that differ in their affinity for the water molecules, so one side of the molecule is hydrophilic (likes water) and the other one is hydrophobic (dislikes water – likes lipids). When the polar organic molecule approaches the polar surface of AC, it is attached on it by its hydrophobic (lipophilic) side and thus is removed from the water solution that contained it. However, carbon will remove not only organic compounds but also inorganic ones. This is especially important. The following list shows some elements / molecules that will be removed by the use of activated carbon. You can see that it will remove both organic and inorganic substances (data obtained by Greek Water Company). Contaminant *MCL, mg/L --------------------------------------- Inorganic Contaminants Organic Arsenic Complexes 0.05 Organic Chromium Complexes 0.05 Mercury (Hg+2) Inorganic 0.05 Organic Mercury Complexes 0.002 Organic Contaminants Benzene 0.005 Endrin 0.0002 Lindane 0.004 Methoxychlor 0.1 1,2-dichloroethane 0.005 1,1-dichloroethylene 0.007 1,1,1-trichloroethane 0.200 Total Trihalomethanes (TTHMs) 0.10 Toxaphene 0.005 Trichloroethylene 0.005 2,4-D 0.1 2,4,5-TP (Silvex) 0.01 Para-dichlorobenzene 0.075
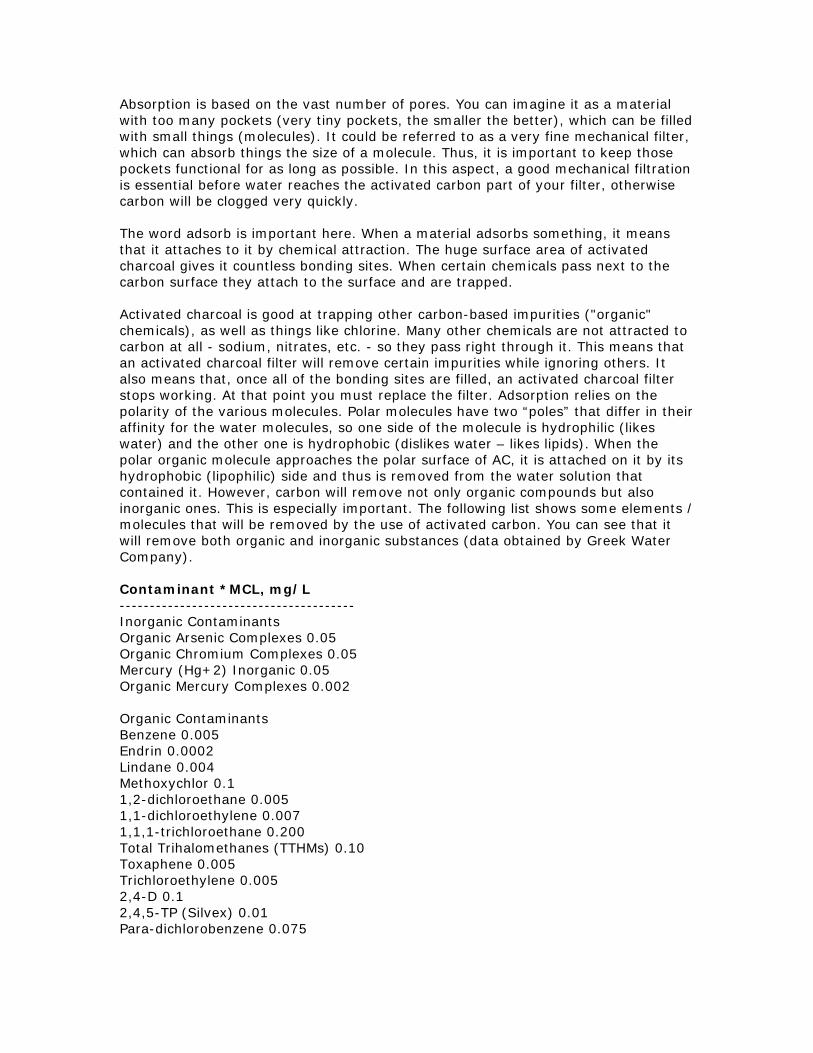
Contaminant **SMCL --------------------------------------- Color 15 color units Foaming Agents (MBAS) 0.5 mg/L Odor 3 threshold Charcoal layer thickness, and effects on odor control: The following table shows the relationship between the filter's CFM rating and the surface area of the filter's inner core (pi x diameter x height).
d= the diameter of the filter's inner core (inches) h = is the filter's height (inches) CFM d h Inner core surface area (in2) 150 4 9 113 200 4 12 151 275 6 12 226 375 6 16 302 400 6 24 452 550 8 24 603 650 10 24 754 850 12 20 754 950 8 39 980 950 12.4 24 935 950 12 24 905 1400 10 39 1225 1700 12 39 1470 1700 12.4 39 1519 2100 14 39 1715

2500 14 48 2111 When you plot the data points, you can see there's a pretty tight linear relationship that can be modeled as: Inner core surface area in square inches = (0.8267 x Fan's CFM rating) +77.363 Here are the filter dimensions to ensure complete scrubbing by the fans that you're considering: 170"cfm 4" inline fan: inner core surface area = 218 square inches thus filter will have to be 17.4" long (4" core) 440 cfm 6": inner core surface area = 441 square inches, thus filter will have to be 23.4" long (6" core) Build your own in-expensive professional carbon scrubber! Plan 1 – A Professional Carbon Scrubber for Under $50 Dollars.
This design is modeled this after the expensive professional filters of similar design. It's very simple and easy to build. The only tools required are a screw driver and some wire cutters or snips of some kind. NOTE: This design is extremely versatile. It can be made longer or shorter depending on your requirements, and space available. Furthermore, smaller filters can be created by replacing the 6 & 8 inch caps and reducers w/ 6 & 4 inch versions. All the materials were just under $50, here's the requirements: 1. Hardware cloth ~ $6 (the steel, not the plastic; in the fencing section of Home
Depot \ Lowe’s) 2. 6" & 8" duct caps ~ $4 (one each) 3. 6" duct collar ~ $2 4. 6" x 8" duct reducer ~ $3 5. Hose clamps ~ $6 (two 6" clamps and four 4" clamps) 6. Three 28oz jars of Activated Carbon ~ $20 (from the pet store) 7. Small package of Poly-fill ~ $1.50 (from Wal-Mart)

8. Two packages(or two-pair) Extra Queen size black panty hose ~ $2 Round that all up to $45
Step 1: Build the "core": Get the hardware cloth out and wrap it around the 6" cap (for sizing, I suppose you could measure instead), and snip. Leave a few inches to overlap to strengthen the seem. Be sure to snip so as to not leave a row of points, that will undoubtedly tear up your skin, not to mention it'll rip the panty hose (used as a filter, and to keep the carbon in place).
NOTE: You can also use a Dremel tool to grind off, or sand down any sharp edges. Extremely important to have a smoother surface, as edges will create holes in the filter. Also, you can use aluminum tape to tape over the sharp edges, to create a smooth surface as shown below.
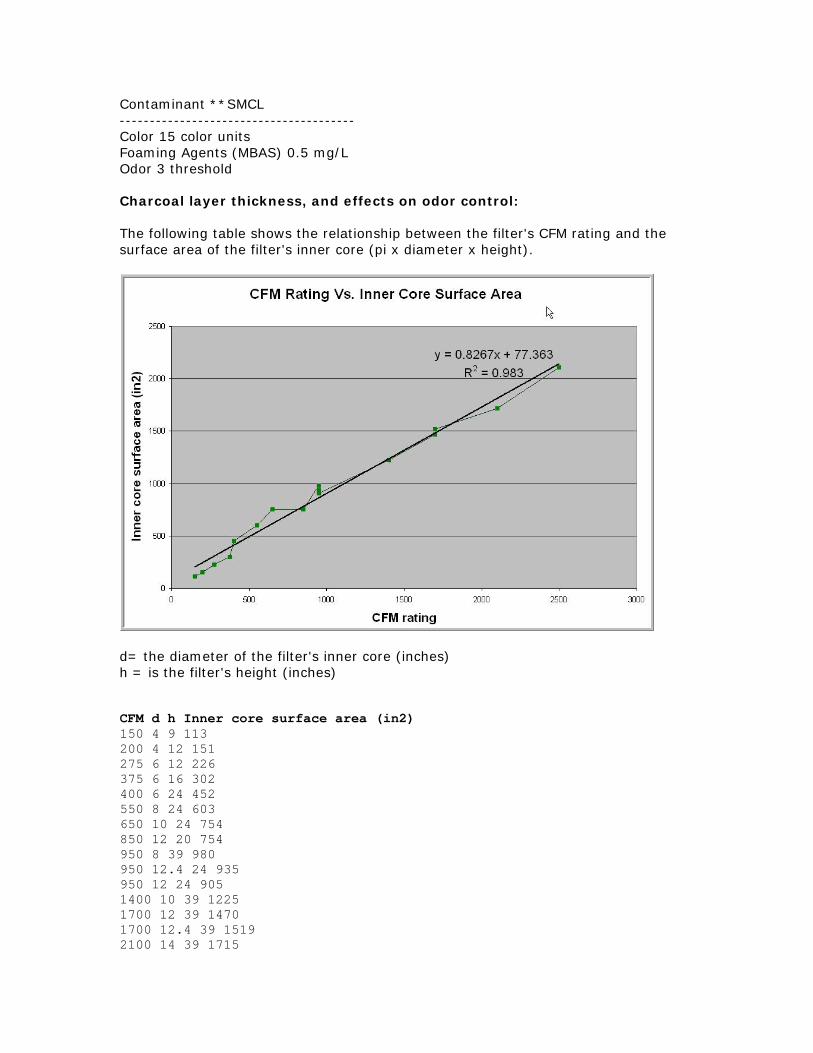
Step 2: Once the hardware cloth is snipped and wrapped around the cap, use a 6" hose clamp to clamp it down. Do the exact same thing on the other end but using the 6" collar - put the crimped end of the collar inside the core, leaving the tabbed end outward.
Step 3: Cut the legs off a pair of panty hose and stretch each one over the capped end of the core, stretching them, and covering the entire core with two layers.
IE: Both foot and leg sections per section. We added a 3rd hose clamp in the middle of the core for additional structural integrity, though it's not necessary. Step 4: Next, take the collar-end of the core and set it into the 6" x 8" reducer as shown.
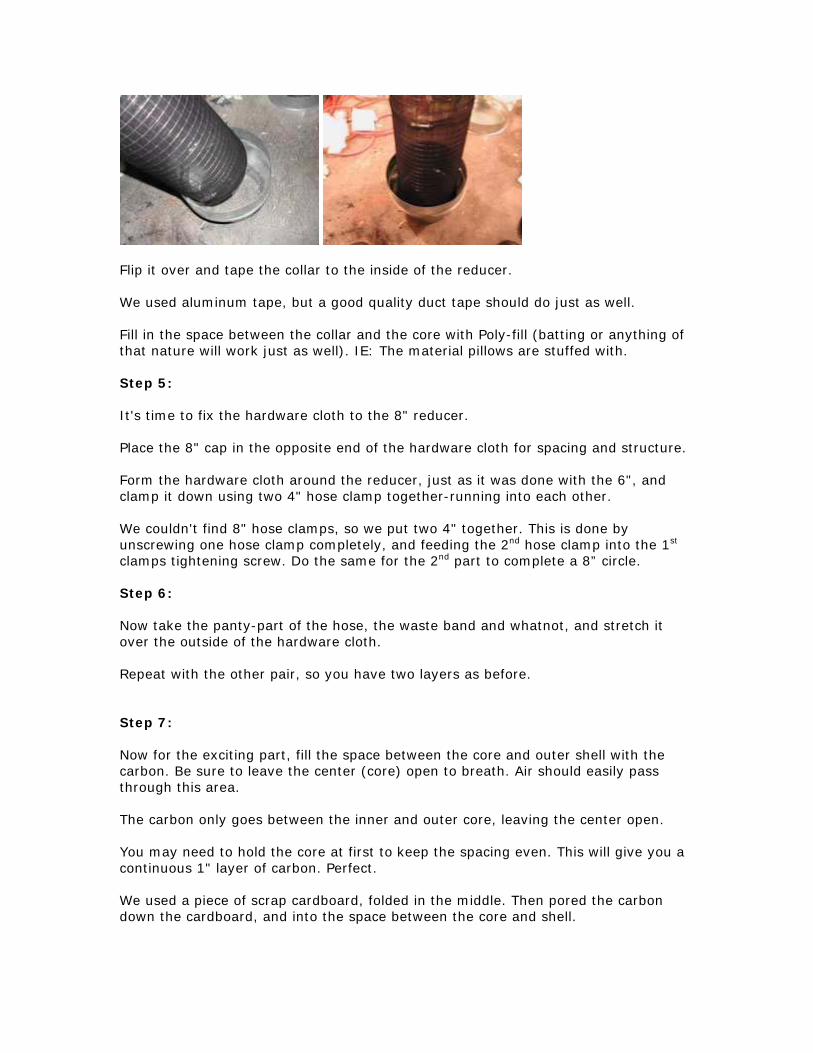
Flip it over and tape the collar to the inside of the reducer. We used aluminum tape, but a good quality duct tape should do just as well. Fill in the space between the collar and the core with Poly-fill (batting or anything of that nature will work just as well). IE: The material pillows are stuffed with. Step 5: It's time to fix the hardware cloth to the 8" reducer. Place the 8" cap in the opposite end of the hardware cloth for spacing and structure. Form the hardware cloth around the reducer, just as it was done with the 6", and clamp it down using two 4" hose clamp together-running into each other. We couldn't find 8" hose clamps, so we put two 4" together. This is done by unscrewing one hose clamp completely, and feeding the 2nd hose clamp into the 1st clamps tightening screw. Do the same for the 2nd part to complete a 8” circle. Step 6: Now take the panty-part of the hose, the waste band and whatnot, and stretch it over the outside of the hardware cloth. Repeat with the other pair, so you have two layers as before. Step 7: Now for the exciting part, fill the space between the core and outer shell with the carbon. Be sure to leave the center (core) open to breath. Air should easily pass through this area. The carbon only goes between the inner and outer core, leaving the center open. You may need to hold the core at first to keep the spacing even. This will give you a continuous 1" layer of carbon. Perfect. We used a piece of scrap cardboard, folded in the middle. Then pored the carbon down the cardboard, and into the space between the core and shell.
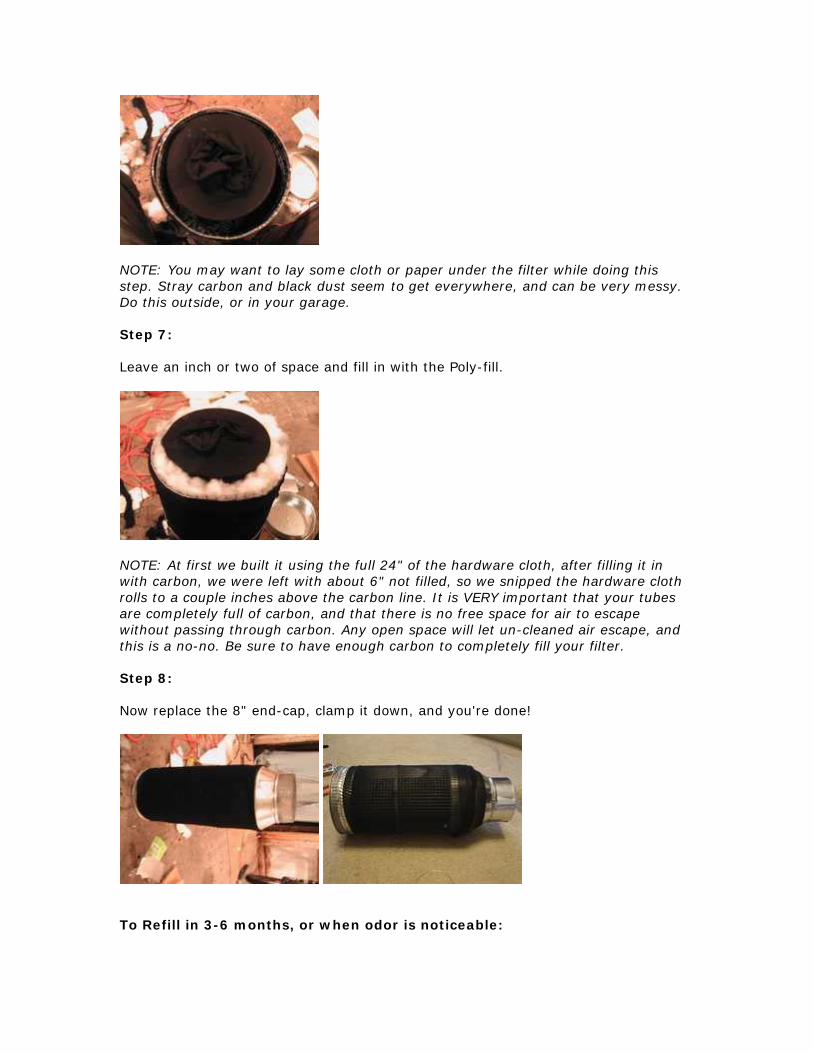
NOTE: You may want to lay some cloth or paper under the filter while doing this step. Stray carbon and black dust seem to get everywhere, and can be very messy. Do this outside, or in your garage. Step 7: Leave an inch or two of space and fill in with the Poly-fill.
NOTE: At first we built it using the full 24" of the hardware cloth, after filling it in with carbon, we were left with about 6" not filled, so we snipped the hardware cloth rolls to a couple inches above the carbon line. It is VERY important that your tubes are completely full of carbon, and that there is no free space for air to escape without passing through carbon. Any open space will let un-cleaned air escape, and this is a no-no. Be sure to have enough carbon to completely fill your filter. Step 8: Now replace the 8" end-cap, clamp it down, and you're done!
To Refill in 3-6 months, or when odor is noticeable:

To refill, simply loosen the clamp on the 8" end cap, remove the cap, dump the carbon, re-fill, replace cap. Types of Fans: At this point, you will need to connect a fan to your carbon scrubber. Air can be either pulled, or pushed through the scrubber, depending on your set-up and type of fan. Air is either taken in through the panty-hose covered part, or it exits here. A duct fan is typically connected to the smaller (open) end of the reducer.
NOTE: For large areas we recommend a powerful squirrel cage or centrifugal type fan. For smaller areas like cabinets, you can use a 100 CFM computer muffin fan, in-line duct booster fan from a hardware store, or a bathroom exhaust fan.
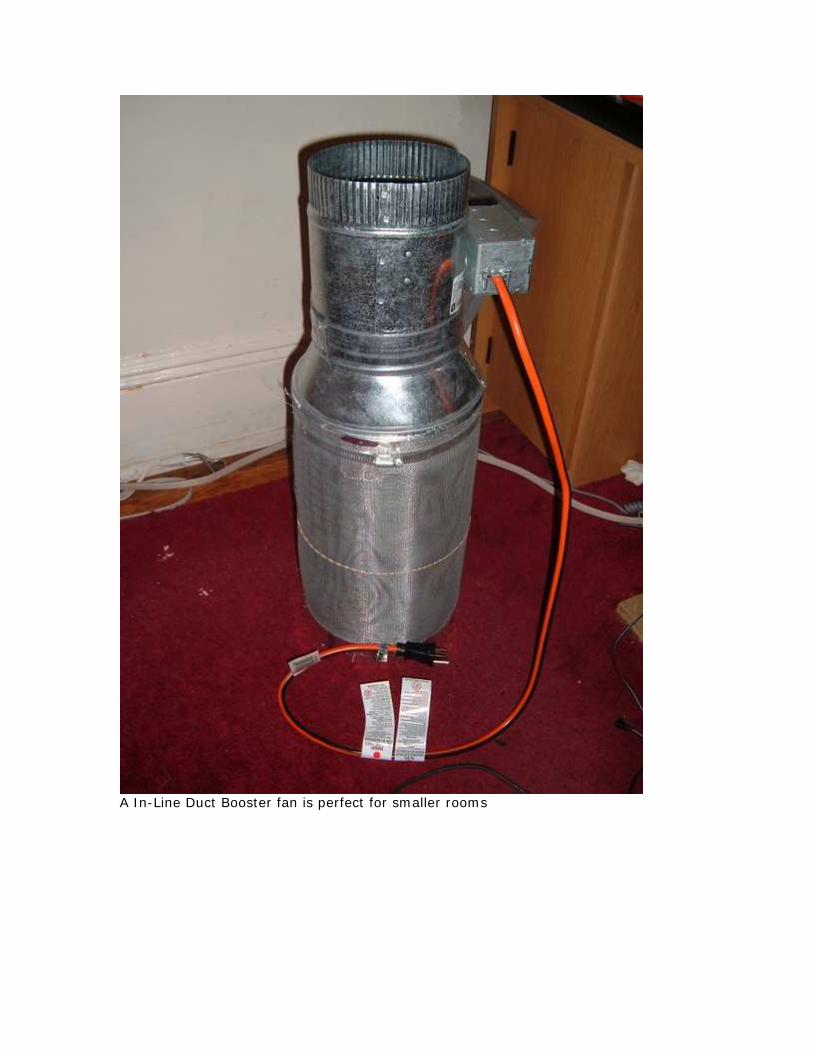
A In-Line Duct Booster fan is perfect for smaller rooms

Shown w/ an In-Line Duct Booster fan and 90 degree duct elbow from Home Depot Design Variations:
Large 10"x12" instead
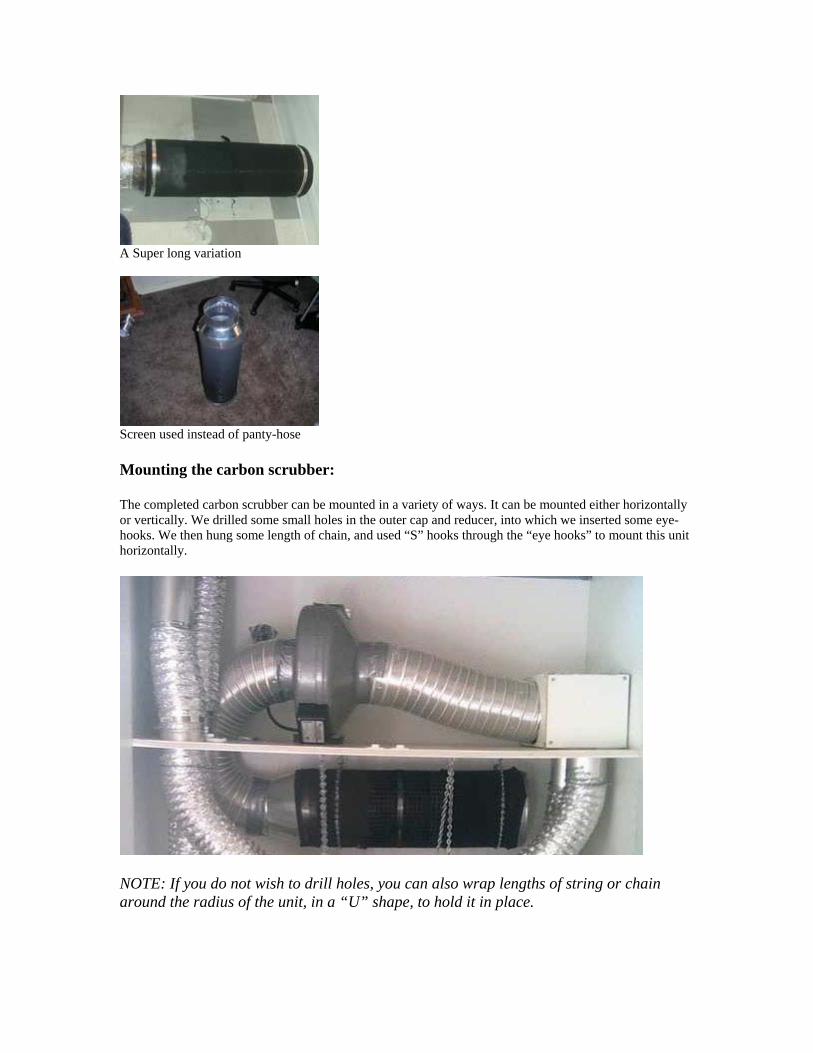
A Super long variation
Screen used instead of panty-hose Mounting the carbon scrubber: The completed carbon scrubber can be mounted in a variety of ways. It can be mounted either horizontally or vertically. We drilled some small holes in the outer cap and reducer, into which we inserted some eye-hooks. We then hung some length of chain, and used “S” hooks through the “eye hooks” to mount this unit horizontally.
NOTE: If you do not wish to drill holes, you can also wrap lengths of string or chain around the radius of the unit, in a “U” shape, to hold it in place.
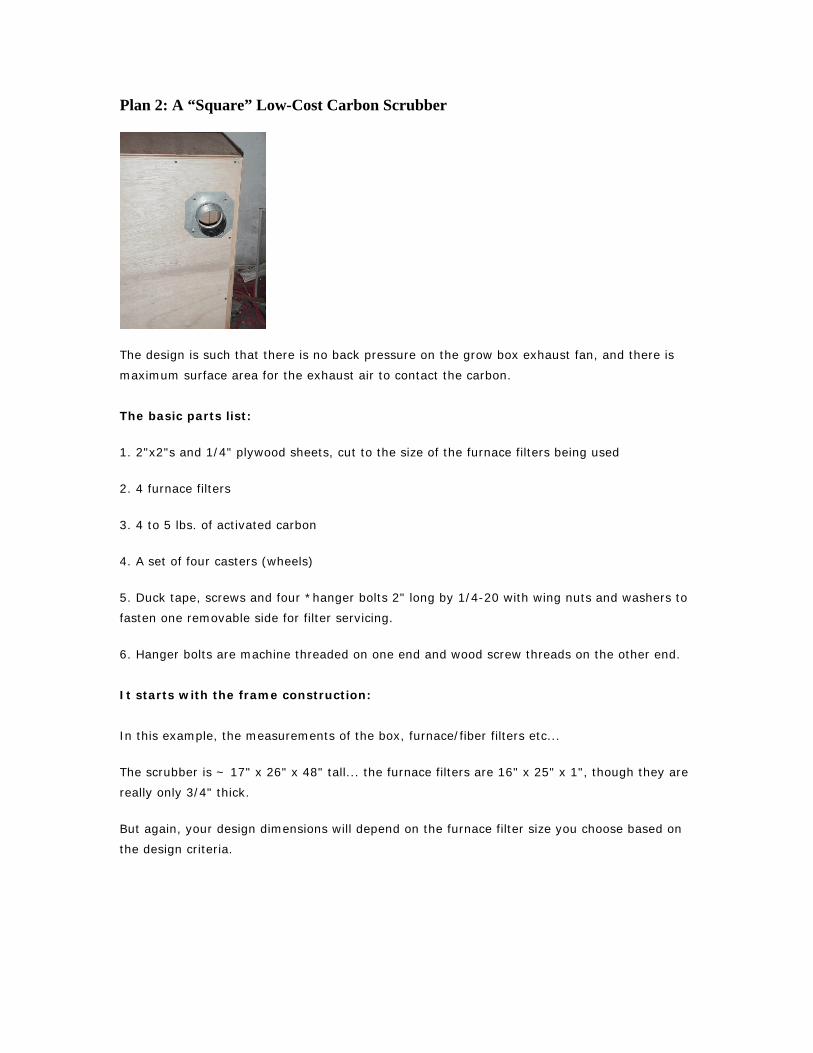
Plan 2: A “Square” Low-Cost Carbon Scrubber
The design is such that there is no back pressure on the grow box exhaust fan, and there is
maximum surface area for the exhaust air to contact the carbon.
The basic parts list:
1. 2"x2"s and 1/4" plywood sheets, cut to the size of the furnace filters being used
2. 4 furnace filters
3. 4 to 5 lbs. of activated carbon
4. A set of four casters (wheels)
5. Duck tape, screws and four *hanger bolts 2" long by 1/4-20 with wing nuts and washers to
fasten one removable side for filter servicing.
6. Hanger bolts are machine threaded on one end and wood screw threads on the other end.
It starts with the frame construction:
In this example, the measurements of the box, furnace/fiber filters etc...
The scrubber is ~ 17" x 26" x 48" tall... the furnace filters are 16" x 25" x 1", though they are
really only 3/4" thick.
But again, your design dimensions will depend on the furnace filter size you choose based on
the design criteria.
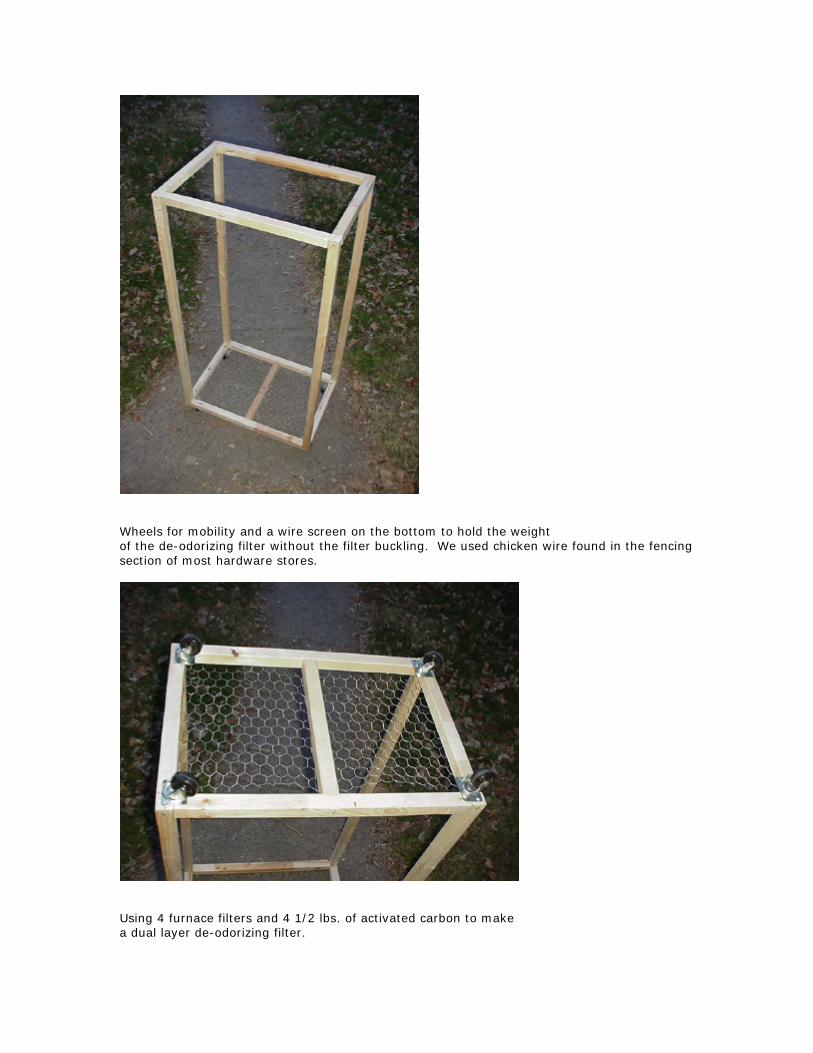
Wheels for mobility and a wire screen on the bottom to hold the weight of the de-odorizing filter without the filter buckling. We used chicken wire found in the fencing section of most hardware stores.
Using 4 furnace filters and 4 1/2 lbs. of activated carbon to make a dual layer de-odorizing filter.
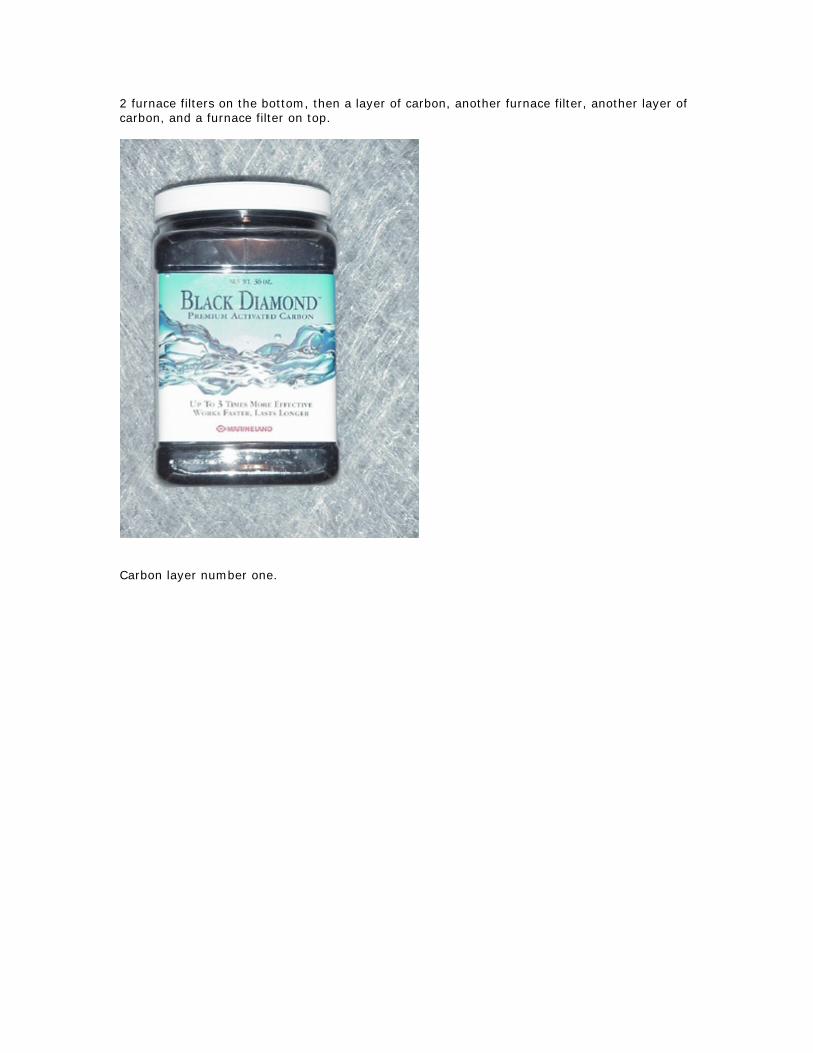
2 furnace filters on the bottom, then a layer of carbon, another furnace filter, another layer of carbon, and a furnace filter on top.
Carbon layer number one.
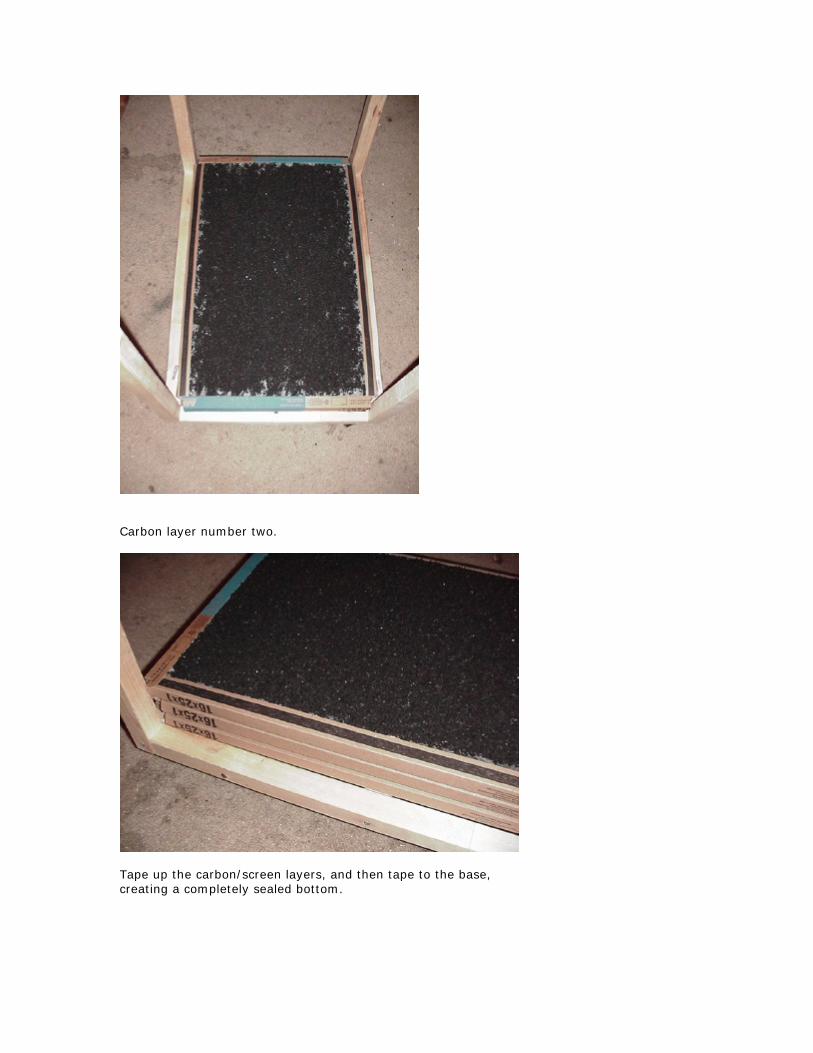
Carbon layer number two.
Tape up the carbon/screen layers, and then tape to the base, creating a completely sealed bottom.
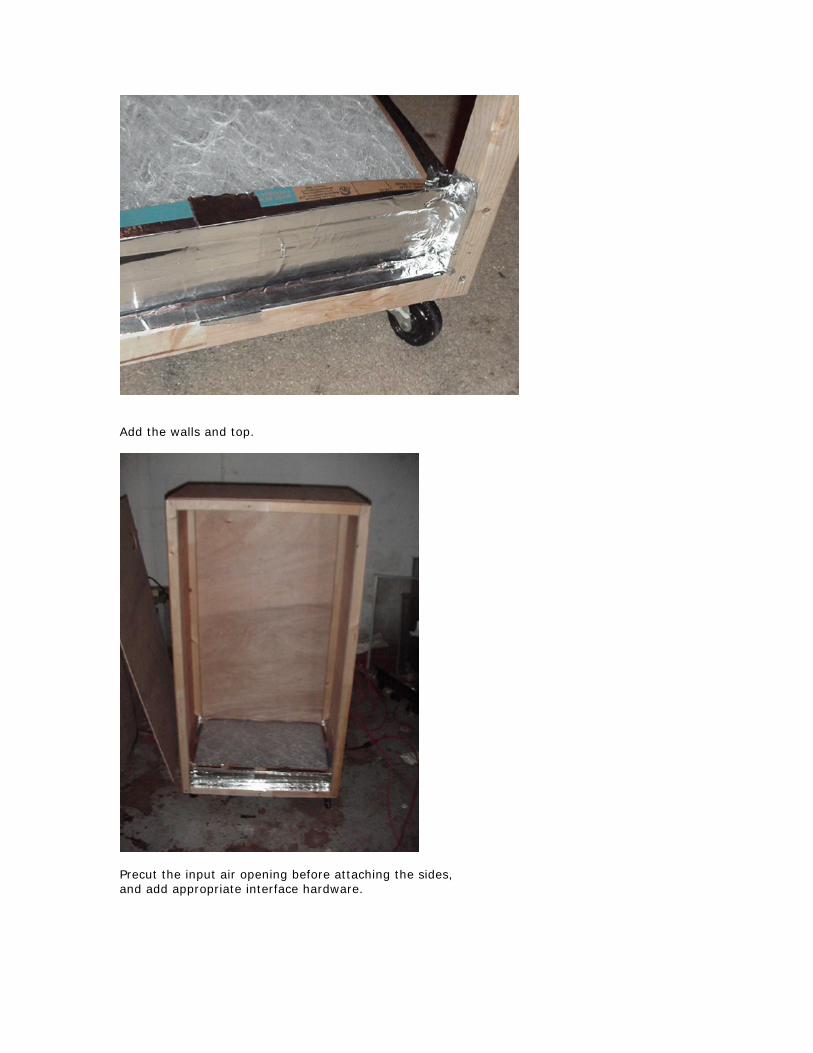
Add the walls and top.
Precut the input air opening before attaching the sides, and add appropriate interface hardware.
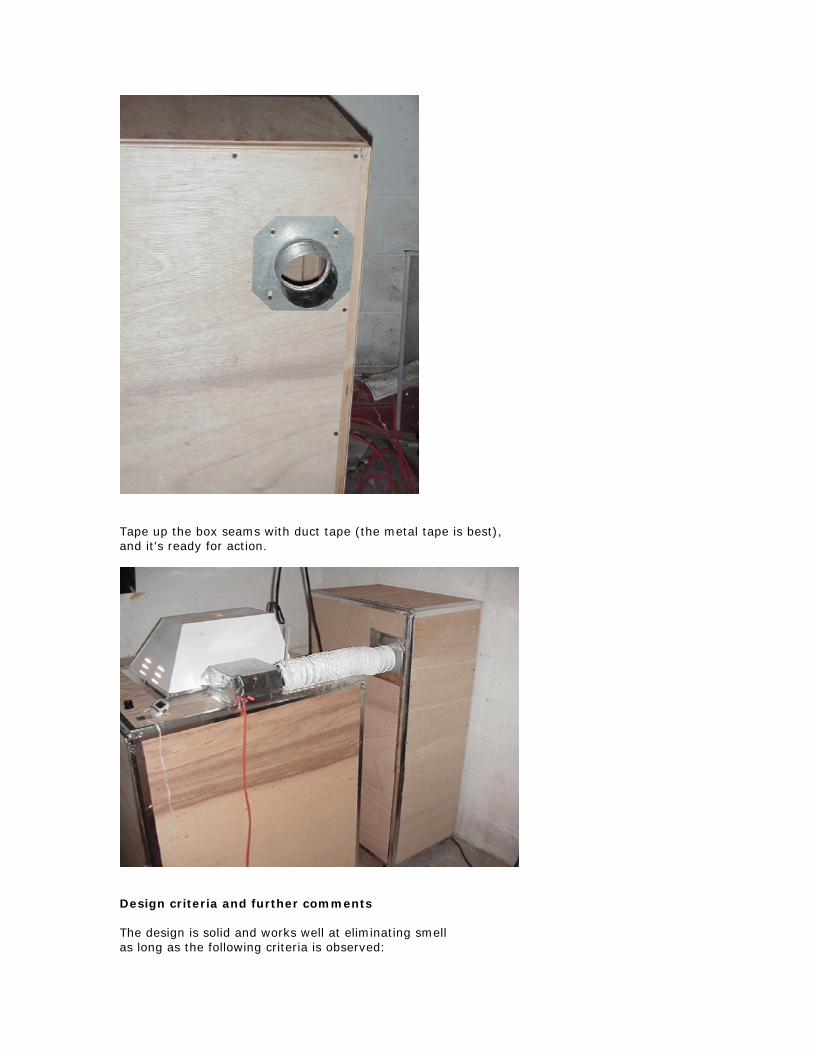
Tape up the box seams with duct tape (the metal tape is best), and it's ready for action.
Design criteria and further comments The design is solid and works well at eliminating smell as long as the following criteria is observed:
For every one (1) cubic feet of exhaust air to scrub: Have a minimum of 1.25 ounces of activated carbon. Have at least 8 square inches of filter surface area. The carbon is changed every three (3) months or so, and so far, it has not reached saturation within that time period. Some Q & A about the carbon air scrubber Why is the box so big? To eliminate back pressure on the exhaust fan to maximize air movement through the grow box. I am sure the overall dimensions can be scaled down, though I am not sure to what dimensions. Where did you purchase the carbon? The neighborhood fish/aquarium store has the pricey stuff, at around $10+ per 2.25 lbs. It comes a lot cheaper, though you might have to change it out more often. Mail-order fish supply places over the net are the way to go when purchasing bulk activated carbon/charcoal. Plan 3: “5 Gallon Bucket” Carbon Scrubber
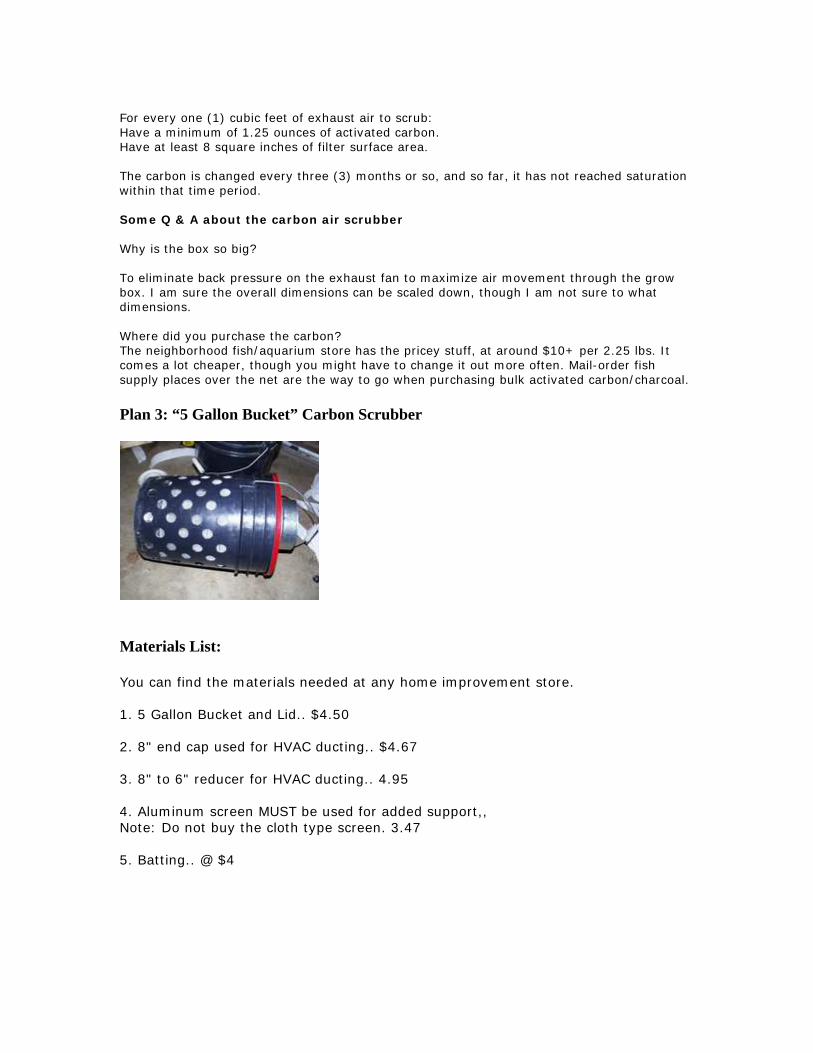
Materials List: You can find the materials needed at any home improvement store. 1. 5 Gallon Bucket and Lid.. $4.50 2. 8" end cap used for HVAC ducting.. $4.67 3. 8" to 6" reducer for HVAC ducting.. 4.95 4. Aluminum screen MUST be used for added support,, Note: Do not buy the cloth type screen. 3.47 5. Batting.. @ $4
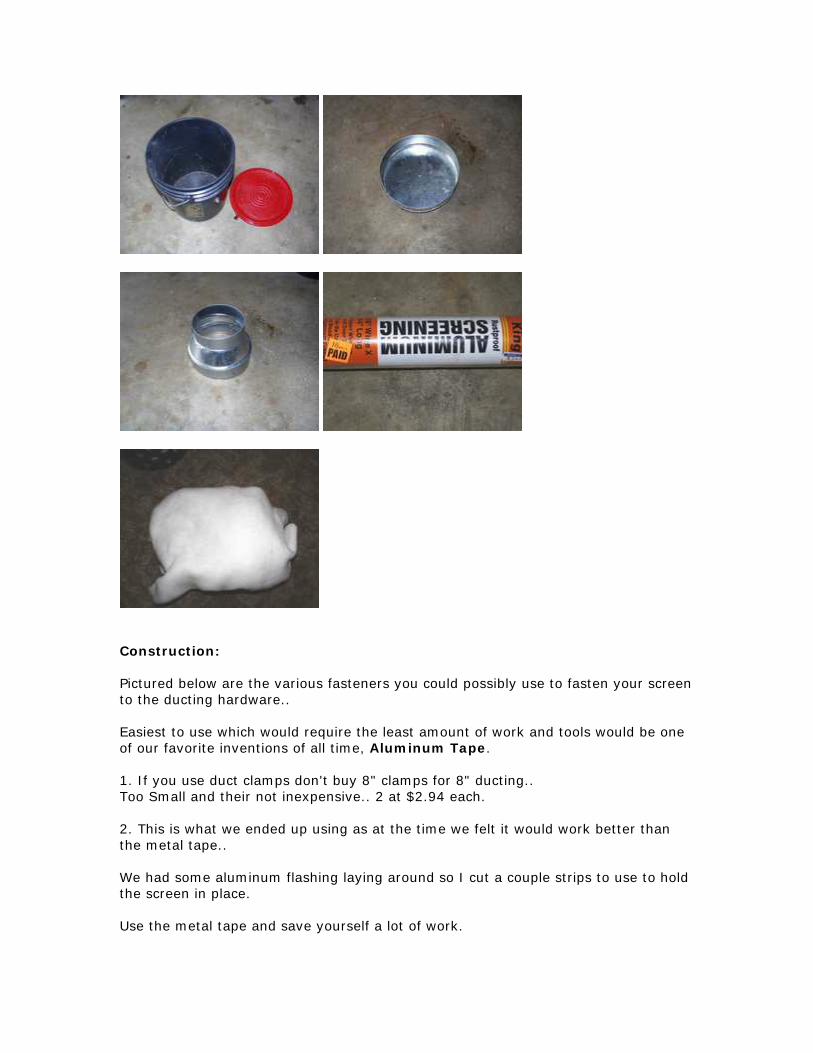
Construction: Pictured below are the various fasteners you could possibly use to fasten your screen to the ducting hardware.. Easiest to use which would require the least amount of work and tools would be one of our favorite inventions of all time, Aluminum Tape. 1. If you use duct clamps don't buy 8" clamps for 8" ducting.. Too Small and their not inexpensive.. 2 at $2.94 each. 2. This is what we ended up using as at the time we felt it would work better than the metal tape.. We had some aluminum flashing laying around so I cut a couple strips to use to hold the screen in place. Use the metal tape and save yourself a lot of work.

3. Aluminum Tape! @ $6 4. Sheet metal screws which you don't need if you use the metal tape.. @ $4.75
Step 1: First center the 8 to 6" reducer onto the lid and trace around the "Inside" of the rim for your opening. By making the hole slightly smaller than the ducting hardware you will get a good seal around the piece of duct. if you find that your opening is a little large you can seal it with the Aluminum tape or a bit of silicon caulking.
Step 2: The lid may be a little tough to push down over the collar but ensures a nice, tight fit.
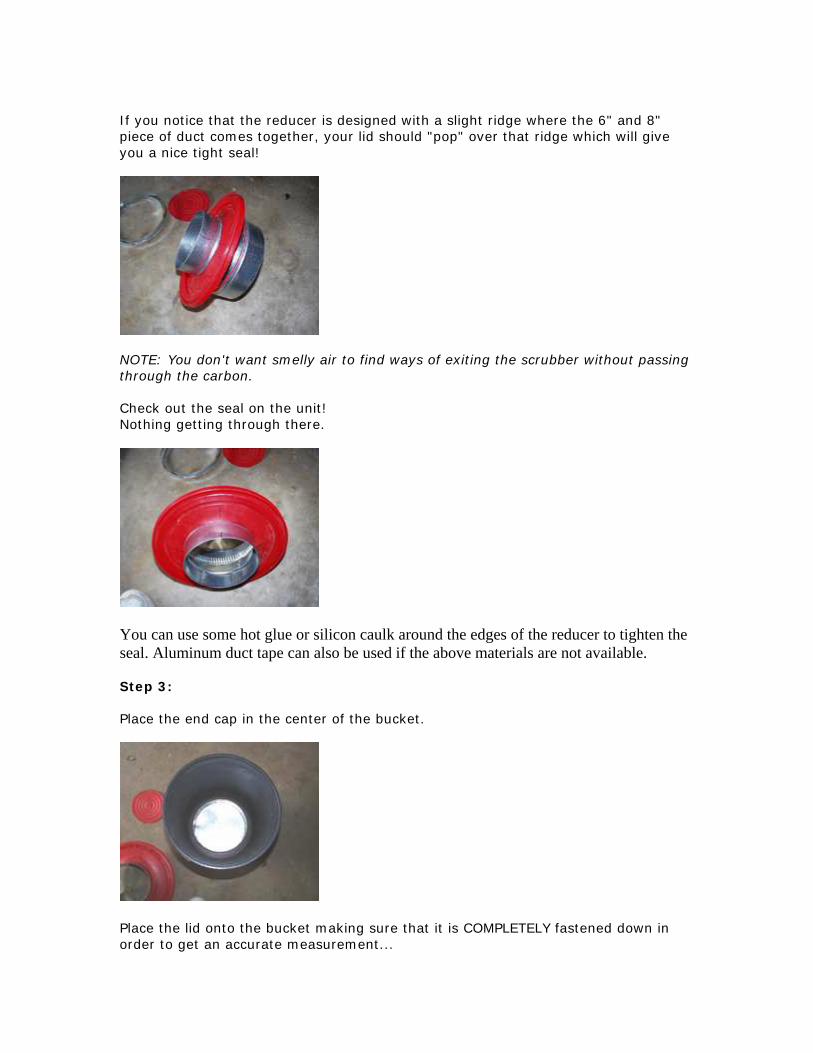
If you notice that the reducer is designed with a slight ridge where the 6" and 8" piece of duct comes together, your lid should "pop" over that ridge which will give you a nice tight seal!
NOTE: You don't want smelly air to find ways of exiting the scrubber without passing through the carbon. Check out the seal on the unit! Nothing getting through there.
You can use some hot glue or silicon caulk around the edges of the reducer to tighten the seal. Aluminum duct tape can also be used if the above materials are not available. Step 3: Place the end cap in the center of the bucket.
Place the lid onto the bucket making sure that it is COMPLETELY fastened down in order to get an accurate measurement...
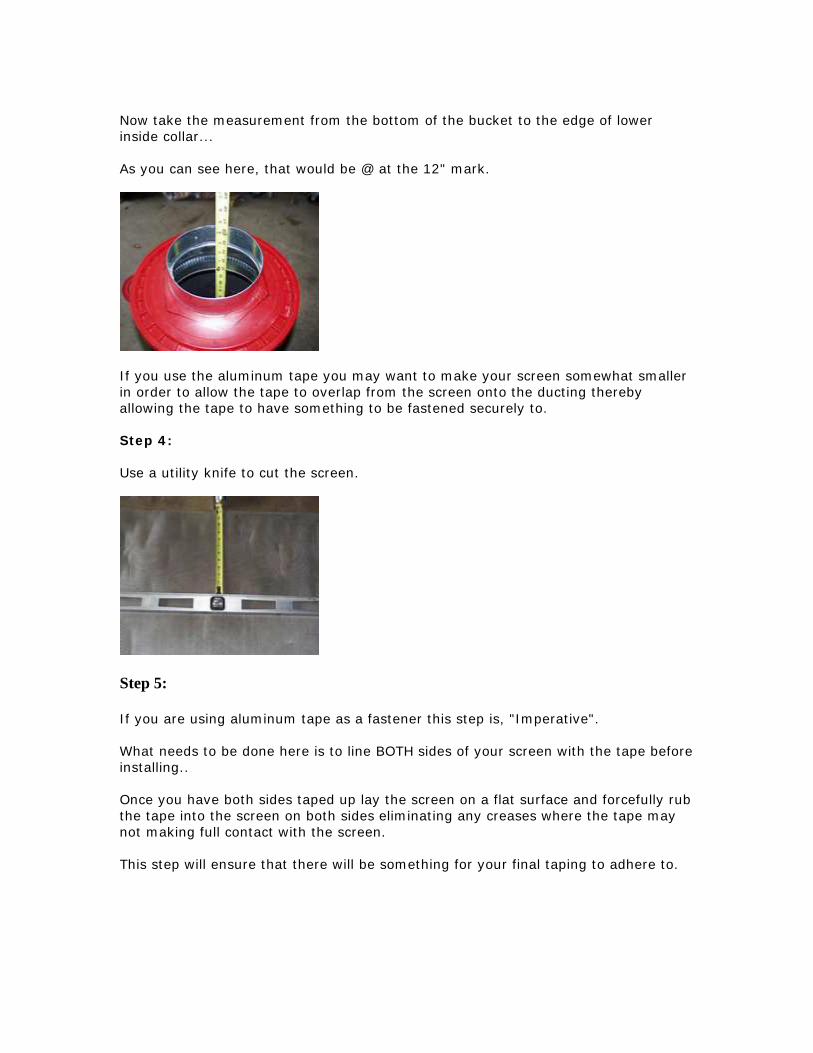
Now take the measurement from the bottom of the bucket to the edge of lower inside collar... As you can see here, that would be @ at the 12" mark.
If you use the aluminum tape you may want to make your screen somewhat smaller in order to allow the tape to overlap from the screen onto the ducting thereby allowing the tape to have something to be fastened securely to. Step 4: Use a utility knife to cut the screen.
Step 5: If you are using aluminum tape as a fastener this step is, "Imperative". What needs to be done here is to line BOTH sides of your screen with the tape before installing.. Once you have both sides taped up lay the screen on a flat surface and forcefully rub the tape into the screen on both sides eliminating any creases where the tape may not making full contact with the screen. This step will ensure that there will be something for your final taping to adhere to.
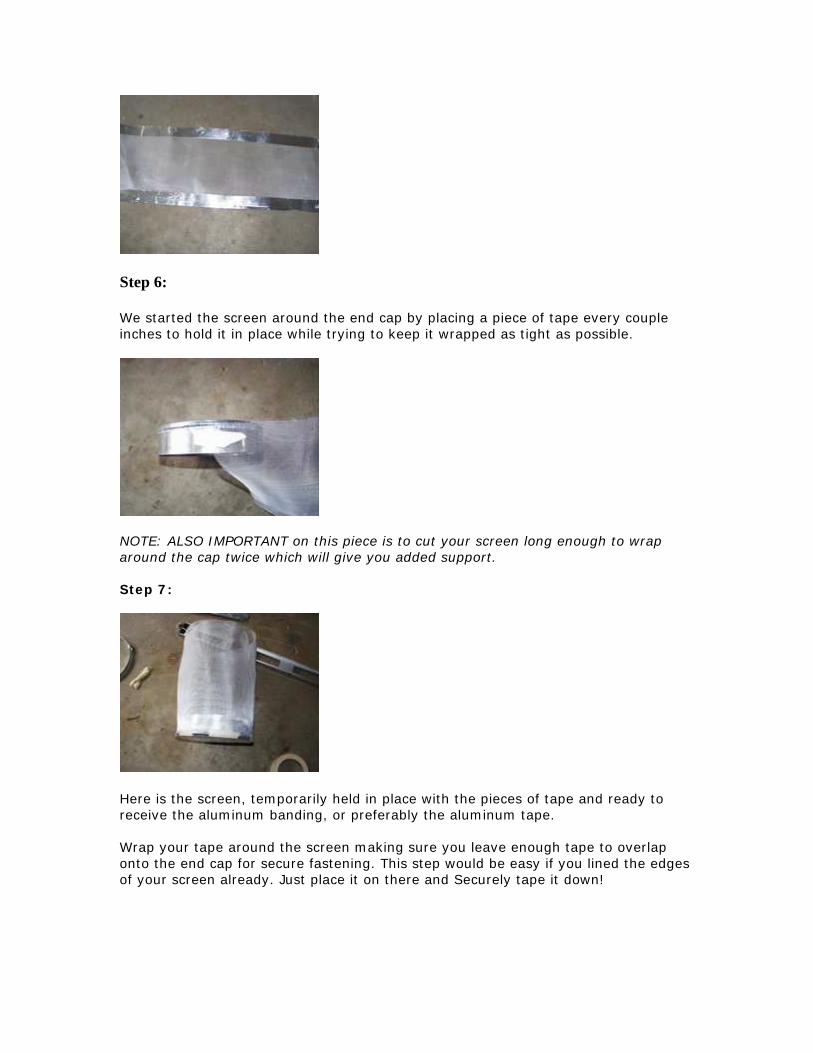
Step 6: We started the screen around the end cap by placing a piece of tape every couple inches to hold it in place while trying to keep it wrapped as tight as possible.
NOTE: ALSO IMPORTANT on this piece is to cut your screen long enough to wrap around the cap twice which will give you added support. Step 7:
Here is the screen, temporarily held in place with the pieces of tape and ready to receive the aluminum banding, or preferably the aluminum tape. Wrap your tape around the screen making sure you leave enough tape to overlap onto the end cap for secure fastening. This step would be easy if you lined the edges of your screen already. Just place it on there and Securely tape it down!
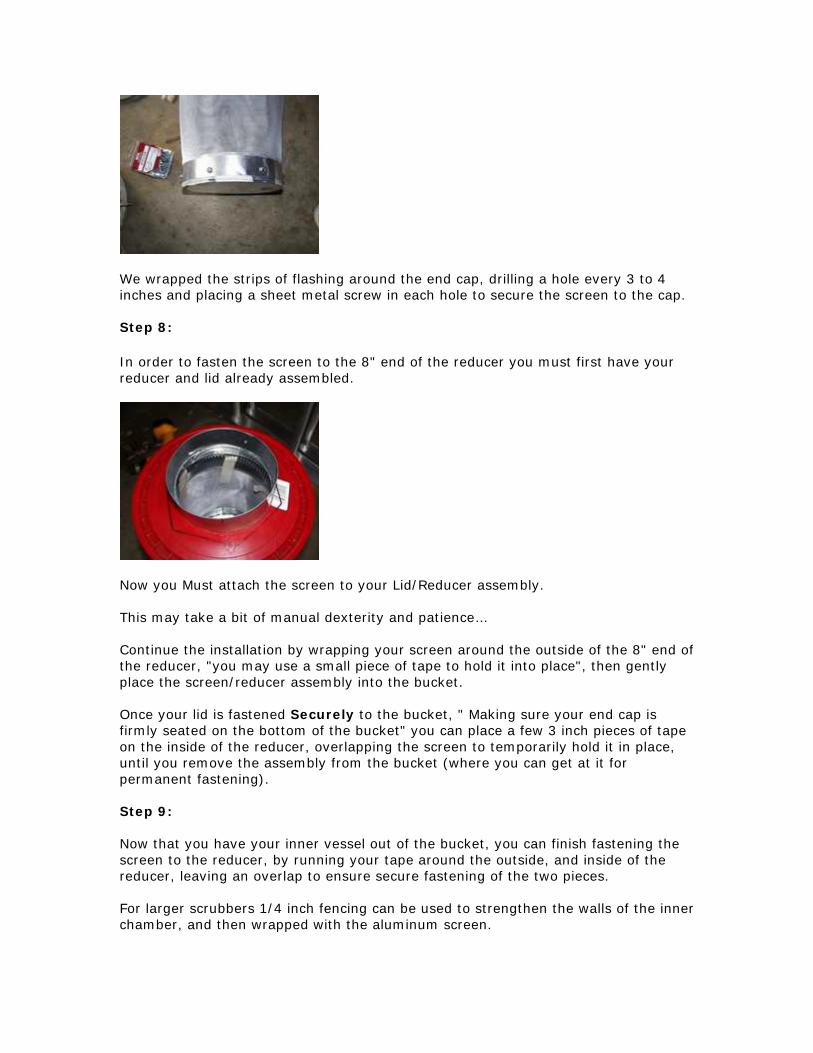
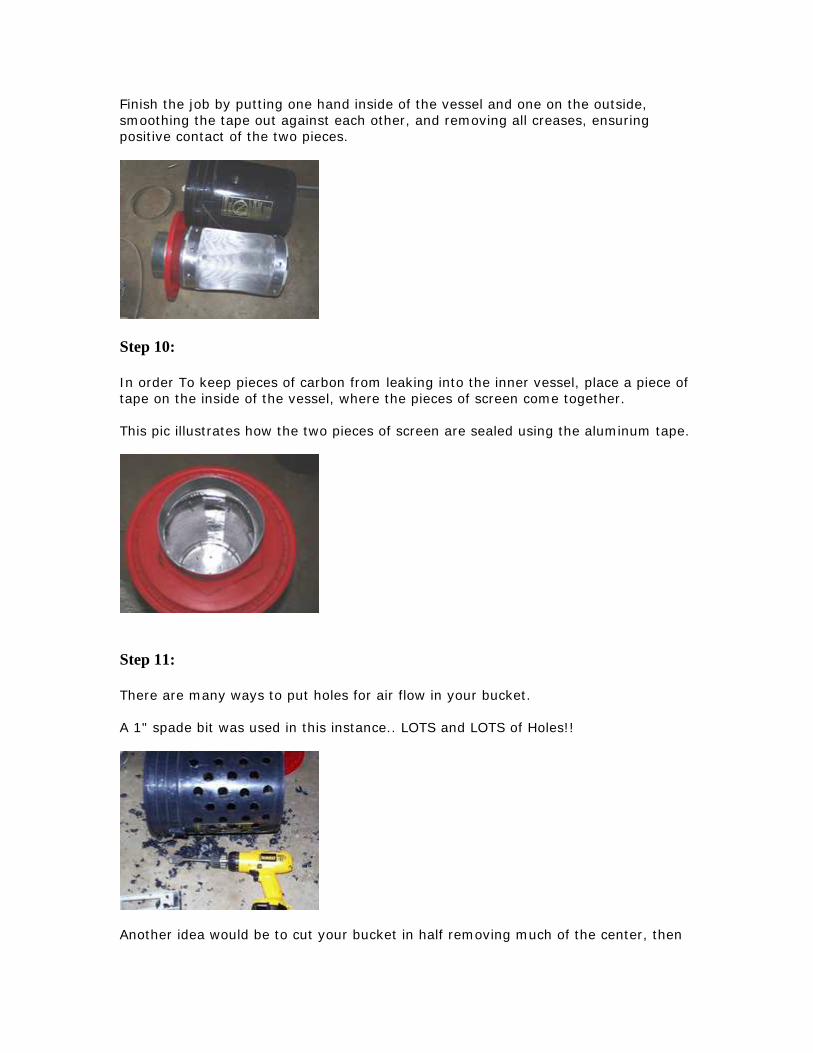
We wrapped the strips of flashing around the end cap, drilling a hole every 3 to 4 inches and placing a sheet metal screw in each hole to secure the screen to the cap. Step 8: In order to fasten the screen to the 8" end of the reducer you must first have your reducer and lid already assembled.
Now you Must attach the screen to your Lid/Reducer assembly. This may take a bit of manual dexterity and patience… Continue the installation by wrapping your screen around the outside of the 8" end of the reducer, "you may use a small piece of tape to hold it into place", then gently place the screen/reducer assembly into the bucket. Once your lid is fastened Securely to the bucket, " Making sure your end cap is firmly seated on the bottom of the bucket" you can place a few 3 inch pieces of tape on the inside of the reducer, overlapping the screen to temporarily hold it in place, until you remove the assembly from the bucket (where you can get at it for permanent fastening). Step 9: Now that you have your inner vessel out of the bucket, you can finish fastening the screen to the reducer, by running your tape around the outside, and inside of the reducer, leaving an overlap to ensure secure fastening of the two pieces. For larger scrubbers 1/4 inch fencing can be used to strengthen the walls of the inner chamber, and then wrapped with the aluminum screen.
Finish the job by putting one hand inside of the vessel and one on the outside, smoothing the tape out against each other, and removing all creases, ensuring positive contact of the two pieces.
Step 10: In order To keep pieces of carbon from leaking into the inner vessel, place a piece of tape on the inside of the vessel, where the pieces of screen come together. This pic illustrates how the two pieces of screen are sealed using the aluminum tape.
Step 11: There are many ways to put holes for air flow in your bucket. A 1" spade bit was used in this instance.. LOTS and LOTS of Holes!!
Another idea would be to cut your bucket in half removing much of the center, then
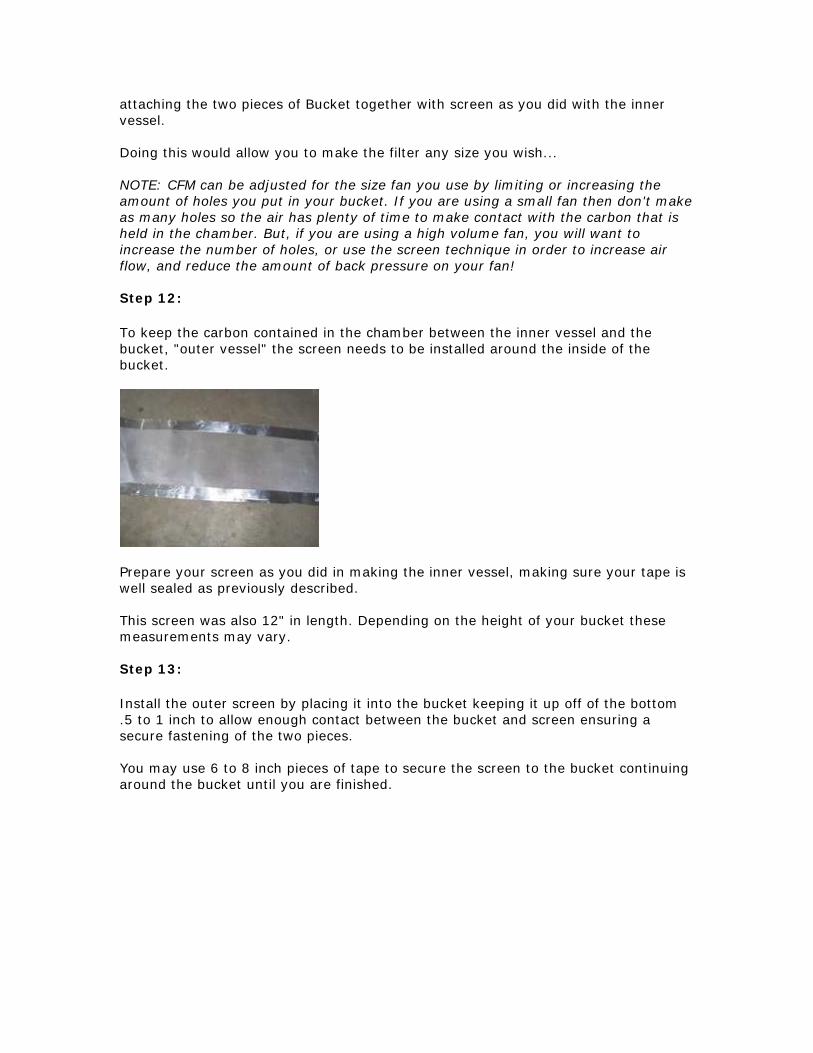
attaching the two pieces of Bucket together with screen as you did with the inner vessel. Doing this would allow you to make the filter any size you wish... NOTE: CFM can be adjusted for the size fan you use by limiting or increasing the amount of holes you put in your bucket. If you are using a small fan then don't make as many holes so the air has plenty of time to make contact with the carbon that is held in the chamber. But, if you are using a high volume fan, you will want to increase the number of holes, or use the screen technique in order to increase air flow, and reduce the amount of back pressure on your fan! Step 12: To keep the carbon contained in the chamber between the inner vessel and the bucket, "outer vessel" the screen needs to be installed around the inside of the bucket.
Prepare your screen as you did in making the inner vessel, making sure your tape is well sealed as previously described. This screen was also 12" in length. Depending on the height of your bucket these measurements may vary. Step 13: Install the outer screen by placing it into the bucket keeping it up off of the bottom .5 to 1 inch to allow enough contact between the bucket and screen ensuring a secure fastening of the two pieces. You may use 6 to 8 inch pieces of tape to secure the screen to the bucket continuing around the bucket until you are finished.
Continue on to securing the bottom of the screen edge to the bucket as you did with the top.
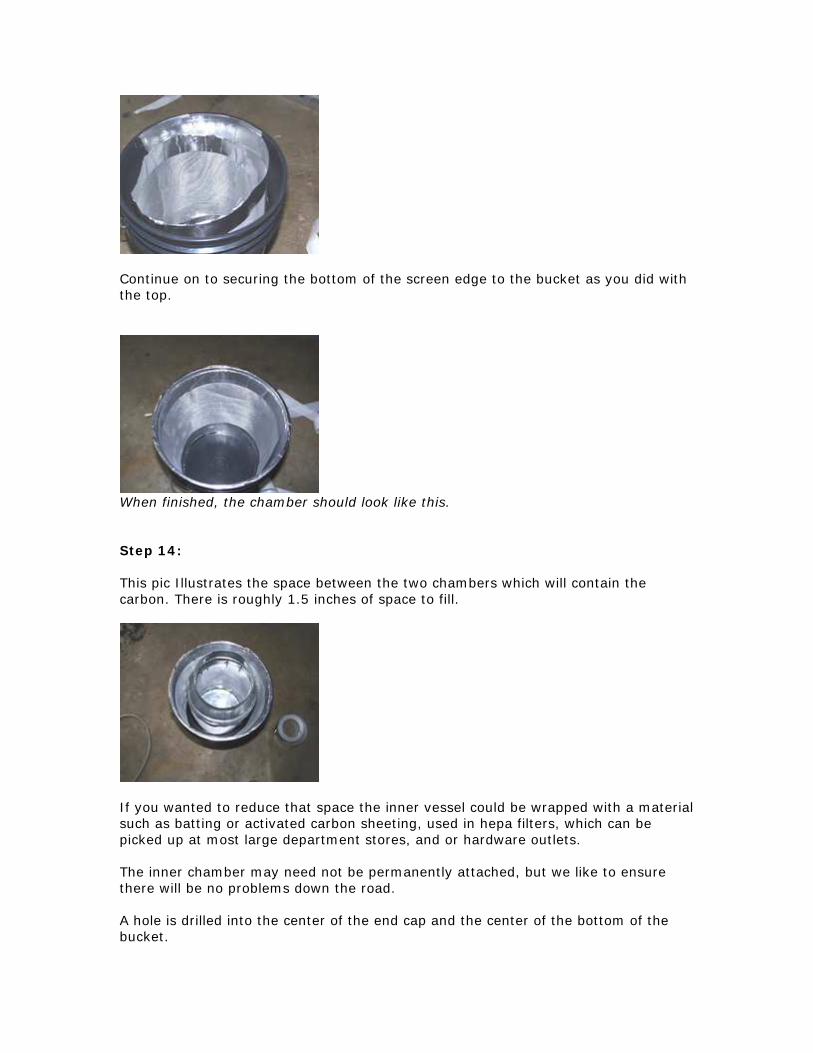
When finished, the chamber should look like this. Step 14: This pic Illustrates the space between the two chambers which will contain the carbon. There is roughly 1.5 inches of space to fill.
If you wanted to reduce that space the inner vessel could be wrapped with a material such as batting or activated carbon sheeting, used in hepa filters, which can be picked up at most large department stores, and or hardware outlets. The inner chamber may need not be permanently attached, but we like to ensure there will be no problems down the road. A hole is drilled into the center of the end cap and the center of the bottom of the bucket.

The ideal tool to be used here would be a pop-rivet gun! Just toss a rivet into the hole and BAM!!!! Your centered! Continue fastening the inner vessel to the bucket by drilling 4 more holes about 2 inches away and around the center hole. Repeat fastening in the same manner as previously described. In this instance sheet metal screws were used only because a rivet gun was not available at the time. Step 15:
This pic illustrates the two vessels in place and fastened together, as one piece, and ready to receive the Activated Charcoal. NOTE: An Inexpensive alternative to Activated Charcoal is a relatively new type of Kitty Litter called Litter Pearls, which is made of silica sand and look like semi-transparent beads. The Litter not only absorbs odors, but also puts out a slight cover scent/chemical odor of it's own, and may be purchased in pine or other scents! Decide for yourself and your situation which is right for you. From our experience, activated charcoal in large amounts also puts off a slight odor, which increases when the odor absorbing capabilities of the charcoal decreases. Step 16: The charcoal is now installed with the lid in place and ready to be connected to either side, exhaust or intake of your fan.
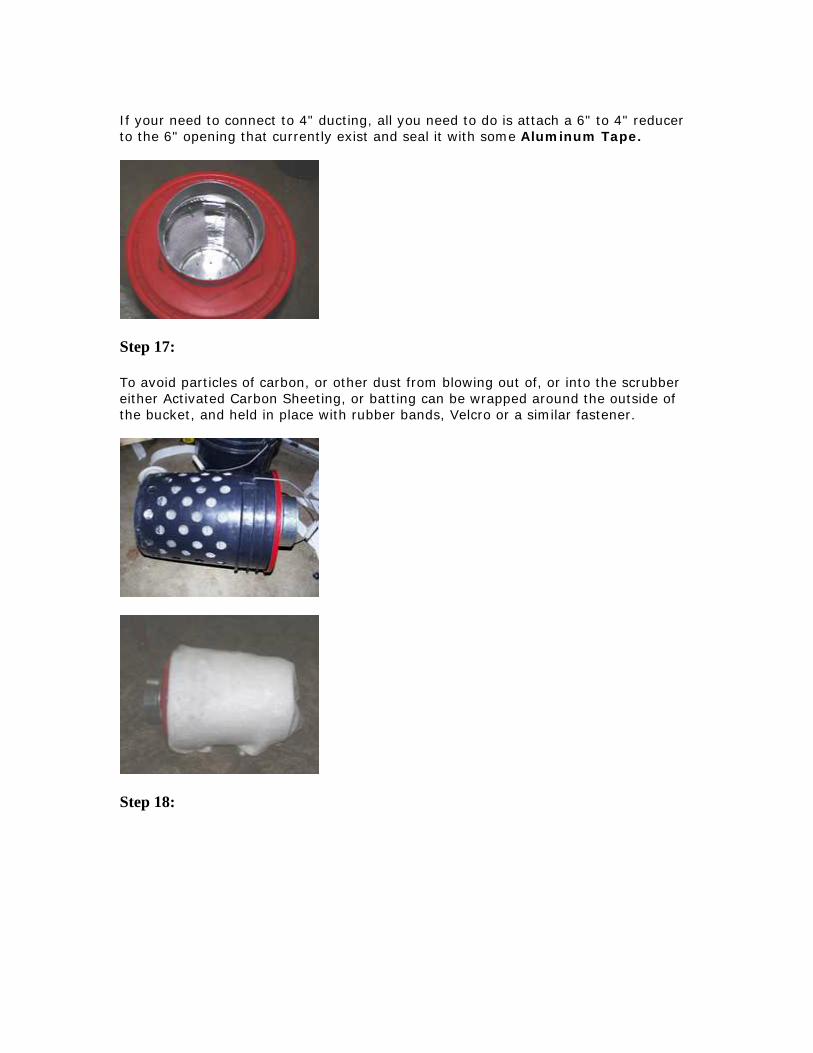
If your need to connect to 4" ducting, all you need to do is attach a 6" to 4" reducer to the 6" opening that currently exist and seal it with some Aluminum Tape.
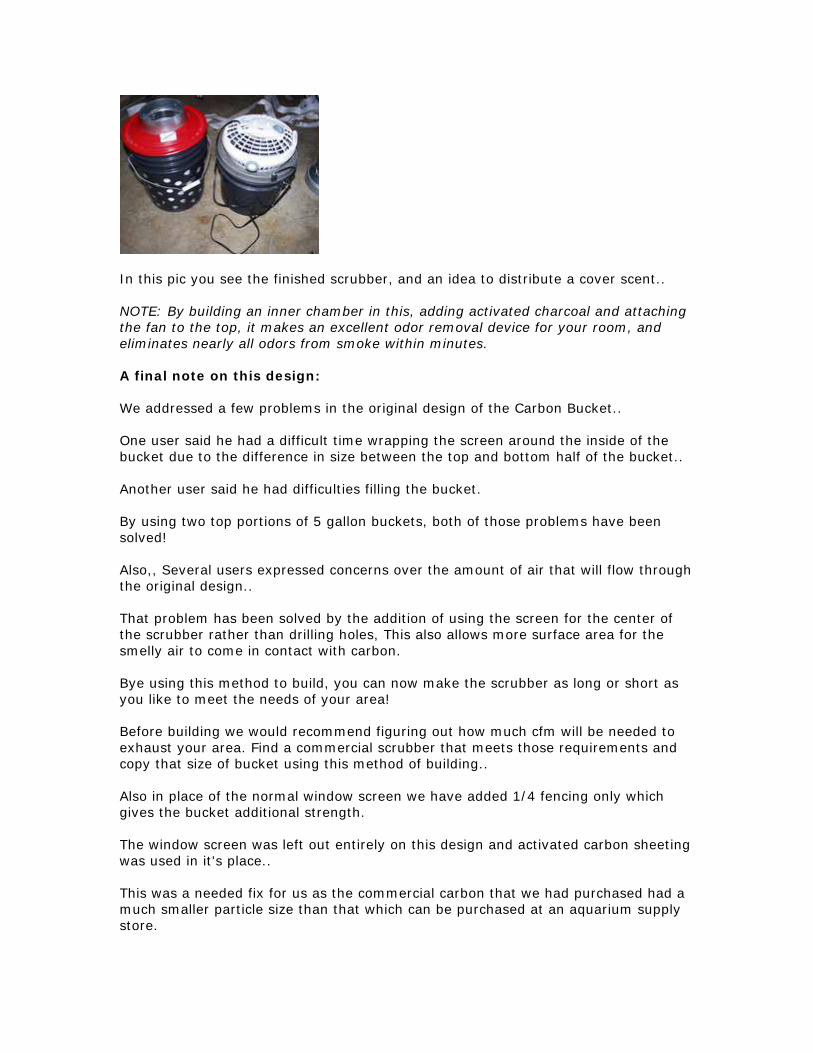
Step 17: To avoid particles of carbon, or other dust from blowing out of, or into the scrubber either Activated Carbon Sheeting, or batting can be wrapped around the outside of the bucket, and held in place with rubber bands, Velcro or a similar fastener.
Step 18:
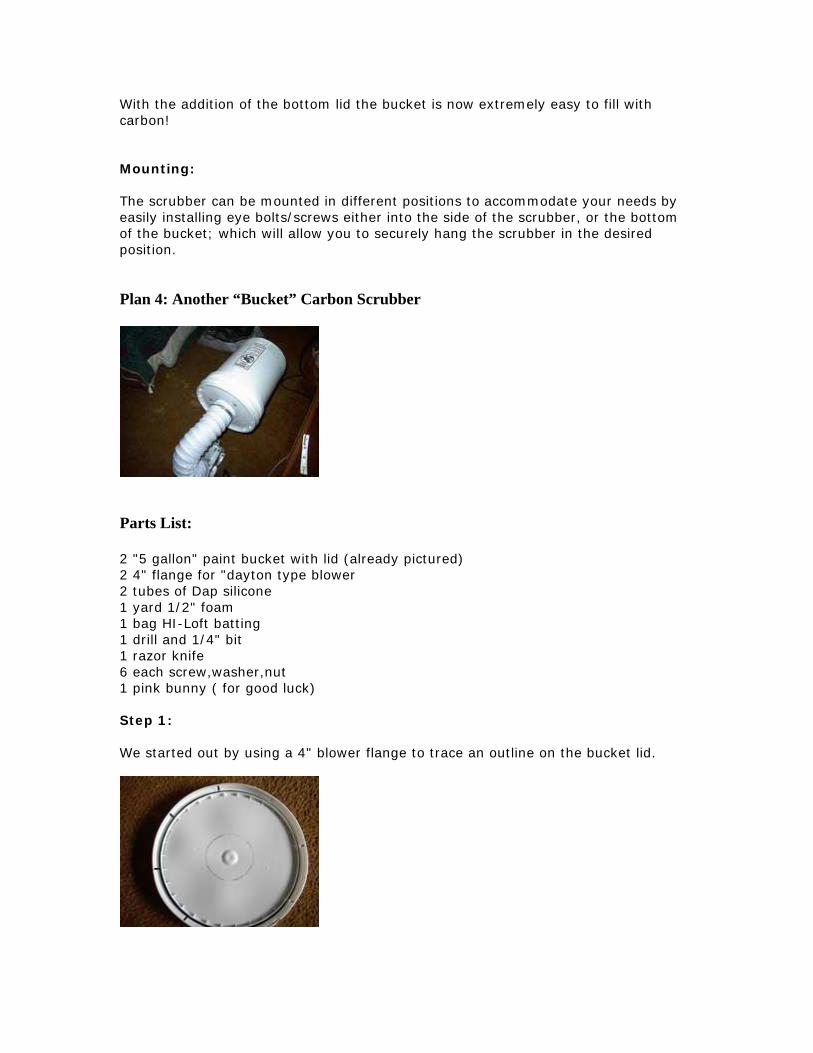
In this pic you see the finished scrubber, and an idea to distribute a cover scent.. NOTE: By building an inner chamber in this, adding activated charcoal and attaching the fan to the top, it makes an excellent odor removal device for your room, and eliminates nearly all odors from smoke within minutes. A final note on this design: We addressed a few problems in the original design of the Carbon Bucket.. One user said he had a difficult time wrapping the screen around the inside of the bucket due to the difference in size between the top and bottom half of the bucket.. Another user said he had difficulties filling the bucket. By using two top portions of 5 gallon buckets, both of those problems have been solved! Also,, Several users expressed concerns over the amount of air that will flow through the original design.. That problem has been solved by the addition of using the screen for the center of the scrubber rather than drilling holes, This also allows more surface area for the smelly air to come in contact with carbon. Bye using this method to build, you can now make the scrubber as long or short as you like to meet the needs of your area! Before building we would recommend figuring out how much cfm will be needed to exhaust your area. Find a commercial scrubber that meets those requirements and copy that size of bucket using this method of building.. Also in place of the normal window screen we have added 1/4 fencing only which gives the bucket additional strength. The window screen was left out entirely on this design and activated carbon sheeting was used in it's place.. This was a needed fix for us as the commercial carbon that we had purchased had a much smaller particle size than that which can be purchased at an aquarium supply store.
With the addition of the bottom lid the bucket is now extremely easy to fill with carbon! Mounting: The scrubber can be mounted in different positions to accommodate your needs by easily installing eye bolts/screws either into the side of the scrubber, or the bottom of the bucket; which will allow you to securely hang the scrubber in the desired position. Plan 4: Another “Bucket” Carbon Scrubber
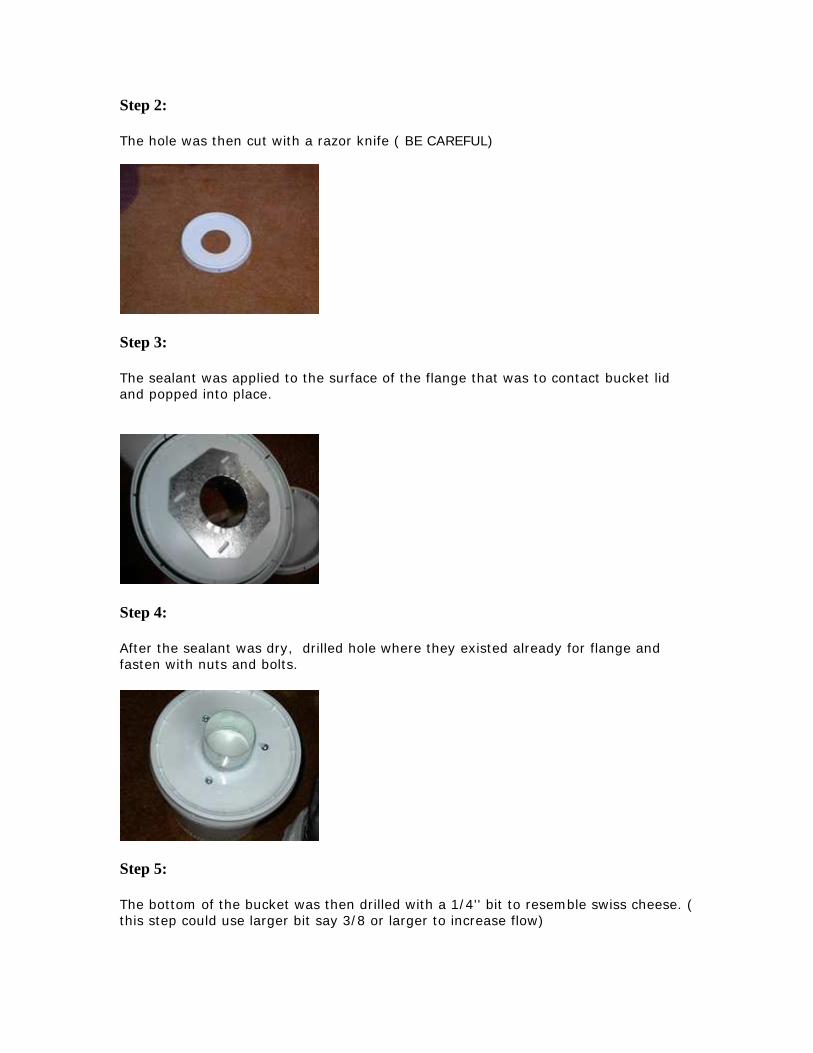
Parts List: 2 "5 gallon" paint bucket with lid (already pictured) 2 4" flange for "dayton type blower 2 tubes of Dap silicone 1 yard 1/2" foam 1 bag HI-Loft batting 1 drill and 1/4" bit 1 razor knife 6 each screw,washer,nut 1 pink bunny ( for good luck) Step 1: We started out by using a 4" blower flange to trace an outline on the bucket lid.
Step 2: The hole was then cut with a razor knife ( BE CAREFUL)
Step 3: The sealant was applied to the surface of the flange that was to contact bucket lid and popped into place.
Step 4: After the sealant was dry, drilled hole where they existed already for flange and fasten with nuts and bolts.
Step 5: The bottom of the bucket was then drilled with a 1/4'' bit to resemble swiss cheese. ( this step could use larger bit say 3/8 or larger to increase flow)

Step 6: We used the bottom of the bucket to size the foam disk, then cut it out.
Step 7: Disk was then placed into the bucket and a layer of hi- loft batting was next.
Step 8: We then filled the bucket with 10 lbs of activated carbon and placed another layer of batting to fill remaining space in the bucket.

Step 9: Completion We popped the lid onto the bucket completing the design!
Some ducting is attached to the flange using standard HVAC hose clamps. Plan 5 – A “Small” Activated Carbon Scrubber Parts List: 1. 1m of fine welded mesh (mouse) 2. 1m od medium welded mesh (aviary) 3. 1 250mm plastic saucer 4. 2 430mm plastic saucer 5. 20m of gaffa tape all above 6. 1.5m of batting (polyfil) 7. 1 8 inch to 6 inch plastic duct reducer 8. 10-12 liters of activated carbon
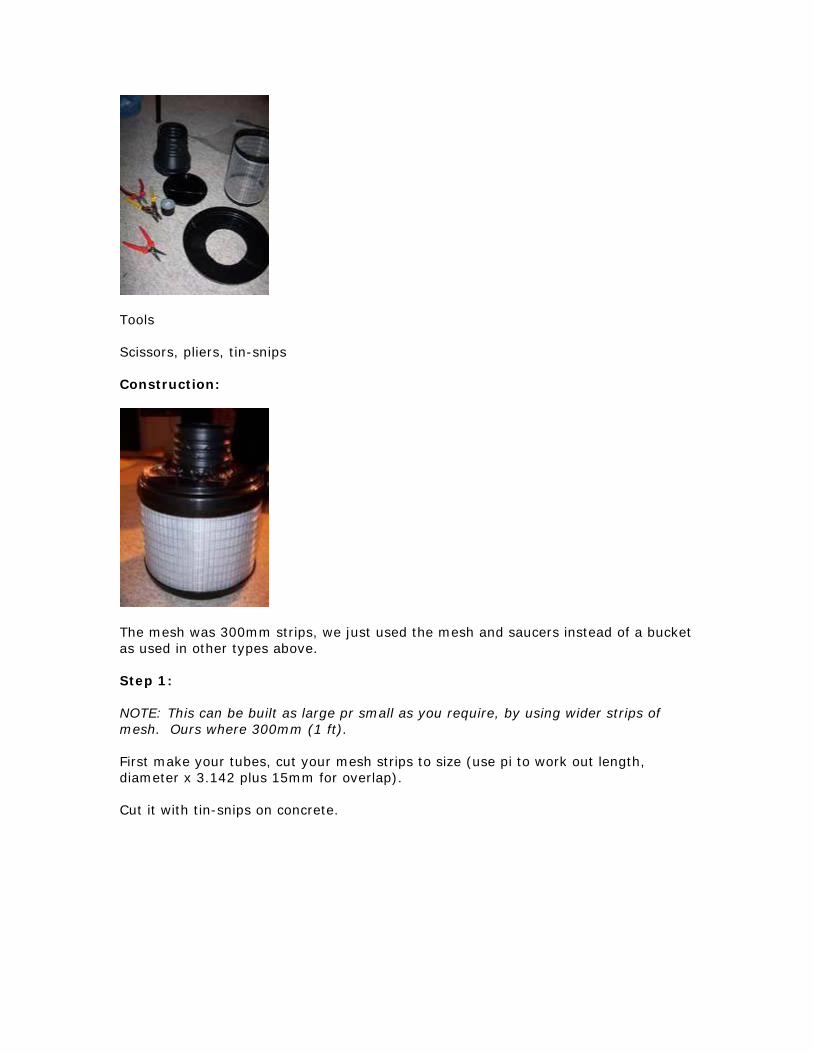
Tools Scissors, pliers, tin-snips Construction:
The mesh was 300mm strips, we just used the mesh and saucers instead of a bucket as used in other types above. Step 1: NOTE: This can be built as large pr small as you require, by using wider strips of mesh. Ours where 300mm (1 ft). First make your tubes, cut your mesh strips to size (use pi to work out length, diameter x 3.142 plus 15mm for overlap). Cut it with tin-snips on concrete.
Step 2: Tie the mesh together using the cut end of the mesh, folding it over around the other end. On the ends of the tube, run gaffer tape and fold over to stick the sticky side back to itself, this makes a surface to tape other parts on.
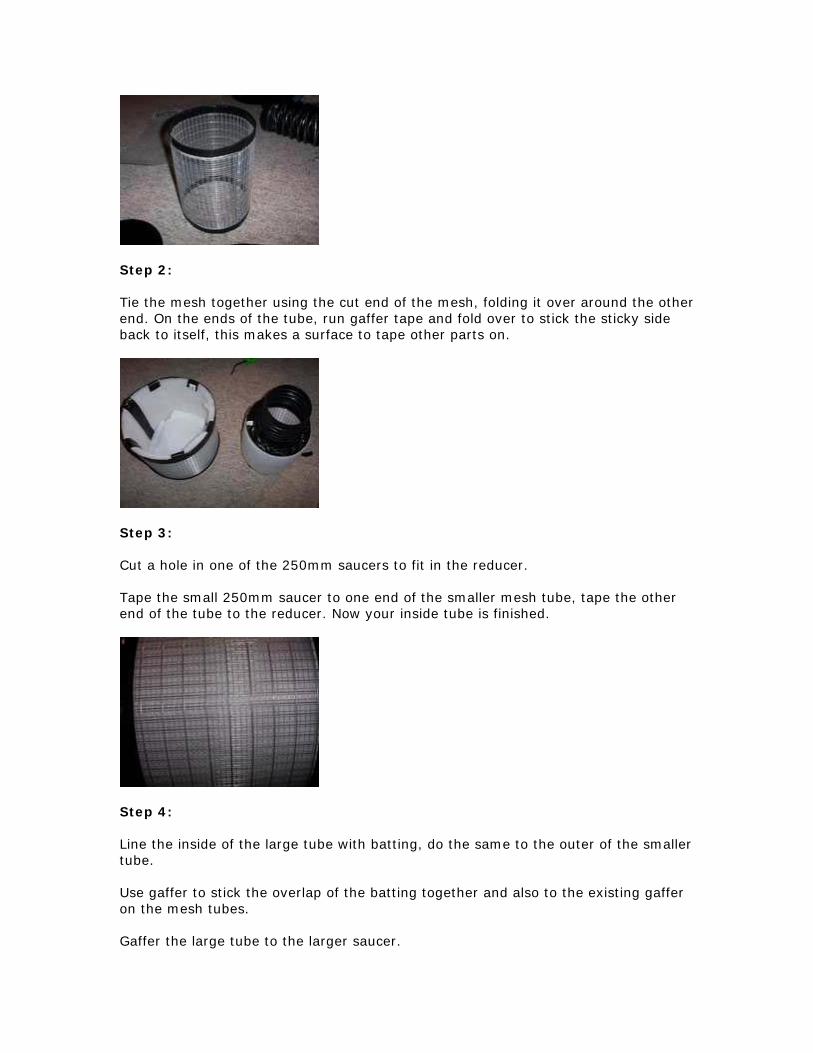
Step 3: Cut a hole in one of the 250mm saucers to fit in the reducer. Tape the small 250mm saucer to one end of the smaller mesh tube, tape the other end of the tube to the reducer. Now your inside tube is finished.
Step 4: Line the inside of the large tube with batting, do the same to the outer of the smaller tube. Use gaffer to stick the overlap of the batting together and also to the existing gaffer on the mesh tubes. Gaffer the large tube to the larger saucer.

Put the smaller tube inside the larger and fill with carbon. Do this outside of in a bath, because there can be some mess, its quite dusty. Shake it down and tamp it a bit to ensure its really full. Put on the bigger saucer (with the hole in it for the reducer) and Gaffer it to the gaffered part on the mesh. Gaffer the top side of the saucer to the reducer.
Completion:
Attach your ducting with a hose clamp and you’re done! Plan 6: “Landry Basket” Carbon Scrubber We are going to show you how anyone can make a carbon filter to remove odors on the
cheap. This is a very simple and effective unit that will work just as well as a commercial unit
that costs $400+ dollars.
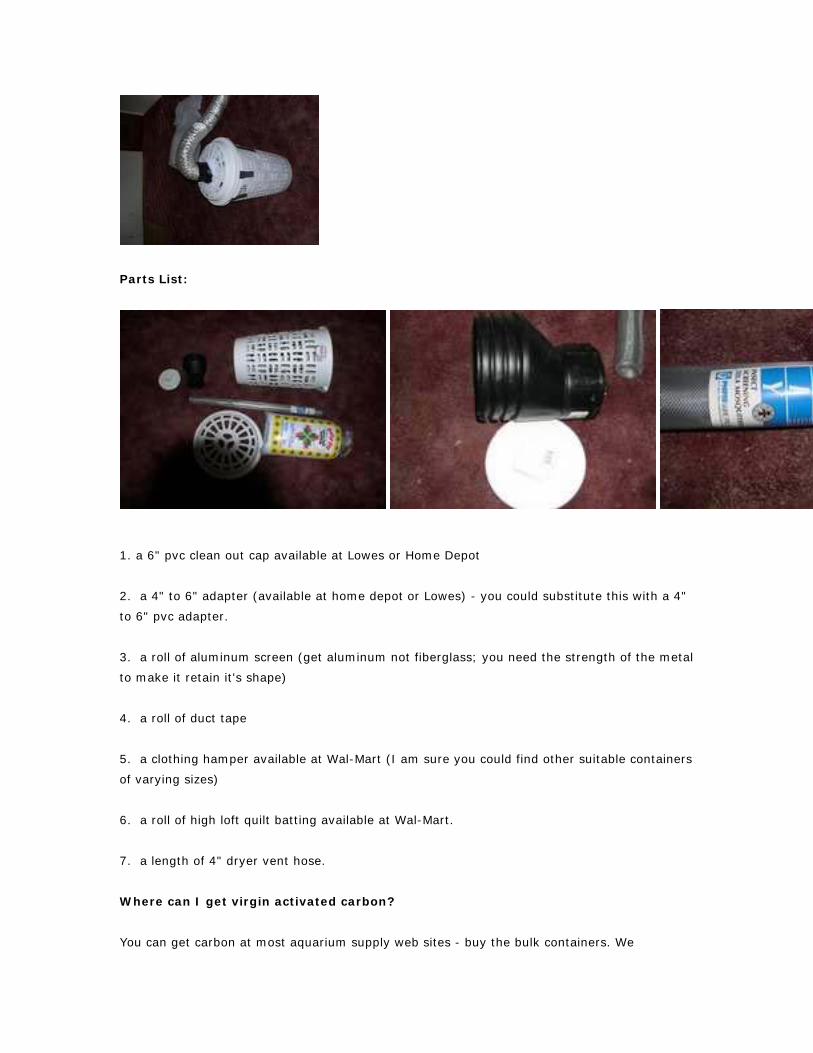
Parts List:
1. a 6" pvc clean out cap available at Lowes or Home Depot
2. a 4" to 6" adapter (available at home depot or Lowes) - you could substitute this with a 4"
to 6" pvc adapter.
3. a roll of aluminum screen (get aluminum not fiberglass; you need the strength of the metal
to make it retain it's shape)
4. a roll of duct tape
5. a clothing hamper available at Wal-Mart (I am sure you could find other suitable containers
of varying sizes)
6. a roll of high loft quilt batting available at Wal-Mart.
7. a length of 4" dryer vent hose.
Where can I get virgin activated carbon?
You can get carbon at most aquarium supply web sites - buy the bulk containers. We
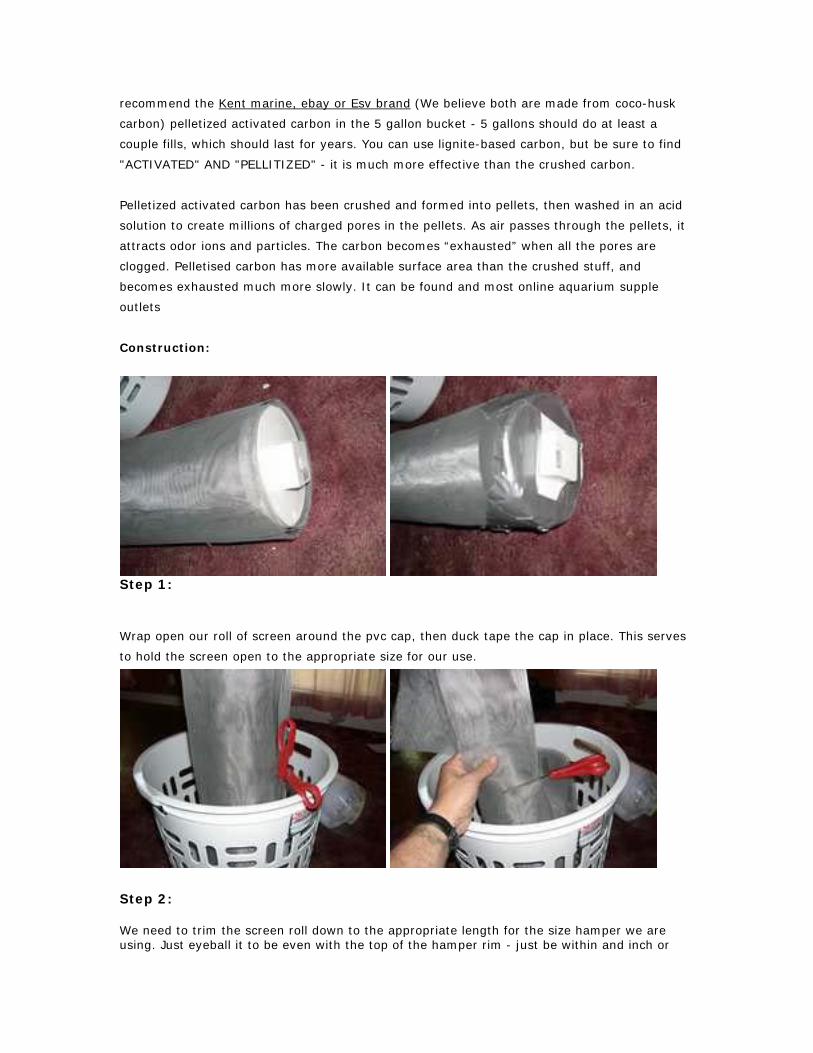
recommend the Kent marine, ebay or Esv brand (We believe both are made from coco-husk
carbon) pelletized activated carbon in the 5 gallon bucket - 5 gallons should do at least a
couple fills, which should last for years. You can use lignite-based carbon, but be sure to find
"ACTIVATED" AND "PELLITIZED" - it is much more effective than the crushed carbon.
Pelletized activated carbon has been crushed and formed into pellets, then washed in an acid
solution to create millions of charged pores in the pellets. As air passes through the pellets, it
attracts odor ions and particles. The carbon becomes “exhausted” when all the pores are
clogged. Pelletised carbon has more available surface area than the crushed stuff, and
becomes exhausted much more slowly. It can be found and most online aquarium supple
outlets
Construction:
Step 1:
Wrap open our roll of screen around the pvc cap, then duck tape the cap in place. This serves
to hold the screen open to the appropriate size for our use.
Step 2: We need to trim the screen roll down to the appropriate length for the size hamper we are using. Just eyeball it to be even with the top of the hamper rim - just be within and inch or
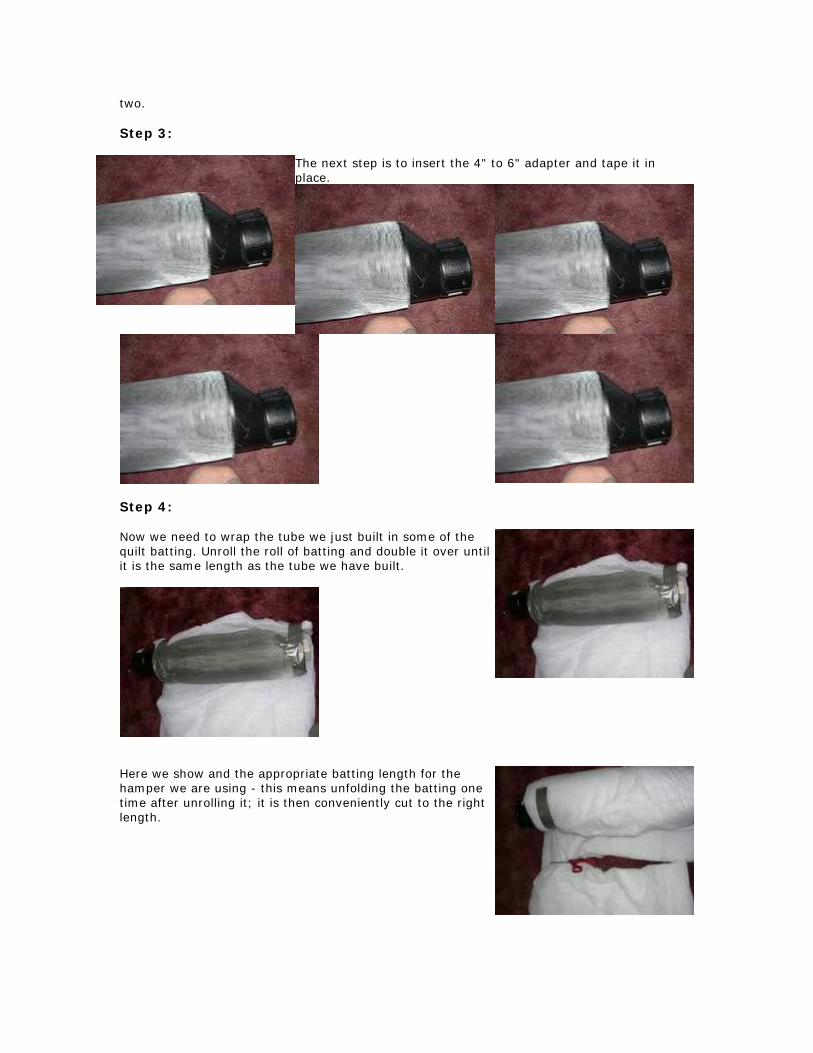
two. Step 3:
sert the 4" to 6" adapter and tape it in The next step is to in
place.
S Now we need to wrap the tube we just built in some of the quilt batting. Unroll the roll of batting and double
tep 4:
it over until is the same length as the tube we have built.
it
Here we show and the appropriate batting length for the hamper we are using - this means unfolding the batting one time after unrolling it; it is then conveniently cut to the right
ngth. le
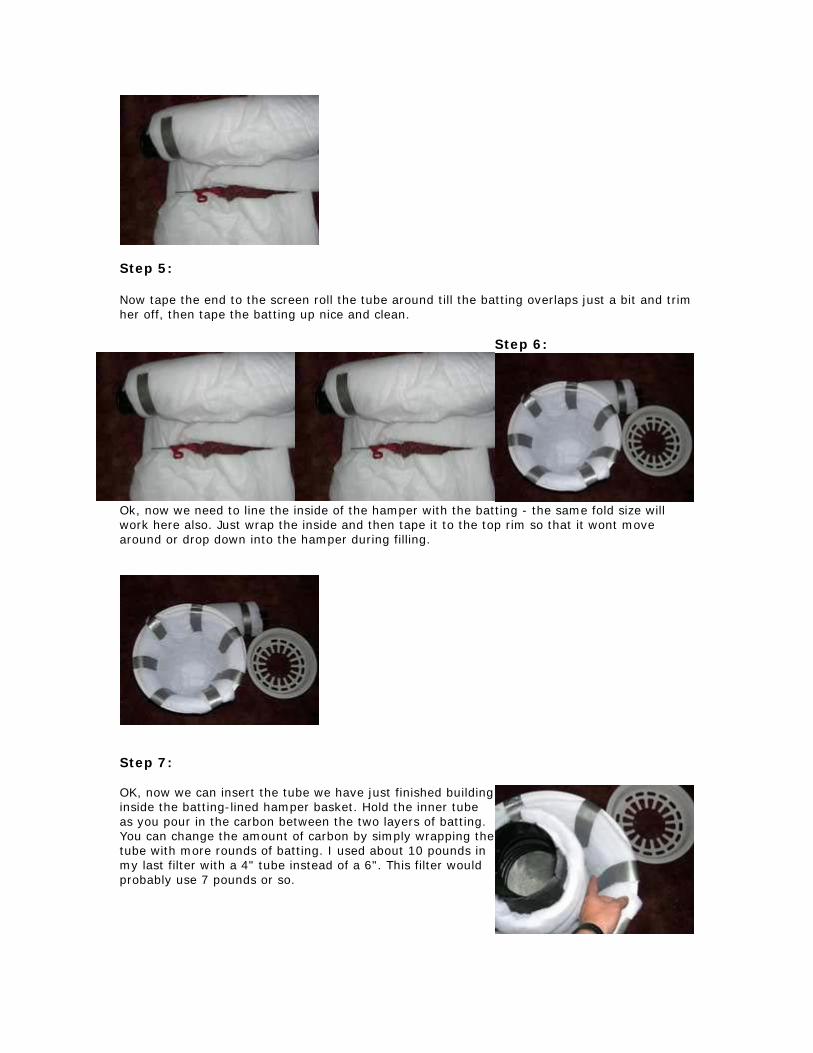
Step 5: Now tape the end to the screen roll the tube around till the batting overlaps just a bit and trim her off, then tape the batting up nice and clean.
Step 6:
Ok, now we need to line the inside of the hamper with the batting - the same fold size will work here also. Just wrap the inside and then tape it to the top rim so that it wont move around or drop down into the hamper during filling.
Step 7: OK, now we can insert the tube we have just finished binside the batting-lined hamper basket. Hold the inner tubas you pour in the carbon between the two layers of batting. You can change the amount of carbon by simply wrapping thtube with more rounds of batting. I used about 10 pounds in my last filter with a 4" tube instead of a 6". This filter wouprobably use 7 pounds or so.
uildine
e
ld
g
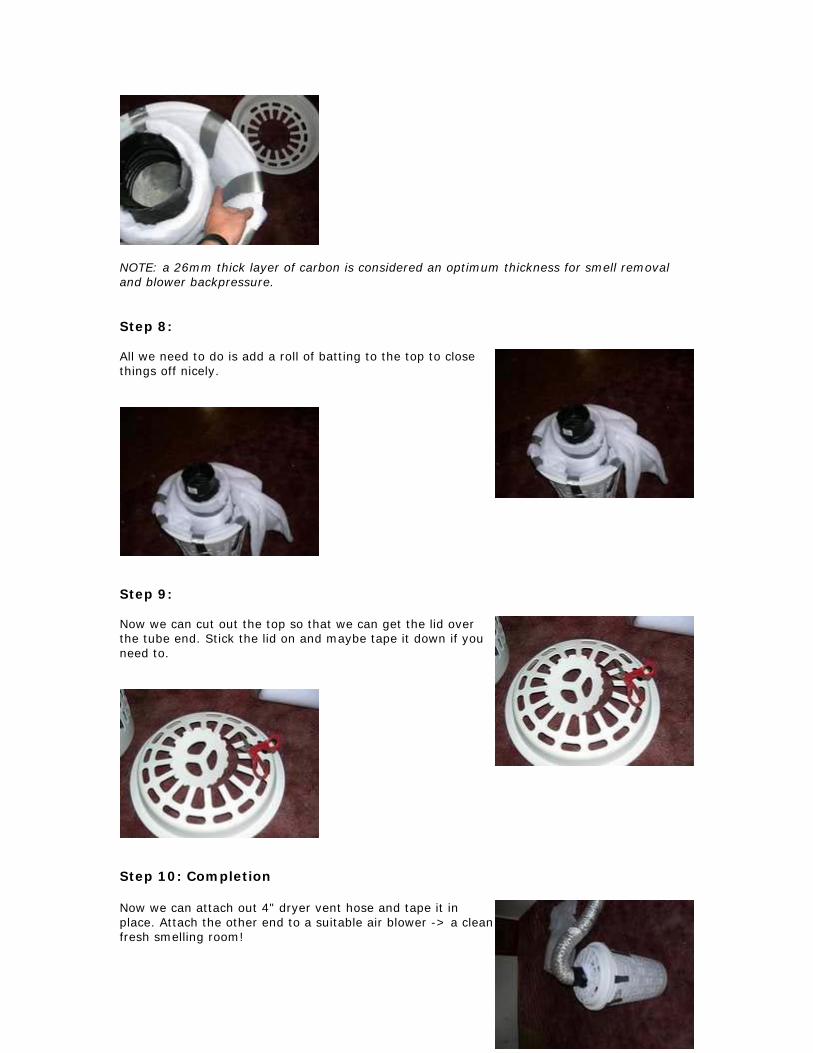
NOTE: a 26mm thick layer of carbon is considered an optimum thickness for smell removal and blower backpressure. Step 8: All we need to do is add a roll of batting to the top to close things off nicely.
Step 9: Now we can cut out the top so that we can get the lid over the tube end. Stick the lid on and maybe tape it down if you need to.
Step 10: Completion Now we can attach out 4" dryer vent hose and tape it in place. Attach the other end to a suitable air blower -> a cfresh smelling room!
lean
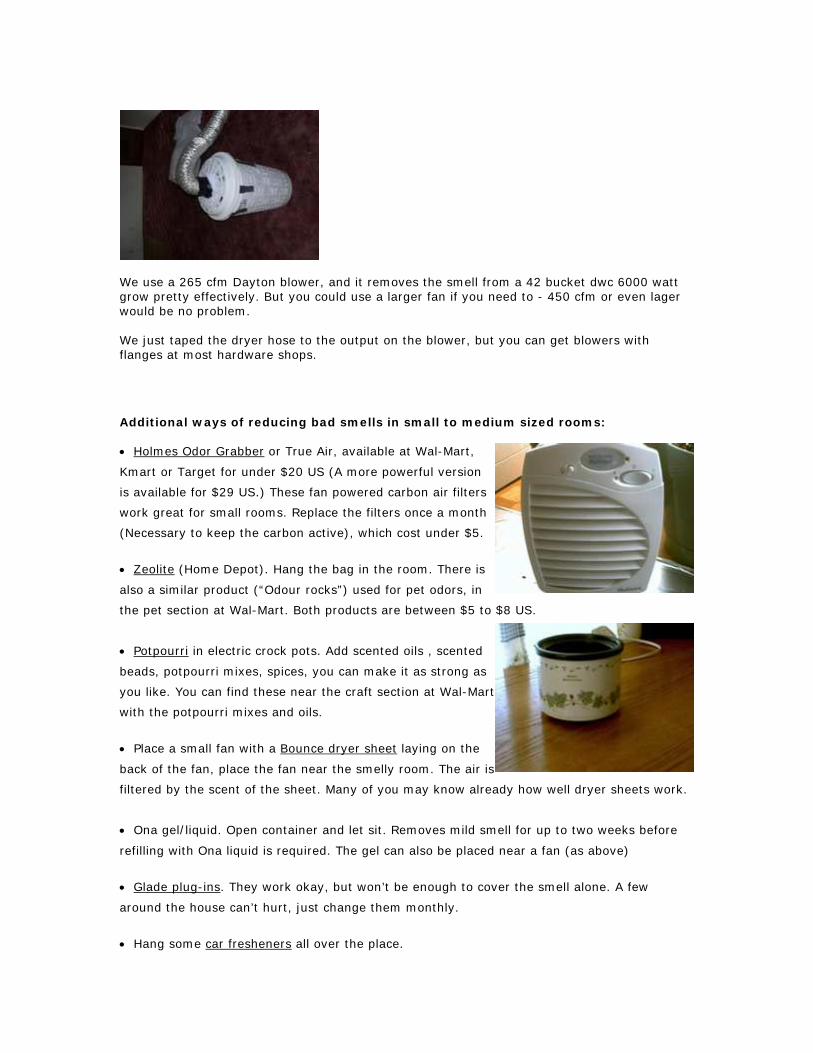
We use a 265 cfm Dayton blower, and it removes the smell from a 42 bucket dwc 6000 watt grow pretty effectively. But you could use a larger fan if you need to - 450 cfm or even lager would be no problem. We just taped the dryer hose to the output on the blower, but you can get blowers with flanges at most hardware shops. Additional ways of reducing bad smells in small to medium sized rooms: • Holmes Odor Grabber or True Air, available at Wal-Mart,
Kmart or Target for under $20 US (A more powerful version
is available for $29 US.) These fan powered carbon air filters
work great for small rooms. Replace the filters once a month
(Necessary to keep the carbon active), which cost under $5.
• Zeolite (Home Depot). Hang the bag in the room. There is
also a similar product (“Odour rocks”) used for pet odors, in
the pet section at Wal-Mart. Both products are between $5 to $8 US.
• Potpourri in electric crock pots. Add scented oils , scented
beads, potpourri mixes, spices, you can make it as strong as
you like. You can find these near the craft section at Wal-Mart
with the potpourri mixes and oils.
• Place a small fan with a Bounce dryer sheet laying on the
back of the fan, place the fan near the smelly room. The air i
filtered by the scent of the sheet. Many of you may know already how well dryer sheets wo
• Ona gel
s
rk.
/liquid. Open container and let sit. Removes mild smell for up to two weeks before
• Glade plug-ins
refilling with Ona liquid is required. The gel can also be placed near a fan (as above)
. They work okay, but won’t be enough to cover the smell alone. A few
• Hang some car fresheners
around the house can’t hurt, just change them monthly.
all over the place.