Embed Size (px)
Citation preview

RAIDExpress 133 RAID
USER MANUAL
Preliminary Specification 0.3

Notice Reasonable efforts have been made to ensure that the information in this
manual is accurate. We assume no liability for technical inaccuracies,
typographical, or other errors contain herein.
Backup your important data before using the IDE RAID product, and
use at your own risk. In no event shall we be liable for any loss of
profile, or for direct, indirect, special, incidental or consequential
damages arising from any defect or error in our products or manuals.

Contents Introduction .........................................................................................................1
Features...................................................................................................... 2
What is the RAIDExpress 133 card............................................................... 3
Quick Start ...........................................................................................................5
Unpack your RAIDExpress 133 Card package.............................................. 5
Install the RAIDExpress 133 Card ................................................................ 6
Create Your Disk Array................................................................................. 8
Setup Utility .......................................................................................................14
Using the RAIDExpress 133 Card Setup Utility ............................................14
RAIDExpress 133 Card Setup Utility Main Menu..........................................15
Auto Configuration......................................................................................16
Define RAID ...............................................................................................21
Delete RAID ...............................................................................................27
Rebuild RAID..............................................................................................30
RAID Card Configuration.............................................................................35
Driver Installation...............................................................................................37
Windows XP...............................................................................................38
Windows 2000............................................................................................44
Windows 98SE/ME.....................................................................................52
Windows NT...............................................................................................60
Linux ..........................................................................................................68
Application.........................................................................................................76
Installation..................................................................................................76
Functions Description .................................................................................79
How to Create Disk Array? ..........................................................................91
Q&A....................................................................................................................93
Technology Support ..........................................................................................94

RAIDExpress 133 RAID USER MANUAL
1
Introduction This manual is mainly to help users setup the RAIDExpress 133 card and solve
problems when they use it.
If it is your first time to use the RAIDExpress 133 card and you are about to install it,
please refer to the “Quick Start” section on page 5. After finishing installing it, you
can get the advantages of enhancing the performance and raising the system’s
reliability.
When you face any difficulties and find anything you don’t understand while using the
RAIDExpress 133 card, please refer to the “Q&A” section on page 93. In this section,
you can refer to the problems users may face and find the correct solutions. You can
follow the instructions to solve your problems and then you will get satisfactory
results.
If there are still any questions you don’t understand, please refer to the “Technology
Support” section on page 94 to look for technical support.
RAIDExpress 133 RAID USER MANUAL
2
Features l Compatible with the ATA/ATAPI-6 specification and supports two IDE channels
with 4 drives.
l Supports ANSI ATA proposal PIO modes 0,1,2,3,4 with flow control, DMA
Modes 0,1,2,3,4,5,6.
l 512 bytes FIFO for auto transfer per IDE channel to get a high performance
l Supports the RAID 0/1/0+1 function.
l Supports the JBOD function.
l Supports the Scatter/Gather function for the DMA/UDMA function.
l Includes one embedded CPU and firmware on the system to handle the RAID
function. It can reduce the driver’s loading of system CPU and improve the
system’s ability.
l Supports Hot Swap function and doesn’t need any special HD removable box.
l Low CPU utilization based on local processor architecture.
l Compatible with PCI Local bus specification v2.2. Our systems can be easily
installed to PCs.
l Supports PCI power Management v1.0 to reduce the power consumption.
l Supports the drivers for Windows 98SE/ME, Windows NT 4.0, Windows
2000/XP/2003 server and Linux v2.4.1.0.

RAIDExpress 133 RAID USER MANUAL
3
What is the RAIDExpress 133 card This RAIDExpress 133 card is an excellent product resulting from Soc concept. It
includes one RAID Chip combining the CPU, firmware, advanced PCI controller and
IDE controller. Its architecture can provide users a RAID system with low CPU
utilization. When a PC is in the high CPU operation or PCI traffic, users won’t have
any penalties for installing the RAID system. This is because this system embeds a
local CPU to deal with the RAID function and it’s unnecessary to share CPU’s
performance. It is entirely different from the traditional software RAID system.
Similarly, it also provides users more system stability. It provides users high speed
and integration and a low price PC RAID system. Additionally, it also provides PCI
33MHz interface and is compatible with PCI spec. v2.2. It can be easily installed into
the PC system nowadays. Besides, we provide each OS a corresponding driver so
that users don’t have to worry that their systems and the IDE RAID system have any
compatibility issue.
This RAIDExpress 133 card can support IDE drivers ranging from the lowest speed of
PIO mode drive to the highest speed of ATA/133 drive. Thus, users can use this
characteristic to combine RAID system without any limitations. Users can use
ATA/133 drive and RAID function to achieve the best performance and get the merit
of system’s stability.
The RAIDExpress 133 card can support the RAID0 (striping), RAID1 (mirroring),
RAID0+1 (striping and mirroring) or JBOD (spanning) mode. When a system is
programmed to the RAID0 mode, it can read or write two drivers at the same time to
enhance the performance. When a system is programmed to the RAID1 mode, two
drivers have the same data and it will prevent data from being damaged. Once data
are damaged, the system will start the rebuild function automatically and save data
back to another new drive. Similarly, this system can use this data-copying

RAIDExpress 133 RAID USER MANUAL
4
characteristic to let two drivers transmit at the same time and balance the
performance to raise the throughput. The RAID0+1 mode uses four drivers to get the
merits of RAID0 and RAID1. As for the JBOD mode, it combines more than two
drives into a drive with a large capacity. This mode does not have the RAID function
and its merits.

RAIDExpress 133 RAID USER MANUAL
5
Quick Start This section leads you to quickly establish your RAID system with default settings.
The default settings can meet most people’s requirements. If you need more
advanced optimal, please refer to Setup Utility on page 14 to achieve your goal.
Unpack your RAIDExpress 133 Card package When you unpack your RAIDExpress 133 card package, you can see the following
items.
l RAIDExpress 133 card.
l RAIDExpress 133 manual.
l RAIDExpress 133 card software CD.
l Two 80-wire/40-pin Ultra ATA/133 hard drive cables.
I f you lack anything mentioned above, please contact your distributor to ask for
remedy.
Warning: In order to prevent any data loss resulting from
inappropriate operation, please backup data before you start to
install your system.
!

RAIDExpress 133 RAID USER MANUAL
6
Install the RAIDExpress 133 Card This RAIDExpress 133 card meets the PCI v2.2 standard and can be easily installed
under 32-bit PCI slots of different PC systems. Please follow the following procedures
to install it.
1. Remove the case of the PC system.
2. Remove the inside slot cover of any available 32-bit PCI slot.
3. Install the RAIDExpress 133 card in this open slot.
4. Attach Ultra ATA/133 hard drives to the RAIDExpress 133 card.
RAIDExpress 133 RAID USER MANUAL
7
The hard drives which are required for the installation
The hard drives, which are connected on the RAIDExpress 133 card, can support
Ultra ATA/133, Ultra ATA/100, Ultra ATA/66, Ultra ATA/33, EIDE or Fast ATA-2 drives.
Nevertheless, for the best performance, it is suggested that you had better use the
hard drives of the same type and capacity to establish your own RAID system. After
getting ready for the hard drives, you can follow the procedures below to install the
system.
1. Exactly set up every hard drive’s master and slave setting to assure that the
hard drives can surely action and unnecessarily incorrect action of data access
won’t occur.
2. Exactly insert the hard drive’s cables into the connectors on the hard drive and
check if it’s really firmly inserted.
3. Insert every power cable connector into the corresponding hard drive and
check if it’s firmly inserted in a correct direction.
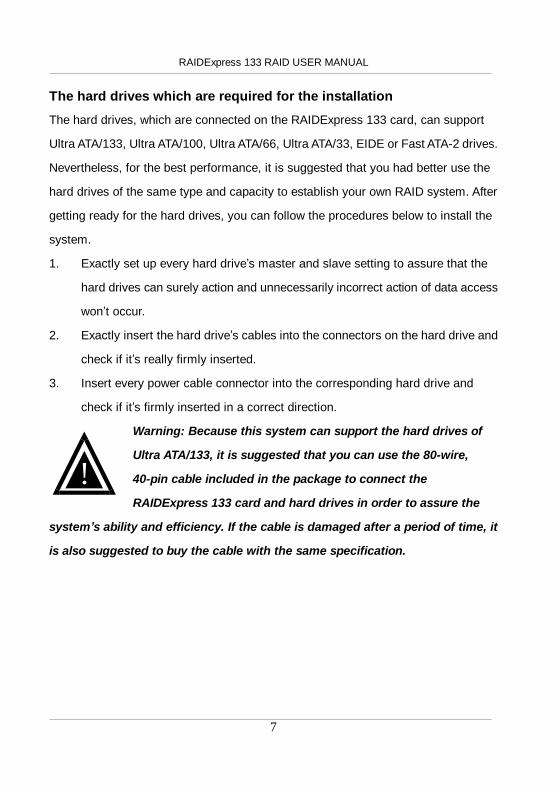
Warning: Because this system can support the hard drives of
Ultra ATA/133, it is suggested that you can use the 80-wire,
40-pin cable included in the package to connect the
RAIDExpress 133 card and hard drives in order to assure the
system’s ability and efficiency. If the cable is damaged after a period of time, it
is also suggested to buy the cable with the same specification.
!
RAIDExpress 133 RAID USER MANUAL
8
Create Your Disk Array You can create your own array using the onboard BIOS utility of the RAIDExpress
133 card with the attached hard drives. Please follow the steps below to setup your
disk array.
Warning: Please backup data in your hard drives to prevent data
damage resulting from the unfamiliarity with the operation.
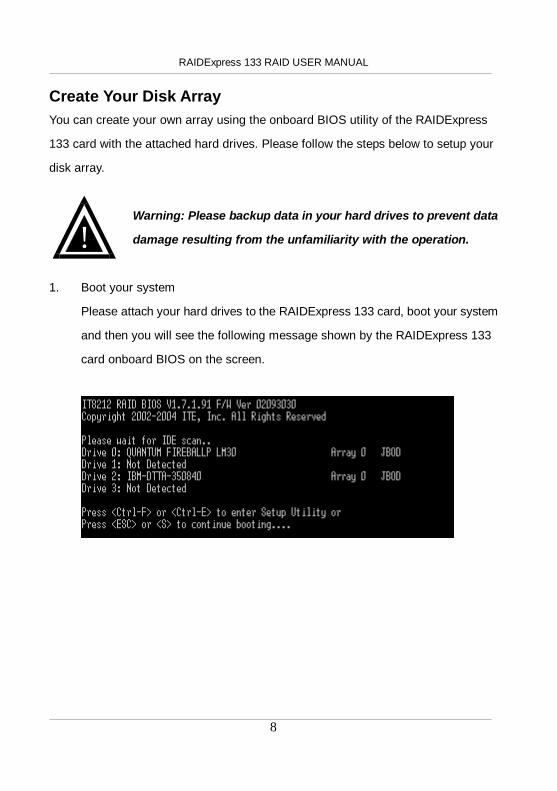
1. Boot your system
Please attach your hard drives to the RAIDExpress 133 card, boot your system
and then you will see the following message shown by the RAIDExpress 133
card onboard BIOS on the screen.
!
RAIDExpress 133 RAID USER MANUAL
9
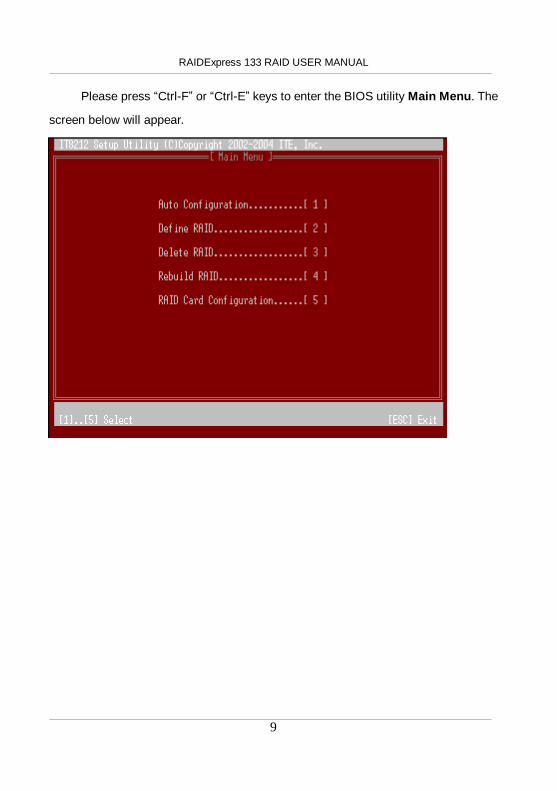
Please press “Ctrl-F” or “Ctrl-E” keys to enter the BIOS utility Main Menu. The
screen below will appear.
RAIDExpress 133 RAID USER MANUAL
10
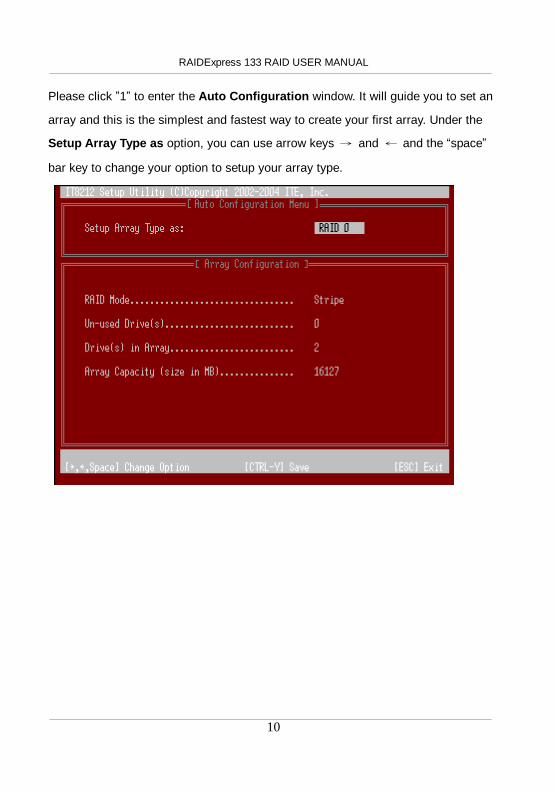
Please click ”1” to enter the Auto Configuration window. It will guide you to set an
array and this is the simplest and fastest way to create your first array. Under the
Setup Array Type as option, you can use arrow keys → and ← and the “space”
bar key to change your option to setup your array type.

RAIDExpress 133 RAID USER MANUAL
11
Totally, there are five configurations supported:
RAID level/Type Configurations Number of disks needed
RAID 0 Disk Striping 2 or 3 or 4
RAID 1 Disk Mirroring 2
RAID 0+1 Disk Striping + Mirroring 4
JBOD Disk Concatenation 2 or 3 or 4
IDE None 1 or 2 or 3 or 4
Setup Array for RAID 0:
The RAIDExpress 133 card allows you to use two, three or four hard drives to set a
RAID 0 (stripe) array. All the hard drives attached on the controller will be set as array
0. When you create a striped array, files are broken into 64k (stripe size) and stripes
are sent to each disk in the array. Selecting RAID 0 can increase data transfer rate
and allow the best overall performance characteristics because of giving up
redundancy.

RAIDExpress 133 RAID USER MANUAL
12
Setup Array for RAID 1:
The RAIDExpress 133 card allows two drives to be setup as a RAID 1 (mirror) array
or four drives as two arrays. The first mirrored array will be set as array 0 and the
second as array 1. RAID 1 is implemented as mirroring; a drive has its data
duplicated on the other different drive. Selecting RAID 1 can enhance read
performance and allow fault tolerance. A RAID 1 array can thoroughly backup your
files to prevent data loss.
Warning: Two hard drives that form a RAID 1 array have to be
attached as the same master or slave hard disks.
Setup Array for RAID 0+1:
A RAID 0+1 (mirror and stripe) array has to be formed by four hard drives. RAID 0+1
is implemented as a mirrored array whose segments are RAID 0 arrays so RAID 0+1
also has fault-tolerance capacity as RAID 1. It not only enhances hard disk access
performance but also backups data to prevent data loss. The formed array is
automatically set as array 0.
Setup Array for JBOD:
The RAIDExpress 133 card allows you to use two, three or four hard drives to form a
JBOD (Just a Bunch Of Disks) array as array 0. Although JBOD doesn’t offer other
RAID functionality, it makes the hard disks appear to be a single one by combining
the drives into one larger logical one without any capacity loss.
!
RAIDExpress 133 RAID USER MANUAL
13
Setup Array for IDE:
You can use the RAIDExpress 133 card as an IDE controller. The RAIDExpress 133
card allows you to use one, two, three or four hard drives. All the hard drives attached
on the RAIDExpress 133 controller are left to act as independent drive volumes.
Please follow the procedures below to set an array:
l Use the “space” bar key to select a RAID type.
l Press “Ctrl-Y” keys to save and create an array. If you select RAID 0, 1, 0+1 or
JBOD, the boot sector of the newly created array will be erased. If you select
IDE, the boot sector will be remained.
Warning: If you prefer to keep data in your hard drives, please
follow the procedures in the Define RAID section on page 21 to
setup your arrays manually.
l Click the “Esc” key to go back to the Main Menu on page 9.
l Click the “Esc” key to quit BIOS and boot.
l You need to FDISK and format your new array. The new array will be regarded
as a new hard drive by the system.
!

RAIDExpress 133 RAID USER MANUAL
14
Setup Utility Using the RAIDExpress 133 Card Setup Utility The RAIDExpress 133 card Setup Utility provides functions to create, delete and
rebuild an array. It also provides the information of each hard drive and the
configuration of the RAIDExpress 133 card. Please attach your hard drives to the
RAIDExpress 133 card and boot your system. If your array’s configuration is correct,
you will see the following message shown by the RAIDExpress 133 card onboard
BIOS on the screen. You can press “Ctrl-F” or “Ctrl-E” keys to enter Setup Utility or
press the “Esc” key to skip and boot directly.
If your array’s configuration is incorrect, you will see an error message on your
screen. You have to enter Setup Utility to reconfigure the arrays then quit utility to
boot.

RAIDExpress 133 RAID USER MANUAL
15
RAIDExpress 133 Card Setup Utility Main Menu There are five options in the Setup Utility Main Menu, please press 1 ~ 5 to enter
the submenu or the “Esc” key to quit the Setup Utility.
If you are not familiar with the array setting, please follow the procedures in Auto
Configuration on page 16 to create new arrays automatically. You can use Define
RAID on page 21 and Delete RAID on page 27 to manually create or delete arrays.
You can also use Rebuild RAID selection on page 30 to help you rebuild a mirrored
(RAID 1 or RAID 0+1) array. Besides, you can use RAID Card Configuration on
page 35 to see the controller’s resources, each hard drive’s status and the setting of
the RAIDExpress 133 card.

RAIDExpress 133 RAID USER MANUAL
16
Auto Configuration Click “1” on the Main Menu to enter Auto Configuration. You can use arrow keys →
and ← and the “space” bar key to change your option. After selecting your option,
you can press “Ctrl-Y” keys to save the setting and click the “Esc” key to leave Auto
Configuration menu and go back to the Main Menu on page 15.

RAIDExpress 133 RAID USER MANUAL
17
Setup Array for RAID 0:
The RAIDExpress 133 card allows you to use two, three or four hard drives to set a
RAID 0 (stripe) array. All the hard drives attached on the controller will be set as array
0. When you create a striped array, files are broken into 64k (stripe size) and stripes
are sent to each disk in the array. Selecting RAID 0 can increase data transfer rate
and allow the best overall performance characteristics because of giving up
redundancy.
RAID 0
PrimaryMaster
13951
PrimarySlave
141062
SecondaryMaster
151173
SecondarySlave
161284
Disk Controller
PrimaryMaster
13951
PrimarySlave
141062
SecondaryMaster
151173
SecondarySlave
161284
Disk Controller
RAIDExpress 133 RAID USER MANUAL
18
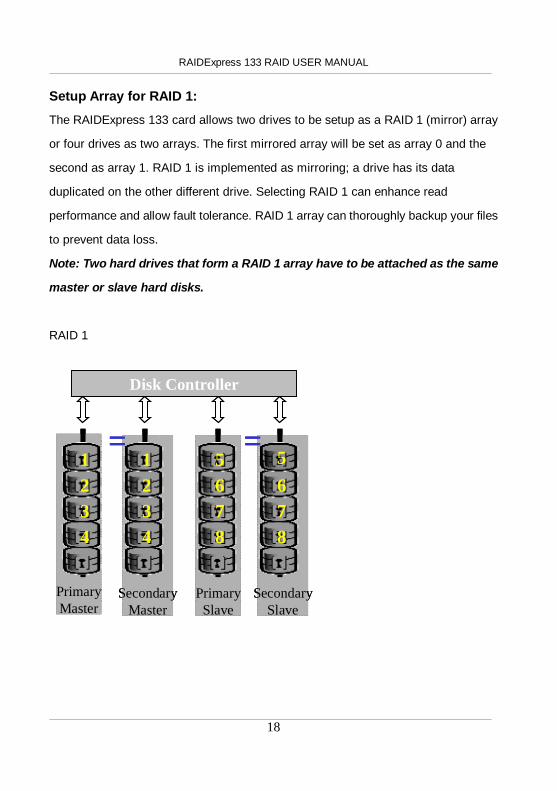
Setup Array for RAID 1:
The RAIDExpress 133 card allows two drives to be setup as a RAID 1 (mirror) array
or four drives as two arrays. The first mirrored array will be set as array 0 and the
second as array 1. RAID 1 is implemented as mirroring; a drive has its data
duplicated on the other different drive. Selecting RAID 1 can enhance read
performance and allow fault tolerance. RAID 1 array can thoroughly backup your files
to prevent data loss.
Note: Two hard drives that form a RAID 1 array have to be attached as the same
master or slave hard disks.
RAID 1
PrimaryMaster
PrimarySlave
8765
SecondarySlave
8765
Disk Controller
4321
SecondaryMaster
4321
= =
PrimaryMaster
PrimarySlave
8765
SecondarySlave
8765
Disk Controller
4321
SecondaryMaster
4321
= =

RAIDExpress 133 RAID USER MANUAL
19
Setup Array for RAID 0+1:
A RAID 0+1 (mirror and stripe) array has to be formed by four hard drives. RAID 0+1
is implemented as a mirrored array whose segments are RAID 0 arrays so RAID 0+1
also has fault-tolerance capacity as RAID 1. It not only enhances hard disk access
performance but also backups data to prevent data loss. The formed array is
automatically set as array 0.
RAID 0+1
PrimaryMaster
SecondaryMaster
4321
SecondarySlave
8765
Disk Controller
4321
PrimarySlave
8765
PrimaryMaster
SecondaryMaster
4321
SecondarySlave
8765
Disk Controller
4321
PrimarySlave
8765

RAIDExpress 133 RAID USER MANUAL
20
Setup Array for JBOD:
The RAIDExpress 133 card allows you to use two, three or four hard drives to form a
JBOD (Just a Bunch Of Disks) array as array 0. Although JBOD doesn’t offer other
RAID functionality, it makes the hard disks appear to be a single one by combining
the drives into one larger logical one without any capacity loss.
Setup Array for IDE:
You can use the RAIDExpress 133 card as an IDE controller. The RAIDExpress 133
card allows you to use one, two, three or four hard drives. All the hard drives attached
on the RAIDExpress 133 controller are left to act as independent drive volumes.
RAIDExpress 133 RAID USER MANUAL
21
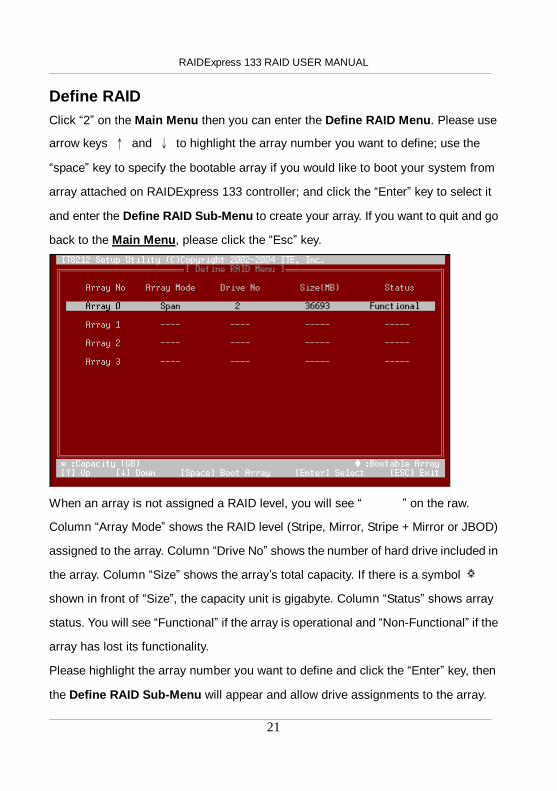
Define RAID Click “2” on the Main Menu then you can enter the Define RAID Menu. Please use
arrow keys ↑ and ↓ to highlight the array number you want to define; use the
“space” key to specify the bootable array if you would like to boot your system from
array attached on RAIDExpress 133 controller; and click the “Enter” key to select it
and enter the Define RAID Sub-Menu to create your array. If you want to quit and go
back to the Main Menu, please click the “Esc” key.
When an array is not assigned a RAID level, you will see “ ” on the raw.
Column “Array Mode” shows the RAID level (Stripe, Mirror, Stripe + Mirror or JBOD)
assigned to the array. Column “Drive No” shows the number of hard drive included in
the array. Column “Size” shows the array’s total capacity. If there is a symbol
shown in front of “Size”, the capacity unit is gigabyte. Column “Status” shows array
status. You will see “Functional” if the array is operational and “Non-Functional” if the
array has lost its functionality.
Please highlight the array number you want to define and click the “Enter” key, then
the Define RAID Sub-Menu will appear and allow drive assignments to the array.

RAIDExpress 133 RAID USER MANUAL
22
Define RAID Sub-Menu
When you highlight the array you want to define on the Define RAID Menu, click the
“Enter” key then you will enter this Define RAID Sub-Menu. You can use arrow keys
↑ and ↓ to highlight different positions. The “space” bar key can help you cycle
through the different options. “Ctrl-Y” keys can save the change and the “Esc” key
can help you quit then go back to the Define RAID Menu on page 21.
Block Size Option
You can select Stripe Block size ranging from 1k to 64k for Stripe (RAID 0) or Stripe +
Mirror (RAID 0+1) array. The selection of block size is related to how your data is sent
and regained from hard drives. You can do some tests to decide which block size is
suitable for your system. Generally, a large block size is suitable to manage large file
transfer such as MPEG files. On the contrary, the small block size is suitable to
manage small files such as e-mail files.

RAIDExpress 133 RAID USER MANUAL
23
Drive Assignments Option You can use arrow keys ↑ and ↓ to highlight the drive you want to assign to the
disk array and change the status of Assignments to “Y” by pressing the “space” bar
key.
For the meanings of “Array Mode”, “Drive No” and “Status”, please refer to Define
RAID Menu on page 21. The location of the hard drive is shown at column “Channel
ID”. “Pri” represents the primary channel and “Sec” represents the secondary channel.
D0 represents a master hard drive while D1 represents a slave hard drive. Column
“Drive Name” shows the model name of the hard drive. Column “Size” shows the
capacity of each hard drive. When a symbol is shown before the size, the capacity
unit is gigabyte.
When you press “Ctrl-Y” keys to save your change, Setup Utility will check if the
setting is legal. If not, an error message will pop up to show you what the error is and
you have to correct the setting. Limitations are shown as below.
Stripe (RAID 0): There isn’t any specific limitation.
Mirror (RAID 1): Two hard drives that form a RAID 1 array have to be attached as the
same master or slave hard disks. For example, primary channel (Pri) master drive
(D0) and secondary channel (Sec) master drive (D0) can form a mirror array; primary
channel (Pri) slave drive (D1) and secondary channel (Sec) slave drive (D1) can form
a mirror array; but primary channel master drive and primary channel slave drive
cannot form a mirror array.

RAIDExpress 133 RAID USER MANUAL
24
Stripe + Mirror (RAID 0+1): A RAID 0+1 array has to be formed by four hard drives.
RAID 0+1 is implemented as a mirrored array whose segments are RAID 0 arrays.
SPAN (JBOD): There isn’t any specific limitation.
IDE: If a hard drive is not included in an array (Column “Assignment” in the View
Drive Assignment is shown “Free”), this hard drive is regarded as an IDE drive. The
existence of the IDE hard drive sometimes will influence the array number user
specified. If the Pri/D0, Pri/D1, Sec/D0 or Sec/D1 hard drive is an IDE drive, array 0,
1, 2 or 3 cannot have the array setting respectively. However, you do not have to
concern about this limitation. If Setup Utility finds any conflicts, Array No will be
adjusted automatically. After finishing setting the array, go back to the Define RAID
Menu on page 21 then you will find the Array No is changed. This is because the
existence of the IDE hard drive(s) causes the Array No to be adjusted automatically.
When you press “Ctrl-Y” keys to save your change and your settings checked by
Setup Utility are correct, the following window will appear. You can choose to clear
the boot sector for the newly created array or not. If your RAID Mode is neither Mirror
nor Stripe + Mirror, this array setting is finished and then you can click the “Esc” key
to go back to the Define RAID Menu on page 21.

RAIDExpress 133 RAID USER MANUAL
25
If your RAID Mode selection is Mirror or Stripe + Mirror and you choose not to delete
the boot sector of the array, the following window will appear to ask whether you want
to rebuild an array. If you choose “Y”, the Rebuild RAID Menu will appear. (Please
refer to page 30.)

RAIDExpress 133 RAID USER MANUAL
26
If you choose not to rebuild this array for the time being, the RAIDExpress 133 card
cannot read data correctly because the data is inconsistent in the mirrored hard
drives. Thus, the following window will appear.
Please press arrow keys ↑ and ↓ to highlight your selection and press the “Enter”
key to select the source disk(s) then the setting will be finished and the screen will go
back to the Define RAID Sub-Menu automatically. This array’s setup is completed.
You can press the “Esc” key to go back to the Define RAID Menu on page 21.

RAIDExpress 133 RAID USER MANUAL
27
Delete RAID Press “3” on the Main Menu then the Delete RAID Menu will appear. Please use
arrow keys ↑ and ↓ to highlight the array you want to delete, press “D” to select it
and then enter the Delete RAID Sub-Menu to delete your array. The key “D” has no
effect if the highlight raw is an empty array. If you want to quit the menu and go to the
Main Menu, press the “Esc” key.
As for the detailed descriptions of “Array Mode”, “Drive No”, “Size” and “Status”,
please refer to Define RAID on page 21.

RAIDExpress 133 RAID USER MANUAL
28
Delete RAID Sub-Menu
When you highlight the array you select to delete at the Delete RAID Menu and
press the “D” key, the Delete RAID Sub-Menu will appear. Please press “Ctrl-Y” keys
to confirm to delete an array or press any other keys to abort array delete.

RAIDExpress 133 RAID USER MANUAL
29
If you press “Ctrl-Y” keys to make sure to delete an array, the following window will
appear. You can choose to clear the array’s boot sector or keep it. After you finish the
selection, Delete RAID Menu will pop up automatically.

RAIDExpress 133 RAID USER MANUAL
30
Rebuild RAID Press ”4” when you are at the Main Menu then the Rebuild RAID Menu will appear.
You can use ↑ and ↓ keys to highlight different arrays, press the “Enter” key to
select an array and enter the next rebuild drive select screen. If the RAID Mode of the
array you want to select is neither mirror nor stripe + mirror, the “Enter” key will have
no effect. If you want to leave and go back to the Main Menu, press the “Esc” key.

RAIDExpress 133 RAID USER MANUAL
31
Rebuild RAID Drive Select
When you highlight the array you want to rebuild on the Rebuild RAID Menu, press
the “Enter” key then the following screen will appear.

RAIDExpress 133 RAID USER MANUAL
32
You can use arrow keys ↑ and ↓ to highlight the source disk(s) then press the
“Enter” key to select the source disk(s). The following window will appear to make
sure if you would like to continue.

RAIDExpress 133 RAID USER MANUAL
33
If you press “Y”, the following window will pop up. You can select to monitor the whole
rebuild process until it ends completely or select background rebuild. You can leave
Setup Utility and boot directly if you choose background rebuild and rebuild can
proceed at the background.

RAIDExpress 133 RAID USER MANUAL
34
The following screen will appear if you choose to monitor the whole rebuild process.
When rebuild is completed, a message below will pop up to inform you that rebuild is
finished.
Then you leave and go back to the Rebuild RAID Menu on page 30.

RAIDExpress 133 RAID USER MANUAL
35
RAID Card Configuration Press “5” on the Main Menu then the RAID Card Configuration menu will appear.
You can use arrow keys → and ← and the “space” bar key to enable or disable
Auto-Rebuild option.
When Auto-Rebuild enables, the RAIDExpress 133 card can rebuild your mirrored
array automatically. If a failed mirrored drive is replaced without shutting down your
PC, the RAIDExpress 133 card can detect the hot-swap action and start rebuilding
automatically. When Auto-Rebuild is disabled, you need to rebuild your mirrored
array manually from Application (Please refer to page 76) or from Rebuild RAID
Menu (Please refer to page 30).
Note: You need to install removable docking case to support hard drive
hot-plug.

RAIDExpress 133 RAID USER MANUAL
36
On the RAID Card Resource section, you can see the PCI slot interrupt and I/O port
address used by the RAIDExpress 133 card. You can also see the status of each
hard drive from the Drive Status section. For the meanings of “Channel ID”, “Drive
Name” and “Size”, please refer to Define RAID sub-Menu on page 22. Column
“Array No” shows hard drive’s array number. If a hard drive is not assigned to an array,
it’s shown as free. A free hard drive is taken as a normal IDE drive. Column “Mode”
shows hard drive’s data transfer mode. “U” represents Ultra DMA (UDMA) mode, “D”
represents Multiword DMA (DMA) mode and “P” represents PIO mode. PIO modes 0,
1, 2, 3, and 4 correspond to maximum transfer rates of 3.3, 5.2, 8.3, 11.1 and 16.7
megabytes per second (MB/s) respectively. Multiword DMA modes 0, 1, and 2 have
maximum transfer rates of 4.2, 13.3, and 16.7 MB/s respectively. Ultra DMA modes 0,
1, 2, 3, 4, and 5 have maximum transfer rates of 16.7, 25, 33.3, 44.4, 66.7, and 100
MB/s respectively.
RAIDExpress 133 RAID USER MANUAL
37
Driver Installation This section details the procedures to install the RAIDExpress 133 ATA RAID
Controller driver under the following various operating systems. Before starting to
install this driver, please make sure that RAIDExpress 133 ATA RAID Controller has
already been properly setup in the system.
l Windows XP
l Windows 2000
l Windows 98/ME
l Windows NT 4.0

RAIDExpress 133 RAID USER MANUAL
38
Windows XP Install the driver during Windows XP installation
1. Start Windows XP installation.
Warning: Because of the different selections of the
following installation methods, the time when step2 starts
will be different.
l Boot from floppy with Windows installation diskette.
l Boot from floppy with un-installable diskette.
l Boot from CD-ROM with Windows installation CD.
2. When the message “Press F6 if you need to install third party SCSI or
RAID driver” appears on the bottom of the screen, please press the <F6> key.
3. The installation will continue. When a message appears to ask you to
designate the device you want to install, press the <S> key.
4. Follow the instruction of the installation program to insert the RAIDExpress 133
ATA RAID Controller Driver diskette into the floppy disk drive then press the
<Enter> key to continue.
5. Select RAIDExpress 133 ATA RAID Controller (Windows XP) from the
device list shown on the window then press the <Enter> key to continue.
6. The devices that are going to be installed will be listed on the next window.
RAIDExpress 133 ATA RAID Controller (Windows XP) should be contained
on the list. If you need to install any other devices, please designate them now.
After designating all the devices, please proceed to the next step.
7. Press the <Enter> key to continue the installation of Windows XP.
!

RAIDExpress 133 RAID USER MANUAL
39
Install the driver under existing Windows XP
1. Start Windows.
2. When Windows detects RAIDExpress 133 ATA Raid Controller in the system, a
dialog box named Found New Hardware Wizard will show on the screen.
Select the Install from a list or specific location (Advanced) option then
click “Next” to continue to setup.
RAIDExpress 133 RAID USER MANUAL
40
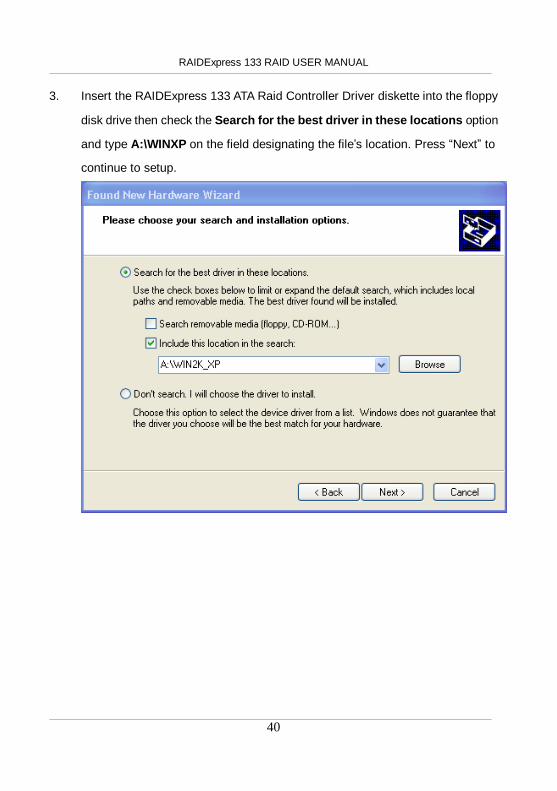
3. Insert the RAIDExpress 133 ATA Raid Controller Driver diskette into the floppy
disk drive then check the Search for the best driver in these locations option
and type A:\WINXP on the field designating the file’s location. Press “Next” to
continue to setup.

RAIDExpress 133 RAID USER MANUAL
41
4. The driver installation has finished. Press “Finish” to continue.
5. Follow the instruction to restart the computer then the driver will take effect.
RAIDExpress 133 RAID USER MANUAL
42
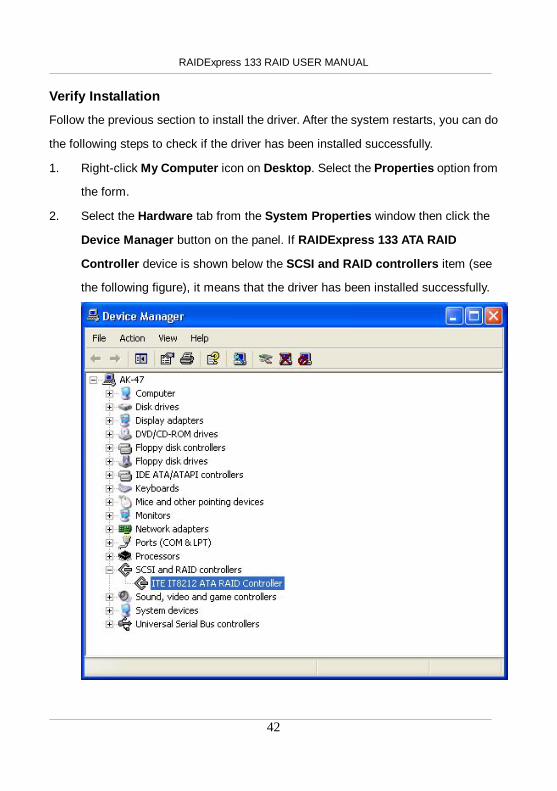
Verify Installation
Follow the previous section to install the driver. After the system restarts, you can do
the following steps to check if the driver has been installed successfully.
1. Right-click My Computer icon on Desktop. Select the Properties option from
the form.
2. Select the Hardware tab from the System Properties window then click the
Device Manager button on the panel. If RAIDExpress 133 ATA RAID
Controller device is shown below the SCSI and RAID controllers item (see
the following figure), it means that the driver has been installed successfully.

RAIDExpress 133 RAID USER MANUAL
43
3. If there is a marking ! or ? before the RAIDExpress 133 ATA RAID Controller
device as shown below, it indicates that the driver has not been correctly
installed. Users should remove the device and reinstall.

RAIDExpress 133 RAID USER MANUAL
44
Windows 2000 Install the driver during Windows 2000 installation
1. Start Windows 2000 installation.
Warning: Because of the different selections of the
following installation methods, the time when step2 starts
will be different.
n Boot from floppy with Windows installation diskette.
n Boot from floppy with un-installable diskette.
n Boot from CD-ROM with Windows installation CD.
2. When the message “Press F6 if you need to install third party SCSI or
RAID driver” appears on the bottom of the screen, please press the <F6> key.
3. The installation will continue. When a message appears to ask you to
designate the device you want to install, press the <S> key.
4. Follow the instruction of the installation program to insert the RAIDExpress 133
ATA RAID Controller Driver diskette into the floppy disk drive then press the
<Enter> key to continue.
5. Select RAIDExpress 133 ATA RAID Controller (Windows 2000) from the
device list shown on the window then press the <Enter> key to continue.
6. The devices that are going to be installed will be listed on the next window.
RAIDExpress 133 ATA RAID Controller (Windows 2000) should be
contained on the list. If you need to install any other devices, please designate
them now. After designating all the devices, please proceed to the next step.
7. Press the <Enter> key to continue the installation of Windows 2000.
!

RAIDExpress 133 RAID USER MANUAL
45
Install the driver under existing Windows 2000
1. Start Windows.
2. When Windows detects RAIDExpress 133 ATA Raid Controller in the system, a
dialog box named Found New Hardware Wizard will show on the screen.
Select the Search for a suitable driver for my device (recommended) option
then click “Next” to continue to setup.
RAIDExpress 133 RAID USER MANUAL
46
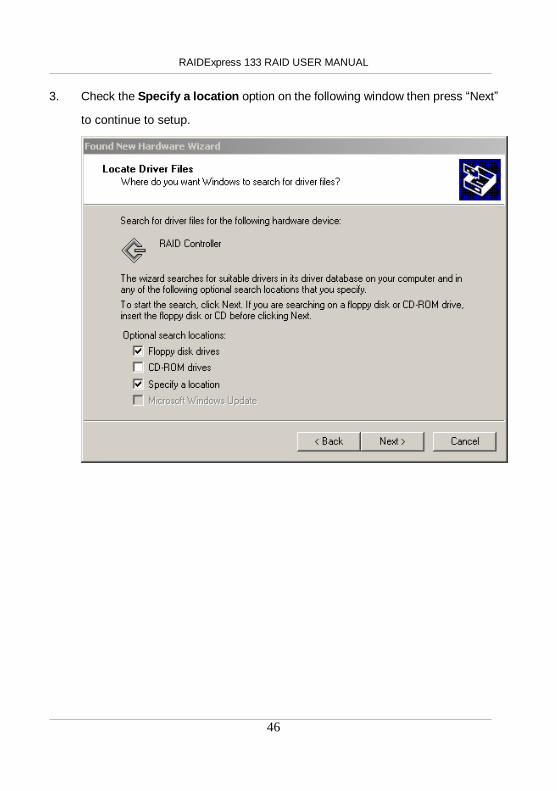
3. Check the Specify a location option on the following window then press “Next”
to continue to setup.

RAIDExpress 133 RAID USER MANUAL
47
4. Insert the RAIDExpress 133 ATA Raid Controller Driver diskette into the floppy
disk drive then type A:\WIN2K on the field designating the file’s location. Press
“Next” to continue to setup.
RAIDExpress 133 RAID USER MANUAL
48
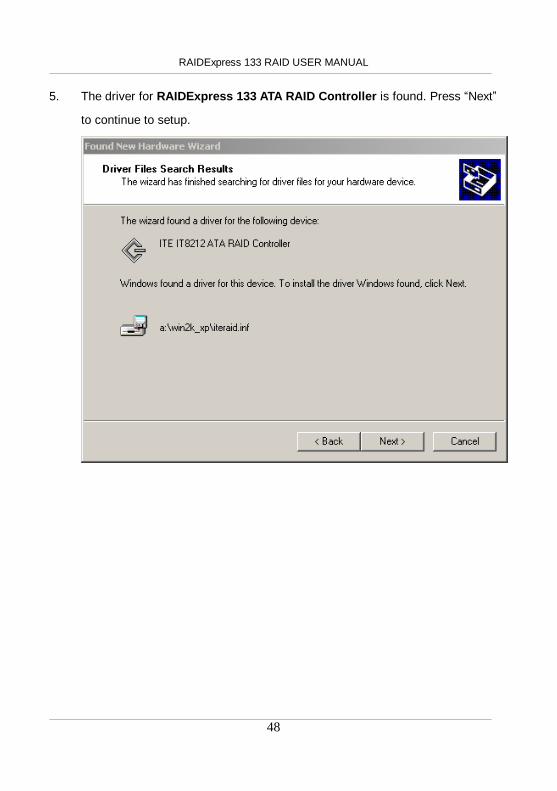
5. The driver for RAIDExpress 133 ATA RAID Controller is found. Press “Next”
to continue to setup.

RAIDExpress 133 RAID USER MANUAL
49
6. The driver installation has finished. Press “Finish” to continue.
7. Follow the instruction to restart the computer then the driver will take effect.

RAIDExpress 133 RAID USER MANUAL
50
Verify Installation
Follow the previous section to install the driver. After the system restarts, you can do
the following steps to check if the driver has been installed successfully.
1. Right-click My Computer icon on Desktop. Select the Properties option from
the form.
2. Select the Hardware tab from the System Properties window then click the
Device Manager button on the panel. If RAIDExpress 133 ATA RAID
Controller device is shown below the SCSI and RAID controllers item (see
the following figure), it means that the driver has been installed successfully.
RAIDExpress 133 RAID USER MANUAL
51
3. If there is a marking ! or ? in front of the RAIDExpress 133 ATA RAID
Controller device, it indicates that the driver has not been correctly installed.
Users should remove the device and reinstall.
RAIDExpress 133 RAID USER MANUAL
52
Windows 98SE/ME Install the driver
1. Start Windows.
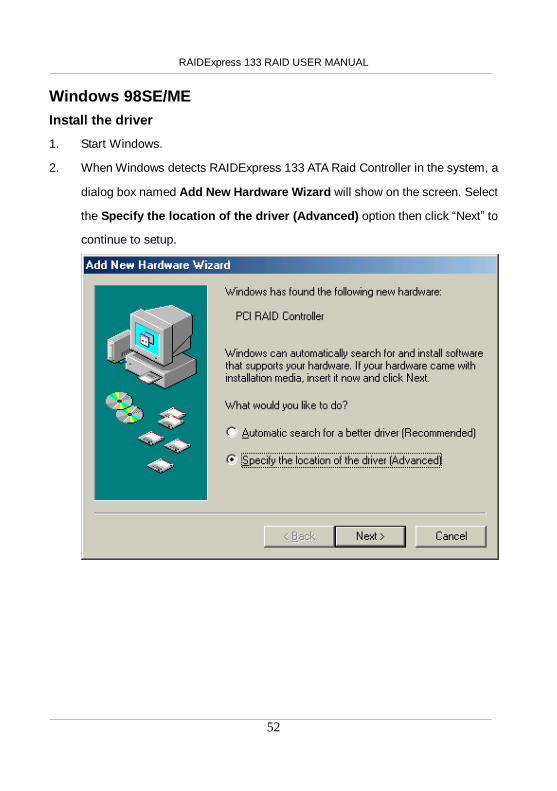
2. When Windows detects RAIDExpress 133 ATA Raid Controller in the system, a
dialog box named Add New Hardware Wizard will show on the screen. Select
the Specify the location of the driver (Advanced) option then click “Next” to
continue to setup.

RAIDExpress 133 RAID USER MANUAL
53
3. Insert the RAIDExpress 133 ATA Raid Controller Driver diskette into the floppy
disk drive then select Search for the best driver for your device
(Recommended) from the following dialog box and type A:\WIN98_ME on the
field designating the file’s location. Press “Next” to continue to setup.

RAIDExpress 133 RAID USER MANUAL
54
4. The driver for RAIDExpress 133 ATA RAID Controller is found. Press “Next”
to continue to setup.

RAIDExpress 133 RAID USER MANUAL
55
5. The driver installation has finished. Press “Finish” to continue.
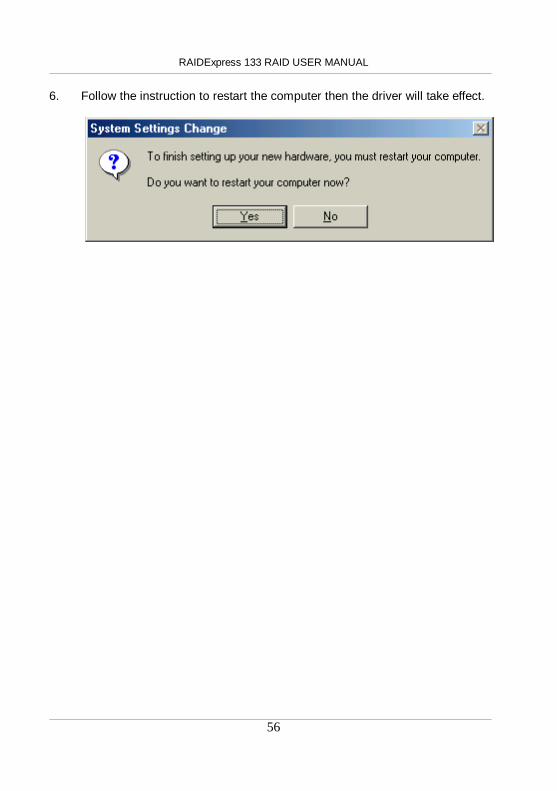
RAIDExpress 133 RAID USER MANUAL
56
6. Follow the instruction to restart the computer then the driver will take effect.

RAIDExpress 133 RAID USER MANUAL
57
Verify Installation
Follow the previous section to install the driver. After the system restarts, you can do
the following steps to check if the driver has been installed successfully.
1. Right-click My Computer icon on Desktop. Select the Properties option from
the form.

RAIDExpress 133 RAID USER MANUAL
58
2. Select the Device Manager panel from the System Properties window. If
RAIDExpress 133 ATA RAID Controller device is shown below the SCSI
controllers item (see the following figure), it means that the driver has been
installed successfully.

RAIDExpress 133 RAID USER MANUAL
59
3. If there is a marking ! or ? in front of the RAIDExpress 133 ATA RAID
Controller device as shown below, it indicates that the driver has not been
correctly installed. User should remove the device and reinstall.

RAIDExpress 133 RAID USER MANUAL
60
Windows NT Install the driver during Windows NT installation
1. Start Windows NT installation.
Warning: Because of the different selections of the
following installation methods, the time when step2 starts
will be different.
n Boot from floppy with Windows installation diskette.
n Boot from floppy with un-installable diskette.
n Boot from CD-ROM with Windows installation CD.
2. When the message “Setup is inspecting your computer’s hardware
configuration” appears on the bottom of the screen, please press the <F6>
key.
3. The installation will continue. When a message appears to ask you to
designate the device you want to install, press the <S> key.
4. The device list of SCSI Adapter will show on the following window. Select
“Other” and press the <Enter> key to continue.
5. Insert RAIDExpress 133 ATA RAID Controller Driver diskette into the floppy
disk drive then press the <Enter> key to continue.
6. Select RAIDExpress 133 ATA RAID Controller (Windows NT) from the
device list shown on the window then press the <Enter> key to continue.
7. The devices that are going to be installed will be listed on the next window.
RAIDExpress 133 ATA RAID Controller (Windows NT) should be contained
on the list. If you need to install any other devices, please designate them now.
After designating all the devices, please proceed to the next step.
8. Press the <Enter> key to continue the installation of Windows NT.
!

RAIDExpress 133 RAID USER MANUAL
61
Install the driver under existing Windows NT
1. Start Windows.
2. Select Settings from the Start menu then choose the Control Panel option
from the Settings form.

RAIDExpress 133 RAID USER MANUAL
62
3. In the Control Panel window, double-click on the SCSI Adapters icon.

RAIDExpress 133 RAID USER MANUAL
63
4. Choose the Drivers tab from the SCSI Adapters window then press “Add” to
continue.

RAIDExpress 133 RAID USER MANUAL
64
5. Click Have Disk from the Install Driver window.

RAIDExpress 133 RAID USER MANUAL
65
6. Insert the RAIDExpress 133 ATA Raid Controller Driver diskette into the floppy
disk drive then type A:\WINNT on the field designating the file’s location. Press
“OK” to continue to setup.
RAIDExpress 133 RAID USER MANUAL
66
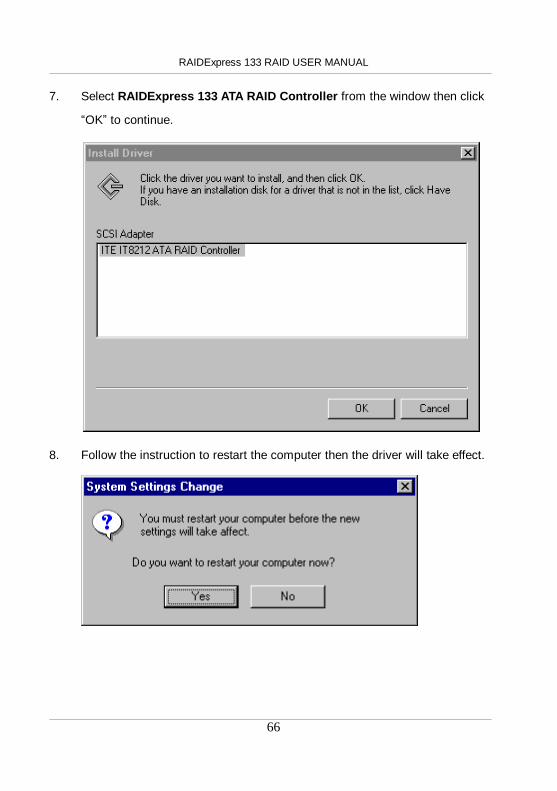
7. Select RAIDExpress 133 ATA RAID Controller from the window then click
“OK” to continue.
8. Follow the instruction to restart the computer then the driver will take effect.

RAIDExpress 133 RAID USER MANUAL
67
Verify Installation
Follow the previous section to install the driver. After the system restarts, you can do
the following steps to check if the driver has been installed successfully.
1. Follow step1 to step3 described in the previous section to activate the SCSI
Adapters option.
2. If the RAIDExpress 133 ATA RAID Controller device is shown on the Devices
panel as shown below, it means that the driver has been installed successfully.

RAIDExpress 133 RAID USER MANUAL
68
Linux Mandrake Installation Guide and Release Notes
1. Component Name(s) and Version #:
Components : For Mandrake 9.0
Kernels Tested : 2.4.19-16mdk
Driver Version : v1.0
Release Date : Jan 16, 2003
2. Files Listing (in linux directory)
redhat.txt This file
mandrake.txt Mandrake installation guide
driver
|
|
+- md90 Mandrake 9.0 directory
| |- iteraid.o Driver module for Mandrake 9.0
|
+- rh73 RedHat 7.3 directory
|- modinfo Module info file
|- modules.cgz Compressed driver modules
|- modules.dep Module dependence file
|- pcitable IT8212 pci info
|- rhdd-6.1 Driver disk label
|- iteraid.o Driver module for RedHat 9.0 3. Installation Procedures
3.1 Install IT8212 Linux Driver into an EXISTING SYSTEM 3.1.1 Boot Linux system and login as root.

RAIDExpress 133 RAID USER MANUAL
69
3.1.2 Copy the IT8212 driver module (/linux/driver/md90/iteraid.o) to
any directory you want, and then go to that directory.
3.1.3 You can test out the module to ensure that it works by the
following commands:
# insmod scsi_mod
# insmod sd_mod
# insmod iteraid.o
To ensure the modules have been loaded successfully, you can
check the driver status by using the "dmesg" command.
# dmesg
Then you will see the following messages. ...
...
Attached scsi disk sda at scsi0, channel 0, id 0, lun 0
SCSI device sda: 120103200 512-byte hdwr sectors (61493
MB)
...
...
3.1.4 The following commands are only for your reference.
You can create the partition when the IT8212 driver module is
ready.
# fdisk /dev/sda
If you create two partitions on /dev/sda such as /dev/sda1 and
/dev/sda2, you can use the mkfs to make the filesystem.

RAIDExpress 133 RAID USER MANUAL
70
# mkfs /dev/sda1 <-- Make /dev/sda1 ext2 filesystem
# mkfs -j /dev/sda2 <-- Make /dev/sda2 ext3 filesystem
After this you can create two directories for mount point. For
example:
# mkdir /mnt/hd0
# mkdir /mnt/hd1
# mount -t ext2 /dev/sda1 /mnt/hd0/
# mount -t ext3 /dev/sda2 /mnt/hd1/

RAIDExpress 133 RAID USER MANUAL
71
Red Hat Installation Guide and Release Notes
1. Component Name(s) and Version #:
Components : For Redhat Linux 7.3
Kernels Tested : 2.4.18-3
Driver Version : v1.1
Release Date : Feb 7, 2003
2. Files Listing (in linux directory)
redhat.txt This file
mandrake.txt Mandrake installation guide
driver driver directory
|
|
+- md90 Mandrake 9.0 directory
| |- iteraid.o Driver module for Mandrake 9.0
|
+- rh73 RedHat 7.3 directory
|- modinfo Module info file
|- modules.cgz Compressed driver modules
|- modules.dep Module dependence file
|- pcitable IT8212 pci info
|- rhdd-6.1 Driver disk label
|- iteraid.o Driver module for RedHat 9.0
3. Installation Procedures
3.1 Installing IT8212 Linux Driver into an EXISTING SYSTEM
3.1.1 Boot Linux system and login as root.
3.1.2 Copy iteraid.o to any directory you want, and then go to that

RAIDExpress 133 RAID USER MANUAL
72
directory.
3.1.3 You can test out the module to ensure that it works by the
following commands:
# insmod scsi_mod
# insmod sd_mod
# insmod iteraid.o
To ensure the modules have been loaded successfully, you can
check the driver status by using the "dmesg" command.
# dmesg
Then you will see the following messages.
...
...
Attached scsi disk sda at scsi0, channel 0, id 0, lun 0
SCSI device sda: 120103200 512-byte hdwr sectors (61493
MB)
..
.. 3.1.4 Most likely, you will not want to type in "insmod iteraid.o" each
time you boot up the system. Therefore you must install the
module and tell the system about it. To install the module, type
in the following commands (first change directory to where the
proper iteraid.o can be loacted):
On Red Hat 7.3, use
# install -d /lib/modules/2.4.18-3/kernel/drivers/scsi

RAIDExpress 133 RAID USER MANUAL
73
# install -c iteraid.o /lib/modules/2.4.18-3/kernel/drivers/scsi
Then you should inform the system when to load the module.
You can add the driver to the existing RAM disk image (In
RedHat 7.3, it will be /boot/initrd-2.4.18-3.img). Use the
following commands:
# gzip -dc /boot/initrd-2.4.18-3.img > /tmp/initrd.ext2
# mkdir /mnt/initrd
# mount -o loop /tmp/initrd.ext2 /mnt/initrd
# cp iteraid.o /mnt/initrd/lib/
# cp /lib/modules/2.4.18-3/kernel/drivers/scsi/scsi_mod.o
/mnt/initrd/lib/
# cp /lib/modules/2.4.18-3/kernel/drivers/scsi/sd_mod.o
/mnt/initrd/lib/
Now, add the following lines to the file /mnt/initrd/linuxrc and you
can use the editor that you are familiar with like vi. Example of
linuxrc:
# vi /mnt/initrd/linuxrc
================================================
#!/bin/sh
echo "Loading scsi_mod module" <-- new insert line
insmod /lib/scsi_mod.o <-- new insert line
echo "Loading sd_mod module" <-- new insert line
insmod /lib/sd_mod.o <-- new insert line
echo "Loading IT8212 module" <-- new insert line

RAIDExpress 133 RAID USER MANUAL
74
insmod /lib/iteraid.o <-- new insert line
...
...
================================================
# umount /mnt/initrd
# gzip -c /tmp/initrd.ext2 > /boot/initrd-2.4.18-3.img
If you are using Lilo to boot your system, you also need to run
lilo:
# lilo
Then reboot your system and the driver will be loaded.
3.1.5 Configure system to mount volumes during startup.
Now you can inform the system to automatically mount the
array by modifying the file /etc/fstab. E.g. You can add the
following line to tell the system to mount /dev/sda1 to location
/mnt/raid after startup:
/dev/sda1 /mnt/raid ext2 defaults 0 0
3.2 Installing Red Hat Linux on IT8212 Controller. 3.2.1 Prepare your hardware for installation.
After attaching your hard disks to IT8212 controller, you can use
IT8212 BIOS to configure your hard disks as RAID 0, RAID 1,
RAID 0/1 or JBOD arrays, or just use them as single disks.
Remember to set the BOOT disk in the IT8212 BIOS
configuration menu.
Before installation, you must remove all the disk drives, which
RAIDExpress 133 RAID USER MANUAL
75
are not physically attached to IT8212 controller, from your
system.
3.2.2 Check system BIOS setting.
In your system bios setup menu, change Boot Sequence in
such a way that system will first boot from CDROM, and then
from SCSI. Refer to your BIOS manual to see how to set boot
sequence.
3.2.3 Prepare the driver diskette.
Copy all the files under /linux/driver/rh73/ directory to a new dos
formatted disk.
3.2.4 Install Red Hat 7.3.
l Start installing Red Hat 7.3 by booting with the CDROM.
l On "welcome to Red Hat Linux 7.3!" installation screen, a
prompted label "boot:" will appear at the bottom of the
screen. Then type in "expert" and press enter.
l Then you will be asked "Do you have a driver disk?".
Select "Yes".
l When "Insert your driver disk and press "OK" to continue"
is prompted, insert the driver disk in the floppy driver and
then select "OK". Then the IT8212 driver will be loaded.
l Continue the installation as normal. You can refer to the
Red Hat Linux installation guide.

RAIDExpress 133 RAID USER MANUAL
76
Application
Installation 1. Run iteraid.exe to install the device driver and the application.
2. Click “Next” to start the installation.

RAIDExpress 133 RAID USER MANUAL
77
3. Review the License Agreement. If you accept the License Agreement, click
“Yes” to continue the installation.

RAIDExpress 133 RAID USER MANUAL
78
4. Click “Finish” to reboot the computer.

RAIDExpress 133 RAID USER MANUAL
79
Functions Description 1. Starting
RAID Manager will be executed automatically when Microsoft Windows is booted. A
small icon, “ ”, will show in the system tray at the right bottom corner to indicate
RAID Manager is active.
Open RAID Manager
Double click on the small icon in the system tray to open the RAID Manager control
panel.
Click the right button on the small icon to open the menu then choose “Open”.
The system information will be presented in the beginning when the RAID Manager
control panel is opened. Please read the next section System Information for more
detail about system information.
Close RAID Manager
Click “Close” to close RAID Manager. The RAID Manager will be minimized to the
system tray at the right bottom corner but will not exit.
Terminate RAID Manager
Right click the small icon, and choose “Exit” to terminate RAID Manager.
Note: Click the “Start Menu” at the left bottom on the RAID Manager control
panel to choose RAID functions.
If more than one adapter exists, click the “RAID Adapter” at the right bottom to
RAIDExpress 133 RAID USER MANUAL
80
choose RAID Adapter.
Alert LED, at the right bottom, is used to indicate the whole system situation.
GREEN: Normal.
RED: If the configuration error of any array occurs.
BLINKING: If there is any array in rebuilding process.

RAIDExpress 133 RAID USER MANUAL
81
2. System Information
Device Status
Click the “Start Menu” at the left bottom on the RAID Manager control panel then
choose “Device Status” to show the system information.
l If the disk arrays exist, they will be listed at the first row.
l If the physical disks exist, they will be listed at the second row.
l Click the disk array or physical disk icons to list the device properties.
l Reset Adapter: Check to reset adapter.
l Click “Refresh” to refresh system information.
l Remarks:
n If only slave disks are hot swapped, make sure that “Reset Adapter” is
checked to get system information correctly.

RAIDExpress 133 RAID USER MANUAL
82
3. Configuration
Create Disk Array
Click the “Start Menu” at the left bottom on the RAID Manager control panel then
choose “Create Disk Array” to create a disk array.
l Array Type: RAID 0, RAID 1, RAID 0+1, JBOD.
l Array Name: Assigned by RAID Manager.
l Block Size: Virtual block size for RAID 0 or RAID 0+1.
l Auto Rebuild: Check to rebuild by hardware automatically.
l Boot Disk: Check to boot from this array.
l Erase Partition: Check to erase partition table.
l Source: Source disk.

RAIDExpress 133 RAID USER MANUAL
83
l Existing Arrays: Existing arrays list.
l Available Disks: Disks can be used to create an array.
l Selected Disks: Disks will be put in an array.
l Click “Create” to create a disk array.
l Remarks:
n Stripe Size is valid when Array Type is RAID 0 or RAID 0+1.
n Auto Rebuild is valid when Array Type is RAID 1 or RAID 0+1.
n Source Disk is valid when Array Type is RAID 1 or RAID 0+1 and Erase
Partition is disabled.
n Check “Erase Partition” to erase partition table or uncheck “Erase
Partition” not to erase partition table. If there is an Array of RAID 1 or
RAID 0+1, “Erase Partition” can’t be modified.
n If “Erase Partition” is unchecked, the “Source” must be assigned.

RAIDExpress 133 RAID USER MANUAL
84
Delete Disk Array
Click the “Start Menu” at the left bottom on the RAID Manager control panel then
choose “Delete Disk Array” to delete disk array.
l Available Arrays: List existing arrays.
l Selected Arrays: Arrays will be deleted.
l Erase Partition: Check to erase partition table.
l Click “Delete” to delete disk arrays.

RAIDExpress 133 RAID USER MANUAL
85
Rebuild Disk Array
Click the “Start Menu” at the left bottom on the RAID Manager control panel then
choose “Rebuild Disk Array” to rebuild disk array.
l Rebuild Array: List arrays that can be rebuilt.
l Source Disk: The source for rebuilding the array.
l Destination Disk: The destination for rebuilding the array.
l Resume Previous Rebuild Process: Check to resume the last rebuild process.
l Status Timer: Time interval for polling rebuild status.
l Click “Rebuild” to start rebuilding a disk array.

RAIDExpress 133 RAID USER MANUAL
86
4. Records
Activity Records
Click the “Start Menu” at the left bottom on the RAID Manager control panel then
choose “Activity Records” to show the activity records.
Click “Clear” to clear all records.

RAIDExpress 133 RAID USER MANUAL
87
5. Options
Email Notification
Click the “Start Menu” at the left bottom on the RAID Manager control panel then
choose “Email Notification” to modify the settings.
l Event Timer: Self error detection time interval.
l Enable Email Notification: Check to enable email notification.
l Email Address: If email notification is enabled, a warning message will be sent
to this email box.
l Select default mail tool or using SMTP protocol to send the mail. If SMTP
protocol is selected, user must provide SMTP server and the email address of
the sender.
RAIDExpress 133 RAID USER MANUAL
88
l Click “Test” to send a test email to the above email address.
l Click “Set” to save the settings.

RAIDExpress 133 RAID USER MANUAL
89
Remote Access
Click the “Start Menu” at the left bottom on the RAID Manager control panel then
choose “Remote Access” to modify the settings.
l Machine Type: Single Machine, Client or Server.
l Server Name: If this machine is client, a server is required.
l Server Name can be a computer name or an IP address.
l Click “Set” to save the settings.
l Restart RAID Manager if settings are modified.

RAIDExpress 133 RAID USER MANUAL
90
6. Miscellaneous
Icon list
represents disk array is inactive.
represents disk array is active.
represents physical disk is inactive.
represents physical disk is active.

RAIDExpress 133 RAID USER MANUAL
91
How to Create Disk Array?
1. Create RAID 0
l Open RAID Manager.
l Change the control panel to “Create Disk Array”.
l Select “Array Type” as “RAID 0”.
l Check “Erase Partition” to erase partition table or uncheck “Erase
Partition” not to erase partition table.
l Select “Stripe Size”. Default is 64 KB.
l Select at least two disks.
l Click “Create”.
2. Create RAID 1
l Open RAID Manager.
l Change the control panel to “Create Disks Array”.
l Select “Array Type” as “RAID 1”.
l Check “Erase Partition” to erase partition table or uncheck “Erase
Partition” not to erase partition table. If there is an Array of RAID 1 or RAID
0+1, “Erase Partition” can’t be modified.
l If “Erase Partition” is unchecked, the “Source” must be assigned.
l Select exactly two disks (These two disks must be “primary master and
secondary master” or “primary slave and secondary slave”).
l Click “Create”.

RAIDExpress 133 RAID USER MANUAL
92
3. Create RAID 0+1
l Open RAID Manager.
l Change the control panel to “Create Disks Array”.
l Select “Array Type” as “RAID 0+1”.
l Check “Erase Partition” to erase partition table or uncheck “Erase
Partition” not to erase partition table. If there is an Array of RAID 1 or RAID
0+1, “Erase Partition” can’t be modified.
l If “Erase Partition” is unchecked, the “Source” must be assigned.
l Select exactly four disks.
l Click “Create”.
4. Create JBOD
l Open RAID Manager.
l Change the control panel to “Create Disk Array”.
l Select “Array Type” as “JBOD”.
l Select at least two disks.
l Click “Create”.

RAIDExpress 133 RAID USER MANUAL
93
Q&A 1. Q: How to set RAID as startup disk?
A: Please set booting device to Array0 and set as SCSI boot in the BIOS.
2. Q: Is CD ROM able to be used?
A: This product does not support any ATAPI devices.
3. Q: How can two RAID0 perform well?
A: For two RAID0, it is suggested that HD should be put in different
channels to get a better performance.
4. Q: Is a special mobile rack necessary for HOT Swap?
A: It’s not necessary. The regular one is just enough.
5. Q: What if R1 and R0+1 just create RAID but don’t Rebuild right away?
A: It is suggested that they should Rebuild as soon as possible because the
HD data of two mirrors are different and if the HD with the correct data is
damaged, the data will lose. 6. Q: For R0+1, when two HDs in the same channel are hot swapping at the same
time, sometimes AP can’t find that Slave is back again.
A: This situation may happen to some HDs. To avoid this situation, please set
Slave HD first then set Master HD.

RAIDExpress 133 RAID USER MANUAL
94
Technology Support If you have any technical problems, please look for the support from the nearby
supplier.


