Embed Size (px)
Citation preview

8/18/2019 Bsc6900 Umts Omu Administration Guide(v900r017c10_02)(PDF)-En
http://slidepdf.com/reader/full/bsc6900-umts-omu-administration-guidev900r017c1002pdf-en 1/310
BSC6900 UMTS
V900R017C10
OMU Administration Guide
Issue 02
Date 2015-05-08
HUAWEI TECHNOLOGIES CO., LTD.

8/18/2019 Bsc6900 Umts Omu Administration Guide(v900r017c10_02)(PDF)-En
http://slidepdf.com/reader/full/bsc6900-umts-omu-administration-guidev900r017c1002pdf-en 2/310
Copyright © Huawei Technologies Co., Ltd. 2015. All rights reserved.
No part of this document may be reproduced or transmitted in any form or by any means without prior written
consent of Huawei Technologies Co., Ltd.
Trademarks and Permissions
and other Huawei trademarks are trademarks of Huawei Technologies Co., Ltd.
All other trademarks and trade names mentioned in this document are the property of their respective holders.
Notice
The purchased products, services and features are stipulated by the contract made between Huawei and the
customer. All or part of the products, services and features described in this document may not be within the
purchase scope or the usage scope. Unless otherwise specified in the contract, all statements, information,
and recommendations in this document are provided "AS IS" without warranties, guarantees or representations
of any kind, either express or implied.
The information in this document is subject to change without notice. Every effort has been made in the
preparation of this document to ensure accuracy of the contents, but all statements, information, and
recommendations in this document do not constitute a warranty of any kind, express or implied.
Huawei Technologies Co., Ltd.
Address: Huawei Industrial Base
Bantian, Longgang
Shenzhen 518129
People's Republic of China
Website: http://www.huawei.com
Email: [email protected]
Issue 02 (2015-05-08) Huawei Proprietary and Confidential
Copyright © Huawei Technologies Co., Ltd.
i

8/18/2019 Bsc6900 Umts Omu Administration Guide(v900r017c10_02)(PDF)-En
http://slidepdf.com/reader/full/bsc6900-umts-omu-administration-guidev900r017c1002pdf-en 3/310
About This Document
Overview
This document describes software structure, working principles, product software installation,
general tasks of OMU boards.
NOTE
In this document, OMU board (hardware) indicates the combination of the OMUa/OMUc board and its
operating system; OMU (logical concept) indicates the OMU board with product software.
This guide also applies to the BSC6810.
Product Version
The following table lists the product versions related to this document.
Product Name Product Version Solution Version
BSC6900 V900R017C10 RAN17.1
Intended Audience
This document is intended for:
l Field engineers
l Shift operators
Organization
1 Change History
This section provides information about the changes in different document versions. There are
two types of changes, including function changes and editorial changes. Function changes refer
to changes in functions of a specific product version. Editorial changes refer to changes in
wording or addition of information that was not described in the earlier version.
2 Introduction to OMU
BSC6900 UMTS
OMU Administration Guide About This Document
Issue 02 (2015-05-08) Huawei Proprietary and Confidential
Copyright © Huawei Technologies Co., Ltd.
ii

8/18/2019 Bsc6900 Umts Omu Administration Guide(v900r017c10_02)(PDF)-En
http://slidepdf.com/reader/full/bsc6900-umts-omu-administration-guidev900r017c1002pdf-en 4/310
This chapter describes the following information about the OMU: position in the network,
software structure, working mode, O&M methods, and safety instructions.
3 Working Principles of the OMU
This section has the following topics:
4 OMU Safety Information
This section describes safety information for OMU operations.
5 OMU High-Risk Command List (Dopra Linux)
This section describes high-risk commands in the Dopra Linux operating system (OS). Exercise
caution when executing these commands.
6 OMU Installation and Maintenance (Dopra Linux)
This chapter describes how to install software and perform operation and maintenance on the
OMU running Dopra Linux. In the Dopra Linux OS, the OMUa or OMUc (recommended) is
used to carry the OMU.
7 OMU Installation and Maintenance (Windows)
This chapter describes how to install software and perform O&M on the OMU running Windows.
In this scenario, the OMUa board is used to carry the OMU.
8 Troubleshooting
This chapter describes OMU faults and troubleshooting methods.
9 Configuring OMU Security Functions
This section describes how to configure OMU security function to improve the security of the
BSC6900.
Conventions
Symbol Conventions
The symbols that may be found in this document are defined as follows.
Symbol Description
Indicates an imminently hazardous situation which, if not
avoided, will result in death or serious injury.
Indicates a potentially hazardous situation which, if not
avoided, could result in death or serious injury.
Indicates a potentially hazardous situation which, if not
avoided, may result in minor or moderate injury.
BSC6900 UMTS
OMU Administration Guide About This Document
Issue 02 (2015-05-08) Huawei Proprietary and Confidential
Copyright © Huawei Technologies Co., Ltd.
iii

8/18/2019 Bsc6900 Umts Omu Administration Guide(v900r017c10_02)(PDF)-En
http://slidepdf.com/reader/full/bsc6900-umts-omu-administration-guidev900r017c1002pdf-en 5/310
Symbol Description
Indicates a potentially hazardous situation which, if not
avoided, could result in equipment damage, data loss,
performance deterioration, or unanticipated results. NOTICE is used to address practices not related to personal
injury.
Calls attention to important information, best practices and
tips.
NOTE is used to address information not related to personal
injury, equipment damage, and environment deterioration.
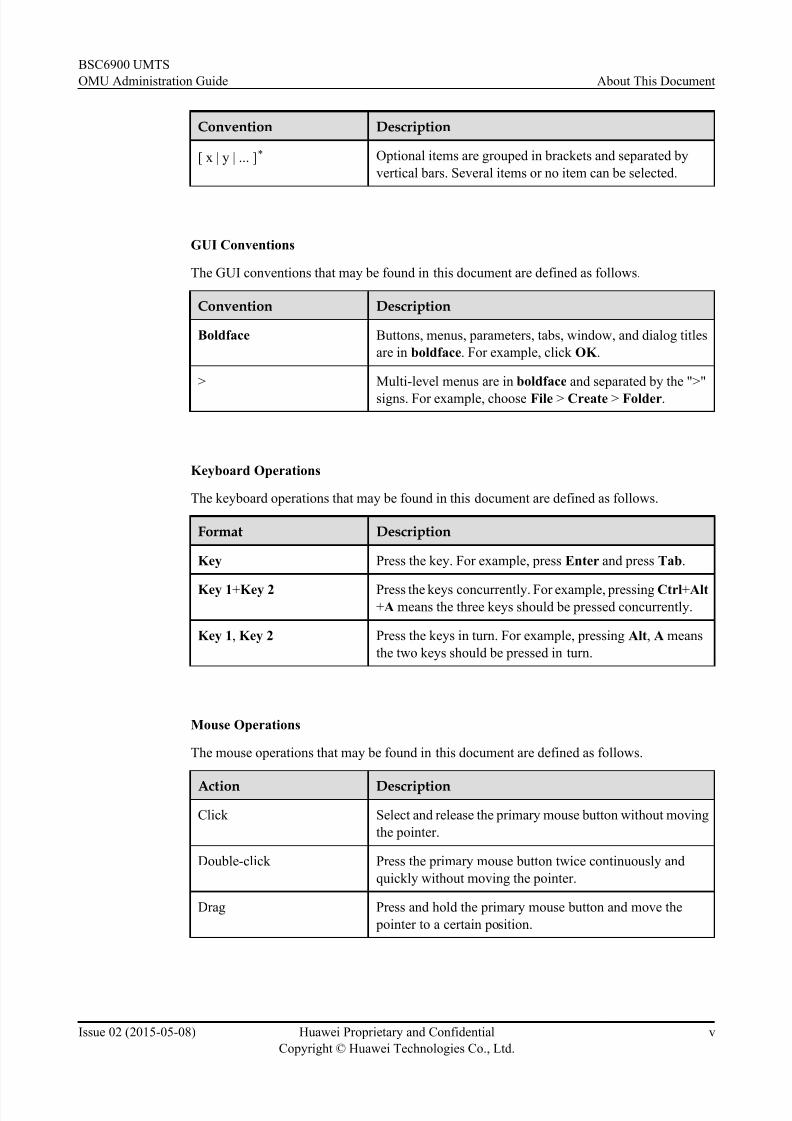
General Conventions
The general conventions that may be found in this document are defined as follows.
Convention Description
Times New Roman Normal paragraphs are in Times New Roman.
Boldface Names of files, directories, folders, and users are in
boldface. For example, log in as user root.
Italic Book titles are in italics.
Courier New Examples of information displayed on the screen are inCourier New.
Command Conventions
The command conventions that may be found in this document are defined as follows.
Convention Description
Boldface The keywords of a command line are in boldface.
Italic Command arguments are in italics.
[ ] Items (keywords or arguments) in brackets [ ] are optional.
{ x | y | ... } Optional items are grouped in braces and separated by
vertical bars. One item is selected.
[ x | y | ... ] Optional items are grouped in brackets and separated by
vertical bars. One item is selected or no item is selected.
{ x | y | ... }* Optional items are grouped in braces and separated by
vertical bars. A minimum of one item or a maximum of all
items can be selected.
BSC6900 UMTS
OMU Administration Guide About This Document
Issue 02 (2015-05-08) Huawei Proprietary and Confidential
Copyright © Huawei Technologies Co., Ltd.
iv
8/18/2019 Bsc6900 Umts Omu Administration Guide(v900r017c10_02)(PDF)-En
http://slidepdf.com/reader/full/bsc6900-umts-omu-administration-guidev900r017c1002pdf-en 6/310
Convention Description
[ x | y | ... ]* Optional items are grouped in brackets and separated by
vertical bars. Several items or no item can be selected.
GUI Conventions
The GUI conventions that may be found in this document are defined as follows.
Convention Description
Boldface Buttons, menus, parameters, tabs, window, and dialog titles
are in boldface. For example, click OK .
> Multi-level menus are in boldface and separated by the ">"
signs. For example, choose File > Create > Folder.
Keyboard Operations
The keyboard operations that may be found in this document are defined as follows.
Format Description
Key Press the key. For example, press Enter and press Tab.
Key 1+Key 2 Press the keys concurrently. For example, pressing Ctrl+Alt+A means the three keys should be pressed concurrently.
Key 1, Key 2 Press the keys in turn. For example, pressing Alt, A means
the two keys should be pressed in turn.
Mouse Operations
The mouse operations that may be found in this document are defined as follows.
Action Description
Click Select and release the primary mouse button without moving
the pointer.
Double-click Press the primary mouse button twice continuously and
quickly without moving the pointer.
Drag Press and hold the primary mouse button and move the
pointer to a certain position.
BSC6900 UMTS
OMU Administration Guide About This Document
Issue 02 (2015-05-08) Huawei Proprietary and Confidential
Copyright © Huawei Technologies Co., Ltd.
v

8/18/2019 Bsc6900 Umts Omu Administration Guide(v900r017c10_02)(PDF)-En
http://slidepdf.com/reader/full/bsc6900-umts-omu-administration-guidev900r017c1002pdf-en 7/310
Contents
About This Document.....................................................................................................................ii
1 Change History..............................................................................................................................1
2 Introduction to OMU....................................................................................................................4
2.1 Position of the OMU in the BSC6900............................................................................................................................5
2.2 OMU Components..........................................................................................................................................................5
2.3 OMU Working Mode.....................................................................................................................................................8
3 Working Principles of the OMU..............................................................................................10
3.1 OMU Ethernet Adapter Configuration.........................................................................................................................11
3.2 OMU IP Address Plan..................................................................................................................................................13
3.3 OMU Networking Principle.........................................................................................................................................24
3.4 Detecting Heartbeats Between Active and Standby OMUs.........................................................................................35
3.5 Synchronization Between Active and Standby OMUs.................................................................................................35
3.6 Switchover Between Active and Standby OMUs.........................................................................................................36
4 OMU Safety Information...........................................................................................................38
5 OMU High-Risk Command List (Dopra Linux)....................................................................39
6 OMU Installation and Maintenance (Dopra Linux).............................................................51
6.1 Initially Commissioning the OMU...............................................................................................................................54
6.1.1 Commissioning an OMU Locally..............................................................................................................................54
6.1.2 Commissioning the OMU Using a USB Flash Drive................................................................................................60
6.2 Reinstalling Software Onsite........................................................................................................................................70
6.2.1 Preparations...............................................................................................................................................................70
6.2.2 Optional: Installing the Operating System and Product Software.............................................................................72
6.2.3 Optional: Installing the Product Software.................................................................................................................89
6.3 Operating and Maintaining the OMU.........................................................................................................................104
6.3.1 Logging In to the OMU...........................................................................................................................................104
6.3.2 Logging Out of the OMU........................................................................................................................................106
6.3.3 Managing the Operating System.............................................................................................................................106
6.3.4 Managing the Product Software..............................................................................................................................126
6.3.5 Backing Up and Restoring Data..............................................................................................................................135
6.3.6 Setting OMU System Parameters............................................................................................................................140
BSC6900 UMTS
OMU Administration Guide Contents
Issue 02 (2015-05-08) Huawei Proprietary and Confidential
Copyright © Huawei Technologies Co., Ltd.
vi

8/18/2019 Bsc6900 Umts Omu Administration Guide(v900r017c10_02)(PDF)-En
http://slidepdf.com/reader/full/bsc6900-umts-omu-administration-guidev900r017c1002pdf-en 8/310
6.4 Obtaining and Using the OMU-Related Software......................................................................................................152
6.4.1 Obtaining and Using the psftp Software..................................................................................................................152
6.4.2 Obtaining and Using the PuTTY Software..............................................................................................................154
6.5 Appendix: OMU-Related Information Tables............................................................................................................156
6.5.1 Information Records of OMU Software Installation...............................................................................................156
6.5.2 Checklist for the OMU Software Factory Settings..................................................................................................158
6.5.3 OMU Directory Operation Rights List....................................................................................................................161
6.5.4 OMU Folder Size List.............................................................................................................................................162
6.5.5 Enabled Ports on the OMU......................................................................................................................................169
7 OMU Installation and Maintenance (Windows).................................................................170
7.1 Reinstalling Software Onsite......................................................................................................................................172
7.1.1 Optional: Reinstalling the Windows Operating System..........................................................................................172
7.1.2 Optional: Switching the OMU Operating System...................................................................................................1867.1.3 Optional: Installing Product Software.....................................................................................................................202
7.2 OMU Operation and Maintenance After the Upgrade...............................................................................................205
7.2.1 Logging In to the OMU...........................................................................................................................................205
7.2.2 Logging Out of the OMU........................................................................................................................................207
7.2.3 Managing the Operating System.............................................................................................................................208
7.2.4 Managing the Product Software..............................................................................................................................241
7.2.5 Backing Up and Restoring Data..............................................................................................................................254
7.2.6 Using the omutool...................................................................................................................................................263
7.3 Appendix: OMU-Related Information Tables............................................................................................................2747.3.1 Record Sheet of OMU Software Installation Information.......................................................................................274
7.3.2 Checklist for the OMU Software Factory Settings..................................................................................................275
7.3.3 Enabled Ports on the OMU......................................................................................................................................277
7.3.4 Disabled Ports on the OMU.....................................................................................................................................277
8 Troubleshooting........................................................................................................................278
8.1 Restoring the OMU Operating System in One-Click Mode.......................................................................................279
8.2 Handling Loss of the Password of User root..............................................................................................................280
9 Configuring OMU Security Functions..................................................................................282
9.1 Enhancing Security of the OMU Operating System..................................................................................................284
9.2 Configuring OMU Route Forwarding........................................................................................................................284
9.2.1 Configuring OMU Route Forwarding in the Dopra Linux OS...............................................................................284
9.2.2 Configuring OMU Route Forwarding in the Windows OS.....................................................................................286
9.3 Disabling Root User Login to an OMU Using SSH...................................................................................................286
9.4 Configuring Non-Root User Execution of OMU Processes.......................................................................................290
9.5 Enhancing Security of Time Synchronization with NTP...........................................................................................292
9.6 Enabling OS File Integrity Check..............................................................................................................................293
9.7 Configuring Real-Time Recording of OS Access Information..................................................................................294
9.8 Setting the Password Policy of the Operating System...............................................................................................295
BSC6900 UMTS
OMU Administration Guide Contents
Issue 02 (2015-05-08) Huawei Proprietary and Confidential
Copyright © Huawei Technologies Co., Ltd.
vii

8/18/2019 Bsc6900 Umts Omu Administration Guide(v900r017c10_02)(PDF)-En
http://slidepdf.com/reader/full/bsc6900-umts-omu-administration-guidev900r017c1002pdf-en 9/310
9.9 Setting the User Event Reservation Policy.................................................................................................................295
9.10 BSC6900 User Account List....................................................................................................................................296
BSC6900 UMTS
OMU Administration Guide Contents
Issue 02 (2015-05-08) Huawei Proprietary and Confidential
Copyright © Huawei Technologies Co., Ltd.
viii

8/18/2019 Bsc6900 Umts Omu Administration Guide(v900r017c10_02)(PDF)-En
http://slidepdf.com/reader/full/bsc6900-umts-omu-administration-guidev900r017c1002pdf-en 10/310
1 Change History
This section provides information about the changes in different document versions. There are
two types of changes, including function changes and editorial changes. Function changes refer
to changes in functions of a specific product version. Editorial changes refer to changes in
wording or addition of information that was not described in the earlier version.
02 (2015-05-08)
This is Issue 02 of V900R017C10.
Compared with Issue 01 (2015.03.25) of V900R017C10, this issue includes the following
changes.
ChangeType
Change Description
Function
al change
Added None
Modified l Updated descriptions of folders that are added for some software
in product software installation directories. For details, see
Checking the Installation Directory of Product Software.
l Updated descriptions of the method to choose the security
transmission type in Optional: Switching the OMU Operating
System.
Deleted None
Editorial
change
None
01 (2015-03-25)
This is Issue 01 of V900R017C10.
Compared with Issue Draft A (2015-01-15) of V900R017C10, this issue includes the following
changes.
BSC6900 UMTS
OMU Administration Guide 1 Change History
Issue 02 (2015-05-08) Huawei Proprietary and Confidential
Copyright © Huawei Technologies Co., Ltd.
1

8/18/2019 Bsc6900 Umts Omu Administration Guide(v900r017c10_02)(PDF)-En
http://slidepdf.com/reader/full/bsc6900-umts-omu-administration-guidev900r017c1002pdf-en 11/310
ChangeType
Change Description
Function
change
Added None
Modified Modified the threshold of the OMU transfer server space from 1500
MB to 2000 MB. For details, see 6.5.4 OMU Folder Size List.
Deleted None
Editorial
change
Revised some description errors. For details, see 6.2.1 Preparations and
Uploading the Product Software Installation Package to the OMU.
Draft A (2015-01-15)
This is Draft A of V900R017C10.
Compared with Issue 03 (2014-09-10) of V900R016C00, this issue includes the following
changes.
ChangeType
Change Description
Function
change
Added l Added descriptions about configuring the OMU route
forwarding function in the Windows OS because the
configuration of this function in the Windows OS is different
from that in the Dopra Linux OS. For details, see Configuring
OMU Route Forwarding in the Windows OS.l Added the user account list, which contains the accounts used
by the operating systems, database, and product software. For
details, see BSC6900User Account List.
Modified l Modified the screen shots and descriptions related to the
U_creator tool because the U_creator tool now supports data
encryption. For details, see USB Flash Drive Making Tool.
l Added the guest_gate process because the BSC6900 can be
equipped with a built-in ECO6910. For details, see OMU
Components.
l Modified descriptions related to real-time recording of OSaccess information because the OMU can record OS access
information including information about login, logout, and
operations on the OMU and upload the information onto the
remote server. For details, see Configuring Real-Time
Recording of OS Access Information.
l Added the related descriptions because the internal fixed IP
address and the internal virtual IP address need to be changed to
private IP addresses. For details, see OMU IP Address Plan.
BSC6900 UMTS
OMU Administration Guide 1 Change History
Issue 02 (2015-05-08) Huawei Proprietary and Confidential
Copyright © Huawei Technologies Co., Ltd.
2

8/18/2019 Bsc6900 Umts Omu Administration Guide(v900r017c10_02)(PDF)-En
http://slidepdf.com/reader/full/bsc6900-umts-omu-administration-guidev900r017c1002pdf-en 12/310
ChangeType
Change Description
Deleted Deleted descriptions about restrictions on the modification of the
virtual IP address because the mechanism for modifying the virtualIP address by running the MOD OMUIP command is optimized.
For details, see Commissioning the OMU Locally.
Editorial
change
None
BSC6900 UMTS
OMU Administration Guide 1 Change History
Issue 02 (2015-05-08) Huawei Proprietary and Confidential
Copyright © Huawei Technologies Co., Ltd.
3

8/18/2019 Bsc6900 Umts Omu Administration Guide(v900r017c10_02)(PDF)-En
http://slidepdf.com/reader/full/bsc6900-umts-omu-administration-guidev900r017c1002pdf-en 13/310
2 Introduction to OMU
About This Chapter
This chapter describes the following information about the OMU: position in the network,
software structure, working mode, O&M methods, and safety instructions.
2.1 Position of the OMU in the BSC6900
This section describes the components of the BSC6900 operation and maintenance (O&M)
network and the position of the OMU in the OM network.
2.2 OMU Components
This section describes the OMU components and their interdependencies.2.3 OMU Working Mode
The OMU works in independent or active/standby mode.
BSC6900 UMTS
OMU Administration Guide 2 Introduction to OMU
Issue 02 (2015-05-08) Huawei Proprietary and Confidential
Copyright © Huawei Technologies Co., Ltd.
4

8/18/2019 Bsc6900 Umts Omu Administration Guide(v900r017c10_02)(PDF)-En
http://slidepdf.com/reader/full/bsc6900-umts-omu-administration-guidev900r017c1002pdf-en 14/310
2.1 Position of the OMU in the BSC6900
This section describes the components of the BSC6900 operation and maintenance (O&M)
network and the position of the OMU in the OM network.
The BSC6900 O&M network is composed of the LMT/U2000, OMU, SCU, and O&M modules
on the host boards. The LMT/U2000 communicates with the BSC6900 host boards by using the
OMU.
Figure 2-1 shows the position of the OMU in the BSC6900 O&M network.
Figure 2-1 Position of the OMU in the BSC6900 O&M Network
As shown in Figure 2-1, the external network is the logical network between the OMU and the
LMT/U2000, and the internal network is the logical network between the OMU and the
BSC6900 host boards.
2.2 OMU Components
This section describes the OMU components and their interdependencies.
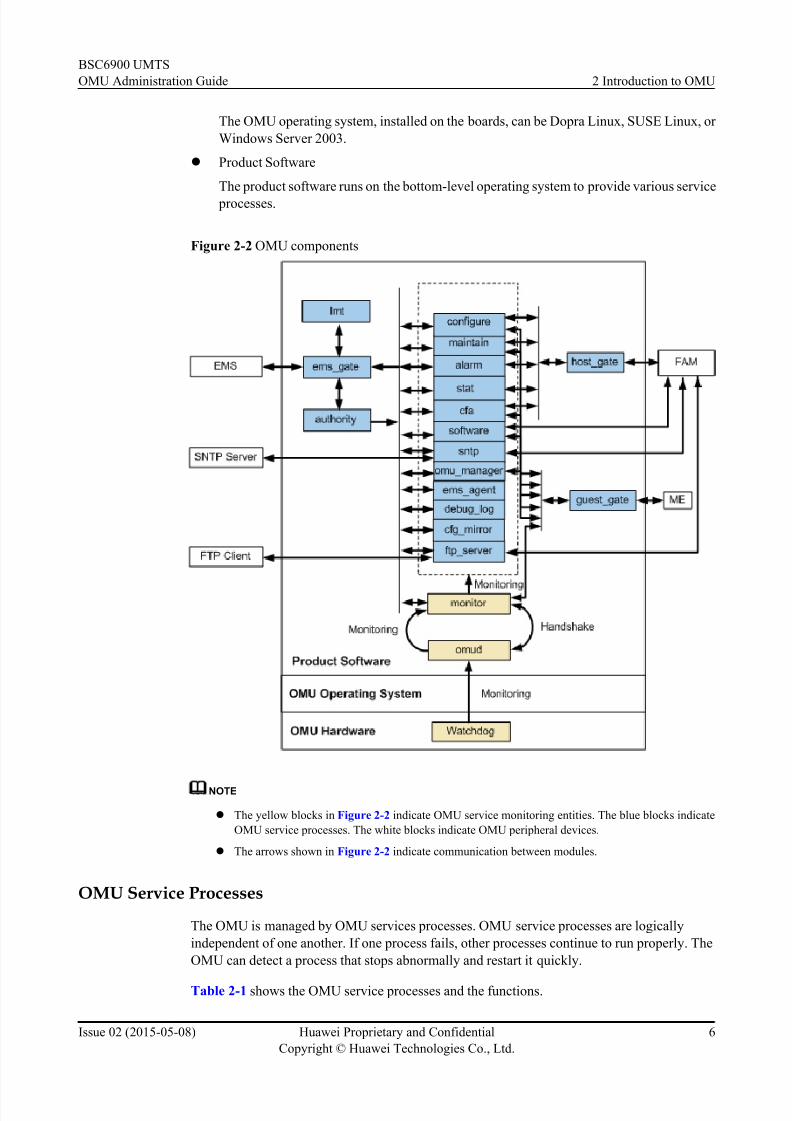
The OMU consists of the OMU hardware, OMU operating system, and product software, as
shown in Figure 2-2.
l OMU Hardware
The OMU hardware is monitoring its software in real time to avoid suspension of product
software.
l OMU Operating System
BSC6900 UMTS
OMU Administration Guide 2 Introduction to OMU
Issue 02 (2015-05-08) Huawei Proprietary and Confidential
Copyright © Huawei Technologies Co., Ltd.
5
8/18/2019 Bsc6900 Umts Omu Administration Guide(v900r017c10_02)(PDF)-En
http://slidepdf.com/reader/full/bsc6900-umts-omu-administration-guidev900r017c1002pdf-en 15/310
The OMU operating system, installed on the boards, can be Dopra Linux, SUSE Linux, or
Windows Server 2003.
l Product Software
The product software runs on the bottom-level operating system to provide various service
processes.
Figure 2-2 OMU components
NOTE
l The yellow blocks in Figure 2-2 indicate OMU service monitoring entities. The blue blocks indicate
OMU service processes. The white blocks indicate OMU peripheral devices.
l The arrows shown in Figure 2-2 indicate communication between modules.
OMU Service Processes
The OMU is managed by OMU services processes. OMU service processes are logically
independent of one another. If one process fails, other processes continue to run properly. The
OMU can detect a process that stops abnormally and restart it quickly.
Table 2-1 shows the OMU service processes and the functions.
BSC6900 UMTS
OMU Administration Guide 2 Introduction to OMU
Issue 02 (2015-05-08) Huawei Proprietary and Confidential
Copyright © Huawei Technologies Co., Ltd.
6

8/18/2019 Bsc6900 Umts Omu Administration Guide(v900r017c10_02)(PDF)-En
http://slidepdf.com/reader/full/bsc6900-umts-omu-administration-guidev900r017c1002pdf-en 16/310
Table 2-1 OMU service processes
Service Processes Functions
Communication Module
(ems_gate)
Receives messages from the Element Management System
(EMS) or Local Maintenance Terminal (LMT), converts themessages into frames for internal communication in the
OMU, and then sends the messages to the authentication
module.
Receives messages from the OMU modules, interprets the
messages, and then sends the messages to the EMS or LMT.
Receives, interprets, and sends messages between the VNP
and maintenance module.
Authentication Module
(authority)
Performs functions such as authority management, log
management, and command resolution.
Network Management Agent
Module (ems_agent)
Performs functions such as batch command processing, and
scheduled task management.
Configuration Module
(configure)
Performs the functions of data configuration and
management for the BSC6900 host, such as configuring data
effective and ineffective modes, formatting the data files
loaded by the host, and checking data consistency.
Maintenance Module
(maintain)
Enables the maintenance terminal to query the operating
status of objects such as the BSC6900 host hardware,
physical/logical links, and channels.
Enables the maintenance terminal to test and maintainobjects.
Alarm Module (alarm) Handles alarms, such as managing the output modes of
alarms, classifying alarms, and shielding alarms.
Performance Module (stat) Collects, stores, and computes the performance measurement
data of the host, and then reports the data to the U2000.
Software Management
Module (software)
Performs functions such as BOOTP services for the OMU
board, OMU software management, OMU active/standby
workspace management, file synchronization between the
active and standby OMU boards, and version upgrade
management.
OMU Management Module
(omu_manager)
Monitors the OMU hardware and software.
Time Server Module (sntp) Performs the following functions:
l The time server provides time synchronization for
BSC6900 boards and the base station.
l The time client synchronizes with the upper-level time
server and provides the reference time.
BSC6900 UMTS
OMU Administration Guide 2 Introduction to OMU
Issue 02 (2015-05-08) Huawei Proprietary and Confidential
Copyright © Huawei Technologies Co., Ltd.
7

8/18/2019 Bsc6900 Umts Omu Administration Guide(v900r017c10_02)(PDF)-En
http://slidepdf.com/reader/full/bsc6900-umts-omu-administration-guidev900r017c1002pdf-en 17/310
Service Processes Functions
FTP Module (ftp_server) Serves as an FTP server and provides the file transfer
function for the host boards, LMT, and EMS.
Exchange Module
(host_gate)
Enables the communication between the OMU processes and
the host.
Fault Diagnosis Module (cfa) Collects end-to-end link fault information, periodically
diagnoses faulty nodes, and performs self-healing.
OMU Log Management
Module (debug_log)
Records and regularly deletes OMU logs.
LMT Module (weblmt) Performs message tracing, performance monitoring, and
device maintenance.
Provides an interface for issuing MML commands.
Data Exportation Module
(cfg_mirror)
Exports the configuration data.
OMU Service Monitoring Entities
The product software performs monitoring at three levels:
l Level 1: hardware-level monitoring
A watchdog functions as a timer to monitor the omud. Once the omud becomes abnormaland causes the watchdog timer to overflow, the OMU will reset automatically.
l Level 2: system-level monitoring
The omud monitors the monitor. As a service entity, the omud is registered in the operating
system and automatically starts when the operating system starts. The monitor is started
when the omud starts and the omud monitors the monitor.
l Level 3: application-level monitoring
The monitor monitors the service processes in real time.
The three-level monitoring mechanism ensures that a faulty service process, monitor, or omud
can be restarted.
2.3 OMU Working Mode
The OMU works in independent or active/standby mode.
Independent Mode
When the BSC6900 is configured with one OMU board or one GBAM server, the OMU works
in independent mode.
In this mode, if the OMU is faulty, operation and maintenance (OM) cannot be performed on
the BSC6900. This reduces system reliability.
BSC6900 UMTS
OMU Administration Guide 2 Introduction to OMU
Issue 02 (2015-05-08) Huawei Proprietary and Confidential
Copyright © Huawei Technologies Co., Ltd.
8

8/18/2019 Bsc6900 Umts Omu Administration Guide(v900r017c10_02)(PDF)-En
http://slidepdf.com/reader/full/bsc6900-umts-omu-administration-guidev900r017c1002pdf-en 18/310
Active/Standby Mode
When the BSC6900 is configured with two OMU boards, the OMU works in active/standby
mode.
In this mode, the OMU board working in active mode is called the active OMU board, and theOMU board working in standby mode is called the standby OMU board. The active and standby
OMU boards must be of the same type. Installing different types of OMU boards is prohibited.
When the BSC6900 is configured in active/standby OMU mode, the OMU can operate properly
with high reliability. Specifically, if a hardware or software fault occurs on the active OMU, the
standby OMU is automatically switched over to the active state and provides services.
NOTE
l The OMU working mode is set during the product software installation.
l After the product software are installed, run the MML command DSP OMU to query the OMU working
mode, and check the value for the Operational state parameter in the command output to check the OMU
working mode. If the value is Active normal or Standby normal, the OMU works in active/standby mode.
If the value is Normal, the OMU works in independent mode.
BSC6900 UMTS
OMU Administration Guide 2 Introduction to OMU
Issue 02 (2015-05-08) Huawei Proprietary and Confidential
Copyright © Huawei Technologies Co., Ltd.
9
8/18/2019 Bsc6900 Umts Omu Administration Guide(v900r017c10_02)(PDF)-En
http://slidepdf.com/reader/full/bsc6900-umts-omu-administration-guidev900r017c1002pdf-en 19/310
3 Working Principles of the OMU
About This Chapter
This section has the following topics:
3.1 OMU Ethernet Adapter Configuration
This section describes the configuration of OMU Ethernet adapters.
3.2 OMU IP Address Plan
The OMU Ethernet adapters must follow the IP address planning principles to meet the
communication requirements of the O&M network.
3.3 OMU Networking PrincipleThe internal Ethernet adapters of the OMU are connected to the SCUs in the MPS by using the
backplane, and the external Ethernet adapters of the OMU are connected to the LMT/U2000. In
this way, the OMU fulfills the communication between the BSC6900 and the LMT/U2000.
3.4 Detecting Heartbeats Between Active and Standby OMUs
This section describes how to detect heartbeats between active and standby OMUs. In active/
standby OMU mode, heartbeats between active and standby OMUs are detected to check
whether the OMUs work properly.
3.5 Synchronization Between Active and Standby OMUs
In active/standby mode, the synchronization between the active and standby OMUs consists of
data synchronization, file synchronization, and time synchronization.
3.6 Switchover Between Active and Standby OMUs
For OMUs working in active/standby mode, there are four types of switchover: manual
switchover, fault-triggered switchover, failover, and self-healing switchover.
BSC6900 UMTS
OMU Administration Guide 3 Working Principles of the OMU
Issue 02 (2015-05-08) Huawei Proprietary and Confidential
Copyright © Huawei Technologies Co., Ltd.
10
8/18/2019 Bsc6900 Umts Omu Administration Guide(v900r017c10_02)(PDF)-En
http://slidepdf.com/reader/full/bsc6900-umts-omu-administration-guidev900r017c1002pdf-en 20/310
3.1 OMU Ethernet Adapter Configuration
This section describes the configuration of OMU Ethernet adapters.
Configuration of Ethernet Adapters on an OMUa Board
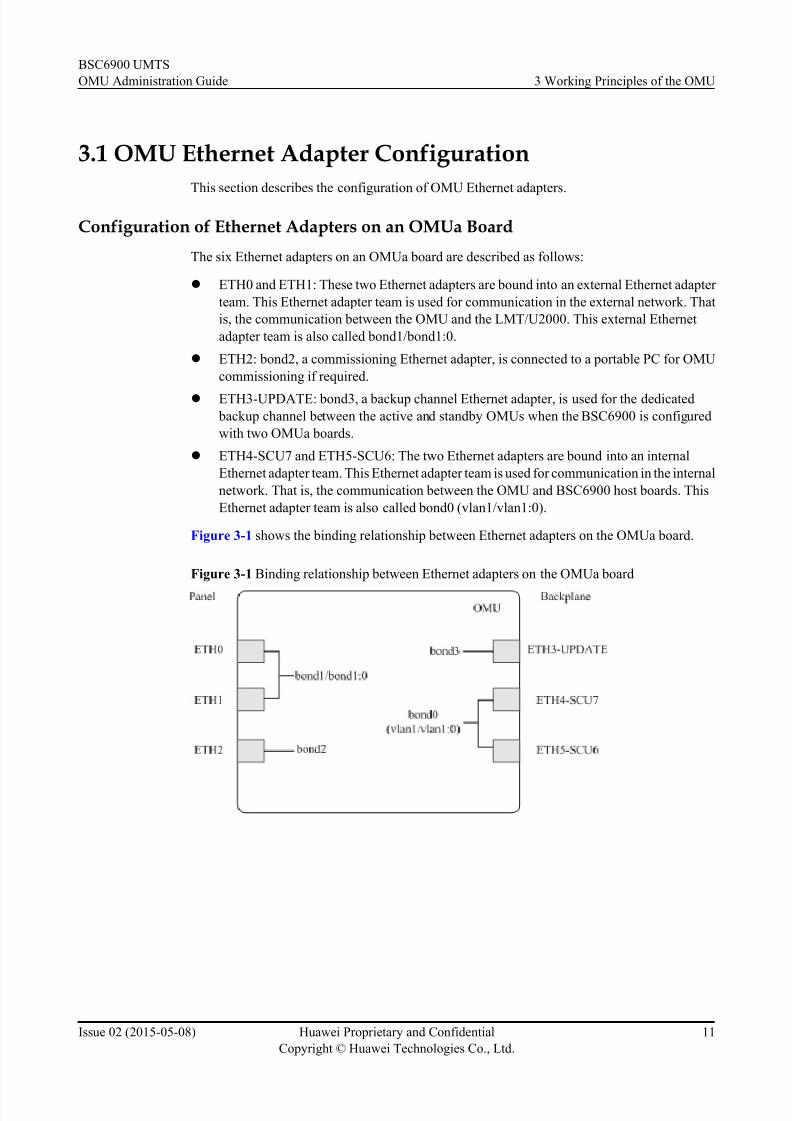
The six Ethernet adapters on an OMUa board are described as follows:
l ETH0 and ETH1: These two Ethernet adapters are bound into an external Ethernet adapter
team. This Ethernet adapter team is used for communication in the external network. That
is, the communication between the OMU and the LMT/U2000. This external Ethernet
adapter team is also called bond1/bond1:0.
l ETH2: bond2, a commissioning Ethernet adapter, is connected to a portable PC for OMU
commissioning if required.
l ETH3-UPDATE: bond3, a backup channel Ethernet adapter, is used for the dedicated
backup channel between the active and standby OMUs when the BSC6900 is configured
with two OMUa boards.
l ETH4-SCU7 and ETH5-SCU6: The two Ethernet adapters are bound into an internal
Ethernet adapter team. This Ethernet adapter team is used for communication in the internal
network. That is, the communication between the OMU and BSC6900 host boards. This
Ethernet adapter team is also called bond0 (vlan1/vlan1:0).
Figure 3-1 shows the binding relationship between Ethernet adapters on the OMUa board.
Figure 3-1 Binding relationship between Ethernet adapters on the OMUa board
BSC6900 UMTS
OMU Administration Guide 3 Working Principles of the OMU
Issue 02 (2015-05-08) Huawei Proprietary and Confidential
Copyright © Huawei Technologies Co., Ltd.
11

8/18/2019 Bsc6900 Umts Omu Administration Guide(v900r017c10_02)(PDF)-En
http://slidepdf.com/reader/full/bsc6900-umts-omu-administration-guidev900r017c1002pdf-en 21/310
NOTE
l ETH0, ETH1, and ETH2 are connected to the external network by using the Ethernet ports on the panel
of the OMUa board. ETH4-SCU7, ETH5-SCU6, and ETH3-UPDATE are connected to the backplane
of the MPS, and you cannot see them on the panel of the OMUa board.
l One of bond1 and bond1:0 is reserved for the external fixed IP address, and the other is reserved for the external virtual IP address.
l When no external fixed IP address is configured, bond1 corresponds to the external virtual IP
address, but bond1:0 does not exist.
l When an external fixed IP address is configured, bond1 corresponds to the external fixed IP address,
and bond1:0 corresponds to the external virtual IP address.
l ETH4-SCU7 and ETH5-SCU6 are bound into an internal Ethernet adapter team, that is, bond0. To
enable communication between the OMU and the SCU, a VLAN whose ID is 1 needs to be established
on bond0. vlan1 and vlan1:0 are used for the internal fixed IP address and the internal virtual IP address,
respectively.
Configuration of Ethernet Adapters on an OMUc Board
The seven Ethernet adapters on the OMUc board are described as follows:
l F_ETH0 and F_ETH1: These two Ethernet adapters are bound into an external Ethernet
adapter team. This Ethernet adapter team is used for communication in the external network.
That is, the communication between the OMU and the LMT/U2000. This external Ethernet
adapter team is also called bond1/bond1:0.
l F_DBG: a commissioning Ethernet adapter, is connected to a portable PC for OMU
commissioning if required.
l B_UPDATE0: a backup channel Ethernet adapter, is used for the dedicated backup channel
between the active and standby OMUs when the BSC6900 is configured with two OMUc
boards.
l B_UPDATE1: a backup channel Ethernet adapter, is used for the dedicated backup channel
between the active and standby OMUs when the BSC6900 is configured with an OMUc
board and an OMUa board.
l B_ETH0 and B_ETH1: The two Ethernet adapters are bound into an internal Ethernet
adapter team. This Ethernet adapter team is used for communication in the internal network.
That is, the communication between the OMU and BSC6900 host boards. This Ethernet
adapter team is also called bond0 (vlan1/vlan1:0).
Figure 3-2 shows the binding relationship between Ethernet adapters on the OMUc board.
BSC6900 UMTS
OMU Administration Guide 3 Working Principles of the OMU
Issue 02 (2015-05-08) Huawei Proprietary and Confidential
Copyright © Huawei Technologies Co., Ltd.
12
8/18/2019 Bsc6900 Umts Omu Administration Guide(v900r017c10_02)(PDF)-En
http://slidepdf.com/reader/full/bsc6900-umts-omu-administration-guidev900r017c1002pdf-en 22/310
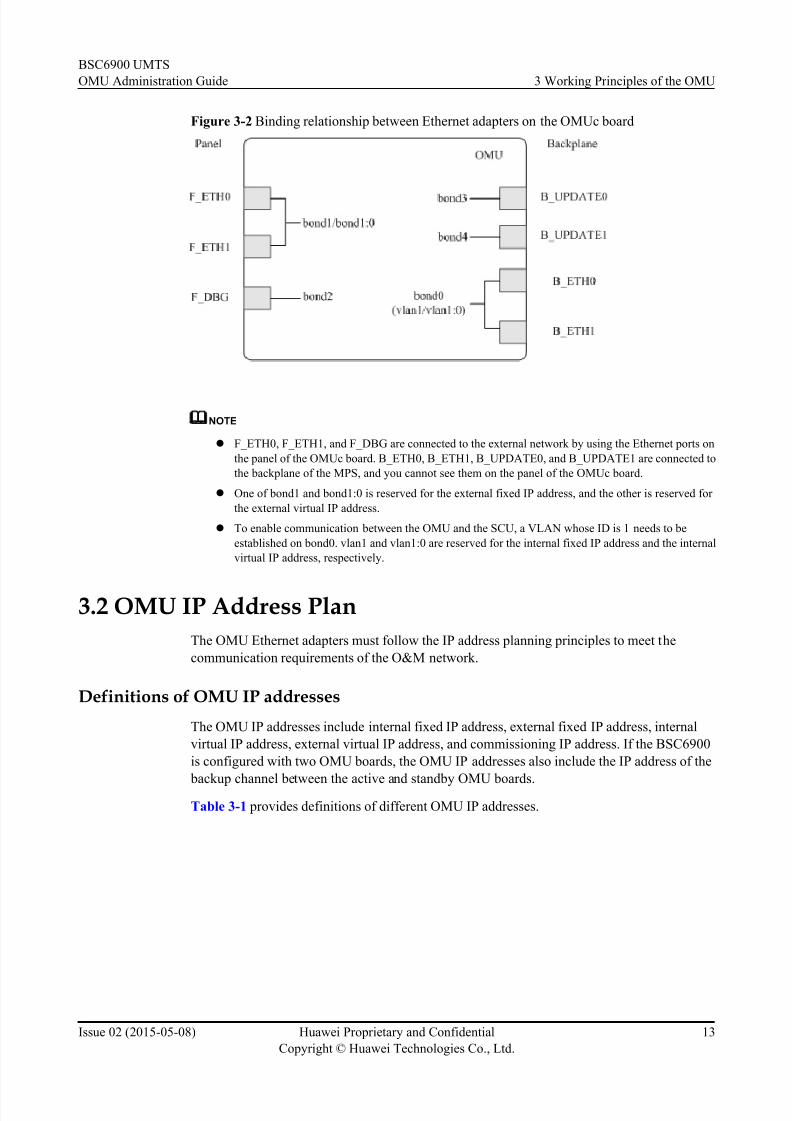
Figure 3-2 Binding relationship between Ethernet adapters on the OMUc board
NOTE
l F_ETH0, F_ETH1, and F_DBG are connected to the external network by using the Ethernet ports on
the panel of the OMUc board. B_ETH0, B_ETH1, B_UPDATE0, and B_UPDATE1 are connected to
the backplane of the MPS, and you cannot see them on the panel of the OMUc board.
l One of bond1 and bond1:0 is reserved for the external fixed IP address, and the other is reserved for
the external virtual IP address.
l To enable communication between the OMU and the SCU, a VLAN whose ID is 1 needs to be
established on bond0. vlan1 and vlan1:0 are reserved for the internal fixed IP address and the internal
virtual IP address, respectively.
3.2 OMU IP Address Plan
The OMU Ethernet adapters must follow the IP address planning principles to meet the
communication requirements of the O&M network.
Definitions of OMU IP addresses
The OMU IP addresses include internal fixed IP address, external fixed IP address, internal
virtual IP address, external virtual IP address, and commissioning IP address. If the BSC6900
is configured with two OMU boards, the OMU IP addresses also include the IP address of the
backup channel between the active and standby OMU boards.Table 3-1 provides definitions of different OMU IP addresses.
BSC6900 UMTS
OMU Administration Guide 3 Working Principles of the OMU
Issue 02 (2015-05-08) Huawei Proprietary and Confidential
Copyright © Huawei Technologies Co., Ltd.
13

8/18/2019 Bsc6900 Umts Omu Administration Guide(v900r017c10_02)(PDF)-En
http://slidepdf.com/reader/full/bsc6900-umts-omu-administration-guidev900r017c1002pdf-en 23/310
Table 3-1 Definitions of OMU IP addresses
IPAddress
Definition and Function Corresponding EthernetAdapters on
the OMUaBoard
Corresponding EthernetAdapters on
the OMUcBoard
External
fixed IP
address
IP address for the communication between
peripheral devices (for example, LMT/
U2000) and the OMU. A user can log in to
the LMT and OMU by using the external
fixed IP address.
The external fixed IP address is
automatically configured on the OMU
external Ethernet adapter team when the
OMU operating system is being installed.If active and standby OMUs are switched
over when a peripheral device
communicates with the active OMU by
using the external fixed IP address, the
communication between the peripheral
device and the active OMU will be
interrupted.
l ETH0
l ETH1
l F_ETH0
l F_ETH1
External
virtual IP
address
IP address for the communication between
peripheral devices (for example, LMT/
U2000) and the OMU. A user can log in to
the LMT and OMU by using the external
fixed IP address.
The external virtual IP address is configured
on the Ethernet adapter team of the active
OMU when the product software are
installed. It takes effect after the product
software are started.
If active and standby OMUs are switched
over when a peripheral device
communicates with the OMUs by using the
external virtual IP address, thecommunication between the peripheral
device and the OMU will be interrupted for
a while and then be recovered. During this
process, the external virtual IP address of
the original standby OMU becomes
effective, and the external virtual IP address
of the original active OMU becomes
ineffective.
l ETH0
l ETH1
l F_ETH0
l F_ETH1
BSC6900 UMTS
OMU Administration Guide 3 Working Principles of the OMU
Issue 02 (2015-05-08) Huawei Proprietary and Confidential
Copyright © Huawei Technologies Co., Ltd.
14

8/18/2019 Bsc6900 Umts Omu Administration Guide(v900r017c10_02)(PDF)-En
http://slidepdf.com/reader/full/bsc6900-umts-omu-administration-guidev900r017c1002pdf-en 24/310
IPAddress
Definition and Function Corresponding EthernetAdapters onthe OMUa
Board
Corresponding EthernetAdapters onthe OMUc
Board
Internal
fixed IP
address
IP address for the communication between
the active and standby OMUs on the
internal network segment (network on
which information is exchanged by using
the SCUa or SCUb board).
The internal fixed IP address is
automatically configured on the OMU
internal Ethernet adapter team when the
OMU operating system is installed.
The internal fixed IP address is not used for the communication between the OMU and
the BSC6900 host boards.
l ETH4-
SCU7
l ETH5-
SCU6
l B_ETH0
l B_ETH1
Internal
virtual IP
address
IP address for the communication between
the active OMU and the BSC6900 host
boards.
The internal virtual IP address is configured
on the internal Ethernet adapter team of the
active OMU. It takes effect after the product
software are started.
The communication between theBSC6900 host boards and the OMU are not
interrupted even during the switchover of
the active and standby OMUs.
l ETH4-
SCU7
l ETH5-
SCU6
l B_ETH0
l B_ETH1
BSC6900 UMTS
OMU Administration Guide 3 Working Principles of the OMU
Issue 02 (2015-05-08) Huawei Proprietary and Confidential
Copyright © Huawei Technologies Co., Ltd.
15

8/18/2019 Bsc6900 Umts Omu Administration Guide(v900r017c10_02)(PDF)-En
http://slidepdf.com/reader/full/bsc6900-umts-omu-administration-guidev900r017c1002pdf-en 25/310
IPAddress
Definition and Function Corresponding EthernetAdapters onthe OMUa
Board
Corresponding EthernetAdapters onthe OMUc
Board
IP address
of the
backup
channel
between
active and
standby
OMU
boards
IP address for the communication between
the active and standby OMUs on the backup
channel network segment (network on
which information is exchanged by using an
Ethernet cable).
The IP address of the backup channel
between the active and standby OMUs is
automatically configured on the standby
OMU Ethernet adapter when the OMU
operating system is being installed.
The active and standby OMUs
communicates by using the backup channel
IP address between the active and standby
OMUs. Any fault on a host board does not
affect the communication between the
active and standby OMUs.
l ETH3-
UPDATE
l B_UPDAT
E0 (used
for the
communic
ation
between
the active
and
standby
OMUc
boards)
l B_UPDAT
E1 (used
for the
communic
ation
between
the OMUc
board and
the OMUa
board)
Commissio
ning IP
address
IP address for operating and maintaining the
OMU when a PC is connected to the debug
port of the OMU by using an Ethernet cable
at the local end. A user can log in to the LMT
by using the commissioning IP address.
l ETH2 l F_DBG
Definition of Onsite Network
The network connecting the OMU external Ethernet adapters and the LMT or U2000 is defined
as an external network or an onsite network. If the OMU external Ethernet adapters are connected
to the LMT or U2000 routers, then the network connecting the OMU external Ethernet adapters
and the first router (gateway) is defined as an onsite network. Figure 3-3 shows an onsite
network.
l The network between the OMU internal Ethernet adapters and host boards is defined as an
internal network. The OMU communicates with the base station by using the host boards.
l The network between the OMU external Ethernet adapters and the LMT or U2000 is defined
as an external network. The OMU is connected to the LMT or U2000 either directly or by
using multiple routers (gateways).
BSC6900 UMTS
OMU Administration Guide 3 Working Principles of the OMU
Issue 02 (2015-05-08) Huawei Proprietary and Confidential
Copyright © Huawei Technologies Co., Ltd.
16

8/18/2019 Bsc6900 Umts Omu Administration Guide(v900r017c10_02)(PDF)-En
http://slidepdf.com/reader/full/bsc6900-umts-omu-administration-guidev900r017c1002pdf-en 26/310
Figure 3-3 Onsite network
Consider the following principles when configuring IP addresses onsite:
l When configuring a NodeB, ensure that none of the IP addresses (set by running the ADD
UNODEBIP command) that are used for O&M on the NodeBs under the BSC6900 arelocated on the same network segment as the external virtual IP addresses, external fixed IP
address, IP address of the backup channel between the active and standby OMU, or
commissioning IP address.
l Assume that IP routes are configured for the OMU (by running the ADD OMUIPRT
command). If IP routes to the NodeB are configured, ensure that the Forward Route
Address and Destination Network Address are not located on the same network segment
as the external virtual IP address, external fixed IP address, IP address of the backup channel
between the active and standby OMUs, or commissioning IP address. If IP routes to the
LMT or U2000 are configured, ensure that the Forward Route Address and Destination
Network Address are not located on the same network segment as the internal virtual IP
address, internal fixed IP address, IP address of the backup channel between the active andstandby OMUs, or commissioning IP address.
IP Addresses to Be Changed Onsite
IP addresses are configured before an OMU is delivered. For more information, see 6.5.2
Checklist for the OMU Software Factory Settings. The default IP addresses may fail to meet
the requirements of onsite network planning. Therefore, you are required to reconfigure some
of the OMU IP addresses.
Generally, the external fixed and virtual IP addresses need to be reconfigured according to the
customer network planning. To reconfigure the IP addresses, do as follows:
l If single OMU is configured, one external fixed IP address and one external virtual IP
address of the OMU must be on the same network segment.
l If active and standby OMUs are configured, the external fixed IP addresses of the active
and standby OMUs, the external virtual IP address of the active and standby OMUs (the
external virtual IP address of the active OMU and that of the standby OMU are the same)
must be configured on the same network segment.
If the internal fixed and virtual IP addresses need to be changed, do as follows:
l If single OMU is configured, one internal fixed IP address and one internal virtual IP address
of the OMU must be on the same network segment. Their subnet masks are fixed to
255.0.0.0.
BSC6900 UMTS
OMU Administration Guide 3 Working Principles of the OMU
Issue 02 (2015-05-08) Huawei Proprietary and Confidential
Copyright © Huawei Technologies Co., Ltd.
17

8/18/2019 Bsc6900 Umts Omu Administration Guide(v900r017c10_02)(PDF)-En
http://slidepdf.com/reader/full/bsc6900-umts-omu-administration-guidev900r017c1002pdf-en 27/310
l If active and standby OMUs are configured, the internal fixed IP addresses of the active
and standby OMUs, the internal virtual IP address of the active and standby OMUs (the
internal virtual IP address of the active OMU and that of the standby OMU are the same)
must be configured on the same network segment. The subnet masks of the IP addresses
are fixed to 255.0.0.0.Table 3-2 describes the planning principles of OMU IP addresses.
Table 3-2 Onsite planning of OMU IP addresses
IP Address Planning Principle
External fixed IP
address
The default external fixed IP address of the active OMU is
192.168.139.201 (255.255.255.0).
The default external fixed IP address of the standby OMU is
192.168.139.202 (255.255.255.0).
Planning principle:
1. The external fixed IP address should be changed so that it is located
on the same network segment as the onsite network IP address. In
addition, the external fixed IP address cannot conflict with the onsite
network IP address. Configure the IP address of the external gateway
so that it is on the same network segment as the external fixed IP
address. In addition, the IP address of the external gateway cannot
conflict with the external fixed IP address.
2. If active and standby OMUs are configured, the external fixed IP
addresses of the active and standby OMUs must be different from each
other and located on the same network segment as the onsite network
IP address.
External virtual
IP address
Change the external virtual IP address as required. Ensure that the external
virtual IP address and the external fixed IP address are on the same
network segment (This network segment is called the OMU external
network segment). In addition, the external virtual IP address cannot
conflict with other IP addresses on the network segment.
l For example, if active and standby OMUs are configured, the external
fixed IP address of the active OMU is 172.121.139.201, and that of the
standby OMU is 172.121.139.202, the external virtual IP address can
be configured as 172.121.139.200.
l For example, if an independent OMU is configured and the externalfixed IP address of the OMU is 172.121.139.201, the external virtual
IP address can be configured as 172.121.139.200.
IP Addresses to Be Checked Onsite
Review OMU IP addresses onsite. If the IP addresses are located on the same network segment
as the onsite network IP address, they should be reconfigured. Table 3-3 describes the principles
of configuring the IP addresses.
BSC6900 UMTS
OMU Administration Guide 3 Working Principles of the OMU
Issue 02 (2015-05-08) Huawei Proprietary and Confidential
Copyright © Huawei Technologies Co., Ltd.
18

8/18/2019 Bsc6900 Umts Omu Administration Guide(v900r017c10_02)(PDF)-En
http://slidepdf.com/reader/full/bsc6900-umts-omu-administration-guidev900r017c1002pdf-en 28/310
Table 3-3 Onsite check of OMU IP addresses
IP Address Check Principle
FInternal fixed
IP address
The internal fixed IP address of the active OMU must be set to X.X.3.50.
The default IP address is 80.168.3.50 (255.0.0.0).The internal fixed IP address of the standby OMU must be set to X.X.3.60.
The default IP address is 80.168.3.60 (255.0.0.0).
After OMU software is started, the network segment in which the internal
fixed IP address is located is automatically changed to the configured
network segment. The configured network segment can be queried by
running the LST SUBNET command. The default network segment is
172.16.X.X. 172 is the subnet number (SUBNET), and 16 is the extended
subnet number (EXSUBNET). If the default internal fixed IP address of
the OMU is set to 80.168.3.50 (255.0.0.0) before delivery and the
configured network segment is 172.16.X.X, the internal fixed IP address
is automatically changed to 172.16.3.50 (255.0.0.0) after OMU softwareis started. The automatic change triggers a reset of the OMU software.
Check principle:
1. The network segment in which the internal fixed IP address is located
cannot conflict with the onsite network segment. If they conflict, you
must change the internal fixed IP address.
l If the internal extended subnet number is 168, the internal subnet
number is exclusive and cannot be used by other networks.
l If the internal extended subnet number is not 168, the network
segments occupied by the internal subnet are SUBNET,
EXSUBNET, SUBNET.(EXSUBNET+1), SUBNET,(EXSUBNET+2), SUBNET.(EXSUBNET+3), and SUBNET.
(EXSUBNET+4). These network segments cannot be used by other
networks.
2. Only the network segment where the internal fixed IP address is
located can be changed. For example, 172.16.3.50 can be changed to
90.91.3.50.
3. If active and standby OMUs are configured, the internal fixed IP
addresses of the active and standby OMUs must be different and on
the same network segment.
4. If an independent OMU is configured and the network segment where
the internal fixed IP address is located does not conflict with the onsite
network segment, reserve the default internal fixed IP address.
5. The subnet mask of the internal fixed IP address must be 255.0.0.0.
BSC6900 UMTS
OMU Administration Guide 3 Working Principles of the OMU
Issue 02 (2015-05-08) Huawei Proprietary and Confidential
Copyright © Huawei Technologies Co., Ltd.
19

8/18/2019 Bsc6900 Umts Omu Administration Guide(v900r017c10_02)(PDF)-En
http://slidepdf.com/reader/full/bsc6900-umts-omu-administration-guidev900r017c1002pdf-en 29/310
IP Address Check Principle
Internal Virtual
IP address
1. The internal virtual IP address must be located in the same subnet as
the internal fixed IP addresses of the active and standby OMUs. This
subnet is called the OMU internal network segment. In addition, theinternal virtual IP address cannot be identical with other IP addresses
in the subnet and it should be configured as X.X.3.40 in which X must
be the same as the network segment where the internal fixed IP address
is located.
For example, if active and standby OMUs are configured, the internal
fixed IP address of the active OMU is 172.16.3.50, and that of the
standby OMU is 80.168.3.60, the internal virtual IP address can be
configured as 172.16.3.40.
2. For example, if an independent OMU is configured and the internal
fixed IP address of the OMU is 172.16.3.50, the internal virtual IP
address can be configured as 80.168.3.40.3. The subnet mask of the internal virtual IP address must be 255.0.0.0
4. After OMU software is started, the network segment in which the
internal virtual IP address is located is automatically changed to the
configured network segment. The configured network segment can be
queried by running the LST SUBNET command. The default network
segment is 172.16.X.X. If the default network segment is used, the
internal virtual IP address is automatically changed to 172.16.3.40
(255.0.0.0) after OMU software is started. The automatic change
triggers a reset of the OMU software.
BSC6900 UMTS
OMU Administration Guide 3 Working Principles of the OMU
Issue 02 (2015-05-08) Huawei Proprietary and Confidential
Copyright © Huawei Technologies Co., Ltd.
20

8/18/2019 Bsc6900 Umts Omu Administration Guide(v900r017c10_02)(PDF)-En
http://slidepdf.com/reader/full/bsc6900-umts-omu-administration-guidev900r017c1002pdf-en 30/310
IP Address Check Principle
Commissioning
IP address
The default commissioning IP address of the active OMU is 192.168.6.50
(255.255.255.0).
The default commissioning IP address of the standby OMU is192.168.6.60 (255.255.255.0).
The commissioning IP address of an OMU does not change even if the
active and standby OMUs are switched over. For example, if the default
commissioning IP address of the active OMU is 192.168.6.50
(255.255.255.0) and a switchover is performed, the commissioning IP
address of this OMU (standby OMU after the switchover) is still
192.168.6.50 (255.255.255.0).
Check principle:
1. The commissioning IP addresses of the active and standby OMUs
cannot be identical with other IP addresses on the onsite network. If
they are identical, you must change the commissioning IP address.
2. If active and standby OMUs are configured, the commissioning IP
addresses of the active and standby OMUs must be different and on
the same network segment.
For example, the commissioning IP address of the active OMU is
192.168.6.50 (255.255.255.0) and the commissioning IP address of the
standby OMU can be 192.168.6.60 (255.255.255.0).
3. If an independent OMU is configured and the network segment where
the commissioning IP addresses is located is different from the onsite
network segment, retain the commissioning IP address.
BSC6900 UMTS
OMU Administration Guide 3 Working Principles of the OMU
Issue 02 (2015-05-08) Huawei Proprietary and Confidential
Copyright © Huawei Technologies Co., Ltd.
21
8/18/2019 Bsc6900 Umts Omu Administration Guide(v900r017c10_02)(PDF)-En
http://slidepdf.com/reader/full/bsc6900-umts-omu-administration-guidev900r017c1002pdf-en 31/310
IP Address Check Principle
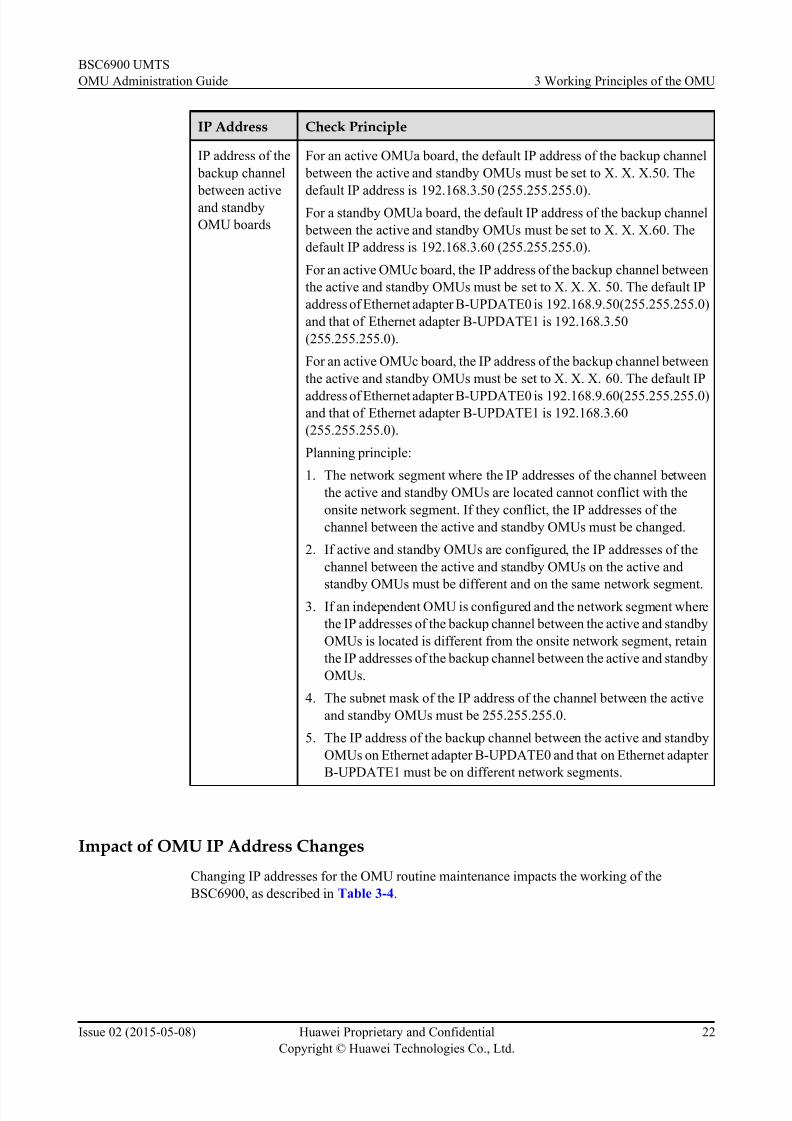
IP address of the
backup channel
between activeand standby
OMU boards
For an active OMUa board, the default IP address of the backup channel
between the active and standby OMUs must be set to X. X. X.50. The
default IP address is 192.168.3.50 (255.255.255.0).For a standby OMUa board, the default IP address of the backup channel
between the active and standby OMUs must be set to X. X. X.60. The
default IP address is 192.168.3.60 (255.255.255.0).
For an active OMUc board, the IP address of the backup channel between
the active and standby OMUs must be set to X. X. X. 50. The default IP
address of Ethernet adapter B-UPDATE0 is 192.168.9.50(255.255.255.0)
and that of Ethernet adapter B-UPDATE1 is 192.168.3.50
(255.255.255.0).
For an active OMUc board, the IP address of the backup channel between
the active and standby OMUs must be set to X. X. X. 60. The default IP
address of Ethernet adapter B-UPDATE0 is 192.168.9.60(255.255.255.0)and that of Ethernet adapter B-UPDATE1 is 192.168.3.60
(255.255.255.0).
Planning principle:
1. The network segment where the IP addresses of the channel between
the active and standby OMUs are located cannot conflict with the
onsite network segment. If they conflict, the IP addresses of the
channel between the active and standby OMUs must be changed.
2. If active and standby OMUs are configured, the IP addresses of the
channel between the active and standby OMUs on the active and
standby OMUs must be different and on the same network segment.3. If an independent OMU is configured and the network segment where
the IP addresses of the backup channel between the active and standby
OMUs is located is different from the onsite network segment, retain
the IP addresses of the backup channel between the active and standby
OMUs.
4. The subnet mask of the IP address of the channel between the active
and standby OMUs must be 255.255.255.0.
5. The IP address of the backup channel between the active and standby
OMUs on Ethernet adapter B-UPDATE0 and that on Ethernet adapter
B-UPDATE1 must be on different network segments.
Impact of OMU IP Address Changes
Changing IP addresses for the OMU routine maintenance impacts the working of the
BSC6900, as described in Table 3-4.
BSC6900 UMTS
OMU Administration Guide 3 Working Principles of the OMU
Issue 02 (2015-05-08) Huawei Proprietary and Confidential
Copyright © Huawei Technologies Co., Ltd.
22

8/18/2019 Bsc6900 Umts Omu Administration Guide(v900r017c10_02)(PDF)-En
http://slidepdf.com/reader/full/bsc6900-umts-omu-administration-guidev900r017c1002pdf-en 32/310
Table 3-4 Impact of OMU IP address changes
IP Address Change Impact
External fixed IP
address
After the external fixed IP address is changed, the device connected to the
external Ethernet port can access the OMU only by using the new externalfixed IP address.
The external fixed IP address can be changed remotely and takes effect
immediately after it is changed.
External eirtual
IP address
After the external virtual IP address is changed, the device connected to
the OMU by using the original IP address can access the OMU only by
using the new external virtual IP address.
The external virtual IP address can be changed remotely and takes effect
immediately after it is changed.
Internal fixed IPaddress The internal fixed and virtual IP addresses must be changed at the sametime.
The internal fixed IP address and the IP addresses of the BSC6900 host
boards have been planned. Therefore, only the network segment on which
the internal fixed IP address is located can be changed so that the internal
fixed IP address is not identical with the IP addresses of the BSC6900 host
boards.
If the network segment where the internal fixed IP address is located is
changed, the BSC6900 subnet number must be changed as well.
Otherwise, the communication between the OMU and the BSC6900 host
boards will be interrupted.
The internal fixed IP address is usually changed when the OMU iscommissioned onsite to avoid negative effects caused by frequent resets
of the BSC6900 during daily maintenance.
The internal fixed IP address can be changed remotely. After it is changed,
you must reset the BSC6900 at the local end.
Internal virtual
IP address
The internal virtual and fixed IP addresses must be changed at the same
time.
After the internal virtual IP address is changed, reset the BSC6900 so that
the communication between the OMU and the BSC6900 host boards can
be re-established.
The internal virtual IP address is usually changed when the OMU is
commissioned onsite to avoid negative effects caused by frequent resets
of the BSC6900 during daily maintenance.
The internal virtual IP address can be changed remotely. After it is
changed, you must reset the BSC6900 at the local end.
IP address of the
backup channel
between active
and standby
OMU boards
After the IP address of the backup channel between the active and standby
OMUs is changed, reset the OMUs so that the communication between
the active and standby OMUs can be re-established.
The IP address of the backup channel between the active and standby
OMUs can be changed remotely and takes effect immediately after it is
changed.
BSC6900 UMTS
OMU Administration Guide 3 Working Principles of the OMU
Issue 02 (2015-05-08) Huawei Proprietary and Confidential
Copyright © Huawei Technologies Co., Ltd.
23

8/18/2019 Bsc6900 Umts Omu Administration Guide(v900r017c10_02)(PDF)-En
http://slidepdf.com/reader/full/bsc6900-umts-omu-administration-guidev900r017c1002pdf-en 33/310
IP Address Change Impact
Commissioning
IP address
After the commissioning IP address is changed, the device connected to
the debug port cannot access the OMU. The OMU can be accessed only
by using the new commissioning IP address.The commissioning IP address must be changed by connecting the debug
port. The new IP address takes effect immediately after the change.
NOTE
l The internal and external fixed IP addresses are bound to the active and standby OMUs, and the internal and
external virtual IP addresses are bound to the active OMU. For example, after the switchover of the active
and standby OMUs, the internal and external fixed IP addresses of the original active and standby OMUs
remain the same while the internal and external virtual IP addresses of the original active OMU become the
internal and external virtual IP addresses of the original standby OMU. There is no internal or external virtual
IP addresses for the original active OMU.
l Each pair of the following IP addresses must be on the same network segment: internal fixed and virtual IP
addresses, external fixed and virtual IP addresses, IP addresses of the channel between the active and standby
OMUs on the active OMU and standby OMU, commissioning IP address of the active and standby OMU.
The network segments of these pairs of IP addresses cannot conflict with each other. Additionally, the IP
addresses on a network segment cannot conflict, either.
l Record the IP addresses in 6.5.1 Information Records of OMU Software Installation.
l The next ho p IP address of the U2000 r oute must be the external virtual IP address of the OMU.
3.3 OMU Networking Principle
The internal Ethernet adapters of the OMU are connected to the SCUs in the MPS by using the
backplane, and the external Ethernet adapters of the OMU are connected to the LMT/U2000. In
this way, the OMU fulfills the communication between the BSC6900 and the LMT/U2000.
Independent OMUa/OMUc Networking Principle
Figure 3-4, Figure 3-5, Figure 3-6, Figure 3-7 show the networking topology in single-OMUa/
OMUc mode.
BSC6900 UMTS
OMU Administration Guide 3 Working Principles of the OMU
Issue 02 (2015-05-08) Huawei Proprietary and Confidential
Copyright © Huawei Technologies Co., Ltd.
24

8/18/2019 Bsc6900 Umts Omu Administration Guide(v900r017c10_02)(PDF)-En
http://slidepdf.com/reader/full/bsc6900-umts-omu-administration-guidev900r017c1002pdf-en 34/310
Figure 3-4 Independent-OMUa (with a single LAN switch)
BSC6900 UMTS
OMU Administration Guide 3 Working Principles of the OMU
Issue 02 (2015-05-08) Huawei Proprietary and Confidential
Copyright © Huawei Technologies Co., Ltd.
25

8/18/2019 Bsc6900 Umts Omu Administration Guide(v900r017c10_02)(PDF)-En
http://slidepdf.com/reader/full/bsc6900-umts-omu-administration-guidev900r017c1002pdf-en 35/310
Figure 3-5 Independent OMUa networking topology (with two LAN switches)
The two internal Ethernet adapters ETH4-SCU7 and ETH5-SCU6 of the OMUa board are
connected to the active and standby SCUs in the MPS by using the backplane, respectively.
The two external Ethernet adapters ETH0 and ETH1 of the OMUa board are connected to the
LMT/U2000 by using network equipment such as a hub, LAN switch, or router. In this way, the
OMU fulfills the communication between the BSC6900 and the LMT/U2000.
As shown in Figure 3-5, the two external Ethernet ports of the OMUa board are connected to
the two LAN switches, respectively, which improves network reliability. In this network
topology, external Ethernet ports on the OMU, ports on the LAN switches for the connection
with the OMU, and the ports on the LAN switches for the connection between LAN switches
must be in the same local area network (LAN).
BSC6900 UMTS
OMU Administration Guide 3 Working Principles of the OMU
Issue 02 (2015-05-08) Huawei Proprietary and Confidential
Copyright © Huawei Technologies Co., Ltd.
26

8/18/2019 Bsc6900 Umts Omu Administration Guide(v900r017c10_02)(PDF)-En
http://slidepdf.com/reader/full/bsc6900-umts-omu-administration-guidev900r017c1002pdf-en 36/310
The Ethernet port marked in blue in Figure 3-4 and Figure 3-5 must be enabled with the
Spanning Tree Protocol (STP) function to prevent network storms.
Figure 3-6 Independent OMUc networking topology (with a single LAN switch)
Figure 3-7 Independent OMUc networking topology (with two LAN switches)
The two internal Ethernet adapters B_ETH1 and B_ETH0 are connected to the active and
standby SCUs in the MPS by using the backplane, respectively.
BSC6900 UMTS
OMU Administration Guide 3 Working Principles of the OMU
Issue 02 (2015-05-08) Huawei Proprietary and Confidential
Copyright © Huawei Technologies Co., Ltd.
27

8/18/2019 Bsc6900 Umts Omu Administration Guide(v900r017c10_02)(PDF)-En
http://slidepdf.com/reader/full/bsc6900-umts-omu-administration-guidev900r017c1002pdf-en 37/310
The two external Ethernet adapters F_ETH1 and F_ETH0 of the OMUc board are connected to
the LMT/U2000 by using network equipment such as a hub, LAN switch, or router. In this way,
the OMU fulfills the communication between the BSC6900 and the LMT/U2000.
As shown in Figure 3-7, the two external Ethernet ports of the OMUc board are connected to
the two LAN switches, respectively, which improves network reliability. In this network topology, external Ethernet ports on the OMU, ports on the LAN switches for the connection
with the OMU, and the ports on the LAN switches for the connection between LAN switches
must be in the same local area network (LAN).
The Ethernet port marked in blue in Figure 3-6 and Figure 3-7 must be enabled with the
Spanning Tree Protocol (STP) function to prevent network storms.
Active/standby OMUa/OMUc Networking Principle
Figure 3-8, Figure 3-9, Figure 3-10, Figure 3-11, Figure 3-12, Figure 3-13 show the network
topology in dual-OMUa/OMUc mode.
BSC6900 UMTS
OMU Administration Guide 3 Working Principles of the OMU
Issue 02 (2015-05-08) Huawei Proprietary and Confidential
Copyright © Huawei Technologies Co., Ltd.
28
8/18/2019 Bsc6900 Umts Omu Administration Guide(v900r017c10_02)(PDF)-En
http://slidepdf.com/reader/full/bsc6900-umts-omu-administration-guidev900r017c1002pdf-en 38/310
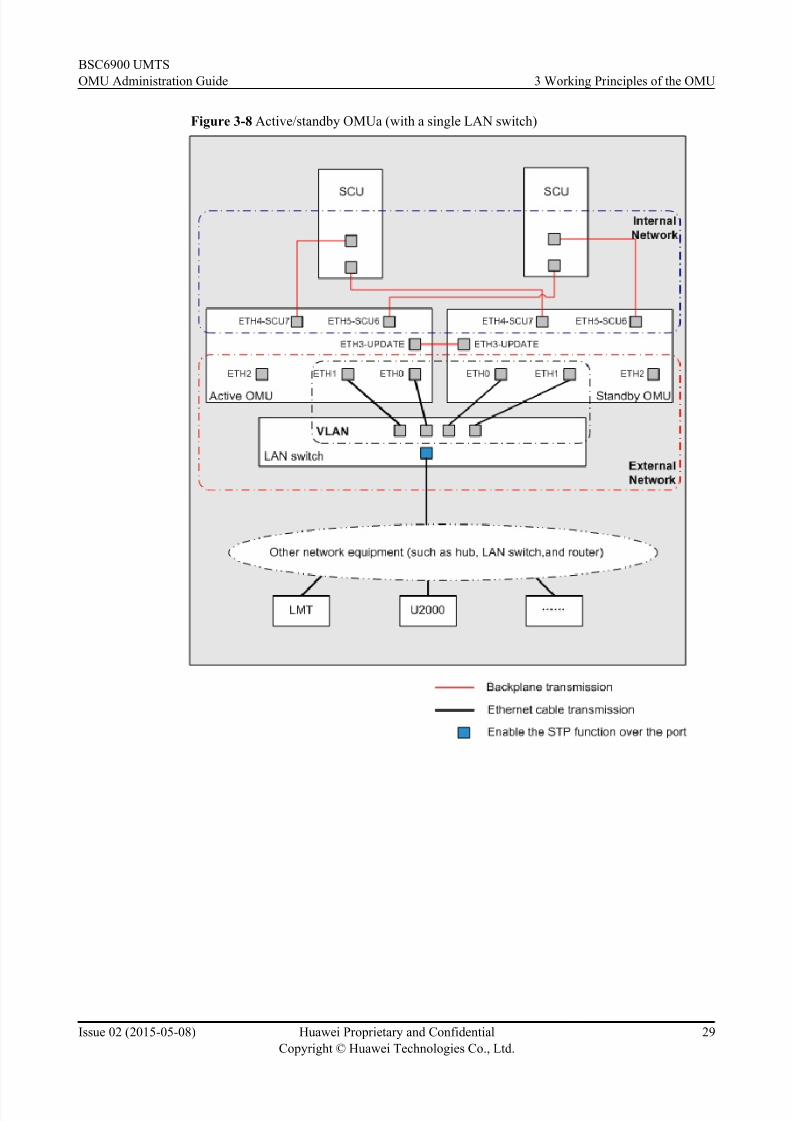
Figure 3-8 Active/standby OMUa (with a single LAN switch)
BSC6900 UMTS
OMU Administration Guide 3 Working Principles of the OMU
Issue 02 (2015-05-08) Huawei Proprietary and Confidential
Copyright © Huawei Technologies Co., Ltd.
29

8/18/2019 Bsc6900 Umts Omu Administration Guide(v900r017c10_02)(PDF)-En
http://slidepdf.com/reader/full/bsc6900-umts-omu-administration-guidev900r017c1002pdf-en 39/310
Figure 3-9 Active/standby OMUa (with two LAN switches)
The two internal Ethernet adapters ETH4-SCU7 and ETH5-SCU6 of the OMUa board are
connected to the active and standby SCUs in the MPS by using the backplane, respectively.
The two external Ethernet adapters ETH0 and ETH1 of the OMUa board are connected to the
LMT/U2000 by using network equipment such as a hub, LAN switch, or router. In this way, the
OMU fulfills the communication between the BSC6900 and the LMT/U2000.
The ETH3-UPDATE Ethernet adapters of the active and standby OMUa boards are connected
by using the backplane to fulfill the data synchronization and software update between the active
and standby OMUs.
As shown in Figure 3-9, the two external Ethernet ports of the active and standby OMUs are
connected to the two LAN switches, respectively, which improves network reliability. In this
BSC6900 UMTS
OMU Administration Guide 3 Working Principles of the OMU
Issue 02 (2015-05-08) Huawei Proprietary and Confidential
Copyright © Huawei Technologies Co., Ltd.
30

8/18/2019 Bsc6900 Umts Omu Administration Guide(v900r017c10_02)(PDF)-En
http://slidepdf.com/reader/full/bsc6900-umts-omu-administration-guidev900r017c1002pdf-en 40/310
network topology, external Ethernet ports on the OMU, ports on the LAN switches for the
connection with the OMU, and the ports on the LAN switches for the connection between LAN
switches must be in the same local area network (LAN).
The Ethernet port marked in blue in Figure 3-8 and Figure 3-9 must be enabled with the
Spanning Tree Protocol (STP) function to prevent network storms.
Figure 3-10 Active/standby OMUc networking topology (with a single LAN switch)
Figure 3-11 Active/standby OMUc networking topology (with two LAN switches)
BSC6900 UMTS
OMU Administration Guide 3 Working Principles of the OMU
Issue 02 (2015-05-08) Huawei Proprietary and Confidential
Copyright © Huawei Technologies Co., Ltd.
31

8/18/2019 Bsc6900 Umts Omu Administration Guide(v900r017c10_02)(PDF)-En
http://slidepdf.com/reader/full/bsc6900-umts-omu-administration-guidev900r017c1002pdf-en 41/310
The two internal Ethernet adapters B_ETH0 and B_ETH1 of the OMUc board are connected to
the active and standby SCUs in the MPS by using the backplane, respectively.
The two external Ethernet adapters F_ETH0 and F_ETH1 of the OMUc board are connected to
the LMT/U2000 by using network equipment such as a hub, LAN switch, or router. In this way,
the OMU fulfills the communication between the BSC6900 and the LMT/U2000.
The B_UPDATE0 Ethernet adapters of the active and standby OMUc boards are connected by
using the backplane. This fulfills data synchronization and software update between active and
standby OMUs.
As shown in Figure 3-11, the two external Ethernet ports of the active and standby OMUs are
connected to the two LAN switches, respectively, which improves network reliability. In this
network topology, external Ethernet ports on the OMU, ports on the LAN switches for the
connection with the OMU, and the ports on the LAN switches for the connection between LAN
switches must be in the same local area network (LAN).
The Ethernet port marked in blue in Figure 3-10 and Figure 3-11 must be enabled with theSpanning Tree Protocol (STP) function to prevent network storms.
BSC6900 UMTS
OMU Administration Guide 3 Working Principles of the OMU
Issue 02 (2015-05-08) Huawei Proprietary and Confidential
Copyright © Huawei Technologies Co., Ltd.
32

8/18/2019 Bsc6900 Umts Omu Administration Guide(v900r017c10_02)(PDF)-En
http://slidepdf.com/reader/full/bsc6900-umts-omu-administration-guidev900r017c1002pdf-en 42/310
Figure 3-12 Active/standby OMUa/OMUc networking topology (with a single LAN switch)
BSC6900 UMTS
OMU Administration Guide 3 Working Principles of the OMU
Issue 02 (2015-05-08) Huawei Proprietary and Confidential
Copyright © Huawei Technologies Co., Ltd.
33

8/18/2019 Bsc6900 Umts Omu Administration Guide(v900r017c10_02)(PDF)-En
http://slidepdf.com/reader/full/bsc6900-umts-omu-administration-guidev900r017c1002pdf-en 43/310
Figure 3-13 Active/standby OMUa&OMUc networking topology (with two LAN switches)
The two internal Ethernet adapters of the OMU boards are connected to the active and standby
SCUs in the MPS by using the backplane, respectively.
The two external Ethernet adapters of the OMU boards are connected to the LMT/U2000 by
using network equipment such as a hub, LAN switch, or router. In this way, the OMU fulfills
the communication between the BSC6900 and the LMT/U2000.
The B_UPDATE1 Ethernet adapter of the active OMUc board and the ETH3–UPDATE Ethernet
adapter of the standby OMUa board are connected by using the backplane. This fulfills data
synchronization and software update between active and standby OMUs.
As shown in Figure 3-13, the two external Ethernet ports of the active and standby OMUs are
connected to the two LAN switches, respectively, which improves network reliability. In this
network topology, external Ethernet ports on the OMU, ports on the LAN switches for the
connection with the OMU, and the ports on the LAN switches for the connection between LAN
switches must be in the same local area network (LAN).
BSC6900 UMTS
OMU Administration Guide 3 Working Principles of the OMU
Issue 02 (2015-05-08) Huawei Proprietary and Confidential
Copyright © Huawei Technologies Co., Ltd.
34

8/18/2019 Bsc6900 Umts Omu Administration Guide(v900r017c10_02)(PDF)-En
http://slidepdf.com/reader/full/bsc6900-umts-omu-administration-guidev900r017c1002pdf-en 44/310
The Ethernet port marked in blue in Figure 3-12 and Figure 3-13 must be enabled with the
Spanning Tree Protocol (STP) function to prevent network storms.
3.4 Detecting Heartbeats Between Active and StandbyOMUs
This section describes how to detect heartbeats between active and standby OMUs. In active/
standby OMU mode, heartbeats between active and standby OMUs are detected to check
whether the OMUs work properly.
Heartbeats refer to response messages exchanged between active and standby OMUs. Active
and standby OMUs send heartbeat messages to each other to ensure that they work properly and
the network connection is normal.
The principle of heartbeat detection is as follows: The active and standby OMUs send status
messages to each other and check the received status messages. Based on the active/standby
policy, they determine whether they are operating in active or standby mode. In addition, they
decide whether to perform a switchover through negotiation. If one of the active and standby
OMUs does not receive any messages from the other for a period of time, the unresponsive OMU
is considered faulty. If the active OMU is faulty, a switchover is triggered.
3.5 Synchronization Between Active and Standby OMUs
In active/standby mode, the synchronization between the active and standby OMUs consists of
data synchronization, file synchronization, and time synchronization.
data synchronization
The OMU data is dynamic, which changes when the BSC6900 is working. After the standby
OMU starts, the active OMU data is fully synchronized, and the increments are synchronized.
This ensures that the OMU can work normally after a switchover.
File Synchronization
The synchronization between active and standby OMU files is mainly applicable to dynamic
files. The dynamic files include the license file, board program, BOOTROM file, DSP file, patch
file, and performance statistics file. The software management module on the standby OMU
regularly checks the active OMU files and synchronizes the dynamic files on the standby OMU
with those on the active OMU. This ensures that the files on the active and standby OMUs are
the same.
Time Synchronization
Time synchronization means that the sntp module on the standby OMU regularly synchronizes
the time with the sntp module on the active OMU. This ensures that the time on the active and
standby OMUs is the same.
BSC6900 UMTS
OMU Administration Guide 3 Working Principles of the OMU
Issue 02 (2015-05-08) Huawei Proprietary and Confidential
Copyright © Huawei Technologies Co., Ltd.
35

8/18/2019 Bsc6900 Umts Omu Administration Guide(v900r017c10_02)(PDF)-En
http://slidepdf.com/reader/full/bsc6900-umts-omu-administration-guidev900r017c1002pdf-en 45/310
3.6 Switchover Between Active and Standby OMUs
For OMUs working in active/standby mode, there are four types of switchover: manual
switchover, fault-triggered switchover, failover, and self-healing switchover.
NOTE
Operation and maintenance (O&M) can be performed on the LMT only after a switchover succeeds.
Manual Switchover
If OMUs work in active/standby mode and data synchronization between the active and standby
OMUs is normal, you can manually switch over the OMUs as required. For example, you need
to manually switch over OMUs for software and hardware upgrade or fault rectification. To
manually switch over the OMUs, run the SWP OMU command or use the LMT. For detailed
operations, see the BSC6900 UMTS LMT User Guide. After the manual switchover, the originalstandby OMU becomes the active OMU, and the original active OMU becomes the standby
OMU.
Manual switchover can be performed only when the active and standby OMUs work properly
and at least one of the following conditions is met:
l The DSP OMU command output shows that the value of Data-sync state is Data
synchronization is successful.
l The DSP OMU command output shows that the version of the active product software is
different from that of the standby product software.
l The ALM-20701 OMU Failure Switchover persists after a fault-triggered OMU switchover
is performed.
NOTICEBefore performing the manual switchover, do not perform an operation that may change the data
in the database. For example, do not modify configuration data or user information.
Fault-Triggered Switchover
When the active and standby OMUs operate properly, the active OMU maintains theBSC6900 and the standby OMU monitors the active OMU. If a fault occurs on the active OMU
and persists for more than 5 minutes, the standby OMU automatically becomes active. After the
fault is rectified, the original active OMU becomes standby. If the fault is rectified within 5
minutes, the switchover does not occur.
After the fault-triggered switchover, the OMU automatically reports the ALM-20701 OMU
Failure Switchover and initiates a Cyclic Redundancy Check (CRC). If the host data is consistent
with the OMU data, the alarm is automatically cleared. If the host data is inconsistent with the
OMU data, the alarm persists.
NOTE
If the DSP OMU command output shows that the values for Internal network link state, External network state, and Backup network link state are all Breakdown, then the active OMU is faulty.
BSC6900 UMTS
OMU Administration Guide 3 Working Principles of the OMU
Issue 02 (2015-05-08) Huawei Proprietary and Confidential
Copyright © Huawei Technologies Co., Ltd.
36

8/18/2019 Bsc6900 Umts Omu Administration Guide(v900r017c10_02)(PDF)-En
http://slidepdf.com/reader/full/bsc6900-umts-omu-administration-guidev900r017c1002pdf-en 46/310
Failover
When the active OMU runs longer than the failover interval, a failover occurs. To reduce the
impact on the services, the failover usually occurs between 03: 00 and 05: 00.
You can run the SET ASWPARA command to set whether the failover between the active andstandby OMUs is allowed. You can also run this command to set the failover interval.
NOTE
l The failover is functional only on an OMU running Windows.
l You should not set parameters during the failover. You can query the time when the failover occurs by
running the LST ASWPARA command.
Self-Healing Switchover
Self-healing switchover is a method of self-healing for OMUs.
The active OMU performs a self-healing switchover when any of the following conditions
occurs:
l The hard disk capacity of the active OMU overflows if the remaining space is smaller than
200 MB.
l An abnormality occurred on the active OMU for 10 times within 30 minutes.
l No Ethernet cable is connected to any external Ethernet port on the active OMU.
l The internal or external virtual IP address of the active OMU is lost for more than 3 minutes.
l The standby OMU detects that the active OMU is restarted abnormally three times within
24 hours.
lThe connection between the active OMU and SCU is interrupted and the connection between the standby OMU and SCU is normal.
l A fault occurs in one or both of the internal and external networks of the active OMU while
the internal and external networks of the standby OMU are normal.
BSC6900 UMTS
OMU Administration Guide 3 Working Principles of the OMU
Issue 02 (2015-05-08) Huawei Proprietary and Confidential
Copyright © Huawei Technologies Co., Ltd.
37

8/18/2019 Bsc6900 Umts Omu Administration Guide(v900r017c10_02)(PDF)-En
http://slidepdf.com/reader/full/bsc6900-umts-omu-administration-guidev900r017c1002pdf-en 47/310
4 OMU Safety Information
This section describes safety information for OMU operations.
l When the OMU is running, do not perform the following operations:
– Creating or deleting directories
– Changing directory attributes
– Deleting backup files
– Modifying system files
– Changing system file attributes
– Disabling Ethernet adapters
– Modifying configuration files for Ethernet adapters
–Configuring routes
l Install and run only the OS software (including necessary drivers and components) and
product software on the OMU.
l The operation information and faults of the BSC6900 are recorded on the OMU. Therefore,
to locate and rectify faults in a timely and accurate manner, do not delete any log file from
the OMU.
l When OS commands are executed on the OMU, OS logs are recorded. Executing an OS
command with the plaintext password brings security risks. Therefore, interactive
commands are recommended.
l After changing the OMU slot by removing and then installing the OMU boards, the OMU
redetects alarms. The alarms generated from the original OMU slot must be manuallycleared.
BSC6900 UMTS
OMU Administration Guide 4 OMU Safety Information
Issue 02 (2015-05-08) Huawei Proprietary and Confidential
Copyright © Huawei Technologies Co., Ltd.
38

8/18/2019 Bsc6900 Umts Omu Administration Guide(v900r017c10_02)(PDF)-En
http://slidepdf.com/reader/full/bsc6900-umts-omu-administration-guidev900r017c1002pdf-en 48/310
5 OMU High-Risk Command List (Dopra
Linux)
This section describes high-risk commands in the Dopra Linux operating system (OS). Exercise
caution when executing these commands.
Command List
There are a large number of Linux commands. To view the help information for a command,
run the command with the --help parameter. Use /sbin/ifconfig as example, as shown in the
following figure.
Figure 5-1 Help information for a command
BSC6900 UMTS
OMU Administration Guide 5 OMU High-Risk Command List (Dopra Linux)
Issue 02 (2015-05-08) Huawei Proprietary and Confidential
Copyright © Huawei Technologies Co., Ltd.
39

8/18/2019 Bsc6900 Umts Omu Administration Guide(v900r017c10_02)(PDF)-En
http://slidepdf.com/reader/full/bsc6900-umts-omu-administration-guidev900r017c1002pdf-en 49/310
Table 5-1 OMU high-risk command list
Type Command
RiskLev
el
Sug gestio
ns
Risk Description ScenarioRestrictions
SubstituteProduc
tCommand
OS
intern
al
comm
and
/sbin/
disk_mana
ger
Hig
h
Pro
hibi
ted
This command can be
invoked by the system only
and cannot be independently
invoked by users.
- None
/sbin/
dl_matchp
artconf_fil
e
Hig
h
Pro
hibi
ted
This command can be
invoked by the system only
and cannot be independently
invoked by users.
- None
/sbin/
dl_recover
_core
Hig
h
Pro
hibi
ted
This command can be
invoked by the system only
and cannot be independently
invoked by users.
- None
/sbin/
dl_upgrade
_core
Hig
h
Pro
hibi
ted
This command can be
invoked by the system only
and cannot be independently
invoked by users.
- None
/sbin/dl_verctl
High
Prohibi
ted
This command can beinvoked by the system only
and cannot be independently
invoked by users.
- None
/sbin/dlcfg Hig
h
Pro
hibi
ted
This command can be
invoked by the system only
and cannot be independently
invoked by users.
- None
/sbin/
rtos_config
Hig
h
Pro
hibi
ted
This command can be
invoked by the system only
and cannot be independentlyinvoked by users.
- None
Disk
and
file
syste
m
mana
geme
nt
/sbin/
fsck.reiserf
s
Hig
h
Pro
hibi
ted
This command is used to
rectify file system errors.
Inappropriate use of this
command will cause data
loss.
- None
BSC6900 UMTS
OMU Administration Guide 5 OMU High-Risk Command List (Dopra Linux)
Issue 02 (2015-05-08) Huawei Proprietary and Confidential
Copyright © Huawei Technologies Co., Ltd.
40

8/18/2019 Bsc6900 Umts Omu Administration Guide(v900r017c10_02)(PDF)-En
http://slidepdf.com/reader/full/bsc6900-umts-omu-administration-guidev900r017c1002pdf-en 50/310
Type Command
RiskLevel
Sug gestions
Risk Description ScenarioRestrictions
SubstituteProduct
Command
/sbin/fsck Hig
h
Pro
hibi
ted
This command is used to
rectify file system errors.
Inappropriate use of this
command will cause data
loss.
- None
/bin/mount Hig
h
Pro
hibi
ted
This command is used to
mount hard disk partitions.
- None
/bin/
umount
Hig
h
Pro
hibi
ted
This command is used to
unmount disk devices. If
key partitions are
unmounted, the system will
become unavailable.
- None
/sbin/
fsck.ext2
Hig
h
Pro
hibi
ted
This command is used to
restore disk partitions.
- None
/sbin/
fsck.ext4
Hig
h
Pro
hibi
ted
This command is used to
restore disk partitions.
- None
/sbin/sfdisk Hig
h
Pro
hibi
ted
This command is used to
query or modify partition
settings.
This
command is
used only to
query
partition
settings.
None
/sbin/fdisk Hig
h
Use
d
with
restr
ictio
ns
This command is used to
query or modify disk
partitions.
This
command is
used only to
query disk
partitions.
None
/sbin/
tune2fs
Hig
h
Pro
hibi
ted
This command is used to
query or modify system file
settings.
This
command is
used only to
query system
file settings.
None
BSC6900 UMTS
OMU Administration Guide 5 OMU High-Risk Command List (Dopra Linux)
Issue 02 (2015-05-08) Huawei Proprietary and Confidential
Copyright © Huawei Technologies Co., Ltd.
41

8/18/2019 Bsc6900 Umts Omu Administration Guide(v900r017c10_02)(PDF)-En
http://slidepdf.com/reader/full/bsc6900-umts-omu-administration-guidev900r017c1002pdf-en 51/310
Type Command
RiskLevel
Sug gestions
Risk Description ScenarioRestrictions
SubstituteProduct
Command
/sbin/
fsck.ext3
Hig
h
Pro
hibi
ted
This command is used to
rectify file system errors.
Inappropriate use of this
command will cause data
loss.
- None
/sbin/
mke2fs
Hig
h
Pro
hibi
ted
This command is used to
format the file system.
- None
/sbin/
mkfs.ext3
Hig
h
Pro
hibi
ted
This command is used to
format the file system.
- None
/sbin/
mkfs.ext4
Hig
h
Pro
hibi
ted
This command is used to
format the file system.
- None
/sbin/
mkreiserfs
Hig
h
Pro
hibi
ted
This command is used to
format the file system.
- None
Process
mana
geme
nt
/bin/fuser High
Prohibi
ted
This command is used to killthe process which occupies
a file. Inappropriate use of
this command will cause
key processes to be killed.
- None
/bin/kill Hig
h
Pro
hibi
ted
This command is used to kill
processes. Inappropriate use
of this command will cause
key processes to be killed.
- Use the
RST
OMU
MODU
LE
comma
nd to
reset
OMU
softwar
e
process
es.
/usr/bin/
killall
Hig
h
Pro
hibi
ted
This command is used to kill
processes. Inappropriate use
of this command will cause
key processes to be killed.
- None
BSC6900 UMTS
OMU Administration Guide 5 OMU High-Risk Command List (Dopra Linux)
Issue 02 (2015-05-08) Huawei Proprietary and Confidential
Copyright © Huawei Technologies Co., Ltd.
42

8/18/2019 Bsc6900 Umts Omu Administration Guide(v900r017c10_02)(PDF)-En
http://slidepdf.com/reader/full/bsc6900-umts-omu-administration-guidev900r017c1002pdf-en 52/310
Type Command
RiskLevel
Sug gestions
Risk Description ScenarioRestrictions
SubstituteProduct
Command
/sbin/
killproc
Hig
h
Pro
hibi
ted
This command is used to kill
processes.
- Use the
RST
OMU
MODU
LE
comma
nd to
reset
OMU
softwar e
process
es.
/usr/bin/
taskset
Hig
h
Pro
hibi
ted
This command is used to
query or modify the CPU
affinity of a thread.
This
command is
used only to
query the
CPU affinity
of a thread.
None
/sbin/killall5
High
Prohibi
ted
This command is used to kill processes. Inappropriate use
of this command will cause
key processes to be killed.
- Use theRST
OMU
MODU
LE
comma
nd to
reset
OMU
softwar
e
processes.
Netw
ork
mana
geme
nt
/sbin/
ethtool
Hig
h
Use
d
with
restr
ictio
ns
This command is used to
query or modify the link
mode of network adapters.
This
command is
used only to
query the
link mode of
network
adapters.
None
BSC6900 UMTS
OMU Administration Guide 5 OMU High-Risk Command List (Dopra Linux)
Issue 02 (2015-05-08) Huawei Proprietary and Confidential
Copyright © Huawei Technologies Co., Ltd.
43

8/18/2019 Bsc6900 Umts Omu Administration Guide(v900r017c10_02)(PDF)-En
http://slidepdf.com/reader/full/bsc6900-umts-omu-administration-guidev900r017c1002pdf-en 53/310
Type Command
RiskLevel
Sug gestions
Risk Description ScenarioRestrictions
SubstituteProduct
Command
/usr/sbin/
iptables-
multi
Hig
h
Use
d
with
restr
ictio
ns
This command is used to
query or modify the firewall
of a local computer.
This
command is
used only to
query the
firewall of a
local
computer.
None
/bin/
domainname
Hig
h
Pro
hibited
This command is used to
query or modify the network domain of a local computer.
This
command isused only to
query the
CPU affinity
of a thread.
None
/bin/
nisdomain
name
Hig
h
Use
d
with
restr
ictio
ns
This command is used to
query or modify the network
domain of NIS services on a
local computer.
This
command is
used only to
query the
network
domain of
NIS serviceson a local
computer.
None
/sbin/arp Hig
h
Use
d
with
restr
ictio
ns
This command is used to
query or modify ARP tables.
This
command is
used only to
query ARP
tables.
None
/sbin/
arptables
Hig
h
Use
dwith
restr
ictio
ns
This command is used to
query or modify the ARPfirewall of a local computer.
This
command isused only to
query the
ARP firewall
of a local
computer.
None
/sbin/ifup Hig
h
Pro
hibi
ted
This command is used to
activate network adapters.
- None
BSC6900 UMTS
OMU Administration Guide 5 OMU High-Risk Command List (Dopra Linux)
Issue 02 (2015-05-08) Huawei Proprietary and Confidential
Copyright © Huawei Technologies Co., Ltd.
44

8/18/2019 Bsc6900 Umts Omu Administration Guide(v900r017c10_02)(PDF)-En
http://slidepdf.com/reader/full/bsc6900-umts-omu-administration-guidev900r017c1002pdf-en 54/310
Type Command
RiskLevel
Sug gestions
Risk Description ScenarioRestrictions
SubstituteProduct
Command
/sbin/ifup-
dhcp
Hig
h
Pro
hibi
ted
This command is used to
activate network adapters.
- None
/sbin/ip Hig
h
Pro
hibi
ted
This command is used to
modify IP addresses.
Inappropriate use of this
command will cause
network disconnection.
- Use the
omutoo
l to set
the
OMU
IPaddress.
/sbin/route Hig
h
Use
d
with
restr
ictio
ns
This command is used to
modify gateways.
Inappropriate use of this
command will cause
network disconnection.
This
command is
used only to
query
routing
information.
Use the
omutoo
l to set
gatewa
ys.
/sbin/
dhclient
Hig
h
Pro
hibi
ted
This command is used to
obtain IP addresses from the
DHCPD server.Inappropriate use of this
command will cause
network disconnection.
- None
/sbin/
ifconfig
Hig
h
Use
d
with
restr
ictio
ns
This command is used to
modify IP addresses.
Inappropriate use of this
command will cause
network disconnection.
This
command is
used only to
query IP
addresses.
Use the
omutoo
l to set
IP
address
es.
filemana
geme
nt
/bin/touch High
Prohibi
ted
This command is used tomodify the file content.
- None
/bin/vi Hig
h
Pro
hibi
ted
This command is used to
edit the file content.
- None
/bin/rmdir Hig
h
Pro
hibi
ted
This command is used to
delete a directory. If system
directories are deleted, the
system will become
unavailable.
- None
BSC6900 UMTS
OMU Administration Guide 5 OMU High-Risk Command List (Dopra Linux)
Issue 02 (2015-05-08) Huawei Proprietary and Confidential
Copyright © Huawei Technologies Co., Ltd.
45

8/18/2019 Bsc6900 Umts Omu Administration Guide(v900r017c10_02)(PDF)-En
http://slidepdf.com/reader/full/bsc6900-umts-omu-administration-guidev900r017c1002pdf-en 55/310
Type Command
RiskLevel
Sug gestions
Risk Description ScenarioRestrictions
SubstituteProduct
Command
/bin/mv Hig
h
Pro
hibi
ted
This command is used to
move files.
- None
/bin/cp Hig
h
Use
d
with
restr
ictio
ns
This command is used to
copy or cover files.
This
command is
used only to
copy files.
None
/bin/dd Hig
h
Pro
hibi
ted
This command is used to
modify the file content.
- None
/bin/rm Hig
h
Pro
hibi
ted
This command is used to
delete files. If system files
are deleted, the files cannot
be restored.
- None
/bin/chown Hig
h
Pro
hibi
ted
This command is used to
modify the file owner.
- None
/usr/bin/
scp
Hig
h
Use
d
with
restr
ictio
ns
This command is used to
copy or cover files.
This
command is
used only to
copy files.
None
/usr/bin/
dos2unix
Hig
h
Pro
hibi
ted
This command is used to
modify the file format.
Inappropriate use of this
command will cause files to
be unavailable.
- None
/usr/bin/tee Hig
h
Pro
hibi
ted
This command is used to
modify the file content.
- None
/usr/bin/tr Hig
h
Pro
hibi
ted
This command is used to
modify the file content.
- None
BSC6900 UMTS
OMU Administration Guide 5 OMU High-Risk Command List (Dopra Linux)
Issue 02 (2015-05-08) Huawei Proprietary and Confidential
Copyright © Huawei Technologies Co., Ltd.
46
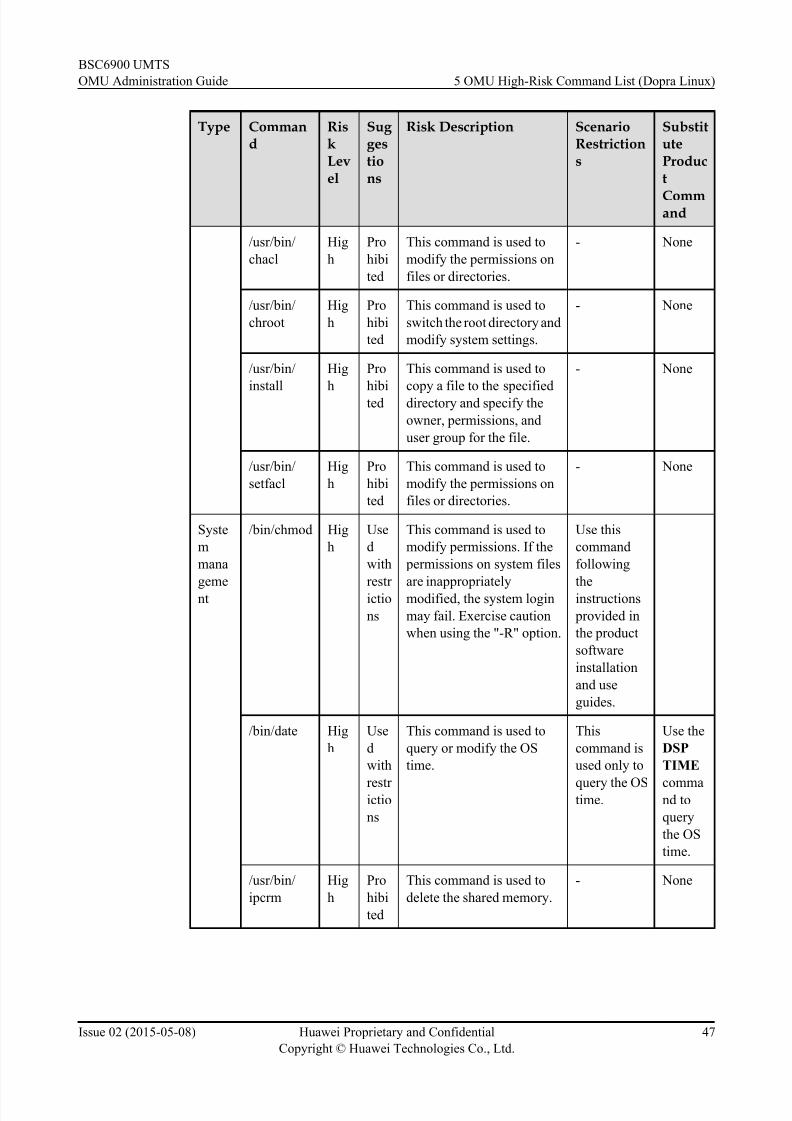
8/18/2019 Bsc6900 Umts Omu Administration Guide(v900r017c10_02)(PDF)-En
http://slidepdf.com/reader/full/bsc6900-umts-omu-administration-guidev900r017c1002pdf-en 56/310
Type Command
RiskLevel
Sug gestions
Risk Description ScenarioRestrictions
SubstituteProduct
Command
/usr/bin/
chacl
Hig
h
Pro
hibi
ted
This command is used to
modify the permissions on
files or directories.
- None
/usr/bin/
chroot
Hig
h
Pro
hibi
ted
This command is used to
switch the root directory and
modify system settings.
- None
/usr/bin/
install
Hig
h
Pro
hibited
This command is used to
copy a file to the specifieddirectory and specify the
owner, permissions, and
user group for the file.
- None
/usr/bin/
setfacl
Hig
h
Pro
hibi
ted
This command is used to
modify the permissions on
files or directories.
- None
Syste
m
mana
geme
nt
/bin/chmod Hig
h
Use
d
with
restr
ictio
ns
This command is used to
modify permissions. If the
permissions on system files
are inappropriately
modified, the system login
may fail. Exercise caution
when using the "-R" option.
Use this
command
following
the
instructions
provided in
the product
software
installation
and use
guides.
/bin/date Hig
h
Use
d
with
restr ictio
ns
This command is used to
query or modify the OS
time.
This
command is
used only to
query the OStime.
Use the
DSP
TIME
command to
query
the OS
time.
/usr/bin/
ipcrm
Hig
h
Pro
hibi
ted
This command is used to
delete the shared memory.
- None
BSC6900 UMTS
OMU Administration Guide 5 OMU High-Risk Command List (Dopra Linux)
Issue 02 (2015-05-08) Huawei Proprietary and Confidential
Copyright © Huawei Technologies Co., Ltd.
47

8/18/2019 Bsc6900 Umts Omu Administration Guide(v900r017c10_02)(PDF)-En
http://slidepdf.com/reader/full/bsc6900-umts-omu-administration-guidev900r017c1002pdf-en 57/310
Type Command
RiskLevel
Sug gestions
Risk Description ScenarioRestrictions
SubstituteProduct
Command
/sbin/
hwclock
Hig
h
Pro
hibi
ted
This command is used to set
hardware time.
- Use the
SET
TIME
comma
nd to
query
hardwar
e time.
/sbin/init High
Prohibi
ted
This command is used to runthe system No.1 process,
change the runlevel, or
restart the system.
- None
/sbin/kexec Hig
h
Pro
hibi
ted
This command is used to
switch the kernel, which
will cause the system to
restart.
- None
/sbin/
modprobe
Hig
h
Pro
hibi
ted
This command is used to
insert a module.
- None
/sbin/
portmap
Hig
h
Pro
hibi
ted
This command is used to
start the portmap service. In
general, scanning software
considers the portmap
service insecure. Therefore,
use this command only if
necessary.
- None
/sbin/
shutdown
Hig
h
Use
d
withrestr
ictio
ns
This command is used to
power off the system.
Use this
command
only whenthe OMU
board needs
to be
replaced or
the OMU
needs to be
powered off
or restarted.
None
BSC6900 UMTS
OMU Administration Guide 5 OMU High-Risk Command List (Dopra Linux)
Issue 02 (2015-05-08) Huawei Proprietary and Confidential
Copyright © Huawei Technologies Co., Ltd.
48
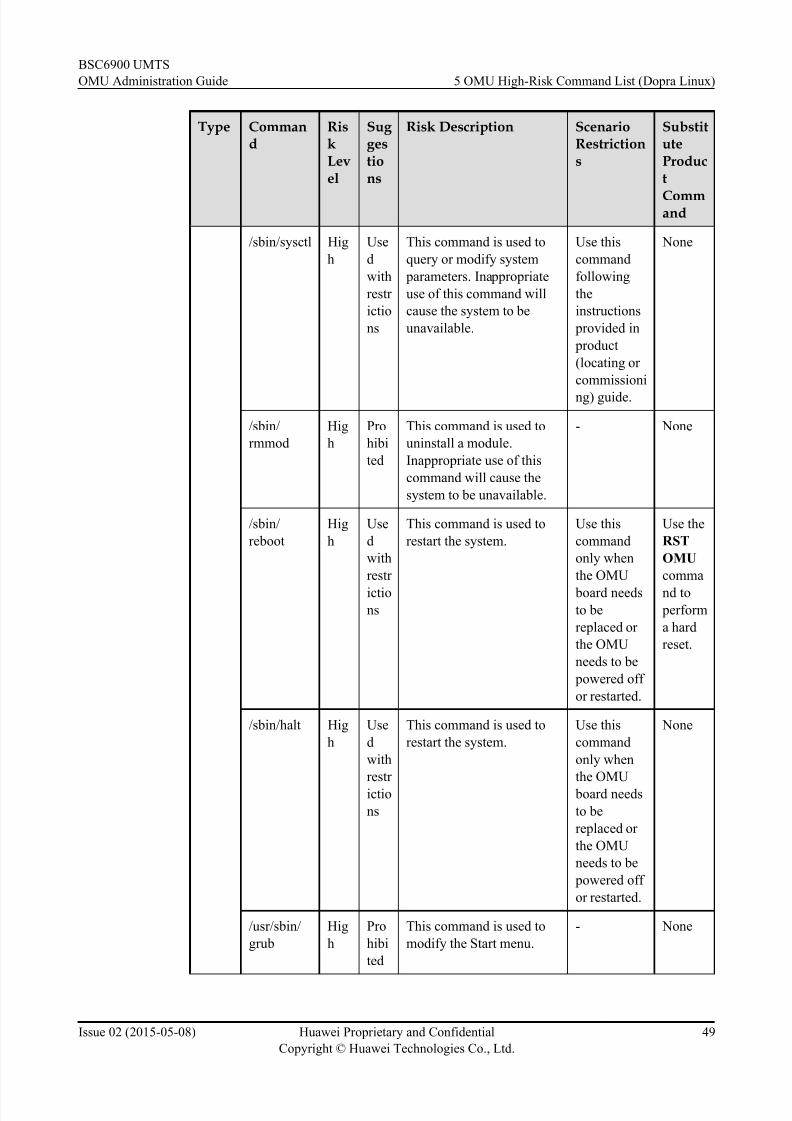
8/18/2019 Bsc6900 Umts Omu Administration Guide(v900r017c10_02)(PDF)-En
http://slidepdf.com/reader/full/bsc6900-umts-omu-administration-guidev900r017c1002pdf-en 58/310
Type Command
RiskLevel
Sug gestions
Risk Description ScenarioRestrictions
SubstituteProduct
Command
/sbin/sysctl Hig
h
Use
d
with
restr
ictio
ns
This command is used to
query or modify system
parameters. Inappropriate
use of this command will
cause the system to be
unavailable.
Use this
command
following
the
instructions
provided in
product
(locating or
commissioni
ng) guide.
None
/sbin/
rmmod
Hig
h
Pro
hibi
ted
This command is used to
uninstall a module.
Inappropriate use of this
command will cause the
system to be unavailable.
- None
/sbin/
reboot
Hig
h
Use
d
with
restr
ictions
This command is used to
restart the system.
Use this
command
only when
the OMU
board needsto be
replaced or
the OMU
needs to be
powered off
or restarted.
Use the
RST
OMU
comma
nd to perform
a hard
reset.
/sbin/halt Hig
h
Use
d
with
restr
ictio
ns
This command is used to
restart the system.
Use this
command
only when
the OMU
board needs
to be
replaced or
the OMU
needs to be
powered off
or restarted.
None
/usr/sbin/
grub
Hig
h
Pro
hibi
ted
This command is used to
modify the Start menu.
- None
BSC6900 UMTS
OMU Administration Guide 5 OMU High-Risk Command List (Dopra Linux)
Issue 02 (2015-05-08) Huawei Proprietary and Confidential
Copyright © Huawei Technologies Co., Ltd.
49

8/18/2019 Bsc6900 Umts Omu Administration Guide(v900r017c10_02)(PDF)-En
http://slidepdf.com/reader/full/bsc6900-umts-omu-administration-guidev900r017c1002pdf-en 59/310
Type Command
RiskLevel
Sug gestions
Risk Description ScenarioRestrictions
SubstituteProduct
Command
User
mana
geme
nt
/usr/bin/
chage
Hig
h
Use
d
with
restr
ictio
ns
This command is used to
change the password
validity period.
Use this
command
only for
managing
external
login users.
None
/usr/bin/
passwd
Hig
h
Use
d
withrestr
ictio
ns
This command is used to
change a password.
Use this
command
only for managing
external
login users.
None
/usr/sbin/
chpasswd
Hig
h
Pro
hibi
ted
This command is used to
change a password. This
command has been deleted
since
V200R003C08SPC080.
- None
/usr/sbin/
groupdel
Hig
h
Use
dwith
restr
ictio
ns
This command is used to
delete a user group.
Use this
commandonly for
managing
the user-
defined user
groups.
None
/usr/sbin/
userdel
Hig
h
Use
d
with
restr
ictio
ns
This command is used to
delete a user.
Use this
command
only for
managing
the user-
definedusers.
None
BSC6900 UMTS
OMU Administration Guide 5 OMU High-Risk Command List (Dopra Linux)
Issue 02 (2015-05-08) Huawei Proprietary and Confidential
Copyright © Huawei Technologies Co., Ltd.
50

8/18/2019 Bsc6900 Umts Omu Administration Guide(v900r017c10_02)(PDF)-En
http://slidepdf.com/reader/full/bsc6900-umts-omu-administration-guidev900r017c1002pdf-en 60/310
6 OMU Installation and Maintenance (Dopra
Linux)
About This Chapter
This chapter describes how to install software and perform operation and maintenance on the
OMU running Dopra Linux. In the Dopra Linux OS, the OMUa or OMUc (recommended) is
used to carry the OMU.
NOTE
Run the LST VER command. Based on the OMU OS displayed in the command output, select the installation
and maintenance scenarios.
OMU Software Architecture
The OMU software consists of the operating system and the product software. Figure 6-1 shows
the OMU software architecture.
Figure 6-1 OMU software architecture
l Operating System
The DOPRA Linux OS is used.
l Product Software
The product software runs on the bottom-level OS to provide various service processes.
BSC6900 UMTS
OMU Administration Guide 6 OMU Installation and Maintenance (Dopra Linux)
Issue 02 (2015-05-08) Huawei Proprietary and Confidential
Copyright © Huawei Technologies Co., Ltd.
51

8/18/2019 Bsc6900 Umts Omu Administration Guide(v900r017c10_02)(PDF)-En
http://slidepdf.com/reader/full/bsc6900-umts-omu-administration-guidev900r017c1002pdf-en 61/310
Scenario Overview
In the scenario of deploying the BSC6900, the OMU runs Dopra Linux. Figure 6-2 shows how
to install product software.
Figure 6-2 Product software installation scenarios
l Commissioning phase
Determine whether to reinstall product software based on the status and version of the
current product software. Configure the correct OMU IP address for communication
between the LMT and BSC6900 O&M network.
l Maintenance phase
If product software cannot work properly during the maintenance phase, reinstall the
product software by using one of the following methods:
– Use the USB flash drive. With this method, the OMU OS and product software will be
reinstalled. For details, see 6.2.2 Optional: Installing the Operating System and
Product Software.
– Use the product software installation file in the version package. With this method, only
the product software will be reinstalled. For details, see 6.2.3 Optional: Installing the
Product Software.
6.1 Initially Commissioning the OMU
This section describes the procedure for initially commissioning the OMU after delivery. For
the commissioning phase, see the chapter Setting OMU System Parameters.
6.2 Reinstalling Software Onsite
BSC6900 UMTS
OMU Administration Guide 6 OMU Installation and Maintenance (Dopra Linux)
Issue 02 (2015-05-08) Huawei Proprietary and Confidential
Copyright © Huawei Technologies Co., Ltd.
52
8/18/2019 Bsc6900 Umts Omu Administration Guide(v900r017c10_02)(PDF)-En
http://slidepdf.com/reader/full/bsc6900-umts-omu-administration-guidev900r017c1002pdf-en 62/310
If an OMU board is damaged onsite, replace it. If the operating system fails, reinstall it along
with the product software.
6.3 Operating and Maintaining the OMU
This section describes how to perform operation and maintenance on the OMU after product
software are installed. To perform this task, log in to the OMU remotely or run MML commands.
6.4 Obtaining and Using the OMU-Related Software
This section describes how to obtain and use the OMU-related software, including the psftp
software and PuTTY software. The OMU-related software is used to assist product software
installation and perform operation and maintenance on the OMU.
6.5 Appendix: OMU-Related Information Tables
This section describes the tables which record the OMU information required for routine
operation and maintenance.
BSC6900 UMTS
OMU Administration Guide 6 OMU Installation and Maintenance (Dopra Linux)
Issue 02 (2015-05-08) Huawei Proprietary and Confidential
Copyright © Huawei Technologies Co., Ltd.
53

8/18/2019 Bsc6900 Umts Omu Administration Guide(v900r017c10_02)(PDF)-En
http://slidepdf.com/reader/full/bsc6900-umts-omu-administration-guidev900r017c1002pdf-en 63/310
6.1 Initially Commissioning the OMU
This section describes the procedure for initially commissioning the OMU after delivery. For
the commissioning phase, see the chapter Setting OMU System Parameters.
l In the initial commissioning phase, check the installation of product software, and configure
the IP addresses, subnet masks, and OMU name of OMU Ethernet adapters based on the
onsite IP address plan. Install product software if the version number is not specified in the
BSC6900 order.
l If only the product software needs to be installed, commission the OMU locally or using a
USB flash drive. If both product software and OMU operating system need to be installed,
commission the OMU using a USB flash drive.
6.1.1 Commissioning an OMU Locally
This section describes how to commission an OMU locally. The commissioning is perfor med
by a field engineer by connecting a PC to the OMU over a commissioning Ethernet port. If the
BSC6900 has been configured with active and standby OMUs, commission both the active OMU
and the standby OMU.
Prerequisites
l The OMU is connected to a local PC using a commissioning Ethernet port.
l The version installation package or patch installation package that you have obtained is the
same as the customer version.
l You have obtained the psftp software and the PuTTY software. For details, see 6.4.1Obtaining and Using the psftp Software and 6.4.2 Obtaining and Using the PuTTY
Software.
Context
l If the product software has been installed before delivery, the active workspace of the OMU
is version_a.
l If the product software is not installed before delivery, plan items in Information Records
of OMU Software Installation before installing the product software.
l For details about the OMU software factory settings, see Checklist for the OMU Software
Factory Settings.l For details about how to commission the OMU locally, see Figure 6-3.
BSC6900 UMTS
OMU Administration Guide 6 OMU Installation and Maintenance (Dopra Linux)
Issue 02 (2015-05-08) Huawei Proprietary and Confidential
Copyright © Huawei Technologies Co., Ltd.
54
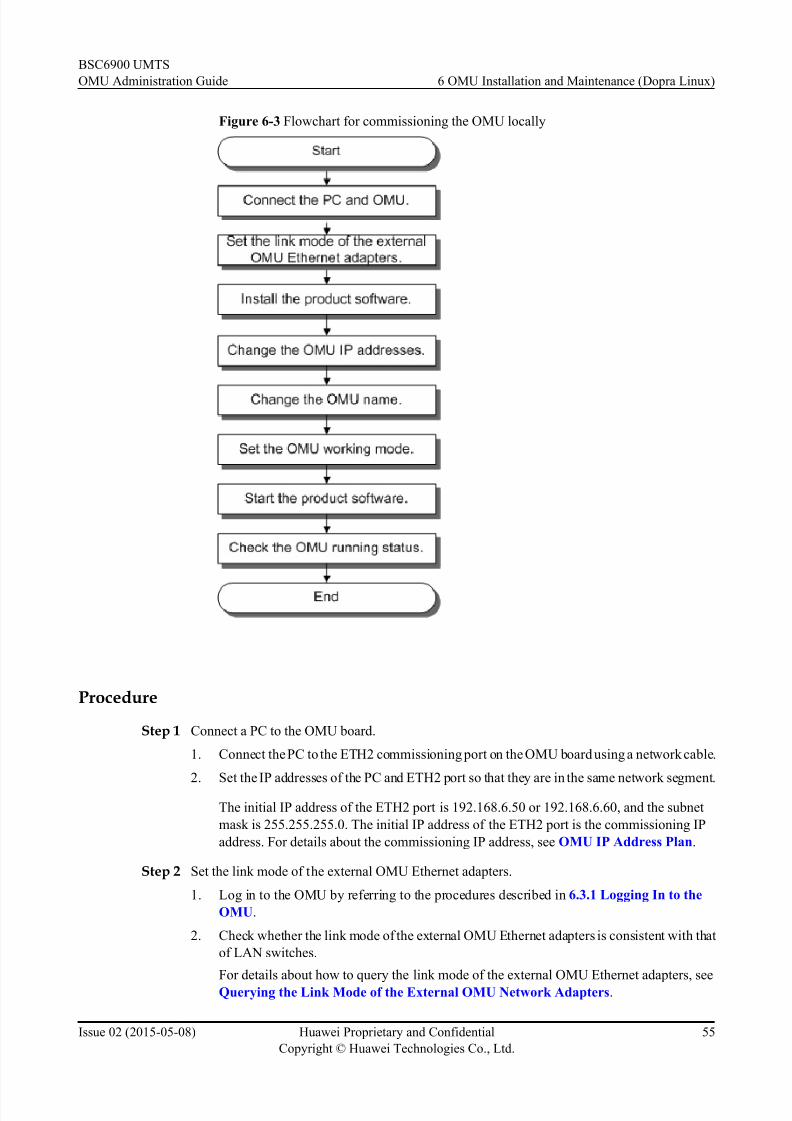
8/18/2019 Bsc6900 Umts Omu Administration Guide(v900r017c10_02)(PDF)-En
http://slidepdf.com/reader/full/bsc6900-umts-omu-administration-guidev900r017c1002pdf-en 64/310
Figure 6-3 Flowchart for commissioning the OMU locally
Procedure
Step 1 Connect a PC to the OMU board.
1. Connect the PC to the ETH2 commissioning port on the OMU board using a network cable.
2. Set the IP addresses of the PC and ETH2 port so that they are in the same network segment.
The initial IP address of the ETH2 port is 192.168.6.50 or 192.168.6.60, and the subnet
mask is 255.255.255.0. The initial IP address of the ETH2 port is the commissioning IP
address. For details about the commissioning IP address, see OMU IP Address Plan.
Step 2 Set the link mode of the external OMU Ethernet adapters.
1. Log in to the OMU by referring to the procedures described in 6.3.1 Logging In to the
OMU.
2. Check whether the link mode of the external OMU Ethernet adapters is consistent with that
of LAN switches.
For details about how to query the link mode of the external OMU Ethernet adapters, see
Querying the Link Mode of the External OMU Network Adapters .
BSC6900 UMTS
OMU Administration Guide 6 OMU Installation and Maintenance (Dopra Linux)
Issue 02 (2015-05-08) Huawei Proprietary and Confidential
Copyright © Huawei Technologies Co., Ltd.
55

8/18/2019 Bsc6900 Umts Omu Administration Guide(v900r017c10_02)(PDF)-En
http://slidepdf.com/reader/full/bsc6900-umts-omu-administration-guidev900r017c1002pdf-en 65/310
If... Then...
The link mode of the external OMU
Ethernet adapters is consistent with that of
LAN switches
Go to Step 3.
The link mode of the external OMU
Ethernet adapters is inconsistent with that
of LAN switches
Set the link mode of the external OMU
network adapters to be consistent with that
of LAN switch by referring to operations
in Procedure of Setting the Link Mode for
External OMU Ethernet Adapters.
Step 3 Install the product software.
1. Enter /etc/rc.d/omud status to check the running status of the OMU process.
If... Then...
running is displayed 1. Enter /etc/rc.d/omud stop to stop the
omud process.
2. Go to Step 3.2.
unused is displayed Go to Step 3.2.
No such file or directory is displayed 1. Install the product software to the active
workspace by referring to operations in
Procedure of Installing the Product
Software in the Active Workspace.
2. Go to Step 7, Step 8 and Step 9.
2. Enter cd /mbsc/upgrade to go to the OMU installation director y, and then enter ls to query
the current version of the product software.
If... Then...
The product software version is the same
as that required by the operator
Go to Step 4.
BSC6900 UMTS
OMU Administration Guide 6 OMU Installation and Maintenance (Dopra Linux)
Issue 02 (2015-05-08) Huawei Proprietary and Confidential
Copyright © Huawei Technologies Co., Ltd.
56

8/18/2019 Bsc6900 Umts Omu Administration Guide(v900r017c10_02)(PDF)-En
http://slidepdf.com/reader/full/bsc6900-umts-omu-administration-guidev900r017c1002pdf-en 66/310
If... Then...
The product software version is different
from that required by the operator
1. Uninstall the product software by
referring to operations in Procedure of
Uninstalling the Product Software.2. Upload the product software
installation package to the OMU by
referring to operations in Procedure of
Uploading the OMU Application
Installation Package to the OMU.
3. Install the product software to the active
workspace by referring to operations in
Procedure of Installing the Product
Software in the Active Workspace.
4. Go to Step 7, Step 8 and Step 9.
Step 4 Modify the OMU IP addresses.
Perform either of the following operations to change IP addresses of the OMU:
l Run the MOD OMUIP command. This operation can be performed only if the Ethernet
adapter is connected to the OMU over a local commissioning port. For details, see the
description of the MOD OMUIP command in the MML command reference.
l Use the omutool to change IP addresses of the OMU. For details, see the following substeps.
NOTE
The following restrictions apply when you execute the MOD OMUIP command. Modify OMU IPaddresses based on actual conditions.
l Only Internal network fixed IP, External network fixed IP, External network fixed IP mask ,
External gateway IP and Backup network IP of the active OMU can be modified when OMUs work
in active/standby mode.
l After the OMU starts, the system automatically updates the first two network segments of the internal
fixed and virtual IP addresses to the configured network segments. You can query the configured
network segments by running the LST SUBNET command.
1. Enter cd /mbsc/bam/version_a/bin/bam to go to the directory where the omutool program
is located.
NOTE
You can execute ./omutool -h to view the help information of the omutool.
2. Change the external fixed IP address and subnet mask according to the operator's plan.
Enter ./omutool extercard The external fixed IP address The subnet mask The gateway IP
address (Optional) to change the external fixed IP address and the subnet mask. For
example, you can enter the following command:
./omutool extercard 10.161.10.100 255.255.255.0
BSC6900 UMTS
OMU Administration Guide 6 OMU Installation and Maintenance (Dopra Linux)
Issue 02 (2015-05-08) Huawei Proprietary and Confidential
Copyright © Huawei Technologies Co., Ltd.
57

8/18/2019 Bsc6900 Umts Omu Administration Guide(v900r017c10_02)(PDF)-En
http://slidepdf.com/reader/full/bsc6900-umts-omu-administration-guidev900r017c1002pdf-en 67/310
NOTE
l Perform either of the following operations if a gateway IP address needs to be changed while
you are changing an external fixed IP address:
l Method 1: Enter ./omutool extercard The external fixed IP address The subnet mask (The
gateway IP address) to change the external fixed IP address and gateway IP address at thesame time. The following is an example:
./omutool extercard 10.161.10.100 255.255.255.0 10.161.10.1
l Method 2: Enter ./omutool gateway The gateway IP address to change the gateway IP
address separately. The following is an example:
./omutool gateway 10.161.10.1
l After the external fixed IP address is changed, the OMU can be connected to the operation and
maintenance (OM) network of the operator over the ETH0 or ETH1 port. In this case, subsequent
commissioning tasks can be performed remotely.
3. Change the external virtual IP address and subnet mask of the active and standby OMUs
according to the plan. Ensure that the external virtual IP address is on the same network
segment as the external fixed IP address.Enter ./omutool extervip The external virtual IP address The subnet mask to change the
external virtual IP address and subnet mask. For example, you can enter the following
command:./omutool extervip 10.161.10.102 255.255.255.0
NOTE
The external virtual, external fixed and gateway IP addresses must all be in the same network segment.
If you change either of the first two of these, you will be prompted to check whether the other two
addresses need to be changed to comply with this rule.
4. Check whether the internal fixed IP address, internal virtual IP address, backup channel IP
address, and commissioning IP address of active and standby OMUs are in the same
network segment as the operator's network.
BSC6900 UMTS
OMU Administration Guide 6 OMU Installation and Maintenance (Dopra Linux)
Issue 02 (2015-05-08) Huawei Proprietary and Confidential
Copyright © Huawei Technologies Co., Ltd.
58

8/18/2019 Bsc6900 Umts Omu Administration Guide(v900r017c10_02)(PDF)-En
http://slidepdf.com/reader/full/bsc6900-umts-omu-administration-guidev900r017c1002pdf-en 68/310
If... Then...
All the preceding IP addresses
are in the same network segment
as the operator's network
Change the IP address in conflict.
l Change the internal network segment by referring
to Follow-up Procedure in Updating the OMUDatabase.
l Change the backup channel IP address and subnet
mask of the active and standby OMUs:
– If OMUa boards are used, enter ./omutool
backupcard The IP address. For example,
you can enter the following command:./omutool backupcard 192.168.3.60
– If OMUc boards are used, enter ./omutool
backupcard_for_omuc The IP address and ./
omutool backupcard_for_omua The IP
address. For example, you can enter the
following commands:./omutool backupcard_for_omuc
192.168.9.60
./omutool backupcard_for_omua
192.168.3.60
l Enter ./omutool debugcard The debugging IP
address to change the commissioning IP address
and subnet mask. For example, you can enter the
following command:./omutool debugcard 192.168.6.60
The preceding IP addresses arenot in the same network segment
as the operator's network
Change the backup channel IP address of the standbyOMU.
l If OMUa boards are used, enter ./omutool
backupcard The IP address. For example, you
can enter the following command:./omutool backupcard 192.168.3.60
l If OMUc boards are used, enter ./omutool
backupcard_for_omuc The IP address and ./
omutool backupcard_for_omua The IP
address. For example, you can enter the following
commands:./omutool backupcard_for_omuc 192.168.9.60
./omutool backupcard_for_omua 192.168.3.60
Step 5 Enter ./omutool dispipinfo to check whether the modified OMU IP address and subnet mask
are correct based on the query result.
Step 6 Change the OMU name.
1. Enter ./omutool computername OMU name to change the name of the OMU.
For example, you can enter ./omutool computername omu_123.
BSC6900 UMTS
OMU Administration Guide 6 OMU Installation and Maintenance (Dopra Linux)
Issue 02 (2015-05-08) Huawei Proprietary and Confidential
Copyright © Huawei Technologies Co., Ltd.
59
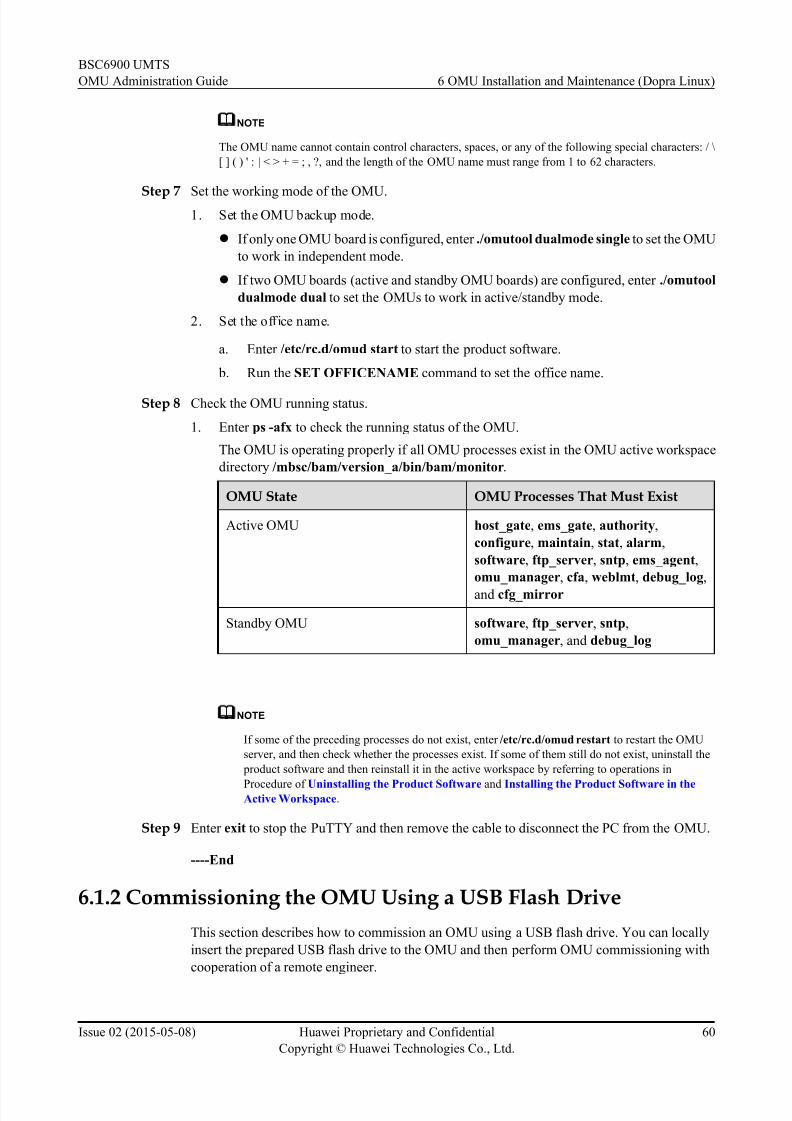
8/18/2019 Bsc6900 Umts Omu Administration Guide(v900r017c10_02)(PDF)-En
http://slidepdf.com/reader/full/bsc6900-umts-omu-administration-guidev900r017c1002pdf-en 69/310
NOTE
The OMU name cannot contain control characters, spaces, or any of the following special characters: / \
[ ] ( ) ' : | < > + = ; , ?, and the length of the OMU name must range from 1 to 62 characters.
Step 7 Set the working mode of the OMU.1. Set the OMU backup mode.
l If only one OMU board is configured, enter ./omutool dualmode single to set the OMU
to work in independent mode.
l If two OMU boards (active and standby OMU boards) are configured, enter ./omutool
dualmode dual to set the OMUs to work in active/standby mode.
2. Set the office name.
a. Enter /etc/rc.d/omud start to start the product software.
b. Run the SET OFFICENAME command to set the office name.
Step 8 Check the OMU running status.
1. Enter ps -afx to check the running status of the OMU.
The OMU is operating properly if all OMU processes exist in the OMU active workspace
directory /mbsc/bam/version_a/bin/bam/monitor.
OMU State OMU Processes That Must Exist
Active OMU host_gate, ems_gate, authority,
configure, maintain, stat, alarm,
software, ftp_server, sntp, ems_agent,
omu_manager, cfa, weblmt, debug_log,
and cfg_mirror
Standby OMU software, ftp_server, sntp,
omu_manager, and debug_log
NOTE
If some of the preceding processes do not exist, enter /etc/rc.d/omud restart to restart the OMU
server, and then check whether the processes exist. If some of them still do not exist, uninstall the
product software and then reinstall it in the active workspace by referring to operations in
Procedure of Uninstalling the Product Software and Installing the Product Software in theActive Workspace.
Step 9 Enter exit to stop the PuTTY and then remove the cable to disconnect the PC from the OMU.
----End
6.1.2 Commissioning the OMU Using a USB Flash Drive
This section describes how to commission an OMU using a USB flash drive. You can locally
insert the prepared USB flash drive to the OMU and then perform OMU commissioning with
cooperation of a remote engineer.
BSC6900 UMTS
OMU Administration Guide 6 OMU Installation and Maintenance (Dopra Linux)
Issue 02 (2015-05-08) Huawei Proprietary and Confidential
Copyright © Huawei Technologies Co., Ltd.
60

8/18/2019 Bsc6900 Umts Omu Administration Guide(v900r017c10_02)(PDF)-En
http://slidepdf.com/reader/full/bsc6900-umts-omu-administration-guidev900r017c1002pdf-en 70/310
Prerequisites
l The preparations for installing software on site are completed. For details, see Onsite
Software Installation Preparations.
l You have obtained the planned OMU information and recorded them in Configuration
Information for Preparing the USB Flash Drive.
l The capacity of the USB flash drive is at least 4 GB. If the BSC6900 is configured with
active and standby OMUs, two USB flash drives are required.
l A USB flash drive has been inserted into an available and uncontrolled (for example, CPM
control) USB port on a portable computer
l Check whether the USB flash drive is usable by referring to the USB Flash Drive
Verification Guide under the USB Disk Tool (a tool used for preparing the USB flash drive)
directory. If the USB flash drive cannot be used, replace it with another one. The Netac
U208 (4 GB), Kingston and Sandisk USB storage devices are recommended.
Context
NOTICE
Back up the OMU data before you install the OMU operating system and product software. This
is because the OMU hard disk will be formatted during the installation of the OMU operating
system and product software using the USB flash drive, and all data will be deleted.
l This section uses the commissioning of active and standby OMUs as an example. The
commissioning operation differences between the OMU in independent mode and theOMUs in active/standby mode are described separately.
l Commissioning an OMU using a USB flash drive involves two steps: preparing the USB
flash drive and commissioning the OMU after inserting the USB flash drive into the OMU.
BSC6900 UMTS
OMU Administration Guide 6 OMU Installation and Maintenance (Dopra Linux)
Issue 02 (2015-05-08) Huawei Proprietary and Confidential
Copyright © Huawei Technologies Co., Ltd.
61

8/18/2019 Bsc6900 Umts Omu Administration Guide(v900r017c10_02)(PDF)-En
http://slidepdf.com/reader/full/bsc6900-umts-omu-administration-guidev900r017c1002pdf-en 71/310
Figure 6-4 Flowchart for commissioning the OMU using a USB flash drive
Procedure
Step 1 Prepare a USB flash drive.
1. Double-click U_creator_eng.exe to begin installing a Dopra Linux operating system on
the USB flash drive, as shown in Figure 6-5.
BSC6900 UMTS
OMU Administration Guide 6 OMU Installation and Maintenance (Dopra Linux)
Issue 02 (2015-05-08) Huawei Proprietary and Confidential
Copyright © Huawei Technologies Co., Ltd.
62

8/18/2019 Bsc6900 Umts Omu Administration Guide(v900r017c10_02)(PDF)-En
http://slidepdf.com/reader/full/bsc6900-umts-omu-administration-guidev900r017c1002pdf-en 72/310
Figure 6-5 U_creator_eng window
2. Right-click NE List in the left pane of the window shown in Figure 6-5 and choose Add
NE from the shortcut menu. A dialog box is displayed, as shown in Figure 6-6.
BSC6900 UMTS
OMU Administration Guide 6 OMU Installation and Maintenance (Dopra Linux)
Issue 02 (2015-05-08) Huawei Proprietary and Confidential
Copyright © Huawei Technologies Co., Ltd.
63

8/18/2019 Bsc6900 Umts Omu Administration Guide(v900r017c10_02)(PDF)-En
http://slidepdf.com/reader/full/bsc6900-umts-omu-administration-guidev900r017c1002pdf-en 73/310
Figure 6-6 Add NE dialog box
3. Specify NE Name, set Operating System Type to DopraLinux, set Operate type to
Install. Then click OK . An NE is added.
NOTE
l If only the operating system is to be installed on the OMU, do not select Install product software?.
If the operating system and product software are to be installed on the OMU, select Install productsoftware? and specify External Virtual IP Address of the NE to be added.
l If only the product software is to be installed on the OMU, set Operate type to Only install product
software, and specify External Virtual IP Address of the NE to be added.
l The NE name, used to identify an NE, can include only letters, numerals, dashes ("-"), and underscores
("_").
l The NE name and the virtual external IP address can be changed only after you delete the NE and then
add it again.
l If you want to prepare multiple USB flash drives, you are advised to prepare and label the USB flash
drives one by one.
4. Double-click the added NE in the left pane. The window is refreshed, as shown in Figure
6-7.
BSC6900 UMTS
OMU Administration Guide 6 OMU Installation and Maintenance (Dopra Linux)
Issue 02 (2015-05-08) Huawei Proprietary and Confidential
Copyright © Huawei Technologies Co., Ltd.
64

8/18/2019 Bsc6900 Umts Omu Administration Guide(v900r017c10_02)(PDF)-En
http://slidepdf.com/reader/full/bsc6900-umts-omu-administration-guidev900r017c1002pdf-en 74/310
Figure 6-7 Configuring information
NOTE
l The IP addresses shown in Figure 6-7 are required by the U_creator tool by default. Change the IP
addresses as required. For details about the principles of changing the IP addresses, see 3.2 OMU IP
Address Plan.
l If Operating System Type in Figure 6-6 is set to DopraLinux, select the product type in Figure
6-7 according to the product where the OMU is to be installed. The rules for checking network
segments of IP addresses vary depending on product types. For details about these rules, see 3.2 OMU
IP Address Plan.
l Select the link mode for external Ethernet adapters listed in Figure 6-7 as required. Ensure that the
link mode for external Ethernet adapters is consistent with that for the onsite LAN switch. Table
6-1 lists the mapping between the queried link mode for external Ethernet adapters and that selected
in Figure 6-7.
l If Install product software? is not selected in Step 1.3, only the names of the active and standby
OMUs and IP addresses are displayed in Figure 6-7.
l In independent OMU mode, only the active OMU configuration is effective, whereas the standby
OMU configuration is ineffective.l The new password policy is as follows:
l Passwords of admin must contain 8 to 32 characters.
l The characters must be uppercase letters, lowercase letters, digits, or special characters, or the
combination of two among these types.
l Special characters include spaces and the following characters ~!@#$%^&*()_+-{}|[]:<>?./
l Modify Debug network IP and Debug network mask based on actual conditions.
BSC6900 UMTS
OMU Administration Guide 6 OMU Installation and Maintenance (Dopra Linux)
Issue 02 (2015-05-08) Huawei Proprietary and Confidential
Copyright © Huawei Technologies Co., Ltd.
65
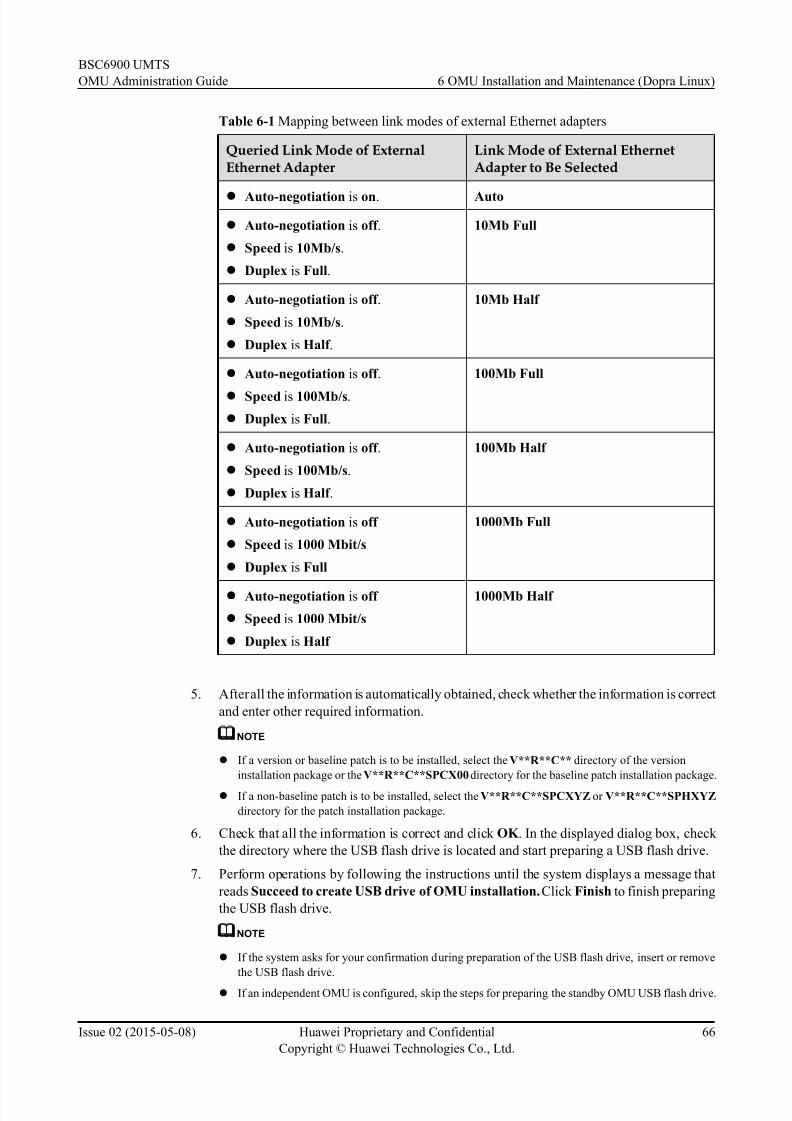
8/18/2019 Bsc6900 Umts Omu Administration Guide(v900r017c10_02)(PDF)-En
http://slidepdf.com/reader/full/bsc6900-umts-omu-administration-guidev900r017c1002pdf-en 75/310
Table 6-1 Mapping between link modes of external Ethernet adapters
Queried Link Mode of ExternalEthernet Adapter
Link Mode of External EthernetAdapter to Be Selected
l Auto-negotiation is on. Auto
l Auto-negotiation is off .
l Speed is 10Mb/s.
l Duplex is Full.
10Mb Full
l Auto-negotiation is off .
l Speed is 10Mb/s.
l Duplex is Half .
10Mb Half
l Auto-negotiation is off .
l Speed is 100Mb/s.
l Duplex is Full.
100Mb Full
l Auto-negotiation is off .
l Speed is 100Mb/s.
l Duplex is Half .
100Mb Half
l Auto-negotiation is off
l Speed is 1000 Mbit/s
l Duplex is Full
1000Mb Full
l Auto-negotiation is off
l Speed is 1000 Mbit/s
l Duplex is Half
1000Mb Half
5. After all the information is automatically obtained, check whether the information is correct
and enter other required information.
NOTE
l If a version or baseline patch is to be installed, select the V**R**C** directory of the version
installation package or the V**R**C**SPCX00 directory for the baseline patch installation package.
l If a non-baseline patch is to be installed, select the V**R**C**SPCXYZ or V**R**C**SPHXYZ
directory for the patch installation package.
6. Check that all the information is correct and click OK . In the displayed dialog box, check
the directory where the USB flash drive is located and start preparing a USB flash drive.
7. Perform operations by following the instructions until the system displays a message that
reads Succeed to create USB drive of OMU installation. Click Finish to finish preparing
the USB flash drive.
NOTE
l If the system asks for your confirmation during preparation of the USB flash drive, insert or remove
the USB flash drive.
l If an independent OMU is configured, skip the steps for preparing the standby OMU USB flash drive.
BSC6900 UMTS
OMU Administration Guide 6 OMU Installation and Maintenance (Dopra Linux)
Issue 02 (2015-05-08) Huawei Proprietary and Confidential
Copyright © Huawei Technologies Co., Ltd.
66
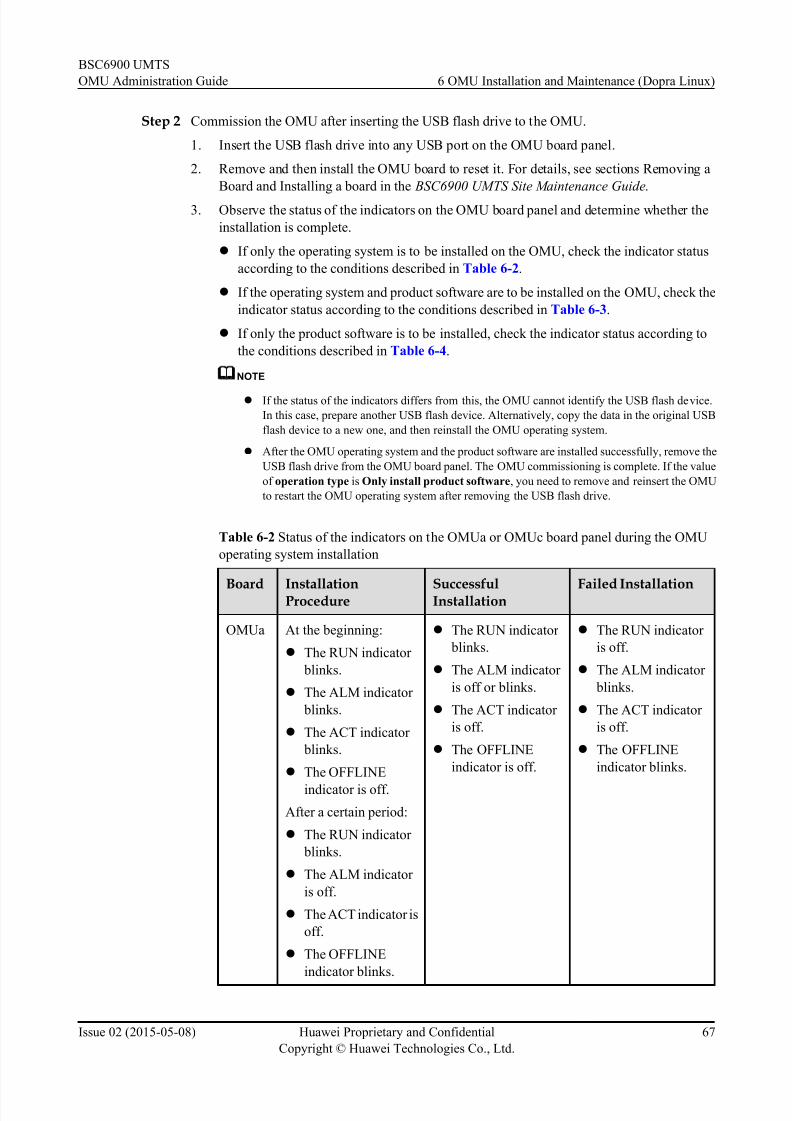
8/18/2019 Bsc6900 Umts Omu Administration Guide(v900r017c10_02)(PDF)-En
http://slidepdf.com/reader/full/bsc6900-umts-omu-administration-guidev900r017c1002pdf-en 76/310
Step 2 Commission the OMU after inserting the USB flash drive to the OMU.
1. Insert the USB flash drive into any USB port on the OMU board panel.
2. Remove and then install the OMU board to reset it. For details, see sections Removing a
Board and Installing a board in the BSC6900 UMTS Site Maintenance Guide.
3. Observe the status of the indicators on the OMU board panel and determine whether the
installation is complete.
l If only the operating system is to be installed on the OMU, check the indicator status
according to the conditions described in Table 6-2.
l If the operating system and product software are to be installed on the OMU, check the
indicator status according to the conditions described in Table 6-3.
l If only the product software is to be installed, check the indicator status according to
the conditions described in Table 6-4.
NOTE
l If the status of the indicators differs from this, the OMU cannot identify the USB flash device.
In this case, prepare another USB flash device. Alternatively, copy the data in the original USB
flash device to a new one, and then reinstall the OMU operating system.
l After the OMU operating system and the product software are installed successfully, remove the
USB flash drive from the OMU board panel. The OMU commissioning is complete. If the value
of operation type is Only install product software, you need to remove and reinsert the OMU
to restart the OMU operating system after removing the USB flash drive.
Table 6-2 Status of the indicators on the OMUa or OMUc board panel during the OMU
operating system installation
Board InstallationProcedure SuccessfulInstallation Failed Installation
OMUa At the beginning:
l The RUN indicator
blinks.
l The ALM indicator
blinks.
l The ACT indicator
blinks.
l The OFFLINE
indicator is off.
After a certain period:
l The RUN indicator
blinks.
l The ALM indicator
is off.
l The ACT indicator is
off.
l The OFFLINE
indicator blinks.
l The RUN indicator
blinks.
l The ALM indicator
is off or blinks.
l The ACT indicator
is off.
l The OFFLINE
indicator is off.
l The RUN indicator
is off.
l The ALM indicator
blinks.
l The ACT indicator
is off.
l The OFFLINE
indicator blinks.
BSC6900 UMTS
OMU Administration Guide 6 OMU Installation and Maintenance (Dopra Linux)
Issue 02 (2015-05-08) Huawei Proprietary and Confidential
Copyright © Huawei Technologies Co., Ltd.
67

8/18/2019 Bsc6900 Umts Omu Administration Guide(v900r017c10_02)(PDF)-En
http://slidepdf.com/reader/full/bsc6900-umts-omu-administration-guidev900r017c1002pdf-en 77/310
Board InstallationProcedure
SuccessfulInstallation
Failed Installation
OMUc l The RUN indicator
blinks.l The ALM indicator
blinks.
l The ACT indicator
blinks.
l The OFFLINE
indicator is off.
l The RUN indicator
blinks.l The ALM indicator
is off.
l The ACT indicator
is off.
l The OFFLINE
indicator blinks.
l The RUN indicator
is off.l The ALM indicator
blinks.
l The ACT indicator
is off.
l The OFFLINE
indicator blinks.
Table 6-3 Status of indicators on the OMUa or OMUc board panel during the OMU
operating system and product software installation
Board InstallationProcedure
SuccessfulInstallation
Failed Installation
OMUa At the beginning:
l The RUN indicator
blinks.
l The ALM indicator
blinks.
l The ACT indicator
blinks.
l The OFFLINE
indicator is off.
After a certain period:
l The RUN indicator
blinks.
l The ALM indicator
is off.
l The ACT indicator is
off.
lThe OFFLINEindicator blinks.
l The RUN indicator
blinks.
l The ALM indicator
is steady on or off.
l The ACT indicator
is steady on or off.
l The OFFLINE
indicator is off.
l The RUN indicator
blinks.
l The ALM indicator
blinks.
l The ACT indicator
is off.
l The OFFLINE
indicator is off.
OMUc l The RUN indicator
blinks.
l The ALM indicator
blinks.
l The ACT indicator
blinks.
l The OFFLINE
indicator is off.
l The RUN indicator
blinks.
l The ALM indicator
is steady on or off.
l The ACT indicator
is steady on or off.
l The OFFLINE
indicator is off.
l The RUN indicator
blinks.
l The ALM indicator
blinks.
l The ACT indicator
is off.
l The OFFLINE
indicator is off.
BSC6900 UMTS
OMU Administration Guide 6 OMU Installation and Maintenance (Dopra Linux)
Issue 02 (2015-05-08) Huawei Proprietary and Confidential
Copyright © Huawei Technologies Co., Ltd.
68
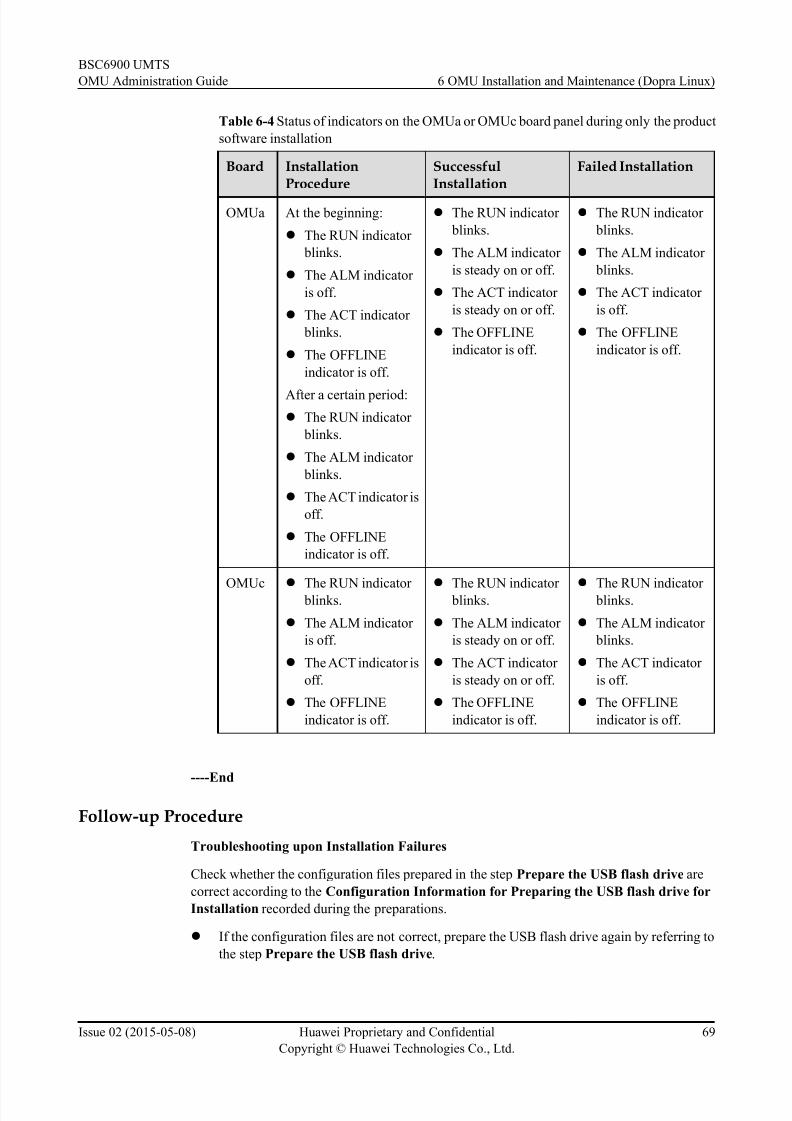
8/18/2019 Bsc6900 Umts Omu Administration Guide(v900r017c10_02)(PDF)-En
http://slidepdf.com/reader/full/bsc6900-umts-omu-administration-guidev900r017c1002pdf-en 78/310
Table 6-4 Status of indicators on the OMUa or OMUc board panel during only the product
software installation
Board InstallationProcedure
SuccessfulInstallation
Failed Installation
OMUa At the beginning:
l The RUN indicator
blinks.
l The ALM indicator
is off.
l The ACT indicator
blinks.
l The OFFLINE
indicator is off.
After a certain period:
l The RUN indicator
blinks.
l The ALM indicator
blinks.
l The ACT indicator is
off.
l The OFFLINE
indicator is off.
l The RUN indicator
blinks.
l The ALM indicator
is steady on or off.
l The ACT indicator
is steady on or off.
l The OFFLINE
indicator is off.
l The RUN indicator
blinks.
l The ALM indicator
blinks.
l The ACT indicator
is off.
l The OFFLINE
indicator is off.
OMUc l
The RUN indicator blinks.
l The ALM indicator
is off.
l The ACT indicator is
off.
l The OFFLINE
indicator is off.
l
The RUN indicator blinks.
l The ALM indicator
is steady on or off.
l The ACT indicator
is steady on or off.
l The OFFLINE
indicator is off.
l
The RUN indicator blinks.
l The ALM indicator
blinks.
l The ACT indicator
is off.
l The OFFLINE
indicator is off.
----End
Follow-up Procedure
Troubleshooting upon Installation Failures
Check whether the configuration files prepared in the step Prepare the USB flash drive are
correct according to the Configuration Information for Preparing the USB flash drive for
Installation recorded during the preparations.
l If the configuration files are not correct, prepare the USB flash drive again by referring to
the step Prepare the USB flash drive.
BSC6900 UMTS
OMU Administration Guide 6 OMU Installation and Maintenance (Dopra Linux)
Issue 02 (2015-05-08) Huawei Proprietary and Confidential
Copyright © Huawei Technologies Co., Ltd.
69
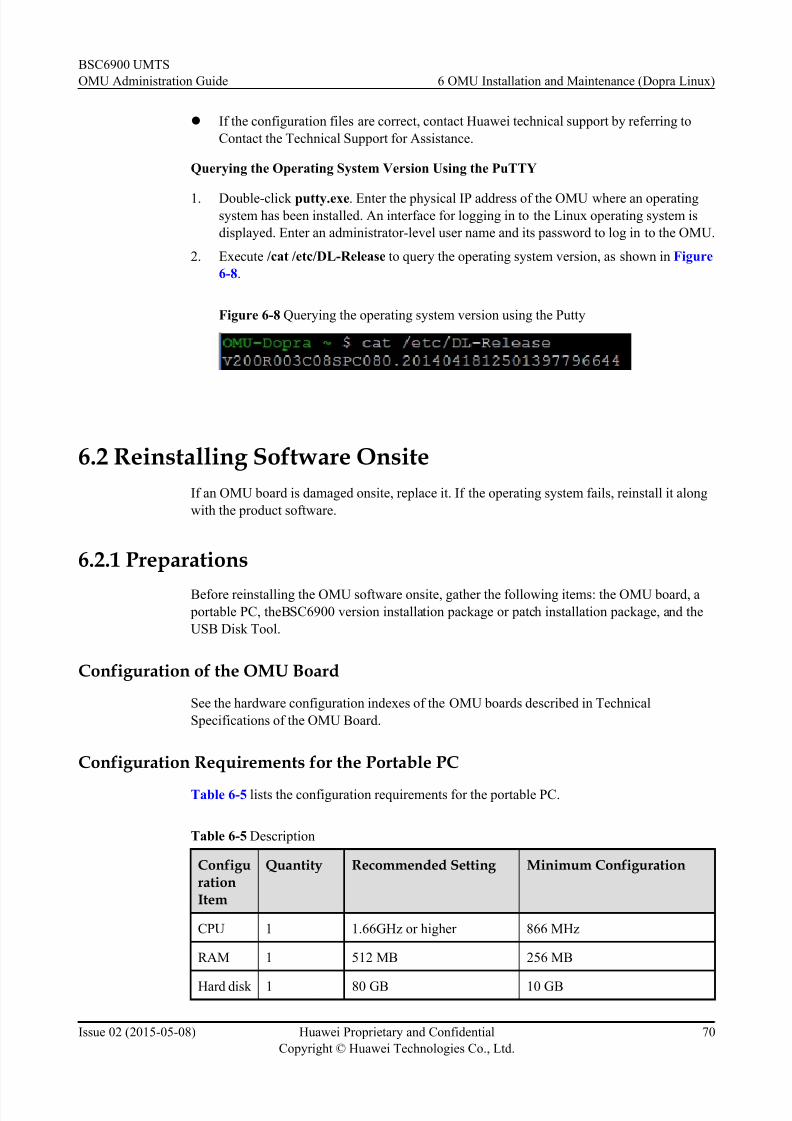
8/18/2019 Bsc6900 Umts Omu Administration Guide(v900r017c10_02)(PDF)-En
http://slidepdf.com/reader/full/bsc6900-umts-omu-administration-guidev900r017c1002pdf-en 79/310
l If the configuration files are correct, contact Huawei technical support by referring to
Contact the Technical Support for Assistance.
Querying the Operating System Version Using the PuTTY
1. Double-click putty.exe. Enter the physical IP address of the OMU where an operatingsystem has been installed. An interface for logging in to the Linux operating system is
displayed. Enter an administrator-level user name and its password to log in to the OMU.
2. Execute /cat /etc/DL-Release to query the operating system version, as shown in Figure
6-8.
Figure 6-8 Querying the operating system version using the Putty
6.2 Reinstalling Software Onsite
If an OMU board is damaged onsite, replace it. If the operating system fails, reinstall it along
with the product software.
6.2.1 Preparations
Before reinstalling the OMU software onsite, gather the following items: the OMU board, a
portable PC, theBSC6900 version installation package or patch installation package, and the
USB Disk Tool.
Configuration of the OMU Board
See the hardware configuration indexes of the OMU boards described in Technical
Specifications of the OMU Board.
Configuration Requirements for the Portable PC
Table 6-5 lists the configuration requirements for the portable PC.
Table 6-5 Description
ConfigurationItem
Quantity Recommended Setting Minimum Configuration
CPU 1 1.66GHz or higher 866 MHz
RAM 1 512 MB 256 MB
Hard disk 1 80 GB 10 GB
BSC6900 UMTS
OMU Administration Guide 6 OMU Installation and Maintenance (Dopra Linux)
Issue 02 (2015-05-08) Huawei Proprietary and Confidential
Copyright © Huawei Technologies Co., Ltd.
70
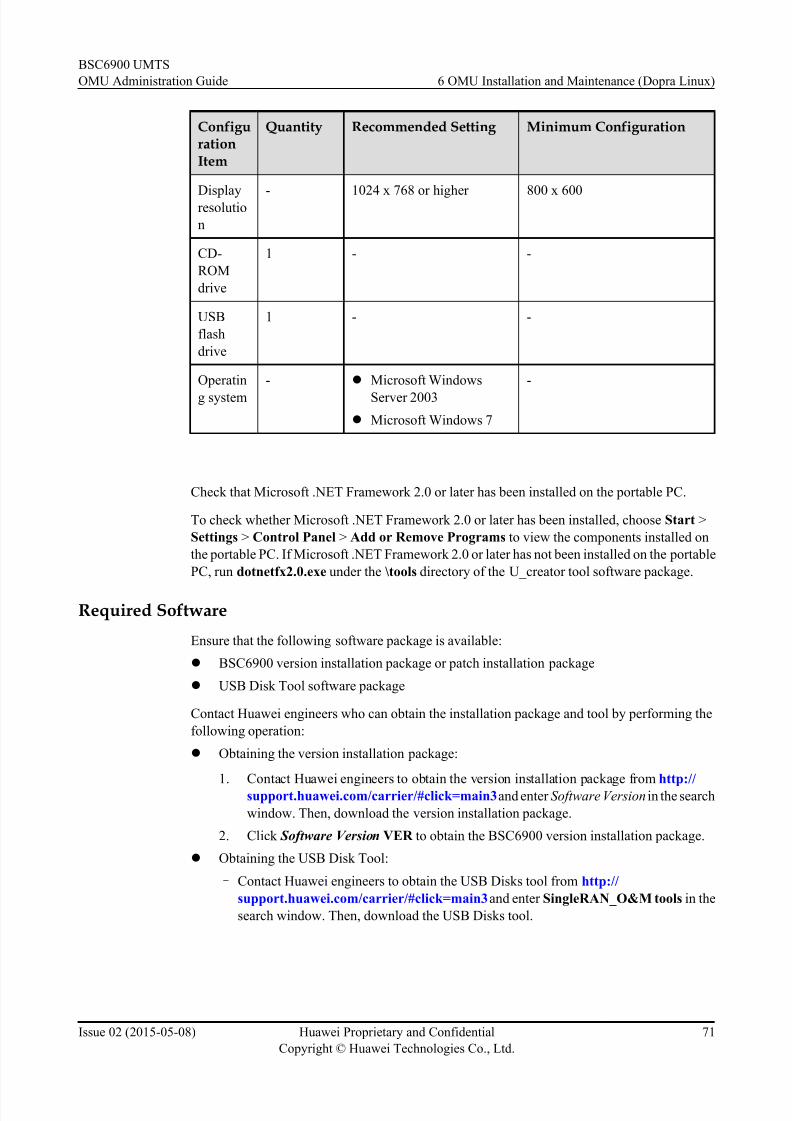
8/18/2019 Bsc6900 Umts Omu Administration Guide(v900r017c10_02)(PDF)-En
http://slidepdf.com/reader/full/bsc6900-umts-omu-administration-guidev900r017c1002pdf-en 80/310
ConfigurationItem
Quantity Recommended Setting Minimum Configuration
Displayresolutio
n
- 1024 x 768 or higher 800 x 600
CD-
ROM
drive
1 - -
USB
flash
drive
1 - -
Operatin
g system
- l Microsoft Windows
Server 2003
l Microsoft Windows 7
-
Check that Microsoft .NET Framework 2.0 or later has been installed on the portable PC.
To check whether Microsoft .NET Framework 2.0 or later has been installed, choose Start >
Settings > Control Panel > Add or Remove Programs to view the components installed on
the portable PC. If Microsoft .NET Framework 2.0 or later has not been installed on the portable
PC, run dotnetfx2.0.exe under the \tools directory of the U_creator tool software package.
Required Software
Ensure that the following software package is available:
l BSC6900 version installation package or patch installation package
l USB Disk Tool software package
Contact Huawei engineers who can obtain the installation package and tool by performing the
following operation:
l Obtaining the version installation package:
1. Contact Huawei engineers to obtain the version installation package from http://support.huawei.com/carrier/#click=main3 and enter Software Version in the search
window. Then, download the version installation package.
2. Click Software Version VER to obtain the BSC6900 version installation package.
l Obtaining the USB Disk Tool:
– Contact Huawei engineers to obtain the USB Disks tool from http://
support.huawei.com/carrier/#click=main3 and enter SingleRAN_O&M tools in the
search window. Then, download the USB Disks tool.
BSC6900 UMTS
OMU Administration Guide 6 OMU Installation and Maintenance (Dopra Linux)
Issue 02 (2015-05-08) Huawei Proprietary and Confidential
Copyright © Huawei Technologies Co., Ltd.
71
8/18/2019 Bsc6900 Umts Omu Administration Guide(v900r017c10_02)(PDF)-En
http://slidepdf.com/reader/full/bsc6900-umts-omu-administration-guidev900r017c1002pdf-en 81/310
6.2.2 Optional: Installing the Operating System and ProductSoftware
If the product software cannot work properly during the maintenance, reinstall the OMU
Operating System and product software by using the USB flash drive.
Context
l When reinstalling the product software, re-import the OMU configuration data. You must
back up the OMU data before reinstalling the product software and restore the OMU data
after the installation. For details, see Backing Up the System Data and Restoring the
System Data.
l If the OMU data cannot be backed up because the product software cannot work properly,
obtain the latest backup data for restoration.
Preparing a USB Flash Drive
This section describes how to prepare a USB flash drive to quickly install and restore the OMU
operating system.
Prerequisites
l The following operations assume that you are preparing a USB flash drive for active and
standby OMUs. Differences are specified for preparing USB flash drives for active and
standby OMUs and for an independent OMU.
l The capacity of the USB flash drive is at least 2 GB. If the BSC6900 is configured with
active and standby OMUs, two USB flash drives are required.
l The USB flash drive is inserted in a functional USB port on the portable PC.
l The portable PC has read and write rights on the USB port.
l You have obtained the planned OMU IP addresses and the OMU name and have recorded
them in Configuration Information for Preparing USB Flash Drive.
l Before preparing a USB flash drive, verify the device by referring to USB Flash Drive
Verification Guide in the directory where the USB Disk Tool is saved. If the USB flash
drive is not usable, replace it. The Netac U208 (2 GB), Kingston and Sandisk USB flash
drives are recommended.
Context
NOTICE
This function is for quickly restoring data and rectifying faults. During the process, data is
encrypted against the risk of inf ormation leakage.
BSC6900 UMTS
OMU Administration Guide 6 OMU Installation and Maintenance (Dopra Linux)
Issue 02 (2015-05-08) Huawei Proprietary and Confidential
Copyright © Huawei Technologies Co., Ltd.
72
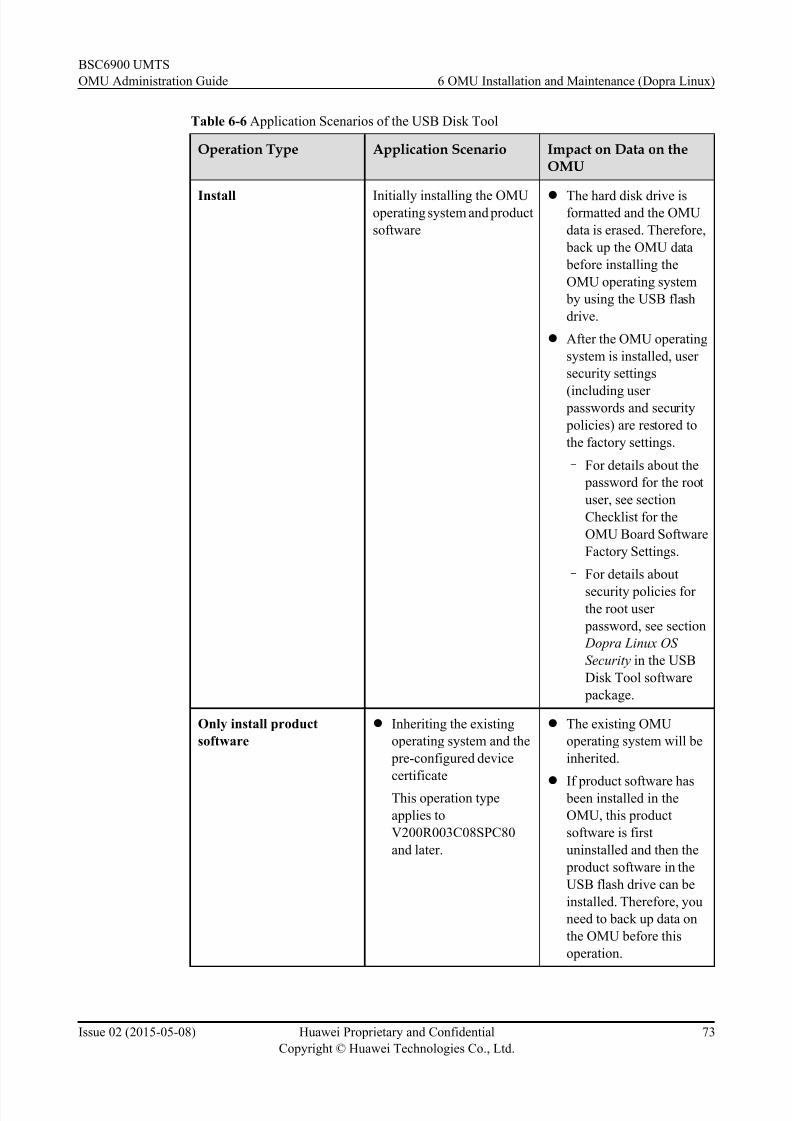
8/18/2019 Bsc6900 Umts Omu Administration Guide(v900r017c10_02)(PDF)-En
http://slidepdf.com/reader/full/bsc6900-umts-omu-administration-guidev900r017c1002pdf-en 82/310
Table 6-6 Application Scenarios of the USB Disk Tool
Operation Type Application Scenario Impact on Data on theOMU
Install Initially installing the OMUoperating system and product
software
l The hard disk drive isformatted and the OMU
data is erased. Therefore,
back up the OMU data
before installing the
OMU operating system
by using the USB flash
drive.
l After the OMU operating
system is installed, user
security settings
(including user passwords and security
policies) are restored to
the factory settings.
– For details about the
password for the root
user, see section
Checklist for the
OMU Board Software
Factory Settings.
– For details about
security policies for the root user
password, see section
Dopra Linux OS
Security in the USB
Disk Tool software
package.
Only install product
software
l Inheriting the existing
operating system and the
pre-configured device
certificate
This operation type
applies to
V200R003C08SPC80
and later.
l The existing OMU
operating system will be
inherited.
lIf product software has been installed in the
OMU, this product
software is first
uninstalled and then the
product software in the
USB flash drive can be
installed. Therefore, you
need to back up data on
the OMU before this
operation.
BSC6900 UMTS
OMU Administration Guide 6 OMU Installation and Maintenance (Dopra Linux)
Issue 02 (2015-05-08) Huawei Proprietary and Confidential
Copyright © Huawei Technologies Co., Ltd.
73
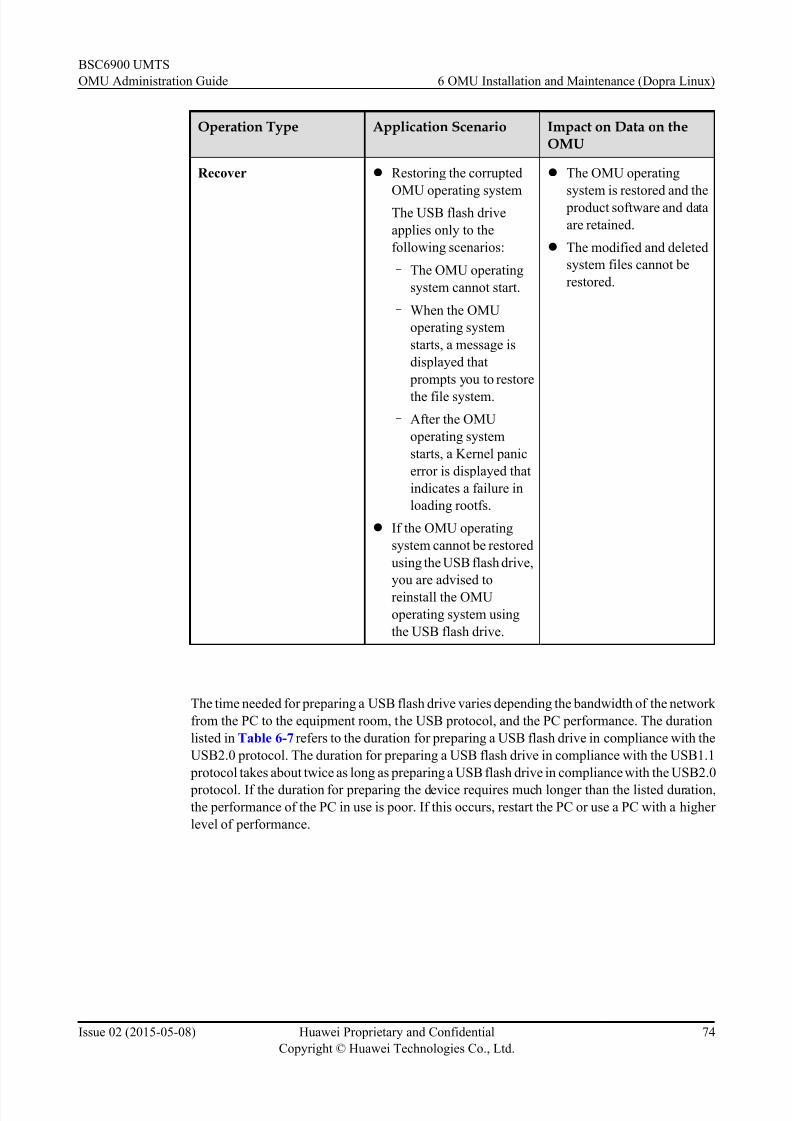
8/18/2019 Bsc6900 Umts Omu Administration Guide(v900r017c10_02)(PDF)-En
http://slidepdf.com/reader/full/bsc6900-umts-omu-administration-guidev900r017c1002pdf-en 83/310
Operation Type Application Scenario Impact on Data on theOMU
Recover l Restoring the corrupted
OMU operating systemThe USB flash drive
applies only to the
following scenarios:
– The OMU operating
system cannot start.
– When the OMU
operating system
starts, a message is
displayed that
prompts you to restore
the file system.
– After the OMU
operating system
starts, a Kernel panic
error is displayed that
indicates a failure in
loading rootfs.
l If the OMU operating
system cannot be restored
using the USB flash drive,
you are advised to
reinstall the OMU
operating system using
the USB flash drive.
l The OMU operating
system is restored and the product software and data
are retained.
l The modified and deleted
system files cannot be
restored.
The time needed for preparing a USB flash drive varies depending the bandwidth of the network
from the PC to the equipment room, the USB protocol, and the PC performance. The duration
listed in Table 6-7 refers to the duration for preparing a USB flash drive in compliance with the
USB2.0 protocol. The duration for preparing a USB flash drive in compliance with the USB1.1
protocol takes about twice as long as preparing a USB flash drive in compliance with the USB2.0
protocol. If the duration for preparing the device requires much longer than the listed duration,the performance of the PC in use is poor. If this occurs, restart the PC or use a PC with a higher
level of performance.
BSC6900 UMTS
OMU Administration Guide 6 OMU Installation and Maintenance (Dopra Linux)
Issue 02 (2015-05-08) Huawei Proprietary and Confidential
Copyright © Huawei Technologies Co., Ltd.
74

8/18/2019 Bsc6900 Umts Omu Administration Guide(v900r017c10_02)(PDF)-En
http://slidepdf.com/reader/full/bsc6900-umts-omu-administration-guidev900r017c1002pdf-en 84/310
Table 6-7 Operation and duration
Operation Duration
Prepare a USB flash drive. The duration varies based on the bandwidth
of the network from the PC to the equipmentroom.
l If the network bandwidth is 1 Mbit/s or
higher:
– When an independent OMU is
configured, the duration is 15 to 30
minutes.
– When active and standby OMUs are
configured, the duration is 30 to 50
minutes.
l If the network bandwidth is 512 kbit/s:– When an independent OMU is
configured, the duration is 25 to 50
minutes.
– When active and standby OMUs are
configured, the duration is 50 to 90
minutes.
Install, restore, or switch the OMU operating
system using a USB flash drive.
20 to 40 minutes
Only install the product software using a USB
flash drive.
20 to 40 minutes
Procedure
l Preparing the USB flash drive for initially installing the OMU operating system and product
software
1. Double-click U_creator_eng.exe to begin installing a Dopra Linux operating system
on the USB flash drive, as shown in Figure 6-9.
BSC6900 UMTS
OMU Administration Guide 6 OMU Installation and Maintenance (Dopra Linux)
Issue 02 (2015-05-08) Huawei Proprietary and Confidential
Copyright © Huawei Technologies Co., Ltd.
75
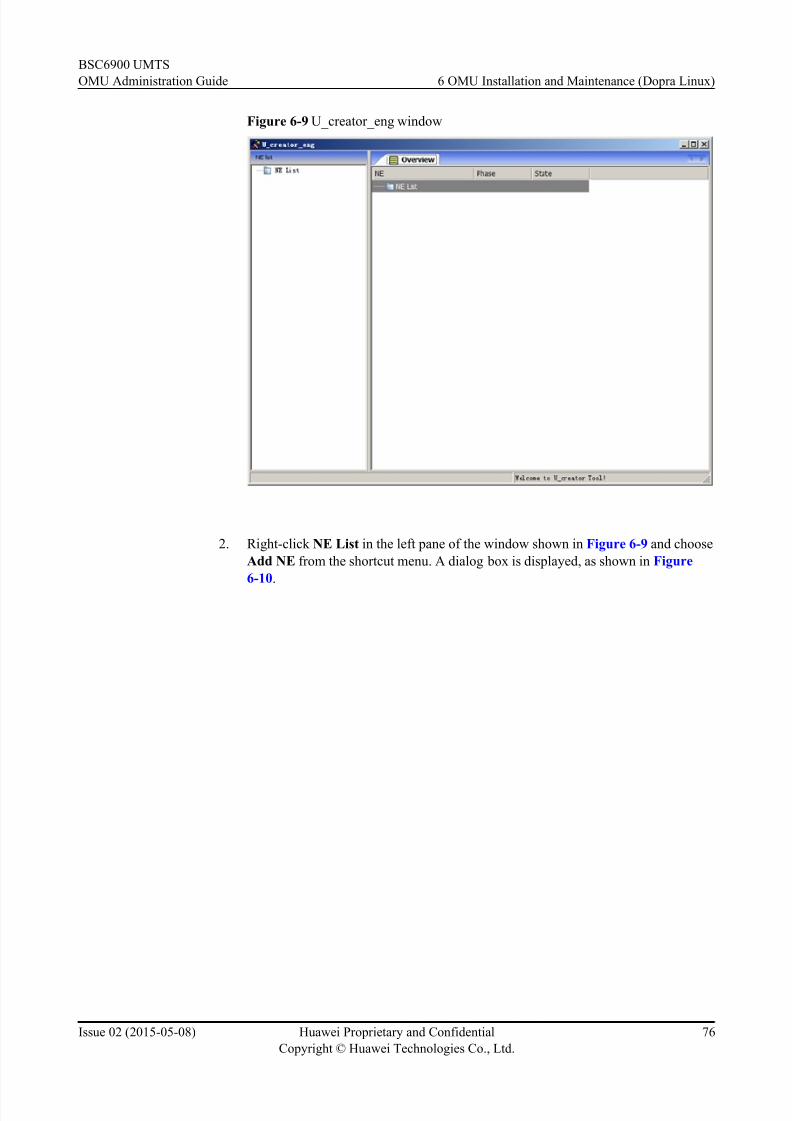
8/18/2019 Bsc6900 Umts Omu Administration Guide(v900r017c10_02)(PDF)-En
http://slidepdf.com/reader/full/bsc6900-umts-omu-administration-guidev900r017c1002pdf-en 85/310
Figure 6-9 U_creator_eng window
2. Right-click NE List in the left pane of the window shown in Figure 6-9 and choose
Add NE from the shortcut menu. A dialog box is displayed, as shown in Figure
6-10.
BSC6900 UMTS
OMU Administration Guide 6 OMU Installation and Maintenance (Dopra Linux)
Issue 02 (2015-05-08) Huawei Proprietary and Confidential
Copyright © Huawei Technologies Co., Ltd.
76

8/18/2019 Bsc6900 Umts Omu Administration Guide(v900r017c10_02)(PDF)-En
http://slidepdf.com/reader/full/bsc6900-umts-omu-administration-guidev900r017c1002pdf-en 86/310
Figure 6-10 Add NE dialog box
3. Specify NE Name, set Operating System Type to DopraLinux, set Operate type
to Install. Then click OK . An NE is added.
NOTE
l If only the operating system is to be installed on the OMU, do not select Install product
software?. If the operating system and product software are to be installed on the OMU, selectInstall product software? and specify External Virtual IP Address of the NE to be added.
l If only the product software is to be installed on the OMU, set Operate type to Only install
product software, and specify External Virtual IP Address of the NE to be added.
l The NE name, used to identify an NE, can include only letters, numerals, dashes ("-"), and
underscores ("_").
l The NE name and the virtual external IP address can be changed only after you delete the NE
and then add it again.
l If you want to prepare multiple USB flash drives, you are advised to prepare and label the USB
flash drives one by one.
4. Double-click the added NE in the left pane. The window is refreshed, as shown in
Figure 6-11.
BSC6900 UMTS
OMU Administration Guide 6 OMU Installation and Maintenance (Dopra Linux)
Issue 02 (2015-05-08) Huawei Proprietary and Confidential
Copyright © Huawei Technologies Co., Ltd.
77

8/18/2019 Bsc6900 Umts Omu Administration Guide(v900r017c10_02)(PDF)-En
http://slidepdf.com/reader/full/bsc6900-umts-omu-administration-guidev900r017c1002pdf-en 87/310
Figure 6-11 Configuring information
NOTE
l The IP addresses shown in Figure 6-11 are required by the U_creator tool by default. Change
the IP addresses as required. For details about the principles of changing the IP addresses, see
3.2 OMU IP Address Plan.
l If Operating System Type in Figure 6-10 is set to DopraLinux, select the product type in
Figure 6-11 according to the product where the OMU is to be installed. The rules for checking
network segments of IP addresses vary depending on product types. For details about these rules,
see 3.2 OMU IP Address Plan.
l Select the link mode for external Ethernet adapters listed in Figure 6-11 as required. Ensure that
the link mode for external Ethernet adapters is consistent with that for the onsite LAN switch.
Table 6-8 lists the mapping between the queried link mode for external Ethernet adapters and
that selected in Figure 6-11.
l If Install product software? is not selected in Step 3, only the names of the active and standby
OMUs and IP addresses are displayed in Figure 6-11.
l In independent OMU mode, only the active OMU configuration is effective, whereas the standby
OMU configuration is ineffective.l The new password policy is as follows:
l Passwords of admin must contain 8 to 32 characters.
l The characters must be uppercase letters, lowercase letters, digits, or special characters, or
the combination of two among these types.
l Special characters include spaces and the following characters ~!@#$%^&*()_+-{}|
[]:<>?./
l Modify Debug network IP and Debug network mask based on actual conditions.
BSC6900 UMTS
OMU Administration Guide 6 OMU Installation and Maintenance (Dopra Linux)
Issue 02 (2015-05-08) Huawei Proprietary and Confidential
Copyright © Huawei Technologies Co., Ltd.
78

8/18/2019 Bsc6900 Umts Omu Administration Guide(v900r017c10_02)(PDF)-En
http://slidepdf.com/reader/full/bsc6900-umts-omu-administration-guidev900r017c1002pdf-en 88/310
Table 6-8 Mapping between link modes of external Ethernet adapters
Queried Link Mode of ExternalEthernet Adapter
Link Mode of External EthernetAdapter to Be Selected
l Auto-negotiation is on. Auto
l Auto-negotiation is off .
l Speed is 10Mb/s.
l Duplex is Full.
10Mb Full
l Auto-negotiation is off .
l Speed is 10Mb/s.
l Duplex is Half .
10Mb Half
l Auto-negotiation is off .
l Speed is 100Mb/s.
l Duplex is Full.
100Mb Full
l Auto-negotiation is off .
l Speed is 100Mb/s.
l Duplex is Half .
100Mb Half
l Auto-negotiation is off
l Speed is 1000 Mbit/s
l Duplex is Full
1000Mb Full
l Auto-negotiation is off
l Speed is 1000 Mbit/s
l Duplex is Half
1000Mb Half
5. After all the information is automatically obtained, check whether the information is
correct and enter other required information.
NOTE
l If a version or baseline patch is to be installed, select the V**R**C** directory of the version
installation package or the V**R**C**SPCX00 directory for the baseline patch installation
package.
l If a non-baseline patch is to be installed, select the V**R**C**SPCXYZ or
V**R**C**SPHXYZ directory for the patch installation package.
6. Check that all the information is correct and click OK . In the displayed dialog box,
check the directory where the USB flash drive is located and start preparing a USB
flash drive.
7. Perform operations by following the instructions until the system displays a message
that reads Succeed to create USB drive of OMU installation. Click Finish to finish
preparing the USB flash drive.
BSC6900 UMTS
OMU Administration Guide 6 OMU Installation and Maintenance (Dopra Linux)
Issue 02 (2015-05-08) Huawei Proprietary and Confidential
Copyright © Huawei Technologies Co., Ltd.
79

8/18/2019 Bsc6900 Umts Omu Administration Guide(v900r017c10_02)(PDF)-En
http://slidepdf.com/reader/full/bsc6900-umts-omu-administration-guidev900r017c1002pdf-en 89/310
NOTE
l If the system asks for your confirmation during preparation of the USB flash drive, insert or
remove the USB flash drive.
l If an independent OMU is configured, skip the steps for preparing the standby OMU USB flash
drive.
l Preparing the USB flash drive for restoring the OMU operating system
1. Double-click U_creator_eng.exe to begin installing a Dopra Linux operating system
on the USB flash drive, as shown in Figure 6-9.
2. Right-click NE List in the left pane of the window shown in Figure 6-9 and choose
Add NE. A dialog box is displayed, as shown in Figure 6-12.
Figure 6-12 Add NE dialog box
3. Specify NE Name, set Operating System Type to DopraLinux, and set Operate
type to Restore. Then click OK . An NE is added.
BSC6900 UMTS
OMU Administration Guide 6 OMU Installation and Maintenance (Dopra Linux)
Issue 02 (2015-05-08) Huawei Proprietary and Confidential
Copyright © Huawei Technologies Co., Ltd.
80

8/18/2019 Bsc6900 Umts Omu Administration Guide(v900r017c10_02)(PDF)-En
http://slidepdf.com/reader/full/bsc6900-umts-omu-administration-guidev900r017c1002pdf-en 90/310
NOTE
l The NE name, used to identify an NE, can include only letters, numerals, dashes ("-"), and
underscores ("_").
l The name of an existing NE cannot be changed. To use another NE name, you must delete the
existing NE and then add a new NE with your desired name.
l If you want to prepare multiple USB flash drives, you are advised to prepare and label the USB
flash drives one by one.
4. Double-click the added NE in the left pane. The window is refreshed, as shown in
Figure 6-13.
Figure 6-13 Configuration information
NOTE
l The IP addresses shown in Figure 6-13 are required by the U_creator tool by default. Change
the IP addresses as required. For details about the principles of changing the IP addresses, see
3.2 OMU IP Address Plan.
l If Operating System Type in Figure 6-12 is set to DopraLinux, select the product type in
Figure 6-13 according to the product where the OMU is to be installed. The rules for checking
network segments of IP addresses vary depending on product types. For details about these rules,
see 3.2 OMU IP Address Plan.
l Select the link mode for external Ethernet adapters listed in Figure 6-13 as required. Ensure that
the link mode for external Ethernet adapters is consistent with that for the onsite LAN switch.l In independent OMU mode, only the active OMU configuration is effective, whereas the standby
OMU configuration is ineffective.
l Modify Debug network IP and Debug network mask based on actual conditions.
5. After all the information is automatically obtained, check whether the information is
correct and enter the required information.
6. Check that all the information is correct and click OK . In the displayed dialog box,
check the directory where the USB flash drive is located and start preparing a USB
flash drive.
7. Perform operations by following the instructions until the system displays a message
that reads Succeed to create USB drive of OMU installation. Click Finish to finish
preparing the USB flash drive.
BSC6900 UMTS
OMU Administration Guide 6 OMU Installation and Maintenance (Dopra Linux)
Issue 02 (2015-05-08) Huawei Proprietary and Confidential
Copyright © Huawei Technologies Co., Ltd.
81

8/18/2019 Bsc6900 Umts Omu Administration Guide(v900r017c10_02)(PDF)-En
http://slidepdf.com/reader/full/bsc6900-umts-omu-administration-guidev900r017c1002pdf-en 91/310
NOTE
l If the system asks for your confirmation during preparation of the USB flash drive, insert or
remove the USB flash drive.
l If an independent OMU is configured, skip the steps for preparing the standby OMU USB flash
drive.
l Preparing the USB flash drive for only installing the product software
1. Double-click U_creator_eng.exe to begin installing a Dopra Linux operating system
on the USB flash drive, as shown in Figure 6-9.
2. Right-click NE List in the left pane of the window shown in Figure 6-9 and choose
Add NE. A dialog box is displayed, as shown in Figure 6-14.
Figure 6-14 Add NE dialog box
3. Specify NE Name, set Operating System Type to DopraLinuxset Operating
System Type to DopraLinux, and set Operate type to Only install product
software. Then click OK . An NE is added.
BSC6900 UMTS
OMU Administration Guide 6 OMU Installation and Maintenance (Dopra Linux)
Issue 02 (2015-05-08) Huawei Proprietary and Confidential
Copyright © Huawei Technologies Co., Ltd.
82

8/18/2019 Bsc6900 Umts Omu Administration Guide(v900r017c10_02)(PDF)-En
http://slidepdf.com/reader/full/bsc6900-umts-omu-administration-guidev900r017c1002pdf-en 92/310
NOTE
l The NE name, used to identify an NE, can include only letters, numerals, dashes ("-"), and
underscores ("_").
l The name of an existing NE cannot be changed. To use another NE name, you must delete the
existing NE and then add a new NE with your desired name.
l If you want to prepare multiple USB flash drives, you are advised to prepare and label the USB
flash drives one by one.
4. Double-click the added NE in the left pane. The window is refreshed, as shown in
Figure 6-15.
Figure 6-15 Configuration information
NOTE
l The IP addresses shown in Figure 6-15 are required by the U_creator tool by default. Change
the IP addresses as required. For details about the principles of changing the IP addresses, see3.2 OMU IP Address Plan.
l If Operating System Type in Figure 6-14 is set to DopraLinux, select the product type in
Figure 6-15 according to the product where the OMU is to be installed. The rules for checking
network segments of IP addresses vary depending on product types. For details about these rules,
see 3.2 OMU IP Address Plan.
l Select the link mode for external Ethernet adapters listed in Figure 6-15 as required. Ensure that
the link mode for external Ethernet adapters is consistent with that for the onsite LAN switch.
l In independent OMU mode, only the active OMU configuration is effective, whereas the standby
OMU configuration is ineffective.
l Modify Debug network IP and Debug network mask based on actual conditions.
5. After all the information is automatically obtained, check whether the information is
correct and enter the required information.
BSC6900 UMTS
OMU Administration Guide 6 OMU Installation and Maintenance (Dopra Linux)
Issue 02 (2015-05-08) Huawei Proprietary and Confidential
Copyright © Huawei Technologies Co., Ltd.
83

8/18/2019 Bsc6900 Umts Omu Administration Guide(v900r017c10_02)(PDF)-En
http://slidepdf.com/reader/full/bsc6900-umts-omu-administration-guidev900r017c1002pdf-en 93/310
6. Check that all the information is correct and click OK . In the displayed dialog box,
check the directory where the USB flash drive is located and start preparing a USB
flash drive.
7. Perform operations by following the instructions until the system displays a message
that reads Succeed to create USB drive of OMU installation. Click Finish to finish preparing the USB flash drive.
NOTE
l If the system asks for your confirmation during preparation of the USB flash drive, insert or
remove the USB flash drive.
l If an independent OMU is configured, skip the steps for preparing the standby OMU USB flash
drive.
----End
Installing the OMU Operating System Using a USB Flash Drive
This section describes how to use a USB flash drive to install, restore the OMU operating system
or only install the product software.
Prerequisites
l The USB flash drive is prepared. For details, see Preparing a USB Flash Drive.
l There are USB ports available on the OMU board panel. The USB flash drive with an
indicator is inserted into the USB port. If the indicator is on, the USB port is available.
Procedure
Step 1 Insert the USB flash drive into any of the USB ports on the OMU board panel.
Step 2 Remove and then reinstall the OMU board to reset the OMU.
NOTE
Press and hold the two locking buttons, flip the ejector levers out on the OMU board panel to unlock them,
and rotate them outward. The OMU board is separated from the backplane. Remove the OMU board after
the OFFLINE indicator blinks fast and then is steady blue.
Step 3 Wait 1 to 2 minutes and then use the USB flash drive to install the OMU operating system. Check
the status of indicators on the OMU board panel to determine whether the OMU operating system
is installed successfully.
l If only the operating system is to be installed on the OMU, check the indicator status. SeeTable 6-9.
l If the OMU operating system is to be restored, check the indicator status. See Table 6-10.
l If the operating system and product software are to be installed on the OMU, check the
indicator status. See Table 6-11.
l If only the product software is to be installed, check the indicator status. See Table 6-12
BSC6900 UMTS
OMU Administration Guide 6 OMU Installation and Maintenance (Dopra Linux)
Issue 02 (2015-05-08) Huawei Proprietary and Confidential
Copyright © Huawei Technologies Co., Ltd.
84

8/18/2019 Bsc6900 Umts Omu Administration Guide(v900r017c10_02)(PDF)-En
http://slidepdf.com/reader/full/bsc6900-umts-omu-administration-guidev900r017c1002pdf-en 94/310
NOTE
l If the status of the indicators differs from this, the OMU cannot identify the USB flash drive. When this
occurs, prepare another USB flash drive. Alternatively, copy the data in the original USB flash drive to a
new USB flash drive, and then reinstall the OMU operating system.
l For details about the time needed for the OMU operating system installation, see Table 1 in Preparing aUSB Flash Drive.
l After the OMU operating system is installed successfully, remove the USB flash drive from the OMU board
panel in a timely manner. If the operation type is Only install product software, after removing the USB
flash drive, remove and reinsert the OMU to restart the OMU operating system .
l After the OMU operating system is restored using a USB flash drive, the password changes to the default
value.
l If the version of the OMU operating system is V200R003C02SPC090 or later, log in to the active OMU
as user lgnusr, whose initial password is osnormal@123. Do not log in to the OMU as user root. After
the login succeeds, you can run the su command to switch to user root, whose initial password is
osadmin@123.
l If the version of the OMU operating system is earlier than V200R003C02SPC090, log in to the active
OMU as user root, whose initial password is mbsc@com, 11111111, or huawei.
l If you do not know the version of the OMU operating system, try to log in to the active OMU first as
user lgnusr and then user root.
Table 6-9 Status of the indicators on the OMUa or OMUc board panel during the OMU operating
system installation
Board Installation Procedure SuccessfulInstallation
Failed Installation
OMUa At the beginning:
l The RUN indicator
blinks.
l The ALM indicator
blinks.
l The ACT indicator
blinks.
l The OFFLINE
indicator is off.
After a certain period:
l The RUN indicator
blinks.l The ALM indicator is
off.
l The ACT indicator is
off.
l The OFFLINE
indicator blinks.
l The RUN indicator
blinks.
l The ALM indicator is
off or blinks.
l The ACT indicator is
off.
l The OFFLINE
indicator is off.
l The RUN indicator is
off.
l The ALM indicator
blinks.
l The ACT indicator is
off.
l The OFFLINE
indicator blinks.
BSC6900 UMTS
OMU Administration Guide 6 OMU Installation and Maintenance (Dopra Linux)
Issue 02 (2015-05-08) Huawei Proprietary and Confidential
Copyright © Huawei Technologies Co., Ltd.
85

8/18/2019 Bsc6900 Umts Omu Administration Guide(v900r017c10_02)(PDF)-En
http://slidepdf.com/reader/full/bsc6900-umts-omu-administration-guidev900r017c1002pdf-en 95/310
Board Installation Procedure SuccessfulInstallation
Failed Installation
OMUc l The RUN indicator
blinks.l The ALM indicator
blinks.
l The ACT indicator
blinks.
l The OFFLINE
indicator is off.
l The RUN indicator
blinks.l The ALM indicator is
off.
l The ACT indicator is
off.
l The OFFLINE
indicator blinks.
l The RUN indicator is
off.l The ALM indicator
blinks.
l The ACT indicator is
off.
l The OFFLINE
indicator blinks.
Table 6-10 Status of the indicators on the OMUa or OMUc board panel during the OMU
operating system restore
Board Installation Procedure SuccessfulInstallation
Failed Installation
OMUa At the beginning:
l The RUN indicator
blinks.
l The ALM indicator
blinks.
l The ACT indicator
blinks.
l The OFFLINE
indicator blinks.
After a certain period:
l The RUN indicator
blinks.
l The ALM indicator
blinks.
l The ACT indicator is
off.
lThe OFFLINEindicator is off.
l The RUN indicator
blinks.
l The ALM indicator is
steady on or off.
l The ACT indicator is
steady on or off.
l The OFFLINE
indicator is off.
l The RUN indicator
blinks.
l The ALM indicator
blinks.
l The ACT indicator is
off.
l The OFFLINE
indicator is off.
OMUc l The RUN indicator
blinks.
l The ALM indicator
blinks.
l The ACT indicator
blinks.
l The OFFLINE
indicator blinks.
l The RUN indicator
blinks.
l The ALM indicator is
steady on or off.
l The ACT indicator is
steady on or off.
l The OFFLINE
indicator is off.
l The RUN indicator
blinks.
l The ALM indicator
blinks.
l The ACT indicator is
off.
l The OFFLINE
indicator is off.
BSC6900 UMTS
OMU Administration Guide 6 OMU Installation and Maintenance (Dopra Linux)
Issue 02 (2015-05-08) Huawei Proprietary and Confidential
Copyright © Huawei Technologies Co., Ltd.
86

8/18/2019 Bsc6900 Umts Omu Administration Guide(v900r017c10_02)(PDF)-En
http://slidepdf.com/reader/full/bsc6900-umts-omu-administration-guidev900r017c1002pdf-en 96/310
Table 6-11 Status of indicators on the OMUa or OMUc board panel during the OMU operating
system and product software installation
Board Installation Procedure SuccessfulInstallation
Failed Installation
OMUa At the beginning:
l The RUN indicator
blinks.
l The ALM indicator
blinks.
l The ACT indicator
blinks.
l The OFFLINE
indicator is off.
After a certain period:
l The RUN indicator
blinks.
l The ALM indicator is
off.
l The ACT indicator is
off.
l The OFFLINE
indicator blinks.
l The RUN indicator
blinks.
l The ALM indicator is
steady on or off.
l The ACT indicator is
steady on or off.
l The OFFLINE
indicator is off.
l The RUN indicator
blinks.
l The ALM indicator
blinks.
l The ACT indicator is
off.
l The OFFLINE
indicator is off.
OMUc l
The RUN indicator blinks.
l The ALM indicator
blinks.
l The ACT indicator
blinks.
l The OFFLINE
indicator is off.
l
The RUN indicator blinks.
l The ALM indicator is
steady on or off.
l The ACT indicator is
steady on or off.
l The OFFLINE
indicator is off.
l
The RUN indicator blinks.
l The ALM indicator
blinks.
l The ACT indicator is
off.
l The OFFLINE
indicator is off.
BSC6900 UMTS
OMU Administration Guide 6 OMU Installation and Maintenance (Dopra Linux)
Issue 02 (2015-05-08) Huawei Proprietary and Confidential
Copyright © Huawei Technologies Co., Ltd.
87
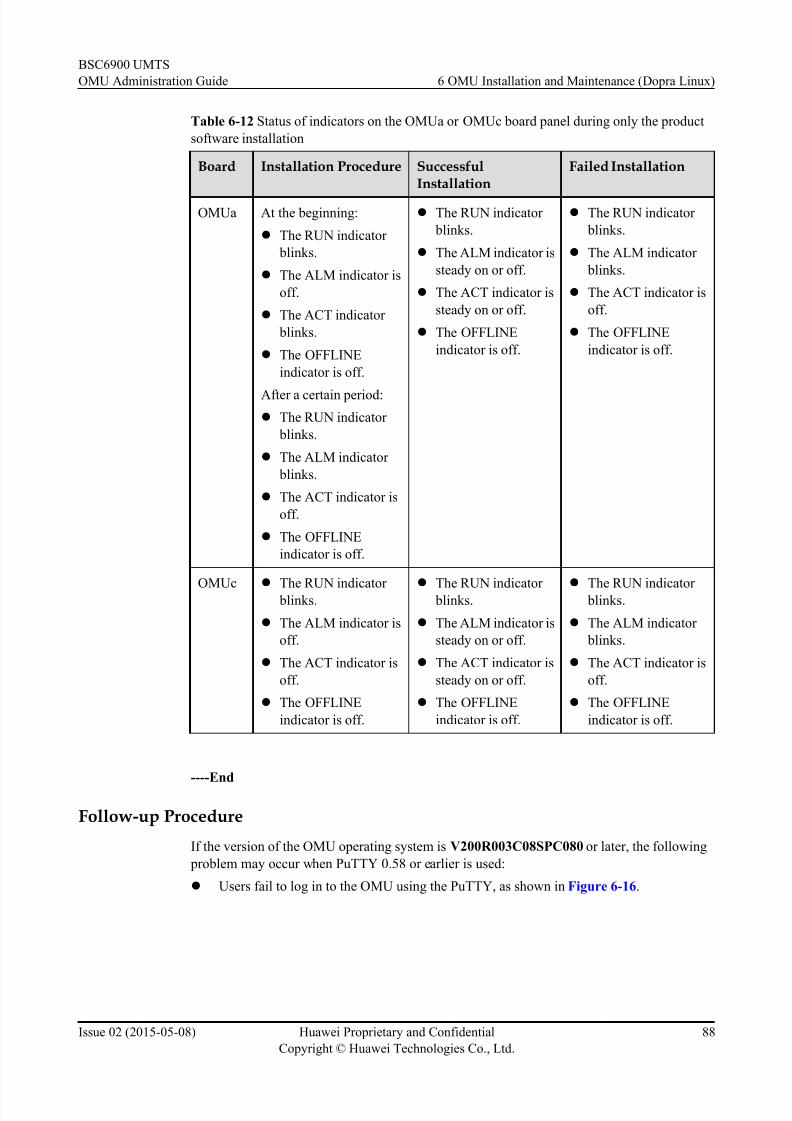
8/18/2019 Bsc6900 Umts Omu Administration Guide(v900r017c10_02)(PDF)-En
http://slidepdf.com/reader/full/bsc6900-umts-omu-administration-guidev900r017c1002pdf-en 97/310
Table 6-12 Status of indicators on the OMUa or OMUc board panel during only the product
software installation
Board Installation Procedure SuccessfulInstallation
Failed Installation
OMUa At the beginning:
l The RUN indicator
blinks.
l The ALM indicator is
off.
l The ACT indicator
blinks.
l The OFFLINE
indicator is off.
After a certain period:
l The RUN indicator
blinks.
l The ALM indicator
blinks.
l The ACT indicator is
off.
l The OFFLINE
indicator is off.
l The RUN indicator
blinks.
l The ALM indicator is
steady on or off.
l The ACT indicator is
steady on or off.
l The OFFLINE
indicator is off.
l The RUN indicator
blinks.
l The ALM indicator
blinks.
l The ACT indicator is
off.
l The OFFLINE
indicator is off.
OMUc l
The RUN indicator blinks.
l The ALM indicator is
off.
l The ACT indicator is
off.
l The OFFLINE
indicator is off.
l
The RUN indicator blinks.
l The ALM indicator is
steady on or off.
l The ACT indicator is
steady on or off.
l The OFFLINE
indicator is off.
l
The RUN indicator blinks.
l The ALM indicator
blinks.
l The ACT indicator is
off.
l The OFFLINE
indicator is off.
----End
Follow-up Procedure
If the version of the OMU operating system is V200R003C08SPC080 or later, the following
problem may occur when PuTTY 0.58 or earlier is used:
l Users fail to log in to the OMU using the PuTTY, as shown in Figure 6-16.
BSC6900 UMTS
OMU Administration Guide 6 OMU Installation and Maintenance (Dopra Linux)
Issue 02 (2015-05-08) Huawei Proprietary and Confidential
Copyright © Huawei Technologies Co., Ltd.
88

8/18/2019 Bsc6900 Umts Omu Administration Guide(v900r017c10_02)(PDF)-En
http://slidepdf.com/reader/full/bsc6900-umts-omu-administration-guidev900r017c1002pdf-en 98/310
Figure 6-16 Error information displayed upon PuTTY login failures
For details about how to obtain and use the latest PuTTY software to log in to the OMU, see
PuTTY Software.
If the OMU operating system fails to be installed, perform the following operations:
1. Prepare a new USB flash drive. For details, see Preparing a USB Flash Drive. Then,
reinstall the OMU operating system again.
l If the OMU operating system is installed successfully, no further action is required.
l If the OMU operating system fails to be installed, Contact the Technical Support for
Assistance.
If you use the USB flash drive to restore the OMU operating system, check whether the following
operations need to be performed:
l After the OMU operating system is restored, the setting on the original operating system
will become ineffective for disabling the remote login function of user root. Enable the
function by referring to 9.3 Disabling Root User Login to an OMU Using SSH.
6.2.3 Optional: Installing the Product Software
If product software cannot work properly during maintenance, use the product software
installation file in the version package.
Context
l When reinstalling the product software, re-import the OMU configuration data. You must
back up the OMU data before reinstalling the product software and restore the OMU data
after the installation. For details, see Backing Up the System Data and Restoring the
System Data.
l If the OMU data cannot be backed up because the product software cannot work properly,
obtain the latest backup data for restoration.
l When installing the product software for the first time, the product software can be installed
only on the active workspace of the OMU, and the OMU data does not need to be backed
up.
l This section uses the version installation package named V900R017C10 as an example to
illustrate how to install the product software.
BSC6900 UMTS
OMU Administration Guide 6 OMU Installation and Maintenance (Dopra Linux)
Issue 02 (2015-05-08) Huawei Proprietary and Confidential
Copyright © Huawei Technologies Co., Ltd.
89

8/18/2019 Bsc6900 Umts Omu Administration Guide(v900r017c10_02)(PDF)-En
http://slidepdf.com/reader/full/bsc6900-umts-omu-administration-guidev900r017c1002pdf-en 99/310
CAUTION
l After an upgrade, record the IP addresses on the live network before installing the product
software. After the product software is installed, reconfigure the IP addresses or recover themto the original IP addresses.
l If a patch has been installed on the original NE, before installing the new product software,
delete old patch files in the patch folder in the product software installation package, and
copy the patch installation package (for example, the V900R01XC0XSPCXXX folder) saved
on the local PC to the patch folder. When the new product software is installed successfully,
the patch installation is complete.
l If the active workspace version is V900R017C10 or later, versions earlier than
V900R017C10 cannot be installed on the standby workspace.
Obtaining Information About Product Software Installation
Before installing the product software, you should obtain the password for the administrator of
the OMU operating system and the IP addresses of the Ethernet adapter teams.
Procedure
Step 1 Before you install the product software, obtain the following information. For details, see 6.5.1
Information Records of OMU Software Installation.
l Password of the operating system administrator
l External fixed IP address, external virtual IP address, and commissioning IP address of the
OMU
----End
Uploading the Product Software Installation Package to the OMU
Before installing the product software, upload the product software package to the specified
directory of the OMU.
Prerequisitesl Contact Huawei engineers to obtain the version installation package or patch installation
package from http://support.huawei.com/carrier/#click=main3 and enter Software
Version in the search window. Then, download the version installation package or patch
installation package.
l You have obtained the psftp. For details about the psftp, see 6.4.1 Obtaining and Using
the psftp Software.
Context
l The product software installation package must be uploaded to the /mbsc/upgrade/
software/upgrade directory of the OMU.
BSC6900 UMTS
OMU Administration Guide 6 OMU Installation and Maintenance (Dopra Linux)
Issue 02 (2015-05-08) Huawei Proprietary and Confidential
Copyright © Huawei Technologies Co., Ltd.
90

8/18/2019 Bsc6900 Umts Omu Administration Guide(v900r017c10_02)(PDF)-En
http://slidepdf.com/reader/full/bsc6900-umts-omu-administration-guidev900r017c1002pdf-en 100/310
l The product software installation package must be named after the version number. That
is, after the product software installation package is uploaded to the OMU, the directory of
the installation package on OMU is "/mbsc/upgrade//software/upgrade/V900R017C10."
l If patches also need to be installed, check whether the original patch files exist in the
patch folder in the product software installation package before installing the productsoftware. If yes, delete the original patch files in the patch folder in the product software
installation package, and copy the patch installation package (for example, the
V900R01XC0XSPCXXX folder) saved on the local computer.
l If you need to delete the patch files V900R01XC0XSPCXXX in the patch directory,
navigate to the /mbsc/upgrade/V900R017C00/patch directory and then run rm -r
\V900R01XC0XSPCXXX.
l During the uploading, if user root cannot log in to the OMU, check with the equipment
room operators to determine whether the 9.3 Disabling Root User Login to an OMU
Using SSH function has been enabled on BSC6900. If it has, log in to the OMU as user
lgnusr or a common user, and then continue with the uploading task.
l As an example, this task uploads the V900R017C10 version installation package to the /
mbsc/upgrade directory of the OMU and downloads version files from http://
support.huawei.com/support/ to local drive D.
l For the default user name, password, and active/standby IP address of the external network
adapter at a new site, see 6.5.2 Checklist for the OMU Software Factory Settings. For
live network maintenance, contact the device administrator.
l The operation rights of lgnusr users, common users, and root users are different, so the
operations performed by the three types of users differ slightly, as shown in Figure 6-17.
Figure 6-17 Operation procedure
BSC6900 UMTS
OMU Administration Guide 6 OMU Installation and Maintenance (Dopra Linux)
Issue 02 (2015-05-08) Huawei Proprietary and Confidential
Copyright © Huawei Technologies Co., Ltd.
91
8/18/2019 Bsc6900 Umts Omu Administration Guide(v900r017c10_02)(PDF)-En
http://slidepdf.com/reader/full/bsc6900-umts-omu-administration-guidev900r017c1002pdf-en 101/310
Procedure
l Log in to the OMU as user lgnusr and upload the product software package to the OMU.
1. Decompress the BSC6900 version installation package to a local drive D.
2. Log in to the OMU as user lgnusr by using psftp. For details, see 6.4.1 Obtaining
and Using the psftp Software.
3. Enter lcd D:\ to navigate to the local directory where version files are saved.
4. Enter cd /home/lgnusr to switch to the directory of user lgnusr.
NOTE
The default directory of user lgnusr is /home/lgnusr. User lgnusr has read/write permissions on
this directory.
5. Enter put -r V900R017C10 to upload files.
6. After files are uploaded, enter exit to exit psftp.
7. Log in to the OMU as user lgnusr by using the PuTTY and switch to user root. For
details, see 6.3.1 Logging In to the OMU.
8. Enter ls /mbsc/upgrade to query whether there is the /mbsc/upgrade directory on
the OMU.
– If the /mbsc/upgrade directory does not exist, go to Step 9.
– If the /mbsc/upgrade directory exists, go to Step 10.
9. Enter mkdir /mbsc/upgrade to create the installation directory on the OMU.
NOTE
Run the commands mkdir /mbsc and mkdir /mbsc/upgrade in sequence to create the /mbsc/
upgrade directory hierarchically.
10. Enter cp /home/lgnusr/V900R017C00 -r /mbsc/upgrade/ to copy the installation
package under the /home/lgnusr directory to the OMU installation directory.
11. Enter exit and press Enter to exit PuTTY.
l Logging in to the OMU as a common user and uploading the product software installation
package to the OMU
1. Log in to the OMU as a common user by using the PuTTY and switch to user root.
For details, see 6.3.1 Logging In to the OMU.
2. Enter path=`grep xxx /etc/passwd | cut -d:-f 6`; if [ !-d $path ] ; then mkdir -p$path; chown xxx $path; fi to create a common user information file directory.
NOTE
In the command above, xxx indicates the name of a common user.
3. Enter cat /etc/passwd to query all the common user file directories.
NOTE
If the queried result is omcuser:x:1001:100::/home/omcuser:/bin/bash, the user files directory for
omcuser is /home/omcuser. In later operations, the /home/omcuser directory of the common user
omcuser is used as an example.
4. Enter exit to log out of PuTTY.
5. Decompress the BSC6900 version installation package to the local drive D.
BSC6900 UMTS
OMU Administration Guide 6 OMU Installation and Maintenance (Dopra Linux)
Issue 02 (2015-05-08) Huawei Proprietary and Confidential
Copyright © Huawei Technologies Co., Ltd.
92
8/18/2019 Bsc6900 Umts Omu Administration Guide(v900r017c10_02)(PDF)-En
http://slidepdf.com/reader/full/bsc6900-umts-omu-administration-guidev900r017c1002pdf-en 102/310
6. Log in to the OMU as a common user by using the psftp software.
7. Enter lcd D:\ to log in to the local directory for version files.
8. Enter cd /home/omcuser to go to the user file directory of the common user
omcuser.
9. Enter put -r V900R017C10 to upload the product software installation package to the
OMU.
10. After the uploading is complete, enter exit to exit the psftp software.
11. Repeat Step 1 to log in to the OMU as a common user and switch the account from a
common user to user root.
12. Enter ls /mbsc/upgrade to check whether there is an installation directory on the
OMU.
– If the /mbsc/upgrade directory does not exist, go to Step 13.
– If the /mbsc/upgrade directory exists, go to Step 14.
13. Enter mkdir /mbsc/upgrade to create then installation directory on the OMU.
NOTE
Run the commands mkdir /mbscmkdir /software and mkdir /mbsc/upgrade in sequence to create
the /mbsc/upgrade directory hierarchically.
14. Enter cp /home/omcuser/V900R017C00 -r /mbsc/upgrade/ and copy the version
installation package under the /home/omcuser directory to the OMU installation
directory.
15. Enter exit to log out of the PuTTY.
l Logging in to the OMU as user root and uploading the product software installation pack age
to the OMU
NOTE
If you fail to log in to the OMU as user lgnusr or a common user, log in to the OMU as user root.
1. Decompress the BSC6900 version installation package to the local drive D.
2. Log in to the OMU as user root by using the psftp. For details, see 6.4.1 Obtaining
and Using the psftp Software.
3. Enter lcd D:\ to go to the directory on the local PC where the version files are saved.
4. Enter ls /mbsc/upgrade to query whether there is an installation directory on the
OMU.
– If the /mbsc/upgrade directory does not exist, go to Step 5.
–If the /mbsc/upgrade directory exists, go to Step 6.
5. Enter mkdir /mbsc/upgrade to create the installation directory on the OMU.
NOTE
Run the commands mkdir /mbsc and mkdir /mbsc/upgrade in sequence to create the /mbsc/
upgrade directory hierarchically.
6. Enter cd /mbsc/upgrade to go to the OMU installation directory.
7. Enter put -r V900R017C00 to upload the product software installation package to
the OMU.
NOTE
If the package fails to be uploaded, check whether any file with the same name as the package nameis in use. If there is such a file, release it.
BSC6900 UMTS
OMU Administration Guide 6 OMU Installation and Maintenance (Dopra Linux)
Issue 02 (2015-05-08) Huawei Proprietary and Confidential
Copyright © Huawei Technologies Co., Ltd.
93

8/18/2019 Bsc6900 Umts Omu Administration Guide(v900r017c10_02)(PDF)-En
http://slidepdf.com/reader/full/bsc6900-umts-omu-administration-guidev900r017c1002pdf-en 103/310
8. After the uploading is complete, enter exit to exist the psftp software.
----End
Installing the Product Software in the Active WorkspaceThis section describes how to install the product software in the active workspace. If the
BSC6900 is configured with active and standby OMU boards, install the product software in the
active workspace of each individual board.
Prerequisites
l Obtained information about OMU software installation.
l Uploaded the product software installation package to the OMU.
Context
The software integrity of the product software is checked before it is installed. The product
software can be installed only if the check passes.
The admin password is the initial password for the administrator to log in to the LMT. The FTP
password is customized. After the product software is installed, you can access the FTP service
with the FTP password.
If product software has been pre-installed on active and standby OMU boards, uninstall them
before installing the product software of a correct version. To check whether product software
has been pre-installed, do as follows:
1. Log in to the OMU by using the external fixed IP address or commissioning IP address.
For details, see 6.3.1 Logging In to the OMU.
2. Enter cd /etc/ssh/ to go to the target directory.
3. Enter ls to switch to the current directory.
l If the omud file is in the directory, product software has been pre-installed. Uninstall
it following steps in Uninstalling the Product Software.
l If the omud file is not in the directory, product software has not been pre-installed.
Install it following the steps provided below.
4. Enter the exit command to close the PuTTY.
Procedure
Step 1 Use the external fixed IP address or commissioning IP address to log in to the OMU by referring
to 6.3.1 Logging In to the OMU, and navigate to the directory where the product software
installation package is saved.
Assume that the product software installation package install_bam.sh is saved in /mbsc/
upgrade/V***R***C**/install/setup. Enter the following command:cd /mbsc/upgrade/V***R***C**/install/setup
Step 2 Enter chmod +x ./install_bam.sh to obtain the permission to run ./install_bam.sh.
Step 3 Enter ./install_bam.sh.
Step 4The system prompts you to type the product running mode. Type the product running mode and
press Enter.
BSC6900 UMTS
OMU Administration Guide 6 OMU Installation and Maintenance (Dopra Linux)
Issue 02 (2015-05-08) Huawei Proprietary and Confidential
Copyright © Huawei Technologies Co., Ltd.
94

8/18/2019 Bsc6900 Umts Omu Administration Guide(v900r017c10_02)(PDF)-En
http://slidepdf.com/reader/full/bsc6900-umts-omu-administration-guidev900r017c1002pdf-en 104/310
[2011-05-03 10:12:32] software integrality verify begin...
[2011-05-03 10:12:42] software integrality verify end...
# The run mode of the product
# GO:GSM only
# UO:UMTS only
# GU:GSM and UMTS# Please select one mode to install.
Please input a valid run_mode :
Step 5 The system prompts you to type the office name. Type the office name and press Enter.
# The name of office
# The name suggest range from 5 to 32 characters.
# The characters suggest be letters, digits, "-"or "_".
Please input a valid office_name :
Step 6 The system prompts you to type the language version. Type the language version and press
Enter.
# The OMU language version. eg: eng/chs
Please input a valid version :
Step 7 The system prompts you to type the admin password. Type the admin password, confirm it, and
press Enter.
# The "admin" user's password of OMU service.
# The password must range from 8 to 32(characters).The characters must be uppercase
letters, lowercase letters, digits, or special characters.
Special characters include spaces and the following characters:~!@#$%^&*()_+-{}|
[]:<>?./
The password must consist of 2 types of uppercase letter,lowercase letter,digit or
special character at least.
# Do not forget the password.
# You can change the password later, but this password should be provided first.
Please input a valid admin_password :
Please input a valid Confirm password :
Step 8 The system prompts you to type the FTP password. Type the FTP password, confirm it, and
press Enter.
# The ftp user's password of OMU service
# The password must range from 8 to 32(characters).The characters must be uppercase
letters, lowercase letters, digits, or special characters.
Special characters include spaces and the following characters:~!@#$%^&*()_+-{}|
[]:<>?./
The password must consist of 2 types of uppercase letter,lowercase letter,digit or
special character at least.
# Do not forget the password.
# You can change it later, but this password should be provided first.
Please input a valid ftp_password :
Please input a valid Confirm password :
Step 9 Type the external virtual IP address or a valid external virtual configuration based on the
displayed message.
BSC6900 UMTS
OMU Administration Guide 6 OMU Installation and Maintenance (Dopra Linux)
Issue 02 (2015-05-08) Huawei Proprietary and Confidential
Copyright © Huawei Technologies Co., Ltd.
95
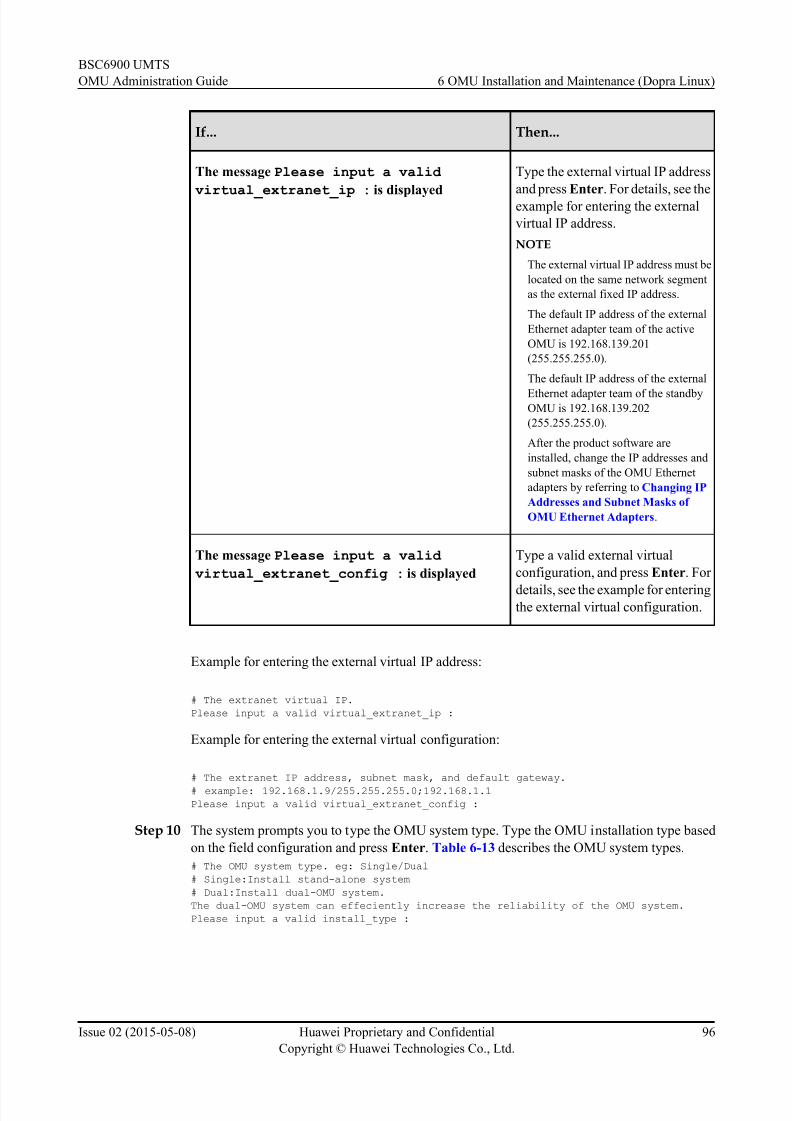
8/18/2019 Bsc6900 Umts Omu Administration Guide(v900r017c10_02)(PDF)-En
http://slidepdf.com/reader/full/bsc6900-umts-omu-administration-guidev900r017c1002pdf-en 105/310
If... Then...
The message Please input a valid
virtual_extranet_ip : is displayed
Type the external virtual IP address
and press Enter. For details, see the
example for entering the external
virtual IP address.
NOTE
The external virtual IP address must be
located on the same network segment
as the external fixed IP address.
The default IP address of the external
Ethernet adapter team of the active
OMU is 192.168.139.201
(255.255.255.0).
The default IP address of the external
Ethernet adapter team of the standbyOMU is 192.168.139.202
(255.255.255.0).
After the product software are
installed, change the IP addresses and
subnet masks of the OMU Ethernet
adapters by referring to Changing IP
Addresses and Subnet Masks of
OMU Ethernet Adapters.
The message Please input a valid
virtual_extranet_config : is displayed
Type a valid external virtual
configuration, and press Enter. For
details, see the example for enteringthe external virtual configuration.
Example for entering the external virtual IP address:
# The extranet virtual IP.
Please input a valid virtual_extranet_ip :
Example for entering the external virtual configuration:
# The extranet IP address, subnet mask, and default gateway.
# example: 192.168.1.9/255.255.255.0;192.168.1.1
Please input a valid virtual_extranet_config :
Step 10 The system prompts you to type the OMU system type. Type the OMU installation type based
on the field configuration and press Enter. Table 6-13 describes the OMU system types.
# The OMU system type. eg: Single/Dual
# Single:Install stand-alone system
# Dual:Install dual-OMU system.
The dual-OMU system can effeciently increase the reliability of the OMU system.
Please input a valid install_type :
BSC6900 UMTS
OMU Administration Guide 6 OMU Installation and Maintenance (Dopra Linux)
Issue 02 (2015-05-08) Huawei Proprietary and Confidential
Copyright © Huawei Technologies Co., Ltd.
96

8/18/2019 Bsc6900 Umts Omu Administration Guide(v900r017c10_02)(PDF)-En
http://slidepdf.com/reader/full/bsc6900-umts-omu-administration-guidev900r017c1002pdf-en 106/310
Table 6-13 Installation types
Parameters Description
Single When the BSC6900 is configured with one
OMU board, install product software on the board in single—OMU mode.
Dual When the BSC6900 is configured with two
OMU boards, install product software on the
boards in dual—OMU mode.
Step 11 The system asks you whether to continue with the installation, as shown:
Please affirm input information. input Y to continue; input E to exit. ->
Step 12 Type Y to install product software. When the message Install OMU succeed! is
displayed, product softwar e are successfully installed.
Step 13 Record the information about the product software installation in 6.5.1 Information Records
of OMU Software Installation.
----End
Checking the Installation Directory of Product Software
This section describes how to check the installation directory of product software. The default
installation directory for product software is /mbsc/bam. This directory stores product software
components,BSC6900 host software, and data used or generated by the BSC6900.
Context
The default installation directory for the product software is /mbsc/bam, which cannot be
changed.
Procedure
1. Log in to the target OMU by seeing the procedures described in 6.3.1 Logging In to the
OMU.
2. Enter cd /mbsc/bam to go to the OMU installation directory.
3. Check whether the OMU installation directory has the same structure as is shown in Figure
6-18 or Figure 6-19.
Directory Structure
NOTICE
Deleting any file from the installation directory of product software will cause an unexpected
impact to the BSC6900.
BSC6900 UMTS
OMU Administration Guide 6 OMU Installation and Maintenance (Dopra Linux)
Issue 02 (2015-05-08) Huawei Proprietary and Confidential
Copyright © Huawei Technologies Co., Ltd.
97

8/18/2019 Bsc6900 Umts Omu Administration Guide(v900r017c10_02)(PDF)-En
http://slidepdf.com/reader/full/bsc6900-umts-omu-administration-guidev900r017c1002pdf-en 107/310
l Figure 6-18 shows the directory structure of the product software when it is installed only
on the active workspace of an OMU for the first time.
l Figure 6-19 shows the directory structure of product software when it is installed on both
the active and standby workspaces of an OMU. The directory structure of the version_b
folder is the same as that of the version_a folder.
NOTE
l Active and standby OMU workspace files are divided by type into version_a and version_b folders.
l Run the LST OMUAREA command to query the OMU workspace version information. If Workarea
flag is version_a, the active workspace file is stored in the version_a folder.
l Figure 6-18 and Figure 6-19 show the directory structure of product software in different conditions.
Figure 6-18 Directory structure of product software on the active workspace
BSC6900 UMTS
OMU Administration Guide 6 OMU Installation and Maintenance (Dopra Linux)
Issue 02 (2015-05-08) Huawei Proprietary and Confidential
Copyright © Huawei Technologies Co., Ltd.
98

8/18/2019 Bsc6900 Umts Omu Administration Guide(v900r017c10_02)(PDF)-En
http://slidepdf.com/reader/full/bsc6900-umts-omu-administration-guidev900r017c1002pdf-en 108/310
Figure 6-19 Directory structure of product software on the active and standby workspaces
Subdirectories
Table 6-14 describes subdirectories under the installation directory of product software.
Table 6-14 Subdirectories under the installation directory of product software
Subdirectory Description
common/bkpomudata Stores the data backup file of the OMU before an upgrade.
common/bts Stores board software (including patches), inventory
information, logs, and RET antenna software for base
stations.
common/bts/btsintf Stores RF module adaptation files for base stations.
common/bts/btsswm Stores baseline version and patch version software for base
stations.
common/bts/eomc_file Stores transmission files on emergency OM channels for
base stations.
common/bts/inventory Stores inventory files of base stations.
common/bts/log Stores log files of base stations.
common/bts/qtru_version Stores QTRU software version files for base stations.
common/bts/retantcfgfile Stores antenna equipment files for base stations.
common/bts/singleomcfgfile Stores data configuration files for eGBTSs.
common/ems Stores U2000-related data.
common/fam Stores host log files and performance statistics files.
BSC6900 UMTS
OMU Administration Guide 6 OMU Installation and Maintenance (Dopra Linux)
Issue 02 (2015-05-08) Huawei Proprietary and Confidential
Copyright © Huawei Technologies Co., Ltd.
99

8/18/2019 Bsc6900 Umts Omu Administration Guide(v900r017c10_02)(PDF)-En
http://slidepdf.com/reader/full/bsc6900-umts-omu-administration-guidev900r017c1002pdf-en 109/310
Subdirectory Description
common/fam/fad Stores last words of the host.
common/fam/fad/linuxinf Stores the dump and trace logs of the Linux operating
system of the host.
common/fam/fad/linuxinf/
linuxproc
Stores the process statistics logs of the Linux operating
system of the host.
common/fam/famlog Stores the host's text log files, which record platform-
related log information. Users can open the files to view
the information.
common/fam/famlogfmt Stores binary logs of the host.
common/fam/famlogfmt/
btsinfo
Stores files that record basic information about base
stations.common/fam/famlogfmt/
gchr
Stores basic information about abnormal calls and
abnormal logs generated during calls.
common/fam/famlogfmt/
gphr
Stores call history records (CHRs) for the packet switched
(PS) domain.
common/fam/famlogfmt/
pchr
Stores information about service access and release,
handovers, and signal quality. The information is used for
network KPI analysis.
common/fam/famlogfmt/
pchr/special
Stores special PCHR logs, including PCHR exception logs,
PCHR logs for all VIP users, and PCHR logs for all cells.
common/fam/famlogfmt/
sysfault
Stores information about severe hardware or software
faults, such as system resource leakage and equipment
failure. The information is used for network health check.
common/fam/famlogfmt/
viptrace
Stores trace files of VIP users.
common/fam/famlogfmt/
sonlog
Stores self-organizing network (SON) logs.
common/fam/ibst_file Stores trace files of TC control bits in a GSM network.
common/fam/mr Stores AMR measurement files.
common/fam/msp_kvm Stores MSP component-related log files.
common/fam/pfm Stores original performance statistics files reported by the
host to the OMU.
common/fam/smlc Stores files about the location function.
common/fam/speechmos Stores online MOS result files.
common/fam/trace Stores message trace files.
BSC6900 UMTS
OMU Administration Guide 6 OMU Installation and Maintenance (Dopra Linux)
Issue 02 (2015-05-08) Huawei Proprietary and Confidential
Copyright © Huawei Technologies Co., Ltd.
100

8/18/2019 Bsc6900 Umts Omu Administration Guide(v900r017c10_02)(PDF)-En
http://slidepdf.com/reader/full/bsc6900-umts-omu-administration-guidev900r017c1002pdf-en 110/310
Subdirectory Description
common/FeatureState Stores result files of feature deployment and status query.
common/log Stores omud logs, common logs of base stations, frequency
scan logs, and commissioning logs for site deployment.
common/log/linuxinfo Stores status information log files of the Linux OS, such as
interruption information and memory information.
common/me Stores basic information files of built-in ECO6910s.
common/MeasResult Stores performance statistics files aggregated and
generated by the OMU.
common/MeasTaskResult Stores performance task result files.
common/ParaAutoCfg Stores configuration adjustment procedure and result of the
UMTS auto-optimization function.
common/reg.ini Stores registry files.
common/services Stores the common programs of the active and standby
workspaces of an OMU.
common/weblmt_cfg Stores configuration files of the LMT.
version_a/bin/bam Stores program files, configuration files, and patch files for
the OMU. Do not perform any operations on this directory.
version_a/bin/fam Stores program files and data files for the host. Do not
perform any operations on this directory.
version_a/cert Stores digital certificates that have taken effect, such as CA
certificate files, device certificate files, and CRL files.
version_a/data/backup Stores backup files of the OMU database.
version_a/data/backup/
data_backup/mml
Stores MML-format configuration data backed up by the
host.
version_a/data/backup/
data_restore/db_data
Stores the DB-format configuration data downloaded from
the U2000 for restoration.
version_a/data/backup/data_restore/mml
Stores the MML-format configuration data downloadedfrom the U2000 for restoration.
version_a/data/gaussdb Stores files related to the Gauss database.
version_a/ftp/batchfile Stores result files of batch configurations.
version_a/ftp/BkpLicense Stores license backup files.
version_a/ftp/bts_upgrade Stores base station upgrade files.
BSC6900 UMTS
OMU Administration Guide 6 OMU Installation and Maintenance (Dopra Linux)
Issue 02 (2015-05-08) Huawei Proprietary and Confidential
Copyright © Huawei Technologies Co., Ltd.
101

8/18/2019 Bsc6900 Umts Omu Administration Guide(v900r017c10_02)(PDF)-En
http://slidepdf.com/reader/full/bsc6900-umts-omu-administration-guidev900r017c1002pdf-en 111/310
Subdirectory Description
version_a/ftp/cert Stores digital certificates downloaded from the U2000,
such as Certificate Authority (CA) certificate files, device
certificate files, certificate request files, certificaterevocation list (CRL) files, and default certificate files.
version_a/ftp/
COLLOGINFO
Stores log collection results.
version_a/ftp/crashfile Stores OMU breakdown logs and dump files generated in
the case of an OMU module fault.
version_a/ftp/DefaultMeas Stores performance measurement task files in use.
version_a/ftp/
DefaultMeasSync
Stores performance synchronization task files.
version_a/ftp/device_file Stores hardware archives exported from the host.
version_a/ftp/e_label Stores electronic label files exported from the host.
version_a/ftp/eCo_interface Stores interface files of built-in ECO6910s.
version_a/ftp/export_almlog Stores export files of alarm logs.
version_a/ftp/ExportBCPFile Stores exported BCP files.
version_a/ftp/export_cfgmml Stores exported MML scripts.
version_a/ftp/
ExportCfgSyncFile
Stores configuration data synchronization files uploaded
on the U2000 by NEs.
version_a/ftp/
ExportCMESyncView
Stores files about the "configure" process. These files are
used for synchronization between the NE and the CME or
U2000.
version_a/ftp/ExporteCoCfg-
SyncFile
Stores configuration data synchronization files uploaded to
ECO6910s by NEs.
version_a/ftp/export_logfile Stores operation log export files.
version_a/ftp/export_sdckey Stores exported key files of encryption and tracing data and
log data.
version_a/ftp/export_xmlfile Stores configuration data export file delivered by the
U2000.
version_a/ftp/
fma_autobalance
Stores result output files of the SPU load-based one-click
BTS swapping function using the FMA.
version_a/ftp/fma_config Stores FMA configuration files.
version_a/ftp/fma_data Stores FMA result files.
version_a/ftp/
health_check_file
Stores result files of the upgrade health check.
BSC6900 UMTS
OMU Administration Guide 6 OMU Installation and Maintenance (Dopra Linux)
Issue 02 (2015-05-08) Huawei Proprietary and Confidential
Copyright © Huawei Technologies Co., Ltd.
102

8/18/2019 Bsc6900 Umts Omu Administration Guide(v900r017c10_02)(PDF)-En
http://slidepdf.com/reader/full/bsc6900-umts-omu-administration-guidev900r017c1002pdf-en 112/310
Subdirectory Description
version_a/ftp/integrity_cfg Stores the user-defined file list of the integrity check.
version_a/ftp/intfself_mngmt Stores reverse persistent log files of DSON and SCTP self-
planning.
version_a/ftp/kpi_file Stores KPI measurement result export files.
version_a/ftp/license Stores license files that have not been activated.
version_a/ftp/licusage Stores files about license usage recorded within 24 hours.
These files are used for analyzing reports from the U2000.
version_a/ftp/LstTemplate Stores data query template files.
version_a/ftp/MeasDefinition Stores multimode performance measurement task files and
measurement definition files.
version_a/ftp/manresalmlog Stores backup files of alarms automatically cleared.
version_a/ftp/ms_saic_cap Stores GSM VAMOS automatic identification information
file.
version_a/ftp/ms_tac_cap Stores GSM MS EMR capability information files.
version_a/ftp/n3gcs Stores UMTS neighboring cell measurement configuration
files.
version_a/ftp/operator_log Stores operation logs and security logs of the standby
OMU.
version_a/ftp/OptMml Stores subsystem deployment and swapping log files for
dynamic cell deployment.
version_a/ftp/sau Stores SAU configuration files.
version_a/ftp/schedule_task Stores automatic output result files of OMU scheduled
tasks.
version_a/ftp/shell_result Stores shell script execution result files.
version_a/ftp/STANDBY Stores export files of standby OMUs.
version_a/ftp/xml_bulkcm Stores fast configuration result files delivered by CMEs.
version_a/license Stores activated license files.
version_a/licensehardware Stores hardware license files.
version_a/log Stores operation logs of the OMU.
version_a/omu_shm Stores files about the mapping between the OMU memory
and hardware space. Part of the OMU memory is used as
the hardware space.
version_a/security_file Stores configuration files of antivirus software and backup
configuration files for system recovery.
BSC6900 UMTS
OMU Administration Guide 6 OMU Installation and Maintenance (Dopra Linux)
Issue 02 (2015-05-08) Huawei Proprietary and Confidential
Copyright © Huawei Technologies Co., Ltd.
103
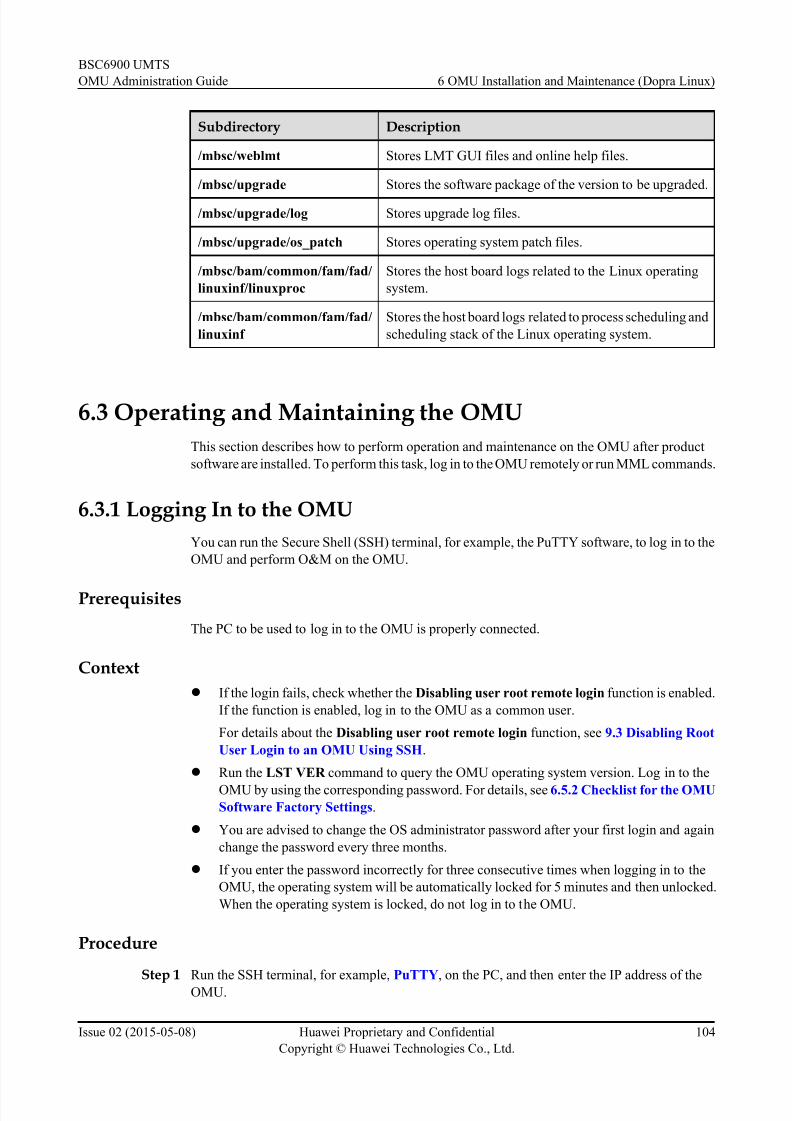
8/18/2019 Bsc6900 Umts Omu Administration Guide(v900r017c10_02)(PDF)-En
http://slidepdf.com/reader/full/bsc6900-umts-omu-administration-guidev900r017c1002pdf-en 113/310
Subdirectory Description
/mbsc/weblmt Stores LMT GUI files and online help files.
/mbsc/upgrade Stores the software package of the version to be upgraded.
/mbsc/upgrade/log Stores upgrade log files.
/mbsc/upgrade/os_patch Stores operating system patch files.
/mbsc/bam/common/fam/fad/
linuxinf/linuxproc
Stores the host board logs related to the Linux operating
system.
/mbsc/bam/common/fam/fad/
linuxinf
Stores the host board logs related to process scheduling and
scheduling stack of the Linux operating system.
6.3 Operating and Maintaining the OMU
This section describes how to perform operation and maintenance on the OMU after product
software are installed. To perform this task, log in to the OMU remotely or run MML commands.
6.3.1 Logging In to the OMU
You can run the Secure Shell (SSH) terminal, for example, the PuTTY software, to log in to the
OMU and perform O&M on the OMU.
Prerequisites
The PC to be used to log in to the OMU is properly connected.
Context
l If the login fails, check whether the Disabling user root remote login function is enabled.
If the function is enabled, log in to the OMU as a common user.
For details about the Disabling user root remote login function, see 9.3 Disabling Root
User Login to an OMU Using SSH.
l Run the LST VER command to query the OMU operating system version. Log in to the
OMU by using the corresponding password. For details, see 6.5.2 Checklist for the OMU
Software Factory Settings.
l You are advised to change the OS administrator password after your first login and again
change the password every three months.
l If you enter the password incorrectly for three consecutive times when logging in to the
OMU, the operating system will be automatically locked for 5 minutes and then unlocked.
When the operating system is locked, do not log in to the OMU.
Procedure
Step 1Run the SSH terminal, for example, PuTTY, on the PC, and then enter the IP address of the
OMU.
BSC6900 UMTS
OMU Administration Guide 6 OMU Installation and Maintenance (Dopra Linux)
Issue 02 (2015-05-08) Huawei Proprietary and Confidential
Copyright © Huawei Technologies Co., Ltd.
104
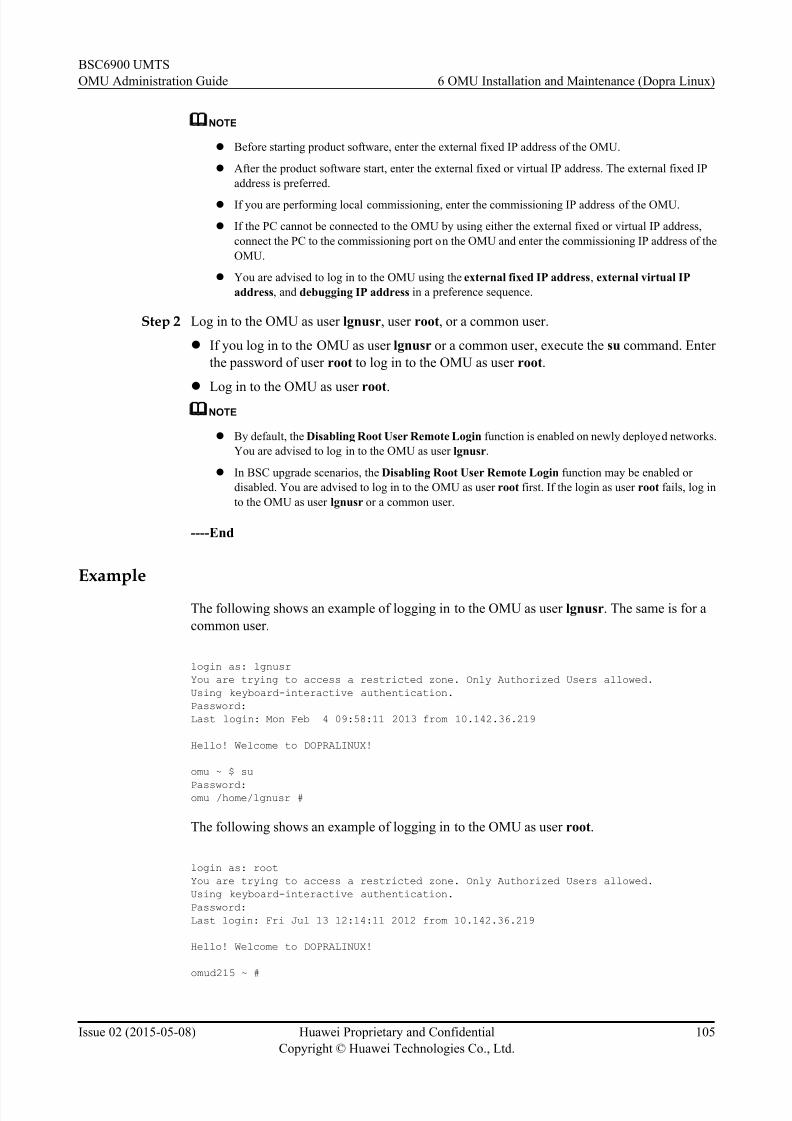
8/18/2019 Bsc6900 Umts Omu Administration Guide(v900r017c10_02)(PDF)-En
http://slidepdf.com/reader/full/bsc6900-umts-omu-administration-guidev900r017c1002pdf-en 114/310
NOTE
l Before starting product software, enter the external fixed IP address of the OMU.
l After the product software start, enter the external fixed or virtual IP address. The external fixed IP
address is preferred.
l If you are performing local commissioning, enter the commissioning IP address of the OMU.
l If the PC cannot be connected to the OMU by using either the external fixed or virtual IP address,
connect the PC to the commissioning port on the OMU and enter the commissioning IP address of the
OMU.
l You are advised to log in to the OMU using the external fixed IP address, external virtual IP
address, and debugging IP address in a preference sequence.
Step 2 Log in to the OMU as user lgnusr, user root, or a common user.
l If you log in to the OMU as user lgnusr or a common user, execute the su command. Enter
the password of user root to log in to the OMU as user root.
l
Log in to the OMU as user root.NOTE
l By default, the Disabling Root User Remote Login function is enabled on newly deployed networks.
You are advised to log in to the OMU as user lgnusr.
l In BSC upgrade scenarios, the Disabling Root User Remote Login function may be enabled or
disabled. You are advised to log in to the OMU as user root first. If the login as user root fails, log in
to the OMU as user lgnusr or a common user.
----End
Example
The following shows an example of logging in to the OMU as user lgnusr. The same is for a
common user.
login as: lgnusr
You are trying to access a restricted zone. Only Authorized Users allowed.
Using keyboard-interactive authentication.
Password:
Last login: Mon Feb 4 09:58:11 2013 from 10.142.36.219
Hello! Welcome to DOPRALINUX!
omu ~ $ su
Password:omu /home/lgnusr #
The following shows an example of logging in to the OMU as user root.
login as: root
You are trying to access a restricted zone. Only Authorized Users allowed.
Using keyboard-interactive authentication.
Password:
Last login: Fri Jul 13 12:14:11 2012 from 10.142.36.219
Hello! Welcome to DOPRALINUX!
omud215 ~ #
BSC6900 UMTS
OMU Administration Guide 6 OMU Installation and Maintenance (Dopra Linux)
Issue 02 (2015-05-08) Huawei Proprietary and Confidential
Copyright © Huawei Technologies Co., Ltd.
105
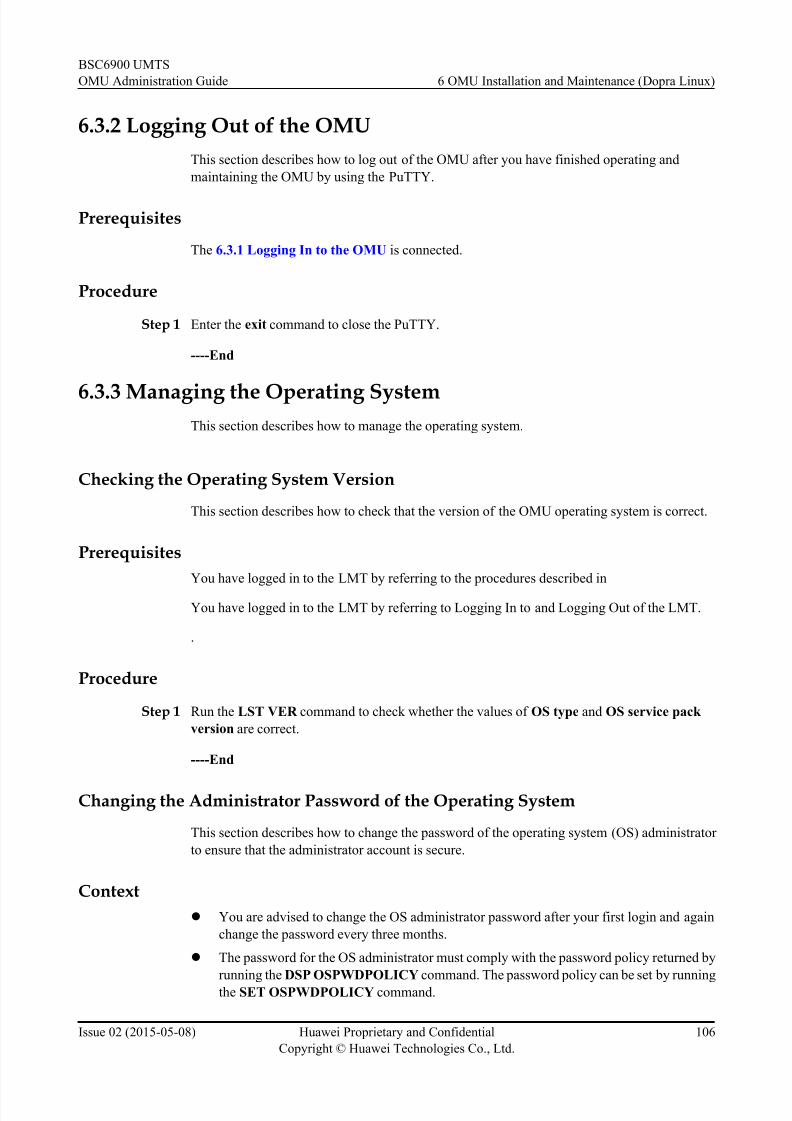
8/18/2019 Bsc6900 Umts Omu Administration Guide(v900r017c10_02)(PDF)-En
http://slidepdf.com/reader/full/bsc6900-umts-omu-administration-guidev900r017c1002pdf-en 115/310
6.3.2 Logging Out of the OMU
This section describes how to log out of the OMU after you have finished operating and
maintaining the OMU by using the PuTTY.
Prerequisites
The 6.3.1 Logging In to the OMU is connected.
Procedure
Step 1 Enter the exit command to close the PuTTY.
----End
6.3.3 Managing the Operating SystemThis section describes how to manage the operating system.
Checking the Operating System Version
This section describes how to check that the version of the OMU operating system is correct.
Prerequisites
You have logged in to the LMT by referring to the procedures described in
You have logged in to the LMT by referring to Logging In to and Logging Out of the LMT.
.
Procedure
Step 1 Run the LST VER command to check whether the values of OS type and OS service pack
version are correct.
----End
Changing the Administrator Password of the Operating System
This section describes how to change the password of the operating system (OS) administrator
to ensure that the administrator account is secure.
Context
l You are advised to change the OS administrator password after your first login and again
change the password every three months.
l The password for the OS administrator must comply with the password policy returned by
running the DSP OSPWDPOLICY command. The password policy can be set by running
the SET OSPWDPOLICY command.
BSC6900 UMTS
OMU Administration Guide 6 OMU Installation and Maintenance (Dopra Linux)
Issue 02 (2015-05-08) Huawei Proprietary and Confidential
Copyright © Huawei Technologies Co., Ltd.
106

8/18/2019 Bsc6900 Umts Omu Administration Guide(v900r017c10_02)(PDF)-En
http://slidepdf.com/reader/full/bsc6900-umts-omu-administration-guidev900r017c1002pdf-en 116/310
Procedure
Step 1 Log in to the OMU by referring to the procedures described in 6.3.1 Logging In to the OMU.
Step 2 Execute passwd root (use root as an example). The following information is displayed:
Changing password for root.
(Current) UNIX password:
Step 3 Enter the current password. The New UNIX password: message is displayed.
Step 4 Enter a new password. The Retype new UNIX password: message is displayed.
Step 5 Reenter the new password. The password is changed successfully.
Step 6 Record the new password in the 6.5.1 Information Records of OMU Software Installation.
----End
Querying the Mapping Between Ethernet AdaptersThis section describes the mapping between the physical and logical Ethernet adapters.
Prerequisites
The product software is installed.
Procedure
Step 1 Log in to the OMU by referring to 6.3.1 Logging In to the OMU.
Step 2 Optional: To query the factory settings of the Ethernet adapters of the OMUa board, type the /root/eth_alias_omu.sh command and press Enter. The following shows the factory settings of
the Ethernet adapters of the OMUa board.
eth0 06,0,0 ETH4-SCU7
eth1 06,0,1 ETH5-SCU6
eth2 04,4,0 ETH2
eth3 04,4,1 ETH3-UPDATE
eth4 08,4,0 ETH0
eth5 08,4,1 ETH1
NOTE
The three columns in the figure for the configuration of OMU Ethernet adapters contain the following
information:
l The first column lists the logical OMU Ethernet adapters for software identification.
l The second column lists the Peripheral Component Identity (PCI) of the Ethernet adapters for hardware
identification.
l The third column lists the physical OMU Ethernet adapters for human identification.
The mapping between the second and third columns cannot be changed. The mapping between the first and
second columns and the mapping between the first and third columns depend on the configuration of the OMU.
Step 3 Optional: To query the factory settings of the Ethernet adapters of the OMUc board, type
the ./eth_alias_names.sh command and press Enter. The following shows the factory settings
of the Ethernet adapters of the OMUc board.
eth0 02,0,0 F_ETH0eth1 01,0,0 F_ETH1
BSC6900 UMTS
OMU Administration Guide 6 OMU Installation and Maintenance (Dopra Linux)
Issue 02 (2015-05-08) Huawei Proprietary and Confidential
Copyright © Huawei Technologies Co., Ltd.
107
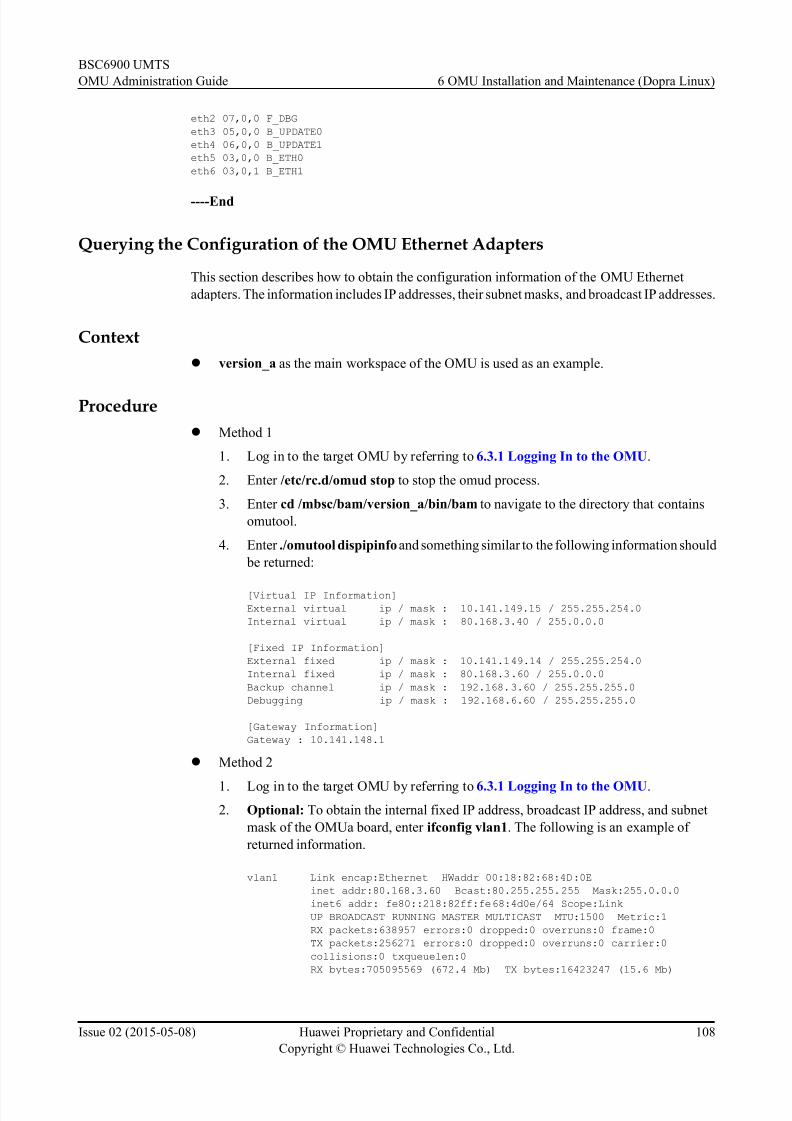
8/18/2019 Bsc6900 Umts Omu Administration Guide(v900r017c10_02)(PDF)-En
http://slidepdf.com/reader/full/bsc6900-umts-omu-administration-guidev900r017c1002pdf-en 117/310
eth2 07,0,0 F_DBG
eth3 05,0,0 B_UPDATE0
eth4 06,0,0 B_UPDATE1
eth5 03,0,0 B_ETH0
eth6 03,0,1 B_ETH1
----End
Querying the Configuration of the OMU Ethernet Adapters
This section describes how to obtain the configuration information of the OMU Ethernet
adapters. The information includes IP addresses, their subnet masks, and broadcast IP addresses.
Context
l version_a as the main workspace of the OMU is used as an example.
Procedure
l Method 1
1. Log in to the target OMU by referring to 6.3.1 Logging In to the OMU.
2. Enter /etc/rc.d/omud stop to stop the omud process.
3. Enter cd /mbsc/bam/version_a/bin/bam to navigate to the directory that contains
omutool.
4. Enter ./omutool dispipinfo and something similar to the following information should
be returned:
[Virtual IP Information]
External virtual ip / mask : 10.141.149.15 / 255.255.254.0
Internal virtual ip / mask : 80.168.3.40 / 255.0.0.0
[Fixed IP Information]
External fixed ip / mask : 10.141.149.14 / 255.255.254.0
Internal fixed ip / mask : 80.168.3.60 / 255.0.0.0
Backup channel ip / mask : 192.168.3.60 / 255.255.255.0
Debugging ip / mask : 192.168.6.60 / 255.255.255.0
[Gateway Information]
Gateway : 10.141.148.1
l Method 2
1. Log in to the target OMU by referring to 6.3.1 Logging In to the OMU.
2. Optional: To obtain the internal fixed IP address, broadcast IP address, and subnet
mask of the OMUa board, enter ifconfig vlan1. The following is an example of
returned information.
vlan1 Link encap:Ethernet HWaddr 00:18:82:68:4D:0E
inet addr:80.168.3.60 Bcast:80.255.255.255 Mask:255.0.0.0
inet6 addr: fe80::218:82ff:fe68:4d0e/64 Scope:Link
UP BROADCAST RUNNING MASTER MULTICAST MTU:1500 Metric:1
RX packets:638957 errors:0 dropped:0 overruns:0 frame:0
TX packets:256271 errors:0 dropped:0 overruns:0 carrier:0
collisions:0 txqueuelen:0
RX bytes:705095569 (672.4 Mb) TX bytes:16423247 (15.6 Mb)
BSC6900 UMTS
OMU Administration Guide 6 OMU Installation and Maintenance (Dopra Linux)
Issue 02 (2015-05-08) Huawei Proprietary and Confidential
Copyright © Huawei Technologies Co., Ltd.
108
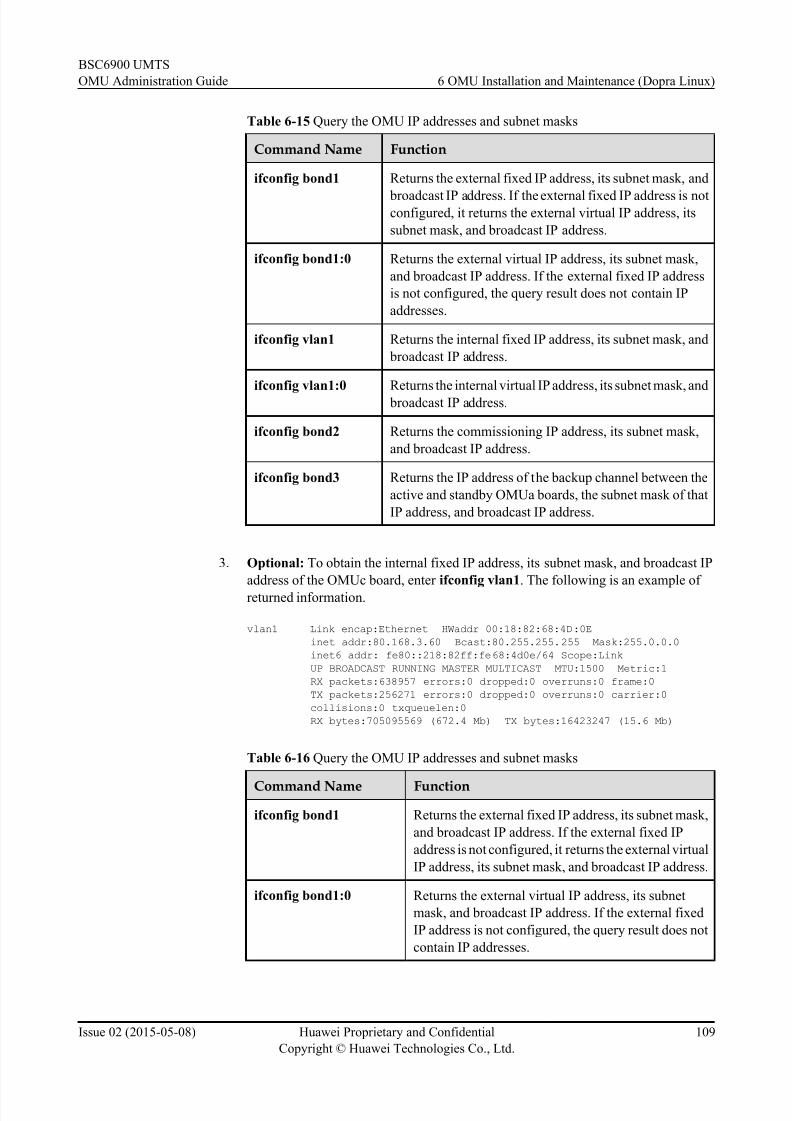
8/18/2019 Bsc6900 Umts Omu Administration Guide(v900r017c10_02)(PDF)-En
http://slidepdf.com/reader/full/bsc6900-umts-omu-administration-guidev900r017c1002pdf-en 118/310
Table 6-15 Query the OMU IP addresses and subnet masks
Command Name Function
ifconfig bond1 Returns the external fixed IP address, its subnet mask, and
broadcast IP address. If the external fixed IP address is notconfigured, it returns the external virtual IP address, its
subnet mask, and broadcast IP address.
ifconfig bond1:0 Returns the external virtual IP address, its subnet mask,
and broadcast IP address. If the external fixed IP address
is not configured, the query result does not contain IP
addresses.
ifconfig vlan1 Returns the internal fixed IP address, its subnet mask, and
broadcast IP address.
ifconfig vlan1:0 Returns the internal virtual IP address, its subnet mask, and
broadcast IP address.
ifconfig bond2 Returns the commissioning IP address, its subnet mask,
and broadcast IP address.
ifconfig bond3 Returns the IP address of the backup channel between the
active and standby OMUa boards, the subnet mask of that
IP address, and broadcast IP address.
3. Optional: To obtain the internal fixed IP address, its subnet mask, and broadcast IP
address of the OMUc board, enter ifconfig vlan1. The following is an example of
returned information.
vlan1 Link encap:Ethernet HWaddr 00:18:82:68:4D:0E
inet addr:80.168.3.60 Bcast:80.255.255.255 Mask:255.0.0.0
inet6 addr: fe80::218:82ff:fe68:4d0e/64 Scope:Link
UP BROADCAST RUNNING MASTER MULTICAST MTU:1500 Metric:1
RX packets:638957 errors:0 dropped:0 overruns:0 frame:0
TX packets:256271 errors:0 dropped:0 overruns:0 carrier:0
collisions:0 txqueuelen:0
RX bytes:705095569 (672.4 Mb) TX bytes:16423247 (15.6 Mb)
Table 6-16 Query the OMU IP addresses and subnet masks
Command Name Function
ifconfig bond1 Returns the external fixed IP address, its subnet mask,
and broadcast IP address. If the external fixed IP
address is not configured, it returns the external virtual
IP address, its subnet mask, and broadcast IP address.
ifconfig bond1:0 Returns the external virtual IP address, its subnet
mask, and broadcast IP address. If the external fixed
IP address is not configured, the query result does not
contain IP addresses.
BSC6900 UMTS
OMU Administration Guide 6 OMU Installation and Maintenance (Dopra Linux)
Issue 02 (2015-05-08) Huawei Proprietary and Confidential
Copyright © Huawei Technologies Co., Ltd.
109
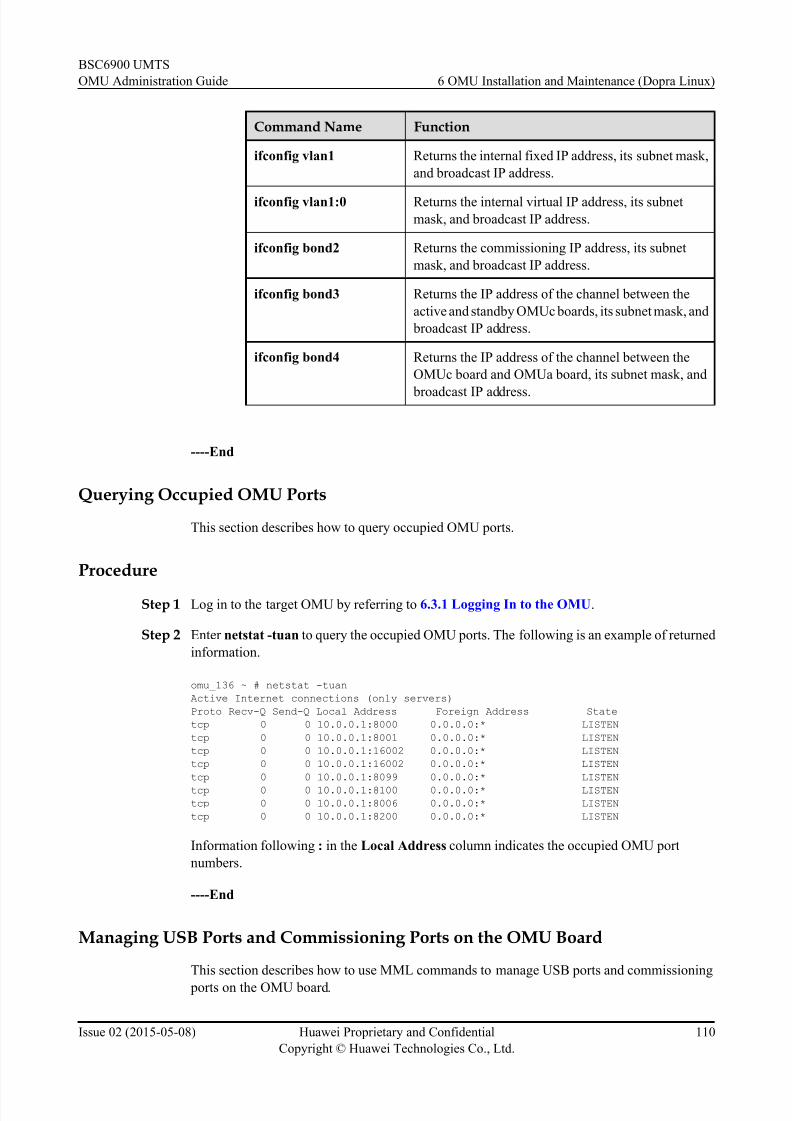
8/18/2019 Bsc6900 Umts Omu Administration Guide(v900r017c10_02)(PDF)-En
http://slidepdf.com/reader/full/bsc6900-umts-omu-administration-guidev900r017c1002pdf-en 119/310
Command Name Function
ifconfig vlan1 Returns the internal fixed IP address, its subnet mask,
and broadcast IP address.
ifconfig vlan1:0 Returns the internal virtual IP address, its subnet
mask, and broadcast IP address.
ifconfig bond2 Returns the commissioning IP address, its subnet
mask, and broadcast IP address.
ifconfig bond3 Returns the IP address of the channel between the
active and standby OMUc boards, its subnet mask, and
broadcast IP address.
ifconfig bond4 Returns the IP address of the channel between the
OMUc board and OMUa board, its subnet mask, and
broadcast IP address.
----End
Querying Occupied OMU Ports
This section describes how to query occupied OMU ports.
Procedure
Step 1 Log in to the target OMU by referring to 6.3.1 Logging In to the OMU.
Step 2 Enter netstat -tuan to query the occupied OMU ports. The following is an example of returned
information.
omu_136 ~ # netstat -tuan
Active Internet connections (only servers)
Proto Recv-Q Send-Q Local Address Foreign Address State
tcp 0 0 10.0.0.1:8000 0.0.0.0:* LISTEN
tcp 0 0 10.0.0.1:8001 0.0.0.0:* LISTEN
tcp 0 0 10.0.0.1:16002 0.0.0.0:* LISTEN
tcp 0 0 10.0.0.1:16002 0.0.0.0:* LISTEN
tcp 0 0 10.0.0.1:8099 0.0.0.0:* LISTEN
tcp 0 0 10.0.0.1:8100 0.0.0.0:* LISTEN
tcp 0 0 10.0.0.1:8006 0.0.0.0:* LISTEN
tcp 0 0 10.0.0.1:8200 0.0.0.0:* LISTEN
Information following : in the Local Address column indicates the occupied OMU port
numbers.
----End
Managing USB Ports and Commissioning Ports on the OMU Board
This section describes how to use MML commands to manage USB ports and commissioning
ports on the OMU board.
BSC6900 UMTS
OMU Administration Guide 6 OMU Installation and Maintenance (Dopra Linux)
Issue 02 (2015-05-08) Huawei Proprietary and Confidential
Copyright © Huawei Technologies Co., Ltd.
110
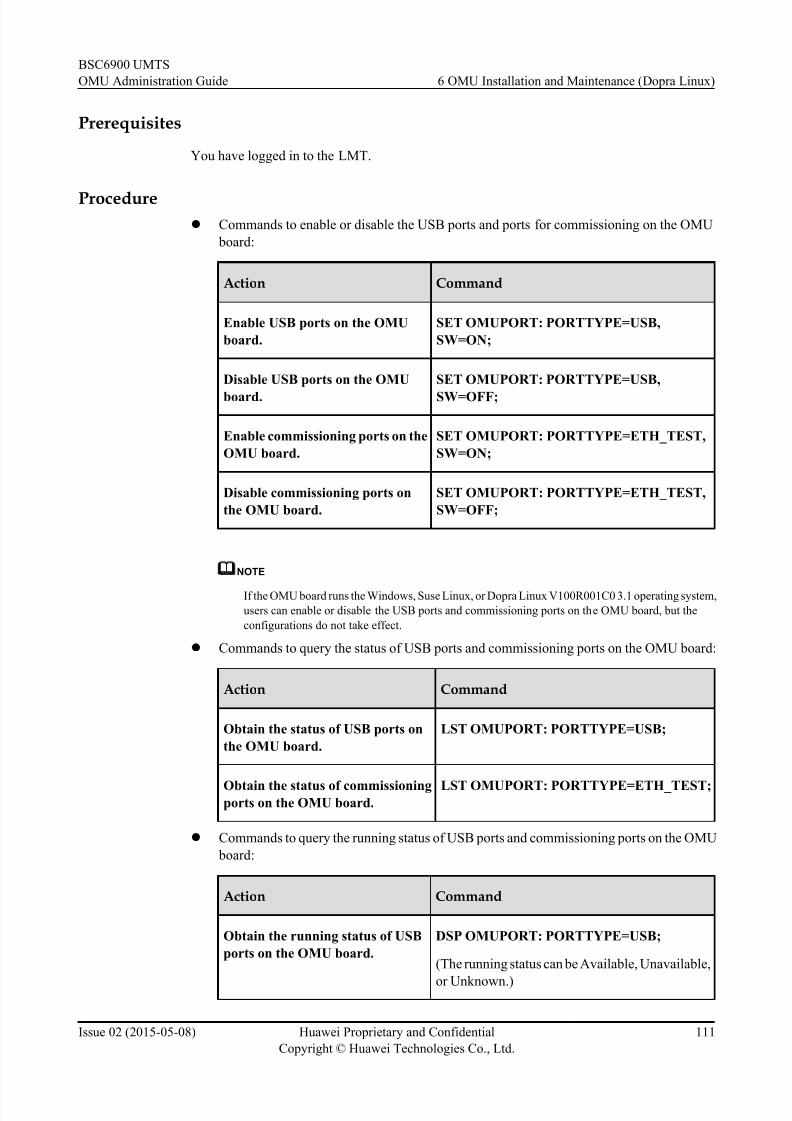
8/18/2019 Bsc6900 Umts Omu Administration Guide(v900r017c10_02)(PDF)-En
http://slidepdf.com/reader/full/bsc6900-umts-omu-administration-guidev900r017c1002pdf-en 120/310
Prerequisites
You have logged in to the LMT.
Procedurel Commands to enable or disable the USB ports and ports for commissioning on the OMU
board:
Action Command
Enable USB ports on the OMU
board.
SET OMUPORT: PORTTYPE=USB,
SW=ON;
Disable USB ports on the OMU
board.
SET OMUPORT: PORTTYPE=USB,
SW=OFF;
Enable commissioning ports on the
OMU board.
SET OMUPORT: PORTTYPE=ETH_TEST,
SW=ON;
Disable commissioning ports on
the OMU board.
SET OMUPORT: PORTTYPE=ETH_TEST,
SW=OFF;
NOTE
If the OMU board runs the Windows, Suse Linux, or Dopra Linux V100R001C0 3.1 operating system,
users can enable or disable the USB ports and commissioning ports on the OMU board, but the
configurations do not take effect.
l Commands to query the status of USB ports and commissioning ports on the OMU board:
Action Command
Obtain the status of USB ports on
the OMU board.
LST OMUPORT: PORTTYPE=USB;
Obtain the status of commissioningports on the OMU board.
LST OMUPORT: PORTTYPE=ETH_TEST;
l Commands to query the running status of USB ports and commissioning ports on the OMU
board:
Action Command
Obtain the running status of USB
ports on the OMU board.
DSP OMUPORT: PORTTYPE=USB;
(The running status can be Available, Unavailable,
or Unknown.)
BSC6900 UMTS
OMU Administration Guide 6 OMU Installation and Maintenance (Dopra Linux)
Issue 02 (2015-05-08) Huawei Proprietary and Confidential
Copyright © Huawei Technologies Co., Ltd.
111
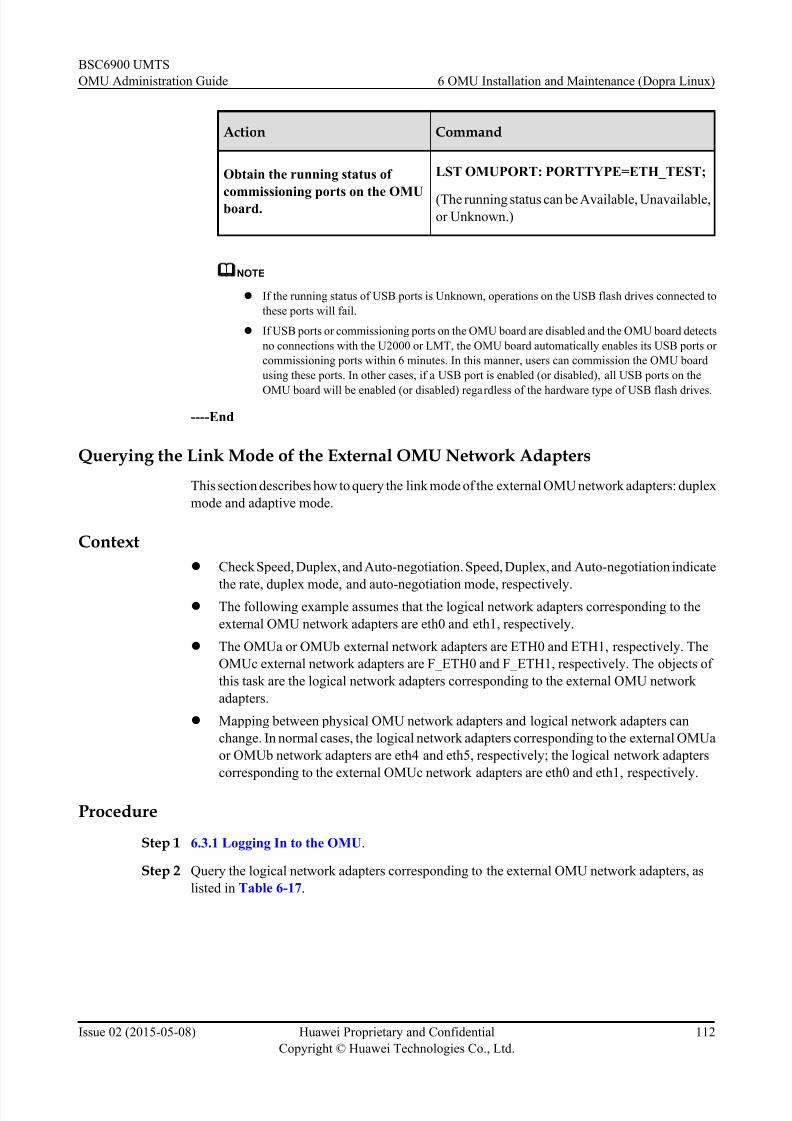
8/18/2019 Bsc6900 Umts Omu Administration Guide(v900r017c10_02)(PDF)-En
http://slidepdf.com/reader/full/bsc6900-umts-omu-administration-guidev900r017c1002pdf-en 121/310
Action Command
Obtain the running status of
commissioning ports on the OMUboard.
LST OMUPORT: PORTTYPE=ETH_TEST;
(The running status can be Available, Unavailable,or Unknown.)
NOTE
l If the running status of USB ports is Unknown, operations on the USB flash drives connected to
these ports will fail.
l If USB por ts or commissioning ports on the OMU board are disabled and the OMU board detects
no connections with the U2000 or LMT, the OMU board automatically enables its USB ports or
commissioning ports within 6 minutes. In this manner, users can commission the OMU board
using these ports. In other cases, if a USB port is enabled (or disabled), all USB ports on the
OMU board will be enabled (or disabled) regardless of the hardware type of USB flash drives.
----End
Querying the Link Mode of the External OMU Network Adapters
This section describes how to query the link mode of the external OMU network adapters: duplex
mode and adaptive mode.
Context
l Check Speed, Duplex, and Auto-negotiation. Speed, Duplex, and Auto-negotiation indicate
the rate, duplex mode, and auto-negotiation mode, respectively.l The following example assumes that the logical network adapters corresponding to the
external OMU network adapters are eth0 and eth1, respectively.
l The OMUa or OMUb external network adapters are ETH0 and ETH1, respectively. The
OMUc external network adapters are F_ETH0 and F_ETH1, respectively. The objects of
this task are the logical network adapters corresponding to the external OMU network
adapters.
l Mapping between physical OMU network adapters and logical network adapters can
change. In normal cases, the logical network adapters corresponding to the external OMUa
or OMUb network adapters are eth4 and eth5, respectively; the logical network adapters
corresponding to the external OMUc network adapters are eth0 and eth1, respectively.
Procedure
Step 1 6.3.1 Logging In to the OMU.
Step 2 Query the logical network adapters corresponding to the external OMU network adapters, as
listed in Table 6-17.
BSC6900 UMTS
OMU Administration Guide 6 OMU Installation and Maintenance (Dopra Linux)
Issue 02 (2015-05-08) Huawei Proprietary and Confidential
Copyright © Huawei Technologies Co., Ltd.
112

8/18/2019 Bsc6900 Umts Omu Administration Guide(v900r017c10_02)(PDF)-En
http://slidepdf.com/reader/full/bsc6900-umts-omu-administration-guidev900r017c1002pdf-en 122/310
Table 6-17 Querying the logical network adapters corresponding to the external OMU network
adapters
Item Description
OMUa/OMUb Board Type /root/eth_alias_omu.sh and pressEnter.
OMUc Board Run the chmod +x ./eth_alias_names.sh
command to obtain the permission to run the ./
eth_alias_names.sh command. Type ./
eth_alias_names.sh and press Enter.
Step 3 Query the effective link mode of the external OMU network adapters. Run the ethtool eth0
command to query the link mode of eth0. Run the ethtool eth1 command to query eth1.
Settings for eth0:
Supported ports: [ FIBRE ]
Supported link modes: 1000baseT/Full
Supports auto-negotiation: Yes
Advertised link modes: 1000baseT/Full
Advertised auto-negotiation: Yes
Speed: 1000Mb/s
Duplex: Full
Port: FIBRE
PHYAD: 0
Transceiver: external
Auto-negotiation: on
Supports Wake-on: pumbag
Wake-on: g
Current message level: 0x00000001 (1) Link detected: yes
----End
Setting the Link Mode for External OMU Ethernet Adapters
This section describes how to set the link mode of the external OMU Ethernet adapters so that
it is the same as that of the LAN switch.
Prerequisites
The link mode, duplex mode, and rate of the LAN switch have been acquired.
Context
l If the link mode of the external Ethernet adapters of the OMUc is modified by omutool,
the network may be interrupted temporarily.
l If the link mode of the external Ethernet adapters of the OMU is inconsistent with that of
the LAN switch, the network may be interrupted. If the link mode of the LAN switch is
specified, the link mode of the external Ethernet adapter of the OMU should also be
specified.
l There are two link modes of the LAN switch: forced mode and auto-negotiation mode. The
link mode of the OMU external Ethernet adapter must be consistent with that of the LAN
switch.
BSC6900 UMTS
OMU Administration Guide 6 OMU Installation and Maintenance (Dopra Linux)
Issue 02 (2015-05-08) Huawei Proprietary and Confidential
Copyright © Huawei Technologies Co., Ltd.
113
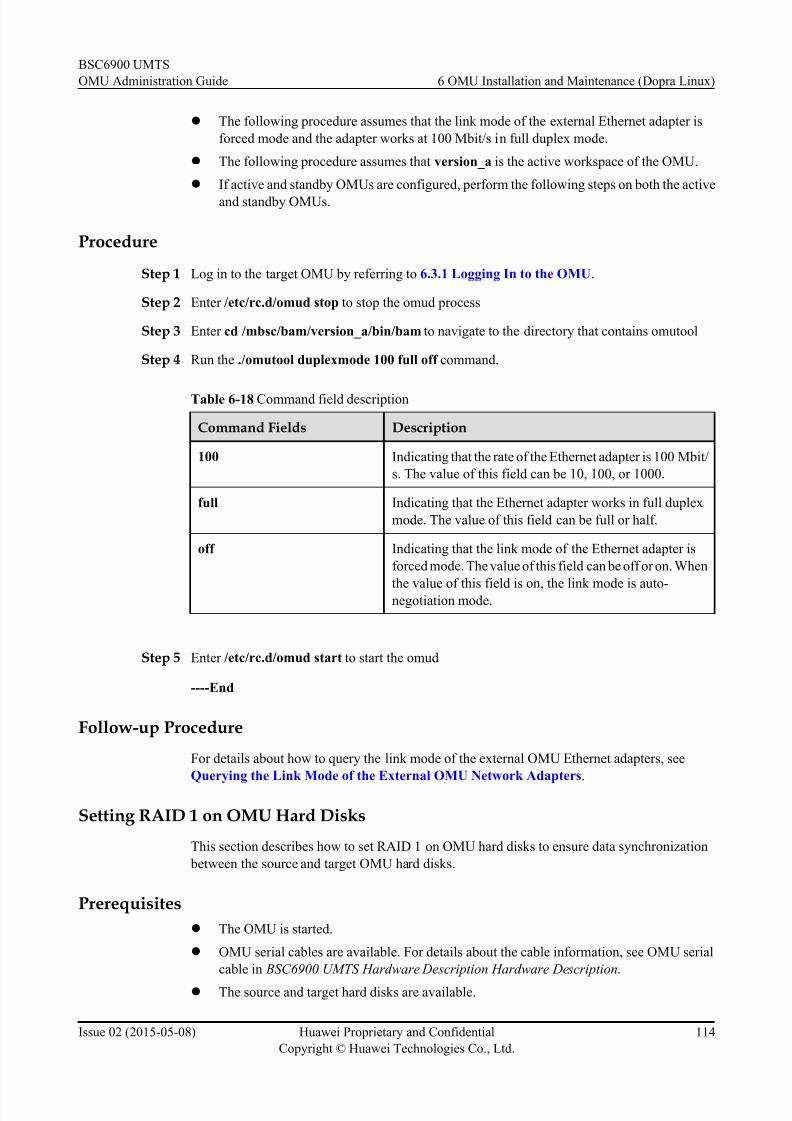
8/18/2019 Bsc6900 Umts Omu Administration Guide(v900r017c10_02)(PDF)-En
http://slidepdf.com/reader/full/bsc6900-umts-omu-administration-guidev900r017c1002pdf-en 123/310

8/18/2019 Bsc6900 Umts Omu Administration Guide(v900r017c10_02)(PDF)-En
http://slidepdf.com/reader/full/bsc6900-umts-omu-administration-guidev900r017c1002pdf-en 124/310
Context
One OMU hard disk serves as the source hard disk, and the other serves as the target hard disk.
Setting RAID 1 on the hard disks synchronizes the data on the source and target hard disks,
improving data security.
l The source hard disk saves backup data and files.
l The target hard disk mirrors the source hard disk.
NOTE
RAID 1 cannot be set on an OMUc board because it is configured with one hard disk.
Procedure
Step 1 Connect the PC to the OMU serial port by using the OMU serial cable.
NOTE
If the OMU serial cable is not available, the USB and VGA ports of the active OMU can be connected to
an external keyboard and monitor, respectively. Then starts from Step 6 to complete the configuration.
Step 2 On the PC, choose Start > All Programs > Accessories > Communications >
HyperTerminal. The dialog box shown in Figure 6-20 is displayed.
Figure 6-20 Connection description
Step 3 Enter the connection name and click OK . The dialog box shown in Figure 6-21 is displayed.
BSC6900 UMTS
OMU Administration Guide 6 OMU Installation and Maintenance (Dopra Linux)
Issue 02 (2015-05-08) Huawei Proprietary and Confidential
Copyright © Huawei Technologies Co., Ltd.
115

8/18/2019 Bsc6900 Umts Omu Administration Guide(v900r017c10_02)(PDF)-En
http://slidepdf.com/reader/full/bsc6900-umts-omu-administration-guidev900r017c1002pdf-en 125/310
Figure 6-21 Confirming the connection
Step 4 Check the connection port and click OK . The dialog box shown in Figure 6-22 is displayed.
BSC6900 UMTS
OMU Administration Guide 6 OMU Installation and Maintenance (Dopra Linux)
Issue 02 (2015-05-08) Huawei Proprietary and Confidential
Copyright © Huawei Technologies Co., Ltd.
116

8/18/2019 Bsc6900 Umts Omu Administration Guide(v900r017c10_02)(PDF)-En
http://slidepdf.com/reader/full/bsc6900-umts-omu-administration-guidev900r017c1002pdf-en 126/310
Figure 6-22 Setting attributes for the connection port
NOTE
The parameters for the connection port must be set as shown in Figure 6-22.
Step 5 Check that the parameters for the connection port are set correctly and click OK . The window
shown in Figure 6-23 is displayed.
BSC6900 UMTS
OMU Administration Guide 6 OMU Installation and Maintenance (Dopra Linux)
Issue 02 (2015-05-08) Huawei Proprietary and Confidential
Copyright © Huawei Technologies Co., Ltd.
117

8/18/2019 Bsc6900 Umts Omu Administration Guide(v900r017c10_02)(PDF)-En
http://slidepdf.com/reader/full/bsc6900-umts-omu-administration-guidev900r017c1002pdf-en 127/310
Figure 6-23 Connection established
Step 6 Restart the OMU.
Option Description
Windows Server 2003 operating system 1. Log in to the target OMU by referring to 7.2.1
Logging In to the OMU.
2. Choose Start > Shutdown, click Restart, and
click OK .
Step 7 After the OMU restarts, press F4 repeatedly until the message "Press Ctrl-C to start
LSI Logic Configuration Utility" is displayed. Then press Ctrl+C. The following
shows examples of the messages displayed.
Adapter PCI PCI PCI PCI FW Revision Status Boot
Bus Dev Fnc Slot Order
SAS1064 05 01 00 00 0.11.01-IR Enabled 0
Step 8 Press Enter. The following shows examples of the messages displayed.
Adapter SAS1064
PCI Slot 00
PCI Address(Bus/Dev/Func) 05:01:00
MPT Firmware Revision 0.11.01.00-IRSAS Address 500E0FC1:23456775
BSC6900 UMTS
OMU Administration Guide 6 OMU Installation and Maintenance (Dopra Linux)
Issue 02 (2015-05-08) Huawei Proprietary and Confidential
Copyright © Huawei Technologies Co., Ltd.
118

8/18/2019 Bsc6900 Umts Omu Administration Guide(v900r017c10_02)(PDF)-En
http://slidepdf.com/reader/full/bsc6900-umts-omu-administration-guidev900r017c1002pdf-en 128/310
NVDATA Version 25.09
Status Enabled
Boot Order 0
Boot Support [Enabled Bios & OS]
RAID Properties
SAS TopologyAdvanced Adapter Properties
Press the arrow keys to select RAID Properties and press Enter. Check the value of Status to
determine whether the RAID is correct.
l If Status is Optimal, the RAID is working properly.
l If Status is Resyncing, the RAID is synchronizing data.
NOTE
l If this is the first time that the RAID is being set on the OMU, go to Step 13.
l If this is not the first time that the RAID is being set on the OMU, go to Step 9.
Step 9 Select RAID Properties and press Enter. The following shows examples of the results that aredisplayed.
Array 1 of 1
Identifier LSILOGICLogical Volume 3000
Type IM
Scan Order 2
Size(MB) 69618
Status Optimal
Manage Array
Slot Device Identifier RAID Hot Drive Pred Size
Num Disk Spr Status Fail (MB)
0 FUJITSU MAY2073rc D109 [Yes] [No] Primary --- 69618
1 FUJITSU MAY2073rc D109 [Yes] [No] Secondary --- 69618
Step 10 Select Manage Array and press Enter. The following shows examples of the results that are
displayed.
Identifier LSILOGICLogical Volume 3000
Type IM
Scan Order 2
Size(MB) 69618
Status Optimal
Manage Hot Spare
Synchronize Array
Activate Array
Delete Array
Step 11 Select Delete Array and press Enter. The following shows examples of the results that aredisplayed.
Y Delete array and exit to Adapter Properties
N Abandon array detetion and exit this menu
Step 12 Select Y. The following shows examples of the results that are displayed.
Adapter SAS1064
PCI Slot 00
PCI Address(Bus/Dev/Func) 05:01:00
MPT Firmware Revision 0.11.01.00-IR
SAS Address 500E0FC1:23456775
NVDATA Version 25.09
Status EnabledBoot Order 0
BSC6900 UMTS
OMU Administration Guide 6 OMU Installation and Maintenance (Dopra Linux)
Issue 02 (2015-05-08) Huawei Proprietary and Confidential
Copyright © Huawei Technologies Co., Ltd.
119
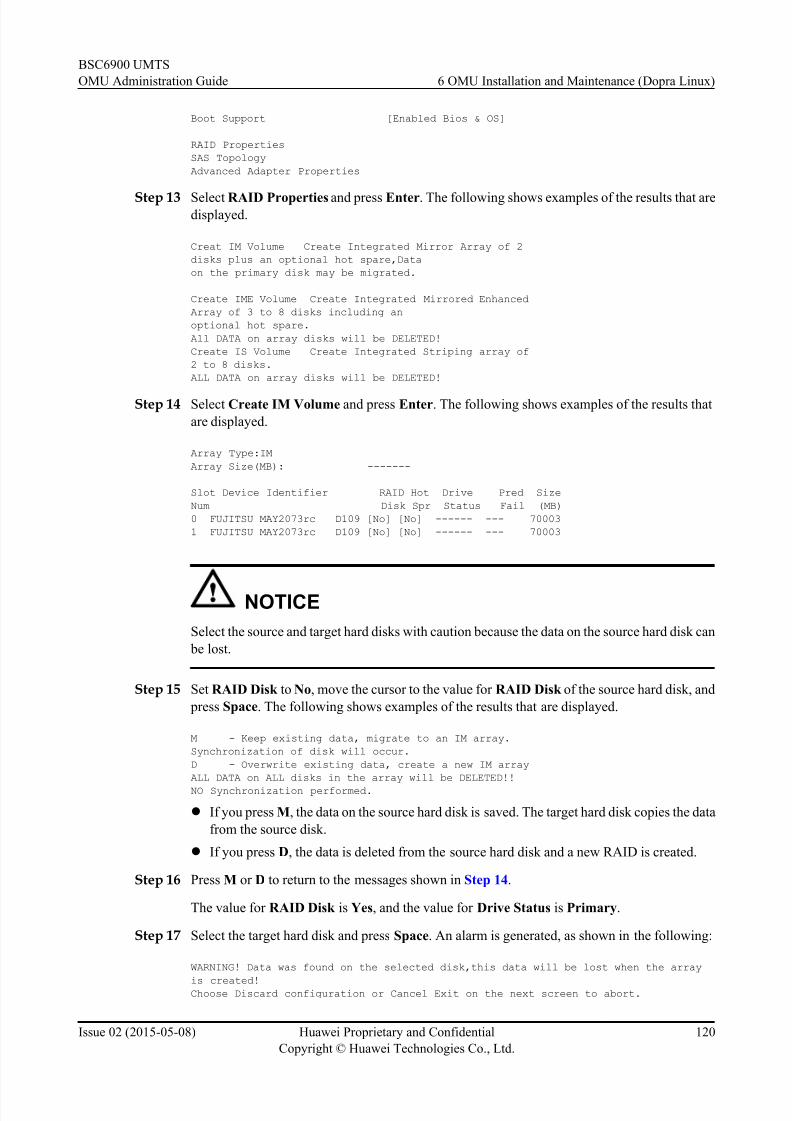
8/18/2019 Bsc6900 Umts Omu Administration Guide(v900r017c10_02)(PDF)-En
http://slidepdf.com/reader/full/bsc6900-umts-omu-administration-guidev900r017c1002pdf-en 129/310
Boot Support [Enabled Bios & OS]
RAID Properties
SAS Topology
Advanced Adapter Properties
Step 13 Select RAID Properties and press Enter. The following shows examples of the results that aredisplayed.
Creat IM Volume Create Integrated Mirror Array of 2
disks plus an optional hot spare,Data
on the primary disk may be migrated.
Create IME Volume Create Integrated Mirrored Enhanced
Array of 3 to 8 disks including an
optional hot spare.
All DATA on array disks will be DELETED!
Create IS Volume Create Integrated Striping array of
2 to 8 disks.
ALL DATA on array disks will be DELETED!
Step 14 Select Create IM Volume and press Enter. The following shows examples of the results that
are displayed.
Array Type:IM
Array Size(MB): -------
Slot Device Identifier RAID Hot Drive Pred Size
Num Disk Spr Status Fail (MB)
0 FUJITSU MAY2073rc D109 [No] [No] ------ --- 70003
1 FUJITSU MAY2073rc D109 [No] [No] ------ --- 70003
NOTICE
Select the source and target hard disks with caution because the data on the source hard disk can
be lost.
Step 15 Set RAID Disk to No, move the cursor to the value for RAID Disk of the source hard disk, and
press Space. The following shows examples of the results that are displayed.
M - Keep existing data, migrate to an IM array.
Synchronization of disk will occur.
D - Overwrite existing data, create a new IM array
ALL DATA on ALL disks in the array will be DELETED!!
NO Synchronization performed.
l If you press M, the data on the source hard disk is saved. The target hard disk copies the data
from the source disk.
l If you press D, the data is deleted from the source hard disk and a new RAID is created.
Step 16 Press M or D to return to the messages shown in Step 14.
The value for RAID Disk is Yes, and the value for Drive Status is Primary.
Step 17 Select the target hard disk and press Space. An alarm is generated, as shown in the following:
WARNING! Data was found on the selected disk,this data will be lost when the array
is created!Choose Discard configuration or Cancel Exit on the next screen to abort.
BSC6900 UMTS
OMU Administration Guide 6 OMU Installation and Maintenance (Dopra Linux)
Issue 02 (2015-05-08) Huawei Proprietary and Confidential
Copyright © Huawei Technologies Co., Ltd.
120
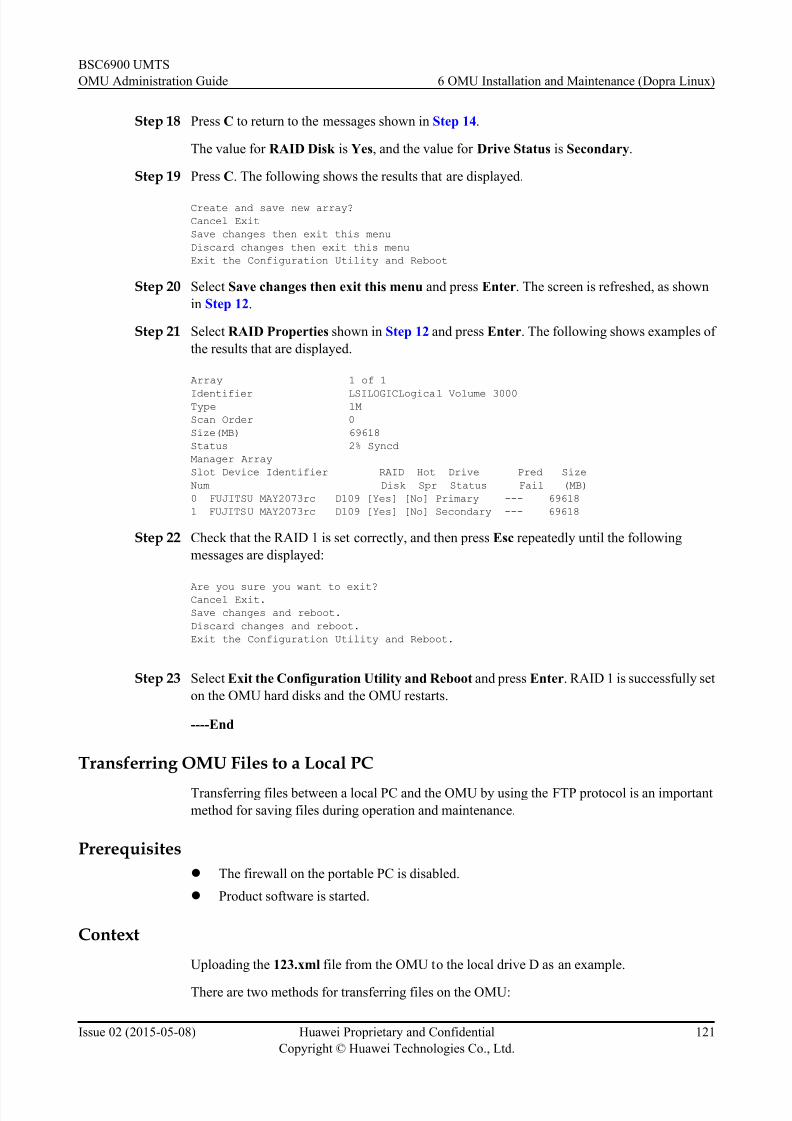
8/18/2019 Bsc6900 Umts Omu Administration Guide(v900r017c10_02)(PDF)-En
http://slidepdf.com/reader/full/bsc6900-umts-omu-administration-guidev900r017c1002pdf-en 130/310
Step 18 Press C to return to the messages shown in Step 14.
The value for RAID Disk is Yes, and the value for Drive Status is Secondary.
Step 19 Press C. The following shows the results that are displayed.
Create and save new array?
Cancel Exit
Save changes then exit this menu
Discard changes then exit this menu
Exit the Configuration Utility and Reboot
Step 20 Select Save changes then exit this menu and press Enter. The screen is refreshed, as shown
in Step 12.
Step 21 Select RAID Properties shown in Step 12 and press Enter. The following shows examples of
the results that are displayed.
Array 1 of 1
Identifier LSILOGICLogical Volume 3000Type 1M
Scan Order 0
Size(MB) 69618
Status 2% Syncd
Manager Array
Slot Device Identifier RAID Hot Drive Pred Size
Num Disk Spr Status Fail (MB)
0 FUJITSU MAY2073rc D109 [Yes] [No] Primary --- 69618
1 FUJITSU MAY2073rc D109 [Yes] [No] Secondary --- 69618
Step 22 Check that the RAID 1 is set correctly, and then press Esc repeatedly until the following
messages are displayed:
Are you sure you want to exit?Cancel Exit.
Save changes and reboot.
Discard changes and reboot.
Exit the Configuration Utility and Reboot.
Step 23 Select Exit the Configuration Utility and Reboot and press Enter. RAID 1 is successfully set
on the OMU hard disks and the OMU restarts.
----End
Transferring OMU Files to a Local PC
Transferring files between a local PC and the OMU by using the FTP protocol is an important
method for saving files during operation and maintenance.
Prerequisites
l The firewall on the portable PC is disabled.
l Product software is started.
Context
Uploading the 123.xml file from the OMU to the local drive D as an example.
There are two methods for transferring files on the OMU:
BSC6900 UMTS
OMU Administration Guide 6 OMU Installation and Maintenance (Dopra Linux)
Issue 02 (2015-05-08) Huawei Proprietary and Confidential
Copyright © Huawei Technologies Co., Ltd.
121
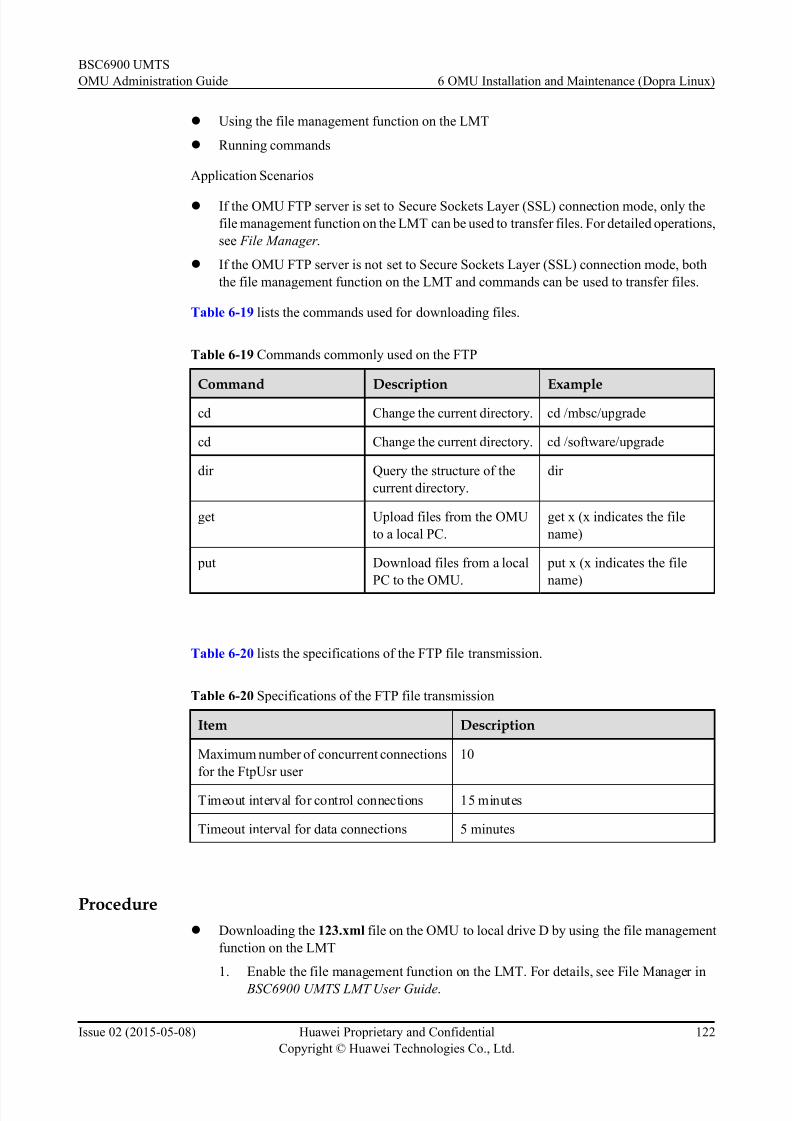
8/18/2019 Bsc6900 Umts Omu Administration Guide(v900r017c10_02)(PDF)-En
http://slidepdf.com/reader/full/bsc6900-umts-omu-administration-guidev900r017c1002pdf-en 131/310
l Using the file management function on the LMT
l Running commands
Application Scenarios
l If the OMU FTP server is set to Secure Sockets Layer (SSL) connection mode, only the
file management function on the LMT can be used to transfer files. For detailed operations,
see File Manager .
l If the OMU FTP server is not set to Secure Sockets Layer (SSL) connection mode, both
the file management function on the LMT and commands can be used to transfer files.
Table 6-19 lists the commands used for downloading files.
Table 6-19 Commands commonly used on the FTP
Command Description Example
cd Change the current directory. cd /mbsc/upgrade
cd Change the current directory. cd /software/upgrade
dir Query the structure of the
current directory.
dir
get Upload files from the OMU
to a local PC.
get x (x indicates the file
name)
put Download files from a local
PC to the OMU.
put x (x indicates the file
name)
Table 6-20 lists the specifications of the FTP file transmission.
Table 6-20 Specifications of the FTP file transmission
Item Description
Maximum number of concurrent connections
for the FtpUsr user
10
Timeout interval for control connections 15 minutes
Timeout interval for data connections 5 minutes
Procedure
l Downloading the 123.xml file on the OMU to local drive D by using the file management
function on the LMT
1. Enable the file management function on the LMT. For details, see File Manager in
BSC6900 UMTS LMT User Guide.
BSC6900 UMTS
OMU Administration Guide 6 OMU Installation and Maintenance (Dopra Linux)
Issue 02 (2015-05-08) Huawei Proprietary and Confidential
Copyright © Huawei Technologies Co., Ltd.
122

8/18/2019 Bsc6900 Umts Omu Administration Guide(v900r017c10_02)(PDF)-En
http://slidepdf.com/reader/full/bsc6900-umts-omu-administration-guidev900r017c1002pdf-en 132/310
2. Select the files to be downloaded in the corresponding directories and click
Download.
l Downloading the 123.xml file on the OMU to local drive D by running commands
1. On the local PC, choose Start > Run, enter cmd, and click OK .
2. Enter d: to go to drive D.
3. Enter ftp IP address to connect the local PC to the OMU, where IP address indicates
the external virtual or commissioning IP address of the OMU.
4. Type the user name and password of the FTP. The connection between the local PC
and the OMU is established after the certification passes.
NOTE
The FTP user name has a fixed value FtpUsr. Its password is mbsc@com or set during the product
software installation. For details, see 6.5.1 Information Records of OMU Software Installation.
5. Navigate to the directory where the 123.xml file is saved by referring to commonly
used FTP commands.6. Transfer the 123.xml file.
Command Description
Run the get 123.xml command. Upload the 123.xml file from the OMU
to the local drive D.
Run the put 123.xml command. Download the 123.xml file from the
local drive D to the OMU.
7. After the file transfer is complete, run the quit command to disconnect the FTP.
----End
Example
The following is an example for downloading the 123.xml file from the local drive D to the /
mbsc/bam/version_a/bin/bam directory of the OMU:C:\Documents and Settings>d:
D:\>ftp 10.161.21.3
Connected to 10.161.21.3.
220 ftp server ready.
User (10.161.21.3:(none)): FtpUsr
331 Password required for FtpUsr.Password:
230 User logged in.
ftp> cd /bam/version_a/bin/bam
250 CWD successful.
ftp> put 123.xml
200 PORT command OK.
150 Opening BINARY mode data connection for '/123.xml' (104 bytes)
226 Transfer complete.
ftp> quit
D:\>
BSC6900 UMTS
OMU Administration Guide 6 OMU Installation and Maintenance (Dopra Linux)
Issue 02 (2015-05-08) Huawei Proprietary and Confidential
Copyright © Huawei Technologies Co., Ltd.
123

8/18/2019 Bsc6900 Umts Omu Administration Guide(v900r017c10_02)(PDF)-En
http://slidepdf.com/reader/full/bsc6900-umts-omu-administration-guidev900r017c1002pdf-en 133/310
Adjusting OMU Slots
This section describes how to adjust the slots that accommodate the operation and maintenance
units (OMUs).
Prerequisites
l Before adjusting the OMU slots that accommodate the OMUs, collect information listed
in Table 6-21.
Table 6-21 Required information
Information Description
OMU Slots Query and record the slots that
accommodate the OMUs.
l Hardware requirement
– The target slots are idle. For details about the OMU slot information, see OMUa Board.
l Software requirement
– None
l License requirement
– None
Context
Prepare the data listed in the following table.
Table 6-22 Data preparation
MO Setting Notes DataSource
MMLCommand
BRD Set Slot No. to an appropriate value. Internal plan ADD BRD
Procedure
Step 1 Run the DSP OMU command to query the numbers of the slots that accommodate the active
and standby OMUs before the reconfiguration.
Step 2 Perform the operations listed in the following table based on the operating system of the OMU.
BSC6900 UMTS
OMU Administration Guide 6 OMU Installation and Maintenance (Dopra Linux)
Issue 02 (2015-05-08) Huawei Proprietary and Confidential
Copyright © Huawei Technologies Co., Ltd.
124

8/18/2019 Bsc6900 Umts Omu Administration Guide(v900r017c10_02)(PDF)-En
http://slidepdf.com/reader/full/bsc6900-umts-omu-administration-guidev900r017c1002pdf-en 134/310
If... Then...
The Dopra Linux operating system is used 1. Log in to the active and standby OMUs
separately.
2. Run the /etc/rc.d/omud stop command tostop the omud process.
3. Run the poweroff command to power off
the OMU.
The Windows operating system is used 1. Log in to the active and standby OMUs
separately.
2. Choose Start > Run. In the Run dialog
box, type cmd, and press Enter. The
OMU command input dialog box is
displayed.
3. In the command line, type the net stopomud command to stop the omud process.
4. Choose Start > Shutdown. In the
displayed dialog box, select Shutdown to
shut down the OMU.
Step 3 When the OFFLINE indicator on the OMU board panel is on, remove the active and standby
OMUs.
Step 4 Insert the active and standby OMUs into the target slots.
Step 5 After five minutes, run the DSP OMU command to check whether the active and standby OMUs
operate properly. If not, check whether the OMUs are installed correctly.
Step 6 Run the RMV BRD command to remove the OMU boards that have been configured.
Step 7 Run the ADD BRD command to add active and standby OMU boards separately. In this step,
set Slot No. to an appropriate value.
Step 8 Log in to the LMT to check whether the OMU status displayed on the device panel is correct.
Step 9 On the LMT, click Alarm, and select Browse Alarm to view current active alarms.
Step 10Optional: If an OMU-related alarm is displayed in the list of active alarms and the OMU slot
number is the original one, right-click the alarm, and choose Clear Alarm from the shortcut
menu to manually clear the alarm.
----End
Example
/*Information Recording Procedure*/
//Querying the numbers of the subracks and slots where the active and standby OMUs
reside before the slot adjustment
DSP OMU:;
/*Reconfiguration Procedure*/
BSC6900 UMTS
OMU Administration Guide 6 OMU Installation and Maintenance (Dopra Linux)
Issue 02 (2015-05-08) Huawei Proprietary and Confidential
Copyright © Huawei Technologies Co., Ltd.
125

8/18/2019 Bsc6900 Umts Omu Administration Guide(v900r017c10_02)(PDF)-En
http://slidepdf.com/reader/full/bsc6900-umts-omu-administration-guidev900r017c1002pdf-en 135/310
//Removing a board
RMV BRD: SRN=0, SN=16;
RMV BRD: SRN=0, SN=18;
//Adding boards
ADD BRD: SRN=0, BRDCLASS=OMU, BRDTYPE=OMUa, SN=24;
ADD BRD: SRN=0, BRDCLASS=OMU, BRDTYPE=OMUa, SN=26;
Follow-up Procedure
l Verification
Run the DSP OMU command to check whether the active and standby OMUs operate
properly.
Expected result: The active and standby OMUs operate properly.
l Rollback
The rollback procedure is similar to the reconfiguration procedure, except that parameters
in the rollback procedure are set to values used before the reconfiguration.
6.3.4 Managing the Product Software
This section describes how to manage the product software.
Querying the OMU Operating Status
This section describes how to query the OMU operating information, the status of OMU service
processes when the OMU is operating properly, and the OMU board information.
Prerequisites
You have logged in to the LMT by referring to Logging In to and Logging Out of the LMT.
Context
If an OMU board becomes faulty, query the information about the OMU board for fault location.
Procedure
l Querying the OMU operating information
1. Run the DSP OMU command. The OMU operating information is displayed,
including the OMU operating status, fixed IP address configuration, virtual IP address
configuration, debugging IP address configuration, status of data synchronization,
status of the internal and external networks, and status of the backup channel.
l Querying the status of OMU service processes when the OMU is operating properly
1. Run the DSP OMUMODULE command. The names and status of the OMU service
processes are displayed.
– If the status of service processes is Started, the OMU service processes are normal.
– If the status of service processes is Stopped, the OMU service processes are normal
and not started.
– If the status of the service processes is Exception, the OMU service processes are
abnormal. When active and standby OMUs are configured, the self-healing
BSC6900 UMTS
OMU Administration Guide 6 OMU Installation and Maintenance (Dopra Linux)
Issue 02 (2015-05-08) Huawei Proprietary and Confidential
Copyright © Huawei Technologies Co., Ltd.
126

8/18/2019 Bsc6900 Umts Omu Administration Guide(v900r017c10_02)(PDF)-En
http://slidepdf.com/reader/full/bsc6900-umts-omu-administration-guidev900r017c1002pdf-en 136/310
switchover is triggered if the abnormal status persists. When an independent OMU
is configured, the OMU reports the ALM-20707 OMU Process Abort alarm.
l Querying the OMU board information
– Run the DSP OMUSRV command. The OMU board status is displayed, including the
CPU usage, memory usage, number of logical CPUs, memory capacity, total space of
logical disks, current available space, percentage of the available space, and the time
cost by input/output (I/O) operation on the OMU hard disks.
– Run the MML command DSP OMUVER . The subrack number, slot number, OMU
type, and version information about the PCB, BIOS, BMC, CPLD, and SDR are
displayed.
l Querying the OMU working environment
1. Run the MML command DSP OMUENV. The CPU inlet temperature, memory inlet
temperature, hard disk temperature, and voltage of chips are displayed.
l
Querying the OMU hardware status1. Run the MML command DSP OMUHW. The subrack number, slot number, operating
status of the hard disk, status of Ethernet adapters and Ethernet adapter teams, and
RAID of the OMU are displayed.
The OMU hardware is normal if the following conditions are met:
– The values for Primer harddisk and Standby harddisk are Online.
– The status of the Raid is Normal, and the Raid rebulid scale is 0.
– ETH0 netcard, ETH1 netcard, or both are Normal.
– In active/standby OMU mode, the value for Backup channel netcard is
Normal; in independent OMU mode, the value for Backup channel netcard does
not have impact on the OMU hardware status.
– Inner0 netcard, Inner1 netcard , or both are Normal.
– Both Inner netcard group and Extra netcard group are Normal.
----End
Querying the Version of the Active/Standby OMU Workspaces
This section describes how to query the version of the active and standby OMU workspaces,
such as the workspace flag and version of the product software.
Prerequisites
You have logged in to the LMT by referring to Logging In to and Logging Out of the LMT.
Procedure
Step 1 Run the LST OMUAREA command to query the version of the active and standby OMU
workspaces.
----End
BSC6900 UMTS
OMU Administration Guide 6 OMU Installation and Maintenance (Dopra Linux)
Issue 02 (2015-05-08) Huawei Proprietary and Confidential
Copyright © Huawei Technologies Co., Ltd.
127

8/18/2019 Bsc6900 Umts Omu Administration Guide(v900r017c10_02)(PDF)-En
http://slidepdf.com/reader/full/bsc6900-umts-omu-administration-guidev900r017c1002pdf-en 137/310
Querying the Status of Data Synchronization Between the Active and StandbyOMUs
This section describes how to query the status of data synchronization between the active and
standby OMUs.
Prerequisites
l You have logged in to the LMT by referring to Logging In to and Logging Out of the LMT.
l Active and standby OMUs are configured.
Context
When faults occur due to network or database problems during data synchronization, OMUs
automatically rectifies the faults.
Procedure
Step 1 Run the MML command DSP OMU on the active or standby OMU. The status of data
synchronization between the active and standby OMUs is displayed.
If data synchronization is abnormal, the ALM-20704 OMU Data Synchronization Failure alarm
is reported. Clear the alarm by referring to the alarm handling suggestions.
NOTICE
When Data-sync state is Data synchronization is successful, Data synchronization not built
due to version inconsistency, or Data synchronization cannot built due to OMU failure
switchover, you are allowed to switch over the active and standby OMUs.
----End
Checking Data Consistency Between the Active OMU and the Standby OMU
This section describes how to check data consistency between the active OMU and the standby
OMU after a fault triggers a switchover.
Prerequisites
l You have logged in to the LMT. For details, see
You have logged in to the LMT by referring to Logging In to and Logging Out of the LMT.
.
l The OMUs work in active/standby mode.
Procedure
Step 1Run the CMP OMUDATA command to check consistency of alarm data, performance data,
configuration data, and platform data between the active and standby OMUs.
BSC6900 UMTS
OMU Administration Guide 6 OMU Installation and Maintenance (Dopra Linux)
Issue 02 (2015-05-08) Huawei Proprietary and Confidential
Copyright © Huawei Technologies Co., Ltd.
128
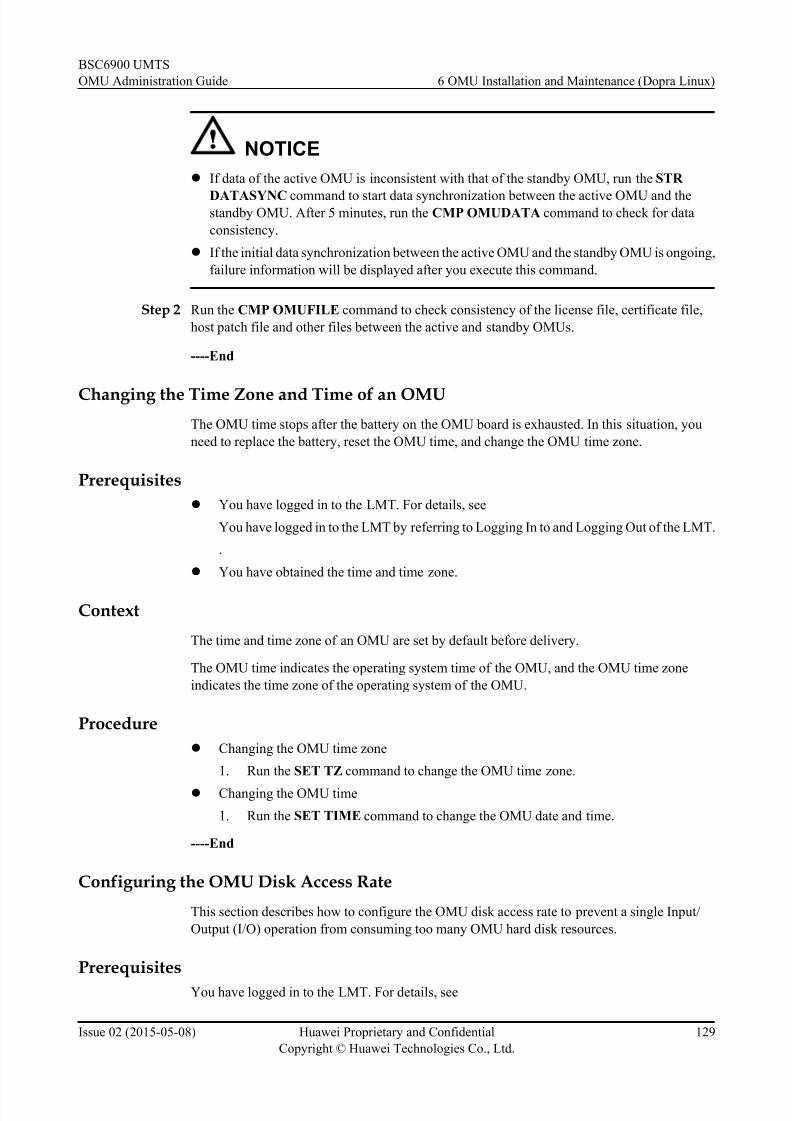
8/18/2019 Bsc6900 Umts Omu Administration Guide(v900r017c10_02)(PDF)-En
http://slidepdf.com/reader/full/bsc6900-umts-omu-administration-guidev900r017c1002pdf-en 138/310
NOTICE
l If data of the active OMU is inconsistent with that of the standby OMU, run the STR
DATASYNC command to start data synchronization between the active OMU and thestandby OMU. After 5 minutes, run the CMP OMUDATA command to check for data
consistency.
l If the initial data synchronization between the active OMU and the standby OMU is ongoing,
failure information will be displayed after you execute this command.
Step 2 Run the CMP OMUFILE command to check consistency of the license file, certificate file,
host patch file and other files between the active and standby OMUs.
----End
Changing the Time Zone and Time of an OMU
The OMU time stops after the battery on the OMU board is exhausted. In this situation, you
need to replace the battery, reset the OMU time, and change the OMU time zone.
Prerequisites
l You have logged in to the LMT. For details, see
You have logged in to the LMT by referring to Logging In to and Logging Out of the LMT.
.
l You have obtained the time and time zone.
Context
The time and time zone of an OMU are set by default before delivery.
The OMU time indicates the operating system time of the OMU, and the OMU time zone
indicates the time zone of the operating system of the OMU.
Procedure
l Changing the OMU time zone
1. Run the SET TZ command to change the OMU time zone.
l Changing the OMU time
1. Run the SET TIME command to change the OMU date and time.
----End
Configuring the OMU Disk Access Rate
This section describes how to configure the OMU disk access rate to prevent a single Input/
Output (I/O) operation from consuming too many OMU hard disk resources.
Prerequisites
You have logged in to the LMT. For details, see
BSC6900 UMTS
OMU Administration Guide 6 OMU Installation and Maintenance (Dopra Linux)
Issue 02 (2015-05-08) Huawei Proprietary and Confidential
Copyright © Huawei Technologies Co., Ltd.
129
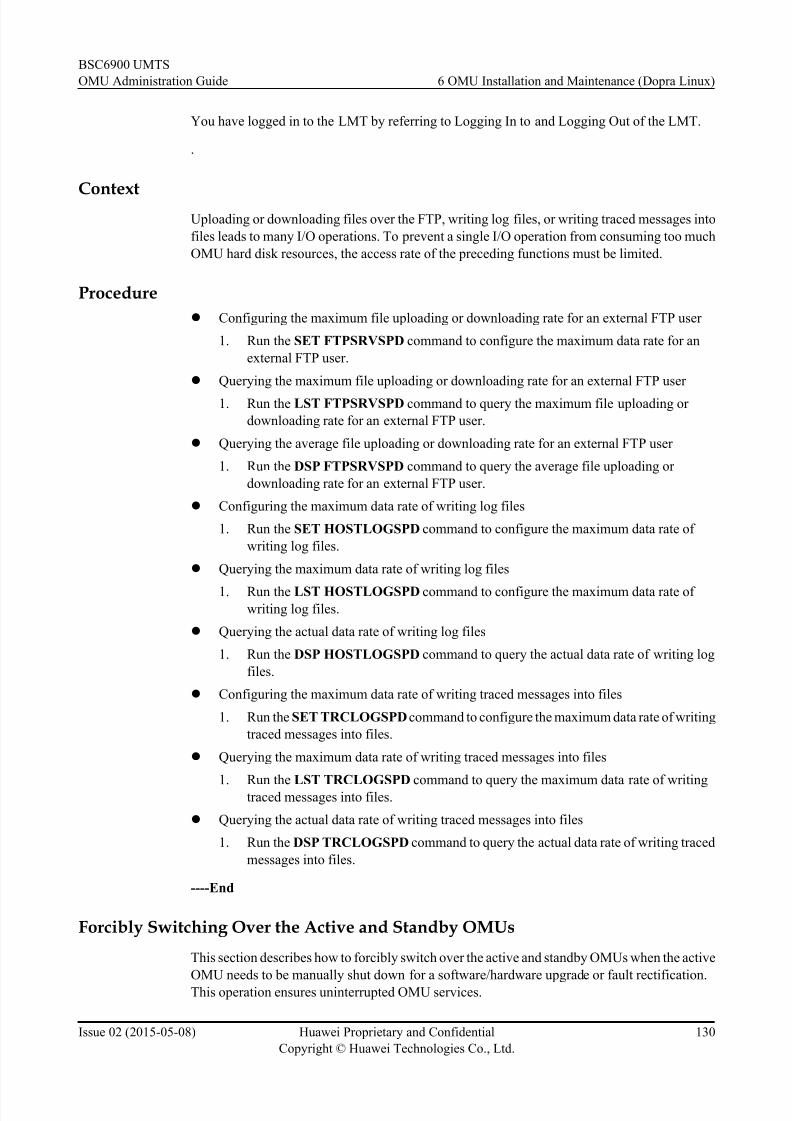
8/18/2019 Bsc6900 Umts Omu Administration Guide(v900r017c10_02)(PDF)-En
http://slidepdf.com/reader/full/bsc6900-umts-omu-administration-guidev900r017c1002pdf-en 139/310
You have logged in to the LMT by referring to Logging In to and Logging Out of the LMT.
.
ContextUploading or downloading files over the FTP, writing log files, or writing traced messages into
files leads to many I/O operations. To prevent a single I/O operation from consuming too much
OMU hard disk resources, the access rate of the preceding functions must be limited.
Procedure
l Configuring the maximum file uploading or downloading rate for an external FTP user
1. Run the SET FTPSRVSPD command to configure the maximum data rate for an
external FTP user.
l Querying the maximum file uploading or downloading rate for an external FTP user
1. Run the LST FTPSRVSPD command to query the maximum file uploading or
downloading rate for an external FTP user.
l Querying the average file uploading or downloading rate for an external FTP user
1. Run the DSP FTPSRVSPD command to query the average file uploading or
downloading rate for an external FTP user.
l Configuring the maximum data rate of writing log files
1. Run the SET HOSTLOGSPD command to configure the maximum data rate of
writing log files.
l Querying the maximum data rate of writing log files
1. Run the LST HOSTLOGSPD command to configure the maximum data rate of writing log files.
l Querying the actual data rate of writing log files
1. Run the DSP HOSTLOGSPD command to query the actual data rate of writing log
files.
l Configuring the maximum data rate of writing traced messages into files
1. Run the SET TRCLOGSPD command to configure the maximum data rate of writing
traced messages into files.
l Querying the maximum data rate of writing traced messages into files
1. Run the LST TRCLOGSPD command to query the maximum data rate of writingtraced messages into files.
l Querying the actual data rate of writing traced messages into files
1. Run the DSP TRCLOGSPD command to query the actual data rate of writing traced
messages into files.
----End
Forcibly Switching Over the Active and Standby OMUs
This section describes how to forcibly switch over the active and standby OMUs when the active
OMU needs to be manually shut down for a software/hardware upgrade or fault rectification.
This operation ensures uninterrupted OMU services.
BSC6900 UMTS
OMU Administration Guide 6 OMU Installation and Maintenance (Dopra Linux)
Issue 02 (2015-05-08) Huawei Proprietary and Confidential
Copyright © Huawei Technologies Co., Ltd.
130

8/18/2019 Bsc6900 Umts Omu Administration Guide(v900r017c10_02)(PDF)-En
http://slidepdf.com/reader/full/bsc6900-umts-omu-administration-guidev900r017c1002pdf-en 140/310
Prerequisites
l You have logged in to the LMT. For details, see
You have logged in to the LMT by referring to Logging In to and Logging Out of the LMT.
.l The OMUs work in active/standby mode and the active and standby OMUs work correctly
for more than 5 minutes (You can run the CMP OMUDATA and CMP OMUFILE
commands to check whether the active OMU data is consistent with the standby OMU data.
Ensure that the data on the active OMU is synchronized to the standby OMU to avoid data
loss after the switchover.)
Procedure
Step 1 Run the DSP OMU command to query the operating status of the active and standby OMUs.
If... Then...
The active and standby OMUs work properly and the data
synchronization is normal
Go to Step 2.
The active and standby OMUs do not work properly or the data
synchronization is abnormal
End this task.
Step 2 Run the SWP OMU command to manually switch over the OMUs.
Step 3 Log in to the LMT again and run the DSP OMU command to query the operating status of the
active OMU after the switchover. If the active OMU works properly, the switchover is
successful.
----End
Resetting the OMU
This section describes how to reset the OMU, product software, and OMU service processes.
Prerequisites
You have logged in to the LMT by referring to Logging In to and Logging Out of the LMT.
Context
l The OMU operating system is restarted after the OMU is reset. If the OMU is reset
successfully, the faults of the OMU operating system or product software can be rectified.
l All the service processes are disrupted after the product software are reset. If the OMU is
reset successfully, the faults of the product software can be rectified.
l Resetting a specified OMU service process interrupts the service of the process for a while.
Procedure
l Reset the OMU or product software
BSC6900 UMTS
OMU Administration Guide 6 OMU Installation and Maintenance (Dopra Linux)
Issue 02 (2015-05-08) Huawei Proprietary and Confidential
Copyright © Huawei Technologies Co., Ltd.
131

8/18/2019 Bsc6900 Umts Omu Administration Guide(v900r017c10_02)(PDF)-En
http://slidepdf.com/reader/full/bsc6900-umts-omu-administration-guidev900r017c1002pdf-en 141/310
1. Run the RST OMU command.
– If Reset Type is set to SOFT, only the product software are reset. The OMU
operating system is not restarted.
– If Reset Type is set to HARD, the OMU operating system is restarted.
NOTE
l When the OMU works in single-OMU mode, set the Reset Target to ACTIVE.
l When the OMUs work in dual-OMU mode, the active OMU is reset if you set the Reset
Target to ACTIVE.
l When the OMUs work in dual-OMU mode, the standby OMU is reset if you set the Reset
Target to STANDBY.
l Reset a specified service process
1. Run the RST OMUMODULE command and specify Reset Target and Module
Name to reset the specified OMU service process.
----End
Managing the omud
This section describes how to start or stop the omud process so that the OMU can provide services
properly.
Starting the omud
Context
l If the BSC6900 is configured with active and standby OMUs, log in to the active or standby
OMU by using the external fixed IP address or the commissioning IP address.l If the BSC6900 is configured with an independent OMU, log in to the OMU by using the
external fixed or virtual IP address or the commissioning IP address.
Procedure
1. Log in to the OMU by using the external fixed IP address by referring to 6.3.1 Logging In
to the OMU.
2. Enter /etc/rc.d/omud start to start the omud.
Stopping the omud
The omud process must be stopped before performing the following operations: uninstalling the product software, upgrading product software, or restoring the BSC6900 data.
BSC6900 UMTS
OMU Administration Guide 6 OMU Installation and Maintenance (Dopra Linux)
Issue 02 (2015-05-08) Huawei Proprietary and Confidential
Copyright © Huawei Technologies Co., Ltd.
132

8/18/2019 Bsc6900 Umts Omu Administration Guide(v900r017c10_02)(PDF)-En
http://slidepdf.com/reader/full/bsc6900-umts-omu-administration-guidev900r017c1002pdf-en 142/310
NOTICE
l When the omud process is stopped, all the OMU service processes will also stop. In turn, the
OMU stops providing services for the BSC6900. Therefore, perform this task with caution.
l If the external virtual IP address is used to log in to the OMU, stopping the omud process
will disconnect the OMU from the peripheral devices.
l If an external fixed IP address is configured for the OMU, stopping the omud will make
the external virtual IP address ineffective. In this situation, users can log in to the OMU
by using the external fixed IP address if an independent OMU is configured. If the OMUs
work in active/standby mode, the external virtual IP address of the original standby OMU
becomes effective after the active OMU is stopped.
l If no external fixed IP address is configured for the OMU, the external virtual IP address
is still effective after you stop the omud.
l If the BSC6900 is configured with active and standby OMUs, log in to the active or standby
OMU by using the external fixed IP address or the commissioning IP address.
l If the BSC6900 is configured with an independent OMU, log in to the OMU by using the
external fixed or virtual IP address or the commissioning IP address.
Procedure
1. Log in to the OMU by using the external fixed IP address by referring to 6.3.1 Logging In
to the OMU.
2. Enter /etc/rc.d/omud stop to stop the omud process.
Querying the Operating Status of the omud
This section describes how to query the operating status of the omud to determine whether the
OMU can provide services normally.
Procedure
Step 1 Log in to the OMU by using the external fixed IP address by referring to 6.3.1 Logging In to
the OMU.
Step 2 Run the /etc/rc.d/omud status command to query the operating status of the omud.
Option Description
If the operating status of the omud is running, The OMU is working.
If the operating status of the omud is unused, The OMU stops working.
----End
Uninstalling the Product Software
This section describes how to uninstall the product software.
BSC6900 UMTS
OMU Administration Guide 6 OMU Installation and Maintenance (Dopra Linux)
Issue 02 (2015-05-08) Huawei Proprietary and Confidential
Copyright © Huawei Technologies Co., Ltd.
133

8/18/2019 Bsc6900 Umts Omu Administration Guide(v900r017c10_02)(PDF)-En
http://slidepdf.com/reader/full/bsc6900-umts-omu-administration-guidev900r017c1002pdf-en 143/310
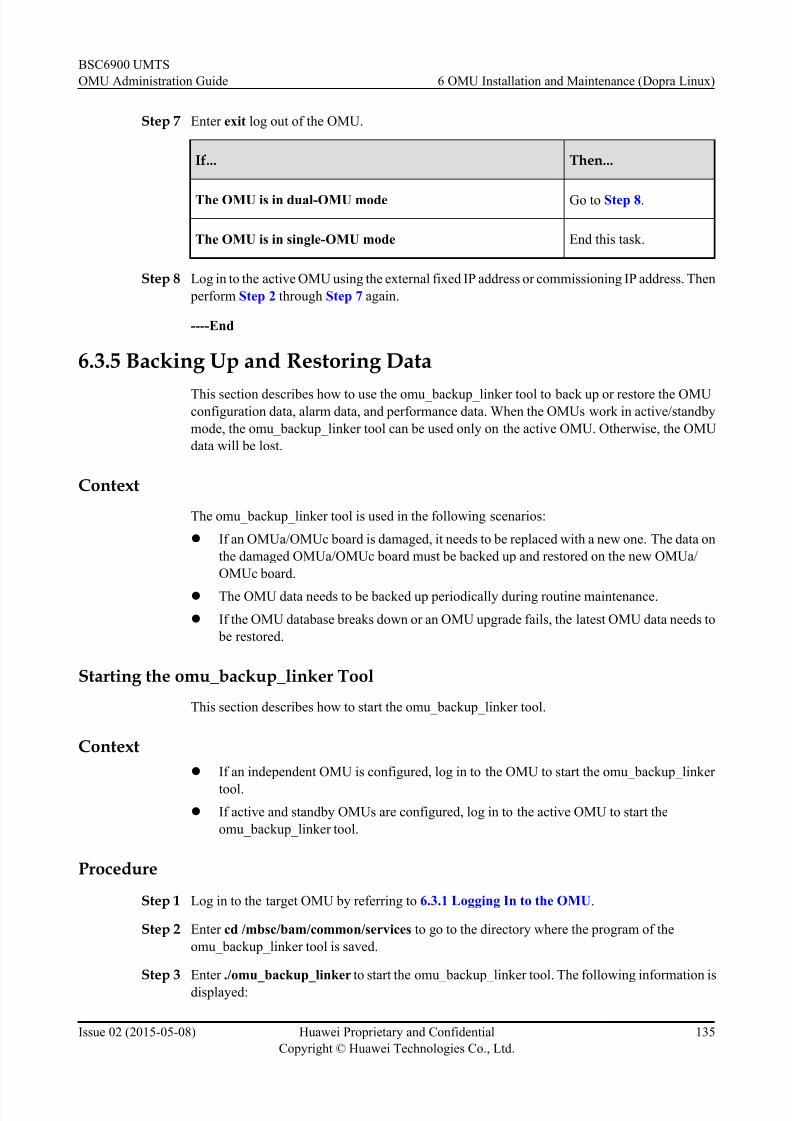
8/18/2019 Bsc6900 Umts Omu Administration Guide(v900r017c10_02)(PDF)-En
http://slidepdf.com/reader/full/bsc6900-umts-omu-administration-guidev900r017c1002pdf-en 144/310
Step 7 Enter exit log out of the OMU.
If... Then...
The OMU is in dual-OMU mode Go to Step 8.
The OMU is in single-OMU mode End this task.
Step 8 Log in to the active OMU using the external fixed IP address or commissioning IP address. Then
perform Step 2 through Step 7 again.
----End
6.3.5 Backing Up and Restoring Data
This section describes how to use the omu_backup_linker tool to back up or restore the OMUconfiguration data, alarm data, and performance data. When the OMUs work in active/standby
mode, the omu_backup_linker tool can be used only on the active OMU. Otherwise, the OMU
data will be lost.
Context
The omu_backup_linker tool is used in the following scenarios:
l If an OMUa/OMUc board is damaged, it needs to be replaced with a new one. The data on
the damaged OMUa/OMUc board must be backed up and restored on the new OMUa/
OMUc board.
l The OMU data needs to be backed up periodically during routine maintenance.
l If the OMU database breaks down or an OMU upgrade fails, the latest OMU data needs to
be restored.
Starting the omu_backup_linker Tool
This section describes how to start the omu_backup_linker tool.
Context
l If an independent OMU is configured, log in to the OMU to start the omu_backup_linker
tool.
l If active and standby OMUs are configured, log in to the active OMU to start the
omu_backup_linker tool.
Procedure
Step 1 Log in to the target OMU by referring to 6.3.1 Logging In to the OMU.
Step 2 Enter cd /mbsc/bam/common/services to go to the directory where the program of the
omu_backup_linker tool is saved.
Step 3Enter ./omu_backup_linker to start the omu_backup_linker tool. The following information is
displayed:
BSC6900 UMTS
OMU Administration Guide 6 OMU Installation and Maintenance (Dopra Linux)
Issue 02 (2015-05-08) Huawei Proprietary and Confidential
Copyright © Huawei Technologies Co., Ltd.
135

8/18/2019 Bsc6900 Umts Omu Administration Guide(v900r017c10_02)(PDF)-En
http://slidepdf.com/reader/full/bsc6900-umts-omu-administration-guidev900r017c1002pdf-en 145/310
# The backup/restore option
# backup :Backup OMU database
# restore :Restore OMU database
# Please select one option to backup or restore OMU database, if you don't know it,
consult the administrator.
Please input a valid bkp_res_type :
----End
Backing Up the System Data
This section describes how to back up the BSC6900 configuration data, performance data, alarm
data, operation logs, operator account, rights information, and product information using an
MML command or the omu_backup_linker_tool. The backup data can be encrypted to ensure
the security in data storage and transmission.
Prerequisites
l Using an MML command:
You have logged in to the LMT by referring to Logging In to and Logging Out of the LMT.
l Using the omu_backup_linker_tool:
The 6.3.1 Logging In to the OMU is connected.
Context
NOTICE
l When the OMUs work in active/standby mode, the system data must be backed up on the
active OMU.
l Before capacity expansion, upgrade, or software loading, you must back up the OMU data
manually to avoid a system data backup failure.
Procedure
l Using an MML command
1. Run the BKP DB command to back up the data to the specified directory on the OMUhard disk. In this step, set Path of Backup File and Backup File Name to appropriate
values. If the backup file needs to be encrypted, set Encrypted Mode to Password
Encrypted and specify File Encryption Password.
2. Obtain the backup file from the specified directory by referring to the procedures
described in Transferring OMU Files to a Local PC.
l Using the omu_backup_linker_tool
1. Log in to the target OMU.
2. Enter cd /mbsc/bam/common/services to go to the directory where the program of
the omu_backup_linker tool is saved.
3. Enter ./omu_backup_linker to start the omu_backup_linker tool.
BSC6900 UMTS
OMU Administration Guide 6 OMU Installation and Maintenance (Dopra Linux)
Issue 02 (2015-05-08) Huawei Proprietary and Confidential
Copyright © Huawei Technologies Co., Ltd.
136

8/18/2019 Bsc6900 Umts Omu Administration Guide(v900r017c10_02)(PDF)-En
http://slidepdf.com/reader/full/bsc6900-umts-omu-administration-guidev900r017c1002pdf-en 146/310

8/18/2019 Bsc6900 Umts Omu Administration Guide(v900r017c10_02)(PDF)-En
http://slidepdf.com/reader/full/bsc6900-umts-omu-administration-guidev900r017c1002pdf-en 147/310
As an example, the OMU in active/standby mode is used in this document. If an OMU is in
independent mode, skip operations on the standby OMU.
This chapter describes how to restore data by using the following methods:
l If an MML command is used to restore data, only the BSC6900 configuration data isrestored while other data, such as alarm data or performance data, cannot be restored.
l If the omu_backup_linker tool is used to restore data, all BSC6900 data is restored,
including configuration data, alarm data, performance data, operating logs, administrator
account, authority information, SSL configuration information, certificate information and
product information.
Procedure
l Restoring the system data through an MML command
1. Run the LST BKPFILE command to query data backup files saved in the OMU
active workspace installation directory\data\backup directory.
2. Run the RTR DB command to restore configuration data on the OMU. If the backup
file is encrypted, specify Encrypted Mode and File Encryption Password.
3. Run the LST SUBNET and DSP OMU commands to query the internal network
segments. If the queried internal network segments in the two command outputs are
different, run the RST OMU command to perform soft resets on the active and standby
OMU boards.
l Restoring the system data by using the omu_backup_linker tool
1. Log in to the active and standby OMUs by referring to 6.3.1 Logging In to the
OMU.2. Enter /etc/rc.d/omud stop to stop the omud process on the active and standby OMUs.
3. Restore data in the original active OMU using the omu_backup_linker tool.
a. Enter cd /mbsc/bam/common/services to go to the directory where the program
of the omu_backup_linker tool is saved
b. Log in to the OMU by referring to Enter ./omu_backup_linker to start the
omu_backup_linker tool.
c. Enter restore and press Enter after the Please input a valid
bkp_res_type : message is displayed.
d. Type the save path and name of the backup file and press Enter when thePlease input a valid backup file pathname : message is
displayed.
e. Enter the encryption mode when the Please input a valid encrypt
mode : message is displayed. If the backup file has not been encrypted, enter
unencrypt. If the backup file has been encrypted, enter encrypt. Then, press
Enter.
f. If you enter encrypt in the previous step, specify File Encryption Password
and press Enter. The system data starts to be restored. After the restoration is
complete, a message is displayed, indicating whether the restoration is
successful. If the restoration is successful, the Restore OMU database
succeed! message is displayed on the interface.
BSC6900 UMTS
OMU Administration Guide 6 OMU Installation and Maintenance (Dopra Linux)
Issue 02 (2015-05-08) Huawei Proprietary and Confidential
Copyright © Huawei Technologies Co., Ltd.
138

8/18/2019 Bsc6900 Umts Omu Administration Guide(v900r017c10_02)(PDF)-En
http://slidepdf.com/reader/full/bsc6900-umts-omu-administration-guidev900r017c1002pdf-en 148/310
4. Copy and save the backup file to be restored in the standby OMU using the psftp
software. For details, see 6.4.1 Obtaining and Using the psftp Software.
5. Repeat Step 3 to restore data in the original standby OMU using the
omu_backup_linker tool.
6. Enter /etc/rc.d/omud start to start the omud on the active and standby OMUs.
7. Log in to the LMT by referring to Logging In to and Logging Out of the LMT in the
BSC6900 UMTS LMT User Guide.
8. Run the LCK CMCTRL command to lock the data configuration right.
9. Run the LST CFGMODE command to query whether the System Configuration
Mode parameter is set to Effective Mode for all subracks. If this parameter is set to
Ineffective Mode for any subrack, run the SET CFGDATAEFFECTIVE command
to change the value to Effective Mode.
10. Check the consistency between the BSC6900 host data and the OMU data.
NOTE
After data restoration, check whether the BSC6900 host data is consistent with the OMU data.
If not, load the restored data to the BSC6900 host.
a. Run the ACT CRC command to check whether the host data is consistent with
the OMU data.
– If the data is consistent, end this task.
– If the data is inconsistent, go to 10.2.
b. Run the FMT DATA command to format the data in the OMU database so that
the data can be loaded into the host.
c. If data inconsistency occurs in only one subrack, run the RST SUBRACK
command to reset this subrack. Before running the command, set Subrack No.
----End
Example
Restore the OMU data by using the omu.bak.ecf file (the file name extension after encryption
is .ecf) under /mbsc/bam. The following shows an example of the results:omd_test_name ~ # /etc/rc.d/omud stop
Shutting down mbsc daemon..........
omd_test_name ~ # cd /mbsc/bam/common/services
omd_test_name /mbsc/bam/common/services # ./omu_backup_linker
# The backup/restore option# backup : Backup OMU database
# restore : Restore OMU database
# Please select one option to backup or restore OMU database, if you don't know
it, please consult the administrator.
Please input a valid bkp_res_type : restore
# The backup file pathname.
# eg: d:/mbsc/bam/omu.bak, in windows;
# eg: /mbsc/bam/omu.bak, in linux.
Please input a valid backup file pathname : /mbsc/bam/omu.bak.ecf
# The backup file encrypted mode.
# unencrypt: The backup file is unencrypted.
# encrypt: The backup file is encrypted.
Please input a valid encrypt mode : encrypt
# The backup file password.
Please input a valid file password :Restore omu database [100%]
BSC6900 UMTS
OMU Administration Guide 6 OMU Installation and Maintenance (Dopra Linux)
Issue 02 (2015-05-08) Huawei Proprietary and Confidential
Copyright © Huawei Technologies Co., Ltd.
139

8/18/2019 Bsc6900 Umts Omu Administration Guide(v900r017c10_02)(PDF)-En
http://slidepdf.com/reader/full/bsc6900-umts-omu-administration-guidev900r017c1002pdf-en 149/310
Restore OMU database succeed!
omd_test_name /mbsc/bam/common/services # /etc/rc.d/omud start
Starting mbsc daemon
6.3.6 Setting OMU System Parameters
This section describes how to use the omutool to modify the configuration data of the active and
standby OMUs, including the OMU working mode, IP addresses and subnet masks of the internal
and external networks, and admin password. This section describes how to adjust OMU system
parameters only during the maintenance process. For the procedure for setting OMU system
parameters during initial OMU commissioning (that is, new deployment), see 6.1 Initially
Commissioning the OMU.
Starting the omutool
This section describes how to start the omutool on the OMU to set OMU system parameters.
Prerequisites
The product software is installed.
Context
l The omutool can be used by only one type of users in the following operating systems:
Only the administrator user is allowed to use the omutool in the Windows operating system.
The created users with the same user rights as the administrator user cannot use this tool.
Only the root user is allowed to use the omutool in the Linux operating system.
l When the BSC6900 is configured with active and standby OMUs and system parametersneed to be set on two OMUs, log in to the active and standby OMUs and start the omutool
on two OMUs, respectively.
l The following procedure assumes that version_a is the OMU active workspace. Run the
LST OMUAREA command to query the OMU active workspace.
Procedure
Step 1 Log in to the target OMU by referring to 6.3.1 Logging In to the OMU.
Step 2 Enter cd /mbsc/bam/version_a/bin/bam to navigate to the directory that contains omutool.
Step 3 Enter ./omutool -h. Parameter information on the omutool is displayed.
----End
Changing Users' Passwords
This section describes how to change the passwords for users admin, GaussDB, and db_user
by using the omutool, how to change the password for user FtpUsr by using the MML command,
and how to log in to the U2000 to change its FTP user's password.
Context
l admin is the account for logging in to the LMT.
BSC6900 UMTS
OMU Administration Guide 6 OMU Installation and Maintenance (Dopra Linux)
Issue 02 (2015-05-08) Huawei Proprietary and Confidential
Copyright © Huawei Technologies Co., Ltd.
140

8/18/2019 Bsc6900 Umts Omu Administration Guide(v900r017c10_02)(PDF)-En
http://slidepdf.com/reader/full/bsc6900-umts-omu-administration-guidev900r017c1002pdf-en 150/310

8/18/2019 Bsc6900 Umts Omu Administration Guide(v900r017c10_02)(PDF)-En
http://slidepdf.com/reader/full/bsc6900-umts-omu-administration-guidev900r017c1002pdf-en 151/310
2. Enter /etc/rc.d/omud stop to stop the omud process.
3. Enter cd /mbsc/bam/version_a/bin/bam to navigate to the directory that contains
omutool.
4. Run the ./omutool adminpwd command to change the password of user admin.
5. Enter /etc/rc.d/omud start to start the omud.
l Changing the password of user GaussDB
1. Log in to the target OMU by referring to 6.3.1 Logging In to the OMU.
2. Enter /etc/rc.d/omud stop to stop the omud process.
3. Enter cd /mbsc/bam/version_a/bin/bam to navigate to the directory that contains
omutool.
4. Run the ./omutool dbrootpwd command to change the password of user GaussDB.
5. Enter /etc/rc.d/omud start to start the omud.
l Changing the password of user db_user
1. Log in to the target OMU.
2. Enter /etc/rc.d/omud stop to stop the omud process.
3. Enter cd /mbsc/bam/version_a/bin/bam to navigate to the directory that contains
omutool.
4. Run the ./omutool dbpwd command to change the password of user db_user.
5. Enter /etc/rc.d/omud start to start the omud.
l Changing the password of user FtpUsr
1. Log in to the LMT by referring to Logging In to and Logging Out of the LMT in the
BSC6900 UMTS LMT User Guide.
2. Run the MML command MOD FTPPWD to change the password of user FtpUsr.
l Changing the password of the U2000's FTP user
1. Log in to the U2000.
2. Change the password of the U2000's FTP user. For details, see Setting an NE as a
Transfer Server in the U2000 version documentation.
----End
Example
The following shows an example for changing the password of user admin:
Dopra_136 /mbsc/bam/version_a/bin/bam # ./omutool adminpwd
Enter a password or press Ctrl+C to quit:
Re-enter password or press Ctrl+C to quit:
Successfully set the admin user's password!
The following shows an example for changing the password of user GaussDB:
Dopra_136 /mbsc/bam/version_a/bin/bam # ./omutool dbrootpwdEnter a password or
press Ctrl+C to quit:
Re-enter password or press Ctrl+C to quit:
Successfully set the super user's password of the database!
The following shows an example for changing the password of user db_user:
BSC6900 UMTS
OMU Administration Guide 6 OMU Installation and Maintenance (Dopra Linux)
Issue 02 (2015-05-08) Huawei Proprietary and Confidential
Copyright © Huawei Technologies Co., Ltd.
142
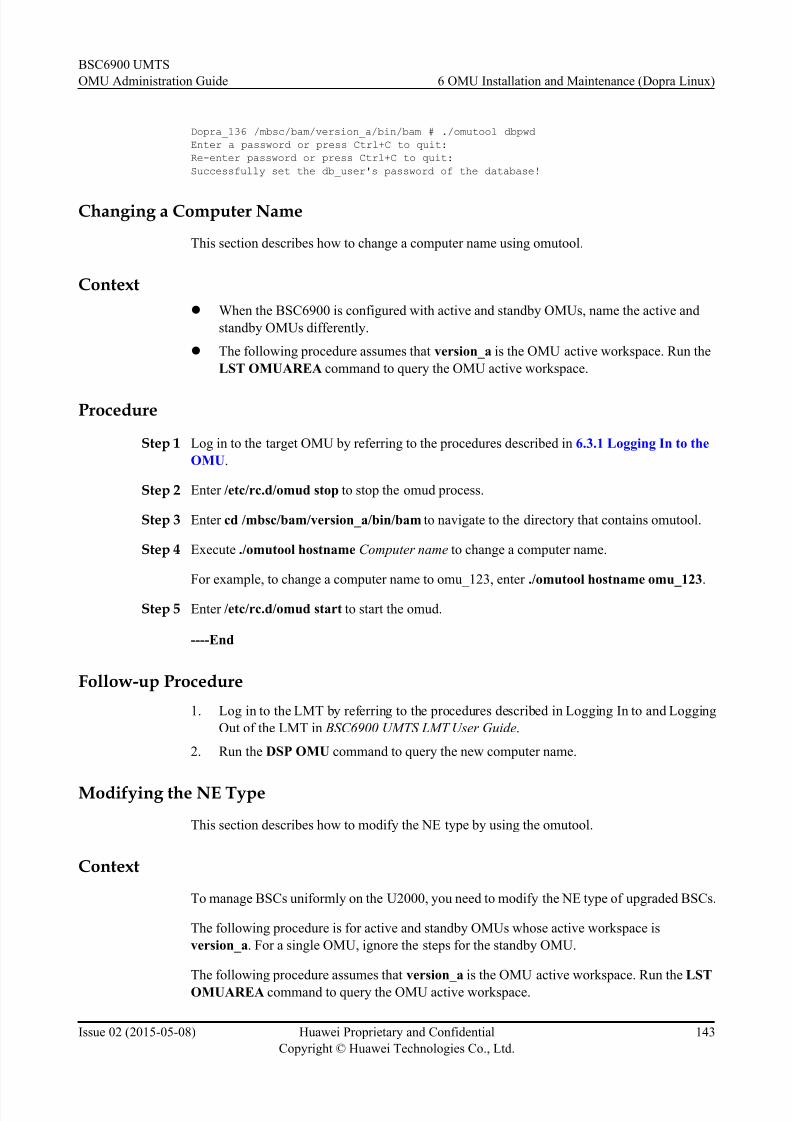
8/18/2019 Bsc6900 Umts Omu Administration Guide(v900r017c10_02)(PDF)-En
http://slidepdf.com/reader/full/bsc6900-umts-omu-administration-guidev900r017c1002pdf-en 152/310
Dopra_136 /mbsc/bam/version_a/bin/bam # ./omutool dbpwd
Enter a password or press Ctrl+C to quit:
Re-enter password or press Ctrl+C to quit:
Successfully set the db_user's password of the database!
Changing a Computer Name
This section describes how to change a computer name using omutool.
Context
l When the BSC6900 is configured with active and standby OMUs, name the active and
standby OMUs differently.
l The following procedure assumes that version_a is the OMU active workspace. Run the
LST OMUAREA command to query the OMU active workspace.
Procedure
Step 1 Log in to the target OMU by referring to the procedures described in 6.3.1 Logging In to the
OMU.
Step 2 Enter /etc/rc.d/omud stop to stop the omud process.
Step 3 Enter cd /mbsc/bam/version_a/bin/bam to navigate to the directory that contains omutool.
Step 4 Execute ./omutool hostname Computer name to change a computer name.
For example, to change a computer name to omu_123, enter ./omutool hostname omu_123.
Step 5 Enter /etc/rc.d/omud start to start the omud.
----End
Follow-up Procedure
1. Log in to the LMT by referring to the procedures described in Logging In to and Logging
Out of the LMT in BSC6900 UMTS LMT User Guide.
2. Run the DSP OMU command to query the new computer name.
Modifying the NE Type
This section describes how to modify the NE type by using the omutool.
Context
To manage BSCs uniformly on the U2000, you need to modify the NE type of upgraded BSCs.
The following procedure is for active and standby OMUs whose active workspace is
version_a. For a single OMU, ignore the steps for the standby OMU.
The following procedure assumes that version_a is the OMU active workspace. Run the LST
OMUAREA command to query the OMU active workspace.
BSC6900 UMTS
OMU Administration Guide 6 OMU Installation and Maintenance (Dopra Linux)
Issue 02 (2015-05-08) Huawei Proprietary and Confidential
Copyright © Huawei Technologies Co., Ltd.
143

8/18/2019 Bsc6900 Umts Omu Administration Guide(v900r017c10_02)(PDF)-En
http://slidepdf.com/reader/full/bsc6900-umts-omu-administration-guidev900r017c1002pdf-en 153/310
Procedure
Step 1 Log in to the standby OMU and stop the omud process on it. Then, log in to the active OMU
and stop the omud process on it. For details, see 6.3.1 Logging In to the OMU and Stopping
the omud.
Step 2 On the active OMU, enter cd /mbsc/bam/version_a/bin/bam to go to the directory where the
omutool program is saved.
Step 3 On the active OMU, enter ./omutool netype NE type to modify the NE type.
The prompt set ne type success! indicates that the NE type has been successfully modified.
NOTE
To query the NE type, enter omutool netype.
Step 4 Start the omud process on the active OMU first and then the omud process on the standby OMU.
For details, see Starting the omud.
----End
Example
dopra_linux_up /mbsc/bam/version_a/bin/bam # ./omutool netype
Current ne type is : BSC6***
dopra_linux_up /mbsc/bam/version_a/bin/bam # ./omutool netype BSC6900
set ne type success!
Setting the OMU Working ModeThis section describes how to set the OMU working mode by using the omutool. The OMU can
work either in independent or active/standby mode.
Prerequisites
l You have logged in to the LMT and queried the slot No. for the OMU by running the LST
BRD command.
l You have logged in to the LMT and queried whether the OMU is in independent or active/
standby mode by running the DSP OMU command.
l You have logged in to the LMT and queried the OMU workspace information by running
the LST OMUAREA command.
l You have logged in to the LMT and queried the OMU service mode by running the LST
MBSCMODE command.
Context
l If the working mode of the OMU is changed from independent mode to active/standby
mode, apply the settings to both the active and standby OMUs. If the working mode is
changed from active/standby mode to independent mode, apply the settings to only the new
active OMU.
l If the working mode of the OMU is changed from independent mode to active/standby
mode, ensure that the operating system, software version, and board type of the active OMU
BSC6900 UMTS
OMU Administration Guide 6 OMU Installation and Maintenance (Dopra Linux)
Issue 02 (2015-05-08) Huawei Proprietary and Confidential
Copyright © Huawei Technologies Co., Ltd.
144

8/18/2019 Bsc6900 Umts Omu Administration Guide(v900r017c10_02)(PDF)-En
http://slidepdf.com/reader/full/bsc6900-umts-omu-administration-guidev900r017c1002pdf-en 154/310
are the same as those of the standby OMU. In addition, the slot number of the active OMU
and that of the standby OMU have an active/standby relationship.
l If the working mode of the OMU is changed from active/standby mode to independent
mode, you should run the MML command DSP OMU to ensure that the Data-sync state
is Data synchronization is successful and run the MML command CMPOMUFILE to ensure that Compare result is consistent.
l The following procedure assumes that version_a is the OMU active workspace. Run the
LST OMUAREA command to query the OMU active workspace.
Procedure
l Switching the OMU from the independent mode to the active/standby mode (product
software are not installed on the OMU to be added).
1. Insert an OMUa/OMUc board into the standby slot by referring to Installing the
OMUa/OMUc/SAUa/SAUc Boards or Installing the OMUc Boards in the BSC6900
UMTSECO6910 Installation Guide
2. Connect the PC to the commissioning Ethernet port of the OMU, and log in to the
standby OMU by using the commissioning IP address. For details, see 6.3.1 Logging
In to the OMU.
3. Install product software on the standby OMU. For details, see Uploading the Product
Software Installation Package to the OMU and Installing the Product Software
in the Active Workspace.
NOTE
You must select active/standby mode during the process of installing the product software for the
standby OMU.
4. Change the IP addresses and subnet masks of the standby OMU to ensure that the
fixed internal IP addresses, fixed external IP addresses, and IP address of the backup
channel between active and standby of OMUs comply with the planning principle for
the IP addresses and do not conflict with each other. For details about changing IP
addresses, see Changing IP Addresses and Subnet Masks of OMU Ethernet
Adapters.
5. Enter /etc/rc.d/omud stop to stop the omud process on the original active OMU.
6. Enter cd /mbsc/bam/version_a/bin/bam to navigate to the directory that contains
omutool on the original active OMU.
7. Run the ./omutool dualmode dual command on the original active OMU to set the
working mode of the OMU to active/standby mode.
8. Enter /etc/rc.d/omud start to start the omud on the original active OMU.
9. Five minutes after the original active OMU has been started, start the omud on the
standby OMU.
CAUTION
You should start the standby OMU 5 minutes after the active OMU is started to keep
the two OMUs from competing for the active state. This helps avoid data loss.
BSC6900 UMTS
OMU Administration Guide 6 OMU Installation and Maintenance (Dopra Linux)
Issue 02 (2015-05-08) Huawei Proprietary and Confidential
Copyright © Huawei Technologies Co., Ltd.
145

8/18/2019 Bsc6900 Umts Omu Administration Guide(v900r017c10_02)(PDF)-En
http://slidepdf.com/reader/full/bsc6900-umts-omu-administration-guidev900r017c1002pdf-en 155/310
10. Change the operating system password on the standby OMU to that of the original
active OMU by referring to Changing the Administrator Password of the
Operating System.
11. Run the ADD BRD command on the LMT to add an OMU.
12. Run the MML command DSP OMU on the LMT and check whether the value for Data-sync state is Data synchronization is successful.
13. Connect an Ethernet cable to the Ethernet port on the added OMU.
l Switching the OMU from the independent mode to the active/standby mode. (product
software are installed on the OMU to be added.)
1. Connect the PC to the commissioning Ethernet port of the OMU and log in to the
original active OMU by using the commissioning IP address. For details, see 6.3.1
Logging In to the OMU.
2. Enter /etc/rc.d/omud stop to sto p the omud process on the original active OMU.
3. Enter cd /mbsc/bam/version_a/bin/bam to navigate to the directory that contains
omutool on the original active OMU.
4. Run the ./omutool dualmode dual command on the original active OMU to set the
working mode of the OMU to active/standby mode.
5. Enter /etc/rc.d/omud start to start the omud on the original active OMU.
6. Insert an OMUa/OMUc board in the standby slot 5 minutes after the original active
OMU starts.
CAUTION
Start the standby OMU 5 minutes after the active OMU is started to avoid the two
OMUs from competing for active state, which will avoid data loss.
7. Set the working mode of the standby OMU to active/standby mode by repeating Step
1 through Step 4.
8. Change the IP addresses and subnet masks of the standby OMU to ensure that the
fixed internal IP addresses, fixed external IP addresses, and IP address of the backup
channel between active and standby of OMUs comply with the planning principle for
the IP addresses and do not conflict with each other. For details about changing IP
addresses, see Changing IP Addresses and Subnet Masks of OMU Ethernet
Adapters.9. Enter /etc/rc.d/omud start to start the omud on the standby OMU.
10. Change the operating system password on the standby OMU to that of the original
active OMU by referring to Changing the Administrator Password of the
Operating System.
11. Run the ADD BRD command on the LMT to add an OMU.
12. Run the MML command DSP OMU on the LMT and check whether the value for
Data-sync state is Data synchronization is successful.
BSC6900 UMTS
OMU Administration Guide 6 OMU Installation and Maintenance (Dopra Linux)
Issue 02 (2015-05-08) Huawei Proprietary and Confidential
Copyright © Huawei Technologies Co., Ltd.
146

8/18/2019 Bsc6900 Umts Omu Administration Guide(v900r017c10_02)(PDF)-En
http://slidepdf.com/reader/full/bsc6900-umts-omu-administration-guidev900r017c1002pdf-en 156/310
If... Then...
Data-sync state is Data
synchronization not built due to
version inconsistency
Reinstall product software on the
standby OMU by performing the
following steps:1. Uninstall product software from the
standby OMU by referring to steps in
Uninstalling the Product
Software.
2. Install product software of the
correct version on the standby OMU.
For details, see Uploading the
Product Software Installation
Package to the OMU and Installing
the Product Software in the Active
Workspace.3. Perform Step 12.
Data-sync state is Data
synchronization is successful
Go to Step 13.
13. Connect an Ethernet cable to the Ethernet port on the added OMU.
l Change the working mode of the OMU from active/standby mode to independent mode.
1. Run the RMV BRD command on the LMT to remove an OMU.
2. Log in to the active and standby OMUs by using the fixed external IP address by
referring to 6.3.1 Logging In to the OMU.
3. Enter /etc/rc.d/omud stop to stop the omud process on the active and standby OMUs.
4. Run the poweroff command on the OMU to be removed to power off the OMU.
5. Remove the OMU.
6. Enter cd /mbsc/bam/version_a/bin/bam to navigate to the directory that contains
omutool on the active OMU.
7. Run the ./omutool dualmode single command on the active OMU to set the working
mode of the OMU to independent mode.
8. Enter /etc/rc.d/omud start to start the omud on the active OMU.
----End
Changing IP Addresses and Subnet Masks of OMU Ethernet Adapters
This section describes how to change the IP addresses and subnet masks of OMU Ethernet
adapters using omutool.
Prerequisites
The product software has been started.
For the default values of OMU system parameters, see 6.5.2 Checklist for the OMU Software
Factory Settings.
BSC6900 UMTS
OMU Administration Guide 6 OMU Installation and Maintenance (Dopra Linux)
Issue 02 (2015-05-08) Huawei Proprietary and Confidential
Copyright © Huawei Technologies Co., Ltd.
147
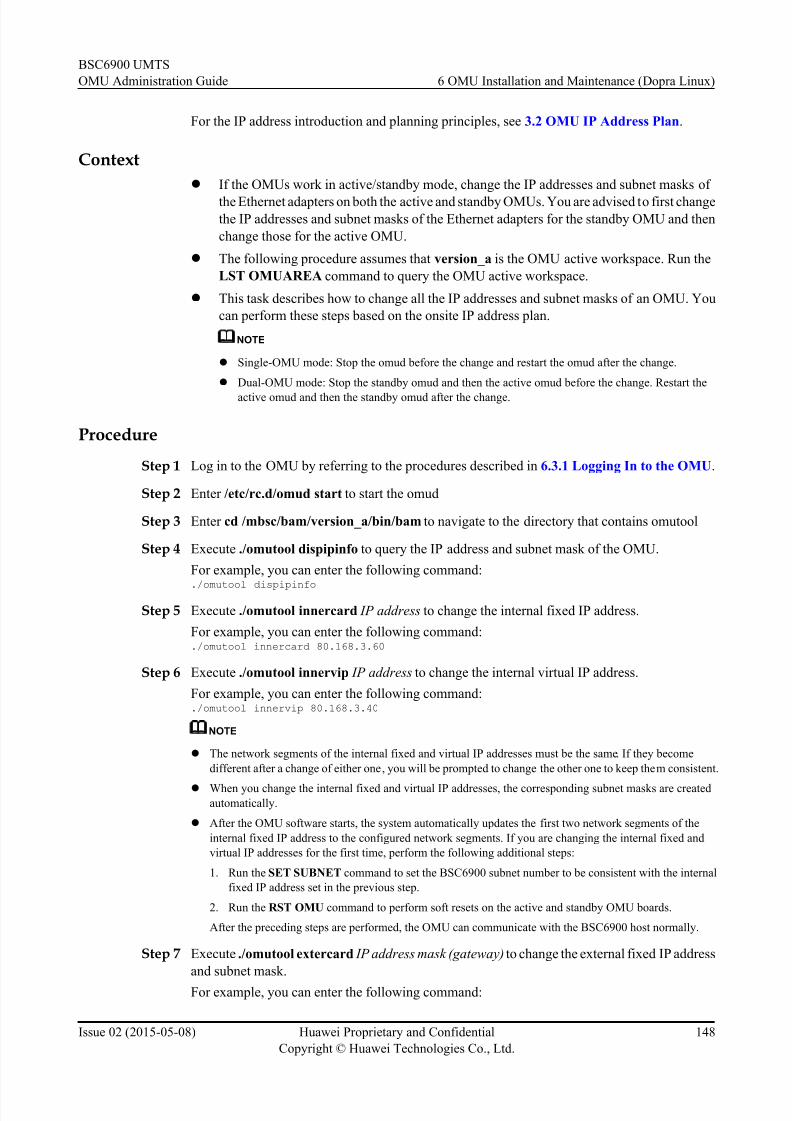
8/18/2019 Bsc6900 Umts Omu Administration Guide(v900r017c10_02)(PDF)-En
http://slidepdf.com/reader/full/bsc6900-umts-omu-administration-guidev900r017c1002pdf-en 157/310
For the IP address introduction and planning principles, see 3.2 OMU IP Address Plan.
Context
l If the OMUs work in active/standby mode, change the IP addresses and subnet masks of
the Ethernet adapters on both the active and standby OMUs. You are advised to first change
the IP addresses and subnet masks of the Ethernet adapters for the standby OMU and then
change those for the active OMU.
l The following procedure assumes that version_a is the OMU active workspace. Run the
LST OMUAREA command to query the OMU active workspace.
l This task describes how to change all the IP addresses and subnet masks of an OMU. You
can perform these steps based on the onsite IP address plan.
NOTE
l Single-OMU mode: Stop the omud before the change and restart the omud after the change.
l Dual-OMU mode: Stop the standby omud and then the active omud before the change. Restart the
active omud and then the standby omud after the change.
Procedure
Step 1 Log in to the OMU by referring to the procedures described in 6.3.1 Logging In to the OMU.
Step 2 Enter /etc/rc.d/omud start to start the omud
Step 3 Enter cd /mbsc/bam/version_a/bin/bam to navigate to the directory that contains omutool
Step 4 Execute ./omutool dispipinfo to query the IP address and subnet mask of the OMU.
For example, you can enter the following command:
./omutool dispipinfo
Step 5 Execute ./omutool innercard IP address to change the internal fixed IP address.
For example, you can enter the following command:./omutool innercard 80.168.3.60
Step 6 Execute ./omutool innervip IP address to change the internal virtual IP address.
For example, you can enter the following command:./omutool innervip 80.168.3.40
NOTE
l The network segments of the internal fixed and virtual IP addresses must be the same. If they become
different after a change of either one, you will be prompted to change the other one to keep them consistent.
l When you change the internal fixed and virtual IP addresses, the corresponding subnet masks are createdautomatically.
l After the OMU software starts, the system automatically updates the first two network segments of the
internal fixed IP address to the configured network segments. If you are changing the internal fixed and
virtual IP addresses for the first time, perform the following additional steps:
1. Run the SET SUBNET command to set the BSC6900 subnet number to be consistent with the internal
fixed IP address set in the previous step.
2. Run the RST OMU command to perform soft resets on the active and standby OMU boards.
After the preceding steps are performed, the OMU can communicate with the BSC6900 host normally.
Step 7 Execute ./omutool extercard IP address mask (gateway) to change the external fixed IP address
and subnet mask.
For example, you can enter the following command:
BSC6900 UMTS
OMU Administration Guide 6 OMU Installation and Maintenance (Dopra Linux)
Issue 02 (2015-05-08) Huawei Proprietary and Confidential
Copyright © Huawei Technologies Co., Ltd.
148

8/18/2019 Bsc6900 Umts Omu Administration Guide(v900r017c10_02)(PDF)-En
http://slidepdf.com/reader/full/bsc6900-umts-omu-administration-guidev900r017c1002pdf-en 158/310
./omutool extercard 10.161.10.100 255.255.255.0
NOTICEBefore changing the external fixed IP address, external virtual IP address, and external gateway
IP address, log in to the OMU using the commissioning IP address at the local end. Remote login
to the OMU to change the IP addresses may disconnect the OMU from its peer.
Step 8 Execute ./omutool extervip IP address subnet mask (gateway IP address) to change the external
virtual IP address and subnet mask.
For example, you can enter the following command:./omutool extervip 10.161.10.102 255.255.255.0
NOTE
l After the external virtual IP address and subnet mask are changed, start the omud, and run the RMV
EMSIP command and then the ADD EMSIP command to change the external virtual IP address and subnet
mask that are recorded in the OMU database.
l The network segments of the external fixed and virtual IP addresses must be the same. If they become
different after a change of either one, you will be prompted to change the other one to keep them consistent.
l Changing the external fixed IP address, external virtual IP address, and gateway IP address will interrupt
remote login to OMU. You must use a new external fixed or virtual IP address to recover the communication.
Step 9 Execute ./omutool gateway gateway IP address to change the gateway IP address.
For example, you can enter the following command:./omutool gateway 10.161.10.1
NOTE
While changing the external fixed or virtual IP address, you can change the gateway IP address simultaneously.
The related commands are as follows:
l ./omutool extercard IP address Subnet mask Gateway IP address used to change the external fixed IP
address and gateway IP address simultaneously
l ./omutool extervip IP address Subnet mask Gateway IP address used to change the external virtual IP
address and gateway IP address simultaneously
Step 10 Change the backup channel IP address and subnet mask of the active and standby OMUs using
the commands listed in the following table.
Option Description
OMUs on the Ethernet adapter ETH3-
UPDATE of the OMUa board
./omutool backupcard IP address.
For example, you can enter the following
command:./omutool backupcard 192.168.3.60
Backup channel IP address of the
active and standby OMUs on the
Ethernet adapter B_UPDATE0 of the
OMUc board
./omutool backupcard_for_omuc IP address.
For example, you can enter the following
command:
./omutool backupcard_for_omuc 192.168.9.60
BSC6900 UMTS
OMU Administration Guide 6 OMU Installation and Maintenance (Dopra Linux)
Issue 02 (2015-05-08) Huawei Proprietary and Confidential
Copyright © Huawei Technologies Co., Ltd.
149

8/18/2019 Bsc6900 Umts Omu Administration Guide(v900r017c10_02)(PDF)-En
http://slidepdf.com/reader/full/bsc6900-umts-omu-administration-guidev900r017c1002pdf-en 159/310
Option Description
Backup channel IP address of the
active and standby OMUs on the
Ethernet adapter B_UPDATE1 of theOMUc board
./omutool backupcard_for_omua IP address.
For example, you can enter the following
command:./omutool backupcard_for_omua 192.168.3.60
Step 11 Execute ./omutool debugcard IP address to change the commissioning IP address.
For example, you can enter the following command:./omutool debugcard 192.168.6.60
NOTE
l While you are changing the backup channel IP addresses and commissioning IP addresses of the active
and standby OMUs, the system will automatically generate corresponding subnet masks.
l While you are changing the OMU IP addresses, follow the principles of IP address planning. For details,
see 3.2 OMU IP Address Plan. When entering the command, ensure that a space is reserved betweenthe IP address and the subnet mask.
l Record the new IP addresses in 6.5.1 Information Records of OMU Software Installation.
Step 12 Execute ./omutool delextercard to delete the external fixed IP address.
For example, you can enter the following command:./omutool delextercard
NOTE
l If the external virtual and fixed IP addresses have been configured and the external fixed IP address will be
deleted as planned, run this command to delete the configured external fixed IP address.
l If ALM-20702 Active and Standby OMU Communication Link Failure has been reported before you delete
the external fixed IP address and the alarm is caused by the external network, manually clear the alarm after
you delete the external fixed IP address.
Step 13 Enter /etc/rc.d/omud start to start the omud
----End
Setting the Switch for Enabling a Non-Root User to Run the OMU Program
This section describes how to use the omutool to set the switch for enabling a non-root user to
run the OMU program.
Context
l In the Linux operating system (OS), a non-root user can run the OMU program. This
enhances the OMU security.
l When the OS is Windows and Dopra Linux V100R001C03, a non-root user cannot run the
OMU program.
l In dual-OMU mode, set the switch for the function of Running the OMU Processes as a
Non-Root User for both the active and standby OMUs. Before the setting, stop the omud
process on the standby OMU then the omud process on the active OMU. After the setting,
start the omud process on the active OMU and then the omud process on the standby OMU.
BSC6900 UMTS
OMU Administration Guide 6 OMU Installation and Maintenance (Dopra Linux)
Issue 02 (2015-05-08) Huawei Proprietary and Confidential
Copyright © Huawei Technologies Co., Ltd.
150

8/18/2019 Bsc6900 Umts Omu Administration Guide(v900r017c10_02)(PDF)-En
http://slidepdf.com/reader/full/bsc6900-umts-omu-administration-guidev900r017c1002pdf-en 160/310
NOTE
l If you set the switch for the function of Running the OMU Processes as a Non-Root User only
for the standby OMU, the status of this function on the standby OMU is overwritten after data
synchronization between the active and standby OMUs.
l If the status of this function on the standby OMU is overwritten after data synchronization between the active and standby OMUs and is inconsistent before and after the overwriting, the
status after the overwriting takes effect only after the standby OMU is restarted or an active/
standby OMU switchover is performed.
Procedure
Step 1 Log in to the target OMU by referring to 6.3.1 Logging In to the OMU.
Step 2 Enter /etc/rc.d/omud stop to stop the omud process.
Step 3 Enter cd /mbsc/bam/version_a/bin/bam to navigate to the directory that contains omutool.
Step 4 Enter ./omutool privilege_restrict on/off to set the switch enabling a non-root user to run the
OMU program.
Examples:
l Turn on the switch enabling a non-root user to run the OMU program
Enter ./omutool privilege_restrict on.
l Turn off the switch enabling a non-root user to run the OMU program
Enter ./omutool privilege_restrict off .
l Query the status of the switch enabling a non-root user to run the OMU program
Enter ./omutool privilege_restrict.
Step 5 Enter /etc/rc.d/omud start to start the omud.
----End
Setting the FtpUsr User Switch
This section describes how to use the omutool to set the FtpUsr user switch.
Contextl Users require that the FtpUsr user switch be turned on for FTP login.
l In BSC upgrade scenarios, the switch retains the value before the upgrade. By default, this
function is enabled for a newly deployed BSC.
l In dual-OMU mode, set the FtpUsr user switch for both the active and standby OMUs.
Before the setting, stop the omud process on the standby OMU then the omud process on
the active OMU. After the setting, start omud process on the active OMU and then the
omud process on the standby OMU.
If you set the FtpUsr user switch only for the standby OMU, the status of this function on
the standby OMU is overwritten after data synchronization between the active and standby
OMUs.
BSC6900 UMTS
OMU Administration Guide 6 OMU Installation and Maintenance (Dopra Linux)
Issue 02 (2015-05-08) Huawei Proprietary and Confidential
Copyright © Huawei Technologies Co., Ltd.
151

8/18/2019 Bsc6900 Umts Omu Administration Guide(v900r017c10_02)(PDF)-En
http://slidepdf.com/reader/full/bsc6900-umts-omu-administration-guidev900r017c1002pdf-en 161/310
Procedure
Step 1 Log in to the target OMU by referring to 6.3.1 Logging In to the OMU.
Step 2 Enter /etc/rc.d/omud stop to stop the omud process.
Step 3 Enter cd /mbsc/bam/version_a/bin/bam to navigate to the directory that contains omutool.
Step 4 Run the ./omutool ftpusruseswitch on/off command to set the FtpUsr user switch.
Examples:
l Turn on the FtpUsr user switch
Run the ./omutool ftpusruseswitch on command and press Enter.
l Turn off the FtpUsr user switch
Run the ./omutool ftpusruseswitch off command and press Enter.
l Query the status of the FtpUsr user switch
Run the ./omutool ftpusruseswitch command and press Enter.
Step 5 Enter /etc/rc.d/omud start to start the omud.
----End
6.4 Obtaining and Using the OMU-Related Software
This section describes how to obtain and use the OMU-related software, including the psftp
software and PuTTY software. The OMU-related software is used to assist product softwareinstallation and perform operation and maintenance on the OMU.
6.4.1 Obtaining and Using the psftp Software
This section describes how to obtain and use the psftp software to upload the product software
installation package to the OMU.
Context
l The psftp software is used to upload files to the OMU hard disk. The product software can
be used only after the psftp software is installed.
l The psftp software is also used to download files from the OMU hard disk to a local PC.
Table 6-23 lists the commands commonly used on the psftp software.
Table 6-23 Commands commonly used on the psftp software
Command Description Example
cd Change the OMU directory. cd /mbsc/upgrade
ls Query the structure of the
current directory.
ls
BSC6900 UMTS
OMU Administration Guide 6 OMU Installation and Maintenance (Dopra Linux)
Issue 02 (2015-05-08) Huawei Proprietary and Confidential
Copyright © Huawei Technologies Co., Ltd.
152

8/18/2019 Bsc6900 Umts Omu Administration Guide(v900r017c10_02)(PDF)-En
http://slidepdf.com/reader/full/bsc6900-umts-omu-administration-guidev900r017c1002pdf-en 162/310
Command Description Example
lcd Go to the local folder. lcd D:\V900R017C10\Software\setup
\linux
get Transfer files from the
OMU to the local PC.
To transfer a file, run the get
V900R017C10V100R017C10
command.
To transfer a folder, run the get -r
V900R017C10V100R017C10
command.
put Transfer files from the local
PC to the OMU.
To transfer a file, run the put
V900R017C10V100R017C10
command.
To transfer a folder, run the put -r
V900R017C10V100R017C10command.
mkdir Create a directory on the
OMU.
mkdir /mbsc/upgrade
mkdir /software/upgrade
rmdir Remove a directory from
the OMU.
rmdir /mbsc/upgrade
rmdir /software/upgrade
Procedure
Step 1 Contact Huawei engineers to obtain the Hash value calculation tool from http://
support.huawei.com/carrier/#click=main3 and enter psftp in the search window. Then,
download the psftp.exe.
Step 2 Double-click psftp.exe. A window is displayed, as shown in Figure 6-24.
BSC6900 UMTS
OMU Administration Guide 6 OMU Installation and Maintenance (Dopra Linux)
Issue 02 (2015-05-08) Huawei Proprietary and Confidential
Copyright © Huawei Technologies Co., Ltd.
153
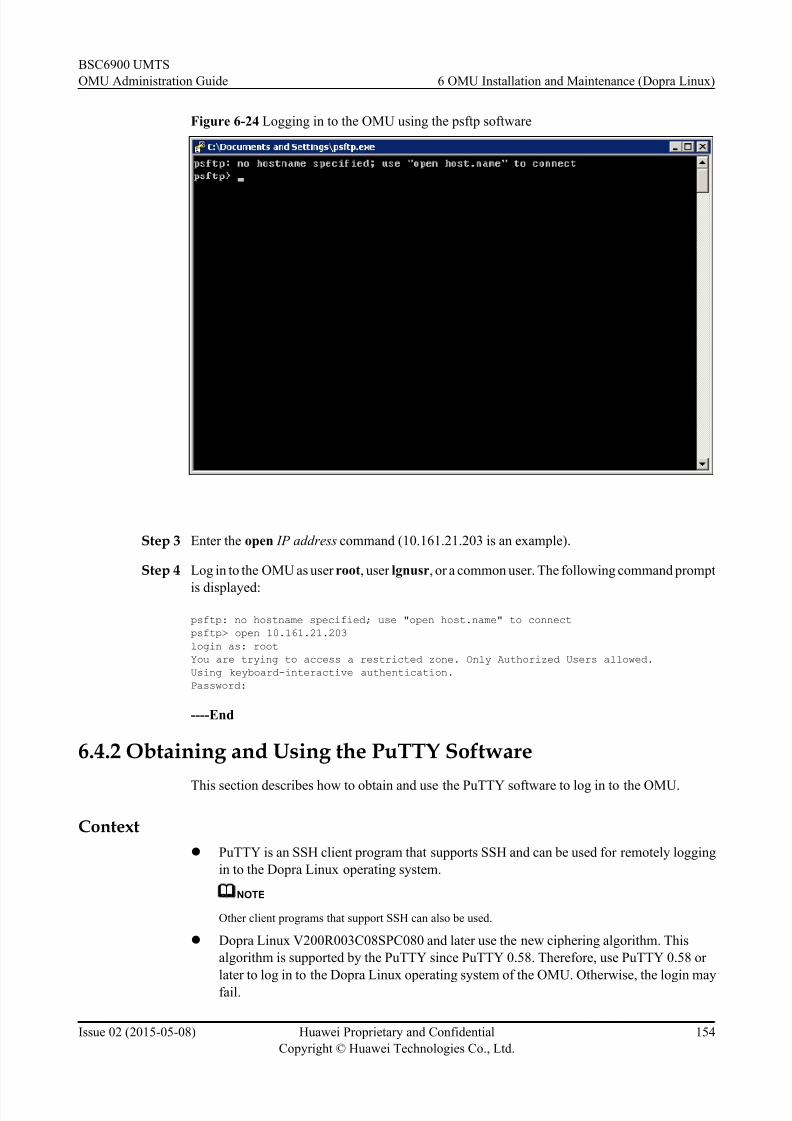
8/18/2019 Bsc6900 Umts Omu Administration Guide(v900r017c10_02)(PDF)-En
http://slidepdf.com/reader/full/bsc6900-umts-omu-administration-guidev900r017c1002pdf-en 163/310
Figure 6-24 Logging in to the OMU using the psftp software
Step 3 Enter the open IP address command (10.161.21.203 is an example).
Step 4 Log in to the OMU as user root, user lgnusr, or a common user. The following command prompt
is displayed:
psftp: no hostname specified; use "open host.name" to connect
psftp> open 10.161.21.203
login as: root
You are trying to access a restricted zone. Only Authorized Users allowed.
Using keyboard-interactive authentication.
Password:
----End
6.4.2 Obtaining and Using the PuTTY Software
This section describes how to obtain and use the PuTTY software to log in to the OMU.
Context
l PuTTY is an SSH client program that supports SSH and can be used for remotely logging
in to the Dopra Linux operating system.
NOTE
Other client programs that support SSH can also be used.
l Dopra Linux V200R003C08SPC080 and later use the new ciphering algorithm. This
algorithm is supported by the PuTTY since PuTTY 0.58. Therefore, use PuTTY 0.58 or
later to log in to the Dopra Linux operating system of the OMU. Otherwise, the login may
fail.
BSC6900 UMTS
OMU Administration Guide 6 OMU Installation and Maintenance (Dopra Linux)
Issue 02 (2015-05-08) Huawei Proprietary and Confidential
Copyright © Huawei Technologies Co., Ltd.
154

8/18/2019 Bsc6900 Umts Omu Administration Guide(v900r017c10_02)(PDF)-En
http://slidepdf.com/reader/full/bsc6900-umts-omu-administration-guidev900r017c1002pdf-en 164/310
PuTTY is an SSH client program that supports SSH and can be used for remotely logging in to
the Dopra Linux operating system.
NOTE
Other client programs that support SSH can also be used.
Procedure
Step 1 Contact Huawei engineers who can obtain the PuTTY software by performing the following
operation: Log in to http://support.huawei.com/carrier/#click=main3 and enter putty in the
search window. Then, download the putty.exe.
Step 2 Double-click putty.exe. The PuTTY Configuration dialog box is displayed, as shown in
Figure 6-25.
Figure 6-25 PuTTY Configuration dialog box
Step 3 In the Specif y your connection by host name or IP address area, specify the Host Name (or
IP address) by entering the IP address of the OMU board, and set Protocol to SSH .
The IP address is determined based on the following rules:
BSC6900 UMTS
OMU Administration Guide 6 OMU Installation and Maintenance (Dopra Linux)
Issue 02 (2015-05-08) Huawei Proprietary and Confidential
Copyright © Huawei Technologies Co., Ltd.
155
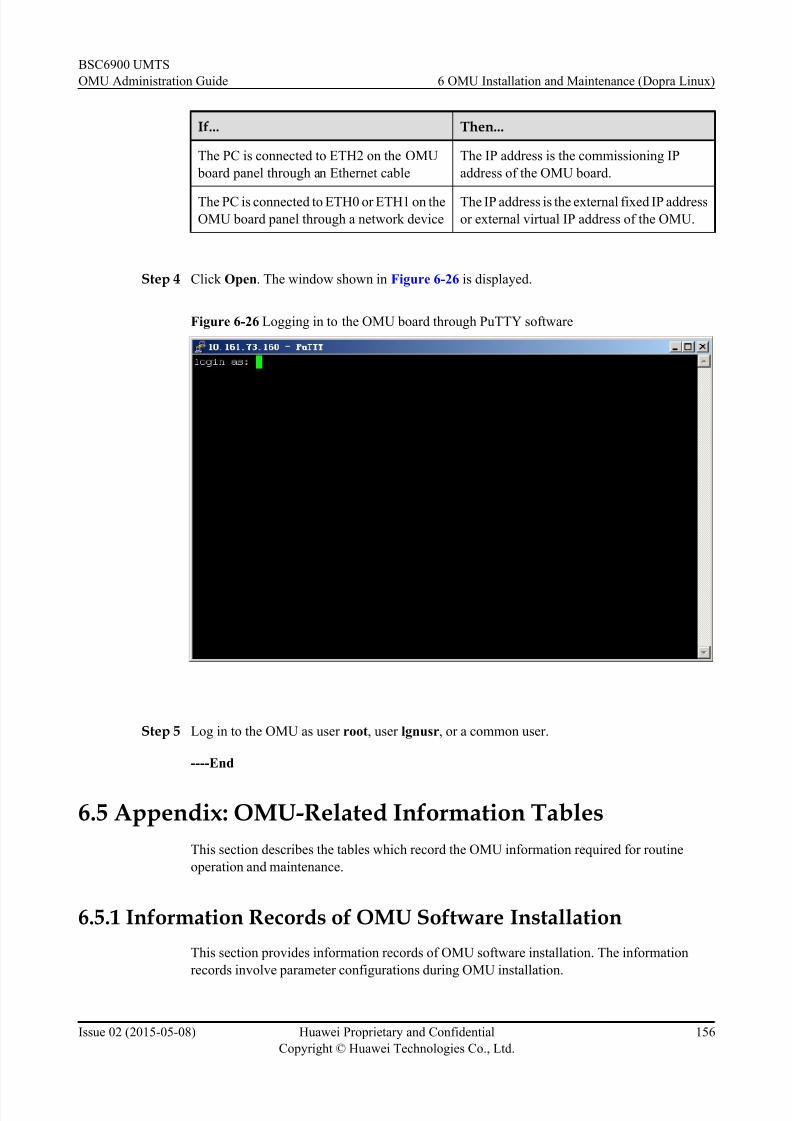
8/18/2019 Bsc6900 Umts Omu Administration Guide(v900r017c10_02)(PDF)-En
http://slidepdf.com/reader/full/bsc6900-umts-omu-administration-guidev900r017c1002pdf-en 165/310
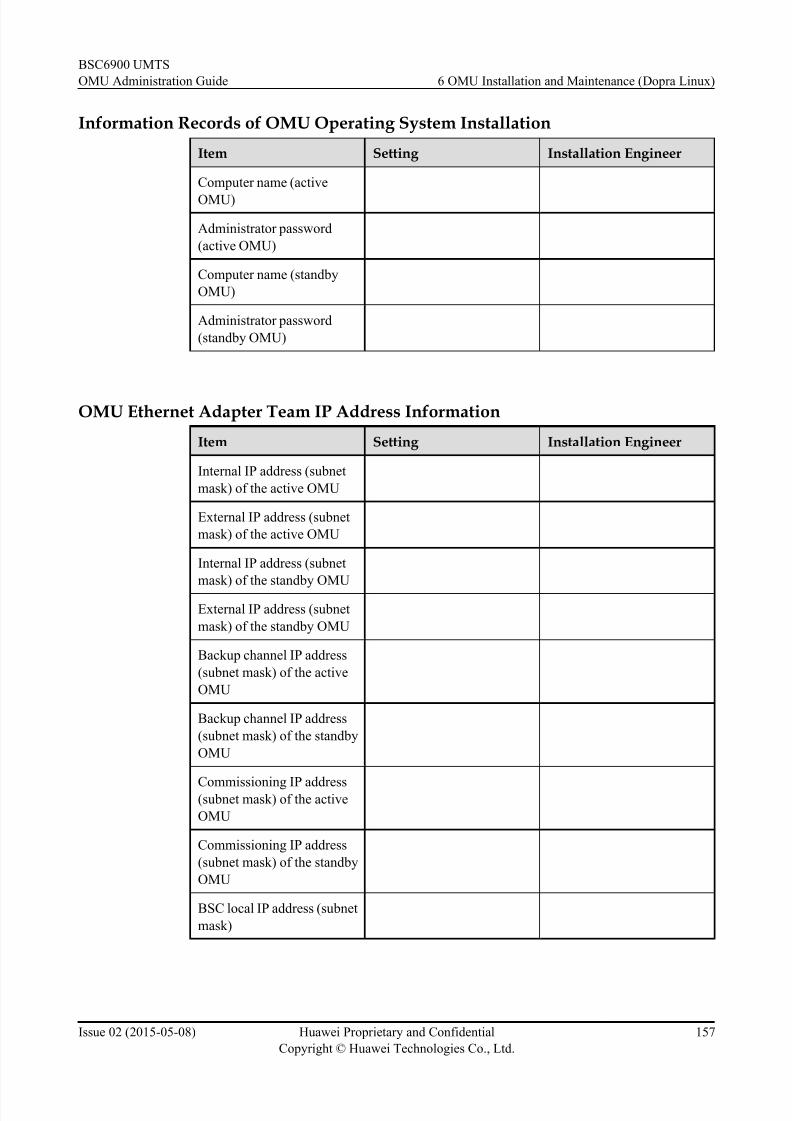
8/18/2019 Bsc6900 Umts Omu Administration Guide(v900r017c10_02)(PDF)-En
http://slidepdf.com/reader/full/bsc6900-umts-omu-administration-guidev900r017c1002pdf-en 166/310

8/18/2019 Bsc6900 Umts Omu Administration Guide(v900r017c10_02)(PDF)-En
http://slidepdf.com/reader/full/bsc6900-umts-omu-administration-guidev900r017c1002pdf-en 167/310
Item Setting Installation Engineer
Virtual Local Area Network
(VLAN) ID for
communication with theVNP
VLAN ID for
communication with the
EMS/LMT
Default gateway
Product Software Installation Information
Item Setting Installation Engineer
Administrator (admin)
password
Internal virtual IP address
External virtual IP address
Local office name
For details, see Information Records of OMU Software Installation.
6.5.2 Checklist for the OMU Software Factory Settings
This section provides a checklist for the OMU software factory settings. The checklist records
software installation and configurations before OMU delivery.
Checklist for the OMUa Board Software Factory Settings
Item Remarks
Setting the RAID 1 relationship between
two SAS hard disks on the OMUa boards
-
Setting OMU BIOS l Set the first boot device of the OMU to USB.
Installing the Dopra Linux operating
system
l The default passwords for user root on the
active and standby OMUs are osadmin@123.
l The default passwords for user lgnusr on the
active and standby OMUs are
osnormal@123.
BSC6900 UMTS
OMU Administration Guide 6 OMU Installation and Maintenance (Dopra Linux)
Issue 02 (2015-05-08) Huawei Proprietary and Confidential
Copyright © Huawei Technologies Co., Ltd.
158

8/18/2019 Bsc6900 Umts Omu Administration Guide(v900r017c10_02)(PDF)-En
http://slidepdf.com/reader/full/bsc6900-umts-omu-administration-guidev900r017c1002pdf-en 168/310

8/18/2019 Bsc6900 Umts Omu Administration Guide(v900r017c10_02)(PDF)-En
http://slidepdf.com/reader/full/bsc6900-umts-omu-administration-guidev900r017c1002pdf-en 169/310
Checklist for the OMUc Board Software Factory Settings
Item Remarks
Setting OMU BIOS l Set the first boot device of the OMU to USB.
Installing the Dopra Linux operating
system
l If the version of the OMU operating system is
V200R003C02SPC090 or later:
– The default passwords for user root on the
active and standby OMUs are
osadmin@123.
– The default passwords for user lgnusr on
the active and standby OMUs are
osnormal@123.
l If the version of the OMU operating system is
earlier than V200R003C02SPC090:
– The default passwords for user root on
active and standby OMUs are
mbsc@com, 11111111, or huawei.
Installing the IPMI driver -
Teaming the internal Ethernet adapters The default IP address of the internal Ethernet
adapter team of the active OMU is 80.168.3.50
(255.0.0.0).
The default IP address of the internal Ethernet
adapter team of the standby OMU is 80.168.3.60
(255.0.0.0).
Teaming the external Ethernet adapters The default IP address of the external Ethernet
adapter team of the active OMU is
172.121.139.201 (255.255.255.0).
The default IP address of the external Ethernet
adapter team of the standby OMU is
172.121.139.202 (255.255.255.0).
BSC6900 UMTS
OMU Administration Guide 6 OMU Installation and Maintenance (Dopra Linux)
Issue 02 (2015-05-08) Huawei Proprietary and Confidential
Copyright © Huawei Technologies Co., Ltd.
160

8/18/2019 Bsc6900 Umts Omu Administration Guide(v900r017c10_02)(PDF)-En
http://slidepdf.com/reader/full/bsc6900-umts-omu-administration-guidev900r017c1002pdf-en 170/310
Item Remarks
Configuring backup channel IP
addresses of the active and standby
OMUc boards
l For the active OMU:
The default backup channel IP address of
B_UPDATE0 is 192.168.9.50
(255.255.255.0).
The default backup channel IP address of
B_UPDATE1 is 192.168.3.50
(255.255.255.0).
l For the standby OMU:
The default backup channel IP address of
B_UPDATE0 is 192.168.9.60
(255.255.255.0).
The default backup channel IP address of
B_UPDATE1 is 192.168.3.60(255.255.255.0).
Configuring commissioning IP
addresses of the active and standby
OMUs
The factory setting for the commissioning IP
address of the active OMU is 192.168.6.50
(255.255.255.0).
The factory setting for the commissioning IP
address of the standby OMU is 192.168.6.60
(255.255.255.0).
For details, see Checklist for the OMU Software Factory Settings.
6.5.3 OMU Directory Operation Rights List
This section describes the OMU directory operation rights list. The list records the operation
rights of all OMU directories.
After product software has been installed, all the generated directories have operation rights.
For details about the OMU directory operation rights list, see the OMU Directory Operation
Rights List.
NOTE
In the OMU directory operation rights list, all files indicates all the files in a specific directory. all other
files indicates all the files that are not listed in a specific directory.
Description of OMU Directory Operation Rights
Figure 6-27 describes the OMU directory operation rights.
Figure 6-27 OMU directory operation rights
BSC6900 UMTS
OMU Administration Guide 6 OMU Installation and Maintenance (Dopra Linux)
Issue 02 (2015-05-08) Huawei Proprietary and Confidential
Copyright © Huawei Technologies Co., Ltd.
161

8/18/2019 Bsc6900 Umts Omu Administration Guide(v900r017c10_02)(PDF)-En
http://slidepdf.com/reader/full/bsc6900-umts-omu-administration-guidev900r017c1002pdf-en 171/310
l (1) indicates the object type corresponding to the operation rights: - represents a file. d
represents a folder.
l (2) indicates the operation rights the current user has over the object: r represents that the
user has the right to read the object. w represents that the user has the right to write into the
object. x represents that the user has the right to execute the object: - represents that the
user does not have the corresponding right.
l (3) indicates the operation rights users in the current user's group have over the object: r
represents that they have the rights to read the object. w represents that they have the rights
to write into the object. x represents that they have the rights to execute the object. -
represents that they do not have the corresponding rights.
l (4) indicates the operation rights users who are not in the current user's group have over
the object: r represents that they have the rights to read the object. w represents that they
have the rights to write into the object. x represents that they have the rights to execute the
object. - represents that they do not have the corresponding rights.l (5) does not indicate anything.
l (6) indicates the current user.
l (7) indicates the user group the current user belongs to.
l (8) indicates the object.
Examples for OMU Directory Operation Rights
The following are two examples for OMU directory operation rights:
/mbsc:drwxr-xr-x 9 root dbgrp gaussdb
-rw-r--r-- 1 root root upsrvcfg.ini
l drwxr-xr-x 9 root dbgrp gaussdb: The current user root has the rights to read and write
into the /mbsc/gaussdb folder as well as the rights to search for files in the folder. The
users in the dbgrp user group that user root belongs to and the users who do not belong to
the dbgrp user group have the rights to read and the rights to search for files in the folder.
l -rw-r--r-- 1 root root upsrvcfg.ini: The current user root has the rights to read and write
into the upsrvcfg.ini file in the /mbsc folder. The users in the root user group that user
root belongs to have the rights to read the upsrvcfg.ini file in the /mbsc folder. The users
who are not in the root user group that user root belongs to have the rights to read the
upsrvcfg.ini file in the /mbsc folder.
6.5.4 OMU Folder Size List
This section provides the OMU folder size list which records the storage space of common
directories in an OMU.
OMU Folder Size List
Directory Specifications
Storage
File Type
Save Path Classification Maximum Size (MB) Maxim
um
BSC6900 UMTS
OMU Administration Guide 6 OMU Installation and Maintenance (Dopra Linux)
Issue 02 (2015-05-08) Huawei Proprietary and Confidential
Copyright © Huawei Technologies Co., Ltd.
162

8/18/2019 Bsc6900 Umts Omu Administration Guide(v900r017c10_02)(PDF)-En
http://slidepdf.com/reader/full/bsc6900-umts-omu-administration-guidev900r017c1002pdf-en 172/310
Directory Specifications
GSM
Only
Numbe
r of
Files
UMT
S
Only
GU
Only
Host
binary log
/mbsc/bam/common/
fam/famlogfmt
Files in the
current
directory
73
GB:
3274
146
GB:
7370
300
GB:
1514
4
500
GB:
2524
1
73
GB:
4298
146
GB:
16490
300
GB:
33884
500GB:
56473
73
GB:
2250
146
GB:
5322
300
GB:
1093
6
500
GB:
1822
7
73 GB:
30000
146
GB:
30000
300
GB:
60000
500
GB:100000
Files and
subdirectories
in the current
directory
73 GB: 9000
hard disk space > 73
GB: 27000
N/A
TC DSP
last wordlog
/mbsc/bam/common/
fam/famlogfmt/dspinfo
Files in the
currentdirectory
73
GB:508
146
GB:
508
300
GB:
1044
500
GB:
1740
N/A 73
GB:508
146
GB:
508
300
GB:
1044
500
GB:
1740
30000
BSC6900 UMTS
OMU Administration Guide 6 OMU Installation and Maintenance (Dopra Linux)
Issue 02 (2015-05-08) Huawei Proprietary and Confidential
Copyright © Huawei Technologies Co., Ltd.
163
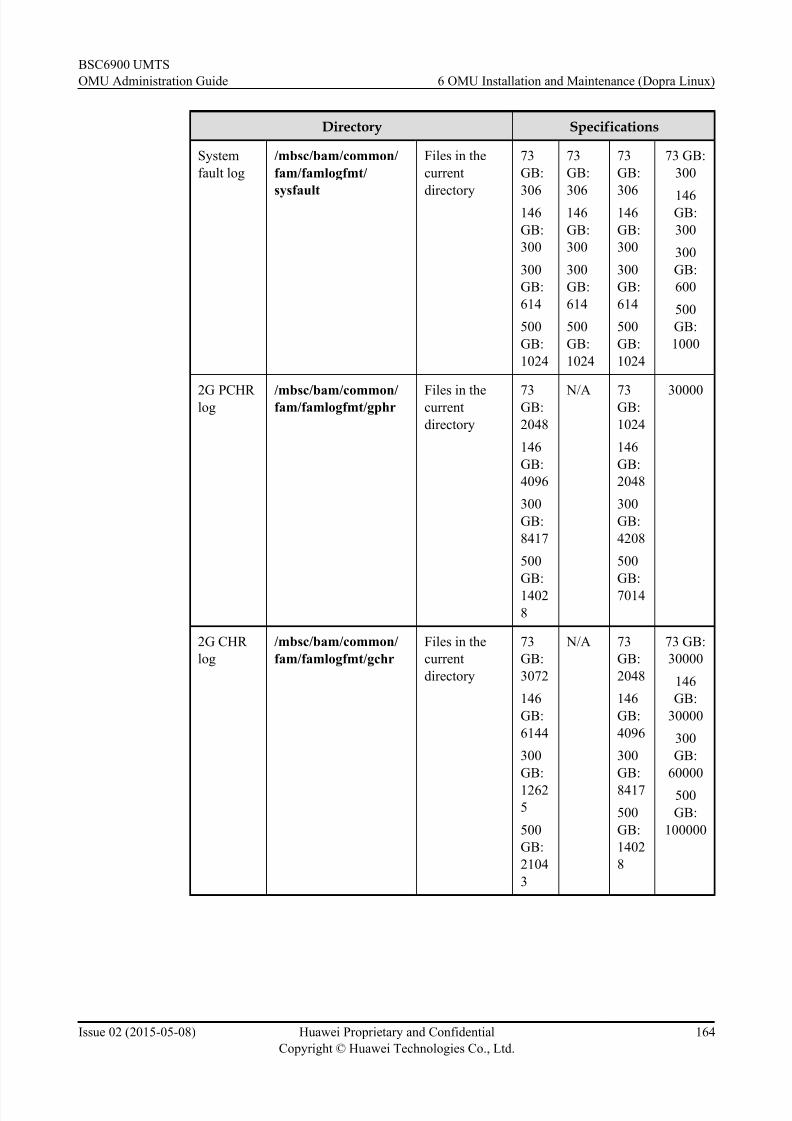
8/18/2019 Bsc6900 Umts Omu Administration Guide(v900r017c10_02)(PDF)-En
http://slidepdf.com/reader/full/bsc6900-umts-omu-administration-guidev900r017c1002pdf-en 173/310
Directory Specifications
System
fault log
/mbsc/bam/common/
fam/famlogfmt/
sysfault
Files in the
current
directory
73
GB:
306146
GB:
300
300
GB:
614
500
GB:
1024
73
GB:
306146
GB:
300
300
GB:
614
500
GB:
1024
73
GB:
306146
GB:
300
300
GB:
614
500
GB:
1024
73 GB:
300
146GB:
300
300
GB:
600
500
GB:
1000
2G PCHR log
/mbsc/bam/common/fam/famlogfmt/gphr
Files in thecurrent
directory
73GB:
2048
146
GB:
4096
300
GB:
8417
500
GB:
1402
8
N/A 73GB:
1024
146
GB:
2048
300
GB:
4208
500
GB:
7014
30000
2G CHR
log
/mbsc/bam/common/
fam/famlogfmt/gchr
Files in the
current
directory
73
GB:
3072
146
GB:
6144
300
GB:
12625
500
GB:
2104
3
N/A 73
GB:
2048
146
GB:
4096
300
GB:
8417
500
GB:
1402
8
73 GB:
30000
146
GB:
30000
300
GB:
60000
500
GB:
100000
BSC6900 UMTS
OMU Administration Guide 6 OMU Installation and Maintenance (Dopra Linux)
Issue 02 (2015-05-08) Huawei Proprietary and Confidential
Copyright © Huawei Technologies Co., Ltd.
164

8/18/2019 Bsc6900 Umts Omu Administration Guide(v900r017c10_02)(PDF)-En
http://slidepdf.com/reader/full/bsc6900-umts-omu-administration-guidev900r017c1002pdf-en 174/310
Directory Specifications
Host crash
log
/mbsc/bam/common/
fam/fad
Files in the
current
directory
73
GB:
1016146
GB:
1016
300
GB:
2088
500
GB:
3481
73
GB:
1016146
GB:
1016
300
GB:
2088
500
GB:
3481
73
GB:
1016146
GB:
1016
300
GB:
2088
500
GB:
3481
30000
Files andsubdirectories
in the current
directory
250 N/A
Host log /mbsc/bam/common/
fam/famlog
Files in the
current
directory
73
GB:
508
146
GB:
508
300GB:
1044
500
GB:
1740
73
GB:
508
146
GB:
508
300GB:
1044
500
GB:
1740
73
GB:
508
146
GB:
508
300GB:
1044
500
GB:
1740
73 GB:
30000
146
GB:
30000
300
GB:30000
500
GB:
30000
Files and
subdirectories
in the current
directory
500 N/A
BSC6900 UMTS
OMU Administration Guide 6 OMU Installation and Maintenance (Dopra Linux)
Issue 02 (2015-05-08) Huawei Proprietary and Confidential
Copyright © Huawei Technologies Co., Ltd.
165

8/18/2019 Bsc6900 Umts Omu Administration Guide(v900r017c10_02)(PDF)-En
http://slidepdf.com/reader/full/bsc6900-umts-omu-administration-guidev900r017c1002pdf-en 175/310
Directory Specifications
3G PCHR
log
/mbsc/bam/common/
fam/famlogfmt/pchr
Files in the
current
directory
N/A 73
GB:
4403146
GB:
9016
300
GB:
18525
500
GB:
30874
73
GB:
2870146
GB:
5936
300
GB:
1219
6
500
GB:
2032
7
73 GB:
30000
146GB:
30000
300
GB:
60000
500
GB:
100000
VIP user
trace log
/mbsc/bam/common/
fam/famlogfmt/
viptrace
Files in the
current
directory
N/A 73
GB:
202
146
GB:
210
300
GB:
431
500
GB:
717
73
GB:
202
146
GB:
210
300
GB:
431
500
GB:
717
12000
MR log /mbsc/bam/common/
fam/mr
Files in the
current
directory
73
GB:
1891
146
GB:
1898
300
GB:3901
500
GB:
6502
73
GB:
1891
146
GB:
1898
300
GB:3901
500
GB:
6502
73
GB:
1891
146
GB:
1898
300
GB:3901
500
GB:
6502
73 GB:
30000
146
GB:
30000
300
GB:
60000
500
GB:
100000
Files and
subdirectories
in the current
directory
2000 N/A
BSC6900 UMTS
OMU Administration Guide 6 OMU Installation and Maintenance (Dopra Linux)
Issue 02 (2015-05-08) Huawei Proprietary and Confidential
Copyright © Huawei Technologies Co., Ltd.
166

8/18/2019 Bsc6900 Umts Omu Administration Guide(v900r017c10_02)(PDF)-En
http://slidepdf.com/reader/full/bsc6900-umts-omu-administration-guidev900r017c1002pdf-en 176/310
Directory Specifications
Trace file /mbsc/bam/common/
fam/trace
Files in the
current
directory
73
GB:
508146
GB:
2048
300
GB:
4208
500
GB:
7014
73
GB:
508146
GB:
2048
300
GB:
4208
500
GB:
7014
73
GB:
508146
GB:
2048
300
GB:
4208
500
GB:
7014
73 GB:
12000
146GB:
12000
300
GB:
24000
500
GB:
40000
Files andsubdirectories
in the current
directory
73 GB: 1000hard disk space > 73
GB: 3000
N/A
File
exported
by running
the EXP
CFGBCP
command
/mbsc/bam/version_x/
ftp/ExportBCPfile
Files in the
current
directory
73
GB:
52
146
GB:
60
300GB:
122
500
GB:
205
73
GB:
52
146
GB:
60
300GB:
122
500
GB:
205
73
GB:
52
146
GB:
60
300GB:
122
500
GB:
205
1000
Exported
U2000 and
CME BCP
file
/mbsc/bam/version_x/
ftp/ExportCMESync-
View
Files in the
current
directory
100 N/A
Fileexported
by running
the
EXP UKPI
command
/mbsc/bam/version_x/ftp/kpi_file
Files andsubdirectories
in the current
directory
100 N/A
Exported
device file
/mbsc/bam/version_x/
ftp/device_file
Files and
subdirectories
in the current
directory
100 N/A
BSC6900 UMTS
OMU Administration Guide 6 OMU Installation and Maintenance (Dopra Linux)
Issue 02 (2015-05-08) Huawei Proprietary and Confidential
Copyright © Huawei Technologies Co., Ltd.
167

8/18/2019 Bsc6900 Umts Omu Administration Guide(v900r017c10_02)(PDF)-En
http://slidepdf.com/reader/full/bsc6900-umts-omu-administration-guidev900r017c1002pdf-en 177/310
Directory Specifications
Exported
electronic
label file
/mbsc/bam/version_x/
ftp/e_label
Files and
subdirectories
in the currentdirectory
100 N/A
File
exported
by running
the
EXP ALM
LOG
command
/mbsc/bam/version_x/
ftp/export_almlog
Files and
subdirectories
in the current
directory
100 N/A
File
exported by running
the EXP
CFGMML
command
/mbsc/bam/version_x/
ftp/export_cfgmml
Files in the
currentdirectory
200 N/A
Directory
exported
from board
replaceme
nt logs and
board
temperatur e logs
/mbsc/bam/version_x/
ftp/export_logfile
Files and
subdirectories
in the current
directory
50 N/A
Cell
relocation
log
/mbsc/bam/version_x/
ftp/OptMml
Files in the
current
directory
73
GB:
22
146
GB:
44
300
GB:
92500
GB:
153
73
GB:
22
146
GB:
44
300
GB:
92500
GB:
153
73
GB:
22
146
GB:
44
300
GB:
92500
GB:
153
300
File server
directory
/mbsc/bam/common/
ems
Files and
subdirectories
in the current
directory
2000 N/A
BSC6900 UMTS
OMU Administration Guide 6 OMU Installation and Maintenance (Dopra Linux)
Issue 02 (2015-05-08) Huawei Proprietary and Confidential
Copyright © Huawei Technologies Co., Ltd.
168
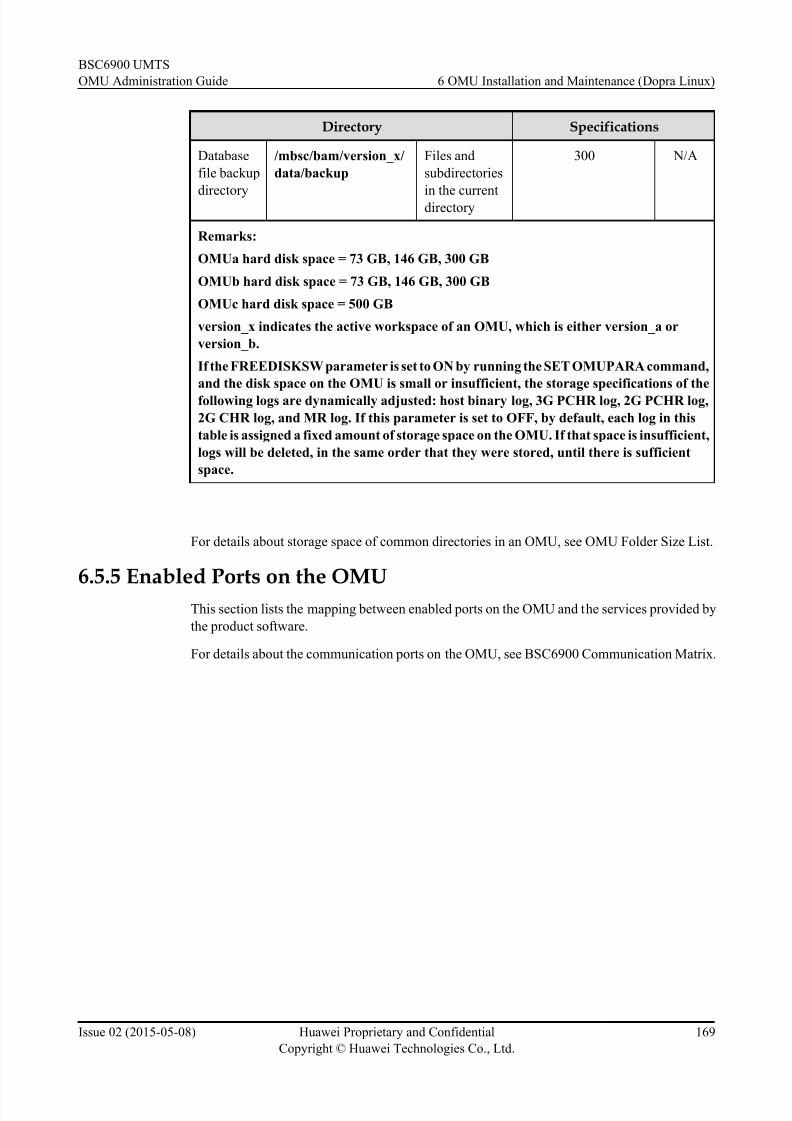
8/18/2019 Bsc6900 Umts Omu Administration Guide(v900r017c10_02)(PDF)-En
http://slidepdf.com/reader/full/bsc6900-umts-omu-administration-guidev900r017c1002pdf-en 178/310
Directory Specifications
Database
file backup
directory
/mbsc/bam/version_x/
data/backup
Files and
subdirectories
in the currentdirectory
300 N/A
Remarks:
OMUa hard disk space = 73 GB, 146 GB, 300 GB
OMUb hard disk space = 73 GB, 146 GB, 300 GB
OMUc hard disk space = 500 GB
version_x indicates the active workspace of an OMU, which is either version_a or
version_b.
If the FREEDISKSW parameter is set to ON by running the SET OMUPARA command,
and the disk space on the OMU is small or insufficient, the storage specifications of the
following logs are dynamically adjusted: host binary log, 3G PCHR log, 2G PCHR log,
2G CHR log, and MR log. If this parameter is set to OFF, by default, each log in this
table is assigned a fixed amount of storage space on the OMU. If that space is insufficient,
logs will be deleted, in the same order that they were stored, until there is sufficient
space.
For details about storage space of common directories in an OMU, see OMU Folder Size List.
6.5.5 Enabled Ports on the OMU
This section lists the mapping between enabled ports on the OMU and the services provided by
the product software.
For details about the communication ports on the OMU, see BSC6900 Communication Matrix.
BSC6900 UMTS
OMU Administration Guide 6 OMU Installation and Maintenance (Dopra Linux)
Issue 02 (2015-05-08) Huawei Proprietary and Confidential
Copyright © Huawei Technologies Co., Ltd.
169

8/18/2019 Bsc6900 Umts Omu Administration Guide(v900r017c10_02)(PDF)-En
http://slidepdf.com/reader/full/bsc6900-umts-omu-administration-guidev900r017c1002pdf-en 179/310
7 OMU Installation and Maintenance
(Windows)
About This Chapter
This chapter describes how to install software and perform O&M on the OMU running Windows.
In this scenario, the OMUa board is used to carry the OMU.
NOTE
Run the LST VER command. Based on the OMU OS displayed in the command output, select the installation
and maintenance scenarios.
OMU Software Architecture
The OMU software consists of the operating system and the product software. Figure 7-1 shows
the OMU software architecture.
Figure 7-1 OMU software architecture
l Operating System
Windows Server 2003 is used.
l Product Software
The product software runs on the bottom-level OS to provide various service processes.
NOTE
Antivirus software such as Norton, Macfee, and Officescan can be installed on the OMU.
BSC6900 UMTS
OMU Administration Guide 7 OMU Installation and Maintenance (Windows)
Issue 02 (2015-05-08) Huawei Proprietary and Confidential
Copyright © Huawei Technologies Co., Ltd.
170

8/18/2019 Bsc6900 Umts Omu Administration Guide(v900r017c10_02)(PDF)-En
http://slidepdf.com/reader/full/bsc6900-umts-omu-administration-guidev900r017c1002pdf-en 180/310

8/18/2019 Bsc6900 Umts Omu Administration Guide(v900r017c10_02)(PDF)-En
http://slidepdf.com/reader/full/bsc6900-umts-omu-administration-guidev900r017c1002pdf-en 181/310
7.1 Reinstalling Software Onsite
This section describes the software installation policies after the BSC6810 is upgraded to theBSC6900.
Context
The operating system of the BSC6810 is Windows Server 2003, and the operating system of the
BSC6900 is Dopra Linux. After the BSC6810 is upgraded to the BSC6900, Windows Server
2003 can be retained or switched to Dopra Linux.
If... Then...
The Windows Server 2003 operating system
can still be used.
1. Install product software by referring to
7.1.3 Optional: Installing ProductSoftware.
The Windows Server 2003 operating system
needs to be reinstalled.
1. Reinstall the Windows Server 2003
operating system by referring to 7.1.1
Optional: Reinstalling the Windows
Operating System.
2. Install product software by referring to
7.1.3 Optional: Installing Product
Software.
The Windows Server 2003 operating system
needs to be switched to the Dopra Linuxoperating system.
1. Switch the operating system by referring
to 7.1.2 Optional: Switching the OMUOperating System.
2. Install product software by referring to
7.1.3 Optional: Installing Product
Software.
NOTE
If product software can be installed during
switching of the operating system, skip 2.
7.1.1 Optional: Reinstalling the Windows Operating System
This section describes how to reinstall the Windows operating system.
Context
After the BSC6810 is upgraded to the BSC6900, reinstall the Windows Server 2003 operating
system if it is retained.
NOTE
The OMUc board supports only the Dopra Linux operating system. Therefore, you only need to reinstall the
Windows operating system when using the OMUa board.
BSC6900 UMTS
OMU Administration Guide 7 OMU Installation and Maintenance (Windows)
Issue 02 (2015-05-08) Huawei Proprietary and Confidential
Copyright © Huawei Technologies Co., Ltd.
172

8/18/2019 Bsc6900 Umts Omu Administration Guide(v900r017c10_02)(PDF)-En
http://slidepdf.com/reader/full/bsc6900-umts-omu-administration-guidev900r017c1002pdf-en 182/310
Preparations for Reinstalling the OMU Operating System
An OMU board, PC, EasyInstall software, and other installation source programs must be
prepared before the OMU operating system is reinstalled.
Configuration Requirements for the OMU Board
l More than 1 GB of RAM is configured.
l Two SAS hard disks with more than 70 GB each are configured.
l RAID 1 is set up for the two hard disks.
Configuration Requirements for the Portable Computer
Table 7-1 lists the configuration requirements for the portable computer.
Table 7-1 Configuration requirements for the portable computer
Item Quantity RecommendedConfiguration
Minimum Configuration
CPU 1 2.8GHz or faster 866MHz
RAM 1 512MB 256MB
Hard disk 1 80 GB 10GB
Display
adapter
resolution
- 1024x768 pixels or higher 800x600
CD drive 1 - -
Ethernet
adapter
1 10&100 Mbps 10&100 Mbps
Operatin
g system
- Microsoft Windows XP
Professional
Microsoft Windows Server
2003
Microsoft Windows 7
-
l If the operating system of the PC is Microsoft Windows XP Professional, the Windows
firewall and simple file sharing must be disabled.
l If the operating system of the PC is Microsoft Windows Server 2003 or Windows 7, the
Windows firewall must be disabled.
Otherwise, the EasyInstall software and the installation of the OMU operating system may be
affected.
If the Microsoft Windows XP Professional or Windows Server 2003, you can perform the
following operations to disable the Windows firewall:
BSC6900 UMTS
OMU Administration Guide 7 OMU Installation and Maintenance (Windows)
Issue 02 (2015-05-08) Huawei Proprietary and Confidential
Copyright © Huawei Technologies Co., Ltd.
173

8/18/2019 Bsc6900 Umts Omu Administration Guide(v900r017c10_02)(PDF)-En
http://slidepdf.com/reader/full/bsc6900-umts-omu-administration-guidev900r017c1002pdf-en 183/310
1. Right-click My Network Places and choose Properties from the shortcut menu.
2. In the Network Connections window, right-click Local Area Connection and choose
Properties from the shortcut menu.
3. In the Local Area Connection Properties dialog box, click the Advanced tab.
4. Click Settings, and in the displayed dialog box click the General tab then click Off . Click
OK . The firewall is now disabled.
If the Microsoft Windows 7, you can perform the following operations to disable the Windows
firewall:
1. Choose Start > Control Panel > Network and Internet > View network status and
tasks.
2. In the Network and Sharing Center window, click Windows Firewall.
3. In the Windows Firewall window, click Turn Windows Firewall on or off . The
Customize settings window is displayed.
Choose Domain network location settings > Turn off Windows Firewall.
Choose Home or work(private) network location settings > Turn off Windows
Firewall.
Choose Public network location settings > Turn off Windows Firewall, and then click
OK to disable the Windows firewall.
If the Microsoft Windows XP Professional, you can perform the following operation to disable
the simple file sharing:
1. Double-click My Computer.
2. In the My Computer window, choose Tools > Folder options.
3. In the Folder options dialog box, click the View tab. In the Advanced settings area, clear
the Use simple file sharing (Recommended) check box.
To configure the IP address of the Ethernet adapter of the portable computer to 192.168.0.215,
perform the following steps:
1. Right-click My Network Places and choose Properties from the shortcut menu.
2. In the Network Connections window, right-click Local Area Connection and choose
Properties from the shortcut menu.
3. In the Local Area Connection Properties dialog box, select Internet Protocol (TCP/
IP) then click Properties.
4. In the Internet Protocol (TCP/IP) Properties dialog box, click Use the following IP
address and set the IP address to 192.168.0.215 and the subnet mask to 255.255.255.0.
Disks and Programs to Be Prepared
Ensure that the following installation disks and programs are available:
l EasyInstall software
l Microsoft Windows Server 2003 R2 standard edition installation disk
l SP2 patch programs: WindowsServer2003-KB914961-SP2-x86-CHS.exe and
WindowsServer2003-KB914961-SP2-x86-ENU.exe
BSC6900 UMTS
OMU Administration Guide 7 OMU Installation and Maintenance (Windows)
Issue 02 (2015-05-08) Huawei Proprietary and Confidential
Copyright © Huawei Technologies Co., Ltd.
174
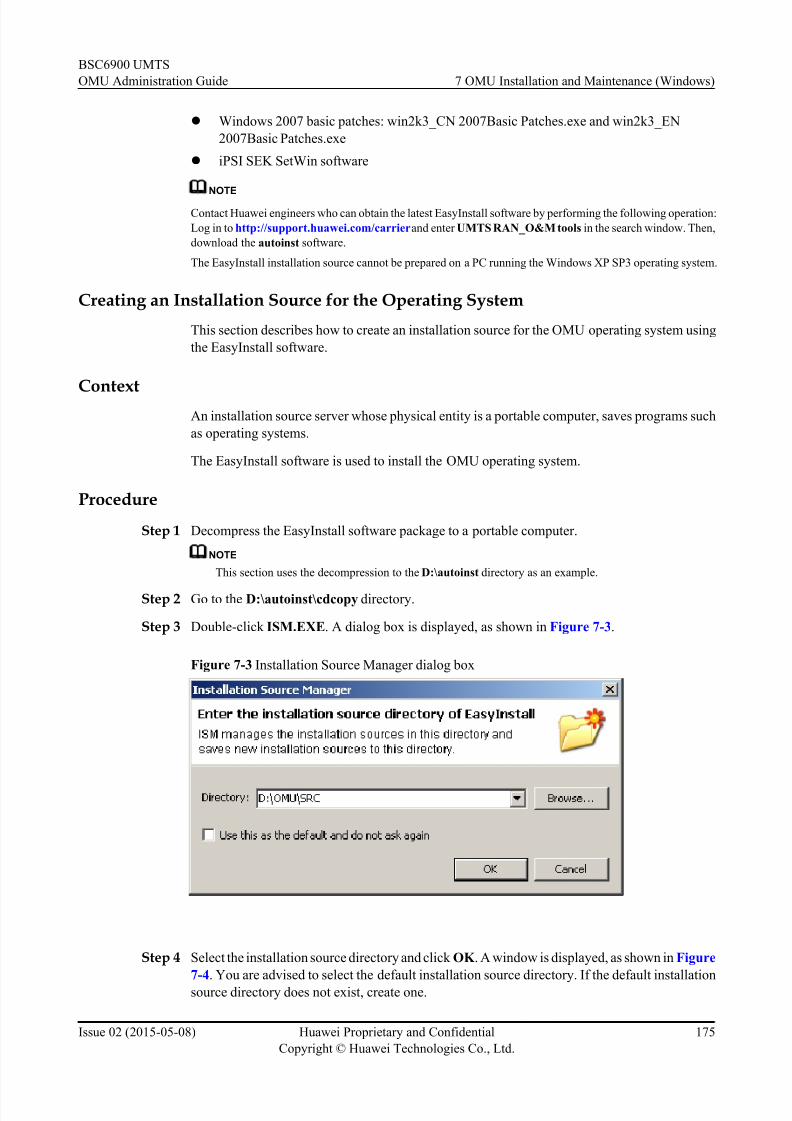
8/18/2019 Bsc6900 Umts Omu Administration Guide(v900r017c10_02)(PDF)-En
http://slidepdf.com/reader/full/bsc6900-umts-omu-administration-guidev900r017c1002pdf-en 184/310
l Windows 2007 basic patches: win2k3_CN 2007Basic Patches.exe and win2k3_EN
2007Basic Patches.exe
l iPSI SEK SetWin software
NOTE
Contact Huawei engineers who can obtain the latest EasyInstall software by performing the following operation:
Log in to http://support.huawei.com/carrier and enter UMTS RAN_O&M tools in the search window. Then,
download the autoinst software.
The EasyInstall installation source cannot be prepared on a PC running the Windows XP SP3 operating system.
Creating an Installation Source for the Operating System
This section describes how to create an installation source for the OMU operating system using
the EasyInstall software.
ContextAn installation source server whose physical entity is a portable computer, saves programs such
as operating systems.
The EasyInstall software is used to install the OMU operating system.
Procedure
Step 1 Decompress the EasyInstall software package to a portable computer.
NOTE
This section uses the decompression to the D:\autoinst directory as an example.
Step 2 Go to the D:\autoinst\cdcopy directory.
Step 3 Double-click ISM.EXE. A dialog box is displayed, as shown in Figure 7-3.
Figure 7-3 Installation Source Manager dialog box
Step 4 Select the installation source directory and click OK . A window is displayed, as shown in Figure
7-4. You are advised to select the default installation source directory. If the default installation
source directory does not exist, create one.
BSC6900 UMTS
OMU Administration Guide 7 OMU Installation and Maintenance (Windows)
Issue 02 (2015-05-08) Huawei Proprietary and Confidential
Copyright © Huawei Technologies Co., Ltd.
175

8/18/2019 Bsc6900 Umts Omu Administration Guide(v900r017c10_02)(PDF)-En
http://slidepdf.com/reader/full/bsc6900-umts-omu-administration-guidev900r017c1002pdf-en 185/310
Figure 7-4 Installation Source Manager window
Step 5 Click New on the toolbar or choose Source > New. A dialog box is displayed, as shown in
Figure 7-5.
Figure 7-5 Creating operating system installation source 1
BSC6900 UMTS
OMU Administration Guide 7 OMU Installation and Maintenance (Windows)
Issue 02 (2015-05-08) Huawei Proprietary and Confidential
Copyright © Huawei Technologies Co., Ltd.
176

8/18/2019 Bsc6900 Umts Omu Administration Guide(v900r017c10_02)(PDF)-En
http://slidepdf.com/reader/full/bsc6900-umts-omu-administration-guidev900r017c1002pdf-en 186/310
Step 6 Select an installation source type and click Next.
If... Then...
Windows Server 2003 R2... is selected A dialog box is displayed, as shown in Figure 7-6.
Figure 7-6 Creating operating system installation source 2
Step 7 Click Next. A dialog box is displayed, as shown in Figure 7-7.
BSC6900 UMTS
OMU Administration Guide 7 OMU Installation and Maintenance (Windows)
Issue 02 (2015-05-08) Huawei Proprietary and Confidential
Copyright © Huawei Technologies Co., Ltd.
177

8/18/2019 Bsc6900 Umts Omu Administration Guide(v900r017c10_02)(PDF)-En
http://slidepdf.com/reader/full/bsc6900-umts-omu-administration-guidev900r017c1002pdf-en 187/310
Figure 7-7 Creating operating system installation source 3
Step 8 Insert CD1 into the CD drive on the portable computer. Click Next. A dialog box is displayed.
Step 9 Click Execute. The file copying starts and the progress is displayed.
Step 10 After all the files in CD1 are copied, the confirmation dialog box is displayed, prompting you
to insert CD2. Click OK and continue to copy other installation CD-ROMs according to the
wizard instructions.
Step 11 After all the CD-ROMs of the OMU operating system are copied, click Finish. The installation
source is displayed in the Installation Source Manager window shown in Figure 7-4.
----End
Creating an Installation Source for the SetWin Software and OS Patches
This section describes how to create an installation source for the SetWin software and operating
system (OS) patches.
Context
l Contact Huawei engineers to obtain the SetWin software by logging in to http://
support.huawei.com/carrier and choosing Support > Tools > Mini-tool Software >
Wireless Product Line > Security Tools > public.
BSC6900 UMTS
OMU Administration Guide 7 OMU Installation and Maintenance (Windows)
Issue 02 (2015-05-08) Huawei Proprietary and Confidential
Copyright © Huawei Technologies Co., Ltd.
178

8/18/2019 Bsc6900 Umts Omu Administration Guide(v900r017c10_02)(PDF)-En
http://slidepdf.com/reader/full/bsc6900-umts-omu-administration-guidev900r017c1002pdf-en 188/310
NOTE
The version of the SetWin software must be consistent with that described in the Guide to Enhancing the
BSC6900 Operating System. To obtain the Guide to Enhancing the BSC6900 Operating System, log in to
http://support.huawei.com/carrier and choose Support > Tools > Mini-tool Software > Wireless
Product Line > Security Tools > public.l Contact Huawei engineers to obtain patches for the Windows SP2 and basic patches for
the Windows 2007 by logging in to http://support.huawei.com/carrier and choosing
Support > Tools > Mini-tool Software > Wireless Product Line > Universal OS
Patches > public.
Procedure
Step 1 Decompress the SetWin software package.
Step 2 Copy the pack folder under autoinst\template\pomu_mode to D:\OMU\SRC.
Step 3 Save the 2700 basic patches and the iPSI SEK Setwin.exe and License.Dat files decompressedfrom the SetWin software package to D:\OMU\SRC\pack\ENU\.
Step 4 Save SP2 to D:\OMU\SRC\ and rename it ws2k3sp2.enu.exe.
The creation of the installation source for the SetWin software and OS patches is complete.
----End
Installing the OMU Operating System by Using the EasyInstall Software
This section describes how to run the EasyInstall software on a portable computer to install the
Windows operating system, SP2, and SetWin software on the OMU.
Prerequisites
l The OMU board is powered on and works properly.
l The OMU is connected to the local PC through the commissioning port.
l The operating system installation source is created. For details, see Creating an
Installation Source for the Operating System.
l In the OMU BIOS settings, PXE corresponding to the ETH2 commissioning port is Enable.
Context
l Other Ethernet adapters are bound before you use the EasyInstall software to install the
OMU operating system. Therefore, you can install the software in network installation
mode by using only the commissioning port. Otherwise, the installation may fail.
l The time required for the installation depends on the configuration of the portable computer
and the performance of the Ethernet adapter. Generally, installing the Windows operating
system, SP2, and SetWin software takes 60 minutes if a 100 Mbit/s Ethernet adapter is
used.
Procedure
Step 1Go to the D:\autoinst path. Open the autoinst.conf file by using the Notepad, and change the
parameter values from the default values to the recommended values, as shown in Table 7-2.
BSC6900 UMTS
OMU Administration Guide 7 OMU Installation and Maintenance (Windows)
Issue 02 (2015-05-08) Huawei Proprietary and Confidential
Copyright © Huawei Technologies Co., Ltd.
179

8/18/2019 Bsc6900 Umts Omu Administration Guide(v900r017c10_02)(PDF)-En
http://slidepdf.com/reader/full/bsc6900-umts-omu-administration-guidev900r017c1002pdf-en 189/310
Table 7-2 Configuration item
Item Default Value RecommendedValue
Description
SRC_PATH d:\OMU\SRC Path for saving theinstallation source file
as needed (you can use
the default path).
Save path of the installationsource file
DHCPD_INT
ERFACE
Local area
connection
Eth2 Name of the Ethernet port
connecting the portable
computer to the OMU
board
IPADDR 192.168.0.1 192.168.0.215 IP address of the portable
computer enabled with
DHCPD services
NETMASK 255.255.255.0 255.255.255.0 Subnet mask of the portable
computer enabled with
DHCPD services
RANGE 192.168.0.2-192.16
8.0.254
192.168.0.2-192.168.
0.254
Range of the IP addresses
that can be assigned to the
portable computer by the
DHCPD server
Step 2 Choose Start > Run, and run the cmd command. The cmd window is displayed.
Enter the following command:C:\Documents and Settings>cd /d D:\autoinst
Step 3 Run checkout.bat. In the displayed POMU Easy-Install Check Result dialog box, check
whether the displayed ports are used, as shown in Figure 7-8.
Figure 7-8 Port status
BSC6900 UMTS
OMU Administration Guide 7 OMU Installation and Maintenance (Windows)
Issue 02 (2015-05-08) Huawei Proprietary and Confidential
Copyright © Huawei Technologies Co., Ltd.
180

8/18/2019 Bsc6900 Umts Omu Administration Guide(v900r017c10_02)(PDF)-En
http://slidepdf.com/reader/full/bsc6900-umts-omu-administration-guidev900r017c1002pdf-en 190/310
NOTE
If the port status is Fail as shown in Figure 7-8, the port is not used. If the port status is OK, the port is
used. To release the port, quit other running programs.
1. Run netstat -a -n -o to query the PID of the port.
2. Open the task manager. Click the Processes tab. Choose View >Select Columns. Select PID and click OK .
3. Query the process mapping the PID and terminate the process.
Step 4 Run install.bat. After the DHCP and TFCP services are started, the command line returns to
D:\autoinst, as shown in Figure 7-9.
Figure 7-9 Starting services
BSC6900 UMTS
OMU Administration Guide 7 OMU Installation and Maintenance (Windows)
Issue 02 (2015-05-08) Huawei Proprietary and Confidential
Copyright © Huawei Technologies Co., Ltd.
181
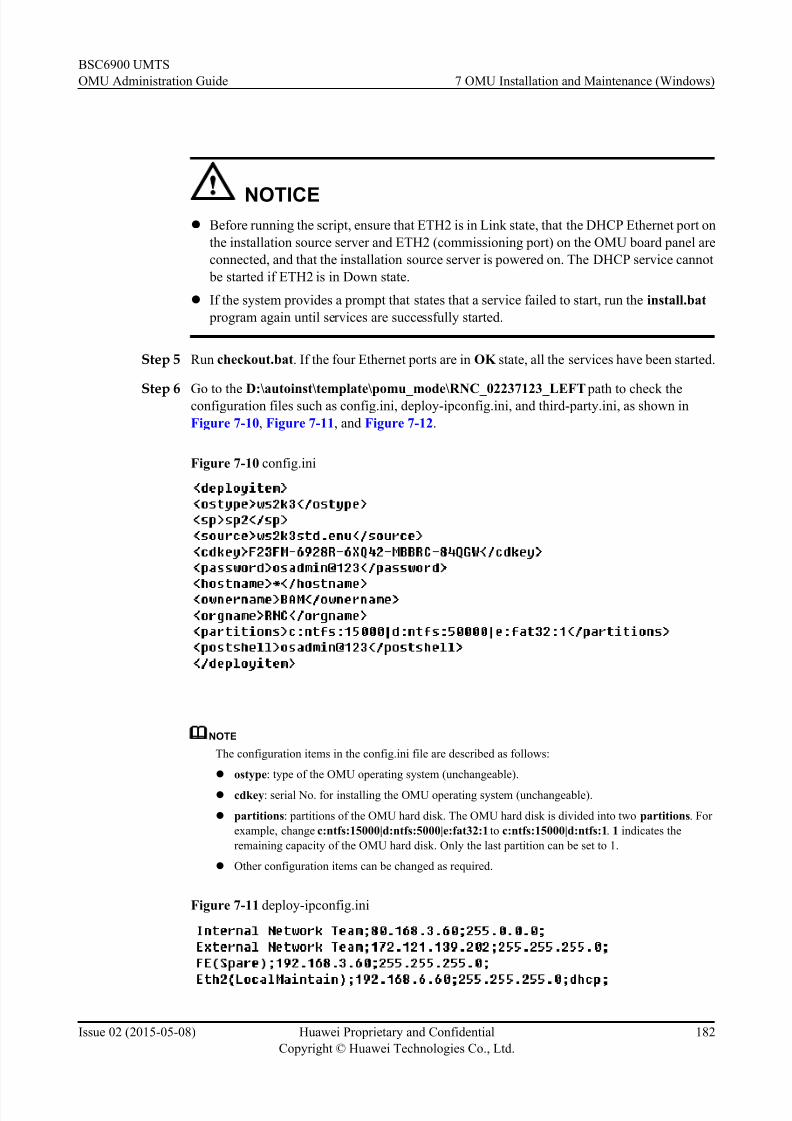
8/18/2019 Bsc6900 Umts Omu Administration Guide(v900r017c10_02)(PDF)-En
http://slidepdf.com/reader/full/bsc6900-umts-omu-administration-guidev900r017c1002pdf-en 191/310
NOTICEl Before running the script, ensure that ETH2 is in Link state, that the DHCP Ethernet port on
the installation source server and ETH2 (commissioning port) on the OMU board panel are
connected, and that the installation source server is powered on. The DHCP service cannot
be started if ETH2 is in Down state.
l If the system provides a prompt that states that a service failed to start, run the install.bat
program again until services are successfully started.
Step 5 Run checkout.bat. If the four Ethernet ports are in OK state, all the services have been started.
Step 6 Go to the D:\autoinst\template\pomu_mode\RNC_02237123_LEFT path to check theconfiguration files such as config.ini, deploy-ipconfig.ini, and third-party.ini, as shown in
Figure 7-10, Figure 7-11, and Figure 7-12.
Figure 7-10 config.ini
NOTE
The configuration items in the config.ini file are described as follows:
l ostype: type of the OMU operating system (unchangeable).
l cdkey: serial No. for installing the OMU o perating system (unchangeable).
l partitions: partitions of the OMU hard disk. The OMU hard disk is divided into two partitions. For
example, change c:ntfs:15000|d:ntfs:5000|e:fat32:1 to c:ntfs:15000|d:ntfs:1. 1 indicates the
remaining capacity of the OMU hard disk. Only the last partition can be set to 1.
l Other configuration items can be changed as required.
Figure 7-11 deploy-ipconfig.ini
BSC6900 UMTS
OMU Administration Guide 7 OMU Installation and Maintenance (Windows)
Issue 02 (2015-05-08) Huawei Proprietary and Confidential
Copyright © Huawei Technologies Co., Ltd.
182

8/18/2019 Bsc6900 Umts Omu Administration Guide(v900r017c10_02)(PDF)-En
http://slidepdf.com/reader/full/bsc6900-umts-omu-administration-guidev900r017c1002pdf-en 192/310
NOTE
The configuration items in the deploy-ipconfig.ini file are described as follows:
l Change the internal and external IP addresses based on the network conditions.
l End each line with a semi-colon.
Figure 7-12 third-party.ini
NOTE
l If third-party software is to be installed, add the software name, save path, and commands to be executed
to the third-party.ini file.
l Delete the information about SQL2000 which is marked in red. Otherwise, the installation of the OMU
operating system may fail.
Step 7 Open the site file in D:\autoinst\site. Enter only the MAC address of ETH2 and the name of the
configuration file, as shown in Figure 7-13.
BSC6900 UMTS
OMU Administration Guide 7 OMU Installation and Maintenance (Windows)
Issue 02 (2015-05-08) Huawei Proprietary and Confidential
Copyright © Huawei Technologies Co., Ltd.
183
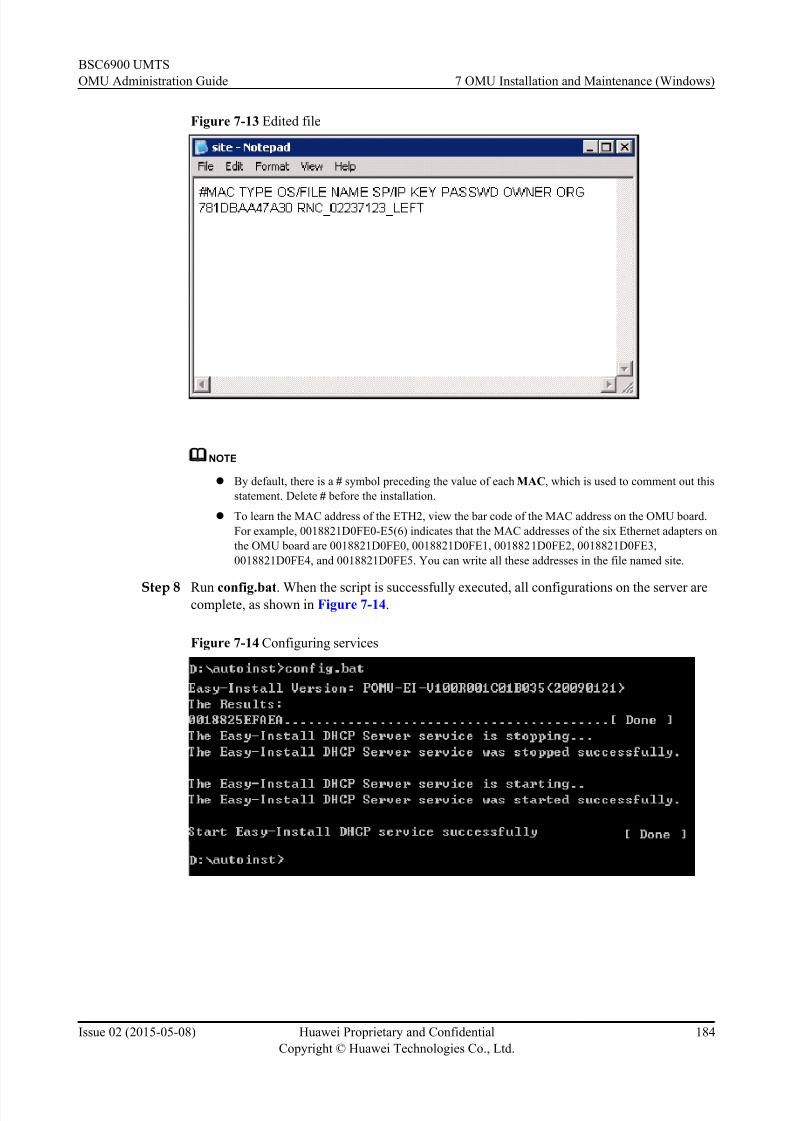
8/18/2019 Bsc6900 Umts Omu Administration Guide(v900r017c10_02)(PDF)-En
http://slidepdf.com/reader/full/bsc6900-umts-omu-administration-guidev900r017c1002pdf-en 193/310
Figure 7-13 Edited file
NOTE
l By default, there is a # symbol preceding the value of each MAC, which is used to comment out this
statement. Delete # before the installation.
l To learn the MAC address of the ETH2, view the bar code of the MAC address on the OMU board.
For example, 0018821D0FE0-E5(6) indicates that the MAC addresses of the six Ethernet adapters on
the OMU board are 0018821D0FE0, 0018821D0FE1, 0018821D0FE2, 0018821D0FE3,
0018821D0FE4, and 0018821D0FE5. You can write all these addresses in the file named site.
Step 8 Run config.bat. When the script is successfully executed, all configurations on the server arecomplete, as shown in Figure 7-14.
Figure 7-14 Configuring services
BSC6900 UMTS
OMU Administration Guide 7 OMU Installation and Maintenance (Windows)
Issue 02 (2015-05-08) Huawei Proprietary and Confidential
Copyright © Huawei Technologies Co., Ltd.
184

8/18/2019 Bsc6900 Umts Omu Administration Guide(v900r017c10_02)(PDF)-En
http://slidepdf.com/reader/full/bsc6900-umts-omu-administration-guidev900r017c1002pdf-en 194/310
NOTICE
l If the system provides a prompt that states that a service failed to start, run config.bat again
until services are successfully configured.
l After config.bat is executed, a symbol # is automatically added in front of the value of
MAC. Delete the symbol # before running install.bat again.
Step 9 Turn the ejector levers on the OMU board outwards. After the OFFLINE indicator on the OMUa
board is Oon, turn the ejector levers inwards until they are in the proper position. The OMU
board automatically restarts on the DHCP server, and the installation of the operating system
starts.
NOTICE
l During the installation process, do not connect the keyboard and mouse to the portable
computer to avoid any interruption to the installation.
l The OMU board may automatically restart several times during the installation process.
l During the installation process, do not run the install.bat script. If you run the install.bat
script, the DHCP server and TFTP server will be reconfigured and the network will be
interrupted temporarily, and the installation fails.
l During the installation process, if the message PXE-E32:TFTP open timeout is
displayed, disable the DHCP server, TFTP server, and firewall. If the DHCP server is enabledafter you run the install.bat script repeatedly, run the install.bat stop command to disable
the DHCP service, as shown in Figure 7-15. Then, run the install.bat script again to start
the EasyInstall software.
Figure 7-15 Stopping services
Step 10 Enter checkout.bat to query the status of the OMU board installation.
BSC6900 UMTS
OMU Administration Guide 7 OMU Installation and Maintenance (Windows)
Issue 02 (2015-05-08) Huawei Proprietary and Confidential
Copyright © Huawei Technologies Co., Ltd.
185
8/18/2019 Bsc6900 Umts Omu Administration Guide(v900r017c10_02)(PDF)-En
http://slidepdf.com/reader/full/bsc6900-umts-omu-administration-guidev900r017c1002pdf-en 195/310
If STATUS of MAC in the displayed window is OK , the installation of the operating system is
complete. Ten seconds after the installation, the board restarts automatically. You can now
remotely log in to the OMU board.
NOTE
Run checkout.bat. The STATUS of MAC in the displayed window indicates the installation status of the
OMU operating system.
l OK indicates that the installation is complete.
l Installing indicates that the installation is in progress.
l Waiting indicates that the client has not sent messages to the server and the installation is not started.
If the OMUa board is in Waiting state after the board is on for ten minutes, check that the network is
connected and that the client PC is powered on.
l Failed indicates that the installation fails. For details, view the LOG.
----End
7.1.2 Optional: Switching the OMU Operating SystemThis section describes how to switch the OMU operating system after the BSC6810 is upgraded
to the BSC6900.
Prerequisites
l Before a USB flash drive used to switch the OMU operating system is prepared, the
communication between the local PC and the OMU must be normal. This ensures that the
U_creator tool can obtain the configuration information of the target OMU.
l The external virtual IP address and external subnet gateway IP address have been obtained.
l The time needed for preparing a USB flash drive varies depending the bandwidth of the
network from the PC to the equipment room, the USB protocol, and the PC performance.The duration listed in Table 6-7 ref ers to the duration for preparing a USB flash drive in
compliance with the USB2.0 protocol. The duration for preparing a USB flash drive in
compliance with the USB1.1 protocol takes about twice as long as preparing a USB flash
drive in compliance with the USB2.0 protocol. If the duration for preparing the device
requires much longer than the listed duration, the performance of the PC in use is poor. If
this occurs, restart the PC or use a PC with a higher level of performance.
Context
The operating system of the BSC6810 is Windows Server 2003, and the operating system of the
BSC6900 is Dopra Linux. After the BSC6810 is upgraded to the BSC6900, Windows Server 2003 can be retained or switched to Dopra Linux.
l After the OMU operating system is switched by using the USB flash drive, all the OMU
data is smoothly moved to the new operating system, including:
– License files
– Product software
– Performance configuration files
– The OMU database that stores the configuration, alarm, and platform data
– SSL certificate files
– The performance result files and log files need to be backed up to a local PC before the
OMU operating system is switched. For details about the directory where these files are
BSC6900 UMTS
OMU Administration Guide 7 OMU Installation and Maintenance (Windows)
Issue 02 (2015-05-08) Huawei Proprietary and Confidential
Copyright © Huawei Technologies Co., Ltd.
186

8/18/2019 Bsc6900 Umts Omu Administration Guide(v900r017c10_02)(PDF)-En
http://slidepdf.com/reader/full/bsc6900-umts-omu-administration-guidev900r017c1002pdf-en 196/310
to be backed up, see Table 1 in Checking the Installation Directory of Product
Software. You can use a file manager to back up the files. For details about the file
manager, see File Manager.
l The OMU is reset when the operating system is switched.
–In active/standby mode, the OMU reset interrupts Operation and Maintenance (O&M)
for about 5 minutes. In independent mode, the OMU reset interrupts O&M for about
20 minutes. The OMU reset does not affect ongoing services.
– The communication between the U2000 and BSC6900 is interrupted when the OMU is
reset. The periodical performance counters that are to be reported to the U2000 when
the OMU is being restarted are lost. You are advised to finish preparing a USB flash
drive for this operation before 24:00.
– If the OMU is in active/standby mode, insert the prepared USB flash drive to the
standby OMU and restart the standby OMU. Then switch over the active and standby
OMUs between 24:00 and 01:00 when performance counters are not being reported
to the U2000. This prevents the loss of performance counters.
– If the OMU is in independent mode, insert the prepared USB storage device and
restart the OMU between 24:00 and 01:00 for the same purpose.
Before preparing a USB flash drive, verify the device by referring to USB Flash Drive
Verification Guide in the directory where the USB Disk Tool is saved. If the USB flash drive is
not usable, replace it. The Netac U208 (2 GB), Kingston and Sandisk USB flash drives are
recommended.
The time needed for preparing a USB flash drive varies depending the bandwidth of the network
from the PC to the equipment room, the USB protocol, and the PC performance. The duration
listed in Table 6-7 refers to the duration for preparing a USB flash drive in compliance with the
USB2.0 protocol. The duration for preparing a USB flash drive in compliance with the USB1.1 protocol takes about twice as long as preparing a USB flash drive in compliance with the USB2.0
protocol. If the duration for preparing the device requires much longer than the listed duration,
the performance of the PC in use is poor. If this occurs, restart the PC or use a PC with a higher
level of performance.
BSC6900 UMTS
OMU Administration Guide 7 OMU Installation and Maintenance (Windows)
Issue 02 (2015-05-08) Huawei Proprietary and Confidential
Copyright © Huawei Technologies Co., Ltd.
187

8/18/2019 Bsc6900 Umts Omu Administration Guide(v900r017c10_02)(PDF)-En
http://slidepdf.com/reader/full/bsc6900-umts-omu-administration-guidev900r017c1002pdf-en 197/310
Table 7-3 Operation and duration
Operation Duration
Prepare a USB flash drive. The duration varies based on the bandwidth
of the network from the PC to the equipmentroom.
l If the network bandwidth is 1 Mbit/s or
higher:
– When an independent OMU is
configured, the duration is 15 to 30
minutes.
– When active and standby OMUs are
configured, the duration is 30 to 50
minutes.
l If the network bandwidth is 512 kbit/s:– When an independent OMU is
configured, the duration is 25 to 50
minutes.
– When active and standby OMUs are
configured, the duration is 50 to 90
minutes.
Install, restore, or switch the OMU operating
system using a USB flash drive.
20 to 40 minutes
Only install the product software using a USB
flash drive.
20 to 40 minutes
NOTICE
l The BSC software version cannot be rolled back after the OMU operating system is switched
by using the USB flash drive.
l After the USB flash drive is prepared, do not modify the OMU data before switching the
OMU operating system. Otherwise, the OMU data will be inconsistent with the host data.
l To ensure data synchronization between the two hard disks of the OMU, the Redundant Array
of Independent Disks (RAID) between them must be normal. If the RAID is abnormal, do
not switch the OMU operating system. To query whether the RAID is normal, run the DSP
OMUHW command.
Procedure
Step 1 Prepare a USB flash drive, portable PC, and program files.
1. Prepare a USB flash drive, and attach the target OMU identification label to the USB flash
drive.
BSC6900 UMTS
OMU Administration Guide 7 OMU Installation and Maintenance (Windows)
Issue 02 (2015-05-08) Huawei Proprietary and Confidential
Copyright © Huawei Technologies Co., Ltd.
188
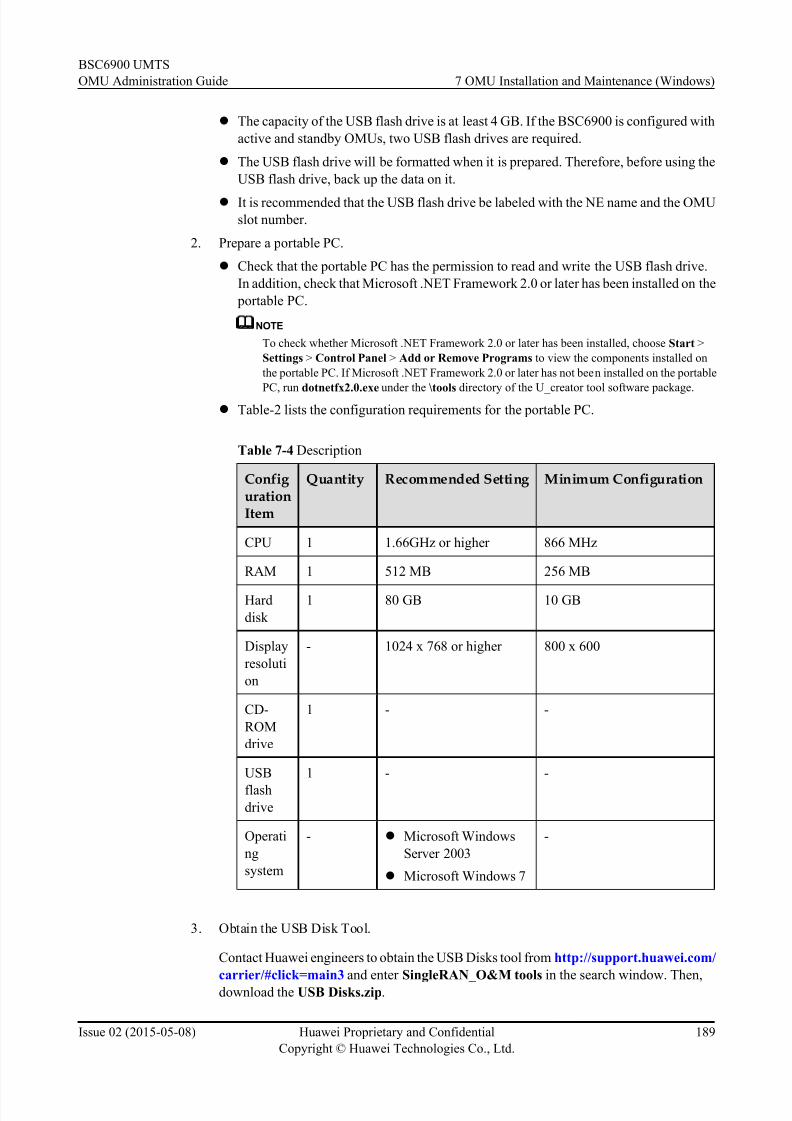
8/18/2019 Bsc6900 Umts Omu Administration Guide(v900r017c10_02)(PDF)-En
http://slidepdf.com/reader/full/bsc6900-umts-omu-administration-guidev900r017c1002pdf-en 198/310
l The capacity of the USB flash drive is at least 4 GB. If the BSC6900 is configured with
active and standby OMUs, two USB flash drives are required.
l The USB flash drive will be formatted when it is prepared. Therefore, before using the
USB flash drive, back up the data on it.
l It is recommended that the USB flash drive be labeled with the NE name and the OMU
slot number.
2. Prepare a por table PC.
l Check that the portable PC has the permission to read and write the USB flash drive.
In addition, check that Microsoft .NET Framework 2.0 or later has been installed on the
portable PC.
NOTE
To check whether Microsoft .NET Framework 2.0 or later has been installed, choose Start >
Settings > Control Panel > Add or Remove Programs to view the components installed on
the portable PC. If Microsoft .NET Framework 2.0 or later has not been installed on the portable
PC, run dotnetfx2.0.exe under the \tools directory of the U_creator tool software package.l Table-2 lists the configuration requirements for the portable PC.
Table 7-4 Description
Config urationItem
Quantity Recommended Setting Minimum Configuration
CPU 1 1.66GHz or higher 866 MHz
RAM 1 512 MB 256 MB
Hard
disk
1 80 GB 10 GB
Display
resoluti
on
- 1024 x 768 or higher 800 x 600
CD-
ROM
drive
1 - -
USB
flashdrive
1 - -
Operati
ng
system
- l Microsoft Windows
Server 2003
l Microsoft Windows 7
-
3. Obtain the USB Disk Tool.
Contact Huawei engineers to obtain the USB Disks tool from http://support.huawei.com/
carrier/#click=main3 and enter SingleRAN_O&M tools in the search window. Then,
download the USB Disks.zip.
BSC6900 UMTS
OMU Administration Guide 7 OMU Installation and Maintenance (Windows)
Issue 02 (2015-05-08) Huawei Proprietary and Confidential
Copyright © Huawei Technologies Co., Ltd.
189

8/18/2019 Bsc6900 Umts Omu Administration Guide(v900r017c10_02)(PDF)-En
http://slidepdf.com/reader/full/bsc6900-umts-omu-administration-guidev900r017c1002pdf-en 199/310
4. Download OMU-related software.
The OMU-related software, including the psftp and PuTTY software, is used to install the
product software and perform O&M on the OMU.
Contact Huawei engineers to obtain the remote login linux tool from http://support.huawei.com/carrier/#click=main3 and enter SingleRAN_O&M tools in the
search window. Then, download the Tools for remote login linux.
5. Obtain the BSC6900 version installation package or patch installation package
Contact Huawei engineers to obtain the version installation package or patch installation
package from http://support.huawei.com/carrier/#click=main3 and enter Software
Version in the search window. Then, download the version installation package or patch
installation package.
6. Prepare the OMU
l Use the OMU external virtual IP address to log in to the LMT by referring to Logging
In to and Logging Out of the LMT. On the LMT, run the BSC6900 MML commandDSP OMUVER to query the current OMU BIOS version.
NOTE
If the OMU BIOS version is V013 or V031, prepare a serial cable, monitor, and USB keyboard so that
the OMU can be restarted from the USB flash drive. For details, see Setting the First Boot Device of
the OMU to USB
7. Check that the host data is consistent with the OMU data.
Before switching the OMU operating system, ensure that the host data is consistent with
the OMU data.
Use the OMU external virtual IP address to log in to the LMT and run the BSC6900 MML
command ACT CRC to check whether the host data is consistent with the OMU data. If
they are inconsistent, the alarm ALM-20736 Data Inconsistency Between OMU and Host
is reported. Clear the alarm by referring to ALM-20736 Data Inconsistency Between OMU
and Host.
Step 2 Prepare the USB flash drive for switching the OMU operating system.
1. Double-click U_creator_eng.exe to begin installing a Dopra Linux operating system on
the USB flash drive, as shown in Figure 7-16.
BSC6900 UMTS
OMU Administration Guide 7 OMU Installation and Maintenance (Windows)
Issue 02 (2015-05-08) Huawei Proprietary and Confidential
Copyright © Huawei Technologies Co., Ltd.
190

8/18/2019 Bsc6900 Umts Omu Administration Guide(v900r017c10_02)(PDF)-En
http://slidepdf.com/reader/full/bsc6900-umts-omu-administration-guidev900r017c1002pdf-en 200/310
Figure 7-16 U_creator_eng window
2. Select NE List in the left pane of the window, right-click the NE list, and choose Add
NE from the shortcut menu. The dialog box shown in Figure 7-17 is displayed.
BSC6900 UMTS
OMU Administration Guide 7 OMU Installation and Maintenance (Windows)
Issue 02 (2015-05-08) Huawei Proprietary and Confidential
Copyright © Huawei Technologies Co., Ltd.
191

8/18/2019 Bsc6900 Umts Omu Administration Guide(v900r017c10_02)(PDF)-En
http://slidepdf.com/reader/full/bsc6900-umts-omu-administration-guidev900r017c1002pdf-en 201/310
Figure 7-17 Add NE dialog box
3. Type the NE Name, select Switch from the Operate type drop-down list box, specify the
External Network Virtual IP, Password of Admin, and EMS Proxy IP Address, select
secure transmission type, and click OK . An NE is added.
BSC6900 UMTS
OMU Administration Guide 7 OMU Installation and Maintenance (Windows)
Issue 02 (2015-05-08) Huawei Proprietary and Confidential
Copyright © Huawei Technologies Co., Ltd.
192

8/18/2019 Bsc6900 Umts Omu Administration Guide(v900r017c10_02)(PDF)-En
http://slidepdf.com/reader/full/bsc6900-umts-omu-administration-guidev900r017c1002pdf-en 202/310
NOTE
l The NE name is used to identify different NEs and only can include letter, numerals, "-", and "_."
l Password of Admin is the password the admin user uses to log in to the LMT. It is configured during
the installation of the product software.
l If EMS Proxy IP Address is specified, ensure that port 31035 on the proxy server is enabled, and is
not shielded by network devices such as firewalls.
l If an NE is accessed through the OSS whose software version is iManager U2000 V200R014C00,
iManager U2000 V200R013C00SPC200, iManager U2000 V200R012C01SPC230, iManager U2000
V200R012C00SPC220, iManager U2000 V200R011C01SPC240, iManager U2000
V200R011C00SPC240, or their later patch versions, the Access Control List (ACL) needs to be
configured for the PortTrunking service on the OSS as follows:
1. Log in to http://support.huawei.com by using a Huawei engineer's user account, if the OSS whose
software version is iManager U2000 V200R014C00 or its later patch versions, choose Core
Network > Wireless-OSS > iManager U2000-II > U2000-M > V200R014C00 to obtain the
U2000 Administrator Guide (Sun, S10). If other OSS software version, choose Core Network >
Wireless-OSS > iManager U2000-II to obtain the U2000 Administrator Guide (Sun, S10). The
U2000 Administrator Guide (Sun, S10) or the U2000 Administrator Guide (Sun, S10) you haveobtained must be compatible with the OSS software version.
2. Log in to the LMT and run the DSP OMU command to obtain the external fixed IP addresses of
the active and standby OMUs and the OMU external virtual IP address.
3. Query the FTP port numbers based on the current version:
l If the version is BSC6900V900R011 or earlier, run the LST FTPSSRV command to obtain
the numbers of the FTP command port and the FTP source data port. The numerical range of
the FTP passive mode data port is 25001-30000.
l If the version is BSC6900V900R012 or BSC6900V900R013, run the LST FTPSSRV
command to obtain the numbers of the FTP command port and the FTP source data port and
run the LST FTPSRVPORT command to obtain the numerical range of the FTP passive mode
data port.
l If the version is BSC6900V900R014 or later, run the LST FTPSSRV command to obtain theFTP command port number, the FTP source data port number, and the numerical range of the
FTP passive mode data port.
4. Run the ipconfig command on a PC running the USB making and protection tool to obtain the IP
address of the PC.
5. Configure information about the PC installed with the U2000 client, external virtual IP address,
and ports, including 6000, 8000, 6088, 8088, and FTP port, for the NE to be upgraded. For details,
see How Do I Configure the ACL for the PortTrunking Service? in the FAQ part of the U2000
Administrator Guide (Sun, S10) or the U2000 Administrator Guide (Sun, S10). If the networking
includes gateway devices such as the Network Address Translation (NAT) device, and NEs or the
PC is located on the internal NAT network, you must set IP addresses in ACL rule configuration
files to IP addresses that can be connected to by the U2000 server. Do not set IP addresses to
internal NAT network IP addresses to which NEs or the PC is bound.l The name, external virtual IP address, and EMS proxy IP address of an existing NE cannot be changed.
To use another NE name, external virtual IP address, or EMS proxy IP address, you must delete the
existing NE and then add a new NE with your desired name, external virtual IP address, or EMS proxy
IP address.
l If you want to prepare multiple USB flash drives, you are advised to prepare and label the USB flash
drives one by one.
l Run the LST SSLCONF command to query the SSL configuration information of the OMU whose
operating system is to be switched. Selecting the security transmission type based on query results.
For details, see Table 7-5.
BSC6900 UMTS
OMU Administration Guide 7 OMU Installation and Maintenance (Windows)
Issue 02 (2015-05-08) Huawei Proprietary and Confidential
Copyright © Huawei Technologies Co., Ltd.
193

8/18/2019 Bsc6900 Umts Omu Administration Guide(v900r017c10_02)(PDF)-En
http://slidepdf.com/reader/full/bsc6900-umts-omu-administration-guidev900r017c1002pdf-en 203/310
Table 7-5 Mapping between the mode and operation
Mode Operation
Connection Type
is set to ALL(AllType) and
Authentication
Mode is set to
NONE(Verify
None).
l If SSL encryption is not required the USB flash drive
preparation, select No-SSL connection in the window shownin Figure 7-17.
l If SSL encryption is required during the USB flash drive
preparation, select SSL connection without the certificate file
and private key file in the window shown in Figure 7-17.
The SSL connection is recommended for secure information
transfer.
Connection Type
is set to ALL(All
Type) and
AuthenticationMode is set to
PEER(Verify Peer
Certificate).
l If the preconfigured Huawei certificate file and private key file
are not used, you need to prepare the certificate file and private
key file.
1. Apply for the corresponding certificate file or private keyfile from Certificate Authority (CA). For details about the
formats of certificates supported by the U_creator tool, see
Table 7-6.
2. Select SSL connection with the certificate file and private
key file, as shown in Figure 7-17. After this, load the
obtained certificate file and private key file. If a password is
required by the private key file, you must enter the correct
password.
l If the preconfigured Huawei certificate file and private key file
are used, you do not need to prepare the certificate file and
private key file. Select SSL connection with thepreconfigured Huawei certificate file and private key file in
Figure 7-17.
Connection Type
is set to
ONLY_SSL(Only
SSL Connection)
and
Authentication
Mode is set to
PEER(Verify Peer Certificate).
Connection Type
is set to
ONLY_SSL(Only
SSL Connection)
and
Authentication
Mode is set to
NONE(Verify
None).
Select SSL connection without the certificate file and private
key file in Figure 7-17.
Table 7-6 The formats of certificates supported by the USB Disk Tool
Certificate Type Format File Extensions
Certificate PEM, DER *.cer, *.crt, *.pem, *.der
Private key PEM, DER *.cer, *.crt, *.pem, *.der
BSC6900 UMTS
OMU Administration Guide 7 OMU Installation and Maintenance (Windows)
Issue 02 (2015-05-08) Huawei Proprietary and Confidential
Copyright © Huawei Technologies Co., Ltd.
194

8/18/2019 Bsc6900 Umts Omu Administration Guide(v900r017c10_02)(PDF)-En
http://slidepdf.com/reader/full/bsc6900-umts-omu-administration-guidev900r017c1002pdf-en 204/310
4. Double-click the added NE in the left pane of the window. The window is updated, as
shown in Figure 7-18.
Figure 7-18 Configuring information
5. After all the information is obtained automatically, check the result and select the directory
for the version package. If there is a patch, also select the directory for the patch. Then click OK to start the preparation of the USB flash drive.
NOTE
l To install the software version, select the V**R**C** directory in the version installation
package. To install the baseline software patch, select V**R**C**SPCX00 directory in the
baseline patch installation package.
l To install a non-baseline software patch, select the V**R**C**SPCXYZ or
V**R**C**SPHXYZ directory in the patch installation package.
l If the link mode of OMU external Ethernet adapters fails to be obtained, query and set it by
referring to Setting the Link Mode for External OMU Ethernet Adapters and Setting the
Link Mode of the External OMU Ethernet Adapter. Table 3 lists the mapping between the
queried link mode of OMU external Ethernet adapters and the mode of OMU external Ethernet
adapters selected in Figure 7-18.
l If you select Data encryption under Please select the external network netcard mode:, enter
the electronic label of the target OMU. Otherwise, you do not need to enter the electronic label
of the target OMU. If the OMU whose OS is to be switched works in dual-OMU mode, specify
Electronic label of the target OMU for the active OMU and Electronic label of the target
OMU for the standby OMU. Otherwise, specify only Electronic label of the target OMU for
the active OMU. To obtain the electronic label of the OMU, run the DSP ELABEL command
to query the value of BarCode, or view the barcode label on the OMU board.
l If you select Switch and Use the local backup data to create the USB device for the USB flash
drive, you are advised to select Data encryption. If Data encryption is deselected in the
preceding scenario, data leakage may occur when users use the USB flash drive.
BSC6900 UMTS
OMU Administration Guide 7 OMU Installation and Maintenance (Windows)
Issue 02 (2015-05-08) Huawei Proprietary and Confidential
Copyright © Huawei Technologies Co., Ltd.
195

8/18/2019 Bsc6900 Umts Omu Administration Guide(v900r017c10_02)(PDF)-En
http://slidepdf.com/reader/full/bsc6900-umts-omu-administration-guidev900r017c1002pdf-en 205/310
Table 7-7 Mapping between link modes of external Ethernet adapters
Queried Link Mode of ExternalEthernet Adapter
Link Mode of External EthernetAdapter to Be Selected
l Auto-negotiation is on. Auto
l Auto-negotiation is off .
l Speed is 10Mb/s.
l Duplex is Full.
10Mb Full
l Auto-negotiation is off .
l Speed is 10Mb/s.
l Duplex is Half .
10Mb Half
l Auto-negotiation is off .
l Speed is 100Mb/s.
l Duplex is Full.
100Mb Full
l Auto-negotiation is off .
l Speed is 100Mb/s.
l Duplex is Half .
100Mb Half
l Auto-negotiation is off
l Speed is 1000 Mbit/s
l Duplex is Full
1000Mb Full
l Auto-negotiation is off
l Speed is 1000 Mbit/s
l Duplex is Half
1000Mb Half
BSC6900 UMTS
OMU Administration Guide 7 OMU Installation and Maintenance (Windows)
Issue 02 (2015-05-08) Huawei Proprietary and Confidential
Copyright © Huawei Technologies Co., Ltd.
196

8/18/2019 Bsc6900 Umts Omu Administration Guide(v900r017c10_02)(PDF)-En
http://slidepdf.com/reader/full/bsc6900-umts-omu-administration-guidev900r017c1002pdf-en 206/310

8/18/2019 Bsc6900 Umts Omu Administration Guide(v900r017c10_02)(PDF)-En
http://slidepdf.com/reader/full/bsc6900-umts-omu-administration-guidev900r017c1002pdf-en 207/310
Figure 7-19 Operational interface
l Click Continue with preparing USB device to start preparing the USB flash drive.
Then go to Step 2.12.
l Click Save the NE backup data, select the save path for the backup file, and click
Finish. Then go to Step 2.7.
NOTE
l If you just want to back up data or you cannot continue with preparing the USB flash drive because
it cannot be identified by the PC, click Save the NE backup data to save the NE backup data
to the PC for future use. Before you click Save the NE backup data, ensure that the relevant
backup file exists in the Dopra Linux\ NE Name\bk_pkg directory.
l The backup file created after you click Save the NE backup data is saved in a file folder named
after the OMU virtual external IP address of the NE.
l The backup file created after you click Save the NE backup data can be saved for preparing the
USB flash drive before going to the site where the USB flash drive cannot be prepared.
NOTICE
l The backup file cannot be modified after being saved on the PC. Otherwise, you cannot
prepare the USB flash drive by using the local backup data of the NE.
l The saved NE data backup file does not contain information of the version or patch
installation package.
7. To prepare the USB flash drive by using the local backup data, double-click
U_creator_eng.exe to start the USB flash drive for installation of the DOPRA Linux
operating system.
8. Select NE List in the left pane of the window, right-click the NE list, and choose Add
NE from the shortcut menu. The dialog box shown in Figure 7-20 is displayed.
BSC6900 UMTS
OMU Administration Guide 7 OMU Installation and Maintenance (Windows)
Issue 02 (2015-05-08) Huawei Proprietary and Confidential
Copyright © Huawei Technologies Co., Ltd.
198
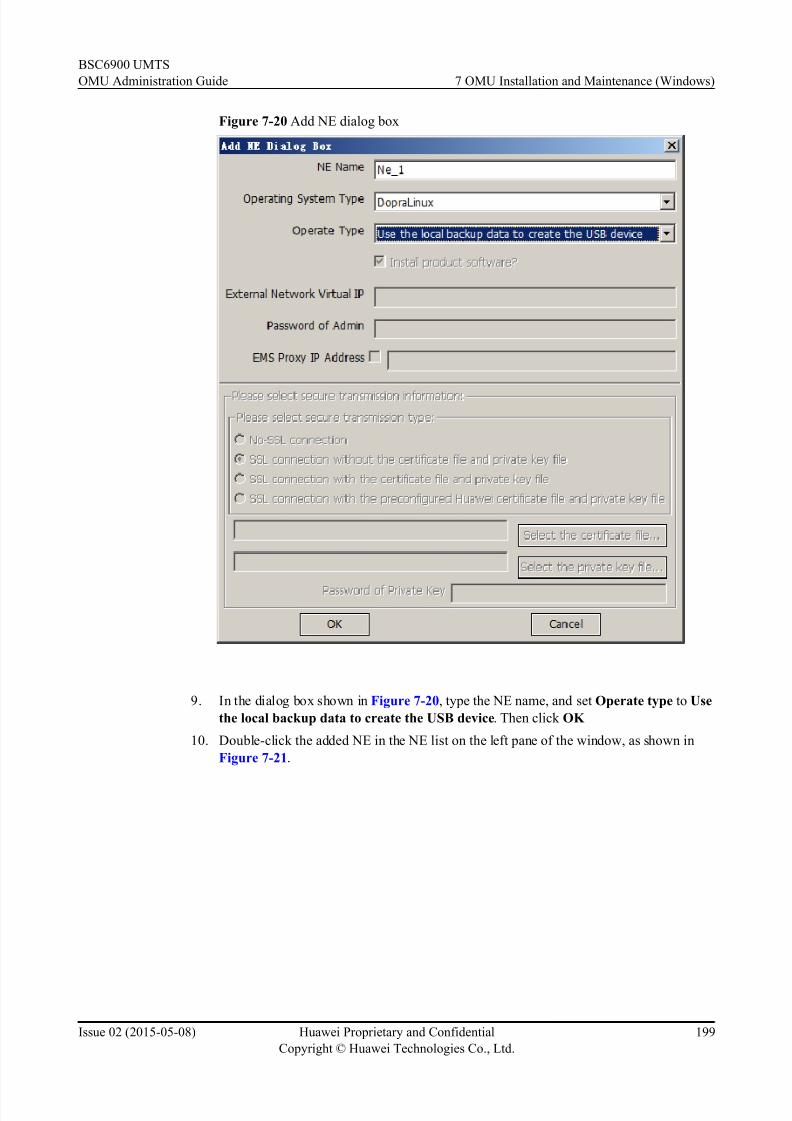
8/18/2019 Bsc6900 Umts Omu Administration Guide(v900r017c10_02)(PDF)-En
http://slidepdf.com/reader/full/bsc6900-umts-omu-administration-guidev900r017c1002pdf-en 208/310
Figure 7-20 Add NE dialog box
9. In the dialog box shown in Figure 7-20, type the NE name, and set Operate type to Use
the local backup data to create the USB device. Then click OK
10. Double-click the added NE in the NE list on the left pane of the window, as shown in
Figure 7-21.
BSC6900 UMTS
OMU Administration Guide 7 OMU Installation and Maintenance (Windows)
Issue 02 (2015-05-08) Huawei Proprietary and Confidential
Copyright © Huawei Technologies Co., Ltd.
199
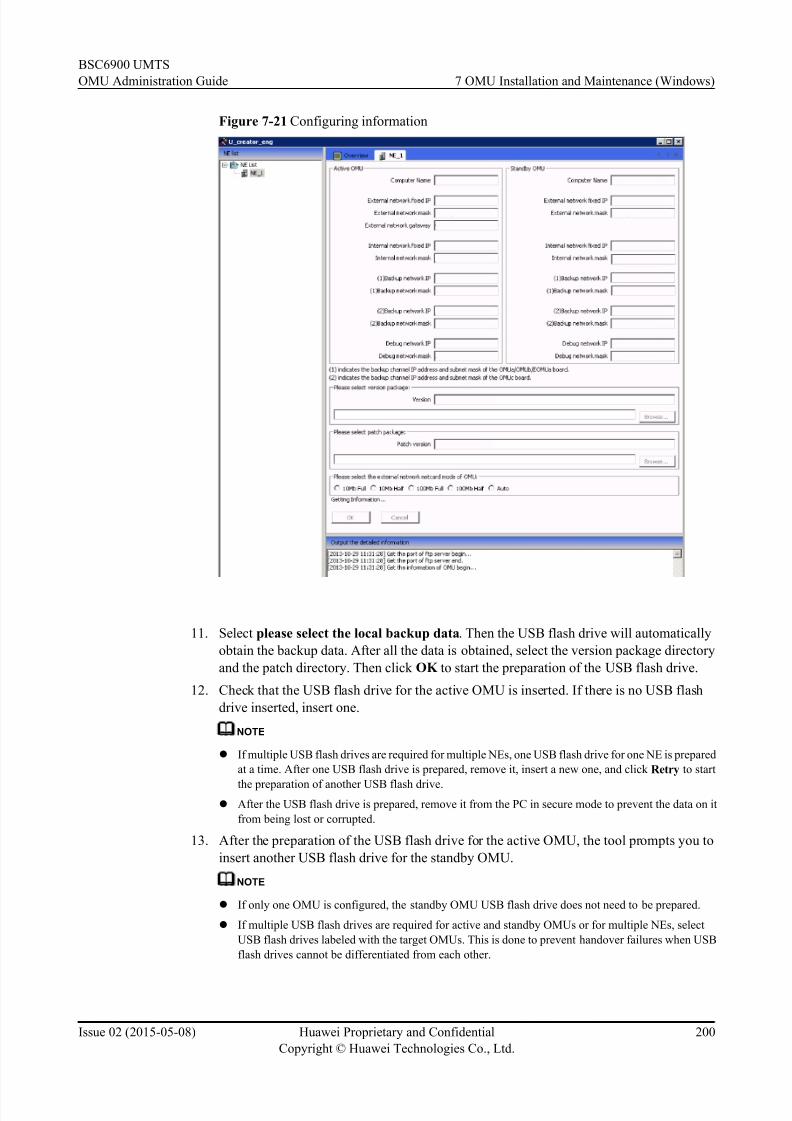
8/18/2019 Bsc6900 Umts Omu Administration Guide(v900r017c10_02)(PDF)-En
http://slidepdf.com/reader/full/bsc6900-umts-omu-administration-guidev900r017c1002pdf-en 209/310
Figure 7-21 Configuring information
11. Select please select the local backup data. Then the USB flash drive will automatically
obtain the backup data. After all the data is obtained, select the version package directory
and the patch directory. Then click OK to start the preparation of the USB flash drive.
12. Check that the USB flash drive for the active OMU is inserted. If there is no USB flash
drive inserted, insert one.
NOTE
l If multiple USB flash drives are required for multiple NEs, one USB flash drive for one NE is prepared
at a time. After one USB flash drive is prepared, remove it, insert a new one, and click Retry to start
the preparation of another USB flash drive.l After the USB flash drive is prepared, remove it from the PC in secure mode to prevent the data on it
from being lost or corrupted.
13. After the preparation of the USB flash drive for the active OMU, the tool prompts you to
insert another USB flash drive for the standby OMU.
NOTE
l If only one OMU is configured, the standby OMU USB flash drive does not need to be prepared.
l If multiple USB flash drives are required for active and standby OMUs or for multiple NEs, select
USB flash drives labeled with the target OMUs. This is done to prevent handover failures when USB
flash drives cannot be differentiated from each other.
BSC6900 UMTS
OMU Administration Guide 7 OMU Installation and Maintenance (Windows)
Issue 02 (2015-05-08) Huawei Proprietary and Confidential
Copyright © Huawei Technologies Co., Ltd.
200
8/18/2019 Bsc6900 Umts Omu Administration Guide(v900r017c10_02)(PDF)-En
http://slidepdf.com/reader/full/bsc6900-umts-omu-administration-guidev900r017c1002pdf-en 210/310
14. After the preparation of the USB flash drive for the standby OMU, click Finish. The
preparation for the USB flash drives is complete.
Step 3 Switch the OMU operating system by using the USB flash drive.
NOTE
l Switching the operating system of active and standby OMUs is used as an example. To switch the operating
system of an OMU in independent mode, perform Step 3.1, Step 3.2, Step 3.3, Step 3.4, Step 3.5, Step
3.9. In Step 3.4, you only need to check that the OMU works properly.
l In active/standby mode, the original active OMU becomes a standby OMU and the original standby OMU
becomes an active OMU after the operating systems of the OMUs are switched. This does not affect the
system.
l Check that the USB flash drive can be written to before inserting it to a USB port on the OMU panel.
1. Insert the USB flash drive into any of the USB ports on the panel of the standby OMU
board.
NOTE
Differentiate the active OMU from the standby OMU by checking the status of the ACT indicator on their
panels. The OMU with the ACT indicator steady on is active, and the OMU with the ACT indicator steady
off is standby.
2. Restart the OMU.
a. Log in to the OMU by using the OMU fixed external IP address or the OMU
commissioning IP address. For details, see 7.2.1 Logging In to the OMU.
b. Choose Start > Shutdown > Restart.
3. Log in to the OMU 5 minutes later to determine whether the OMU operating system has
started installing from the USB flash drive.
l If you fail to log in to the OMU, the OMU operating system has started to be installed
from the USB flash drive.
l If you log in to the OMU successfully, the OMU operating system has not started to be
installed from the USB flash drive. Prepare another USB flash drive.
4. Wait 15 to 25 minutes, check the status of indicators on the OMU board to determine
whether the OMU operating system has been installed successfully (for details about the
indicator status, see step 3 in the Installing the OMU Operating System Using a USB
Flash Drive). After the operating system has been installed, use the virtual external IP
address of the OMU to log in to the LMT. After the OMU works properly (indicated on
the device panel), run the BSC6900 MML command DSP OMU to query Data-sync
state.
Expected result: Data-sync state is Data synchronization is successful.
5. Remove the USB flash drive and restart the OMU by referring to Step 3.2.
6. Wait about 5 minutes and log in to the LMT by using the OMU virtual external IP address.
After the OMU returns to normal (indicated on the device panel), run the BSC6900 MML
command DSP OMU to query Data-sync state.
Expected result: Data-sync state is Data synchronization is successful.
7. Run the BSC6900 MML command SWP OMU to switch over the active and standby
OMUs.
8. Wait about 5 minutes and log in to the LMT by using the OMU virtual external IP address.
Check the status of the active and standby OMUs on the device panel.
BSC6900 UMTS
OMU Administration Guide 7 OMU Installation and Maintenance (Windows)
Issue 02 (2015-05-08) Huawei Proprietary and Confidential
Copyright © Huawei Technologies Co., Ltd.
201

8/18/2019 Bsc6900 Umts Omu Administration Guide(v900r017c10_02)(PDF)-En
http://slidepdf.com/reader/full/bsc6900-umts-omu-administration-guidev900r017c1002pdf-en 211/310

8/18/2019 Bsc6900 Umts Omu Administration Guide(v900r017c10_02)(PDF)-En
http://slidepdf.com/reader/full/bsc6900-umts-omu-administration-guidev900r017c1002pdf-en 212/310
l If the operating system is still Windows after the upgrade from the BSC6810> to the
BSC6900, see this section for the installation method of the product software.
CAUTION
l After the upgrade and before product software are reinstalled, record the IP addresses of the
live network. After product software are reinstalled, change the IP addresses or restore them
to the historical IP addresses according to onsite requirements.
l If patches have been installed, before installing product software, replace the original patch
files in the patch folder of the product software installation package with the patch
installation package (for example, the V900R01XC0XSPCXXX folder) saved on the local
PC.
If product software has been pre-installed on active and standby OMU boards, uninstall them before installing the product software of a correct version. To check whether product software
has been pre-installed, do as follows:
1. Log in to the OMU by using the fixed external IP address or debugging IP address. For
details, see 7.2.1 Logging In to the OMU.
2. Choose Start > Control Panel > Administrative Tools > Services to check whether the
omud service is available.
l If the omud service is available, product software have been pre-installed. Uninstall
them by following operation steps in Uninstalling the Product Software.
l If the omud is service is not available, product software have not been pre-installed.
Install the product software following the installation procedures.
3. Log out of the OMU. For details, see 7.2.2 Logging Out of the OMU.
Procedure
Step 1 Go to the V***R***C**\install\setup directory of the version installation package and double-
click install_bam.bat.
NOTE
V***R***C** is an example of the version installation package. During installation, see the actual version.
The software integrity of the product software is checked before they are automatically installed. The product
software can be installed only if the check passes.
Step 2 Type the product running mode and press Enter.
[2011-05-03 10:12:32] software integrality verify begin...
[2011-05-03 10:12:42] software integrality verify end...
# The run mode of the product
# GO:GSM only
# UO:UMTS only
# GU:GSM and UMTS
# Please select one mode to install.
Please input a valid run_mode :
Step 3 Type the office name and press Enter.
# The name of office# The name suggest range from 5 to 32 characters.
BSC6900 UMTS
OMU Administration Guide 7 OMU Installation and Maintenance (Windows)
Issue 02 (2015-05-08) Huawei Proprietary and Confidential
Copyright © Huawei Technologies Co., Ltd.
203

8/18/2019 Bsc6900 Umts Omu Administration Guide(v900r017c10_02)(PDF)-En
http://slidepdf.com/reader/full/bsc6900-umts-omu-administration-guidev900r017c1002pdf-en 213/310
# The characters suggest be letters, digits, "-"or "_".
Please input a valid office_name :
Step 4 Type the language and press Enter.
# The OMU language version. eg: eng/chs
Please input a valid version :
Step 5 Type the admin password and press Enter.
# The "admin" user's password of OMU service.
# The password must range from 8 to 32(characters).The characters must be uppercase
letters, lowercase letters, digits, or special characters.
Special characters include spaces and the following characters:~!@#$%^&*()_+-{}|
[]:<>?./
The password must consist of 2 types of uppercase letter,lowercase letter,digit or
special character at least.
# Do not forget the password.
# You can change the password later, but this password should be provided first.
Please input a valid admin_password :
Please input a valid Confirm password :
Step 6 Type the ftp password and press Enter.
# The ftp user's password of OMU service
# The password must range from 8 to 32(characters).The characters must be uppercase
letters, lowercase letters, digits, or special characters.
Special characters include spaces and the following characters:~!@#$%^&*()_+-{}|
[]:<>?./
The password must consist of 2 types of uppercase letter,lowercase letter,digit or
special character at least.
# Do not forget the password.
# You can change it later, but this password should be provided first.
Please input a valid ftp_password :
Please input a valid Confirm password :
Step 7 Type the external virtual IP address and press Enter.
# The extranet IP address, subnet mask, and default gateway.
# example: 192.168.1.9/255.255.255.0;192.168.1.1
Please input a valid virtual_extranet_config :
NOTE
The external virtual IP address must be located on the same network segment as the external fixed IP
address. The factory setting of the external fixed IP address is 172.121.139.201 (255.255.255.0). After the
product software are installed, you can change the IP addresses and subnet masks of the OMU Ethernet
adapters
Step 8 Enter the OMU installation type based on the field configuration and press Enter. Table 7-8
describes the OMU installation types.
# The OMU system type. eg: Single/Dual
# Single:Install stand-alone system
# Dual:Install dual-OMU system.
The dual-OMU system can effeciently increase the reliability of the OMU system.
Please input a valid install_type :
Table 7-8 Description
Parameter Description
Single When the BSC6900 is configured with one
OMU board, install the product software on
the board in single-OMU mode.
BSC6900 UMTS
OMU Administration Guide 7 OMU Installation and Maintenance (Windows)
Issue 02 (2015-05-08) Huawei Proprietary and Confidential
Copyright © Huawei Technologies Co., Ltd.
204

8/18/2019 Bsc6900 Umts Omu Administration Guide(v900r017c10_02)(PDF)-En
http://slidepdf.com/reader/full/bsc6900-umts-omu-administration-guidev900r017c1002pdf-en 214/310
Parameter Description
Dual When the BSC6900 is configured with two
OMU boards, install product software on the
board in dual-OMU mode.
Step 9 The system asks you whether to continue with the installation, as shown:
Please affirm input information. input Y to continue; input E to exit. ->
Step 10 Enter Y to install product software. When the message Install OMU succeed! is
displayed, product software are successfully installed.
Step 11 Record the information about the product software installation in 7.3.1 Record Sheet of OMU
Software Installation Information.
----End
7.2 OMU Operation and Maintenance After the Upgrade
This section describes how to perform operation and maintenance on the OMU after product
software are installed. To perform this task, log in to the OMU remotely or run MML commands.
Context
After the BSC6810 is upgraded to the BSC6900, the OMU operation and maintenance are related
to the OMU OS.
l If the OMU OS is switched to Dopra Linux, perform operation and maintenance on the
OMU by referring to 6.3 Operating and Maintaining the OMU.
l If the OMU OS is still Windows Server 2003, perform the steps in this section for the OMU
operation and maintenance.
7.2.1 Logging In to the OMU
This section describes how to log in to the OMU for the OMU operation and maintenance by
running the mstsc.exe program on a computer.
Prerequisitesl The OMU is started.
l The computer for remote login to the OMU runs an operating system of Windows XP or
later versions.
l The computer for remote login to the OMU works properly and is connected to the OMU
external network properly.
l The external fixed IP address, external virtual IP address, or commissioning IP address of
the OMU are obtained. For details about the IP addresses of the OMU, see Record Sheet
of OMU Software Installation Information.
l The computer for remote login to the OMU and the IP addresses of OMU external network
are on the same network segment.
BSC6900 UMTS
OMU Administration Guide 7 OMU Installation and Maintenance (Windows)
Issue 02 (2015-05-08) Huawei Proprietary and Confidential
Copyright © Huawei Technologies Co., Ltd.
205

8/18/2019 Bsc6900 Umts Omu Administration Guide(v900r017c10_02)(PDF)-En
http://slidepdf.com/reader/full/bsc6900-umts-omu-administration-guidev900r017c1002pdf-en 215/310
Context
l The OMU can be connected to only one computer by running the mstsc.exe program.
l The mstsc.exe program by running which you log in to the OMU should have the console
parameter. Otherwise, you cannot log in to the OMU.
NOTE
If the operating system of the computer for remote login to the OMU is Windows XP SP3, run the mstsc.exe
program with the admin parameter. That is, type mstsc /admin instead of mstsc /console.
Procedure
Step 1 Choose Start > Run on the computer used for remote login to the OMU.
Step 2 In the displayed Run dialog box, type mstsc /console and click Confirm. The Remote Desktop
Connection dialog box shown in Figure 7-22 is displayed.
NOTICE
When typing mstsc /console, include a space between mstsc and /console.
Figure 7-22 Remote desktop connection dialog box
Step 3 Type the IP address of the OMU and click Connect.
NOTE
l Before starting product software, enter the external fixed IP address of the OMU.
l After the product software start, enter the external fixed or virtual IP address. The external fixed IP
address is preferred.
l If you are performing local commissioning, enter the commissioning IP address of the OMU.
l If the PC cannot be connected to the OMU by using either the external fixed or virtual IP address,
connect the PC to the commissioning port on the OMU and enter the commissioning IP address of the
OMU.
l You are advised to log in to the OMU using the external fixed IP address, external virtual IP
address, and debugging IP address in a preference sequence.
Step 4Type the administrator user name and password and click Confirm based on the interface
message. The login is complete.
BSC6900 UMTS
OMU Administration Guide 7 OMU Installation and Maintenance (Windows)
Issue 02 (2015-05-08) Huawei Proprietary and Confidential
Copyright © Huawei Technologies Co., Ltd.
206
8/18/2019 Bsc6900 Umts Omu Administration Guide(v900r017c10_02)(PDF)-En
http://slidepdf.com/reader/full/bsc6900-umts-omu-administration-guidev900r017c1002pdf-en 216/310
NOTE
You are advised to change the system administrator password after your first login and change the password
every three months.
----End
7.2.2 Logging Out of the OMU
This section describes how to log out of the OMU after you log in to the OMU by running the
mstsc.exe program on a computer and perform operation and maintenance on the OMU.
Prerequisites
You have logged in to the OMU by referring to 7.2.1 Logging In to the OMU.
Context
NOTICE
l Do not log out of the OMU by directly closing the desktop used for the remote login to the
OMU. Otherwise, the OMU operating system resources may not be fully released, and the
use of the OMU can be affected.
l Do not log off from the OMU directly. Otherwise, OMU processes will become abnormal.
l Shutting down the OMU will stop all the OMU services. If this occurs, you must restart the
OMU at the local end.
Procedure
Step 1 Choose Start > Close.
BSC6900 UMTS
OMU Administration Guide 7 OMU Installation and Maintenance (Windows)
Issue 02 (2015-05-08) Huawei Proprietary and Confidential
Copyright © Huawei Technologies Co., Ltd.
207
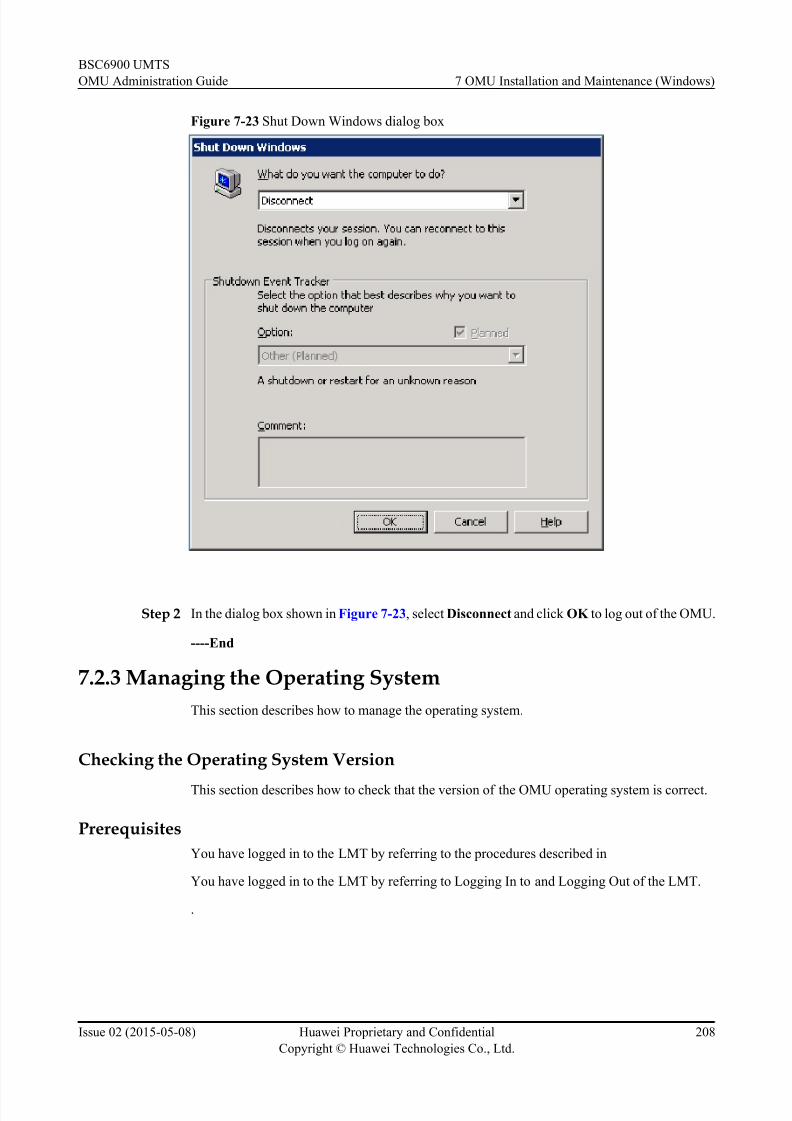
8/18/2019 Bsc6900 Umts Omu Administration Guide(v900r017c10_02)(PDF)-En
http://slidepdf.com/reader/full/bsc6900-umts-omu-administration-guidev900r017c1002pdf-en 217/310
Figure 7-23 Shut Down Windows dialog box
Step 2 In the dialog box shown in Figure 7-23, select Disconnect and click OK to log out of the OMU.
----End
7.2.3 Managing the Operating System
This section describes how to manage the operating system.
Checking the Operating System Version
This section describes how to check that the version of the OMU operating system is correct.
Prerequisites
You have logged in to the LMT by referring to the procedures described in
You have logged in to the LMT by referring to Logging In to and Logging Out of the LMT.
.
BSC6900 UMTS
OMU Administration Guide 7 OMU Installation and Maintenance (Windows)
Issue 02 (2015-05-08) Huawei Proprietary and Confidential
Copyright © Huawei Technologies Co., Ltd.
208

8/18/2019 Bsc6900 Umts Omu Administration Guide(v900r017c10_02)(PDF)-En
http://slidepdf.com/reader/full/bsc6900-umts-omu-administration-guidev900r017c1002pdf-en 218/310

8/18/2019 Bsc6900 Umts Omu Administration Guide(v900r017c10_02)(PDF)-En
http://slidepdf.com/reader/full/bsc6900-umts-omu-administration-guidev900r017c1002pdf-en 219/310
Figure 7-24 Computer Management Window
Step 3 On the right pane of Figure 7-24, right-click Administrator and choose Set Password from
the shortcut menu. A prompt box is displayed, as shown in Figure 7-25.
Figure 7-25 Setting the password for administrator
Step 4 Click Proceed in Figure 7-25. A dialog box is displayed, as shown in Figure 7-26.
BSC6900 UMTS
OMU Administration Guide 7 OMU Installation and Maintenance (Windows)
Issue 02 (2015-05-08) Huawei Proprietary and Confidential
Copyright © Huawei Technologies Co., Ltd.
210

8/18/2019 Bsc6900 Umts Omu Administration Guide(v900r017c10_02)(PDF)-En
http://slidepdf.com/reader/full/bsc6900-umts-omu-administration-guidev900r017c1002pdf-en 220/310
Figure 7-26 Setting Password for administrator window
Step 5 Type the new password and confirm it. Record the password in the Record Sheet of OMU
Software Installation Information.
Step 6 Click OK on the displayed interface to finish the operation.
----End
Querying the Configuration of the OMU Ethernet Adapters
This section describes how to obtain the configuration information of the OMU Ethernetadapters. The information includes IP addresses, their subnet masks, and broadcast IP addresses.
Procedure
l Method 1
1. Log in to the target OMU by referring to 7.2.1 Logging In to the OMU.
2. Choose Start > Run. Enter the cmd command to enter the command mode of the
OMU
3. Run the net stop omud command to stop the omud
4. Enter the cd /d d:\mbsc\bam\common\services command and press Enter to go to
the directory where the program of the omu_backup_linker tool is saved
5. Enter ./omutool dispipinfo. The following is an example of returned information.
[Virtual IP Information]
External virtual ip / mask : 10.141.149.15 / 255.255.254.0
Internal virtual ip / mask : 80.168.3.40 / 255.0.0.0
[Fixed IP Information]
External fixed ip / mask : 10.141.149.14 / 255.255.254.0
Internal fixed ip / mask : 80.168.3.60 / 255.0.0.0
Backup channel ip / mask : 192.168.3.60 / 255.255.255.0
Debugging ip / mask : 192.168.6.60 / 255.255.255.0
[Gateway Information]Gateway : 10.141.148.1
BSC6900 UMTS
OMU Administration Guide 7 OMU Installation and Maintenance (Windows)
Issue 02 (2015-05-08) Huawei Proprietary and Confidential
Copyright © Huawei Technologies Co., Ltd.
211

8/18/2019 Bsc6900 Umts Omu Administration Guide(v900r017c10_02)(PDF)-En
http://slidepdf.com/reader/full/bsc6900-umts-omu-administration-guidev900r017c1002pdf-en 221/310
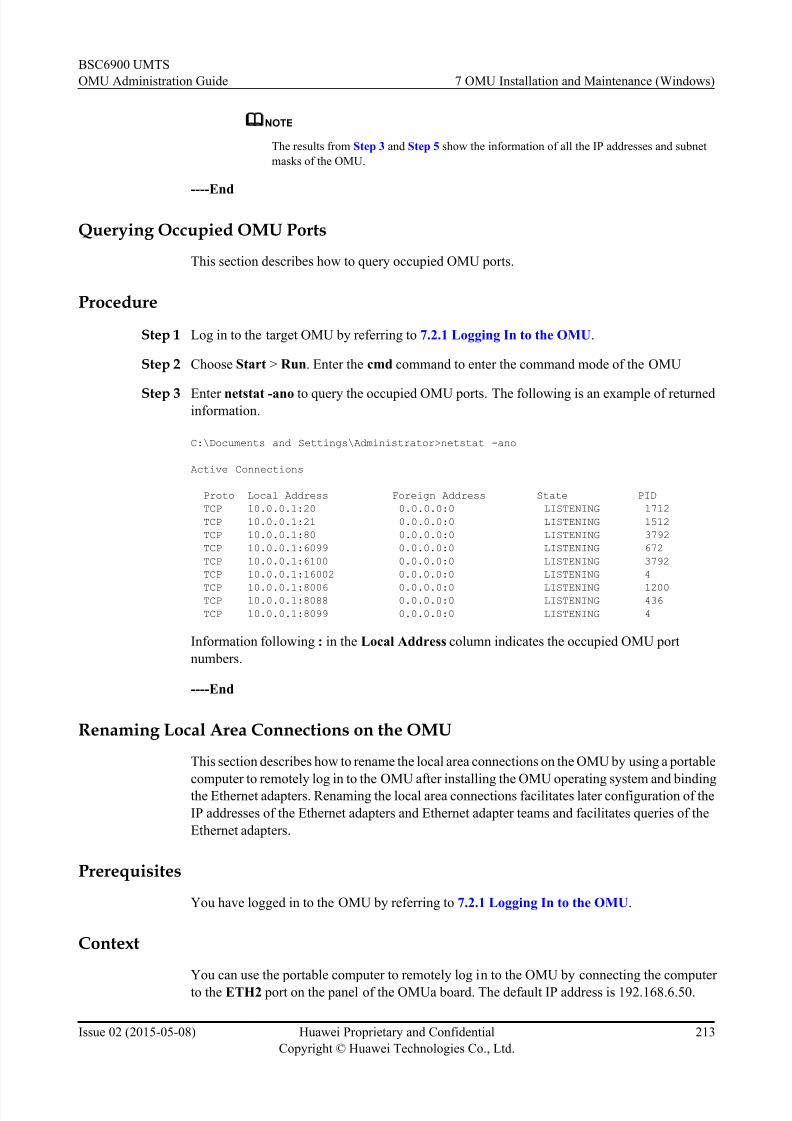
8/18/2019 Bsc6900 Umts Omu Administration Guide(v900r017c10_02)(PDF)-En
http://slidepdf.com/reader/full/bsc6900-umts-omu-administration-guidev900r017c1002pdf-en 222/310
NOTE
The results from Step 3 and Step 5 show the information of all the IP addresses and subnet
masks of the OMU.
----End
Querying Occupied OMU Ports
This section describes how to query occupied OMU ports.
Procedure
Step 1 Log in to the target OMU by referring to 7.2.1 Logging In to the OMU.
Step 2 Choose Start > Run. Enter the cmd command to enter the command mode of the OMU
Step 3 Enter netstat -ano to query the occupied OMU ports. The following is an example of returnedinformation.
C:\Documents and Settings\Administrator>netstat -ano
Active Connections
Proto Local Address Foreign Address State PID
TCP 10.0.0.1:20 0.0.0.0:0 LISTENING 1712
TCP 10.0.0.1:21 0.0.0.0:0 LISTENING 1512
TCP 10.0.0.1:80 0.0.0.0:0 LISTENING 3792
TCP 10.0.0.1:6099 0.0.0.0:0 LISTENING 672
TCP 10.0.0.1:6100 0.0.0.0:0 LISTENING 3792
TCP 10.0.0.1:16002 0.0.0.0:0 LISTENING 4
TCP 10.0.0.1:8006 0.0.0.0:0 LISTENING 1200 TCP 10.0.0.1:8088 0.0.0.0:0 LISTENING 436
TCP 10.0.0.1:8099 0.0.0.0:0 LISTENING 4
Information following : in the Local Address column indicates the occupied OMU port
numbers.
----End
Renaming Local Area Connections on the OMU
This section describes how to rename the local area connections on the OMU by using a portable
computer to remotely log in to the OMU after installing the OMU operating system and bindingthe Ethernet adapters. Renaming the local area connections facilitates later configuration of the
IP addresses of the Ethernet adapters and Ethernet adapter teams and facilitates queries of the
Ethernet adapters.
Prerequisites
You have logged in to the OMU by referring to 7.2.1 Logging In to the OMU.
Context
You can use the portable computer to remotely log in to the OMU by connecting the computer
to the ETH2 port on the panel of the OMUa board. The default IP address is 192.168.6.50.
BSC6900 UMTS
OMU Administration Guide 7 OMU Installation and Maintenance (Windows)
Issue 02 (2015-05-08) Huawei Proprietary and Confidential
Copyright © Huawei Technologies Co., Ltd.
213

8/18/2019 Bsc6900 Umts Omu Administration Guide(v900r017c10_02)(PDF)-En
http://slidepdf.com/reader/full/bsc6900-umts-omu-administration-guidev900r017c1002pdf-en 223/310
Procedure
Step 1 Right-click My Network Places and choose Properties from the shortcut menu. Figure 7-27
shows the pop-up interface.
Figure 7-27 Network Connections window
NOTE
The name of the external Ethernet adapter team has been displayed as External Network Team; therefore, it
does not need to be renamed.
Step 2 In the Network Connections window, rename the local area connections with the Device
Name of TEAM: Internal Network Team Internal Network Team.
Step 3 Double-click the network_identify.js tool for identifying Ethernet adapters in the C:
\DRIVERS path. An Ethernet adapter can also be called a Network Interface Card, or NIC. The
interface shown in Figure 7-28 is displayed.
BSC6900 UMTS
OMU Administration Guide 7 OMU Installation and Maintenance (Windows)
Issue 02 (2015-05-08) Huawei Proprietary and Confidential
Copyright © Huawei Technologies Co., Ltd.
214

8/18/2019 Bsc6900 Umts Omu Administration Guide(v900r017c10_02)(PDF)-En
http://slidepdf.com/reader/full/bsc6900-umts-omu-administration-guidev900r017c1002pdf-en 224/310
Figure 7-28 Interface for identifying the Ethernet adapters (example)
NOTE
NIC Name in Figure 7-28 indicates the name of each local area connection in the Network
Connections window.
Step 4 Rename the local area connections according to the rules shown in Table 7-9.
Table 7-9 Table containing renaming rules
NIC Type New Name
ETH1 Eth1(External)
ETH0 Eth0(External)
ETH5-SCU6 Intel0(Internal)
ETH4-SCU7 Intel1(Internal)
ETH3-UPDATE FE(Spare)
BSC6900 UMTS
OMU Administration Guide 7 OMU Installation and Maintenance (Windows)
Issue 02 (2015-05-08) Huawei Proprietary and Confidential
Copyright © Huawei Technologies Co., Ltd.
215

8/18/2019 Bsc6900 Umts Omu Administration Guide(v900r017c10_02)(PDF)-En
http://slidepdf.com/reader/full/bsc6900-umts-omu-administration-guidev900r017c1002pdf-en 225/310
NIC Type New Name
ETH2 Eth2(LocalMaintain)
Step 5 Click Close to close the interface of the tool.
Figure 7-29 shows the Network Connections window after the renaming is complete.
Figure 7-29 Network Connections window after the renaming
----End
Setting RAID 1 on OMU Hard Disks
This section describes how to set RAID 1 on OMU hard disks to ensure data synchronization
between the source and target OMU hard disks.
Prerequisites
l The OMU is started.
l OMU serial cables are available. For details about the cable information, see OMU serial
cable in BSC6900 UMTS Hardware Description Hardware Description.
l The source and target hard disks are available.
Context
One OMU hard disk serves as the source hard disk, and the other serves as the target hard disk.
Setting RAID 1 on the hard disks synchronizes the data on the source and target hard disks,
improving data security.
l The source hard disk saves backup data and files.
l The target hard disk mirrors the source hard disk.
NOTE
RAID 1 cannot be set on an OMUc board because it is configured with one hard disk.
BSC6900 UMTS
OMU Administration Guide 7 OMU Installation and Maintenance (Windows)
Issue 02 (2015-05-08) Huawei Proprietary and Confidential
Copyright © Huawei Technologies Co., Ltd.
216

8/18/2019 Bsc6900 Umts Omu Administration Guide(v900r017c10_02)(PDF)-En
http://slidepdf.com/reader/full/bsc6900-umts-omu-administration-guidev900r017c1002pdf-en 226/310
Procedure
Step 1 Connect the PC to the OMU serial port by using the OMU serial cable.
NOTE
If the OMU serial cable is not available, the USB and VGA ports of the active OMU can be connected to
an external keyboard and monitor, respectively. Then starts from Step 6 to complete the configuration.
Step 2 On the PC, choose Start > All Programs > Accessories > Communications >
HyperTerminal. The dialog box shown in Figure 7-30 is displayed.
Figure 7-30 Connection description
Step 3 Enter the connection name and click OK . The dialog box shown in Figure 7-31 is displayed.
BSC6900 UMTS
OMU Administration Guide 7 OMU Installation and Maintenance (Windows)
Issue 02 (2015-05-08) Huawei Proprietary and Confidential
Copyright © Huawei Technologies Co., Ltd.
217

8/18/2019 Bsc6900 Umts Omu Administration Guide(v900r017c10_02)(PDF)-En
http://slidepdf.com/reader/full/bsc6900-umts-omu-administration-guidev900r017c1002pdf-en 227/310
Figure 7-31 Confirming the connection
Step 4 Check the connection port and click OK . The dialog box shown in Figure 7-32 is displayed.
BSC6900 UMTS
OMU Administration Guide 7 OMU Installation and Maintenance (Windows)
Issue 02 (2015-05-08) Huawei Proprietary and Confidential
Copyright © Huawei Technologies Co., Ltd.
218
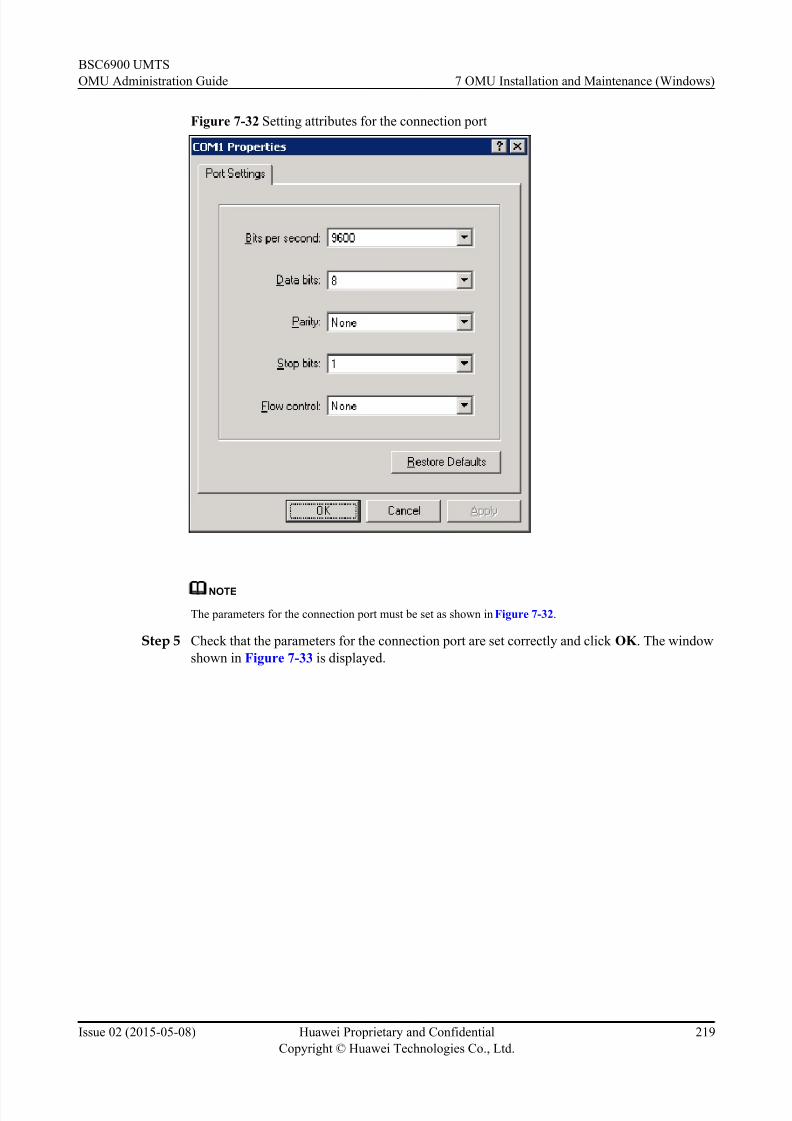
8/18/2019 Bsc6900 Umts Omu Administration Guide(v900r017c10_02)(PDF)-En
http://slidepdf.com/reader/full/bsc6900-umts-omu-administration-guidev900r017c1002pdf-en 228/310
Figure 7-32 Setting attributes for the connection port
NOTE
The parameters for the connection port must be set as shown in Figure 7-32.
Step 5 Check that the parameters for the connection port are set correctly and click OK . The window
shown in Figure 7-33 is displayed.
BSC6900 UMTS
OMU Administration Guide 7 OMU Installation and Maintenance (Windows)
Issue 02 (2015-05-08) Huawei Proprietary and Confidential
Copyright © Huawei Technologies Co., Ltd.
219

8/18/2019 Bsc6900 Umts Omu Administration Guide(v900r017c10_02)(PDF)-En
http://slidepdf.com/reader/full/bsc6900-umts-omu-administration-guidev900r017c1002pdf-en 229/310
Figure 7-33 Connection established
Step 6 Restart the OMU.
Option Description
Windows Server 2003 operating system 1. Log in to the target OMU by referring to 7.2.1
Logging In to the OMU.
2. Choose Start > Shutdown, click Restart, and
click OK .
Step 7 After the OMU restarts, press F4 repeatedly until the message "Press Ctrl-C to start
LSI Logic Configuration Utility" is displayed. Then press Ctrl+C. The following
shows examples of the messages displayed.
Adapter PCI PCI PCI PCI FW Revision Status Boot
Bus Dev Fnc Slot Order
SAS1064 05 01 00 00 0.11.01-IR Enabled 0
Step 8 Press Enter. The following shows examples of the messages displayed.
Adapter SAS1064
PCI Slot 00
PCI Address(Bus/Dev/Func) 05:01:00
MPT Firmware Revision 0.11.01.00-IRSAS Address 500E0FC1:23456775
BSC6900 UMTS
OMU Administration Guide 7 OMU Installation and Maintenance (Windows)
Issue 02 (2015-05-08) Huawei Proprietary and Confidential
Copyright © Huawei Technologies Co., Ltd.
220

8/18/2019 Bsc6900 Umts Omu Administration Guide(v900r017c10_02)(PDF)-En
http://slidepdf.com/reader/full/bsc6900-umts-omu-administration-guidev900r017c1002pdf-en 230/310

8/18/2019 Bsc6900 Umts Omu Administration Guide(v900r017c10_02)(PDF)-En
http://slidepdf.com/reader/full/bsc6900-umts-omu-administration-guidev900r017c1002pdf-en 231/310
Boot Support [Enabled Bios & OS]
RAID Properties
SAS Topology
Advanced Adapter Properties
Step 13 Select RAID Properties and press Enter. The following shows examples of the results that aredisplayed.
Creat IM Volume Create Integrated Mirror Array of 2
disks plus an optional hot spare,Data
on the primary disk may be migrated.
Create IME Volume Create Integrated Mirrored Enhanced
Array of 3 to 8 disks including an
optional hot spare.
All DATA on array disks will be DELETED!
Create IS Volume Create Integrated Striping array of
2 to 8 disks.
ALL DATA on array disks will be DELETED!
Step 14 Select Create IM Volume and press Enter. The following shows examples of the results that
are displayed.
Array Type:IM
Array Size(MB): -------
Slot Device Identifier RAID Hot Drive Pred Size
Num Disk Spr Status Fail (MB)
0 FUJITSU MAY2073rc D109 [No] [No] ------ --- 70003
1 FUJITSU MAY2073rc D109 [No] [No] ------ --- 70003
NOTICE
Select the source and target hard disks with caution because the data on the source hard disk can
be lost.
Step 15 Set RAID Disk to No, move the cursor to the value for RAID Disk of the source hard disk, and
press Space. The following shows examples of the results that are displayed.
M - Keep existing data, migrate to an IM array.
Synchronization of disk will occur.
D - Overwrite existing data, create a new IM array
ALL DATA on ALL disks in the array will be DELETED!!
NO Synchronization performed.
l If you press M, the data on the source hard disk is saved. The target hard disk copies the data
from the source disk.
l If you press D, the data is deleted from the source hard disk and a new RAID is created.
Step 16 Press M or D to return to the messages shown in Step 14.
The value for RAID Disk is Yes, and the value for Drive Status is Primary.
Step 17 Select the target hard disk and press Space. An alarm is generated, as shown in the following:
WARNING! Data was found on the selected disk,this data will be lost when the array
is created!Choose Discard configuration or Cancel Exit on the next screen to abort.
BSC6900 UMTS
OMU Administration Guide 7 OMU Installation and Maintenance (Windows)
Issue 02 (2015-05-08) Huawei Proprietary and Confidential
Copyright © Huawei Technologies Co., Ltd.
222

8/18/2019 Bsc6900 Umts Omu Administration Guide(v900r017c10_02)(PDF)-En
http://slidepdf.com/reader/full/bsc6900-umts-omu-administration-guidev900r017c1002pdf-en 232/310
Step 18 Press C to return to the messages shown in Step 14.
The value for RAID Disk is Yes, and the value for Drive Status is Secondary.
Step 19 Press C. The following shows the results that are displayed.
Create and save new array?
Cancel Exit
Save changes then exit this menu
Discard changes then exit this menu
Exit the Configuration Utility and Reboot
Step 20 Select Save changes then exit this menu and press Enter. The screen is refreshed, as shown
in Step 12.
Step 21 Select RAID Properties shown in Step 12 and press Enter. The following shows examples of
the results that are displayed.
Array 1 of 1
Identifier LSILOGICLogical Volume 3000Type 1M
Scan Order 0
Size(MB) 69618
Status 2% Syncd
Manager Array
Slot Device Identifier RAID Hot Drive Pred Size
Num Disk Spr Status Fail (MB)
0 FUJITSU MAY2073rc D109 [Yes] [No] Primary --- 69618
1 FUJITSU MAY2073rc D109 [Yes] [No] Secondary --- 69618
Step 22 Check that the RAID 1 is set correctly, and then press Esc repeatedly until the following
messages are displayed:
Are you sure you want to exit?Cancel Exit.
Save changes and reboot.
Discard changes and reboot.
Exit the Configuration Utility and Reboot.
Step 23 Select Exit the Configuration Utility and Reboot and press Enter. RAID 1 is successfully set
on the OMU hard disks and the OMU restarts.
----End
Setting the Link Mode of the External OMU Ethernet Adapter
This section describes how to set the link mode of the external OMU Ethernet adapters so that
it is the same as that of the LAN switch.
Prerequisites
The link mode, duplex mode, and rate of the LAN switch have been acquired.
Context
l If the link mode of the external Ethernet adapters of the OMUc is modified by omutool,
the network may be interrupted temporarily.
l If the link mode of the external Ethernet adapters of the OMU is inconsistent with that of
the LAN switch, the network may be interrupted. If the link mode of the LAN switch is
BSC6900 UMTS
OMU Administration Guide 7 OMU Installation and Maintenance (Windows)
Issue 02 (2015-05-08) Huawei Proprietary and Confidential
Copyright © Huawei Technologies Co., Ltd.
223

8/18/2019 Bsc6900 Umts Omu Administration Guide(v900r017c10_02)(PDF)-En
http://slidepdf.com/reader/full/bsc6900-umts-omu-administration-guidev900r017c1002pdf-en 233/310
specified, the link mode of the external Ethernet adapter of the OMU should also be
specified.
l There are two link modes of the LAN switch: forced mode and auto-negotiation mode. The
link mode of the OMU external Ethernet adapter must be consistent with that of the LAN
switch.
l The following procedure assumes that the link mode of the external Ethernet adapter is
forced mode and the adapter works at 100 Mbit/s in full duplex mode.
l The following procedure assumes that version_a is the active workspace of the OMU.
l If active and standby OMUs are configured, perform the following steps on both the active
and standby OMUs.
Procedure
Step 1 Connect the PC to the commissioning port of the OMU and log in to the OMU by using the
commissioning IP address. For details about the commissioning IP address, see 7.2.1 Logging
In to the OMU.
Step 2 Click Start > Settings > Control Panel > Network Connections. The Network
Connections window is displayed.
Step 3 Double-click Eth1(External). The interface shown in Figure 7-34 is displayed.
Figure 7-34 Eth1(External) status
BSC6900 UMTS
OMU Administration Guide 7 OMU Installation and Maintenance (Windows)
Issue 02 (2015-05-08) Huawei Proprietary and Confidential
Copyright © Huawei Technologies Co., Ltd.
224

8/18/2019 Bsc6900 Umts Omu Administration Guide(v900r017c10_02)(PDF)-En
http://slidepdf.com/reader/full/bsc6900-umts-omu-administration-guidev900r017c1002pdf-en 234/310
Step 4 Click Properties. The interface shown in Figure 7-35 is displayed.
Figure 7-35 Eth1(External) properties
Step 5 Click Configure in the General tab. The Broadcom NetXtreme Gigabit Ethernet #2
Properties interface is displayed.
Step 6 As shown in Figure 7-36, click the Advanced tab and choose Property > Speed & Duplex on
the left.
BSC6900 UMTS
OMU Administration Guide 7 OMU Installation and Maintenance (Windows)
Issue 02 (2015-05-08) Huawei Proprietary and Confidential
Copyright © Huawei Technologies Co., Ltd.
225
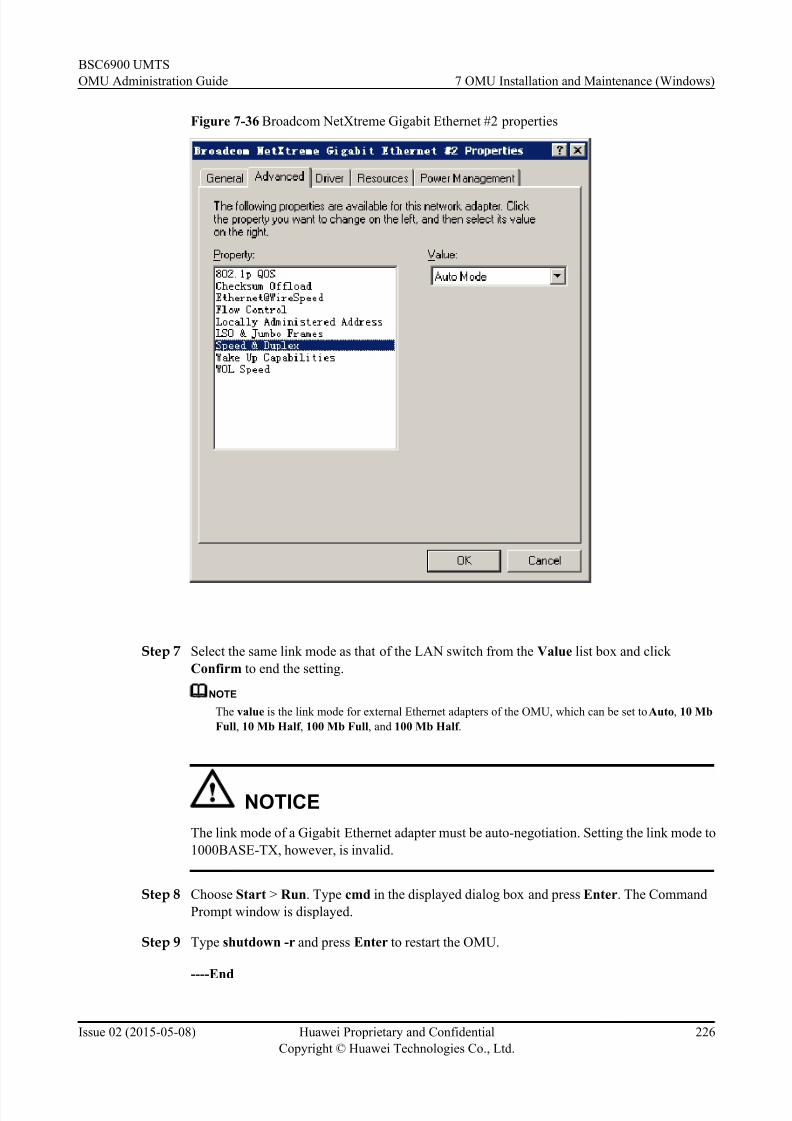
8/18/2019 Bsc6900 Umts Omu Administration Guide(v900r017c10_02)(PDF)-En
http://slidepdf.com/reader/full/bsc6900-umts-omu-administration-guidev900r017c1002pdf-en 235/310
Figure 7-36 Broadcom NetXtreme Gigabit Ethernet #2 properties
Step 7 Select the same link mode as that of the LAN switch from the Value list box and click
Confirm to end the setting.
NOTE
The value is the link mode for external Ethernet adapters of the OMU, which can be set to Auto, 10 Mb
Full, 10 Mb Half , 100 Mb Full, and 100 Mb Half .
NOTICE
The link mode of a Gigabit Ethernet adapter must be auto-negotiation. Setting the link mode to
1000BASE-TX, however, is invalid.
Step 8 Choose Start > Run. Type cmd in the displayed dialog box and press Enter. The Command
Prompt window is displayed.
Step 9 Type shutdown -r and press Enter to restart the OMU.
----End
BSC6900 UMTS
OMU Administration Guide 7 OMU Installation and Maintenance (Windows)
Issue 02 (2015-05-08) Huawei Proprietary and Confidential
Copyright © Huawei Technologies Co., Ltd.
226

8/18/2019 Bsc6900 Umts Omu Administration Guide(v900r017c10_02)(PDF)-En
http://slidepdf.com/reader/full/bsc6900-umts-omu-administration-guidev900r017c1002pdf-en 236/310
Setting the First Boot Device of the OMU to USB
Before installing the Dopra Linux operating system using a USB storage device, ensure that the
first boot device of the OMU is USB.
Prerequisites
l The OMU starts normally.
l The OMU is locally configured with a keyboard and monitor.
l The OMU serial cable has been obtained. For details about the OMU serial cable, see OMU
serial cable.
l The USB storage device has been inserted to the USB port on the OMUa board.
Context
l This section is designed for OMUa board and uses the OMUa board as an example. An
OMUc board is started from a USB port by default.
l There are two methods for starting the OMU:
1. Connecting the OMU to a PC through the HyperTerminal program on the PC.
2. Directly connecting the OMU to the keyboard and monitor.
Procedure
l Connecting the OMU to a PC through the HyperTerminal program on the PC
(recommended)
1. Connect the PC to the OMU serial port by using the OMU serial cable.
2. On the PC, choose Start > All Programs > Accessories > Communications >
HyperTerminal. The dialog box shown inFigure 7-37 is displayed.
Figure 7-37 Connection description
BSC6900 UMTS
OMU Administration Guide 7 OMU Installation and Maintenance (Windows)
Issue 02 (2015-05-08) Huawei Proprietary and Confidential
Copyright © Huawei Technologies Co., Ltd.
227

8/18/2019 Bsc6900 Umts Omu Administration Guide(v900r017c10_02)(PDF)-En
http://slidepdf.com/reader/full/bsc6900-umts-omu-administration-guidev900r017c1002pdf-en 237/310
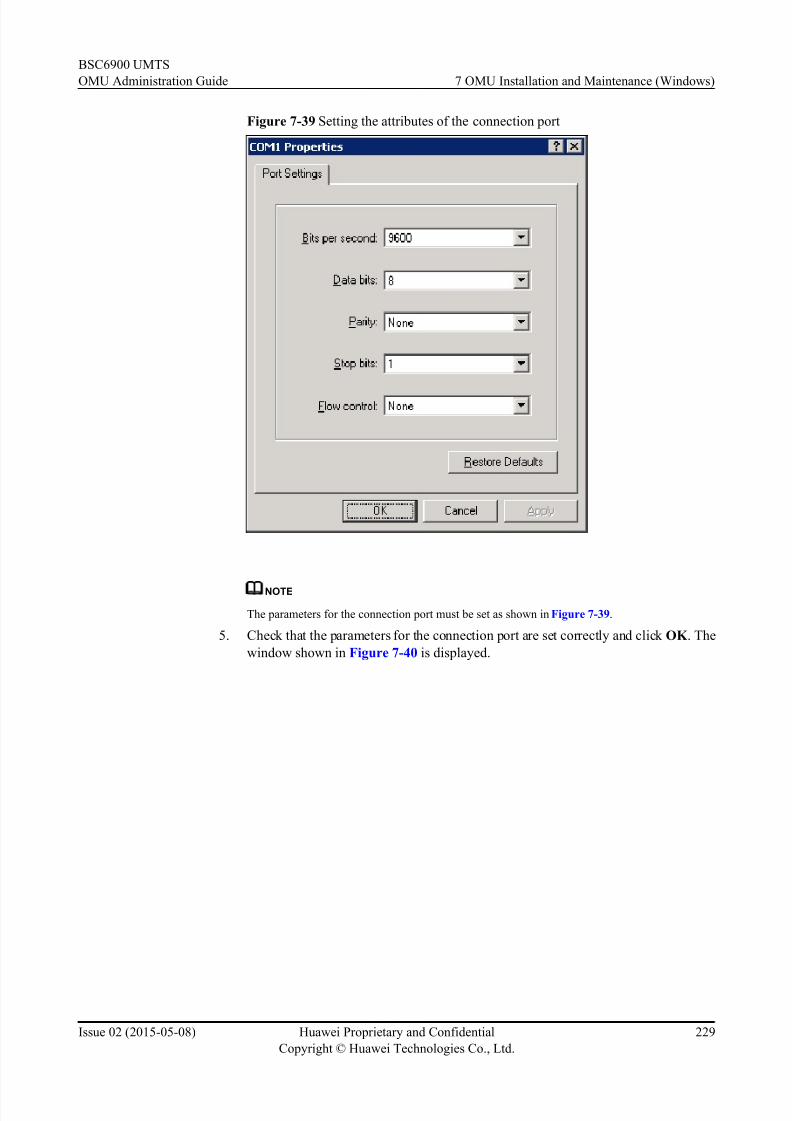
8/18/2019 Bsc6900 Umts Omu Administration Guide(v900r017c10_02)(PDF)-En
http://slidepdf.com/reader/full/bsc6900-umts-omu-administration-guidev900r017c1002pdf-en 238/310
Figure 7-39 Setting the attributes of the connection port
NOTE
The parameters for the connection port must be set as shown in Figure 7-39.
5. Check that the parameters for the connection port are set correctly and click OK . The
window shown in Figure 7-40 is displayed.
BSC6900 UMTS
OMU Administration Guide 7 OMU Installation and Maintenance (Windows)
Issue 02 (2015-05-08) Huawei Proprietary and Confidential
Copyright © Huawei Technologies Co., Ltd.
229

8/18/2019 Bsc6900 Umts Omu Administration Guide(v900r017c10_02)(PDF)-En
http://slidepdf.com/reader/full/bsc6900-umts-omu-administration-guidev900r017c1002pdf-en 239/310
Figure 7-40 Connection established
6. Restart the OMU.– If the OMU runs the Windows Server 2003 operating system,
a. Install the OMU operating system from a USB storage device by referring to
7.2.1 Logging In to the OMU.
b. Choose Start > Shutdown, click Restart, and click OK .
7. After the OMU is restarted, switch to the window shown in Figure 7-40. Press F4 or
S repeatedly until the window is updated, as shown in Figure 7-41.
BSC6900 UMTS
OMU Administration Guide 7 OMU Installation and Maintenance (Windows)
Issue 02 (2015-05-08) Huawei Proprietary and Confidential
Copyright © Huawei Technologies Co., Ltd.
230

8/18/2019 Bsc6900 Umts Omu Administration Guide(v900r017c10_02)(PDF)-En
http://slidepdf.com/reader/full/bsc6900-umts-omu-administration-guidev900r017c1002pdf-en 240/310
Figure 7-41 BIOS information
8. Press the arrow keys to select Boot. The window is updated, as shown in Figure
7-42.
Figure 7-42 Boot setting
9. Press the arrow keys to select Boot Device Priority and press Enter. The window is
updated, as shown in Figure 7-43.
BSC6900 UMTS
OMU Administration Guide 7 OMU Installation and Maintenance (Windows)
Issue 02 (2015-05-08) Huawei Proprietary and Confidential
Copyright © Huawei Technologies Co., Ltd.
231

8/18/2019 Bsc6900 Umts Omu Administration Guide(v900r017c10_02)(PDF)-En
http://slidepdf.com/reader/full/bsc6900-umts-omu-administration-guidev900r017c1002pdf-en 241/310
Figure 7-43 Setting the boot device priority
10. Press the arrow keys to select 1st Boot Device and press Enter. The window is
updated, as shown in Figure 7-44.
Figure 7-44 Setting the 1st boot device
11. Press Esc, select Exit, and press Enter. The window is updated, as shown in Figure
7-45.
BSC6900 UMTS
OMU Administration Guide 7 OMU Installation and Maintenance (Windows)
Issue 02 (2015-05-08) Huawei Proprietary and Confidential
Copyright © Huawei Technologies Co., Ltd.
232

8/18/2019 Bsc6900 Umts Omu Administration Guide(v900r017c10_02)(PDF)-En
http://slidepdf.com/reader/full/bsc6900-umts-omu-administration-guidev900r017c1002pdf-en 242/310
Figure 7-45 Saving changes and exit
12. Press the arrow keys to select Save Changes and Exit and press Enter. The changes
are saved. Exit the setting.
l Connecting the OMU to the keyboard and monitor directly
1. Directly connect the keyboard to the USB port and the monitor to the VGA port onthe OMU.
2. Log in to the LMT. Run the RST OMU command to set Reset Type to HARD. Then
reset the target OMU. The BIOS Setup screen is displayed on the monitor, as shown
in Figure 7-46.
Figure 7-46 BIOS Setup
3. Press DEL to enter the BIOS Setup screen.
4. Press the arrow keys to select Boot, as shown in Figure 7-47.
BSC6900 UMTS
OMU Administration Guide 7 OMU Installation and Maintenance (Windows)
Issue 02 (2015-05-08) Huawei Proprietary and Confidential
Copyright © Huawei Technologies Co., Ltd.
233

8/18/2019 Bsc6900 Umts Omu Administration Guide(v900r017c10_02)(PDF)-En
http://slidepdf.com/reader/full/bsc6900-umts-omu-administration-guidev900r017c1002pdf-en 243/310
Figure 7-47 Boot tab page
5. Use the arrow keys on the keyboard to select Boot Device Priority and press Enter.
6. Use the arrow keys on the keyboard to select 1st Boot Device and press Enter. Set
the first boot device of the OMU operating system to USB, as shown in Figure
7-48.
Figure 7-48 Selecting the 1st boot device
7. Press F10 to save the settings and exit.
----End
BSC6900 UMTS
OMU Administration Guide 7 OMU Installation and Maintenance (Windows)
Issue 02 (2015-05-08) Huawei Proprietary and Confidential
Copyright © Huawei Technologies Co., Ltd.
234

8/18/2019 Bsc6900 Umts Omu Administration Guide(v900r017c10_02)(PDF)-En
http://slidepdf.com/reader/full/bsc6900-umts-omu-administration-guidev900r017c1002pdf-en 244/310
Uploading Files to the OMU
This section describes how to upload files on a local PC to the OMU by using file sharing. This
task is applicable only to the OMU running the Windows operating system.
Prerequisites
l The OMU is started.
l The version installation package has not been installed on the OMU.
l The external fixed IP address, external virtual IP address, or commissioning IP address of
the OMU are available. For details about the OMU IP addresses, see Record Sheet of
OMU Software Installation Information.
Context
This task uploads the version installation package from a local PC to the OMU.
Procedure
Step 1 7.2.1 Logging In to the OMU.
Step 2 Set up a new folder on the OMU. Right-click the folder and choose Sharing and Security. The
Program Files Properties dialog box is displayed.
Step 3 In the Program Files Properties dialog box, select Share this folder and click OK .
Step 4 Choose StartRun on the local PC. Enter \\IP address of the OMU, input the user name and
password, and click OK .
Step 5 Copy the files to be uploaded to the target OMU directory that holds the files.
----End
Transfer OMU Files to the Local Computer
Transferring files between a local PC and the OMU by using the FTP protocol is an important
method for saving files during operation and maintenance.
Prerequisites
l The firewall on the portable PC is disabled.
l Product software is started.
Context
Uploading the 123.xml file from the OMU to the local drive D as an example.
There are two methods for transferring files on the OMU:
l Using the file management function on the LMT
l Running commands
Application Scenarios
BSC6900 UMTS
OMU Administration Guide 7 OMU Installation and Maintenance (Windows)
Issue 02 (2015-05-08) Huawei Proprietary and Confidential
Copyright © Huawei Technologies Co., Ltd.
235

8/18/2019 Bsc6900 Umts Omu Administration Guide(v900r017c10_02)(PDF)-En
http://slidepdf.com/reader/full/bsc6900-umts-omu-administration-guidev900r017c1002pdf-en 245/310
l If the OMU FTP server is set to Secure Sockets Layer (SSL) connection mode, only the
file management function on the LMT can be used to transfer files. For detailed operations,
see File Manager .
l If the OMU FTP server is not set to Secure Sockets Layer (SSL) connection mode, both
the file management function on the LMT and commands can be used to transfer files.
Table 7-10 lists the commands used for downloading files.
Table 7-10 Commands commonly used on the FTP
Command Description Example
cd Change the current directory. cd /mbsc/upgrade
cd Change the current directory. cd /software/upgrade
dir Query the structure of the
current directory.
dir
get Upload files from the OMU
to a local PC.
get x (x indicates the file
name)
put Download files from a local
PC to the OMU.
put x (x indicates the file
name)
Table 7-11 lists the specifications of the FTP file transmission.
Table 7-11 Specifications of the FTP file transmission
Item Description
Maximum number of concurrent connections
for the FtpUsr user
10
Timeout interval for control connections 15 minutes
Timeout interval for data connections 5 minutes
Procedure
l Downloading the 123.xml file on the OMU to local drive D by using the file management
function on the LMT
1. Enable the file management function on the LMT. For details, see File Manager in
BSC6900 UMTS LMT User Guide.
2. Select the files to be downloaded in the corresponding directories and click
Download.
l Downloading the 123.xml file on the OMU to local drive D by running commands
1. On the local PC, choose Start > Run, enter cmd, and click OK .
2. Enter d: to go to drive D.
BSC6900 UMTS
OMU Administration Guide 7 OMU Installation and Maintenance (Windows)
Issue 02 (2015-05-08) Huawei Proprietary and Confidential
Copyright © Huawei Technologies Co., Ltd.
236
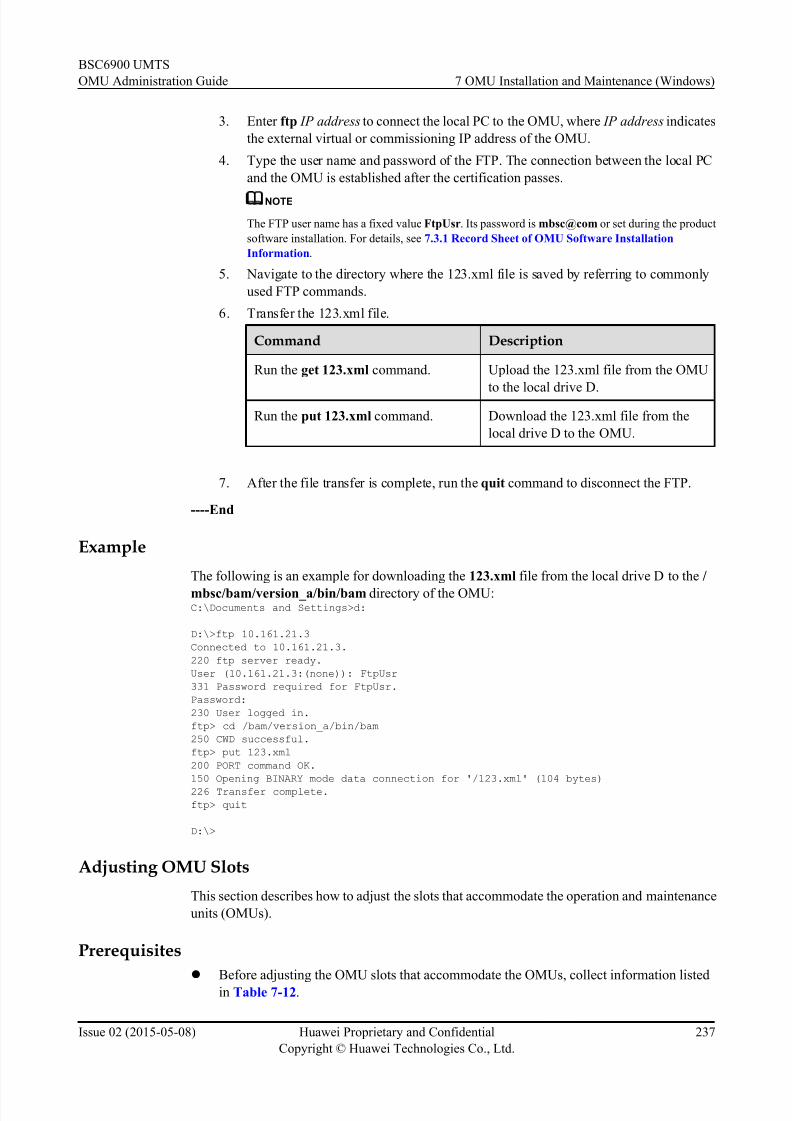
8/18/2019 Bsc6900 Umts Omu Administration Guide(v900r017c10_02)(PDF)-En
http://slidepdf.com/reader/full/bsc6900-umts-omu-administration-guidev900r017c1002pdf-en 246/310
3. Enter ftp IP address to connect the local PC to the OMU, where IP address indicates
the external virtual or commissioning IP address of the OMU.
4. Type the user name and password of the FTP. The connection between the local PC
and the OMU is established after the certification passes.
NOTE
The FTP user name has a f ixed value FtpUsr. Its password is mbsc@com or set during the product
software installation. For details, see 7.3.1 Record Sheet of OMU Software Installation
Information.
5. Navigate to the directory where the 123.xml file is saved by referring to commonly
used FTP commands.
6. Transfer the 123.xml file.
Command Description
Run the get 123.xml command. Upload the 123.xml file from the OMU
to the local drive D.
Run the put 123.xml command. Download the 123.xml file from the
local drive D to the OMU.
7. After the file transfer is complete, run the quit command to disconnect the FTP.
----End
Example
The following is an example for downloading the 123.xml file from the local drive D to the /
mbsc/bam/version_a/bin/bam directory of the OMU:C:\Documents and Settings>d:
D:\>ftp 10.161.21.3
Connected to 10.161.21.3.
220 ftp server ready.
User (10.161.21.3:(none)): FtpUsr
331 Password required for FtpUsr.
Password:
230 User logged in.
ftp> cd /bam/version_a/bin/bam
250 CWD successful.
ftp> put 123.xml
200 PORT command OK.
150 Opening BINARY mode data connection for '/123.xml' (104 bytes)
226 Transfer complete.
ftp> quit
D:\>
Adjusting OMU Slots
This section describes how to adjust the slots that accommodate the operation and maintenance
units (OMUs).
Prerequisites
l Before adjusting the OMU slots that accommodate the OMUs, collect information listed
in Table 7-12.
BSC6900 UMTS
OMU Administration Guide 7 OMU Installation and Maintenance (Windows)
Issue 02 (2015-05-08) Huawei Proprietary and Confidential
Copyright © Huawei Technologies Co., Ltd.
237

8/18/2019 Bsc6900 Umts Omu Administration Guide(v900r017c10_02)(PDF)-En
http://slidepdf.com/reader/full/bsc6900-umts-omu-administration-guidev900r017c1002pdf-en 247/310
Table 7-12 Required information
Information Description
OMU Slots Query and record the slots that
accommodate the OMUs.
l Hardware requirement
– The target slots are idle. For details about the OMU slot information, see OMUa Board.
l Software requirement
– None
l License requirement
– None
Context
Prepare the data listed in the following table.
Table 7-13 Data preparation
MO Setting Notes DataSource
MMLCommand
BRD Set Slot No. to an appropriate value. Internal plan ADD BRD
Procedure
Step 1 Run the DSP OMU command to query the numbers of the slots that accommodate the active
and standby OMUs before the reconfiguration.
Step 2 Perform the operations listed in the following table based on the operating system of the OMU.
If... Then...
The Dopra Linux operating system is used 1. Log in to the active and standby OMUs
separately.
2. Run the /etc/rc.d/omud stop command tostop the omud process.
3. Run the poweroff command to power off
the OMU.
BSC6900 UMTS
OMU Administration Guide 7 OMU Installation and Maintenance (Windows)
Issue 02 (2015-05-08) Huawei Proprietary and Confidential
Copyright © Huawei Technologies Co., Ltd.
238

8/18/2019 Bsc6900 Umts Omu Administration Guide(v900r017c10_02)(PDF)-En
http://slidepdf.com/reader/full/bsc6900-umts-omu-administration-guidev900r017c1002pdf-en 248/310
If... Then...
The Windows operating system is used 1. Log in to the active and standby OMUs
separately.
2. Choose Start > Run. In the Run dialog box, type cmd, and press Enter. The
OMU command input dialog box is
displayed.
3. In the command line, type the net stop
omud command to stop the omud process.
4. Choose Start > Shutdown. In the
displayed dialog box, select Shutdown to
shut down the OMU.
Step 3 When the OFFLINE indicator on the OMU board panel is on, remove the active and standby
OMUs.
Step 4 Insert the active and standby OMUs into the target slots.
Step 5 After five minutes, run the DSP OMU command to check whether the active and standby OMUs
operate properly. If not, check whether the OMUs are installed correctly.
Step 6 Run the RMV BRD command to remove the OMU boards that have been configured.
Step 7 Run the ADD BRD command to add active and standby OMU boards separately. In this step,
set Slot No. to an appropriate value.
Step 8 Log in to the LMT to check whether the OMU status displayed on the device panel is correct.
Step 9 On the LMT, click Alarm, and select Browse Alarm to view current active alarms.
Step 10 Optional: If an OMU-related alarm is displayed in the list of active alarms and the OMU slot
number is the original one, right-click the alarm, and choose Clear Alarm from the shortcut
menu to manually clear the alarm.
----End
Example
/*Information Recording Procedure*/
//Querying the numbers of the subracks and slots where the active and standby OMUs
reside before the slot adjustment
DSP OMU:;
/*Reconfiguration Procedure*/
//Removing a board
RMV BRD: SRN=0, SN=16;
RMV BRD: SRN=0, SN=18;
//Adding boards
ADD BRD: SRN=0, BRDCLASS=OMU, BRDTYPE=OMUa, SN=24;ADD BRD: SRN=0, BRDCLASS=OMU, BRDTYPE=OMUa, SN=26;
BSC6900 UMTS
OMU Administration Guide 7 OMU Installation and Maintenance (Windows)
Issue 02 (2015-05-08) Huawei Proprietary and Confidential
Copyright © Huawei Technologies Co., Ltd.
239

8/18/2019 Bsc6900 Umts Omu Administration Guide(v900r017c10_02)(PDF)-En
http://slidepdf.com/reader/full/bsc6900-umts-omu-administration-guidev900r017c1002pdf-en 249/310
Follow-up Procedure
l Verification
Run the DSP OMU command to check whether the active and standby OMUs operate
properly.
Expected result: The active and standby OMUs operate properly.
l Rollback
The rollback procedure is similar to the reconfiguration procedure, except that parameters
in the rollback procedure are set to values used before the reconfiguration.
Uninstalling the SQL Server 2000
After the BSC6810 is upgraded to the BSC6900, the SQL Server 2000 will not be used; however,
it still occupies operating system resources and is a potential safety hazard. As a result, you are
required to uninstall the SQL Server 2000 after the version is stable.
Context
If active and standby OMUs are configured, uninstall the SQL Server 2000 on both active and
standby OMUs.
Exit all the applications including Windows NT event viewer and register editor. You are advised
to perform the operation during off-peak traffic hours.
Procedure
Step 1 Log in to the target OMU by referring to 7.2.1 Logging In to the OMU.
Step 2 On the OMU, choose Start > Control Panel >Add or Remove Programs, the Add or Remove
Programs window will be displayed.
Step 3 Select Microsoft SQL Server 2000 and click Change/Remove to finish the installation, as
shown in Figure 7-49.
BSC6900 UMTS
OMU Administration Guide 7 OMU Installation and Maintenance (Windows)
Issue 02 (2015-05-08) Huawei Proprietary and Confidential
Copyright © Huawei Technologies Co., Ltd.
240
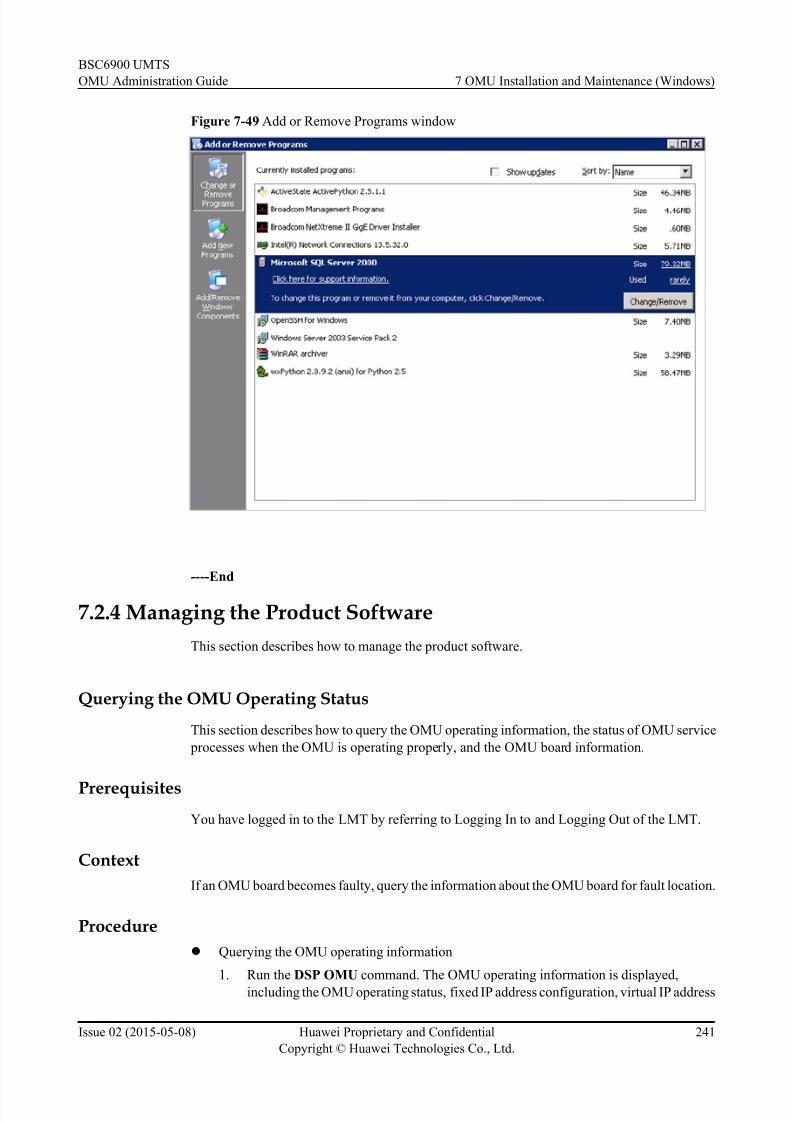
8/18/2019 Bsc6900 Umts Omu Administration Guide(v900r017c10_02)(PDF)-En
http://slidepdf.com/reader/full/bsc6900-umts-omu-administration-guidev900r017c1002pdf-en 250/310
Figure 7-49 Add or Remove Programs window
----End
7.2.4 Managing the Product Software
This section describes how to manage the product software.
Querying the OMU Operating Status
This section describes how to query the OMU operating information, the status of OMU service
processes when the OMU is operating properly, and the OMU board information.
Prerequisites
You have logged in to the LMT by referring to Logging In to and Logging Out of the LMT.
Context
If an OMU board becomes faulty, query the information about the OMU board for fault location.
Procedure
l Querying the OMU operating information
1. Run the DSP OMU command. The OMU operating information is displayed,
including the OMU operating status, fixed IP address configuration, virtual IP address
BSC6900 UMTS
OMU Administration Guide 7 OMU Installation and Maintenance (Windows)
Issue 02 (2015-05-08) Huawei Proprietary and Confidential
Copyright © Huawei Technologies Co., Ltd.
241
8/18/2019 Bsc6900 Umts Omu Administration Guide(v900r017c10_02)(PDF)-En
http://slidepdf.com/reader/full/bsc6900-umts-omu-administration-guidev900r017c1002pdf-en 251/310
configuration, debugging IP address configuration, status of data synchronization,
status of the internal and external networks, and status of the backup channel.
l Querying the status of OMU service processes when the OMU is operating properly
1. Run the DSP OMUMODULE command. The names and status of the OMU service
processes are displayed.
– If the status of service processes is Started, the OMU service processes are normal.
– If the status of service processes is Stopped, the OMU service processes are normal
and not started.
– If the status of the service processes is Exception, the OMU service processes are
abnormal. When active and standby OMUs are configured, the self-healing
switchover is triggered if the abnormal status persists. When an independent OMU
is configured, the OMU reports the ALM-20707 OMU Process Abort alarm.
l Querying the OMU board information
–Run the DSP OMUSRV command. The OMU board status is displayed, including theCPU usage, memory usage, number of logical CPUs, memory capacity, total space of
logical disks, current available space, percentage of the available space, and the time
cost by input/output (I/O) operation on the OMU hard disks.
– Run the MML command DSP OMUVER . The subrack number, slot number, OMU
type, and version information about the PCB, BIOS, BMC, CPLD, and SDR are
displayed.
l Querying the OMU working environment
1. Run the MML command DSP OMUENV. The CPU inlet temperature, memory inlet
temperature, hard disk temperature, and voltage of chips are displayed.
l Querying the OMU hardware status
1. Run the MML command DSP OMUHW. The subrack number, slot number, operating
status of the hard disk, status of Ethernet adapters and Ethernet adapter teams, and
RAID of the OMU are displayed.
The OMU hardware is normal if the following conditions are met:
– The values for Primer harddisk and Standby harddisk are Online.
– The status of the Raid is Normal, and the Raid rebulid scale is 0.
– ETH0 netcard, ETH1 netcard, or both are Normal.
–In active/standby OMU mode, the value for Backup channel netcard isNormal; in independent OMU mode, the value for Backup channel netcard does
not have impact on the OMU hardware status.
– Inner0 netcard, Inner1 netcard , or both are Normal.
– Both Inner netcard group and Extra netcard group are Normal.
----End
Querying the Version of the Active/Standby OMU Workspaces
This section describes how to query the version of the active and standby OMU workspaces,
such as the workspace flag and version of the product software.
BSC6900 UMTS
OMU Administration Guide 7 OMU Installation and Maintenance (Windows)
Issue 02 (2015-05-08) Huawei Proprietary and Confidential
Copyright © Huawei Technologies Co., Ltd.
242

8/18/2019 Bsc6900 Umts Omu Administration Guide(v900r017c10_02)(PDF)-En
http://slidepdf.com/reader/full/bsc6900-umts-omu-administration-guidev900r017c1002pdf-en 252/310
Prerequisites
You have logged in to the LMT by referring to Logging In to and Logging Out of the LMT.
Procedure
Step 1 Run the LST OMUAREA command to query the version of the active and standby OMU
workspaces.
----End
Querying the Status of Data Synchronization Between the Active and Standby
OMUs
This section describes how to query the status of data synchronization between the active and
standby OMUs.
Prerequisites
l You have logged in to the LMT by referring to Logging In to and Logging Out of the LMT.
l Active and standby OMUs are configured.
Context
When faults occur due to network or database problems during data synchronization, OMUs
automatically rectifies the faults.
Procedure
Step 1 Run the MML command DSP OMU on the active or standby OMU. The status of data
synchronization between the active and standby OMUs is displayed.
If data synchronization is abnormal, the ALM-20704 OMU Data Synchronization Failure alarm
is reported. Clear the alarm by referring to the alarm handling suggestions.
NOTICEWhen Data-sync state is Data synchronization is successful, Data synchronization not built
due to version inconsistency, or Data synchronization cannot built due to OMU failure
switchover, you are allowed to switch over the active and standby OMUs.
----End
Forcibly Switching Over the Active and Standby OMUs
This section describes how to forcibly switch over the active and standby OMUs when the active
OMU needs to be manually shut down for a software/hardware upgrade or fault rectification.
This operation ensures uninterrupted OMU services.
BSC6900 UMTS
OMU Administration Guide 7 OMU Installation and Maintenance (Windows)
Issue 02 (2015-05-08) Huawei Proprietary and Confidential
Copyright © Huawei Technologies Co., Ltd.
243

8/18/2019 Bsc6900 Umts Omu Administration Guide(v900r017c10_02)(PDF)-En
http://slidepdf.com/reader/full/bsc6900-umts-omu-administration-guidev900r017c1002pdf-en 253/310
Prerequisites
l You have logged in to the LMT. For details, see
You have logged in to the LMT by referring to Logging In to and Logging Out of the LMT.
.l The OMUs work in active/standby mode and the active and standby OMUs work correctly
for more than 5 minutes (You can run the CMP OMUDATA and CMP OMUFILE
commands to check whether the active OMU data is consistent with the standby OMU data.
Ensure that the data on the active OMU is synchronized to the standby OMU to avoid data
loss after the switchover.)
Procedure
Step 1 Run the DSP OMU command to query the operating status of the active and standby OMUs.
If... Then...
The active and standby OMUs work properly and the data
synchronization is normal
Go to Step 2.
The active and standby OMUs do not work properly or the data
synchronization is abnormal
End this task.
Step 2 Run the SWP OMU command to manually switch over the OMUs.
Step 3 Log in to the LMT again and run the DSP OMU command to query the operating status of the
active OMU after the switchover. If the active OMU works properly, the switchover is
successful.
----End
Manually Synchronizing the Data of the Active and Standby OMUs
This section describes how to manually synchronize the data of the standby OMU with that of
the active OMU.
Prerequisites
l You have logged in to the LMT by referring to Logging In to and Logging Out of the LMT.
l The OMUs work in active/standby mode.
Context
After running the CMP OMUDATA command, you can manually synchronize the data of the
standby OMU with that of the active OMU if the data is inconsistent.
Procedure
Step 1Run the STR DATASYNC command to start synchronizing the data of the standby OMU with
that of the active OMU.
BSC6900 UMTS
OMU Administration Guide 7 OMU Installation and Maintenance (Windows)
Issue 02 (2015-05-08) Huawei Proprietary and Confidential
Copyright © Huawei Technologies Co., Ltd.
244

8/18/2019 Bsc6900 Umts Omu Administration Guide(v900r017c10_02)(PDF)-En
http://slidepdf.com/reader/full/bsc6900-umts-omu-administration-guidev900r017c1002pdf-en 254/310
NOTE
Successful running of the command only indicates that the data synchronization procedure between the active
and standby OMUs has started. To check whether the data synchronization succeeds, run the DSP OMU
command and query the value of Data-sync state.
----End
Stopping the Synchronization of the Data of the Active and Standby OMUs
This section describes how to manually stop synchronizing the data of the standby OMU with
the active OMU.
Prerequisites
l You have logged in to the LMT by referring to Logging In to and Logging Out of the LMT.
l The OMUs work in active/standby mode.
l The data of the standby OMU is being synchronized with that of the active OMU.
Procedure
Step 1 Run the STP DATASYNC command to stop the data synchronization between the active and
standby OMUs.
NOTE
Running this command leads to asynchronous data between the active and standby OMUs. Even after an OMU
switchover, the data between the active and standby OMUs can be still asynchronous. You can restart data
synchronization only by running the STR DATASYNC command.
----End
Checking Data Consistency Between the Active OMU and the Standby OMU
This section describes how to check data consistency between the active OMU and the standby
OMU after a fault triggers a switchover.
Prerequisites
l You have logged in to the LMT. For details, seeYou have logged in to the LMT by referring to Logging In to and Logging Out of the LMT.
.
l The OMUs work in active/standby mode.
Procedure
Step 1 Run the CMP OMUDATA command to check consistency of alarm data, performance data,
configuration data, and platform data between the active and standby OMUs.
BSC6900 UMTS
OMU Administration Guide 7 OMU Installation and Maintenance (Windows)
Issue 02 (2015-05-08) Huawei Proprietary and Confidential
Copyright © Huawei Technologies Co., Ltd.
245

8/18/2019 Bsc6900 Umts Omu Administration Guide(v900r017c10_02)(PDF)-En
http://slidepdf.com/reader/full/bsc6900-umts-omu-administration-guidev900r017c1002pdf-en 255/310
NOTICE
l If data of the active OMU is inconsistent with that of the standby OMU, run the STR
DATASYNC command to start data synchronization between the active OMU and thestandby OMU. After 5 minutes, run the CMP OMUDATA command to check for data
consistency.
l If the initial data synchronization between the active OMU and the standby OMU is ongoing,
failure information will be displayed after you execute this command.
Step 2 Run the CMP OMUFILE command to check consistency of the license file, certificate file,
host patch file and other files between the active and standby OMUs.
----End
Configuring the OMU Disk Access Rate
This section describes how to configure the OMU disk access rate to prevent a single Input/
Output (I/O) operation from consuming too many OMU hard disk resources.
Prerequisites
You have logged in to the LMT. For details, see
You have logged in to the LMT by referring to Logging In to and Logging Out of the LMT.
.
Context
Uploading or downloading files over the FTP, writing log files, or writing traced messages into
files leads to many I/O operations. To prevent a single I/O operation from consuming too much
OMU hard disk resources, the access rate of the preceding functions must be limited.
Procedure
l Configuring the maximum file uploading or downloading rate for an external FTP user
1. Run the SET FTPSRVSPD command to configure the maximum data rate for an
external FTP user.l Querying the maximum file uploading or downloading rate for an external FTP user
1. Run the LST FTPSRVSPD command to query the maximum file uploading or
downloading rate for an external FTP user.
l Querying the average file uploading or downloading rate for an external FTP user
1. Run the DSP FTPSRVSPD command to query the average file uploading or
downloading rate for an external FTP user.
l Configuring the maximum data rate of writing log files
1. Run the SET HOSTLOGSPD command to configure the maximum data rate of
writing log files.
l Querying the maximum data rate of writing log files
BSC6900 UMTS
OMU Administration Guide 7 OMU Installation and Maintenance (Windows)
Issue 02 (2015-05-08) Huawei Proprietary and Confidential
Copyright © Huawei Technologies Co., Ltd.
246
8/18/2019 Bsc6900 Umts Omu Administration Guide(v900r017c10_02)(PDF)-En
http://slidepdf.com/reader/full/bsc6900-umts-omu-administration-guidev900r017c1002pdf-en 256/310
1. Run the LST HOSTLOGSPD command to configure the maximum data rate of
writing log files.
l Querying the actual data rate of writing log files
1. Run the DSP HOSTLOGSPD command to query the actual data rate of writing log
files.
l Configuring the maximum data rate of writing traced messages into files
1. Run the SET TRCLOGSPD command to configure the maximum data rate of writing
traced messages into files.
l Querying the maximum data rate of writing traced messages into files
1. Run the LST TRCLOGSPD command to query the maximum data rate of writing
traced messages into files.
l Querying the actual data rate of writing traced messages into files
1. Run the DSP TRCLOGSPD command to query the actual data rate of writing traced
messages into files.
----End
Resetting the OMU
This section describes how to reset the OMU, product software, and OMU service processes.
Prerequisites
You have logged in to the LMT by referring to Logging In to and Logging Out of the LMT.
Context
l The OMU operating system is restarted after the OMU is reset. If the OMU is reset
successfully, the faults of the OMU operating system or product software can be rectified.
l All the service processes are disrupted after the product software are reset. If the OMU is
reset successfully, the faults of the product software can be rectified.
l Resetting a specified OMU service process interrupts the service of the process for a while.
Procedure
l Reset the OMU or product software
1. Run the RST OMU command.
– If Reset Type is set to SOFT, only the product software are reset. The OMU
operating system is not restarted.
– If Reset Type is set to HARD, the OMU operating system is restarted.
NOTE
l When the OMU works in single-OMU mode, set the Reset Target to ACTIVE.
l When the OMUs work in dual-OMU mode, the active OMU is reset if you set the Reset
Target to ACTIVE.
l When the OMUs work in dual-OMU mode, the standby OMU is reset if you set the Reset
Target to STANDBY.
l Reset a specified service process
BSC6900 UMTS
OMU Administration Guide 7 OMU Installation and Maintenance (Windows)
Issue 02 (2015-05-08) Huawei Proprietary and Confidential
Copyright © Huawei Technologies Co., Ltd.
247

8/18/2019 Bsc6900 Umts Omu Administration Guide(v900r017c10_02)(PDF)-En
http://slidepdf.com/reader/full/bsc6900-umts-omu-administration-guidev900r017c1002pdf-en 257/310
1. Run the RST OMUMODULE command and specify Reset Target and Module
Name to reset the specified OMU service process.
----End
Managing the omud
This section describes how to start or stop the omud process so that the OMU can provide services
properly.
Starting the omud
Prerequisites
l You have logged in to the OMU by referring to 7.2.1 Logging In to the OMU.
l The product software has been installed. For details, see 7.1.3 Optional: Installing
Product Software.
Procedure
l To start the omud using commands, perform the following operations:
1. Choose Start > Run. Enter the cmd command to enter the command mode of the
OMU.
2. Run the net start omud command to start the omud.
l To start the omud using menus, perform the following operations:
1. Choose Start > Settings > Control Panel to enter the control panel interface.
2. Double-click Administrative Tools > Services to open the Services window, asshown in Figure 7-50.
Figure 7-50 Services window (for starting the omud)
BSC6900 UMTS
OMU Administration Guide 7 OMU Installation and Maintenance (Windows)
Issue 02 (2015-05-08) Huawei Proprietary and Confidential
Copyright © Huawei Technologies Co., Ltd.
248

8/18/2019 Bsc6900 Umts Omu Administration Guide(v900r017c10_02)(PDF)-En
http://slidepdf.com/reader/full/bsc6900-umts-omu-administration-guidev900r017c1002pdf-en 258/310
3. Select omud.
4. Click the icon on the toolbar to start the omud.
5. When the Status of omud is Started, close the Services window.
Stopping the omud
Prerequisites
l You have logged in to the OMU by referring to 7.2.1 Logging In to the OMU.
l The product software has been installed. For details, see 7.1.3 Optional: Installing
Product Software.
Context
The omud process must be stopped before performing the following operations: uninstalling the
product software, upgrading product software, or restoring the BSC6900 data.
NOTICE
l When the omud process is stopped, all the OMU service processes will also stop. In turn, the
OMU stops providing services for the BSC6900. Therefore, perform this task with caution.
l If the external virtual IP address is used to log in to the OMU, stopping the omud process
will disconnect the OMU from the peripheral devices.
l
If an external fixed IP address is configured for the OMU, stopping the omud will makethe external virtual IP address ineffective. In this situation, users can log in to the OMU
by using the external fixed IP address if an independent OMU is configured. If the OMUs
work in active/standby mode, the external virtual IP address of the original standby OMU
becomes effective after the active OMU is stopped.
l If no external fixed IP address is configured for the OMU, the external virtual IP address
is still effective after you stop the omud.
l If the BSC6900 is configured with active and standby OMUs, log in to the active or standby
OMU by using the external fixed IP address or the commissioning IP address.
l If the BSC6900 is configured with an independent OMU, log in to the OMU by using the
external fixed or virtual IP address or the commissioning IP address.
Procedure
l To stop the omud using commands, perform the following operations:
1. Choose Start > Run. Enter the cmd command to enter the command mode of the
OMU.
2. Run the net stop omud command to stop the omud.
l To stop the omud using menus, perform the following operations:
1. Choose Start > Settings > Control Panel to enter the control panel interface.
2. Double-click Administrative Tools > Services to open the Services window, as
shown in Figure 7-51.
BSC6900 UMTS
OMU Administration Guide 7 OMU Installation and Maintenance (Windows)
Issue 02 (2015-05-08) Huawei Proprietary and Confidential
Copyright © Huawei Technologies Co., Ltd.
249

8/18/2019 Bsc6900 Umts Omu Administration Guide(v900r017c10_02)(PDF)-En
http://slidepdf.com/reader/full/bsc6900-umts-omu-administration-guidev900r017c1002pdf-en 259/310
Figure 7-51 Services window (for stopping the omud)
3. Select omud.
4. Click the icon on the toolbar to stop the omud.
5. When the Status of omud is blank, close the Services window.
Querying the Operating Status of the omud
This section describes how to query the operating status of the omud to determine whether the
OMU can provide services normally.
Prerequisites
l You have logged in to the OMU by referring to 7.2.1 Logging In to the OMU.
l The product software has been installed. For details, see 7.1.3 Optional: Installing
Product Software.
Procedure
l To query the operating status of the omud using commands, perform the following steps:
1. Choose Start > Run. Then enter the cmd command and press Enter to enter the
command mode of the OMU.
2. Run the sc query omud command to query the operating status of the omud.
l To query the operating status of the omud using menus, perform the following steps:
1. Log in to the OMU by referring to 7.2.1 Logging In to the OMU.
2. Click Start > Settings > Control Panel to enter the Control Panel interface.
3. Double-click Administrative Tools > Services to enter the Services interface.
BSC6900 UMTS
OMU Administration Guide 7 OMU Installation and Maintenance (Windows)
Issue 02 (2015-05-08) Huawei Proprietary and Confidential
Copyright © Huawei Technologies Co., Ltd.
250
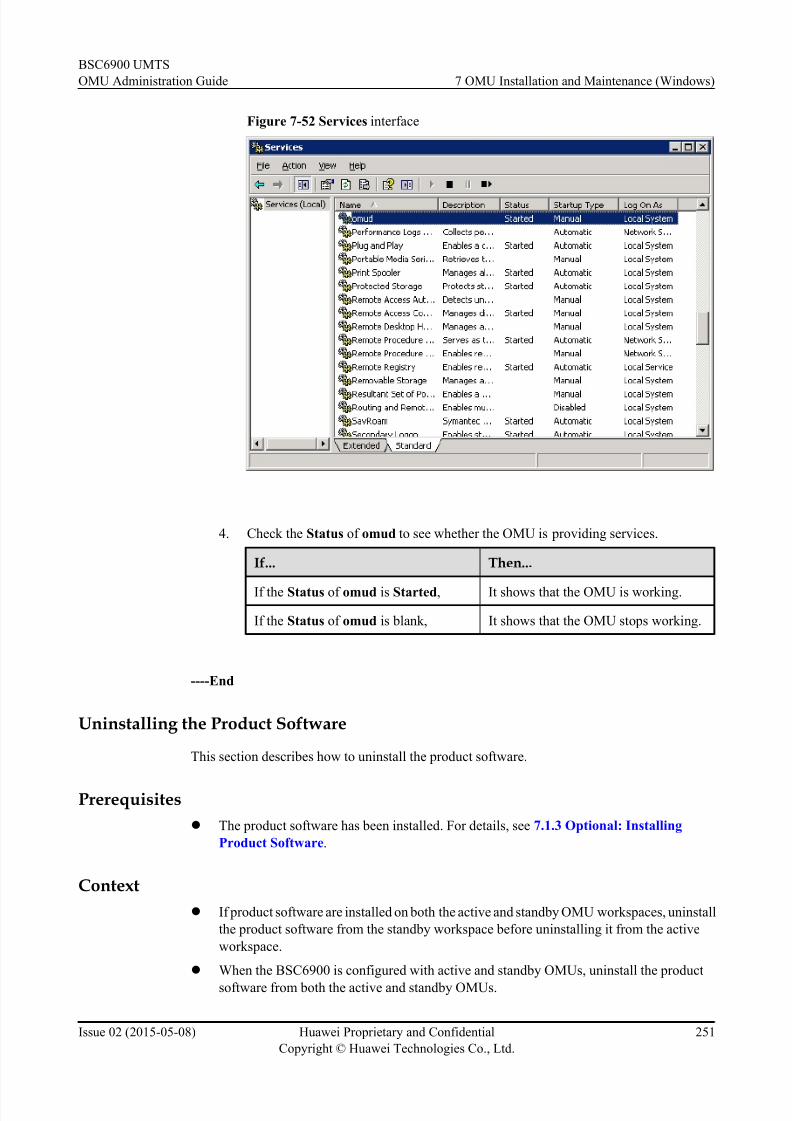
8/18/2019 Bsc6900 Umts Omu Administration Guide(v900r017c10_02)(PDF)-En
http://slidepdf.com/reader/full/bsc6900-umts-omu-administration-guidev900r017c1002pdf-en 260/310
Figure 7-52 Services interface
4. Check the Status of omud to see whether the OMU is providing services.
If... Then...
If the Status of omud is Started, It shows that the OMU is working.
If the Status of omud is blank, It shows that the OMU stops working.
----End
Uninstalling the Product Software
This section describes how to uninstall the product software.
Prerequisites
l The product software has been installed. For details, see 7.1.3 Optional: Installing
Product Software.
Context
l If product software are installed on both the active and standby OMU workspaces, uninstall
the product software from the standby workspace before uninstalling it from the active
workspace.
l When the BSC6900 is configured with active and standby OMUs, uninstall the product
software from both the active and standby OMUs.
BSC6900 UMTS
OMU Administration Guide 7 OMU Installation and Maintenance (Windows)
Issue 02 (2015-05-08) Huawei Proprietary and Confidential
Copyright © Huawei Technologies Co., Ltd.
251

8/18/2019 Bsc6900 Umts Omu Administration Guide(v900r017c10_02)(PDF)-En
http://slidepdf.com/reader/full/bsc6900-umts-omu-administration-guidev900r017c1002pdf-en 261/310

8/18/2019 Bsc6900 Umts Omu Administration Guide(v900r017c10_02)(PDF)-En
http://slidepdf.com/reader/full/bsc6900-umts-omu-administration-guidev900r017c1002pdf-en 262/310
Figure 7-53 cmd interface for uninstallation 1
Figure 7-54 cmd interface for uninstallation 2
Step 5 Enter Y, and press Enter until the Uninstall OMU succeed! message is displayed.
BSC6900 UMTS
OMU Administration Guide 7 OMU Installation and Maintenance (Windows)
Issue 02 (2015-05-08) Huawei Proprietary and Confidential
Copyright © Huawei Technologies Co., Ltd.
253

8/18/2019 Bsc6900 Umts Omu Administration Guide(v900r017c10_02)(PDF)-En
http://slidepdf.com/reader/full/bsc6900-umts-omu-administration-guidev900r017c1002pdf-en 263/310
If... Then...
The product software are installed in only
the active workspace,
Uninstalling the product software on the
standby OMU is finished.
The product software are installed in both
the active and standby workspaces,
1. Go to Step 4 after uninstalling the product
software in the standby workspace.
2. Perform Step 5 to finish uninstalling the
product software in the active workspace.
Then uninstalling the product software on
the standby OMU is finished.
Step 6 Log in to the active OMU using the fixed external IP address or debugging IP address. Then
perform Step 2 through Step 5 again.
----End
7.2.5 Backing Up and Restoring Data
This section describes how to use the omu_backup_linker tool to back up or restore the OMU
configuration data, alarm data, and performance data. When the OMUs work in active/standby
mode, the omu_backup_linker tool can be used only on the active OMU. Otherwise, the data
will be lost.
Context
The omu_backup_linker tool is used in the following scenarios:l If an OMU board is damaged, it needs to be replaced with a new one. The data on the
damaged OMU board must be backed up and restored on the new OMU board.
l The OMU data needs to be backed up periodically during routine maintenance.
l If the OMU database breaks down or an OMU upgrade fails, the latest OMU data needs to
be restored.
Starting the omu_backup_linker Tool
This section describes how to start the omu_backup_linker tool.
Context
l If an independent OMU is configured, log in to the OMU to start the omu_backup_linker
tool.
l If active and standby OMUs are configured, log in to the active OMU to start the
omu_backup_linker tool.
Procedure
Step 1 Log in to the target OMU by referring to 7.2.1 Logging In to the OMU.
Step 2Choose Start > Run. Then enter the cmd command and press Enter to enter the command mode
of the OMU.
BSC6900 UMTS
OMU Administration Guide 7 OMU Installation and Maintenance (Windows)
Issue 02 (2015-05-08) Huawei Proprietary and Confidential
Copyright © Huawei Technologies Co., Ltd.
254
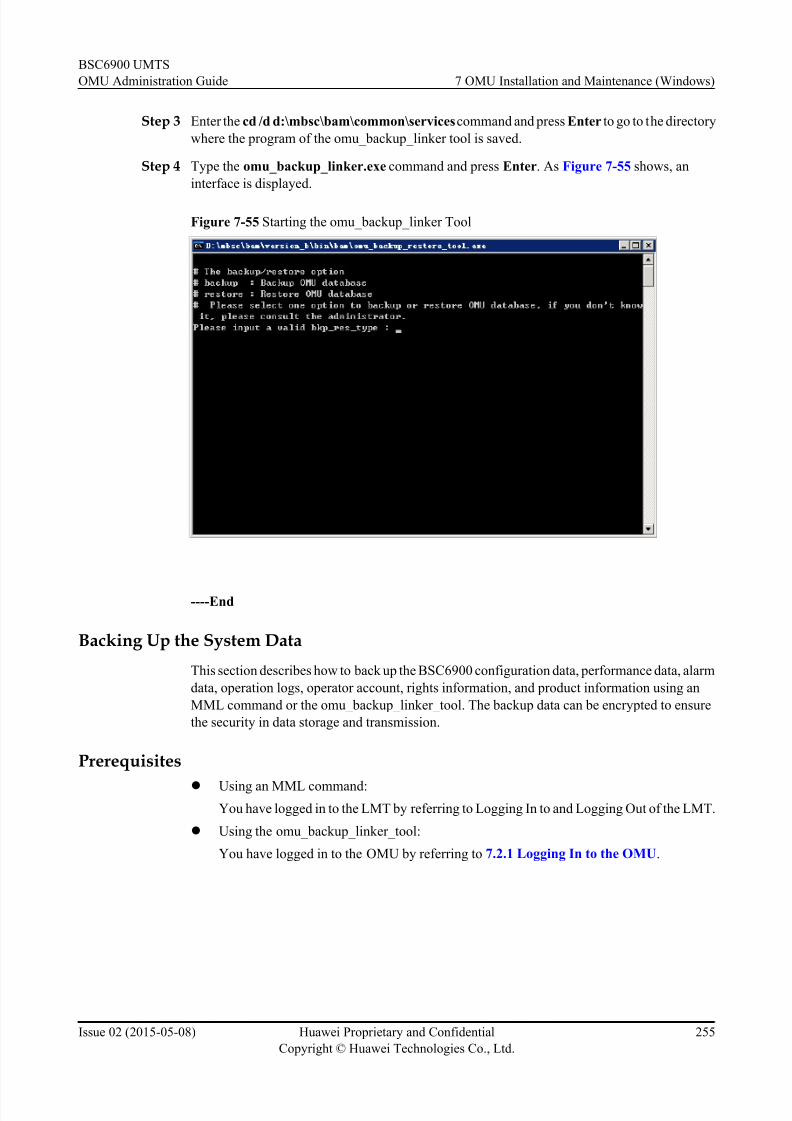
8/18/2019 Bsc6900 Umts Omu Administration Guide(v900r017c10_02)(PDF)-En
http://slidepdf.com/reader/full/bsc6900-umts-omu-administration-guidev900r017c1002pdf-en 264/310
Step 3 Enter the cd /d d:\mbsc\bam\common\services command and press Enter to go to the directory
where the program of the omu_backup_linker tool is saved.
Step 4 Type the omu_backup_linker.exe command and press Enter. As Figure 7-55 shows, an
interface is displayed.
Figure 7-55 Starting the omu_backup_linker Tool
----End
Backing Up the System Data
This section describes how to back up the BSC6900 configuration data, performance data, alarm
data, operation logs, operator account, rights information, and product information using an
MML command or the omu_backup_linker_tool. The backup data can be encrypted to ensure
the security in data storage and transmission.
Prerequisites
l Using an MML command:
You have logged in to the LMT by referring to Logging In to and Logging Out of the LMT.
l Using the omu_backup_linker_tool:
You have logged in to the OMU by referring to 7.2.1 Logging In to the OMU.
BSC6900 UMTS
OMU Administration Guide 7 OMU Installation and Maintenance (Windows)
Issue 02 (2015-05-08) Huawei Proprietary and Confidential
Copyright © Huawei Technologies Co., Ltd.
255

8/18/2019 Bsc6900 Umts Omu Administration Guide(v900r017c10_02)(PDF)-En
http://slidepdf.com/reader/full/bsc6900-umts-omu-administration-guidev900r017c1002pdf-en 265/310
Context
NOTICEl When the OMUs work in active/standby mode, the system data must be backed up on the
active OMU.
l Before capacity expansion, upgrade, or software loading, you must back up the OMU data
manually to avoid a system data backup failure.
Procedure
l Using an MML command
1. Run the BKP DB command to back up the data to the specified directory on the OMUhard disk. In this step, set Path of Backup File and Backup File Name to appropriate
values. If the backup file needs to be encrypted, set Encrypted Mode to Password
Encrypted and specify File Encryption Password.
2. Obtain the backup file from the specified directory by referring to the procedures
described in Transfer OMU Files to the Local Computer.
l Using the omu_backup_linker_tool
1. Choose Start > Run. Then enter the cmd command and press Enter to enter the
command mode of the OMU.
2. Enter the cd /d d:\mbsc\bam\common\services command and press Enter to go to
the directory where the program of the omu_backup_linker tool is saved.3. Enter backup in the interface, as shown in Figure 7-56.
Figure 7-56 Backing up the system data
BSC6900 UMTS
OMU Administration Guide 7 OMU Installation and Maintenance (Windows)
Issue 02 (2015-05-08) Huawei Proprietary and Confidential
Copyright © Huawei Technologies Co., Ltd.
256

8/18/2019 Bsc6900 Umts Omu Administration Guide(v900r017c10_02)(PDF)-En
http://slidepdf.com/reader/full/bsc6900-umts-omu-administration-guidev900r017c1002pdf-en 266/310
4. Enter the save path and names of the backup files.
Figure 7-57 Entering the save path and names of backup files
5. If the backup file does not need to be encrypted, enter unencrypt. If the backup file
needs to be encrypted, enter encrypt, as shown in Figure 7-58.
Figure 7-58 Specifying encryption mode of the backup file
6. If you have entered encrypt in the previous step, enter File Encryption Password,
as shown in Figure 7-59.
BSC6900 UMTS
OMU Administration Guide 7 OMU Installation and Maintenance (Windows)
Issue 02 (2015-05-08) Huawei Proprietary and Confidential
Copyright © Huawei Technologies Co., Ltd.
257

8/18/2019 Bsc6900 Umts Omu Administration Guide(v900r017c10_02)(PDF)-En
http://slidepdf.com/reader/full/bsc6900-umts-omu-administration-guidev900r017c1002pdf-en 267/310
Figure 7-59 Entering the file encryption password
7. The system starts to back up data. If the data is successfully backed up to the OMU
hard disk, the "Backup OMU database succeed!" message is displayed, as
shown in Figure 7-60.
Figure 7-60 Backup result indication
8. Press any key to exit.
----End
BSC6900 UMTS
OMU Administration Guide 7 OMU Installation and Maintenance (Windows)
Issue 02 (2015-05-08) Huawei Proprietary and Confidential
Copyright © Huawei Technologies Co., Ltd.
258
8/18/2019 Bsc6900 Umts Omu Administration Guide(v900r017c10_02)(PDF)-En
http://slidepdf.com/reader/full/bsc6900-umts-omu-administration-guidev900r017c1002pdf-en 268/310
Restoring the System Data
This section describes how to restore the system data using the data backup file and using the
encrypted backup file.
Context
Restoring the BSC6900 system data will interrupt services on the BSC6900. The data on the
host will be inconsistent with the data on the OMU after the system data is restored. As a result,
the services will be greatly impacted. Therefore, you are advised to restore the system data in
the early morning hours when traffic volume is low.
As an example, the OMU in active/standby mode is used in this document. If an OMU is in
independent mode, skip operations on the standby OMU.
This chapter describes how to restore data by using the following methods:
l If an MML command is used to restore data, only the BSC6900 configuration data isrestored while other data, such as alarm data or performance data, cannot be restored.
l If the omu_backup _linker tool is used to restore data, all BSC6900 data is restored,
including configuration data, alarm data, performance data, operating logs, administrator
account, authority information, SSL configuration information, certificate information and
product information.
Procedure
l Restoring the system data through an MML command
1. Run the LST BKPFILE command to query data backup files saved in the OMU
active workspace installation directory\data\backup directory.
2. Run the RTR DB command to restore configuration data on the OMU. If the backup
file is encrypted, specify Encrypted Mode and File Encryption Password.
3. Run the LST SUBNET and DSP OMU commands to query the internal network
segments. If the queried internal network segments in the two command outputs are
different, run the RST OMU command to perform soft resets on the active and standby
OMU boards.
l Restoring the system data by using the omu_backup_linker tool
1. (Optional) If the OMUs work in active/standby mode, stop the data synchronization
between the active and standby OMUs by referring to Stopping the Synchronization
of the Data of the Active and Standby OMUs
2. Log in to the active and standby OMUs by referring to 7.2.1 Logging In to the
OMU.
3. Choose Start > Run. Enter the cmd command to enter the command mode of the
OMU on the active and standby OMUs.
4. Run the net stop omud command to stop the omud on the active and standby OMUs.
5. Restore data in the original active OMU using the omu_backup_linker tool.
a. Choose Start > Run. Then enter the cmd command and press Enter to enter the
command mode of the OMU.
b. Enter the cd /d d:\mbsc\bam\common\services command and press Enter to
go to the directory where the program of the omu_backup_linker tool is saved.
BSC6900 UMTS
OMU Administration Guide 7 OMU Installation and Maintenance (Windows)
Issue 02 (2015-05-08) Huawei Proprietary and Confidential
Copyright © Huawei Technologies Co., Ltd.
259
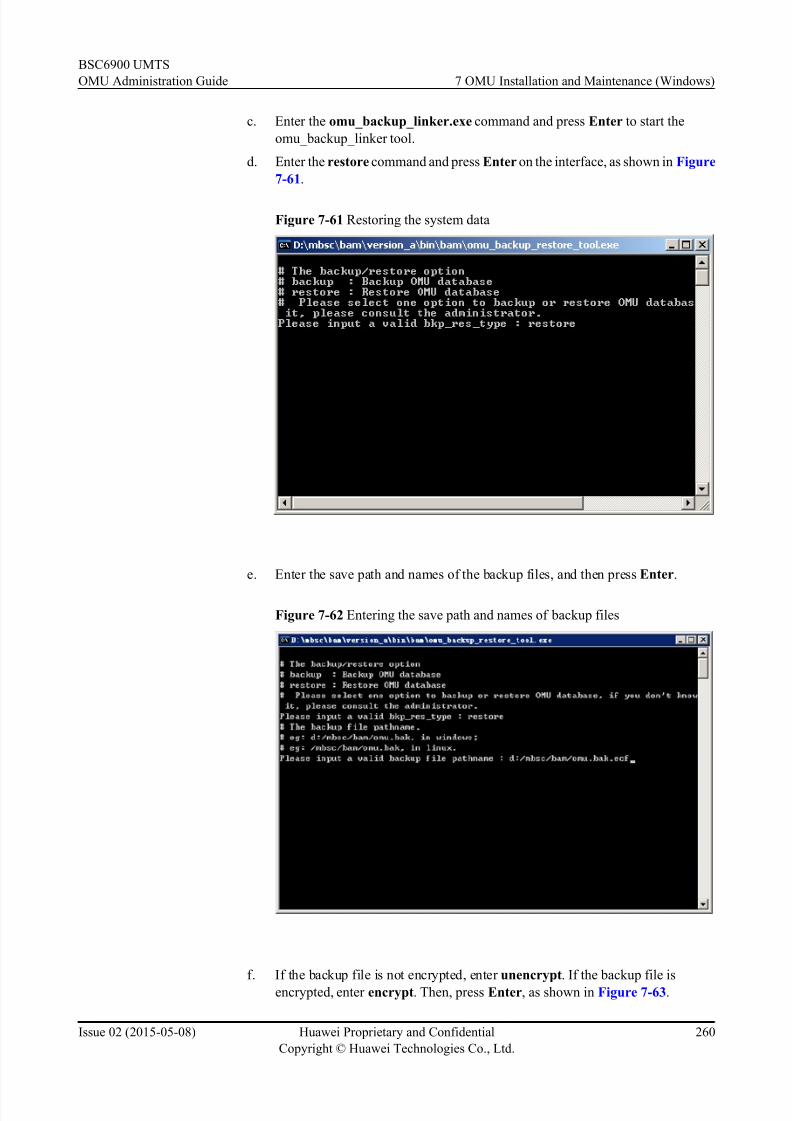
8/18/2019 Bsc6900 Umts Omu Administration Guide(v900r017c10_02)(PDF)-En
http://slidepdf.com/reader/full/bsc6900-umts-omu-administration-guidev900r017c1002pdf-en 269/310
c. Enter the omu_backup_linker.exe command and press Enter to start the
omu_backup_linker tool.
d. Enter the restore command and press Enter on the interface, as shown in Figure
7-61.
Figure 7-61 Restoring the system data
e. Enter the save path and names of the backup files, and then press Enter.
Figure 7-62 Entering the save path and names of backup files
f. If the backup file is not encrypted, enter unencrypt. If the backup file is
encrypted, enter encrypt. Then, press Enter, as shown in Figure 7-63.
BSC6900 UMTS
OMU Administration Guide 7 OMU Installation and Maintenance (Windows)
Issue 02 (2015-05-08) Huawei Proprietary and Confidential
Copyright © Huawei Technologies Co., Ltd.
260

8/18/2019 Bsc6900 Umts Omu Administration Guide(v900r017c10_02)(PDF)-En
http://slidepdf.com/reader/full/bsc6900-umts-omu-administration-guidev900r017c1002pdf-en 270/310
Figure 7-63 Entering the mode of the backup files to be restored
g. If you enter encrypt in the previous step, specify File Encryption Password
and press Enter, as shown in Figure 7-64.
Figure 7-64 Entering the file encryption password
h. The system data starts to be restored. After the restoration is complete, a message
is displayed, indicating whether the restoration is successful. If the restoration is
successful, the Restore OMU database succeed! message is displayed
on the interface, as shown in Figure 7-65.
BSC6900 UMTS
OMU Administration Guide 7 OMU Installation and Maintenance (Windows)
Issue 02 (2015-05-08) Huawei Proprietary and Confidential
Copyright © Huawei Technologies Co., Ltd.
261

8/18/2019 Bsc6900 Umts Omu Administration Guide(v900r017c10_02)(PDF)-En
http://slidepdf.com/reader/full/bsc6900-umts-omu-administration-guidev900r017c1002pdf-en 271/310
Figure 7-65 Result indication of restoring the system data
i. Press any key to exit.
6. Copy and save the backup file to be restored in the standby OMU using file sharing.
For details, see Uploading Files to the OMU.
7. Repeat Step 5 to restore data in the original active OMU using the omu_backup_linker
tool.
8. Managing the omud on the active and standby OMUs.
9. Log in to the LMT by referring to Logging In to and Logging Out of the LMT in the
BSC6900 UM TS LMT User Guide.
10. Run the LCK CMCTRL command to lock the data configuration right.
11. Run the LST CFGMODE command to query whether the System Configuration
Mode parameter is set to Eff ective Mode for all subracks. If this parameter is set to
Ineffective Mode for any subrack, run the SET CFGDATAEFFECTIVE command
to change the value to Effective Mode.
12. Check the consistency between the BSC6900 host data and the OMU data.
NOTE
After data restoration, check whether the BSC6900 host data is consistent with the OMU data.
If not, load the restored data to the BSC6900 host.
a. Run the ACT CRC command to check whether the host data is consistent with
the OMU data.
– If the data is consistent, end this task.
– If the data is inconsistent, go to 12.2.
b. Run the FMT DATA command to format the data in the OMU database so that
the data can be loaded into the host.
c. If data inconsistency occurs in only one subrack, run the RST SUBRACK
command to reset this subrack. Before running the command, set Subrack No.
BSC6900 UMTS
OMU Administration Guide 7 OMU Installation and Maintenance (Windows)
Issue 02 (2015-05-08) Huawei Proprietary and Confidential
Copyright © Huawei Technologies Co., Ltd.
262

8/18/2019 Bsc6900 Umts Omu Administration Guide(v900r017c10_02)(PDF)-En
http://slidepdf.com/reader/full/bsc6900-umts-omu-administration-guidev900r017c1002pdf-en 272/310

8/18/2019 Bsc6900 Umts Omu Administration Guide(v900r017c10_02)(PDF)-En
http://slidepdf.com/reader/full/bsc6900-umts-omu-administration-guidev900r017c1002pdf-en 273/310
Changing Users' Passwords
This section describes how to change the passwords for users admin, GaussDB, and db_user
by using the omutool, how to change the password for user FtpUsr by using the MML command,
and how to log in to the U2000 to change its FTP user's password.
Context
l admin is the account for logging in to the LMT.
l GaussDB is the default internal account of the GaussDB database and cannot be deleted.
GaussDB is used for database initialization. It cannot be used for logging in to the database
by default.
l db_user is the account for accessing the OMU database.
l FtpUsr is the account for uploading and downloading files to and from the OMU.
lThe U2000's FTP user is used for the U2000 to access BSC6900 for file loading anddownloading.
l The following procedure assumes that version_a is the OMU active workspace. Run the
LST OMUAREA command to query the OMU active workspace.
l If active and standby OMUs are configured on the BSC6900, you must change the
passwords of users admin, db_user, and GaussDB on both the active and standby OMUs.
NOTE
l Single-OMU mode: Stop the omud before the change and restart the omud after the change.
l Dual-OMU mode: Stop the standby omud and then the active omud before the change. Restart
the active omud and then the standby omud after the change.
NOTE
l You are advised to change the password at your first login and then change the password every
three months. The initial passwords of user db_user is MBSC_db_2008. The initial password
of user GaussDB is a random value with 8 to 32 bits automatically generated during database
initialization.
l Users GaussDB and db_usr must both contain the combination of the following:
l At least one lower-case letter
l At least one upper-case letter
l At least one digit
l At least one special character -?[]_+{}
The user password must have a minimum length of 8 characters and maximum length of 32
characters.
l User admin must both contain the combination of the following:
l At least one lower-case letter
l At least one upper-case letter
l At least one digit
l At least one special character ~!@#$%^&*()_+-{}|[]:<>?./
The user password must have a minimum length of 8 characters and maximum length of 32
characters.
BSC6900 UMTS
OMU Administration Guide 7 OMU Installation and Maintenance (Windows)
Issue 02 (2015-05-08) Huawei Proprietary and Confidential
Copyright © Huawei Technologies Co., Ltd.
264

8/18/2019 Bsc6900 Umts Omu Administration Guide(v900r017c10_02)(PDF)-En
http://slidepdf.com/reader/full/bsc6900-umts-omu-administration-guidev900r017c1002pdf-en 274/310
DANGER
Keep the password safe. You need to reinstall the OMU operating system if the password
is lost.
Procedure
l Changing the password of user admin
1. Log in to the target OMU by referring to the procedures described in 7.2.1 Logging
In to the OMU.
2. Choose Start > Run. Enter the cmd command to enter the command mode of the
OMU.
3. Run the net stop omud command to stop the omud.
4. Enter cd /d d:\mbsc\bam\version_a\bin\bam to go to the directory where the program of the omutool is saved.
5. Execute omutool adminpwd to change the password of user admin.
6. Run the net start omud command to start the omud.
l Changing the password of user GaussDB
1. Log in to the target OMU by referring to the procedures described in 7.2.1 Logging
In to the OMU.
2. Choose Start > Run. Enter the cmd command to enter the command mode of the
OMU.
3. Run the net stop omud command to stop the omud.4. Enter cd /d d:\mbsc\bam\version_a\bin\bam to go to the directory where the
program of the omutool is saved.
5. Execute omutool dbrootpwd to change the password of user GaussDB.
6. Run the net start omud command to start the omud.
l Changing the password of user db _user
1. Log in to the target OMU.
2. Choose Start > Run. Enter the cmd command to enter the command mode of the
OMU.
3. Run the net stop omud command to stop the omud.
4. Enter cd /d d:\mbsc\bam\version_a\bin\bam to go to the directory where the
program of the omutool is saved.
5. Execute omutool dbpwd to change the password of user db_user.
6. Run the net start omud command to start the omud.
l Changing the password of user FtpUsr
1. Log in to the LMT by referring to Logging In to and Logging Out of the LMT in the
BSC6900 UMTS LMT User Guide.
2. Run the MML command MOD FTPPWD to change the password of user FtpUsr.
l Changing the password of the U2000's FTP user
1. Log in to the U2000.
BSC6900 UMTS
OMU Administration Guide 7 OMU Installation and Maintenance (Windows)
Issue 02 (2015-05-08) Huawei Proprietary and Confidential
Copyright © Huawei Technologies Co., Ltd.
265
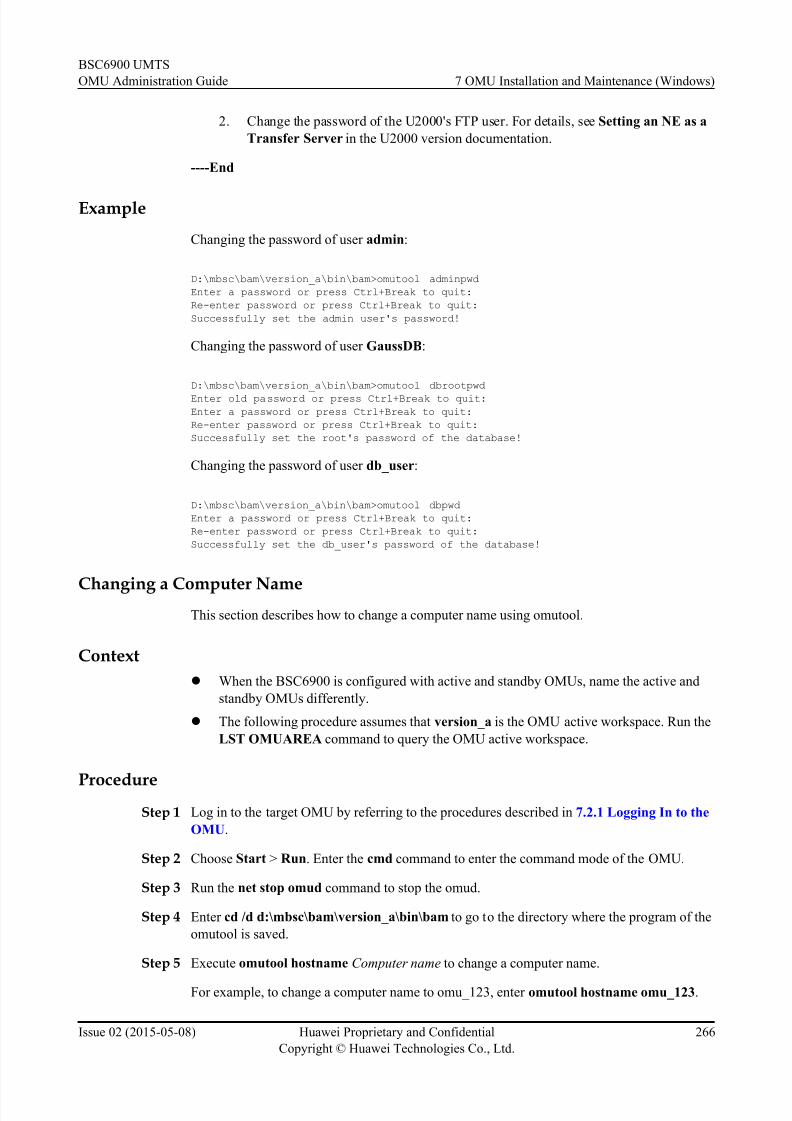
8/18/2019 Bsc6900 Umts Omu Administration Guide(v900r017c10_02)(PDF)-En
http://slidepdf.com/reader/full/bsc6900-umts-omu-administration-guidev900r017c1002pdf-en 275/310
2. Change the password of the U2000's FTP user. For details, see Setting an NE as a
Transfer Server in the U2000 version documentation.
----End
Example
Changing the password of user admin:
D:\mbsc\bam\version_a\bin\bam>omutool adminpwd
Enter a password or press Ctrl+Break to quit:
Re-enter password or press Ctrl+Break to quit:
Successfully set the admin user's password!
Changing the password of user GaussDB:
D:\mbsc\bam\version_a\bin\bam>omutool dbrootpwd
Enter old password or press Ctrl+Break to quit:
Enter a password or press Ctrl+Break to quit:
Re-enter password or press Ctrl+Break to quit:
Successfully set the root's password of the database!
Changing the password of user db_user:
D:\mbsc\bam\version_a\bin\bam>omutool dbpwd
Enter a password or press Ctrl+Break to quit:
Re-enter password or press Ctrl+Break to quit:
Successfully set the db_user's password of the database!
Changing a Computer NameThis section describes how to change a computer name using omutool.
Context
l When the BSC6900 is configured with active and standby OMUs, name the active and
standby OMUs differently.
l The following procedure assumes that version_a is the OMU active workspace. Run the
LST OMUAREA command to query the OMU active workspace.
ProcedureStep 1 Log in to the target OMU by referring to the procedures described in 7.2.1 Logging In to the
OMU.
Step 2 Choose Start > Run. Enter the cmd command to enter the command mode of the OMU.
Step 3 Run the net stop omud command to stop the omud.
Step 4 Enter cd /d d:\mbsc\bam\version_a\bin\bam to go to the directory where the program of the
omutool is saved.
Step 5 Execute omutool hostname Computer name to change a computer name.
For example, to change a computer name to omu_123, enter omutool hostname omu_123.
BSC6900 UMTS
OMU Administration Guide 7 OMU Installation and Maintenance (Windows)
Issue 02 (2015-05-08) Huawei Proprietary and Confidential
Copyright © Huawei Technologies Co., Ltd.
266
8/18/2019 Bsc6900 Umts Omu Administration Guide(v900r017c10_02)(PDF)-En
http://slidepdf.com/reader/full/bsc6900-umts-omu-administration-guidev900r017c1002pdf-en 276/310
Step 6 Choose Start > Shut Down. In the displayed dialog box, select Restart and click OK to restart
the OMU.
----End
Follow-up Procedure
1. Log in to the LMT by referring to the procedures described in Logging In to and Logging
Out of the LMT in BSC6900 UMTS LMT User Guide.
2. Run the DSP OMU command to query the new computer name.
Modifying the NE Type
This section describes how to modify the NE type by using the omutool.
ContextTo manage BSCs uniformly on the U2000, you need to modify the NE type of upgraded BSCs.
The following procedure is for active and standby OMUs whose active workspace is
version_a. For a single OMU, ignore the steps for the standby OMU.
The following procedure assumes that version_a is the OMU active workspace. Run the LST
OMUAREA command to query the OMU active workspace.
Procedure
Step 1 Log in to the standby OMU and stop the omud process on it. Then, log in to the active OMUand stop the omud process on it. For details, see Logging In to the OMU and Stopping the
omud.
Step 2 Choose Start > Run on the active OMU. Enter cmd to enter the command mode of the OMU.
Step 3 On the active OMU, enter cd /d d:\mbsc\bam\version_a\bin\bam to navigate to the directory
where the omutool program is saved.
Step 4 On the active OMU, enter omutool netype NE type to modify the NE type.
The prompt set ne type success! indicates that the NE type has been successfully modified.
NOTE
To query the NE type, enter the omutool netype command.
Step 5 Start the omud process on the active OMU first and then the omud process on the standby OMU.
For details, see Managing the omud.
----End
Example
D:\mbsc\bam\version_b\bin\bam>omutool netype
Current ne type is : BSC6***
D:\mbsc\bam\version_b\bin\bam>omutool netype BSC6900set ne type success!
BSC6900 UMTS
OMU Administration Guide 7 OMU Installation and Maintenance (Windows)
Issue 02 (2015-05-08) Huawei Proprietary and Confidential
Copyright © Huawei Technologies Co., Ltd.
267

8/18/2019 Bsc6900 Umts Omu Administration Guide(v900r017c10_02)(PDF)-En
http://slidepdf.com/reader/full/bsc6900-umts-omu-administration-guidev900r017c1002pdf-en 277/310
Setting the OMU Working Mode
This section describes how to set the OMU working mode by using the omutool. The OMU can
work either in independent or active/standby mode.
Prerequisites
l You have logged in to the LMT and queried the slot No. for the OMU by running the LST
BRD command.
l You have logged in to the LMT and queried whether the OMU is in independent or active/
standby mode by running the DSP OMU command.
l You have logged in to the LMT and queried the OMU workspace information by running
the LST OMUAR EA command.
l You have logged in to the LMT and queried the OMU service mode by running the LST
MBSCMODE command.
Context
l If the working mode of the OMU is changed from independent mode to active/standby
mode, apply the settings to both the active and standby OMUs. If the working mode is
changed from active/standby mode to independent mode, apply the settings to only the new
active OMU.
l If the working mode of the OMU is changed from independent mode to active/standby
mode, ensure that the operating system, software version, and board type of the active OMU
are the same as those of the standby OMU. In addition, the slot number of the active OMU
and that of the standby OMU have an active/standby relationship.
l
If the working mode of the OMU is changed from active/standby mode to independentmode, you should run the MML command DSP OMU to ensure that the Data-sync state
is Data synchronization is successful and run the MML command CMP
OMUFILE to ensure that Compare result is consistent.
l The following procedure assumes that version_a is the OMU active workspace. Run the
LST OMUAREA command to query the OMU active workspace.
Procedure
l Switching the OMU from the independent mode to the active/standby mode (product
software are not installed on the OMU to be added).
1. Insert an OMUa/OMUc board into the standby slot by referring to Installing the
OMUa/OMUc/SAUa/SAUc Boards or Installing the OMUc Boards in the BSC6900
UMTS Installation Guide.
2. Log in to the standby OMU using the fixed external IP address by referring to 7.2.1
Logging In to the OMU.
3. Install product software on the standby OMU. For details, see 7.1.3 Optional:
Installing Product Software.
NOTE
You must select active/standby mode during the process of installing the product software for the
standby OMU.
4. Change the IP addresses and subnet masks of the standby OMU to ensure that the
fixed internal IP addresses, fixed external IP addresses, and IP address of the backup
BSC6900 UMTS
OMU Administration Guide 7 OMU Installation and Maintenance (Windows)
Issue 02 (2015-05-08) Huawei Proprietary and Confidential
Copyright © Huawei Technologies Co., Ltd.
268

8/18/2019 Bsc6900 Umts Omu Administration Guide(v900r017c10_02)(PDF)-En
http://slidepdf.com/reader/full/bsc6900-umts-omu-administration-guidev900r017c1002pdf-en 278/310
channel between active and standby of OMUs comply with the planning principle for
the IP addresses and do not conflict with each other. For details about changing IP
addresses, see Changing IP Addresses and Subnet Masks of OMU Ethernet
Adapters.
5. Choose Start > Run. Enter the cmd command to enter the command mode of theOMU on the original active OMU.
6. Run the net stop omud command to stop the omud on the original active OMU.
7. Enter cd /d d:\mbsc\bam\version_a\bin\bam to go to the directory where the
program of the omutool is saved on the original active OMU.
8. Run the ./omutool dualmode dual command on the original active OMU to set the
working mode of the OMU to active/standby mode.
9. Run the net start omud command to start the omud on the original active OMU.
10. Five minutes after the original active OMU has been started, start the omud on the
standby OMU.
CAUTION
You should start the standby OMU 5 minutes after the active OMU is started to keep
the two OMUs from competing for the active state. This helps avoid data loss.
11. Change the operating system password on the standby OMU to that of the original
active OMU by referring to Changing the Administrator Password of the
Operating System.
12. Run the ADD BRD command on the LMT to add an OMUa or OMUc board.
13. Run the MML command DSP OMU on the LMT and check whether the value for
Data-sync state is Data synchronization is successful.
14. Connect an Ethernet cable to the Ethernet port on the added OMU.
l Switching the OMU from the independent mode to the active/standby mode (product
software are installed on the OMU to be added).
1. Log in to the original active OMU by using the fixed external IP address by referring
to 7.2.1 Logging In to the OMU.
2. Choose Start > Run. Enter the cmd command to enter the command mode of the
OMU on the original active OMU.
3. Run the net stop omud command to stop the omud on the original active OMU.
4. Enter cd /d d:\mbsc\bam\version_a\bin\bam to go to the directory where the
program of the omutool is saved on the original active OMU.
5. Run the ./omutool dualmode dual command on the original active OMU to set the
working mode of the OMU to active/standby mode.
6. Run the net start omud command to start the omud on the original active OMU.
7. Insert an OMUa/OMUc board in the standby slot 5 minutes after the original active
OMU is started.
BSC6900 UMTS
OMU Administration Guide 7 OMU Installation and Maintenance (Windows)
Issue 02 (2015-05-08) Huawei Proprietary and Confidential
Copyright © Huawei Technologies Co., Ltd.
269

8/18/2019 Bsc6900 Umts Omu Administration Guide(v900r017c10_02)(PDF)-En
http://slidepdf.com/reader/full/bsc6900-umts-omu-administration-guidev900r017c1002pdf-en 279/310
CAUTION
You should start the standby OMU 5 minutes after the active OMU is started to keep
the two OMUs from competing for the active state. This helps avoid data loss.
8. Set the working mode of the standby OMU to active/standby mode by repeating Step
1 through Step 5.
9. Change the IP addresses and subnet masks of the standby OMU to ensure that the
fixed internal IP addresses, fixed external IP addresses, and IP address of the backup
channel between active and standby of OMUs comply with the planning principle for
the IP addresses and do not conflict with each other. For details about changing IP
addresses, see Changing IP Addresses and Subnet Masks of OMU Ethernet
Adapters.
10. Start the omud on the standby OMU.11. Change the operating system password on the standby OMU to that of the original
active OMU by referring to Changing the Administrator Password of the
Operating System.
12. Run the ADD BRD command on the LMT to add an OMUa or OMUc board.
13. Run the MML command DSP OMU on the LMT and check whether the value for
Data-sync state is Data synchronization is successful.
14. Connect an Ethernet cable to the Ethernet port on the added OMU.
l Change the working mode of the OMU from active/standby mode to independent mode.
1. Run the RMV BRD command on the LMT to remove an OMUa or OMUc board.
2. Log in to the active and standby OMUs by using the fixed external IP address by
referring to 7.2.1 Logging In to the OMU.
3. Choose Start > Run. Enter the cmd command to enter the command mode of the
OMU on the active and standby OMUs.
4. Run the net stop omud command to stop the omud on the active and standby OMUs.
5. Run the poweroff command on the OMU to be removed to power off the OMU.
6. Remove the OMUa/OMUc board to be removed by referring to step 2 to step 5
inScenario: Old and New OMU Boards Running the Same OS.
7. Enter cd /d d:\mbsc\bam\version_a\bin\bam to go to the directory where the
program of the omutool is saved on the active OMU.
8. Run the ./omutool dualmode single command on the working OMU to set the
working mode of the OMU to single-OMU mode.
9. Run the net start omud command to start the omud on the active OMU.
----End
Changing IP Addresses and Subnet Masks of OMU Ethernet Adapters
This section describes how to change the IP addresses and subnet masks of OMU Ethernet
adapters using omutool.
BSC6900 UMTS
OMU Administration Guide 7 OMU Installation and Maintenance (Windows)
Issue 02 (2015-05-08) Huawei Proprietary and Confidential
Copyright © Huawei Technologies Co., Ltd.
270
8/18/2019 Bsc6900 Umts Omu Administration Guide(v900r017c10_02)(PDF)-En
http://slidepdf.com/reader/full/bsc6900-umts-omu-administration-guidev900r017c1002pdf-en 280/310
Context
l If the OMUs work in active/standby mode, change the IP addresses and subnet masks of
the Ethernet adapters on both the active and standby OMUs. You are advised to first change
the IP addresses and subnet masks of the Ethernet adapters for the standby OMU and then
change those for the active OMU.
l The following procedure assumes that version_a is the OMU active workspace. Run the
LST OMUAREA command to query the OMU active workspace.
l This task describes how to change all the IP addresses and subnet masks of an OMU. You
can perform these steps based on the onsite IP address plan.
NOTE
l Single-OMU mode: Stop the omud before the change and restart the omud after the change.
l Dual-OMU mode: Stop the standby omud and then the active omud before the change. Restart the
active omud and then the standby omud after the change.
Procedure
Step 1 Log in to the OMU by referring to the procedures described in 7.2.1 Logging In to the OMU.
Step 2 Choose Start > Run. Enter the cmd command to enter the command mode of the OMU.
Step 3 Run the net stop omud command to stop the omud.
Step 4 Enter cd /d d:\mbsc\bam\version_a\bin\bam to go to the directory where the program of the
omutool is saved.
Step 5 Execute omutool dispipinfo to query the IP address and subnet mask of the OMU.
For example, you can enter the following command:omutool dispipinfo
Step 6 Execute omutool innercard IP address to change the internal fixed IP address.
For example, you can enter the following command:omutool innercard 80.168.3.60
Step 7 Execute omutool innervip IP address to change the internal virtual IP address.
For example, you can enter the following command:omutool innervip 80.168.3.40
NOTE
l The network segments of the internal fixed and virtual IP addresses must be the same. If they become
different after a change of either one, you will be prompted to change the other one to keep them consistent.
l When you change the internal fixed and virtual IP addresses, the corresponding subnet masks are created
automatically.
l After the OMU software starts, the system automatically updates the first two network segments of the
internal fixed IP address to the configured network segments. If you are changing the internal fixed and
virtual IP addresses for the first time, perform the following additional steps:
1. Run the SET SUBNET command to set the BSC6900 subnet number to be consistent with the internal
fixed IP address set in the previous step.
2. Run the RST OMU command to perform soft resets on the active and standby OMU boards.
After the preceding steps are performed, the OMU can communicate with the BSC6900 host normally.
Step 8Execute omutool extercard IP address subnet mask (gateway IP address) to change the external
fixed IP address and subnet mask.
BSC6900 UMTS
OMU Administration Guide 7 OMU Installation and Maintenance (Windows)
Issue 02 (2015-05-08) Huawei Proprietary and Confidential
Copyright © Huawei Technologies Co., Ltd.
271

8/18/2019 Bsc6900 Umts Omu Administration Guide(v900r017c10_02)(PDF)-En
http://slidepdf.com/reader/full/bsc6900-umts-omu-administration-guidev900r017c1002pdf-en 281/310
For example, you can enter the following command:omutool extercard 10.161.10.100 255.255.255.0
NOTICE
Before changing the external fixed IP address, external virtual IP address, and external gateway
IP address, log in to the OMU using the commissioning IP address at the local end.
Step 9 Execute ./omutool extervip IP address subnet mask (gateway IP address) to change the external
virtual IP address and subnet mask.
For example, you can enter the following command:omutool extervip 10.161.10.102 255.255.255.0
NOTE
l After the external virtual IP address and subnet mask are changed, start the omud, and run the RMV
EMSIP command and then the ADD EMSIP command to change the external virtual IP address and subnet
mask that are recorded in the OMU database.
l The network segments of the external fixed and virtual IP addresses must be the same. If they become
different after a change of either one, you will be prompted to change the other one to keep them consistent.
l Changing the external fixed IP address, external virtual IP address, and gateway IP address will interrupt
remote login to OMU. You must use a new external fixed or virtual IP address to recover the communication.
Step 10 Execute omutool gateway gateway IP address to change the gateway IP address.
For example, you can enter the following command:omutool gateway 10.161.10.1
NOTE
While you are changing the external fixed or virtual IP address, change the gateway IP address simultaneously.
The related commands are as follows:
l omutool extercard IP address Subnet mask Gateway IP address used to change the external fixed IP address
and gateway IP address simultaneously
l omutool extervip IP address Subnet mask Gateway IP address used to change the external virtual IP address
and gateway IP address simultaneously
Step 11 Change the backup channel IP address of the active and standby OMUs using the commands
listed in the following table.
Option Description
Backup channel IP address of the
active and standby OMUs on the
Ethernet adapter ETH3-UPDATE of
the OMUa board
omutool backupcard IP address.
For example, you can enter the following
command:omutool backupcard 192.168.3.60
Backup channel IP address of the
active and standby OMUs on the
Ethernet adapter B_UPDATE0 of the
OMUc board
omutool backupcard IP address.
For example, you can enter the following
command:
omutool backupcard_for_omuc 192.168.9.60
BSC6900 UMTS
OMU Administration Guide 7 OMU Installation and Maintenance (Windows)
Issue 02 (2015-05-08) Huawei Proprietary and Confidential
Copyright © Huawei Technologies Co., Ltd.
272
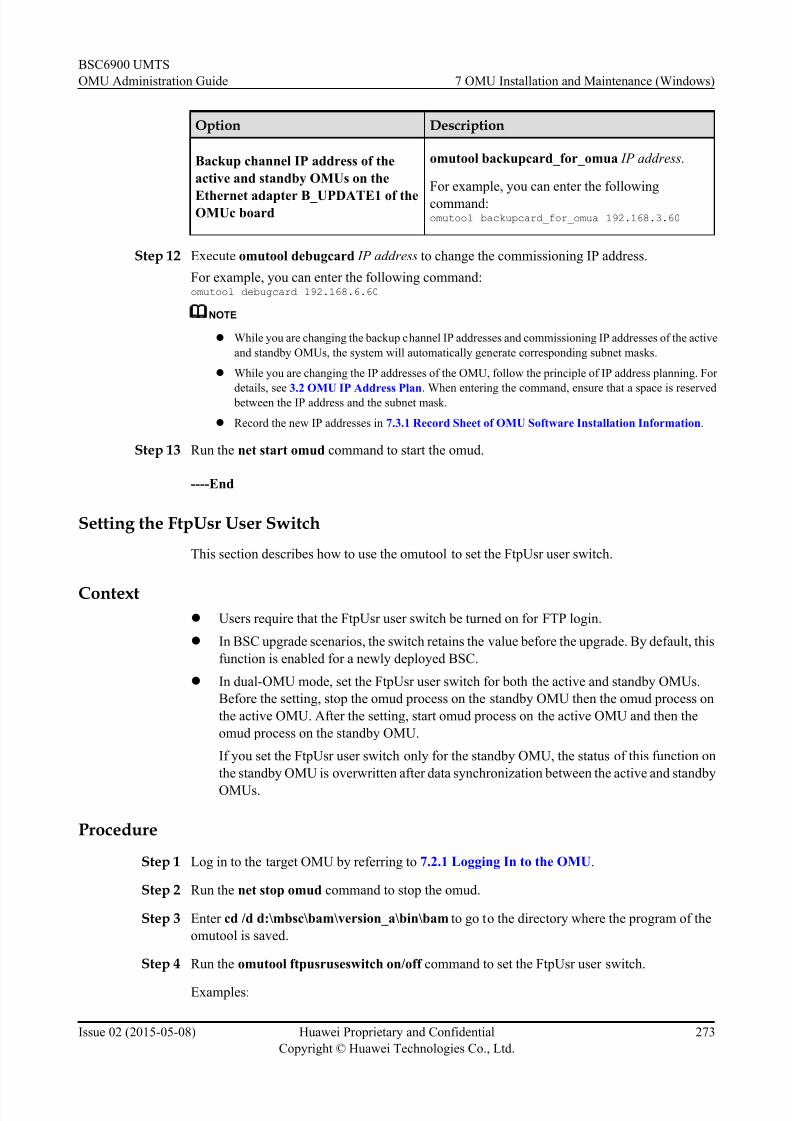
8/18/2019 Bsc6900 Umts Omu Administration Guide(v900r017c10_02)(PDF)-En
http://slidepdf.com/reader/full/bsc6900-umts-omu-administration-guidev900r017c1002pdf-en 282/310
Option Description
Backup channel IP address of the
active and standby OMUs on the
Ethernet adapter B_UPDATE1 of theOMUc board
omutool backupcard_for_omua IP address.
For example, you can enter the following
command:omutool backupcard_for_omua 192.168.3.60
Step 12 Execute omutool debugcard IP address to change the commissioning IP address.
For example, you can enter the following command:omutool debugcard 192.168.6.60
NOTE
l While you are changing the backup channel IP addresses and commissioning IP addresses of the active
and standby OMUs, the system will automatically generate corresponding subnet masks.
l While you are changing the IP addresses of the OMU, follow the principle of IP address planning. For
details, see 3.2 OMU IP Address Plan. When entering the command, ensure that a space is reserved between the IP address and the subnet mask.
l Record the new IP addresses in 7.3.1 Record Sheet of OMU Software Installation Information.
Step 13 Run the net start omud command to start the omud.
----End
Setting the FtpUsr User Switch
This section describes how to use the omutool to set the FtpUsr user switch.
Contextl Users require that the FtpUsr user switch be turned on for FTP login.
l In BSC upgrade scenarios, the switch retains the value before the upgrade. By default, this
function is enabled for a newly deployed BSC.
l In dual-OMU mode, set the FtpUsr user switch for both the active and standby OMUs.
Before the setting, stop the omud process on the standby OMU then the omud process on
the active OMU. After the setting, start omud process on the active OMU and then the
omud process on the standby OMU.
If you set the FtpUsr user switch only for the standby OMU, the status of this function on
the standby OMU is overwritten after data synchronization between the active and standby
OMUs.
Procedure
Step 1 Log in to the target OMU by referring to 7.2.1 Logging In to the OMU.
Step 2 Run the net stop omud command to stop the omud.
Step 3 Enter cd /d d:\mbsc\bam\version_a\bin\bam to go to the directory where the program of the
omutool is saved.
Step 4 Run the omutool ftpusruseswitch on/off command to set the FtpUsr user switch.
Examples:
BSC6900 UMTS
OMU Administration Guide 7 OMU Installation and Maintenance (Windows)
Issue 02 (2015-05-08) Huawei Proprietary and Confidential
Copyright © Huawei Technologies Co., Ltd.
273

8/18/2019 Bsc6900 Umts Omu Administration Guide(v900r017c10_02)(PDF)-En
http://slidepdf.com/reader/full/bsc6900-umts-omu-administration-guidev900r017c1002pdf-en 283/310
l Turn on the FtpUsr user switch
Run the omutool ftpusruseswitch on command and press Enter.
l Turn off the FtpUsr user switch
Run the omutool ftpusruseswitch off command and press Enter.l Query the status of the FtpUsr user switch
Run the omutool ftpusruseswitch command and press Enter.
Step 5 Run the net start omud command to start the omud.
----End
7.3 Appendix: OMU-Related Information Tables
This section describes the tables which record the OMU information required for routine
operation and maintenance.
7.3.1 Record Sheet of OMU Software Installation Information
This section provides information records of OMU software installation. The information
records involve parameter configurations during OMU installation.
Record Sheet of OMU Operating System Installation Information
Item Setting Information Installation Personnel
Computer name (activeOMU)
Administrator password
(active OMU)
Computer name (standby
OMU)
Administrator password
(standby OMU)
Records of the IP Addresses of the OMU Ethernet Adapter Teams
Item Setting Information Installation Personnel
Internal IP address (subnet
mask) of the active OMU
External IP address (subnet
mask) of the active OMU
Internal IP address (subnet
mask) of the standby OMU
BSC6900 UMTS
OMU Administration Guide 7 OMU Installation and Maintenance (Windows)
Issue 02 (2015-05-08) Huawei Proprietary and Confidential
Copyright © Huawei Technologies Co., Ltd.
274

8/18/2019 Bsc6900 Umts Omu Administration Guide(v900r017c10_02)(PDF)-En
http://slidepdf.com/reader/full/bsc6900-umts-omu-administration-guidev900r017c1002pdf-en 284/310
Item Setting Information Installation Personnel
External IP address (subnet
mask) of the standby OMU
Backup channel IP address
(subnet mask) of the active
OMU
Backup channel IP address
(subnet mask) of the standby
OMU
Debugging IP address
(subnet mask) of the active
OMU
Debugging IP address(subnet mask) of the standby
OMU
Default gateway
Records of the Product Software Installation Information
Item Setting Information Installation Personnel
Administrator (admin) password
Password of the FTP user
(FtpUsr)
Internal virtual IP address
External virtual IP address
Local office name
For details, see Record Sheet of OMU Software Installation Information.
7.3.2 Checklist for the OMU Software Factory Settings
This section provides a checklist for the OMU software factory settings. The checklist records
software installation and configurations before OMU delivery.
BSC6900 UMTS
OMU Administration Guide 7 OMU Installation and Maintenance (Windows)
Issue 02 (2015-05-08) Huawei Proprietary and Confidential
Copyright © Huawei Technologies Co., Ltd.
275

8/18/2019 Bsc6900 Umts Omu Administration Guide(v900r017c10_02)(PDF)-En
http://slidepdf.com/reader/full/bsc6900-umts-omu-administration-guidev900r017c1002pdf-en 285/310
Checklist for the OMU Software Factory Settings
Item Status
RAID 1 relationship between two SAS hard
disks on the OMUa board
Set
Windows Server 2003 Installed, with the administrator passwords
on the active and standby OMU boards set to
11111111
License for Windows Server 2003 Activated
IPMI driver program Installed
Memory diagnosis driver program based on
Windows
Installed
Routing and Remote Access service Started, with Start Type set to Automatic.
By default, the processes DHCP Relay
Agent and NAT/Basic Firewall are removed
before the OMU delivery. If the processes are
started during the OMU maintenance, you
must remove them by choosing Start > All
Programs > Administrative tools >
Routing and Remote Access.
Windows Time service Disabled
Computer Browser service Disabled
Terminal Services Started, with Start Type set to Automatic.
Remote login property Enabled
Intel 82571 Ethernet adapter binding driver
program
Installed
BACS Ethernet adapter binding driver
program
Installed
Commissioning IP addresses of the active and
standby OMUs
Set
The factory setting for the commissioning IPaddress of the active OMU is 192.168.6.50
(255.255.255.0).
The factory setting for the commissioning IP
address of the standby OMU is 192.168.6.60
(255.255.255.0).
iPSI SEK SetWin software Installed
For details, see Checklist for the OMU Software Factory Settings.
BSC6900 UMTS
OMU Administration Guide 7 OMU Installation and Maintenance (Windows)
Issue 02 (2015-05-08) Huawei Proprietary and Confidential
Copyright © Huawei Technologies Co., Ltd.
276

8/18/2019 Bsc6900 Umts Omu Administration Guide(v900r017c10_02)(PDF)-En
http://slidepdf.com/reader/full/bsc6900-umts-omu-administration-guidev900r017c1002pdf-en 286/310
7.3.3 Enabled Ports on the OMU
This section lists the mapping between enabled ports on the OMU and the services provided by
the product software.
For details about the communication ports on the OMU, see BSC6900 Communication Matrix.
7.3.4 Disabled Ports on the OMU
This section provides ports that are disabled on an OMU. For the sake of OMU security, an
OMU automatically disables the ports that are not used.
Protocol Port No. Service Description
TCP 135 Port 135 is used for the services that comply with
the Remote Procedure Call (RPC) protocol and
for the Distributed Components Object Mode
(DCOM) services.
UDP 138 Port 138 is used for the browsing of NetBIOS
and displaying all the PCs in the network.
UDP 139 Port 139 is used for the NetBIOS Session
Service, that is, the Windows file and printer
sharing and the Samba service in the Unix
system. To share Windows files in the local area
network (LAN), the service must be used.
UDP 445 Port 445 is used for the NetBIOS Session
Service, that is, the Windows file and printer sharing and the Samba service in the Unix
system. To share Windows files in the LAN, the
service must be used.
For details, see Disabled Ports on the OMU.
BSC6900 UMTS
OMU Administration Guide 7 OMU Installation and Maintenance (Windows)
Issue 02 (2015-05-08) Huawei Proprietary and Confidential
Copyright © Huawei Technologies Co., Ltd.
277

8/18/2019 Bsc6900 Umts Omu Administration Guide(v900r017c10_02)(PDF)-En
http://slidepdf.com/reader/full/bsc6900-umts-omu-administration-guidev900r017c1002pdf-en 287/310
8 Troubleshooting
About This Chapter
This chapter describes OMU faults and troubleshooting methods.
8.1 Restoring the OMU Operating System in One-Click Mode
This section describes how to use a keyboard and monitor to restore the OMU operating system
(OS) when the OMU OS is faulty.
8.2 Handling Loss of the Password of User root
This section describes how to handle the loss of the password of user root.
BSC6900 UMTS
OMU Administration Guide 8 Troubleshooting
Issue 02 (2015-05-08) Huawei Proprietary and Confidential
Copyright © Huawei Technologies Co., Ltd.
278
8/18/2019 Bsc6900 Umts Omu Administration Guide(v900r017c10_02)(PDF)-En
http://slidepdf.com/reader/full/bsc6900-umts-omu-administration-guidev900r017c1002pdf-en 288/310
8.1 Restoring the OMU Operating System in One-Click
ModeThis section describes how to use a keyboard and monitor to restore the OMU operating system
(OS) when the OMU OS is faulty.
Prerequisites
l The OMU OS is Dopra Linux V200R003C08SPC080 or later.
l The keyboard connected to the USB port and the monitor connected to the VGA port have
been obtained.
ContextThe OMU OS can start the startup menu for logging in to the OS. Otherwise, this feature cannot
be used to restore the OS.
Procedure
Step 1 Connect the keyboard and monitor to the OMU.
1. Connect the keyboard to the USB port on the OMU.
2. Connect the monitor to the VGA port on the OMU.
Step 2 Start the server.
1. Reset the OMU using the two ejector levers.
NOTE
l To reset the OMU, do as follows: Turn outwards the ejector levers until the OFFLINE indicator
is ON steady. Then, turn inwards the ejector levers to restart the OMU
l Do not use the RESET button and SHUTDOWN button on the OMU panel to reset or power off
the OMU.
2. The OMU enters the startup menu of the OS.
After the OMU enters the startup menu of the OS, startup options such as
V200R003C08SPC080.****** and V200R003C08SPC080.******.recover are
displayed.
NOTE
l V200R003C08SPC080 in the startup menu title of the OS is the version of the OS. The version
varies depending on the actual OS.
Step 3 Restore the OS.
1. Use arrow keys or the Page Up and PageDown keys to select recover. For example, select
V200R003C08SPC080.******.recover.
2. Enter the user name root and its password (default password: osadmin@123). OS
restoration starts after about 5s.
After OS restoration, the restored OS is automatically displayed.
BSC6900 UMTS
OMU Administration Guide 8 Troubleshooting
Issue 02 (2015-05-08) Huawei Proprietary and Confidential
Copyright © Huawei Technologies Co., Ltd.
279
8/18/2019 Bsc6900 Umts Omu Administration Guide(v900r017c10_02)(PDF)-En
http://slidepdf.com/reader/full/bsc6900-umts-omu-administration-guidev900r017c1002pdf-en 289/310
NOTE
l If you do not manually select the startup option, the default OS is displayed after 10s.
l If the arrow keys cannot be used, use the Page Up and Page Down keys to select the required options.
l After the OS is restored, the user name and password are restored to factory settings. The password of
user lgnusr is osnormal@123 and the password of user root is osadmin@123.
l After the OS is restored, the computer name is restored to the factory settings as follows:
l The default computer name of the OMUa, OMUb, or OMUc boards is Jasper.
Step 4 (Optional) Set the startup menu password of the OS again.
1. After the OS is started, log in to the OMU using the PuTTY.
2. Run the grub-sha512-crypt command to change the startup menu password of the OS.
NOTE
The password complexity must meet the following requirements:
l The password must contain at least eight characters.
l The password must contain at least two types of the following characters: uppercase letters,
lowercase letters, digits, and other characters.
----End
Exception Handling
Step 1 Log in to the OMU by using the PuTTY. If the login fails, a fault that cannot be rectified using
the feature is generated. In this case, use the USB flash drive to reinstall the OS or replace the
board.
Step 2 Restart the OMU software process and check whether the OMU software can be successfully
started. If not, reinstall the OMU software.
Step 3 Log in to the LMT to check whether the server data is consistent with the LMT data. If not,
configure the BSC based on correct data.
----End
8.2 Handling Loss of the Password of User root
This section describes how to handle the loss of the password of user root.
Prerequisites
For the Dopra Linux OS, if the password of user root is lost, you cannot log in to the OMU.
Context
To ensure system security, the password of user root cannot be retrieved once it is lost. In this
situation, reinstall the OMU OS.
BSC6900 UMTS
OMU Administration Guide 8 Troubleshooting
Issue 02 (2015-05-08) Huawei Proprietary and Confidential
Copyright © Huawei Technologies Co., Ltd.
280

8/18/2019 Bsc6900 Umts Omu Administration Guide(v900r017c10_02)(PDF)-En
http://slidepdf.com/reader/full/bsc6900-umts-omu-administration-guidev900r017c1002pdf-en 290/310
Procedure
Step 1 If the password of user root is lost, reinstall the Dopra Linux OS. For details, see
Preparations and Optional: Installing the Operating System and Product Software.
----End
BSC6900 UMTS
OMU Administration Guide 8 Troubleshooting
Issue 02 (2015-05-08) Huawei Proprietary and Confidential
Copyright © Huawei Technologies Co., Ltd.
281
8/18/2019 Bsc6900 Umts Omu Administration Guide(v900r017c10_02)(PDF)-En
http://slidepdf.com/reader/full/bsc6900-umts-omu-administration-guidev900r017c1002pdf-en 291/310
9 Configuring OMU Security Functions
About This Chapter
This section describes how to configure OMU security function to improve the security of the
BSC6900.
9.1 Enhancing Security of the OMU Operating System
This section describes how to enhance the security of the OMU operating system (OS).
9.2 Configuring OMU Route Forwarding
This section describes how to configure the OMU route forwarding function. This function helps
monitor the OMU OS security.
9.3 Disabling Root User Login to an OMU Using SSH
This section describes how to disable root user login to an OMU using SSH to improve the
security of the BSC6900.
9.4 Configuring Non-Root User Execution of OMU Processes
This section describes how to configure non-root user execution of OMU processes to improve
OMU security.
9.5 Enhancing Security of Time Synchronization with NTP
This section describes how to enhance security of time synchronization with Network Time
Protocol (NTP). NTP messages are authenticated by configuring encryption algorithms and
cipher key on the client and server. This way, the security of time synchronization with NTP is
enhanced for the BSC6900.
9.6 Enabling OS File Integrity Check
This section describes how to enable the operating system (OS) file integrity check. This function
is used to monitor the security of the OMU OS.
9.7 Configuring Real-Time Recording of OS Access Information
This section describes how to configure real-time recording of OMU operating system (OS)
access information when users log in to or out of the OMU OS. This function helps monitor the
OMU OS security.
9.8 Setting the Password Policy of the Operating System
This section describes how to set the password policy of the operating system to improve the
security of the BSC6900.
BSC6900 UMTS
OMU Administration Guide 9 Configuring OMU Security Functions
Issue 02 (2015-05-08) Huawei Proprietary and Confidential
Copyright © Huawei Technologies Co., Ltd.
282

8/18/2019 Bsc6900 Umts Omu Administration Guide(v900r017c10_02)(PDF)-En
http://slidepdf.com/reader/full/bsc6900-umts-omu-administration-guidev900r017c1002pdf-en 292/310
9.9 Setting the User Event Reservation Policy
This section describes how to set the user event reservation policy so that the OMU can
periodically monitor trace files and CHP/MR files. This function enhances security of user data.
9.10 BSC6900 User Account List
BSC6900 UMTS
OMU Administration Guide 9 Configuring OMU Security Functions
Issue 02 (2015-05-08) Huawei Proprietary and Confidential
Copyright © Huawei Technologies Co., Ltd.
283

8/18/2019 Bsc6900 Umts Omu Administration Guide(v900r017c10_02)(PDF)-En
http://slidepdf.com/reader/full/bsc6900-umts-omu-administration-guidev900r017c1002pdf-en 293/310
9.1 Enhancing Security of the OMU Operating System
This section describes how to enhance the security of the OMU operating system (OS).
Procedure
Step 1 Visit http://support.huawei.com/carrier and log in using the account of a Huawei engineer.
Choose Support > Tools > Mini-tool Software > Wireless Product Line > Security Tools
> public to obtain Guide to Enhancing the BSC6900 Operating System.
Step 2 Enhance system security by referring to Guide to Enhancing the BSC6900 Operating System.
----End
9.2 Configuring OMU Route Forwarding This section describes how to configure the OMU route forwarding function. This function helps
monitor the OMU OS security.
9.2.1 Configuring OMU Route Forwarding in the Dopra Linux OS
This section describes how to enable or disable the route forwarding function of the OMU that
runs the Dopra Linux OS.
Prerequisitesl The current software version is BSC6900V900R013C00SPH529 or later.
l The OMU is running properly.
Context
This operation only applies to Dopra Linux V2.
This section assumes that the active workspace of an OMU uses version_a. To query the version
for the active workspace of the current OMU, run the LST OMUAREA command.
Procedurel Disabling OMU route forwarding
NOTE
l The OMU route forwarding cannot be disabled if it is required on the live network. For example, do
not disable the OMU route forwarding when NodeBs are maintained by the U2000 using BSC routes.
Otherwise, remote O&M channels for NodeBs will be disconnected.
l The OMU route forwarding is enabled by default.
1. Log in to the OMU. For details, see 6.3.1 Logging In to the OMU.
2. Enter cd /mbsc/bam/version_a/bin/bam to go to the directory where the
ip_forward.sh script is saved.
3. Enter chmod +x root_login.sh to make the ip_forward.sh script executable.
BSC6900 UMTS
OMU Administration Guide 9 Configuring OMU Security Functions
Issue 02 (2015-05-08) Huawei Proprietary and Confidential
Copyright © Huawei Technologies Co., Ltd.
284

8/18/2019 Bsc6900 Umts Omu Administration Guide(v900r017c10_02)(PDF)-En
http://slidepdf.com/reader/full/bsc6900-umts-omu-administration-guidev900r017c1002pdf-en 294/310
4. Enter ./ip_forward.sh disable to disable the OMU route forwarding.
l Enabling OMU route forwarding
1. Log in to the OMU.
2. Enter cd /mbsc/bam/version_a/bin/bam to go to the directory where theip_forward.sh script is saved.
3. Enter chmod +x root_login.sh to make the ip_forward.sh script executable.
4. Enter ./ip_forward.sh enable to enable the OMU route forwarding.
l Querying the status of OMU route forwarding
1. Log in to the OMU.
2. Enter cd /mbsc/bam/version_a/bin/bam to go to the directory where the
ip_forward.sh script is saved.
3. Enter chmod +x root_login.sh to make the ip_forward.sh script executable.
4. Enter ./ip_forward.sh status to query the status of OMU route forwarding.
NOTE
Parameter description
l Configuration status indicates the OMU route forwarding status to be configured.
l Actual status indicates the status of OMU route forwarding.
l enabled indicates that OMU route forwarding is enabled. disabled indicates that OMU route
forwarding is disabled.
----End
Example
Disabling OMU route forwarding
omucc_68 ~ # cd /mbsc/bam/version_a/bin/bam
omucc_68 /mbsc/bam/version_a/bin/bam # chmod +x ip_forward.sh
omucc_68 /mbsc/bam/version_a/bin/bam # ./ip_forward.sh disable
Disabling ip forward done
Enabling OMU route forwarding
omucc_68 ~ # cd /mbsc/bam/version_a/bin/bam
omucc_68 /mbsc/bam/version_a/bin/bam # chmod +x ip_forward.shomucc_68 /mbsc/bam/version_a/bin/bam # ./ip_forward.sh enable
Enabling ip forward done
Querying the status of OMU route forwarding
omucc_68 ~ # cd /mbsc/bam/version_a/bin/bam
omucc_68 /mbsc/bam/version_a/bin/bam # chmod +x ip_forward.sh
omucc_68 /mbsc/bam/version_a/bin/bam # ./ip_forward.sh status
Configuration status: enabled Actual status: enabled
Follow-up Procedure
1. Record the status of OMU route forwarding.
BSC6900 UMTS
OMU Administration Guide 9 Configuring OMU Security Functions
Issue 02 (2015-05-08) Huawei Proprietary and Confidential
Copyright © Huawei Technologies Co., Ltd.
285

8/18/2019 Bsc6900 Umts Omu Administration Guide(v900r017c10_02)(PDF)-En
http://slidepdf.com/reader/full/bsc6900-umts-omu-administration-guidev900r017c1002pdf-en 295/310
9.2.2 Configuring OMU Route Forwarding in the Windows OS
This section describes how to enable or disable the route forwarding function of the OMU that
runs the Windows OS.
Prerequisites
The OMU is working properly.
Procedure
l Disabling OMU route forwarding
NOTE
l The OMU route forwarding cannot be disabled if it is required on the live network. For example:
1. Do not disable the OMU route forwarding when NodeBs are maintained by the U2000 using BSC
routes. Otherwise, remote O&M channels for NodeBs will be disconnected2. Do not disable the OMU route forwarding when the BSC6900 is configured with a management
entity (ME). Otherwise, remote O&M channels for the ME will be disconnected.
l The OMU route forwarding is disabled by default.
1. Log in to the OMU. For details, see 7.2.1 Logging In to the OMU.
2. Choose Start > Run, and enter regedit to enter the OMU OS registry editor.
3. Choose HKEY_LOCAL_MACHINE > SYSTEM > CurrentControlSet >
services > Tcpip > Parameters. In the displayed pane, right-click
IPEnableRouter.
4. Choose Modify from the shortcut menu. Change the key value of IPEnableRouter
to 0.
NOTE
The key values of IPEnableRouter are described as follows:0 indicates that the OMU route
forwarding function is disabled.1 indicates that the OMU route forwarding function is enabled.
l Enabling OMU route forwarding
1. Log in to the OMU.
2. Choose Start > Run, and enter regedit to enter the OMU OS registry editor.
3. Choose HKEY_LOCAL_MACHINE > SYSTEM > CurrentControlSet >
services > Tcpip > Parameters. In the displayed pane, right-click
IPEnableRouter.
4. Choose Modify from the shortcut menu. Change the key value of IPEnableRouterto 1.
----End
Follow-up Procedure
1. Record the status of OMU route forwarding.
9.3 Disabling Root User Login to an OMU Using SSH
This section describes how to disable root user login to an OMU using SSH to improve the
security of the BSC6900.
BSC6900 UMTS
OMU Administration Guide 9 Configuring OMU Security Functions
Issue 02 (2015-05-08) Huawei Proprietary and Confidential
Copyright © Huawei Technologies Co., Ltd.
286

8/18/2019 Bsc6900 Umts Omu Administration Guide(v900r017c10_02)(PDF)-En
http://slidepdf.com/reader/full/bsc6900-umts-omu-administration-guidev900r017c1002pdf-en 296/310

8/18/2019 Bsc6900 Umts Omu Administration Guide(v900r017c10_02)(PDF)-En
http://slidepdf.com/reader/full/bsc6900-umts-omu-administration-guidev900r017c1002pdf-en 297/310
2. Enter passwd. You are prompted to change the password.
3. Type the original and new passwords. The password is changed.
NOTE
lYou are advised to change the OS administrator password after your first login and again changethe password every three months.
l The password for the OS administrator must comply with the password policy returned by
running the DSP OSPWDPOLICY command. The password policy can be set by running the
SET OSPWDPOLICY command.
l Switching from a common user account or a lgnusr user account to a root user account
1. Log in to the OMU as a common user or lgnusr user.
2. Enter su. You are prompted to type the password.
3. Enter the root user password to switch the user account from common user or lgnusr
user to root user.
lQuerying user information on the OMU1. Log in to the OMU as a common user, lgnusr user or root user.
2. Enter cat /etc/passwd to query the information of all users.
l Deleting a common user account
NOTE
l To delete a common user account, you must have a root user account.
l A common user account in use cannot be deleted.
l If no other common users are allowed to log in to the OMU using SSH, the lgnusr user cannot be
deleted.
1. Log in to the OMU as a common user, lgnusr user or root user.NOTE
If you have logged in to the OMU as a common user or lgnusr user, re-log in to the OMU as a root
user before deleting the common user account.
2. Enter userdel -r User Name to delete the account.
l Enabling root user login to the OMU using SSH
1. Log in to the OMU as a common user or lgnusr user.
2. Switch a common user or lgnusr user to a root user.
3. Enter cd /mbsc/bam/version_a/bin/bam to go to the directory where the
root_login.sh script is saved.4. Enter chmod +x root_login.sh to make the root_login.sh script executable.
5. Enter ./root_login.sh enable. The message Enable root user login, are you sure?
[y/n]: is displayed. Enter y to enable root user login to the OMU using SSH.
l Querying the status of root user login to the OMU using SSH
1. Log in to the OMU as a root user.
2. Enter cd /mbsc/bam/version_a/bin/bam to go to the directory where the
root_login.sh script is saved.
3. Enter chmod +x root_login.sh to make the root_login.sh script executable.
4. Enter ./root_login.sh status to query the status of root user login to the OMU using
SSH.
BSC6900 UMTS
OMU Administration Guide 9 Configuring OMU Security Functions
Issue 02 (2015-05-08) Huawei Proprietary and Confidential
Copyright © Huawei Technologies Co., Ltd.
288
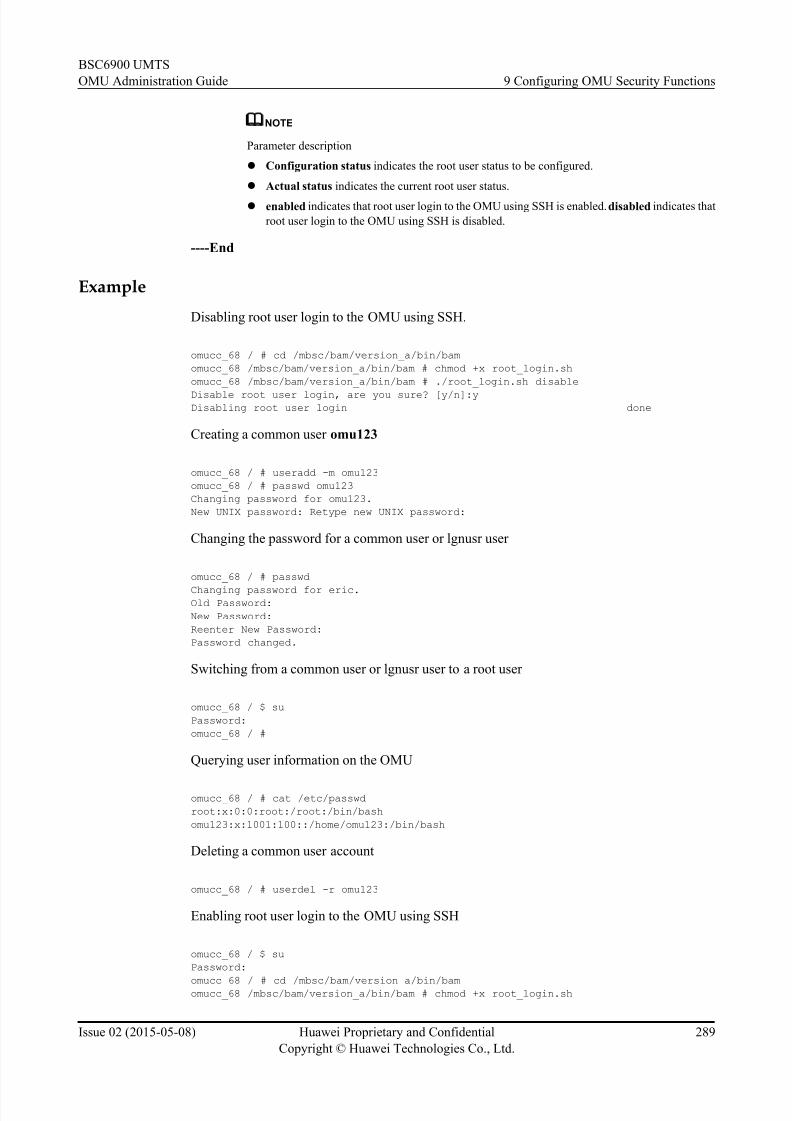
8/18/2019 Bsc6900 Umts Omu Administration Guide(v900r017c10_02)(PDF)-En
http://slidepdf.com/reader/full/bsc6900-umts-omu-administration-guidev900r017c1002pdf-en 298/310
NOTE
Parameter description
l Configuration status indicates the root user status to be configured.
l Actual status indicates the current root user status.
l enabled indicates that root user login to the OMU using SSH is enabled. disabled indicates that
root user login to the OMU using SSH is disabled.
----End
Example
Disabling root user login to the OMU using SSH.
omucc_68 / # cd /mbsc/bam/version_a/bin/bam
omucc_68 /mbsc/bam/version_a/bin/bam # chmod +x root_login.sh
omucc_68 /mbsc/bam/version_a/bin/bam # ./root_login.sh disable
Disable root user login, are you sure? [y/n]:yDisabling root user login done
Creating a common user omu123
omucc_68 / # useradd -m omu123
omucc_68 / # passwd omu123
Changing password for omu123.
New UNIX password: Retype new UNIX password:
Changing the password for a common user or lgnusr user
omucc_68 / # passwd
Changing password for eric.Old Password:
New Password:
Reenter New Password:
Password changed.
Switching from a common user or lgnusr user to a root user
omucc_68 / $ su
Password:
omucc_68 / #
Querying user information on the OMU
omucc_68 / # cat /etc/passwd
root:x:0:0:root:/root:/bin/bash
omu123:x:1001:100::/home/omu123:/bin/bash
Deleting a common user account
omucc_68 / # userdel -r omu123
Enabling root user login to the OMU using SSH
omucc_68 / $ su
Password:
omucc_68 / # cd /mbsc/bam/version_a/bin/bamomucc_68 /mbsc/bam/version_a/bin/bam # chmod +x root_login.sh
BSC6900 UMTS
OMU Administration Guide 9 Configuring OMU Security Functions
Issue 02 (2015-05-08) Huawei Proprietary and Confidential
Copyright © Huawei Technologies Co., Ltd.
289

8/18/2019 Bsc6900 Umts Omu Administration Guide(v900r017c10_02)(PDF)-En
http://slidepdf.com/reader/full/bsc6900-umts-omu-administration-guidev900r017c1002pdf-en 299/310
omucc_68 /mbsc/bam/version_a/bin/bam # ./root_login.sh enable
Enable root user login, are you sure? [y/n]:y
Enabling root user login done
omucc_68 /mbsc/bam/version_a/bin/bam #
Querying the status of root user login to the OMU using SSH
omucc_68 / # cd /mbsc/bam/version_a/bin/bam
omucc_68 /mbsc/bam/version_a/bin/bam # chmod +x root_login.sh
omucc_68 /mbsc/bam/version_a/bin/bam # ./root_login.sh status
Configuration status: enabled Actual status: enabled
Follow-up Procedure
1. Record the information about the new common user and the status of the root user.
9.4 Configuring Non-Root User Execution of OMU
Processes
This section describes how to configure non-root user execution of OMU processes to improve
OMU security.
Prerequisites
l The OMU board runs the Linux operating system except Dopra Linux V100R001C03.
l Users cannot add a user-defined omuser user that does not belong to the non-root user group
to the Linux operating system.
Context
l In dual-OMU mode, configure non-root user execution of OMU processes for both the
active and standby OMUs. Before the configuration, stop the omud process on the standby
OMU and then that on the active OMU. After the configuration, start the omud process on
the active OMU and then that on the standby OMU.
NOTE
l If you configure non-root user execution of OMU processes only for the standby OMU, the
configuration data of this function on the standby OMU will be overwritten after data
synchronization between the active and standby OMUs.
l If the configuration data of this function on the standby OMU is overwritten after data
synchronization between the active and standby OMUs and the configuration data on the standby
OMU is different before and after the overwriting, the configuration data after the overwriting
takes effect only after the standby OMU is restarted or an active/standby OMU switchover is
performed.
l After this function is enabled, the omuser user of the Linux operating system is
automatically added. The omuser user, which belongs to the root user group, can run the
OMU processes but cannot log in to the OMU.
l After this function is enabled, the omud, monitor, omu_manager, software, and sntp
processes can only be executed by user root. Other processes can be executed by user
omuser.
l If non-root users run OMU processes, they have no permission to operate files which are
authorized only for the root user, thereby improving system security.
BSC6900 UMTS
OMU Administration Guide 9 Configuring OMU Security Functions
Issue 02 (2015-05-08) Huawei Proprietary and Confidential
Copyright © Huawei Technologies Co., Ltd.
290

8/18/2019 Bsc6900 Umts Omu Administration Guide(v900r017c10_02)(PDF)-En
http://slidepdf.com/reader/full/bsc6900-umts-omu-administration-guidev900r017c1002pdf-en 300/310
l If users upload license files or MML scripts in sftp mode to the OMU as the root user of
the Linux operating system, they must run the chmod command to add permission for the
root user group to a file. For example, execute chmod 770 /mbsc/bam/version_a/ftp/
license/lic.dat to add permission to the lic.dat license file. If the permission is not added,
users cannot perform operations on OMU processes, such as license activation and MMLscript execution.
If users modify the permission to a file stored in the OMU software installation directory
as the root user of the Linux operating system, the OMU software cannot work properly.
l If the value of The Type of FTP Server Command Port is changed from
CUSTOMPORT(Custom Port) to DEFAULTPORT(Default 21 Port) for the FTP
server by running the SET FTPSSRV command, the ftp_server process automatically
resets to allow the setting to take effect.
l In upgrade scenarios, this function will be inherited. By default, this function is disabled
for new networks.
Procedurel Enabling non-root user execution of OMU processes
1. Log in to the target OMU by referring to the procedures described in 6.3.1 Logging
In to the OMU.
2. Enter /etc/rc.d/omud stop to stop the omud process.
3. Enter cd /mbsc/bam/version_a/bin/bam to navigate to the directory that contains
omutool.
4. Enter ./omutool privilege_restrict on.
5. Enter /etc/rc.d/omud start to start the omud.
l Disabling non-root user execution of OMU processes1. Log in to the target OMU.
2. Enter /etc/rc.d/omud stop to stop the omud process.
3. Enter cd /mbsc/bam/version_a/bin/bam to navigate to the directory that contains
omutool.
4. Enter ./omutool privilege_restrict off .
5. Enter /etc/rc.d/omud start to start the omud.
l Querying the status of non-root user execution of OMU processes
1. Log in to the target OMU.
2. Enter /etc/rc.d/omud stop to stop the omud process.3. Enter cd /mbsc/bam/version_a/bin/bam to navigate to the directory that contains
omutool.
4. Enter ./omutool privilege_restrict.
5. Enter /etc/rc.d/omud start to start the omud.
----End
Example
Enabling non-root user execution of OMU processes
omucc_68 ~ # cd /mbsc/bam/version_a/bin/bam
BSC6900 UMTS
OMU Administration Guide 9 Configuring OMU Security Functions
Issue 02 (2015-05-08) Huawei Proprietary and Confidential
Copyright © Huawei Technologies Co., Ltd.
291

8/18/2019 Bsc6900 Umts Omu Administration Guide(v900r017c10_02)(PDF)-En
http://slidepdf.com/reader/full/bsc6900-umts-omu-administration-guidev900r017c1002pdf-en 301/310
omucc_68 /mbsc/bam/version_a/bin/bam # ./omutool privilege_restrict on
User right verification is passed.
Successfully set the privilege restrict flag on!
Disabling non-root user execution of OMU processes
omucc_68 ~ # cd /mbsc/bam/version_a/bin/bam
omucc_68 /mbsc/bam/version_a/bin/bam # ./omutool privilege_restrict off
User right verification is passed.
Successfully set the privilege restrict flag off!
Querying the status of non-root user execution of OMU processes
omucc_68 ~ # cd /mbsc/bam/version_a/bin/bam
omucc_68 /mbsc/bam/version_a/bin/bam # ./omutool privilege_restrict
User right verification is passed.
Current privilege restrict flag is OFF.
9.5 Enhancing Security of Time Synchronization with NTP
This section describes how to enhance security of time synchronization with Network Time
Protocol (NTP). NTP messages are authenticated by configuring encryption algorithms and
cipher key on the client and server. This way, the security of time synchronization with NTP is
enhanced for the BSC6900.
Prerequisites
l The peer equipment supports NTP and NTP message authentication.
lThe IP address, NTP server port number, and key index of the peer equipment have beenobtained.
Context
Before sending a time synchronization request to an NTP server, the OMU, as an NTP client,
encrypts the request and attaches a key index and encryption information to the request. The
NTP server decrypts the request and sends a synchronization response to the NTP client. After
receiving the response, the NTP client checks whether the encryption information in the response
is consistent with that in the request. If it is, the time synchronization between the NTP client
and server starts.
If multiple NTP servers are configured for the time synchronization with the OMU (NTP client),the OMU automatically selects the best NTP server as the clock source.
When the OMU of the BSC6900 is used as an NTP client, the OMU supports the NTP-based
time synchronization in plaintext or in cipher mode.
When the OMU of the BSC6900 is used as an NTP server, the OMU provides NTP plaintext
only in the internal network.
Procedure
Step 1Log in to the LMT by referring to the procedures described in Logging In to and Logging Out
of the LMT.
BSC6900 UMTS
OMU Administration Guide 9 Configuring OMU Security Functions
Issue 02 (2015-05-08) Huawei Proprietary and Confidential
Copyright © Huawei Technologies Co., Ltd.
292

8/18/2019 Bsc6900 Umts Omu Administration Guide(v900r017c10_02)(PDF)-En
http://slidepdf.com/reader/full/bsc6900-umts-omu-administration-guidev900r017c1002pdf-en 302/310
Step 2 To add the information for an NTP server connected to the OMU, run the ADD
SNTPSRVINFO command with the following parameters set as required: IP Address, Port,
NTP Authentication Mode, Key ID, Encryption Algorithm, Key, Confirmation Key.
NOTE
Repeat Step 2 to configure multiple NTP servers available for time synchronization with the OMU.
----End
9.6 Enabling OS File Integrity Check
This section describes how to enable the operating system (OS) file integrity check. This function
is used to monitor the security of the OMU OS.
Prerequisites
The OMU OS File Integrity Checklist is available.
Context
l The OMU OS File Integrity Checklist is used to specify the OS files to be checked. This
checklist must be in .txt format and path information for a maximum of 5000 files can be
provided in the list. Path information for each file occupies one line and must include the
file name. The following is an example of path information: /etc/sysctl.conf for Linux and
C:\WINDOWS\explorer.exe for Windows.
l If the function is enabled, the OMU checks the integrity of specified files every 12 hours.
If the check fails, the ALM-20723 File Loss or Damage is reported. In the version upgrade,driver upgrade, or OS upgrade scenario, if the ALM-20723 File Loss or Damage is reported
after a monitored file is changed, clear the alarm by following the alarm handling
procedures.
l After an OS switch, this function will be automatically disabled and the OMU OS File
Integrity Checklist will be deleted. To enable this function, the OMU OS File Integrity
Checklist must be created and loaded again.
l The files to be checked should be important and will not be changed by the NE
automatically. If the OMU runs Linux, it is recommended that files in the following
directories be checked: /bin, /boot, /etc, /sbin, and /sys
NOTE
If the OMUs work in active/standby mode, enable or disable this function on both active and standby
OMUs.
Procedure
l Enabling this function
1. Upload the OMU OS File Integrity Checklist into the ftp/integrity_cfg directory in
the active workspace of an OMU. For details, see File Manager.
2. Run the ACT FILEINTEGRITYPRO command to enable this function.
l Disabling this function
1. Run the DEA FILEINTEGRITYPRO command to disable this function.
BSC6900 UMTS
OMU Administration Guide 9 Configuring OMU Security Functions
Issue 02 (2015-05-08) Huawei Proprietary and Confidential
Copyright © Huawei Technologies Co., Ltd.
293
8/18/2019 Bsc6900 Umts Omu Administration Guide(v900r017c10_02)(PDF)-En
http://slidepdf.com/reader/full/bsc6900-umts-omu-administration-guidev900r017c1002pdf-en 303/310
l Querying the function status
1. Run the LST FILEINTEGRITYPRO command to query the status of this function.
----End
9.7 Configuring Real-Time Recording of OS AccessInformation
This section describes how to configure real-time recording of OMU operating system (OS)
access information when users log in to or out of the OMU OS. This function helps monitor the
OMU OS security.
Prerequisites
l The OMU OS is Dopra Linux.
l The peer equipment OS is Linux or Unix.
Context
When this function is enabled, the OMU automatically records a user's information when the
user logs in to or out of the OMU OS and information about all operations the user performs on
the OMU, and the OMU transfers the recorded information to the peer equipment in real time
using the syslog service.
This function can be enabled on multiple OMUs. Once it is enabled, the OMUs simultaneously
report their users' information to the peer equipment.
NOTE
For example, the active workspace of an OMU uses version_a. You can run the LST OMUAREA
command to query the version for the active workspace of the current OMU.
Procedure
l Enabling real-time recording of OMU OS access information
1. Log in to the target OMU. For details, see 6.3.1 Logging In to the OMU.
2. Execute cd /mbsc/bam/version_a/bin/bam to go to the directory where the
syslog_config.sh script is saved.
3. Execute ./syslog_config.sh IP address PORT to enable real-time recording of OMU
OS access information.
NOTE
l IP address represents the IP address of the third-party server.
l PORT represents the number of port through which the third-party server is enabled with real-
time recording of OMU OS access information. The recommended value for this parameter is
514.
For example, you can run the ./syslog_config.sh 10.142.38.157 514 to enable this function.
l Disabling real-time recording of OMU OS access information
1. Log in to the target OMU.
BSC6900 UMTS
OMU Administration Guide 9 Configuring OMU Security Functions
Issue 02 (2015-05-08) Huawei Proprietary and Confidential
Copyright © Huawei Technologies Co., Ltd.
294

8/18/2019 Bsc6900 Umts Omu Administration Guide(v900r017c10_02)(PDF)-En
http://slidepdf.com/reader/full/bsc6900-umts-omu-administration-guidev900r017c1002pdf-en 304/310
2. Execute cd /mbsc/bam/version_a/bin/bam to go to the directory where the
syslog_config.sh script is saved.
3. Execute ./syslog_config.sh disable to disable real-time recording of OMU OS access
information.
l Checking whether real-time recording of OMU OS access information is enabled
1. Log in to the target OMU.
2. Execute cd /mbsc/bam/version_a/bin/bam to go to the directory where the
syslog_config.sh script is saved.
3. Execute ./syslog_config.sh l to check whether real-time recording of OMU OS access
information is enabled.
----End
9.8 Setting the Password Policy of the Operating SystemThis section describes how to set the password policy of the operating system to improve the
security of the BSC6900.
Context
This operation applies only to the Windows and Dopra Linux operating systems except the Dopra
Linux operating system of V100R001.
Procedure
Step 1 Run the MML command SET OSPWDPOLICY to set the password policy for the currentOMU operating system.
NOTE
The password policy takes effect only when the OS Password Policy Switch is set to on in this parameter.
Step 2 Run the MML command DSP OSPWDPOLICY to query whether the password policy takes
effect.
----End
9.9 Setting the User Event Reservation PolicyThis section describes how to set the user event reservation policy so that the OMU can
periodically monitor trace files and CHP/MR files. This function enhances security of user data.
Prerequisites
The OMU is running properly.
BSC6900 UMTS
OMU Administration Guide 9 Configuring OMU Security Functions
Issue 02 (2015-05-08) Huawei Proprietary and Confidential
Copyright © Huawei Technologies Co., Ltd.
295
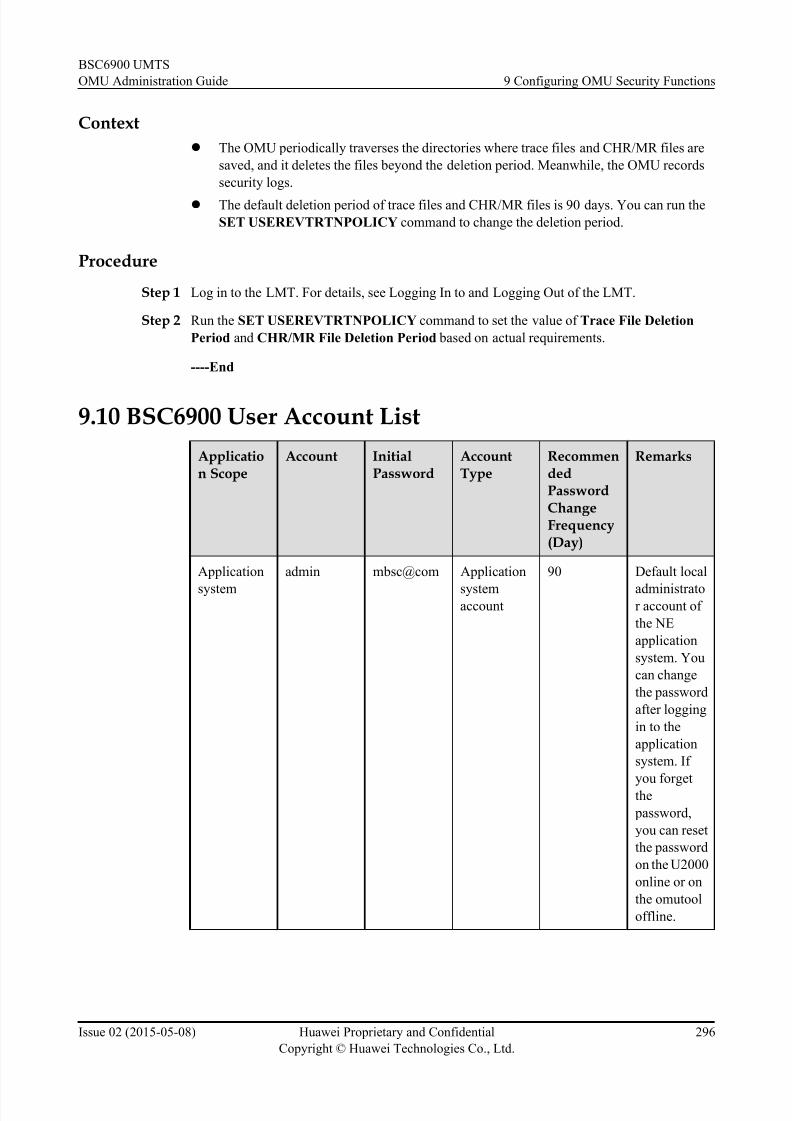
8/18/2019 Bsc6900 Umts Omu Administration Guide(v900r017c10_02)(PDF)-En
http://slidepdf.com/reader/full/bsc6900-umts-omu-administration-guidev900r017c1002pdf-en 305/310
Context
l The OMU periodically traverses the directories where trace files and CHR/MR files are
saved, and it deletes the files beyond the deletion period. Meanwhile, the OMU records
security logs.
l The default deletion period of trace files and CHR/MR files is 90 days. You can run the
SET USEREVTRTNPOLICY command to change the deletion period.
Procedure
Step 1 Log in to the LMT. For details, see Logging In to and Logging Out of the LMT.
Step 2 Run the SET USEREVTRTNPOLICY command to set the value of Trace File Deletion
Period and CHR/MR File Deletion Period based on actual requirements.
----End
9.10 BSC6900 User Account List
Application Scope
Account InitialPassword
AccountType
RecommendedPasswordChangeFrequency(Day)
Remarks
Application
system
admin mbsc@com Application
systemaccount
90 Default local
administrator account of
the NE
application
system. You
can change
the password
after logging
in to the
application
system. If
you forget
the
password,
you can reset
the password
on the U2000
online or on
the omutool
offline.
BSC6900 UMTS
OMU Administration Guide 9 Configuring OMU Security Functions
Issue 02 (2015-05-08) Huawei Proprietary and Confidential
Copyright © Huawei Technologies Co., Ltd.
296

8/18/2019 Bsc6900 Umts Omu Administration Guide(v900r017c10_02)(PDF)-En
http://slidepdf.com/reader/full/bsc6900-umts-omu-administration-guidev900r017c1002pdf-en 306/310
Application Scope
Account InitialPassword
AccountType
RecommendedPasswordChange
Frequency(Day)
Remarks
FtpUsr mbsc@com FTP account 90 Default FTP
account of
the NE. The
administrato
r can change
the
password aft
er logging
in to the web
LMT or change it on
the omutool
offline. The
administrato
r can also
disable this
account on
the omutool.
M2000 Mbsc_@_M
2000
FTP account 90 U2000 FTP
account used
for logging
in to the NE
to transfer
files. You
can
only change
the password
of this
account on
the U2000
online.
BSC6900 UMTS
OMU Administration Guide 9 Configuring OMU Security Functions
Issue 02 (2015-05-08) Huawei Proprietary and Confidential
Copyright © Huawei Technologies Co., Ltd.
297

8/18/2019 Bsc6900 Umts Omu Administration Guide(v900r017c10_02)(PDF)-En
http://slidepdf.com/reader/full/bsc6900-umts-omu-administration-guidev900r017c1002pdf-en 307/310
Application Scope
Account InitialPassword
AccountType
RecommendedPasswordChange
Frequency(Day)
Remarks
Database db_user MBSC_db_
2008
Database
account
90 Default
account used
for
connecting
the NE
application
system to the
database.
You can
reset the password of
this account
on the
omutool
offline.
GaussDB NA Database
account
90 Default
administrato
r account of
the database.
This account
is used for
initializing
the database
but not for
logging in to
the database.
The initial
password is
randomly
generated by
the operating
system. Youcan reset the
initial
password on
the omutool
offline.
Linux OS root osadmin@1
23
Linux OS
system
administrato
r account
90 Default
administrato
r account of
the Linux
OS.
BSC6900 UMTS
OMU Administration Guide 9 Configuring OMU Security Functions
Issue 02 (2015-05-08) Huawei Proprietary and Confidential
Copyright © Huawei Technologies Co., Ltd.
298

8/18/2019 Bsc6900 Umts Omu Administration Guide(v900r017c10_02)(PDF)-En
http://slidepdf.com/reader/full/bsc6900-umts-omu-administration-guidev900r017c1002pdf-en 308/310
Application Scope
Account InitialPassword
AccountType
RecommendedPasswordChange
Frequency(Day)
Remarks
lgnusr osnormal@1
23
Linux OS
common
account
90 Common
account of
the Linux
OS. After OS
security
hardening is
implemented
, you cannot
log in to the
OMU as user root using
SSH. In this
situation,
you can use
this account
to remotely
log in to the
OMU.
omuser NA Linux OS
service start
account
- This account
is
automaticall
y added
when a non-
root user
runs OMU
processes. It
is used for
starting
OMU
services. It
cannot be
used for login by
default.
GaussDB NA Linux OS
service start
account
- This account
is used for
starting
GaussDB
services but
not for
logging in to
GaussDB.
BSC6900 UMTS
OMU Administration Guide 9 Configuring OMU Security Functions
Issue 02 (2015-05-08) Huawei Proprietary and Confidential
Copyright © Huawei Technologies Co., Ltd.
299
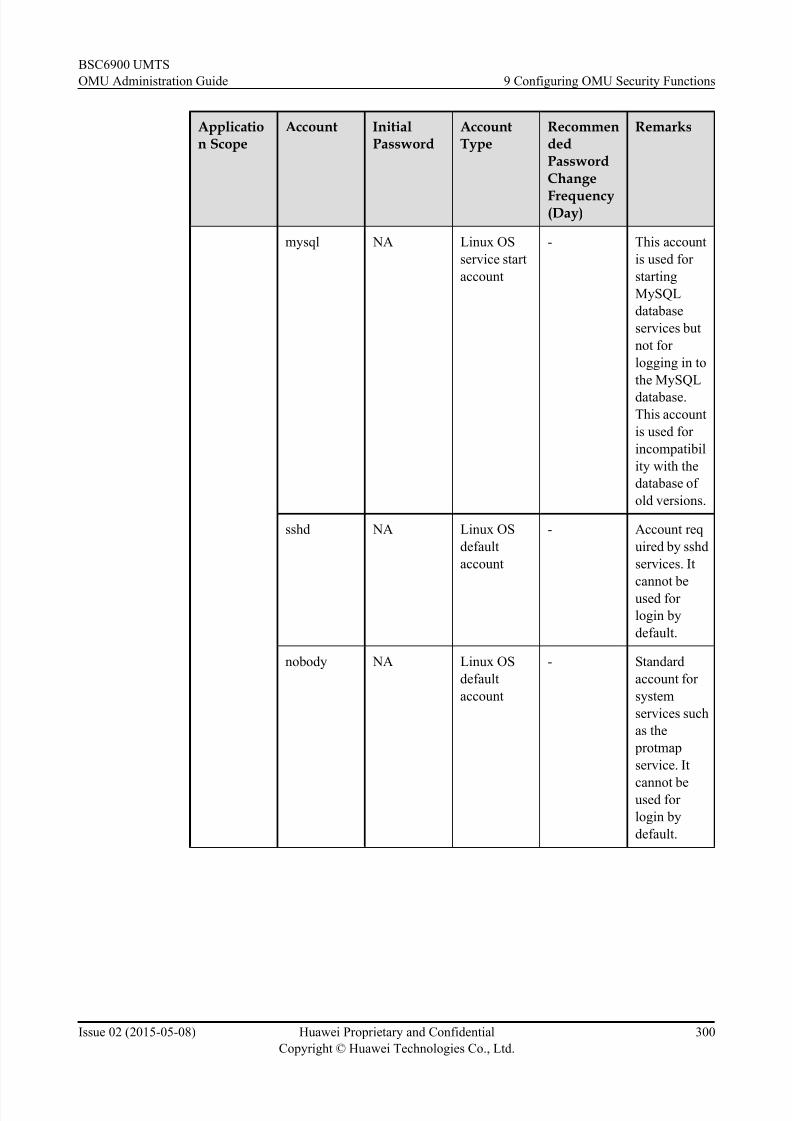
8/18/2019 Bsc6900 Umts Omu Administration Guide(v900r017c10_02)(PDF)-En
http://slidepdf.com/reader/full/bsc6900-umts-omu-administration-guidev900r017c1002pdf-en 309/310
Application Scope
Account InitialPassword
AccountType
RecommendedPasswordChange
Frequency(Day)
Remarks
mysql NA Linux OS
service start
account
- This account
is used for
starting
MySQL
database
services but
not for
logging in to
the MySQL
database.This account
is used for
incompatibil
ity with the
database of
old versions.
sshd NA Linux OS
default
account
- Account req
uired by sshd
services. It
cannot be
used for
login by
default.
nobody NA Linux OS
default
account
- Standard
account for
system
services such
as the
protmap
service. It
cannot beused for
login by
default.
BSC6900 UMTS
OMU Administration Guide 9 Configuring OMU Security Functions
Issue 02 (2015-05-08) Huawei Proprietary and Confidential
Copyright © Huawei Technologies Co., Ltd.
300

8/18/2019 Bsc6900 Umts Omu Administration Guide(v900r017c10_02)(PDF)-En
http://slidepdf.com/reader/full/bsc6900-umts-omu-administration-guidev900r017c1002pdf-en 310/310