Embed Size (px)
Citation preview
0Table of Contents
Version 2.4.89 Bridge User Guide User Guide - Reference and Administration
Bridge
User Guide - Reference and Administration
Version 2.4.89
iTable of Contents
Table of Contents
TABLE OF CONTENTS.........................................................................................I
INTRODUCTION...................................................................................................1
MANAGING CLIENTS..........................................................................................2Creating a New Client Company........................................................................................2Viewing and Modifying a Client Company..........................................................................5Creating a New Individual Client........................................................................................8Viewing and Modifying an Individual Client......................................................................13Deactivating a Client........................................................................................................15
MANAGING COMPANIES AND USERS............................................................17
Managing Distributor Companies...........................................................................17Managing Distributor Master Cover Associations.............................................................21Managing Distributor Commission Overrides...................................................................24
Managing Insurers...................................................................................................27Creating a New Insurer Company....................................................................................27Viewing and Modifying an Insurer Company....................................................................29Deactivating an Insurer Company....................................................................................31
Managing Licensee Offices.....................................................................................33Creating a New Licensee Office.......................................................................................33Viewing and Modifying a Licensee Office.........................................................................35Deactivating a Licensee Office.........................................................................................37
Managing User Accounts........................................................................................39Creating a New User Account..........................................................................................39Viewing and Modifying a User Account............................................................................44Deactivating a User Account............................................................................................46Resetting a User's Password...........................................................................................47Generating the Users & Roles Report..............................................................................47
Customizing Password E-mails..............................................................................50
Version 2.4.89 Bridge User Guide User Guide - Reference and Administration
iiTable of Contents
IMPORT...............................................................................................................52Importing Bound Transactions.........................................................................................54Importing Distributor Companies......................................................................................55
MANAGING PORTALS......................................................................................58
Assigning a Custom Domain to the Default Portal...............................................58
Creating a New Portal..............................................................................................61
Modifying a Portal....................................................................................................64
Managing External Links on the Main Menu.........................................................65
Defining the Appearance of a Portal......................................................................70
Custom Portal Content............................................................................................75
CUSTOM LABELS..............................................................................................79Exporting a Language File...............................................................................................79Modifying a Language File...............................................................................................80Importing a Language File...............................................................................................82
Import/Export Rates.................................................................................................84
Import/Export Resource Codes..............................................................................86
MANAGING ADD-INS.........................................................................................87
FULL EVENT TRACKING REPORT...................................................................89Calculation Trace Viewer Window....................................................................................92
APPLICATION LOGS VIEWER..........................................................................96
REFERENCE......................................................................................................98
Appendix A - Portal Color Settings........................................................................98
Appendix B - XML Structure for Import Files......................................................117Transaction Import XML Sample....................................................................................117
Version 2.4.89 Bridge User Guide User Guide - Reference and Administration
iiiTable of Contents
Transaction Import XML Details.....................................................................................121Distributor Import XML Sample......................................................................................126Distributor Import XML Details.......................................................................................128
INDEX................................................................................................................130
Version 2.4.89 Bridge User Guide User Guide - Reference and Administration
1Reference
Introduction
Welcome to the Bridge insurance access portal. The system provides a full workflow, from the administration of products and coverage, to the submission and management of individual policies.
Access to all features, options, and data are controlled by the settings in your user account. This guide is for users with administration rights, covering the creation and management of companies (licensee, insurer, distributor, and client) and user accounts, as well as the configuration of the website itself.
This guide assumes the user is familiar with the general functions of the system. For instructions on logging in and using common features throughout the system, see the User Guide - Introduction document.
Version 2.4.89 Bridge User Guide User Guide - Reference and Administration

2Reference
Managing Clients
Clients are the companies or individuals who are listed on the policy as the insured party in case of a claim.
Clients can be created ahead of time through the Clients menu, as explained here, or they can be created by the end users during the process of creating a submission.
Once created, the company record displays lists of associated products and any users under the company (for client companies).
Creating a New Client Company
A client company is a single insured entity that may have multiple users with access to create and manage submissions and policies.
1. In the main menu, select Clients, then select New Company. The Client Company Information page opens. Alternatively, the Create Company button is available when viewing the Client List.
2. Complete the necessary information. Fields marked with a red asterisk * are required.
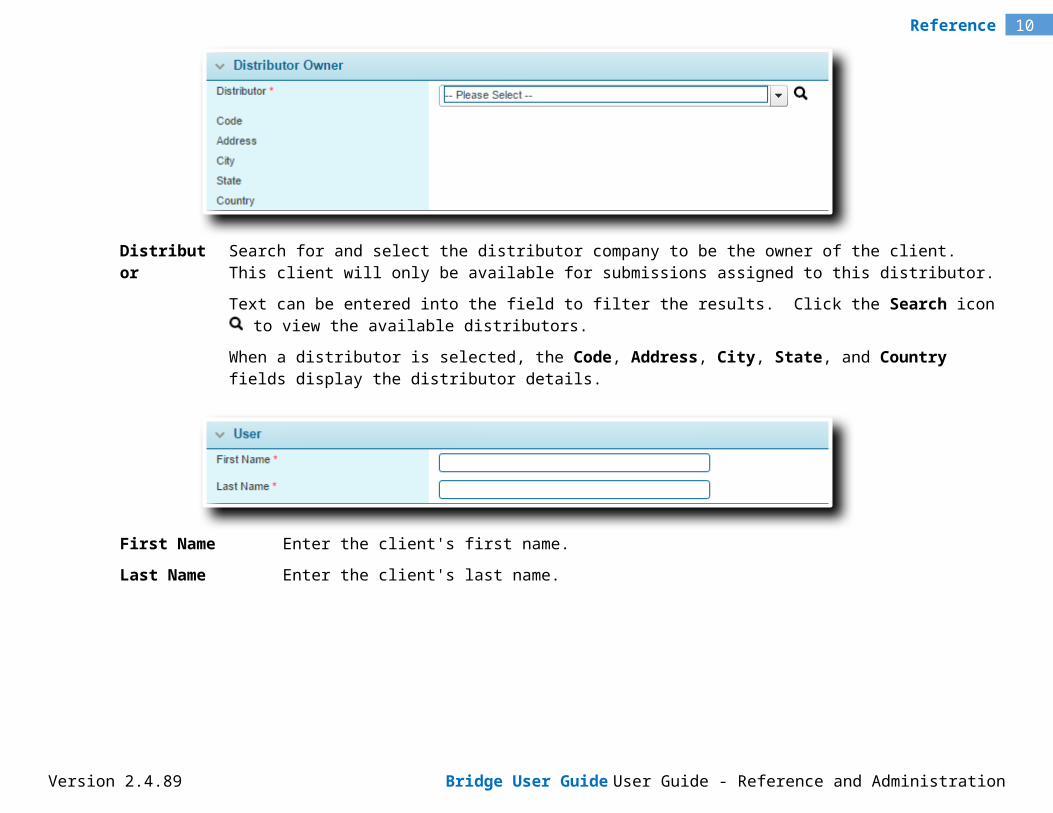
Distributor Search for and select the distributor company to be the owner of the client. This client will only be available for submissions assigned to this distributor.
Version 2.4.89 Bridge User Guide User Guide - Reference and Administration

3Reference
Text can be entered into the field to filter the results. Click the Search icon to view the available distributors.
When a distributor is selected, the Code, Address, City, State, and Country fields display the distributor details.
Enter the company details.
Name Enter the company name.
Code Enter a unique identifier code for the company. If no code is provided, the system will generate a code on saving.
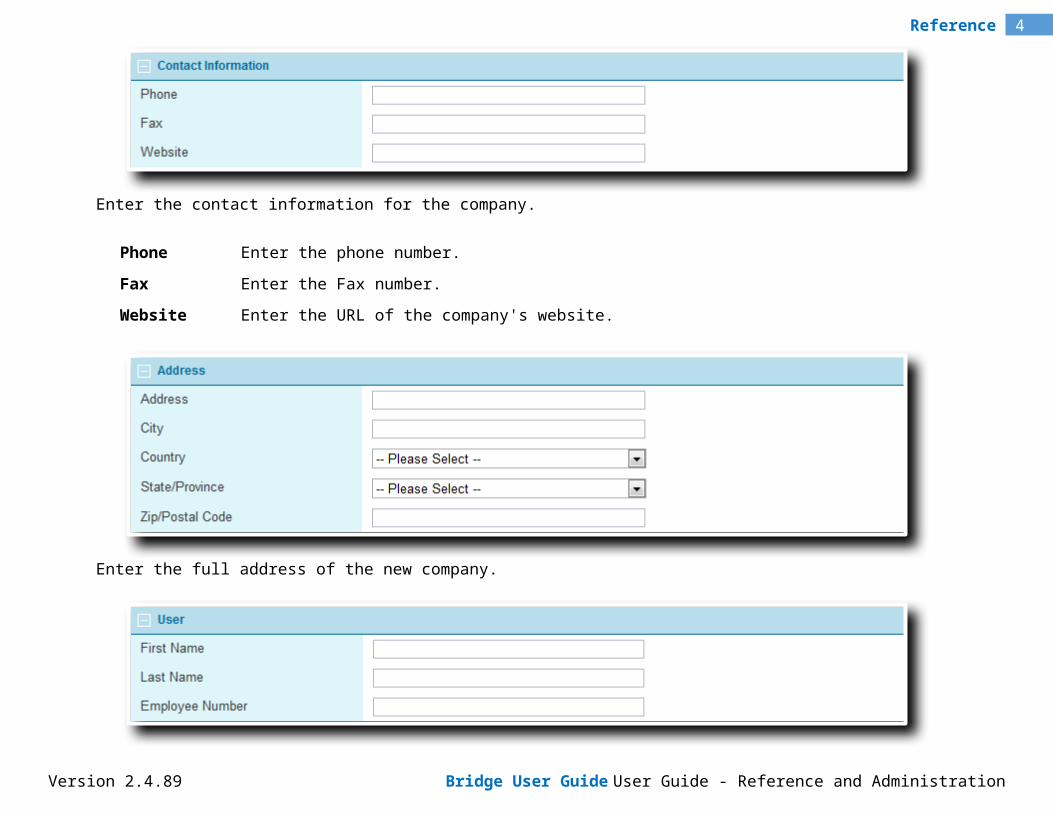
Enter the contact information for the company.
Phone Enter the phone number.
Fax Enter the Fax number.
Website Enter the URL of the company's website.
Version 2.4.89 Bridge User Guide User Guide - Reference and Administration
4Reference
Enter the full address of the new company.
The first User can be identified for the company. On saving the new client company, this information is used to automatically create the first user account under this company.
First Name Enter the user's first name.
Last Name Enter the user's last name.
Employee Number Enter an employee number to identify the user.
Version 2.4.89 Bridge User Guide User Guide - Reference and Administration

5Reference
E-mail If the user requires access to the system, an e-mail address must be provided.
Phone Enter the phone number for the user.
3. Click Add to save the company information and remain on the page, click Add & Close to save and return to the client list, or click Close to return to the client list without saving the company.
4. Once the company has been saved, the Designate as Bill To Party button becomes available. This button automatically creates and saves a billing profile for the client, and opens the Bill To Party Management page to proceed with the configuration.
Viewing and Modifying a Client Company
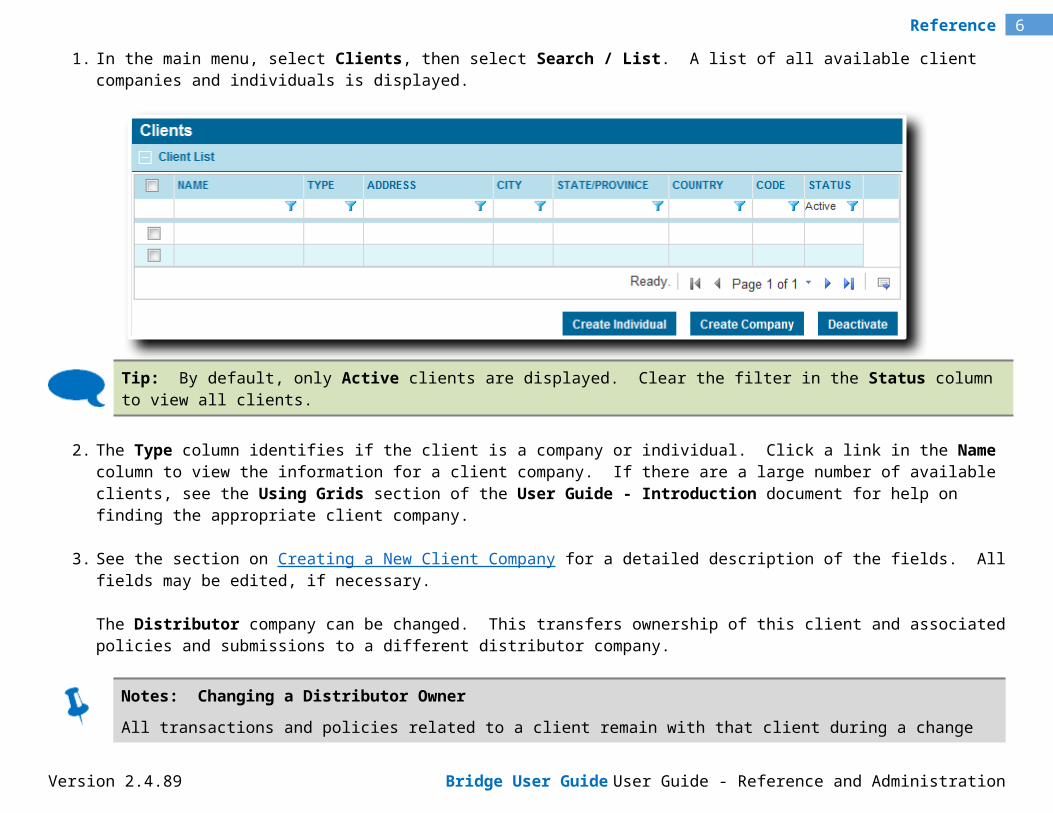
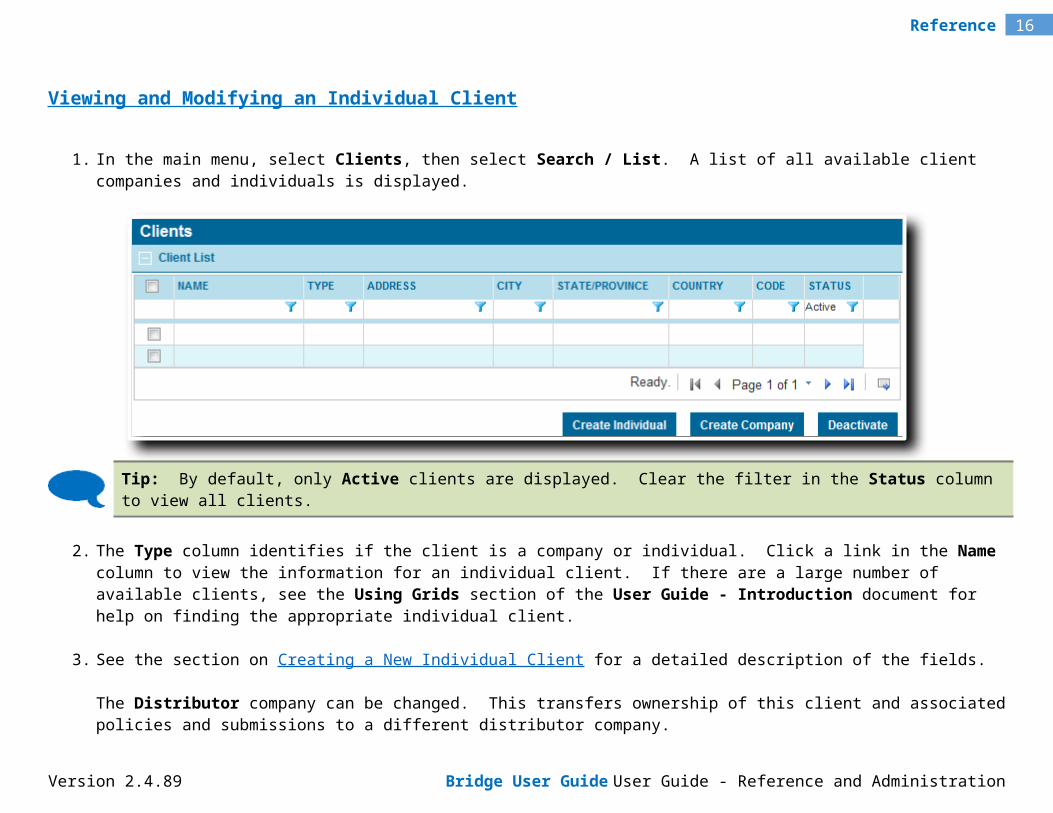
1. In the main menu, select Clients, then select Search / List. A list of all available client companies and individuals is displayed.
Tip: By default, only Active clients are displayed. Clear the filter in the Status column to view all clients.
2. The Type column identifies if the client is a company or individual. Click a link in the Name column to view the information for a client company. If there are a large number of available clients, see the Using Grids section of the User Guide - Introduction document for help on finding the appropriate client company.
Version 2.4.89 Bridge User Guide User Guide - Reference and Administration
6Reference
3. See the section on Creating a New Client Company for a detailed description of the fields. All fields may be edited, if necessary.
The Distributor company can be changed. This transfers ownership of this client and associated policies and submissions to a different distributor company.
Notes: Changing a Distributor OwnerAll transactions and policies related to a client remain with that client during a change of ownership. Distributor access to those transactions and policies changes as follows.
The former owner: retains access to all transactions and policies created while they owned the client.
can edit any transaction or policy they have access to, and perform policy actions.
does not have access to any new transactions or policies created after the transfer, even if they create the transaction themselves.
can view the client details within a transaction or policy, but cannot edit the information. The client record can no longer be accessed through the Client menu.
The new owner: gains access to all transactions and policies related to the client, with full control to edit and perform policy actions.
can edit the client information, through the Clients menu or through a transaction or policy.
The following panels have been added to the page.
The Distributor Change History grid displays the ownership history of the client. All changes to the distributor owner are listed here, including the date and the name of the user who made the change.
Version 2.4.89 Bridge User Guide User Guide - Reference and Administration

7Reference
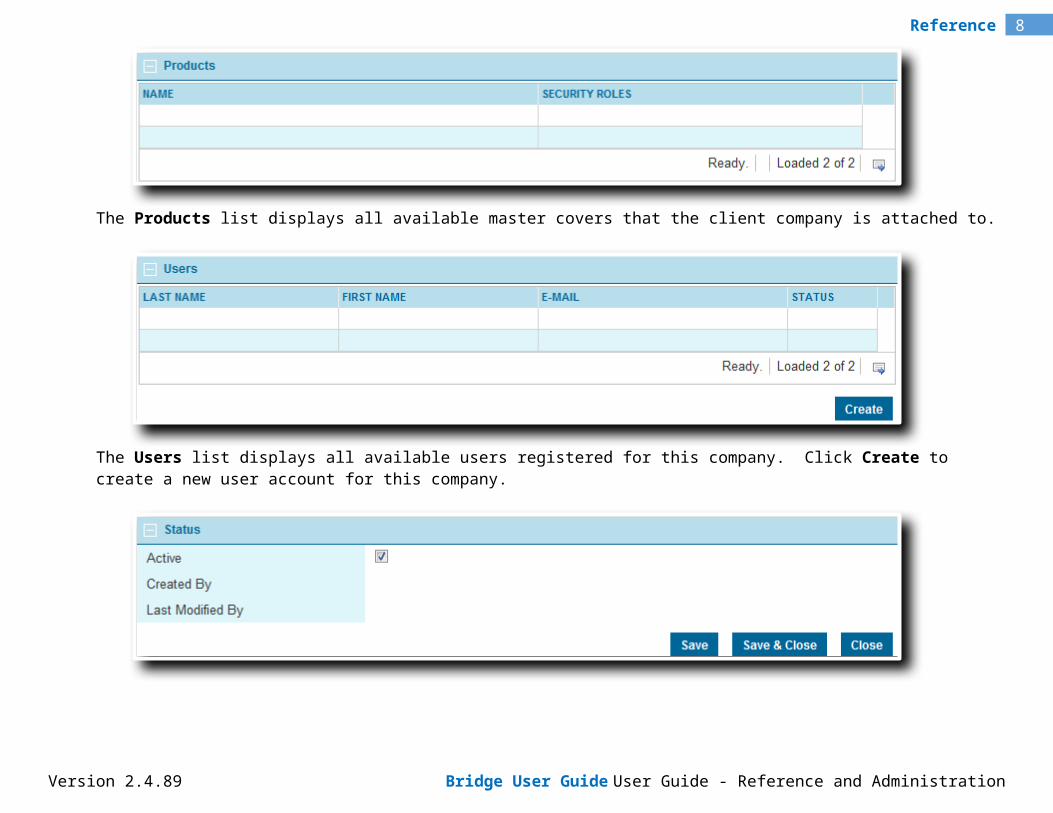
The Products list displays all available master covers that the client company is attached to.
The Users list displays all available users registered for this company. Click Create to create a new user account for this company.
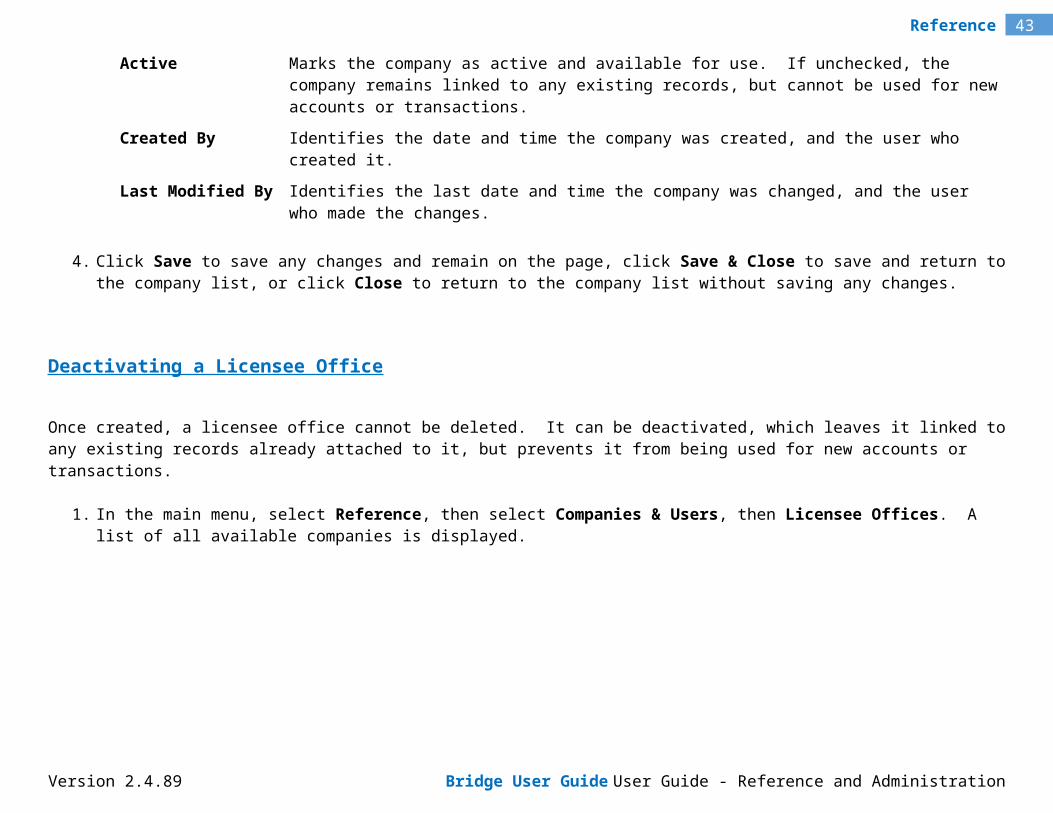
Active Marks the company as active and available for use. If unchecked, the company remains linked to any existing records, but cannot be used for new accounts or transactions.
Created By Identifies the date and time the company was created, and the user who created it.
Version 2.4.89 Bridge User Guide User Guide - Reference and Administration
8Reference
Last Modified By Identifies the last date and time the company was changed, and the user who made the changes.
4. Click Save to save any changes and remain on the page, click Save & Close to save and return to the client list, or click Close to return to the client list without saving any changes.
5. Click Designate as Bill To Party to automatically create and save a billing profile for the client, and open the Bill To Party Management page to proceed with the configuration.
Creating a New Individual Client
An individual client is a single insured person who may have access to create and manage submissions and policies.
1. In the main menu, select Clients, then select New Individual. The Individual Client Information page opens. Alternatively, the Create Individual button is available when viewing the Client List.
2. Complete the necessary information. Fields marked with a red asterisk * are required.
Distributor Search for and select the distributor company to be the owner of the client. This client will only be available for submissions assigned to this distributor.
Text can be entered into the field to filter the results. Click the Search icon to view the available distributors.
When a distributor is selected, the Code, Address, City, State, and Country fields display the distributor details.
Version 2.4.89 Bridge User Guide User Guide - Reference and Administration

9Reference
First Name Enter the client's first name.
Last Name Enter the client's last name.
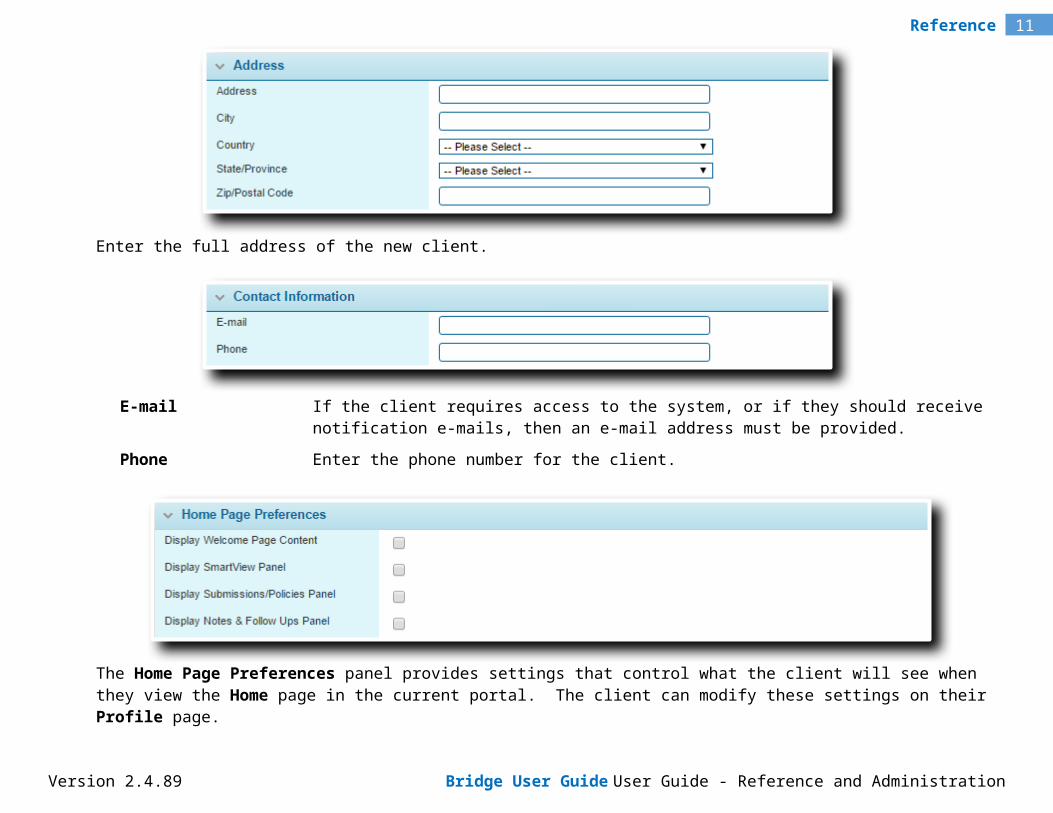
Enter the full address of the new client.
E-mail If the client requires access to the system, or if they should receive notification e-mails, then an e-mail address must be provided.
Phone Enter the phone number for the client.
Version 2.4.89 Bridge User Guide User Guide - Reference and Administration
10Reference
The Home Page Preferences panel provides settings that control what the client will see when they view the Home page in the current portal. The client can modify these settings on their Profile page.
Display Welcome Page Content Selects whether or not the greetings and instructions are displayed on the home page for the client.
Note: The Welcome Page content may have been customized to provide important information or instructions. Please review the content before deactivating it.
Display SmartView Panel Selects whether or not SmartView is displayed on the home page for the client. SmartView is a data tracking and management system, providing customizable and interactive data views arranged in "Dashboard" screens. Data from throughout the system can be collected and displayed in a range of tables, graphs, and charts, with interactive connections that allow one data view to adjust, filter, or even replace another data view.
A default policy dashboard is provided for this option.
Display Submissions/Policies Panel Selects whether or not the client will see the grid containing all available submissions and policies on the home page.
Display Notes & Follow Ups Panel Selects whether or not to the client will see the grid containing any notes or follow ups requiring action on the home page.
Note: The SmartView, submission, and notes options are only available to clients with the necessary rights to view each feature.
3. Click Add to save the client information and remain on the page to continue configuration, click Add & Close to save and return to the client list, or click Close to return to the client list without saving the client.
Version 2.4.89 Bridge User Guide User Guide - Reference and Administration
11Reference
The Client Risk Manager security role is automatically assigned to individual clients. The default configuration of this role allows the user to create submissions and manage their own client details.
Once the client record has been saved, additional panels become available.
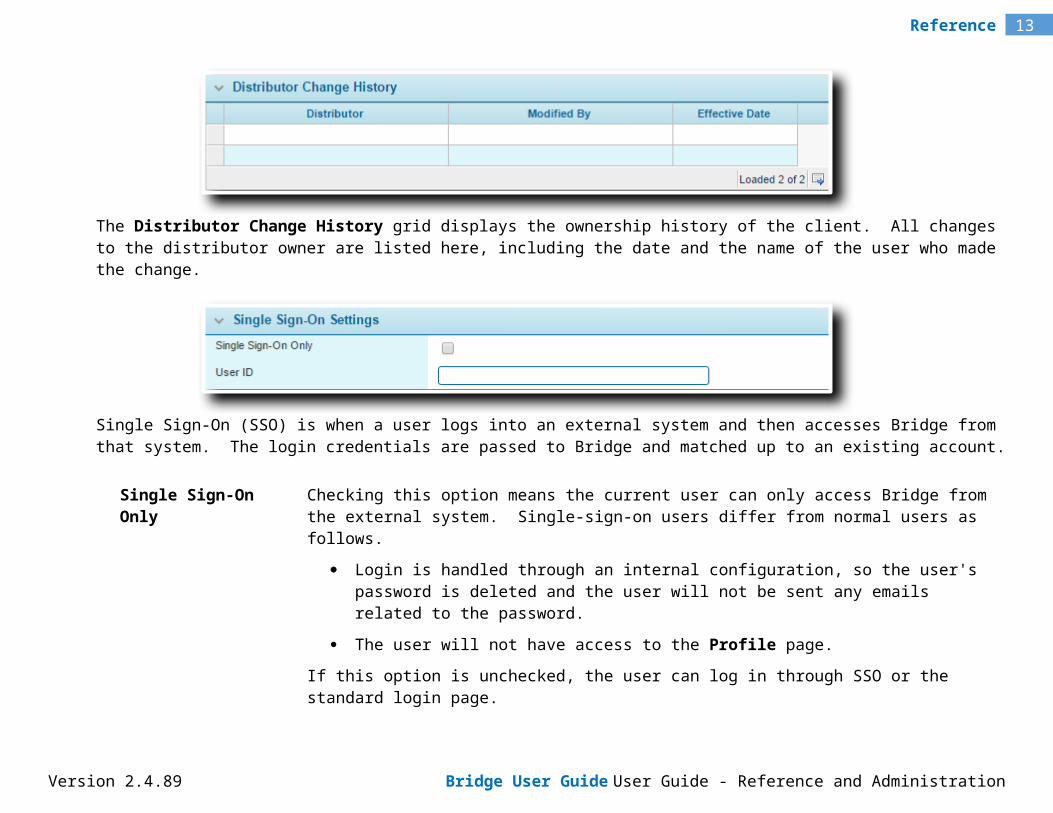
The Distributor Change History grid displays the ownership history of the client. All changes to the distributor owner are listed here, including the date and the name of the user who made the change.
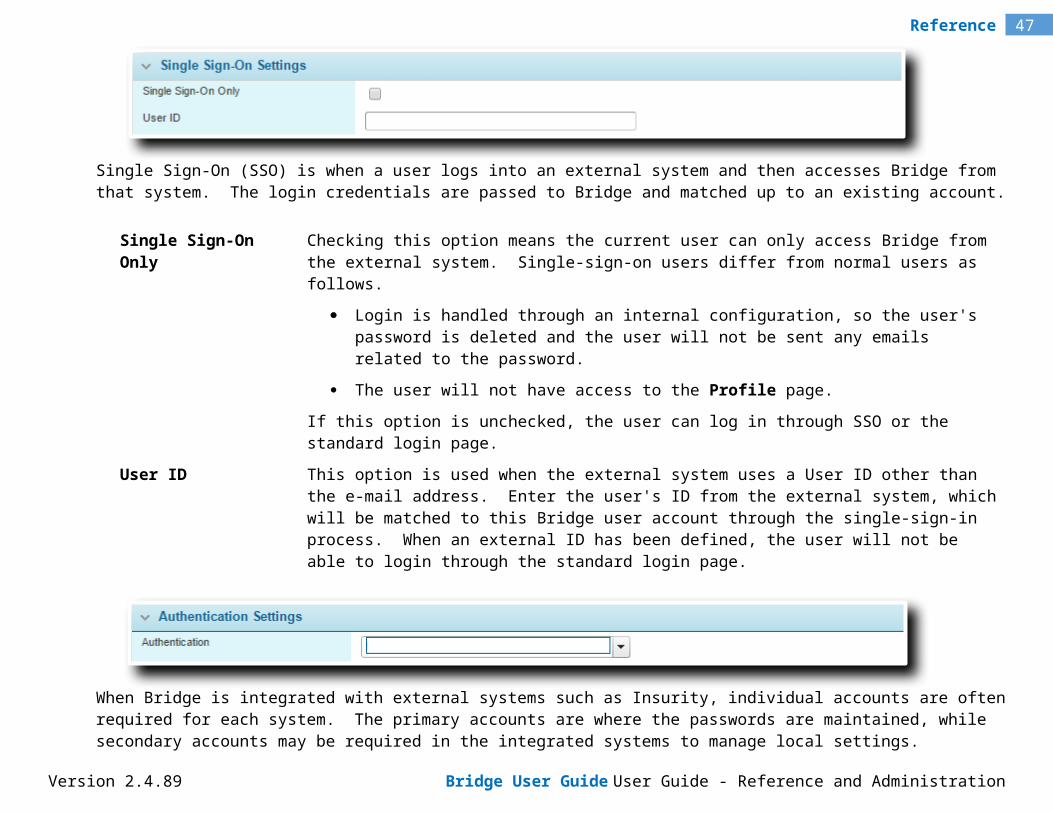
Single Sign-On (SSO) is when a user logs into an external system and then accesses Bridge from that system. The login credentials are passed to Bridge and matched up to an existing account.
Single Sign-On Only Checking this option means the current user can only access Bridge from the external system. Single-sign-on users differ from normal users as follows.
Login is handled through an internal configuration, so the user's password is deleted and the user will not be sent any emails related to the password.
The user will not have access to the Profile page.
If this option is unchecked, the user can log in through SSO or the standard login page.
User ID This option is used when the external system uses a User ID other than the e-mail address. Enter the user's ID from the external system, which will be matched to this Bridge user account through the single-sign-in process. When an external ID has been defined, the user will not be able to login through the standard login page.
Version 2.4.89 Bridge User Guide User Guide - Reference and Administration

12Reference
When Bridge is integrated with external systems such as Insurity, individual accounts are often required for each system. The primary accounts are where the passwords are maintained, while secondary accounts may be required in the integrated systems to manage local settings.
In the Authentication field, select which system has the primary account. At login, the user will be authenticated in the selected system.
If Bridge is selected, the primary account is managed within Bridge. If Insurity services are enabled, they will be available without a secondary account.
If Insurity is selected, the primary account is managed within Insurity. A secondary account must exist within the Bridge system, and must have the same e-mail address as the primary account on the Insurity side. Any new or existing password related to the secondary account will not be valid. The other profile information within the Bridge account should be maintained, as it is used to define security rights, contact information, and other user-specific settings.
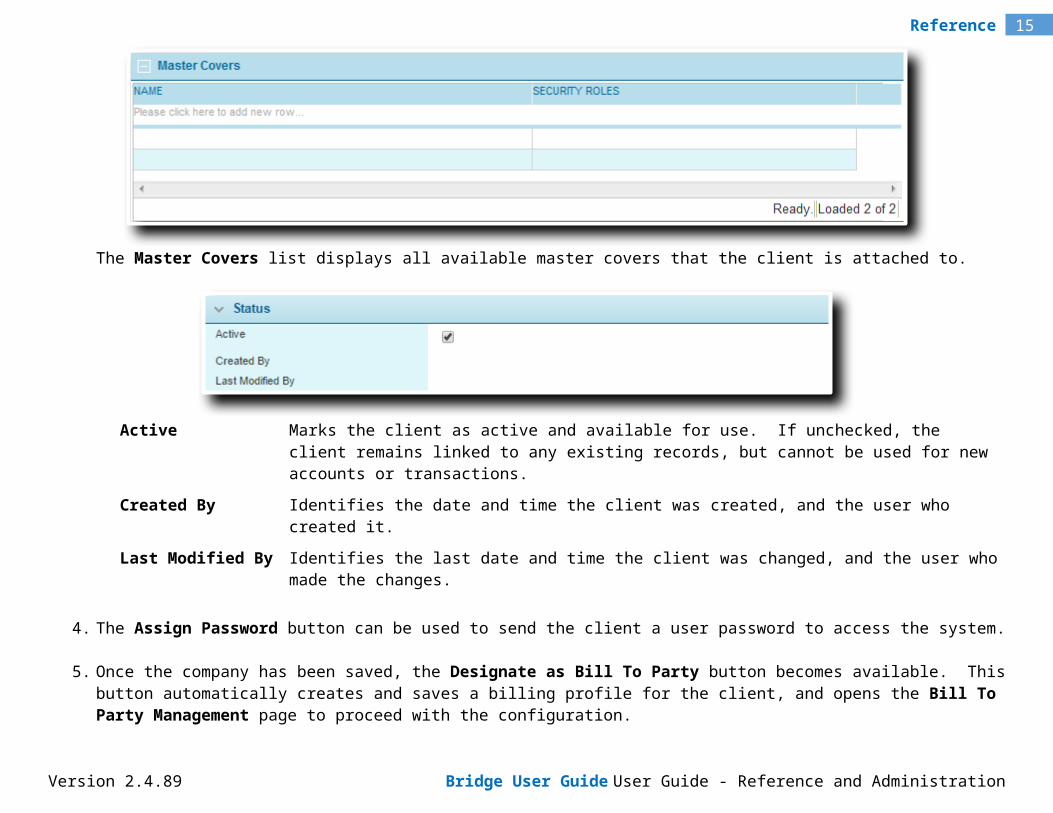
The Master Covers list displays all available master covers that the client is attached to.
Version 2.4.89 Bridge User Guide User Guide - Reference and Administration
13Reference
Active Marks the client as active and available for use. If unchecked, the client remains linked to any existing records, but cannot be used for new accounts or transactions.
Created By Identifies the date and time the client was created, and the user who created it.
Last Modified By Identifies the last date and time the client was changed, and the user who made the changes.
4. The Assign Password button can be used to send the client a user password to access the system.
5. Once the company has been saved, the Designate as Bill To Party button becomes available. This button automatically creates and saves a billing profile for the client, and opens the Bill To Party Management page to proceed with the configuration.
Viewing and Modifying an Individual Client
1. In the main menu, select Clients, then select Search / List. A list of all available client companies and individuals is displayed.
Version 2.4.89 Bridge User Guide User Guide - Reference and Administration

14Reference
Tip: By default, only Active clients are displayed. Clear the filter in the Status column to view all clients.
2. The Type column identifies if the client is a company or individual. Click a link in the Name column to view the information for an individual client. If there are a large number of available clients, see the Using Grids section of the User Guide - Introduction document for help on finding the appropriate individual client.
3. See the section on Creating a New Individual Client for a detailed description of the fields.
The Distributor company can be changed. This transfers ownership of this client and associated policies and submissions to a different distributor company.
Notes: Changing a Distributor OwnerAll transactions and policies related to a client remain with that client during a change of ownership. Distributor access to those transactions and policies changes as follows.
The former owner: Retains access to all transactions and policies created while they owned the client.
Can edit any transaction or policy they have access to, and perform policy actions.
Does not have access to any new transactions or policies created after the transfer, even if they create the transaction themselves.
Version 2.4.89 Bridge User Guide User Guide - Reference and Administration
15Reference
Can view the client record, both through the Clients menu and within a transaction or policy, but cannot edit the client information.
The new owner: Gains access to all transactions and policies related to the client, with full control to edit and perform policy actions.
Can edit the client information, through the Clients menu or through a transaction or policy.
4. Click Save to save any changes and remain on the page, click Save & Close to save and return to the client list, or click Close to return to the client list without saving any changes.
5. The Assign Password button can be used to send the client a user password to access the system.
6. Click Designate as Bill To Party to automatically create and save a billing profile for the client, and open the Bill To Party Management page to proceed with the configuration.
Deactivating a Client
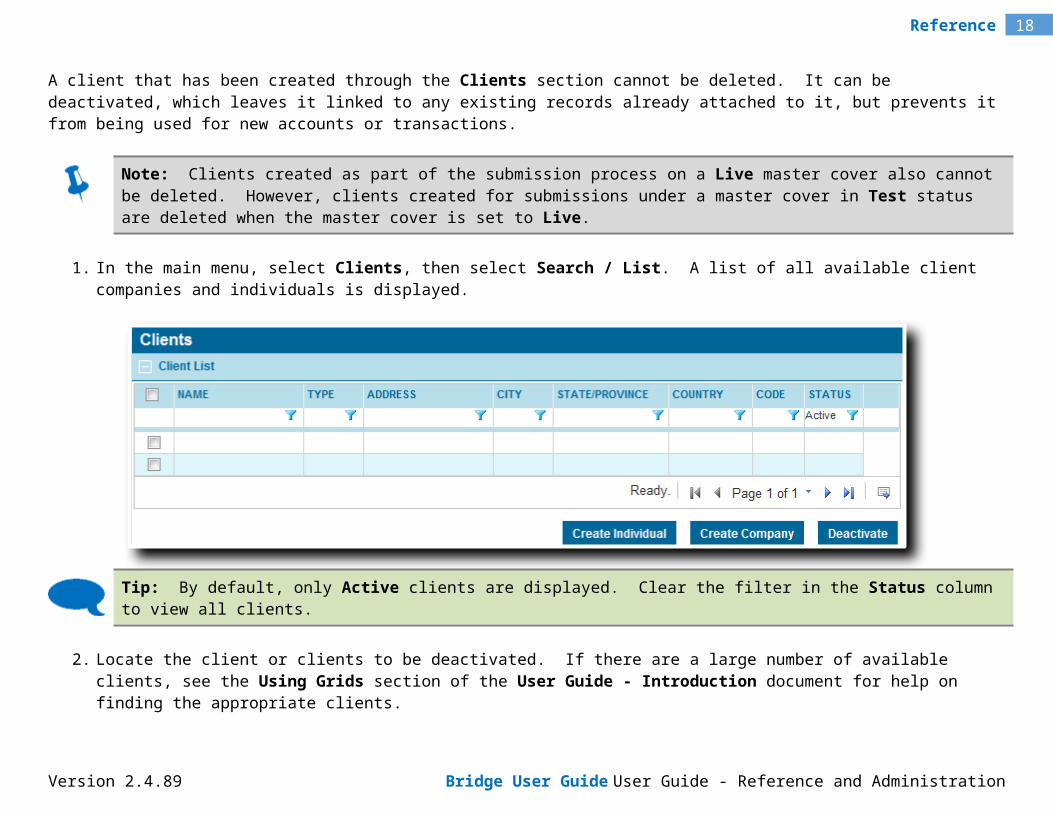
A client that has been created through the Clients section cannot be deleted. It can be deactivated, which leaves it linked to any existing records already attached to it, but prevents it from being used for new accounts or transactions.
Note: Clients created as part of the submission process on a Live master cover also cannot be deleted. However, clients created for submissions under a master cover in Test status are deleted when the master cover is set to Live.
1. In the main menu, select Clients, then select Search / List. A list of all available client companies and individuals is displayed.
Version 2.4.89 Bridge User Guide User Guide - Reference and Administration
16Reference
Tip: By default, only Active clients are displayed. Clear the filter in the Status column to view all clients.
2. Locate the client or clients to be deactivated. If there are a large number of available clients, see the Using Grids section of the User Guide - Introduction document for help on finding the appropriate clients.
3. Check the boxes for all clients to be deactivated.
4. Click Deactivate, then confirm the deactivation when prompted to do so. All selected clients are deactivated. If the client list is still defaulted to only show active clients, they disappear from the list.
Tip: Clients can also be deactivated or reactivated one at a time directly through the client record. See the sections on Viewing and Modifying a Client Company and Viewing and Modifying an Individual client for details.
Version 2.4.89 Bridge User Guide User Guide - Reference and Administration
17Reference
Managing Companies and Users
When a Bridge Licensee Environment is created, a Head Office is setup. Additional offices can be created as subsidiaries of the Head Office, serving as insurers or distributors, or external associate companies can be added.
Managing Distributor Companies
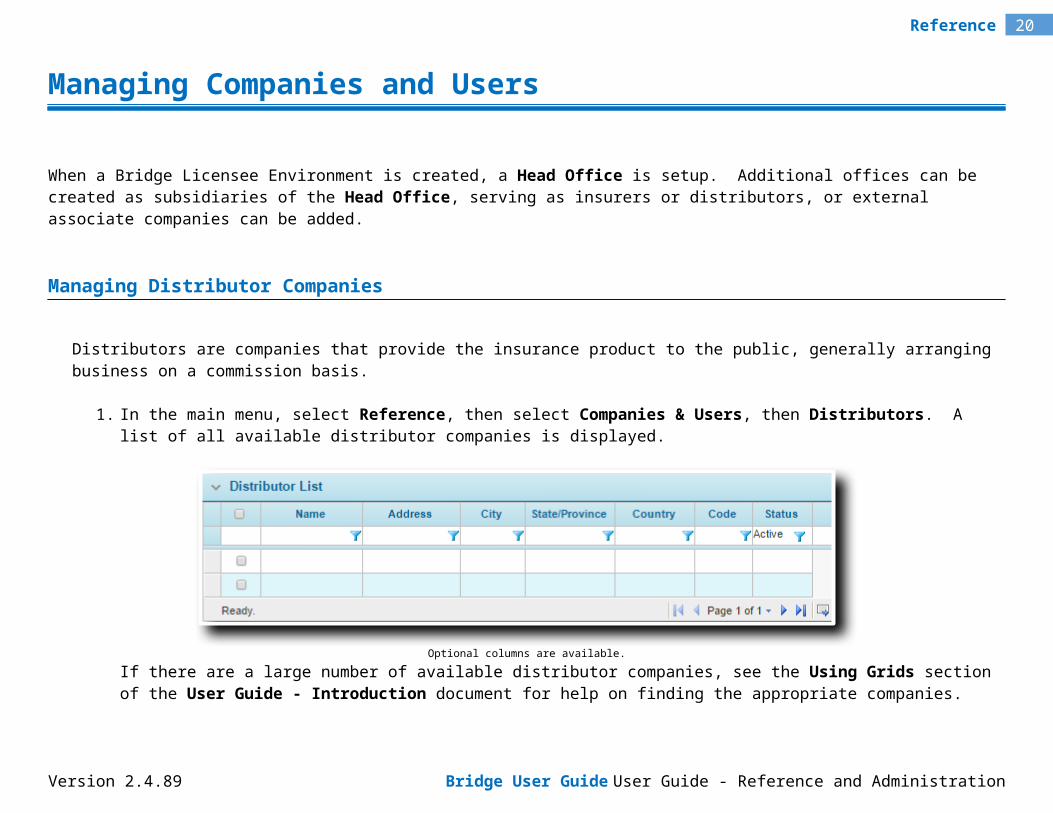
Distributors are companies that provide the insurance product to the public, generally arranging business on a commission basis.
1. In the main menu, select Reference, then select Companies & Users, then Distributors. A list of all available distributor companies is displayed.
Optional columns are available.
If there are a large number of available distributor companies, see the Using Grids section of the User Guide - Introduction document for help on finding the appropriate companies.
Tip: By default, only Active companies are displayed. Clear the filter in the Status column to view all companies.
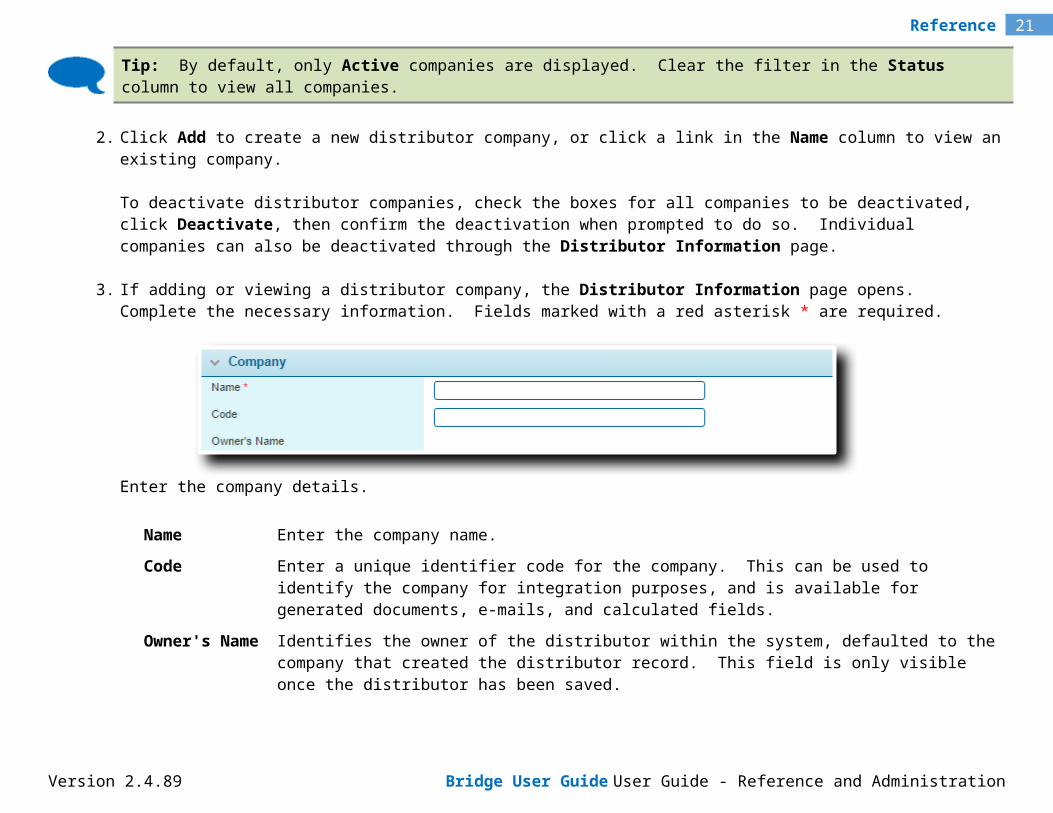
2. Click Add to create a new distributor company, or click a link in the Name column to view an existing company.
Version 2.4.89 Bridge User Guide User Guide - Reference and Administration
18Reference
To deactivate distributor companies, check the boxes for all companies to be deactivated, click Deactivate, then confirm the deactivation when prompted to do so. Individual companies can also be deactivated through the Distributor Information page.
3. If adding or viewing a distributor company, the Distributor Information page opens. Complete the necessary information. Fields marked with a red asterisk * are required.
Enter the company details.
Name Enter the company name.
Code Enter a unique identifier code for the company. This can be used to identify the company for integration purposes, and is available for generated documents, e-mails, and calculated fields.
Owner's Name Identifies the owner of the distributor within the system, defaulted to the company that created the distributor record. This field is only visible once the distributor has been saved.
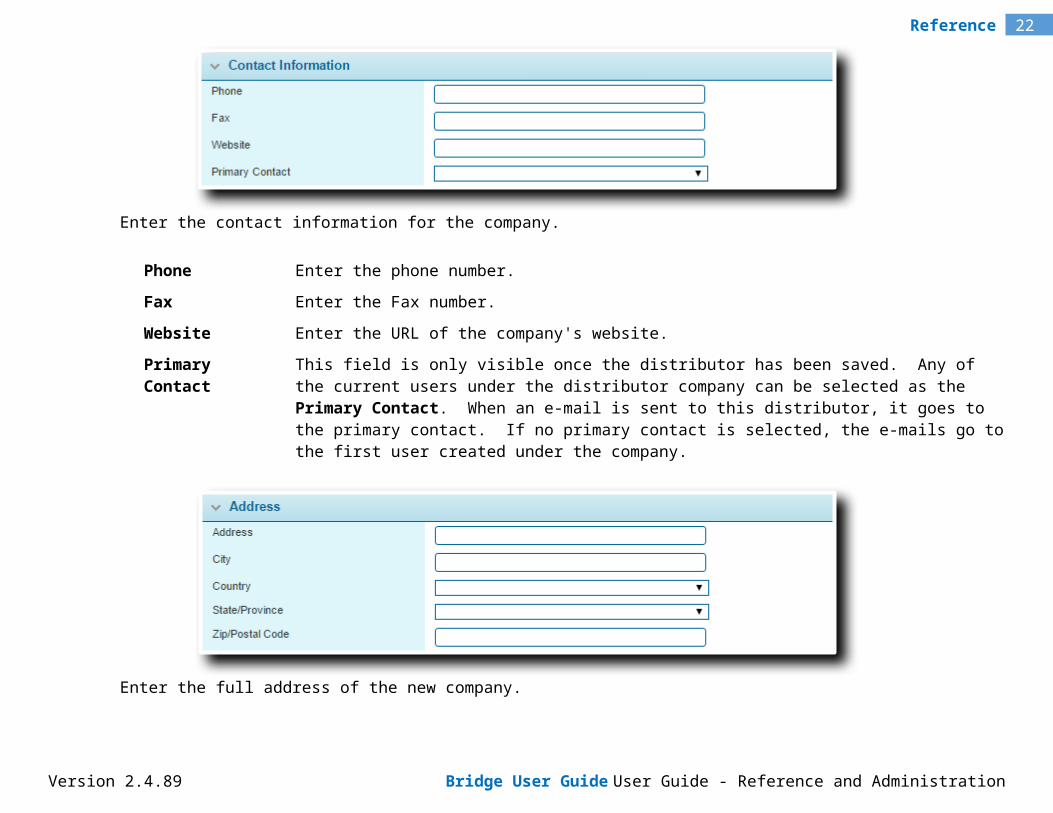
Enter the contact information for the company.
Phone Enter the phone number.
Fax Enter the Fax number.
Version 2.4.89 Bridge User Guide User Guide - Reference and Administration
19Reference
Website Enter the URL of the company's website.
Primary Contact This field is only visible once the distributor has been saved. Any of the current users under the distributor company can be selected as the Primary Contact. When an e-mail is sent to this distributor, it goes to the primary contact. If no primary contact is selected, the e-mails go to the first user created under the company.
Enter the full address of the new company.
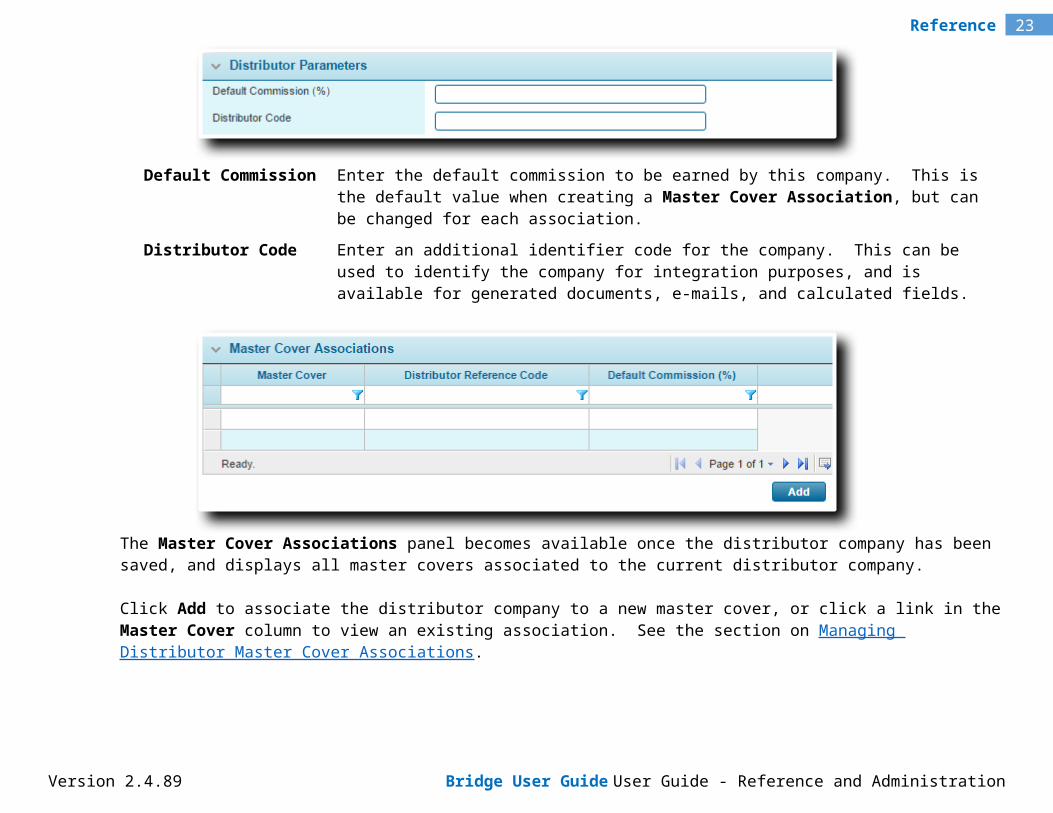
Default Commission Enter the default commission to be earned by this company. This is the default value when creating a Master Cover Association, but can be changed for each association.
Distributor Code Enter an additional identifier code for the company. This can be used to identify the company for integration purposes, and is available for generated documents, e-mails, and calculated fields.
Version 2.4.89 Bridge User Guide User Guide - Reference and Administration
20Reference
The Master Cover Associations panel becomes available once the distributor company has been saved, and displays all master covers associated to the current distributor company.
Click Add to associate the distributor company to a new master cover, or click a link in the Master Cover column to view an existing association. See the section on Managing Distributor Master Cover Associations.
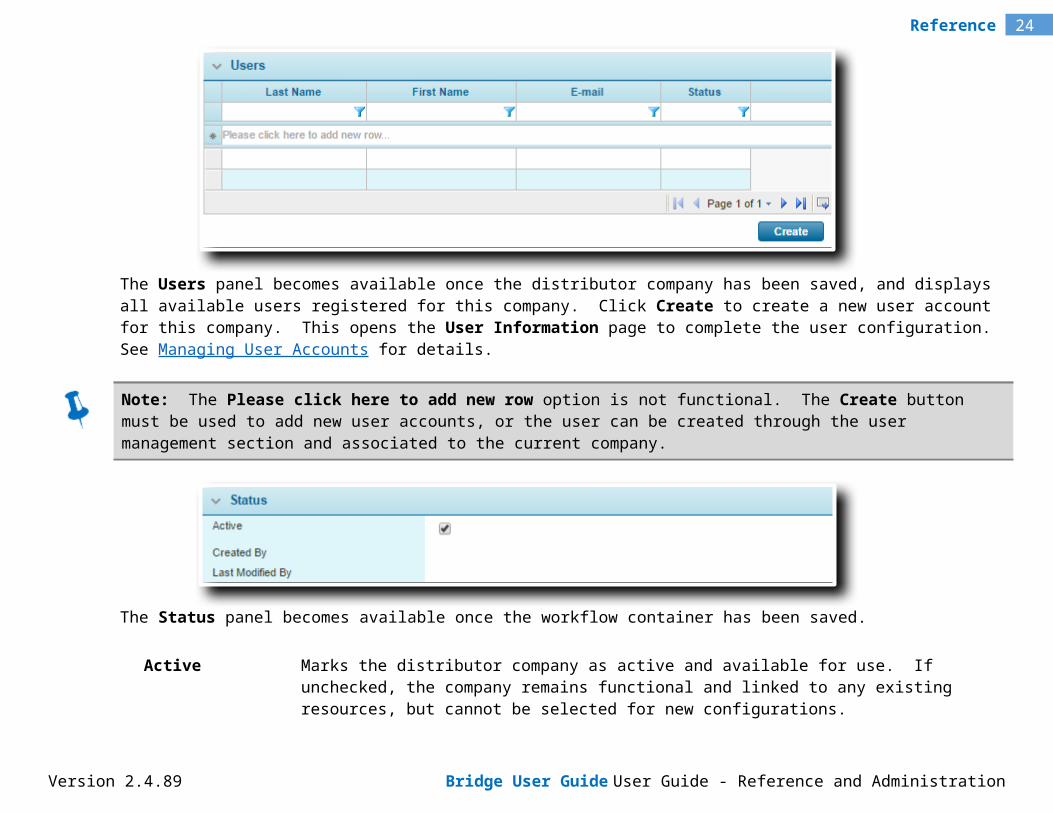
The Users panel becomes available once the distributor company has been saved, and displays all available users registered for this company. Click Create to create a new user account for this company. This opens the User Information page to complete the user configuration. See Managing User Accounts for details.
Note: The Please click here to add new row option is not functional. The Create button must be used to add new user accounts, or the user can be created through the user management section and associated to the current company.
Version 2.4.89 Bridge User Guide User Guide - Reference and Administration
21Reference
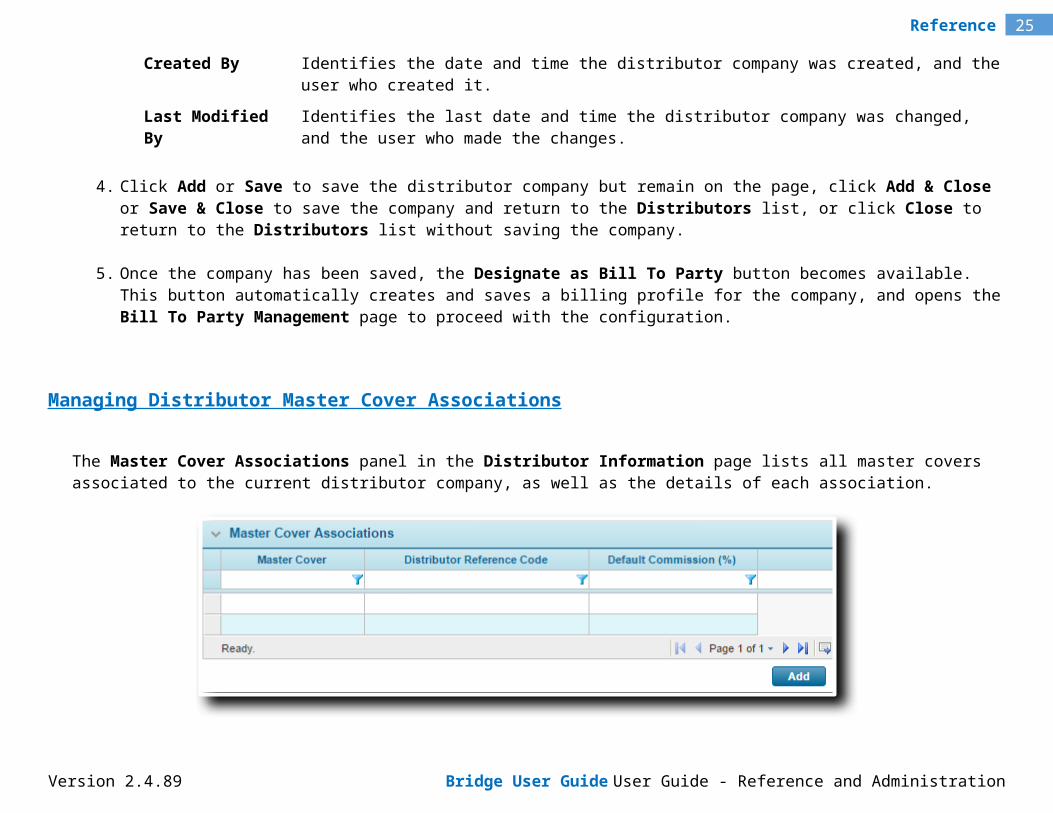
The Status panel becomes available once the workflow container has been saved.
Active Marks the distributor company as active and available for use. If unchecked, the company remains functional and linked to any existing resources, but cannot be selected for new configurations.
Created By Identifies the date and time the distributor company was created, and the user who created it.
Last Modified By Identifies the last date and time the distributor company was changed, and the user who made the changes.
4. Click Add or Save to save the distributor company but remain on the page, click Add & Close or Save & Close to save the company and return to the Distributors list, or click Close to return to the Distributors list without saving the company.
5. Once the company has been saved, the Designate as Bill To Party button becomes available. This button automatically creates and saves a billing profile for the company, and opens the Bill To Party Management page to proceed with the configuration.
Managing Distributor Master Cover Associations
The Master Cover Associations panel in the Distributor Information page lists all master covers associated to the current distributor company, as well as the details of each association.
Version 2.4.89 Bridge User Guide User Guide - Reference and Administration
22Reference
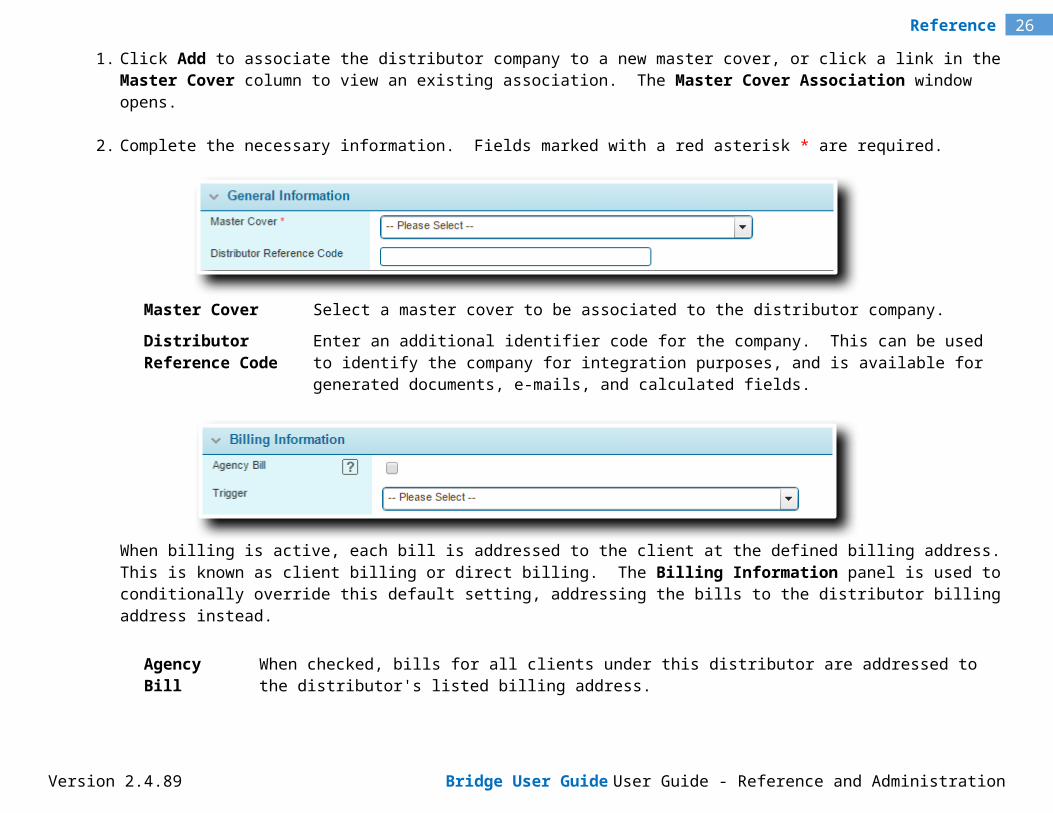
1. Click Add to associate the distributor company to a new master cover, or click a link in the Master Cover column to view an existing association. The Master Cover Association window opens.
2. Complete the necessary information. Fields marked with a red asterisk * are required.
Master Cover Select a master cover to be associated to the distributor company.
Distributor Reference Code
Enter an additional identifier code for the company. This can be used to identify the company for integration purposes, and is available for generated documents, e-mails, and calculated fields.
When billing is active, each bill is addressed to the client at the defined billing address. This is known as client billing or direct billing. The Billing Information panel is used to conditionally override this default setting, addressing the bills to the distributor billing address instead.
Version 2.4.89 Bridge User Guide User Guide - Reference and Administration
23Reference
Agency Bill When checked, bills for all clients under this distributor are addressed to the distributor's listed billing address.
Trigger A trigger can be selected to control this setting. If the trigger evaluates as true, or if no trigger is selected, the bill is addressed to the distributor as configured. If the trigger evaluates as false, the bill reverts to client billing. The trigger option is only active when Agency Bill is checked.
Default Commission Enter the default commission, in percentage, for this distributor company under the associated master cover. This default can be overridden for individual premium types.
Field Override Trigger This field is available once the association has been saved. Select a trigger to determine if the system should use the Default Commission or the Default Commission Field Override. If the trigger evaluates as false, the Default Commission is used. If the trigger evaluates as true, the Default Commission Field Override is used.
If no trigger is selected, the Default Commission Field Override (if selected) is always used.
Default Commission Field Override
This field is available once the association has been saved. Select a numerical field from the workflow associated to the selected master cover. This field provides the commission percentage in the event of an override. The field can be a calculated field, or can take direct input from the user.
If the selected field is left blank in the submission form, either by the calculation or by the user, it is considered to be a zero value.
If no override field is selected in this panel, the Default Commission is used.
Version 2.4.89 Bridge User Guide User Guide - Reference and Administration
24Reference
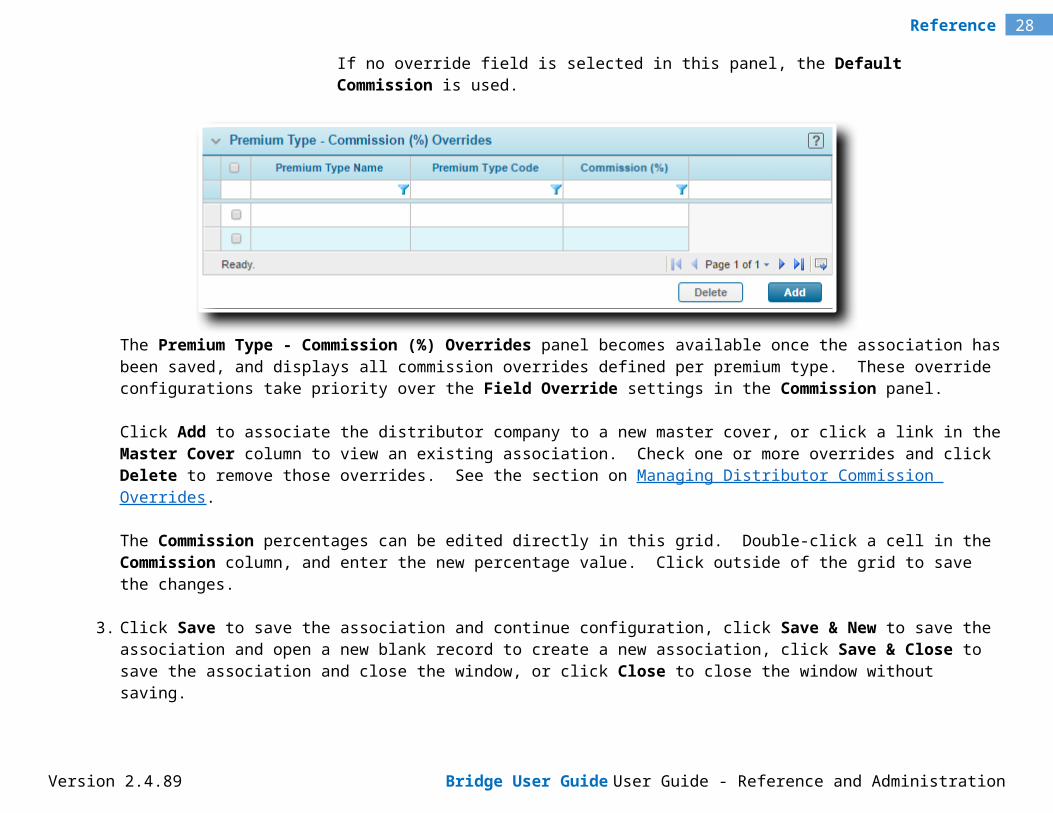
The Premium Type - Commission (%) Overrides panel becomes available once the association has been saved, and displays all commission overrides defined per premium type. These override configurations take priority over the Field Override settings in the Commission panel.
Click Add to associate the distributor company to a new master cover, or click a link in the Master Cover column to view an existing association. Check one or more overrides and click Delete to remove those overrides. See the section on Managing Distributor Commission Overrides.
The Commission percentages can be edited directly in this grid. Double-click a cell in the Commission column, and enter the new percentage value. Click outside of the grid to save the changes.
3. Click Save to save the association and continue configuration, click Save & New to save the association and open a new blank record to create a new association, click Save & Close to save the association and close the window, or click Close to close the window without saving.
When viewing a saved association, the Previous and Next buttons can be used to navigate through the association configurations, and the Delete button can be used to delete the current association.
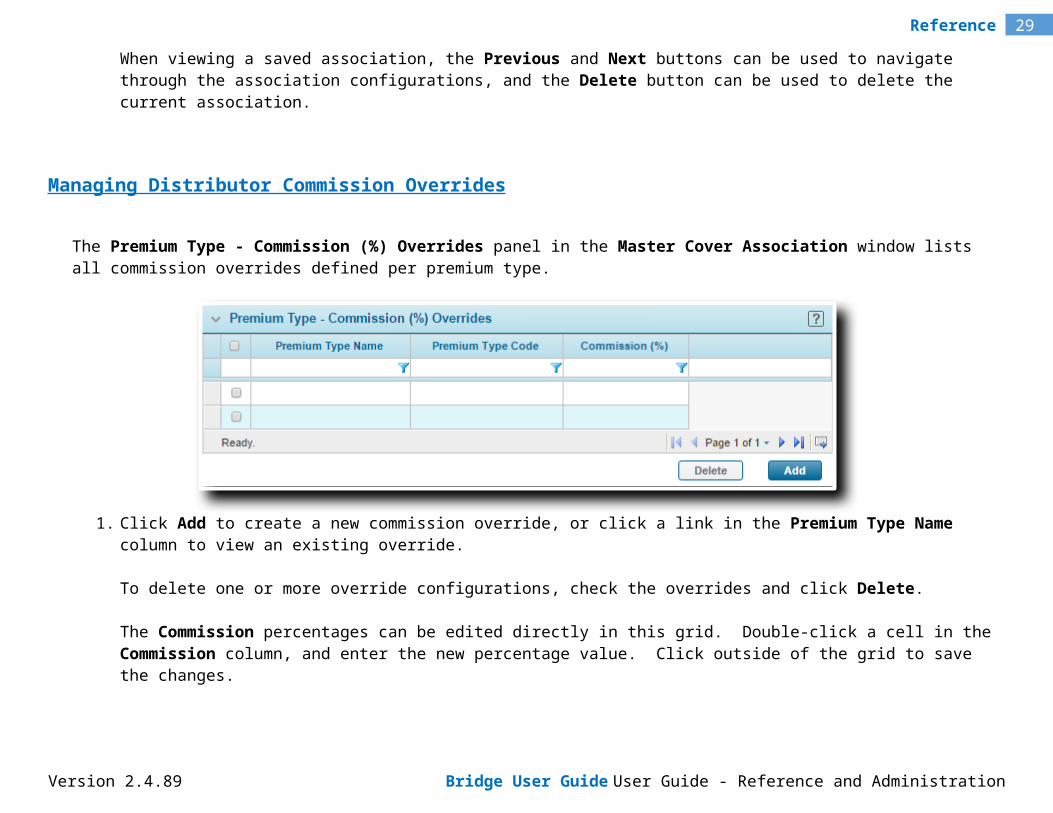
Managing Distributor Commission Overrides
The Premium Type - Commission (%) Overrides panel in the Master Cover Association window lists all commission overrides defined per premium type.
Version 2.4.89 Bridge User Guide User Guide - Reference and Administration
25Reference
1. Click Add to create a new commission override, or click a link in the Premium Type Name column to view an existing override.
To delete one or more override configurations, check the overrides and click Delete.
The Commission percentages can be edited directly in this grid. Double-click a cell in the Commission column, and enter the new percentage value. Click outside of the grid to save the changes.
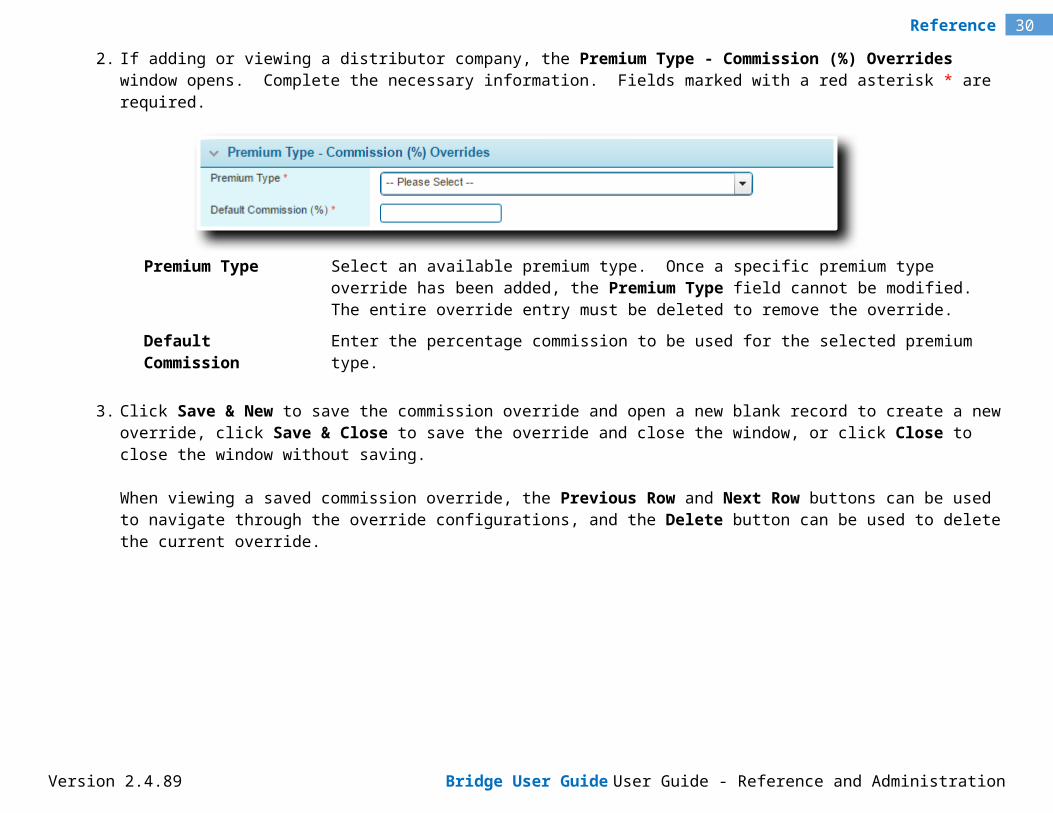
2. If adding or viewing a distributor company, the Premium Type - Commission (%) Overrides window opens. Complete the necessary information. Fields marked with a red asterisk * are required.
Premium Type Select an available premium type. Once a specific premium type override has been added, the Premium Type field cannot be modified. The entire override entry must be deleted to remove the override.
Default Commission Enter the percentage commission to be used for the selected premium type.
3. Click Save & New to save the commission override and open a new blank record to create a new override, click Save & Close to save the override and close the window, or click Close to close the window without saving.
Version 2.4.89 Bridge User Guide User Guide - Reference and Administration
26Reference
When viewing a saved commission override, the Previous Row and Next Row buttons can be used to navigate through the override configurations, and the Delete button can be used to delete the current override.
Version 2.4.89 Bridge User Guide User Guide - Reference and Administration

27Reference
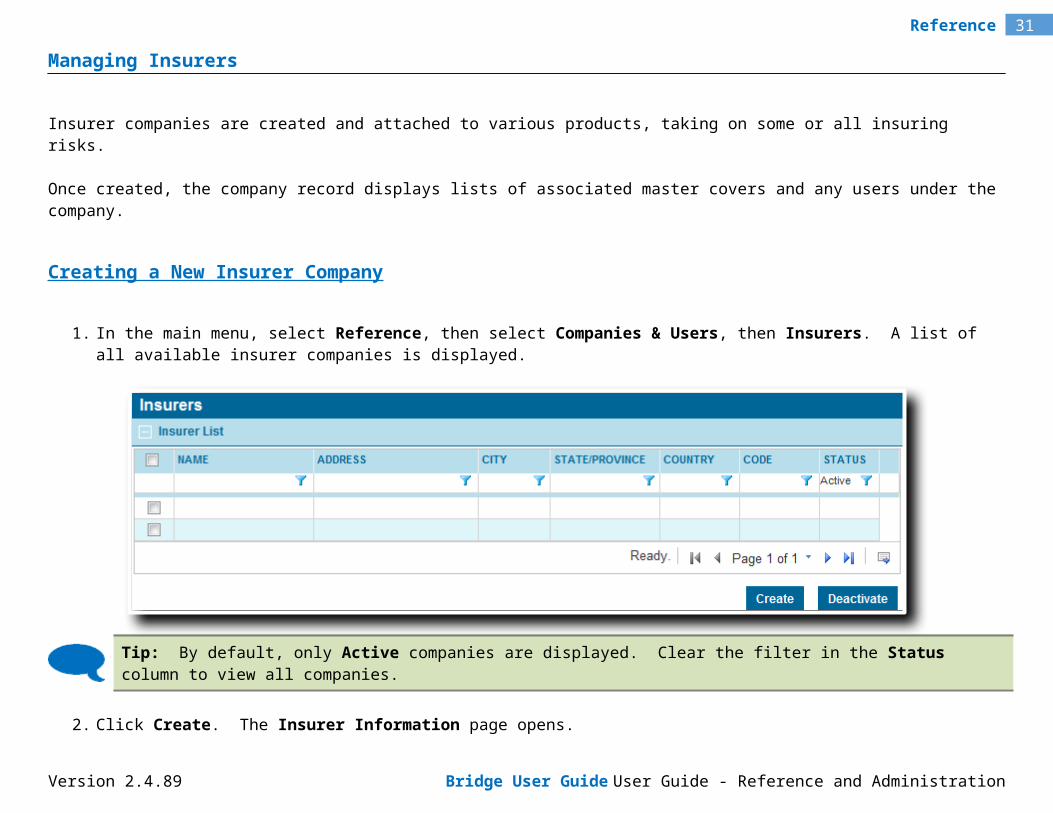
Managing Insurers
Insurer companies are created and attached to various products, taking on some or all insuring risks.
Once created, the company record displays lists of associated master covers and any users under the company.
Creating a New Insurer Company
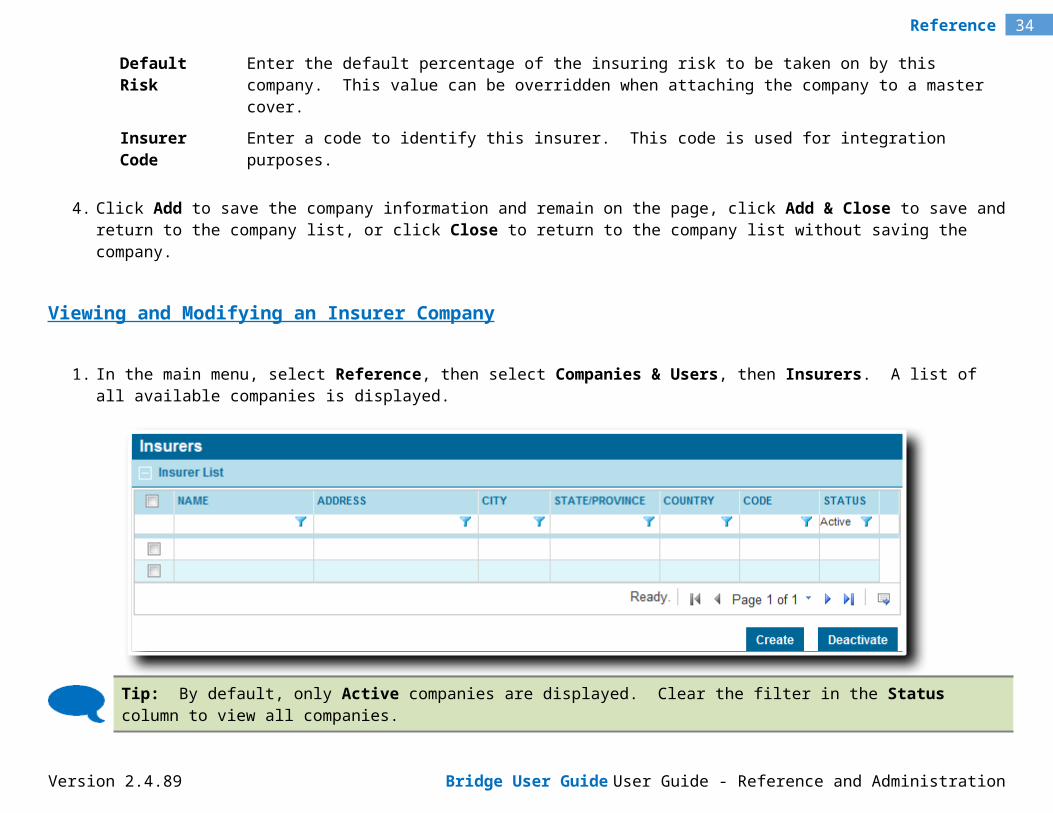
1. In the main menu, select Reference, then select Companies & Users, then Insurers. A list of all available insurer companies is displayed.
Tip: By default, only Active companies are displayed. Clear the filter in the Status column to view all companies.
2. Click Create. The Insurer Information page opens.
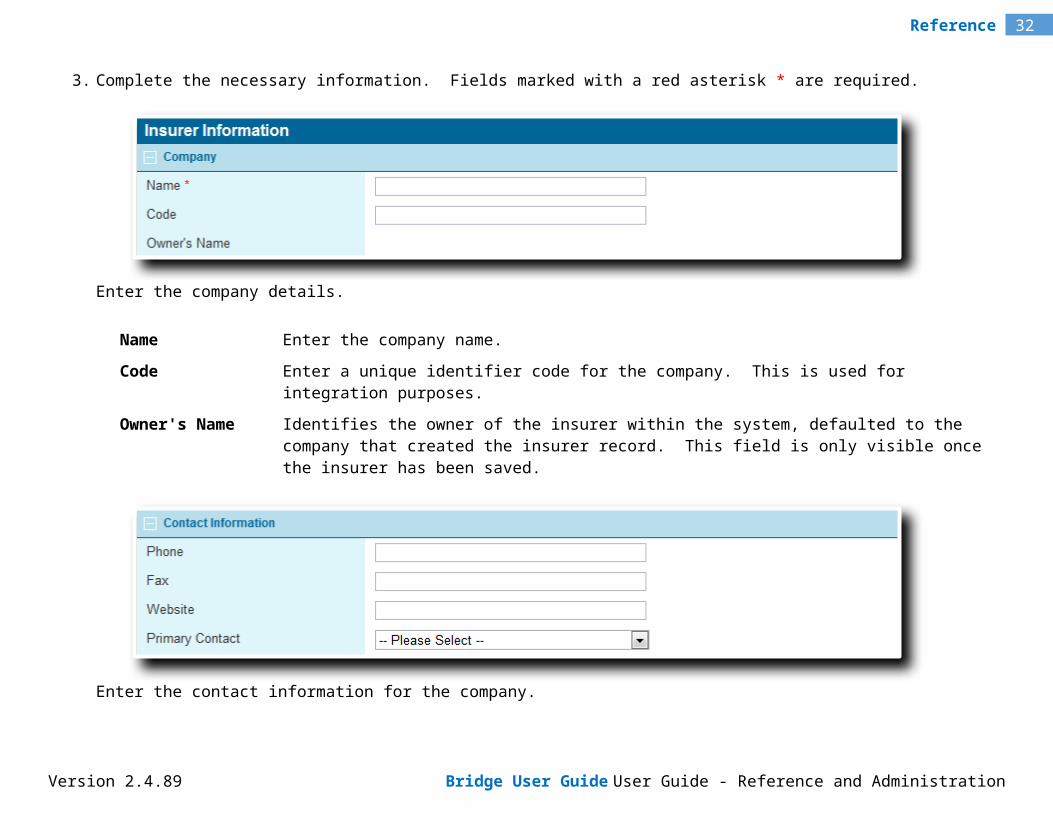
3. Complete the necessary information. Fields marked with a red asterisk * are required.
Version 2.4.89 Bridge User Guide User Guide - Reference and Administration
28Reference
Enter the company details.
Name Enter the company name.
Code Enter a unique identifier code for the company. This is used for integration purposes.
Owner's Name Identifies the owner of the insurer within the system, defaulted to the company that created the insurer record. This field is only visible once the insurer has been saved.
Enter the contact information for the company.
Phone Enter the phone number.
Fax Enter the Fax number.
Website Enter the URL of the company's website.
Primary Contact Any of the current users under the insurer company can be selected as the Primary Contact. When an e-mail is sent to this insurer, it goes to the primary contact. If no primary contact is selected, the e-mails go to the first user created under the company. This field is only visible once the insurer has been saved.
Version 2.4.89 Bridge User Guide User Guide - Reference and Administration
29Reference
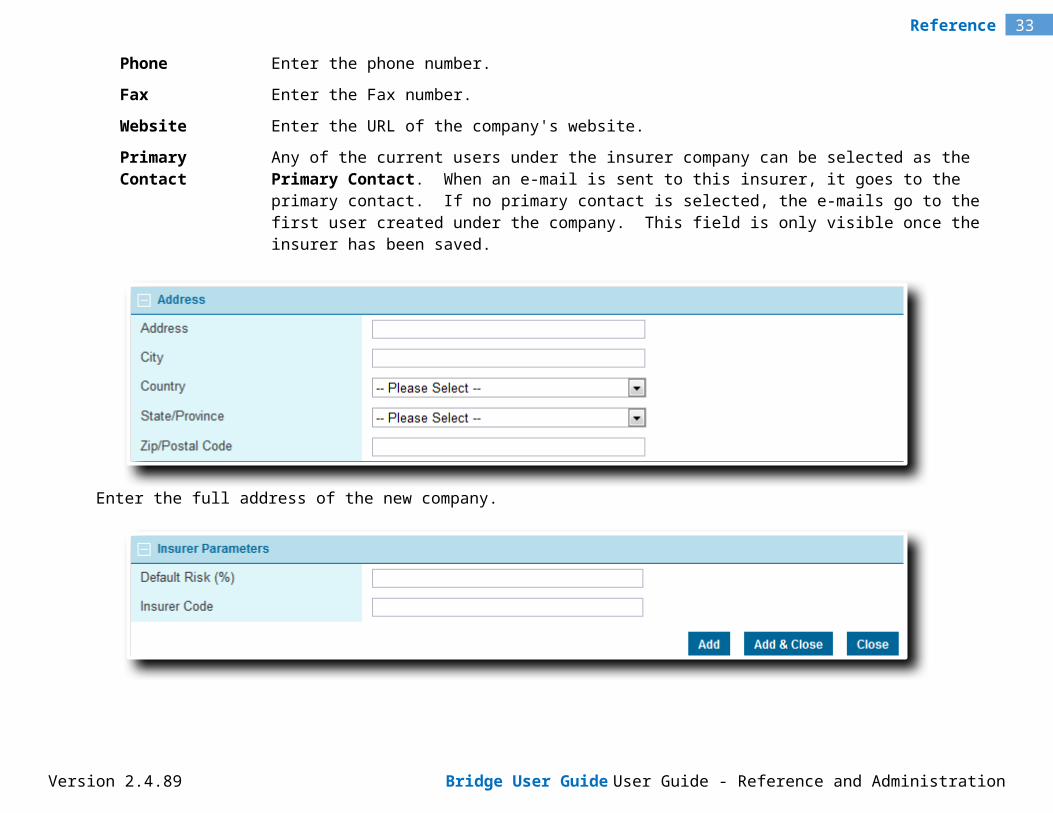
Enter the full address of the new company.
Default Risk Enter the default percentage of the insuring risk to be taken on by this company. This value can be overridden when attaching the company to a master cover.
Insurer Code Enter a code to identify this insurer. This code is used for integration purposes.
4. Click Add to save the company information and remain on the page, click Add & Close to save and return to the company list, or click Close to return to the company list without saving the company.
Viewing and Modifying an Insurer Company
1. In the main menu, select Reference, then select Companies & Users, then Insurers. A list of all available companies is displayed.
Version 2.4.89 Bridge User Guide User Guide - Reference and Administration
30Reference
Tip: By default, only Active companies are displayed. Clear the filter in the Status column to view all companies.
2. Click a link in the Name column to view the company information. If there are a large number of available companies, see the Using Grids section of the User Guide - Introduction document for help on finding the appropriate company.
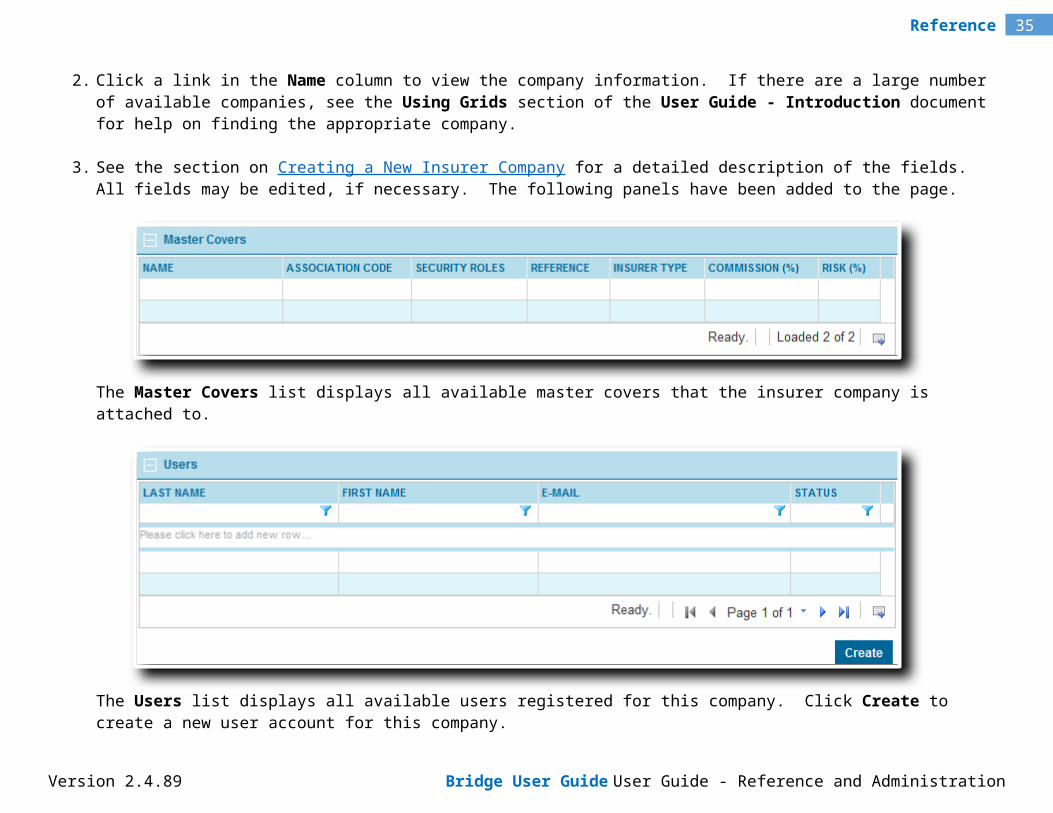
3. See the section on Creating a New Insurer Company for a detailed description of the fields. All fields may be edited, if necessary. The following panels have been added to the page.
The Master Covers list displays all available master covers that the insurer company is attached to.
Version 2.4.89 Bridge User Guide User Guide - Reference and Administration
31Reference
The Users list displays all available users registered for this company. Click Create to create a new user account for this company.
Active Marks the company as active and available for use. If unchecked, the company remains linked to any existing records, but cannot be used for new accounts or transactions.
Created By Identifies the date and time the company was created, and the user who created it.
Last Modified By Identifies the last date and time the company was changed, and the user who made the changes.
4. Click Save to save any changes and remain on the page, click Save & Close to save and return to the company list, or click Close to return to the company list without saving any changes.
Deactivating an Insurer Company
Version 2.4.89 Bridge User Guide User Guide - Reference and Administration
32Reference
Once created, an insurer cannot be deleted. It can be deactivated, which leaves it linked to any existing records already attached to it, but prevents it from being used for new accounts or transactions.
1. In the main menu, select Reference, then select Companies & Users, then Insurers. A list of all available companies is displayed.
Tip: By default, only Active companies are displayed. Clear the filter in the Status column to view all companies.
2. Locate the company or companies to be deactivated. If there are a large number of available companies, see the Using Grids section of the User Guide - Introduction document for help on finding the appropriate companies.
3. Check the boxes for all companies to be deactivated.
4. Click Deactivate, then confirm the deactivation when prompted to do so. All selected companies are deactivated. If the company list is still defaulted to only show active companies, they disappear from the list.
Tip: Individual companies can also be deactivated or reactivated directly through the company record. See the section on Viewing and Modifying an Insurer Office for details.
Version 2.4.89 Bridge User Guide User Guide - Reference and Administration
33Reference
Managing Licensee Offices
The Licensee Headquarters company is automatically created when the Bridge environment is set up. Additional offices and subsidiaries can be created, with subsidiaries of their own, to represent the hierarchical structure of your organization.
Once created, the company record displays lists of associated master covers and any users under the company.
Creating a New Licensee Office
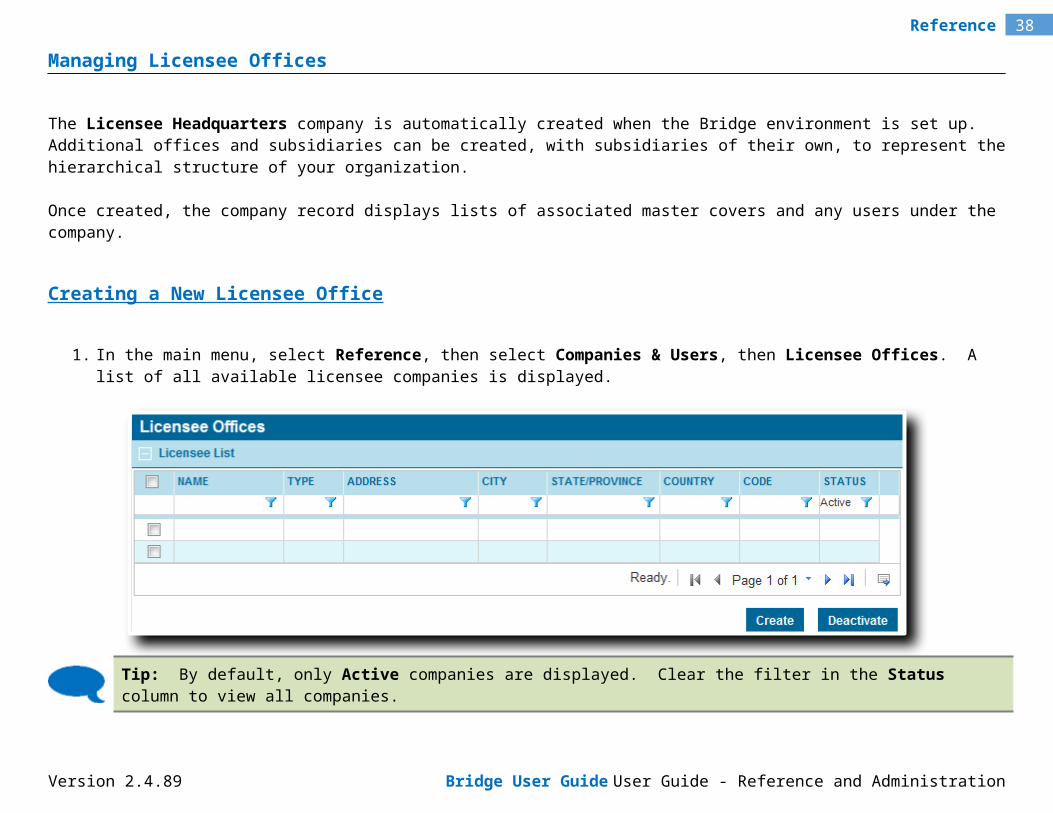
1. In the main menu, select Reference, then select Companies & Users, then Licensee Offices. A list of all available licensee companies is displayed.
Tip: By default, only Active companies are displayed. Clear the filter in the Status column to view all companies.
2. Click Create. The Licensee Information page opens.
3. Complete the necessary information. Fields marked with a red asterisk * are required.
Version 2.4.89 Bridge User Guide User Guide - Reference and Administration
34Reference
Enter the company details.
Parent Company Select the parent company. The new company is a direct subsidiary of the selected company.
Type Select any option. This will revert to Licensee on saving the company. An additional panel for Insurer Parameters or Distributor Parameters will appear at the bottom of the page, but this can be ignored.
Name Enter the company name.
Code Enter a unique identifier code for the company. This is used for integration purposes.
Enter the contact information for the company.
Phone Enter the phone number.
Fax Enter the Fax number.
Website Enter the URL of the company's website.
Version 2.4.89 Bridge User Guide User Guide - Reference and Administration
35Reference
Primary Contact Any of the current users under the licensee company can be selected as the Primary Contact. When an e-mail is sent to this licensee, it goes to the primary contact. If no primary contact is selected, the e-mails go to the first user created under the company. This field is only visible once the licensee has been saved.
Enter the full address of the new company.
4. Click Add to save the company information and remain on the page, click Add & Close to save and return to the company list, or click Close to return to the company list without saving the company.
Viewing and Modifying a Licensee Office
1. In the main menu, select Reference, then select Companies & Users, then Licensee Offices. A list of all available companies is displayed.
Version 2.4.89 Bridge User Guide User Guide - Reference and Administration

36Reference
Tip: By default, only Active companies are displayed. Clear the filter in the Status column to view all companies.
2. Click a link in the Name column to view the company information. If there are a large number of available companies, see the Using Grids section of the User Guide - Introduction document for help on finding the appropriate company.
3. See the section on Creating a New Licensee Office for a detailed description of the fields. All fields may be edited, if necessary. The following panels have been added to the page.
The Master Covers list displays all available master covers attached to the licensee office.
Version 2.4.89 Bridge User Guide User Guide - Reference and Administration

37Reference
The Users list displays all available users registered for this company. Click Create to create a new user account for this company.
Active Marks the company as active and available for use. If unchecked, the company remains linked to any existing records, but cannot be used for new accounts or transactions.
Created By Identifies the date and time the company was created, and the user who created it.
Last Modified By Identifies the last date and time the company was changed, and the user who made the changes.
4. Click Save to save any changes and remain on the page, click Save & Close to save and return to the company list, or click Close to return to the company list without saving any changes.
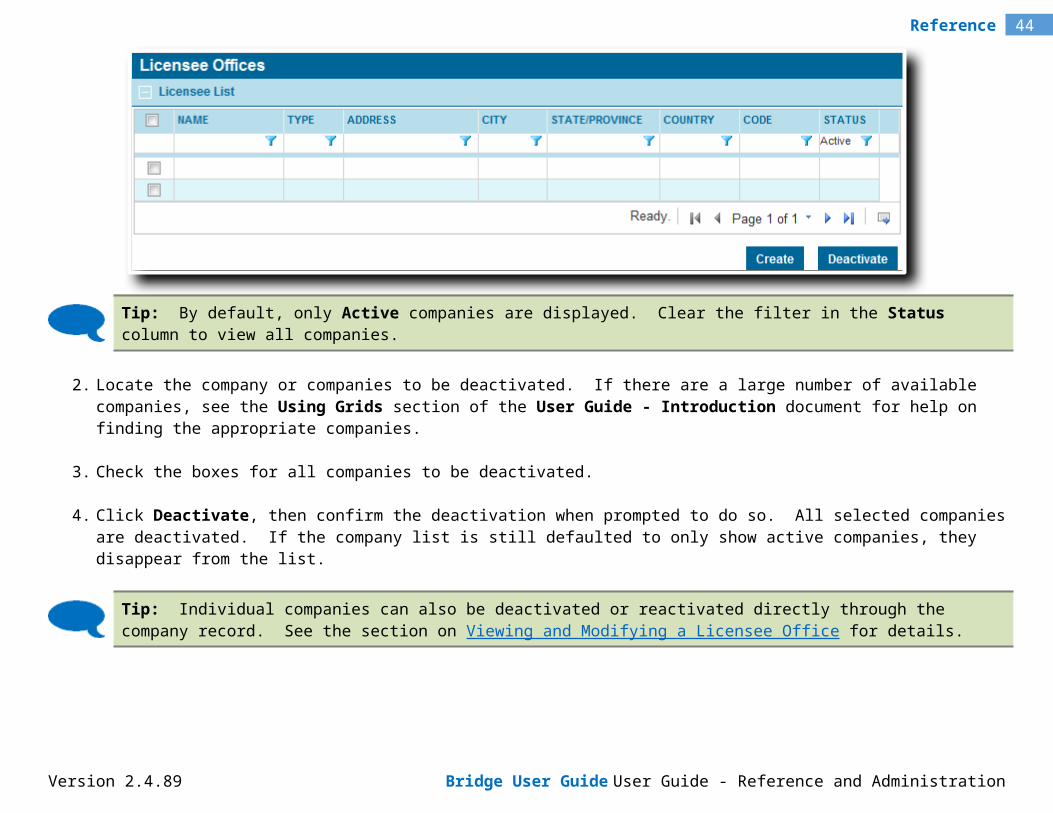
Deactivating a Licensee Office
Version 2.4.89 Bridge User Guide User Guide - Reference and Administration
38Reference
Once created, a licensee office cannot be deleted. It can be deactivated, which leaves it linked to any existing records already attached to it, but prevents it from being used for new accounts or transactions.
1. In the main menu, select Reference, then select Companies & Users, then Licensee Offices. A list of all available companies is displayed.
Tip: By default, only Active companies are displayed. Clear the filter in the Status column to view all companies.
2. Locate the company or companies to be deactivated. If there are a large number of available companies, see the Using Grids section of the User Guide - Introduction document for help on finding the appropriate companies.
3. Check the boxes for all companies to be deactivated.
4. Click Deactivate, then confirm the deactivation when prompted to do so. All selected companies are deactivated. If the company list is still defaulted to only show active companies, they disappear from the list.
Tip: Individual companies can also be deactivated or reactivated directly through the company record. See the section on Viewing and Modifying a Licensee Office for details.
Version 2.4.89 Bridge User Guide User Guide - Reference and Administration

39Reference
Managing User Accounts
For all licensee, insurer, distributor, and client companies, access to the system is achieved through individual user accounts. Each account has security roles defining what features and options are available, and an administrative level controlling what data can be accessed.
Creating a New User Account
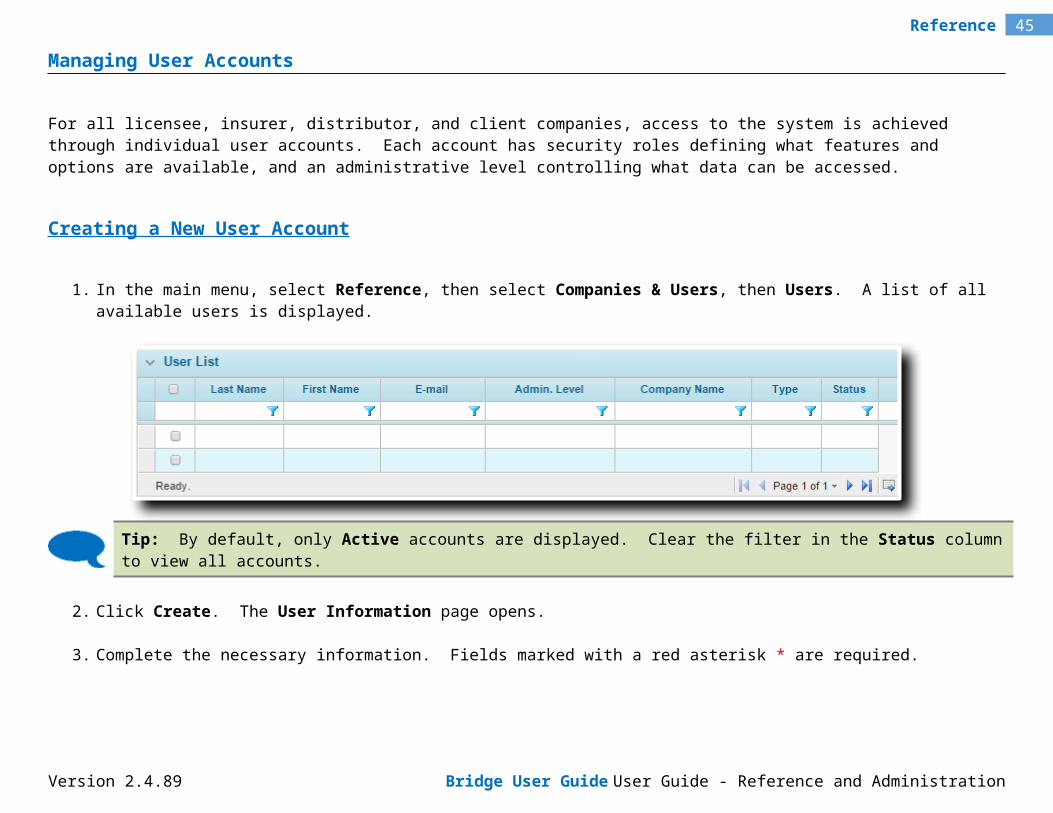
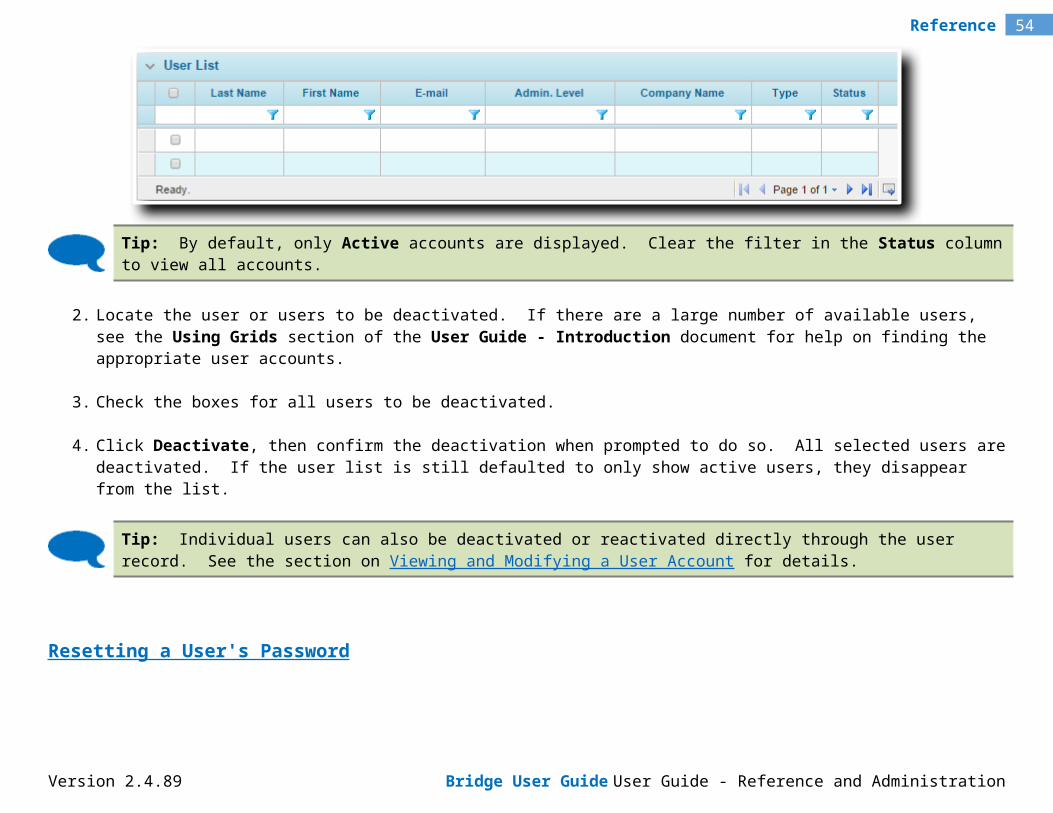
1. In the main menu, select Reference, then select Companies & Users, then Users. A list of all available users is displayed.
Tip: By default, only Active accounts are displayed. Clear the filter in the Status column to view all accounts.
2. Click Create. The User Information page opens.
3. Complete the necessary information. Fields marked with a red asterisk * are required.
Version 2.4.89 Bridge User Guide User Guide - Reference and Administration

40Reference
Company Name Select the company the new account is to be created under.
First Name Enter the user's first name.
Last Name Enter the user's last name.
Employee Number A unique identifier code can be entered for the user. This is used for integration purposes.
E-mail Enter the user's email address. This field is required, as it is used when logging in to the system. This address is also used for any notification emails, as well as access emails when resetting a password. Only a valid email address should be used, and should be kept current.
Phone The user's phone number can be entered.
Version 2.4.89 Bridge User Guide User Guide - Reference and Administration

41Reference
Single Sign-On (SSO) is when a user logs into an external system and then accesses Bridge from that system. The login credentials are passed to Bridge and matched up to an existing account.
Single Sign-On Only Checking this option means the current user can only access Bridge from the external system. Single-sign-on users differ from normal users as follows.
Login is handled through an internal configuration, so the user's password is deleted and the user will not be sent any emails related to the password.
The user will not have access to the Profile page.
If this option is unchecked, the user can log in through SSO or the standard login page.
User ID This option is used when the external system uses a User ID other than the e-mail address. Enter the user's ID from the external system, which will be matched to this Bridge user account through the single-sign-in process. When an external ID has been defined, the user will not be able to login through the standard login page.
When Bridge is integrated with external systems such as Insurity, individual accounts are often required for each system. The primary accounts are where the passwords are maintained, while secondary accounts may be required in the integrated systems to manage local settings.
In the Authentication field, select which system has the primary account. At login, the user will be authenticated in the selected system.
If Bridge is selected, the primary account is managed within Bridge. If Insurity services are enabled, they will be available without a secondary account.
If Insurity is selected, the primary account is managed within Insurity. A secondary account must exist within the Bridge system, and must have the same e-mail address as the primary account on the Insurity side. Any new or existing password related to the secondary account will not be valid. The other profile information within the Bridge account should be maintained, as it is used to define security rights, contact information, and other user-specific settings.
Version 2.4.89 Bridge User Guide User Guide - Reference and Administration

42Reference
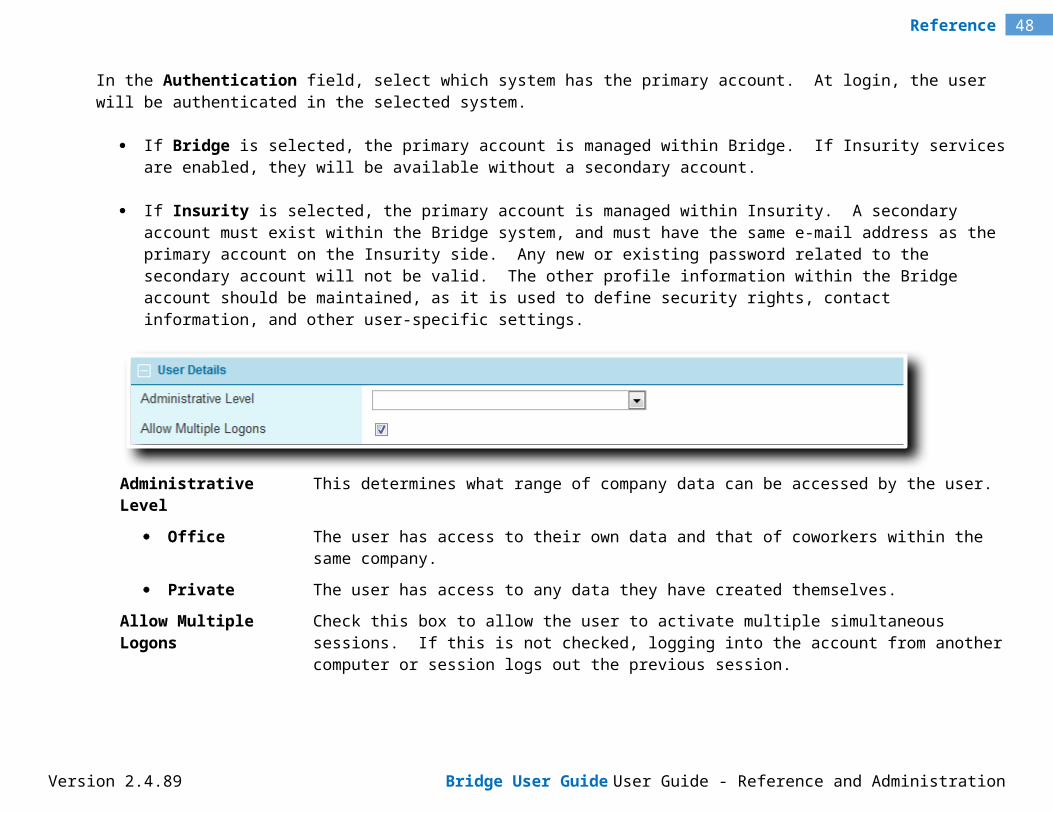
Administrative Level This determines what range of company data can be accessed by the user.
Office The user has access to their own data and that of coworkers within the same company.
Private The user has access to any data they have created themselves.
Allow Multiple Logons Check this box to allow the user to activate multiple simultaneous sessions. If this is not checked, logging into the account from another computer or session logs out the previous session.
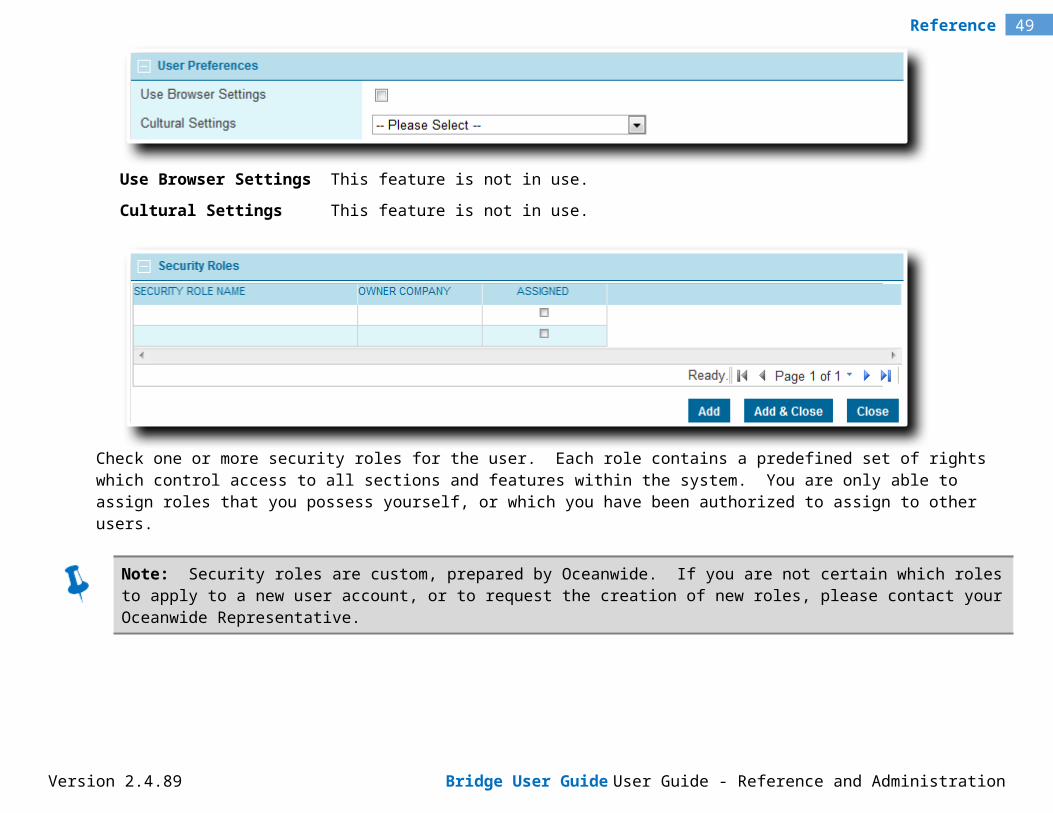
Use Browser Settings This feature is not in use.
Cultural Settings This feature is not in use.
Version 2.4.89 Bridge User Guide User Guide - Reference and Administration
43Reference
Check one or more security roles for the user. Each role contains a predefined set of rights which control access to all sections and features within the system. You are only able to assign roles that you possess yourself, or which you have been authorized to assign to other users.
Note: Security roles are custom, prepared by Oceanwide. If you are not certain which roles to apply to a new user account, or to request the creation of new roles, please contact your Oceanwide Representative.
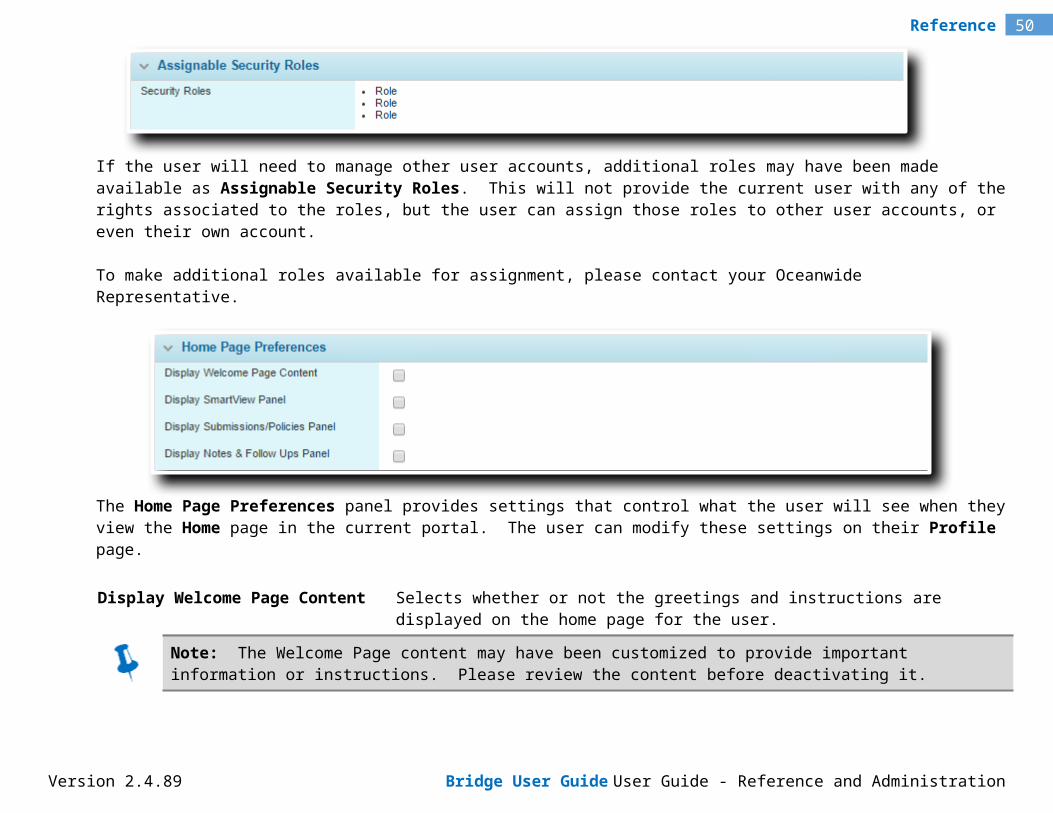
If the user will need to manage other user accounts, additional roles may have been made available as Assignable Security Roles. This will not provide the current user with any of the rights associated to the roles, but the user can assign those roles to other user accounts, or even their own account.
To make additional roles available for assignment, please contact your Oceanwide Representative.
The Home Page Preferences panel provides settings that control what the user will see when they view the Home page in the current portal. The user can modify these settings on their Profile page.
Display Welcome Page Content Selects whether or not the greetings and instructions are displayed on the home page for the user.
Note: The Welcome Page content may have been customized to provide important information or instructions. Please review the content before deactivating it.
Version 2.4.89 Bridge User Guide User Guide - Reference and Administration
44Reference
Display SmartView Panel Selects whether or not SmartView is displayed on the home page for the user. SmartView is a data tracking and management system, providing customizable and interactive data views arranged in "Dashboard" screens. Data from throughout the system can be collected and displayed in a range of tables, graphs, and charts, with interactive connections that allow one data view to adjust, filter, or even replace another data view.
A default policy dashboard is provided for this option.
Display Submissions/Policies Panel Selects whether or not the user will see the grid containing all available submissions and policies on the home page.
Display Notes & Follow Ups Panel Selects whether or not to the user will see the grid containing any notes or follow ups requiring action on the home page.
Note: The SmartView, submission, and notes options are only available to users with the necessary rights to view each feature.
4. If you want to send the user's login information immediately, click Add to save the user information and remain on the page. If the login information is to be sent later, click Add & Close to save and return to the user list. Click Close to return to the user list without saving the user.
5. To send an access email to the user, click Assign Password after adding the user. An access email is sent to the e-mail address registered in the account.
Viewing and Modifying a User Account
Users can modify some of the details of their account using the Profile page. Any other changes must be done by a user with access to the user accounts.
1. In the main menu, select Reference, then select Companies & Users, then Users. A list of all available users is displayed.
Version 2.4.89 Bridge User Guide User Guide - Reference and Administration
45Reference
Tip: By default, only Active accounts are displayed. Clear the filter in the Status column to view all accounts.
2. Click a link in the Last Name column to view the user information. If there are a large number of available users, see the Using Grids section of the User Guide - Introduction document for help on finding the appropriate user.
3. The first five panels include the general user information. See the section on Creating a New User Account for a detailed description. The Company Name cannot be changed, but all other fields may be edited, if necessary. The following panels have been added to the page.
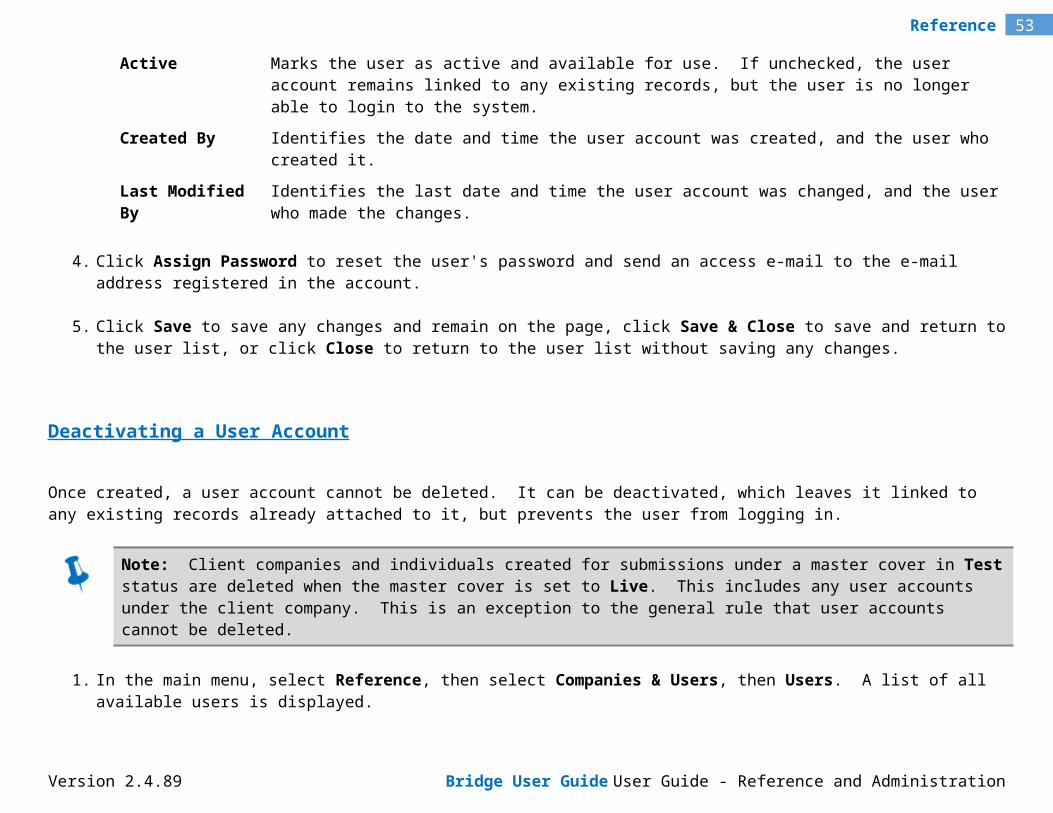
Active Marks the user as active and available for use. If unchecked, the user account remains linked to any existing records, but the user is no longer able to login to the system.
Created By Identifies the date and time the user account was created, and the user who created it.
Last Modified By Identifies the last date and time the user account was changed, and the user who made the changes.
4. Click Assign Password to reset the user's password and send an access e-mail to the e-mail address registered in the account.
Version 2.4.89 Bridge User Guide User Guide - Reference and Administration

46Reference
5. Click Save to save any changes and remain on the page, click Save & Close to save and return to the user list, or click Close to return to the user list without saving any changes.
Deactivating a User Account
Once created, a user account cannot be deleted. It can be deactivated, which leaves it linked to any existing records already attached to it, but prevents the user from logging in.
Note: Client companies and individuals created for submissions under a master cover in Test status are deleted when the master cover is set to Live. This includes any user accounts under the client company. This is an exception to the general rule that user accounts cannot be deleted.
1. In the main menu, select Reference, then select Companies & Users, then Users. A list of all available users is displayed.
Tip: By default, only Active accounts are displayed. Clear the filter in the Status column to view all accounts.
2. Locate the user or users to be deactivated. If there are a large number of available users, see the Using Grids section of the User Guide - Introduction document for help on finding the appropriate user accounts.
3. Check the boxes for all users to be deactivated.
Version 2.4.89 Bridge User Guide User Guide - Reference and Administration
47Reference
4. Click Deactivate, then confirm the deactivation when prompted to do so. All selected users are deactivated. If the user list is still defaulted to only show active users, they disappear from the list.
Tip: Individual users can also be deactivated or reactivated directly through the user record. See the section on Viewing and Modifying a User Account for details.
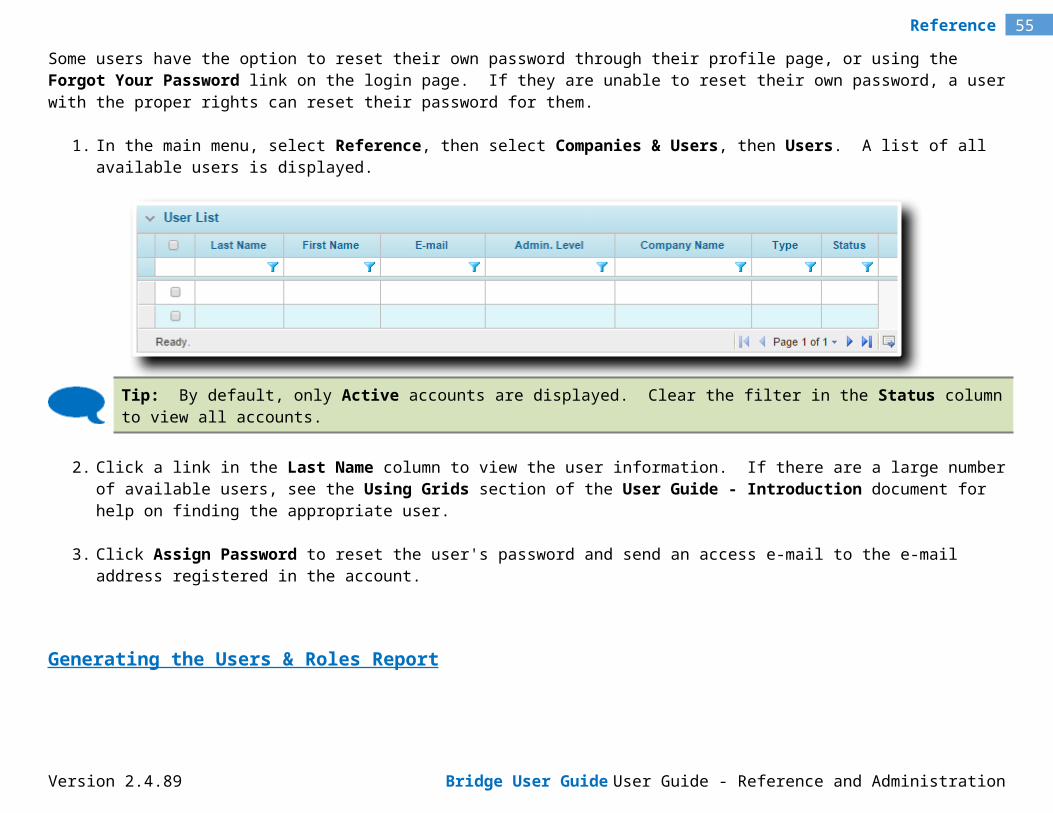
Resetting a User's Password
Some users have the option to reset their own password through their profile page, or using the Forgot Your Password link on the login page. If they are unable to reset their own password, a user with the proper rights can reset their password for them.
1. In the main menu, select Reference, then select Companies & Users, then Users. A list of all available users is displayed.
Tip: By default, only Active accounts are displayed. Clear the filter in the Status column to view all accounts.
2. Click a link in the Last Name column to view the user information. If there are a large number of available users, see the Using Grids section of the User Guide - Introduction document for help on finding the appropriate user.
3. Click Assign Password to reset the user's password and send an access e-mail to the e-mail address registered in the account.
Generating the Users & Roles Report
Version 2.4.89 Bridge User Guide User Guide - Reference and Administration
48Reference
When an organization has a large number of users with a variety of roles, it can be time-consuming to review individual user accounts. The Users & Roles Report provides a full list of users and their associated security roles.
1. In the main menu, select Reference, then select Companies & Users, then Users. A list of all available users is displayed.
Tip: By default, only Active accounts are displayed. Clear the filter in the Status column to view all accounts.
2. Click Users & Roles Report. The report is produced in Excel format. A standard Save / Open dialogue box appears. Select if you want to Open the file, Save the file to your computer, or Cancel the download.
3. When viewing the report, the following information is provided.
Last Name Displays the last name of the user.
First Name Displays the first name of the user.
E-mail Displays the e-mail address of the user.
Company Name Displays the name of the user's company. This will be blank for individual client accounts.
Type Displays the type of the user's company. This will show Assured for individual client accounts.
Version 2.4.89 Bridge User Guide User Guide - Reference and Administration
49Reference
User Status Identifies if the user account is Active or Inactive.
Last Modified By Displays the name of the last user to change the user account.
Last Modified On Displays the last date and time the user account was changed.
Security Role Displays a single role that is assigned to the user, or that the user can assign to accounts.
Role Type Identifies how the role is available to the user.
Assigned The role has been assigned directly to the user, giving them access to the features and options controlled by that role.
Assignable The user can assign the role to user accounts.
Individual entries exist for each unique combination of role, type, and user information. The report can be sorted and filtered using the standard Excel controls.
Version 2.4.89 Bridge User Guide User Guide - Reference and Administration
50Reference
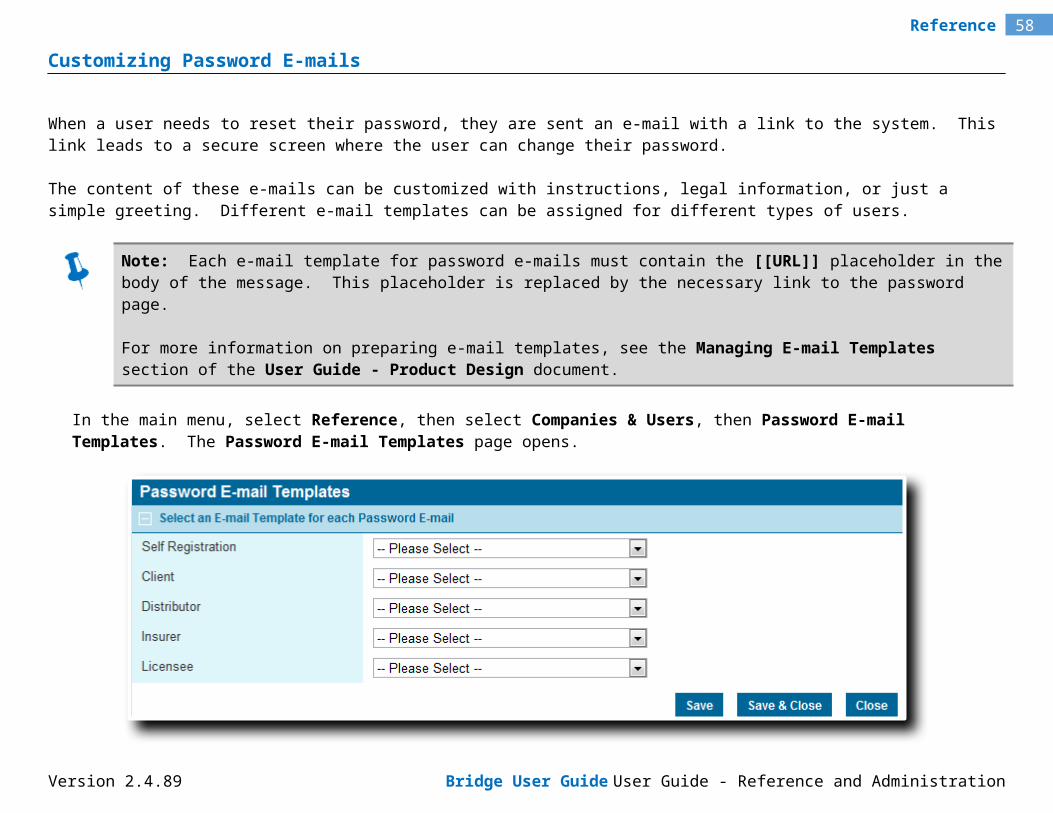
Customizing Password E-mails
When a user needs to reset their password, they are sent an e-mail with a link to the system. This link leads to a secure screen where the user can change their password.
The content of these e-mails can be customized with instructions, legal information, or just a simple greeting. Different e-mail templates can be assigned for different types of users.
Note: Each e-mail template for password e-mails must contain the [[URL]] placeholder in the body of the message. This placeholder is replaced by the necessary link to the password page.
For more information on preparing e-mail templates, see the Managing E-mail Templates section of the User Guide - Product Design document.
In the main menu, select Reference, then select Companies & Users, then Password E-mail Templates. The Password E-mail Templates page opens.
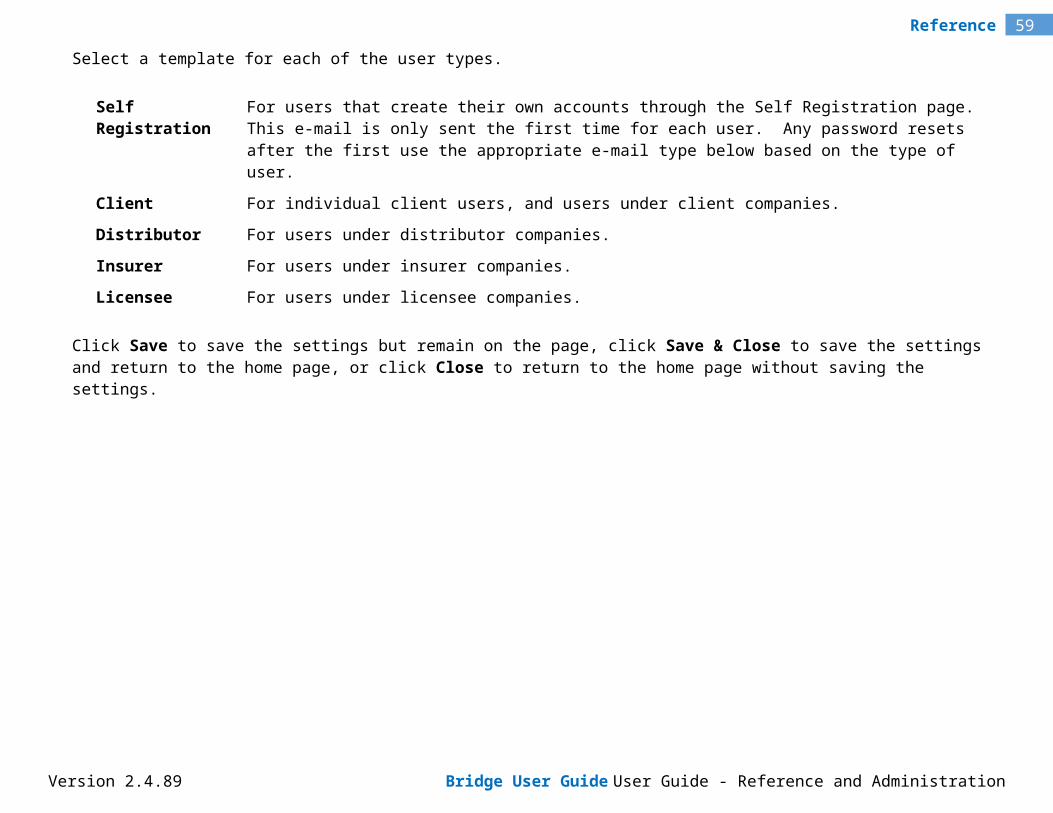
Select a template for each of the user types.
Version 2.4.89 Bridge User Guide User Guide - Reference and Administration

51Reference
Self Registration For users that create their own accounts through the Self Registration page. This e-mail is only sent the first time for each user. Any password resets after the first use the appropriate e-mail type below based on the type of user.
Client For individual client users, and users under client companies.
Distributor For users under distributor companies.
Insurer For users under insurer companies.
Licensee For users under licensee companies.
Click Save to save the settings but remain on the page, click Save & Close to save the settings and return to the home page, or click Close to return to the home page without saving the settings.
Version 2.4.89 Bridge User Guide User Guide - Reference and Administration

52Reference
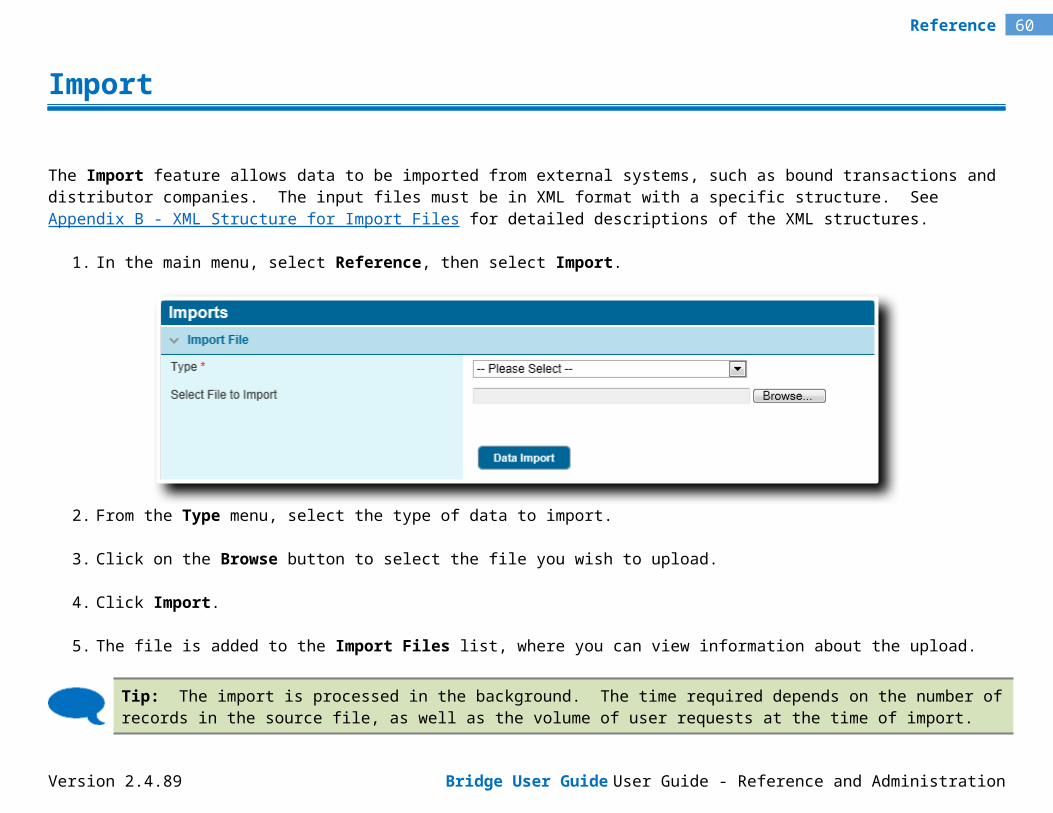
Import
The Import feature allows data to be imported from external systems, such as bound transactions and distributor companies. The input files must be in XML format with a specific structure. See Appendix B - XML Structure for Import Files for detailed descriptions of the XML structures.
1. In the main menu, select Reference, then select Import.
2. From the Type menu, select the type of data to import.
3. Click on the Browse button to select the file you wish to upload.
4. Click Import.
5. The file is added to the Import Files list, where you can view information about the upload.
Tip: The import is processed in the background. The time required depends on the number of records in the source file, as well as the volume of user requests at the time of import. You can continue to work throughout the system, or even submit additional import files.
Version 2.4.89 Bridge User Guide User Guide - Reference and Administration
53Reference
6. To open a report with the details of the current table, click the Export Grid button in the bottom right corner of the grid.
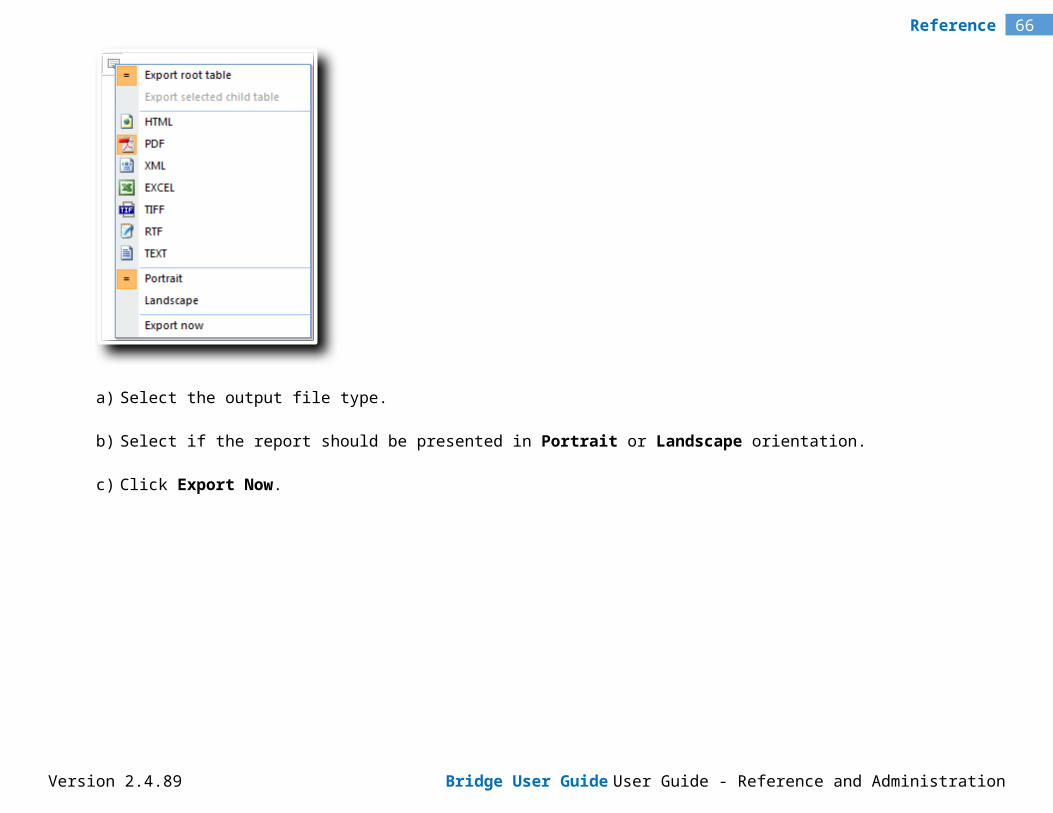
a) Select the output file type.
b) Select if the report should be presented in Portrait or Landscape orientation.
c) Click Export Now.
7. Click a link in the Response column to view the XML response file for the entire import, including any error messages that may have occurred. This file is only available once all records have been processed.
Version 2.4.89 Bridge User Guide User Guide - Reference and Administration
54Reference
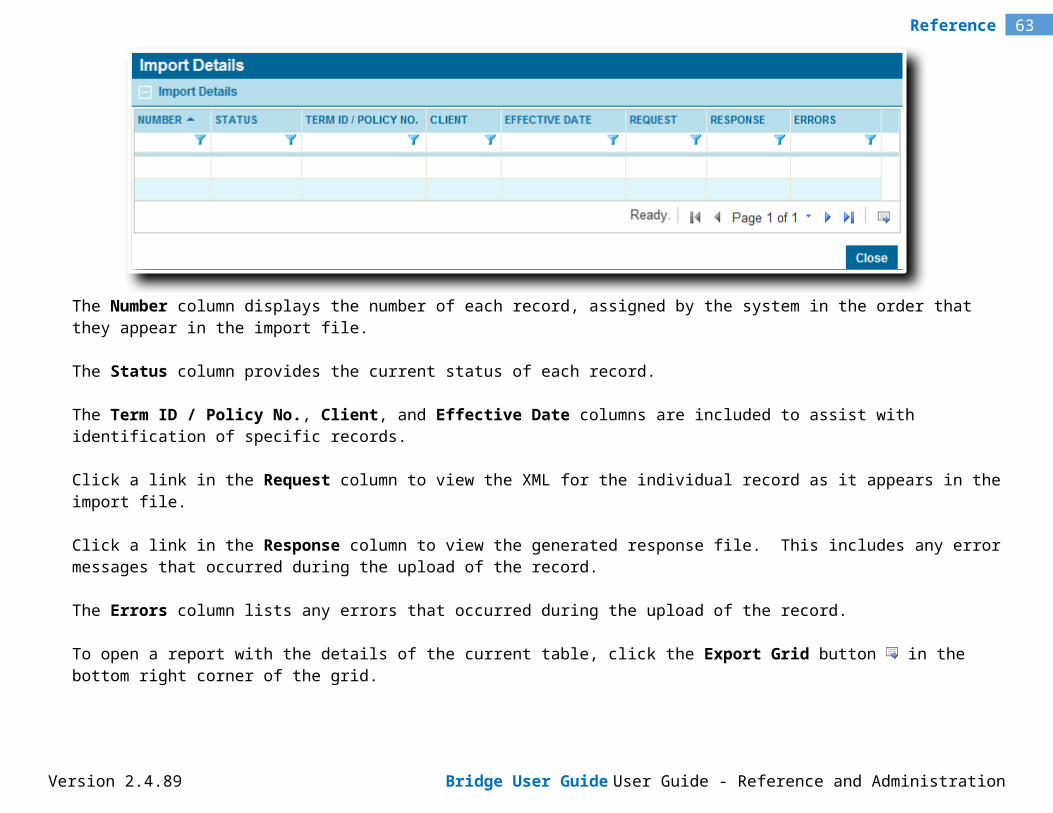
8. Click a link in the Request column to view the original uploaded file.
9. The Status column displays the status of the entire upload, as of the last time the page was loaded or refreshed. Click a link in the Status column to view a detailed listing of all records within the import file, and the status of each.
The Import Details table is different for each type of import. Please see the appropriate section below:
Importing Bound Transactions
New Business or Renewal transactions can be imported as new transactions or to update existing transactions.
Note: If a field is configured as read-only by default, it will be populated by a new transaction import but cannot be changed by an update import.
The Number column displays the number of each record, assigned by the system in the order that they appear in the import file.
The Status column provides the current status of each record.
The Term ID / Policy No., Client, and Effective Date columns are included to assist with identification of specific records.
Click a link in the Request column to view the XML for the individual record as it appears in the import file.
Version 2.4.89 Bridge User Guide User Guide - Reference and Administration
55Reference
Click a link in the Response column to view the generated response file. This includes any error messages that occurred during the upload of the record.
The Errors column lists any errors that occurred during the upload of the record.
To open a report with the details of the current table, click the Export Grid button in the bottom right corner of the grid.
a) Select the output file type.
b) Select if the report should be presented in Portrait or Landscape orientation.
c) Click Export Now.
Importing Distributor Companies
Version 2.4.89 Bridge User Guide User Guide - Reference and Administration

56Reference
The Number column displays the number of each record, assigned by the system in the order that they appear in the source document.
The Status column provides the current status of each record.
The Company column is included to assist with identification of specific records.
Click a link in the Request column to view the XML for the individual record as it appears in the import file.
Click a link in the Response column to view the generated response file. This includes any error messages that occurred during the upload for this record.
The Errors column lists any errors that occurred during the upload of the record.
To open a report with the details of the current table, click the Export Grid button in the bottom right corner of the grid.
Version 2.4.89 Bridge User Guide User Guide - Reference and Administration
57Reference
a) Select the output file type.
b) Select if the report should be presented in Portrait or Landscape orientation.
c) Click Export Now.
Version 2.4.89 Bridge User Guide User Guide - Reference and Administration
58Reference
Managing Portals
Any Licensee of Bridge can create as many Portals as required for their distribution channels. These Portals can be configured by the Business User to have the corporate look and feel of each given distribution channel.
Assigning a Custom Domain to the Default Portal
In addition to branding portals with corporate colors and logos, a custom domain can be assigned to a default portal. While navigating the system, your users see the custom domain as the root of the URL for each page, and e-mails sent from the system are sent from the selected domain.
The first step is to purchase the domain (if it is not already owned), and register the domain to your Bridge licensee site. Please contact your Oceanwide Account Representative for the details necessary to complete the registration.
Note: A domain can only be registered to one website, so it is not possible to use your company's corporate domain. A unique domain must be registered, although it may be a variation of your corporate domain.
1. In the Main Menu, select Reference, then select Portals. The Portals page opens with a list of all available portals.
2. Click the (default) link in the Name column to view the default portal. The Portal - General Information page opens.
Version 2.4.89 Bridge User Guide User Guide - Reference and Administration
59Reference
Name Displays the name of the portal. For the default portal, the name cannot be changed.
Description Enter a description to appear on the portals list.
Last Published By This field displays the name of the user who last published this portal, plus the date and time it was published.
URL This field displays the internal URL of the portal. This is the direct access to the portal, which should be used by all users if a custom domain is not defined. Even if a custom domain has been defined, this URL remains functional. This can be used as an emergency access option if there are any problems with the custom domain.
Note: Logging in using the internal URL bypasses the custom domain. When navigating the system using this option, the internal URL is shown as the address of each page, instead of the custom domain. This also affects e-mails sent from the system while logged into the internal URL.
Custom Domain Once the custom domain has been registered, enter the domain in this field. The domain name should include the name and extension, such as "oceanwide.com", without any server identifiers or protocol information (www, https, etc.), or any subfolders (/login, /home, etc.). The domain entered in this field must also match the registered domain exactly.
Version 2.4.89 Bridge User Guide User Guide - Reference and Administration
60Reference
Created By This field displays the name of the user who created this portal, plus the date and time it was created.
Last Modified This field displays the name of the last user to make changes to this portal, plus the date and time of the changes.
3. Click Save to save the portal but remain on the page, click Save & Close to save the portal and return to the portal list, or click Close to return to the portal list without saving the portal.
Note: While this page can be saved, as well as all the other pages in the Screens widget, the changes are not applied to the live website until the portal is published.
4. Additional configuration options can be applied to the default portal before publishing. The other features are available under the Screens widget, and are described in detail in the sections below.
5. Once all changes have been made to the portal and saved, click Publish in the General Information page to apply all changes to the live website. Any changes that have not been saved are not published.
Once a custom domain has been registered and assigned to the default portal, any additional portals (see below) can be accessed at that domain with the appropriate sub-folders. To confirm the exact URL to access additional portals, check the URL field in each additional portal record.
Version 2.4.89 Bridge User Guide User Guide - Reference and Administration
61Reference
Creating a New Portal
While the default portal is automatically created when a new licensee site is set up, you can add additional portals with different settings, color schemes, and branding. These additional portals are accessed with a URL Extension assigned to the portal.
1. In the Main Menu, select Reference, then select Portals. The Portals page opens with a list of all available portals.
2. Click Create. The Portal - General Information page opens.
Name Enter the name of the portal. This name is used in the portal list.
Description Enter a description to appear on the portals list.
Last Published By This field is displayed once a portal has been published for the first time. This field displays the name of the user who last published the portal, and the date and time that it was published.
Version 2.4.89 Bridge User Guide User Guide - Reference and Administration

62Reference
URL Extension Additional portals are accessed through extensions to the internal URL or custom domain. Enter the name of the extension, exactly as it should appear in the URL. Only numbers and letters are allowed, with no spaces or special characters.
Examples: If the URL Extension is "Cars" and a Custom Domain has not been specified, the URL would
resemble: https://licensee.oceanwidebridge.com/Cars
If the URL Extension is "Ocean" and the Custom Domain is "insurance.com", the URL would resemble: https://insurance.com/Ocean
These are example URLs. The actual URLs include additional information after the URL Extension.
URL This field displays the internal URL of the portal, plus the URL Extension. This is the direct access to the portal, which should be used by all users if a custom domain is not defined. Even if a custom domain has been defined, this URL remains functional. This can be used as an emergency access option if there are any problems with the custom domain.
Note: Using the internal URL bypasses the custom domain. When navigating the system using this option, the internal URL is shown as the address of each page, instead of the custom domain. This also affect e-mails sent from the system while logged into the internal URL.
Custom Domain If a custom domain has been defined for the default portal, this field displays the custom URL of the portal, plus the URL Extension.
3. Click Add to save the portal but remain on the page, click Add & Close to save the portal and return to the portal list, or click Close to return to the portal list without saving the portal.
Note: Saving the portal does not make a new portal available for use, and does not update an existing portal with the changes that have been made. A portal must be Published to make the new settings available for use.
Version 2.4.89 Bridge User Guide User Guide - Reference and Administration
63Reference
4. After clicking Add, the Status panel is added to the page and the Screens widget appears. The widget options are described in detail in the sections below.
Created By This field displays the name of the user who created this portal, plus the date and time it was created.
Last Modified This field displays the name of the last user to make changes to this portal, plus the date and time of the changes.
5. Once all changes have been made to the portal and saved, click Publish to apply all changes to the live website. Any changes that have not been saved are not published.
Version 2.4.89 Bridge User Guide User Guide - Reference and Administration

64Reference
Modifying a Portal
The default portal is automatically created when a new licensee site is set up, and additional portals can be created. The default portal and all custom portals can be modified after they have been created.
1. In the Main Menu, select Reference, then select Portals. The Portals page opens with a list of all available portals.
2. Click a link in the Name column to open a portal. The Portal - General Information page opens.
3. See the section on Creating a New Portal for a description of the fields in the General Information page. All information can be edited except for the URL and Domain fields.
4. Click Save to save any changes but remain on the page, click Save & Close to save any changes and return to the portal list, or click Close to return to the portal list without saving any changes.
5. Additional configuration options can be applied to the portal before publishing. The other features are available under the Screens widget, and are described in detail in the following sections.
6. Once all changes have been made to the portal and saved, click Publish to apply all changes to the live website. Any changes that have not been saved are not published.
Version 2.4.89 Bridge User Guide User Guide - Reference and Administration

65Reference
Managing External Links on the Main Menu
In the event that you want to direct your users to other websites, links can be added to individual portals, and appear in the main menu at the top of the page.
The links are included in the main menu as the last items before the username menu, and can be set to show individually or in a sub-menu. Clicking one of these links opens a new browser window with the selected URL.
Note: Given the limited horizontal space (which varies according to the features available to each user), It is recommended to group links wherever possible, and shortening the names of groups and links that appear in the top level menu.
Ideally, most users should have up to seven menu options total, although high-level administrative users are most likely to exceed that number. This is not a strict limitation, as the menu bar wraps around to create a second line of menu options if it exceeds the width of the browser window.
1. In the Main Menu, select Reference, then select Portals. The Portals page opens with a list of all available portals.
2. Click a link in the Name column to view a portal. The Portal - General Information page opens, and additional options are available in the Screens widget to the left of the page.
3. Select Custom Menu Items in the Screens widget. The Portal - Custom Menu Items page opens.
Version 2.4.89 Bridge User Guide User Guide - Reference and Administration
66Reference
Group External Links in a main menu item
Check this box to display all external links in a sub-menu that expands when the Menu Label (see below) is clicked. If this box is not checked, all links are displayed directly in the main menu.
Menu label for External Links
If the links are grouped under a sub-menu, enter the name of the sub-menu here, as it should appear in the main menu. If left blank, the menu item defaults to External Links.
4. Click Save to save the settings.
5. Select External Links in the Screens widget. The External Links page opens with a list of all links attached to the current portal.
Tip: By default, only Active links are displayed. Clear the filter in the Status column to view all links.
6. Click a link in the Name column to view an existing link, or click Create to add a new link. The External Links page opens.
Checking the box next to a link and clicking Deactivate makes the link inactive, and it does not appear in the menu unless the filter is cleared from the Status column.
7. Select the settings for the link in the Portal - External Links page.
Version 2.4.89 Bridge User Guide User Guide - Reference and Administration
67Reference
Label Enter the name of the link as it should appear in the menu.
Link To File When this box is checked, clicking on the link will download a file instead of opening a website. This is useful for providing users with a convenient way to access files.
File This field becomes available when Link To File is checked. Use it to upload a file that will be downloaded when the link is clicked. Only one file can be uploaded per link.
To upload the file, use the Select or Drop File to Upload button to select a file to upload. On selecting the file, its name will replace the Select or Drop File to Upload button and a Remove button will appear.
If creating a new link, click Add or Add & Close to save the file. If updating an existing link, click Save or Save & Close to save the file.
Once the link has been saved, the URL field appears with a read-only path to the uploaded file. The File field will be hidden and a Delete button appears below the URL.
To delete the file and upload a new one, click on the Delete button. The Select or Drop File to Upload button will appear. Use it to select the replacement file and then click Save or Save & Close.
To delete the file and change the link to open a website, click on the Delete button, uncheck Link to File, and then click Save or Save & Close. Note that the URL field will have to be updated.
URL This field is available when Link to File is unchecked. It will also appear as read-only when Link to File is checked and a file is saved for the link.
Version 2.4.89 Bridge User Guide User Guide - Reference and Administration

68Reference
When the link is used to open a website, use this field to enter the website’s full URL. This should include the protocol ("http://" or "https://", for example). If you are unsure of the full address of the site, you can visit the site directly and copy the URL from the Address bar in the browser.
Sequence Enter a Sequence number. This determines the link's position in the menu, with lower numbers appearing first.
Tips:It is advisable to leave gaps between the sequence numbers, such as 5, 10, 15. This allows new items to be added to the list at a later date, inserted between existing items. Otherwise, the sequence numbers of existing items must be changed to allow for the new addition.
If multiple items are given the same sequence number, they are grouped together and sorted alphabetically.
Security Role Access to the link can be restricted according to security roles. Select all roles that should have access to the link, and only users who have at least one of the selected roles are able to see and use the link. Select all roles to make the link available to all users.
The Status panel is displayed once a link has been saved, or when viewing an existing link.
Version 2.4.89 Bridge User Guide User Guide - Reference and Administration

69Reference
Active This checkbox controls if the link is displayed and available for use by users with the appropriate security roles. If unchecked, the link is not available to any users, and is not shown in the External Link List unless the filter is cleared in the Status column.
Created By Identifies the date and time the link was created, and the user who created it.
Last Modified By Identifies the last date and time the link was changed, and the user who made the changes.
8. Click Save to save the link but remain on the page, click Save & Close to save the link and return to the links list table, or click Close to return to the links list table without saving the link.
Note: When creating a new link, the buttons are displayed as Add, Add & Close, and Close. However, they function exactly the same as the Save buttons.
9. Once all settings and links are ready, the saved changes are applied when the portal is published from the General Information page of the portal.
Version 2.4.89 Bridge User Guide User Guide - Reference and Administration

70Reference
Defining the Appearance of a Portal
When creating a new portal for a specific product or distributor, or when modifying the default portal for your company's use, the color scheme can be customized to match company branding or color design preferences.
Note: A portal’s colors and Skin will not affect the appearance of the Quick Search tool.
1. In the Main Menu, select Reference, then select Portals. The Portals page opens with a list of all available portals.
2. Click a link in the Name column to view a portal. The Portal - General Information page opens, and additional options become
available in the Screens widget to the left of the page.
3. Select Appearance in the Screens widget. The Portal - Appearance page opens.
4. Complete the necessary information. Fields marked with a red asterisk * are required.
The Bridge system has multiple skins to change the general appearance of the site. Select an option in the Skin field.
Classic Small Font This is the default setting.
Version 2.4.89 Bridge User Guide User Guide - Reference and Administration

71Reference
Classic Large Font The classic configuration, but with larger fonts and fields.
Modern Small Font Squared corners and fewer dividing lines.
Version 2.4.89 Bridge User Guide User Guide - Reference and Administration
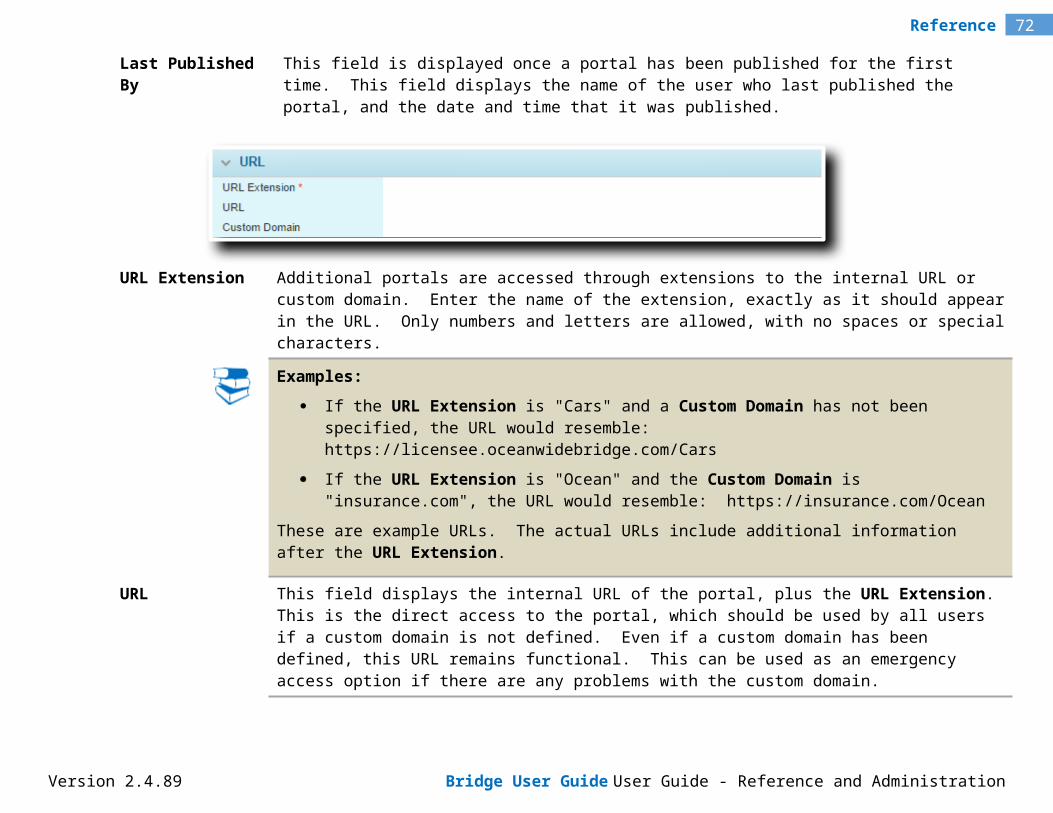
72Reference
Modern Large Font The modern configuration, but with larger fonts and fields.
Version 2.4.89 Bridge User Guide User Guide - Reference and Administration

73Reference
In the Colors panel, a series of groups allow individual colors to be assigned to multiple related elements. Clicking in the code field opens a color picker tool.
Version 2.4.89 Bridge User Guide User Guide - Reference and Administration

74Reference
5. The controls in the color picker can be used to precisely define the colors.
For examples of the affected screen areas, see Appendix A - Portal Color Settings .
6. Once the colors have been defined for all groups, click Save. The saved changes are applied when the portal is published from the General Information page of the portal.
Version 2.4.89 Bridge User Guide User Guide - Reference and Administration
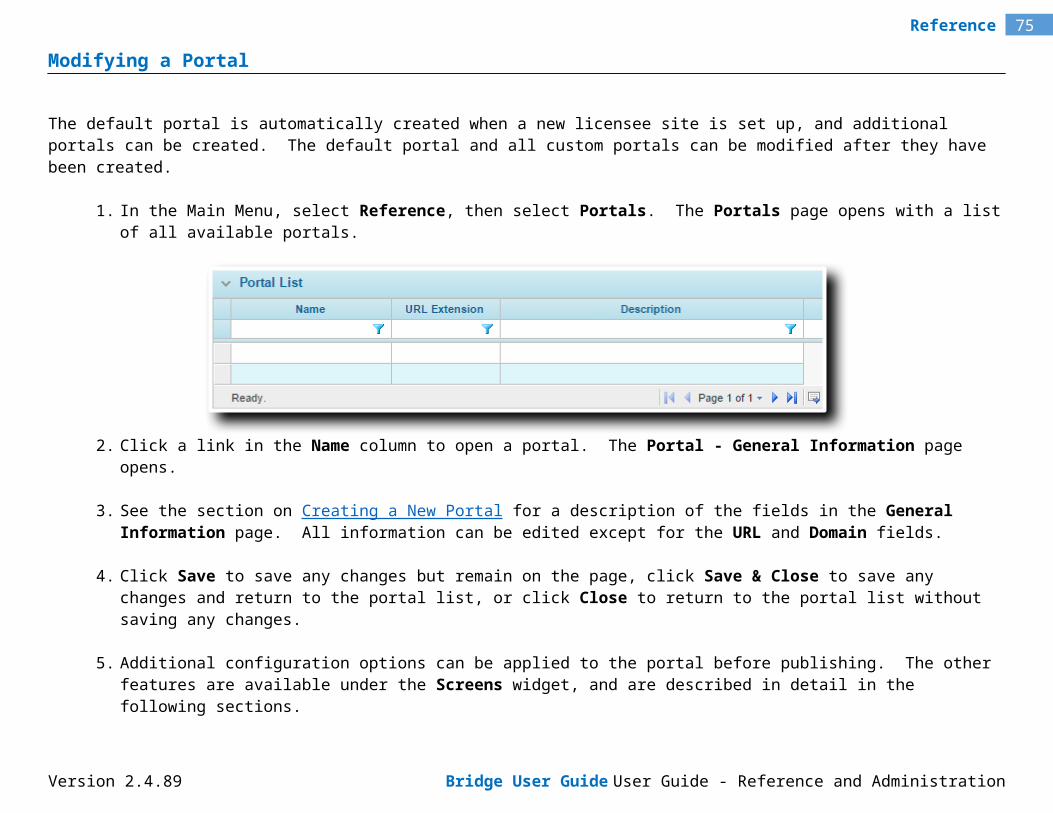
75Reference
Custom Portal Content
All newly created portals begin with default content for the logon page, the self-registration page, and the welcome page, as well as the headers and footers of each page in the system. These areas can be redesigned to suit specific needs per portal, allowing custom content including fully formatted text, pictures, and links.
1. In the Main Menu, select Reference, then select Portals. The Portals page opens with a list of all available portals.
2. Click a link in the Name column to view an existing portal. The Portal - General Information page opens, and additional options become available in the Screens widget to the left of the page.
3. Select Content in the Screens widget. The Portal - Content page opens.
4. Multiple areas of the system can be customized from this page. In the Content Areas drop-down, select the area that you want to customize.
Footer The banner area at the bottom of the page.
Header The banner area at the top of the page.
Logon Page The page containing the logon panel.
Logon Page Left The left column of the Logon page.
Version 2.4.89 Bridge User Guide User Guide - Reference and Administration
76Reference
Logon Page Right The right column of the Logon page.
Password Pages Left The left column of the Set Password and Forgot your Password pages.
Password Pages Right The right column of the Set Password and Forgot your Password pages.
Policy Form Left The left column of the submission/policy screen. The content appears below any widgets currently on the screen.
Policy Form Right The right column of the submission/policy screen. The content appears below any widgets currently on the screen.
Self-Registration Page If activated, this page allows users to create their own account to access the system.
Self-Registration Page Left The left column of the Self-Registration page.
Self-Registration Page Right The right column of the Self-Registration page.
Welcome Page The first page the user sees after logging in.
5. The Content panel appears when the Content Area is selected, and is where the content is prepared. Default content is included for any new portals, and can be modified to suit requirements or entirely replaced. Content can be built directly in the window using a variety of common editing tools presented in the toolbar, or it can be pasted in as Text or Rich Text.
Tip: Text pasted into the editor may undergo some minor formatting changes. The formatting tools can be used to correct the differences.
The available space varies according to the Content Area.
Version 2.4.89 Bridge User Guide User Guide - Reference and Administration
77Reference
Welcome Page The welcome page content does not have size limits.
Header The default height of the header is 90 pixels. Any content that exceeds this height is cut off. The width expands to match the content.
Footer The default height of the footer is 60 pixels. Any content that exceeds this height is cut off. The width expands to match the content.
Logon Page The logon page content does not have size limits.
Self-Registration Page The registration page content does not have size limits.
Side Columns The side columns do not have any vertical limits, a scrollbar appears if the content exceeds the screen space. The default width of each column is 260 pixels, although that space is reduced if the scrollbars appear (the exact width of the scrollbars may vary according to browser settings). Any content exceeding the available width is cut off.
Note: The height of the header and footer areas can be customized, and the footer can be hidden entirely. The customization applies to all portals, and must be applied by Oceanwide. Please contact your Oceanwide Representative to request these changes.
6. To add images to the page, click the Browse button to open a standard file selection window. The system supports image files of GIF, JPG, PNG, and BMP formats. Select the file to be included and click Open. The full path and filename are displayed in the Image File field.
7. Click Insert Image to add the image at the end of the current content. The image can then be moved by clicking on it with the mouse and dragging it to the appropriate location in the content. The system does not limit the dimensions or file size of the image, however very large files take longer to load each time a user accesses the page.
Note: Using drag-and-drop or copy and paste to insert images may cause those images to be broken for some users. The Insert Image button should be used to add all image files.
8. The content can be saved at any time by clicking Save.
Tip: Moving between content areas does not automatically save the content of the current area. Click the Save button to save the content before navigating away from the page.
Version 2.4.89 Bridge User Guide User Guide - Reference and Administration

78Reference
9. Once the content is ready, the saved changes are applied when the portal is published from the General Information page of the portal.
Version 2.4.89 Bridge User Guide User Guide - Reference and Administration
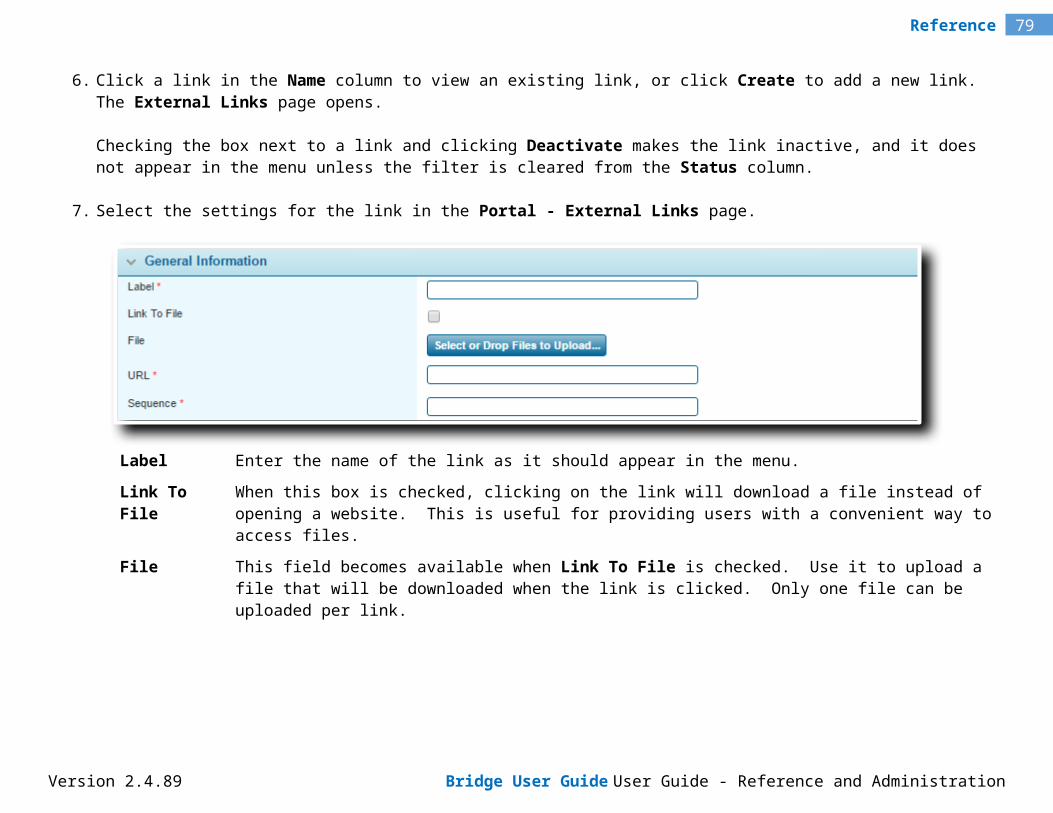
79Reference
Custom Labels
By default, the Bridge system supports multiple languages. All panel, field, and button labels, for each language, are stored in internal tables. These tables can be customized to reflect regional differences or preferred corporate terminology.
For example, the default Bridge term for the end user is "Client". However, in Europe, the terms "Insured" or "Assured" are more commonly used. This feature allows a user to locate all instances of "Client" within the system, and provide alternate text.
The process involves downloading the entire language chart for a particular language as an Excel file. The file includes the default English labels (for reference) and columns to add alternate text for the entire language or for individual regional versions. The modified file is then uploaded back into the system, and the changes are applied immediately.
Exporting a Language File
1. In the main menu, select Reference, then select Custom Language. The Custom Labels page opens.
2. Select a language from the Select Language to Export menu. Only the general languages are listed, as the language file includes all regional versions.
Version 2.4.89 Bridge User Guide User Guide - Reference and Administration

80Reference
3. Click Export.
4. A standard Save/Open dialogue box opens. Click Save and save the file to your computer.
Modifying a Language File
1. Open the exported file (see above for exporting instructions).
Fields are color coded. Any fields in white or grey should not be changed or it could result in errors when importing the file. The fields in yellow are used for the custom changes.
The following columns are included:Resource Key Identifies the internal name of each label.
Version 2.4.89 Bridge User Guide User Guide - Reference and Administration

81Reference
Labels and help text for workflow items such as fields, panels, screens, integration configurations, and workflow steps are identified by the following Resource Key formats. The text shown in green will be the code of the field, panel, etc.Premium Type Names: Label_PremiumType_PremiumTypeCodeOption List Items (Static-Custom only): Label_OptionListItem_ListCode_ItemCodeField Labels: Label_Field_FieldCodeField Help Text: HelpText_Field_FieldCodeData Source Display Column Header Labels (Data Table):
Label_DataSourceDisplayColumn_DataSourceConfigurationCode_ColumnCodeData Source Display Column Header Labels (Grid):
Label_DataSourceDisplayColumn_DataSourceConfigurationCode_FieldCodeData Source Display Column Header Labels (Web Service):
Label_DataSourceDisplayColumn_DataSourceConfigurationCode_ColumnNamePanel Labels: Label_Panel_PanelCodePanel Help Text: HelpText_Panel_PanelCodeScreen Labels: Label_Screen_ScreenCodeStep Labels: Label_Step_StepCodeIntegration Label: Label_Integration_IntegrationConfigurationCodeQuick Search Category - All: Label_QuickSearch_FilterAllQuick Search Category - Claims: Label_QuickSearch_FilterClaimQuick Search Category - Clients: Label_QuickSearch_FilterClientQuick Search Category - Invoices: Label_QuickSearch_FilterInvoiceQuick Search Category - Policies: Label_QuickSearch_FilterPolicyQuick Search - Recent Searches: Label_QuickSearch_RecentSearchesQuick Search - Search: Label_QuickSearch_Search
Note: Codes will be shown as they appear elsewhere in the system, while others will be modified to remove spaces and special characters.
Default Text (language) This displays the original English text from the system. For all language files other than English, any Custom (en) text from the English language file will be displayed instead.
This can be used as a reference to verify the purpose of the label and the accuracy of any translations.
Custom (language) Any text entered into this column replaces the appropriate label for all regional versions of the selected language.
Version 2.4.89 Bridge User Guide User Guide - Reference and Administration
82Reference
Custom (language-region) Any text entered into these columns replaces the appropriate label for just the specified regional version. If an entry has also been made in the Custom (language) column for a given label, the regional label is used. This allows one label to be applied to the entire language in general, with exceptions made for specific regions.
Context Provides a general description of the label and where it is used in the system. These entries can be customized, and are saved for all languages.
Whenever a page is loaded, the system identifies the language settings for the browser and then locates the appropriate labels. It checks Custom (language-region), then Custom (language), Custom (en), and finally Default Text (en) if no custom labels are found.
2. Once all changes are complete, save the file. The filename should not be changed, or it will not be accepted when importing it back to the system.
Note:Deleting a custom label from the language file does not remove the label from the system. In order to return a label to its default text, the custom label must be replaced with the default text. This can be done by copying and pasting the default label from the Default Text (language) column, or by entering the original label text manually. When the file is imported again, the custom label is applied with the updated text.
When changing labels that can be referenced directly, such as submission/policy status, any triggers and calculated fields that use the old label as a condition must be updated.
Importing a Language File
1. In the main menu, select Reference, then select Custom Language. The Custom Labels page opens.
Version 2.4.89 Bridge User Guide User Guide - Reference and Administration
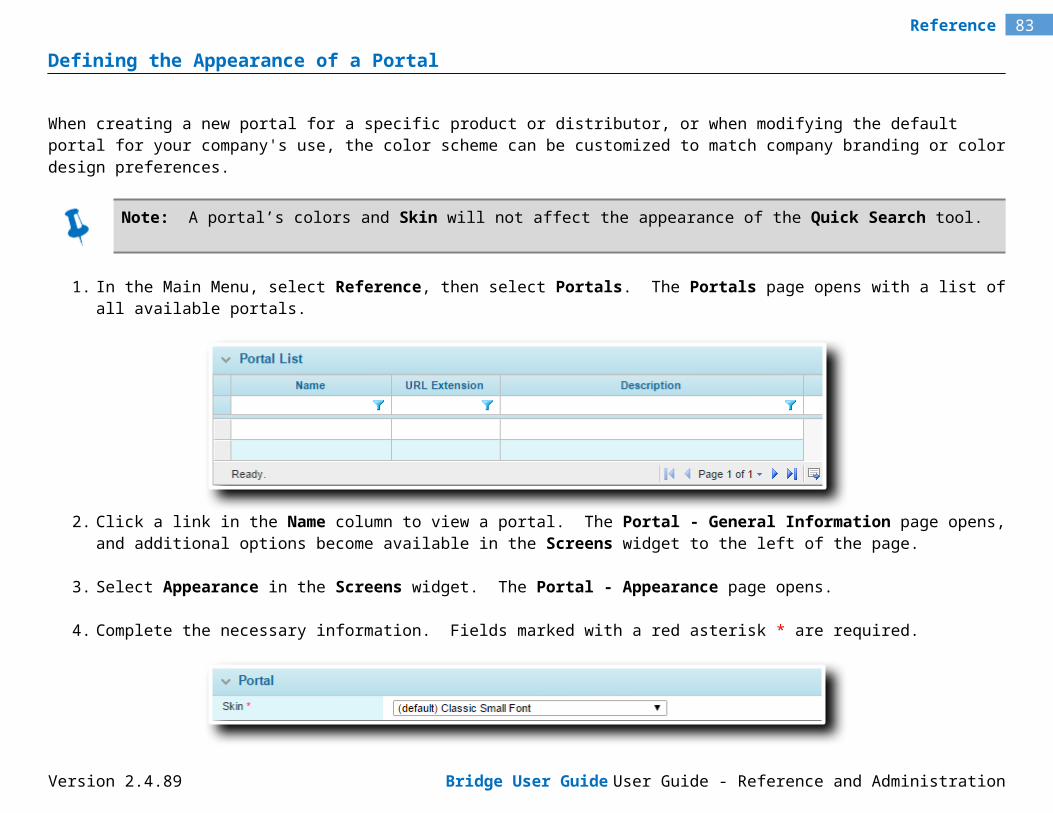
83Reference
2. Click the Browse button to open a standard file selection window. Select the language file to be imported and click Open. The full path and filename are displayed in the Select File to Import field.
3. Click Import. The file is processed and the changes should appear immediately.
Note: Once a language file is exported, any changes to the system (such as a system update) are not reflected in the exported language file. If the language file is imported after such system changes, any resources that have been removed or renamed are not updated with the label changes. This should be a rare occurrence, and the chances are reduced by always making changes to a freshly exported language file, then importing once all changes are complete. Checking the customized labels in the system after the import should confirm that the changes were applied properly.
Version 2.4.89 Bridge User Guide User Guide - Reference and Administration
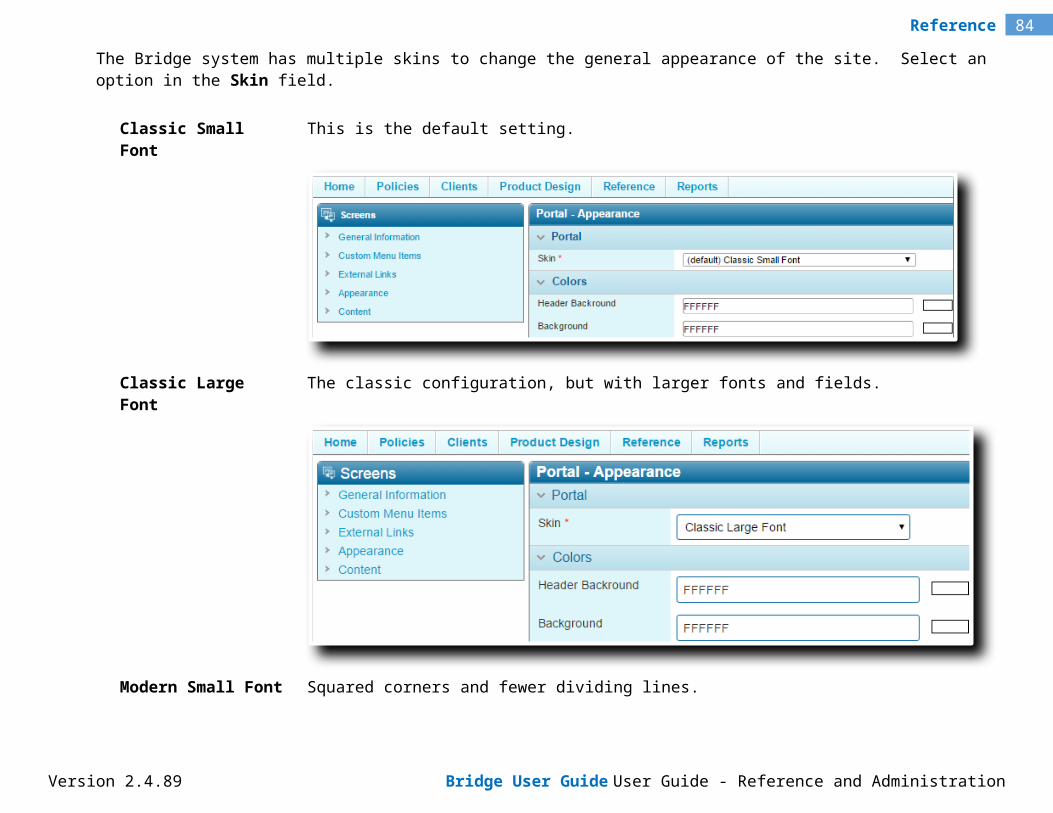
84Reference
Import/Export Rates
Within a complex product that may have many pages of rates, manual entry and maintenance of individual rates can be very time-consuming. This feature allows rates to be configured in an Excel sheet, and imported into the system.
In order to ensure proper control over the data and structure, a template should be downloaded, updated, then imported back into the system.
1. Under the Reference menu, select Maintenance/Troubleshooting. The Maintenance/Troubleshooting page opens.
The Import/Export Rates panel contains the controls for this feature.
Master Cover Select the master cover to be updated. Only master covers in Draft or Test status are listed.
Quote Option Definition Select the quote option to be updated.
2. Click Export Rates to export all existing rates for the selected quote option into an Excel file. A standard Save / Open dialogue box appears. Select if you want to Open the file, Save the file to your computer, or Cancel the download.
3. All rates in the Excel sheet can be modified or deleted, and new rates can be added.
Version 2.4.89 Bridge User Guide User Guide - Reference and Administration

85Reference
Premium Type Enter the Code of the premium type.
Rates Type Enter the Code of the rate type.
Type Code
Rate rate
Multiplier multiplier
Flat Amount flatamount
Minimum minimum
Discount or Surcharge discountsurcharge
Driver Field Enter the Code of the driver field, if necessary.
Amount Enter the amount.
Trigger Enter the Code for the trigger, if necessary.
Sequence Enter a sequence number, if necessary.
Note: The Rate Configuration table in the master cover includes fields that are hidden by default, Attachment, Limit, Effective Date, and Valid Until Date. These fields are not included in the export, but will be overwritten like the others during import. If any of those fields have been used, this feature should not be used or those settings will be deleted.
4. Once the Excel file has been saved with the rates, click the Browse button in the Import/Export Rates panel to open a standard file selection window. Select the Excel file and click Open. The full path and filename is displayed in the Select File to Import field.
5. Verify that the correct Master Cover and Quote Option Definition are selected. The upload will replace all rates in the selected quote option, and cannot be undone.
6. Click Import Rates to upload the rates.
Version 2.4.89 Bridge User Guide User Guide - Reference and Administration

86Reference
Version 2.4.89 Bridge User Guide User Guide - Reference and Administration
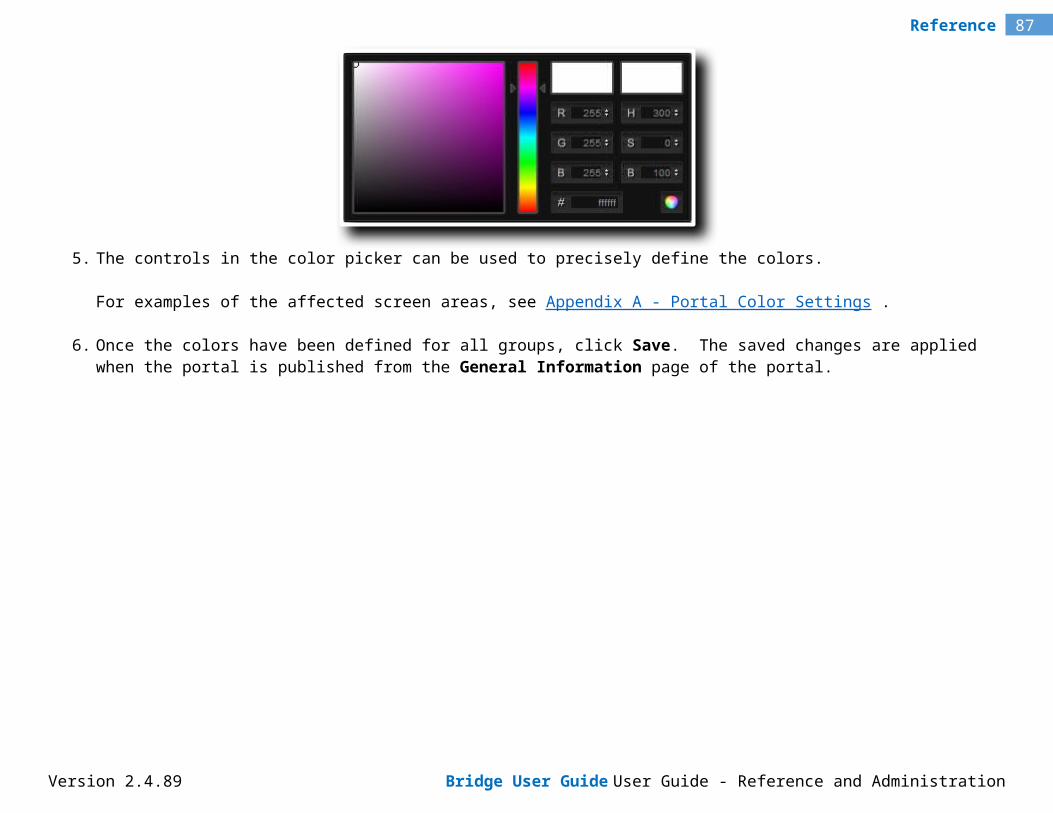
87Reference
Import/Export Resource Codes
Older resources may have been created without codes, which later became mandatory. The Product Export/Import feature used to fill in these codes automatically, but this could cause duplication issues. The Export/Import will now stop with an error if codes are missing, so this feature was added to locate resources that are missing necessary codes, and update them all with an Excel import.
An Excel file with the relevant resources is downloaded, updated, then imported back into the system.
1. Under the Reference menu, select Maintenance/Troubleshooting. The Maintenance/Troubleshooting page opens.
2. In the Import/Export Resource Codes panel, click Export Resources to export all relevant resources into an Excel file. A standard Save / Open dialogue box appears. Select if you want to Open the file, Save the file to your computer, or Cancel the download.
3. In the Excel sheet, add the necessary codes. The codes should be unique within each resource type (field, panel, etc.). No other columns should be modified, and no records should be added to the list. This feature is specifically for adding missing codes, and cannot be used to add resources or edit details.
Inactive resources will also be included to maintain internal connections. These should also be updated.
If the Excel sheet is empty, then there are no resources missing codes.
4. Once the Excel file has been saved with the changes, click the Browse button in the Import/Export Resource Codes panel to open a standard file selection window. Select the Excel file and click Open. The full path and filename is displayed in the Select File to Import field.
5. Click Import Resources to upload the codes.
Version 2.4.89 Bridge User Guide User Guide - Reference and Administration
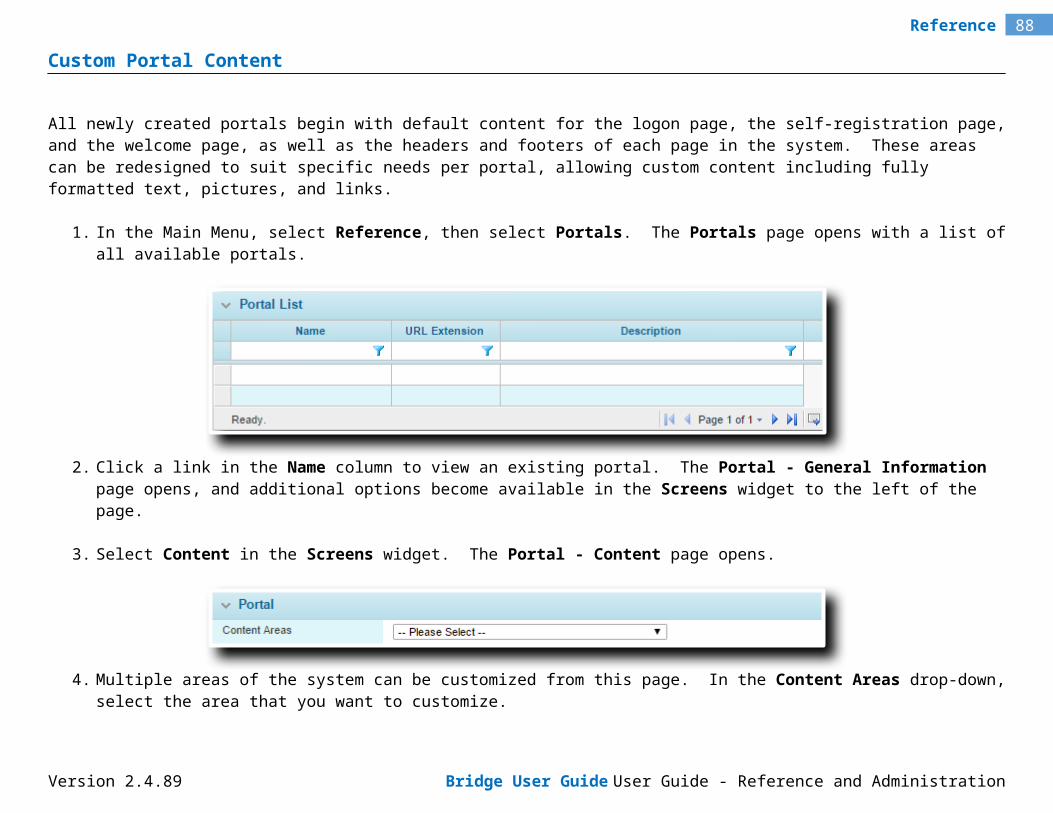
88Reference
Managing Add-Ins
Add-ins are software tools that enable Bridge to work together with other applications such as Microsoft Word and Microsoft Excel. To view the files available for add-ins, open the Reference menu, then click on Add-Ins. Each panel on this page contains information and installer files for a given add-in.
The content of this page is managed separately per licensee. For information about the contents of this page for your version of Bridge, please contact your Oceanwide representative.
The Bridge Policy Excel Add-In creates an Oceanwide menu tab within Microsoft Excel. The tab contains various integrated features that allow Excel to use data provided by Bridge. Any available files related to the add-in such as instructions and installers will appear here. To download an add-in file, click on its corresponding Download link.
The Bridge Document Template Word Add-In (2010 and later) creates an Oceanwide menu tab within versions of Microsoft Word 2010 and later. The tab contains various integrated features that allow Microsoft Word to use data provided by Bridge. Any available files related to the add-in such as instructions and installers will appear here. To download an add-in file, click on its corresponding Download link.
Version 2.4.89 Bridge User Guide User Guide - Reference and Administration
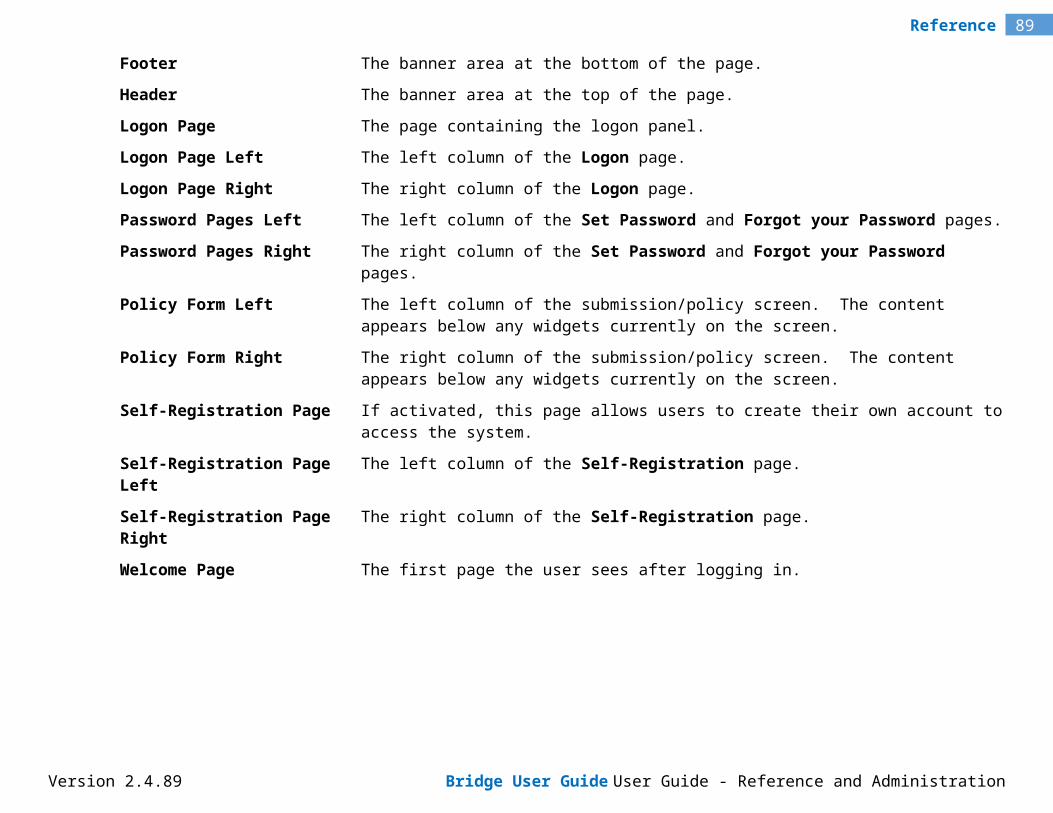
89Reference
The Bridge Document Template Word Add-In (2007 and prior) creates an Oceanwide menu tab within versions of Microsoft Word 2007 and prior. The tab contains various integrated features that allow Microsoft Word to use data provided by Bridge. Any available files related to the add-in such as instructions and installers will appear here. To download an add-in file, click on its corresponding Download link.
Note: If no files are available for a given panel, the entire panel will be hidden. If you are missing a panel that should be visible, contact your Oceanwide representative.
Version 2.4.89 Bridge User Guide User Guide - Reference and Administration

90Reference
Full Event Tracking Report
While working with transactions, various events occur automatically or initiated by the user. This includes events such as saving the transaction, calculating quotes, and binding the transaction.
The Event Tracking report provides details on all events for all transactions, including a breakdown of the operations involved in processing the event. A similar report is available when viewing a transaction, focusing on events for that transaction.
1. Under the Reference menu, select Event Tracking. The Event Tracking page opens.
The Events panel lists all events. The list can be filtered, sorted, and customized. See the Using Grids section of the User Guide - Introduction document for details.
Event Displays the type of event.
Triggered On Displays the date and time that the event started.
Completed At Displays the time that the event was completed.
Time to Completion Displays the elapsed time of the event.
Triggered By Displays the name of the user who initiated the event. This includes indirect initiation, such as when a save or quote calculation is triggered by the user navigating through the workflow. This will not display a user if the event was triggered by internal scheduled events.
2. Click a link in the Event column to view the details of the event. The Event Tracking page opens.
Version 2.4.89 Bridge User Guide User Guide - Reference and Administration
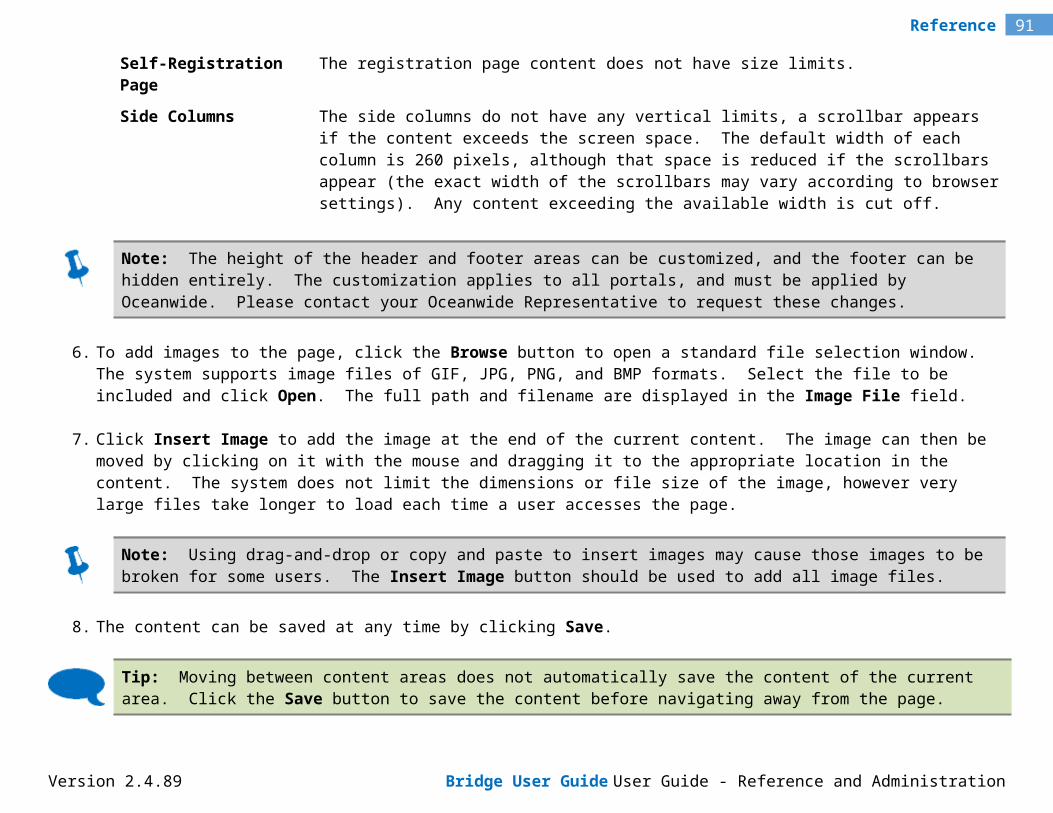
91Reference
The Event Tracking panel display the basic information for the event.
Event Displays the type of event.
Triggered On Displays the date and time that the event started.
Triggered By Displays the name of the user who initiated the event. This includes indirect initiation, such as when a save or quote calculation is triggered by the user navigating through the workflow. This will not display a user if the event was triggered by internal scheduled events.
Version 2.4.89 Bridge User Guide User Guide - Reference and Administration
92Reference
Some columns have been hidden.
The details grid provides a hierarchical listing of operations involved in the current event. Each major activity is listed with the total duration and any error indicator displayed in the header, and all sub-activities listed below. Sections can be expanded or collapsed using the and icons.
Sequence The sequence number shows the order in which the activities were processed.
Operation Identifies the general type of activities being performed.
Activity Identifies the specific activity being performed.
Step Identifies the steps taken in processing the activity.
Version 2.4.89 Bridge User Guide User Guide - Reference and Administration

93Reference
Payload If the step involved evaluating specific data, clicking this link opens the Calculation Trace View in a new tab or window, depending on your browser settings. The trace view displays the calculations and results involved in the associated operation. See the Calculation Trace Viewer Window section.
Started On Displays the time that the step began processing.
Completed On Displays the time that the step completed processing.
Duration Displays the total processing time for the step.
Status Displays the status of the activity, if applicable.
Operation Result If an activity has a success or fail result, an Operation Result link is displayed in this column. Clicking the link opens the response XML file in a new tab or window.
3. Click Close to return to the Events list.
Calculation Trace Viewer Window
The Event Tracking report lists events and operations performed during processing of transactions. When an operation includes the evaluation of triggers and calculated fields, a Payload link is available to view the details of those calculations. This opens the Calculation Trace View window.
Version 2.4.89 Bridge User Guide User Guide - Reference and Administration
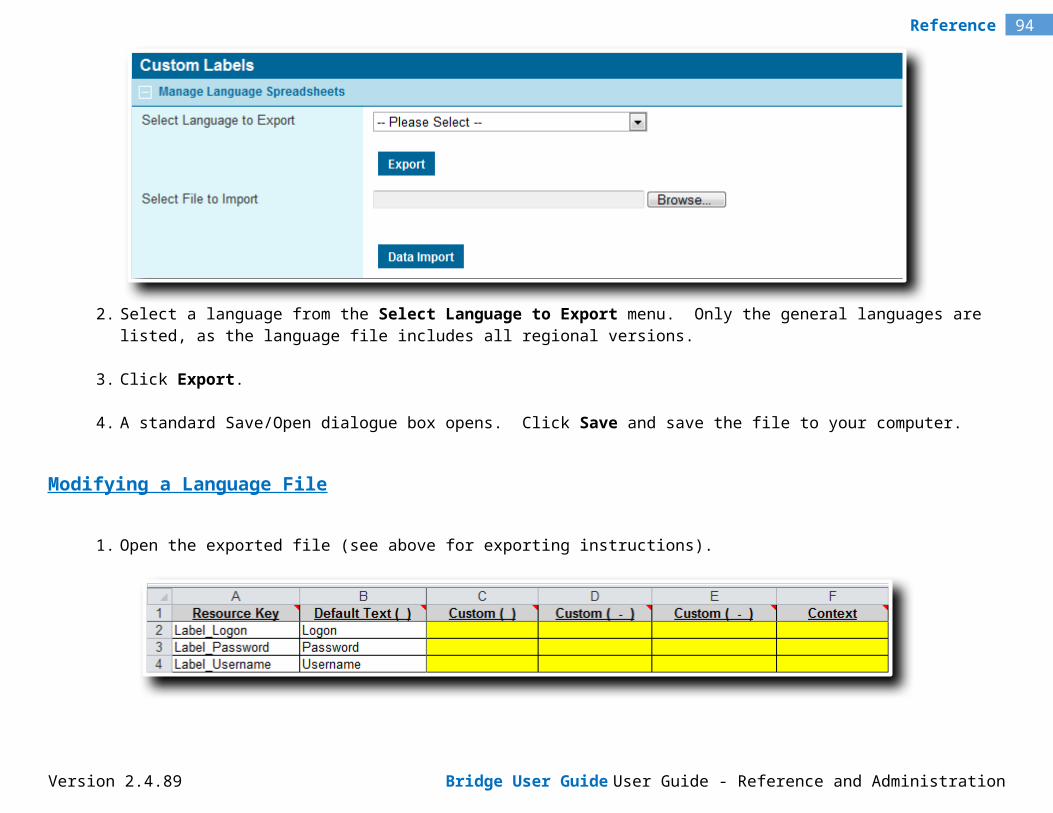
94Reference
The Calculation Trace View window displays a branching list of fields, triggers, and functions that have been evaluated for a specific operation. The icon on each row identifies the type of entry. Place the mouse pointer over any entry to view additional details in a tooltip window.
Data Field Represents a system field or user-entered field. Each entry displays the Code of the field and the value.
The tooltip windows for these entries display the data type and field level.
Version 2.4.89 Bridge User Guide User Guide - Reference and Administration

95Reference
Calculated Field Represents a field containing a formula. Each entry displays the Code of the field and the final calculated value.
The branches below each entry detail the components of the formula, such as triggers, functions, and fields.
The tooltip windows for these entries display the data type, field level, the original formula, and a version of the formula with placeholder values displayed.
Grid Field Represents one field (column) within a grid. Each entry displays the Code of the grid, the Code of the field within the grid, and the value of the first row in the grid.
The branches below each entry display each row of the grid, identifying the row number and value.
The tooltip windows for these entries display the data type of the field and the grid name. If the field is a calculated field, the original formula and a version of the formula with placeholder values displayed are also provided.
Trigger Represents a trigger. Each entry displays the Code of the trigger and whether it evaluated to True or False. For ease of use, the trigger icon itself is displayed as black when the trigger evaluates as True, and red when False.
The branches below each entry detail the components evaluated by the trigger, such as functions and fields.
The tooltip windows for these entries display the data type (boolean) and field level. The trigger configuration is displayed as a formula, and a version of the formula with placeholder values is displayed.
Function Represents a function used within a trigger or calculated field. Each entry displays the name of the function and the final calculated value.
The branches below each entry identify each parameter of the function.
The tooltip windows for these entries display the data type of the function and the field level.
Function Parameter Represents one parameter within a function. Each entry displays the parameter number and the value of that parameter.
The branches below each entry detail any components evaluated for that parameter.
The tooltip windows for these entries display the data type and the field level.
Version 2.4.89 Bridge User Guide User Guide - Reference and Administration
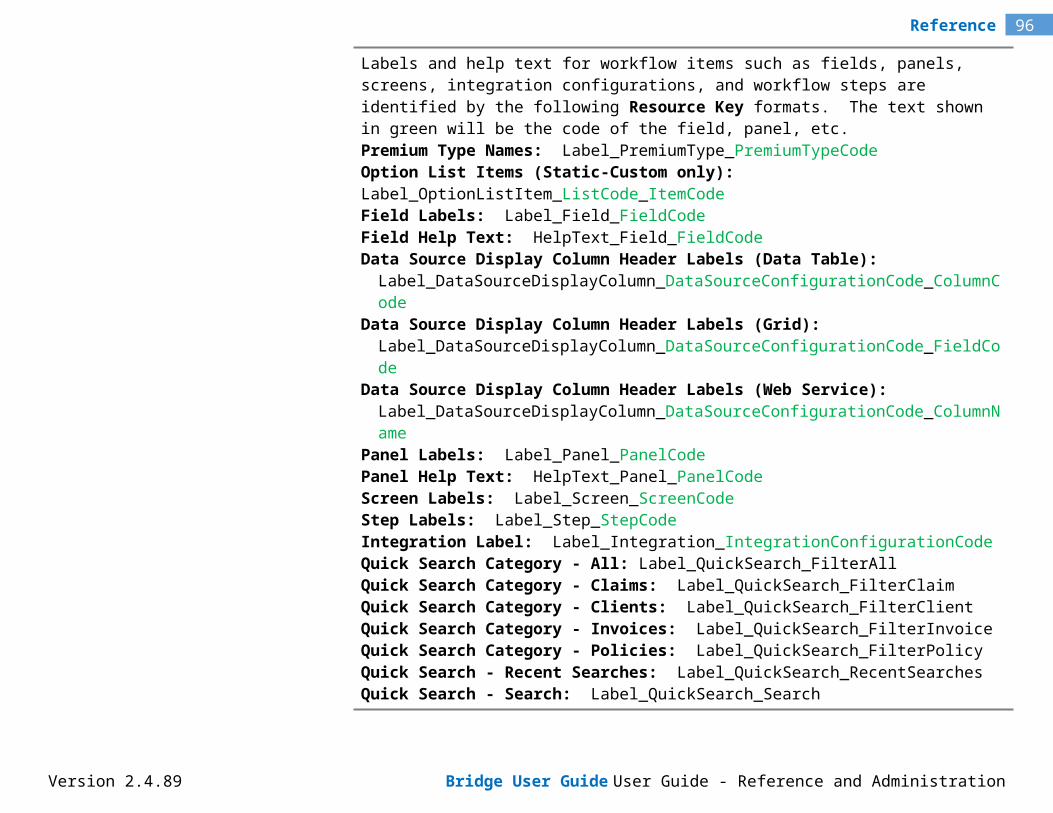
96Reference
Error If an error occurs in any part of the calculations, an error entry is included with details of the error.
Version 2.4.89 Bridge User Guide User Guide - Reference and Administration
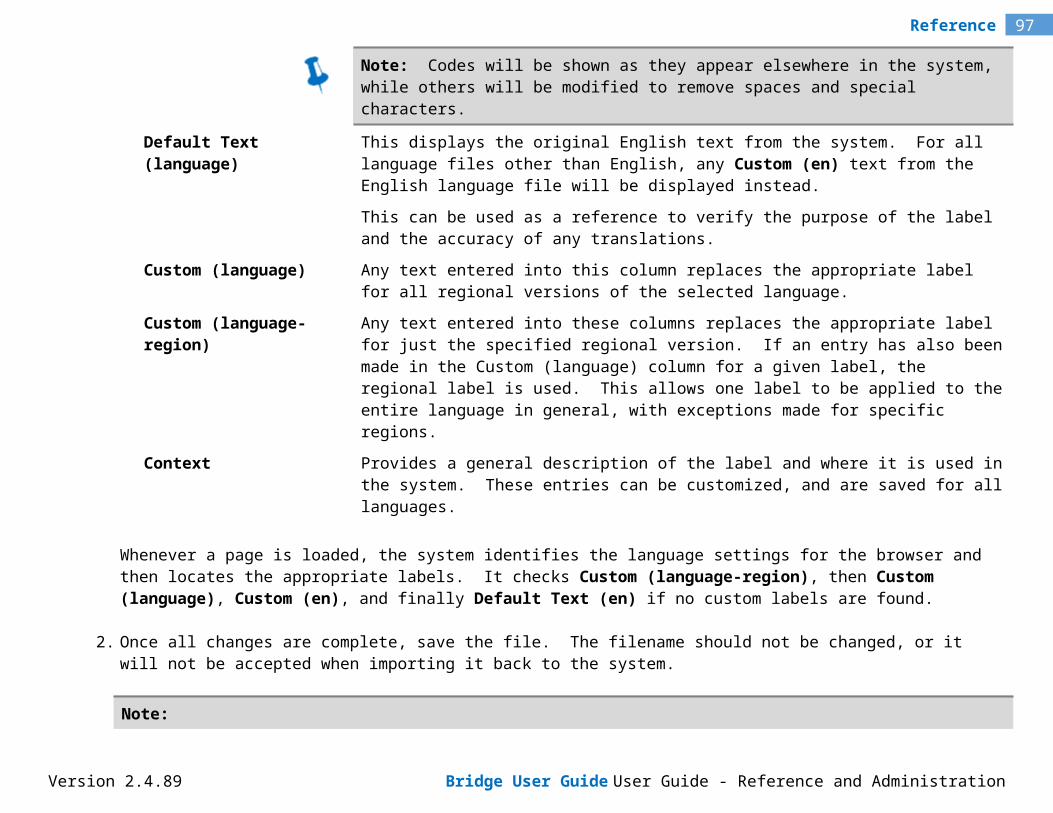
97Reference
Application Logs Viewer
While working within the system, a variety of errors and other notification messages may occur, and are logged in the system. These can result from internal issues, problems with communications, configuration errors, or other causes.
The Application Logs Viewer provides a structured view of these logs, with details on errors and messages recorded by the system. This can be used to troubleshoot problems, particularly when descriptive errors have been suppressed by the system configuration.
Under the Reference menu, select Application Logs. The Application Logs Viewer page opens.
The Application Logs Viewer panel lists all messages. The list can be sorted, filtered, and exported, among other options. For more information on working with grids, see the Using Grids section of the User Guide - Introduction document.
Error Code Displays the internal code used to identify the message.
Error Message Displays the full message.
Severity Identifies the type of message.
Error An error message.
Notification A message to provide information.
Warning A warning of an issue that is not an error.
Category Identifies if the message is from the System or Application.
User Logon Id Displays the user id of the user whose actions produced the message.
Version 2.4.89 Bridge User Guide User Guide - Reference and Administration
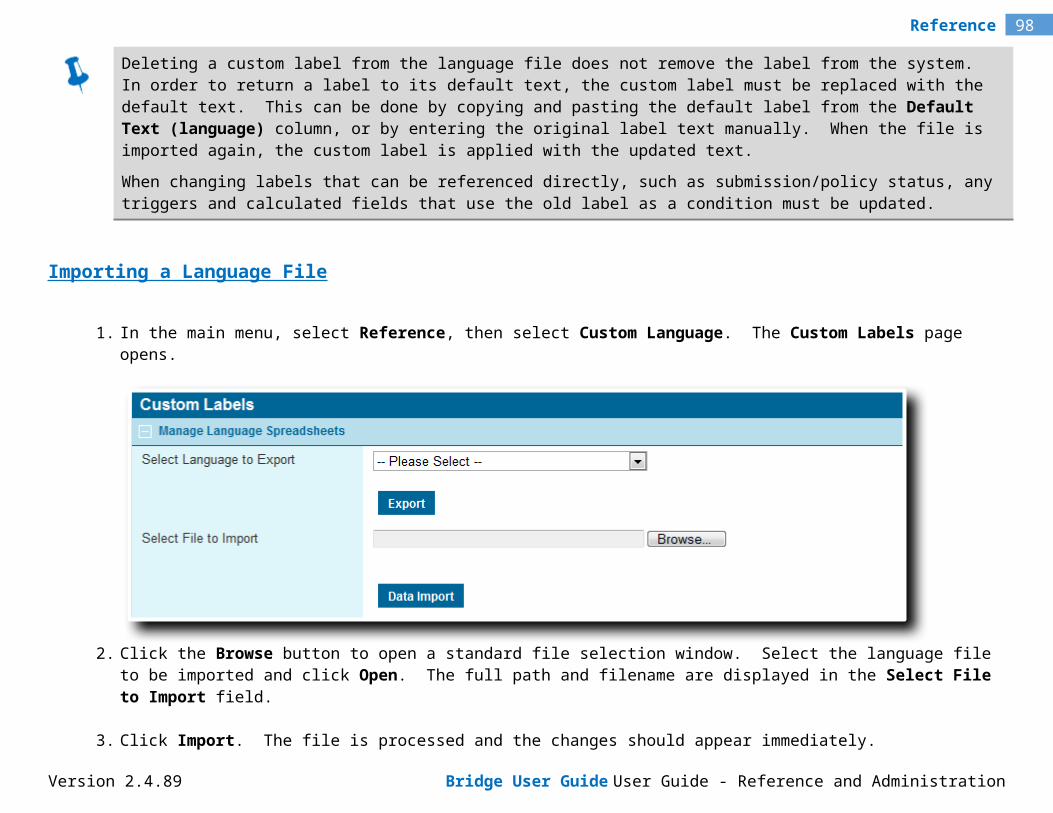
98Reference
User Name Displays the full name of the user whose actions produced the message.
Time Stamp Displays the date and time that the message occurred.
Event If the message was related to a specific event in processing a transaction, a link to the event is displayed.
Version 2.4.89 Bridge User Guide User Guide - Reference and Administration
99Reference
Reference
Appendix A - Portal Color Settings
Almost all areas of the system can be customized to specific colors for each portal. This can be done to match corporate branding for companies and individual products.
See the section on Defining the Appearance of a Portal for instructions on changing colors. This section lists the color groups and identifies the affected areas.
For a new licensee site, the default portal is preset with the default color scheme. Newly created portals also have this default color scheme.
Version 2.4.89 Bridge User Guide User Guide - Reference and Administration
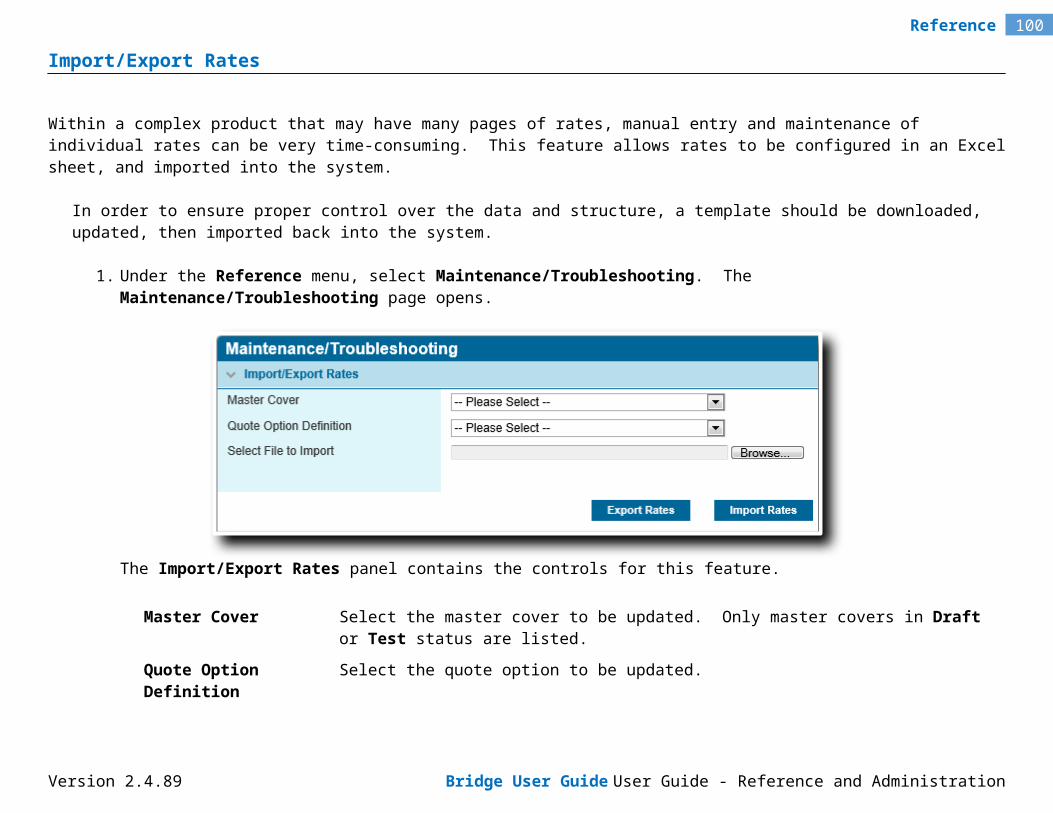
100Reference
Each color can be customized.
Once all screen elements have been customized, click Save. The color changes are applied when the portal is published.
Header Background
Version 2.4.89 Bridge User Guide User Guide - Reference and Administration

101Reference
Affects the empty space behind the header content. If the header area is larger than the content, the Background color will be shown in the remaining space.
Background
Version 2.4.89 Bridge User Guide User Guide - Reference and Administration
102Reference
Affects the empty space behind all of the windows, menus, and widgets, as well as the header and footer areas.
Note that some screen elements are semi-transparent, and the background color will show through. This affects widget headers and certain colors in the progress bar.
Label and Control Text
Version 2.4.89 Bridge User Guide User Guide - Reference and Administration
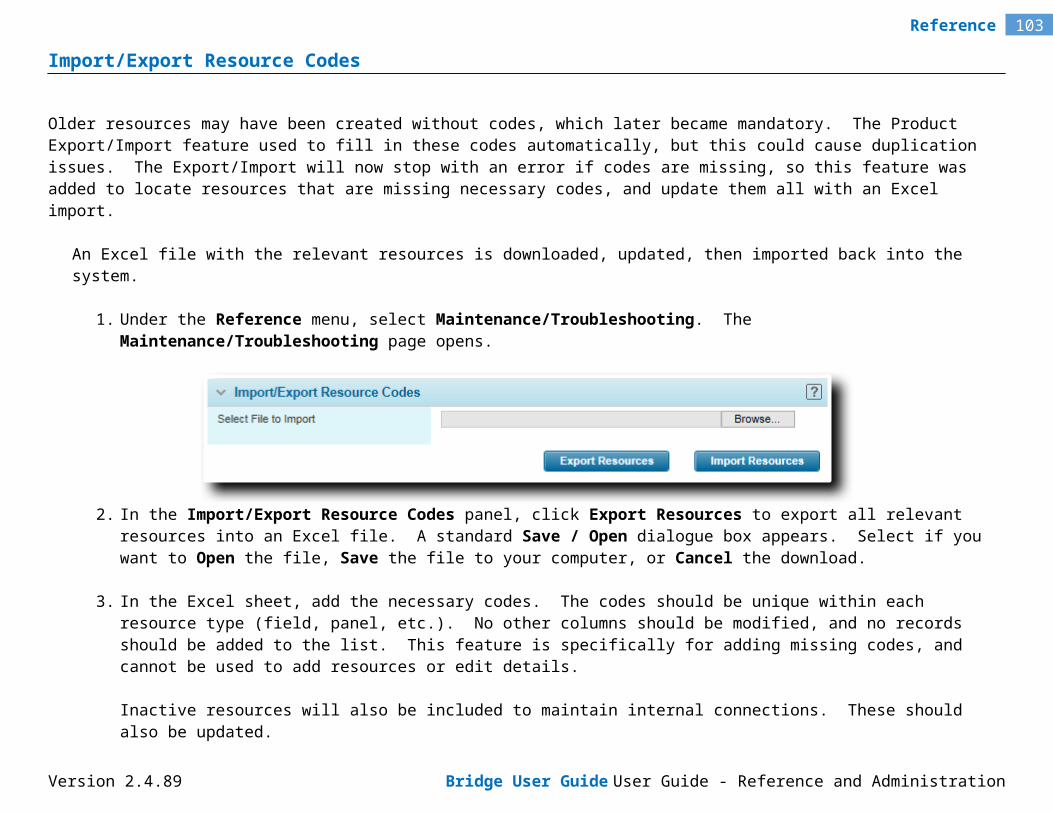
103Reference
Affects the text in the label area, the text in the editable fields, static text (non-link) in the widgets, as well as messages and navigation controls in grids.
Panel Header Bottom Border
Version 2.4.89 Bridge User Guide User Guide - Reference and Administration
104Reference
Affects the dividing line between the panel header and the content of the panel.
Panel Header Text
Version 2.4.89 Bridge User Guide User Guide - Reference and Administration
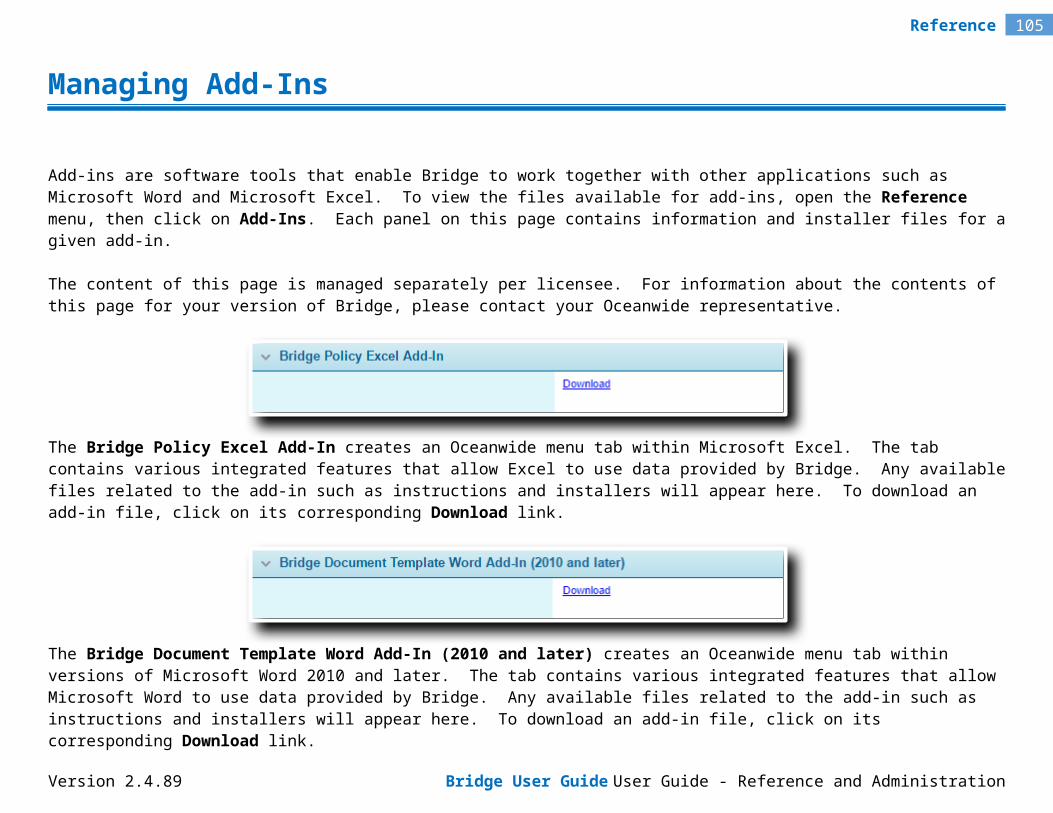
105Reference
Affects the text in the panel headers.
Grid Header Text
Version 2.4.89 Bridge User Guide User Guide - Reference and Administration
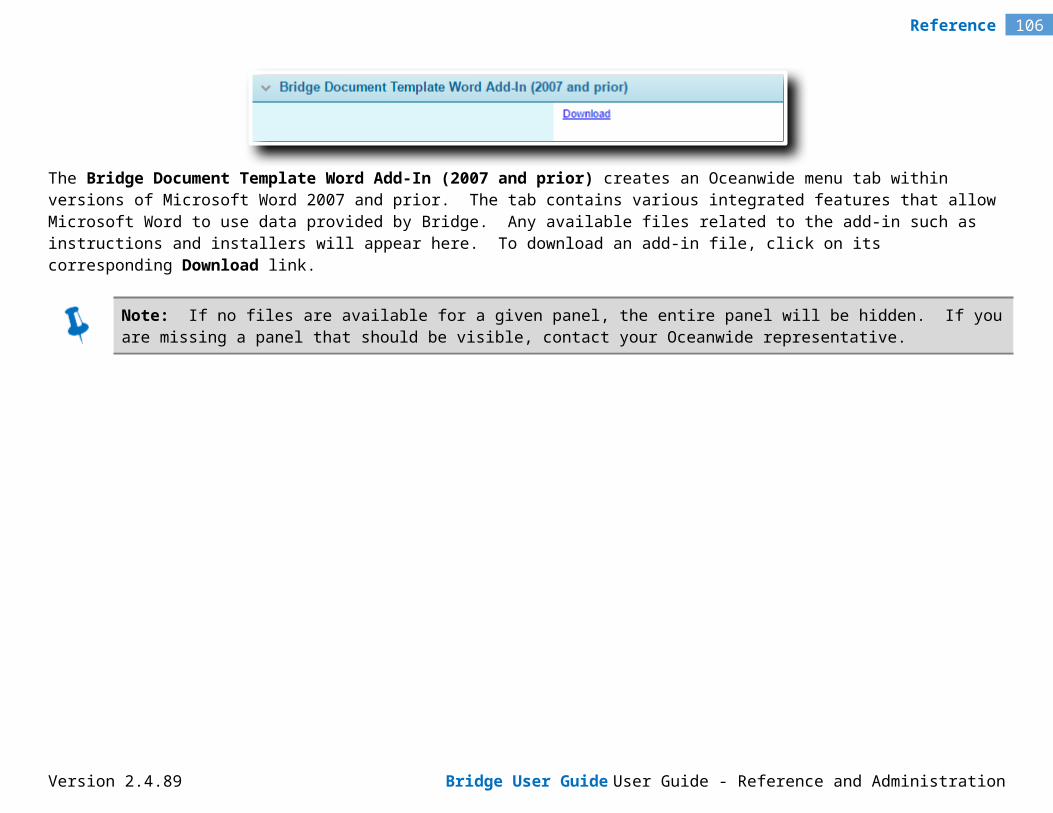
106Reference
Affects the text in grid column headers.
Panel Header
Version 2.4.89 Bridge User Guide User Guide - Reference and Administration
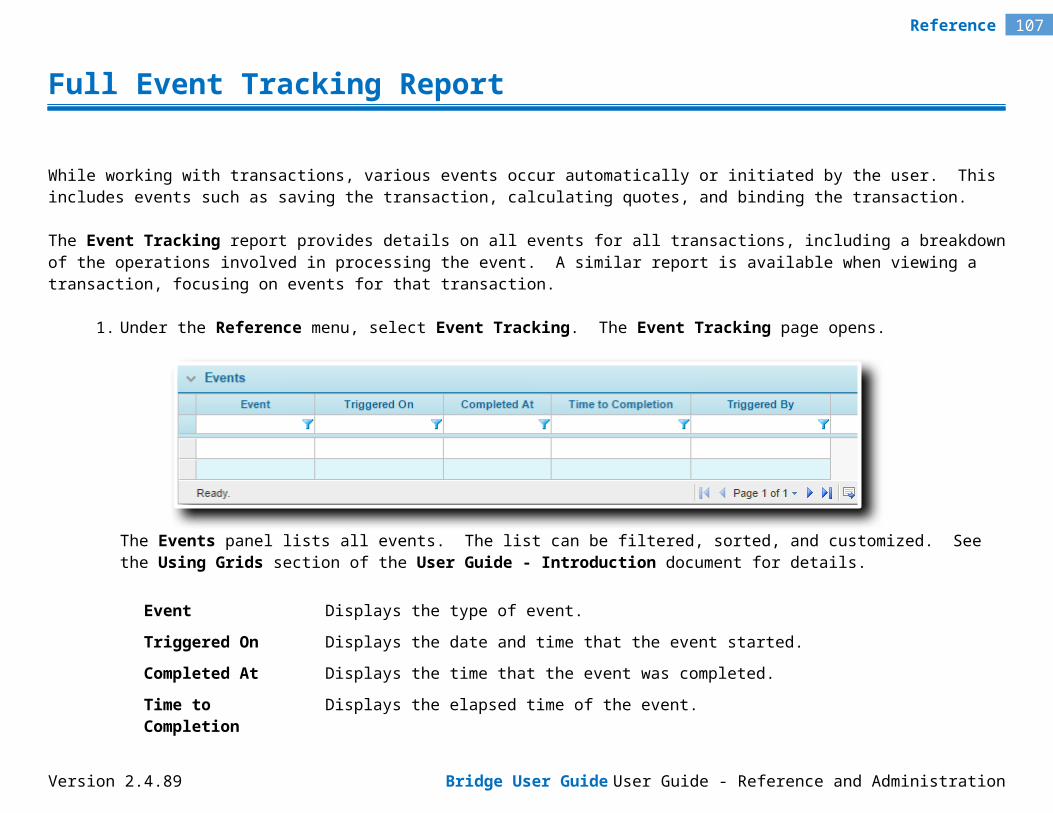
107Reference
Affects the background in the panel headers.
Grid Header
Version 2.4.89 Bridge User Guide User Guide - Reference and Administration
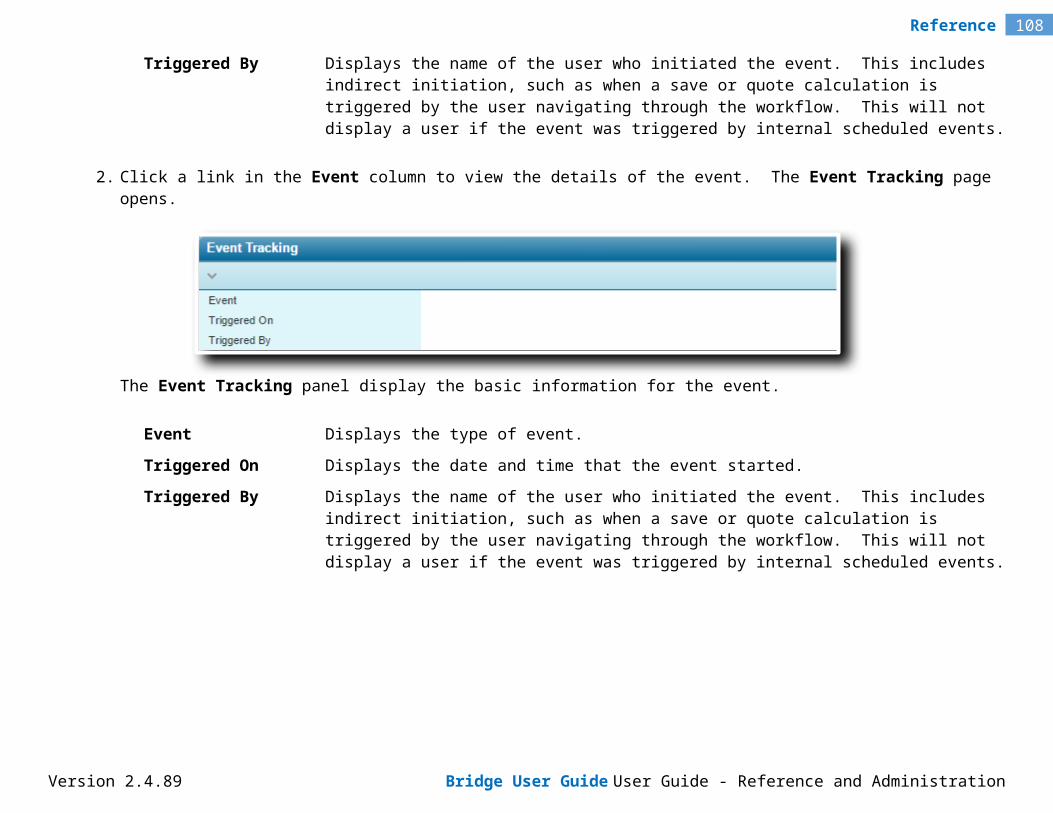
108Reference
Affects the background in grid column headers.
Menu Background, Label Area, Widget Background and Grid Alternating Row
Version 2.4.89 Bridge User Guide User Guide - Reference and Administration
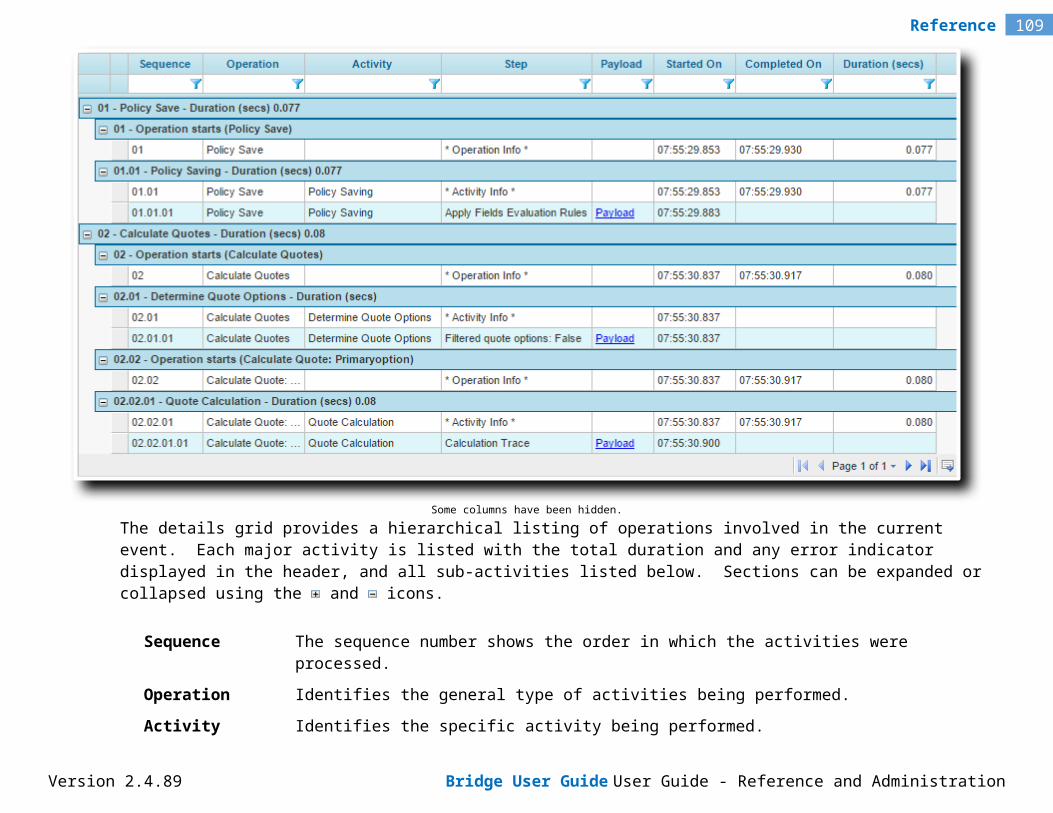
109Reference
Affects the background of the main menu, widgets, label area in panels, and the alternating line highlighting in grids.
Menu Text
Version 2.4.89 Bridge User Guide User Guide - Reference and Administration
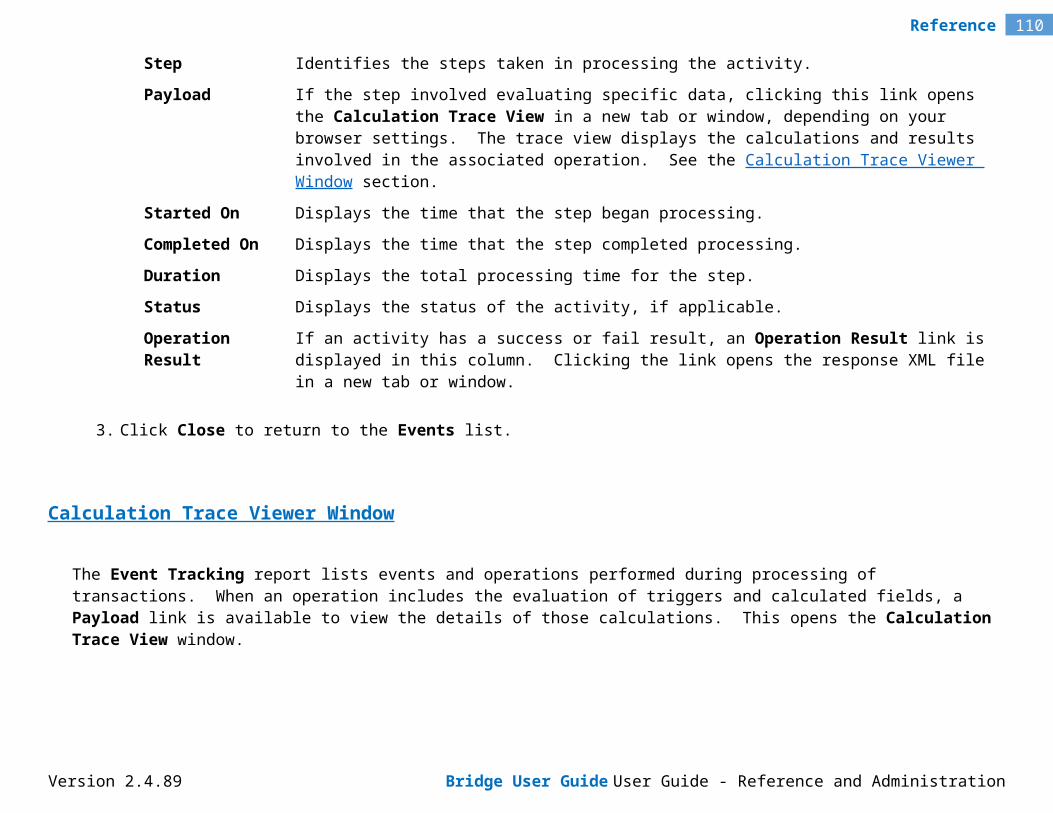
110Reference
Affects the text in the main menu.
Widget Hyperlinks
Version 2.4.89 Bridge User Guide User Guide - Reference and Administration
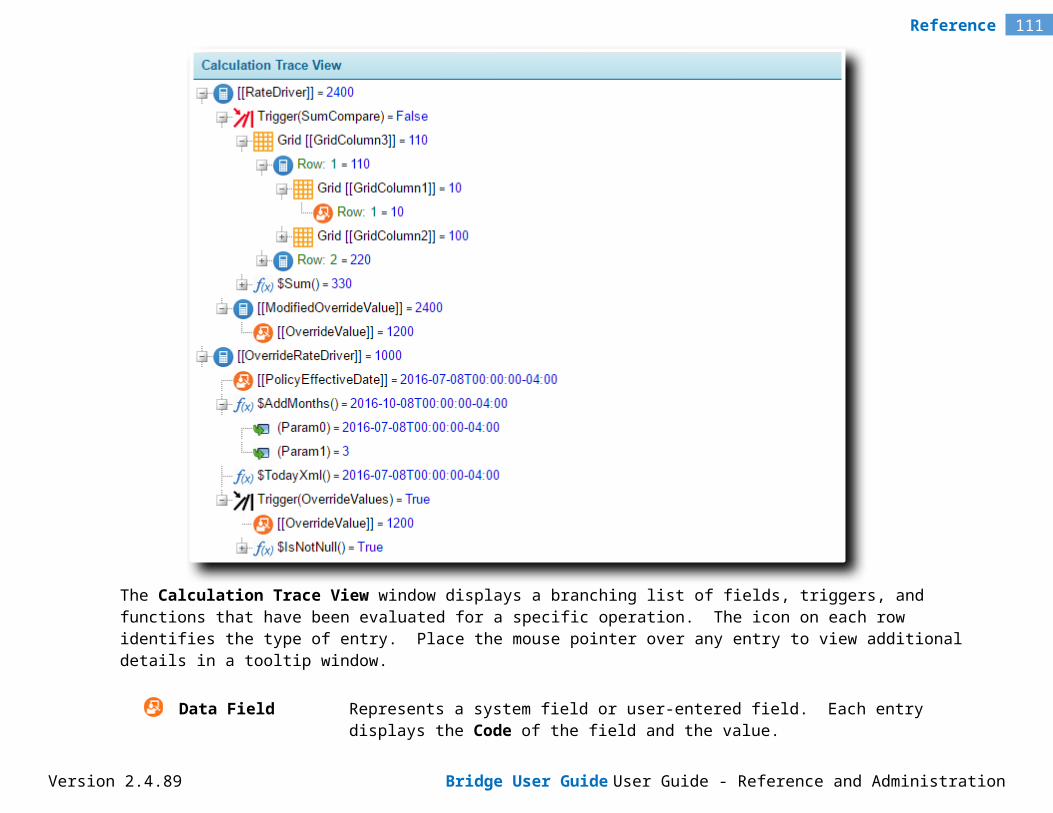
111Reference
Affects any hyperlink text in the widgets. Any static text in the widgets is controlled by the Label and Control Text setting.
Mouse Over Menu and Mouse Over Widget Buttons
Version 2.4.89 Bridge User Guide User Guide - Reference and Administration
112Reference
Affects the highlighting of main menu and widget items as the mouse passes over them. This does not apply to links such as in the Common Screens, Policy Information, Client Information, or Premium widgets.
Screen Header Text and Widget Header Text
Version 2.4.89 Bridge User Guide User Guide - Reference and Administration
113Reference
Affects the text in the screen header and widget headers.
Screen Header and Widget Header
Version 2.4.89 Bridge User Guide User Guide - Reference and Administration
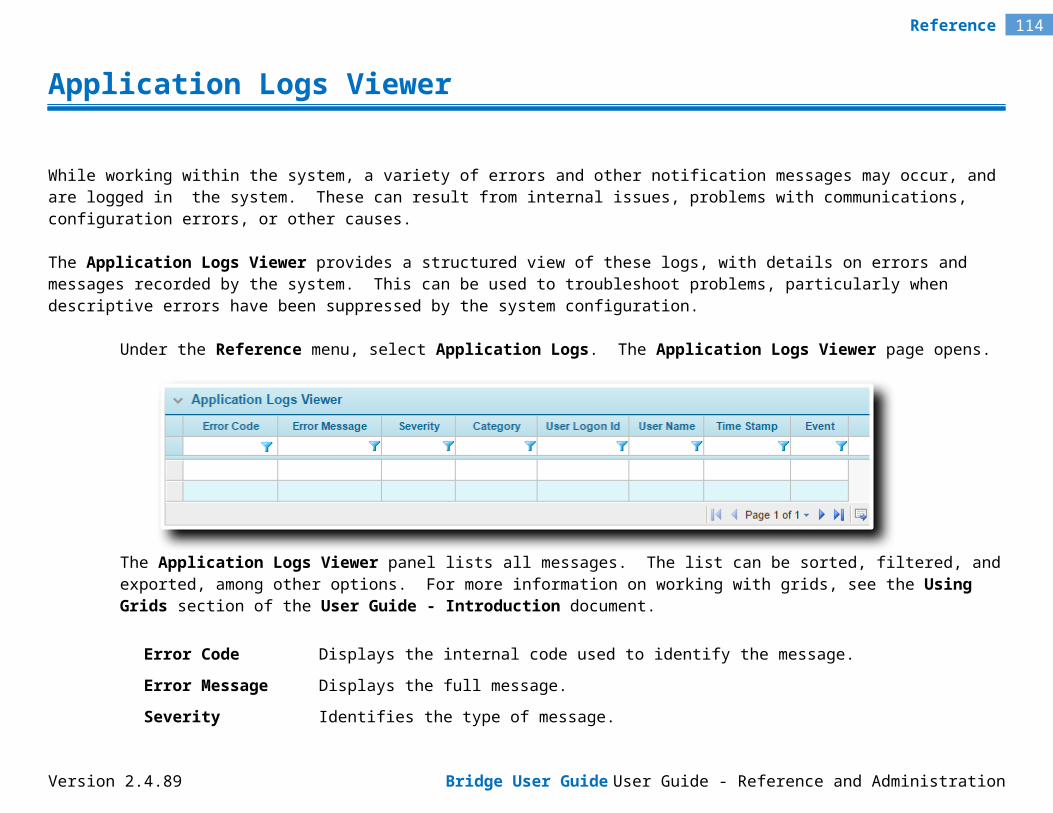
114Reference
Affects the backgrounds in the screen header and widget headers, as well as completed step icons in the Progress Bar.
Note that the widget headers are semi-transparent, allowing the background color to show through.
Button Text
Version 2.4.89 Bridge User Guide User Guide - Reference and Administration
115Reference
Affects the text in buttons.
Button and Editable Field Border
Version 2.4.89 Bridge User Guide User Guide - Reference and Administration
116Reference
Affects the background color of buttons, and the border color of fields. The border color does not apply to checkboxes, radio buttons, or include/exclude fields.
In-Focus Field Background
Version 2.4.89 Bridge User Guide User Guide - Reference and Administration
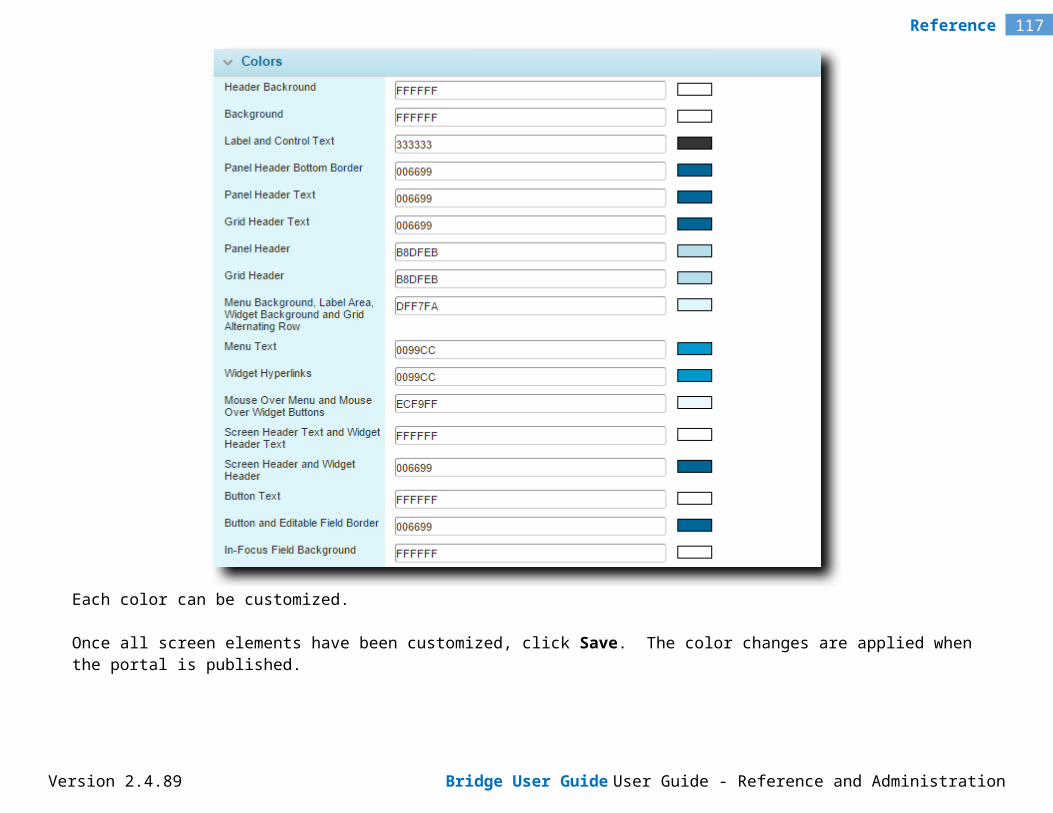
117Reference
Affects the background color of selected fields, and applies a semi-transparent background to buttons when selected or clicked.
Version 2.4.89 Bridge User Guide User Guide - Reference and Administration
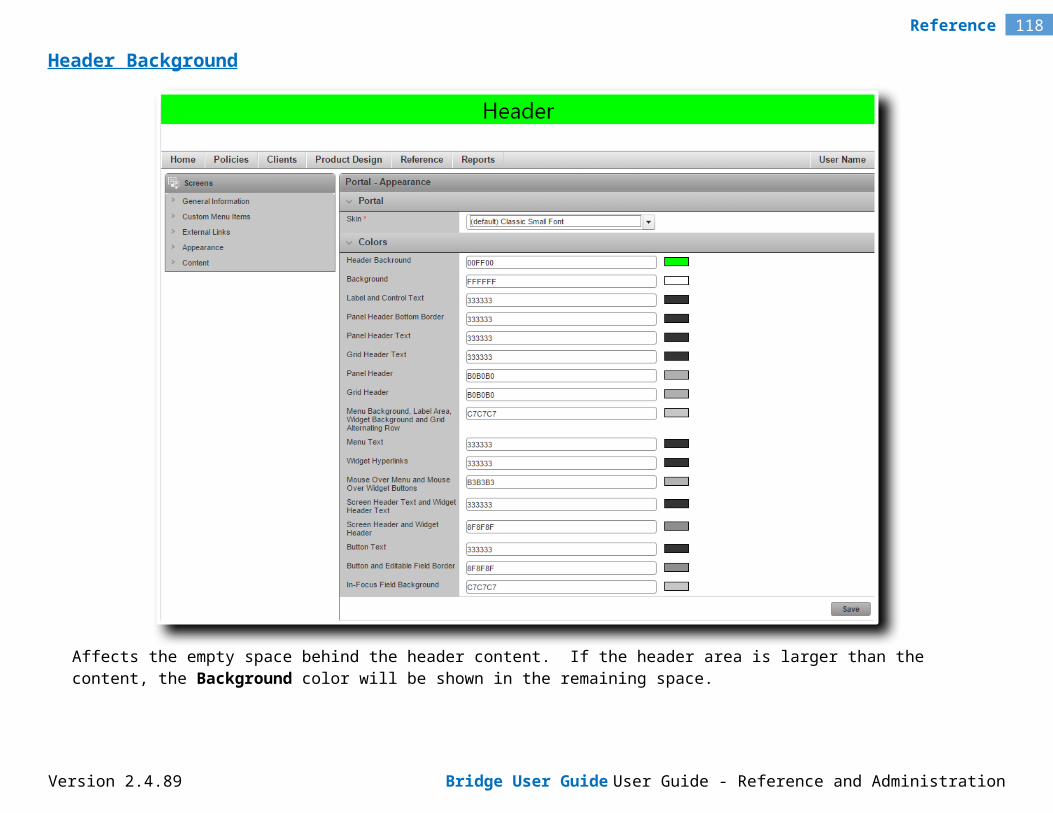
118Reference
Appendix B - XML Structure for Import Files
The Import feature allows transactions and distributor companies to be loaded directly into the system without extensive data entry. The import files are in XML format, which can be created from a simple form, or exported from an entirely different system.
The formatting and structure of the input XML must be precise, so sample files are included below, with a detailed breakdown of all requirements.
Transaction Import XML Sample
The sample XML below can be copied and pasted into an XML file, or the file attached above can be saved and edited. All black text must be replaced by the appropriate policy details, except where instructed otherwise.
Note: Some XML editors may display the code using different color markers. Refer to the sample below to resolve any discrepancies.
The structure should only be changed where the instructions advise that sections should be copied and pasted to insert repetitive details. Links to the instructions for each section are included at the far right, and each set of instructions has a link to return to the same section in the code.
<?xml version="1.0"?><Policies>
<Policy> <!-- Details --><PolicyInfo xmlns="http://oceanwide.bridge.com">
<StandardInfo><PolicyHeader>
<PolicyIdentifiers> <!-- Details --><PolicyNumber>Number</PolicyNumber><MasterCover Code="Code"/>
Version 2.4.89 Bridge User Guide User Guide - Reference and Administration
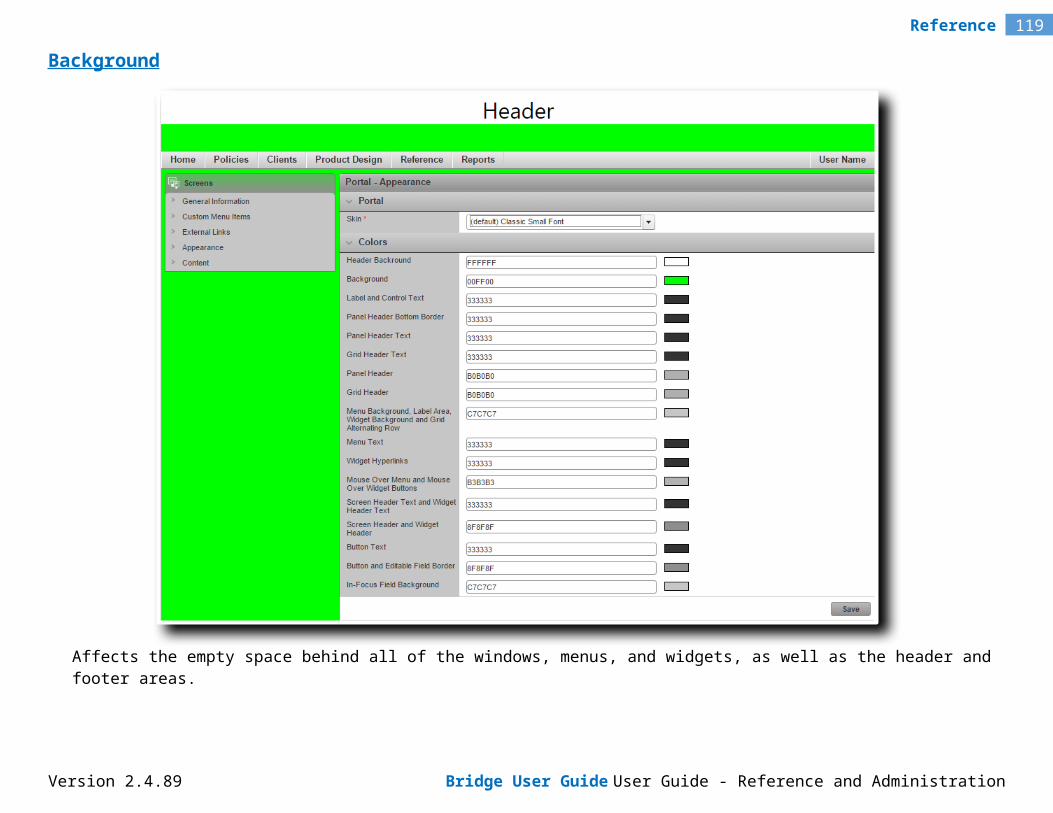
119Reference
</PolicyIdentifiers><PolicyTermIdentifiers> <!-- Details -->
<PolicyTermNumber>Number</PolicyTermNumber></PolicyTermIdentifiers><PolicyTransactionIdentifiers> <!-- Details -->
<TransactionEffectiveCoveragePeriod><EffectiveDate>Date</EffectiveDate><ValidUntilDate>Date</ValidUntilDate>
</TransactionEffectiveCoveragePeriod><TransactionType Code="Code" /><TransactionStatus Code="Bound" />
</PolicyTransactionIdentifiers></PolicyHeader><Distributors> <!-- Details -->
<Distributor Code="Code"/></Distributors><AssuredCompanies> <!-- Details -->
<AssuredCompany Code="Code"><PartyInfo>
<AddressInfo><Address>Street Address</Address><City>City</City><State Code="Code" /><Country Code="Code" /><Zip>Zip</Zip>
</AddressInfo><CommunicationInfo>
<Phone>Number</Phone><Fax>Number</Fax><Website>Website</Website>
</CommunicationInfo></PartyInfo><CompanyInfo>
<CompanyName>Name</CompanyName></CompanyInfo><ResourceInfo>
<OwnershipInfo><Owners>
Version 2.4.89 Bridge User Guide User Guide - Reference and Administration
120Reference
<Owner Code="Distributor Code" /></Owners>
</OwnershipInfo></ResourceInfo>
</AssuredCompany></AssuredCompanies>
</StandardInfo><CustomInfo>
<Fields> <!-- Details --><Field Code="Code" Value="Value" Text="Text" /><Field Code="Code" Value="Value" Text="Text" /><Field Code="Code" Value="Value" Text="Text" />
</Fields><Arrays> <!-- Details -->
<Array Code="Code" Action="Overwrite"><ArrayItem Code="Code">
<ParentArrayItem Code="Code" /><Field Code="Code" Value="Value" Text="Text" /><Field Code="Code" Value="Value" Text="Text" /><Field Code="Code" Value="Value" Text="Text" />
</ArrayItem></Array>
</Arrays></CustomInfo>
</PolicyInfo><CoverageInfo>
<QuoteOptionDefinition Code="Code" /> <!-- Details --><InsuredValue> <!-- Details -->
<Amount>Amount</Amount></InsuredValue><GeneralInsuringConditions> <!-- Details -->
<Text>Text</Text><Sequence>Number</Sequence>
</GeneralInsuringConditions><CurrencyISO>Code</CurrencyISO> <!-- Details --><Coverages> <!-- Details -->
<Coverage><CoverageType Code="Code" />
Version 2.4.89 Bridge User Guide User Guide - Reference and Administration
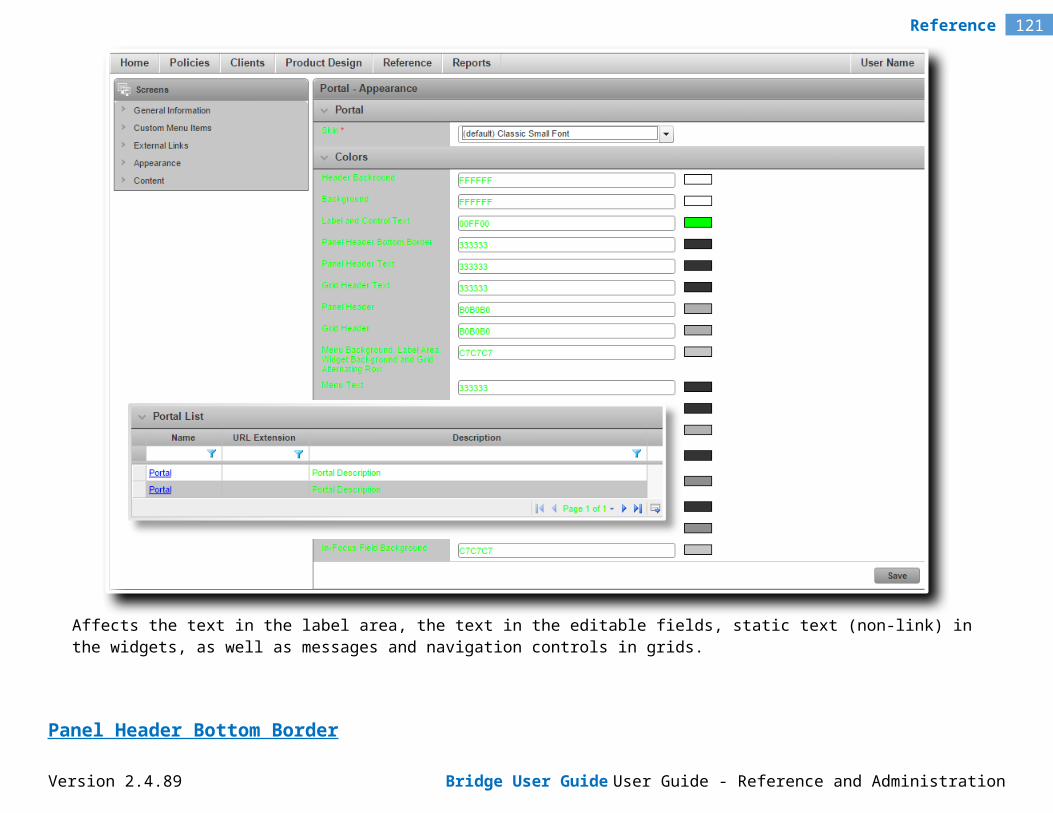
121Reference
<Premiums> <!-- Details --><Premium>
<ProratedAmount><Amount>Amount</Amount>
</ProratedAmount><TermAmount>
<Amount>Amount</Amount></TermAmount><AnnualAmount>
<Amount>Amount</Amount></AnnualAmount><NetChangeAmount>
<Amount>Amount</Amount></NetChangeAmount><Taxes>
<Tax Code="Code"><Amount>
<Amount>Amount</Amount></Amount>
</Tax></Taxes><Commissions>
<Commission><Distributor Code="Code" Id="Id"/><Amount>
<Amount>Amount</Amount></Amount>
</Commission></Commissions>
</Premium></Premiums><Limits> <!-- Details -->
<Limit><LimitType Code="Code" /><Description>Description</Description><LimitAmount>
<Amount>Amount</Amount></LimitAmount>
Version 2.4.89 Bridge User Guide User Guide - Reference and Administration
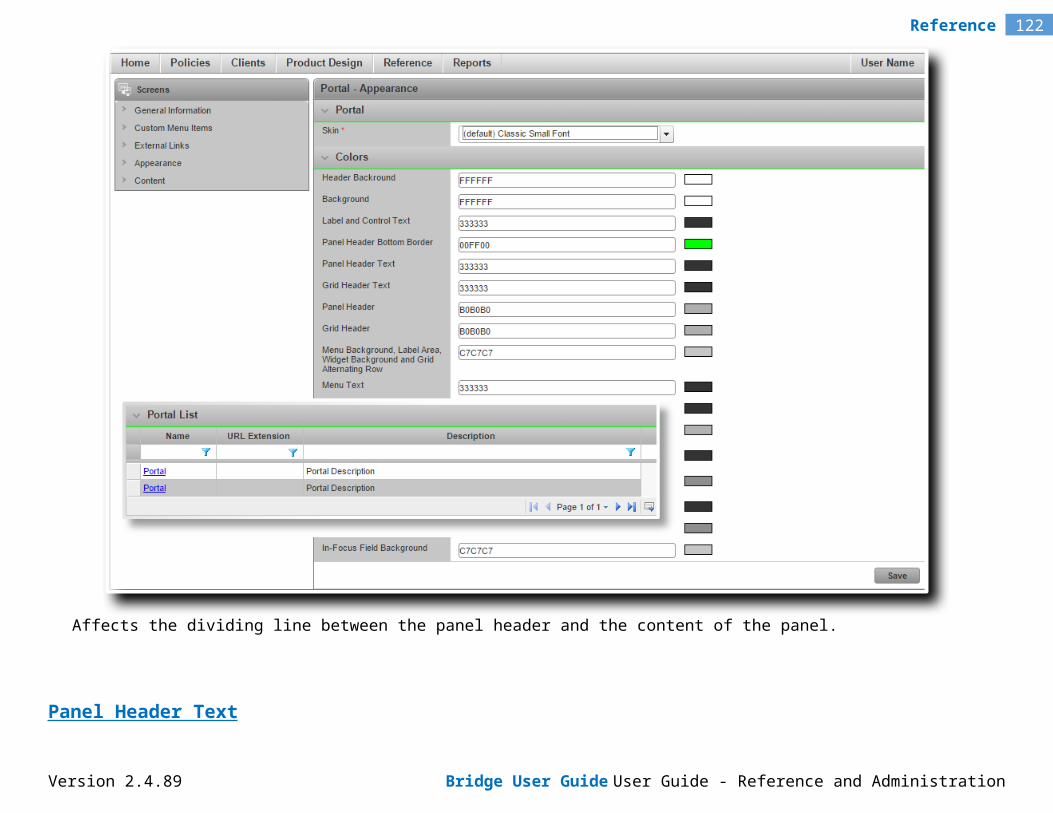
122Reference
</Limit></Limits><Deductibles> <!-- Details -->
<Deductible><DeductibleType Code="Code" /><Description>Description</Description><DeductibleAmount>
<Amount>Amount</Amount></DeductibleAmount>
</Deductible></Deductibles>
</Coverage></Coverages>
</CoverageInfo></Policy>
</Policies>
Transaction Import XML Details
Policies Return
The Policies section, including its closing tag </Policies>, contains all of the information for one transaction. The entire section can be repeated as many times as necessary to upload multiple transactions.
PolicyIdentifiers Return
PolicyNumber (required) Insert the unique policy number to represent the policy for its entire lifespan or at least for the first term (depending on master cover settings).
MasterCover (required) Insert the Code of the master cover under which the policy is to be created.
PolicyTermIdentifiers Return
The PolicyTermIdentifiers section, including its closing tag </PolicyTermIdentifiers>, contains the information to define a Renewal transaction. This section can be omitted for New Business transactions or, if left in, the details must match the policy details provided in other sections.
Version 2.4.89 Bridge User Guide User Guide - Reference and Administration
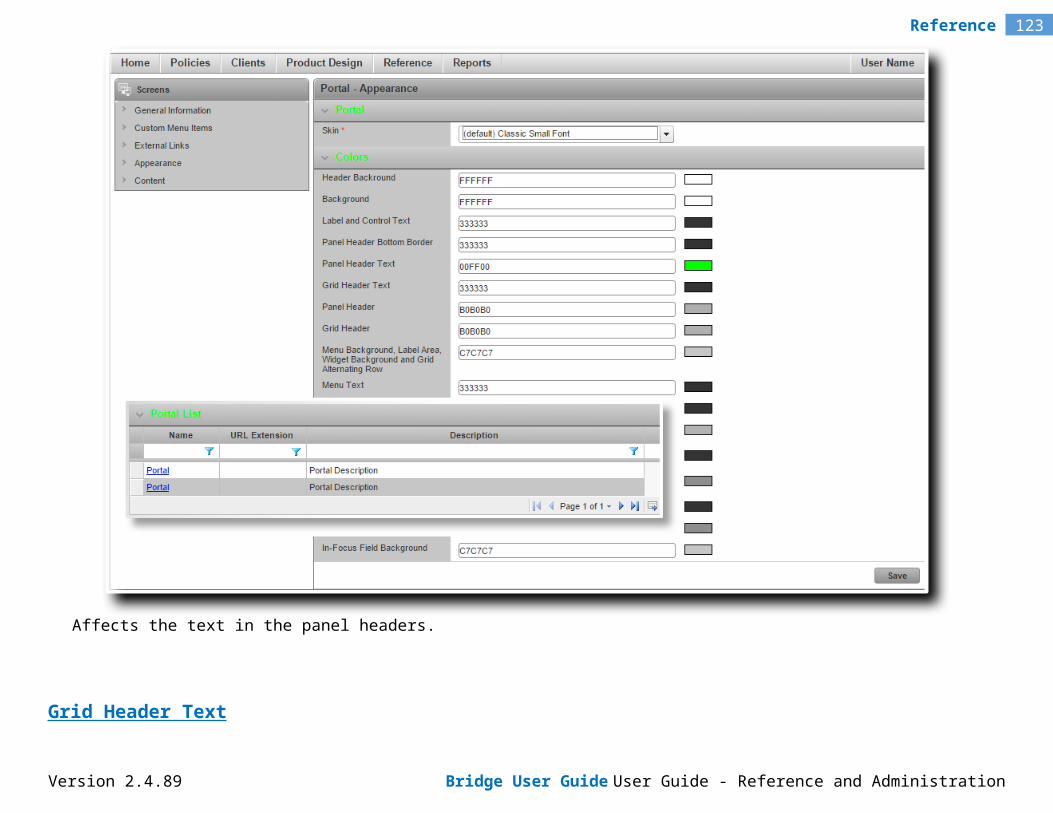
123Reference
PolicyTermNumber (required) Insert the policy number for the renewal. If the renewal should have its own policy number, the number should be unique. If the policy number for the first term should be maintained, include that number here.
PolicyTransactionIdentifiers Return
EffectiveDate (required) Insert the date that the transaction comes into effect. For Renewal transactions, the effective date must be the day after the last day of the previous term. The date must be in long format as follows: 2011-01-01T01:00:00-05:00. The time element must be included, but is ignored.
ValidUntilDate (required) Insert the date on which the transaction ends. The date must be in long format as follows: 2011-01-01T01:00:00-05:00. The time element must be included, but is ignored.
TransactionType (required) Currently only New Business and Renewal transactions are supported. Code must be "NewBusiness" or "Renewal".
TransactionStatus (required) Currently only Bound policies are supported. Code must be "Bound".
Distributors Return
Distributor (required) Insert the Code of the distributor company to be attached to the policy.
AssuredCompanies Return
AssuredCompany (required) Insert the Code of the client record. If the client record already exists in the system, the record is updated. If the client record does not exist, a new client record is created.
Address (optional) Insert the street address for the client.
City (optional) Insert the city name for the client.
State (optional) Insert the state Code for the client.
Country (optional) Insert the country Code for the client.
Zip (optional) Insert the Zip Code or Postal Code for the client.
Phone (optional) Insert the phone number for the client.
Fax (optional) Insert the fax number for the client.
Website (optional) Insert the URL for the client's website.
CompanyName (required) Insert the name of the client company or individual.
Version 2.4.89 Bridge User Guide User Guide - Reference and Administration
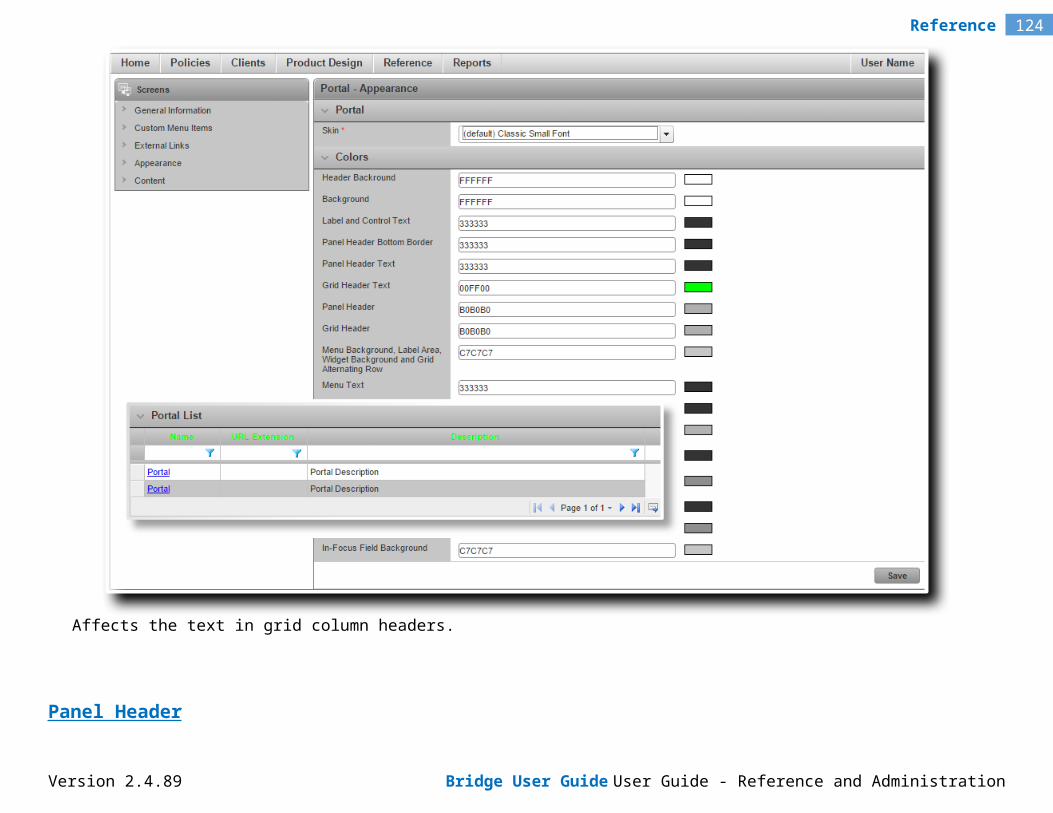
124Reference
Owner (required) Insert the Code of the distributor company to be the owner of the client record. This should be the same distributor as defined for the policy.
Fields Return
Field Insert the Code of the field, and the Value to be assigned to that field.Repeat this line as many times as required to fill in all necessary fields in the workflow (not including fields within grids, see below). Any fields to be left blank in the policy can be omitted from this section.The format of the Value data depends on the type of field.
Text Box, Textbox (Decimal), Textbox (Email), and Textbox (Integer): Insert the value suitable to the field type.
Text Area: Insert the text, including any line breaks.
Rich Text: Insert the text, with all formatting represented by text codes.Example: "<b>This is bold text</b>"
Radio Buttons and Drop Down: Insert the Code for the option list item to be selected.
Checkbox: If the box is to be checked, insert "true". If it should be unchecked, omit it from the Fields section entirely.
Date Picker: Insert the date in long format as follows: 2011-01-01T01:00:00-05:00. The time element must be included, but is ignored.
Label: Label content is defined in the workflow. Labels should not be included in the Fields section.
Checkbox Group, Include Exclude List, and Multi Select: These field types are defined in the Arrays section below.
If the target field is a combo box control, the optional Text attribute can be provided. While the Value attribute is the saved value of the field, the Text attribute determines what will be displayed in the field. If the Text attribute is not provided, the Value attribute will be displayed by default.
Arrays Return
Version 2.4.89 Bridge User Guide User Guide - Reference and Administration
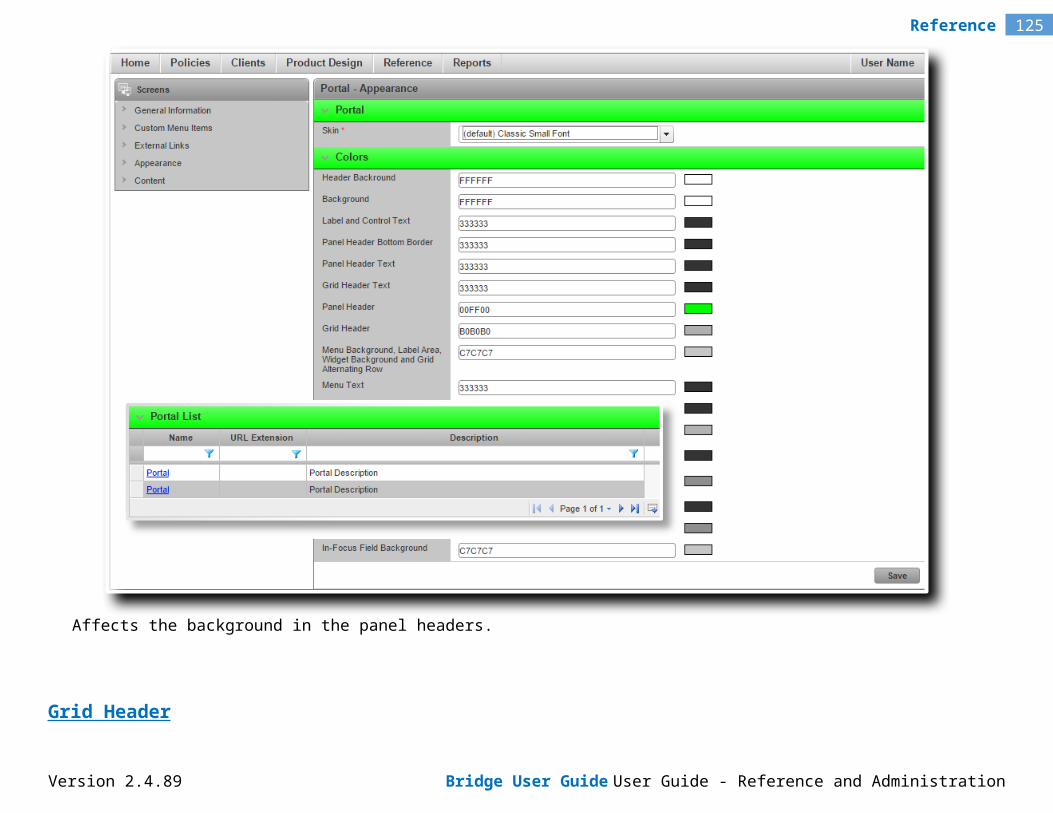
125Reference
Arrays are used for two purposes, building grids, and populating stand-alone fields with multiple selections such as Checkbox Groups, Include Exclude Lists, and Multi Selects.The Array section, including its closing tag </Array>, must be repeated for each grid or multi-option field to be populated.Note: It is currently not possible to import multi-selection fields within grids. Such fields must be populated manually after import.
Array (field) Insert the Code of the Checkbox Group, Include Exclude List, or Multi Select.
ArrayItem (field) The ArrayItem section, including its closing tag </ArrayItem>, must be repeated for each selected option in the field. Options that are not selected should not be listed.The ExternalCode should not be included when importing a field.
Field (field) Within each ArrayItem section should be one Field entry. Enter "Item" as the Code, and for Value insert the Code for the option list item to be selected.
Array (grid) Insert the Code of the grid.When updating a policy, the Action="Overwrite" option can be used to clear all data from a grid before importing new data.
ArrayItem (grid) The ArrayItem section, including its closing tag </ArrayItem>, must be repeated for each row of data in the grid.A unique Code can be defined for each row in the grid. This allows child grid data to be assigned to the current row, and allows individual rows to be updated with future imports by referencing the provided code. If a matching code is not found, the row is added to the grid as a new row.
ParentArrayItem (grid)
This line identifies the current array item as being a child entry associated to a specific row in a parent grid.Insert the Code of the parent ArrayItem.This line should only be added once per ArrayItem.
Field (grid) Insert the Code of the field, and the Value to be assigned to that field.Repeat this line as many times as required to fill in all necessary fields in the current row of the grid. Any fields to be left blank in the current row can be omitted from this section.The format of the Value data depends on the type of field. See the Fields section above for details.
QuoteOptionDefinition Return
When importing transactions into a multi-quote workflow, the code for a suitable quote option must be provided.
InsuredValue Return
Version 2.4.89 Bridge User Guide User Guide - Reference and Administration
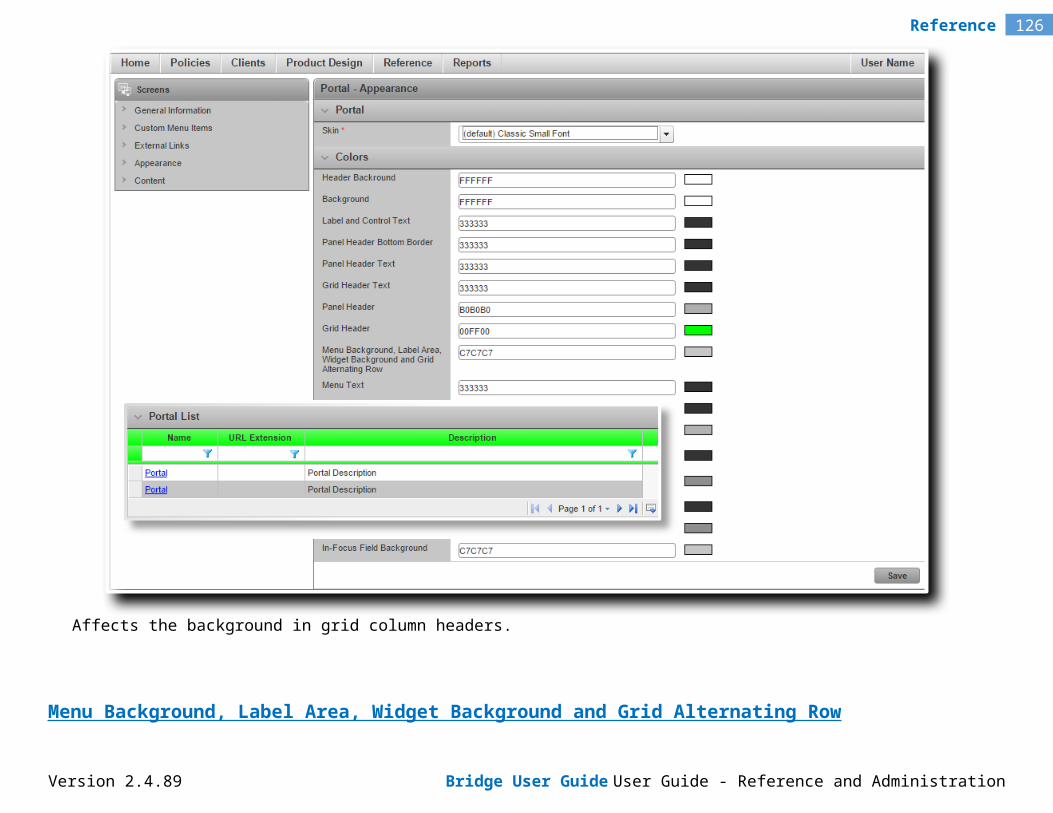
126Reference
Amount (optional) Insert the insured value for the policy. This value is independent from the values input into the workflow fields, and is used for reports, documents, and e-mails.
GeneralInsuringConditions Return
The GeneralInsuringConditions section, including its closing tag </GeneralInsuringConditions>, must be repeated for each distinct condition text.
Text (optional) Insert the text for the insuring conditions.
Sequence (optional) If more than one block of insuring conditions are being included, insert the sequence number to determine the order in which they are displayed.
CurrencyISO Return
Code Insert the three-character ISO currency code to apply to the premiums. The provided currency must be configured in the associated master cover or the import will result in an error. Any triggers associated to the currency configurations will not be evaluated.If the master cover only has one currency configured, this node can be omitted and that currency will be assigned by default. If the master cover has more than one currency configured, this node must be provided or the import will result in an error.Currencies can be applied for New Business transactions, and can be changed for Renewal transactions. The currency cannot be changed with update imports for existing policies.
Coverages Return
Coverage The Coverage section, including its closing tag </Coverage>, must be repeated for each premium type used in the policy.
CoverageType (required) Insert the Code of the premium type.
Premiums Return
ProratedAmount Represents the final premium, prorated as part of the full term. Since the new business transaction is always the full term, this value should be the same as the TermAmount below.
o Amount (required) Insert the prorated premium amount.
TermAmount Represents the total premium for the full term, without prorating. Since the new business transaction is always the full term, this value should be the same as the ProratedAmount above.
o Amount (required) Insert the term premium amount.
Version 2.4.89 Bridge User Guide User Guide - Reference and Administration

127Reference
AnnualAmount Represents the total premium for a full year, without prorating. If the term equals a full year, this value should be the same as the TermAmount above.
o Amount (required) Insert the annual premium amount.
NetChangeAmount Represents the total premium for the transaction. Since the new business transaction is always the full term, this value should be the same as the TermAmount above.
o Amount (required) Insert the premium amount.
Taxes This section lists all taxes applied to the current premium type. If no taxes are applicable, this section can be left out.
o Tax The Tax section, including its closing tag </Tax>, must be repeated for each separate tax applied to the current premium type.(optional) Insert the Code for the tax type.
o Amount (optional) Insert the Amount for this tax type applied to the current premium type.
Commissions This section contains the commission amount for the current premium type. If no commission is applicable, this section can be left out.
o Distributor (optional) Insert the Code and Id of the distributor to whom the commission is to be paid.
o Amount (optional) Insert the Amount of the commission. This amount should be included in the premium totals for the current premium type.
Limits Return
Limit The Limit section, including its closing tag </Limit>, must be repeated for each limit applied to the current premium type.
LimitType (optional) Insert the code for the limit type.
Description (optional) Insert the Description of the limit.
Amount (optional) Insert the Amount of the limit.
Deductibles Return
Deductible The Deductible section, including its closing tag </Deductible>, must be repeated for each deductible applied to the current premium type.
DeductibleType (optional) Insert the code for the deductible type.
Version 2.4.89 Bridge User Guide User Guide - Reference and Administration
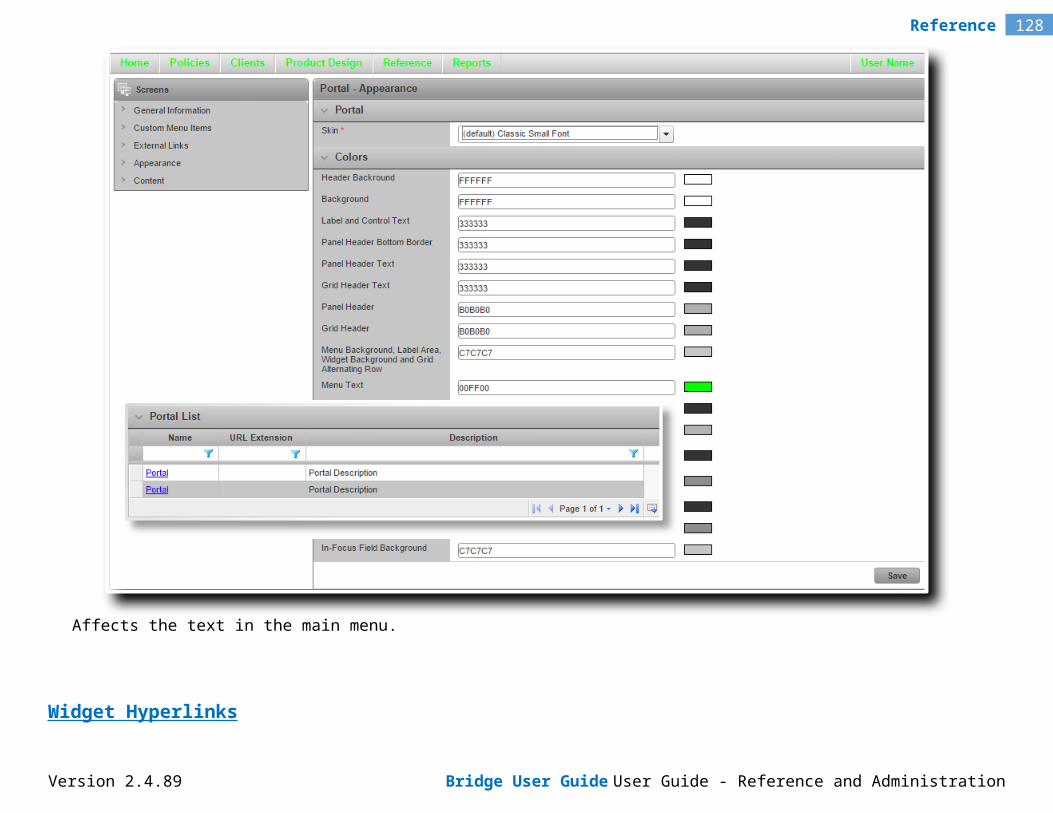
128Reference
Description (optional) Insert the Description of the deductible.
Amount (optional) Insert the Amount of the deductible.
Distributor Import XML Sample
The sample XML below can be copied and pasted into an XML file, or the file attached above can be saved and edited. All black text must be replaced by the appropriate policy details, except where instructed otherwise.
Note: Some XML editors may display the code using different color markers. Refer to the sample below to resolve any discrepancies.
The structure should only be changed where the instructions advise that sections should be copied and pasted to insert repetitive details. Links to the instructions for each section are included at the far right, and each set of instructions has a link to return to the same section in the code.
<?xml version="1.0"?><Distributors>
<Distributor Code="Distributor_20130610_001" xmlns="http://oceanwide.bridge.com"> <!-- Details --><PartyInfo>
<PrimaryRole Code="Distributor">Distributor</PrimaryRole><AddressInfo> <!-- Details -->
<Address>Street Address</Address><City>City</City><State Code="Code"/><Country Code="Code"/><Zip>Zip/Postal Code</Zip>
</AddressInfo><CommunicationInfo> <!-- Details -->
<Phone>Number</Phone>
Version 2.4.89 Bridge User Guide User Guide - Reference and Administration
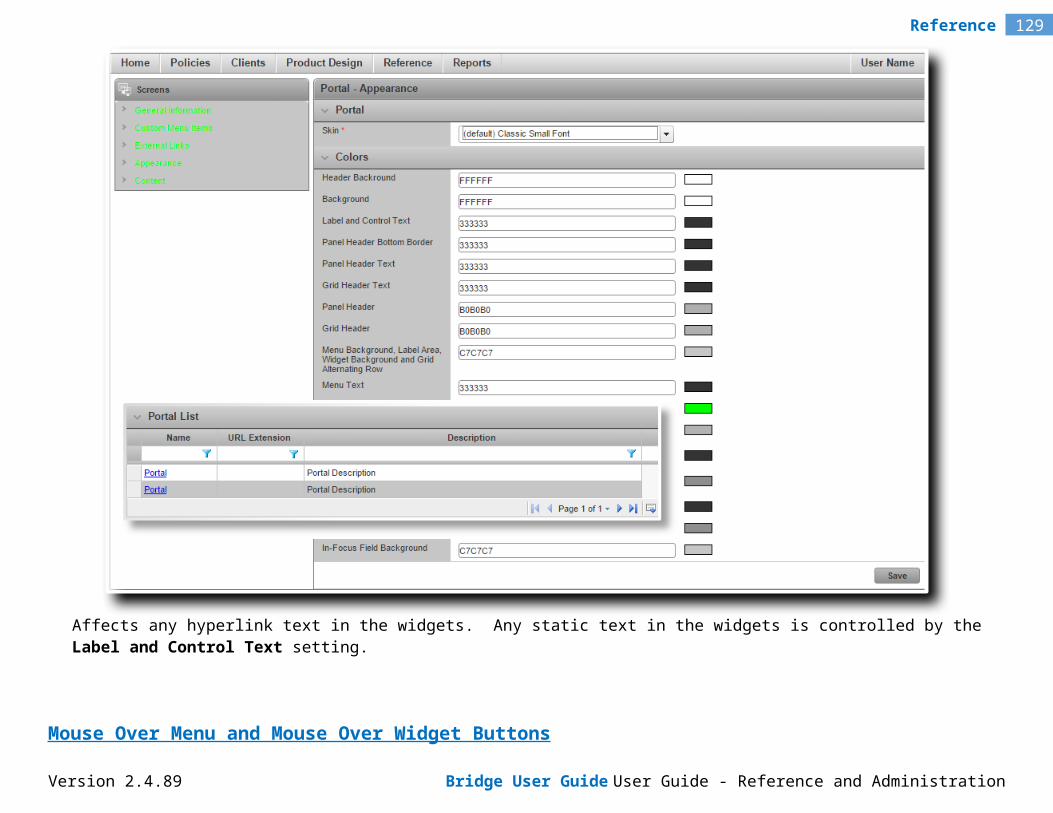
129Reference
<Fax>Number</Fax><Email>Email Address</Email><Website>Website URL</Website>
</CommunicationInfo></PartyInfo><CompanyInfo> <!-- Details -->
<CompanyName>Name</CompanyName></CompanyInfo><DistributorInfo> <!-- Details -->
<CommissionPercentage>Percentage</CommissionPercentage></DistributorInfo>
</Distributor></Distributors>
Distributor Import XML Details
Distributor Return
The Distributor section, including its closing tag </Distributor>, contains all of the information for one distributor. The entire section can be repeated as many times as necessary to upload multiple distributors.(required) Insert the Code to identify the distributor. The code must be unique when importing a new distributor. If a distributor exists in the system with the same code, that distributor will be updated with the provided information.
PrimaryRole (optional) Both the Code and the value for this line should be Distributor.
AddressInfo Return
Address (optional) Insert the street address for the distributor.
City (optional) Insert the city name for the distributor.
State (optional) Insert the state Code for the distributor.
Country (optional) Insert the country Code for the distributor.
Version 2.4.89 Bridge User Guide User Guide - Reference and Administration
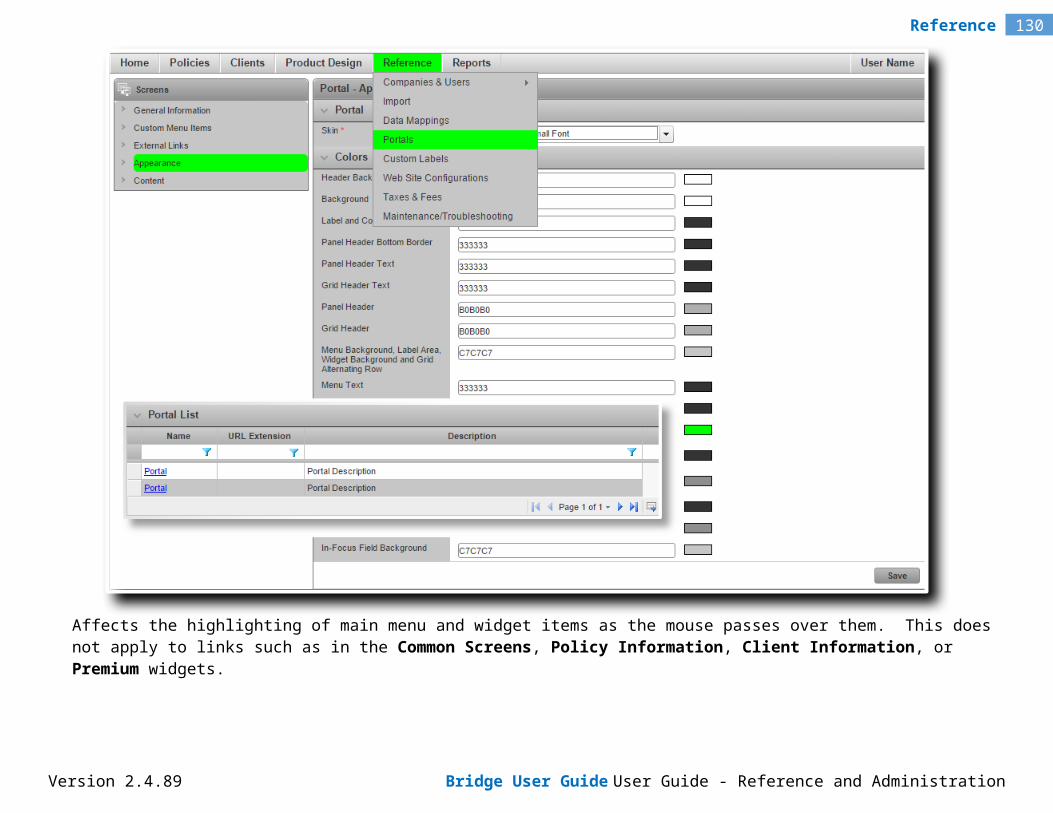
130Reference
Zip (optional) Insert the Zip Code or Postal Code for the distributor.
CommunicationInfo Return
Phone (optional) Insert the phone number for the distributor.
Fax (optional) Insert the fax number for the distributor.
Email (optional) Insert the email address for the distributor.
Website (optional) Insert the URL for the distributor's website.
CompanyInfo Return
CompanyName (required) Insert the name of the distributor company.
DistributorInfo Return
CommissionPercentage (optional) Insert the default commission percentage earned by this distributor.
Version 2.4.89 Bridge User Guide User Guide - Reference and Administration
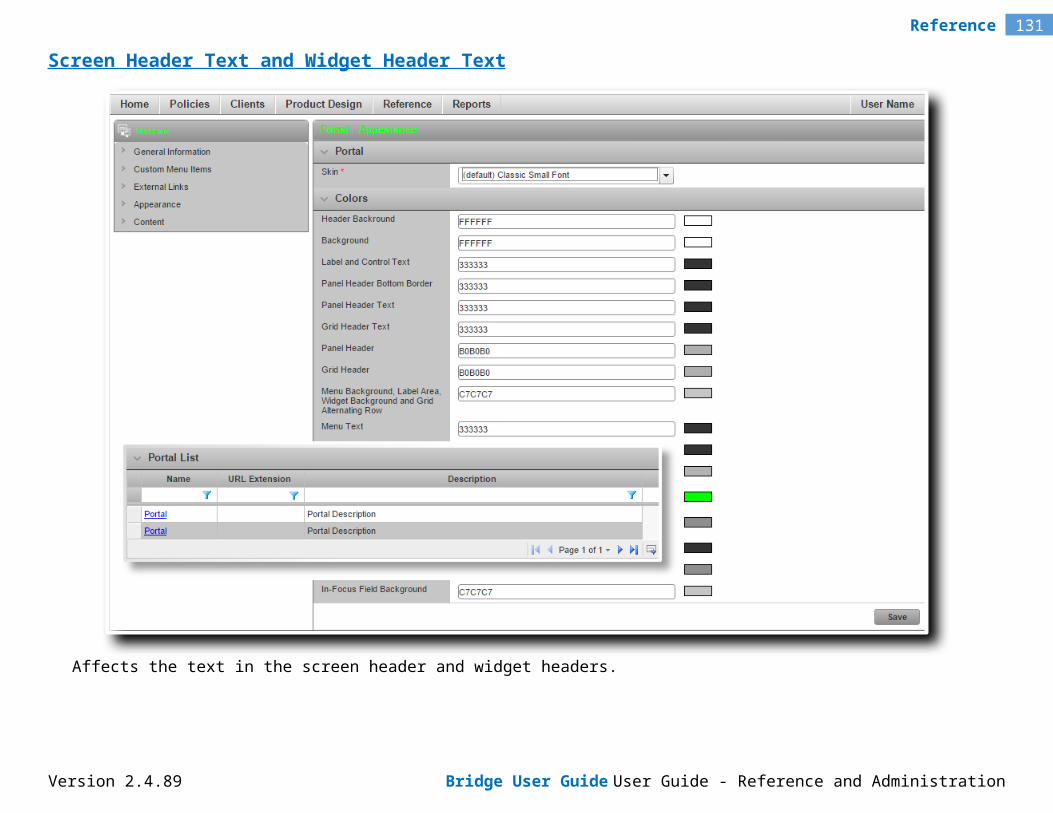
131Reference
Index
((default) link 58AActive checkbox 7, 13, 21, 31, 37, 45, 69Activity column 91Add & Close button 5, 10, 21, 29, 35, 44, 62, 67Add button 5, 10, 17, 20, 21, 22, 24, 25, 29, 35, 44, 62, 67Add-Ins menu item 87Address field 3, 8Address panel 4, 9, 19, 29, 35Address XML node 122, 128AddressInfo XML node 128Administrative Level field 42Agency Bill checkbox 23Allow Multiple Logons checkbox 42Amount column 85Amount XML node 124, 125, 126AnnualAmount XML node 125Appearance page 70Appendix A - Portal Color Settings 98Appendix B - XML Structure for Import Files 117Application Logs menu item 96Application Logs Viewer 96Application Logs Viewer page 96Application Logs Viewer panel 96Array XML node 123, 124ArrayItem XML node 124Arrays XML node 123Assign Password button 13, 14, 44, 45, 47Assignable column 49Assignable Security Roles panel 43Assigned column 49Assigning a Custom Domain to the Default Portal 58AssuredCompanies XML node 122
Version 2.4.89 Bridge User Guide User Guide - Reference and Administration
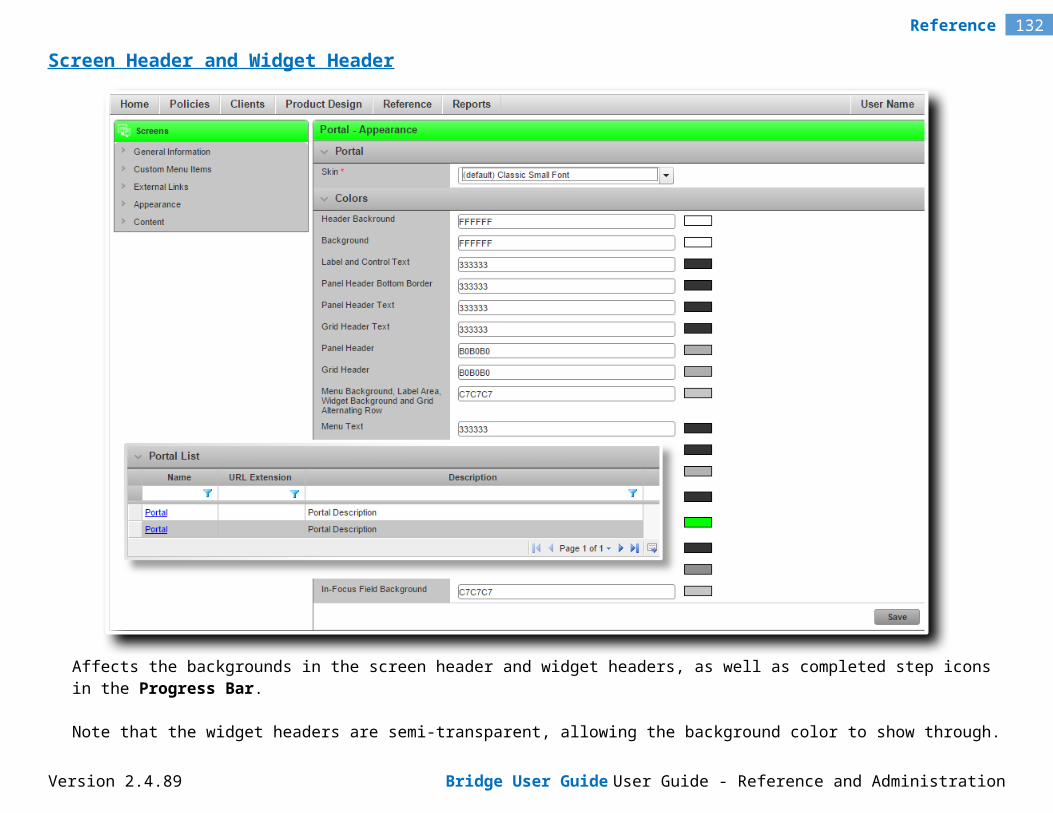
132Reference
AssuredCompany XML node 122Attachment column 85Authentication field 12, 41Authentication Settings panel 12, 41BBackground colors 100Bill To Party Management page 5, 8, 13, 15, 21Billing Information panel 22Bridge authentication option 12, 41Bridge Document Template Word Add-In (2007 and prior) 87Bridge Document Template Word Add-In (2007 and prior) panel 87Bridge Document Template Word Add-In (2010 and later) 87Bridge Document Template Word Add-In (2010 and later) panel 87Bridge Policy Excel Add-In 87Bridge Policy Excel Add-In panel 87Browse button 52, 77, 83Button and Editable Field Border colors 114Button Text colors 113CCalculated Field trace view component 94Calculation Trace View panel 93Calculation Trace View window 92, 93Calculation Trace Viewer Window 92Category column 96Checkbox control type 123Checkbox Group control type 123City field 3, 8City XML node 122, 128Classic Large Font skin 71Classic Small Font skin 70Client column 54Client Company Information page 2Client field 51Client List page 2, 8Client List panel 5, 13, 15Clients menu 2, 5, 6, 8, 13, 14, 15Close button 5, 8, 10, 14, 21, 24, 25, 29, 31, 35, 37, 44, 46, 51, 60, 62, 64, 69, 92Code field 3, 8, 18, 28, 34
Version 2.4.89 Bridge User Guide User Guide - Reference and Administration
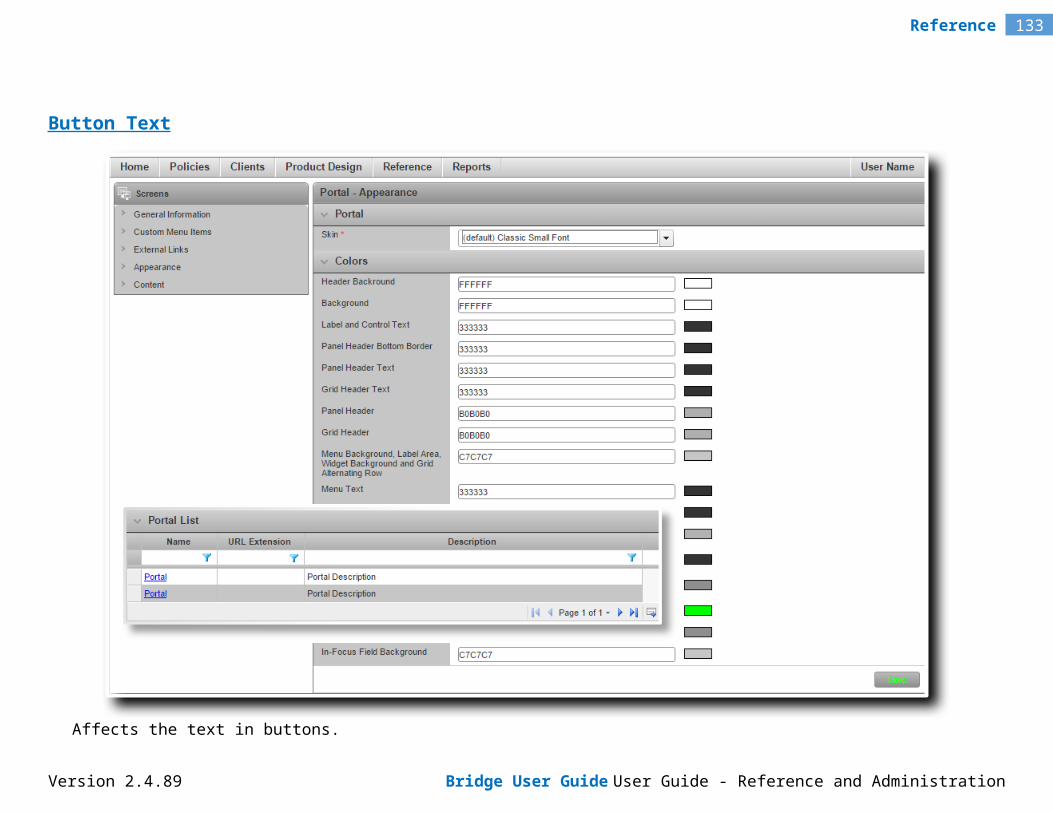
133Reference
Color Picker tool 74Colors panel 73, 99Commission column 24, 25Commission panel 23, 24CommissionPercentage XML node 129Commissions XML node 126CommunicationInfo XML node 128Companies & Users menu 17, 27, 29, 32, 33, 35, 38, 39, 44, 46, 47, 48, 50Company column 56Company Name column 48Company Name field 40Company panel 3, 18, 28, 34CompanyInfo XML node 128CompanyName XML node 122, 128Completed At column 89Completed On column 92Contact Information panel 3, 4, 9, 18, 28, 34, 40Content Areas field 75Content page 75Content panel 76Context column 82Country field 3, 8Country XML node 122, 128Coverage XML node 125Coverages XML node 125CoverageType XML node 125Create button 7, 20, 27, 31, 33, 37, 39, 61, 66Create Company button 2Create Individual button 8Created By field 7, 13, 21, 31, 37, 45, 60, 63, 69Creating a New Client Company 2Creating a New Individual Client 8Creating a New Insurer Company 27Creating a New Licensee Office 33Creating a New Portal 61Creating a New User Account 39Cultural Settings field 42Custom (language) column 81
Version 2.4.89 Bridge User Guide User Guide - Reference and Administration
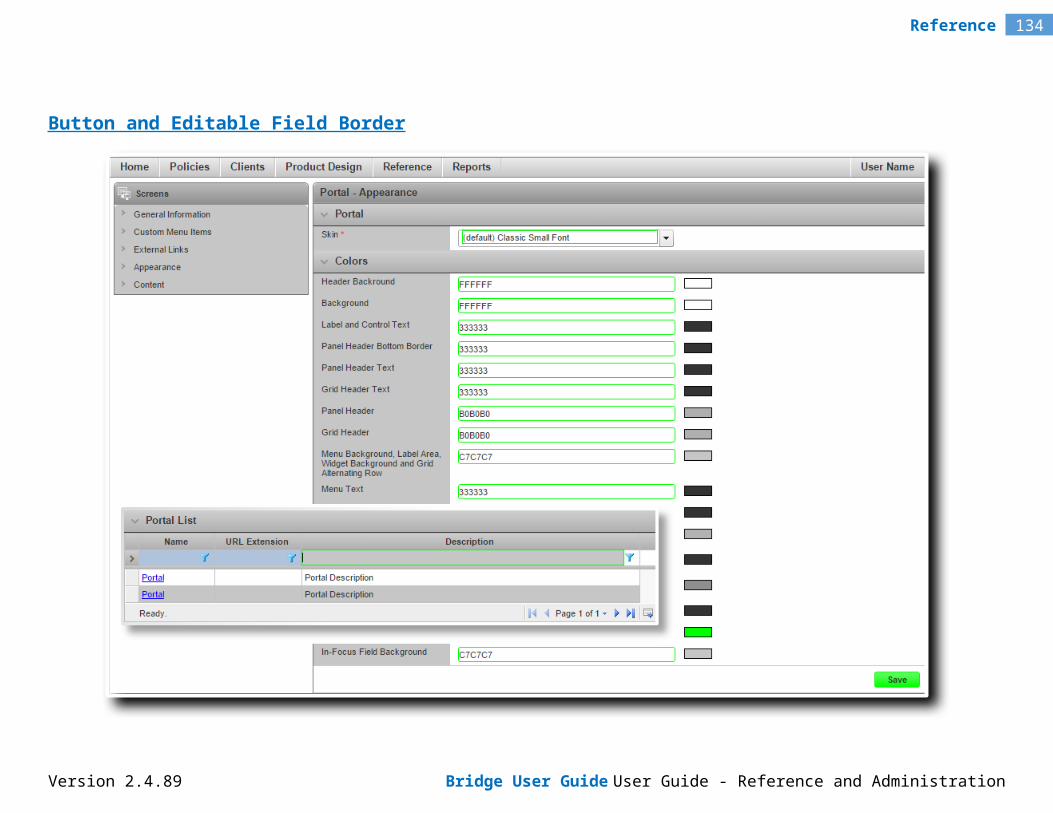
134Reference
Custom (language-region) columns 82Custom Domain field 59, 62Custom Labels 79Custom Labels page 79, 82Custom Language menu item 79, 82Custom Menu Items page 65Custom Portal Content 75Customizing Password E-mails 50DData Field trace view component 93Data Import 117Data Import button 52Data Import menu item 52Date Picker control type 123Deactivate button 16, 17, 32, 38, 46, 66Deactivating a Client 15Deactivating a Licensee Office 38Deactivating a User Account 46Deactivating an Insurer Company 32Deductible XML node 126Deductibles XML node 126DeductibleType XML node 126Default Commission field 19, 23, 25Default Commission Field Override field 23Default Risk field 29Default Text (language) column 81Defining the Appearance of a Portal 70Delete button 24, 25, 26, 67Description field 59, 61Description XML node 126Designate as Bill To Party button 5, 8, 13, 15, 21Discount or Surcharge rate type 85Display Notes & Follow Ups Panel checkbox 10, 44Display SmartView Panel checkbox 10, 44Display Submissions/Policies Panel checkbox 10, 44Display Welcome Page Content checkbox 10, 43Distributor Change History panel 6, 11Distributor Code field 19
Version 2.4.89 Bridge User Guide User Guide - Reference and Administration
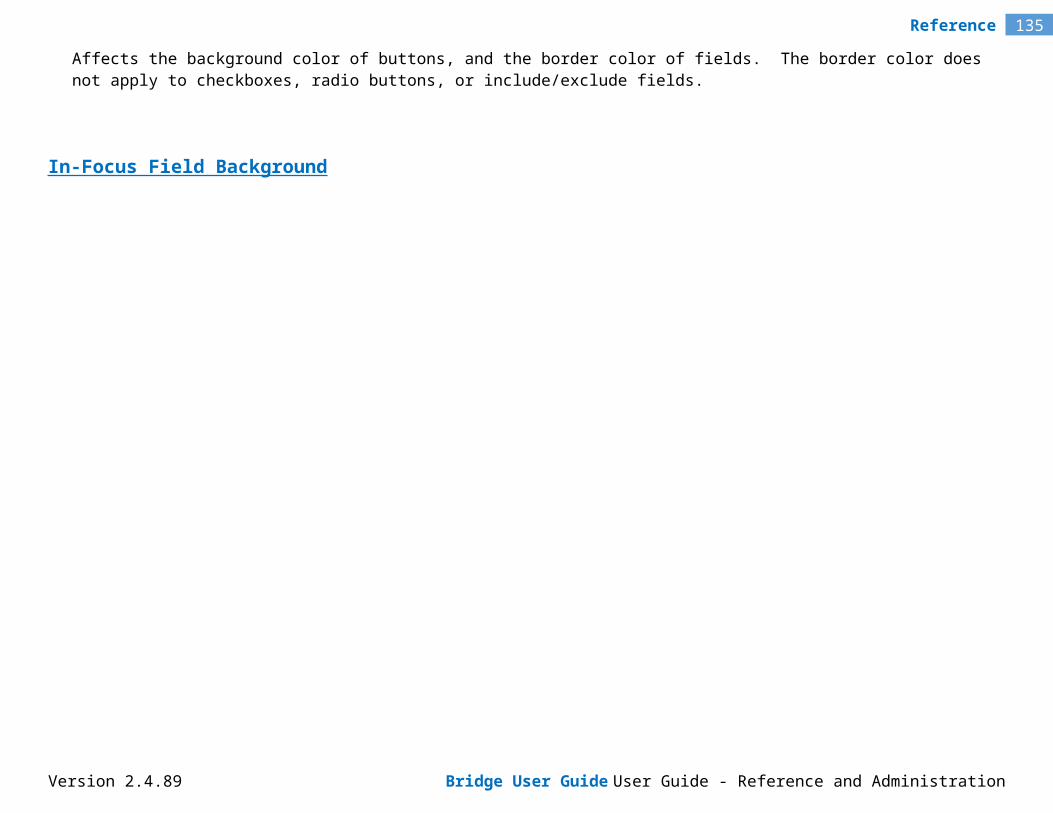
135Reference
Distributor field 2, 6, 8, 14, 51Distributor Import XML Details 128Distributor Import XML Sample 126Distributor Information page 17, 18, 21Distributor List panel 17Distributor Owner 6Distributor Owner panel 2, 8Distributor Parameters panel 19Distributor Reference Code field 22Distributor XML node 122, 126, 128DistributorInfo XML node 129Distributors menu item 17Distributors XML node 122Download link 87, 88Draft status 84Driver Field column 85Drop Down control type 123Duration column 92EEffective Date column 54, 85EffectiveDate XML node 122E-mail column 48E-mail field 5, 9, 40Email XML node 128Employee Number field 4, 40Error Code column 96Error Message column 96Error severity 96Error trace view component 95Errors column 55, 56Event column 89, 97Event field 90Event Tracking menu item 89Event Tracking page 89Event Tracking panel 90, 91Event Tracking report 92Events panel 89, 92Export button 79
Version 2.4.89 Bridge User Guide User Guide - Reference and Administration

136Reference
Export Grid button 55, 56Export Grid menu 53, 55, 57Export Now option 53, 55, 57Export Rates button 84Export Resources button 86Exporting a Language File 79External Links page 66FFax field 3, 18, 28, 34Fax XML node 122, 128Field Override field 24Field Override Trigger field 23Field XML node 123, 124Fields XML node 122File field 67First Name column 48First Name field 4, 9, 40Flat Amount rate type 85Footer 77Footer content area 75Forgot Your Password link 47Forgot your Password page 75, 76Full Event Tracking Report 89Function Parameter trace view component 94Function trace view component 94GGeneral Information page 60, 69, 74, 77General Information panel 22, 59, 61, 67GeneralInsuringConditions XML node 124Generating the Users & Roles Report 47Grid Field trace view component 94Grid Header colors 106Grid Header Text colors 104Group External Links in a main menu item checkbox 66HHead Office 17Header 77Header Background colors 99
Version 2.4.89 Bridge User Guide User Guide - Reference and Administration
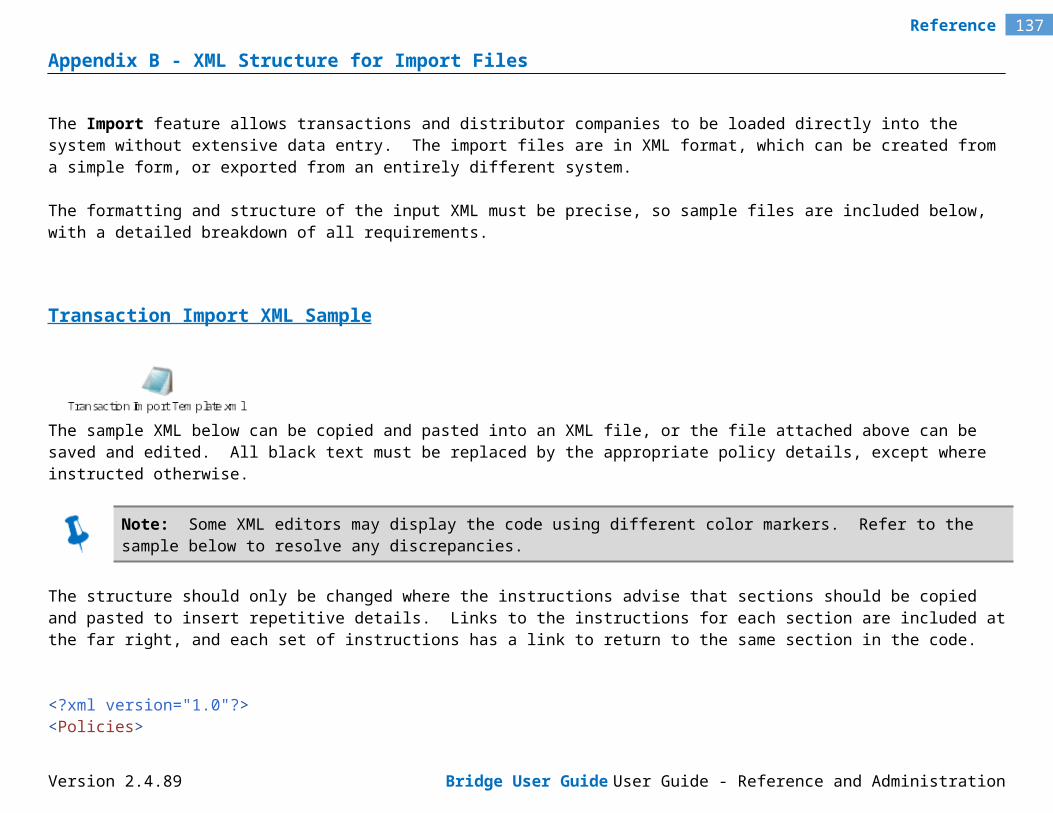
137Reference
Header content area 75Home page 10, 43Home Page Preferences panel 10, 43IImage File field 77Import 52Import button 83Import Details panel 54Import File panel 52Import Files panel 52, 53Import Rates button 85Import Resources button 86Import/Export Rates 84Import/Export Rates panel 84, 85Import/Export Resource Codes 86Import/Export Resource Codes panel 86Importing a Language File 82Importing Bound Transactions 54Importing Distributor Companies 56Include Exclude control type 123Include Exclude List control type 123Individual Client Information page 8In-Focus Field Background colors 115Insert Image button 77InsuredValue XML node 124Insurer Code field 29Insurer field 51Insurer Information page 27Insurer List panel 27, 30, 32Insurer Parameters field 29Insurers menu item 27, 29, 32Insurity authentication option 12, 41Introduction 1LLabel and Control Text colors 101Label control type 123Label field 67Landscape orientation 53, 55, 57
Version 2.4.89 Bridge User Guide User Guide - Reference and Administration
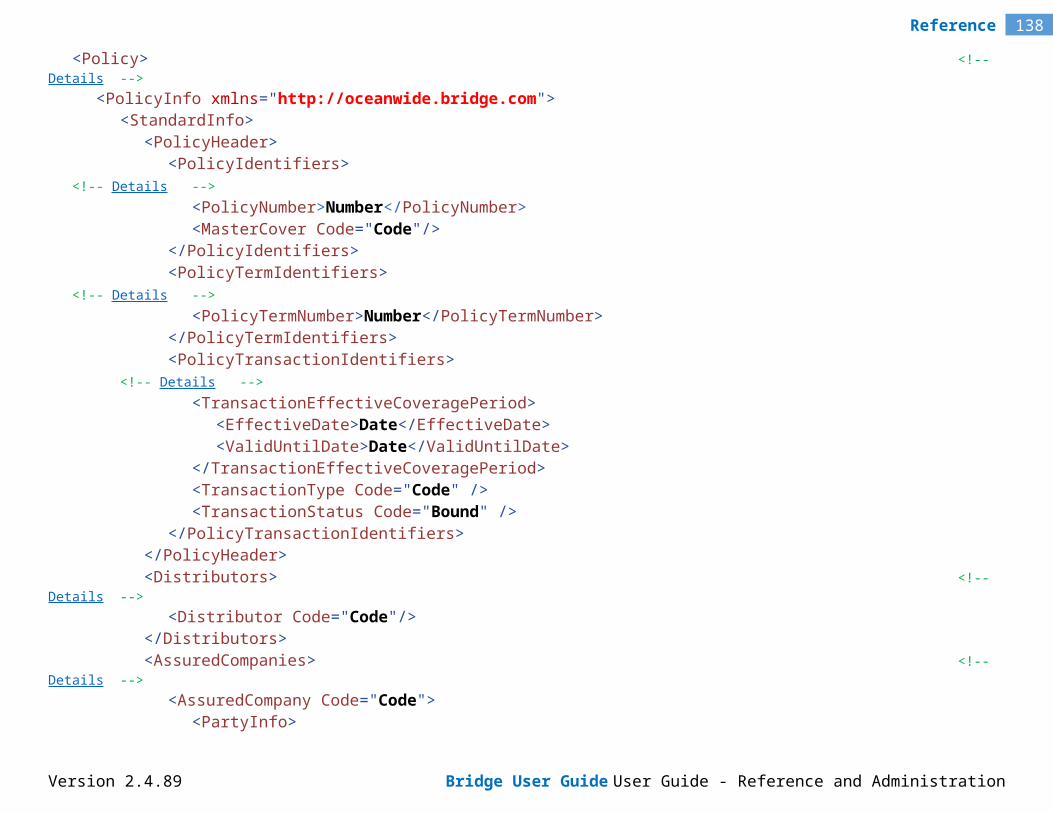
138Reference
Language File sample 80Last Modified By field 8, 13, 21, 31, 37, 45, 69Last Modified field 60, 63Last Name column 45, 47, 48Last Name field 4, 9, 40Last Published By field 59, 61Licensee field 51Licensee Headquarters company 33Licensee Information page 33Licensee List panel 33, 36, 38Licensee Offices menu item 33, 35, 38Limit column 85Limit XML node 126Limits XML node 126LimitType XML node 126Link To File checkbox 67Live status 15, 46Logon page 75Logon Page 77Logon Page content area 75Logon Page Left content area 75Logon Page Right content area 75MMaintenance/Troubleshooting menu item 84, 86Maintenance/Troubleshooting page 84, 86Manage Language Spreadsheets panel 79, 83Managing Add-Ins 87Managing Clients 2Managing Companies and Users 17Managing Distributor Commission Overrides 24Managing Distributor Companies 17Managing Distributor Master Cover Associations 21Managing External Links on the Main Menu 65Managing Insurers 27Managing Licensee Offices 33Managing Portals 58Managing User Accounts 39Master Cover Association window 22, 24
Version 2.4.89 Bridge User Guide User Guide - Reference and Administration
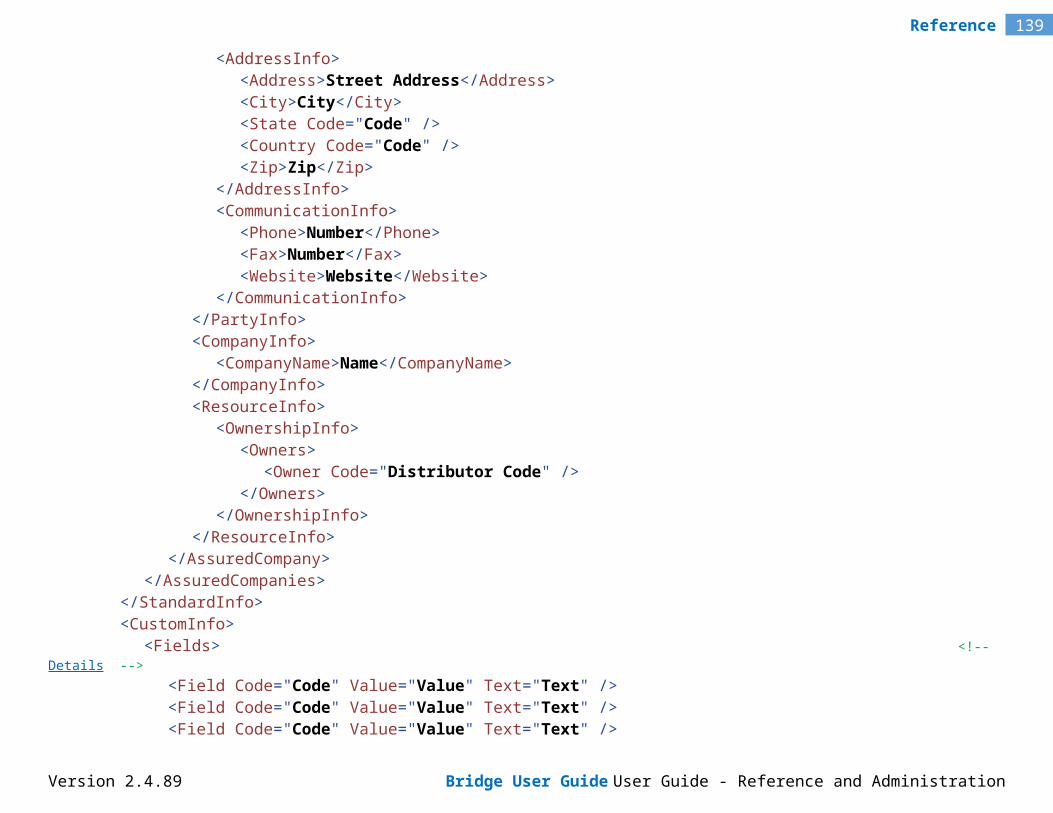
139Reference
Master Cover Associations panel 20, 21, 22Master Cover column 20, 22, 24Master Cover field 22, 84, 85Master Covers panel 12, 30, 36MasterCover XML node 121Menu Background, Label Area, Widget Background and Grid Alternating Row colors 107Menu label for External Links field 66Menu Text colors 108Minimum rate type 85Modern Large Font skin 72Modern Small Font skin 71Modifying a Language File 80Modifying a Portal 64Mouse Over Menu and Mouse Over Widget Buttons colors 110Multi Select control type 123Multiplier rate type 85NName column 5, 14, 17, 30, 36, 58, 64, 65, 66, 70, 75Name field 3, 18, 28, 34, 59, 61NetChangeAmount XML node 125New Business transaction type 54, 121New Company menu item 2New Individual menu item 8Next button 24Next Row button 26Notification severity 96Number column 54, 56OOffice administrative level 42Open button 77, 83Operation column 91Owner XML node 122Owner's Name field 18, 28PPanel Header Bottom Border colors 102Panel Header colors 105Panel Header Text colors 103Parent Company field 34
Version 2.4.89 Bridge User Guide User Guide - Reference and Administration
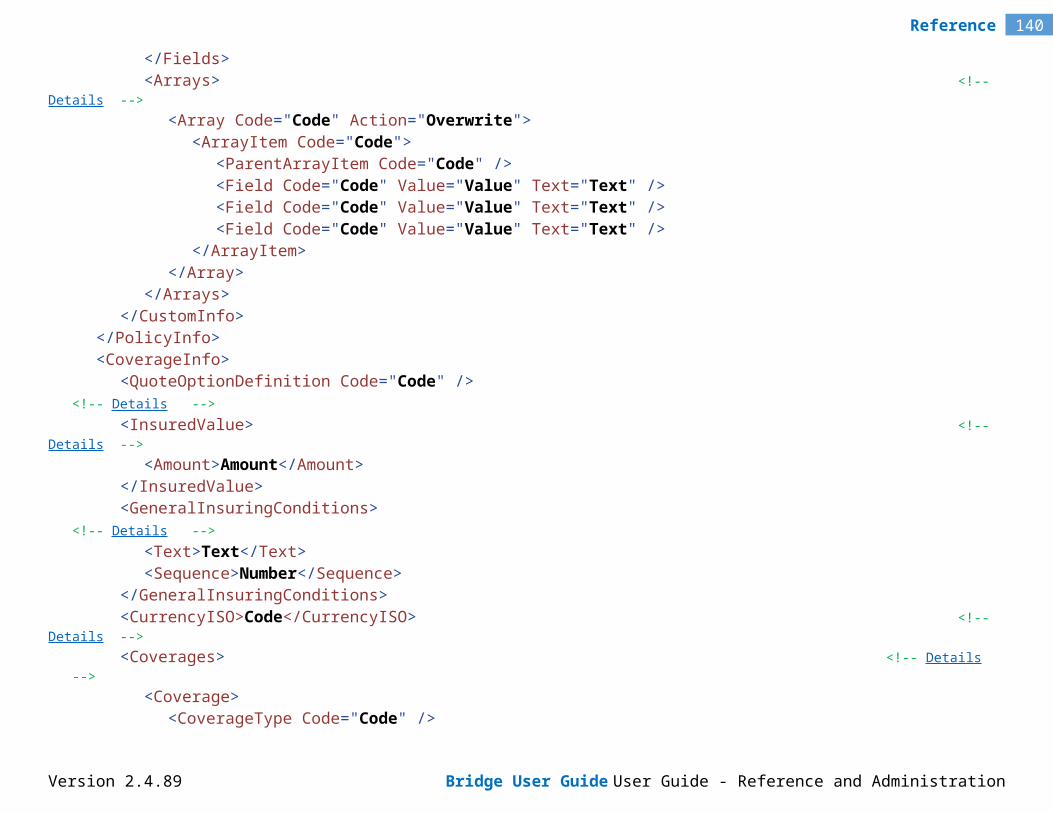
140Reference
ParentArrayItem XML node 124Password E-mail Templates menu item 50Password E-mail Templates page 50Password Pages Left content area 75Password Pages Right content area 76Payload column 92Payload link 92Phone field 3, 5, 9, 18, 28, 34, 40Phone XML node 122, 128Policies XML node 121Policy Form Left content area 76Policy Form Right content area 76PolicyIdentifiers XML node 121PolicyNumber XML node 121PolicyTermIdentifiers XML node 121PolicyTermNumber XML node 121PolicyTransactionIdentifiers XML node 122Portal - Appearance page 70Portal - Content page 75Portal - Custom Menu Items page 65Portal - External Links page 66Portal - General Information page 58, 61, 64, 65, 70, 75Portal List panel 58, 61, 64, 65, 70, 75Portal panel 65, 66, 70, 75Portals menu item 58, 61, 64, 65, 70, 75Portals page 58, 61, 64, 65, 70, 75Portrait orientation 53, 55, 57Premium Type - Commission (%) Overrides panel 24, 25Premium Type - Commission (%) Overrides window 25Premium Type column 85Premium Type field 25Premium Type Name column 25Premiums XML node 125Previous button 24Previous Row button 26Primary Contact 19, 28Primary Contact field 19, 28, 35PrimaryRole XML node 128
Version 2.4.89 Bridge User Guide User Guide - Reference and Administration
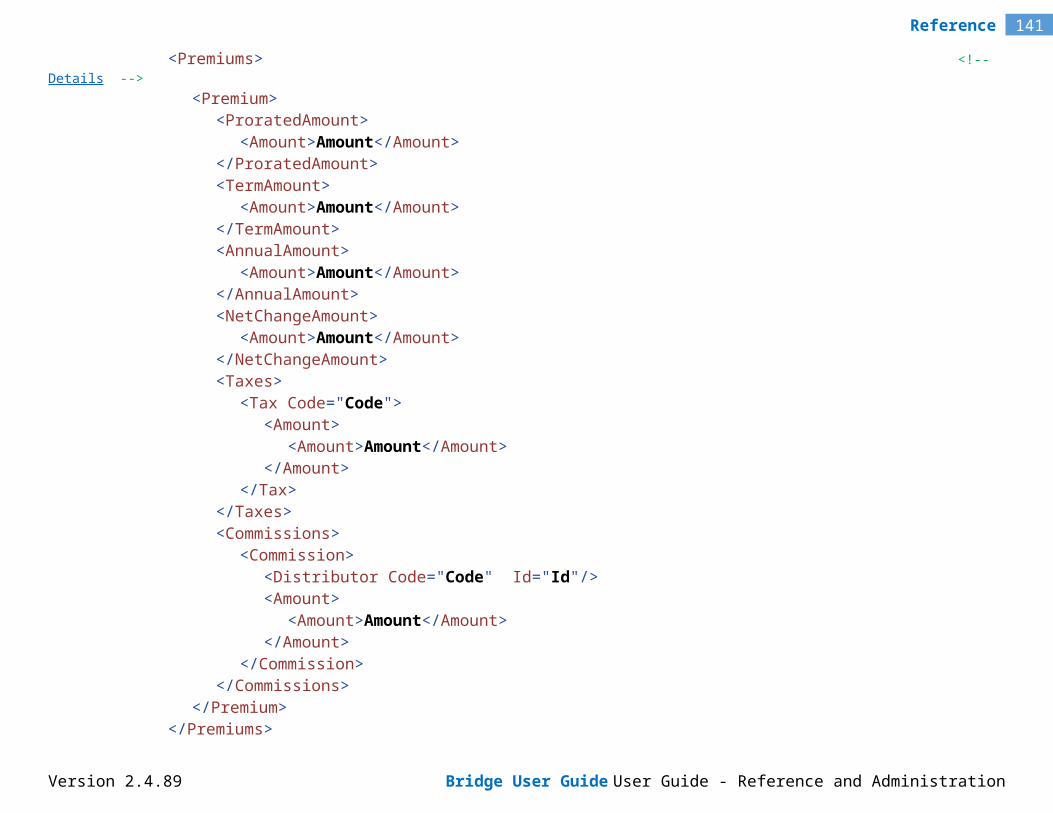
141Reference
Private administrative level 42Products panel 7Profile page 10, 11, 41, 43, 44ProratedAmount XML node 125Publish button 60, 63, 64Publish Portal 62QQuote Option Definition field 84, 85QuoteOptionDefinition XML node 124RRadio Buttons control type 123Rate Configuration panel 85Rate rate type 85Rates Type column 85Reference 98Reference menu 17, 27, 29, 32, 33, 35, 38, 39, 44, 46, 47, 48, 50, 52, 58, 61, 64, 65, 70, 75, 79, 82, 84, 86, 87, 89, 96Remove button 67Renewal transaction type 54, 121, 122Request column 54, 56Resetting a User's Password 47Resource Key column 80Response column 53, 55, 56Rich Text control type 123Role Type column 49SSave & Close button 8, 14, 21, 24, 25, 31, 37, 46, 51, 60, 64, 67, 69Save & New button 24, 25Save button 8, 14, 21, 24, 31, 37, 46, 51, 60, 64, 66, 67, 69, 74, 77, 80, 99Screen Header and Widget Header colors 112Screen Header Text and Widget Header Text colors 111Screens widget 60, 63, 64, 65, 66, 70, 75Search / List menu item 5, 13, 15Search icon 2, 8Security Role field 68Security Role Selection panel 68Security Roles column 49Security Roles field 43Security Roles panel 42
Version 2.4.89 Bridge User Guide User Guide - Reference and Administration
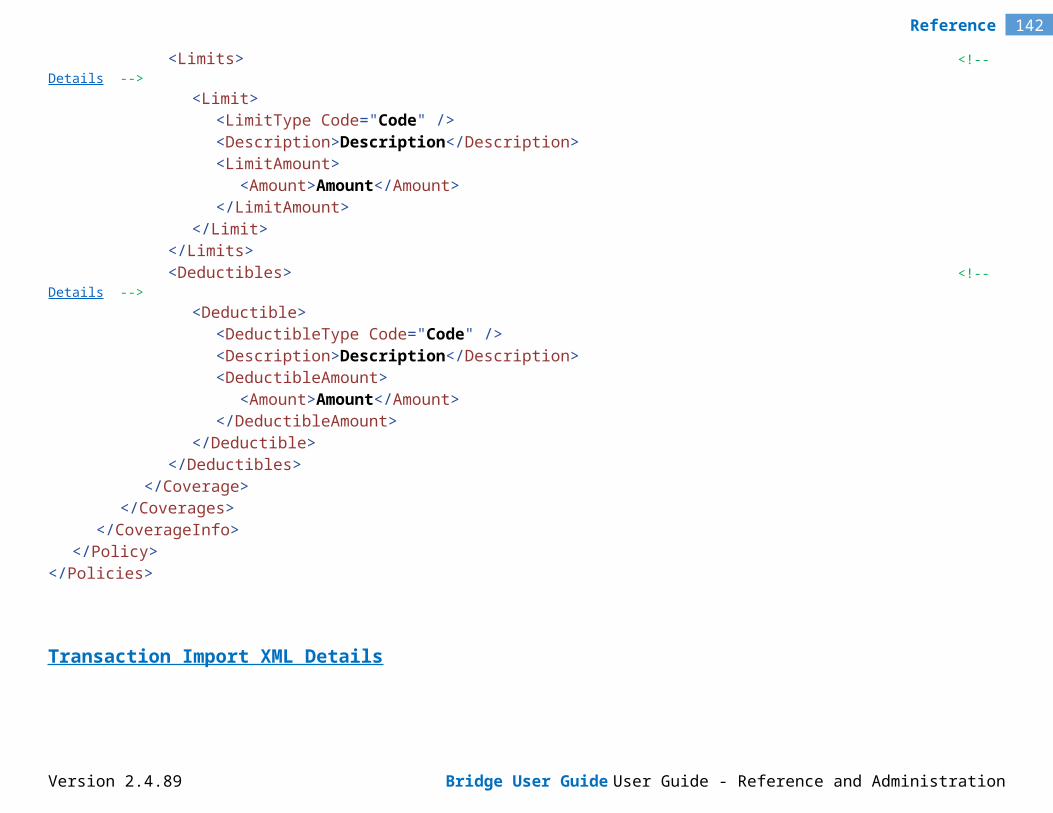
142Reference
Select an E-mail Template for each Password E-mail panel 50Select File to Import field 83, 85, 86Select Language to Export field 79Select or Drop File to Upload button 67Self Registration field 50Self-Registration page 76Self-Registration Page 77Self-Registration Page content area 76Self-Registration Page Left content area 76Self-Registration Page Right content area 76Sequence column 85, 91Sequence field 68Sequence XML node 125Set Password page 75, 76Severity column 96Side Columns 77Single Sign-On Only checkbox 11, 41Single Sign-On Settings panel 11, 40Skin field 70Started On column 92State field 3, 8State XML node 122, 128Status column 54, 56, 66Status panel 7, 13, 21, 31, 37, 45, 60, 63, 68Step column 91TTax XML node 126Taxes XML node 126Term ID / Policy No. column 54TermAmount XML node 125Test status 15, 46, 84Text Area control type 123Text Box control type 123Text XML node 124, 125Textbox (Decimal) control type 123Textbox (Email) control type 123Textbox (Integer) control type 123Time Stamp column 97
Version 2.4.89 Bridge User Guide User Guide - Reference and Administration
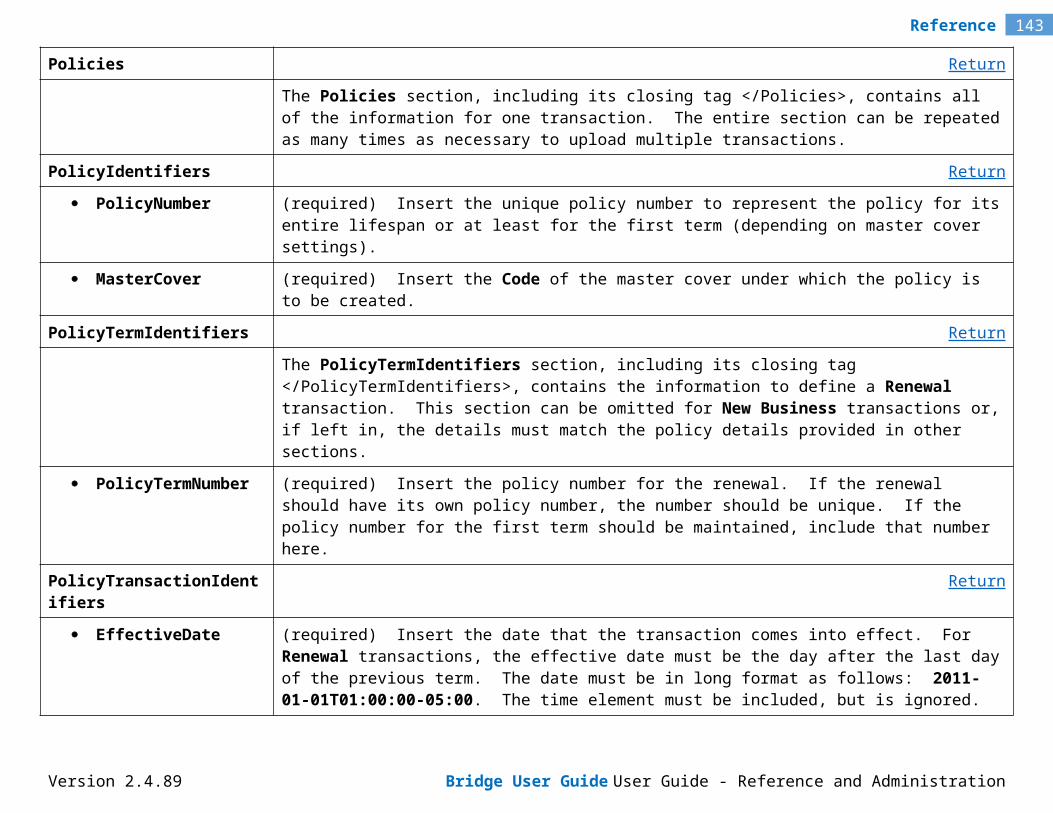
143Reference
Time to Completion column 89Transaction Import XML Details 121Transaction Import XML Sample 117TransactionStatus XML node 122TransactionType XML node 122Trigger column 85Trigger field 23Trigger trace view component 94Triggered By column 89Triggered By field 90Triggered On column 89Triggered On field 90Type column 5, 14, 48Type field 34, 52UURL Extension field 62URL field 59, 62, 67URL panel 59, 62Use Browser Settings checkbox 42User Details panel 42User ID field 11, 41User Information page 20, 39User List panel 39, 45, 46, 47, 48User Logon Id column 96User Name column 96User panel 4, 9, 40User Preferences panel 42User Status column 48Users & Roles Report 47, 48Users & Roles Report button 48Users menu item 39, 44, 46, 47, 48Users panel 7, 20, 31, 37VValid Until Date column 85ValidUntilDate XML node 122Viewing and Modifying a Client Company 5Viewing and Modifying a Licensee Office 35Viewing and Modifying a User Account 44
Version 2.4.89 Bridge User Guide User Guide - Reference and Administration
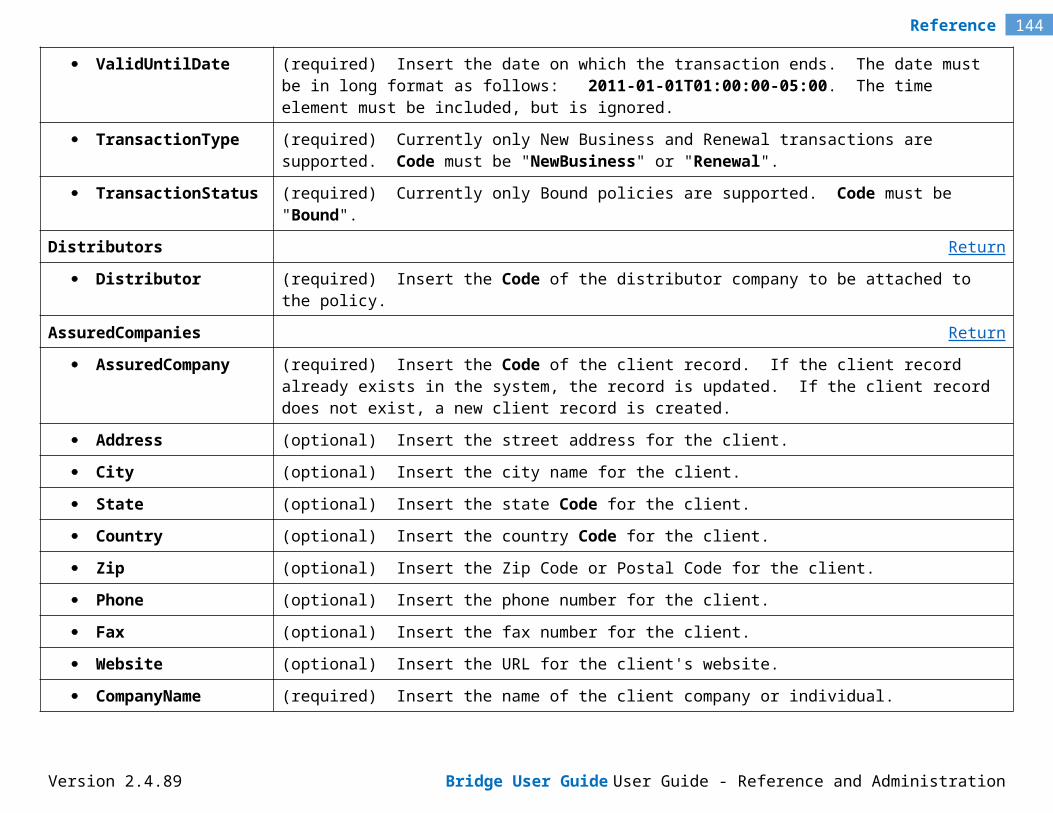
144Reference
Viewing and Modifying an Individual Client 13Viewing and Modifying an Insurer Company 29WWarning severity 96Website field 3, 18, 28, 34Website XML node 122, 128Welcome Page 76Welcome Page content area 76Widget Hyperlinks colors 109ZZip XML node 122, 128
Version 2.4.89 Bridge User Guide User Guide - Reference and Administration
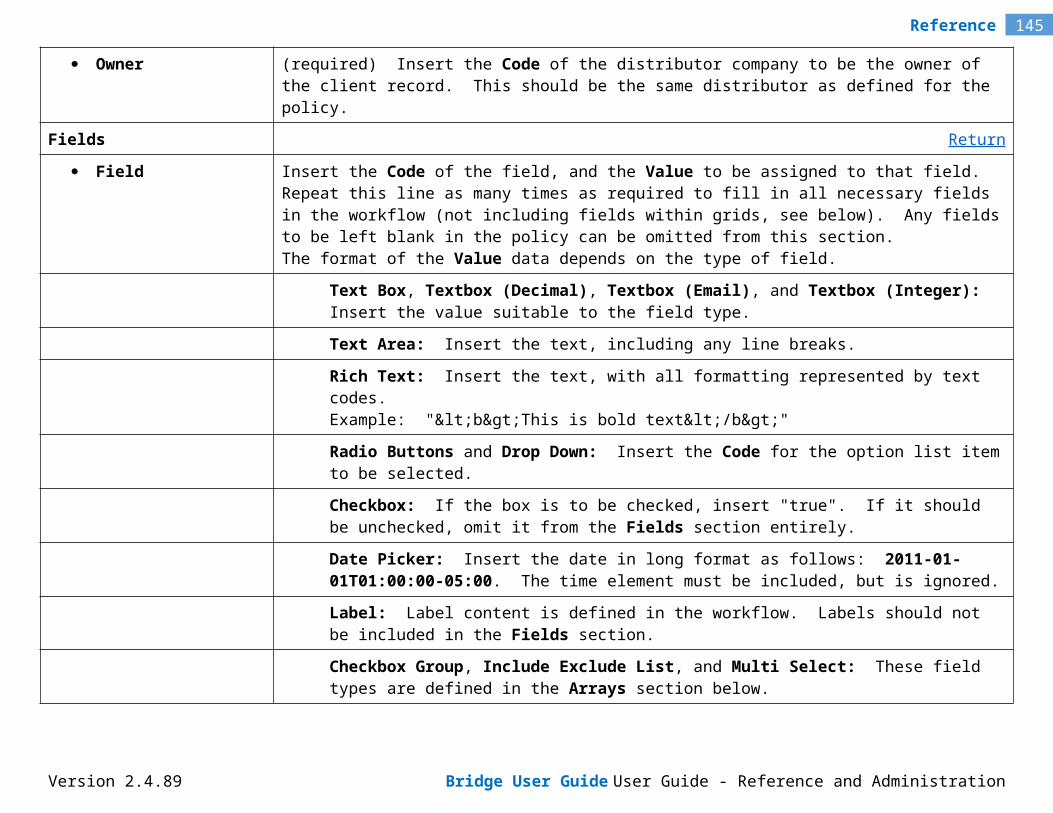
Copyright Notice
Copyright © 1998 - 2017 Oceanwide Canada Inc. All Rights Reserved.
All material in this document and on this website are protected by copyright and intellectual property laws and are the property of Oceanwide Canada Inc.
No part of this document may be reproduced, stored in a retrieval system, or transmitted by any means, electronic, mechanical, photocopying, recording or otherwise, without prior written permission from the owner Oceanwide Canada Inc. Printed and published in Montreal, Quebec CANADA.
Trademarks
All trademarks, registered trademarks and service marks in this document are exclusive to Oceanwide Canada Inc.
Disclaimer
The publisher Oceanwide Canada Inc. and authors specifically disclaim any responsibility for any liability, loss, or risk; whether corporate, personal or otherwise in whole or in part of which; is incurred as a consequence directly or indirectly of the application use; or reliance on or any of the contents of this document (documentation).


