Embed Size (px)
Citation preview

BRAKE
BRAKE SYSTEM BR–1. . . . . . . . . . . . . . . . . . . . . . . .
TROUBLESHOOTING BR–2. . . . . . . . . . . . . . . . . . . .
BRAKE FLUID BR–4. . . . . . . . . . . . . . . . . . . . . . . . . . .
BRAKE PEDAL BR–6. . . . . . . . . . . . . . . . . . . . . . . . . .
PARKING BRAKE PEDAL BR–8. . . . . . . . . . . . . . . . .
BRAKE MASTER CYLINDER BR–14. . . . . . . . . . . . . .
BRAKE BOOSTER ASSEMBLY BR–23. . . . . . . . . . . .
FRONT BRAKE PAD BR–29. . . . . . . . . . . . . . . . . . . . .
FRONT BRAKE CALIPER BR–32. . . . . . . . . . . . . . . . .
REAR BRAKE PAD BR–40. . . . . . . . . . . . . . . . . . . . . . .
REAR BRAKE CALIPER BR–43. . . . . . . . . . . . . . . . . .
PARKING BRAKE BR–49. . . . . . . . . . . . . . . . . . . . . . . .
PROPORTIONING VALVE (P VALVE) BR–53. . . . . .
BRAKE ACTUATOR BR–54. . . . . . . . . . . . . . . . . . . . . .
FRONT SPEED SENSOR BR–58. . . . . . . . . . . . . . . . .
REAR SPEED SENSOR BR–61. . . . . . . . . . . . . . . . . .

BR061–04
–BRAKE BRAKE SYSTEM
BR–1
LEXUS RX300 (RM785E)
BRAKE SYSTEM
PRECAUTION� Care must be taken to replace each part properly as it could affect the performance of the brake
system and result in a driving hazard. Replace the parts with parts having the same part number
or equivalent.
� It is very important to keep parts and the area clean when repairing the brake system.
� If the vehicle is equipped with a mobile communication system, refer to the precautions in the
IN section.
BR062–06
BR–2–BRAKE TROUBLESHOOTING
LEXUS RX300 (RM785E)
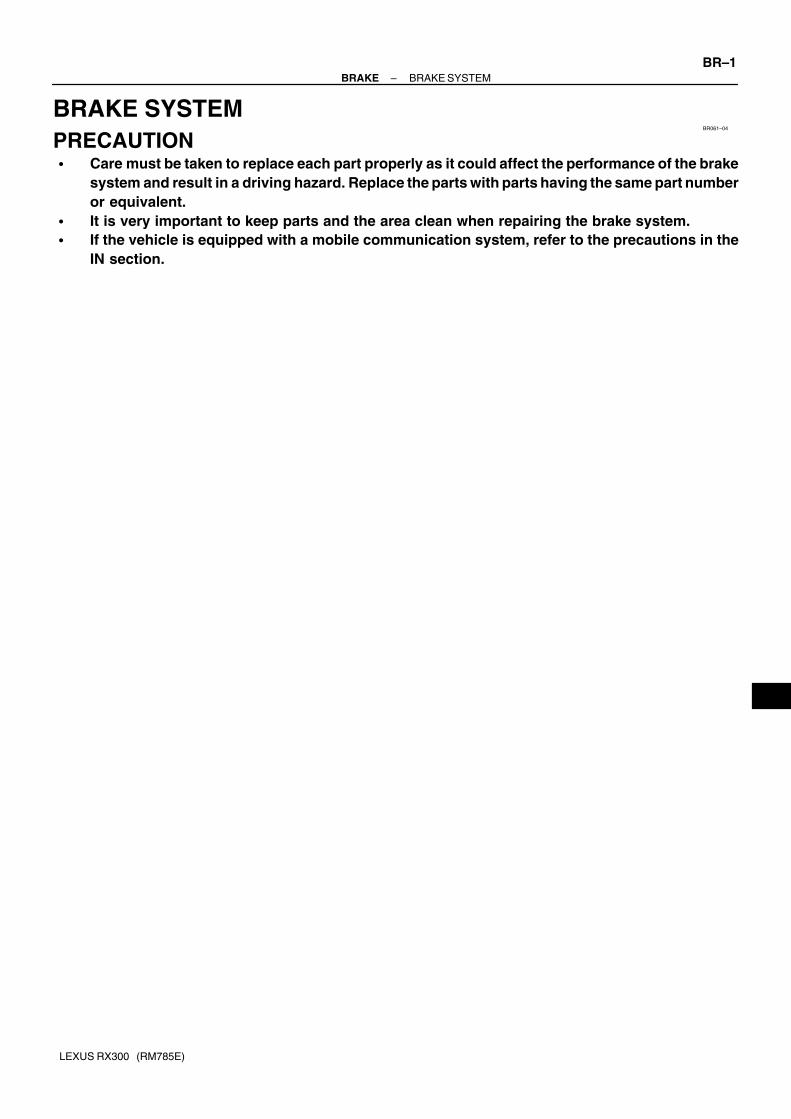
TROUBLESHOOTING
PROBLEM SYMPTOMS TABLEUse the table below to help you find the cause of the problem. The numbers indicate the priority of the likely
cause of the problem. Check each part in order. If necessary, replace these parts.
Symptom Suspect Area See page
Lower pedal or spongy pedal
4. Brake system (Fluid leaks)
5. Brake system (Air in)
6. Piston seals (Worn or damaged)
7. Master cylinder (Faulty)
8. Booster push rod (Out of adjustment)
DI–302
BR–4
BR–32
BR–43
BR–14
BR–27
Brake drag
1. Brake pedal freeplay (Minimal)
2. Parking brake pedal travel (Out of adjustment)
3. Parking brake wire (Sticking)
4. Rear brake shoe clearance (Out of adjustment)
5. Pad (Cracked or distorted)
6. Piston (Stuck)
7. Piston (Frozen)
8. Tension or return spring (Faulty)
9. Booster push rod (Out of adjustment)
10.Vacuum leaks for booster system
11.Master cylinder (Faulty)
BR–6
BR–8
–
BR–52
BR–29
BR–40
BR–32
BR–43
BR–32
BR–43
BR–49
BR–27
BR–24
BR–14
Brake pull
1. Piston (Stuck)
2. Pad (Oily)
3. Piston (Frozen)
4. Disc (Scored)
5. Pad (Cracked or distorted)
BR–32
BR–43
BR–29
BR–40
BR–32
BR–43
BR–32
BR–43
BR–29
BR–40
Hard pedal but brake inefficient
1. Brake system (Fluid leaks)
2. Brake system (Air in)
3. Piston (Stuck)
4. Pad (Cracked or distorted)
5. Pad (Oily)
6. Pad (Glazed)
7. Disc (Scored)
8. Booster push rod (Out of adjustment)
9. Vacuum leaks for booster system
DI–302
BR–4
BR–32
BR–43
BR–29
BR–40
BR–29
BR–40
BR–29
BR–40
BR–32
BR–43
BR–27
BR–24
–BRAKE TROUBLESHOOTING
BR–3
LEXUS RX300 (RM785E)
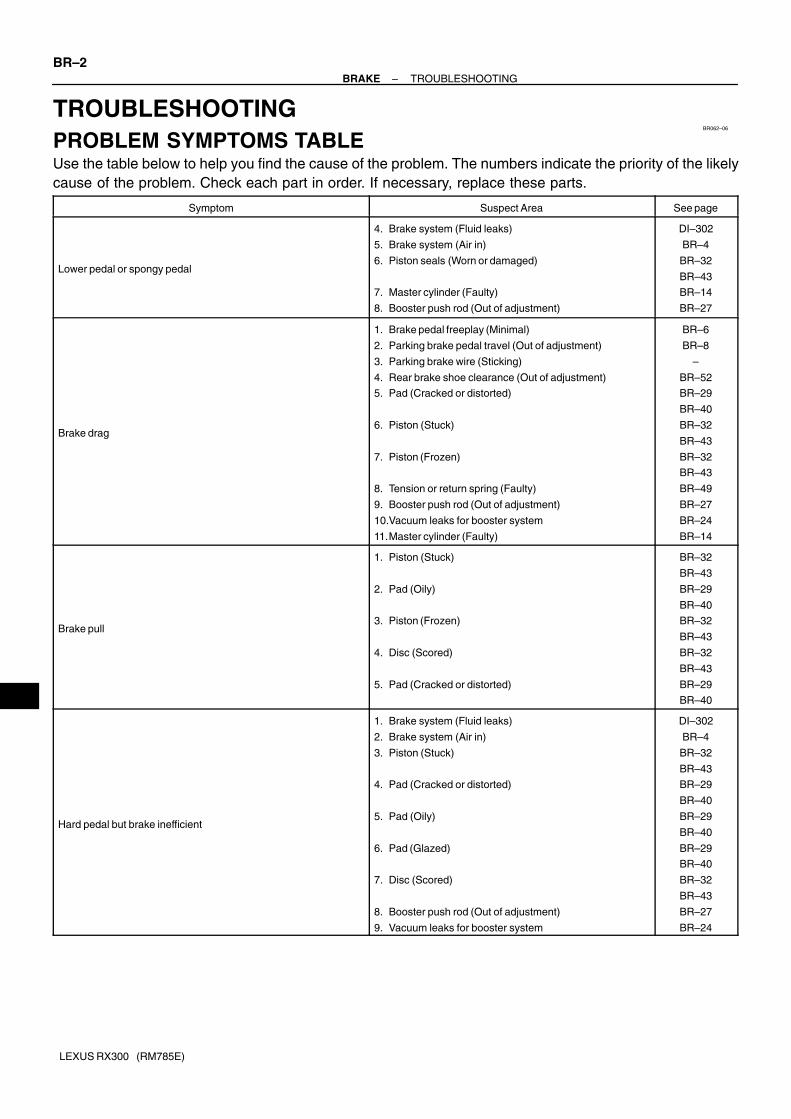
Symptom Suspect Area See page
Noise from brake
1. Pad (Cracked or distorted)
2. Installation bolt (Loosen)
3. Disc (Scored)
4. Pad support plate (Loosen)
5. Sliding pin (Worn)
6. Pad (Dirty)
7. Pad (Glazed)
8. Tension or return spring (Faulty)
9. Anti–squeal shim (Damage)
10.Hold–down spring (Damage)
BR–29
BR–40
BR–32
BR–43
BR–32
BR–43
BR–29
BR–40
BR–32
BR–43
BR–29
BR–40
BR–29
BR–40
BR–49
BR–32
BR–43
BR–49

BR1KG–01
F14026
F14027
F14028
F04932
BR–4–BRAKE BRAKE FLUID
LEXUS RX300 (RM785E)
BRAKE FLUIDBLEEDINGHINT:
If any work is done on the brake system or if air in the brake lines
is suspected, bleed the air from the brake system.
NOTICE:
Do not let brake fluid remain on a painted surface. Wash it
off immediately.
1. FILL BRAKE RESERVOIR WITH BRAKE FLUID
Check the fluid level in the reservoir after bleeding each wheel.
Add fluid, if necessary.
Fluid: SAE J1703 or FMVSS No. 116 DOT3
2. BLEED MASTER CYLINDER
HINT:
If the master cylinder has been disassembled or if the reservoir
becomes empty, bleed the air from the master cylinder.
(a) Disconnect the brake lines from the master cylinder.
SST 09751–36011
(b) Slowly depress the brake pedal and hold it.
(c) Block off the outlet plugs with your fingers and release the
brake pedal.
(d) Repeat (b) and (c) 3 or 4 times.
3. CONNECT VINYL TUBE TO BRAKE CALIPER BLEED-
ER PLUG
Insert the other end of the tube in a half–full container of brake
fluid.
NOTICE:
Bleed air of the rear brake first. If front brake is bled first,
rear brake air cannot be bled.
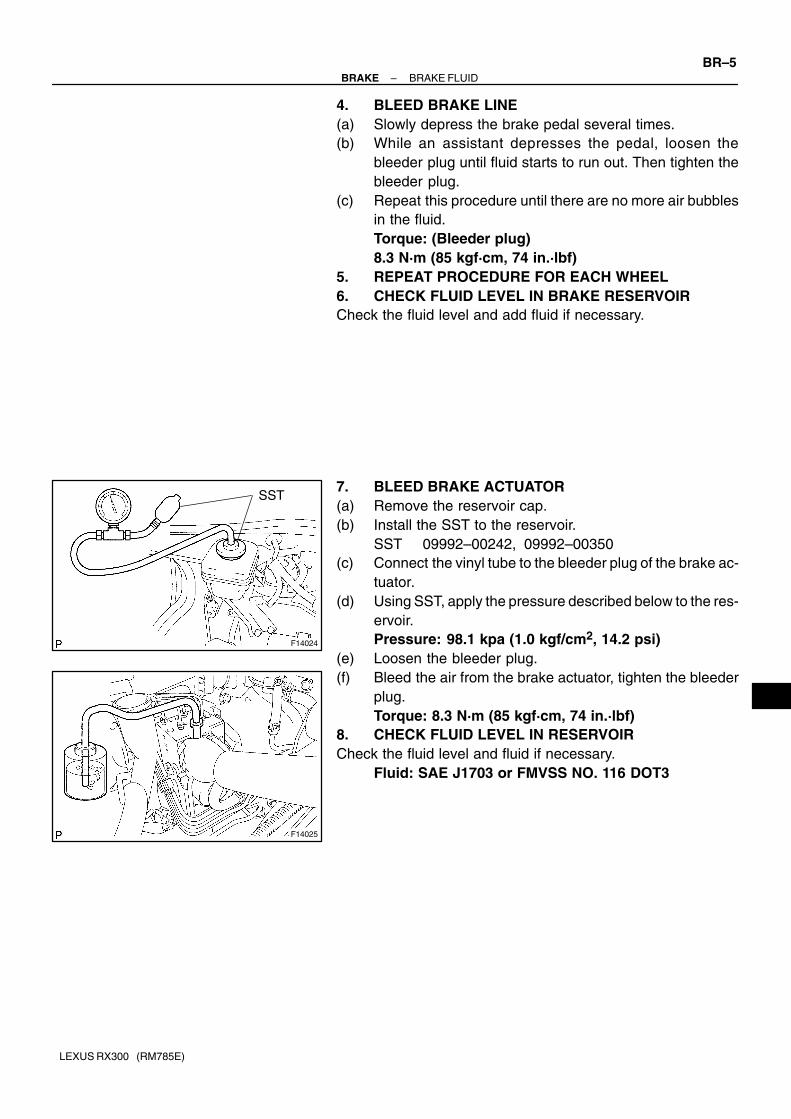
F14024
SST
F14025
–BRAKE BRAKE FLUID
BR–5
LEXUS RX300 (RM785E)
4. BLEED BRAKE LINE
(a) Slowly depress the brake pedal several times.
(b) While an assistant depresses the pedal, loosen the
bleeder plug until fluid starts to run out. Then tighten the
bleeder plug.
(c) Repeat this procedure until there are no more air bubbles
in the fluid.
Torque: (Bleeder plug)
8.3 N·m (85 kgf·cm, 74 in.·lbf)
5. REPEAT PROCEDURE FOR EACH WHEEL
6. CHECK FLUID LEVEL IN BRAKE RESERVOIR
Check the fluid level and add fluid if necessary.
7. BLEED BRAKE ACTUATOR
(a) Remove the reservoir cap.
(b) Install the SST to the reservoir.
SST 09992–00242, 09992–00350
(c) Connect the vinyl tube to the bleeder plug of the brake ac-
tuator.
(d) Using SST, apply the pressure described below to the res-
ervoir.
Pressure: 98.1 kpa (1.0 kgf/cm2, 14.2 psi)
(e) Loosen the bleeder plug.
(f) Bleed the air from the brake actuator, tighten the bleeder
plug.
Torque: 8.3 N·m (85 kgf·cm, 74 in.·lbf)
8. CHECK FLUID LEVEL IN RESERVOIR
Check the fluid level and fluid if necessary.
Fluid: SAE J1703 or FMVSS NO. 116 DOT3
F04751
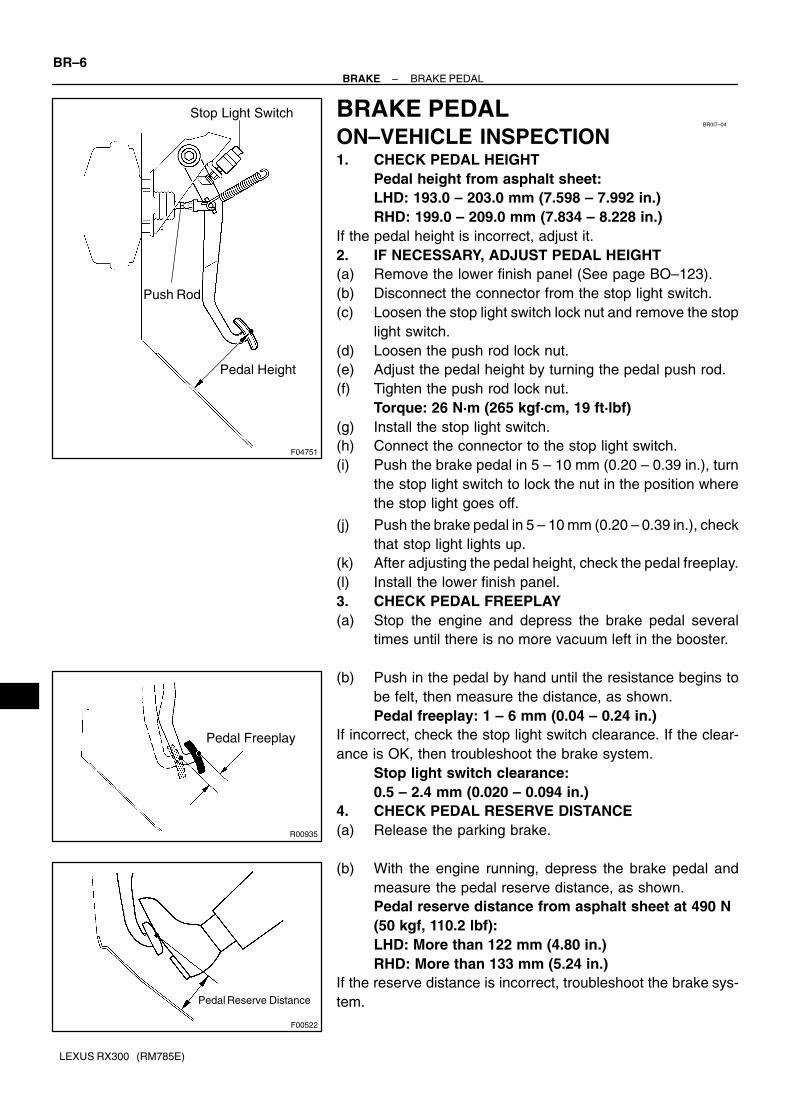
Stop Light Switch
Pedal Height
Push Rod
BR0I7–04
R00935
Pedal Freeplay
F00522
Pedal Reserve Distance
BR–6–BRAKE BRAKE PEDAL
LEXUS RX300 (RM785E)
BRAKE PEDALON–VEHICLE INSPECTION1. CHECK PEDAL HEIGHT
Pedal height from asphalt sheet:
LHD: 193.0 – 203.0 mm (7.598 – 7.992 in.)
RHD: 199.0 – 209.0 mm (7.834 – 8.228 in.)
If the pedal height is incorrect, adjust it.
2. IF NECESSARY, ADJUST PEDAL HEIGHT
(a) Remove the lower finish panel (See page BO–123).
(b) Disconnect the connector from the stop light switch.
(c) Loosen the stop light switch lock nut and remove the stop
light switch.
(d) Loosen the push rod lock nut.
(e) Adjust the pedal height by turning the pedal push rod.
(f) Tighten the push rod lock nut.
Torque: 26 N·m (265 kgf·cm, 19 ft·lbf)
(g) Install the stop light switch.
(h) Connect the connector to the stop light switch.
(i) Push the brake pedal in 5 – 10 mm (0.20 – 0.39 in.), turn
the stop light switch to lock the nut in the position where
the stop light goes off.
(j) Push the brake pedal in 5 – 10 mm (0.20 – 0.39 in.), check
that stop light lights up.
(k) After adjusting the pedal height, check the pedal freeplay.
(l) Install the lower finish panel.
3. CHECK PEDAL FREEPLAY
(a) Stop the engine and depress the brake pedal several
times until there is no more vacuum left in the booster.
(b) Push in the pedal by hand until the resistance begins to
be felt, then measure the distance, as shown.
Pedal freeplay: 1 – 6 mm (0.04 – 0.24 in.)
If incorrect, check the stop light switch clearance. If the clear-
ance is OK, then troubleshoot the brake system.
Stop light switch clearance:
0.5 – 2.4 mm (0.020 – 0.094 in.)
4. CHECK PEDAL RESERVE DISTANCE
(a) Release the parking brake.
(b) With the engine running, depress the brake pedal and
measure the pedal reserve distance, as shown.
Pedal reserve distance from asphalt sheet at 490 N
(50 kgf, 110.2 lbf):
LHD: More than 122 mm (4.80 in.)
RHD: More than 133 mm (5.24 in.)
If the reserve distance is incorrect, troubleshoot the brake sys-
tem.
BR1KH–01
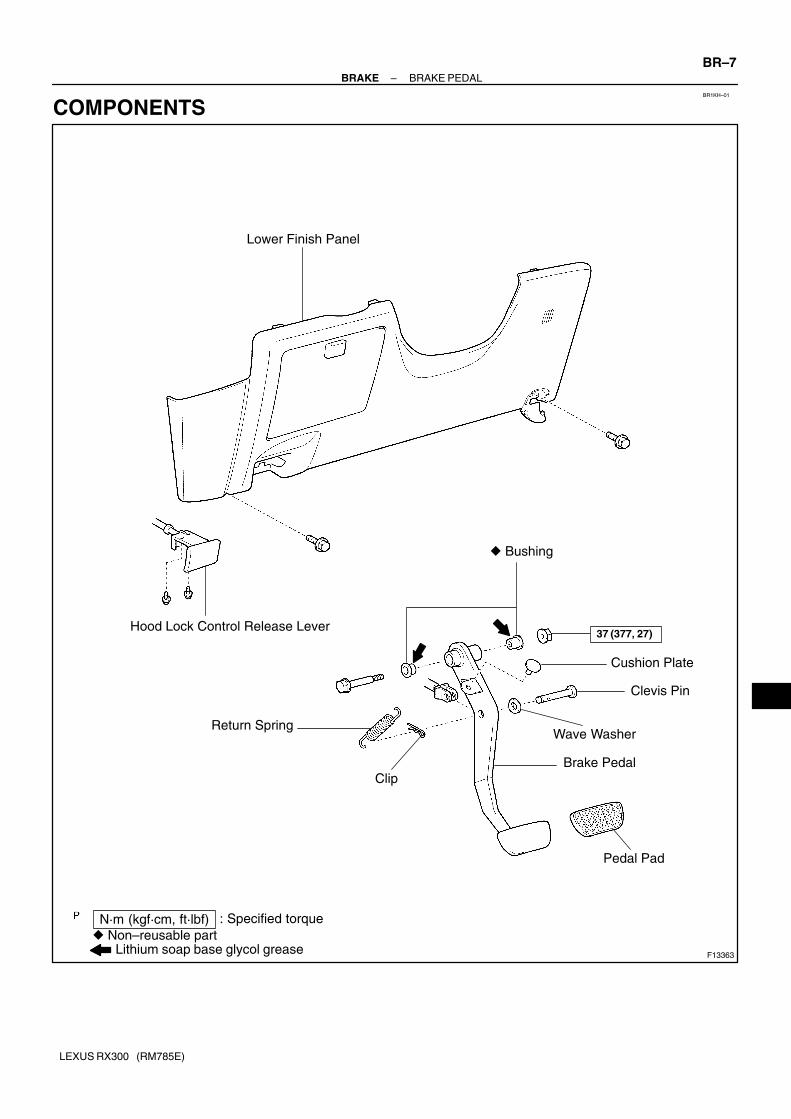
F13363
Lower Finish Panel
� Bushing
Cushion Plate
Clevis Pin
Wave Washer
Brake Pedal
Pedal Pad
Return Spring
Clip
37 (377, 27)
N·m (kgf·cm, ft·lbf) : Specified torque
� Non–reusable partLithium soap base glycol grease
Hood Lock Control Release Lever
–BRAKE BRAKE PEDAL
BR–7
LEXUS RX300 (RM785E)
COMPONENTS
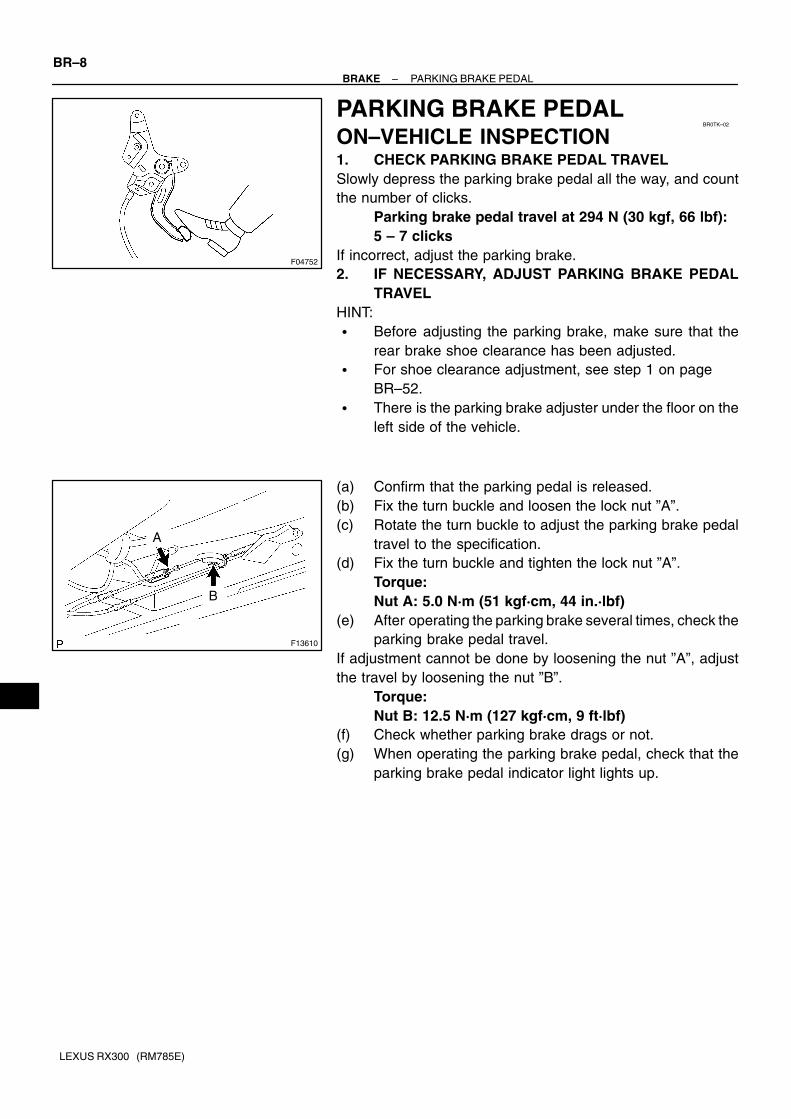
F04752
BR0TK–02
F13610
A
B
BR–8–BRAKE PARKING BRAKE PEDAL
LEXUS RX300 (RM785E)
PARKING BRAKE PEDALON–VEHICLE INSPECTION1. CHECK PARKING BRAKE PEDAL TRAVEL
Slowly depress the parking brake pedal all the way, and count
the number of clicks.
Parking brake pedal travel at 294 N (30 kgf, 66 lbf):
5 – 7 clicks
If incorrect, adjust the parking brake.
2. IF NECESSARY, ADJUST PARKING BRAKE PEDAL
TRAVEL
HINT:
� Before adjusting the parking brake, make sure that the
rear brake shoe clearance has been adjusted.
� For shoe clearance adjustment, see step 1 on page
BR–52.
� There is the parking brake adjuster under the floor on the
left side of the vehicle.
(a) Confirm that the parking pedal is released.
(b) Fix the turn buckle and loosen the lock nut ”A”.
(c) Rotate the turn buckle to adjust the parking brake pedal
travel to the specification.
(d) Fix the turn buckle and tighten the lock nut ”A”.
Torque:
Nut A: 5.0 N·m (51 kgf·cm, 44 in.·lbf)
(e) After operating the parking brake several times, check the
parking brake pedal travel.
If adjustment cannot be done by loosening the nut ”A”, adjust
the travel by loosening the nut ”B”.
Torque:
Nut B: 12.5 N·m (127 kgf·cm, 9 ft·lbf)
(f) Check whether parking brake drags or not.
(g) When operating the parking brake pedal, check that the
parking brake pedal indicator light lights up.
BR1KI–01
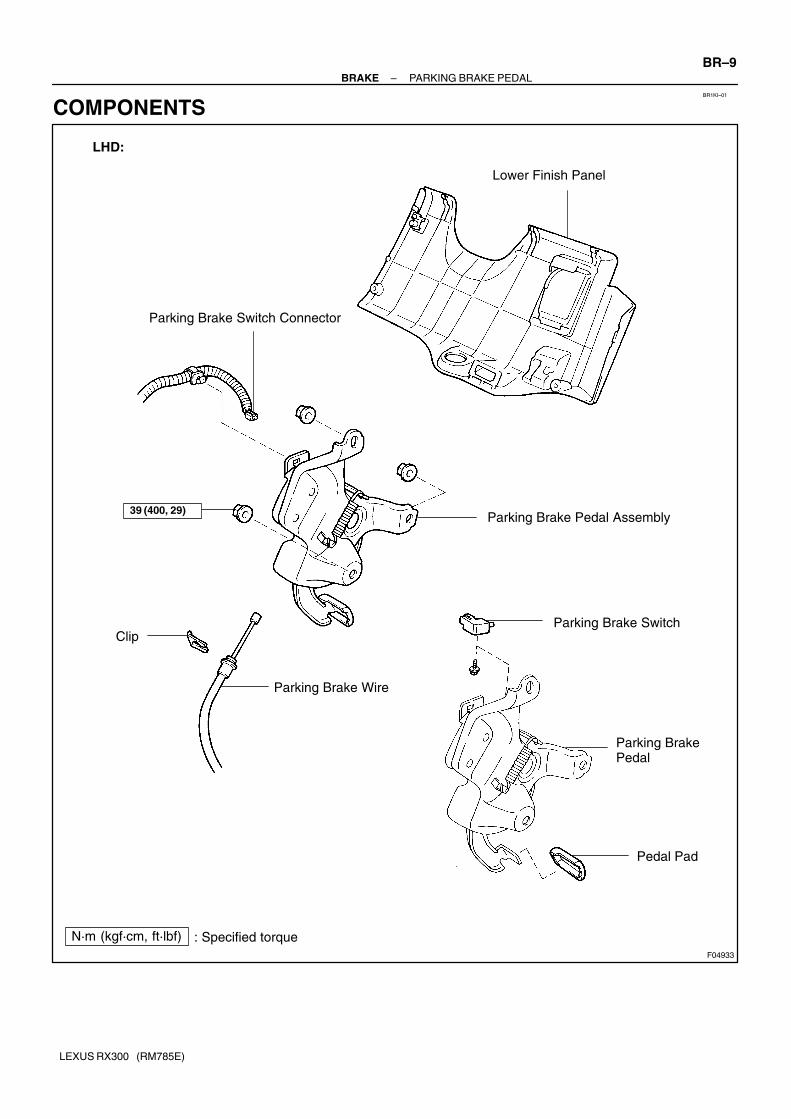
F04933
Parking Brake Switch Connector
Lower Finish Panel
Parking Brake Pedal Assembly
Parking Brake Switch
Parking BrakePedal
Pedal Pad
Parking Brake Wire
Clip
39 (400, 29)
N·m (kgf·cm, ft·lbf) : Specified torque
LHD:
–BRAKE PARKING BRAKE PEDAL
BR–9
LEXUS RX300 (RM785E)
COMPONENTS
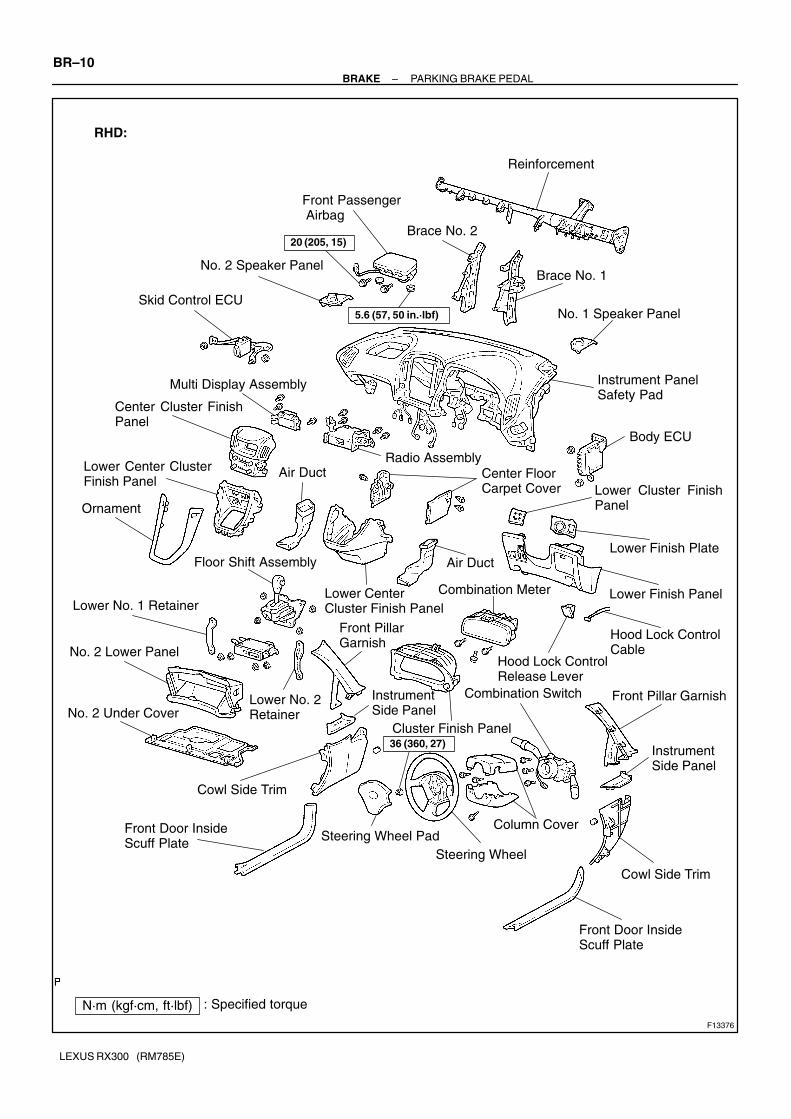
F13376
RHD:
Reinforcement
No. 1 Speaker Panel
No. 2 Speaker Panel
Brace No. 2
Brace No. 1
Instrument PanelSafety Pad
Ornament
Lower CenterCluster Finish Panel
Lower Finish Panel
Front Passenger Airbag
Air DuctLower Center ClusterFinish Panel
Floor Shift Assembly
Lower No. 1 Retainer
Hood Lock ControlRelease Lever
Hood Lock ControlCableNo. 2 Lower Panel
Skid Control ECU
Multi Display Assembly
Center Cluster FinishPanel
Radio AssemblyCenter FloorCarpet Cover
Body ECU
InstrumentSide Panel
Combination Meter
Front Pillar Garnish
Cluster Finish Panel
Steering Wheel Pad
Combination Switch
Front Door InsideScuff Plate
Column Cover
Steering Wheel
Lower No. 2Retainer
Front Door InsideScuff Plate
Cowl Side Trim
Cowl Side Trim
Front PillarGarnish
Lower Cluster FinishPanel
Lower Finish PlateAir Duct
No. 2 Under Cover
InstrumentSide Panel
20 (205, 15)
5.6 (57, 50 in.·lbf)
36 (360, 27)
N·m (kgf·cm, ft·lbf) : Specified torque
BR–10–BRAKE PARKING BRAKE PEDAL
LEXUS RX300 (RM785E)
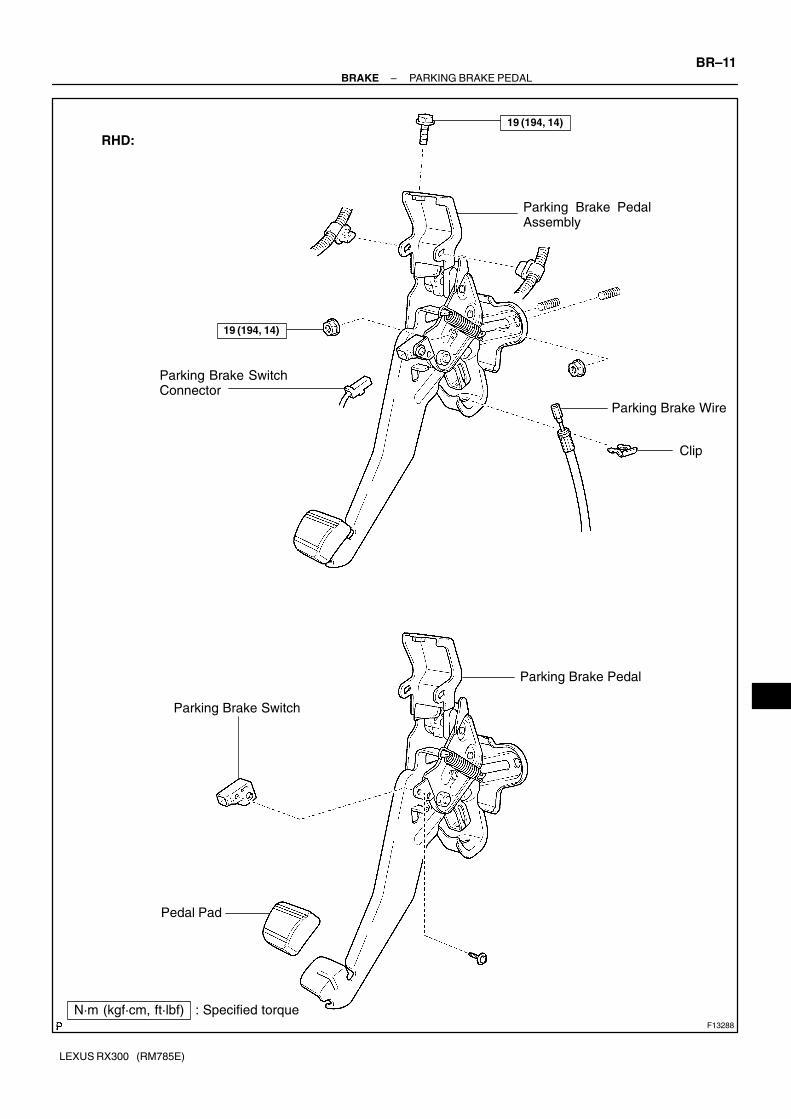
F13288
Parking Brake PedalAssembly
Parking Brake SwitchConnector
Pedal Pad
Clip
Parking Brake Pedal
Parking Brake Wire
19 (194, 14)
Parking Brake Switch
19 (194, 14)
N·m (kgf·cm, ft·lbf) : Specified torque
RHD:
–BRAKE PARKING BRAKE PEDAL
BR–11
LEXUS RX300 (RM785E)

BR0TL–02
F13289
LHD:
RHD:
BR–12–BRAKE PARKING BRAKE PEDAL
LEXUS RX300 (RM785E)
REMOVAL1. LHD:
REMOVE LOWER FINISH PANEL
2. RHD:
REMOVE INSTRUMENT PANEL SAFETY PAD AND
REINFORCEMENT (See page BO–123)
3. RELEASE PARKING BRAKE PEDAL
4. DISCONNECT PARKING BRAKE SWITCH CONNEC-
TOR AND CLAMP
(a) Disconnect the parking brake switch connector.
(b) RHD:
Disconnect the 2 wire harness clamps from the bracket.
(c) LHD:
Disconnect the wire harness clamp from the bracket.
5. REMOVE PARKING BRAKE PEDAL ASSEMBLY
(a) LHD:
Remove the 3 nuts and parking brake pedal assembly.
Torque: 39 N·m (400 kgf·cm, 29 ft·lbf)
(b) RHD:
Remove the 2 nuts and parking brake pedal assembly.
Torque: 19 N·m (194 kgf·cm, 14 ft·lbf)
(c) Remove the clip and disconnect the parking brake wire.
6. REMOVE PARKING BRAKE SWITCH
Remove the screw and parking brake switch.
7. REMOVE PEDAL PAD FROM PARKING BRAKE PED-
AL
BR0IB–04
–BRAKE PARKING BRAKE PEDAL
BR–13
LEXUS RX300 (RM785E)
INSTALLATIONInstallation is in the reverse order of removal (See page BR–12).
BR069–06
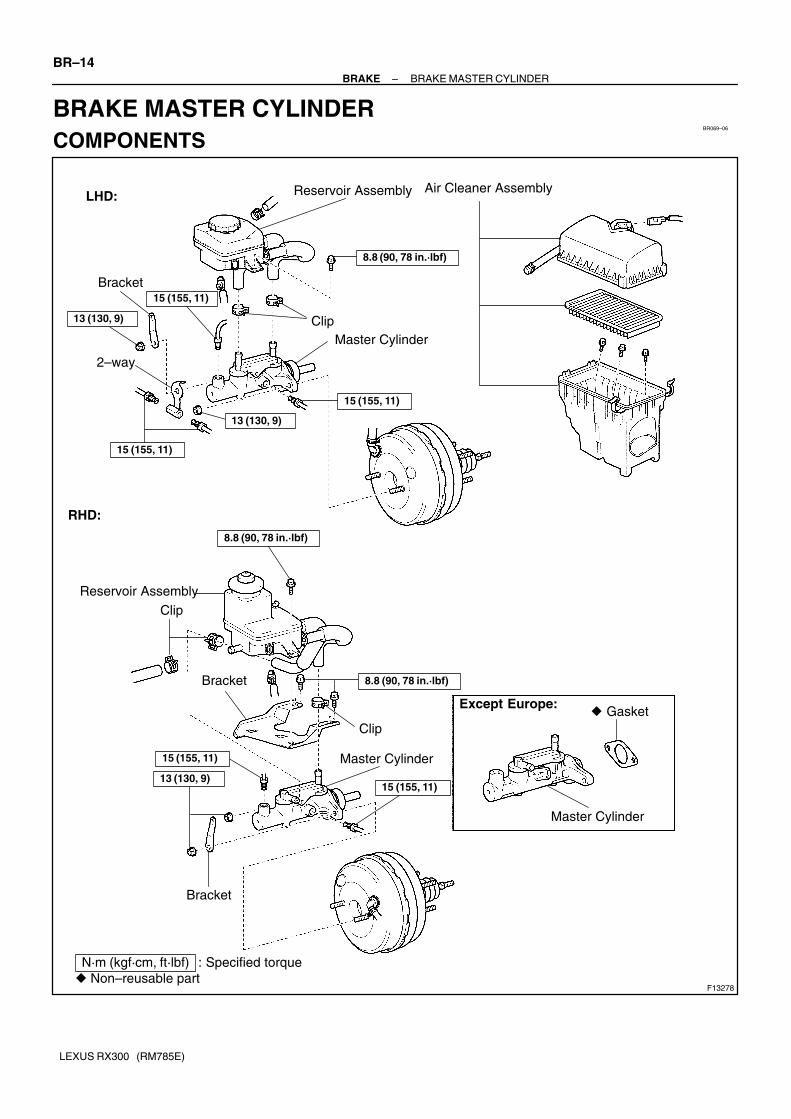
F13278
Reservoir Assembly
8.8 (90, 78 in.·lbf)
Clip
Bracket
Air Cleaner Assembly
N·m (kgf·cm, ft·lbf) : Specified torque
LHD: Reservoir Assembly
Clip
Clip
Master Cylinder
RHD:
15 (155, 11)
Bracket
Master Cylinder
Master Cylinder
13 (130, 9)
Except Europe:� Gasket
� Non–reusable part
15 (155, 11)
8.8 (90, 78 in.·lbf)
15 (155, 11)
13 (130, 9)
Bracket
15 (155, 11)
2–way
13 (130, 9)
15 (155, 11)
8.8 (90, 78 in.·lbf)
BR–14–BRAKE BRAKE MASTER CYLINDER
LEXUS RX300 (RM785E)
BRAKE MASTER CYLINDER
COMPONENTS
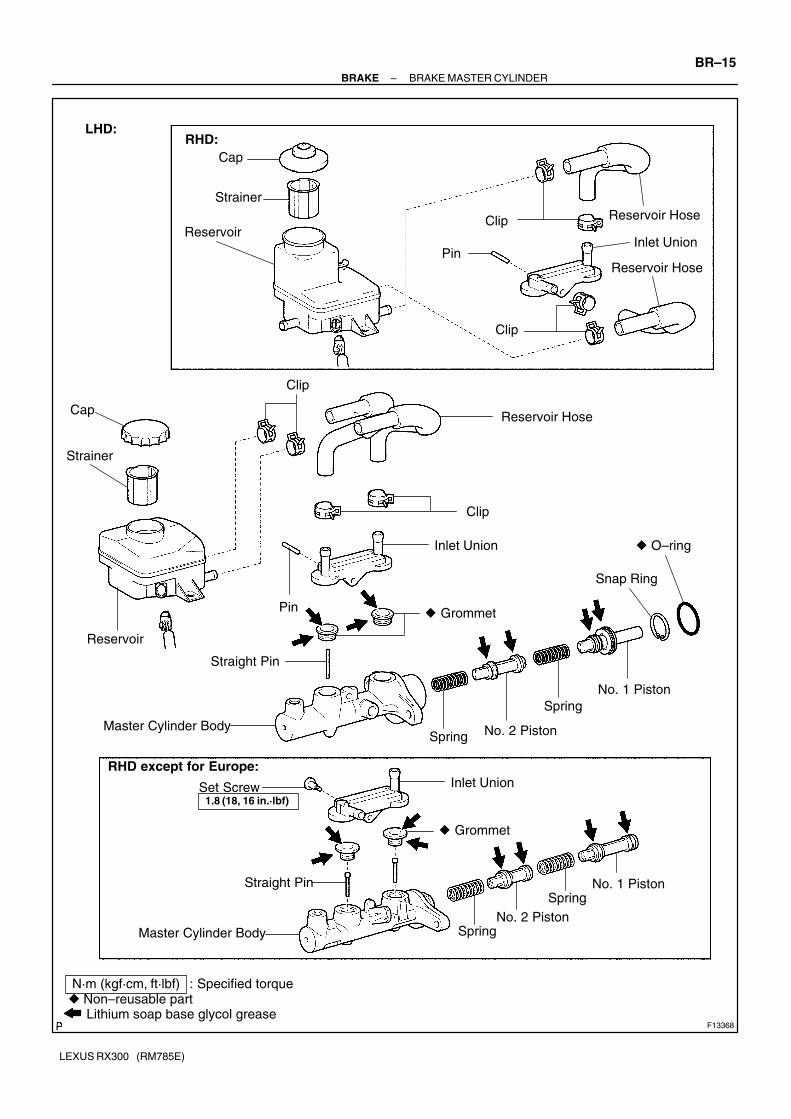
F13368
Cap
Strainer
Clip
Reservoir Hose
Clip
Inlet Union
Reservoir
Clip
Straight Pin
Master Cylinder BodySpring No. 2 Piston
Spring
No. 1 Piston
� Non–reusable partLithium soap base glycol grease
Clip
Pin
Cap
Strainer
� GrommetPin
Reservoir Hose
Snap Ring
RHD:
Reservoir Hose
Reservoir
Inlet Union
Straight Pin
Master Cylinder Body SpringNo. 2 Piston
SpringNo. 1 Piston
� Grommet
Set Screw1.8 (18, 16 in.·lbf)
N·m (kgf·cm, ft·lbf) : Specified torque
RHD except for Europe:
� O–ring
Inlet Union
LHD:
–BRAKE BRAKE MASTER CYLINDER
BR–15
LEXUS RX300 (RM785E)
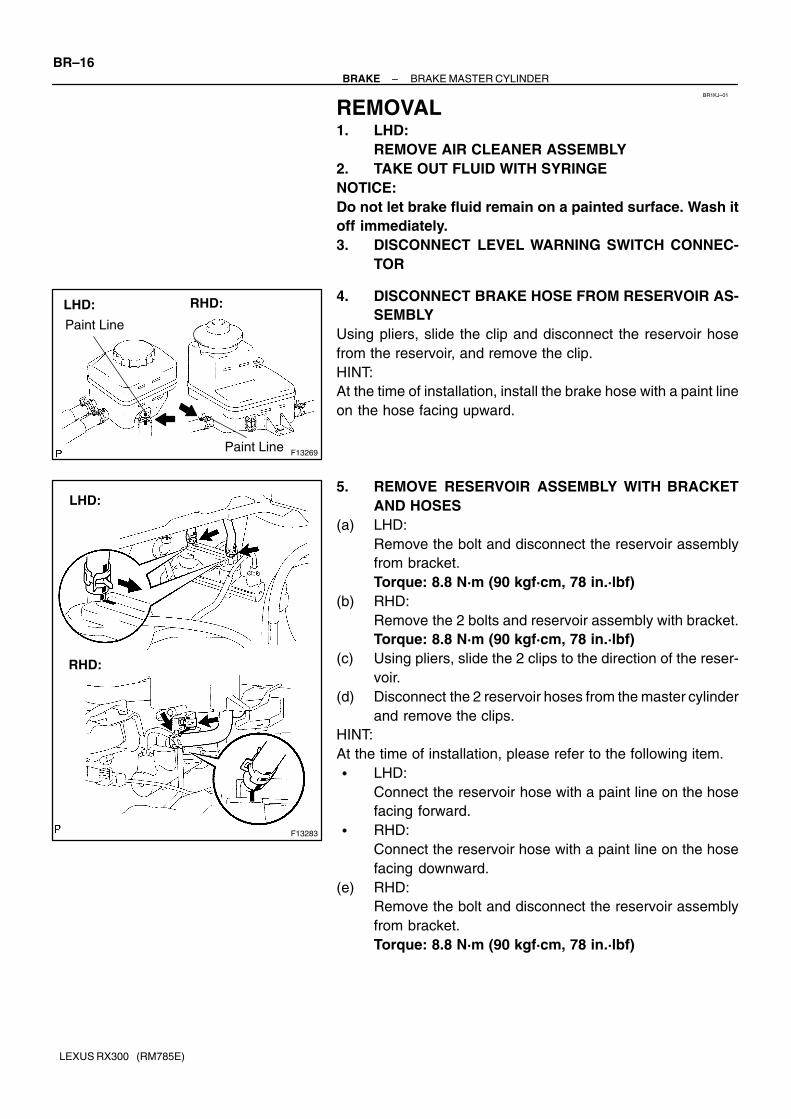
BR1KJ–01
F13269
Paint Line
Paint Line
LHD: RHD:
F13283
LHD:
RHD:
BR–16–BRAKE BRAKE MASTER CYLINDER
LEXUS RX300 (RM785E)
REMOVAL1. LHD:
REMOVE AIR CLEANER ASSEMBLY
2. TAKE OUT FLUID WITH SYRINGE
NOTICE:
Do not let brake fluid remain on a painted surface. Wash it
off immediately.
3. DISCONNECT LEVEL WARNING SWITCH CONNEC-
TOR
4. DISCONNECT BRAKE HOSE FROM RESERVOIR AS-
SEMBLY
Using pliers, slide the clip and disconnect the reservoir hose
from the reservoir, and remove the clip.
HINT:
At the time of installation, install the brake hose with a paint line
on the hose facing upward.
5. REMOVE RESERVOIR ASSEMBLY WITH BRACKET
AND HOSES
(a) LHD:
Remove the bolt and disconnect the reservoir assembly
from bracket.
Torque: 8.8 N·m (90 kgf·cm, 78 in.·lbf)
(b) RHD:
Remove the 2 bolts and reservoir assembly with bracket.
Torque: 8.8 N·m (90 kgf·cm, 78 in.·lbf)
(c) Using pliers, slide the 2 clips to the direction of the reser-
voir.
(d) Disconnect the 2 reservoir hoses from the master cylinder
and remove the clips.
HINT:
At the time of installation, please refer to the following item.
� LHD:
Connect the reservoir hose with a paint line on the hose
facing forward.
� RHD:
Connect the reservoir hose with a paint line on the hose
facing downward.
(e) RHD:
Remove the bolt and disconnect the reservoir assembly
from bracket.
Torque: 8.8 N·m (90 kgf·cm, 78 in.·lbf)

F13284
SST
F13285
–BRAKE BRAKE MASTER CYLINDER
BR–17
LEXUS RX300 (RM785E)
6. REMOVE MASTER CYLINDER
(a) Using SST, disconnect the 2 brake lines.
SST 09751–36011
Torque: 15 N·m (155 kgf·cm, 11 ft·lbf)
(b) LHD:
Remove the 2 nuts, bracket, 2–way and pull out the mas-
ter cylinder.
Torque: 13 N·m (130 kgf·cm, 9 ft·lbf)
(c) Europe RHD:
Remove the 2 nuts, bracket and pull out the master cylin-
der.
Torque: 13 N·m (130 kgf·cm, 9 ft·lbf)
(d) RHD except for Europe:
Remove the 2 nuts, bracket and pull out the master cylin-
der and gasket.

BR1KK–01
F13270
Paint Line
F13282
F13280
������
������
F13609
LHD and Europe RHD:
RHD except for Europe:
BR–18–BRAKE BRAKE MASTER CYLINDER
LEXUS RX300 (RM785E)
DISASSEMBLY1. REMOVE RESERVOIR
(a) Using pliers, slide the 2 clips and remove the reservoir
hoses and clips from the reservoir.
HINT:
At the time of reassembly, install the reservoir hose with a paint
line facing upward.
(b) Remove the cap, strainer from the reservoir.
2. PLACE MASTER CYLINDER IN VISE
3. REMOVE INLET UNION
(a) LHD and Europe RHD:
Using a pin punch (5 mm) and hammer, remove the pin
from the cylinder body.
(b) RHD except for Europe:
Remove the set screw.
(c) Pull out the inlet union.
4. REMOVE 2 GROMMETS
5. REMOVE 2 PISTONS AND SPRING
(a) LHD and Europe RHD:
Push in the No. 1 piston by hand, remove the snap ring
with snap ring pliers.
(b) Push in the piston with a screwdriver, and remove the
straight pin or 2 straght pins by turning over the cylinder
body.
HINT:
Tape the screwdriver tip before use.
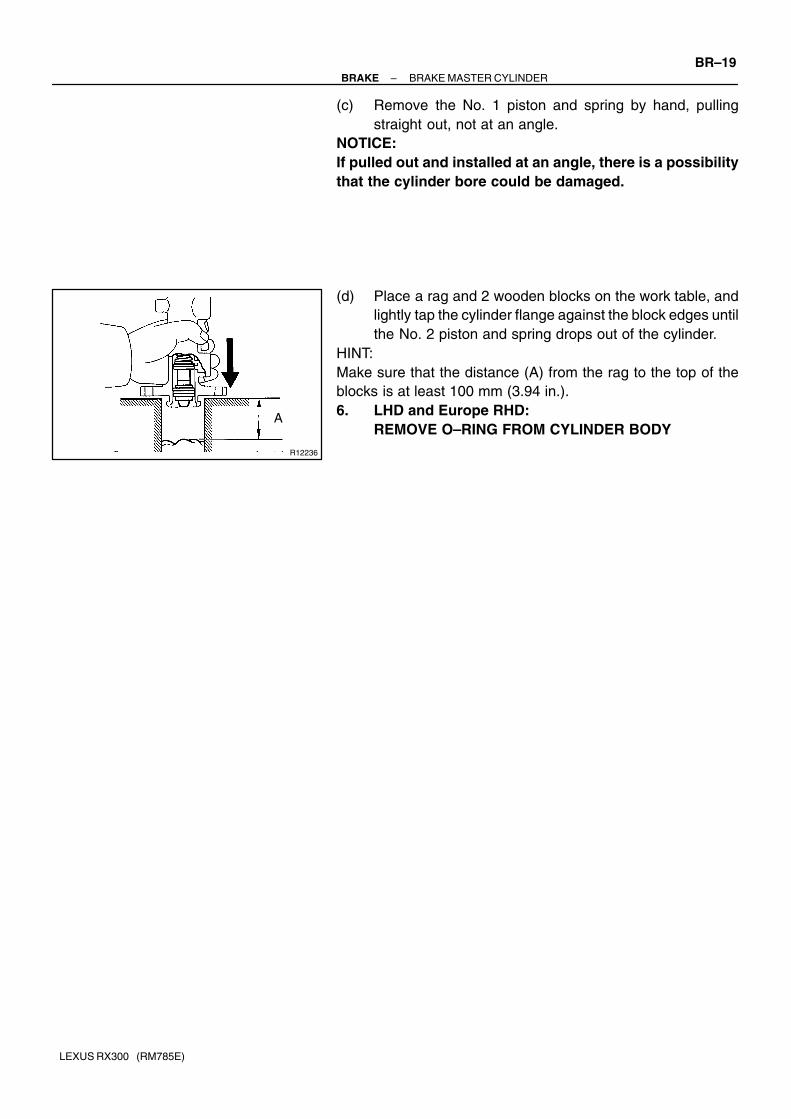
R12236
A
–BRAKE BRAKE MASTER CYLINDER
BR–19
LEXUS RX300 (RM785E)
(c) Remove the No. 1 piston and spring by hand, pulling
straight out, not at an angle.
NOTICE:
If pulled out and installed at an angle, there is a possibility
that the cylinder bore could be damaged.
(d) Place a rag and 2 wooden blocks on the work table, and
lightly tap the cylinder flange against the block edges until
the No. 2 piston and spring drops out of the cylinder.
HINT:
Make sure that the distance (A) from the rag to the top of the
blocks is at least 100 mm (3.94 in.).
6. LHD and Europe RHD:
REMOVE O–RING FROM CYLINDER BODY
BR06C–02
BR–20–BRAKE BRAKE MASTER CYLINDER
LEXUS RX300 (RM785E)
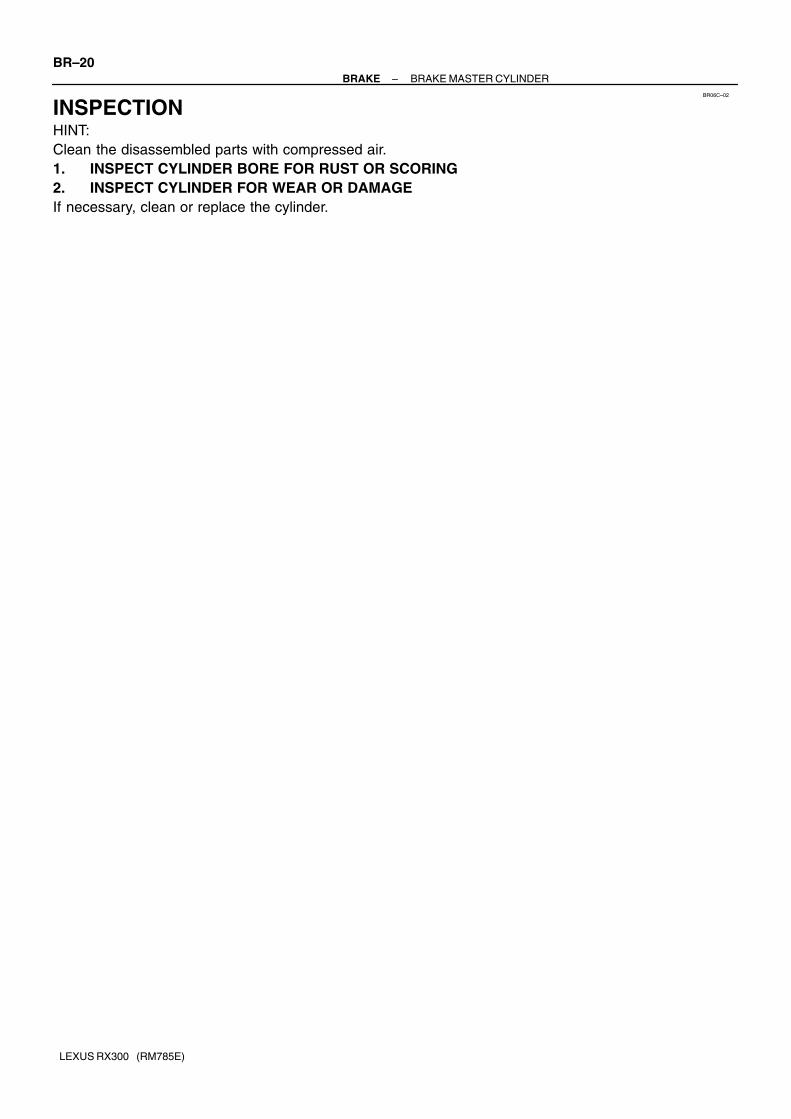
INSPECTIONHINT:
Clean the disassembled parts with compressed air.
1. INSPECT CYLINDER BORE FOR RUST OR SCORING
2. INSPECT CYLINDER FOR WEAR OR DAMAGE
If necessary, clean or replace the cylinder.

BR1KL–01
F13279
Straight PinUpward
W03590
F13280
F13281
4.0 1.5 mm(0.157 0.059 in.)
–BRAKE BRAKE MASTER CYLINDER
BR–21
LEXUS RX300 (RM785E)
REASSEMBLYNOTICE:
Apply lithium soap base glycol grease to the rubber parts
indicated by the arrows (See page BR–14).
1. PLACE CYLINDER IN VISE
2. LHD and Europe RHD:
INSTALL SPRING AND NO. 2 PISTON
(a) Install the spring and No. 2 piston into the cylinder body.
(b) Push in the piston with a screwdriver, and install the
straight pin to the cylinder body.
HINT:
� Tape the screwdriver tip before use.
� Insert the piston with elliptic hole facing horizontally.
NOTICE:
Be careful not to damage the rubber lips on the pistons.
3. RHD except for Europe:
INSTALL SPRINGS AND PISTONS
(a) Install the 2 springs and pistons to the cylinder body.
(b) Push in the piston with a screwdriver, and install the 2
straight pins to the cylinder body.
HINT:
� Tape the screwdriver tip before use.
� Insert the piston with elliptic hole facing vertically.
NOTICE:
Be careful not to damage the rubber lips on the pistons.
4. LHD and Europe RHD:
INSTALL NO. 1 PISTON AND SPRING
(a) Install the No. 1 piston and spring into the cylinder body.
(b) Push in the piston by hand, install the snap ring with snap
ring pliers.
5. INSTALL 2 GROMMETS
6. INSTALL INLET UNION
(a) Install the inlet union to the cylinder body.
(b) LHD and Europe RHD:
Using a pin punch (5 mm) and hammer, drive in the pin.
(c) RHD except for Europe:
Install the set screw.
Torque: 1.8 N·m (18 kgf·cm, 16 in.·lbf)
7. LHD and Europe RHD:
INSTALL O–RING TO CYLINDER BODY

BR06E–05
BR–22–BRAKE BRAKE MASTER CYLINDER
LEXUS RX300 (RM785E)
INSTALLATIONInstallation is in the reverse order of removal (See page BR–16).
HINT:
� Before installation, adjust length of brake booster push rod (See page BR–27).
� After installation, fill the brake reservoir with brake fluid and bleed brake system (See page
BR–4), and check for leaks.
� Check and adjust brake pedal (See page BR–8).
BR2237
BR06F–05
BR2238
GOOD NO GOOD
1st2nd
3rd
–BRAKE BRAKE BOOSTER ASSEMBLY
BR–23
LEXUS RX300 (RM785E)
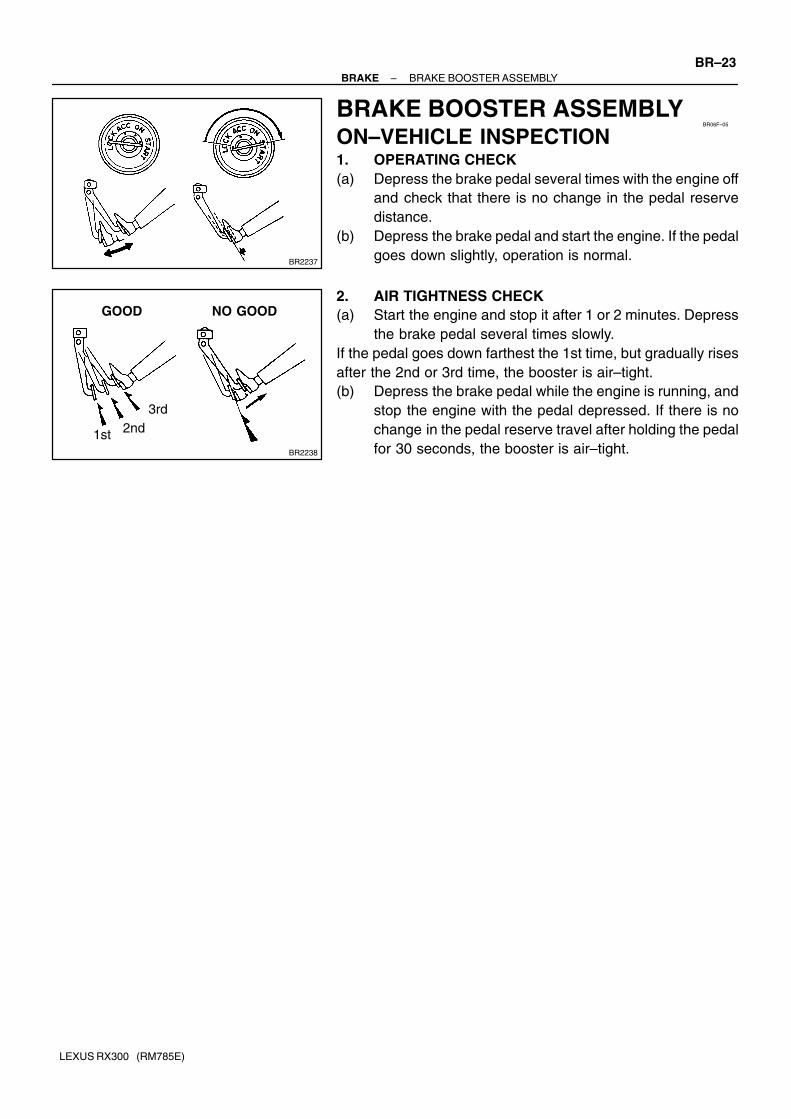
BRAKE BOOSTER ASSEMBLYON–VEHICLE INSPECTION1. OPERATING CHECK
(a) Depress the brake pedal several times with the engine off
and check that there is no change in the pedal reserve
distance.
(b) Depress the brake pedal and start the engine. If the pedal
goes down slightly, operation is normal.
2. AIR TIGHTNESS CHECK
(a) Start the engine and stop it after 1 or 2 minutes. Depress
the brake pedal several times slowly.
If the pedal goes down farthest the 1st time, but gradually rises
after the 2nd or 3rd time, the booster is air–tight.
(b) Depress the brake pedal while the engine is running, and
stop the engine with the pedal depressed. If there is no
change in the pedal reserve travel after holding the pedal
for 30 seconds, the booster is air–tight.

BR1KM–01
F13364
Air Cleaner Assembly
Bracket
Clip
Master Cylinder
Clamp
Return Spring
Clevis
Reservoir Assembly
Pin
� Gasket
Brake Booster
N·m (kgf·cm, ft·lbf) : Specified torque
� Non–reusable part
Clip
Clip
8.8 (90, 78 in.·lbf)
15 (155, 11)
13 (130, 9)
26 (265, 19)
LHD:
Clip
13 (130, 9)
13 (130, 9)
15 (155, 11)
15 (155, 11)
2–way
BR–24–BRAKE BRAKE BOOSTER ASSEMBLY
LEXUS RX300 (RM785E)
COMPONENTS

F13267
N·m (kgf·cm, ft·lbf) : Specified torque
� Non–reusable part
Return Spring
Pin
Master Cylinder
Clevis
Clip
Brake Booster
Clip
Bracket
Wiper Motor & LinkAssembly
Front Upper Suspension Brace
Outer Cowl Top Panel
Weatherstrip
Cowl Louver RH
Wiper Arm
Cowl Louver LH
Reservoir Assembly
Clip
13 (130, 9)
� Gasket
15 (155, 11)
15 (155, 11)
13 (130, 9)
Clip
7.0 (71, 62 in.·lbf)
24 (245, 18)
Wiper Pivot Guide No. 2 Bracket
RHD:
W/ Cruise Control :Cruise Control Actuator
26 (265, 19)
8.8 (90, 78 in.·lbf)
Except Europe:
Brake Booster
8.8 (90, 78 in.·lbf)
80 (810, 59)
Bracket
–BRAKE BRAKE BOOSTER ASSEMBLY
BR–25
LEXUS RX300 (RM785E)

BR06H–05
F04968
BR–26–BRAKE BRAKE BOOSTER ASSEMBLY
LEXUS RX300 (RM785E)
REMOVAL1. RHD:
REMOVE OUTER COWL TOP PANEL (See page
BO–57)
2. RHD w/ CRUISE CONTROL:
REMOVE CRUISE CONTROL ACTUATOR
(a) Disconnect the cable from the throttle body.
(b) Disconnect the connector and clamp.
(c) Remove the 3 bolts and actuator.
3. REMOVE MASTER CYLINDER (See page BR–16)
4. RHD:
REMOVE FRONT UPPER SUSPENSION BRACE
Remove the 4 nuts and front upper suspension brace.
Torque: 80 N·m (810 kgf·cm, 59 ft·lbf)
5. DISCONNECT VACUUM HOSE FROM BRAKE
BOOSTER
Using pliers, slide the clip and disconnect the vacuum hose
from the brake booster and remove the clip.
6. LHD:
DISCONNECT 2 BRAKE LINES FROM CLAMP
7. REMOVE RETURN SPRING
8. REMOVE CLIP AND CLEVIS PIN
9. REMOVE BRAKE BOOSTER, GASKET AND CLEVIS
(a) Remove the 4 nuts and clevis.
(b) Pull out the brake booster and gasket.
BR1KN–01
F13377
SST
Gasket
F05422
SST
F05421
SST
–BRAKE BRAKE BOOSTER ASSEMBLY
BR–27
LEXUS RX300 (RM785E)
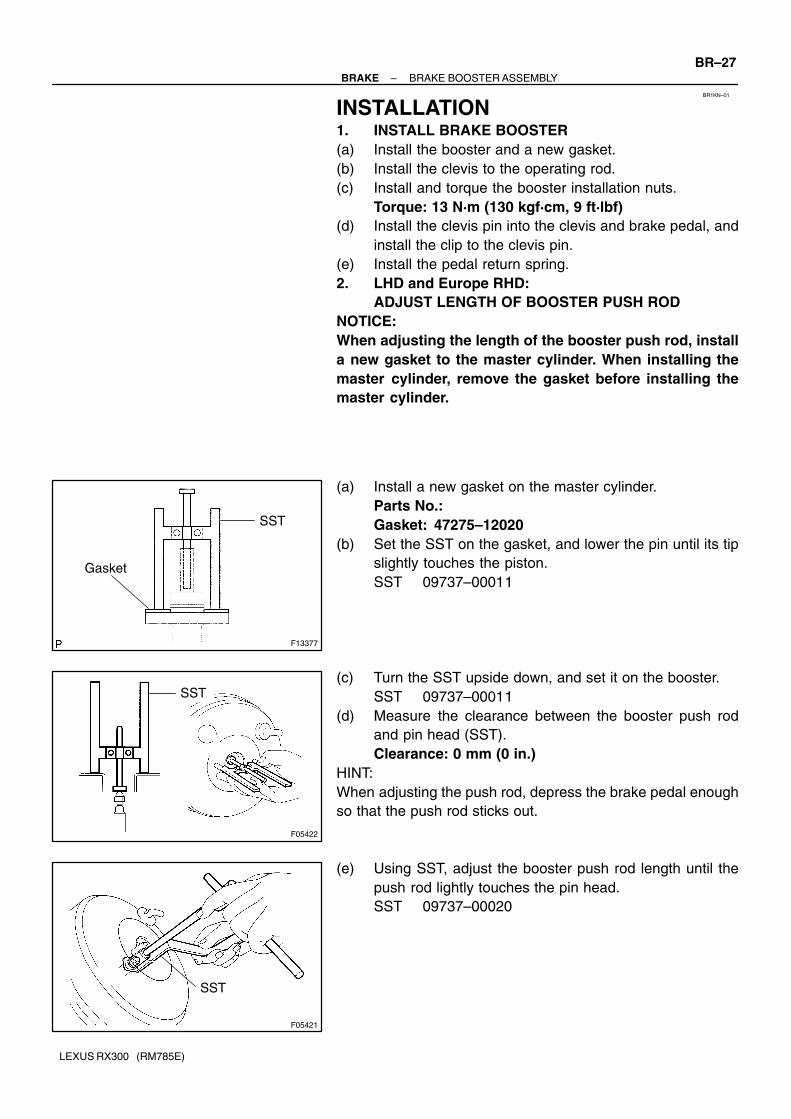
INSTALLATION1. INSTALL BRAKE BOOSTER
(a) Install the booster and a new gasket.
(b) Install the clevis to the operating rod.
(c) Install and torque the booster installation nuts.
Torque: 13 N·m (130 kgf·cm, 9 ft·lbf)
(d) Install the clevis pin into the clevis and brake pedal, and
install the clip to the clevis pin.
(e) Install the pedal return spring.
2. LHD and Europe RHD:
ADJUST LENGTH OF BOOSTER PUSH ROD
NOTICE:
When adjusting the length of the booster push rod, install
a new gasket to the master cylinder. When installing the
master cylinder, remove the gasket before installing the
master cylinder.
(a) Install a new gasket on the master cylinder.
Parts No.:
Gasket: 47275–12020
(b) Set the SST on the gasket, and lower the pin until its tip
slightly touches the piston.
SST 09737–00011
(c) Turn the SST upside down, and set it on the booster.
SST 09737–00011
(d) Measure the clearance between the booster push rod
and pin head (SST).
Clearance: 0 mm (0 in.)
HINT:
When adjusting the push rod, depress the brake pedal enough
so that the push rod sticks out.
(e) Using SST, adjust the booster push rod length until the
push rod lightly touches the pin head.
SST 09737–00020

F03521
SST
Gasket
R11347
SST
BR–28–BRAKE BRAKE BOOSTER ASSEMBLY
LEXUS RX300 (RM785E)
3. RHD except for Europe:
ADJUST LENGTH OF BOOSTER PUSH ROD
(a) Install a new gasket on the master cylinder.
(b) Set the SST on the gasket, and lower the pin until its tip
slightly touches the piston.
SST 09737–00010
(c) Turn the SST upside down, and set it on the booster.
SST 09737–00010
(d) Measure the clearance between the booster push rod
and pin head (SST).
Clearance: 0 mm (0 in.)
(e) Adjust the booster push rod length until the push rod light-
ly touches the pin head.
NOTICE:
Adjust the clearance with no negative pressure applied in-
side the booster. (With the engine stopped, press the brake
pedal several times to set the pressure inside the booster
to the atmospheric pressure.)
4. INSTALL MASTER CYLINDER (See page BR–22)
5. CONNECT VACUUM HOSE TO BRAKE BOOSTER
6. FILL BRAKE RESERVOIR WITH BRAKE FLUID AND
BLEED BRAKE SYSTEM (See page BR–4)
7. CHECK FOR FLUID LEAKAGE
8. CHECK AND ADJUST BRAKE PEDAL
(See page BR–6)
9. DO OPERATIONAL CHECK (See page BR–23)
BR0IM–04
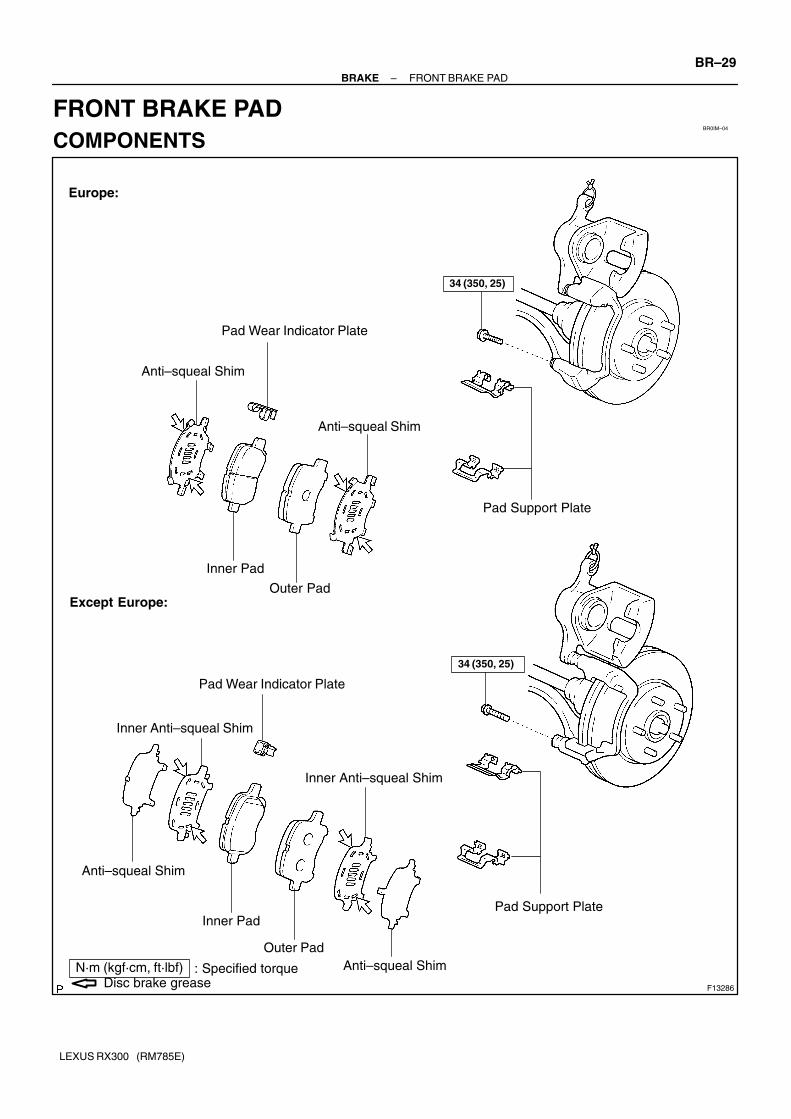
F13286
Pad Wear Indicator Plate
Anti–squeal Shim
Inner Pad
N·m (kgf·cm, ft·lbf) : Specified torqueDisc brake grease
Europe:
Except Europe:
Pad Wear Indicator Plate
Inner Anti–squeal Shim
Anti–squeal Shim
Anti–squeal Shim
Inner PadPad Support Plate
Inner Anti–squeal Shim
Anti–squeal Shim
34 (350, 25)
Pad Support Plate
34 (350, 25)
Outer Pad
Outer Pad
–BRAKE FRONT BRAKE PAD
BR–29
LEXUS RX300 (RM785E)
FRONT BRAKE PAD
COMPONENTS

BR0IN–04
F13271
F13272
BR–30–BRAKE FRONT BRAKE PAD
LEXUS RX300 (RM785E)
REPLACEMENT1. REMOVE FRONT WHEEL
Remove the wheel and temporarily fasten the disc with the hub
nuts.
2. INSPECT PAD LINING THICKNESS
Check the pad thickness through the caliper inspection hole
and replace the pads if they are not within specification.
Minimum thickness: 1.0 mm (0.039 in.)
3. LIFT UP CALIPER
(a) Hold the sliding pin on the bottom and loosen the installa-
tion bolt, and remove the installation bolt.
(b) Lift up the caliper and suspend it securely.
HINT:
Do not disconnect the flexible hose from the caliper.
4. REMOVE 2 PADS WITH ANTI–SQUEAL SHIMS AND
PAD WEAR INDICATOR PLATE
5. REMOVE 2 PAD SUPPORT PLATES
NOTICE:
The support plates can be used again provided that they
have sufficient rebound, no deformation, cracks or wear,
and have had all rust, dirt and foreign particles cleaned off.
6. CHECK DISC THICKNESS AND RUNOUT
(See page BR–36)
7. INSTALL 2 PAD SUPPORT PLATES
8. INSTALL NEW PADS
NOTICE:
When replacing worn pads, the anti–squeal shims and pad
wear indicator plates must be replaced together with the
pads.
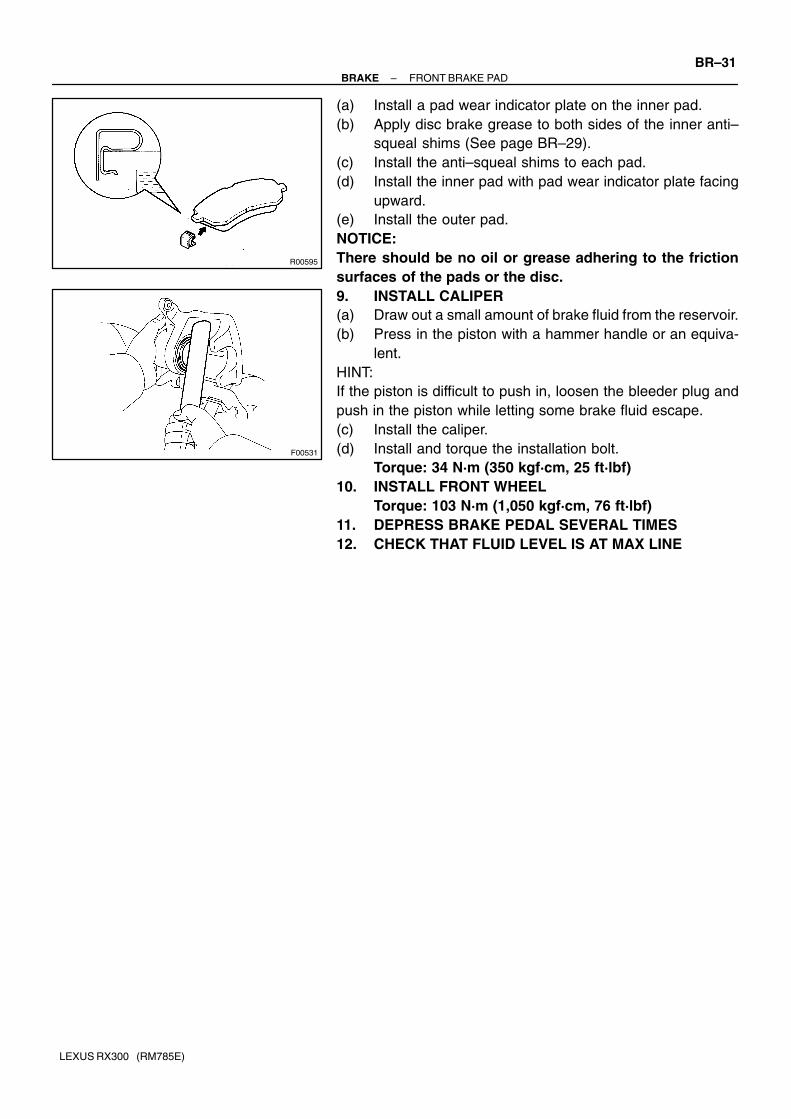
R00595
F00531
–BRAKE FRONT BRAKE PAD
BR–31
LEXUS RX300 (RM785E)
(a) Install a pad wear indicator plate on the inner pad.
(b) Apply disc brake grease to both sides of the inner anti–
squeal shims (See page BR–29).
(c) Install the anti–squeal shims to each pad.
(d) Install the inner pad with pad wear indicator plate facing
upward.
(e) Install the outer pad.
NOTICE:
There should be no oil or grease adhering to the friction
surfaces of the pads or the disc.
9. INSTALL CALIPER
(a) Draw out a small amount of brake fluid from the reservoir.
(b) Press in the piston with a hammer handle or an equiva-
lent.
HINT:
If the piston is difficult to push in, loosen the bleeder plug and
push in the piston while letting some brake fluid escape.
(c) Install the caliper.
(d) Install and torque the installation bolt.
Torque: 34 N·m (350 kgf·cm, 25 ft·lbf)
10. INSTALL FRONT WHEEL
Torque: 103 N·m (1,050 kgf·cm, 76 ft·lbf)
11. DEPRESS BRAKE PEDAL SEVERAL TIMES
12. CHECK THAT FLUID LEVEL IS AT MAX LINE

BR1KO–01
F13287
N·m (kgf·cm, ft·lbf) : Specified torque
Disc brake grease
34 (350, 25)
Inner Anti–squeal Shim
Bleeder Plug
� Gasket
Caliper
� Sliding Bushing
Disc
Torque Plate
107 (1090, 79)29 (300, 21)
8.3 (85, 74 in.·lbf)
Piston Seal
Piston
Piston Boot
Boot Ring
Sliding Pin
� Dust Boot
Pad Support Plate
� Dust Boot
Sliding Pin
Pad Wear Indicator Plate
Inner Anti–squeal Shim
Lithium soap base glycol grease
� Non–reusable part
Outer Pad
29 (300, 21)
Flexible Hose
Inner Pad
Europe:
BR–32–BRAKE FRONT BRAKE CALIPER
LEXUS RX300 (RM785E)
FRONT BRAKE CALIPER
COMPONENTS

F13379
Bleeder Plug
Except Europe:
Caliper
Piston Seal
PistonSliding Pin
Piston Boot
Boot Ring
Torque Plate
Pad Support Plate
Pad Wear Indicator
Inner Anti–squeal Shim
Anti–squeal Shim
Inner Pad
� Gasket
� Sliding Bushing
� Dust Boot
� Non–reusable part
N·m (kgf·cm, ft·lbf) : Specified torque
Disc brake grease
Lithium soap base glycol grease
Inner Anti–squeal Shim
Anti–squeal Shim
� Dust Boot
Sliding Pin
8.3 (85, 74 in.·lbf) 29 (300, 21)
29 (300, 21)34 (350, 25)107 (1090, 79)
Outer Pad
Flexible Hose
–BRAKE FRONT BRAKE CALIPER
BR–33
LEXUS RX300 (RM785E)

BR0IP–03
F13273
BR–34–BRAKE FRONT BRAKE CALIPER
LEXUS RX300 (RM785E)
REMOVAL1. REMOVE FRONT WHEEL
Remove the wheel and temporarily fasten the disc with the hub
nuts.
2. DISCONNECT FLEXIBLE HOSE
(a) Remove the flexible hose from the shock absorber.
Torque: 29 N·m (300 kgf·cm, 21 ft·lbf)
(b) Remove the union bolt and 2 gaskets from the caliper,
then disconnect the flexible hose from the caliper.
Torque: 29 N·m (300 kgf·cm, 21 ft·lbf)
HINT:
At the time of installation, install the flexible hose lock securely
in the lock hole in the caliper.
(c) Use a container to catch the brake fluid as it drains out.
3. REMOVE CALIPER
(a) Remove the 2 installation bolts.
Torque: 34 N·m (350 kgf·cm, 25 ft·lbf)
(b) Remove the caliper from the torque plate.
4. REMOVE 2 PADS WITH ANTI–SQUEAL SHIMS
5. REMOVE 2 PAD SUPPORT PLATES
NOTICE:
At the time of installation, there should be no oil or grease
adhering to the friction surfaces of the pads or disc.

BR0IQ–04
R00121
R00122
R00123
F13274
–BRAKE FRONT BRAKE CALIPER
BR–35
LEXUS RX300 (RM785E)
DISASSEMBLY1. REMOVE BOOT RING AND PISTON BOOT
Using a screwdriver, remove the boot ring and piston boot.
2. REMOVE PISTON FROM CYLINDER
(a) Put a piece of cloth or equivalent between the piston and
the caliper.
(b) Use compressed air to remove the piston from the cylin-
der.
CAUTION:
Do not place your fingers in front of the piston when using
compressed air.
3. REMOVE PISTON SEAL FROM CYLINDER
Using a screwdriver, remove the piston seal.
4. REMOVE SLIDING PINS AND DUST BOOTS
(a) Remove the 2 sliding pins from the torque plate.
NOTICE:
At the time of reassembly, insert the sliding pin with sliding
bushing into the upper part, and insert the sliding pin with-
out sliding bushing into the lower part.
(b) Remove the sliding bushing from the upper side of the
sliding pin.
(c) Using a screwdriver and hammer, tap the 2 dust boots.
HINT:
At the time of reassembly, use a 24 mm socket and hammer, tap
in the 2 new dust boots.
NOTICE:
At the time of reassembly, confirm that the metal plate por-
tion of the dust boot fits snugly in the torque plate.

BR0IR–04
F13378
F13275
F13276
F13277
BR–36–BRAKE FRONT BRAKE CALIPER
LEXUS RX300 (RM785E)
INSPECTION1. MEASURE PAD LINING THICKNESS
Using a ruler, measure the pad lining thickness.
Standard thickness: 11.0 mm (0.433 in.)
Minimum thickness: 1.0 mm (0.039 in.)
Replace the pad if the pad’s thickness is at the minimum thick-
ness or less, or if the pad has severe, uneven wear.
2. MEASURE DISC THICKNESS
Using a micrometer, measure the disc thickness.
Standard thickness: 28.0 mm (1.102 in.)
Minimum thickness: 26.0 mm (1.024 in.)
Replace the disc if the thickness of the disc is at the minimum
thickness or less. Replace the disc or grind it on a lathe if it is
scored or is worn unevenly.
3. MEASURE DISC RUNOUT
Using a dial indicator, measure the disc runout at a position 10
mm (0.39 in.) from the outside edge.
Eurpe:
Maximum disc runout: 0.035 mm (0.0020 in.)
Except Eurpe:
Maximum disc runout: 0.05 mm (0.0020 in.)
If the disc’s runout is at the maximum value or greater, check the
bearing play in the axial direction and check the axle hub runout
(See page SA–10). If the bearing play and axle hub runout are
not abnormal, adjust the disc runout or grind it on a ”On–car”
brake lathe.
4. IF NECESSARY, ADJUST DISC RUNOUT
(a) Remove the 2 bolts and torque plate from the knuckle.
(b) Remove the hub nuts and the disc. Reinstall the disc ro-
tating 1/5 of a turn from its original position on the hub.
Install and torque the hub nuts.
Torque: 103 N·m (1,050 kgf·cm, 76 ft·lbf)
(c) Remeasure the disc runout. Make a note down of the run-
out and the disc’s position on the hub.
–BRAKE FRONT BRAKE CALIPER
BR–37
LEXUS RX300 (RM785E)
(d) Europe:
Repeat (b) and (c) until the disc has been installed on the
3 remaining hub positions.
� If the minimum runout recorded in (c) and (d) is less
than 0.035 mm (0.0020 in.), install the disc in that
position.
� If the minimum runout recorded in (c) and (d) is
greater than 0.035 mm (0.0020 in.), replace the disc
and repeat step 3.
(e) Except Europe:
Repeat (b) and (c) until the disc has been installed on the
3 remaining hub positions.
� If the minimum runout recorded in (c) and (d) is less
than 0.05 mm (0.0020 in.), install the disc in that
position.
� If the minimum runout recorded in (c) and (d) is
greater than 0.05 mm (0.0020 in.), replace the disc
and repeat step 3.
(f) Install the torque plate and torque the mounting bolts.
Torque: 107 N·m (1,090 kgf·cm, 79 ft·lbf)
BR0IS–02
BR–38–BRAKE FRONT BRAKE CALIPER
LEXUS RX300 (RM785E)
REASSEMBLYReassembly is in the reverse order of disassembly (See page BR–35).
NOTICE:
Apply lithium soap base glycol grease to the parts indicated by the arrows (See page BR–32).

BR0IT–04
–BRAKE FRONT BRAKE CALIPER
BR–39
LEXUS RX300 (RM785E)
INSTALLATIONInstallation is in the reverse order of removal (See page BR–34).
HINT:
� After installation fill the brake reservoir with brake fluid, bleed brake system (See pageBR–4).
� Check for leaks.
BR06R–05
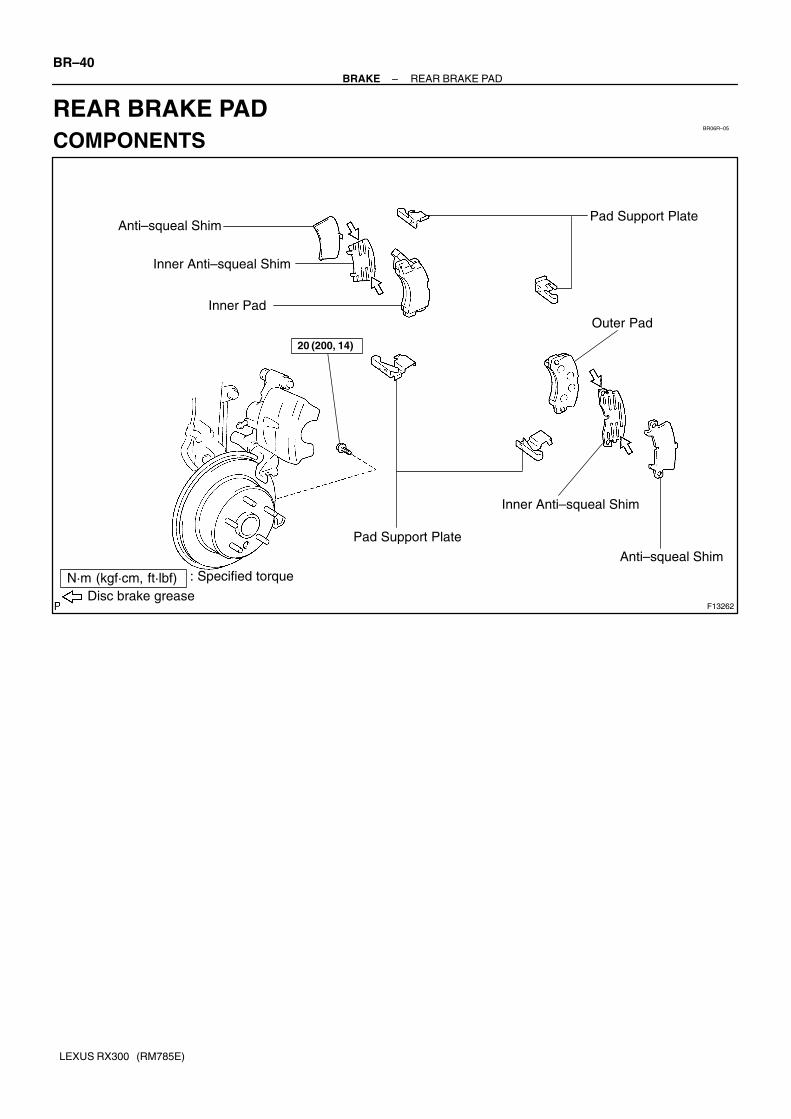
F13262
Pad Support Plate
Inner Pad
Inner Anti–squeal Shim
Anti–squeal Shim
Pad Support Plate
Outer Pad
Inner Anti–squeal Shim
Anti–squeal Shim
Disc brake grease
N·m (kgf·cm, ft·lbf) : Specified torque
20 (200, 14)
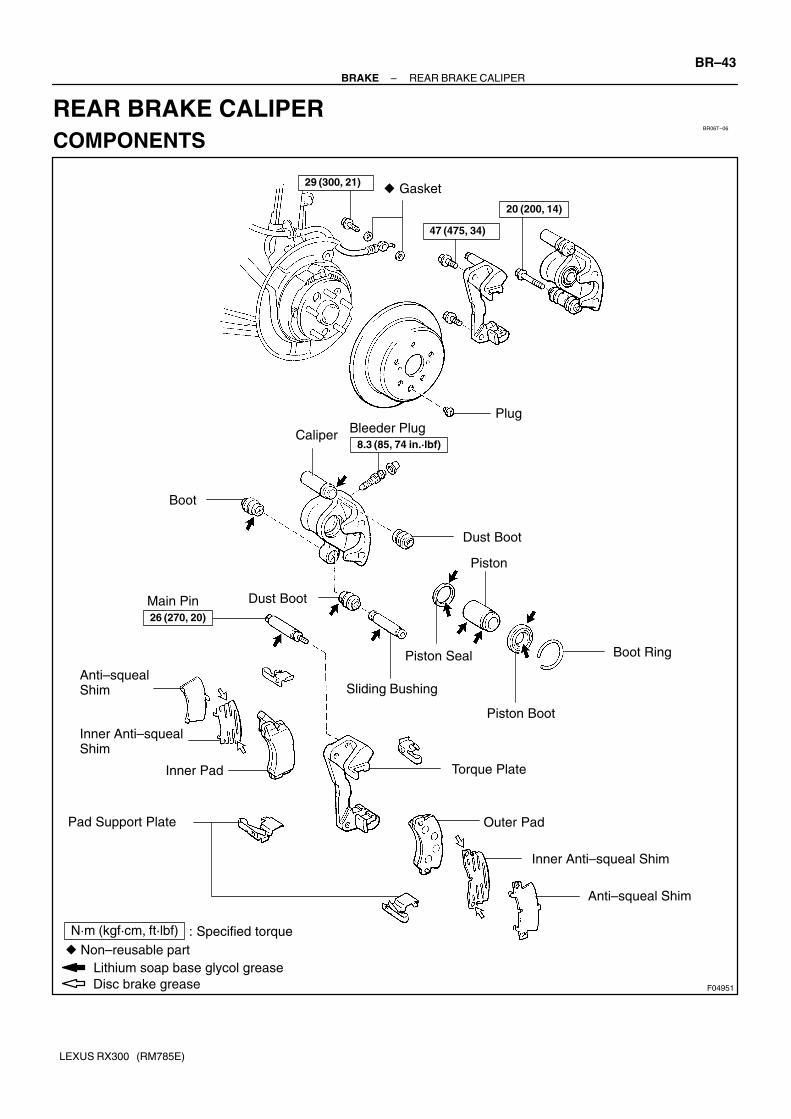
BR–40–BRAKE REAR BRAKE PAD
LEXUS RX300 (RM785E)
REAR BRAKE PAD
COMPONENTS
BR06S–04
R00591
R00514
R10387
–BRAKE REAR BRAKE PAD
BR–41
LEXUS RX300 (RM785E)
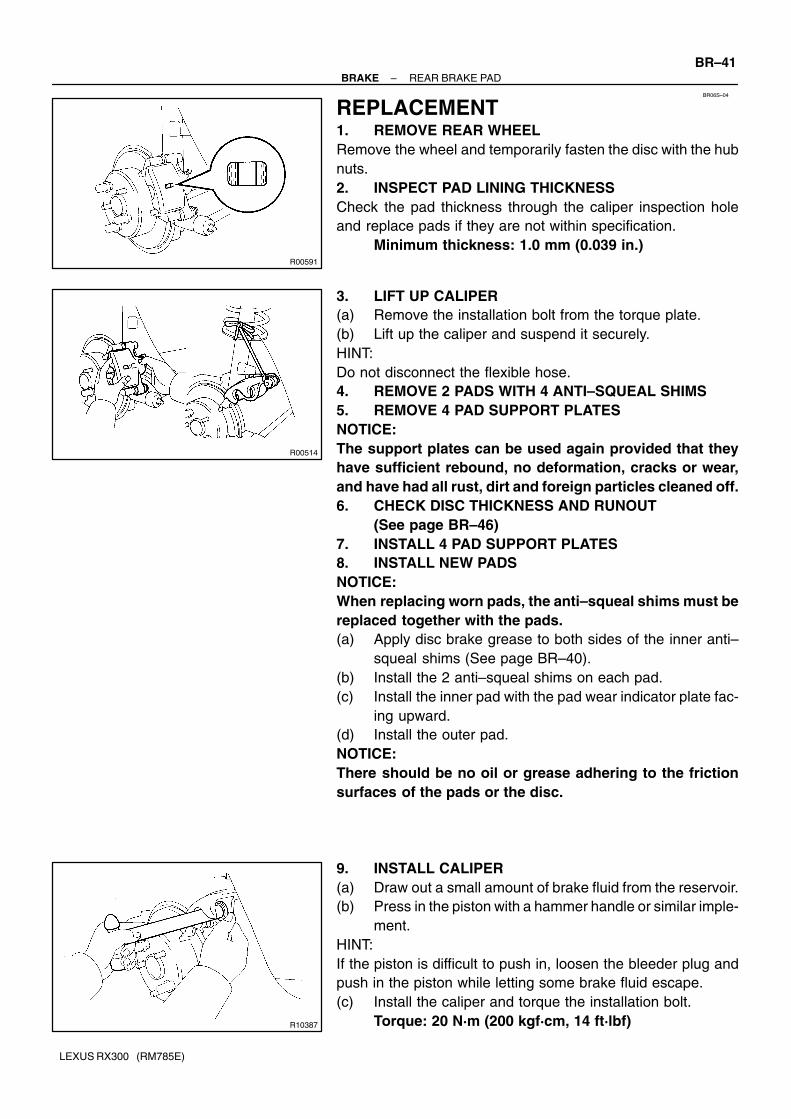
REPLACEMENT1. REMOVE REAR WHEEL
Remove the wheel and temporarily fasten the disc with the hub
nuts.
2. INSPECT PAD LINING THICKNESS
Check the pad thickness through the caliper inspection hole
and replace pads if they are not within specification.
Minimum thickness: 1.0 mm (0.039 in.)
3. LIFT UP CALIPER
(a) Remove the installation bolt from the torque plate.
(b) Lift up the caliper and suspend it securely.
HINT:
Do not disconnect the flexible hose.
4. REMOVE 2 PADS WITH 4 ANTI–SQUEAL SHIMS
5. REMOVE 4 PAD SUPPORT PLATES
NOTICE:
The support plates can be used again provided that they
have sufficient rebound, no deformation, cracks or wear,
and have had all rust, dirt and foreign particles cleaned off.
6. CHECK DISC THICKNESS AND RUNOUT
(See page BR–46)
7. INSTALL 4 PAD SUPPORT PLATES
8. INSTALL NEW PADS
NOTICE:
When replacing worn pads, the anti–squeal shims must be
replaced together with the pads.
(a) Apply disc brake grease to both sides of the inner anti–
squeal shims (See page BR–40).
(b) Install the 2 anti–squeal shims on each pad.
(c) Install the inner pad with the pad wear indicator plate fac-
ing upward.
(d) Install the outer pad.
NOTICE:
There should be no oil or grease adhering to the friction
surfaces of the pads or the disc.
9. INSTALL CALIPER
(a) Draw out a small amount of brake fluid from the reservoir.
(b) Press in the piston with a hammer handle or similar imple-
ment.
HINT:
If the piston is difficult to push in, loosen the bleeder plug and
push in the piston while letting some brake fluid escape.
(c) Install the caliper and torque the installation bolt.
Torque: 20 N·m (200 kgf·cm, 14 ft·lbf)

BR–42–BRAKE REAR BRAKE PAD
LEXUS RX300 (RM785E)
10. INSTALL REAR WHEEL
Torque: 103 N·m (1,050 kgf·cm, 76 ft·lbf)
11. CHECK THAT FLUID LEVEL IS AT MAX LINE
12. DEPRESS BRAKE PEDAL SEVERAL TIMES
BR06T–06
F04951
N·m (kgf·cm, ft·lbf) : Specified torque
Disc brake grease
Lithium soap base glycol grease
� Non–reusable part
� Gasket
47 (475, 34)
Plug
Caliper
Boot
Dust Boot
Dust Boot
Piston
Piston Seal
Main Pin
Boot Ring
Torque Plate
Anti–squeal Shim
Inner Anti–squeal Shim
Pad Support Plate
Inner Anti–squealShim
Anti–squeal Shim
26 (270, 20)
Piston Boot
Sliding Bushing
8.3 (85, 74 in.·lbf)
Bleeder Plug
Inner Pad
Outer Pad
29 (300, 21)
20 (200, 14)
–BRAKE REAR BRAKE CALIPER
BR–43
LEXUS RX300 (RM785E)
REAR BRAKE CALIPER
COMPONENTS
F12077
BR06U–05
F13367
BR–44–BRAKE REAR BRAKE CALIPER
LEXUS RX300 (RM785E)
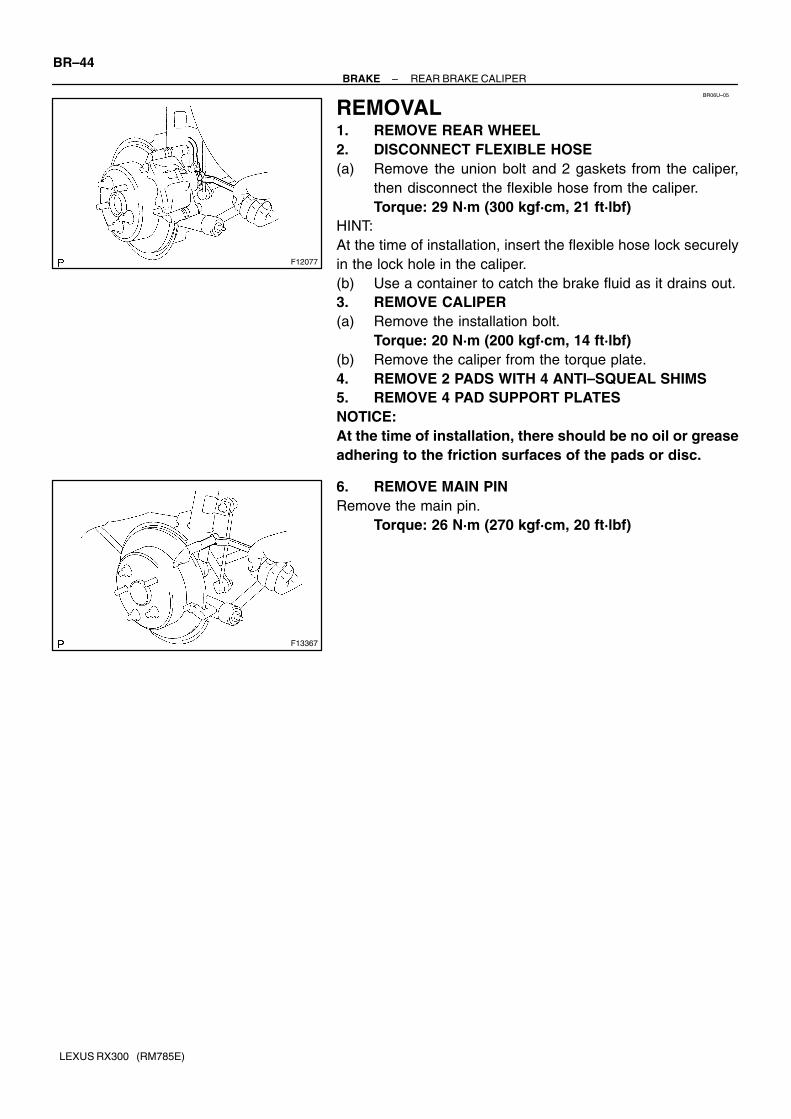
REMOVAL1. REMOVE REAR WHEEL
2. DISCONNECT FLEXIBLE HOSE
(a) Remove the union bolt and 2 gaskets from the caliper,
then disconnect the flexible hose from the caliper.
Torque: 29 N·m (300 kgf·cm, 21 ft·lbf)
HINT:
At the time of installation, insert the flexible hose lock securely
in the lock hole in the caliper.
(b) Use a container to catch the brake fluid as it drains out.
3. REMOVE CALIPER
(a) Remove the installation bolt.
Torque: 20 N·m (200 kgf·cm, 14 ft·lbf)
(b) Remove the caliper from the torque plate.
4. REMOVE 2 PADS WITH 4 ANTI–SQUEAL SHIMS
5. REMOVE 4 PAD SUPPORT PLATES
NOTICE:
At the time of installation, there should be no oil or grease
adhering to the friction surfaces of the pads or disc.
6. REMOVE MAIN PIN
Remove the main pin.
Torque: 26 N·m (270 kgf·cm, 20 ft·lbf)
BR06V–04
R00520
–BRAKE REAR BRAKE CALIPER
BR–45
LEXUS RX300 (RM785E)
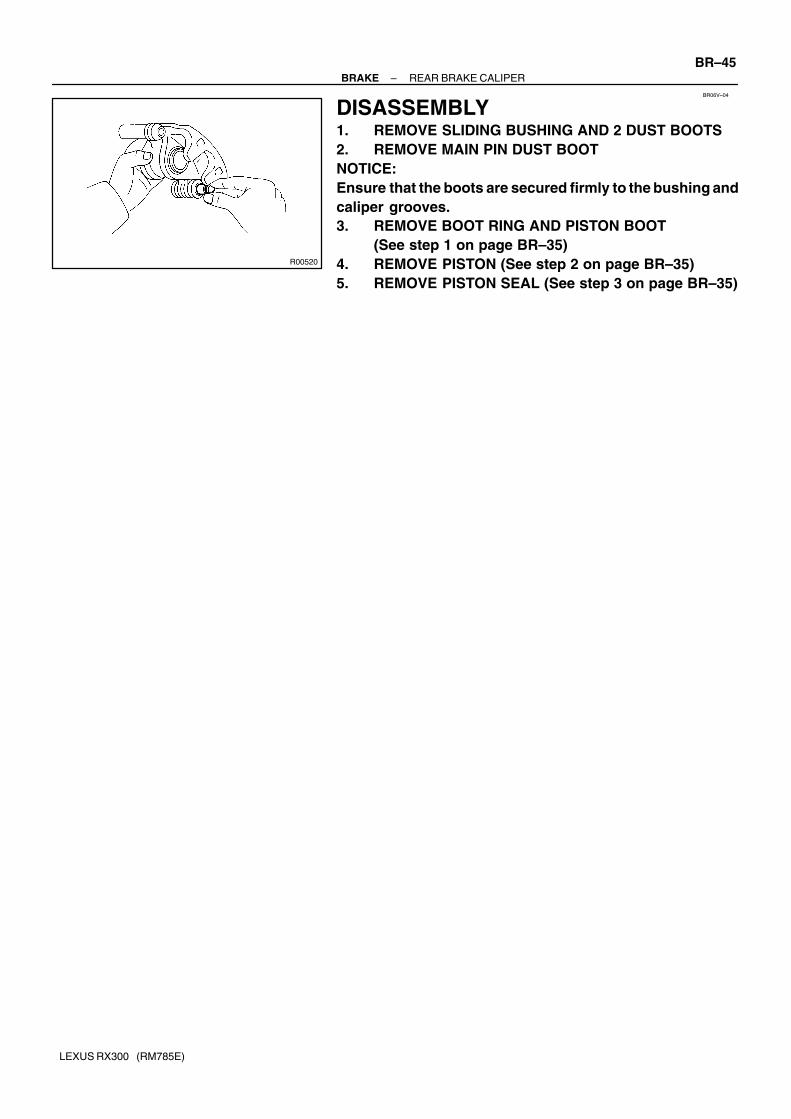
DISASSEMBLY1. REMOVE SLIDING BUSHING AND 2 DUST BOOTS
2. REMOVE MAIN PIN DUST BOOT
NOTICE:
Ensure that the boots are secured firmly to the bushing and
caliper grooves.
3. REMOVE BOOT RING AND PISTON BOOT
(See step 1 on page BR–35)
4. REMOVE PISTON (See step 2 on page BR–35)
5. REMOVE PISTON SEAL (See step 3 on page BR–35)
BR06W–05
F13369
BR–46–BRAKE REAR BRAKE CALIPER
LEXUS RX300 (RM785E)
INSPECTION1. MEASURE PAD LINING THICKNESS
(See step 1 on page BR–36)
Standard thickness: 10.0 mm (0.394 in.)
Minimum thickness: 1.0 mm (0.039 in.)
2. MEASURE DISC THICKNESS
(See step 2 on page BR–36)
Standard thickness: 10.0 mm (0.394 in.)
Minimum thickness: 8.5 mm (0.354 in.)
3. MEASURE DISC RUNOUT
(See step 3 on page BR–36)
Maximum disc runout: 0.15 mm (0.0059 in.)
If the disc’s runout is maximum value or greater, check the bear-
ing play in the axial direction and check the axle hub runout
(See page SA–45). If the bearing play and axle hub runout are
not abnormal, adjust the disc runout or grind it on a ”On–car”
brake lathe.
4. IF NECESSARY, ADJUST DISC RUNOUT
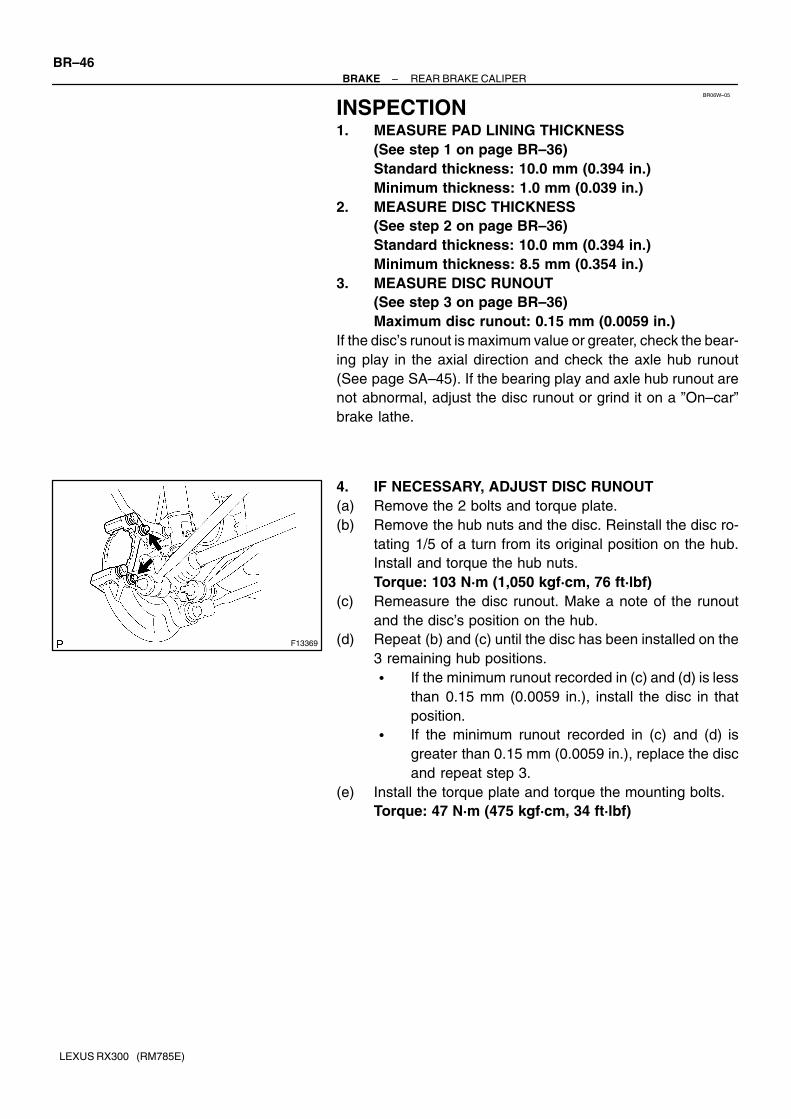
(a) Remove the 2 bolts and torque plate.
(b) Remove the hub nuts and the disc. Reinstall the disc ro-
tating 1/5 of a turn from its original position on the hub.
Install and torque the hub nuts.
Torque: 103 N·m (1,050 kgf·cm, 76 ft·lbf)
(c) Remeasure the disc runout. Make a note of the runout
and the disc’s position on the hub.
(d) Repeat (b) and (c) until the disc has been installed on the
3 remaining hub positions.
� If the minimum runout recorded in (c) and (d) is less
than 0.15 mm (0.0059 in.), install the disc in that
position.
� If the minimum runout recorded in (c) and (d) is
greater than 0.15 mm (0.0059 in.), replace the disc
and repeat step 3.
(e) Install the torque plate and torque the mounting bolts.
Torque: 47 N·m (475 kgf·cm, 34 ft·lbf)
BR06X–02
–BRAKE REAR BRAKE CALIPER
BR–47
LEXUS RX300 (RM785E)
REASSEMBLYReassembly is in the reverse order of disassembly (See page BR–45).
NOTICE:
Apply lithium soap base glycol grease to the parts indicated by the arrows (See page BR–43).
BR06Y–05
BR–48–BRAKE REAR BRAKE CALIPER
LEXUS RX300 (RM785E)
INSTALLATIONInstallation is in the reverse order of removal (See page BR–44).
HINT:
� After installation, fill the brake reservoir with brake fluid and bleed brake system (See page BR–4).
� Check for leaks.

BR06Z–06
F04967
N·m (kgf·cm, ft·lbf) : Specified torque
High temperature grease
� Non–reusable part
Guide Plate
Spring
Shoe Strut
Shim
� C–washer
Pin
Front Shoe
Adjuster
Tension Spring
Shoe Hold–downSpring
Shoe Hold–downSpring Cap
Plug
Rear Shoe PinShoe Return Spring
47 (475, 34) Rear Disc Brake
Adjuster
Parking BrakeLever
–BRAKE PARKING BRAKE
BR–49
LEXUS RX300 (RM785E)
PARKING BRAKE
COMPONENTS
BR070–04
F13365
R00309
F04953
F04954
BR–50–BRAKE PARKING BRAKE
LEXUS RX300 (RM785E)
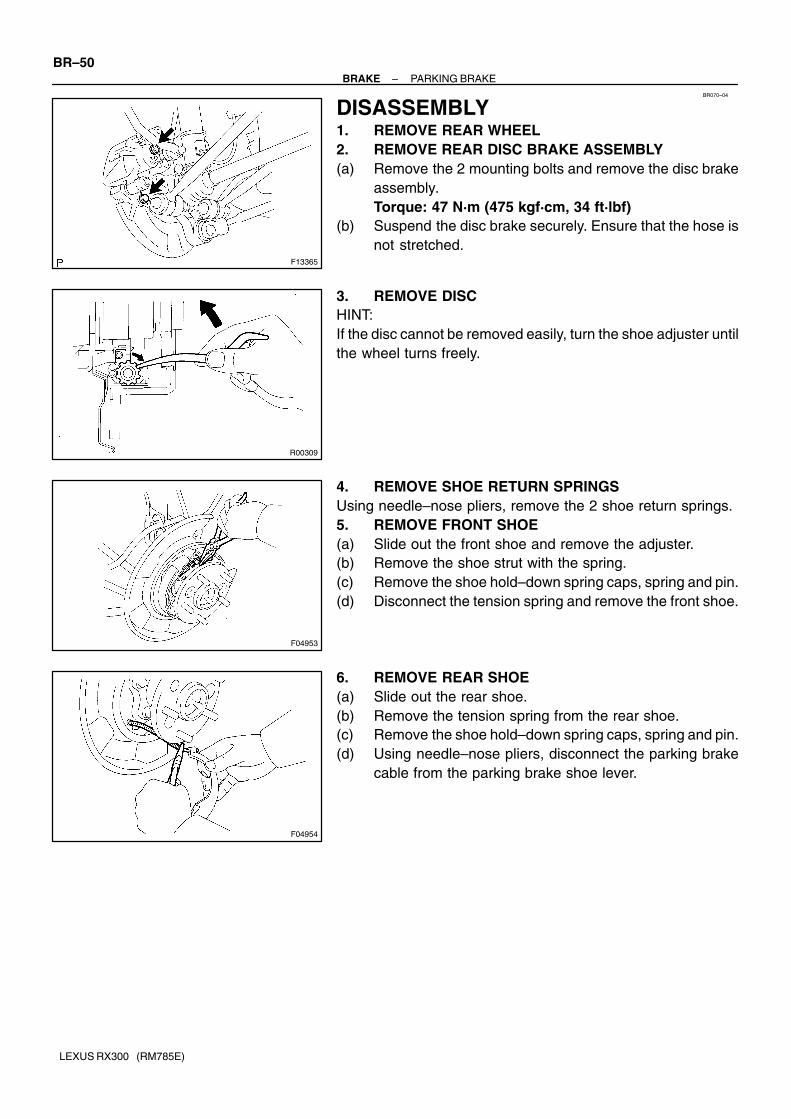
DISASSEMBLY1. REMOVE REAR WHEEL
2. REMOVE REAR DISC BRAKE ASSEMBLY
(a) Remove the 2 mounting bolts and remove the disc brake
assembly.
Torque: 47 N·m (475 kgf·cm, 34 ft·lbf)
(b) Suspend the disc brake securely. Ensure that the hose is
not stretched.
3. REMOVE DISC
HINT:
If the disc cannot be removed easily, turn the shoe adjuster until
the wheel turns freely.
4. REMOVE SHOE RETURN SPRINGS
Using needle–nose pliers, remove the 2 shoe return springs.
5. REMOVE FRONT SHOE
(a) Slide out the front shoe and remove the adjuster.
(b) Remove the shoe strut with the spring.
(c) Remove the shoe hold–down spring caps, spring and pin.
(d) Disconnect the tension spring and remove the front shoe.
6. REMOVE REAR SHOE
(a) Slide out the rear shoe.
(b) Remove the tension spring from the rear shoe.
(c) Remove the shoe hold–down spring caps, spring and pin.
(d) Using needle–nose pliers, disconnect the parking brake
cable from the parking brake shoe lever.

BR071–05
BR5332
F06409
BR0828
R00343
Shim
Clearance
R00313
–BRAKE PARKING BRAKE
BR–51
LEXUS RX300 (RM785E)
INSPECTION1. INSPECT DISASSEMBLED PARTS
Inspect the disassembled parts for wear, rust or damage.
2. MEASURE BRAKE SHOE LINING THICKNESS
Using a ruler, measure the thickness of the shoe lining.
Standard thickness: 2.0 mm (0.079 in.)
Minimum thickness: 1.0 mm (0.039 in.)
If the lining thickness is at the minimum thickness or less, or if
there is severe, uneven wear, replace the brake shoe.
3. MEASURE DISC INSIDE DIAMETER
Using brake drum gauge or equivalent, measure the inside di-
ameter of the disc.
Standard inside diameter: 170 mm (6.69 in.)
Maximum inside diameter: 171 mm (6.73 in.)
Replace the disc if the inside diameter is at the maximum value
or more. Replace the disc or grind it with a lathe if the disc is
scored or is worn unevenly.
4. INSPECT PARKING BRAKE LINING AND DISC FOR
PROPER CONTACT
Apply chalk to the inside surface of the disc, then grind down
the brake shoe lining to fit. If the contact between the disc and
the brake shoe lining is improper, repair it using a brake shoe
grinder or replace the brake shoe assembly.
5. MEASURE CLEARANCE BETWEEN PARKING
BRAKE SHOE AND LEVER
Using a feeler gauge, measure the clearance.
Standard clearance: Less than 0.35 mm (0.0138 in.)
If the clearance is not within the specification, replace the shim
with one of the correct size.
Shim Thickness Shim Thickness
0.3 mm (0.012 in.) 0.9 mm (0.035 in.)
0.6 mm (0.024 in.) –
6. IF NECESSARY, REPLACE SHIM
(a) Using a screwdriver, remove the C–washer and shim.
(b) Install the correct size shim.
(c) Using needle–nose pliers, install the parking brake lever
with a new C–washer.
(d) Remeasure the clearance.
BR072–05
BR0823
Contract
Expand
BR–52–BRAKE PARKING BRAKE
LEXUS RX300 (RM785E)
REASSEMBLYReassembly is in the reverse order of disassembly (See
page BR–50).
NOTICE:
Apply high temperature grease to the parts indicated by the
arrows (See page BR–49).
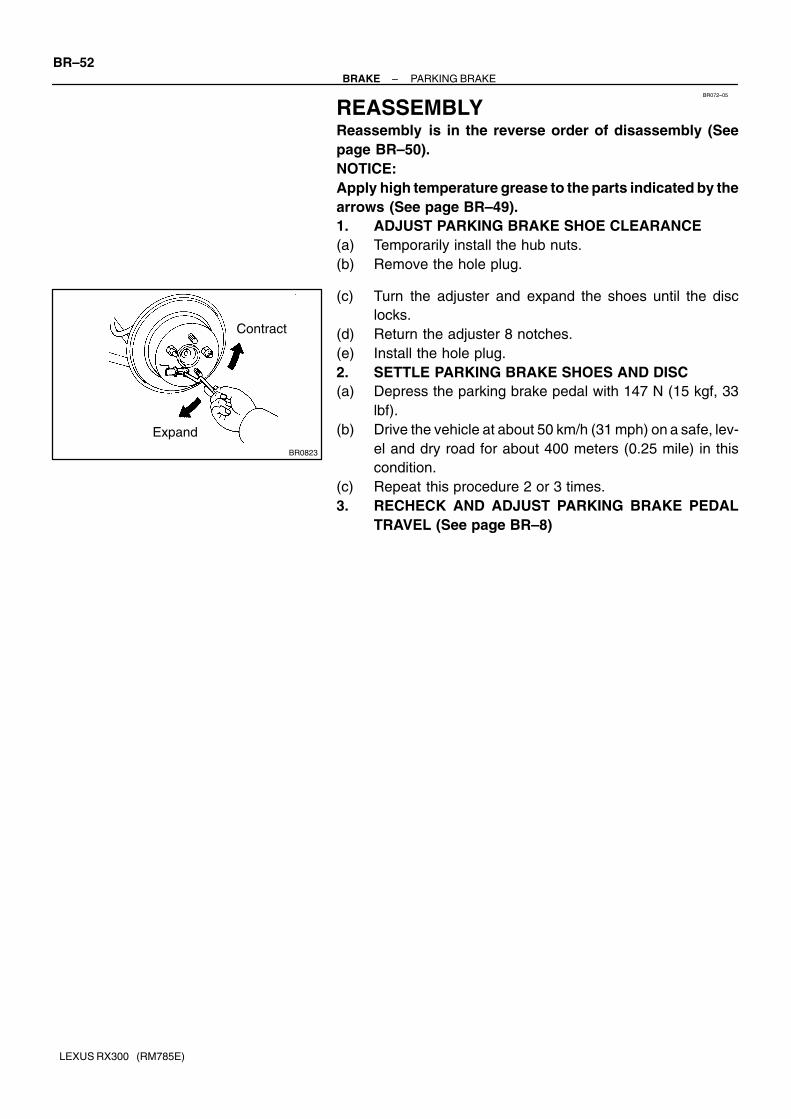
1. ADJUST PARKING BRAKE SHOE CLEARANCE
(a) Temporarily install the hub nuts.
(b) Remove the hole plug.
(c) Turn the adjuster and expand the shoes until the disc
locks.
(d) Return the adjuster 8 notches.
(e) Install the hole plug.
2. SETTLE PARKING BRAKE SHOES AND DISC
(a) Depress the parking brake pedal with 147 N (15 kgf, 33
lbf).
(b) Drive the vehicle at about 50 km/h (31 mph) on a safe, lev-
el and dry road for about 400 meters (0.25 mile) in this
condition.
(c) Repeat this procedure 2 or 3 times.
3. RECHECK AND ADJUST PARKING BRAKE PEDAL
TRAVEL (See page BR–8)

BR073–06
F13268
SST
SST
–BRAKE PROPORTIONING VALVE (P VALVE)
BR–53
LEXUS RX300 (RM785E)
PROPORTIONING VALVE (P VALVE)
ON–VEHICLE INSPECTION
1. INSTALL LSPV GAUGE (SST) AND BLEED AIR
SST 09709–29018
2. BLEED AIR FROM FLUID PRESSURE GAUGE
3. RAISE MASTER CYLINDER PRESSURE AND CHECK REAR CALIPER PRESSURE
Master cylinder fluid pressure Rear brake caliper fluid pressure
2,942 kPa (30 kgf/cm2, 427 psi) 2,942 kPa (30 kgf/cm2, 427 psi)
7,845 kPa (80 kgf/cm2, 1,138 psi) 5,884 kPa (60 kgf/cm2, 853 psi)
If the rear brake caliper pressure is incorrect, replace the P valve assembly.
4. REMOVE LSPV GAUGE (SST)
SST 09709–29018
5. BLEED BRAKE SYSTEM (See page BR–4)
6. CHECK FOR LEAKS

D09456DLC3
Hand–held Tester BR1KP–01
BR–54–BRAKE BRAKE ACTUATOR
LEXUS RX300 (RM785E)
BRAKE ACTUATORON–VEHICLE INSPECTION1. CONNECT HAND–HELD TESTER
(a) Connect the hand–held tester to the DLC3.
(b) Start the engine and run it at idle.
(c) Select the ACTIVE TEST mode on the hand–held tester.
HINT:
Please refer to the hand–held tester operator’s manual for fur-
ther details.
2. INSPECT ACTUATOR MOTOR OPERATION
(a) With the motor relay ON, check the actuator motor opera-
tion noise.
(b) Turn the motor relay OFF.
(c) Depress the brake pedal and hold it for about 15 seconds.
Check that the brake pedal cannot be depressed.
(d) With the motor relay ON, check that the pedal does not
pulsate.
NOTICE:
Do not keep motor relay ON for more than 5 seconds con-
tinuously. When operating it continuously, set the interval
of more than 20 seconds.
(e) Turn the motor relay OFF and release the brake pedal.
3. INSPECT RIGHT FRONT WHEEL OPERATION
NOTICE:
Never turn ON the solenoid which is not described below.
(a) With the brake pedal depressed, perform the following
operations.
(b) Turn the SFRH and SFRR solenoid ON simulteneously,
and check that the pedal cannot be depressed.
NOTICE:
Do not keep solenoid ON for more than 10 seconds contin-
uously. When operating it continuously, set the interval of
more than 20 seconds.
(c) Turn the SFRH and SFRR solenoid OFF simulteneously,
and check that the pedal can be depressed.
(d) Turn the motor relay ON and check that the pedal returns.
NOTICE:
Do not keep motor relay ON for more than 5 seconds con-
tinuously. When operating it continuously, set the interval
of more than 20 seconds.
(e) Turn the motor relay OFF and release the brake pedal.
4. INSPECT OTHER WHEELS OPERATION
As in the same procedure, check the solenoids of other wheels.
HINT:
Left front wheel: SFLH, SFLR
Right rear wheel: SRRH, SRRR
Left rear wheel: SRLH, SRLR
5. CLEAR DTC (See page DI–205)
BR1KQ–01
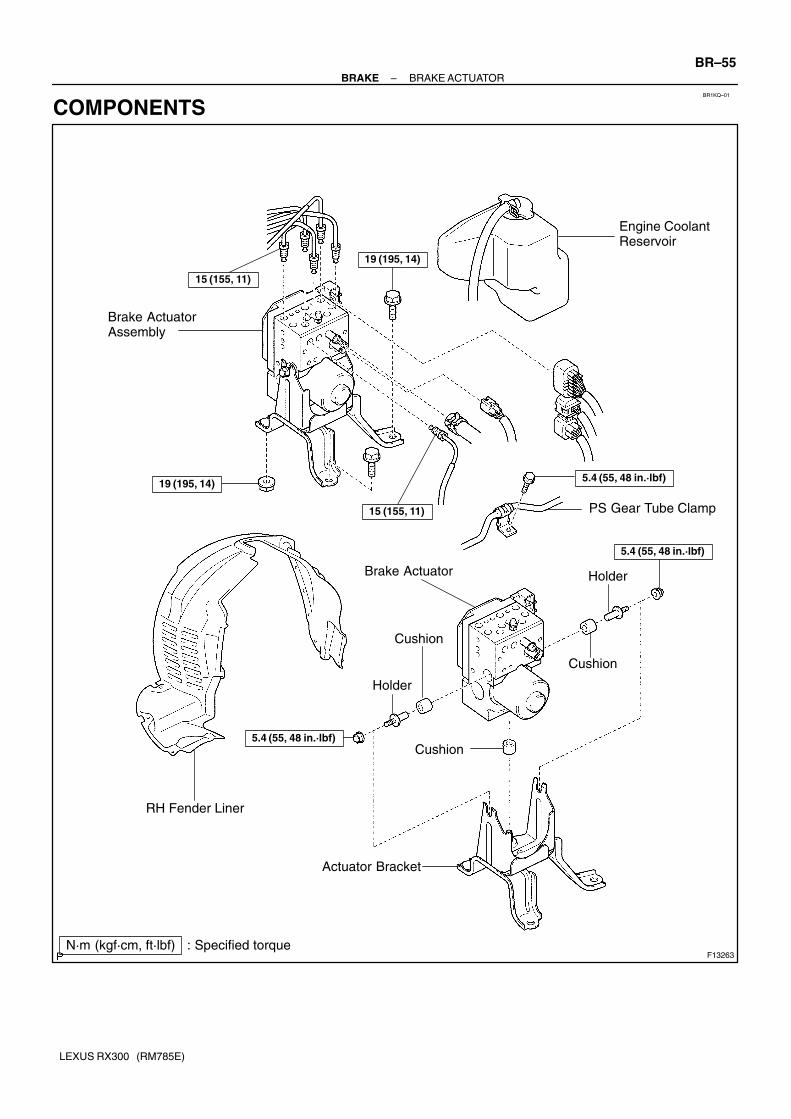
F13263
Brake ActuatorAssembly
Engine CoolantReservoir
5.4 (55, 48 in.·lbf)
PS Gear Tube Clamp
RH Fender Liner
Holder
Cushion
Holder
Cushion
Cushion
Actuator Bracket
N·m (kgf·cm, ft·lbf) : Specified torque
5.4 (55, 48 in.·lbf)
5.4 (55, 48 in.·lbf)
19 (195, 14)
19 (195, 14)
15 (155, 11)
Brake Actuator
15 (155, 11)
–BRAKE BRAKE ACTUATOR
BR–55
LEXUS RX300 (RM785E)
COMPONENTS
BR1KR–01
F13264
F13265
SST
F13266
BR–56–BRAKE BRAKE ACTUATOR
LEXUS RX300 (RM785E)
REMOVAL1. REMOVE RIGHT FRONT WHEEL AND FRONT FEND-
ER LINER
2. REMOVE PS GEAR TUBE CLAMP BOLT
Torque: 5.4 N·m (55 kgf·cm, 48 in.·lbf)
3. DISCONNECT ENGINE COOLANT RESERVOIR
Slide the engine coolant reservoir upward and remove it from
the bracket.
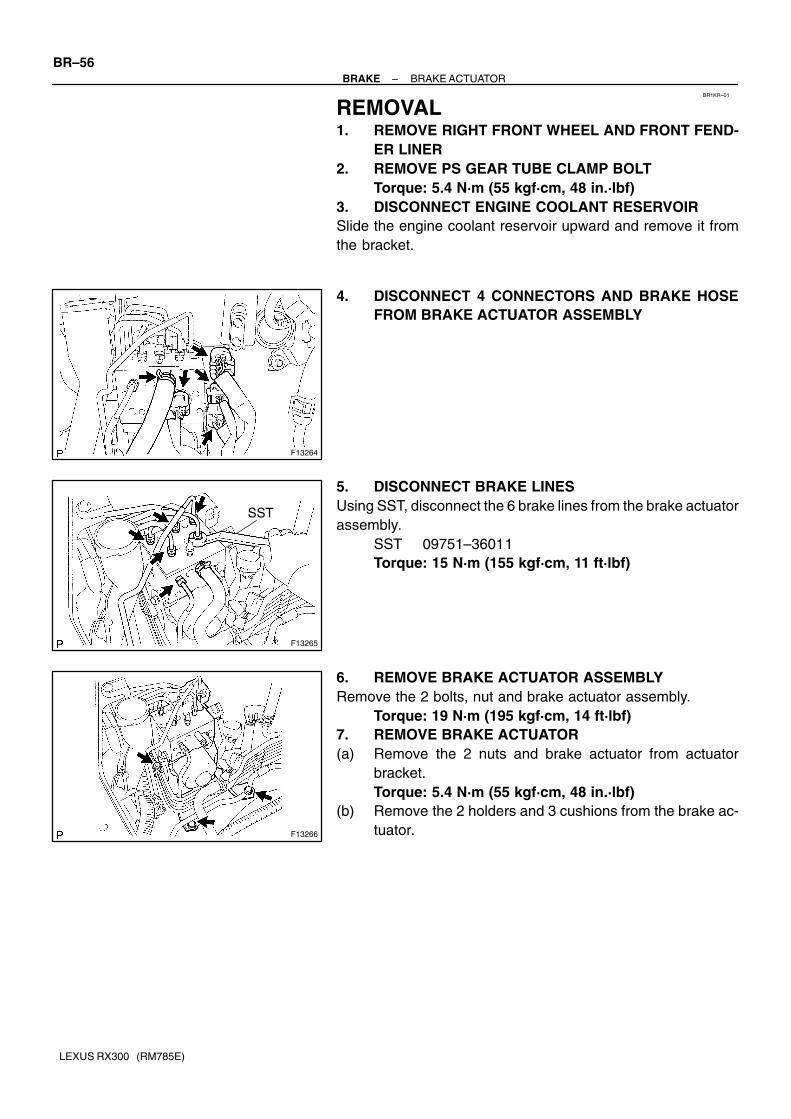
4. DISCONNECT 4 CONNECTORS AND BRAKE HOSE
FROM BRAKE ACTUATOR ASSEMBLY
5. DISCONNECT BRAKE LINES
Using SST, disconnect the 6 brake lines from the brake actuator
assembly.
SST 09751–36011
Torque: 15 N·m (155 kgf·cm, 11 ft·lbf)
6. REMOVE BRAKE ACTUATOR ASSEMBLY
Remove the 2 bolts, nut and brake actuator assembly.
Torque: 19 N·m (195 kgf·cm, 14 ft·lbf)
7. REMOVE BRAKE ACTUATOR
(a) Remove the 2 nuts and brake actuator from actuator
bracket.
Torque: 5.4 N·m (55 kgf·cm, 48 in.·lbf)
(b) Remove the 2 holders and 3 cushions from the brake ac-
tuator.
BR1KS–01
–BRAKE BRAKE ACTUATOR
BR–57
LEXUS RX300 (RM785E)
INSTALLATIONInstallation is in the reverse order of removal (See page BR–56).
HINT:
� After installation, fill brake reservoir with brake fluid and bleed brake system (See page BR–4).
� Check for leaks.
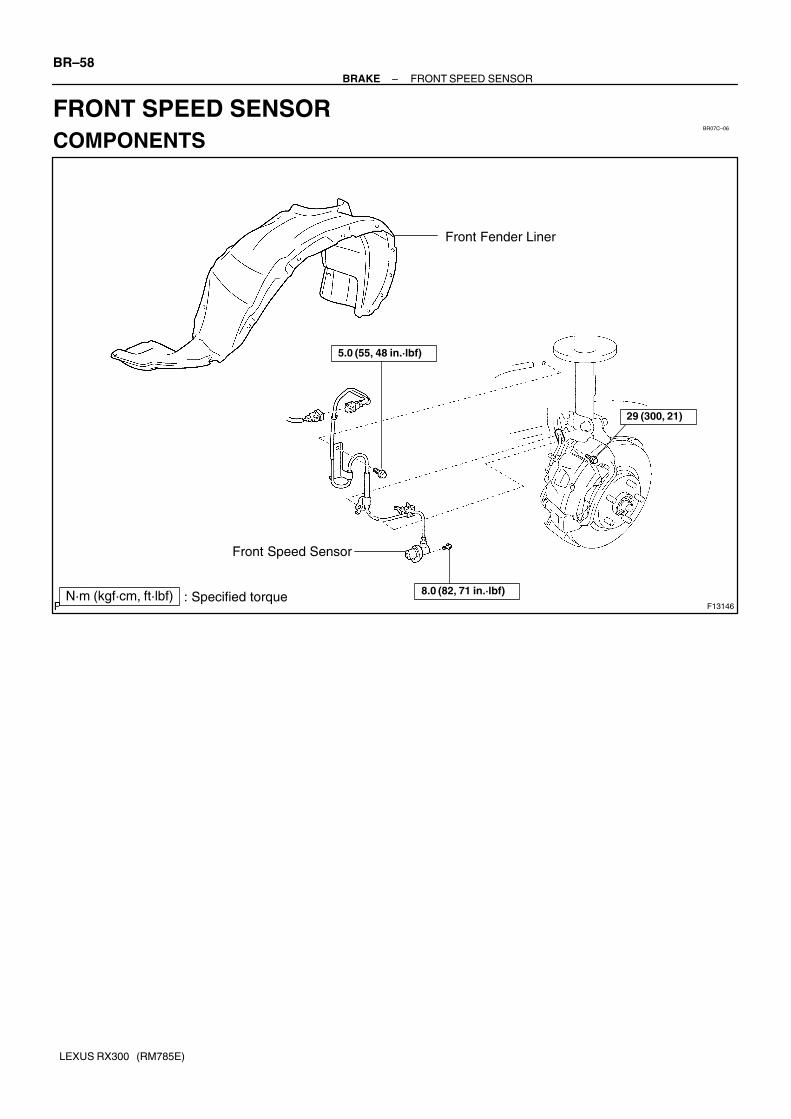
BR07C–06
F13146N·m (kgf·cm, ft·lbf) : Specified torque
8.0 (82, 71 in.·lbf)
Front Speed Sensor
Front Fender Liner
5.0 (55, 48 in.·lbf)
29 (300, 21)
BR–58–BRAKE FRONT SPEED SENSOR
LEXUS RX300 (RM785E)
FRONT SPEED SENSOR
COMPONENTS
BR07D–05
F04963
F13366
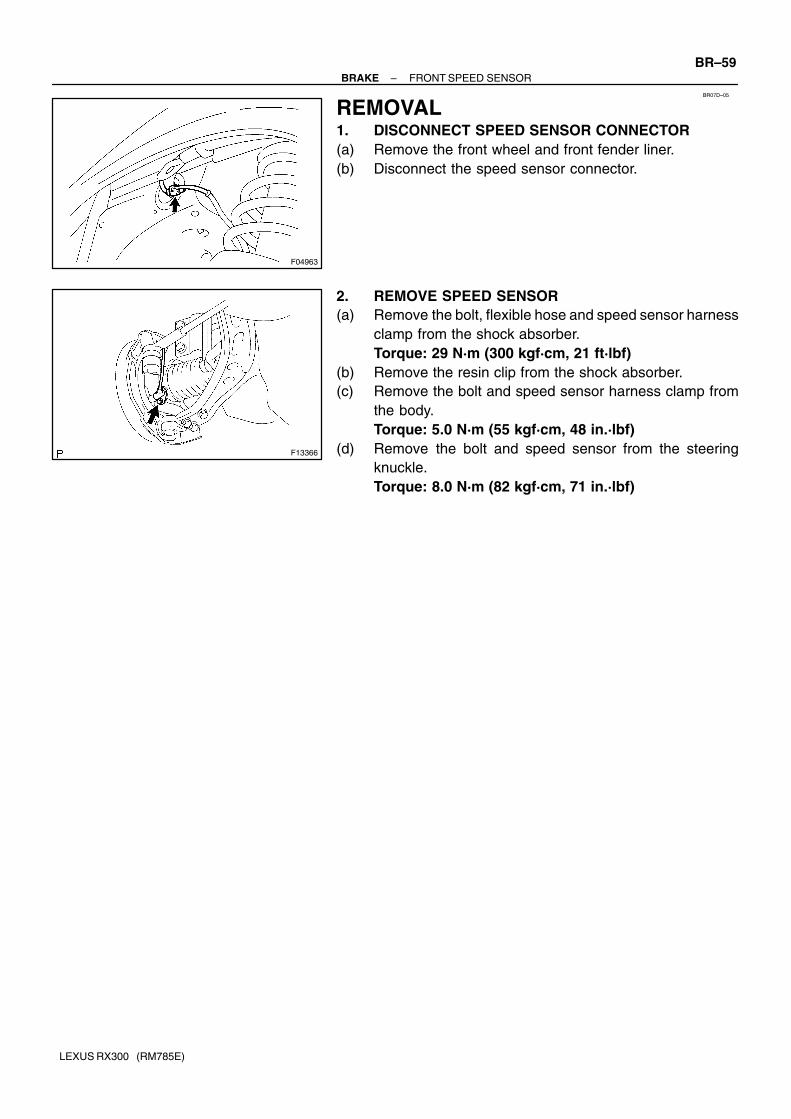
–BRAKE FRONT SPEED SENSOR
BR–59
LEXUS RX300 (RM785E)
REMOVAL1. DISCONNECT SPEED SENSOR CONNECTOR
(a) Remove the front wheel and front fender liner.
(b) Disconnect the speed sensor connector.
2. REMOVE SPEED SENSOR
(a) Remove the bolt, flexible hose and speed sensor harness
clamp from the shock absorber.
Torque: 29 N·m (300 kgf·cm, 21 ft·lbf)
(b) Remove the resin clip from the shock absorber.
(c) Remove the bolt and speed sensor harness clamp from
the body.
Torque: 5.0 N·m (55 kgf·cm, 48 in.·lbf)
(d) Remove the bolt and speed sensor from the steering
knuckle.
Torque: 8.0 N·m (82 kgf·cm, 71 in.·lbf)
BR07E–07
BR–60–BRAKE FRONT SPEED SENSOR
LEXUS RX300 (RM785E)
INSTALLATIONInstallation is in the reverse order of removal (See page BR–59).
HINT:
After installation, check speed sensor signal (See page DI–205).
BR07F–06
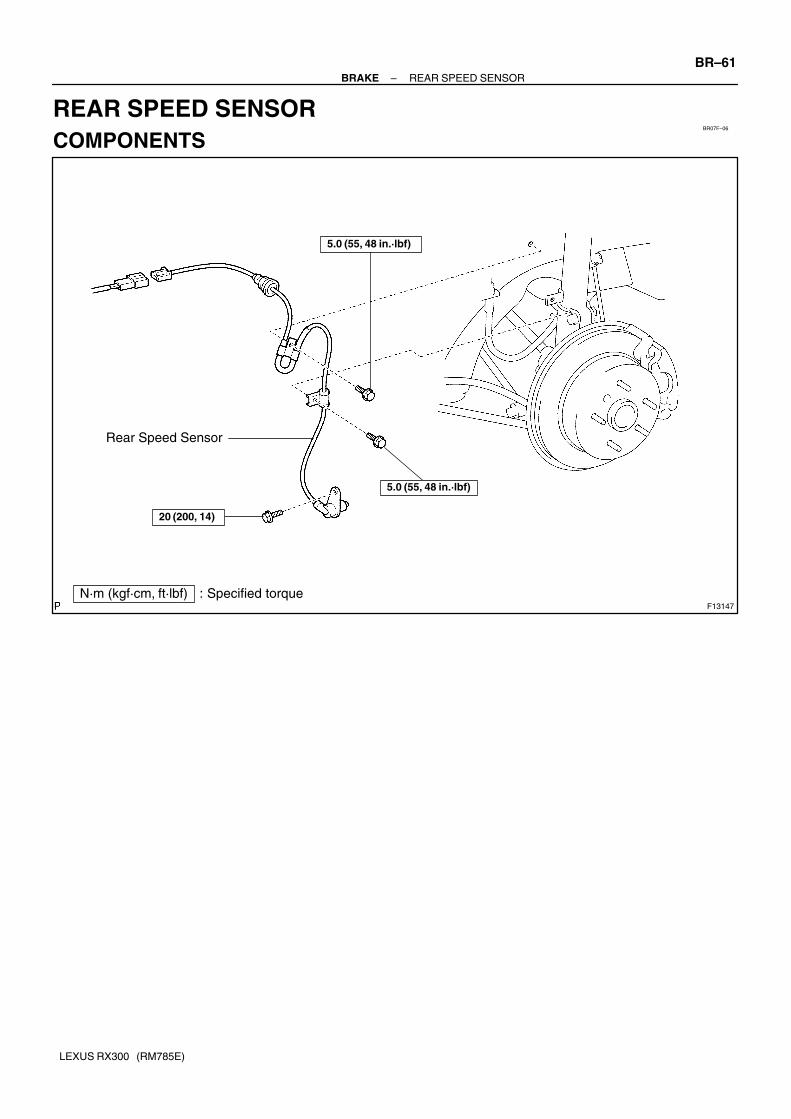
F13147
Rear Speed Sensor
N·m (kgf·cm, ft·lbf) : Specified torque
20 (200, 14)
5.0 (55, 48 in.·lbf)
5.0 (55, 48 in.·lbf)
–BRAKE REAR SPEED SENSOR
BR–61
LEXUS RX300 (RM785E)
REAR SPEED SENSOR
COMPONENTS

BR07G–05
F04965
F13148
BR–62–BRAKE REAR SPEED SENSOR
LEXUS RX300 (RM785E)
REMOVAL1. DISCONNECT SPEED SENSOR CONNECTOR
(a) Remove the rear seat, scuff plate and rear seat side gar-
nish.
(b) Disconnect the speed sensor connector, and pull out the
sensor wire harness with the grommet.
2. REMOVE SPEED SENSOR
(a) Remove the 2 clamp bolts holding the sensor wire har-
ness from the body and shock absorber.
Torque: 5.0 N·m (55 kgf·cm, 48 in.·lbf)
(b) Remove the bolt and speed sensor from the axle carrier.
Torque: 20 N·m (200 kgf·cm, 14 ft·lbf)
BR07H–07
–BRAKE REAR SPEED SENSOR
BR–63
LEXUS RX300 (RM785E)
INSTALLATIONInstallation is in the reverse order of removal (See page BR–62).
HINT:
After installation, check speed sensor signal (See page DI–205)