Embed Size (px)
Citation preview

BOSE SOUNDCONTROL™ HEARING AIDS
Owner’s Guide

2
1. Safety and health informationIntended use 7
Indications for use 7
Clinical data 7
Hearing health care information 8
Important safety instructions 11
Warnings 12
Cautions 13
2. Set up the hearing aidsWhat’s in the box 16
Hearing aid overview 17
Connect your phone 18
Download the Bose Hear app 19
Insert the batteries 20

3
3. How to wearPut on the hearing aids 24
Check your fit 27
4. Hearing aid and app controlsPower on 31
Power off 31
World Volume 32
Treble and bass 34
Focus 35
Left/Right Ear Balance 37
Modes 39
5. Adjusting to the hearing aidsWhat to expect 41

4
6. Battery managementWhen to replace batteries 44
Remove the batteries 44
Battery life 45
Purchase batteries 46
7. Bluetooth® connectionsConnect your phone 48
Connect a different phone 49
Clear the hearing aid device lists 49
8. Care and maintenanceStore the hearing aids 52
Maintain the hearing aids 53
Replacement components 56
Limited warranty 56
Returns and exchanges 57
Update the hearing aids 57
5
9. TroubleshootingTry these solutions first 59
Other solutions 60
Eartip troubleshooting 73
Cable size troubleshooting 79
10. Regulatory and legal informationSymbols and descriptions 99

1Safety and health information
Intended use
Indications for use
Clinical data
Hearing health care information
Important safety instructions
Warnings
Cautions
Safety and health information 1
7
Intended useThe Bose SoundControl™ hearing aids are a pair of user- fitted wireless air conduction hearing aids intended for use by individuals 18 years and older with perceived mild to moderate hearing impairment.
Indications for useThe Bose SoundControl™ hearing aids are intended to amplify sound for individuals 18 years of age or older with perceived mild to moderate hearing impairment. They are adjusted by the user to meet the user’s hearing needs. No pre-programming or hearing test is necessary. The device is intended for direct-to-consumer sale and use without the assistance of a hearing care professional.
Clinical dataIn a clinical study, people with mild to moderate hearing impairment generally experienced similar hearing benefit, and were more satisfied, when using the Bose self-fitting technology compared with professional fitting of the same device. There were no adverse events encountered during this study.

Safety and health information
8
1
Hearing health care informationThis product may help you hear better if you:
• Strain to follow conversations when others don’t, especially in noisy places.
• Have trouble understanding the TV.
This product may not be right for you if you: • Consistently experience feedback (whistling) of the hearing aid when you turn up World Volume to a level that is comfortable for you, even after you have followed the suggestions in these Instructions for Use to make sure your hearing aid fits properly.
• Feel the hearing aid is not providing enough amplification even at the highest World Volume setting.
A hearing health care professional may be able to help you select a different hearing aid solution to meet your needs.

Safety and health information
9
1
You should see a hearing health care professional if you: • Have a visible deformity of the ear.
• Have a current ear infection or a history of active discharge from one or both ears within the past 90 days.
• Have sudden or rapid progression of hearing loss within the past 90 days in one or both ears.
• Have acute or chronic dizziness, poor dexterity, poor vision, or significant dementia.
• Suspect that you have significant ear wax accumulation or a foreign object in the ear canal. Symptoms of significant ear wax accumulation can include itching in your ear, a feeling of fullness in your ear, and/or reduced hearing.
• Experience pain or discomfort in the ear.
• Have a noticeable difference in hearing between ears.
• Have sudden onset or rapid worsening of tinnitus (ringing in the ear) in one or both ears within the past 90 days.

Safety and health information
1 0
1
This product will not restore normal hearing and will not prevent or improve a hearing impairment resulting from organic conditions. This product is designed to help you make greater use of your remaining hearing ability. You should keep in mind that it can take time to become accustomed to hearing new sounds.
For best results, practice using the hearing aids as much as possible. In most cases, infrequent use of the hearing aids doesn’t permit you to attain full benefit from them.
The use of a hearing aid is only part of hearing habilitation and may need to be supplemented by auditory training and instruction in lipreading.
It is good health practice for a person with a hearing loss to have a medical evaluation by a licensed physician (preferably a physician who specializes in diseases of the ear). Licensed physicians who specialize in diseases of the ear are often referred to as otolaryngologists, otologists, or otorhinolaryngologists. The purpose of a medical evaluation is to assure that all medically treatable conditions that may affect hearing are identified and treated.

Safety and health information
1 1
1
Please read and keep all safety and use instructions.
Important safety instructionsOnly use attachments/components specified by the manufacturer.
The battery provided with this product may present a risk of chemical burn if mishandled.
Please dispose of used batteries properly, following local regulations.
When a replacement is needed, use only size 312 zinc-air batteries.
Do NOT use the hearing aids without the supplied eartips attached.
This product contains magnetic material. Consult your physician on whether this might affect your implantable medical device.

Safety and health information
1 2
1
WARNINGS
• Do NOT store or replace batteries near where you store medication or near children. Battery ingestion can cause serious harm. If you think that you or someone else has swallowed a battery or placed a battery inside any part of the body, seek immediate medical attention.
Keep and store device and components out of reach of children. Contains small parts which may be a choking hazard.
• To prevent hearing damage: – Use appropriate hearing protection in loud environments. The hearing aids are NOT hearing protection devices.
– Remove the hearing aids if you encounter any overly loud sounds.
• Do NOT use the hearing aids in explosive or oxygen-enriched atmospheres. Otherwise, a fire or explosion could occur.

Safety and health information
1 3
1
WARNINGS
• Check before using the hearing aids in areas where electronics or wireless devices are restricted. This may cause interference.
• Do NOT resell the hearing aids or share them with others. They are intended for use by a single user. Using resold or shared hearing aids may lead to infection.
• Keep the product away from fire and excessive heat (e.g., from storage in direct sunlight, near candles, or in a hot car) to avoid burns or damage to product.
• Do NOT submerge in water, wear in the shower, or wear while participating in water sports, e.g., swimming, waterskiing, surfing, etc. Prolonged exposure to water may damage the hearing aids.
CAUTIONS
• Be aware that some sounds may sound different when you’re using the hearing aids. Keep this in mind when you need to be aware of your surroundings. You should adjust to this over time.

Safety and health information
1 4
1
CAUTIONS
• Consult a hearing care professional if you experience any unusual side effects like skin irritation, excessive accumulation of ear wax, dizziness, change in your hearing, or if you think there may be a foreign object in your ear canal.
• When adjusting the World Volume, turn up gradually until you reach a comfortable listening level.
• Do NOT use the hearing aids or their components if any part of them is damaged, if they emit any loud unusual noise, if you experience a warming sensation, or if you experience loss of audio. If this happens, remove and power off the hearing aids immediately, then contact the Bose Hear Better Team. Visit: worldwide.Bose.com/HearContact
• Do NOT make unauthorized alterations to this product. • If the battery leaks, do NOT allow the liquid to come in contact with the skin or eyes. If contact is made, seek medical advice.

What’s in the box
Hearing aid overview
Connect your phone
Download the Bose Hear app
Insert the batteries
2Set up the hearing aids

Set up the hearing aids
1 6
2
What’s in the box
Bose SoundControl™ hearing aids (1 pair)
Carrying case (1) Size 312 batteries (8)
Open eartips (3 pairs): Sizes 1 and 3*
Closed eartips (3 pairs): Sizes 1, 2, and 3
Hearing aid brush (1)
123
R*Size 2 open eartips are attached to the hearing aids.
note If any part of the product is damaged, don’t use it. Contact your authorized Bose dealer or the Bose Hear Better Team.
Cable sizing tool (1) (see page 79)
Visit: worldwide.Bose.com/Support/SoundControl

Set up the hearing aids
1 7
2
Hearing aid overview
Battery door
Cable
World Volume up button
World Volume down button
Microphones
Eartip
Speaker
Hearing aid body

Set up the hearing aids
1 8
2
Connect your phoneTo control the hearing aids using the Bose Hear app, you must connect your phone with the hearing aids.
To connect your phone, follow the steps below.
Step 1:Download the Bose Hear app (see page 19).
Step 2:Insert the batteries and fully close the battery doors to power on the hearing aids (see page 20).
Step 3:Follow the app instructions to connect the hearing aids and learn how to wear and use them with video tutorials.
note For the best experience, connect the hearing aids to your phone using the Bose Hear app instead of the Bluetooth menu on your phone.

Set up the hearing aids
1 9
2
Download the Bose Hear appThe Bose Hear app lets you set up the hearing aids, adjust them to fit your hearing needs, and manage settings.
Step 1:On your smartphone, use your web browser to visit app.Bose.com/SC and download the Bose Hear app. Or, download from the App Store or Google Play store.
note There are many apps from Bose. Make sure to download the Bose Hear app.
Step 2:Insert the batteries so the app can find the hearing aids (see page 20).
BOSE HEAR

Set up the hearing aids
2 0
2
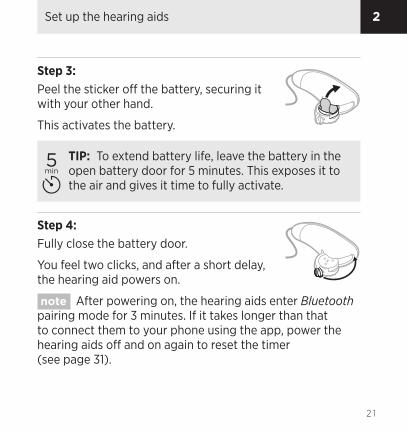
Insert the batteries note Wash and dry your hands before handling the batteries. Grease and dirt can reduce battery life and damage the hearing aids.
Step 1:Gently pull the tab on the bottom of the hearing aid until the battery door fully opens.
Step 2:Insert one of the provided size 312 batteries in the door with the sticker facing up and the rounded side facing down.
Set up the hearing aids
2 1
2
Step 3:Peel the sticker off the battery, securing it with your other hand.
This activates the battery.
TIP: To extend battery life, leave the battery in the open battery door for 5 minutes. This exposes it to the air and gives it time to fully activate.
Step 4:Fully close the battery door.
You feel two clicks, and after a short delay, the hearing aid powers on.
note After powering on, the hearing aids enter Bluetooth pairing mode for 3 minutes. If it takes longer than that to connect them to your phone using the app, power the hearing aids off and on again to reset the timer (see page 31).
5min

Set up the hearing aids
2 2
2
Step 5:Repeat steps 1 – 4 for the other hearing aid.
Step 6:Follow the app instructions to connect the hearing aids and learn how to wear and use them with video tutorials.
note After completing the app tutorials, if you’d like more information about wearing or using the hearing aids, see “How to wear” on page 23 or “Hearing aid and app controls” on page 30.

Put on the hearing aids
Check your fit
3How to wear

How to wear
24
3
Put on the hearing aids
TIPS: • If you have long hair, put your hair up. • If you wear glasses, keep your glasses on. • Consider using a mirror to check your fit.
Step 1:Compare the left and right hearing aids. The left hearing aid has a blue speaker, and the right hearing aid has a red speaker.
Step 2:Place the right hearing aid on your right ear.
The hearing aid body should sit near the top of your ear. The curved section of cable should wrap around the front of your ear.
L R

How to wear
2 5
3
TIP: If you wear glasses, place the hearing aid between your glasses and your ear.
Step 3:Hold the hearing aid by the bend in the cable close to the eartip.
Step 4:Fully insert the eartip into your ear canal until the cable is flat against your ear and the eartip feels secure.
note The eartip may feel strange or itchy inside your ear canal at first. If you’re uncomfortable, check whether your eartip size is correct (see page 28).

How to wear
2 6
3
Step 5:Check to make sure that all parts of the cable run close to the side of your head.
Step 6:Repeat steps 2 – 5 for the left hearing aid.
Step 7:Check your fit (see page 27).
To remove the hearing aidsHold the cable close to the eartip and gently remove the eartip from your ear canal. Then, pull the hearing aid body out from behind your ear.

How to wear
2 7
3
Check your fitUse a mirror to make sure that the hearing aids are on correctly and that they fit your ears properly.
Are the hearing aids on correctly?
Correct: • The hearing aid body is behind your ear. • The eartip is deep in your ear canal. • If you look straight in a mirror, you can’t see the eartip or speaker.

How to wear
2 8
3
Is the eartip size correct for each ear?
The size of the eartip affects comfort and stability.
Correct size: • The eartip feels secure, though it may feel strange at first (see “Adjusting to the hearing aids” on page 40).
• If you shake your head and open your mouth, the eartip feels comfortable and doesn’t move.
If the eartip feels uncomfortable or loose: Check whether the eartip is too big or too small (see page 73). If it is, you can replace it with a different size.

How to wear
2 9
3
Is the cable size correct for each ear?
The size of the cable determines the position and angle of the hearing aid behind your ear. This affects audio performance, comfort, and stability.
The provided cables will fit most ears. However, you might need longer or shorter cables or a different size for each ear.
note Don’t try to modify the shape of the cable to force the hearing aid to fit.
Correct size: • If you shake your head, the hearing aid body feels secure.
• The cable runs close to the side of your head.
• The hearing aid body sits near the top of your ear.
If the hearing aid body feels loose or the cable feels tight: Check whether the cable is too long or too short (see page 79). If it is, you can order a free replacement.

4Hearing aid and app controls
Power on
Power off
World Volume
Treble and bass
Focus
Left/Right Ear Balance
Modes

Hearing aid and app controls 4
3 1
Power onTo power on, fully close the battery door on each hearing aid.
You feel two clicks as each door closes. If you’re wearing the hearing aids, after 3 seconds, you hear a tone; 6 seconds later, the hearing aids power on.
note This delay gives you time to put on the hearing aids before the microphones turn on. This helps prevent the hearing aids from whistling.
Power offTo power off, partially open the battery door on each hearing aid until you feel a click.
notes
• Partially opening the battery doors prevents the batteries from falling out.
• When not using the hearing aids, make sure to partially open the battery doors to disconnect the batteries.

Hearing aid and app controls
3 2
4
World Volume You can make sounds louder or quieter by adjusting World Volume.
Adjust World Volume using the hearing aid controlsThe World Volume buttons are located on the back of each hearing aid.
Increase World Volume (make sounds louder)
Decrease World Volume (make sounds quieter)

Hearing aid and app controls
3 3
4
notes
• Pressing the World Volume buttons on either hearing aid adjusts World Volume in both ears.
• To quickly adjust World Volume, press and release either World Volume button multiple times.
Adjust World Volume using the Bose Hear app In the Bose Hear app, from the home screen, do one of the following:
• To increase World Volume (make sounds louder): Drag the World Volume wheel up.
• To decrease World Volume (make sounds quieter): Drag the World Volume wheel down.

Hearing aid and app controls
3 4
4
Treble and bassYou can make voices sound clearer using the treble and bass controls in the Bose Hear app.
Adjust treble and bass In the Bose Hear app, from the home screen, do one of the following:
• To increase treble (make sounds brighter): Drag the Treble and Bass wheel up.
• To increase bass (make sounds deeper): Drag the Treble and Bass wheel down.

Hearing aid and app controls
3 5
4
Focus You can adjust Focus settings so that the microphones focus on sounds coming from different areas around you.
When to use each Focus setting Each Focus setting is best for different situations.
Focus setting Description When to use
Everywhere
Helps you hear sounds from all directions. Best for general awareness and listening.
Use in most cases, including crossing the street, watching TV, or listening to music.
Front
Helps you hear sounds in front of you. Better for conversations when background noise is present.
Use when having a conversation in a noisy environment, like a restaurant or a party.

Hearing aid and app controls
3 6
4
Select a Focus setting
Step 1:In the Bose Hear app, from the home screen, tap the Focus button.
The Focus menu appears.
Step 2:Tap your preferred Focus setting.
BOSE HEARING AID

Hearing aid and app controls
3 7
4
Left/Right Ear Balance If sound seems uneven between your ears (one ear is louder than the other), you can even things out using the Ear Balance controls in the Bose Hear app.
Adjust Ear Balance
Step 1:In the Bose Hear app, from the home screen, tap the Balance button.
The Ear Balance menu appears.
BOSE HEARING AID

Hearing aid and app controls
3 8
4
Step 2:Do one of the following:
• To make sounds louder in your left ear: Drag your finger to the left along the semicircle.
• To make sounds louder in your right ear: Drag your finger to the right along the semicircle.
The number in the center shows the new setting. The higher the number, the louder that sounds are in that ear.
note To easily reset the Ear Balance to zero, tap the line at the top of the semicircle.

Hearing aid and app controls
3 9
4
ModesModes are groups of settings that you can create and quickly switch between depending on your situation. You can customize the suggested Modes — Focused Conversation, Outdoors, Music, and Television — or create your own.
note The suggested Modes are NOT personalized for your hearing needs. After selecting a suggested Mode, adjust the settings according to your preference, then save your changes.
Access ModesIn the Bose Hear app, from the home screen, tap the Modes button.

5Adjusting to the hearing aids
What to expect

Adjusting to the hearing aids 5
4 1
What to expectAdjusting to a new hearing aid can feel overwhelming at first, and it can take time to feel fully comfortable. With patience, though, you’ll soon be enjoying better hearing.
Here’s what you can expect during the first few days and weeks of using the hearing aids.
Comfort and fit • The eartips may feel strange or itchy inside your ear canal at first. This is normal, and you’ll get used to the feeling over time. However, if they feel painful, try a different eartip size (see page 75).
• The hearing aids might feel slightly uncomfortable to start. Try to wear them as much as possible to give yourself time to get used to the feeling.
TIP: If you aren’t comfortable wearing the hearing aids all day, try wearing them for a few hours at a time and gradually work up to longer use.

Adjusting to the hearing aids
4 2
5
Adjusting to new sounds • Sounds may seem loud or different. You may also notice background noises that you haven’t heard before. As your brain learns to recognize and filter out these sounds, they’ll become less apparent over time.
TIP: Wear the hearing aids as much as possible to become more quickly accustomed to new sounds.
• Your voice may seem loud at first. To help, practice talking with a friend in a familiar environment before using the hearing aids for other conversations.
• You might need to experiment with different hearing aid settings as you try the hearing aids in new environments. Over time, you’ll find settings that work for you and won’t need to adjust them as often.
TIP: Be patient! It can take some people up to several months to fully adjust to their hearing aids.

6Battery management
When to replace batteries
Remove the batteries
Battery life
Purchase batteries

Battery management
4 4
6
When to replace batteriesWhen you hear “Low battery,” from one of the hearing aids, replace the battery in that hearing aid.
Remove the batteries
Step 1:Gently pull the tab on the bottom of the hearing aid until the battery door fully opens.
Step 2:Push the battery out through the back of the battery door.
TIP: You can use the magnetic end of the hearing aid brush to easily remove the battery.

Battery management
4 5
6
WARNING
Do NOT store or replace batteries near where you store medication or near children. Battery ingestion can cause serious harm. If you think that you or someone else has swallowed a battery or placed a battery inside any part of the body, seek immediate medical attention.
Battery lifeEach battery can provide up to 4 days of use, assuming that you use both hearing aids for 14 hours per day.
note Battery life may vary by battery brand, age, chemistry, and frequency of use, or if you use a single hearing aid. When a replacement is needed, use only size 312 zinc-air batteries.
TIP: To extend battery life, when replacing batteries, leave the new batteries exposed to the air for 5 minutes before closing the battery doors (see page 20).
5min

Battery management
4 6
6
Purchase batteries You can purchase more batteries through the Bose Hear Better Team (see page 56) or from your local pharmacy. Search for size 312 zinc-air batteries.
7Bluetooth connections
Connect your phone
Connect a different phone
Clear the hearing aid device lists

4 8
7 Bluetooth connections
Bluetooth Low Energy wireless technology lets you control the hearing aids using the Bose Hear app. Before you can control the hearing aids, you must download the app and connect your phone with the hearing aids.
note Although connecting your phone lets you control the hearing aids using the app, it doesn’t let you wirelessly stream music or phone calls from your phone.
Connect your phoneFor first-time connection instructions, see page 18.
notes
• After powering on, the hearing aids enter Bluetooth pairing mode for 3 minutes. If it takes longer than that for you to connect a new phone using the app, power the hearing aids off and on again to reset the timer (see page 31).
• For the best experience, connect the hearing aids to your phone using the Bose Hear app instead of the Bluetooth menu on your phone.

4 9
7Bluetooth connections
Connect a different phoneYou can store up to 20 phones in the hearing aid device lists.
To connect a different phone, see page 18.
note If a previously-connected phone is within range of the hearing aids, turn the Bluetooth feature off on that phone before connecting a different phone.
Clear the hearing aid device lists
Step 1:Power on and wear both hearing aids (see page 31 and page 24).

5 0
7 Bluetooth connections
Step 2:On one of the hearing aids, press and hold the World Volume down button for 15 seconds until you hear “Bluetooth device list cleared.”
Step 3:Repeat step 2 for the other hearing aid.
Step 4:Delete the hearing aids from the Bluetooth list on your phone.
All devices are cleared, and the hearing aids are ready to connect.

8Care and maintenance
Store the hearing aids
Maintain the hearing aids
Replacement components
Limited warranty
Returns and exchanges
Update the hearing aids
Care and maintenance
5 2
8
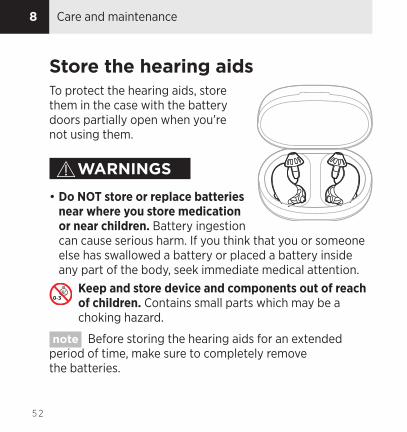
Store the hearing aids To protect the hearing aids, store them in the case with the battery doors partially open when you’re not using them.
WARNINGS
• Do NOT store or replace batteries near where you store medication or near children. Battery ingestion can cause serious harm. If you think that you or someone else has swallowed a battery or placed a battery inside any part of the body, seek immediate medical attention.
Keep and store device and components out of reach of children. Contains small parts which may be a choking hazard.
note Before storing the hearing aids for an extended period of time, make sure to completely remove the batteries.
Care and maintenance
5 3
8
Maintain the hearing aidsTo prevent damage and preserve sound quality, it’s important to regularly maintain the hearing aids and replace components.
MoistureMoisture can damage the hearing aids or cause them to fail.
Keep the hearing aids dry • Never wear the hearing aids in the shower, bath, or pool. • Protect the hearing aids from prolonged exposure to rain. • Never apply hairspray, cologne, creams, or other cosmetics while wearing the hearing aids.
If the hearing aids become excessively wet • Open both battery doors, remove the batteries, and leave the hearing aids and batteries in the case overnight with the lid open to dry.
• To thoroughly dry the hearing aids, store them in a container with desiccants or in a hearing aid drying case. This can help if you live in a humid climate or sweat often.

Care and maintenance
5 4
8
Daily maintenanceMaintain the eartips and microphones: After removing the hearing aids, remove earwax and debris from the eartips and microphones using the provided hearing aid brush or a soft, lint-free cloth.
Weekly maintenanceMaintain the cable and hearing aid body: Wipe the outside of the cable and hearing aid body with a soft, lint-free cloth.
Quarterly maintenanceReplace the eartips: Replace the eartips every 3 months (see page 56). If they become discolored or stiff or if they fall off when you remove the hearing aids, replace them immediately.
Microphones
EartipWax guard

Care and maintenance
5 5
8
Daily maintenanceMaintain the eartips and microphones: After removing the hearing aids, remove earwax and debris from the eartips and microphones using the provided hearing aid brush or a soft, lint-free cloth.
Weekly maintenanceMaintain the cable and hearing aid body: Wipe the outside of the cable and hearing aid body with a soft, lint-free cloth.
Quarterly maintenanceReplace the eartips: Replace the eartips every 3 months (see page 56). If they become discolored or stiff or if they fall off when you remove the hearing aids, replace them immediately.
Microphones
EartipWax guardReplace the wax guards: Replace
the white plastic screens at the ends of each speaker every 3 months. To order replacement wax guards, call the Bose Hear Better Team. For contact information, visit: worldwide.Bose.com/ HearContact
If the wax guards get blocked by earwax buildup or you notice that the hearing aids sound quieter than usual, replace the wax guards and the eartips immediately.
Yearly maintenanceReplace the cables: Replace the cables every year (see page 56). If the hearing aids sound quieter than usual or if audio is crackly or intermittent, replace the cables immediately.

Care and maintenance
5 6
8
Replacement components Replacement components can be ordered through the Bose Hear Better Team.
Visit: worldwide.Bose.com/Support/SoundControl
• Open or closed eartips, size 1, 2, or 3
• Carrying case
• Batteries, size 312
• Cable, size 1, 2, or 3
• Hearing aid brush
Limited warrantyThe hearing aids are covered by a limited warranty. Visit our website at global.Bose.com/warranty for details of the limited warranty.
To register your product, visit global.Bose.com/register for instructions. Failure to register will not affect your limited warranty rights.

Care and maintenance
57
8
Returns and exchanges Satisfaction is guaranteed on all Bose products purchased by consumers directly from Bose. We want you to be thrilled, so if you’re not satisfied with your purchase for any reason, simply return it within the trial period for a full refund. Please see the Bose Product Support page at worldwide.Bose.com/Support/SoundControl for details.
If you did not purchase your product directly from Bose, please see the store from which you purchased your product for their policies.
Update the hearing aidsThe hearing aids update automatically when connected to the Bose Hear app. Follow the app instructions.

9Troubleshooting
Try these solutions first
Other solutions
Eartip troubleshooting
Cable size troubleshooting

Troubleshooting 9
5 9
Try these solutions first If you experience problems with the hearing aids, try these general solutions first:
• Open and fully close the battery doors (see page 31). • Replace the batteries (see page 20). • Download the Bose Hear app and run available software updates (see page 19).
• Make sure that your phone supports Bluetooth Low Energy (also called Bluetooth Smart). All phones that are compatible with iOS 10 and newer and most phones that are compatible with Android™ 5.0 and newer support Bluetooth Low Energy.
• If Bluetooth communication is disrupted while in proximity to a Wi-Fi® device or other 2.4 GHz ISM band emitter, move away from the potential interfering source by at least 10 feet (3 meters) to help regain connectivity.
• If your hearing aids do not operate as intended, including with the Bose Hear app, please ensure that they are paired with the appropriate phone.

Troubleshooting
6 0
9
Other solutions If you could not resolve your issue, see the table below to identify symptoms and solutions to common problems. If you are unable to resolve your issue, contact the Bose Hear Better Team.
Visit: worldwide.Bose.com/HearContact
Problem Solutions
Hearing aids don’t power on (no amplification)
Make sure both battery doors are fully closed. You should feel two clicks.
While wearing the hearing aids, close the battery doors and wait 3 seconds. If you hear a tone, the hearing aids are powering on (see page 31).
Make sure both batteries are inserted correctly (see page 20).
Clear any debris or grease from the batteries.
Replace the batteries (see page 20).

Troubleshooting
6 1
9
Problem Solutions
Unable to locate the Bose Hear app
Type app.Bose.com/SC into the address bar of your phone’s web browser, not a search bar or separate search application.
On your phone, open the App Store or Google Play store and search for “Bose Hear.”
note There are many apps from Bose. Make sure to download the Bose Hear app.
Visit: worldwide.Bose.com/Support/SoundControl to see how-to videos.

Troubleshooting
6 2
9
Problem Solutions
Hearing aids don’t connect to phone
On your phone:
• Turn the Bluetooth feature off and then on.
• Delete the hearing aids from the Bluetooth list on your phone. Connect again.
Open and fully close both battery doors (see page 31). This causes the hearing aids to enter Bluetooth pairing mode for 3 minutes. If it takes longer than that to connect them to your phone using the app, repeat to reset the timer.
Move your phone closer to the hearing aids and away from any interference or obstructions.
(continued on next page)
Troubleshooting
6 3
9
Problem Solutions
Hearing aids don’t connect to phone
(continued from previous page)
If another previously-connected phone is within range, turn the Bluetooth feature off on that phone.
Clear the hearing aid device lists (see page 49).
Connect the hearing aids to a different phone (see page 19).
Replace the batteries (see page 20).
Visit: worldwide.Bose.com/Support/SoundControl to see how-to videos.

Troubleshooting
6 4
9
Problem Solutions
Bose Hear app doesn’t work on phone
Restart your phone.
Make sure the Bose Hear app is compatible with your phone. Visit the Bose Hear page on the App Store or Google Play store for compatibility information.
Uninstall the Bose Hear app on your phone, then reinstall the app (see page 19).
World Volume doesn’t adjust
Try adjusting World Volume using the hearing aid controls (see page 32).
Try adjusting World Volume using the Bose Hear app (see page 33).
Open and fully close both battery doors (see page 31).

Troubleshooting
6 5
9
Problem Solutions
Poor sound quality
Clear any debris or wax buildup from the eartips and microphones (see page 53).
Dry the hearing aids: Open both battery doors, remove the batteries, and leave the hearing aids and batteries in the case overnight with the lid open (see page 53).
Replace the batteries (see page 20).
Make sure that the Ear Balance controls are adjusted to your desired settings (see page 37).
Replace the wax guards (see page 55).
Replace the cables (see page 56).

Troubleshooting
6 6
9
Problem Solutions
Hearing aids aren’t loud enough (not enough amplification)
Increase World Volume (see page 32).
Clear any debris or wax buildup from the eartips and microphones (see page 53).
If you’re using open eartips, try replacing them with the same size closed eartips (see page 76).
Replace the wax guards (see page 55).
Replace the cables (see page 56).

Troubleshooting
67
9
Problem Solutions
Hearing aids are uncomfortable
Make sure that you’re putting the hearing aids on correctly (see page 24).
Choose another eartip size (see page 75). You may need a different size for each ear.
Check whether you need a different size cable (see page 29).
It can take time to get used to the feeling of wearing hearing aids. If necessary, you can wear them for a few hours at a time to start (see page 41).

Troubleshooting
6 8
9
Problem Solutions
Hearing aids falling out of ears
Make sure that you’re placing the eartips in your ears correctly. Remember to insert each eartip deep into your ear canal until the cable is flat against your ear and the eartip feels secure (see page 24).
Choose another eartip size (see page 75). You may need a different size for each ear.
Eartips falling off
Securely fasten the eartips to the speakers (see page 77).
Replace the eartips (see page 56).
Eartips discolored or stiff
Replace the eartips (see page 56).

Troubleshooting
6 9
9
Problem Solutions
Eartip stuck in ear
Contact a hearing health care professional for removal.
Lost eartips Contact the Bose Hear Better Team for replacement eartips (see page 56).
Cable detached from hearing aid
Refer to the replacement cable quick start guide for instructions on reattaching the cable. Visit: worldwide.Bose.com/Support/ SoundControl
Troubleshooting
70
9
Problem Solutions
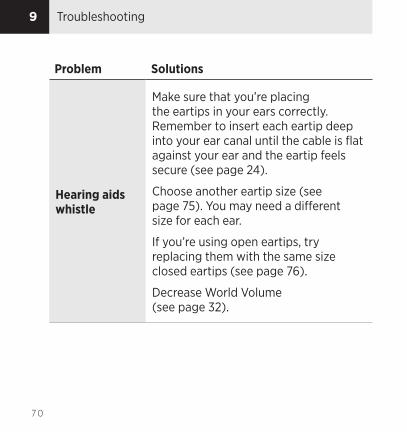
Hearing aids whistle
Make sure that you’re placing the eartips in your ears correctly. Remember to insert each eartip deep into your ear canal until the cable is flat against your ear and the eartip feels secure (see page 24).
Choose another eartip size (see page 75). You may need a different size for each ear.
If you’re using open eartips, try replacing them with the same size closed eartips (see page 76).
Decrease World Volume (see page 32).

Troubleshooting
7 1
9
Problem Solutions
Can’t hear phone call
On your phone, increase the volume.
If you’re in private, turn on speakerphone and hold your phone in front of you.
Make sure you’re not pressing your phone too hard against your ear. This can block the hearing aid microphones and cause the call to sound muffled.
Try holding your phone so that the phone speaker is slightly above and behind your ear. This puts it closer to the hearing aid microphones.
note It can take some practice to learn how to hold your phone relative to the hearing aid. Experiment with different positions to find what works best for you.

Troubleshooting
7 2
9
Problem Solutions
Hearing aids whistle when on the phone
Tilt your phone speaker slightly away from the hearing aid on that ear.
Hearing aids sound different from each other
Adjust World Volume (see page 32). This syncs audio settings between the hearing aids.
Sound of own voice is too loud
Practice listening to new sounds and talking with a friend in a familiar environment before you use the hearing aids for conversation (see page 41).
If you’re using closed eartips, try replacing them with the same size open eartips (see page 76).

Troubleshooting
7 3
9
Eartip troubleshootingCheck if the eartips are too big or too smallIf one or both eartips match the descriptions below, try a different eartip size (see page 75).
Too big: • The eartip feels painful or uncomfortable. • It’s difficult to insert the eartip into your ear canal. • The bend in the cable close to the eartip doesn’t sit flat against your ear.
Too small: • The eartip feels loose or insecure. • If you shake your head and open your mouth, the eartip feels painful or moves.
Correct size: • The eartip feels secure, though it may feel strange at first. • If you shake your head and open your mouth, the eartip feels comfortable and doesn’t move.

Troubleshooting
74
9
Eartip sizesThe eartip size is marked on the eartip packaging as size 1, size 2, or size 3.
SIZE 1 SIZE 2 SIZE 3
Size 2 open eartips come attached to the hearing aids.
note Eartip size doesn’t relate to cable length. You might have a different eartip size and cable size for the same hearing aid.
Troubleshooting
7 5
9
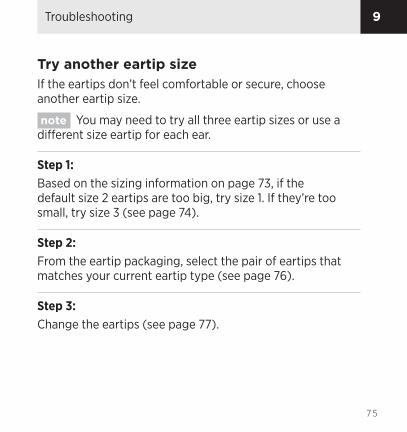
Try another eartip sizeIf the eartips don’t feel comfortable or secure, choose another eartip size.
note You may need to try all three eartip sizes or use a different size eartip for each ear.
Step 1:Based on the sizing information on page 73, if the default size 2 eartips are too big, try size 1. If they’re too small, try size 3 (see page 74).
Step 2:From the eartip packaging, select the pair of eartips that matches your current eartip type (see page 76).
Step 3:Change the eartips (see page 77).

Troubleshooting
76
9
Eartip typesWithin each eartip size, there are two types of eartips: open and closed.
Open eartips (attached to the hearing aids) help your voice sound more natural. They have holes around the center of the eartip.
Closed eartips provide more bass and allow you to comfortably use a higher World Volume setting.
Try another eartip typeDuring first-time setup, use the default open eartips and focus on finding the correct size for each ear.
After using the hearing aids for some time, though, if you feel like you need more amplification or hear whistling at higher World Volume settings, consider trying closed eartips.

Troubleshooting
7 7
9
Change the eartips
Step 1:Hold the speaker and firmly pull the current eartip off.
Step 2:Choose a new eartip size (see page 75) and/or eartip type (see page 76).
note Each eartip can work with either the left or right hearing aid.
Step 3:Align the opening of the new eartip with the speaker and slide the eartip onto the speaker.

Troubleshooting
7 8
9
Step 4:Gently tug the eartip to make sure that it’s securely fastened on the speaker.
note Don’t wear the hearing aid if the eartip isn’t secure. Otherwise, the eartip could become stuck in your ear canal (see page 69).
Step 5:Repeat steps 1 – 4 for the other hearing aid, if necessary.
Step 6:Put on the hearing aids (see page 24).
Step 7:Check your fit (see page 28).

Troubleshooting
7 9
9
Cable size troubleshootingCheck if the cables are too long or too shortIf one or both cables match the descriptions below, use the provided cable sizing tool to measure your exact size (see page 81). If you need a different size, you can order a free replacement.
Too long: • The cable bends away from your head or hangs above your ear.
• The hearing aid body sits far back behind your ear or feels loose.
Too short: • The cable feels tight or pulls the eartip partially out of your ear canal.
• If you look straight in a mirror, you see the hearing aid body over the top of your ear.

Troubleshooting
8 0
9
Correct size: • If you shake your head, the hearing aid body feels secure.
• The cable runs close to the side of your head.
• The hearing aid body sits near the top of your ear.

Troubleshooting
8 1
9
Measure your cable size
Step 1:Ask a friend or family member to help (recommended).
They can make things easier by checking that the cable sizing tool is on your ear correctly and taking a photo for you.
note If nobody’s around to help, you can use a mirror to check the cable sizing tool and use your phone camera to take a photo.
Step 2:Locate the cable sizing tool provided in the box.
You’ll use it to measure which cable size you need for each ear.

Troubleshooting
8 2
9
Step 3:Compare the red and blue sides of the tool.
Use the red side to measure your right ear and the blue side to measure your left ear.
Step 4:Place the tool on your right ear. It should hook around the front of your ear and lie flat against the side of your head.
Make sure that the dotted line near the top of the tool is level and aligned with the top of your ear.
Dotted line

Troubleshooting
8 3
9
Step 5:Ask a friend or family member to take a photo of your ear.
Make sure that you can see your ear canal in the photo.
note If you’re taking the photo yourself, rest your elbow on a surface and hold your phone facing you. Position yourself so that you can see your face in your phone’s front-facing camera display. Then, turn your head and take a photo of your ear.
Ear canal

Troubleshooting
8 4
9
Step 6:Look at the photo and see which colored band aligns with the top of your ear canal.
The number in the band is the cable size you need. Size 1
Size 2
Size 3

Troubleshooting
8 5
9
Step 7:Repeat steps 4 – 6 for your left ear.
note You may need a different cable size for each ear.
Step 8:
Compare your measurements for each ear.
• If you need size 2: Size 2 cables come attached to the hearing aids, so you already have the correct size for that ear.
• If you need size 1 or 3: Order a free replacement cable through the Bose Hear Better Team. Visit: worldwide.Bose.com/Support/SoundControl

Symbols and descriptions
10Regulatory and legal information

10
8 7
Regulatory and legal information
This equipment has been tested and found to comply with the limits for a Class B digital device, pursuant to Part 15 of the FCC Rules. These limits are designed to provide reasonable protection against harmful interference in a residential installation. This equipment generates, uses, and can radiate radio frequency energy and, if not installed and used in accordance with the instructions, may cause harmful interference to radio communications. However, there is no guarantee that interference will not occur in a particular installation. If this equipment does cause harmful interference to radio or television reception, which can be determined by turning the equipment off and on, the user is encouraged to try to correct the interference by one or more of the following measures:
• Reorient or relocate the receiving antenna.
• Increase the separation between the equipment and receiver.
• Connect the equipment into an outlet on a circuit different from that to which the receiver is connected.
• Consult the dealer or an experienced radio/TV technician for help.
Changes or modifications not expressly approved by Bose Corporation could void the user’s authority to operate this equipment.

8 8
10 Regulatory and legal information
This device complies with part 15 of the FCC Rules. Operation is subject to the following two conditions: (1) This device may not cause harmful interference, and (2) this device must accept any interference received, including interference that may cause undesired operation.
This device complies with FCC radiation exposure limits set forth for general population. This transmitter must not be co-located or operating in conjunction with any other antenna or transmitter.
FCC ID: A94BMD0012
Radio Technology: Bluetooth Low Energy (BLE) and proprietary technologies.
Radio Transceiver Frequency Range: 2.4 to 2.4835 GHz
Radio Receiver Bandwidth: 2 MHz
Modulation Type: 1 Mb/s and 2 Mb/s GFSK
Peak Effective Isotropic Radiated Power: 0 dBm
This equipment has been tested and found to comply with the limits per CISPR 11 class B.

8 9
10Regulatory and legal information
This symbol means the product must not be discarded as household waste, and should be delivered to an appropriate collection facility for recycling. Proper disposal and recycling helps protect natural resources, human health and the environment. For more information on disposal and recycling of this product, contact your local municipality, disposal service, or the shop where you bought this product.
Operating Conditions: Temperature Range: 32°F – 104°F (0°C – 40°C) Humidity Range: 0 – 95% RH Pressure Range: 70 – 110 kPa
Storage/Transport Conditions: Temperature Range: -13°F – 158°F (-25°C – 70°C) Humidity Range: 0 – 90% RH Pressure Range: 70 – 110 kPa
Time to warm from minimum storage temperature before use: 1 hour (ambient temperature 68°F or 20°C)
Time to cool from maximum storage temperature before use: 1 hour (ambient temperature 68°F or 20°C)

9 0
10 Regulatory and legal information
Dimensions (Single Hearing Aid): Overall with cable: 33 mm long x 23 mm wide x 18 mm thick Overall without cable: 30 mm long x 14 mm wide x 8 mm thick
Disposal: The Bose SoundControl™ hearing aids and components are electronic components which should be discarded in accordance with national, regional, and local regulations.
Expected Service Life of Product and Components: 2 Years
Classification: The hearing aids are classified as a Type B Applied Part, IEC 60601-2-66 b
This product does not contain natural rubber latex.
d This product is provided non-sterile.
Do NOT use if package is damaged.
The Bose SoundControl™ hearing aids comply with the following domestic and international regulations for medical devices:
IEC 60601-1:2005/A1:2012
IEC 60601-1-2:2014
IEC 60601-2-66:2019
IEC 60601-1-6:2010
FCC 47 Part 15.247

9 1
10Regulatory and legal information
Features per ANSI/CTA-2051:2017
Feature Category The Bose SoundControl™ hearing aids
Fixed or Level-Dependent Frequency Equalization
have level-dependent frequency equalization that is adjusted via user controls.
Level- Dependent Gain/ Compression
utilize 12-channel wide dynamic range compression to make conversation easier without making loud sounds too loud.
Noise Reduction make steady noises (like vacuum cleaners, air conditioners, etc.) less loud.
Signal-to-Noise Ratio Enhancement
have user-selectable directional microphones to emphasize sounds from in front, making conversations in noisy places easier.
Feedback Control reduce feedback (whistling).
Personalization
are self-tuned by the user either via an app on a smart device (phone or tablet) or by using the on-device controls. Individual hearing thresholds are not required to personalize the amplification settings.
Coupling to the Ear
have a user-adjustable fit for greater comfort and better sound quality. The eartip is a soft, conical, open or closed tip that rests deep in the ear canal.
Wireless Connectivity use Bluetooth technology to control the hearing aids via a paired smart device.

9 2
10 Regulatory and legal information
Guidance and Manufacturer’s Declaration – Electromagnetic EmissionsThe hearing aid is intended for use in the electromagnetic environment specified below. The user of the hearing aid should assure that it is used in such an environment.
Emissions Test IEC60601 Test Level
Compliance Level
Electromagnetic Environment Guidance
RF emissions
CISPR 11Group 1 Group 1
The hearing aid uses RF energy only for its internal function. Therefore, its RF emissions are very low and are not likely to cause any interference in nearby electronic equipment.
RF emissions
CISPR 11Class B Class B
The hearing aid is suitable for use in all establishments, including domestic establishments and those directly connected to the public low-voltage power supply network that supplies buildings used for domestic purposes.

9 3
10Regulatory and legal information
Guidance and Manufacturer’s Declaration – Electromagnetic ImmunityThe hearing aid is intended for use in the electromagnetic environment specified below. The user of the hearing aid should assure that it is used in such an environment.
Immunity Test IEC60601 Test Level Compliance Level
Electrostatic discharge (ESD)
IEC 61000-4-2
+/- 8 kV contact
+/- 15 kV air
+/- 8 kV contact
+/- 15 kV air
Radiated RF EM Fields
IEC 61000-4-3
10 V/m
80 MHz – 2.7 GHz
80% AM at 1 kHz
10 V/m
80 MHz – 2.7 GHz
80% AM at 1 kHz

9 4
10 Regulatory and legal information
Immunity Test IEC60601 Test Level Compliance Level
Proximity fields from RF wireless communications equipment
IEC 61000-4-3
9 V/m; 710, 745, 780 MHz; Pulse modulation 18 Hz
9 V/m; 5240, 5500, 5785 MHz; Pulse modulation 217 Hz
27 V/m; 385 MHz; Pulse modulation 18 Hz
28 V/m; 450 MHz FM +/- 5 kHz deviation; 1 kHz sine
28 V/m; 810, 870, 930 MHz; Pulse modulation 18 Hz
28 V/m; 1720, 1845, 1970, 2450 MHz; Pulse modulation 217 Hz

9 5
10Regulatory and legal information
Measurements per ANSI S3.22:2014 (or per ANSI/CTA-2051:2017 where denoted with *) Result
Maximum output (OSPL90) curve See Figure 1
Maximum output (OSPL90) 113 dB SPL
Fitted OSPL90 Up to 108 dB SPL
High-frequency average (HFA) OSPL90 106 dB SPL
High-frequency average full-on gain (HFA-FOG) 30 dB
Reference test gain 29 dB
Frequency response curve See Figure 2
Frequency range < 200 – 8000 Hz
Harmonic distortion < 0.5% typical, < 1% max
Equivalent input noise < 23 dB SPL typical, < 27 dB SPL max
Battery current drain 2.8 mA
Latency* 5.5 ms

9 6
10 Regulatory and legal information
Frequency (Hz)
Full-On Gain (FOG50)
Gai
n (d
B)
1000 100000100
10
20
30
40
50 Figure 2: Nominal frequency response curve as measured in a 2 cc coupler.
Frequency (Hz)
Maximum Output (OSPL90)
Out
put (
dB S
PL)
1000 1000070
100
80
90
100
110
120 Figure 1: Nominal OSPL90 curve as measured in a 2 cc coupler.

97
10Regulatory and legal information
Please complete and retain for your records
The serial numbers are located on the bottom of each hearing aid.
Serial number: ___________________________________
Model number: BMD0012
Please keep your receipt with this document. Now is a good time to register your Bose product. You can easily do this by going to global.Bose.com/register
Proper operation of your Bose product requires a safe, private, and secure operating environment. To ensure your security, Bose recommends following best practices for securing your home network and mobile device. For more information, refer to the US Federal Trade Commission’s guidance on online security. Visit: consumer.ftc.gov/topics/online-security

9 8
10 Regulatory and legal information
The Bose Privacy Policy is available at worldwide.bose.com/privacypolicy
Apple and the Apple logo are trademarks of Apple Inc., registered in the U.S. and other countries. App Store is a service mark of Apple Inc.
The Bluetooth® word mark and logos are registered trademarks owned by Bluetooth SIG, Inc. and any use of such marks by Bose Corporation is under license.
Android and Google Play are trademarks of Google LLC.
Wi-Fi is a registered trademark of Wi-Fi Alliance®.
Bose, SoundControl, and the Bose Hear app icon are trademarks of Bose Corporation.
©2021 Bose Corporation. No part of this work may be reproduced, modified, distributed, or otherwise used without prior written permission.
h BMD0012

9 9
10Regulatory and legal information
Symbols and descriptionsSymbol Description
gBatch code
Bluetooth
hCatalogue number
Caution
Choking hazard
a Consult instructions for use
w Customer support
NDate of Manufacture
Symbol Description
Does not contain latex
Do not use if package is damaged
s Downloads
o Forum
Magnetic material
MManufacturer
dNon-sterile
Note

1 0 0
10 Regulatory and legal information
Symbol Description
m Phone
fSerial number
312 Size 312 zinc-air battery
b Type B applied part
W Videos
Waste Electrical and Electronic Equipment Directive symbol

1 0 1
10Regulatory and legal information

1 0 2
10 Regulatory and legal information

1 0 3
10Regulatory and legal information
©2021 Bose Corporation, 100 The Mountain Road, Framingham, MA 01701-9168 USA AM862366-0010 Rev. 07
wworldwide.Bose.com/Support/SoundControl
m o s W
global.Bose.com/warranty