Embed Size (px)
Citation preview

xAPI Bootcamp 2014 June 18-19, 2014
Orlando, FL xAPI Web Content Development: Starting from scratch
TYLER MULLIGAN ADL Technical Team
ADVANCED DISTRIBUTED LEARNING (ADL) INITIATIVE [email protected]
HTTP://WWW.ADLNET.GOV TWITTER: @tylerADL
LINKED IN: http://linkedin.com/in/tylermulligan
JASON HAAG ADL Technical Team
ADVANCED DISTRIBUTED LEARNING (ADL) INITIATIVE [email protected]
HTTP://WWW.ADLNET.GOV TWITTER: @mobileJSON
LINKED IN: http://linkedin.com/in/jasonhaag

xAPI Web Content Development: Starting from scratch
Integration of the Experience API (xAPI) using jQuery Mobile (jQM) version 1.4.2 with demos and templates based on xapijqm which handle the heavy lifting in communicating statements to a Learning Record Store (LRS)
Date/Time
Wednesday, June 18, 2014 8:45AM -10:15AM, Track 2
Description The purpose of this tutorial is to showcase how to use xAPI with a web course and complimentary web performance support resource. This is a conceptual use case focused onstudents in culinary school that are required to take a module on how to make french toast. The course uses xAPI to track the learners progress in the course, access to resources, and will show a final score on their test. Upon completion of the module they are asked to perform by using the steps for making french toast. The students are provided the performance support resource to reference (if needed). The xAPI will also track which stepsand videos the students accessed the most by using xAPI. Using xAPI to track interactions with the performance support job aid, instructors can best understand which parts of the course might need improvement in terms of clarity and directions. The xAPI is used to provide insights into usage patterns and performance.
Duration
90-minute Bring Your Own Laptop (B.Y.O.L)
Learning Objectives
Work with HTML5 jQuery Mobile components and code samples (list
views, modal windows, table of contents, glossary, checklists, quiz) to create a prototype mobile course and companion performance support app
Learn how to add basic xAPI statements to track user interactions with checklists, pages, quizzes, and videos.
Learn how to work with existing JQM + xAPI templates on GitHub to get started with your own project.
Prerequisites
Experience with jQuery, jQuery Mobile and Javascript are a plus Experience with xAPI is a plus, but not required Experience with HTML A laptop Web Browser (preferably Chrome for testing) HTML or Text editor with syntax highlighting (notepad++, sublime, geany,
dreamweaver, etc.)

Resources
Companion website which includes templates and demos
http://adlnet.github.io/xapi-jqm/
jQuery Mobile: http://jquerymobile.com Experience API: http://xapi.adlnet.gov xAPI Wrapper: https://github.com/adlnet/xAPIWrapper
Outline
I. Demo of Web Course and Performance Support Samples
II. Introduction to jQuery Mobile and xAPI
a. What is jQuery Mobile? b. Using xAPI with jQuery Mobile
III. Using Templates to Start Your Project
IV. Handson Exercises
a. Download the package from Github b. Configuration options c. Course Widgets
i. Table of Contents ii. Glossary iii. Checklist iv. Video Tracking v. Glossary vi. Quiz vii. Modal (popup) Window
d. Performance Support Widgets
i. Checklist ii. Video tracking

xAPI Web Content Development: Starting from scratch
I. Demo of Web Course and Performance Support Samples

II. Introduction to jQuery Mobile and xAPI This hands-on exercise will provide you with an opportunity to learn how to create xAPI web content from scratch that will render in any web browser, but more importantly it will allow you to create consistent mobile content and web apps that can be deployed to any smartphone platform. This content will leverage the jQuery Mobile framework which is now included as a component in Adobe Dreamweaver. However, you don’t need Dreamweaver to participate or follow along. We will only be covering some of the introductory aspects of using the jQuery Mobile Framework. But first we’ll briefly discuss the following:
What is jQuery? What is jQuery Mobile? How you can use xAPI with jQuery Mobile
What is JQuery? jQuery is a feature-rich JavaScript library. It makes things like HTML document traversal and DOM manipulation, event handling, animating, and Ajax much simpler with an easy-to-use API and minimal query syntax that works across a multitude of browsers.
What is JQuery Mobile? Let’s look at what makes up the anatomy of page in jQuery Mobile. Here are some important things to understand about the jQuery Mobile framework:
The jQuery Mobile "page" structure is optimized to support both unlimited external HTML pages and internally linked "pages" (using AJAX) within one HTML file. In our exercise, we will be working with both types.
In the 'head', references to jQuery, jQuery Mobile and the mobile theme CSS are all required. These are generated for you anytime you create a new page.
Inside the <body> tag, each view or "page" on the mobile device is identified with an element (usually a div) with the data-role="page" attribute. The jQuery Mobile framework uses HTML5 data- attributes to allow for markup-based initialization and configuration of widgets. View the data- attribute reference to see all the possible attributes you can add to pages: http://api.jquerymobile.com/data-attribute/
Within the "page" container, any valid HTML markup can be used, but for typical pages in jQuery Mobile, the immediate children of a "page" are divs with data-roles of "header", "content", and "footer".
<div datarole="page"> <div datarole="header">...</div> <div datarole="content">...</div>

<div datarole="footer">...</div> </div>
III. Using Templates to Start Your Project
Several of the components and widgets used in the course and performance support demos have been abstracted and broken out into minimal templates for easy reuse. Check out the templates folder on github for starting points: https://github.com/adlnet/xapi-jqm/tree/master/templates To start a new project using one of these templates, simply download the zip package from github and edit the HTML using your text or HTML editor.
IV. Hands-on Exercises The following exercises are intended to familiarize you with how the demos are structured and to get you started with creating your own examples or projects. For the sake of brevity, these exercises will not cover JQuery or JQuery mobile concepts in depth. The are only intended to serve as a starting point and to stimulate new tracking ideas when using the xAPI.
Download the Packages from Github 1. Go to: https://github.com/adlnet/xapi-jqm and download the repository
(https://github.com/adlnet/xapi-jqm/zipball/master) 2. Extract the zip package to a location on your local hard drive where you usually work on web
projects.
Configuration options The wrapper at a minimum needs to know the url of the LRS, though most cases will also require the authorization information as well.
1. To edit the configuration options, browse to folder where you extracted the zip file downloaded from github: xapijqm / demos / course / js /
2. You can edit the LRS endpoint, username, and password for your LRS credentials. For this tutorial we are
using the ADL LRS. If you would like to test this content with the your own LRS or the ADL LRS you need to first establish your own account. To continue with the demo, open the config.js file to see the LRS credentials.
Example LRS credentials

Config.endpoint = "https://lrs.adlnet.gov/xapi/";
Config.user = "jqm";
Config.password = "xapijqm";
3. Additionally, there are other configuration options in the config.js file for global variables that map to activity ids and types. Below are a few examples of global variables in config.js.
“Global” Variables
var moduleID = "http://adlnet.gov/xapi/samples/xapi-jqm/course/"; // trailing
slash
var moduleName = "How to Make French Toast xapi-jqm Course Demo";
var courseType = "http://adlnet.gov/xapi/activities/course";
For more documentation on configuration options, you can access the readme for the demos:
https://github.com/adlnet/xapijqm/tree/master/demos/course
Course Widgets
Table of Contents
The course demo uses a table of contents to provide a visual display of the learner’s progress through each of the lessons or sections in the course. In the past with SCORM this was handled by the LMS leaving the developer with limited options for controlling the visual indicators. By using a table of contents widget and xAPI the developer has full control of how to visually convey the progress. JQuery Mobile comes packaged with a library of icons that could be used for this purpose. For more information on using icons in JQuery or the grunticon loader read the JQuery Mobile documenation here: http://demos.jquerymobile.com/1.4.2/icons/
Follow the list of steps below to understand how progress through a "chapter" is tracked and displayed in the table of contents:
1. Browse to the “course” folder and open index.html in an editor. 2. In the content section of the page ( <div datarole=”content”> ) notice that the table of contents is set
up by using a list view using jquery mobile data attributes. 3. For each list item, you can edit the text if you want to change the titles of any of the table of contents /
menu items. Usually these items will equate to lessons or chapters within the course where there is a start and end point that you would like to track progress and completion.
4. Allow everyone to edit the table of contents menu items and their own custom text. Then have them save changes and open index.html in a browser.
5. In the head section of the HTML document, you will see the function that tracks the completion of the chapters. For this demo, we are using the check mark icon. Until the chapter has been completed, the visual progress indicator is in the form of an empty circle next to each list item. Once the chapter is completed, it will change to a check mark.

6. The getChaptersCompleted() function checks to see if which chapters have been completed before the table of contents is loaded. The completion of each chapter is executed on the next button on the last page of each lesson or chapter. Note: Pages can consist of independent HTML files or they can be internal AJAX pages ( <div datarole=”page”> ) loaded into a single HTML page.
7. Next, browse to the “chapters” folder and open intro.html. 8. Look in the footer section of the page ( <div datarole=”footer”> ) to see where the next button is
setting the chapter to complete by triggering the setChapterComplete() function when the OnClick event handler is fired.
9. Next, we will look at where the xAPI statement is being set in the setChapterComplete() function. Browse to the “js” folder and open the functions.js file.
10. Go to line 74 in functions.js to analyze the setChapterComplete() function. On line 90, the xAPI statement is dynamically grabbing the ID of the module and the chapter for the object and using the verb “completed” to send this data to the LRS.
Glossary
The glossary widget provides for some valuable opportunities for tracking with xAPI. For example, in a course you could provide contextual links to terms in the glossary for your learners. This could be valuable for a teacher wanting to see what percentage of students may have searched for the meaning of a specific word used in the course. The teacher could leverage the results from xAPI tracking to generate ideas for adding specific terms to followon quizzes or tests.
The following steps will walk you through creating a glossary example and linking it to an HTML page that will send a xAPI statement to the LRS.
1. Browse to the “templates > glossary” folder. 2. Open the “” file as we will be using the glossary template. 3. Next, let’s create some new terms. Under the “B” and “C” section, create the following
terms on the glossary.html page. You will do this by creating a new HTML list item for each term. Add these under the <li data-role="list-divider">B</li> section in alphabetical order.
a. baking b. cream
4. You can copy and paste the previous glossary entries to start if you aren’t comfortable typing the HTML by hand.
5. Next, you will link to these terms from an a separate HTML file. Open the index.html page.
6. Browse to the ( <div data-role="content"> ) section and after the link to the glossary page, add a new link to a glossary term within the glossary page. There are several options for opening up glossary terms using Jquery mobile transitions. For more information on how to create jquery mobile transitions, visit the documentation here: http://demos.jquerymobile.com/1.4.2/transitions/ and for more information ont he different types of dialogs and popups that are possible, visit these links: http://demos.jquerymobile.com/1.4.2/transitions/pages-dialog/ and http://demos.jquerymobile.com/1.4.2/transitions/popup/
7. Here’s an example of a link to a glossary term that is popped up within the current page:
a. <a href="glossary.html#bowl" data-transition="pop">Bowl</a> 8. Save the index.html page and preview in a browser.
Checklist
Reports checked and unchecked
Video Tracking
Utilizes popcorn.js and xapipopcorn.js to track videos
Launched Suspended Resumed Completed
Quiz
Quizzes can be built from three types of inputs:
Checklist (multiple choice selection)
Radio (single choice selection)
Text Box (string comparison)
The HTML is consists of jQuery Mobile Widgets, a gradeQuestion() function is triggered in the quizfunctions.js file
in an onclickattribute of the next button.
Answers for quizzes are defined in by an array CORRECT_QUIZ_ANSWERS. The example below has answers that
correspond with the input types listed above: checklist, radio, textbox.
Configuration
Most configuration is handled in the quiz-functions.js file.

The quiz should have a unique ID that identifies the statements in the LRS, in this example, the moduleID is pulled from the config.js and we append a quiz specific string to it:
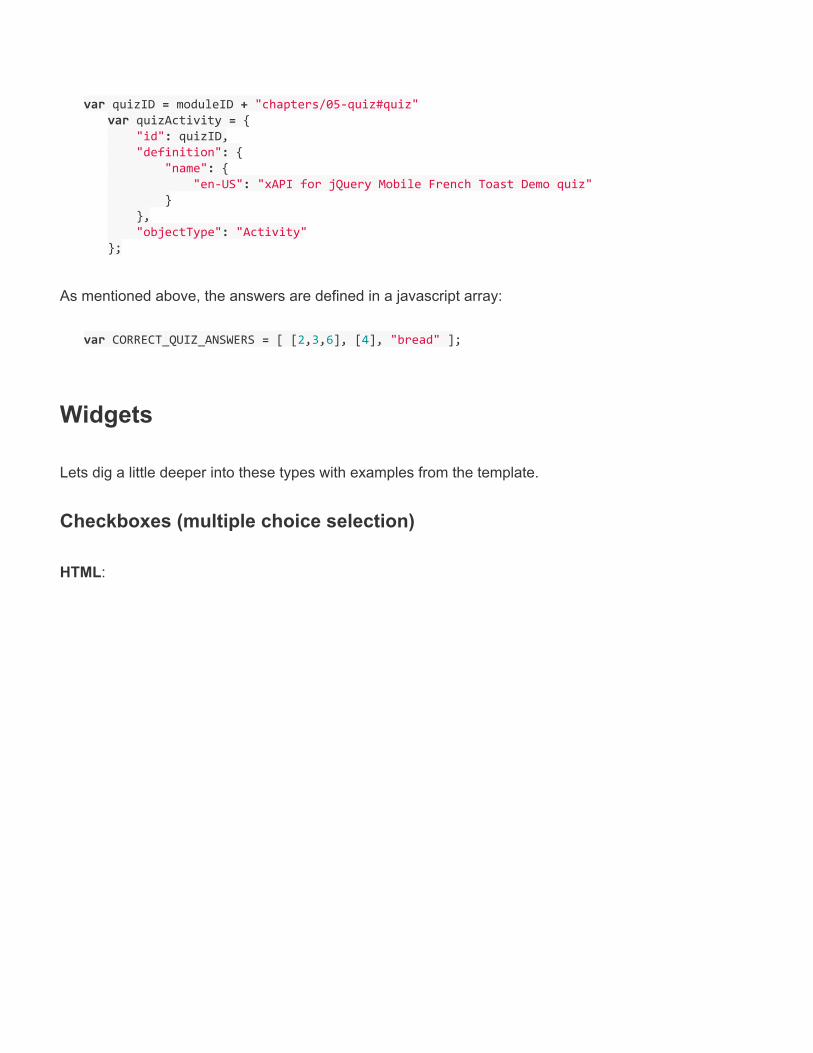
var quizID = moduleID + "chapters/05-quiz#quiz" var quizActivity = "id": quizID, "definition": "name": "en-US": "xAPI for jQuery Mobile French Toast Demo quiz" , "objectType": "Activity" ;
As mentioned above, the answers are defined in a javascript array:
var CORRECT_QUIZ_ANSWERS = [ [2,3,6], [4], "bread" ];
Widgets
Lets dig a little deeper into these types with examples from the template.
Checkboxes (multiple choice selection)
HTML:

<div data-role="content"> <div class="infoblock"> <h2>1. What ingredients are required to make french toast?</h2> </div> <form id="p1_form"> <fieldset data-role="controlgroup"> <input type="checkbox" name="quiz-q1[]" id="q1-chocolate"><label for="q1-chocolate">Chocolate</label> <input type="checkbox" name="quiz-q1[]" id="q1-bread"><label for="q1-bread">Bread</label> <input type="checkbox" name="quiz-q1[]" id="q1-eggs"><label for="q1-eggs">Eggs</label> <input type="checkbox" name="quiz-q1[]" id="q1-hose"><label for="q1-hose">Fire Hose</label> <input type="checkbox" name="quiz-q1[]" id="q1-rice"><label for="q1-rice">Rice</label> <input type="checkbox" name="quiz-q1[]" id="q1-butter"><label for="q1-butter">Butter / Oil or Non-stick Spray</label> </fieldset> </form> </div><!-- /content --> <div data-role="footer" data-theme="b" data-position="fixed"> <div data-role="navbar"> <ul> <li><a href="../index.html#toc" data-theme="b" data-rel="back" data-icon="carat-l" data-iconpos="top" data-transition="slide" data-direction="reverse" data-ajax="false">Previous</a></li> <li><a onclick="gradeQuestion()" href="#p2" id="next" data-theme="b" data-icon="carat-r" data-iconpos="top" data-transition="slide" data-ajax="false">Next</a></li> </ul> </div><!-- /navbar --> </div><!-- /footer -->
Javascript:
Make note of the onclick that is firing the javascript function to compare the user's answers to the CORRECT_QUIZ_ANSWERS array.
The answer array for this first question, has an array of ids that correspond with the index of the item in the list, [2,3,6] which translates into "bread, eggs, and butter" being the 2nd, 3rd and 6th list items.

Radio Selection (single choice selection)
HTML:
<div data-role="content"> <div class="infoblock"> <h2>2. Which cooking tool is required to make french toast?</h2> </div> <form id="p2_form"> <fieldset data-role="controlgroup"> <input type="radio" name="quiz-q2[]" id="q2-pot" value="A Pot"><label for="q2-pot">A Pot</label> <input type="radio" name="quiz-q2[]" id="q2-toaster" value="A Toaster"><label for="q2-toaster">A Toaster</label> <input type="radio" name="quiz-q2[]" id="q2-oven" value="An Oven"><label for="q2-oven">An Oven</label> <input type="radio" name="quiz-q2[]" id="q2-pan" value="A Pan or an electric skillet"><label for="q2-pan">A Pan or an electric skillet</label> <input type="radio" name="quiz-q2[]" id="q2-blender" value="A Blender"><label for="q2-blender">A Blender</label> </fieldset> </form> </div><!-- /content --> <div data-role="footer" data-theme="b" data-position="fixed"> <div data-role="navbar"> <ul> <li><a href="#p1" data-theme="b" data-rel="back" data-icon="carat-l" data-iconpos="top" data-transition="slide" data-direction="reverse" data-ajax="false">Previous</a></li> <li><a onclick="gradeQuestion()" href="#p3" id="next" data-theme="b" data-icon="carat-r" data-iconpos="top" data-transition="slide" data-ajax="false">Next</a></li> </ul> </div><!-- /navbar --> </div><!-- /footer -->
Javascript:
Referencing the CORRECT_QUIZ_ANSWERS array, we'll notice the second item is [4] which means the 4th list
item, "pan" as the correct answer.
Text Box (string comparison)

HTML:
<div data-role="content"> <div class="infoblock"> <h2>3. What is the main ingredient of french toast?</h2> </div> <form id="p3_form"> <input type="text" data-clear-btn="true" name="quiz-q3[]" id="q3-text"> </form> </div><!-- /content --> <div data-role="footer" data-theme="b" data-position="fixed"> <div data-role="navbar"> <ul> <li><a href="#p2" data-theme="b" data-rel="back" data-icon="carat-l" data-iconpos="top" data-transition="slide" data-direction="reverse" data-ajax="false">Previous</a></li> <li><a onclick="gradeQuestion();makeAssessment()" href="#results" id="results" data-theme="b" data-icon="carat-r" data-iconpos="top" data-transition="slide" data-ajax="false">Get Results</a></li> </ul> </div><!-- /navbar --> </div><!-- /footer -->
Javascript:
Referencing the CORRECT_QUIZ_ANSWERS array, "bread" is the defined string, which is caseinsensitive; "Bread" would also be a valid answer to the question.
As the last question in the quiz, one other function is called in the onclick of the "next" or "get results" button, makeAssessment()which will calculate a score based on the number of questions answered correctly.
Optionally, this function can also fire courseMastered(). In this template, "mastered" is defined by having completed all the steps and scoring 100% on the quiz. This also displays a french toast master badge. This function can be customized to fit the needs of what "mastered" means in the context of your app.
Modal (popup) Windows
A template for a trigger that opens a modal a.k.a. popup window.

Performance Support Video Tracking Video tracking for the performance support app uses a different approach than for the course. Since this example is intended to provide a job aid to culinary students that are attempting to perform the steps of making french toast, the desire is to see which patterns may arise. Some of the steps might have been committed to memory as a result of taking the course. While other steps might not be clear because of the course instruction or simply because the student needs further support. For example, Step 6“Coat a slice of the bread with the mixture” might warrant further visual support by students that have never cooked french toast and unsure how much coating is required. The steps in the performance support app are aided by video animations of how to perform each step. When the video icon is tapped or click the video is opened. Once the video is closed, an xAPI statement is sent to the LRS indicating that the video has been viewed. Follow the steps below to see how this tracking activity is executed using the JQuery Mobile xAPI demo:
1. Browse to the “performance-support > chapters” folder and open the 03-steps.html file. 2. In an editor, look for the content section under each step where ( <div data-role=”popup”>)
and notice that the button to close the video is triggering the setVideoID() and videoViewed() functions.
3. Each time setVideoID() is executed it is grabbing the id from the parent <div> element and dynamically inserting that id into the xAPI statement for the object name and moreInfo properties.
4. Next, browse to the “js” folder and open the functions.js file to see the xAPI statement on line 267. The verb “viewed” was specially created for this type of performance support activity.