Embed Size (px)
DESCRIPTION
Boleo - Eloleo - Patroon
Citation preview

large reversible bag with round pockets
by eloleofor Van Katoen
Tutorial

1 - Diffi culty:Assembling the bag is pretty easy. If you are not an experienced seamstress, you had better try sewing the round opening in some cheap fabric fi rst. Try stitching loosely around the opening a number of times (see 5.4 for a description)
2 - Duration:4 to 6 hours, depending on your sewing experience
3 - Bag dimensions:- about 19.7 inches wide- about 25.6 inches high (shoulder strap included)
4 - Supplies:
4.1. pdf pattern- print the pattern on A4 format (don’t scale manually, don’t scale to fi t paper size)- cut out the 5 pattern pieces. Also cut out the circle and the dart MIND: do not cut out the circle or darts from the actual fabric. Only cut them out of the paper pattern piece.- tape the 2 pattern pieces of the strap together (A facing A)- tape the 3 pieces of the bag together (A facing A, B facing B)- to make it easier, you might want to print the pattern twice, assemble the other half and tape
it to the fi rst half (mirrored). Now you have a complete pattern that you can easily transfer onto the fabric.
- A seam allowance of 0.4 inches (3/8) is included, except for the darts and the circle, as you are supposed to sew those on the lines of the pattern
4.2. fabric:- cotton or light-weight linen are ideal, so light and fl owing fabrics- use two contrasting colors or prints. We used “griffi th leaf” (Alexander Henry, 44’ wide, referred
to hereafter as the fl ower fabric) and blue linen (55’ wide) from a local fabric store.- for fabrics that are 44’ wide, you need 51.2 inches of both fabrics, see the picture in 5.1- for fabrics that are 55’ wide, you need 39.4 inches of both fabrics
4.3. Interfacing H630a piece of fusible interfacing of 23.6 by 5.9 inches for the strap
4.4. Sewing machine, needle and yarn:You will have to sew through 4 layers of fabric, and through even more layers at the top of the darts. In normal circumstances any basic machine can handle this, but do use a slightly thicker needle (80/12 or 90/14). Choose two colors of good quality thread.
5 - Assembling:
5.1. Cutting fabric and interfacing and preparation- lay down the pattern so that the grainline of the fabric is parallel to the selvage (or: the folding
line is parallel to the fi nished edge of the fabric)- copy the pattern onto the fabric, i.e. 4 times the entire bag and 1 strap for each fabric- for each bag part, indicate the darts on the wrong side of the fabric. Copy the circle only
twice, i.e. once on the wrong side of the fl ower fabric and once on the wrong side of the contrasting fabric
1

• if you usually wear your bag on your right shoulder, draw the circle on the left-hand side (as in this tutorial)
• if you usually wear your bag on your left shoulder, then draw the circle on the right- hand side
- cut out all pattern pieces. Mind you, do not cut out the darts or circles!- if your fabric is 44’ wide and has a design that can only be used in one direction, see the
photo on the left/right- if your fabric is 55’ wide, the shoulder
strap will fi t next to the parts of the bag- cut out one strap using fusible
interfacing, but make sure it is 3/8 inch shorter at the top and bottom of the strap
- if your fabric frays easily, like e.g. linen, then zigzag all edges prior to assembling the bag (this is not necessary for 100% cotton fabric)
5.2. Making the strap:
- iron the fusible interfacing onto 1 of the strap parts (if you use linen, then preferably iron on this fabric)
- use thread that matches the color of the fabric, so use a different color than the spool
- position the 2 parts so that the right sides face each other and (top)stitch left and right side
- on the left and right, cut a small notch in the fabric next to the slimmest point
- turn inside out and iron
- topstitch left and right on 0.2 and 0.6 inches off the edge
- topstitch in the middle (draw a line very lightly to help you)
5.3. Selecting the fabric pieces- make two piles of 4 fabric pieces each
pile #1:pile #1:• two pieces of contrasting fabric (here: blue), one of which with a circle drawn on the
back• two pieces of fl ower fabric
pile #2:pile #2:• two pieces of fl ower fabric, one of which with a circle drawn on the back• two pieces of contrasting fabric (here blue)
5.4. Sewing the bagBegin with pile #1: - put a piece of fl ower fabric on the table, right side facing upwards - put the contrasting fabric (with the circle on the back) on top of the fl ower fabric, right sides facing each other. - pin both pieces together, around the entire circle - sew both pieces together, on the line and use a small stitch, i.e. a stitch that is shorter than the standard stich on your sewing machine
- cut out the inside of the circle, through both fabrics, as closely to the stitched line as possible. Use a pair of pinking shears or a pair of scissors and make small notches
- put the contrasting fabric through the hole- make sure both parts overlap and iron- pin together both parts ans sew loosely around the circle.
Use your machine’s standard stitch length and make a few circles. Make sure that you do not pull the fabric while stitching.
- consider using thread in a contrasting color so that the topstitched circles are actually an eyecatcher.
3

- even if you did not pull the fabric, the circle may seem a bit stretched. You can undo this by ironing the circle with a lot of steam
- sew the darts in all 4 bag pieces of pile #1. Put the lines of the darts right on top of each other and sew
- use a shorter stitch length- iron the darts
- take the other piece of contrasting fabric from pile #1, right side facing upwards- put the piece with the round opening on top of that, contrasting fabric facing downwards,
fl ower fabric facing upwards. The right sides of both pieces of contrasting fabric are now facing each other
- pin all three layers together: start pinning close to the darts, fold the darts in opposite directions
- sew all around the bag, using a broad and long zigzag stitch and iron the bag • this zigzagging does not contribute to the fi rmness of the bag, it is only a means to hold
all three layers together
4
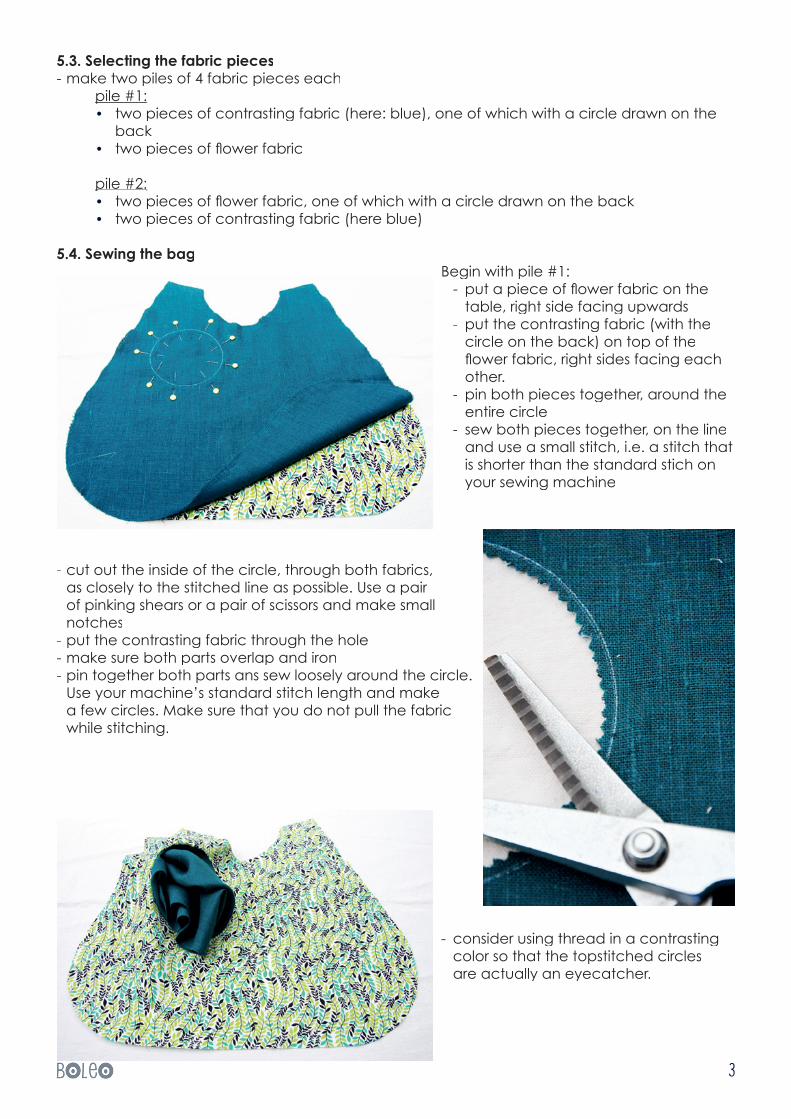
- put the remaining piece of fl ower fabric of pile #1 face down on the three-layered piece
- pin together, start at the darts and stitch from point A to point B using a short stitch. Leave a 4 inch opening at the bottom for turning the right side out later on
- Clip rounded corners
5.5. Sewing the bag
Continue with pile #2Execute all steps of 5.4 with the pieces of pile #2You start by taking the contrasting fabric, right side facing up and putting the fl ower fabric with the circle drawn on it right on top of it. So for each step of 5.5 you take the opposite fabric compared to 5.4.There’s no need to leave an opening at the bottom this time.
Steps 5.4 and 5.5 result in two separate bags that will be put together, one inside the other.
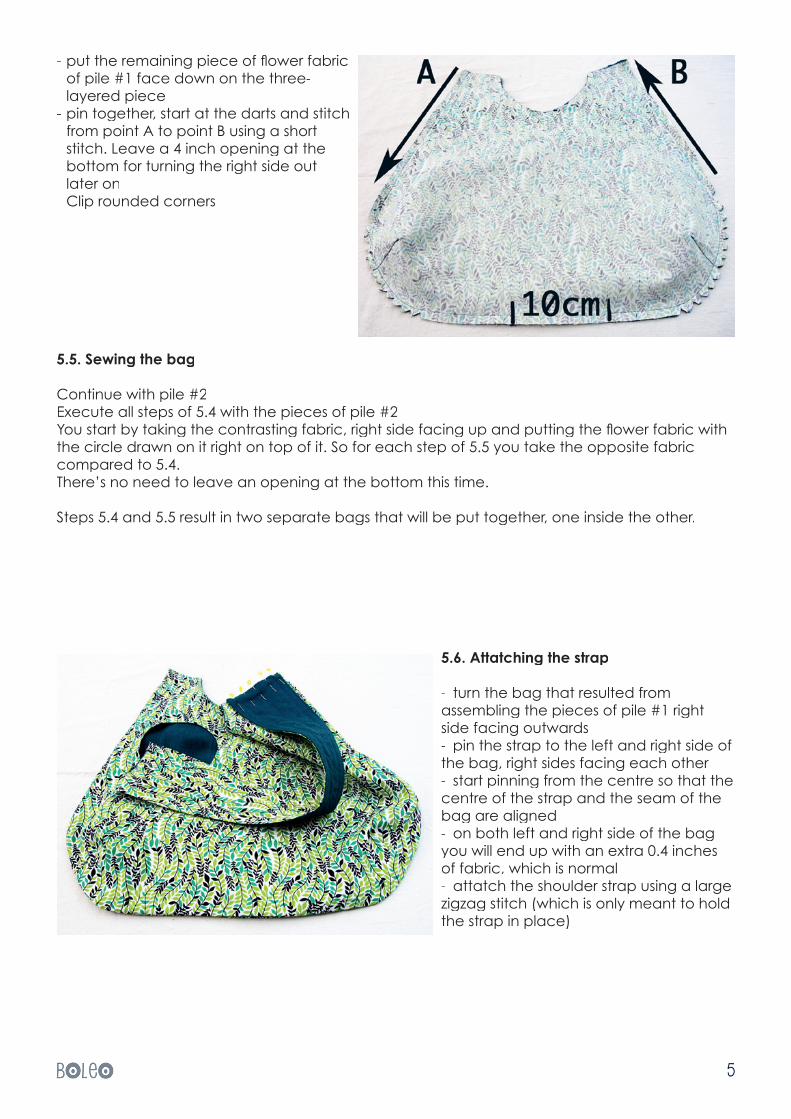
5.6. Attatching the strap
- turn the bag that resulted from assembling the pieces of pile #1 right side facing outwards- pin the strap to the left and right side of the bag, right sides facing each other- start pinning from the centre so that the centre of the strap and the seam of the bag are aligned- on both left and right side of the bag you will end up with an extra 0.4 inches of fabric, which is normal- attatch the shoulder strap using a large zigzag stitch (which is only meant to hold the strap in place)
5

5.7. Putting everything together
- put the bag onto which the shoulder strap is attatched into the other bag
- make sure the right sides are facing each other. On the outside you see the seam that runs from point A to point B
- make sure both openings are not on the same side, which would lead to a bag with 6 layers of fabric at the front and 2 at the back. The shoulder strap is now inside the bag, so it is completely hidden
- pin both bags together. Start pinning from the seams. Make sure they are perfectly aligned.
- stitch all around and clip rounded corners (see the arrow on the photo underneath)
- turn the bag inside out through the opening at the bottom
- close the hole by using the invisible closing seam
(e.g.: http://quilttaffy.blogspot.com/2008/07/invisible-closing-seam-tutorial.html)
- if you think it is necessary, topstitch the top of the bag at approximately 0.2 inches off the edge
- take a towel, roll it up, put it inside the bag and iron the rounded corners of the bag to give them a nice curve
READY!
Good luck with it,… and remember, you can do a boleo in a tango!
6

More picture of Boleo’s:http://eloleo.blogspot.com/search/label/Boleo
Van katoen:All profi ts generated through the Boleo pattern sale will be donated to Van Katoen 2012 (http://www.vankatoen.org). Van Katoen 2012 collects funds for ‘Annick for Kenia’ (http://annick-van-uytsel.be). All profi ts generated by Van Katoen actions will entirely be donated to this good cause.
Flickr-pool:We are very curious to see your version of the Boleo. You can upload a piction in the following Flickr groups:Van Katoen: http://www.fl ickr.com/groups/vankatoenpatronen/Eloleo: http://www.fl ickr.com/groups/eloleo-pool/
Copyright:eloleo, http://www.eloleo.beThe Boleo pattern is used for personal use only. Please do not use this pattern, nor creations that are made from this pattern, unless all profi ts generated through the sale will entirely be donated to a good cause. Do not pass on the pattern, but encourage other people to also buy this pattern and help Annick for Kenia.
7

A
SHOULDER STRAP
tape together A/A and B/B
foldline
grainline
test square 3x3cm

SHOULDER STRAP
A

BAG
A
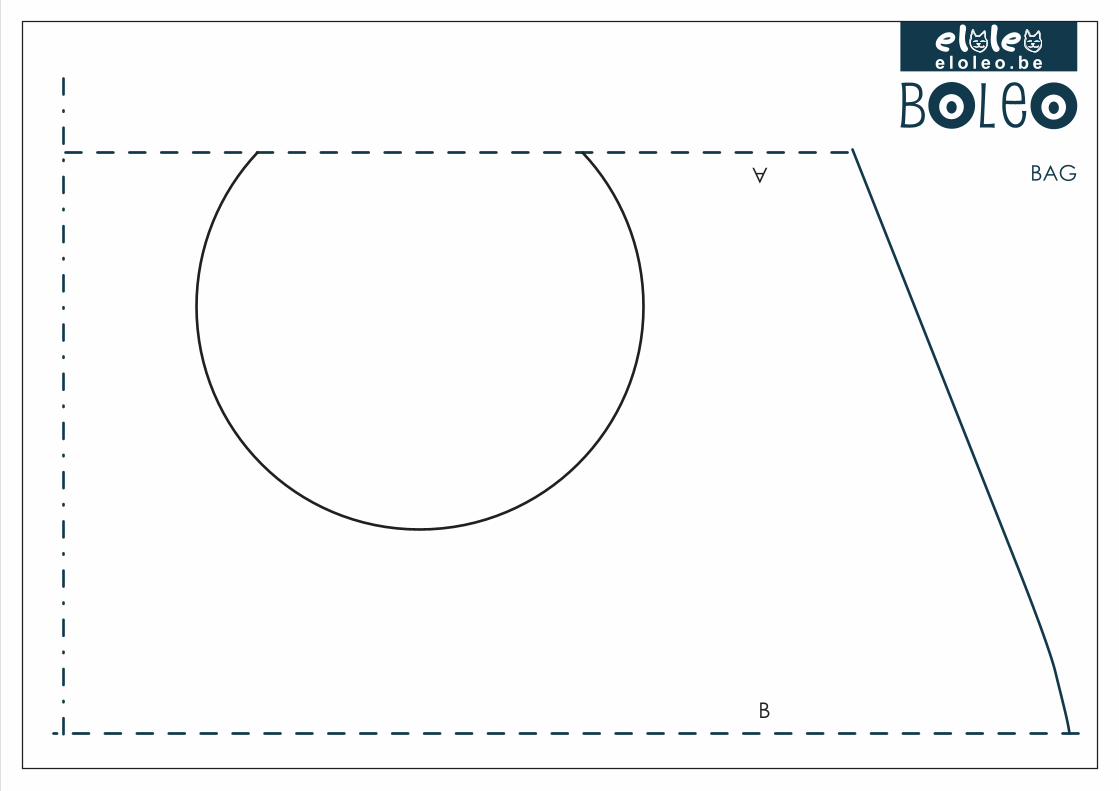
BAG
A
B

BAG
B