Embed Size (px)
Citation preview

&
wwb w wb wn
wb w
3 53 4 5
3 6
&
œ œ#œ œ#
3 43 6
œœ œ# œ
3 4 55
œ# œ œ œ#
3 4 5 6
œ œ œ œ
33 5 6
œ œ# œn œ
5 6 5 3
&
œ œ œ œ#
6 5 36
œ œ œ# œ
5 4 35
œ# œnœ œ#
4 35 4
œœ# ˙
36 3
Improvising solos is one of the most challenging skills for a musician to master. One of the best ways to learn how to improvise is to solo over blues progression; this is called blues improvisation. This article will take the mystery out of improvising a solo by examining the four elements of a solo and building the solo around the twelve-bar blues chord progression. The blues scale and an altered blues scale will be introduced. Also included are three examples of a 12-bar blues chord progression that you will record for practicing the skill building exercises.
The four elements of a solo are the motive, the development, the climax and the closing gesture. It is much like a story. The motive is the opening statement. It is a catchy line or musical phrase that invites the listener into the solo. The development builds on the opening statement giving details of what the motive introduces. The climax or “peak” is the most exciting part of the solo, moving it to the highest level. The closing statement brings the energy level down to an end. In most solos you will have a series of motives, developments and closings, which builds with each time through the progression until you reach your climax. A final closing statement ends the solo. A good way to conclude the solo is by returning to the motive. One method is to move down the register or slow your speed until you bring your solo to an end.
With the understanding of the elements of a solo, let’s look at using them over a blues progression. There are several reasons why I suggest starting with the blues progression when learning how to solo. First, the 12 bar blues structure is set up in a way that makes it easy to hear where you are within the structure so your solo makes more musical sense. Secondly, the fingering for the blues scale is easy to play on guitar. Finally and most importantly, playing the blues teaches you how to play with feeling and style, which is essential, regardless of the type of music you are playing. Here are two types of blues scales.
Blues Improvisationby John E. Lawrence
The Altered Blues Scale
The Blues Scale
Copyright © 2000 by Mel Bay Publications, Inc. All rights reserved.
&c .
. ’ ’ ’ ’
Motive
)̀̀̀̀3G7
’ ’ ’ ’
)̀̀̀̀3G7
’ ’ ’ ’
)̀̀̀̀3Response
G7
’ ’ ’ ’
)̀̀̀̀3G7
’ ’ ’ ’
)̀̀̀`3
Repeat Motive
C7
’ ’ ’ ’
)̀̀̀`3
C7
’ ’ ’ ’
)̀̀̀̀3Response
G7
’ ’ ’ ’
)̀̀̀̀3G7
.
.’ ’ ’ ’
)̀̀̀`5
Closing Gesture
D7
’ ’ ’ ’
)̀̀̀`3
C7
’ ’ ’ ’
)̀̀̀̀3Response
G7
’ ’ ’ ’
)̀̀̀`5
D7
.
. ’ ’ ’ ’
)̀̀̀̀3Motive
G7
’ ’ ’ ’
)̀̀̀̀3C9
’ ’ ’ ’
)̀̀̀̀3Response
G7
’ ’ ’ ’
)``̀`3
)``̀`3G13 G#7(#5)
’ ’ ’ ’
)̀̀̀̀3Repeat Motive
C9
’ ’ ’ ’
)̀̀̀̀3C9
’ ’ ’ ’
)̀̀̀̀3Response
)``̀`1G7 F7
’ ’ ’ ’
)̀̀̀`7
E7
.
.’ ’ ’ ’
)̀̀̀̀5Closing Gesture
A7
’ ’ ’ ’
)̀̀̀`7
D7
’ ’ ’ ’
)̀̀̀̀3Response
)̀̀̀`7
G7 E7
’ ’ ’ ’
)̀̀̀̀5 )̀̀̀`5
A7 D7
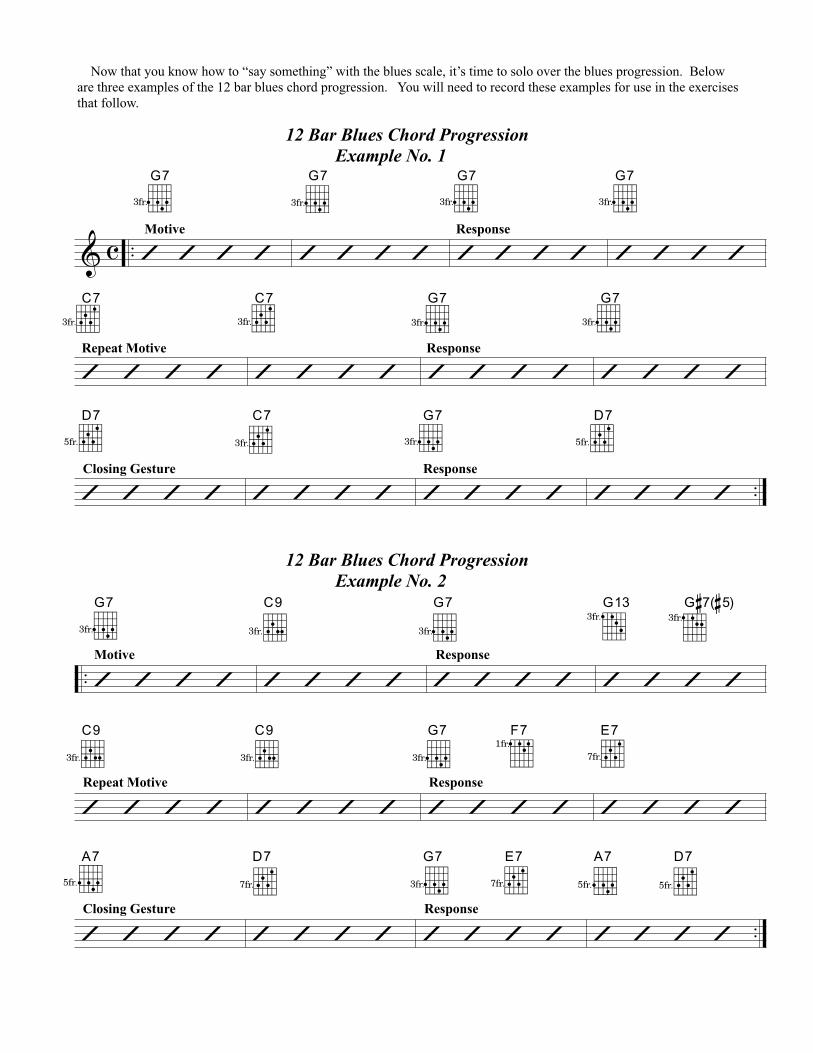
12 Bar Blues Chord Progression Example No. 1
12 Bar Blues Chord Progression Example No. 2
Now that you know how to “say something” with the blues scale, it’s time to solo over the blues progression. Below are three examples of the 12 bar blues chord progression. You will need to record these examples for use in the exercises that follow.

&
.
. ’ ’ ’ ’
)̀̀̀̀3Motive
G7
’ ’ ’ ’
)̀̀̀̀3C9
’ ’ ’ ’
)̀̀̀̀3Response
G7
’ ’ ’ ’
)``̀`3
)``̀`4G13 G#13
’ ’ ’ ’
)̀̀̀̀3Repeat Motive
C9
’ ’ ’ ’
)̀̀̀̀3C9
’ ’ ’ ’
)̀̀̀̀3Response
)̀̀̀̀̀5GM7 Am7
’ ’ ’ ’
)̀̀̀̀̀7 )̀̀̀̀̀6Bm7 Bbm7
.
.’ ’ ’ ’
)̀̀̀̀̀5Closing Gesture
Am7
’ ’ ’ ’
)̀̀̀`5
D7
’ ’ ’ ’
)̀̀̀̀3Response
)̀̀̀`7
G7 E7
’ ’ ’ ’
)``̀`4 )
``̀`3G#13 G13
12 Bar Blues Chord progression Example No. 3
Example No. 1 is your traditional 12 bar blues progression. Example No. 2 uses chord substitutions in order to enhance the sound of the progression. Example No. 3 incorporates even more of the chord substitutions. Using the Example No. 1 chord progression, we will practice the “Call and Response” technique. One instrument plays the initial statement known as the “call”, and the second instrument plays a musical phrase in response to the first, thus the term “Call and Response”. Now let’s create a motive that lasts over the first two measures (G7/G7/). Note that sometimes it is necessary to let your motive carryover into the beginning of the third measure in order to resolve your phrase. In this case the motive should only last two measures to leave space in the music for the rhythm section or to allow another instrument to respond to you. The response is to be played over the third and fourth measures (G7/G7/). When the fifth and six measures (C7/ C7/) are played, you should repeat your initial opening statement. The fact that you are now playing your opening statement over a different set of chords enhances the sound and keeps it from becoming too repetitious. Repeating your opening statement gives you and your listener something familiar to listen to.
Over measures nine and ten (D7/C7/) you should play your closing gesture. The closing gesture is your closing melody. When measures eleven and twelve (G7/D7/) are played you can rest again because the G7 and D7 are turn around chords. Their purpose is to take you back to the beginning of the chord progression. When the chord progression starts over, it is time to state a new motive and repeat the process outlined above. It is very important that you make sure the new motive is more exciting than the previous one. This will increase the excitement of each of the following stages—development and closing statement. You can continue this structure for as long as you like. If you run out of ideas for opening statements try repeating your closing gesture at the beginning of the progression using it as your new opening statement. This helps to build the excitement of your solo. As your solo continues to build you may want to make longer statements. Your opening statement can last three or four measures once your solo has begun to build. When you do this, the band can still respond to you, but now they will be responding in a different way.

You can intensify your solo to build to a climax in a number of ways. One way of doing this is by playing faster notes. If your solo was made up of quarter notes and half notes, then you can increase your speed to eight notes and sixteenth notes. When you do this you may want to lengthen your phrases. Sometimes I will play twelve bar phrases. Another way to intensify your solo is to move higher up the register. The higher you move up the neck of the guitar the more exciting your solo becomes. Here is one of my favorite ways to build intensity to climax my solos. I take two or three notes and play them as fast as I can, using thirty-second notes and sixty-fourth notes. Do not be afraid to stay in the climax section of your solo for at least two times through the entire progression. Once you have reached the climax of your solo your audience should be rendering a thunderous applause.
Now is it time for the final closing gesture. The reason why it is called a closing gesture is because you give the audible sensation that you are going to close your solo. Here is a suggestion you can try for closing your solo. Start bringing the energy level down the last time through the progression. This can be done a number of ways. The first way is to slow your playing down to a level similar to the level used at the beginning of your solo.
The more you structure your solo in this way the easier it becomes. If you practice this daily it will become second nature. And the more you practice this the better you will get.
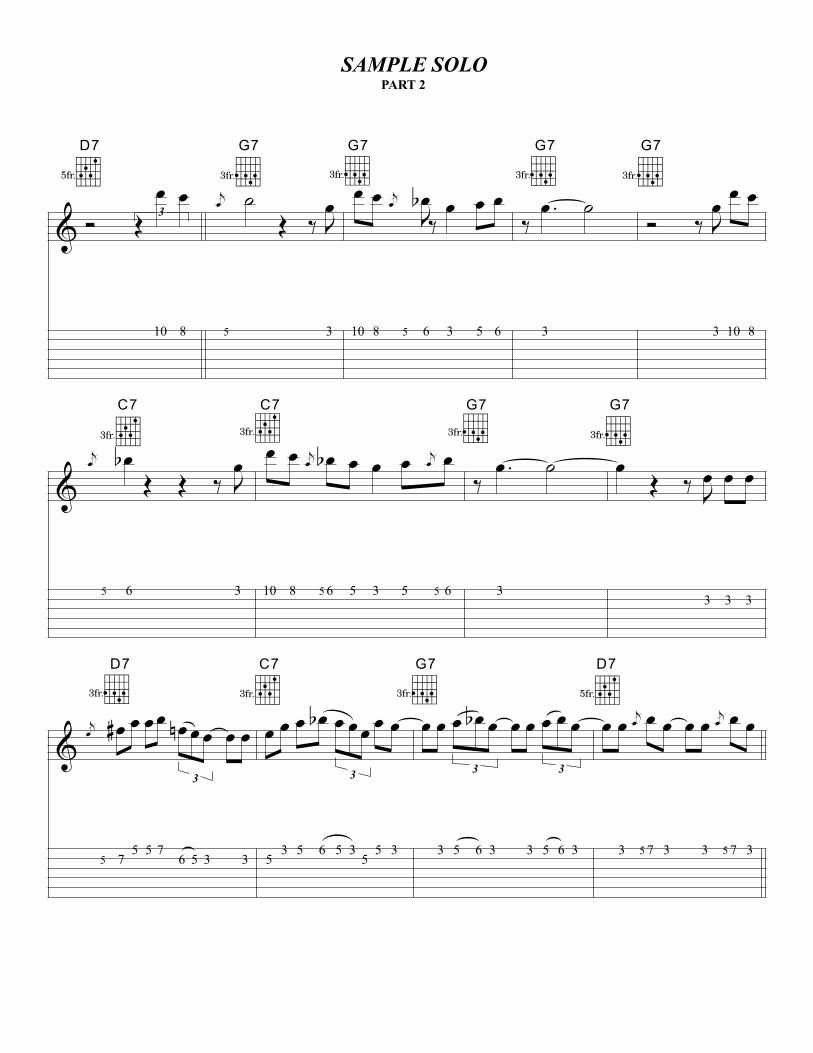
Following is part of a sample solo for you to follow. See if you recognize how I build my blues solo by using the opening statement, the call and response and closing gesture. As you play, listen for the quartertone and microtones.
Yes, improvising solos is one of the most challenging skills for a musician to master, but improvising over blues progression makes it much easier. Practicing the proven techniques described in this article will take the mystery out of improvising solos and open the doors to many exciting musical moments.

&c Ó Œ
3
œ œœ
33 5
)̀̀̀̀3œ œ
Œ Œ
3
œ œœ
G7
3 3 33 5
)̀̀̀̀3œ
œœ
œ
œ œb œ œœ œ
G7
3 3 5 6 5 35 5 5 3
)̀̀̀̀3.˙ œ
œ
œ
j
œ
œ
œ
œœœ
G7
5 3 35 4 45 5 5
&
)̀̀̀̀3
Ó Œ
3
œ œœ
G7
33 5
)̀̀̀`3
œ œ
Œ Œ
3
œ œœ
C7
3 3 33 5
)̀̀̀`3
œœ
œœ
œ œb œ œœ œ
C7
3 3 5 6 5 35 5 5 3
)̀̀̀̀3.˙ œ
œ
œ
œœ
œ
œ
G7
5 35 45 3
3
&
)̀̀̀̀3Ó Œ
3
œ œœ
G7
33 5
j
œ
)̀̀̀`5
œ œ
œ œ‰
J
œ
D7
3 5 55 3 3
)̀̀̀`3
œœ œ œb
3
œ œœ
œ œ
C7
3 5 6 5 3 5 35 5
)̀̀̀̀3w
G7
SAMPLE SOLOWritten by John E. Lawrence[Copyright] 2000
Transcription byJoe Palmer
&
)̀̀̀`5
Ó
3Œ
œ œ
D7
10 8
j
œ
)̀̀̀̀3˙
Œ ‰ J
œ
G7
5 3
)̀̀̀̀3œ œ j
œ
J
œb
‰
œ œ œ
G7
10 8 5 6 3 5 6
‰
)̀̀̀̀3.œ ˙
G7
3
)̀̀̀̀3Ó ‰ J
œ
œ œ
G7
3 10 8
&
j
œ
)̀̀̀`3
œb
Œ Œ ‰ J
œ
C7
5 6 3
)̀̀̀`3
œ œ j
œœb œ œ œ
j
œœ
C7
10 8 5 6 5 3 5 5 6
)̀̀̀̀3
‰
.œ ˙
G7
3
)̀̀̀̀3œ
Œ ‰
J
œ œ œ
G7
3 3 3
&
j
œ
)̀̀̀̀3œ#
œ œ œ
3
œn œ œ œ œ
D7
5 5 75 7 6 5 3 3
)̀̀̀`3
œœ œ œb
3
œ œœ
œ œ
C7
3 5 6 5 3 5 35 5
)̀̀̀̀3œ œ
3
œ œbœ œ œ
3
œ œœ
G7
3 5 6 3 3 5 6 3
)̀̀̀`5
œ œ
j
œœ
œ œ œ
j
œœ
œ
D7
3 5 7 3 3 5 7 3
SAMPLE SOLO PART 2


![Stoned - Index Of Songsaeppli.ch/TUG08/ROMStonedUp.pdf · Stoned - Index Of Songs 853 Reasons Why The Rolling Stones Is The World’s ... 12-Bar Blues 1975[Pt.1]B 12-Bar Blues Improvisation](https://img.dokumen.tips/doc/110x75/5b8892e57f8b9a301e8dc7a9/stoned-index-of-stoned-index-of-songs-853-reasons-why-the-rolling-stones.jpg)


