Embed Size (px)
Citation preview

Copyright 2008 All Rights Reserved
Blueocean - Administrator Guide Scope: The scope of this document includes end user level help for all the features provided for the Employer in the Blueocean Portal
Version 0.7 30 November 2010

User Guide Blueocean
Page 2
Copyright 2008 All Rights Reserved
STARTING THE BLUEOCEAN PORTAL ................................................................................................ 5
THE URL ......................................................................................................................................................... 5 SYSTEM REQUIREMENTS ................................................................................................................................ 5 FIRST TIME USERS ........................................................................................................................................... 5 SAVING THE URL IN YOUR BROWSER ............................................................................................................ 5
1. ADMINISTRATOR LOGIN .................................................................................................................. 6
2. EMPLOYEE ON BOARDING ............................................................................................................. 8
2.1. ADD EMPLOYEE ................................................................................................................................... 8 2.2. PRE-FILLED FORMS ............................................................................................................................ 9 2.3. TRAINING AND COMPLIANCE ............................................................................................................. 10 2.4. STANDARD OPERATING PROCEDURE ............................................................................................... 10 2.5. EQUIPMENT LIST ............................................................................................................................... 11
3. EMPLOYEE INFORMATION ............................................................................................................ 13
3.1. SELECT EMPLOYEES ........................................................................................................................ 13 3.2. ADD EMPLOYEE ................................................................................................................................. 14 3.3. PAYROLL INFORMATION .................................................................................................................... 14 3.3.1. ADDING EMPLOYEE PAYROLL INFORMATION .................................................................................... 15 3.3.2. ADDRESS CHANGE ............................................................................................................................ 17 3.3.3. EMPLOYEE RATE CHANGES .............................................................................................................. 17 3.3.4. ADD RATE/ADD UNIT RATE ............................................................................................................... 20 3.3.5. SCHEDULED EARNINGS ..................................................................................................................... 20 3.3.6. SCHEDULED DEDUCTIONS ................................................................................................................ 21 3.3.6.1. DEDUCTION - RECIPIENTS .......................................................................................................... 23 3.3.7. TAX FILING ......................................................................................................................................... 24 3.3.8. DIRECT DEPOSIT ............................................................................................................................... 26 3.3.9. LEAVE ACCRUAL BALANCES ............................................................................................................. 27 3.3.10. LEAVE ADJUSTMENTS ................................................................................................................ 28 3.3.11. LABOR DISTRIBUTION ................................................................................................................. 29 3.3.12. EEOC INFORMATION ................................................................................................................. 30 3.4. BENEFITS INFORMATION .................................................................................................................... 31 3.4.1. DEPENDENTS ..................................................................................................................................... 31 3.4.2. PLANS ................................................................................................................................................ 32 3.4.3. BENEFICIARIES .................................................................................................................................. 32 3.4.4. COORDINATION OF BENEFITS ........................................................................................................... 32 3.4.5. MEDICARE ......................................................................................................................................... 33 3.4.6. CERTIFICATE OF CREDITABLE COVERAGE ....................................................................................... 33 3.4.7. BALANCES ......................................................................................................................................... 34 3.5. HR INFORMATION .............................................................................................................................. 34 3.5.1. EDUCATION ........................................................................................................................................ 35 3.5.2. SKILLS ................................................................................................................................................ 36 3.5.3. TRAINING ........................................................................................................................................... 37 3.5.4. REVIEWS ............................................................................................................................................ 37 3.5.5. GENERAL ........................................................................................................................................... 38 3.5.6. PERSONAL ......................................................................................................................................... 39 3.5.7. CERTIFICATES AND LICENSES ........................................................................................................... 40 3.5.8. EVENTS .............................................................................................................................................. 41 3.5.9. COMPANY PROPERTY ....................................................................................................................... 41 3.5.10. TEST RESULTS ........................................................................................................................... 42 3.5.11. CONTINUING EDUCATION ........................................................................................................... 43
User Guide Blueocean
Page 3
Copyright 2008 All Rights Reserved
3.5.12. VIRTUAL FILE .............................................................................................................................. 43 3.5.13. CONFIDENTIAL ............................................................................................................................ 44 3.5.14. CONFIDENTIAL I-9 ...................................................................................................................... 44 3.6. SELF SERVICE ................................................................................................................................... 44 3.6.1. RESET PASSWORD ............................................................................................................................ 45 3.6.2. UNLOCK USER ................................................................................................................................... 46
4. BENEFITS ........................................................................................................................................... 47
4.1. FILL-IN FORMS................................................................................................................................... 47 4.1.1. EMPLOYEES FILL-IN FORMS.............................................................................................................. 47 4.1.2. ALL EMPLOYEES FILL-IN FORMS ...................................................................................................... 48 4.2. PLAN DOCUMENTS ............................................................................................................................ 49 4.3. VIEW CLAIMS ..................................................................................................................................... 49
5. PAYROLL ............................................................................................................................................ 52
5.1. TIME & ATTENDANCE ........................................................................................................................ 52 5.1.1. ATTENDANCE CALENDARS ................................................................................................................ 52 5.1.2. EDIT TIMESHEET ................................................................................................................................ 53 5.1.3. ADDING/EDITING TIME PUNCHES AND HOURS ................................................................................. 53 5.1.4. ADDING A TIME PUNCH ..................................................................................................................... 54 5.1.5. ADDING AN HOURS ENTRY ................................................................................................................ 54 5.1.6. VIEW LEAVE ACCRUAL BALANCES .................................................................................................... 55 5.1.7. EDITING OR DELETING A TIME PUNCH .............................................................................................. 55 5.1.8. EDITING OR DELETING AN HOURS ENTRY ........................................................................................ 56 5.1.9. TIME AND ATTENDANCE REPORTS .................................................................................................... 56 5.2. GENERATING PAYROLL ..................................................................................................................... 58 5.2.1. GENERATE PAYROLL ......................................................................................................................... 59 5.2.2. PAYROLL EMPLOYEE SELECTION ..................................................................................................... 61 5.2.3. PAYROLL WORKSHEET ...................................................................................................................... 61 5.2.4. ADVANCED PAYROLL ENTRY............................................................................................................. 62 5.2.5. EMPLOYEE CHECK DETAILS .............................................................................................................. 63 5.2.6. TIME CODES ...................................................................................................................................... 64 5.2.7. EARNING CODES ............................................................................................................................... 65 5.2.8. DEDUCTIONS ..................................................................................................................................... 66 5.2.9. PAYROLL SUMMARY .......................................................................................................................... 67 5.3. MANUAL CHECKS .............................................................................................................................. 70 5.4. VOID CHECKS .................................................................................................................................... 72 5.5. PAYROLL REPORTS ........................................................................................................................... 75 5.6. STANDARD REPORTS ........................................................................................................................ 76 5.7. AD HOC REPORTS ............................................................................................................................. 78 5.8. SETUP REPORTS ............................................................................................................................... 80 5.9. CHECK HISTORY ................................................................................................................................ 81
6. BILLING ............................................................................................................................................... 82
6.1. BILLING SUMMARY ............................................................................................................................. 82 6.2. OTHER CARRIER BILLS ..................................................................................................................... 82
7. HR ......................................................................................................................................................... 83
7.1. STANDARD REPORTS ........................................................................................................................ 83 7.2. CONFIDENTIAL FOLDER ..................................................................................................................... 85
8. EMPLOYEE OFF BOARDING ......................................................................................................... 86
8.1. EQUIPMENT REQUEST ....................................................................................................................... 86 8.2. STANDARD OPERATING PROCEDURE ............................................................................................... 88

User Guide Blueocean
Page 4
Copyright 2008 All Rights Reserved
8.3. EXIT INTERVIEW ................................................................................................................................. 88 8.4. EXIT INTERVIEW REPORT .................................................................................................................. 90
9. SETUP .................................................................................................................................................. 91
9.1. COMPANY NEWS ............................................................................................................................... 91 9.2. EXIT INTERVIEW QUESTIONNAIRE ..................................................................................................... 91 9.3. PERFORMANCE REVIEW .................................................................................................................... 93 9.4. OTHER USEFUL LINKS ....................................................................................................................... 95 9.5. FORMS & DOCUMENTS...................................................................................................................... 95
10. FREQUENTLY ASKED QUESTIONS ................................................................................. 96
10.1. PAYROLL FAQ ................................................................................................................................... 96 10.1.1. WHY DIDN’T I RECEIVE A CHECK FOR AN EMPLOYEE’S CHILD SUPPORT DEDUCTION? .............. 96 10.1.2. WHY IS MY NEW EMPLOYEE UNABLE TO CLOCK IN AND OUT? ................................................... 96 10.1.3. WHAT DO I DO IF WE ARE HIRING EMPLOYEES IN A NEW STATE? .............................................. 96 10.1.4. WHAT LEVELS OF SECURITY ACCESS ARE AVAILABLE? ............................................................. 96 10.1.5. HOW DO WE CATCH UP DEDUCTIONS FOR EMPLOYEES THAT HAVE MISSED A PAYCHECK? ..... 97

User Guide Blueocean
Page 5
Copyright 2008 All Rights Reserved
Starting the Blueocean Portal
The URL The Blueocean Portal can be started using a browser by typing the following URL in the address line of the browser.
https://Blueocean.edh.com
System Requirements The portal can be accessed using the Windows Operating System as well as the MAC Operating System. The following browsers are supported.
Windows Operating System
Internet explorer 5.5 and above
FireFox
Mozilla
Netscape
MAC Operating System
FireFox
Mozilla
Netscape
First time users
To access all the features of the portal the following settings needs to be configured in the browser.
Popup blocker needs to be turned off .(For IE users Click on ‘Tools’ ->’Pop-up Blocker’ and select ‘Turn Off Pop-up Blocker ‘)
Saving the URL in your Browser You may want to store the URL as a Favorite in your browser menu (Click on the Favorites menu on the browser, select ‘Add to Favorites’ and in the Name field, enter Blueocean). From then on, you can start the browser and select the Blueocean from the Favorites Menu to access the portal.
User Guide Blueocean
Page 6
Copyright 2008 All Rights Reserved
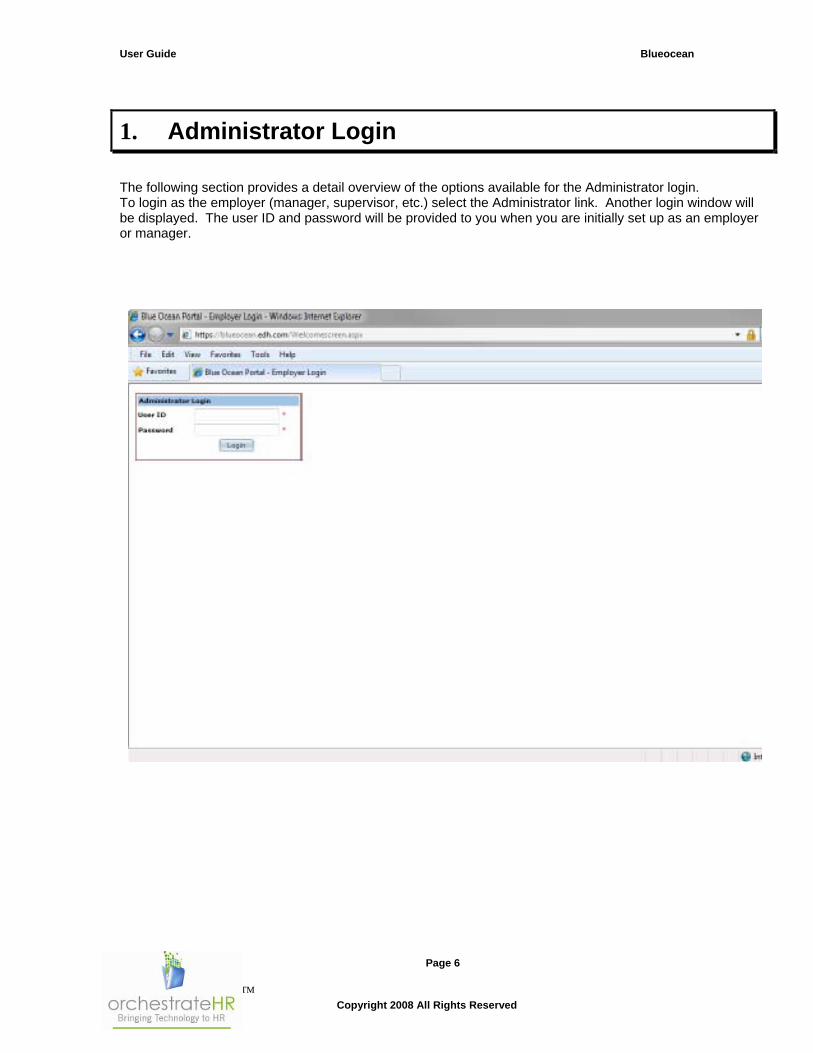
1. Administrator Login
The following section provides a detail overview of the options available for the Administrator login. To login as the employer (manager, supervisor, etc.) select the Administrator link. Another login window will be displayed. The user ID and password will be provided to you when you are initially set up as an employer or manager.

User Guide Blueocean
Page 7
Copyright 2008 All Rights Reserved
Once the login is successful the following page is displayed.
If you have access to a single company (group), you will automatically be taken to the Home screen. If you have access to more than one company (group), Click on the “Select Group” option and a listing of all applicable companies will be displayed. To select a company, click on the company name.

User Guide Blueocean
Page 8
Copyright 2008 All Rights Reserved
2. Employee On Boarding
Employee On Boarding Module provides the following options: Add Employee Pre-Filled Forms Training And Compliance Standard Operating Procedure Equipment List
These options are provided to make the employee enrollment related processes easier.
2.1. Add Employee When adding a new employee, click on the Add Employee Menu under Employee On Boarding. Enter the new employee information. Note that any fields that are ‘required’ are marked with a red asterisk. Social security numbers and phone numbers should be entered without dashes, slashes or any other characters. The Benefits - Hours per Week and the Benefits - Annual Salary fields are used for benefit purposes only and do not impact the employee’s payroll record. Click the Save button once all the information has been entered.

User Guide Blueocean
Page 9
Copyright 2008 All Rights Reserved
2.2. Pre-Filled Forms This option enables you to download forms that are pre-filled with the employee’s basic information. You need to select employee using Select Employee menu or by the name list at the top of the screen.
You may opt to download individual forms by clicking on the blue form name or to download multiple forms by selecting the check box to the left of the chosen forms as shown in the figure and pressing the ‘Download Zip File’ button. To download all the forms, use the check box at the very top and click on the ‘Download Zip File’ button.
User Guide Blueocean
Page 10
Copyright 2008 All Rights Reserved
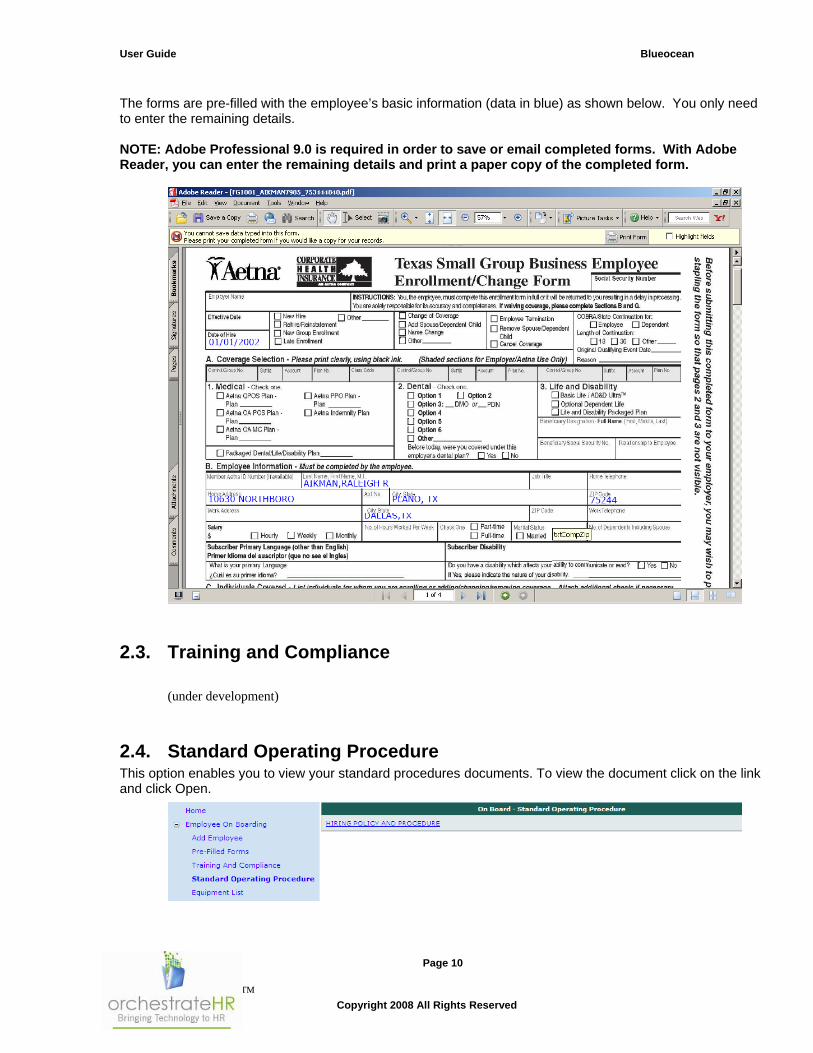
The forms are pre-filled with the employee’s basic information (data in blue) as shown below. You only need to enter the remaining details. NOTE: Adobe Professional 9.0 is required in order to save or email completed forms. With Adobe Reader, you can enter the remaining details and print a paper copy of the completed form.
2.3. Training and Compliance
(under development)
2.4. Standard Operating Procedure This option enables you to view your standard procedures documents. To view the document click on the link and click Open.
User Guide Blueocean
Page 11
Copyright 2008 All Rights Reserved
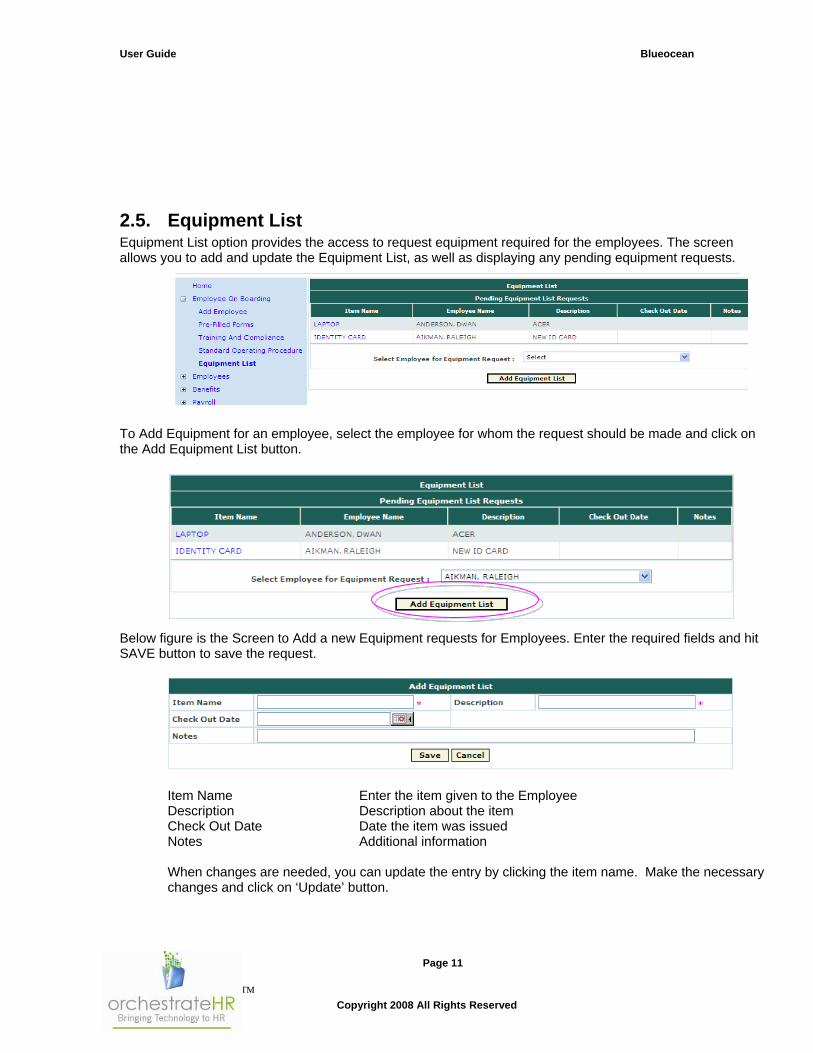
2.5. Equipment List Equipment List option provides the access to request equipment required for the employees. The screen allows you to add and update the Equipment List, as well as displaying any pending equipment requests.
To Add Equipment for an employee, select the employee for whom the request should be made and click on the Add Equipment List button.
Below figure is the Screen to Add a new Equipment requests for Employees. Enter the required fields and hit SAVE button to save the request.
Item Name Enter the item given to the Employee Description Description about the item Check Out Date Date the item was issued Notes Additional information When changes are needed, you can update the entry by clicking the item name. Make the necessary changes and click on ‘Update’ button.

User Guide Blueocean
Page 12
Copyright 2008 All Rights Reserved

User Guide Blueocean
Page 13
Copyright 2008 All Rights Reserved
3. Employee Information The Employees menu provides options to Search for Employees, Add New Employee (also available under Employee On Boarding), as well as the accessing employee information.
3.1. Select Employees To search for an employee, expand the Employees menu item, and click on Select Employee. The user can refine the search by entering one or more of the search criteria (First Name, Last Name, SSN, or Date of Birth). By Default, only active employees will be displayed. Select the Show Termed Employees option to display terminated employees. The first 15 records will display on screen 1. Additional records will be displayed on screens 2, 3, etc.
To select an employee, click on the employee name. This displays the Employee Details screen.
User Guide Blueocean
Page 14
Copyright 2008 All Rights Reserved
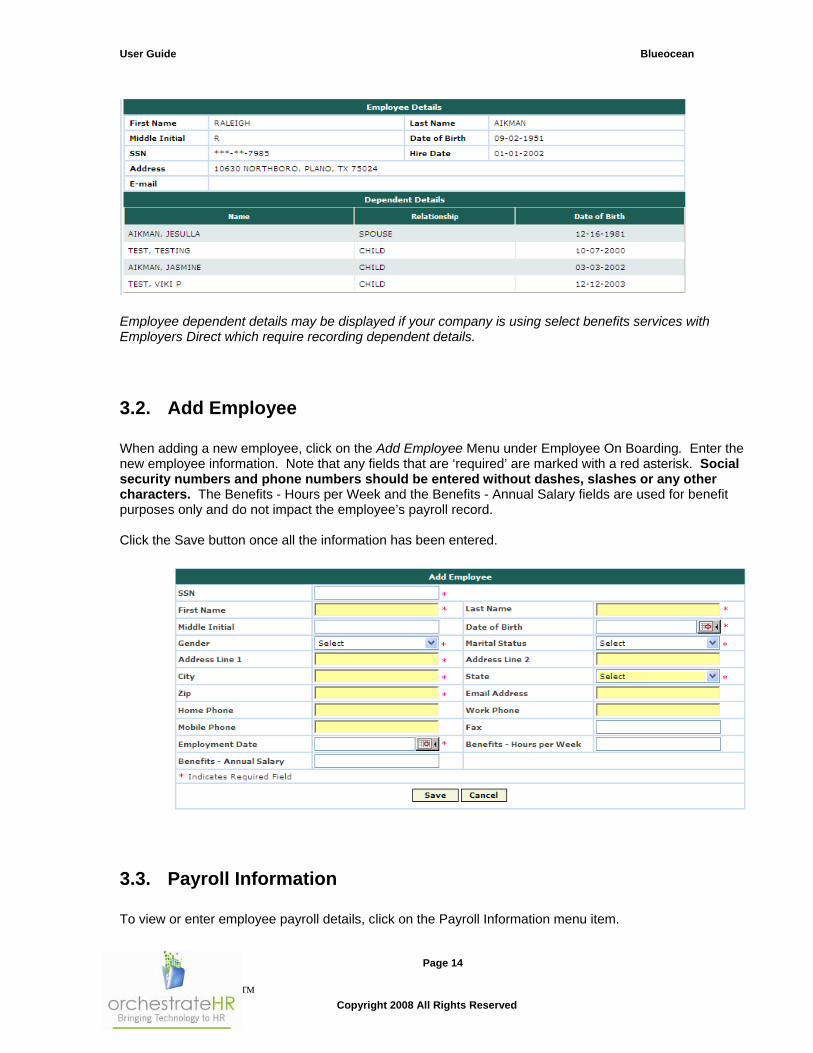
Employee dependent details may be displayed if your company is using select benefits services with Employers Direct which require recording dependent details.
3.2. Add Employee When adding a new employee, click on the Add Employee Menu under Employee On Boarding. Enter the new employee information. Note that any fields that are ‘required’ are marked with a red asterisk. Social security numbers and phone numbers should be entered without dashes, slashes or any other characters. The Benefits - Hours per Week and the Benefits - Annual Salary fields are used for benefit purposes only and do not impact the employee’s payroll record. Click the Save button once all the information has been entered.
3.3. Payroll Information To view or enter employee payroll details, click on the Payroll Information menu item.
User Guide Blueocean
Page 15
Copyright 2008 All Rights Reserved
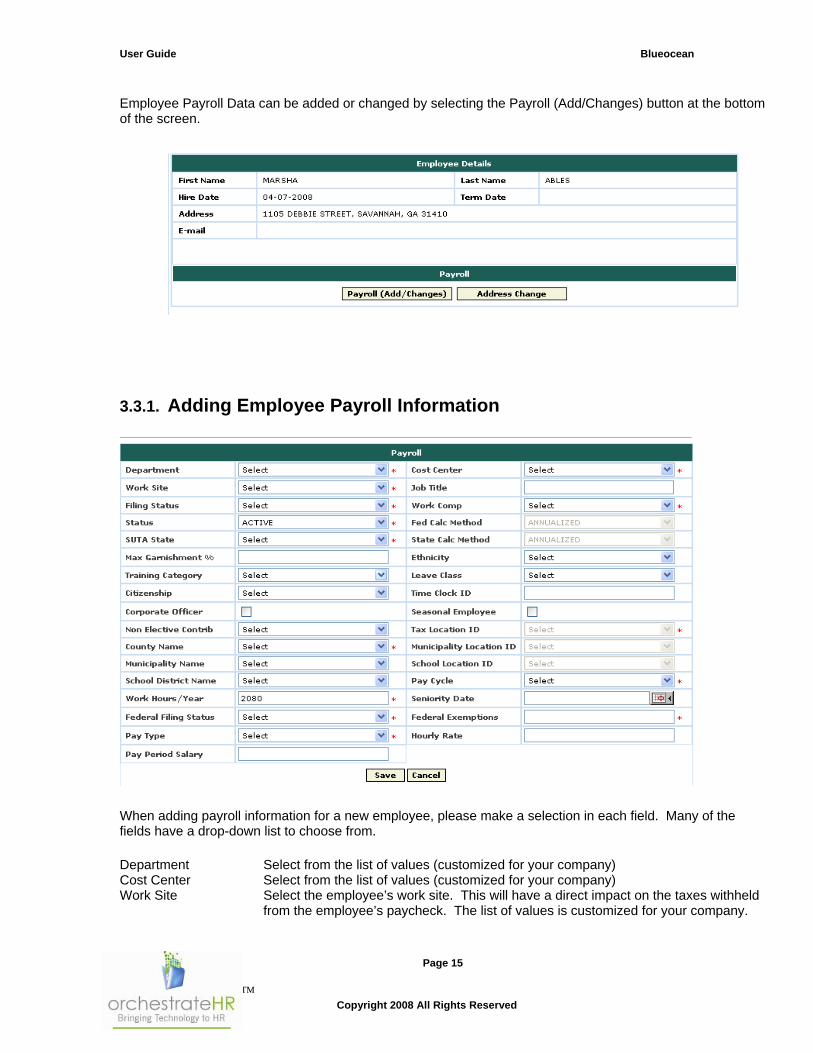
Employee Payroll Data can be added or changed by selecting the Payroll (Add/Changes) button at the bottom of the screen.
3.3.1. Adding Employee Payroll Information
When adding payroll information for a new employee, please make a selection in each field. Many of the fields have a drop-down list to choose from. Department Select from the list of values (customized for your company) Cost Center Select from the list of values (customized for your company) Work Site Select the employee’s work site. This will have a direct impact on the taxes withheld
from the employee’s paycheck. The list of values is customized for your company.

User Guide Blueocean
Page 16
Copyright 2008 All Rights Reserved
Job Title Optional – enter the employee’s job title Filing Status Select W2 or 1099 as appropriate. If this field needs to be changed after the
employee is initially added, please contact your Client Relationship Manager. Work Comp Select from the list of values (customized for your company) Status Select from the list of values. Fed Calc Method Default SUTA State Select from the list of values. If you need a new SUTA state added, please contact
your Client Relationship Manger. State Calc Method Default Max Garnishment % Used in the calculation of garnishments, student loans, and state tax levies. Please
enter the maximum percentage to be deducted for garnishments. If left blank, a maximum of 25% will be withheld. This field is not used when calculating other involuntary deductions (child support, IRS tax levies, tax payment agreements, or bankruptcy)
Ethnicity Select from the list of values Training Category Reserved for future development Leave Class If leave accruals have been established for your company, select from the list of
values. Citizenship Select from the list of values – This information is required when filing information
with some states. Time Clock ID If your company uses an external time clock import, this field is necessary to import
the payroll data. If this field is entered, Blueocean Time & Attendance will not import for the employee.
Corporate Officer Mark the box if the employee is a corporate officer – This information is required when filing information with some states.
Seasonal Employee Mark the box if the employee works on a seasonal basis – This information is required when filing information with some states.
Non Elective Contrib. If your company makes a contribution to a 401k or 403b plan for employees regardless of whether the employee contributes, please select from the list of values.
Tax Location ID System generated County Name* Select from the list of values – this information will have a direct impact on the taxes
withheld from the employee’s paycheck. If a list of counties is not present, please review the employee’s address. If the city, state, and zip code are not spelled or entered correctly, Blueocean is unable to determine the county. Contact your Client Relationship Manager if further assistance is needed.
Municipality Location ID System Generated Municipality Name Pennsylvania only – select from the list of values School District ID System Generated School District Name Pennsylvania and Ohio only – select from the list of values Pay Cycle Select from the list of values Work Hours/Year Enter the employee’s standard work hours per year (generally 2080 for a 40 hour
work week). This number is used when loading default regular hours and calculating an employee’s rate when processing payroll.
Seniority Date Enter the employee’s seniority date if applicable. If the seniority date is entered, it will be used instead of the employee’s hire date when calculating length of service for leave accruals.
Federal Filing Status Select the status indicated on the employee’s W4 form Federal Exemptions Enter the number of exemptions claimed on the employee’s W4 form. Pay Type Select Hourly, Salary, or Commission Hourly Rate If pay type of Hourly was selected, enter the employee’s hourly rate. Pay Period Salary If pay type of Salary was selected, enter the pay period salary amount. Select SAVE to save the record.

User Guide Blueocean
Page 17
Copyright 2008 All Rights Reserved
*The county for a specific address can be found on www.usps.com by looking up a zip code and viewing the mailing industry information.
3.3.2. Address Change To change the address for an employee, click the Address Change button. The employee's current address will be displayed as well as fields for the new address. Enter the required information. Select a county from the list of values which is generated after you enter the zip code. Tax location ID will be generated automatically as you select the county*. Select the Municipality and School District if the employee is located in Pennsylvania or Ohio.
If a list of counties is not present, please review the employee’s address. If the city, state, and zip code are not spelled or entered correctly, Blueocean is unable to determine the county. Contact your Client Relationship Manager if further assistance is needed. *The county for a specific address can be found on www.usps.com by looking up a zip code and viewing the mailing industry information.
Click on update button to save the new address for the employee.
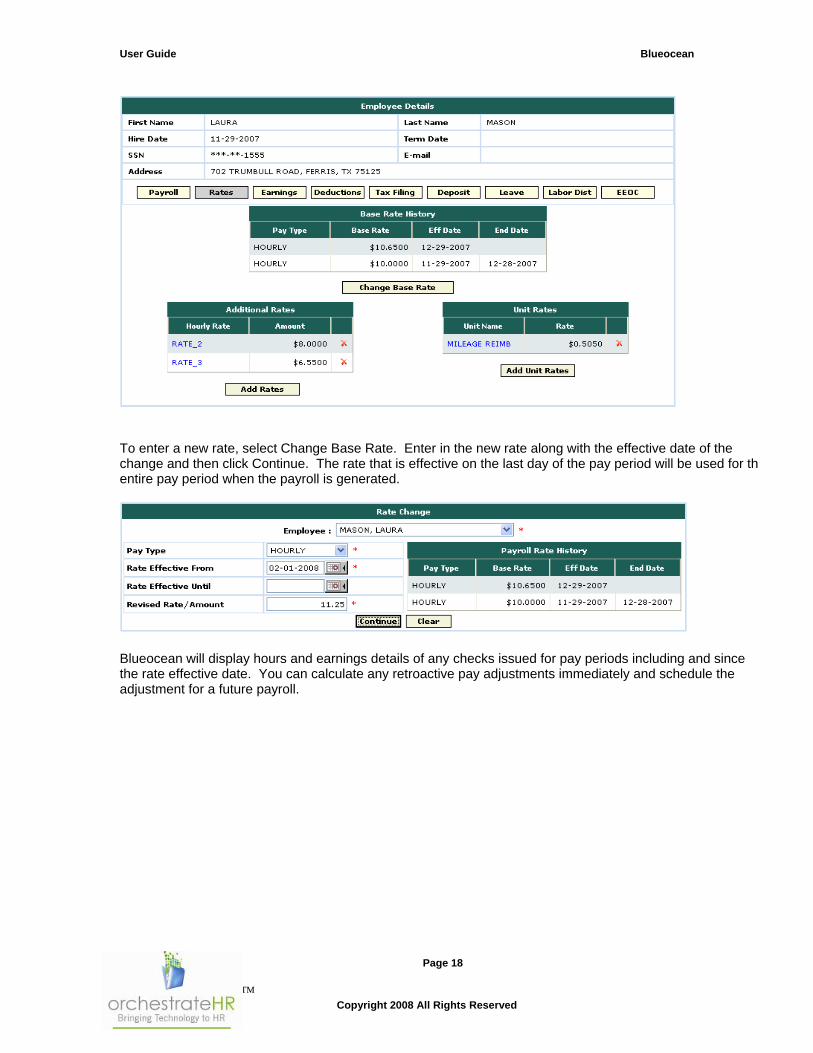
3.3.3. Employee Rate Changes A full history of an employee’s base rate is displayed for quick reference. You can also navigate directly to the Rate Change screen by selecting the Rate Change menu item under the Payroll Information menu.
User Guide Blueocean
Page 18
Copyright 2008 All Rights Reserved
To enter a new rate, select Change Base Rate. Enter in the new rate along with the effective date of the change and then click Continue. The rate that is effective on the last day of the pay period will be used for th entire pay period when the payroll is generated.
Blueocean will display hours and earnings details of any checks issued for pay periods including and since the rate effective date. You can calculate any retroactive pay adjustments immediately and schedule the adjustment for a future payroll.

User Guide Blueocean
Page 19
Copyright 2008 All Rights Reserved
Select the lines to be included in the retroactive pay adjustment. The number of hours can be overridden for mid period rate changes. The Rate Diff is based on the new rate and the original rate paid. For any codes that have a factor applied (such as overtime, shift differentials, etc), the default rate difference amount must be entered. Once the retroactive pay adjustment is determined, select if the adjustment should be included in a future payroll. If yes, select the payroll period schedule and the earnings code. NOTE: Only payrolls with a future scheduled process date will be displayed. If you are entering the rate change on your scheduled process date, you should select no and manually add the earnings to the scheduled earnings screen or enter it on the Advance Entry screen once payroll is generated. Here click on the Confirm Rate Change to confirm the rates or Cancel to cancel this change. If the rate change is confirmed, the additional earnings will be added to the employee’s scheduled earnings screen with the selected pay period dates and will be included when the payroll is generated.
User Guide Blueocean
Page 20
Copyright 2008 All Rights Reserved
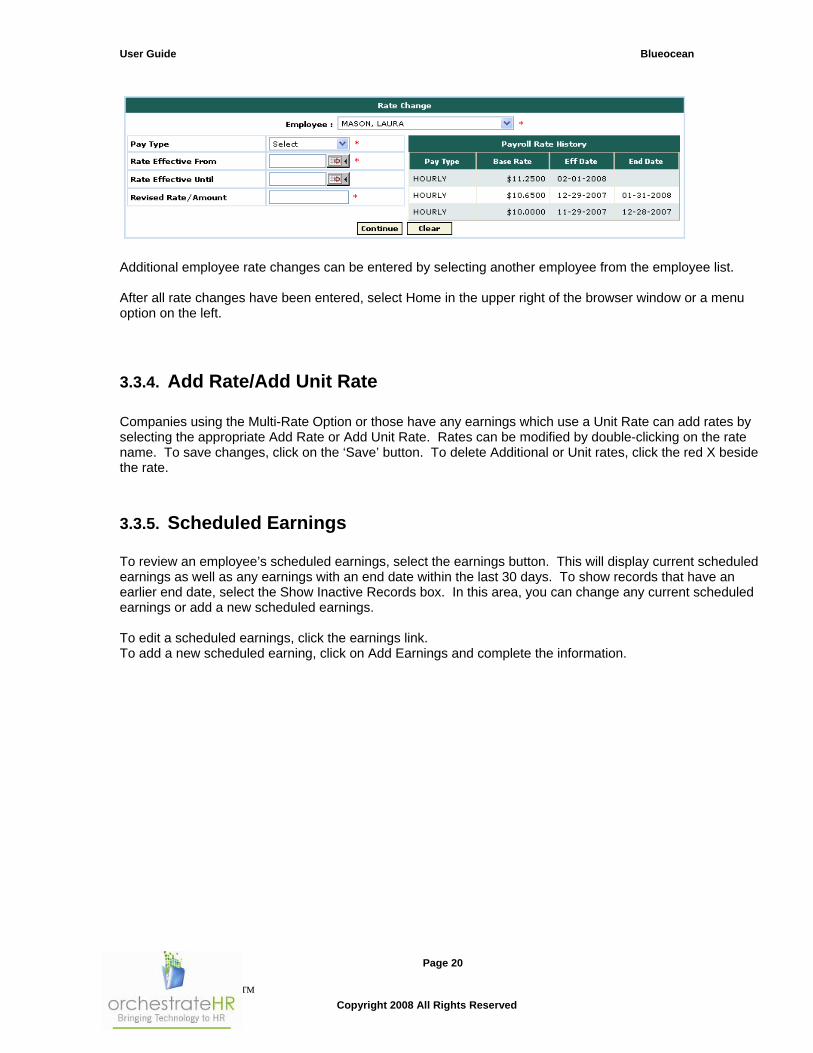
Additional employee rate changes can be entered by selecting another employee from the employee list. After all rate changes have been entered, select Home in the upper right of the browser window or a menu option on the left.
3.3.4. Add Rate/Add Unit Rate Companies using the Multi-Rate Option or those have any earnings which use a Unit Rate can add rates by selecting the appropriate Add Rate or Add Unit Rate. Rates can be modified by double-clicking on the rate name. To save changes, click on the ‘Save’ button. To delete Additional or Unit rates, click the red X beside the rate.
3.3.5. Scheduled Earnings
To review an employee’s scheduled earnings, select the earnings button. This will display current scheduled earnings as well as any earnings with an end date within the last 30 days. To show records that have an earlier end date, select the Show Inactive Records box. In this area, you can change any current scheduled earnings or add a new scheduled earnings. To edit a scheduled earnings, click the earnings link. To add a new scheduled earning, click on Add Earnings and complete the information.

User Guide Blueocean
Page 21
Copyright 2008 All Rights Reserved
Earnings Select an earnings code form the drop-down list of values. Type Display only - will display the type of earnings code (Amount, Units). Amount Enter the earnings amount to be added to scheduled payrolls. Field will be enabled if
the earnings type is Amount. Units Enter the number of units to be added to scheduled payrolls. Field will be enabled if
the earnings type is Unit. When using an earnings code based on units, please ensure that the employee has the appropriate unit rate assigned on their rate screen.
Effective Date When the effective date is on or before the pay period begin date, the earnings will be added to the payroll.
Term Date When the term date is on or after the pay period end date, the earnings will be added to the payroll.
3.3.6. Scheduled Deductions To review an employees deductions, select the deduction button. This will display current deductions as well as any deductions with an end date within the last 30 days. To show records that are have an earlier end date, check the “Show Inactive Records” box. In this area, you can change any current deductions or add a scheduled deduction.

User Guide Blueocean
Page 22
Copyright 2008 All Rights Reserved
The deduction screen displays the following information:
Deduction Description Deduction Frequency (indicates how often the deduction is taken) Employee Amount or Percentage Employee Limit Amount Employer Contribution Amount or Percentage Employer Limit Amount Effective Date End Date
To edit a deduction, select the deduction description. To add a new deduction, select the Add Deductions button.
Deductions Select a deduction from the drop-down list Type Display only Displays the type of deduction code (Amount, Percentage) EE Percentage Enter the percentage (enter 10% as 10). The field will be enabled if the deduction
type is Percentage EE Amount Enter the amount. The field will be enabled if the deduction type is Amount

User Guide Blueocean
Page 23
Copyright 2008 All Rights Reserved
ER Percentage Enter the percentage the employer is contributing. The field will be enabled based on your company’s setup. Entries in this field will not affect the employee’s net pay, it is a memo field only.
ER Amount Enter the amount the employer is contributing. The field will be enabled based on your company’s setup. Entries in this field will not affect the employee’s net pay, it is a memo field only.
Effective Date When the effective date is on or before the pay period begin date, the deduction will be added to the payroll.
End Date When the end date is on or after the pay period end date, the deduction will be added to the payroll.
EE Limit Amount Enter the deduction limit. IRS limits for Dependent Care benefits and 401(k) contributions are built into Blueocean and do not need to be entered.
EE Limit Frequency Enter the limit frequency from the drop-down list. Please review accumulated deduction amounts especially when selecting quarterly, annual, or lifetime limits.
Each Payroll – checks that the deduction amount on each payroll check does not exceed the limit. Limit starts over on each payroll check. Monthly – checks that month-to-date amounts do not exceed limit. Limit starts over each month. Quarterly – checks that quarter-to-date amounts do not exceed limit. Limit starts over each quarter. Annual – checks that year-to-date amounts do not exceed limit. Limit starts over each year. Lifetime – checks that life-to-date amounts do not exceed limit. Limit never starts over.
ER Limit Amount Enter the limit for employer contributions. NOTE: This field is not considered when
calculating employer contributions for Savings (401k/403b) plans. ER Limit Frequency Enter the limit frequency from the drop-down list. Please review accumulated
employer contribution amounts especially when selecting quarterly, annual, or lifetime limits. NOTE: This field is not considered when calculating employer contributions for Savings (401k/403b) plans. (see above for definition of limit frequencies).
ER Match Select the Match code for employer contributions to Savings (401k/403b) plans. Garnish Min Wage Used in calculating garnishment deductions only. Enter the minimum amount the
employee should receive each pay period. Payee Used for issuing payments for involuntary deductions only - select from the drop
down list. Additional recipient information can be entered through the Recipient button (see page 22) If a recipient is not selected, an agency check will not created with the payroll, you will be responsible for issuing a check to the payee.
Deduction Priority When left blank, system level deduction priorities will be utilized. Deduction priorities can be changed if desired. Deductions are withheld from employees paychecks in deduciton priority order, lowest number first. Deduction priorities should be updated when adding IRS Levies to ensure eligible deductions continue to be withheld.
Include in Additional check? Display Only – Indicates if the scheduled deduction will be included in
unscheduled payrolls and extra checks. This is based on your company setup. ****ADD ADDITIONAL INFORMATION ON SETTING UP INVOLUNTARY DEDUCTIONS****
3.3.6.1. Deduction - Recipients

User Guide Blueocean
Page 24
Copyright 2008 All Rights Reserved
For involuntary deductions such as a child supports, garnishments, etc, a recipient must be added in order for a check to be issued to the recipient. The recipient can be viewed on click of the Recipient button and new recipients can be added using the Add Recipients button in the recipients screen. If a recipient is set up and selected on the deduction screen, a check payable to the recipient will be issued with the payroll process when the deduction is taken from the employee check.
Payee Short Name Enter a brief id for the payee – Suggestion: use the case number Payee Full Name Enter the party the check is to be made payable to Address Line 1 Address Line 2 City State Zip Reference Enter any case number, cause number, social security number, or other information
that should be included on the check. Effective Date Enter an effective date. End Date Enter an end date when this information should no longer be used. If the recipient
information has an end date, Blueocean will automatically cease to pay the recipient after the date. No check will be issued unless a new recipient is selected on the employee deduction screen.
3.3.7. Tax Filing To view an employee’s tax filing information, select the Tax Filing button on the employee payroll information screen.

User Guide Blueocean
Page 25
Copyright 2008 All Rights Reserved
To change an employee’s federal tax filing information, click on the marital filing status to open the Fed Filing window. Filing Status Select the Federal W4 filing status from the drop-down list Exemptions Enter the number of exemptions from the employees Federal W4 Exempt Federal Withholding? Check the box if the employee is claiming exempt from Federal Tax
withholding (this will not impact the taxable wages recorded on the W2 at year end)
Additional Amount Enter the additional amount to be deducted from each check issued Additional Percent Enter the additional percentage to be deducted from each check issued Earned Income Credit Status Select the Federal W5 filing Status from the drop-down list Click the Update button to save the changes.

User Guide Blueocean
Page 26
Copyright 2008 All Rights Reserved
Edit State tax information by clicking on the state name. To add state/local tax information, select the Add State/Local button and then select the state from the drop-down list. State withholding information varies by state and generally reflects the information contained on the individual state’s withholding form. If state tax information is not entered, the equivalent of single filing status and zero allowances will be used when calculating the employee’s tax withholding. For employees that work in multiple states, withholding information for more than one state can be entered.
3.3.8. Direct Deposit To view an employee’s current direct deposit set up, select the deposit button on the employee screen.
If an employee has chosen to send a portion of their check to one account and the balance of their check to another, the first account would be setup with a deposit type of distribution (partial deposit) and the second with a deposit type of net (remaining net pay). Net deposits will automatically process last. To add a new deposit, select ‘Add Deposit” and complete the necessary information. To change an existing direct deposit, select the record by clicking on the account type and making the necessary changes.

User Guide Blueocean
Page 27
Copyright 2008 All Rights Reserved
NOTE: The account type (checking/saving) and deposit type (Net/Distribution) cannot be edited, the direct deposit information will have to be deleted and re-entered. To delete a deposit, click on the red X on the far right column of the deposit to be removed. Employees may have multiple distribution deposits, but may only have one net deposit
. When adding a new distribution deposit, you must indicate the distribution sequence as a number between 1 and 99. Distribution deposits are processed in sequence order, lowest to highest.
Account Type Select Checking or Savings Deposit Type Select Net or Distribution Bank Name Enter the bank name* Account Number Enter the account number. The account number cannot exceed 17 characters. Routing Number Enter the routing number. The routing number must contain 9 digits. Distribution Sequence For Net Deposits – the distribution sequence field will not be available and will default
to 999 so that it is processed last. For Distributions (or partial) deposits, enter the distribution sequence.
Distribution Amount or Distribution Percent For Net Deposits – this field is not available as the employee’s remaining net pay will be sent. For Distributions (or partial) deposits, enter the amount or percentage to be deposited.
*With the bank routing number, you can find the bank name at http://www.gregthatcher.com/ or http://www.checkcomposer.com/frmBankSearch.aspx
3.3.9. Leave Accrual Balances Leave accrual balance hours are tracked as per your company setup. Accrual descriptions and accrual rates available on an employee’s leave screen are dependent on the leave class selected on the employee’s payroll tab.

User Guide Blueocean
Page 28
Copyright 2008 All Rights Reserved
YTD accrued, YTD Taken, End Balance, and Ending Liability Amount are updated when payroll is processed. Hours entered though Time & Attendance do not impact the leave balances unless/until they are processed with a payroll. Leave Adjustments to one or multiple fields can be entered at any time.
Description Description of Leave Balance Adjustment Opening Balance YTD Accrued YTD Accrued amount as of the last payroll processed or adjustment entered YTD Taken YTD Taken amount as of the last payroll processed or adjustment entered. End Balance End Balance is the sum of Balance Adjustment plus YTD Accrued minus
YTD Taken. Ending Liability Amount Ending Liability Amount is calculated by multiplying the End Balance by the
employee’s hourly base rate for hourly employees. For salaried employees, the ending liability balance is multiplied by the hourly equivalent (Salary Rate times # of paychecks per year divided by work hours per year).
3.3.10. Leave Adjustments Leave adjustments can be entered at any time. To enter a leave adjustment for a leave that is not displayed (if leave accruals have just been implemented for your company or the employee’s leave class has been changed), select the Add Leave button and the adjustment window will open. Select the leave to adjust from the drop-down list. To enter an adjustment for a leave that is displayed, click on the leave description and the adjustment screen will open. Enter the adjustment amount in the appropriate field and hit Tab. The leave balance information at the bottom of the screen will update showing the result of the adjustment. Click on Confirm Adjustment to save or click on Cancel to return to the leave balance screen.

User Guide Blueocean
Page 29
Copyright 2008 All Rights Reserved
3.3.11. Labor Distribution Employee payroll information can be distributed to any combination of Departments, Work Sites, and Cost Centers every payroll. If the distribution information varies each payroll period, it can be entered on the ADV screen when payroll is generated (see the Generating Payroll section). For distributions that remain the same for multiple payrolls, labor distribution information can be entered here and updated only when changes occur.
To add labor distribution information, click on the Add Labor Dist button. To change existing labor distribution information, click on the department of the line you wish to edit. To delete existing information, click on the red X on the right side of the screen.
In each field, select from the drop-down list. All fields are required. The Allocation Percentages should be entered without the percent symbol (example 23.25% is entered as 23.25). The Total Allocations must equal 100%. If the total allocations do not equal 100%, the labor distribution reports will be incorrect.
User Guide Blueocean
Page 30
Copyright 2008 All Rights Reserved
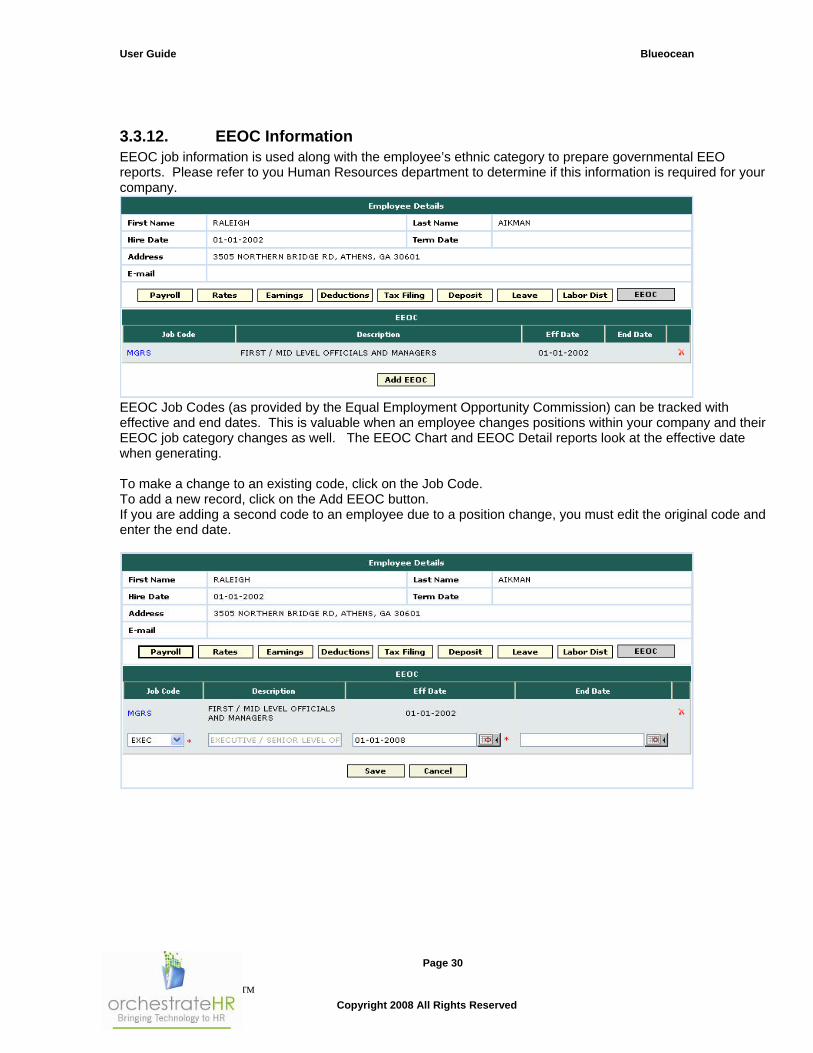
3.3.12. EEOC Information EEOC job information is used along with the employee’s ethnic category to prepare governmental EEO reports. Please refer to you Human Resources department to determine if this information is required for your company.
EEOC Job Codes (as provided by the Equal Employment Opportunity Commission) can be tracked with effective and end dates. This is valuable when an employee changes positions within your company and their EEOC job category changes as well. The EEOC Chart and EEOC Detail reports look at the effective date when generating. To make a change to an existing code, click on the Job Code. To add a new record, click on the Add EEOC button. If you are adding a second code to an employee due to a position change, you must edit the original code and enter the end date.
User Guide Blueocean
Page 31
Copyright 2008 All Rights Reserved
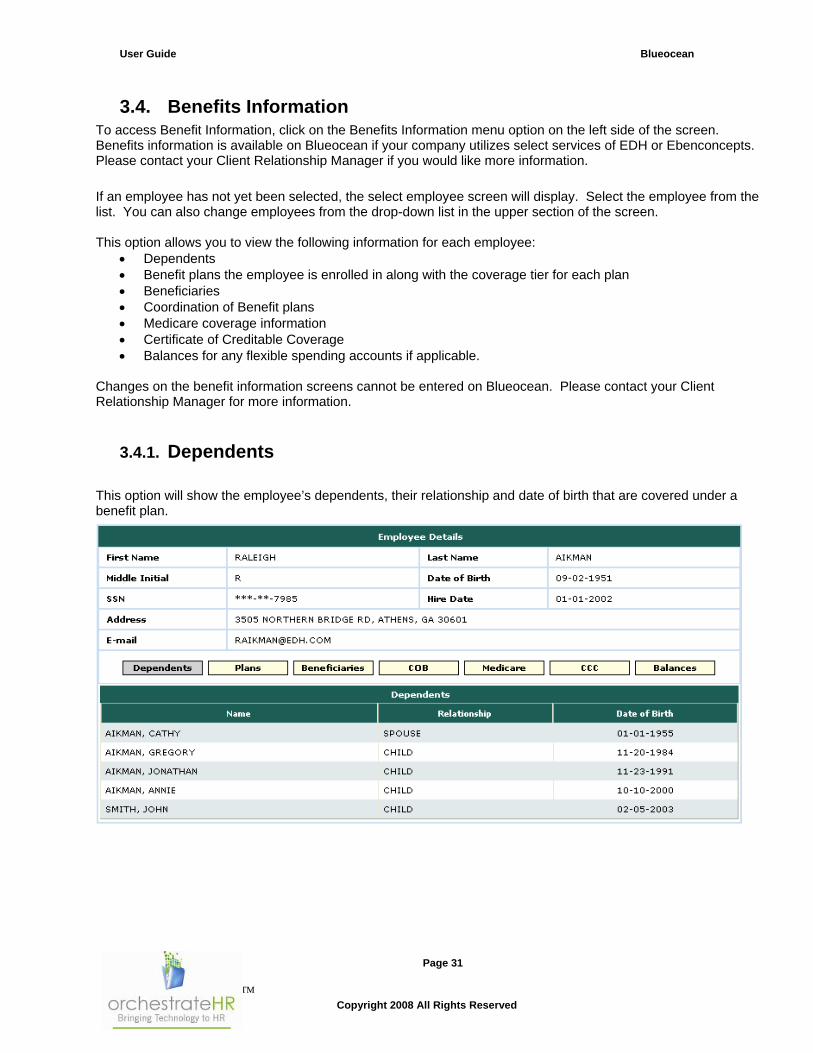
3.4. Benefits Information To access Benefit Information, click on the Benefits Information menu option on the left side of the screen. Benefits information is available on Blueocean if your company utilizes select services of EDH or Ebenconcepts. Please contact your Client Relationship Manager if you would like more information.
If an employee has not yet been selected, the select employee screen will display. Select the employee from the list. You can also change employees from the drop-down list in the upper section of the screen. This option allows you to view the following information for each employee:
Dependents Benefit plans the employee is enrolled in along with the coverage tier for each plan Beneficiaries Coordination of Benefit plans Medicare coverage information Certificate of Creditable Coverage Balances for any flexible spending accounts if applicable.
Changes on the benefit information screens cannot be entered on Blueocean. Please contact your Client Relationship Manager for more information.
3.4.1. Dependents
This option will show the employee’s dependents, their relationship and date of birth that are covered under a benefit plan.

User Guide Blueocean
Page 32
Copyright 2008 All Rights Reserved
3.4.2. Plans By selecting Plans button, you can view the plans the employee has enrolled in. This includes the plan description, coverage type, the start and end date of coverage along with the start and end date of the Network to which your plan belongs.
3.4.3. Beneficiaries To view beneficiary information, select the Beneficiaries button. This option provides the details of your beneficiaries and the percentage of coverage for each of them when multiple beneficiaries are present.
3.4.4. Coordination of Benefits

User Guide Blueocean
Page 33
Copyright 2008 All Rights Reserved
When you click on COB, details of the coordination of benefits coverage (when an employee is covered by two or more group health insurance policies) is displayed. COB ensures that the total benefit paid does not exceed 100 % of the total allowable expenses incurred.
The primary carrier is the plan that pays first, the secondary carrier pays second and on down the line. The COB Regulation provides guidelines for the general order by which the primary carrier and secondary carrier(s) are determined.
3.4.5. Medicare
When you click on the Medicare button, details on the employee’s Medicare coverage are displayed.
3.4.6. Certificate of Creditable Coverage
When you click on the CCC button, you can view details of any certificates of creditable coverage that an employee has provided. The concept of creditable coverage is that individuals should be given credit for previous health coverage when moving from one employer group health plan to another, from an employer group health plan to an individual policy, or from certain kinds of individual coverage to an employer group health plan.

User Guide Blueocean
Page 34
Copyright 2008 All Rights Reserved
3.4.7. Balances This option provides detail information about the ceiling for the given plan, the amount claimed by employee and the amount remaining. Available balances for medical reimbursement and dependent care reimbursement accounts will also be shown.
Provision is available to check the balances for the previous years as well from the date of coverage start of the plan. To use this feature select the year in the Choose period to view summary select box.
3.5. HR Information
To view or add employee HR information, click on the HR Information menu item available under the Employees menu. If an employee has not yet been selected, the select employee screen will display. Select the employee from the list. You can also change employees from the drop-down list in the upper section of the screen.

User Guide Blueocean
Page 35
Copyright 2008 All Rights Reserved
Once Information for a particular employee has been added, you can add information for another employee by selecting the Employee from the Dropdown list on top center. Any fields with a red asterisk ‘*’ to the right of the field indicates required field.
3.5.1. Education
If education details have already been entered for a selected employee, they will be displayed. Select the Add Education button to add a new entry. To update the existing details click on the link in Education column.

User Guide Blueocean
Page 36
Copyright 2008 All Rights Reserved
You can either click on ‘Save’ button to save the entry or click on ‘Cancel’ button to exclude the changes.
Education Select from the list of values Institution Enter the institution in which Employee has done the education Major subject Enter the major subject GPA Enter the GPA (grade point average) From date Enter the date that the course began To date Enter end date of the course
3.5.2. Skills Employee skills can be added by clicking on the ‘Add skills’ button. You can update a particular skill by clicking on the link in the skills column.

User Guide Blueocean
Page 37
Copyright 2008 All Rights Reserved
Skills Select from the list of values Skill Set Rating Select from the list of values Comment Enter the comment You can either click on ‘Save’ button to save the entry or click on ‘Cancel’ button to exclude the changes.
3.5.3. Training
Training information for each employee can be added or changed. To add a new entry, click on the Add Training button. To update the existing information, click on the link in category column. You can either click on ‘Save’ button to save the entry or click on ‘Cancel’ button to exclude the changes.
Category Select from the list of values Training frequency Will be displayed automatically based on the category selected Job description Will be displayed automatically based on the category selected Hours Need to enter the number of hours for training From Date Enter the start date of training To Date Enter the end date of training
3.5.4. Reviews
Various reviews conducted for each employee at different periods can be added and maintained. You can add a new review info by clicking the ‘Add Reviews’ button. To update an existing review, click on the link in Review type. You can either click on ‘Save’ button to save the entry or click on ‘Cancel’ button to exclude the changes.

User Guide Blueocean
Page 38
Copyright 2008 All Rights Reserved
Review Type Select from the list of values Frequency Will be displayed automatically based on review type selected Review date Date on which review was conducted Next Review date Date next review will be conducted Rating Select from the list of values Comment Comment by the Employer about the review
3.5.5. General
This provides general information such as credentials, Key Employee status, Highly Compensated status, etc. To add or update, click on the General (Add/Changes) button. You can either click on ‘Save’ button to save the entry or click on ‘Cancel’ button to exclude the changes.
Credentials Credentials of the Employee

User Guide Blueocean
Page 39
Copyright 2008 All Rights Reserved
Full Time Equivalent Enter the total hours worked divided by the average annual hours worked in full time positions.
Manager Name Name of the manager Rehire Date Date of rehire if the employee is rehired. High Compensated Employee Check the box if ‘Highly Compensated Employee’ Key Employee Check the box if ‘Key Employee’ Eligible for Rehire Check the box if ‘Eligible for rehire’.
3.5.6. Personal
Provides personal information such as immigration info, emergency contact info, license details, etc of the employee selected. You can add or update the information clicking the Personal (add/change).
You can add new info or update the existing information and click the ‘Update’ button. If personal info has not been previously entered for an employee, you will have a 'Save' button instead of an ‘Update’ button.

User Guide Blueocean
Page 40
Copyright 2008 All Rights Reserved
3.5.7. Certificates and Licenses Certificate and License information can be recorded for employees. To add or update, click on the Add Certification button. To edit an existing entry, click on the link in the Descriptions column. You can either click on ‘Save’ button to save the entry or click on ‘Cancel’ button to exclude the changes.
Document type Select either certification or license Certification name Name of the certification or license Verified Check the box if the documents are verified Date completed Completed date Expiration Date Date of Expiry Comment Comments can be added

User Guide Blueocean
Page 41
Copyright 2008 All Rights Reserved
3.5.8. Events
You can add or update events for employees. To add new events click on ‘Add Events’ button. To update the existing events click on the link in Events type. You can either click on ‘Save’ button to save the entry or click on ‘Cancel’ button to exclude the changes.
Events Type Select from the list of values Events Date Date the event will occur Regarding Event description Notes Notes
If your required event is not listed under Events type; you can add it by selecting the Insert Event button. Once the record is saved, the screen will return to the events screen and the newly added event type will be available in the list of values.
Events type Enter the new event type Description Enter description which will be displayed in the Events type list of values.
3.5.9. Company Property
This would list company property which has been provided to the employee. If any property is issued to the employee you can add this information by clicking on the ‘Add Company Property’ button. Return date is not required when adding the item.

User Guide Blueocean
Page 42
Copyright 2008 All Rights Reserved
Enter all the required details and click on ‘Save’ button. If you don’t want to save the changes you can click on the ‘Cancel’ button.
Item Name Enter the item given to the Employee Description Description about the item Check Out Date Date the item was issued Return Date Not required on issue of item Notes Additional information
When the Employee returns the item or need to make any changes you can update by clicking the link on the item name. Make the necessary changes and click on ‘Update’ button.
3.5.10. Test Results
Employees may be required to take tests during his employment period. You can add and maintain such information in the test results screen. To add new test result information, click on ‘Add Test Results. To update an existing entry, click on the link under the test results column.
User Guide Blueocean
Page 43
Copyright 2008 All Rights Reserved
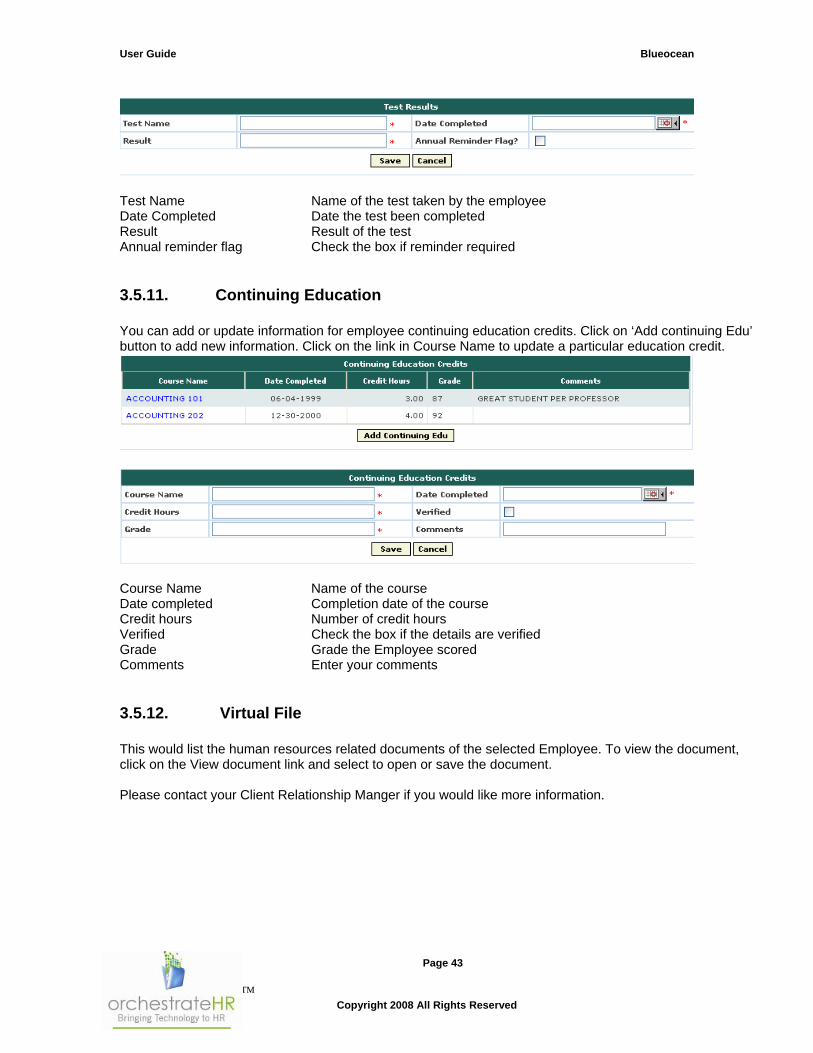
Test Name Name of the test taken by the employee Date Completed Date the test been completed Result Result of the test Annual reminder flag Check the box if reminder required
3.5.11. Continuing Education
You can add or update information for employee continuing education credits. Click on ‘Add continuing Edu’ button to add new information. Click on the link in Course Name to update a particular education credit.
Course Name Name of the course Date completed Completion date of the course Credit hours Number of credit hours Verified Check the box if the details are verified Grade Grade the Employee scored Comments Enter your comments
3.5.12. Virtual File This would list the human resources related documents of the selected Employee. To view the document, click on the View document link and select to open or save the document. Please contact your Client Relationship Manger if you would like more information.

User Guide Blueocean
Page 44
Copyright 2008 All Rights Reserved
3.5.13. Confidential This lists any employee documents that are confidential and are only available on a restricted basis.
3.5.14. Confidential I-9
The employee’s I-9 is stored separately and is only available on a restricted basis.
3.6. Self Service This link enables you to reset password or unlock employee user accounts. If an employee forgets their password, you can reset the password. When the employee attempts to logon with wrong password more than three consecutive times, the user id will be locked. Password reports are available in Adobe or Excel format. The report will include only the employees that have a system generated random password. NOTE: Administrator passwords can only be reset by your Client Relationship Manager.

User Guide Blueocean
Page 45
Copyright 2008 All Rights Reserved
To reset password or unlock user, you will need to select the employee from the list. You can refine the search by entering one or more search criteria. The employees meeting the search criteria will be displayed in the table. You can also scroll through the employees by clicking page numbers in the top or bottom of the page.
3.6.1. Reset Password To reset password, click on the reset password link. A confirmation box will be displayed. If you click yes, a new random password will automatically generate. The employee will be required to change the password when they login.
User Guide Blueocean
Page 46
Copyright 2008 All Rights Reserved
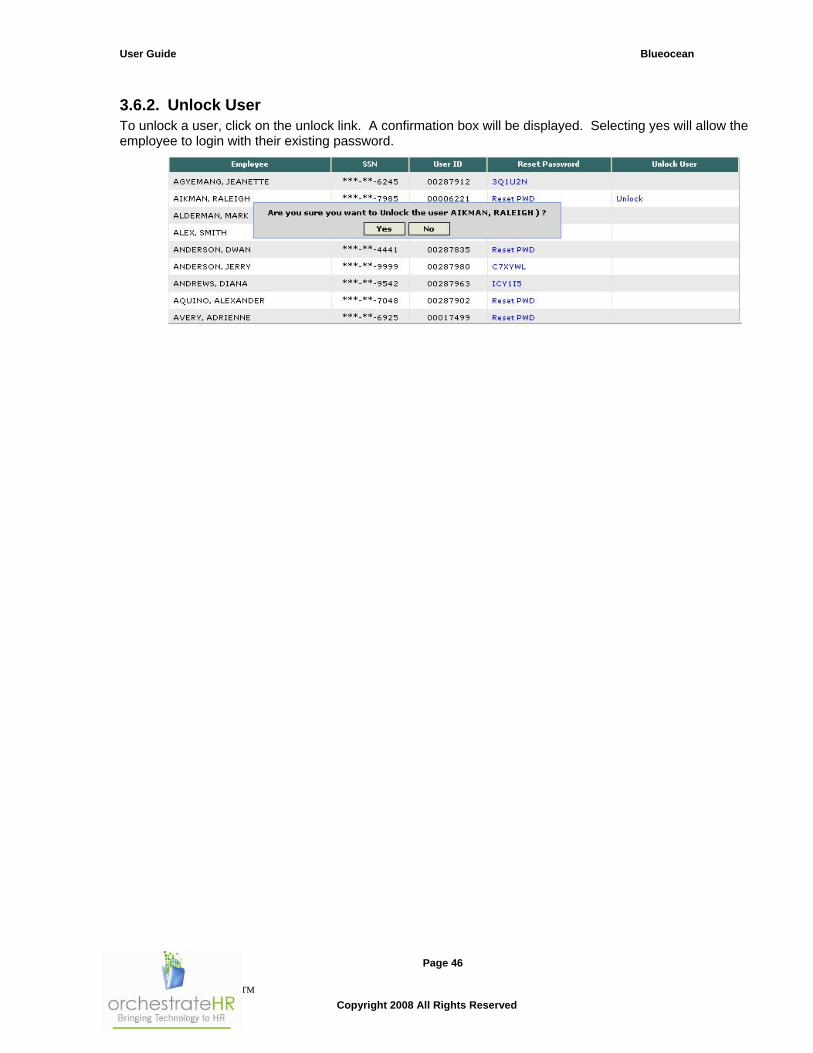
3.6.2. Unlock User To unlock a user, click on the unlock link. A confirmation box will be displayed. Selecting yes will allow the employee to login with their existing password.

User Guide Blueocean
Page 47
Copyright 2008 All Rights Reserved
4. Benefits
4.1. Fill-In Forms You can view and save the various insurance forms under the Fill-in Forms menu. There are two different options to download or save the forms for your employees:
Employees Fill-In Form All Employees Fill-In Forms
Please contact your Client Relationship Manager if you have additional forms you would like available on Blueocean.
4.1.1. Employees Fill-In Forms This option enables you to download forms that are pre-filled with the employee’s basic information. You need to select employee using Select Employee menu or by the name list at the top of the screen.
You may opt to download individual forms by clicking on the blue form name or to download multiple forms by selecting the check box to the left of the chosen forms as shown in the figure and pressing the ‘Download Zip File’ button. To download all the forms, use the check box at the very top and click on the ‘Download Zip File’ button. The forms are pre-filled with the employee’s basic information (data in blue) as shown below. You only need to enter the remaining details. NOTE: Adobe Professional 9.0 is required in order to save or email completed forms. With Adobe Reader, you can enter the remaining details and print a paper copy of the completed form.

User Guide Blueocean
Page 48
Copyright 2008 All Rights Reserved
4.1.2. All Employees Fill-In Forms This option enables you to download forms that are pre-filled with the employee’s basic information. You need to select employee using Select Employee menu or by the name list at the top of the screen.
To download the fill-in form, select the form then select the employee by checking the check boxes provided. Click on the Download Zip File button to download the form for the chosen employee. You can also download the form for all employees at once by selecting the check box at the very top and clicking the Download Zip File button.

User Guide Blueocean
Page 49
Copyright 2008 All Rights Reserved
4.2. Plan Documents This would list the documents related to plans selected by your company. Select the link in the Document name column to open or save the document.
4.3. View Claims
This link provides a search facility for the claims submitted by the employees and their dependents. Select the individual on whose behalf you want to do the search and enter the claim search date information. Click on the ‘search’ button after filling in the required details. This option is only available if your company is using selected services of EDH. Please contact your Client Relationship Manager for more information.

User Guide Blueocean
Page 50
Copyright 2008 All Rights Reserved
Selecting the All Dates option will provide you to list out all the claims of the individual.

User Guide Blueocean
Page 51
Copyright 2008 All Rights Reserved
You can view the claims for a particular month by selecting For Month and Year option.
You can also search claims by date range. Enter the From and To Dates and click search to view claims.
You may narrow down the search by using the ‘Claim Type’ and ‘Claim Status’ select box.

User Guide Blueocean
Page 52
Copyright 2008 All Rights Reserved
5. Payroll
5.1. Time & Attendance The Time & Attendance module allows you to view employee’s timesheets for time worked as well as leave time.
5.1.1. Attendance Calendars Attendance Calendars by Month and by Day provide a ‘snapshot’ of employees that have selected leave hours recorded.
To change the day or month viewed, make another selection on the left side of the screen.
To exit, select HOME in the upper right of the browser window.
User Guide Blueocean
Page 53
Copyright 2008 All Rights Reserved
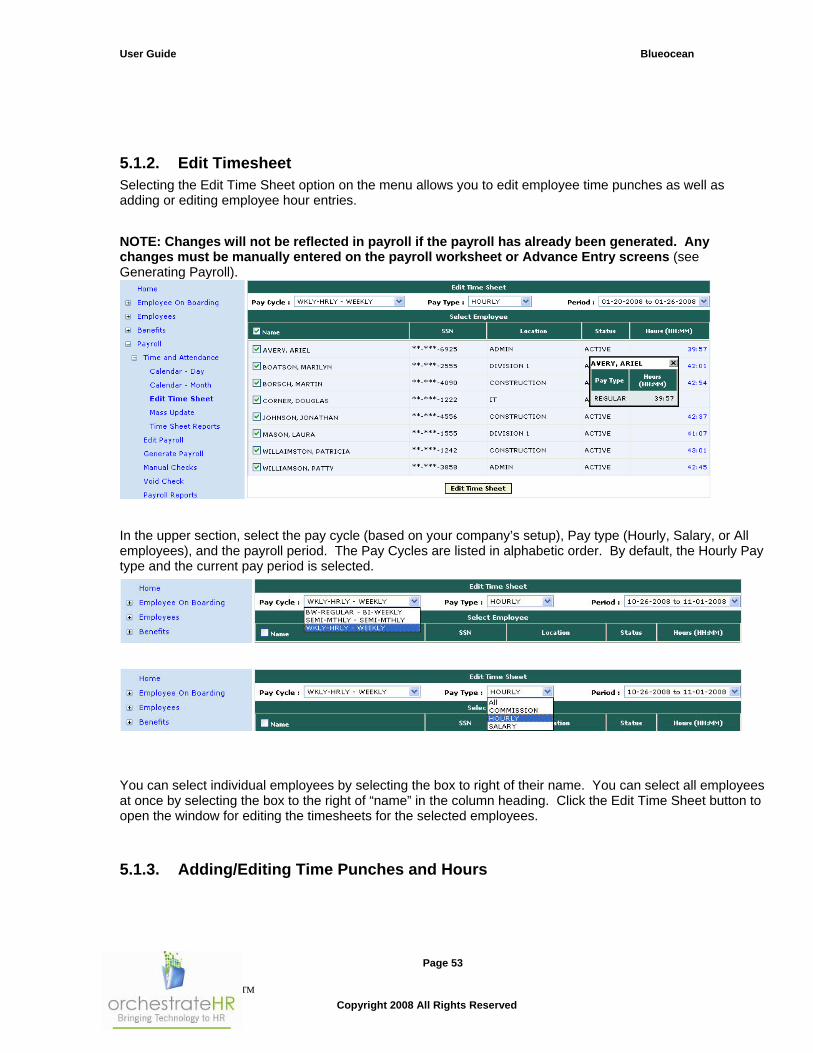
5.1.2. Edit Timesheet Selecting the Edit Time Sheet option on the menu allows you to edit employee time punches as well as adding or editing employee hour entries.
NOTE: Changes will not be reflected in payroll if the payroll has already been generated. Any changes must be manually entered on the payroll worksheet or Advance Entry screens (see Generating Payroll).
In the upper section, select the pay cycle (based on your company’s setup), Pay type (Hourly, Salary, or All employees), and the payroll period. The Pay Cycles are listed in alphabetic order. By default, the Hourly Pay type and the current pay period is selected.
You can select individual employees by selecting the box to right of their name. You can select all employees at once by selecting the box to the right of “name” in the column heading. Click the Edit Time Sheet button to open the window for editing the timesheets for the selected employees.
5.1.3. Adding/Editing Time Punches and Hours

User Guide Blueocean
Page 54
Copyright 2008 All Rights Reserved
The names of the employees selected under Edit timesheet are displayed on the left in the Select Employee section. The timesheet details for the highlighted employee are displayed. To display details for another employee, highlight the employee under Select Employee and the screen will refresh and display the new information. The period selected under Edit Timesheet is displayed. Other periods can be viewed by using the drop-down list to select another period.
5.1.4. Adding a Time Punch Clicking the Punch button opens an edit area to add time punches. Punches can be added for multiple consecutive days at once.
Change the start date to the date of the punch you are adding, the end date will default to the same date. To add the punch for multiple days, change the end date.
Select the Time punch type (In Day, Out Lunch, In Lunch, or Out Day)
Select the time of the punch (Hours, Minutes, AM or PM – the time zone is view only)
Click on Save to insert the entry in the timesheet.
5.1.5. Adding an Hours Entry Clicking the Hours button opens an edit area to add hours. Hours can be added for multiple consecutive days at once.

User Guide Blueocean
Page 55
Copyright 2008 All Rights Reserved
Change the start date to the date of the hours entry you are adding, the end date will default to the same date. To add hours for multiple days, change the end date.
Select the Pay Type from the drop-down list (example: Regular, PTO, Holiday, etc). The available time codes are based on your company’s setup.
Select the number of hours in hours and minutes
Click on Save to insert the entry in the timesheet.
5.1.6. View Leave Accrual Balances Clicking the Leave Accrual button will open a window displaying the employee’s leave balances. Please refer to the Leave accrual section for more information.
Note: The leave balances reflect entries from the last payroll processed. Hours entered on the Timesheet for the current period will not update leave balances until after the payroll for the period is processed.
5.1.7. Editing or Deleting a Time Punch
In order to edit the time of an existing punch, click on the time and the punch details will appear at the top of the timesheet to be edited. The punch type and date cannot be modified – the punch will have to be deleted and re-entered to correct punch type or date.
Click on update to save the changes.
To delete a time punch, click on the entry and then select the Delete button

User Guide Blueocean
Page 56
Copyright 2008 All Rights Reserved
5.1.8. Editing or Deleting an Hours Entry Click the Hours and the hours entry details will appear at the top of the timesheet to be edited. The time code cannot be modified. Comments entered will be displayed on the Audit Report.
Click on update to save the changes.
To delete an hours entry, click on the entry and then select the Delete button.
5.1.9. Time and Attendance Reports
Time and Attendance reports can be produced with a variety of filters and custom date ranges. Different reports can be selected using the drop down list at the top of the screen. Available reports include:
Audit Report
Missing Punch Report (with page breaks by employee) Missing Punch Report (without breaks)
Daily Timesheet (with page breaks by employee)
Daily Timesheet (without breaks)
Weekly Timesheet Report
Report filters are optional. If no filters are selected, all departments, employees, and time codes will be included on the report. To filter (or restrict) the data on the report, double click the item to filter for (example employee: Aikman, Raleigh) so that it is displayed on the right, under Selected Filters.
The payroll name and date range are required to generate the report. In the Date Range section, select the payroll from the drop down list. You may select a pay period from the Pay Period list or you can enter the beginning and ending dates for the desired date range.

User Guide Blueocean
Page 57
Copyright 2008 All Rights Reserved
You can optionally restrict the report for employees with a specific status. Use the drop-down list to make a selection.
Some reports are available in multiple output formats. If it is available for the report selected, you can choose output formats of Screen, Excel, or PDF.
Click on the Generate Report button to create the report.
Sample Time and Attendance Report generated with the following settings:
Daily Timesheet Report (without break)
Selected Filter: Raleigh Aikman
Payroll: Wkly-Hrly
Date Range: 01-13-2008 to 01-19-2008

User Guide Blueocean
Page 58
Copyright 2008 All Rights Reserved
5.2. Generating Payroll Generating Payroll is the cornerstone to creating payroll for your company. Every payroll has unique requirements, please contact your Client Relationship Manager with any questions you may have.
User Guide Blueocean
Page 59
Copyright 2008 All Rights Reserved
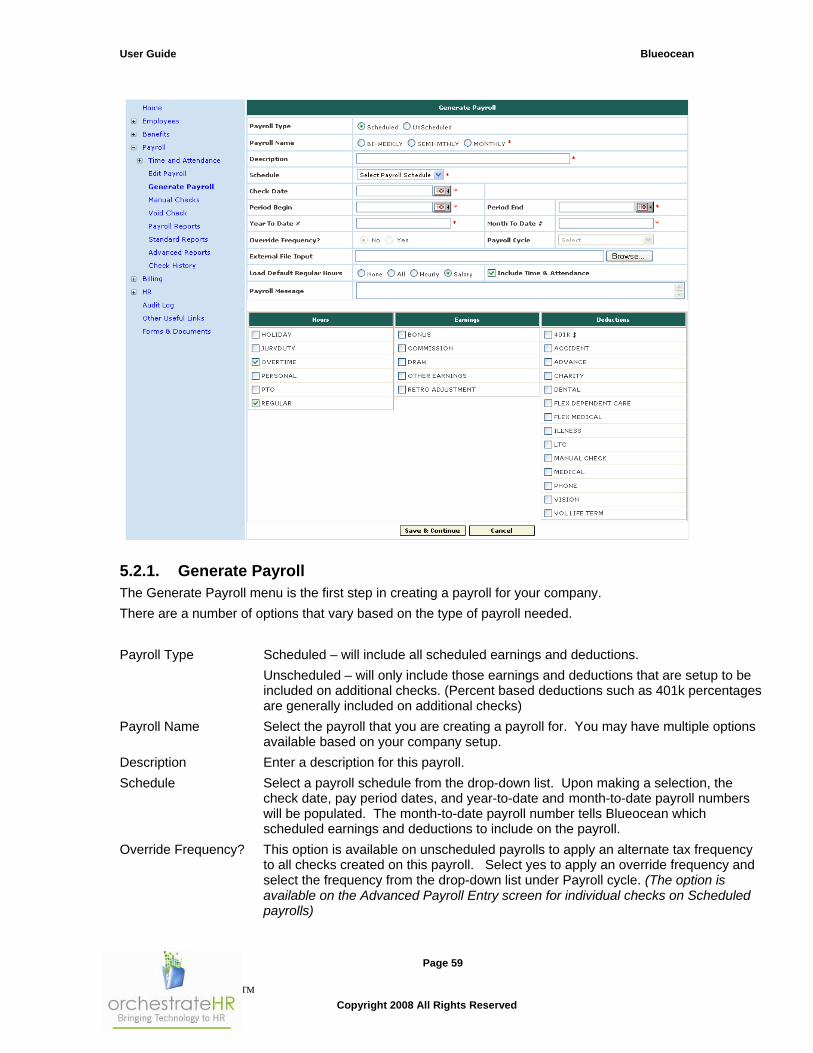
5.2.1. Generate Payroll The Generate Payroll menu is the first step in creating a payroll for your company.
There are a number of options that vary based on the type of payroll needed.
Payroll Type Scheduled – will include all scheduled earnings and deductions.
Unscheduled – will only include those earnings and deductions that are setup to be included on additional checks. (Percent based deductions such as 401k percentages are generally included on additional checks)
Payroll Name Select the payroll that you are creating a payroll for. You may have multiple options available based on your company setup.
Description Enter a description for this payroll.
Schedule Select a payroll schedule from the drop-down list. Upon making a selection, the check date, pay period dates, and year-to-date and month-to-date payroll numbers will be populated. The month-to-date payroll number tells Blueocean which scheduled earnings and deductions to include on the payroll.
Override Frequency? This option is available on unscheduled payrolls to apply an alternate tax frequency to all checks created on this payroll. Select yes to apply an override frequency and select the frequency from the drop-down list under Payroll cycle. (The option is available on the Advanced Payroll Entry screen for individual checks on Scheduled payrolls)

User Guide Blueocean
Page 60
Copyright 2008 All Rights Reserved
External file Input Allows for import of time and attendance data from an external system. Browse for the file on your local computer to import the data. This option must be setup for your company prior to use. Note: Time & Attendance information will override default hours for hourly and salary employees. If you are tracking salaried employees hour by having salaried employees clock in/out, the hours from time & attendance will roll in to the payroll and must be manually changed.
Load Default Regular Hours Select to load default hours for Salaried only, Hourly only, All employees or None of the employees. If default hours are loaded, they can be overridden on the Payroll Worksheet. Default hours are calculated for each employee by dividing each employee’s Work Hrs/Year by number of payrolls per year.
Include Time & Attendance Select to include Blueocean Time & Attendance information. Note: Time & Attendance information will override default hours for hourly and salary employees
Payroll Message Payroll messages entered on the Generate Payroll screen will print on all checks for all employees on this payroll.
Hours, Earnings, and Deductions: At least one code must be selected for at least one of the categories. The codes selected will appear on the Payroll Worksheet screen for ease of entry. The default regular and overtime time codes are selected automatically and can be unselected if desired. Percentage based deductions are not available to select for display on the payroll worksheet but can be edited/added on the Advance Entry screen.
Click the Save & Continue button to move to the next step of Generating Payroll – Payroll Employee Selection.
User Guide Blueocean
Page 61
Copyright 2008 All Rights Reserved
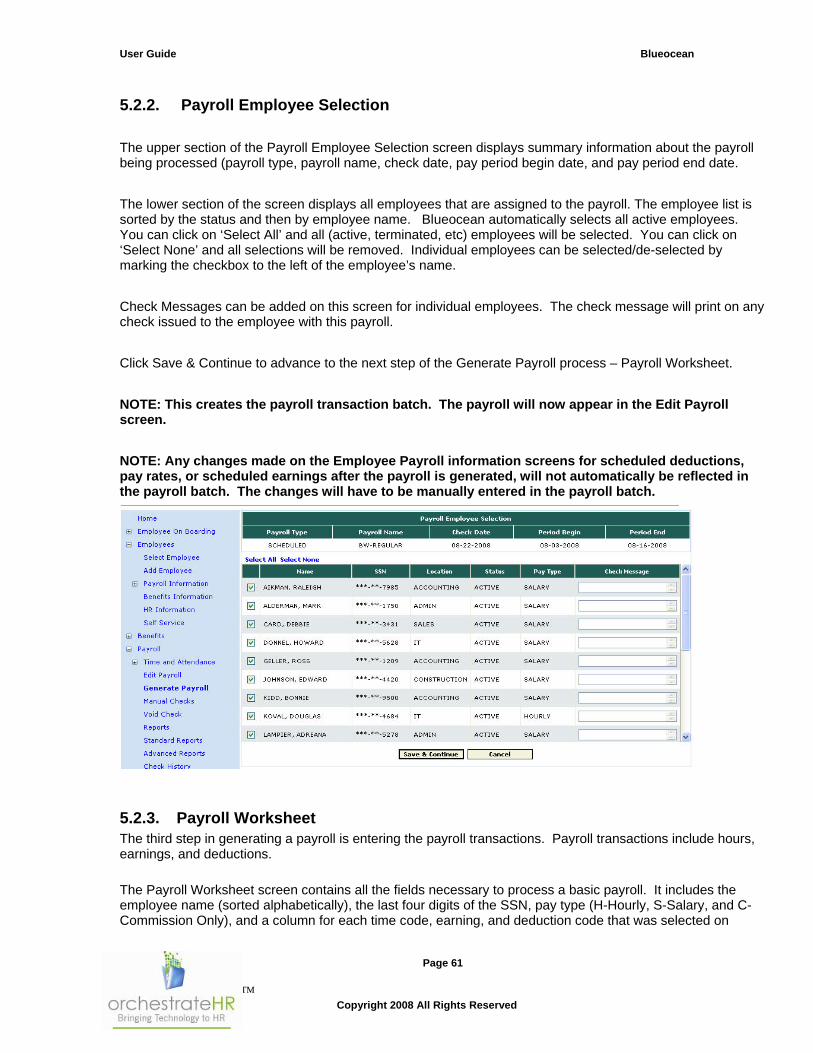
5.2.2. Payroll Employee Selection
The upper section of the Payroll Employee Selection screen displays summary information about the payroll being processed (payroll type, payroll name, check date, pay period begin date, and pay period end date.
The lower section of the screen displays all employees that are assigned to the payroll. The employee list is sorted by the status and then by employee name. Blueocean automatically selects all active employees. You can click on ‘Select All’ and all (active, terminated, etc) employees will be selected. You can click on ‘Select None’ and all selections will be removed. Individual employees can be selected/de-selected by marking the checkbox to the left of the employee’s name.
Check Messages can be added on this screen for individual employees. The check message will print on any check issued to the employee with this payroll.
Click Save & Continue to advance to the next step of the Generate Payroll process – Payroll Worksheet.
NOTE: This creates the payroll transaction batch. The payroll will now appear in the Edit Payroll screen.
NOTE: Any changes made on the Employee Payroll information screens for scheduled deductions, pay rates, or scheduled earnings after the payroll is generated, will not automatically be reflected in the payroll batch. The changes will have to be manually entered in the payroll batch.
5.2.3. Payroll Worksheet The third step in generating a payroll is entering the payroll transactions. Payroll transactions include hours, earnings, and deductions.
The Payroll Worksheet screen contains all the fields necessary to process a basic payroll. It includes the employee name (sorted alphabetically), the last four digits of the SSN, pay type (H-Hourly, S-Salary, and C-Commission Only), and a column for each time code, earning, and deduction code that was selected on

User Guide Blueocean
Page 62
Copyright 2008 All Rights Reserved
Generate Payroll. If you chose to load default hours, they are displayed. Note: Time & Attendance hours will override default hours. Hours or Amounts can be entered on this screen or they can be entered on the Advanced Payroll Entry screen. To issue multiple checks to an employee, click on the Add’l Check button. The Chk # number column will display the number of the check. Scheduled Earnings and Deductions will be included on additional checks as per your company setup – usually these are percentage based deductions only. Check the Do Not Pay box to exclude an employee from the payroll. The ADV button will take you to the Advanced Payroll Entry screen for the selected employee. Selecting Abandon Changes will take you to the Summary Screen and will not save any changes. Save and Continue Working will save your work and remain on the Payroll Worksheet screen. When all transactions have been completed, click Advance to Summary Screen. NOTE: For security purposes, Blueocean will automatically log out after 5 minutes of inactivity. Please click the Save and Continue Working button every few minutes to prevent losing your work.
5.2.4. Advanced Payroll Entry The Advanced Payroll Entry screen provides additional options and information to the Payroll Worksheet screen. At any time, you can select one of the Save and Return to Payroll Worksheet buttons (available at the top and bottom of the screen) to return to the Payroll Worksheet. Changing to another employee will save your entries (exception: any new codes must be saved separately – see following information for further details)

User Guide Blueocean
Page 63
Copyright 2008 All Rights Reserved
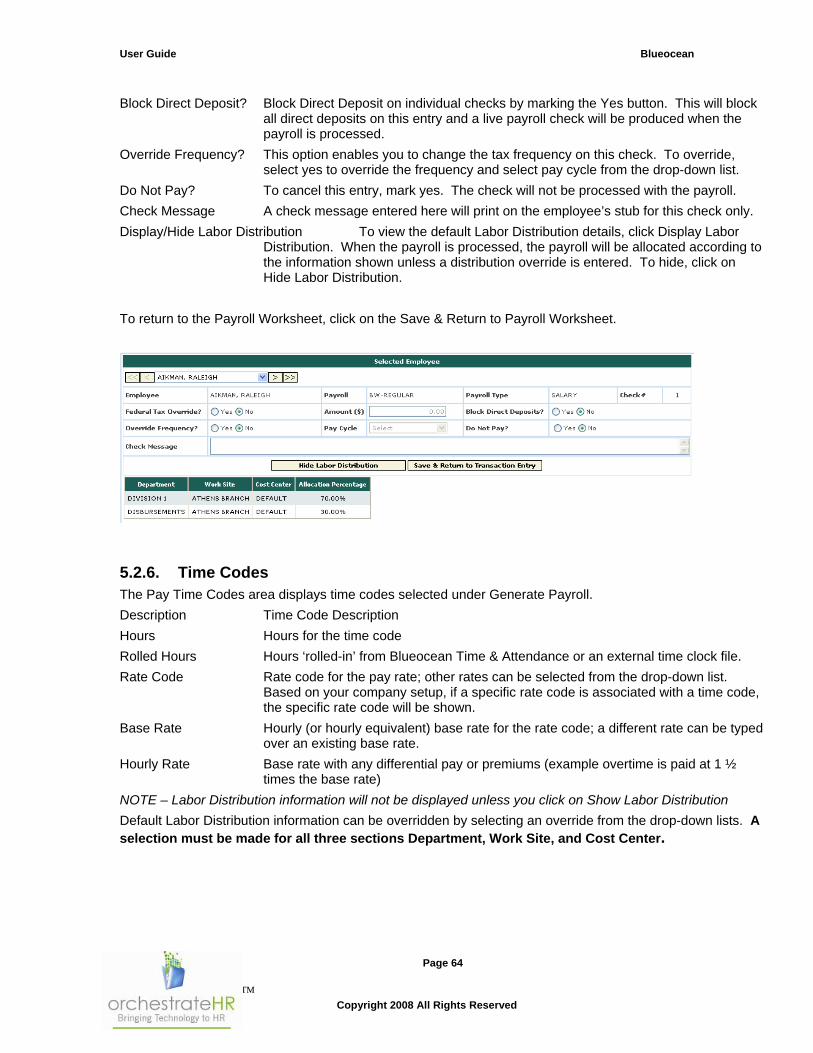
5.2.5. Employee Check Details The employee name is displayed along with the payroll name, employee pay type, and check number. You can use the arrows beside the employee name to move to the first employee, move back one record, move forward one record, or move to the last employee. You may also use the drop-down list to select the employee/transaction you wish to edit. Entries on this screen will impact the check displayed and will not affect other checks for this employee.
Federal Tax Override? To override Federal Income tax withheld, select yes and enter the amount. This
amount will override the amount of federal income tax regardless of the employee’s tax information.
User Guide Blueocean
Page 64
Copyright 2008 All Rights Reserved
Block Direct Deposit? Block Direct Deposit on individual checks by marking the Yes button. This will block all direct deposits on this entry and a live payroll check will be produced when the payroll is processed.
Override Frequency? This option enables you to change the tax frequency on this check. To override, select yes to override the frequency and select pay cycle from the drop-down list.
Do Not Pay? To cancel this entry, mark yes. The check will not be processed with the payroll.
Check Message A check message entered here will print on the employee’s stub for this check only.
Display/Hide Labor Distribution To view the default Labor Distribution details, click Display Labor Distribution. When the payroll is processed, the payroll will be allocated according to the information shown unless a distribution override is entered. To hide, click on Hide Labor Distribution.
To return to the Payroll Worksheet, click on the Save & Return to Payroll Worksheet.
5.2.6. Time Codes The Pay Time Codes area displays time codes selected under Generate Payroll.
Description Time Code Description
Hours Hours for the time code
Rolled Hours Hours ‘rolled-in’ from Blueocean Time & Attendance or an external time clock file.
Rate Code Rate code for the pay rate; other rates can be selected from the drop-down list. Based on your company setup, if a specific rate code is associated with a time code, the specific rate code will be shown.
Base Rate Hourly (or hourly equivalent) base rate for the rate code; a different rate can be typed over an existing base rate.
Hourly Rate Base rate with any differential pay or premiums (example overtime is paid at 1 ½ times the base rate)
NOTE – Labor Distribution information will not be displayed unless you click on Show Labor Distribution
Default Labor Distribution information can be overridden by selecting an override from the drop-down lists. A selection must be made for all three sections Department, Work Site, and Cost Center.

User Guide Blueocean
Page 65
Copyright 2008 All Rights Reserved
To add hours for another time code, click on Add Time Codes.
Select the time code from the drop-down list and enter the hours.
Change the rate code and/or rate as needed.
You must click on Save Time Codes before entering any other changes or your entry will not be saved.
5.2.7. Earning Codes
The Earnings Codes area displays the earnings codes selected under Generate Payroll and any Scheduled Earnings for this pay period. The fields enabled for each deduction are based upon your company setup.
Description Earnings Description
Amount Earnings Amount
Units Number of Units to pay
Unit Rates Rate the units are paid at
Block? To block scheduled earnings and not pay on this payroll, select the Block check box
NOTE – Labor Distribution information will not be displayed unless you click on Show Labor Distribution
Default Labor Distribution information can be overridden by selecting an override from the drop-down lists. A selection must be made for all three sections Department, Work Site, and Cost Center. The WC code can be overridden by selecting a code from the drop-down list.
To add another earnings code, click on Add Earnings.
Select the earnings code from the drop-down list and enter the amount, units, and unit rate as needed.

User Guide Blueocean
Page 66
Copyright 2008 All Rights Reserved
You must click on Save Earnings before entering any other changes or your entry will not be saved.
5.2.8. Deductions
The Deductions area displays the deduction codes selected under Generate Payroll and any Scheduled Deductions for this pay period. The fields enabled for each deduction are based upon your company setup.
Description Deduction Description
EE Amount Employee Deduction Amount
EE % Employee Deduction Percentage
ER Amount Employer Contribution Amount – does not impact the employee’s check amount
ER % Employer Contribution Percentage – does not impact the employee’s check amount
ER Match Match code - determines the amount of the employer matching contribution to Savings deductions (401k, 403b, 401k Roth, etc)
Override ER Match? Select the check box if you with to enter an adjustment to the ER Match calculation.
Override ER Match Amount Adjustment Amount (overrides the system calculation with the adjustment amount entered)
Block? To block a scheduled deduction and not included it on this payroll, select the Block? Check box
Arrows Deductions are listed in priority order – lowest to highest. The arrows enable you to override the standard deduction order by moving the deductions up or down as needed. If an employee does not have enough net pay for all deductions, the deductions with the lowest priority are withheld in order until the employee’s net pay is zero.
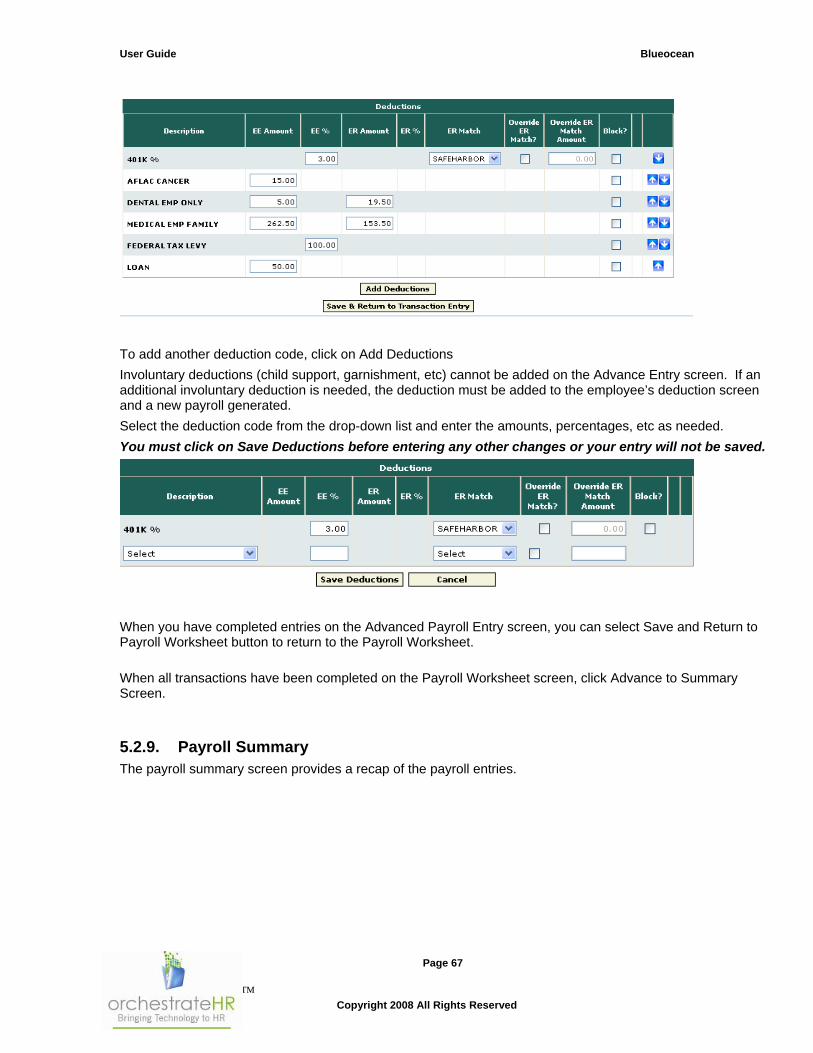
User Guide Blueocean
Page 67
Copyright 2008 All Rights Reserved
To add another deduction code, click on Add Deductions
Involuntary deductions (child support, garnishment, etc) cannot be added on the Advance Entry screen. If an additional involuntary deduction is needed, the deduction must be added to the employee’s deduction screen and a new payroll generated.
Select the deduction code from the drop-down list and enter the amounts, percentages, etc as needed.
You must click on Save Deductions before entering any other changes or your entry will not be saved.
When you have completed entries on the Advanced Payroll Entry screen, you can select Save and Return to Payroll Worksheet button to return to the Payroll Worksheet.
When all transactions have been completed on the Payroll Worksheet screen, click Advance to Summary Screen.
5.2.9. Payroll Summary The payroll summary screen provides a recap of the payroll entries.
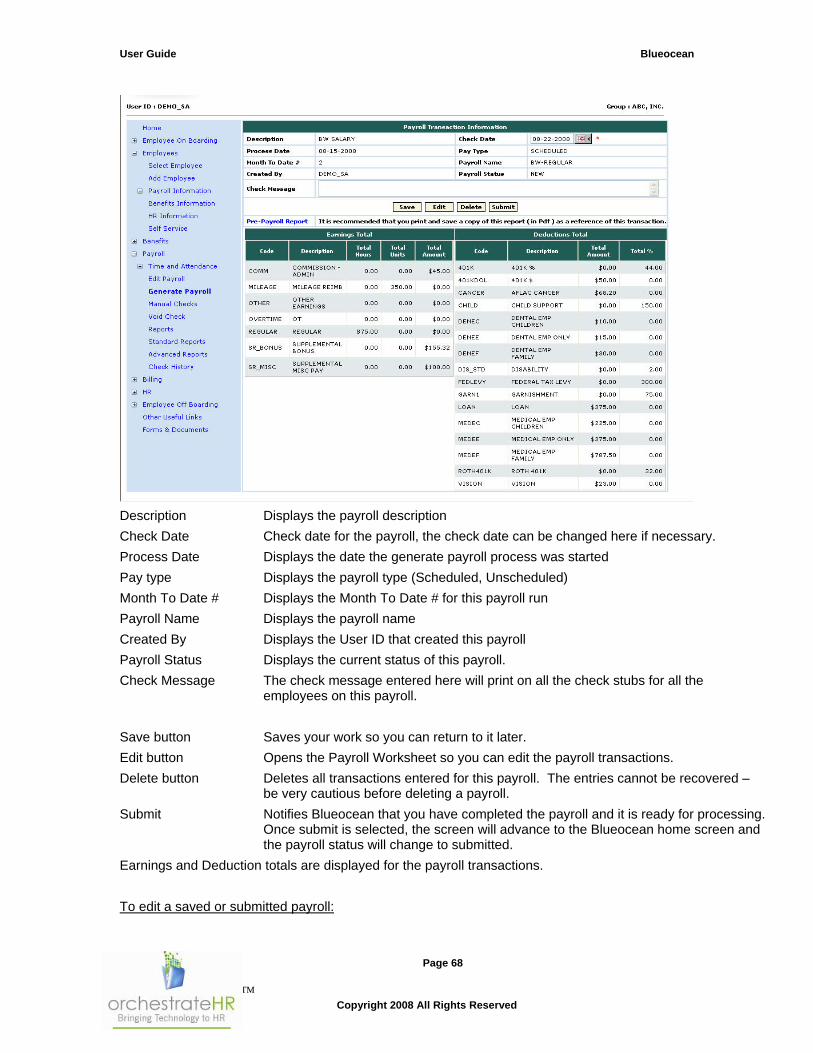
User Guide Blueocean
Page 68
Copyright 2008 All Rights Reserved
Description Displays the payroll description
Check Date Check date for the payroll, the check date can be changed here if necessary.
Process Date Displays the date the generate payroll process was started
Pay type Displays the payroll type (Scheduled, Unscheduled)
Month To Date # Displays the Month To Date # for this payroll run
Payroll Name Displays the payroll name
Created By Displays the User ID that created this payroll
Payroll Status Displays the current status of this payroll.
Check Message The check message entered here will print on all the check stubs for all the employees on this payroll.
Save button Saves your work so you can return to it later.
Edit button Opens the Payroll Worksheet so you can edit the payroll transactions.
Delete button Deletes all transactions entered for this payroll. The entries cannot be recovered – be very cautious before deleting a payroll.
Submit Notifies Blueocean that you have completed the payroll and it is ready for processing. Once submit is selected, the screen will advance to the Blueocean home screen and the payroll status will change to submitted.
Earnings and Deduction totals are displayed for the payroll transactions.
To edit a saved or submitted payroll:

User Guide Blueocean
Page 69
Copyright 2008 All Rights Reserved
Select Edit Payroll from the Blueocean Payroll Menu. Click on the check date to open the payroll summary window. Select the Edit button once the payroll summary window opens.
Click on Pre-Payroll Report to open an Adobe Acrobat report of the payroll transactions.
We strongly recommend that you save a copy of the Pre-Payroll report on paper or in a copy of the file as a reference of the payroll.
The first page of the Pre-Payroll Report provides a list of warnings items that require review. This report will not list every possible warning or error. It is your responsibility to review the Pre-Payroll Report for accuracy before submitting the payroll
Possible warnings include:
Checks with $0 total earnings
Totals earnings of $10,000 or more
Hours/Earnings entries with a 0.00 rate
New employees hired during the pay period
Rate Changes that occurred during the pay period
Void Check entries
Manual Check entries
The remainder of the Pre-Payroll Report includes details of the payroll transaction entries.
Hours, earnings, and deduction details are listed for each check for each employee.
Company totals are included on the last page of the report.

User Guide Blueocean
Page 70
Copyright 2008 All Rights Reserved
5.3. Manual Checks
Use the Manual Checks option to calculate and record payroll checks you have issued outside of Blueocean. Pending Manual checks will be included with the next payroll processed for your company. Requests can be deleted by clicking the red X at right side of the screen.

User Guide Blueocean
Page 71
Copyright 2008 All Rights Reserved
In order to create a manual check, select the employee name, select the payroll schedule, and enter the number of the check being manually issued. The check date will default to the system date, although it may be changed to a future date if appropriate. The pay period begin and end date will display according to the schedule selected. These dates can be overridden if necessary.
The Override Frequency option allows you to select a different tax frequency for this check. To use this feature, select YES and choose a payroll cycle from the drop-down list.

User Guide Blueocean
Page 72
Copyright 2008 All Rights Reserved
The second screen of the manual check process displays the check calculations. Blueocean automatically includes the employee’s default hours, scheduled earnings, and scheduled deductions on the initial calculation.
Additional Earnings or Deductions can be added by selecting the appropriate button at the upper portion of the screen. Existing earnings and certain taxes can be edited by clicking on the corresponding hyperlink (name in blue).
Existing deductions can be changed be selecting the corresponding hyperlink (amounts in blue) to be edited. If the deduction includes both a deduction as well as a benefit/match amount, the amounts must be edited separately. To remove earnings or deductions, change the amounts to zero and save the change.
Note: Leave accrued time must be manually adjusted on the employee’s leave screen. Leave taken time will be updated.
The manual check is automatically saved and will be included with the next payroll processed. To cancel this check, select the Cancel Check button.
5.4. Void Checks
The void checks menu provides a simple process for voiding checks.
To void a check, you must first select the employee from the drop-down list.
Once an employee is selected, all of the employee’s checks are displayed. To view the check stub, click on the date in the pay date column. To select the check for voiding, click on select.

User Guide Blueocean
Page 73
Copyright 2008 All Rights Reserved
Summary information for the selected check is displayed. An optional comment field is available for notes.
To submit the void request, click on the Confirm Void Request button.
Once the void request is confirmed, a message will showing that the void request was created.
Note: Leave accrual balances must be adjusted manually.

User Guide Blueocean
Page 74
Copyright 2008 All Rights Reserved
Clicking the Continue button will return you to the first screen of the void check process. Any void requests that have been submitted but not yet processed with a payroll are displayed. These void requests can be deleted by clicking on the red X on the right side of the screen.
If your company uses EDAS bank accounts for live checks, please submit the original check to your Client Relationship Manager to be voided.
Direct Deposits voids will not be credited to your company unless an ACH Reference ID exists and is selected during the void check process.

User Guide Blueocean
Page 75
Copyright 2008 All Rights Reserved
5.5. Payroll Reports This menu option provides you to view the reports for payroll related information like invoices, ledger, deduction, direct deposit etc. Many of the reports are available in both in PDF and excel formats.
Select the Pay Cycle and payroll process to view. The list of payrolls processed included the check date and period end date for reference. To view any of the reports, click on the link and then select to open or save buttons in the dialog box.

User Guide Blueocean
Page 76
Copyright 2008 All Rights Reserved
5.6. Standard Reports Standard Report provides additional reports that not tied to a specific payroll process. Following are the standard reports currently available
Master File Report Employee Anniversary Report Employee Leave Accrual By Department Employee Hire Date Report Employee Term Date Report Employee Birth Date Report Active Address Report Employee Emergency Contact Report EEOC-Chart EEOC-Detail Report Payroll Detail By Period Report Labor Distribution by Period Scheduled Earnings Report Scheduled Deductions Report
To view the report, click on the link (report name). You will be prompted for the parameters necessary to create the report. Select the parameter(s) accordingly and click the Generate Report button. If the report is available in multiple formats, select the desired format.

User Guide Blueocean
Page 77
Copyright 2008 All Rights Reserved
Click on the Back button to go to the standard Report screen.
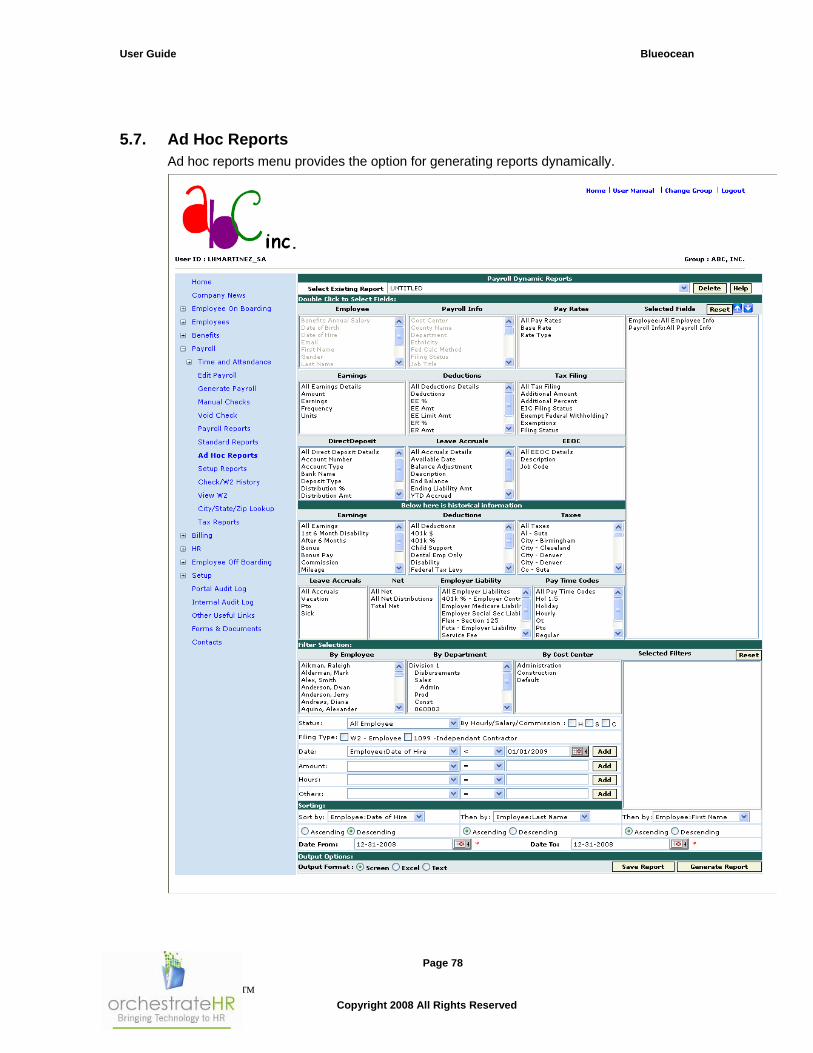
User Guide Blueocean
Page 78
Copyright 2008 All Rights Reserved
5.7. Ad Hoc Reports Ad hoc reports menu provides the option for generating reports dynamically.

User Guide Blueocean
Page 79
Copyright 2008 All Rights Reserved
To generate a report. select the fields from Select Employee Fields by double clicking the fields. You
can change the order of selected columns by clicking the up and down arrows. To delete a
selected column, highlight the item and click on the red x in the center of the screen. Once the fields are selected enter the From Date and To Date and hit the Generate Report button.
Report is generated with selected fields. You can also export the report to excel format by clicking the Export to Excel button.
You can save the query generated once for future reference by clicking the Save Query button. It will prompt for the name which query needs to be saved. Enter the name and hit Save Query button.

User Guide Blueocean
Page 80
Copyright 2008 All Rights Reserved
Once the query is saved it will appear in the select query column.
5.8. Setup Reports Your company’s setup information is available under Setup Reports. One or more areas can be included on a single report by marking the boxes and selecting Generate Report. The report will open in PDF format.
Click on the name of an area and a report for that selection will be displayed on the screen.
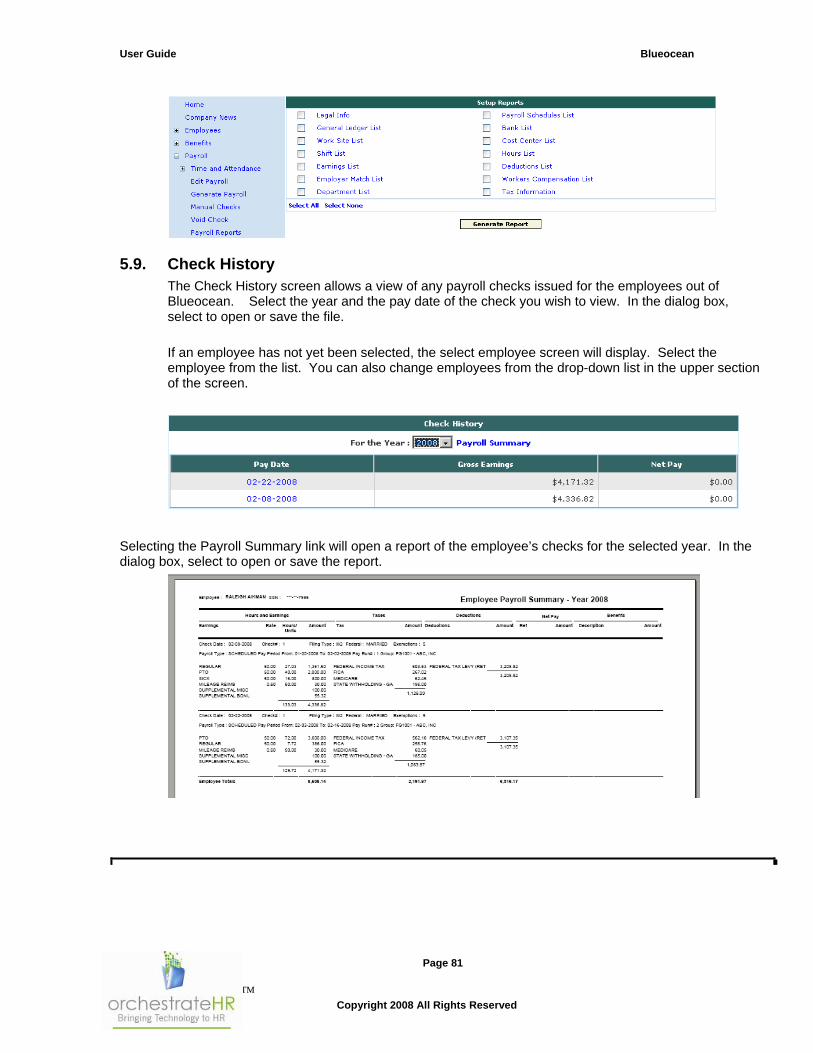
User Guide Blueocean
Page 81
Copyright 2008 All Rights Reserved
5.9. Check History The Check History screen allows a view of any payroll checks issued for the employees out of Blueocean. Select the year and the pay date of the check you wish to view. In the dialog box, select to open or save the file.
If an employee has not yet been selected, the select employee screen will display. Select the employee from the list. You can also change employees from the drop-down list in the upper section of the screen.
Selecting the Payroll Summary link will open a report of the employee’s checks for the selected year. In the dialog box, select to open or save the report.

User Guide Blueocean
Page 82
Copyright 2008 All Rights Reserved
6. Billing
6.1. Billing Summary You can view the bills of your company in either .pdf format or .xls format. Select the bill period from the list of values such as last 6 months bill or last 12 months. Select the bill format from the list of values to view in specified format.
List of bills will be displayed with bill number, date, amount, due date and status. Status may be ‘Approved’, ‘pending approval’, ‘New’. You can view information about particular bill by clicking on the link under Bill Number.
6.2. Other Carrier Bills For the insurance carriers that are included with Consolidated Billing, the actual bills received from the insurance carriers are available to view. You can view the bill by clicking on the link in description.

User Guide Blueocean
Page 83
Copyright 2008 All Rights Reserved
7. HR
7.1. Standard Reports You can view the various reports related to HR. Clicking the standard reports under HR menu, list the available reports. To view each report, click on the respective link.
You can see the reviews conducted during specified periods by clicking the review report. The report requires entry of From and To dates and allows you to choose the format (‘screen’ or ‘Excel’). Clicking on ‘Generate Report’ will open the report in the specified format.

User Guide Blueocean
Page 84
Copyright 2008 All Rights Reserved
You can view the Exit interview report by clicking ‘Employee Exit Interview Report’ and then select the employee from the list of values (Employee who attended the exit interview) for whom to view the report, also select the format option to view the report.
Click on the ‘Generate Report’ button to view the result.

User Guide Blueocean
Page 85
Copyright 2008 All Rights Reserved
7.2. Confidential Folder This lists the confidential documents for the Employee. Click the link to view the document. Confidential documents may include review documents, exit interview document (if employee is terminated).The Confidential tab in HR information would list document only for the selected employee.

User Guide Blueocean
Page 86
Copyright 2008 All Rights Reserved
8. Employee Off Boarding Employee Off Boarding Module groups processes and procedures to simplify employee terminations.
Equipment Request Standard Operating procedure Turnover Report Exit Interview Performance Review
T
8.1. Equipment Request This menu option allows you to view and update the status of any equipment that was assigned to the employee. The pending equipment returns are listed and a report can be generated in excel format.
When an item is returned, update the item return date by clicking on the Item Name link. Enter the Return Date and click the Update button to update the item.
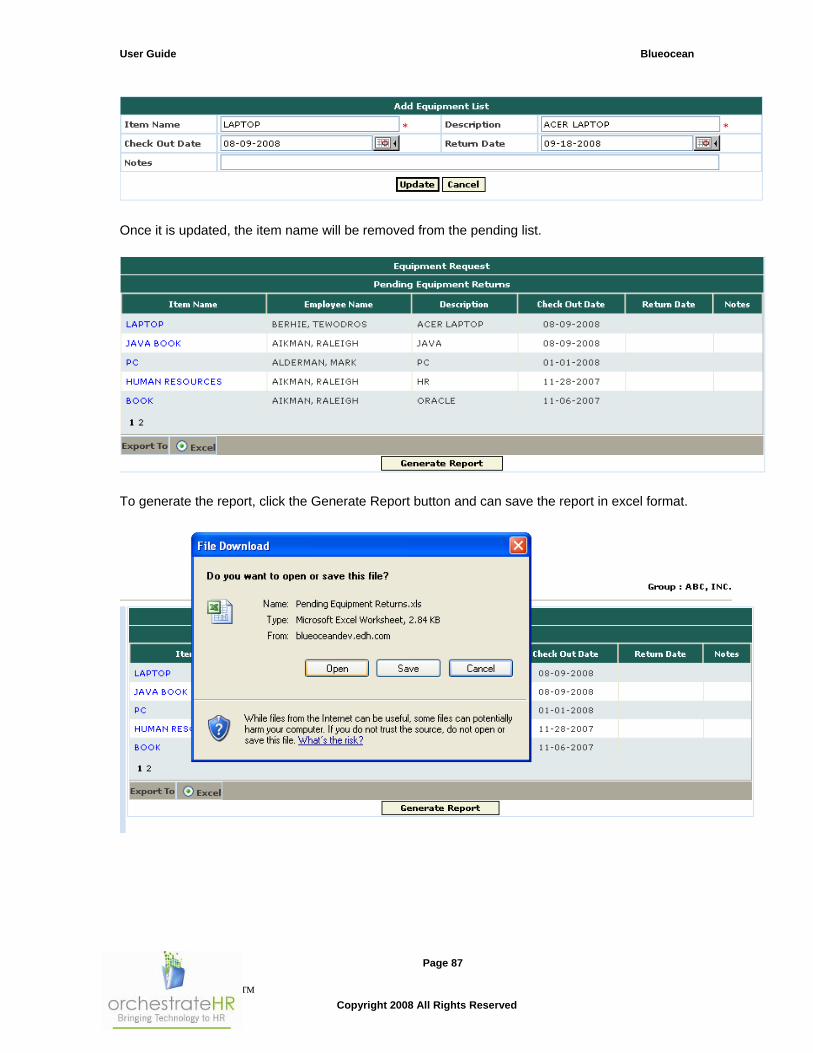
User Guide Blueocean
Page 87
Copyright 2008 All Rights Reserved
Once it is updated, the item name will be removed from the pending list.
To generate the report, click the Generate Report button and can save the report in excel format.

User Guide Blueocean
Page 88
Copyright 2008 All Rights Reserved
8.2. Standard Operating Procedure This option provides access to your standard procedures documents. To view the document click on the link and click Open.
8.3. Exit Interview The exit interview menu provides options to conduct Exit Interview for terminated employees.
Select the Employee and enter Interview Date. Hit the Start Interview button. The Exit Interview Questions will be displayed one by one. Select the answer and hit the Next button to move to the next question.
If you select an employee that has already completed the exit interview, the summary will be displayed.

User Guide Blueocean
Page 89
Copyright 2008 All Rights Reserved
Once all the questions are answered, a summary will be displayed.

User Guide Blueocean
Page 90
Copyright 2008 All Rights Reserved
8.4. Exit Interview Report This menu provides you to view the Exit Interview Report. The report provides a percentage of the responses from all completed exit interviews.

User Guide Blueocean
Page 91
Copyright 2008 All Rights Reserved
9. Setup
9.1. Company News You can use this option to add and maintain updates of information that needs to be notified to the Employees. Click on the ‘Add company news’ to add new info. To update the news, click on the link in the Title column. To delete the news from the list, click on the red X button on the right side of the screen.
Title Enter the title related to the info Effective Date Date from which news should be available to the employees Termination Date Date to which news should be available to the employees. News Enter the news information
9.2. Exit Interview Questionnaire You can set the questions that need to be conducted during exit interviews for an employee as well as the possible answers for each question.

User Guide Blueocean
Page 92
Copyright 2008 All Rights Reserved
Exit Interview Questions for: Lists the Question type To add new questions to the selected Question type click on the ‘Add Exit Interview Questions’ To update the existing question click on the link in Questions No.
Question code Enter code for the question Question No. Enter Question number Answer type Select from the list for the type of answer Display Sequence Sequence Question Enter the question
You can add possible answers to a question by clicking the link on the Question column. This would display the possible answers if already added and also ‘Add Possible Answers’ button. Click on the Add Possible Answers button to add a new answer.
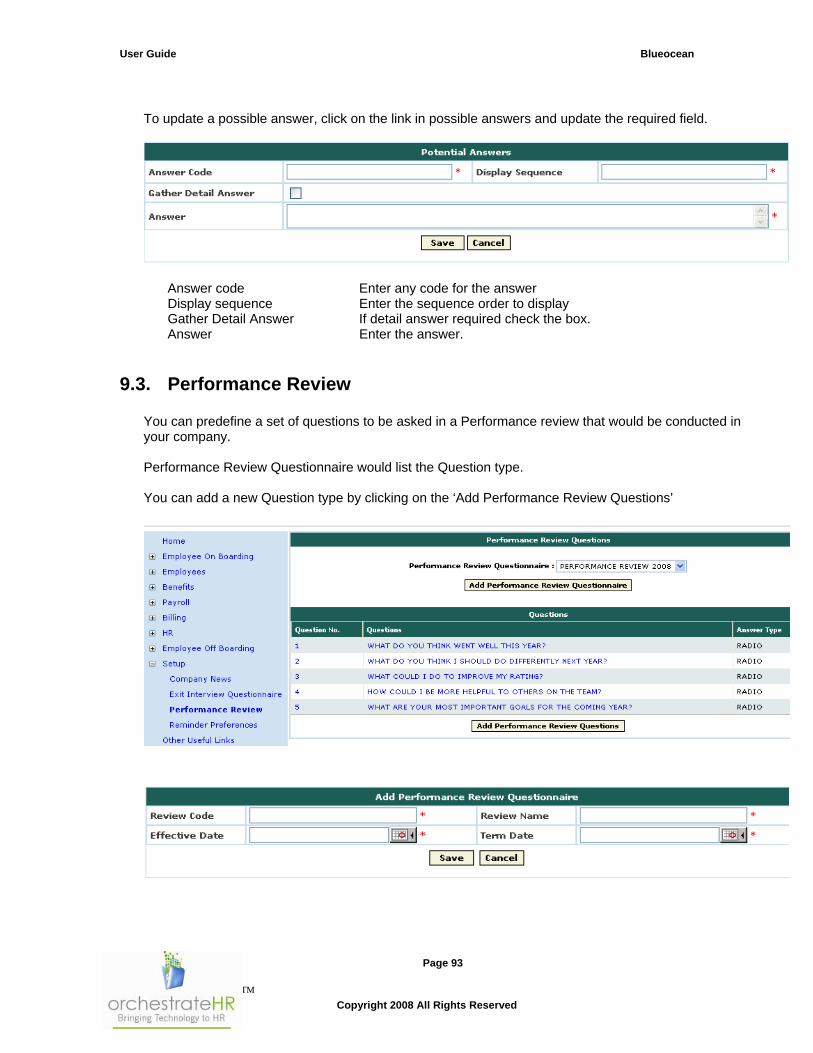
User Guide Blueocean
Page 93
Copyright 2008 All Rights Reserved
To update a possible answer, click on the link in possible answers and update the required field.
Answer code Enter any code for the answer Display sequence Enter the sequence order to display Gather Detail Answer If detail answer required check the box. Answer Enter the answer.
9.3. Performance Review You can predefine a set of questions to be asked in a Performance review that would be conducted in your company. Performance Review Questionnaire would list the Question type. You can add a new Question type by clicking on the ‘Add Performance Review Questions’

User Guide Blueocean
Page 94
Copyright 2008 All Rights Reserved
Review code Enter any code Review Name Enter the review name Effective Date Enter effective date Term Date Enter termination date for the review type
To add new performance review questions to the selected review Question type click on the ‘Add performance Review Questions’. To update the existing question click on the link in Question No.
Question code Enter code for the question Question No. Enter Question number Answer type Select from the list for the type of answer Display Sequence Display Sequence order Question Enter the question
You can add possible answers to a question by clicking the link on the Question column. This would display the possible answers if already added and also ‘Add Possible Answers’ button. Click the ‘Add Possible Answers’ button to add possible answer. To update a possible answer, click on the link in possible answers and update the required field.
Answer code Enter any code for the answer Display sequence Enter the sequence order to display Gather Detail Answer If detail answer required check the box.

User Guide Blueocean
Page 95
Copyright 2008 All Rights Reserved
Answer Enter the answer.
9.4. Other Useful Links This provides links of useful websites. To access the website, click on link. Suggestions:
Your company website Insurance websites to look up providers. 401k company
9.5. Forms & Documents This provides downloadable links to various forms and documents. To download or save, the click the links of the documents listed.

User Guide Blueocean
Page 96
Copyright 2008 All Rights Reserved
10. Frequently Asked Questions
10.1. Payroll FAQ Following are frequently asked questions related to Payroll
10.1.1. Why didn’t I receive a check for an employee’s child support deduction?
Check to see if a recipient id is selected on the employee’s deduction screen. If a recipient ID is not selected, a check will not be generated. You will need to issue a check to the recipient through your office.
10.1.2. Why is my new employee unable to clock in and out?
If the employee’s hire date was entered as a future date, the employee’s rate effective date must be changed to the present of past date. Without a ‘current’ rate, the employee will not be able to utilize Blueocean Time & Attendance. Enter a rate change, using the same pay rate and the correct date.
Submit a request to [email protected] in order to correct the hire date.
Other times, if IP restrictions are in place for your company, the employee may be attempting to clock in/out from an invalid IP address. Please provide the exact error message to your Client Relationship Manger so that the issue can be resolved.
10.1.3. What do I do if we are hiring employees in a new state? Contact the state and register/apply for appropriate state income tax and state unemployment tax accounts. At least 48 hours before adding the employee in Blueocean, you will need to provide your Client Relationship Manger with the worksite address and state identification numbers. If you have not received the identification numbers yet, please provide copies of the applications. We will use a new business SUTA rate (from www.payroll-taxes.com) if your rate has not been assigned yet.
10.1.4. What levels of security access are available?
Currently we have the following “roles” available (exact access will vary based upon the provided services). Multiple “roles” can be assigned to a single user.
User Guide Blueocean
Page 97
Copyright 2008 All Rights Reserved
PAYADMIN – requires access to all departments – can view/add/edit all payroll and HR employee data, Self Service menu, Full Payroll menu (time & attendance, generate payroll, view/create to all payroll reports), HR-confidential folder, Setup – Company news, Portal Audit Log PAYSUPER – access to Payroll / Time & attendance menu only – can restrict access to selected departments PAYWRATE – access to employee payroll information screen – can view/add/edit all info including rates – can restrict access to selected departments HRADMIN – access to employee HR information screen, Add Employee screen, Self Service menu, HR Standard Reports, Setup for company news, reminder preferences– can restrict access to selected departments PLANADMIN – access to employee benefit information, Add Employee screen, Self Service menu, Benefits menus; Billing menu, Setup – Company news – can restrict access to selected departments
10.1.5. How do we catch up deductions for employees that have missed a paycheck?
When payroll is generated, on the Advanced Entry Screen, the deduction amount can be changed, or the deduction can be added again and the amount entered on a separate line.