Embed Size (px)
Citation preview

Blue Coat® SystemsProxySG® Appliance
Configuration and Management SuiteVolume 4: Securing the Blue Coat ProxySG
SGOS Version 5.3.x
Volume 4: Securing the Blue Coat ProxySG
ii
Contact Information
Blue Coat Systems Inc.420 North Mary Ave Sunnyvale, CA 94085-4121
http://www.bluecoat.com/support/contactsupport
http://www.bluecoat.com
For concerns or feedback about the documentation: [email protected]
Copyright© 1999-2008 Blue Coat Systems, Inc. All rights reserved worldwide. No part of this document may be reproduced by any means nor modified, decompiled, disassembled, published or distributed, in whole or in part, or translated to any electronic medium or other means without the written consent of Blue Coat Systems, Inc. All right, title and interest in and to the Software and documentation are and shall remain the exclusive property of Blue Coat Systems, Inc. and its licensors. ProxyAV™, CacheOS™, SGOS™, SG™, Spyware Interceptor™, Scope™, ProxyRA Connector™, ProxyRA Manager™, Remote Access™ and MACH5™ are trademarks of Blue Coat Systems, Inc. and CacheFlow®, Blue Coat®, Accelerating The Internet®, ProxySG®, WinProxy®, AccessNow®, Ositis®, Powering Internet Management®, The Ultimate Internet Sharing Solution®, Cerberian®, Permeo®, Permeo Technologies, Inc.®, and the Cerberian and Permeo logos are registered trademarks of Blue Coat Systems, Inc. All other trademarks contained in this document and in the Software are the property of their respective owners.
BLUE COAT SYSTEMS, INC. DISCLAIMS ALL WARRANTIES, CONDITIONS OR OTHER TERMS, EXPRESS OR IMPLIED, STATUTORY OR OTHERWISE, ON SOFTWARE AND DOCUMENTATION FURNISHED HEREUNDER INCLUDING WITHOUT LIMITATION THE WARRANTIES OF DESIGN, MERCHANTABILITY OR FITNESS FOR A PARTICULAR PURPOSE AND NONINFRINGEMENT. IN NO EVENT SHALL BLUE COAT SYSTEMS, INC., ITS SUPPLIERS OR ITS LICENSORS BE LIABLE FOR ANY DAMAGES, WHETHER ARISING IN TORT, CONTRACT OR ANY OTHER LEGAL THEORY EVEN IF BLUE COAT SYSTEMS, INC. HAS BEEN ADVISED OF THE POSSIBILITY OF SUCH DAMAGES.
Document Number: 231-03013Document Revision: SGOS 5.3.1—08/2008

iii
Contents
Contact Information
Chapter 1: About SecurityControlling ProxySG Access ........................................................................................................... 11Controlling User Access with Identity-based Access Controls.................................................. 12SSL Between the ProxySG and the Authentication Server ......................................................... 12About This Book................................................................................................................................ 13Document Conventions ................................................................................................................... 13Notes and Warnings ......................................................................................................................... 14About Procedures ............................................................................................................................. 14Illustrations ........................................................................................................................................ 15
Chapter 2: Controlling Access to the ProxySGLimiting Access to the ProxySG...................................................................................................... 17
Requiring a PIN for the Front Panel ........................................................................................ 17Limiting Workstation Access.................................................................................................... 18Securing the Serial Port ............................................................................................................. 18
About Password Security ................................................................................................................ 18Limiting User Access to the ProxySG—Overview....................................................................... 19Moderate Security: Restricting Management Console Access Through the Console Access
Control List (ACL) .................................................................................................................... 21Maximum Security: Administrative Authentication and Authorization Policy ..................... 23
Defining Administrator Authentication and Authorization Policies ................................. 23Defining Policies Using the Visual Policy Manager.............................................................. 23Defining Policies Directly in Policy Files ................................................................................ 24Admin Transactions and <Admin> Layers............................................................................ 24Example Policy Using CPL Syntax .......................................................................................... 28
Chapter 3: Controlling Access to the Internet and Intranet
Section A: Managing UsersAbout User Login.............................................................................................................................. 30Viewing Logged-In Users ................................................................................................................ 30Logging Out Users............................................................................................................................ 31
Inactivity Timeout ...................................................................................................................... 32Administrator Action................................................................................................................. 32Policy ............................................................................................................................................ 32

Volume 4: Securing the Blue Coat ProxySG
iv
Refreshing User Data ...................................................................................................................... 33Credential Refresh Time ........................................................................................................... 33Authorization Refresh Time .................................................................................................... 34Surrogate Refresh Time............................................................................................................. 34Policy............................................................................................................................................ 35
Related CLI Syntax to Manage Users ............................................................................................ 35
Section B: Using Authentication and ProxiesTerminology ...................................................................................................................................... 37About Authentication Modes ......................................................................................................... 38
Setting the Default Authenticate Mode Property.................................................................. 40About Origin-Style Redirection ............................................................................................... 40Selecting an Appropriate Surrogate Credential .................................................................... 41Configuring Transparent Proxy Authentication ................................................................... 41Permitting Users to Login with Authentication or Authorization Failures ...................... 42Using Guest Authentication ..................................................................................................... 43Using Default Groups................................................................................................................ 45
Guest Authentication Example....................................................................................................... 45Overview of Policy Steps .......................................................................................................... 45
Section C: Using SSL with Authentication and Authorization ServicesUsing SSL Between the Client and the ProxySG ................................................................... 46
Section D: Creating a Proxy Layer to Manage Proxy OperationsUsing CPL ................................................................................................................................... 47
Chapter 4: Managing X.509 Certificates
Section A: ConceptsPublic Keys and Private Keys ......................................................................................................... 58Certificates ......................................................................................................................................... 58
SSL Certificates ........................................................................................................................... 58CA Certificates............................................................................................................................ 59External Certificates................................................................................................................... 59
Keyrings ............................................................................................................................................. 59Cipher Suites Supported by SGOS Software ................................................................................ 59Server-Gated Cryptography and International Step-Up ............................................................ 60
Section B: Using Keyrings and SSL CertificatesCreating a Keyring ........................................................................................................................... 63
Deleting an Existing Keyring and Certificate ........................................................................ 66
Section C: Managing CertificatesManaging Certificate Signing Requests ........................................................................................ 67
Creating a CSR............................................................................................................................ 67

Contents
v
Viewing a Certificate Signing Request.................................................................................... 69Managing SSL Certificates .............................................................................................................. 69
Creating Self-Signed SSL Certificates...................................................................................... 70Importing a Server Certificate .................................................................................................. 71
Using Certificate Revocation Lists ................................................................................................ 72Troubleshooting Certificate Problems........................................................................................... 73
Section D: Using External CertificatesImporting and Deleting External Certificates .............................................................................. 75
Deleting an External Certificate ............................................................................................... 76Digitally Signing Access Logs......................................................................................................... 76
Section E: Advanced ConfigurationImporting an Existing Keypair and Certificate ............................................................................ 77About Certificate Chains ................................................................................................................. 79Importing a CA Certificate.............................................................................................................. 79Creating CA Certificate Lists .......................................................................................................... 81
Section F: Checking Certificate Revocation Status in Real Time (OCSP)About OCSP ...................................................................................................................................... 84
How Blue Coat ProxySG Uses OCSP...................................................................................... 84Basic OCSP Setup Scenarios ..................................................................................................... 85BlueCoat Reverse Proxy and SSL Proxy Scenarios ............................................................... 87
Creating and Configuring an OCSP Responder .......................................................................... 88Setting the Default Responder ........................................................................................................ 92OCSP CLI Commands...................................................................................................................... 93OCSP CPL Policy Configuration .................................................................................................... 94OCSP Listed Exceptions .................................................................................................................. 94OCSP Access Log Fields .................................................................................................................. 94
Chapter 5: Certificate Realm AuthenticationHow Certificate Realm Works ........................................................................................................ 97Creating a Certificate Realm ........................................................................................................... 98Defining a Certificate Realm ........................................................................................................... 98Defining Certificate Realm Authorization Properties................................................................. 99Defining Certificate Realm General Properties .......................................................................... 101Revoking User Certificates ............................................................................................................ 103Creating the Certificate Authorization Policy ............................................................................ 104Tips ................................................................................................................................................... 105Certificate Realm Example ............................................................................................................ 105
Chapter 6: Oracle COREid AuthenticationAbout COREid Interaction with Blue Coat................................................................................. 109Configuring the COREid Access System .................................................................................... 110
Volume 4: Securing the Blue Coat ProxySG
vi
Additional COREid Configuration Notes................................................................................... 111Configuring the ProxySG Realm.................................................................................................. 111Participating in a Single Sign-On (SSO) Scheme........................................................................ 111
Avoiding ProxySG Challenges............................................................................................... 112Creating a COREid Realm............................................................................................................. 112Configuring Agents........................................................................................................................ 113Configuring the COREid Access Server...................................................................................... 115Configuring the General COREid Settings ................................................................................. 117Creating the CPL............................................................................................................................. 119
Chapter 7: Forms-Based Authentication
Section A: About Authentication FormsUser/Realm CPL Substitutions for Authentication Forms ...................................................... 126Tip ..................................................................................................................................................... 126
Section B: Creating and Editing a Form
Section C: Setting Storage Options
Section D: Using CPL with Forms-Based Authentication
Chapter 8: IWA Realm Authentication and AuthorizationAbout IWA ...................................................................................................................................... 133How Blue Coat Works with IWA................................................................................................. 133Creating an IWA Realm ................................................................................................................ 134IWA Servers..................................................................................................................................... 134Defining IWA Realm General Properties.................................................................................... 136Creating the CPL............................................................................................................................. 139Notes................................................................................................................................................. 140
Chapter 9: LDAP Realm Authentication and AuthorizationOverview.......................................................................................................................................... 141Creating an LDAP Realm ............................................................................................................. 142LDAP Servers .................................................................................................................................. 143Defining LDAP Base Distinguished Names ............................................................................... 145LDAP Search & Groups Tab (Authorization and Group Information).................................. 147Customizing LDAP Objectclass Attribute Values ..................................................................... 149Defining LDAP General Realm Properties ................................................................................. 150Creating the CPL............................................................................................................................. 154
Notes .......................................................................................................................................... 155
Chapter 10: Local Realm Authentication and AuthorizationCreating a Local Realm.................................................................................................................. 157Changing Local Realm Properties................................................................................................ 158
Notes .......................................................................................................................................... 160

Contents
vii
Defining the Local User List.......................................................................................................... 160Creating a Local User List....................................................................................................... 160Populating a List using the .htpasswd File .......................................................................... 161Uploading the .htpasswd File ............................................................................................... 162Populating a Local User List through the ProxySG ........................................................... 162Enhancing Security Settings for the Local User List ........................................................... 165
Creating the CPL............................................................................................................................. 166
Chapter 11: Policy Substitution RealmAbout Policy Substitution Realms ............................................................................................... 167Creating a Policy Substitution Realm .......................................................................................... 170Configuring User Information...................................................................................................... 171Creating a List of Users to Ignore................................................................................................. 173Configuring Authorization ........................................................................................................... 174Defining Policy Substitution Realm General Properties........................................................... 174
Notes .......................................................................................................................................... 177Creating the Policy Substitution Policy....................................................................................... 178
Using Single Sign-On Realms and Proxy Chains ................................................................ 178
Chapter 12: CA eTrust SiteMinder AuthenticationAbout SiteMinder Interaction with Blue Coat............................................................................ 181
Configuring the SiteMinder Policy Server ........................................................................... 182Additional SiteMinder Configuration Notes ....................................................................... 183Configuring the ProxySG Realm ........................................................................................... 183
Participating in a Single Sign-On (SSO) Scheme........................................................................ 184Avoiding ProxySG Challenges............................................................................................... 184
Creating a SiteMinder Realm ....................................................................................................... 185Configuring Agents ................................................................................................................. 185
Configuring SiteMinder Servers................................................................................................... 187Defining SiteMinder Server General Properties ........................................................................ 188
Configuring Authorization Settings for SiteMinder ........................................................... 190Configuring General Settings for SiteMinder ...................................................................... 192
Creating the CPL............................................................................................................................. 196SiteMinder Authorization Example............................................................................................. 196
Chapter 13: RADIUS Realm Authentication and AuthorizationAbout RADIUS................................................................................................................................ 199Creating a RADIUS Realm ............................................................................................................ 200Defining RADIUS Realm Properties............................................................................................ 200Defining RADIUS Realm General Properties............................................................................. 202Creating the Policy ......................................................................................................................... 205
Fine-Tuning RADIUS Realms ................................................................................................ 206

Volume 4: Securing the Blue Coat ProxySG
viii
Creating RADIUS Groups....................................................................................................... 207CPL Example ............................................................................................................................ 207
Troubleshooting.............................................................................................................................. 207Notes................................................................................................................................................. 208
Chapter 14: Novell Single Sign-on Authentication and AuthorizationAbout Novell SSO Realms............................................................................................................. 209Creating a Novell SSO Realm ...................................................................................................... 211Novell SSO Agents ......................................................................................................................... 211Adding LDAP Servers to Search and Monitor........................................................................... 213Querying the LDAP Search Realm............................................................................................... 214Configuring Authorization ........................................................................................................... 215Defining Novell SSO Realm General Properties........................................................................ 216Modifying the sso.ini File for Novell SSO Realms..................................................................... 219Creating the CPL............................................................................................................................. 220
Using Single Sign-On Realms and Proxy Chains ................................................................ 220Notes................................................................................................................................................. 221
Chapter 15: Sequence Realm AuthenticationAbout Sequencing........................................................................................................................... 223Adding Realms to a Sequence Realm .......................................................................................... 223Creating a Sequence Realm........................................................................................................... 224Adding Realms to a Sequence Realm .......................................................................................... 224Defining Sequence Realm General Properties ........................................................................... 226Tips ................................................................................................................................................... 227
Chapter 16: Windows Single Sign-on AuthenticationHow Windows SSO Realms Work............................................................................................... 229
How Windows SSO Works with BCAAA............................................................................ 230BCAAA Synchronization ........................................................................................................ 230How Windows SSO Authorization Works........................................................................... 231
Creating a Windows SSO Realm ................................................................................................. 232Windows SSO Agents .................................................................................................................... 232Configuring Authorization ........................................................................................................... 234Defining Windows SSO Realm General Properties................................................................... 235Modifying the sso.ini File for Windows SSO Realms................................................................ 237Creating the CPL............................................................................................................................. 239
Using Single Sign-On Realms and Proxy Chains ................................................................ 239Notes................................................................................................................................................. 240
Chapter 17: Using XML RealmsAbout XML Realms ........................................................................................................................ 243Before Creating an XML Realm.................................................................................................... 244
Contents
ix
Creating an XML Realm ................................................................................................................ 244Configuring XML Servers ............................................................................................................. 245Configuring XML Options ............................................................................................................ 247Configuring XML Realm Authorization ..................................................................................... 247Configuring XML General Realm Properties ............................................................................. 249Creating the CPL............................................................................................................................. 253Viewing Statistics............................................................................................................................ 253
Appendix A: Using BCAAAOperating System Requirements.................................................................................................. 255Using the BCAAA Service............................................................................................................. 256
Performance Notes................................................................................................................... 257Installing the BCAAA Service on a Windows System .............................................................. 257
Notes on SSL and Systems Running pre-Windows 2003 ................................................... 262Notes on SSL and Systems Running Windows 2003 and Later ........................................ 263
Installing the BCAAA Service on a Solaris System ................................................................... 263Creating Service Principal Names for IWA Realms .................................................................. 264Troubleshooting Authentication Agent Problems..................................................................... 265Common BCAAA Event Messages.............................................................................................. 266
Appendix B: Authentication and Authorization Errors
Appendix C: Managing SSL Traffic
Section A: SSL Client ProfilesAbout the SSL Client Profile ......................................................................................................... 288Editing an SSL Client ..................................................................................................................... 288
Associating a Keyring, Protocol, and CCL with the SSL Client ........................................ 288Changing the Cipher Suite of the SSL Client ....................................................................... 289
Section B: SSL Device ProfilesAbout SSL Device Profiles............................................................................................................. 292Editing or Creating an SSL Device Profile .................................................................................. 292Related CLI Syntax to Manage SSL Device Profiles .................................................................. 294
Section C: Notes and TroubleshootingTroubleshooting Server Certificate Verification ........................................................................ 295Setting the SSL Negotiation Timeout........................................................................................... 295
Appendix D: XML Protocol
Section A: Authenticate RequestGET Method (User Credentials in Request) ............................................................................... 298GET Method (User Credentials in Headers)............................................................................... 298

Volume 4: Securing the Blue Coat ProxySG
x
POST Method (User Credentials in Request) ............................................................................. 298POST Method (User Credentials in Headers) ............................................................................ 298
Section B: Authenticate ResponseSuccess.............................................................................................................................................. 300Failed/Denied ................................................................................................................................. 300
Section C: Authorize RequestGET Method .................................................................................................................................... 302POST Method .................................................................................................................................. 302
Section D: Authorize ResponseSuccess.............................................................................................................................................. 303Failed ................................................................................................................................................ 303
Glossary
Index

11
Chapter 1: About Security
Enterprise-wide security begins with security on the ProxySG, and continues with controlling user access to the Intranet and Internet.
SSH and HTTPS are the recommended (and default) methods for managing access to the ProxySG. SSL is the recommended protocol for communication between the and a realm's off-box authentication server.
Topics in this ChapterThis chapter includes information about the following topics:
❐ "Controlling ProxySG Access" on page 11
❐ "Controlling User Access with Identity-based Access Controls" on page 12
❐ "SSL Between the ProxySG and the Authentication Server" on page 12
❐ "About This Book" on page 13
❐ "Document Conventions" on page 13
❐ "Notes and Warnings" on page 14
❐ "About Procedures" on page 14
❐ "Illustrations" on page 15
Controlling ProxySG AccessYou can control access to the ProxySG several ways: by limiting physical access to the system, by using passwords, restricting the use of console account, through per-user RSA public key authentication, and through Blue Coat Content Policy Language (CPL). How secure the system needs to be depends upon the environment.
You can limit access to the ProxySG by:
❐ Restricting physical access to the system and by requiring a PIN to access the front panel.
❐ Restricting the IP addresses that are permitted to connect to the ProxySG CLI.
❐ Requiring a password to secure the Setup Console.
These methods are in addition to the restrictions placed on the console account (a console account user password) and the Enable password. For information on using the console account, refer to Volume 2: Getting Started.
By using every possible method (physically limiting access, limiting workstation IP addresses, and using passwords), the ProxySG is very secure.

Volume 4: Securing the Blue Coat ProxySG
12
After the ProxySG is secure, you can limit access to the Internet and intranet. It is possible to control access to the network without using authentication. You only need to use authentication if you want to use identity-based access controls.
Controlling User Access with Identity-based Access ControlsThe ProxySG provides a flexible authentication architecture that supports multiple services with multiple backend servers (for example, LDAP directory servers together with NT domains with no trust relationship) within each authentication scheme with the introduction of the realm.
A realm authenticates and authorizes users for access to ProxySG services using either explicit proxy or transparent proxy mode, discussed in Volume 3: Proxies and Proxy Services.
Multiple authentication realms can be used on a single ProxySG. Multiple realms are essential if the enterprise is a managed provider or the company has merged with or acquired another company. Even for companies using only one protocol, multiple realms might be necessary, such as the case of a company using an LDAP server with multiple authentication boundaries. You can use realm sequencing to search the multiple realms all at once.
A realm configuration includes:
❐ Realm name.
❐ Authentication service—(IWA, LDAP, RADIUS, Local, Certificate, Sequences, CA eTrust SiteMinder®, Oracle COREid™, Policy Substitution, Windows SSO, Novell SSO).
❐ External server configuration—Backend server configuration information, such as host, port, and other relevant information based on the selected service.
❐ Authentication schema—The definition used to authenticate users.
❐ Authorization schema—The definition used to authorize users for membership in defined groups and check for attributes that trigger evaluation against any defined policy rules.
❐ One-time passwords are supported for RADIUS realms only.
You can view the list of realms already created by clicking Configuration > Authentication > Realms. Realms are created on the home page for each realm.
SSL Between the ProxySG and the Authentication ServerSSL communication between the ProxySG and LDAP and IWA authentication servers is supported. In addition, you can also use SSL between the client and the ProxySG. For more information on using SSL between the client and the, see "Using SSL with Authentication and Authorization Services" on page 46.
Configuring a realm to use SSL between the ProxySG and the authentication server is performed on a per-realm basis. Part of the SSL configuration is specifying whether to verify the server's certificate. If the server certificate is to be

Chapter 1: About Security
13
verified, then the server's certificate must be signed by a Certificate Authority that the ProxySG trusts, and the common name in the server certificate must match the server host as specified in the realm configuration.
The realms use the default SSL client defined on the ProxySG for SSL communications to the authentication servers.
About This BookThe first few chapters of Volume 4: Securing the Blue Coat ProxySG Appliance deal with limiting access to the ProxySG. The remainder of the book discusses the various realms:
❐ Chapter 2: "Controlling Access to the ProxySG" on page 17
❐ Chapter 3: "Controlling Access to the Internet and Intranet" on page 29
❐ Chapter 4: "Managing X.509 Certificates" on page 57
❐ Chapter 5: "Certificate Realm Authentication" on page 97
❐ Chapter 6: "Oracle COREid Authentication" on page 109
❐ Chapter 7: "Forms-Based Authentication" on page 121
❐ Chapter 8: "IWA Realm Authentication and Authorization" on page 133
❐ Chapter 9: "LDAP Realm Authentication and Authorization" on page 141
❐ Chapter 10: "Local Realm Authentication and Authorization" on page 157
❐ Chapter 11: "Policy Substitution Realm" on page 167
❐ Chapter 12: "CA eTrust SiteMinder Authentication" on page 181
❐ Chapter 13: "RADIUS Realm Authentication and Authorization" on page 199
❐ Chapter 14: "Novell Single Sign-on Authentication and Authorization" on page 209
❐ Chapter 15: "Sequence Realm Authentication" on page 223
❐ Chapter 16: "Windows Single Sign-on Authentication" on page 229
❐ Chapter 17: "Using XML Realms" on page 243
❐ Appendix A: "Using BCAAA" on page 255
❐ Appendix B: "Authentication and Authorization Errors" on page 273
❐ Appendix C: "Managing SSL Traffic" on page 287
❐ Appendix D: "XML Protocol" on page 297
Document ConventionsThe following section lists the typographical and Command Line Interface (CLI) syntax conventions used in this manual.
Note: If the browser is configured for on-line checking of certificate revocation, the status check must be configured to bypass authentication.

Volume 4: Securing the Blue Coat ProxySG
14
Notes and WarningsThe following is provided for your information and to caution you against actions that can result in data loss or personal injury:
About Procedures Many of the procedures in this volume begin:
❐ Select Configuration > TabName, if you are working in the Management Console, or
❐ From the (config) prompt, if you are working in the command line interface (CLI).
Blue Coat assumes that you are logged into the first page of the Management Console or entered into configuration mode in the CLI.
Table 1–1 Document Conventions
Conventions Definition
Italics The first use of a new or Blue Coat-proprietary term.
Courier font Screen output. For example, command line text, file names, and Blue Coat Content Policy Language (CPL).
Courier Italics A command line variable that is to be substituted with a literal name or value pertaining to the appropriate facet of your network system.
Courier Boldface A Blue Coat literal to be entered as shown.
Arial Boldface Screen elements in the Management Console.
{ } One of the parameters enclosed within the braces must be supplied
[ ] An optional parameter or parameters.
| Either the parameter before or after the pipe character can or must be selected, but not both.
Note: Information to which you should pay attention.
Important: Critical information that is not related to equipment damage or personal injury (for example, data loss).
WARNING! Used only to inform you of danger of personal injury or physical damage to equipment. An example is a warning against electrostatic discharge (ESD) when installing equipment.

Chapter 1: About Security
15
IllustrationsTo save space, screen shots illustrating a procedure often have the bottom portion removed, along with the blank space.
Figure 1–1 Configuration > General Tab with Bottom Buttons
❐ Preview: Click this button to view the configuration changes before applying the configuration to the ProxySG. To modify your changes, click Close and return to the tab whose settings you want to modify.
❐ Apply: Click this button to apply unsaved configuration changes to the ProxySG.
❐ Revert: Click this button to revert any unapplied changes to the ProxySG configuration. Changes that previously have been applied to the ProxySG are not affected.
❐ Help: Click this button to view conceptual and procedural documentation about the tab’s topic.
Figure 1–2 Configuration > General Tab with Bottom Buttons Removed

Volume 4: Securing the Blue Coat ProxySG
16

17
Chapter 2: Controlling Access to the ProxySG
This chapter describes how to control user access to the ProxySG.
Topics in this ChapterThis chapter includes information about the following topics::
❐ "Limiting Access to the ProxySG" on page 17
❐ "About Password Security" on page 18
❐ "Limiting User Access to the ProxySG—Overview" on page 19
❐ "Moderate Security: Restricting Management Console Access Through the Console Access Control List (ACL)" on page 21
❐ "Maximum Security: Administrative Authentication and Authorization Policy" on page 23
Limiting Access to the ProxySG You can limit access to the ProxySG by:
❐ Restricting physical access to the system and by requiring a PIN to access the front panel.
❐ Restricting the IP addresses that are permitted to connect to the ProxySG CLI.
❐ Requiring a password to secure the Setup Console.
These methods are in addition to the restrictions placed on the console account (a console account user password) and the Enable password. For information on using the console account, refer to Volume 2: Getting Started.
By using every possible method (physically limiting access, limiting workstation IP addresses, and using passwords), the ProxySG is very secure.
This section discusses:
❐ "Requiring a PIN for the Front Panel"
❐ "Limiting Workstation Access" on page 18
❐ "Securing the Serial Port" on page 18
Requiring a PIN for the Front PanelOn systems that have a front panel display, you can create a four-digit PIN to protect the system from unauthorized use. The PIN is hashed and stored. You can only create a PIN from the command line.
To create a front panel PIN, after initial configuration is complete:
From the (config) prompt:SGOS#(config) security front-panel-pin PIN

Volume 4: Securing the Blue Coat ProxySG
18
where PIN is a four-digit number.
To clear the front-panel PIN, enter:SGOS#(config) security front-panel-pin 0000
Limiting Workstation AccessDuring initial configuration, you have the option of preventing workstations with unauthorized IP addresses from accessing the CLI. If this option is not enabled, all workstations are allowed to access the CLI. You can also add allowed workstations later to the access control list (ACL). (For more information on limiting workstation access, see "Moderate Security: Restricting Management Console Access Through the Console Access Control List (ACL)" on page 21.)
Securing the Serial PortIf you choose to secure the serial sort, you must provide a Setup Console password that is required to access the Setup Console in the future.
Once the secure serial port is enabled:
❐ The Setup Console password is required to access the Setup Console.
❐ An authentication challenge (username and password) is issued to access the CLI through the serial port.
To recover from a lost Setup Console password, you can:
❐ Use the Front Panel display to either disable the secure serial port or enter a new Setup Console password.
❐ Use the CLI restore-defaults factory-defaults command to delete all system settings. For information on using the restore-defaults factory-defaults command, refer to Managing the Blue Coat SG.
❐ Use the reset button (if the appliance has a reset button) to delete all system settings. Otherwise, reset the ProxySG to its factory settings by holding down the left arrow key on the front-panel for 5 seconds. The appliance will be reinitialized. To reconfigure the appliance, refer to the Installation Guide for your platform.
To enable the secure serial port, refer to the Installation Guide for your platform.
About Password SecurityIn the ProxySG, the console administrator password, the Setup Console password, and Enable (privileged-mode) password are hashed and stored. It is not possible to reverse the hash to recover the plaintext passwords.
In addition, the show config and show security CLI commands display these passwords in their hashed form. The length of the hashed password depends on the hash algorithm used so it is not a fixed length across the board.
Note: The format of encrypted passwords has changed. As a result an encrypted password from SGOS 5.2 and earlier is not accepted by an SGOS 5.3 system; an encrypted password from SGOS 5.3 is not accepted by SGOS 5.2.x and earlier.

Chapter 2: Controlling Access to the ProxySG
19
Passwords that the ProxySG uses to authenticate itself to outside services are encrypted using triple-DES on the appliance, and using RSA public key encryption for output with the show config CLI command. You can use a third-party encryption application to create encrypted passwords and copy them into the ProxySG using an encrypted-password command (which is available in several modes and described in those modes). If you use a third-party encryption application, verify it supports RSA encryption, OAEP padding, and Base64 encoded with no new lines.
These passwords, set up during configuration of the external service, include:
❐ Access log FTP client passwords (primary, alternate)—For configuration information, refer to Volume 9: Access Logging.
❐ Archive configuration FTP password—For configuration information, refer to the archive configuration information in Volume 2: Getting Started.
❐ RADIUS primary and alternate secret—For configuration information, see Chapter 13: "RADIUS Realm Authentication and Authorization" on page 199.
❐ LDAP search password—For configuration information, see "LDAP Search & Groups Tab (Authorization and Group Information)" on page 147.
❐ Content filter download passwords—For configuration information, refer to the content filtering information in Volume 8: Managing Content.
Limiting User Access to the ProxySG—OverviewWhen deciding how to give other users read-only or read-write access to the ProxySG, sharing the basic console account settings is only one option. The following summarizes all available options:
❐ Console account—minimum security
The console account username and password are evaluated when the ProxySG is accessed from the Management Console through a browser and from the CLI through SSH with password authentication. The Enable (privileged-mode) password is evaluated when the console account is used through SSH with password authentication and when the CLI is accessed through the serial console and through SSH with RSA authentication. The simplest way to give access to others is sharing this basic console account information, but it is the least secure and is not recommended.
To give read-only access to the CLI, do not give out the Enable (privileged-mode) password.
Note: If Telnet Console access is configured, Telnet can be used to manage the ProxySG with behavior similar to SSH with password authentication.
SSL configuration is not allowed through Telnet, but is permissible through SSH.
Behavior in the following sections that applies to SSH with password authentication also applies to Telnet. Use of Telnet is not recommended because it is not a secure protocol.

Volume 4: Securing the Blue Coat ProxySG
20
❐ Console access control list—moderate security
Using the access control list (ACL) allows you to further restrict use of the console account and SSH with RSA authentication to workstations identified by their IP address and subnet mask. When the ACL is enforced, the console account can only be used by workstations defined in the console ACL. Also, SSH with RSA authentication connections are only valid from workstations specified in the console ACL (provided it is enabled).
After setting the console account username, password, and Enable (privileged-mode) password, use the CLI or the Management Console to create a console ACL. See "Moderate Security: Restricting Management Console Access Through the Console Access Control List (ACL)" on page 21.
❐ Per-user RSA public key authentication—moderate security
Each administrator’s public keys are stored on the appliance. When connecting through SSH, the administrator logs in with no password exchange. Authentication occurs by verifying knowledge of the corresponding private key. This is secure because the passwords never go over the network.
This is a less flexible option than CPL because you cannot control level of access with policy, but it is a better choice than sharing the console credentials.
❐ Blue Coat Content Policy Language (CPL)—maximum security
CPL allows you to control administrative access to the ProxySG through policy. If the credentials supplied are not the console account username and password, policy is evaluated when the ProxySG is accessed through SSH with password authentication or the Management Console. Policy is never evaluated on direct serial console connections or SSH connections using RSA authentication.
• Using the CLI or the Management Console GUI, create an authentication realm to be used for authorizing administrative access. For administrative access, the realm must support BASIC credentials—for example, LDAP, RADIUS, Local, or IWA with BASIC credentials enabled.
• Using the Visual Policy Manager, or by adding CPL rules to the Local or Central policy file, specify policy rules that: (1) require administrators to log in using credentials from the previously-created administrative realm, and (2) specify the conditions under which administrators are either denied all access, given read-only access, or given read-write access. Authorization can be based on IP address, group membership, time of day, and many other conditions. For more information, refer to Volume 6: The Visual Policy Manager and Advanced Policy.
• To prevent anyone from using the console credentials to manage the ProxySG, set the console ACL to deny all access (unless you plan to use SSH with RSA authentication). For more information, see "Moderate Security: Restricting Management Console Access Through the Console Access Control List (ACL)" on page 21. You can also restrict access to a single IP address that can be used as the emergency recovery workstation.
Chapter 2: Controlling Access to the ProxySG
21
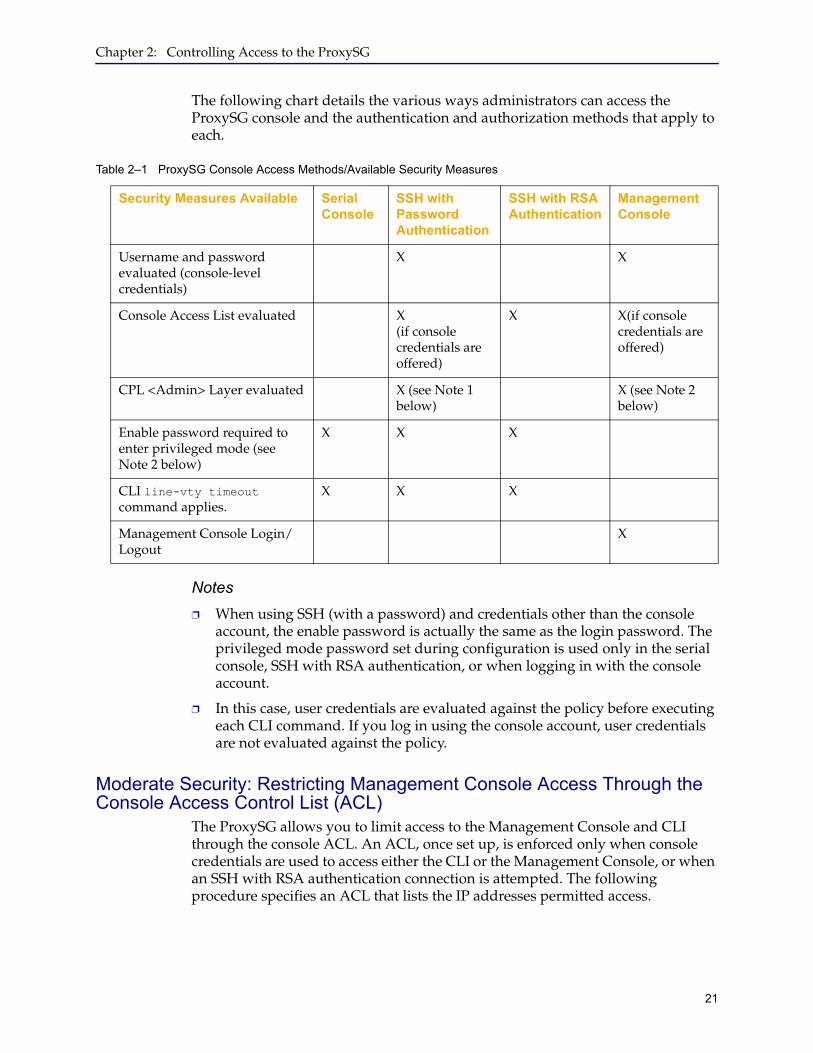
The following chart details the various ways administrators can access the ProxySG console and the authentication and authorization methods that apply to each.
Notes❐ When using SSH (with a password) and credentials other than the console
account, the enable password is actually the same as the login password. The privileged mode password set during configuration is used only in the serial console, SSH with RSA authentication, or when logging in with the console account.
❐ In this case, user credentials are evaluated against the policy before executing each CLI command. If you log in using the console account, user credentials are not evaluated against the policy.
Moderate Security: Restricting Management Console Access Through the Console Access Control List (ACL)
The ProxySG allows you to limit access to the Management Console and CLI through the console ACL. An ACL, once set up, is enforced only when console credentials are used to access either the CLI or the Management Console, or when an SSH with RSA authentication connection is attempted. The following procedure specifies an ACL that lists the IP addresses permitted access.
Table 2–1 ProxySG Console Access Methods/Available Security Measures
Security Measures Available Serial Console
SSH with Password Authentication
SSH with RSA Authentication
Management Console
Username and password evaluated (console-level credentials)
X X
Console Access List evaluated X(if console credentials are offered)
X X(if console credentials are offered)
CPL <Admin> Layer evaluated X (see Note 1 below)
X (see Note 2 below)
Enable password required to enter privileged mode (see Note 2 below)
X X X
CLI line-vty timeout command applies.
X X X
Management Console Login/Logout
X
Volume 4: Securing the Blue Coat ProxySG
22
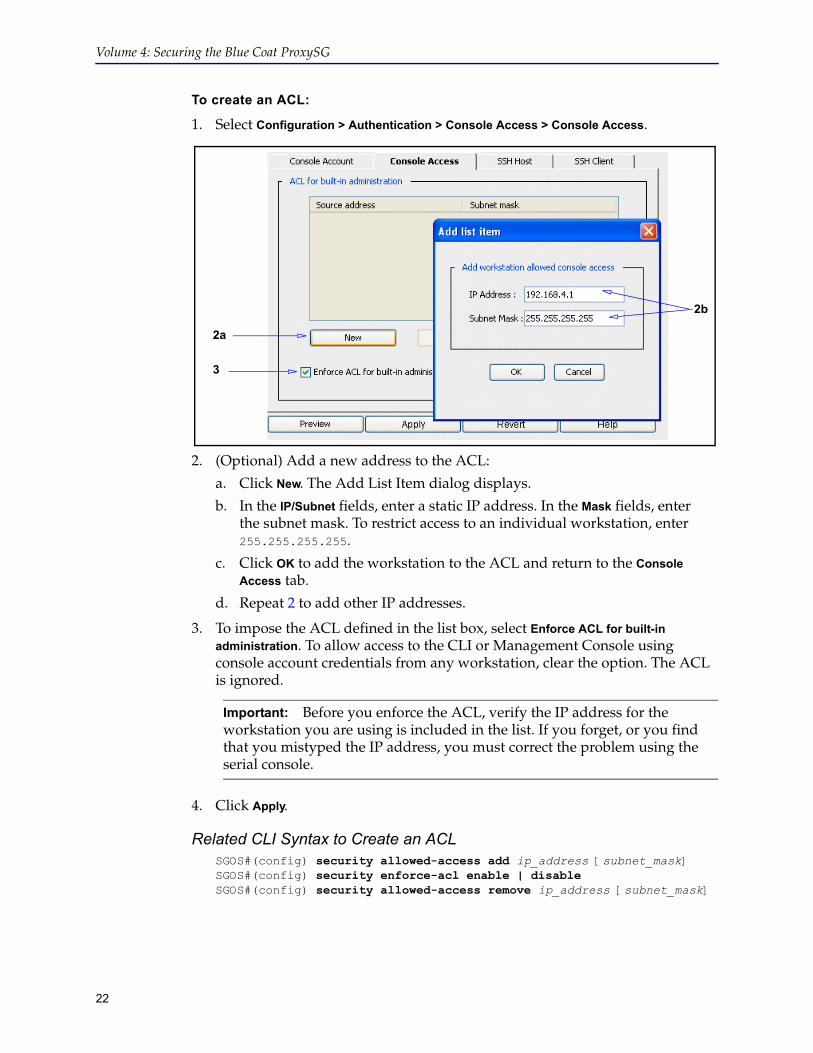
To create an ACL:
1. Select Configuration > Authentication > Console Access > Console Access.
2. (Optional) Add a new address to the ACL:
a. Click New. The Add List Item dialog displays.
b. In the IP/Subnet fields, enter a static IP address. In the Mask fields, enter the subnet mask. To restrict access to an individual workstation, enter 255.255.255.255.
c. Click OK to add the workstation to the ACL and return to the Console Access tab.
d. Repeat 2 to add other IP addresses.
3. To impose the ACL defined in the list box, select Enforce ACL for built-in administration. To allow access to the CLI or Management Console using console account credentials from any workstation, clear the option. The ACL is ignored.
4. Click Apply.
Related CLI Syntax to Create an ACL SGOS#(config) security allowed-access add ip_address [subnet_mask]SGOS#(config) security enforce-acl enable | disableSGOS#(config) security allowed-access remove ip_address [subnet_mask]
Important: Before you enforce the ACL, verify the IP address for the workstation you are using is included in the list. If you forget, or you find that you mistyped the IP address, you must correct the problem using the serial console.
2a
3
2b

Chapter 2: Controlling Access to the ProxySG
23
Maximum Security: Administrative Authentication and Authorization PolicyThe ProxySG permits you to define a rule-based administrative access policy. This policy is enforced when accessing:
❐ the Management Console through http or https
❐ the CLI through SSH when using password authentication
❐ the CLI through telnet
❐ the CLI through the serial port if the secure serial port is enabled
These policy rules can be specified either by using the VPM or by editing the Local policy file. Using policy rules, you can deny access, allow access without providing credentials, or require administrators to identify themselves by entering a username and password. If access is allowed, you can specify whether read-only or read-write access is given. You can make this policy contingent on IP address, time of day, group membership (if credentials were required), and many other conditions.
Serial-console access is not controlled by policy rules. For maximum security to the serial console, physical access must be limited.
SSH with RSA authentication also is not controlled by policy rules. You can configure several settings that control access: the enable password, the console ACL, and per-user keys configured through the Configuration > Services > SSH > SSH Client page. (If you use the CLI, SSH commands are under config > services > ssh-console.)
Defining Administrator Authentication and Authorization PoliciesThe ProxySG uses CPL to define policies, including administrator, authentication, and authorization policies. CPL also allows you to give administrator privileges to users in any external authentication service.
The following summarizes the steps required to define Administrator Authentication and Authorization policies on the ProxySG:
❐ (Optional) If you need to give administrative access to existing users or groups, create and configure the authentication realm.
❐ Define the policies in the appropriate policy file where you keep the <Admin> Layer layers and rules.
❐ Load the policy file on the ProxySG.
When you define such policies, make sure you define them in the appropriate policy file(s). For more information on policy files and how they are used, refer to Volume 6: The Visual Policy Manager and Advanced Policy.
Defining Policies Using the Visual Policy ManagerTo define policies through the Management Console, use the Visual Policy Manager. When you use the VPM, policies are configured in CPL and saved in the VPM policy file. For examples of Administrator authentication or authorization policy CPL, continue with the next section. The VPM is described in detail in Volume 6: The Visual Policy Manager and Advanced Policy.

Volume 4: Securing the Blue Coat ProxySG
24
Defining Policies Directly in Policy FilesTo define policies manually, type CPL rules directly in one of the two policy files, Central or Local.
Following are the CPL elements that can be used to define administrator policies for the ProxySG.
To define administrator policies by editing a policy file:
1. Open the policy file in a text editor.
2. Define the policies, using the correct CPL syntax.
3. Save the file.
4. Load the policy file (refer to Volume 6: The Visual Policy Manager and Advanced Policy).
Admin Transactions and <Admin> LayersAdmin transactions execute <Admin> layers. Only a restricted set of conditions, properties, and actions are permitted in <Admin> layers. The table below lists the conditions permitted in the <Admin> layer.
Important: For specific information on creating policies within the policy files, refer to Volume 10: Content Policy Language Guide.
Table 2–2 Network Connection Conditions
<Admin> Network Connection Conditions
client_address=ip_address[.subnetmask]
Tests for a match between ip_address and the IP address of the client transaction source.
proxy.port=number Tests for a match between number and the port number for which the request is destined.
proxy.address=ip_address Tests for a match between ip_address and the IP address of the network interface card for which the request is destined.
proxy.card=number Tests for a match between number and the ordinal number associated with the network interface card for which the request is destined.
<Admin> General Conditions
condition=condition.label Tests if the specified defined condition is true.
release.id= Tests the ProxySG release id.

Chapter 2: Controlling Access to the ProxySG
25
<Admin> Date/Time Conditions
date[.utc]=[date | date…date] Tests for a match between date and the date timestamp associated with the source of the transaction. date specifies a single date of the form YYYY-MM-DD or an inclusive range, as in YYYY-MM-DD…YYYY-MM-DD. By default, date is calculated based on local time. To calculate year based on the Coordinated Universal Time, include the .utc qualifier
year[.utc]=[year | year…year] Tests for a match between year and the year timestamp associated with the source of the transaction. year specifies a single Gregorian calendar year of the form YYYY or an inclusive range of years, as in YYYY…YYYY. By default, year is calculated based on local time. To calculate year based on the Coordinated Universal Time, include the .utc qualifier.
month[.utc]=[month | month…month] Tests for a match between month and the month timestamp associated with the source of the transaction. month specifies a single Gregorian calendar month of the form MM or an inclusive range of months, as in MM…MM. By default, month is calculated based on local time. To calculate month based on the Coordinated Universal Time, include the .utc qualifier.
weekday[.utc]=[number | number…number]
Tests for a match between weekday and the weekday timestamp associated with the source of the transaction. weekday specifies a single day of the week (where Monday=1, Tuesday=2, and Sunday=7) or an inclusive range of weekdays, as in number…number. By default, weekday is calculated based on local time. To calculate weekday based on the Coordinated Universal Time, include the .utc qualifier.
day[.utc]=[day | day…day] Tests for a match between day and the day timestamp associated with the source of the transaction. day specifies a single Gregorian calendar day of the month of the form DD or an inclusive range of days, as in DD…DD. By default, day is calculated based on local time. To calculate day based on the Coordinated Universal Time, include the .utc qualifier.
hour[.utc]=[hour | hour…hour] Tests for a match between hour and the hour timestamp associated with the source of the transaction. hour specifies a single Gregorian hour of the form HH (00, 01, and so forth, through 23) or an inclusive range of hours, as in HH…HH. By default, hour is calculated based on local time. To calculate hour based on the Coordinated Universal Time, include the .utc qualifier.
Table 2–2 Network Connection Conditions (Continued)

Volume 4: Securing the Blue Coat ProxySG
26
minute[.utc]=[minute | minute…minute]
Tests for a match between minute and the minute timestamp associated with the source of the transaction. minute specifies a single Gregorian minute of the form MM (00, 01, and so forth, through 59) or an inclusive range of minutes, as in MM…MM. By default, minute is calculated based on local time. To calculate minute based on the Coordinated Universal Time, include the .utc qualifier.
time[.utc]=[time | time…time] Tests for a match between time and the time timestamp associated with the source of the transaction. time specifies military time of the form TTTT (0000 through 2359) or an inclusive range of times, as in TTTT…TTTT. By default, time is calculated based on local time. To calculate time based on the Coordinated Universal Time, include the .utc qualifier.
<Admin> Authorization Conditions
attribute.name =value Tests if the current transaction is authorized in a RADIUS or LDAP realm, and if the authenticated user has the specified attribute with the specified value. This trigger is unavailable if the current transaction is not authenticated
authenticated={yes | no} Tests if authentication was requested and the credentials could be verified.
group=group_name If authenticate=yes, the group condition tests the source of the transaction for membership in the specified groupname.
has_attribute.name=boolean Tests if the current transaction is authorized in an LDAP realm and if the authenticated user has the specified LDAP attribute.
realm=realm_name If authenticate=yes, the realm condition tests the source of the transaction for membership in the specified realm name.
user=username If authenticate=yes, the user condition tests the source of the transaction for the expected username.
user.domain=windows_domain_name
(This condition is IWA-realm specific.) If authenticate=yes, the user_domain condition tests whether the realm type is IWA and whether the domain component of the username is the expected domain name.
Table 2–2 Network Connection Conditions (Continued)

Chapter 2: Controlling Access to the ProxySG
27
The table below lists the properties permitted in the <Admin> layer:
<Admin> Read-only or Read-write Conditions
admin_access=read | write read tests whether the source of the transaction has read-only permission for the ProxySG console. write tests whether the source has read-write permission. When an Administrator logs into the CLI, the ProxySG executes an <Admin> transaction that includes the condition admin_access=read. If the transaction is ultimately allowed (all conditions have been met), the user will have read-only access to configuration information through the CLI. Further, when that user executes the CLI enable command, or logs into the Management Console, the ProxySG executes an <Admin> transaction with admin_access=write. If the transaction is allowed, the user will have read-write access within the CLI or the Management Console.
Table 2–2 Network Connection Conditions (Continued)
Table 2–3 Properties in the <Admin> Layer
<Admin> Properties
deny Refuse service to the source of the transaction.
authenticate(realm_name) Requests authentication of the transaction source for the specified realm.
authenticate.force( ) If yes is specified then forces authentication even if the transaction is denied. This results in the user information being available for logging. If no, then early denial without authentication is possible.
allow Permit further service to the source of the transaction.
log.suppress.field-id ( ) Controls suppression of the specified field-id in all facilities
log.suppress.field-id[log_list]( ) Controls suppression of the specified field-id in the specified facilities.
log.rewrite.field-id( ) Controls rewrites of a specific log field in all facilities.
log.rewrite.field-id[log_list]( )
Controls rewrites of a specific log field in a specified list of log facilities.

Volume 4: Securing the Blue Coat ProxySG
28
The table below lists the actions permitted in the <Admin> layer:
Example Policy Using CPL SyntaxTo authenticate users against an LDAP realm, use the following syntax in the Local Policy file:
<admin>authenticate(LDAP_Realm)
<admin>group="cn=Administrators,cn=Groups,dc=bluecoat,dc=com" allow
This authenticates users against the specified LDAP realm. If the users are successfully authenticated and belong to group Administrators, they are allowed to administer the ProxySG.
Table 2–4 Actions permitted in the <Admin> Layer
<Admin> Actions
notify_email( ) Sends an e-mail notification to the list of recipients specified in the Event Log mail configuration when the transaction terminates.
notify_snmp( ) The SNMP trap is sent when the transaction terminates.

29
Chapter 3: Controlling Access to the Internet and Intranet
This chapter describes how to limit user access to the Internet and intranet.
Topics in this ChapterThis chapter includes information about the following topics:
❐ "Managing Users" on page 30
❐ "Using Authentication and Proxies" on page 37
❐ "Using SSL with Authentication and Authorization Services" on page 46
❐ "Creating a Proxy Layer to Manage Proxy Operations" on page 47

Chapter 3: Controlling Access to the Internet and Intranet
30
Section A: Managing Users
Section A: Managing UsersWhen a user is first authenticated to an ProxySG, a user login is created. You can view users who are logged in and configure the ProxySG to log them out and refresh their data.
This section includes the following topics:
❐ "About User Login" on page 30
❐ "Viewing Logged-In Users" on page 30
❐ "Logging Out Users" on page 31
❐ "Refreshing User Data" on page 33
❐ "Related CLI Syntax to Manage Users" on page 35
About User LoginA user login is the combination of:
❐ An IP address
❐ A username
❐ A realm
For a specific realm, a user is only considered to be logged in once from a given workstation, even if using multiple user agents. However:
❐ If policy authenticates the user against multiple realms, the user is logged in once for each realm.
❐ If a user logs in from multiple workstations, the user is logged in once per workstation.
❐ If multiple users share an IP address (same server, terminal services, or are behind a NAT, which allows a local-area network to use one set of IP addresses), each user is logged in once.
❐ If a user logs in from multiple workstations behind a NAT, the user is logged in once.
Viewing Logged-In UsersYou can browse all users logged into the ProxySG. You can also filter the displayed users by Glob-username pattern, by IP address subnet, and by realm.
The glob-based username pattern supports three operators:
❐ * : match zero or more characters
❐ ? : match exactly one character
❐ [x-y]: match any character in the character range from x to y
The IP address subnet notation is based on Classless Inter-Domain_Routing (CIDR), a way of interpreting IP addresses, as follows:
Chapter 3: Controlling Access to the Internet and Intranet
31
Section A: Managing Users
❐ 1.2.3.4 : the IP address 1.2.3.4
❐ 1.2.3.0/24: the subnet 1.2.3.0 with netmask 255.255.255.0
The realm selection allows an exact realm name or All realms to be selected.
You can use a combination of these filters to display only the users you are interested in.
To browse users:
1. Click Statistics > Authentication.
2. Select a single realm or All realms from the Realm drop-down list.
3. (Optional) Enter a regular expression in the User pattern field to display the usernames that match the pattern.
4. (Optional) Enter an IP address or subnet in the IP prefix field to display the IP addresses that match the prefix.
5. Click Display by user to display the statistic results by user, or Display by IP to display the results by IP address.
Logging Out UsersA logged-in user can be logged out with one of three mechanisms:
❐ Inactivity timeout (see "Inactivity Timeout" on page 32)
❐ Explicit logout by the administrator (see "Administrator Action" on page 32)
❐ Policy (see "Policy" on page 32)
A logged-out user must re-authenticate with the proxy before logging back in.
❐ For single sign-on (SSO) realms (Windows SSO, Novell SSO, and IWA configured for SSO), reauthentication is transparent to the user.
❐ For non-SSO realms, the user is explicitly challenged for credentials after logout, depending on the Challenge user after logout setting in the ProxySG’s realm.
2
3
4

Chapter 3: Controlling Access to the Internet and Intranet
32
Section A: Managing Users
Inactivity TimeoutEach realm has a new inactivity-timeout setting, used in conjunction with the last activity- time value for a particular login. Each time that a login is completed, this activity time is updated. If the time since the last activity time for a specific login exceeds the inactivity-timeout value, the user is logged out.
Administrator ActionThe administrator can explicitly log out a set of users using the Logout link at the bottom of the user login information pages. See "Viewing Logged-In Users" on page 30 for information about displaying user login information. For information about using the CLI to logout users, see "Related CLI Syntax to Manage Users" on page 35.
PolicyPolicy has three properties and three conditions to manage user logouts. These properties and conditions can be used to dynamically log out users. For example, you can create a logout link for users.
For information about using policy, refer to Volume 6: The Visual Policy Manager and Advanced Policy and Volume 10: Content Policy Language Guide.
New PropertiesPolicy has three properties for logging out users.
❐ user.login.log_out(yes)
This property logs out the user referenced by the current transaction.
❐ user.login.log_out_other(yes)
If a user is logged in at more than one IP address, this property logs the user out from all IP addresses except the current IP address.
❐ client.address.login.log_out_other(yes)
If more than one user is logged in at the IP address of the current transaction, this property logs out all users from the current IP address except the current user.
New ConditionsSeveral conditions support different logout policies.
❐ user.login.count
Note: The Challenge user after logout option only works when cookie-surrogate credentials are used. If this setting is enabled, the user is explicitly challenged for credentials after logging out.

Chapter 3: Controlling Access to the Internet and Intranet
33
Section A: Managing Users
This condition matches the number of times that a specific user is logged in with the current realm. You can use this condition to ensure that a user can be logged in only at one workstation. If the condition is combined with the user.login.log_out_other property, old login sessions on other workstations are automatically logged out.
❐ client.address.login.count
This condition matches the number of different users who are logged into the current IP address, and you can use it to limit the user number.
❐ user.login.time
This condition matches the number of seconds since the current login started, and you can use it to limit the length of a login session.
Refreshing User Data You can refreshing user data with the following refresh-time options on the specified realm on the ProxySG:
❐ Credential refresh time: This option specifies how long a cached username and password is trusted (do not require revalidation).
❐ Surrogate refresh time: This option specifies how long surrogate credentials are trusted in a particular realm.
❐ Authorization refresh time: This option specifies how long authorization data, such as groups and attributes, are trusted.
While the realms have the baseline settings for the different refresh times, policy and administrator actions can override the realm settings. Using the same interface and filters as used for viewing logins, the administrator can select logins and refresh the authorization data, the credentials, or the surrogate credentials using the links available on the user login information page. Refreshing user data might be necessary if users are added to new groups or there is concern about the actual identity of the user on a long-lived IP surrogate credential.
Credential Refresh Time You can set the credential refresh time with realms that can cache the username and password on the ProxySG. This is limited to realms that use Basic username and password credentials, including LDAP, RADIUS, XML, IWA (with Basic credentials), SiteMinder, and COREid.
Note: The local realm uses Basic credentials but does not need to cache them since they are stored already on the ProxySG.

Chapter 3: Controlling Access to the Internet and Intranet
34
Section A: Managing Users
Cached Usernames and PasswordsYou can use a cached username and password to verify a user's credentials without having to verify the credentials with the offbox authentication server. Essentially, this reduces the load on the authentication server. For authentication modes that do not use surrogate credentials (that is, proxy or origin modes), this can greatly reduce the traffic to the authentication server.
The credential refresh time value determines how long a cached username and password is trusted. After that time has expired, the next transaction that needs credential authentication sends a request to the authentication server. A password different than the cached password also results in a request to the authentication server.
One-Time PasswordsOne-time passwords are trusted for the credential refresh time. Only when the credential refresh time expires is the user challenged again.
Authorization Refresh Time Realms (Local, LDAP, Windows SSO, Novell SSO, Certificate, XML, and Policy Substitution) that can do authorization and authentication separately can use the authorization refresh time value to manage the load on the authorization server.
These realms determine authorization data (group membership and attribute values) separately from authentication, allowing the time the authorization data is trusted to be increased or decreased
For realms that must authenticate the user to determine authorization data, the authorization data is updated only when the user credentials are verified by the authentication server.
Surrogate Refresh Time This value manages how long surrogate credentials are trusted in a particular realm. The authentication mode determines the type of surrogate credential that is used.
❐ Cookie surrogate credentials are used with one of the cookie authentication modes; IP address surrogates are used with one of the IP authentications modes; and the Auto authentication mode attempts to select the best surrogate for the current transaction.
❐ IP address surrogate credentials work with all user agents, but require that each workstation has a unique IP address; they do not work with users behind a NAT. An IP surrogate credential authenticates all transactions from a given IP address as belonging to the user who was last authenticated at that IP address.
When a user is logged out, all surrogate credentials are discarded, along with the cached credentials and authorization data.
For more information about using cookie and IP address surrogate credentials, see "About Authentication Modes" on page 38.

Chapter 3: Controlling Access to the Internet and Intranet
35
Section A: Managing Users
PolicyPolicy has three properties for setting the refresh times for individual transactions. ❐ authenticate.authorization_refresh_time(x)
where x is the number of seconds to use for the authorization refresh time during this transaction. The refresh time cannot exceed the time configured in the realm; policy can be used only to reduce the authorization refresh time. You can use this property to dynamically force the user's authorization data to be refreshed.
❐ authenticate.credential_refresh_time(x)
where x is the number of seconds to use for the credential refresh time during this transaction. The refresh time cannot exceed the time configured in the realm; policy can be used only to reduce the credential refresh time. You can use this property to dynamically force the user's credentials to be refreshed.
❐ authenticate.surrogate_refresh_time(x)
where x is the number of seconds to use for the surrogate refresh time during this transaction. The refresh time cannot exceed the time configured in the realm; policy can be used only to reduce the surrogate refresh time. You can use this property to dynamically force the user's surrogate to be refreshed.
For information about using policy, refer to Volume 6: The Visual Policy Manager and Advanced Policy and Volume 10: Content Policy Language Guide.
Related CLI Syntax to Manage Users❐ To enter the manage users submode, use the following commands:
SGOS#(config) security users
SGOS#(config users)
❐ The following commands are available:
(config users) authorization-refresh {ip-addresses prefix [realm_name] | realms [realm_name]| users glob_user_name [realm_name]}(config users) credentials-refresh {ip-addresses prefix [realm_name] | realms [realm_name]| users glob_user_name [realm_name]}(config users) log-out {ip-addresses prefix [realm_name] | realms [realm_name]| users glob_user_name [realm_name]}(config users) surrogates-refresh {ip-addresses prefix [realm_name] | realms [realm_name]| users glob_user_name [realm_name]}(config users) view {detailed {ip-addresses prefix [realm_name] | realms [realm_name]| users glob_user_name [realm_name]} | ip-addresses prefix [realm_name] | realms [realm_name] | users glob_user_name [realm_name]}

Chapter 3: Controlling Access to the Internet and Intranet
36
Section A: Managing Users
t
Note: Usernames and passwords can each be from 1 to 64 characters in length, but the passwords must be in quotes.
Usernames that contain \ (backward slash), * (asterisk), or ? (question mark) must be escaped when viewing users from the command line interface. The escape character is \.
For example:
❐ user1* is searched as #(config users) view users user1\*
❐ user1? is searched as #(config users) view users user1\?
❐ user1\ is searched as #(config users) view users user1\\
Chapter 3: Controlling Access to the Internet and Intranet
37
Section B: Using Authentication and Proxies
Section B: Using Authentication and ProxiesAuthentication means that the ProxySG requires proof of user identity in order to make decisions based on that identity. This proof is obtained by sending the client (a browser, for example) a challenge—a request to provide credentials. Browsers can respond to different kinds of credential challenges:
❐ Proxy-style challenges—Sent from proxy servers to clients that are explicitly proxied. In HTTP, the response code is 407.
An authenticating explicit proxy server sends a proxy-style challenge (407/Proxy-Authenticate) to the browser. The browser knows it is talking to a proxy and that the proxy wants proxy credentials. The browser responds to a proxy challenge with proxy credentials (Proxy-Authorization: header). The browser must be configured for explicit proxy in order for it to respond to a proxy challenge.
❐ Origin-style challenges—Sent from origin content servers (OCS), or from proxy servers impersonating a OCS. In HTTP, the response code is 401 Unauthorized.
In transparent proxy mode, the ProxySG uses the OCS authentication challenge (HTTP 401 and WWW-Authenticate)—acting as though it is the location from which the user initially requested a page. A transparent proxy, including a reverse proxy, must not use a proxy challenge, because the client might not be expecting it.
Once the browser supplies the credentials, the ProxySG authenticates them.
Terminology❐ authentication modes: The various ways that the ProxySG interacts with the
client for authentication. For more information, see "About Authentication Modes" on page 38.
❐ challenge type: The kind of authentication challenge that is issues (for example, proxy or origin-ip-redirect).
❐ guest authentication: Allowing a guest to login with limited permissions.
❐ impersonation: The proxy uses the user credentials to connect to another computer and access content that the user is authorized to see.
❐ surrogate credentials: Credentials accepted in place of the user’s real credentials. Surrogate credentials can be either cookie-based or IP address-based.
❐ virtual authentication site: Used with authentication realms such as IWA, and LDAP. The request for credentials is redirected to the ProxySG instead of the origin server. The appliance intercepts the request for the virtual authentication site and issues the appropriate credential challenge. Thus, the challenge appears to come from the virtual site, which is usually named to make it clear to the user that ProxySG credentials are requested.
Chapter 3: Controlling Access to the Internet and Intranet
38
Section B: Using Authentication and Proxies
About Authentication ModesYou can control the way the ProxySG interacts with the client for authentication by controlling the authentication mode. The mode specifies the challenge type and the accepted surrogate credential.
❐ Auto: The default; the mode is automatically selected, based on the request. Auto can choose any of proxy, origin, origin-ip, or origin-cookie-redirect, depending on the kind of connection (explicit or transparent) and the transparent authentication cookie configuration.
❐ Proxy: The ProxySG uses an explicit proxy challenge. No surrogate credentials are used. This is the typical mode for an authenticating explicit proxy. In some situations proxy challenges do not work; origin challenges are then issued.
If you have many requests consulting the back-end authentication authority (such as LDAP, RADIUS, or the BCAAA service), you can configure the ProxySG (and possibly the client) to use persistent connections. This dramatically reduces load on the back-end authentication authority and improves the all-around performance of the network.
❐ Proxy-IP: The ProxySG uses an explicit proxy challenge and the client's IP address as a surrogate credential. Proxy-IP specifies an insecure forward proxy, possibly suitable for LANs of single-user workstations. In some situations proxy challenges do not work; origin challenges are then issued.
❐ Origin: The ProxySG acts like an OCS and issues OCS challenges. The authenticated connection serves as the surrogate credential.
❐ Origin-IP: The ProxySG acts like an OCS and issues OCS challenges. The client IP address is used as a surrogate credential. Origin-IP is used to support IWA authentication to the upstream device when the client cannot handle cookie credentials. This mode is primarily used for automatic downgrading, but it can be selected for specific situations.
Note: Windows supports Kerberos authentication only to origin servers; proxy servers cannot participate. Therefore, explicit authentication modes are not compatible with Kerberos. However, because Internet Explorer automatically selects NTLM for an explicit challenge (where the browser is configured with the proxy as a proxy server), no special processing is required for explicit authentication. An origin redirect authentication mode, such as authenticate.mode (origin-cookie-redirect), can be used to obtain Kerberos authentication when using an explicit proxy if the browser is configured to bypass the proxy for the virtual URL.

Chapter 3: Controlling Access to the Internet and Intranet
39
Section B: Using Authentication and Proxies
❐ Origin-cookie: The ProxySG acts like an origin server and issues origin server challenges. A cookie is used as the surrogate credential. Origin-cookie is used in forward proxies to support pass-through authentication more securely than origin-ip if the client understands cookies. Only the HTTP and HTTPS protocols support cookies; other protocols are automatically downgraded to origin-ip.
This mode could also be used in reverse proxy situations if impersonation (where the proxy uses the user credentials to connect to another computer. and access content that the user is authorized to see).is not possible and the origin server requires authentication.
❐ Origin-cookie-redirect: The client is redirected to a virtual URL to be authenticated, and cookies are used as the surrogate credential. The ProxySG does not support origin-redirects with the CONNECT method. For forward proxies, only origin-*-redirect modes are supported for Kerberos/IWA authentication. (Any other mode uses NTLM authentication.)
❐ Origin-IP-redirect: The client is redirected to a virtual URL to be authenticated, and the client IP address is used as a surrogate credential. The ProxySG does not support origin-redirects with the CONNECT method. For forward proxies, only origin-*-redirect modes are supported for Kerberos/IWA authentication. (Any other mode uses NTLM authentication.)
❐ SG2: The mode is selected automatically, based on the request, and uses the SGOS 2.x-defined rules.
❐ Form-IP: A form is presented to collect the user's credentials. The form is presented whenever the user’s credential cache entry expires.
❐ Form-Cookie: A form is presented to collect the user's credentials. The cookies are set on the OCS domain only, and the user is presented with the form for each new domain. This mode is most useful in reverse proxy scenarios where there are a limited number of domains.
❐ Form-Cookie-Redirect: A form is presented to collect the user's credentials. The user is redirected to the authentication virtual URL before the form is presented. The authentication cookie is set on both the virtual URL and the OCS domain. The user is only challenged when the credential cache entry expires.
❐ Form-IP-redirect: This is similar to form-ip except that the user is redirected to the authentication virtual URL before the form is presented.
Note: During cookie-based authentication, the redirect request to strip the authentication cookie from the URL is logged as a 307 (or 302) TCP_DENIED.

Chapter 3: Controlling Access to the Internet and Intranet
40
Section B: Using Authentication and Proxies
The default value is auto.
For more information about using authentication modes, refer to Volume 10: Content Policy Language Guide.
Setting the Default Authenticate Mode PropertySetting the authentication.mode property selects a challenge type and surrogate credential combination. In auto mode, explicit IWA uses connection surrogate credentials. In sg2 mode, explicit IWA uses IP surrogate credentials.
To configure the IWA default authenticate mode settings:SGOS#(config) security default-authenticate-mode {auto | sg2}
About Origin-Style RedirectionSome authentication modes redirect the browser to a virtual authentication site before issuing the origin-style challenge. This gives the user feedback as to which credentials are required, and makes it possible to (but does not require) send the credentials over a secure connection.
Since browser requests are transparently redirected to the ProxySG, the appliance intercepts the request for the virtual authentication site and issues the appropriate credential challenge. Thus, the challenge appears to come from the virtual site, which is usually named to make it clear to the user that ProxySG credentials are requested.
If authentication is successful, the ProxySG establishes a surrogate credential and redirects the browser back to the original request, possibly with an encoded surrogate credential attached. This allows the ProxySG to see that the request has been authenticated, and so the request proceeds. The response to that request can also carry a surrogate credential.
To provide maximum flexibility, the virtual site is defined by a URL. Requests to that URL (only) are intercepted and cause authentication challenges; other URLs on the same host are treated normally. Thus, the challenge appears to come from a host that in all other respects behaves normally.
Note: Modes that use an IP address surrogate credential are insecure: After a user has authenticated from an IP address, all further requests from that IP address are treated as from that user. If the client is behind a NAT, or on a multi-user system, this can present a serious security problem.
Note: Sharing the virtual URL with other content on a real host requires additional configuration if the credential exchange is over SSL.

Chapter 3: Controlling Access to the Internet and Intranet
41
Section B: Using Authentication and Proxies
You can configure the virtual site to something that is meaningful for your company. The default, which requires no configuration, is www.cfauth.com. See "Configuring Transparent Proxy Authentication" on page 41 to set up a virtual URL for transparent proxy.
Tip: Using CONNECT and Origin-Style RedirectionYou cannot use the CONNECT method with origin-style redirection or form redirect modes. An error message similar to the following is displayed:
Cannot use origin-redirect for CONNECT method (explicit proxy of https URL)
Instead, you can add policy to either bypass authentication on the CONNECT method, or use proxy authentication. For example:
<proxy>allow http.method=CONNECT authenticate.mode(proxy)
authenticate(ldap)allow authenticate(cert) authenticate.mode(origin-cookie-redirect)
Selecting an Appropriate Surrogate CredentialIP address surrogate credentials are less secure than cookie surrogate credentials and should be avoided if possible. If multiple clients share an IP address (such as when they are behind a NAT firewall or on a multi-user system), the IP surrogate credential mechanism cannot distinguish between those users.
Configuring Transparent Proxy AuthenticationThe following sections provide general instructions on configuring for transparent proxy authentication.
In addition to configuring transparent proxy authentication, you must also enable a transparent proxy port before the transparent proxy is functional. To enable a transparent proxy port, refer to Volume 2: Proxies and Proxy Services.
To set transparent proxy options:
1. Select Configuration > Authentication > Transparent Proxy.
2. Select the transparent proxy method—Cookie-based or IP address-based. The default is Cookie.
3. Click Apply.
Related CLI Syntax to Set Transparent Proxy Options SGOS#(config) security transparent-proxy-auth method {cookie | ip}

Chapter 3: Controlling Access to the Internet and Intranet
42
Section B: Using Authentication and Proxies
Permitting Users to Login with Authentication or Authorization FailuresYou can configure policy (VPM or CPL) to attempt user authentication while permitting specific authentication or authorization errors. The policy can specify that, after certain authentication or authorization failures, the user transaction should be allowed to proceed and not be terminated.
Note: For a list of permitted authentication and authorization errors, see Appendix B: "Authentication and Authorization Errors" on page 273.
Permitted ErrorsAuthentication and authorization can be permitted to fail if policy has been written to allow specific failures. The behavior is as follows:
❐ Authentication Failures: After an authentication failure occurs, the authentication error is checked against the list of errors that policy specifies as permitted.
• If the error is not on the list, the transaction is terminated.
• If the error is on the list, the transaction is allowed to proceed although the user is unauthenticated. Because the transaction is not considered authenticated, the authenticated=yes policy condition evaluates to false and the user has no username, group information, or surrogate credentials. Policy that uses the user, group, domain, or attribute conditions does not match.
❐ Authorization Failures: After an authorization failure occurs, the authorization error is checked against the list of errors that policy specifies as permitted.
• If the error is not on the list, the transaction is terminated.
• If the error is on the list, the transaction is allowed to proceed and the user is marked as not having authorization data.
• If a user is successfully authenticated but does not have authorization data, the authenticated=yes condition evaluates to true and the user has valid authentication credentials.
• The user.authorization_error=any is evaluate to true if user authorization failed, the user object contains username and domain information, but not group or attribute information. As a result, policy using user or domain actions still match, but policy using group or attribute conditions do not.
To view all authentication and authorization errors, use the SGOS# show security authentication-errors CLI command.
Policy Used with Permitted ErrorsBefore creating policy to permit errors, you must:

Chapter 3: Controlling Access to the Internet and Intranet
43
Section B: Using Authentication and Proxies
❐ Identify the type of access the transactions should be permitted.
❐ Identify under which circumstances transactions can proceed even if authentication or authorization fails.
❐ Identify which errors correspond to those circumstances.
You can use the advanced authentication URL (Statistics > Advanced > Show Authentication Error Statistics as a troubleshooting guide. The policy substitutions $(x-sc-authentication-error) and $(x-sc-authorization-error) can also be used to log the errors on a per-transaction basis.
Policy conditions and properties that are available include:❐ authenticate.tolerate_error( )
❐ authorize.tolerate_error( )
❐ user.authentication_error=
❐ user.authorization_error=
❐ has_authorization_data=
You can also use the following policy substitutions:
❐ x-sc-authentication-error: If authentication has failed, this is the error corresponding to the failure. If authentication has not been attempted, the value is not_attempted. If authentication has succeeded, the value is none.
❐ x-sc-authorization-error: If authorization has failed, this is the error corresponding to the failure. If authorization has not been attempted, the value is not_attempted. If authorization has succeeded, the value is none.
Using Guest AuthenticationUsing policy (VPM or CPL), you can allow a user to log in as a guest user. Guest authentication allows you to assign a username to a user who would have otherwise been considered unauthenticated.
In the case of guest authentication, a user is not actually authenticated against the realm, but is:
❐ Assigned the specified guest username
❐ Marked as authenticated in the specified realm
Note: You are not limited to these conditions and properties in creating policy. For a discussion and a complete list of policy conditions and properties you can use, refer to Volume 10: Content Policy Language Guide.
Note: You can use guest authentication with or without default groups. If you use default groups, you can assign guest users to groups for tracking and statistics purposes. For more information about default groups, see "Using Default Groups" on page 45.

Chapter 3: Controlling Access to the Internet and Intranet
44
Section B: Using Authentication and Proxies
❐ Marked as a guest user
❐ Tracked in access logs
Since the user is not actually authenticated, the username does not have to be valid in that realm.
Using Policy with Guest AuthenticationBefore creating policy for guest authentication:
❐ Determine the circumstances in which guest access is permitted. Guest users are typically allowed in circumstances where no authentication is needed.
❐ Determine authentication policy. Will the realms attempt to authenticate users first and fallback to guest authentication or authenticate users as guest users without attempting authentication?
Write the corresponding policy. Policy available for guest authentication includes:❐ authenticate.guest
❐ user.is_guest
❐ authenticated
Using Policy Substitutions with Guest AuthenticationThe following policy substitution was created for use with guest authentication.
❐ x-cs-user-type: If the user is an authenticated guest user, the value is guest. If the user is an authenticated non-guest user, the value is authenticated. If the user is not authenticated, the value is unauthenticated.
You are not limited to this substitution, and you can use the substitution in other circumstances. For a complete list of policy substitutions, refer to access log substitutions in Volume 8: Access Logging.
Note: If a transaction matches both a regular authentication action and guest authentication action, regular authentication is attempted first. This can result in a user challenge before dropping back to guest authentication. If you inadvertently enter invalid credentials and so drop back to guest access, you must log out as guest or close and reopen the browser if using session cookies or connection surrogates. You then can enter the correct credentials to obtain regular access.
Note: You are not limited to these conditions and properties in creating policy. For a complete list of policy conditions and properties you can use, refer to Volume 11: ProxySG Content Policy Language Guide.

Chapter 3: Controlling Access to the Internet and Intranet
45
Section B: Using Authentication and Proxies
Using Default GroupsYou can use default groups with any realm, and they can be used when authorization succeeds, fails or wasn't attempted at all. Default groups allow you to assign users to groups and use those groups in reporting and subsequent authorization decisions.
Using Policy with Default GroupsBefore creating policy for default groups, you must determine which set of groups are assigned as default.
You can specify a single or multiple groups here. In most cases, only a single group will be required, but occasionally you might need to assign the user to multiple groups:
❐ For extra reporting abilities.
❐ If the policy is structured in a way that users should receive the same access as if they belonged in multiple different groups.
Policy available for default groups includes:❐ group
❐ authorize.add_group
Guest Authentication ExampleThe following is an example of how to set up guest authentication on a realm using VPM.
Overview of Policy Steps❐ Create a Realm Authentication object.
❐ Open it for Edit.
❐ Define the communication error
Note: You can use default groups in conjunction with guest users (see "Using Guest Authentication" on page 43) or it can be used with regular user authentication.
Note: You are not limited to these conditions and properties in creating policy. For a complete list of policy conditions and properties you can use, refer to Volume 10: Content Policy Language Guide.
Note: This example assumes you have already created a realm in Configuration > Authentication.

Chapter 3: Controlling Access to the Internet and Intranet
46
Section C: Using SSL with Authentication and Authorization Services
Section C: Using SSL with Authentication and Authorization ServicesBlue Coat recommends that you use SSL during authentication to secure your user credentials. Blue Coat supports SSL between the client and the ProxySG and between the ProxySG and LDAP and IWA authentication servers.
Using SSL Between the Client and the ProxySG To configure SSL to use origin-cookie-redirect or origin-ip-redirect challenges, you must:
❐ Specify a virtual URL with the HTTPS protocol (for example, https://virtual_address).
❐ Create a keyring and certificate on the ProxySG.
❐ Create an HTTPS service to run on the port specified in the virtual URL and to use the keyring you just created.
When redirected to the virtual URL, the user is prompted to accept the certificate offered by the ProxySG (unless the certificate is signed by a trusted certificate authority). If accepted, the authentication conversation between the ProxySG and the user is encrypted using the certificate.
You can use SSL between the ProxySG and the IWA and LDAP authentication servers. For more information, see "SSL Between the ProxySG and the Authentication Server" on page 12.
Note: You can use SSL between the client and the ProxySG for origin-style challenges on transparent and explicit connections (SSL for explicit proxy authentication is not supported).
In addition, if you use a forward proxy, the challenge type must use redirection; it cannot be an origin or origin-ip challenge type.
Note: If the hostname does not resolve to the IP address of the ProxySG, then the network configuration must redirect traffic for that port to the appliance. Also, if you use the IP address as the virtual hostname, you might have trouble getting a certificate signed by a CA-Certificate authority (which might not be important).

Chapter 3: Controlling Access to the Internet and Intranet
47
Section D: Creating a Proxy Layer to Manage Proxy Operations
Section D: Creating a Proxy Layer to Manage Proxy OperationsOnce hardware configuration is complete and the system configured to use transparent or explicit proxies, use CPL or VPM to provide on-going management of proxy operations.
Using CPLBelow is a table of all commands available for use in proxy layers of a policy. If a condition, property, or action does not specify otherwise, it can be used only in <Proxy> layers. For information about creating effective CPL, refer to Volume 10: Content Policy Language Guide.
Table 3–1 CPL Commands Available in the <Proxy> Layer
<Proxy> Layer Conditions Meaning
admin.access= Tests the administrative access requested by the current transaction. Can also be used in <Admin> layers.
attribute.name= Tests if the current transaction is authenticated in a RADIUS or LDAP realm, and if the authenticated user has the specified attribute with the specified value. Can also be used in <Admin> layers.
authenticated= Tests if authentication was requested and the credentials could be verified; otherwise, false. Can also be used in <Admin> layers.
bitrate= Tests if a streaming transaction requests bandwidth within the specified range or an exact match. Can also be used in <Cache> layers.
category= Tests if the content categories of the requested URL match the specified category, or if the URL has not been categorized. Can also be used in <Cache> layers.
client_address= Tests the IP address of the client. Can also be used in <Admin> layers.
client.connection.negotiated_cipher=
Test the cipher suite negotiated with a securely connected client. Can also be used in <Exception> layers.
client.connection.negotiated_cipher.strength=
Test the cipher strength negotiated with a securely connected client. Can also be used in <Exception> layers.
client.host= Test the hostname of the client (obtained through RDNS). Can also be used in <Admin>, <Forward>, and <Exception> layers.
client.host.has_name= Test the status of the RDNS performed to determine client.host. Can also be used in <Admin>, <Forward>, and <Exception> layers.
client_protocol= Tests true if the client transport protocol matches the specification. Can also be used in <Exception> layers.
condition= Tests if the specified defined condition is true. Can be used in all layers.

Chapter 3: Controlling Access to the Internet and Intranet
48
Section D: Creating a Proxy Layer to Manage Proxy Operations
console_access= (This trigger was formerly admin=yes|no.) Tests if the current request is destined for the admin layer. Can also be used in <Cache> and <Exception> layers.
content_management= (This trigger was formerly content_admin=yes|no.) Tests if the current request is a content-management transaction. Can also be used in <Exception> and <Forward> layers.
date[.utc]= Tests true if the current time is within the startdate..enddate range, inclusive. Can be used in all layers.
day= Tests if the day of the month is in the specified range or an exact match. Can be used in all layers.
exception.id= Indicates that the requested object was not served, providing this specific exception page.Can also be used in <Exception> layers.
ftp.method= Tests ftp request methods against any of a well-known set of FTP methods. Can also be used in <Cache> and <Exception> layers.
group= Tests if the authenticated condition is set to yes, the client is authenticated, and the client belongs to the specified group. Can also be used in <Admin> layers.
has_attribute.name= Tests if the current transaction is authenticated in an LDAP realm and if the authenticated user has the specified LDAP attribute. Can also be used in <Admin> layers.
hour= Tests if the time of day is in the specified range or an exact match. Can be used in all layers.
http.method= Tests HTTP request methods against any of a well known set of HTTP methods. Can also be used in <Cache> and <Exception> layers.
http.method.regex= Test the HTTP method using a regular expression. Can also be used in <Exception> layers.
http.request_line.regex= Test the HTTP protocol request line. Can also be used in <Exception> layers.
http.request.version= Tests the version of HTTP used by the client in making the request to the ProxySG. Can also be used in <Cache> and <Exception> layers.
http.response_code= Tests true if the current transaction is an HTTP transaction and the response code received from the origin server is as specified. Can also be used in <Cache> and <Exception> layers.
http.response.version= Tests the version of HTTP used by the origin server to deliver the response to the ProxySG. Can also be used in <Cache> and <Exception> layers.
http.transparent_authentication=
This trigger evaluates to true if HTTP uses transparent proxy authentication for this request. Can also be used in <Cache> and <Exception> layers.
Table 3–1 CPL Commands Available in the <Proxy> Layer (Continued)

Chapter 3: Controlling Access to the Internet and Intranet
49
Section D: Creating a Proxy Layer to Manage Proxy Operations
im.buddy_id= Tests the buddy_id associated with the IM transaction. Can also be used in <Exception> layers.
im.chat_room.conference= Tests whether the chat room associated with the transaction has the conference attribute set. Can also be used in <Exception> layers.
im.chat_room.id= Tests the chat room ID associated with the transaction. Can also be used in <Exception> layers.
im.chat_room.invite_only=
Tests whether the chat room associated with the transaction has the invite_only attribute set. Can also be used in <Exception> layers.
im.chat_room.type= Tests whether the chat room associated with the transaction is public or private. Can also be used in <Exception> layers.
im.chat_room.member= Tests whether the chat room associated with the transaction has a member matching the specified criterion. Can also be used in <Exception> layers.
im.chat_room.voice_enabled=
Tests whether the chat room associated with the transaction is voice enabled. Can also be used in <Exception> layers.
im.client= Test the type of IM client in use. Can also be used in <Exception>, <Forward>, and <Cache> layers.
im.file.extension= Tests the file extension. Can also be used in <Exception> layers.
im.file.name= Tests the file name (the last component of the path), including the extension. Can also be used in <Exception> layers.
im.file.path= Tests the file path against the specified criterion. Can also be used in <Exception> layers.
im.file.size= Performs a signed 64-bit range test. Can also be used in <Exception> layers.
im.message.reflected Test whether IM reflection occurred. Can also be used in <Exception> and <Forward> layers.
im.message.route= Tests how the IM message reaches its recipients. Can also be used in <Exception> layers.
im.message.size= Performs a signed 64-bit range test. Can also be used in <Exception> layers.
im.message.text.substring=
Performs a signed 64-bit range test. Can also be used in <Exception> layers.
im.message.opcode= Tests the value of an opcode associated with an im.method of unknown_send or unknown_receive.
im.message.type= Tests the message type. Can also be used in <Exception> layers.
im.method= Tests the method associated with the IM transaction. Can also be used in <Cache> and <Exception> layers.
Table 3–1 CPL Commands Available in the <Proxy> Layer (Continued)

Chapter 3: Controlling Access to the Internet and Intranet
50
Section D: Creating a Proxy Layer to Manage Proxy Operations
im.user_id= Tests the user_id associated with the IM transaction. Can also be used in <Exception> layers.
live= Tests if the streaming content is a live stream. Can also be used in <Cache> layers.
minute= Tests if the minute of the hour is in the specified range or an exact match. Can be used in all layers.
month= Tests if the month is in the specified range or an exact match. Can be used in all layers.
proxy.address= Tests the IP address of the network interface card (NIC) on which the request arrives. Can also be used in <Admin> layers.
proxy.card= Tests the ordinal number of the network interface card (NIC) used by a request. Can also be used in <Admin> layers.
proxy.port= Tests if the IP port used by a request is within the specified range or an exact match. Can also be used in <Admin> layers.
raw_url Test the value of the raw request URL. Can also be used in <Exception> layers.
raw_url.host Test the value of the 'host' component of the raw request URL. Can also be used in <Exception> layers.
raw_url.path Test the value of the 'path' component of the raw request URL. Can also be used in <Exception> layers.
raw_url.pathquery Test the value of the 'path and query' component of the raw request URL. Can also be used in <Exception> layers.
raw_url.port Test the value of the 'port' component of the raw request URL. Can also be used in <Exception> layers.
raw_url.query Test the value of the 'query' component of the raw request URL. Can also be used in <Exception> layers.
realm= Tests if the authenticated condition is set to yes, the client is authenticated, and the client has logged into the specified realm. an also be used in <Admin> layers.
release.id= Tests the ProxySG release ID. Can be used in all layers.
request.header_address.header_name=
Tests if the specified request header can be parsed as an IP address. Can also be used in <Cache> layers.
request.header.header_name=
Tests the specified request header (header_name) against a regular expression. Can also be used in <Cache> layers.
request.header.header_name.count
Test the number of header values in the request for the given header_name. Can also be used in <Exception> layers.
request.header.header_name.length
Test the total length of the header values for the given header_name. Can also be used in <Exception> layers.
Table 3–1 CPL Commands Available in the <Proxy> Layer (Continued)

Chapter 3: Controlling Access to the Internet and Intranet
51
Section D: Creating a Proxy Layer to Manage Proxy Operations
request.header.Referer.url.host.has_name=
Test whether the Referer URL has a resolved DNS hostname. Can also be used in <Exception> layers.
request.header.Referer.url.is_absolute
Test whether the Referer URL is expressed in absolute form. Can also be used in <Exception> layers.
request.raw_headers.count
Test the total number of HTTP request headers. Can also be used in <Exception> layers.
request.raw_headers.length
Test the total length of all HTTP request headers. Can also be used in <Exception> layers.
request.raw_headers.regex
Test the value of all HTTP request headers with a regular expression. Can also be used in <Exception> layers.
request.x_header.header_name.count
Test the number of header values in the request for the given header_name. Can also be used in <Exception> layers.
request.x_header.header_name.length
Test the total length of the header values for the given header_name. Can also be used in <Exception> layers.
response.header.header_name=
Tests the specified response header (header_name) against a regular expression. Can also be used in <Cache> layers.
response.x_header.header_name=
Tests the specified response header (header_name) against a regular expression. Can also be used in <Cache> layers.
server_url[.case_sensitive|.no_lookup]=
Tests if a portion of the requested URL exactly matches the specified pattern. Can also be used in <Forward> layers.
socks.accelerated= Controls the SOCKS proxy handoff to other protocol agents.
socks.method= Tests the protocol method name associated with the transaction. Can also be used in <Cache> and <Exception> layers.
socks.version= Switches between SOCKS 4/4a and 5. Can also be used in <Exception> and <Forward> layers.
streaming.content= (This trigger has been renamed from streaming.) Can also be used in <Cache>, <Exception>, and <Forward> layers.
time= Tests if the time of day is in the specified range or an exact match. Can be used in all layers.
tunneled=
url.domain= Tests if the requested URL, including the domain-suffix portion, matches the specified pattern. Can also be used in <Forward> layers.
url.extension= Tests if the filename extension at the end of the path matches the specified string. Can also be used in <Forward> layers.
url.host= Tests if the host component of the requested URL matches the IP address or domain name. Can also be used in <Forward> layers.
Table 3–1 CPL Commands Available in the <Proxy> Layer (Continued)

Chapter 3: Controlling Access to the Internet and Intranet
52
Section D: Creating a Proxy Layer to Manage Proxy Operations
url.host.has_name Test whether the request URL has a resolved DNS hostname. Can also be used in <Exception> layers
url.is_absolute Test whether the request URL is expressed in absolute form. Can also be used in <Exception> layers
url.host.is_numeric= This is true if the URL host was specified as an IP address. Can also be used in <Forward> layers.
url.host.no_name= This is true if no domain name can be found for the URL host. Can also be used in <Forward> layers.
url.host.regex= Tests if the specified regular expression matches a substring of the domain name component of the request URL. Can also be used in <Forward> layers.
url.host.suffix= Can also be used in <Forward> layers.
url.path= Tests if a prefix of the complete path component of the requested URL, as well as any query component, matches the specified string. Can also be used in <Forward> layers.
url.path.regex= Tests if the regex matches a substring of the path component of the request URL. Can also be used in <Forward> layers.
url.port= Tests if the port number of the requested URL is within the specified range or an exact match. Can also be used in <Forward> layers.
url.query.regex= Tests if the regex matches a substring of the query string component of the request URL. Can also be used in <Forward> layers.
url.regex= Tests if the requested URL matches the specified pattern. Can also be used in <Forward> layers.
url.scheme= Tests if the scheme of the requested URL matches the specified string. Can also be used in <Forward> layers.
user= Tests the authenticated user name of the transaction. Can also be used in <Admin> layers.
user.domain= Tests if the authenticated condition is set to yes, the client is authenticated, the logged-into realm is an IWA realm, and the domain component of the user name is the specified domain. Can also be used in <Admin> layers.
weekday= Tests if the day of the week is in the specified range or an exact match. Can be used in all layers.
year= Tests if the year is in the specified range or an exact match. Can be used in all layers.
Table 3–1 CPL Commands Available in the <Proxy> Layer (Continued)
Table 3–2 Properties Available in the <Proxy> Layer
<Proxy> Layer Properties Meaning

Chapter 3: Controlling Access to the Internet and Intranet
53
Section D: Creating a Proxy Layer to Manage Proxy Operations
action.action_label( ) Selectively enables or disables a specified define action block. Can also be used in <Cache> layers.
allow Allows the transaction to be served. Can be used in all layers except <Exception> and <Forward> layers.
always_verify( ) Determines whether each request for the objects at a particular URL must be verified with the origin server.
authenticate( ) Identifies a realm that must be authenticated against. Can also be used in <Admin> layers.
authenticate.force( ) Either disables proxy authentication for the current transaction (using the value no) or requests proxy authentication using the specified authentication realm. Can also be used in <Admin> layers.
authenticate.form( ) When forms-based authentication is in use, authenticate.form ( ) selects the form used to challenge the user.
authenticate.mode(auto)authenticate.mode(sg2)
Setting the authentication.mode property selects a challenge type and surrogate credential combination. In auto mode, explicit IWA uses connection surrogate credentials. In sg2.mode, explicit IWA uses IP surrogate credentials.
authenticate.redirect_stored_requests
Sets whether requests stored during forms-based authentication can be redirected if the upstream host issues a redirecting response.
bypass_cache( ) Determines whether the cache is bypassed for a request.
check_authorization( ) In connection with CAD (Caching Authenticated Data) and CPAD (Caching Proxy Authenticated Data) support, check_authorization( ) is used when you know that the upstream device will sometimes (not always or never) require the user to authenticate and be authorized for this object. Can also be used in <Cache> layers.
delete_on_abandonment( ) If set to yes, then if all clients requesting an object close their connections prior to the object being delivered, the object fetch from the origin server is abandoned. Can also be used in <Cache> layers.
deny Denies service. Can be used in all layers except <Exception> and <Forward> layers.
dynamic_bypass( ) Used to indicate that a particular transparent request should not be handled by the proxy, but instead be subjected to our dynamic bypass methodology.
exception( ) Indicates not to serve the requested object, but instead serve this specific exception page.Can be used in all layers except <Exception> layers.
ftp.server_connection( ) Determines when the control connection to the server is established.
ftp.welcome_banner( ) Sets the welcome banner for a proxied FTP transaction.
Table 3–2 Properties Available in the <Proxy> Layer (Continued)

Chapter 3: Controlling Access to the Internet and Intranet
54
Section D: Creating a Proxy Layer to Manage Proxy Operations
http.client.recv.timeout Sets the socket timeout for receiving bytes from the client.
http.request.version( ) The http.request.version( ) property sets the version of the HTTP protocol to be used in the request to the origin content server or upstream proxy. Can also be used in <Cache> layers.
http.response.parse_meta_tag.Cache-Control( )
Controls whether the Cache-Control META Tag is parsed in an HTML response body. Can also be used in <Cache> layers.
http.response.parse_meta_tag. Expires
Controls whether the Expires META Tag is parsed in an HTML response body. Can also be used in <Cache> layers.
http.response.parse_meta_tag. Pragma.no-cache
Controls whether the Pragma: no-cache META Tag is parsed in an HTML response body. Can also be used in <Cache> layers.
http.response.version( ) The http.response.version( ) property sets the version of the HTTP protocol to be used in the response to the client's user agent.
http.server.recv.timeout( )
Sets the socket timeout for receiving bytes from the upstream host. Can also be used in <Forward> layers.
im.block_encryption Prevents the encryption of AOL IM messages by modifying messages during IM login time.
im.reflect Sets whether IM reflection should be attempted.
im.strip_attachments( ) Determines whether attachments are stripped from IM messages.
im.transport Sets the type of upstream connection to make for IM traffic.
log.suppress.field-id( ) The log.suppress.field-id( ) controls suppression of the specified field-id in all facilities (individual logs that contain all properties for that specific log in one format). Can be used in all layers.
log.suppress.field-id[log_list]( )
The log.suppress.field-id [log_list]( ) property controls suppression of the specified field-id in the specified facilities. Can be used in all layers.
log.rewrite.field-id( ) The log.rewrite.field-id( ) property controls rewrites of a specific log field in all facilities. Can be used in all layers.
log.rewrite.field-id[log_list]( )
The log.rewrite.field-id [log_list]( ) property controls rewrites of a specific log field in a specified list of log facilities. Can be used in all layers.
reflect_ip( ) Determines how the client IP address is presented to the origin server for explicitly proxied requests. Can also be used in <Forward> layers.
request.filter_service( )
Websense is the built in service name for the off-box content filtering service. Can also be used in <Cache> layers.
request.icap_service( ) Determines whether a request from a client should be processed by an external ICAP service before going out.
shell.prompt Sets the prompt for a proxied Shell transaction.
Table 3–2 Properties Available in the <Proxy> Layer (Continued)

Chapter 3: Controlling Access to the Internet and Intranet
55
shell.realm_banner Sets the realm banner for a proxied Shell transaction.
shell.welcome_banner Sets the welcome banner for a proxied Shell transaction.
socks.accelerate( ) The socks.accelerate property controls the SOCKS proxy handoff to other protocol agents.
socks.authenticate( ) The same realms can be used for SOCKS proxy authentication as can be used for regular proxy authentication.
socks.authenticate.force( )
The socks.authenticate.force( ) property forces the realm to be authenticated through SOCKS.
Table 3–3 Actions Available in the <Proxy> Layer
<Proxy> Layer Actions Meaning
log_message( ) Writes the specified string to the ProxySG event log. Can be used in all layers except <Admin>.
notify_email( ) Sends an e-mail notification to the list of recipients specified in the Event Log mail configuration. Can be used in all layers.
notify_snmp( ) The SNMP trap is sent when the transaction terminates. Can be used in all layers.
redirect( ) Ends the current HTTP transaction and returns an HTTP redirect response to the client.
transform Invokes the active content or URL rewrite transformer.
Table 3–2 Properties Available in the <Proxy> Layer (Continued)

Volume 4: Securing the Blue Coat ProxySG
56

57
Chapter 4: Managing X.509 Certificates
This chapter discusses X.509 certificates, which is a cryptographic standard for public key infrastructure (PKI) that specifies standard formats for public key certificates. Several RFCs and books exist on the public key cryptographic system (PKCS). This discussion of the elements of PKCS is relevant to their implementation in SGOS.
Blue Coat uses certificates for various applications, including:
❐ authenticating the identity of a server
❐ authenticating ProxySG
❐ securing an intranet
❐ encrypting data
Topics in this ChapterThis chapter includes information about the following topics:
❐ Section A: "Concepts" on page 58
❐ Section B: "Using Keyrings and SSL Certificates" on page 62
❐ Section C: "Managing Certificates" on page 67
❐ Section D: "Using External Certificates" on page 75
❐ Section E: "Advanced Configuration" on page 77
❐ Section F: "Checking Certificate Revocation Status in Real Time (OCSP)" on page 84

Volume 5: Advanced Networking
58
Section A: Concepts
Section A: ConceptsThis section discusses concepts surrounding certificates and SGOS.
Public Keys and Private KeysIn PKCS systems, the intended recipient of encrypted data generates a private/public keypair, and publishes the public key, keeping the private key secret. The sender encrypts the data with the recipient's public key, and sends the encrypted data to the recipient. The recipient uses the corresponding private key to decrypt the data.
For two-way encrypted communication, the endpoints can exchange public keys, or one endpoint can choose a symmetric encryption key, encrypt it with the other endpoint's public key, and send it.
CertificatesThe SGOS software uses:
❐ SSL Certificates.
❐ CA Certificates.
❐ External Certificates.
You can also use wildcard certificates during HTTPS termination. Microsoft’s implementation of wildcard certificates is as described in RFC 2595, allowing an * (asterisk) in the leftmost-element of the server's common name only. For information on wildcards supported by Internet Explorer, refer to the Microsoft knowledge base, article: 258858. Any SSL certificate can contain a common name with wildcard characters.
SSL CertificatesSSL certificates are used to authenticate the identity of a server or a client. A certificate is confirmation of the association between an identity (expressed as a string of characters) and a public key. If a party can prove they hold the corresponding private key, you can conclude that the party is who the certificate says it is. The certificate contains other information, such as its expiration date.
The association between a public key and a particular server is done by generating a certificate signing request using the server's or client’s public key. A certificate signing authority (CA) verifies the identity of the server or client and generates a signed certificate. The resulting certificate can then be offered by the server to clients (or from clients to servers) who can recognize the CA's signature. Such use of certificates issued by CAs has become the primary infrastructure for authentication of communications over the Internet.
The SG trusts all root CA certificates trusted by Internet Explorer and Firefox. The list is updated periodically to be in sync with the latest versions of IE and Firefox.

Chapter 4: Managing X.509 Certificates
59
Section A: Concepts
CA certificates installed on the SG are used to verify the certificates presented by HTTPS servers and the client certificates presented by browsers. Browsers offer a certificate if the server is configured to ask for one and an appropriate certificate is available to the browser.
CA CertificatesCA certificates are certificates that belong to certificate authorities. CA certificates are used by ProxySG devices to verify X.509 certificates presented by a client or a server during secure communication. ProxySG appliances are pre-installed with the most common CA certificates.
The ProxySG comes with many popular CA certificates already installed. You can review these certificates using the Management Console or the CLI. You can also add certificates for your own internal certificate authorities.
External CertificatesAn external certificate is any X509 certificate for which the ProxySG does not have the private key. The certificate can be used to encrypt data, such as access logs, with a public key so that it can only be decrypted by someone who has the corresponding private key. Refer to Volume 8: Access Logging for information about encrypting access logs.
KeyringsA keyring contains a public/private keypair. It can also contain a certificate signing request or a signed certificate. Keyrings are named, can be created, deleted and viewed; there are built-in keyrings for specified purposes. For information on managing keyrings, see Section B: "Using Keyrings and SSL Certificates" on page 62.
Cipher Suites Supported by SGOS SoftwareA cipher suite specifies the algorithms used to secure an SSL connection. When a client makes an SSL connection to a server, it sends a list of the cipher suites that it supports.
The server compares this list with its own supported cipher suites and chooses the first cipher suite proposed by the client that they both support. Both the client and server then use this cipher suite to secure the connection.
All cipher suites supported by the ProxySG use the RSA key exchange algorithm, which uses the public key encoded in the server's certificate to encrypt a piece of secret data for transfer from the client to server. This secret is then used at both endpoints to compute encryption keys.
Note: You can delete cipher suites that you do not trust. However, SGOS does not provide any mechanism to change the ordering of the ciphers used.
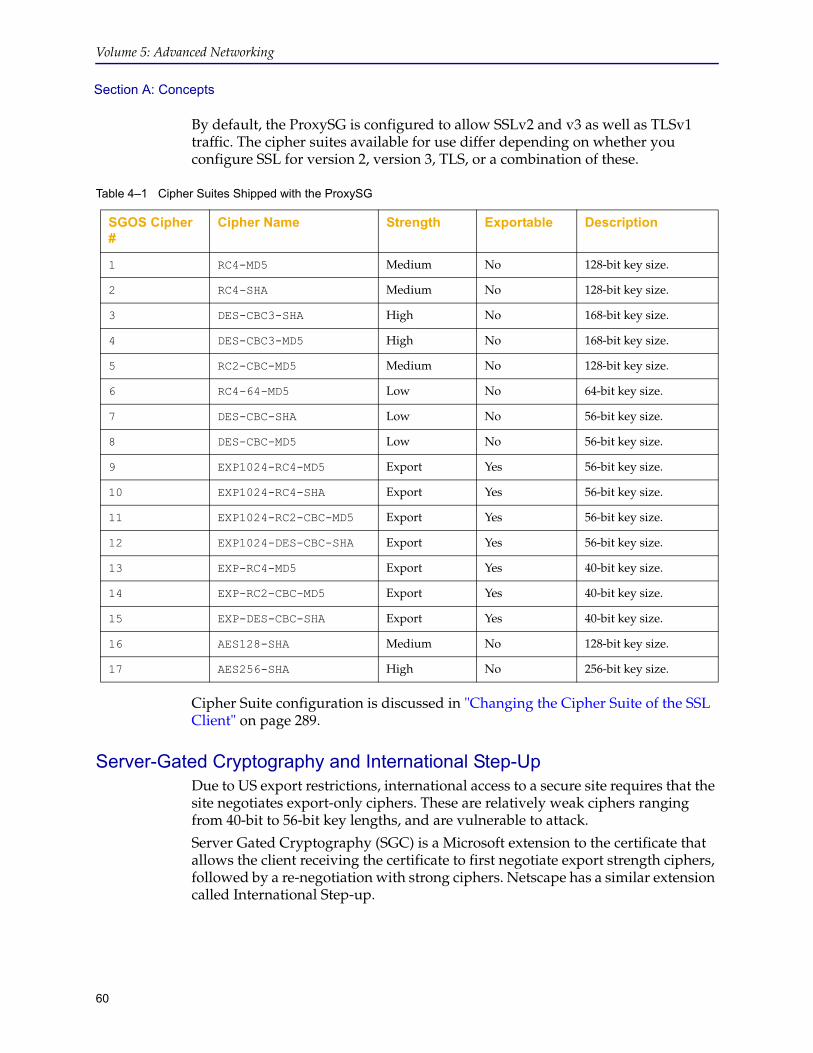
Volume 5: Advanced Networking
60
Section A: Concepts
By default, the ProxySG is configured to allow SSLv2 and v3 as well as TLSv1 traffic. The cipher suites available for use differ depending on whether you configure SSL for version 2, version 3, TLS, or a combination of these.
Cipher Suite configuration is discussed in "Changing the Cipher Suite of the SSL Client" on page 289.
Server-Gated Cryptography and International Step-UpDue to US export restrictions, international access to a secure site requires that the site negotiates export-only ciphers. These are relatively weak ciphers ranging from 40-bit to 56-bit key lengths, and are vulnerable to attack.
Server Gated Cryptography (SGC) is a Microsoft extension to the certificate that allows the client receiving the certificate to first negotiate export strength ciphers, followed by a re-negotiation with strong ciphers. Netscape has a similar extension called International Step-up.
Table 4–1 Cipher Suites Shipped with the ProxySG
SGOS Cipher #
Cipher Name Strength Exportable Description
1 RC4-MD5 Medium No 128-bit key size.
2 RC4-SHA Medium No 128-bit key size.
3 DES-CBC3-SHA High No 168-bit key size.
4 DES-CBC3-MD5 High No 168-bit key size.
5 RC2-CBC-MD5 Medium No 128-bit key size.
6 RC4-64-MD5 Low No 64-bit key size.
7 DES-CBC-SHA Low No 56-bit key size.
8 DES-CBC-MD5 Low No 56-bit key size.
9 EXP1024-RC4-MD5 Export Yes 56-bit key size.
10 EXP1024-RC4-SHA Export Yes 56-bit key size.
11 EXP1024-RC2-CBC-MD5 Export Yes 56-bit key size.
12 EXP1024-DES-CBC-SHA Export Yes 56-bit key size.
13 EXP-RC4-MD5 Export Yes 40-bit key size.
14 EXP-RC2-CBC-MD5 Export Yes 40-bit key size.
15 EXP-DES-CBC-SHA Export Yes 40-bit key size.
16 AES128-SHA Medium No 128-bit key size.
17 AES256-SHA High No 256-bit key size.

Chapter 4: Managing X.509 Certificates
61
Section A: Concepts
SGOS supports both SGC and International Step-up in its SSL implementation. There are, however, known anomalies in Internet Explorer's implementation that can cause SSL negotiation to fail. Refer to the following two documents for more detail and check for recent updates on the Microsoft support site.
http://support.microsoft.com/support/kb/articles/Q249/8/63.ASPhttp://support.microsoft.com/support/kb/articles/Q244/3/02.ASP
To take advantage of this technology, SGOS supports VeriSign's Global ID Certificate product. The Global ID certificate contains the extra information necessary to implement SGC and International Step-up.

Volume 5: Advanced Networking
62
Section B: Using Keyrings and SSL Certificates
Section B: Using Keyrings and SSL CertificatesKeyrings are virtual containers, holding a public/private keypair with a customized keylength and a certificate or certificate signing request.
Certificates can be meant for internal use (self-signed) or they can be meant for external use.
In general, SSL certificates involve three parties:
❐ The subject of the certificate.
❐ The Certificate Authority (CA), which signs the certificate, attesting to the binding between the public key in the certificate and the subject.
❐ The relying party, which is the entity that trusts the CA and relies on the certificate to authenticate the subject.
Keyrings and certificates are used in:
❐ Encrypting data.
❐ Digitally Signing Access Logs.
❐ Authenticating end users.
❐ Authenticating a ProxySG.
The steps in creating keyrings and certificates include:
❐ Create a keyring. A default keyring is shipped with the system and is used for accessing the Management Console, although you can use others. You can also use the default keyring for other purposes. You can create other keyrings for each SSL service. (See "Creating a Keyring" on page 63.)
❐ (Optional) Create Certificate Signing Requests (CSRs) to be sent to Certificate Signing Authorities (CAs).
❐ Import X.509 certificates issued by trusted CA authorities for external use and associate them with the keyring. (See "Managing SSL Certificates" on page 69.)
-or-
Create certificates and associate them with the keyring. (See "Creating Self-Signed SSL Certificates" on page 70.)
❐ (Optional, if using SSL Certificates from CAs) Import Certificate Revocation Lists (CRLs) so the SG can verify that certificates are still valid.
❐ Creating an HTTP Reverse Proxy Service and associating the keyring with the service. (Refer to Volume 9: Managing the Blue Coat ProxySG Appliance.)
Note: You can also import keyrings. For information on importing keyrings, see "Importing an Existing Keypair and Certificate" on page 77.

Chapter 4: Managing X.509 Certificates
63
Section B: Using Keyrings and SSL Certificates
Creating a KeyringThe ProxySG ships with several keyrings already created:
❐ default: The default keyring contains a certificate and an automatically-generated keypair. The default keyring is intended for securely accessing the ProxySG Management Console. Create an additional keyring for each HTTPS service defined.
❐ configuration-passwords-key: The configuration-passwords-key keyring contains a keypair but does not contain a certificate. This keyring is used to encrypt passwords in the show config command and should not be used for other purposes.
❐ appliance-key: The appliance-key keyring contains an internally-generated keypair. If the ProxySG is authenticated (has obtained a certificate from the Blue Coat CA appliance-certificate server), that certificate is associated with this keyring, which is used to authenticate the device. (For more information on authenticating the ProxySG, refer to Volume 5: Advanced Networking.)
❐ passive-attack-protection-only-key: The passive-attack-protection-only-key keyring allows data to be encrypted, but with no endpoint authentication. Although the traffic cannot be sniffed, it can be intercepted with a man-in-the-middle attack. The passive-attack-protection-only-key keyring is NOT considered secure; therefore, it should not be used on production networks.
If an origin content server requires a client certificate and no keyring is associated with the ProxySG SSL client, the HTTPS connections fails. For information on using the SSL client, see Appendix C: "Managing SSL Traffic" on page 287.
To create a keyring:
1. Select Configuration > SSL > Keyrings > SSL Keyrings.
2. Click Create; the Create Keyring dialog appears.
Note: These steps must be done using a secure connection such as HTTPS, SSH, or a serial console.

Volume 5: Advanced Networking
64
Section B: Using Keyrings and SSL Certificates
3. Configure the options:
a. Keyring Name: Give the keyring a meaningful name.
b. Select one of the following show options:
• Show keypair allows the keys to be viewed and exported.
• Do not show keypair prevents the keypair from being viewed or exported.
• Show keypair to director is a keyring viewable only if Director is issuing the command using a SSH-RSA connection.
Note: Spaces in keyring names are not supported. Including a space can cause unexpected errors while using such keyrings.
3a3b3c-or-3d
3e

Chapter 4: Managing X.509 Certificates
65
Section B: Using Keyrings and SSL Certificates
c. Enter the key length in the Create a new ______ -bit keyring field. A length of 2048 bits is the maximum (and default). For deployments reaching outside the U.S., determine the maximum key length allowed for export.
Click OK. The keyring is created with the name you chose. It does not have a certificate associated with it yet. To associate a certificate, see "Importing a Server Certificate" on page 71.
-or-
d. Select Import keyring. The grayed-out Keyring field becomes enabled, allowing you to paste in an already existing private key. Any certificate or certificate request associated with this private key must be imported separately. For information on importing a certificate, see "Importing a Server Certificate" on page 71.
e. If the private key that is being imported has been encrypted with a password, select Keyring Password and enter the password into the field.
4. Click OK to close the dialog.
5. Click Apply.
To view or edit a keyring:
1. Select Configuration > SSL > Keyrings > SSL Keyrings.
2. Click Edit.
Related CLI Syntax to Create an SSL KeyringSGOS#(config) sslSGOS#(config ssl) create keyring {show | show-director | no-show} keyring_id [key_length]
Notes❐ To view the keypair in an encrypted format, you can optionally specify des or
des3 before the keyring_id, along with an optional password. If the optional password is provided on the command line, the CLI does not prompt for a password.
Note: The choice among show, do not show keypair, and show keypair to director has implications for whether keyrings are included in profiles and backups created by Director. For more information, refer to the Blue Coat Director Configuration and Management Guide.
Note: The only way to retrieve a keyring's private key from the ProxySG is by using Director or the command line —it cannot be exported through the Management Console.

Volume 5: Advanced Networking
66
Section B: Using Keyrings and SSL Certificates
❐ If the optional password is not provided on the command line, the CLI asks for the password (interactive). If you specify either des or des3, you are prompted.
❐ To view the keypair in unencrypted format, select either the optional keyring_id or use the unencrypted command option.
❐ You cannot view a keypair over a Telnet connection because of the risk that it could be intercepted.
Deleting an Existing Keyring and Certificate
To delete a keyring and the associated certificate:
1. Select Configuration > SSL > Keyrings > SSL Keyrings.
2. Highlight the name of the keyring to delete.
3. Click Delete. The Confirm delete dialog displays.
4. Click OK in the Confirm delete dialog.
Related CLI Syntax to Delete a Keyring and the Associated CertificateSGOS#(config) sslSGOS#(config ssl) delete keyring keyring_id

Chapter 4: Managing X.509 Certificates
67
Section C: Managing Certificates
Section C: Managing CertificatesThis section discusses how to manage certificates, from obtaining certificate signing requests to using certificate revocation lists.
In this section are:
❐ "Managing Certificate Signing Requests"
❐ "Managing SSL Certificates" on page 69
❐ "Using Certificate Revocation Lists" on page 72
❐ "Troubleshooting Certificate Problems" on page 73
Managing Certificate Signing RequestsCertificate signing requests (CSRs) are used to obtain a certificate signed by a Certificate Authority. You can also create CSRs off box.
Creating a CSR
To create a CSR:
1. Select Configuration > SSL > SSL Keyrings.
2. Select the keyring for which you need a signed certificate and click Edit. The Edit Keyring dialog displays.
3

Volume 5: Advanced Networking
68
Section C: Managing Certificates
3. In the Certificate Signing Request area, click Create. The Create Certificate-signing-request dialog displays.
4. Fill in the fields:
• State/Province—Enter the state or province where the machine is located.
• Country Code—Enter the two-character ISO code of the country.
• City/Locality—Enter the city.
• Organization—Enter the name of the company.
• Unit—Enter the name of the group that is managing the machine.
• Common Name—Enter the URL of the company.
• Challenge—Enter a 4-20 character alphanumeric challenge.
• E-mail Address—The e-mail address you enter must be 60 characters or less. A longer e-mail address generates an error.
• Company—Enter the name of the company.

Chapter 4: Managing X.509 Certificates
69
Section C: Managing Certificates
5. Click OK to close the dialog. The Certificate Signing Request area displays the certificate information.
6. Click OK to close the dialog. The CSR column for the keyring displays Yes.
Related CLI Syntax to Create a CSR SGOS#(config) sslSGOS#(config ssl) create signing-request keyring_idSGOS#(config ssl) create signing-request keyring_id [attribute_value] [attribute_value]
Viewing a Certificate Signing RequestAfter a CSR is created, you must submit it to a CA in the format the CA requires. You can view the output of a certificate signing request either through the Management Console or the CLI.
To view the output of a certificate signing request:
1. Select Configuration > SSL > SSL Keyrings.
2. Click Edit.
3. From the drop-down list, select the keyring for which you have created a certificate signing request.
The certificate signing request displays in the Certificate Signing Request window and can be copied for submission to a CA.
Managing SSL CertificatesSSL certificates can be obtained two ways:
❐ Created on the ProxySG as a self-signed certificate
To create a SSL self-signed certificate on the ProxySG using a Certificate Signing Request, continue with the next section.
❐ Imported after receiving the certificate from the signing authority
If you plan to use SSL certificates issued by Certificate Authorities, the procedure is:
• Obtain the keypair and Certificate Signing Requests (CSRs), either off box or on box, and send them to the Certificate Authority for signing.
Note: Most field limits are counted in terms of bytes rather than characters. The number of non-ASCII characters a field can accommodate will be less than the size limit because non-ASCII characters can occupy more than one byte, depending on the encoding. The only exception is the Challenge field, which is counted in terms of characters.
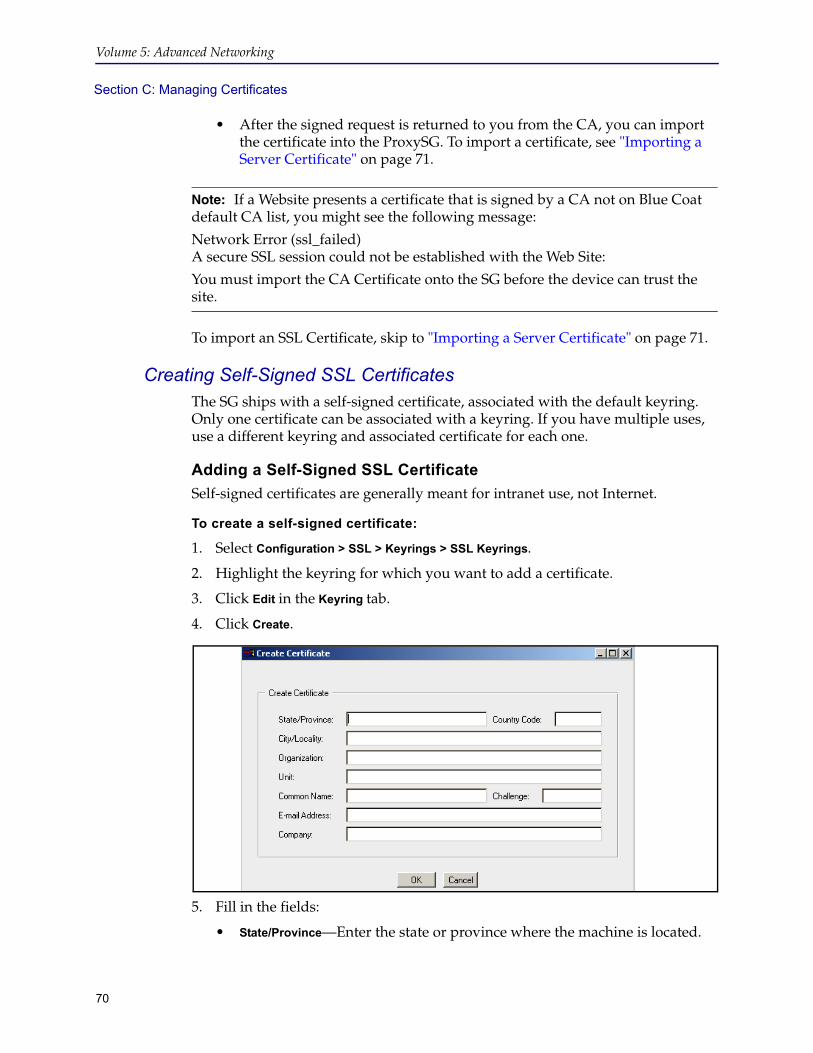
Volume 5: Advanced Networking
70
Section C: Managing Certificates
• After the signed request is returned to you from the CA, you can import the certificate into the ProxySG. To import a certificate, see "Importing a Server Certificate" on page 71.
To import an SSL Certificate, skip to "Importing a Server Certificate" on page 71.
Creating Self-Signed SSL CertificatesThe SG ships with a self-signed certificate, associated with the default keyring. Only one certificate can be associated with a keyring. If you have multiple uses, use a different keyring and associated certificate for each one.
Adding a Self-Signed SSL CertificateSelf-signed certificates are generally meant for intranet use, not Internet.
To create a self-signed certificate:
1. Select Configuration > SSL > Keyrings > SSL Keyrings.
2. Highlight the keyring for which you want to add a certificate.
3. Click Edit in the Keyring tab.
4. Click Create.
5. Fill in the fields:
• State/Province—Enter the state or province where the machine is located.
Note: If a Website presents a certificate that is signed by a CA not on Blue Coat default CA list, you might see the following message:
Network Error (ssl_failed)A secure SSL session could not be established with the Web Site:
You must import the CA Certificate onto the SG before the device can trust the site.

Chapter 4: Managing X.509 Certificates
71
Section C: Managing Certificates
• Country Code—Enter the two-character ISO code of the country.
• City/Locality—Enter the city.
• Organization—Enter the name of the company.
• Unit—Enter the name of the group that is managing the machine.
• Common Name—A common name should be the one that contains the URL with client access to that particular origin server.
• Challenge—Enter a 4-20 character alphanumeric challenge.
• E-mail Address—The e-mail address you enter must be 60 characters or less. A longer e-mail address generates an error.
• Company—Enter the name of the company.
6. The Create tab displays the message: Creating.....
Related CLI Syntax to Create a Self-Signed SSL CertificateSGOS#(config ssl) create certificate keyring_idSGOS#(config ssl) create certificate keyring-id [attribute_value] [attribute_value]
Example:SGOS#(config ssl) create certificate keyring-id cn bluecoat challenge test c US state CA company bluecoat
Importing a Server CertificateAfter the CA signs the server certificate and returns it to you, you can import the certificate onto the ProxySG.
To import a server certificate:
1. Copy the certificate to your clipboard. You must include the Begin Certificate and End Certificate statements.
2. Select Configuration > SSL > Keyrings.
3. Highlight the keyring for which you want to import a certificate.
4. Click Edit in the Keyrings tab.
5. In the Certificate panel, click Import.
6. Paste the certificate you copied into the dialog box. Click OK.
The certificate should display in the SSL Certificates Pane, associated with the keyring you selected earlier.

Volume 5: Advanced Networking
72
Section C: Managing Certificates
Using Certificate Revocation Lists Certificate Revocation Lists (CRLs) enable checking server and client certificates against lists provided and maintained by CAs that show certificates that are no longer valid. Only CRLs that are issued by a trusted issuer can be successfully verified by the ProxySG. The CRL can be imported only when the CRL issuer certificate exists as a CA certificate on the ProxySG.
You can determine if the ProxySG SSL certificates are still valid by checking Certificate Revocation Lists (CRLs) that are created and issued by trusted Certificate Signing Authorities. A certificate on the list is no longer valid.
Only CRLs that are issued by a trusted issuer can be verified by the ProxySG successfully. The CRL can be imported only when the CRL issuer certificate exists as a CA certificate on the ProxySG.
SGOS allows:
❐ One local CRL list per certificate issuing authority.
❐ An import of a CRL that is expired; a warning is displayed in the log.
❐ An import of a CRL that is effective in the future; a warning is displayed in the log.
CRLs can be used for the following purposes:
❐ Checking revocation status of client or server certificates with HTTPS Reverse Proxy.
❐ Checking revocation status of client or server certificates with SSL proxy. (For more information on using CRLS with the SSL proxy, refer to Volume 2: Proxies and Proxy Services.)
❐ SG-originated HTTPS downloads (secure image download, content filter database download, and the like).
❐ PEM-encoded CRLs, if cut and pasted through the inline command.
❐ DER-format (binary) CRLs, if downloaded from a URL.
To import a CRL:You can choose from among four methods to install a CRL on the SG:
❐ Use the Text Editor, which allows you to enter the installable list (or copy and paste the contents of an already-created file) directly onto the SG.
❐ Create a local file on your local system.
❐ Enter a remote URL, where you placed an already-created file on an FTP or HTTP server to be downloaded to the SG.
❐ Use the CLI inline command.

Chapter 4: Managing X.509 Certificates
73
Section C: Managing Certificates
To update a CRL:
1. Select Configuration > SSL > CRLs.
2. Click New or highlight an existing CRL and click Edit.
3. Give the CRL a name.
4. From the drop-down list, select the method to use to install the CRL; click Install.
• Remote URL:
Enter the fully-qualified URL, including the filename, where the CRL is located. To view the file before installing it, click View. Click Install.
The Install CRL dialog displays. Examine the installation status that displays; click OK.
• Local File:
Click Browse to display the Local File Browse window. Browse for the CRL file on the local system. Open it and click Install. When the installation is complete, a results window opens. View the results, close the window, click Close.
• Text Editor:
Copy a new CRL file into the window, and click Install.
When the installation is complete, a results window opens. View the results, close the window, click Close.
5. Click OK; click Apply
Related CLI Syntax to Create a CRLAt the (config) command prompt, enter the following commands:
SGOS#(config) ssl
SGOS#(config ssl) create crl list_nameor
SGOS#(config) ssl
SGOS#(config ssl) inline crl CRL_list_name eofPaste CRL hereeof
Troubleshooting Certificate ProblemsTwo common certificate problems are discussed below.
❐ If the client does not trust the Certificate Signing Authority that has signed the appliance’s certificate, an error message similar to the following appears in the event log:
Note: The Management Console text editor can be used to enter a CRL file. You cannot use it to enter CLI commands.

Volume 5: Advanced Networking
74
Section C: Managing Certificates
2004-02-13 07:29:28-05:00EST "CFSSL:SSL_accept error:14094416:SSLroutines:SSL3_READ_BYTES:sslv3 alert certificate unknown" 0 310000:1../cf_ssl.cpp:1398
This commonly occurs when you use the HTTPS-Console service on port 8082, which uses a self-signed certificate by default. When you access the Management Console over HTTPS, the browser displays a pop-up that says that the security certificate is not trusted and asks if you want to proceed. If you select No instead of proceeding, the browser sends an unknown CA alert to the ProxySG.
You can eliminate the error message one of two ways:
• If this was caused by the Blue Coat self-signed certificate (the certificate associated with the default keyring), import the certificate as a trusted Certificate Signing Authority certificate. See "Importing a Server Certificate" on page 71 for more information.
• Import a certificate on the ProxySG for use with HTTPS-Console that is signed by a CA that a browser already trusts.
❐ If the ProxySG appliance’s certificate is not accepted because of a host name mismatch or it is an invalid certificate, you can correct the problem by creating a new certificate and editing the HTTPS-Console service to use it. For information on editing the HTTPS-Console service, refer to Volume 2: Proxies and Proxy Services.

Chapter 4: Managing X.509 Certificates
75
Section D: Using External Certificates
Section D: Using External CertificatesExternal certificates are certificates for which Blue Coat does not have the private key. The first step in using external certificates is to import the certificates onto the ProxySG.
Importing and Deleting External CertificatesTo Import an external certificate:
1. Copy the certificate onto the clipboard.
2. Select Configuration > SSL > External Certificates.
3. Click Import.
4. Enter the name of the external certificate into the External Cert Name field and paste the certificate into the External Certificate field. You must include the ----BEGIN CERTIFICATE---- and -----END CERTIFICATE---- statements.
5. Click OK.

Volume 5: Advanced Networking
76
Section D: Using External Certificates
Deleting an External Certificate
To delete an external certificate:
1. Select Configuration > SSL > External Certificates.
2. Highlight the name of the external certificate to be deleted.
3. Click Delete.
4. Click OK in the Confirm delete dialog that displays.
5. Click Apply.
Digitally Signing Access Logs You can digitally sign access logs to certify that a particular SG wrote and uploaded a specific log file. Signing is supported for both content types—text and gzip—and for both upload types—continuous and periodic. Each log file has a signature file associated with it that contains the certificate and the digital signature used for verifying the log file. When you create a signing keyring (which must be done before you enable digital signing), keep in mind the following:
❐ The keyring must include a certificate. .
❐ The certificate purpose must be set for smime signing. If the certificate purpose is set to anything else, you cannot use the certificate for signing.
❐ Add the %c parameter in the filenames format string to identify the keyring used for signing. If encryption is enabled along with signing, the %c parameter expands to keyringName_Certname.
For more information about digitally signing access logs, refer to Volume 8: Access Logging.
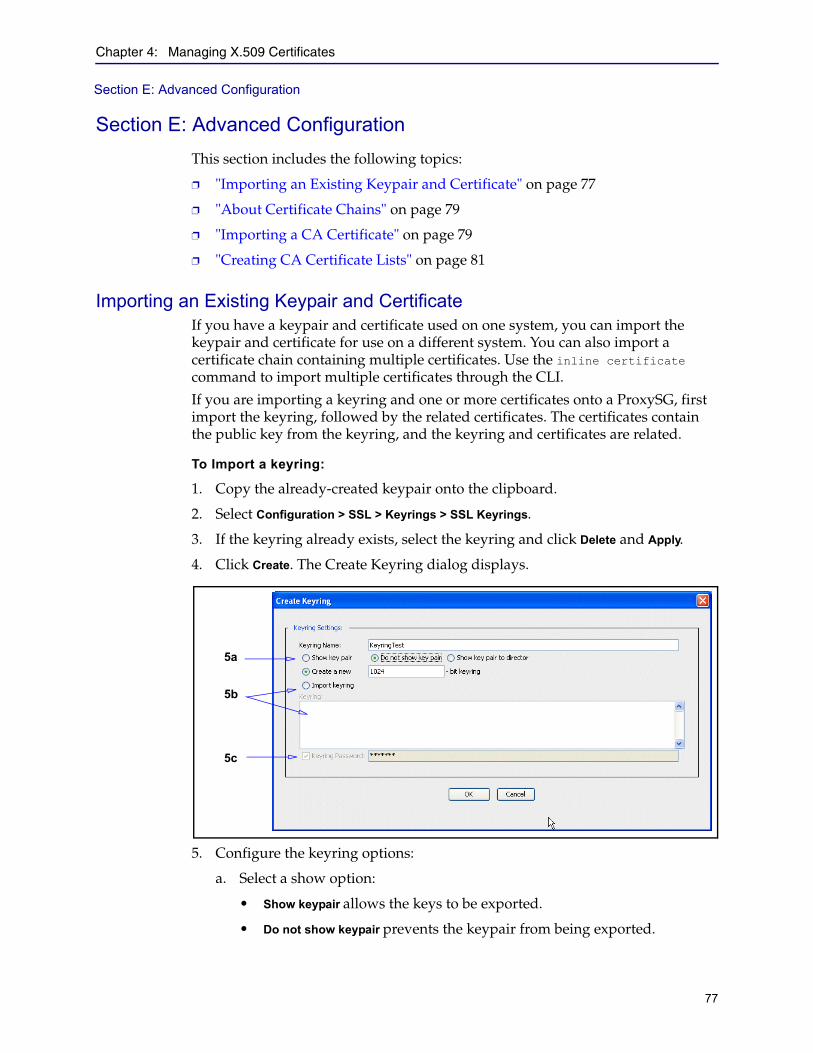
Chapter 4: Managing X.509 Certificates
77
Section E: Advanced Configuration
Section E: Advanced ConfigurationThis section includes the following topics:
❐ "Importing an Existing Keypair and Certificate" on page 77
❐ "About Certificate Chains" on page 79
❐ "Importing a CA Certificate" on page 79
❐ "Creating CA Certificate Lists" on page 81
Importing an Existing Keypair and CertificateIf you have a keypair and certificate used on one system, you can import the keypair and certificate for use on a different system. You can also import a certificate chain containing multiple certificates. Use the inline certificate command to import multiple certificates through the CLI.
If you are importing a keyring and one or more certificates onto a ProxySG, first import the keyring, followed by the related certificates. The certificates contain the public key from the keyring, and the keyring and certificates are related.
To Import a keyring:
1. Copy the already-created keypair onto the clipboard.
2. Select Configuration > SSL > Keyrings > SSL Keyrings.
3. If the keyring already exists, select the keyring and click Delete and Apply.
4. Click Create. The Create Keyring dialog displays.
5. Configure the keyring options:
a. Select a show option:
• Show keypair allows the keys to be exported.
• Do not show keypair prevents the keypair from being exported.
5a
5b
5c

Volume 5: Advanced Networking
78
Section E: Advanced Configuration
• Show keypair to director is a keyring viewable only if Director is issuing the command using a SSH-RSA connection.
b. Select the Import keyring radio button.
The grayed-out Keyring field becomes enabled, allowing you to paste in the already existing keypair. The certificate associated with this keypair must be imported separately.
c. If the keypair that is being imported has been encrypted with a password, select Keyring Password and enter the password into the field.
d. Click OK.
6. Click Apply.
To import a certificate and associate it with a keyring:
1. Copy the certificate onto the clipboard.
2. Select Configuration > SSL > Keyrings and click Edit/View.
3. From the drop-down list, select the keyring that you just imported.
4. Click Import in the Certificate field.
5. Paste the certificate into the Import Certificate dialog that appears. Be sure to include the ----BEGIN CERTIFICATE---- and -----END CERTIFICATE---- statements.
6. Click OK.
Related CLI Syntax to Import a Keyring SGOS#(config ssl) inline {keyring show | show-director | no-show} keyring_id eofPaste keypair hereeof
Related CLI Syntax to Import a Certificate and Associate it with a Keyring SGOS#(config) sslSGOS#(config ssl) inline certificate keyring_id eofPaste certificate here
eof
Note: The choice among show, do not show and show keypair to director has implications for whether keyrings are included in profiles and backups created by Director. For more information, refer to the Blue Coat Director Configuration and Management Guide.

Chapter 4: Managing X.509 Certificates
79
Section E: Advanced Configuration
About Certificate ChainsA certificate chain is one that requires that the certificates form a chain where the next certificate in the chain validates the previous certificate, going up the chain to the root, which is signed by a trusted CA. Expiration is done at the single certificate level and is checked independently of the chain verification. Each certificate in the chain must be valid for the entire chain to be valid. You can import a certificate chain containing multiple certificates.
The valid certificate chain can be presented to a browser. To get the ProxySG to present a valid certificate chain, the keyring for the HTTPS service must be updated.
The appliance's CA-certificate list must also be updated if the ProxySG uses HTTPS to communicate with the origin server and if the ProxySG is configured, through the ssl-verify-server option, to verify the certificate (chain) presented by HTTPS server. If the ProxySG uses HTTP to communicate with the origin server, updating the CA-certificate list has no effect.
Importing a CA CertificateA CA Certificate is a certificate that verifies the identity of a Certificate Authority. The certificate is used by the ProxySG to verify server and client certificates.
To import an approved CA certificate:
1. Copy the certificate to the clipboard.
2. Select Configuration > SSL > CA Certificates > CA Certificates.

Volume 5: Advanced Networking
80
Section E: Advanced Configuration
3. Click Import.
4. Name the certificate. .
5. Paste the signed CA Certificate into the Import CA Certificate field.
6. Click OK.
To view a CA certificate:
1. Select Configuration > SSL > CA Certificates > CA Certificates.
2. Select the certificate you want to view.
3. Click View. Examine the contents and click Close.
To delete a CA certificate:
1. Select Configuration > SSL > CA Certificates > CA Certificates.
2. Select the certificate to delete.
3. Click Delete.
4. Click OK.
Note: Spaces in CA Certificate names are not supported. Including a space can cause unexpected errors while using such certificates.
3 4 5. Paste signed CA certificate here.

Chapter 4: Managing X.509 Certificates
81
Section E: Advanced Configuration
Related CLI Syntax to Import a CA Certificate SGOS#(config) sslSGOS#(config ssl) inline ca-certificate ca_certificate_name eof Paste certificate hereeof
Creating CA Certificate ListsA CA certificate list (CCL), which contains some of the CA Certificates available on the ProxySG, allows the administrator to control the set of CA certificates trusted for a particular set of SSL connections. A CCL contains a subset of the available CA certificates on the ProxySG, and restricts trust to those certificates. The CCL referenced by the profile or service configuration is used when an SSL connection is established to that service or using that profile.
Two CCLs are created by default on the ProxySG:
❐ appliance-ccl: This list is used for authenticating connections among devices manufactured by Blue Coat Systems. By default it contains the Blue Coat ABRCA root certificate (ABRCA_root).
This list is used by default in the bluecoat-appliance-certificate SSL device profile. This CCL can be edited but not deleted.
For more information on device authentication, refer to Volume 5: Advanced Networking.
❐ browser-trusted-ccl: This list of CA certificates includes most of the well-known CAs trusted by common browsers such as Internet Explorer and Firefox. This CCL can be edited but not deleted.
This CCL is used by default during certificate verification by:
• The SSL client profile
• Some SSL device profiles
Note: For information on using the SSL client or SSL-device profiles, see Appendix C: "Managing SSL Traffic" on page 287.
To create a CA-Certificate list:
1. Select Configuration > SSL > CA Certificates > CA Certificate Lists.

Volume 5: Advanced Networking
82
Section E: Advanced Configuration
2. Configure the list:
a. Click New to create a new list. The Create CA Certificate List dialog displays.
b. Enter a meaningful name for the list in the CA-Certificate List Name field.
c. To add CA Certificates to the list, highlight the certificate and click Add. The certificate must have been imported onto the ProxySG before it can be added to a certificate list. To remove CA Certificates from the list, highlight the certificate in the Add list and click Remove.
d. Click OK
3. Click Apply.
Related CLI Syntax to Manage CA-Certificate Lists ❐ To enter configuration mode:
SGOS#(config ssl) create ccl list_nameSGOS#(config ssl) edit ccl list_name
❐ The following subcommands are available:
SGOS#(config ssl ccl list_name) add ca_cert_nameSGOS#(config ssl ccl list_name) remove ca_cert_name
2 2b 2c. Select certificates and click Add.

Chapter 4: Managing X.509 Certificates
83
Section E: Advanced Configuration
SSGOS #(config ssl ccl list_name) viewCertificate ID: ABRCA_rootCertificate Issuer: Blue Coat Systems, Inc.Valid from: Dec 19 17:40:48 2006 GMTValid to: Dec 18 17:40:48 2021 GMTThumbprint: F3:8D:C0:5B:B9:32:DB:97:D1:C1:2D:68:28:50:6B:B4

Volume 5: Advanced Networking
84
Section F: Checking Certificate Revocation Status in Real Time (OCSP)
Section F: Checking Certificate Revocation Status in Real Time (OCSP)
This section describes how to use the Blue Coat ProxySG for performing real time certificate revocation checks using the Online Certificate Status Protocol (OCSP).
About OCSPOCSP (RFC 2560) allows you to obtain the revocation status of an X.509 digital certificate. OCSP provides the same revocation functionality as the local Certificate Revocation List (CRL) configured on the ProxySG.
Managing large CRLs poses scalability challenges. This is due to high memory consumption on the ProxySG associated with storing revocation lists. OCSP overcomes these limitations by checking certificate status in real time using off-box OCSP responders.
How Blue Coat ProxySG Uses OCSPThe ProxySG can act as an OCSP client and issue OCSP queries to remote OCSP responders located on the intranet or the Internet. OCSP configuration and administration is usually performed by the administrator who manages the web access policy for an organization.
The ProxySG supports OCSP based revocation checks for:
❐ SSL proxy
❐ HTTPS reverse proxy
❐ SSL health checks
❐ secure image downloads
❐ secure URL database downloads
❐ secure heartbeats
OCSP-based revocation checks are performed on client or server certificates by the above applications where suitable. In this secion, these client or server certificates are referred to as subject certificates. The ProxySG acts as an OCSP client and sends OCSP queries to an OCSP responder for the given certificate. An OCSP responder is a server for OCSP request processing and response building functions.
The OCSP responder sends status of the certificate back to the ProxySG (OCSP client). Status can be good, revoked or unknown. Good means that the certificate is not revoked and valid at the time of the query. Revoked means that the certificate has been revoked either permanently or temporarily. Unknown means that the responder does not know about the revocation status of the certificate being requested.
The ProxySG can also cache OCSP responses and has the ability to respect, override or ignore the timestamps related to cacheability in the OCSP response.

Chapter 4: Managing X.509 Certificates
85
Section F: Checking Certificate Revocation Status in Real Time (OCSP)
If the certificate status is valid, the end user (in cases of SSL proxy or HTTPS reverse proxy) can access the secure website. If the status is revoked, an error is flagged and the end user is denied access to the secure website. If status is unknown, the ProxySG has the ability to treat it as an error or ignore it based on the administrator’s discretion.
Basic OCSP Setup ScenariosThis section describes three general OCSP setup scenarios which are based on the relationship between the subject certificate (the certificate whose revocation status is queried, for example, client or server certificate) and the responder certificate (the certificate that signed the OCSP response).
In the following scenario illustrations, the subject certificate chain is comprised of certificates shown on the left-hand side. The responder certificate chain is comprised of certificates shown on the right-hand side.
Scenario A
The OCSP response is signed by a root CA that also issued the subject certificate.
Scenario B

Volume 5: Advanced Networking
86
Section F: Checking Certificate Revocation Status in Real Time (OCSP)
The OCSP response is signed by a delegated certificate and both the responder certificate and the subject certificate are issued by the same root CA. The root CA in this scenario delegates the job of the signing OCSP responses to the OCSP responder by adding the OCSP signing purpose to the extendedKeyUsage extension of the responder's certificate (See section 4.2.2.2 of RFC 2560).This denotes that the certificate has been delegated for the purpose of signing OCSP responses by the root CA certificate.
Scenario C
The OCSP response is signed by a certificate having no common issuer with the subject certificate. Thus, the root CA certificates signing the subject certificate and OCSP response are different. This only works if the responder certificate’s root CA is trusted by the administrator for the OCSP signing. The administrator can denote this trust by adding the OCSP Signing trust setting in the Trusted Uses section of the root CA. OpenSSL provides a command line tool to add this trust setting to a traditional root CA certificate.
Here is an example of how to create a root CA trusted for OCSP signing from an existing root:
openssl x509 -in <root CA file> -addtrust OCSPSigning -out <trusted root CA>
A trusted certificate is an ordinary certificate that has several additional pieces of information attached to it. Information can include the permitted and prohibited uses of the certificate and an alias. Trust settings are a non-standard way to override the purposes present in the keyUsage or extendedKeyUsage extensions of a certificate.
By default, a trusted certificate must be stored locally and must be a root CA. Trust settings currently are only used with a root CA. They allow finer control over the purposes for which the root CA can be used for. For example, a CA may be trusted for an SSL client but not SSL server use. Other trust values that are supported by OpenSSL include:
❐ clientAuth (SSL client use)

Chapter 4: Managing X.509 Certificates
87
Section F: Checking Certificate Revocation Status in Real Time (OCSP)
❐ serverAuth (SSL server use)
❐ emailProtection (S/MIME email)
Notes❐ The keyword TRUSTED is denoted in the certificate header and footer:
-----BEGIN TRUSTED CERTIFICATE-----
-----END TRUSTED CERTIFICATE-----
❐ The Ignore OCSP signing purpose check option (see Step 5 on page 91 in "Creating and Configuring an OCSP Responder") lists the errors that are related to the OCSP signing delegation. This applies to Scenarios B and C only.
BlueCoat Reverse Proxy and SSL Proxy Scenarios
Reverse Proxy ScenarioThe following diagram shows how the ProxySG uses OSCP in a typical HTTPS reverse proxy scenario.
Figure 4–1 Reverse Proxy Scenario
Data Flow
1. The user accesses a secure website that is fronted by a ProxySG.
2. The ProxySG requests a client certificate from the browser.
3. The browser sends a client certificate, based on the user’s choice, to the ProxySG.
4. The ProxySG sends an OCSP query for the revocation status of the client certificate to the responder.
5. The responder returns the revocation status in an OCSP response.
6a. If the status is good, the request is allowed and the content is displayed.
6b. If the status is revoked, the user is denied access to the content.

Volume 5: Advanced Networking
88
Section F: Checking Certificate Revocation Status in Real Time (OCSP)
SSL Proxy ScenarioIn a common SSL proxy scenario, the ProxySG reads in the server certificate and sends an OCSP request to the responder to validate the certificate. Then based on the certificate status in the OCSP response the ProxySG denies or allows user access to content on the origin content server.
Creating and Configuring an OCSP ResponderTo enable an OCSP revocation check, configure an OCSP responder profile:
1. Select Configuration > SSL > OCSP.
2. Click New to create a new OCSP responder. The Create OCSP responder dialog displays.
3. Configure the OCSP responder options:
• Name—Give the responder a meaningful name. If you are editing an existing responder, this field is grayed out.
3

Chapter 4: Managing X.509 Certificates
89
Section F: Checking Certificate Revocation Status in Real Time (OCSP)
• URL—Indicates the location of the OCSP responder. The ProxySG needs this URL to locate the responder. This location can be obtained from the certificate’s Authority Information Access (AIA) extension or from a user-defined configuration. The default is to use the URL from the certificate.
• Use URL from certificate—Select this option if you want the ProxySG to look up the OCSP server location from the subject certificate’s AIA extension.
• Use URL:—Select this option if the location of the designated OCSP responder is known to you. Enter a specific responder HTTP or HTTPS URL.
• Issuer CCL—This option is used to decide which responder is contacted for a given client or server certificate. Typically each certificate issuer uses a designated OCSP responder for all the certificates it issues. The issuer CCL attribute allows the administrator to specify the certificate authorities (issuers) for which the responder in question is the designated responder. This means that when a certificate is signed by one of the CAs in this CCL, the OCSP query for that certificate will be sent to this responder.
In the section "Basic OCSP Setup Scenarios" on page 85, the entire certificate chain shown on the left-hand side (including the root CA certificate) in each figure (except for the certificate appearing lowest in the chain) must be part of the issuer CCL. The left-hand side certificate chain represents the subject certificate chain, that is, certificates on which an OCSP query is done. OCSP revocation check happens for each certificate in the chain, including the root CA. If any CA in that chain is absent from the issuer CCL this responder will not be used to query the missing CA's OCSP status.
From the drop-down list, select a CA Certificate List (CCL) that contains the CA certificate names for which this is the designated responder. Each CA may only appear in one responder’s Issuer CCL. The default is None. Thus, for a given certificate, this CCL is used to determine which responder to use when doing an OCSP check.

Volume 5: Advanced Networking
90
Section F: Checking Certificate Revocation Status in Real Time (OCSP)
• Response CCL—This attribute is used during verification of OCSP responses. In the section "Basic OCSP Setup Scenarios" on page 85, the entire certificate chain shown on the right-hand side (including the root CA certificate) in each figure (except for the certificate appearing lowest in the chain) must be part of this CCL. The right-hand side certificate chain represents all certificates in the signing hierarchy of the OCSP responder certificate. If any CA in that chain is absent from this CCL, then response verification fails and an untrusted-responder error is stored in the ProxySG event log.
From the drop-down list, select the CCL list you want to use. The default value is browser-trusted.
For Scenarios A and B, this CCL must contain the Root CA as depicted in the respective figures. For Scenario C, the CCL must contain at least the Root CA. The root CA must be imported on the ProxySG using the trusted certificate format (with OCSPSigning trust enabled). If OCSP responder does not chain all intermediate CAs, then this CCL must also include all those intermediate CAs, otherwise an untrusted-responder error is stored in the event log.
• Device Profile—This attribute is used when the responder URL is an HTTPS URL. From the drop-down list, select the device profile you want to use when connecting to the OCSP server via SSL. All existing profiles on the ProxySG appear. The device profile is a unique set of SSL cipher-suites, protocols, and keyrings. When the responder URL is HTTPS the ProxySG makes the HTTPS connection with this responder using its device profile. If the URL is HTTP the device profile is not used. The default value for the device profile attribute is default.
• Response Cache TTL—This option indicates how many days an OCSP response is cached on the ProxySG. The default is to use TTL from OCSP response.
• Use the TTL from OCSP response—Select this option to use the value of nextUpdate timestamp (see section 2.2 of RFC 2560) in the OCSP response. If this timestamp is not set or is in the past, the OCSP response is not cached on the ProxySG. The ProxySG permits a clock skew of up to five minutes with the responder's clock when validating the nextUpdate timestamp.
• Use the TTL:—Enter the length of time (in days) you want the OCSP response to be cached regardless of nextUpdate timestamp in the OCSP response. If TTL is set to 0, the response is not cached.
• Enable forwarding—This option specifies that OCSP requests are to be sent through a forwarding host, if configured. The default is to have forwarding enabled. Based on whether the responder URL is HTTPS or HTTPS the usual forwarding rules apply.

Chapter 4: Managing X.509 Certificates
91
Section F: Checking Certificate Revocation Status in Real Time (OCSP)
4. Configure the extensions options:
a. Enable nonce—To avoid replay attacks, click Enable nonce. A nonce is a random sequence of 20 bytes places in an OCSP response. The default is to disable the use of a nonce.
b. Request signing keyring— This keyring is used when an OCSP request is required to be signed. In this case, the ProxySG includes the certificate chain (minus the root CA) that is associated with this keyring to help the OCSP responder verify the signature.
When a valid keyring is selected then OCSP request signing is enabled. When None is selected no request signing occurs.
5. Configure the following Ignore Settings:
• Ignore request failures—This setting ignores various connection errors. By default, connection errors are not ignored. The following failures are ignored by this setting:
• The responder’s URL is set to from-certificate and the URL in the certificate’s AIA extension is neither HTTP or HTTPS, or is not a valid URL.
• The TCP layer fails to connect with the responder.
• The responder URL is HTTPS and the initial SSL connection fails with the responder.
• The TCP connection times out while reading the response from the responder.
• The TCP connection fails for any reason not already listed.
• The responder URL is HTTPS and a hostname mismatch error occurs on the responder’s certificate.
4a
4b
5

Volume 5: Advanced Networking
92
Section F: Checking Certificate Revocation Status in Real Time (OCSP)
• The responder URL is HTTPS and an error occurs while analyzing the response. Any other error not caught is covered by the following ignore settings.
• The OCSP responder returns an error message that is described in section 2.3 of RFC 2560. For instance, when an OCSP query is sent to a responder that is not authorized to return an OCSP status for that certificate, the responder returns and unauthorized error, that appears as Responder error (unauthorized) in event-log of the ProxySG. Enabling this setting causes this error to be ignored as well as other errors described in the RFC.
• The OCSP responder returns a response that is not a basic OCSP response (see section 4.2.1 of RFC 2560).
• Ignore expired responder certificate—This setting ignores invalid dates in the responder certificate. By default, invalid responder certificate dates cause the subject certificate verification to fail.
• Ignore untrusted responder certificate—This setting ignores the response validation error that occurs when the responder's certificate cannot be trusted. By default, any untrusted certificate failure is an error and causes subject certificate verification to fail.
• Ignore OCSP signing purpose check—This setting ignores errors which are related to the OCSP signing delegation and applies only to Scenarios B and C. (See"Basic OCSP Setup Scenarios" on page 85.) The errors might occur in one of two ways:
• Scenario B—The response signer certificate is not delegated for the OCSP signing. The event log records this error as missing ocspsigning usage.
• Scenario C—The root CA does not have the trust setting enabled for the OCSP Signing. The event log records this error as root ca not trusted.
Either of these errors may be ignored by enabling this setting.
• Ignore unknown revocation status—Select this setting to ignore unknown revocation status as an error. By default, unknown status is an error and causes subject certificate verification to fail.
6. Click OK.
7. Click Apply.
Setting the Default ResponderTo set the default responder OCSP responder profile:
1. Select Configuration > SSL > OCSP.

Chapter 4: Managing X.509 Certificates
93
Section F: Checking Certificate Revocation Status in Real Time (OCSP)
2. From the Default Responder drop-down list, select the responder you want to be designated as the default responder. If a responder has not been previously created then <None> is the only option.
If the subject certificate is not associated with any responder (using Issuer CCL option) then the OCSP request for this certificate is sent to the default responder.
3. Click Apply.
See Also"About OCSP" on page 84
"How Blue Coat ProxySG Uses OCSP" on page 84
"OCSP CLI Commands" on page 93
"OCSP CPL Policy Configuration" on page 94
"OCSP Listed Exceptions" on page 94
"OCSP Access Log Fields" on page 94
OCSP CLI CommandsFor detailed information about OCSP CLI commands, including full syntax and descriptions, see Volume 11: Command Line Interface Reference, Chapter 3, configure command config ssl ocsp.
Important: If the default responder has a URL that is set to from certificate (see Step 4), then all ProxySG components which are capable of performing OCSP checks generate OCSP requests to responders that may be anywhere on the Internet depending on where the certificate’s AIA extension URL is pointing. Use a default responder that has its URL set to from certificate with caution.
2

Volume 5: Advanced Networking
94
Section F: Checking Certificate Revocation Status in Real Time (OCSP)
The OCSP Management Console features have the following equivalent CLI commands:
SGOS#(config ssl)ocspSGOS#(config ssl ocsp)create responder_nameSGOS#(config ssl ocsp)edit responder_nameSGOS#(config ocsp responder_name){exit | extension | ignore |issuer-ccl | no | response-ccl | ssl-device-profile | ttl |url |use-forwarding | view}
OCSP CPL Policy ConfigurationThe following policy property is extended for revocation check under the SSL layer:
<ssl>
server.certificate.validate.check_revocation(auto|local|ocsp|no)
<ssl>
client.certificate.validate.check_revocation(auto|local|ocsp|no)
For detailed information about CPL policy configuration and revocation check, see Volume 10: Content Language Policy Guide, Chapter 4.
OCSP Listed ExceptionsWhen a certificate state is revoked, the following predefined exceptions are sent depending on which certificate is revoked:
❐ ssl_client_cert_revoked
❐ ssl_server_cert_revoked
When a certificate status is unknown and the responder is configured to not ignore it, the following predefined exceptions are sent depending on which certificate is revoked:
❐ ssl_client_cert_unknown
❐ ssl_server_cert_unknown
For detailed information about defining Exceptions, see Volume 6: The VisualPolicy Manager and Advanced Policy Tasks, Chapter 4, Table 4-1.
OCSP Access Log Fields
Note: See Volume 8: Access Logging, Chapter 2 for detailed information about creating and editing log formats.
The OCSP access log fields are:Table 4–2 Access Log Substitutions
ELFF Description
x-rs-ocsp-error An error was observed during the OCSP check for a server certificate.

Chapter 4: Managing X.509 Certificates
95
The OSCP access log field descriptions are:
x-cs-ocsp-error An error was observed during the OCSP check for a client certificate.
Table 4–3 Access Log Field Descriptions
Access Log Field Description
unsupported-responder-url An error occurs if:• The responder’s URL is set to from-certificate and the URL in the target certificate’s AIA field is neither HTTP or HTTPS.
• Or, the URL is not a valid.
connection-failure An error occurs during the TCP connection with the responder.
ssl-handshake-error An error occurs over the HTTPS transport during the initial SSL handshake with the responder.
request-timeout An error occurs if the TCP times out while reading the response from responder.
connection-dropped An error occurs when any other TCP failure happens which is not encountered in the errors described in this table.
ssl-cert-hostname-mismatch An error occurs during the HTTPS transport when there is a hostname mismatch on the responder front-end certificate.
invalid-response An error occurs during the parsing of an OCSP response. For example, during an HTTP parsing error.
ocsp-signing-purpose-error An error occurs during the OCSP response verification in the following cases (Refer to RFC 2560, section 4.2.2.2):• The response-signer’s certificate’s
extendedKeyUsage does not have an OCSPsigning value making the signer unauthorized.
• Or, the root certificate of the response-signer has the same missing extension value as above.
untrusted-responder-cert An error occurs during response verification when the response signer’s certificate is not trusted by ProxySG
Table 4–2 Access Log Substitutions
ELFF Description

Volume 5: Advanced Networking
96
expired-responder-cert An error occurs during response verification when the response signer’s certificate has invalid dates.
internal-error An error occurs when an error happens that is not described in this table.
Table 4–3 Access Log Field Descriptions
Access Log Field Description

97
Chapter 5: Certificate Realm Authentication
Certificate realms are useful for companies that have a Public Key Infrastructure (PKI) in place and would like to have the ProxySG authenticate their end-users using the client's X.509 certificates. If the users are members of an LDAP, XML, or Local group, the Certificate Realm can also forward the user credentials to the specified authorization realm, which determines the user’s authorization (permissions).
Topics in this ChapterThis chapter includes information about the following topics:
❐ "How Certificate Realm Works" on page 97
❐ "Creating a Certificate Realm" on page 98
❐ "Defining a Certificate Realm" on page 98
❐ "Defining Certificate Realm Authorization Properties" on page 99
❐ "Defining Certificate Realm General Properties" on page 101
❐ "Revoking User Certificates" on page 103
❐ "Creating the Certificate Authorization Policy" on page 104
❐ "Tips" on page 105
❐ "Certificate Realm Example" on page 105
How Certificate Realm WorksAfter an SSL session has been established, the user is asked to select the certificate to send to the ProxySG. If the certificate was signed by a Certificate Signing Authority that the ProxySG trusts, the user is considered authenticated. The username for the user is the one extracted from the certificate during authentication.
At this point the user is authenticated. If an authorization realm has been specified, such as LDAP, XML or Local, the certificate realm then passes the username to the specified authorization realm, which figures out which groups the user belongs to.
Certificate realms do not require an authorization realm. If no authorization realm is configured, the user cannot be a member of any group.
You do not need to specify an authorization realm if:
❐ The policy does not make any decisions based on groups
Note: If you authenticate with a certificate realm, you cannot also challenge for a password.

Volume 4: Securing the Blue Coat ProxySG
98
❐ The policy works as desired when all certificate realm-authenticated users are not in any group
To use a Certificate Realm, you must:
❐ Configure SSL between the client and ProxySG (for more information, see "Using SSL with Authentication and Authorization Services" on page 46).
❐ Enable verify-client on the HTTPS service to be used (for more information, refer to Volume 2: Proxies and Proxy Services).
❐ Verify that the certificate authority that signed the client's certificates is in the ProxySG trusted list.
❐ Configure Authorization (optional)
Creating a Certificate RealmTo create a certificate realm:
1. Select Configuration > Authentication > Certificate > Certificate Realms.
2. Click New.
3. In the Realm name field, enter a realm name. The name can be 32 characters long and composed of alphanumeric characters and underscores. The name must start with a letter.
4. Click OK.
5. Click Apply.
Defining a Certificate RealmTo define certificate authentication properties:
1. Select Configuration > Authentication > Certificate > Certificate Main.
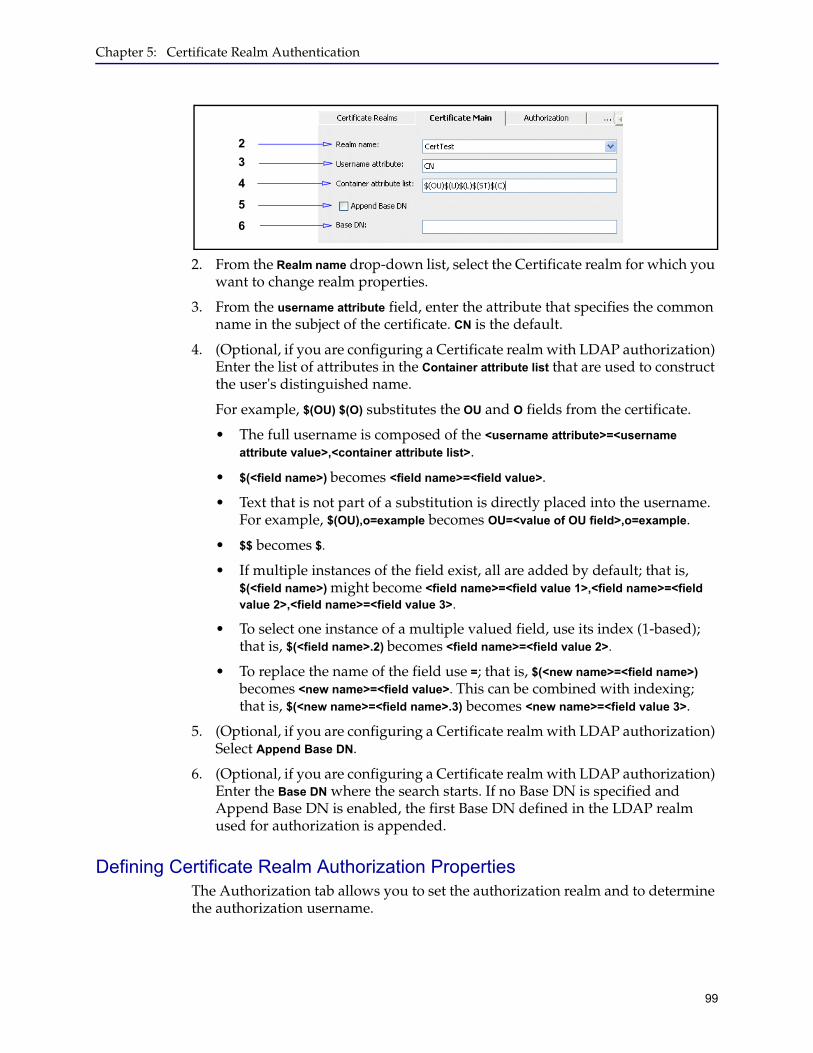
Chapter 5: Certificate Realm Authentication
99
2. From the Realm name drop-down list, select the Certificate realm for which you want to change realm properties.
3. From the username attribute field, enter the attribute that specifies the common name in the subject of the certificate. CN is the default.
4. (Optional, if you are configuring a Certificate realm with LDAP authorization) Enter the list of attributes in the Container attribute list that are used to construct the user's distinguished name.
For example, $(OU) $(O) substitutes the OU and O fields from the certificate.
• The full username is composed of the <username attribute>=<username attribute value>,<container attribute list>.
• $(<field name>) becomes <field name>=<field value>.
• Text that is not part of a substitution is directly placed into the username. For example, $(OU),o=example becomes OU=<value of OU field>,o=example.
• $$ becomes $.
• If multiple instances of the field exist, all are added by default; that is, $(<field name>) might become <field name>=<field value 1>,<field name>=<field value 2>,<field name>=<field value 3>.
• To select one instance of a multiple valued field, use its index (1-based); that is, $(<field name>.2) becomes <field name>=<field value 2>.
• To replace the name of the field use =; that is, $(<new name>=<field name>) becomes <new name>=<field value>. This can be combined with indexing; that is, $(<new name>=<field name>.3) becomes <new name>=<field value 3>.
5. (Optional, if you are configuring a Certificate realm with LDAP authorization) Select Append Base DN.
6. (Optional, if you are configuring a Certificate realm with LDAP authorization) Enter the Base DN where the search starts. If no Base DN is specified and Append Base DN is enabled, the first Base DN defined in the LDAP realm used for authorization is appended.
Defining Certificate Realm Authorization PropertiesThe Authorization tab allows you to set the authorization realm and to determine the authorization username.
23
4
5
6

Volume 4: Securing the Blue Coat ProxySG
100
To set certificate realm authorization properties:
1. Select Configuration > Authentication > Certificate > Authorization.
2. From the Realm name drop-down list, select a LDAP, XML, Certificate, or Local realm.
3. From the Authorization realm name drop-down list, select the LDAP, Local, or XML realm you want to use to authorize users.
4. Configure authorization options. You cannot always construct the user's authorization username from the substitutions available. If not, you can search on a LDAP server for a user with an attribute matching the substitution and then use the FQDN for the matched user as the authorization username. Authorization would then be done on that authorization username.:
a. In the Authorization username field, enter the substitution to use to identify the user. The default authorization username is $(cs-username). You can use any policy substitutions. -or-
b. Select Use FQDN or to determine through search criteria, which uses the FQDN or full username determined while identifying the user during the authentication process. -or-
c. Select Determine by search, which enables the fields below. Specify the following to focus the search:
• LDAP search realm name: An LDAP realm to search. In most cases, this is the same as the LDAP realm used for authorization.
• Search filter: Used during the LDAP search. This search filter can contain policy substitutions including the $(cs-username) substitution.
2
3
4a
4b
4c
5

Chapter 5: Certificate Realm Authentication
101
• User attribute: An attribute on the entry returned in the LDAP search results that has the value to use as the authorization username. In most cases this is the FQDN of the user entry.
5. (Optional) Click Set Users to Ignore to add a list of users excluded from searches.
6. Click Apply.
Defining Certificate Realm General PropertiesThe Certificate General tab allows you to specify the display name, the refresh times, an inactivity timeout value, cookies, and a virtual URL.
To configure certificate realm general settings:
1. Select Configuration > Authentication > Certificate > Certificate General.

Volume 4: Securing the Blue Coat ProxySG
102
2. From the Realm name drop-down list, select the Certificate realm to modify.
3. If necessary, change the realm’s display name.
4. Configure refresh options:
a. Select Use the same refresh time for all to use the same refresh time for all.
b. Enter the number of seconds in the Surrogate refresh time field. The Surrogate Refresh Time allows you to set a realm default for how often a user’s surrogate credentials are refreshed. Surrogate credentials are credentials accepted in place of a user’s actual credentials. The default setting is 900 seconds (15 minutes). You can configure this in policy for better control over the resources as policy overrides any settings made here.
Before the refresh time expires, if a surrogate credential (IP address or cookie) is available and it matches the expected surrogate credential, the ProxySG authenticates the transaction. After the refresh time expires, the ProxySG will verify the user’s certificate.
c. Enter the number of seconds in the Authorization refresh time field. The Authorization Refresh Time allows you to manage how often the authorization data is verified with the authentication realm. It has a default setting of 900 seconds (15 minutes). You can configure this in policy for better control over the resources as policy overrides any settings made here.
5. Enter the number of seconds in the Inactivity timeout field to specify the amount of time a session can be inactive before being logged out.
2
3
4
5
6
7

Chapter 5: Certificate Realm Authentication
103
6. Configure cookie options:
a. Select the Use persistent cookies check box to use persistent browser cookies instead of session browser cookies.
b. Select the Verify the IP address in the cookie check box if you would like the cookies surrogate credentials to only be accepted for the IP address that the cookie was authenticated. Disabling this allows cookies to be accepted from other IP addresses.
7. You can specify a virtual URL. For more information on the virtual URL, see "About Origin-Style Redirection" on page 40.
8. Click Apply.
Related CLI Syntax to Configure a Certificate RealmFor detailed information about the CLI commands for certificate realms, refer to Volume 11: Command Line Interface Reference.
❐ To enter configuration mode:
SGOS#(config) security certificate create-realm realm_name SGOS#(config) security certificate edit-realm realm_name
❐ The following commands are available:
SGOS#(config certificate realm_name) authorization {ignore-user-list {add | clear |remove} | realm {none | realm-name realm_name}| search-filter search_filter| user-attribute {fqdn | LDAP_attribute_name| username {determine-by-search | use-full-username | username_for_authorization}}SGOS#(config certificate realm_name) cookie {persistent {enable | disable} | verify-ip {enable | disable}}
SGOS#(config certificate realm_name) display-name display_nameSGOS#(config certificate realm_name) identification {append-base-dn {disable | dn dn | enable} | container-attr-list list | no container-attr-list | username-attribute attribute}SGOS#(config certificate realm_name) inactivity-timeout secondsSGOS#(config certificate realm_name) refresh-time surrogate-refresh secondsSGOS#(config certificate realm_name) refresh-time authorization-refresh secondsSGOS#(config certificate realm_name) rename new_nameSGOS#(config certificate realm_name) viewSGOS#(config certificate realm_name) virtual-url url
Revoking User CertificatesUsing policy, you can revoke certain certificates by writing policy that denies access to users who have authenticated with a certificate you want to revoke. You must maintain this list on the ProxySG; it is not updated automatically.

Volume 4: Securing the Blue Coat ProxySG
104
A certificate is identified by its issuer (the Certificate Signing Authority that signed it) and its serial number, which is unique to that CA.
Using that information, you can use the following strings to create a policy to revoke user certificates:
❐ user.x509.serialNumber—This is a string representation of the certificate’s serial number in HEX. The string is always an even number of characters long, so if the number needs an odd number of characters to represent in hex, there is a leading zero. Comparisons are case insensitive.
❐ user.x509.issuer—This is an RFC2253 LDAP DN. Comparisons are case sensitive.
❐ (optional) user.x509.subject: This is an RFC2253 LDAP DN. Comparisons are case sensitive.
ExampleIf you have only one Certificate Signing Authority signing user certificates, you do not need to test the issuer. In the <Proxy> layer of the Local Policy file:
<proxy>deny user.x509.serialnumber=11deny user.x509.serialNumber=0F
If you have multiple Certificate Signing Authorities, test both the issuer and the serial number. In the <Proxy> layer of the Local Policy file:
<proxy>deny
user.x509.issuer="Email=name,CN=name,OU=name,O=company,L=city,ST=state or province,C=country" user.x509.serialnumber=11\deny user.x509.issuer="CN=name,OU=name,O=company, L=city,ST=state or province,C=country" \deny user.x509.serialnumber=2CB06E9F00000000000B
Creating the Certificate Authorization PolicyWhen you complete Certificate realm configuration, you can create CPL policies. Be aware that the examples below are just part of a comprehensive authentication policy. By themselves, they are not adequate.
Be aware that the default policy condition for these examples is allow. On new SGOS systems, the default policy condition is deny.
❐ Every certificate realm authenticated user is allowed access the ProxySG.
Note: This method of revoking user certificates is meant for those with a small number of certificates to manage.
For information on using automatically updated lists, refer to Volume 2: Proxies and Proxy Services.
Note: Refer to Volume 10: Content Policy Language Guide for details about CPL and how transactions trigger the evaluation of policy file <Proxy> and other layers.

Chapter 5: Certificate Realm Authentication
105
<Proxy> authenticate(CertificateRealm)
❐ A subnet definition determines the members of a group, in this case, members of the Human Resources department. (They are allowed access to the two URLs listed. Everyone else is denied permission.)
<Proxy> authenticate(CertificateRealm)<Proxy> Define subnet HRSubnet 192.168.0.0/16 10.0.0.0/24 End subnet HRSubnet [Rule] client_address=HRSubnet
url.domain=monster.comurl.domain=hotjobs.comdeny
.
.
.[Rule]deny
TipsIf you use a certificate realm and see an error message similar to the following
Realm configuration error for realm "cert": connection is not SSL.
This means that certificate authentication was requested for a transaction, but the transaction was not done on an SSL connection, so no certificate was available.
This can happen in three ways:
❐ The authenticate mode is either origin-IP-redirect/origin-cookie-redirect or origin-IP/origin-cookie, but the virtual URL does not have an https: scheme. This is likely if authentication through a certificate realm is selected with no other configuration, because the default configuration does not use SSL for the virtual URL.
❐ In a server accelerator deployment, the authenticate mode is origin and the transaction is on a non-SSL port.
❐ The authenticate mode is origin-IP-redirect/origin-cookie-redirect, the user has authenticated, the credential cache entry has expired, and the next operation is a POST or PUT from a browser that does not handle 307 redirects (that is, from a browser other than Internet Explorer). The workaround is to visit another URL to refresh the credential cache entry and then try the POST again.
Certificate Realm ExampleSituationReverse proxy with user authentication and authorization from the ProxySG in combination with an LDAP server and an end-user PKI certificate. The subject of the certificate includes the e-mail address of the user.

Volume 4: Securing the Blue Coat ProxySG
106
Configuration
1. Configure an HTTPS reverse proxy as explained in the HTTPS Reverse Proxy chapter in Volume 2: Proxies and Proxy Services. Be sure to enable the verify-client option.
2. Configure SSL between the client and ProxySG (for more information, see "Using SSL with Authentication and Authorization Services" on page 46).
3. Verify that the certificate authority that signed the client's certificates is in the ProxySG trusted list.
4. Make sure that ProxySG CRL is correct (for more information, see "Using Certificate Revocation Lists" on page 72.)
5. Create a Certificate Authority Certificate List (CCL) and add the CA that created the certificate to the CCL. (For more information, see "Creating CA Certificate Lists" on page 81.)
6. Configure the certificate realm:
• Use the Configuration > Authentication > Certificate > Realms tab to name the realm.
• Use the Configuration > Authentication > Certificate > Main tab to define certificate attributes:
• username
• attribute list
• base DN
• Use the Configuration > Authentication > Certificate > Authorization tab to:
• Specify the LDAP realm to search
• Specify the email address as the unique ID for the user
• Use the Configuration > Authentication > Certificate > General tab to set:
• Refresh times
• Inactivity timeout
• Cookies
• Virtual URL
Behavior
❐ The ProxySG retrieves the end-user PKI certificate from the browser when an HTTP request is received for the domain.
❐ The user enters the smart card and pin code information into the browser.
❐ The browser retrieves the certificate from the smart card and sends it to the ProxySG .
• For a specific destination, the certificate must be a validate certificate from a specific Certificate Authority and the certificate must not be revoked.

Chapter 5: Certificate Realm Authentication
107
• The e-mail address must be retrieved from the certificate as a unique ID for the user.
❐ The ProxySG does an LDAP search operation with the retrieved e-mail address from the certificate. If only one entry in the LDAP server exists with this e-mail address, the user is authenticated. If the user has the correct group attributes, the user is authorized to access the Web site.

Volume 4: Securing the Blue Coat ProxySG
108

109
Chapter 6: Oracle COREid Authentication
This chapter discusses how the ProxySG can be configured to consult an Oracle COREid (formerly known as Oracle NetPoint) Access Server for authentication and session management decisions.
Topics in this ChapterThis chapter includes information about the following topics:
❐ "About COREid Interaction with Blue Coat" on page 109
❐ "Configuring the COREid Access System" on page 110
❐ "Additional COREid Configuration Notes" on page 111
❐ "Configuring the ProxySG Realm" on page 111
❐ "Participating in a Single Sign-On (SSO) Scheme" on page 111
❐ "Creating a COREid Realm" on page 112
❐ "Configuring Agents" on page 113
❐ "Configuring the COREid Access Server" on page 115
❐ "Configuring the General COREid Settings" on page 117
❐ "Creating the CPL" on page 119
About COREid Interaction with Blue CoatWithin the COREid Access System, BCAAA acts as a custom AccessGate. It communicates with the COREid Access Servers to authenticate the user and to obtain a COREid session token, authorization actions, and group membership information.
HTTP header variables and cookies specified as authorization actions are returned to BCAAA and forwarded to the ProxySG. They can (as an option) be included in requests forwarded by the appliance.
Within the ProxySG system, BCAAA acts as its agent to communicate with the COREid Access Servers. The ProxySG provides the user information to be validated to BCAAA, and receives the session token and other information from BCAAA.
Each ProxySG COREid realm used causes the creation of a BCAAA process on the Windows host computer running BCAAA. When a process is created, a temporary working directory containing the Oracle COREid files needed for configuration is created for that process. A single host computer can support multiple ProxySG realms (from the same or different ProxySGs); the number depends on the capacity of the BCAAA host computer and the amount of activity in the realms.

Volume 4: Securing the Blue Coat ProxySG
110
Access to the COREid Access System occurs through the Blue Coat Authentication and Authorization Agent (BCAAA), which must be installed on a Windows 2000 system or higher with access to the COREid Access Servers. Configuration of the ProxySG COREid realm must be coordinated with configuration of the Access System. Each must be aware of the AccessGate. In addition, certain authorization actions must be configured in the Access System so that BCAAA gets the information the ProxySG needs.
The ProxySG supports authentication with Oracle COREid v6.5 and v7.0.
Configuring the COREid Access System
Because BCAAA is an AccessGate in the COREid Access System, it must be configured in the Access System just like any other AccessGate. BCAAA obtains its configuration from the ProxySG so configuration of BCAAA on the host computer is not required. If the Cert Transport Security Mode is used by the Access System, then the certificate files for the BCAAA AccessGate must reside on BCAAA’s host computer.
COREid protects resources identified by URLs in policy domains. A ProxySG COREid realm is associated with a single protected resource. This could be an already existing resource in the Access System, (typical for a reverse proxy arrangement) or it could be a resource created specifically to protect access to ProxySG services (typical for a forward proxy).
The COREid policy domain that controls the protected resource must use one of the challenge methods supported by the ProxySG.
Supported challenge methods are Basic, X.509 Certificates and Forms. Acquiring the credentials over SSL is supported as well as challenge redirects to another server.
The ProxySG requires information about the authenticated user to be returned as COREid authorization actions for the associated protected resource. Since authentication actions are not returned when a session token is simply validated, the actions must be authorization and not authentication actions.
The following authorization actions should be set for all three authorization types (Success, Failure, and Inconclusive):
❐ A HeaderVar action with the name BCSI_USERNAME and with the value corresponding to the simple username of the authenticated user. For example, with an LDAP directory this might be the value of the cn attribute or the uid attribute.
Note: Blue Coat assumes you are familiar with the configuration of the COREid Access System and WebGates.
Important: The request URL is not sent to the Access System as the requested resource; the requested resource is the entire ProxySG realm. Access control of individual URLs is done on the ProxySG using policy.

Chapter 6: Oracle COREid Authentication
111
❐ A HeaderVar action with the name BCSI_GROUPS and the value corresponding to the list of groups to which the authenticated user belongs. For example, with an LDAP directory this might be the value of the memberOf attribute.
Once the COREid AccessGate, authentication scheme, policy domain, rules, and actions have been defined, the ProxySGcan be configured.
Additional COREid Configuration NotesThe ProxySG credential cache only caches the user's authentication information for the lesser of the two values of the time-to-live (TTL) configured on the ProxySG and the session TTL configured in the Access System for the AccessGate.
Configuring the ProxySG RealmThe ProxySG realm must be configured so that it can:
❐ Communicate with the Blue Coat agent(s) that act on its behalf (hostname or IP address, port, SSL options, and the like).
❐ Provide BCAAA with the information necessary to allow it to identify itself as an AccessGate (AccessGate id, shared secret).
❐ Provide BCAAA with the information that allows it to contact the primary COREid Access Server (IP address, port, connection information).
❐ Provide BCAAA with the information that it needs to do authentication and collect authorization information (protected resource name), and general options (off-box redirection).
For more information on configuring the ProxySG COREid realm, see "Creating a COREid Realm" on page 112.
Participating in a Single Sign-On (SSO) SchemeThe ProxySG can participate in SSO using the encrypted ObSSOCookie cookie. This cookie is set in the browser by the first system in the domain that authenticates the user; other systems in the domain obtain authentication information from the cookie and so do not have to challenge the user for credentials. The ProxySG sets the ObSSOCookie cookie if it is the first system to authenticate a user, and authenticates the user based on the cookie if the cookie is present.
Since the SSO information is carried in a cookie, the ProxySG must be in the same cookie domain as the servers participating in SSO. This imposes restrictions on the authenticate.mode() used on the ProxySG.
❐ A reverse proxy can use any origin mode.
Note: All ProxySG and agent configuration occurs on the appliance. The appliance sends the necessary information to BCAAA when it establishes communication.

Volume 4: Securing the Blue Coat ProxySG
112
❐ A forward proxy must use one of the origin-redirect modes (such as origin-cookie-redirect). When using origin-*-redirect modes, the virtual URL's hostname must be in the same cookie domain as the other systems. It cannot be an IP address; the default www.cfauth.com does not work either.
When using origin-*-redirect, the SSO cookie is automatically set in an appropriate response after the ProxySG authenticates the user. When using origin mode (in a reverse proxy), setting this cookie must be explicitly specified by the administrator using the policy substitution variable $(x-agent-sso-cookie). The variable $(x-agent-sso-cookie) expands to the appropriate value of the set-cookie: header.
Avoiding ProxySG ChallengesIn some COREid deployments all credential challenges are issued by a central authentication service. Protected services do not challenge and process request credentials; instead, they work entirely with the SSO token. If the request does not include an SSO token, or if the SSO token is not acceptable, the request is redirected to the central service, where authentication occurs. Once authentication is complete, the request is redirected to the original resource with a response that sets the SSO token.
If the COREid authentication scheme is configured to use a forms-based authentication, the ProxySG redirects authentication requests to the form URL automatically. If the authentication scheme is not using forms authentication but has specified a challenge redirect URL, the ProxySG only redirects the request to the central service if always-redirect-offbox is enabled for the realm on the ProxySG. If the always-redirect-offbox option is enabled, the authentication scheme must use forms authentication or have a challenge redirect URL specified.
Creating a COREid RealmTo create a COREid realm:
1. Select Configuration > Authentication > Oracle COREid > COREid Realms.
2. Click New.
Note: The ProxySG must not attempt to authenticate a request for the off-box authentication URL. If necessary, authenticate(no) can be used in policy to prevent this.

Chapter 6: Oracle COREid Authentication
113
3. In the Realm name field, enter a realm name. The name can be 32 characters long and composed of alphanumeric characters and underscores. The name must start with a letter. The name should be meaningful to you, but it does not have to be the name of the COREid AccessGate.
4. Click OK to close the dialog.
5. Click Apply.
Configuring AgentsYou must configure the COREid realm so that it can find the Blue Coat Authentication and Authorization Agent (BCAAA).
To configure the BCAAA agent:
1. Select Configuration > Authentication > Oracle COREid > Agents.

Volume 4: Securing the Blue Coat ProxySG
114
2. From the Realm Name drop-down list, select the COREid realm.
3. Configure the Primary Agent:
a. In the Primary agent section, enter the hostname or IP address where the agent resides.
b. Change the port from the default of 16101 if necessary.
c. Enter the AccessGate ID in the AccessGate id field. The AccessGate ID is the ID of the AccessGate as configured in the Access System.
d. If an AccessGate password has been configured in the Access System, you must specify the password on the ProxySG. Click Change Secret and enter the password. The passwords can be up to 64 characters long and are always case sensitive.
4. (Optional) Enter an alternate agent host and AccessGate ID in the Alternate agent section.
5. (Optional) Select Enable SSL to enable SSL between the ProxySG and the BCAAA agent. Select the SSL device profile that this realm uses to make an SSL connection to a remote system. Select any device profile that displays in the drop-down list. For information on using device profiles, refer to Volume 4: Securing the Blue Coat ProxySG Appliance.
6. Specify the length of time in the Timeout Request field, in seconds, to elapse before timeout if a response from BCAAA is not received. (The default request timeout is 60 seconds.)
7. If you want username and group comparisons on the ProxySG to be case sensitive, select Case sensitive.
8. Click Apply.

Chapter 6: Oracle COREid Authentication
115
Configuring the COREid Access ServerOnce you create a COREid realm, use the COREid Access Server page to specify the primary Access Server information.
To configure the COREid Access Server:
1. Select Configuration > Authentication > Oracle COREid > COREid Access Server.

Volume 4: Securing the Blue Coat ProxySG
116
2. Select the realm name to edit from the drop-down list.
3. Enter the protected resource name. The protected resource name is the same as the resource name defined in the Access System policy domain.
4. Select the Security Transport Mode for the AccessGate to use when communicating with the Access System.
5. If Simple or Cert mode is used, specify the Transport Pass Phrase configured in the Access System. Click Change Transport Pass Phrase to set the pass phrase.
6. If Cert mode is used, specify the location on the BCAAA host machine where the key, server and CA chain certificates reside. The certificate files must be named aaa_key.pem, aaa_cert.pem, and aaa_chain.pem, respectively.
7. To force authentication challenges to always be redirected to an off-box URL, select Always redirect off-box.
8. To enable validation of the client IP address in SSO cookies, select Validate client IP address. If the client IP address in the SSO cookie can be valid yet different from the current request client IP address because of downstream proxies or other devices, then deselect the Validate client IP address in the realm. Also modify the WebGates participating in SSO with the ProxySG. Modify the WebGateStatic.lst file to either set the ipvalidation parameter to false or to add the downstream proxy/device to the IPValidationExceptions lists.
9. If your Web applications need information from the Authorization Actions, select Add Header Responses. Authorization actions from the policy domain obtained during authentication are added to each request forwarded by the ProxySG. Header responses replace any existing header of the same name; if no such header exists, the header is added. Cookie responses replace a cookie header with the same cookie name, if no such cookie header exists, one is added.
10. Specify the ID of the AccessGate’s primary Access Server.
11. Specify the hostname of the AccessGate’s primary Access Server.
12. Specify the port of the AccessGate’s primary Access Server.
13. Click Apply.

Chapter 6: Oracle COREid Authentication
117
Configuring the General COREid SettingsThe COREid General tab allows you to specify a display name, the refresh times, an inactivity timeout value, cookies, and a virtual URL.
To configure the general COREid settings:
1. Select Authentication > Oracle COREid > COREid General.
2. From the Realm name drop-down list, select the COREid realm for which you want to change properties.
3. If needed, change the COREid realm display name. The default value for the display name is the realm name. The display name cannot be greater than 128 characters and it cannot be null.
4. Select the Use the same refresh time for all option to use the same refresh time for all.
5. Enter the number of seconds in the Credential refresh time field. The Credential Refresh Time is the amount of time basic credentials (username and password) are kept on the ProxySG. This feature allows the ProxySG to reduce the load on the authentication server and enables credential spoofing. It has a default setting of 900 seconds (15 minutes). You can configure this in policy for better control over the resources as policy overrides any settings made here.
Volume 4: Securing the Blue Coat ProxySG
118
Before the refresh time expires, the ProxySG authenticates the user supplied credentials against the cached credentials. If the credentials received do not match the cached credentials, they are forwarded to the authentication server in case the user password changed. After the refresh time expires, the credentials are forwarded to the authentication server for verification.
6. Enter the number of seconds in the Surrogate refresh time field. The Surrogate Refresh Time allows you to set a realm default for how often a user’s surrogate credentials are refreshed. Surrogate credentials are credentials accepted in place of a user’s actual credentials. The default setting is 900 seconds (15 minutes). You can configure this in policy for better control over the resources as policy overrides any settings made here.
Before the refresh time expires, if a surrogate credential (IP address or cookie) is available and it matches the expected surrogate credential, the ProxySG authenticates the transaction. After the refresh time expires, the ProxySG will verify the user’s credentials. Depending upon the authentication mode and the user-agent, this may result in challenging the end user for credentials.
The main goal of this feature is to verify that the user-agent still has the appropriate credentials.
7. Type the number of seconds in the Inactivity timeout field to specify the amount of time a session can be inactive before being logged out.
8. If you use Basic credentials and want to cache failed authentication attempts (to reduce the load on the authentication service), enter the number of seconds in the Rejected Credentials time field. This setting, enabled by default and set to one second, allows failed authentication attempts to be automatically rejected for up to 10 seconds. Any Basic credentials that match a failed result before its cache time expires are rejected without consulting the back-end authentication service. The original failed authentication result is returned for the new request.
All failed authentication attempts can be cached: Bad password, expired account, disabled account, old password, server down.
Chapter 6: Oracle COREid Authentication
119
To disable caching for failed authentication attempts, set the Rejected Credentials time field to 0.
9. Select the Use persistent cookies check box to use persistent browser cookies instead of session browser cookies.
10. Select the Verify the IP address in the cookie check box if you would like the cookies surrogate credentials to only be accepted for the IP address that the cookie was authenticated. Disabling this will allow cookies to be accepted from other IP addresses.
11. Specify the virtual URL to redirect the user to when they need to be challenged by the ProxySG. If the appliance is participating in SSO, the virtual hostname must be in the same cookie domain as the other servers participating in the SSO. It cannot be an IP address or the default, www.cfauth.com.
12. Select the Challenge user after logout option if the realm requires the users to enter their credentials after they have logged out.
13. Click Apply.
Related CLI Syntax to Configure a COREid Realm❐ To enter configuration mode:
SGOS#(config) security coreid create-realm realm_name SGOS#(config) security coreid edit-realm realm_name
❐ The following subcommands are available:
SGOS#(config coreid realm_name) primary-agent {host hostname | port port_number}SGOS#(config coreid realm_name) alternate-agent {host hostname | port port_number}SGOS#(config coreid realm_name) ssl enableSGOS#(config coreid realm_name) ssl-device-profile ssl_device_profile_nameSGOS#(config coreid realm_name) sso-type {query-client | query-dc | query-dc-client}
SGOS#(config coreid realm_name) inactivity-timeout secondsSGOS#(config coreid realm_name) refresh-time credential-refresh secondsSGOS#(config coreid realm_name) refresh-time rejected-credentials-refresh secondsSGOS#(config coreid realm_name) refresh-time surrogate-refresh secondsSGOS#(config coreid realm_name) cookie {persistent {enable | disable} | verify-ip {enable | disable}}
SGOS#(config coreid realm_name) virtual-url url
Creating the CPLYou can create CPL policies now that you have completed COREid realm configuration. Be aware that the examples below are just part of a comprehensive authentication policy. By themselves, they are not adequate for your purposes.

Volume 4: Securing the Blue Coat ProxySG
120
The examples below assume the default policy condition is allow. On new SGOS 5.x systems, the default policy condition is deny.
❐ Every COREid-authenticated user is allowed access the ProxySG.
<Proxy>authenticate(COREidRealm)
❐ Group membership is the determining factor in granting access to the ProxySG.
<Proxy>authenticate(COREidRealm)
<Proxy>group=”cn=proxyusers, ou=groups, o=myco”deny
Note: Refer to Volume 10: Content Policy Language Guide for details about CPL and how transactions trigger the evaluation of policy file <Proxy> and other layers.

121
Chapter 7: Forms-Based Authentication
This chapter discusses forms-based authentication exceptions, which control what your users see during an authentication process.
This chapter includes information about the following topics:
❐ Section A: "About Authentication Forms" on page 122
❐ Section B: "Creating and Editing a Form" on page 127
❐ Section C: "Setting Storage Options" on page 129
❐ Section D: "Using CPL with Forms-Based Authentication" on page 131
With forms-based authenticating, you can set limits on the maximum request size to store and define the request object expiry time. You can also specify whether to verify the client’s IP address against the original request and whether to allow redirects to the original request.
To create and put into use forms-based authentication, you must complete the following steps:
❐ Create a new form or edit one of the existing authentication form exceptions
❐ Set storage options
❐ Set policies

Volume 4: Securing the Blue Coat ProxySG
122
Section A: About Authentication Forms
Section A: About Authentication FormsWith forms-based authenticating, you can set limits on the maximum request size to store and define the request object expiry time. You can also specify whether to verify the client’s IP address against the original request and whether to allow redirects to the original request.
You can:
❐ Specify the realm the user is to authenticate against.
❐ Specify that the credentials requested are for the ProxySG. This avoids confusion with other authentication challenges.
❐ Make the form comply with company standards and provide other information, such as a help link.
The authentication form (an HTML document) is served when the user makes a request and requires forms-based authentication. If the user successfully authenticates to the ProxySG, the appliance redirects the user back to the original request.
If the user does not successfully authenticate against the ProxySG and the error is user-correctable, the user is presented with the authentication form again.
To create and put into use forms-based authentication, you must complete the following steps:
❐ Create a new form or edit one of the existing authentication form exceptions
❐ Set storage options
❐ Set policies
Three authentication forms are created initially:
❐ authentication_form: Enter Proxy Credentials for Realm $(cs-realm). This is the standard authentication form that is used for authentication with the ProxySG.
❐ new_pin_form: Create New PIN for Realm $(cs-realm). This form is used if you created a RADIUS realm using RSA SecurID tokens. This form prompts the user to enter a new PIN. The user must enter the PIN twice in order to verify that it was entered correctly.
❐ query_form: Query for Realm $(cs-realm). This form is used if you created a RADIUS realm using RSA SecurID tokens. The form is used to display the series of yes/no questions asked by the SecurID new PIN process.
Note: You can configure and install an authentication form and several properties through the Management Console and the CLI, but you must use policy to dictate the authentication form’s use.

Chapter 7: Forms-Based Authentication
123
Section A: About Authentication Forms
You can customize any of the three initial authentication form exceptions or you can create other authentication forms. (You can create as many authentication form exceptions as needed. The form must be a valid HTML document that contains valid form syntax.)
Each authentication form can contain the following:
❐ Title and sentence instructing the user to enter ProxySG credentials for the appropriate realm.
❐ Domain: Text input with maximum length of 64 characters The name of the input must be PROXY_SG_DOMAIN, and you can specify a default value of $(x-cs-auth-domain) so that the user's domain is prepopulated on subsequent attempts (after a failure).
The input field is optional, used only if the authentication realm is an IWA realm. If it is used, the value is prepended to the username value with a backslash.
❐ Username: Text input with maximum length of 64 characters. The name of the input must be PROXY_SG_USERNAME, and you can specify a default value of $(cs-username) so the username is prepopulated on subsequent attempts (after a failure).
❐ Password: The password should be of type PASSWORD with a maximum length of 64 characters. The name of the input must be PROXY_SG_PASSWORD.
❐ Request ID: If the request contains a body, then the request is stored on the ProxySG until the user is successfully authenticated.
The request ID should be of type HIDDEN. The input name must be PROXY_SG_REQUEST_ID, and the value must be $(x-cs-auth-request-id). The information to identify the stored request is saved in the request id variable.
❐ Challenge State: The challenge state should be of type HIDDEN. If a RADIUS realm is using a response/challenge, this field is used to cache identification information needed to correctly respond to the challenge.
The input name must be PROXY_SG_PRIVATE_CHALLENGE_STATE, and the value must be $(x-auth-private-challenge-state).
❐ Submit button. The submit button is required to submit the form to the ProxySG.
❐ Clear form button. The clear button is optional and resets all form values to their original values.
❐ Form action URI: The value is the authentication virtual URL plus the query string containing the base64 encoded original URL $(x-cs-auth-form-action-url).
❐ Form METHOD of POST. The form method must be POST. The ProxySG does not process forms submitted with GET.
The ProxySG only parses the following input fields during form submission:
❐ PROXY_SG_USERNAME (required)

Volume 4: Securing the Blue Coat ProxySG
124
Section A: About Authentication Forms
❐ PROXY_SG_PASSWORD (required)
❐ PROXY_SG_REQUEST_ID (required)
❐ PROXY_SG_PRIVATE_CHALLENGE_STATE (required)
❐ PROXY_SG_DOMAIN (optional) If specified, its value is prepended to the username and separated with a backslash.
Authentication_formThe initial form, authentication_form, looks similar to the following:
<HTML><HEAD><TITLE>Enter Proxy Credentials for Realm $(cs-realm)</TITLE></HEAD><BODY><H1>Enter Proxy Credentials for Realm $(cs-realm)</H1><P>Reason for challenge: $(exception.last_error)<P>$(x-auth-challenge-string)<FORM METHOD="POST" ACTION=$(x-cs-auth-form-action-url)>$(x-cs-auth-form-domain-field)<P>Username: <INPUT NAME="PROXY_SG_USERNAME" MAXLENGTH="64" VALUE=$(cs-username)></P><P>Password: <INPUT TYPE=PASSWORD NAME="PROXY_SG_PASSWORD" MAXLENGTH="64"></P><INPUT TYPE=HIDDEN NAME="PROXY_SG_REQUEST_ID" VALUE=$(x-cs-auth-request-id)><INPUT TYPE=HIDDEN NAME="PROXY_SG_PRIVATE_CHALLENGE_STATE"VALUE=$(x-auth-private-challenge-state)><P><INPUT TYPE=SUBMIT VALUE="Submit"> <INPUT TYPE=RESET></P></FORM><P>$(exception.contact)</BODY></HTML>
If the realm is an IWA realm, the $(x-cs-auth-form-domain-field) substitution expands to:
<P>Domain: <INPUT NAME=PROXY_SG_DOMAIN MAXLENGTH=64 VALUE=$(x-cs-auth-
domain)> If you specify $(x-cs-auth-form-domain-field), you do not need to explicitly add the domain input field.
For comparison, the new_pin_form and query_form look similar to the following:
New_pin_form<HTML><HEAD><TITLE>Create New PIN for Realm $(cs-realm)</TITLE><SCRIPT LANGUAGE="JavaScript"><!--function validatePin() {var info;var pin = document.pin_form.PROXY_SG_PASSWORD;if (pin.value != document.pin_form.PROXY_SG_RETYPE_PIN.value) {
info = "The PINs did not match. Please enter them again.";} else {
Chapter 7: Forms-Based Authentication
125
Section A: About Authentication Forms
// Edit this regular expression to match local PIN definition
var re=/^[A-Za-z0-9]{4,16}$/var match=re.exec(pin.value);
if (match == null) {info = "The PIN must be 4 to 16 alphanumeric
characters";} else {
return true;}
}alert(info);pin.select();pin.focus();return false;}// --></script></HEAD>
<BODY><H1>Create New PIN for Realm $(cs-realm)</H1><P>$(x-auth-challenge-string)<FORM NAME="pin_form" METHOD="POST" ACTION=$(x-cs-auth-form-action-url)ONSUBMIT="return validatePin()">$(x-cs-auth-form-domain-field)<P> Enter New Pin: <INPUT TYPE=PASSWORD NAME="PROXY_SG_PASSWORD" MAXLENGTH="64"></P><P>Retype New Pin: <INPUT TYPE=PASSWORD NAME="PROXY_SG_RETYPE_PIN" MAXLENGTH="64"></P><INPUT TYPE=HIDDEN NAME="PROXY_SG_USERNAME" VALUE=$(cs-username)><INPUT TYPE=HIDDEN NAME="PROXY_SG_REQUEST_ID" VALUE=$(x-cs-auth-request-id)><INPUT TYPE=HIDDEN NAME="PROXY_SG_PRIVATE_CHALLENGE_STATE" VALUE=$(x-auth-private-challenge-state)><P><INPUT TYPE=SUBMIT VALUE="Submit"></P></FORM><P>$(exception.contact)</BODY></HTML>
Query_form<HTML><HEAD><TITLE>Query for Realm $(cs-realm)</TITLE></HEAD><BODY><H1>Query for Realm $(cs-realm)</H1><P>$(x-auth-challenge-string)<FORM METHOD="POST" ACTION=$(x-cs-auth-form-action-url)>$(x-cs-auth-form-domain-field)<INPUT TYPE=HIDDEN NAME="PROXY_SG_USERNAME" VALUE=$(cs-username)><INPUT TYPE=HIDDEN NAME="PROXY_SG_REQUEST_ID" VALUE=$(x-cs-auth-request-id)><INPUT TYPE=HIDDEN NAME="PROXY_SG_PRIVATE_CHALLENGE_STATE" VALUE=$(x-auth-private-challenge-state)><INPUT TYPE=HIDDEN NAME="PROXY_SG_PASSWORD""><P><INPUT TYPE=SUBMIT VALUE="Yes"

Volume 4: Securing the Blue Coat ProxySG
126
Section A: About Authentication Forms
ONCLICK="PROXY_SG_PASSWORD.value='Y'"><INPUT TYPE=SUBMIT VALUE="No" ONCLICK="PROXY_SG_PASSWORD.value='N'"></P></FORM><P>$(exception.contact)
</BODY></HTML>
User/Realm CPL Substitutions for Authentication FormsCPL user/realm substitutions that are common in authentication form exceptions are listed below. The syntax for a CPL substitution is:
$(CPL_substitution)
For a discussion of CPL and a complete list of CPL substitutions, as well as a description of each substitution, refer to Volume 10: Content Policy Language Guide.
TipThere is no realm restriction on the number of authentication form exceptions you can create. You can have an unlimited number of forms, but make them as generic as possible to cut down on maintenance.
group user-name x-cs-auth-request-id
groups user.x509.issuer x-cs-auth-domain
realm user.x509.serialNumber x-cs-auth-form-domain-field
user user.x509.subject x-cs-auth-form-action-url
cs-realm x-cs-auth-request-id x-auth-challenge-string
x-auth-private-challenge-state
Note: Any substitutions that are valid in CPL and in other exceptions are valid in authentication form exceptions.

Chapter 7: Forms-Based Authentication
127
Section B: Creating and Editing a Form
Section B: Creating and Editing a FormYou can create a new form or you can edit one of the existing ones. If you create a new form, you need to define its type (authentication_form, new_pin_form, or query_form). The form is created from the default definition for that type. Editing the initial forms does not affect how future forms are created.
To create or edit an authentication form:
1. Select Configuration > Authentication > Forms.
2. Select one of the buttons below the authentication forms:
• Highlight the form you want to edit, delete, or view.
• Click New to create a new form.
To create a new form:The New button works independently of the highlighted form. The template used for the new form is chosen from the Add Authentication Form dialog.
❐ Enter the form name and select the authentication type from the dropdown menu.
❐ Click OK.
To edit a form:Select the form you want to edit and click Edit.
Note: View in the Authentication Forms panel and View in the Default Definitions panel have different functions. View in the Authentication Forms panel allows you to view the form you highlighted; View in the Default Definitions panel allows you view the original, default settings for each form. This is important in an upgrade scenario; any forms already installed will not be changed. You can compare existing forms to the default version and decide if your forms need to be modified.

Volume 4: Securing the Blue Coat ProxySG
128
Section B: Creating and Editing a Form
❐ From the drop-down list, select the method to use to install the authentication form; click Install.
• Remote URL:
Enter the fully-qualified URL, including the filename, where the authentication form is located. To view the file before installing it, click View. Click Install. To view the results, click Results; to close the dialog when through, click OK.
• Local File:
Click Browse to bring up the Local File Browse window. Browse for the file on the local system. Open it and click Install. When the installation is complete, a results window opens. View the results; to close the window, click Close.
• Text Editor:
The current authentication form is displayed in the text editor. You can edit the form in place. Click Install to install the form. When the installation is complete, a results window opens. View the results; to close the window, click Close.
Related CLI Syntax to Create a Form #(config) security authentication-forms copy [source_form_name target_form_name#(config) security authentication-forms create {authentication-form | new-pin-form | query-form} form_name#(config) security authentication-forms delete form_name#(config) security authentication-forms inline form_name eof_marker#(config) security authentication-forms load form_name#(config) security authentication-forms no path [form_name]#(config) security authentication-forms path [form_name] path#(config) security authentication-forms view

Chapter 7: Forms-Based Authentication
129
Section C: Setting Storage Options
Section C: Setting Storage OptionsWhen a request requiring the user to be challenged with a form contains a body, the request is stored on the ProxySG appliance while the user is being authenticated. Storage options include:
❐ the maximum request size.
❐ the expiration of the request.
❐ whether to verify the IP address of the client requesting against the original request.
❐ whether to allow redirects from the origin server
The storage options are global, applying to all form exceptions you use.
The global allow redirects configuration option can be overridden on a finer granularity in policy using the authenticate.redirect_stored_requests(yes|no) action.
To set storage options:
1. Select Configuration > Authentication > Request Storage.
2. In the Maximum request size to store (Megabytes) field, enter the maximum POST request size allowed during authentication. The default is 50 megabytes.
3. In the Request object expiry time (seconds) field, enter the amount of time before the stored request expires. The default is 300 seconds (five minutes). The expiry time should be long enough for the user to fill out and submit the authentication form.
4. If you do not want the ProxySG to Verify the IP address against the original request, deselect that option. The default is to verify the IP address.
5. To Allow redirects from the origin servers, select the check box. The default is to not allow redirects from origin servers. Enable this option if you know that the redirects are going to a known server.
2
3
4
5

Volume 4: Securing the Blue Coat ProxySG
130
Section C: Setting Storage Options
6. Click Apply.
Related CLI Syntax to Set Storage Options SGOS#(config) security request-storage max-size megabytesSGOS#(config) security request-storage expiry-time secondsSGOS#(config) security request-storage verify-ip enable | disableSGOS#(config) security request-storage allow-redirects enable | disable
Note: During authentication, the user's POST is redirected to a GET request. The client therefore automatically follows redirects from the origin server. Because the ProxySG is converting the GET to a POST and adding the post data to the request before contacting the origin server, the administrator must explicitly specify that redirects to these POSTs requests can be automatically followed.

Chapter 7: Forms-Based Authentication
131
Section D: Using CPL with Forms-Based Authentication
Section D: Using CPL with Forms-Based AuthenticationTo use forms-based authentication, you must create policies that enable it and also control which form is used in which situations. A form must exist before it can be referenced in policy.
❐ Which form to use during authentication is specified in policy using one of the CPL conditions authenticate.form(form_name), authenticate.new_pin_form(form_name), or authenticate.query_form (form_name).
These conditions override the use of the initial forms for the cases where a new pin form needs to be displayed or a query form needs to be displayed. All three of the conditions verify that the form name has the correct type.
❐ Using the authentication.mode( ) property selects a combination of challenge type and surrogate credentials. The authentication.mode( ) property offers several options specifically for forms-based authentication:
• Form-IP—The user’s IP address is used as a surrogate credential. The form is presented whenever the user’s credential cache entry expires.
• Form-Cookie—Cookies are used as surrogate credentials. The cookies are set on the OCS domain only, and the user is presented with the form for each new domain. This mode is most useful in reverse proxy scenarios where there are a limited number of domains.
• Form-Cookie-Redirect—The user is redirected to the authentication virtual URL before the form is presented. The authentication cookie is set on both the virtual URL and the OCS domain. The user is only challenged when the credential cache entry expires.
• Form-IP-redirect —This is similar to Form-IP except that the user is redirected to the authentication virtual URL before the form is presented.
❐ If you authenticate users who have third-party cookies explicitly disabled, you can use the authenticate.use_url_cookie( ) property.
❐ Since the authentication.mode( ) property is defined as a form mode (above) in policy, you do not need to adjust the default authenticate mode through the CLI.
Note: Each of these conditions can be used with the form authentication modes only. If no form is specified, the form defaults to the CPL condition for that form. That is, if no name is specified for authenticate.form(form_name), the default is authentication_form; if no name is specified for authenticate.new_pin_form(form_name), the default is authenticate.new_pin_form, and if no name is specified for authenticate.query_form(form_name), the default is authenticate.query_form.

Volume 4: Securing the Blue Coat ProxySG
132
Section D: Using CPL with Forms-Based Authentication
❐ Using the authenticate.redirect_stored_requests(yes|no) action allows granularity in policy over the global allow redirect config option.
For information on using these CPL conditions and properties, refer to Volume 10: Content Policy Language Guide.
Tips❐ If the user is supposed to be challenged with a form on a request for an image
or video, the ProxySG returns a 403 error page instead of the form. If the reason for the challenge is that the user's credentials have expired and the object is from the same domain as the container page, then reloading the container page results in the user receiving the authentication form and being able to authenticate. However, if the client browser loads the container page using an existing authenticated connection, the user might still not receive the authentication form.
Closing and reopening the browser should fix the issue. Requesting a different site might also cause the browser to open a new connection and the user is returned the authentication form.
If the container page and embedded objects have a different domain though and the authentication mode is form-cookie, reloading or closing and reopening the browser might not fix the issue, as the user is never returned a cookie for the domain the object belongs to. In these scenarios, Blue Coat recommends that policy be written to either bypass authentication for that domain or to use a different authentication mode such as form-cookie-redirect for that domain.
❐ Forms-based authentication works with HTTP browsers only.
❐ Because forms only support Basic authentication, authentication-form exceptions cannot be used with a Certificate realm. If a form is in use and the authentication realm is or a Certificate realm, you receive a configuration error.
❐ User credentials are sent in plain text. However, they can be sent securely using SSL if the virtual URL is HTTPS.
❐ Because not all user requests support forms (such as WebDAV and streaming), create policy to bypass authentication or use a different authentication mode with the same realm for those requests.
133
Chapter 8: IWA Realm Authentication and Authorization
This chapter discusses Integrated Windows Authentication (IWA), which is an authentication mechanism available on Windows networks. (The name of the realm has been changed from NTLM to IWA.)
Topics in this ChapterThis chapter includes information about the following topics:
❐ "About IWA" on page 133
❐ "How Blue Coat Works with IWA" on page 133
❐ "Creating an IWA Realm" on page 134
❐ "IWA Servers" on page 134
❐ "Defining IWA Realm General Properties" on page 136
❐ "Creating the CPL" on page 139
❐ "Notes" on page 140
About IWAIWA is a Microsoft-proprietary authentication suite that allows Windows clients (running on Windows 2000 and higher) to automatically choose between using Kerberos and NTLM authentication challenge/response, as appropriate. When an IWA realm is used and a resource is requested by the client from the ProxySG, the appliance contacts the client's domain account to verify the client's identity and request an access token. The access token is generated by the domain controller (in case of NTLM authentication) or a Kerberos server (in the case of Kerberos authentication) and passed to (and if valid, accepted by) the ProxySG.
Refer to the Microsoft Web site for detailed information about the IWA protocol.
How Blue Coat Works with IWAThe server side of the Kerberos or NTLM authentication exchange is handled by the Blue Coat Authentication and Authorization Agent (BCAAA).
A single BCAAA service can support multiple ProxySGs; however, the service starts a processor agent for each realm that only handles authentication requests coming from that particular realm.
BCAAA must be installed on a domain controller or member server. If the server where the BCAAA service is installed and its domain have a trust relationship with other domains, the user is authenticated automatically by the other domains.

Volume 4: Securing the Blue Coat ProxySG
134
For a server to participate in an IWA Kerberos authentication exchange, it must share a secret with the Kerberos server (called a KDC) and have registered an appropriate Service Principal Name.
For instructions on installing the BCAAA service and configuring a Service Principal Name, see Appendix A: "Using BCAAA" on page 255.
Creating an IWA Realm To create an IWA realm, you must provide at least the primary host of the IWA server for that realm.
To create an IWA realm:
1. Select Configuration > Authentication > IWA > IWA Realms.
2. Click New.
3. In the Realm name field, enter a realm name. The name can be 32 characters long and composed of alphanumeric characters and underscores. The name must start with a letter.
4. Enter the primary server host for the machine running BCAAA. You must enter a valid host or an error message is generated.
5. (Optional) The default port is 16101. You can change the port number if the primary server is listening on a different port.
6. Click OK to close the dialog.
7. Select Apply.
IWA ServersOnce you create an IWA realm, you can use the IWA Servers page to change the current default settings.
1. Select Configuration > Authentication > IWA > IWA Servers.

Chapter 8: IWA Realm Authentication and Authorization
135
2. From the Realm name drop-down list, select the IWA realm for which you want to change server properties.
You must define at least one IWA realm (using the IWA Realms page) before attempting to set IWA server properties. If the message Realms must be added in the IWA Realms tab before editing this tab is displayed in red at the bottom of this page, you do not currently have any IWA realms defined
3. Specify the host and port for the primary IWA server. The default port is 16101. Optionally, specify the host and port for an alternate IWA server.
4. (Optional) In the SSL Options area, SSL Options, select SSL enable to enable SSL. Select the SSL device profile that this realm uses to make an SSL connection to a remote system. You can choose any device profile that displays in the drop-down list. For information on using device profiles, refer to Volume 4: Securing the Blue Coat ProxySG Appliance.
5. In the Timeout Request field, enter the number of seconds the ProxySG allows for each request attempt before timing out. (The default request timeout is 60 seconds.)
6. Configure credentials:
a. You can enable or disable support for Basic credentials in the realm by selecting or deselecting the Allow Basic credentials checkbox.
At least one Basic or NTLM/Kerberos credential must be enabled. Note that Basic credentials cannot be disabled in the IWA realm if the IWA realm is part of a sequence realm but is not the first realm in the sequence with try IWA authentication only once enabled.
You can disable both NTLM and Kerberos credentials, leaving a realm that collects plaintext credentials but validates them against a Windows domain.
2
3
4
5
6

Volume 4: Securing the Blue Coat ProxySG
136
b. (Optional) You can enable or disable support for NTLM credentials in the realm by selecting or deselecting the Allow NTLM credentials checkbox. You can only enable support for Kerberos credentials in the realm if support for NTLM credentials has been enabled.
c. (Optional) You can enable or disable support for Kerberos credentials in the realm by selecting or deselecting the Allow Kerberos credentials.You can only enable support for Kerberos credentials in the realm if support for NTLM credentials has been enabled.
7. Select Apply.
8. Repeat the above steps for additional IWA realms, up to a total of 40.
Defining IWA Realm General PropertiesThe IWA General tab allows you to specify the display name, the refresh times, an inactivity timeout value, cookies, and a virtual URL.
To configure IWA general settings:
1. Select Configuration > Authentication > IWA > IWA General.
Important: The configuration of the realm can have significant security implications. If an IWA realm accepts Basic credentials, the client can automatically downgrade to sending the password in plaintext. Similarly, the client can use NTLM instead of Kerberos.

Chapter 8: IWA Realm Authentication and Authorization
137
2. Configure realm name from the Realm name drop-down list, select the IWA realm for which you want to change properties.
3. If needed, change the IWA realm display name. The default value for the display name is the realm name. The display name cannot be greater than 128 characters and it cannot be null.
4. Configure refresh options:
a. Select the Use the same refresh time for all check box if you would like to use the same refresh time for all.
b. Enter the number of seconds in the Credential refresh time field. The Credential Refresh Time is the amount of time basic credentials (username and password) are kept on the ProxySG. This feature allows the ProxySG to reduce the load on the authentication server and enables credential spoofing. It has a default setting of 900 seconds (15 minutes). You can configure this in policy for better control over the resources as policy overrides any settings made here.
Before the refresh time expires, the ProxySG will authenticate the user supplied credentials against the cached credentials. If the credentials received do not match the cached credentials, they are forwarded to the authentication server in case the user password changed. After the refresh time expires, the credentials are forwarded to the authentication server for verification.
c. Enter the number of seconds in the Surrogate refresh time field. The Surrogate Refresh Time allows you to set a realm default for how often a user’s surrogate credentials are refreshed. Surrogate credentials are credentials accepted in place of a user’s actual credentials. The default
2
3
4
5
6
7
8
9

Volume 4: Securing the Blue Coat ProxySG
138
setting is 900 seconds (15 minutes). You can configure this in policy for better control over the resources as policy overrides any settings made here.
Before the refresh time expires, if a surrogate credential (IP address or cookie) is available and it matches the expected surrogate credential, the ProxySG authenticates the transaction. After the refresh time expires, the ProxySG will verify the user’s credentials. Depending upon the authentication mode and the user-agent, this may result in challenging the end user for credentials.
The main goal of this feature is to verify that the user-agent still has the appropriate credentials.
5. Type the number of seconds in the Inactivity timeout field to specify the amount of time a session can be inactive before being logged out.
6. If you use Basic credentials and want to cache failed authentication attempts (to reduce the load on the authentication service), enter the number of seconds in the Rejected Credentials time field. This setting, enabled by default and set to one second, allows failed authentication attempts to be automatically rejected for up to 10 seconds. Any Basic credentials that match a failed result before its cache time expires are rejected without consulting the back-end authentication service. The original failed authentication result is returned for the new request.
All failed authentication attempts can be cached: Bad password, expired account, disabled account, old password, server down.
To disable caching for failed authentication attempts, set the Rejected Credentials time field to 0.
7. Configure cookie options:
a. Select the Use persistent cookies check box to use persistent browser cookies instead of session browser cookies.
b. Select the Verify the IP address in the cookie check box if you would like the cookies surrogate credentials to only be accepted for the IP address that the cookie was authenticated. Disabling this will allow cookies to be accepted from other IP addresses.
8. In the Virtual URL field, enter the URL to redirect to when the user needs to be challenged for credentials if using a redirecting authenticate.mode.
You can specify a virtual URL based on the individual realm. For more information on the virtual URL, see "About Origin-Style Redirection" on page 40.
When NTLM is in use, requests to the virtual URL must be sent to the proxy. This can be done either by transparent redirection or by making the virtual URL hostname resolve to an IP address of the proxy.
Note: The virtual URL is not involved if the challenge does not redirect.

Chapter 8: IWA Realm Authentication and Authorization
139
When Kerberos is in use:
• The virtual URL hostname must be part of the Kerberos realm (this is using the term realm in the Kerberos sense, not the ProxySG sense).
• For a forward proxy, this hostname should be added to the DNS server for the same domain as the Kerberos protected resources so that requests for this address go directly to the ProxySG.
In both NTLM and Kerberos, if single-sign on is desired, then the virtual URL hostname must have no dots and must not be proxied by the browser. The client must be able to resolve this hostname to an IP address of the proxy.
9. Select the Challenge user after logout check box if the realm requires the users to enter their credentials after they have logged out.
10. Select Apply.
Related CLI Syntax to Configure an IWA Realm❐ To enter configuration mode:
SGOS#(config) security iwa create-realm realm_name SGOS#(config) security iwa edit-realm realm_name
❐ The following subcommands are available:
SGOS#(config iwa realm_name) alternate-server host [port]SGOS#(config iwa realm_name) display-name display_nameSGOS#(config iwa realm_name) ssl enableSGOS#(config iwa realm_name) ssl-device-profile ssl_device_profile_nameSGOS#(config iwa realm_name) sso-type {query-client | query-dc | query-dc-client}
SGOS#(config iwa realm_name) inactivity-timeout secondsSGOS#(config iwa realm_name) refresh-time credential-refresh secondsSGOS#(config iwa realm_name) refresh-time rejected-credentials-refresh secondsSGOS#(config iwa realm_name) refresh-time surrogate-refresh secondsSGOS#(config iwa realm_name) cookie {persistent {enable | disable} | verify-ip {enable | disable}}
SGOS#(config iwa realm_name) virtual-url url
Creating the CPLYou can create CPL policies now that you have completed IWA realm configuration. Be aware that the examples below are just part of a comprehensive authentication policy. By themselves, they are not adequate for your purposes.
The examples below assume the default policy condition is allow. On new systems, the default policy condition is deny.
❐ Every IWA-authenticated user is allowed access the ProxySG.
Note: Refer to Volume 10: Content Policy Language Guide for details about CPL and how transactions trigger the evaluation of policy file layers.

Volume 4: Securing the Blue Coat ProxySG
140
<Proxy>authenticate(IWARealm)
❐ Group membership is the determining factor in granting access to the ProxySG.
<Proxy>authenticate(IWARealm)
<Proxy>deny
Notes❐ Forms authentication modes cannot be used with an IWA realm that allows
only NTLM/Kerberos credentials. If a form mode is in use and the authentication realm is an IWA realm, you receive a configuration error.
❐ For Windows Internet Explorer IWA users who want true single-sign-on (allowing Internet Explorer to provide your credentials automatically when challenged), you must set the virtual URL to a hostname that is resolvable to the IP address of the ProxySG by the client machines. Dots (for example, 10.1.1.1) are not allowed.
To define the information in Internet Explorer, navigate to Internet Options > Security > Local intranet > Sites > Advanced > Web sites. (For XP, navigate to Internet Options > Security > Internet > Custom Level, then select Automatic logon with current username and password.)
For Windows Internet Explorer 6.x, add the virtual host address.
❐ If you use guest authentication, remember that IWA/NTLM realms retrieve authorization data at the same time as the user is authenticated. In some cases, the system can distinguish between an authentication and authorization failure. Where the system cannot determine if the error was due to authentication or authorization, both the authentication and authorization are considered to be failed.
Note: Firefox (1.02 and higher) allows NTLM credentials for single sign-on but not Kerberos.

141
Chapter 9: LDAP Realm Authentication and Authorization
This chapter discusses the Lightweight Directory Access Protocol (LDAP) which enables software to find an individual user without knowing where that user is located in the network topology.
Topics in this ChapterThis chapter includes information about the following topics:
❐ "Overview"
❐ "Creating an LDAP Realm" on page 142
❐ "LDAP Servers" on page 143
❐ "Defining LDAP Base Distinguished Names" on page 145
❐ "LDAP Search & Groups Tab (Authorization and Group Information)" on page 147
❐ "Customizing LDAP Objectclass Attribute Values" on page 149
❐ "Defining LDAP General Realm Properties" on page 150
❐ "Creating the CPL" on page 154
OverviewBlue Coat supports both LDAP v2 and LDAP v3, but recommends LDAP v3 because it uses Transport Layer Security (TLS) and SSL to provide a secure connection between the ProxySG and the LDAP server.
An LDAP directory, either version 2 or version 3, consists of a simple tree hierarchy. An LDAP directory might span multiple LDAP servers. In LDAP v3, servers can return referrals to others servers back to the client, allowing the client to follow those referrals if desired.
Directory services simplify administration; any additions or changes made once to the information in the directory are immediately available to all users and directory-enabled applications, devices, and ProxySGs.
The ProxySG supports the use of external LDAP database servers to authenticate and authorize users on a per-group or per-attribute basis.
LDAP group-based authentication for the ProxySG can be configured to support any LDAP-compliant directory including:
❐ Microsoft Active Directory Server
❐ Novell NDS/eDirectory Server
❐ Netscape/Sun iPlanet Directory Server
❐ Other

Volume 4: Securing the Blue Coat ProxySG
142
The ProxySG also provides the ability to search for a single user in a single root of an LDAP directory information tree (DIT), and to search in multiple Base Distinguished Names (DNs).
You can configure a LDAP realm to use SSL when communicating to the LDAP server.
Configuring LDAP involves the following steps:
❐ Creating a realm (up to 40) and configuring basic settings.
❐ Configuring an LDAP server
❐ Defining LDAP Base Distinguished Names
❐ Defining Authorization and Group information
❐ Configuring general LDAP realm settings
❐ Creating policy
Creating an LDAP Realm To create an LDAP realm:
1. Select Configuration > Authentication > LDAP > LDAP Realms.
2. Click New. The Add LDAP Realm dialog displays.

Chapter 9: LDAP Realm Authentication and Authorization
143
3. In the Realm Name field, enter a realm name. The name can be 32 characters long and composed of alphanumeric characters and underscores. The name must start with a letter.
4. Configure the realm options:
a. From the Type of LDAP server drop-down list, select the specific LDAP server.
b. Specify the host and port for the primary LDAP server. The host must be entered. The default port number is 389.
c. In the User attribute type field, specify the default user attribute type for the type of LDAP server:
• Microsoft Active Directory Servers: sAMAccountName=
• Novell NDS/eDirectory Server/Other: cn=
• Netscape/iPlanet Directory Server: uid=
d. Click OK to close the dialog.
5. Click Apply.
LDAP ServersAfter you create an LDAP realm, use the LDAP Servers page to change the current default settings.
To edit LDAP server properties: Default values exist. You do not need to change these values if the default settings are acceptable.
1. Select Configuration > Authentication > LDAP > LDAP Servers.
3
4a
4b
3c

Volume 4: Securing the Blue Coat ProxySG
144
2. Configure realm information:
a. From the Realm Name drop-down list, select the LDAP realm for which you want to change server properties.
b. From the Type of LDAP server drop-down list, select the specific LDAP server.
c. From the LDAP Protocol Version drop-down list, select v2 for LDAP v2 support. LDAP v3 is the default.
If you use LDAP v3, you can select Follow referrals to allow the client to follow referrals to other servers. (This feature is not available with LDAP v2.) The default is Disabled.
3. Specify the host and port for the primary LDAP server. The host must be entered. The default port number is 389. If you enable SSL, change the port to an SSL listening port, such as port 636. (Optional) Specify the host and port for the alternate LDAP server. The default port is 389.
4. (Optional) Configure SSL options:
a. Under SSL Options, select Enable SSL to enable SSL. This option if valid only for LDAP v3.
b. Select the SSL device profile that this realm uses to make an SSL connection to a remote system. You can choose any device profile that displays in the drop-down list. For information on using device profiles, refer to Volume 4: Securing the Blue Coat ProxySG Appliance.
5. (Optional) Change the timeout request for the server from its default of 60 seconds.
6. If the LDAP server is configured to expect case-sensitive usernames and passwords, select Case sensitive.
7. Click Apply.
2a
2b
2c
3
4
5
6

Chapter 9: LDAP Realm Authentication and Authorization
145
8. Repeat the above steps for additional LDAP realms, up to a total of 40.
Defining LDAP Base Distinguished NamesThe ProxySG allows you to specify multiple Base Distinguished Names (DNs) to search per realm, along with the ability to specify a specific branch of a Base DN.
A Base DN identifies the entry that is starting point of the search. You must specify at least one non-null base-DN for LDAP authentication to succeed.
You must enter complete DNs. See the table below for some examples of distinguished name attributes.
Table 9–1 Distinguished Name Attributes
DN Attribute Syntax Parameter Description
c=country Country in which the user or group resides. Examples: c=US, c=GB.
cn=common name Full name of person or object defined by the entry. Examples: cn=David Smith, cn=Administrators, cn=4th floor printer
dc=domain component Component name of a domain. Examples: cn=David Smith, ou=Sales, dc=MyDomain, dc=com
mail=e-mail address User or group e-mail address.
givenName=given name User's first name.
l=locality Locality in which the user or group resides. This can be the name of a city, country, township, or other geographic regions. Examples: l=Seattle, l=Pacific Northwest, l=King County.
o=organization Organization to which the user or group is a member. Examples: o=Blue Coat Inc, o=UW.
ou=organizational unit Unit within an organization. Examples: ou=Sales, ou=IT, ou=Compliance.
st=state or province State or province in which the user or group resides. Examples: st=Washington, st=Florida.
userPassword=password Password created by a user.
streetAddress=street address
Street number and address of user or group defined by the entry. Example: streetAddress= 4240 North Mary Avenue, Sunnyvale, California 94085.
sn=surname User's last name.
telephoneNumber=telephone User or group telephone number.
title=title User's job title.

Volume 4: Securing the Blue Coat ProxySG
146
To define searchable LDAP base DNs:
1. Select Configuration > Authentication > LDAP > LDAP DN.
2. From the Realm name drop-down list, select the LDAP realm for which you want to change DN properties.
3. In the User attribute type field, the ProxySG has entered the default user attribute type for the type of LDAP server you specified when creating the realm.
• Microsoft Active Directory Servers: sAMAccountName=
• Novell NDS/eDirectory Server/Other: cn=
• Netscape/iPlanet Directory Server: uid=
If you entered information correctly when creating the realm, you do not need to change the User attribute type in this step. If you do need to change or edit the entry, do so directly in the field.
4. Enter as many Base DNs as required for the realm. Assume, for example, that Exampe Corp has offices in New York and Lisbon, each with its own Base DN. A simplified directory information tree is illustrated below.
uid=user ID Name that uniquely identifies the person or object defined by the entry. Examples: uid=ssmith, uid=kjones.
Table 9–1 Distinguished Name Attributes (Continued)
DN Attribute Syntax Parameter Description
2
4
3

Chapter 9: LDAP Realm Authentication and Authorization
147
To specify entries for the Base DNs field, click New, enter the Base DN, and click OK. Repeat for multiple Base DNs. To search all of Sample_Company, enter o values:
To search the manufacturing organizations, rather than starting at the top, enter ou and o values.
You can add, edit, and delete Base DNs for an ProxySG to search. The ProxySG searches multiple DNs in the order listed, starting at the top and working down. Select an individual DN and move it up or down in the list with the Promote and Demote buttons.
5. Click Apply.
LDAP Search & Groups Tab (Authorization and Group Information)After creating an LDAP realm, providing at least the required fields of the LDAP server for that realm, and defining base DNs for the realm, you must define authorization properties for each LDAP realm you created.
To define LDAP realm authorization properties:
1. Select Configuration > Authentication > LDAP > LDAP Search & Groups.
Note: Authorization decisions are completely handled by policy. The groups that the appliance looks up and queries are derived from the groups specified in policy in group= conditions, attribute= conditions, and has_attribute conditions. If you do not have any of those conditions, then Blue Coat does not look up any groups or attributes to make policy decisions based on authorization.

Volume 4: Securing the Blue Coat ProxySG
148
2. From the Realm name drop-down list, select an LDAP realm for which you want to specify authorization information.
3. Specify whether to allow anonymous search or to enforce user authentication before allowing a search.
Some directories require a valid user to be able to perform an LDAP search; they do not allow anonymous bind. (Active Directory is one such example.) For these directories, you must specify a valid fully-qualified distinguished username and the password that permits directory access privileges. (For example, cn=user1,cn=users,dc=bluecoat,dc=com is a possible fully-qualified distinguished name.)
To permit users to anonymously bind to the LDAP service, select Anonymous Search Allowed. For example, with Netscape/iPlanet Directory Server, when anonymous access is allowed, no username or password is required by the LDAP client to retrieve information.
The LDAP directory attributes available for an anonymous client are typically a subset of those available when a valid user distinguished name and password have been used as search credentials.
To enforce user authentication before binding to the LDAP service, deselect Anonymous Search Allowed, and set the Search User DN and Search User Password. Enter a user distinguished name in the Search User DN field. This username can identify a single user or a user object that acts as a proxy for multiple users (a pool of administrators, for example). A search user distinguished name can be up to 512 characters long.
You can set or change the user password by clicking Change Password. This password can be up to 64 alphanumeric characters long.
You might want to create a separate user (such as Blue Coat, for example) instead of using an Administrator distinguished name and password.
23
4

Chapter 9: LDAP Realm Authentication and Authorization
149
The Dereference level field has four values—always, finding, never, searching—that allow you to specify when to search for a specific object rather than search for the object’s alias. The default is Always.
4. Configure group information:
Membership type and Membership attribute: The ProxySG enters the appropriate default:
• Microsoft Active Directory: Membership type: user Membership attribute type: memberOf
• Netscape/Sun iPlanet:Membership type:group Membership attribute type:uniqueMember
• Novell NDS eDirectoryMembership type:groupMembership attribute type:member
• OtherMembership type:userMembership attribute type:member
Username type to lookup: Select either FQDN or Relative. Only one can be selected at a time.
• Relative can only be selected in the membership type is Group.
• FQDN indicates that the lookup is done only on the user object. FQDN can be selected when the membership type is either Group or User.
5. Nested LDAP: If the LDAP server you use does not natively support group membership tests of nested groups, you can select the Nested LDAP checkbox.
6. Nested group attribute: For other, ad and nds, the default attribute is member. For iPlanet, the attribute is uniqueMember.
7. Click Apply.
Customizing LDAP Objectclass Attribute ValuesThe objectclass attributes on an LDAP object define the type of object an entry is. For example, a user entry might have an objectclass attribute value of person while a group entry might have an objectclass attribute value of group.
The objectclass attribute values defined on a particular entry can differ among LDAP servers. The objectclass attribute values are attribute values only, they are not DNs of any kind.
Currently, the objectclass attribute values are used by Blue Coat during a VPM browse of an LDAP server. If an administrator wants to browse the groups in a particular realm, the ProxySG searches the LDAP server for objects that have objectclass attribute values matching those in the group list and in the container list. The list of objectclass attribute values in the container list is needed so that containers that contain groups can be fetched and expanded correctly.

Volume 4: Securing the Blue Coat ProxySG
150
To customize LDAP objectclass attribute values:
1. Select Configuration > Authentication > LDAP > LDAP Objectclasses.
2. From the Realm name drop-down list, select the LDAP realm whose objectclasses you want to modify.
3. From the Object type drop-down list, select the type of object: container, group, or user.
4. To create or edit an object for the specified objectclass, click New or Edit. (The only difference is whether you are adding or editing an objectclass value.)
5. Enter or edit the objectclass, and click OK.
6. Click Apply.
Defining LDAP General Realm PropertiesThe LDAP General page allows you to specify the display name, the refresh times, an inactivity timeout value, cookies, and a virtual URL.
To configure general LDAP settings:
1. Select Configuration > Authentication > LDAP > LDAP General.
2
3
4

Chapter 9: LDAP Realm Authentication and Authorization
151
2. Configure realm information:
a. From the Realm name drop-down list, select the LDAP realm for which you want to change properties.
b. If needed, give the LDAP realm a display name. The default value for the display name is the realm name. The display name cannot be greater than 128 characters and it cannot be null.
3. Configure refresh option:
a. Select the Use the same refresh time for all check box if you would like to use the same refresh time for all.
b. Enter the number of seconds in the Credential refresh time field. The Credential Refresh Time is the amount of time basic credentials (username and password) are kept on the ProxySG. This feature allows the ProxySG to reduce the load on the authentication server and enables credential spoofing. It has a default setting of 900 seconds (15 minutes). You can configure this in policy for better control over the resources as policy overrides any settings made here.
Before the refresh time expires, the ProxySG will authenticate the user supplied credentials against the cached credentials. If the credentials received do not match the cached credentials, they are forwarded to the authentication server in case the user password changed. After the refresh time expires, the credentials are forwarded to the authentication server for verification.
c. Enter the number of seconds in the Surrogate refresh time field. The
2
3
4
5
6
7
8

Volume 4: Securing the Blue Coat ProxySG
152
Surrogate Refresh Time allows you to set a realm default for how often a user’s surrogate credentials are refreshed. Surrogate credentials are credentials accepted in place of a user’s actual credentials. The default setting is 900 seconds (15 minutes). You can configure this in policy for better control over the resources as policy overrides any settings made here.
Before the refresh time expires, if a surrogate credential (IP address or cookie) is available and it matches the expected surrogate credential, the ProxySG authenticates the transaction. After the refresh time expires, the ProxySG verifies the user’s credentials. Depending upon the authentication mode and the user-agent, this may result in challenging the end user for credentials.
The main goal of this feature is to verify that the user-agent still has the appropriate credentials.
d. Enter the number of seconds in the Authorization refresh time field. The Authorization Refresh Time allows you to manage how often the authorization data is verified with the authentication realm. It has a default setting of 900 seconds (15 minutes). You can configure this in policy for better control over the resources as policy overrides any settings made here.
4. Enter the number of seconds in the Inactivity timeout field to specify the amount of time a session can be inactive before being logged out.
5. If you use Basic credentials and want to cache failed authentication attempts (to reduce the load on the authentication service), enter the number of seconds in the Rejected Credentials time field. This setting, enabled by default and set to one second, allows failed authentication attempts to be automatically rejected for up to 10 seconds. Any Basic credentials that match a failed result before its cache time expires are rejected without consulting the back-end authentication service. The original failed authentication result is returned for the new request. All failed authentication attempts can be cached: Bad password, expired account, disabled account, old password, server down.
To disable caching for failed authentication attempts, set the Rejected Credentials time field to 0.
6. Select the Use persistent cookies check box to use persistent browser cookies instead of session browser cookies.
7. Select the Verify the IP address in the cookie check box if you would like the cookies surrogate credentials to only be accepted for the IP address that the cookie was authenticated. Disabling this will allow cookies to be accepted from other IP addresses.
8. You can specify a virtual URL. For more information on the virtual URL, see "About Origin-Style Redirection" on page 40.
9. Select the Challenge user after logout check box if the realm requires the users to enter their credentials after they have logged out.
10. Click Apply.
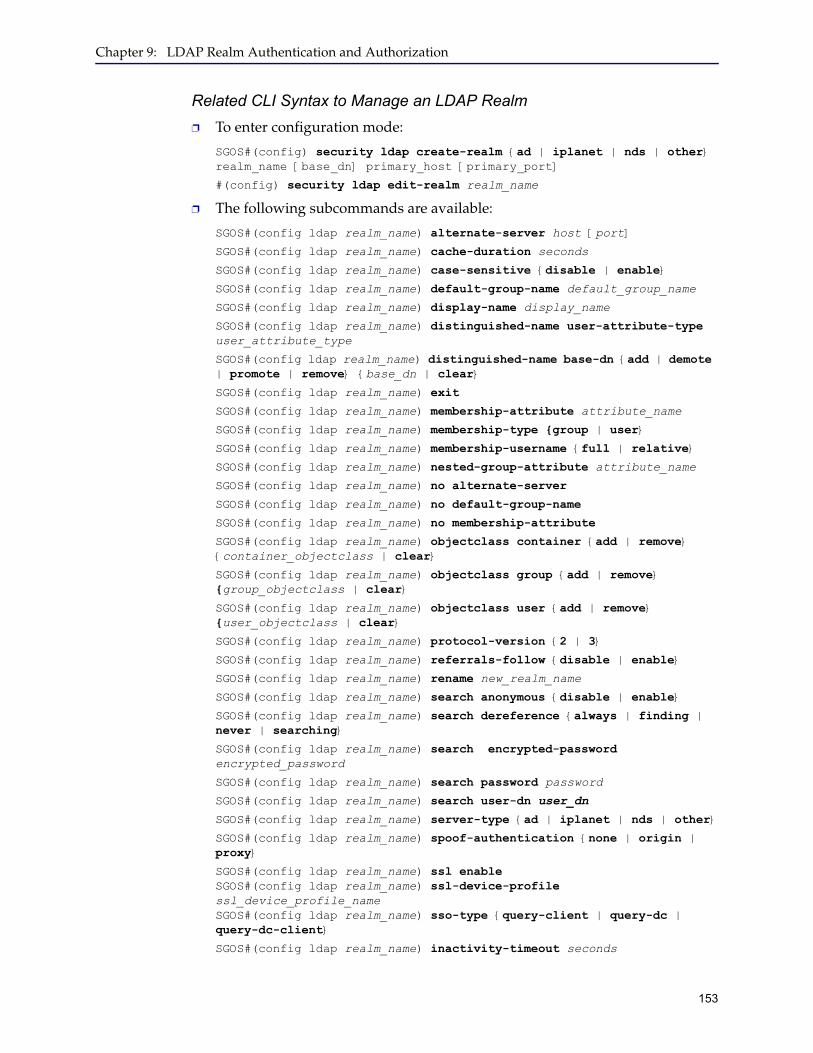
Chapter 9: LDAP Realm Authentication and Authorization
153
Related CLI Syntax to Manage an LDAP Realm❐ To enter configuration mode:
SGOS#(config) security ldap create-realm {ad | iplanet | nds | other} realm_name [base_dn] primary_host [primary_port]
#(config) security ldap edit-realm realm_name
❐ The following subcommands are available:
SGOS#(config ldap realm_name) alternate-server host [port]SGOS#(config ldap realm_name) cache-duration secondsSGOS#(config ldap realm_name) case-sensitive {disable | enable}SGOS#(config ldap realm_name) default-group-name default_group_nameSGOS#(config ldap realm_name) display-name display_nameSGOS#(config ldap realm_name) distinguished-name user-attribute-type user_attribute_typeSGOS#(config ldap realm_name) distinguished-name base-dn {add | demote | promote | remove} {base_dn | clear}SGOS#(config ldap realm_name) exitSGOS#(config ldap realm_name) membership-attribute attribute_nameSGOS#(config ldap realm_name) membership-type {group | user}SGOS#(config ldap realm_name) membership-username {full | relative}SGOS#(config ldap realm_name) nested-group-attribute attribute_nameSGOS#(config ldap realm_name) no alternate-serverSGOS#(config ldap realm_name) no default-group-nameSGOS#(config ldap realm_name) no membership-attributeSGOS#(config ldap realm_name) objectclass container {add | remove} {container_objectclass | clear}SGOS#(config ldap realm_name) objectclass group {add | remove} {group_objectclass | clear}SGOS#(config ldap realm_name) objectclass user {add | remove} {user_objectclass | clear}SGOS#(config ldap realm_name) protocol-version {2 | 3}SGOS#(config ldap realm_name) referrals-follow {disable | enable}SGOS#(config ldap realm_name) rename new_realm_nameSGOS#(config ldap realm_name) search anonymous {disable | enable}SGOS#(config ldap realm_name) search dereference {always | finding | never | searching}
SGOS#(config ldap realm_name) search encrypted-password encrypted_passwordSGOS#(config ldap realm_name) search password passwordSGOS#(config ldap realm_name) search user-dn user_dnSGOS#(config ldap realm_name) server-type {ad | iplanet | nds | other}SGOS#(config ldap realm_name) spoof-authentication {none | origin | proxy}
SGOS#(config ldap realm_name) ssl enableSGOS#(config ldap realm_name) ssl-device-profile ssl_device_profile_nameSGOS#(config ldap realm_name) sso-type {query-client | query-dc | query-dc-client}
SGOS#(config ldap realm_name) inactivity-timeout seconds

Volume 4: Securing the Blue Coat ProxySG
154
SGOS#(config ldap realm_name) refresh-time credential-refresh secondsSGOS#(config ldap realm_name) refresh-time rejected-credentials-refresh secondsSGOS#(config ldap realm_name) refresh-time surrogate-refresh secondsSGOS#(config ldap realm_name) refresh-time authorization-refresh secondsSGOS#(config ldap realm_name) cookie {persistent {enable | disable} | verify-ip {enable | disable}}
SGOS#(config ldap realm_name) virtual-url url
Creating the CPLBe aware that the examples below are just part of a comprehensive authentication policy. By themselves, they are not adequate for your purposes.
Be aware that the default policy condition for these examples is allow. The default policy condition on new SGOS 5.x systems is deny.
❐ Every LDAP-authenticated user is allowed access the ProxySG.
<Proxy> authenticate(LDAPRealm)
❐ Group membership is the determining factor in granting access to the ProxySG.
<Proxy> authenticate(LDAPRealm)<Proxy> group=”cn=proxyusers, ou=groups, o=myco” deny
❐ A subnet definition determines the members of a group, in this case, members of the Human Resources department.
<Proxy> authenticate(LDAPRealm)<Proxy> Define subnet HRSubnet 192.168.0.0/16 10.0.0.0/24 End subnet HRSubnet [Rule] client_address=HRSubnet
url.domain=monster.comurl.domain=hotjobs.comdeny
.
.
. [Rule]
deny
Note: Refer to Volume 10: Content Policy Language Guide for details about CPL and how transactions trigger the evaluation of policy file layers.

Chapter 9: LDAP Realm Authentication and Authorization
155
NotesIf you use guest authentication/authorization, note that:
❐ LDAP realms provide split authorization, and it is possible to be successfully authenticated but have authorization fail.
❐ If the LDAP realm validate authorized user command is disabled and the user does not exist in the authorization realm, authorization is considered a success and the user is assigned to the default group if there is one configured and it is of interest to policy.

Volume 4: Securing the Blue Coat ProxySG
156

157
Chapter 10: Local Realm Authentication and Authorization
Using a Local realm is appropriate when the network topology does not include external authentication or when you want to add users and administrators to be used by the ProxySG only.
The Local realm (you can create up to 40) uses a Local User List, a collection of users and groups stored locally. You can create up to 50 different Local User Lists. Multiple Local realms can reference the same list at the same time, although each realm can only reference one list at a time. The default list used by the realm can be changed at any time.
Topics in this ChapterThis chapter includes information about the following topics:
❐ "Creating a Local Realm"
❐ "Changing Local Realm Properties" on page 158
❐ "Defining the Local User List" on page 160
❐ "Creating the CPL" on page 166
Creating a Local RealmTo create a local realm:
1. Select Configuration > Authentication > Local > Local Realms.
2. Click New.
3. Create the realm:
a. In the Realm name field, enter a realm name. The name can be 32 characters long and composed of alphanumeric characters and underscores. The name must start with a letter.
b. Click OK.
4. Click Apply.

Volume 4: Securing the Blue Coat ProxySG
158
Changing Local Realm PropertiesOnce you have created a Local realm, you can modify the properties.
To define or change local realm properties:
1. Select Configuration > Authentication > Local > Local Main.
2. Configure basic information:
a. From the Realm name drop-down list, select the Local realm for which you want to change properties.
b. Display name: The default value for the display name is the realm name. The display name cannot be greater than 128 characters and it cannot be null.
c. Local user list: the local user list from the drop-down list.
3. Configure refresh options:
a. Select the Use the same refresh time for all check box if you would like to use the same refresh time for all.
b. Enter the number of seconds in the Surrogate refresh time field. The Surrogate Refresh Time allows you to set a realm default for how often a user’s surrogate credentials are refreshed. Surrogate credentials are credentials accepted in place of a user’s actual credentials. The default setting is 900 seconds (15 minutes). You can configure this in policy for better control over the resources as policy overrides any settings made here.
2a
2b
2c
3a
3b
3c
3d
4
5
6
7

Chapter 10: Local Realm Authentication and Authorization
159
Before the refresh time expires, if a surrogate credential (IP address or cookie) is available and it matches the expected surrogate credential, the ProxySG authenticates the transaction. After the refresh time expires, the ProxySG verifies the user’s credentials. Depending upon the authentication mode and the user-agent, this may result in challenging the end user for credentials.
The main goal of this feature is to verify that the user-agent still has the appropriate credentials.
Enter the number of seconds in the Authorization refresh time field. The Authorization Refresh Time allows you to manage how often the authorization data is verified with the authentication realm. It has a default setting of 900 seconds (15 minutes). You can configure this in policy for better control over the resources as policy overrides any settings made here.
4. In the Inactivity timeout field, enter the number of seconds to specify the amount of time a session can be inactive before it is logged out.
5. Configure cookie options:
a. Select the Use persistent cookies check box to use persistent browser cookies instead of session browser cookies.
b. Select the Verify the IP address in the cookie check box if you would like the cookies surrogate credentials to only be accepted for the IP address that the cookie was authenticated. Disabling this will allow cookies to be accepted from other IP addresses.
6. You can specify a virtual URL. For more information on the virtual URL, see "About Origin-Style Redirection" on page 40.
7. Select the Challenge user after logout check box if the realm requires the users to enter their credentials after they have logged out.
8. Click Apply.
Related CLI Syntax to Define or Change Local Realm Properties ❐ To enter configuration mode:
SGOS#(config) security local create-realm realm_nameSGOS#(config) security local edit-realm realm_name
❐ The following subcommands are available:
SGOS#(config local realm_name) display-name display_nameSGOS#(config local realm_name) local-user-list local_user_list_nameSGOS#(config local realm_name) inactivity-timeout secondsSGOS#(config local realm_name) refresh-time surrogate-refresh secondsSGOS#(config local realm_name) refresh-time authorization-refresh secondsSGOS#(config local realm_name) cookie {persistent {enable | disable} | verify-ip {enable | disable}}SGOS#(config local realm_name) virtual-url url
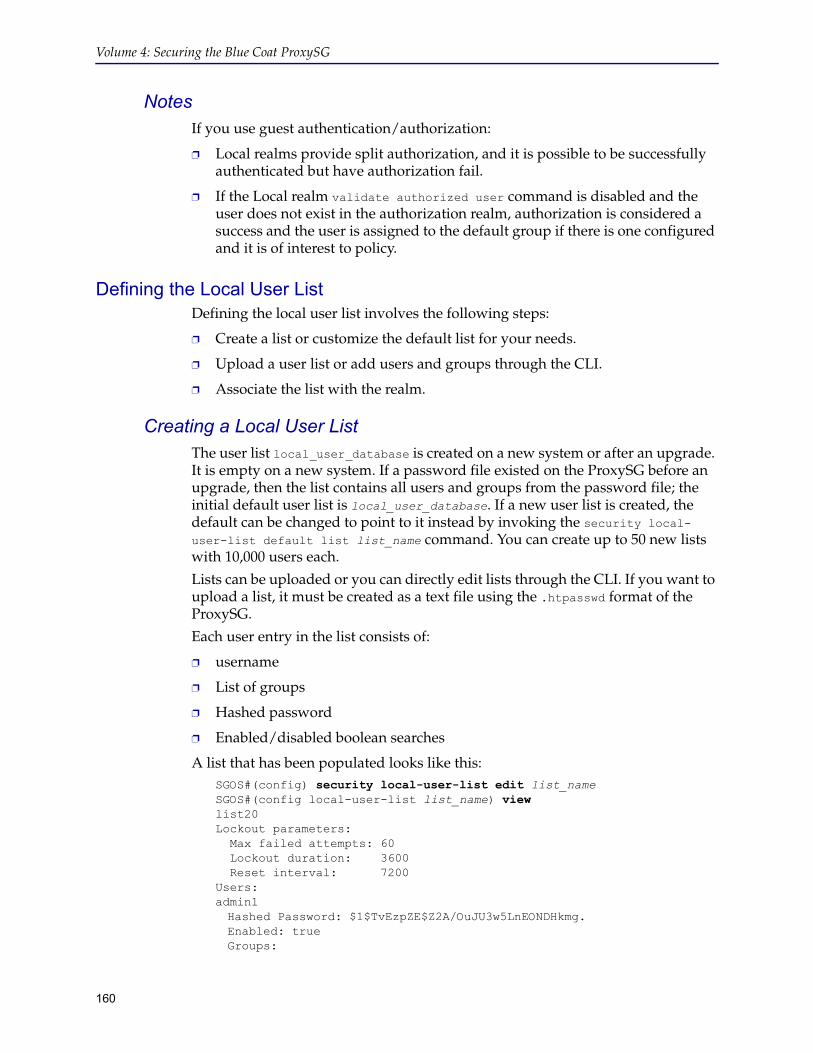
Volume 4: Securing the Blue Coat ProxySG
160
NotesIf you use guest authentication/authorization:
❐ Local realms provide split authorization, and it is possible to be successfully authenticated but have authorization fail.
❐ If the Local realm validate authorized user command is disabled and the user does not exist in the authorization realm, authorization is considered a success and the user is assigned to the default group if there is one configured and it is of interest to policy.
Defining the Local User ListDefining the local user list involves the following steps:
❐ Create a list or customize the default list for your needs.
❐ Upload a user list or add users and groups through the CLI.
❐ Associate the list with the realm.
Creating a Local User ListThe user list local_user_database is created on a new system or after an upgrade. It is empty on a new system. If a password file existed on the ProxySG before an upgrade, then the list contains all users and groups from the password file; the initial default user list is local_user_database. If a new user list is created, the default can be changed to point to it instead by invoking the security local-user-list default list list_name command. You can create up to 50 new lists with 10,000 users each.
Lists can be uploaded or you can directly edit lists through the CLI. If you want to upload a list, it must be created as a text file using the .htpasswd format of the ProxySG.
Each user entry in the list consists of:
❐ username
❐ List of groups
❐ Hashed password
❐ Enabled/disabled boolean searches
A list that has been populated looks like this:SGOS#(config) security local-user-list edit list_nameSGOS#(config local-user-list list_name) viewlist20Lockout parameters:
Max failed attempts: 60Lockout duration: 3600Reset interval: 7200
Users: admin1Hashed Password: $1$TvEzpZE$Z2A/OuJU3w5LnEONDHkmg.Enabled: trueGroups:

Chapter 10: Local Realm Authentication and Authorization
161
group1admin2Hashed Password: $1$sKJvNB3r$xsInBU./2hhBz6xDAHpND.Enabled: trueGroups:group1group2
admin3Hashed Password: $1$duuCUt30$keSdIkZVS4RyFz47G78X20Enabled: trueGroups:group2
Groups:group1group2
To create a new empty local user list:SGOS#(config) security local-user-list create list_name
UsernameThe username must be case-sensitively unique, and can be no more than 64 characters long. All characters are valid, except for a colon (:).
A new local user is enabled by default and has an empty password.
List of GroupsYou cannot add a user to a group unless the group has previously been created in the list. The group name must be case-sensitively unique, and can be no more than 64 characters long. All characters are valid, except for colon (:).
The groups can be created in the list; however, their user permissions are defined through policies only.
Hashed PasswordThe hashed password must be a valid UNIX DES or MD5 password whose plain-text equivalent cannot be more than 64 characters long.
To populate the local user list using an off-box .htpasswd file, continue with the next section. To populate the local user list using the ProxySG CLI, go to "Defining the Local User List" on page 160.
Populating a List using the .htpasswd FileTo add users to a text file in .htpasswd format, enter the following UNIX htpasswd command:
prompt> htpasswd [-c] .htpasswd username
The –c option creates a new .htpasswd file and should only be used for the very first .htpasswd command. You can overwrite any existing .htpasswd file by using the -c option.
After entering this command, you are prompted to enter a password for the user identified by username. The entered password is hashed and added to the user entry in the text file. If the -m option is specified, the password is hashed using MD5; otherwise, UNIX DES is used.

Volume 4: Securing the Blue Coat ProxySG
162
After you add the users to the .htpasswd file, you can manually edit the file to add user groups. When the .htpasswd file is complete, it should have the following format:
user:encrypted_password:group1,group2,…user:encrypted_password:group1,group2,…
Uploading the .htpasswd File When the .htpasswd file is uploaded, the entries from it either replace all entries in the default local user list or append to the entries in the default local user list. One default local user list is specified on the ProxySG.
To set the default local user list use the command security local-user-list default list list_name. The list specified must exist.
To specify that the uploaded .htpasswd file replace all existing user entries in the default list, enter security local-user-list default append-to-default disable before uploading the .htpasswd file.
To specify that the .htpasswd file entries should be appended to the default list instead, enter security local-user-list default append-to-default enable.
To upload the .htpasswd file:The .htpasswd file is loaded onto the ProxySG with a Perl script found at:
http://download.bluecoat.com/release/tools/set_auth.zip
Unzip the file, which contains the set_auth.pl script.
To load the .htpasswd file:prompt> set_auth.pl username password path_to_.htpasswd_file_on_local_machine ip_address_of_the_ProxySG
where username and password are valid administrator credentials for the ProxySG.
Populating a Local User List through the ProxySG You can populate a local user list from scratch or modify a local user list that was populated by loading an .htpasswd file.
Important: Because the -c option overwrites the existing file, do not use the option if you are adding users to an existing .htpasswd file.
Note: You can also modify the users and groups once they are loaded on the ProxySG. To modify the list once it is on the appliance, see "Populating a Local User List through the ProxySG" on page 162.
Note: To use the set_auth.pl script, you must have Perl binaries on the system where the script is running.

Chapter 10: Local Realm Authentication and Authorization
163
To create a new, empty local user list:SGOS#(config) security local-user-list create list_name
To modify an existing local user list (can be empty or contain users):
❐ To enter configuration mode:
SGOS#(config) security local-user-list edit list_nameSGOS#(config local-user-list list_name)
❐ The following subcommands are available:
SGOS#(config local-user-list list_name) group create group1SGOS#(config local-user-list list_name) group create group2SGOS#(config local-user-list list_name) group create group3SGOS#(config local-user-list list_name) user create usernameSGOS#(config local-user-list list_name) user edit usernameSGOS#(config local-user-list list_name username) group add groupname1SGOS#(config local-user-list list_name username) group add groupname2SGOS#(config local-user-list list_name username) password password-or-SGOS#(config local-user-list list_name username) hashed-password hashed-password
1. (Optional) The user account is enabled by default. To disable a user account:SGOS#(config local-user-list list_name username) disableok
2. Repeat for each user you want added to the list.
To view the results of an individual user account:Remain in the user account submode and enter the following command:
SGOS#(config local-user-list list_name username) viewadmin1Hashed Password: $1$TvEzpZE$Z2A/OuJU3w5LnEONDHkmg.Enabled: trueFailed Logins: 6Groups:group1
Note: To add users and groups to the list, enter the following commands, beginning with groups, since they must exist before you can add them to a user account.
Note: If you enter a plain-text password, the ProxySG hashes the password. If you enter a hashed password, the appliance does not hash it again.
Note: If a user has no failed logins, the statistic does not display.

Volume 4: Securing the Blue Coat ProxySG
164
To view the users in the entire list:Exit the user account submode and enter:
SGOS#(config local-user-list list_name username) exitSGOS#(config local-user-list list_name) viewlist20Lockout parameters:Max failed attempts: 60Lockout duration: 3600Reset interval: 7200
Users: admin1Hashed Password: $1$TvEzpZE$Z2A/OuJU3w5LnEONDHkmg.Enabled: trueGroups:group1
admin2Hashed Password: $1$sKJvNB3r$xsInBU./2hhBz6xDAHpND.Enabled: trueGroups:group1group2
admin3Hashed Password: $1$duuCUt30$keSdIkZVS4RyFz47G78X20Enabled: trueGroups:group2
Groups:group1group2
To view all the lists on the ProxySG:SGOS#(config) show security local-user-listDefault List: local_user_databaseAppend users loaded from file to default list: falselocal_user_databaseLockout parameters:
Max failed attempts: 60Lockout duration: 3600Reset interval: 7200
Users:Groups:
test1Users:Groups:
To delete groups associated with a user:SGOS#(config local-user-list list_name username) group remove group_name
To delete users from a list:SGOS#(config local-user-list list_name) user delete usernameThis will permanently delete the object. Proceed with deletion? (y or n) yok

Chapter 10: Local Realm Authentication and Authorization
165
To delete all users from a list:SGOS#(config local-user-list list_name) user clear ok
The groups remain but have no users.
To delete all groups from a list:SGOS#(config local-user-list list_name) group clearok
The users remain but do not belong to any groups.
Enhancing Security Settings for the Local User ListYou can configure a local user database so that each user account is automatically disabled if too many failed login attempts occur for the account in too short a period, indicating a brute-force password attack on the ProxySG. The security settings are available through the CLI only.
Available security settings are:
❐ Maximum failed attempts: The maximum number of failed password attempts allowed for an account. When this threshold is reached, the account is disabled (locked). If this is zero, there is no limit. The default is 60 attempts.
❐ Lockout duration: The time after which a locked account is re-enabled. If this is zero, the account does not automatically re-enable, but instead remains locked until manually enabled. The default is 3600 seconds (one hour).
❐ Reset interval: The time after which a failed password count resets after the last failed password attempt. If this is zero, the failed password count resets only when the account is enabled or when its password is changed. The default is 7200 seconds (two hours).
These values are enabled by default on the system for all user account lists. You can change the defaults for each list that exists on the system.
To change the security settings for a specific user account list:
1. Enter the following commands from the (config) prompt:SGOS#(config) security local-user-list edit list_nameSGOS#(config local-user-list list_name) lockout-duration secondsSGOS#(config local-user-list list_name) max-failed-attempts attemptsSGOS#(config local-user-list list_name) reset-interval seconds
2. (Optional) View the settings:SGOS#(config local-user-list list_name) viewlistnameLockout parameters:
Max failed attempts: 45Lockout duration: 3600Reset interval: 0
3. (Optional) To disable any of these settings:SGOS#(config local-user-list list_name) no [lockout-duration | max-failed-attempts | reset-interval]

Volume 4: Securing the Blue Coat ProxySG
166
Creating the CPLBe aware that the examples below are just part of a comprehensive authentication policy. By themselves, they are not adequate for your purposes. (The default policy in these examples is deny.)
❐ Every Local-authenticated user is allowed access the ProxySG.
<Proxy> authenticate(LocalRealm)
❐ Group membership is the determining factor in granting access to the ProxySG.
<Proxy> authenticate(LocalRealm)<Proxy> group=”group1” allow
❐ A subnet definition determines the members of a group, in this case, members of the Human Resources department.
<Proxy> authenticate(LocalRealm)<Proxy> Define subnet HRSubnet 192.168.0.0/16 10.0.0.0/24 End subnet HRSubnet [Rule] client_address=HRSubnet
url.domain=monster.comurl.domain=hotjobs.comdeny
.
.
. [Rule] deny
Note: Refer to Volume 11: ProxySG Content Policy Language Guide for details about CPL and how transactions trigger the evaluation of policy file layers.

167
Chapter 11: Policy Substitution Realm
This chapter discusses Policy Substitution realms, which provide a mechanism for identifying and authorizing users based on information in the request to the ProxySG.
Topics in this ChapterThis chapter includes information about the following topics:
❐ "About Policy Substitution Realms"
❐ "Creating a Policy Substitution Realm" on page 170
❐ "Configuring User Information" on page 171
❐ "Creating a List of Users to Ignore" on page 173
❐ "Configuring Authorization" on page 174
❐ "Defining Policy Substitution Realm General Properties" on page 174
About Policy Substitution Realms The Policy Substitution realm is used typically for best-effort user discovery, mainly for logging and subsequent reporting purposes, without the need to authenticate the user. Be aware that if you use Policy Substitution realms to provide granular policy on a user, it might not be very secure because the information used to identify the user can be forged.
The realm uses information in the request and about the client to identify the user. The realm is configured to construct user identity information by using policy substitutions.
If authorization data (such as group membership) is required, configure the realm with the name of an associated authorization realm (such as LDAP or local). If an authorization realm is configured, the fully-qualified username is sent to the authorization realm’s authority to collect authorization data.
You can use policy substitutions realms in many situations. For example, a Policy Substitution realm can be configured to identify the user:
❐ based on the results of a NetBIOS over TCP/IP query to the client computer.
❐ based on the results of a reverse DNS lookup of the client computer's IP address.
❐ based on the contents of a header in the request. This might be used when a downstream device is authenticating the user.
❐ based on the results of an Ident query to the client computer.

Volume 4: Securing the Blue Coat ProxySG
168
The realm is configured the same way as other realms, except that the realm uses policy substitutions to construct the username and full username from information available in and about the request. Any policy substitution whose value is available at client logon can be used to provide information for the name.
The Policy Substitution realm, in addition to allowing you to create and manipulate realm properties (such as the name of the realm and the number of seconds that credential cache entries from this realm are valid) also contains attributes to determine the user's identity. The user's identity can be determined by explicitly defining the usernames or by searching a LDAP server. The following two fields are used to determine the user's identity by definition:
❐ A user field: A string containing policy substitutions that describes how to construct the simple username.
❐ A full username field: A string containing policy substitutions that describes how to construct the full username, which is used for authorization realm lookups. This can either be an LDAP FQDN when the authorization realm is an LDAP realm, or a simple name when local realms are being used for authorization.
If no policy substitutions exist that map directly to the user's simple and full usernames but there are substitutions that map to attributes on the user on the LDAP server, the user's identity can be determined by searching the LDAP server. The following fields are used to determine the user's identity by LDAP search:
❐ LDAP search realm: The LDAP realm on the ProxySG that corresponds to the LDAP server where the user resides
❐ Search filter: An LDAP search filter as defined in RFC 2254 to be used in the LDAP search operation. Similar to the explicitly defined username and full username fields, the search filter string can contain policy substitutions that are available based on the user's request. The search filter string must be escaped according to RFC 2254. The policy substitution modifier escape_ldap_filter is recommended to use with any policy substitutions that could contain characters that need to be escaped. It will escape the policy substitution value per RFC 2254.
Note: The user field and username field must include at least one substitution that successfully evaluates in order for the user to be considered authenticated.
Note: The search filter must include at least one substitution that successfully evaluates before the LDAP search will be issued and the user authenticated.

Chapter 11: Policy Substitution Realm
169
❐ User attribute: The attribute on the search result entry that corresponds to the user's full username. If the search result entry is a user entry, the attribute is usually the FQDN of that entry. The user's full username is the value of the specified attribute. If the attribute value is an FQDN, the user's simple username is the value of the first attribute in the FQDN. If the attribute value is not an FQDN, the simple username is the same as the full username.
Remember that Policy Substitution realms do not require an authorization realm. If no authorization realm is configured, the user is not a member of any group. The effect this has on the user depends on the authorization policy. If the policy does not make any decisions based on groups, you do not need to specify an authorization realm. Also, if your policy is such that it works as desired when all Policy Substitution realm users are not in any group, you do not have to specify an authorization realm.
After the Policy Substitution realm is configured, you must create policy to authenticate the user.
ExampleThe following is an example of how to use substitutions with Policy Substitution realms.
Assumptions:❐ The user susie.smith is logged in to a Windows client computer at IP address
10.25.36.47.
❐ The Windows messenger service is enabled on the client computer.
❐ The client computer is in the domain AUTHTEAM.
❐ The customer has an LDAP directory in which group information is stored. The DN for a user's group information is
cn=username,cn=users,dc=computer_domain,dc=company,dc=com
where username is the name of the user, and computer_domain is the domain to which the user's computer belongs.
❐ A login script that runs on the client computer updates a DNS server so that a reverse DNS lookup for 10.25.36.47 results in susie.smith.authteam.location.company.com.
Note: Policy Substitution realms never challenge for credentials. If the username and full username cannot be determined from the configured substitutions, authentication in the Policy Substitution realm fails.
Note: If all the policy substitutions fail, authentication fails. If any policy substitution works, authentication succeeds in the realm.

Volume 4: Securing the Blue Coat ProxySG
170
Results:Under these circumstances, the following username and full username attributes might be used:
❐ Username: $(netbios.messenger-username)@$(client.address).
This results in [email protected].
❐ Full username: cn=$(netbios.messenger-username),cn=users, dc=$(netbios.computer-domain),dc=company,dc=com.
This results in cn=SUSIE.SMITH,cn=users, dc=AUTHTEAM,dc=company,dc=com.
❐ Username: $(netbios.computer-domain)\$(netbios.messenger-username).
This results in AUTHTEAM\SUSIE.SMITH.
❐ Username: $(client.host:label(6)).$(client.host:label(5)).
This results in SUSIE.SMITH.
ExampleThe following is an example of how to determine the user's identity by search.
Assumptions:❐ The user susie.smith is logged in to a Windows client computer.
❐ The customer has an LDAP directory in which group information is stored. The FQDN for Susie Smith is cn=Susie Smith, cn=Users, dc=Eng, dc=company, dc=com.
Results:Under these circumstances the login username can not be explicitly mapped to the user's FQDN, so a search of the LDAP server for the user's login identity is required instead. The following values can be used:
❐ Search filter: (sAMAccountName=$(netbios.messenger-username:escape_ldap_filter))
❐ User attribute: default of FQDN
This results in a simple username of Susie Smith and a full username of cn=Susie Smith, cn=Users, dc=Eng, dc=company, dc=com.
Creating a Policy Substitution RealmTo create a Policy Substitution realm:
1. Select Configuration > Authentication > Policy Substitution > Policy Substitution Realms.

Chapter 11: Policy Substitution Realm
171
2. Click New; the Add Policy Substitution Realm dialog displays.
3. In the Realm name field, enter a realm name. The name can be up to 32 characters long and composed of alphanumeric characters and underscores. The name must start with a letter.
4. Click OK to close the dialog.
5. Click Apply.
Related CLI Syntax to Create a Policy Substitution Realm:SGOS#(config) security policy-substitution create-realm realm_name
Configuring User InformationThis section describes how to add user search information.
PrerequisitesYou must have defined at least one Policy Substitution realm (using the Policy Substitution Realms tab) before attempting to set Policy Substitution realm properties. If the message Realms must be added in the Policy Substitutions Realms tab before editing this tab is displayed in red at the bottom of this page, you do not currently have any Policy Substitution realms defined.
To Define Policy Substitution User Information:
1. Select Configuration > Authentication > Policy Substitution > User Information.

Volume 4: Securing the Blue Coat ProxySG
172
2. From the Realm name drop-down list, select the Policy Substitution realm for which you want to change realm properties.
3. To determine username by definition, select Determine username by definition and specify the username and full username strings. Remember that the Username and Full username attributes are character strings that contain policy substitutions. When authentication is required for the transaction, these character strings are processed by the policy substitution mechanism, using the current transaction as input. The resulting string becomes the user's identity for the current transaction. For an overview of usernames and full usernames, see "About Policy Substitution Realms" on page 167.
-or-
4. To determine username by search, select Determine username by search.
• From the drop-down list, select the LDAP realm to use as a search realm.
• The search filter must be a valid LDAP search filter per RFC 2254. The search filter can contain any of the policy substitutions that are available based on the user's request (such as IP address, netbios query result, and ident query result).
• The user attribute is the attribute on the LDAP search result that corresponds to the user's full username. The LDAP search usually results in user entries being returned, in which case the user attribute is the FQDN. If the LDAP search was for a non-user object, however, the username might be a different attribute on the search result entry.
5. Click Apply.
Related CLI Syntax to Define Policy Substitution User Information SGOS#(config) security policy-substitution edit-realm realm_nameSGOS#(config policy-substitution realm_name)
❐ To search by definition:
2
3
-or-
4

Chapter 11: Policy Substitution Realm
173
SGOS#(config policy-substitution realm_name) identification determine-usernames by-definitionSGOS#(config policy-substitution realm_name) identification username construction_ruleSGOS#(config policy-substitution realm_name) identification full-username construction_rule
❐ To determine users by search:
SGOS#(config policy-substitution realm_name) identification determine-usernames by-searchSGOS#(config policy-substitution realm_name) identification realm-name LDAP_realmSGOS#(config policy-substitution realm_name) identification search-filter search_filterSGOS#(config policy-substitution realm_name) identification user-attribute {fqdn | LDAP_attribute_name}
Creating a List of Users to IgnoreThis section describes how to create a list of users to be ignored during an LDAP username search (see "Configuring User Information" on page 171).
PrerequisiteYou must have defined at least one Policy Substitution realm (using the Policy Substitution Realms tab) before attempting to set Policy Substitution realm properties. If the message Realms must be added in the Policy Substitutions Realms tab before editing this tab is displayed in red at the bottom of this page, you do not currently have any Policy Substitution realms defined.
1. Select Configuration > Authentication > Policy Substitution > Ignore Users.
2. From the Realm Name drop-down list, select the Policy Substitution realm for which you want to change realm properties.
3. Click New to add a username to be ignored during the username search. The username format depends on what the LDAP search is looking for but will most often be an LDAP FQDN.
4. Click OK to close the dialog; repeat the previous step to add other users.
5. Click Apply.
Related CLI Syntax to Create a List of Users to Ignore ❐ Enter the following commands:
SGOS#(config policy-substitution realm_name) identification determine-usernames by-searchSGOS#(config policy-substitution realm_name) identification ignore-user-list {add username| clear | remove username}
where add allows you to add a user to the list, clear removes all users from the list, and remove deletes one user from the list.

Volume 4: Securing the Blue Coat ProxySG
174
Configuring AuthorizationPolicy Substitution realms do not require an authorization realm. If the policy does not make any decisions based on groups, you need not specify an authorization realm.
PrerequisiteYou must have defined at least one Policy Substitution realm (using the Policy Substitution Realms tab) before attempting to set Policy Substitution realm properties. If the message Realms must be added in the Policy Substitutions Realms tab before editing this tab is displayed in red at the bottom of this page, you do not currently have any Policy Substitution realms defined.
To configure an authorization realm:
1. Select Configuration > Authentication > Policy Substitution > Authorization..
2. From the Realm Name drop-down list, select the Policy Substitution realm for which you want to change realm properties.
3. From the Authorization Realm Name drop-down list, select the authorization realm you want to use to authorize users.
4. Click Apply.
Related CLI Syntax to Configure an Authorization RealmSGOS#(config) security policy-substitution edit-realm realm_nameSGOS#(config policy-substitution realm_name) authorization-realm-name authorization_realm_name
Defining Policy Substitution Realm General PropertiesThe Policy Substitution General tab allows you to specify the refresh times, an inactivity timeout value, cookies, and a virtual URL.
PrerequisiteYou must have defined at least one Policy Substitution realm (using the Policy Substitution Realms tab) before attempting to set Policy Substitution general properties. If the message Realms must be added in the Policy Substitution Realms tab before editing this tab is displayed in red at the bottom of this page, you do not currently have any Policy Substitution realms defined.
2
3
Chapter 11: Policy Substitution Realm
175
To configure Policy Substitution realm general settings
1. Select Configuration > Authentication > Policy Substitution > General.

Volume 4: Securing the Blue Coat ProxySG
176
2. From the Realm name drop-down list, select the Policy Substitution realm for which to change properties.
3. Configure refresh options:
a. Select the Use the same refresh time for all check box if you would like to use the same refresh time for all.
b. Enter the number of seconds in the Surrogate refresh time field. The Surrogate Refresh Time allows you to set a realm default for how often a user’s surrogate credentials are refreshed. Surrogate credentials are credentials accepted in place of a user’s actual credentials. The default setting is 900 seconds (15 minutes). You can configure this in policy for better control over the resources as policy overrides any settings made here.
Before the refresh time expires, if a surrogate credential (IP address or cookie) is available and it matches the expected surrogate credential, the ProxySG authenticates the transaction. After the refresh time expires, the ProxySG reevaluates the user’s credentials.
c. Enter the number of seconds in the Authorization refresh time field. The Authorization Refresh Time allows you to manage how often the authorization data is verified with the authentication realm. It has a default setting of 900 seconds (15 minutes). You can configure this in policy for better control over the resources as policy overrides any settings made here.
4. Enter the number of seconds in the Inactivity timeout field to specify the amount of time a session can be inactive before being logged out.
5. Configure cookie options:
a. Select the Use persistent cookies option to use persistent browser cookies instead of session browser cookies.
b. Select the Verify the IP address in the cookie option if you would like the
2
3
4
5
6

Chapter 11: Policy Substitution Realm
177
cookies surrogate credentials to only be accepted for the IP address that the cookie was authenticated. Disabling this will allow cookies to be accepted from other IP addresses.
6. You can specify a virtual URL. For more information on the virtual URL, see "About Origin-Style Redirection" on page 40.
7. Click Apply.
Related CLI Syntax to Configure Policy Substitution Realm General Settings Enter the following commands to modify Policy Substitution realm properties:
SGOS#(config policy-substitution realm_name) inactivity-timeout secondsSGOS#(config policy-substitution realm_name) refresh-time surrogate-refresh secondsSGOS#(config policy-substitution realm_name) refresh-time authorization-refresh secondsSGOS#(config policy-substitution realm_name) cookie {persistent {enable | disable} | verify-ip {enable | disable}}
SGOS#(config policy-substitution realm_name) virtual-url url
Notes❐ Following are examples of how to configure four different types of Policy
Substitution realms. For a list of available substitutions, see Volume 8: Access Logging.
• Identity to be determined by sending a NetBIOS over TCP/IP query to the client computer, and using LDAP authorization
SGOS#(config) security policy-substitution create-realm netbiosSGOS#(config) security policy-substitution edit-realm netbiosSGOS#(config policy-substitution netbios) username \ $(netbios.messenger-username)SGOS#(config policy-substitution netbios) full-username \ cn=$(netbios.messenger-username),cn=users,dc=company,dc=comSGOS#(config policy-substitution netbios) authorization-realm-name ldap
• Identity to be determined by reverse DNS, using local authorization. Blue Coat assumes login scripts on the client computer update the DNS record for the client.
SGOS#(config) security policy-substitution create-realm RDNSSGOS#(config) security policy-substitution edit-realm RDNSSGOS#(config policy-substitution RDNS) username \ $(client.host:label(5)).$(client.host:label(6))#SGOS#(config policy-substitution RDNS) full-username \ $(client.host:label(5)).$(client.host:label(6))SGOS#(config policy-substitution RDNS) authorization-realm-name local
• Identity to be determined by a header in the request, using LDAP authorization.
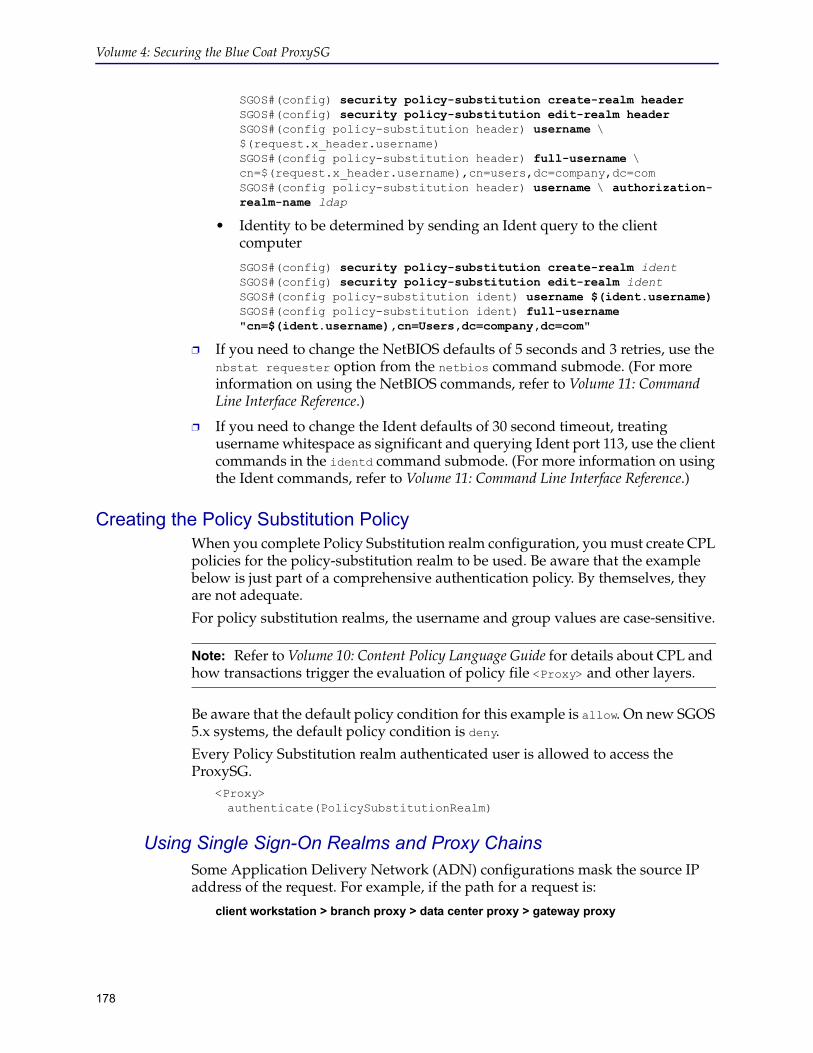
Volume 4: Securing the Blue Coat ProxySG
178
SGOS#(config) security policy-substitution create-realm headerSGOS#(config) security policy-substitution edit-realm headerSGOS#(config policy-substitution header) username \ $(request.x_header.username)SGOS#(config policy-substitution header) full-username \ cn=$(request.x_header.username),cn=users,dc=company,dc=comSGOS#(config policy-substitution header) username \ authorization-realm-name ldap
• Identity to be determined by sending an Ident query to the client computer
SGOS#(config) security policy-substitution create-realm identSGOS#(config) security policy-substitution edit-realm identSGOS#(config policy-substitution ident) username $(ident.username)SGOS#(config policy-substitution ident) full-username "cn=$(ident.username),cn=Users,dc=company,dc=com"
❐ If you need to change the NetBIOS defaults of 5 seconds and 3 retries, use the nbstat requester option from the netbios command submode. (For more information on using the NetBIOS commands, refer to Volume 11: Command Line Interface Reference.)
❐ If you need to change the Ident defaults of 30 second timeout, treating username whitespace as significant and querying Ident port 113, use the client commands in the identd command submode. (For more information on using the Ident commands, refer to Volume 11: Command Line Interface Reference.)
Creating the Policy Substitution PolicyWhen you complete Policy Substitution realm configuration, you must create CPL policies for the policy-substitution realm to be used. Be aware that the example below is just part of a comprehensive authentication policy. By themselves, they are not adequate.
For policy substitution realms, the username and group values are case-sensitive.
Be aware that the default policy condition for this example is allow. On new SGOS 5.x systems, the default policy condition is deny.
Every Policy Substitution realm authenticated user is allowed to access the ProxySG.
<Proxy>authenticate(PolicySubstitutionRealm)
Using Single Sign-On Realms and Proxy ChainsSome Application Delivery Network (ADN) configurations mask the source IP address of the request. For example, if the path for a request is:
client workstation > branch proxy > data center proxy > gateway proxy
Note: Refer to Volume 10: Content Policy Language Guide for details about CPL and how transactions trigger the evaluation of policy file <Proxy> and other layers.

Chapter 11: Policy Substitution Realm
179
policy running on the gateway might see the IP address of the data center proxy rather than the IP address of the client workstation.
In this ADN configuration, policy needs to be configured so that Windows SSO, Novell SSO, and policy substitution realms can authenticate users correctly.
Use the user.login.address and authenticate.credentials.address policy gestures to override the IP address of the credentials used for authentication and match the IP address of the authenticated user.
You can also use the x-cs-user-login-address substitution to log this event.
ExamplesIn the following example, the address to use for authenticating with myrealm is set to the address received from the HTTP Client-IP header.
<proxy> authenticate(myrealm)\ authenticate.credentials.address($(request.header.Client-IP))
In the following example, the user is authenticated if logged in from the 1.2.3.0/24 subnet.
<proxy>user.login.address=1.2.3.0/24 allow
Note: The source IP address is not masked if you use the reflect client ip attribute.
Note: The user.login.address condition only works correctly if you use the authenticate.credentials.address property to set the address.

Volume 4: Securing the Blue Coat ProxySG
180

181
Chapter 12: CA eTrust SiteMinder Authentication
The ProxySG can be configured to consult a SiteMinder policy server for authentication and session management decisions. This requires that a SiteMinder realm be configured on the ProxySG and policy written to use that realm for authentication.
Access to the SiteMinder policy server is done through the Blue Coat Authentication and Authorization Agent (BCAAA), which must be installed on a Solaris or a Windows 2000 system or higher with access to the SiteMinder policy servers. (For information on configuring the BCAAA service, see Appendix A: "Using BCAAA" on page 255.)
Topics in this ChapterThis chapter includes information about the following topics:
❐ "About SiteMinder Interaction with Blue Coat" on page 181
❐ "Participating in a Single Sign-On (SSO) Scheme" on page 184
❐ "Creating a SiteMinder Realm" on page 185
❐ "Configuring SiteMinder Servers" on page 187
❐ "Defining SiteMinder Server General Properties" on page 188
❐ "Creating the CPL" on page 196
❐ "SiteMinder Authorization Example" on page 196
About SiteMinder Interaction with Blue CoatWithin the SiteMinder system, BCAAA acts as a custom Web agent. It communicates with the SiteMinder policy server to authenticate the user and to obtain a SiteMinder session token, response attribute information, and group membership information.
Custom header and cookie response attributes associated with OnAuthAccept and OnAccessAccept attributes are obtained from the policy server and forwarded to the ProxySG. They can (as an option) be included in requests forwarded by the appliance.
Within the ProxySG system, BCAAA acts as its agent to communicate with the SiteMinder server. The ProxySG provides the user information to be validated to BCAAA, and receives the session token and other information from BCAAA.
Each ProxySG SiteMinder realm used causes the creation of a BCAAA process on the Windows or Solaris host computer running BCAAA. A single host computer can support multiple ProxySG realms (from the same or different ProxySG appliances); the number depends on the capacity of the BCAAA host computer and the amount of activity in the realms.

Volume 4: Securing the Blue Coat ProxySG
182
Configuration of the ProxySG realm must be coordinated with configuration of the SiteMinder policy server. Each must be configured to be aware of the other. In addition, certain SiteMinder responses must be configured so that BCAAA gets the information the ProxySG needs.
Configuring the SiteMinder Policy Server
Since BCAAA is a Web agent in the SiteMinder system, it must be configured on the SiteMinder policy server. Configuration of BCAAA on the host computer is not required; the agent obtains its configuration information from the ProxySG.
A suitable Web agent must be created and configured on the SiteMinder server. This must be configured to support 5.x agents, and a shared secret must be chosen and entered on the server (it must also be entered in the ProxySG SiteMinder realm configuration).
SiteMinder protects resources identified by URLs. A ProxySG realm is associated with a single protected resource. This could be an already existing resource on a SiteMinder server, (typical for a reverse proxy arrangement) or it could be a resource created specifically to protect access to ProxySG services (typical for a forward proxy).
The SiteMinder realm that controls the protected resource must be configured with a compatible authentication scheme. The supported schemes are Basic (in plain text and over SSL), Forms (in plain text and over SSL), and X.509 certificates. Configure the SiteMinder realm with one of these authentication schemes.
The ProxySG requires information about the authenticated user to be returned as a SiteMinder response. The responses should be sent by an OnAuthAccept rule used in the policy that controls the protected resource.
Note: Each (active) SiteMinder realm on the ProxySG should reference a different agent on the Policy Server.
Note: Blue Coat assumes you are familiar with configuration of SiteMinder policy servers and Web agents.
Note: The request URL is not sent to the SiteMinder policy server as the requested resource; the requested resource is the entire ProxySG realm. Access control of individual URLs is done on the ProxySG using CPL or VPM.
Note: Only the following X.509 Certificates are supported: X.509 Client Cert Template, X.509 Client Cert and Basic Template, and X.509 Client Cert and Form Template.

Chapter 12: CA eTrust SiteMinder Authentication
183
The responses must include the following:
❐ A Web-Agent-HTTP-Header-variable named BCSI_USERNAME. It must be a user attribute; the value of the response must be the simple username of the authenticated user. For example, with an LDAP directory this might be the value of the cn attribute or the uid attribute.
❐ A Web-Agent-HTTP-Header-variable named BCSI_GROUPS. It must be a user attribute and the value of the response must be SM_USERGROUPS.
If the policy server returns an LDAP FQDN as part of the authentication response, the ProxySG uses that LDAP FQDN as the FQDN of the user.
Once the SiteMinder agent object, configuration, realm, rules, responses and policy have been defined, the ProxySG can be configured.
Additional SiteMinder Configuration Notes
❐ If using single-sign on (SSO) with off-box redirection (such as to a forms login page), the forms page must be processed by a 5.x or later Web Agent, and that agent must be configured with fcccompatmode=no. This keeps that agent from doing SSO with 5.x agents.
❐ For SSO to work with other Web agents, the other agents must have the AcceptTPCookie=YES as part of their configuration. This is described in the SiteMinder documentation.
❐ Blue Coat does not extract the issuerDN from X.509 certificates in the same way as the SiteMinder agent. Thus, a separate certificate mapping might be needed for the SGOS agent and the SiteMinder agents.
For example, the following was added to the SiteMinder policy server certificate mappings:
CN=Waterloo Authentication and Security Team,OU=Waterloo R&D, O=Blue Coat\, Inc.,L=Waterloo,ST=ON,C=CA
❐ In order to use off-box redirection (such as an SSO realm), all agents involved must have the setting EncryptAgentName=no in their configurations.
❐ The ProxySG's credential cache only caches the user's authentication information for the smaller of the time-to-live (TTL) configured on the ProxySG and the session TTL configured on the SiteMinder policy server.
Configuring the ProxySG RealmThe ProxySG realm must be configured so that it can:
❐ Find the BCAAA service that acts on its behalf (hostname or IP address, port, SSL options, and the like).
❐ Provide BCAAA with the information necessary to allow it to identify itself as a Web agent (agent name, shared secret).
Note: Additional configuration might be needed on the SiteMinder server depending on specific features being used.

Volume 4: Securing the Blue Coat ProxySG
184
❐ Provide BCAAA with the information that allows it to find the SiteMinder policy server (IP address, ports, connection information.)
❐ Provide BCAAA with the information that it needs to do authentication and collect authorization information (protected resource name), and general options (server fail-over and off-box redirection)
For more information on configuring the ProxySG SiteMinder realm, see "Creating a SiteMinder Realm" on page 185.
Participating in a Single Sign-On (SSO) SchemeThe ProxySG can participate in SSO with other systems that use the same SiteMinder policy server. Users must supply their authentication credentials only once to any of the systems participating. Participating in SSO is not a requirement, the ProxySG can use the SiteMinder realm as an ordinary realm.
When using SSO with SiteMinder, the SSO token is carried in a cookie (SMSESSION). This cookie is set in the browser by the first system that authenticates the user; other systems obtain authentication information from the cookie and so do not have to challenge the user for credentials. The ProxySG sets the SMSESSION cookie if it is the first system to authenticate a user, and authenticates the user based on the cookie if the cookie is present.
Since the SSO information is carried in a cookie, all the servers participating must be in the same cookie domain, including the ProxySG. This imposes restrictions on the authenticate.mode() used on the ProxySG.
❐ A reverse proxy can use any origin mode.
❐ A forward proxy must use one of the origin-redirect modes (such as origin-cookie-redirect). When using origin-*-redirect modes, the virtual URL hostname must be in the same cookie domain as the other systems. It cannot be an IP address; the default www.cfauth.com does not work either.
When using origin-*-redirect, the SSO cookie is automatically set in an appropriate response after the ProxySG authenticates the user. When using origin mode (in a reverse proxy), setting this cookie must be explicitly specified by the administrator. The policy substitution variable $(x-agent-sso-cookie) expands to the appropriate value of the set-cookie: header.
Avoiding ProxySG ChallengesIn some SiteMinder deployments all credential challenges are issued by a central authentication service (typically a Web server that challenges through a form). Protected services do not challenge and process request credentials; instead, they work entirely with the SSO token. If the request does not include an SSO token, or the SSO token is not acceptable, the request is redirected to the central service, where authentication occurs. Once authentication is complete, the request is redirected to the original resource with a response that sets the SSO token.
Note: All ProxySG and agent configuration is done on the appliance. The appliance sends the necessary information to BCAAA when it establishes communication.

Chapter 12: CA eTrust SiteMinder Authentication
185
If the SiteMinder policy server is configured to use a forms-based authentication scheme, the above happens automatically. However, in this case, the ProxySG realm can be configured to redirect to an off-box authentication service always. The URL of the service is configured in the scheme definition on the SiteMinder policy server. The ProxySG realm is then configured with always-redirect-offbox enabled.
The ProxySG must not attempt to authenticate a request for the off-box authentication URL. If necessary, authenticate(no) can be used in policy to prevent this.
Creating a SiteMinder Realm To create a SiteMinder realm:
1. Select Configuration > Authentication > CA eTrust SiteMinder > SiteMinder Realms.
2. Click New.
3. In the Realm name field, enter a realm name. The name can be 32 characters long and composed of alphanumeric characters and underscores. The name must start with a letter. The name should be meaningful to you, but it does not have to be the name of the SiteMinder policy server.
4. Click OK.
5. Click Apply.
Configuring AgentsYou must configure the SiteMinder realm so that it can find the Blue Coat Authentication and Authorization Agent (BCAAA).
1. Select Configuration > Authentication > CA eTrust SiteMinder > Agents.

Volume 4: Securing the Blue Coat ProxySG
186
2. Select the realm name to edit from the drop-down list.
3. Configure the primary agent:
a. In the Primary agent section, enter the hostname or IP address where the agent resides.
b. Change the port from the default of 16101 if your SiteMinder port is different.
c. Enter the agent name in the Agent name field. The agent name is the name as configured on the SiteMinder policy server.
d. You must create a secret for the Agent that matches the secret created on the SiteMinder policy server. Click Change Secret. SiteMinder secrets can be up to 64 characters long and are always case sensitive.
4. (Optional) Enter an alternate agent host and agent name in the Alternate agent section.
5. Configure SSL options:
a. (Optional) Click Enable SSL to enable SSL between the ProxySG and the BCAAA service.
b. (Optional) Select the SSL device profile that this realm uses to make an SSL connection to a remote system. You can choose any device profile that displays in the drop-down list. For information on using device profiles, refer to Volume 4: Securing the Blue Coat ProxySG Appliance
6. In the Timeout Request field, enter the number of seconds the ProxySG allows for each request attempt before timing out. (The default request timeout is 60 seconds.)
7. If you want group comparisons for SiteMinder groups to be case sensitive, select Case sensitive.
8. Click Apply.
2
3
4
5
6
7

Chapter 12: CA eTrust SiteMinder Authentication
187
Configuring SiteMinder ServersOnce you create a SiteMinder realm, use the SiteMinder Servers page to create and edit the list of SiteMinder policy servers consulted by the realm.
1. Select Configuration > Authentication > CA eTrust SiteMinder > SiteMinder Servers.
2. From the Realm name drop-down list, select the SiteMinder realm for which you want to add servers or change server properties.
3. To create a new SiteMinder policy server, click New.
4. Enter the name of the server in the dialog. This name is used only to identify the server in the ProxySG’s configuration; it usually is the real hostname of the SiteMinder policy server.
5. Click OK.
6. To edit an existing SiteMinder policy server, highlight the server and click Edit. The Edit SiteMinder Server.

Volume 4: Securing the Blue Coat ProxySG
188
7. Configure the server options:
a. Enter the IP address of the SiteMinder policy server in the IP address field.
b. Enter the correct port numbers for the Authentication, Authorization, and Accounting ports, which are the same ports configured on their SiteMinder policy server. The valid port range is 1-65535.
c. The Maximum Connections to the server is 32768; the default is 256.
d. The Connection Increment specifies how many connections to open at a time if more are needed and the maximum has not been exceeded. The default is 1.
e. The Timeout value has a default of 60 seconds, which can be changed.
f. Click OK.
8. Click Apply.
Defining SiteMinder Server General PropertiesThe SiteMinder Server General tab allows you to specify the protected resource name, the server mode, and whether requests should always be redirected off box.
To configure general settings:
1. Select Configuration > Authentication > CA eTrust SiteMinder > SiteMinder Server General.
7a
7b
7c
7d
7e

Chapter 12: CA eTrust SiteMinder Authentication
189
2. Configure the following options:
a. From the Realm name drop-down list, select the SiteMinder realm for which you want to change properties.
b. Enter the Protected resource name. The protected resource name is the same as the resource name on the SiteMinder policy server that has rules and policy defined for it. When entering a protected resource name, precede it with a forward slash (/). For example, if the protected resource name is bcsi, you would enter /bcsi .
c. In the Server mode drop-down list, select either failover or round-robin. Failover mode falls back to one of the other servers if the primary one is down. Round-robin modes specifies that all of the servers should be used together in a round-robin approach. Failover is the default.
3. To force authentication challenges to always be redirected to an off-box URL, select Always redirect off-box.
Note: The server mode describes the way the agent (the BCAAA service) interacts with the SiteMinder policy server, not the way that ProxySG interacts with BCAAA.
Note: All SiteMinder Web agents involved must have the setting EncryptAgentName=no in their configurations to go off-box for any reason.
2a
2b
2c
3
4
5

Volume 4: Securing the Blue Coat ProxySG
190
If using SiteMinder forms for authentication, the ProxySG always redirects the browser to the forms URL for authentication. You can force this behavior for other SiteMinder schemes by configuring the always redirect off-box property on the realm.
4. If your Web applications need information from the SiteMinder policy server responses, you can select Add Header Responses. Responses from the policy server obtained during authentication are added to each request forwarded by the ProxySG. Header responses replace any existing header of the same name; if no such header exists, the header is added. Cookie responses replace a cookie header with the same cookie name; if no such cookie header exists, one is added.
5. To enable validation of the client IP address, select Validate client IP address. If the client IP address in the SSO cookie can be valid yet different from the current request client IP address, due to downstream proxies or other devices, clear the Validate client IP address option for the realm. Also modify the SiteMinder agents participating in SSO with the ProxySG; set the TransientIPCheck variable to yes to enable IP address validation and no to disable it.
6. Click Apply.
Configuring Authorization Settings for SiteMinderThe Siteminder Authorization tab allows you to authorize users through another realm and specify search criteria for the user ID.
To specify authorization settings for SiteMinder:
1. Select Configuration > Authentication > CA eTrust SiteMinder > Authorization.

Chapter 12: CA eTrust SiteMinder Authentication
191
2. From the Realm name drop-down list, select a SiteMinder realm.
3. From the Authorization realm name drop-down list, select the LDAP, Local, or XML realm you want to use to authorize users. If Self is selected, the Authorization username must be Use FQDN.
4. Configure authorization options. You cannot always construct the user's authorization username from the substitutions available. If not, you can search on a LDAP server for a user with an attribute matching the substitution and then use the FQDN for the matched user as the authorization username. Authorization then occurs on that authorization username:
a. In the Authorization username field, enter the substitution to use to identify the user. The default authorization username is $(cs-username). You can use any policy substitutions. -or-
b. Select Use FQDN or to determine through search criteria, which uses the FQDN or full username determined while identifying the user during the authentication process. -or-
c. Select Determine by search, which enables the fields below. Specify the following to focus the search:
• LDAP search realm name: An LDAP realm to search. In most cases, this is the same as the LDAP realm used for authorization.
• Search filter: Used during the LDAP search. This search filter can contain policy substitutions including the $(cs-username) substitution.
• User attribute: An attribute on the entry returned in the LDAP search results that has the value to use as the authorization username. In most cases this is the FQDN of the user entry.
5. (Optional) Click Set Users to Ignore to add a list of users excluded from searches.
6. Click Apply.
2
3
4a
4b
4c
5

Volume 4: Securing the Blue Coat ProxySG
192
Configuring General Settings for SiteMinderThe SiteMinder General tab allows you to specify a display name, the refresh times, a inactivity timeout value, cookies, and a virtual URL.
To configure general settings for SiteMinder:
1. Select Configuration > Authentication > CA eTrust SiteMinder > SiteMinder General.
2. From the Realm name drop-down list, select the SiteMinder realm for which you want to change properties.
3. If needed, change the SiteMinder realm display name. The default value for the display name is the realm name. The display name cannot be greater than 128 characters and it cannot be empty.
4. Configure refresh options:
a. Select the Use the same refresh time for all check box if you would like to use the same refresh time for all.
b. Enter the number of seconds in the Credential refresh time field. The Credential Refresh Time is the amount of time Basic credentials (username and password) are kept on the ProxySG. This feature allows the ProxySG to reduce the load on the authentication server and enables credential spoofing. It has a default setting of 900 seconds (15 minutes). You can configure this in policy for better control over the resources as policy overrides any settings made here. Before the refresh time expires, the ProxySG authenticates the user supplied
2
3
4
5
6
7
8
9

Chapter 12: CA eTrust SiteMinder Authentication
193
credentials against the cached credentials. If the credentials received do not match the cached credentials, they are forwarded to the authentication server in case the user password changed. After the refresh time expires, the credentials are forwarded to the authentication server for verification.
c. Enter the number of seconds in the Surrogate refresh time field. The Surrogate Refresh Time allows you to set a realm default for how often a user’s surrogate credentials are refreshed. Surrogate credentials are credentials accepted in place of a user’s actual credentials. The default setting is 900 seconds (15 minutes). You can configure this in policy for better control over the resources as policy overrides any settings made here.
Before the refresh time expires, if a surrogate credential (IP address or cookie) is available and it matches the expected surrogate credential, the ProxySG authenticates the transaction. After the refresh time expires, the ProxySG verifies the user’s credentials. Depending upon the authentication mode and the user-agent, this may result in challenging the end user for credentials.
The main goal of this feature is to verify that the user-agent still has the appropriate credentials.
5. Enter the number of seconds in the Inactivity timeout field to specify the amount of time a session can be inactive before being logged out.
6. If you use Basic credentials and want to cache failed authentication attempts (to reduce the load on the authentication service), enter the number of seconds in the Rejected Credentials time field. This setting, enabled by default and set to one second, allows failed authentication attempts to be automatically rejected for up to 10 seconds. Any Basic credentials that match a failed result before its cache time expires are rejected without consulting the back-end authentication
Volume 4: Securing the Blue Coat ProxySG
194
service. The original failed authentication result is returned for the new request. All failed authentication attempts can be cached: Bad password, expired account, disabled account, old password, server down. To disable caching for failed authentication attempts, set the Rejected Credentials time field to 0.
7. Configure cookie options:
a. Select the Use persistent cookies check box to use persistent browser cookies instead of session browser cookies.
b. Select the Verify the IP address in the cookie check box if you would like the cookies surrogate credentials to only be accepted for the IP address that the cookie was authenticated. Disabling this allows cookies to be accepted from other IP addresses.
8. Specify the virtual URL to redirect the user to when they need to be challenged by the ProxySG. If the appliance is participating in SSO, the virtual hostname must be in the same cookie domain as the other servers participating in the SSO. It cannot be an IP address or the default, www.cfauth.com.
9. Select the Challenge user after logout check box if the realm requires the users to enter their credentials after they have logged out.
10. Click Apply.
Related CLI Syntax to Configure a SiteMinder Realm❐ To enter configuration mode:
SGOS#(config) security siteminder create-realm realm_name SGOS#(config) security siteminder edit-realm realm_name
❐ The following subcommands are available:
SGOS#(config siteminder realm_name) add-header-responses {enable | disable}SGOS#(config siteminder realm_name) alternate-agent agent-nameSGOS#(config siteminder realm_name) alternate-agent encrypted-secret encrypted-shared-secretSGOS#(config siteminder realm_name) alternate-agent hostSGOS#(config siteminder realm_name) alternate-agent portSGOS#(config siteminder realm_name) alternate-agent shared-secret secretSGOS#(config siteminder realm_name) alternate-agent always-redirect-offboxSGOS#(config siteminder realm_name) always-redirect-offbox {enable | disable}SGOS#(config siteminder realm_name) authorization ignore-user-list {add | clear |remove} SGOS#(config siteminder realm_name) authorization realm {none | realm-name realm_nameSGOS#(config siteminder realm_name) authorization search-filter search_filterSGOS#(config siteminder realm_name) authorization user-attribute {fqdn | LDAP_attribute_name}SGOS#(config siteminder realm_name) authorization username {determine-by-search | use-full-username | username_for_authorization}

Chapter 12: CA eTrust SiteMinder Authentication
195
SGOS#(config siteminder realm_name) cache-duration secondsSGOS#(config siteminder realm_name) case-sensitive {enable | disable}SGOS#(config siteminder realm_name) display-name display_nameSGOS#(config siteminder realm_name) exit#(config siteminder realm_name) inactivity-timeout seconds#(config siteminder realm_name) log-out {challenge {enable | disable} | display-time seconds}SGOS#(config siteminder realm_name) no alternate-agentSGOS#(config siteminder realm_name) primary-agent agent-nameSGOS#(config siteminder realm_name) primary-agent encrypted-secret encrypted-shared-secret SGOS#(config siteminder realm_name) primary-agent hostSGOS#(config siteminder realm_name) primary-agent portSGOS#(config siteminder realm_name) primary-agent shared-secret secretSGOS#(config siteminder realm_name) primary-agent always-redirect-offboxSGOS#(config siteminder realm_name) protected-resource-name resource-nameSGOS#(config siteminder realm_name) rename new_realm_nameSGOS#(config siteminder realm_name) server-mode {failover | round-robin}SGOS#(config siteminder realm_name) validate-client-ip {enable | disable}SGOS#(config siteminder realm_name) siteminder-server create server_nameSGOS#(config siteminder realm_name) siteminder-server delete server_nameSGOS#(config siteminder realm_name) siteminder-server edit server_nameSGOS#(config siteminder realm_name server_name)
SGOS#(config siteminder realm_name server_name) accounting-port port_numberSGOS#(config siteminder realm_name server_name) authentication-port port_numberSGOS#(config siteminder realm_name server_name) authorization-port port_numberSGOS#(config siteminder realm_name server_name) connection-increment numberSGOS#(config siteminder realm_name server_name) exitSGOS#(config siteminder realm_name server_name) ip-address ip_addressSGOS#(config siteminder realm_name server_name) max-connections numberSGOS#(config siteminder realm_name server_name) min-connections numberSGOS#(config siteminder realm_name server_name) timeout secondsSGOS#(config siteminder realm_name server_name) view
SGOS#(config siteminder realm_name) ssl enableSGOS#(config siteminder realm_name) ssl-device-profile ssl_device_profile_nameSGOS#(config siteminder realm_name) sso-type {query-client | query-dc | query-dc-client}
SGOS#(config siteminder realm_name) inactivity-timeout seconds

Volume 4: Securing the Blue Coat ProxySG
196
SGOS#(config siteminder realm_name) refresh-time credential-refresh secondsSGOS#(config siteminder realm_name) refresh-time rejected-credentials-refresh secondsSGOS#(config siteminder realm_name) refresh-time surrogate-refresh secondsSGOS#(config siteminder realm_name) cookie {persistent {enable | disable} | verify-ip {enable | disable}}
SGOS#(config siteminder realm_name) virtual-url url
Creating the CPLYou can create CPL policies now that you have completed SiteMinder realm configuration. Be aware that the examples below are just part of a comprehensive authentication policy. By themselves, they are not adequate for your purposes.
The examples below assume the default policy condition is allow. On new SGOS systems, the default policy condition is deny.
❐ Every SiteMinder-authenticated user is allowed access the ProxySG.
<Proxy>authenticate(SiteMinderRealm)
❐ Group membership is the determining factor in granting access to the ProxySG.
<Proxy> authenticate(SiteMinderRealm)<Proxy> group=”cn=proxyusers, ou=groups, o=myco” deny
SiteMinder Authorization ExampleSituationCredential challenges are issued by a central authentication service (this means the SiteMinder realm must enabled to always redirect authentication requests offbox), and an LDAP search can be used to find the FQDN.
Configuration
1. Download and install the BCAAA service.
2. Set up the SiteMinder server; be sure to configure the SMSession cookie and the BCSI_USERNAME variable on the SiteMinder server.
3. Configure an LDAP, XML, or Local realm that can be used to authorize users.
4. Create and define a ProxySG SiteMinder realm. Specifically:
• Use the Agents tab to configure the BCAAA service and the SiteMinder service to work with the SiteMinder server.
Note: Refer to Volume 10: Content Policy Language Guide for details about CPL and how transactions trigger the evaluation of policy file <Proxy> and other layers.

Chapter 12: CA eTrust SiteMinder Authentication
197
• Use the SiteMinder Server tab to associate the realm with the SiteMinder server.
• Use the SiteMinder Server General tab to always redirect requests off box.
• Use the Authorization tab to set up search criteria for user IDs.
Behavior
❐ ProxySG receives a request for a user.
• If this request does not contain an SMSession cookie (user unauthenticated), the ProxySG redirects the request to the central authentication service. The URL of the service is configured in the scheme definition on the SiteMinder policy server. When the request returns from the central authentication service, the SMSession cookie is extracted and sent to the BCAAA service for validation.
• If the request does contain an SMSession cookie, the ProxySG passes the SMSession cookie through the BCAAA service for validation and authentication.
❐ The SiteMinder policy server authenticates the user and sends the LDAP attribute of the user (UID) in the BCSI_USERNAME variable to the BCAAA service, which then passes it on the ProxySG.
❐ The ProxySG uses the UID attribute to do an LDAP search, identifying the user FQDN.
❐ The ProxySG uses the FQDN to construct an LDAP query to the authorization LDAP realm server to compare and validate group membership.
You can use the result to check group-based policy.

Volume 4: Securing the Blue Coat ProxySG
198

199
Chapter 13: RADIUS Realm Authentication and Authorization
This chapter discusses RADIUS authentication and authorization.
Topics in this ChapterThis chapter includes information about the following topics:
❐ "Creating a RADIUS Realm" on page 200
❐ "Defining RADIUS Realm Properties" on page 200
❐ "Defining RADIUS Realm General Properties" on page 202
❐ "Creating the Policy" on page 205
❐ "Troubleshooting" on page 207
About RADIUSRADIUS is often the protocol of choice for ISPs or enterprises with very large numbers of users. RADIUS is designed to handle these large numbers through centralized user administration that eases the repetitive tasks of adding and deleting users and their authentication information. RADIUS also inherently provides some protection against sniffing.
Some RADIUS servers support one-time passwords. One-time passwords are passwords that become invalid as soon as they are used. The passwords are often generated by a token or program, although pre-printed lists are also used. Using one-time passwords ensures that the password cannot be used in a replay attack.
The ProxySG’s one-time password support works with products such as Secure Computing SafeWord synchronous and asynchronous tokens and RSA SecurID tokens.
The ProxySG supports RADIUS servers that use challenge/response as part of the authentication process. SafeWord asynchronous tokens use challenge/response to provide authentication. SecurID tokens use challenge/response to initialize or change PINs.
The challenge is displayed as the realm information in the authentication dialog; Blue Coat recommends that you use form authentication if you create a challenge/response realm, particularly if you use SecurID tokens.
If you set an authentication mode that uses forms, the system detects what type of question is being asked. If it is a yes/no question, it displays the query form with a yes and no button. If it is a new PIN question, the system displays a form with entry fields for the new PIN.
Note: For this release, HTTP is the only supported protocol.

Volume 4: Securing the Blue Coat ProxySG
200
For information on using form authentication, see Chapter 7: "Forms-Based Authentication" on page 121.
Using policy, you can fine-tune RADIUS realms based on RADIUS attributes. If you use the Blue Coat attribute, groups are supported within a RADIUS realm.
Creating a RADIUS Realm To create a RADIUS realm: You can create up to 40 RADIUS realms.
1. Select Configuration > Authentication > RADIUS > RADIUS Realms.
2. Click New.
3. In the Realm name field, enter a realm name.
The name can be 32 characters long and composed of alphanumeric characters and underscores. The name must start with a letter.
4. Specify the host and port for the primary RADIUS server. The default port is 1812.
5. Specify the RADIUS secret. RADIUS secrets can be up to 64 characters long and are always case sensitive.
6. Click OK.
7. Click Apply.
Defining RADIUS Realm PropertiesOnce you have created the RADIUS realm, you can change the primary host, port, and secret of the RADIUS server for that realm.
To re-define RADIUS server properties:
1. Select Configuration > Authentication > RADIUS > RADIUS Servers.
4
4
5

Chapter 13: RADIUS Realm Authentication and Authorization
201
2. From the Realm Name drop-down list, select a RADIUS realm.
3. Specify the host and port for the primary RADIUS server.
The default port is 1812. (To create or change the RADIUS secret, click Change Secret. RADIUS secrets can be up to 64 characters long and are always case sensitive.)
4. (Optional) Specify the host and port for the alternate RADIUS server.
5. From the Send credentials to server encoded with character set drop-down list, select the character set used for encoding credentials; the RADIUS server needs the same character set.
A character set is a Multipurpose Internet Mail Extension (MIME) charset name. Any of the standard charset names for encodings commonly supported by Web browsers can be used. The default is Unicode:UTF8.
6. In the Timeout Request field, enter the number of seconds the ProxySG allows for each request attempt before trying another server.
Within a timeout, multiple packets can be sent to the server, in case the network is busy and packets are lost. The default request timeout is 10 seconds.
In the Retry field, enter the number of attempts you want to permit before marking a server offline.
The client maintains an average response time from the server; the retry interval is initially twice the average. If that retry packet fails, then the next packet waits twice as long again. This increases until it reaches the timeout value. The default number of retries is 10.
7. If you are using one-time passwords, select the One-time passwords option.
23
4
5
6
7
8

Volume 4: Securing the Blue Coat ProxySG
202
You must enable one-time passwords if you created a challenge/response realm.
8. If the RADIUS server is configured to expect case-sensitive usernames and passwords, make sure the Case sensitive option is selected.
9. Click Apply.
Defining RADIUS Realm General PropertiesThe RADIUS General tab allows you to specify the display name, the refresh times, an inactivity timeout value, cookies, and a virtual URL.
To configure general settings:
1. Select Configuration > Authentication > RADIUS > RADIUS General.

Chapter 13: RADIUS Realm Authentication and Authorization
203
2. Configure name options:
a. From the Realm name drop-down list, select the RADIUS realm for which you want to change properties.
b. (Optional) In the Display Name field, change the RADIUS realm display name.
The default value for the display name is the realm name. The display name cannot be greater than 128 characters and it cannot be empty.
3. Configure refresh options:
a. Select the Use the same refresh time for all check box if you would like to use the same refresh time for all.
b. Enter the number of seconds in the Credential refresh time field.
The Credential Refresh Time is the amount of time basic credentials (username and password) are kept on the ProxySG. This feature allows the ProxySG to reduce the load on the authentication server and enables credential spoofing. It has a default setting of 900 seconds (15 minutes). You can configure this in policy for better control over the resources as policy overrides any settings made here.
Before the refresh time expires, the ProxySG authenticates the user supplied credentials against the cached credentials. If the credentials received do not match the cached credentials, they are forwarded to the authentication server in case the user password changed. After the refresh time expires, the credentials are forwarded to the authentication server for verification.
c. Enter the number of seconds in the Surrogate refresh time field.
2
3
4
5
6
7
8

Volume 4: Securing the Blue Coat ProxySG
204
The Surrogate Refresh Time allows you to set a realm default for how often a user’s surrogate credentials are refreshed. Surrogate credentials are credentials accepted in place of a user’s actual credentials. The default setting is 900 seconds (15 minutes). You can configure this in policy for better control over the resources as policy overrides any settings made here.
Before the refresh time expires, if a surrogate credential (IP address or cookie) is available and it matches the expected surrogate credential, the ProxySG authenticates the transaction. After the refresh time expires, the ProxySG verifies the user’s credentials. Depending upon the authentication mode and the user-agent, this may result in challenging the end user for credentials.
The main goal of this feature is to verify that the user-agent still has the appropriate credentials.
4. Type the number of seconds in the Inactivity timeout field to specify the amount of time a session can be inactive before being logged out.
5. If you use Basic credentials and want to cache failed authentication attempts (to reduce the load on the authentication service), enter the number of seconds in the Rejected Credentials time field.
This setting, enabled by default and set to one second, allows failed authentication attempts to be automatically rejected for up to 10 seconds. Any Basic credentials that match a failed result before its cache time expires are rejected without consulting the back-end authentication service. The original failed authentication result is returned for the new request.
All failed authentication attempts can be cached: Bad password, expired account, disabled account, old password, server down.
To disable caching for failed authentication attempts, set the Rejected Credentials time field to 0.
6. Configure cookie options:
a. Select the Use persistent cookies check box to use persistent browser cookies instead of session browser cookies.
b. Select the Verify the IP address in the cookie check box if you would like the cookies surrogate credentials to only be accepted for the IP address that the cookie was authenticated.
Disabling this allows cookies to be accepted from other IP addresses.
7. You can specify a virtual URL. For more information on the virtual URL, see "About Origin-Style Redirection" on page 40.
8. Select the Challenge user after logout check box if the realm requires the users to enter their credentials after they have logged out.
9. Click Apply.
Related CLI Syntax to Configure a RADIUS Realm❐ To enter configuration mode:

Chapter 13: RADIUS Realm Authentication and Authorization
205
SGOS#(config) security radius create-realm realm_name secret primary-server_host [primary-server_port]-or-SGOS#(config) security radius create-realm-encrypted realm_name encrypted_secret primary_host [primary_port]
❐ The following subcommands are available:
SGOS#(config radius realm_name) alternate-server encrypted-secret encrypted_secretSGOS#(config radius realm_name) alternate-server host [port]SGOS#(config radius realm_name) alternate-server secret secretSGOS#(config radius realm_name) case-sensitive {disable | enable}SGOS#(config radius realm_name) display-name display_nameSGOS#(config radius realm_name) exitSGOS#(config radius realm_name) no alternate-serverSGOS#(config radius realm_name) one-time-passwords {disable | enable}SGOS#(config radius realm_name) primary-server encrypted-secret encrypted_secretSGOS#(config radius realm_name) primary-server host [port]SGOS#(config radius realm_name) primary-server secret secretSGOS#(config radius realm_name) timeout secondsSGOS#(config radius realm_name) server-charset charsetSGOS#(config radius realm_name) server-retry countSGOS#(config radius realm_name) spoof-authentication {none | origin | proxy}
SGOS#(config radius realm_name) inactivity-timeout secondsSGOS#(config radius realm_name) refresh-time credential-refresh secondsSGOS#(config radius realm_name) refresh-time rejected-credentials-refresh secondsSGOS#(config radius realm_name) refresh-time surrogate-refresh secondsSGOS#(config radius realm_name) refresh-time authorization-refresh secondsSGOS#(config radius realm_name) cookie {persistent {enable | disable} | verify-ip {enable | disable}}
SGOS#(config radius realm_name) virtual-url url
Creating the PolicyFine-tune RADIUS realms through attributes configured by policy—CPL or VPM. You can also create RADIUS groups. To fine-tune RADIUS realms, continue with the next section. To create RADIUS groups, see "Creating RADIUS Groups" on page 207.
Note: RADIUS groups can only be configured through policy. This feature is not available through either the Management Console or the CLI.

Volume 4: Securing the Blue Coat ProxySG
206
Fine-Tuning RADIUS RealmsFine-tune RADIUS Realms by using the following attributes in the attribute.<name> and has_attribute.<name> CPL conditions and source objects in VPM.
Table 13–1 RADIUS Attributes for the attribute.<name> and has_attribute.<name> Conditions
RADIUS Attribute Name CPL Gesture Name Type (Possible Value)
Callback-ID attribute.Callback-ID String
Callback-Number attribute.Callback-Number String
Filter-ID attribute.Filter-ID String
Framed-IP-Address attribute.Framed-IP-Address IP Address
Framed-IP-Netmask attribute.Framed-IP-Netmask IP Address
Framed-MTU attribute.Framed-MTU Integer
Framed-Pool attribute.Framed-Pool Strong
Framed-Protocol attribute.Framed-Protocol Integer (1-6)
Framed-Route attribute.Framed-Route String
Idle-Timeout attribute.Idle-Timeout Integer
Login-LAT-Group attribute.Login-LAT-Group String
Login-LAT-Node attribute.Login-LAT-Node String
Login-LAT-Port attribute.Login-LAT-Port Integer
Login-LAT-Service attribute.Login-LAT-Service String
Login-IP-Host attribute.Login-IP-Host IP Address
Login-Service attribute.Login-Service Integer (0-7)
Login-TCP-Port attribute.Login-TCP-Port Integer (0-65535)
Port-Limit attribute.Port-Limit Integer
Service-Type attribute.Service-Type Integer (1-11)
Session-Timeout attribute.Session-Timeout Integer
Tunnel-Assignment-ID attribute.Tunnel-Assignment-ID String
Tunnel-Medium-Type attribute.Tunnel-Medium-Type Integer (1-15)
Tunnel-Private-Group-ID attribute.Tunnel-Private-Group-ID
String
Tunnel-Type attribute.Tunnel-Type Integer (1-12)
Blue-Coat-Group attribute.Blue-Coat-Group String

Chapter 13: RADIUS Realm Authentication and Authorization
207
Creating RADIUS GroupsCreate a RADIUS realm group by using the custom Blue Coat attribute, which can appear multiple times within a RADIUS response. It can be used to assign a user to one or more groups. Values that are found in this attribute can be used for comparison with the group condition in CPL and the group object in VPM. The group name is a string with a length from 1-247 characters. The Blue Coat Vendor ID is 14501, and the Blue-Coat-Group attribute has a Vendor Type of 1.
If you are already using the Filter-ID attribute for classifying users, you can use that attribute instead of the custom Blue-Coat-Group attribute. While the Filter-ID attribute does not work with the CPL group condition or the group object in VPM, the attribute.Filter-ID condition can be used to manage users in a similar manner.
CPL ExampleThe examples below are just part of a comprehensive authentication policy. By themselves, they are not adequate.
❐ Every RADIUS-authenticated user is allowed access the ProxySG if the RADIUS attribute service-type is set.
<Proxy> authenticate(RADIUSRealm)<Proxy> allow has_attribute.Service-Type=yes deny
❐ A group called RegisteredUsersGroup is allowed to access the ProxySG if the allow group gesture is defined.
<proxy>authenticate(RADIUSRealm)
<proxy>allow group=RegisteredUsersGroupdeny
TroubleshootingOne of five conditions can cause the following error message:
Your request could not be processed because of a configuration error: "The request timed out while trying to authenticate. The authentication server may be busy or offline."
❐ The secret is wrong.
❐ The network is so busy that all packets were lost to the RADIUS server.
❐ The RADIUS server was slow enough that the ProxySG gave up before the server responded.
❐ The RADIUS servers are up, but the RADIUS server is not running. In this case, you might also receive ICMP messages that there is no listener.
Note: Refer to Volume 10: Content Policy Language Guide for details about CPL and how transactions trigger the evaluation of policy file layers.

Volume 4: Securing the Blue Coat ProxySG
208
❐ RADIUS servers machines are not running/unreachable. Depending on the network configuration, you might also receive ICMP messages.
NotesIf you use guest authentication, remember that RADIUS realms retrieve authorization data at the same time as the user is authenticated. In some cases, the system can distinguish between an authentication and authorization failure. Where the system cannot determine if the error was due to authentication or authorization, both the authentication and authorization are considered to be failed.

209
Chapter 14: Novell Single Sign-on Authentication and Authorization
This chapter discusses the Novell® Single Sign-on (SSO) realm, which is an authentication mechanism that provides single sign-on authentication for users that authenticate against a Novell eDirectory server.
Topics in this ChapterThis chapter includes information about the following topics:
❐ "About Novell SSO Realms" on page 209
❐ "Creating a Novell SSO Realm" on page 211
❐ "Novell SSO Agents" on page 211
❐ "Adding LDAP Servers to Search and Monitor" on page 213
❐ "Querying the LDAP Search Realm" on page 214
❐ "Configuring Authorization" on page 215
❐ "Defining Novell SSO Realm General Properties" on page 216
❐ "Modifying the sso.ini File for Novell SSO Realms" on page 219
❐ "Creating the CPL" on page 220
❐ "Notes" on page 221
About Novell SSO RealmsThe mechanism uses the Novell eDirectory Network Address attribute to map the user's IP address to an LDAP FQDN. Because the mechanism is based on the user's IP address, it only works in environments where an IP address can be mapped to a unique user.
A Novell SSO realm consists of the following:
❐ BCAAA service information
❐ Novell eDirectory information
❐ Authorization realm information
❐ General realm information.
The Novell eDirectory information consists of a ProxySG LDAP realm that points to the master Novell eDirectory server that it is to be searched and monitored for user logins (see Chapter 9: "LDAP Realm Authentication and Authorization" on page 141 for information on configuring LDAP realms) and a list of eDirectory server and port combinations that specify additional servers to monitor for logins. Additional monitor servers must be specified if they contain user information that is not replicated to the master Novell eDirectory server being searched.

Volume 4: Securing the Blue Coat ProxySG
210
After a Novell SSO realm has been configured, you can write policy that authenticates and authorizes users against the Novell SSO realm.
To ensure that users who do not successfully authenticate against the Novell SSO realm are not challenged, administrators can use a realm sequence that contains the Novell SSO realm and then a policy substitution realm to use when Novell SSO authentication fails.
When a user logs into the Novell network, the user entry in Novell eDirectory is updated with the login time and the IP address that the user logged in from and the login time. The ProxySG uses BCAAA to do LDAP searches and monitoring of the configured Novell eDirectory servers to obtain the user login information and maintain a user IP address to user FQDN map.
To create the initial IP/FQDN map, the BCAAA service searches the configured master eDirectory server for all user objects within the configured base DNs that have a Network Address attribute. For each user entry returned, BCAAA parses the Network Address attribute and adds the IP/FQDN entry to the map. If an existing entry exists for that IP address, it is overwritten.
A user entry can have more than one Network Address entry in which case an entry for each IP address is added to the map. Since service accounts can login using the same IP address and subsequently overwrite entries for actual users, the BCAAA service has a configurable list of the Service names to ignore. Users can be added or removed from the list in the sso.ini file. (see "Modifying the sso.ini File for Novell SSO Realms" on page 219.)
Once the initial map has been created it is kept current by monitoring all of the eDirectory servers that contain unique partition data for the eDirectory tree. By default, the search server defined by the LDAP realm is monitored. If other servers contain data that is not replicated to the search server, they must be individually monitored. When a server is being monitored, each time a user logs in or logs out, an event message is sent to BCAAA to update its mapping of FQDNs to IP addresses.
Multiple ProxySG devices can talk to the same BCAAA service and can reference the same eDirectory servers. To avoid multiple queries to the same server, the LDAP hostname and port combination uniquely identifies an eDirectory configuration and should be shared across devices.
To ensure that BCAAA has complete map of FQDNs to IP addresses, the realm can be configured to do a full search of the configured master eDirectory server up to once per day.
The BCAAA service must be version 120 or higher and must be installed on a Windows 2000+ machine that can access the eDirectory server. The BCAAA machine does not need to have a Windows trust relationship with the eDirectory server.
Note: The Novell SSO realm works reliably only in environments where one IP address maps to one user. If an IP address cannot be mapped to a single user, authentication fails. Those with NAT systems, which uses one set of IP addresses for intranet traffic and a different set for Internet traffic, may need to use a different realm for authentication.

Chapter 14: Novell Single Sign-on Authentication and Authorization
211
A Novell SSO realm can be configured to perform no authorization, authorize against itself (the default), or authorize against another valid authorization realm.
When a Novell SSO realm is configured to authorize against itself, authorization is done through the LDAP search realm specified by the Novell SSO realm. The behavior is similar to the Novell SSO realm explicitly selecting the LDAP realm as the authorization realm.
Creating a Novell SSO Realm The Configuration > Authentication > Novell SSO > Novell SSO Realms tab allows you to create a new Novell SSO realm. Up to 40 Novell SSO realms can be created.
To Create a Novell SSO Realm through the Management Console
1. Select Configuration > Authentication > Novell SSO > Novell SSO Realms.
2. Click New.
3. In the Realm name field, enter a realm name. The name can be 32 characters long and composed of alphanumeric characters and underscores. The name must start with a letter.
4. Click OK to close the dialog.
5. Click Apply.
Novell SSO AgentsYou must configure the Novell realm so that it can find the Blue Coat Authentication and Authorization Agent (BCAAA).
Note: For information on configuring the BCAAA service, see Appendix A: "Using BCAAA" on page 255.
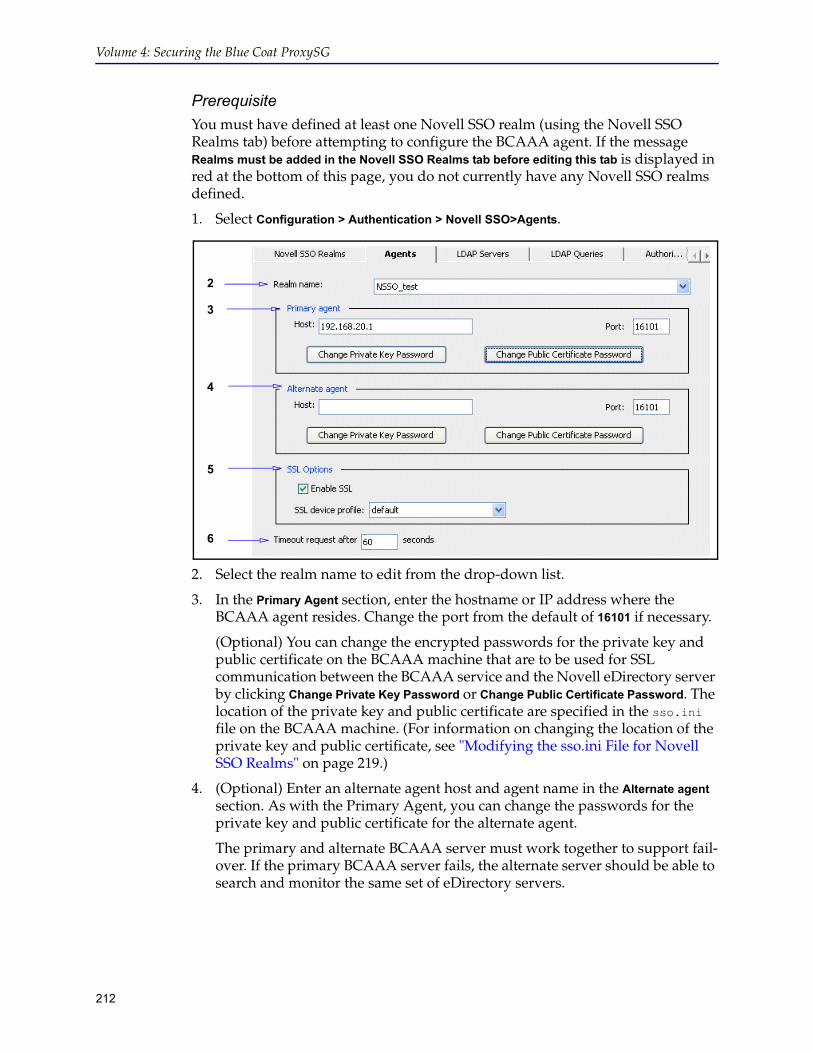
Volume 4: Securing the Blue Coat ProxySG
212
PrerequisiteYou must have defined at least one Novell SSO realm (using the Novell SSO Realms tab) before attempting to configure the BCAAA agent. If the message Realms must be added in the Novell SSO Realms tab before editing this tab is displayed in red at the bottom of this page, you do not currently have any Novell SSO realms defined.
1. Select Configuration > Authentication > Novell SSO>Agents.
2. Select the realm name to edit from the drop-down list.
3. In the Primary Agent section, enter the hostname or IP address where the BCAAA agent resides. Change the port from the default of 16101 if necessary.
(Optional) You can change the encrypted passwords for the private key and public certificate on the BCAAA machine that are to be used for SSL communication between the BCAAA service and the Novell eDirectory server by clicking Change Private Key Password or Change Public Certificate Password. The location of the private key and public certificate are specified in the sso.ini file on the BCAAA machine. (For information on changing the location of the private key and public certificate, see "Modifying the sso.ini File for Novell SSO Realms" on page 219.)
4. (Optional) Enter an alternate agent host and agent name in the Alternate agent section. As with the Primary Agent, you can change the passwords for the private key and public certificate for the alternate agent.
The primary and alternate BCAAA server must work together to support fail-over. If the primary BCAAA server fails, the alternate server should be able to search and monitor the same set of eDirectory servers.
2
3
4
5
6

Chapter 14: Novell Single Sign-on Authentication and Authorization
213
5. (Optional) Configure SSL options:
a. Click Enable SSL to enable SSL between the ProxySG and the BCAAA.
b. (Optional) Select the SSL device profile that this realm uses to make an SSL connection to a remote system. You can choose any device profile that displays in the drop-down list. For information on using device profiles, refer to Volume 4: Securing the Blue Coat ProxySG Appliance.
6. In the Timeout Request field, enter the number of seconds the ProxySG allows for each request attempt before timing out. (The default request timeout is 60 seconds.)
7. Click Apply.
Related CLI Syntax to Create and Define a Novell SSO Realm 8. At the (config) prompt:
SGOS#(config) security novell-sso create-realm realm_name SGOS#(config) security novell-sso edit-realm realm_nameSGOS#(config novell-sso realm_name) primary-agent {host hostname | port port_number}SGOS#(config novell-sso realm_name) alternate-agent {host hostname | port port_number}SGOS#(config novell-sso realm_name) ssl enableSGOS#(config novell-sso realm_name)ssl-device-profile ssl_device_profile_nameSGOS#(config novell-sso realm_name) sso-type {query-client | query-dc | query-dc-client}
Adding LDAP Servers to Search and MonitorThe BCAAA service searches and monitors specified eDirectory servers to determine which users are logged in and their Network Address attribute value. Those attribute values are converted into IP addresses, and BCAAA maintains a map of IP addresses to LDAP FQDNs.
If the eDirectory tree is partitioned across multiple servers, the realm must monitor every eDirectory server that has unique user information.
PrerequisiteYou must have defined at least one Novell SSO realm (using the Novell SSO Realms tab) before attempting to specify LDAP server configuration. If the message Realms must be added in the Novell SSO Realms tab before editing this tab is displayed in red at the bottom of this page, you do not currently have any Novell SSO realms defined.
To specify the eDirectory servers:
1. Select Configuration > Authentication > Novell SSO > LDAP Servers.
Note: The Enable SSL setting only enables SSL between the ProxySG and BCAAA. To enable SSL between BCAAA and the eDirectory server, the Enable SSL setting must be set in the LDAP search realm.

Volume 4: Securing the Blue Coat ProxySG
214
2. Select the realm name to edit from the drop-down list.
3. Select an LDAP realm from the drop-down list. The servers configured in this LDAP realm are used to do the full searches of the eDirectory tree.
4. If you have a deployment with multiple servers holding partitions that are not fully replicated to the master server, you can monitor each LDAP server individually.
a. To add an LDAP server to monitor, click New.
b. Add the IP address and port of the LDAP server and click OK to close the dialog.
c. Repeat for additional LDAP servers you need to monitor.
5. Click Apply.
Related CLI Syntax to specify the LDAP search realm and LDAP servers to monitor:
SGOS#(config) security novell-sso edit-realm realm_nameSGOS#(config novell-sso realm_name) ldap search-realm ldap_realmSGOS#(config novell-sso realm_name) ldap monitor-servers {add host [port] | clear | remove host [port]}
Querying the LDAP Search RealmYou can specify the time and days that a full search of the eDirectory tree is repeated in order to ensure that the mappings maintained by BCAAA are up to date.
2
3
4a
4b

Chapter 14: Novell Single Sign-on Authentication and Authorization
215
PrerequisiteYou must have defined at least one Novell SSO realm (using the Novell SSO Realms tab) before attempting to configure LDAP queries. If the message Realms must be added in the Novell SSO Realms tab before editing this tab is displayed in red at the bottom of this page, you do not currently have any Novell SSO realms defined.
To specify search criteria:
1. Select Configuration > Authentication > Novell SSO > LDAP Queries.
2. Select the realm name to edit from the drop-down list.
3. In the full search pane, specify the time of day you want the search to take place from the drop-down list.
4. Select or clear checkboxes to specify days to search.
5. If you have changed the Novell eDirectory Network Address or Login Time LDAP attribute name, you can enter those changed names in the Network Address LDAP name and the Login Time LDAP name fields. The names must match the LDAP names configured on the eDirectory server for authentication to succeed.
6. Click Apply.
Related CLI Syntax to Specify Search CriteriaSGOS#(config) security novell-sso edit-realm realm_nameSGOS#(config novell-sso realm_name) full-search day-of-week {all | friday | monday | no | none | saturday | sunday | thursday | tuesday | wednesday}SGOS#(config novell-sso realm_name) full-search time-of-day 0-23SGOS#(config novell-sso realm_name) ldap-name {login-time ldap_name | network-address ldap_name}
Configuring AuthorizationNovell SSO realm can be configured to do no authorization, authorize against itself (the default), or authorize against another valid authorization realm (either LDAP or Local).
2
3
4
5

Volume 4: Securing the Blue Coat ProxySG
216
PrerequisiteYou must have defined at least one Novell SSO realm (using the Novell SSO Realms tab) before attempting to configure authorization. If the message Realms must be added in the Novell SSO Realms tab before editing this tab is displayed in red at the bottom of this page, you do not currently have any Novell SSO realms defined.
To specify an authorization realm:
1. Select Configuration > Authentication > Novell SSO > Authorization.
2. From the Realm Name drop-down list, select the Novell SSO realm to edit.
3. By default, the Novell SSO realm is selected to authorize against itself by default. To select another realm, clear the Self checkbox and select an authorization realm from the drop-down list.
4. The LDAP FQDN is selected as the Authorization user name, by default. Change this if the user's authorization information resides in a different root DN. To select a different authorization name, clear the Use FQDN option and enter a different name. For example:cn=$(user.name),ou=partition,o=company
5. Click Apply.
Related CLI Syntax to Configure Authorization SettingsSGOS#(config novell-sso realm_name) authorization realm-name authorization-realm-nameSGOS#(config novell-sso realm-name) authorization username authorization-usernameSGOS#(config-novell-sso realm-name) authorization self {enable | disable}
Defining Novell SSO Realm General PropertiesThe Novell SSO General tab allows you to specify the refresh times, an inactivity timeout value, and cookies, and a virtual URL.
Novell SSO realms default to the origin-ip authentication mode when no authentication mode or the auto authentication mode is specified in policy. After a user has first successfully authenticated to the ProxySG, all subsequent requests from that same IP address for the length of the surrogate credential refresh time are authenticated as that user. If the first user is allowed or denied access,
2
3
4
Chapter 14: Novell Single Sign-on Authentication and Authorization
217
subsequent users during that same time coming from the same IP address are allowed or denied as that first user. This is true even if policy would have treated them differently if they were authenticated as themselves.
If multiple users often log in from the same IP address, it is recommended to use a shorter surrogate credential refresh timeout than the default or an authentication mode that does not use IP surrogate credentials.
PrerequisiteYou must have defined at least one Novell SSO realm (using the Novell SSO Realms tab) before attempting to set Novell SSO general properties. If the message Realms must be added in the Novell SSO Realms tab before editing this tab is displayed in red at the bottom of this page, you do not currently have any Novell SSO realms defined.
To configure Novell SSO general settings:
1. Select Configuration > Authentication > Novell SSO > Novell SSO General.

Volume 4: Securing the Blue Coat ProxySG
218
2. From the Realm name drop-down list, select the Novell SSO realm for which you want to change properties.
3. Configure refresh options:
a. Select the Use the same refresh time for all option to use the same refresh time for all.
b. Enter the number of seconds in the Surrogate refresh time field. The Surrogate Refresh Time allows you to set a realm default for how often a user’s surrogate credentials are refreshed. Surrogate credentials are credentials accepted in place of a user’s actual credentials. The default setting is 900 seconds (15 minutes). You can configure this in policy for better control over the resources as policy overrides any settings made here.
Before the refresh time expires, if a surrogate credential (IP address or cookie) is available and it matches the expected surrogate credential, the ProxySG authenticates the transaction. After the refresh time expires, the ProxySG determines which user is using the current IP address, and update the surrogate credential to authenticate with that user.
c. Enter the number of seconds in the Authorization refresh time field. The Authorization Refresh Time allows you to manage how often the authorization data is verified with the authentication realm. It has a default setting of 900 seconds (15 minutes). You can configure this in policy for better control over the resources as policy overrides any settings made here.
4. Type the number of seconds in the Inactivity timeout field to specify the amount of time a session can be inactive before being logged out.
5. Configure cookie options:
a. Select the Use persistent cookies check box to use persistent browser cookies instead of session browser cookies.
2
3
4
5
6

Chapter 14: Novell Single Sign-on Authentication and Authorization
219
b. Select the Verify the IP address in the cookie check box if you would like the cookies surrogate credentials to only be accepted for the IP address that the cookie was authenticated. Disabling this allows cookies to be accepted from other IP addresses.
6. You can specify a virtual URL. For more information on the virtual URL, see "About Origin-Style Redirection" on page 40.
7. Click Apply.
Related CLI Syntax to Configure General SettingsSGOS#(config novell-sso realm_name) inactivity-timeout secondsSGOS#(config novell-sso realm_name) refresh-time surrogate-refresh secondsSGOS#(config novell-sso realm_name) refresh-time authorization-refresh secondsSGOS#(config novell-sso realm_name) cookie {persistent {enable | disable} | verify-ip {enable | disable}}
SGOS#(config novell-sso realm_name) virtual-url url
Modifying the sso.ini File for Novell SSO RealmsThe Novell SSO realm uses the sso.ini file for configuration parameters required by the BCAAA service to manage communication with the Novell eDirectory server. Three sections in the sso.ini file are related to the Novell SSO realm: NovellSetup, NovellTrustedRoot Certificates, and SSOServiceUsers. You only need to modify settings in the NovellTrustedRoot Certificates section if the LDAP realm used by the Novell SSO realm requires that the identity of the server be verified.
The sso.ini file is located in the BCAAA installation directory.
To modify Novell SSO realms parameters:
1. Open the file in a text editor.
2. In the Novell Setup section, modify the parameters as needed (the default values are as follows):
• MonitorRetryTime=30
• SearchRetryTime=30
• TrustedRootCertificateEncoding=der
• PublicCertificateEncoding=der
• PrivateKeyFile=
Note: The changes to the sso.ini file have no effect until the BCAAA service is restarted.

Volume 4: Securing the Blue Coat ProxySG
220
• PrivateKeyEncoding=der
3. If the LDAP realm used by the Novell SSO realm requires that the identity of the server be verified, add the paths to the Trusted root certificate files in the NovellTrustedRootCertificates section.
4. In the SSOServiceUsers section, list the names of users who can log in with eDirectory credentials on behalf of the service and mask the identity of the logged-on user.
Listing these users here forces the BCAAA service to ignore them for authentication purposes.
5. Save the sso.ini file.
Creating the CPLYou can create CPL policies now that you have completed Novell SSO realm configuration. Be aware that the examples below are just part of a comprehensive authentication policy. By themselves, they are not adequate for your purposes.
Refer to Volume 10: Content Policy Language Guide for details about CPL and how transactions trigger the evaluation of policy file layers.
❐ Every Novell SSO-authenticated user is allowed access the ProxySG.
<Proxy>authenticate(NSSORealm)
❐ Group membership is the determining factor in granting access to the ProxySG.
<Proxy>authenticate(NSSORealm)
<Proxy>group=”cn=proxyusers, ou=groups, o=myco” ALLOW
deny
Using Single Sign-On Realms and Proxy ChainsSome Application Delivery Network (ADN) configurations mask the source IP address of the request. For example, if the path for a request is:
client workstation > branch proxy > data center proxy > gateway proxy
policy running on the gateway might see the IP address of the data center proxy rather than the IP address of the client workstation.
In this ADN configuration, policy must be configured so that Windows SSO, Novell SSO, and policy substitution realms authenticate users correctly.
Note: The examples below assume the default policy condition is allow.
Note: The source IP address is not masked if you use the reflect client ip attribute.

Chapter 14: Novell Single Sign-on Authentication and Authorization
221
Use the user.login.address and authenticate.credentials.address policy gestures to override the IP address of the credentials used for authentication and match the IP address of the authenticated user.
You can also use the x-cs-user-login-address substitution to log this event.
ExamplesIn the following example, the address to use for authenticating with myrealm is set to the address received from the HTTP Client-IP header.
<proxy> authenticate(myrealm)\ authenticate.credentials.address($(request.header.Client-IP))
In the following example, the user is authenticated if logged in from the 1.2.3.0/24 subnet.
<proxy>user.login.address=1.2.3.0/24 allow
Notes❐ The Novell SSO realm works reliably only in environments where one IP
address maps to one user. NAT environments are not supported.
❐ Novell SSO realms are not supported in IPX environments.
❐ Event monitoring of eDirectory is only compatible with eDirectory 8.7+.
❐ Upgrade to Novell client 4.91 SP1 or later if you experience issues with the Network Address attribute not being updated during login.
❐ Novell SSO realms do not use user credentials so they cannot spoof authentication information to an upstream server.
❐ If an upstream proxy is doing Novell SSO authentication, all downstream proxies must send the client IP address.
❐ There can be response time issues between the BCAAA service and the eDirectory servers during searches; configure the timeout for LDAP searches to allow the eDirectory server adequate time to reply.
Note: The user.login.address condition only works correctly if you use the authenticate.credentials.address property to set the address.

Volume 4: Securing the Blue Coat ProxySG
222

223
Chapter 15: Sequence Realm Authentication
This chapter discusses how to configure the ProxySG associate authentication realms.
Topics in this ChapterThis chapter includes information about the following topics:
❐ "About Sequencing" on page 223
❐ "Adding Realms to a Sequence Realm" on page 223
❐ "Creating a Sequence Realm" on page 224
❐ "Defining Sequence Realm General Properties" on page 226
❐ "Tips" on page 227
About SequencingAfter a realm is configured, you can associate it with other realms to allow Blue Coat to search for the proper authentication credentials for a specific user. That is, if the credentials are not acceptable to the first realm, they are sent to the second, and so on until a match is found or all the realms are exhausted. This is called sequencing.
For example, if a company has one set of end-users authenticating against an LDAP server and another using NTLM, a sequence realm can specify to attempt NTLM authentication first; if that fails because of a user-correctable error (such as credentials mismatch or a user not in database) then LDAP authentication can be specified to try next. You can also use sequences to fall through to a policy substitution realm if the user did not successfully authenticate against one of the earlier realms in the sequence.
Adding Realms to a Sequence RealmConsider the following rules for using realm sequences:
❐ Ensure the realms to be added to the sequence are customized to your needs. Check each realm to be sure that the current values are correct. For IWA, verify that the Allow Basic Credentials option is set correctly.
❐ All realms in the realm sequence must exist and cannot be deleted or renamed while the realm sequence references them.
❐ Only one IWA realm is allowed in a realm sequence.
Note: Errors such as server down do not fall through to the next realm in the sequence. Those errors result in an exception returned to the user. Only errors that are end-user correctable result in the next realm in the sequence being attempted.
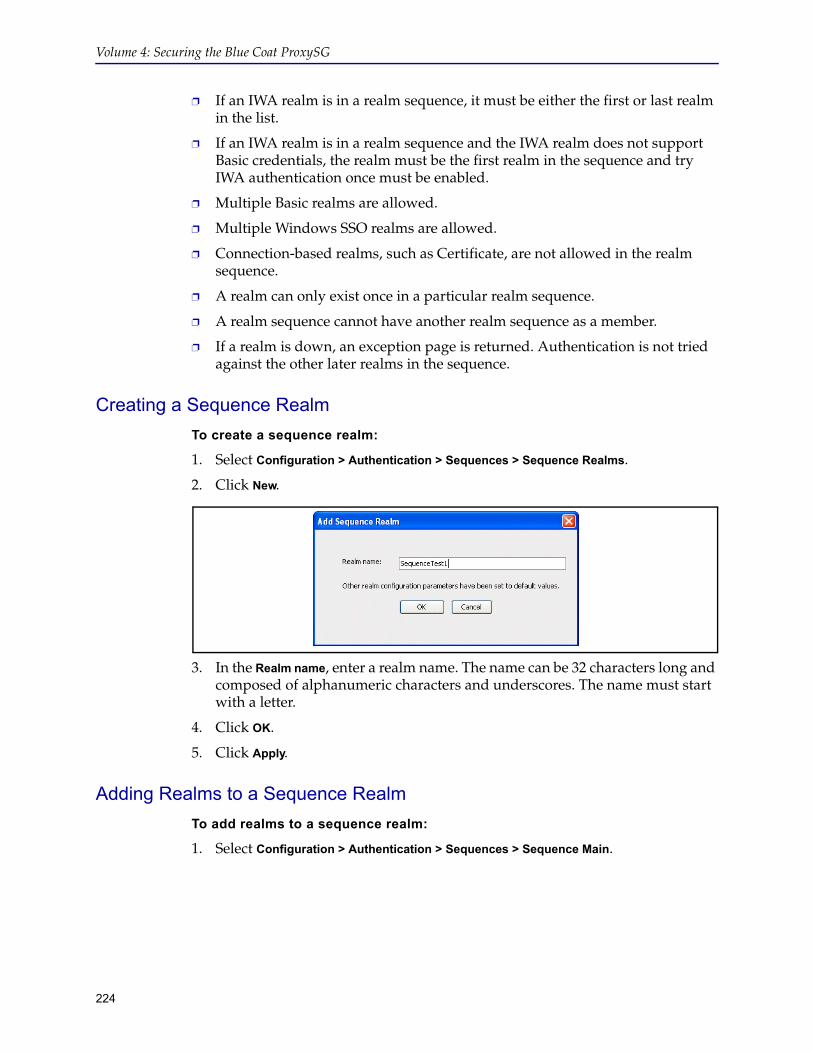
Volume 4: Securing the Blue Coat ProxySG
224
❐ If an IWA realm is in a realm sequence, it must be either the first or last realm in the list.
❐ If an IWA realm is in a realm sequence and the IWA realm does not support Basic credentials, the realm must be the first realm in the sequence and try IWA authentication once must be enabled.
❐ Multiple Basic realms are allowed.
❐ Multiple Windows SSO realms are allowed.
❐ Connection-based realms, such as Certificate, are not allowed in the realm sequence.
❐ A realm can only exist once in a particular realm sequence.
❐ A realm sequence cannot have another realm sequence as a member.
❐ If a realm is down, an exception page is returned. Authentication is not tried against the other later realms in the sequence.
Creating a Sequence RealmTo create a sequence realm:
1. Select Configuration > Authentication > Sequences > Sequence Realms.
2. Click New.
3. In the Realm name, enter a realm name. The name can be 32 characters long and composed of alphanumeric characters and underscores. The name must start with a letter.
4. Click OK.
5. Click Apply.
Adding Realms to a Sequence RealmTo add realms to a sequence realm:
1. Select Configuration > Authentication > Sequences > Sequence Main.

Chapter 15: Sequence Realm Authentication
225
2. Add a realm to the sequence:
a. Click New. The Member Realm dialog displays.
b. From the Member Realm To Add drop-down list, select an existing realm to the realm sequence. Remember that each realm can be used only once in a realm sequence.
c. Click OK to close the dialog.
3. Click Apply.
4. Repeat from Step a until you have added all necessary realms.
2a
2b

Volume 4: Securing the Blue Coat ProxySG
226
5. To change the order that the realms are checked, use the promote/demote buttons. When you add an IWA realm, it is placed first in the list and you can allow the realm sequence to try IWA authentication only once. If you demote the IWA entry, it becomes last in the sequence and the default of checking IWA multiple times is enabled.
6. If you permit authentication or authorization errors, you can select the Try next realm on tolerated error checkbox to specify that the next realm on the list should be attempted if authentication in the previous realm has failed with a permitted error. The default value is to not attempt the next realm and fall out of the sequence. (For information on using permitted errors and guest authentication, see "Permitting Users to Login with Authentication or Authorization Failures" on page 42.)
7. Click Apply.
Defining Sequence Realm General Properties The Sequence General tab allows you to specify the display name and a virtual URL.
1. Select Configuration > Authentication > Sequences > Sequence General.
5
6

Chapter 15: Sequence Realm Authentication
227
2. From the Realm name drop-down list, select the Sequence realm for which you want to change properties.
3. (Optional) If required, change the Sequence realm name in the Display Name field. The default value for the display name is the realm name. The display name cannot be longer than 128 characters and it cannot be null.
4. You can specify a virtual URL based on the individual realm sequence. For more information on the virtual URL, see Chapter 3: "Controlling Access to the Internet and Intranet" on page 29.
5. Click Apply.
Related CLI Syntax to Configure a Sequence Realm❐ To enter configuration mode:
SGOS#(config) security sequence create-realm realm_sequence_name(config) security sequence edit-realm realm_sequence_name
❐ The following subcommands are available:
#(config sequence realm_sequence_name)#(config sequence realm_sequence_name) display-name display_name#(config sequence realm_sequence_name) exit#(config sequence realm_sequence_name) IWA-only-once {disable | enable}#(config sequence realm_sequence_name) realm {add | demote | promote | remove} {realm_name | clear}#(config sequence realm_sequence_name) try-next-realm-on-error {disable | enable}#(config sequence realm_sequence_name) rename new_realm_name#(config sequence realm_sequence_name) view#(config sequence realm_sequence_name) virtual-url url
Tips❐ Explicit Proxy involving a sequence realm configured with an NTLM/IWA
realm and a substitution realm.
Internet Explorer (IE) automatically sends Windows credentials in the Proxy-Authorization: header when the ProxySG issues a challenge for NTLM/IWA. The prompt for username/password appears only if NTLM authentication fails. However, in the case of a sequence realm configured with an NTLM/IWA realm and a substitution realm, the client is authenticated as a guest in the policy substitution realm, and the prompt allowing the user to correct the NTLM credentials never appears.
2
3
4

Volume 4: Securing the Blue Coat ProxySG
228
❐ Transparent Proxy setup involving a sequence realm configured with an NTLM/IWA realm and a substitution realm.
The only way the ProxySG differentiates between a domain and non-domain user is though the NTLM/IWA credentials provided during the authentication challenge.
IE does not offer Windows credentials in the Proxy-Authorization: header when the Proxy issues a challenge for NTLM/IWA unless the browser is configured to do so. In this case, the behavior is the same as for explicit proxy.
If IE is not configured to offer Windows credentials, the browser issues a prompt for username/password, allowing non-domain users to be authenticated as guests in the policy substitution realm by entering worthless credentials.

229
Chapter 16: Windows Single Sign-on Authentication
This chapter describes how to configure he Windows Single Sign-on (SSO) realm, which is an authentication mechanism available on Windows networks.
Topics in this ChapterThis chapter includes information about the following topics:
❐ "How Windows SSO Realms Work" on page 229
❐ "Creating a Windows SSO Realm" on page 232
❐ "Windows SSO Agents" on page 232
❐ "Configuring Authorization" on page 234
❐ "Defining Windows SSO Realm General Properties" on page 235
❐ "Modifying the sso.ini File for Windows SSO Realms" on page 237
❐ "Creating the CPL" on page 239
❐ "Notes" on page 240
How Windows SSO Realms WorkIn a Windows SSO realm, the client is never challenged for authentication. Instead, the BCAAA agent collects information about the current logged on user from the domain controller and/or by querying the client machine. Then the IP address of an incoming client request is mapped to a user identity in the domain. If authorization information is also needed, then another realm (LDAP or local) must be created. For more information, see "How Windows SSO Authorization Works" on page 231.
To authenticate a user, the Windows SSO realm uses two methods, either separately or together:
❐ Domain Controller Querying: The domain controller is queried to identify which users are connecting to, or authenticating with, the domain controller. This can be used to infer the identity of the user at a particular workstation.
❐ Client Querying: The client workstation is queried to determine who the client workstation thinks is logged in.
Note: The Windows SSO realm works reliably only in environments where one IP address maps to one user. If an IP address cannot be mapped to a single user, authentication fails. Those with NAT systems, which uses one set of IP addresses for intranet traffic and a different set for Internet traffic, should use a different realm for authentication

Volume 4: Securing the Blue Coat ProxySG Appliance
230
❐ When Domain Controller Querying and Client Querying are both used, the Domain Controller Query result is used if it exists and is still within the valid time-to-live as configured in the sso.ini file. If the Domain Controller Query result is older than the configured time-to-live, the client workstation is queried.
For the most complete solution, an IWA realm could be configured at the same time as the Windows SSO realm and both realms added to a realm sequence. Then, if the Windows SSO realm failed to authenticate the user, the IWA realm could be used. For information on using a sequence realm, see Chapter 15: "Sequence Realm Authentication" on page 223.
How Windows SSO Works with BCAAAThe server side of the authentication exchange is handled by the Blue Coat Authentication and Authorization Agent (BCAAA). Windows SSO uses a single BCAAA process for all realms and proxies that use SSO.
BCAAA must be installed on a domain controller or member server. By default, the BCAAA service authenticates users in all domains trusted by the computer on which it is running. When using Domain Controller Querying, the BCAAA service can be configured to only query certain domain controllers in those trusted domains.
By default the BCAAA service is installed to run as LocalSystem. For a Windows SSO realm to have correct permissions to query domain controllers and clients, the user who BCAAA runs under must be an authenticated user of the domain.
When the Windows SSO realm is configured to do Client Querying, the user that BCAAA runs under must be an authenticated user of the domain. For failover purposes, a second BCAAA can be installed and configured to act as an alternate BCAAA in the Windows SSO realm. The alternate BCAAA service is used in the event of a failure with the primary BCAAA service configured in the realm.
BCAAA Synchronization Optionally, when using Domain Controller Querying, you can configure a BCAAA service to use another BCAAA service as a synchronization server. Whenever a BCAAA service restarts, it contacts its synchronization server and updates the logon state. Two given BCAAA services can use each other as their synchronization server. Thus, each BCAAA service can act as a synchronization server to provide logon state to other BCAAA services, as well as acting as a synchronization client to update its logon state from another BCAAA service.
Note: Before Domain Controller Querying or Client Querying can be used, the sso.ini file, located in the same directory as the BCAAA service, must be modified. For information on modifying this file, see "Modifying the sso.ini File for Windows SSO Realms" on page 237.
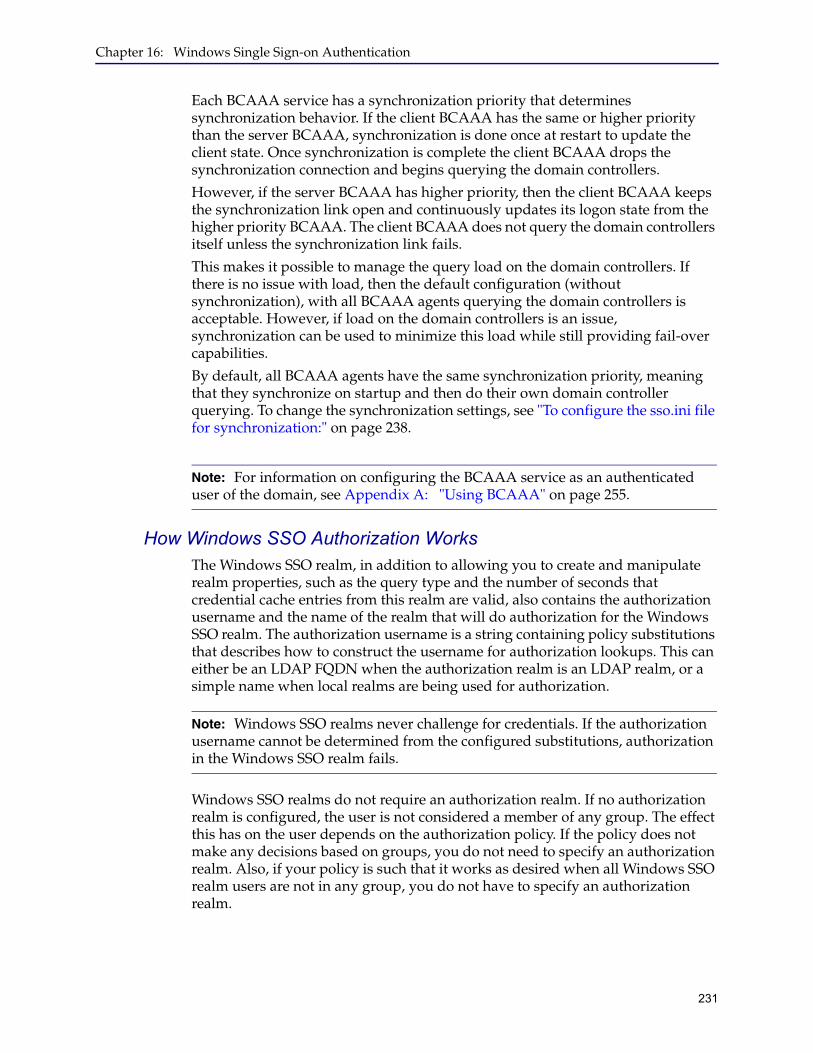
Chapter 16: Windows Single Sign-on Authentication
231
Each BCAAA service has a synchronization priority that determines synchronization behavior. If the client BCAAA has the same or higher priority than the server BCAAA, synchronization is done once at restart to update the client state. Once synchronization is complete the client BCAAA drops the synchronization connection and begins querying the domain controllers.
However, if the server BCAAA has higher priority, then the client BCAAA keeps the synchronization link open and continuously updates its logon state from the higher priority BCAAA. The client BCAAA does not query the domain controllers itself unless the synchronization link fails.
This makes it possible to manage the query load on the domain controllers. If there is no issue with load, then the default configuration (without synchronization), with all BCAAA agents querying the domain controllers is acceptable. However, if load on the domain controllers is an issue, synchronization can be used to minimize this load while still providing fail-over capabilities.
By default, all BCAAA agents have the same synchronization priority, meaning that they synchronize on startup and then do their own domain controller querying. To change the synchronization settings, see "To configure the sso.ini file for synchronization:" on page 238.
How Windows SSO Authorization WorksThe Windows SSO realm, in addition to allowing you to create and manipulate realm properties, such as the query type and the number of seconds that credential cache entries from this realm are valid, also contains the authorization username and the name of the realm that will do authorization for the Windows SSO realm. The authorization username is a string containing policy substitutions that describes how to construct the username for authorization lookups. This can either be an LDAP FQDN when the authorization realm is an LDAP realm, or a simple name when local realms are being used for authorization.
Windows SSO realms do not require an authorization realm. If no authorization realm is configured, the user is not considered a member of any group. The effect this has on the user depends on the authorization policy. If the policy does not make any decisions based on groups, you do not need to specify an authorization realm. Also, if your policy is such that it works as desired when all Windows SSO realm users are not in any group, you do not have to specify an authorization realm.
Note: For information on configuring the BCAAA service as an authenticated user of the domain, see Appendix A: "Using BCAAA" on page 255.
Note: Windows SSO realms never challenge for credentials. If the authorization username cannot be determined from the configured substitutions, authorization in the Windows SSO realm fails.
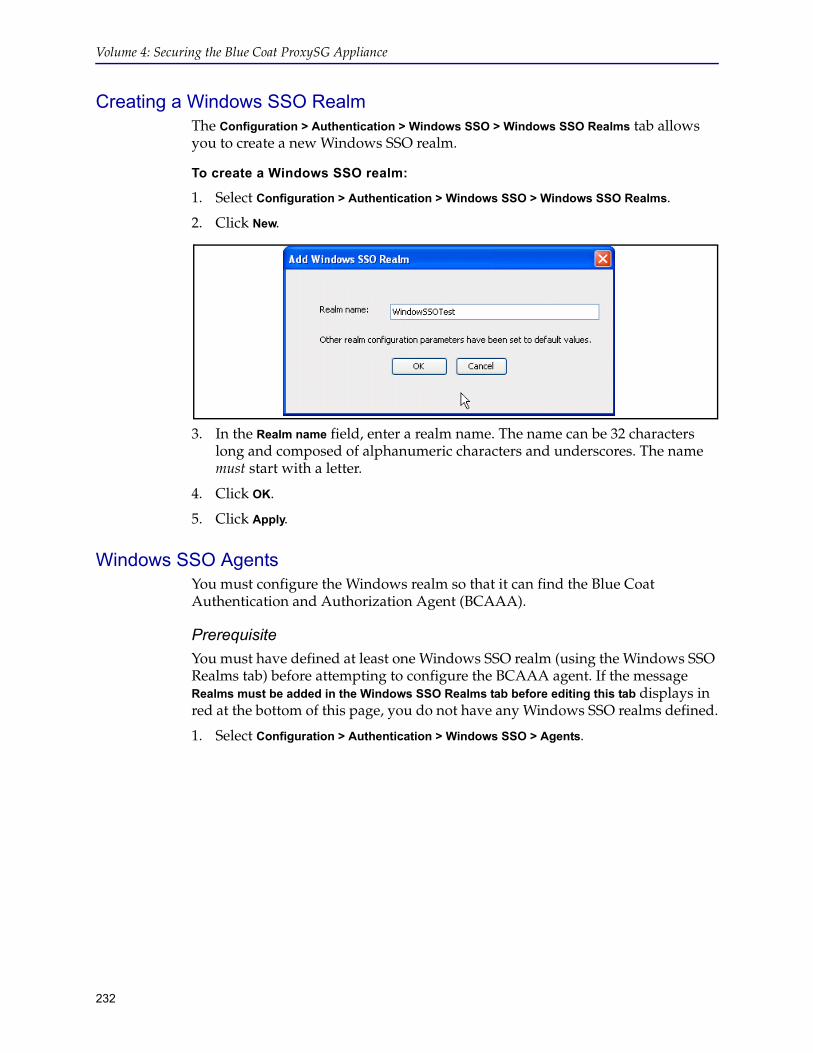
Volume 4: Securing the Blue Coat ProxySG Appliance
232
Creating a Windows SSO Realm The Configuration > Authentication > Windows SSO > Windows SSO Realms tab allows you to create a new Windows SSO realm.
To create a Windows SSO realm:
1. Select Configuration > Authentication > Windows SSO > Windows SSO Realms.
2. Click New.
3. In the Realm name field, enter a realm name. The name can be 32 characters long and composed of alphanumeric characters and underscores. The name must start with a letter.
4. Click OK.
5. Click Apply.
Windows SSO AgentsYou must configure the Windows realm so that it can find the Blue Coat Authentication and Authorization Agent (BCAAA).
PrerequisiteYou must have defined at least one Windows SSO realm (using the Windows SSO Realms tab) before attempting to configure the BCAAA agent. If the message Realms must be added in the Windows SSO Realms tab before editing this tab displays in red at the bottom of this page, you do not have any Windows SSO realms defined.
1. Select Configuration > Authentication > Windows SSO > Agents.

Chapter 16: Windows Single Sign-on Authentication
233
2. Select the realm name to edit from the drop-down list.
3. In the Primary agent area (Host field), enter the hostname or IP address where the BCAAA agent resides. Change the port from the default of 16101 if necessary.
4. (Optional) Enter an alternate agent host and agent name in the Alternate agent area (Host field). The primary and alternate BCAAA server must work together to support fail-over. If the primary BCAAA server fails, the alternate server should be able to provide the same mappings for the IP addresses.
5. (Optional) Configure SSL options:
a. Click Enable SSL to enable SSL between the ProxySG and BCAAA.
b. (Optional) Select the SSL device profile that this realm uses to make an SSL connection to a remote system. You can choose any device profile that displays in the drop-down list. For information on using device profiles, see Appendix C: "Managing SSL Traffic" on page 287.
6. In the Timeout Request field, type the number of seconds the ProxySG allows for each request attempt before timing out. (The default request timeout is 60 seconds.)
7. In the Query Type field, select the method you want to use from the drop-down menu.
If all of the client computers can be queried directly, then the most accurate results can be provided by the Query Clients option.
By default the Windows SSO realm is configured for Domain Controller Querying. Note that the BCAAA service is disabled by default, so it must be enabled manually before using the Domain Controller Querying option. For more information on enabling Domain Controller Querying in the BCAAA service, see "Modifying the sso.ini File for Windows SSO Realms" on page 237.
2
3
4
5
6
7

Volume 4: Securing the Blue Coat ProxySG Appliance
234
Client Querying is blocked by the Windows XP SP2 firewall. This can be overridden through domain policy. If the firewall setting Allow remote administration exception or Allow file and printer sharing exception or Define port exceptions (with port 445) is enabled, then the query will work.
If an authentication mode without surrogate credentials is being used (Proxy or Origin authenticate mode), then the Query Domain Controller and Client and Query Client options can cause too much traffic when querying the clients, as each authentication request results in a request to the BCAAA service, which can result in a client workstation query depending on the client query time-to-live. If the client workstation querying traffic is a concern, the Query Domain Controllers option should be used instead.
8. Click Apply.
Related CLI Syntax to Create and Define a Windows SSO RealmAt the (config) prompt, enter the following command to create a Windows SSO realm:
SGOS#(config) security windows-sso create-realm realm_name
where realm_name is the name of the Windows SSO realm.
To redefine the Windows SSO realm configuration for the realm you just created, enter the following commands:
SGOS#(config) security windows-sso edit-realm realm_nameSGOS#(config windows-sso realm_name) primary-agent {host hostname | port port_number}SGOS#(config windows-sso realm_name) alternate-agent {host hostname | port port_number}SGOS#(config windows-sso realm_name) ssl enableSGOS#(config windows-sso realm_name) ssl-device-profile ssl_device_profile_nameSGOS#(config windows-sso realm_name) sso-type {query-client | query-dc | query-dc-client}
Configuring AuthorizationAfter the Windows SSO realm is created, you can use the Windows SSO Authorization tab to configure authorization for the realm.
PrerequisiteYou must have defined at least one Windows SSO realm (using the Windows SSO Realms tab) before attempting to set Windows SSO realm properties. If the message Realms must be added in the Windows SSO Realms tab before editing this tab is displayed in red at the bottom of this page, you do not currently have any Windows SSO realms defined.
1. Select Configuration > Authentication > Windows SSO > Authorization.
Note: Windows SSO realms do not require an authorization realm. If the policy does not make any decisions based on groups, you do not need to specify an authorization realm.

Chapter 16: Windows Single Sign-on Authentication
235
2. Configure authorization options:
a. From the Realm name drop-down list, select the Windows SSO realm for which you want to change realm properties.
b. (Optional) From the Authorization realm name drop-down list, select the previously-configured realm used to authorize users.
To construct usernames, remember that the authorization username attributes is a string that contains policy substitutions. When authorization is required for the transaction, the character string is processed by the policy substitution mechanism, using the current transaction as input. The resulting string becomes the user's authorization name for the current transaction.
c. By default, the LDAP FQDN is selected as the Authorization user name. Change this value if the user's authorization information resides in a different root DN. To use a different authorization name, de-select Use FQDN and enter a different name, for example:
cn=$(user.name),ou=partition,o=company
3. Click Apply.
Related CLI Syntax to Configure Authorization Settings SGOS#(config windows-sso realm_name) authorization realm-name authorization-realm-nameSGOS#(config windows-sso realm_name) authorization username authorization-username
Defining Windows SSO Realm General PropertiesThe Windows SSO General tab allows you to specify the display name, the refresh times, an inactivity timeout value, cookies, and a virtual URL.
Table 16–1 Common Substitutions Used in the Authorization username Field
ELFF Substitution CPL Equivalent Description
x-cs-auth-domain $(user.domain) The Windows domain of the authenticated user.
cs-username $(user.name) The relative username of the authenticated user.

Volume 4: Securing the Blue Coat ProxySG Appliance
236
Windows SSO realms default to the origin-ip authentication mode when either no authentication mode or the auto authentication mode is specified in policy. After a user has first successfully authenticated to the ProxySG, all subsequent requests from that same IP address for the length of the surrogate credential refresh time are authenticated as that user. If the first user is allowed or denied access, subsequent users during that same time coming from the same IP address are allowed or denied as that first user. This is true even if policy would have treated them differently if they were authenticated as themselves.
If multiple users often log in from the same IP address, it is recommended to use a shorter surrogate credential refresh timeout than the default or an authentication mode that uses cookie surrogate credentials.
PrerequisiteYou must have defined at least one Windows SSO realm (using the Windows SSO Realms tab) before attempting to set Windows SSO general properties. If the message Realms must be added in the Windows SSO Realms tab before editing this tab displays in red at the bottom of this page, you do not currently have any Windows SSO realms defined.
To configure general settings:
1. Select Configuration > Authentication > Windows SSO > Windows SSO General.
2. From the Realm name drop-down list, select the Windows SSO realm for which you want to change properties.
3. Configure refresh options:
a. Select the Use the same refresh time for all check box if you would like to use the same refresh time for all.
b. Enter the number of seconds in the Surrogate refresh time field. The Surrogate Refresh Time allows you to set a realm default for how often a user’s surrogate credentials are refreshed. Surrogate credentials are credentials accepted in place of a user’s actual credentials. The default setting is 900 seconds (15 minutes). You can configure this in policy for
2
3
4
5
6

Chapter 16: Windows Single Sign-on Authentication
237
better control over the resources as policy overrides any settings made here. Before the refresh time expires, if a surrogate credential (IP address or cookie) is available and it matches the expected surrogate credential, the ProxySG authenticates the transaction. After the refresh time expires, the ProxySG determines which user is using the current IP address, and update the surrogate credential to authenticate with that user.
c. Enter the number of seconds in the Authorization refresh time field. The Authorization Refresh Time allows you to manage how often the authorization data is verified with the authentication realm. It has a default setting of 900 seconds (15 minutes). You can configure this in policy for better control over the resources as policy overrides any settings made here.
4. Enter the number of seconds in the Inactivity timeout field to specify the amount of time a session can be inactive before being logged out.
5. Configure cookie options:
a. Select the Use persistent cookies check box to use persistent browser cookies instead of session browser cookies.
b. Select the Verify the IP address in the cookie check box if you would like the cookies surrogate credentials to only be accepted for the IP address that the cookie was authenticated. Disabling this allows cookies to be accepted from other IP addresses.
6. You can specify a virtual URL. For more information on the virtual URL, see "About Origin-Style Redirection" on page 40.
7. Click Apply.
Related CLI Syntax to Configure General Settings ISGOS#(config windows-sso realm_name) inactivity-timeout secondsSGOS#(config windows-sso realm_name) refresh-time surrogate-refresh secondsSGOS#(config windows-sso realm_name) refresh-time authorization-refresh secondsSGOS#(config windows-sso realm_name) cookie {persistent {enable | disable} | verify-ip {enable | disable}}
SGOS#(config windows-sso realm_name) virtual-url url
Modifying the sso.ini File for Windows SSO RealmsTo enable the method of authentication querying you choose, you must modify the sso.ini file by adding domain controllers you want to query and user accounts you want to ignore.
The sso.ini file is located in the BCAAA installation directory.
If you are only using one method of querying, you only need configure the specific settings for that method. If you plan to use both methods to query, you must configure all the settings.

Volume 4: Securing the Blue Coat ProxySG Appliance
238
To configure the sso.ini file for Domain Controller Querying
1. Open the file in a text editor.
2. In the section DCQSetup, uncomment the line: DCQEnabled=1.
3. In the section DCQSetup, set the ValidTTL time to mark users as logged out after a defined number of seconds. This prevents stale mappings in the IP-to-user-table. For example, setting ValidTTL to 86400 requires users log into their workstations at least once per day in order to be considered logged in by the ProxySG.
4. In the section DCQDomainControllers, list the domain controllers you want to query or the IP address ranges of interest.
By default all domain controllers that are in the forest or are trusted are queried. In large organizations, domain controllers that are not of interest for the ProxySG installation might be queried. The sso.ini file can be used to list the domain controllers of interest or IP address ranges of interest.
5. In the section SSOServiceUsers, list the domain names of users who can access the domain controller on behalf of the service and mask the identity of the logged-on user.
Listing these users here forces the BCAAA service to ignore them for authentication purposes.
6. Save the sso.ini file.
To configure the sso.ini file for client querying:
1. Open the file in a text editor.
2. Review the TTL times in the ClientQuerySetup section to be sure they are appropriate for your network environment.
3. Update the SSOServiceUsers section to ignore domain users used for services.
4. Save the sso.ini file.
To configure the sso.ini file for synchronization:
1. Open the file in a text editor.
2. Update the section SSOSyncSetup (the defaults are listed below). Note that explanations of each setting are provided in the sso.ini file.
Note: The changes to the sso.ini file have no effect until the BCAAA service is restarted.
Note: Before you use the Windows SSO realm, you must change the BCAAA service to run as a domain user, and, if using XP clients, update the domain policy to allow the client query to pass through the firewall.
For information on installing and configuring the BCAAA service, see Appendix A: "Using BCAAA" on page 255.

Chapter 16: Windows Single Sign-on Authentication
239
• ServerPriority=100
• EnableSyncServer=1
• SyncPortNumber=16102
• UseSSL=0
• VerifyCertificate=0
• QueryDelta=10
• RetrySyncTime=60
3. Update the section SSOSyncServer with the IP address or hostname of the BCAAA service to use a synchronization server.
4. In the section SSOSyncClients, list the IP addresses or hostnames of the BCAAA services that will use this BCAAA service as their synchronization service.
5. Save the sso.ini file.
Creating the CPLYou can create CPL policies now that you have completed Windows SSO realm configuration. Be aware that the examples below are just part of a comprehensive authentication policy. By themselves, they are not adequate for your purposes.
The examples below assume the default policy condition is allow. On new systems, the default policy condition is deny.
❐ Every Windows SSO-authenticated user is allowed access the ProxySG.<Proxy>authenticate(WSSORealm)
❐ Group membership is the determining factor in granting access to the ProxySG.<Proxy>authenticate(WSSORealm)
<Proxy>group=”cn=proxyusers, ou=groups, o=myco” ALLOWdeny
Using Single Sign-On Realms and Proxy ChainsSome Application Delivery Network (ADN) configurations mask the source IP address of the request. For example, if the path for a request is:
client workstation > branch proxy > data center proxy > gateway proxy
Policy running on the gateway might see the IP address of the data center proxy rather than the IP address of the client workstation.
Note: Refer to Volume 10: Content Policy Language Guide for details about CPL and how transactions trigger the evaluation of policy file layers.

Volume 4: Securing the Blue Coat ProxySG Appliance
240
In this ADN configuration, policy needs to be configured so that Windows SSO, Novell SSO, and policy substitution realms can authenticate users correctly.
Use the user.login.address and authenticate.credentials.address policy gestures to override the IP address of the credentials used for authentication and match the IP address of the authenticated user.
You can also use the x-cs-user-login-address substitution to log this event.
ExamplesIn the following example, the address to use for authenticating with myrealm is set to the address received from the HTTP Client-IP header.
<proxy> authenticate(myrealm)\ authenticate.credentials.address($(request.header.Client-IP))
In the following example, the user is authenticated if logged in from the 1.2.3.0/24 subnet.
<proxy>user.login.address=1.2.3.0/24 allow
Notes❐ The Windows SSO realm works reliably only in environments where one IP
address maps to one user.
❐ This realm never uses a password.
❐ When doing domain controller querying, the Windows SSO realm can lose the logon if the NetBIOS computer name cannot by determined through a DNS query or a NetBIOS query. The DNS query can fail if the NetBIOS name is different than the DNS host name or if the computer is in a different DNS domain than the BCAAA computer and the BCAAA computer is not set up to impute different DNS domains.
The NetBIOS query can fail because the NetBIOS broadcast does not reach the target computer. This can happen if the computer is behind a firewall that is not forwarding NetBIOS requests or if the computer is on a subnet that is not considered to be local to the BCAAA server.
To prevent this issue, the BCAAA machine must be configured to be able to query the NetBIOS name of any computer of interest and get the correct IP address.
Note: The source IP address is not masked if you use the reflect client ip attribute.
Note: The user.login.address condition only works correctly if you use the authenticate.credentials.address property to set the address.

Chapter 16: Windows Single Sign-on Authentication
241
One workaround is to use a WINS server. This works like a DNS server but handles NetBIOS lookups.

Volume 4: Securing the Blue Coat ProxySG Appliance
242

243
Chapter 17: Using XML Realms
This chapter discusses XML realms, which are used to integrate SGOS with the authentication/authorization protocol. If you use an authentication or authorization protocol that is not natively supported by Blue Coat, you can use the XML realm.
Topics in this ChapterThis chapter includes information about the following topics:
❐ "About XML Realms"
❐ "Before Creating an XML Realm" on page 244
❐ "Creating an XML Realm" on page 244
❐ "Configuring XML Servers" on page 245
❐ "Configuring XML Options" on page 247
❐ "Configuring XML Realm Authorization" on page 247
❐ "Configuring XML General Realm Properties" on page 249
❐ "Creating the CPL" on page 253
❐ "Viewing Statistics" on page 253
About XML RealmsAn XML realm uses XML messages to request authentication and authorization information from an HTTP XML service (the XML responder that runs on an external server). The XML realm (the XML requestor) supports both HTTP GET and HTTP POST methods to request an XML response. The XML messages are based on SOAP 1.2.
The XML responder service accepts XML requests from the ProxySG, communicates with an authentication or authorization server, and responds with the result. When the realm is used to authenticate users, it challenges for Basic credentials. The username and password are then sent to the XML responder to authenticate and authorize the user.
The XML realm can place the username and password in the HTTP headers of the request or in the body of the XML POST request. If the credentials are placed in the HTTP headers, the Web server must do the authentication and the XML service just handles authorization. If credentials are placed in the XML request body, the XML service handles both authentication and authorization.
XML messages must conform to the Blue Coat XML realm schema. This is an XML schema based on SOAP 1.2. The schema can be found at http://www.bluecoat.com/xmlns/xml-realm/1.0.
Volume 4: Securing the Blue Coat ProxySG
244
An authenticate request sends the credentials to the XML responder and optionally sends the groups and attributes referenced in policy. The XML responder can then authenticate the credentials. The response indicates if the user was successfully authenticated and also includes the user’s groups and attributes if the XML responder is performing authorization.
An authorize request sends the authenticated username to the XML responder and optionally sends the groups and attributes referenced in policy. The response includes the user’s groups and attributes.
Before Creating an XML RealmThe following list describes the tasks you must complete before creating an XML realm.
❐ Create an appropriate XML realm responder (one that is designed to talk to the Blue Coat XML realm protocol) and install it on an HTTP Web server. You can either create the responder yourself or have a third party create it, such as Blue Coat Professional Services.
To create the XML realm responder, see Appendix D: "XML Protocol" on page 297 for a description of the SOAP protocol. The XML responder must correctly conform to the protocol. The XML realm performance is dependent on the response time of the XML responder.
❐ Configure an HTTP server with appropriate authentication controls. The authentication service can either depend on the HTTP server to authenticate the credentials, or the service can authenticate them directly. If the HTTP server is used to authenticate the credentials, it must be set up to protect the service with HTTP Basic authentication.
❐ (Optional) Configure an alternate HTTP server for redundancy. The XML responder service must be installed on the alternate server.
Creating an XML RealmTo create an XML realm: Before you create an XML realm, be sure to complete the tasks in "Before Creating an XML Realm" above.
1. In the Management Console, select Configuration > Authentication > XML > XML Realms.
2. Click New.
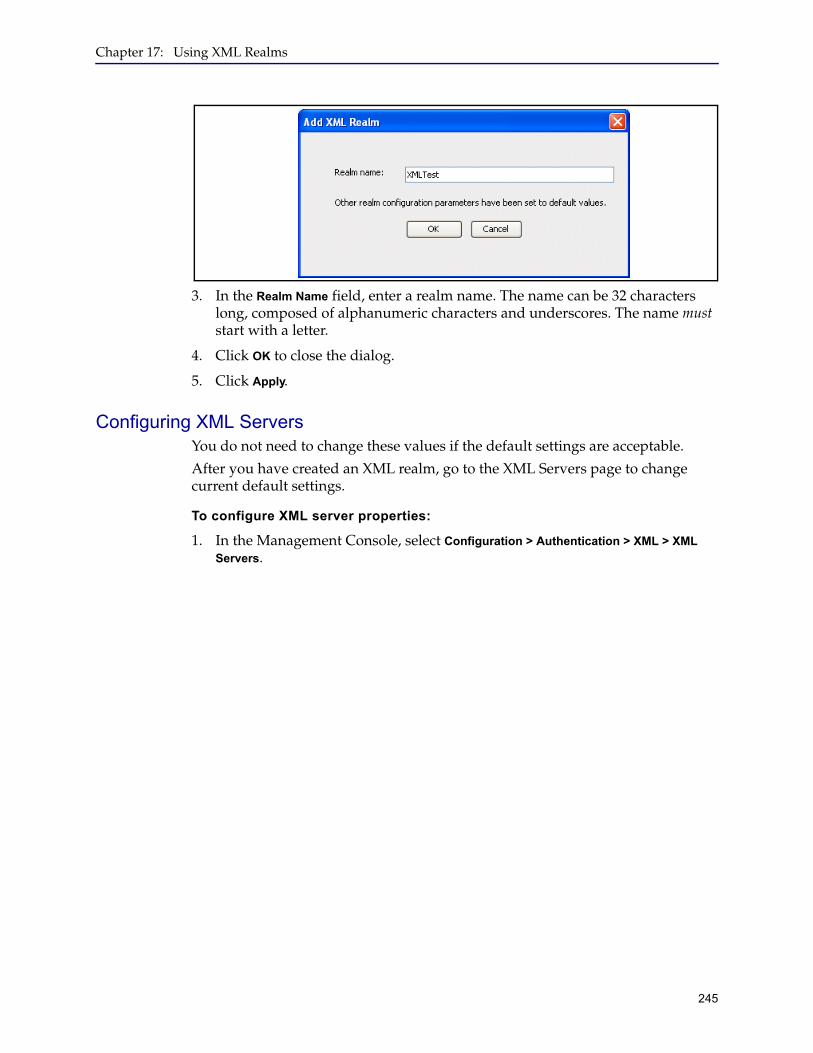
Chapter 17: Using XML Realms
245
3. In the Realm Name field, enter a realm name. The name can be 32 characters long, composed of alphanumeric characters and underscores. The name must start with a letter.
4. Click OK to close the dialog.
5. Click Apply.
Configuring XML ServersYou do not need to change these values if the default settings are acceptable.
After you have created an XML realm, go to the XML Servers page to change current default settings.
To configure XML server properties:
1. In the Management Console, select Configuration > Authentication > XML > XML Servers.

Volume 4: Securing the Blue Coat ProxySG
246
2. From the Realm Name drop-down list, select the XML realm.
3. Configure the Responder options:
a. Responder: Select the XML responder service to configure—Primary or Alternate—from the drop-down list. Primary is the default. You can configure both responder services before clicking Apply.
b. Host: This is the hostname or IP address of the HTTP server that has the XML service. You must specify a host. The port defaults to port 80.
c. Authenticate request path: Enter the XML responder path for authentication requests.
d. Authorize request path: Enter the XML responder path for authorization requests.
4. In the timeout request fields, enter the number of seconds for the system to wait for a request and the number of times for the system to retry a request. The default is not to retry a request.
5. Specify the maximum number of connections to the responder. The default is five connections.
6. (Optional) Select One-time passwords to integrate with a non-Blue Coat supported authentication service that uses one-time passwords.
7. Click Apply.
8. Repeat the above steps for additional XML realms, up to a total of 40.
Note: One-time passwords are passwords that become invalid as soon as they are used. The passwords are often generated by a token or program, although pre-printed lists are also used. Using one-time passwords ensures that the password cannot be used in a replay attack.
2
3a
3b
3c
3d
4
5
6

Chapter 17: Using XML Realms
247
Configuring XML OptionsYou do not need to change these values if the default settings are acceptable.
With XML realms, you can place the username and password in the HTTP headers of the request or in the body of the XML POST request. If the credentials are placed in the HTTP headers, the Web server can do the authentication and the XML service can just handle authorization. If the credentials are placed in the XML request body, the XML service handles both authentication and authorization.
To configure XML options:
1. In the Management Console, select Configuration > Authentication > XML > XML Options.
2. From the Realm name drop-down list, select the XML realm.
3. Select the HTTP request method: GET or POST.
4. Select a user credential option:
• If the HTTP server is integrated with the authentication system, the HTTP server can authenticate the credentials. Select the Put user credentials for authentication in the HTTP header radio button. However, if this does not provide enough flexibility, the XML responder can do authentication.
• To have the XML responder service handle both authentication and authorization, select the Put user credentials for authentication in the request radio button.
5. Enter the username parameter in the Username parameter field. The default is username.
6. Click Apply.
Configuring XML Realm AuthorizationYou do not need to change these values if the default settings are acceptable.
After you have created the XML realm, you still must take into consideration how you will use authentication and authorization:
❐ Use an XML realm for both authorization and authentication.
The realm is used for authentication and uses itself for authorization.
2
3
4
5
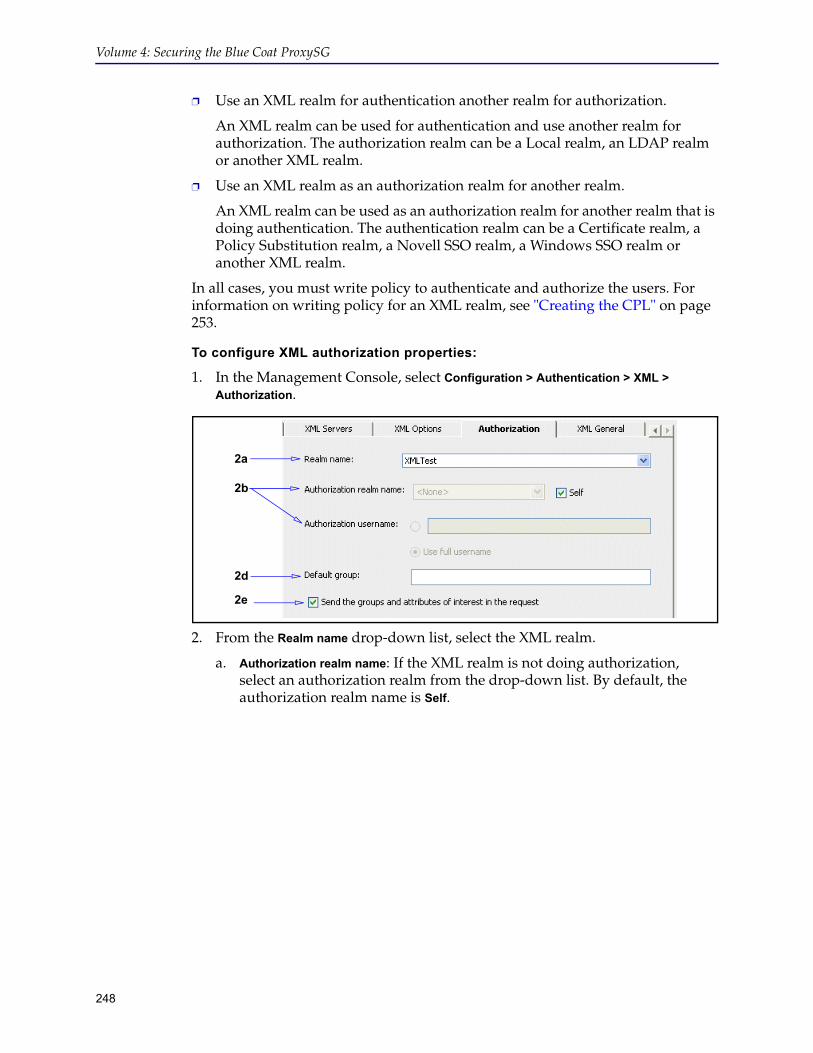
Volume 4: Securing the Blue Coat ProxySG
248
❐ Use an XML realm for authentication another realm for authorization.
An XML realm can be used for authentication and use another realm for authorization. The authorization realm can be a Local realm, an LDAP realm or another XML realm.
❐ Use an XML realm as an authorization realm for another realm.
An XML realm can be used as an authorization realm for another realm that is doing authentication. The authentication realm can be a Certificate realm, a Policy Substitution realm, a Novell SSO realm, a Windows SSO realm or another XML realm.
In all cases, you must write policy to authenticate and authorize the users. For information on writing policy for an XML realm, see "Creating the CPL" on page 253.
To configure XML authorization properties:
1. In the Management Console, select Configuration > Authentication > XML > Authorization.
2. From the Realm name drop-down list, select the XML realm.
a. Authorization realm name: If the XML realm is not doing authorization, select an authorization realm from the drop-down list. By default, the authorization realm name is Self.
2a
2b
2d
2e

Chapter 17: Using XML Realms
249
b. Authorization username: The default is Use full username. Clear the Use full username option to use a different name or to use a policy substitution that generates a username.
c. Default group: The default is no groups are selected.
d. The send the groups and attributes of interest in the request option is selected by default. These are the groups and attributes that are used in policy.
3. Click Apply.
Configuring XML General Realm PropertiesThe XML General page allows you to indicate the realm’s display name, the refresh times, an inactivity timeout value, cookies, and a virtual URL for this realm.
To configure general XML settings:
1. In the Management Console, select Configuration > Authentication > XML > XML General.
Note: If Self is selected, the Authorization realm name drop-down list is unavailable. To make the Authorization realm name drop-down list active, clear the Self check box.

Volume 4: Securing the Blue Coat ProxySG
250
2. Configure realm name information:
a. From the Realm name drop-down list, select the XML realm for which you want to change properties.
b. If needed, give the LDAP realm a display name. The default value for the display name is the realm name. The display name cannot be greater than 128 characters and it cannot be null.
3. Configure refresh options:
a. Select the Use the same refresh time for all check box if you would like to use the same refresh time for all.
b. Enter the number of seconds in the Credential refresh time field. The Credential Refresh Time is the amount of time basic credentials (username and password) are kept on the ProxySG. This feature allows the ProxySG to reduce the load on the authentication server and enables credential spoofing. It has a default setting of 900 seconds (15 minutes). You can configure this in policy for better control over the resources as policy overrides any settings made here. Before the refresh time expires, the ProxySG authenticates the user supplied
2
3
4
5
6
7
8

Chapter 17: Using XML Realms
251
credentials against the cached credentials. If the credentials received do not match the cached credentials, they are forwarded to the authentication server in case the user password changed. After the refresh time expires, the credentials are forwarded to the authentication server for verification.
c. Enter the number of seconds in the Surrogate refresh time field. The Surrogate Refresh Time allows you to set a realm default for how often a user’s surrogate credentials are refreshed. Surrogate credentials are credentials accepted in place of a user’s actual credentials. The default setting is 900 seconds (15 minutes). You can configure this in policy for better control over the resources as policy overrides any settings made here.
Before the refresh time expires, if a surrogate credential (IP address or cookie) is available and it matches the expected surrogate credential, the ProxySG authenticates the transaction. After the refresh time expires, the ProxySG verifies the user’s credentials. Depending upon the authentication mode and the user-agent, this may result in challenging the end user for credentials.
The main goal of this feature is to verify that the user-agent still has the appropriate credentials.
d. Enter the number of seconds in the Authorization refresh time field. The Authorization Refresh Time allows you to manage how often the authorization data is verified with the authentication realm. It has a default setting of 900 seconds (15 minutes). You can configure this in policy for better control over the resources as policy overrides any settings made here.
4. Enter the number of seconds in the Inactivity timeout field to specify the amount of time a session can be inactive before being logged out.
5. If you use Basic credentials and want to cache failed authentication attempts (to reduce the load on the authentication service), enter the number of seconds in the Rejected Credentials time field. This setting, enabled by default and set to one second, allows failed authentication attempts to be automatically rejected for up to 10 seconds. Any Basic credentials that match a failed result before its cache time expires are rejected without consulting the back-end authentication service. The original failed authentication result is returned for the new request.
All failed authentication attempts can be cached: Bad password, expired account, disabled account, old password, server down.

Volume 4: Securing the Blue Coat ProxySG
252
To disable caching for failed authentication attempts, set the Rejected Credentials time field to 0.
6. Select the Use persistent cookies check box to use persistent browser cookies instead of session browser cookies.
7. Select the Verify the IP address in the cookie check box if you would like the cookies surrogate credentials to only be accepted for the IP address that the cookie was authenticated. Disabling this allows cookies to be accepted from other IP addresses.
8. You can specify a virtual URL. For more information on the virtual URL, see "About Origin-Style Redirection" on page 40.
9. Click Apply.
Related CLI Syntax to Configure an XML Realm❐ To enter configuration mode for the service:
SGOS#(config) security create xml realm_nameSGOS#(config) security edit xml realm_name
The following subcommands are available:SGOS#(config realm_name)?SGOS#(config realm_name) alternate-responder {host host | path {authenticate authenticate-path | authorize authorize-path}| port port}SGOS#(config realm_name) authorization {default-group-name group_name | realm {none | realm-name realm_name | self} | username {use-full-username | username}}SGOS#(config realm_name) cache-duration secondsSGOS#(config realm_name) connections numberSGOS#(config realm_name) display-name display_nameSGOS#(config realm_name) exit SGOS#(config realm_name) no {alternate-responder | default-group-name}SGOS#(config realm_name) one-time-passwords {enable | disable}SGOS#(config realm_name) primary-responder {host host | path {authenticate authenticate-path | authorize authorize-path}| port port}SGOS#(config realm_name) rename new_realm_nameSGOS#(config realm_name) timeout secondsSGOS#(config realm_name) retry numberSGOS#(config realm_name) viewSGOS#(config realm_name) refresh-time credential-refresh secondsSGOS#(config realm_name) refresh-time rejected-credentials-refresh secondsSGOS#(config realm_name) refresh-time surrogate-refresh secondsSGOS#(config realm_name) refresh-time authorization-refresh secondsSGOS#(config realm_name) inactivity-timeout secondsSGOS#(config realm_name) cookie {persistent {enable | disable} | verify-ip {enable | disable}}
SGOS#(config realm_name) virtual-url virtual_url

Chapter 17: Using XML Realms
253
Creating the CPL
This CPL example gives access to users who are authenticated in the XML realm called eng_users and who are in the group waterloo. You also can create policy for XML realms through VPM.
<proxy>authenticate(eng_users)
<proxy>realm=eng_users group=waterloo allow
Viewing StatisticsTo view statistics for XML realms, select Statistics > Authentication > User Logins. Select an XML realm from the Realm drop-down list.
Note: For information on using policy, refer to Volume 6: The Visual Policy Manager and Advanced Policy or Volume 10: Content Policy Language Guide.

Volume 4: Securing the Blue Coat ProxySG
254
255
Appendix A: Using BCAAA
The Blue Coat Systems Authentication and Authorization Agent (BCAAA) allows SGOS 5.x to manage authentication and authorization for several different realms. The agent is installed and configured separately from SGOS 5.x and is available at the Blue Coat website.
The BCAAA service must be installed on a domain controller or member server, allowing the ProxySG to access domain controllers. The BCAAA service authenticates users in all domains trusted by the computer on which it is running. A single installation of the BCAAA service can support multiple appliances.
Multiple versions of BCAAA can run on the same machine. This allows you to use the same machine to support versions of the ProxySG that have different BCAAA version requirements.
The BCAAA install directory can include multiple executable programs.
❐ The program bcaaa.exe (bcaaa on Solaris) handles connections from ProxySG and hands them off to the correct version of the processor.
❐ The program bcaaa-99.exe (bcaaa-99 on Solaris) handles communication with versions of the ProxySG prior to SGOS 4.2.
❐ The program bcaaa-100.exe (bcaaa-100 on Solaris) handles communication with SGOS 4.2.1, SGOS 5.1.1, and SGOS 5.1.2.
❐ The program bcaaa-110.exe (bcaaa-110 on Solaris) handles communication with SGOS 4.2.2 , SGOS 5.1.3, and SGOS 5.1.4.
❐ The program bcaaa-120.exe (bcaaa-120 on Solaris) handles communication with SGOS 4.2.3, SGOS 4.2.4, and SGOS 5.2.1 and later.
When a new version of BCAAA is installed in the same installation directory as earlier versions, the earlier versions are not removed.
This allows ProxySGs that were communicating with the old version to continue to operate.
Operating System RequirementsThe BCAAA operating system requirements are:
❐ IWA and COREid: Windows® 2000 or later.
❐ SiteMinder: Windows 2000 or later or Solaris™ 5.8 or 5.9.
❐ Novell SSO: Windows 2000 or later
❐ Windows SSO: Windows 2000 or later
BCAAA can run on any harware or virtual machine as long as the preceding operating system requirements are met.
Volume 4: Securing the Blue Coat ProxySG
256
Using the BCAAA ServiceSeveral realms use the BCAAA service:
❐ IWA: The BCAAA service uses an Integrated Windows Authentication (IWA) to authenticate a user with Active Directory. When using IWA, the network typically chooses automatically whether to use NTLM or Kerberos (IWA).
• NTLM: NTLM is a subset of IWA, meant to be used with Windows NT systems.
• Kerberos: If using Kerberos, the BCAAA service must share a secret with a Kerberos server (called a KDC) and register an appropriate Service Principal Name (SPN). For information on sharing a secret and registering an SPN, see "Creating Service Principal Names for IWA Realms" on page 264.
❐ SiteMinder and COREid: When a SiteMinder or COREid realm is referenced in policy, a BCAAA process is created. The ProxySG then sends a configuration request that describes the servers to use. The BCAAA service logs in to the appropriate servers and determines configuration information to be passed back to the ProxySG (such as the kind of credentials required). Responses from the SiteMinder and COREid policy servers are translated into appropriate BCAAA protocol responses and returned to the ProxySG.
Before you can use the BCAAA service with SiteMinder or COREid, you must configure the appropriate ProxySG realm to work with the SiteMinder or COREid servers. The realm can be configured from the SiteMinder or COREid configuration tabs in the Management Console or from the CLI.
For specific information about configuring the SiteMinder realm to work with the CA eTrust policy servers, see Chapter 12: "CA eTrust SiteMinder Authentication" on page 181. For specific information about configuring the COREid realm to work with Oracle COREid Access Servers, see Chapter 6: "Oracle COREid Authentication" on page 109.
❐ Windows Single Sign-on (SSO): The BCAAA service is used to supply mappings for IP addresses to logged on users. The Windows SSO realm can use domain controller querying, or client querying, or both domain controller and client querying to determine the logged-on user.
To use domain controller querying, you must configure the sso.ini file to enable it and to add the domain controllers you want to query. For information on configuring the sso.ini file, see "Modifying the sso.ini File for Windows SSO Realms" on page 237.
❐ Novell SSO: The BCAAA service manages communication with the Novell eDirectory server. This realm also requires that the sso.ini file be configured. For information on configuring the sso.ini file, see "Modifying the sso.ini File for Novell SSO Realms" on page 219.
Note: Each (active) SiteMinder realm on the ProxySG should reference a different agent on the Policy Server.

Appendix A: Using BCAAA
257
Performance NotesBlue Coat recommends that the Windows BCAAA service be installed on a dedicated Windows machine. Installation of any other non-essential software might degrade the BCAAA service performance, which in turn degrades the user experience.
This is because the BCAAA server is in the client data path for accessing protected resources. Users make client requests to the ProxySG, which in turn proxies authentication requests to the BCAAA service. The user must wait for the authentication request to complete before the ProxySG responds to the user with a protected resource.
The appendix discusses:
❐ "Installing the BCAAA Service on a Windows System"
❐ "Installing the BCAAA Service on a Solaris System" on page 263
❐ "Creating Service Principal Names for IWA Realms" on page 264
❐ "Troubleshooting Authentication Agent Problems" on page 265
❐ "Common BCAAA Event Messages" on page 266
Installing the BCAAA Service on a Windows SystemAll images in this section are from a Windows 2000 system. For information on SSL issues with systems running pre-Windows 2003, skip to "Notes on SSL and Systems Running pre-Windows 2003" on page 262 after installation is complete; for information on specific issues with systems running Windows 2003 or later, skip to "Notes on SSL and Systems Running Windows 2003 and Later" on page 263 after installation is complete.
To install the authentication agent:
1. Download the file from the Blue Coat download site at:https://download.bluecoat.com/
2. Launch the install wizard.
3. Click Next to select the destination folder.
4. Click Browse to select a different destination folder for the BCAAA service.
5. Click Next to accept the default and select the port number.
Note: The firewall on Windows machine should be disabled for BCAAA to work.
Note: When upgrading from one version of BCAAA to another version of BCAAA, you must install into the previous BCAAA folder to retain your settings. If you install to a different folder, a new .ini file with default settings is created.

Volume 4: Securing the Blue Coat ProxySG
258
6. The port number must match the port number you specify on the ProxySG for the BCAAA service. The default is 16101.
7. Click Next to select the number of threads.
8. The recommended (and default) value is 2. The maximum number of threads allowed is 99 per ProxySG. After selecting the number, click Next to specify the SSL requirements.

Appendix A: Using BCAAA
259
9. The default is that SSL is Permitted, allowing both SSL and non-SSL connections. This setting must be compatible with the setting on the ProxySG.
10. Click Next to specify the subject of the SSL certificate.
11. Specify the subject of the certificate.
The BCAAA service looks up the specified subject in the service's certificate store. If it finds the subject, it uses it instead of generating a new certificate. If not, it generates a self-signed certificate with that subject. This generated certificate can be saved (as specified on the next screen).
12. Click Next to specify save options for the certificate.

Volume 4: Securing the Blue Coat ProxySG
260
13. Click Next to specify whether the ProxySG must provide a valid certificate when connecting to the BCAAA service.
14. To force the ProxySG to provide a valid certificate to connect to the BCAAA service, select the Yes option. The default is No.
15. Click Next to view the summary of the changes you made.
16. Click Install to install the BCAAA service using the settings you configured.
When installation completes, the final BCAAA screen displays.
To modify settings or uninstall the authentication agent:
1. Launch the install wizard.

Appendix A: Using BCAAA
261
2. Click Modify to re-enter the installation wizard; click Remove to uninstall the BCAAA service from the system.
3. Click Next to start the procedure.
4. Click Finish to exit the uninstall application.
To view the application event logThe BCAAA service logs all errors to the Windows 2000 Application Event Log under the name BCAAA.
1. Launch the Event Log.
2. Doubleclick the information message BCAAA service to see that the BCAAA service has been automatically started.
To view the BCAAA serviceThe BCAAA service logs all errors to the Windows 2000 Application Event Log under the name BCAAA.
1. Launch the Event Viewer.
2. Right-click on BCAAA and select Properties to manage the service. For example, to make the BCAAA service start only manually, set the Startup Type to Manual. (Automatic is the default setting.)
Completing Setup for the BCAAA ServiceAfter the BCAAA service is installed, you must complete BCAAA setup by configuring the service to work with Windows.
Note: For instructions on using the installation wizard, see "Installing the BCAAA Service on a Windows System" on page 257.
Volume 4: Securing the Blue Coat ProxySG
262
To configure the BCAAA service:
1. Open the properties panel for the BCAAA service.
a. Select the Log-on tab.
b. Change the account to the one you created for the BCAAA service, and enter the password.
c. Click OK. You might be warned that the account has been given logon as service privileges.
2. Verify in Local Security Policy's User Rights Assignment folder that the BCAAA Service user account has been added to the list of the Log on as a service policy.
3. (Optional) If group-based authorization is being done, then:
• Ensure that the user impersonation privilege is set for the SERVICE group. For more information setting the user impersonation privilege, see:
http://support.microsoft.com/default.aspx?scid=kb;en-us;831218.
• Ensure that the Active Directory computer account running the BCAAA service has the Trust computer for delegation configuration property enabled.
4. (Optional) For all users authenticating to the ProxySG using IWA realms, user accounts in the Active Directory must have permission to log onto the machine where the BCAAA server is running.
5. Go to the user’s account properties user account tab.
6. Click Log On To… to specify the domain that computers can log onto. If the network environment restricts users to specific computers, then each user must have the name of the host running the BCAAA service added to their list.
Notes on SSL and Systems Running pre-Windows 2003The BCAAA service fails to negotiate an SSL connection under certain conditions when the BCAAA user is changed.
If the BCAAA was originally running as LocalSystem and a self-signed certificate was created and saved (that is, you chose to save the automatically generated certificate option) SSL fails if the BCAAA service is changed to run as a different user.
To solve this:
1. Stop the BCAAA service.
2. From the Run prompt, type mmc, which is the Microsoft Management Console.
3. Click File > Add/Remove Snap-in > Add > Certificates > Add Service Account > Local Computer > BCAAA
4. Delete any certificate shown in the BCAAA/Personal category.
Note: You must have modify/write privileges in the BCAAA folder.

Appendix A: Using BCAAA
263
Now when the BCAAA is run, it can create a new certificate and successfully handle an SSL connection.
Notes on SSL and Systems Running Windows 2003 and LaterThe BCAAA service fails to negotiate an SSL connection under certain conditions when the BCAAA user is changed.
The certificate store can only be accessed by a Domain Administrator or LocalSystem. If the BCAAA service is running as a Domain User who does not have Domain Administrator privileges, it cannot negotiate an SSL connection.
Solutions:
❐ Make the BCAAA user a Domain Administrator or an Administrator of the computer where the BCAAA service is running.
❐ Give the BCAAA user access the certificate store:
• Stop the BCAAA service.
• From the Run prompt, launch the regedit program to give the BCAAA user full access to the following key and its children:
HKEY_LOCAL_MACHINE\SOFTWARE\Microsoft\Cryptography\Services
Installing the BCAAA Service on a Solaris SystemTo install the BCAAA service on Solaris, complete the following instructions. You must be root to complete installation.
1. Download the shell script to your system.
2. Execute the shell script:# sh bcaaa-version_number-SOLARIS-install.sh
3. Answer the questions to install the service on your Solaris system. A sample session is shown below:Enter a path to a scratch directory [/tmp]:Install Blue Coat Systems Authentication and Authorization Agent (BCAAA)? (y/n)yEnter user that should own the installed files [root]Enter group for the installed files [root]/usr/local/bin/bcaaa installed/usr/local/bin/bcaaa-100 installedLibraries installed in /usr/local/lib/BlueCoatSystems//usr/local/etc/bcaaa.ini installed
If you use inetd, append the following line to /etc/services
bcaaa 16101/tcp #Blue Coat Systems Authentication Agent
If you use inetd, append the following line to /etc/inetd.conf, then signal inetd to re-read the configuration file
Note: For successful installation of the BCAAA service on a Solaris system, you need libstdc++.so.5", usually installed with package SFWgcc32 gcc-3.2 - GNU Compiler Collection Version 3.2

Volume 4: Securing the Blue Coat ProxySG
264
If you use something else, make the equivalent changes
bcaaa stream tcp nowait root /usr/local/bin/bcaaa bcaaa -c /usr/local/etc/bcaaa.ini
Installation complete
Creating Service Principal Names for IWA RealmsFor the BCAAA service to participate in an IWA Kerberos authentication exchange, it must share a secret with the Kerberos server (called a KDC) and have registered an appropriate Service Principal Name (SPN).
You can share the secret two ways:
❐ LocalSystem
In this approach the SPN is registered with the NetBIOS name of the machine on which BCAAA is running. BCAAA runs under LocalSystem (the default for services), and uses the machine's shared secret.
The primary advantage of this approach is convenience: it works with the default settings for service installation. The disadvantage is that only one BCAAA server is allowed for the realm, so you cannot have a backup server.
❐ Service Account
You can also create a service account for the BCAAA service and register the SPN on the service account. This allows multiple servers to run BCAAA all using the same account.
The advantage is the ability to have a backup BCAAA server. The disadvantage is that it requires additional configuration on the Active Directory server, the domain controller, and on each BCAAA machine. It is also less secure, since the BCAAA account password is shared among multiple machines.
To share a secret by creating a service account:
1. Go to the Active Directory server.
2. Create an account for use by the BCAAA service.
3. Create a password.
4. On the domain controller, open the domain policy console and modify the Local Policy’s user rights assignment and allow the account you created in on the Active Directory to have the right to "act as the operating system."
5. Run the following command:
Note: Handling of the shared secret is done by Windows when the machine joins the domain; there is no explicit knowledge of the shared secret by SGOS or by BCAAA.
Note: All steps require administrator privileges.

Appendix A: Using BCAAA
265
setspn -A HTTP/FQDN-of-host name
where name is the name of the account created in step 1 and the FQDN is the virtual URL that was set in the authentication realm. For example: setspn -A HTTP/krbproxy.authteam.waterloo.bluecoat.com authteam\krb-bcaaa
(Optional) To create a group account (a BCAAA user account capable of doing group-based authorization):If group-based authorization is being done, then:
1. Ensure that the user impersonation privilege is set for the SERVICE group.
2. Ensure that the Active Directory computer account running the BCAAA service has the Trust computer for delegation configuration property enabled.
On each machine where you want to run the BCAAA service:
1. Install the BCAAA service as normal.
2. Open the Properties panel for the BCAAA service and select the Logon tab. Change the account to the one you created on the Active Directory server, and enter the password. When you click OK, it might warn you that the account has been granted Log On as A Service right.
3. Change the security on the BCAAA install directory to give the account created on the Active Directory server full control.
All these machines now share the same secret with the KDC and can decrypt service tickets intended for the service described by the SPN.
Troubleshooting Authentication Agent ProblemsThis section describes some common problems you might encounter when setting up or using the BCAAA service on a Windows platform.
To troubleshoot the BCAAA service, launch the event viewer.
The Properties pane displays, providing information about the status of the BCAAA service at that time. Notice the Type and the Event ID. The description below the Type/Event ID lists the problem. You can often find more information about the problem and suggestions for its solution in "Common BCAAA Event Messages" on page 266.
Common problems:
❐ If an attempt to start the BCAAA service is issued when BCAAA is already started, the following error message displays:
Note: The setspn application might have to be downloaded from Microsoft. It is installed by default in program files\resource kit.
Note: For information on setting the user impersonation privilege, see:http://support.microsoft.com/default.aspx?scid=kb;en-us;831218

Volume 4: Securing the Blue Coat ProxySG
266
The requested service has already been started.
❐ If another application is using the same port number as the BCAAA service, the following messages are displayed:
The BCAAA service could not be started.
A system error has occurred.
System error 10048 has occurred.
Only one usage of each socket address (protocol/network address/port) is normally permitted.
❐ Active Directory Distribution groups are not supported by BCAAA for IWA realms. IWA realms only support Security Groups or testing against individual users.
Common BCAAA Event MessagesFollowing are the most common event messages that can be logged to the Windows 2000 Application Event Log. Most of the event messages not listed here are error status messages returned by Win32 function calls. When a Win32 call fails, the error code and error text containing the reason for the error displays in the event log under the name BCAAA.
To view the BCAAA event log:
1. Right click on My Computer and select Manage.
2. Select System Tools > Event Viewer > Application.
For each BCAAA event message, the event message is displayed along with the event number.
Table A–1 BCAA Event Messages
Message ID
Message Description
200 Various messages The associated message provides information about a condition that is not an error.
300 Various messages The associated message warns about an unexpected condition that does not prevent operation.
400 Various messages The associated message describes an error condition that prevents normal operation.
1001 Authentication Agent service started: port=# threads=# socket=0x# process id=# agent version=# ProxySG version=#
This indicates successful startup and provides information about the agent.
1002 Authentication Agent stopped This indicates normal shutdown of the service.
1003 ProxySG (a.b.c.d) connected; Process # spawned as #
This indicates a ProxySG has connected to the agent (Windows only).

Appendix A: Using BCAAA
267
1004 ProxySG agent process exited (normal logout)
This indicates normal logout by a ProxySG.
1005 Process %d has terminated, ExitCode=0x#, link=0x#
This indicates an unexpected termination of an agent process (Windows only).
1006 Service dispatcher exited. This indicates an unexpected termination of the service dispatcher.
1007 CreateNamedPipe failed, pipe='%s'
The agent dispatcher could not create the named pipe for the reason given.
1008 ConnectNamedPipe failed, pipe='%s'
The agent process could not obtain the information from the dispatcher on the named pipe for the reason given.
1009 WriteFile failed, pipe='%s' The dispatcher could not write information to the named pipe for the reason given.
1011 CreateThread (ProcessTimerThread) failed
The dispatcher could not create its timer thread.
1012 Failed to create ProxySG process '%s' The BCAAA server does not have the same version
of BCAAA available as the ProxySG is expecting.
1019 Various The dispatcher was unable to determine the exit status of an agent process.
1020 Terminating ProxySG process #, ProcNum=# Handle=0x#
An agent process was active when the Windows service was shut down.
1022 Various The associated message reports the status of a ProxySG login attempt.
1101 BasicAuth: CloseHandle failed; user 'xx\\xx'
The agent was unable to close the login handle for the specified user.
1102 Username: '%s\\%s' too long The ProxySG offered the specified username, which is too long.
1106 Various An attempted authentication using BASIC credentials failed for the reason given.
1107 User Right 'Act as part of the operating system' required for Basic Authentication
The agent does not have the necessary privileges to do BASIC authentication
1108 Various The agent was unable to determine information about the user for the reason given.
1202 Unable to create GroupsOfInterest mutex 'xx' - already exists
The agent could not create the Windows mutex needed for group authorization checks because it already exists.
Table A–1 BCAA Event Messages (Continued)
Message ID
Message Description

Volume 4: Securing the Blue Coat ProxySG
268
1203 Unable to create GroupsOfInterest mutex 'xx
The agent could not create the Windows mutex needed for group authorization checks.
1204 OpenMutex failed for AuthGroups mutex '%s', group='%s'
The agent was unable to open the Windows mutex needed for group authorization checks.
1205 Various The agent was unable to close the Windows mutex named for the reason given.
1207 GetAclInformation failed The agent was unable to obtain ACL information needed to do group authorization checks.
1209 GetKernelObjectSecurity failed for AuthGroup='%s'
The agent was unable to obtain security information about the specified group.
1210 SetKernelObjectSecurity failed
The agent was unable to set up security information for the reason specified.
1211 InitializeSecurityDescriptor failed
The agent was unable to initialize the security descriptor for the reason specified.
1212 GetSecurityDescriptorDacl failed
The agent was unable to get the discretionary access control list (DACL) for the reason specified.
1213 SetSecurityDescriptorDacl failed
The agent was unable to set the discretionary access control list (DACL) for the reason specified.
1214 InitializeAcl failed The agent was unable to initialize the access control list (ACL) for the reason specified.
1215 GetUserName failed for AuthGroup='%s'
The agent was unable to determine the username while processing the specified group.
1217 GetAce failed for AuthGroup='%s'
The agent was unable to get the access control entry (ACE) for the specified group.
1218 AddAce failed The agent was unable to add the necessary access control entry (ACE) for the reason specified.
1219 AddAccessAllowedAce failed The agent was unable to add the necessary "access allowed" access control entry (ACE).
1220 Could not establish groups-of-interest: result=0x##
The agent was unable to initialize groups-of-interest checking.
1221 AuthGroup '%s' does not exist The specified group does not exist.
1222 IWA RevertSecurityContext failed, user='%s'
The agent could not revert the security context for the specified user.
1223 BASIC: RevertToSelf failed, user='%s'
The agent could not revert the security context for the specified user.
Table A–1 BCAA Event Messages (Continued)
Message ID
Message Description

Appendix A: Using BCAAA
269
1224 Error calling OpenProcessToken The agent's call to OpenProcessToken failed for the specified reason.
1225 Error calling LookupPrivilegeValue
The agent could not get information about a needed privilege.
1226 Error calling AdjustTokenPrivileges
The agent could not adjust its privileges as required.
1227 ImpersonateLoggedOnUser failed; Group access denied for user '%s'
The agent could not impersonate the specified user.
1228 IWA: ImpersonateSecurityContext failed; Group access denied for user '%s'
The agent could not impersonate the specified user.
1301 NOTE: Pending ContextLink=### timed out; deleting SecurityContext h=## TS=## now=##
The ProxySG did not provide a response to a challenge quickly enough.
1302 Various An authentication request from a ProxySG referenced an in-progress request that has timed out or does not exist.
1304 Various The agent was unable to delete a security context for the reason given.
1305 AcceptSecurityContext failure, SEC_E_INVALID_HANDLE, ContextLink=### count=#
The agent was provided with an invalid context handle.
1306 Various The client provided an invalid token to the authentication system.
1308 AcceptSecurityContext failure, ContextLink=# count=#, detail=#(xxx)
Windows rejected the authentication attempt for the reason given.
1310 Various This records the failure of NTLM authentication or group authorization.
1311 3:Failed NTLM Authentication for user: '%s'
This records the failure of NTLM authentication; the user name was supplied by the client.
1312 Various The agent could not determine the username from the NTLM type 3 message supplied by the client.
1313 Invalid Type3 message The client provided an NTLM type 3 message that was invalid.
Table A–1 BCAA Event Messages (Continued)
Message ID
Message Description

Volume 4: Securing the Blue Coat ProxySG
270
1314 BASE64_Decode: Length of token exceeds max (%d)
The client provided an NTLM token that was too long.
1316 Unsupported version in request: %d(0x%x)
The ProxySG sent a request with an unsupported version number.
1401 Various The agent lost communication with the ProxySG.
1403 Various The agent is aborting for the reason given.
1402 Unexpected thread 0 exit The agent exited unexpectedly.
1404 Unable to get ProcessInfo from parent process.
The agent could not obtain its information from the dispatcher.
1405 CreateFile failed, pipe='xx' The agent could not create a handle for the dispatcher's named pipe.
1406 WaitNamedPipe failed, pipe='%s'
The agent could not wait for the dispatcher's named pipe.
1407 ReadFile failed, pipe='%s' The agent could not read information from the dispatcher's named pipe.
1409 Various The agent could not create the specified thread for the reason given.
1412 Various The agent could not create a required Windows event object.
1413 AuthMethod 'xxs' not supported: returning _AuthResult=0x##
The ProxySG requested an unsupported authentication mechanism.
1414 Various The specified request is unsupported.
1500 Various The agent has a problem with memory allocation; typically this means there is not enough memory.
1501 Unable to allocate memory for ProcLink buffer.
The agent could not allocate some needed memory.
1502 Unable to allocate memory for ContextLink buffer.
The agent could not allocate some needed memory.
1503 Various The agent was unable to allocate needed memory.
1604 Service dispatch failed The Windows service dispatcher failed to start.
1605 RegisterServiceCtrlHandler failed
The agent dispatcher was unable to register the service control handler.
1608 SetServiceStatus failed, g_StatusHandle=%d
The agent was unable to set the service's status.
Table A–1 BCAA Event Messages (Continued)
Message ID
Message Description

Appendix A: Using BCAAA
271
1610 Unsupported service control code: #
Windows sent a service control code that the agent does not support.
1701 WSASocket failed The agent could not create a Windows socket for the reason given.
1702 WSAStartup failed. The agent could not start the Windows socket for the reason given.
1703 Various The agent could not send data to the ProxySG for the reason given.
1704 Various The agent could not receive data from the ProxySG for the reason given.
1705 accept failed The agent dispatcher could not initialize to accept new connections.
1706 bind failed, PortNumber=# The agent dispatcher could not bind to the specified port.
1707 listen failed. The agent dispatcher could not listen for new connections.
1708 Various Windows reported an event wait failure to the agent while doing I/O on the socket.
1709 The agent is already running or the agent's port # is in use by another process
Some other process is already using the port needed by the agent.
1710 WSARecv failed reading bytes from socket
Windows reported an error when the agent tried to receive bytes from the ProxySG.
1711 WSASend failed sending bytes to socket.
Windows reported an error when the agent tried to send bytes to the ProxySG.
1712 Various A socket I/O operation did not complete successfully.
1801 Error calling AcquireCredentialsHandle
The agent could not acquire its credentials from Windows.
1803 Various The agent could not load a needed library (DLL).
1804 Various The agent could not locate the needed services in a library (DLL).
1805 Unsupported SSPI Windows platform; PlatformId=#
The reported Windows platform is not supported for NTLM authentication.
1806 Error calling QueryContextAttributes
The agent could not determine the authenticated user's security attributes.
Table A–1 BCAA Event Messages (Continued)
Message ID
Message Description

Volume 4: Securing the Blue Coat ProxySG
272
1807 QuerySecurityPackageInfo failed
The agent could not get needed security information from Windows.
1808 Max Token size too long (#); max size is #
The client supplied an NTLM token that is too long.
1809 FreeContextBuffer failed An attempt to free the NTLM context buffer failed.
1811 Username 'x\\y' too long The reported user name is too long.
1901 Admin Services Error: Access denied to domain/user/group information
The agent was unable to access necessary information.
1902 Admin Services Error: Invalid computer from which to fetch information
The computer to be used to get security information is invalid.
1903 Admin Services Error: Group not found
The requested group could not be found.
1904 Various The reported error was encountered while browsing.
1905 Admin services error: could not translate context to Unicode
The requested object for browsing could not be translated to Unicode
1906 Admin service out of memory The browsing service ran out of memory.
1907 Search request object too long: # > #
The requested object for browsing is too long.
2000 AcquireCredentialsHandle failed: 0x#
The agent could not acquire the credentials needed for an SSL session.
2001 Various The agent was unable to negotiate an SSL session for the reason given.
2002 Various An I/O error occurred during an SSL session.
2003 Various The specified cryptographic error occurred during an SSL session.
2004 Various The specified problem occurred with a certificate during SSL negotiation.
Table A–1 BCAA Event Messages (Continued)
Message ID
Message Description

273
Appendix B: Authentication and Authorization Errors
Following is the list of all groups and individual errors that can be permitted during authentication and authorization. The first table lists the groups and the individual errors within each group. The second table lists all of the individual errors along with descriptions of the errors.
Table B-1. Groups and Individual Errors
Error Group CPL Members Description
All All account_disabledaccount_expiredaccount_locked_outaccount_must_change_passwordaccount_restrictedaccount_wrong_placeaccount_wrong_timeagent_config_changedagent_config_cmd_failedagent_connection_failedagent_init_failedagent_no_groups_providedagent_resource_not_protectedagent_too_many_retriesagent_unsupported_schemeauthorization_username_too_long
basic_password_too_longbasic_username_too_long
cannot_decrypt_secretcannot_determine_authorization_usernamecannot_determine_full_usernamecannot_determine_usernamecannot_expand_credentials_substitutioncannot_redirect_connectcannot_redirect_https_to_httpcannot_setup_working_dircert_explicit_unsupportedcertificate_missingcredential_decode_failurecredentials_mismatch
Includes all errors that can be permitted. If this group includes errors, such as need_credentials. If permitted, these errors result in the user never being challenged. As this is not the desired behavior for most realms (for example, the user should be given the chance to enter credentials) do not permit this group when using challenge realms. Instead, use combinations of the other error groups as appropriate.
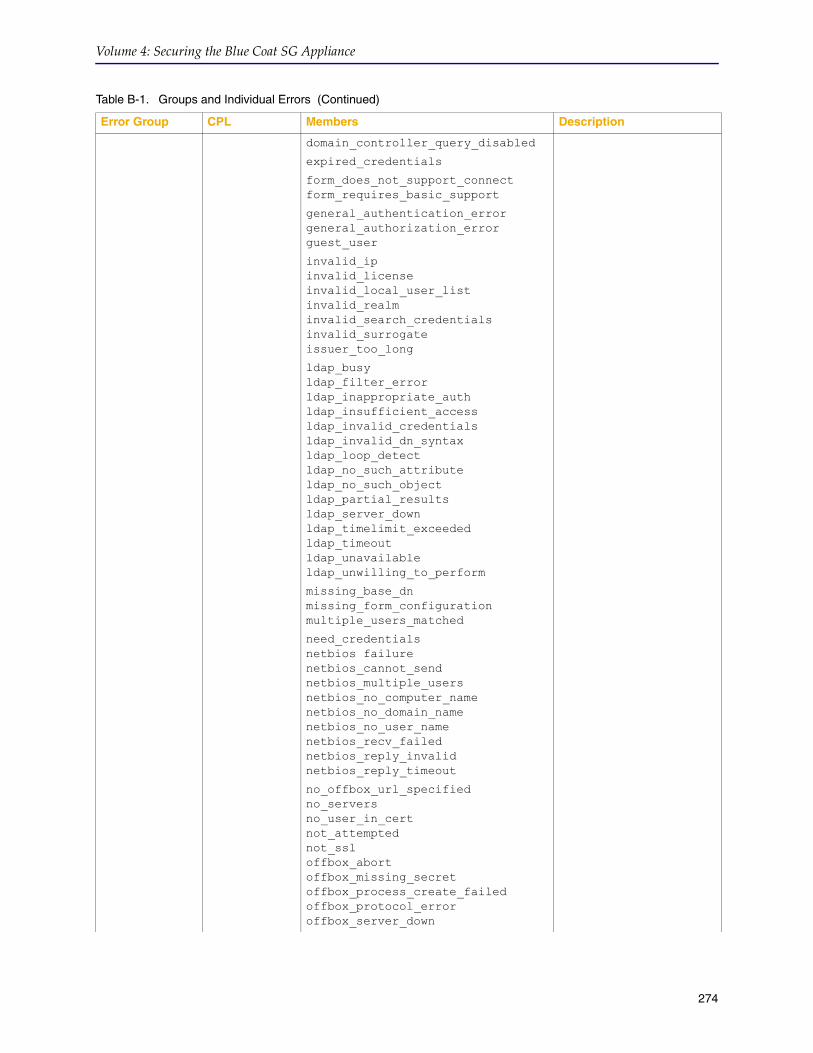
Volume 4: Securing the Blue Coat SG Appliance
274
domain_controller_query_disabled
expired_credentials
form_does_not_support_connectform_requires_basic_support
general_authentication_errorgeneral_authorization_errorguest_user
invalid_ipinvalid_licenseinvalid_local_user_listinvalid_realminvalid_search_credentialsinvalid_surrogateissuer_too_long
ldap_busyldap_filter_errorldap_inappropriate_authldap_insufficient_accessldap_invalid_credentialsldap_invalid_dn_syntaxldap_loop_detectldap_no_such_attributeldap_no_such_objectldap_partial_resultsldap_server_downldap_timelimit_exceededldap_timeoutldap_unavailableldap_unwilling_to_perform
missing_base_dnmissing_form_configurationmultiple_users_matched
need_credentialsnetbios failurenetbios_cannot_sendnetbios_multiple_usersnetbios_no_computer_namenetbios_no_domain_namenetbios_no_user_namenetbios_recv_failednetbios_reply_invalidnetbios_reply_timeout
no_offbox_url_specifiedno_serversno_user_in_certnot_attemptednot_ssloffbox_abortoffbox_missing_secretoffbox_process_create_failedoffbox_protocol_erroroffbox_server_down
Table B-1. Groups and Individual Errors (Continued)
Error Group CPL Members Description

Appendix B: Authentication and Authorization Errors
275
offbox_server_unreachableoffbox_timeoutotp_already_used
password_too_long
radius_socket_interfacerdns_cannot_determine_namerdns_failedredirect_from_vh
sspi_context_lostsspi_context_too_oldsspi_domain_controller_not_foundsspi_invalid_handlesspi_invalid_mechanismsspi_invalid_tokensspi_invalid_type3_messagesspi_logon_deniedsspi_logon_type_not_grantedsspi_no_authenticating_authoritysspi_null_lm_passwordsspi_process_create_failedsspi_rpc_errorsspi_service_disabledsspi_timeoutsspi_unable_to_connect_to_agentsubject_too_long
too_many_users
unable_to_query_clientunknown_useruser_domain_not_trustedusername_too_long
Communication Error
communica-tion_error
agent_connection_failedldap_busyldap_loop_detectldap_server_downldap_unavailableldap_unwilling_to_performnetbios_cannot_sendnetbios_reply_invalidno_serversradius_socket_interfacesspi_no_authenticating_authoritysspi_rpc_errorsspi_unable_to_connect_to_agent
Includes communication errors with BCAAA, LDAP, and RADIUS servers and during NetBIOS queries.
Configuration Changed
configura-tion_changed
agent_config_changedoffbox_abort
The ProxySG has been notified that configuration affecting the realm has been changed offbox. Used primarily with SiteMinder and COREid realms.
Table B-1. Groups and Individual Errors (Continued)
Error Group CPL Members Description

Volume 4: Securing the Blue Coat SG Appliance
276
General Authentication Failure
general_authentication_failure
general_authentication_error A general authentication error has occurred. This is returned when a specific error does not apply. It does not include all authentication errors.
General Authorization Failure
general_authoriza-tion_failure
cannot_determine_authorization_username
general_authorization_error
A general authorization error has occurred. This is returned when a specific error does not apply. It does not include all authorization errors. This can be returned as an authentication error in realms that do not support specifying a separate authorization realm.
General Offbox Error
offbox_error agent_connection_failedagent_init_failedcannot_determine_full_username
ldap_busyldap_loop_detectldap_server_downldap_timelimit_exceededldap_timeoutldap_unavailableldap_unwilling_to_perform
netbios failurenetbios_cannot_sendnetbios_multiple_usersnetbios_no_computer_namenetbios_no_domain_namenetbios_no_user_namenetbios_recv_failednetbios_reply_invalidnetbios_reply_timeout
no_servers
offbox_process_create_failedoffbox_protocol_erroroffbox_server_downoffbox_server_unreachableoffbox_timeout
radius_socket_interfacerdns_cannot_determine_namerdns_failed
sspi_context_lostsspi_context_too_oldsspi_invalid_mechanismsspi_no_authenticating_authoritysspi_process_create_failedsspi_rpc_errorsspi_timeoutsspi_unable_to_connect_to_agent
Includes all errors that can result with failures found during any offbox configuration or communications. It includes all errors found in the Communication Error group.
Table B-1. Groups and Individual Errors (Continued)
Error Group CPL Members Description

Appendix B: Authentication and Authorization Errors
277
Ident Error ident_error Errors found during Ident query
Initialization Error
initialization_error
agent_init_failedoffbox_process_create_failedsspi_process_create_failed
Errors related to initializing the realm.
Internal Error
internal_error
Any internal error.
Invalid BCAAA Request
invalid_bcaaa_request
sspi_context_lostsspi_context_too_oldsspi_invalid_mechanism
Includes errors returned if the request sent to BCAAA is invalid. Applies to IWA realms only.
Invalid Configuration
invalid_con-figuration
agent_config_cmd_failedagent_no_groups_providedagent_resource_not_protectedagent_too_many_retriesagent_unsupported_scheme
cannot_decrypt_secretcannot_determine_full_usernamecannot_determine_usernamecannot_setup_working_dircert_explicit_unsupported
domain_controller_query_disabled
form_does_not_support_connectform_requires_basic_support
invalid_local_user_listinvalid_realminvalid_search_credentials
ldap_filter_errorldap_inappropriate_authldap_insufficient_accessldap_invalid_dn_syntaxldap_no_such_attributeldap_no_such_objectldap_partial_results
missing_base_dnmissing_form_configuration
no_offbox_url_specifiedno_serversnot_ssl
offbox_missing_secretoffbox_protocol_erroroffbox_server_unreachable
sspi_domain_controller_not_foundsspi_logon_type_not_grantedsspi_null_lm_passwordsspi_service_disabled
Includes any errors that resulted from a possible misconfiguration of the SG. These errors usually require administrator action to address.
Invalid License
invalid_license
invalid_license An invalid license was found for an authentication component.
Table B-1. Groups and Individual Errors (Continued)
Error Group CPL Members Description

Volume 4: Securing the Blue Coat SG Appliance
278
Invalid NetBIOS Reply
invalid_netbios_reply
netbios failurenetbios_multiple_usersnetbios_no_computer_namenetbios_no_domain_namenetbios_no_user_namenetbios_recv_failed
The NetBIOS reply was invalid.
Invalid User Information
invalid_user_info
authorization_username_too_long
basic_password_too_longbasic_username_too_long
cannot_expand_credentials_substitutioncredential_decode_failurecredentials_mismatch
general_authentication_errorinvalid_surrogateissuer_too_long
ldap_invalid_credentials
otp_already_used
password_too_long
sspi_invalid_handlesspi_invalid_tokensspi_invalid_type3_messagesspi_logon_deniedsubject_too_long
user_domain_not_trustedusername_too_long
Includes errors that result from invalid user information being entered.
RDNS Failure rdns_failure rdns_cannot_determine_namerdns_failed
Errors found during Reverse DNS lookup.
Redirect Error
redirect_error
cannot_redirect_connectcannot_redirect_https_to_httpredirect_from_vh
Errors found while attempting to redirect the user’s request for authentication. Only returned when using a redirect authentication mode.
Request Timeout
request_timeout
ldap_timelimit_exceededldap_timeout
netbios_reply_timeout
offbox_timeout
sspi_timeout
Includes timeout errors with authentication servers.
Single Sign-on Failure
sso_failure invalid_ip
multiple_users_matched
too_many_users
unknown_userunable_to_query_client
Errors returned during Single Sign-on authentication. These errors apply to Windows SSO and Novell SSO realms only.
Table B-1. Groups and Individual Errors (Continued)
Error Group CPL Members Description
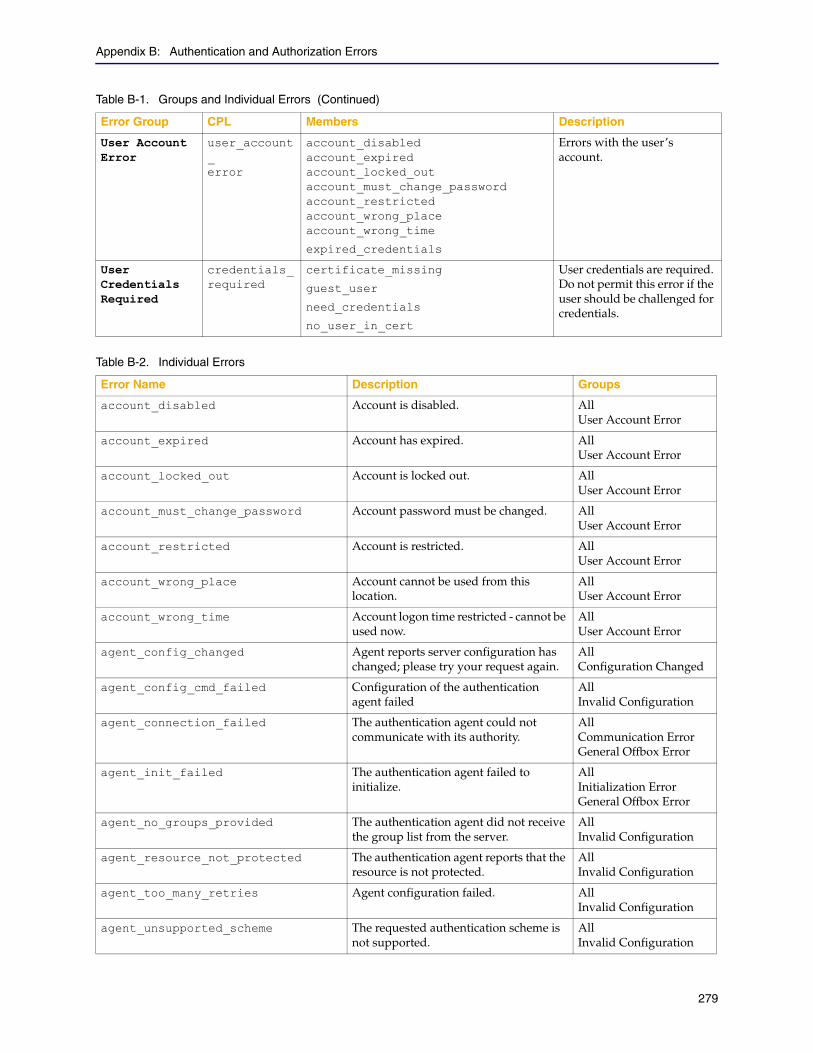
Appendix B: Authentication and Authorization Errors
279
User Account Error
user_account_error
account_disabledaccount_expiredaccount_locked_outaccount_must_change_passwordaccount_restrictedaccount_wrong_placeaccount_wrong_time
expired_credentials
Errors with the user’s account.
User Credentials Required
credentials_required
certificate_missing
guest_user
need_credentials
no_user_in_cert
User credentials are required. Do not permit this error if the user should be challenged for credentials.
Table B-1. Groups and Individual Errors (Continued)
Error Group CPL Members Description
Table B-2. Individual Errors
Error Name Description Groups
account_disabled Account is disabled. AllUser Account Error
account_expired Account has expired. AllUser Account Error
account_locked_out Account is locked out. AllUser Account Error
account_must_change_password Account password must be changed. AllUser Account Error
account_restricted Account is restricted. AllUser Account Error
account_wrong_place Account cannot be used from this location.
AllUser Account Error
account_wrong_time Account logon time restricted - cannot be used now.
AllUser Account Error
agent_config_changed Agent reports server configuration has changed; please try your request again.
AllConfiguration Changed
agent_config_cmd_failed Configuration of the authentication agent failed
AllInvalid Configuration
agent_connection_failed The authentication agent could not communicate with its authority.
AllCommunication ErrorGeneral Offbox Error
agent_init_failed The authentication agent failed to initialize.
AllInitialization ErrorGeneral Offbox Error
agent_no_groups_provided The authentication agent did not receive the group list from the server.
AllInvalid Configuration
agent_resource_not_protected The authentication agent reports that the resource is not protected.
AllInvalid Configuration
agent_too_many_retries Agent configuration failed. AllInvalid Configuration
agent_unsupported_scheme The requested authentication scheme is not supported.
AllInvalid Configuration

Volume 4: Securing the Blue Coat SG Appliance
280
authorization_username_too_long The resolved authorization username is too long.
AllInvalid User Information
basic_password_too_long Basic password is too long. AllInvalid User Information
basic_username_too_long Basic username is too long. AllInvalid User Information
cannot_decrypt_secret Cannot decrypt shared secret. AllInvalid Configuration
cannot_determine_authorization_username
Could not determine the authorization username.
AllGeneral Authorization Failure
cannot_determine_full_username Could not determine full user name. AllInvalid ConfigurationGeneral Offbox Error
cannot_determine_username Agent could not determine simple user name.
AllInvalid Configuration
cannot_expand_credentials_substitution
The substitution used to determine the credentials could not be expanded.
AllInvalid User Information
cannot_redirect_connect Cannot use origin-redirect or form-redirect for CONNECT method (explicit proxy of https URL)
AllRedirect Error
cannot_redirect_https_to_http Cannot redirect an HTTPS request to an HTTP virtual URL
AllRedirect Error
cannot_setup_working_dir Unable to setup working directory for COREid AccessGate
AllInvalid Configuration
cert_explicit_unsupported Certificate authentication not supported for explicit proxy.
AllInvalid Configuration
certificate_missing No certificate found. Check that verify-client is set on https service.
AllUser Credentials Required
credential_decode_failure Unable to decode base64 credentials. AllInvalid User Information
credentials_mismatch Credentials did not match. AllInvalid User Information
domain_controller_query_disabled Windows SSO Domain Controller Querying is not enabled on the Single Sign-on agent.
AllInvalid Configuration
expired_credentials Credentials on back-end server have expired.
AllUser Account Error
form_does_not_support_connect Cannot use form authentication for CONNECT method (explicit proxy of https URL)
AllInvalid Configuration
form_requires_basic_support Form authentication requires the realm to support Basic credentials.
AllInvalid Configuration
general_authentication_error General authentication failure due to bad user ID or authentication token.
AllGeneral Authentication FailureInvalid User Information
Table B-2. Individual Errors (Continued)
Error Name Description Groups

Appendix B: Authentication and Authorization Errors
281
general_authorization_error Unable to authorize authenticated user. AllGeneral Authorization Failure
guest_user Credentials required. AllUser Credentials Required
invalid_ip The IP address of this computer could not be determined by the Single Sign-on agent.
AllSingle Sign-on Failure
invalid_license The license for the configured realm does not exist or is invalid. A valid license must be installed.
AllInvalid License
invalid_local_user_list Invalid local user list. AllInvalid Configuration
invalid_realm The specified realm is invalid. AllInvalid Configuration
invalid_search_credentials The LDAP search credentials are invalid. AllInvalid Configuration
invalid_surrogate The surrogate is invalid for the specified realm.
AllInvalid User Information
issuer_too_long Certificate's issuer string is too long. AllInvalid User Information
ldap_busy LDAP: server busy. AllCommunication ErrorGeneral Offbox Error
ldap_filter_error LDAP: filter error. AllInvalid Configuration
ldap_inappropriate_auth LDAP: inappropriate authentication. AllInvalid Configuration
ldap_insufficient_access LDAP: insufficient access. AllInvalid Configuration
ldap_invalid_credentials LDAP: invalid credentials. AllInvalid User Information
ldap_invalid_dn_syntax LDAP: invalid DN syntax. AllInvalid Configuration
ldap_loop_detect LDAP: loop detected. AllCommunication ErrorGeneral Offbox Error
ldap_no_such_attribute LDAP: No such attribute. AllInvalid Configuration
ldap_no_such_object LDAP: no such object. AllInvalid Configuration
ldap_partial_results LDAP server returned partial results. AllInvalid Configuration
ldap_server_down Could not connect to LDAP server. AllCommunication ErrorGeneral Offbox Error
Table B-2. Individual Errors (Continued)
Error Name Description Groups

Volume 4: Securing the Blue Coat SG Appliance
282
ldap_timelimit_exceeded LDAP server exceeded time limit. AllRequest TimeoutGeneral Offbox Error
ldap_timeout The LDAP request timed out. AllRequest TimeoutGeneral Offbox Error
ldap_unavailable LDAP: service unavailable. AllCommunication ErrorGeneral Offbox Error
ldap_unwilling_to_perform LDAP: server unwilling to perform requested action.
AllCommunication ErrorGeneral Offbox Error
missing_base_dn No base DNs are configured. AllInvalid Configuration
missing_form_configuration Form authentication is not properly configured
AllInvalid Configuration
multiple_users_matched The user query resulted in multiple users. A unique user could not be determined.
AllSingle Sign-on Failure
need_credentials Credentials are missing. AllUser Credentials Required
netbios failure NetBIOS reply did not contain data needed for authentication.
AllInvalid NetBIOS ReplyGeneral Offbox Error
netbios_cannot_send Could not send NetBIOS query. AllCommunication ErrorGeneral Offbox Error
netbios_multiple_users NetBIOS reply contained multiple user names.
AllInvalid NetBIOS ReplyGeneral Offbox Error
netbios_no_computer_name Could not determine computer name from NetBIOS reply.
AllInvalid NetBIOS ReplyGeneral Offbox Error
netbios_no_domain_name Could not determine domain name from NetBIOS reply.
AllInvalid NetBIOS ReplyGeneral Offbox Error
netbios_no_user_name NetBIOS reply did not contain the user name.
AllInvalid NetBIOS ReplyGeneral Offbox Error
netbios_recv_failed Failed to receive reply to NetBIOS query. AllInvalid NetBIOS ReplyGeneral Offbox Error
netbios_reply_invalid Reply to NetBIOS query was invalid. AllCommunication ErrorGeneral Offbox Error
netbios_reply_timeout Timed out awaiting reply to NetBIOS query.
AllRequest TimeoutGeneral Offbox Error
Table B-2. Individual Errors (Continued)
Error Name Description Groups

Appendix B: Authentication and Authorization Errors
283
no_offbox_url_specified Off-box redirects are configured but no off-box URL is specified.
AllInvalid Configuration
no_servers No usable authentication servers found. AllCommunication ErrorInvalid ConfigurationGeneral Offbox Error
no_user_in_cert Could not retrieve username from certificate.
AllUser Credentials Required
none Status successful.
not_attempted The method has not been attempted. All
not_ssl SSL is required but connection is not using it (check virtual-url).
AllInvalid Configuration
offbox_abort The request was aborted due to a change in configuration.
AllConfiguration Changed
offbox_missing_secret Secret is not defined for authentication realm
AllInvalid Configuration
offbox_process_create_failed Could not create offbox authentication processes
AllInitialization ErrorGeneral Offbox Error
offbox_protocol_error The authentication server returned an invalid result.
AllInvalid ConfigurationGeneral Offbox Error
offbox_server_down The authentication server cannot process requests.
AllGeneral Offbox Error
offbox_server_unreachable The authentication server could not be contacted.
AllInvalid ConfigurationGeneral Offbox Error
offbox_timeout The request timed out while trying to authenticate. The authentication server may be busy or offline.
AllRequest TimeoutGeneral Offbox Error
otp_already_used The one-time password has already been used
AllInvalid User Information
password_too_long Password is too long. AllInvalid User Information
radius_socket_interface RADIUS received an unexpected socket error.
AllCommunication ErrorGeneral Offbox Error
rdns_cannot_determine_name Could not determine user name from client host name.
AllRDNS FailureGeneral Offbox Error
rdns_failed Reverse DNS address resolution failed. AllRDNS FailureGeneral Offbox Error
redirect_from_vh Redirecting from the virtual host. AllRedirect Error
Table B-2. Individual Errors (Continued)
Error Name Description Groups

Volume 4: Securing the Blue Coat SG Appliance
284
sspi_context_lost Authentication agent rejected request (context lost).
AllInvalid BCAAA RequestGeneral Offbox Error
sspi_context_too_old Authentication agent rejected request - too old.
AllInvalid BCAAA RequestGeneral Offbox Error
sspi_domain_controller_not_found Cannot find domain controller. AllInvalid Configuration
sspi_invalid_handle SSPI protocol error - invalid context handle.
AllInvalid User Information
sspi_invalid_mechanism Authentication agent rejected request - Invalid mechanism requested.
AllInvalid BCAAA RequestGeneral Offbox Error
sspi_invalid_token The credentials provided are invalid. AllInvalid User Information
sspi_invalid_type3_message Client sent invalid NTLM Type 3 message.
AllInvalid User Information
sspi_logon_denied The logon failed. AllInvalid User Information
sspi_logon_type_not_granted Requested logon type not granted. AllInvalid Configuration
sspi_no_authenticating_authority No authority could be contacted for authentication.
AllCommunication ErrorGeneral Offbox Error
sspi_null_lm_password Windows NT password too complex for LanMan.
AllInvalid Configuration
sspi_process_create_failed NTLM realm could not create administrator processes.
AllInitialization ErrorGeneral Offbox Error
sspi_rpc_error Connection to authentication agent lost. AllCommunication ErrorGeneral Offbox Error
sspi_service_disabled SSPI service disabled. AllInvalid Configuration
sspi_timeout Authentication agent did not respond to request in time.
AllRequest TimeoutGeneral Offbox Error
sspi_unable_to_connect_to_agent Unable to connect to authentication agent.
AllCommunication ErrorGeneral Offbox Error
subject_too_long Certificate's subject string is too long. AllInvalid User Information
too_many_users More than one user is logged onto this computer. Only one user can be logged on for Single Sign-on authentication.
AllSingle Sign-on Failure
unable_to_query_client The client workstation could not be queried by the Single Sign-on agent.
AllSingle Sign-on Failure
Table B-2. Individual Errors (Continued)
Error Name Description Groups

Appendix B: Authentication and Authorization Errors
285
unknown_user The user could not be determined by the Single Sign-on agent.
AllSingle Sign-on Failure
user_domain_not_trusted The specified domain is not trusted. AllInvalid User Information
username_too_long Specified username is too long. AllInvalid User Information
Table B-2. Individual Errors (Continued)
Error Name Description Groups

Volume 4: Securing the Blue Coat SG Appliance
286

287
Appendix C: Managing SSL Traffic
This chapter describes how to configure the SSL client and devices profiles, which are required for secure connections. These profiles are configured to group together the collection of settings required for an SSL connection. The profiles themselves include:
❐ Keyrings
❐ CA certificates
❐ CA Certificate List (CCL)
❐ Cipher Suite
CA certificates, keyrings, CCLs and cipher suites must be configured individually before being added to an SSL client profile or an SSL device profile. Except for cipher suites, discussed in "Changing the Cipher Suite of the SSL Client" on page 289, these settings are discussed in greater detail in Chapter 4: "Managing X.509 Certificates" on page 57.
This chapter discusses the following topics:
❐ Section A: "SSL Client Profiles" on page 288.
❐ Section B: "SSL Device Profiles" on page 292.
❐ Section C: "Notes and Troubleshooting" on page 295.

Volume 4: Securing the Blue Coat ProxySG Appliance
288
Section A: SSL Client Profiles
Section A: SSL Client ProfilesThis section discusses SSL Client profiles.
About the SSL Client ProfileThe SSL client profile contains the settings needed to make an SSL connection; this profile can be used by any HTTP or HTTPS proxy service that needs to make an upstream SSL connection.
Default settings for the SSL client are:
❐ Keyring: None
❐ SSL Versions: SSLv2v3TLSv1 (SSLv2, SSLv3, TLSv1)
❐ CCL: browser-trusted
❐ Cipher suite: All
To modify any parameters for SSL connections, change the corresponding SSL device profile. Do not modify the SSL client profile settings.
Editing an SSL ClientThe SSL client settings are global, affecting all services that use it. Unless required by your environment, you do not need to change any settings.
To change the protocol, the cipher suite, the keyring or the CCL associated with the SSL client, continue with "Associating a Keyring, Protocol, and CCL with the SSL Client" on page 288 or "Changing the Cipher Suite of the SSL Client" on page 289.
Associating a Keyring, Protocol, and CCL with the SSL ClientThe SSL client, called default, already exists on the ProxySG.
To edit the SSL client:
1. Select Configuration>SSL>SSL Client.
Note: The SSL proxy, also known as the SSL forward proxy, uses parameters taken from the SSL connection made by the client when originating SSL connections to the server. As a result, settings in the default SSL client profile are not applied to these connections.

Appendix C: Managing SSL Traffic
289
Section A: SSL Client Profiles
2. Complete the following steps:
a. If the server in question requires a client certificate, select the keyring used to negotiate with origin content servers through an encrypted connection. Only keyrings with certificates can be associated with the SSL client, displayed in the Keyring drop-down list. By default, no keyring is selected.
b. (Optional) Change the SSL Versions default from SSLv2v3TLSv1 to any other combination of protocols listed in the drop-down list.
c. Select the CCL that the ProxySG uses to determine which CA certificates are trusted during server certificate validation. The CCL can be any already created certificate list. By default, the browser-trusted CCL is used.
3. Click Apply.
Related CLI Syntax to Associate a Keyring, Protocol, and CCL with the SSL Client
SGOS#(config) sslSGOS#(config ssl) edit ssl-client defaultSGOS#(config ssl ssl-client default) ccl {ccl_name | all}SGOS#(config ssl ssl-client default) keyring-id keyring_idSGOS#(config ssl ssl-client default) protocol {sslv2 | sslv3 | tlsv1 | sslv2v3 | sslv2tlsv1 | sslv3tlsv1 | sslv2v3tlsv1}
Changing the Cipher Suite of the SSL ClientThe cipher suite sets the encryption method for the ProxySG. Changing the cipher suite can be done only through the CLI.
To change the cipher suite of the SSL client: The default is to use all ciphers.
2a
2b
2c
Note: Director uses non-interactive commands (commands that do not send options to the screen and wait for user input) to create the cipher suite used in Director overlays and profiles. For more information on Director, refer to the Blue Coat Director Configuration and Management Guide.
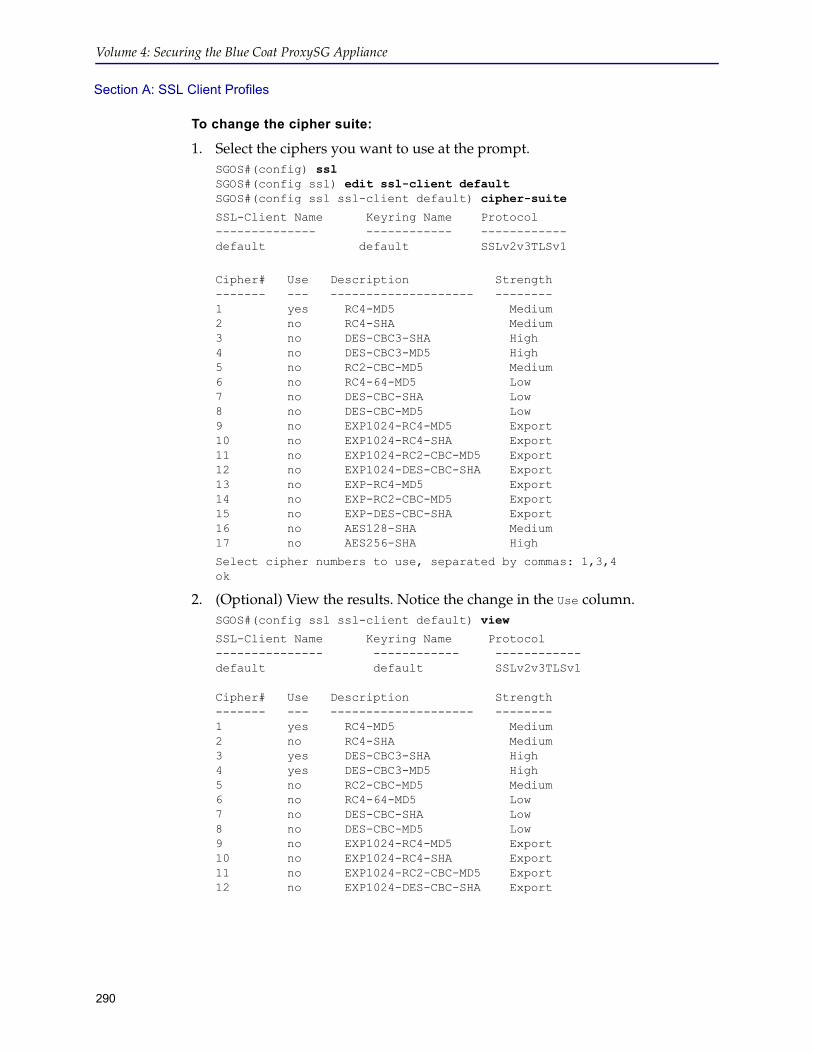
Volume 4: Securing the Blue Coat ProxySG Appliance
290
Section A: SSL Client Profiles
To change the cipher suite:
1. Select the ciphers you want to use at the prompt.SGOS#(config) sslSGOS#(config ssl) edit ssl-client defaultSGOS#(config ssl ssl-client default) cipher-suite
SSL-Client Name Keyring Name Protocol-------------- ------------ ------------default default SSLv2v3TLSv1
Cipher# Use Description Strength------- --- -------------------- --------1 yes RC4-MD5 Medium2 no RC4-SHA Medium3 no DES-CBC3-SHA High4 no DES-CBC3-MD5 High5 no RC2-CBC-MD5 Medium6 no RC4-64-MD5 Low7 no DES-CBC-SHA Low8 no DES-CBC-MD5 Low9 no EXP1024-RC4-MD5 Export10 no EXP1024-RC4-SHA Export11 no EXP1024-RC2-CBC-MD5 Export12 no EXP1024-DES-CBC-SHA Export13 no EXP-RC4-MD5 Export14 no EXP-RC2-CBC-MD5 Export15 no EXP-DES-CBC-SHA Export16 no AES128-SHA Medium17 no AES256-SHA High
Select cipher numbers to use, separated by commas: 1,3,4ok
2. (Optional) View the results. Notice the change in the Use column.SGOS#(config ssl ssl-client default) view
SSL-Client Name Keyring Name Protocol--------------- ------------ ------------default default SSLv2v3TLSv1
Cipher# Use Description Strength------- --- -------------------- --------1 yes RC4-MD5 Medium2 no RC4-SHA Medium3 yes DES-CBC3-SHA High4 yes DES-CBC3-MD5 High5 no RC2-CBC-MD5 Medium6 no RC4-64-MD5 Low7 no DES-CBC-SHA Low8 no DES-CBC-MD5 Low9 no EXP1024-RC4-MD5 Export10 no EXP1024-RC4-SHA Export11 no EXP1024-RC2-CBC-MD5 Export12 no EXP1024-DES-CBC-SHA Export

Appendix C: Managing SSL Traffic
291
Section A: SSL Client Profiles
13 no EXP-RC4-MD5 Export14 no EXP-RC2-CBC-MD5 Export15 no EXP-DES-CBC-SHA Export16 no AES128-SHA Medium17 no AES256-SHA High
To change the cipher suite non-interactively:Enter the following commands:
SGOS#(config) sslSGOS#(config ssl) edit ssl-client defaultSGOS#(config ssl ssl-client default) cipher-suite cipher
where cipher is any of those listed above
Notes:❐ If you do not specify any attributes, the cipher suite cannot be used.
❐ Multiple ciphers can be specified on the command line, separated by blank spaces.
ExampleSGOS#(config ssl ssl-client default) cipher-suite rc4-sha
okSGOS#(config ssl ssl-client default) viewSSL-Client: defaultKeyring: <None>CCL: browser-trustedProtocol: SSLv2v3TLSv1Cipher suite: rc4-sha

Volume 4: Securing the Blue Coat ProxySG Appliance
292
Section B: SSL Device Profiles
Section B: SSL Device ProfilesThis section discusses SSL Device profiles.
About SSL Device ProfilesAn SSL device profile contains the settings needed to make an SSL connection to a remote system; this profile is used when the ProxySG is an SSL endpoint for non-proxy traffic, such as secure ADN connections, LDAP client, BCAAA client, and DRTR. The ProxySG is pre-configured with three SSL device profiles, each with a specific purpose. You can create other profiles for other purposes or edit the default profile to suit the environment.
The already-created SSL device profiles and their purposes are:
❐ bluecoat-appliance-certificate: This profile, which cannot be edited or deleted, is used for device-to-device authentication, allowing Blue Coat devices on a network to identify other Blue Coat devices that can be trusted. For more information on using the bluecoat-appliance-certificate SSL device profile, refer to Volume 5: Advanced Networking.
❐ passive-attack-detection-only: This profile, which cannot be edited or deleted, optionally can be used in place of the bluecoat-appliance-certificate profile. The passive-attack-detection-only profile uses a self-signed certificate and disables the verify-peer option, so that no authentication is done on the endpoints of the connection. The traffic is encrypted, but is vulnerable to active attacks.
❐ default: This profile can be edited but not deleted. Only secured non-proxy traffic uses this profile.
Some non-proxy traffic, such as ADN, has no default profile; you must choose a profile before enabling security for the traffic.
Editing or Creating an SSL Device Profile You can edit the existing default SSL device profile for the environment; you can also create additional SSL device profiles with different settings.
Additional profiles with different settings can be created; for example, if you require a different cipher setting than what the default profile uses, you can create a profile with the different cipher suite.
To edit or create an SSL device profile:
1. Select Configuration > SSL > Device Profiles > Profiles.
2. Click New (if you are creating a new profile) or Edit (if you are editing the default profile).
Note: Non-proxy traffic uses an SSL device profile. Proxy traffic uses the SSL client profile. For proxy traffic, see Section A: "SSL Client Profiles" on page 288.

Appendix C: Managing SSL Traffic
293
Section B: SSL Device Profiles
3. Configure the Device Profile options:
a. Name: Give the profile a meaningful name. (If you are editing the default profile, this field is grayed out.) The only valid characters are alphanumeric, the underscore, and hyphen, and the first character must be a letter.
b. SSL protocol versions: Change the default from SSLv2v3TLSv1 to any other combination of protocols listed in the drop-down list.
c. Keyring: If the server in question requires a client certificate, then select the keyring used to negotiate with origin content servers through an encrypted connection. Only keyrings with certificates can be associated with the SSL client, displayed in the Keyring drop-down list.By default, no keyring is selected.
d. CCL: From the drop-down list, select the CA Certificate List you want to use. The browser-trusted CCL is the default.
e. Device ID extractor: This field describes how device ID information is extracted from a presented certificate. The string contains references to the attributes of the subject or issuer in the form $(subject.attr[.n]) or $(issuer.attr[.n]), where attr is the short-form name of the attribute and n is the ordinal instance of that attribute, counting from 1 when the subject is in LDAP (RFC 2253) order. If n is omitted, it is assumed to be 1. The default is $(subject.CN); many other subject attributes are recognized, among them OU, O, L, ST, C, and DC.
f. Verify peer: This setting determines whether a client certificate is requested on incoming SSL connections and verified against the specified CCL. This is enabled by default.
g. Selected ciphers: If you want to use different ciphers, click Edit ciphers on the right-hand side of the pane.
3a
3b3c3d3e
3f3g

Volume 4: Securing the Blue Coat ProxySG Appliance
294
Section B: SSL Device Profiles
4. Select the ciphers you want to use. Click Add to add the cipher to the list of selected ciphers. Remove unwanted ciphers from the Selected Options list.
5. Click OK.
6. Click Apply.
Related CLI Syntax to Manage SSL Device Profiles❐ To enter configuration mode:
SGOS#(config) ssl
❐ The following SSL device profile commands are available:
SGOS#(config ssl) create ssl-device-profile profile_name keyring_IDSGOS#(config ssl) edit ssl-device-profile test
SGOS#(config device-profile test) cipher-suite cipher-suite SGOS#(config device-profile test) ccl ccl_nameSGOS#(config device-profile test) device-id device_IDSGOS#(config device-profile test) exit SGOS#(config device-profile test) keyring-id keyring_IDSGOS#(config device-profile test) protocol {sslv2 | sslv3 | tlsv1 | sslv2v3 | sslv2tlsv1 | sslv3tlsv1 | sslv2v3tlsv1}SGOS#(config device-profile test) verify-peer [enable | disable]SGOS#(config device-profile test) view
SGOS#(config ssl) request-appliance-certificate SGOS#(config ssl) view appliance-certificate-requestSGOS#(config ssl) view ssl-device-profile

Appendix C: Managing SSL Traffic
295
Section C: Notes and Troubleshooting
Section C: Notes and TroubleshootingThe following topics apply to both the SSL Client and the SSL device profiles.
Troubleshooting Server Certificate VerificationThe three most common causes of server certificate verification failure are:
❐ The absence of a suitable CA certificate on the ProxySG. Be sure that the ProxySG is configured with the relevant CA certificates to avoid unwanted verification failures.
❐ The certificate is being used before its valid-from date or used after its valid-to date. This generally happens when a clock mismatch occurs between the certificate and the machine using the certificate. It is also possible that the clock on one of the machines is wrong.
❐ The common name in the certificate might not match the hostname in the URL.
Server certification validation can also be controlled through policy:
❐ CPL: Use the server.certificate.validate( ) property in the Forwarding layer.
❐ VPM: Use the Set Server Certificate Validation action in the SSL Access Layer.
Setting the SSL Negotiation TimeoutThe SSL negotiation timeout value dictates the time a ProxySG waits for a new SSL handshake to complete.
You can change the default SSL negotiation timeout value if the default, 300 seconds, is not sufficient for the environment. This value can only be changed through the CLI; it cannot be set from the Management Console.
To change the timeout period, enter the following commands from the command prompt:
SGOS#(config) sslSGOS#(config ssl) view ssl-nego-timeout 300SGOS#(config ssl) ssl-nego-timeout seconds

Volume 4: Securing the Blue Coat ProxySG Appliance
296
Section C: Notes and Troubleshooting

297
Appendix D: XML Protocol
The XML realm uses a SOAP 1.2 based protocol for the Blue Coat supported protocol. A schema has been placed at:
http://www.bluecoat.com/xmlns/xml-realm/1.0.
This appendix includes the following sections:
❐ Section A: "Authenticate Request" on page 298
❐ Section B: "Authenticate Response" on page 300
❐ Section C: "Authorize Request" on page 302
❐ Section D: "Authorize Response" on page 303

Volume 4: Securing the Blue Coat ProxySG
298
Section A: Authenticate Request
Section A: Authenticate Request
GET Method (User Credentials in Request)If the user credentials are not set in the HTTP headers, the username and password are added to the query. The name of the username parameter is configured in the realm. The groups and attributes of interest are only included if the realm is configured to include them.
http://<server hostname>:<server port>/<authenticate service path>?<username parameter name>=<username>&password=<password>[&group=<group 1>&group=<group 2>…&attribute=<attribute 1>&attribute=<attribute 2>]
GET Method (User Credentials in Headers)If the user credentials are in the HTTP headers, the password is not added to the query.
http://<server hostname>:<server port>/<authenticate service path>/authenticate?<username parameter name>=<username>[&group=<group 1>&group=<group 2>…&attribute=<attribute 1>&attribute=<attribute 2>]
POST Method (User Credentials in Request)The parameter name of the username is configured in the realm. The groups and attributes of interest will only be included if the realm is configured to include them.
<?xml version='1.0'encoding="UTF-8" ?><env:Envelope xmlns:env="http://www.w3.org/2003/05/soap-envelope"><env:Body env:encodingStyle="http://www.w3.org/2003/05/soap-
encoding" xmlns:enc="http://www.w3.org/2003/05/soap-encoding"><m:authenticate xmlns:m="http://www.bluecoat.com/xmlns/xml-realm/1.0"><m:username>Username</m:username><m:password>password</m:password><m:groups enc:arraySize="*" enc:itemType="xsd:string"><m:group>group1</m:group><m:group>group2</m:group>
</m:groups><m:attributes enc:arraySize="*" enc:itemType="xsd:string"><m:attribute>attribute1</m:attribute><m:attribute>attribute2</m:attribute>
</m:attributes></m:authenticate>
</env:Body></env:Envelope>
POST Method (User Credentials in Headers)If the user credentials are in the HTTP headers, the password is not added to the request.

Appendix D: XML Protocol
299
Section A: Authenticate Request
<?xml version='1.0' encoding="UTF-8" ?><env:Envelope xmlns:env="http://www.w3.org/2003/05/soap-envelope"><env:Body env:encodingStyle="http://www.w3.org/2003/05/soap-encoding"><m:authenticate xmlns:m="http://www.bluecoat.com/xmlns/xml-realm/1.0"><m:username>Username</m:username><m:challenge-state>challenge state</m:challenge-state><m:groups enc:arraySize="*" enc:itemType="xsd:string"><m:group>group1</m:group><m:group>group2</m:group>
</m:groups><m:attributes enc:arraySize="*" enc:itemType="xsd:string"><m:attribute>attribute1</m:attribute><m:attribute>attribute2</m:attribute>
</m:attributes></m:authenticate>
</env:Body></env:Envelope>

Volume 4: Securing the Blue Coat ProxySG
300
Section B: Authenticate Response
Section B: Authenticate Response
SuccessAll of the response fields except full-username are optional. The intersection of the groups of interest and the groups that the user is in are returned in the groups element. The attributes of interest for the user are returned in a flattened two dimensional array of attribute names and values.
<?xml version='1.0' encoding="UTF-8" ?><env:Envelope xmlns:env="http://www.w3.org/2003/05/soap-envelope"><env:Body env:encodingStyle="http://www.w3.org/2003/05/soap-encoding"><m:authenticate-response xmlns:m="http://www.bluecoat.com/xmlns/xml-realm/1.0"><m:full-username>full-username</m:full-username><m:groups enc:arraySize="*" enc:itemType="xsd:string"><m:group>group2</m:group>
</m:groups><m:attribute-values enc:arraySize="* 2"
enc:itemType="xsd:string"><m:item>attribute2</m:item><m:item>value2a</m:item><m:item>attribute2</m:item><m:item>value2b</m:item><m:item>attribute2</m:item><m:item>value2c</m:item>
</m:attribute-values></m:authenticate-response>
</env:Body></env:Envelope>
Failed/DeniedThe failed response includes a text description of the failure that becomes the text description of the error reported to the user. The fault-code is one of a set of SGOS authentication errors that can be returned from the responder. The codes are returned as strings, but are part of an enumeration declared in the schema for the protocol. Only codes in this list are acceptable.
account_disabledaccount_restrictedcredentials_mismatchgeneral_authentication_errorexpired_credentialsaccount_locked_outaccount_must_change_passwordoffbox_server_downgeneral_authorization_errorunknown_error

Appendix D: XML Protocol
301
Section B: Authenticate Response
<?xml version='1.0' encoding="UTF-8" ?><env:Envelope xmlns:env="http://www.w3.org/2003/05/soap-envelope"><env:Body><env:Fault><env:Code><env:Value>env:Sender</env:Value>
</env:Code><env:Reason><env:Text xml:lang="en-US">Bad username or password</env:Text>
</env:Reason><env:Detail><e:realm-faultxmlns:e="http://www.bluecoat.com/xmlns/xml-realm/1.0"><e:fault-code>general_authentication_error</e:fault-code>
<e:realm-fault><env:Detail>
<env:Fault></env:Body>
</env:Envelope>

Volume 4: Securing the Blue Coat ProxySG
302
Section C: Authorize Request
Section C: Authorize RequestThe groups and attributes of interest for the user are embedded in the request if they are configured to be included. The XML responder must not require credentials for authorization requests.
GET Methodhttp://<server hostname>:<server port>/<authorize service path>?<username parameter name>=<username>[&group=<group1>&group=<group2>…&attribute=<attribute1>&…]
POST Method<?xml version='1.0' encoding="UTF-8" ?><env:Envelope xmlns:env="http://www.w3.org/2003/05/soap-envelope"><env:Bodyenv:encodingStyle="http://www.w3.org/2003/05/soap-encoding"xmlns:enc="http://www.w3.org/2003/05/soap-encoding"><m:authorizexmlns:m="http://www.bluecoat.com/soap/xmlns/xml-realm/1.0"><m:username>Username</m:username><m:groups enc:arraySize="*" enc:itemType="xsd:string"><m:group>group1</m:group><m:group>group2</m:group>
</m:groups><m:attributes enc:arraySize="*" enc:itemType="xsd:string"><m:attribute>attribute1</m:attribute><m:attribute>attribute2</m:attribute>
</m:attributes></m:authorize>
</env:Body></env:Envelope>

Appendix D: XML Protocol
303
Section D: Authorize Response
Section D: Authorize Response
SuccessOnly applicable groups and attributes are returned. Multi-valued attributes are returned by multiple instances of the same attribute name.
<?xml version='1.0' encoding="UTF-8" ?><env:Envelope xmlns:env="http://www.w3.org/2003/05/soap-envelope"><env:Bodyenv:encodingStyle="http://www.w3.org/2003/05/soap-encoding"xmlns:enc="http://www.w3.org/2003/05/soap-encoding"><m:authorize-responsexmlns:m="http://www.bluecoat.com/xmlns/xml-realm/1.0"><m:groups enc:arraySize="*" enc:itemType="xsd:string"><m:group>group2</m:group>
</m:groups><m:attribute-values enc:arraySize="* 2"
enc:itemType="xsd:string"><m:item>attribute2</m:item><m:item>value2a</m:item><m:item>attribute2</m:item><m:item>value2b</m:item><m:item>attribute2</m:item><m:item>value2c</m:item>
</m:attribute-values></m:authorize-response>
</env:Body></env:Envelope>
Failed<?xml version='1.0'encoding="UTF-8" ?><env:Envelope xmlns:env="http://www.w3.org/2003/05/soap-envelope"><env:Body><env:Fault><env:Code><env:Value>env:Receiver</env:Value>
</env:Code><env:Reason><env:Text xml:lang="en-US">Could not contact LDAP server</
env:Text></env:Reason><env:Detail><e:realm-faultxmlns:e="http://www.bluecoat.com/xmlns/xml-realm/1.0"><e:fault-code>offbox_server_down</e:fault-code>
</e:realm-fault></env:Detail>
</env:Fault></env:Body>
</env:Envelope>

Volume 4: Securing the Blue Coat ProxySG
304
Section D: Authorize Response

305
Glossary
Aaccess control list—Allows or denies specific IP addresses access to a server.
access log—A list of all the requests sent to a ProxySG. You can read an access log using any of the popular log-reporting programs. When a client uses HTTP streaming, the streaming entry goes to the same access log.
account—A named entity that has purchased the ProxySG or the Entitlements from Blue Coat.
activation code—A string of approximately 10 characters that is generated and mailed to customers when they purchase the ProxySG.
active content stripping—Provides a way to identify potentially dangerous mobile or active content and scripts, and strip them out of a response.
active content types—Used in the Visual Policy Manager. Referring to Web Access policies, you can create and name lists of active content types to be stripped from Web pages. You have the additional option of specifying a customized message to be displayed to the user
administration access policy—A policy layer that determines who can access the ProxySG to perform administrative tasks.
administration authentication policy—A policy layer that determines how administrators accessing the ProxySG must authenticate.
AJAX—Acronym for Asynchronous JavaScript and XML, the technology used for live updating of Web objects without having to reload the entire page.
Application Delivery Network (ADN)—A WAN that has been optimized for acceleration and compression by Blue Coat. This network can also be secured through the use of appliance certificates. An ADN network is composed of an ADN manager and backup ADN manager, ADN nodes, and a network configuration that matches the environment.
ADN backup manager—Takes over for the ADN manager in the event it becomes unavailable. See ADN manager.
ADN manager—Responsible for publishing the routing table to SG Clients (and to other ProxySG appliances).
ADN optimize attribute—Controls whether to optimize bandwidth usage when connecting upstream using an ADN tunnel.
A record—The central records of DNS, which link a domain or subdomain to an IP address. An A record can correspond to a single IP address or many IP addresses.
asx rewrite—Allows you to rewrite URLs and then direct a client's subsequent request to the new URL. One of the main applications of ASX file rewrites is to provide explicit proxy-like support for Windows Media Player 6.4, which cannot set explicit proxy mode for protocols other than HTTP.

Volume 4: Securing the Blue Coat ProxySG
306
audit—A log that provides a record of who accessed what and how.
authenticate-401 attribute—All transparent and explicit requests received on the port always use transparent authentication (cookie or IP, depending on the configuration). This is especially useful to force transparent proxy authentication in some proxy-chaining scenarios
authenticated content—Cached content that requires authentication at the origin content server (OCS). Supported authentication types for cached data include basic authentication and IWA (or NTLM).
authentication—Allows you to verify the identity of a user. In its simplest form, this is done through usernames and passwords. Much more stringent authentication can be employed using digital certificates that have been issued and verified by a Certificate Authority. See also basic authentication, proxy authentication, and SSL authentication.
authentication realm—Authenticates and authorizes users to access SG services using either explicit proxy or transparent proxy mode. These realms integrate third-party vendors, such as LDAP, Windows, and Novell, with the Blue Coat operating system.
authorization—The permissions given to an authenticated user.
Bbandwidth—The amount of data you can send through a network or modem connection, usually measured in bits per second (bps).
bandwidth class—A defined unit of bandwidth allocation.
bandwidth class hierarchy—A gouping of bandwidth classes into a tree structure that specifies the relationship among different classes. You create a hierarchy by creating at least one parent class and assigning other classes as its children.
bandwidth gain—Bandwidth gain is a calculation of the savings that occur when bandwidth is not consumed as a result of some form of optimization.
For example, bandwidth gain for active sessions is calculated by subtracting the number of client bytes from the number of server bytes and dividing the result by the number of server bytes.
(Client Bytes - Server Bytes) / Server Bytes
bandwidth management—Classify, control, and, if needed, limit the amount of bandwidth used by network traffic flowing in or out of a ProxySG.
basic authentication—The standard authentication for communicating with the target as identified in the URL.
BCAAA—Blue Coat Authentication and Authorization Agent. Allows SGOS 5.x to manage authentication and authorization for IWA, CA eTrust SiteMinder realms, Oracle COREid, Novell, and Windows realms. The agent is installed and configured separately from SGOS 5.x and is available from the Blue Coat Web site.
BCLP—Blue Coat Licensing Portal.
byte-range support—The ability of the ProxySG to respond to byte-range requests (requests with a Range: HTTP header).

307
Ccache—An "object store," either hardware or software, that stores information (objects) for later retrieval. The first time the object is requested, it is stored, making subsequent requests for the same information much faster.
A cache helps reduce the response time and network bandwidth consumption on future, equivalent requests. The ProxySG serves as a cache by storing content from many users to minimize response time and prevent extraneous network traffic.
cache control—Allows you to configure which content the ProxySG stores.
cache efficiency—A tab found on the Statistics pages of the Management Console that shows the percent of objects served from cache, the percent loaded from the network, and the percent that were non-cacheable.
cache hit—Occurs when the ProxySG receives a request for an object and can serve the request from the cache without a trip to the origin server.
cache miss—Occurs when the ProxySG receives a request for an object that is not in the cache. The ProxySG must then fetch the requested object from the origin server.
cache object—Cache contents includes all objects currently stored by the ProxySG. Cache objects are not cleared when the ProxySG is powered off.
Certificate Authority (CA)—A trusted, third-party organization or company that issues digital certificates used to create digital signatures and public key/private key pairs. The role of the CA is to guarantee that the individuals or company representatives who are granted a unique certificate are who they claim to be.
child class (bandwidth gain)—The child of a parent class is dependent on that parent class for available bandwidth (they share the bandwidth in proportion to their minimum/maximum bandwidth values and priority levels). A child class with siblings (classes with the same parent class) shares bandwidth with those siblings in the same manner.
cipher suite—Specifies the algorithms used to secure an SSL connection. When a client makes an SSL connection to a server, it sends a list of the cipher suites that it supports.
client consent certificates—A certificate that indicates acceptance or denial of consent to decrypt an end user's HTTPS request.
client-side transparency—A way of replacing the ProxySG IP address with the Web server IP address for all port 80 traffic destined to go to the client. This effectively conceals the ProxySG address from the client and conceals the identity of the client from the Web server.
concentrator—A ProxySG, usually located in a data center, that provides access to data center resources, such as file servers.
content filtering—A way of controlling which content is delivered to certain users. ProxySG appliances can filter content based on content categories (such as gambling, games, and so on), type (such as http, ftp, streaming, and mime type), identity (user, group, network), or network conditions. You can filter content using vendor-based filtering or by allowing or denying access to URLs.

Volume 4: Securing the Blue Coat ProxySG
308
Ddefault boot system—The system that was successfully started last time. If a system fails to boot, the next most recent system that booted successfully becomes the default boot system.
default proxy listener—See proxy service (default).
denial of service (DoS)—A method that hackers use to prevent or deny legitimate users access to a computer, such as a Web server. DoS attacks typically send many request packets to a targeted Internet server, flooding the server's resources and making the system unusable. Any system connected to the Internet and equipped with TCP-based network services is vulnerable to a DoS attack.
The ProxySG resists DoS attacks launched by many common DoS tools. With a hardened TCP/IP stack, the ProxySG resists common network attacks, including traffic flooding.
destination objects—Used in Visual Policy Manager. These are the objects that define the target location of an entry type.
detect protocol attribute—Detects the protocol being used. Protocols that can be detected include: HTTP, P2P (eDonkey, BitTorrent, FastTrack, Gnutella), SSL, and Endpoint Mapper.
diagnostic reporting—Found in the Statistics pane, the Diagnostics tab allows you to control whether Daily Heartbeats and/or Blue Coat Monitoring are enabled or disabled.
directives—Commands used in installable lists to configure forwarding and SOCKS gateway.
DNS access—A policy layer that determines how the ProxySG processes DNS requests.
domain name system (DNS)—An Internet service that translates domain names into IP addresses.
dynamic bypass—Provides a maintenance-free method for improving performance of the ProxySG by automatically compiling a list of requested URLs that return various kinds of errors.
dynamic real-time rating (DRTR)—Used in conjunction with the Blue Coat Web Filter (BCWF), DRTR (also known as dynamic categorization) provides real-time analysis and content categorization of requested Web pages to solve the problem of new and previously unknown uncategorized URLs—those not in the database.
When a user requests a URL that has not already been categorized by the BCWF database (for example, a brand new Web site), the ProxySG dynamic categorization service analyzes elements of the requested content and assigns a category or categories. The dynamic service is consulted only when the installed BCWF database does not contain category information for an object.
Eearly intercept attribute—Controls whether the proxy responds to client TCP connection requests before connecting to the upstream server. When early intercept is disabled, the proxy delays responding to the client until after it has attempted to contact the server.

309
ELFF-compatible format—A log type defined by the W3C that is general enough to be used with any protocol.
emulated certificates—Certificates that are presented to the user by the ProxySG when intercepting HTTPS requests. Blue Coat emulates the certificate from the server and signs it, copying the subjectName and expiration. The original certificate is used between the ProxySG and the server.
encrypted log—A log is encrypted using an external certificate associated with a private key. Encrypted logs can only be decrypted by someone with access to the private key. The private key is not accessible to the ProxySG.
EULA—End user license agreement.
event logging—Allows you to specify the types of system events logged, the size of the event log, and to configure Syslog monitoring. The ProxySG can also notify you by email if an event is logged. See also access logging.
explicit proxy—A configuration in which the browser is explicitly configured to communicate with the proxy server for access to content. This is the default for the ProxySG and requires configuration for both the browser and the interface card.
extended log file format (ELFF)—A variant of the common log file format, which has two additional fields at the end of the line—the referer and the user agent fields.
Ffail open/closed—Failing open or closed applies to forwarding hosts and groups and SOCKS gateways. Fail open or closed applies when health checks are showing sick for each forwarding or SOCKS gateway target in the applicable fail-over sequence. If no systems are healthy, the ProxySG fails open or closed, depending on the configuration. If closed, the connection attempt simply fails.
If open, an attempt is made to connect without using any forwarding target (or SOCKS gateway). Fail open is usually a security risk; fail closed is the default if no setting is specified.
filtering—See content filtering.
forward proxy—A proxy server deployed close to the clients and used to access many servers. A forward proxy can be explicit or transparent.
FTP—See Native FTP and Web FTP.
Ggateway—A device that serves as entrance and exit into a communications network.
Hhardware serial number—A string that uniquely identifies the ProxySG; it is assigned to each unit in manufacturing.
health check tests—The method of determining network connectivity, target responsiveness, and basic functionality. The following tests are supported:

Volume 4: Securing the Blue Coat ProxySG
310
• ICMP
• TCP
• SSL
• HTTP
• HTTPS
• Group
• Composite and reference to a composite result
• ICAP
• Websense
• DRTR rating service
health check type—The kind of device or service the specific health check tests. The following types are supported:
• Forwarding host and forwarding group
• SOCKS gateway and SOCKS gateway group
• CAP service and ICAP service group
• Websense off-box service and Websense off-box service group
• DRTR rating service
• User-defined host and a user-defined composite
heartbeat—Messages sent once every 24 hours that contain the statistical and configuration data for the ProxySG, indicating its health. Heartbeats are commonly sent to system administrators and to Blue Coat. Heartbeats contain no private information, only aggregate statistics useful for pre-emptively diagnosing support issues.
The ProxySG sends emergency heartbeats whenever it is rebooted. Emergency heartbeats contain core dump and restart flags in addition to daily heartbeat information.
host affinity—The attempt to direct multiple connections by a single user to the same group member. Host affinity is closely tied to load balancing behavior; both should be configured if load balancing is important.
host affinity timeout—The host affinity timeout determines how long a user remains idle before the connection is closed. The timeout value checks the user's IP address, SSL ID, or cookie in the host affinity table.
Iinbound traffic (bandwidth gain)—Network packets flowing into the ProxySG. Inbound traffic mainly consists of the following:
• Server inbound: Packets originating at the origin content server (OCS) and sent to the ProxySG to load a Web object.

311
• Client inbound: Packets originating at the client and sent to the ProxySG for Web requests.
installable list—A list of configuration parameters that can be created using a text editor (either Blue Coat or another text editor) or through the CLI inline commands. The list can then be downloaded to the ProxySG from an HTTP server or locally from your PC. Configurations that can be created and installed this way include the SG Client, archiving, forwarding hosts, SOCKS gateways, ICP, policy files, and exceptions.
integrated host timeout—An integrated host is an origin content server (OCS) that has been added to the health check list. The host, added through the integrate_new_hosts property, ages out of the integrated host table after being idle for the specified time. The default is 60 minutes.
intervals—Time period from the completion of one health check to the start of the next health check.
IP reflection—Determines how the client IP address is presented to the origin server for explicitly proxied requests. All proxy services contain a reflect-ip attribute, which enables or disables sending of client's IP address instead of the IP address of the ProxySG.
issuer keyring—The keyring used by the ProxySG to sign emulated certificates. The keyring is configured on the appliance and managed through policy.
Llicensable component (LC)—(Software) A subcomponent of a license; it is an option that enables or disables a specific feature.
LCAMS—License Configuration and Management System.
license—Provides both the right and the ability to use certain software functions within a ProxyAV (or ProxySG) appliance. The license key defines and controls the license, which is owned by an account.
listener—The service that is listening on a specific port. A listener can be identified by any destination IP/subnet and port range. Multiple listeners can be added to each service.
live content—Also called live broadcast. Used in streaming, it indicates that the content is being delivered fresh.
LKF—License key file.
load balancing—A way to share traffic requests among multiple upstream systems or multiple IP addresses on a single host.
local bypass list—A list you create and maintain on your network. You can use a local bypass list alone or in conjunction with a central bypass list.
local policy file—Written by enterprises (as opposed to the central policy file written by Blue Coat); used to create company- and department-specific advanced policies written in the Blue Coat Policy Language (CPL).

Volume 4: Securing the Blue Coat ProxySG
312
log facility—A separate log that contains a single logical file and supports a single log format. It also contains the file’s configuration and upload schedule information as well as other configurable information such as how often to rotate (switch to a new log) the logs at the destination, any passwords needed, and the point at which the facility can be uploaded.
log format—The type of log that is used: NCSA/Common, SQUID, ELFF, SurfControl, or Websense.
The proprietary log types each have a corresponding pre-defined log format that has been set up to produce exactly that type of log (these logs cannot be edited). In addition, a number of other ELFF type log formats are also pre-defined (im, main, p2p, ssl, streaming). These can be edited, but they start out with a useful set of log fields for logging particular protocols understood by the ProxySG. It is also possible to create new log formats of type ELFF or Custom which can contain any desired combination of log fields.
log tail—The access log tail shows the log entries as they get logged. With high traffic on the ProxySG, not all access log entries are necessarily displayed. However, you can view all access log information after uploading the log.
MMACH5—SGOS 5 MACH5 Edition.
Management Console—A graphical Web interface that lets you to manage, configure, monitor, and upgrade the ProxySG from any location. The Management Console consists of a set of Web pages and Java applets stored on the ProxySG. The appliance acts as a Web server on the management port to serve these pages and applets.
management information base (MIB)—Defines the statistics that management systems can collect. A managed device (gateway) has one or more MIBs as well as one or more SNMP agents, which implements the information and management functionality defined by a specific MIB.
maximum object size—The maximum object size stored in the ProxySG. All objects retrieved that are greater than the maximum size are delivered to the client but are not stored in the ProxySG.
Media Access Control (MAC) address—A unique value associated with a network adapter; also known as hardware address or physical address. For the ProxySG, it is a hardware address that is stored in each network card (such as an SSL accelerator card or a Quad GigE Fiber LX card) on the ProxySG. The MAC address uniquely identifies an adapter on a LAN and is a 12-digit hexadecimal number (48 bits in length).
MIME/FILE type filtering—Allows organizations to implement Internet policies for both uploaded and downloaded content by MIME or FILE type.
multi-bit rate—The capability of a single stream to deliver multiple bit rates to clients requesting content from ProxySG appliances from within varying levels of network conditions (such as different connecting bandwidths and traffic).
multicast—Used in streaming; the ability for hundreds or thousands of users to play a single stream.

313
multicast aliases—Used in streaming; a streaming command that specifies an alias for a multicast URL to receive an .nsc file. The .nsc files allows the multicast session to obtain the information in the control channel
multicast station—Used in streaming; a defined location on the proxy where the Windows Media player can retrieve streams. A multicast station enables multicast transmission of Windows Media content from the cache. The source of the multicast-delivered content can be a unicast-live source, a multicast (live) source, and simulated live (video-on-demand content converted to scheduled live content).
multimedia content services—Used in streaming; multimedia support includes Real Networks, Microsoft Windows Media, Apple QuickTime, MP3, and Flash.
Nname inputing—Allows a ProxySG to resolve host names based on a partial name specification. When a host name is submitted to the DNS server, the DNS server resolves the name to an IP address. If the host name cannot be resolved, Blue Coat adds the first entry in the name-inputing list to the end of the host name and resubmits it to the DNS server
native FTP—Native FTP involves the client connecting (either explicitly or transparently) using the FTP protocol; the ProxySG then connects upstream through FTP (if necessary).
NCSA common log format—Blue Coat products are compatible with this log type, which contains only basic HTTP access information.
network address translation (NAT)—The process of translating private network (such as intranet) IP addresses to Internet IP addresses and vice versa. This methodology makes it possible to match private IP addresses to Internet IP addresses even when the number of private addresses outnumbers the pool of available Internet addresses.
non-cacheable objects—A number of objects are not cached by the ProxySG because they are considered non-cacheable. You can add or delete the kinds of objects that the appliance considers non-cacheable. Some of the non-cacheable request types are:
• Pragma no-cache, requests that specify non-cached objects, such as when you click refresh in the Web browser.
• Password provided, requests that include a client password.
• Data in request that include additional client data.
• Not a GET request.
.nsc file—Created from the multicast station definition and saved through the browser as a text file encoded in a Microsoft proprietary format. Without an .nsc file, the multicast station definition does not work.

Volume 4: Securing the Blue Coat ProxySG
314
NTP—To manage objects in an appliance, a ProxySG must know the current Universal Time Coordinates (UTC) time. By default, the ProxySG attempts to connect to a Network Time Protocol (NTP) server to acquire the UTC time. The ProxySG includes a list of NTP servers available on the Internet, and attempts to connect to them in the order they appear in the NTP server list on the NTP tab.
Oobject (used in caching)—An object is the item that is stored in an appliance. These objects can be frequently accessed content, content that has been placed there by content publishers, or Web pages, among other things.
object (used in Visual Policy Manager)—An object (sometimes referred to as a condition) is any collection or combination of entry types you can create individually (user, group, IP address/subnet, and attribute). To be included in an object, an item must already be created as an individual entry.
object pipelining—This patented algorithm opens as many simultaneous TCP connections as the origin server will allow and retrieves objects in parallel. The objects are then delivered from the appliance straight to the user's desktop as fast as the browser can request them.
Online Certificate Status Protocol (OCSP)— An Internet protocol used for obtaining the revocation status of an X.509 digital certificate. OCSP was created as an alternative to certificate revocation lists (CRL), specifically addressing certain problems associated with using CRLs in a public key infrastructure (PKI). OCSP servers are called OCSP responders due to the request/response nature of these messages.
origin content server (OCS)—Also called origin server. This is the original source of the content that is being requested. An appliance needs the OCS to acquire data the first time, to check that the content being served is still fresh, and to authenticate users.
outbound traffic (bandwidth gain)—Network packets flowing out of the ProxySG. Outbound traffic mainly consists of the following:
• Client outbound: Packets sent to the client in response to a Web request.
• Server outbound: Packets sent to an OCS or upstream proxy to request a service.
PPAC (Proxy AutoConfiguration) scripts—Originally created by Netscape, PACs are a way to avoid requiring proxy hosts and port numbers to be entered for every protocol. You need only enter the URL. A PAC can be created with the needed information and the local browser can be directed to the PAC for information about proxy hosts and port numbers.
packet capture (PCAP)—Allows filtering on various attributes of the Ethernet frame to limit the amount of data collected. You can capture packets of Ethernet frames going into or leaving a ProxySG.

315
parent class (bandwidth gain)—A class with at least one child. The parent class must share its bandwidth with its child classes in proportion to the minimum/maximum bandwidth values or priority levels.
passive mode data connections (PASV)—Data connections initiated by an FTP client to an FTP server.
pipelining—See object pipelining.
policies—Groups of rules that let you manage Web access specific to the needs of an enterprise. Policies enhance ProxySG feature areas such as authentication and virus scanning, and let you control end-user Web access in your existing infrastructure.
policy-based bypass list—Used in policy. Allows a bypass based on the properties of the client, unlike static and dynamic bypass lists, which allow traffic to bypass the appliance based on destination IP address. See also dynamic bypass.
policy layer—A collection of rules created using Blue Coat CPL or with the VPM.
pragma: no cache (PNC)—A metatag in the header of a request that requires the appliance to forward a request to the origin server. This allows clients to always obtain a fresh copy.
proxy—Caches content, filters traffic, monitors Internet and intranet resource usage, blocks specific Internet and intranet resources for individuals or groups, and enhances the quality of Internet or intranet user experiences.
A proxy can also serve as an intermediary between a Web client and a Web server and can require authentication to allow identity-based policy and logging for the client.
The rules used to authenticate a client are based on the policies you create on the ProxySG, which can reference an existing security infrastructure—LDAP, RADIUS, IWA, and the like.
Proxy Edition—SGOS 5 Proxy Edition.
proxy service—The proxy service defines the ports, as well as other attributes. that are used by the proxies associated with the service.
proxy service (default)—The default proxy service is a service that intercepts all traffic not otherwise intercepted by other listeners. It only has one listener whose action can be set to bypass or intercept. No new listeners can be added to the default proxy service, and the default listener and service cannot be deleted. Service attributes can be changed.
ProxySG—A Blue Coat security and cache box that can help manage security and content on a network.
public key certificate—An electronic document that encapsulates the public key of the certificate sender, identifies this sender, and aids the certificate receiver to verify the identity of the certificate sender. A certificate is often considered valid if it has been digitally signed by a well-known entity, which is called a Certificate Authority (such as VeriSign).
public virtual IP (VIP)—Maps multiple servers to one IP address and then propagates that information to the public DNS servers. Typically, there is a public VIP known to the public Internet that routes the packets internally to the private VIP. This enables you to “hide” your servers from the Internet.

Volume 4: Securing the Blue Coat ProxySG
316
Rreal-time streaming protocol (RTSP)—A standard method of transferring audio and video and other time-based media over Internet-technology based networks. The protocol is used to stream clips to any RTP-based client.
reflect client IP attribute—Enables the sending of the client's IP address instead of the SG's IP address to the upstream server. If you are using an application delivery network (ADN), this setting is enforced on the concentrator proxy through the Configuration > App. Delivery Network > Tunneling tab.
registration—An event that binds the appliance to an account, that is, it creates the Serial#, Account association.
remote authentication dial-in user service (RADIUS)—Authenticates user identity via passwords for network access.
Return to Sender (RTS)—A way of allowing outgoing TCP packets to use the same network interface on which the corresponding incoming TCP packets arrived. The destination Media Acess Control (MAC) address for the outgoing packets is the same as the source MAC address of the incoming packets. See also Media Access Control (MAC) address.
reverse proxy—A proxy that acts as a front end to a small number of predefined servers, typically to improve performance. Many clients can use it to access the small number of predefined servers.
routing information protocol (RIP)—Designed to select the fastest route to a destination. RIP support is built into ProxySG appliances.
router hops—The number of jumps a packet takes when traversing the Internet.
RTS—See Return to Sender.
Ssecure shell (SSH)—Also known as Secure Socket Shell. SSH is an interface and protocol that provides strong authentication and enables you to securely access a remote computer. Three utilities—login, ssh, and scp—comprise SSH. Security via SSH is accomplished using a digital certificate and password encryption. Remember that the Blue Coat ProxySG requires SSH1. A ProxySG supports a combined maximum of 16 Telnet and SSH sessions.
serial console—A third-party device that can be connected to one or more Blue Coat appliances. Once connected, you can access and configure the appliance through the serial console, even when you cannot access the appliance directly.
server certificate categories—The hostname in a server certificate can be categorized by BCWF or another content filtering vendor to fit into categories such as banking, finance, sports.
server portals—Doorways that provide controlled access to a Web server or a collection of Web servers. You can configure Blue Coat appliances to be server portals by mapping a set of external URLs onto a set of internal URLs.

317
server-side transparency—The ability for the server to see client IP addresses, which enables accurate client-access records to be kept. When server-side transparency is enabled, the appliance retains client IP addresses for all port 80 traffic to and from the ProxySG. In this scheme, the client IP address is always revealed to the server.
service attributes—Define the parameters, such as explicit or transparent, cipher suite, and certificate verification, that the ProxySG uses for a particular service.
sibling class (bandwidth gain)—A bandwidth class with the same parent class as another class.
signed system image—Cryptographically signed with a key known only to Blue Coat, and the signature is verified when the image is downloaded to the system.
simple network management protocol (SNMP)—The standard operations and maintenance protocol for the Internet. It consists of a set of standards for network management, including an application layer protocol, a database schema, and a set of data objects. In SNMP, the available information is defined by management information bases (MIBs), which describe the structure of the management data.
simulated live—Used in streaming. Defines playback of one or more video-on-demand files as a scheduled live event, which begins at a specified time. The content can be looped multiple times, or scheduled to start at multiple start times throughout the day.
SmartReporter log type—A proprietary ELFF log type that is compatible with the SmartFilter SmartReporter tool.
SOCKS—A proxy protocol for TCP/IP-based networking applications that allows users transparent access across the firewall. If you are using a SOCKS server for the primary or alternate forwarding gateway, you must specify the appliance’s ID for the identification protocol used by the SOCKS gateway. The machine ID should be configured to be the same as the appliance’s name.
SOCKS proxy—A generic way to proxy TCP and UDP protocols. The ProxySG supports both SOCKSv4/4a and SOCKSv5; however, because of increased username and password authentication capabilities and compression support, Blue Coat recommends that you use SOCKS v5.
splash page—The custom message page that displays the first time you start the client browser.
split proxy—Employs co-operative processing at the branch and the core to implement functionality that is not possible in a standalone proxy. Examples of split proxies include:
• Mapi Proxy
• SSL Proxy
SQUID-compatible format—A log type that was designed for cache statistics and is compatible with Blue Coat products.
squid-native log format—The Squid-compatible format contains one line for each request.
SSL authentication—Ensures that communication is with “trusted” sites only. Requires a certificate issued by a trusted third party (Certificate Authority).

Volume 4: Securing the Blue Coat ProxySG
318
SSL client—See SSL device profile.
SSL device profile—Used to determine various SSL parameters for outgoing HTTPS connections. Specifically, its role is to:
• Identify the SSL protocol version that the ProxySG uses in negotiations with origin servers.
• Identify the cipher suites used.
• Determine which certificate can be presented to origin servers by associating a keyring with the profile.
SSL interception—Decrypting SSL connections.
SSL proxy—A proxy that can be used for any SSL traffic (HTTPS or not), in either forward or reverse proxy mode.
static route—A manually-configured route that specifies the transmission path a packet must follow, based on the packet’s destination address. A static route specifies a transmission path to another network.
statistics—Every Blue Coat appliance keeps statistics of the appliance hardware and the objects it stores. You can review the general summary, the volume, resources allocated, cache efficiency, cached contents, and custom URLs generated by the appliance for various kinds of logs. You can also check the event viewer for every event that occurred since the appliance booted.
stream—A flow of a single type of data, measured in kilobits per second (Kbps). A stream could be the sound track to a music video, for example.
SurfControl log type—A proprietary log type that is compatible with the SurfControl reporter tool. The SurfControl log format includes fully-qualified usernames when an NTLM realm provides authentication. The simple name is used for all other realm types.
syslog—An event-monitoring scheme that is especially popular in Unix environments. Most clients using Syslog have multiple devices sending messages to a single Syslog daemon. This allows viewing a single chronological event log of all of the devices assigned to the Syslog daemon. The Syslog format is: “Date Time Hostname Event.”
system cache—The software cache on the appliance. When you clear the cache, all objects in the cache are set to expired. The objects are not immediately removed from memory or disk, but a subsequent request for any object requested is retrieved from the origin content server before it is served.
TTCP window size—The number of bytes that can be buffered before the sending host must wait for an acknowledgement from the receiving host.
time-to-live (TTL) value—Used in any situation where an expiration time is needed. For example, you do not want authentication to last beyond the current session and also want a failed command to time out instead of hanging the box forever.
traffic flow (bandwidth gain)—Also referred to as flow. A set of packets belonging to the same TCP/UDP connection that terminate at, originate at, or flow through the ProxySG. A single request from a client involves two separate connections. One of

319
them is from the client to the ProxySG, and the other is from the ProxySG to the OCS. Within each of these connections, traffic flows in two directions—in one direction, packets flow out of the ProxySG (outbound traffic), and in the other direction, packets flow into the ProxySG (inbound traffic). Connections can come from the client or the server. Thus, traffic can be classified into one of four types:
• Server inbound
• Server outbound
• Client inbound
• Client outbound
These four traffic flows represent each of the four combinations described above. Each flow represents a single direction from a single connection.
transmission control protocol (TCP)—TCP, when used in conjunction with IP (Internet Protocol) enables users to send data, in the form of message units called packets, between computers over the Internet. TCP is responsible for tracking and handling, and reassembly of the packets; IP is responsible for packet delivery.
transparent proxy—A configuration in which traffic is redirected to the ProxySG without the knowledge of the client browser. No configuration is required on the browser, but network configuration, such as an L4 switch or a WCCP-compliant router, is required.
trial period—Starting with the first boot, the trial period provides 60 days of free operation. All features are enabled during this time.
Uunicast alias—Defines an name on the appliance for a streaming URL. When a client requests the alias content on the appliance, the appliance uses the URL specified in the unicast-alias command to request the content from the origin streaming server.
universal time coordinates (UTC)—A ProxySG must know the current UTC time. By default, the appliance attempts to connect to a Network Time Protocol (NTP) server to acquire the UTC time. If the ProxySG cannot access any NTP servers, you must manually set the UTC time.
URL filtering—See content filtering.
URL rewrite rules—Rewrite the URLs of client requests to acquire the streaming content using the new URL. For example, when a client tries to access content on www.mycompany.com, the ProxySG is actually receiving the content from the server on 10.253.123.123. The client is unaware that mycompany.com is not serving the content; however, the ProxySG access logs indicate the actual server that provides the content.
WWCCP—Web Cache Communication Protocol. Allows you to establish redirection of the traffic that flows through routers.

Volume 4: Securing the Blue Coat ProxySG
320
Web FTP—Web FTP is used when a client connects in explicit mode using HTTP and accesses an ftp:// URL. The ProxySG translates the HTTP request into an FTP request for the OCS (if the content is not already cached), and then translates the FTP response with the file contents into an HTTP response for the client.
Websense log type—A Blue Coat proprietary log type that is compatible with the Websense reporter tool.
XXML responder—HTTP XML service that runs on an external server.
XML requestor—XML realm.

321
Index
Aaccess control list
creating 22, 31restricting access with 21
access logsdigital signing
overview 76access restrictions
access control list for 21configuring 21
AD distribution groups, troubleshooting BCAAA issues 266
Admin layerexample 28
administratordefining policies 23security levels 19
ADNrealms, using with 178, 220, 239
appliance-ccl, when used 81Application Delivery Network (ADN)
Novell SSO realms, using with 179, 220, 240policy substitution realms, using with 179,
220, 240realm authentication, configuring policy 178,
220, 239reflect ip address attribute, using 179Windows SSO realms, using with 179, 220,
240authenticate.mode, IWA, realm setting for 40authentication
configuring transparent proxy authentication 41
definition of 11guest 43LDAP realm 141permitted errors, understanding 42policies 11, 17setting options for transparent proxy
authentication 41authentication realm
typical configuration 12authorization
certificate realm example 105certificate realm, configuring 99definition of 11LDAP realm 141policies 11, 17, 62siteminder realm example 196siteminder realm, configuring 190
authorization refresh time, discussed 34
BBCAAA
COREid realm, using with 113event log, viewing 261event messages 266installation folder, selecting 257Service Principal Names, creating 264services, viewing 261SSL, using with pre-Windows 2003 262SSL, using with Windows 2003 and higher
263troubleshooting 265
AD distribution groups 266same port, using 266service already started 265
WIDMS, configuring for 185browser-trusted CCL, when used 81
CCA Certificate Lists. SeeCCLs 81CA Certificates
certificate signing requestcreating 67, 69
error message 70lists
creating 81creating through CLI 82
managing 69troubleshooting 70
CAASNT, see BCAAA

Volume 4: Securing the Blue Coat ProxySG
322
CCLsappliance-ccl 81browser-trusted 81understanding 81
certificate realmauthentication and authorization overview
97authorization, configuring 99configuring authentication and authorization
97container attributes, explained 99defining properties 98defining realm server properties 98example, authorization 105how it works 97overview 97policies, creating 104requirements 97
Certificate Revocation Lists (CRLs)configuring 73PEM encoded/DER format 72using 72
certificate signing requestcreating 67
Certificate Signing Request, viewing 69certificates
chaining, about 79commands
creating certificate 69creating 70CSA
importing 79explained 58importing 78importing existing 77self-signed
creating 71troubleshooting 73
challenge type, explained 37cipher suites
International Step-Up, working with 60Server Gated Cryptography, working with 60SGOS, supported by 59
ciphersinteractive mode, using 290
non-interactive mode, using 291CONNECT method, using with origin-style
redirection 41console account
minimum security 19container attributes, explained 99cookie surrogates, refresh time, discussed 34COREid realm
Access Serverspecifying 115
agents, configuring 113Blue Coat appliance
challenges, avoiding 112configuring 111
CPL, creating 119creating 112forward proxy, using with 112general settings
configuring 117general settings, specifying 117SSO scheme, participating in 111system, configuring 110
CPLAdmin layer, example 28certificate realm, policies, creating 104IWA realm policies, creating 139LDAP realm examples 154local realm, creating policies 166Netegrity SiteMinder policies, creating 196Novell SSO
policies, creating 220policy substitution realm, policies, creating
178RADIUS realm policies, creating 205Windows SSO
policies, creating 239credential refresh time
cached usernames, passwords 34discussed 33one-time passwords 34
Ddatabase
creating through ProxySG 162local realm, setting up 160viewing all users 164

Index
323
default groupspolicy used with 45understanding 45
DER-format URLs, CRLs, using with 72device authentication
ciphers, changing 293CLI syntax 294device ID, setting 293ssl device profile, creating 292
digital signing, overview 76document
conventions 13
Eerror message, HTTPS Console 74event messages, BCAAA 266explicit proxy
policy substitution realm, troubleshooting 227
external certificates, using with digital signing 76
Fforms-based authentication realm
CPL, using with 131creating 128creating, tips 126creating/editing form 127credentials sent in cleartext 132customizing through ProxySG 128installing from local file 128installing from remote URL 128required values 123storage options, setting 129, 130substitutions for 126tips/boundary conditions 132understanding 122
front panel PINclearing 17creating 17
Gguest authentication
policy substitutions used with 44policy used with 44understanding 43
H.htpasswd file
creating password realm database 161loading 162uploading 162
hashed passwords, using 18header
policy substitution realm, using with 177HTTP server
XML realms, configuring for 244HTTPS Console
certificate error message 74troubleshooting certificate problems 73
HTTPS terminationcertificates 58configuring 62keyring, creating 63
IInternet Explorer
troubleshooting for explicit policy substitution realm 227
troubleshooting for transparent proxy 228IP address surrogates, refresh time, discussed 34IWA realm
authenticate.mode, setting 40configuring authentication and authorization
133defining realm server properties 134Kerberos, enabling 136overview 133policies, creating 139Service Principal Names, creating 264single sign-on, configuring 140
KKerberos. See IWAkeyring
associating with certificate 78importing 77SSL client, associating 288
LLDAP
policy-substitution realm, adding to 174v2/v3 support 141

Volume 4: Securing the Blue Coat ProxySG
324
LDAP realmauthentication and authorization overview
141authorization 147case-sensitive configuration 144CPL examples 154defining Base DNs 146defining realm authorization properties and
group information 147defining realm server properties 142defining server properties 143group information 149search boundaries 148searching multiple base DNs 145SSL, enabling 144virtual URL, setting up 152
Lightweight Directory Access Protocol, see LDAP
local realmauthentication and authorization overview
157changing properties 158CPL, creating policies 166creating a realm 158database users, viewing 164database, creating 160database, creating through ProxySG 162database, populated 160database, setting up 160defining realm server properties 157deleting groups 165deleting users 164, 165groups, defined 161groups, deleting 164hashed passwords 161policy substitution realm, adding to 174user name, defined 161users, deleting 165view all lists 164virtual URL, setting up 159
local user listsecurity settings, changing 165
Nnetbios
using with policy substitution realm 177
Netegrity SiteMinder realmagents, configuring 185case-sensitive configuration 186creating 185display name, changing 192policies, creating 196protected resource, entering 189server mode, configuring 189servers, configuring 187servers, editing 188SSO-only mode, enabling 189
Novell SSO realmsADN, using with 178, 220, 239BCAAA, configuring 211creating a realm through CLI 213defining realm server properties 211general properties, configuring 216policies, creating 220sso.ini file, modifying 219
Novell SSO realms, ADN using with 178, 220, 239
NTLM realm. See IWA realm
OOCSP 84
configuring an OCSP responder 88forward proxy scenario 88reverse proxy 87reverse proxy scenario 87setup scenarios 85SSL proxy 87
one-time passwordsXML realms, configuring 246
origin-style authenticationorigin 37origin-cookie 37origin-cookie-redirect 37origin-ip 37origin-ip-redirect 37
Ppasswords
hashed, encrypted 18security, understanding 18
passwords, user, quoting 36PEM-encoded URLs, CRLs, using with 72
Index
325
permitted errors, authenticationauthentication failures 42authorization failures 42policy used with 42
policyfor maximum security 20for moderate security 20
policy substitution realmconfiguring 167creating a realm through CLI 171defining properties through Management
Console 171defining realm server properties through
Management Console 170full usernames, constructing 172general properties, defining through CLI 177general properties, defining through
Management Console 175header, using with 177LDAP authorization, adding 174local authorization, adding 174netbios, using with 177policies, creating 178troubleshooting 228user, username fields, explained 168usernames, constructing 172
policy substitution realmsADN, using with 178, 220, 239
proxiessetting up 11
ProxySGread-only and read-write access 19restricting access to 21
RRADIUS realm
authentication and authorization overview 199
case-sensitive usernames, setting 202defining realm server properties 200policies, creating 205troubleshooting 207
read-only access in ProxySG 19read-write access in ProxySG 19Real Time Certificate Revocation (OCSP) 84realm sequence
creating 224promote/demote member realms 225
realmscertificate 97forms-based authentication 122IWA 133LDAP 141local 157RADIUS 199sequence 224understanding 12
requestor. See XML realmsresponder See XML realms
Ssecurity
console account 19local user list settings, changing 165policies for 20
sequence realmdefining realm server properties 224
sequences, troubleshooting 223serial port
password, creating 18Service Principal Names, creating for IWA realm
264set_aut.pl script, using with .htpasswd file 162setup console
password, creating 18siteminder realm
authorization, configuring 190example, authorization 196
SiteMinder, see Netegrity SiteMinder realmSOAP
XML realms, using with 243SSH
password authentication 19SSH with RSA authentication, not controlled by
policy 23SSL
authentication/authorization services, using with 46
ciphers interactive mode, using 290LDAP realm, enabling 144no-show keyring option 64show keyring option 64

Volume 4: Securing the Blue Coat ProxySG
326
show-director option 64timeout, configuring 295
SSL certificates, see certificates.SSL client
keyring, associating 288sso.ini, modifying for Novell SSO realms 219sso.ini, modifying for Windows SSO realm 237surrogate credentials
defined 37refresh time, discussed 34
Ttimeout
configuring for non-proxy SSL traffic 295transparent proxy
CLI commands 41policy substitution realm, troubleshooting
228transparent proxy authentication
configuring 41setting options for 41
troubleshootingBCAAA service 265CA Certificates 70CONNECT method 41forms-based authentication realm 132HTTPS Console 73RADIUS realm 207TCP_DENIED 39usernames/passwords 36
Uuser data
policy, refreshing through 35refreshing 33
usernames, escaping 36users
administrator logout 32credential refresh time, discussed 33logged-in, viewing 30logging in 30logging out 31logout conditions 32logout properties 32managing 30policy logout 32
timeout 32user data, refreshing 33
Vvirtual URL
LDAP realm set up 152
WWindows
configuring authorization 229Windows SSO
authorization, configuring 234authorization, using 231BCAAA, configuring 232BCAAA, works with 230creating a realm through CLI 234defining general properties through CLI 237defining realm server properties 232defining realm server properties through
Management Console 232general properties, configuring 235how it works 229policies, creating 239sso.ini file, modifying 237substitutions, available 235
Windows SSO realmsADN, using with 178, 220, 239
XXML realms
authorization, configuring 247creating 244HTTP server, configuring 244one-time passwords, configuring 246requestor, understanding 243responder,
authentication/authorization,configuring 247
responder, creating 244server, default values, changing 245SOAP, using with 243statistics, viewing 253tasks before creating realm 244understanding 243user credential location, configuring 247username parameters, configuring 247

Index
327
XML realms, authorization, understanding 247