Embed Size (px)
Citation preview

Active Insulin 1.5 uBolus Basal
93mg/dL
12:24PM
93 mgdL
Before Meal
12:24 PM l 10/13
BolusReminder
Notes
®
CONTOUR®NEXT LINK 2.4 is the only blood glucose monitoring system (BGMS) approved as part of the MiniMed® 630G system with SmartGuardTM. The meter is designed to be used exclusively for Continuous Glucose Monitoring (CGM) calibration and insulin administration decisions as part of the MiniMed 630G system.
The CONTOUR NEXT LINK 2.4 BGMS is highly accurate and has been demonstrated to close the gap between laboratory accuracy and real world test results.11 Clinical studies show that differences in BGMS accuracy could result in clinically important differences in insulin dosing.12, 13
USER GUIDEUses only CONTOUR®NEXT blood glucose test strips from Bayer
Wireless Blood Glucose Monitoring System
DATE:CLIENT:
DESCRIPTION:
SCHAWK JOB#:SKU#:
DIMENSIONS:PRINTER SPEC:
RELEASE: V-1 LANGUAGE(S): ENGLISHINTERNAL: R-X
18211 NE 68th Street, E120 Redmond, WA 98052 T: 425-881-5454
BAN#: 85098543 Rev. 11/15Contour Next LINK 2.4 UG - USAlt#1 - 12/01/15 copy changes
December 01, 2015Bayer HealthCareContour Next LINK 2.4 UG US - English9189686260 Parent BAN#: multi7.5" (H) x 6.5" (W)10000012465 REV 01
FONTS: Helvetica, Helvetica Neue, Zapf Dingbats, Skinny Mini, Mini Micra, Myriad ProCOLORS: Cyan Magenta Yellow Black 281 Process Build: 100C 79M 10Y 42K
NOTE: THIS COLOR PROOF INDICATES COLOR BREAK ONLY AND MAY NOT ACCURATELY REFLECT ACTUAL PRODUCTION COLOR.Clinical Trials Template No: CT-128Global Master Template No: M-UG-0303-R0005
FC: 22.5mm BC: 14 mmFooter: 7mm1/3rd of the Cross clear space has been applied.7mm min.
85098543_CntrNextLINK_2_4_UG_EN_FpBp_v1.indd ofc1 12/1/15 9:13 AM

iii
• Use a new lancet each time you test because it is no longer sterile after use.• Always dispose of test strips and lancets as medical waste or as advised by your health care
professional. All products that come in contact with human blood should be handled as if capable of transmitting infectious diseases.
PRECAUTIONS• Read your CONTOUR®NEXT LINK 2.4 user guide, the lancing device package insert, your
Medtronic device user guide and all instructional materials provided in your meter kit before testing. Please follow all instructions for use and care exactly as described to help avoid inaccurate results.
• Examine product for missing, damaged, or broken parts. If the test strip bottle is open inside a new box of strips, do not use those strips. For replacement parts, contact Customer Service. Please see back cover for contact information.
• The CONTOUR®NEXT LINK 2.4 meter from Bayer only works with CONTOUR®NEXT test strips and CONTOUR®NEXT control solutions.
• Always keep the CONTOUR NEXT test strips in their original bottle. Tightly close the bottle immediately after removing a test strip. The bottle is designed to keep the test strips dry. Avoid exposing meter and test strips to excessive humidity, heat, cold, dust, and dirt. Exposure to room humidity from leaving the bottle open or not storing the strips in their original bottle can damage your test strips. This could lead to inaccurate results. Do not use a test strip that appears damaged or has been used.
• Check the expiration dates on your test strips and control solution. Do not use the test strips or control solution if the expiration date printed on the bottle label and carton has passed. This can cause inaccurate results. For the control solution, do not use if it has been 6 months since you first opened the bottle. After first opening the bottle, write the 6-month discard date on the control solution label.
• If your control solution test result is out of range, contact Customer Service. Please see back cover for contact information. Do not use the meter for blood glucose testing until you resolve this issue.
• The meter has been designed to give accurate results at temperatures between 41° to 113°F. If you are outside this range, you should not test. Whenever the meter is moved from one location to another, allow approximately 20 minutes for the meter to adjust to the temperature of the new location before performing a blood glucose test.
• Do not perform a blood glucose test when the CONTOUR NEXT LINK 2.4 meter is connected to a computer.
• Use only approved cables or wall charger from the manufacturer or a 5V charger approved by a certified body such as UL or TUV.
• The CONTOUR®NEXT LINK 2.4 meter from Bayer has been preset and locked to display results in mg/dL (milligrams of glucose per deciliter of blood).
� Results in mg/dL will never have a decimal point; � Results in mmol/L will always have a decimal point.
Example: 93 or . � Check your display screen to be sure the results are shown the right way. If not, please see Customer Service contact information on the back cover of this user guide.
• The CONTOUR NEXT LINK 2.4 wireless blood glucose monitoring system from Bayer has a measuring range of 20 mg/dL to 600 mg/dL.
� For results under 20 mg/dL or over 600 mg/dL; о If your blood sugar reading is under 20 mg/dL, the “Follow Medical Advice Immediately” screen
will display and the meter will beep twice. Contact your health care professional.
85098543_CntrNextLINK_2_4_UG_EN_FpBp_v0.indd iii 11/20/15 12:07 PM
ii®
INTENDED USEThe CONTOUR®NEXT LINK 2.4 wireless blood glucose monitoring system is an over the counter (OTC) device utilized by persons with diabetes in home settings for the measurement of glucose in whole blood, and is for single-patient use only and should not be shared. The CONTOUR NEXT LINK 2.4 wireless blood glucose monitoring system is indicated for use with fresh capillary whole blood samples drawn from the fingertip and palm only. The system consists of a CONTOUR NEXT LINK 2.4 wireless blood glucose meter, CONTOUR NEXT test strips and CONTOUR NEXT control solutions. CONTOUR NEXT test strips are intended for self-testing by persons with diabetes for the quantitative measurement of glucose in whole blood samples from 20 to 600 mg/dL. The CONTOUR NEXT control solutions are aqueous glucose solutions intended for use in self-testing by people with diabetes as a quality control check. The CONTOUR NEXT LINK 2.4 wireless blood glucose monitoring system is intended to be used to transmit glucose values to MiniMed® 630G Pump and facilitate transfer of information to Medtronic CareLink® Software through use of radio frequency communication. The CONTOUR NEXT LINK 2.4 wireless blood glucose monitoring system is not intended for the diagnosis of or screening for diabetes mellitus and is not intended for use on neonates.
IMPORTANT SAFETY INFORMATION
WARNINGS
Serious Illness• Capillary (fingerstick or Alternative Site) blood glucose testing may not be clinically appropriate
when peripheral flow is decreased. Shock, severe hypotension, hyperosmolar hyperglycemia, diabetic ketoacidosis, and occurrence of severe dehydration are examples of clinical conditions that may adversely affect the measurement of glucose in peripheral blood.1-3
• Keep out of reach of children. This kit contains small parts which could cause suffocation if accidentally swallowed.
Talk to Your Health Care Professional• Before setting any Target ranges or High or Low Alerts on your meter.• Before changing your medication based on test results. • If your blood sugar reading is under 50 mg/dL, follow medical advice immediately.• If your blood sugar reading is over 250 mg/dL, wash and dry your hands well and repeat the test
with a new strip. If you get a similar result, call your health care professional as soon as possible.• About whether Alternative Site Testing (AST) is appropriate for you.
Potential Biohazard• Always wash and dry your hands well with soap and water before and after testing, handling the
meter, lancing device or test strips.• The meter, lancing device and lancets are for single person use. Do not share them with anyone
including other family members. Do not use on multiple persons.4,5
• All parts of this kit are considered biohazardous and can potentially transmit infectious diseases, even after you have performed cleaning and disinfection. For Cleaning and Disinfection instructions, please see page 63.
• The lancing device provided by Bayer is intended for self-testing by a single patient. It must not be used on more than one person due to the risk of infection.
85098543_CntrNextLINK_2_4_UG_EN_FpBp_v0.indd ii 11/20/15 12:07 PM
iii
• Use a new lancet each time you test because it is no longer sterile after use.• Always dispose of test strips and lancets as medical waste or as advised by your health care
professional. All products that come in contact with human blood should be handled as if capable of transmitting infectious diseases.
PRECAUTIONS• Read your CONTOUR®NEXT LINK 2.4 user guide, the lancing device package insert, your
Medtronic device user guide and all instructional materials provided in your meter kit before testing. Please follow all instructions for use and care exactly as described to help avoid inaccurate results.
• Examine product for missing, damaged, or broken parts. If the test strip bottle is open inside a new box of strips, do not use those strips. For replacement parts, contact Customer Service. Please see back cover for contact information.
• The CONTOUR®NEXT LINK 2.4 meter from Bayer only works with CONTOUR®NEXT test strips and CONTOUR®NEXT control solutions.
• Always keep the CONTOUR NEXT test strips in their original bottle. Tightly close the bottle immediately after removing a test strip. The bottle is designed to keep the test strips dry. Avoid exposing meter and test strips to excessive humidity, heat, cold, dust, and dirt. Exposure to room humidity from leaving the bottle open or not storing the strips in their original bottle can damage your test strips. This could lead to inaccurate results. Do not use a test strip that appears damaged or has been used.
• Check the expiration dates on your test strips and control solution. Do not use the test strips or control solution if the expiration date printed on the bottle label and carton has passed. This can cause inaccurate results. For the control solution, do not use if it has been 6 months since you first opened the bottle. After first opening the bottle, write the 6-month discard date on the control solution label.
• If your control solution test result is out of range, contact Customer Service. Please see back cover for contact information. Do not use the meter for blood glucose testing until you resolve this issue.
• The meter has been designed to give accurate results at temperatures between 41° to 113°F. If you are outside this range, you should not test. Whenever the meter is moved from one location to another, allow approximately 20 minutes for the meter to adjust to the temperature of the new location before performing a blood glucose test.
• Do not perform a blood glucose test when the CONTOUR NEXT LINK 2.4 meter is connected to a computer.
• Use only approved cables or wall charger from the manufacturer or a 5V charger approved by a certified body such as UL or TUV.
• The CONTOUR®NEXT LINK 2.4 meter from Bayer has been preset and locked to display results in mg/dL (milligrams of glucose per deciliter of blood).
� Results in mg/dL will never have a decimal point; � Results in mmol/L will always have a decimal point.
Example: 93 or . � Check your display screen to be sure the results are shown the right way. If not, please see Customer Service contact information on the back cover of this user guide.
• The CONTOUR NEXT LINK 2.4 wireless blood glucose monitoring system from Bayer has a measuring range of 20 mg/dL to 600 mg/dL.
� For results under 20 mg/dL or over 600 mg/dL; о If your blood sugar reading is under 20 mg/dL, the “Follow Medical Advice Immediately” screen
will display and the meter will beep twice. Contact your health care professional.
85098543_CntrNextLINK_2_4_UG_EN_FpBp_v0.indd iii 11/20/15 12:07 PM
ii®
INTENDED USEThe CONTOUR®NEXT LINK 2.4 wireless blood glucose monitoring system is an over the counter (OTC) device utilized by persons with diabetes in home settings for the measurement of glucose in whole blood, and is for single-patient use only and should not be shared. The CONTOUR NEXT LINK 2.4 wireless blood glucose monitoring system is indicated for use with fresh capillary whole blood samples drawn from the fingertip and palm only. The system consists of a CONTOUR NEXT LINK 2.4 wireless blood glucose meter, CONTOUR NEXT test strips and CONTOUR NEXT control solutions. CONTOUR NEXT test strips are intended for self-testing by persons with diabetes for the quantitative measurement of glucose in whole blood samples from 20 to 600 mg/dL. The CONTOUR NEXT control solutions are aqueous glucose solutions intended for use in self-testing by people with diabetes as a quality control check. The CONTOUR NEXT LINK 2.4 wireless blood glucose monitoring system is intended to be used to transmit glucose values to MiniMed® 630G Pump and facilitate transfer of information to Medtronic CareLink® Software through use of radio frequency communication. The CONTOUR NEXT LINK 2.4 wireless blood glucose monitoring system is not intended for the diagnosis of or screening for diabetes mellitus and is not intended for use on neonates.
IMPORTANT SAFETY INFORMATION
WARNINGS
Serious Illness• Capillary (fingerstick or Alternative Site) blood glucose testing may not be clinically appropriate
when peripheral flow is decreased. Shock, severe hypotension, hyperosmolar hyperglycemia, diabetic ketoacidosis, and occurrence of severe dehydration are examples of clinical conditions that may adversely affect the measurement of glucose in peripheral blood.1-3
• Keep out of reach of children. This kit contains small parts which could cause suffocation if accidentally swallowed.
Talk to Your Health Care Professional• Before setting any Target ranges or High or Low Alerts on your meter.• Before changing your medication based on test results. • If your blood sugar reading is under 50 mg/dL, follow medical advice immediately.• If your blood sugar reading is over 250 mg/dL, wash and dry your hands well and repeat the test
with a new strip. If you get a similar result, call your health care professional as soon as possible.• About whether Alternative Site Testing (AST) is appropriate for you.
Potential Biohazard• Always wash and dry your hands well with soap and water before and after testing, handling the
meter, lancing device or test strips.• The meter, lancing device and lancets are for single person use. Do not share them with anyone
including other family members. Do not use on multiple persons.4,5
• All parts of this kit are considered biohazardous and can potentially transmit infectious diseases, even after you have performed cleaning and disinfection. For Cleaning and Disinfection instructions, please see page 63.
• The lancing device provided by Bayer is intended for self-testing by a single patient. It must not be used on more than one person due to the risk of infection.
85098543_CntrNextLINK_2_4_UG_EN_FpBp_v0.indd ii 11/20/15 12:07 PM85098543_CntrNextLINK_2_4_UG_EN_FpBp_v1_placed.pdf:2

GE
TT
ING
STA
RT
ED
TE
ST
ING
FEAT
UR
ES
US
ING
TH
E
MA
IN M
EN
UT
EC
HN
ICA
L&
CA
RE
Table of Contents
Your CONTOUR®NEXT LINK 2.4 Wireless Blood Glucose Monitoring System from Bayer ......................................................................................3
Your CONTOUR®NEXT Test Strip .......................................................................................3Initial Setup ......................................................................................................................5
Preparing the Lancing Device ........................................................................................13Getting the Blood Drop — Fingertip Testing ..................................................................15Test Results ...................................................................................................................16Alternative Site Testing (AST) – Palm .............................................................................18Control Solution Testing .................................................................................................23
AutoLog (Marking Your Results) ....................................................................................25Sending Results to Your Pump ......................................................................................25Sending a Bolus to Your Pump ......................................................................................25Test Reminders ..............................................................................................................28Notes .............................................................................................................................30
Transferring Data to CareLink® Personal Therapy Management Software ....................53Error Detection Displays ................................................................................................53Battery Status ................................................................................................................54Technical Information .....................................................................................................57Caring for Your Meter.....................................................................................................63Cleaning and Disinfection ..............................................................................................63Warranty .........................................................................................................................67INDEX ............................................................................................................................68
Bolus .................................................... 31Logbook ............................................... 31Trends (Averages and Summaries) ....... 32Setup .................................................... 33
Pump Options ............................................33Meter Send Options ...................................37Test Reminders ..........................................43Date and Time ...........................................45
Sound ........................................................47AutoLog .....................................................47Blood Sugar Targets ..................................49Trends Range .............................................51High and Low Alerts ..................................51Set Language .............................................52Customer Service ......................................52
85098543_CntrNextLINK_2_4_UG_EN_FpBp_v0.indd 1 11/20/15 12:07 PM
iv
о If your blood sugar reading is over 600 mg/dL the next screen will tell you to retest. The meter will beep twice. If results are still over 600 mg/dL, “Follow Medical Advice Immediately” is displayed.
• Please be aware that USB ports in some computers and self-powered USB hubs can become much warmer than the room. A USB extension cable is available. If you wish to test immediately after disconnecting from your computer, please use the USB cable to protect the meter from exposure to heat created by the computer.
CAUTION: Your CONTOUR®NEXT LINK 2.4 meter only works with CONTOUR®NEXT test strips and CONTOUR®NEXT control solutions.
Rechargeable BatteryYour CONTOUR NEXT LINK 2.4 meter from Bayer has a rechargeable battery. You must charge your battery before you can use your meter and you cannot do a blood sugar test while the battery is charging.
CAUTION: Please be aware that USB ports in some computers and self-powered USB hubs can become much warmer than the room. If you wish to test immediately after disconnecting from your computer, please use the USB cable to protect the meter from exposure to heat created by the computer.
CAUTION: Do not perform a blood glucose test when your meter is connected to an external device, e.g., computer.
Charge Your Meter Using a Wall Outlet or a Computer• Remove USB cap.• Insert the meter USB plug into the wall charger* or use the USB
extension cable.The meter is fully charged when the test strip port light stops flashing and turns off.
NOTE: Your meter can Rapid Charge. After 1 minute of charging, you can unplug the meter and run one blood sugar test, if needed. A USB extension cable is included for your convenience.
OR• Remove USB cap.• Insert the meter USB plug into your computer or use the USB
extension cable.• Be sure your computer is turned on and not in sleep, hibernate,
or power save mode.
* Wall charger may not be included in all meter kits. Contact Customer Service for information on obtaining a wall charger.
85098543_CntrNextLINK_2_4_UG_EN_FpBp_v0.indd iv 11/20/15 12:07 PM
GE
TT
ING
STA
RT
ED
TE
ST
ING
FEAT
UR
ES
US
ING
TH
E
MA
IN M
EN
UT
EC
HN
ICA
L&
CA
RE
Table of Contents
Your CONTOUR®NEXT LINK 2.4 Wireless Blood Glucose Monitoring System from Bayer ......................................................................................3
Your CONTOUR®NEXT Test Strip .......................................................................................3Initial Setup ......................................................................................................................5
Preparing the Lancing Device ........................................................................................13Getting the Blood Drop — Fingertip Testing ..................................................................15Test Results ...................................................................................................................16Alternative Site Testing (AST) – Palm .............................................................................18Control Solution Testing .................................................................................................23
AutoLog (Marking Your Results) ....................................................................................25Sending Results to Your Pump ......................................................................................25Sending a Bolus to Your Pump ......................................................................................25Test Reminders ..............................................................................................................28Notes .............................................................................................................................30
Transferring Data to CareLink® Personal Therapy Management Software ....................53Error Detection Displays ................................................................................................53Battery Status ................................................................................................................54Technical Information .....................................................................................................57Caring for Your Meter.....................................................................................................63Cleaning and Disinfection ..............................................................................................63Warranty .........................................................................................................................67INDEX ............................................................................................................................68
Bolus .................................................... 31Logbook ............................................... 31Trends (Averages and Summaries) ....... 32Setup .................................................... 33
Pump Options ............................................33Meter Send Options ...................................37Test Reminders ..........................................43Date and Time ...........................................45
Sound ........................................................47AutoLog .....................................................47Blood Sugar Targets ..................................49Trends Range .............................................51High and Low Alerts ..................................51Set Language .............................................52Customer Service ......................................52
85098543_CntrNextLINK_2_4_UG_EN_FpBp_v0.indd 1 11/20/15 12:07 PM
iv
о If your blood sugar reading is over 600 mg/dL the next screen will tell you to retest. The meter will beep twice. If results are still over 600 mg/dL, “Follow Medical Advice Immediately” is displayed.
• Please be aware that USB ports in some computers and self-powered USB hubs can become much warmer than the room. A USB extension cable is available. If you wish to test immediately after disconnecting from your computer, please use the USB cable to protect the meter from exposure to heat created by the computer.
CAUTION: Your CONTOUR®NEXT LINK 2.4 meter only works with CONTOUR®NEXT test strips and CONTOUR®NEXT control solutions.
Rechargeable BatteryYour CONTOUR NEXT LINK 2.4 meter from Bayer has a rechargeable battery. You must charge your battery before you can use your meter and you cannot do a blood sugar test while the battery is charging.
CAUTION: Please be aware that USB ports in some computers and self-powered USB hubs can become much warmer than the room. If you wish to test immediately after disconnecting from your computer, please use the USB cable to protect the meter from exposure to heat created by the computer.
CAUTION: Do not perform a blood glucose test when your meter is connected to an external device, e.g., computer.
Charge Your Meter Using a Wall Outlet or a Computer• Remove USB cap.• Insert the meter USB plug into the wall charger* or use the USB
extension cable.The meter is fully charged when the test strip port light stops flashing and turns off.
NOTE: Your meter can Rapid Charge. After 1 minute of charging, you can unplug the meter and run one blood sugar test, if needed. A USB extension cable is included for your convenience.
OR• Remove USB cap.• Insert the meter USB plug into your computer or use the USB
extension cable.• Be sure your computer is turned on and not in sleep, hibernate,
or power save mode.
* Wall charger may not be included in all meter kits. Contact Customer Service for information on obtaining a wall charger.
85098543_CntrNextLINK_2_4_UG_EN_FpBp_v0.indd iv 11/20/15 12:07 PM85098543_CntrNextLINK_2_4_UG_EN_FpBp_v1_placed.pdf:4

3
GE
TT
ING
STA
RT
ED
Before Meal
mgdL
12:24 PM l 10/13
93 Bolus
Reminder
Notes
Selection/Scrolling Buttons See page 5
Display Screen Meter USB Plug
Top Menu Button See page 4
Protective USB Cap
Test Strip PortInsert the test strip here. To turn on the test strip port light, see page 4.
Your CONTOUR NEXT Test Strip
Gray Square EndInsert this end into the test strip port with the gray end facing up.
Sample TipBlood sample pulled in here.
Getting Started Your CONTOUR®NEXT LINK 2.4 Wireless Blood Glucose Monitoring System from BayerYour CONTOUR NEXT LINK 2.4 wireless blood glucose monitoring system from Bayer works with CONTOUR®NEXT test strips from Bayer.
WARNINGKeep out of reach of children. Accidental swallowing could cause suffocation.
Your C
ON
TO
UR
®NE
XT LIN
K 2.4 W
ireless Blo
od
G
lucose M
onito
ring S
ystem fro
m B
ayer
CAUTION: Your CONTOUR NEXT LINK 2.4 meter only works with CONTOUR NEXT test strips and CONTOUR®NEXT control solutions!
85098543_CntrNextLINK_2_4_UG_EN_FpBp_v0.indd 3 11/20/15 12:07 PM85098543_CntrNextLINK_2_4_UG_EN_FpBp_v0.indd 2 11/20/15 12:07 PM
3
GE
TT
ING
STA
RT
ED
Before Meal
mgdL
12:24 PM l 10/13
93 Bolus
Reminder
Notes
Selection/Scrolling Buttons See page 5
Display Screen Meter USB Plug
Top Menu Button See page 4
Protective USB Cap
Test Strip PortInsert the test strip here. To turn on the test strip port light, see page 4.
Your CONTOUR NEXT Test Strip
Gray Square EndInsert this end into the test strip port with the gray end facing up.
Sample TipBlood sample pulled in here.
Getting Started Your CONTOUR®NEXT LINK 2.4 Wireless Blood Glucose Monitoring System from BayerYour CONTOUR NEXT LINK 2.4 wireless blood glucose monitoring system from Bayer works with CONTOUR®NEXT test strips from Bayer.
WARNINGKeep out of reach of children. Accidental swallowing could cause suffocation.
Your C
ON
TO
UR
®NE
XT LIN
K 2.4 W
ireless Blo
od
G
lucose M
onito
ring S
ystem fro
m B
ayer
CAUTION: Your CONTOUR NEXT LINK 2.4 meter only works with CONTOUR NEXT test strips and CONTOUR®NEXT control solutions!
85098543_CntrNextLINK_2_4_UG_EN_FpBp_v0.indd 3 11/20/15 12:07 PM85098543_CntrNextLINK_2_4_UG_EN_FpBp_v0.indd 2 11/20/15 12:07 PM85098543_CntrNextLINK_2_4_UG_EN_FpBp_v1_placed.pdf:6

5
GE
TT
ING
STA
RT
EDOK
MENU
BolusLogbookTrendsSetup
OK
The Main Menu has four choices: Bolus, Logbook, Trends and Setup. Press the � or � button to scroll to your desired selection. When your choice is highlighted, press OK.
Turn On
Initial Setup
• The three buttons next to the screen allow you to make your selection by pressing the button next to your choice.
• Scroll up or down for additional choices when the � or � arrows appear on the meter screen.
• When your choice is highlighted, make a selection by pressing OK.NOTE: Press and hold the � or � button to scroll through the list faster.
� Button OK Button
� Button
CAUTION: Unplug meter from charging source before beginning Setup.
Using the Main Menu
Initial Setup
1. Before use, fully charge your meter. See page iv.
Using the Selection/Scrolling Buttons
2. Press and hold the top Menu button until the meter turns on. After a welcome screen, you see the Language choice screen.
85098543_CntrNextLINK_2_4_UG_EN_FpBp_v0.indd 5 11/20/15 12:07 PM
GE
TT
ING
STA
RT
ED
4
Active Insulin 1.5 uBolus BasalAAAAccctictitiicActict vvvvve Insulin 1.5 uBoBoBBoooluoluuuuBo s s BBaBaassasas l
mg/dL
Active Insulin 1.5 uBolus Basal
12:24PM
®
Meter Overview Turning the Meter On or Off• Press and hold the top Menu button to turn the meter on or off.• Insert a test strip to turn the meter on.• Meter turns off after 3 minutes of inactivity.
The top Menu button has three functions:• To turn the meter on/off, press and hold the top Menu button.• To go back one screen from most screens, press the top Menu button once.• To turn on/off the test strip port light, quickly press the top Menu button two times.
Met
er O
verv
iew
Using the Top Menu Button
“Talks” to Your MiniMed 630G Insulin Pump
Your CONTOUR®NEXT LINK 2.4 meter can automatically send your blood glucose result or a bolus directly to your MiniMed insulin pump, if your meter and pump are linked. This eliminates the need to manually enter a bolus or your blood glucose result into your insulin pump. Up to 3 CONTOUR NEXT LINK 2.4 meters can be connected to your MiniMed insulin pump. To use the meter link feature, your CONTOUR NEXT LINK 2.4meter and MiniMed insulin pump must be within 6 feet of each other. If you are not using the meter link feature, you may want to set the Send option to Never on your CONTOUR NEXT LINK 2.4 meter to save battery power.
Display Screen
MenuSelect
Right
Up
Back
Notification Light
Left
Down
85098543_CntrNextLINK_2_4_UG_EN_FpBp_v0.indd 4 11/20/15 12:07 PM
5
GE
TT
ING
STA
RT
EDOK
MENU
BolusLogbookTrendsSetup
OK
The Main Menu has four choices: Bolus, Logbook, Trends and Setup. Press the � or � button to scroll to your desired selection. When your choice is highlighted, press OK.
Turn On
Initial Setup
• The three buttons next to the screen allow you to make your selection by pressing the button next to your choice.
• Scroll up or down for additional choices when the � or � arrows appear on the meter screen.
• When your choice is highlighted, make a selection by pressing OK.NOTE: Press and hold the � or � button to scroll through the list faster.
� Button OK Button
� Button
CAUTION: Unplug meter from charging source before beginning Setup.
Using the Main Menu
Initial Setup
1. Before use, fully charge your meter. See page iv.
Using the Selection/Scrolling Buttons
2. Press and hold the top Menu button until the meter turns on. After a welcome screen, you see the Language choice screen.
85098543_CntrNextLINK_2_4_UG_EN_FpBp_v0.indd 5 11/20/15 12:07 PM
GE
TT
ING
STA
RT
ED
4
Active Insulin 1.5 uBolus BasalAAAAccctictitiicActict vvvvve Insulin 1.5 uBoBoBBoooluoluuuuBo s s BBaBaassasas l
mg/dL
Active Insulin 1.5 uBolus Basal
12:24PM
®
Meter Overview Turning the Meter On or Off• Press and hold the top Menu button to turn the meter on or off.• Insert a test strip to turn the meter on.• Meter turns off after 3 minutes of inactivity.
The top Menu button has three functions:• To turn the meter on/off, press and hold the top Menu button.• To go back one screen from most screens, press the top Menu button once.• To turn on/off the test strip port light, quickly press the top Menu button two times.
Met
er O
verv
iew
Using the Top Menu Button
“Talks” to Your MiniMed 630G Insulin Pump
Your CONTOUR®NEXT LINK 2.4 meter can automatically send your blood glucose result or a bolus directly to your MiniMed insulin pump, if your meter and pump are linked. This eliminates the need to manually enter a bolus or your blood glucose result into your insulin pump. Up to 3 CONTOUR NEXT LINK 2.4 meters can be connected to your MiniMed insulin pump. To use the meter link feature, your CONTOUR NEXT LINK 2.4meter and MiniMed insulin pump must be within 6 feet of each other. If you are not using the meter link feature, you may want to set the Send option to Never on your CONTOUR NEXT LINK 2.4 meter to save battery power.
Display Screen
MenuSelect
Right
Up
Back
Notification Light
Left
Down
85098543_CntrNextLINK_2_4_UG_EN_FpBp_v0.indd 4 11/20/15 12:07 PM85098543_CntrNextLINK_2_4_UG_EN_FpBp_v1_placed.pdf:8

7
GE
TT
ING
STA
RT
ED
Device OptionsManage DevicesConnect Device
Connect DeviceManual ConnectAuto Connect
8. In the Utilities menu, use the down arrow to scroll to Device Options. Press Select button .
9. In the Device Options menu, scroll to Connect Device. Press Select button .
10. Place the meter and pump next to each other. Select Auto Connect on your pump.
Select Auto Connect on your meter.If you select Manual Connect, see page 38.
Co
nnect to P
ump
UtilitiesSelf TestCarb UnitManage SettingsSensor DemoDevice Options
Manual Connect
Auto Connect
CONNECT TO PUMP
NOTE: If your meter is lost or stolen, delete the meter from your pump. See your MiniMed insulin pump user guide.
85098543_CntrNextLINK_2_4_UG_EN_FpBp_v0.indd 7 11/20/15 12:07 PM
GE
TT
ING
STA
RT
ED
6
3. Press the � button to see more language choices. When your language is highlighted, press OK.
4. Press OK to confirm. If the correct language is not displayed, press No.
LANGUAGE
EnglishDeutschEspañol
OK
Connect to aMiniMed Pump?
OK
Skip
CONNECT TO PUMP
Select "Connect Device" on your Pump. OK
Go Back
CONNECT TO PUMP
NOTE: If your pump screen turns off, press any button to turn back on.
5. Press OK to connect to a MiniMed insulin pump now. If you press Skip, you will be asked to accept or change the date and time. To change, follow instructions starting on page 45, step 5. Return to Initial Setup, page 10, step 21, when set.
Connect to Pump
Language:English
OK
No
Set Language
6. Press OK.
®
7. Put the meter down and pick up your MiniMed insulin pump.Press any button to turn the screen on. Press the Menu button . Use the down arrow to scroll to Utilities.Press Select button .
Set
Lan
gua
ge
MenuInsulin SettingsSensor SettingsEvent MarkersRemindersUtilities
85098543_CntrNextLINK_2_4_UG_EN_FpBp_v0.indd 6 11/20/15 12:07 PM
7
GE
TT
ING
STA
RT
ED
Device OptionsManage DevicesConnect Device
Connect DeviceManual ConnectAuto Connect
8. In the Utilities menu, use the down arrow to scroll to Device Options. Press Select button .
9. In the Device Options menu, scroll to Connect Device. Press Select button .
10. Place the meter and pump next to each other. Select Auto Connect on your pump.
Select Auto Connect on your meter.If you select Manual Connect, see page 38.
Co
nnect to P
ump
UtilitiesSelf TestCarb UnitManage SettingsSensor DemoDevice Options
Manual Connect
Auto Connect
CONNECT TO PUMP
NOTE: If your meter is lost or stolen, delete the meter from your pump. See your MiniMed insulin pump user guide.
85098543_CntrNextLINK_2_4_UG_EN_FpBp_v0.indd 7 11/20/15 12:07 PM
GE
TT
ING
STA
RT
ED
6
3. Press the � button to see more language choices. When your language is highlighted, press OK.
4. Press OK to confirm. If the correct language is not displayed, press No.
LANGUAGE
EnglishDeutschEspañol
OK
Connect to aMiniMed Pump?
OK
Skip
CONNECT TO PUMP
Select "Connect Device" on your Pump. OK
Go Back
CONNECT TO PUMP
NOTE: If your pump screen turns off, press any button to turn back on.
5. Press OK to connect to a MiniMed insulin pump now. If you press Skip, you will be asked to accept or change the date and time. To change, follow instructions starting on page 45, step 5. Return to Initial Setup, page 10, step 21, when set.
Connect to Pump
Language:English
OK
No
Set Language
6. Press OK.
®
7. Put the meter down and pick up your MiniMed insulin pump.Press any button to turn the screen on. Press the Menu button . Use the down arrow to scroll to Utilities.Press Select button .
Set
Lan
gua
ge
MenuInsulin SettingsSensor SettingsEvent MarkersRemindersUtilities
85098543_CntrNextLINK_2_4_UG_EN_FpBp_v0.indd 6 11/20/15 12:07 PM85098543_CntrNextLINK_2_4_UG_EN_FpBp_v1_placed.pdf:10

9
GE
TT
ING
STA
RT
ED
PUMP CONNECTED
MiniMed Pumpconnected:AA1234567B
Next
Delete
mg/dL
Active Insulin 0.0 uBolus Basal
12:24PM
Co
nnect to P
ump
When the pump links to the meter, the SN on the meter screen will change to a different serial number. This number is the pump SN.
14. Turn the pump over. Check that the SN on the back of the pump matches the pump serial number now on the meter screen.
The Manage Devices screen appears on your pump.
15. The confirmation screen appears briefly on your pump.
Manage DevicesBGJ133333F
BG Meter connectionsuccessful
Hold the back button on the pump until you see the home screen.
PUMP CONNECTED
MiniMed Pumpconnected:AA1234567B
Next
Delete
Then press Next on your meter.
16. Put your pump down and pick up meter.
85098543_CntrNextLINK_2_4_UG_EN_FpBp_v0.indd 9 11/20/15 12:07 PM
GE
TT
ING
STA
RT
ED
8
Search
New DeviceSee User Guide to connect new device. Select Search below when ready.
Cancel Continue
Auto Connect
are in search mode.
Before using AutoConnect, be sure no other nearby Medtronic devices
Confirm Device SNBGJ133333F found: SN:BGJ133333F
11. Read pump screen. Be sure other nearby Medtronic devices are NOT in search mode. Use the down arrow to scroll to the next page. Use arrow buttons to scroll to Continue. Press Select button .
Select Search on your meter.
The search may take up to 2 minutes.
12. Select Search on your pump.
CONNECT TO PUMP Searching...
Cancel
Cancel
Co
nnec
t to
Pum
p
CONNECT TO PUMP
Select “Search” on your Pump and meter. Search
Cancel
Use Pump to confirm Device SN:BGJ133333F
13. Check that the Device SN (serial number) on the pump screen matches the meter SN on the meter screen. If they match, Confirm on the pump. Press Select button .
CONNECT TO PUMP Confirm
Searching...
Start search on new device. Search may take up to 2
minutes.
85098543_CntrNextLINK_2_4_UG_EN_FpBp_v0.indd 8 11/20/15 12:07 PM
9
GE
TT
ING
STA
RT
ED
PUMP CONNECTED
MiniMed Pumpconnected:AA1234567B
Next
Delete
mg/dL
Active Insulin 0.0 uBolus Basal
12:24PM
Co
nnect to P
ump
When the pump links to the meter, the SN on the meter screen will change to a different serial number. This number is the pump SN.
14. Turn the pump over. Check that the SN on the back of the pump matches the pump serial number now on the meter screen.
The Manage Devices screen appears on your pump.
15. The confirmation screen appears briefly on your pump.
Manage DevicesBGJ133333F
BG Meter connectionsuccessful
Hold the back button on the pump until you see the home screen.
PUMP CONNECTED
MiniMed Pumpconnected:AA1234567B
Next
Delete
Then press Next on your meter.
16. Put your pump down and pick up meter.
85098543_CntrNextLINK_2_4_UG_EN_FpBp_v0.indd 9 11/20/15 12:07 PM
GE
TT
ING
STA
RT
ED
8
Search
New DeviceSee User Guide to connect new device. Select Search below when ready.
Cancel Continue
Auto Connect
are in search mode.
Before using AutoConnect, be sure no other nearby Medtronic devices
Confirm Device SNBGJ133333F found: SN:BGJ133333F
11. Read pump screen. Be sure other nearby Medtronic devices are NOT in search mode. Use the down arrow to scroll to the next page. Use arrow buttons to scroll to Continue. Press Select button .
Select Search on your meter.
The search may take up to 2 minutes.
12. Select Search on your pump.
CONNECT TO PUMP Searching...
Cancel
Cancel
Co
nnec
t to
Pum
p
CONNECT TO PUMP
Select “Search” on your Pump and meter. Search
Cancel
Use Pump to confirm Device SN:BGJ133333F
13. Check that the Device SN (serial number) on the pump screen matches the meter SN on the meter screen. If they match, Confirm on the pump. Press Select button .
CONNECT TO PUMP Confirm
Searching...
Start search on new device. Search may take up to 2
minutes.
85098543_CntrNextLINK_2_4_UG_EN_FpBp_v0.indd 8 11/20/15 12:07 PM85098543_CntrNextLINK_2_4_UG_EN_FpBp_v1_placed.pdf:12

11
GE
TT
ING
STA
RT
ED
NOTE: Your Target Ranges must be within your High and Low Alert levels. You set your Target Ranges next.
Accept
Change
HIGH AND LOW ALERTS
High: 250 mg/dL
Low: 70 mg/dL
Your meter comes preset with a high alert level of 250 mg/dL and a low alert level of 70 mg/dL. You can Accept or Change these levels.NOTE: Alerts can only be set outside your selected Target Range(s). For additional information, you may contact Customer Service. Contact information for Customer Service is on the back cover.
22. Select Accept to keep the preset alert levels. If you wish to change these alert levels, press Change.
23. If you selected Change, press the � or � button to select your High Alert level. This can be set between 126 – 360 mg/dL. Press OK.
24. Press the � or � button to select your Low Alert level. This can be set between 54 – 99 mg/dL. Press OK.
NOTE: Press and hold the � or � button to scroll through the numbers faster.
HIGH AND LOW ALERTS
High: 250 mg/dL
Low: 70 mg/dL
OK
HIGH AND LOW ALERTS
High: 251 mg/dL
Low: 70 mg/dL
OK
25. The next screen confirms your choices. Press Accept to confirm your Alert settings.
Alerts are set.
Accept
Change
High: 251 mg/dL
Low: 69 mg/dL
WARNINGTalk to your health care professional before setting any High or Low Alerts on your meter.
Hig
h and Lo
w A
lerts High and Low AlertsThe High and Low Alert feature tells you when your test result is above or below the settings you choose. Results above High are marked High Blood Sugar. Results below Low are marked Low Blood Sugar. Alerts appear as large orange numbers.
85098543_CntrNextLINK_2_4_UG_EN_FpBp_v0.indd 11 11/20/15 12:08 PM
GE
TT
ING
STA
RT
ED
10
Automatically send results to the Pump?
Always
Ask me
Never
SEND OPTIONS
OK
Send Options set. Meter will always send results.
Meter Send Options17. After the meter and pump are connected, you set your Send Options. This controls
how your meter sends blood glucose readings to your MiniMed insulin pump. Your options are:
Always Meter will always send resultsAsk Me Meter will ask you before sending resultsNever Meter will never send results
Press the Send Option that is best for you.
20. Press OK.OK
DATE/TIME
Date / Time is set by Pump.10:30 AM | 10/13/11
AutoLog is Off. Accept
Turn On
AUTOLOG
Met
er S
end
Op
tio
ns
Your choice can be changed later using Setup (see page 42).
18. Press OK.
Date and Time Format
In this step, you select how the date and time are displayed on your meter. If you are not connected to a pump (e.g., if you pressed Skip in Step 5 of Initial Setup), you are asked to accept or change the displayed date, followed by the time.NOTE: Your pump automatically controls the date and time. If they need to be changed on your pump, see your MiniMed insulin pump user guide. The date format you choose on the meter applies to the meter only.
Month/Day/Year
Day.Month.Year
DATE FORMAT
SELECT19. The Date Format screen appears on your meter.
Choose your date format.
AutoLogThe AutoLog feature lets you mark your test result as
Fasting Before Meal After Meal No Mark
Your meter comes preset with AutoLog turned OFF.
21. When the AutoLog screen appears, press Accept to keep AutoLog OFF. Or, to activate AutoLog, select Turn On.
85098543_CntrNextLINK_2_4_UG_EN_FpBp_v0.indd 10 11/20/15 12:08 PM
11
GE
TT
ING
STA
RT
ED
NOTE: Your Target Ranges must be within your High and Low Alert levels. You set your Target Ranges next.
Accept
Change
HIGH AND LOW ALERTS
High: 250 mg/dL
Low: 70 mg/dL
Your meter comes preset with a high alert level of 250 mg/dL and a low alert level of 70 mg/dL. You can Accept or Change these levels.NOTE: Alerts can only be set outside your selected Target Range(s). For additional information, you may contact Customer Service. Contact information for Customer Service is on the back cover.
22. Select Accept to keep the preset alert levels. If you wish to change these alert levels, press Change.
23. If you selected Change, press the � or � button to select your High Alert level. This can be set between 126 – 360 mg/dL. Press OK.
24. Press the � or � button to select your Low Alert level. This can be set between 54 – 99 mg/dL. Press OK.
NOTE: Press and hold the � or � button to scroll through the numbers faster.
HIGH AND LOW ALERTS
High: 250 mg/dL
Low: 70 mg/dL
OK
HIGH AND LOW ALERTS
High: 251 mg/dL
Low: 70 mg/dL
OK
25. The next screen confirms your choices. Press Accept to confirm your Alert settings.
Alerts are set.
Accept
Change
High: 251 mg/dL
Low: 69 mg/dL
WARNINGTalk to your health care professional before setting any High or Low Alerts on your meter.
Hig
h and Lo
w A
lerts High and Low AlertsThe High and Low Alert feature tells you when your test result is above or below the settings you choose. Results above High are marked High Blood Sugar. Results below Low are marked Low Blood Sugar. Alerts appear as large orange numbers.
85098543_CntrNextLINK_2_4_UG_EN_FpBp_v0.indd 11 11/20/15 12:08 PM
GE
TT
ING
STA
RT
ED
10
Automatically send results to the Pump?
Always
Ask me
Never
SEND OPTIONS
OK
Send Options set. Meter will always send results.
Meter Send Options17. After the meter and pump are connected, you set your Send Options. This controls
how your meter sends blood glucose readings to your MiniMed insulin pump. Your options are:
Always Meter will always send resultsAsk Me Meter will ask you before sending resultsNever Meter will never send results
Press the Send Option that is best for you.
20. Press OK.OK
DATE/TIME
Date / Time is set by Pump.10:30 AM | 10/13/11
AutoLog is Off. Accept
Turn On
AUTOLOG
Met
er S
end
Op
tio
ns
Your choice can be changed later using Setup (see page 42).
18. Press OK.
Date and Time Format
In this step, you select how the date and time are displayed on your meter. If you are not connected to a pump (e.g., if you pressed Skip in Step 5 of Initial Setup), you are asked to accept or change the displayed date, followed by the time.NOTE: Your pump automatically controls the date and time. If they need to be changed on your pump, see your MiniMed insulin pump user guide. The date format you choose on the meter applies to the meter only.
Month/Day/Year
Day.Month.Year
DATE FORMAT
SELECT19. The Date Format screen appears on your meter.
Choose your date format.
AutoLogThe AutoLog feature lets you mark your test result as
Fasting Before Meal After Meal No Mark
Your meter comes preset with AutoLog turned OFF.
21. When the AutoLog screen appears, press Accept to keep AutoLog OFF. Or, to activate AutoLog, select Turn On.
85098543_CntrNextLINK_2_4_UG_EN_FpBp_v0.indd 10 11/20/15 12:08 PM85098543_CntrNextLINK_2_4_UG_EN_FpBp_v1_placed.pdf:14

13
TE
ST
ING
Testing Getting Ready to Test
Read your CONTOUR®NEXT LINK 2.4 user guide, your MiniMed 630G insulin pump user guide, the lancing device insert and all instructional materials provided in your meter kit before testing. Please follow all instructions for use and care exactly as described. Examine product for missing, damaged, or broken parts. If the test strip bottle is open inside a new box of strips, do not use those strips. Contact Customer Service for replacement parts. Please see back cover for contact information.
CAUTION: Your CONTOUR®NEXT LINK 2.4 meter only works with CONTOUR®NEXT test strips and CONTOUR®NEXT control solutions.
Use a new lancet each time you test because it is no longer sterile after use. Read the lancing device insert for complete instructions. If you are using a different lancing device, see that manufacturer’s instructions for use. For Alternative Site Testing instructions, see page 18.
Getting
Read
y to Test
WARNING: Potential BiohazardThe lancing device from Bayer is intended for self-testing by a single patient. It must not be used on more than one person due to the risk of infection.
2. Loosen the round protective cap on a lancet by rotating it ¼ turn, but do not remove it.
1. Remove the endcap from the lancing device. Hold the endcap dial and gently snap off the endcap from top to bottom.
Have all the materials you need ready before you begin testing. This includes your CONTOUR NEXT LINK 2.4 meter, CONTOUR NEXT test strips, and the lancing device and lancets provided by Bayer. You may also need CONTOUR NEXT control solution to perform a quality control check. CONTOUR NEXT control solutions are available separately if not included in the meter kit.• Do not perform a blood glucose test when your meter is connected to an external
device, e.g., computer.• Use only approved cables or wall charger from the manufacturer or a 5V charger
approved by certified body such as UL or TUV.
Preparing the Lancing DeviceThe lancing device graphics are for illustration purposes only. Your lancing device may look different. Refer to your lancing device insert for detailed instructions on preparing the lancing device.
85098543_CntrNextLINK_2_4_UG_EN_FpBp_v0.indd 13 11/20/15 12:08 PM
GE
TT
ING
STA
RT
ED
12
Target RangesNext you are asked to accept your blood sugar Targets. Targets are your personal ranges for your blood sugar results. With AutoLog OFF, you have a single Target range. With AutoLog ON, you have Target ranges for Fasting, Before Meal, and After Meal.
26. If AutoLog is OFF, Accept or Change the preset blood sugar Target range. The preset range is 70 – 180 mg/dL.
Accept
Change
TARGET
70 - 180
Fasting 70 – 130 mg/dL
Before Meal 70 – 130 mg/dL
After Meal 70 – 180 mg/dL
If AutoLog is ON, Accept or Change the preset blood sugar range for Fasting, Before Meal, and After Meal screens. Each Target has an option to Accept or Change.
TARGET
70 - 130
Fasting:Accept
Change
The preset values based on ADA recommendations are:6
Setup is complete.Insert strip to start atest.
Initial Setup is complete. You may now test your blood sugar. See Testing, next page.
27. To change the Targets press the � or � button until the desired Target is reached and then press OK. Press Accept on confirmation screen.You can change these settings later by going to the Main Menu and selecting Setup. See page 49.
TARGET
75 - 180 OK
NOTE: Targets can only be set inside your selected Alert level(s). For additional information, you may contact Customer Service. Contact information for Customer Service is on the back cover.
WARNINGTalk to your health care professional before setting any Target ranges on your meter.
®
Targ
et R
ang
es
85098543_CntrNextLINK_2_4_UG_EN_FpBp_v0.indd 12 11/20/15 12:08 PM
13
TE
ST
ING
Testing Getting Ready to Test
Read your CONTOUR®NEXT LINK 2.4 user guide, your MiniMed 630G insulin pump user guide, the lancing device insert and all instructional materials provided in your meter kit before testing. Please follow all instructions for use and care exactly as described. Examine product for missing, damaged, or broken parts. If the test strip bottle is open inside a new box of strips, do not use those strips. Contact Customer Service for replacement parts. Please see back cover for contact information.
CAUTION: Your CONTOUR®NEXT LINK 2.4 meter only works with CONTOUR®NEXT test strips and CONTOUR®NEXT control solutions.
Use a new lancet each time you test because it is no longer sterile after use. Read the lancing device insert for complete instructions. If you are using a different lancing device, see that manufacturer’s instructions for use. For Alternative Site Testing instructions, see page 18.
Getting
Read
y to Test
WARNING: Potential BiohazardThe lancing device from Bayer is intended for self-testing by a single patient. It must not be used on more than one person due to the risk of infection.
2. Loosen the round protective cap on a lancet by rotating it ¼ turn, but do not remove it.
1. Remove the endcap from the lancing device. Hold the endcap dial and gently snap off the endcap from top to bottom.
Have all the materials you need ready before you begin testing. This includes your CONTOUR NEXT LINK 2.4 meter, CONTOUR NEXT test strips, and the lancing device and lancets provided by Bayer. You may also need CONTOUR NEXT control solution to perform a quality control check. CONTOUR NEXT control solutions are available separately if not included in the meter kit.• Do not perform a blood glucose test when your meter is connected to an external
device, e.g., computer.• Use only approved cables or wall charger from the manufacturer or a 5V charger
approved by certified body such as UL or TUV.
Preparing the Lancing DeviceThe lancing device graphics are for illustration purposes only. Your lancing device may look different. Refer to your lancing device insert for detailed instructions on preparing the lancing device.
85098543_CntrNextLINK_2_4_UG_EN_FpBp_v0.indd 13 11/20/15 12:08 PM
GE
TT
ING
STA
RT
ED
12
Target RangesNext you are asked to accept your blood sugar Targets. Targets are your personal ranges for your blood sugar results. With AutoLog OFF, you have a single Target range. With AutoLog ON, you have Target ranges for Fasting, Before Meal, and After Meal.
26. If AutoLog is OFF, Accept or Change the preset blood sugar Target range. The preset range is 70 – 180 mg/dL.
Accept
Change
TARGET
70 - 180
Fasting 70 – 130 mg/dL
Before Meal 70 – 130 mg/dL
After Meal 70 – 180 mg/dL
If AutoLog is ON, Accept or Change the preset blood sugar range for Fasting, Before Meal, and After Meal screens. Each Target has an option to Accept or Change.
TARGET
70 - 130
Fasting:Accept
Change
The preset values based on ADA recommendations are:6
Setup is complete.Insert strip to start atest.
Initial Setup is complete. You may now test your blood sugar. See Testing, next page.
27. To change the Targets press the � or � button until the desired Target is reached and then press OK. Press Accept on confirmation screen.You can change these settings later by going to the Main Menu and selecting Setup. See page 49.
TARGET
75 - 180 OK
NOTE: Targets can only be set inside your selected Alert level(s). For additional information, you may contact Customer Service. Contact information for Customer Service is on the back cover.
WARNINGTalk to your health care professional before setting any Target ranges on your meter.
®
Targ
et R
ang
es
85098543_CntrNextLINK_2_4_UG_EN_FpBp_v0.indd 12 11/20/15 12:08 PM85098543_CntrNextLINK_2_4_UG_EN_FpBp_v1_placed.pdf:16

15
TE
ST
ING
APPLY BLOOD
2. Hold the test strip with the gray square end facing up.3. Insert the gray square end into the test strip port until
the meter beeps (if the Sound is set to ON).
Getting
the Blo
od
Dro
p —
Fingertip
Testing
You will see the Apply Blood screen. The meter is now ready for you to test.
NOTE: After test strip is inserted, if you do not apply blood to the test strip within 1 minute, the meter screen will dim and the meter will beep. Press any button and the Apply Blood screen will become bright again. After a total of 3 minutes of inactivity the meter will turn off.
1. Press the lancing device firmly against the puncture site and press the release button.
Getting the Blood Drop — Fingertip Testing
2. Stroke your hand and finger toward the puncture site to form a drop of blood. Do not squeeze around the puncture site.
3. Test immediately after a good drop of blood has formed.
4. Immediately touch the tip of the test strip to the drop of blood. The blood is pulled into the test strip through the tip.
Hold the tip of the test strip in the blood drop until the meter beeps.Do not press the tip against the skin or place the blood on top of the test strip or you could get inaccurate results or errors.
85098543_CntrNextLINK_2_4_UG_EN_FpBp_v0.indd 15 11/20/15 12:08 PM
TE
ST
ING
14
WARNINGAlways wash your hands with soap and water and dry them well before and after testing, handling the meter, lancing device or test strips.
®
Pre
par
ing
the
Tes
t S
trip
6. Rotate the endcap dial to adjust the puncture depth. The amount of pressure applied to the puncture site also affects puncture depth.
1. Remove a CONTOUR®NEXT test strip from the bottle. Tightly close the bottle lid immediately after you have removed the test strip.
Preparing the Test Strip
4. Twist off the round protective lancet cap. Save it for disposing of the used lancet.
5. Replace the endcap.
3. Insert the lancet firmly into the lancing device until it comes to a full stop.
85098543_CntrNextLINK_2_4_UG_EN_FpBp_v0.indd 14 11/20/15 12:08 PM
15
TE
ST
ING
APPLY BLOOD
2. Hold the test strip with the gray square end facing up.3. Insert the gray square end into the test strip port until
the meter beeps (if the Sound is set to ON).
Getting
the Blo
od
Dro
p —
Fingertip
Testing
You will see the Apply Blood screen. The meter is now ready for you to test.
NOTE: After test strip is inserted, if you do not apply blood to the test strip within 1 minute, the meter screen will dim and the meter will beep. Press any button and the Apply Blood screen will become bright again. After a total of 3 minutes of inactivity the meter will turn off.
1. Press the lancing device firmly against the puncture site and press the release button.
Getting the Blood Drop — Fingertip Testing
2. Stroke your hand and finger toward the puncture site to form a drop of blood. Do not squeeze around the puncture site.
3. Test immediately after a good drop of blood has formed.
4. Immediately touch the tip of the test strip to the drop of blood. The blood is pulled into the test strip through the tip.
Hold the tip of the test strip in the blood drop until the meter beeps.Do not press the tip against the skin or place the blood on top of the test strip or you could get inaccurate results or errors.
85098543_CntrNextLINK_2_4_UG_EN_FpBp_v0.indd 15 11/20/15 12:08 PM
TE
ST
ING
14
WARNINGAlways wash your hands with soap and water and dry them well before and after testing, handling the meter, lancing device or test strips.
®
Pre
par
ing
the
Tes
t S
trip
6. Rotate the endcap dial to adjust the puncture depth. The amount of pressure applied to the puncture site also affects puncture depth.
1. Remove a CONTOUR®NEXT test strip from the bottle. Tightly close the bottle lid immediately after you have removed the test strip.
Preparing the Test Strip
4. Twist off the round protective lancet cap. Save it for disposing of the used lancet.
5. Replace the endcap.
3. Insert the lancet firmly into the lancing device until it comes to a full stop.
85098543_CntrNextLINK_2_4_UG_EN_FpBp_v0.indd 14 11/20/15 12:08 PM85098543_CntrNextLINK_2_4_UG_EN_FpBp_v1_placed.pdf:18
17
TE
ST
ING
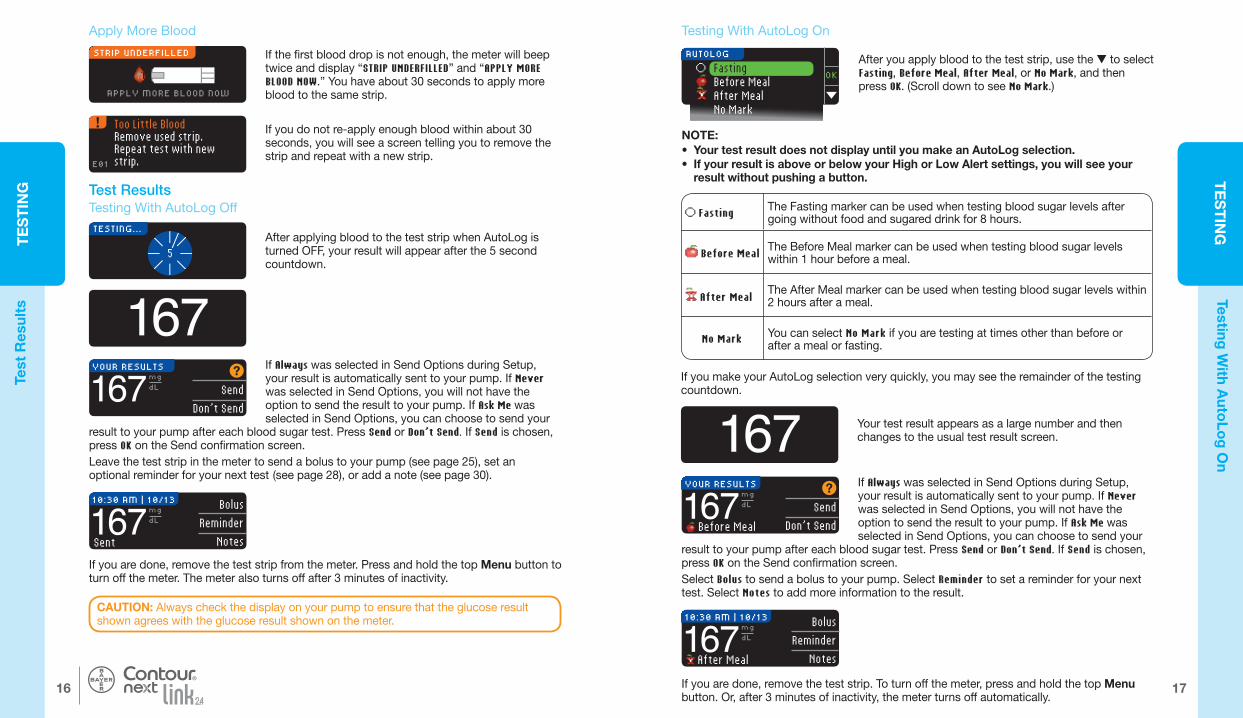
OK Fasting Before Meal After Meal
No Mark
AUTOLOG
Fasting The Fasting marker can be used when testing blood sugar levels after going without food and sugared drink for 8 hours.
Before MealThe Before Meal marker can be used when testing blood sugar levels within 1 hour before a meal.
After MealThe After Meal marker can be used when testing blood sugar levels within 2 hours after a meal.
No Mark You can select No Mark if you are testing at times other than before or after a meal or fasting.
167 Your test result appears as a large number and then changes to the usual test result screen.
If you make your AutoLog selection very quickly, you may see the remainder of the testing countdown.
10:30 AM | 10/13 Bolus
Reminder
Notes167mg
dL
After Meal
If you are done, remove the test strip. To turn off the meter, press and hold the top Menu button. Or, after 3 minutes of inactivity, the meter turns off automatically.
YOUR RESULTS
Send
Don’t Send167mg
dL
Before Meal
Testing W
ith Auto
Log
On
Testing With AutoLog On
After you apply blood to the test strip, use the � to select Fasting, Before Meal, After Meal, or No Mark, and then press OK. (Scroll down to see No Mark.)
NOTE:• Your test result does not display until you make an AutoLog selection.• If your result is above or below your High or Low Alert settings, you will see your
result without pushing a button.
If Always was selected in Send Options during Setup, your result is automatically sent to your pump. If Never was selected in Send Options, you will not have the option to send the result to your pump. If Ask Me was selected in Send Options, you can choose to send your
result to your pump after each blood sugar test. Press Send or Don’t Send. If Send is chosen, press OK on the Send confirmation screen.Select Bolus to send a bolus to your pump. Select Reminder to set a reminder for your next test. Select Notes to add more information to the result.
85098543_CntrNextLINK_2_4_UG_EN_FpBp_v0.indd 17 11/20/15 12:08 PM
TE
ST
ING
16
STRIP UNDERFILLED
APPLY MORE BLOOD NOW
1675
TESTING...After applying blood to the test strip when AutoLog is turned OFF, your result will appear after the 5 second countdown.
Too Little BloodRemove used strip. Repeat test with new strip.E01
If you do not re-apply enough blood within about 30 seconds, you will see a screen telling you to remove the strip and repeat with a new strip.
If Always was selected in Send Options during Setup, your result is automatically sent to your pump. If Never was selected in Send Options, you will not have the option to send the result to your pump. If Ask Me was selected in Send Options, you can choose to send your
result to your pump after each blood sugar test. Press Send or Don’t Send. If Send is chosen, press OK on the Send confirmation screen.Leave the test strip in the meter to send a bolus to your pump (see page 25), set an optional reminder for your next test (see page 28), or add a note (see page 30).
YOUR RESULTS
Send
Don’t Send167mg
dL
If you are done, remove the test strip from the meter. Press and hold the top Menu button to turn off the meter. The meter also turns off after 3 minutes of inactivity.
10:30 AM | 10/13 Bolus
Reminder
Notes167mg
dL
Sent
®
Test
Res
ults
Apply More Blood
Test Results Testing With AutoLog Off
If the first blood drop is not enough, the meter will beep twice and display “STRIP UNDERFILLED” and “APPLY MORE BLOOD NOW.” You have about 30 seconds to apply more blood to the same strip.
CAUTION: Always check the display on your pump to ensure that the glucose result shown agrees with the glucose result shown on the meter.
85098543_CntrNextLINK_2_4_UG_EN_FpBp_v0.indd 16 11/20/15 12:08 PM
17
TE
ST
ING
OK Fasting Before Meal After Meal
No Mark
AUTOLOG
Fasting The Fasting marker can be used when testing blood sugar levels after going without food and sugared drink for 8 hours.
Before MealThe Before Meal marker can be used when testing blood sugar levels within 1 hour before a meal.
After MealThe After Meal marker can be used when testing blood sugar levels within 2 hours after a meal.
No Mark You can select No Mark if you are testing at times other than before or after a meal or fasting.
167 Your test result appears as a large number and then changes to the usual test result screen.
If you make your AutoLog selection very quickly, you may see the remainder of the testing countdown.
10:30 AM | 10/13 Bolus
Reminder
Notes167mg
dL
After Meal
If you are done, remove the test strip. To turn off the meter, press and hold the top Menu button. Or, after 3 minutes of inactivity, the meter turns off automatically.
YOUR RESULTS
Send
Don’t Send167mg
dL
Before Meal
Testing W
ith Auto
Log
On
Testing With AutoLog On
After you apply blood to the test strip, use the � to select Fasting, Before Meal, After Meal, or No Mark, and then press OK. (Scroll down to see No Mark.)
NOTE:• Your test result does not display until you make an AutoLog selection.• If your result is above or below your High or Low Alert settings, you will see your
result without pushing a button.
If Always was selected in Send Options during Setup, your result is automatically sent to your pump. If Never was selected in Send Options, you will not have the option to send the result to your pump. If Ask Me was selected in Send Options, you can choose to send your
result to your pump after each blood sugar test. Press Send or Don’t Send. If Send is chosen, press OK on the Send confirmation screen.Select Bolus to send a bolus to your pump. Select Reminder to set a reminder for your next test. Select Notes to add more information to the result.
85098543_CntrNextLINK_2_4_UG_EN_FpBp_v0.indd 17 11/20/15 12:08 PM
TE
ST
ING
16
STRIP UNDERFILLED
APPLY MORE BLOOD NOW
1675
TESTING...After applying blood to the test strip when AutoLog is turned OFF, your result will appear after the 5 second countdown.
Too Little BloodRemove used strip. Repeat test with new strip.E01
If you do not re-apply enough blood within about 30 seconds, you will see a screen telling you to remove the strip and repeat with a new strip.
If Always was selected in Send Options during Setup, your result is automatically sent to your pump. If Never was selected in Send Options, you will not have the option to send the result to your pump. If Ask Me was selected in Send Options, you can choose to send your
result to your pump after each blood sugar test. Press Send or Don’t Send. If Send is chosen, press OK on the Send confirmation screen.Leave the test strip in the meter to send a bolus to your pump (see page 25), set an optional reminder for your next test (see page 28), or add a note (see page 30).
YOUR RESULTS
Send
Don’t Send167mg
dL
If you are done, remove the test strip from the meter. Press and hold the top Menu button to turn off the meter. The meter also turns off after 3 minutes of inactivity.
10:30 AM | 10/13 Bolus
Reminder
Notes167mg
dL
Sent
®
Test
Res
ults
Apply More Blood
Test Results Testing With AutoLog Off
If the first blood drop is not enough, the meter will beep twice and display “STRIP UNDERFILLED” and “APPLY MORE BLOOD NOW.” You have about 30 seconds to apply more blood to the same strip.
CAUTION: Always check the display on your pump to ensure that the glucose result shown agrees with the glucose result shown on the meter.
85098543_CntrNextLINK_2_4_UG_EN_FpBp_v0.indd 16 11/20/15 12:08 PM85098543_CntrNextLINK_2_4_UG_EN_FpBp_v1_placed.pdf:20

19
TE
ST
ING
8. Hold the tip of the test strip in the blood drop until the meter beeps. Do not press the tip against the skin or place the blood on top of the test strip or you could get inaccurate results or errors.
STRIP UNDERFILLED
APPLY MORE BLOOD NOW
If the first blood drop is not enough, the meter will beep twice and display “ STRIP UNDERFILLED” and “APPLY MORE BLOOD NOW.” You have about 30 seconds to apply more blood to the same strip.
Too Little BloodRemove used strip. Repeat test with new strip.E01
If you do not apply more blood within about 30 seconds, remove the strip and repeat with a new strip.
Getting
a Blo
od
Dro
p fo
r Alternative S
ite Testing
4. Press the lancing device firmly against puncture site and then press the release button.
5. Maintain steady pressure until a small, round blood drop forms.
6. Lift the device straight up and away from the skin without smearing the blood.
7. Test immediately after you have formed a small, round blood drop.Immediately touch the tip of the test strip to the drop of blood. The blood is pulled into the test strip through the tip.
Do not test the blood sample from palm if you get:• Smeared blood • Clotted blood • Runny blood • Clear fluid mixed with the blood
The lancing device graphics are for illustration purposes only.
85098543_CntrNextLINK_2_4_UG_EN_FpBp_v0.indd 19 11/20/15 12:08 PM
TE
ST
ING
18
WARNING• Ask your health care professional if Alternative Site Testing is right for you.• Do not calibrate your continuous glucose monitoring device from an AST result.• Do not calculate a bolus based on an AST result.
®
Alternative Site Testing (AST) – Palm
IMPORTANT: For Alternative Site Testing, use the clear endcap on your lancing device. Your CONTOUR®NEXT LINK 2.4 meter can be used for fingertip or palm testing. See the lancing device insert for complete instructions in Alternative Site Testing.
Getting a Blood Drop for Alternative Site Testing
1. Wash your hands and the puncture site with soap and warm water. Rinse and dry well.
2. Attach the clear AST endcap to the lancing device provided by Bayer. Refer to the lancing device insert for detailed instructions.
3. Select a puncture site from a fleshy area on the palm. Avoid veins, moles, bones and tendons.
IMPORTANT: Do not use AST under the following conditions:• If you think your blood sugar is low• When blood sugar is changing rapidly (after a meal, insulin dose, or exercise)• If you are unable to feel symptoms of low blood sugar (hypoglycemic unawareness)• If you get alternative site blood sugar results that do not agree with how you feel• During illness or times of stress• If you will be driving a car or operating machineryAlternative Site test results may be different from fingertip results when glucose levels are changing rapidly (e.g., after a meal, after taking insulin, or during or after exercise). Additionally, glucose levels may not rise as high or fall as low as levels in the fingertip. As such, fingertip testing results may identify hypoglycemic levels sooner than alternate site results.Alternative Site Testing is recommended only when it is more than 2 hours after a meal, diabetes medication, or exercise.If you do not have a clear endcap to perform AST, contact Customer Service. Please see back cover for contact information.
Alt
erna
tive
Sit
e Te
stin
g (A
ST
) - P
alm
85098543_CntrNextLINK_2_4_UG_EN_FpBp_v0.indd 18 11/20/15 12:08 PM
19
TE
ST
ING
8. Hold the tip of the test strip in the blood drop until the meter beeps. Do not press the tip against the skin or place the blood on top of the test strip or you could get inaccurate results or errors.
STRIP UNDERFILLED
APPLY MORE BLOOD NOW
If the first blood drop is not enough, the meter will beep twice and display “ STRIP UNDERFILLED” and “APPLY MORE BLOOD NOW.” You have about 30 seconds to apply more blood to the same strip.
Too Little BloodRemove used strip. Repeat test with new strip.E01
If you do not apply more blood within about 30 seconds, remove the strip and repeat with a new strip.
Getting
a Blo
od
Dro
p fo
r Alternative S
ite Testing
4. Press the lancing device firmly against puncture site and then press the release button.
5. Maintain steady pressure until a small, round blood drop forms.
6. Lift the device straight up and away from the skin without smearing the blood.
7. Test immediately after you have formed a small, round blood drop.Immediately touch the tip of the test strip to the drop of blood. The blood is pulled into the test strip through the tip.
Do not test the blood sample from palm if you get:• Smeared blood • Clotted blood • Runny blood • Clear fluid mixed with the blood
The lancing device graphics are for illustration purposes only.
85098543_CntrNextLINK_2_4_UG_EN_FpBp_v0.indd 19 11/20/15 12:08 PM
TE
ST
ING
18
WARNING• Ask your health care professional if Alternative Site Testing is right for you.• Do not calibrate your continuous glucose monitoring device from an AST result.• Do not calculate a bolus based on an AST result.
®
Alternative Site Testing (AST) – Palm
IMPORTANT: For Alternative Site Testing, use the clear endcap on your lancing device. Your CONTOUR®NEXT LINK 2.4 meter can be used for fingertip or palm testing. See the lancing device insert for complete instructions in Alternative Site Testing.
Getting a Blood Drop for Alternative Site Testing
1. Wash your hands and the puncture site with soap and warm water. Rinse and dry well.
2. Attach the clear AST endcap to the lancing device provided by Bayer. Refer to the lancing device insert for detailed instructions.
3. Select a puncture site from a fleshy area on the palm. Avoid veins, moles, bones and tendons.
IMPORTANT: Do not use AST under the following conditions:• If you think your blood sugar is low• When blood sugar is changing rapidly (after a meal, insulin dose, or exercise)• If you are unable to feel symptoms of low blood sugar (hypoglycemic unawareness)• If you get alternative site blood sugar results that do not agree with how you feel• During illness or times of stress• If you will be driving a car or operating machineryAlternative Site test results may be different from fingertip results when glucose levels are changing rapidly (e.g., after a meal, after taking insulin, or during or after exercise). Additionally, glucose levels may not rise as high or fall as low as levels in the fingertip. As such, fingertip testing results may identify hypoglycemic levels sooner than alternate site results.Alternative Site Testing is recommended only when it is more than 2 hours after a meal, diabetes medication, or exercise.If you do not have a clear endcap to perform AST, contact Customer Service. Please see back cover for contact information.
Alt
erna
tive
Sit
e Te
stin
g (A
ST
) - P
alm
85098543_CntrNextLINK_2_4_UG_EN_FpBp_v0.indd 18 11/20/15 12:08 PM85098543_CntrNextLINK_2_4_UG_EN_FpBp_v1_placed.pdf:22

21
TE
ST
ING
WARNING: Potential Biohazard• Always dispose of test strip and lancet as medical waste or as advised by your
health care professional. All products that come in contact with human blood should be handled as if capable of transmitting infectious diseases.
• Please refer to your lancing device package insert for instructions on how to properly remove and dispose of the lancet.
WARNINGYou should consult your health care professional for glucose values specific to your needs.
• If your blood sugar reading is under 50 mg/dL, follow medical advice immediately. • If your blood sugar reading is over 250 mg/dL, wash and dry your hands well and
repeat the test with a new strip. If you get a similar result, follow medical advice immediately.
• Always consult your health care professional before changing your medication based on test results.
Test Results —
Exp
ected Values
Test Results — Expected ValuesBlood glucose values will vary depending on food intake, medication dosages, health, stress, or activity. Non diabetic plasma glucose concentrations are normally maintained within a relatively narrow range, approximately 70 – 110 mg/dL in a fasting state.7
85098543_CntrNextLINK_2_4_UG_EN_FpBp_v0.indd 21 11/20/15 12:08 PM
TE
ST
ING
20
YOUR RESULTS
Send
Don’t Send167mg
dL
Before Meal
9. If you have the AutoLog feature turned ON, the AutoLog screen appears. Select Fasting, Before Meal, After Meal, or No Mark by pressing the OK button when your selection is highlighted. Scroll down to see No Mark.
OK Fasting Before Meal After Meal
No Mark
AUTOLOG
NOTE:• Your test result does not display until you make an AutoLog selection.• If your result is above or below your High or Low Alert settings, you will see your
result without pushing a button.
®
If you are done, remove the test strip from the meter. Press and hold the top Menu button to turn off the meter. The meter also turns off after 3 minutes of inactivity.
WARNING• Dispose of the used lancet as medical waste or as advised by your health care
professional.
• Do not reuse lancets. Use a new lancet each time you test.
Ejecting and Disposing of the Used Lancet
1. Do not use your fingers to remove the lancet from the lancing device. Your Bayer device has an automatic lancet ejection feature.
2. Refer to the separate lancing device insert provided by Bayer for instructions on automatic ejection of the lancet.
If Always was selected in Send Options during Setup, your result is automatically sent to your pump. If Never was selected in Send Options, you will not have the option to send the result to your pump. If Ask Me was selected in Send Options, you can choose to send your result to your
pump after each blood sugar test. Press Send or Don’t Send. If Send is chosen, press OK on the Send confirmation screen. You can change your send option at any time using the Setup Menu (see page 42).
WARNING• Do not calculate a bolus based on an AST result.• Do not calibrate your continuous glucose monitoring device from an AST.
Eje
ctin
g a
nd D
isp
osi
ng o
f th
e U
sed
Lan
cet
85098543_CntrNextLINK_2_4_UG_EN_FpBp_v0.indd 20 11/20/15 12:08 PM
21
TE
ST
ING
WARNING: Potential Biohazard• Always dispose of test strip and lancet as medical waste or as advised by your
health care professional. All products that come in contact with human blood should be handled as if capable of transmitting infectious diseases.
• Please refer to your lancing device package insert for instructions on how to properly remove and dispose of the lancet.
WARNINGYou should consult your health care professional for glucose values specific to your needs.
• If your blood sugar reading is under 50 mg/dL, follow medical advice immediately. • If your blood sugar reading is over 250 mg/dL, wash and dry your hands well and
repeat the test with a new strip. If you get a similar result, follow medical advice immediately.
• Always consult your health care professional before changing your medication based on test results.
Test Results —
Exp
ected Values
Test Results — Expected ValuesBlood glucose values will vary depending on food intake, medication dosages, health, stress, or activity. Non diabetic plasma glucose concentrations are normally maintained within a relatively narrow range, approximately 70 – 110 mg/dL in a fasting state.7
85098543_CntrNextLINK_2_4_UG_EN_FpBp_v0.indd 21 11/20/15 12:08 PM
TE
ST
ING
20
YOUR RESULTS
Send
Don’t Send167mg
dL
Before Meal
9. If you have the AutoLog feature turned ON, the AutoLog screen appears. Select Fasting, Before Meal, After Meal, or No Mark by pressing the OK button when your selection is highlighted. Scroll down to see No Mark.
OK Fasting Before Meal After Meal
No Mark
AUTOLOG
NOTE:• Your test result does not display until you make an AutoLog selection.• If your result is above or below your High or Low Alert settings, you will see your
result without pushing a button.
®
If you are done, remove the test strip from the meter. Press and hold the top Menu button to turn off the meter. The meter also turns off after 3 minutes of inactivity.
WARNING• Dispose of the used lancet as medical waste or as advised by your health care
professional.
• Do not reuse lancets. Use a new lancet each time you test.
Ejecting and Disposing of the Used Lancet
1. Do not use your fingers to remove the lancet from the lancing device. Your Bayer device has an automatic lancet ejection feature.
2. Refer to the separate lancing device insert provided by Bayer for instructions on automatic ejection of the lancet.
If Always was selected in Send Options during Setup, your result is automatically sent to your pump. If Never was selected in Send Options, you will not have the option to send the result to your pump. If Ask Me was selected in Send Options, you can choose to send your result to your
pump after each blood sugar test. Press Send or Don’t Send. If Send is chosen, press OK on the Send confirmation screen. You can change your send option at any time using the Setup Menu (see page 42).
WARNING• Do not calculate a bolus based on an AST result.• Do not calibrate your continuous glucose monitoring device from an AST.
Eje
ctin
g a
nd D
isp
osi
ng o
f th
e U
sed
Lan
cet
85098543_CntrNextLINK_2_4_UG_EN_FpBp_v0.indd 20 11/20/15 12:08 PM85098543_CntrNextLINK_2_4_UG_EN_FpBp_v1_placed.pdf:24

23
TE
ST
ING
APPLY BLOOD
WARNING• Do not calibrate your continuous glucose monitoring device from a control result• Do not calculate a bolus based on a control result
WARNINGShake the control solution well before testing.
Co
ntrol S
olutio
n Testing Control Solution* Testing
CAUTION: Check the expiration date on the test strip bottle and the expiration date and discard date on the control solution bottle. DO NOT use expired materials.
Quality Control
Level 1 and Level 2 control solutions are available separately if not included in the meter kit. Always use CONTOUR NEXT control solutions from Bayer. Other brands could present incorrect results. If you need help locating CONTOUR NEXT control solutions from Bayer, contact Customer Service. Please see back cover for contact information.
1. Remove the test strip from the bottle and firmly snap the lid closed.
2. Hold the test strip with the gray square end facing up.3. Insert the gray square end of the test strip into the test
strip port until the meter beeps.
4. You will see the Apply Blood screen. The meter is now ready for you to test.
CAUTION: Use only CONTOUR®NEXT control solution from Bayer (Level 1 and Level 2) with your CONTOUR®NEXT LINK 2.4 blood glucose monitoring system. Using anything other than CONTOUR NEXT control solution can cause inaccurate results.
* Control solution may not be included in all meter kits. Contact Customer Service for information on obtaining control solution. See back cover for Customer Service contact information.
• Shake the control solution bottle well, about 15 times before every use.
• Unmixed control solution may cause inaccurate results.You should perform a control test when:• using your meter for the first time• you open a new bottle or package of test strips• you think your meter may not be working correctly• you have repeated, unexpected blood glucose results
85098543_CntrNextLINK_2_4_UG_EN_FpBp_v0.indd 23 11/20/15 12:08 PM
TE
ST
ING
22
69Low Blood Sugar
251High Blood Sugar
• A screen with large orange numbers alerts you that your blood sugar is high.
10:30 AM | 10/13 Bolus
Reminder
Notes
251mgdL
High Blood Sugar
Before Meal After Meal
Time After Meal Don’t Feel Right Sick Stress Activity Go Back
ADD NOTES
OK
®
Hig
h an
d L
ow
Blo
od
Sug
ar A
lert
Scr
eens
High and Low Blood Sugar Alert ScreensYour meter has been preset with a low blood sugar (hypoglycemia) value of 70 mg/dL and a high blood sugar (hyperglycemia) value of 250 mg/dL. These are the preset values, but can be customized by you and/or your health care professional. You can change the High and Low Alert levels under Main Menu, Setup option (see page 51).If your blood sugar reading is under your low blood sugar alert level:
• A screen with large orange numbers alerts you that your blood sugar is low.
If your blood sugar reading is over your high blood sugar alert level:
• If AutoLog is ON and you did not mark your result before the high or low alert appeared, select Notes.
• Press the � or � button to scroll through the choices.• Press OK when your choice is highlighted.
Testing in the Dark Your meter has a lighted test strip port to help you test in the dark. • With the meter off, give the top Menu button two quick presses to turn on the test strip
port light. • Insert a test strip and the display screen appears. • Once blood is applied to the test strip, the light goes off. • Continue with your test. • Two quick presses of the top Menu button also turns off the light.
85098543_CntrNextLINK_2_4_UG_EN_FpBp_v0.indd 22 11/20/15 12:08 PM
23
TE
ST
ING
APPLY BLOOD
WARNING• Do not calibrate your continuous glucose monitoring device from a control result• Do not calculate a bolus based on a control result
WARNINGShake the control solution well before testing.
Co
ntrol S
olutio
n Testing Control Solution* Testing
CAUTION: Check the expiration date on the test strip bottle and the expiration date and discard date on the control solution bottle. DO NOT use expired materials.
Quality Control
Level 1 and Level 2 control solutions are available separately if not included in the meter kit. Always use CONTOUR NEXT control solutions from Bayer. Other brands could present incorrect results. If you need help locating CONTOUR NEXT control solutions from Bayer, contact Customer Service. Please see back cover for contact information.
1. Remove the test strip from the bottle and firmly snap the lid closed.
2. Hold the test strip with the gray square end facing up.3. Insert the gray square end of the test strip into the test
strip port until the meter beeps.
4. You will see the Apply Blood screen. The meter is now ready for you to test.
CAUTION: Use only CONTOUR®NEXT control solution from Bayer (Level 1 and Level 2) with your CONTOUR®NEXT LINK 2.4 blood glucose monitoring system. Using anything other than CONTOUR NEXT control solution can cause inaccurate results.
* Control solution may not be included in all meter kits. Contact Customer Service for information on obtaining control solution. See back cover for Customer Service contact information.
• Shake the control solution bottle well, about 15 times before every use.
• Unmixed control solution may cause inaccurate results.You should perform a control test when:• using your meter for the first time• you open a new bottle or package of test strips• you think your meter may not be working correctly• you have repeated, unexpected blood glucose results
85098543_CntrNextLINK_2_4_UG_EN_FpBp_v0.indd 23 11/20/15 12:08 PM
TE
ST
ING
22
69Low Blood Sugar
251High Blood Sugar
• A screen with large orange numbers alerts you that your blood sugar is high.
10:30 AM | 10/13 Bolus
Reminder
Notes
251mgdL
High Blood Sugar
Before Meal After Meal
Time After Meal Don’t Feel Right Sick Stress Activity Go Back
ADD NOTES
OK
®
Hig
h an
d L
ow
Blo
od
Sug
ar A
lert
Scr
eens
High and Low Blood Sugar Alert ScreensYour meter has been preset with a low blood sugar (hypoglycemia) value of 70 mg/dL and a high blood sugar (hyperglycemia) value of 250 mg/dL. These are the preset values, but can be customized by you and/or your health care professional. You can change the High and Low Alert levels under Main Menu, Setup option (see page 51).If your blood sugar reading is under your low blood sugar alert level:
• A screen with large orange numbers alerts you that your blood sugar is low.
If your blood sugar reading is over your high blood sugar alert level:
• If AutoLog is ON and you did not mark your result before the high or low alert appeared, select Notes.
• Press the � or � button to scroll through the choices.• Press OK when your choice is highlighted.
Testing in the Dark Your meter has a lighted test strip port to help you test in the dark. • With the meter off, give the top Menu button two quick presses to turn on the test strip
port light. • Insert a test strip and the display screen appears. • Once blood is applied to the test strip, the light goes off. • Continue with your test. • Two quick presses of the top Menu button also turns off the light.
85098543_CntrNextLINK_2_4_UG_EN_FpBp_v0.indd 22 11/20/15 12:08 PM85098543_CntrNextLINK_2_4_UG_EN_FpBp_v1_placed.pdf:26
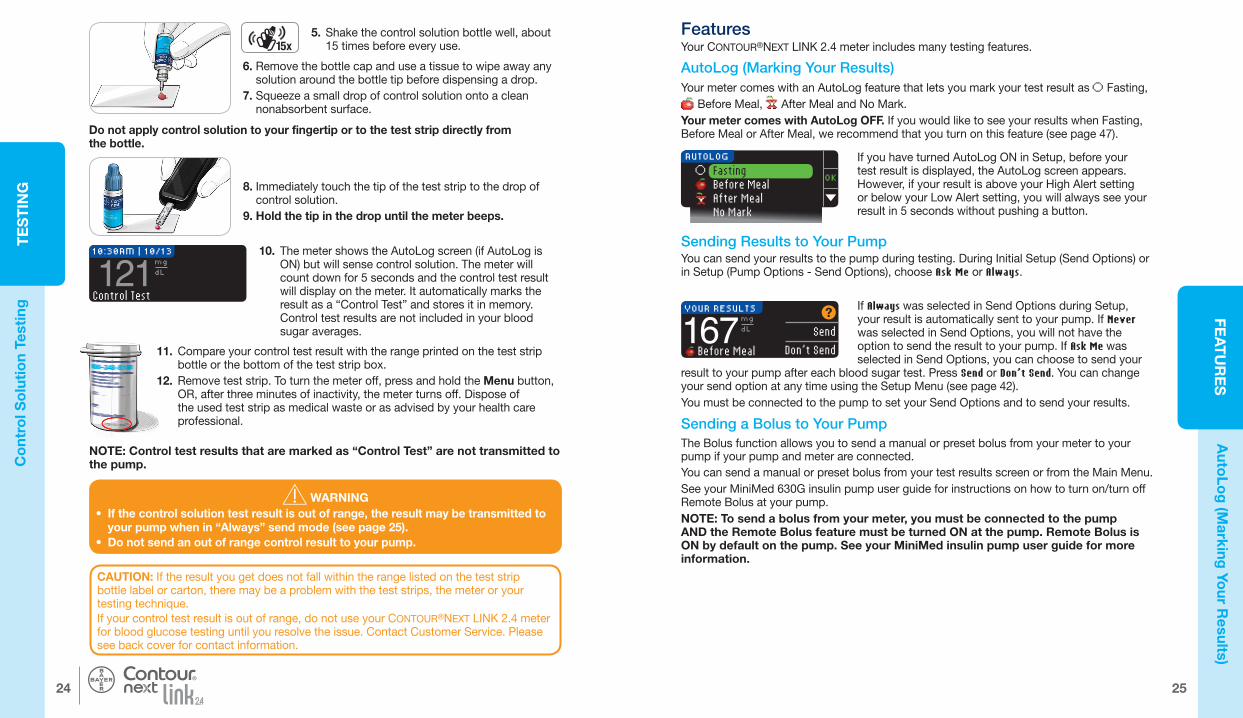
25
FEAT
UR
ES
OK Fasting Before Meal After Meal
No Mark
AUTOLOG
YOUR RESULTS
Send
Don’t Send167mg
dL
Before Meal
Auto
Log
(Marking
Your R
esults) FeaturesYour CONTOUR®NEXT LINK 2.4 meter includes many testing features.
AutoLog (Marking Your Results)Your meter comes with an AutoLog feature that lets you mark your test result as Fasting,
Before Meal, After Meal and No Mark. Your meter comes with AutoLog OFF. If you would like to see your results when Fasting, Before Meal or After Meal, we recommend that you turn on this feature (see page 47).
If you have turned AutoLog ON in Setup, before your test result is displayed, the AutoLog screen appears. However, if your result is above your High Alert setting or below your Low Alert setting, you will always see your result in 5 seconds without pushing a button.
Sending Results to Your PumpYou can send your results to the pump during testing. During Initial Setup (Send Options) or in Setup (Pump Options - Send Options), choose Ask Me or Always.
If Always was selected in Send Options during Setup, your result is automatically sent to your pump. If Never was selected in Send Options, you will not have the option to send the result to your pump. If Ask Me was selected in Send Options, you can choose to send your
result to your pump after each blood sugar test. Press Send or Don’t Send. You can change your send option at any time using the Setup Menu (see page 42). You must be connected to the pump to set your Send Options and to send your results.
Sending a Bolus to Your Pump The Bolus function allows you to send a manual or preset bolus from your meter to your pump if your pump and meter are connected.You can send a manual or preset bolus from your test results screen or from the Main Menu.See your MiniMed 630G insulin pump user guide for instructions on how to turn on/turn off Remote Bolus at your pump.NOTE: To send a bolus from your meter, you must be connected to the pump AND the Remote Bolus feature must be turned ON at the pump. Remote Bolus is ON by default on the pump. See your MiniMed insulin pump user guide for more information.
85098543_CntrNextLINK_2_4_UG_EN_FpBp_v0.indd 25 11/20/15 12:08 PM
TE
ST
ING
24
10:30AM | 10/13
121mgdL
Control Test
WARNING• If the control solution test result is out of range, the result may be transmitted to
your pump when in “Always” send mode (see page 25).• Do not send an out of range control result to your pump.
®
Co
ntro
l So
luti
on
Test
ing
10. The meter shows the AutoLog screen (if AutoLog is ON) but will sense control solution. The meter will count down for 5 seconds and the control test result will display on the meter. It automatically marks the result as a “Control Test” and stores it in memory. Control test results are not included in your blood sugar averages.
8. Immediately touch the tip of the test strip to the drop of control solution.
9. Hold the tip in the drop until the meter beeps.
CAUTION: If the result you get does not fall within the range listed on the test strip bottle label or carton, there may be a problem with the test strips, the meter or your testing technique.If your control test result is out of range, do not use your CONTOUR®NEXT LINK 2.4 meter for blood glucose testing until you resolve the issue. Contact Customer Service. Please see back cover for contact information.
11. Compare your control test result with the range printed on the test strip bottle or the bottom of the test strip box.
12. Remove test strip. To turn the meter off, press and hold the Menu button, OR, after three minutes of inactivity, the meter turns off. Dispose of the used test strip as medical waste or as advised by your health care professional.
NOTE: Control test results that are marked as “Control Test” are not transmitted to the pump.
5. Shake the control solution bottle well, about 15 times before every use.
Do not apply control solution to your fingertip or to the test strip directly from the bottle.
6. Remove the bottle cap and use a tissue to wipe away any solution around the bottle tip before dispensing a drop.
7. Squeeze a small drop of control solution onto a clean nonabsorbent surface.
85098543_CntrNextLINK_2_4_UG_EN_FpBp_v0.indd 24 11/20/15 12:08 PM
25
FEAT
UR
ES
OK Fasting Before Meal After Meal
No Mark
AUTOLOG
YOUR RESULTS
Send
Don’t Send167mg
dL
Before Meal
Auto
Log
(Marking
Your R
esults) FeaturesYour CONTOUR®NEXT LINK 2.4 meter includes many testing features.
AutoLog (Marking Your Results)Your meter comes with an AutoLog feature that lets you mark your test result as Fasting,
Before Meal, After Meal and No Mark. Your meter comes with AutoLog OFF. If you would like to see your results when Fasting, Before Meal or After Meal, we recommend that you turn on this feature (see page 47).
If you have turned AutoLog ON in Setup, before your test result is displayed, the AutoLog screen appears. However, if your result is above your High Alert setting or below your Low Alert setting, you will always see your result in 5 seconds without pushing a button.
Sending Results to Your PumpYou can send your results to the pump during testing. During Initial Setup (Send Options) or in Setup (Pump Options - Send Options), choose Ask Me or Always.
If Always was selected in Send Options during Setup, your result is automatically sent to your pump. If Never was selected in Send Options, you will not have the option to send the result to your pump. If Ask Me was selected in Send Options, you can choose to send your
result to your pump after each blood sugar test. Press Send or Don’t Send. You can change your send option at any time using the Setup Menu (see page 42). You must be connected to the pump to set your Send Options and to send your results.
Sending a Bolus to Your Pump The Bolus function allows you to send a manual or preset bolus from your meter to your pump if your pump and meter are connected.You can send a manual or preset bolus from your test results screen or from the Main Menu.See your MiniMed 630G insulin pump user guide for instructions on how to turn on/turn off Remote Bolus at your pump.NOTE: To send a bolus from your meter, you must be connected to the pump AND the Remote Bolus feature must be turned ON at the pump. Remote Bolus is ON by default on the pump. See your MiniMed insulin pump user guide for more information.
85098543_CntrNextLINK_2_4_UG_EN_FpBp_v0.indd 25 11/20/15 12:08 PM
TE
ST
ING
24
10:30AM | 10/13
121mgdL
Control Test
WARNING• If the control solution test result is out of range, the result may be transmitted to
your pump when in “Always” send mode (see page 25).• Do not send an out of range control result to your pump.
®
Co
ntro
l So
luti
on
Test
ing
10. The meter shows the AutoLog screen (if AutoLog is ON) but will sense control solution. The meter will count down for 5 seconds and the control test result will display on the meter. It automatically marks the result as a “Control Test” and stores it in memory. Control test results are not included in your blood sugar averages.
8. Immediately touch the tip of the test strip to the drop of control solution.
9. Hold the tip in the drop until the meter beeps.
CAUTION: If the result you get does not fall within the range listed on the test strip bottle label or carton, there may be a problem with the test strips, the meter or your testing technique.If your control test result is out of range, do not use your CONTOUR®NEXT LINK 2.4 meter for blood glucose testing until you resolve the issue. Contact Customer Service. Please see back cover for contact information.
11. Compare your control test result with the range printed on the test strip bottle or the bottom of the test strip box.
12. Remove test strip. To turn the meter off, press and hold the Menu button, OR, after three minutes of inactivity, the meter turns off. Dispose of the used test strip as medical waste or as advised by your health care professional.
NOTE: Control test results that are marked as “Control Test” are not transmitted to the pump.
5. Shake the control solution bottle well, about 15 times before every use.
Do not apply control solution to your fingertip or to the test strip directly from the bottle.
6. Remove the bottle cap and use a tissue to wipe away any solution around the bottle tip before dispensing a drop.
7. Squeeze a small drop of control solution onto a clean nonabsorbent surface.
85098543_CntrNextLINK_2_4_UG_EN_FpBp_v0.indd 24 11/20/15 12:08 PM85098543_CntrNextLINK_2_4_UG_EN_FpBp_v1_placed.pdf:28

27
FEAT
UR
ES
BolusTotalStop Bolus Basal
mg/dL167
0.250 U Manual Bolus was sent.
OK 7. A confirmation screen appears on both your meter and your pump.
BolusTotalStop Bolus Basal
mg/dL167
NOTE: Verify that the bolus amount shown on your meter matches the total amount shown on your pump.
Preset BolusFirst, follow Steps 1, 2 and 3 on page 26. 4. Next, choose the Preset Bolus you wish to send to your pump.NOTE: Preset bolus is set on your pump.
6. Press Yes to send the bolus to your pump.
PRESET BOLUS
OKBreakfastDinner N 0.750 USnack
Deliver Dinner Bolus?
PRESET BOLUS
Yes
NoN 0.750 U
N 0.750 U Dinner Bolus was sent.
OK
5. Press the � or � button until your preset bolus choice is highlighted. Then press OK.
10:00PM
10:00AM
Preset B
olus
7. A confirmation screen appears on both your meter and your pump.
85098543_CntrNextLINK_2_4_UG_EN_FpBp_v0.indd 27 11/20/15 12:08 PM
FEAT
UR
ES
26
4. Next, choose the bolus amount.
MANUAL BOLUSSET BOLUS AMOUNT
0.000 UOK
MANUAL BOLUSSET BOLUS AMOUNT
0.250 UOK
Deliver Bolus?
MANUAL BOLUS
Yes
No0.250 U
Manual Bolus
BOLUS
Manual Bolus
Preset Bolus
2. On the next screen, press Manual Bolus or Preset Bolus.3. The Connecting to Pump screen appears.
MENU
BolusLogbookTrends
OK
To send a Manual Bolus, continue with step 4, below. To send a Preset Bolus, continue with step 4, page 27.
10:30 AM | 10/13 Bolus
Reminder
Notes167mg
dL
Sent, Before...
®
Man
ual B
olu
s
NOTE: Bolus increment setting on your meter is determined by the setting on your MiniMed insulin pump. You can set your increment to 0.1, 0.05, or 0.025 units on your pump.
5. Press the � or � button to set the desired bolus amount. Then press OK.
NOTE: Press and hold the � or � button to scroll through the list faster.
6. Press Yes to send the bolus to your pump.
OR, from the Main Menu, press Bolus.
1. While the test result is still displayed on the meter, press Bolus.
If Block Mode is ON at the pump, you are asked if you want to proceed with the bolus. Block Mode is a MiniMed pump setting that restricts access to critical pump settings. Please see your MiniMed insulin pump user guide for more detailed instructions.
85098543_CntrNextLINK_2_4_UG_EN_FpBp_v0.indd 26 11/20/15 12:08 PM
27
FEAT
UR
ES
BolusTotalStop Bolus Basal
mg/dL167
0.250 U Manual Bolus was sent.
OK 7. A confirmation screen appears on both your meter and your pump.
BolusTotalStop Bolus Basal
mg/dL167
NOTE: Verify that the bolus amount shown on your meter matches the total amount shown on your pump.
Preset BolusFirst, follow Steps 1, 2 and 3 on page 26. 4. Next, choose the Preset Bolus you wish to send to your pump.NOTE: Preset bolus is set on your pump.
6. Press Yes to send the bolus to your pump.
PRESET BOLUS
OKBreakfastDinner N 0.750 USnack
Deliver Dinner Bolus?
PRESET BOLUS
Yes
NoN 0.750 U
N 0.750 U Dinner Bolus was sent.
OK
5. Press the � or � button until your preset bolus choice is highlighted. Then press OK.
10:00PM
10:00AM
Preset B
olus
7. A confirmation screen appears on both your meter and your pump.
85098543_CntrNextLINK_2_4_UG_EN_FpBp_v0.indd 27 11/20/15 12:08 PM
FEAT
UR
ES
26
4. Next, choose the bolus amount.
MANUAL BOLUSSET BOLUS AMOUNT
0.000 UOK
MANUAL BOLUSSET BOLUS AMOUNT
0.250 UOK
Deliver Bolus?
MANUAL BOLUS
Yes
No0.250 U
Manual Bolus
BOLUS
Manual Bolus
Preset Bolus
2. On the next screen, press Manual Bolus or Preset Bolus.3. The Connecting to Pump screen appears.
MENU
BolusLogbookTrends
OK
To send a Manual Bolus, continue with step 4, below. To send a Preset Bolus, continue with step 4, page 27.
10:30 AM | 10/13 Bolus
Reminder
Notes167mg
dL
Sent, Before...
®
Man
ual B
olu
s
NOTE: Bolus increment setting on your meter is determined by the setting on your MiniMed insulin pump. You can set your increment to 0.1, 0.05, or 0.025 units on your pump.
5. Press the � or � button to set the desired bolus amount. Then press OK.
NOTE: Press and hold the � or � button to scroll through the list faster.
6. Press Yes to send the bolus to your pump.
OR, from the Main Menu, press Bolus.
1. While the test result is still displayed on the meter, press Bolus.
If Block Mode is ON at the pump, you are asked if you want to proceed with the bolus. Block Mode is a MiniMed pump setting that restricts access to critical pump settings. Please see your MiniMed insulin pump user guide for more detailed instructions.
85098543_CntrNextLINK_2_4_UG_EN_FpBp_v0.indd 26 11/20/15 12:08 PM85098543_CntrNextLINK_2_4_UG_EN_FpBp_v1_placed.pdf:30

29
FEAT
UR
ES
REMINDER
15 mins
CHANGE COUNTDOWN
3 hrs
OK
Reminder in:
15 mins3 hrsChange
Done
Changing a Reminder Time1. Press the � or � button to select the correct hours and minutes (in 15-minute
increments).
Chang
ing a R
emind
er Tim
e
2. Press OK after each selection.
A screen confirms the Reminder Countdown time.
When the Reminder feature is on, the clock symbol appears in the headers on the Setup and Main Menu screens.The meter retains the reminder time that you set until you change it or turn it off.
Getting a ReminderWhen the reminder time is reached, 20 beeps will sound. The meter will turn on and a reminder screen will appear. You can stop the beeps in two ways:
NOTE: If you decide to test within 15 minutes before the reminder time, the countdown is stopped with the insertion of the test strip. Proceed with testing.
Time for your nexttest. OK
1. Press OK, insert a test strip and proceed with testing, OR
2. Insert a test strip and proceed with testing (see page 13).
85098543_CntrNextLINK_2_4_UG_EN_FpBp_v0.indd 29 11/20/15 12:08 PM
FEAT
UR
ES
28
10:30 AM | 10/13Bolus
Reminder
Notes92
Before Meal
mgdL
REMINDER Start
Change
Go Back2 hrs
COUNTDOWN
REMINDER Start
Change
Go Back2 hrs
COUNTDOWN
SETUPPump OptionsReminder: OffDate
OK
REMINDER
30 mins
REMINDER IN
1 hr
Stop
Change
Go Back
2. To stop the countdown, press Stop.A confirmation screen appears and the countdown stops.
1. Press Reminder. If the countdown is currently on, the screen will read “Reminder In” with the remaining amount of time displayed.
10:30 AM | 10/13 Bolus
Reminder
Notes167mg
dL
After Meal
Turning Off a Test ReminderA reminder can be turned off or changed after testing or from the Setup Menu.NOTE: If you do a blood sugar test within 15 minutes of a set reminder, the reminder turns off automatically.
®
Test
Rem
ind
ers
Test RemindersA reminder for your next test can be set after testing OR from the Setup Menu (see page 43).A reminder can be set in 15-minute increments from 15 minutes to 23 hours, 45 minutes.
1. With the test strip still in the meter, press Reminder.
2. Press Start to begin the countdown. The preset time is 2 hours or, if you have changed it, the last reminder time that you set is now the default.
OR from the Setup Menu press the � button to highlight Reminder: Off. Press OK to turn the Reminder ON.
You can change the Reminder Countdown time by pressing Change.
Setting a Test Reminder
85098543_CntrNextLINK_2_4_UG_EN_FpBp_v0.indd 28 11/20/15 12:08 PM
29
FEAT
UR
ES
REMINDER
15 mins
CHANGE COUNTDOWN
3 hrs
OK
Reminder in:
15 mins3 hrsChange
Done
Changing a Reminder Time1. Press the � or � button to select the correct hours and minutes (in 15-minute
increments).
Chang
ing a R
emind
er Tim
e
2. Press OK after each selection.
A screen confirms the Reminder Countdown time.
When the Reminder feature is on, the clock symbol appears in the headers on the Setup and Main Menu screens.The meter retains the reminder time that you set until you change it or turn it off.
Getting a ReminderWhen the reminder time is reached, 20 beeps will sound. The meter will turn on and a reminder screen will appear. You can stop the beeps in two ways:
NOTE: If you decide to test within 15 minutes before the reminder time, the countdown is stopped with the insertion of the test strip. Proceed with testing.
Time for your nexttest. OK
1. Press OK, insert a test strip and proceed with testing, OR
2. Insert a test strip and proceed with testing (see page 13).
85098543_CntrNextLINK_2_4_UG_EN_FpBp_v0.indd 29 11/20/15 12:08 PM
FEAT
UR
ES
28
10:30 AM | 10/13Bolus
Reminder
Notes92
Before Meal
mgdL
REMINDER Start
Change
Go Back2 hrs
COUNTDOWN
REMINDER Start
Change
Go Back2 hrs
COUNTDOWN
SETUPPump OptionsReminder: OffDate
OK
REMINDER
30 mins
REMINDER IN
1 hr
Stop
Change
Go Back
2. To stop the countdown, press Stop.A confirmation screen appears and the countdown stops.
1. Press Reminder. If the countdown is currently on, the screen will read “Reminder In” with the remaining amount of time displayed.
10:30 AM | 10/13 Bolus
Reminder
Notes167mg
dL
After Meal
Turning Off a Test ReminderA reminder can be turned off or changed after testing or from the Setup Menu.NOTE: If you do a blood sugar test within 15 minutes of a set reminder, the reminder turns off automatically.
®
Test
Rem
ind
ers
Test RemindersA reminder for your next test can be set after testing OR from the Setup Menu (see page 43).A reminder can be set in 15-minute increments from 15 minutes to 23 hours, 45 minutes.
1. With the test strip still in the meter, press Reminder.
2. Press Start to begin the countdown. The preset time is 2 hours or, if you have changed it, the last reminder time that you set is now the default.
OR from the Setup Menu press the � button to highlight Reminder: Off. Press OK to turn the Reminder ON.
You can change the Reminder Countdown time by pressing Change.
Setting a Test Reminder
85098543_CntrNextLINK_2_4_UG_EN_FpBp_v0.indd 28 11/20/15 12:08 PM85098543_CntrNextLINK_2_4_UG_EN_FpBp_v1_placed.pdf:32

31
US
ING
TH
E
MA
IN M
EN
ULOGBOOK
167mgdL
Sent, Before Meal
11/06/0910:30 AM
END OF LOGBOOK
97mgdL
Sent, After Meal
11/05/0910:30 AM
Using the Main MenuThe Main Menu has 4 choices: Bolus, Logbook, Trends and Setup. To select one, press the � or � button to scroll to your desired selection. When your choice is highlighted, press OK.
OKBolusLogbookTrendsSetup
MENU
Bo
lus
BolusThe Bolus function allows you to send a Manual or Preset Bolus from your meter to your pump if your pump and meter are connected.You can send a bolus from the main menu or directly from your blood test result screen. If your pump and meter are not yet connected and you select Bolus, you are asked if you want to connect to a pump. You can only send a bolus to the pump if you have enabled Remote Bolus on the pump.If Block Mode is turned on at your pump, you will be asked if you want to proceed with the bolus. Block Mode is a MiniMed 630G insulin pump setting that restricts access to critical pump settings. Please see your MiniMed insulin pump user guide for more detailed instructions.NOTE: To send a bolus from your meter, you must be connected to the pump AND the Remote Bolus feature must be turned ON at the pump. Remote Bolus is ON by default on the pump.
For the steps on sending a bolus to your pump, see page 25.
Logbook The Logbook contains blood sugar test results and notes that you have made to those test results. The Logbook will hold up to 1000 results. When the maximum is reached, the oldest test result will be removed as a new test is completed and saved to the Logbook. A sound indicates the last entry.
3. You can scroll through all your stored test results using the � button.
When you reach the oldest entry you will see the End of Logbook screen.
1. To review entries in the Logbook, press and hold the top Menu button to turn the meter on.
2. Press the � button to highlight Logbook. Press OK to select.
85098543_CntrNextLINK_2_4_UG_EN_FpBp_v0.indd 31 11/20/15 12:08 PM
FEAT
UR
ES
30
2. Press the � or � button to scroll through the choices. Some may not be visible until you scroll down. Press OK when your choice is highlighted.A screen confirms your choice.
Fasting Before Meal After Meal
Time After Meal Don’t Feel Right Sick
OK
ADD NOTES
®
NotesYou may add notes to your test result that may help explain results. Your notes will be saved in the Logbook. The option to add a note is available only after a test result.1. From the test result screen, press Notes.
NOTE: When you choose After Meal, Time After Meal will be selectable. Select Time After Meal and then you can select times from 15 minutes to 3 hours.After the confirmation screen disappears, you may remove the note or add one or more notes by repeating the steps above. The notes will scroll across the bottom so that you can read them all. While you can add more than one note, only one AutoLog option can be chosen (e.g., Fasting, Before Meal or After Meal).
No
tes
85098543_CntrNextLINK_2_4_UG_EN_FpBp_v0.indd 30 11/20/15 12:08 PM
31
US
ING
TH
E
MA
IN M
EN
ULOGBOOK
167mgdL
Sent, Before Meal
11/06/0910:30 AM
END OF LOGBOOK
97mgdL
Sent, After Meal
11/05/0910:30 AM
Using the Main MenuThe Main Menu has 4 choices: Bolus, Logbook, Trends and Setup. To select one, press the � or � button to scroll to your desired selection. When your choice is highlighted, press OK.
OKBolusLogbookTrendsSetup
MENU
Bo
lus
BolusThe Bolus function allows you to send a Manual or Preset Bolus from your meter to your pump if your pump and meter are connected.You can send a bolus from the main menu or directly from your blood test result screen. If your pump and meter are not yet connected and you select Bolus, you are asked if you want to connect to a pump. You can only send a bolus to the pump if you have enabled Remote Bolus on the pump.If Block Mode is turned on at your pump, you will be asked if you want to proceed with the bolus. Block Mode is a MiniMed 630G insulin pump setting that restricts access to critical pump settings. Please see your MiniMed insulin pump user guide for more detailed instructions.NOTE: To send a bolus from your meter, you must be connected to the pump AND the Remote Bolus feature must be turned ON at the pump. Remote Bolus is ON by default on the pump.
For the steps on sending a bolus to your pump, see page 25.
Logbook The Logbook contains blood sugar test results and notes that you have made to those test results. The Logbook will hold up to 1000 results. When the maximum is reached, the oldest test result will be removed as a new test is completed and saved to the Logbook. A sound indicates the last entry.
3. You can scroll through all your stored test results using the � button.
When you reach the oldest entry you will see the End of Logbook screen.
1. To review entries in the Logbook, press and hold the top Menu button to turn the meter on.
2. Press the � button to highlight Logbook. Press OK to select.
85098543_CntrNextLINK_2_4_UG_EN_FpBp_v0.indd 31 11/20/15 12:08 PM
FEAT
UR
ES
30
2. Press the � or � button to scroll through the choices. Some may not be visible until you scroll down. Press OK when your choice is highlighted.A screen confirms your choice.
Fasting Before Meal After Meal
Time After Meal Don’t Feel Right Sick
OK
ADD NOTES
®
NotesYou may add notes to your test result that may help explain results. Your notes will be saved in the Logbook. The option to add a note is available only after a test result.1. From the test result screen, press Notes.
NOTE: When you choose After Meal, Time After Meal will be selectable. Select Time After Meal and then you can select times from 15 minutes to 3 hours.After the confirmation screen disappears, you may remove the note or add one or more notes by repeating the steps above. The notes will scroll across the bottom so that you can read them all. While you can add more than one note, only one AutoLog option can be chosen (e.g., Fasting, Before Meal or After Meal).
No
tes
85098543_CntrNextLINK_2_4_UG_EN_FpBp_v0.indd 30 11/20/15 12:08 PM85098543_CntrNextLINK_2_4_UG_EN_FpBp_v1_placed.pdf:34

33
US
ING
TH
E
MA
IN M
EN
U6. Press the � button to go to the 14 Day Results screen.
14 DAY RESULTS
AVERAGE
175 Results:115
mgdL
SetupYou can view and change options on your meter and personalize it from the Setup Menu.1. Press and hold the top Menu button to turn the meter on.2. Press the � button to highlight Setup. Press OK to select.
OK
SETUPPump OptionsReminderDateTimeSoundAutoLogTargetTrends RangeHign and Low AlertsLanguageCustomer Service
The current settings in the meter for the Reminder, Date, Time, Sound and AutoLog can be viewed by scrolling through the Setup Menu items. To view the settings of the other items, or to make any changes to any of the items, you can select the item using the � and � keys and pressing OK.
3. Press the � button to highlight Pump Options. Press OK to select.Pump Options
ReminderDate
OK
SETUP
1. Press and hold the top Menu button to turn the meter on.
2. Press the � button to highlight Setup. Press OK to select.
Setup
Pump Options Pump Options allows you to connect or disconnect from a MiniMed insulin pump and change your Send Settings (how your blood sugar readings are sent to your pump).
Connecting the Meter and PumpYou can send blood sugar results and a remote bolus to your pump if your meter and pump are connected. There are two ways to connect your meter to your pump: Manual Connect and Auto Connect. Use Auto Connect to quickly connect to your pump. Use Manual Connect if there are other Medtronic devices nearby. With Manual Connect, you will be prompted to enter the device (meter) serial number so the pump can find your meter. With Auto Connect, there is no need to enter a serial number. The meter and pump search for each other, and you just need to confirm the serial numbers to connect.
Connecting to the Pump Using Auto ConnectNOTE: Place your meter and your pump side by side before you begin the connection process. You need to alternate between both devices to complete the connection.
85098543_CntrNextLINK_2_4_UG_EN_FpBp_v0.indd 33 11/20/15 12:08 PM
US
ING
TH
E
MA
IN M
EN
U
32
3. Press the � button to display the 14 Day Fasting Average. If you have marked any test results as Fasting, you will see your Fasting Average first.
14 DAY FASTINGAVERAGE
12812
8
40
60mgdL
5. Press the � button to go to the 14 Day After Meal Average.
4. Press the � button to go to the 14 Day Before Meal Average.
14 DAY BEFORE MEAL
AVERAGE
1288
26
4
38mgdL
14 DAY AFTER MEALAVERAGE
1759
8
0
17mgdL
TRENDS
TARGET: 70 - 130
Viewing Trends With AutoLog OffYour meter has been preset to 14 day averages. You can change the Trends time range to 7, 30, or 90 days in Setup.1. Press and hold the top Menu button to turn the meter on.2. Press the � button to highlight Trends. Press OK to select.
3. Press the � button to display the 14 Day Results screen.
14 DAY RESULTS
AVERAGE
175mgdL
18
22
5
45
Trends (Averages and Summaries)The Trends feature displays your averages and your results as they compare to your Targets, over a period of time that you select. The options available are 7, 14, 30 and 90 day averages. Your meter has been preset to 14 day averages, but you can change this under Trends Range in the Setup Menu (see page 51).Your 90 day average is not intended to be reflective of your HbA1c result.
Your screen will display the total number of test results included in the average and the number of tests above , within and below Target.
Tren
ds
(Ave
rag
es a
nd S
umm
arie
s)
Viewing Trends With AutoLog On1. Press and hold the top Menu button to turn the meter on.2. Press the � button to highlight Trends. Press OK to select.
This example shows that your Before Meal average is 128 mg/dL and 38 test results are included in the Before Meal average with 26 within the Target range, 8 above the Target range and 4 below the Target range.
85098543_CntrNextLINK_2_4_UG_EN_FpBp_v0.indd 32 11/20/15 12:08 PM
33
US
ING
TH
E
MA
IN M
EN
U6. Press the � button to go to the 14 Day Results screen.
14 DAY RESULTS
AVERAGE
175 Results:115
mgdL
SetupYou can view and change options on your meter and personalize it from the Setup Menu.1. Press and hold the top Menu button to turn the meter on.2. Press the � button to highlight Setup. Press OK to select.
OK
SETUPPump OptionsReminderDateTimeSoundAutoLogTargetTrends RangeHign and Low AlertsLanguageCustomer Service
The current settings in the meter for the Reminder, Date, Time, Sound and AutoLog can be viewed by scrolling through the Setup Menu items. To view the settings of the other items, or to make any changes to any of the items, you can select the item using the � and � keys and pressing OK.
3. Press the � button to highlight Pump Options. Press OK to select.Pump Options
ReminderDate
OK
SETUP
1. Press and hold the top Menu button to turn the meter on.
2. Press the � button to highlight Setup. Press OK to select.
Setup
Pump Options Pump Options allows you to connect or disconnect from a MiniMed insulin pump and change your Send Settings (how your blood sugar readings are sent to your pump).
Connecting the Meter and PumpYou can send blood sugar results and a remote bolus to your pump if your meter and pump are connected. There are two ways to connect your meter to your pump: Manual Connect and Auto Connect. Use Auto Connect to quickly connect to your pump. Use Manual Connect if there are other Medtronic devices nearby. With Manual Connect, you will be prompted to enter the device (meter) serial number so the pump can find your meter. With Auto Connect, there is no need to enter a serial number. The meter and pump search for each other, and you just need to confirm the serial numbers to connect.
Connecting to the Pump Using Auto ConnectNOTE: Place your meter and your pump side by side before you begin the connection process. You need to alternate between both devices to complete the connection.
85098543_CntrNextLINK_2_4_UG_EN_FpBp_v0.indd 33 11/20/15 12:08 PM
US
ING
TH
E
MA
IN M
EN
U
32
3. Press the � button to display the 14 Day Fasting Average. If you have marked any test results as Fasting, you will see your Fasting Average first.
14 DAY FASTINGAVERAGE
12812
8
40
60mgdL
5. Press the � button to go to the 14 Day After Meal Average.
4. Press the � button to go to the 14 Day Before Meal Average.
14 DAY BEFORE MEAL
AVERAGE
1288
26
4
38mgdL
14 DAY AFTER MEALAVERAGE
1759
8
0
17mgdL
TRENDS
TARGET: 70 - 130
Viewing Trends With AutoLog OffYour meter has been preset to 14 day averages. You can change the Trends time range to 7, 30, or 90 days in Setup.1. Press and hold the top Menu button to turn the meter on.2. Press the � button to highlight Trends. Press OK to select.
3. Press the � button to display the 14 Day Results screen.
14 DAY RESULTS
AVERAGE
175mgdL
18
22
5
45
Trends (Averages and Summaries)The Trends feature displays your averages and your results as they compare to your Targets, over a period of time that you select. The options available are 7, 14, 30 and 90 day averages. Your meter has been preset to 14 day averages, but you can change this under Trends Range in the Setup Menu (see page 51).Your 90 day average is not intended to be reflective of your HbA1c result.
Your screen will display the total number of test results included in the average and the number of tests above , within and below Target.
Tren
ds
(Ave
rag
es a
nd S
umm
arie
s)
Viewing Trends With AutoLog On1. Press and hold the top Menu button to turn the meter on.2. Press the � button to highlight Trends. Press OK to select.
This example shows that your Before Meal average is 128 mg/dL and 38 test results are included in the Before Meal average with 26 within the Target range, 8 above the Target range and 4 below the Target range.
85098543_CntrNextLINK_2_4_UG_EN_FpBp_v0.indd 32 11/20/15 12:08 PM85098543_CntrNextLINK_2_4_UG_EN_FpBp_v1_placed.pdf:36

35
US
ING
TH
E
MA
IN M
EN
UConnect DeviceManual ConnectAuto Connect
Cancel Continue
Auto Connect
are in search mode.
Before using AutoConnect, be sure no other nearby Medtronic devices
New DeviceSee User Guide to connect new device. Select Search below when ready.
Search
CONNECT TO PUMP Searching...
Cancel
The search may take up to 2 minutes.Searching...
Start search on new device. Search may take up to 2
minutes.
10. Read the pump screen. Be sure other nearby Medtronic devices are NOT in search mode. Use the down arrow to scroll to the next page. Use arrow buttons to scroll to Continue. Press Select button .
Co
nnecting to
the Pum
p U
sing A
uto C
onnect
9. Place the meter and pump next to each other. Select Auto Connect on your pump.
NOTE: With Auto Connect, the meter automatically searches for a pump. With Manual Connect, you enter your meter serial number into the pump. See page 38 for information about Manual Connect.
Manual Connect
Auto Connect
CONNECT TO PUMP
Select Auto Connect on your meter.
11. Place the meter and pump next to each other. Select Search on your pump.
Search
Cancel
CONNECT TO PUMP
Select “Search” on Your Pump and meter. Select Search on your meter.
85098543_CntrNextLINK_2_4_UG_EN_FpBp_v0.indd 35 11/20/15 12:08 PM
US
ING
TH
E
MA
IN M
EN
U
34
6. Pick up your pump. Press any button to turn the screen on, then press the Menu button . Use the down arrow to scroll to Utilities. Press Select button .
MenuInsulin SettingsSensor SettingsEvent MarkersRemindersUtilities
NOTE: If your pump screen turns off, press any button to turn it back on.
7. In the Utilities menu, use the down arrow to scroll to Device Options. Press Select button .
8. In the Device Options menu, scroll to Connect Device. Press Select button .
5. Press OK. Put the meter down.Select “Connect Device” on your Pump.
CONNECT TO PUMP
OK
Go Back
4. The Connect to Pump screens appear next. Press Yes to connect to a MiniMed insulin pump now.
No MiniMed Pumpconnected. Connect now?
PUMP OPTIONS
Yes
No
®
Co
nnec
ting
to
the
Pum
p U
sing
Aut
o C
onn
ect
UtilitiesSelf TestCarb UnitManage SettingsSensor DemoDevice Options
Device OptionsManage DevicesConnect Device
85098543_CntrNextLINK_2_4_UG_EN_FpBp_v0.indd 34 11/20/15 12:08 PM
35
US
ING
TH
E
MA
IN M
EN
UConnect DeviceManual ConnectAuto Connect
Cancel Continue
Auto Connect
are in search mode.
Before using AutoConnect, be sure no other nearby Medtronic devices
New DeviceSee User Guide to connect new device. Select Search below when ready.
Search
CONNECT TO PUMP Searching...
Cancel
The search may take up to 2 minutes.Searching...
Start search on new device. Search may take up to 2
minutes.
10. Read the pump screen. Be sure other nearby Medtronic devices are NOT in search mode. Use the down arrow to scroll to the next page. Use arrow buttons to scroll to Continue. Press Select button .
Co
nnecting to
the Pum
p U
sing A
uto C
onnect
9. Place the meter and pump next to each other. Select Auto Connect on your pump.
NOTE: With Auto Connect, the meter automatically searches for a pump. With Manual Connect, you enter your meter serial number into the pump. See page 38 for information about Manual Connect.
Manual Connect
Auto Connect
CONNECT TO PUMP
Select Auto Connect on your meter.
11. Place the meter and pump next to each other. Select Search on your pump.
Search
Cancel
CONNECT TO PUMP
Select “Search” on Your Pump and meter. Select Search on your meter.
85098543_CntrNextLINK_2_4_UG_EN_FpBp_v0.indd 35 11/20/15 12:08 PM
US
ING
TH
E
MA
IN M
EN
U
34
6. Pick up your pump. Press any button to turn the screen on, then press the Menu button . Use the down arrow to scroll to Utilities. Press Select button .
MenuInsulin SettingsSensor SettingsEvent MarkersRemindersUtilities
NOTE: If your pump screen turns off, press any button to turn it back on.
7. In the Utilities menu, use the down arrow to scroll to Device Options. Press Select button .
8. In the Device Options menu, scroll to Connect Device. Press Select button .
5. Press OK. Put the meter down.Select “Connect Device” on your Pump.
CONNECT TO PUMP
OK
Go Back
4. The Connect to Pump screens appear next. Press Yes to connect to a MiniMed insulin pump now.
No MiniMed Pumpconnected. Connect now?
PUMP OPTIONS
Yes
No
®
Co
nnec
ting
to
the
Pum
p U
sing
Aut
o C
onn
ect
UtilitiesSelf TestCarb UnitManage SettingsSensor DemoDevice Options
Device OptionsManage DevicesConnect Device
85098543_CntrNextLINK_2_4_UG_EN_FpBp_v0.indd 34 11/20/15 12:08 PM85098543_CntrNextLINK_2_4_UG_EN_FpBp_v1_placed.pdf:38

37
US
ING
TH
E
MA
IN M
EN
U
17. After the meter and pump are connected, you set your Send Options. This controls how your meter sends blood glucose readings to your MiniMed insulin pump. Choose the Send Option that is best for you.
Your options are:
Always Meter will always send results
Ask Me Meter will ask you before sending resultsNever Meter will never send results
Automatically send results to the Pump?
Always
Ask me
Never
SEND OPTIONS
OK
Send Options set. Meter will always send results.
18. The next screen confirms your Send Option choice. Press OK.
In this step, you select how the date and time are displayed on your meter.NOTE: Your pump automatically controls the date and time. If they need to be changed on your pump, see your MiniMed insulin pump user guide. The date format you choose on the meter applies to the meter only.
Month/Day/Year
Day.Month.Year
DATE FORMAT
SELECT19. The Date Format screen appears. Choose your date
format.
20. After making your choice, a confirmation screen appears. Press OK to confirm and return to the Setup Menu.
OK
DATE/TIME
Date / Time is set by Pump.10:30 AM | 10/13/11
Meter S
end O
ptio
ns
mg/dL
Active Insulin 0.0 uBolus Basal
10:30AM
16. Hold the back button on the pump until you see the home screen. Put down the pump and pick up the meter.
Your choice can be changed later using Setup (see page 42).
85098543_CntrNextLINK_2_4_UG_EN_FpBp_v0.indd 37 11/20/15 12:08 PM
US
ING
TH
E
MA
IN M
EN
U
36
Manage DevicesBGJ133333F
PUMP CONNECTED
MiniMed Pumpconnected:AA1234567B
Next
Delete
14. The confirmation screen briefly appears on your pump followed by the Manage Devices screen.
®
Co
nnec
ting
to
the
Pum
p U
sing
Aut
o C
onn
ect
12. Check that the SN (serial number) on the pump screen matches the meter SN on the meter screen. If they match, scroll to Confirm on the pump. Press Select button .
Confirm Device SNBGJ133333F found: SN:BGJ133333F
Cancel Confirm Use Pump to confirm Device SN:BGJ133333F
CONNECT TO PUMP
13. Turn the pump over. Check that the SN on the back of the pump matches the pump serial number now on the meter screen.
When the pump links to the meter, the SN on the meter screen will change to a different serial number. This number is the pump SN.
PUMP CONNECTED
MiniMed Pumpconnected:AA1234567B
Next
Delete
15. Then press Next on your meter.
NOTE: To remove this pump, press Delete. The Connect to Pump process starts over to allow you to connect to a different pump.
85098543_CntrNextLINK_2_4_UG_EN_FpBp_v0.indd 36 11/20/15 12:08 PM
37
US
ING
TH
E
MA
IN M
EN
U
17. After the meter and pump are connected, you set your Send Options. This controls how your meter sends blood glucose readings to your MiniMed insulin pump. Choose the Send Option that is best for you.
Your options are:
Always Meter will always send results
Ask Me Meter will ask you before sending resultsNever Meter will never send results
Automatically send results to the Pump?
Always
Ask me
Never
SEND OPTIONS
OK
Send Options set. Meter will always send results.
18. The next screen confirms your Send Option choice. Press OK.
In this step, you select how the date and time are displayed on your meter.NOTE: Your pump automatically controls the date and time. If they need to be changed on your pump, see your MiniMed insulin pump user guide. The date format you choose on the meter applies to the meter only.
Month/Day/Year
Day.Month.Year
DATE FORMAT
SELECT19. The Date Format screen appears. Choose your date
format.
20. After making your choice, a confirmation screen appears. Press OK to confirm and return to the Setup Menu.
OK
DATE/TIME
Date / Time is set by Pump.10:30 AM | 10/13/11
Meter S
end O
ptio
ns
mg/dL
Active Insulin 0.0 uBolus Basal
10:30AM
16. Hold the back button on the pump until you see the home screen. Put down the pump and pick up the meter.
Your choice can be changed later using Setup (see page 42).
85098543_CntrNextLINK_2_4_UG_EN_FpBp_v0.indd 37 11/20/15 12:08 PM
US
ING
TH
E
MA
IN M
EN
U
36
Manage DevicesBGJ133333F
PUMP CONNECTED
MiniMed Pumpconnected:AA1234567B
Next
Delete
14. The confirmation screen briefly appears on your pump followed by the Manage Devices screen.
®
Co
nnec
ting
to
the
Pum
p U
sing
Aut
o C
onn
ect
12. Check that the SN (serial number) on the pump screen matches the meter SN on the meter screen. If they match, scroll to Confirm on the pump. Press Select button .
Confirm Device SNBGJ133333F found: SN:BGJ133333F
Cancel Confirm Use Pump to confirm Device SN:BGJ133333F
CONNECT TO PUMP
13. Turn the pump over. Check that the SN on the back of the pump matches the pump serial number now on the meter screen.
When the pump links to the meter, the SN on the meter screen will change to a different serial number. This number is the pump SN.
PUMP CONNECTED
MiniMed Pumpconnected:AA1234567B
Next
Delete
15. Then press Next on your meter.
NOTE: To remove this pump, press Delete. The Connect to Pump process starts over to allow you to connect to a different pump.
85098543_CntrNextLINK_2_4_UG_EN_FpBp_v0.indd 36 11/20/15 12:08 PM85098543_CntrNextLINK_2_4_UG_EN_FpBp_v1_placed.pdf:40

39
US
ING
TH
E
MA
IN M
EN
U8. In the Device Options menu, scroll to Connect Device. Press
Select button .
Manual Connect
Auto Connect
CONNECT TO PUMP
9. Place the meter and pump next to each other. Select Manual Connect on your pump. Select Manual Connect on your meter.
10. Pick up the pump. Enter the meter serial number (SN) shown on the meter into the pump screen. Use the up and down buttons to select the characters, then press the right button to move to the next character. Keep pressing up to get to the alphabet. Press down to go in reverse (starting with “Z”). Press the Select button after entering the last SN character. Select OK on your pump.
Use Pump to enter this Device SN: BG1234567B.
OK
Go Back
CONNECT TO PUMP
Enter Device SN
Press OK on the meter after entering the complete meter SN into the pump.
Co
nnecting to
the Pum
p U
sing M
anual Co
nnect
Device OptionsManage DevicesConnect Device
Connect DeviceManual ConnectAuto Connect
85098543_CntrNextLINK_2_4_UG_EN_FpBp_v0.indd 39 11/20/15 12:08 PM
US
ING
TH
E
MA
IN M
EN
U
38
Connecting to the Pump Using Manual ConnectNOTE: Place your meter and your pump side by side before you begin. You need to alternate between both devices to complete the connection.
See page 33 for the Auto Connect steps.1. Press and hold the top Menu button to turn the meter on.
2. Press the � button to highlight Setup. Press OK to select.
3. Press the � button to highlight Pump Options. Press OK to select.Pump Options
ReminderDate
OK
SETUP
4. The Pump Options screen appears and asks if you would like to Connect now. Press Yes.
No MiniMed Pumpconnected. Connect now?
PUMP OPTIONS
Yes
No
5. Press OK. Put the meter down.Select "Connect Device" on your Pump. OK
Go Back
CONNECT TO PUMP
6. Pick up your pump.Press any button to turn screen on, then press the Menu button
. Use the down arrow to scroll to Utilities. Press Select button .
7. In the Utilities menu, use the down arrow to scroll to Device Options. Press Select button .
NOTE: If your pump screen turns off, press any button to turn it back on.
®
Co
nnec
ting
to
the
Pum
p U
sing
Man
ual C
onn
ect
NOTE: If your pump
MenuInsulin SettingsSensor SettingsEvent MarkersRemindersUtilities
UtilitiesSelf TestCarb UnitManage SettingsSensor DemoDevice Options
85098543_CntrNextLINK_2_4_UG_EN_FpBp_v0.indd 38 11/20/15 12:08 PM
39
US
ING
TH
E
MA
IN M
EN
U8. In the Device Options menu, scroll to Connect Device. Press
Select button .
Manual Connect
Auto Connect
CONNECT TO PUMP
9. Place the meter and pump next to each other. Select Manual Connect on your pump. Select Manual Connect on your meter.
10. Pick up the pump. Enter the meter serial number (SN) shown on the meter into the pump screen. Use the up and down buttons to select the characters, then press the right button to move to the next character. Keep pressing up to get to the alphabet. Press down to go in reverse (starting with “Z”). Press the Select button after entering the last SN character. Select OK on your pump.
Use Pump to enter this Device SN: BG1234567B.
OK
Go Back
CONNECT TO PUMP
Enter Device SN
Press OK on the meter after entering the complete meter SN into the pump.
Co
nnecting to
the Pum
p U
sing M
anual Co
nnect
Device OptionsManage DevicesConnect Device
Connect DeviceManual ConnectAuto Connect
85098543_CntrNextLINK_2_4_UG_EN_FpBp_v0.indd 39 11/20/15 12:08 PM
US
ING
TH
E
MA
IN M
EN
U
38
Connecting to the Pump Using Manual ConnectNOTE: Place your meter and your pump side by side before you begin. You need to alternate between both devices to complete the connection.
See page 33 for the Auto Connect steps.1. Press and hold the top Menu button to turn the meter on.
2. Press the � button to highlight Setup. Press OK to select.
3. Press the � button to highlight Pump Options. Press OK to select.Pump Options
ReminderDate
OK
SETUP
4. The Pump Options screen appears and asks if you would like to Connect now. Press Yes.
No MiniMed Pumpconnected. Connect now?
PUMP OPTIONS
Yes
No
5. Press OK. Put the meter down.Select "Connect Device" on your Pump. OK
Go Back
CONNECT TO PUMP
6. Pick up your pump.Press any button to turn screen on, then press the Menu button
. Use the down arrow to scroll to Utilities. Press Select button .
7. In the Utilities menu, use the down arrow to scroll to Device Options. Press Select button .
NOTE: If your pump screen turns off, press any button to turn it back on.
®
Co
nnec
ting
to
the
Pum
p U
sing
Man
ual C
onn
ect
NOTE: If your pump
MenuInsulin SettingsSensor SettingsEvent MarkersRemindersUtilities
UtilitiesSelf TestCarb UnitManage SettingsSensor DemoDevice Options
85098543_CntrNextLINK_2_4_UG_EN_FpBp_v0.indd 38 11/20/15 12:08 PM85098543_CntrNextLINK_2_4_UG_EN_FpBp_v1_placed.pdf:42
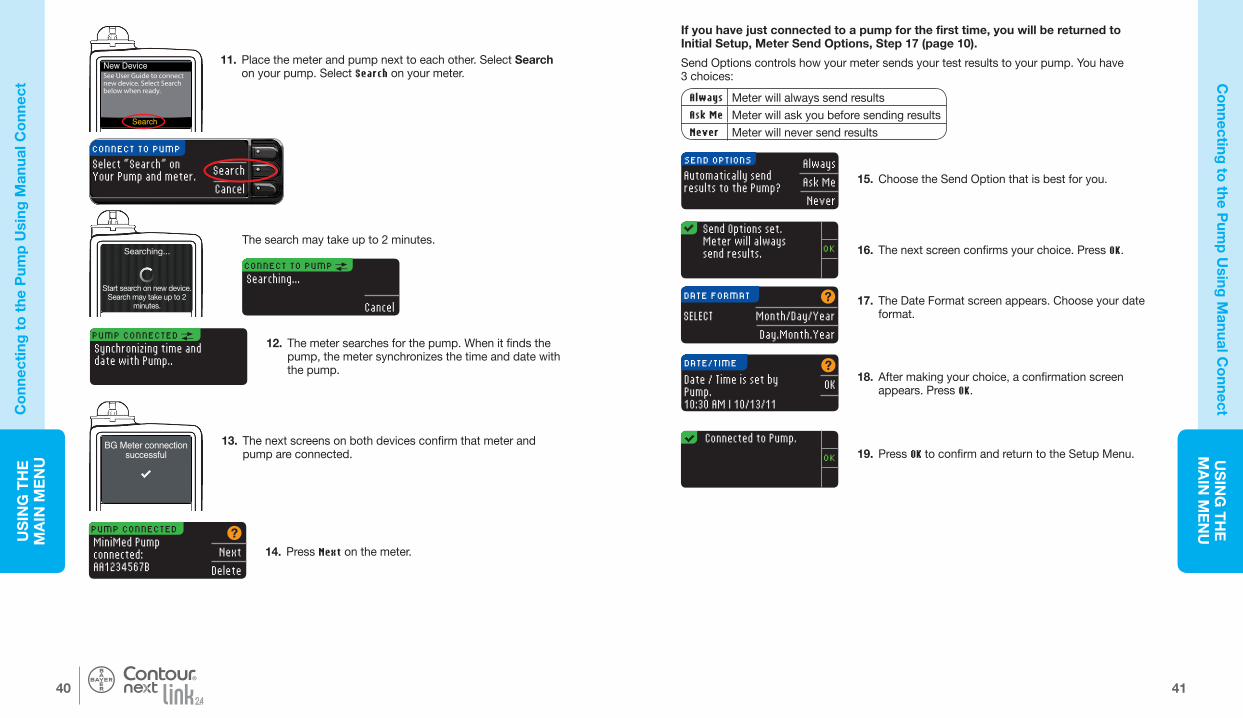
41
US
ING
TH
E
MA
IN M
EN
U
Automatically sendresults to the Pump?
Always
Ask Me
Never
SEND OPTIONS
Send Options set. Meter will always send results. OK
17. The Date Format screen appears. Choose your date format.
OK
DATE/TIME
Date / Time is set by Pump.10:30 AM | 10/13/11
Month/Day/Year
Day.Month.Year
DATE FORMAT
SELECT
18. After making your choice, a confirmation screen appears. Press OK.
19. Press OK to confirm and return to the Setup Menu. Connected to Pump.
OK
Co
nnecting to
the Pum
p U
sing M
anual Co
nnectIf you have just connected to a pump for the first time, you will be returned to Initial Setup, Meter Send Options, Step 17 (page 10).
Send Options controls how your meter sends your test results to your pump. You have 3 choices:
Always Meter will always send resultsAsk Me Meter will ask you before sending resultsNever Meter will never send results
16. The next screen confirms your choice. Press OK.
15. Choose the Send Option that is best for you.
85098543_CntrNextLINK_2_4_UG_EN_FpBp_v0.indd 41 11/20/15 12:08 PM
US
ING
TH
E
MA
IN M
EN
U
40
PUMP CONNECTED Synchronizing time anddate with Pump..
BG Meter connection successful
PUMP CONNECTEDMiniMed Pumpconnected:AA1234567B
Next
Delete
Search
New DeviceSee User Guide to connect new device. Select Search below when ready.
CONNECT TO PUMP Searching...
Cancel
Searching...
Start search on new device. Search may take up to 2
minutes.
®
Co
nnec
ting
to
the
Pum
p U
sing
Man
ual C
onn
ect
13. The next screens on both devices confirm that meter and pump are connected.
12. The meter searches for the pump. When it finds the pump, the meter synchronizes the time and date with the pump.
14. Press Next on the meter.
11. Place the meter and pump next to each other. Select Search on your pump. Select Search on your meter.
Search
Cancel
CONNECT TO PUMP
Select “Search” on Your Pump and meter.
The search may take up to 2 minutes.
85098543_CntrNextLINK_2_4_UG_EN_FpBp_v0.indd 40 11/20/15 12:08 PM
41
US
ING
TH
E
MA
IN M
EN
U
Automatically sendresults to the Pump?
Always
Ask Me
Never
SEND OPTIONS
Send Options set. Meter will always send results. OK
17. The Date Format screen appears. Choose your date format.
OK
DATE/TIME
Date / Time is set by Pump.10:30 AM | 10/13/11
Month/Day/Year
Day.Month.Year
DATE FORMAT
SELECT
18. After making your choice, a confirmation screen appears. Press OK.
19. Press OK to confirm and return to the Setup Menu. Connected to Pump.
OK
Co
nnecting to
the Pum
p U
sing M
anual Co
nnectIf you have just connected to a pump for the first time, you will be returned to Initial Setup, Meter Send Options, Step 17 (page 10).
Send Options controls how your meter sends your test results to your pump. You have 3 choices:
Always Meter will always send resultsAsk Me Meter will ask you before sending resultsNever Meter will never send results
16. The next screen confirms your choice. Press OK.
15. Choose the Send Option that is best for you.
85098543_CntrNextLINK_2_4_UG_EN_FpBp_v0.indd 41 11/20/15 12:08 PM
US
ING
TH
E
MA
IN M
EN
U
40
PUMP CONNECTED Synchronizing time anddate with Pump..
BG Meter connection successful
PUMP CONNECTEDMiniMed Pumpconnected:AA1234567B
Next
Delete
Search
New DeviceSee User Guide to connect new device. Select Search below when ready.
CONNECT TO PUMP Searching...
Cancel
Searching...
Start search on new device. Search may take up to 2
minutes.
®
Co
nnec
ting
to
the
Pum
p U
sing
Man
ual C
onn
ect
13. The next screens on both devices confirm that meter and pump are connected.
12. The meter searches for the pump. When it finds the pump, the meter synchronizes the time and date with the pump.
14. Press Next on the meter.
11. Place the meter and pump next to each other. Select Search on your pump. Select Search on your meter.
Search
Cancel
CONNECT TO PUMP
Select “Search” on Your Pump and meter.
The search may take up to 2 minutes.
85098543_CntrNextLINK_2_4_UG_EN_FpBp_v0.indd 40 11/20/15 12:08 PM85098543_CntrNextLINK_2_4_UG_EN_FpBp_v1_placed.pdf:44

43
US
ING
TH
E
MA
IN M
EN
U
Send Options
Connection
Go Back
PUMP OPTIONS
CONNECTION
Connected to: AA1234567B MiniMed Pump
Delete
Go Back
CONNECTION
Delete Pump? AA1234567B MiniMed Pump
Yes
No
Pump OptionsReminderDate
OK
SETUP
Pump Deleted. Pump and meter are no longer connected. OK
4. Press Connection.
SETUP
OKPump OptionsReminder: OffDate
3. Press the � button to highlight Reminder: Off. Press OK to turn ON the reminder.
Test Rem
inders
Viewing or Disconnecting Your Pump ConnectionYour meter must be connected to your MiniMed insulin pump to view pump connection or disconnect from pump.1. Press and hold the top Menu button to turn the meter on.2. Press the � button to highlight Setup. Press OK to select.
5. To disconnect from the pump shown, press Delete.
6. Press Yes to confirm you want to delete the pump.
7. A confirmation screen appears. Press OK to return to Setup.
3. Press the � button to highlight Pump Options. Press OK to select.
Test RemindersA reminder for your next test can be set after testing or from the Setup Menu. See page 28 for Setting a Test Reminder after Testing.
Setting a Reminder1. Press and hold the top Menu button to turn the meter on. 2. Press the � button to highlight Setup. Press OK to select.
85098543_CntrNextLINK_2_4_UG_EN_FpBp_v0.indd 43 11/20/15 12:08 PM
US
ING
TH
E
MA
IN M
EN
U
42
Send Options set. Meter will ask you before sending results. OK
Always
Ask Me
Never
SEND OPTIONS
Automatically sendresults to the Pump?
SEND OPTIONS
Send is set toAlways.
Change
Go Back
Send Options
Connection
Go Back
PUMP OPTIONS
4. Press Send Options.
NOTE: For Connection settings, see page 33.
Pump OptionsReminderDate
OK
SETUP
Changing the Send Option
NOTE: The meter must be connected to your MiniMed insulin pump to set or change Send Options.
Send Options controls how your meter sends your test results to your pump. You have 3 choices:
Always Meter will always send resultsAsk Me Meter will ask you before sending resultsNever Meter will never send results
NOTE: You may want to test with the Send Option set to Never if you do not want to create a wireless signal (for example, if you have been asked to turn off all electronic devices on an aircraft).
1. Press and hold the top Menu button to turn the meter on.2. Press the � button to highlight Setup. Press OK to select.
®
Cha
ngin
g t
he S
end
Op
tio
n
5. To change the current Send Option, press Change.
6. Choose the Send Option that is best for you.
7. A confirmation screen appears. Press OK to return to Pump Options.
3. Press the � button to highlight Pump Options. Press OK to select.
85098543_CntrNextLINK_2_4_UG_EN_FpBp_v0.indd 42 11/20/15 12:08 PM
43
US
ING
TH
E
MA
IN M
EN
U
Send Options
Connection
Go Back
PUMP OPTIONS
CONNECTION
Connected to: AA1234567B MiniMed Pump
Delete
Go Back
CONNECTION
Delete Pump? AA1234567B MiniMed Pump
Yes
No
Pump OptionsReminderDate
OK
SETUP
Pump Deleted. Pump and meter are no longer connected. OK
4. Press Connection.
SETUP
OKPump OptionsReminder: OffDate
3. Press the � button to highlight Reminder: Off. Press OK to turn ON the reminder.
Test Rem
inders
Viewing or Disconnecting Your Pump ConnectionYour meter must be connected to your MiniMed insulin pump to view pump connection or disconnect from pump.1. Press and hold the top Menu button to turn the meter on.2. Press the � button to highlight Setup. Press OK to select.
5. To disconnect from the pump shown, press Delete.
6. Press Yes to confirm you want to delete the pump.
7. A confirmation screen appears. Press OK to return to Setup.
3. Press the � button to highlight Pump Options. Press OK to select.
Test RemindersA reminder for your next test can be set after testing or from the Setup Menu. See page 28 for Setting a Test Reminder after Testing.
Setting a Reminder1. Press and hold the top Menu button to turn the meter on. 2. Press the � button to highlight Setup. Press OK to select.
85098543_CntrNextLINK_2_4_UG_EN_FpBp_v0.indd 43 11/20/15 12:08 PM
US
ING
TH
E
MA
IN M
EN
U
42
Send Options set. Meter will ask you before sending results. OK
Always
Ask Me
Never
SEND OPTIONS
Automatically sendresults to the Pump?
SEND OPTIONS
Send is set toAlways.
Change
Go Back
Send Options
Connection
Go Back
PUMP OPTIONS
4. Press Send Options.
NOTE: For Connection settings, see page 33.
Pump OptionsReminderDate
OK
SETUP
Changing the Send Option
NOTE: The meter must be connected to your MiniMed insulin pump to set or change Send Options.
Send Options controls how your meter sends your test results to your pump. You have 3 choices:
Always Meter will always send resultsAsk Me Meter will ask you before sending resultsNever Meter will never send results
NOTE: You may want to test with the Send Option set to Never if you do not want to create a wireless signal (for example, if you have been asked to turn off all electronic devices on an aircraft).
1. Press and hold the top Menu button to turn the meter on.2. Press the � button to highlight Setup. Press OK to select.
®
Cha
ngin
g t
he S
end
Op
tio
n
5. To change the current Send Option, press Change.
6. Choose the Send Option that is best for you.
7. A confirmation screen appears. Press OK to return to Pump Options.
3. Press the � button to highlight Pump Options. Press OK to select.
85098543_CntrNextLINK_2_4_UG_EN_FpBp_v0.indd 42 11/20/15 12:08 PM85098543_CntrNextLINK_2_4_UG_EN_FpBp_v1_placed.pdf:46

45
US
ING
TH
E
MA
IN M
EN
U
SETUP
OKReminderDate: 10/13/10Time
DATESELECT
Month/Day/Year
Day.Month.Year
DATE
10 / 13 / 11CHANGE YEAR OK
Date is set.
Done
Change10 / 13 / 11
DATE
10 / 13 / 10mm/dd/yy
Change
Go Back
Date and
Tim
e Date and Time Setting the Date (When Not Connected to a Pump)You can set the date and time on your meter only when the meter is NOT connected to a pump. If the meter is connected to a pump, date and time are set on the pump (see Setting the Date and Time When Connected to a Pump, page 46).1. Press and hold the top Menu button to turn the meter on.2. Press the � button to highlight Setup. Press OK to select.
5. Select either format, Month/Day/Year or Day.Month.Year.
3. Press the � button to highlight Date. Press OK to select.
6. Press the � or � button to select the correct year, month and day. Press OK after each selection.
7. A screen confirms the date you entered. Press Done if the date is correct.
Setting the Time (When Not Connected to a Pump)You can set the date and time on your meter only when the meter is NOT connected to a pump. If the meter is connected to a pump, date and time are set on the pump (see Setting the Date and Time When Connected to a Pump, page 46).1. Press and hold the top Menu button to turn the meter on.2. Press the � button to highlight Setup. Press OK to select.
4. To change the date, press Change.
85098543_CntrNextLINK_2_4_UG_EN_FpBp_v0.indd 45 11/20/15 12:08 PM
US
ING
TH
E
MA
IN M
EN
U
44
Reminder in:
15 mins3 hrsChange
Done
6. A confirmation screen appears and you can select Change or Done.
If you accept the reminder, a reminder icon will appear in the Setup and Main Menu headers.NOTE: If you decide to test within 15 minutes before the reminder time, the countdown stops when you insert a test strip.
3. Press the � button to highlight Reminder: On. Press OK to turn the Reminder OFF.
SETUP
OKPump OptionsReminder: OnDate
4. Select Stop. A confirmation screen appears and the countdown stops.
Pump OptionsReminder: OffDate
OK
SETUP
5. Reminder is now off.
REMINDERREMINDER IN
2 hrs 30 mins
Stop
Change
Go Back
4. To accept the preset time shown, select Start. To change the time, select Change, and you can change the reminder time in 15-minute increments from 15 minutes to 23 hours, 45 minutes.
REMINDERCHANGE COUNTDOWN
2 hrs 30 mins
OK
REMINDERCOUNTDOWN
2 hrs 30 mins
Start
Change
Go Back
5. After you have selected hours, press OK. After you have selected minutes, press OK.
®
Turn
ing
Off
a R
emin
der
Turning Off a ReminderTo turn off a reminder, you can use the Setup Menu, or do a blood sugar test within 15 minutes of the reminder time. To use the Setup Menu:1. Press and hold the top Menu button to turn the meter on. 2. Press the � button to highlight Setup. Press OK to select.
85098543_CntrNextLINK_2_4_UG_EN_FpBp_v0.indd 44 11/20/15 12:08 PM
45
US
ING
TH
E
MA
IN M
EN
U
SETUP
OKReminderDate: 10/13/10Time
DATESELECT
Month/Day/Year
Day.Month.Year
DATE
10 / 13 / 11CHANGE YEAR OK
Date is set.
Done
Change10 / 13 / 11
DATE
10 / 13 / 10mm/dd/yy
Change
Go Back
Date and
Tim
e Date and Time Setting the Date (When Not Connected to a Pump)You can set the date and time on your meter only when the meter is NOT connected to a pump. If the meter is connected to a pump, date and time are set on the pump (see Setting the Date and Time When Connected to a Pump, page 46).1. Press and hold the top Menu button to turn the meter on.2. Press the � button to highlight Setup. Press OK to select.
5. Select either format, Month/Day/Year or Day.Month.Year.
3. Press the � button to highlight Date. Press OK to select.
6. Press the � or � button to select the correct year, month and day. Press OK after each selection.
7. A screen confirms the date you entered. Press Done if the date is correct.
Setting the Time (When Not Connected to a Pump)You can set the date and time on your meter only when the meter is NOT connected to a pump. If the meter is connected to a pump, date and time are set on the pump (see Setting the Date and Time When Connected to a Pump, page 46).1. Press and hold the top Menu button to turn the meter on.2. Press the � button to highlight Setup. Press OK to select.
4. To change the date, press Change.
85098543_CntrNextLINK_2_4_UG_EN_FpBp_v0.indd 45 11/20/15 12:08 PM
US
ING
TH
E
MA
IN M
EN
U
44
Reminder in:
15 mins3 hrsChange
Done
6. A confirmation screen appears and you can select Change or Done.
If you accept the reminder, a reminder icon will appear in the Setup and Main Menu headers.NOTE: If you decide to test within 15 minutes before the reminder time, the countdown stops when you insert a test strip.
3. Press the � button to highlight Reminder: On. Press OK to turn the Reminder OFF.
SETUP
OKPump OptionsReminder: OnDate
4. Select Stop. A confirmation screen appears and the countdown stops.
Pump OptionsReminder: OffDate
OK
SETUP
5. Reminder is now off.
REMINDERREMINDER IN
2 hrs 30 mins
Stop
Change
Go Back
4. To accept the preset time shown, select Start. To change the time, select Change, and you can change the reminder time in 15-minute increments from 15 minutes to 23 hours, 45 minutes.
REMINDERCHANGE COUNTDOWN
2 hrs 30 mins
OK
REMINDERCOUNTDOWN
2 hrs 30 mins
Start
Change
Go Back
5. After you have selected hours, press OK. After you have selected minutes, press OK.
®
Turn
ing
Off
a R
emin
der
Turning Off a ReminderTo turn off a reminder, you can use the Setup Menu, or do a blood sugar test within 15 minutes of the reminder time. To use the Setup Menu:1. Press and hold the top Menu button to turn the meter on. 2. Press the � button to highlight Setup. Press OK to select.
85098543_CntrNextLINK_2_4_UG_EN_FpBp_v0.indd 44 11/20/15 12:08 PM85098543_CntrNextLINK_2_4_UG_EN_FpBp_v1_placed.pdf:48

47
US
ING
TH
E
MA
IN M
EN
U
SETUP
OKTimeSound: OnAutoLog
Sound is Off.
Sound is On. Accept
Turn Off
SOUND
SoundAutoLog: OffTarget
OK
SETUP
So
und Sound Turning the Sound On/OffSound is ON when you receive your meter. Some error messages and the Reminder bell will override the Sound Off setting.1. Press and hold the top Menu button to turn the meter on.2. Press the � button to highlight Setup. Press OK to select.
3. Press the � button to select Sound. Press OK.
4. To turn the sound OFF, press Turn Off. To keep the sound turned ON, press Accept.
A screen confirms your choice.
AutoLogNOTE: Your meter comes with AutoLog turned OFF. The AutoLog feature lets you mark your test result as
Fasting Before Meal After Meal No Mark
To Turn On AutoLog1. Press and hold the top Menu button to turn the meter on.2. Press the � button to highlight Setup. Press OK to select.
3. Press the � button to highlight AutoLog. Press OK to select.
85098543_CntrNextLINK_2_4_UG_EN_FpBp_v0.indd 47 11/20/15 12:08 PM
US
ING
TH
E
MA
IN M
EN
U
46
SETUP
OKDateTime: 11:30Sound
3. Press the � button to highlight Time. Press OK to select.
4. To change the time, press Change.
TIME
11:3024 HOUR CLOCK
Change
Go Back
5. Select either the 12 Hour Clock or 24 Hour Clock option.
TIMESELECT
12 Hour Clock
24 Hour Clock
6. Press the � or � button to select the correct hour and minute. Press OK after each selection.
7. If you have selected the 12 hour clock format, press the � or � button to select AM or PM.
OK
Sync
DATE/TIME
Date / Time is set by Pump.10:30 AM | 10/13/11
TIMECHANGE HOURS
OK
10:30 AM
Time is set.
Done
Change10:30 AM8. Time is set. A screen confirms your choice. Press Done.
NOTE: The date format change only applies to the meter (not the pump).
®
Set
ting
the
Tim
e (W
hen
No
t C
onn
ecte
d t
o a
Pum
p)
If this is the first time you are setting the date and time, return to Initial Setup, AutoLog, Step 21 (page 10).
When connected to a pump, you can only change the format of the date as it appears on the meter.Press Sync to synchronize the meter with the date and time that is set on the Pump.
Setting Date and Time (When Connected to a Pump)When connected to a pump, you can change the date and time at the pump. The date and time are synchronized to the pump when the meter is first connected to the pump, when a blood sugar result is sent to the pump, or if you select the Date or Time option in the Setup Menu.
85098543_CntrNextLINK_2_4_UG_EN_FpBp_v0.indd 46 11/20/15 12:08 PM
47
US
ING
TH
E
MA
IN M
EN
U
SETUP
OKTimeSound: OnAutoLog
Sound is Off.
Sound is On. Accept
Turn Off
SOUND
SoundAutoLog: OffTarget
OK
SETUP
So
und Sound Turning the Sound On/OffSound is ON when you receive your meter. Some error messages and the Reminder bell will override the Sound Off setting.1. Press and hold the top Menu button to turn the meter on.2. Press the � button to highlight Setup. Press OK to select.
3. Press the � button to select Sound. Press OK.
4. To turn the sound OFF, press Turn Off. To keep the sound turned ON, press Accept.
A screen confirms your choice.
AutoLogNOTE: Your meter comes with AutoLog turned OFF. The AutoLog feature lets you mark your test result as
Fasting Before Meal After Meal No Mark
To Turn On AutoLog1. Press and hold the top Menu button to turn the meter on.2. Press the � button to highlight Setup. Press OK to select.
3. Press the � button to highlight AutoLog. Press OK to select.
85098543_CntrNextLINK_2_4_UG_EN_FpBp_v0.indd 47 11/20/15 12:08 PM
US
ING
TH
E
MA
IN M
EN
U
46
SETUP
OKDateTime: 11:30Sound
3. Press the � button to highlight Time. Press OK to select.
4. To change the time, press Change.
TIME
11:3024 HOUR CLOCK
Change
Go Back
5. Select either the 12 Hour Clock or 24 Hour Clock option.
TIMESELECT
12 Hour Clock
24 Hour Clock
6. Press the � or � button to select the correct hour and minute. Press OK after each selection.
7. If you have selected the 12 hour clock format, press the � or � button to select AM or PM.
OK
Sync
DATE/TIME
Date / Time is set by Pump.10:30 AM | 10/13/11
TIMECHANGE HOURS
OK
10:30 AM
Time is set.
Done
Change10:30 AM8. Time is set. A screen confirms your choice. Press Done.
NOTE: The date format change only applies to the meter (not the pump).
®
Set
ting
the
Tim
e (W
hen
No
t C
onn
ecte
d t
o a
Pum
p)
If this is the first time you are setting the date and time, return to Initial Setup, AutoLog, Step 21 (page 10).
When connected to a pump, you can only change the format of the date as it appears on the meter.Press Sync to synchronize the meter with the date and time that is set on the Pump.
Setting Date and Time (When Connected to a Pump)When connected to a pump, you can change the date and time at the pump. The date and time are synchronized to the pump when the meter is first connected to the pump, when a blood sugar result is sent to the pump, or if you select the Date or Time option in the Setup Menu.
85098543_CntrNextLINK_2_4_UG_EN_FpBp_v0.indd 46 11/20/15 12:08 PM85098543_CntrNextLINK_2_4_UG_EN_FpBp_v1_placed.pdf:50

49
US
ING
TH
E
MA
IN M
EN
U
AutoLogTargetTrends Range
OK
SETUP
TARGET
Accept
Change70 - 180
5. Use the � or � button to change each value of the Target. Press OK after each selection.
A screen confirms your choice.
TARGET
75 - 180OK
Target is set.
Done
Change75 - 180
Blo
od
Sug
ar Targets
Blood Sugar TargetsTargets are your personal ranges for your blood sugar results. With AutoLog OFF, you have a single Target range. With AutoLog ON, you have Target ranges for Fasting, Before Meal, and After Meal.
WARNINGTalk to your health care professional before setting any Target ranges on your meter.
1. Press and hold the top Menu button to turn the meter on.2. Press the � button to highlight Setup. Press OK to select.
Changing Targets With AutoLog OffWhen AutoLog is OFF, you have only one Target range. It comes preset to 70 – 180 mg/dL.
3. Press the � button to highlight Target. Press OK to select.
4. To make changes to your Target range, press Change.
85098543_CntrNextLINK_2_4_UG_EN_FpBp_v0.indd 49 11/20/15 12:08 PM
US
ING
TH
E
MA
IN M
EN
U
48
1. Press and hold the top Menu button to turn the meter on.2. Press the � button to highlight Setup. Press OK to select.
4. To turn AutoLog OFF, press Turn Off.
SoundAutoLog: OnTarget
OK
SETUP
AUTOLOG
AutoLog is On. Accept
Turn Off
3. Press the � button to highlight AutoLog. Press OK to select.
NOTE: When you change your AutoLog setting to OFF, you are asked to confirm your Target setting.
A screen confirms your choice.
AutoLog is Off.
AUTOLOG
AutoLog is Off. Accept
Turn On
AutoLog is On.
®
To T
urn
Off
Aut
oLo
g
To Turn Off AutoLogNOTE: Your meter comes with AutoLog OFF.
4. Press Turn On to activate AutoLog.
A screen confirms your choice.
NOTE:• When you change your AutoLog setting to ON, you are asked to confirm your Target
settings for Fasting, Before Meal and After Meal.• Your test result does not display until you make an AutoLog selection.• If your result is above or below your High or Low Alert settings, you will see your
result without pushing a button.
85098543_CntrNextLINK_2_4_UG_EN_FpBp_v0.indd 48 11/20/15 12:08 PM
49
US
ING
TH
E
MA
IN M
EN
U
AutoLogTargetTrends Range
OK
SETUP
TARGET
Accept
Change70 - 180
5. Use the � or � button to change each value of the Target. Press OK after each selection.
A screen confirms your choice.
TARGET
75 - 180OK
Target is set.
Done
Change75 - 180
Blo
od
Sug
ar Targets
Blood Sugar TargetsTargets are your personal ranges for your blood sugar results. With AutoLog OFF, you have a single Target range. With AutoLog ON, you have Target ranges for Fasting, Before Meal, and After Meal.
WARNINGTalk to your health care professional before setting any Target ranges on your meter.
1. Press and hold the top Menu button to turn the meter on.2. Press the � button to highlight Setup. Press OK to select.
Changing Targets With AutoLog OffWhen AutoLog is OFF, you have only one Target range. It comes preset to 70 – 180 mg/dL.
3. Press the � button to highlight Target. Press OK to select.
4. To make changes to your Target range, press Change.
85098543_CntrNextLINK_2_4_UG_EN_FpBp_v0.indd 49 11/20/15 12:08 PM
US
ING
TH
E
MA
IN M
EN
U
48
1. Press and hold the top Menu button to turn the meter on.2. Press the � button to highlight Setup. Press OK to select.
4. To turn AutoLog OFF, press Turn Off.
SoundAutoLog: OnTarget
OK
SETUP
AUTOLOG
AutoLog is On. Accept
Turn Off
3. Press the � button to highlight AutoLog. Press OK to select.
NOTE: When you change your AutoLog setting to OFF, you are asked to confirm your Target setting.
A screen confirms your choice.
AutoLog is Off.
AUTOLOG
AutoLog is Off. Accept
Turn On
AutoLog is On.
®
To T
urn
Off
Aut
oLo
g
To Turn Off AutoLogNOTE: Your meter comes with AutoLog OFF.
4. Press Turn On to activate AutoLog.
A screen confirms your choice.
NOTE:• When you change your AutoLog setting to ON, you are asked to confirm your Target
settings for Fasting, Before Meal and After Meal.• Your test result does not display until you make an AutoLog selection.• If your result is above or below your High or Low Alert settings, you will see your
result without pushing a button.
85098543_CntrNextLINK_2_4_UG_EN_FpBp_v0.indd 48 11/20/15 12:08 PM85098543_CntrNextLINK_2_4_UG_EN_FpBp_v1_placed.pdf:52

51
US
ING
TH
E
MA
IN M
EN
U Trends RangeThe Trends feature displays your averages and your results as they compare to your Targets, over a period of time that you select. The options available are 7, 14, 30 and 90 day averages. Your meter has been preset to 14 day averages, but you can change this in Setup.
1. Press and hold the top Menu button to turn the meter on.2. Press the � button to highlight Setup. Press OK to select.
5. Your current setting is displayed. You can Accept or Change your current setting.
TargetTrends RangeHigh and Low Alerts
OK
SETUP
TRENDS RANGE
Accept
Change
CURRENT SETTING
14 Day
NOTE: Your 90 day average is not intended to be reflective of your HbA1c result.
3. Press the � button to highlight Trends Range. 4. Press OK to select.
6. Select 7, 14, 30 or 90 Day by using the � button and then press OK.A screen confirms your choice.
OK7 Day14 Day30 Day90 Day
TRENDS RANGE
3. Press the � button to highlight High and Low Alerts. Press OK to select.
Trends RangeHigh and Low AlertsLanguage
OK
SETUP
Trends R
ange High and Low Alerts
The High and Low Alerts tell you that your test result is above or below the setting you choose. Alerts appear as large orange numbers. Results above High are marked High Blood Sugar. Results below Low are marked Low Blood Sugar.NOTE: Alerts can only be set outside your selected Target Range(s). For additional information, you may contact Customer Service. Contact information for Customer Service is on the back cover.
WARNINGTalk to your health care professional before setting any High or Low Alerts on your meter.
1. Press and hold the top Menu button to turn the meter on.2. Press the � button to highlight Setup. Press OK to select.
85098543_CntrNextLINK_2_4_UG_EN_FpBp_v0.indd 51 11/20/15 12:08 PM
US
ING
TH
E
MA
IN M
EN
U
50
5. Press the � or � button to select your desired Fasting Targets. Press OK after each selection.
TARGET
Accept
Change
Fasting
70 - 130
4. To make changes to your Fasting Target range, press Change, otherwise press Accept.
SETUP
OKAutoLogTargetTrends Range
6. Repeat this process to set your personal Before Meal Targets and After Meal Targets. 7. Press OK after each selection.
3. Press the � button to highlight Target. Press OK to select.
TARGET
OKFasting
70 - 130
Targets are set.
Done
Change
70 - 130 70 - 180 70 - 180
A screen confirms that all Target ranges are set.
If correct, press Done to return to the Setup Menu.To make changes, press Change and repeat the process.
®
Cha
ngin
g T
arg
ets
Wit
h A
uto
Log
On
Changing Targets With AutoLog OnNOTE: Targets can only be set inside your selected Alert level(s). For additional information, you may contact Customer Service. Contact information for Customer Service is on the back cover.
When AutoLog is ON, your CONTOUR®NEXT LINK 2.4 meter comes preset with the following Target ranges for testing:
Fasting 70 – 130 mg/dLBefore Meal 70 – 130 mg/dL
After Meal 70 – 180 mg/dL
Ranges can be changed to personal Targets decided by you and/or your health care professional.1. Press and hold the top Menu button to turn the meter on.2. Press the � button to highlight Setup. Press OK to select.
85098543_CntrNextLINK_2_4_UG_EN_FpBp_v0.indd 50 11/20/15 12:08 PM
51
US
ING
TH
E
MA
IN M
EN
U Trends RangeThe Trends feature displays your averages and your results as they compare to your Targets, over a period of time that you select. The options available are 7, 14, 30 and 90 day averages. Your meter has been preset to 14 day averages, but you can change this in Setup.
1. Press and hold the top Menu button to turn the meter on.2. Press the � button to highlight Setup. Press OK to select.
5. Your current setting is displayed. You can Accept or Change your current setting.
TargetTrends RangeHigh and Low Alerts
OK
SETUP
TRENDS RANGE
Accept
Change
CURRENT SETTING
14 Day
NOTE: Your 90 day average is not intended to be reflective of your HbA1c result.
3. Press the � button to highlight Trends Range. 4. Press OK to select.
6. Select 7, 14, 30 or 90 Day by using the � button and then press OK.A screen confirms your choice.
OK7 Day14 Day30 Day90 Day
TRENDS RANGE
3. Press the � button to highlight High and Low Alerts. Press OK to select.
Trends RangeHigh and Low AlertsLanguage
OK
SETUP
Trends R
ange High and Low Alerts
The High and Low Alerts tell you that your test result is above or below the setting you choose. Alerts appear as large orange numbers. Results above High are marked High Blood Sugar. Results below Low are marked Low Blood Sugar.NOTE: Alerts can only be set outside your selected Target Range(s). For additional information, you may contact Customer Service. Contact information for Customer Service is on the back cover.
WARNINGTalk to your health care professional before setting any High or Low Alerts on your meter.
1. Press and hold the top Menu button to turn the meter on.2. Press the � button to highlight Setup. Press OK to select.
85098543_CntrNextLINK_2_4_UG_EN_FpBp_v0.indd 51 11/20/15 12:08 PM
US
ING
TH
E
MA
IN M
EN
U
50
5. Press the � or � button to select your desired Fasting Targets. Press OK after each selection.
TARGET
Accept
Change
Fasting
70 - 130
4. To make changes to your Fasting Target range, press Change, otherwise press Accept.
SETUP
OKAutoLogTargetTrends Range
6. Repeat this process to set your personal Before Meal Targets and After Meal Targets. 7. Press OK after each selection.
3. Press the � button to highlight Target. Press OK to select.
TARGET
OKFasting
70 - 130
Targets are set.
Done
Change
70 - 130 70 - 180 70 - 180
A screen confirms that all Target ranges are set.
If correct, press Done to return to the Setup Menu.To make changes, press Change and repeat the process.
®
Cha
ngin
g T
arg
ets
Wit
h A
uto
Log
On
Changing Targets With AutoLog OnNOTE: Targets can only be set inside your selected Alert level(s). For additional information, you may contact Customer Service. Contact information for Customer Service is on the back cover.
When AutoLog is ON, your CONTOUR®NEXT LINK 2.4 meter comes preset with the following Target ranges for testing:
Fasting 70 – 130 mg/dLBefore Meal 70 – 130 mg/dL
After Meal 70 – 180 mg/dL
Ranges can be changed to personal Targets decided by you and/or your health care professional.1. Press and hold the top Menu button to turn the meter on.2. Press the � button to highlight Setup. Press OK to select.
85098543_CntrNextLINK_2_4_UG_EN_FpBp_v0.indd 50 11/20/15 12:08 PM85098543_CntrNextLINK_2_4_UG_EN_FpBp_v1_placed.pdf:54

53
TE
CH
NIC
AL
& C
AR
E
For more information, contact Customer Service. Please see back cover for contact information.
IMPORTANT: The CONTOUR NEXT LINK 2.4 meter from Bayer has only been tested for use with GLUCOFACTS DELUXE diabetes management software from Bayer and CareLink Personal. Bayer is not responsible for any erroneous results from the use of other software.
Wrong Strip Inserted Repeat test with correct Bayer strip.
E04
Transferring D
ata to C
areLink® P
ersonal T
herapy M
anagem
ent So
ftware
Transferring Data to CareLink® Personal Therapy Management Software
Technical and Care
You can easily transfer blood glucose results from your meter to CareLink Personal. You can also wirelessly transfer data from your MiniMed 630G insulin pump to CareLink Personal using your CONTOUR®NEXT LINK 2.4 meter.
1. Refer to the CareLink Personal user guide for instructions on how to set up CareLink Personal and load the required drivers onto your computer.
2. If you are running GLUCOFACTS®DELUXE diabetes management software from Bayer on your computer, you must close it.
3. Start up CareLink Personal. Follow the instructions to plug your CONTOUR NEXT LINK 2.4 meter into a USB port on your computer. CareLink Personal will automatically find the CONTOUR NEXT LINK 2.4 meter and your MiniMed 630G insulin pump.
Your CONTOUR NEXT LINK 2.4 meter is also compatible with GLUCOFACTS DELUXE diabetes management software from Bayer, which may not be available in all countries.
Error Detection Displays• An error screen will always have an “E” with a number in the lower left corner of
the display.
• If there is an error (hardware, software, testing errors) detected by your meter, your meter will beep twice.
• You will see specific instructions to guide you. The first line of the error screen will tell you the error. The next lines describe what you should do. When an error screen displays an OK, press the button next to it to continue.
• If you do not resolve the problem, contact Customer Service. Please see back cover for contact information.
85098543_CntrNextLINK_2_4_UG_EN_FpBp_v0.indd 53 11/20/15 12:08 PM
US
ING
TH
E
MA
IN M
EN
U
52
Accept
Change
HIGH AND LOW ALERTS
High: 250 mg/dL
Low: 70 mg/dL
Alerts are set.
Done
Change
High: 251 mg/dL
Low: 69 mg/dL
4. Choose Accept to use the preset Alert levels (or the Alert levels you chose during initial setup) for High and Low Alerts. The preset High Alert is 250 mg/dL and the preset Low Alert is 70 mg/dL.
5. Choose Change if you wish to use different Alert levels.
6. Press the � or � button to select your High and Low Alert. Press OK after each selection.
7. The next screen confirms your choices. Press Done.
High and Low AlertsLanguageCustomer Service
OK
SETUP
Language:English
OK
No
LANGUAGEEnglishDeutschEspañol
OK
HIGH AND LOW ALERTS
High: 251 mg/dL
Low: 70 mg/dL
OK
®
Set
Lan
gua
ge
Set Language1. Press and hold the top Menu button to turn the meter on.2. Press the � button to highlight Setup. Press OK to select.
5. Verify that the language you selected is displayed. Press OK to confirm.If the correct language is not displayed, press No.
3. Press the � button to highlight Language. Press OK to select.
Customer ServiceThis option is to be used if you are speaking to a Customer Service representative. They will give you a code that enables them to verify certain settings. It is not for use any other time. Please see back cover for contact information.
4. Press the � or � button to select the language you prefer. Press � to see more choices. Press OK.
85098543_CntrNextLINK_2_4_UG_EN_FpBp_v0.indd 52 11/20/15 12:08 PM
53
TE
CH
NIC
AL
& C
AR
E
For more information, contact Customer Service. Please see back cover for contact information.
IMPORTANT: The CONTOUR NEXT LINK 2.4 meter from Bayer has only been tested for use with GLUCOFACTS DELUXE diabetes management software from Bayer and CareLink Personal. Bayer is not responsible for any erroneous results from the use of other software.
Wrong Strip Inserted Repeat test with correct Bayer strip.
E04
Transferring D
ata to C
areLink® P
ersonal T
herapy M
anagem
ent So
ftware
Transferring Data to CareLink® Personal Therapy Management Software
Technical and Care
You can easily transfer blood glucose results from your meter to CareLink Personal. You can also wirelessly transfer data from your MiniMed 630G insulin pump to CareLink Personal using your CONTOUR®NEXT LINK 2.4 meter.
1. Refer to the CareLink Personal user guide for instructions on how to set up CareLink Personal and load the required drivers onto your computer.
2. If you are running GLUCOFACTS®DELUXE diabetes management software from Bayer on your computer, you must close it.
3. Start up CareLink Personal. Follow the instructions to plug your CONTOUR NEXT LINK 2.4 meter into a USB port on your computer. CareLink Personal will automatically find the CONTOUR NEXT LINK 2.4 meter and your MiniMed 630G insulin pump.
Your CONTOUR NEXT LINK 2.4 meter is also compatible with GLUCOFACTS DELUXE diabetes management software from Bayer, which may not be available in all countries.
Error Detection Displays• An error screen will always have an “E” with a number in the lower left corner of
the display.
• If there is an error (hardware, software, testing errors) detected by your meter, your meter will beep twice.
• You will see specific instructions to guide you. The first line of the error screen will tell you the error. The next lines describe what you should do. When an error screen displays an OK, press the button next to it to continue.
• If you do not resolve the problem, contact Customer Service. Please see back cover for contact information.
85098543_CntrNextLINK_2_4_UG_EN_FpBp_v0.indd 53 11/20/15 12:08 PM
US
ING
TH
E
MA
IN M
EN
U
52
Accept
Change
HIGH AND LOW ALERTS
High: 250 mg/dL
Low: 70 mg/dL
Alerts are set.
Done
Change
High: 251 mg/dL
Low: 69 mg/dL
4. Choose Accept to use the preset Alert levels (or the Alert levels you chose during initial setup) for High and Low Alerts. The preset High Alert is 250 mg/dL and the preset Low Alert is 70 mg/dL.
5. Choose Change if you wish to use different Alert levels.
6. Press the � or � button to select your High and Low Alert. Press OK after each selection.
7. The next screen confirms your choices. Press Done.
High and Low AlertsLanguageCustomer Service
OK
SETUP
Language:English
OK
No
LANGUAGEEnglishDeutschEspañol
OK
HIGH AND LOW ALERTS
High: 251 mg/dL
Low: 70 mg/dL
OK
®
Set
Lan
gua
ge
Set Language1. Press and hold the top Menu button to turn the meter on.2. Press the � button to highlight Setup. Press OK to select.
5. Verify that the language you selected is displayed. Press OK to confirm.If the correct language is not displayed, press No.
3. Press the � button to highlight Language. Press OK to select.
Customer ServiceThis option is to be used if you are speaking to a Customer Service representative. They will give you a code that enables them to verify certain settings. It is not for use any other time. Please see back cover for contact information.
4. Press the � or � button to select the language you prefer. Press � to see more choices. Press OK.
85098543_CntrNextLINK_2_4_UG_EN_FpBp_v0.indd 52 11/20/15 12:08 PM85098543_CntrNextLINK_2_4_UG_EN_FpBp_v1_placed.pdf:56

55
TE
CH
NIC
AL
& C
AR
E
Do Not TestRapid Charge
End of Meter Life/Battery Removal
Pry up rechargeable battery here (A).Disconnect battery by pulling battery connector (B).
NOTE: Carry out this process only when you no longer intend to use the meter. Meter will not be functional once opened to remove the battery.
Dispose of the meter and lithium polymer battery in accordance with your local/country laws and regulations.
To remove the battery for proper disposal, you will need to pry the upper and lower cases apart. With a screwdriver, beginning near the strip port, insert the tip of the screwdriver and twist to pry the case loose. Continue to do this down the side until the upper case comes apart.
Rap
id C
harge
Rapid ChargeIf the battery is low when you plug in your meter, it will Rapid Charge for about 1 minute. You can run a blood sugar test as soon as Rapid Charge is complete and you have unplugged the meter.
Normal Charging When Rapid Charge ends, normal charging is expected to last up to 2 hours when plugged into a high-powered USB port. When the battery is fully charged, the test strip port light turns off.
NOTE: If the charging status displays “Low Power Charging,” your CONTOUR®NEXT LINK 2.4 meter may be plugged into a low-powered USB port. Please try a different USB port on your computer. Only connect to a computer or a 5V charger approved by a certified body such as UL or TUV.
CAUTION: Please be aware that USB ports in some computers and self-powered USB hubs can become much warmer than the room. If you wish to test immediately after disconnecting from your computer, please use the USB cable to protect the meter from exposure to heat created by the computer.
B
A
B
A
85098543_CntrNextLINK_2_4_UG_EN_FpBp_v0.indd 55 11/20/15 12:08 PM
TE
CH
NIC
AL
& C
AR
E
54
OKBolusLogbookTrendsSetup
MENU
OKBolusLogbookTrendsSetup
MENU
Charge SoonBattery low.
A40
Shutting DownBattery is dead.
A42
®
Battery Status Battery Status DisplaysThe battery status is displayed with a battery symbol on the Apply Blood screen and the Main Menu screen. It shows how much battery life is left.
Bat
tery
Sta
tus
As the battery is used, the battery symbol on the screen gradually shows less fill color. The color of the battery fill turns yellow when the battery is low and then red when your battery is almost out of charge.
A series of low battery alerts tell you that the battery is low and to Charge Soon.
Battery ChargingWhen you plug your meter into your wall charger or computer, it starts to charge immediately. While the battery charges, the test strip port light flashes slowly. Press the top Menu button at any time to display the charging status.
Plug the meter into your wall charger or into the USB port of your computer. Be sure your computer is turned on and not in sleep, hibernate or power save mode. The test strip port light flashes during charging and stops flashing and turns off when charging is complete. Please remove the meter and store in the Carrying Case until you are ready to test.
If you do not charge the battery, a display alerts you: “Shutting down, Battery is dead.” You must charge immediately.
This screen displays full battery.
85098543_CntrNextLINK_2_4_UG_EN_FpBp_v0.indd 54 11/20/15 12:08 PM
55
TE
CH
NIC
AL
& C
AR
E
Do Not TestRapid Charge
End of Meter Life/Battery Removal
Pry up rechargeable battery here (A).Disconnect battery by pulling battery connector (B).
NOTE: Carry out this process only when you no longer intend to use the meter. Meter will not be functional once opened to remove the battery.
Dispose of the meter and lithium polymer battery in accordance with your local/country laws and regulations.
To remove the battery for proper disposal, you will need to pry the upper and lower cases apart. With a screwdriver, beginning near the strip port, insert the tip of the screwdriver and twist to pry the case loose. Continue to do this down the side until the upper case comes apart.
Rap
id C
harge
Rapid ChargeIf the battery is low when you plug in your meter, it will Rapid Charge for about 1 minute. You can run a blood sugar test as soon as Rapid Charge is complete and you have unplugged the meter.
Normal Charging When Rapid Charge ends, normal charging is expected to last up to 2 hours when plugged into a high-powered USB port. When the battery is fully charged, the test strip port light turns off.
NOTE: If the charging status displays “Low Power Charging,” your CONTOUR®NEXT LINK 2.4 meter may be plugged into a low-powered USB port. Please try a different USB port on your computer. Only connect to a computer or a 5V charger approved by a certified body such as UL or TUV.
CAUTION: Please be aware that USB ports in some computers and self-powered USB hubs can become much warmer than the room. If you wish to test immediately after disconnecting from your computer, please use the USB cable to protect the meter from exposure to heat created by the computer.
B
A
B
A
85098543_CntrNextLINK_2_4_UG_EN_FpBp_v0.indd 55 11/20/15 12:08 PM
TE
CH
NIC
AL
& C
AR
E
54
OKBolusLogbookTrendsSetup
MENU
OKBolusLogbookTrendsSetup
MENU
Charge SoonBattery low.
A40
Shutting DownBattery is dead.
A42
®
Battery Status Battery Status DisplaysThe battery status is displayed with a battery symbol on the Apply Blood screen and the Main Menu screen. It shows how much battery life is left.
Bat
tery
Sta
tus
As the battery is used, the battery symbol on the screen gradually shows less fill color. The color of the battery fill turns yellow when the battery is low and then red when your battery is almost out of charge.
A series of low battery alerts tell you that the battery is low and to Charge Soon.
Battery ChargingWhen you plug your meter into your wall charger or computer, it starts to charge immediately. While the battery charges, the test strip port light flashes slowly. Press the top Menu button at any time to display the charging status.
Plug the meter into your wall charger or into the USB port of your computer. Be sure your computer is turned on and not in sleep, hibernate or power save mode. The test strip port light flashes during charging and stops flashing and turns off when charging is complete. Please remove the meter and store in the Carrying Case until you are ready to test.
If you do not charge the battery, a display alerts you: “Shutting down, Battery is dead.” You must charge immediately.
This screen displays full battery.
85098543_CntrNextLINK_2_4_UG_EN_FpBp_v0.indd 54 11/20/15 12:08 PM85098543_CntrNextLINK_2_4_UG_EN_FpBp_v1_placed.pdf:58

57
TE
CH
NIC
AL
& C
AR
E
Table 2 — System accuracy results for glucose concentration ≥ 75 mg/dL
Within ± 5% Within ± 10% Within ± 15% Within ± 20%
145 of 209 (69.4%) 196 of 209 (93.8%) 206 of 209 (98.6%) 209 of 209 (100%)
Analytical AccuracyThe CONTOUR NEXT LINK 2.4 blood glucose monitoring system was tested in 100 capillary blood samples using 600 CONTOUR®NEXT test strips. Two replicates were tested with each of 3 lots of CONTOUR NEXT test strips for a total of 600 readings. Results were compared to the YSI glucose analyzer, which is traceable to the CDC hexokinase method. The tables below compare the performance of the 2 methods.
Table 3 — System accuracy results for glucose concentration < 100 mg/dL
Accuracy
Table 1 — System accuracy results for glucose concentration < 75 mg/dL
Within ± 5 mg/dL Within ± 10 mg/dL Within ± 15 mg/dL
5 of 9 (55.6%) 9 of 9 (100%) 9 of 9 (100%)
Within ± 5 mg/dL Within ± 10 mg/dL Within ± 15 mg/dL
160 of 186 (86.0%) 183 of 186 (98.4%) 186 of 186 (100%)
Table 4 — System accuracy results for glucose concentration ≥ 100 mg/dL
Within ± 5% Within ± 10% Within ± 15%
307 of 414 (74.2%) 411 of 414 (99.3%) 414 of 414 (100%)
Table 5 — System accuracy results for glucose concentrations between 37 mg/dL and 478 mg/dL
Within ± 15 mg/dL or ±15%
600 of 600 (100%)
Technical InformationUser AccuracyUser accuracy criteria require that 95% of all differences in glucose values (i.e., between reference method and meter) should be within ±15 mg/dL for glucose values less than 75 mg/dL, and within ±15% for glucose values greater than or equal to 75 mg/dL.The CONTOUR®NEXT LINK 2.4 blood glucose monitoring system was tested in a user performance study by 218 people with diabetes using capillary blood samples and 3 CONTOUR NEXT test strip lots. The results were compared to the YSI® glucose analyzer laboratory reference method, traceable to the CDC hexokinase method.8 The tables below show how well the 2 methods compared.
85098543_CntrNextLINK_2_4_UG_EN_FpBp_v0.indd 57 11/20/15 12:08 PM
TE
CH
NIC
AL
& C
AR
E
56
WARNINGIf you are experiencing any of these symptoms, test your blood sugar. If your test result is under 50 mg/dL or above 250 mg/dL, contact your health care professional immediately.
For additional information and a complete list of symptoms, contact your health care professional.
®
Sym
pto
ms
of
Hig
h o
r Lo
w B
loo
d S
ugar
Symptoms of High or Low Blood SugarYou can better understand your test results by being aware of the symptoms of high or low blood sugar. Some of the most common symptoms are:
Low blood sugar (Hypoglycemia):
High blood sugar (Hyperglycemia): Ketones (Ketoacidosis):
• Shakiness• Sweating• Fast Heartbeat• Blurred Vision• Confusion• Passing Out• Irritability• Seizure• Extreme Hunger• Dizziness
• Frequent Urination• Excessive Thirst• Blurred Vision• Increased Fatigue• Hunger
• Shortness of Breath• Nausea or Vomiting• Very Dry Mouth
85098543_CntrNextLINK_2_4_UG_EN_FpBp_v0.indd 56 11/20/15 12:08 PM
57
TE
CH
NIC
AL
& C
AR
E
Table 2 — System accuracy results for glucose concentration ≥ 75 mg/dL
Within ± 5% Within ± 10% Within ± 15% Within ± 20%
145 of 209 (69.4%) 196 of 209 (93.8%) 206 of 209 (98.6%) 209 of 209 (100%)
Analytical AccuracyThe CONTOUR NEXT LINK 2.4 blood glucose monitoring system was tested in 100 capillary blood samples using 600 CONTOUR®NEXT test strips. Two replicates were tested with each of 3 lots of CONTOUR NEXT test strips for a total of 600 readings. Results were compared to the YSI glucose analyzer, which is traceable to the CDC hexokinase method. The tables below compare the performance of the 2 methods.
Table 3 — System accuracy results for glucose concentration < 100 mg/dL
Accuracy
Table 1 — System accuracy results for glucose concentration < 75 mg/dL
Within ± 5 mg/dL Within ± 10 mg/dL Within ± 15 mg/dL
5 of 9 (55.6%) 9 of 9 (100%) 9 of 9 (100%)
Within ± 5 mg/dL Within ± 10 mg/dL Within ± 15 mg/dL
160 of 186 (86.0%) 183 of 186 (98.4%) 186 of 186 (100%)
Table 4 — System accuracy results for glucose concentration ≥ 100 mg/dL
Within ± 5% Within ± 10% Within ± 15%
307 of 414 (74.2%) 411 of 414 (99.3%) 414 of 414 (100%)
Table 5 — System accuracy results for glucose concentrations between 37 mg/dL and 478 mg/dL
Within ± 15 mg/dL or ±15%
600 of 600 (100%)
Technical InformationUser AccuracyUser accuracy criteria require that 95% of all differences in glucose values (i.e., between reference method and meter) should be within ±15 mg/dL for glucose values less than 75 mg/dL, and within ±15% for glucose values greater than or equal to 75 mg/dL.The CONTOUR®NEXT LINK 2.4 blood glucose monitoring system was tested in a user performance study by 218 people with diabetes using capillary blood samples and 3 CONTOUR NEXT test strip lots. The results were compared to the YSI® glucose analyzer laboratory reference method, traceable to the CDC hexokinase method.8 The tables below show how well the 2 methods compared.
85098543_CntrNextLINK_2_4_UG_EN_FpBp_v0.indd 57 11/20/15 12:08 PM
TE
CH
NIC
AL
& C
AR
E
56
WARNINGIf you are experiencing any of these symptoms, test your blood sugar. If your test result is under 50 mg/dL or above 250 mg/dL, contact your health care professional immediately.
For additional information and a complete list of symptoms, contact your health care professional.
®
Sym
pto
ms
of
Hig
h o
r Lo
w B
loo
d S
ugar
Symptoms of High or Low Blood SugarYou can better understand your test results by being aware of the symptoms of high or low blood sugar. Some of the most common symptoms are:
Low blood sugar (Hypoglycemia):
High blood sugar (Hyperglycemia): Ketones (Ketoacidosis):
• Shakiness• Sweating• Fast Heartbeat• Blurred Vision• Confusion• Passing Out• Irritability• Seizure• Extreme Hunger• Dizziness
• Frequent Urination• Excessive Thirst• Blurred Vision• Increased Fatigue• Hunger
• Shortness of Breath• Nausea or Vomiting• Very Dry Mouth
85098543_CntrNextLINK_2_4_UG_EN_FpBp_v0.indd 56 11/20/15 12:08 PM85098543_CntrNextLINK_2_4_UG_EN_FpBp_v1_placed.pdf:60

59
TE
CH
NIC
AL
& C
AR
E
Table 6 — System repeatability results for CONTOUR NEXT LINK 2.4 meter using CONTOUR NEXT test strips
Mean, mg/dL
Pooled Standard Deviation
Coefficient of Variation, %
39.6 0.8 2.0
80.7 1.0 1.3
122.3 1.6 1.3
204.8 2.8 1.4
330.4 4.5 1.4
Intermediate precision (which includes variability across multiple days) was evaluated using 2 control solutions. With each of 3 lots of CONTOUR NEXT test strips, each control was tested once on each of 10 instruments on 10 separate days for a total of 300 readings.
Table 7 — System intermediate precision results for CONTOUR NEXT LINK 2.4 meter using CONTOUR NEXT test strips
Control Level
Mean, mg/dL
Standard Deviation, mg/dL
Coefficient of Variation, %
Level 1 46.3 0.7 1.6
Level 2 130.3 2.1 1.6
Precisio
nPrecision
A repeatability study was conducted with the CONTOUR®NEXT LINK 2.4 blood glucose monitoring system using 5 venous whole blood specimens with glucose levels from 40 to 334 mg/dL. Multiple replicates (n=300) were tested using multiple CONTOUR®NEXT LINK 2.4 blood glucose meters and 3 lots of CONTOUR®NEXT blood glucose test strips. The following precision results were obtained.
85098543_CntrNextLINK_2_4_UG_EN_FpBp_v0.indd 59 11/20/15 12:08 PM
TE
CH
NIC
AL
& C
AR
E
58®
Acc
urac
yFigure 1 — 100% of results are within Zone A of the Consensus Error Grid for
CONTOUR NEXT LINK 2.4.9
CONT
OUR
® NEX
T LI
NK 2
.4 (m
g/dL
)
YSI (mg/dL)
100
200
300
400
500
100 200 300 400 500
E D CB
A
A
B
C
D
00
System Accuracy (Difference) Plot, CONTOUR®NEXT LINK 2.4 with Three CONTOUR®NEXT Reagent Lots
ZONE DEGREE OF RISK
A No effect on clinical action
B Altered clinical action with little or no effect on clinical outcome
C Altered clinical action—likely to affect clinical outcome
D Altered clinical action with possibly significant medical risk
E Altered clinical action with possibly dangerous consequences
85098543_CntrNextLINK_2_4_UG_EN_FpBp_v0.indd 58 11/20/15 12:08 PM
59
TE
CH
NIC
AL
& C
AR
E
Table 6 — System repeatability results for CONTOUR NEXT LINK 2.4 meter using CONTOUR NEXT test strips
Mean, mg/dL
Pooled Standard Deviation
Coefficient of Variation, %
39.6 0.8 2.0
80.7 1.0 1.3
122.3 1.6 1.3
204.8 2.8 1.4
330.4 4.5 1.4
Intermediate precision (which includes variability across multiple days) was evaluated using 2 control solutions. With each of 3 lots of CONTOUR NEXT test strips, each control was tested once on each of 10 instruments on 10 separate days for a total of 300 readings.
Table 7 — System intermediate precision results for CONTOUR NEXT LINK 2.4 meter using CONTOUR NEXT test strips
Control Level
Mean, mg/dL
Standard Deviation, mg/dL
Coefficient of Variation, %
Level 1 46.3 0.7 1.6
Level 2 130.3 2.1 1.6
Precisio
nPrecision
A repeatability study was conducted with the CONTOUR®NEXT LINK 2.4 blood glucose monitoring system using 5 venous whole blood specimens with glucose levels from 40 to 334 mg/dL. Multiple replicates (n=300) were tested using multiple CONTOUR®NEXT LINK 2.4 blood glucose meters and 3 lots of CONTOUR®NEXT blood glucose test strips. The following precision results were obtained.
85098543_CntrNextLINK_2_4_UG_EN_FpBp_v0.indd 59 11/20/15 12:08 PM
TE
CH
NIC
AL
& C
AR
E
58®
Acc
urac
y
Figure 1 — 100% of results are within Zone A of the Consensus Error Grid for CONTOUR NEXT LINK 2.4.9
CONT
OUR
® NEX
T LI
NK 2
.4 (m
g/dL
)
YSI (mg/dL)
100
200
300
400
500
100 200 300 400 500
E D CB
A
A
B
C
D
00
System Accuracy (Difference) Plot, CONTOUR®NEXT LINK 2.4 with Three CONTOUR®NEXT Reagent Lots
ZONE DEGREE OF RISK
A No effect on clinical action
B Altered clinical action with little or no effect on clinical outcome
C Altered clinical action—likely to affect clinical outcome
D Altered clinical action with possibly significant medical risk
E Altered clinical action with possibly dangerous consequences
85098543_CntrNextLINK_2_4_UG_EN_FpBp_v0.indd 58 11/20/15 12:08 PM85098543_CntrNextLINK_2_4_UG_EN_FpBp_v1_placed.pdf:62

61
TE
CH
NIC
AL
& C
AR
E
Symbols Used The following symbols are used throughout the product labeling for the CONTOUR®NEXT LINK 2.4 blood glucose monitoring system (meter packaging and labeling, and reagent and control solution packaging and labeling).
Service Info
rmatio
n Service Information If you have a problem and none of the problem-solving messages on the meter help, contact Customer Service. Please see back cover for contact information. We have trained specialists to help you. ImportantSpeak to a Customer Service Representative before returning your meter for any reason. He/she will give you the information needed to get your problem handled correctly and efficiently. Have your CONTOUR®NEXT LINK 2.4 blood glucose meter and CONTOUR®NEXT test strips available when you phone. It would also be helpful to have a bottle of CONTOUR®NEXT control solution suitable for your test strips nearby.
A
XXXX SN
123456
B
Check ListThis check list may be helpful when speaking with Customer Service: 1. Locate the model number (A) and serial number (B) on the back of the meter. 2. Locate the test strips’ expiration date on the bottle. 3. Check the battery symbol on the screen. (See page 54, Battery Status.)
Symbol SymbolWhat It Means What It Means
Use by date (last day of month)In Vitro Diagnostic Medical Device
Batch code
Shake 15 times Caution
Consult instructions for use Do not re-use
85098543_CntrNextLINK_2_4_UG_EN_FpBp_v0.indd 61 11/20/15 12:08 PM
TE
CH
NIC
AL
& C
AR
E
60
WARNING (Part 15.21)Changes or modifications not expressly approved by the party responsible for compliance could void the user’s authority to operate the equipment.
®
Pri
ncip
les
of
the
Pro
ced
ure
Federal Communications Commission (FCC) Certified DeviceThis equipment has been tested and found to meet the limits for a Class B digital device, pursuant to part 15 of the FCC Rules. These limits are designed to provide reasonable protection against harmful interference in a residential installation. This equipment generates, uses and can radiate radio frequency energy and, if not installed and used in accordance with the instructions, may cause harmful interference to radio communications. However, there is no guarantee that interference will not occur in a particular installation. If this equipment does cause harmful interference to radio or television reception, which can be determined by turning the equipment off and on, the user is encouraged to try to correct the interference by one or more of the following measures:• Reorient or relocate the receiving antenna.• Increase the separation between the equipment and receiver.This portable transmitter with its antenna complies with FCC/IC RF exposure limits for general population / uncontrolled exposure.If you have questions, please contact Customer Service. Please see back cover for contact information.
Principles of the ProcedureThe CONTOUR®NEXT LINK 2.4 blood glucose test is based on measurement of electrical current caused by the reaction of the glucose with the reagents on the electrode of the strip. The blood sample is drawn into the tip of the test strip through capillary action. Glucose in the sample reacts with FAD glucose dehydrogenase (FAD-GDH) and the mediator. Electrons are generated, producing a current that is proportional to the glucose in the sample. After the reaction time, the glucose concentration in the sample is displayed. No calculation is required. Comparison OptionsThe CONTOUR NEXT LINK 2.4 system is designed for use with capillary whole blood. Comparison to a laboratory method must be done simultaneously with aliquots of the same sample. Note: Glucose concentrations drop rapidly due to glycolysis (approximately 5%-7% per hour).10
85098543_CntrNextLINK_2_4_UG_EN_FpBp_v0.indd 60 11/20/15 12:08 PM
61
TE
CH
NIC
AL
& C
AR
E
Symbols Used The following symbols are used throughout the product labeling for the CONTOUR®NEXT LINK 2.4 blood glucose monitoring system (meter packaging and labeling, and reagent and control solution packaging and labeling).
Service Info
rmatio
n Service Information If you have a problem and none of the problem-solving messages on the meter help, contact Customer Service. Please see back cover for contact information. We have trained specialists to help you. ImportantSpeak to a Customer Service Representative before returning your meter for any reason. He/she will give you the information needed to get your problem handled correctly and efficiently. Have your CONTOUR®NEXT LINK 2.4 blood glucose meter and CONTOUR®NEXT test strips available when you phone. It would also be helpful to have a bottle of CONTOUR®NEXT control solution suitable for your test strips nearby.
A
XXXX SN
123456
B
Check ListThis check list may be helpful when speaking with Customer Service: 1. Locate the model number (A) and serial number (B) on the back of the meter. 2. Locate the test strips’ expiration date on the bottle. 3. Check the battery symbol on the screen. (See page 54, Battery Status.)
Symbol SymbolWhat It Means What It Means
Use by date (last day of month)In Vitro Diagnostic Medical Device
Batch code
Shake 15 times Caution
Consult instructions for use Do not re-use
85098543_CntrNextLINK_2_4_UG_EN_FpBp_v0.indd 61 11/20/15 12:08 PM
TE
CH
NIC
AL
& C
AR
E
60
WARNING (Part 15.21)Changes or modifications not expressly approved by the party responsible for compliance could void the user’s authority to operate the equipment.
®
Pri
ncip
les
of
the
Pro
ced
ure
Federal Communications Commission (FCC) Certified DeviceThis equipment has been tested and found to meet the limits for a Class B digital device, pursuant to part 15 of the FCC Rules. These limits are designed to provide reasonable protection against harmful interference in a residential installation. This equipment generates, uses and can radiate radio frequency energy and, if not installed and used in accordance with the instructions, may cause harmful interference to radio communications. However, there is no guarantee that interference will not occur in a particular installation. If this equipment does cause harmful interference to radio or television reception, which can be determined by turning the equipment off and on, the user is encouraged to try to correct the interference by one or more of the following measures:• Reorient or relocate the receiving antenna.• Increase the separation between the equipment and receiver.This portable transmitter with its antenna complies with FCC/IC RF exposure limits for general population / uncontrolled exposure.If you have questions, please contact Customer Service. Please see back cover for contact information.
Principles of the ProcedureThe CONTOUR®NEXT LINK 2.4 blood glucose test is based on measurement of electrical current caused by the reaction of the glucose with the reagents on the electrode of the strip. The blood sample is drawn into the tip of the test strip through capillary action. Glucose in the sample reacts with FAD glucose dehydrogenase (FAD-GDH) and the mediator. Electrons are generated, producing a current that is proportional to the glucose in the sample. After the reaction time, the glucose concentration in the sample is displayed. No calculation is required. Comparison OptionsThe CONTOUR NEXT LINK 2.4 system is designed for use with capillary whole blood. Comparison to a laboratory method must be done simultaneously with aliquots of the same sample. Note: Glucose concentrations drop rapidly due to glycolysis (approximately 5%-7% per hour).10
85098543_CntrNextLINK_2_4_UG_EN_FpBp_v0.indd 60 11/20/15 12:08 PM85098543_CntrNextLINK_2_4_UG_EN_FpBp_v1_placed.pdf:64

63
TE
CH
NIC
AL
& C
AR
ECAUTION: Avoid exposing meter and test strips to excessive humidity, heat, cold, dust, or dirt.
Caring for Your MeterC
aring fo
r Your M
eter
• Store your meter in the carrying case provided whenever possible.• Wash hands and dry well before handling to keep the meter and test strips free of
water, oils and other contaminants. • Keep blood, control solution, and cleaning fluid from entering the test strip port or USB plug.• Handle the meter carefully to avoid damaging the electronics or causing other malfunctions. • The USB cap of your CONTOUR®NEXT LINK 2.4 meter is designed to protect the USB plug.
Should you lose the cap, contact Customer Service for a replacement. Please see back cover for contact information.
Cleaning and DisinfectionYour CONTOUR®NEXT LINK 2.4 system should be cleaned and disinfected once a week. Use only Clorox® Germicidal Wipes containing 0.55% sodium hypochlorite (bleach), which has been proven to be safe to use with the CONTOUR NEXT LINK 2.4 meter and lancing device from Bayer.Cleaning is the removal of visible dirt and debris, but does not reduce the risk for transmission of infectious diseases. Your CONTOUR NEXT LINK 2.4 system should be cleaned of dirt and debris once a week.Disinfecting (if performed properly) reduces the risk of transmitting infectious diseases. Your meter and lancing device should be disinfected once a week.
NOTE: If your meter is being operated by a second person who is providing testing assistance to you, the meter and lancing device should be disinfected prior to use by the second person. The cleaning and disinfecting directions provided should not cause any damage or degradation to the external case, buttons or display. Your CONTOUR NEXT LINK 2.4 meter and lancing device from Bayer have been tested for 260 cycles of cleaning and disinfection (one cycle per week for 5 years). These devices have been demonstrated to withstand 5 years of cleaning and disinfection without damage. You should call Bayer Diabetes Care Customer Service for assistance if your device malfunctions for any cause or if you notice any changes in the meter case or display. Clorox Germicidal Wipes are available for purchase online at http://www.officedepot.com or http://www.amazon.com or for more information call Bayer Diabetes Care Customer Service. Contact information for CustomerService is on the back cover.For more information see:“FDA Public Health Notification: Use of Fingerstick Devices on More than One Person Poses Risk for Transmitting Bloodborne Pathogens: Initial Communication” (2010).http://www.fda.gov/MedicalDevices/Safety/AlertsandNotices/ucm224025.htm“CDC Clinical Reminder: Use of Fingerstick Devices on More than One Person Poses Risk for Transmitting Bloodborne Pathogens” (2010).http://www.cdc.gov/injectionsafety/Fingerstick-DevicesBGM.html
WARNING Always wash your hands well with soap and water before and after testing and handling the meter, lancing device, or test strips.
85098543_CntrNextLINK_2_4_UG_EN_FpBp_v0.indd 63 11/20/15 12:08 PM
TE
CH
NIC
AL
& C
AR
E
62
System Specifications Test Sample: Capillary whole blood
Test Result: Referenced to plasma/serum glucose
Sample Volume: 0.6 μL
Measuring Range: 20 mg/dL – 600 mg/dL
Countdown Time: 5 seconds
Memory: Stores most recent 1000 test results
Battery Type: Non-serviceable, 250mAh rechargeable lithium polymer battery, 3.4V – 4.2V (5V input voltage)
Meter/Battery Life: 5 years
Charging Current: 300 mA
Strip Storage Temperature Range: 41ºF – 86ºF
Control Storage Temperature Range: 48ºF – 86ºF
Meter Operating Temperature Range: 41ºF – 113ºF
Humidity: 10%–93% RH
Dimensions: 3.8 in wide x 2.1 in high x 0.7 in thick
Weight: 43 grams
Sound Output: 45 to 80 dBA at a distance of 3.9 in
Radio Frequency Communication: 2.4 GHz
Electromagnetic Compatibility (EMC): The CONTOUR®NEXT LINK 2.4 meter complies with the electromagnetic requirements specified in ISO 15197: 2013. Electromagnetic emissions are low and unlikely to interfere with other nearby electronic equipment, nor are emissions from nearby electronic equipment likely to interfere with the CONTOUR NEXT 2.4. The CONTOUR NEXT 2.4 meter meets the requirements of IEC 61326-2-6 for immunity to electrostatic discharge. It is advisable to avoid use of electronic devices in very dry environments especially if synthetic materials are present. The CONTOUR NEXT 2.4 meter meets the requirements of IEC 61326-1 for radio frequency interference. To avoid radio frequency interference do not use the CONTOUR NEXT 2.4 meter near cellular or cordless telephones, walkie talkies, garage door openers, radio transmitters or other electrical or electronic equipment that are sources of electromagnetic radiation, as these may interfere with the proper operation of the meter.
®
Sys
tem
Sp
ecifi
cati
ons
85098543_CntrNextLINK_2_4_UG_EN_FpBp_v0.indd 62 11/20/15 12:08 PM
63
TE
CH
NIC
AL
& C
AR
ECAUTION: Avoid exposing meter and test strips to excessive humidity, heat, cold, dust, or dirt.
Caring for Your MeterC
aring fo
r Your M
eter
• Store your meter in the carrying case provided whenever possible.• Wash hands and dry well before handling to keep the meter and test strips free of
water, oils and other contaminants. • Keep blood, control solution, and cleaning fluid from entering the test strip port or USB plug.• Handle the meter carefully to avoid damaging the electronics or causing other malfunctions. • The USB cap of your CONTOUR®NEXT LINK 2.4 meter is designed to protect the USB plug.
Should you lose the cap, contact Customer Service for a replacement. Please see back cover for contact information.
Cleaning and DisinfectionYour CONTOUR®NEXT LINK 2.4 system should be cleaned and disinfected once a week. Use only Clorox® Germicidal Wipes containing 0.55% sodium hypochlorite (bleach), which has been proven to be safe to use with the CONTOUR NEXT LINK 2.4 meter and lancing device from Bayer.Cleaning is the removal of visible dirt and debris, but does not reduce the risk for transmission of infectious diseases. Your CONTOUR NEXT LINK 2.4 system should be cleaned of dirt and debris once a week.Disinfecting (if performed properly) reduces the risk of transmitting infectious diseases. Your meter and lancing device should be disinfected once a week.
NOTE: If your meter is being operated by a second person who is providing testing assistance to you, the meter and lancing device should be disinfected prior to use by the second person. The cleaning and disinfecting directions provided should not cause any damage or degradation to the external case, buttons or display. Your CONTOUR NEXT LINK 2.4 meter and lancing device from Bayer have been tested for 260 cycles of cleaning and disinfection (one cycle per week for 5 years). These devices have been demonstrated to withstand 5 years of cleaning and disinfection without damage. You should call Bayer Diabetes Care Customer Service for assistance if your device malfunctions for any cause or if you notice any changes in the meter case or display. Clorox Germicidal Wipes are available for purchase online at http://www.officedepot.com or http://www.amazon.com or for more information call Bayer Diabetes Care Customer Service. Contact information for CustomerService is on the back cover.For more information see:“FDA Public Health Notification: Use of Fingerstick Devices on More than One Person Poses Risk for Transmitting Bloodborne Pathogens: Initial Communication” (2010).http://www.fda.gov/MedicalDevices/Safety/AlertsandNotices/ucm224025.htm“CDC Clinical Reminder: Use of Fingerstick Devices on More than One Person Poses Risk for Transmitting Bloodborne Pathogens” (2010).http://www.cdc.gov/injectionsafety/Fingerstick-DevicesBGM.html
WARNING Always wash your hands well with soap and water before and after testing and handling the meter, lancing device, or test strips.
85098543_CntrNextLINK_2_4_UG_EN_FpBp_v0.indd 63 11/20/15 12:08 PM
TE
CH
NIC
AL
& C
AR
E
62
System Specifications Test Sample: Capillary whole blood
Test Result: Referenced to plasma/serum glucose
Sample Volume: 0.6 μL
Measuring Range: 20 mg/dL – 600 mg/dL
Countdown Time: 5 seconds
Memory: Stores most recent 1000 test results
Battery Type: Non-serviceable, 250mAh rechargeable lithium polymer battery, 3.4V – 4.2V (5V input voltage)
Meter/Battery Life: 5 years
Charging Current: 300 mA
Strip Storage Temperature Range: 41ºF – 86ºF
Control Storage Temperature Range: 48ºF – 86ºF
Meter Operating Temperature Range: 41ºF – 113ºF
Humidity: 10%–93% RH
Dimensions: 3.8 in wide x 2.1 in high x 0.7 in thick
Weight: 43 grams
Sound Output: 45 to 80 dBA at a distance of 3.9 in
Radio Frequency Communication: 2.4 GHz
Electromagnetic Compatibility (EMC): The CONTOUR®NEXT LINK 2.4 meter complies with the electromagnetic requirements specified in ISO 15197: 2013. Electromagnetic emissions are low and unlikely to interfere with other nearby electronic equipment, nor are emissions from nearby electronic equipment likely to interfere with the CONTOUR NEXT 2.4. The CONTOUR NEXT 2.4 meter meets the requirements of IEC 61326-2-6 for immunity to electrostatic discharge. It is advisable to avoid use of electronic devices in very dry environments especially if synthetic materials are present. The CONTOUR NEXT 2.4 meter meets the requirements of IEC 61326-1 for radio frequency interference. To avoid radio frequency interference do not use the CONTOUR NEXT 2.4 meter near cellular or cordless telephones, walkie talkies, garage door openers, radio transmitters or other electrical or electronic equipment that are sources of electromagnetic radiation, as these may interfere with the proper operation of the meter.
®
Sys
tem
Sp
ecifi
cati
ons
85098543_CntrNextLINK_2_4_UG_EN_FpBp_v0.indd 62 11/20/15 12:08 PM85098543_CntrNextLINK_2_4_UG_EN_FpBp_v1_placed.pdf:66

65
TE
CH
NIC
AL
& C
AR
EC
aring fo
r Your M
eterDisinfecting Your Lancing DeviceSupplies Needed for Disinfecting:• Clorox® Germicidal Wipes containing 0.55% sodium hypochlorite (bleach) • Paper towels • Timing device1. Before disinfecting, clean the lancing device as described above in Cleaning Your
Lancing Device.
2. Remove the endcap and lancet, if present.
For proper disinfection, you must keep all lancing device surfaces wet for 60 seconds.
For proper disinfection, you must keep all endcap surfaces wet for 60 seconds.
3. Using a new Clorox Germicidal Wipe, carefully wipe all external and internal surfaces of the endcap until wet.
4. Use Clorox Germicidal Wipes to disinfect all exposed surfaces of your lancing device until wet.
5. Dry all lancing device surfaces and endcap with a clean paper towel if needed.
The lancing device graphics are for illustration purposes only. Refer to the lancing device insert provided by Bayer for detailed instructions.
85098543_CntrNextLINK_2_4_UG_EN_FpBp_v0.indd 65 11/20/15 12:08 PM
TE
CH
NIC
AL
& C
AR
E
64®
Car
ing
fo
r Yo
ur M
eter
Cleaning Your MeterSupplies Needed for Cleaning:• Clorox® Germicidal Wipes containing 0.55% sodium hypochlorite (bleach)• Paper towels1. Carefully clean the meter with Clorox Germicidal Wipes until all soil is removed.
Do not allow cleaning solution to run into the meter through areas such as around the buttons or the meter’s test strip or data ports.
2. Dry as necessary with a clean paper towel.
Disinfecting Your MeterSupplies Needed for Disinfecting:• Clorox Germicidal Wipes containing 0.55% sodium hypochlorite (bleach)• Paper towels • Timing device
Using a new Clorox Germicidal Wipe, carefully wipe all outer surfaces of your meter until wet. Do not allow cleaning solution to run into the meter through areas such as around the buttons or the meter’s test strip or data ports.
For proper disinfection, you must keep all meter surfaces wet for 60 seconds.
1. Before disinfecting, clean the meter as described above in Cleaning Your Meter.
Cleaning Your Lancing DeviceSupplies Needed for Cleaning:• Clorox® Germicidal Wipes containing 0.55% sodium hypochlorite (bleach) • Paper towels1. Clean the lancing device with Clorox Germicidal Wipes until all soil is removed. 2. Dry as necessary with a clean paper towel.
2. Dry all meter surfaces and test strip port using a clean paper towel if needed.
Strip Port
USB Connector(under cap)
Buttons
85098543_CntrNextLINK_2_4_UG_EN_FpBp_v0.indd 64 11/20/15 12:08 PM
65
TE
CH
NIC
AL
& C
AR
EC
aring fo
r Your M
eterDisinfecting Your Lancing DeviceSupplies Needed for Disinfecting:• Clorox® Germicidal Wipes containing 0.55% sodium hypochlorite (bleach) • Paper towels • Timing device1. Before disinfecting, clean the lancing device as described above in Cleaning Your
Lancing Device.
2. Remove the endcap and lancet, if present.
For proper disinfection, you must keep all lancing device surfaces wet for 60 seconds.
For proper disinfection, you must keep all endcap surfaces wet for 60 seconds.
3. Using a new Clorox Germicidal Wipe, carefully wipe all external and internal surfaces of the endcap until wet.
4. Use Clorox Germicidal Wipes to disinfect all exposed surfaces of your lancing device until wet.
5. Dry all lancing device surfaces and endcap with a clean paper towel if needed.
The lancing device graphics are for illustration purposes only. Refer to the lancing device insert provided by Bayer for detailed instructions.
85098543_CntrNextLINK_2_4_UG_EN_FpBp_v0.indd 65 11/20/15 12:08 PM
TE
CH
NIC
AL
& C
AR
E
64®
Car
ing
fo
r Yo
ur M
eter
Cleaning Your MeterSupplies Needed for Cleaning:• Clorox® Germicidal Wipes containing 0.55% sodium hypochlorite (bleach)• Paper towels1. Carefully clean the meter with Clorox Germicidal Wipes until all soil is removed.
Do not allow cleaning solution to run into the meter through areas such as around the buttons or the meter’s test strip or data ports.
2. Dry as necessary with a clean paper towel.
Disinfecting Your MeterSupplies Needed for Disinfecting:• Clorox Germicidal Wipes containing 0.55% sodium hypochlorite (bleach)• Paper towels • Timing device
Using a new Clorox Germicidal Wipe, carefully wipe all outer surfaces of your meter until wet. Do not allow cleaning solution to run into the meter through areas such as around the buttons or the meter’s test strip or data ports.
For proper disinfection, you must keep all meter surfaces wet for 60 seconds.
1. Before disinfecting, clean the meter as described above in Cleaning Your Meter.
Cleaning Your Lancing DeviceSupplies Needed for Cleaning:• Clorox® Germicidal Wipes containing 0.55% sodium hypochlorite (bleach) • Paper towels1. Clean the lancing device with Clorox Germicidal Wipes until all soil is removed. 2. Dry as necessary with a clean paper towel.
2. Dry all meter surfaces and test strip port using a clean paper towel if needed.
Strip Port
USB Connector(under cap)
Buttons
85098543_CntrNextLINK_2_4_UG_EN_FpBp_v0.indd 64 11/20/15 12:08 PM85098543_CntrNextLINK_2_4_UG_EN_FpBp_v1_placed.pdf:68

67
TE
CH
NIC
AL
& C
AR
E WarrantyManufacturer’s Warranty: Bayer HealthCare warrants to the original purchaser that this instrument will be free from defects in materials and workmanship for 5 years from the date of original purchase (except as noted below). During the stated 5 year period, Bayer HealthCare shall, at no charge, replace a unit found to be defective with an equivalent or current version of the owner’s model.
Limitations of Warranty: This warranty is subject to the following exceptions and limitations:
1. A 90-day warranty only will be extended for consumable parts and/or accessories.
2. This warranty is limited to replacement due to defects in parts or workmanship. Bayer HealthCare shall not be required to replace any units which malfunction or are damaged due to abuse, accidents, alteration, modification, misuse, neglect, maintenance by someone other than Bayer HealthCare, or failure to operate the instrument in accordance with instructions. Further, Bayer HealthCare assumes no liability for malfunction or damage to Bayer HealthCare instruments caused by the use of reagents other than the appropriate reagents (e.g., CONTOUR®NEXT test strips) manufactured or recommended by Bayer HealthCare.
3. Bayer HealthCare reserves the right to make changes in design of this instrument without obligation to incorporate such changes into previously manufactured instruments.
4. Bayer HealthCare has no knowledge of the performance of the CONTOUR®NEXT LINK 2.4 blood glucose meter when used with any test strips other than CONTOUR NEXT test strips, and therefore makes no warranty of the performance of the CONTOUR NEXT LINK 2.4 meter when used with any test strips other than CONTOUR NEXT test strips or when the CONTOUR NEXT test strip is altered or modified in any manner.
5. Bayer HealthCare makes no warranty of the performance of the CONTOUR®NEXT LINK 2.4 meter or test results when used with any control solution other than CONTOUR®NEXT control solution.
6. Bayer HealthCare makes no warranty of the performance of the CONTOUR NEXT LINK 2.4 meter or test results when used with any software other than GLUCOFACTS®DELUXE diabetes management software from Bayer (where supported) and CareLink Personal therapy management software.
BAYER HEALTHCARE MAKES NO OTHER EXPRESS WARRANTY FOR THIS PRODUCT. THE OPTION OF REPLACEMENT, DESCRIBED ABOVE, IS BAYER HEALTHCARE’S ONLY OBLIGATION UNDER THIS WARRANTY. IN NO EVENT SHALL BAYER HEALTHCARE BE LIABLE FOR INDIRECT, SPECIAL OR CONSEQUENTIAL DAMAGES, EVEN IF BAYER HEALTHCARE HAS BEEN ADVISED OF THE POSSIBILITY OF SUCH DAMAGES.
Some states do not allow the exclusion or limitation of incidental or consequential damages, so the above limitation or exclusion may not apply to you. This warranty gives you specific legal rights and you may also have other rights which vary from state to state.
For warranty service: Purchaser must contact Customer Service for assistance and/or instructions for the use of this instrument. Please see back cover for contact information.
Warranty
85098543_CntrNextLINK_2_4_UG_EN_FpBp_v0.indd 67 11/20/15 12:08 PM
TE
CH
NIC
AL
& C
AR
E
66
SuppliesWhen calling or writing for supplies be sure to include the name of the replacement part or accessory item.
Replacement Parts / Items
References1. Wickham NWR, Achar KN, Cove DH. Unreliability of capillary blood glucose in peripheral
vascular disease. Practical Diabetes. 1986;3(2):100. 2. Atkin, S. et al. Fingerstick Glucose Determination in Shock. Ann Intern Med.
1991;114:1020-1024. 3. Desachy A, Vuagnat AC, et al. Accuracy of bedside glucometry in critically ill patients:
influence of clinical characteristics and perfusion index. Mayo Clin Proc. 2008;83(4):400-405.
4. FDA Public Health Notification: Use of Fingerstick Devices on More than One Person Poses Risk for Transmitting Bloodborne Pathogens: Initial Communication: Update 11/29/2010. http://www.fda.gov/MedicalDevices/Safety/AlertsandNotices/ucm224025.htm
5. CDC Clinical Reminder: Use of Fingerstick Devices on More than One Person Poses Risk for Transmitting Bloodborne Pathogens (2010). http://www.cdc.gov/injectionsafety/Fingerstick-DevicesBGM.html
6. American Diabetes Association. Standards of medical care in diabetes—2012. Diabetes Care. 2012;35(Suppl 1):S11-63.
7. Longo D.L. et al. Harrison’s Principles of Internal Medicine, 18th Edition, 2011. http://www.accessmedicine.com
8. Data on file, Bayer HealthCare Diabetes Care.9. Parkes J.L. et al. A new consensus error grid to evaluate the clinical significance of
inaccuracies in the measurement of blood-glucose. Diabetes Care. 2000;23(8): 1143-1148.
10. Tietz Fundamentals of Clinical Chemistry, 5th Edition, Edited by Burtis CA and Ashwood ER, W. B. Saunders Co., Philadelphia, PA, 2001, p. 444.
11. Bailey T et al. Accuracy, precision, and user performance evaluation of the CONTOUR®NEXT LINK 2.4 blood glucose monitoring system. Poster presented at: 7th International Conference on Advanced Technologies & Treatments for Diabetes; February 5-8, 2014; Vienna, Austria.
12. Greene C, et al. Comparative accuracy of 3 blood glucose monitoring systems that communicate with an insulin pump. Endocr Pract. 2014;20(10):1016-1021.
13. Pardo S, et al. Comparison of bolus insulin dose error distributions based on results from 2 clinical trials of blood glucose monitoring systems. Presented at: 14th Annual Meeting of the Diabetes Technology Society; November 6-8, 2014; Bethesda, MD.
• CONTOUR®NEXT LINK 2.4 user guide • CONTOUR NEXT LINK 2.4 quick reference
guide • USB extension cable from Bayer • USB cap • Wall charger • CONTOUR®NEXT test strips • CONTOUR®NEXT control solution
• Lancing device from Bayer• Lancets from Bayer• Check the website
www.diabetes.bayer.com for any meter updates or GLUCOFACTS®DELUXE updates.
• To order parts, contact Customer Service. Please see back cover for contact information.
Sup
plie
s
85098543_CntrNextLINK_2_4_UG_EN_FpBp_v1.indd 66 12/1/15 9:19 AM
67
TE
CH
NIC
AL
& C
AR
E WarrantyManufacturer’s Warranty: Bayer HealthCare warrants to the original purchaser that this instrument will be free from defects in materials and workmanship for 5 years from the date of original purchase (except as noted below). During the stated 5 year period, Bayer HealthCare shall, at no charge, replace a unit found to be defective with an equivalent or current version of the owner’s model.
Limitations of Warranty: This warranty is subject to the following exceptions and limitations:
1. A 90-day warranty only will be extended for consumable parts and/or accessories.
2. This warranty is limited to replacement due to defects in parts or workmanship. Bayer HealthCare shall not be required to replace any units which malfunction or are damaged due to abuse, accidents, alteration, modification, misuse, neglect, maintenance by someone other than Bayer HealthCare, or failure to operate the instrument in accordance with instructions. Further, Bayer HealthCare assumes no liability for malfunction or damage to Bayer HealthCare instruments caused by the use of reagents other than the appropriate reagents (e.g., CONTOUR®NEXT test strips) manufactured or recommended by Bayer HealthCare.
3. Bayer HealthCare reserves the right to make changes in design of this instrument without obligation to incorporate such changes into previously manufactured instruments.
4. Bayer HealthCare has no knowledge of the performance of the CONTOUR®NEXT LINK 2.4 blood glucose meter when used with any test strips other than CONTOUR NEXT test strips, and therefore makes no warranty of the performance of the CONTOUR NEXT LINK 2.4 meter when used with any test strips other than CONTOUR NEXT test strips or when the CONTOUR NEXT test strip is altered or modified in any manner.
5. Bayer HealthCare makes no warranty of the performance of the CONTOUR®NEXT LINK 2.4 meter or test results when used with any control solution other than CONTOUR®NEXT control solution.
6. Bayer HealthCare makes no warranty of the performance of the CONTOUR NEXT LINK 2.4 meter or test results when used with any software other than GLUCOFACTS®DELUXE diabetes management software from Bayer (where supported) and CareLink Personal therapy management software.
BAYER HEALTHCARE MAKES NO OTHER EXPRESS WARRANTY FOR THIS PRODUCT. THE OPTION OF REPLACEMENT, DESCRIBED ABOVE, IS BAYER HEALTHCARE’S ONLY OBLIGATION UNDER THIS WARRANTY. IN NO EVENT SHALL BAYER HEALTHCARE BE LIABLE FOR INDIRECT, SPECIAL OR CONSEQUENTIAL DAMAGES, EVEN IF BAYER HEALTHCARE HAS BEEN ADVISED OF THE POSSIBILITY OF SUCH DAMAGES.
Some states do not allow the exclusion or limitation of incidental or consequential damages, so the above limitation or exclusion may not apply to you. This warranty gives you specific legal rights and you may also have other rights which vary from state to state.
For warranty service: Purchaser must contact Customer Service for assistance and/or instructions for the use of this instrument. Please see back cover for contact information.
Warranty
85098543_CntrNextLINK_2_4_UG_EN_FpBp_v0.indd 67 11/20/15 12:08 PM
TE
CH
NIC
AL
& C
AR
E
66
SuppliesWhen calling or writing for supplies be sure to include the name of the replacement part or accessory item.
Replacement Parts / Items
References1. Wickham NWR, Achar KN, Cove DH. Unreliability of capillary blood glucose in peripheral
vascular disease. Practical Diabetes. 1986;3(2):100. 2. Atkin, S. et al. Fingerstick Glucose Determination in Shock. Ann Intern Med.
1991;114:1020-1024. 3. Desachy A, Vuagnat AC, et al. Accuracy of bedside glucometry in critically ill patients:
influence of clinical characteristics and perfusion index. Mayo Clin Proc. 2008;83(4):400-405.
4. FDA Public Health Notification: Use of Fingerstick Devices on More than One Person Poses Risk for Transmitting Bloodborne Pathogens: Initial Communication: Update 11/29/2010. http://www.fda.gov/MedicalDevices/Safety/AlertsandNotices/ucm224025.htm
5. CDC Clinical Reminder: Use of Fingerstick Devices on More than One Person Poses Risk for Transmitting Bloodborne Pathogens (2010). http://www.cdc.gov/injectionsafety/Fingerstick-DevicesBGM.html
6. American Diabetes Association. Standards of medical care in diabetes—2012. Diabetes Care. 2012;35(Suppl 1):S11-63.
7. Longo D.L. et al. Harrison’s Principles of Internal Medicine, 18th Edition, 2011. http://www.accessmedicine.com
8. Data on file, Bayer HealthCare Diabetes Care.9. Parkes J.L. et al. A new consensus error grid to evaluate the clinical significance of
inaccuracies in the measurement of blood-glucose. Diabetes Care. 2000;23(8): 1143-1148.
10. Tietz Fundamentals of Clinical Chemistry, 5th Edition, Edited by Burtis CA and Ashwood ER, W. B. Saunders Co., Philadelphia, PA, 2001, p. 444.
11. Bailey T et al. Accuracy, precision, and user performance evaluation of the CONTOUR®NEXT LINK 2.4 blood glucose monitoring system. Poster presented at: 7th International Conference on Advanced Technologies & Treatments for Diabetes; February 5-8, 2014; Vienna, Austria.
12. Greene C, et al. Comparative accuracy of 3 blood glucose monitoring systems that communicate with an insulin pump. Endocr Pract. 2014;20(10):1016-1021.
13. Pardo S, et al. Comparison of bolus insulin dose error distributions based on results from 2 clinical trials of blood glucose monitoring systems. Presented at: 14th Annual Meeting of the Diabetes Technology Society; November 6-8, 2014; Bethesda, MD.
• CONTOUR®NEXT LINK 2.4 user guide • CONTOUR NEXT LINK 2.4 quick reference
guide • USB extension cable from Bayer • USB cap • Wall charger • CONTOUR®NEXT test strips • CONTOUR®NEXT control solution
• Lancing device from Bayer• Lancets from Bayer• Check the website
www.diabetes.bayer.com for any meter updates or GLUCOFACTS®DELUXE updates.
• To order parts, contact Customer Service. Please see back cover for contact information.
Sup
plie
s
85098543_CntrNextLINK_2_4_UG_EN_FpBp_v1.indd 66 12/1/15 9:19 AM85098543_CntrNextLINK_2_4_UG_EN_FpBp_v1_placed.pdf:70

69
Meter Care ........................................................... 63
mg/dL (milligrams per deciliter) ............................. iiimmol/L (millimoles per liter) .................................. iiiMiniMed Insulin Pump ........................................... 4Notes ................................................................... 30
Adding to a Test Result ......................................... 30Removing a Note .................................................. 30
On/Off: Meter ....................................................... 4Precision .............................................................. 59
Preset Bolus ........................................................ 27
Pump Connection .............................................. 33Auto Connect ........................................................ 33Disconnect/Delete ................................................ 43Manual Connect ................................................... 38Viewing Connection .............................................. 43
Pump Options ..................................................... 33Auto Connect ........................................................ 33Manual Connect ................................................... 38
Reminders ........................................................... 28Setting After Testing.............................................. 28Setting from Setup Menu ...................................... 43Turn Off ................................................................ 44
Remote Bolus Off ............................................... 31
Sample Volume ................................................... 62
Scrolling/Selection Buttons ................................... 5Send Options ...................................................... 10
Change Setting ..................................................... 10Sending Test Results to Pump.............................. 25
Service Information ............................................. 61
Setup Menu ......................................................... 33AutoLog ................................................................ 47Customer Service ................................................. 52Date ...................................................................... 45High and Low Alerts ............................................. 51Language .............................................................. 52Pump Options ....................................................... 33Reminders ............................................................. 43Sound ................................................................... 47Targets .................................................................. 49Time ...................................................................... 45Trends Range ........................................................ 51
Sound On/Off ...................................................... 47
Strip Port Light ..................................................... 4
Strips .................................................................... 3Underfilled Strip .................................................... 16
Supplies/Replacement Parts ............................... 66
Symbols Used ..................................................... 61
Symptoms of High/Low Blood Sugar ...................................................... 56
Synchronize Time and Date ................................ 45
System Specifications ......................................... 62
Target Ranges...................................................... 12With AutoLog Off .................................................. 49With AutoLog On .................................................. 50
Technical Information ......................................... 57
Test Strip Port Light ............................................... 4
Test Strips ............................................................. 3
Testing ................................................................ 13Alternative Site Testing (AST) ............................... 18Fingertip Testing .................................................. 15Testing in the Dark ............................................... 22Testing with AutoLog Off ..................................... 16Testing with AutoLog On ...................................... 17Testing Your Blood Sugar .................................... 13
Time ..................................................................... 45Format (12 hour or 24 hour clock) ........................ 46Setting: Connected to Pump ................................ 46Setting: Not Connected to Pump ......................... 45
Trends (Averages/Summaries) ............................. 32Viewing with AutoLog Off ..................................... 32Viewing with AutoLog On ..................................... 32
Trends Range: Setting ........................................ 51
Turning Meter Off/On ............................................. 4
Underfilled Strip ................................................... 16
USB Extension Cable ............................................ivWarranty .............................................................. 67
Website ................................................... Back cover
Wireless, Turning On/Off ..................................... 42
85098543_CntrNextLINK_2_4_UG_EN_FpBp_v0.indd 69 11/20/15 12:08 PM
68
Accuracy ............................................................. 57
Alerts ................................................................... 11Battery .................................................................. 54High/Low Blood Sugar ......................................... 22
Alternative Site Testing (AST) .............................. 18
Apply More Blood ................................................ 16
Auto Connect Meter and Pump .......................... 33
AutoLog/Meal Marking ........................................ 10Turning Off ............................................................ 48Turning On ............................................................ 47
Averages/Trends .................................................. 32
Battery ................................................................. 54Charge .................................................................. 55Rapid Charge ........................................................ 55Removal ................................................................ 55Status Display ....................................................... 54
Block Mode ........................................................ 26
Blood Drop .......................................................... 15Obtaining for Alternative
Site Testing ......................................................... 18Obtaining for Fingertip Testing ............................. 15
Bolus from Setup Menu ..................................... 31
Bolus from Test Result ....................................... 25Manual Bolus ........................................................ 26Preset Bolus .......................................................... 27
Buttons .................................................................. 4OK ........................................................................... 5Scrolling/Selection .................................................. 5Top Menu ................................................................ 4
Caring for your Meter .......................................... 63Changing Alerts ................................................... 11
Changing Targets ................................................ 50
Cleaning and Disinfection.................................... 63
Connecting Meter and Pump .............................. 33Auto Connect ........................................................ 33Manual Connect ................................................... 38
CONTOUR®NEXT
Control Solution .................................................... 23Test Strip ................................................................ 3
Control Solution Testing ...................................... 23
Customer Service ................................................ 52Contact Number ..................................... Back cover
Date ..................................................................... 45Format (Day.Month.Year) or
(Month/Day/Year) ................................................ 10Setting : Connected to Pump ............................... 46Setting: Not Connected to Pump ......................... 45
Disconnect Pump From Meter ............................ 43
Endcap .................................................................. 3Clear Endcap (for AST) ........................................... 3Gray Endcap (for Fingertip Testing) ........................ 3
Error Displays ...................................................... 53
Fingertip Testing .................................................. 15
High and Low Alerts ............................................ 11Setting ................................................................... 11When Testing ........................................................ 22
High (or Low) Blood Sugar .................................. 22Alerts ..................................................................... 11Symptoms ............................................................. 56
Initial Setup ............................................................ 5
Lancing ................................................................ 13
Language ............................................................... 6
Light (on Test Strip Port) ........................................ 4
Link Meter and Pump .......................................... 33
Logbook/Memory ................................................ 31Adding Entries (Notes) .......................................... 30Reviewing ............................................................. 31
Low (and High) Blood Sugar Results ........................................ 22
Low (or High) Blood Sugar Symptoms ................ 56
Main Menu ........................................................... 31Bolus ..................................................................... 31Logbook ................................................................ 31Setup .................................................................... 33Trends ................................................................... 32
Manual Bolus ....................................................... 26
Manual Connect ................................................. 38
Meal Markers/AutoLog ........................................ 10
Memory/Logbook ................................................ 31
Menu Button .......................................................... 4
Meter ..................................................................... 4Disposal ................................................................ 55Overview ................................................................. 4
Index
85098543_CntrNextLINK_2_4_UG_EN_FpBp_v0.indd 68 11/20/15 12:08 PM
69
Meter Care ........................................................... 63
mg/dL (milligrams per deciliter) ............................. iiimmol/L (millimoles per liter) .................................. iiiMiniMed Insulin Pump ........................................... 4Notes ................................................................... 30
Adding to a Test Result ......................................... 30Removing a Note .................................................. 30
On/Off: Meter ....................................................... 4Precision .............................................................. 59
Preset Bolus ........................................................ 27
Pump Connection .............................................. 33Auto Connect ........................................................ 33Disconnect/Delete ................................................ 43Manual Connect ................................................... 38Viewing Connection .............................................. 43
Pump Options ..................................................... 33Auto Connect ........................................................ 33Manual Connect ................................................... 38
Reminders ........................................................... 28Setting After Testing.............................................. 28Setting from Setup Menu ...................................... 43Turn Off ................................................................ 44
Remote Bolus Off ............................................... 31
Sample Volume ................................................... 62
Scrolling/Selection Buttons ................................... 5Send Options ...................................................... 10
Change Setting ..................................................... 10Sending Test Results to Pump.............................. 25
Service Information ............................................. 61
Setup Menu ......................................................... 33AutoLog ................................................................ 47Customer Service ................................................. 52Date ...................................................................... 45High and Low Alerts ............................................. 51Language .............................................................. 52Pump Options ....................................................... 33Reminders ............................................................. 43Sound ................................................................... 47Targets .................................................................. 49Time ...................................................................... 45Trends Range ........................................................ 51
Sound On/Off ...................................................... 47
Strip Port Light ..................................................... 4
Strips .................................................................... 3Underfilled Strip .................................................... 16
Supplies/Replacement Parts ............................... 66
Symbols Used ..................................................... 61
Symptoms of High/Low Blood Sugar ...................................................... 56
Synchronize Time and Date ................................ 45
System Specifications ......................................... 62
Target Ranges...................................................... 12With AutoLog Off .................................................. 49With AutoLog On .................................................. 50
Technical Information ......................................... 57
Test Strip Port Light ............................................... 4
Test Strips ............................................................. 3
Testing ................................................................ 13Alternative Site Testing (AST) ............................... 18Fingertip Testing .................................................. 15Testing in the Dark ............................................... 22Testing with AutoLog Off ..................................... 16Testing with AutoLog On ...................................... 17Testing Your Blood Sugar .................................... 13
Time ..................................................................... 45Format (12 hour or 24 hour clock) ........................ 46Setting: Connected to Pump ................................ 46Setting: Not Connected to Pump ......................... 45
Trends (Averages/Summaries) ............................. 32Viewing with AutoLog Off ..................................... 32Viewing with AutoLog On ..................................... 32
Trends Range: Setting ........................................ 51
Turning Meter Off/On ............................................. 4
Underfilled Strip ................................................... 16
USB Extension Cable ............................................ivWarranty .............................................................. 67
Website ................................................... Back cover
Wireless, Turning On/Off ..................................... 42
85098543_CntrNextLINK_2_4_UG_EN_FpBp_v0.indd 69 11/20/15 12:08 PM
68
Accuracy ............................................................. 57
Alerts ................................................................... 11Battery .................................................................. 54High/Low Blood Sugar ......................................... 22
Alternative Site Testing (AST) .............................. 18
Apply More Blood ................................................ 16
Auto Connect Meter and Pump .......................... 33
AutoLog/Meal Marking ........................................ 10Turning Off ............................................................ 48Turning On ............................................................ 47
Averages/Trends .................................................. 32
Battery ................................................................. 54Charge .................................................................. 55Rapid Charge ........................................................ 55Removal ................................................................ 55Status Display ....................................................... 54
Block Mode ........................................................ 26
Blood Drop .......................................................... 15Obtaining for Alternative
Site Testing ......................................................... 18Obtaining for Fingertip Testing ............................. 15
Bolus from Setup Menu ..................................... 31
Bolus from Test Result ....................................... 25Manual Bolus ........................................................ 26Preset Bolus .......................................................... 27
Buttons .................................................................. 4OK ........................................................................... 5Scrolling/Selection .................................................. 5Top Menu ................................................................ 4
Caring for your Meter .......................................... 63Changing Alerts ................................................... 11
Changing Targets ................................................ 50
Cleaning and Disinfection.................................... 63
Connecting Meter and Pump .............................. 33Auto Connect ........................................................ 33Manual Connect ................................................... 38
CONTOUR®NEXT
Control Solution .................................................... 23Test Strip ................................................................ 3
Control Solution Testing ...................................... 23
Customer Service ................................................ 52Contact Number ..................................... Back cover
Date ..................................................................... 45Format (Day.Month.Year) or
(Month/Day/Year) ................................................ 10Setting : Connected to Pump ............................... 46Setting: Not Connected to Pump ......................... 45
Disconnect Pump From Meter ............................ 43
Endcap .................................................................. 3Clear Endcap (for AST) ........................................... 3Gray Endcap (for Fingertip Testing) ........................ 3
Error Displays ...................................................... 53
Fingertip Testing .................................................. 15
High and Low Alerts ............................................ 11Setting ................................................................... 11When Testing ........................................................ 22
High (or Low) Blood Sugar .................................. 22Alerts ..................................................................... 11Symptoms ............................................................. 56
Initial Setup ............................................................ 5
Lancing ................................................................ 13
Language ............................................................... 6
Light (on Test Strip Port) ........................................ 4
Link Meter and Pump .......................................... 33
Logbook/Memory ................................................ 31Adding Entries (Notes) .......................................... 30Reviewing ............................................................. 31
Low (and High) Blood Sugar Results ........................................ 22
Low (or High) Blood Sugar Symptoms ................ 56
Main Menu ........................................................... 31Bolus ..................................................................... 31Logbook ................................................................ 31Setup .................................................................... 33Trends ................................................................... 32
Manual Bolus ....................................................... 26
Manual Connect ................................................. 38
Meal Markers/AutoLog ........................................ 10
Memory/Logbook ................................................ 31
Menu Button .......................................................... 4
Meter ..................................................................... 4Disposal ................................................................ 55Overview ................................................................. 4
Index
85098543_CntrNextLINK_2_4_UG_EN_FpBp_v0.indd 68 11/20/15 12:08 PM85098543_CntrNextLINK_2_4_UG_EN_FpBp_v1_placed.pdf:72

85098543_CntrNextLINK_2_4_UG_EN_FpBp_v0.indd 71 11/20/15 12:08 PM85098543_CntrNextLINK_2_4_UG_EN_FpBp_v0.indd 70 11/20/15 12:08 PM 85098543_CntrNextLINK_2_4_UG_EN_FpBp_v0.indd 71 11/20/15 12:08 PM85098543_CntrNextLINK_2_4_UG_EN_FpBp_v0.indd 70 11/20/15 12:08 PM85098543_CntrNextLINK_2_4_UG_EN_FpBp_v1_placed.pdf:74

Bayer HealthCare LLCMishawaka, IN 46544 USA
Bayer Customer Service is available 24 hours per day, 7 days per week at:1-800-348-8100www.diabetes.bayer.com
© 2015 Bayer. All rights reserved.85098543 Rev. 11/15
All other trademarks are the property of their respective owners.
Bayer, the Bayer Cross, CONTOUR, GLUCOFACTS and the No Coding logo are registered trademarks of Bayer.
85098543_CntrNextLINK_2_4_UG_EN_FpBp_v0.indd 72 11/20/15 12:08 PM


![Renard-17-30Maig13.ppt [Modo de compatibilidad]CASO CLINICO • Sobrina de 23 años : • Calcio 10,9 mg/dl • Fósforo 2,6 mg/dl • Magnesio 2,2 mg/dl • Creatinina 0,94 mg/dl](https://img.dokumen.tips/doc/110x75/5fe880661572c17d762f0376/renard-17-modo-de-compatibilidad-caso-clinico-a-sobrina-de-23-aos-a-calcio.jpg)