Embed Size (px)
Citation preview

Installation Requires Knowledge of:• AAMA Installation Instructions.• Applicable Federal, State, Local Codes and Regulations.• An Understanding of the Fundamentals of Residential Construction.• A Working Knowledge of the Tools, Equipment and Methods Required for Installation.• A Familiarity with Caulking, Sealing Procedures and Glass Handling Procedures.
Block ConstructionBlock Frame Installation Instructions
These instructions will serve as a general guideline for installing a block frame window. Your wall construction and situation may vary. Before installing, inspect the new window. Any damage to the window frame joint seals must be repaired. The sill track must be able to hold water for 15 minutes without leaking to the interior. If purchasing an aluminum product, steps should be taken to protect the aluminum frame from the decomposing effect of electrolysis. Aluminum products must be isolated from dissimilar or corrosive materials with a non conductive coating or sealant material.
MASONRY WALL INSTALLATION
Window installations in Surface Barrier Walls, (masonry walls), are divided into two groups: walls that use a wood frame or wood buck and those that do not. When working with masonry walls, a wood buck is recommended, but not required.
INSTALLING A BLOCK FRAME WITH A WOOD BUCK.
A wood buck in a masonry opening will facilitate installation, anchorage and sealing of a block frame. A wood buck can be built and attached to brick, concrete or concrete block walls. A buck should be made of a kiln-dried or pressure-treated fir, pine or redwood to resist degradation. 2-by lumber (1-1/2” thick) is recommended for a buck, but nothing less than 3/4” lumber (1”x 4” or 1” x 6”).
Assemble the buck and set it in the opening. Check for level at bottom and top and shim where needed. Set it plumb and check for true (not racked).
Secure all four sides of the buck to the masonry opening with anchors and fasteners. See Fig. 1. Apply a perimeter seal between the buck and the masonry opening. Seal both inside and out. Use a bond breaking type of backer rod, if needed, to control the joint depth and shape. (Width dimension should be greater or equal to depth dimension.)
Dry fit the window for size and center it in the opening. Determine the installation screw locations on head and jambs of frame and mark them. No screw should be installed through sill. Screws should be no more than 18” apart,
Tools and Materials You Will NeedA few simple hand tools will aid in installation. Refer to the specific installation method instructions for materials required.
Fig. 1

on center, with corner screws approximately 6” from end. Shim around the perimeter to set the window level, square, plumb and true. Position shims as near to the fasteners as possible. See Fig. 2. Avoid over-shimming as this may cause bowing and deflection of the frame. Predrill installation holes in head and jambs.
With an appropriate sealant, apply some to each hole before fastening. See Fig. 3. Fasten frame to buck by starting at one of the upper jamb corners. Attach one screw and check frame for level and plumb. Measure frame diagonally for squareness and make any adjustments. Continue fastening the frame, sealing over fastener heads with sealant.
Apply a continuous bead of sealant around the interior and exterior perimeter, where frame and wood buck come in contact. See Fig. 4. With larger gaps at these joints, use a backer rod or some insulation material to fill the space.
INSTALLING A BLOCK FRAME DIRECTLY TO A SURFACE BARRIER WALL.
Dry fit the window for size and squareness. Set frame level and plumb. Measure frame diagonally for squareness and shim where needed. Determine the installation screw locations on head and jambs of frame and mark them. Screws should be no more than 18” apart, on center, with corner screws approximately 6” from end. Predrill screw holes in head and jambs, but not in sill. Mark masonry surface for screw anchor locations. Remove window frame, keeping in mind the shim locations. Drill holes in masonry and install screw anchors. Reposition frame with shims and secure with fasteners. Apply some sealant to each hole before fastening. Start at one of the upper jamb corners and attach one screw. Check frame for level, square and plumb. Continue fastening the frame and seal over fastener heads with sealant.
With an appropriate sealant, apply a continuous bead around the interior and exterior perimeter, where frame and wall condition come in contact. With larger gaps at these joints, use a backer rod or some insulation material to fill the space. See Fig. 5.
SILL PAN FLASHING FOR BLOCK FRAME IN SURFACE BARRIER WALL.
Sill pan flashing is recommended for block frame window installations. A sill pan is used to ensure that incidental water that penetrates the building envelope will be collected and allowed to drain.
A sill pan is a rigid piece of flashing with walls to the interior and sides to prevent water from flowing into the wall or interior finishes. The sill pan flashing must be formed to fit around the block frame and to fit sill condition, sloping if needed to the exterior. See Fig. 6.
INSTALLING THE SILL PAN.
Check the sill condition to determine if it is level. If not level, use shims under the sill pan. Set the sill pan into position and determine location of fasteners. Fasten at a minimum of 3 places, based on a maximum of 16” apart, on center. Predrill the installation holes for fasteners. Drill sill condition for anchors, if needed. With an appropriate sealant, apply some to each hole and fasten sill pan to sill condition. Seal over the fastener heads. All joints must be sealed between the sill pan and the surface barrier wall. See Fig. 7.
Dry fit the window for size in the opening. Determine the installation screw locations on head and jambs of frame and mark them. Screws should be no more than 18” apart, on center, with corner screws approximately 6” from end. Set frame level and plumb with shims.
Measure frame diagonally for squareness and shim where needed. Position shims as near to the fasteners as possible. Predrill installation holes in head and jambs of frame, but not in sill. Mark masonry surface for screw anchor locations. Remove window frame, keeping in mind the location of the shims. Drill holes in masonry and install screw anchors.
Apply a full length, continuous bead of sealant, to the rear, upright wall of the sill pan. This bead will make contact with the frame to create an air seal along the back side of the window and sill condition.
Fig. 2
Fig. 3
Fig. 4
Fig. 5

Apply a 3/8” diameter bead of sealant to the top of the sill pan where the exterior leg of the block frame will come in contact. Leave two 1” voids, approximately 6” from each jamb. This will allow any water entering the sill pan to drain to the exterior. See Fig. 8.
Reposition window into sill pan with shims. Set frame in sealant and tool or wipe off any excess. Apply sealant into screw holes and secure frame with fasteners. Start with one of the upper jamb corners. Attach one screw and check frame for level, square, plumb and true. Continue fastening the frame, sealing over fastener heads with sealant.
Once window is secure, apply a fillet bead of sealant around the perimeter, between the frame and the wall condition.
BLOCK FRAME REPLACEMENT WINDOW
This section will show a typical installation of an aluminum replacement window into an existing wood window frame, your situation may vary. The new unit will fit between the interior casing and the exterior stops or blind stops. Certain wood frame components will be removed and reinstalled in the process, but if they are damaged or deteriorated, they must be repaired or replaced. We’ll use the “outside-in” method for instruction purposes. This is where it is easier to remove or replace the window from outside the building. The parting beads and exterior stops in the wood frame are removed, but the stool and interior stop/casing, if separate, remain intact. See Fig. 9.
Determine which exterior frame components need to be remove in order to extract the sash members from the existing frame. Save exterior casing/stops for reinstallation later. If the wood is painted, carefully score the joints with a utility knife to break the bond before prying out the stop. Use a wide chisel to carefully pry the stop. With exterior stops out of the way, remove the sash. If the window is a double hung style, cut the sash cord to remove the sash. Caution should be taken as some sash balance mechanisms may react suddenly when the weight of the sash is removed.
Pry out the parting beads or stops which typically will not be saved. If the stops are too heavily painted and will not come out easily, chisel them flush with the surface of the side jambs. Once the parting beads are out, the remaining sash can be removed. Remove pulleys and sash weights. If mounting screws are corroded, it may be necessary to pry out the pulleys.
If the existing window has a preformed aluminum tracks, it will usually contain a wooden parting stop at the top and aluminum track on the sides. Remove the wooden parting stop. Pull out the fasteners (staples or nails) securing the side tracks. Remove the small aluminum blocks located at the top and bottom of each track. Remove the two side tracks and sash as one unit. Inspect the opening for wood damage or decay and replace any section. Check for level and squareness of the opening.
SLOPE SILL FRAME
The existing wood sill may be sloped to the exterior. Determine if a “Sill Adapter” needs to be installed. The replacement unit may have a slope sill design to match the angle of the wooden sill. Cutting the interior frame leg to match the sill angle is another option, otherwise a sill adapter should be installed.
Before installing the sill adapter, check sill for level and shim if needed. Apply a 1/4” bead of an appropriate sealant along the interior sill corner and sill surface, where the sill adapter will be installed. See Fig. 10. Leave two 1/2” long gaps in the exterior bead to allow moisture to escape.
Drill at least three installation holes along the v-groove on the top surface of the adapter and attach to wood sill. Seal over screw heads with sealant.
INSTALL THE REPLACEMENT WINDOW
Set the new unit into the opening to verify fit and clearance for adjustment. The replacement unit will rest atop the flat surface of the sill adapter, if one was used.
Fig. 6
Fig. 7
Fig. 8
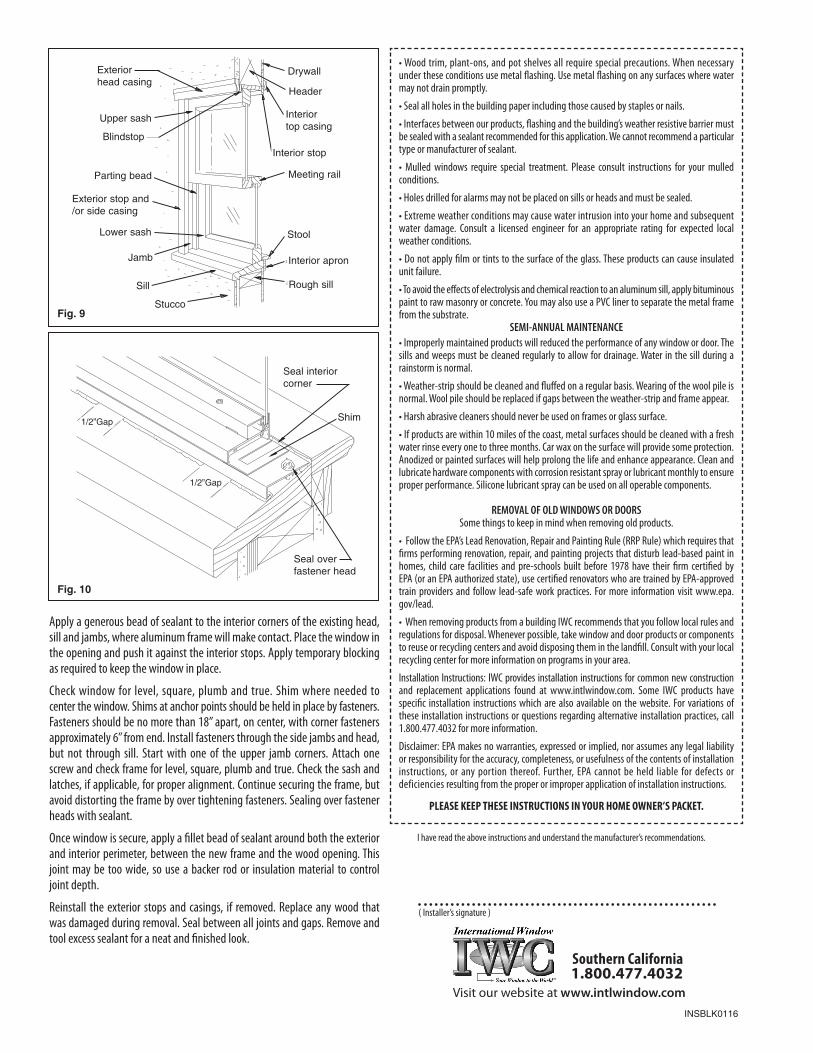
Apply a generous bead of sealant to the interior corners of the existing head, sill and jambs, where aluminum frame will make contact. Place the window in the opening and push it against the interior stops. Apply temporary blocking as required to keep the window in place.
Check window for level, square, plumb and true. Shim where needed to center the window. Shims at anchor points should be held in place by fasteners. Fasteners should be no more than 18” apart, on center, with corner fasteners approximately 6” from end. Install fasteners through the side jambs and head, but not through sill. Start with one of the upper jamb corners. Attach one screw and check frame for level, square, plumb and true. Check the sash and latches, if applicable, for proper alignment. Continue securing the frame, but avoid distorting the frame by over tightening fasteners. Sealing over fastener heads with sealant.
Once window is secure, apply a fillet bead of sealant around both the exterior and interior perimeter, between the new frame and the wood opening. This joint may be too wide, so use a backer rod or insulation material to control joint depth.
Reinstall the exterior stops and casings, if removed. Replace any wood that was damaged during removal. Seal between all joints and gaps. Remove and tool excess sealant for a neat and finished look.
• Wood trim, plant-ons, and pot shelves all require special precautions. When necessary under these conditions use metal flashing. Use metal flashing on any surfaces where water may not drain promptly.
• Seal all holes in the building paper including those caused by staples or nails.
• Interfaces between our products, flashing and the building’s weather resistive barrier must be sealed with a sealant recommended for this application. We cannot recommend a particular type or manufacturer of sealant.
• Mulled windows require special treatment. Please consult instructions for your mulled conditions.
• Holes drilled for alarms may not be placed on sills or heads and must be sealed.
• Extreme weather conditions may cause water intrusion into your home and subsequent water damage. Consult a licensed engineer for an appropriate rating for expected local weather conditions.
• Do not apply film or tints to the surface of the glass. These products can cause insulated unit failure.
• To avoid the effects of electrolysis and chemical reaction to an aluminum sill, apply bituminous paint to raw masonry or concrete. You may also use a PVC liner to separate the metal frame from the substrate.
SEMI-ANNUAL MAINTENANCE• Improperly maintained products will reduced the performance of any window or door. The sills and weeps must be cleaned regularly to allow for drainage. Water in the sill during a rainstorm is normal.
• Weather-strip should be cleaned and fluffed on a regular basis. Wearing of the wool pile is normal. Wool pile should be replaced if gaps between the weather-strip and frame appear.
• Harsh abrasive cleaners should never be used on frames or glass surface.
• If products are within 10 miles of the coast, metal surfaces should be cleaned with a fresh water rinse every one to three months. Car wax on the surface will provide some protection. Anodized or painted surfaces will help prolong the life and enhance appearance. Clean and lubricate hardware components with corrosion resistant spray or lubricant monthly to ensure proper performance. Silicone lubricant spray can be used on all operable components.
REMOVAL OF OLD WINDOWS OR DOORSSome things to keep in mind when removing old products.
• Follow the EPA’s Lead Renovation, Repair and Painting Rule (RRP Rule) which requires that firms performing renovation, repair, and painting projects that disturb lead-based paint in homes, child care facilities and pre-schools built before 1978 have their firm certified by EPA (or an EPA authorized state), use certified renovators who are trained by EPA-approved train providers and follow lead-safe work practices. For more information visit www.epa.gov/lead.
• When removing products from a building IWC recommends that you follow local rules and regulations for disposal. Whenever possible, take window and door products or components to reuse or recycling centers and avoid disposing them in the landfill. Consult with your local recycling center for more information on programs in your area.
Installation Instructions: IWC provides installation instructions for common new construction and replacement applications found at www.intlwindow.com. Some IWC products have specific installation instructions which are also available on the website. For variations of these installation instructions or questions regarding alternative installation practices, call 1.800.477.4032 for more information.
Disclaimer: EPA makes no warranties, expressed or implied, nor assumes any legal liability or responsibility for the accuracy, completeness, or usefulness of the contents of installation instructions, or any portion thereof. Further, EPA cannot be held liable for defects or deficiencies resulting from the proper or improper application of installation instructions.
PLEASE KEEP THESE INSTRUCTIONS IN YOUR HOME OWNER’S PACKET.
( Installer’s signature )
Visit our website at www.intlwindow.com
Southern California1.800.477.4032
I have read the above instructions and understand the manufacturer’s recommendations.
Fig. 9
Fig. 10
INSBLK0116