Embed Size (px)
Citation preview

BLACKBOARD
COURSE MATERIAL
FOR STUDENTS

Training course
INTRODUCTION
MANUAL
Version 1.0
Publisher AU IT / BSS Support Fuglesangs Allé 4 8210 Aarhus V
Knowledge group Advanced Multimedia Group
Editors Benjamin Møller Jensen, Bertel Kirkeby
Contributors Bjarke Rahbek, Mahmoud Ismail
Reviewers Margit Grønborg, Merethe Kirstine Juhl Hollen
Photos and graphics AU Kommunikation, Blackboard
Design AU Kommunikation, Advanced Multimedia Group

CONTENTS
Introduction 1
Blackboard Login 2
My Institution Page 3
Add Module 3
Visual Customisation 4
Global Navigation Menu 5
Global Navigation Menu Icons 5
Edit Personal Information 7
Change Personal Settings 8
Edit Notification Settings 8
Notifications Dashboard 10
Administer Student Group 11
Add module 11
Group Tools 12
Blackboard for smartphone and tablets 13
Blackboard for Android 13
Blackboard for IPhone 16
Blackboard for IPad 18

1 INTRODUCTION
INTRODUCTION
K
K
K
Blackboard is what is known as a Learning Management System (LMS), i.e. a system for online course management and e-learning. Like AULA and CampusNet, Blackboard can therefore be used to communicate important information about courses, as well as serving as a repository for course material and a forum for online learning and student activities. In addition, Blackboard can basis for differentiated group work, gather course materials and documents for use to broadcast important information in relation to teaching.
Blackboard is to replace both AULA and to some extent CampusNet at BSS as from autumn 2013, although BSc and MSc students (in Danish HA and Cand.merc.) will not be switching from CampusNet to Blackboard until February 2014. Students from AU Herning will be transferred to the new version of Blackboard February 2014. Blackboard will subsequently be rolled out to all departments at AU. After the implementation of Blackboard, it will still be possible to use AULA and CampusNet to access saved documents etc.
The purpose of the present course material, produced for students at Aarhus University, is to facilitate the transition from other LMS to Blackboard and to prepare students and staff for their use of and interaction with Blackboard by giving instructions and guidelines in the basic use of the system.
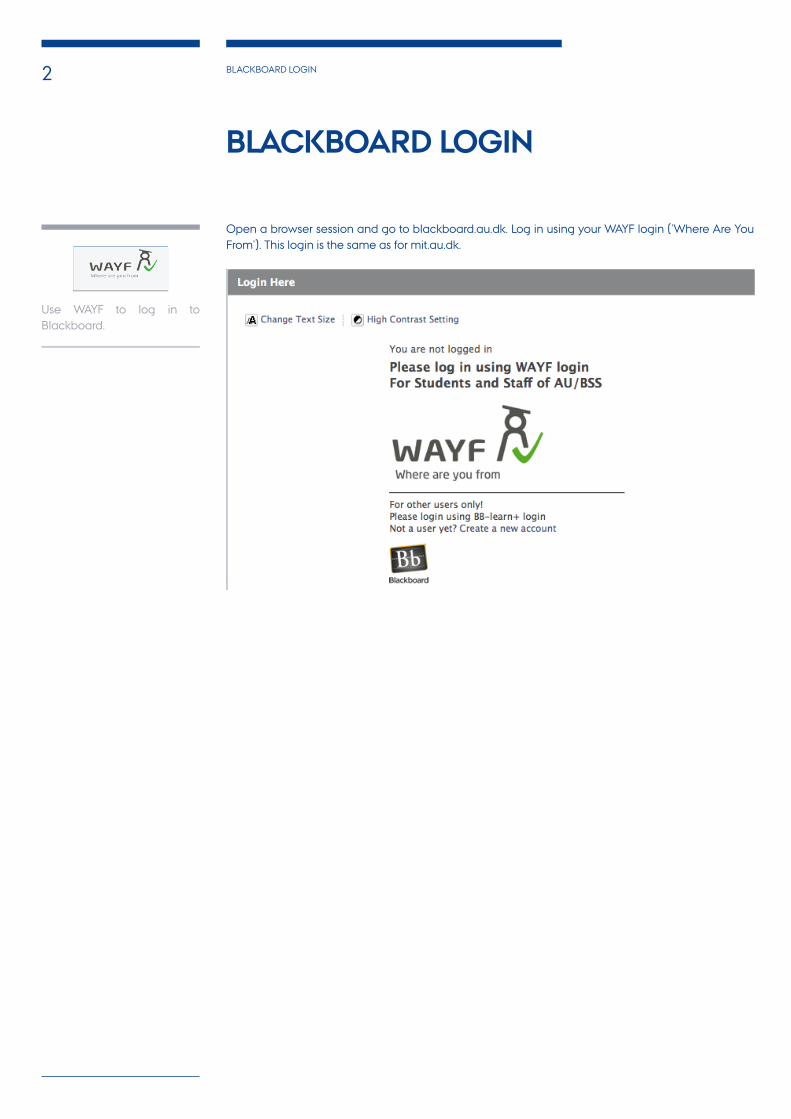
Blackboard is accessed by login at blackboard.au.dk using WAYF login (’Where Are You From’). This login is the same as for mit.au.dk.
A Blackboard support web page is available in case you have questions or need help logging on to or using Blackboard. Please visit this web page by clicking the link below in order to find the correct department or person to respond to your inquiry.
bss.au.dk/bssupport
BSS Support, Aarhus University
K
2 BLACKBOARD LOGIN
Open a browser session and go to blackboard.au.dk. Log in using your WAYF login (’Where Are You From’). This login is the same as for mit.au.dk.
Use WAYF to log in to Blackboard.
BLACKBOARD LOGIN

3 MY INSTITUTION PAGE ADD MODULE
MY INSTITUTION PAGE
The ’My Institution’ page is the first page shown when staff or students log on to Blackboard. The page consists of modules where each module serves a specific purpose. These modules range from news feeds, announcements and course creation to current assignments, practical information and simple tools such as a clock or a calculator.
It is entirely up to each Blackboard user to customize their own ‘My Institution’ page with the modules they want to use.
1. To add a module to the ’My Institution’ page, click ’Add Module’ in the upper-left corner.
2. A list of available modules is displayed. Every available module has an ‘Add’ option. The modules already added to your ‘My Institution’ page have a ‘Remove’ button instead. Add or remove modules as you please.
3. Click ‘OK’ in the bottom-right corner to save changes and go back to ‘My Institution’.
ADD MODULE
Add modules to ’My Institution’.

4 MY INSTITUTION PAGE VISUAL CUSTOMISATION
VISUAL CUSTOMISATION
You can customise the appearance of the Home Page of the course. Different themes are available and the modules on the Home Page can be reordered quickly and easily.
1. Click ‘Customise Page’ in the upper right corner in order to change the theme of the Home Page.
2. Select the theme you wish to use.
3. Click ‘Submit’ to save the changes.
The modules on the Home Page are divided into two columns. You can arrange the modules of the Home Page as you please.
1. Click and hold the gray bar on top of a given module, then drag it to its new position and release.
2. Click the arrow in the upper left corner of a given module in order to either collapse or expand the module.
3. Click the ‘x’ in the upper right corner of a given module in order to remove the module from the Home Page. The module can always be added again from the ‘Add Course Module’ in the upper left corner of the Home page.
4. You can also reorder the modules from the Reorder Modules Menu. To do so, click the two arrows in the upper right corner.
5. Use the arrows to rearrange the order of the modules and to move modules from one column to another.
6. When finished, click ‘Submit’ to save the changes.
CUSTOMISE THEME
REORDER MODULES
Tilpas dit kursus’ Hjemmeside.

5 GLOBAL NAVIGATION MENU GLOBAL NAVIGATION MENU ICONS
GLOBAL NAVIGATION MENU
The Global Navigation Menu is your entry to tools and features related to your profile as well as settings for your profile.
From this menu, you can access your messages, grades, calendars, contacts etc. and you can adjust the settings for your profile, for instance change language and notification settings.
GLOBAL NAVIGATION MENU ICONS
OVERVIEW
POSTS
UPDATES
MY GRADES
The ‘Overview’ contains recent and relevant changes in Blackboard. This ranges from personal emails, calendar reminders, returned graded papers, and more. This is basically an overview of what you can see under all the other navigation icons from the menu to the left.
If new content is added to blogs, discussion forums, wikies, etc. of which you are an editor or reader, you will be notified here.
If you have new assignments due, new course material is available, etc. in a course in which you are enrolled, you will be notified here.
A new column is displayed to the right of the icon based navigation column to the far left. Click on one of your courses to see updates specific to the course. Click on ‘All’ to see updates from all courses.
When a teacher has graded your assignments, your grades can be found here.
To open the Global Navigation Menu, click your name in the upper right corner. Clicking any of the links from the Global Navigation Menu’s Left Column will direct you to a new page. The content under the link you clicked shows up to the right. The same navigation column with the same icons as in the Global Navigation Menu is displayed to the left.
For now, try clicking on the little house at the top. You are now directed to the ‘Overview’.

6 GLOBAL NAVIGATION MENU GLOBAL NAVIGATION MENU ICONS
A new column is displayed to the right of the icon-based navigation column to the far left. Select the calendars you wish to have displayed. All the selected calendar events will show up in the same one calendar on this page, but events from various calendars will be marked in different colours.
The institution calendar contains events that are relevant to everyone at the university.
CALENDAR
INSTITUTION CALENDAR
PERSONAL CALENDAR
Only you can see your personal calendar events. When adding an event to the calendar, it is added to your personal calendar by default.
COURSE SPECIFIC CALENDARSEach course has its own calendar. Only teachers of a course can add events or notifications of due assignments, etc. to that course’s calendar.
ADD CALENDAR EVENT1. On the calendar, click on the day on which you wish to add an event.
2. Enter the details of the event.
3. Use the drop-down menu by ‘Calendar:’ to select the calendar to use for this event.
4. When finished, click on ‘Save’.
7 GLOBAL NAVIGATION MENU EDIT PERSONAL INFORMATION
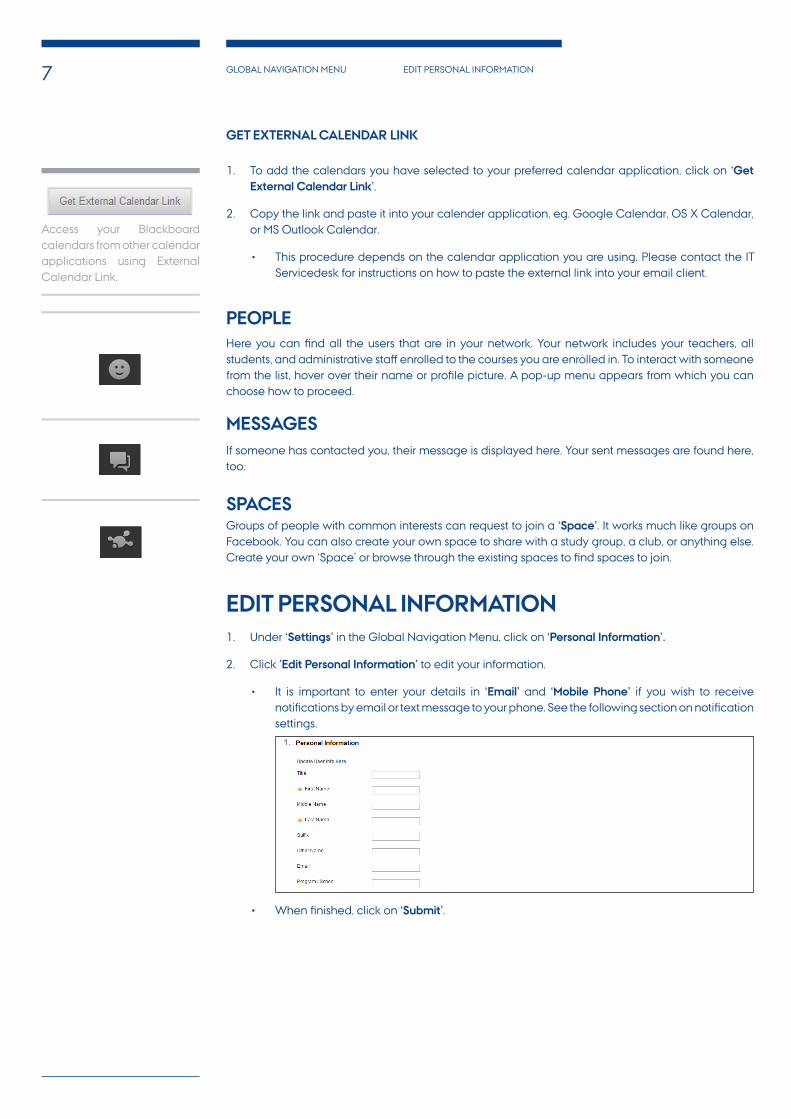
GET EXTERNAL CALENDAR LINK
1. To add the calendars you have selected to your preferred calendar application, click on ‘Get External Calendar Link’.
2. Copy the link and paste it into your calender application, eg. Google Calendar, OS X Calendar, or MS Outlook Calendar.
• This procedure depends on the calendar application you are using. Please contact the IT Servicedesk for instructions on how to paste the external link into your email client.
Here you can find all the users that are in your network. Your network includes your teachers, all students, and administrative staff enrolled to the courses you are enrolled in. To interact with someone from the list, hover over their name or profile picture. A pop-up menu appears from which you can choose how to proceed.
If someone has contacted you, their message is displayed here. Your sent messages are found here, too.
Groups of people with common interests can request to join a ‘Space’. It works much like groups on Facebook. You can also create your own space to share with a study group, a club, or anything else. Create your own ‘Space’ or browse through the existing spaces to find spaces to join.
EDIT PERSONAL INFORMATION1. Under ‘Settings’ in the Global Navigation Menu, click on ‘Personal Information’.
2. Click ’Edit Personal Information’ to edit your information.
• It is important to enter your details in ‘Email’ and ‘Mobile Phone’ if you wish to receive notifications by email or text message to your phone. See the following section on notification settings.
• When finished, click on ‘Submit’.
Access your Blackboard calendars from other calendar applications using External Calendar Link.
PEOPLE
MESSAGES
SPACES

8 GLOBAL NAVIGATION MENU CHANGE PERSONAL SETTINGS
1. Under ‘Settings’ in the Global Navigation Menu, click on ‘Personal Information’.
2. Click ’Change Personal Settings’ to change your settings.
• Under ’Select Langauge Pack’, you can change the language in Blackboard.
• When finished, click on ‘Submit’.
CHANGE PERSONAL SETTINGS
Blackboard can notify you of recent events whenever and however needed. Such events could be incoming messages from another Blackboard user, overdue assignments and much more. To access the menu, go to the upper-right corner and click on your own name to open the ‘Global Navigation Menu’.
1. Under ‘Settings’, click on ‘Edit Notification Settings’.
EDIT NOTIFICATION SETTINGS

9 GLOBAL NAVIGATION MENU CHANGE PERSONAL SETTINGS
2. Click on ‘Edit General Settings’ to edit all general settings.
• General settings are divided into Course and Organisation settings.
• ’General Settings: Courses’ are applied to notifications related to any courses you are teaching or attending.
• ‘General Settings: Organisations’ are applied to notifications related to the organisation in general – but also to any other organisation in which you are enrolled.
• Under ‘Email Settings’, select ‘Individual Messages’ to be notified as soon as something new happens. This option is recommended rather than the ‘Daily Email Digest’ option, as only one notification message, containing all notifications of the day, is sent once every day.
• ‘Send Due-Date Reminders’ apply to calendar appointments, assignments, and anything else on Blackboard to which a due-date can be specified.
• Click ‘Submit’ to save all changes to these settings.
3. Under ‘Edit Individual Course Settings’, all your courses are listed. Click on a course to make changes to the notification settings for that specific course. There are three ways to be notified by Blackboard.
• ‘Dashboard’: Notifications are displayed on the Home Page of the course, but also on your ‘Notifications Dashboard’. It is recommended to let Blackboard notify you of any change even remotely relevant to you through here. Let Blackboard notify you of anything important by either:
• ‘Email’: Select which events are important enough to be notified by email of them.
• ‘Mobile’: If it is crucial to be notified of an event instantly, Blackboard can notify you by text message to your mobile phone.
4. Click ‘Submit’ to save all changes to the above settings.
Note: The ‘Mobile’ and ‘Email’ options require that you have specified a valid phone number andemail address under “Edit Personal Information”.
You can either go through all your courses and specify specific settings for each course, or just change all of them at once using the ‘Bulk Edit Notification Settings’.
The ‘Bulk Edit Notification Settings’ option allows you to apply specified notification settings to multiple courses at once. To select which courses to apply notification setting changes to, click on the courses individually, and then click on the little arrow in the middle to move courses from the ‘Items to Select’ list to the ‘Selected Items’ list. Specify your settings and then click ‘Submit’.
Click ’Submit’ to save notification settings.

10 GLOBAL NAVIGATION MENU NOTIFICATIONS DASHBOARD
To manage the ’Notifications Dashboard’, click on the ’Notifications Dashboard’ next to ’My institution’ in the upper-left corner.
This page works just like the ‘My Institution’ page, cf. p. 3. It is common to add modules that post notifications to the ‘Notifications Dashboard’ – and keep other modules on the ‘My Institution’ page. However, anyone can do as they please.
1. To add a module to the ’Notifications Dashboard’ page, click ’Add Module’ in the upper-left corner.
2. A list of available modules is displayed. Every available module has an ‘Add’ option. The modules already added to your ‘My Institution’ page have a ‘Remove’ button instead. Add or remove modules as you please.
3. Click ‘OK’ in the bottom-right corner to save changes and go back to ‘Notifications Dashboard’.
NOTIFICATIONS DASHBOARD
Manage notifications from the ’Notifications Dashboard’.
Add modules to your ’Notifications Dashboard’.

11 ADMINISTER STUDENT GROUP ADD MODULE
1. Just like on the ‘My Institution’ page, you can add modules to the Group Homepage. Click on ‘Add Personal Module’ to do so.
2. Select the modules that you wish to add to the Group Homepage.
• A list of available modules is displayed. Every available module has an ‘Add’ option. The modules already added to the group page have a ‘Remove’ button instead. Add or remove modules as you please and click ’OK’ to save changes.
ADMINISTER STUDENT GROUP
A good-to-know feautre is enrolling to the Student Group of a course and then administering it. This requires that groups have already been created by the administrator of this particular course.
1. From the ‘My Institution’ Page, under ‘My Courses’, click on the relevant course.
2. From the navigation menu to the left, click ‘Groups’.
3. Click the ‘Sign Up’ button by the group in which you wish to enrol.
• Alternatively, click on ‘Create Group’. This option is only accessible if the administrator of the course has allowed students to create groups by themselves.
4. Click on ’Sign Up’. The front page of the group can be administered by all students in this group.
ADD MODULE
Manage groups from the navigation menu to the left.
Add modules to the Group Homepage.

12 ADMINISTER STUDENT GROUP GROUP TOOLS
A list of tools are available in all of your groups. These tools are found in the ’Group Tools’ module that is visible on the Group Homepage by default.
Access to the group as well as control of the group content is limited to the members of the group.
Tool availability can be managed by the administrator of the course.
1. To enter a chat room for members of the group to join, try the Group Tool ‘Collaboration’.
2. Use ‘File Exchange’ to upload files to share with members of the group.
3. The ‘Group Tasks’ can also be very useful. When teachers add ‘Group Tasks’, due dates for these tasks will show up on your own ‘My Institution’ page. This also applies to all other members of the group.
4. Group members can add a group Wiki by clicking on ‘Group Wiki’ . Only members of the student group have access to this Wiki. The same goes for all other group features. Wikis are further elaborated in the following section.
5. Emails can be sent directly to other group members from Blackboard by using the ‘Send Email’ Group Tool.
Other tools are available from Group Tools which can be useful to explore. The following sections will demonstrate the use of the three collaborative tools Wiki, Blogs and Discussion Board.
GROUP TOOLS

13 BLACKBOARD FOR SMARTPHONE AND TABLETSBLACKBOARD FOR ANDROID
BLACKBOARD FOR SMARTPHONE AND TABLETS
This chapter reviews how to find and install Blackboard on your smartphone or tablet. Below is a guide for Android, iPhone and IPad users.
The icon for ”Play Store” looks like this on your smartphone
BLACKBOARD FOR ANDROIDNot all features from Blackboard are available through the Android app. This tutorial gives a quick overview of the available features and how to install the app. Blackborad to Android on smartphone og tablet is the same.
INSTALLATION
1. Find the app called ’Play Store’ on your phone and press it to open it. This is where apps for your phone can be found.
2. Press the little magnifying glass at the top-right corner to search for the App called ’Blackboard learn’ an app.
3. The App ’Blackboard Mobile Learn’ should appear in the search results. Press this
4. Press ’INSTALL’ to install this app.
5. Press ’ACCEPT’ to accept the app’s permissions.
6. The app will immediately start downloading. Once finished, go back to the home screen..
OPEN THE APP
7. Find and press the App ’Learn’ among all your applications. Note: The App is not available in Danish!
8. Put a check mark in the box, ’I accept these conditions’, and then press ’ Continue’.
Find the Blackboard icon among all your applications. It’s called ”Learn’.

14 BLACKBOARD FOR SMARTPHONE AND TABLETSBLACKBOARD FOR ANDROID
9. In the search field, search for ”aarhus”. From the search results list, one of the search results should be ”Aarhus University”. Press it to select it.
10. A pop-up box informs you that you will have to log in every time because your phone can’t log in automatically.
11. Optional: If you don’t want to see the message again, put a check mark in ’No need to show this again’.
12. Press ’Got It’.
LOG IN13. Press ’WAYF LOGIN’.
14. Select ’Aarhus University’ from the list.
FEATURES
15. Now you see a list of all the courses to which you are currently enrolled.
Here you can find all your courses you are enrolled

15 BLACKBOARD FOR SMARTPHONE AND TABLETSBLACKBOARD FOR ANDROID
16. Press on a course to enter it.
17. There are now two tabs:
18. ’Course Info’: You see the course description and the names of all users enrolled to the course.
19. ’Course Map’: This is what you see in the course’s navigation menu as you know it from viewing the course in an Internet browser. There are subfolders, too. Try pressing on ’Tools’. Here, you can, for instance, see your grades by pressing ’My Grades’.
20. All other course information and functionality is available here, too. If you are not sure what everything is, go through the general tutorial for Blackboard that is based on Internet browser access. This tutorial covers the most important features you see here, too.

16 BLACKBOARD FOR SMARTPHONE AND TABLETSBLACKBOARD FOR IPHONE
Not all the services from Blackboard are available through the iOS app. This guide’s purpose is to give a overview of the available services and an installation guide.
INSTALLATION
1. Find ‘App Store’ on your iPhone’s desktop.
2. Hit the small magnifying glass in the top right corner to search for the app ’blackboard learn’.
3. The app ‘Blackboard Mobile Learn’ should be in the top of the search result.
4. The app ‘Blackboard Mobile Learn’ should be in the top of the search result.
5. Hit ‘install’ to install the app.
6. Hit ‘Accept’ to approve the app.
7. Now the app will download. When it is done downloading hit the ‘home’ button to return to your desktop
ÅBEN APPEN
8. The app will be on the list of apps on your iPad. It will also be visible as an icon on your desktop.
9. Find the ‘Mobile learn’ app and press it.
10. Check the checkbox in ‘I accept these conditions’ to accept the conditions and hit ‘Continue’ afterwards
11. In the search field write ‘Aarhus’. Find “Aarhus University”
12. A pop-up will tell you that you have to manually log in every time you use the app, since there is no automatic login option.
BLACKBOARD FOR IPHONEThis chapter reviews how to find and install Blackboard on your iPhone. The Blackboard version for IIPhone is slightly different compared to the version for iPad.
The icon for ”App Store” looks like this.
Find the Blackboard icon on your desktop page

17 BLACKBOARD FOR SMARTPHONE AND TABLETSBLACKBOARD FOR IPHONE
LOG IN
13. Press ‘WAYF LOGIN’.
14. Choose ‘Aarhus University’.
SERVICES
15. Here is a list with the courses you are registered in
16. Select a course.
17. There are now two tabs:
18. ’Course Info’: Her ses en kursusbeskrivelse og navnene på alle brugere, som er skrevet op til kurset.
19. ‘Course Map: This tab contains what you usually see in the course navigation menu when you use Blackboard on an internet browser on a computer. Hit ‘Tools’ to see the available services. For example, you can see your grades if you press ‘My Grades’.
20. All the other course information and services are available here. For more information about every available service look at the guide for Blackboard which is based on internet browser access. This guide covers the most important services.
21. By pressing the cog wheel ‘settings’ at the top of the app you have the option to link your dropbox to blackboard, help search function, read more about the app under privacy and log out.
22. To the right you see your dashboard where relevant information is available.
The icon for courses

18 BLACKBOARD FOR SMARTPHONE AND TABLETSBLACKBOARD FOR IPAD
Not all the services from Blackboard are available through the iOS app. This guide’s purpose is to give a overview of the available services and an installation guide.
INSTALLATION
1. Find ‘App Store’ on your iPad’s desktop.
2. Hit the small magnifying glass in the top right corner to search for the app ’blackboard learn’.
3. The app ‘Blackboard Mobile Learn’ should be in the top of the search result.
4. The app ‘Blackboard Mobile Learn’ should be in the top of the search result.
5. Hit ‘install’ to install the app.
6. Hit ‘Accept’ to approve the app.
7. Now the app will download. When it is done downloading hit the ‘home’ button to return to your desktop
ÅBEN APPEN
8. The app will be on the list of apps on your iPad. It will also be visible as an icon on your desktop.
9. Find the ‘Mobile learn’ app and press it.
10. Check the checkbox in ‘I accept these conditions’ to accept the conditions and hit ‘Continue’ afterwards
11. In the search field write ‘Aarhus’. Find “Aarhus University”
12. A pop-up will tell you that you have to manually log in every time you use the app, since there is no automatic login option.
BLACKBOARD FOR IPADThis chapter reviews how to find and install Blackboard on your tablet. Below is a guide to iPad / iOS users. Blackboard version for iPad is slightly different compared to the version for IPhone.
The icon for ”App Store” looks like this.
Find the Blackboard icon on your desktop page

19 BLACKBOARD FOR SMARTPHONE AND TABLETSBLACKBOARD FOR IPAD
LOG IN
13. Press ‘WAYF LOGIN’.
14. Choose ‘Aarhus University’.
SERVICES
15. Here is a list with the courses you are registered in
16. Select a course.
17. There are now two tabs:
18. ’Course Info’: Her ses en kursusbeskrivelse og navnene på alle brugere, som er skrevet op til kurset.
19. ‘Course Map: This tab contains what you usually see in the course navigation menu when you use Blackboard on an internet browser on a computer. Hit ‘Tools’ to see the available services. For example, you can see your grades if you press ‘My Grades’.
20. All the other course information and services are available here. For more information about every available service look at the guide for Blackboard which is based on internet browser access. This guide covers the most important services.
21. By pressing the cog wheel ‘settings’ at the top of the app you have the option to link your dropbox to blackboard, help search function, read more about the app under privacy and log out.
22. To the right you see your dashboard where relevant information is available.

BLACKBOARD FOR SMARTPHONE AND TABLETSBLACKBOARD FOR IPADBLACKBOARD FOR IPAD
AU IT / BSS Support Fuglesangs Allé 4 8210 Aarhus V
T: 8715 2424M: [email protected]/it