Embed Size (px)
Citation preview
Bizmail Manual for Administrator - English Version: 3.0
Page 1 of 12
BizMail Manual for Administrator English Version: 3.0

Bizmail Manual for Administrator - English Version: 3.0
Page 2 of 12
1 GETTING START Go to “http://mailmanagement.ksc.net”, fill in the following information to log in;
Username: Your username is your domain name, for example “ksc.th.com” or
“yourdomain.com”. Please use lowercase letters. Password: Fill in your password.
After finished, click “Login” button.
After logged in, you will see the below window. The “Account Management” => “General” tab is a default screen.
1. Domain: Show your domain name, for example; ksc.th.com or yourdomain.com. 2. General: Show the summary of your organization e-mail account and storage.
Quota Accounts: Show total numbers of e-mail accounts that you can create. Used Accounts: Show the numbers of e-mail accounts that you have created. Quota Storage: Show the total space of your e-mail domain. Used Storage: Show the total space that is used (MB).
3. Email Account: Add or delete e-mail account. 4. Email Group: Add or delete e-mail group. 5. WhiteList Domain: Add or delete white list. 6. BlackList Domain: Add or delete junk mail or unwanted mail. 7. Log: See the administrator system usage history of the user. 8. Account Management: Manage e-mail account details and policy of your organization. 9. Import Account/Group: Import e-mail account or e-mail group. 10. Change Password: Change Login password. 11. Logout: Log out from the system.
1
3 2 4 5 6 7 8
9
10
11

Bizmail Manual for Administrator - English Version: 3.0
Page 3 of 12
2 ADD OR DELETE EMAIL At this page, you can add, edit or delete the e-mail accounts, click “Email Account” tab and the
following details will be appeared.
1. Add new record: Add new e-mail accounts.
2. Export to Excel: Save all visible e-mail account details to excel file. 3. Redirect: Set up the redirect e-mail system.
4. AutoReply: Set up the auto-reply e-mail system. 5. Filter Account Name: Search from e-mail account.
6. Page number: Show current page number.
7. Items per page: Show the amount of e-mail in one page. 8. Column Width: Click to adjust column width.
9. Filter Status: Select the desired status. 10. Edit: Edit the selected e-mail account.
11. Delete: Delete the unused e-mail account.
8 2 1
5 3 4
6 7
10 11
9

Bizmail Manual for Administrator - English Version: 3.0
Page 4 of 12
2.1 Add e-mail account Click “Add new record” button.
You will see the below window.
Account Name: Create a new e-mail account. Fill in the name without @domain. For example,
if you would like to create an e-mail account for Sales Department, you may fill in only the word “sales”.
Remark: The valid E-mail account must contain 3-30 characters in length and starts with a letter. No special character (@, &, ‘, (, ), <, or >.) is allowed, except the underscores (_).
Password: Fill in your password. To ensure that you fill in a valid password, the system will
display the characters in this process. The password must contain 6-50 characters in length.
Package: Set the desired space of the e-mail account.
1
2
3

Bizmail Manual for Administrator - English Version: 3.0
Page 5 of 12
2.2 Redirect e-mail message Click “Redirect” button in front of the desired account.
You will see the below window.
1. Redirect All Mail to: Enable the redirect e-mail system. 2. Keep a Copy: Store e-mail in inbox before forwarding.
3. Preserve To/Cc fields: Click to keep To and Cc value.
4. Add new record: Add new field to fill in email address. 5. Account Name: Fill in the e-mail address that you want to forward message to.
6. Save changes: Click to save the current setting. 7. Cancel changes: Click to cancel the current setting.
8. Delete: Click to delete the unwanted account.
1
2
3
4 6 7
8 5

Bizmail Manual for Administrator - English Version: 3.0
Page 6 of 12
2.3 Auto-reply message setting Click “Auto Reply” button in front of the desired account.
You will see the below window.
1. Enable: Enable the auto-reply system. 2. Start date: Set the date to start the auto-reply message.
3. End date: Set the date to end the auto-reply message.
4. Message: Type the auto-reply message. 5. Submit: Click to save the current setting.
6. Reset: Click to cancel the current setting.
1
2
3
4
5 6

Bizmail Manual for Administrator - English Version: 3.0
Page 7 of 12
3 ADD OR DELETE EMAIL GROUP You can add, edit or delete the e-mail group, click “Email Group” tab and the following details will be appeared.
1. Add new record: Add new group name.
2. Export to Excel: Save e-mail group details to excel file. 3. Account List: Add e-mail account to the group.
4. Group Name: Search from e-mail group name. 5. Real Name: Search from e-mail group specific name.
6. Edit: Edit e-mail group name. 7. Delete: Edit unused e-mail group.
3.1 Add e-mail account to e-mail group Click “Account List” button in front of the e-mail group. You will see the below window.
1. Save changes: Save the current setting.
2. Cancel changes: Cancel the current setting. 3. Account: Search from e-mail account.
4. Select: Select the desired status.
5. Select: Select the e-mail account which will be in the group.
1 2
3
4 5 6 7
5
1 2
3 4
Bizmail Manual for Administrator - English Version: 3.0
Page 8 of 12
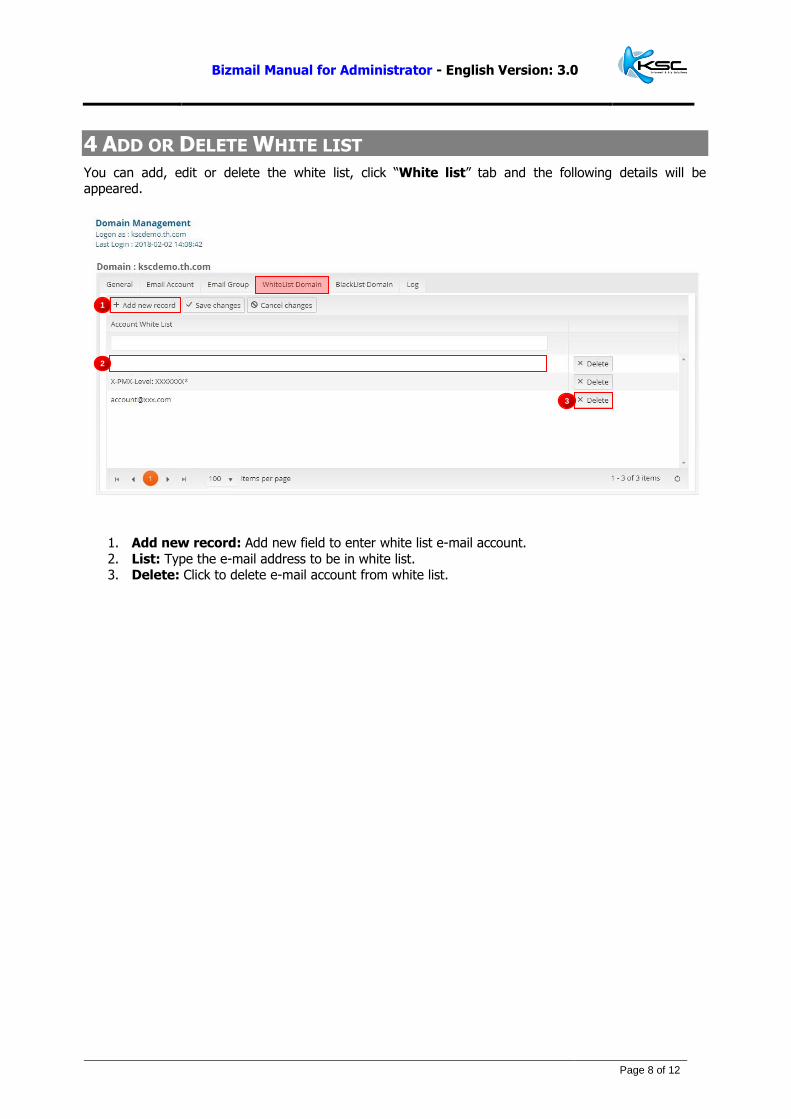
4 ADD OR DELETE WHITE LIST You can add, edit or delete the white list, click “White list” tab and the following details will be appeared.
1. Add new record: Add new field to enter white list e-mail account.
2. List: Type the e-mail address to be in white list. 3. Delete: Click to delete e-mail account from white list.
1
2
3

Bizmail Manual for Administrator - English Version: 3.0
Page 9 of 12
5 ADD OR DELETE BLACK LIST You can add, edit or delete the black list, click “Black list” tab and the following details will be appeared.
1. Add new record: Add new field to enter black list e-mail account.
2. List: Type the e-mail address to be in black list. 3. Delete: Click to delete e-mail account from black list.
1
2
3

Bizmail Manual for Administrator - English Version: 3.0
Page 10 of 12
6 USAGE LOG Click the “Log” tab to see the usage history. You will see the below window.
1. Export to Excel: Save log details to excel file.
2. Date Time: Show the usage date and time. 3. Log: Show the usage details.
4. Action by: Show the name of user.
1
2 3 4

Bizmail Manual for Administrator - English Version: 3.0
Page 11 of 12
7 IMPORT EMAIL ACCOUNT To import, click “Import Account/Group” manu and select “Import Account” tab. You will see the below window.
1. Download Example File: Download example file.
2. File: Add a file to import.
3. Submit: Import the e-mail accounts.
1
2
3
Bizmail Manual for Administrator - English Version: 3.0
Page 12 of 12
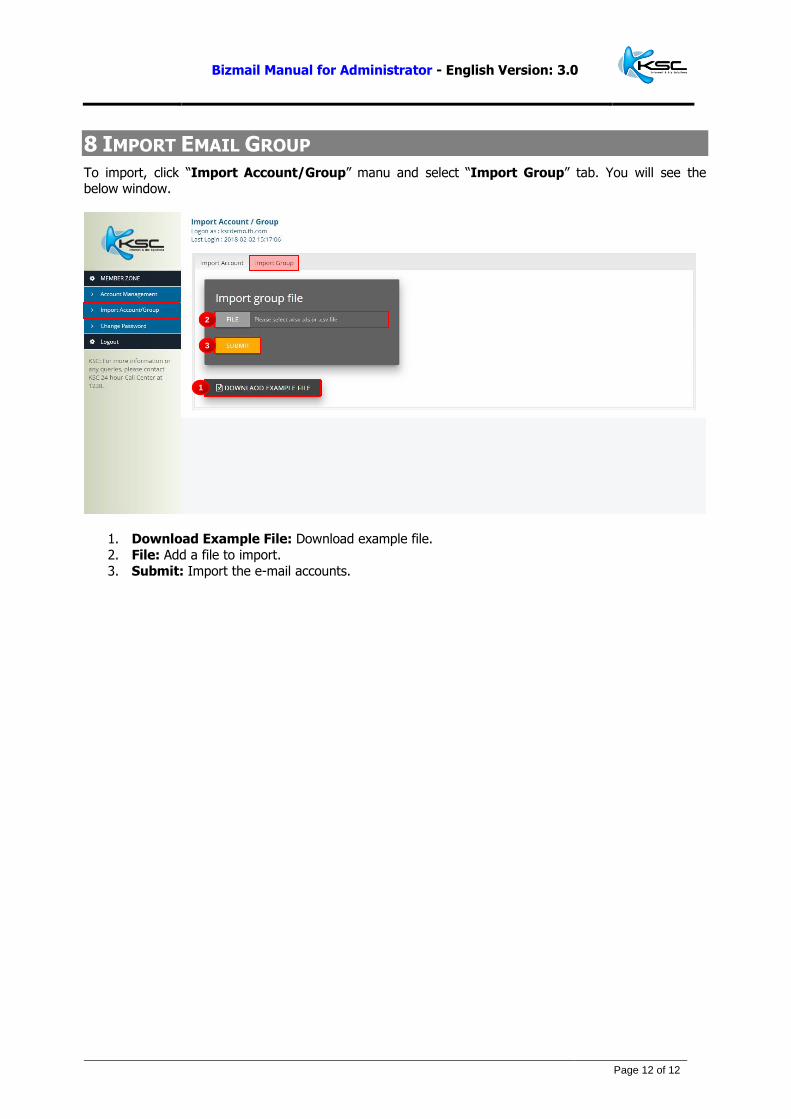
8 IMPORT EMAIL GROUP To import, click “Import Account/Group” manu and select “Import Group” tab. You will see the below window.
1. Download Example File: Download example file.
2. File: Add a file to import.
3. Submit: Import the e-mail accounts.
1
2
3