Embed Size (px)
Citation preview

BIOS Update ������������������������������������������������������������������������������������� 2
UEFI BIOS Setup �������������������������������������������������������������������������������� 6
SMART FAN Control �������������������������������������������������������������������������� 7
1� Main Menu ����������������������������������������������������������������������������������� 8
2� Advanced Menu ���������������������������������������������������������������������������� 9
3� Chipset Menu �������������������������������������������������������������������������������22
4� Boot Menu �����������������������������������������������������������������������������������26
5� Security Menu ������������������������������������������������������������������������������28
6� O�N�E Menu����������������������������������������������������������������������������������30
7� Exit Menu�������������������������������������������������������������������������������������32
BIOS User GuideA320MH

2 | BIOS Update
BIOS Update
The BIOS can be updated using either of the following utilities: • BIOSTAR BIOS-FLASHER: Using this utility, the BIOS can be updated from a file on a hard disk,
a USB drive (a flash drive or a USB hard drive), or a CD-ROM.• BIOSTAR BIOS Update Utility: It enables automated updating while in the Windows
environment. Using this utility, the BIOS can be updated from a file on a hard disk, a USB drive (a flash drive or a USB hard drive), or a CD-ROM, or from the file location on the Web.
BIOSTAR BIOS-FLASHER
Note» This utility only allows storage device with FAT32/16 format and single partition.» Shutting down or resetting the system while updating the BIOS will lead to system boot failure.
Updating BIOS with BIOSTAR BIOS-FLASHER1. Go to the website to download the latest BIOS file for the motherboard.2. Then, copy and save the BIOS file into a USB flash (pen) drive.(Only supported FAT/FAT32
format)3. Insert the USB pen drive that contains the BIOS file to the USB port.4. Power on or reset the computer and then press <F12> during the POST process.
5. After entering the POST screen, the BIOS-FLASHER utility pops out. Choose <fs0> to search for the BIOS file.
6. Select the proper BIOS file, and a message asking if you are sure to flash the BIOS file. Click “Yes” to start updating BIOS.

BIOS Update | 3
A320MH
7. A dialog pops out after BIOS flash is completed, asking you to restart the system. Press the <Y> key to restart system.
8. While the system boots up and the full screen logo shows up, press <DEL> key to enter BIOS setup.After entering the BIOS setup, please go to the <Save & Exit>, using the <Restore Defaults> function to load Optimized Defaults, and select <Save Changes and Reset> to restart the computer. Then the BIOS Update is completed.
BIOS Update Utility (through the Internet)1. Installing BIOS Update Utility from the DVD Driver. 2. Please make sure the system is connected to the internet before using this function.
3. Launch BIOS Update Utility and click the “Online Update” button on the main screen.
4. An open dialog will show up to request your agreement to start the BIOS update. Click “Yes” to start the online update procedure.
5. If there is a new BIOS version, the utility will ask you to download it. Click “Yes” to proceed.
6. After the download is completed, you will be asked to program (update) the BIOS or not. Click “Yes” to proceed.

4 | BIOS Update
7. After the updating process is finished, you will be asked you to reboot the system. Click “OK” to reboot.
8. While the system boots up and the full screen logo shows up, press <DEL> key to enter BIOS setup.After entering the BIOS setup, please go to the <Save & Exit>, using the <Restore Defaults> function to load Optimized Defaults, and select <Save Changes> and <Reset> to restart the computer. Then, the BIOS Update is completed.
BIOS Update Utility (through a BIOS file)1. Installing BIOS Update Utility from the DVD Driver.2. Download the proper BIOS from http://www.biostar.com.tw/
3. Launch BIOS Update Utility and click the “Update BIOS” button on the main screen.
4. A warning message will show up to request your agreement to start the BIOS update. Click “OK” to start the update procedure.
5. Choose the location for your BIOS file in the system. Please select the proper BIOS file, and then click on “Open”. It will take several minutes, please be patient.

UEFI BIOS Setup | 5
A320MH
6. After the BIOS Update process is finished, click on “OK” to reboot the system.
7. While the system boots up and the full screen logo shows up, press <DEL> key to enter BIOS setup.After entering the BIOS setup, please go to the <Save & Exit>, using the <Restore Defaults> function to load Optimized Defaults, and select <Save Changes and Reset> to restart the computer. Then, the BIOS Update is completed.
Backup BIOSClick the Backup BIOS button on the main screen for the backup of BIOS, and select a proper location for your backup BIOS file in the system, and click “Save”.

6 | UEFI BIOS Setup
UEFI BIOS Setup
IntroductionThe purpose of this manual is to describe the settings in the AMI UEFI BIOS Setup program on this motherboard. The Setup program allows users to modify the basic system configuration and save these settings to NVRAM.UEFI BIOS determines what a computer can do without accessing programs from a disk. This system controls most of the input and output devices such as keyboard, mouse, serial ports and disk drives. BIOS activates at the first stage of the booting process, loading and executing the operating system. Some additional features, such as virus and password protection or chipset fine-tuning options are also included in UEFI BIOS. The rest of this manual will to guide you through the options and settings in UEFI BIOS Setup.
Plug and Play SupportThis AMI UEFI BIOS supports the Plug and Play Version 1.0A specification.
EPA Green PC SupportThis AMI UEFI BIOS supports Version 1.03 of the EPA Green PC specification.
ACPI SupportAMI ACPI UEFI BIOS support Version 1.0/2.0 of Advanced Configuration and Power interface specification (ACPI). It provides ASL code for power management and device configuration capabilities as defined in the ACPI specification, developed by Microsoft, Intel and Toshiba.
PCI Bus SupportThis AMI UEFI BIOS also supports Version 2.3 of the Intel PCI (Peripheral Component Interconnect) local bus specification.
Using SetupWhen starting up the computer, press <Del> during the Power-On Self-Test (POST) to enter the UEFI BIOS setup utility.In the UEFI BIOS setup utility, you will see General Help description at the top right corner, and this is providing a brief description of the selected item. Navigation Keys for that particular menu are at the bottom right corner, and you can use these keys to select item and change the settings.
Note » The default UEFI BIOS settings apply for most conditions to ensure optimum performance of the
motherboard. If the system becomes unstable after changing any settings, please load the default settings to ensure system’s compatibility and stability. Use Load Setup Default under the Exit Menu.
» For better system performance, the UEFI BIOS firmware is being continuously updated. The UEFI BIOS information described in this manual is for your reference only. The actual UEFI BIOS information and settings on board may be slightly different from this manual.
» The content of this manual is subject to be changed without notice. We will not be responsible for any mistakes found in this user’s manual and any system damage that may be caused by wrong-settings.

SMART FAN Control | 7
A320MH
SMART FAN Control
Press <F5> to display the SMART FAN Control menu.
1� CPU1/2 RPM & SYSTEM1/2 RPM: Click button to set the status value of CPU and system fan.2� PWM/Temperature Panel: According to the fan PWM value corresponding to CPU and system temperature to adjust the fan speed. » Allows you to adjust according to your preferences.3� Temperature: Shows the current CPU and system temperature.4� Control Mode: Allows you to control mode of the fans.• Quiet: Enable Quiet mode.• Aggressive: Enable Aggressive mode.• Manual: Enable Manual mode.• Full on: Enable Full On mode.
Note » Menu contents will be different slightly, depending on different motherboard of users’ computers. » Once you are finished making your selections, choose the <Save & Exit> menu to save.
8 | 1. Main Menu
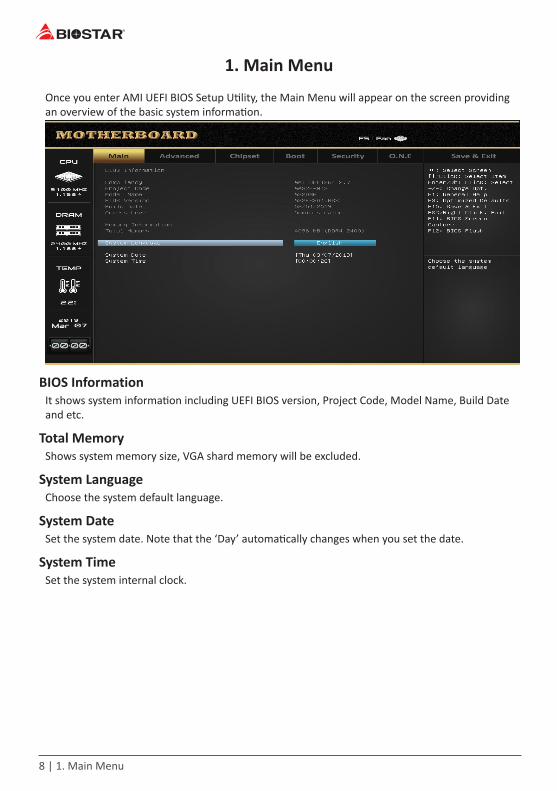
1� Main Menu
Once you enter AMI UEFI BIOS Setup Utility, the Main Menu will appear on the screen providing an overview of the basic system information.
BIOS InformationIt shows system information including UEFI BIOS version, Project Code, Model Name, Build Date and etc.
Total MemoryShows system memory size, VGA shard memory will be excluded.
System LanguageChoose the system default language.
System DateSet the system date. Note that the ‘Day’ automatically changes when you set the date.
System TimeSet the system internal clock.

2. Advanced Menu | 9
A320MH
2� Advanced Menu
The Advanced Menu allows you to configure the settings of CPU, Super I/O, Power Management, and other system devices.
Note » Beware of that setting inappropriate values in items of this menu may cause system to malfunction.
Note » The AMD CBS option appears only with Summit Ridge/ Raven Ridge/ Pinnacle Ridge.
Trusted Computing

10 | 2. Advanced Menu
Security Device SupportThis item enables or disables BIOS support for security device. O.S. will not show Security Device. TCG EFI protocol and INT1A interface will not be available.Options: Enabled (Default) / Disabled
SHA-1 PCR BankThis item enables or disables SHA-1 PCR Bank.Options: Enabled (Default) / Disabled
SHA256 PCR BankThis item enables or disables SHA256 PCR Bank.Options: Enabled (Default) / Disabled
Pending operationThis item Schedule an Operation for the Security Device.Options: None (Default) / TPM Clear
» Your computer will reboot during restart in order to change state of Security Device.
Platform HierarchyThis item enables or disables Platform Hierarchy.Options: Enabled (Default) / Disabled
Storage HierarchyThis item enables or disables Storage Hierarchy.Options: Enabled (Default) / Disabled
Endorsement HierarchyThis item enables or disables Endorsement Hierarchy.Options: Enabled (Default) / Disabled
TPM2�0 UEFI Spec VersionThis item select the TCG2 Spec Version support. TCG_1_2: the Compatible mode for Win8/Win10 ; TCG_2: Support new TCG2 protocol and event format for Win10 or later.Options: TCG_2 (Default) / TCG_1_2
Physical Presence Spec VersionThis item select to tell O.S. to support PPI Spec Version 1.2 or 1.3 .Options: 1.3 (Default) / 1.2
» some HCK tests might not support 1.3 .

2. Advanced Menu | 11
A320MH
ACPI Settings/WakeUp Event control
ErP ControlThis item enables or disables ErP Control function. When ErP Enabled, system meets ErP requirment. All wake up events do not work except Power Button after power down system(S5).Options: Disabled (Default) / Enabled
ACPI Sleep StateThis item select ACPI sleep state the system will enter when the SUSPEND button is pressed.Options: S3 (Suspend to RAM) (Default) / Suspend Disabled
Restore AC Power LossThe item specify what state to go to when power is re-applied after a power failure.Options: Power Off (Default) / Power On / Last State
PME Wake up from S5The item enables the system to wake from S5 using PME event.Options: Disabled (Default) / Enabled
Wake system with Fixed TimeThis item enables or disables the system to wake on by alarm event. When this item is enabled, the system will wake on the hr::min::sec specified.Options: Disabled (Default) / Enabled
Wake up dateYou can choose which date the system will boot up.Wake up hour / Wake up minute / Wake up secondYou can choose the system boot up time, input hour, minute and second to specify.
PS2 Keyboard PowerOnThis item allows you to control the keyboard power on function.Options: Disabled (Default) / Any Key / Stroke Key / Specific Key
12 | 2. Advanced Menu
Stroke KeysThis item will show only when Keyboard PowerOn is set “Stroke Key.”Options: Wake Key (Default) / Power Key / Ctrl+F1 / Ctrl+F2 / Ctrl+F3 / Ctrl +F4 / Ctrl+F5 / Ctrl+F6Specific KeyThis item will show only when Keyboard PowerOn is set “Specific Key.” Press Enter to set Specific key.
PS2 Mouse PowerOnThis item allows you to control the mouse power on function.Options: Disabled (Default) / Enabled
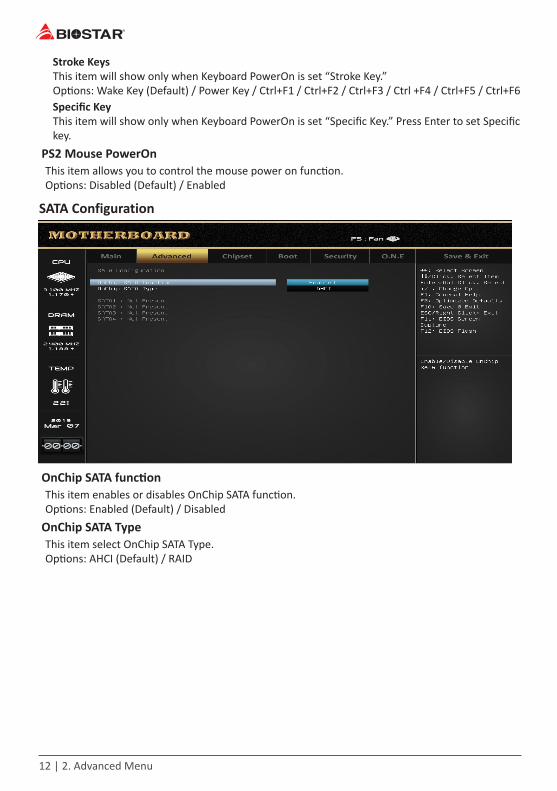
SATA Configuration
OnChip SATA functionThis item enables or disables OnChip SATA function.Options: Enabled (Default) / Disabled
OnChip SATA TypeThis item select OnChip SATA Type.Options: AHCI (Default) / RAID
2. Advanced Menu | 13
A320MH
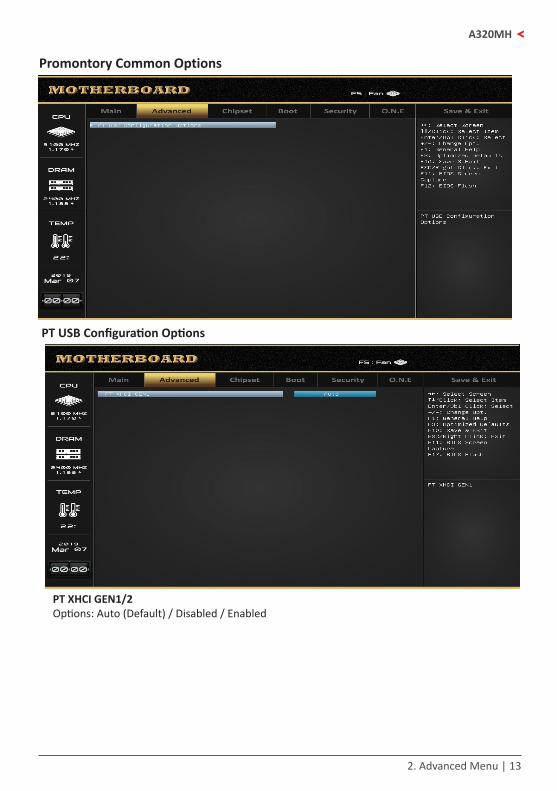
Promontory Common Options
PT USB Configuration Options
PT XHCI GEN1/2Options: Auto (Default) / Disabled / Enabled

14 | 2. Advanced Menu
IT8613 Super IO Configuration
Serial PortThis item enabled or Disabled Serial Port (COM).Options: Enabled (Default) / Disabled
Change SettingsThis item select an optimal settings for Super IO Device.Options: Auto (Default) / IO=3F8h; IRQ=4 / IO=3F8h; IRQ=3,4,5,6,7,9,10,11,12 / IO=2F8h; IRQ=3,4,5,6,7,9,10,11,12 / IO=3E8h; IRQ=3,4,5,6,7,9,10,11,12 / IO=2E8h; IRQ=3,4,5,6,7,9,10,11,12
H/W Monitor
PWM Processor HotOptions: Enabled (Default) / Disabled
2. Advanced Menu | 15
A320MH
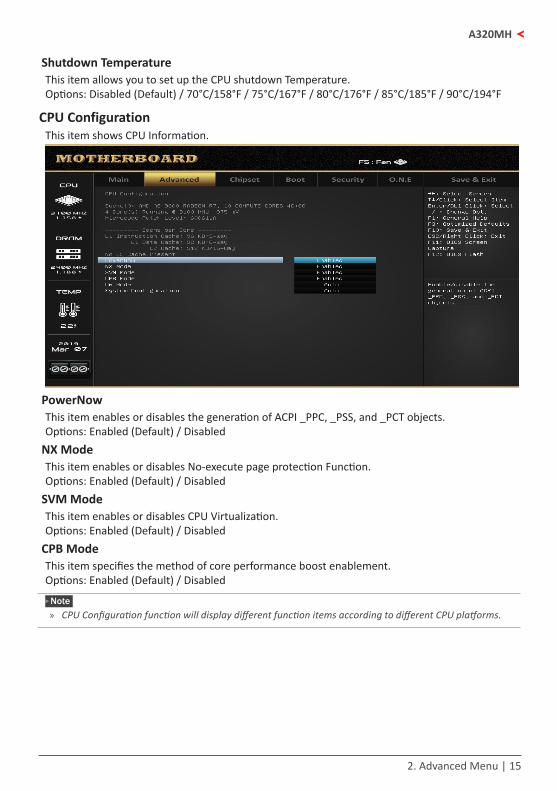
Shutdown TemperatureThis item allows you to set up the CPU shutdown Temperature. Options: Disabled (Default) / 70°C/158°F / 75°C/167°F / 80°C/176°F / 85°C/185°F / 90°C/194°F
CPU ConfigurationThis item shows CPU Information.
PowerNowThis item enables or disables the generation of ACPI _PPC, _PSS, and _PCT objects.Options: Enabled (Default) / Disabled
NX ModeThis item enables or disables No-execute page protection Function.Options: Enabled (Default) / Disabled
SVM ModeThis item enables or disables CPU Virtualization.Options: Enabled (Default) / Disabled
CPB ModeThis item specifies the method of core performance boost enablement.Options: Enabled (Default) / Disabled
Note » CPU Configuration function will display different function items according to different CPU platforms.

16 | 2. Advanced Menu
PCI Subsystem Settings
PCI Latency TimerThis item value to be programmed into PCI Latency Timer Register.Options: 32 PCI Bus Clocks (Default) / 64 PCI Bus Clocks / 96 PCI Bus Clocks / 128 PCI Bus Clocks / 160 PCI Bus Clocks / 192 PCI Bus Clocks / 224 PCI Bus Clocks / 248 PCI Bus Clocks
PCI-X Latency TimerThis item value to be programmed into PCI Latency Timer Register.Options: 64 PCI Bus Clocks (Default) / 32 PCI Bus Clocks / 96 PCI Bus Clocks / 128 PCI Bus Clocks / 160 PCI Bus Clocks / 192 PCI Bus Clocks / 224 PCI Bus Clocks / 248 PCI Bus Clocks
VGA Palette SnoopThis item enables or disables VGA Palette Registers Snooping.Options: Disabled (Default) / Enabled
Above 4G DecodingThis item enables or disables 64bit capable Devices to be Decoded in Above 4G Address Space (Only if System Supports 64bit PCI Decoding).Options: Disabled (Default) / Enabled
SR-IOV SupportThis item if system has SR-IOV capable PCIe Devices, this option enables or disables Single Root IO Virtualization Support.Options: Disabled (Default) / Enabled
BME DMA MitigationThis item if system has SR-IOV capable PCIe Devices, this option enables or disables Single Root IO Virtualization Support.Options: Disabled (Default) / Enabled

2. Advanced Menu | 17
A320MH
PCI Express Settings
No SnoopThis item enables or disables PCI Express Device No Snoop option.Options: Enabled (Default) / DisabledMaximum PayloadThis item set Maximum Payload of PCI Express Device or allow System BIOS to select the value.Options: Auto (Default) / 128 Bytes / 256 Bytes / 512 Bytes / 1024 Bytes / 2048 Bytes /4096 BytesMaximum Read RequestThis item set Maximum Read Request Size of PCI Express Device or allow system BIOS to select the value.Options: Auto (Default) / 128 Bytes / 256 Bytes / 512 Bytes / 1024 Bytes / 2048 Bytes /4096 BytesASPM SupportThis item set the ASPM Level: Force L0s - Force all links to L0s State ; AUTO - BIOS auto configure ; Disable - Disable ASPM.Options: Disabled (Default) / Auto / Force L0s

18 | 2. Advanced Menu
USB Configuration
Legacy USB SupportThe item allows you to enable Legacy USB support. AUTO option disables legacy support if no USB devices are connected. DISABLE option will keep USB devices available only for EFI applications.Options: Enabled (Default) / Disabled / Auto
Legacy USB3.0 SupportThe item enables or disables legacy USB3.0 support.Options: Enabled (Default) / Disabled
XHCI Hand-offThis is a workaround for OSes without XHCI hand-off support. The XHCI ownership change should be claimed by XHCI driver.Options: Enabled (Default) / Disabled
EHCI Hand-offThis is a workaround for OSes without EHCI hand-off support. The EHCI ownership change should be claimed by EHCI driver.Options: Disabled (Default) / Enabled
USB FLASH DRIVE PMAPThis item Mass storage device emulation type. ‘AUTO‘ enumerates devices according to their media format. Optical drives are emulated as ‘CDROM’ , drives with no media will be emulated according to a drive type.Options: Auto (Default) / Floppy / Forced FDD / Hard Disk / CD-ROM
Note » CPU Configuration function will display different function items according to different CPU platforms.
2. Advanced Menu | 19
A320MH
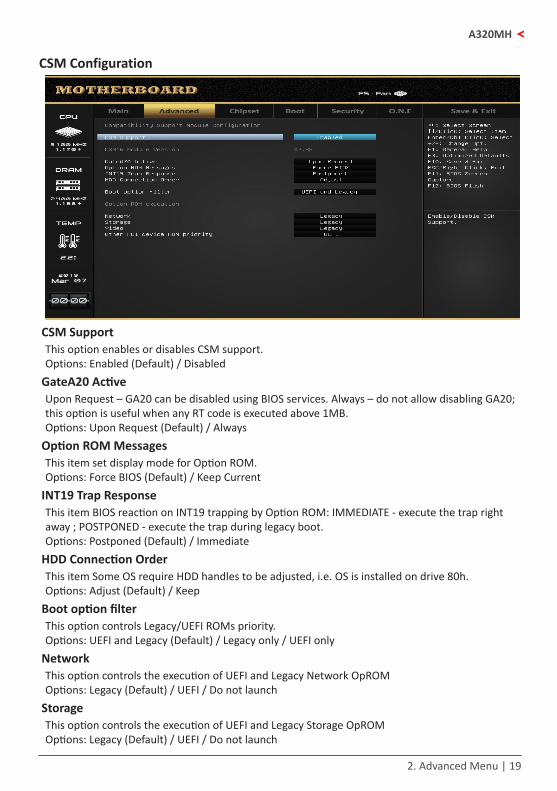
CSM Configuration
CSM SupportThis option enables or disables CSM support.Options: Enabled (Default) / Disabled
GateA20 ActiveUpon Request – GA20 can be disabled using BIOS services. Always – do not allow disabling GA20; this option is useful when any RT code is executed above 1MB.Options: Upon Request (Default) / Always
Option ROM MessagesThis item set display mode for Option ROM.Options: Force BIOS (Default) / Keep Current
INT19 Trap ResponseThis item BIOS reaction on INT19 trapping by Option ROM: IMMEDIATE - execute the trap right away ; POSTPONED - execute the trap during legacy boot.Options: Postponed (Default) / Immediate
HDD Connection OrderThis item Some OS require HDD handles to be adjusted, i.e. OS is installed on drive 80h.Options: Adjust (Default) / Keep
Boot option filterThis option controls Legacy/UEFI ROMs priority.Options: UEFI and Legacy (Default) / Legacy only / UEFI only
NetworkThis option controls the execution of UEFI and Legacy Network OpROMOptions: Legacy (Default) / UEFI / Do not launch
StorageThis option controls the execution of UEFI and Legacy Storage OpROMOptions: Legacy (Default) / UEFI / Do not launch

20 | 2. Advanced Menu
VideoThis option controls the execution of UEFI and Legacy Video OpROMOptions: Legacy (Default) / UEFI / Do not launch
Other PCI device ROM priorityThis item for PCI devices other than Network, Mass storage or Video defines which OpROM to launch.Options: UEFI (Default) / Legacy / Do not launch
NVMe ConfigurationThe item shows NVMe controller and driver information.
Offboard PCIe SATA Controller

2. Advanced Menu | 21
A320MH
Network Stack Configuration
Network StackThis item enables or disables UEFI network stackOptions: Disabled (Default) / Enabled
Note » The following items appear only when you set the Network Stack function to [Enabled]
IPv4 PXE SupportThis item enables or disables IPv4 PXE Boot Support. If disabled IPv4 PXE boot option will not be created.Options: Disabled (Default) / EnabledIPv4 HTTP SupportThis item enables or disables IPv4 HTTP Boot Support. If disabled IPV4 HTTP boot option will not be created.Options: Disabled (Default) / EnabledIPv6 PXE SupportThis item enables or disables IPv6 PXE Boot Support. If disabled IPv6 PXE boot option will not be created.Options: Disabled (Default) / EnabledIPv6 HTTP SupportThis item enables or disables IPv6 HTTP Boot Support. If disabled IPv6 HTTP boot option will not be created.Options: Disabled (Default) / EnabledIPSEC CertificateThis item enables or disables IPSEC certificate for Ikev.Options: Enabled (Default) / DisabledPXE boot wait timeWait time to press ESC key to abort the PXE boot.Media detect countNumber of times presence of media will be checked.

22 | 3. Chipset Menu
3� Chipset Menu
This section describes configuring the PCI bus system. PCI, or Personal Computer Interconnect, is a system which allows I/O devices to operate at speeds nearing the speed of the CPU itself uses when communicating with its own special components.
Note » Beware of that setting inappropriate values in items of this menu may cause system to malfunction.
CEC2019This item enables or disables CEC2019.Options: Disabled (Default) / Enabled
South Bridge

3. Chipset Menu | 23
A320MH
SB USB Configuration
XHCI ControllerThis item enables or disables XHCI Controller.Options: Auto (Default) / Disabled / EnabledEHCI HC (Bus 0 Dev 18 Fn 0)Options: Auto (Default) / Disabled / Enabled
SB Power Saving
AB Clock GatingThis item enables or disables AB Internal Clock Gating.Options: Auto (Default) / Disabled / EnabledPCIB Clock RunThis item enables or disables PCIB Clock Run.Options: Auto (Default) / Disabled / Enabled

24 | 3. Chipset Menu
North Bridge
IOMMUThis item enables or disables IOMMU support.Options: Disabled (Default) / Enabled
GFX Configuration
Primary Video Device (Bristol Ridge/ Raven Ridge Only)This item allows you to select Primary Video Device that BIOS will use to for output.Options: NB PCIe slot Video (Default) / IGD VideoIntegrated Graphics (Bristol Ridge/ Raven Ridge Only)This item allows you to controller the Integrated Graphics function.Options: Auto (Default) / Disabled
3. Chipset Menu | 25
A320MH
UMA Frame Buffer Size (Bristol Ridge/ Raven Ridge Only)This item allows you to set UMA FB Size.Options: Auto (Default) / 32M / 64M / 128M / 256M / 512M / 1G / 2GGnb Hd AudioThis item enables or disables Gnb Hd Audio.Options: Auto (Default) / Disabled / EnabledPSPP PolicyThis item allows you to set PCIe speed power policy.Options: Auto (Default) / Disabled / Performance / Balanced-High / Balanced-Low / Power SavingSurround View (Bristol Ridge/ Raven Ridge Only)This item support multi-display function.Options: Disabled (Default) / Auto
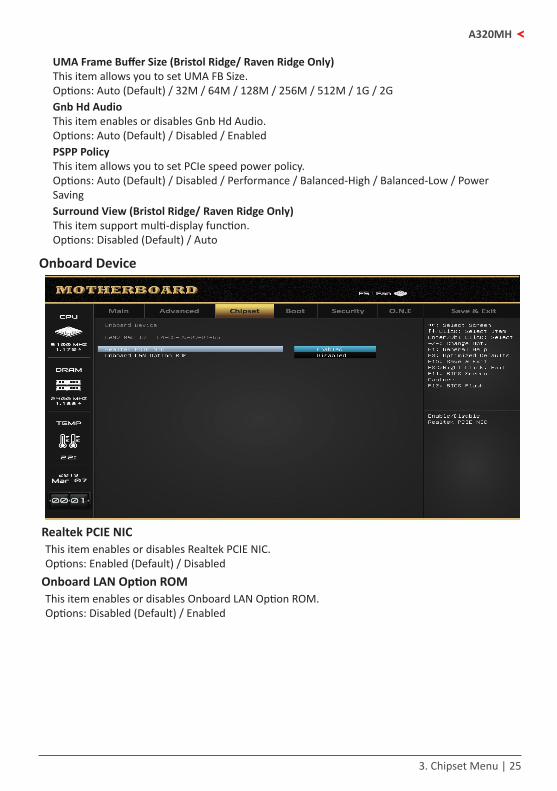
Onboard Device
Realtek PCIE NICThis item enables or disables Realtek PCIE NIC.Options: Enabled (Default) / Disabled
Onboard LAN Option ROMThis item enables or disables Onboard LAN Option ROM.Options: Disabled (Default) / Enabled

26 | 4. Boot Menu
4� Boot Menu
This menu allows you to setup the system boot options.
Setup Prompt TimeoutThis item sets number of seconds to wait for setup activation key.Options: 2 (Default)
Bootup NumLock StateThis item selects the keyboard NumLock state.Options: On (Default) / Off
Full Screen Logo DisplayThis item allows you to enable or disable Full Screen Logo Show function.Options: Enabled (Default) / Disabled
Boot Option #1/ #2This item allows you to sets the system boot order.
Fast BootThis item allows you to enables or disables boot with initialization of a minimal set of devices required to launch active boot option. Has no effect for BBS boot options.Options: Disabled (Default) / Enabled
Note » The following items appear only when you set the Fast Boot function to [Enabled]
SATA SupportOptions: Last Boot HDD Only (Default) / All Sata Devices

4. Boot Menu | 27
A320MH
VGA SupportIf Auto, only install Legacy OpRom with Legacy OS and logo would NOT be shown during post. EFI driver will still installed with EFI OS.Options: EFI Driver (Default) / AutoUSB SupportIf Disabled, all USB devices will NOT be available until after OS boot. If Partial Initial, USB Mass Storage and specific USB port/device will NOT be available before OS boot. If Enabled, all USB devices will be available in OS and Post.Options: Full Initial (Default) / Disabled / Partial InitialPS2 Devices SupportIf Disabled, PS2 devices will be skipped.Options: Enabled (Default) / DisabledNetwork Stack Driver SupportIf Disabled, Network Stack Drivers will be skipped.Options: Disabled (Default) / Enabled
Redirection SupportIf Disabled, Redirection function will be disabled.Options: Disabled (Default) / Enabled
BIOS Flash protectionWhile enabled, it can’t flash write and flash erase by SMI.Options: Enabled (Default) / Disabled
Boot Success BeepThis item BIOS boot post beep message.Options: Enabled (Default) / Disabled
Hard Drive BBS PrioritiesThis item allows you to set the order of the legacy devices in this group.Options: Enabled (Default) / Disabled

28 | 5. Security Menu
5� Security Menu
Administrator PasswordThis item sets Administrator Password.
User PasswordThis item sets User Password.
Note » CPU Configuration function will display different function items according to different CPU platforms.
Secure Boot Menu

5. Security Menu | 29
A320MH
Secure BootSecure Boot activated when Platform Key(PK) is enrolled, System mode is User/Deployed, and CSM function is disabled.Options: Disabled (Default) / Enabled
Key Management
Restore Factory KeysForce System to User Mode - Configure NVRAM to contain OEM-defined factory default secure boot keys.Reset To Setup ModeDelete NVRAM content of all UEFI Secure Boot key databases.Platform Key (PK)Options: Details / Export / Update / DeleteKey Exchange KeysOptions: Details / Export / Update / Append / DeleteAuthorized SignaturesOptions: Details / Export / Update / Append / DeleteForbidden SignaturesOptions: Details / Export / Update / Append / DeleteAuthorized TimestampsOptions: Update / AppendOsRecovery SignaturesOptions: Update / Append
30 | 6. O.N.E Menu
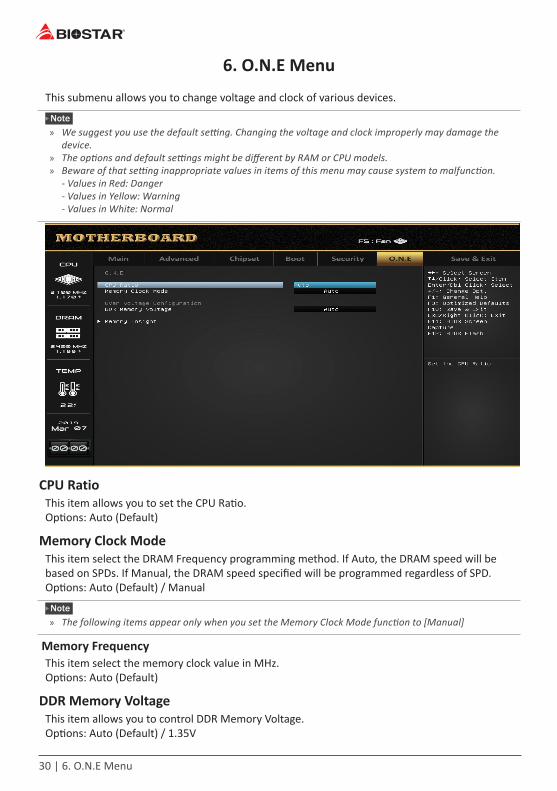
6� O�N�E Menu
This submenu allows you to change voltage and clock of various devices.
Note » We suggest you use the default setting. Changing the voltage and clock improperly may damage the
device. » The options and default settings might be different by RAM or CPU models. » Beware of that setting inappropriate values in items of this menu may cause system to malfunction.
- Values in Red: Danger - Values in Yellow: Warning - Values in White: Normal
CPU RatioThis item allows you to set the CPU Ratio.Options: Auto (Default)
Memory Clock ModeThis item select the DRAM Frequency programming method. If Auto, the DRAM speed will bebased on SPDs. If Manual, the DRAM speed specified will be programmed regardless of SPD.Options: Auto (Default) / Manual
Note » The following items appear only when you set the Memory Clock Mode function to [Manual]
Memory FrequencyThis item select the memory clock value in MHz.Options: Auto (Default)
DDR Memory VoltageThis item allows you to control DDR Memory Voltage.Options: Auto (Default) / 1.35V

6. O.N.E Menu | 31
A320MH
Memory Insight
DIMM ProfileThese items display memory information.
Note » CPU Configuration function will display different function items according to different CPU platforms.

32 | 7. Exit Menu
7� Exit Menu
This menu allows you to load the optimal default settings, and save or discard the changes to the BIOS items.
Discard Changes and ExitAbandon all changes made during the current session and exit setup.
Save Changes and ResetReset the system after saving the changes.
Restore DefaultsRestore/Load Default values for all the setup options.