Embed Size (px)
Citation preview

Biometrics Guide Sagem & Secugen V10

Biometrics Guide – Sagem & Secugen V10 Page 2 of 42
I N D E X 1) REVIEW SEQUENCE ................................................................................................................................................... 3
2) DOCUMENT OVERVIEW ............................................................................................................................................ 3
DOCUMENT SUMMARY ................................................................................................................................................ 3
FUNCTIONALITY SCOPE ................................................................................................................................................. 3
3) NEW ENROLLMENT (HIGHLY RECOMMENDED) ........................................................................................................ 4
PREREQUISITES ............................................................................................................................................................. 4
GET THE FILES FROM THE FTP SITE ............................................................................................................................... 4
1 DOTNET V4.5.1 ........................................................................................................................................................... 5
2 SAFRAN MORPHO LICENCE PROTECTION .................................................................................................................. 5
3 MORPHOSMART DRIVERS .......................................................................................................................................... 8
4 SAFENET DRIVERS .................................................................................................................................................... 11
5 MORPHO DRIVERS ................................................................................................................................................... 14
6 VS RUNTIMES ........................................................................................................................................................... 17
7 SECUGEN DRIVERS ................................................................................................................................................... 19
XTIME.PROPERTIES ..................................................................................................................................................... 23
TESTING THE DRIVER INSTALLATION - SAGEM ........................................................................................................... 23
TESTING THE DRIVER INSTALLATION .......................................................................................................................... 25
4) OPTIMAL FINGER PLACEMENT ................................................................................................................................ 26
5) CAPTURE & MATCHING THRESHOLDS .................................................................................................................... 26
SECUGEN - CAPTURE ................................................................................................................................................... 26
SECUGEN - MATCHING:............................................................................................................................................... 27
SAGEM - SYSTEM ......................................................................................................................................................... 27
6) CAPTURING A SAGEM & SAVING A SECUGEN TEMPLATE ...................................................................................... 28
7) CAPTURING A SECUGEN & SAVING A SAGEM TEMPLATE ...................................................................................... 32
1 – ENROLL FINGER 1 .................................................................................................................................................. 32
2 – VERIFY FINGER 1 .................................................................................................................................................... 34
3 – ENROLL FINGER 2 .................................................................................................................................................. 34
4 – VERIFY FINGER 2 .................................................................................................................................................... 35
8) FINGER ON CARD .................................................................................................................................................... 36
INSTALLING THE OMNIKEY DRIVERS ........................................................................................................................... 36
XTIME PROPERTIES FILE ENTRIES ................................................................................................................................ 36
XTIME900 SETTINGS .................................................................................................................................................... 37
ENROLLMENT UNITS ................................................................................................................................................... 38
CAPTURE THE FINGERPRINTS ...................................................................................................................................... 39
ISSUE AN HID TAG ....................................................................................................................................................... 39
9) CURRENT ENROLLMENT .......................................................................................................................................... 40
MORPHOKIT 4.0.4 ....................................................................................................................................................... 40
SECUGEN V2.15.01.0 & PREVIOUS .............................................................................................................................. 41
Biometrics Guide – Sagem & Secugen V10 Page 3 of 42
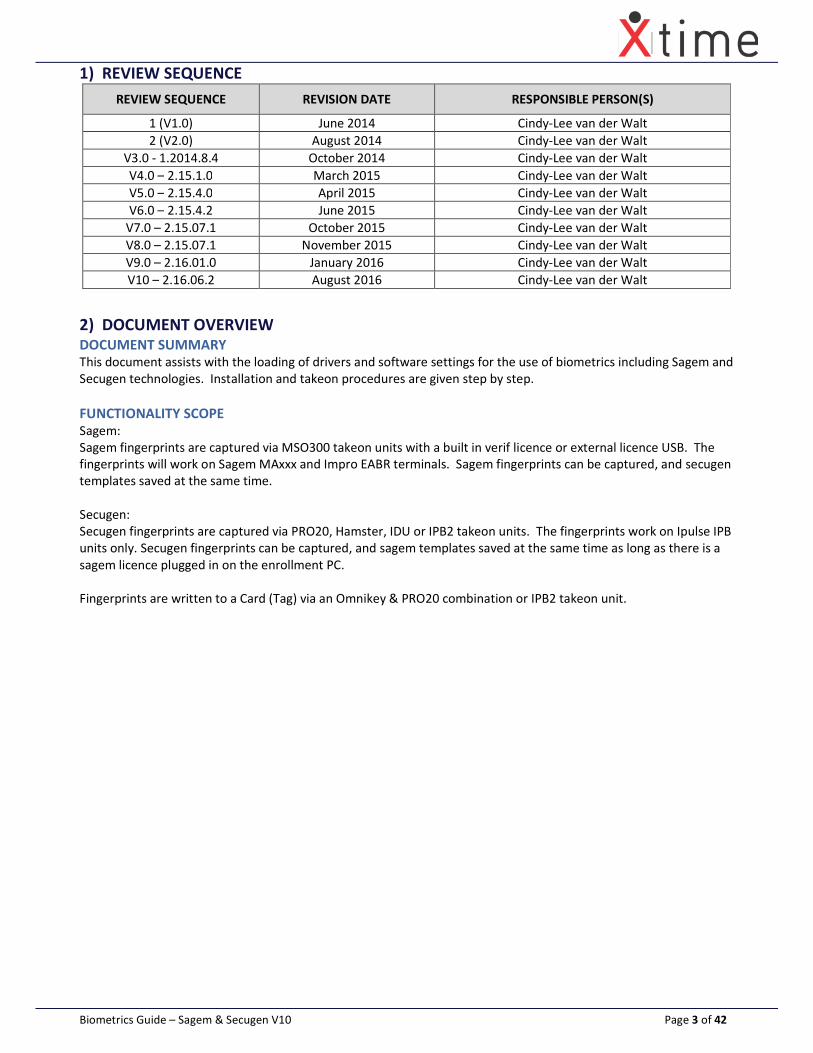
1) REVIEW SEQUENCE
REVIEW SEQUENCE REVISION DATE RESPONSIBLE PERSON(S)
1 (V1.0) June 2014 Cindy-Lee van der Walt
2 (V2.0) August 2014 Cindy-Lee van der Walt
V3.0 - 1.2014.8.4 October 2014 Cindy-Lee van der Walt
V4.0 – 2.15.1.0 March 2015 Cindy-Lee van der Walt
V5.0 – 2.15.4.0 April 2015 Cindy-Lee van der Walt
V6.0 – 2.15.4.2 June 2015 Cindy-Lee van der Walt
V7.0 – 2.15.07.1 October 2015 Cindy-Lee van der Walt
V8.0 – 2.15.07.1 November 2015 Cindy-Lee van der Walt
V9.0 – 2.16.01.0 January 2016 Cindy-Lee van der Walt
V10 – 2.16.06.2 August 2016 Cindy-Lee van der Walt
2) DOCUMENT OVERVIEW
DOCUMENT SUMMARY
This document assists with the loading of drivers and software settings for the use of biometrics including Sagem and
Secugen technologies. Installation and takeon procedures are given step by step.
FUNCTIONALITY SCOPE
Sagem:
Sagem fingerprints are captured via MSO300 takeon units with a built in verif licence or external licence USB. The
fingerprints will work on Sagem MAxxx and Impro EABR terminals. Sagem fingerprints can be captured, and secugen
templates saved at the same time.
Secugen:
Secugen fingerprints are captured via PRO20, Hamster, IDU or IPB2 takeon units. The fingerprints work on Ipulse IPB
units only. Secugen fingerprints can be captured, and sagem templates saved at the same time as long as there is a
sagem licence plugged in on the enrollment PC.
Fingerprints are written to a Card (Tag) via an Omnikey & PRO20 combination or IPB2 takeon unit.
Biometrics Guide – Sagem & Secugen V10 Page 4 of 42
3) NEW ENROLLMENT (HIGHLY RECOMMENDED) On new sites, this is the only enrollment that will be supported from V2.15.10.0 major release. If an existing site
would like to use the new enrollment and currenly has Morphokit 4.0.4 installed, it must be uninstalled before
installing V5.6 described below. If this is not done, there will be 2 instances of the Sagem Licence Manager on the PC
which compete with each other to register the MSO300 licence. When trying to initialise the MSO300 unit, you will
get a message that says “cannot locate sagem licence”and you will not be able to capture fingers. We highly
recommend that you upgrade your clients to the new enrollment as the templates saved to the database are of a
much higher quality than the previous 4.0.4 version. The XTime900 upgrade exe now installs the Xtime.Biometrics
application in its own folder in which the new biometrics is automatically loaded and updated each time you do a
system upgrade from V2.15.04.0
Features:
� Sagem enrollment can be used and a secugen template can be saved
� Secugen enrollment can be used and a sagem template can be saved
� Better quality templates with the new sagem V5.6 SDK
PREREQUISITES
� .Net 4.5.1 – to see whether there is .Net 4.5.1 loaded on the PC, go to Control Panel | Programs and Features
and look in the program list for the following:
If there is 4.5.1 then you do not have to install the files in step 1.
� Sagem Dongle and an MSO300, or an MSO300 with a built in Verif dongle
� IPB2, PRO 20, Hamster
PLEASE DO NOT PLUG THE UNITS IN UNTIL THE SOFTWARE INSTALLATION IS COMPLETE
GET THE FILES FROM THE FTP SITE
From the windows explorer, type in ftp://ftp.za.g4s.com
Login with User: Client and Password: 5KyC0m – Please note that these are case sensitive
Navigate to the following folder:
ftp://ftp.za.g4s.com/XTime900/Current%20release/drivers%20and%20SDKs/Biometrics%20Install/
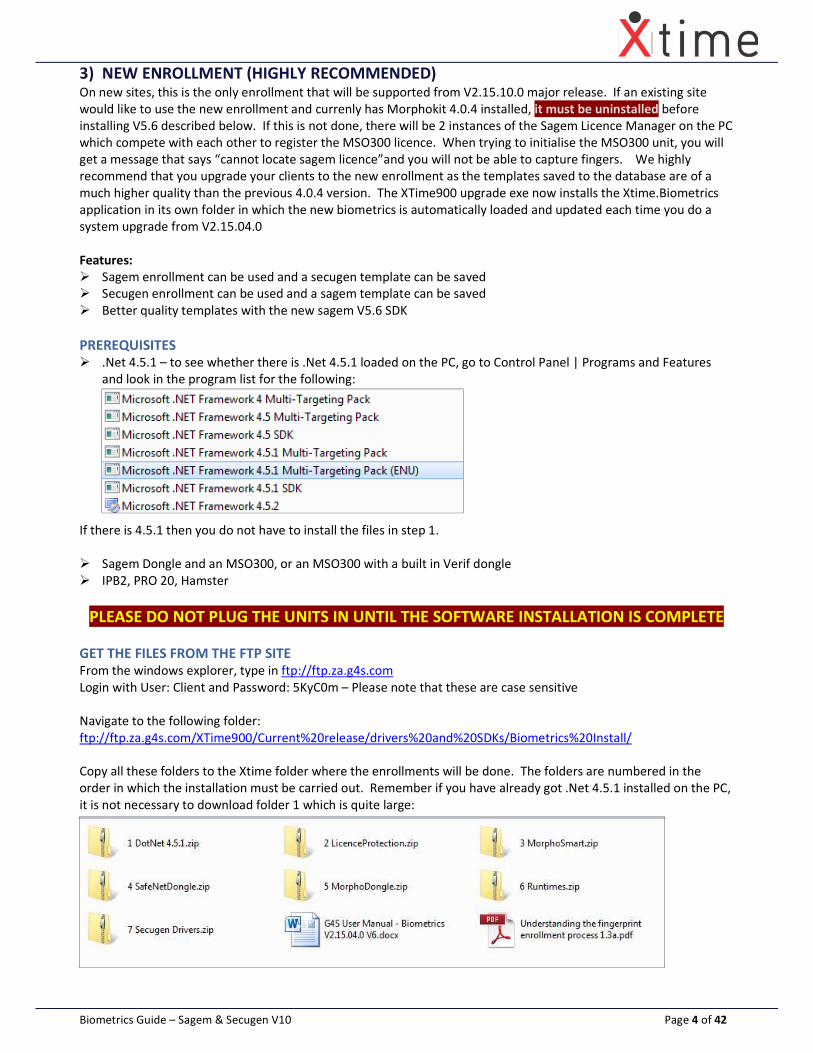
Copy all these folders to the Xtime folder where the enrollments will be done. The folders are numbered in the
order in which the installation must be carried out. Remember if you have already got .Net 4.5.1 installed on the PC,
it is not necessary to download folder 1 which is quite large:
Biometrics Guide – Sagem & Secugen V10 Page 5 of 42
Copy all these files to a folder on the local machine. Note that a PC reboot will be needed during the installation so
make sure that all other programs are closed.
1 DOTNET V4.5.1
The software used to capture the fingerprint templates requires V4.5.1 of the .Net Framework to be installed on the
PC. It is provided in the Biometrics Install folder for your convenience. If you are not sure which version is loaded on
the PC, copy and paste this link:
http://msdn.microsoft.com/en-us/library/hh925568(v=vs.110).aspx
in your internet browser. Microsoft will check your system and alert you as to which version of dot net is installed.
This framework must be loaded before anything else is attempted. It is an automated install that only requires the
user to click the next buttons until complete.
2 SAFRAN MORPHO LICENCE PROTECTION
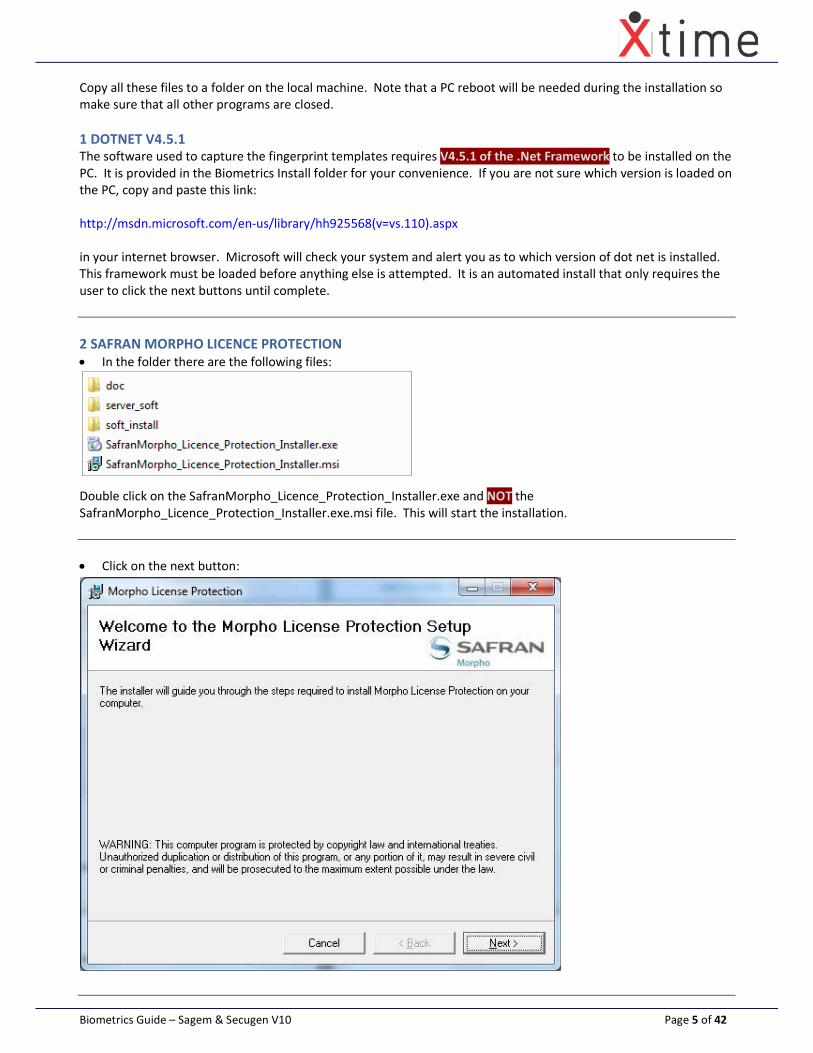
• In the folder there are the following files:
Double click on the SafranMorpho_Licence_Protection_Installer.exe and NOT the
SafranMorpho_Licence_Protection_Installer.exe.msi file. This will start the installation.
• Click on the next button:

Biometrics Guide – Sagem & Secugen V10 Page 6 of 42
Select the first option “Copy and install service” and click the next button:
Leave the default file path that is in the block under Folder, select the “everyone” option and click the next button:
Biometrics Guide – Sagem & Secugen V10 Page 7 of 42
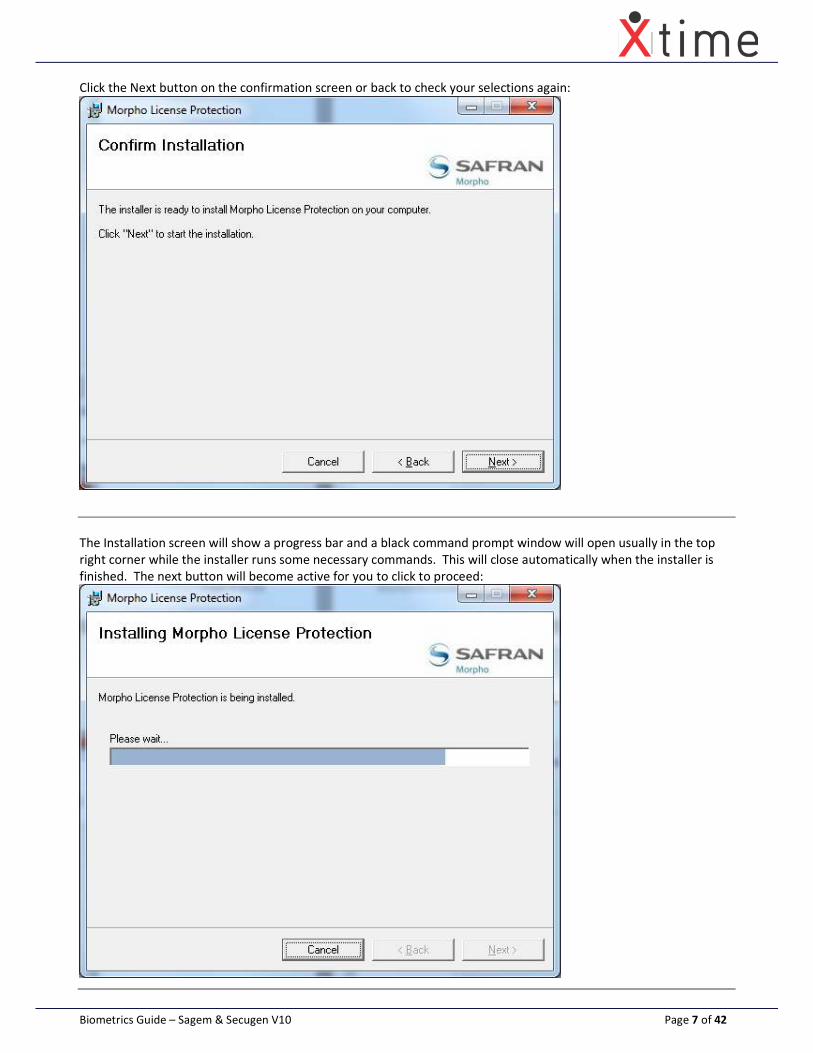
Click the Next button on the confirmation screen or back to check your selections again:
The Installation screen will show a progress bar and a black command prompt window will open usually in the top
right corner while the installer runs some necessary commands. This will close automatically when the installer is
finished. The next button will become active for you to click to proceed:
Biometrics Guide – Sagem & Secugen V10 Page 8 of 42
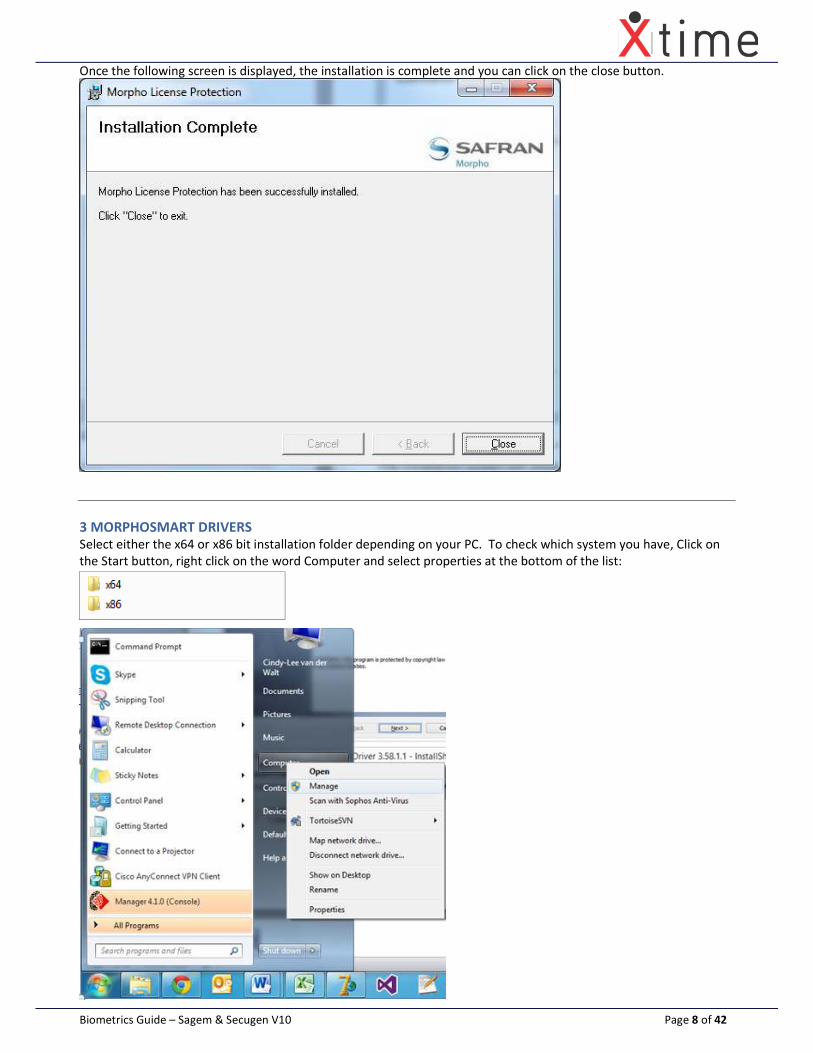
Once the following screen is displayed, the installation is complete and you can click on the close button.
3 MORPHOSMART DRIVERS
Select either the x64 or x86 bit installation folder depending on your PC. To check which system you have, Click on
the Start button, right click on the word Computer and select properties at the bottom of the list:
Biometrics Guide – Sagem & Secugen V10 Page 9 of 42
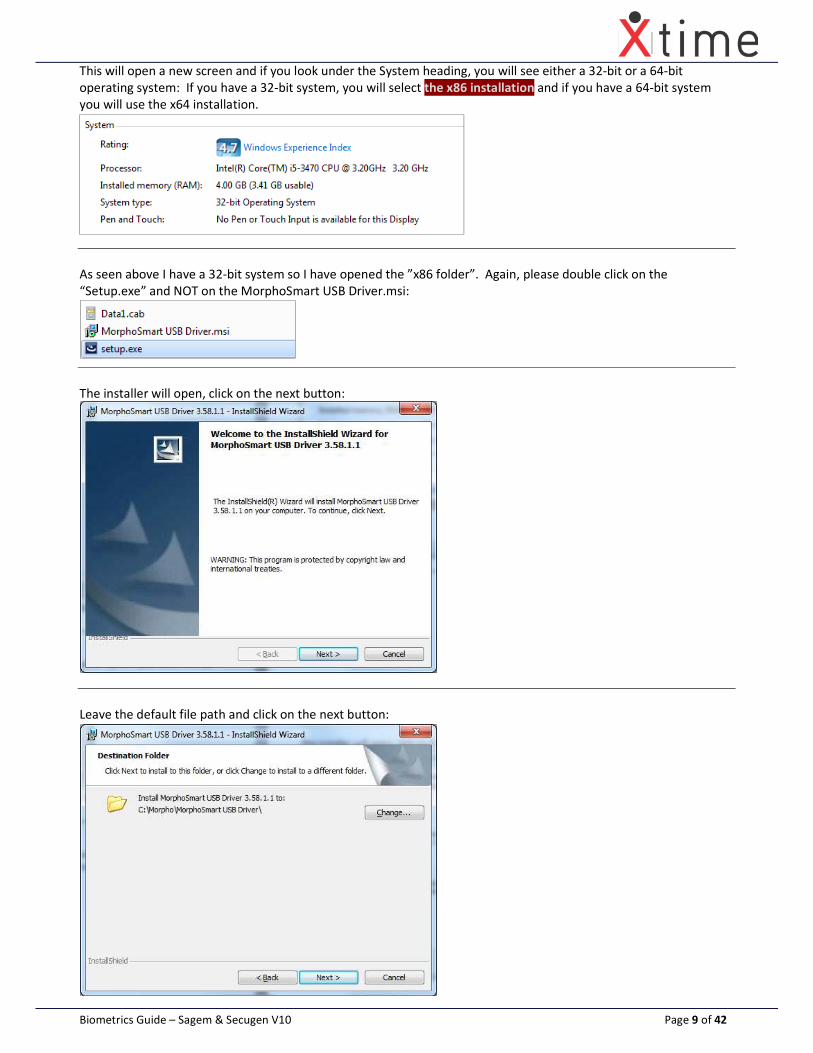
This will open a new screen and if you look under the System heading, you will see either a 32-bit or a 64-bit
operating system: If you have a 32-bit system, you will select the x86 installation and if you have a 64-bit system
you will use the x64 installation.
As seen above I have a 32-bit system so I have opened the ”x86 folder”. Again, please double click on the
“Setup.exe” and NOT on the MorphoSmart USB Driver.msi:
The installer will open, click on the next button:
Leave the default file path and click on the next button:
Biometrics Guide – Sagem & Secugen V10 Page 10 of 42
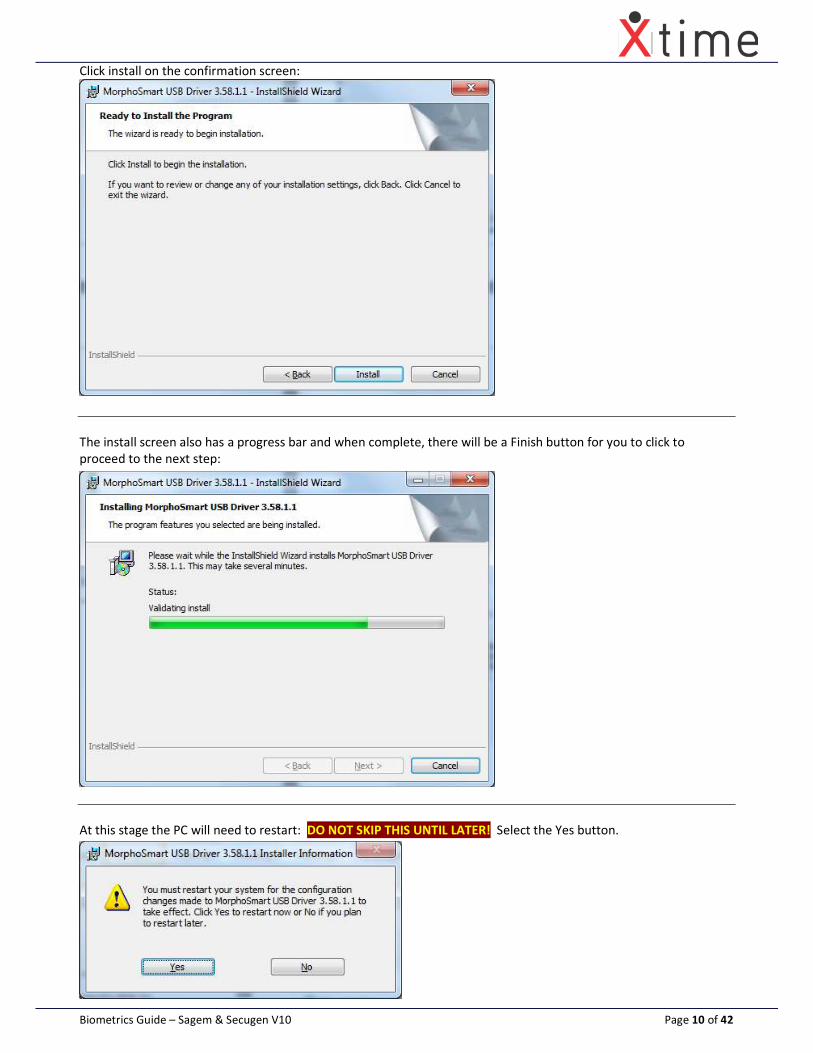
Click install on the confirmation screen:
The install screen also has a progress bar and when complete, there will be a Finish button for you to click to
proceed to the next step:
At this stage the PC will need to restart: DO NOT SKIP THIS UNTIL LATER! Select the Yes button.
Biometrics Guide – Sagem & Secugen V10 Page 11 of 42
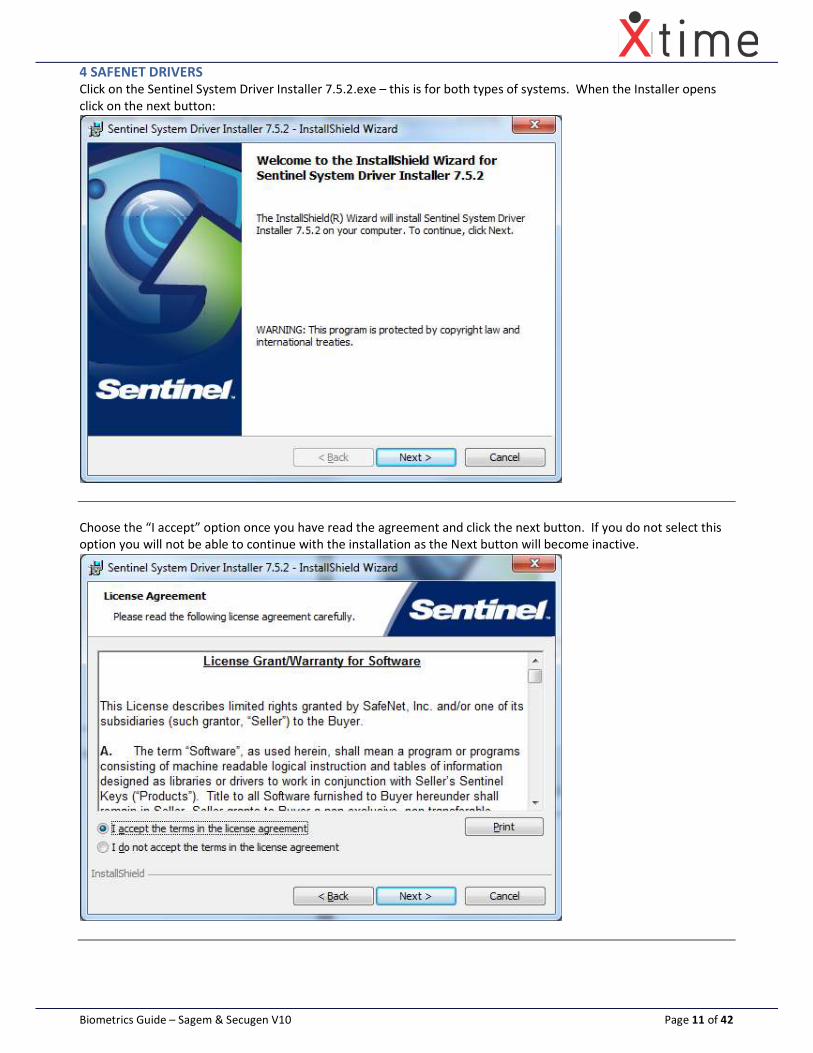
4 SAFENET DRIVERS
Click on the Sentinel System Driver Installer 7.5.2.exe – this is for both types of systems. When the Installer opens
click on the next button:
Choose the “I accept” option once you have read the agreement and click the next button. If you do not select this
option you will not be able to continue with the installation as the Next button will become inactive.

Biometrics Guide – Sagem & Secugen V10 Page 12 of 42
Select the “Complete” option followed by the Next button:
On the confirmation screen click the install button to continue or back to check your selections:
Biometrics Guide – Sagem & Secugen V10 Page 13 of 42
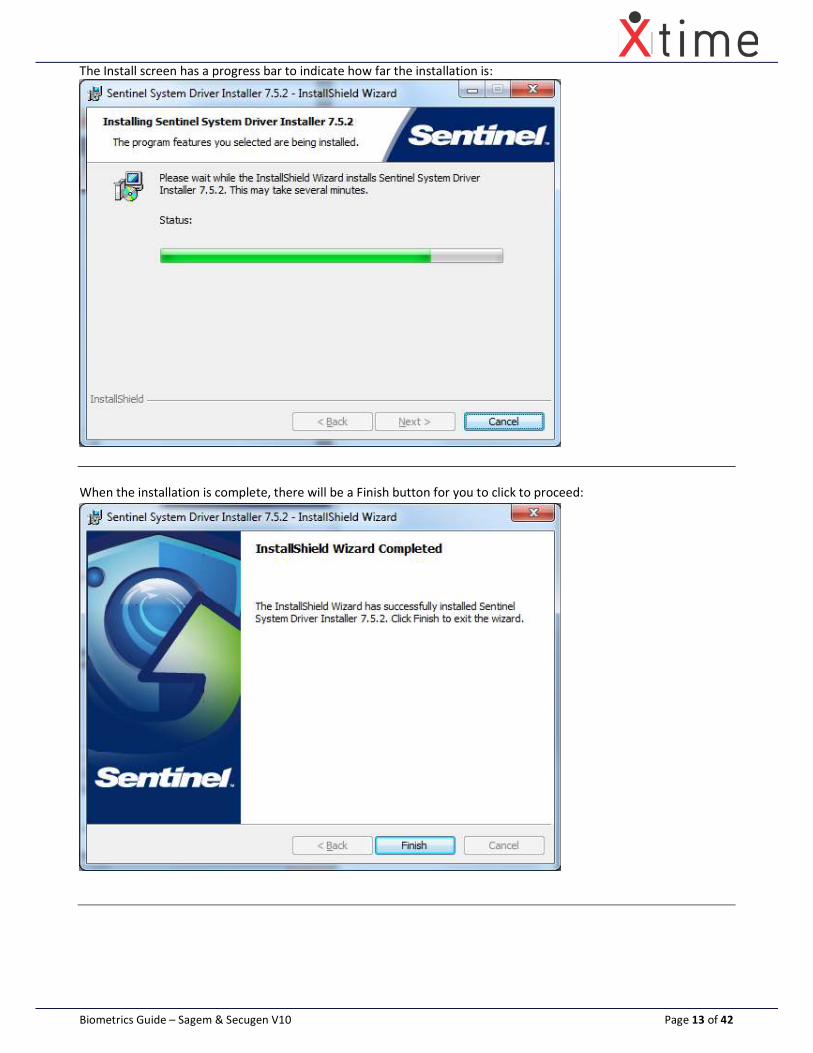
The Install screen has a progress bar to indicate how far the installation is:
When the installation is complete, there will be a Finish button for you to click to proceed:
Biometrics Guide – Sagem & Secugen V10 Page 14 of 42
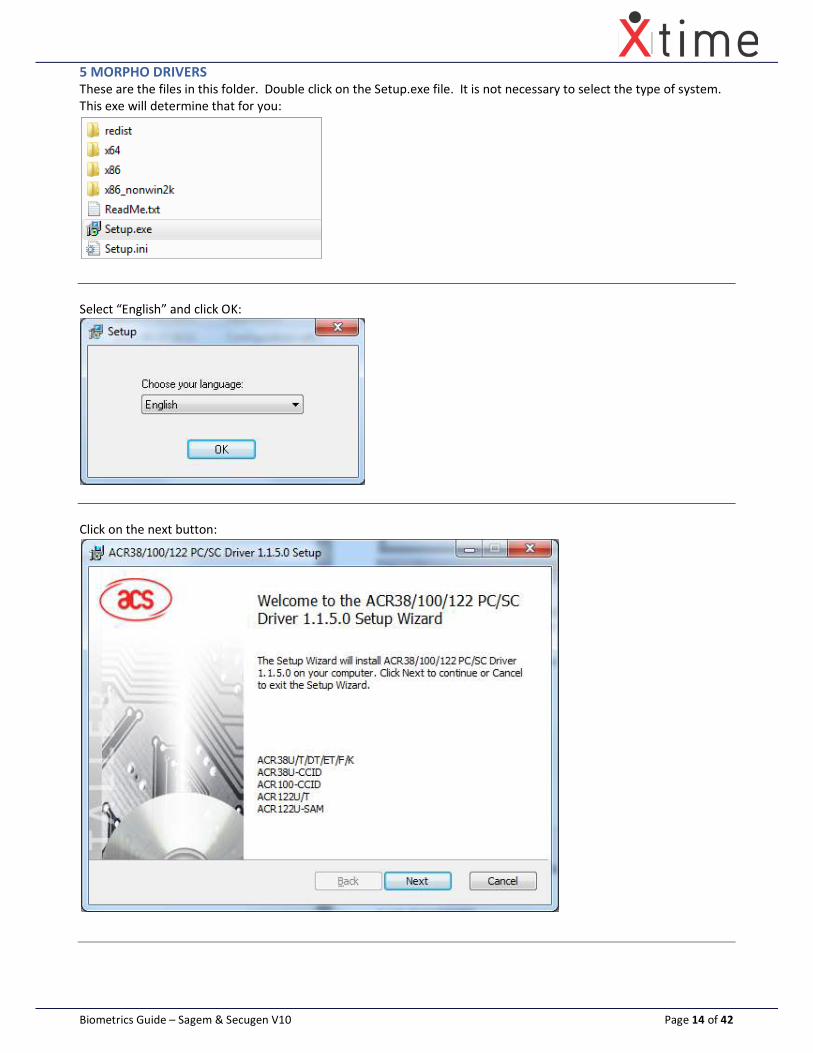
5 MORPHO DRIVERS
These are the files in this folder. Double click on the Setup.exe file. It is not necessary to select the type of system.
This exe will determine that for you:
Select “English” and click OK:
Click on the next button:
Biometrics Guide – Sagem & Secugen V10 Page 15 of 42
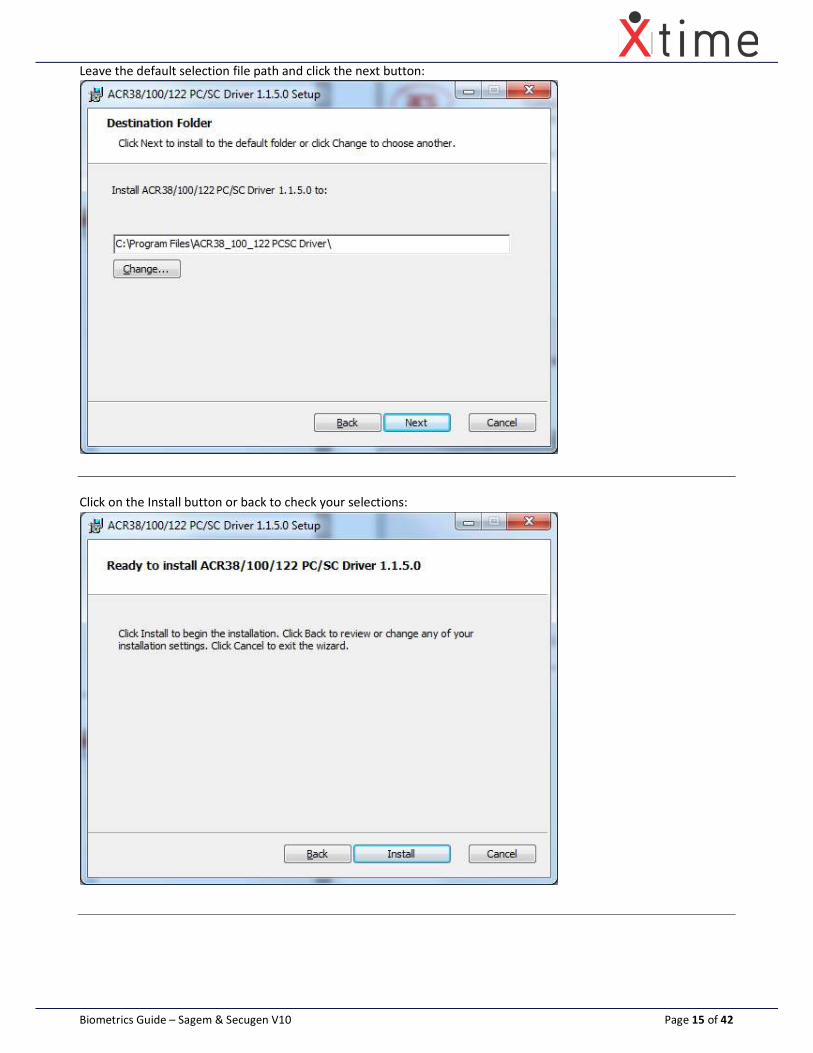
Leave the default selection file path and click the next button:
Click on the Install button or back to check your selections:
Biometrics Guide – Sagem & Secugen V10 Page 16 of 42
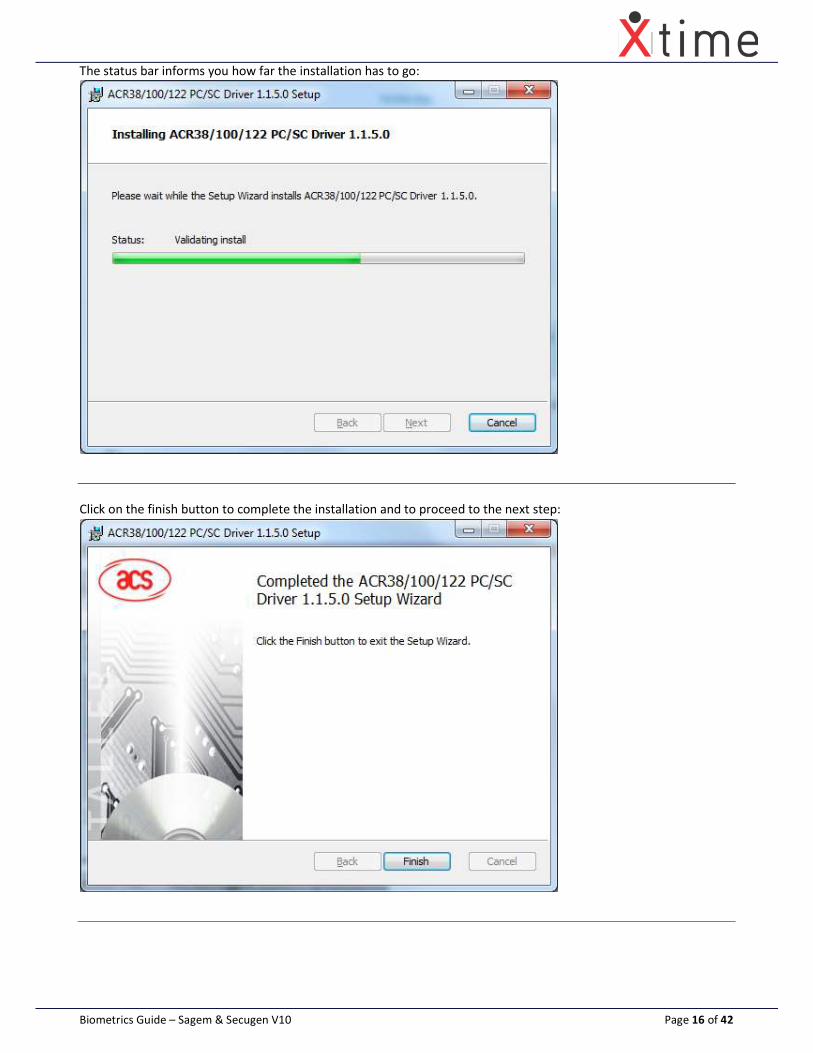
The status bar informs you how far the installation has to go:
Click on the finish button to complete the installation and to proceed to the next step:
Biometrics Guide – Sagem & Secugen V10 Page 17 of 42
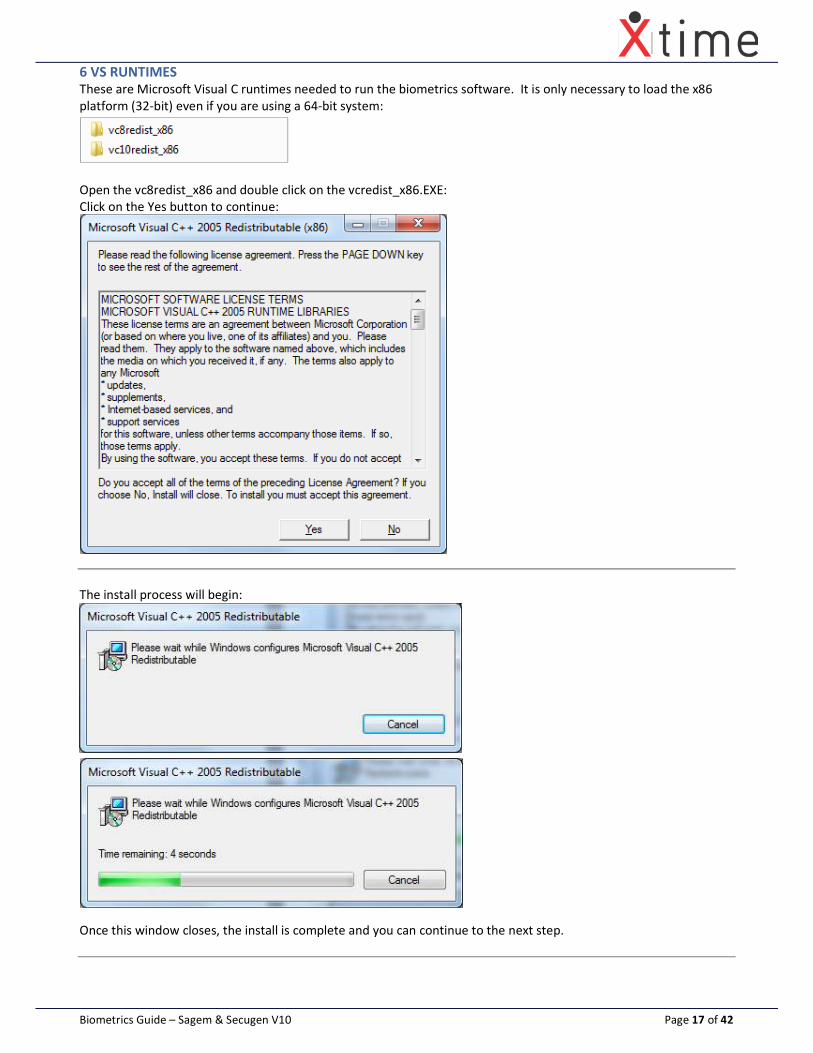
6 VS RUNTIMES
These are Microsoft Visual C runtimes needed to run the biometrics software. It is only necessary to load the x86
platform (32-bit) even if you are using a 64-bit system:
Open the vc8redist_x86 and double click on the vcredist_x86.EXE:
Click on the Yes button to continue:
The install process will begin:
Once this window closes, the install is complete and you can continue to the next step.
Biometrics Guide – Sagem & Secugen V10 Page 18 of 42
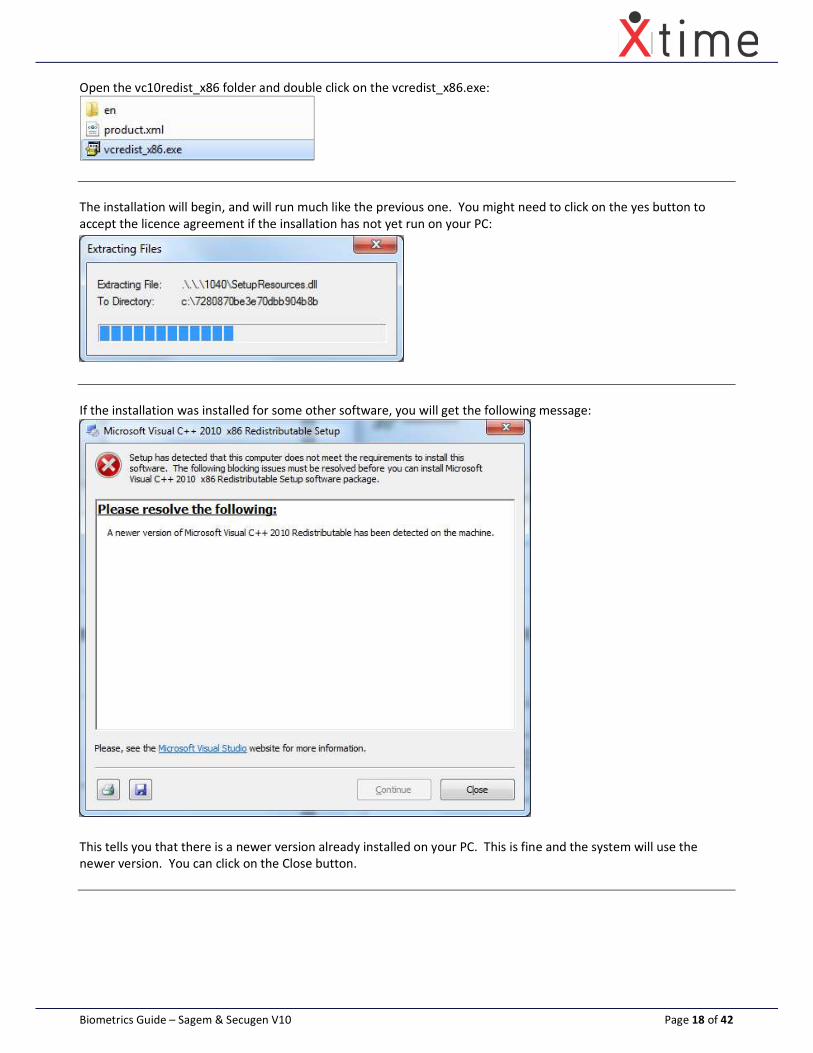
Open the vc10redist_x86 folder and double click on the vcredist_x86.exe:
The installation will begin, and will run much like the previous one. You might need to click on the yes button to
accept the licence agreement if the insallation has not yet run on your PC:
If the installation was installed for some other software, you will get the following message:
This tells you that there is a newer version already installed on your PC. This is fine and the system will use the
newer version. You can click on the Close button.
Biometrics Guide – Sagem & Secugen V10 Page 19 of 42
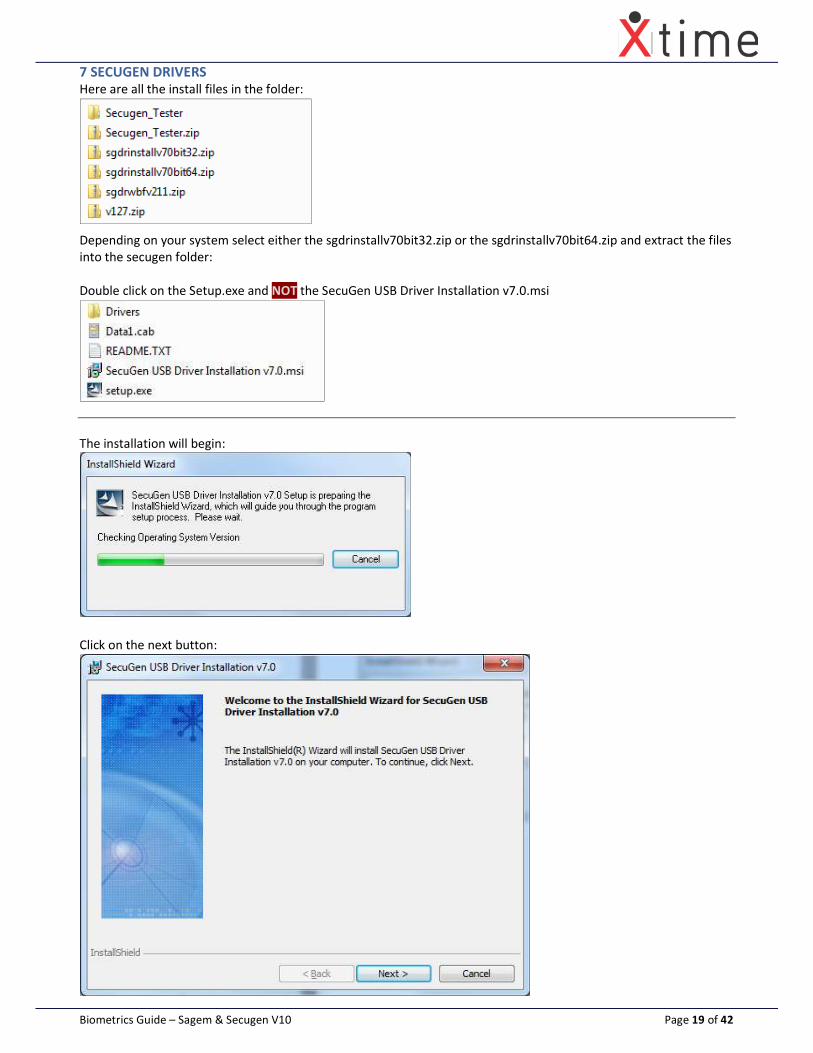
7 SECUGEN DRIVERS
Here are all the install files in the folder:
Depending on your system select either the sgdrinstallv70bit32.zip or the sgdrinstallv70bit64.zip and extract the files
into the secugen folder:
Double click on the Setup.exe and NOT the SecuGen USB Driver Installation v7.0.msi
The installation will begin:
Click on the next button:
Biometrics Guide – Sagem & Secugen V10 Page 20 of 42
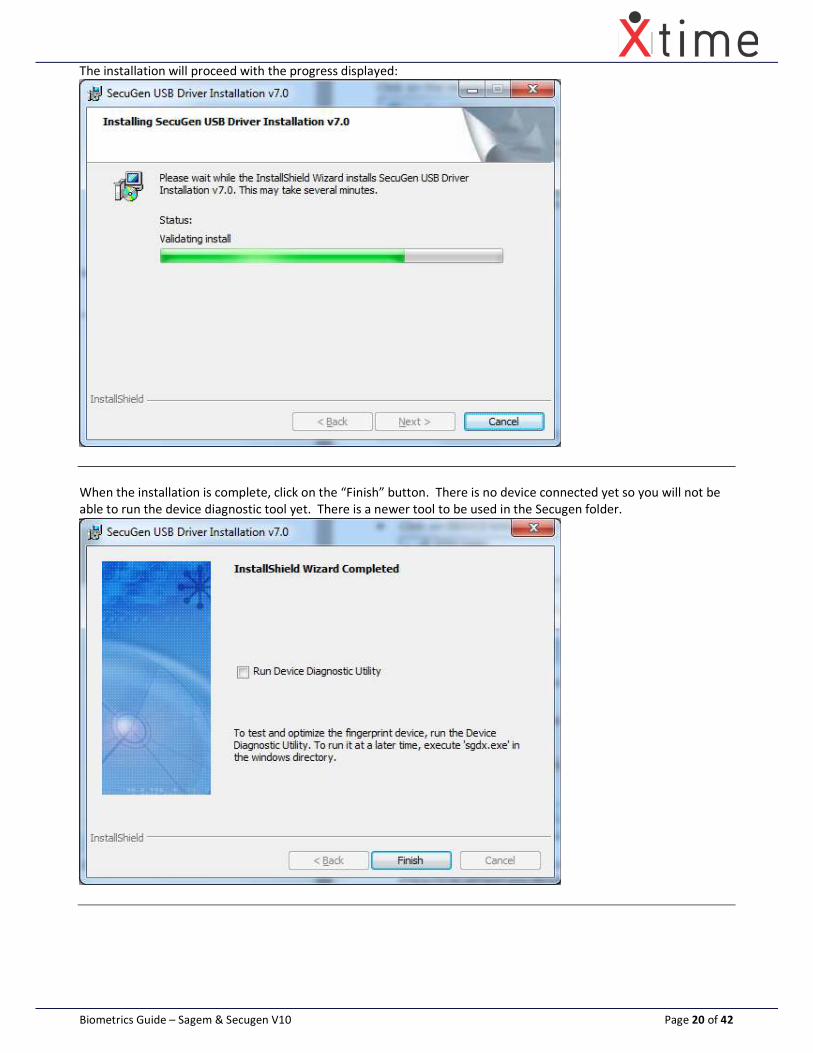
The installation will proceed with the progress displayed:
When the installation is complete, click on the “Finish” button. There is no device connected yet so you will not be
able to run the device diagnostic tool yet. There is a newer tool to be used in the Secugen folder.
Biometrics Guide – Sagem & Secugen V10 Page 21 of 42
• When you plug in the unit, windows usually tries to automatically install the unit. This shouldn’t be a problem
and the correct driver should be installed.
• If the drivers do not install automatically, or the automatically installed drivers are not working, go to the device
manager by clicking on START, then right clicking on MY COMPUTER and selecting manage.
• Click on DEVICE MANAGER in the menu on the left and look for the Biometrics devices on the right at the top:
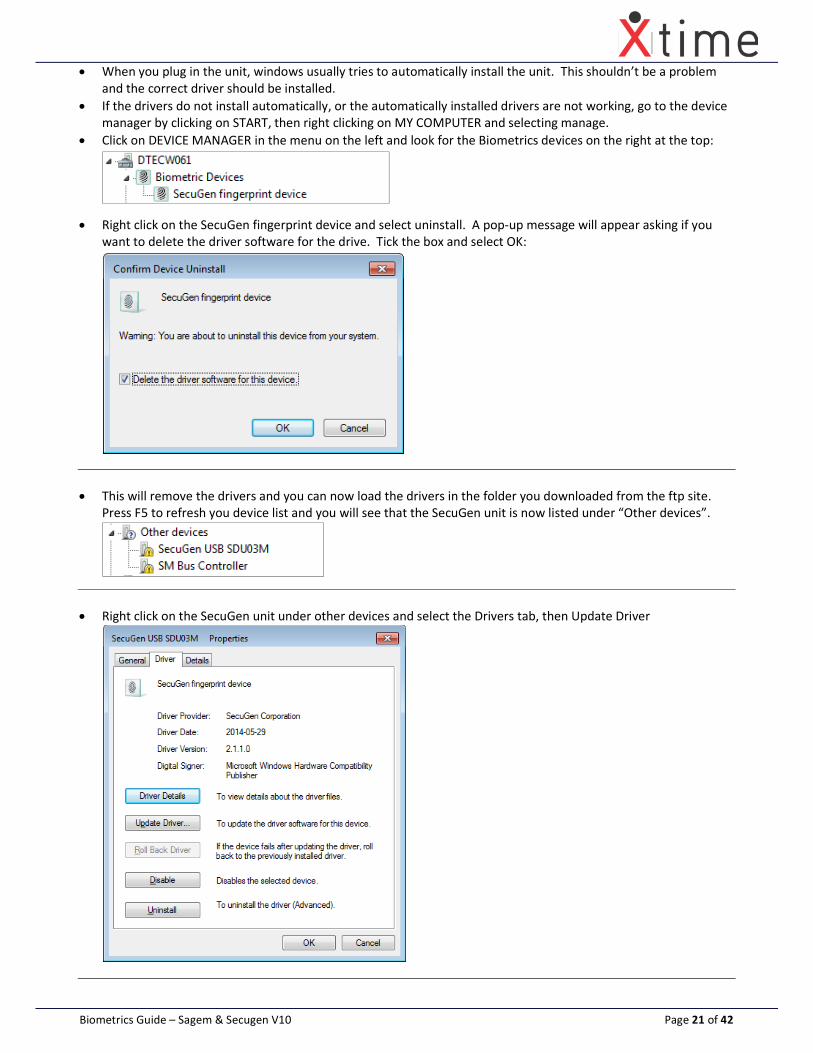
• Right click on the SecuGen fingerprint device and select uninstall. A pop-up message will appear asking if you
want to delete the driver software for the drive. Tick the box and select OK:
• This will remove the drivers and you can now load the drivers in the folder you downloaded from the ftp site.
Press F5 to refresh you device list and you will see that the SecuGen unit is now listed under “Other devices”.
• Right click on the SecuGen unit under other devices and select the Drivers tab, then Update Driver

Biometrics Guide – Sagem & Secugen V10 Page 22 of 42
• Select the browse my computer for driver software and then navigate to where you saved the sgdrwbfv211
folder (ensure that you have unzipped it first):
• Ensure that the Include subfolder box is checked and select next:
• This will successfully install the drivers for the SecuGen unit. And the unit will move to the Biometric Devices
heading at the top of the device list again.
• If the device still does not detect, follow the same procedure to uninstall the drivers and then when you get to
the “browse for driver software in this location” select the V127 folder and then the correct system (x86 for 32
bit or x64 for 64 bit) and try again.
• This should then identify the correct driver for the Pro 20 and the IPB 2 unit which use the same Pro20 drivers.
Some operating systems accept the first drivers and some require the specific Pro20 driver found in the v127
folder.
Biometrics Guide – Sagem & Secugen V10 Page 23 of 42
XTIME.PROPERTIES
You need to enter a parameter in the XTIME.PROPERTIES file which is located in the XTime folder.
If you are using Secugen (Ipulse) then the entry will be: FINGER.TAKEON.TYPE = BIO-
If you are using Sagem (MSO300) then the entry will be: FINGER.TAKEON.TYPE = BIO+
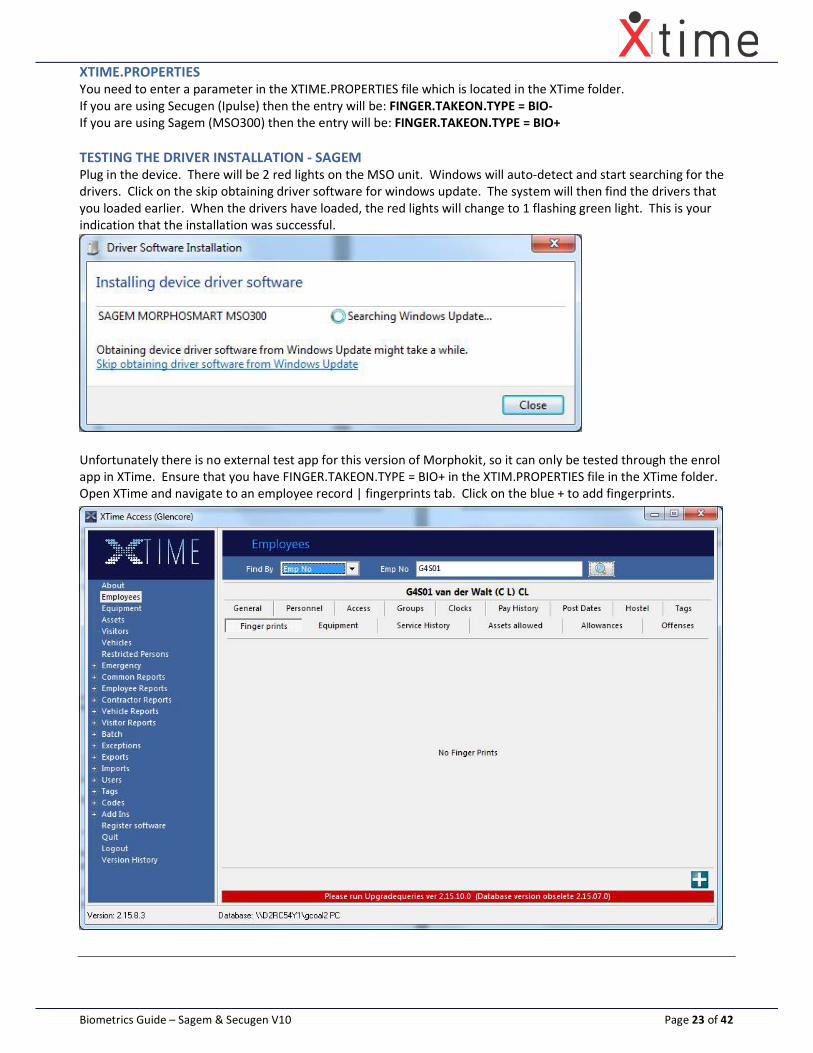
TESTING THE DRIVER INSTALLATION - SAGEM
Plug in the device. There will be 2 red lights on the MSO unit. Windows will auto-detect and start searching for the
drivers. Click on the skip obtaining driver software for windows update. The system will then find the drivers that
you loaded earlier. When the drivers have loaded, the red lights will change to 1 flashing green light. This is your
indication that the installation was successful.
Unfortunately there is no external test app for this version of Morphokit, so it can only be tested through the enrol
app in XTime. Ensure that you have FINGER.TAKEON.TYPE = BIO+ in the XTIM.PROPERTIES file in the XTime folder.
Open XTime and navigate to an employee record | fingerprints tab. Click on the blue + to add fingerprints.
Biometrics Guide – Sagem & Secugen V10 Page 24 of 42
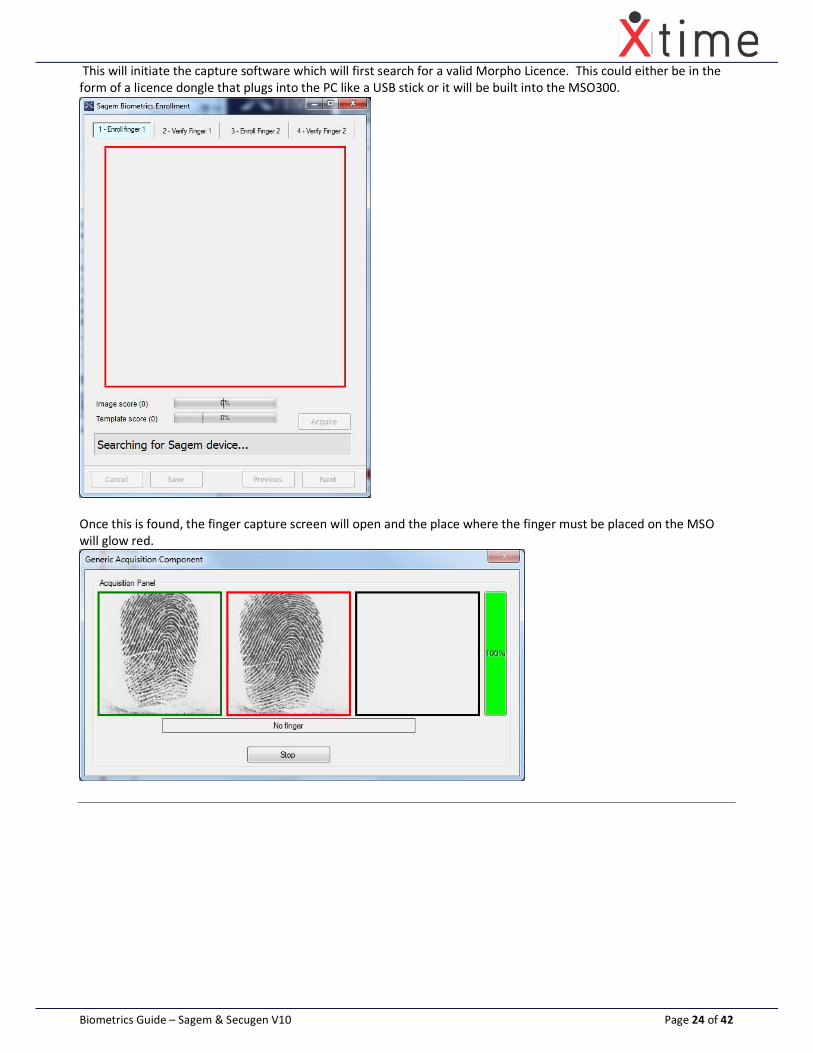
This will initiate the capture software which will first search for a valid Morpho Licence. This could either be in the
form of a licence dongle that plugs into the PC like a USB stick or it will be built into the MSO300.
Once this is found, the finger capture screen will open and the place where the finger must be placed on the MSO
will glow red.
Biometrics Guide – Sagem & Secugen V10 Page 25 of 42
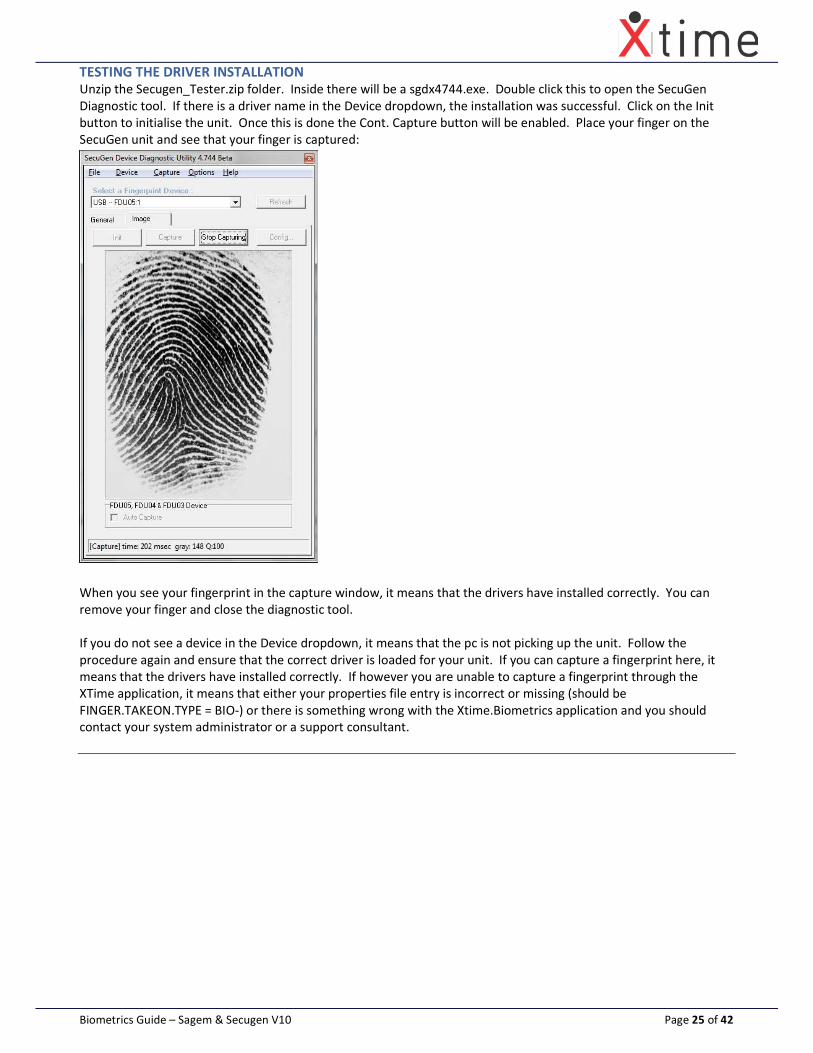
TESTING THE DRIVER INSTALLATION
Unzip the Secugen_Tester.zip folder. Inside there will be a sgdx4744.exe. Double click this to open the SecuGen
Diagnostic tool. If there is a driver name in the Device dropdown, the installation was successful. Click on the Init
button to initialise the unit. Once this is done the Cont. Capture button will be enabled. Place your finger on the
SecuGen unit and see that your finger is captured:
When you see your fingerprint in the capture window, it means that the drivers have installed correctly. You can
remove your finger and close the diagnostic tool.
If you do not see a device in the Device dropdown, it means that the pc is not picking up the unit. Follow the
procedure again and ensure that the correct driver is loaded for your unit. If you can capture a fingerprint here, it
means that the drivers have installed correctly. If however you are unable to capture a fingerprint through the
XTime application, it means that either your properties file entry is incorrect or missing (should be
FINGER.TAKEON.TYPE = BIO-) or there is something wrong with the Xtime.Biometrics application and you should
contact your system administrator or a support consultant.

Biometrics Guide – Sagem & Secugen V10 Page 26 of 42
4) OPTIMAL FINGER PLACEMENT It is very important that the below placement of a finger is used as it will result in the best quality fingerprint image.
Please use this method at all times.
5) CAPTURE & MATCHING THRESHOLDS
SECUGEN - CAPTURE
The default capture & matching thresholds for Secugen are as follows:
REGISTER QUALITY: 50
This refers to the quality of a captured (scanned) image. The value is determined by two factors. One is the ratio of
the fingerprint image area to the whole scanned area, and the other is the ridge quality of the fingerprint image
area. A quality value of 50 or higher is recommended for registration.
VERIFY QUALITY: 30
A quality value of 40 or higher is recommended for verification of the fingerprint against the captured image.
IMAGE TIME OUT: 5
Resets the scanner if the finger on signal is detected but no image has been scanned.
MINIMUM MINUTAE: 30
This indicates the quality of the template.
Biometrics Guide – Sagem & Secugen V10 Page 27 of 42
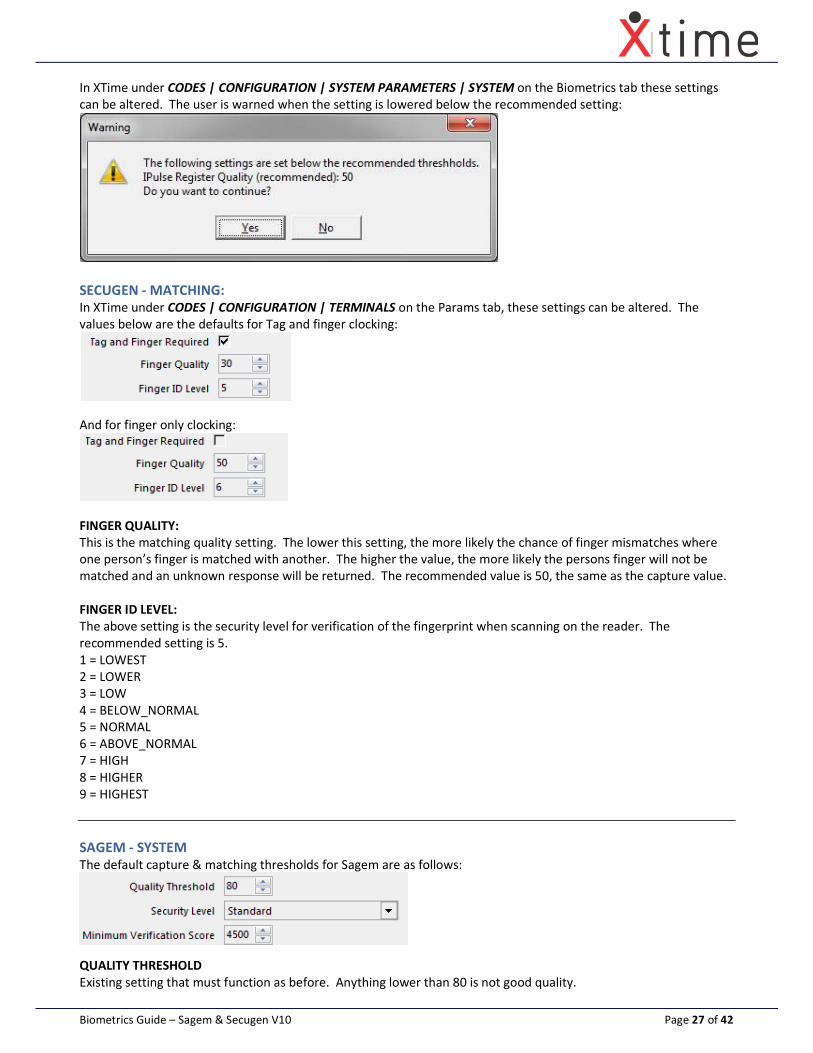
In XTime under CODES | CONFIGURATION | SYSTEM PARAMETERS | SYSTEM on the Biometrics tab these settings
can be altered. The user is warned when the setting is lowered below the recommended setting:
SECUGEN - MATCHING:
In XTime under CODES | CONFIGURATION | TERMINALS on the Params tab, these settings can be altered. The
values below are the defaults for Tag and finger clocking:
And for finger only clocking:
FINGER QUALITY:
This is the matching quality setting. The lower this setting, the more likely the chance of finger mismatches where
one person’s finger is matched with another. The higher the value, the more likely the persons finger will not be
matched and an unknown response will be returned. The recommended value is 50, the same as the capture value.
FINGER ID LEVEL:
The above setting is the security level for verification of the fingerprint when scanning on the reader. The
recommended setting is 5.
1 = LOWEST
2 = LOWER
3 = LOW
4 = BELOW_NORMAL
5 = NORMAL
6 = ABOVE_NORMAL
7 = HIGH
8 = HIGHER
9 = HIGHEST
SAGEM - SYSTEM
The default capture & matching thresholds for Sagem are as follows:
QUALITY THRESHOLD
Existing setting that must function as before. Anything lower than 80 is not good quality.
Biometrics Guide – Sagem & Secugen V10 Page 28 of 42
SECURITY LEVEL
Defaults to “Standard” but can be set to “Medium” or “High”.
VERIFICATION SCORE
This is the minimum matching level for the verification of templates during enrolment. Any value lower than this will
be treated as a mismatch. The default is 3500 with the lowest value of 2000 and highest of 4500.
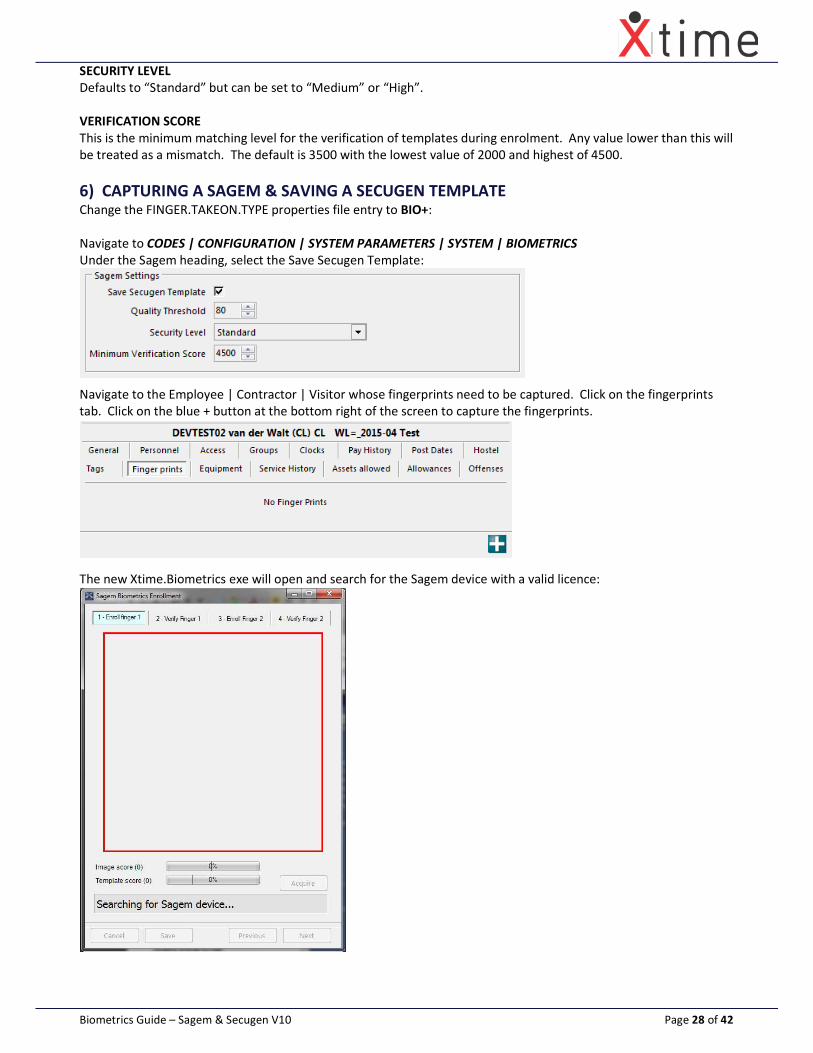
6) CAPTURING A SAGEM & SAVING A SECUGEN TEMPLATE Change the FINGER.TAKEON.TYPE properties file entry to BIO+:
Navigate to CODES | CONFIGURATION | SYSTEM PARAMETERS | SYSTEM | BIOMETRICS
Under the Sagem heading, select the Save Secugen Template:
Navigate to the Employee | Contractor | Visitor whose fingerprints need to be captured. Click on the fingerprints
tab. Click on the blue + button at the bottom right of the screen to capture the fingerprints.
The new Xtime.Biometrics exe will open and search for the Sagem device with a valid licence:
Biometrics Guide – Sagem & Secugen V10 Page 29 of 42
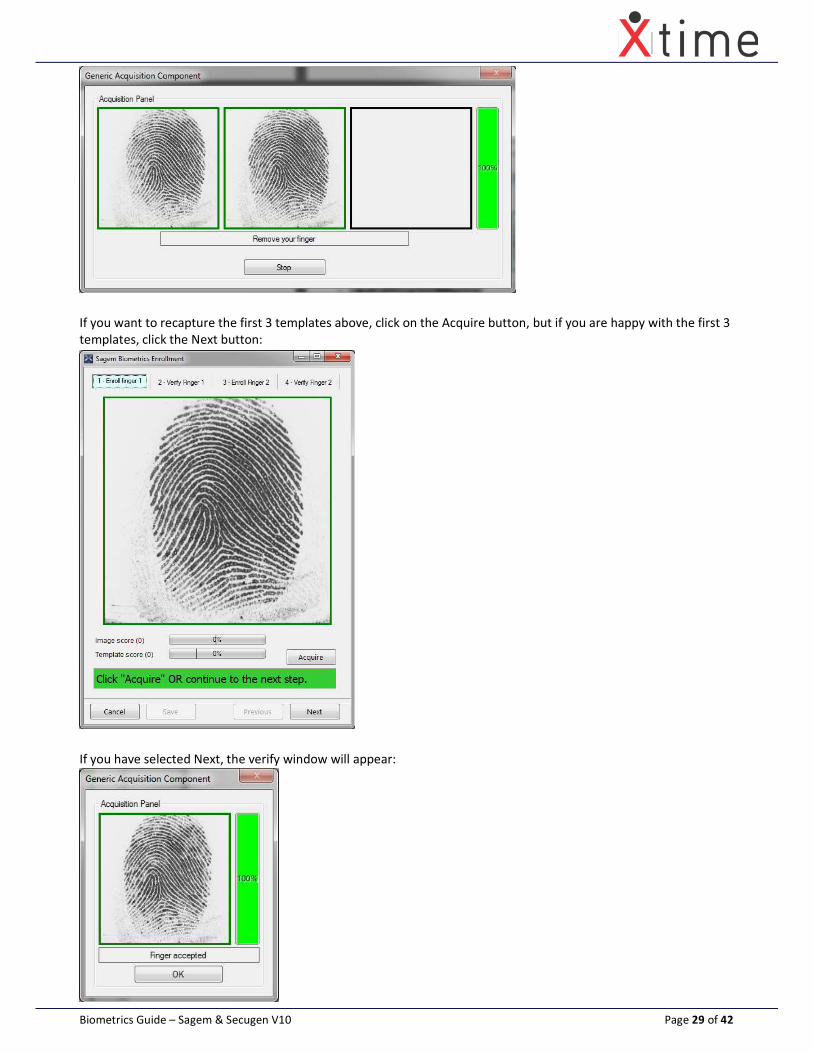
If you want to recapture the first 3 templates above, click on the Acquire button, but if you are happy with the first 3
templates, click the Next button:
If you have selected Next, the verify window will appear:
Biometrics Guide – Sagem & Secugen V10 Page 30 of 42
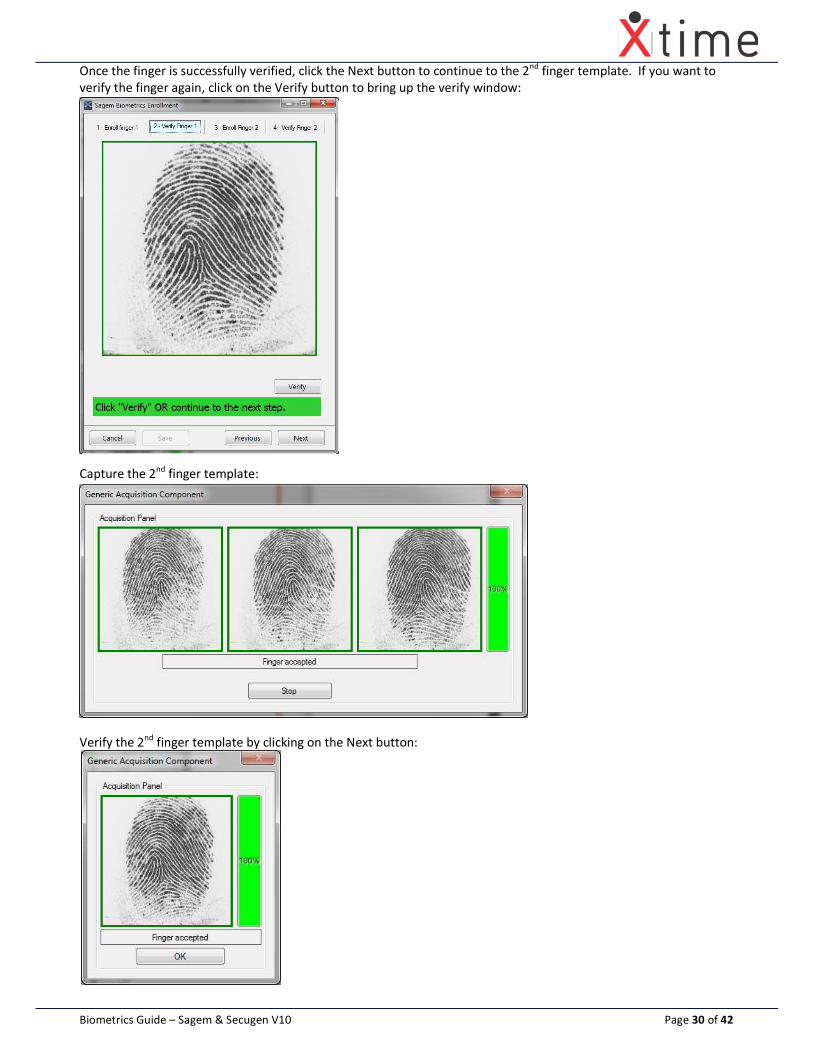
Once the finger is successfully verified, click the Next button to continue to the 2nd
finger template. If you want to
verify the finger again, click on the Verify button to bring up the verify window:
Capture the 2nd
finger template:
Verify the 2nd
finger template by clicking on the Next button:
Biometrics Guide – Sagem & Secugen V10 Page 31 of 42
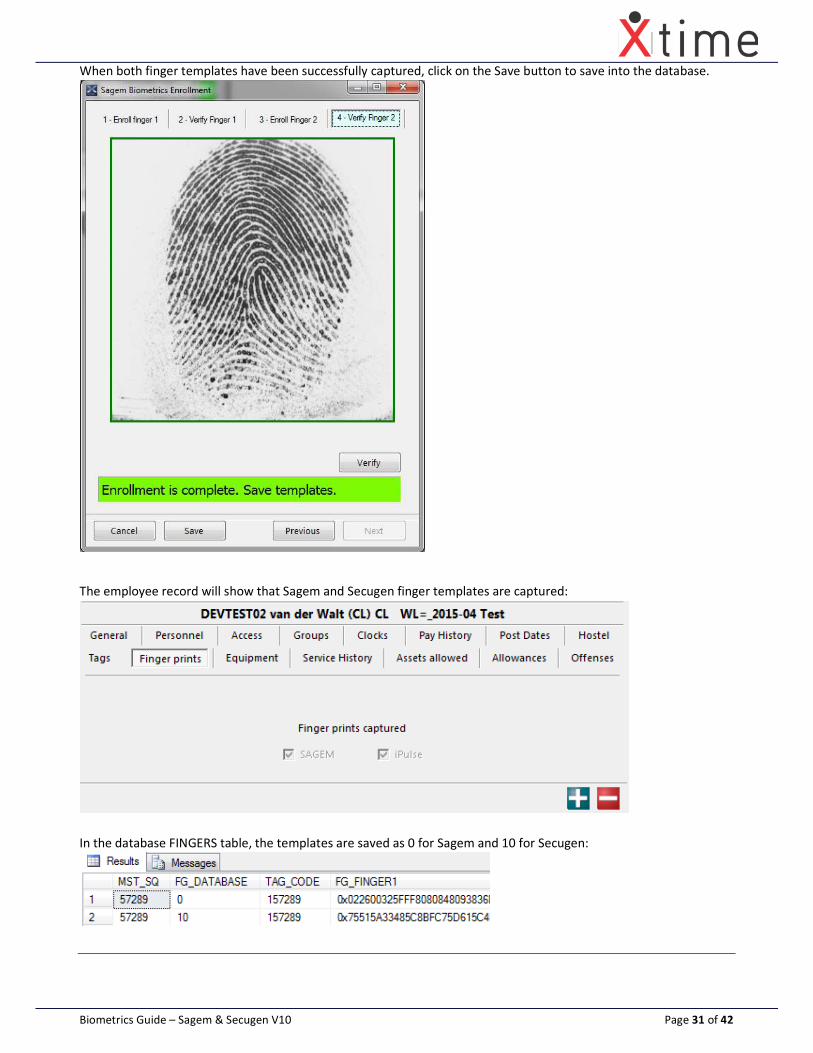
When both finger templates have been successfully captured, click on the Save button to save into the database.
The employee record will show that Sagem and Secugen finger templates are captured:
In the database FINGERS table, the templates are saved as 0 for Sagem and 10 for Secugen:
Biometrics Guide – Sagem & Secugen V10 Page 32 of 42
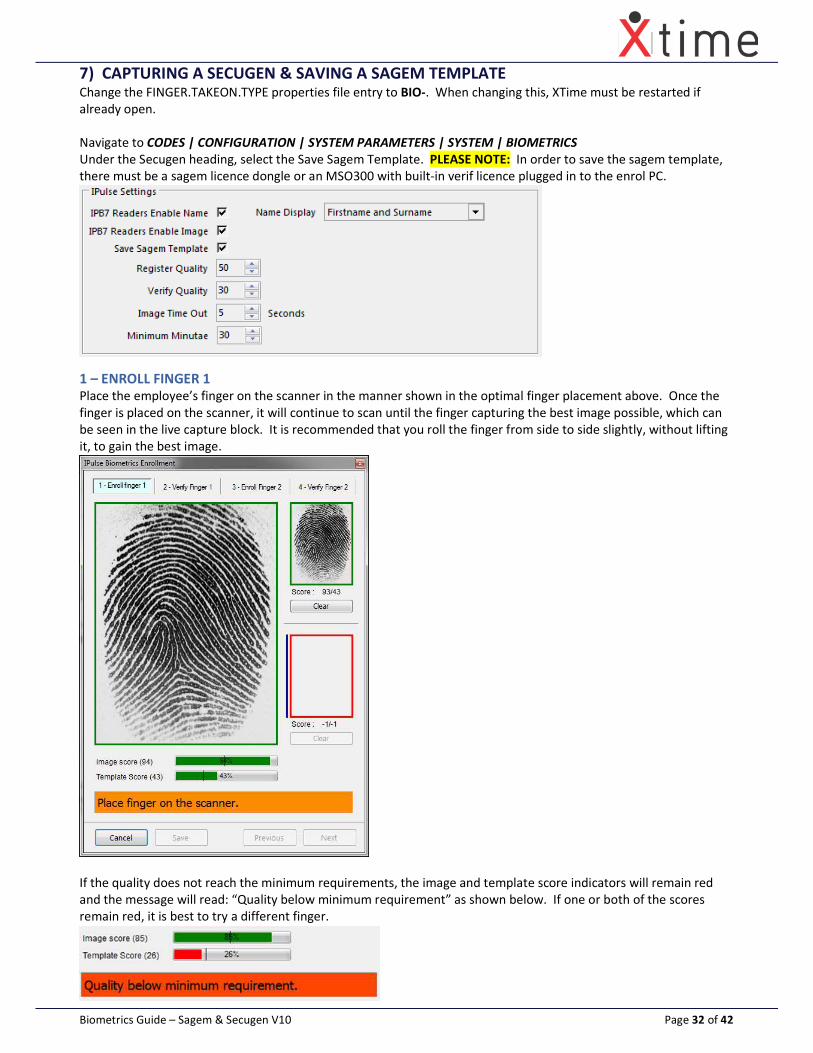
7) CAPTURING A SECUGEN & SAVING A SAGEM TEMPLATE Change the FINGER.TAKEON.TYPE properties file entry to BIO-. When changing this, XTime must be restarted if
already open.
Navigate to CODES | CONFIGURATION | SYSTEM PARAMETERS | SYSTEM | BIOMETRICS
Under the Secugen heading, select the Save Sagem Template. PLEASE NOTE: In order to save the sagem template,
there must be a sagem licence dongle or an MSO300 with built-in verif licence plugged in to the enrol PC.
1 – ENROLL FINGER 1
Place the employee’s finger on the scanner in the manner shown in the optimal finger placement above. Once the
finger is placed on the scanner, it will continue to scan until the finger capturing the best image possible, which can
be seen in the live capture block. It is recommended that you roll the finger from side to side slightly, without lifting
it, to gain the best image.
If the quality does not reach the minimum requirements, the image and template score indicators will remain red
and the message will read: “Quality below minimum requirement” as shown below. If one or both of the scores
remain red, it is best to try a different finger.
Biometrics Guide – Sagem & Secugen V10 Page 33 of 42
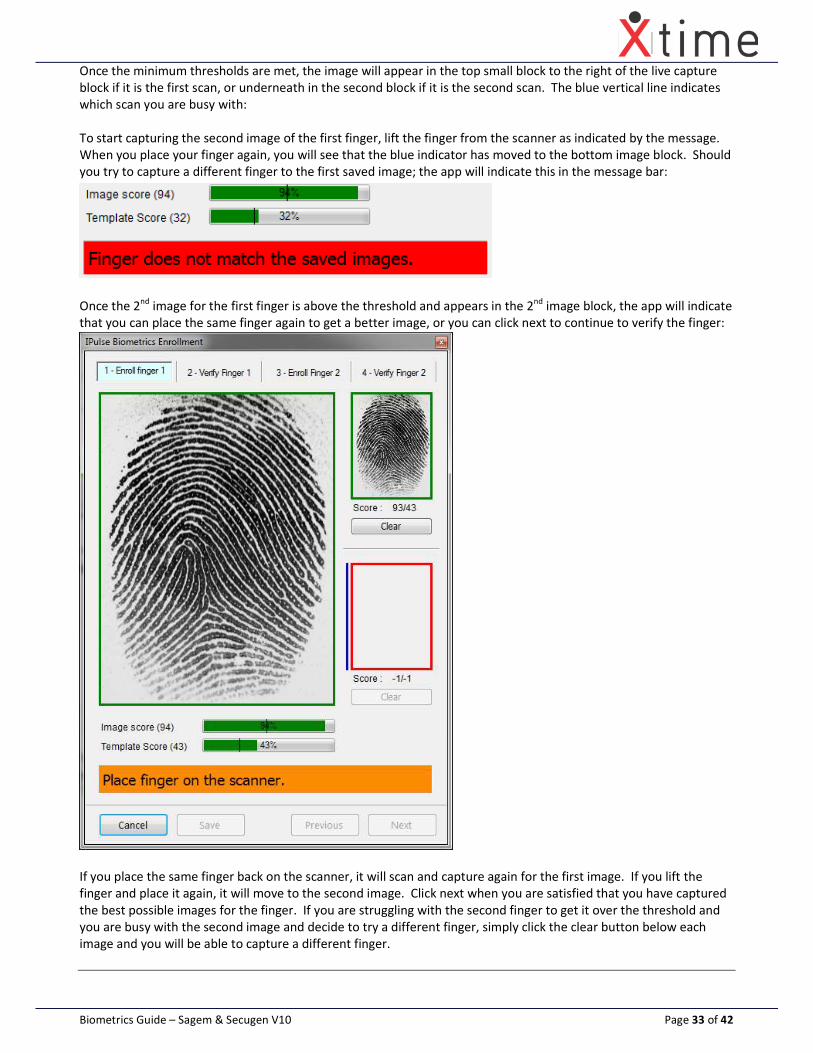
Once the minimum thresholds are met, the image will appear in the top small block to the right of the live capture
block if it is the first scan, or underneath in the second block if it is the second scan. The blue vertical line indicates
which scan you are busy with:
To start capturing the second image of the first finger, lift the finger from the scanner as indicated by the message.
When you place your finger again, you will see that the blue indicator has moved to the bottom image block. Should
you try to capture a different finger to the first saved image; the app will indicate this in the message bar:
Once the 2nd
image for the first finger is above the threshold and appears in the 2nd
image block, the app will indicate
that you can place the same finger again to get a better image, or you can click next to continue to verify the finger:
If you place the same finger back on the scanner, it will scan and capture again for the first image. If you lift the
finger and place it again, it will move to the second image. Click next when you are satisfied that you have captured
the best possible images for the finger. If you are struggling with the second finger to get it over the threshold and
you are busy with the second image and decide to try a different finger, simply click the clear button below each
image and you will be able to capture a different finger.
Biometrics Guide – Sagem & Secugen V10 Page 34 of 42
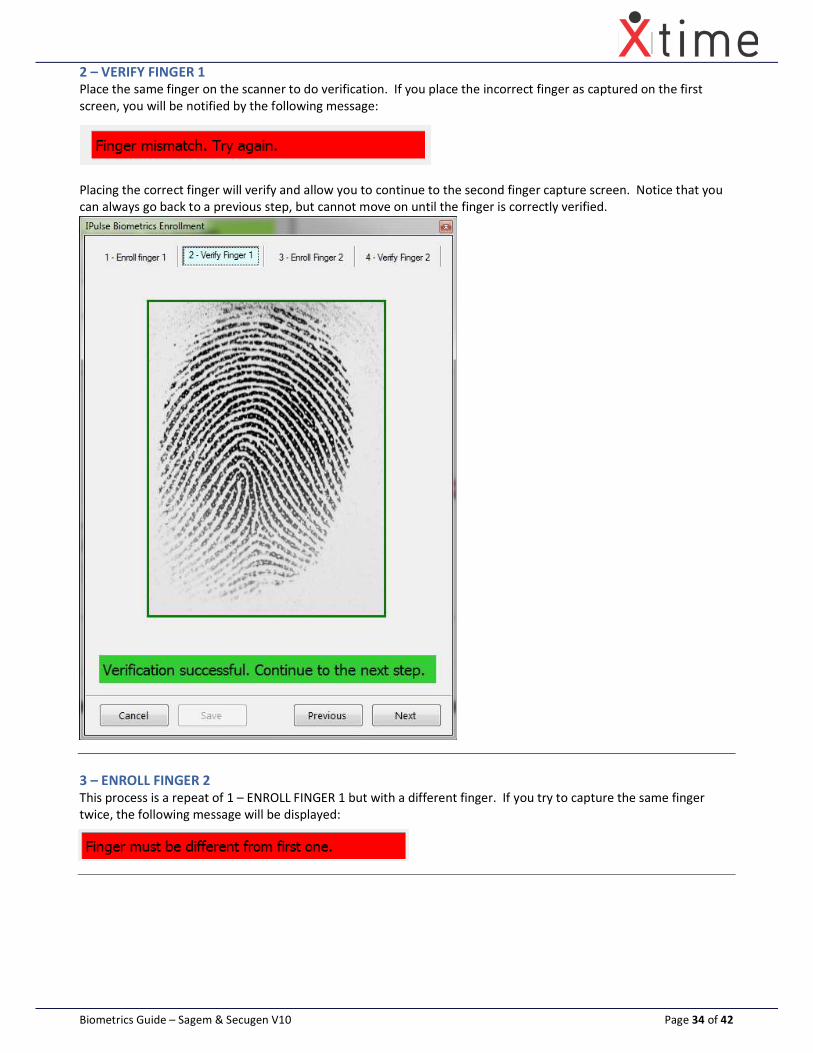
2 – VERIFY FINGER 1
Place the same finger on the scanner to do verification. If you place the incorrect finger as captured on the first
screen, you will be notified by the following message:
Placing the correct finger will verify and allow you to continue to the second finger capture screen. Notice that you
can always go back to a previous step, but cannot move on until the finger is correctly verified.
3 – ENROLL FINGER 2
This process is a repeat of 1 – ENROLL FINGER 1 but with a different finger. If you try to capture the same finger
twice, the following message will be displayed:
Biometrics Guide – Sagem & Secugen V10 Page 35 of 42
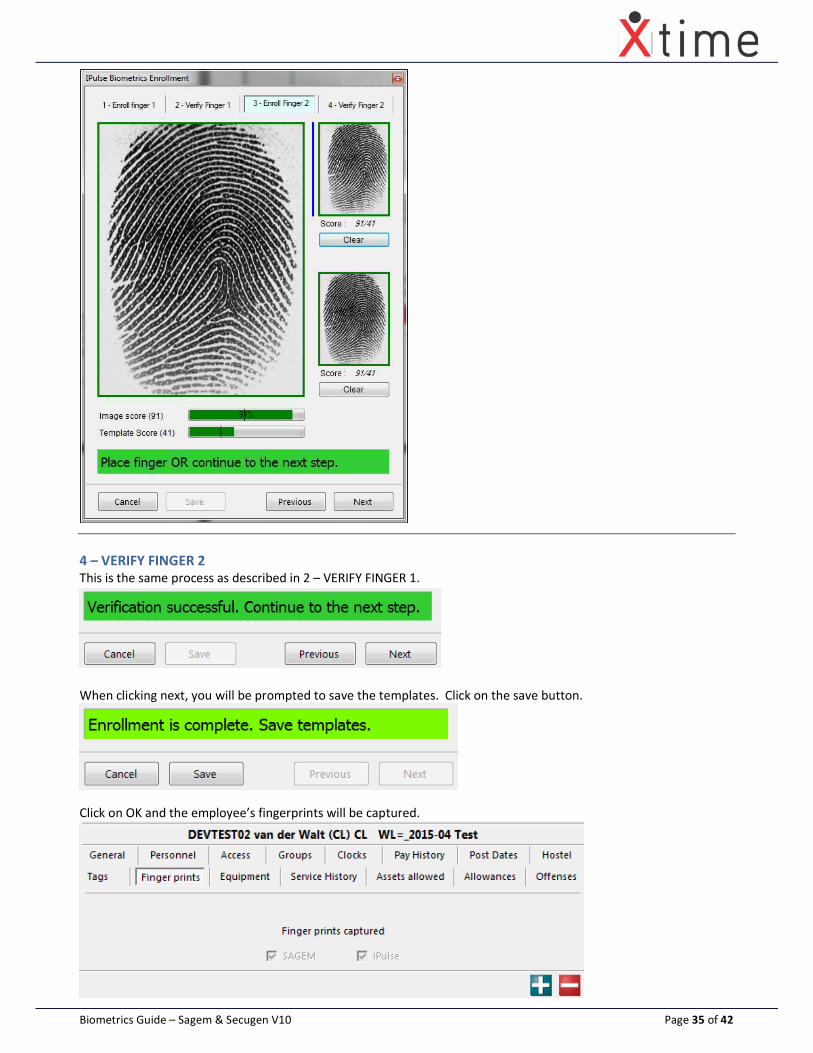
4 – VERIFY FINGER 2
This is the same process as described in 2 – VERIFY FINGER 1.
When clicking next, you will be prompted to save the templates. Click on the save button.
Click on OK and the employee’s fingerprints will be captured.
Biometrics Guide – Sagem & Secugen V10 Page 36 of 42
8) FINGER ON CARD The facility to write the fingerprints to HID tags also exists within XTime and Xtime.Biometrics. A stand-alone
OMNIKEY tag reader or the IPB2 units can be used to save the fingers to the tag.
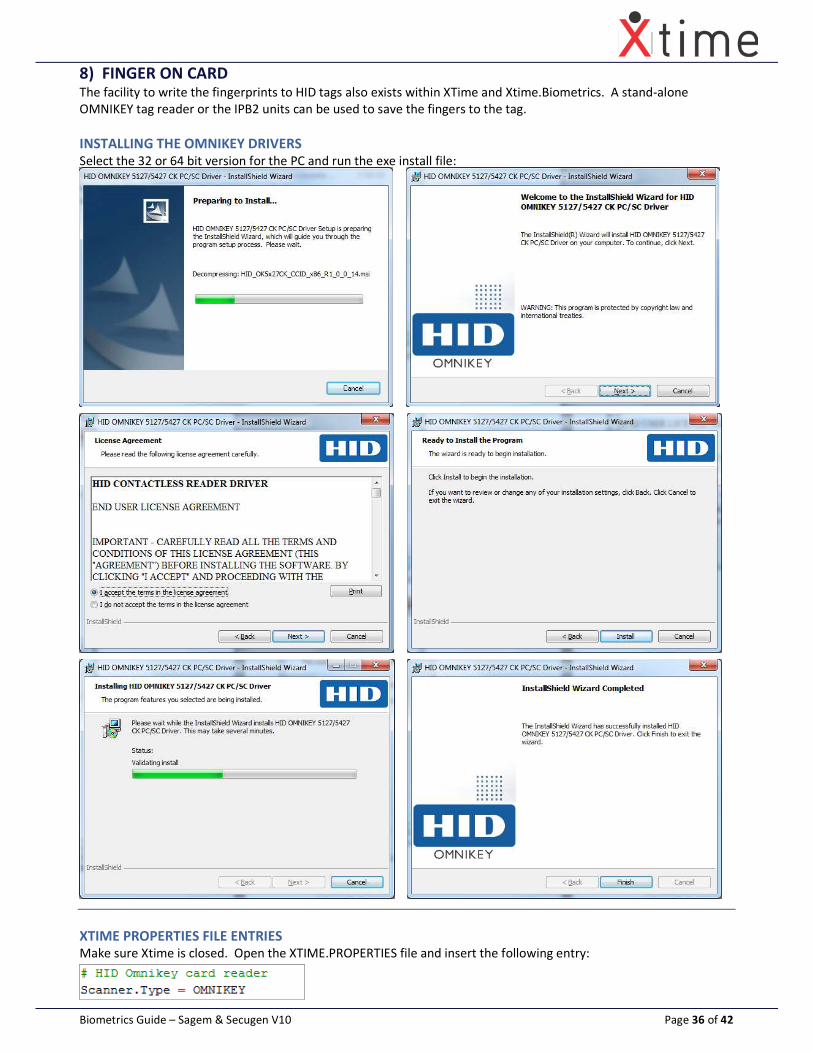
INSTALLING THE OMNIKEY DRIVERS
Select the 32 or 64 bit version for the PC and run the exe install file:
XTIME PROPERTIES FILE ENTRIES
Make sure Xtime is closed. Open the XTIME.PROPERTIES file and insert the following entry:
Biometrics Guide – Sagem & Secugen V10 Page 37 of 42
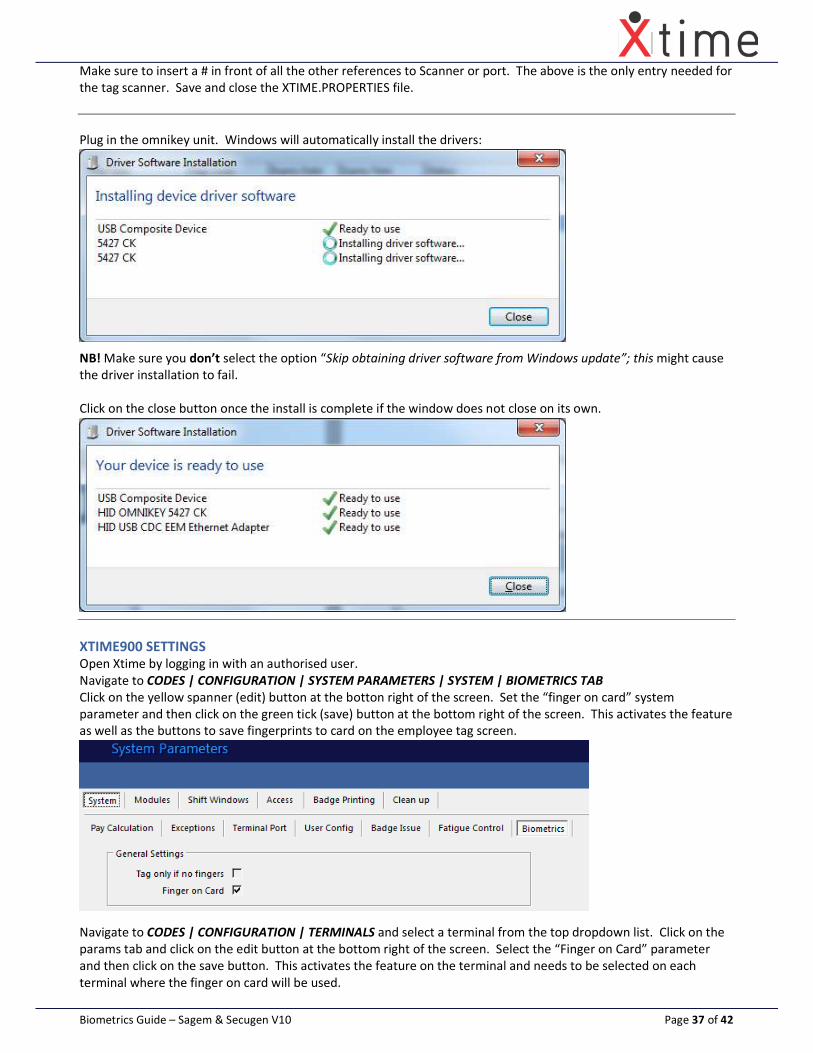
Make sure to insert a # in front of all the other references to Scanner or port. The above is the only entry needed for
the tag scanner. Save and close the XTIME.PROPERTIES file.
Plug in the omnikey unit. Windows will automatically install the drivers:
NB! Make sure you don’t select the option “Skip obtaining driver software from Windows update”; this might cause
the driver installation to fail.
Click on the close button once the install is complete if the window does not close on its own.
XTIME900 SETTINGS
Open Xtime by logging in with an authorised user.
Navigate to CODES | CONFIGURATION | SYSTEM PARAMETERS | SYSTEM | BIOMETRICS TAB
Click on the yellow spanner (edit) button at the botton right of the screen. Set the “finger on card” system
parameter and then click on the green tick (save) button at the bottom right of the screen. This activates the feature
as well as the buttons to save fingerprints to card on the employee tag screen.
Navigate to CODES | CONFIGURATION | TERMINALS and select a terminal from the top dropdown list. Click on the
params tab and click on the edit button at the bottom right of the screen. Select the “Finger on Card” parameter
and then click on the save button. This activates the feature on the terminal and needs to be selected on each
terminal where the finger on card will be used.
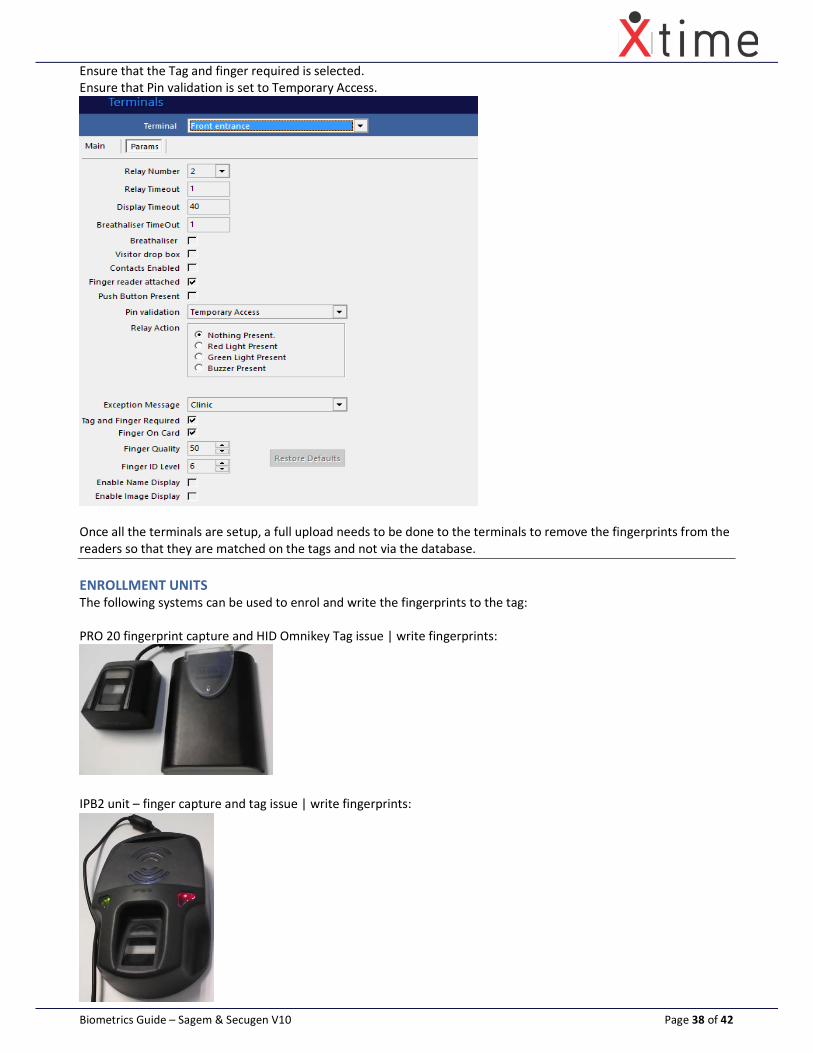
Biometrics Guide – Sagem & Secugen V10 Page 38 of 42
Ensure that the Tag and finger required is selected.
Ensure that Pin validation is set to Temporary Access.
Once all the terminals are setup, a full upload needs to be done to the terminals to remove the fingerprints from the
readers so that they are matched on the tags and not via the database.
ENROLLMENT UNITS
The following systems can be used to enrol and write the fingerprints to the tag:
PRO 20 fingerprint capture and HID Omnikey Tag issue | write fingerprints:
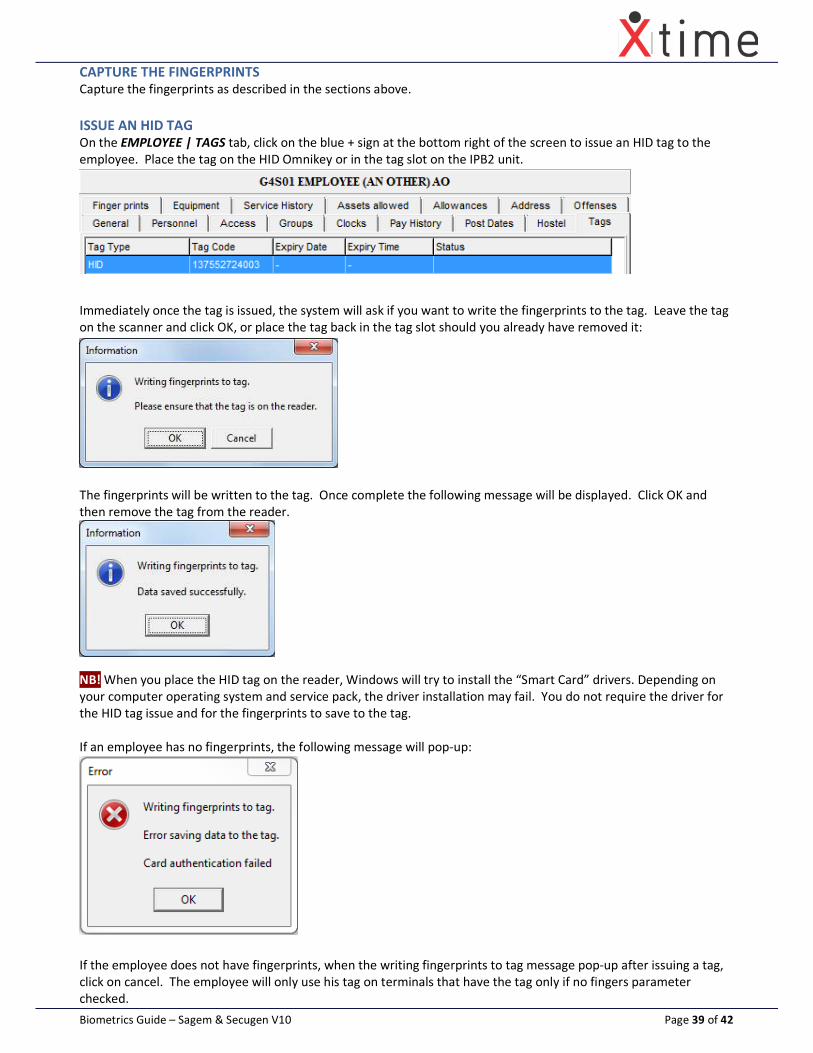
IPB2 unit – finger capture and tag issue | write fingerprints:
Biometrics Guide – Sagem & Secugen V10 Page 39 of 42
CAPTURE THE FINGERPRINTS
Capture the fingerprints as described in the sections above.
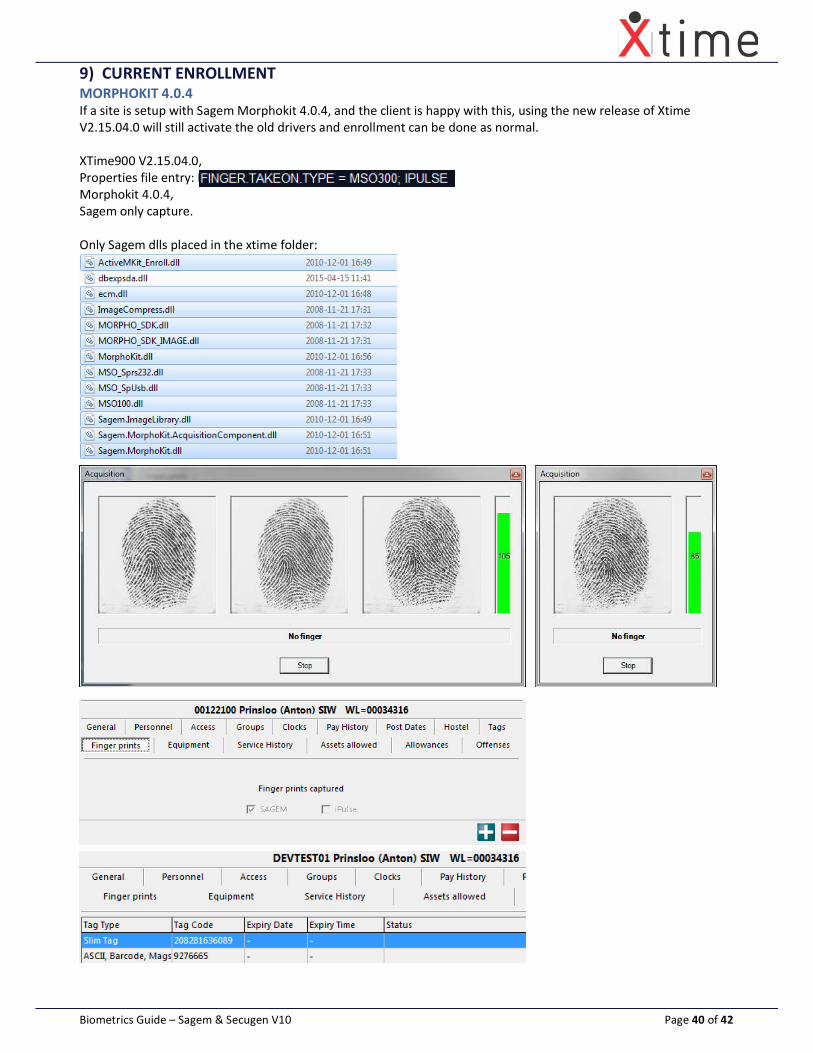
ISSUE AN HID TAG
On the EMPLOYEE | TAGS tab, click on the blue + sign at the bottom right of the screen to issue an HID tag to the
employee. Place the tag on the HID Omnikey or in the tag slot on the IPB2 unit.
Immediately once the tag is issued, the system will ask if you want to write the fingerprints to the tag. Leave the tag
on the scanner and click OK, or place the tag back in the tag slot should you already have removed it:
The fingerprints will be written to the tag. Once complete the following message will be displayed. Click OK and
then remove the tag from the reader.
NB! When you place the HID tag on the reader, Windows will try to install the “Smart Card” drivers. Depending on
your computer operating system and service pack, the driver installation may fail. You do not require the driver for
the HID tag issue and for the fingerprints to save to the tag.
If an employee has no fingerprints, the following message will pop-up:
If the employee does not have fingerprints, when the writing fingerprints to tag message pop-up after issuing a tag,
click on cancel. The employee will only use his tag on terminals that have the tag only if no fingers parameter
checked.
Biometrics Guide – Sagem & Secugen V10 Page 40 of 42
9) CURRENT ENROLLMENT
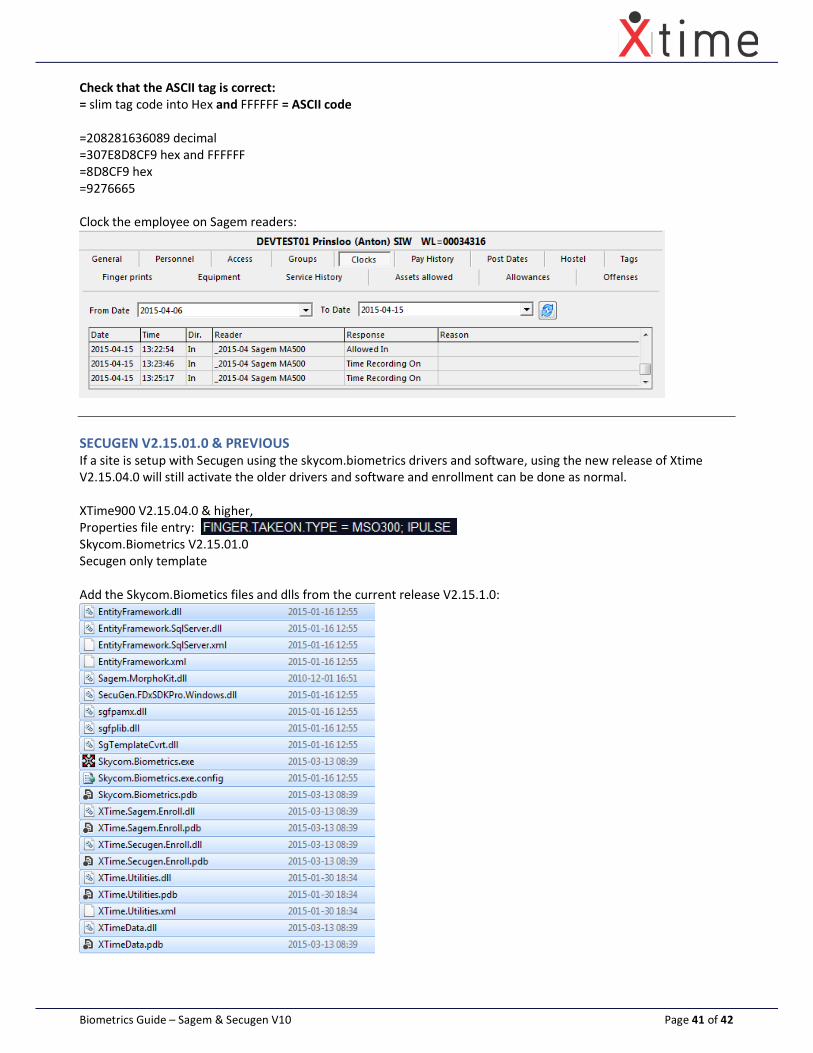
MORPHOKIT 4.0.4
If a site is setup with Sagem Morphokit 4.0.4, and the client is happy with this, using the new release of Xtime
V2.15.04.0 will still activate the old drivers and enrollment can be done as normal.
XTime900 V2.15.04.0,
Properties file entry: MSO300;IPULSE,
Morphokit 4.0.4,
Sagem only capture.
Only Sagem dlls placed in the xtime folder:
Biometrics Guide – Sagem & Secugen V10 Page 41 of 42
Check that the ASCII tag is correct:
= slim tag code into Hex and FFFFFF = ASCII code
=208281636089 decimal
=307E8D8CF9 hex and FFFFFF
=8D8CF9 hex
=9276665
Clock the employee on Sagem readers:
SECUGEN V2.15.01.0 & PREVIOUS
If a site is setup with Secugen using the skycom.biometrics drivers and software, using the new release of Xtime
V2.15.04.0 will still activate the older drivers and software and enrollment can be done as normal.
XTime900 V2.15.04.0 & higher,
Properties file entry:
Skycom.Biometrics V2.15.01.0
Secugen only template
Add the Skycom.Biometics files and dlls from the current release V2.15.1.0:
Biometrics Guide – Sagem & Secugen V10 Page 42 of 42
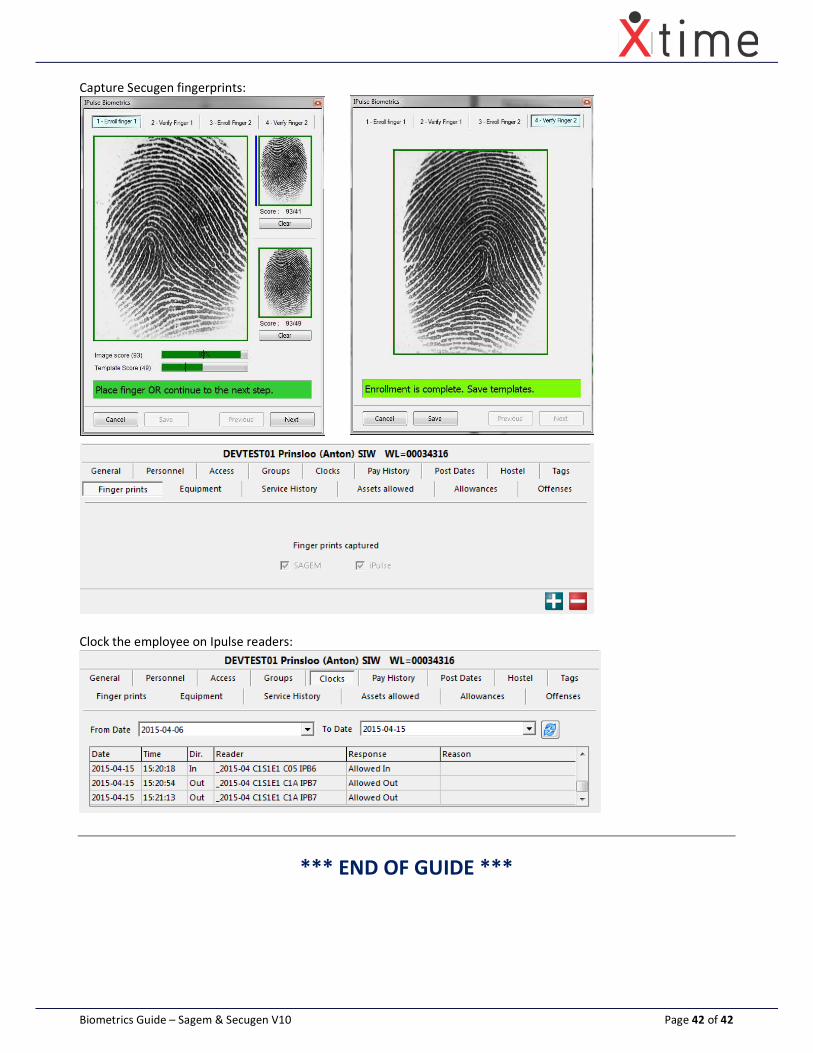
Capture Secugen fingerprints:
Clock the employee on Ipulse readers:
*** END OF GUIDE ***