Embed Size (px)
Citation preview

“Your reference guide
to doc-tor.com”
40 Exchange Pl Suite 1705 New York, NY 10005 (T): 718.369.0012 accessintegra.com
Billing Software Instructions
&
Frequently Asked Questions

2
Table of Contents
I.) Logging into Integra Partners Billing Software………………………………………………………………….………3
II.) Entering Patient Information……………………………………………………………………………………………………4
III.) Entering the Referring Provider…………………………………………………..…………………………………………..7
IV.) Entering the Insurance…………………………………………………………………………..……………………………….10
V.) Entering a Bill……………………………………………………………………………………………………….………………..12
VI.) Documentation Uploading……………………………………………………………………………………………………..18
VII.) Claim Status……………………………………………………………………………………………………..………..………….20
VIII.) Patient Reporting………………………………………………………………………………..…………………..…………….23
IX.) Recap……………………………………………………………………………………………………………..………………………27
X.) Frequently Asked Questions………………………………….………………………….……………………………………28

3
I.) Logging Into Integra Partners Billing Software
1.) Go to www.accessintegra.com and click on the top link “Provider Login”
2.) Enter your user id and password (provided in your welcome package), then click “Log In”.
Tip: If your user id and password needs to be reset, please contact us at: [email protected] .
Once logged in you will be taken to the “Notes Page”. This is your “Home” screen. Tip: Notes are sent by the system for Billers to be kept updated on Insurance Updates. New notes added will have a
current date at the left side of the section. Notes that DO NOT pertain to your type of business can be deleted.
4
II.) Entering Patient Information
3.) To begin, click the “Front Desk” tab on the left side toolbar. The screen below will appear.
4.) Next, click on the “Demographics” icon.
5.) Begin by searching for the patient to ensure that the patient was not previously entered into the system.
Tip: Type in the first 3 letter of the patient last and first name, then hit “Search”.
Click
“Demographics”

5
6.) If the following screen appears, it means the patient has not been entered into the system by your company.
The patient must be entered by your office.
7.) Click on “Add New Patient” icon at the top right side of the screen and begin entering the patient’s
demographics.
Click “Add
New Patient”

6
8.) Fill in all necessary patient information including;
Last name
First name
Social Security # (if provided)
Gender
Date of birth
Telephone number (Home or Cell)
Email (if available)
Address (our system is registered to the US postal service).
Tip: First enter the zip code, and then click on the envelope picture above the zip code and the city and state will
automatically pop up. Then proceed to enter apartment # in the second line of the address.
9.) Once the patient information is entered click “Submit” to save the data.
Tip: Important to note, if no Social Security # is entered into the system, the message “You have not entered a Social
Security. Please hit submit again to add the patient” – click “Submit” again to save the entry.
If the patient was already entered by another provider the system will let you know that “The patient already exists
under this Account # 123345” – remove the Social Security # you have entered and click “Submit” to save the entry.

7
III.) Entering the Referring Provider
10.) Begin by entering the first 3 letters of the last name and only 1 letter of the first name, then click “Search”.
Tip: The “Referring Provider” means the physician ordering the equipment/supplies/device for the patient
*IMPORTANT: Please note that the state of the doctor defaults to the state of the patient. Therefore if the
doctor’s office is located in a different state, you will need to use the drop down menu under “State” to match the
doctor’s current address.*
Make sure the
“State” matches
with the doctor’s
current address

8
11.) Once a doctor’s name appears on the line, click on the “Arrow” to view the list of doctors already entered
into the system.
Tip: Not all doctors have been entered into our system. If you cannot locate the doctor or address of the doctor, please
complete the “Referring Provider” form (in the welcome package and attached to this document) and fax it to
(718.289.1229) or email it to ([email protected]) so the system can be updated.
12.) If your doctor does not show up in the search box, click on the name to open a dropdown menu.
Click
Here

9
13.) Once you have located the doctor and the address listed on the prescription, click on the name and click
“Submit” to save the entry.
14.) If the wrong doctor was selected, click on the “Clear” button in the same box of the doctor entry, and go back
to step 10.
10
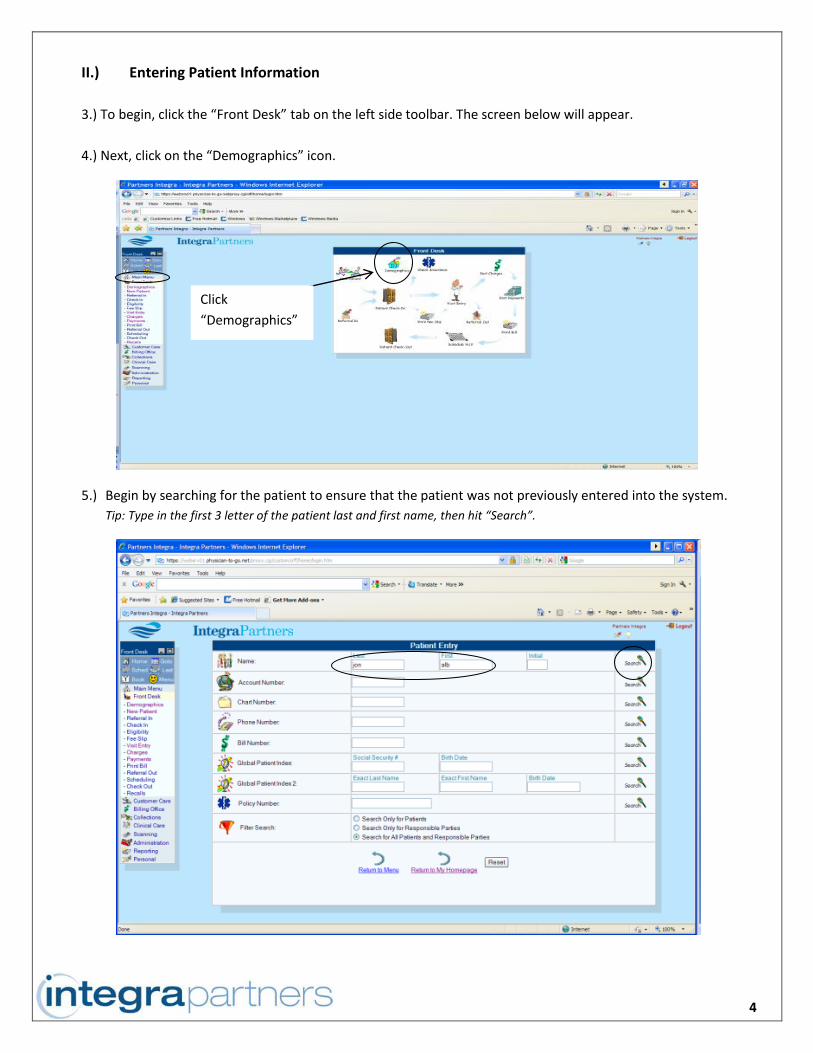
IV.) Entering the Insurance
15.) To enter the patient’s insurance information, click on “Skip to Plan”.
16.) The patient’s insurance is to be selected from the “Hotlist” (bottom section of the screen).
*IMPORTANT: Do not search for the insurance by entering the name or PO Box *
17.) Click on the drop “Arrow” and a list of insurance companies/payors that Integra is contracted with will
appear.
Click
Here
Use the “Hotlist”
when selecting an
insurance

11
18.) Scroll through the names of the insurance companies / payors (listed alphabetically) and select the one
needed. Highlight the insurance name, and click on the “Add from Hotlist” key to save the entry.
19.) Enter the patient’s insurance id # in the “Policy” section, then hit “Submit” to save the entry.
*Important: The effective date is not a valid effective date for the patient’s insurance. The system does not verify
the patient’s eligibility with the plan. Please make sure that the effective date is always prior to the date of
service. The date can be manually overridden by deleting the date and entering the day prior to the date of
service.*
Click here to add
from “Hotlist”

12
V.) Entering a Bill
*Important: A bill cannot be entered without a signed delivery ticket from the patient as receipt of the
equipment/supplies/device.*
20.) To begin, Click on “Front Desk” on the left navigation bar.
21.) Then Click on the “Post Charges” icon.
First click here
Then click here

13
22.) Select the patient by entering the first three letters of the last and first name and click “Search”.
23.) Click on the patient’s name

14
24.) Click on the blue ADD key to the right on the white bar.
25.) Enter the following information;
Visit date - enter the date the patient received the equipment/supplies/device
Pre-Auth # - enter the authorization number
Tip: If no authorization was required, the “Pre-Auth #” does not have to be entered.
26.) Click on the “Procedures” tab (third tab on the top).
Click to Add
(1) Fill in the
visit date
(2) Fill out Pre-Auth # if required
(3) Click on
“Procedure” Tab

15
27.) Begin by entering the HCPC/CPT procedure code and the modifier.
28.) Tab to the “Diagnosis” box and enter the diagnosis (up to 6).
29.) Tab to the “Unit” box and enter the unit(s).
30.) Click on the “Add” key in the “Charges” box.
O&P example

16
DME example
Tip: Once your entry has dropped, you have entered your bill. Repeat the process, if there are additional codes to enter.
Tip: There is a section in the bill where a note can be entered. Click on the “Add” key to the right of “Bill Notes”. An example of a bill note may include; 1) Price for a miscellaneous procedure code 2) The claims remittance address for a Multiplan claim. There are two sections where information should be entered, “Subject” and “Note”.

17
Example 1: Price For a Miscellaneous Procedure Code
Example 2: Claims Remittance Address For a Multiplan Claim
Once entry is made, click on “Submit” to save and “Exit”

18
Documentation Uploading
All claims submitted for payment must have the appropriate documentation for the claim to be released to the insurance company for payment.
Required documentation must be received BEFORE a claim can complete processing for payment. All documentation must be clear and legible.
Claims for which documentation is not received cannot be processed for submission to plans.
Visit Entry Screen 1. In the BILL NOTES section,
click the word Add
2. Add a brief description of what you will be attaching in the Subject Line
3. Click submit

19
4. Click Create Attachment
5. Description: Please type what you are attaching (this may be the same as the subject line) 6. Type: Select “Scanned Document” 7. Format: Select “’Adobe Acrobat File” (Your documents should be in a PDF format) 8. Click BROWSE, select file to be uploaded (Attachment cannot exceed 1MB) 9. Click submit

20
VI.) Claim Status
31.) To find the status of a claim, click on the “Customer Care” section on the toolbar on the left of the screen,
and then click on “Patient Summary”.
(1) Click on
“Customer Care” (2) Click on “Patient
Summary”

21
32.) Enter the Patient’s name (Last/First), Birth Date or Bill Number in the appropriate section.
33.) Click “Search” next to the field you have inputted.
34.) Click on the patient’s name.

22
35.) Click on the bill number.
The itemized bill will appear. Any transaction entered for the bill will be listed line by line.

23
VII.) Patient Reporting
36.) To run a report to see all patient activity through the Integra network, click on the “Reporting” button on the
left navigation menu. Then click on “Reports”.
37.) In the third section, “Billing”/ “$”, click on “Transactions by Office”
(1) Click on “Reporting”
(2) Click on Reports
Click on “Billing”/ “$” section

24
Tip: This report can be run: Daily, Weekly, Monthly or whatever your desired dates are.
38.) Click “Execute Report”.
Click here to run
report

25
39.) Click “Submit”
40.) A message will appear confirming the generation of this report. Click on the “Home” screen on the left
navigation menu to see the status of your report.
Click here to see the
status of your report

26
Tip: Depending how much information you have requested, larger date spans will take longer, the report will show up in the
“Home” section. A short report can take a couple of minutes to run and show up in this menu, a long report can take up to one
hour.
41.) You can retrieve your report by clicking on your transaction and then click on “retrieve”.

27
42.) Click on page 2 to view the report.
Tip: To export into MS Word, click on the “Printer Friendly” link.
--------------------------------------------------------------------------------------------------------------------------
VIII.) Recap
You should now have the tools to:
- Log into Integra Partners billing software
- Enter a patients’ information
- Enter the referring provider
- Enter insurance/payor
- Enter a bill
- Check a claim status
- Run patient reports
Welcome to Integra Partners.
Should you have any questions or require further support, please email us at
[email protected] or call us at 718-369-0012.

28
Frequently Asked Questions
Question: How do I ensure that I will be paid for the products and the remittance won’t go to another Integra provider? Answer: You should enter the patients information into the system as soon as possible. Be sure to include; patients first and last name, date of birth, address, and the referring doctor. By doing so, this will link the patient to your office. Question: What happens when I search for a patient and their name appears in black letters? Answer: This means that the patient is/has been serviced by another provider. You can still add the patient under your practice by entering their information. Question: What happens if the system notes that the patient already exists? Answer: Delete the patient’s social security number. Question: Why does it say NO INSURANCE on the bill? Answer: The effective date on the insurance section is after your billing date of service. Question: When do I enter a bill for a patient? Answer: Once you have a signed delivery ticket from the patient and the services have been delivered. Question: What if the doctor cannot be located? Answer: Complete the “Referring Physician” form and fax to Integra for the doctor to be entered. Question: When can I expect payment on a bill? Answer: Please allow 30 to 45 business days for the payor to process a claim. Question: What date is entered for “Visit Date”? Answer: The date the patient signed for the services.
Question: What happens when I enter a bill and the amount defaults to zero? Answer: You should input notes into the system so when Integra scrubs the bills the following day it can be updated/corrected.