Embed Size (px)
DESCRIPTION
Â
Citation preview


Copyright © 2006 by Bill Hurter.All rights reserved.
Front cover photograph by Yervant Zanazanian.Back cover photograph by Craig Minielly.
Published by:Amherst Media, Inc.P.O. Box 586Buffalo, N.Y. 14226Fax: 716-874-4508www.AmherstMedia.com
Publisher: Craig AlesseSenior Editor/Production Manager: Michelle PerkinsAssistant Editor: Barbara A. Lynch-Johnt
ISBN: 1-58428-188-XLibrary of Congress Card Catalog Number: 2005937370
Printed in Korea.10 9 8 7 6 5 4 3 2 1
No part of this publication may be reproduced, stored, or transmitted in any form or by any means, electronic, mechan-ical, photocopied, recorded or otherwise, without prior written consent from the publisher.
Notice of Disclaimer: The information contained in this book is based on the author’s experience and opinions. Theauthor and publisher will not be held liable for the use or misuse of the information in this book.
ABOUT THE AUTHOR
Bill Hurter started out in photography in 1972 in Washington, DC, where he was a news photographer. He evencovered the political scene—including the Watergate hearings. After graduating with a BA in literature fromAmerican University in 1972, he completed training at the Brooks Institute of Photography in 1975. Going on towork at Petersen’s PhotoGraphic magazine, he held practically every job except art director. He has been the ownerof his own creative agency, shot stock, and worked assignments (including a year or so with the L.A. Dodgers). Hehas been directly involved in photography for the last thirty years and has seen the revolution in technology. In1988, Bill was awarded an honorary Masters of Science degree from the Brooks Institute. He has written more thana dozen instructional books for professional photographers and is currently the editor of Rangefinder magazine.
ACKNOWLEDGMENTS . . . . . . . . . . . . . . . . . . . . . . . . . .5
1. THE ADVANTAGES OF DIGITAL CAPTURE . . . . . . . . . . . .6Reduced Costs, Increased Shooting . . . . . . . . . . . . .6Instant Previews . . . . . . . . . . . . . . . . . . . . . . . . . . .6Enhanced Creativity . . . . . . . . . . . . . . . . . . . . . . . .8Archival Permanence . . . . . . . . . . . . . . . . . . . . . . .10Digital Retouching . . . . . . . . . . . . . . . . . . . . . . . .11Remote Capture and Wireless Transfer . . . . . . . . .11
2. CAMERA EQUIPMENT . . . . . . . . . . . . . . . . . . . . . . .15Zoom Lenses vs. Prime Lenses . . . . . . . . . . . . . . .15Zoom Lenses . . . . . . . . . . . . . . . . . . . . . . . . . . .15Prime Lenses . . . . . . . . . . . . . . . . . . . . . . . . . . .17
Telephoto Lenses . . . . . . . . . . . . . . . . . . . . . . . . . .19AF Technology . . . . . . . . . . . . . . . . . . . . . . . . . . .19Removable Storage Media . . . . . . . . . . . . . . . . . . .21Types of Media . . . . . . . . . . . . . . . . . . . . . . . . .21Write Speeds . . . . . . . . . . . . . . . . . . . . . . . . . . .23Card Readers . . . . . . . . . . . . . . . . . . . . . . . . . . .24
Image Sensors . . . . . . . . . . . . . . . . . . . . . . . . . . . .24CCD vs. CMOS . . . . . . . . . . . . . . . . . . . . . . . .24Sensor Size . . . . . . . . . . . . . . . . . . . . . . . . . . . .25A Clean Image Sensor . . . . . . . . . . . . . . . . . . . .26
Things to Consider WhenPurchasing a DSLR System . . . . . . . . . . . . . .26
Sensitivity/ISO Range . . . . . . . . . . . . . . . . . . . .26Burst Rate . . . . . . . . . . . . . . . . . . . . . . . . . . . . .27LCD Monitor . . . . . . . . . . . . . . . . . . . . . . . . . .27Playback . . . . . . . . . . . . . . . . . . . . . . . . . . . . . .27Lens Conversion Factor . . . . . . . . . . . . . . . . . . .27
Effective Pixels . . . . . . . . . . . . . . . . . . . . . . . . .27File Types . . . . . . . . . . . . . . . . . . . . . . . . . . . . .28PC Terminal . . . . . . . . . . . . . . . . . . . . . . . . . . .28Shutter-Lag Time . . . . . . . . . . . . . . . . . . . . . . .28Lens Capability and Accessories . . . . . . . . . . . . .29Removable Media . . . . . . . . . . . . . . . . . . . . . . .29Dimensions/Weight . . . . . . . . . . . . . . . . . . . . .29Battery Power . . . . . . . . . . . . . . . . . . . . . . . . . .29Price . . . . . . . . . . . . . . . . . . . . . . . . . . . . . . . . .29White Balance . . . . . . . . . . . . . . . . . . . . . . . . . .20
3. LIGHTING EQUIPMENT . . . . . . . . . . . . . . . . . . . . . .30Studio Strobe Systems . . . . . . . . . . . . . . . . . . . . . .30Power Packs . . . . . . . . . . . . . . . . . . . . . . . . . . .30Firing Studio Strobes . . . . . . . . . . . . . . . . . . . . .30What to Look For . . . . . . . . . . . . . . . . . . . . . . .30
Recycle Times . . . . . . . . . . . . . . . . . . . . . . . .31Modeling Lights . . . . . . . . . . . . . . . . . . . . . . .31Color Temperature . . . . . . . . . . . . . . . . . . . . .32Fan-Cooled Generator . . . . . . . . . . . . . . . . . .32Multi-Voltage Capability . . . . . . . . . . . . . . . .32Computer Control . . . . . . . . . . . . . . . . . . . . .32Open-Flash Function . . . . . . . . . . . . . . . . . . .32Heads and Accessories . . . . . . . . . . . . . . . . . .32
Variations and Accessories . . . . . . . . . . . . . . . . .32Barebulb . . . . . . . . . . . . . . . . . . . . . . . . . . . .32Barn Doors . . . . . . . . . . . . . . . . . . . . . . . . . .33Diffusers . . . . . . . . . . . . . . . . . . . . . . . . . . . .33Flats . . . . . . . . . . . . . . . . . . . . . . . . . . . . . . .34Gobos . . . . . . . . . . . . . . . . . . . . . . . . . . . . . .34Grid Spots . . . . . . . . . . . . . . . . . . . . . . . . . . .35
TABLE OF CONTENTS 3
TABLE OF CONTENTS
Light Tents . . . . . . . . . . . . . . . . . . . . . . . . . .36Mirrors . . . . . . . . . . . . . . . . . . . . . . . . . . . . .39Reflectors . . . . . . . . . . . . . . . . . . . . . . . . . . .39Reflectors, Wide-Angle . . . . . . . . . . . . . . . . . .39Reflectors, Narrow-Angle . . . . . . . . . . . . . . . .39Reflectors, Parabolic . . . . . . . . . . . . . . . . . . . . .39Scrims . . . . . . . . . . . . . . . . . . . . . . . . . . . . . .41Snoots . . . . . . . . . . . . . . . . . . . . . . . . . . . . . .41Softboxes . . . . . . . . . . . . . . . . . . . . . . . . . . . .41Spotlights . . . . . . . . . . . . . . . . . . . . . . . . . . . .43Strip Lights . . . . . . . . . . . . . . . . . . . . . . . . . .43Umbrellas . . . . . . . . . . . . . . . . . . . . . . . . . . .43Umbrellas, Shoot-Through . . . . . . . . . . . . . . .43
On-Camera Flash . . . . . . . . . . . . . . . . . . . . . . . . .43Bounce-Flash Devices . . . . . . . . . . . . . . . . . . . .43
Handheld Video Lights . . . . . . . . . . . . . . . . . . . . .45
4. GOOD DIGITAL WORKING TECHNIQUES . . . . . . . . . . .46File Size . . . . . . . . . . . . . . . . . . . . . . . . . . . . . . . . .46Resolution . . . . . . . . . . . . . . . . . . . . . . . . . . . . .48File Format . . . . . . . . . . . . . . . . . . . . . . . . . . . .49Changing Image Size and Resolution . . . . . . . .49
Resampling . . . . . . . . . . . . . . . . . . . . . . . . . .49Interpolation . . . . . . . . . . . . . . . . . . . . . . . . .49Step Interpolation . . . . . . . . . . . . . . . . . . . . .50
Exposure and Metering . . . . . . . . . . . . . . . . . . . . .50Determining Your Camera’s E.I. . . . . . . . . . . . .50Metering . . . . . . . . . . . . . . . . . . . . . . . . . . . . . .52
Evaluating Exposure . . . . . . . . . . . . . . . . . . . . . . .54Histograms . . . . . . . . . . . . . . . . . . . . . . . . . . . .54Evaluating an LCD Image . . . . . . . . . . . . . . . . .56
Camera Settings . . . . . . . . . . . . . . . . . . . . . . . . . . .56White Balance . . . . . . . . . . . . . . . . . . . . . . . . . .56Contrast . . . . . . . . . . . . . . . . . . . . . . . . . . . . . .58Color Space . . . . . . . . . . . . . . . . . . . . . . . . . . . .58Sharpening . . . . . . . . . . . . . . . . . . . . . . . . . . . .59Metadata . . . . . . . . . . . . . . . . . . . . . . . . . . . . . .59
5. FILE FORMATS . . . . . . . . . . . . . . . . . . . . . . . . . . . .60File Compression . . . . . . . . . . . . . . . . . . . . . . . . . .60JPEG Format . . . . . . . . . . . . . . . . . . . . . . . . . . . .60JPEG 2000 Format . . . . . . . . . . . . . . . . . . . . . . . .61GIF Format . . . . . . . . . . . . . . . . . . . . . . . . . . . . . .62TIFF Format . . . . . . . . . . . . . . . . . . . . . . . . . . . . .62Photoshop EPS Format . . . . . . . . . . . . . . . . . . . . .63
DCS . . . . . . . . . . . . . . . . . . . . . . . . . . . . . . . . .63PSD Format . . . . . . . . . . . . . . . . . . . . . . . . . . . . .63Photoshop RAW Format . . . . . . . . . . . . . . . . . . . .64RAW Format . . . . . . . . . . . . . . . . . . . . . . . . . . . . .65How JPEG Differs from RAW . . . . . . . . . . . . . .65
JPEG . . . . . . . . . . . . . . . . . . . . . . . . . . . . . .66RAW . . . . . . . . . . . . . . . . . . . . . . . . . . . . . .66
RAW File Converters . . . . . . . . . . . . . . . . . . . . .66Adobe Camera RAW . . . . . . . . . . . . . . . . . . .69
Reformat Your Cards . . . . . . . . . . . . . . . . . . . . . . .71
6. COLOR MANAGEMENT AND DEVICE PROFILING . . . . . .73Monitor Profiles . . . . . . . . . . . . . . . . . . . . . . . . . .75Gamma . . . . . . . . . . . . . . . . . . . . . . . . . . . . . . .76
Camera Profiles . . . . . . . . . . . . . . . . . . . . . . . . . . .76Printer Profiles . . . . . . . . . . . . . . . . . . . . . . . . . . . .78Soft Proofing . . . . . . . . . . . . . . . . . . . . . . . . . . . . .78Previewing Colors Using a Soft Proof . . . . . . . .80
7. WORKFLOW METHODS . . . . . . . . . . . . . . . . . . . . . .81Michael Ayers’ Basic Wedding Workflow
for Highest-Quality JPEGs . . . . . . . . . . . . .81Uploading . . . . . . . . . . . . . . . . . . . . . . . . . . . . .81File Backup . . . . . . . . . . . . . . . . . . . . . . . . . . . .81Edit and Adjust . . . . . . . . . . . . . . . . . . . . . . . . .81Image Manipulation . . . . . . . . . . . . . . . . . . . . .82Rename . . . . . . . . . . . . . . . . . . . . . . . . . . . . . . .82Copy Again . . . . . . . . . . . . . . . . . . . . . . . . . . . .82Proof Setting and Printing . . . . . . . . . . . . . . . . .83FlipAlbum . . . . . . . . . . . . . . . . . . . . . . . . . . . . .84Uploading to the Internet . . . . . . . . . . . . . . . . .84Consolidate Orders . . . . . . . . . . . . . . . . . . . . . .84Thumbnails . . . . . . . . . . . . . . . . . . . . . . . . . . . .84Album Layout . . . . . . . . . . . . . . . . . . . . . . . . . .85Retouching . . . . . . . . . . . . . . . . . . . . . . . . . . . .85Ordering . . . . . . . . . . . . . . . . . . . . . . . . . . . . . .85Album Ordering . . . . . . . . . . . . . . . . . . . . . . . .85Print Sorting . . . . . . . . . . . . . . . . . . . . . . . . . . .85Folders and Mounting . . . . . . . . . . . . . . . . . . . .85Shipping . . . . . . . . . . . . . . . . . . . . . . . . . . . . . .86Archiving . . . . . . . . . . . . . . . . . . . . . . . . . . . . . .86
Jerry Ghionis’ Album Workflow . . . . . . . . . . . . . . .86Chris LaLonde’s On-Location Workflow . . . . . . . .86Mike Colón’s WiFi Workflow . . . . . . . . . . . . . . . .86
4 THE BEST OF PROFESSIONAL DIGITAL PHOTOGRAPHY

TABLE OF CONTENTS 5
8. ADOBE PHOTOSHOP . . . . . . . . . . . . . . . . . . . . . . . .91Photoshop Tools . . . . . . . . . . . . . . . . . . . . . . . . . .91Actions . . . . . . . . . . . . . . . . . . . . . . . . . . . . . . .91Layers . . . . . . . . . . . . . . . . . . . . . . . . . . . . . . . .93
Duplicate the Background Layer . . . . . . . . . .93Name Each Layer . . . . . . . . . . . . . . . . . . . . .93Opacity and Blending Options . . . . . . . . . . . .93Linked Layers . . . . . . . . . . . . . . . . . . . . . . . .93Filling New Layers . . . . . . . . . . . . . . . . . . . . .93Layer Styles . . . . . . . . . . . . . . . . . . . . . . . . . .94Adjustment and Fill Layers . . . . . . . . . . . . . .94Layer Masks . . . . . . . . . . . . . . . . . . . . . . . . . .96Layer Groups . . . . . . . . . . . . . . . . . . . . . . . . .96
Healing Brush and Clone Tool . . . . . . . . . . . . .96Liquify Filter . . . . . . . . . . . . . . . . . . . . . . . . . . .96
Basic Retouching Techniques . . . . . . . . . . . . . . . .96Soft Focus . . . . . . . . . . . . . . . . . . . . . . . . . . . . .96
Selective Soft Focus . . . . . . . . . . . . . . . . . . . . .97Vignetting . . . . . . . . . . . . . . . . . . . . . . . . . . . . .97Straightening Verticals . . . . . . . . . . . . . . . . . . . .98
Lens Correction . . . . . . . . . . . . . . . . . . . . . . .98Sharpening . . . . . . . . . . . . . . . . . . . . . . . . . . . .99
Basic Color and Tonal Corrections . . . . . . . . . . .100Selective Color . . . . . . . . . . . . . . . . . . . . . . . .100Targeting White and Gray Points in Levels . . .102Shadow/Highlight . . . . . . . . . . . . . . . . . . . . .102
Color Enhancements . . . . . . . . . . . . . . . . . . . . . .103Sepia/Blue Tone . . . . . . . . . . . . . . . . . . . . . . .103Mixing Color and Black & Whitein the Same Image . . . . . . . . . . . . . . . . . . .103
Soft Color . . . . . . . . . . . . . . . . . . . . . . . . . . . .104Professional Photoshop Enhancements . . . . . . . .104Claude Jodoin’s Facial Retouching . . . . . . . . .104
Eliminating Blemishes . . . . . . . . . . . . . . . . .104Smoothing the Skin . . . . . . . . . . . . . . . . . . .104Enhancing the Eyes . . . . . . . . . . . . . . . . . . .105
Marcus Bell’s Fine-Art Color Effects . . . . . . . .105David Wendt’s Layers Techniques . . . . . . . . . .110Jim DiVitale Knows When Size Matters . . . . . .112
CONCLUSIONS . . . . . . . . . . . . . . . . . . . . . . . . . . . .114GLOSSARY . . . . . . . . . . . . . . . . . . . . . . . . . . . . . . .115THE PHOTOGRAPHERS . . . . . . . . . . . . . . . . . . . . . . .121INDEX . . . . . . . . . . . . . . . . . . . . . . . . . . . . . . . . . .125
ACKNOWLEDGMENTS
As you will see from the photographs throughout this book, the range of creativity and uniqueness displayed by today’s top dig-
ital photographers is incomparable. I wish to thank the many fine photographers who have contributed to this book—not only
for their images, but also for their expertise. As anyone who has investigated the technical aspects of digital beyond a surface
level has no doubt discovered, there are contradictions galore and volumes of misinformation surrounding everything digital. It
is my hope that throughout this book you will find many of those mysteries unraveled. I also wish to thank the many photog-
raphers who shared trade secrets with me for the purposes of illuminating others. Some of their tips, which appear throughout
the book, are as ingenious as they are invaluable.

greater frequency—as are peripheral products that sup-port digital imaging. Almost without exception, imag-ing manufacturers’ entire research and developmentbudgets are going into digital products. The reason forthis sea change in image-making is clear: digital offerscontemporary photographers flexibility, speed, and cre-ative control.
REDUCED COSTS, INCREASED SHOOTING
Ask any photographer shooting film if he or she mental-ly inventories the number of exposed and unexposedrolls during a wedding or portrait session and they’ll alltell you that they do it. They also mentally calculate thefees of buying, processing, and proofing that film. Notso with digital, where there are no film and processingcosts. The net result is that digital photographers shootmany more images at any given event. They can alsochange from color to black & white on the fly or switchthe white balance and film speed from frame to frame.In addition, since digital media now offer multiple giga-bytes of storage, today’s photographers don’t need tospend valuable time on a shoot changing film.
INSTANT PREVIEWS
Digital capture also provides the ability to instantly pre-view images, meaning that if you missed the shot for anyreason, you can delete that file and retake it on the spot.Kathleen Hawkins, an acclaimed wedding and chil-dren’s portrait photographer and the other half of JeffHawkins Photography, says, “That kind of insurance ispriceless. Think about it—you’re photographing thefirst dance, capturing the couple from all angles andpossibly using your assistant to backlight them. You seethat the background light is not bright enough or thatyour on-camera flash misfired. With digital, instead ofwaiting a week or two to see that you blew it, you canadjust the lighting and move on.” These previews alsomake it possible for the subject or client to examine thecaptured images instantly, capitalizing on the excite-ment of the in-progress photo session.
6 THE BEST OF PROFESSIONAL DIGITAL PHOTOGRAPHY
1. THE ADVANTAGES OF DIGITAL CAPTURE
FACING PAGE—Digital capture lets the photographer create a work of
art to deliver to the client. Photograph by Jeff Hawkins.
Digital technology is virtually exploding. New cameraswith higher resolutions, improved imaging chips, andadded functionality are being introduced with ever-

ENHANCED CREATIVITY
Photographers are no longer just recording images andsending them off to the lab for color correction,retouching, and printing. Says Kathleen Hawkins, “Wecan now perfect our art to the fullest extent of ourvision!”
Digital has also opened up a wealth of creative op-portunities for Connecticut’s Charles and Jennifer Mar-ing, transporting them from being merely photogra-phers to the status of artists and graphic designers. Theirunique digital wedding albums include an array of beau-tifully designed pages with graphic elements that shape
8 THE BEST OF PROFESSIONAL DIGITAL PHOTOGRAPHY
ABOVE—Charles and Jennifer Maring put so
much fun and creativity into their wedding
albums. Here is a sample page from one of their
albums. LEFT—Album design programs, such as
Montage allow you to drag and drop images into
to template pages for the ultimate ease of
design. Because the program doesn’t require
full-resolution images, proxy images are used
instead, the design process is fast and seamless.
Images by Kathleen and Jeff Hawkins. FACING
PAGE—David Beckstead considers himself more
an artist than a photographer and he likes his
clients to feel the same way. He is constantly
searching for new angles and moments within
the wedding day to create striking images that
are unique.

each page and layout. Their story-telling style is assleekly designed as the latest issue of Modern Bride. TheMarings not only work each image but also design eachalbum. Says Charles, “There is a unique feeling whendesigning the art. I don’t know what an image will looklike until I am almost done with it. I also don’t knowwhere the vision comes from. I relate this to the art ofphotography. A higher place maybe.”This talented couple believes so totally in controlling
the end product that they also own their own digitallab, named R-Lab. “We have been totally digital forquite some time, and the challenge and precision of thechange has actually made us better photographers thanwe were with film,” says Charles. He believes the out-side of the album is every bit as important to his upscaleclients as each page therein, and has been known to use
covers ranging from black leather, to metal, to red igua-na skin. He has even found a local bookbinder with hisown working bindery for finishing their digital albums.
ARCHIVAL PERMANENCE
Another benefit of digital is its archival permanence.Traditional photographic film and prints achievearchival status by having a reduced chemical reactivity oftheir basic components. In other words, the dyes, pig-ments, and substrates used in their creation remain sta-ble over time, provided that storage or display condi-tions are optimal. A digital image, on the other hand, isstable over time and there is no degradation in copying.Every copy is a perfect copy. Multiple copies stored onstable media assure survivability and endurance overtime.
10 THE BEST OF PROFESSIONAL DIGITAL PHOTOGRAPHY
Kersti Malvre uses her scanned and Photoshop-manipulated images in many ways. She will often create a series of 5x7-inch digital portfo-
lios to send to friends and potential clients. The images are printed on velvet paper, mounted on elegant printed card stock with her signa-
ture and a message about her artwork, then bound in a folio that she has created for her digital prints.

DIGITAL RETOUCHING
In addition to the above benefits, the daunting task oftraditional retouching has been all but eliminated by theease of retouching in Adobe Photoshop. This has per-manently changed the style and scope of professionalimagery. Once the exclusive province of accomplisheddarkroom technicians, special effects are now routinelycreated by photographers in the comfort of their homesor studios—and with results most people feel far exceedthose achieved in a traditional lab or darkroom.Today’s best photographers spend a great deal of
time perfecting each and every image that goes out to aclient. Perhaps this aspect of contemporary photogra-phy, more than any other, has accounted for the pro-found increase in artistic images. This fine-art approach,in turn, raises the bar financially for such photographers,allowing them to charge premium prices for their ses-sions. Says photographer David Beckstead, “I treat eachand every image as an art piece. If you pay this muchattention to the details of the final image, your clientswill pick up on this and often replace the word ‘photog-rapher’ with the word ‘artist.’”
REMOTE CAPTURE AND WIRELESS TRANSFER
Digital photography is completely interlocked withcomputer technology and derives many benefits becauseof it. For instance, commercial photographers often uselaptop computers as control stations. Nikon Capture,
the RAW file processing program for Nikon NEFimages, also comes with a program called Nikon Cap-ture Control, which turns the camera into a remote-capture device for the computer. With this software, youcan download captured images directly to the laptop,where they can be viewed full screen. This lets clients,on location, view live, in-progress images and make use-ful comments on the success or failure of the assign-ment. This is a huge difference from the days of film,where the client would be shown proofs or transparen-cies hours or days after the job was shot. Creative clientinput can be put into effect immediately as the assign-ment progresses. Plus, there is no need for loupes orlight boxes—the image is bold and bright on the laptopscreen.
ADVANTAGES OF DIGITAL CAPTURE 11
A screen grab from Nikon’s
Capture image editor shows of
the options for changing a RAW
image (or in this case NEF—
Nikon’s name for their RAW for-
mat) before processing.
TIME AND MONEY
Of course, the many digital advances don’t come without at
least some cost. One of the biggest complaints of photog-
raphers who have gone digital is the long workflow. For
many, the money they save in film and processing seems to
go right back into expensive digital equipment, computers,
and ever-changing technology. Even beyond the expendi-
tures, the time many photographers now spend in front of a
computer monitor has drastically increased.


Another remarkable feature of digital photography isthe wireless transmission of images, otherwise known asWiFi technology. With a wireless transmitter, it’s possi-ble to transmit images directly from the camera over awireless LAN (local area network). Nikon’s WirelessTransmitter WT-2A allows photographers to transmitimages over a WiFi network and use wireless remotecontrol of the camera over a WiFi network from a com-
puter running Nikon Capture software (as in the teth-ered application above). This lets photographers posi-tion their cameras in places that may be inaccessible orrestricted to photographers, then wirelessly adjust set-tings, trigger the camera, and instantly retrieve theimages over the LAN. With this technology, events likethe space-shuttle launches, where security is unforgiv-ing, can now be accessed remotely. The latest versions
ADVANTAGES OF DIGITAL CAPTURE 13
FACING PAGE—Mike Colon is a well known wedding photographer who uses Nikon DSLRs and their WiFi technology to download images to a
laptop as they are recorded throughout the wedding day. Mike’s assistant preps the images and then saves them into a slide-show program
so that guests just entering the reception are greeted with a visual treat. The power of digital imaging has transformed the wedding day
into a multimedia event. ABOVE—Chris LaLonde uses his G4 PowerBook as an on-site monitor when shooting assignments. This lets Chris
and his clients inspect the photos at close range. If the layout calls for a specifically shaped photo, Chris will create a black matte mask to
tape into position on the monitor.

of this software also feature drastically improved trans-mission times and highly refined security protocols,making it nearly impossible for someone to interceptthe transmission.The Internet also plays a huge role in the life of the
digital wedding photographer. Online proofing andsales have become a big part of every event package.
Bridal couples can check out “the take” of images whileon their honeymoon by going to the photographer’sweb site and entering their own unique password—allfrom the comfort of their hotel room or a digital café.The use of FTP (file transfer protocol) sites for transfer-ring files to the lab for proofing and or printing has nowbecome routine.
14 THE BEST OF PROFESSIONAL DIGITAL PHOTOGRAPHY
DON’T GET CAUGHT UP WITH THE TOOLS
It is easy to get caught up in the hardware and software of digital photography. It is expensive, exotic, and amazingly produc-
tive. Yervant Zanazanian, an award-winning Australian photographer, puts this in perspective. “A lot of photographers still think
it is my tools (digital capture and Photoshop) that make my images what they are. They forget the fact that these are only new
tools; image-making is in the eye, in the mind, and in the heart of a good photographer. During all my talks and presentations,
I always remind the audience that you have to be a good photographer first. You can’t expect or rely on some modern tool or
technology to fix a bad image.” It’s good advice.
Yervant, like Charles Maring, is an expert album designer and even has a line of album page templates available (www.yervant.com)
called Page Gallery for designing album pages in Photoshop.

frames-per-second, amazingly accurate autofocus lensperformance, and incredible developments in digitalimaging technology have led to the 35mm DSLR (dig-ital single-lens reflex) becoming the camera system ofchoice for today’s top professional photographers.Professional 35mm digital camera systems include a
full array of lenses, dedicated TTL flash units, and sys-tem accessories. Currently, there are seven companiesmanufacturing full-fledged DSLR systems: Canon,Nikon, Olympus, Fuji (which uses Nikon autofocuslenses), Pentax, Konica/Minolta, and Sigma (whichuses the radically different Foveon X3 image sensor).Each manufacturer has several models within theirproduct line to meet varying price points. Many of thepre-digital lenses available from these same manufactur-ers for their film cameras also fit the new digital cameras(although often with a corresponding change in focallength). In addition, a number of third-party lens man-ufacturers also make AF lenses to fit various brands ofDSLRs. These include Tokina, Tamron, and Sigma.Since the advent of the DSLR, manufacturers are
investing huge sums into product development and
engineering and more advanced, less expensive cameramodels are appearing every day.
ZOOM LENSES VS. PRIME LENSES
Zoom Lenses. For today’s digital photographer, one ofthe most popular lenses for all types of photographyseems to be the 80–200mm f/2.8 (Nikon) and70–200mm f/2.8 (Nikon and Canon). These are veryfast, lightweight lenses that offer a wide variety of use-ful focal lengths for many applications. This makes themparticularly popular among wedding photographers,
CAMERA EQUIPMENT 15
The days of medium-format cameras being used exclusivelyfor fine photography seem to be at an end. Fast, versatilezoom lenses, cameras that operate at burst rates of 6
2. CAMERA EQUIPMENT
FOCAL-LENGTH FACTORS
Since all but full-frame DSLRs have chip sizes smaller than
24x36mm (the size of a 35mm film frame), there is a mag-
nification factor that changes the effective focal length of
the lens. For instance, Nikon DSLRs have a 1.5X focal-length
factor that makes a 50mm f/1.4 lens a 75mm f/1.4 lens—
an ideal portrait lens. This does not affect the lens speed.
who find them useful for all phases of the ceremony andreception. They are also internal focusing, meaning thatautofocus is lightning fast and the lens does not changeits physical length as it is focused. At the shortest range,80mm (or 70mm), these lenses are perfect for full- andthree-quarter-length portraits. At the long end, the200mm setting is ideal for tightly cropped candid cov-erage or head-and-shoulders portraits. These zoomlenses also feature fixed maximum apertures, which donot change as the lens is zoomed. This is a prerequisitefor any lens to be used in fast-changing conditions.Lenses with variable maximum apertures provide a cost
savings but are not as functional nor as bright in theviewfinder as a faster, fixed-aperture lenses.Wide-angle lenses are also popular—both fixed
focal-length lenses and wide-angle zooms. Focal lengthsfrom 17mm to 35mm are ideal for capturing atmos-phere as well as for photographing larger groups.Because digital lenses do not have to produce as
wide a circle of coverage as lenses designed for full-frame chips, lens manufacturers have been able to comeup with some splendid long-range zooms that coverwide-angle to telephoto focal lengths. Lenses likeCanon’s EF 28–300mm f/3.5–5.6L IS USM and EF
16 THE BEST OF PROFESSIONAL DIGITAL PHOTOGRAPHY
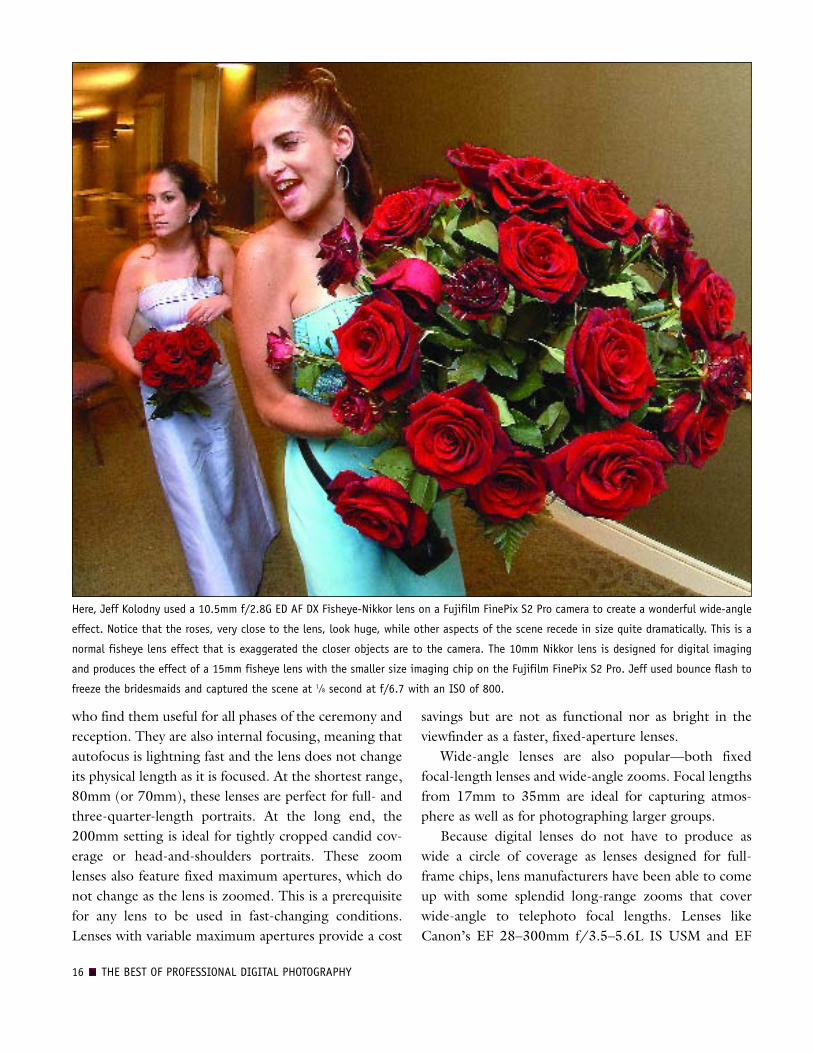
Here, Jeff Kolodny used a 10.5mm f/2.8G ED AF DX Fisheye-Nikkor lens on a Fujifilm FinePix S2 Pro camera to create a wonderful wide-angle
effect. Notice that the roses, very close to the lens, look huge, while other aspects of the scene recede in size quite dramatically. This is a
normal fisheye lens effect that is exaggerated the closer objects are to the camera. The 10mm Nikkor lens is designed for digital imaging
and produces the effect of a 15mm fisheye lens with the smaller size imaging chip on the Fujifilm FinePix S2 Pro. Jeff used bounce flash to
freeze the bridesmaids and captured the scene at 1/8 second at f/6.7 with an ISO of 800.

28–200mm f/3.5–5.6 USM are fast, lightweight, andextremely versatile given the extreme range of focallengths covered.
Prime Lenses. Fast, fixed focal-length (prime) lens-es (f/2.8, f/2, f/1.8, f/1.4, f/1.2, etc.) will get lots ofuse, as they afford many more “available light” oppor-tunities than slower speed lenses. Anytime you canavoid using flash, which naturally calls attention to it-self, you should generally do so. Additionally, althoughmodern zoom lenses, particularly those designed fordigital SLRs, are extremely sharp, many photographersinsist that a multipurpose lens cannot possibly be as
sharp as a prime lens, which is optimized for use at a sin-gle focal length.Mike Colón, a talented photographer from the San
Diego area, uses prime lenses (not zooms) in his wed-ding coverage and shoots at wide-open apertures mostof the time to minimize background distractions. Hesays, “The telephoto lens is my first choice, because itallows me to be far enough away to avoid drawingattention to myself but close enough to clearly capturethe moment. Wide-angle lenses, however, are great forshooting from the hip. I can grab unexpected momentsall around me without even looking through the lens.”
CAMERA EQUIPMENT 17
Wedding photographer Jeff Kolodny uses a Canon EOS 1Ds Mark II DSLR. This image was recorded with an EF 70–200mm f/4L USM lens at
the 70mm setting. He used a 1000-speed ISO setting and exposed the image at 1/40 second at f/7 to extend the minimal depth of field at
this close-focus setting. Because the 1Ds Mark II uses a full-size imaging chip (the same size as a 35mm film frame), there is no focal-length
factor; a 70mm setting is 70mm.


TELEPHOTO LENSES
Many photojournalists use ultra-fast telephotos, like the300mm f/2.8 or f/3.5 lenses. These lenses, while heavyand often requiring a monopod for prolonged use, areideal for working unobserved and they can help iso-late some wonderful moments. Even more than the80–200mm lens, the 300mm throws backgroundsbeautifully out of focus. When used wide open at a rela-tively close camera-to-subject distance, the 300mm pro-vides a delicately thin band of focus, which is ideal forisolating image details.Another favorite lens is the 85mm (f/1.2 for Canon;
f/1.4 or f/1.8 for Nikon), which is a short telephoto
with exceptional sharpness. This lens gets used fre-quently because of its speed and ability to throw back-grounds out of focus, depending on the subject-to-camera distance. Because it produces exceptional imagecontrast, the difference between in-focus and out-of-focus areas appears much more distinct, thus exaggerat-ing the effects of shooting wide open.
AF TECHNOLOGY
Autofocus, once unreliable and unpredictable, is nowextremely advanced. Some cameras feature multiple-area autofocus so that you can, with a touch of a thumb-wheel, change the AF sensor area to different areas of
CAMERA EQUIPMENT 19
FACING PAGE—Mike Colón prefers prime
lenses. One of the best kept secrets is the
standard lens, in this case a 50mm f/1.4,
which becomes a 75mm f/1.4 on the
Nikon D1X. This image, shot wide open,
reveals very shallow depth of field and
high image sharpness and contrast.
RIGHT—The short telephoto, here a
135mm f/2, produces beautifully soft
blended backgrounds when shot wide
open. The photographer, Mike Colón,
made this image at 1/60 second at f/2.8
with the 135mm f/2D AF DC-Nikkor and
his D1X.

the viewfinder (the center or outer quadrants). Thisallows you to “de-center” your images for more dynam-ic compositions. Once accustomed to quickly changingthe AF area, this feature becomes an extension of thephotographer’s technique.Using autofocus with moving subjects used to be an
almost insurmountable problem. While you could pre-dict the rate of movement and focus accordingly, theearliest AF systems could not. Now, however, almost all
AF systems use a form of predictive autofocus, meaningthat the system senses the speed and direction of themovement of the main subject and reacts by trackingthe focus of the moving subject. This is an ideal featurefor wedding photojournalism, where the action can behighly unpredictable.A new addition to autofocus technology is dense
multi-sensor area AF, in which an array of AF sensorzones (up to 45 at this writing) are densely packed with-
20 THE BEST OF PROFESSIONAL DIGITAL PHOTOGRAPHY

in the frame, making precision focusing much faster andmore accurate. These AF zones are user selectable orcan all be activated at the same time for the fastest AFoperation.
REMOVABLE STORAGE MEDIA
Types of Media. Instead of film, digital cameras storeand save digital image files on portable digital media,such as CompactFlash (CF) cards, Memory Sticks,
microdrives, and xD cards. The camera writes the imagedata to the removable storage device as photographs arecaptured. When the media becomes full, you eject it andinsert a new card or microdrive just like you wouldchange film at the end of the roll. Removable media arerated and priced according to storage capacity—themore storage capacity, the higher the price.There are two types of media: flash memory (like CF
cards and Memory Sticks) and microdrives (miniature
CAMERA EQUIPMENT 21
Drake Busath is a gifted photog-
rapher who happens to love Italy
and teaches workshops there
quite regularly. This image was
made in Portofino and exempli-
fies why photographers love dig-
ital. The late-day image was pho-
tographed normally, but the hill-
sides were softened so that the
town stood out against them.
This would be physically impossi-
ble given that the hillsides are at
infinity and the softness does
not precede the area of sharp
focus. However, in Photoshop a
different reality is available.
Grain/noise was added to give
the final image a Pointillistic
rendition.


portable hard drives). Flash memory, which uses nomoveable parts, tends to perform better than mechani-cal hard drives under adverse shooting conditions. Somecameras feature dual slots for different media types, oth-ers accept only a single type of card. Obviously, themore options you have, the more flexible the camerawill be over time. The most common formats at thistime seem to be the CF cards (Types I and II) andmicrodrives.
Write Speeds. The write speeds of the differentmedia (how fast data can be recorded by the card) varyfrom 1.8MB/s (megabytes per second) all the way upto 10MB/s. Write speed is a critical function, especiallyif you plan to shoot RAW files, which are inherentlybulkier than JPEGs. However, the write speed of the
media is not the only determining factor in how fastinformation will write from the camera to the storagemedia. The software used by the camera, the file size,
CAMERA EQUIPMENT 23
FACING PAGE—No, it really is raining that hard. Wedding photographer Joe Buissink kept coaxing his bride to make the picture, acknowledg-
ing the oncoming storm. When she finally acquiesced, it was pouring but the moment was by no means spoiled. Joe helped enhance the
feeling of pouring rain by using an 85mm f/1.4D AF Nikkor on his Nikon D2H. A shutter speed of 1/60 second was used so that the rain would
have slight motion to it. ABOVE—A scene from a fishing village in Burano, Italy, is truly representative of the artistic freedom that digital
capture allows. The bright, posterized color of the fishing boats contrasts with the muted monochrome sky reflected in the water. A wide-
angle lens makes the scene intimate and strong. The image was made by Drake Busath with a Nikon D2H and Nikon wide-angle zoom lens.
XD CARDS
The latest memory card at this writing is the xD card, devel-
oped jointly by Fuji and Olympus. The xD card, which uses
NAND Flash memory, is very small and provides write speeds
up to 3MB per second. Currently, the largest capacity xD
card is 512MB, but by the time you read this, it will be up
to 8 gigabytes. Various adapters make the cards useable
across a wide range of digital cameras.

and the number of individual files tobe written are all determining factors.However, as the crow flies, faster writespeed is a desirable quality in storagecards.
Card Readers. Digital images mustbe uploaded from the removable storagemedia to a computer. To facilitate thisprocess, a number of digital card readersare available very inexpensively. Ofcourse, the camera can be connecteddirectly to the computer and the imagesuploaded in this manner, but a cardreader gives the photographer the flexi-bility of putting the camera back intoaction immediately—loaded with a freshcard. Card readers feature USB 2.0 orFireWire connectivity, which make up-loading incredibly fast. Once the imagesare safely stored on the computer’s harddrive and safely backed up on CD orDVD, the memory card can be erased,reformatted, and reused.
IMAGE SENSORS
CCD vs. CMOS. Digital cameras useimage sensors to record images. Pres-ently there are two main types: CCDand CMOS sensors. While opinions onthe aesthetic performance of the twoimaging chips vary from pro to pro,both sensor types provide excellent qual-ity image files.CCDs (charge-coupled devices) re-
cord an image in black and white, thenpass the light through an array of red,green, and blue filters (called a Bayer fil-ter pattern) to form a color image. Eachfilter lets only one wavelength of light—red, green, or blue—pass through toany given imaging site (pixel), allowingit to record only one color.Like CCDs, CMOS imaging chips
(complementary metal oxide semicon-
24 THE BEST OF PROFESSIONAL DIGITAL PHOTOGRAPHY
Mark Cafiero captured this wonderful faraway moment at a wedding reception with his
Canon EOS 1D Mark II (which uses a full-size 16.7MP CMOS image sensor), a 70–200mm
f/2.8 zoom lens, and bounce flash. This combination is ideal for weddings where you
can work unobserved from a distance. To the naked eye there is no discernable differ-
ence between the CMOS and CCD sensors.

ductors) use a Bayer filter pattern over the photodetec-tors. Also included on the CMOS imaging chip, howev-er, is analog signal-processing circuitry that collects andinterprets signals generated by the photodiode array.After an image has been obtained, it is amplified andconverted into standard red, green, and blue (RGB)format through interpolation systems. CMOS chips aremore energy-efficient than CCDs, an important consid-eration as digital cameras are big-time battery con-sumers. They are also somewhat less expensive to man-ufacture.
Sensor Size. Although full-frame image sensors nowexist, most imaging sensors are smaller than the full35mm frame size (24x36mm). While the chip size doesnot necessarily affect image quality or file size, it doeschange the effective focal length of existing lenses. Withsensors smaller than 24x36mm, all lenses get effectivelylonger in focal length. This is not usually a problemwhere telephotos and telephoto zooms are concerned,
as the maximum aperture of the lens doesn’t change.When your expensive wide-angles or wide-angle zoomsbecome significantly less wide on the digital camerabody, however, it can be disconcerting. A 17mm lens,for example, with a 1.4X lens focal-length factor be-comes a 24mm lens.At this writing, there are two camps: manufacturers
who believe full-size sensors are the way to go, andthose who believe a smaller sensor is more efficient,cheaper to manufacture, and just as reliable—even ifthere is an effective focal-length magnification. Canon’sflagship EOS 1Ds is one of the few full-frame chips stillavailable, but the remainder of Canon’s DSLR line usessmaller size chips. Nikon’s top-of-the-line D2X alsouses a smaller chip (22.7x15.7mm), creating a 1.5Xfocal-length factor.Camera manufacturers who have committed to the
smaller image sensor sizes have begun to introduce lenslines specifically designed for digital imaging. The circle
Mark Cafiero made this wonderful image of the parents on the dance floor with his Canon EOS 1Ds. This camera uses a full-frame image sen-
sor, so there is no focal-length factor. The image was shot with a 70–200mm f/2.8 zoom lens at the 153mm setting.

of coverage (the area of focused light falling on the filmplane or digital-imaging chip) is smaller and more colli-mated to compensate for the smaller chip size. Thus,the lenses can be made more economically and smallerin size, yet still offer as wide a range of focal lengths astraditional lenses.
A Clean Image Sensor. Unlike film cameras, theimage sensor in a digital camera must be kept clean ofdust and other foreign matter in order for it to performto its optimum level. Depending on the environmentwhere you do most of your shooting, spots may appearon your images. Cleaning the sensor prior to everyshoot will help you to minimize or eliminate such spotsin your photos.While each camera manufacturer has different rec-
ommendations for cleaning the sensor, Canon digitalcameras have a sensor-cleaning mode to which the cam-era can be set. With the camera’s reflex mirror up (afunction of the cleaning-mode setting), the companyrecommends light air from an air syringe to gentlyremove any foreign matter. Turning the camera offresets the mirror.One should realize the image sensor is an extremely
delicate device. Do not use propelled air cans, whichhave airborne propellants that can coat the sensor in afine mist, worsening the situation.Intemos (www.intemos.com) markets a liquid-free
cleaning product that removes dust and lint from thecamera sensor. Lint-free tips with hundred of microp-ores, called DSLR Clean Sticks, gently clean a sensor’ssensitive surface with a delicate vacuum effect that liftsand traps the unwanted dust. Clean Sticks work withboth CCD and CMOS sensors.
THINGS TO CONSIDER WHEN PURCHASING A DSLR SYSTEM
In no particular order, here are some things to considerwhen purchasing a digital SLR system.
Sensitivity/ISO Range. Most digital camera sys-tems feature a sensitivity range from ISO 100 to 800 or,in some cases, 1600. Some cameras also offer an ISO3200 setting as a special custom function. Obviously,the wider the range of sensitivity, the more useful thecamera system will be under a wider variety of shootingconditions.
26 THE BEST OF PROFESSIONAL DIGITAL PHOTOGRAPHY
Most photographers agree that digital file capture is sharper than
film capture. Perhaps that is because there is no medium, like film
with its three imaging layers, to degrade the lens’s sharpness.
Another reason for digital’s sharpness might be that, with digital
lenses and smaller imaging chips, the light being transmitted to the
lens is more collimated (in line, like water falling into a bucket).
This optimizes the recording of the image at the photodetector sites.
Photograph by Ron Capobianco.
DSLR Clean Sticks are designed to remove dust and lint from sensi-
tive DSLR image sensors.
Burst Rate. Unlike film cameras, which use a motordrive to propel the film past the focal plane, there is nofilm-transport system in a DSLR. The number of framesper second (FPS) the camera can record is dictated by anumber of factors, including write speed (how fast theimage can be written to the storage media), file type,buffer size, and file size. RAW files are larger thanJPEGs, for example, and take longer to record, thus theburst rate is slower when shooting RAW files than it iswhen shooting JPEGs. Typical burst rates range from2.5fps (frames per second) for up to six shots, all theway up to 8fps for up to 40 shots. The spec to look atis the number of consecutive frames that can be cap-tured in a single burst (6, 8, 10, etc.) and the frames-per-second rate (3fps up to 8fps).
LCD Monitor. The size and resolution of the cam-era’s LCD screen are important as these screens arehighly useful in determining if you got the shot or not.LCD screens range from about 1.8 inches to 2.5 inchesand screen resolutions range from around 120,000 to220,000 dots.
Playback. As important as the physical specificationsof the LCD is the number of playback options available.Some systems let you zoom in on the image to inspectdetails. Some let you navigate across the image to checkdifferent areas of the frame in close-up mode. Somecamera systems allow you a thumbnail or proof-sheetreview of exposed frames. Some of the more sophisticat-
ed systems offer a histogram (to gauge exposure) andhighlight-point display to determine if the highlightexposure is accurate or “clipped” (i.e. detail is lost in thebrighter highlights).
Lens Conversion Factor. The rated focal length ofthe lens multiplied by the focal-length factor gives theeffective focal length. With a 1.6X focal-length factor,for example, a 50mm lens would become an 80mmlens. (Note: Lens speed, as mentioned above, is notaffected by this conversion. Your f/1.8 lens would stillremain an f/1.8 lens.)
Effective Pixels. This is the maximum image sizethe sensor can record. The spec might be given as 5 mil-lion pixels or 5MP (megapixels). Obviously, the higher
CAMERA EQUIPMENT 27
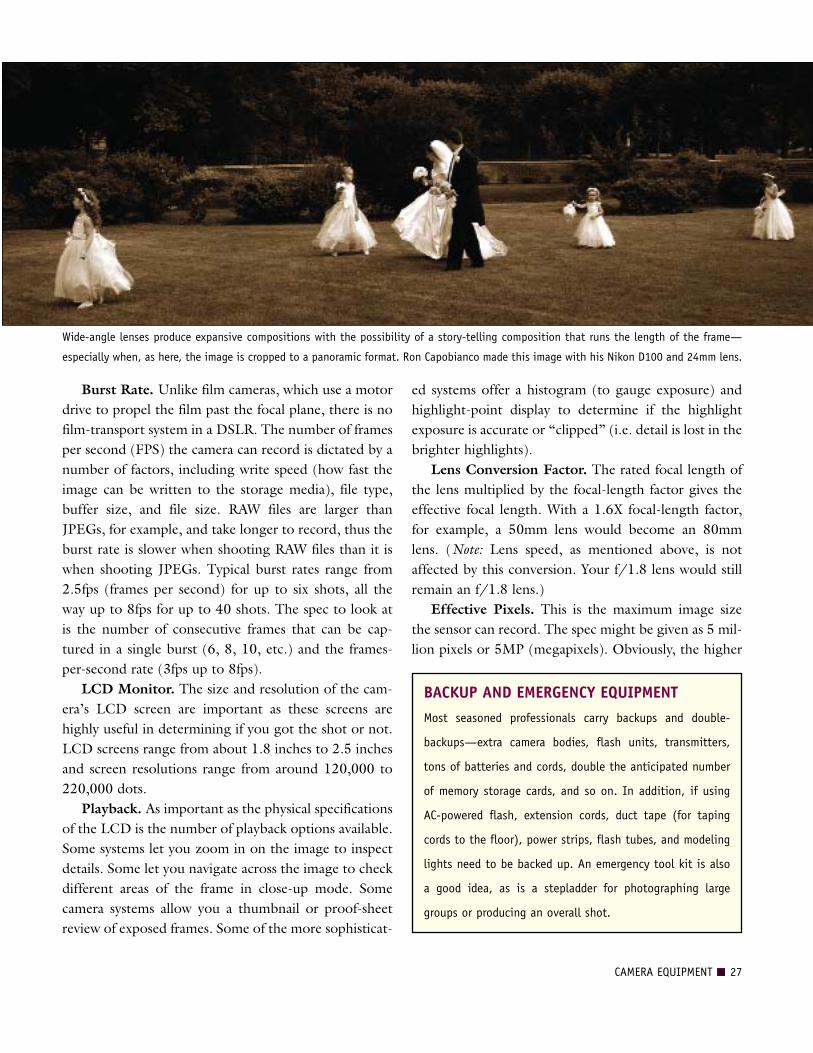
Wide-angle lenses produce expansive compositions with the possibility of a story-telling composition that runs the length of the frame—
especially when, as here, the image is cropped to a panoramic format. Ron Capobianco made this image with his Nikon D100 and 24mm lens.
BACKUP AND EMERGENCY EQUIPMENTMost seasoned professionals carry backups and double-
backups—extra camera bodies, flash units, transmitters,
tons of batteries and cords, double the anticipated number
of memory storage cards, and so on. In addition, if using
AC-powered flash, extension cords, duct tape (for taping
cords to the floor), power strips, flash tubes, and modeling
lights need to be backed up. An emergency tool kit is also
a good idea, as is a stepladder for photographing large
groups or producing an overall shot.

the number of pixels, the larger the file; the larger thefile, the larger the print you can create from it. Somemanufacturers also give the spec in terms of Photoshopfile sizes—11MB (megabytes) or 18MB TIFFs, forexample, since many people think in these terms. It isimportant to note that some manufacturers use process-ing algorithms to interpolate resolution. For example,the chip size might be 6MP, yet the standard file size is12MP because of the software interpolation.
File Types. The different types of files that DSLRstypically record are RAW files, JPEGs, and TIFF files.JPEGs allow you to shoot more quickly because there isfile compression inherent in the format. RAW files pro-vide the maximum amount of information in the cap-tured image.
PC Terminal. Some of the lower-priced DSLRsmight seem a bargain until you realize they don’t in-clude professional features like a PC terminal for con-necting to electronic studio flash.
Shutter-Lag Time. This is a spec most camera man-ufacturers don’t provide in their literature, but is impor-tant to know before making a purchase. This is thelength of time between when you press the shutterrelease and when the camera actually fires. Consumerand prosumer cameras (consumer cameras with profes-sional features) have substantially longer shutter-response times than professional systems, which arealmost instantaneous, but it is still worthwhile testingout each camera in various modes to see the differencesbetween models. Shutter-lag time will directly affect the
28 THE BEST OF PROFESSIONAL DIGITAL PHOTOGRAPHY
Some photographers prefer to leave their camera settings at minimal contrast and sharpness so that these tasks can be more sensitively
applied in Photoshop after the image is saved. Here, Joe Buissink captured the image in JPEG mode at the “hard” sharpness setting on his
Nikon D2H with an 80–200mm f/2.8D ED AF Zoom-Nikkor.

camera’s burst rate. Rates of shutter-release delay timeare usually given in milliseconds (thousands of a second)if the spec is even given. An average shutter lag timewould be in the area of 90ms.
Lens Capability and Accessories. If you’re likemost professionals, you’ve already invested heavily inone 35mm SLR system. Convincing you to trade in allthose lenses and accessories and change to a differentbrand of camera would take some compelling argu-ments. Will your current lenses fit the DSLR and will allof their features be useable on the digital camera body?Know the answers to these questions before you invest.
Removable Media. Some cameras feature dual slotsfor different media types, others accept only certaintypes of removable cards, like CompactFlash cards.Obviously, the more options you have to use larger andor less expensive media, the more flexible the camerawill be over time.
Dimensions/Weight. As with any camera system,ergonomics are extremely important—especially to thewedding photographer, who will be working for hourson end handholding the camera with a variety of lenses.Try the camera out. It might be quite different thaneven your same-brand film camera.
Battery Power. So, where’s the motor drive? It’sbeen turned into a battery pack. Since you don’t needmotorized film transport, there is no motor drive orwinder, but the cameras still look the same because themanufacturers have smartly designed the auxiliary bat-tery packs to look just like a motor or winder attach-ment. While most of these cameras run on AA batteries,it is advisable to purchase the auxiliary battery packs,since most digital camera systems (especially those withCCD sensors) chew up AAs like jelly beans. Most of theauxiliary battery packs used on DSLRs use rechargeableLithium-ion batteries.
Price. It’s not necessarily the price of the flagshipcamera in a manufacturer’s product lineup that’s impor-tant, but rather it’s the range of prices. Many photogra-
phers have decided to purchase several top-of-the-lineDSLRs and then several of the lower-priced modelsfrom the same manufacturer for backup and assistants’cameras. These backups still take the same lenses andremovable media cards, but are less expensive than thetop-of-the-line cameras.
White Balance. White balance determines the colorbalance of the recorded image. It can be set individual-ly for each series of shots you make (like applying acolor-correction filter). Some manufacturers offer awide range of white-balance options that correspond toa range of Kelvin degree (the color temperature of light)settings. Others use more photographer-friendly termslike “afternoon shade.” In addition, virtually all of thecameras feature an automatic white-balance setting,which allows the camera to sense and determine theoptimal white-balance setting. Most also include set-tings for fluorescent and incandescent lighting. Customfunctions allow you to create your own unique white-balance settings to correspond to certain known shoot-ing conditions or mixed light conditions. Obviously, themore flexibility you have in accurate white-balancerecording, the less color correction you will have to per-form later in Photoshop. Some camera systems evenoffer a white-balance bracketing feature.
CAMERA EQUIPMENT 29
A NOTE ABOUT SPARE BATTERIES
As was mentioned above, DSLRs go through batteries rather
quickly. While you may bring along extra memory cards, the
real essential backup item is spare battery packs. Even with
quick-chargers, you will miss precious photo opportunities if
you are waiting around for the battery pack to charge. Spare
packs should be fully charged and ready to go and you
should have enough to handle your cameras, your assistants’
cameras, and the backup gear, as well.
studio flash. Strobes are cool-working, portable, andrun on household current.
STUDIO STROBE SYSTEMS
Types. Studio strobes come in two types: monolightsand power-pack kits. Monolights are self-contained;simply plug one into a household AC socket and you’reready to go. Monolights contain light triggers, com-monly called slaves, which fire the strobe when theysense the light of another electronic flash. These can beused very far apart and are ideal for location lighting orlarge rooms.Power-pack systems accept multiple strobe heads—
up to four individual heads can usually be plugged intoa moderately priced power pack. Power pack strobes aremost often used in studios, since you cannot place theindividual lights more than about 20–25 feet from thepower pack. Power pack outlets are usually divided intotwo channels, each with variable power settings thatprovide either symmetrical or asymmetrical output thatcan be distributed between one, two, three, or four flashheads.
Studio strobe systems use self-contained modelinglights that are usually dimmable quartz-halogen bulbsthat mimic the light of the surrounding flash tube.
Firing Studio Strobes. Studio strobes must be trig-gered by the camera to fire at the instant the shuttercurtain is open. This is often accomplished with a synccord that runs from the camera’s PC connection to thepower pack or to one of the monolights (which subse-quently triggers all the other monolights that areplugged in and ready to fire). Another means of firingstrobes remotely is with radio remote-control devices,which use a digital radio signal to trip the auxiliarystrobes at the instant of exposure.
What to Look For. Things to look for in a profes-sional studio strobe system are:
Power. Strobe systems are rated in watt-seconds(W/S); the more W/S, the more light output. The out-put rating of the power pack means that the total W/Sis divided by the number of flash heads in use.
Flash Duration. Short flash durations range from 1/800
to about 1/12,000 second. The longer the flash duration,the less action-stopping ability the system has and the
30 THE BEST OF PROFESSIONAL DIGITAL PHOTOGRAPHY
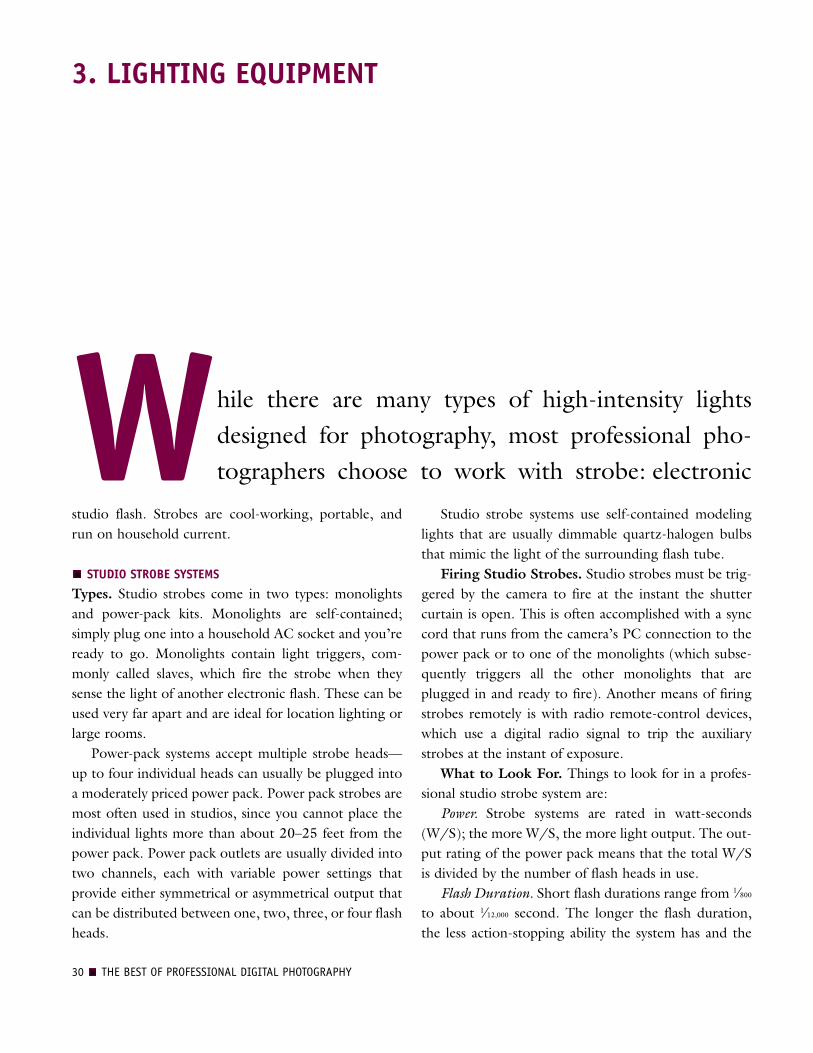
While there are many types of high-intensity lightsdesigned for photography, most professional pho-tographers choose to work with strobe: electronic
3. LIGHTING EQUIPMENT
more likely it becomes that exposures may be influencedby existing light.
Recycle Times. Recycle times range from 2 secondsdown to less than 1/4 second. The faster the recycling
time, the faster you can make consecutive full-powerexposures.
Modeling Lights. Proportional modeling lights are anecessity, so that each light can be made to closely re-
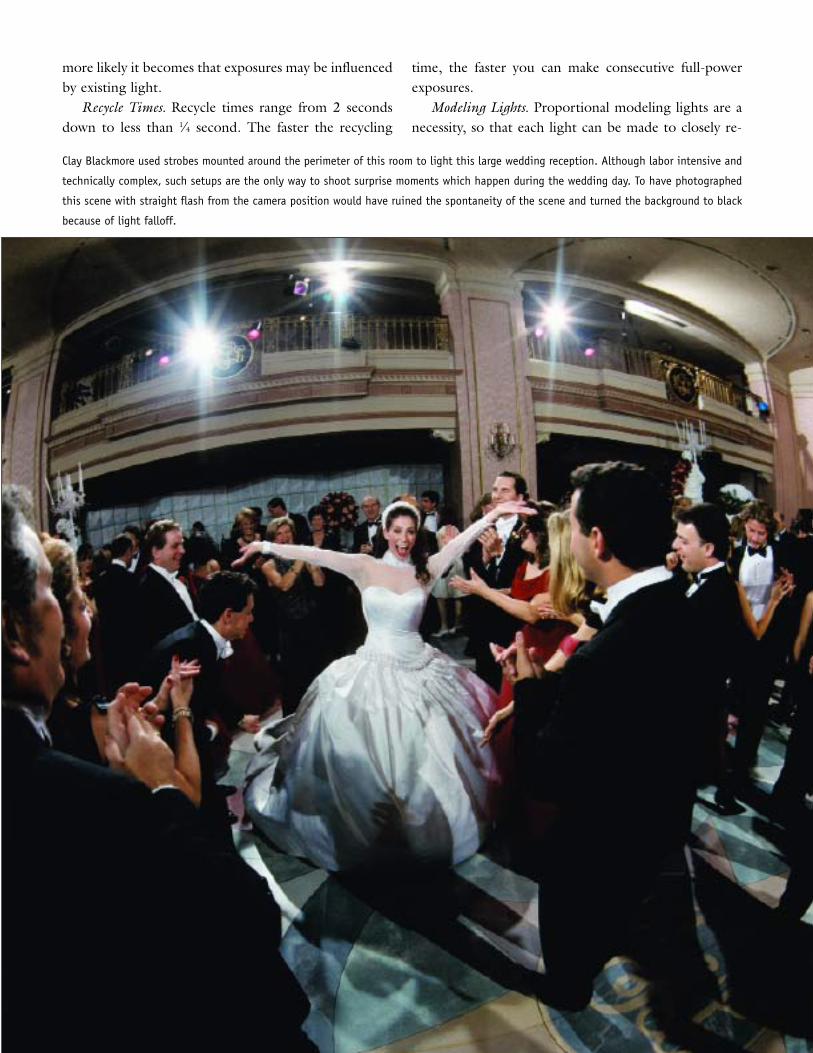
Clay Blackmore used strobes mounted around the perimeter of this room to light this large wedding reception. Although labor intensive and
technically complex, such setups are the only way to shoot surprise moments which happen during the wedding day. To have photographed
this scene with straight flash from the camera position would have ruined the spontaneity of the scene and turned the background to black
because of light falloff.

semble the output of the individual flash tube. Withoutaccurate modeling lights, it is impossible to achieve pre-cise lighting effects.
Color Temperature. Consistent color-temperatureoutput is a must-have feature—especially when shoot-ing digital JPEGs. Some strobe systems’ color tempera-ture output will vary depending on the recycle rate,causing uneven exposures and color-correction prob-lems. Variable color-temperature settings are availableon some systems, which can be adjusted in 50°K inter-vals for consistently warmer or cooler output. These sys-tems will not fire until the units are fully recharged,making consistent color temperature possible.
Fan-Cooled Generator. Power-pack systems have atendency to overheat and will often require an internalfan to cool the electronics.
Multi-Voltage Capability. This feature allows thestrobe system to be used in different countries with dif-
ferent power systems. Often, this is an automatic, self-seeking function that the photographer never even hasto worry about.
Computer Control. Some of the recently introducedsystems offer a computer interface so that settings canbe changed from a laptop or PDA—an invaluable fea-ture for remote applications.
Open-Flash Function. The open-flash control firesthe flash manually in the predetermined configuration.It is ideal for open-shutter multiple pops, which areoften used with the camera shutter open to build upsuccessive flash exposures to achieve a given f-stop fordepth-of-field needs.
Heads and Accessories. The wider the range of avail-able flash heads, accessories, and light modifiers, themore useful the system.
Variations and Accessories. Here are some varia-tions in strobes and the accessories used to modify thequality and quantity of light output.
Barebulb. When the reflector is removed from theflash head, you effectively have a barebulb light source.The light scatters in every direction—360 degrees. Re-moving the reflector has advantages if you have to placea light in a confined area. Some photographers use abarebulb flash as a background light for a portrait set-ting, positioning the light on a small floor stand direct-ly behind the subject. Barebulb heads are also used in-side softboxes, light boxes, and strip lights for the max-imum light spray inside the diffusing device.Barebulb units with an upright mounted flash tube
sealed for protection in a plastic housing are one of themost frequently used handheld flash units at weddings.This is because the 360-degree light coverage meansthat you can use all of your wide-angle lenses. One pop-ular unit is the Dyna-Lite NE-1 flash, which has a 1000watt-second pencil-style flash tube. This great locationlighting tool is compact and lightweight and can literal-ly fit in your pocket. These light sources act more likelarge point-source lights than small portable flashes.Light falloff is less than with other handheld units, andthey are ideal for flash-fill situations, particularly out-doors. These are predominantly manual flash units,meaning that you must adjust their intensity by chang-ing the flash-to-subject distance or by adjusting the flash
32 THE BEST OF PROFESSIONAL DIGITAL PHOTOGRAPHY
The Profoto Stick Light is a barebulb head that is designed to be
placed in hard-to-light areas, such as under furniture or in the cor-
ner of a room. It features a long cord so it can be positioned a good
distance from the power pack. It doesn’t have a housing or reflec-
tor, allowing it to be taped down or laid into position easily.
output. At weddings, many photographers mount asequence of barebulb flash units on light stands (usingball-head adapters to fine-tune the placement of thelight) for doing candids on the dance floor.
Barn Doors. These are black, metal, adjustable flapsthat can be opened or closed to control the width of thebeam of the light. Barn doors ensure that you light onlythe parts of the scene you want lighted. They also keepstray light off the camera lens, which can cause lensflare.
Diffusers. A diffuser is nothing more than piece offrosted plastic or acetate in a frame or screen thatmounts to the perimeter of the lamp’s metal reflector. Adiffuser turns a parabolic-equipped light into a floodlight with a broader, more diffused light pattern. Whenusing a diffuser over a light, make sure there is sufficientroom between the diffuser and the reflector to allowheat to escape. (Note: This is even more important withhot lights than with strobes.) The light should also havebarn doors attached. As with all lights, they can be
LIGHTING EQUIPMENT 33
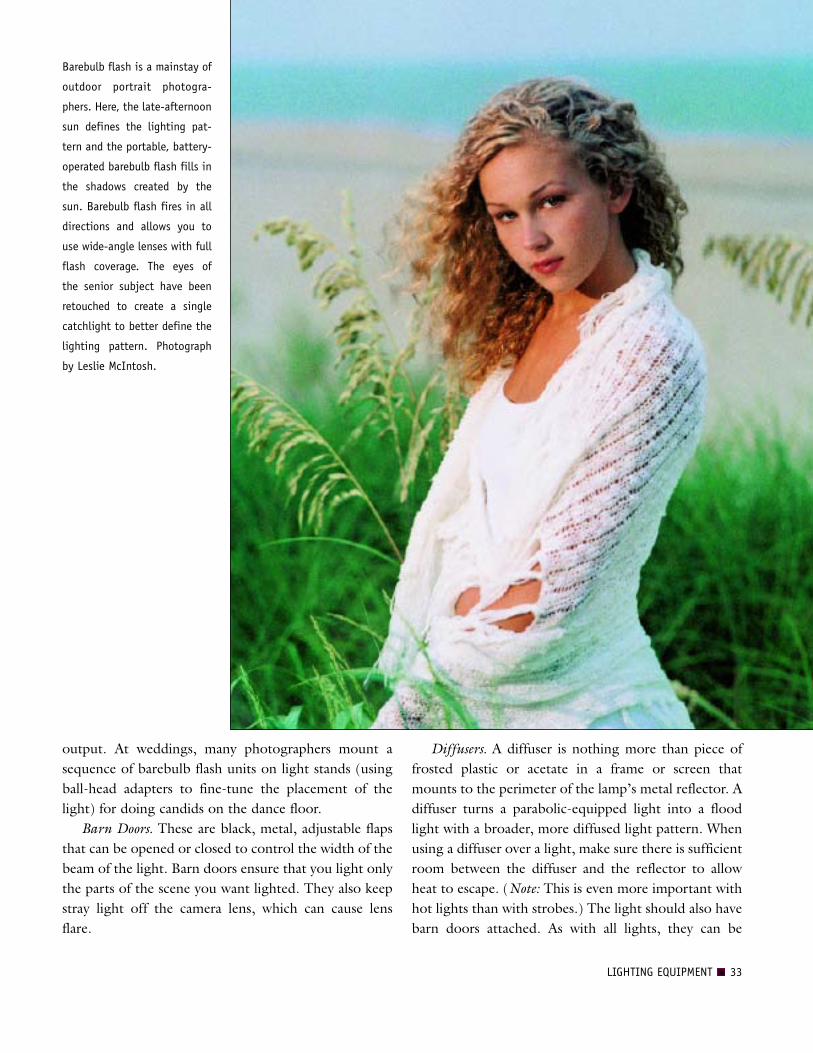
Barebulb flash is a mainstay of
outdoor portrait photogra-
phers. Here, the late-afternoon
sun defines the lighting pat-
tern and the portable, battery-
operated barebulb flash fills in
the shadows created by the
sun. Barebulb flash fires in all
directions and allows you to
use wide-angle lenses with full
flash coverage. The eyes of
the senior subject have been
retouched to create a single
catchlight to better define the
lighting pattern. Photograph
by Leslie McIntosh.

“feathered” by aiming the core of light away from thesubject and using just the edge of the beam of light.
Flats. Flats are large, white opaque reflectors that areportable (usually on rollers or castors) and used asreflectors. Once wheeled into position, lights arebounced into them like a temporary wall.
Gobos. Gobos (or black flags, as they’re sometimescalled) are panels that are used as light blockers. In thestudio, they are used to shield a part of the subject fromlight. In the field, they are often used to block overheadlight when no natural obstruction exists. This reducesthe overhead nature of the lighting, minimizing the
34 THE BEST OF PROFESSIONAL DIGITAL PHOTOGRAPHY
Chris LaLonde shot this image of a blood test for stock. It was shot on location and lit using White Lightning strobes to duplicate a hospi-
tal room’s stark lighting. The colors were desaturated in Photoshop to give the image a sterile, cold feeling.

darkness under the eyes. In effect, the overhead gobolowers the angle of the main light source so that it ismore of a sidelight. Gobos are also used to create alighting ratio when the source of the main light is verylarge, with little or no light falloff on the shadow side ofthe subject. In this case, the gobo essentially reflectsblack onto the shadow side of the subject.
Grid Spots. Grid spots are honeycomb metal gridsthat snap onto the perimeter of the light housing. They
come usually in 10-degree and 45-degree versions, the10-degree grid being the narrower beam of light. Eachcell in the honeycomb prevents the light from spreadingout, so grid spots produce a narrow core of light with adiffused edge that falls off quickly. Because the light iscollimated, there is very little spill with a grid spot. As aresult, grid spots provide a great amount of control andallow you to place light in a specific and relatively smallarea. Grids are ideal for portraiture where a dramatic
LIGHTING EQUIPMENT 35
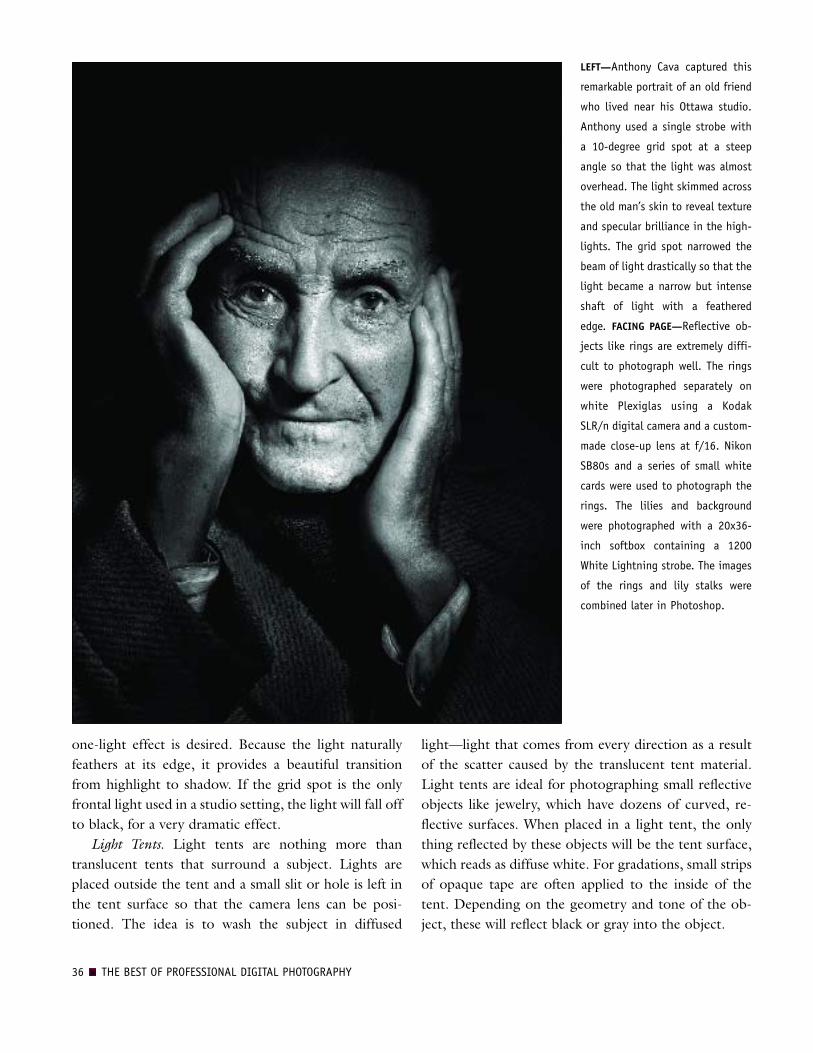
Anthony Cava created this
striking image with a parabolic
light source off to the right to
light her body. He then used a
light with a grid spot (to nar-
row the beam of light) to illu-
minate her face. The parabolic
reflector and grid light produce
a much harder light than soft-
boxes or window light, as evi-
denced by the hard shadows on
the background and the dis-
tinct shadow under her nose
that mirrors the lighting pat-
tern. Direct light not only pro-
duces distinct shadows, but it
creates levels of highlights on
contoured surfaces.
one-light effect is desired. Because the light naturallyfeathers at its edge, it provides a beautiful transitionfrom highlight to shadow. If the grid spot is the onlyfrontal light used in a studio setting, the light will fall offto black, for a very dramatic effect.
Light Tents. Light tents are nothing more thantranslucent tents that surround a subject. Lights areplaced outside the tent and a small slit or hole is left inthe tent surface so that the camera lens can be posi-tioned. The idea is to wash the subject in diffused
light—light that comes from every direction as a resultof the scatter caused by the translucent tent material.Light tents are ideal for photographing small reflectiveobjects like jewelry, which have dozens of curved, re-flective surfaces. When placed in a light tent, the onlything reflected by these objects will be the tent surface,which reads as diffuse white. For gradations, small stripsof opaque tape are often applied to the inside of thetent. Depending on the geometry and tone of the ob-ject, these will reflect black or gray into the object.
36 THE BEST OF PROFESSIONAL DIGITAL PHOTOGRAPHY
LEFT—Anthony Cava captured this
remarkable portrait of an old friend
who lived near his Ottawa studio.
Anthony used a single strobe with
a 10-degree grid spot at a steep
angle so that the light was almost
overhead. The light skimmed across
the old man’s skin to reveal texture
and specular brilliance in the high-
lights. The grid spot narrowed the
beam of light drastically so that the
light became a narrow but intense
shaft of light with a feathered
edge. FACING PAGE—Reflective ob-
jects like rings are extremely diffi-
cult to photograph well. The rings
were photographed separately on
white Plexiglas using a Kodak
SLR/n digital camera and a custom-
made close-up lens at f/16. Nikon
SB80s and a series of small white
cards were used to photograph the
rings. The lilies and background
were photographed with a 20x36-
inch softbox containing a 1200
White Lightning strobe. The images
of the rings and lily stalks were
combined later in Photoshop.


Believe it or not, this beautiful food shoot by Chris LaLonde was made by available light, diffused by an oversized scrim in an 8-foot window in
Chris’s studio. Directly opposite the window was a large 2x4-foot white Fome-Cor reflector, and throughout the set are 10 small makeup mirrors on
stands. These were used to redirect direct light back onto the food and place setting, creating effects ranging from soft fill-in light to bright spec-
ular highlights that create bold accents on the crawfish. The photo was made with a Nikon D1X and 50mm f/1.4 lens at 1/8 second at f/4 in RAW
mode at ISO 125.
Mirrors.Mirrors are used to bounce light into shad-ow areas or to provide a reflected main light. Becausemirrors reflect a high percentage of the light that strikesthem, they can be used outdoors to channel backlightinto a main light. On a tabletop setup, small mirrors thesize of matchbooks are sometimes used to kick lightinto a hard-to-light shadow areas. This technique isespecially useful in lighting food, where deep shadowsare unacceptable and strong specular highlights projecta freshness and “just cooked” feeling to the food.
Reflectors. Reflectors are large white, silver, or goldsurfaces that are used to bounce light into the shadowareas of a subject. A wide variety or reflectors are avail-able commercially, including the kind that are collapsi-ble and store in a small pouch. The silver- and gold-foilsurfaces provide more light than matte white or translu-cent surfaces—and the gold reflectors are ideal forshade, where a warm-tone fill is desirable. Black reflec-tors are also available for subtractive lighting effects.When using a reflector, it should be placed slightly in
front of the subject’s face, not beside it where it mayresemble a secondary light source coming from theopposite direction of the main light. Properly placed,the reflector picks up some of the main light and wrapsit around onto the shadow side of the face, opening updetail even in even the deepest shadows.
Reflectors, Wide-Angle. Strobe heads accept differentsize reflectors, which mount to the perimeter of theflash-head housing. The smallest of these is usually thefive-inch wide-angle standard reflector, which is a veryshallow pan reflector. With this reflector attached, lightis reflected out in a wide pattern. This reflector is oftenused to focus light onto the full surface of an umbrella.Without a reflector (i.e., barebulb) the light would scat-ter everywhere, making it less efficient. Wide-angle re-flectors also make the flash head suitable for bouncingoff of ceilings and walls and for shooting into flats orscrims. Bounced light is very soft and usable. The lightquality can be controlled by changing the distance fromthe flash head to the reflector, wall, or ceiling. Anothergood thing about wide-angle reflectors is that they pro-tect the flash tube and modeling light from damage,and they make the light more compact for traveling.
Reflectors, Narrow-Angle. Twelve-inch and widerreflectors are useful for situations where specular (sharp-edged) light is needed in a narrow angle. These reflec-tors, while having a larger circumference than the wide-angle reflectors, are much deeper and thus create a moredefined, narrower beam of light. Some pan reflectorsare polished; some use a brushed matte surface, whichhas the effect of diffusing the beam of light. Some havefacets that gather and focus the light. Photographersrarely use undiffused pan reflectors any more, favoringvarious diffusion methods, but for beautiful specularlight and a highly functional feathered edge to the light,nothing beats the polished pan reflectors, which areoften called parabolics because of the shape of the pan.Many photographers prefer using this reflector when
the strobe is to be bounced off of reflective surfaces likewalls or ceilings. The narrower spread of light is con-trollable and efficient, with less light loss.
Reflectors, Parabolic. Parabolics are polished silvermetal reflectors into which the lamp or strobe heads areplaced for a sharp light with well defined shadows andlots of contrast. Parabolics create a light pattern that isbrighter in the center with light gradually falling off inintensity toward the edges. The soft edge of the circularlight pattern, called the penumbra, is the area of pri-mary concern to the portrait photographer. The centerof the light pattern, the umbra, is hot and unforgiving
LIGHTING EQUIPMENT 39
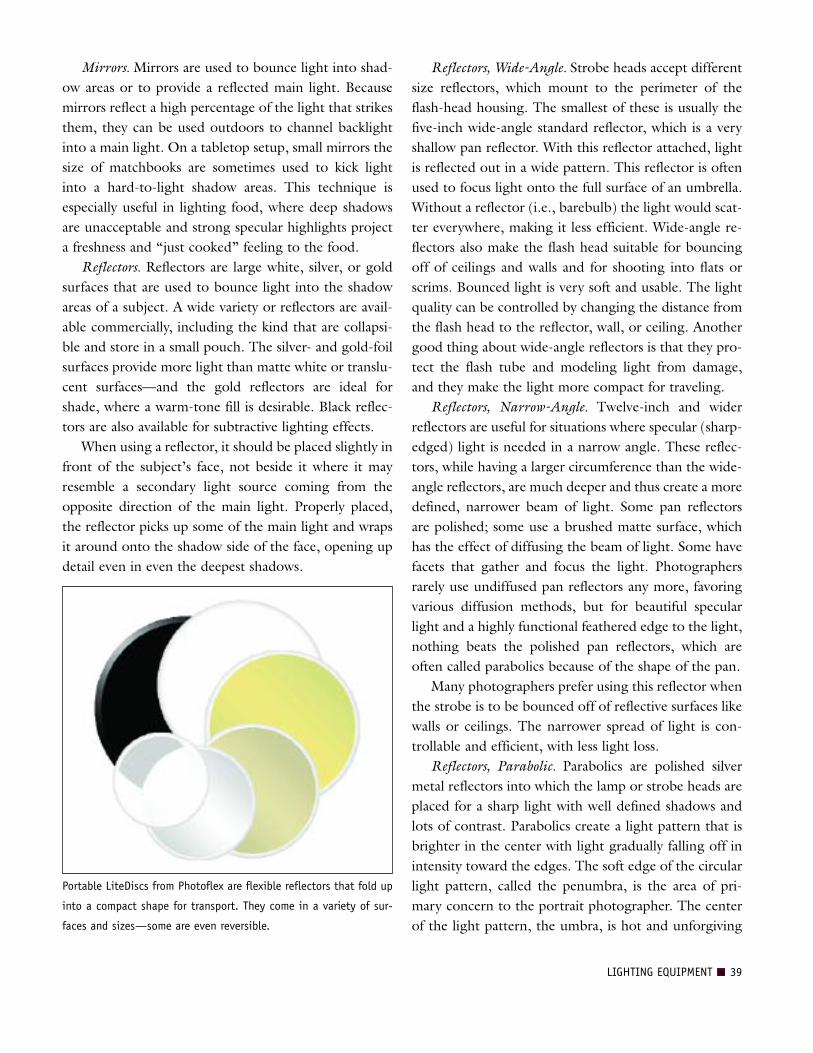
Portable LiteDiscs from Photoflex are flexible reflectors that fold up
into a compact shape for transport. They come in a variety of sur-
faces and sizes—some are even reversible.


and produces highlights without detail on the face.Feathering the light (adjusting the light so as to use thepenumbra) will help achieve even illumination acrossthe facial plane with soft specular highlights.
Scrims. Scrims are translucent diffusers. Light isdirected through the material of the scrim to diffuse thelight. In the movie business, huge scrims are suspendedlike sails on adjustable flats or frames and positionedbetween the sun (or a bank of lights) and the actors, dif-fusing the light over the entire stage area. A scrim worksthe same way a diffuser in a softbox works, scatteringthe light that shines through it. Monte Zucker has per-fected a system of using large scrims—3x6 feet and larg-er. With the sun as a backlight, he has two assistantshold the translucent light panel above and behind thesubject so that the backlighting is diffused. In front ofthe subject(s) he uses a reflector close to the subject tobounce the diffused backlight onto the subject(s). Theshadowless lighting effect is very much like thatachieved with an oversized softbox.Scrims can also be used in window frames for soften-
ing sunlight that enters the windows. The scrim can be
tucked inside the window frame and made invisiblefrom the camera position.
Snoots. These are attachments that snap to the lighthousing and resemble a top hat. Snoots narrow thebeam of light into a very thin core. They are ideal forsmall edge lights used from behind the subject.
Softboxes. A softbox is like a tent housing for one ormore undiffused strobe heads. Often, fiberglass polesprovide the rigid support of the softbox housing. Thefrontal surface is translucent nylon, usually double
LIGHTING EQUIPMENT 41
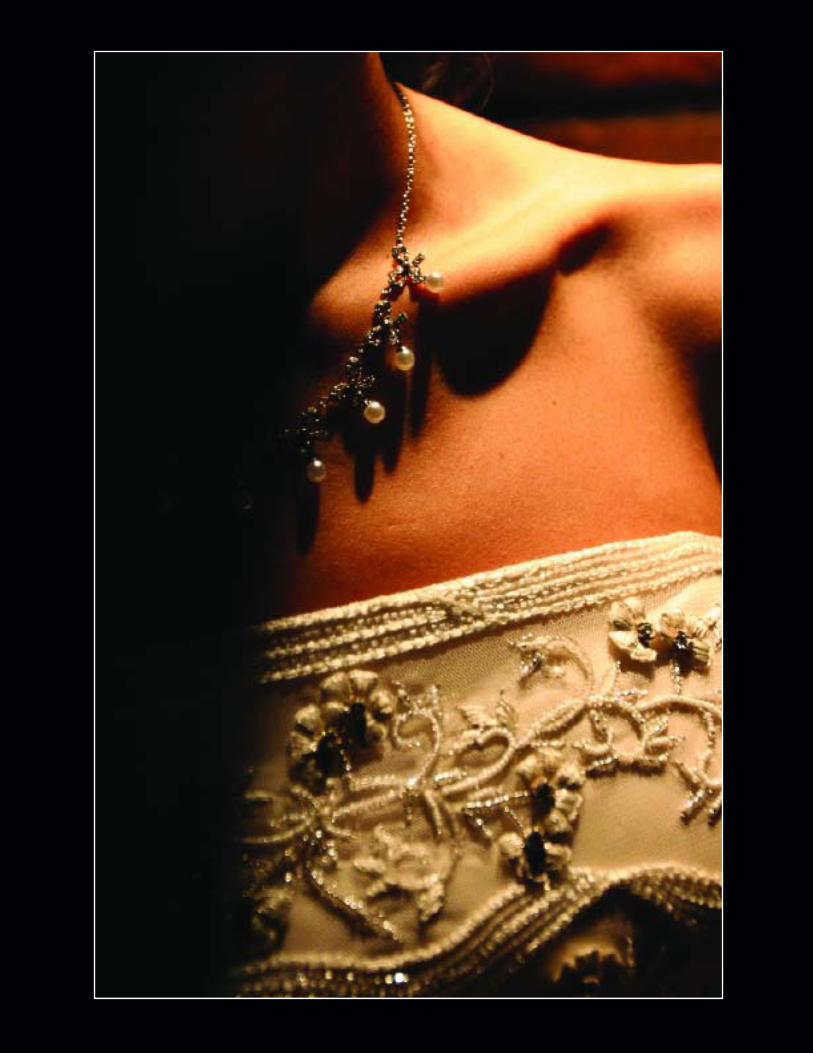
FACING PAGE—Cherie Steinberg Coté
created this beautiful fashion image
that shows off the necklace with
amazing clarity. The lighting in this
image is superb and much different
than portrait light, where facial
details are of paramount importance.
This lighting is diffused and direc-
tional but geared specifically to
show off the gown and necklace.
Cherie shot the image with a Nikon
D70 in RAW mode with a 16mm lens.
RIGHT—Cherie Steinberg Coté also
created this portrait by incorporat-
ing a busy downtown L.A street
scene, a gorgeous bride in a black
veil in full makeup, and diffused
flash at the same output as the day-
light exposure. The result is an edgy
portrait where the background and
portrait are both perfectly exposed.
A CLASSIC LIGHTING STYLE
In the old days, the light intensity needed to capture an
image on very slow film required all portrait be lit with par-
abolics and continuous-light sources. While today’s strobe
technology is great, there is an advantage to learning light-
ing with parabolics. With these harder sources, you have to
see and control light more efficiently than with diffused
lights, which are much more forgiving.

LEFT—This is a self portrait that Chris LaLonde
created for publicity use. He lit the portrait
with a single softbox overhead to create a bold
but soft lighting pattern. He feathered the light
away from his face to use its more dynamic
edge. (Note: you can see the position of the
softbox by examining the catchlights in his
eyes.) In Photoshop, he softened everything
behind the mask of his face and darkened the
area as well. Chris, who shoots with Nikon
DSLRs, often uses a laptop for proofing and
fine-tuning the image, as well as for camera
control. BELOW—This striking image by Cherie
Steinberg Coté was made with a single tung-
sten spotlight, which produced a strong shad-
ow that was used as part of the composition.
The image was captured with a Nikon D100,
using the camera’s tungsten white-balance
mode. Using a DSLR makes it much easier to
produce color-balanced images—just match
the white balance to your light source. With a
film camera, you would need to change film or
employ a color-correction filter.

thickness. The sides are black on the outside and whiteon the inside to gather and diffuse more light. Soft-boxes come in many sizes and shapes. Although mostlysquare, there are a few round ones out there. The sizesrange from 12 inches square all the way up to 5x7 feet.Softboxes are the ideal means of putting a lot of softlight in a controlled area. They provide much more pre-cise control over the light than umbrellas, which losemuch of their light intensity to scatter. Some softboxesaccept multiple strobe heads for additional lightingpower and intensity.
Spotlights. A spotlight is a hard-edged light source.Usually it is a small light with a Fresnel lens attached.The Fresnel is a glass filter that focuses the spotlight,making the beam of light stay condensed over a longerdistance. Barn doors are usually affixed to spots so thatthey don’t spray light all over the set.Spots are often used to light a selective area of the
scene, like a corner of the room or a portion of a seam-less background. They are usually set to an output thatis less than the main light or fill, although they may alsobe used as a main light at times.Spots produce a distinct shadow edge, giving more
shape to the subject’s features than lower-contrast, dif-fused light sources. Although originally a hot light, var-ious strobe manufacturers have introduced strobe ver-sions of Fresnel spots.
Strip Lights. A strip light is a long, skinny softbox.These are used as background and hair lights in portrai-ture, as well as edge lights for contouring in tabletopphotography. Sometimes they can be used as odd-shaped main lights, although their small size makes ittricky to use them for this purpose.
Umbrellas. Umbrellas, while not as popular as theyonce were, are still useful for spreading soft light overlarge areas. They produce a rounded catchlight in theeyes of portrait subjects and, when used close to thesubject, provide an almost shadowless light that showsgreat roundness. Umbrellas are usually used with ashort, wide-angle reflector on the flash head that en-ables you to better focus the entire beam of light. Um-brellas need to be focused to be optimized. All thatmeans is sliding the umbrella back and forth until thelight covers the entire umbrella surface without spill.
Photographic umbrellas are either white or silver. Asilver-lined umbrella produces a more specular, directlight than does a matte white umbrella. When usinglights of equal intensity, a silver-lined umbrella can beused as a main light because of its increased intensityand directness. It will also produce wonderful specularhighlights in the overall highlight areas of the face. Amatte-white umbrella can then be used as a fill or sec-ondary light.
Umbrellas, Shoot-Through. Some photographers usea translucent umbrella in the reverse position, turningthe light and umbrella around so that the light shinesthrough the umbrella and onto the subject. This gives asofter, more directional light than when the light isturned away from the subject and aimed into theumbrella. Of course, with a silver-lined umbrella, youcan’t shine the light through it because the silveredmaterial is almost fully opaque. There are many varietiesof shoot-through umbrellas available commercially andthey act very much like softboxes.
ON-CAMERA FLASH
Even at weddings, on-camera flash is used sparinglythese days because of its flat, harsh light. As an alterna-tive, many photographers use on-camera flash brackets,which position the flash over and away from the lens,minimizing red-eye and dropping the harsh shadowsbehind the subjects—a slightly more flattering light.On-camera flash is, however, often used outdoors,
especially with TTL-balanced flash exposure systems.
LIGHTING EQUIPMENT 43
INCIDENT FLASHMETER
A handheld incident flashmeter is essential for working
indoors and out, but particularly crucial when mixing flash
and daylight. It is also useful for determining lighting
ratios. Flashmeters are invaluable when using multiple
strobes and when trying to determine the overall evenness
of lighting in a large-size room. Flashmeters are also ambi-
ent incident light meters, meaning that they measure the
light falling on them and not the light reflected from a
source or object as the in-camera meter does.

With such systems, you can adjust the flash output forvarious fill-in ratios, thus producing consistent expo-sures. In these situations, the on-camera flash is mostfrequently used to fill in the shadows caused by the day-light, or to match the ambient light output, providingdirection to the light.
Bounce-Flash Devices. Many photographers usetheir on-camera flash in bounce flash mode. A problem,however, with bounce flash is that it produces an over-head soft light. With high ceilings, the problem is evenworse—the light source, while soft, is almost directlyoverhead. There are a number of devices on the marketthat solve this problem. For example, the LumiquestProMax system allows 80 percent of the flash’s illumi-
nation to bounce off the ceiling while 20 percent is redi-rected forward as fill light. The system also includesinterchangeable white, gold, and silver inserts, as well asa removable frosted diffusion screen. This same compa-ny also offers devices like the Pocket Bouncer, whichenlarges and redirects light at a 90-degree angle fromthe flash to soften the quality of light and distribute itover a wider area. While no exposure compensation isnecessary with TTL flash exposure systems, operatingdistances are somewhat reduced. With both systems,light loss is approximately 11/3 stops, however with theProMax system, using the gold or silver inserts willlower the light loss to approximately 2/3 stop.
44 THE BEST OF PROFESSIONAL DIGITAL PHOTOGRAPHY
A combination of window light and bounce flash produced this striking portrait that accentuates the light-blue eyes of the beautiful bride.
Photograph by Jeff Kolodny.
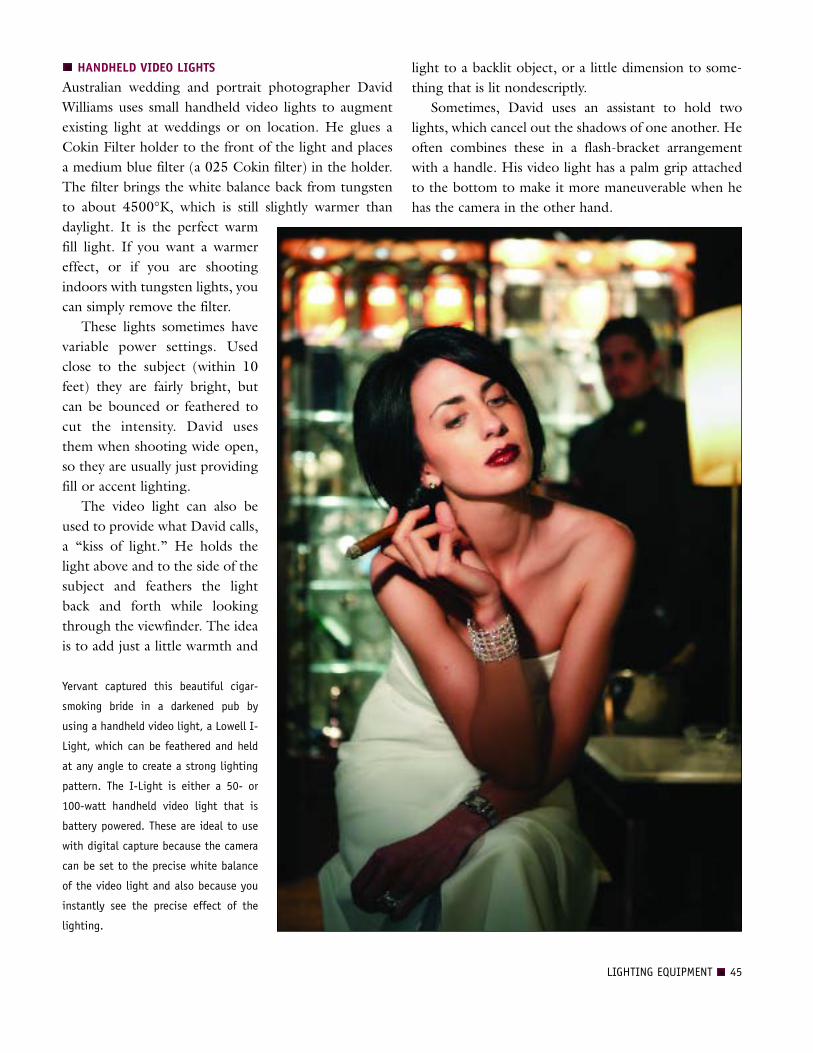
HANDHELD VIDEO LIGHTS
Australian wedding and portrait photographer DavidWilliams uses small handheld video lights to augmentexisting light at weddings or on location. He glues aCokin Filter holder to the front of the light and placesa medium blue filter (a 025 Cokin filter) in the holder.The filter brings the white balance back from tungstento about 4500°K, which is still slightly warmer thandaylight. It is the perfect warmfill light. If you want a warmereffect, or if you are shootingindoors with tungsten lights, youcan simply remove the filter.These lights sometimes have
variable power settings. Usedclose to the subject (within 10feet) they are fairly bright, butcan be bounced or feathered tocut the intensity. David usesthem when shooting wide open,so they are usually just providingfill or accent lighting.The video light can also be
used to provide what David calls,a “kiss of light.” He holds thelight above and to the side of thesubject and feathers the lightback and forth while lookingthrough the viewfinder. The ideais to add just a little warmth and
light to a backlit object, or a little dimension to some-thing that is lit nondescriptly.Sometimes, David uses an assistant to hold two
lights, which cancel out the shadows of one another. Heoften combines these in a flash-bracket arrangementwith a handle. His video light has a palm grip attachedto the bottom to make it more maneuverable when hehas the camera in the other hand.
LIGHTING EQUIPMENT 45
Yervant captured this beautiful cigar-
smoking bride in a darkened pub by
using a handheld video light, a Lowell I-
Light, which can be feathered and held
at any angle to create a strong lighting
pattern. The I-Light is either a 50- or
100-watt handheld video light that is
battery powered. These are ideal to use
with digital capture because the camera
can be set to the precise white balance
of the video light and also because you
instantly see the precise effect of the
lighting.

almost non-existent. Some photographers liken shoot-ing digital, especially JPEGs, to shooting transparencyfilm: it is unforgiving in terms of its exposure latitude.The up side of this seeming flaw in the process is thatgreater care taken in creating a proper exposure onlymakes you a better photographer. But for those used to+/–2 stops of over- and underexposure latitude, this is adifferent ballgame altogether.Proper exposure is essential in that it determines the
dynamic range of tones and the overall quality of theimage—in fact, it is one of the key factors determiningthe quality of the final output from your digital file.Underexposed digital files tend to have an excessiveamount of noise; overexposed files lack detail in thehighlights.According to Claude Jodoin, a wedding and event
photographer and digital expert, “Your days of overex-posing are over! You must either be right on with yourexposures or, if you make an error, let it be only slight-ly underexposed, which is survivable. Otherwise youwill be giving refunds to your clients. Overexposure ofany kind is death with digital.” Strong words to be sure,
but with digital capture you must guarantee that thedynamic range of the processed image fits that of thematerials you will use to exhibit the image (i.e., theprinting paper and ink or photographic paper).
FILE SIZE
The file size of an image is the digital size of the imagefile, measured in kilobytes (K), megabytes (MB), orgigabytes (GB). File size is related to the number ofpixels in the image. Images with more pixels will pro-duce more detail at a given printed size, require moredisk space to store, and be slower to edit and print.Image resolution thus becomes a compromise between
46 THE BEST OF PROFESSIONAL DIGITAL PHOTOGRAPHY
Working with digital files is very much different thanworking with film. For one thing, the exposure lati-tude, particularly when it comes to overexposure, is
4. GOOD DIGITAL WORKING TECHNIQUES
FACING PAGE—White on white on white—it’s a challenge for any
photographer, but especially for one who shoots JPEGs. David
Beckstead’s technique is very good. Here he balanced a warm-toned,
late-afternoon skylight with all of the ship’s white tones and the
bride’s dress. Perfect exposure guarantees a full range of detail
throughout the highlights. Beckstead made the image with a Canon
EOS 1D Mark II and Canon EF 16–35mm f/2.8L USM lens at 1/250 sec-
ond at f/2.8 at an ISO of 500.
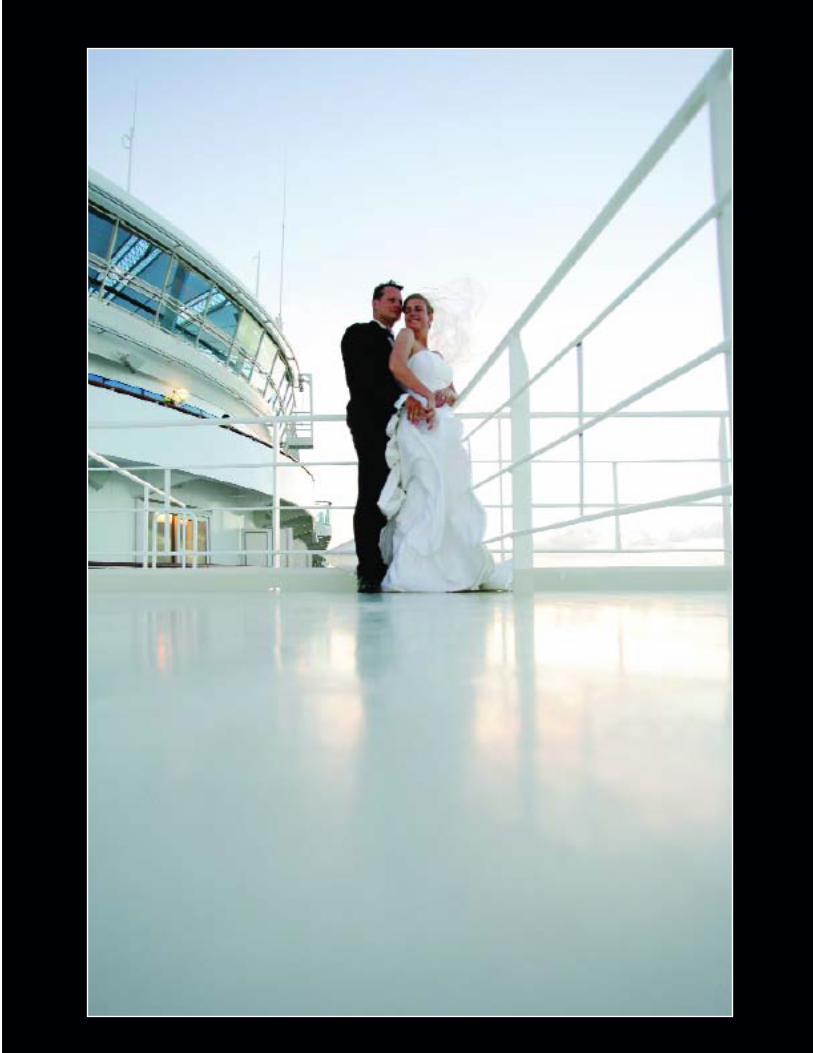
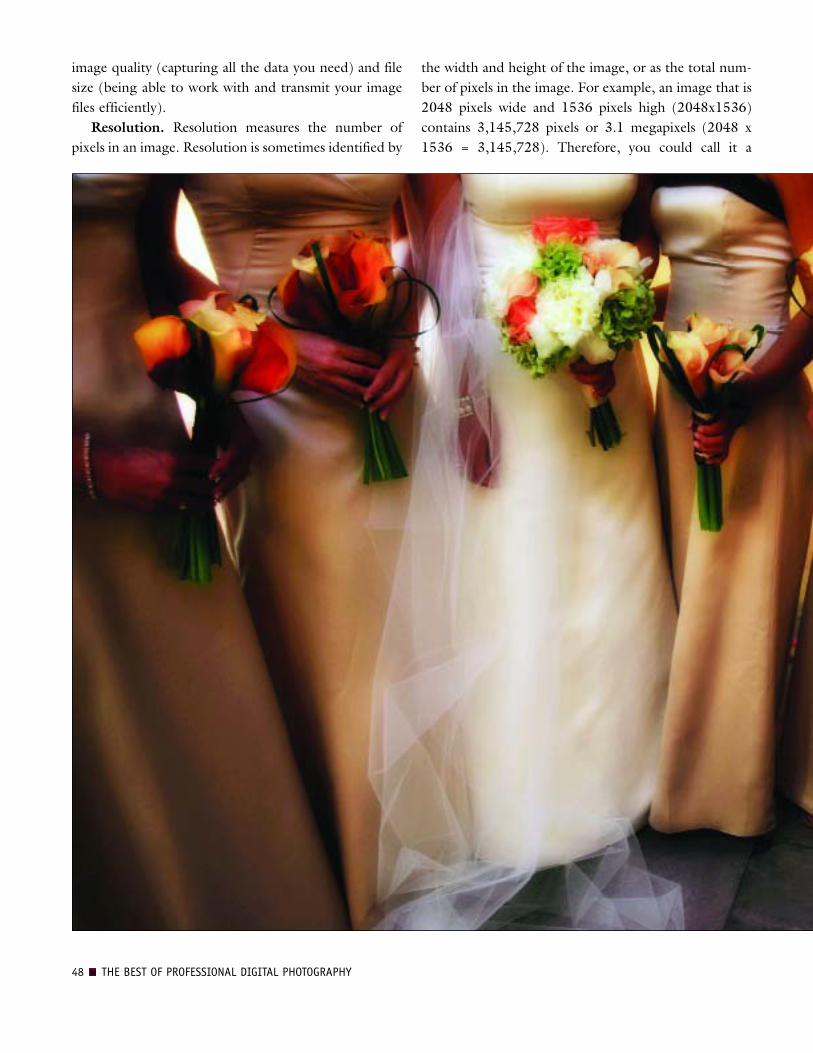
image quality (capturing all the data you need) and filesize (being able to work with and transmit your imagefiles efficiently).
Resolution. Resolution measures the number ofpixels in an image. Resolution is sometimes identified by
the width and height of the image, or as the total num-ber of pixels in the image. For example, an image that is2048 pixels wide and 1536 pixels high (2048x1536)contains 3,145,728 pixels or 3.1 megapixels (2048 x1536 = 3,145,728). Therefore, you could call it a
48 THE BEST OF PROFESSIONAL DIGITAL PHOTOGRAPHY

2048x1536 or a 3.1 megapixel image. As the megapix-els in the camera sensor increase so does the maximumprint size. This means that a 5-megapixel camera iscapable of producing a larger image than a 3-megapixelcamera.
File Format. Another factor that affects file size isfile format. Due to varying compression methods usedby GIF, JPEG, and PNG file formats, file sizes can varyconsiderably for the same number of pixels. Similarly,color bit-depth and the number of layers and channelsin an image affect the file size.
Changing Image Size and Resolution. There aremany reasons why you may want to adjust the size of animage. Keep in mind, however, that these changes mayinvolve corresponding changes in image quality.
Resampling. Resampling refers to changing the totalnumber of pixels in an image. When you downsample(decrease the number of pixels), information is deletedfrom the image. When you upsample (increase the num-ber of pixels), new pixels are added. Resampling canresult in poorer image quality. For example, when youresample an image to larger pixel dimensions, the imagewill lose some detail and sharpness. Applying the Un-sharp Mask filter to a resampled image can help restorethe image’s details.
Interpolation. Photoshop uses sophisticated methodsto, as much as possible, preserve the quality and detailfrom the original image when you resample. In thisprocess, the interpolation method determines howcolor values, based on the color values of existing pixels
GOOD DIGITAL WORKING TECHNIQUES 49
Every good picture starts with a good exposure, as did this one by
David Beckstead. David captured this image knowing that he would
later, in Photoshop, use a nik ColorEfex filter to soften the shot and
blend the highlights and shadows. David used his Canon EOS 1D Mark
II and wide-angle lens to capture the scene at ISO 320. He shot the
image as a high-quality JPEG.
BITMAP VS. VECTORWhen resizing an image, bitmap and vector data can pro-
duce different results. Bitmap data, which is made of rows
of pixels, is resolution-dependent; therefore, changing the
number of pixels in a bitmap image can cause a loss in
image quality and sharpness. In contrast, vector data is
comprised of mathematical formulas for its different shapes.
This makes it resolution-independent, so you can resize it
without losing its crisp edges.

in the image, are assigned to any new pixels Photoshopcreates. The three interpolation methods most usefulfor resizing photos are as follows:
1. Bicubic: A slow but precise method resultingin the smoothest tonal gradations.
2. Bicubic Smoother: Produces smootherresults when you’re enlarging images.
3. Bicubic Sharper: The best setting for reduc-ing the size of an image. This method main-tains the detail in a resampled image. It may,however, over-sharpen some areas of animage. If this occurs, try using Bicubic.
These are set in the General Preferences dialog box,where you specify a default method to use when imagesare resampled with the Image Size or Transform com-mands. In the Image Size dialog box, you can also spec-ify an interpolation method other than the default.
Step Interpolation. Fred Miranda (www.fredmiran-da.com) is a photographer who produces plug-ins thatmake dealing with digital files a snap. His SI Pro 2, is aPhotoshop plug-in that allows you to increase imagesize by percentage or to a set print size. It works bygradually increasing the image size in small increments(steps) and sharpening at optimum points within theprocess. The task runs like an action in Photoshop. Youset the parameters and it works to complete the file,renaming it in the process so you don’t accidentallydestroy the original.
EXPOSURE AND METERING
Determining Your Camera’s E.I.. Not all digital cam-eras are created equal. As with all things man-made,there are manufacturing and production tolerances thatmake complex devices dissimilar. It is important toknow if your camera’s metering system, on which youwill rely heavily, is faster or slower than its rated ISO.
50 THE BEST OF PROFESSIONAL DIGITAL PHOTOGRAPHY
For minor adjustment, you can boost image size in Photoshop by working in small
increments. For example, if the image is 6x9 inches at 300dpi, and you want to make
it 8x12 at 300dpi, go to Image>Image Size and check Constrain Proportions, Scale
Styles, and Resample Image. In the Resample menu, select Bicubic Smoother. Tab to
the width of the image and add a small increment—perhaps 6.5 inches. Repeat the
process in small increments until the desired size is reached. The final step is to apply
the Unsharp Mask. You will be amazed at the quality this method produces. Original
photo (facing page) by Fernando Basurto.

Here’s an adaptation of a simple test that technicalwiz Don Emmerich came up with using an 18-percentgray card. Simply fill the frame with the 18-percent graycard and meter the scene with the in-camera meter.Expose an image exactly as the meter indicates and viewthe histogram.If the ISO is dead on, there will be a single spike
dead center in the histogram. If the spike is to the rightor left of center, adjust the camera’s ISO by 1/3 or 1/2 stopand try again. If, for example, your initial test was madewith an ISO of 400 and the spike on the histogram isslightly to the left of center, it means the exposure is
slightly underexposed, so adjust thesetting to E.I. 320 or E.I. 250 andmake another frame and review thathistogram. If the spike is to theright of center, the frame is overex-posed and you will have to reduceexposure by setting the ISO to 1/3 or1/2 stop higher; i.e., E.I. 500 or E.I.620. Once the spike is properly inthe middle of the histogram, youhave a perfect exposure for this par-ticular lighting.So how do you apply what
you’ve learned? If you repeat thistest at different ISOs and under dif-ferent lighting conditions, youshould come up with a reliable fac-tor. Or, you may find your meter is
perfectly accurate. If, however, you find that the meteris consistently underexposing frames by 1/3 stop, you canadd 1/3 stop of exposure compensation. If, on the otherhand, the meter is consistently overexposing by 1/3 stop,for example, dial in –1/3 stop of exposure compensationor adjust your ISO accordingly.Perform this same series of tests with your handheld
incident meter to make sure all the meters in your arse-nal are precisely accurate.
Metering. The preferred type of meter is the hand-held digital incident-light meter, which measures lightin small units—tenths of a stop. This type of meter does
52 THE BEST OF PROFESSIONAL DIGITAL PHOTOGRAPHY
In this print made by David Worthington for
international competition, you can see the
painstaking efforts needed to create a per-
fect print. The vast tonality in this image
creates a visual feast for the viewer. Note
the criss-cross tones of the arched ceiling
and the long gradients of detailed high-
lights in the vertical columns. Worthing-
ton’s expertise comes in not only capturing
a perfect exposure and manipulating the
print with mastery (note the subtle corner
vignettes), but also knowing the perfect
time of day to work at a location.
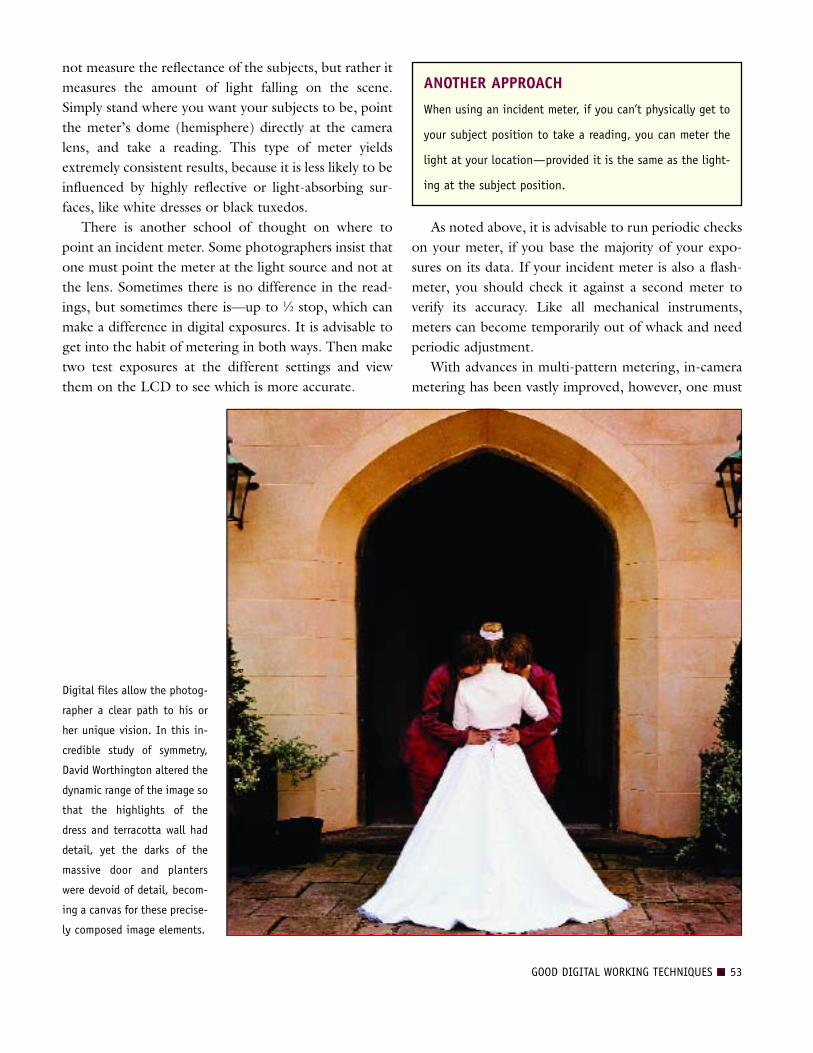
not measure the reflectance of the subjects, but rather itmeasures the amount of light falling on the scene.Simply stand where you want your subjects to be, pointthe meter’s dome (hemisphere) directly at the cameralens, and take a reading. This type of meter yieldsextremely consistent results, because it is less likely to beinfluenced by highly reflective or light-absorbing sur-faces, like white dresses or black tuxedos.There is another school of thought on where to
point an incident meter. Some photographers insist thatone must point the meter at the light source and not atthe lens. Sometimes there is no difference in the read-ings, but sometimes there is—up to 1/2 stop, which canmake a difference in digital exposures. It is advisable toget into the habit of metering in both ways. Then maketwo test exposures at the different settings and viewthem on the LCD to see which is more accurate.
As noted above, it is advisable to run periodic checkson your meter, if you base the majority of your expo-sures on its data. If your incident meter is also a flash-meter, you should check it against a second meter toverify its accuracy. Like all mechanical instruments,meters can become temporarily out of whack and needperiodic adjustment.With advances in multi-pattern metering, in-camera
metering has been vastly improved, however, one must
GOOD DIGITAL WORKING TECHNIQUES 53
Digital files allow the photog-
rapher a clear path to his or
her unique vision. In this in-
credible study of symmetry,
David Worthington altered the
dynamic range of the image so
that the highlights of the
dress and terracotta wall had
detail, yet the darks of the
massive door and planters
were devoid of detail, becom-
ing a canvas for these precise-
ly composed image elements.
ANOTHER APPROACH
When using an incident meter, if you can’t physically get to
your subject position to take a reading, you can meter the
light at your location—provided it is the same as the light-
ing at the subject position.
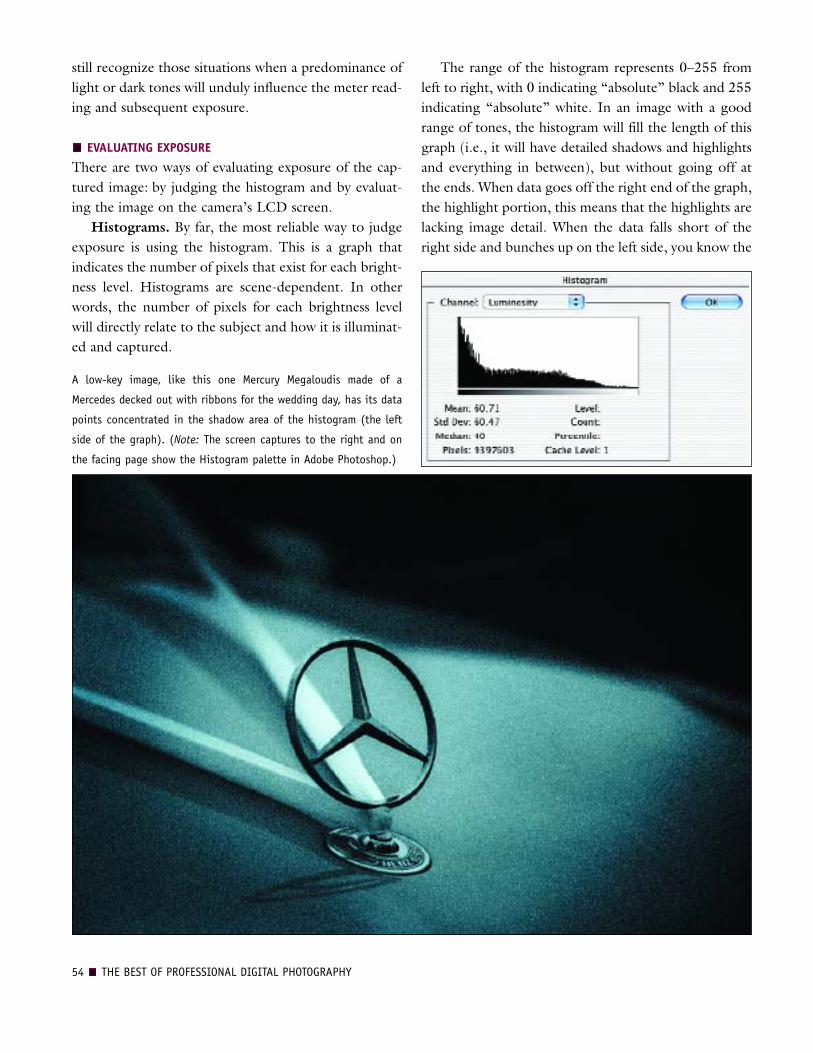
still recognize those situations when a predominance oflight or dark tones will unduly influence the meter read-ing and subsequent exposure.
EVALUATING EXPOSURE
There are two ways of evaluating exposure of the cap-tured image: by judging the histogram and by evaluat-ing the image on the camera’s LCD screen.
Histograms. By far, the most reliable way to judgeexposure is using the histogram. This is a graph thatindicates the number of pixels that exist for each bright-ness level. Histograms are scene-dependent. In otherwords, the number of pixels for each brightness levelwill directly relate to the subject and how it is illuminat-ed and captured.
The range of the histogram represents 0–255 fromleft to right, with 0 indicating “absolute” black and 255indicating “absolute” white. In an image with a goodrange of tones, the histogram will fill the length of thisgraph (i.e., it will have detailed shadows and highlightsand everything in between), but without going off atthe ends. When data goes off the right end of the graph,the highlight portion, this means that the highlights arelacking image detail. When the data falls short of theright side and bunches up on the left side, you know the
54 THE BEST OF PROFESSIONAL DIGITAL PHOTOGRAPHY
A low-key image, like this one Mercury Megaloudis made of a
Mercedes decked out with ribbons for the wedding day, has its data
points concentrated in the shadow area of the histogram (the left
side of the graph). (Note: The screen captures to the right and on
the facing page show the Histogram palette in Adobe Photoshop.)

image is underexposed. In a properly exposed image,the histogram may show detail throughout (from0–255) but it will trail off on either end of the graph.Detailed highlights will fall in the 235–245 range;detailed blacks will fall in the 15–30 range (in RGB).
The histogram also gives an overall view of the “key”of the image. A low-key image has its detail concentrat-ed in the shadows (a high number of data points at thelow end of the scale); a high-key image has detail con-centrated in the highlights (a high number of data
GOOD DIGITAL WORKING TECHNIQUES 55
In a normally exposed image with an average range of highlights and
shadows, the histogram will have the highest number of pixels in the
midtones, as is seen here in this image by David Williams.
In a high-key image, such as this one by Ann Hamilton, the his-
togram has most of its image detail concentrated in the highlights
(the right side of the histogram).

points at the high end of the scale). An average-keyimage has detail concentrated in the midtones.
Evaluating an LCD Image. With higher resolutionLCDs, larger screens, and more functions in the play-back mode of the camera, there’s no reason you can’tuse the LCD most of the time for evaluating images.For example, most professional DSLRs let you zoomand scroll across an image to evaluate details. This willtell you if the image is sharp or not. Also, you can setcertain playback presets to automatically indicate prob-lems like “clipped” highlights. These are regions of theimage in which no detail is present. I personally like thisfeature, because as the clipped highlights blink on theLCD preview, I can tell what areas were not properlyexposed and how to remedy the situation. On Nikon’splayback menu, you can scroll from histogram back tohighlight-clipping mode in an instant. As you begin touse these features, they become second nature.
CAMERA SETTINGS
White Balance. White balance is the camera’s ability tocorrect color when shooting under a variety of differentlighting conditions, including daylight, strobe, tung-sten, fluorescent, and mixed lighting. Choosing theright white-balance setting is very important if you areshooting highest-quality JPEG files. It is less importantwhen shooting in RAW file mode, since these files con-tain more data than the compressed JPEG files and areeasily remedied later in RAW processing.DSLRs have a variety of white-balance presets, such
as daylight, incandescent, and fluorescent. Some alsoallow the photographer to dial in specific color temper-atures in Kelvin degrees. These are often related to atime of day. For example, a pre-sunrise shoot might callfor a white-balance setting of 2000°K, while heavy over-cast lighting might call for a white-balance setting of8000°K.
56 THE BEST OF PROFESSIONAL DIGITAL PHOTOGRAPHY
There are three different light
sources in this scene: daylight
streaming in through floor-to-
ceiling windows behind the
group, overhead tungsten light
from room chandeliers, and low-
wattage light from the camera
position illuminating the sub-
jects. The latter comes from a
10-watt handheld video light,
which also dictated the white
balance of the scene. This is a
perfect situation for digital with
its great flexibility for recording
mixed lighting. Photograph by
David Williams.
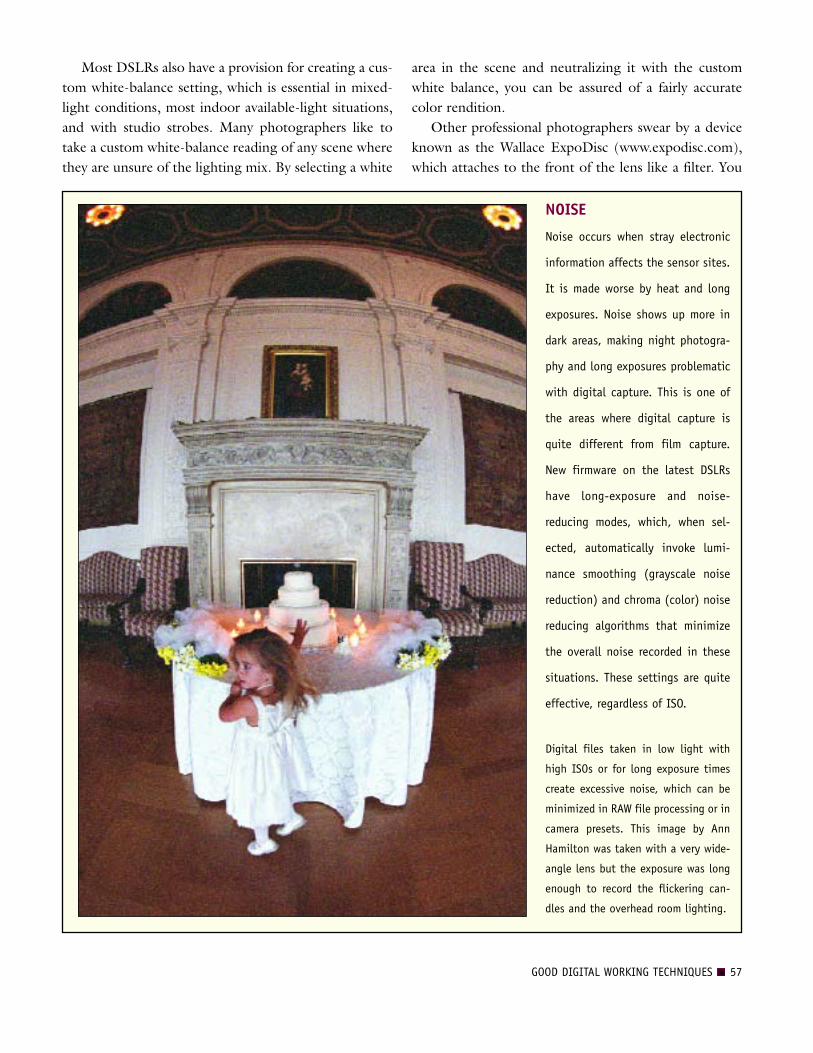
Most DSLRs also have a provision for creating a cus-tom white-balance setting, which is essential in mixed-light conditions, most indoor available-light situations,and with studio strobes. Many photographers like totake a custom white-balance reading of any scene wherethey are unsure of the lighting mix. By selecting a white
area in the scene and neutralizing it with the customwhite balance, you can be assured of a fairly accuratecolor rendition.Other professional photographers swear by a device
known as the Wallace ExpoDisc (www.expodisc.com),which attaches to the front of the lens like a filter. You
GOOD DIGITAL WORKING TECHNIQUES 57
NOISE
Noise occurs when stray electronic
information affects the sensor sites.
It is made worse by heat and long
exposures. Noise shows up more in
dark areas, making night photogra-
phy and long exposures problematic
with digital capture. This is one of
the areas where digital capture is
quite different from film capture.
New firmware on the latest DSLRs
have long-exposure and noise-
reducing modes, which, when sel-
ected, automatically invoke lumi-
nance smoothing (grayscale noise
reduction) and chroma (color) noise
reducing algorithms that minimize
the overall noise recorded in these
situations. These settings are quite
effective, regardless of ISO.
Digital files taken in low light with
high ISOs or for long exposure times
create excessive noise, which can be
minimized in RAW file processing or in
camera presets. This image by Ann
Hamilton was taken with a very wide-
angle lens but the exposure was long
enough to record the flickering can-
dles and the overhead room lighting.

take a white-balance reading with the disc in place andthe lens pointed at your scene. It is highly accurate inmost situations and can also be used to take exposurereadings.
Contrast. Contrast should be adjusted to the lowestpossible setting. According to wedding photographer
Chris Becker, “It’s always easyto add contrast later, but moredifficult to take away.”
Color Space. Many DSLRsallow you to shoot in either Ad-obe RGB 1998 or sRGB colorspace. There is considerableconfusion over which of these isthe “right” choice. Adobe RGB1998 is a wider-gamut colorspace than sRGB, so photogra-phers reason that they shouldchoose this in order to capturethe maximum range of color.Professional digital imaginglabs, however, use the sRGBcolor space for their digital prin-ters. Therefore, professionalphotographers working in Ad-obe 1998 RGB will be some-what disheartened when theirfiles are reconfigured and outputin the narrower color sRGBspace.Many photographers who
work in JPEG format use theAdobe 1998 RGB color space allthe time—right up to the point
that files are sent to a printer or out to the lab for print-ing. The reasoning is that since the color gamut is widerwith Adobe 1998 RGB, more control is afforded.Claude Jodoin is one such photographer. He likes to getthe maximum amount of color information in the orig-inal file, edit the file in the same color space for maxi-
58 THE BEST OF PROFESSIONAL DIGITAL PHOTOGRAPHY
Mercury Megaloudis photographed a
talkative cat named Jabber with a Can-
on EOS 10D and 100mm Macro lens wide
open. He was concentrating on Jabber’s
brilliant blue eyes, opting to crop the
image very tightly. The one eye was col-
or enhanced in Photoshop then sharp-
ened using Unsharp Mask to make it the
focal point of the composition.

mum control of the image subtleties, then convert theimage for output.Is there ever a need for other color spaces? Yes. It
depends on your particular workflow. For example, allthe images you see in this book have been convertedfrom their native sRGB or Adobe 1998 RGB colorspace to the CMYK color space for photomechanicalprinting. As a general preference, I prefer images fromphotographers be in the Adobe 1998 RGB color spaceas they seem to convert more naturally to CMYK.
Sharpening. In your camera’s presets you will prob-ably have a setting for image sharpening. You shouldchoose “none” or “low sharpening.” The reason for thisis that sharpening can eliminate data in an image andcause minor color shifts. Sharpening is best done afterthe other post-processing effects are complete. Also, ifshooting RAW files you will want to add sharpening inthe RAW file-processing, where it is most effective.
Metadata. DSLRs give you the option of taggingyour digital image files with data, which often includesthe date and time, a caption, as well as the camera set-tings. In Photoshop, go to File>File Info to see a rangeof data, including caption and ID information. If youthen go to EXIF data in the pull-down menu, you willsee all of the data that the camera automatically tagswith the file. Depending on camera model, variousother information can be written to the EXIF file, which
can be useful for either the client or lab. You can alsoadd your copyright symbol (©) and notice either fromwithin Photoshop or from your camera’s metadatasetup files. Adobe Photoshop supports the informationstandard developed by the Newspaper Association ofAmerica (NAA) and the International Press Telecom-munications Council (IPTC) to identify transmittedtext and images. This standard includes entries for cap-tions, keywords, categories, credits, and origins fromPhotoshop.
GOOD DIGITAL WORKING TECHNIQUES 59
GET IT RIGHT
Although it is true that an underexposed image is better
than an overexposed one, an underexposed image will still
never look as good as a properly exposed one. You can cor-
rect for underexposure in Photoshop, but it is time consum-
ing to adjust exposure in this manner.
SYNC THEM UP
Wedding photographer Chris Becker offers this tip: if shoot-
ing with multiple camera bodies, be sure to sync the inter-
nal clocks of the cameras. This will make it much easier to
sequentially organize your images after the event.

Photoshop features they support. With the exception ofthe Large Document Format (PSB), Photoshop Raw,and TIFF, all file formats can only support documentswith a file size of 2GB or less.
FILE COMPRESSION
Many file formats use compression to reduce the filesize of bitmap images. Lossless formats compress the filewithout removing image detail or color information.Lossy formats remove detail. Here are some commonlyused compression schemes:
LZW—Lossless compression; supported byTIFF, PDF, GIF, and PostScript languagefile formats.
JPEG—Lossy compression; supported byJPEG, TIFF, PDF, and PostScript languagefile formats. Recommended for continuous-tone images, such as photographs. When sav-ing an image in Photoshop, you can specifythe image quality by choose an option fromthe Quality menu (in the JPEG Options dia-
log box), entering a value between 0 and 12.For the best results, always choose the high-est quality (10 to 12). JPEG files can beprinted only on Level 2 (or later) PostScriptprinters and may not separate into individualplates for photomechanical reproduction.
ZIP—Lossless compression; supported by PDFand TIFF file formats. Like LZW, the ZIPcompression strategy provides the greatestreduction in file size when used for imagesthat contain large areas of a single color.
JPEG FORMAT
The JPEG (Joint Photographic Experts Group) formatis commonly used to display photographs and othercontinuous-tone images in hypertext markup language(HTML) documents over the Internet and other onlineservices. JPEG format supports CMYK, RGB, andGrayscale color modes, but does not support alphachannels. JPEG images retain all the color informationin an RGB file but compress the file size by selectivelydiscarding data. A JPEG image is automatically decom-
60 THE BEST OF PROFESSIONAL DIGITAL PHOTOGRAPHY
Graphic file formats differ in the way they represent imagedata (i.e., as either pixels or as vectors), compressiontechnique (how much data is compressed), and which
5. FILE FORMATS

pressed when opened. A higher level of compressionresults in lower image quality, and a lower level of com-pression results in better image quality.
JPEG 2000 FORMAT
JPEG 2000 provides greater flexibility than the stan-dard JPEG format. Using JPEG 2000, you can produceimages with better compression and quality for bothInternet and print publishing. To save files in the JPEG2000 format, an optional JPEG 2000 plug-in must be
installed in Adobe Photoshop CS2. This can be foundon the Photoshop CS2 installation CD in Goodies>Optional Plug-Ins>Photoshop Only> File Formats.Unlike traditional JPEG files, which are lossy, the
JPEG 2000 format supports optional lossless compres-sion. The JPEG 2000 format also supports 16-bit coloror grayscale files, 8-bit transparency, and it can retainalpha channels and spot channels. Grayscale, RGB,CMYK, and Lab are the only modes supported by theJPEG 2000 format.
FILE FORMATS 61
The JPEG format allows the photographer to work quickly and conserve storage space. This file, when closed, is 1.47MB as a JPEG. Once
opened, it is a 20.60MB file, meaning that it was saved at less-than-highest quality as a JPEG. Once transported or sent to another party,
files like these should be saved as lossless TIFF files to preserve the image data. This beautiful bridal formal was made by Kevin Jairaj.

A very interesting feature of the JPEG 2000 formatis that it supports using a Region of Interest (ROI) tominimize file size and preserve quality in critical areas ofan image. By using an alpha channel, you can specify theregion (ROI) where the most detail should be pre-served, allowing greater compression and less detail inother regions.
GIF FORMAT
Graphics Interchange Format (GIF) is the file formatcommonly used to display indexed-color graphics and
images in hypertext markup language (HTML) docu-ments over the Internet. GIF is an LZW-compressedformat designed to minimize file size and electronictransfer time. The GIF format preserves transparency inindexed-color images; however, it does not supportalpha channels.
TIFF FORMAT
TIFF (Tagged Image File Format) files are the mostwidely used file format in digital photography. TIFFsupports the following image modes: RGB, CMYK,
62 THE BEST OF PROFESSIONAL DIGITAL PHOTOGRAPHY
Kersti Malvre saves most of her files in PSD format. There are many reasons for this. You can preserve layers without having to flatten them
so that the image can be altered later. Also, you can specify that the Photoshop data be saved in EXIF form within the metadata file for
later reference. This beautiful portrait encapsulates an image of itself over the fireplace.

Grayscale, Lab, and Indexed color. TIFF files are loss-less, meaning that they do not degrade in image qualitywhen repeatedly opened and closed. TIFF files may becompressed when saved in Photoshop by using threedifferent compression schemes: LZW, JPEG, or ZIP(see page 60).TIFF files are used to exchange files between appli-
cations and computer platforms. TIFF is a flexiblebitmap image format supported by virtually all painting,image-editing, and page-layout applications. Also, virtu-ally all desktop scanners can produce TIFF files. TIFFdocuments can have a maximum file size of 4GB.Photoshop CS and later support large documents savedin TIFF format. However, most other applications (andolder versions of Photoshop) do not support docu-ments with file sizes greater than 2GB.Photoshop can save layers in a TIFF file;
however, if you open the file in anotherapplication, only the flattened image is visi-ble. Photoshop can also save annotations,transparency, and multi-resolution pyramiddata in TIFF format.
PHOTOSHOP EPS FORMAT
EPS (Encapsulated PostScript) files cancontain both vector and bitmap graphicsand are supported by virtually all graphics,illustration, and page-layout programs. EPSfiles are used to transfer PostScript-languageartwork between applications. When youopen an EPS file containing vector graphics,Photoshop rasterizes it, converting the vec-tor graphics to pixels. The EPS format sup-ports Lab, CMYK, RGB, Indexed Color,Duotone, Grayscale, and Bitmap colormodes, but not alpha channels. EPS does,however, support clipping paths. To printEPS files, you must use a PostScript printer.
DCS. The DCS (Desktop Color Separ-ations) format, a version of the standard
EPS format, lets you save color separations of CMYKimages. You can use the DCS 2.0 format to exportimages containing spot channels.
PSD FORMAT
PSD (Photoshop Document) is the default file formatand the only format that supports most Photoshop fea-tures (other than the Large Document Format [PSB]).Due to the tight integration between Adobe products,other Adobe applications can directly import PSD filesand preserve many Photoshop features.When saving a PSD file for use in a previous version
of Photoshop, you can set a preference to maximize filecompatibility. Normally, you should choose Alwaysfrom the Maximize PSD File Compatibility menu. This
FILE FORMATS 63
In this image by Kersti Malvre, the Edit History is pre-
served in metadata form so that it can be referred to
in precise detail at a later date.

saves a composite (flattened) image along with the lay-ers of the document. If file size is an issue or if you’reonly opening your files in Photoshop, turning offMaximize PSD File Compatibility will reduce the filesizes significantly.If you edit or save your PSD image using an earlier
version of Photoshop, any unsupported features will bediscarded. Keep in mind the following features whenworking with earlier versions of Photoshop:
Photoshop CS introduced nestedlayers, Hard Mix blending mode,Photo Filter adjustment layers, 56channel limit, text on a path, sup-port for files greater than 2GB,support for files greater than30,000 pixels in any dimension,non-square pixels support, 16-bitlayers, 16-bit patterns, and 16-bitBrushes.
Photoshop 7.0 introduced theLinear Burn, Linear Dodge, VividLight, Linear Light, and PinLight blending modes, as well asthe Layer Mask Hides Effect andVector Mask Hides Effectadvanced blending options.
Photoshop 6.0 introduced layersets, layer color-coding, layer clip-ping paths, fill layers, layer styles,editable type, advanced type for-matting, and new layer effects.
Photoshop 5.0 introduced layereffects (effects added in laterversions of Photoshop are notsupported, however), color sam-
plers, spot channels, and embedded ICCprofiles.
Photoshop 4.0 introduced adjustment layersand guides.
PHOTOSHOP RAW FORMAT
The Photoshop RAW format is a flexible file format fortransferring images between applications and computerplatforms. This format supports CMYK, RGB, and
64 THE BEST OF PROFESSIONAL DIGITAL PHOTOGRAPHY
Kevin Jairaj created this beautiful portrait of a
bride and groom for print competition. Kevin
often shoots in the RAW format so he can adjust
the skin tones and lighting subtleties after the
capture. In this image, he used a single flash to
light the couple and had an assistant “drop” the
veil an instant before exposure so it would look
like it was suspended in mid air.

grayscale images with alpha channels, as well as multi-channel and Lab images without alpha channels.Documents saved in the Photoshop RAW format can beany pixel or file size, but cannot contain layers. Imagesin the Photoshop RAW format consist of a stream ofbytes describing the color information. Each pixel isdescribed in binary format, with 0 representing blackand 255 representing white (for images with 16-bitchannels, the white value is 65535). Photoshop desig-nates the number of channels needed to describe theimage, plus any additional channels in the image. Youcan save the image in an interleaved or noninterleavedformat. If you choose interleaved, the color values (red,green, and blue, for example) are stored sequentially.Your choice depends on requirements of the applicationthat will open the file. (Note: Photoshop RAW is not thesame file format as a RAW image file from a digital cam-era. A digital camera’s RAW image file is a camera-specific proprietary format that provides the photog-rapher with a digital negative—an image free of any
filtering, white balance adjustments, or other in-cameraprocessing.)
RAW FORMAT
RAW is a general term for a variety of proprietary fileformats such as Nikon’s .NEF, Canon’s .CRW and.CR2, and Olympus’ .ORF. While there are many dif-ferent encoding strategies, in each case the file recordsthe raw, unprocessed image-sensor data. RAW files con-sist of the image pixels themselves and the image meta-data, which contains a variety of information about howthe image was recorded.
How JPEG Differs from RAW. When you shootJPEG, a built-in RAW converter in the camera carriesout all of the same tasks as described above to turn theRAW capture into a color image, then compresses itusing JPEG compression. Some camera systems allowyou to set parameters for this JPEG conversion—usual-ly, a choice of sRGB or Adobe RGB 1998 color space,a sharpness setting, and a curve or contrast setting.
This is an image file that was captured with a Nikon D70s in both JPEG and NEF (Nikon RAW) file formats simultaneously. In Adobe Camera
RAW, the file was tweaked in the areas of white balance, exposure, and sharpness. Saved as a TIFF, it was then opened in Photoshop CS2.
It was selectively diffused, lightly vignetted, and some minor burning and dodging and overall color-balance corrections were performed.
Photograph by Bill Hurter.
JPEG. JPEGs offer fairly limited editing ability, sincethe mode applies heavy compression to the color data.In the typical conversion process, the JPEG compres-sion will discard roughly a stop of usable dynamic range,and you have very little control over what informationgets discarded.So why do many photographers still choose to shoot
JPEGs? First, shooting in JPEG mode creates smallerfiles, so you can save more images per CF card or stor-age device. Second, compared to shooting RAW files,
JPEGs do not take nearly as long to write to memory.Both factors allow you to work much faster—a clearadvantage in some situations. If you shoot JPEGs,selecting the JPEG Fine mode (sometimes called JPEGHighest Quality) will apply the least compression and,therefore, produce the best possible files.JPEG is a “lossy” format, meaning that images are
subject to degradation by repeated opening and closingof the file. Therefore, most photographers who shoot inJPEG mode save the file as a JPEG copy each time theywork on it or save it to the TIFF format. TIFF is a “loss-less” format, meaning that images can be saved againand again without further degradation.
RAW. When you shoot in RAW mode, you getunparalleled control over the interpretation of theimage. The only in-camera settings that have an effecton the captured pixels are ISO speed, shutter speed, andaperture setting. Everything else is under your controlwhen you convert the RAW file—you can reinterpretthe white balance, the colorimetric rendering, the tonalresponse, and the detail rendition (sharpening and noisereduction) with complete flexibility. Within limits(which vary from one RAW converter to another), youcan even reinterpret the exposure compensation.While RAW files offer the benefit of retaining the
highest amount of image data from the original capture,they also take longer to write to the storage media anddrastically reduce the number of files you can capture ona single CF card or microdrive because of their in-creased file size. Although the cost of media is comingdown, the time it takes to record the information is notnecessarily getting much faster. If the kind of shootingyou do requires fast burst rates and lots of image files,such as the wedding photographer or photojournalistwould experience, then RAW capture may not be yourbest choice.
RAW File Converters. Because they include someadditional metadata, RAW format files must be convert-ed by a RAW image converter before they can be used.These converters process the white balance, colorimet-ric data (the assigning of red, green, and blue to eachpixel), Gamma correction, noise reduction, antialiasing(to avoid color artifacts), and sharpening. However, dif-ferent converters use different algorithms—some
66 THE BEST OF PROFESSIONAL DIGITAL PHOTOGRAPHY
DNG FORMAT
To resolve the disparity between RAW file formats, Adobe
Systems introduced an open RAW file format, appropriately
named the Digital Negative (DNG) format. Adobe is pushing
digital camera manufacturers and imaging software develop-
ers to adopt the new DNG format. Unlike the numerous pro-
prietary RAW formats out there, the DNG format was
designed with enough flexibility built in to incorporate all
the image data and metadata that any digital camera might
generate. Proprietary RAW format images that are pulled
into Photoshop can be saved to the new DNG file format
with all the RAW characteristics being retained. DNG Save
options include the ability to embed the original RAW file in
the DNG file, to convert the image data to an interpolated
format, and to vary the compression ratio of the accompa-
nying JPEG preview image.
JPEG VS. RAW
In some ways, shooting JPEGs is like shooting transparency
film, while shooting RAW is more like shooting color-nega-
tive film. With JPEG, as with transparency film, you need to
get everything right in the camera because there’s very lit-
tle you can do to change it later. Shooting RAW mode pro-
vides considerable latitude in determining the tonal rendi-
tion and also offers much greater freedom in interpreting
the color balance and saturation.

process the tones with less contrast in order to provideediting maneuverability, others will increase the contrastof the file to achieve a more film-like rendition, forexample. As a result, the same image may look differentwhen processed by different RAW converter engines.Only a few years ago RAW file processing software
was limited to the camera manufacturer’s software,which was often slow and tedious to use. Over time, thesoftware and process has improved drastically and withthe introduction of independent software like AdobeCamera RAW and Phase One’s Capture One DSLR,RAW file processing is not nearly as daunting.The first step is to access the files and save them for
editing, storage, and output. You can access yourimages using the software supplied with your camera orphoto-editing software that recognizes the RAW filetype. Usually, image-browsing software is used to ini-
tially access the images. Your camera manufacturer maysupply this software or it may be third-party software.After displaying and verifying that all of the files exist
on the card, save a version of all of your source filesprior to making any modifications or adjustments. Ifyou shoot in RAW mode, backup the RAW files as RAWfiles, as these are your originals. Most people use CD-ROMs for this purpose because the medium is inexpen-sive and writes quickly from most computers. You canalso save your source files to an auxiliary hard drive.Once backups are made you can process the RAW
files after certain general parameters are set. You willneed to establish things like your default editing pro-gram (i.e., Photoshop) and destination folder, filenames, numbering sequence, and so forth.Files can be processed individually or batch pro-
cessed to apply certain characteristics (white balance,
FILE FORMATS 67
Apple’s Aperture is an all-in-one post-production tool that provides everything photographers need for RAW file processing. Aperture offers
an advanced and incredibly fast RAW workflow that makes working with a camera’s RAW images as easy as working with JPEGs. Built from
the ground up for pros, Aperture features powerful compare and select tools, nondestructive image processing, color managed printing, and
custom web and book publishing. RAW images are maintained natively throughout Aperture without any intermediate conversion process,
and can be retouched with exceptional results using a suite of adjustment tools designed especially for photographers.

68 THE BEST OF PROFESSIONAL DIGITAL PHOTOGRAPHY

brightness, tagged color space, and more) to theentire group of images. Remember that your orig-inal capture data is retained in the source imagefile. Processing the images creates new, completelyseparate files. You will also have an opportunity tosave the file in a variety of file formats, whichever ismost convenient to your image-editing workflow.
Adobe Camera RAW. Adobe Camera RAW,Adobe’s RAW file converter, is a sophisticated ap-plication within Photoshop that lets you far exceedthe capabilities of what you can do to a JPEG filein the camera. For instance, by changing the colorspace from Adobe RGB 1998, a wide gamut colorspace, to ProPhoto RGB, an even wider gamutcolor space, it allows you to interpolate the colordata in the RAW file upward. In the exampleshown on page70, the native file size is roughly2000x3000 pixels. By converting the file to Pro-Photo RGB, the file can be easily enlarged toroughly 4000x6000 pixels, the equivalent of a72MB file when it’s opened in Photoshop—withalmost no loss in quality. This is because the Pro-Photo RGB color space expands the native colordata in the RAW file, making upward interpolationnot only possible, but practical.Using the Advanced Settings in Adobe Camera
RAW, you can adjust many of the image parame-ters with much more power and discriminationthan you can in the camera. For instance, underthe Detail menu, you can adjust image sharpness,luminance smoothing, and color noise reduction(luminance smoothing reduces grayscale noise,while color noise reduction reduces chroma noise).In the Adjust menu you can control white bal-
FILE FORMATS 69
Wedding photographer Becker downloads his images to a lap-
top in the field. Once the cards are downloaded, he transfers
the downloads folder to an iPod (or any portable external
FireWire hard drive) for safekeeping. He shoots more RAW files
now than ever before. This beautiful backlit image was record-
ed with soft contrast, auto white balance, low saturation and
soft sharpness. This allows finer interpolation in the RAW file
processing of the image.

Shadow tint, hue, and saturation were adjusted. Also vignetting was
adjusted in the Lens menu (not shown).
White balance, overall exposure, shadow exposure, brightness, contrast and
saturation were then adjusted.
Sharpness, luminance smoothing and color noise reduction were then
adjusted.
In the image shown here, the file was processed in Adobe Camera RAW. The
color space was changed from Adobe RGB 1998 to ProPhoto RGB to increase
the amount of color data to be processed.
The number of pixels was quadrupled—from the chip’s native resolution of
2000x3000 pixels up to roughly 4000x6000 pixels.
The final, processed 72MB file. RAW file image courtesy of Adobe.

ance, exposure, shadow density, brightness, contrast,and color saturation. The Lens menu lets you adjustlens parameters that affect digital cameras, such as chro-matic aberration and vignetting. These controls exist toallow you to make up for certain optical deficiencies inlenses, but can also be used for creative effects, as well—especially the vignetting control, which either adds orsubtracts image density in the corners of the image. Inthe Calibrate menu, you can adjust the hue and satura-tion of each channel (RGB), as well as shadow tint.(Shadow tint is particularly useful, as it provides thebasis for color correction of images with people in them.In traditional color printing, color correction is done toneutralize the tint in the shadows of the face and body,so they are neutral gray. With shadow tint control, youisolate the shadows from the rest of the image so thatyou can neutralize the shadows, while leaving a warmtone, for example, in the facial highlights.)In Photoshop CS2, Adobe Camera RAW combines
with the modified file browser, called Bridge, to allowyou to group a number of like files and correct them allthe same way at the same time. This capability is a mod-ified or selective batch processing that is much moreuseful than former means of batch processing. Plus youcan continue working while the files process.
REFORMAT YOUR CARDS
After you backup your source files, it’s a good idea toerase all of the images from your CF cards and thenreformat them. It isn’t enough to simply delete theimages, because extraneous data may remain on thecard causing data interference. After reformatting,you’re ready to use the CF card again.Never format your cards prior to backing up your
files to at least two sources. Some photographers shootan entire job on a series of cards and take them back tothe studio prior to performing any backup. Othersrefuse to fill an entire card at any time; instead opting todownload, back up, and reformat cards directly duringa shoot. This is a question of preference and security.Many photographers who shoot with a team of shoot-ers train their assistants to perform these operations toguarantee the images are safe and in hand before anyoneleaves the wedding.
FILE FORMATS 71
Bridge is a sophisticated application that is a part of Adobe CS2. It
allows you to work across applications and perform batch-processing
operations.
Fernando Basurto captured this marvelous image at a wedding using
RAW file presets that increased brightness, contrast, and sharpness
and reduced image noise. The image was made with a Canon EOS 1D
Mark II and Canon EF 70–200mm f/2.8L IS USM lens at 1/250 second
at f/2.8 at ISO 400. Fernando capitalizes on the flexibility of RAW,
but sets certain presets in order to accommodate his visual tastes
and to speed up his workflow. Grain was added in Photoshop.

Becker’s sense of timing is exquisite, but this is not just a “grab shot.” There are elements that are truly beautiful—the vignetting, the near
transparent rendition of the water, the priceless expressions of the bride and groom, the look of the passerby, and the beautiful rendition
of the clouds overhead.
Tim Schooler always shoots in RAW mode, then
converts the files in Phase One’s Capture One.
One of Schooler’s settings in Capture One is for
high-contrast skin tones and a 7-percent in-
crease in color saturation. This gives his fin-
ished images a little more color, an effect he
says seniors like a lot. Capture One has four
options to emulate the look of film: Linear
Response, Film Standard, Film Extra Shadows, or
Film High Contrast. Tim used to use the Film
Standard setting but found he was tweaking
Curves too often. Now he uses Film High Con-
trast and he finds it’s a lot closer to Portra VC,
which was his preferred film before his studio
went digital. “My goal is to shoot everything as
a finished image, in fact that’s how I proof.
Nothing is edited or retouched before the client
sees it. We retouch only what they ask for.”
72 THE BEST OF PROFESSIONAL DIGITAL PHOTOGRAPHY
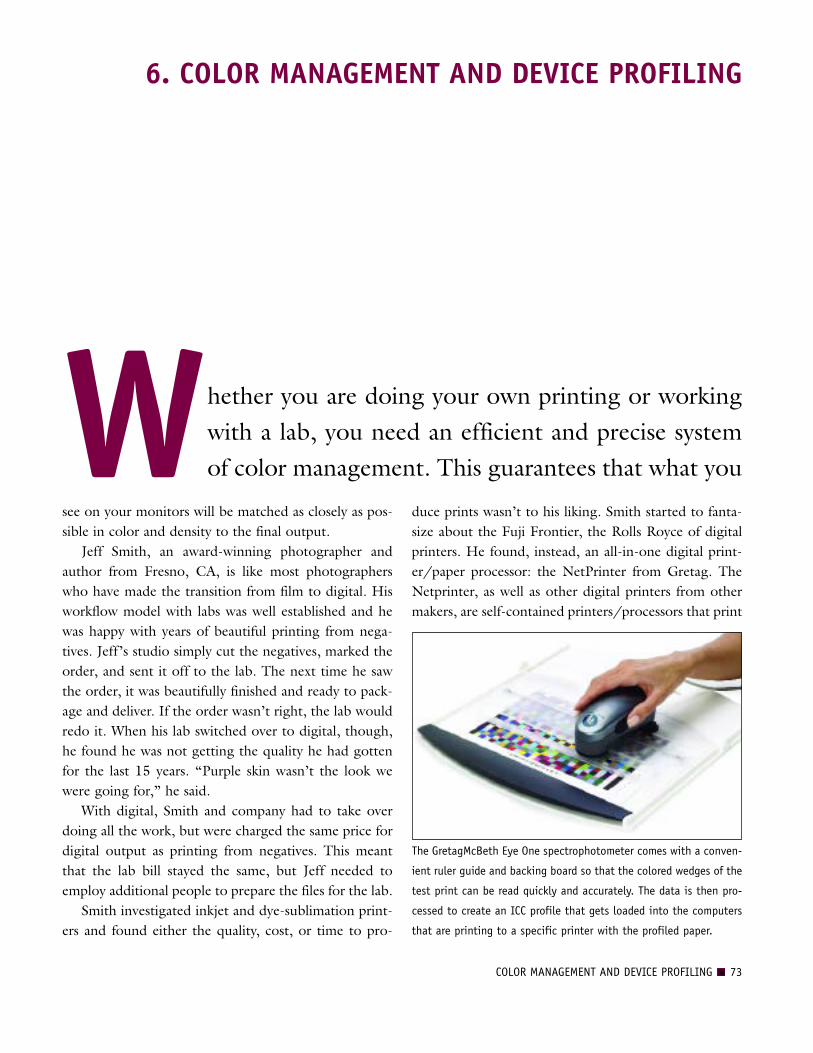
COLOR MANAGEMENT AND DEVICE PROFILING 73
see on your monitors will be matched as closely as pos-sible in color and density to the final output.Jeff Smith, an award-winning photographer and
author from Fresno, CA, is like most photographerswho have made the transition from film to digital. Hisworkflow model with labs was well established and hewas happy with years of beautiful printing from nega-tives. Jeff’s studio simply cut the negatives, marked theorder, and sent it off to the lab. The next time he sawthe order, it was beautifully finished and ready to pack-age and deliver. If the order wasn’t right, the lab wouldredo it. When his lab switched over to digital, though,he found he was not getting the quality he had gottenfor the last 15 years. “Purple skin wasn’t the look wewere going for,” he said.With digital, Smith and company had to take over
doing all the work, but were charged the same price fordigital output as printing from negatives. This meantthat the lab bill stayed the same, but Jeff needed toemploy additional people to prepare the files for the lab.Smith investigated inkjet and dye-sublimation print-
ers and found either the quality, cost, or time to pro-
duce prints wasn’t to his liking. Smith started to fanta-size about the Fuji Frontier, the Rolls Royce of digitalprinters. He found, instead, an all-in-one digital print-er/paper processor: the NetPrinter from Gretag. TheNetprinter, as well as other digital printers from othermakers, are self-contained printers/processors that print
Whether you are doing your own printing or workingwith a lab, you need an efficient and precise systemof color management. This guarantees that what you
6. COLOR MANAGEMENT AND DEVICE PROFILING
The GretagMcBeth Eye One spectrophotometer comes with a conven-
ient ruler guide and backing board so that the colored wedges of the
test print can be read quickly and accurately. The data is then pro-
cessed to create an ICC profile that gets loaded into the computers
that are printing to a specific printer with the profiled paper.

74 THE BEST OF PROFESSIONAL DIGITAL PHOTOGRAPHY
This is a standard printer calibration target, courtesy of
Claude Jodoin. Claude sent me this target as a file, which I
then printed with my Epson Photo Stylus 2200 printer. I
sent the print back to Claude, who then created a profile,
which I installed when he e-mailed it to me. From that day
on, I had the paper I normally use perfectly profiled. The
color and print density showed marked improvements after
the system was profiled. Each paper you use needs its own
unique profile.
Skin tone and color balance are perfect in this outdoor senior portrait by Jeff Smith. As Smith recalls, it took quite awhile to get everything
calibrated, but once it was, everyone on his studio’s staff could make perfect prints on the Netprinter.

on almost any photographic paper. Smith’s Netprinteroutputs up to 12x18-inch prints at 500dpi for an aver-age cost per 8x10 of 35–45 cents per print—and, themachine can print up to 200 prints per hour.So what does this story have to do with color man-
agement? Well, what Smith found out was that eventhough the Netprinter came loaded with ICC profilesfor the most popular papers, the studio wasn’t gettingconsistent results. In the end, what Smith ended updoing was purchasing Eye One Calibration software tocalibrate each monitor and write specific ICC profilesfor the machine. This got the monitors close to the finaloutput on paper, but still the staff, as a group, had tolearn to interpret the subtle differences between the col-ors and contrast of the monitors and how they repro-duced on specific papers.Today, Jeff’s staff is trained to interpret color, the
customers are happy, and he’s happy too. According toSmith, “For our studio this was a necessary step to makedigital as profitable as shooting with film.”By mixing red, green, and blue (RGB) colored light
in varying proportions and intensities, a large percent-age of the visible spectrum can be represented. RGBdevices, including most digital cameras, scanners andmonitors, use red, green, and blue light to reproducecolor. A color-management system performs twoimportant functions: (1) it interprets these RGB (orCMYK) values and (2) it maintains the appearance ofthose colors from one device to another consistently—from input, to display, to output.So why, even in a color-managed system, does the
print sometimes look different than the screen image?The answer lies not so much in the color-managementquestion, but in the differences between media. Becausemonitors and printers have a different color gamut (adifferent fixed range of color values they can produce ordisplay), the physical properties of these two differentdevices make it impossible to show exactly the same col-ors on your screen and on paper. However, effectivecolor management allows you to align the output fromall of your devices to simulate how the color values ofyour image will be reproduced in a print. This beginswith device profiling.
MONITOR PROFILES
If you set up three identical monitors and had each dis-play the exact same image, the images would all look alittle bit different. This is where profiles come into play.Profiling, which uses a hardware calibration device andaccompanying software, characterizes the monitor’soutput so that it displays a neutral or at least a pre-dictable range of colors.A monitor profile is like a color-correction filter.
Going back to the example of the three monitors above,one monitor might be slightly green, one magenta, andone slightly darker than the other two. Once the moni-tor is calibrated and profiled, and the resulting profile isstored in your computer, however, the profile will senda correction to the computer’s video card, correctingthe excess green, magenta, and brightness, respectively,so that all three monitors represent the same imageidentically.Monitor profiling devices range from relatively inex-
pensive ($250–$500) to outlandishly expensive (severalthousand dollars), but it is an investment you cannotavoid if you are going to get predictable results fromyour digital systems.
COLOR MANAGEMENT AND DEVICE PROFILING 75
OPTIMAL VIEWING
It is recommended that you set your computer desktop to a
neutral gray for viewing and optimizing images. Because
you will most likely make adjustments to color and luminos-
ity, it is important to provide a completely neutral, colorless
backdrop to avoid distractions that might affect your criti-
cal ability to judge color. Since I deal with tens of thou-
sands of images each year, my monitors all are optimized
with neutral gray backgrounds. It’s not as exciting as wall-
paper, but it helps keep my sense of accurate color balance
intact. To optimize your working area, the room lighting
should also be adjusted to avoid any harsh, direct lighting
on the monitor. This will allow more accurate adjustments
to your images and will reduce eyestrain. Attempt to keep
ambient light in the room as low as possible.

Gamma. Gamma refers to the monitor’s brightnessand contrast and represents a known aim point. Forexample, if your video card sends your monitor a mes-sage that a certain pixel should have an intensity equalto x, the monitor will actually display a pixel that has anintensity equal to x. Typically, monitors used with Macshave a default gamma setting of 1.8, while monitorsused with PCs and Windows have a default setting of2.2. Both operating systems allow gamma to be adjust-ed, which can be important if your lab is using a differ-ent gamma than you. Also, both systems have built-inself-correction software to optimize the accurateappearance of images.
CAMERA PROFILES
DSLRs are used in a wide variety ofshooting conditions. This is especiallytrue in wedding photography, where thephotographer may encounter a dozendifferent combinations of lighting in asingle afternoon, all with varying intensi-ties and color temperatures. The wed-ding photographer is looking at a worldof color.Just as all monitors are different, all
digital cameras vary at least a little inhow they capture color. As a result, some camera man-ufacturers, like Canon, don’t provide device profiles fortheir cameras. After all, if the manufacturer made oneprofile for all their cameras, it would prove somewhatuseless. Additionally, there are software controls builtinto the setup and processing modes for each DSLRthat allow photographers sufficient control to alter andcorrect the color of the captured image.Creating these custom camera profiles is beneficial if
your camera consistently delivers off-color images undera variety of lighting conditions, captures skin tonesimproperly, or fails to record colors accurately whensuch precision is critical, such as in the fashion and gar-ment industry. Commercial photographers, for exam-
76 THE BEST OF PROFESSIONAL DIGITAL PHOTOGRAPHY
Camera profiles can be somewhat impractical
under general shooting conditions. This is
because most scenes vary wildly, so whatever
aspect of the scene the photographer wants to
emphasize or de-emphasize can be controlled—
but not by a generic system of settings. Take this
blue interior by Chris LaLonde for example. He
shot it in RAW mode and made the following
adjustments in Adobe Camera Raw: White bal-
ance: 5000°; tint: +1; exposure: –0.05; shadows:
9; brightness: 59; contrast: +95; saturation: +15;
sharpness: 25; color noise reduction: 86. The list
goes on and on, but the point is that very specif-
ic adjustments were important to this scene that
might not be important to the next scene pho-
tographed. This flexibility is why RAW is fast
becoming the file format of preference.

ple, often use camera profiles to satisfy the color render-ing needs of specific assignments.One of the most inexpensive and effective camera
profiling systems is the ColorEyes profiling setup. It issimple enough, albeit time consuming. Basically, youphotograph a Macbeth ColorChecker (a highly accurateand standardized color chart) and create a profile usingColorEyes software. The software looks at each patchand measures the color the camera saw. Next, the soft-ware calculates the difference between what the camerasaw and what the reference file says the color is sup-posed to be. Third, the software builds the profile,which is actually a set of corrections to make the camera“see” more accurately.
While the wedding photographer would not neces-sarily profile each camera used on each location, a cam-era profile might prove useful in a studio setting wherea specific set of strobes produces consistently off-colorresults. That profile would not apply for any other situ-ation than that studio and those lights, but it is moreconvenient than other means of color correction.Fortunately, most digital cameras are manufactured
so that their color gamut is very close to a universalcolor space, such as sRGB or Adobe RGB 1998. Colorspace is a type of universal profile. Anytime a file is sentfrom one person to another (or from you to your lab),it should be in one of these universal color spaces.(Note: Most labs have a preferred color space. Usually
The bumpers on this Jaguar image looked like plastic to the client, so they were retouched to look like chrome, as shown here. The Brush
tool in Photoshop was used to create this effect and the Smudge tool was used to smear the highlights for a starburst effect. The retouch-
ing was done in RGB because the retouching artist, Glenn Honiball, was uncertain of the many possible final destinations for the image.

this is sRGB, but not always. Check with your lab tomake sure your files are using the correct color space.)
PRINTER PROFILES
Printer profiles are built by printing a set of known colorpatches from a special digital image file. A spectropho-tometer is then used to read the color patches so thesoftware can interpret the difference between the origi-nal file and the actual printed patches. This information
is stored in the form of a printer profile, which is thenapplied to future prints to ensure they are rendered cor-rectly. Custom printer profiles ensure that you are get-ting the full range of colors that your printer can pro-duce. For best results, use a unique custom profile foreach inkjet paper you use.Custom profiles, such as the Atkinson profiles, which
are highly regarded, can be downloaded from the Epsonwebsite (www.epson.com) and a variety of other sites.
78 THE BEST OF PROFESSIONAL DIGITAL PHOTOGRAPHY
This is an industrial image used in a corporate brochure for Nexen Chemicals. It was shot with a Haselblad 500C/M, 150mm lens and day-
light transparency film with an orange filter on the lens. It was scanned right away and the color mode of CMYK and the working CMYK color
profile of U.S. web (coated) SWOP 20% assigned to the file. These choices were made because the image’s final destination was a four-color
printed brochure on coated paper. Photograph by Christian LaLonde.
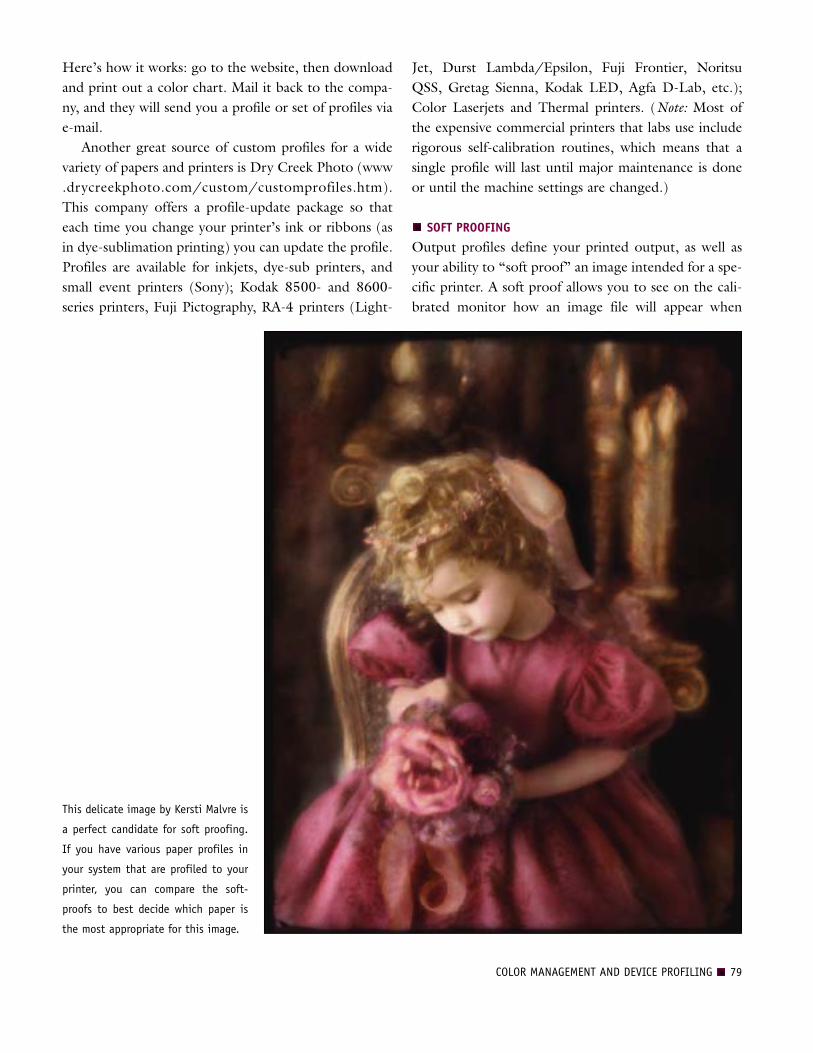
Here’s how it works: go to the website, then downloadand print out a color chart. Mail it back to the compa-ny, and they will send you a profile or set of profiles viae-mail.Another great source of custom profiles for a wide
variety of papers and printers is Dry Creek Photo (www.drycreekphoto.com/custom/customprofiles.htm).This company offers a profile-update package so thateach time you change your printer’s ink or ribbons (asin dye-sublimation printing) you can update the profile.Profiles are available for inkjets, dye-sub printers, andsmall event printers (Sony); Kodak 8500- and 8600-series printers, Fuji Pictography, RA-4 printers (Light-
Jet, Durst Lambda/Epsilon, Fuji Frontier, NoritsuQSS, Gretag Sienna, Kodak LED, Agfa D-Lab, etc.);Color Laserjets and Thermal printers. (Note: Most ofthe expensive commercial printers that labs use includerigorous self-calibration routines, which means that asingle profile will last until major maintenance is doneor until the machine settings are changed.)
SOFT PROOFING
Output profiles define your printed output, as well asyour ability to “soft proof” an image intended for a spe-cific printer. A soft proof allows you to see on the cali-brated monitor how an image file will appear when
COLOR MANAGEMENT AND DEVICE PROFILING 79
This delicate image by Kersti Malvre is
a perfect candidate for soft proofing.
If you have various paper profiles in
your system that are profiled to your
printer, you can compare the soft-
proofs to best decide which paper is
the most appropriate for this image.
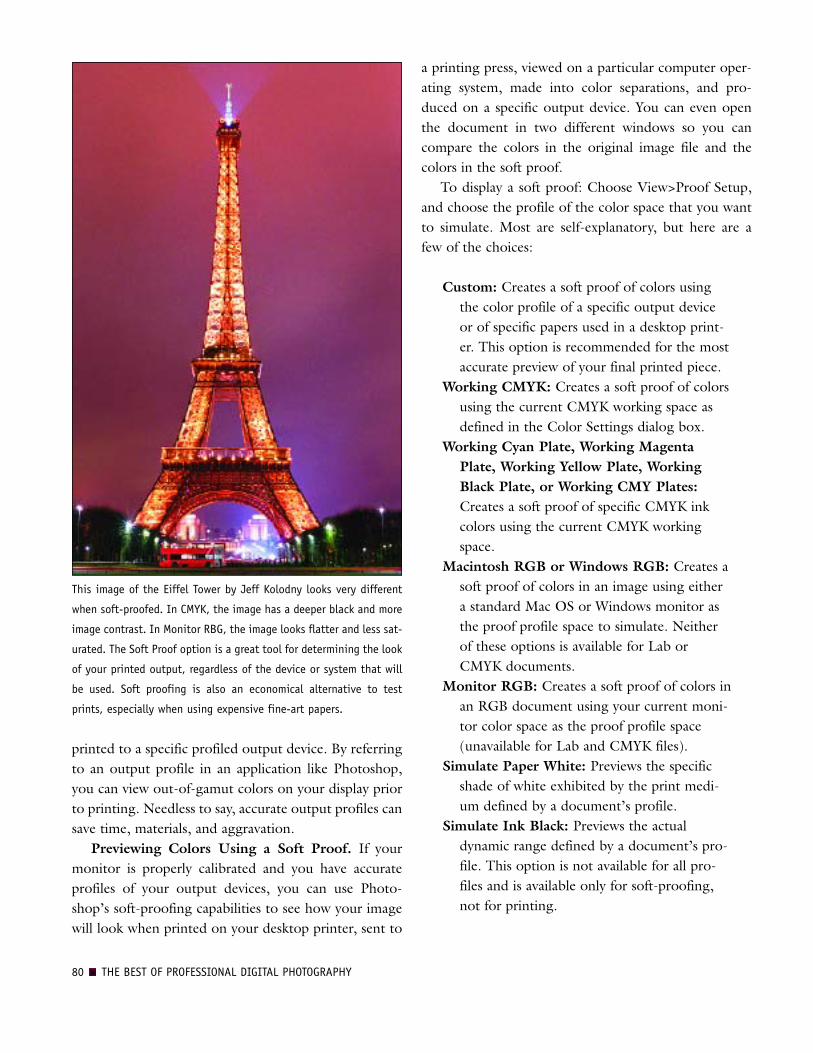
printed to a specific profiled output device. By referringto an output profile in an application like Photoshop,you can view out-of-gamut colors on your display priorto printing. Needless to say, accurate output profiles cansave time, materials, and aggravation.
Previewing Colors Using a Soft Proof. If yourmonitor is properly calibrated and you have accurateprofiles of your output devices, you can use Photo-shop’s soft-proofing capabilities to see how your imagewill look when printed on your desktop printer, sent to
a printing press, viewed on a particular computer oper-ating system, made into color separations, and pro-duced on a specific output device. You can even openthe document in two different windows so you cancompare the colors in the original image file and thecolors in the soft proof.To display a soft proof: Choose View>Proof Setup,
and choose the profile of the color space that you wantto simulate. Most are self-explanatory, but here are afew of the choices:
Custom: Creates a soft proof of colors usingthe color profile of a specific output deviceor of specific papers used in a desktop print-er. This option is recommended for the mostaccurate preview of your final printed piece.
Working CMYK: Creates a soft proof of colorsusing the current CMYK working space asdefined in the Color Settings dialog box.
Working Cyan Plate, Working MagentaPlate, Working Yellow Plate, WorkingBlack Plate, or Working CMY Plates:Creates a soft proof of specific CMYK inkcolors using the current CMYK workingspace.
Macintosh RGB or Windows RGB: Creates asoft proof of colors in an image using eithera standard Mac OS or Windows monitor asthe proof profile space to simulate. Neitherof these options is available for Lab orCMYK documents.
Monitor RGB: Creates a soft proof of colors inan RGB document using your current moni-tor color space as the proof profile space(unavailable for Lab and CMYK files).
Simulate Paper White: Previews the specificshade of white exhibited by the print medi-um defined by a document’s profile.
Simulate Ink Black: Previews the actualdynamic range defined by a document’s pro-file. This option is not available for all pro-files and is available only for soft-proofing,not for printing.
This image of the Eiffel Tower by Jeff Kolodny looks very different
when soft-proofed. In CMYK, the image has a deeper black and more
image contrast. In Monitor RBG, the image looks flatter and less sat-
urated. The Soft Proof option is a great tool for determining the look
of your printed output, regardless of the device or system that will
be used. Soft proofing is also an economical alternative to test
prints, especially when using expensive fine-art papers.
80 THE BEST OF PROFESSIONAL DIGITAL PHOTOGRAPHY

printing, retouching, and so forth, but the way the indi-vidual tasks are accomplished is quite different andunique from photographer to photographer.
MICHAEL AYERS’ BASIC WEDDING WORKFLOW
FOR HIGHEST QUALITY JPEGS
This example of a basic workflow comes courtesy ofMichael Ayers, an award-winning photographer fromOhio. It assumes that the files were captured as highestquality JPEGs. (The RAW file workflow pattern isinvolves RAW-file processing, but would be very similarother than that.) Ayers’ workflow is a good model be-cause it includes printed proofs, a virtual proof albumon CD, and uploading low-resolution JPEGs to awebsite for general viewing and purchase by guests andrelatives.
Uploading. After the images have been captured,the CF cards or removable media are assembled and theprocess of uploading the JPEG files to your computer’shard drive can begin. FireWire or USB 2.0 card readersare recommended for this purpose, as their connectivityspeed allows you to upload large numbers of image files
quickly. Files should be uploaded to folders, which canbe broken down according to chronology or function—1. Pre-Wedding, 2. Wedding, 3. Reception, and soforth. Some photographers name these file folders1000, 2000, 3000, etc., so that files named with thoseprefixes will be instantly recognizable as “Wedding,”“Reception,” and so forth.
File Backup. All image files should be backed uponto CD-ROMs at this point; these are your sourcefiles—your originals. Many photographers use DVDs, astheir capacity is much greater and all of the folders canbe copied onto one disk. You may also consider a por-table hard drive as a suitable backup device.
Edit and Adjust. Michael Ayers always shoots extracopies of some images, especially groups, to insure thathe has captured everyone looking their best. At thisstage, he goes into the computer browser (Microsoft XPfilmstrip browser, Adobe Photoshop file browser,Photoshop CS2’s Bridge) to edit the images. Any poor-ly exposed images or duplicates are deleted at this point.Some exposures may need color adjustment or contrastchanges. At this point in the process, Ayers will adjust
WORKFLOW METHODS 81
The wedding photographer’s workflow for a film-capturedwedding is quite different from the digital photographer’sworkflow. The tasks include the same things—proofing,
7. WORKFLOW METHODS
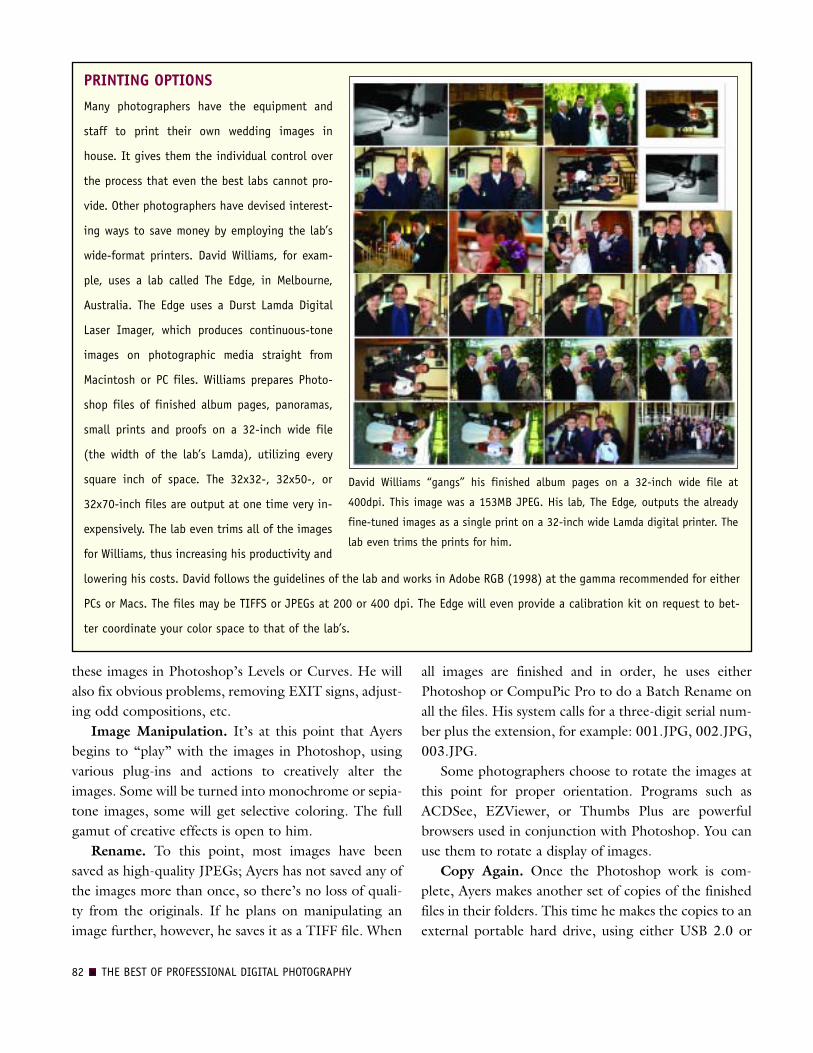
these images in Photoshop’s Levels or Curves. He willalso fix obvious problems, removing EXIT signs, adjust-ing odd compositions, etc.
Image Manipulation. It’s at this point that Ayersbegins to “play” with the images in Photoshop, usingvarious plug-ins and actions to creatively alter theimages. Some will be turned into monochrome or sepia-tone images, some will get selective coloring. The fullgamut of creative effects is open to him.
Rename. To this point, most images have beensaved as high-quality JPEGs; Ayers has not saved any ofthe images more than once, so there’s no loss of quali-ty from the originals. If he plans on manipulating animage further, however, he saves it as a TIFF file. When
all images are finished and in order, he uses eitherPhotoshop or CompuPic Pro to do a Batch Rename onall the files. His system calls for a three-digit serial num-ber plus the extension, for example: 001.JPG, 002.JPG,003.JPG.Some photographers choose to rotate the images at
this point for proper orientation. Programs such asACDSee, EZViewer, or Thumbs Plus are powerfulbrowsers used in conjunction with Photoshop. You canuse them to rotate a display of images.
Copy Again. Once the Photoshop work is com-plete, Ayers makes another set of copies of the finishedfiles in their folders. This time he makes the copies to anexternal portable hard drive, using either USB 2.0 or
82 THE BEST OF PROFESSIONAL DIGITAL PHOTOGRAPHY
PRINTING OPTIONS
Many photographers have the equipment and
staff to print their own wedding images in
house. It gives them the individual control over
the process that even the best labs cannot pro-
vide. Other photographers have devised interest-
ing ways to save money by employing the lab’s
wide-format printers. David Williams, for exam-
ple, uses a lab called The Edge, in Melbourne,
Australia. The Edge uses a Durst Lamda Digital
Laser Imager, which produces continuous-tone
images on photographic media straight from
Macintosh or PC files. Williams prepares Photo-
shop files of finished album pages, panoramas,
small prints and proofs on a 32-inch wide file
(the width of the lab’s Lamda), utilizing every
square inch of space. The 32x32-, 32x50-, or
32x70-inch files are output at one time very in-
expensively. The lab even trims all of the images
for Williams, thus increasing his productivity and
lowering his costs. David follows the guidelines of the lab and works in Adobe RGB (1998) at the gamma recommended for either
PCs or Macs. The files may be TIFFS or JPEGs at 200 or 400 dpi. The Edge will even provide a calibration kit on request to bet-
ter coordinate your color space to that of the lab’s.
David Williams “gangs” his finished album pages on a 32-inch wide file at
400dpi. This image was a 153MB JPEG. His lab, The Edge, outputs the already
fine-tuned images as a single print on a 32-inch wide Lamda digital printer. The
lab even trims the prints for him.

Firewire connectivity for fastest transfer. Ayers recom-mends disconnecting this hard drive from the comput-er and storing it unplugged in another location.
Proof Setup and Printing. For proofing, Ayers’studio provides pages placed into a 10x13-inch GeneralProducts album binder. These 10x13-inch proof pages
are printed “nine-up” (three rows of three), so eachimage is about 3x4 inches with a border. He createsthese using the Picture Index function in CompuPicPro, which takes only a few minutes. There are otherprograms that will create similar proofs, includingPhotoshop (File>Automate>Contact Sheet II). Ayers
WORKFLOW METHODS 83
Ayers’ workflow is based on shoot-
ing highest quality JPEGs with a
Fujifilm FinePix DSLR. This image
was shot with a 50mm lens at ISO
400.

sometimes prints these pages out on his Fujifilm PG4500 printer, otherwise he sends them to his lab.
FlipAlbum. FlipAlbum Pro is a program used tocreate attractive digital proof books on CD-ROM.Ayers first copies all of the finished images in his wed-ding folders into a folder called the FlipAlbum folder.The images will become the basis for the virtual proofbook made with the FlipAlbum Professional software.Having a complete but separate folder for these imagesis a necessary step and a safeguard against damaging orchanging any originals from the wedding folder.All images in this folder get resized to 1200x800
pixels. Ayers uses Photoshop’s Batch controls (File>Automate>Batch) and saves these images as low-qualityJPEGs at the “3” quality setting—good enough forscreen viewing. This ensures the FlipAlbums will run atpeak speed and require little disk space on a CD-R.At this point, Ayers goes through the images in the
FlipAlbum folder, highlighting the vertical ones. Hethen opens them in Photoshop and batch rotates themusing an easy-to-create Photoshop action, so all areproperly oriented on screen. Every one of these photo-graphs is now oriented correctly and will be used notonly for the FlipAlbum CD-Rs but also as the images toupload to the Eventpix.com website later in the process.Special features of FlipAlbum include the ability
to show panoramas, an index, and table of contents,
and security options like passwordprotection, expiration date, and anti-copy/print functions. Ayers generallybuilds several of these CD-Rs so thatthe couple and significant familymembers can have them to chooseimages and place orders.
Uploading to the Internet.There are a number of Internet com-panies that will display your weddingphotos online and even handle onlineordering and fulfillment for you.Ayers uses Eventpix.com, because he
says it is fast and secure for his clients to use. He findsthat using the site has resulted in many additional ordersper wedding from people who would normally neverhave even viewed the event’s originals! He usually up-loads about 150 images and leaves them up for abouttwo months.
Consolidate Orders. All orders received online, byfax, by phone, or from the couple are consolidated intoa big print order in a separate folder for Ayers’ lab usingFujifilm’s Studiomaster Pro software. Studiomaster Prolets a customer build an order that goes directly to yourlab and provides all the tools you need to create a daz-zling studio preview for your clients. It also allows crop-ping, resizing, and retouching to be done to yourimages before printing. Later, album orders are alsoarranged into orders and even “Smart Pages” using thissoftware. Ayers raves about this workflow package,claiming it is quickly becoming the key to his studio’sproductivity. (Note: Kodak’s comparable software, ProShots, is currently in its sixth generation and is alsoquite popular with many labs and photographers.)
Thumbnails. Contact Sheet II in Photoshop allowsAyers to print out tiny thumbnails of all of the couple’sfavorites, which are now in a folder called “AlbumChoices.” He prints these little images on adhesive-backed paper and cuts them up into little stickers. Hesays of this method, “I’ve used many album design soft-
84 THE BEST OF PROFESSIONAL DIGITAL PHOTOGRAPHY
By uploading his images to Eventpix.com, an
online hosting/ordering service, Ayers has
substantially increased his print orders.

ware programs in the past and this manual option givesme greater flexibility with my creative pages.”
Album Layout. Ayers schedules an appointment forthe couple to review the album choices, then they stickthe thumbnails down onto squares, which represent thepages of the album—almost like playing Scrabble! Thecouple usually has a lot of input as he shows them hisideas. The album will be built exactly as they have envi-sioned it.
Retouching. With all the orders and albums readyto be printed, Ayers goes through each photograph onelast time to check color and fix any problem, such asblemishes, glasses glare, stray hairs, shiny faces, and even“blinks” are corrected here, if possible.
Ordering. Ayers’ orders from Studiomaster Pro aresent directly to his lab using CDs or FTP (File TransferProtocol). Most orders are processed and returned injust a few days without rush service charges. All imagesare printed on a Fujifilm Frontier on Fuji CrystalArchive Paper.
Album Ordering. Ayers then faxes the order for thealbum cover, mats, inserts, and panorama pages toGeneral Products, a Chicago album company. This isanother area that differs greatly among photographers;Ayers prefers mats and inserts, other photographers pre-fer digitally generated, hand-bound albums.
Print Sorting.When prints come back from the lab,the quality and quantity are checked. Then the printsare separated with each person’s orders. The albumprints are put in order with the layout forms so they canbe placed in mats quickly. Missing or damaged prints arenoted so they can be sent back with the next order tothe lab. All client orders are placed on the studio’swork-in-progress shelves in the studio productionroom.
Folders and Mounting. Ayers’ studio uses foldersfor 5x7-inch and smaller prints, which come fromGeneral Products. Larger individual prints are mountedon premium-quality mount board. Ayers believes thatpresentation is very important if you charge a premium
WORKFLOW METHODS 85
Michael Ayers’ wedding albums are exquisite traditional volumes put together with a very modern and streamlined digital workflow.
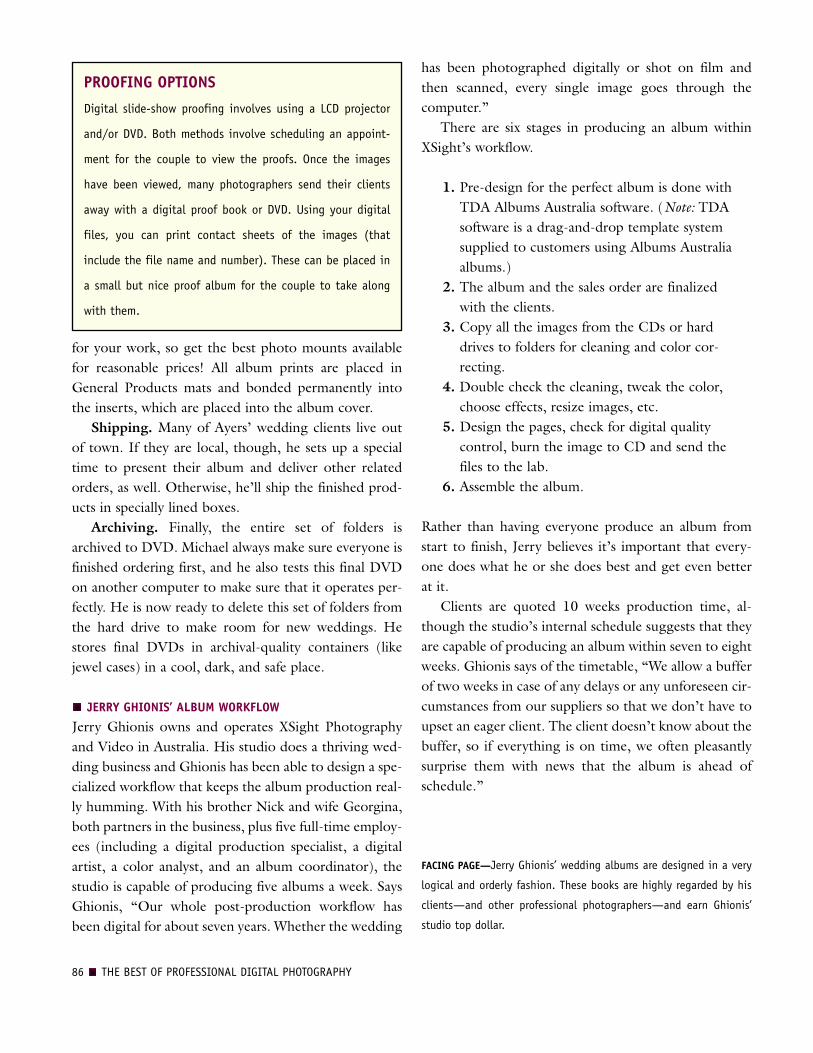
for your work, so get the best photo mounts availablefor reasonable prices! All album prints are placed inGeneral Products mats and bonded permanently intothe inserts, which are placed into the album cover.
Shipping. Many of Ayers’ wedding clients live outof town. If they are local, though, he sets up a specialtime to present their album and deliver other relatedorders, as well. Otherwise, he’ll ship the finished prod-ucts in specially lined boxes.
Archiving. Finally, the entire set of folders isarchived to DVD. Michael always make sure everyone isfinished ordering first, and he also tests this final DVDon another computer to make sure that it operates per-fectly. He is now ready to delete this set of folders fromthe hard drive to make room for new weddings. Hestores final DVDs in archival-quality containers (likejewel cases) in a cool, dark, and safe place.
JERRY GHIONIS’ ALBUM WORKFLOW
Jerry Ghionis owns and operates XSight Photographyand Video in Australia. His studio does a thriving wed-ding business and Ghionis has been able to design a spe-cialized workflow that keeps the album production real-ly humming. With his brother Nick and wife Georgina,both partners in the business, plus five full-time employ-ees (including a digital production specialist, a digitalartist, a color analyst, and an album coordinator), thestudio is capable of producing five albums a week. SaysGhionis, “Our whole post-production workflow hasbeen digital for about seven years. Whether the wedding
has been photographed digitally or shot on film andthen scanned, every single image goes through thecomputer.”There are six stages in producing an album within
XSight’s workflow.
1. Pre-design for the perfect album is done withTDA Albums Australia software. (Note: TDAsoftware is a drag-and-drop template systemsupplied to customers using Albums Australiaalbums.)
2. The album and the sales order are finalizedwith the clients.
3. Copy all the images from the CDs or harddrives to folders for cleaning and color cor-recting.
4. Double check the cleaning, tweak the color,choose effects, resize images, etc.
5. Design the pages, check for digital qualitycontrol, burn the image to CD and send thefiles to the lab.
6. Assemble the album.
Rather than having everyone produce an album fromstart to finish, Jerry believes it’s important that every-one does what he or she does best and get even betterat it.Clients are quoted 10 weeks production time, al-
though the studio’s internal schedule suggests that theyare capable of producing an album within seven to eightweeks. Ghionis says of the timetable, “We allow a bufferof two weeks in case of any delays or any unforeseen cir-cumstances from our suppliers so that we don’t have toupset an eager client. The client doesn’t know about thebuffer, so if everything is on time, we often pleasantlysurprise them with news that the album is ahead ofschedule.”
86 THE BEST OF PROFESSIONAL DIGITAL PHOTOGRAPHY
PROOFING OPTIONS
Digital slide-show proofing involves using a LCD projector
and/or DVD. Both methods involve scheduling an appoint-
ment for the couple to view the proofs. Once the images
have been viewed, many photographers send their clients
away with a digital proof book or DVD. Using your digital
files, you can print contact sheets of the images (that
include the file name and number). These can be placed in
a small but nice proof album for the couple to take along
with them.
FACING PAGE—Jerry Ghionis’ wedding albums are designed in a very
logical and orderly fashion. These books are highly regarded by his
clients—and other professional photographers—and earn Ghionis’
studio top dollar.

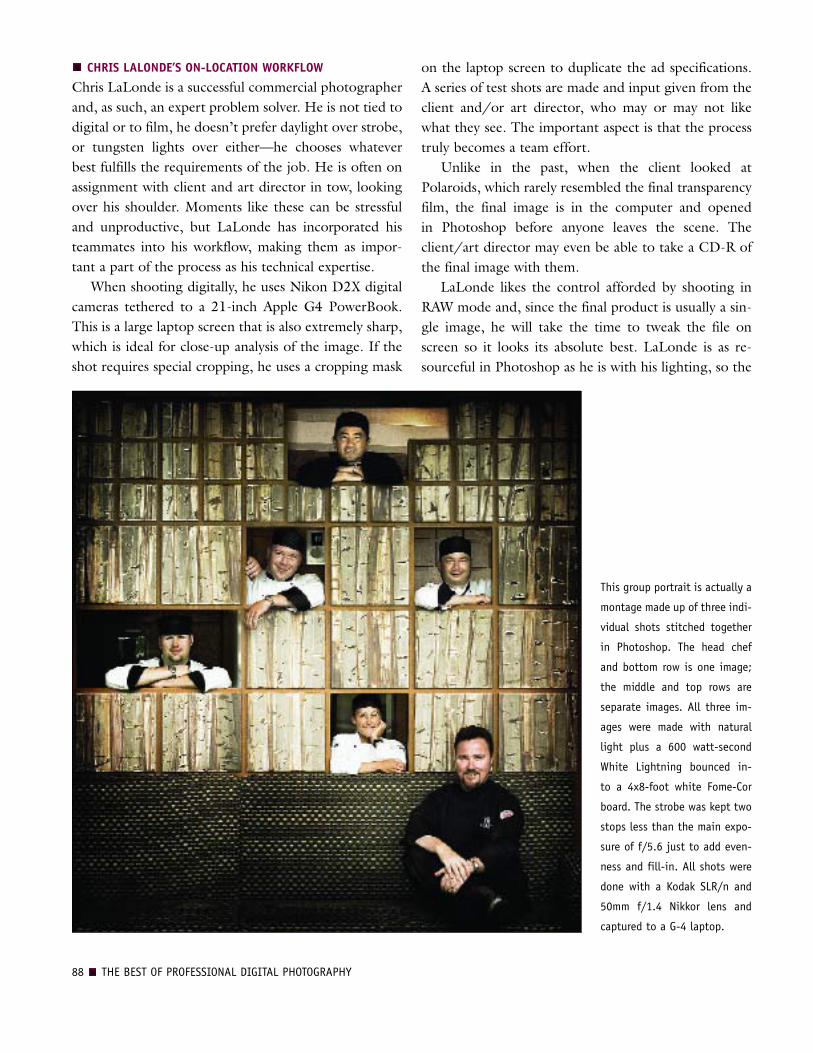
CHRIS LALONDE’S ON-LOCATION WORKFLOW
Chris LaLonde is a successful commercial photographerand, as such, an expert problem solver. He is not tied todigital or to film, he doesn’t prefer daylight over strobe,or tungsten lights over either—he chooses whateverbest fulfills the requirements of the job. He is often onassignment with client and art director in tow, lookingover his shoulder. Moments like these can be stressfuland unproductive, but LaLonde has incorporated histeammates into his workflow, making them as impor-tant a part of the process as his technical expertise.When shooting digitally, he uses Nikon D2X digital
cameras tethered to a 21-inch Apple G4 PowerBook.This is a large laptop screen that is also extremely sharp,which is ideal for close-up analysis of the image. If theshot requires special cropping, he uses a cropping mask
on the laptop screen to duplicate the ad specifications.A series of test shots are made and input given from theclient and/or art director, who may or may not likewhat they see. The important aspect is that the processtruly becomes a team effort.Unlike in the past, when the client looked at
Polaroids, which rarely resembled the final transparencyfilm, the final image is in the computer and openedin Photoshop before anyone leaves the scene. Theclient/art director may even be able to take a CD-R ofthe final image with them.LaLonde likes the control afforded by shooting in
RAW mode and, since the final product is usually a sin-gle image, he will take the time to tweak the file onscreen so it looks its absolute best. LaLonde is as re-sourceful in Photoshop as he is with his lighting, so the
88 THE BEST OF PROFESSIONAL DIGITAL PHOTOGRAPHY
This group portrait is actually a
montage made up of three indi-
vidual shots stitched together
in Photoshop. The head chef
and bottom row is one image;
the middle and top rows are
separate images. All three im-
ages were made with natural
light plus a 600 watt-second
White Lightning bounced in-
to a 4x8-foot white Fome-Cor
board. The strobe was kept two
stops less than the main expo-
sure of f/5.6 just to add even-
ness and fill-in. All shots were
done with a Kodak SLR/n and
50mm f/1.4 Nikkor lens and
captured to a G-4 laptop.

image becomes a final image before the client’s eyes.Before the set is struck, the team agrees that the assign-ment is right and that the job is done.
MIKE COLON’S WIFI WORKFLOW
Today’s wedding clients expect immediacy. They aren’tcontent with seeing proofs four weeks after the honey-moon. As a result, Newport Beach wedding photogra-pher Mike Colón has revised his wedding workflow sothat he can deliver wedding photos at the weddingreception—even photos taken during the reception.Mike has each of his Nikon D2H cameras fitted with
a Nikon WT-1A wireless transmitter. As he shoots, the
WT-1A automatically sends each to an Apple G4PowerBook, which comes with a built-in WiFi trans-ceiver. It takes about two seconds for each image totransfer. At the same time, the images are still beingwritten to the CF cards in the camera as backup.During the ceremony, Mike’s assistant with the
PowerBook stays within transmitting range (typicallyabout 100 feet, although the optional Nikon WA-E1extended antenna can transmit up to 450 feet from thecamera) and checks the images as they are being shot inreal time. Once he has a good number of images,Colón’s assistant begins to create a slideshow. Near theend of the reception, Mike then uses a digital projector
WORKFLOW METHODS 89
ABOVE—This is one of six images done for a big hotel chain by Chris LaLonde. Each image
had to have some kind of movement. The lighting was a mix of ambient and window light,
but Chris still needed a kicker (backlight) on the male model. He used a 4x8-foot white
panel to light up the background and model. He made sure that the image was a little
overexposed on the chairs and background area by using an extra softbox coming in from
the back right. The large window on the left, being overexposed, provided a great move-
ment effect because of the white space against the almost silhouetted model. His team
did several tests at various exposures, and 1/4 second gave them the best results with the
model’s walking speed. When on location, Chris always carries a laptop on which clients
can see the just-photographed images. He shoots right into the laptop and the large
screen is great for proofing with the clients. He usually places a cropping mask onto the
screen to show what the final format will look like. In this case, all of the six images were to be panoramic in the billboard format. This
image blew the clients away as soon as they saw it. RIGHT—Nikon WT-2A transmitter on the D2X body. Images can be so quickly downloaded
and ramped up for projection that wedding guests cannot believe their eyes.

to produce a show for the guests. Images captured rightup to the start of the slide show can be incorporatedinto the presentation. Mike says the surprise of seeingthe images immediately really delights both the guestsand the bride and groom. Not surprisingly, he finds thespontaneity often makes guests more likely to orderprints. If it’s not possible to project the slide show, hewill show the images directly on the PowerBook.
While all this is going on, Colón also selects keyimages that he outputs as 4x6-inch prints on aMitsubishi dye-sub printer. At the end of the wedding,he places these in a mini album that the bride andgroom can take with them on their honeymoon.
90 THE BEST OF PROFESSIONAL DIGITAL PHOTOGRAPHY
Mike Colón has a great eye in addition to
his outstanding technical skills. Here, Mike
stacked the two figures so that you see
both the similarities and differences be-
tween them. Notice the subtle separation
of the little girl’s dress against the pure
white wedding dress in the background.
Without this minor detail, the image would
not communicate so effectively.

darkroom. And better than darkroom work, Photoshopallows you to work on the image as a positive (ratherthan a negative) so you can preview the effect as youcreate it.Photoshop’s flexibility also makes it open to a wide
variety of unique creative techniques. In fact, if you sitdown with six photographers and ask them each howthey do a fairly common correction, like selective dif-fusion, you just might get six completely different an-swers. Many practitioners pick up one technique hereand another at a workshop they’ve attended and, thenext thing you know, the two techniques have becomehybridized to produce a slightly different result thanwas yielded by either of the original methods.The following is a collection of Photoshop tech-
niques gleaned from the photographers who appear inthis book.
PHOTOSHOP TOOLS
Actions. An action is a series of commands that yourecord as you perform them, then play back to apply thesame functions on another image or set of images. The
Actions palette is accessed under the Window menu. Tocreate an action, select New Action from the fly-outmenu at the top right corner of the Actions palette. Youwill be asked to name it, then you can start recording byclicking the record button at the bottom of the palette.Once you are recording, everything you do to the im-age will be recorded as part of the action. When done,simply stop recording. Whenever you want to performthat same action, you can access it in the Actions win-dow. When you hit the play button, the action runs onthe open image. Most commands and tool operationsare recordable in actions. Actions can also include stopsthat let you perform tasks that cannot be recorded (forexample, using a painting tool) and modal controls thatlet you enter values in a dialog box while playing anaction.Photoshop comes with a variety of preloaded actions
you can use as is or customize to meet your needs. Youcan also purchase actions from reliable sources on theInternet to utilize the experience of some of the bestPhotoshop practitioners in the business. For example,Fred Miranda has a site (www.fredmiranda.com) that
ADOBE PHOTOSHOP 91
Adobe Photoshop is much more than a powerful programfor editing image files, it is a virtual digital darkroomthat offers more creative flexibility than a conventional
8. ADOBE PHOTOSHOP

contains a wide variety of excellent actions at reasonableprices. Two of Miranda’s more noteworthy actions areSI Pro II (short for Stair Interpolation Pro), which al-
lows you to increase file size and dimensions, and Intel-lisharpen II, which is a smart-sharpening action thatgives you 12 sharpening options with full previews.
92 THE BEST OF PROFESSIONAL DIGITAL PHOTOGRAPHY
Here, the original image (left) is flat and there
is no real modeling to the lighting on their
faces. In the second image (below), we see
several actions in use: PortraitPopper, Shadow-
Soft Natural, Facial Enhancements, Porcelain-
Skin, DarkEdge Strong, Fashionizers Strong,
and UnsharpMask Medium. Selective darkening
was also applied around the subjects and
bright areas with local lightening on subjects.
The edge details were enhanced with Fashion-
izer’s built in masks. This image sequence is by
Craig Minielly, MPA. The actions used on it
were designed by Craig and are available at
www.craigsactions.com.
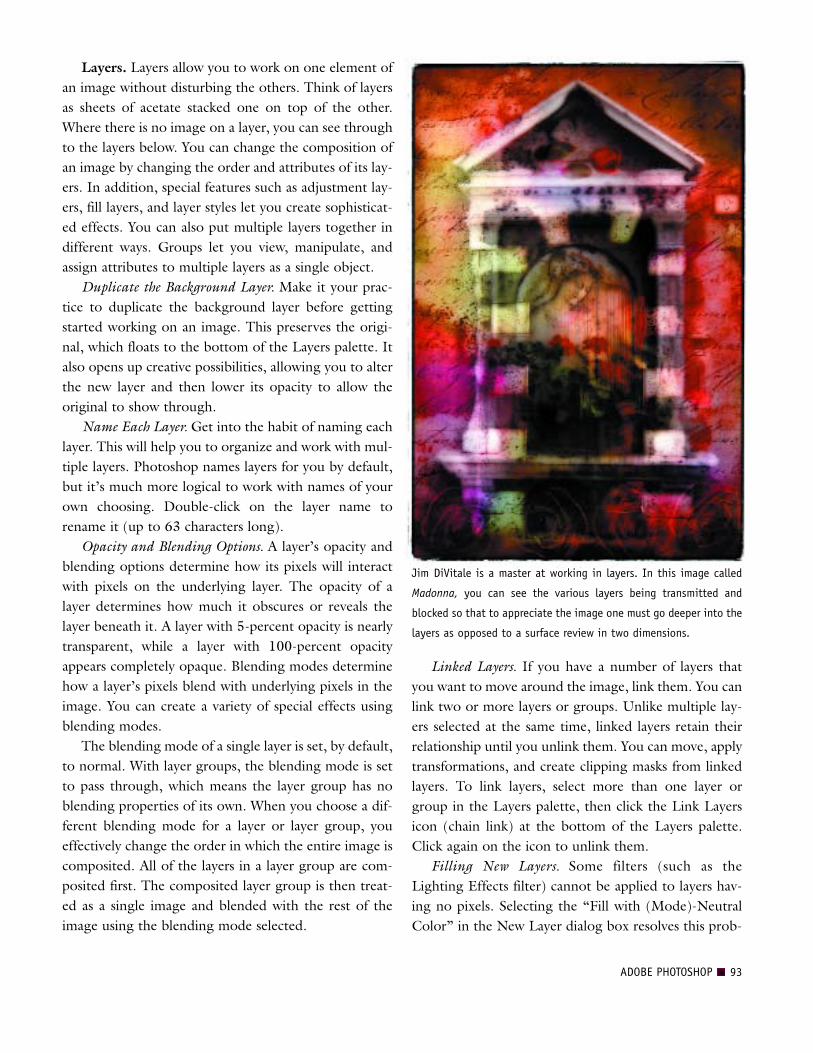
Layers. Layers allow you to work on one element ofan image without disturbing the others. Think of layersas sheets of acetate stacked one on top of the other.Where there is no image on a layer, you can see throughto the layers below. You can change the composition ofan image by changing the order and attributes of its lay-ers. In addition, special features such as adjustment lay-ers, fill layers, and layer styles let you create sophisticat-ed effects. You can also put multiple layers together indifferent ways. Groups let you view, manipulate, andassign attributes to multiple layers as a single object.
Duplicate the Background Layer. Make it your prac-tice to duplicate the background layer before gettingstarted working on an image. This preserves the origi-nal, which floats to the bottom of the Layers palette. Italso opens up creative possibilities, allowing you to alterthe new layer and then lower its opacity to allow theoriginal to show through.
Name Each Layer. Get into the habit of naming eachlayer. This will help you to organize and work with mul-tiple layers. Photoshop names layers for you by default,but it’s much more logical to work with names of yourown choosing. Double-click on the layer name torename it (up to 63 characters long).
Opacity and Blending Options. A layer’s opacity andblending options determine how its pixels will interactwith pixels on the underlying layer. The opacity of alayer determines how much it obscures or reveals thelayer beneath it. A layer with 5-percent opacity is nearlytransparent, while a layer with 100-percent opacityappears completely opaque. Blending modes determinehow a layer’s pixels blend with underlying pixels in theimage. You can create a variety of special effects usingblending modes.The blending mode of a single layer is set, by default,
to normal. With layer groups, the blending mode is setto pass through, which means the layer group has noblending properties of its own. When you choose a dif-ferent blending mode for a layer or layer group, youeffectively change the order in which the entire image iscomposited. All of the layers in a layer group are com-posited first. The composited layer group is then treat-ed as a single image and blended with the rest of theimage using the blending mode selected.
Linked Layers. If you have a number of layers thatyou want to move around the image, link them. You canlink two or more layers or groups. Unlike multiple lay-ers selected at the same time, linked layers retain theirrelationship until you unlink them. You can move, applytransformations, and create clipping masks from linkedlayers. To link layers, select more than one layer orgroup in the Layers palette, then click the Link Layersicon (chain link) at the bottom of the Layers palette.Click again on the icon to unlink them.
Filling New Layers. Some filters (such as theLighting Effects filter) cannot be applied to layers hav-ing no pixels. Selecting the “Fill with (Mode)-NeutralColor” in the New Layer dialog box resolves this prob-
ADOBE PHOTOSHOP 93
Jim DiVitale is a master at working in layers. In this image called
Madonna, you can see the various layers being transmitted and
blocked so that to appreciate the image one must go deeper into the
layers as opposed to a surface review in two dimensions.

lem by first filling the layer with a preset color. The neu-tral color is assigned based on the layer’s blending modeand is effectively invisible. If no effect is applied, fillingwith a neutral color has no effect on the remaining lay-ers. To activate this option in the New Layer dialog box,switch the mode to something other than Normal,Dissolve, Hue, Saturation, Color, or Luminosity.
Layer Styles. Layer styles let you quickly apply certaineffects to a layer’s content. You can scan through thevariety of predefined layer styles and apply one with theclick of the mouse, or you can create a custom style byapplying multiple effects to a layer.
Adjustment and Fill Layers. Adjustment layers allowyou to apply color and tonal adjustments to an imagewithout permanently changing the pixels in the image.
The color and tonal changes exist only within theadjustment layer, which acts as a veil through which theunderlying image layers can be seen. An adjustmentlayer affects all the layers below it. This means that youcan correct multiple layers by making a single adjust-ment, rather than making the adjustment to each layerindependently.Fill layers let you add color, patterns, or gradient ele-
ments to an image without changing the pixels in theimage itself. Unlike adjustment layers, fill layers do notaffect the layers beneath them.Adjustment layers and fill layers have the same opac-
ity and blending mode options as image layers and canbe rearranged, deleted, hidden, and duplicated in thesame manner as individual image layers.
94 THE BEST OF PROFESSIONAL DIGITAL PHOTOGRAPHY
Jim Fender created this beautiful wedding portrait with a considerable assist from Photoshop. Elements such as the sandstone background
and steps were minimized with layers to darken them, accentuating the bride and groom. Her dress was also treated with great care, bring-
ing out all of the detail and texture in the material.

RIGHT—Says Rich Nortnik of his art, “With
most of the pieces I do, I end up with 90 lay-
ers or more. I don’t like to flatten anything I
have done to a layer because at the end, I
might want to go back and change something.”
BELOW—Kersti Malvre created this image with
multiple layers and preserved them by saving it
as a PSD. Here are some of the individual lay-
ers she created: duplicate layer with Dynamic
Skin Softener effect, duplicate layer with “Soft
Diffuse Glow” of “YervantPortraitPerfect” set;
adjustment layer with curves adjustment; layer
mask with various brushes applied; new dupli-
cate layer with saturation applied . . . you get
the idea.
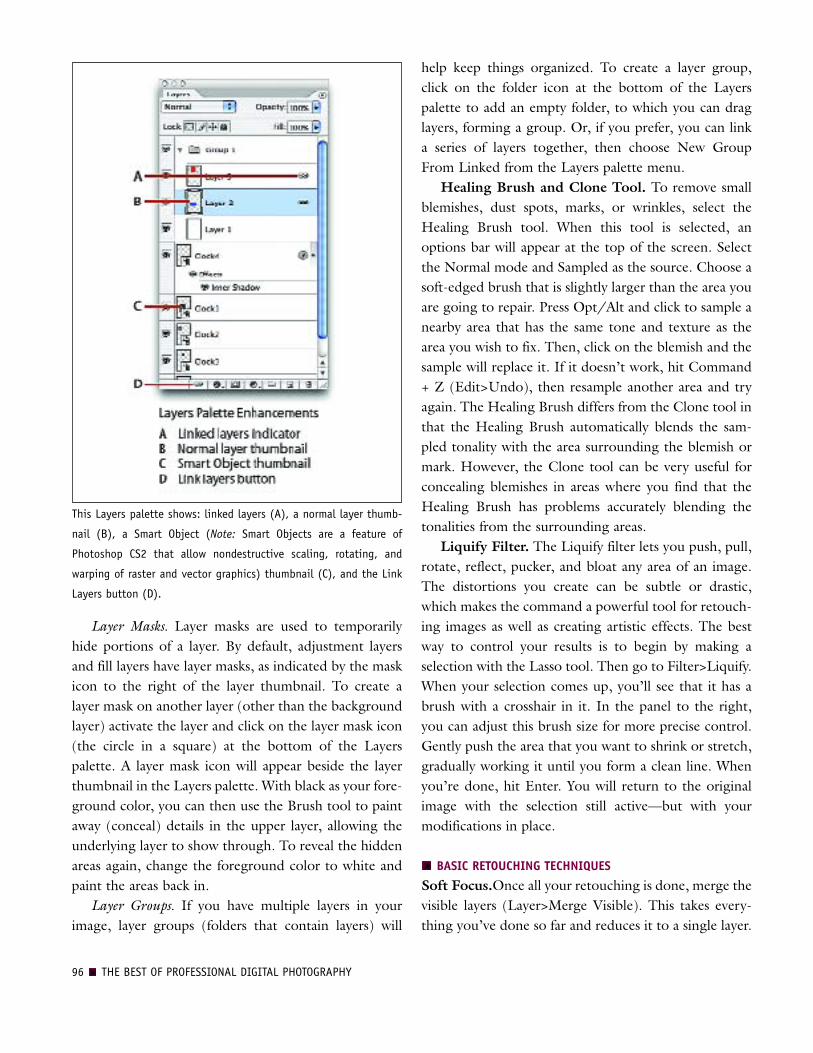
Layer Masks. Layer masks are used to temporarilyhide portions of a layer. By default, adjustment layersand fill layers have layer masks, as indicated by the maskicon to the right of the layer thumbnail. To create alayer mask on another layer (other than the backgroundlayer) activate the layer and click on the layer mask icon(the circle in a square) at the bottom of the Layerspalette. A layer mask icon will appear beside the layerthumbnail in the Layers palette. With black as your fore-ground color, you can then use the Brush tool to paintaway (conceal) details in the upper layer, allowing theunderlying layer to show through. To reveal the hiddenareas again, change the foreground color to white andpaint the areas back in.
Layer Groups. If you have multiple layers in yourimage, layer groups (folders that contain layers) will
help keep things organized. To create a layer group,click on the folder icon at the bottom of the Layerspalette to add an empty folder, to which you can draglayers, forming a group. Or, if you prefer, you can linka series of layers together, then choose New GroupFrom Linked from the Layers palette menu.
Healing Brush and Clone Tool. To remove smallblemishes, dust spots, marks, or wrinkles, select theHealing Brush tool. When this tool is selected, anoptions bar will appear at the top of the screen. Selectthe Normal mode and Sampled as the source. Choose asoft-edged brush that is slightly larger than the area youare going to repair. Press Opt/Alt and click to sample anearby area that has the same tone and texture as thearea you wish to fix. Then, click on the blemish and thesample will replace it. If it doesn’t work, hit Command+ Z (Edit>Undo), then resample another area and tryagain. The Healing Brush differs from the Clone tool inthat the Healing Brush automatically blends the sam-pled tonality with the area surrounding the blemish ormark. However, the Clone tool can be very useful forconcealing blemishes in areas where you find that theHealing Brush has problems accurately blending thetonalities from the surrounding areas.
Liquify Filter. The Liquify filter lets you push, pull,rotate, reflect, pucker, and bloat any area of an image.The distortions you create can be subtle or drastic,which makes the command a powerful tool for retouch-ing images as well as creating artistic effects. The bestway to control your results is to begin by making aselection with the Lasso tool. Then go to Filter>Liquify.When your selection comes up, you’ll see that it has abrush with a crosshair in it. In the panel to the right,you can adjust this brush size for more precise control.Gently push the area that you want to shrink or stretch,gradually working it until you form a clean line. Whenyou’re done, hit Enter. You will return to the originalimage with the selection still active—but with yourmodifications in place.
BASIC RETOUCHING TECHNIQUES
Soft Focus.Once all your retouching is done, merge thevisible layers (Layer>Merge Visible). This takes every-thing you’ve done so far and reduces it to a single layer.
96 THE BEST OF PROFESSIONAL DIGITAL PHOTOGRAPHY
This Layers palette shows: linked layers (A), a normal layer thumb-
nail (B), a Smart Object (Note: Smart Objects are a feature of
Photoshop CS2 that allow nondestructive scaling, rotating, and
warping of raster and vector graphics) thumbnail (C), and the Link
Layers button (D).

Duplicate this layer, then apply the Gaussian Blur filterwith a radius setting of about 25 pixels, so that theentire image is blurred. Reduce the opacity to about 50percent for a true soft focus lens effect, a soft image atopa sharp image.
Selective Soft Focus. After applying the soft focuseffect (above), click the Layer Mask button to create amask. With the Brush tool selected and the foregroundcolor set to black, start painting away the diffusion fromareas like the teeth, eyes, eyebrows, hairline, lips, andbridge of the nose. By varying the brush size, hardness,
opacity, and flow you will easily restore sharpness inthese critical areas while leaving the rest of the facepleasingly soft. The best thing is that there will be notelltale sign of your retouching. When you are done,flatten the layers.
Vignetting. Make a new layer and fill it with black.Adjust the opacity back to about 35 percent so that theimage looks dimmed. Add a mask to the layer and then,using a circular black-to-white gradient with theGradient tool, click near the eyes and drag outwardtoward the image edge and release the mouse. The
This composition, called Color Theory II, drew on memories of a Color Theory class Rich Nortnik Jr. had in college. Of this image he says, “I
wanted to experiment with many shades of color, so I started out with a set of Pantone swatches I was using for a project at work. I brought
the swatches forward by placing them onto a, then adding a bevel and light shadow for a special effect. I used different color modes on
each layer to see what kind of response I could achieve. Then I added different shapes to give it interest. The background of this piece is
where I spent most of my time, though—stacking unusual textures, pictures, and color on top of each other, then committing color layer
modes, opacity, and color adjustments to the actual layer.”

result will be a full vignette with the face lighter than theedges of the image.
Straightening Verticals. One of the most amazingthings Photoshop does is found under the Edit>Trans-form menu. Using these tools, you can correct architec-tural verticals in an image. Here’s how:Open your image and make it smaller than the sur-
rounding canvas area (you can do this by reducing thepercentage view at the lower left of the image window,or by moving the slider in the Navigator window). Turnyour rulers on (View>Rulers). Click on the horizontalor vertical ruler at the edge of the image and drag a ruleinto position, placing it on the edge of one of thecrooked lines so you will be able to gauge when the linehas been straightened. Then, select the entire image(Select>All) and go to the transform function (Edit>Transform>Skew). When you do this, handles will ap-pear on all four corners. Holding down your Optionkey and dragging on one of the handles allows you topush or pull one edge independently of the others. Bydoing so, you can correct the vertical or horizontal lineswithin the image. When the lines are straight, pressReturn or Enter and the image will process.
Lens Correction. You can also correct a wide range ofcommon lens distortion flaws from a single interface inPhotoshop CS2. You can eliminate barrel or pincushiondistortion, chromatic aberration, vignetting, and per-spective flaws in all three dimensions—and do it in onepass with simple, intuitive controls, a live preview, andan alignment grid.Photoshop CS2’s optical lens correction (Filter>Dis-
tort>Lens Correction) lets you remove the distortioncaused by either wide-angle lens use or bad perspective.This mini-application lets you correct verticals moreeasily than Free Transform. You can also:
• Use the Zoom tool to magnify edges in theimage to more easily correct chromatic aber-ration or vignetting, and the Move Grid toolto adjust the alignment grid.
• Use the Edge menu to determine how theedges of the transformed image are filled, oruse the scale slider to expand the image andfill in the edges.
• Use the Distortion tool to correct distortionby dragging in the image.
98 THE BEST OF PROFESSIONAL DIGITAL PHOTOGRAPHY
Photoshop CS2’s Lens Correction, which is found under Filter>Distort.
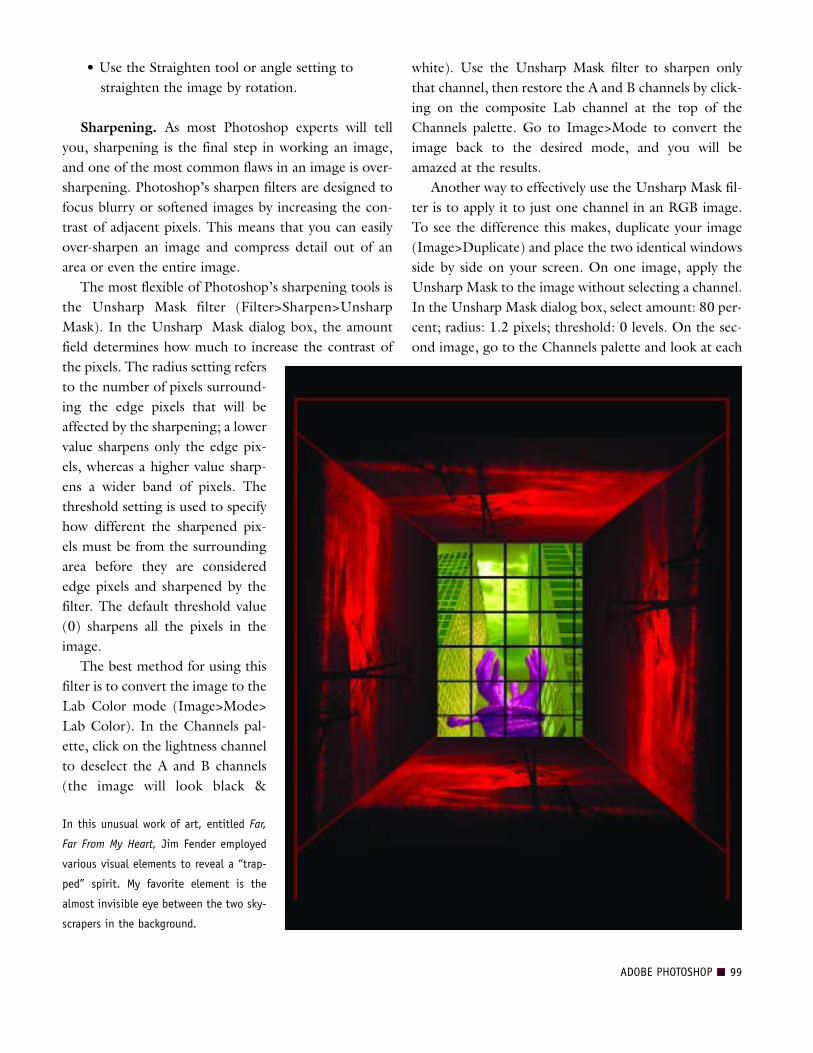
• Use the Straighten tool or angle setting tostraighten the image by rotation.
Sharpening. As most Photoshop experts will tellyou, sharpening is the final step in working an image,and one of the most common flaws in an image is over-sharpening. Photoshop’s sharpen filters are designed tofocus blurry or softened images by increasing the con-trast of adjacent pixels. This means that you can easilyover-sharpen an image and compress detail out of anarea or even the entire image.The most flexible of Photoshop’s sharpening tools is
the Unsharp Mask filter (Filter>Sharpen>UnsharpMask). In the Unsharp Mask dialog box, the amountfield determines how much to increase the contrast ofthe pixels. The radius setting refersto the number of pixels surround-ing the edge pixels that will beaffected by the sharpening; a lowervalue sharpens only the edge pix-els, whereas a higher value sharp-ens a wider band of pixels. Thethreshold setting is used to specifyhow different the sharpened pix-els must be from the surroundingarea before they are considerededge pixels and sharpened by thefilter. The default threshold value(0) sharpens all the pixels in theimage.The best method for using this
filter is to convert the image to theLab Color mode (Image>Mode>Lab Color). In the Channels pal-ette, click on the lightness channelto deselect the A and B channels(the image will look black &
white). Use the Unsharp Mask filter to sharpen onlythat channel, then restore the A and B channels by click-ing on the composite Lab channel at the top of theChannels palette. Go to Image>Mode to convert theimage back to the desired mode, and you will beamazed at the results.Another way to effectively use the Unsharp Mask fil-
ter is to apply it to just one channel in an RGB image.To see the difference this makes, duplicate your image(Image>Duplicate) and place the two identical windowsside by side on your screen. On one image, apply theUnsharp Mask to the image without selecting a channel.In the Unsharp Mask dialog box, select amount: 80 per-cent; radius: 1.2 pixels; threshold: 0 levels. On the sec-ond image, go to the Channels palette and look at each
ADOBE PHOTOSHOP 99
In this unusual work of art, entitled Far,
Far From My Heart, Jim Fender employed
various visual elements to reveal a “trap-
ped” spirit. My favorite element is the
almost invisible eye between the two sky-
scrapers in the background.

channel individually. Select the channel with the mostmidtone data (this is usually the green channel, but notalways) and apply the Unsharp Mask filter to it using thesame settings. Then, turn the other two channels backon. Enlarge a key area, like the face, of both images toexactly the same magnification—say 200 percent. Atthis level of sharpening, you will probably see artifacts inthe image in which all three layers were sharpenedsimultaneously. In the image where only the greenchannel was sharpened, you will actually see a muchfiner rendition.
BASIC COLOR AND TONAL CORRECTIONS
Selective Color. Many people like to use Curves tocolor correct an image, but there are also those whoprefer the Selective Color function (Image>Adjust-ments>Selective Color). It is among the most powerful
tools in Photoshop. This tool does not require you toknow in advance which channel (R, G, or B) is the oneaffecting the color shift. It only requires you to selectwhich color needs adjustment—reds, yellows, greens,cyans, blues, magentas, whites, neutrals, or blacks. Onceyou’ve selected the color you want to adjust, use theslider controls (cyan, magenta, yellow, and black) tomake the needed correction. (Note: Make sure themethod mode is set to absolute, which gives a moredefinitive result in smaller increments.) If, for example,you select reds, no other colors in the scene will bechanged by any adjustments you make using the sliderbars.Skin tones are easy to correct using Selective Color,
as well. Most caucasian skin tones are comprised ofvarying amounts of magenta and yellow. Usually whenskin tones are off, they can be easily corrected by select-ing neutrals, then experimenting with either the magen-ta or yellow sliders. In outdoor images, you will some-times pick up excess cyan in the skin tones; this is easilydialed out in selective color.The Selective Color tool is also useful for eliminating
color casts on wedding dresses, which often reflect anearby color—particularly if the material has a sheen.Outdoors, the dress might go green or blue, dependingon whether shade or grass is being reflected into it. Tocorrect the problem, select the whites. Then, if the dressis blue or cyan, add a little yellow or remove a little cyanand judge the preview. If the dress has gone green, adda little magenta and perhaps remove a slight amount ofyellow. Often, wedding gowns are treated with bright-eners that make the dress almost seem to fluoresce.While this is an attractive trait to the naked eye, to theimaging sensor or film, the dress often goes blue or amix of cyan and blue. Selective Color is a simple way tocolor correct just the dress and nothing else in thescene.
100 THE BEST OF PROFESSIONAL DIGITAL PHOTOGRAPHY
KODAK COLOR PRINT VIEWING FILTERS
If you aren’t sure of the color shift, try using a Kodak Color
Print Viewing Filter Kit. This is comprised of six cards—
cyan, magenta, and yellow; and red, green, and blue view-
ing cards. In a darkened room, inspect your image on the
monitor using the card that is the complementary color of
the indicated color shift. For example, if the shift looks
blue, use the yellow card to view the image. If the color
shift is green, choose the magenta card, and so on. Flick the
appropriate card quickly in and out of your field of view
while cupping one eye with your hand (i.e. use only one eye
to view the screen through the filter). You should be exam-
ining the midtones and shadows as you do so. Avoid look-
ing at the image highlights as you will learn nothing from
this. If the yellow card, in this example, neutralizes the
color shift in the midtones and shadows then you are on the
right track. There are three densities on each card, so try
each one before ruling out a specific color correction. Once
you’ve identified the problem, use Photoshop’s Selective
Color command to correct it.
FACING PAGE—A variation of the technique of mixing color and black
& white in the same image is seen in this image by Jeffrey and Julia
Woods. The bouquet and boardwalk are rich saturated color, while
the sky and water have been desaturated to give them a mono-
chrome look.
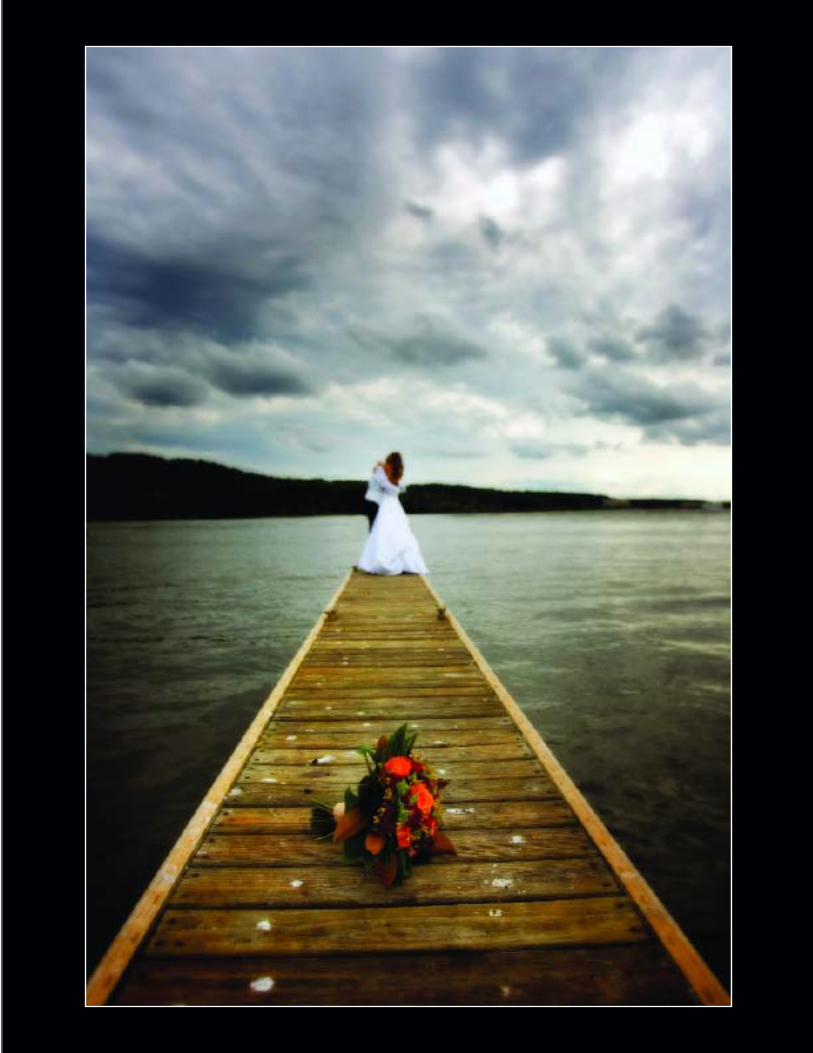
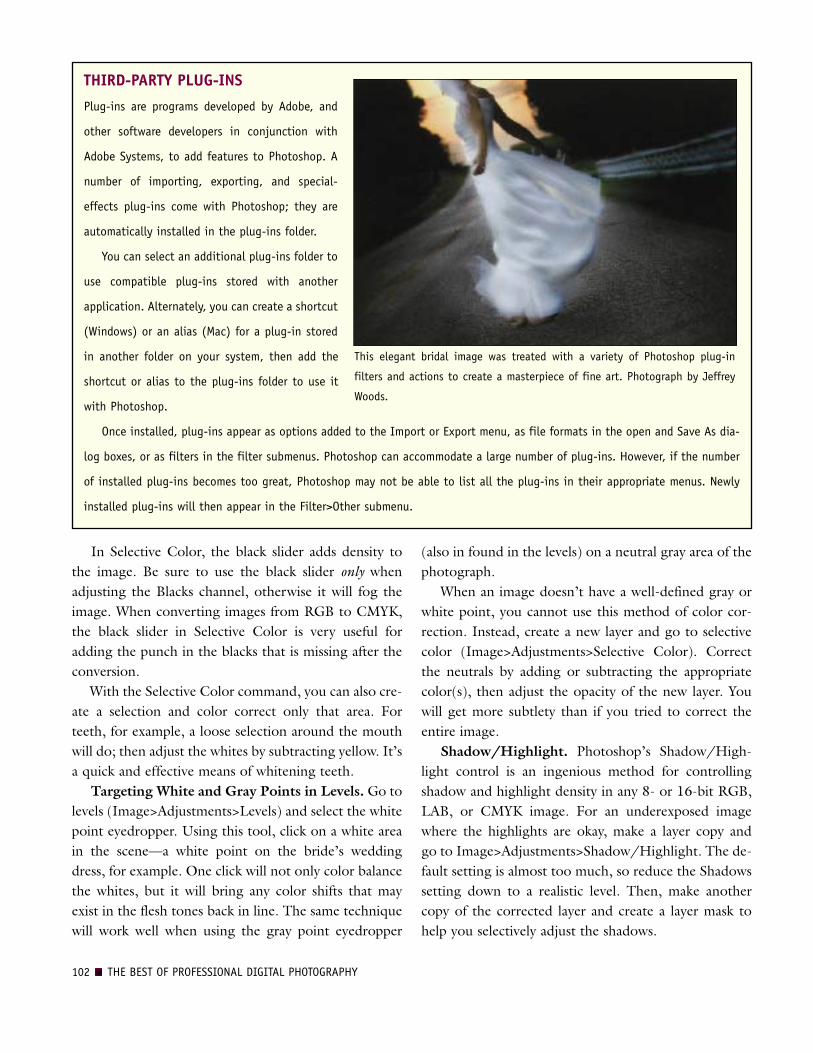
In Selective Color, the black slider adds density tothe image. Be sure to use the black slider only whenadjusting the Blacks channel, otherwise it will fog theimage. When converting images from RGB to CMYK,the black slider in Selective Color is very useful foradding the punch in the blacks that is missing after theconversion.With the Selective Color command, you can also cre-
ate a selection and color correct only that area. Forteeth, for example, a loose selection around the mouthwill do; then adjust the whites by subtracting yellow. It’sa quick and effective means of whitening teeth.
Targeting White and Gray Points in Levels. Go tolevels (Image>Adjustments>Levels) and select the whitepoint eyedropper. Using this tool, click on a white areain the scene—a white point on the bride’s weddingdress, for example. One click will not only color balancethe whites, but it will bring any color shifts that mayexist in the flesh tones back in line. The same techniquewill work well when using the gray point eyedropper
(also in found in the levels) on a neutral gray area of thephotograph.When an image doesn’t have a well-defined gray or
white point, you cannot use this method of color cor-rection. Instead, create a new layer and go to selectivecolor (Image>Adjustments>Selective Color). Correctthe neutrals by adding or subtracting the appropriatecolor(s), then adjust the opacity of the new layer. Youwill get more subtlety than if you tried to correct theentire image.
Shadow/Highlight. Photoshop’s Shadow/High-light control is an ingenious method for controllingshadow and highlight density in any 8- or 16-bit RGB,LAB, or CMYK image. For an underexposed imagewhere the highlights are okay, make a layer copy andgo to Image>Adjustments>Shadow/Highlight. The de-fault setting is almost too much, so reduce the Shadowssetting down to a realistic level. Then, make anothercopy of the corrected layer and create a layer mask tohelp you selectively adjust the shadows.
102 THE BEST OF PROFESSIONAL DIGITAL PHOTOGRAPHY
THIRD-PARTY PLUG-INS
Plug-ins are programs developed by Adobe, and
other software developers in conjunction with
Adobe Systems, to add features to Photoshop. A
number of importing, exporting, and special-
effects plug-ins come with Photoshop; they are
automatically installed in the plug-ins folder.
You can select an additional plug-ins folder to
use compatible plug-ins stored with another
application. Alternately, you can create a shortcut
(Windows) or an alias (Mac) for a plug-in stored
in another folder on your system, then add the
shortcut or alias to the plug-ins folder to use it
with Photoshop.
Once installed, plug-ins appear as options added to the Import or Export menu, as file formats in the open and Save As dia-
log boxes, or as filters in the filter submenus. Photoshop can accommodate a large number of plug-ins. However, if the number
of installed plug-ins becomes too great, Photoshop may not be able to list all the plug-ins in their appropriate menus. Newly
installed plug-ins will then appear in the Filter>Other submenu.
This elegant bridal image was treated with a variety of Photoshop plug-in
filters and actions to create a masterpiece of fine art. Photograph by Jeffrey
Woods.
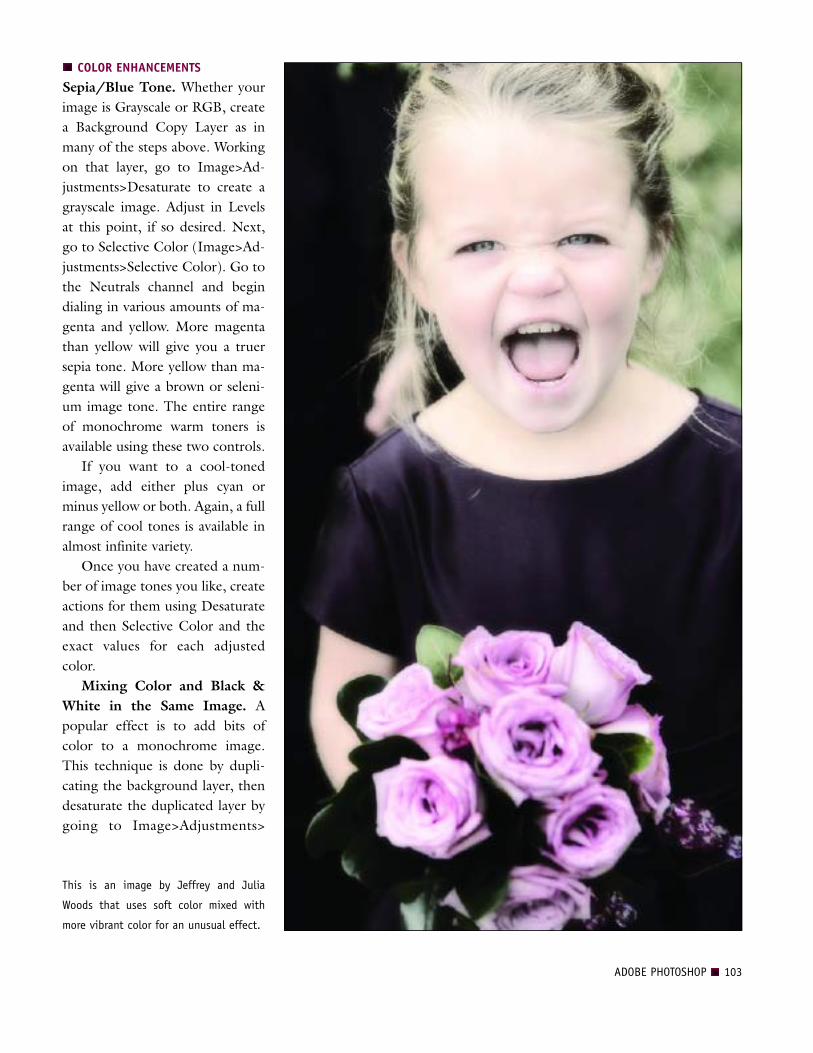
COLOR ENHANCEMENTS
Sepia/Blue Tone. Whether yourimage is Grayscale or RGB, createa Background Copy Layer as inmany of the steps above. Workingon that layer, go to Image>Ad-justments>Desaturate to create agrayscale image. Adjust in Levelsat this point, if so desired. Next,go to Selective Color (Image>Ad-justments>Selective Color). Go tothe Neutrals channel and begindialing in various amounts of ma-genta and yellow. More magentathan yellow will give you a truersepia tone. More yellow than ma-genta will give a brown or seleni-um image tone. The entire rangeof monochrome warm toners isavailable using these two controls.If you want to a cool-toned
image, add either plus cyan orminus yellow or both. Again, a fullrange of cool tones is available inalmost infinite variety.Once you have created a num-
ber of image tones you like, createactions for them using Desaturateand then Selective Color and theexact values for each adjustedcolor.
Mixing Color and Black &White in the Same Image. Apopular effect is to add bits ofcolor to a monochrome image.This technique is done by dupli-cating the background layer, thendesaturate the duplicated layer bygoing to Image>Adjustments>
ADOBE PHOTOSHOP 103
This is an image by Jeffrey and Julia
Woods that uses soft color mixed with
more vibrant color for an unusual effect.

Desaturate. After desaturating, go to the Levels controlto adjust brightness and contrast to your liking. Thenchoose the Eraser tool (set to a small to medium-sizedsoft brush and 100-percent opacity) and start erasing.In the areas where you erase the desaturated layer, colorfrom the original, underlying background layer willshow through.
Soft Color. This is a technique that mutes the col-ors in an image. To achieve it, duplicate the backgroundlayer and convert it using Image>Adjustments>Gradi-ent Map. Choose a black-to-white gradient for a full-tone black & white image. Blur the underlying colorlayer using the Gaussian Blur filter with a radius settingof about 12 pixels. In the Layers palette, reduce opaci-ty of the black & white layer to about 65 percent. Addanother adjustment layer (Layer>New Adjustment Lay-er>Photo Filter), then vary the setting of the filter for arange of colored effects.
PROFESSIONAL PHOTOSHOP TECHNIQUES
Claude Jodoin’s Facial Retouching. Claude Jodoin isan award-winning wedding and portrait photographerwhose digital-retouching techniques are highly esteem-ed. The following are some of the operations he fre-quently performs when retouching portraits.
Eliminating Blemishes. Jodoin enlarges the face to100 percent and selects the Patch tool. Then, he simplysurrounds the blemish and drags it to an adjacent areaof skin. This removes the blemish while maintaining thesame general color and texture of the skin.
Smoothing the Skin. To smooth the skin, Jodoin cre-ates a rough selection around the face and copies it ontoa new layer. Using a filter called Airbrush Gem Profes-sional from Kodak, he selects a default value of 60 per-cent to airbrush the sharpness and pores out of the face.If the correction goes too far, he reduces the opacityof the layer or uses a layer mask to restore sharpness asnecessary.
104 THE BEST OF PROFESSIONAL DIGITAL PHOTOGRAPHY
This before and after example includes all of the techniques described here. The original digital image was so sharp that it needed soften-
ing so that the face would not be so incredibly detailed. Even people with exceptional eyesight do not experience others’ features in this
way. Photographs by Claude Jodoin.

Enhancing the Eyes. Jodoin begin this process by cre-ating a Curves Adjustment Layer and lightening theoverall image by about 20 percent. He then creates alayer mask and fills it with black to mask the entireimage. To brighten the eyes, he paints on the mask withwhite, using a small brush set to about 15 percent opac-ity. He paints very gradually, lightening the whites ofthe eyes without making them completely white. Thepresence of blood vessels in the eyes is realistic andshould not be eliminated entirely. (Note: By creatinganother Curves Adjustment layer that darkens theimage, you can reapply the same technique to increasethe color contrast between the pupil and the iris.)An alternate technique for lightening the whites of
the eyes is to use the Dodge tool (in the Options, besure to set the range to highlights and select a smallbrush). With the Burn tool and a small brush, you candarken the very edge of the iris to produce a more
dynamic look and burn in the pupil to make it morestark.
Marcus Bell’s Fine-Art Color Effects. Marcus Bellis known across two continents as a master photogra-pher. In his native home, Australia, he has been namedLandscape Photographer of the Year, Wedding Photog-rapher of the Year, and Portrait Photographer of theYear—an unheard of accomplishment.Marcus takes a color image, whether it’s a scan or
digital original, and converts it to Grayscale to produce
ADOBE PHOTOSHOP 105
Here is the original scan (right) and the final rendition (below) after
Marcus Bell has worked his magic.
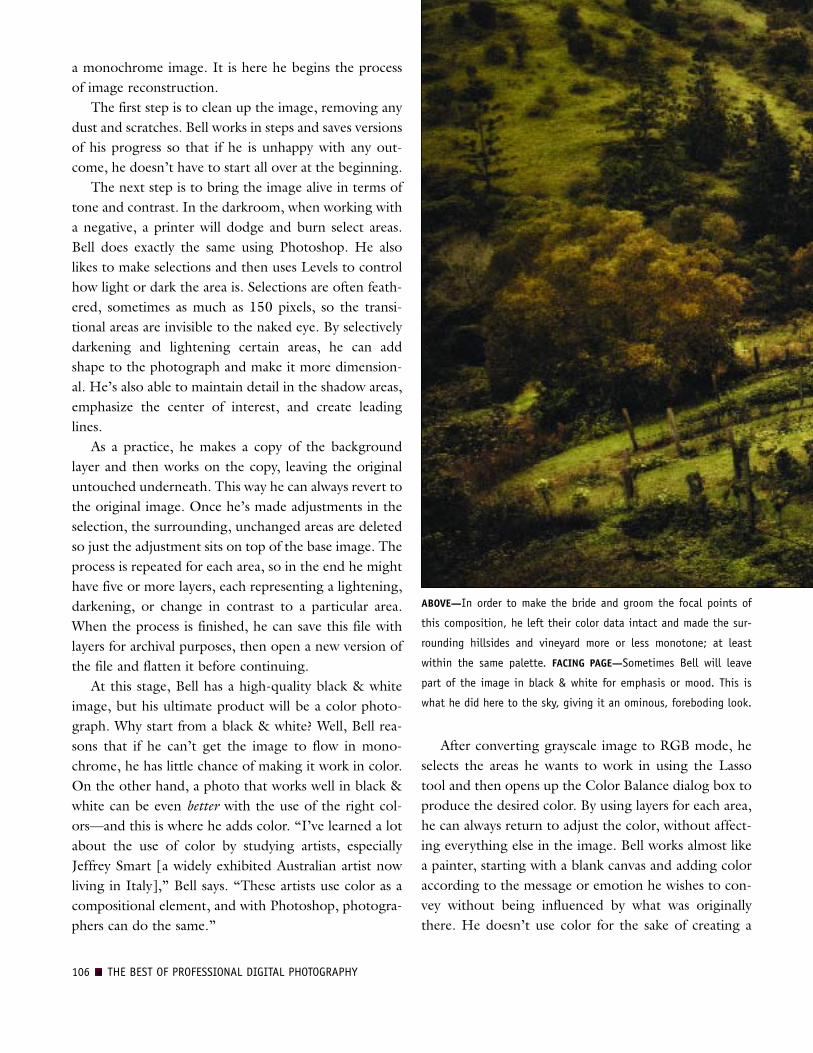
a monochrome image. It is here he begins the processof image reconstruction.The first step is to clean up the image, removing any
dust and scratches. Bell works in steps and saves versionsof his progress so that if he is unhappy with any out-come, he doesn’t have to start all over at the beginning.The next step is to bring the image alive in terms of
tone and contrast. In the darkroom, when working witha negative, a printer will dodge and burn select areas.Bell does exactly the same using Photoshop. He alsolikes to make selections and then uses Levels to controlhow light or dark the area is. Selections are often feath-ered, sometimes as much as 150 pixels, so the transi-tional areas are invisible to the naked eye. By selectivelydarkening and lightening certain areas, he can addshape to the photograph and make it more dimension-al. He’s also able to maintain detail in the shadow areas,emphasize the center of interest, and create leadinglines.As a practice, he makes a copy of the background
layer and then works on the copy, leaving the originaluntouched underneath. This way he can always revert tothe original image. Once he’s made adjustments in theselection, the surrounding, unchanged areas are deletedso just the adjustment sits on top of the base image. Theprocess is repeated for each area, so in the end he mighthave five or more layers, each representing a lightening,darkening, or change in contrast to a particular area.When the process is finished, he can save this file withlayers for archival purposes, then open a new version ofthe file and flatten it before continuing.At this stage, Bell has a high-quality black & white
image, but his ultimate product will be a color photo-graph. Why start from a black & white? Well, Bell rea-sons that if he can’t get the image to flow in mono-chrome, he has little chance of making it work in color.On the other hand, a photo that works well in black &white can be even better with the use of the right col-ors—and this is where he adds color. “I’ve learned a lotabout the use of color by studying artists, especiallyJeffrey Smart [a widely exhibited Australian artist nowliving in Italy],” Bell says. “These artists use color as acompositional element, and with Photoshop, photogra-phers can do the same.”
After converting grayscale image to RGB mode, heselects the areas he wants to work in using the Lassotool and then opens up the Color Balance dialog box toproduce the desired color. By using layers for each area,he can always return to adjust the color, without affect-ing everything else in the image. Bell works almost likea painter, starting with a blank canvas and adding coloraccording to the message or emotion he wishes to con-vey without being influenced by what was originallythere. He doesn’t use color for the sake of creating a
106 THE BEST OF PROFESSIONAL DIGITAL PHOTOGRAPHY
ABOVE—In order to make the bride and groom the focal points of
this composition, he left their color data intact and made the sur-
rounding hillsides and vineyard more or less monotone; at least
within the same palette. FACING PAGE—Sometimes Bell will leave
part of the image in black & white for emphasis or mood. This is
what he did here to the sky, giving it an ominous, foreboding look.


pretty picture, but rather to emphasize different aspectswithin the image. “By choosing colors that complementor oppose each other,” says Bell, “you can take control
of your image, guiding the eye as you please and addingweight to certain elements over others.”He sometimes needs to do a little dodging and
burning after adding color or the result will look a bitflat, and selections are lightly feathered—2 to 10 pix-els—so the colors blend together naturally. He can alsouse the opacity control on each layer to reduce thestrength and change the weight, so his choice of colorcan be subtle or strong. Another tool he likes is theBrush tool in color mode.Marcus is amazed how this approach has changed his
work. “I find I’m looking at my work in a totally newlight,” he says. “Images I might have passed over beforenow have me thinking, ‘Wow!’”
108 THE BEST OF PROFESSIONAL DIGITAL PHOTOGRAPHY
LEFT—Sometime Marcus just wants a cool tone monochromatic look,
as was done here. BELOW AND FACING PAGE—Then there are times
when Bell wants only to enhance the colors that exist in his scene.
The gray sky in the wedding image is enhanced and the white bal-
ance in the portrait of the older gentleman has been set to daylight,
allowing the warm room lights in the background to add atmosphere.


David Wendt’s Layers Techniques. David Wendtphotographs cars, and planes, and trains, and just aboutanything that moves—but he chooses his subjects wise-ly. They are rare examples of each breed and he turns hiscollections into calendars and hopefully, someday,books.Wendt is a little different from most photographers
in that he’s got complete control over the final piece. Tohim it’s “very liberating and I suspect it’s very rare.” Sohe considers himself lucky to have such control. Oncehe gets a few shots he likes for his calendar projects, hestarts manipulating the image in Photoshop, which heruns on an Apple G5 with lots of RAM. He uses anApple 23HD flat-screen monitor, a product he loves.
In Photoshop, Wendt uses layers to build color andcontrast. He wants warmer and cooler colors to worktogether to separate one thing from another. He likes toblend cool colors, which tend to recede visually, andwarm colors, which tend to advance. The blendinghelps to produce contrast and vivid color. He sometimesmakes a duplicate layer, adjusts it to be cooler, then useslayer masking to erase the cooler layer and let thewarmer base layer show through. This technique tendsto “cool off” the background.Wendt also uses blurring to create contrast. For
example, he might take that same duplicate layer that hejust cooled off, duplicate it again and use Gaussian Blurto “knock back the focus.” The results can be very
110 THE BEST OF PROFESSIONAL DIGITAL PHOTOGRAPHY
Wendt took two decades to photograph this Aston Martin DB9 . . . well, not really—but he first discovered the location twenty years earli-
er and had never used it until he discovered the right time of year (May), the right day of the week (Sunday, when nobody was around), and
the right time of day (very early morning). He always knew this location was capable of producing an incredible image, so he had to wait
for the right car, as well. The Aston Martin, with its long, low lines and glass-like paintwork, proved to be the secret ingredient. Wendt used
a Canon EOS-1Ds Mark II, 70–200mm f/2.8 Canon lens at the 200mm setting, and RAW mode. He used Photoshop to blend and build the
highlights in the bodywork and multiple layers to house each phase of the artwork.
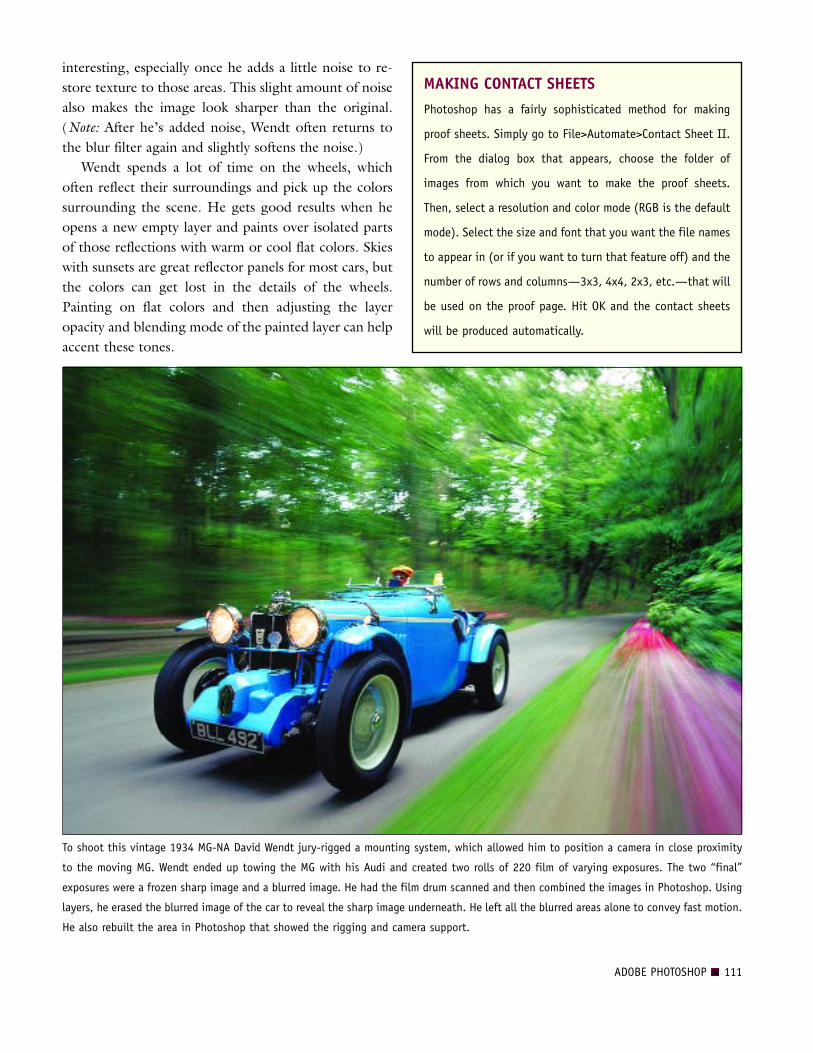
interesting, especially once he adds a little noise to re-store texture to those areas. This slight amount of noisealso makes the image look sharper than the original.(Note: After he’s added noise, Wendt often returns tothe blur filter again and slightly softens the noise.)Wendt spends a lot of time on the wheels, which
often reflect their surroundings and pick up the colorssurrounding the scene. He gets good results when heopens a new empty layer and paints over isolated partsof those reflections with warm or cool flat colors. Skieswith sunsets are great reflector panels for most cars, butthe colors can get lost in the details of the wheels.Painting on flat colors and then adjusting the layeropacity and blending mode of the painted layer can helpaccent these tones.
ADOBE PHOTOSHOP 111
To shoot this vintage 1934 MG-NA David Wendt jury-rigged a mounting system, which allowed him to position a camera in close proximity
to the moving MG. Wendt ended up towing the MG with his Audi and created two rolls of 220 film of varying exposures. The two “final”
exposures were a frozen sharp image and a blurred image. He had the film drum scanned and then combined the images in Photoshop. Using
layers, he erased the blurred image of the car to reveal the sharp image underneath. He left all the blurred areas alone to convey fast motion.
He also rebuilt the area in Photoshop that showed the rigging and camera support.
MAKING CONTACT SHEETS
Photoshop has a fairly sophisticated method for making
proof sheets. Simply go to File>Automate>Contact Sheet II.
From the dialog box that appears, choose the folder of
images from which you want to make the proof sheets.
Then, select a resolution and color mode (RGB is the default
mode). Select the size and font that you want the file names
to appear in (or if you want to turn that feature off) and the
number of rows and columns—3x3, 4x4, 2x3, etc.—that will
be used on the proof page. Hit OK and the contact sheets
will be produced automatically.
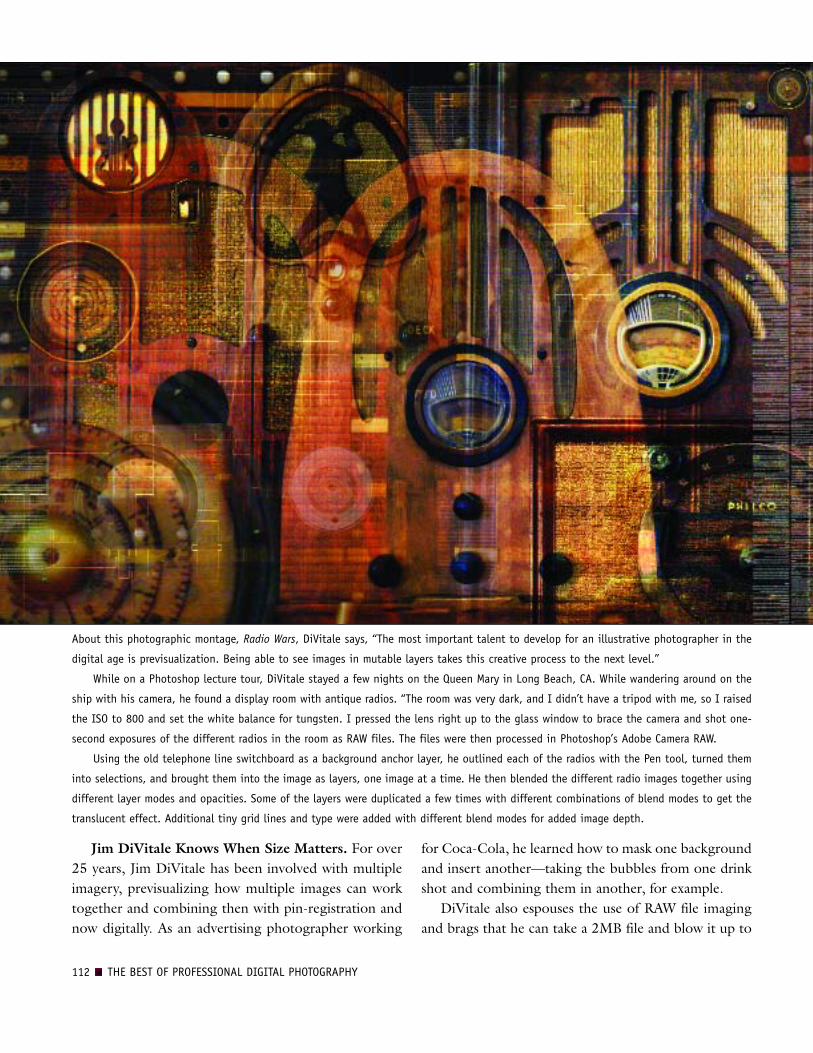
Jim DiVitale Knows When Size Matters. For over25 years, Jim DiVitale has been involved with multipleimagery, previsualizing how multiple images can worktogether and combining then with pin-registration andnow digitally. As an advertising photographer working
for Coca-Cola, he learned how to mask one backgroundand insert another—taking the bubbles from one drinkshot and combining them in another, for example.DiVitale also espouses the use of RAW file imaging
and brags that he can take a 2MB file and blow it up to
112 THE BEST OF PROFESSIONAL DIGITAL PHOTOGRAPHY
About this photographic montage, Radio Wars, DiVitale says, “The most important talent to develop for an illustrative photographer in the
digital age is previsualization. Being able to see images in mutable layers takes this creative process to the next level.”
While on a Photoshop lecture tour, DiVitale stayed a few nights on the Queen Mary in Long Beach, CA. While wandering around on the
ship with his camera, he found a display room with antique radios. “The room was very dark, and I didn’t have a tripod with me, so I raised
the ISO to 800 and set the white balance for tungsten. I pressed the lens right up to the glass window to brace the camera and shot one-
second exposures of the different radios in the room as RAW files. The files were then processed in Photoshop’s Adobe Camera RAW.
Using the old telephone line switchboard as a background anchor layer, he outlined each of the radios with the Pen tool, turned them
into selections, and brought them into the image as layers, one image at a time. He then blended the different radio images together using
different layer modes and opacities. Some of the layers were duplicated a few times with different combinations of blend modes to get the
translucent effect. Additional tiny grid lines and type were added with different blend modes for added image depth.

500MB. “If you know how to do it right, it works per-fectly” he says. He believes that most digital shootersdon’t quite get the idea of RAW files. They start shoot-ing JPEGs for speed and when they blow things up, theimages fall apart because there’s no data there. Fromhis top-quality RAW files, DiVitale is able to makeDuratrans transparencies, trade show displays, andlarge-scale images as big as 40-feet long. You just haveto know the right techniques in Photoshop.The best way to increase the size of images is to up-
sample the image in small increments, otherwise knownas stair interpolation. This method of up-sizing ispreferable to increasing image size in one large step, sayfrom 100 directly to 400 percent. The concept of stairinterpolation is simple: rather than using the Image>Size command to go from 100 to 400 percent in onestep, you use the command in small increments, increas-ing the image by perhaps 10 percent at a time and
repeating it as many times as it takes to get to the sizeyou need. As you do this, alternate the resamplingmode between Bicubic, Bicubic Sharper, and BicubicSmoother. If you want to enlarge an image from 5x7- to8x10-inches for example, be sure to check Scale Styles,Constrain Proportions, and Resample Image. Changethe 7-inch dimension to 7.5 inches and click OK. Re-peat in half-inch increments until your image is thedesired size. You may or may not need to sharpen theimage when you’re finished.Obviously, this can be tedious if your software does
not have some automation capability. Fred Miranda’s SIPro and Resize Pro are stair interpolation plug-ins forPhotoshop that solve this problem by automating theresizing process. You enter the size increase or thedesired dimensions, specify sharpening or not, and theimage is quickly enlarged—and it is almost indistin-guishable from the original.
ADOBE PHOTOSHOP 113
Jim Divitale has a great design sense combined with an amazing grasp of the technical. This image is simply titled Glasses.

of 1600. It was a shock, coming out of photo school,where fine grain and full-range tonality were the expect-ed standard. But we all have to learn the differencesbetween the theoretical and the practical; between whatwe learn in school and what we learn on the job. Butnothing in my wildest imagination could have preparedme for what we now casually call the “digital revolu-tion.” It was a changing of the guard so complete andso vast that the economic destinies of Fortune 500 com-panies have shifted and reversed and an entirely freshwave of new-technology companies has swept across thephotographic landscape. As dramatic as the economicchanges that digital technology has created are, theypale in comparison to the profound changes in howprofessional photographers view their craft. Techniquesthat were once difficult or nearly impossible are nowcommonplace and the creative horizon has stretchedfarther than anyone could have anticipated.
There are few, if any, imposed ceilings anymore. Aswe imagine new ways of seeing the world, so we createthe images that redefine it. That is the true beauty ofdigital—technology feeding creativity. Different disci-plines, like cinema, graphic design, and multimedia arenow merging full throttle into photography. Fine artblends with classical portraiture and soon there are lit-erally no boundaries.One might think that with this great technical revo-
lution comes a dismissal of the traditions and practicesthat were and are the foundation of conventional pho-tography. Not so. The traditions carry on with unex-pected nuances and a blending of what is expected andwhat is unexpected.Perhaps the most telling truth now evident in this
time is that that there is, more than ever before, noroadmap of what comes next. But one thing is certain:it’s going to be fun!
114 THE BEST OF PROFESSIONAL DIGITAL PHOTOGRAPHY
CONCLUSION
When I first started out in professional photography in1972, we used 6x7 Koni-Omega rangefinder cam-eras and 120 Tri-X souped in Acufine at a film speed

Action. In Adobe Photoshop, a series of commands thatyou play back on a single file or a batch of files.
Adobe Camera RAW. The Photoshop Camera RAWplug-in lets you open a camera’s RAW image filedirectly in Photoshop without using another pro-gram to convert the camera RAW image into a read-able format. As a result, all your work with cameraRAW image files can be completely done inPhotoshop.
Adobe DNG. Adobe Digital Negative (DNG) is a pub-licly available archival format for the RAW files gen-erated by digital cameras. By addressing the lack ofan open standard for the RAW files created by indi-vidual camera models, DNG helps ensure that pho-tographers will be able to access their files in thefuture.
Adobe RGB 1998. The largest recommended RGBworking space. Well suited for print production witha broad range of colors. Widest gamut color space ofworking RGBs.
Antialiasing. Refers to methods of eliminating or reduc-ing unwanted artifacts such as jagged lines. In thecontext of images, antialiasing refers to the reduc-tion of the jagged borders between colors.
Barebulb Flash. A portable flash unit with a vertical flashtube that fires the flash illumination 360 degrees.
Barn Doors. Black, metal folding doors that attach to alight’s reflector. These are used to control the widthof the beam of light.
Bit. Stands for binary digit. Smallest unit of informationhandled by a computer. One bit is expressed as a 1or a 0 in a binary numeral. A single bit conveys littleinformation a human would consider meaningful.
However, a group of eight bits makes up a byte, rep-resenting more substantive information.
Bit Depth. Number of bits per pixel allocated for storingcolor information in an image file.
Bitmap Image. Also called a raster graphic, bitmapimages are created from rows of different coloredpixels that together form an image. Bitmaps are res-olution dependent. Examples of bitmap graphic for-mats include GIF, JPEG, PNG, TIFF, XBM, BMP,and PCX as well as bitmap (i.e., screen) fonts.
Box Light. A diffused light source housed in a box-shaped reflector. The bottom of the box is translu-cent material. The side pieces of the box are opaque,but they are coated with a reflective material such asfoil on the inside to optimize light output.
Bounce Flash. Bouncing the light of a studio or portableflash off a surface such as a ceiling or wall to produceindirect, shadowless lighting.
Burning In. A darkroom or computer printing techniquein which specific areas of the image are given addi-tional exposure in order to darken them.
Burst Rate. The number of frames per second (fps) adigital camera can record and the number of framesper exposure sequence a camera can record. Typicalburst rates range from 2.5fps up to six shots, all theway up to 8fps up to 40 shots.
Byte. A unit of data consisting of eight bits. Computermemory and storage are referenced in bytes—kilo-bytes (KB=1000 bytes), megabytes (MB=1 millionbytes), or gigabytes (GB=1 trillion bytes).
Calibration. The process of altering the behavior of adevice so that it will function within a known rangeof performance or output.
GLOSSARY 115
GLOSSARY

Catchlight. The specular highlights that appear in the irisor pupil of the subject’s eyes, reflected from the por-trait lights.
CCD (Charge-Coupled Device). A type of image sensorthat separates the spectrum of color into red, green,and blue for digital processing by the camera. ACCD captures only black & white images. Theimage is passed through red, green, and blue filtersin order to capture color.
CF Card. CompactFlash (CF) cards are popular memorycards developed by SanDisk in 1994 that uses solid-state memory to store data on a very small card.
CF Card Reader. A device that is used to connect a CFcard or Microdrive to a computer. CF card readersare used to download digital image files from a cap-ture and/or storage device to your computer work-station.
Channel. Used extensively in Photoshop, channels areimages that use grayscale data to portray image com-ponents. Channels are created whenever you open anew image and accessed in the Channels palette. Theimage’s color mode determines the number of colorchannels created. For example, an RGB image hasfour default channels: one for each of the red, green,and blue primary colors, plus a composite channelused for editing the image. Additional channels canbe created in an image file for such things as masksor selections.
Chromatic Aberration. A common lens defect in whichthe lens focuses different frequencies (colors) oflight differently. One type of chromatic aberrationresults in the different colors being in focus, buteach color’s image point at a slightly different size.This type of aberration results in complementarycolor fringing in areas away from the center of theimage.
CMOS (Complementary Metal Oxide Semiconduc-tor). A type of semiconductor that has been, untilthe Canon EOS D30, widely unavailable for digitalcameras. CMOS imaging chips offer more integra-tion (more functions on the chip), lower power dis-sipation (at the chip level), and smaller system size ascompared to CCD (charge-coupled device), theother major type of imaging chip.
CMYK. In Photoshop’s CMYK mode, pixels are assigneda percentage value for each of the process inks. Thelightest (highlight) colors are assigned small percent-
ages of process ink colors, the darker (shadow) col-ors are assigned higher percentages. For example, abright red might contain 2 percent cyan, 93 percentmagenta, 90 percent yellow, and 0 percent black. InCMYK images, pure white is generated when all fourcomponents have values of 0 percent.
Color Management. A system of software-based checksand balances that ensures consistent color through avariety of capture, display, editing, and output deviceprofiles.
Color Space. An environment referring to the range ofcolors that a particular device is able to produce.
Color Temperature. The degrees Kelvin (K°) of a lightsource or film sensitivity. Color films are balancedfor 5500°K (daylight), 3200°K (tungsten), or3400°K (photoflood).
Cross Processing. With film, developing color negativefilm in color transparency chemistry (or vice versa).With digital, a Photoshop effect that mimics filmcross processing.
Curves. Changing the shape of the curve in the curvesdialog box alters the tonality and color of an image.In the RGB mode, bowing the curve upward light-ens an image; bowing the curve downward darkensit. The steeper sections of the curve represent por-tions of an image with more contrast. Conversely,flatter sections of the curve represent areas of lowercontrast in an image.
Depth of Field. The distance that is sharp beyond and infront of the focus point at a given f-stop.
Depth of Focus. The amount of sharpness that extendsin front of and behind the focus point. Some lenses’depth of focus extends 50 percent in front of and 50percent behind the focus point. Other lenses vary.
Diffusion Flat. Portable, translucent diffuser that can bepositioned in a window frame or near the subject todiffuse the light striking the subject. Also known asa scrim.
Dodging. Darkroom or computer printing technique inwhich specific areas of the print are given less printexposure, making them lighter.
DPI (Dots Per Inch). Printer resolution is measured bythe number of ink dots per inch (dpi) produced byall laser printers, including imagesetters. Inkjet print-ers produce a microscopic spray of ink, not actualdots; however, most inkjet printers have an approxi-mate resolution of 300 to 2880dpi.
116 THE BEST OF PROFESSIONAL DIGITAL PHOTOGRAPHY

Dragging the Shutter.Using a shutter speed slower thanthe X-sync speed in order to capture the ambientlight in a scene.
E.I. (Exposure Index). The term refers to a film speedother than the rated ISO of the film.
Embedding. Including a color profile as part of the datawithin an image file. Color space, for example, is anembedded profile.
Emulation Profiles. Characteristic settings used in RAWfile converters to emulate certain types of film orother image effects.
EPS (Encapsulated PostScript). File format capable ofcontaining high-quality vector and bitmap graphics,including flexible font capabilities. The EPS formatis supported by most graphic, illustration, and page-layout software.
EXIF (Exchangeable Image Format). EXIF is a digitalimaging standard for storing metadata, such ascamera settings and other text, within digital imagefiles. EXIF data is found under File>File Info inPhotoshop.
Feathered Edge. Also known as the penumbra; the softedge of the circular light pattern from a light in aparabolic reflector.
Feathering. (1) Misdirecting the light deliberately so thatthe edge of the beam of light illuminates the subject.(2) In Photoshop, spreading the selection over awider area so as to minimize the apparent edge ofthe selected area.
Fill Card. A white or silver card used to reflect light backinto the shadow areas of the subject.
Fill Light. Secondary light source used to fill in the shad-ows created by the key light.
Flash Fill. Flash technique that uses electronic flash to fillin the shadows created by the main light source.
FireWire. A high-speed interface designed to transferdata at speeds of 400 to 800 megabits per second.FireWire technology transfers data uncompressed inreal time.
Flashing. A darkroom technique used in printing todarken an area of the print by exposing it to rawlight. The same technique can be achieved in Photo-shop using a transparent vignette.
Flashmeter. A handheld incident light meter that meas-ures both the ambient light of a scene and, whenconnected to an electronic flash, will read flash onlyor a combination of flash and ambient light. They
are invaluable for determining outdoor flash expo-sures and lighting ratios.
Flat. A large white or gray reflector, usually on castors,that can be moved around a set for bouncing lightonto the set or subject.
Focusing an Umbrella. Adjusting the length of theexposed shaft of an umbrella in a light housing tooptimize the light output.
Fresnel Lens. The glass filter on a spotlight that concen-trates the light rays into a narrow beam of light.
FTP (File Transfer Protocol). A means of opening aportal on a website for direct transfer of large files orfolders to or from a website.
Gamut. Fixed range of color values reproducible on adisplay (e.g., monitor) or output (e.g., printer)device. Gamut is determined by the color gamut,which refers to the actual range of colors, and thedynamic range, which refers to the brightness values.
Gaussian Blur. Filter used to blur a selection by anadjustable amount. Gaussian refers to the bell-shaped curve that is generated when Photoshop ap-plies a weighted average to the pixels. The GaussianBlur filter adds low-frequency detail and can pro-duce a hazy effect.
Gradient Map. A command that maps the equivalentgrayscale range of an image to the colors of a speci-fied gradient fill. If you specify a two-color gradientfill, for example, shadows in the image map to oneof the endpoint colors of the gradient fill, highlightsmap to the other endpoint color, and midtones mapto the gradations in between.
Grayscale. Color model consisting of up to 254 shades ofgray plus absolute black and absolute white. Everypixel of a grayscale image displays as a brightnessvalue ranging from 0 (black) to 255 (white). Theexact range of grays represented in a grayscale imagecan vary.
Highlight Brilliance. Refers to the specularity of high-lights on the skin. An image with good highlightbrilliance shows specular highlights (paper basewhite) within a major highlight area. Achievedthrough good lighting and exposure techniques.
Histogram. A graph associated with an image file thatindicates the number of pixels for each brightnesslevel. The range of the histogram represents 0 to255 from left to right, with 0 indicating “absolute”black and 255 indicating “absolute” white.
GLOSSARY 117

Hot Spots. (1) A highlight area of the image file that isoverexposed and without detail. Sometimes theseareas are etched down to a printable density. (2) Thecenter of the core of light that is often brighter thanthe edges of the light’s core.
ICC Profile. File that contains device-specific informa-tion that describes how the device behaves towardcolor density and color gamut. Since all devices com-municate differently as far as color is concerned, pro-files enable the color management system to convertdevice-dependent colors into or out of each specificcolor space based on the profile for each componentin the workflow. ICC profiles can utilize a device-independent color space to act as a translatorbetween two or more different devices.
Incident Light Meter. A handheld light meter thatmeasures the amount of light falling on its light-sen-sitive dome.
Interpolation. When an image is resampled, an interpo-lation method is used to assign color values to anynew pixels Photoshop creates, based on the colorvalues of existing pixels in the image. For interpola-tion, choose: bilinear for a medium-quality method;bicubic for the slow but more precise method,resulting in the smoothest tonal gradations; bicubicsmoother when you’re enlarging images; and bicu-bic sharper for reducing the size of an image. Thismethod maintains the detail in a resampled image. Itmay, however, oversharpen some areas of an image.In this case, try using bicubic.
JPEG (Joint Photographic Experts Group). JPEG isan image file format with various compression levels.The higher the compression rate, the lower theimage quality, when the file is expanded (restored).Although there is a form of JPEG that employs loss-less compression, the most commonly used forms ofJPEG employ lossy compression algorithms, whichdiscard varying amounts of the original image datain order to reduce file storage size.
LCD (Liquid Crystal Display). On digital SLRs, theLCD is used to display images and data.
Levels. In Photoshop, levels allows you to correct thetonal range and color balance of an image. In thelevels dialog box, input refers to the original intensi-ty values of the pixels in an image and output refersto the revised color values that are based on youradjustments.
Lighting Ratio. The difference in intensity between thehighlight side of the face and the shadow side of theface. A 3:1 ratio implies that the highlight side isthree times brighter than the shadow side.
Lossy/Lossless Files.Many file formats use compressionto reduce the file size of bitmap images. Losslesstechniques compress the file without removingimage detail or color information; lossy techniquesremove detail.
LPI (Lines Per Inch). Also known as screen ruling orline screen, screen frequency is measured in lines perinch (lpi) or lines of cells per inch in a halftonescreen. The higher an output device’s resolution, thefiner (higher) a screen ruling you can use. The rela-tionship between image resolution and screen fre-quency determines the quality of detail in the print-ed image. To produce a halftone image of the high-est quality, you generally use an image resolutionthat is two times the screen frequency.
Mask. In Photoshop, an adjustment tool that sits atop alayer, allowing you to isolate areas of an image as youapply color changes, filters, or other effects to theunmasked part of the image. When you select part ofan image, the area that is not selected is “masked” orprotected from editing.
Metadata. Metadata (literally, data about data) preservesinformation about the contents, copyright status,origin, and history of documents, and can be used tosearch for files.
Microdrive. Storage medium for portable electronicdevices using the CF Type II industry standard.Current microdrive capacities range from 340MB to1GB of storage. The benefit of a microdrive is highstorage capacity at a low cost. The downside is thesusceptibility to shock—bumping or dropping amicrodrive has been known to lead to data loss.
Modeling light. A secondary light mounted in the cen-ter of a studio flash head that gives a close approxi-mation of the lighting that the flash tube will pro-duce. Usually high-intensity quartz bulbs.
Monolight. A studio-type flash unit that is self-con-tained, including its own capacitor and discharge cir-cuitry. Monolights come with internal infrared flashtriggers so the light can be fired without directlyconnecting the flash to a camera or power pack.
NNooiissee.. Extraneous visible artifacts that degrade imagequality. Image noise is made up of luminance
118 THE BEST OF PROFESSIONAL DIGITAL PHOTOGRAPHY

(grayscale) noise, which makes an image look grainy,and chroma (color) noise, which is usually visible ascolored artifacts in the image. Photographing with ahigher ISO can result in images with objectionablenoise. Luminance smoothing reduces grayscalenoise, while color noise reduction reduces chromanoise.
Parabolic Reflector.Oval-shaped dish that houses a lightand directs its beam outward in an even, controlledmanner.
Penumbra. The soft edge of the circular light patternfrom a light in a parabolic reflector. It is also knownas the feathered edge of the undiffused light source.
Perspective. The appearance of objects in a scene asdetermined by their relative distance and position.
Pixel (Picture Element). Smallest element used to forman image on a screen or paper. Thousands of pixelsare used to display an image on a computer screen orprint an image from a printer.
Plug-Ins. Software programs developed by Adobe andby other software developers in conjunction withAdobe Systems to add features to Photoshop. Anumber of importing, exporting, and special-effectsplug-ins come with Photoshop; they are automati-cally installed inside the plug-ins folder.
PPI (Pixels Per Inch). Image file resolution is measuredin pixels per inch. A typical high-resolution file is300ppi.
Print Driver. Software that translates data from a device,usually a computer, into instructions that a specificprinter uses to create a graphical representation ofthat data on paper or other media.
Profiling. Method by which the color reproduction char-acteristics of a device are measured and recorded ina standardized fashion. Profiles are used to ensurecolor consistency throughout the workflow process.
PSD (Photoshop Document). The default file format inPhotoshop and the only format that supports allPhotoshop features. The PSD format saves all imagelayers created within the file.
RAW File. File format that uses lossless compressionalgorithms to record picture data directly from thesensor without applying any in-camera corrections.In order to use images recorded in the RAW format,files must first be processed by compatible software.RAW processing includes the option to adjust theexposure, white balance, and color of the image
while leaving the original RAW picture dataunchanged.
Reflected Light Meter. A meter that measures theamount of light reflected from a surface or scene. Allin-camera meters are of the reflected type.
Reflector. (1) Same as fill card. (2) A housing on a lightthat reflects the light outward in a controlled beam.
Resolution. The number of pixels or dots per inch.When printed, higher-resolution images can repro-duce more detail and subtler color transitions thanlower-resolution images because of the density ofthe pixels in the images.
RGB (Red, Green, and Blue). Computers and otherdigital devices handle color information as shadesand combinations of red, green, and blue. A 24-bitdigital camera, for example, will have 8 bits perchannel in red, green, and blue, resulting in 256shades of color per channel.
Scrim. A panel used to diffuse sunlight. Scrims can bemounted in panels and set in windows, used onstands, or they can be suspended in front of a lightsource to diffuse the light.
Shadow Edge. Where a highlight and shadow meet on asurface is the shadow edge. With hard light, theshadow edge is abrupt. With soft light the shadowedge is gradual. Also known as the transfer edge.
Sharpening. In Photoshop, filters that increase apparentsharpness by increasing the contrast of adjacent pix-els in an image.
Soft Proof. An on-screen preview of the document col-ors as they will be reproduced on a specified device.
Slave. A remote triggering device used to fire auxiliaryflash units. These may be either optical, or radio-controlled.
Snoot. A conical accessory that attaches to a light hous-ing’s reflector and narrows the beam of light. Snootsallow the illumination of very small areas with rela-tively bright light.
Softbox. Same as a box light. Can contain one or morelight heads and single or double-diffused scrims.
Specular Highlights. Sharp, dense image points on thenegative. Specular highlights are very small and usu-ally appear on pores in the skin. Specular highlightsare pure white with no detail.
Spotmeter. A handheld reflected light meter that meas-ures a narrow angle of view—usually from 1 to 4degrees.
GLOSSARY 119
Spot. See Spotlight.sRGB. Color-matching standard jointly developed by
Microsoft and Hewlett-Packard. Cameras, monitors,applications, and printers that comply with this stan-dard are able to reproduce colors the same way. Alsoknown as a color space designated for digital cam-eras. sRGB is suitable for RGB images destined forthe web but not recommended for print productionwork, according to Adobe.
TIFF (Tagged Image File Format). File format com-monly used for image files. TIFF files are lossless,meaning that no matter how many times they areopened and closed, the data remains the same(unlike JPEG files, which are designated as lossyfiles, meaning that data is lost each time the files areopened and closed).
Transfer Edge. See Shadow Edge.TTL-Balanced Fill Flash. System that reads the flash
exposure through the camera lens and adjusts flashoutput relative to the ambient light for a balancedflash–ambient exposure.
Umbrella Lighting. Type of soft, casual lighting thatuses one or more photographic umbrellas to diffusethe light source(s).
Umbra. The hot center portion of the light pattern froman undiffused light in a parabolic reflector.
Unsharp Mask. A sharpening filter in Adobe Photoshopthat is usually the last step in preparing an image forprinting.
USB/USB 2.0 (Universal Serial Bus). An external busstandard that supports data transfer rates of 12MBper second. USB is particularly well suited for high-speed downloading of images from your digital cam-era straight to your computer. USB 2.0 transfersdata at a much greater rate than USB, with a480MB-per-second rate in a dedicated USB 2.0port.
Vector Data. Vector images, also known as object-orient-ed graphics, are constructed using mathematical for-mulas to describe shapes, colors, and placement.Rather than a grid of pixels, a vector graphic consistsof shapes, curves, and lines that together make a pic-ture. Vector images are resolution-independent.Examples of vector graphic formats are PICT, EPS,and WMF as well as PostScript and TrueType fonts.
Vignette. A semicircular, soft-edged border around themain subject. Vignettes can be either light or dark intone and can be included at the time of shooting orcreated later in printing.
Watt-Seconds. Numerical system used to rate the poweroutput of electronic flash units. Primarily used torate studio strobe systems.
White Balance. The camera’s ability to correct color andtint when shooting under different lighting condi-tions, including daylight, indoor, and fluorescentlighting.
Working Color Space. Predefined color-managementsettings specifying the color profiles to be associatedwith the RGB, CMYK, and Grayscale color modes.The settings also specify the color profile for spotcolors in a document. Central to the color manage-ment workflow, these profiles are known as workingspaces. The working spaces specified by predefinedsettings represent the color profiles that will producethe best color fidelity for several common outputconditions.
Wraparound Lighting. Soft type of light that wrapsaround the subject, producing a low lighting ratioand open, well-illuminated highlight areas.
X-Sync Speed. The shutter speed at which focal-planeshutters synchronize with electronic flash.
Zebra. A term used to describe reflectors or umbrellashaving alternating reflecting materials such as silverand white cloth.
120 THE BEST OF PROFESSIONAL DIGITAL PHOTOGRAPHY
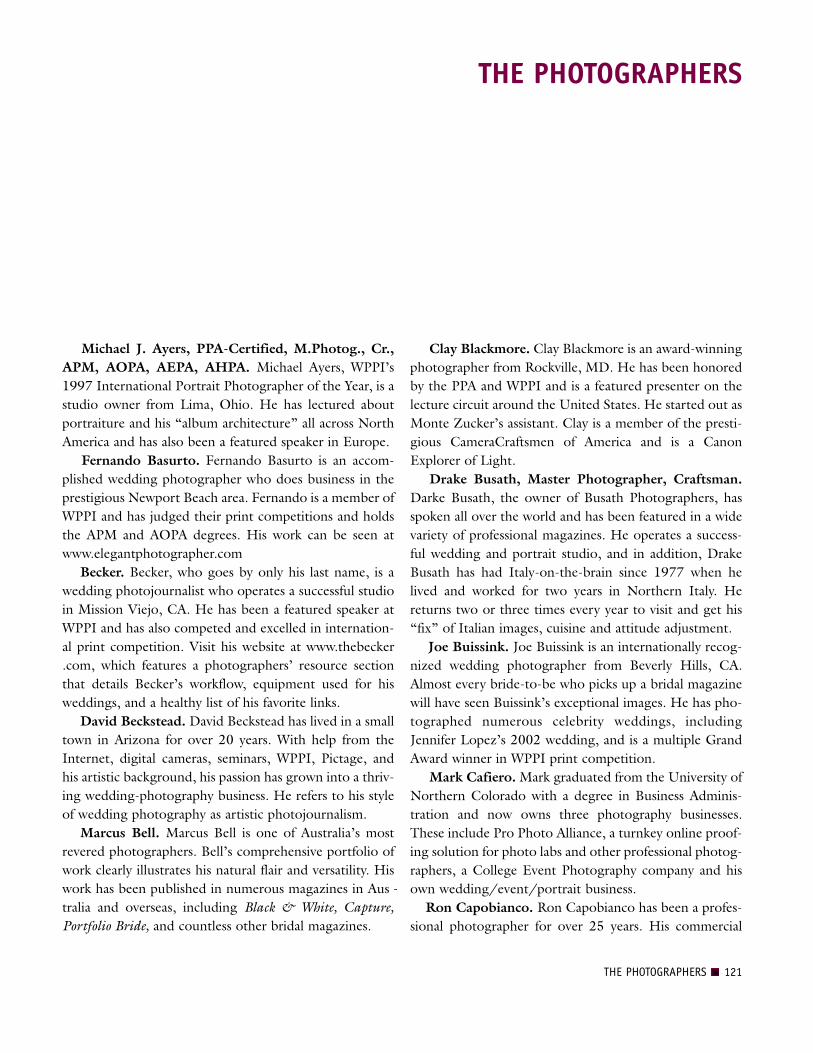
THE PHOTOGRAPHERS 121
Michael J. Ayers, PPA-Certified, M.Photog., Cr.,APM, AOPA, AEPA, AHPA. Michael Ayers, WPPI’s1997 International Portrait Photographer of the Year, is astudio owner from Lima, Ohio. He has lectured aboutportraiture and his “album architecture” all across NorthAmerica and has also been a featured speaker in Europe.
Fernando Basurto. Fernando Basurto is an accom-plished wedding photographer who does business in theprestigious Newport Beach area. Fernando is a member ofWPPI and has judged their print competitions and holdsthe APM and AOPA degrees. His work can be seen atwww.elegantphotographer.comBecker. Becker, who goes by only his last name, is a
wedding photojournalist who operates a successful studioin Mission Viejo, CA. He has been a featured speaker atWPPI and has also competed and excelled in internation-al print competition. Visit his website at www.thebecker.com, which features a photographers’ resource sectionthat details Becker’s workflow, equipment used for hisweddings, and a healthy list of his favorite links.David Beckstead. David Beckstead has lived in a small
town in Arizona for over 20 years. With help from theInternet, digital cameras, seminars, WPPI, Pictage, andhis artistic background, his passion has grown into a thriv-ing wedding-photography business. He refers to his styleof wedding photography as artistic photojournalism.Marcus Bell. Marcus Bell is one of Australia’s most
revered photographers. Bell’s comprehensive portfolio ofwork clearly illustrates his natural flair and versatility. Hiswork has been published in numerous magazines in Aus -tralia and overseas, including Black & White, Capture,Portfolio Bride, and countless other bridal magazines.
Clay Blackmore. Clay Blackmore is an award-winningphotographer from Rockville, MD. He has been honoredby the PPA and WPPI and is a featured presenter on thelecture circuit around the United States. He started out asMonte Zucker’s assistant. Clay is a member of the presti-gious CameraCraftsmen of America and is a CanonExplorer of Light.
Drake Busath, Master Photographer, Craftsman.Darke Busath, the owner of Busath Photog raphers, hasspoken all over the world and has been featured in a widevariety of professional magazines. He operates a success-ful wedding and portrait studio, and in addition, DrakeBusath has had Italy-on-the-brain since 1977 when helived and worked for two years in Northern Italy. Hereturns two or three times every year to visit and get his“fix” of Italian images, cuisine and attitude adjustment. Joe Buissink. Joe Buissink is an internationally recog-
nized wedding photographer from Beverly Hills, CA.Almost every bride-to-be who picks up a bridal magazinewill have seen Buissink’s exceptional images. He has pho-tographed numerous celebrity weddings, includingJennifer Lopez’s 2002 wedding, and is a multiple GrandAward winner in WPPI print competition.
Mark Cafiero.Mark graduated from the Univer sity ofNorthern Colorado with a degree in Business Ad minis -tration and now owns three photography businesses.These include Pro Photo Alliance, a turnkey online proof-ing solution for photo labs and other professional photog-raphers, a College Event Photography company and hisown wedding/event/portrait business.Ron Capobianco. Ron Capobianco has been a profes-
sional photographer for over 25 years. His commercial
THE PHOTOGRAPHERS

work has been seen in Vogue, W, Glamour, New York,French Vogue, Harper’s Bazaar, the New York Times, andMadam Figaro. His wedding work has been seen inModern Bride, Bride’s, Wedding Bells, Manhattan Bride,and other bridal publications. He also has collaborated onseveral book projects including, Eclectic Living: At Homewith Bari Lyn (Harper Collins, 1998) and Hair: TheInter-Beauty Collection (Intercommunication Magazine,1979) by Elena Domo. Anthony Cava, BA, MPA, APPO. Born and raised
in Ottawa, Ontario, Canada, Anthony Cava owns andoperates Photolux Studio with his brother, Frank. Frankand Anthony’s parents originally founded Photolux as awedding/portrait studio 30 years ago. Anthony joinedWPPI and the Professional Photographers of Canada 10years ago. At one time, he was the youngest Master ofPhotographic Arts (MPA) in Canada. Cava won WPPI’sGrand Award for the year with the first print that he everentered in competition.Mike Colón. Mike Colón is a celebrated wedding
photojournalist from the San Diego, CA, area. Colón’swork reveals his love for people and his passion for life.His natural and fun approach frees his subjects to bethemselves, revealing their true personalities and emo-tions. His images combine inner beauty, joy, life, and lovefrozen forever in time. He has spoken before nationalaudiences on the art of wedding photography.Cherie Steinberg Coté. Cherie began her photogra-
phy career as a photojournalist at the Toronto Sun and hadthe distinction of being the first female freelance photog-rapher for that paper. She was also honored with Canada’sequivalent of the National Endowment for the Arts.Cherie currently lives in Los Angeles and has recentlybeen published in the L.A. Times, Los Angeles Magazine,and Towne & Country.Jim DiVitale, M.Photog, MEI, Cr, API, F-ASP.
Jim DiVitale’s award-winning digital photography hasbeen featured in Graphis Photo, Print, Archive, Creativity,Photo Electronic Imaging, Digital Output Magazine,Digital Imaging, Rangefinder, and Photo District News.Jim has lectured before audiences at Seybold, Photo Plus,MAC Design, Imaging USA, HOW Design, WPPI, andWorld Council of Professional Photographers. His clientsinclude IBM, BP Amoco, Mizuno USA, Genuine PartsCompany, Witness Systems, JP Morgan Financial, TECAmerica, Coca-Cola USA, and Scientific Atlanta. Seemore of Jim’s work at www.DiVitalePhoto.com
Don Emmerich, M.Photog., M.Artist, M.EI, Cr.,CEI, CPPS. Don Emmerich is a virtuoso of the visualarts and one of the pioneers of applied photographic dig-ital imaging. He belongs to a select group of profession-als who have earned all four photographic degrees, andwas chosen to be a member of the exclusive CameraCraftsmen of America Society, comprised of the 40 topportrait photographers in the United States. Don hasbeen PPA’s Technical Editor for the past 12 years, withsome 150 articles published in various magazines, bothnationally and internationally.
Jim Fender. Jim Fender is part of Fender DonischPhotography in Naperville, IL. Fender has won numer-ous awards including many local honors, Fuji Masterpieceawards, and Kodak Gallery Awards. He also has severalprints on display at Epcot Center in Disney World as wellas in the PPA Traveling Loan collection. His studio haswon the Top Wedding Album for Illinois several times.
Jerry Ghionis. Jerry Ghionis of XSiGHT Photog -raphy and Video started his professional career in 1994and has established himself as one of Australia’s leadingphotographers. His versatility extends to the wedding,portrait, fashion, and corporate fields. Jerry’s efforts wererecognized in the industry, being honored with the 1999AIPP (Australian Institute of Professional Photog raphy)award for best new talent in Victoria. In 2002 Jerry wonthe AIPP Victorian Wedding Album of the Year, and in2003 he won Wedding Album of the Year and also takingthe Grand Award in the Album competition at WPPI.
Ann Hamilton. Ann Hamilton began her profession-al career as a journalist writing lifestyle stories for an EastCoast newspaper. Now, as a photographer documentingweddings, Ann combines her love of photography with ajournalistic sense and artistic flair. Ann’s work was hasbeen featured in Wedding Bells and The Knot magazines.She also won two honorable mentions at the WPPIInternational print competition, of which she is a mem-ber. She and her husband, Austin, along with their pug,Bogie, reside in San Francisco, CA.Jeff and Kathleen Hawkins. Jeff and Kathleen
Hawkins operate a high-end wedding and portrait pho-tography studio in Orlando, FL. They have authored sev-eral books, including Professional Mar keting & SellingTech niques for Wedding Photog raphers (2001) and Pro -fessional Techniques for Digi tal Wedding Photography (2nded., 2004), both published by Amherst Media. JeffHawkins has been a professional photographer for over
122 THE BEST OF PROFESSIONAL DIGITAL PHOTOGRAPHY
twenty years. Kathleen Hawkins holds a masters degree inbusiness administration and is past president of theWedding Professionals of Central Florida (WPCF) andpast affiliate vice president for the National Association ofCatering Executives (NACE). Visit their website at:www.jeffhawkins.com.Glenn Honiball. Glenn Honiball is the ultimate
Photoshop practioner. His clients are ad agencies—themost prestigious ones—from around the world. He hasworked for the likes of: J. Walter Thompson, OpticNerve, Brainstorm, Saatchi & Saatchi, and Zig, to namea few. Companies he’s worked for include such big namesas Ford, GE, BMW, Coke, Sony, Kraft Foods and theNFL. At this writing Glenn Honiball is working on a newbook, Com mercial Photoshop Retouching: In the Studio(O’Reilly, 2005). For a look at 80 of Glenn’s befores andafters, visit his web site: www.retouch.ca.
Kevin Jairaj. Kevin Jairaj is an award-winning wed-ding and portrait photographer whose creative eye hasearned him a stellar reputation in the Dallas/Fort Worth,TX, area. He is formerly a fashion photographer who usesskills learned in that discipline when shooting his wed-dings and portraits. His web site is: www.kjimages.com.Claude Jodoin. Claude Jodoin is an award-winning
photographer from Detroit, MI. He has been involved indigital imaging since 1986 and has not used film since1999. He is an event specialist and also shoots numerousweddings and portrait sessions throughout the year. Youcan e-mail him at claudej1 @aol.com.
Jeff Kolodny. Jeff Kolodny began his career as a pro-fessional photographer in 1985 after receiving a BA inFilm Production from Adelphi University in New York.Jeff recently relocated his business from Los Angeles toSouth Florida, where his ultimate goal is to produce dig-ital wedding photography that is cutting edge and thatsets him apart from others in his field.
Christian LaLonde. Chris is a native of Ottawa,Canada. After graduation from La Cite Collegiale, in1996 he took a job in a commercial studio in Ottawa,shooting food. He later taught lighting for his alma materand, while there, was approached by Anthony and FrankCava of Photolux Studio in Ottawa about opening a com-mercial division within Photolux. He gladly accepted andnow concentrates mostly on corporate, architectural,food, product, and editorial jobs. In 2002 and 2003 hewas awarded the prestigious Canadian CommercialPhotographer of the Year.
Kersti Malvre. After a long and successful career inthe fashion and cosmetics industries, Kersti Malvre dis-covered the world of hand-painted photography. Since1995, she has been devoted to this art form. She is nowrecognized as one of the top photographic artists in thecountry and holds the PPA Photographic Craftsman’sdegree for outstanding contributions to the portrait pho-tography profession.Charles and Jennifer Maring. Charles and Jennifer
Maring own Maring Photography, Inc. in Wallingford,CT. Charles is a second-generation photographer, his par-ents having operated a successful studio in New Englandfor many years. His parents now operate Rlab (www.res-olutionlab.com), a digital lab that does all of the work forMaring Photography, as well as for other discriminatingphotographers in need of high-end digital work. CharlesMaring is the winner of the WPPI 2001 Album of theYear Award. His work was recently featured in Peoplemagazine, which ran six pages of his images from the StarJones wedding.Leslie McIntosh. Continuing a family tradition into
the new millennium, Leslie McIntosh represents a newgeneration of high-quality portrait artists. Recentlyreturning to Virginia Beach to join the McIntosh familybusiness, Leslie completed her Bachelor of Fine Artsdegree from the Art Institute of Chicago, moving on toLondon and then Hamburg to build a successful career inthe advertising and fashion photography business. Shesensitively captures the mood of a subject’s character, per-sonality, and stage of life. Leslie has specialized in families,mothers and children, along with high school seniors, butis open to all markets.
Mercury Megaloudis. Mercury Megaloudis is anaward-winning Australian photographer and owner ofMegagraphics Photography in Strathmore, Victoria,Australia. The Australian Institute of ProfessionalPhotography awarded him the Master of Photographydegree in 1999. He has won awards all over Australia andhas recently begun entering and winning print competi-tion in the United States. Craig Minielly, MPA, SPA. Craig Minielly is the
owner and operator of AURA Photographics, a totallydigital photography studio servicing the Canadian marketfor the last 18 years. Craig is currently on the PPOCNational Exhibition Committee and is the National Ac -creditation Chairman for PPOC. He is a three-timeOntario Photographer of the Year, British Columbia
THE PHOTOGRAPHERS 123

Photographer of the Year finalist, and six-time CanadianPhotographer of the Year finalist. His Photoshop actionsare widely regarded as some of the best and most creativeplug-ins available. His website is www.craigsactions.com.Rich Nortnik, Jr. Educated in fine arts, Rich
Nortnik, Jr. is considered to be one of the world’s fore-most experts in Photoshop. In the last five years, he hasbeen awarded numerous design and digital- illustrationawards and has even been christened an official“Photoshop Guru.” As senior designer/illustrator for theShaw Group, one of the world’s largest engineering andconstruction firms, he has designed artwork and illustra-tions for transportation projects all over the world. VisitRich Nortnik Jr.’s website at www.richnortnikjr.com.Tim Schooler. Tim Schooler Photography is an
award-winning studio specializing in high-school seniorportrait photography with a cutting-edge style. Tim’soutstanding work has been published internationally inmagazines and books. His studio is located in Lafayette,LA. See Tim’s outrageous portfolio of senior images athis website: www.timschooler.com.Jeff Smith. Jeff Smith is an award-winning senior
pho tographer from Fresno, CA. He owns and operatestwo studios in Central California and is well recognized asa speaker on lighting and senior photography. He is theauthor of Corrective Lighting, Posing, and Retouching forDigital Portrait Photog raphers (Amherst Media, 2005),Senior Contracts (self-published), and Outdoor andLocation Portrait Photography (Amherst Media, 2003).He can be reached at www.jeffsmithphoto.com.David Clark Wendt. After years of shooting tradition-
al commercial work and stock photography, Cincinnati,OH, photographer David Clark Wendt has found hisniche in self-publishing calendars of fast-moving and slickcars. He has also produced award-winning calendars on18-wheelers and steam locomotives. An entrepreneur,Wendt started with the bare minimum print run of 5000calendars and is now printing 40,000 a year. His work canbe purchased in Borders and other popular bookstores.His work can be seen at www.wendtworldwide.com.David Anthony Williams, M.Photog., FRPS,
AOPA. David Anthony Williams owns and operates awedding studio in Ashburton, Victoria, Australia. In1992, he achieved the rare distinction of receivingAssociateship and Fellow ship of the Royal Photo graphicSociety of Great Britain (FRPS) on the same day.Through the annual Australian Profes sional Pho tog raphy
Awards system, Williams achieved the level of Master ofPhotography with Gold Bar—the equivalent of a doublemaster. In 2000, he was awarded the Accolade ofOutstanding Photographic Achievement from WPPI andwas a Grand Award winner at their annual conventions inboth 1997 and 2000.Jeffrey and Julia Woods. Jeffrey and Julia Woods are
award-winning wedding and portrait photographers fromWashington, IL, who work as a team. They have beenawarded Best Wedding Album of the Year for 2002 and2003, two Fuji Masterpiece awards, a Kodak GalleryAward, and Best of Show at the APPI fall convention. In2002 and 2003, they were named Top Ten Photog -raphers in Illinois. To see more of their beautiful images,just visit www.jwweddinglife.com.David Worthington, L.M.P.A. David Worthington is
a professional photographer who specializes in classicalwedding photography. David is one of only two photog-raphers in the northwest UK to have a wedding imagepublished in a book celebrating the best professional pho-tos from photographers over the last fifty years. This isindeed a fine achievement as only fifty images were select-ed from entries sent from around the world. Two ofDavid’s most recent awards include the 2003 ClassicalWedding Photographer of the Year Award for the UK,Northwest Region, and 2003 Licentiate WeddingPhotog rapher of the Year, UK, Northwest Region. Yervant Zanazanian, M. Photog. AIPP, F.AIPP.
Yervant was born in Ethiopia, lived and studied in Italy,then settled in Australia 25 years ago. His passion forphotography and the darkroom began at a young age,when he worked after school at a photography businessrun by his father, photographer to Emperor Hailé Silasséof Ethiopia. Yervant owns one of the most prestigiousphotography studios of Australia and services clients bothnationally and internationally. His awards are too numer-ous to mention, but he has been Aus tralia’s WeddingPhotographer of the Year three of the past four years.Monte Zucker.When it comes to perfection in posing
and lighting, timeless imagery, and contemporary, yetclassical photographs, Monte Zucker is world famous.He’s been bestowed every major honor the photograph-ic profession offers, including WPPI’s Lifetime Achieve -ment Award. In his endeavor to educate photographers atthe highest level, Monte, along with his partner, GaryBern stein, has created an information-based web site forphotographers, www.Zuga.net.
124 THE BEST OF PROFESSIONAL DIGITAL PHOTOGRAPHY

A
Adobe Photoshop, 49–50, 59, 91–113
actions, 91–92blemishes, eliminating, 104Clone tool, 96color and black & white, mixing, 103–4, 105–9
contact sheets, 111eyes, enhancing, 105file size, changing, 49–50, 112–13
Healing Brush, 96layers, 93–96, 110–11Levels command, 102Liquify filter, 96retouching, basic, 96–100retouching, facial, 104–5selective color, 100–102Shadow/Highlight command, 102
sharpening, 50, 59, 99–100skin, smoothing, 104soft color, 104soft focus, 96–97toning, 102verticals, straightening, 98–99vignetting, 97–98
Advantages of digital capture, 6–10Archival permanence, 10Autofocus technology, 19–21
B
Backup equipment, 27Batteries, 29Burst rate, 27
C
Camera equipment, 15–29, 56–58batteries, 29burst rate, 27effective pixels, 27file formats, 28ISO range, 26LCD monitor, 27, 56lens capability and accessories, 29lens conversion factor, 27PC terminal, 28playback options, 27price, 29removable media, 21–24, 29shutter-lag time, 28–29white balance, 29, 56–58
Camera settings, 26, 50, 56–59color space, 58–59contrast, 58ISO settings, 26, 57metadata, 59noise, 57sharpening, 50, 59white balance, 29, 56–58
Color management, 73–80camera profiles, 76–78
(Color management, cont’d)monitor profiles, 75–76printer profiles, 78–79soft proofing, 79–80viewing area, optimizing, 75
D
Device profiling, see Color management
Digital retouching, 11DSLRs, see Camera equipment
E
Exposure, 50–56determining camera’s E.I., 50–52
evaluating, 54–56histograms, 54–56metering, 52–54
F
File formats, 28, 49, 60–72compression, 60GIF, 62JPEG, 61, 65–66JPEG 2000, 61–62Photoshop EPS, 63Photoshop RAW, 64–65PSD, 63–64RAW, 65–71; see also RAW files, working with
INDEX 125
INDEX

(File formats, cont’d)TIFF, 62–63
File size, 46–50, 112–13changing, 49–50file format, effect of, 49interpolation, 49–50, 112–13resampling, 49resolution, 48–49
H
Histograms, 54–56
I
Image sensors, 24–26CCD vs. CMOS, 24–25cleanliness, 26sensor size, 25–26
ISO settings, 26, 57
L
Lens selection, 15–21, 27autofocus, 19–21focal-length factors, 15, 27telephoto, 19wide-angle, 16zoom vs. prime, 15–18
Lighting equipment, 30–45barebulb, 32–33barn doors, 33bounce-flash devices, 44color temperature, 32diffusers, 33–34flash duration, 30–31
(Lighting equipment, cont’d)flash, on-camera, 43–44flats, 34gobos, 34–35grid spots, 35–36light tents, 36mirrors, 39modeling lights, 31–32parabolics, 39–41power, 30recycle times, 31reflectors, 39reflectors, narrow-angle, 39reflectors, wide-angle, 39scrims, 42snoots, 41softboxes, 41–43spotlights, 43strip lights, 43studio strobe systems, 30–43umbrellas, 43video lights, handheld, 45
M
Metadata, 59Metering, 52–54
R
RAW files, working with, 65–71Adobe Camera RAW, 69–71file converters, 66–71RAW vs. JPEG, 65–66
Remote capture, 11–14
Resolution, 48–49Retouching techniques, 96–100
S
Sharpening, 50, 59, 99–100Soft focus, 96–97Storage media, removable, 21–24,
29, 71card readers, 24reformatting, 71types, 21–23, 29write speeds, 23–24
T
Toning, digital, 102
V
Verticals, straightening, 98–99Vignetting, 97–98
W
White balance, 29Wireless transfer, 11–14Workflow methods, 81–90album design, 86on location, 88printing options, 82proofing options, 86WiFi, 89–90with JPEG capture, 81–86
126 THE BEST OF PROFESSIONAL DIGITAL PHOTOGRAPHY
ARTISTIC TECHNIQUES WITHADOBE® PHOTOSHOP® ANDCOREL® PAINTER®
Deborah Lynn FerroFlex your creative skills and learn how to transformphotographs into fine-art masterpieces. Step-by-step techniques make it easy! $34.95 list, 81⁄2x11,128p, 200 color images, index, order no. 1806.
DIGITAL PHOTOGRAPHYBOOT CAMPKevin KubotaKevin Kubota’s popular workshop is now a book! Adown-and-dirty, step-by-step course in building aprofessional photography workflow and creatingdigital images that sell! $34.95 list, 81⁄2x11, 128p,250 color images, index, order no. 1809.
MARKETING & SELLING TECHNIQUES FOR DIGITAL PORTRAIT PHOTOGRAPHERS
Kathleen HawkinsGreat portraits aren’t enough to ensure the suc cessof your business! Learn how to attract clients andboost your sales. $34.95 list, 81⁄2x11, 128p, 150color photos, index, order no. 1804.
PROFITABLE PORTRAITSTHE PHOTOGRAPHER’S GUIDE TOCREATING PORTRAITS THAT SELL
Jeff SmithLearn how to design images that are preciselytailored to your clients’ tastes—portraits that willpractically sell themselves! $29.95 list, 81⁄2x11, 128p,100 color photos, index, order no. 1797.
PROFESSIONAL TECHNIQUES FOR
BLACK & WHITE DIGITAL PHOTOGRAPHYPatrick RiceDigital makes it easier than ever to create black &white images. With these techniques, you’ll learn toachieve dazzling results! $29.95 list, 81⁄2x11, 128p,100 color photos, index, order no. 1798.
DIGITAL INFRAREDPHOTOGRAPHYPatrick RiceThe dramatic look of infrared photography has longmade it popular—but with digital it’s actually easytoo! Add digital IR to your repertoire with thiscomprehensive book. $29.95 list, 81⁄2x11, 128p,100 b&w and color photos, index, order no. 1792.
LIGHTING TECHNIQUES FOR
FASHION AND GLAMOURPHOTOGRAPHYStephen A. Dantzig, PsyD.In fashion and glamour photography, light is thekey to producing images with impact. With thesetechniques, you’ll be primed for success! $29.95list, 81⁄2x11, 128p, over 200 color images, index,order no. 1795.
MASTER LIGHTING GUIDE FOR PORTRAIT PHOTOGRAPHERS
Christopher GreyEfficiently light executive and model portraits, highand low key images, and more. Master traditionallighting styles and use creative modi-fications thatwill maximize your results. $29.95 list, 81⁄2x11,128p, 300 color photos, index, order no. 1778.
POWER MARKETING FORWEDDING AND PORTRAITPHOTOGRAPHERSMitche GrafSet your business apart and create clients for lifewith this comprehensive guide to achieving yourprofessional goals. $29.95 list, 81⁄2x11, 128p, 100color images, index, order no. 1788.
POSING FOR PORTRAITPHOTOGRAPHYA HEAD-TO-TOE GUIDE
Jeff SmithAuthor Jeff Smith teaches surefire techniques forfine-tuning every aspect of the pose for the mostflattering results. $29.95 list, 81⁄2x11, 128p, 150color photos, index, order no. 1786.
OTHER BOOKS FROM
Amherst Media®

Amherst MediaPUBLISHER OF PHOTOGRAPHY BOOKS
PO Box 586Buffalo, NY 14226
www.AmherstMedia.com
$34.95 USA$47.95 Canada
M A S T E R S S E R I E S ™
Go behind the scenes with industry leaders and dis-cover how digital technology is changing every facet
of professional photography.
FEATURES:Understanding the advantages of digital capture—and howthey can improve your photography
Features to consider when purchasing a digital SLR system
What to look for in lighting equipment for digital photography, whether in the studio or on location
Good digital working techniques to get the best resultswith every capture
Developing an effective and efficient digital workflow
Techniques for color management and device profiling
Digital retouching and enhancement techniques for flawless images#1824
Michael Ayers
Marcus Bell
Clay Blackmore
Joe Buissink
Drake Busath
Glenn Honiball
Claude Jodoin
Christian LaLonde
Rich Nortnik, Jr.
Jeff Smith
Monte Zucker
. . . and more!
FEATURING TECHNIQUES AND IMAGES BY . . .