Embed Size (px)
Citation preview

BIG-IP® Access Policy Manager®:VMware Horizon View Integration
Implementations
Version 11.4

Table of Contents
Legal Notices.....................................................................................................5
Acknowledgments.............................................................................................7
Chapter 1: VMware Horizon View Requirements for APM Integration................................11
About VMware Horizon View server required settings.....................................................12
About VMware Horizon View server settings and SSL offloading....................................12
Chapter 2: Authenticating Standalone View Clients with APM............................................13
Overview: Authenticating View Client with APM...............................................................14
Creating a pool of View Connection Servers.........................................................14
Configuring a VMware View remote desktop resource..........................................15
Configuring a full webtop.......................................................................................15
Creating an access profile ....................................................................................16
Creating an access policy for View Client authentication......................................16
Creating a connectivity profile...............................................................................18
Creating a custom server SSL profile....................................................................19
Configuring an HTTPS virtual server for View Client authentication.....................19
Configuring a UDP virtual server for PCoIP traffic................................................20
Configuring for virtual servers that use a private IP address................................20
Chapter 3: Presenting a View Desktop on an APM Webtop ................................................23
Overview: Accessing a View Desktop from an APM webtop............................................24
About client requirements to launch View Client from a webtop...........................24
Creating a pool of View Connection Servers.........................................................24
Configuring a VMware View remote desktop resource..........................................25
Configuring a full webtop.......................................................................................26
Creating an access profile ....................................................................................26
Creating an access policy for a dynamic webtop..................................................26
Assigning resources to the access policy..............................................................28
Creating a connectivity profile...............................................................................29
Creating a custom server SSL profile....................................................................29
Configuring an HTTPS virtual server for a dynamic webtop.................................29
Configuring a UDP virtual server for PCoIP traffic................................................30
Configuring for virtual servers that use a private IP address................................31
Chapter 4: Tips for Standalone View Client and Dynamic Webtop Integration..................33
Example access policy for standalone View Client and View on webtop.........................34
About a configuration for standalone View Client and View on webtop............................35
3
Table of Contents
Chapter 5: Configuring AAA Servers in APM........................................................................37
About VMware View and APM authentication types........................................................38
Task summary..................................................................................................................38
Configuring an Active Directory AAA server ........................................................38
Configuring a SecurID AAA server in APM ..........................................................39
4
Table of Contents
Legal Notices
Publication Date
This document was published on July 29, 2013.
Publication Number
MAN-0464-00
Copyright
Copyright © 2012-2013, F5 Networks, Inc. All rights reserved.
F5 Networks, Inc. (F5) believes the information it furnishes to be accurate and reliable. However, F5 assumesno responsibility for the use of this information, nor any infringement of patents or other rights of thirdparties which may result from its use. No license is granted by implication or otherwise under any patent,copyright, or other intellectual property right of F5 except as specifically described by applicable userlicenses. F5 reserves the right to change specifications at any time without notice.
Trademarks
AAM, Access Policy Manager, Advanced Client Authentication, Advanced Firewall Manager, AdvancedRouting, AFM, Alive With F5, APM, Application Acceleration Manager, Application Security Manager,ARX, AskF5, ASM, BIG-IP, BIG-IQ, Cloud Extender, CloudFucious, Cloud Manager, ClusteredMultiprocessing, CMP, COHESION, Data Manager, DevCentral, DevCentral [DESIGN], DNS Express,DSC, DSI, Edge Client, Edge Gateway, Edge Portal, ELEVATE, EM, Enterprise Manager, ENGAGE, F5,F5 [DESIGN], F5 Certified [DESIGN], F5 Networks, Fast Application Proxy, Fast Cache, FirePass, GlobalTrafficManager, GTM,GUARDIAN, iApps, IBR, Intelligent Browser Referencing, Intelligent Compression,IPv6 Gateway, iControl, iHealth, iQuery, iRules, iRules OnDemand, iSession, L7 Rate Shaping, LC, LinkController, Local TrafficManager, LTM, LineRate, LineRate Systems [DESIGN], LROS,Message SecurityManager, MSM, OneConnect, Packet Velocity, PEM, Policy Enforcement Manager, Protocol SecurityManager, PSM, Real Traffic Policy Builder, ScaleN, Signalling Delivery Controller, SDC, SSLAcceleration,StrongBox, SuperVIP, SYN Check, TCP Express, TDR, TMOS, Traffic Management Operating System,Traffix Systems, Traffix Systems (DESIGN), Transparent Data Reduction, UNITY, VAULT, VIPRION,vCMP, VE F5 [DESIGN], Virtual Clustered Multiprocessing, WA, WAN Optimization Manager,WebAccelerator, WOM, and ZoneRunner, are trademarks or service marks of F5 Networks, Inc., in theU.S. and other countries, and may not be used without F5's express written consent.
All other product and company names herein may be trademarks of their respective owners.
Patents
This product may be protected by U.S. Patent 7,114,180; 8,301,837. This list is believed to be current as ofJuly 29, 2013.
Export Regulation Notice
This product may include cryptographic software. Under the Export Administration Act, the United Statesgovernment may consider it a criminal offense to export this product from the United States.
RF Interference Warning
This is a Class A product. In a domestic environment this product may cause radio interference, in whichcase the user may be required to take adequate measures.

FCC Compliance
This equipment has been tested and found to comply with the limits for a Class A digital device pursuantto Part 15 of FCC rules. These limits are designed to provide reasonable protection against harmfulinterference when the equipment is operated in a commercial environment. This unit generates, uses, andcan radiate radio frequency energy and, if not installed and used in accordance with the instruction manual,may cause harmful interference to radio communications. Operation of this equipment in a residential areais likely to cause harmful interference, in which case the user, at his own expense, will be required to takewhatever measures may be required to correct the interference.
Anymodifications to this device, unless expressly approved by themanufacturer, can void the user's authorityto operate this equipment under part 15 of the FCC rules.
Canadian Regulatory Compliance
This Class A digital apparatus complies with Canadian ICES-003.
Standards Compliance
This product conforms to the IEC, European Union, ANSI/UL and Canadian CSA standards applicable toInformation Technology products at the time of manufacture.
6
Legal Notices
Acknowledgments
This product includes software developed by Bill Paul.
This product includes software developed by Jonathan Stone.
This product includes software developed by Manuel Bouyer.
This product includes software developed by Paul Richards.
This product includes software developed by the NetBSD Foundation, Inc. and its contributors.
This product includes software developed by the Politecnico di Torino, and its contributors.
This product includes software developed by the Swedish Institute of Computer Science and its contributors.
This product includes software developed by the University of California, Berkeley and its contributors.
This product includes software developed by the Computer Systems Engineering Group at the LawrenceBerkeley Laboratory.
This product includes software developed by Christopher G. Demetriou for the NetBSD Project.
This product includes software developed by Adam Glass.
This product includes software developed by Christian E. Hopps.
This product includes software developed by Dean Huxley.
This product includes software developed by John Kohl.
This product includes software developed by Paul Kranenburg.
This product includes software developed by Terrence R. Lambert.
This product includes software developed by Philip A. Nelson.
This product includes software developed by Herb Peyerl.
This product includes software developed by Jochen Pohl for the NetBSD Project.
This product includes software developed by Chris Provenzano.
This product includes software developed by Theo de Raadt.
This product includes software developed by David Muir Sharnoff.
This product includes software developed by SigmaSoft, Th. Lockert.
This product includes software developed for the NetBSD Project by Jason R. Thorpe.
This product includes software developed by Jason R. Thorpe for AndCommunications, http://www.and.com.
This product includes software developed for the NetBSD Project by Frank Van der Linden.
This product includes software developed for the NetBSD Project by John M. Vinopal.
This product includes software developed by Christos Zoulas.
This product includes software developed by the University of Vermont and State Agricultural College andGarrett A. Wollman.
This product includes software developed by Balazs Scheidler ([email protected]), which is protected underthe GNU Public License.
This product includes software developed by Niels Mueller ([email protected]), which is protected underthe GNU Public License.
In the following statement, This software refers to theMitsumi CD-ROMdriver: This software was developedby Holger Veit and Brian Moore for use with 386BSD and similar operating systems. Similar operatingsystems includes mainly non-profit oriented systems for research and education, including but not restrictedto NetBSD, FreeBSD, Mach (by CMU).
This product includes software developed by the Apache Group for use in the Apache HTTP server project(http://www.apache.org/).
This product includes software licensed from Richard H. Porter under the GNU Library General PublicLicense (© 1998, Red Hat Software), www.gnu.org/copyleft/lgpl.html.
This product includes the standard version of Perl software licensed under the Perl Artistic License (© 1997,1998 TomChristiansen and Nathan Torkington). All rights reserved. Youmay find the most current standardversion of Perl at http://www.perl.com.
This product includes software developed by Jared Minch.
This product includes software developed by the OpenSSL Project for use in the OpenSSL Toolkit(http://www.openssl.org/).
This product includes cryptographic software written by Eric Young ([email protected]).
This product contains software based on oprofile, which is protected under the GNU Public License.
This product includes RRDtool software developed by Tobi Oetiker (http://www.rrdtool.com/index.html)and licensed under the GNU General Public License.
This product contains software licensed from Dr. Brian Gladman under the GNU General Public License(GPL).
This product includes software developed by the Apache Software Foundation (http://www.apache.org/).
This product includes Hypersonic SQL.
This product contains software developed by the Regents of the University of California, SunMicrosystems,Inc., Scriptics Corporation, and others.
This product includes software developed by the Internet Software Consortium.
This product includes software developed by Nominum, Inc. (http://www.nominum.com).
This product contains software developed by Broadcom Corporation, which is protected under the GNUPublic License.
This product contains software developed byMaxMind LLC, and is protected under the GNULesser GeneralPublic License, as published by the Free Software Foundation.
This product includes Intel QuickAssist kernel module, library, and headers software licensed under theGNU General Public License (GPL).
This product includes software licensed fromGerald Combs ([email protected]) under the GNUGeneralPublic License as published by the Free Software Foundation; either version 2 of the License, or any laterversion. Copyright ©1998 Gerald Combs.
This product includes software developed by Daniel Stenberg. Copyright ©1996 - 2012, Daniel Stenberg,([email protected]). All rights reserved.
Permission to use, copy, modify, and distribute this software for any purpose with or without fee is herebygranted, provided that the above copyright notice and this permission notice appear in all copies.
THE SOFTWARE IS PROVIDED "AS IS", WITHOUT WARRANTY OF ANY KIND, EXPRESS ORIMPLIED, INCLUDING BUT NOT LIMITED TO THE WARRANTIES OF MERCHANTABILITY,FITNESS FOR A PARTICULAR PURPOSE ANDNONINFRINGEMENTOF THIRD PARTY RIGHTS.IN NO EVENT SHALL THEAUTHORSORCOPYRIGHTHOLDERS BE LIABLE FORANYCLAIM,DAMAGES OR OTHER LIABILITY, WHETHER IN AN ACTION OF CONTRACT, TORT OROTHERWISE, ARISING FROM, OUT OF OR IN CONNECTION WITH THE SOFTWARE OR THEUSE OR OTHER DEALINGS IN THE SOFTWARE.
8
Acknowledgments

Except as contained in this notice, the name of a copyright holder shall not be used in advertising or otherwiseto promote the sale, use or other dealings in this Software without prior written authorization of the copyrightholder.
This product includes software developed by Thomas Williams and Colin Kelley. Copyright ©1986 - 1993,1998, 2004, 2007
Permission to use, copy, and distribute this software and its documentation for any purpose with or withoutfee is hereby granted, provided that the above copyright notice appear in all copies and that both thatcopyright notice and this permission notice appear in supporting documentation. Permission to modify thesoftware is granted, but not the right to distribute the complete modified source code. Modifications are tobe distributed as patches to the released version. Permission to distribute binaries produced by compilingmodified sources is granted, provided you
1. distribute the corresponding source modifications from the released version in the form of a patch filealong with the binaries,
2. add special version identification to distinguish your version in addition to the base release versionnumber,
3. provide your name and address as the primary contact for the support of your modified version, and4. retain our contact information in regard to use of the base software.
Permission to distribute the released version of the source code alongwith corresponding sourcemodificationsin the form of a patch file is granted with same provisions 2 through 4 for binary distributions. This softwareis provided "as is" without express or implied warranty to the extent permitted by applicable law.
This product contains software developed by Google, Inc. Copyright ©2011 Google, Inc.
Permission is hereby granted, free of charge, to any person obtaining a copy of this software and associateddocumentation files (the "Software"), to deal in the Software without restriction, including without limitationthe rights to use, copy, modify, merge, publish, distribute, sublicense, and/or sell copies of the Software,and to permit persons to whom the Software is furnished to do so, subject to the following conditions:
The above copyright notice and this permission notice shall be included in all copies or substantial portionsof the Software.
THE SOFTWARE IS PROVIDED "AS IS", WITHOUT WARRANTY OF ANY KIND, EXPRESS ORIMPLIED, INCLUDING BUT NOT LIMITED TO THE WARRANTIES OF MERCHANTABILITY,FITNESS FOR A PARTICULAR PURPOSE ANDNONINFRINGEMENT. IN NO EVENT SHALL THEAUTHORS OR COPYRIGHT HOLDERS BE LIABLE FOR ANY CLAIM, DAMAGES OR OTHERLIABILITY, WHETHER IN ANACTIONOF CONTRACT, TORT OROTHERWISE, ARISING FROM,OUT OF OR IN CONNECTION WITH THE SOFTWARE OR THE USE OR OTHER DEALINGS INTHE SOFTWARE.
9
BIG-IP® Access Policy Manager®: VMware View Integration Implementations


Chapter
1VMware Horizon View Requirements for APM Integration
• About VMware Horizon View server requiredsettings
• About VMware Horizon View server settingsand SSL offloading

About VMware Horizon View server required settings
To integrate Access Policy Manager® with VMware Horizon View, you must meet specific configurationrequirements for VMware, as described here.
SecureTunnel and PCoIP Secure Gateway disabledEnsure that Secure Tunnel and PCoIP Secure Gateway are disabled on the VMware Horizon Viewserver.
Advanced authentication disabledEnsure that RSA authentication and other advanced authentication types are disabled on the VMwareHorizon View server.
About VMware Horizon View server settings and SSL offloading
If you want to use Access Policy Manager® (APM®) to offload SSL from VMware View Horizon servers,you must configure your VMware View Horizon servers for SSL offloading. For more information, referto the administration guide for your VMware Horizon View server and search for Off-load SSL Connections.
Note: APM supports SSL offloading. However, it is not a requirement for integrating APM with VMware.
12
VMware Horizon View Requirements for APM Integration

Chapter
2Authenticating Standalone View Clients with APM
• Overview: Authenticating View Client withAPM

Overview: Authenticating View Client with APM
Access Policy Manager® can present VMware View logon pages on a View Client, perform authentication,and load-balance VMware View Connection Servers. APM® supports the PC over IP (PCoIP) displayprotocol for the virtual desktop.
A View Client makes connections to support different types of traffic between it and a View ConnectionServer. APM supports these connections with two virtual servers that share the same destination IP address.
Task summaryCreating a pool of View Connection ServersConfiguring a VMware View remote desktop resourceConfiguring a full webtopCreating an access profileCreating an access policy for View Client authenticationCreating a connectivity profileCreating a custom server SSL profileConfiguring an HTTPS virtual server for View Client authenticationConfiguring a UDP virtual server for PCoIP trafficConfiguring for virtual servers that use a private IP address
Creating a pool of View Connection Servers
You create a pool of View Connection Servers to provide load-balancing and high-availability functions.
1. On the Main tab, click Local Traffic > Pools.The Pool List screen opens.
2. Click Create.The New Pool screen opens.
3. In the Name field, type a unique name for the pool.4. In the Resources area, using theNewMembers setting, add each View Connection Server that you want
to include in the pool:a) Type an IP address in the Address field, or select a node address from the Node List.b) In the Service Port field, type 443 (if your View Connection Servers use HTTPS), or type 80 (if
your View Connection Servers use HTTP).By default, View Connection Servers use HTTPS. However, if you configure your View ConnectionServers for SSL offloading, they use HTTP.
c) Click Add.
5. Click Finished.
The new pool appears in the Pools list.
14
Authenticating Standalone View Clients with APM

Configuring a VMware View remote desktop resource
Configure a VMware View remote desktop resource so that you can log on to a View Connection Serverand gain access to a standalone View Client, or launch a View desktop from an APM® webtop, dependingon the access policy.
1. On the Main tab, click Access Policy > Application Access > Remote Desktops.The Remote Desktops list opens.
2. Click Create.The New Resource screen opens.
3. For the Type setting, select VMware View.4. For the Destination setting, select Pool and from the Pool Name list, select a pool of View Connection
Servers that you configured previously.5. For the Server Side SSL setting:
• Select the Enable check box if your View Connection Servers use HTTPS (default).• Clear the Enable check box if your View Connection Servers use HTTP; that is, they are configured
for SSL offloading.
6. In the Auto Logon area, select the Enable check box, so that a user can automatically log on to a ViewConnection Server after logging in to APM®.If you enable auto logon, you must also configure credential sources.a) In the Username Source field, accept the default or type the session variable to use as the source
for the auto logon user name.b) In the Password Source field, accept the default or type the session variable to use as the source for
the auto logon user password.c) In the Domain Source field, accept the default or type the session variable to use as the source for
the auto logon user domain.
7. In the Customization Settings for language_name area, type a Caption.The caption is the display name of the VMware View resource on the APM full webtop.
8. Click Finished.All other parameters are optional.
This creates the VMware View remote desktop resource. To use it, you must assign it along with a fullwebtop in an access policy.
Configuring a full webtop
You can use a full webtop to provide web-based access to VMware View and other resources.
1. On the Main tab, click Access Policy >Webtops.The Webtops screen opens.
2. Click Create.The New Webtop screen opens.
3. Type a name for the webtop.4. From the Type list, select Full.
The Configuration area displays with additional settings configured at default values.5. Click Finished.
15
BIG-IP® Access Policy Manager®: VMware View Integration Implementations

The webtop is now configured and appears in the webtop list.
Creating an access profile
You create an access profile to provide the access policy configuration for a virtual server that establishesa secured session.
1. On the Main tab, click Access Policy > Access Profiles.The Access Profiles List screen opens.
2. Click Create.The New Profile screen opens.
3. Type a name for the access profile.4. In the Language Settings area, add and remove accepted languages, and set the default language.
A browser uses the highest priority accepted language. If no browser language matches the acceptedlanguages list, the browser uses the default language.
5. Click Finished.
This creates an access profile with a default access policy.
Creating an access policy for View Client authentication
Before you create this access policy, configure the AAA server (or servers) to use for authentication.
Note: The standalone View Client supports authentication with Active Directory domain credentials(required) and with an RSA SecureID PIN (optional). To use both types of authentication, place the ActiveDirectory logon and authentication actions after the RSA logon and authentication actions.
Create an access policy so that a standalone View Client can use a View desktop after logging on andauthenticating with Access Policy Manager® (APM®).
1. On the Main tab, click Access Policy > Access Profiles.The Access Profiles List screen opens.
2. In the Access Policy column, click the Edit link for the access profile you want to configure to launchthe visual policy editor.The visual policy editor opens the access policy in a separate screen.
3. Click the (+) sign anywhere in the access policy to add a new action item.An Add Item screen opens, listing predefined actions on tabs such as General Purpose, Authentication,and so on.
4. Type client in the search field, select Client Type from the results list, and click Add Item.The Client Type action identifies clients and enables branching based on the client type.A properties screen opens.
5. Click Save.The properties screen closes. The visual policy editor displays the Client Type action. A VMware Viewbranch follows it. Add the remaining actions on the VMware View branch.
6. Configure logon and authentication actions for Active Directory:Active Directory authentication is required.a) Click the (+) sign on the VMware View branch. An Add Item screen opens, listing predefined actions
on tabs such as General Purpose, Authentication, and so on
16
Authenticating Standalone View Clients with APM

b) On the Logon tab, select VMware View Logon Page, and click Add Item.A properties screen displays.
c) From the VMware View Logon Screen Type list, retain the default settingWindows Password.d) In the VMware View Windows Domains field, type domain names separated by spaces to use for
Active Directory authentication.Type at least one domain name. These domains names are displayed on the View Client.
e) Click Save.The properties screen closes and the visual policy editor is displayed.
f) Click the plus (+) icon after the previous VMware View Logon Page action.A popup screen opens.
g) On the Authentication tab, select AD Auth and click Add Item.h) From the Server list, select an AAA server and click Save.
The properties screen closes.
7. Assign a full webtop and the VMware View remote desktop resource that you configured previously.a) Click the (+) sign after the previous action.b) Type adv in the search field, select Advanced Resource Assignment from the results, and click
Add Item.A properties screen displays.
c) Click Add new entryA new line is added to the list of entries.
d) Click the Add/Delete link below the entry.The screen changes to display resources on multiple tabs.
e) On the Remote Desktop tab, select the VMware View remote desktop resource that you configuredpreviously.
f) On the Webtop tab, select a full webtop and click Update.The properties screen closes and the resources you selected are displayed.
g) Click Save.The properties screen closes and the visual policy editor is displayed.
8. To use RSA SecurID authentication in addition to Active Directory authentication, insert logon andauthentication actions for RSA SecurID ahead of those for Active Directory:a) Click the (+) sign before the previous VMware View Logon Page action.
A popup screen opens.b) On the Logon tab, select VMware View Logon Page, and click Add Item.
A properties screen displays.
c) From the VMware View Logon Screen Type list, select RSA SecurID.d) In the VMware View Windows Domains field, type the domain names to use for logon.e) Click Save.
The properties screen closes and the visual policy editor is displayed.f) Click the plus (+) icon after the previous VMware View Logon Page action.
A popup screen opens.g) On the Authentication tab, select RSA SecurID, and click Add Item.h) From the Server list, select the AAA server that you created previously and click Save.
The properties screen closes.
9. (Optional) If you want to display amessage to the user inside of the ViewClient (for example, a disclaimeror acceptable terms of use), this is how you do it:a) Click the (+) sign anywhere in your access profile to add a new action item.
17
BIG-IP® Access Policy Manager®: VMware View Integration Implementations

AnAdd Item screen opens, listing predefined actions on tabs such as General Purpose, Authentication,and so on.
b) On the Logon tab, select VMware View Logon Page, and click Add Item.A properties screen displays.
c) From VMware View Logon Screen Type, select Disclaimerd) In the Customization area from the Language list, select the language for the message.e) In the Disclaimer message field, type the message to display on the logon page.f) Click Save.
The properties screen closes and the visual policy editor is displayed.
You have configured a logon page that displays a logon page with a message on a View Client.10. On the fallback branch between the last action and Deny, select the Deny check box, click Allow and
click Save.11. Click Apply Access Policy.
You have an access policy that displays at least one logon page, and authenticates a View Client againstActive Directory before assigning resources to the session; and at most, displays three logon pages andperforms two-factor authentication before assigning resources to the session.
Figure 1: Example access policy with single-factor authentication for View Client
Figure 2: Example access policy with two-factor authentication for View Client
For the access policy to take effect, you must add it to a virtual server.
Creating a connectivity profile
You create a connectivity profile to configure client connections.
1. On the Main tab, click Access Policy > Secure Connectivity.A list of connectivity profiles displays.
2. Click Add.The Create New Connectivity Profile popup screen opens and displays General Settings.
3. Type a Profile Name for the connectivity profile.4. Select a Parent Profile from the list.
APM provides a default profile, connectivity.
5. Click OK.The popup screen closes, and the Connectivity Profile List displays.
The connectivity profile appears in the list.
To provide functionality with a connectivity profile, you must add the connectivity profile to a virtual server.
18
Authenticating Standalone View Clients with APM

Creating a custom server SSL profile
With a server SSL profile, the BIG-IP® system can perform decryption and encryption for server-side SSLtraffic.
1. On the Main tab, click Local Traffic > Profiles > SSL > Server.The SSL Server profile list screen opens.
2. Click Create.The New Server SSL Profile screen opens.
3. In the Name field, type a unique name for the profile.4. From the Parent Profile list, select serverssl.5. In the Configuration area, select Advanced and select the Custom check box.
Additional settings display. All settings in the Configuration area become available.6. Scroll down to the Server Name field and type pcoip-default-sni.7. Click Finished.
The custom server SSL profile is listed in the SSL Server list.
Configuring an HTTPS virtual server for View Client authentication
Before you start this task, create a connectivity profile in Access Policy Manager®. (Default settings areacceptable.)
Create this virtual server to support View Client authentication. This is the virtual server that users willspecify in the View Client.
Note: This is one of two virtual servers that you must configure for View Client connections. Use the samedestination IP address for each one.
1. On the Main tab, click Local Traffic > Virtual Servers.The Virtual Server List screen opens.
2. Click the Create button.The New Virtual Server screen opens.
3. In the Name field, type a unique name for the virtual server.4. For the Destination setting, select Host and in the Address field, type the IP address for the virtual
server.5. In the Service Port field, type 443 or select HTTPS from the list.6. From the HTTP Profile list, select http.7. For the SSL Profile (Client) setting, select a client SSL profile.8. For the SSL Profile (Server) setting, from the Available list, select the name of the Server SSL profile
you previously created and move the name to the Selected list.9. From the Source Address Translation list, select Auto Map.10. In the Access Policy area, from the Access Profile list, select the access profile.11. From the Connectivity Profile list, select the connectivity profile.12. Select the VDI & Java Support check box.13. Locate the Resources area of the screen and from the Default Persistence Profile list, select one of
these profiles:
• cookie - This is the default cookie persistence profile. Cookie persistence is recommended.
19
BIG-IP® Access Policy Manager®: VMware View Integration Implementations

• source_addr - This is the default source address translation persistence profile. Select it only whenthe cookie persistence type is not available.
14. Click Finished.
A virtual server handles View Client access and handles XML protocol data.
Configuring a UDP virtual server for PCoIP traffic
Create this virtual server to support a PC over IP (PCoIP) data channel for View Client traffic.
1. On the Main tab, click Local Traffic > Virtual Servers.The Virtual Server List screen opens.
2. Click the Create button.The New Virtual Server screen opens.
3. In the Name field, type a unique name for the virtual server.4. For the Destination setting, select Host and in the Address field, type the IP address for the virtual
server.Type the same IP address as the one for the View Client authentication virtual server.
5. In the Service Port field, type 4172.6. From the Protocol list, select UDP.7. From the Source Address Translation list, select Auto Map.8. From the Access Policy area, select the VDI & Java Support check box.9. Click Finished.
This virtual server is configured to support PCoIP transport protocol traffic for VMware View Clients.
Configuring for virtual servers that use a private IP address
If you configured the HTTPS and UDP virtual servers with a private IP address that is not reachable fromthe Internet, but instead a publicly available device (typically a firewall or a router) performs NAT for it,you need to perform these steps.
You update the access policy by assigning the variable view.proxy_addr to the IP address that the clientuses to reach the virtual server. Otherwise, a View Client cannot connect when the virtual servers have aprivate IP address.
1. On the Main tab, click Access Policy > Access Profiles.The Access Profiles List screen opens.
2. In the Access Policy column, click the Edit link for the access profile you want to configure to launchthe visual policy editor.The visual policy editor opens the access policy in a separate screen.
3. Click the (+) sign anywhere in the access policy to add a new action item.An Add Item screen opens, listing predefined actions on tabs such as General Purpose, Authentication,and so on.
4. Type var in the search field, select Variable Assign from the results list, and click Add Item.The Variable Assign properties screen opens.
5. Click the change link next to the empty entry.A popup screen displays two panes, with Custom Variable selected on the left and Custom Expressionselected on the right.
20
Authenticating Standalone View Clients with APM

6. In the Custom Variable field, type view.proxy_addr.7. In the Custom Expression field, type expr {"proxy address"}where proxy address is the IP address
that the client uses to reach the virtual server.8. Click Finished to save the variable and expression and return to the Variable Assign action popup screen.9. Click Save.
The properties screen closes and the visual policy editor displays.10. Click the Apply Access Policy link to apply and activate the changes to the access policy.
21
BIG-IP® Access Policy Manager®: VMware View Integration Implementations


Chapter
3Presenting a View Desktop on an APM Webtop
• Overview: Accessing a View Desktop froman APM webtop

Overview: Accessing a View Desktop from an APM webtop
In this implementation, you integrate Access Policy Manager® (APM®) with View Connection Servers andpresent View Desktops on an APM dynamic webtop. APM authenticates to a View Connection Server andrenders the View Desktops. APM load balances the View Connection Servers for high availability.
Note:
Access Policy Manager supports this implementation in APM version 11.4.0 (with hotfix 3) and later.
APM supports the necessary connections with two virtual servers that share the same destination IP address.
Task summaryCreating a pool of View Connection ServersConfiguring a VMware View remote desktop resourceConfiguring a full webtopCreating an access profileCreating an access policy for a dynamic webtopAssigning resources to the access policyCreating a connectivity profileCreating a custom server SSL profileConfiguring an HTTPS virtual server for a dynamic webtopConfiguring a UDP virtual server for PCoIP trafficConfiguring for virtual servers that use a private IP address
About client requirements to launch View Client from a webtop
If you want to use Access Policy Manager® (APM®) to launch a View Client from an APM webtop, youmust install the standalone ViewClient on your client. The standalone ViewClient is available fromVMware.
Note:
Access Policy Manager supports launching View Client from a dynamic webtop in APM version 11.4.0(with hotfix 3) and later.
Creating a pool of View Connection Servers
You create a pool of View Connection Servers to provide load-balancing and high-availability functions.
1. On the Main tab, click Local Traffic > Pools.The Pool List screen opens.
2. Click Create.The New Pool screen opens.
3. In the Name field, type a unique name for the pool.4. In the Resources area, using theNewMembers setting, add each View Connection Server that you want
to include in the pool:
24
Presenting a View Desktop on an APM Webtop

a) Type an IP address in the Address field, or select a node address from the Node List.b) In the Service Port field, type 443 (if your View Connection Servers use HTTPS), or type 80 (if
your View Connection Servers use HTTP).By default, View Connection Servers use HTTPS. However, if you configure your View ConnectionServers for SSL offloading, they use HTTP.
c) Click Add.
5. Click Finished.
The new pool appears in the Pools list.
Configuring a VMware View remote desktop resource
Configure a VMware View remote desktop resource so that you can log on to a View Connection Serverand gain access to a standalone View Client, or launch a View desktop from an APM® webtop, dependingon the access policy.
1. On the Main tab, click Access Policy > Application Access > Remote Desktops.The Remote Desktops list opens.
2. Click Create.The New Resource screen opens.
3. For the Type setting, select VMware View.4. For the Destination setting, select Pool and from the Pool Name list, select a pool of View Connection
Servers that you configured previously.5. For the Server Side SSL setting:
• Select the Enable check box if your View Connection Servers use HTTPS (default).• Clear the Enable check box if your View Connection Servers use HTTP; that is, they are configured
for SSL offloading.
6. In the Auto Logon area, select the Enable check box, so that a user can automatically log on to a ViewConnection Server after logging in to APM®.If you enable auto logon, you must also configure credential sources.a) In the Username Source field, accept the default or type the session variable to use as the source
for the auto logon user name.b) In the Password Source field, accept the default or type the session variable to use as the source for
the auto logon user password.c) In the Domain Source field, accept the default or type the session variable to use as the source for
the auto logon user domain.
7. In the Customization Settings for language_name area, type a Caption.The caption is the display name of the VMware View resource on the APM full webtop.
8. Click Finished.All other parameters are optional.
This creates the VMware View remote desktop resource. To use it, you must assign it along with a fullwebtop in an access policy.
25
BIG-IP® Access Policy Manager®: VMware View Integration Implementations

Configuring a full webtop
You can use a full webtop to provide web-based access to VMware View and other resources.
1. On the Main tab, click Access Policy >Webtops.The Webtops screen opens.
2. Click Create.The New Webtop screen opens.
3. Type a name for the webtop.4. From the Type list, select Full.
The Configuration area displays with additional settings configured at default values.5. Click Finished.
The webtop is now configured and appears in the webtop list.
Creating an access profile
You create an access profile to provide the access policy configuration for a virtual server that establishesa secured session.
1. On the Main tab, click Access Policy > Access Profiles.The Access Profiles List screen opens.
2. Click Create.The New Profile screen opens.
3. Type a name for the access profile.4. In the Language Settings area, add and remove accepted languages, and set the default language.
A browser uses the highest priority accepted language. If no browser language matches the acceptedlanguages list, the browser uses the default language.
5. Click Finished.
This creates an access profile with a default access policy.
Creating an access policy for a dynamic webtop
Before you can create an access policy for an Access Policy Manager® (APM®) dynamic webtop, you mustconfigure AAA server objects in APM to use for authentication. (You can use any type of authentication.)
Note: An Active Directory AAA server must include the IP address of the domain controller and the FQDNof the Windows domain name. If anonymous binding to Active Directory is not allowed in your environment,you must provide the admin name and password for the Active Directory AAA server.
Configure an access policy to authenticate a user and enable APM dynamic webtop.
Note: This example access policy shows how to use RSA SecurID and Active Directory authentication.However, you can use any type of authentication.
1. On the Main tab, click Access Policy > Access Profiles.The Access Profiles List screen opens.
26
Presenting a View Desktop on an APM Webtop

2. In the Access Policy column, click the Edit link for the access profile you want to configure to launchthe visual policy editor.The visual policy editor opens the access policy in a separate screen.
3. Click the (+) sign anywhere in the access policy to add a new action item.An Add Item screen opens, listing predefined actions on tabs such as General Purpose, Authentication,and so on.
4. From the Logon Page tab, select Logon Page, and click Add Item.A properties screen displays.
5. Configure the Logon Page properties.To support Active Directory authentication only, no changes are required. To support both ActiveDirectory and RSA SecurID authentication, an additional password field is required and the labels forthe password fields require change.a) In the Logon Page Agent table row 3, for Type, select password.b) In the Post Variable Name field, type password1.c) In the Session Variable Name field, type password1.d) In the Customization Area in Logon Page Input Field #2, type RSA Tokencode.
RSA Tokencode replaces the default label, Password.
e) In the Customization Area in Logon Page Input Field #3, type AD Password.f) Click Save.
The properties screen closes.
The Logon Page is configured to display Username, RSA Tokencode, and AD Password. Logon PageInput Field #2 accepts the RSA Tokencode into the session.logon.last.password variable (fromwhich authentication agents read it). Logon Page Input Field #3 saves the AD password into thesession.logon.last.password1 variable.
6. (Optional) To add RSA SecurID authentication, click the plus (+) icon between Logon Page and Deny:a) From the Authentication tab, select RSA SecurID, and click Add Item.b) In the properties screen from the Server list, select the AAA server that you created previously and
click Save.The properties screen closes.
c) After the RSA SecurID action, add a Variable Assign action.Use theVariable Assign action tomove theAD password into the session.logon.last.passwordvariable.
d) Click Add new entry.An empty entry appears in the Assignment table.
e) Click the change link next to the empty entry.A popup screen displays, where you can enter a variable and an expression.
f) From the left-side list, select Custom Variable (the default), and typesession.logon.last.password.
g) From the right-side list, select Custom Expression (the default), and type expr { "[mcget-secure session.logon.last.password1]" }.
27
BIG-IP® Access Policy Manager®: VMware View Integration Implementations
The AD password is now available for use in Active Directory authentication.h) Click Finished to save the variable and expression, and return to the Variable Assign action screen.
7. Add the AD Auth action after one of these actions:
• Variable Assign - This action is present only if you added RSA SecurID authentication.• Logon Page - Add here if you did not add RSA SecurID authentication.
A properties screen for the AD Auth action opens.8. Configure the properties for the AD Auth action:
a) From the AAA Server list, select the AAA server that you created previously.b) Configure the rest of the properties as applicable to your configuration and click Save.
9. On the fallback path between the last action and Deny, click the Deny link, and then click Allow andSave.
10. Click Close.
You have an access policy that is configured to enable APM dynamic webtop after the appropriateauthentication checks.
Assigning resources to the access policy
Before you start, open the existing access policy for edit.
Assign the full webtop and VMware View remote desktop resource that you configured previously to asession so that users can log into View Connection Servers and launch a View Desktop from the webtop.
Note: This access policy shows how to use the Advanced Resource Assign action item to assign the resources.Alternatively, you can use the Resource Assign and Webtop and Links Assign action items.
1. Click the (+) sign anywhere in the access policy to add a new action item.An Add Item screen opens, listing predefined actions on tabs such as General Purpose, Authentication,and so on.
2. On the Assignment tab, select Advanced Resource Assign and click Add Item.The properties screen opens.
3. Click Add new entry.An Empty entry displays.
4. Click the Add/Delete link below the entry.The screen changes to display resources that you can add and delete.
5. Select the Remote Desktop tab.A list of remote desktop resources is displayed.
6. Select VMware View remote desktop resources and click Update.You are returned to the properties screen where Remote Desktop and the names of the selected resourcesare displayed.
7. Click Add new entry.An Empty entry displays.
8. Click the Add/Delete link below the entry.The screen changes to display resources that you can add and delete.
9. Select the Webtop tab.A list of webtops is displayed.
28
Presenting a View Desktop on an APM Webtop
10. Select a webtop and click Update.The screen changes to display properties and the name of the selected webtop is displayed.
11. Select Save to save any changes and return to the access policy.
A VMware View remote desktop resource and an Access Policy Manager® dynamic webtop are assignedto the session when the access policy runs.
Creating a connectivity profile
You create a connectivity profile to configure client connections.
1. On the Main tab, click Access Policy > Secure Connectivity.A list of connectivity profiles displays.
2. Click Add.The Create New Connectivity Profile popup screen opens and displays General Settings.
3. Type a Profile Name for the connectivity profile.4. Select a Parent Profile from the list.
APM provides a default profile, connectivity.
5. Click OK.The popup screen closes, and the Connectivity Profile List displays.
The connectivity profile appears in the list.
To provide functionality with a connectivity profile, you must add the connectivity profile to a virtual server.
Creating a custom server SSL profile
With a server SSL profile, the BIG-IP® system can perform decryption and encryption for server-side SSLtraffic.
1. On the Main tab, click Local Traffic > Profiles > SSL > Server.The SSL Server profile list screen opens.
2. Click Create.The New Server SSL Profile screen opens.
3. In the Name field, type a unique name for the profile.4. From the Parent Profile list, select serverssl.5. In the Configuration area, select Advanced and select the Custom check box.
Additional settings display. All settings in the Configuration area become available.6. Scroll down to the Server Name field and type pcoip-default-sni.7. Click Finished.
The custom server SSL profile is listed in the SSL Server list.
Configuring an HTTPS virtual server for a dynamic webtop
Before you start this task, create a connectivity profile in Access Policy Manager®. (Default settings areacceptable.)
29
BIG-IP® Access Policy Manager®: VMware View Integration Implementations

Create this virtual server to support launching a View Desktop from an APM® dynamic webtop. This is thevirtual server that users will specify in the browser.
Note: This is one of two virtual servers that you must configure. Use the same destination IP address foreach one.
1. On the Main tab, click Local Traffic > Virtual Servers.The Virtual Server List screen opens.
2. Click the Create button.The New Virtual Server screen opens.
3. In the Name field, type a unique name for the virtual server.4. For the Destination setting, select Host and in the Address field, type the IP address for the virtual
server.5. In the Service Port field, type 443 or select HTTPS from the list.6. From the HTTP Profile list, select http.7. For the SSL Profile (Client) setting, select a client SSL profile.8. For the SSL Profile (Server) setting, from the Available list, select the name of the Server SSL profile
you previously created and move the name to the Selected list.9. From the Source Address Translation list, select Auto Map.10. In the Access Policy area, from the Access Profile list, select the access profile.11. From the Connectivity Profile list, select the connectivity profile.12. Select the VDI & Java Support check box.13. Locate the Resources area of the screen and from the Default Persistence Profile list, select one of
these profiles:
• cookie - This is the default cookie persistence profile. Cookie persistence is recommended.• source_addr - This is the default source address translation persistence profile. Select it only when
the cookie persistence type is not available.
14. Click Finished.
This virtual server handles access and handles XML protocol data.
Configuring a UDP virtual server for PCoIP traffic
Create this virtual server to support a PC over IP (PCoIP) data channel for View Client traffic.
1. On the Main tab, click Local Traffic > Virtual Servers.The Virtual Server List screen opens.
2. Click the Create button.The New Virtual Server screen opens.
3. In the Name field, type a unique name for the virtual server.4. For the Destination setting, select Host and in the Address field, type the IP address for the virtual
server.Type the same IP address as the one for the View Client authentication virtual server.
5. In the Service Port field, type 4172.6. From the Protocol list, select UDP.7. From the Source Address Translation list, select Auto Map.8. From the Access Policy area, select the VDI & Java Support check box.
30
Presenting a View Desktop on an APM Webtop

9. Click Finished.
This virtual server is configured to support PCoIP transport protocol traffic for VMware View Clients.
Configuring for virtual servers that use a private IP address
If you configured the HTTPS and UDP virtual servers with a private IP address that is not reachable fromthe Internet, but instead a publicly available device (typically a firewall or a router) performs NAT for it,you need to perform these steps.
You update the access policy by assigning the variable view.proxy_addr to the IP address that the clientuses to reach the virtual server. Otherwise, a View Client cannot connect when the virtual servers have aprivate IP address.
1. On the Main tab, click Access Policy > Access Profiles.The Access Profiles List screen opens.
2. In the Access Policy column, click the Edit link for the access profile you want to configure to launchthe visual policy editor.The visual policy editor opens the access policy in a separate screen.
3. Click the (+) sign anywhere in the access policy to add a new action item.An Add Item screen opens, listing predefined actions on tabs such as General Purpose, Authentication,and so on.
4. Type var in the search field, select Variable Assign from the results list, and click Add Item.The Variable Assign properties screen opens.
5. Click the change link next to the empty entry.A popup screen displays two panes, with Custom Variable selected on the left and Custom Expressionselected on the right.
6. In the Custom Variable field, type view.proxy_addr.7. In the Custom Expression field, type expr {"proxy address"}where proxy address is the IP address
that the client uses to reach the virtual server.8. Click Finished to save the variable and expression and return to the Variable Assign action popup screen.9. Click Save.
The properties screen closes and the visual policy editor displays.10. Click the Apply Access Policy link to apply and activate the changes to the access policy.
31
BIG-IP® Access Policy Manager®: VMware View Integration Implementations

Chapter
4Tips for Standalone View Client and Dynamic WebtopIntegration
• Example access policy for standalone ViewClient and View on webtop
• About a configuration for standalone ViewClient and View on webtop

Example access policy for standalone View Client and View on webtop
You can configure one access policy for access to standalone View Client and for launching View from awebtop by using the Client Type action in the access policy.
Note:
Access Policy Manager® (APM®) supports launching View from a webtop in APM version 11.4.0 (withhotfix 3) and later.
Client Type action branch rules
Place actions for the standalone View Client on the VMware View branch, and place actions for launchingView from a dynamic webtop on the Full or Mobile Browser branch.
Example access policy continued: Logon and authentication
To support a standalone View Client, you must provide a VMware View Logon page and Active Directoryauthentication. (SecurID authentication is optional for a standalone View Client; if used, it must precedeAD Auth.)
To support launching View from a webtop, you can provide a Logon Page and any authentication type.
34
Tips for Standalone View Client and Dynamic Webtop Integration
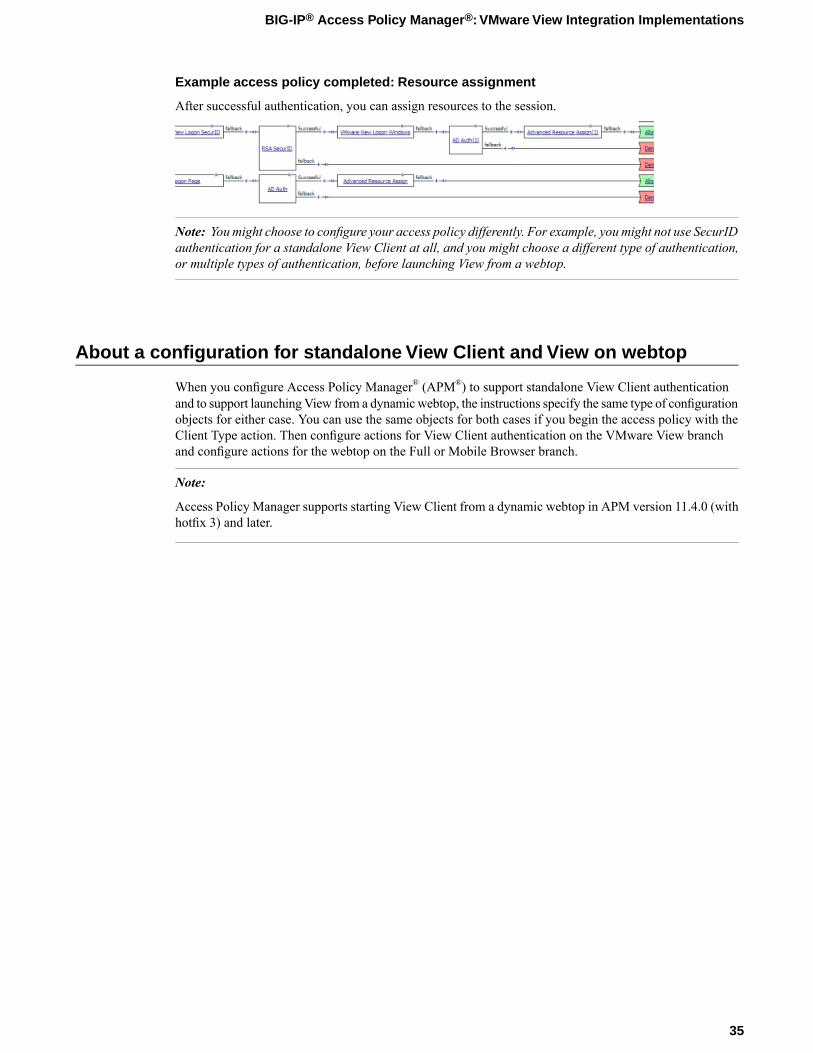
Example access policy completed: Resource assignment
After successful authentication, you can assign resources to the session.
Note: Youmight choose to configure your access policy differently. For example, you might not use SecurIDauthentication for a standalone View Client at all, and you might choose a different type of authentication,or multiple types of authentication, before launching View from a webtop.
About a configuration for standalone View Client and View on webtop
When you configure Access Policy Manager® (APM®) to support standalone View Client authenticationand to support launchingView from a dynamic webtop, the instructions specify the same type of configurationobjects for either case. You can use the same objects for both cases if you begin the access policy with theClient Type action. Then configure actions for View Client authentication on the VMware View branchand configure actions for the webtop on the Full or Mobile Browser branch.
Note:
Access Policy Manager supports starting View Client from a dynamic webtop in APM version 11.4.0 (withhotfix 3) and later.
35
BIG-IP® Access Policy Manager®: VMware View Integration Implementations


Chapter
5Configuring AAA Servers in APM
• About VMware View and APM authenticationtypes
• Task summary

About VMware View and APM authentication types
You can authenticate View Clients in Access Policy Manager® (APM®) using the types of authenticationthat View Clients support: Active Directory authentication (required) and RSA SecurID authentication(optional). APM supports these authentication types with AAA servers that you configure in APM.
For more information, refer to the BIG-IP® Access Policy Manager®: Authentication Configuration Guideat http://support.f5.com.
Task summary
You need at least one AAA Active Directory (AD) server object in Access Policy Manager® (APM®) tosupport AD authentication for VMware View. If you also want to collect RSA PINs, you need at least oneAAA SecurID server object in APM.Configuring an Active Directory AAA serverConfiguring a SecurID AAA server in APM
Configuring an Active Directory AAA server
Configure anActive Directory AAA server in Access PolicyManager® (APM®) to specify domain controllersand credentials for APM to use for authenticating users.
1. On the Main tab, click Access Policy > AAA Servers > Active Directory.The Active Directory Servers list screen opens.
2. Click Create.The New Server properties screen opens.
3. In the Name field, type a unique name for the authentication server.4. In the Domain Name field, type the name of the Windows Domain.5. For the Server Connection setting, select one of these options:
• Select Use Pool to set up high availability for the AAA server.• Select Direct to set up the AAA server for standalone functionality.
6. If you selected Direct, type a name in the Domain Controller field.7. If you selected Use Pool, configure the pool as described here:
a) Type a name in the Domain Controller Pool Name field.b) Specify the Domain Controllers in the pool by typing the IP address and hostname for each and
clicking the Add button.c) To monitor the health of the AAA server, you have the option to select a health monitor. Only the
gateway_icmp monitor is appropriate in this case; you can select it from the Server Pool Monitorlist.
8. In the Admin Name field, type an administrator name that has Active Directory administrativepermissions.APM uses the information in the Admin Name and Admin Password fields for AD Query. If ActiveDirectory is configured for anonymous queries, you do not need to provide an Admin Name. Otherwise,
38
Configuring AAA Servers in APM

APM needs an account with sufficient privilege to bind to an Active Directory server, fetch user groupinformation, and fetch Active Directory password policies to support password-related functionality.(APM must fetch password policies, for example, if you select the Prompt user to change passwordbefore expiration option in an AD Query action.) If you do not provide Admin account information inthis configuration, APM uses the user account to fetch information. This works if the user account hassufficient privilege.
Note: The administrator name is case-sensitive.
9. In the Admin Password field, type the administrator password associated with the Domain Name.10. From the Kerberos Preauthentication Encryption Type list, select an encryption type.
The default is None. If you specify an encryption type, the BIG-IP® system includes Kerberospreauthentication data within the first authentication service request (AS-REQ) packet.
11. In the Timeout field, type a timeout interval (in seconds) for the AAA server. (This setting is optional.)12. Click Finished to add the new server to the configuration, and return to the main screen.
This adds the new Active Directory server to the AAA Server List.
Configuring a SecurID AAA server in APM
Configure a SecurID AAA server for Access PolicyManager® to request RSA SecurID authentication froman RSA Manager authentication server.
1. On the Main tab, click Access Policy > AAA Servers.The AAA Servers list screen opens.
2. On the menu bar, click AAA Servers By Type, and select SecurID.The SecurID screen opens and displays the servers list.
3. Click Create.The New Server properties screen opens.
4. In the Name field, type a unique name for the authentication server.5. In the Configuration area, for the Agent Host IP Address (must match the IP address in SecurID
Configuration File) setting, select an option as appropriate:
• Select from Self IP List: Choose this when there is no NAT device between APM and the RSAAuthentication Manager. Select an IP from the list of those configured in Access Policy Manager.
• Other: Choose this when there is a NAT device in the network path between Access PolicyManagerand the RSA Authentication Manager server. If selected, type the address as translated by the NATdevice.
6. For the SecurID Configuration File setting, browse to upload the sdconf.rec file.Consult your RSA Authentication Manager administrator to generate this file for you.
7. Click Finished to add the new server to the configuration, and return to the main screen.
This adds a new RSA SecurID server to the AAA Servers list.
39
BIG-IP® Access Policy Manager®: VMware View Integration Implementations


Index
A
AAA serverscreating 38
access policyadding two-factor authentication 16APM dynamic webtop, supporting 26authentication actions, adding 26
access profilecreating 16, 26
authentication methods 38
C
Client Type branch rulesfor standalone View Client 34for webtop access 34
connectivity profilecreating 18, 29
F
firewallin front of virtual server 20, 31
full webtopassigning to a session 28configuring 15, 26
H
high availabilityusing a pool 14, 24
I
IP address 20, 31
L
load-balancingusing a pool 14, 24
logon pageVMware View 16
P
PCoIPprotocol, APM support for 14transport protocol 20, 30
PCoIP Secure Gatewaydisabling on VMware Horizon View server 12
profilescreating Server SSL 19, 29
R
routerNATand virtual server 20, 31in front of virtual server 20, 31
S
Secure Tunneldisabling on VMware Horizon View server 12
SSL offloadingVMware Horizon View server configuration 12
standalone View Clientconfiguration objects 35
U
using NAT 20, 31
V
View Clientauthentication 14VMware View client type 34
View Connection Serverauto logon from an APM webtop 15, 25high availability 14, 24load-balancing 14, 24load-balancing with BIG-IP system 15, 25SSL offloading 15, 25
View Desktopon APM webtop 24
View on webtopconfiguration objects 35
View webtopfull or mobile browser client type 34
virtual serverfor PCoIP data channel 20, 30for View Client authentication 19, 29
VMware Viewremote desktop resource, configuring 15, 25
VMware View logon pagedisclaimer 16RSA passcode 16Windows password 16
VMware View remote desktop resourceassigning to a session 28
W
webtopconfiguring full 15, 26
41
Index

42
Index