Embed Size (px)
Citation preview

ZB570TLUser Guide
ZENFONE 5

2
Care and safety
Guidelines
Road safety comes first. We strongly recommend not to use your device when driving or operating any type of vehicle.
This device should only be used in environments with ambient temperatures between 0°C (32°F) and 35°C (95°F).
Turn off your device in restricted areas where the use of mobile devices is prohibited. Always obey rules and regulations when in restricted areas, such as, in aircraft, movie theater, in hospitals or near medical equipment, near gas or fuel, construction sites, blasting sites and other areas.Use only AC adapters and cables approved by ASUS for use with this device. Refer to the rating label on the bottom of your device and ensure that your power adapter complies with this rating.
Do not use damaged power cables, accessories, and other peripherals with your device.
Keep your device dry. Do not use or expose your device near liquids, rain, or moisture.
You can put your device through x-ray machines (such as those used in conveyor belts for airport security), but do not expose the device to magnetic detectors and wands.The device screen is made of glass. If the glass gets broken, stop using the device and do not touch the broken glass parts. Immediately send device for repair to ASUS-qualified service personnel.
Do not listen at high volume levels for long periods to prevent possible hearing damage.
Disconnect the AC power before cleaning your device. Use only a clean cellulose sponge or chamois cloth when cleaning your device screen.
Send device for repair to ASUS-qualified service personnel only.
E13437December 2017First Edition

3
Proper disposal
Risk of explosion if battery is replaced by an incorrect type. Dispose of used batteries according to the instructions.
DO NOT throw the battery in municipal waste. The symbol of the crossed out wheeled bin indicates that the battery should not be placed in municipal waste.
DO NOT throw this product in municipal waste. This product has been designed to enable proper reuse of parts and recycling. The symbol of the crossed out wheeled bin indicates that the product (electrical, electronic equipment and mercury-containing button cell battery) should not be placed in municipal waste. Check local regulations for disposal of electronic products.
DO NOT throw this product in fire. DO NOT short circuit the contacts. DO NOT disassemble this product.
ZenTalk Fans Forum (http://www.asus.com/zentalk/global_forward.php)
WARNING
Cancer and Reproductive Harm-
www.P65Warnings.ca.gov
NOTE: The app descriptions shown in this manual are for reference purposes only, and may not exactly match what you see on your device.

4
1 BasicsWelcome! ................................................................................................................... 7Get your ASUS Phone ready! ............................................................................................................. 8Installing a nano SIM card .................................................................................................................. 9Removing a nano SIM card ..............................................................................................................10Installing a memory card ..................................................................................................................11Removing a memory card ................................................................................................................12Starting for the first time ..................................................................................................................16Using the touchscreen.......................................................................................................................18
2 There’s no place like HomeZen Home features .....................................................................................................21
Home screen ............................................................................................................21Quick settings .......................................................................................................................................23Notifications ..........................................................................................................................................24
Personalizing your Home screen ...............................................................................25Widgets ....................................................................................................................25Wallpapers ...............................................................................................................26Easy mode ..............................................................................................................................................27Kids mode ................................................................................................................30Setting up the date and time ..........................................................................................................32Setting up your ringtone and alert sounds................................................................................32
Lock Screen .................................................................................................................33Customizing your lock screen .........................................................................................................33Using and customizing the quick access buttons ...................................................................34
Fingerprint ID sensor ..................................................................................................35Starting your ASUS phone for the first time ..............................................................................35Setting up fingerprint ID from Settings ......................................................................................36
Face Unlock .................................................................................................................39Setting up face unlock from Settings ...........................................................................................39
ZenUI Keyboard ..........................................................................................................42Resizing your ZenUI keyboard ........................................................................................................42Editing texts...........................................................................................................................................42
3 Work hard, play harderChrome ........................................................................................................................44
Launching Chrome .............................................................................................................................44Sharing pages .......................................................................................................................................45Bookmarking pages ...........................................................................................................................45Clearing the browsing data .............................................................................................................45
Gmail ............................................................................................................................46Google Calendar .........................................................................................................47
Creating events ....................................................................................................................................47Editing or removing events .............................................................................................................47Creating reminders .............................................................................................................................48
Contents

5
Editing or removing reminders ......................................................................................................48File Manager................................................................................................................49The Cloud.....................................................................................................................50
ASUS WebStorage ...................................................................................................50ZenUI FAQs ..................................................................................................................51
4 Keeping in touchCall in style ..................................................................................................................52
Dual SIM feature .....................................................................................................52Making calls ...........................................................................................................................................54Receiving calls .........................................................................................................56Other call options ................................................................................................................................57Managing multiple calls ....................................................................................................................58Recording calls .....................................................................................................................................58
Managing contacts .....................................................................................................59Contacts Settings ................................................................................................................................59Setting up your profile ......................................................................................................................59Adding contacts ...................................................................................................................................59Importing contacts .................................................................................................61Exporting contacts .................................................................................................61Managing your block list ........................................................................................62Social networking with your contacts .........................................................................................62
Send messages and more ..........................................................................................64Google Messenger ..............................................................................................................................64
5 Fun and entertainmentUsing a headset ...........................................................................................................65
Connecting the audio jack ...............................................................................................................65Google Play Music ......................................................................................................66
6 Your precious momentsCapture moments .......................................................................................................67
Launching the Camera app .............................................................................................................67Advanced camera features ..............................................................................................................69
Using the Gallery ........................................................................................................71Viewing files from your social network or cloud storage ......................................................71Viewing the photo location .............................................................................................................72Sharing files from the Gallery ..........................................................................................................73Deleting files from the Gallery ........................................................................................................73Editing images ......................................................................................................................................73
7 Staying connectedMobile network ...........................................................................................................74
Enabling the mobile network ................................................................................74Wi-Fi .............................................................................................................................74
Enabling Wi-Fi .........................................................................................................74Connecting to a Wi-Fi network ..............................................................................75Disabling Wi-Fi ........................................................................................................75

6
Bluetooth® ......................................................................................................................................................................................................... 75
Enabling Bluetooth® ...............................................................................................75Pairing your ASUS Phone to a Bluetooth® device ....................................................................76Unpairing your ASUS Phone from the Bluetooth® device ....................................................76
Tethering .....................................................................................................................77Wi-Fi Hotspot ........................................................................................................................................77Bluetooth Tethering ............................................................................................................................78
8 Travel and MapsWeather .......................................................................................................................79
Launching the Weather app ............................................................................................................79Weather home screen ........................................................................................................................80
Clock ............................................................................................................................81Alarm clock ............................................................................................................................................81World Clock ............................................................................................................................................82Stopwatch ..............................................................................................................................................82Timer ........................................................................................................................................................83
9 Zen EverywhereSpecial Zen Tools .........................................................................................................84
Calculator ...............................................................................................................................................84Sound Recorder ...................................................................................................................................85Mobile Manager ...................................................................................................................................87PowerMaster .........................................................................................................................................88
10 Maintain your ZenKeeping your device up-to-date ................................................................................89
Updating your system .......................................................................................................................89Storage ....................................................................................................................89Backup and reset ....................................................................................................89Securing your ASUS Phone ..............................................................................................................90
Appendix Safety information ......................................................................................................93Notices .........................................................................................................................95
Index

7Chapter 1: Basics
Basics 11 Basics
Welcome!Explore the intuitive simplicity of ASUS ZenUI!
ASUS ZenUI is a charming and intuitive interface exclusively for ASUS Phones. It provides you with special apps, which are integrated in or with other apps, to fit your unique individual needs and make your life easier while letting you have fun with your ASUS Phone.
ZenUI FAQ Find answers from FAQs (Frequently Asked Questions) or provide your feedbacks in the user forum.CameraWith PixelMaster technology, capture those precious moments in vivid and high-quality photos and videos.
NOTE: Availability of ASUS ZenUI apps vary per region and ASUS Phone model. Swipe up from your Home screen to check the apps available on your ASUS Phone.

8 Chapter 1: Basics
Get your ASUS Phone ready!
Parts and featuresTake a hold of your device and have it running in a jiffy.
WARNING!
• Toavoidnetworkconnectionandbatteryissues:
• DONOTplaceametallicstickerontheantennaarea.
• DONOTuseametallicprotectiveframe/caseonyourASUSPhone.
• DONOTcovertheantennaareawithyourhandsorotherobjectswhileusingsomefunctionssuchas making calls or using the mobile data connection.
• WerecommendthatyouuseASUS-compatiblescreenprotectors.Usingnon-ASUS-compatiblescreen protectors may cause your ASUS Phone's sensor to malfunction.
NOTES:
• BothNanoSIMcardslotssupportLTE,WCDMA,andGSM/EDGEnetworkbands.ButonlyoneNanoSIM can connect to LTE at a time.
• ThemicroSDcardslotsupportsmicroSDandmicroSDHCcardformats.
IMPORTANT!
• Wedonotrecommendusingascreenprotectorasitcaninterferewiththeproximitysensor.Ifyouwant to use a screen protector, ensure that it does not block the proximity sensor.
• Keepthedevice,particularlythetouchscreen,dryallthetime.Waterorotherliquidscancausethetouch screen to malfunction.
Microphone
Audio jack
ReceiverSensorFront cameraLED indicator
Touch screen display
Fingerprint sensor
Speaker
Micro USB port
NanoSIMx2/microSD card slot
Eject holeVolume key
Power key
FlashRear camera

9Chapter 1: Basics
Installing a nano SIM cardYour nano SIM card slot supports GSM, WCDMA, FDD-LTE, and TDD-LTE bands.
NOTE: To prevent connector damage, ensure to use a standard nano SIM card without a SIM adapter or the use of a cutter.
CAUTION! Be extra careful when handling a nano SIM card. ASUS is not responsible for any data loss or damage incurred to your nano SIM card.
ToinstallananoSIMcard:
1. Withthephonefacingup,insertthetoolthatcamewithyourphoneintotheholebesidetheSIM/microSD card tray and gently press to open the tray.
CAUTION!
• Becarefulnottodamagethecardslotcoverorinjureyourfingernailswhenyouremovethecover.
• Donotforciblyremove,shear,ordistortthecard slot cover.
• Donotusesharptoolsorsolventonyourdevicetoavoidscratchesonit.
2. Place the nano SIM card into the slot (as shown) with the gold contacts facing down.
3. Gently push the tray back in until it’s securely closed.
IMPORTANT!WhentwoSIMcardsareinserted,onlyoneSIMcardslotsupports4G/3Gservice.Theother SIM card slot only supports 3G service.

10 Chapter 1: Basics
Removing a nano SIM card
CAUTION! Be extra careful when handling a nano SIM card. ASUS is not responsible for any data loss or damage incurred to your nano SIM card.
ToremoveananoSIMcard:
1. Withthephonefacingup,insertthetoolthatcamewithyourphoneintotheholebesidetheSIM/microSD card tray and gently press to open the tray.
CAUTION!
• Becarefulnottodamagethebackcoverorinjureyourfingernailswhenyouremovethecover.
• Donotforciblyremove,shear,ordistortthebackcover.
• Donotusesharptoolsorsolventonyourdevicetoavoidscratchesonit.
2. Remove the nano SIM card from the slot.
3. Gently push the tray back in until it’s securely closed.
11Chapter 1: Basics
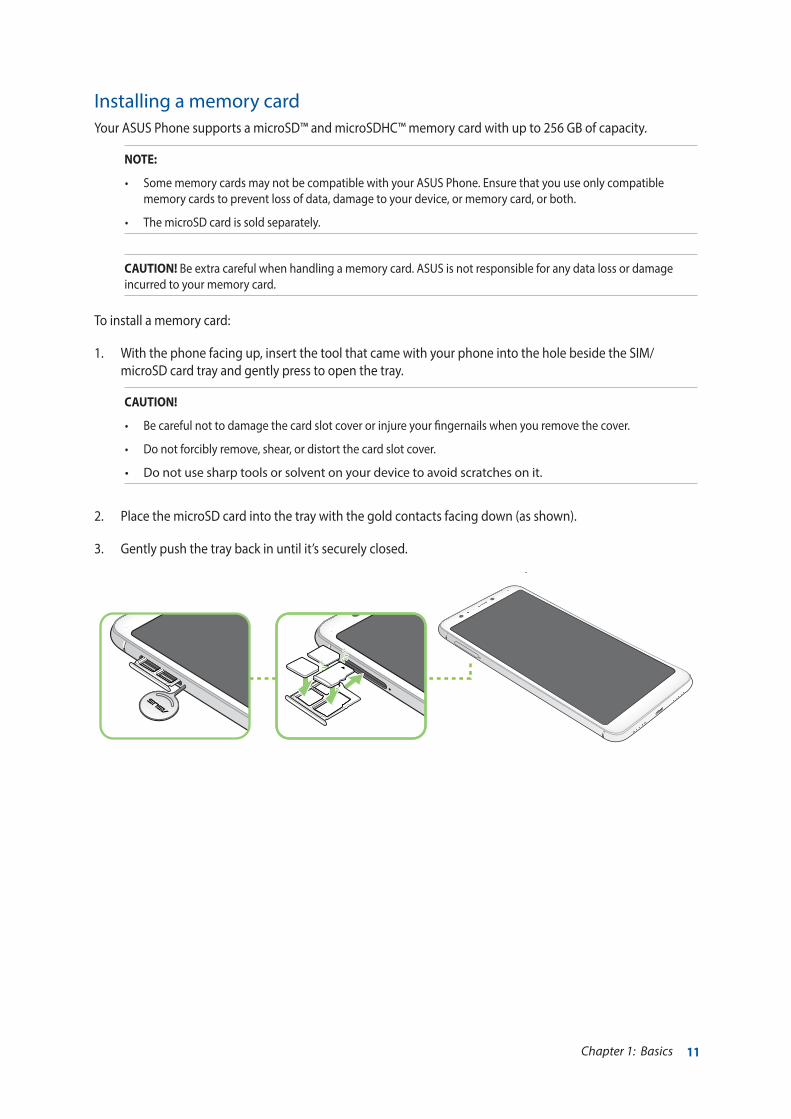
Installing a memory cardYour ASUS Phone supports a microSD™ and microSDHC™ memory card with up to 256 GB of capacity.
NOTE:
• SomememorycardsmaynotbecompatiblewithyourASUSPhone.Ensurethatyouuseonlycompatiblememory cards to prevent loss of data, damage to your device, or memory card, or both.
• ThemicroSDcardissoldseparately.
CAUTION! Be extra careful when handling a memory card. ASUS is not responsible for any data loss or damage incurred to your memory card.
To installamemorycard:
1. Withthephonefacingup,insertthetoolthatcamewithyourphoneintotheholebesidetheSIM/microSD card tray and gently press to open the tray.
CAUTION!
• Becarefulnottodamagethecardslotcoverorinjureyourfingernailswhenyouremovethecover.
• Donotforciblyremove,shear,ordistortthecardslotcover.
• Donotusesharptoolsorsolventonyourdevicetoavoidscratchesonit.
2. Place the microSD card into the tray with the gold contacts facing down (as shown).
3. Gently push the tray back in until it’s securely closed.

12 Chapter 1: Basics
Removing a memory card
CAUTION!
• Beextracarefulwhenhandlingamemorycard.ASUSisnotresponsibleforanydatalossordamageincurredtoyour memory card.
• Ejectthememorycardproperlytosafelyremoveitfromdevice.To eject the memory card, tap Settings > Storage, then under Portable storage, click beside SD card.
Toremoveamemorycard:
1. Withthephonefacingup,insertthetoolthatcamewithyourphoneintotheholebesidetheSIM/microSD card tray and gently press to open the tray.
CAUTION!
• Becarefulnottodamagethecardslotcoverorinjureyourfingernailswhenyouremovethecover.
• Donotforciblyremove,shear,ordistortthecardslotcover.
• Donotusesharptoolsorsolventonyourdevicetoavoidscratchesonit.
2. Remove the microSD card from the tray.
3. Gently push the tray back in until it’s securely closed.

13Chapter 1: Basics
Charging your ASUS PhoneYour ASUS Phone comes partially charged but you must charge it fully before using it for the first time. Read the following important notices and cautions before charging your device.
IMPORTANT!
• Forsafetypurposes,useONLY the bundled power adapter and cable to avoid damaging your device and prevent the risk of injury.
• PeelofftheprotectivefilmontheACpoweradapterandmicroUSBcablebeforeusingitwithyourdevice.
• EnsuretoplugtheACpoweradaptertoacompatiblepoweroutlet.YoucanplugtheACpoweradapter to any compatible 100~240 V outlet.
• TheoutputvoltageoftheACpoweradapterforthisdeviceis+5V 2A, 10W.
• WhenusingyourASUSPhonewhileplugged-intoapoweroutlet,thepoweroutletmustbenearyour device and easily accessible.
• Toconserveelectricity,unplugtheACpoweradapterfromthepoweroutletwhennotinuse.
• DonotplaceheavyobjectsontopofyourASUSPhone.
CAUTION!
• Whilecharging,yourASUSPhonecanbecomewarm.Thisisnormal,however,ifyourdevicebecomes unusually hot, disconnect the micro-USB cable from your device and send the device, including the AC power adapter and cable to an ASUS-qualified service personnel.
• TopreventanydamagetoyourASUSPhone,ACadapter,ormicro-USBcable.Ensurethatthemicro-USB cable, AC adapter, and your device are connected properly before charging.
TochargeyourASUSPhone:
1. Connect the micro USB cable to the power adapter.
2. Connect the micro USB cable to your ASUS Phone.
3. Plug the AC power adapter to a grounded power outlet.
3
1
2

14 Chapter 1: Basics
IMPORTANT!
• WhenusingyourASUSPhonewhileitispluggedtoapoweroutlet,thegroundedpoweroutletmust be near to the unit and easily accessible.
• WhenchargingyourASUSPhonethroughyourcomputer,ensurethatyouplugthemicroUSBcabletoyourcomputer’sUSB2.0/USB3.0port.
• AvoidchargingyourASUSPhoneinanenvironmentwithambienttemperatureofabove35oC (95oF).
• ChargeyourASUSPhoneforeight(8)hoursbeforeusingitinbatterymodeforthefirsttime.
• Thestatusofbatterychargeisindicatedbythefollowingicons:
Low Not Charging Charging Full
NOTES:
• Forsafetypurposes,useONLY the bundled power adapter and cable to avoid damaging your device and prevent the risk of injury.
• Forsafetypurposes,useONLY the bundled power adapter and cable to charge your ASUS Phone.
• TheinputvoltagerangebetweenthewalloutletandthisadapterisAC100V-240V.Theoutputvoltageofthedeviceis+5V 2A, 10W.
4. When fully-charged, disconnect the USB cable from your ASUS Phone first before unplugging the AC power adapter from the power outlet.
NOTES:
• Youcanuseyourdevicewhilechargingbutitmaytakelongertofullychargethedevice.
• ChargingyourdeviceviaUSBportofacomputermaytakelongertofullychargethedevice.
• IfyourcomputerdoesnotprovideenoughpowerforchargingviaUSBport,chargeyourASUSPhone using the AC power adapter plugged to a power outlet instead.

15Chapter 1: Basics
Turning your ASUS Phone on or off
Turning your device onTo turn your device on, press and hold the power button until your device vibrates and starts up.
Turning your device offToturnyourdeviceoff:
1. If your screen is turned off, press the power button to turn it on. If your screen is locked, unlock the device screen.
2. Press and hold the power button, then when prompted, tap Power off then tap OK.
Sleep modeTo put your device in sleep mode, press the power button once until the screen turns off.
Power key

16 Chapter 1: Basics
Starting for the first timeWhen you turn your ASUS Phone on for the first time, Setup Wizard will guide you through the setup process. Follow the onscreen instructions to select your language, select input methods, set up your mobile network, Wi-Fi and security features, sync accounts, and configure your location services.
Use your Google or ASUS account to set up your device, if you do not have a Google or ASUS account yet, go ahead and create one.
Google Account
UsingaGoogleAccountallowsyoutofullyutilizetheseAndroidOSfeatures:
• Organizeandseeallyourinformationfromanywhere.
• Automaticallybackupallyourdata.
• LeverageGoogleservicesconvenientlyfromanywhere.
ASUS Account
HavinganASUSAccountgetsyoutoenjoythefollowingperks:
• PersonalizedASUSsupportserviceandwarrantyextensionforregisteredproducts.
• Free5GBofCloudstoragespace.
• Receivethelatestdeviceandfirmwareupdates.

17Chapter 1: Basics
Battery power conservation tipsThe battery charge is the lifeline of your ASUS Phone. Here are some battery power conservation tips that helps preserve the power of your ASUS Phone battery.
– Close all running apps that are not in use.
– When not in use, press the power button to put the device in sleep mode.
– Decrease brightness of display.
– Keep the speaker volume to a low level.
– Disable Wi-Fi feature.
– Disable Bluetooth feature.
– Disable the screen auto-rotate feature.
– Disable all auto-sync features in your device.

18 Chapter 1: Basics
Using the touchscreenUse these gestures on the touchscreen to launch apps, access some settings, and navigate your ASUS Phone.
Launching apps or selecting itemsDoanyofthefollowing:
• Tolaunchanapp,simplytaponit.
• ToselectanitemsuchasinFileManagerapp,simplytaponit.
Moving or deleting itemsDoanyofthefollowing:
• Tomoveanapporwidget,tapandholdthendragittothelocationwhereyouwantittobe.
• TodeleteanapporwidgetfromtheHomescreen,tapandholdthendragituptoRemove.

19Chapter 1: Basics
Moving through pages or screensDoanyofthefollowing:
• SwipeyourfingertotheleftortotherighttoswitchbetweenscreensortoflipthroughaGalleryof images.
• Scrollyourfingerupordowntogothroughwebpagesorlistofitems.
Zooming inSpread apart your two fingers on the touch panel to zoom in an image in Gallery or Maps, or zoom in a web page.

20 Chapter 1: Basics
Zooming outBring together your two fingers on the touch panel to zoom out an image in Gallery or Maps, or zoom out of a web page.
NOTE: Youmaynotbeabletozoomin/outofsomewebpagesasthesepagesmayhavebeendesigned specifically to fit your mobile screen.

21Chapter 2: There’s no place like Home
There’s no place like Home 22 There’s no place like Home
Zen Home features
Home screenGet reminders of important events, app and system updates, weather forecasts, and text messages from people who really matter to you, right from your Home screen.
Swipe down this area once to display System notifications Swipe down this area twice to display Quick settings
Tap to display Time settings
Tap to update Weather settings
Swipe up to open All Apps screen
Tap to open an app
Tap to open Google Search page
Tap to open Voice Search
Tap to display recent apps
Tap to go back
Tap to go to Home screen

22 Chapter 2: There’s no place like Home
Understanding notification iconsThese icons are shown on the status bar and will guide you of the current status of your ASUS Phone.
Mobile networkShows the signal strength of your mobile network.
1 Nano SIM card 1Shows that Nano SIM card is inserted in Nano SIM card 1 slot.
2 Nano SIM card 2Shows that a Nano SIM card is inserted in Nano SIM card 2 slot.
NOTE: If the SIM card icon is displayed in green, it indicates that it is set as the preferred network.
MessagesShows that you have an unread message.
Wi-FiShows the signal strength of your Wi-Fi connection.
4G 4G networkShows your ASUS Phone is connected to 4G network.
BluetoothShows that Bluetooth is turned on.
Battery lifeShows the battery status of your ASUS Phone.
MicroSD cardShows that a MicroSD card is inserted in your ASUS Phone.
ScreenshotsShows that you took screenshots of your ASUS Phone.
Airplane modeShows that your ASUS Phone is on Airplane mode.
Wi-Fi HotspotShows that Wi-Fi hotspot of your ASUS Phone is enabled.
Do not disturbShows that Do not disturb mode is enabled.
Vibrate modeShows that Vibrate mode is enabled.
Download statusShows the download status of an app or file.

23Chapter 2: There’s no place like Home
Quick settingsThe Quick settings panel provides a one-tap access to some of the wireless features and settings of your ASUS Phone. Each of these features are represented by a button.
To launch the Quick settings panel, swipe down twice from the top of your screen.
NOTE: A blue button indicates that the feature is currently enabled while a gray button indicates a disabled feature. The green buttons refer to individual utilities that you can quickly access via the Quick Settings Notification Panel.
Swipe up to switch to System notifications panel
Adding buttonsToaddbuttonstotheASUSQuickSettingspanel:
1. Launch Quick settings then tap
2. Swipe up Drag to add tiles.
3. Select a tile, then drag it up to the Quick Settings panel.
Removing buttonsToremoveexistingbuttonsfromtheASUSQuickSettingspanel:
1. Launch Quick settings then tap .
2. Select a button and drag it down to remove it from Quick Settings panel.
Tap these buttons to enable or disable their functions.
Slide left or right to adjust the screen’s brightness
Tap to open Settings
Taptoselect/deselectitemstodisplayinQuicksettings
Taptoenable/disableautomaticbrightnessadjustment

24 Chapter 2: There’s no place like Home
NotificationsFrom Notifications, you can see the latest updates done and system changes made on your ASUS Phone. Most of these changes are data and system-related.
To launch the Notifications panel, swipe down from the top of your screen.
Tap on the notification to view its details
Tap to open Settings
Tap this to delete all of the listed notifications

25Chapter 2: There’s no place like Home
Personalizing your Home screenStamp your own personality on your Home screen. Select an attractive design as your wallpaper, add shortcuts for quick access to your favorite apps, and add widgets for a quick review of important info. You can also add more pages so you can add and quickly access or view more apps or widgets on your Home screen.
TolaunchtheManageHomescreen:
• TapandholdanemptyareaonyourHomescreen.
Widgets Widgets shortcuts make it easier to quickly-access your often-used or favorite widgets from your Home screen.
You can put widgets, which are small dynamic apps, on your Home screen. Widgets provide you with quick-views of the weather forecast, calendar events information, battery status, and more.
Adding widgetsToaddawidget:
1. Tap and hold an empty area on your Home screen and select Widgets.
2. From the Widgets screen, tap and hold a widget, then drag it to an empty area on your Home screen.
Removing widgetsFrom your Home screen, tap and hold a widget, then drag it to Remove on top of your screen.

26 Chapter 2: There’s no place like Home
Grouping your app shortcuts in a folderCreate folders to organize your app shortcuts on your Home screen.
1. On your Home screen, tap and drag an app onto another app and a folder will appear with an automatically assigned name.
2. If you want to change the folder name, tap the folder and tap the folder name to assign a new name to this folder.
WallpapersLet your apps, icons, and other Zen elements sit on an attractively designed wallpaper. You may add a translucent background tint to your wallpaper for readability and clarity. You can also select an animated wallpaper to make your screen come alive.
Applying wallpaperToapplywallpaper:
1. Tap and hold an empty area on your Home screen and select Wallpapers.
2. Select a wallpaper, then tap Apply.
3. Select to set wallpaper to Home screen, Lock screen or Home and lock screen.
Tap to select wallpaper
Tap to select where you want to apply the wallpaper

27Chapter 2: There’s no place like Home
Applying an animated wallpaperToapplyananimatedwallpaper:
1. Tap and hold an empty area on your Home screen and select Wallpapers.
2. Tap Live Wallpaper.
3. Select an animated wallpaper, then tap SET WALLPAPER.
NOTE: YoucanalsosetupyourwallpapersettingsfromSettings > Display > Wallpaper.
Editing your Home screenYou can extend your Home screen, select a scroll effect, change the icon and font, adjust the size and color of the icon and font, and align the icons to the top or bottom of your screen.
1. Tap and hold an empty area on your Home screen and select Edit Home screen.
2. Tap a feature to edit your Home screen.
Easy modeNavigate your ASUS Phone better with Easy mode, an intuitive interface with large icons, buttons, and font size for better readability and easier user experience. You can also quickly do your core tasks such as making calls, sending messages, and more in Easy mode.
Enabling Easy modeToenableEasymode:
1. LaunchtheSettingsscreenbydoinganyofthefollowing:
• Launch Quick settings then tap . • Swipe up from your Home screen and tap Settings.
2. Scroll down the Settings screen and select Special modes > Easy mode.
3. Slide Easy mode to ON.
28 Chapter 2: There’s no place like Home
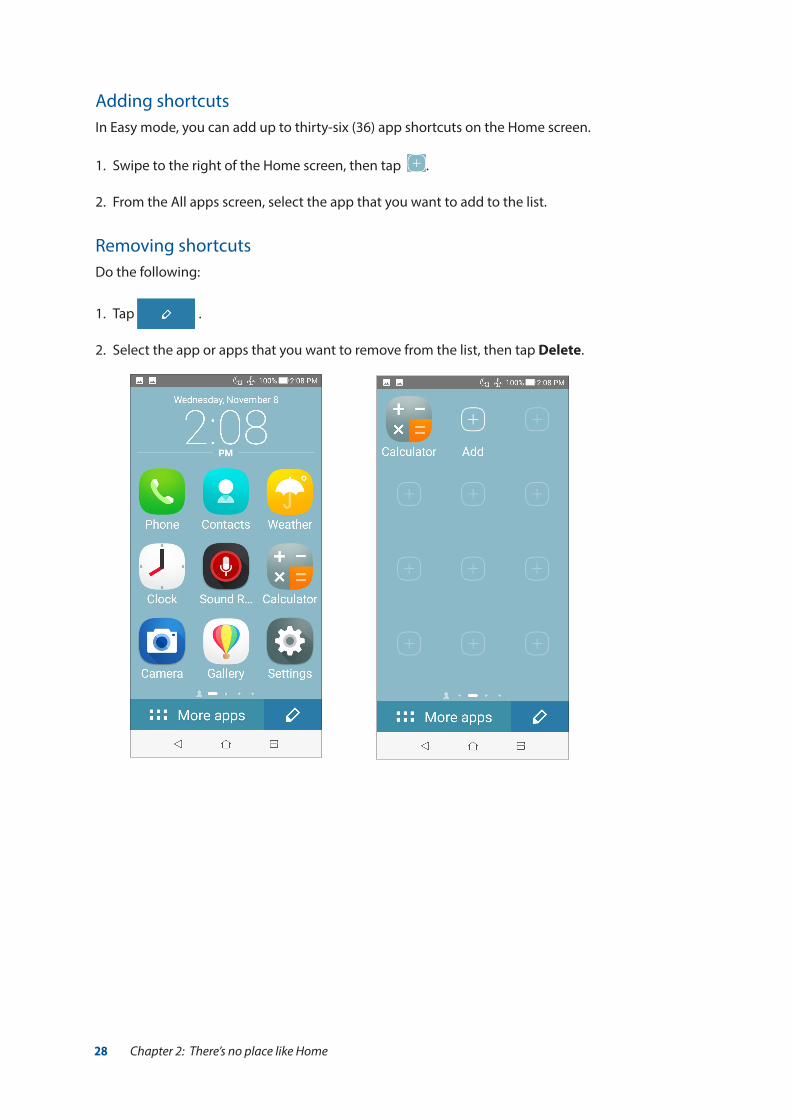
Adding shortcutsIn Easy mode, you can add up to thirty-six (36) app shortcuts on the Home screen.
1. Swipe to the right of the Home screen, then tap .
2. From the All apps screen, select the app that you want to add to the list.
Removing shortcutsDothefollowing:
1. Tap .
2. Select the app or apps that you want to remove from the list, then tap Delete.

29Chapter 2: There’s no place like Home
Adding contactsIn Easy mode, you can add your frequently contacts on the Home screen.
1. Swipe to the left of the Home screen, then tap .
2. From the Contacts screen, select the contact that you want to add to the list.
Removing contactsDothefollowing:
1. Swipe to the left of the Home screen, then tap Edit contacts.
2. Select the contact or contacts that you want to remove from the list, then tap Delete.
Disabling Easy modeTodisableEasymode:
1. Swipe down from the top of your screen then tap .
2. Select Special modes > Easy mode from the Settings screen.
3. Slide Easy mode to OFF.

30 Chapter 2: There’s no place like Home
Kids modeKids mode is a parental control feature, which allows you to limit your children’s use of your phone, including app access and usage time restrictions and incoming call blocking.
Using Kids modeTouseKidsmode:
1. LaunchtheSettingsscreenbydoinganyofthefollowing:
• Launch Quick settings then tap . • Swipe up from your Home screen and tap Settings.
2. Scroll down the Settings screen and select Special modes > Kids mode.
3. Slide Kids mode to ON.
4. Create your PIN, select a security question and key in your answer.
5. Select the apps you want to display under Kids mode then tap Next.

31Chapter 2: There’s no place like Home
6. Configure the incoming call settings then tap Finish.
7. Tap to configure more settings for Kids mode.
8. Tap to disable Kids mode.

32 Chapter 2: There’s no place like Home
Setting up the date and timeBy default, the date and time displayed on your Home screen automatically syncs with your mobile provider’s settings.
Tochangethedateandtimesettings:
1. LaunchtheSettingsscreenbydoinganyofthefollowing:
• Launch Quick settings then tap . • Swipe up from your Home screen and tap Settings.
2. Scroll down the Settings screen and select Date & time.
3. Move the slider of Automatic date & time and Automatic time zone to the left.
4. Adjust the date and time.
5. Select the time zone and manually set the date and time.
6. You can opt to use the 24-hour format, if you prefer.
NOTE: See also Clock.
Setting up your ringtone and alert soundsSet up the sound for your phone ringtone, notifications such as text messages, emails, and event alerts. You can also choose to enable or disable the dial pad touch tones, touch sounds, screen lock sound, or you can choose to have your ASUS Phone vibrate when you tap on it.
Tosetupthesoundsettings:
1. LaunchtheSettingsscreenbydoinganyofthefollowing:
• Launch Quick settings then tap . • Swipe up from your Home screen and tap Settings.
2. Scroll down the Settings screen and select Sound & Vibration.
3. Set up your preferred sound settings.

33Chapter 2: There’s no place like Home
Lock ScreenBy default, the lock screen appears after turning on your device and while waking it up from sleep mode. From the lock screen, you can proceed to your device’s Android® system by swiping on your touch screen panel.
Your device’s lock screen can also be customized to regulate access to your mobile data and apps.
Customizing your lock screenIf you want to change your lock screen settings from the default Swipe option, refer to the followingsteps:
1. Launch Quick settings then tap .
2. Scroll down the Settings screen and select Security.
3. In the next screen, tap Screen lock.
4. Tap the screen lock option you would like to use.
NOTE: For more details, see Securing your ASUS Phone.

34 Chapter 2: There’s no place like Home
Using and customizing the quick access buttonsYour lock screen provides three customizable quick access buttons. Enable this feature and customizethesebuttonstolaunchotherappsonthelockscreenusingthefollowingsteps:
1. Launch Quick settings then tap .
2. Scroll down the Settings screen and select Lock screen.
3. Under Display, tap Quick access.
4. Move the slider to the right to enable Customize quick access apps. The quick access buttons appear on the lock screen.
5. Select which button you would like to customize.
6. Tap the app you would like to preset on the quick access button you chose to configure.
NOTE: Scroll up or down to view the current list of apps you can preset.
35Chapter 2: There’s no place like Home
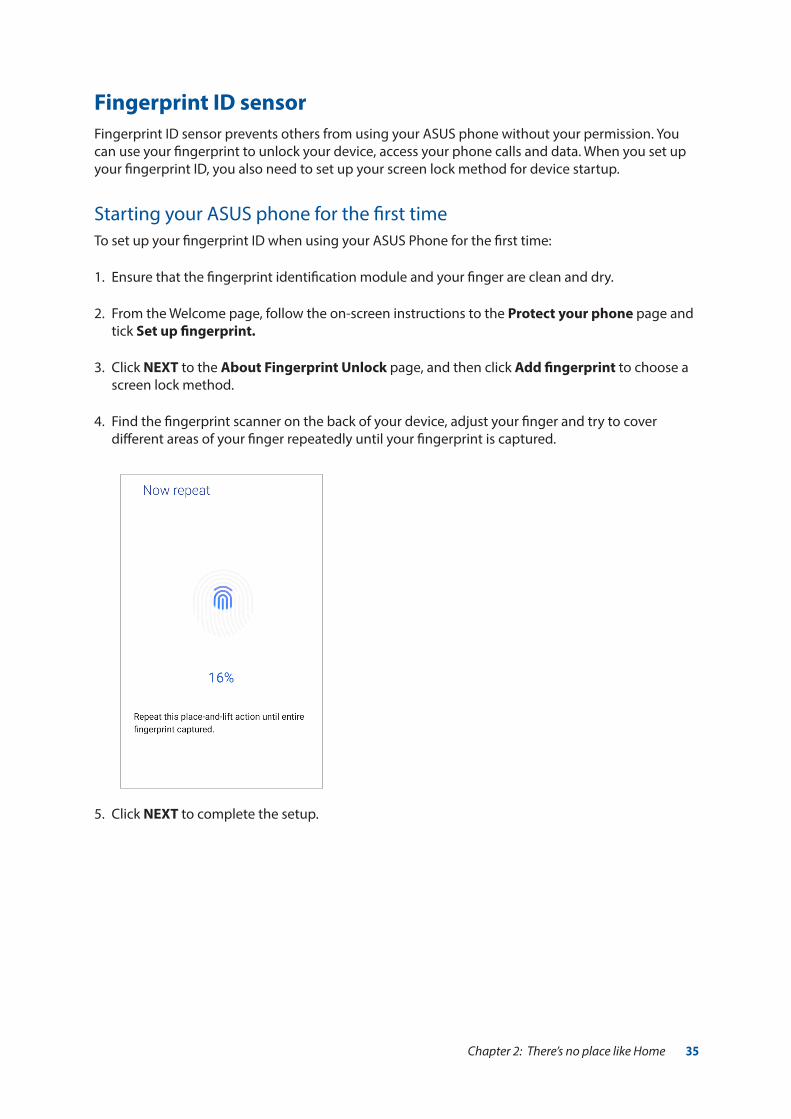
Fingerprint ID sensorFingerprint ID sensor prevents others from using your ASUS phone without your permission. You can use your fingerprint to unlock your device, access your phone calls and data. When you set up your fingerprint ID, you also need to set up your screen lock method for device startup.
Starting your ASUS phone for the first timeTosetupyourfingerprintIDwhenusingyourASUSPhoneforthefirsttime:
1. Ensure that the fingerprint identification module and your finger are clean and dry.
2. From the Welcome page, follow the on-screen instructions to the Protect your phone page and tick Set up fingerprint.
3. Click NEXT to the About Fingerprint Unlock page, and then click Add fingerprint to choose a screen lock method.
4. Find the fingerprint scanner on the back of your device, adjust your finger and try to cover different areas of your finger repeatedly until your fingerprint is captured.
5. Click NEXT to complete the setup.

36 Chapter 2: There’s no place like Home
Setting up fingerprint ID from SettingsTo set up your fingerprint ID from Settings:
1. Ensure that the fingerprint scanner and your finger are clean and dry.
2. LaunchtheSettingsscreenbydoinganyofthefollowing:
• Launch Quick settings then tap . • Swipe up from your Home screen and tap Settings.
3. Scroll down the Settings screen and select Security > Fingerprint.
4. Tap CONTINUE.
5. Follow the instructions to set up your backup screen lock method.
37Chapter 2: There’s no place like Home
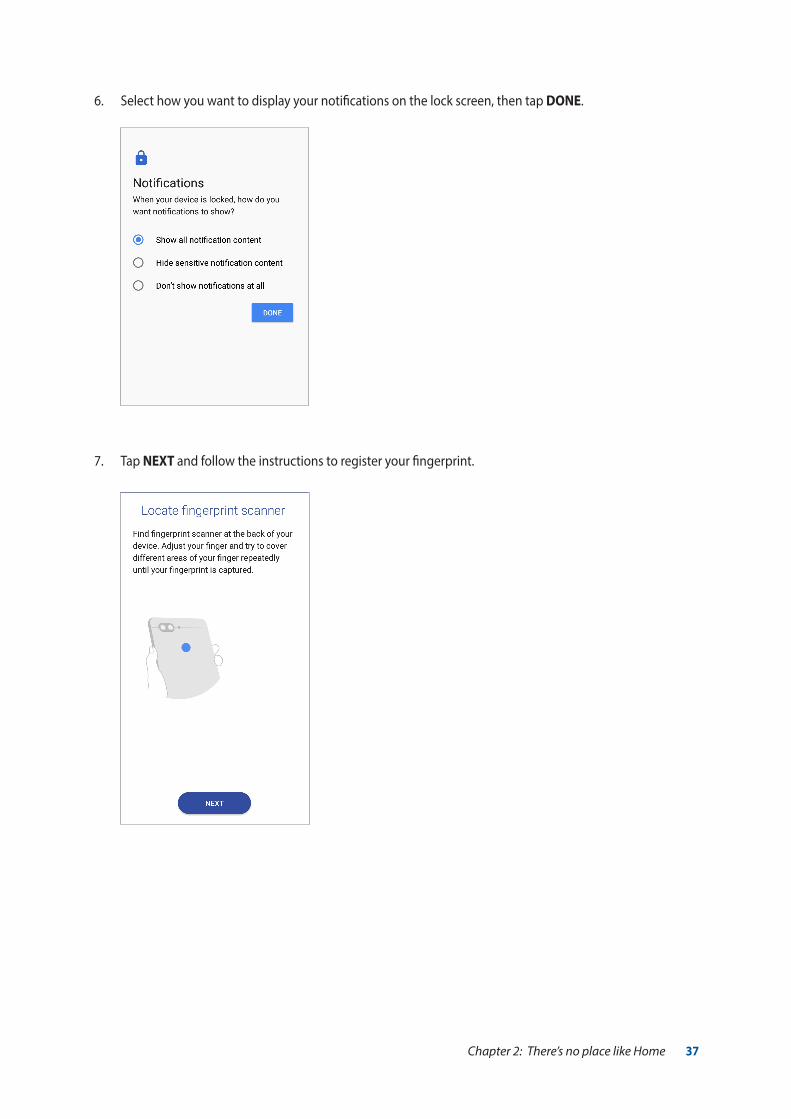
6. Select how you want to display your notifications on the lock screen, then tap DONE.
7. Tap NEXT and follow the instructions to register your fingerprint.

38 Chapter 2: There’s no place like Home
8. When finished, tap DONE.

39Chapter 2: There’s no place like Home
Face UnlockFace unlock prevents others from using your ASUS phone without your permission effertlessly. You can light up your ASUS Phone’s screen and look at it to unlock your device, access your phone’s home screen in one second. When you set up your face unlock, you also need to set up your screen lock method for device startup.
Setting up face unlock from SettingsTo set up face unlock from Settings:
1. LaunchtheSettingsscreenbydoinganyofthefollowing:
• Launch Quick settings then tap . • Swipe up from your Home screen and tap Settings.
2. Scroll down the Settings screen and select Security >Face recognition.
3. Tap CONTINUE.
4. Follow the instructions to set up your backup screen lock method.

40 Chapter 2: There’s no place like Home
5. Select how you want to display your notifications on the lock screen, then tap DONE.

41Chapter 2: There’s no place like Home
7. Tap NEXT and follow the instructions to register your fingerprint.
8. When finished, tap DONE.
NOTES:
• Show your mouth, nose and opened eyes while using face unlock feature.
• Wearing sunglasses or insufficient light will lead to failure of face unlock.

42 Chapter 2: There’s no place like Home
ZenUI KeyboardZenUI Keyboard allows you to enjoy a faster, smoother and easier one-hand typing experience.
Resizing your ZenUI keyboardGet comfortable as you customize your preferred keyboard size on the screen.
ToresizeyourZenUIkeyboard:
1. From the toolbar of the ZenUI Keyboard, tap > Resize keyboard.
Editing textsAccurately select a word, a phrase or a paragraph to cut , copy or paste.
ToedittextswithyourZenUIkeyboard:
1. From the toolbar of the ZenUI Keyboard, tap > Text editing.
2. Drag or toadjusttheheight/widthofyourZenUIKeyboard.
3. Drag to move the ZenUI keyboard to your desired area.

43Chapter 2: There’s no place like Home
NOTE: You can also set up your ZenUI keyboard settings from Settings > Languages & input > Virtual keyboard > ZenUI Keyboard.
2. Tap Select and move the cursor over the text with the navigation keys to highlight the contents you want. Then tap the Cut, Copy, or Paste key to apply.
44 Chapter 3: Work hard, play harder
Work hard, play harder 33 Work hard, play harder
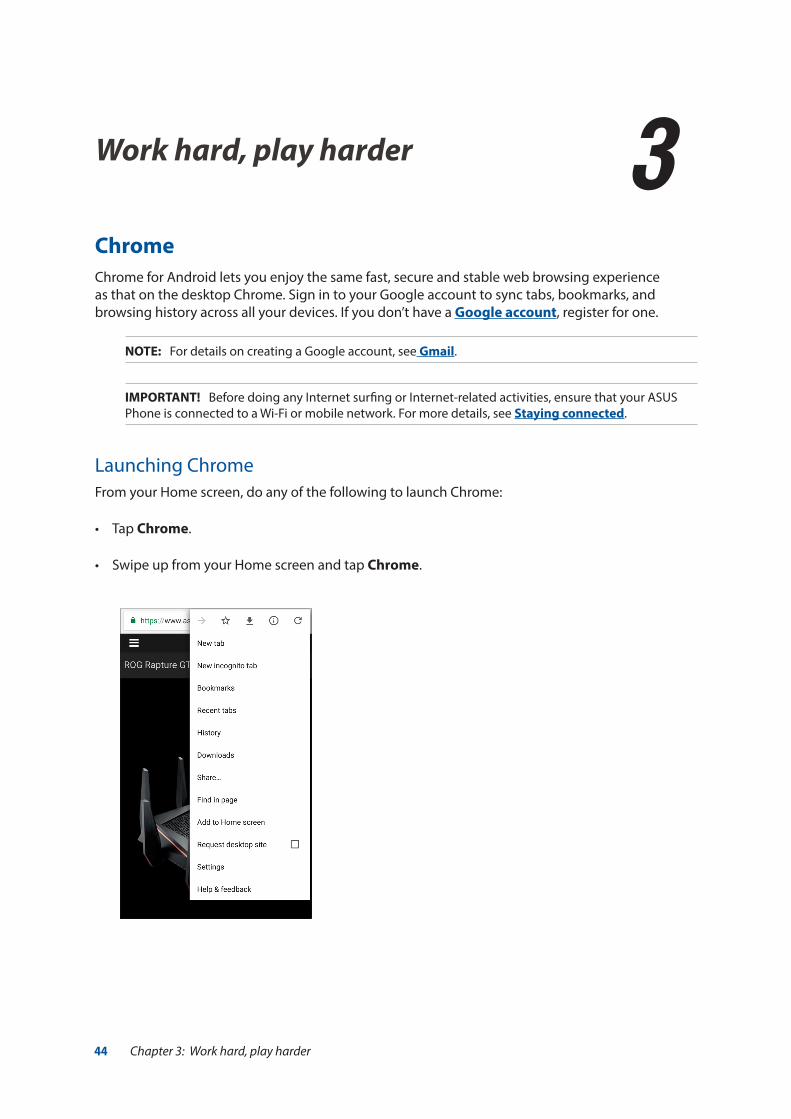
ChromeChrome for Android lets you enjoy the same fast, secure and stable web browsing experience as that on the desktop Chrome. Sign in to your Google account to sync tabs, bookmarks, and browsing history across all your devices. If you don’t have a Google account, register for one.
NOTE: For details on creating a Google account, see Gmail.
IMPORTANT! Before doing any Internet surfing or Internet-related activities, ensure that your ASUS Phone is connected to a Wi-Fi or mobile network. For more details, see Staying connected.
Launching ChromeFromyourHomescreen,doanyofthefollowingtolaunchChrome:
• TapChrome.
• SwipeupfromyourHomescreenandtapChrome.

45Chapter 3: Work hard, play harder
Sharing pagesShare interesting pages from your ASUS Phone to others via an email account, cloud storage account, Bluetooth, or other ASUS Phone apps.
1. Launch Chrome.
2. From a web page, tap > Share...
3. Tap the account or app that you want to use as medium in sharing the page.
Bookmarking pagesBookmark your favorite pages or websites so you can go back and browse them again.
Tobookmarkapage:
From the page, tap > . To view your favorite pages, tap > Bookmarks, then select the page you want to view or access.
Clearing the browsing dataClear the browsing data that are temporarily stored in your ASUS Phone to improve the loading performance of your Chrome browser. The browsing data includes browsing history, cache, cookies/sitedata,savedpasswords,andautofilldata.
1. Launch the browser.
2. Tap > Settings > Privacy > Clear browsing data.
3. Select the browsing data that you want to delete.
4. When done, click CLEAR DATA.

46 Chapter 3: Work hard, play harder
GmailUse Gmail to set up your Google account to get into Google-related services and apps as well as receive, send, and browse emails right from your ASUS Phone. You can also set up other email accounts such as Yahoo or your work email account via Gmail.
IMPORTANT! Your ASUS Phone must be connected to a Wi-Fi or mobile network so you can add an email account or send and receive emails from added accounts. For more details, see Staying connected.
TosetupyourGoogleaccount:
1. FromyourHomescreen,doanyofthefollowingtolaunchGmail:
• TapGoogle > Gmail.
• SwipeupfromyourHomescreenandtapGoogle > Gmail.
2. Tap Add an email address.
3. Select Google, then tap Next.
4. Enter your email address. To create a new Google account, tap Or create a new account.
5. Follow the next steps to sign in to your Google account.
NOTE: If you want to set up your work account on your ASUS Phone, ask for the email settings from your network administrator.

47Chapter 3: Work hard, play harder
Google CalendarBring your schedule to life and keep track of all your important events or reminders. Events that you create or edit will automatically sync with all Google Calendar versions that you’ve logged into.
Creating eventsTocreateanevent:
1. From the Home screen, tap Google > Calendar.
2. Tap then tap Event.
3. Enter your event name, and select the date and time for the event. You may set the event as an all-day or recurring event.
• All-dayevent:FromtheAll day field, move the slider to the right.
• Recurringevent:TapMore options > , then select how often you want the event to recur or repeat.
4. To set the time zone, tap More options > , then enter the country whose time zone you want displayed.
5. From the Add location field, enter the venue or location of the event.
6. Tap , then you may select or set the time or day to get a notification or reminder about the event.
7. From the Invite people field, enter the email addresses of your guests to the event.
8. You may also add note or attachment from the Add note or Add attachment field.
9. Once finished, tap SAVE.
Editing or removing eventsToeditorremoveanevent:
1. From the Home screen, tap Google > Calendar.
2. Tap the event that you want to edit or delete.
3. To edit the event, tap and make the necessary changes. To remove the event, tap > Delete, then tap OK to confirm the deletion.

48 Chapter 3: Work hard, play harder
Creating remindersTocreateareminder:
1. From the Home screen, Google > Calendar.
2. Tap then tap Reminder.
3. Enter your reminder name and tap DONE.
4. Set the date and time for the reminder. You may set the reminder as an all-day or recurring reminder.
• All-dayreminder:FromtheAll day field, move the slider to the right.
• Recurringreminder:Tap , then select how often you want the reminder to recur or repeat.
5. Once finished, tap SAVE.
Editing or removing remindersToeditorremoveareminder:
1. Tap Google > Calendar.
2. Tap the reminder that you want to edit or delete.
3. To edit the reminder, tap and make the necessary changes. To remove the reminder, tap > Delete, then tap OK to confirm the deletion.

49Chapter 3: Work hard, play harder
File ManagerUsing File Manager allows you to easily locate and manage your data on the internal storage of your ASUS Phone and its connected external storage devices.
To launch File Manager, swipe up from your Home screen and tap File Manager.
IMPORTANT! Before accessing files saved on the network and cloud storage, ensure that Wi-Fi or mobile network is enabled on your ASUS Phone. For details, see Staying connected.
Tap to display the files under the category
Displays the usage of the internal and external storage
Tap to search for a file
Tap to access the internal, external, network, and cloud storage
Tap to clear search history, invite a friend, view ZenUI instant updates, and more

50 Chapter 3: Work hard, play harder
The CloudBack up your data, sync files among different devices, and share files securely and privately via a Cloud account such as ASUS WebStorage, Drive, OneDrive, and Dropbox.
ASUS WebStorageRegister for or sign in to ASUS WebStorage and get free cloud storage. Automatically upload newly captured photos for instant sharing, sync files among different devices, or share files via your ASUS WebStorage account.
IMPORTANT! Ensure that Wi-Fi or mobile network is enabled on your ASUS Phone. For details, see Staying connected.

51Chapter 3: Work hard, play harder
ZenUI FAQsFind answers from FAQs (Frequently Asked Questions) or directly interact with other ZenUI users to find and share solutions about ZenUI apps.
ToaccessZenUIFAQs:
1. From your Home screen tap ASUS > ZenUI Help.
2. Tap ZenUI FAQs, then select the app that you want to find answers for.

52 Chapter 4: Keeping in touch
Keeping in touch 44 Keeping in touch
Call in style
Dual SIM featureThe dual SIM feature of your ASUS Phone lets you manage the settings of the installed Nano SIM cards.Withthisfeature,youcanenable/disableNanoSIMcards,assignSIMnames,orsetoneasapreferred network.
Renaming your Nano SIM cardsChange the names of your Nano SIM cards on your ASUS Phone so that you can identify them easily.
To change the names of your Nano SIM cards, tap SIM1 name: SIM1 or SIM2 name: SIM2 then key in the names for your Nano SIM cards.
NOTE: If your SIMs have different mobile service providers, we recommend you to use the names of these providers for your SIM names. If both SIMs have the same mobile service provider, we recommend you to use the mobile numbers for your SIM names.

53Chapter 4: Keeping in touch
Assigning a preferred SIM cardAssign a SIM card as your preferred SIM for voice calls, SMS messages, and data services.
SIM card for voice callsWhen you make a call, your ASUS Phone automatically uses the preferred SIM card to connect the call.
To assign a SIM card for voice calls, tap Calls then tap the SIM that you want to use.
IMPORTANT! You can only use this feature if you make a call from your contacts list.
SIM card for SMS messagesTo assign a SIM card for SMS messages, tap SMS messages then select from SIM1 or SIM2.
SIM card for data serviceTo assign a SIM card for data service, tap Cellular data then select from SIM1 or SIM2.

54 Chapter 4: Keeping in touch
Making callsYour ASUS Phone offers you many ways to make a call. Call your friends from your contacts list, smart dial to quickly place a call, or enter a speed-dial number to call your frequently-called contact.
NOTE: Organize your contacts in the Contacts app. For details, see Managing contacts.
Launching the Phone appFromyourHomescreen,doanyofthefollowingtolaunchthePhoneapp:
• Tap .
• SwipeupfromyourHomescreenandtapPhone.
Dialing a phone numberUse the Phone app to directly dial a phone number.
1. From your Home screen, tap then tap the number keys.
2. Select from call buttons SIM1 or SIM2 to dial the number.
NOTE: The labels of the call buttons may vary depending on the setting that you made to your SIM cards. For more details, see Dual SIM feature.
Dialing an extension numberWhen you need to call an extension number, you can do any of these steps to skip the voice prompts.
Prompting for confirmation of an extension numberYou can insert a confirmation prompt for the extension number after dialing the main number.
1. From the Phone app, enter the main number.
2. To insert a confirmation prompt, tap and hold # until a semi-colon (;) appears.
3. Select from call buttons SIM1 or SIM2 to make the call.
4. When prompted, tap Yes to confirm the extension number.
5. Tap to end the call.

55Chapter 4: Keeping in touch
Auto-dialing an extension numberYou can insert a short or long pause after dialing the main number, then the extension number is dialed automatically.
1. From the Phone app, enter the main number.
2. To insert a pause, tap and hold * until a comma (,) appears.
3. Enter the extension number.
4. Select from call buttons SIM1 or SIM2 to place the call.
5. Tap to end the call.
Smart dialing your contactsAs you enter the first few numbers or letters of your contact’s name, Smart Dial filters through your contacts list or call logs and provide you with possible matches. You can check if the contact you’re trying to reach is on the list of possible matches, then you can quickly place that call.
1. Launch the Phone app then enter the number or name of the contact.
2. From the list of possible matches, tap the contact you wish to call. If the contact is not on list, enter the complete number or name of the contact.
3. Select from call buttons SIM1 or SIM2 to make the call.
NOTE: The labels of the call buttons may vary depending on the setting that you made to your SIM cards. For more details, see also Dual SIM feature.
Calling from Contacts appUse the Contacts app to make a call from your contacts list.
1. Launch the Contacts app.
2. Tap the contact name then tap the number that you wish to dial.
3. If there are two SIM cards installed, tap the SIM card from which you want to make the call.
4. Tap to end the call.
NOTE: To view all contacts from all contact accounts, tap Contacts to display dropdown list then tick all accounts.

56 Chapter 4: Keeping in touch
Calling your favorite contactsWhen you add a contact to your Favorites list, you can quickly call the contact from the Phone app.
1. Launch the Contacts app.
2. Tap > Favorites to display your Favorites list, then tap your favorite contact whom you want to call.
3. Tap to end the call.
Receiving callsThe touch screen of your ASUS Phone lights up when there is an incoming call. The display of the incoming call also varies, depending on the status of your ASUS Phone.
Answering callsTherearetwowaystoansweracalldependingonthestatusofyourASUSPhone:
• Ifyourdeviceisactive,tapAnswer or to reject a call, tap Dismiss.
• Ifyourdeviceislocked,drag to to answer or to to reject the call.
Managing your call logsFrom your call logs, you can call back your missed calls, save calls to your contacts list, or redial your recently-called number or contact.
Saving calls to ContactsYoucanaddacall/numberfromyourcalllogstoyourcontactslist.
1. From the Phone app, tap to display your call logs.
2. Tap beside the number that you want to add to your contacts list.
3. Tap beside the number.
4. Tap Create new contact to add a new entry to your contacts list.
Tap Add to an existing contact, select a contact, then tap if you want to overwrite the contact’s number with this new one.

57Chapter 4: Keeping in touch
Redialing your last-called numberToredialyourlast-callednumber:
1. From the Phone app, tap to display your call logs.
2. Tap Call to display your last-called number, then tap Call again to redial the number.
3. Tap to end the call.
Other call options
During an active call, tap and tap any of the possible call options for when a call is in progress.
MicrophoneTurns the microphone for the active call on or off. When the microphone is off or in mute mode, you can hear the caller but the caller can’t hear you.SpeakerphoneTurns the speakerphone on or off.
Call on holdPuts an active call on hold.
Conference callWhen you have subscribed to a conference call service with your mobile service provider, this icon allows you to add a contact or contacts in an active call.
NOTES:
• Thenumberofparticipantsintheconferencecalldependonyourconferencecallsubscription. You can inquire from your mobile service provider about this service.
• Formoredetailsonconferencecall,seeManaging multiple calls.
RecordRecords an active call.
IMPORTANT! Before recording an active call, it is dictated by most local laws to ask permission from the other person or persons on the other line.
NOTE: For more details, refer to the section Recording calls.

58 Chapter 4: Keeping in touch
Managing multiple callsYour ASUS Phone provides you the convenience of making or taking two calls.
Answering another callWhile you are talking on your ASUS Phone, you can hear a beeping sound, indicating of another incoming call. Tap Answer on the touch screen to receive an incoming call while on an active call.
Recording callsYour ASUS Phone allows you to record a conversation for future reference or information.
1. Call a contact or dial a number.
2. Tap to record the call.
IMPORTANT! Before recording a call, ensure that you ask for permission from the other party or parties.
3. To stop recording, tap This icon appears on the system notification bar.
4. Swipe down from the top of the screen, then tap Call recording saved notification to view the recorded conversation.

59Chapter 4: Keeping in touch
Managing contactsOrganize your contacts and easily stay in touch with them via calls, SMS messages, emails, or social networks. Group your contacts as Favorites to quickly get in touch with them.
You can also sync your contacts with your email or social network accounts, link contacts’ info for easy access in one place, or filter the contacts you want to keep in touch with.
To launch the Contacts app, swipe up from your Home screen and tap Contacts.
Contacts SettingsSelect how you would want to display your contacts from the Contacts settings. Such display optionsincludedisplayingonlythosecontactswithphones,sortinglistbyfirst/lastname,orviewingcontactnamesasfirst/lastnamesfirst.TosetupyourContactssettings,tap > Settings from the Contacts app.
Setting up your profileMake your ASUS Phone truly your own and set up your profile info.
1. Launch the Contacts app then tap ME.
2. Fill in your info such as mobile or home number. To add other info, tap Add another field.
3. When you’ve completed your info, tap .
Adding contactsAdd contacts to your device, corporate, Google, or other email accounts and fill in more important contact information such as contact numbers, email addresses, special events for VIPs, and more.
1. Launch the Contacts app then tap .
2. Select Device.
NOTES:
• YoucanalsosavethecontacttoyourSIMcardoranemailaccount.
• Ifyoudon'thaveanemailaccount,tapADD ACCOUNT then create one.
3. Fill in the necessary information such as mobile or home number, email address, or group where you want to put the contact in.
4. After filling in the information and you want to add more contact numbers or email addresses, tap Add new.
5. If you want to add other contact information, tap Add another field.
6. When you’ve completed the info, tap .

60 Chapter 4: Keeping in touch
Adding an extension number to a contact numberYou can add a contact’s extension number to skip the voice prompts when making a call.
1. In the contact’s information screen, enter the contact’s main number and extension number in eitherofthesetwoways:
• Insert a comma (,) after the main number, then enter the contact’s extension number. There’ll be a short pause before the extension number is dialed automatically. To extend the pause, tap Pause to insert another comma.
• Insert a semi-colon (;) after the main number, then enter the contact’s extension number. When dialing the contact number, you’ll be prompted to confirm the extension number. Tap Yes on the confirmation message.
2. When you’ve completed the info, tap .
Customizing your contact’s profileEdit your contact’s info, add a photo, set a ringtone, or take a photo as a cover for your contact’s profile.
1. Launch the Contacts app then select the contact whose info or profile you want to edit or customize.
2. Make the changes from the contact’s profile page.
Tap to add your contact’s photo from Gallery or by capturing a photo
Tap to edit your contact’s info
Tap to add your contact’s profile cover from Gallery or by capturing a photo
You can display a Facebook profile cover as the theme cover for a Facebook contact

61Chapter 4: Keeping in touch
Importing contactsImport your contacts and their respective data from one contact source to your ASUS Phone, email account, or a SIM card.
1. Swipe up from your Home screen and tap Contacts then tap > Manage contacts.
2. Tap Import/Export thenselectfromthefollowingimportingoptions:
a. ImportfromSIM1card/ImportfromSIM2card
b. Import from storage
3. Selectfromthefollowingaccountstosavethecontact:
a. Device
b. SIM1/SIM2
4. Tick to select the contacts that you wish to import and when done, tap .
Exporting contactsExport your contacts to any of the storage accounts in your ASUS Phone.
1. Swipe up from your Home screen and tap Contacts then tap > Manage contacts.
2. Tap Import/export thenselectfromthefollowingexportingoptions:
a. ExporttoSIM1card/ExporttoSIM2card
b. Export to storage
3. Taptoselectthecontactsfromthefollowingaccounts:
a. All contacts
b. Device
c. SIM1/SIM2
4. Tick the contacts that you want to export.
5. When done, tap .
62 Chapter 4: Keeping in touch
Managing your block list
Blocking contacts or numbersCreate your list of blocked contacts or numbers to avoid receiving any unwanted calls or messages. Your blocked calls and messages will be saved to the Block List archive.
1. Swipe up from your Home screen and tap Contacts then tap > Manage contacts > Block list.
2. Tap ,thendoanyofthefollowing:
• To block a contact, tap Choose from contacts, then select the contact you want to block from your contacts list.
• To block a number from the recent call logs, tap Choose from recent call logs, then select the contact you want to block from your contacts list.
• To block a number, tap Enter a number then enter the number that you want to block. • To block a SIP number, tap Enter a SIP number then enter the number that you want to
block.
3. When done, tap .
Unblocking contacts or numbersYou may remove a blocked contact or number from your list and receive calls or messages from the contact or number again.
1. Swipe up from your Home screen and tap Contacts then tap > Manage contacts > Block list.
2. Tap and hold on the contact or number that you want to unblock then tap Remove from block list.
Social networking with your contactsIntegrating the social network accounts of your contacts makes it easier for you to view their profiles, news, and social feeds. Stay updated with the activities of your contacts in real time.
IMPORTANT! Before you can integrate social network accounts of your contacts, you need to log in to your social network account and sync its settings.

63Chapter 4: Keeping in touch
Syncing your social network accountSync your social network account to add the social network accounts of your contacts to your ASUS Phone.
1. DoanyofthefollowingtolaunchtheSettingsapp:
• Launch Quick settings then tap . • Swipe up from your Home screen and tap Settings.
2. From the Settings screen, tap your social network account under Accounts section.
3. Slide Contacts to ON to sync the social network accounts of your contacts.
4. Launch the Contacts app to view your contacts list.
5. To view only your contacts with social network accounts, tap Contacts to display then untick the other contact sources, leaving the social network name checked.
6. When done, tap .

64 Chapter 4: Keeping in touch
Send messages and more
Google MessengerGoogleMessenger,anintuitiveanddelightfulapp,letsyousend/receiveSMS/MMSmessages,as well as send group texts, photos, or audio messages. You can add emojis or stickers to your messages, share your location, archive your messages, and easily block SMS senders. You can also take photos or record videos and easily share these files.
Sending messages
1. From the Home screen, tap .
2. Tap , then select the contact whom you want to send a message to.
3. Start composing your message in the message field.
4. When you’re done, select the SIM account where you’re going to send your message from.
Replying to messages
1. Tap your message alert from your Home screen or Lock screen.
2. Start composing your reply in the message field.
3. When you’re done, select the SIM account where you’re going to send your reply from.

65Chapter 5: Fun and entertainment
Fun and entertainment 55 Fun and entertainment
Using a headsetHave the freedom to do other things while you’re in a call or enjoy listening to your favorite music, using a headset.
Connecting the audio jackInsert the 3.5mm headset jack into the audio port of your device.
WARNING!
• Donotinsertotherobjectsintotheaudiojackport.
• Donotinsertacablewithelectricpoweroutputintotheaudiojackport.
• Listeningatahighvolumeforlongperiodscandamageyourhearing.
NOTES:
• Wehighlyrecommendtouseonlycompatibleheadsetsorthebundledheadsetwiththisdevice.
• Unpluggingtheaudiojackwhilelisteningtomusic,automaticallypausesthemusicplayed.
• Unpluggingtheaudiojackwhilewatchingavideo,automaticallypausesthevideoplayback.
66 Chapter 5: Fun and entertainment
Google Play MusicWith Google Play Music, you can stream your favorite music, create playlists, or listen to the radio. You can also store up to 50,000 music files to the cloud for free. You can also subscribe to Google Play Music for unlimited and ad-free access to millions of music files that you can add to your own music library.
Setting up your Google Play MusicSign in to your Google or Gmail account to be able to use Google Play Music. Once you've signed in to your account, all music files on your ASUS Phone, including the uploaded or purchased ones from Google Play, are added to your library.
TosetupyourGooglePlayMusic:
1. From the Home screen, Google > Play Music.
2. Tap then tap Settings > Tap to choose account.
3. Enter your account, then tap ADD ACCOUNT.
4. Follow the next instructions to sign in to your account.
NOTES:
• GooglePlayMusicsubscriptionisonlyavailableinsomecountriesorregion.
• FormoredetailsonusingGooglePlayMusic,visithttps://support.google.com .
67Chapter 6: Your precious moments
Your precious moments 66 Your precious moments
Capture moments
Launching the Camera appCapture images and record videos using your ASUS Phone’s Camera app. Refer to any of the steps below to open the Camera app.
From the lock screen
Drag to any direction until the camera app is launched.
From the home screen
Tap .
Using the volume keyWhile your ASUS Phone is on sleep mode, double-click the volume key to wake it up and immediately launch the Camera app.

68 Chapter 6: Your precious moments
Camera home screenYour ASUS Phone’s camera is equipped with auto-scene detection and auto-image stabilizer features. It also features a video stabilization function that helps prevent shakiness while video recording.
Tap the icons to start using your camera and explore the image and video features of your ASUS Phone.
Photo LocationsToenablethelocationtaggingfeature,refertothefollowingsteps:
1. Turn on the location access from Settings > Location.
2. Ensure that you have shared your location to Google Map.
3. From the Camera app’s home screen, tap > Other and activate Location services before you take the photo.
Adjust settings
Switch between screen modes
Set the time (in second) delay before capturing photos
See the Gallery
Record videosTake photos
Swipe to the right to use advanced camera settings
Swipe to the left to use effects
Enableordisabletheflashfunction
Enable or disable HDR
Switch between the front and rear cameras
Touch to switch between Auto mode and Manual mode
Touch to switch between Normal mode and Wide Angle mode
Switch between Normal mode and Portrait mode

69Chapter 6: Your precious moments
Advanced camera featuresExplore new ways of capturing images or videos and make captured extra special moments using the advanced camera features of your ASUS Phone.
IMPORTANT! Apply the settings first before taking images. Available features may vary per model.
BeautyHave fun during and after taking photos of your family and friends using the Beauty feature of your ASUS Phone. When enabled, this feature allows you to make live beauty enhancements on your subject’s face before you press the shutter button.
Capturing Beauty photos
1. From the Camera app’s home screen, swipe to the right then tap Beauty.
2. Tap to adjust the Beauty settings to apply to the photo.
3. Tap to start capturing the photo.
NOTE: Drag towards the center of the screen to set a countdown timer.
Applying Beauty to photos
1. Tap the thumbnail to select the photo.
2. Tap the photo and tap to select your preferred Beauty feature, then tap to save the photo.
GIF animationCreate GIF (Graphics Interchange Format) images straight from your ASUS Phone’s camera using the GIF animation feature.
Capturing GIF animation photos
1. From the Camera app’s home screen, swipe to the right then tap GIF Animation.
2. Long press the shutter button to start capturing burst photo for GIF animation.
3. Make your preferred adjustments to the GIF animation settings.
4. Tap when finished.

70 Chapter 6: Your precious moments
PanoramaCapture images from various angles using Panorama. Images captured from a wide angle perspective are automatically stitched together using this feature.
Capturing panoramic photos
1. From the Camera app’s home screen, swipe to the right then tap Panorama.
2. Tap the shutter button then pan your ASUS Phone horizontally (to the left or right) or vertically (upward or downward) to capture the scenery.
NOTE:WhilepanningyourASUSPhone,atimelineofthumbnailsappearsonthelowerpartofyourscreenasitcaptures the scenery.
3. Tap when finished.
Time lapseThe time lapse video feature of your ASUS Phone allows you to capture stills for automatic time lapse playback. In effect, events seem to move in a fast-forward manner though they actually occurred and were recorded between long intervals.
Recording Time lapse videos
1. From the Camera app’s home screen, swipe to the right then tap Time lapse.
2. Tap then select the time lapse interval.
3. Tap the shutter button to start taking Time lapse videos.

71Chapter 6: Your precious moments
NOTES:
• YoucandownloadphotostoyourASUSPhonefromyourcloudaccountandusethemasyourwallpaper or a contact's cover image.
• Fordetailsonaddingcoverimagestoyourcontacts,seeCustomizing your contact's profile.
• Fordetailsonusingphotosorimagesasyourwallpaper,seeWallpapers.
IMPORTANT! Internet connection is required for viewing photos and videos under ASUS HomeCloud and My cloud.
Using the GalleryView images and play videos on your ASUS Phone using the Gallery app.
This app also allows you to edit, share, or delete image and video files stored in your ASUS Phone. From Gallery, you can display images in a slideshow or tap to view the selected image or video file.
To launch Gallery, swipe up from your Home screen and tap Gallery.
Viewing files from your social network or cloud storageBy default, your Gallery displays all the media files on your ASUS Phone according to their album folders.
ToviewthemediafilesfromotherlocationsaccessibleviayourASUSPhone:
1. Tap any of the following source locations to view their respective media files.

72 Chapter 6: Your precious moments
Viewing the photo locationEnable the location access on your ASUS Phone, and get the location details on your photos. Your photos’ location details include the area where the photos are taken, as well a map of the location via Google Map or Baidu (in China only).
Toviewthedetailsofaphoto:
1. Turn on the location access from Settings > Location.
2. Ensure that you have shared your location to Google Map or Baidu.
3. Launch the Gallery app, and select the photo whose photo details you want to view.
4. Tap the photo then tap .
Tap to show the photo location details

73Chapter 6: Your precious moments
Sharing files from the Gallery
1. From the Gallery screen, tap the folder where the files you want to share are located.
2. After opening the folder, tap .
3. Tap the files you want to share. A check mark appears on top of the image you select.
4. Tap then select from the list where you want to share the images.
Deleting files from the Gallery
1. From the Gallery screen, tap the folder where the files you want to delete are located.
2. After opening the folder, tap to activate file selection.
3. Tap the files you want to delete. A check mark appears on top of the image you select.
4. Tap .
Editing imagesThe Gallery also features its own image editing tools that you can use to enhance images saved on your ASUS Phone.
1. From the Gallery screen, tap the folder where the files are located.
2. After opening the folder, tap the image you want to edit.
3. Once the image is opened, tap it again to show its functions.
4. Tap to open the image editing toolbar.
5. Tap any of the icons on the editing toolbar to apply changes to the image.

74 Chapter 7: Staying connected
Staying connected 77 Staying connected
Mobile networkWhen there’s no available Wi-Fi network that you can connect to, you can enable your mobile network’s data access for Internet connection.
Enabling the mobile network
1. DoanyofthefollowingtolaunchtheSettingsscreen:
• Launch Quick settings then tap . • Swipe up from your Home screen and tap Settings.
2. Tap Data Usage.
3. Slide Cellular data to ON, and configure the other mobile network settings, if necessary.
NOTES:
• IfyouaccesstheInternetviayourmobilenetwork,additionalchargeswillbeincurreddependingonyour data plan.
• Formoredetailsonyourmobilenetworkcharges/feesandsetttings,contactyourmobileserviceprovider.
Wi-FiThe Wi-Fi technology of your ASUS Phone gets you connected to the wireless world. Update your social media accounts, browse the Internet, or exchange data and messages wirelessly from your ASUS Phone.
Enabling Wi-Fi
1. LaunchtheSettingsscreenbydoinganyofthefollowing:
• Launch Quick settings then tap > Wi-Fi. • Swipe up from your Home screen and tap Settings > Wi-Fi.
2. Slide the Wi-Fi switch to the right to turn on the Wi-Fi.
NOTE: You can also enable the Wi-Fi from Quick Settings screen. Refer to section Quick Settings on how to launch Quick Settings screen.

75Chapter 7: Staying connected
Connecting to a Wi-Fi network
1. On the Settings screen, tap Wi-Fi to display all detected Wi-Fi networks.
2. Tap a network name to connect to it. For a secured network, you may be prompted to key in a password or other security credentials.
NOTES:
• YourASUSPhoneautomaticallyreconnectstothenetworkthatyouconnectedwithpreviously.
• Turn off the Wi-Fi feature when you're not using it to help save battery power.
Disabling Wi-FiTodisableWi-Fi:
1. LaunchtheSettingsscreenbydoinganyofthefollowing:
• Launch Quick settings then tap > Wi-Fi. • Swipe up from your Home screen and tap Settings > Wi-Fi.
2. Slide the Wi-Fi switch to the left to turn off the Wi-Fi.
NOTE: You can also disable the Wi-Fi from Quick Settings screen. See Quick Settings on how to launch Quick Settings screen.
Bluetooth®Use the Bluetooth feature of your ASUS Phone to send or receive files and stream multimedia files with other smart devices over short distances. With Bluetooth, you can share your media files with your friends’ smart devices, send data for print with a Bluetooh printer, or play music files with a Bluetooth speaker.
Enabling Bluetooth®
1. DoanyofthefollowingtolaunchtheSettingsscreen:
• Launch Quick settings then tap > Bluetooth. • Swipe up from your Home screen and tap Settings > Bluetooth.
2. Slide the Bluetooth switch to the right to turn on the Bluetooth.
NOTE: You can also enable the Bluetooth from Quick Settings screen. See Quick Settings on how to launch Quick Settings screen.

76 Chapter 7: Staying connected
Pairing your ASUS Phone to a Bluetooth® deviceBefore using the Bluetooth feature of your ASUS Phone in full scale, you have to pair it first with the Bluetooth device. The ASUS Phone automatically stores the pairing connection of the Bluetooth device.
1. On the Settings screen, tap Bluetooth to display all available devices.
IMPORTANT!
• Ifthedevicethatyouwanttopairisnotinthelist,ensuretoenableitsBluetoothfeatureandisdiscoverable.
• SeetheuserguidethatcamewithyourdevicetolearnhowtoenableitsBluetoothandandsetittodiscoverable.
2. Tap > Refresh to scan for more Bluetooth devices.
3. In the list of available devices, tap the Bluetooth device that you want to pair with.
4. Ensure that the same passkey show on both devices, then tap PAIR.
NOTE: Turn off the Bluetooth feature when you're not using it to help save battery power.
Unpairing your ASUS Phone from the Bluetooth® device
1. On the Settings screen, tap Bluetooth to display all available and paired devices.
2. In the list of paired devices, tap of Bluetooth device that you want to unpair, then tap Forget.

77Chapter 7: Staying connected
TetheringWhen Wi-Fi service is not available, you can use your ASUS Phone as a modem or turn it into a Wi-Fi hotspot to get Internet access on your laptop, tablet, and other mobile devices.
IMPORTANT! Most mobile service providers may require a data plan for you to be able to use the tethering function. Contact your mobile service provider about availing of this data plan.
NOTES:
• Internet access via tethering may be slower than the standard Wi-Fi or mobile connection.
• Only a limited number of mobile devices can tether to your ASUS Phone for Internet access.
• Turn off the tethering feature when you're not using it to help save battery power.
Wi-Fi HotspotTurn your ASUS Phone into a Wi-Fi Hotspot to share Internet connection with other devices.
1. DoanyofthefollowingtolaunchtheSettingsscreen:
• Launch Quick settings then tap . • Swipe up from your Home screen and tap Settings.
2. Tap More > Tethering & portable hotspot, slide Portable Wi-Fi hotspot to the right to turn it on, and tap Tap to set up.
3. Assign a unique SSID or network name and a strong 8-character password for your Wi-Fi hotspot. When done, tap Save.

78 Chapter 7: Staying connected
4. Connect other devices to your ASUS Phone’s hotspot connection the same way you connect to a Wi-Fi network.
Bluetooth TetheringEnable Bluetooth on your ASUS Phone and use it as a modem for Internet access on your Bluetooth-enabled mobile devices such as a laptop or a tablet.
1. Enable Bluetooth on your ASUS Phone and the other device.
2. Pair both devices.
NOTE: For details, see Pairing your ASUS Phone to a Bluetooth® device.
3. From the Settings screen, tap More > Tethering & portable hotspot, then silde Bluetooth tethering to ON. You can now surf the Internet or do Internet-related activities on your ASUS Phone.

79Chapter 8: Travel and Maps
Travel and Maps 88 Travel and Maps
WeatherGet real-time weather updates straight from your ASUS Phone using the weather app. Using Weather, you can also check other weather details from around the world.
Launching the Weather appFromyourHomescreen,launchtheWeatherappusingeitherofthefollowingoptions:
• Swipe up from your Home screen and tap Weather. • From your ASUS Phone’s home screen, tap the weather icon.

80 Chapter 8: Travel and Maps
Weather home screenSet up and get your current location’s weather updates as well as other parts of the world.
Tap to search for a city’s weather info
Tap to get the area’s current weather info, refresh the weather info, edit the location list, or configure the weather settings
Swipe up to see other weather informationSwipe to the left or right to see the weather information of other cities in your location list

81Chapter 8: Travel and Maps
ClockCustomize the time zone settings of your ASUS Phone, set alarms, and use your ASUS Phone as a stop watch using the Clock app.
Launching Clock
LaunchtheClockappusingeitherofthefollowingoptions:
• Swipe up from your Home screen and tap Clock. • From your ASUS Phone’s home screen, tap the digital clock display.
Alarm clock
Tap to access the alarm clock settings of your ASUS Phone.
Tap this to access the settings of the alarm clock feature
Tap this to delete any of the previously set alarms
Tap this to set a new alarm time

82 Chapter 8: Travel and Maps
World Clock
Tap to access the world clock settings of your ASUS Phone.
Tap this to set your clock on night mode
Tap this to edit the cities marked on your world clock
Tap this to toggle between the weather forecast and the world clock’s map
Tap this to add a new city to mark on your world clock’s map.
Tap this to access the Clock app settings
Stopwatch
Tap to use your ASUS Phone as a stopwatch.
Tap this button to start running the stopwatch feature

83Chapter 8: Travel and Maps
TimerYoumaysetmultipletimeroptionsforyourASUSPhone.Todothis,followthestepsbelow:
Setting the timer
1. Tap to access the timer feature of your ASUS Phone.
Tap this to set a new timer
Tap this to delete the preset timer.
Tap this to access the settings of the timer feature.
Tap to set the ringtone for the timer.
Tap this to edit the preset timer.
Tap this button to start running the timer.

84 Chapter 9: Zen Everywhere
Special Zen Tools
CalculatorOne-swipe and a tap is all it takes to launch your Calculator. When you open the Quick settings panel, the Calculator icon is there visibly on top of the list. Tap it to get started with your computations.
Zen Everywhere 99 Zen Everywhere
Tap this to enable the calculator

85Chapter 9: Zen Everywhere
Calculator screen
Sound RecorderRecord audio files using your ASUS Phone by enabling the Sound Recorder app.
Launching Sound RecorderTo launch Sound Recorder, swipe up from your Home screen and tap Sound Recorder.
Tap to start audio recording
Tap to customize the Sound Recorder settings
Tap to view the list of saved audio recording files

86 Chapter 9: Zen Everywhere
Pausing a recordingDuring a paused recording, you can choose to resume, delete, or save the recording.
Recording ListFrom the Recording List, you can play, rename, share, or delete a saved audio recording file.
To view your recording list, tap from the Sound Recorder main screen.
Tap to resume the recording
Tap to save the recording
Tap to delete the recording
Taptoplay/pauseyourselectedrecording
Tap to share, rename, or delete your selected recording

87Chapter 9: Zen Everywhere
Mobile ManagerMobile Manager provides an integrated interface for several apps that are designed to optimize device performance, manage the phone power, storage usage and system notifications.
To launch the ASUS Mobile Manager app, swipe up from your Home screen then tap Mobile Manager.
Tap this to launch the PowerMaster app
Tap this to allow or block notifications from an individual app
Tap this to view the mobile data usage, set a monthly limit for mobile data use, and control apps to access the Internet only over Wi-Fi, only over mobile network, neither or both
Tap this to boost system memory
Tap this to run privacy and security scan
Tap this to uninstall the selected unused apps to free up some storage

88 Chapter 9: Zen Everywhere
PowerMasterWith an intelligent suite of power management technologies, PowerMaster fully optimizes the performance of your device, provides an integrated interface for power-related optimization features and settings, and offers extended protection for your system, battery, adapter, and the charging function.
DothefollowingtolaunchPowerMaster:
• From your ASUS Phone’s home screen, tap PowerMaster.
Taponanyofthesefunctions:
• 2x Lifespan :ExtendsthebatterylifeofyourASUSphonebyuptotwotimes. • Reverse charging:AllowsyoutouseyourASUSphonetochargeothermobiledevices. • Scan:Scansforoptimizationstosavepower. • Auto-start manager:AllowsyoutolaunchAuto-startmanagerapp. • Battery modes:Allowsyoutoselectyourbatterymodesandcustomizeyourpowersavingsettings
according to your needs. • Boost:Closesunusedprocessesthatarerunninginthebackgroundtoretrievemoresystem
memory and extend the battery life. • Power-safe technology:Providesextended protection for your system, battery, adapter, and
the charging function. • Battery-saving options:Allowsyoutodisablesomefeaturesorstopunnecessaryappstosave
power. • Battery usage:Allowsyoutoviewthebatteryusage.

89Chapter 10: Maintain your Zen
Keeping your device up-to-dateKeep your ASUS Phone in the loop of Android system updates and upgraded apps and features.
Updating your system
1. Swipe up from your Home screen then tap Settings.
2. On the Settings screen, slide down to display other items then tap About.
3. Tap System update then tap Check Update.
NOTE: You can preview the last time your ASUS Phone’s system was updated at the Last update check:oftheSystemupdatewindow.
StorageYou can store data, apps, or files on your ASUS Phone (internal storage), on an external storage, or on an online storage. You need an internet connection to transfer or download your files on an online storage. Use the bundled USB cable to copy files to or from the computer to your ASUS Phone.
Backup and resetBack up data, Wi-Fi passwords, and other settings to Google servers using your ASUS Phone.
1. Swipe up from your Home screen then tap Settings > Backup & reset.
2. FromtheBackup&resetwindow,youcan:
• Back up my data: This feature backs up your data, Wif-Fi passwords, and other settings to Google servers when enabled.
• Backup account: Allows you to specify the account you to be associated when you save your backup.
• Automatic restore: This feature facilitates restoration of backed up settings and data when you reinstall an app.
• Factory data reset: Erases all data on phone.
Maintain your Zen 1010 Maintain your Zen

90 Chapter 10: Maintain your Zen
Securing your ASUS PhoneUse the security features of your ASUS Phone to prevent unauthorized calls or access of information.
Unlocking your screenWhen the screen is locked, you can open it with the security unlocking options that the ASUS Phone offers you.
1. Swipe up from your Home screen then tap Settings > Lock screen.
2. Tap Screen lock then select an option to unlock your ASUS Phone.
NOTES:
• Refertosection Unlock screen options for more information.
• Todeactivatetheunlockscreenoptionthatyouset,tapNone on Choose screen lock screen.
Unlock screen optionsChoose from these options to lock your ASUS Phone.
Swipe
Swipe up to unlock your ASUS Phone.

91Chapter 10: Maintain your Zen
PINKey in at least four numbers to set a PIN.
IMPORTANT! Ensure to remember the PIN that you created to unlock your device.
PatternSlide your finger on the dots and create a pattern.
IMPORTANT! You can create a pattern with a minimum of four dots. Ensure to remember the pattern that you created to unlock your device.
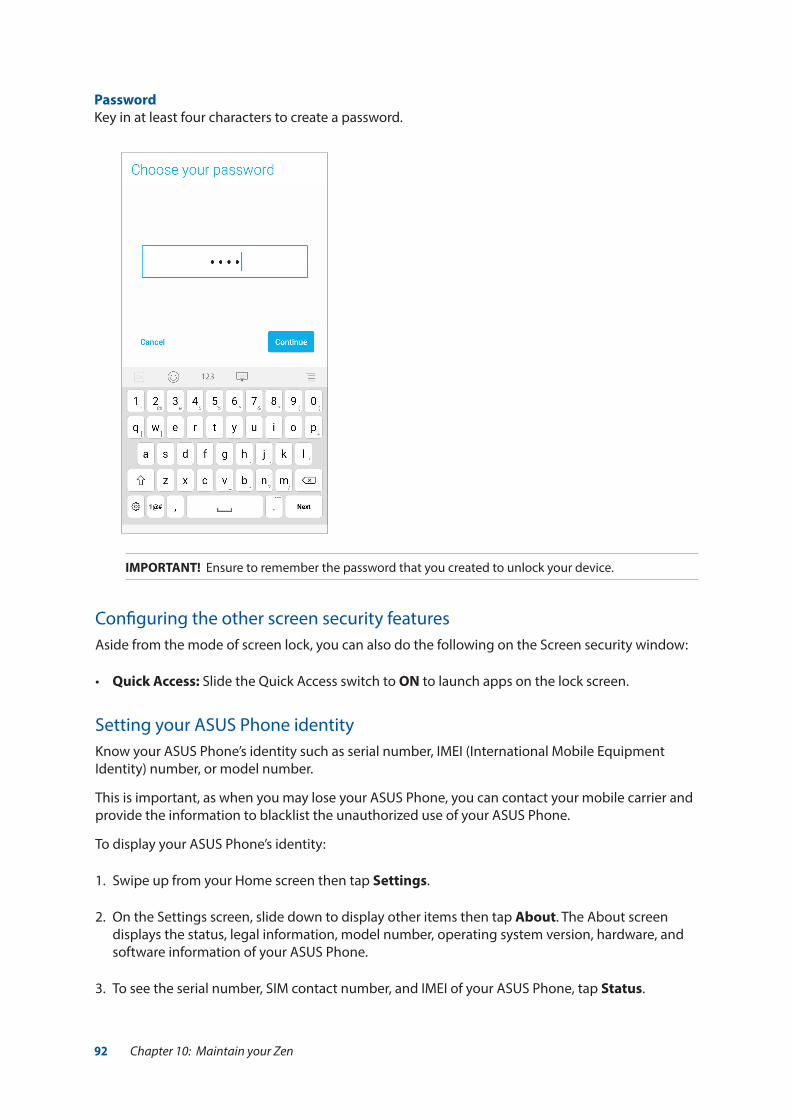
92 Chapter 10: Maintain your Zen
PasswordKey in at least four characters to create a password.
IMPORTANT! Ensure to remember the password that you created to unlock your device.
Configuring the other screen security featuresAsidefromthemodeofscreenlock,youcanalsodothefollowingontheScreensecuritywindow:
• Quick Access: Slide the Quick Access switch to ON to launch apps on the lock screen.
Setting your ASUS Phone identityKnow your ASUS Phone’s identity such as serial number, IMEI (International Mobile Equipment Identity) number, or model number.
This is important, as when you may lose your ASUS Phone, you can contact your mobile carrier and provide the information to blacklist the unauthorized use of your ASUS Phone.
TodisplayyourASUSPhone’sidentity:
1. Swipe up from your Home screen then tap Settings.
2. On the Settings screen, slide down to display other items then tap About. The About screen displays the status, legal information, model number, operating system version, hardware, and software information of your ASUS Phone.
3. To see the serial number, SIM contact number, and IMEI of your ASUS Phone, tap Status.

93
Appendix
Appendix
Safety information
CAUTION! Use of controls or adjustments or performance of procedures other than those specified herein may result in hazardous radiation exposure.
ASUS Phone care
• UseyourASUSPhoneinanenvironmentwithambienttemperaturesbetween0°C(32°F)and35 °C (95 °F).
The battery
WARNING: Disassembling the battery by yourself will void its warranty and may cause serious harm.
Your ASUS Phone is equipped with a high performance non-detachable Li-polymer battery. Observe the maintenance guidelines for a longer battery life.
• Donotremovethenon-detachableLi-polymerbatteryasthiswillvoidthewarranty.
• Avoidcharginginextremelyhighorlowtemperature.Thebatteryperformsoptimallyinanambienttemperatureof+5°Cto+35°C.
• Donotremoveandreplacethebatterywithanon-approvedbattery.
• UseonlyASUSbattery.Usingadifferentbatterymaycausephysicalharm/injuryandmaydamage your device.
• Donotremoveandsoakthebatteryinwateroranyotherliquid.
• Nevertrytoopenthebatteryasitcontainssubstancesthatmightbeharmfulifswallowedorallowed to come into contact with unprotected skin.
• Donotremoveandshort-circuitthebattery,asitmayoverheatandcauseafire.Keepitawayfrom jewelry or metal objects.
• Donotremoveanddisposeofthebatteryinfire.Itcouldexplodeandreleaseharmfulsubstances into the environment.
• Donotremoveanddisposeofthebatterywithyourregularhouseholdwaste.Takeittoahazardous material collection point.

94
• Donottouchthebatteryterminals.
• Toavoidfireorburns,donotdisassemble,bend,crush,orpuncturethebattery.
NOTES:
• Riskofexplosionifbatteryisreplacedbyanincorrecttype.
• Disposeofusedbatteryaccordingtotheinstructions.
The charger
• UseonlythechargersuppliedwithyourASUSPhone.
CautionYour ASUS Phone is a high quality piece of equipment. Before operating, read all instructions and cautionary markings on the (1) AC Adapter.
• DonotusetheASUSPhoneinanextremeenvironmentwherehightemperatureorhighhumidity exists. The ASUS Phone performs optimally in an ambient temperature between 0 °C (32 °F) and 35 °C (95 °F).
• DonotdisassembletheASUSPhoneoritsaccessories.Ifserviceorrepairisrequired,returntheunit to an authorized service center. If the unit is disassembled, a risk of electric shock or fire may result.
• Donotshort-circuitthebatteryterminalswithmetalitems.

95
Notices
Federal Communications Commission StatementThis device complies with part 15 of the FCC Rules. Operation is subject to the following two conditions:(1)Thisdevicemaynotcauseharmfulinterference,and(2)thisdevicemustacceptanyinterference received, including interference that may cause undesired operation.
Changes or modifications not expressly approved by the party responsible for compliance could void the user‘s authority to operate the equipment.
This equipment has been tested and found to comply with the limits for a Class B digital device, pursuant to part 15 of the FCC Rules. These limits are designed to provide reasonable protection against harmful interference in a residential installation. This equipment generates, uses and can radiate radio frequency energy and, if not installed and used in accordance with the instructions, may cause harmful interference to radio communications. However, there is no guarantee that interference will not occur in a particular installation. If this equipment does cause harmful interference to radio or television reception, which can be determined by turning the equipment off and on, the user is encouraged to try to correct the interference by one or more of the following measures:
- Reorient or relocate the receiving antenna.
- Increase the separation between the equipment and receiver.
- Connect the equipment into an outlet on a circuit different from that to which the receiver is connected.
- Consultthedealeroranexperiencedradio/TVtechnicianforhelp.
The antenna(s) used for this transmitter must not be co-located or operated in conjunction with any other antenna or transmitter.
The country code selection is for non-US models only and is not available to all US models. Per FCC regulation, all WiFi products that are marketed in US must be fixed to US-operated channels only.

96
RF Exposure Information (SAR)This device has been tested and meets applicable limits for Radio Frequency (RF) exposure.
Specific Absorption Rate (SAR) refers to the rate at which the body absorbs RF energy. SAR limits are 1.6 Watts per kilogram (over a volume containing a mass of 1 gram of tissue) in countries that followtheUnitedStatesFCClimitand2.0W/kg(averagedover10gramsoftissue)incountriesthat follow the Council of the European Union limit. Tests for SAR are conducted using standard operating positions with the device transmitting at its highest certified power level in all tested frequency bands.
To reduce exposure to RF energy, use a hands-free accessory or other similar option to keep this device away from your head and body. Carry this device at least 10 mm away from your body to ensure exposure levels remain at or below the as-tested levels. Choose the belt clips, holsters, or other similar body-worn accessories which do not contain metallic components to support operation in this manner. Cases with metal parts may change the RF performance of the device, including its compliance with RF exposure guidelines, in a manner that has not been tested or certified, and use such accessories should be avoided.
ThehighestFCCSARvaluesforthedeviceareasfollows:
• 0.41W/Kg@1g(Head)• 1.20W/Kg@1g(Body)
The FCC has granted an Equipment Authorization for this device with all reported SAR levels evaluated as in compliance with the FCC RF exposure guidelines. SAR information on this device is on file with the FCC and can be found under the Display Grant section of www.fcc.gov/oet/ea/fccid aftersearchingonFCCID:MSQX018D.
Canada, Industry Canada (IC) NoticesThis device complies with Industry Canada’s licence-exempt RSS standard(s). Operation is subject tothefollowingtwoconditions:
(1) This device may not cause interference; and
(2) This device must accept any interference, including interference that may cause undesired operation of the device.
Le présent appareil est conforme aux CNR d’Industrie Canada applicables aux appareils radio exemptsdelicence.L’exploitationestautoriséeauxdeuxconditionssuivantes:
(1) l’appareil ne doit pas produire de brouillage, et
(2) l’utilisateur de l’appareil doit accepter tout brouillage radioélectrique subi, même si le brouillage est susceptible d’en compromettre le fonctionnement.

97
Radio Frequency (RF) Exposure Information
The radiated output power of the Wireless Device is below the Industry Canada (IC) radio frequency exposure limits. The Wireless Device should be used in such a manner such that the potential for human contact during normal operation is minimized. This device has been evaluated for and shown compliant with the IC Specific Absorption Rate (“SAR”) limits when installed in specific host products operated in portable exposure conditions.
Canada’sREL(RadioEquipmentList)canbefoundatthefollowingwebaddress:http://www.ic.gc.ca/app/sitt/reltel/srch/nwRdSrch.do?lang=eng
AdditionalCanadianinformationonRFexposurealsocanbefoundatthefollowingwebaddress:http://www.ic.gc.ca/eic/site/smt-gst.nsf/eng/sf08792.html
Informations concernant l’exposition aux fréquences radio (RF)
La puissance de sortie émise par cet appareil sans fil est inférieure à la limite d’exposition aux fréquences radio d’Industrie Canada (IC). Utilisez l’appareil sans fil de façon à minimiser les contacts humains lors du fonctionnement normal.
Ce périphérique a été évalué et démontré conforme aux limites SAR (Specific Absorption Rate – Taux d’absorption spécifique) d’IC lorsqu’il est installé dans des produits hôtes particuliers qui fonctionnent dans des conditions d’exposition à des appareils portables.
Ce périphérique est homologué pour l’utilisation au Canada. Pour consulter l’entrée correspondant à l’appareil dans la liste d’équipement radio (REL - Radio Equipment List) d’Industrie Canada rendez-voussur:
http://www.ic.gc.ca/app/sitt/reltel/srch/nwRdSrch.do?lang=eng
Pourdesinformationssupplémentairesconcernantl’expositionauxRFauCanadarendez-voussur:
http://www.ic.gc.ca/eic/site/smt-gst.nsf/eng/sf08792.html
CAN ICES-3(B)/NMB-3(B)
This Class B digital apparatus complies with Canadian ICES-003.
Cet appareil numérique de la classe B est conforme à la norme NMB-003 du Canada.
This device and its antenna(s) must not be co-located or operated in conjunction with any other antenna or transmitter, except tested built-in radios. The County Code Selection feature is disabled forproductsthataremarketedintheUS/Canada.
Cet appareil et son antenne ne doivent pas être situés ou fonctionner en conjonction avec une autre antenne ou un autre émetteur, exception faites des radios intégrées qui ont été testées.
La fonction de sélection de l’indicatif du pays est désactivée pour les produits commercialisés aux États-Unis et au Canada.
TheICIDforthisdeviceis3568A-X018D.
L’identifiantIndustrieCanadadecetappareilest:3568A-X018D.

98
Additional statements for phones:
To reduce exposure to RF energy, use a hands-free accessory or other similar option to keep this device away from your head and body. Carry this device at least 10 mm away from your body to ensure exposure levels remain at or below the as-tested levels. Choose the belt clips, holsters, or other similar body-worn accessories which do not contain metallic components to support operation in this manner. Cases with metal parts may change the RF performance of the device, including its compliance with RF exposure guidelines, in a manner that has not been tested or certified, and use such accessories should be avoided.
EU Radio Equipment Directive ComplianceSimplified EU Declaration of Conformity
Hereby,ASUSTekComputerInc.declaresthattheradioequipmentASUS_X018DisincompliancewithDirective2014/53/EU.FulltextofEUdeclarationofconformityisavailableathttps://www.asus.com/support/. (Search for ZB570TL)
Items Maximum Radio-Frequency Output Power Table
Bluetooth BluetoothBR/EDR(2402~2480MHz) 7.72 (dBm)Bluetooth 4.0-LE (2402~2480 MHz) -0.02 (dBm)
WLAN
2.4GHz 802.11b (2412~2472 MHz) 16.02 (dBm)2.4GHz 802.11g (2412~2472 MHz) 14.11 (dBm)2.4GHz 802.11n HT20 (2412~2472 MHz) 12.09 (dBm)2.4GHz 802.11n HT40 (2422~2462 MHz) 12.04 (dBm)
GSMGSM 900 Burst (880~915; 925~960 MHz) 32.81 (dBm)GSM 1800 Burst (1710~1785 ; 1805~1880 MHz) 29.66 (dBm)
WCDMA WCDMA Band I (1920~1980 ; 2110~2170 MHz) 22.62 (dBm)WCDMA Band VIII (880~915 ; 925~960 MHz) 23.33 (dBm)
LTE
LTE Band I (1920~1980; 2110~2170 MHz) 23.26 (dBm) LTE Band III (1710~1785; 1805~1880 MHz) 23.29 (dBm) LTE Band V (824~849; 869~894 MHz) 23.6 (dBm) LTE Band VII (2500~2570; 2620~2690 MHz) 23.36 (dBm) LTE Band VIII (880~915; 925~960 MHz) 23.36 (dBm) LTEBandXX(832~862;791~821MHz) 23.24 (dBm)LTEBandXL(2300~2400;2300~2400MHz) 23.61 (dBm)
RF Output Table
NOTE: ThisRFoutputpowertableisforEUmemberstates,theEEAStates,theEFTAStatesandTurkeyonly. The frequency range and the RF output power may differ from other non-EU countries.

99
CE Marking
Prevention of Hearing LossTo prevent possible hearing damage, do not listen at high volume levels for long periods.
Using GPS (Global Positioning System) on your ASUS PhoneTousetheGPSpositioningfeatureonyourASUSPhone:
Ensure that your device is connected to the Internet before using Google Map or any GPS-enabled apps.
For first-time use of a GPS-enabled app on your device, ensure that you are outdoors to get the best positioning data.
When using a GPS-enabled app on your device inside a vehicle, the metallic component of the car window and other electronic devices might affect the GPS performance.
ForFrance,headphones/earphonesforthisdevicearecompliantwiththesoundpressurelevelrequirementlaiddownintheapplicableEN50332-1:2013and/orEN50332-2:2013standardrequired by French Article L.5232-1.
RF Exposure InformationThis ASUS product has been tested and meets applicable European SAR limits. The SAR limit is 2.0 W/kgincountriesthatsetthelimitaveragedover10gramsoftissue.ThespecificmaximumSARvaluesforthisdeviceareasfollows:
• Head:0.282W/Kg
• Body:0.746W/Kg
When carrying this device or using it while worn on the body, either use an approved accessory such as a holster or otherwise maintain a distance of 0.5 cm from the body to ensure compliance with RF exposure requirements.

100
India E-Waste (Management) Rules 2016This product complies with the “India E-Waste (Management) Rules, 2016” and prohibits use of lead, mercury, hexavalent chromium, polybrominated biphenyls (PBBs) and polybrominated diphenyl ethers (PBDEs) in concentrations exceeding 0.1% by weight in homogenous materials and 0.01 % by weight in homogenous materials for cadmium, except for the exemptions listed in Schedule II of the Rule.
ASUSRecycling/TakebackServicesASUS recycling and takeback programs come from our commitment to the highest standards for protecting our environment. We believe in providing solutions for you to be able to responsibly recycle our products, batteries, other components as well as the packaging materials. Please go to http://csr.asus.com/english/Takeback.htm for detailed recycling information in different regions.
Regional notice for Singapore
Manufacturer: ASUSTeK Computer Inc.Address: 4F, No.150, LI-TE RD., PEITOU, TAIPEI 112, TAIWANAuthorised representative in Europe: ASUS Computer GmbHAddress: HARKORT STR. 21-23, 40880 RATINGEN, GERMANY
Modelname:ASUS_X018D(ZB570TL)
This ASUS product complies with IMDA Standards.

IndexA
Advanced camera features 69All Smiles
- see also Advanced camera features 69App shortcuts
- adding 25- removing 25
ASUS Phone 8- charging 13- parts and features 8-turningon/off15
B
Backup and reset 89Beauty
- see also Advanced camera features 69block list 62
- blocking 62- unblocking 62
Bluetooth 75- enabling 75- pairing 76- see also Bluetooth Tethering 78- unpairing 76
Bluetooth Tethering 78- see also Tethering 77
C
Calculator 84Call logs 56
- redial your last-called number 57- saving calls to Contacts 56
Calls 54- answering 56- calling from Contacts 55- calling your favorite contacts 56- dialing a phone number 54- launching the Phone app 54- other call options 57- receiving 56- recording 58- see also Contacts 59- see Call logs 56- see Extension number 54- see Multiple calls 58- see Smart Dialing 55
Camera 67- launching 67- see Advanced camera features 69
IndexChrome 44
- bookmarking pages 45- clearing the browser cache 45- launching 44- sharing pages 45
Clock 81- alarm clock 81- launching 81- stopwatch 82- timer 83- world clock 82
Cloud 50Contacts 59
- adding 59- adding an extension number 60- contacts settings 59- customizing your contact’s profile 60- exporting 61- importing 61- see also Block list 62- see also Social networking 62- setting up your profile 59
D
Date and time 32- setting up 32
Depth of field- see also Advanced camera features 69
Dual SIM feature 52- assigning 53- renaming 52
E
Easy Mode 27- adding contacts 29- adding shortcuts 28- disabling 29- enabling 27, 30- removing contacts 29- removing shortcuts 28
Extension number 54- auto dialing 55- confirmation prompt 54- dialing 54
F
Face Unlock 39Favorite contacts 56
- calling 56File Manager 49
- accessing the internal storage 49Fingerprint 35
- setting up fingerprint ID from Settings 36,

39- starting your ASUS phone for the first time 35
G
Gallery 71-deleting files 73- editing images 73- sharing files 73- viewing files from social network or cloud storage 71- viewing the photo location 72
GIF animation 69- see also Advanced camera features 69
Gmail 46Google Calendar 47
- Creating events 47- Creating reminders 48- Editing or removing events 47- Editing or removing reminders 48
Google Messenger 64- replying to messages 64- sending messages 64
Google Play Music 66- setting up your Google Play Music 66
H
Headset 65- connecting 65
Home screen 21- notification icons 22- personalizing 25- see also Easy Mode 27- see also Wallpapers 26, 30- see also Widgets 25
K
Kids Mode 30- using Kids Mode 30
L
Lock screen 33, 42- customizing 33- see also Securing your ASUS phone 90- using and customizing the quick access buttons 34
M
Managing your call logs 56- redialing your last-called number 57- saving calls to Contacts 56
microSD card 11- install 11
- removing 12Mobile Manager 87, 88Mobile network 74
- enabling 74Multiple calls 58
- answering another call 58
N
Nano SIM Card 9- installing 9- removing 10
Notifications 24
P
Panorama- see also Advanced camera features 69
PowerMaster 88
Q
Quick settings 23- adding or removing buttons 23
R
Ringtone 32- setting up 32- sound & vibration 32
S
Security 90Smart Dialing 55Smart remove
- see also Advanced camera features 69Social networking 62
- syncing 63Sound Recorder 85
- pausing a recording 86- recording list 86
Storage 89System 89
- updating 89
T
Tethering 77- bluetooth tethering 78- Wi-Fi hotspot 77
Time lapse- see also Advanced camera features 69
Touchscreen 18- launching apps or selecting items 18- moving or deleting items 18- moving through pages or screens 19- zooming in 19- zooming out 20

W
Wallpapers 26, 30- animated wallpaper 27
Weather 79- launching 79- weather home screen 80
WebStorage 50Widgets 25Wi-Fi 74
- connecting 75- disabling 75- enabling 74- see also Wi-Fi Hotspot tethering 77
Z
Zen UI 7ZenUI FAQ 51ZenUI Keyboard 42
- editing texts 42- resizing your ZenUI keyboard 42