Embed Size (px)
DESCRIPTION
Instruction Manual for Bezzera BZ99
Citation preview

Dal 1901
Mod. BZ99 DEMod. BZ99 PM
IT
EN
FR
DE
ES
MACCHINA PER CAFFE’ ESPRESSOESPRESSO COFFEE MACHINEMACHINE A CAFE’ ESPRESSOESPRESSO-KAFFEEMASCHINE
MÁQUINA PARA CAFE’ EXPRESSO
Manuale di istruzioniInstruction manual
Manuel d’instructionsBedienungsanleitung
Manual de instrucciones

3
MOD. BZ 99
7 - 14 16 - 2425 - 3334 - 4243 - 51
IT
EN
FR
DE
ES
© 2005 G. BEZZERA - Tutti i diritti riservatiQuesta pubblicazione o parti di essa non possono venire riprodotte, immagazzinate in una macchina di memorizzazione, trasmesse, tras-critte o tradotte in alcun linguaggio, comune o informatico, in alcuna forma o con alcun mezzo, elettronico, meccanico, magnetico, ottico, chimico, manuale o altro, senza un’espressa autorizzazione scritta della G. BEZZERA.
© 2005 G. BEZZERA - All rights reservedThis publication or any part of it cannot be reproduced, stored in any kind of processor, transmitted, transcribed or translated in any common or software language, in any form or with any means be they electronic, mechanical, magnetic, optical, chemical, manual or other, without the previous written authorisation of G. BEZZERA.
© 2005 G. BEZZERA - Tous droits réservésCette publication ou des parties d’elle ne peuvent pas être reproduites, emmagasinées dans une machine de mise en mémoire, transmises, transcrites ou traduites dans aucun language, commun ou informatique, dans aucune forme ou avec aucun moyen, électronique, mécanique, magnetique, optique, chimique, manuel ou autre chose, sans une expresse autorisation écrite par G. BEZZERA.
© 2005 G. BEZZERA - Alle Rechte vorbehaltenDiese Veröffentlichung bzw. Teile derselben dürfen ohne die ausdrückliche schriftliche Genehmigung der Firma G. BEZZERA weder re-produziert, in einem Betriebssystem gespeichert, übermittelt, abgeschrieben oder in irgendeine Sprache übersetzt werden, und zwar weder allgemein noch informativ, in keinerlei Form und mit keinerlei elektronischem, mechanischem, magnetischem, optischem, chemischem, manuellem oder ähnlichem Hilfsmittel.
© 2005 G. BEZZERA - Reservados todos los derechosQuedan rigurosamente prohibidas la registración, grabación, transmisión, transcripción, traducción a idiomas o lenguajes comunes o in-formáticos o las reproducciones parciales o totales de esta publicación por cualquier medio o proceso electrónico, mecánico, magnético, óptico, químico, manual o de cualquier otro tipo, sin específica autorización escrita otorgada por G. BEZZERA.
16 - 24
SIMBOLOGIA DI SICUREZZASAFETY SYMBOLSSYMBOLES DE SECURITESICHERHEITSSYMBOLIKSIMBOLOGÍA DE SEGURIDAD
Attenzione! Importanti indicazioni per la sicurezza!Warning! important safety warnings!Attention! Prescriptions de sécurité importantes!Achtung! Wichtige Sicherheitshinweise!¡Atención! ¡Indicaciones importantes para la seguridad!
Attenzione! Importanti avvertenze per il corretto uso della macchina.Caution! Important warnings for the correct use of the machineAvis importants pour l’emploi correct de la machine.Wichtige Warnhinweise für die korrekte Benützung der Maschine.Importantes advertencias para el uso correcto de la máquina.
MOD. BZ 99
4
7 1 9 10 2 8 7 1 89 10 16
12
13
14
6
5
4
11
7 1 9 10 2 8 7 1 89 10 16
15
12
3
3
11
5
6
4
FIG. 01
5
MOD. BZ 99
FIG. 03
7 1 9 10 2 8
7 1 89 10 16
FIG. 02
FIG. 04

MOD. BZ 99
6
FIG. 05 FIG. 06
FIG. 07
7
FIG. 08

MOD. BZ 99
16
SUMMARY- 1 - GENERAL WARNING 1.1 General Warning ....................................................................................... 17 1.2 Use Allowed ............................................................................................... 17
- 2 - TRANSPORT 2.1 Packing ...................................................................................................... 17 2.2 Handling .................................................................................................... 17 2.3 Warehousing .............................................................................................. 17
- 3 - MACHINE DESCRIPTION3.1 Machine Operating Cycle ........................................................................... 183.2 Controls Description .................................................................................... 183.3 Specifications ............................................................................................. 18
- 4 - MACHINE INSTALLATION4.1 Warning .................................................................................................... 194.2 Installation Presetting ................................................................................... 19
4.2.1 Electrical Connection .......................................................................... 194.2.2 Water Supply Connection (version R) ................................................... 194.2.3 Drain Connection (version R) ............................................................... 19
4.3 Equipotential connection ............................................................................. 19
- 5 - USE OF THE MACHINE5.1 Machine Start and Water Supply ................................................................. 205.2 Heating ...................................................................................................... 205.3 Coffee Preparation ...................................................................................... 205.4 Steam Outlet ............................................................................................. 205.5 Getting Hot Water ...................................................................................... 20
5.6 Machine Stop ............................................................................................. 20 5.7 Dose Programming (version DE) .................................................................. 21
- 6 - MAINTENANCE6.1 Safety Rules ................................................................................................. 216.2 Machine Cleaning ....................................................................................... 216.3 Scheduled Inspections .................................................................................. 216.4 Safety Thermostat – Manual Reset ................................................................. 226.5 Correct disposal of this product ..................................................................... 22
- 7 - TROUBLE SHOOTINGProblem / Diagnostics / Suggestions .................................................................. 23

17
MOD. BZ 99
1 - WARNING1.1 General Warning
All other uses are to be considered unfit and the-refore strictly forbidden.The manufacturer shall not be held responsible for damages due to unsuitable use of the espres-so machine.
2 - TRANSPORT2.1 PackingThe espresso machine BZ99, is protected with foam packed in carton.
- Power and water supply installations must be prearranged by the user according to the in-dications of Chapter 4 of this booklet “Machi-ne Installation”.
- The installer is not allowed for any reason to modify the preexistent installation prepared by the user.
- This booklet is integrating part of the machine and has to be read carefully by the user befo-re starting up the machine.
- Keep this document as a reference manual for the future.
- The machine is delivered without water into the boiler so as to avoid possible damages due to ice.
- Take care of the electrical installation groun-ding.
- Do not touch the machine with damp and/or wet hands and feet.
- Do not use the machine barefoot.- Do not connect the power supply cable to tem-
porary extensions or similar devices.- Do not turn off the machine by pulling the
power supply cable.- Do not operate the machine with the power
supply cable rolled up.- Do not allow unskilled personnel and/or chil-
dren to operate the machine.- In order to avoid seepages of water into the
machine, take care to put the cups on the war-mer with open side up.
1.2 Use AllowedThe espresso machine BZ 99 is intended to di-spense espresso, hot water, tea, camomile and other infusions, to create steam and to warm drinks (milk, chocolate, cappuccino, punch, etc.).This machine has been planned only and exclusi-vely for the above mentioned purposes.
Warning:- After the unpacking, make sure that the ma-
chine and relevant equipment are complete and undamaged.
- The unpackings must be kept out of the reach of children and disposed at the proper dum-ps.
- Should you detect damages to the machine or missing pieces in the equipment, do not use the machine and inform immediately the area agent.
2.2 HandlingThe espresso machine can be handled by means of a transpallet or a lift truck or manually.
2.3 WarehousingThe machine, properly packed, shall be kept dry, with temperature ranging from 5 to 30 °C and humidity below 70%.Four cases maximum are allowed, one upon another.

MOD. BZ 99
18
3 - MACHINE DESCRIPTION3.1 Machine Operating CycleVersion RThe water coming from the water supply by means of a vibration pump controlled by a pressure ran-ging from 9 to 10 bar passes through an overpressure valve set to 12 bar. The boiler water heated by a resistance, heats in its turn the water in the exchanger water, which by means of a suction lift allows a constant temperature. From the external exchanger, the water goes directly into the group which, by an electric valve controlled electrically by a push-button panel or by a key, allows the water to get in for the coffee infusion.Version SThe water coming from the tank at the back of the machine by means of a vibration pump controlled by a pressure ranging from 9 to 10 bar and heated by a resistance, heats in its turn the water in the exchanger, which, by means of a suction lift, allows to keep a constant temperature .From the exchanger, the water goes directly into the group which, by an electric valve controlled electronically by a push-button, allows the water to get in, to supply coffee.
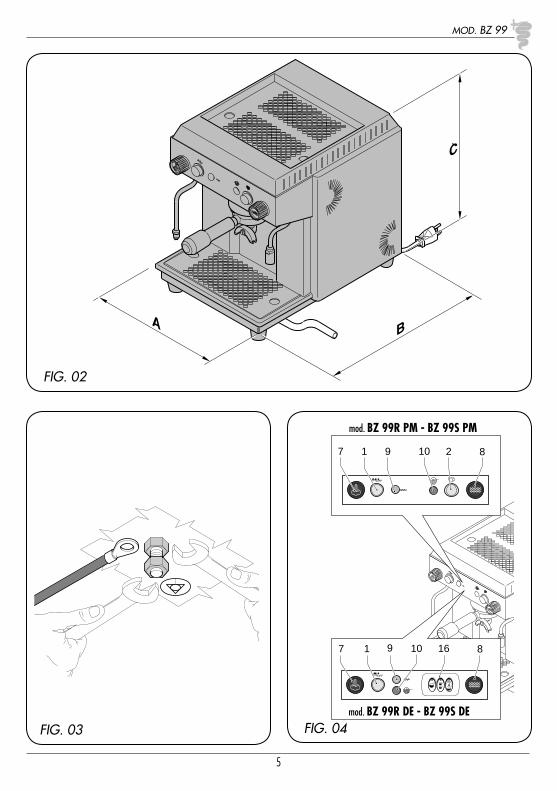
1 GROUPPower Supply V 220 - 240 / 50-60 Hz 110 - 120 / 50-60HzResistance V 220-230-240 110 - 120Resistance W 1200 1200Boiler l 1.5Width “A” mm 310Depth “B” mm 380Height “C” mm 345Net Weight kg 17.5Gross Weight kg 19.5Nipple for water supply G 3/8”Drain Connector Diameter mm 10
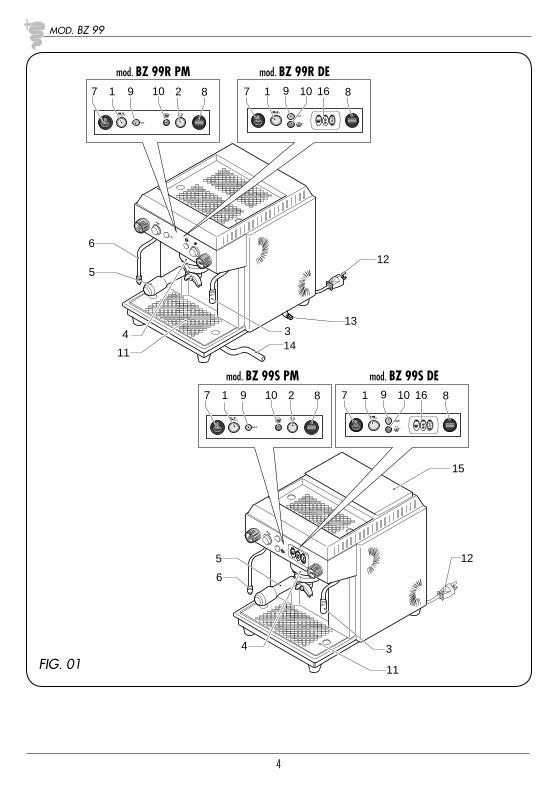
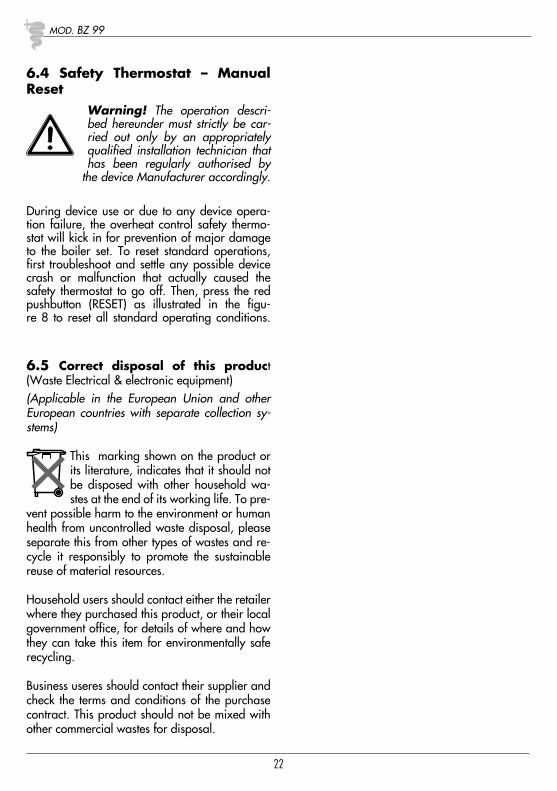
3.2 Controls Description(Fig. 01)1 Main Switch2 Coffee supply (version PM)3 Hot Water Supply4 Supply Group5 Filter Holder6 Steam Nozzle7 Steam Knob8 Water knob9 Yellow light
10 Green light11 Cup supporting grid12 Power Supply Cable13 Water Inlet Nipple (version R)14 Drain pipe (version R)15 Water Tank (version S)16 Coffee distribution keypad (version DE)
3.3 Specifications (Fig. 02)

19
MOD. BZ 99
4 - MACHINE INSTALLATION4.1 WarningThe installation must be carried out by qualified operators according to manufacturer’s instruc-tions and laws in force.
4.2 Installation PresettingPut the machine on a plane surface with sizes and solidity suitable to overall dimensions of the equipment so that the cup heating level is over 150 cm from the ground. Do not use water jets or install in places where water jets are used. To ensure regular operation, the equipment shall be installed in places with temperature between +5°C and +32°C and humidity not exceeding 70%.The machine is electrically powered and requires for its operating:- power supply connection.- water supply connection (version R).- drain system connection (version R).
4.2.1 Electrical ConnectionWarning:-- The power supply connection must be carried
out by qualified personnel.- The installation must be carried out in com-
pliance with the laws in force and must be equipped with proper grounding.
The machine is provided with electric cord with plug.
4.2.2 Water Supply Connection (Fig. 01) (version R)Make sure that the water supply installation is connected to drinkable water supply with opera-ting pressure ranging from 0 to 6 bar.Should the pressure be above 6 bar, provide a reducer.Provide an intercepting tap upstream the machi-ne connection.A nipple G 3/8 “ is provided for the water sup-ply connection (fig. 1; pos. 13).
4.2.3 Drain Connection (Fig. 01) (ver-sion R)Connect a rubber pipe with inner diameter of 10 mm to the arranged connector of the machine drain well (fig.01; pos. 14) and join it with the open drain-trap, previously prepared.
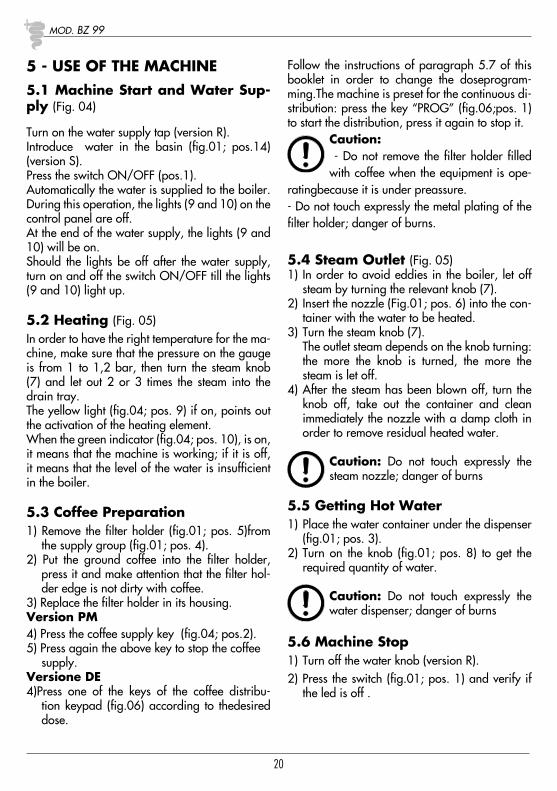
4.3 Equipotential connection (Fig. 03)The function of this connection, required by some standards, is to prevent the electric potential differences between the masses of the different equipment installed in the same place. This de-vice is provided with a terminal installed under the base to connect an external wire having a rated section in compliance with the current re-gulations.
MOD. BZ 99
20
5 - USE OF THE MACHINE5.1 Machine Start and Water Sup-ply (Fig. 04)
Turn on the water supply tap (version R).Introduce water in the basin (fig.01; pos.14) (version S).Press the switch ON/OFF (pos.1).Automatically the water is supplied to the boiler. During this operation, the lights (9 and 10) on the control panel are off. At the end of the water supply, the lights (9 and 10) will be on.Should the lights be off after the water supply, turn on and off the switch ON/OFF till the lights (9 and 10) light up.
5.2 Heating (Fig. 05)In order to have the right temperature for the ma-chine, make sure that the pressure on the gauge is from 1 to 1,2 bar, then turn the steam knob (7) and let out 2 or 3 times the steam into the drain tray.The yellow light (fig.04; pos. 9) if on, points out the activation of the heating element.When the green indicator (fig.04; pos. 10), is on, it means that the machine is working; if it is off, it means that the level of the water is insufficient in the boiler.
5.3 Coffee Preparation1) Remove the filter holder (fig.01; pos. 5)from
the supply group (fig.01; pos. 4).2) Put the ground coffee into the filter holder,
press it and make attention that the filter hol-der edge is not dirty with coffee.
3) Replace the filter holder in its housing.Version PM4) Press the coffee supply key (fig.04; pos.2).5) Press again the above key to stop the coffee
supply.Versione DE4)Press one of the keys of the coffee distribu-
tion keypad (fig.06) according to thedesired dose.
Follow the instructions of paragraph 5.7 of this booklet in order to change the doseprogram-ming.The machine is preset for the continuous di-stribution: press the key “PROG” (fig.06;pos. 1) to start the distribution, press it again to stop it.
Caution: - Do not remove the filter holder filled with coffee when the equipment is ope-
ratingbecause it is under preassure.- Do not touch expressly the metal plating of the filter holder; danger of burns.
5.4 Steam Outlet (Fig. 05)1) In order to avoid eddies in the boiler, let off
steam by turning the relevant knob (7).2) Insert the nozzle (Fig.01; pos. 6) into the con-
tainer with the water to be heated.3) Turn the steam knob (7). The outlet steam depends on the knob turning:
the more the knob is turned, the more the steam is let off.
4) After the steam has been blown off, turn the knob off, take out the container and clean immediately the nozzle with a damp cloth in order to remove residual heated water.
Caution: Do not touch expressly the steam nozzle; danger of burns
5.5 Getting Hot Water1) Place the water container under the dispenser
(fig.01; pos. 3).2) Turn on the knob (fig.01; pos. 8) to get the
required quantity of water.
Caution: Do not touch expressly the water dispenser; danger of burns
5.6 Machine Stop1) Turn off the water knob (version R).2) Press the switch (fig.01; pos. 1) and verify if
the led is off .

21
MOD. BZ 99
5.7 Dose Programming (versione DE) (Fig.06)
A= single doseB= double doseC= continuous dispensing
To program every single dose, do what follows: keep pressed the key “PROG” relativeto the con-tinuous dose programming (fig.06; pos. C) for about 5 seconds until the LED blinks.Select the desired dose by pressing the relati-ve key (A-B) (LED switching-on), select thekey once again after reaching the desired dose (LED switching-off); the dose is programmed.
Notes:- The push-button panel LEDs blink intermittently:
no water into the tank.- The push-button panel LEDs blink intermittently
and quickly: no water into the boiler.- The LED of the button selected blinks: too fine
coffee.
N.B.If the water should not come out of the group (fig.01; pos. 4) although the boiler is underpres-sure and there is water into the tank, turn off the switch (fig.01; pos. 1) and releasethe vapour from the tap (fig.01; pos. 6). Wait for the machi-ne to cool completely.Turn on the switch again (fig.01; pos. 1) and press the continuous dose key (C) until thewater comes out of the group, press stop and wait for the machine to be underpressure.
6 - MAINTENANCEFor a proper working of the machine follow the maintenance instructions given below.
6.1 Safety RulesDo not wash the machine with water jets.Disconnect the machine from the power supply by taking off the plug and turn off the water knob before
carrying out maintenance and/or cleaning operations.In case of malfunctioning machine, do not carry out any temporary repair and call immediately the technical assistance service. Should the power supply cable be damaged, switch off immediately the machine, stop the wa-ter supply and ask for the technical assistance service. Do not replace it by yourselves.Carry out the cleaning/maintenance when the machine is cold, wearing preferably, protective gloves.
6.2 Machine CleaningClean the following pieces: steam nozzle and hot water dispenser (every time they are used), fil-ter holder and filter, grills of warmer and drain tray.
6.3 Scheduled InspectionsWash the group every 15 days as follows: Clasp the filter holder with the blind filter to the group and select coffee dispensing several times.N.B.: You can put special powder detergents for coffee machines in the blind filter.Inspect every 15 days the small basin placed un-der the drain tray.Clean the group gasket weekly with the pro-per brush supplied together with the machine (fig.07).For the machine equipped with deconcentrator, follow the enclosed maintenance instructions.
MOD. BZ 99
22
6.4 Safety Thermostat – Manual Reset
Warning! The operation descri-bed hereunder must strictly be car-ried out only by an appropriately qualified installation technician that has been regularly authorised by
the device Manufacturer accordingly.
During device use or due to any device opera-tion failure, the overheat control safety thermo-stat will kick in for prevention of major damage to the boiler set. To reset standard operations, first troubleshoot and settle any possible device crash or malfunction that actually caused the safety thermostat to go off. Then, press the red pushbutton (RESET) as illustrated in the figu-re 8 to reset all standard operating conditions.
6.5 Correct disposal of this product (Waste Electrical & electronic equipment)(Applicable in the European Union and other European countries with separate collection sy-stems)
This marking shown on the product or its literature, indicates that it should not be disposed with other household wa-stes at the end of its working life. To pre-
vent possible harm to the environment or human health from uncontrolled waste disposal, please separate this from other types of wastes and re-cycle it responsibly to promote the sustainable reuse of material resources.
Household users should contact either the retailer where they purchased this product, or their local government office, for details of where and how they can take this item for environmentally safe recycling.
Business useres should contact their supplier and check the terms and conditions of the purchase contract. This product should not be mixed with other commercial wastes for disposal.
23
MOD. BZ 99
7 - TROUBLE SHOOTING
Problem Diagnostics/solution SuggestionsLack of steam distribu-tion from the pipe
The steam pipe nozzle is obstructed, clear it by using a pin. This problem depends on the introduction of the spout into the milk.
Clean the steam spout after using it.
Leakage from the filter holder
Possible causes:1-The lower bowl gasket is worn or en-
crusted.2-The filter holder is positioned incorrectly
on the group.3-The filter into the filter holder is dama-
ged.
In all above-mentioned ca-ses, call a skilled technician.
Difficult positioning of the filter holder on the coupling ring
The problem depends on the excessive cof-fee dose inside the filter holder.
Decrease coffee quantity in the filter holder.
Incorrect positioning of the filter holder after pla-cing it on to the group
The filter holder handle, after fixing it to the group, is turned to the right more than usual. The lower bowl gasket is worn.
Contact a skilled technician to replace the lower bowl gasket.
The coffee dispenses in-sufficiently
The coffee dispenses drop by drop, the dispensing time is too long, the quality of the coffee is not good and presents a dark cream. Possible causes:1-The coffee grind is too fine.2-The coffee into the filter holder is too
pressed.3-The dose into the filter holder is exces-
sive.4-The small douche of the group is ob-
structed.5-The filter into the filter holder is ob-
structed.
In cases 1-2-3, it isnecessary to adjust the grinder cor-rectly. In case 4, it is necessary to call a technician.In case 5, clean the filter or replace it.
The coffeedispenses tooabundantly
The coffee dispenses too quickly and the cream is clearer than usual.Possible causes:1-The grind of the coffee is too coarse.2-The coffee into the filter holder is not pressedenough.3-The coffee dose into the filter holder is insufficient.
In cases 1-2-3, it is neces-sary to adjust the grinder correctly.

MOD. BZ 99
24
Problem Diagnostics/solution SuggestionsThe coffee is too cold Possible causes:
1-The filter holders are cold.2-The coffee grind is too fine.3-The water circuit of the machine is dirty
(milestone).
In case 1, keep the filter hol-der mounted on the group.In case 2 change the coffee grind. In cases 3 call a skilled tech-nician.
The coffee is tepid The coffee is tepid, although the pressure is normal between 1 and 1,2 BAR. In this case, the pressure measurement is dummy.
Call a skilled technician to check the relief valve.Meanwhile, in order to use the machine, open the steam valve, the boiler pressure will drop to zero: in this way, the heat elements will be con-nected and the temperature will increase. Carry on this operation every day when turning on the machine.
The coffee is too hot Possible causes:1-The boiler pressure is higher than 1,3
bar.2-The machine is covered with something
that prevents its cooling.3-The machine has been installed in a
position that prevents air circulation.
In case 1 call a skilled techni-cian.In cases 2-3 reset the machine cooling conditions.
Coffee deposit on the cup bottom
Possible causes:1-The coffee grind is too fine.2-The filter holder is dirtyinside, or the fil-
ter is damaged.3-The grinder mills are worn, call a tech-
nician to replace them.
In case 1, it is necessary to adjust the grinder correctly.In case 2, clean the filter hol-der or replace th filter.In case 3 the technician’s in-tervention is required.

Dal 1901
G.BEZZERAMACCHINE PER CAFFE’ ESPRESSO
Via Luigi Bezzera,120088 Rosate - Milano - Italy
Tel. 02 90848102 r.a. - Telefax 02 90870287Web: www.g.bezzera.it
e-mail: [email protected]
Cod
.994
1006
.01
ed
.01/
06
rev.
01