Embed Size (px)
Citation preview

1
2.4GHz USBWireless Adapter
DWL-122
If any of the above items are missing, please contact your reseller.
CD-ROM (containing Drivers, Manual and Warranty)
This product works with the following operating
system software: Windows XP, Windows2000, Windows Me, Windows 98SE,Macintosh OS X (10.2.x or later)
Before You BeginYou must have at least the following for PC Windows Based Computers:
• You will need a computer with an available USB port to connect the DWL-122Wireless USB adapter.
• At least a 300 MHz processor and 32 MB of memory• An 802.11b Access Point (for Infrastructure Mode) or another 802.11b wireless
adapter (for Ad-Hoc; Peer-to-Peer networking mode.)• Properly installed and working USB Controller.
DWL-122 Wireless USB Adapter
Check Your Package ContentsThese are the items included with your DWL-122 purchase:
USB Extension Cable
You must have at least the following for Macintosh OS X Based Computers:• A Power Mac G3 or G4, iMac, iBook, or PowerBook (post PowerBook G3) with
at least 128MB RAM.• An 802.11b Access Point (i.e., D-Link Wireless Router, access point or Airport
Base Station for Infrastructure Mode) or another 802.11b wireless adapter (forAd-Hoc; Peer-to-Peer networking mode).
• Properly installed and working USB Controller.
©2003 D-Link Systems, Inc. All rights reserved. Trademarks or registered trademarks are the property of their respective holders. Software andspecifications subject to change without notice. 1G-BDWL-122 04222003
2
The Install Screen will appear.
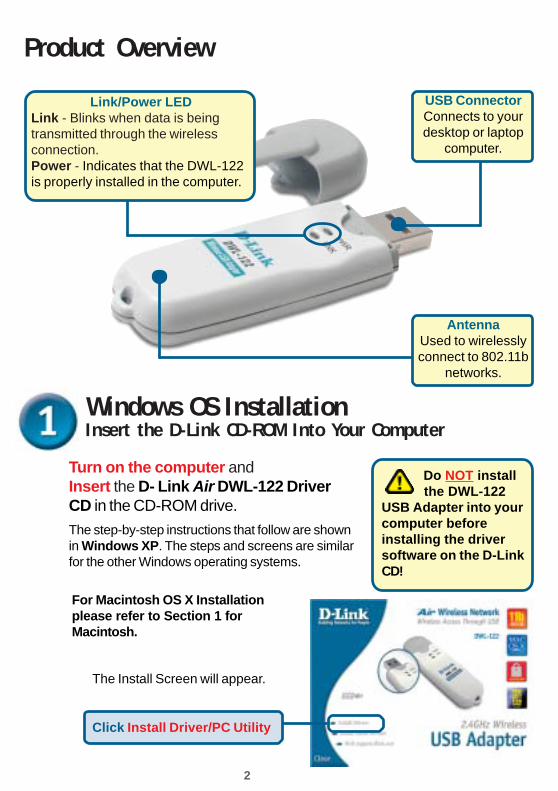
Turn on the computer andInsert the D- Link Air DWL-122 DriverCD in the CD-ROM drive.The step-by-step instructions that follow are shownin Windows XP. The steps and screens are similarfor the other Windows operating systems.
Windows OS Installation
Do NOT install the DWL-122USB Adapter into yourcomputer beforeinstalling the driversoftware on the D-LinkCD!
Click Install Driver/PC Utility
AntennaUsed to wirelesslyconnect to 802.11b
networks.
Link/Power LEDLink - Blinks when data is beingtransmitted through the wirelessconnection.Power - Indicates that the DWL-122is properly installed in the computer.
USB ConnectorConnects to yourdesktop or laptop
computer.
For Macintosh OS X Installationplease refer to Section 1 forMacintosh.
Product Overview
Insert the D-Link CD-ROM Into Your Computer

3
If the CD Autorun function does notautomatically Go to Start > Run onyour computer, then type“D:\PC\Driver\Setup.exe.” If it doesstart, proceed to the next screen.
Type “D:\PC\Driver\Setup.exe.”
Click Next
Click Next
Click OK
The letter “D” represents the letter of the CD-ROM drive. Your CD-ROM drive may be adifferent drive letter.
D:\PC\Driver\Setup.exe

4
Installing the DWL-122 Wireless USBAdapter to Your Computer
A. Insert one end of theUSB Adapter into theprovided USB cable andplug the other end intoyour computer’s USBPort.
Begin by pressing down onthe cover with your thumb.
Then pull the cover awayfrom the DWL-122.
Removing the protective covering for the DWL-122.
Click Finish
Click No, I will restartmy computer later
Shut down Your Computer

5
Turn on Your Computer
When you restart your computerthis Found New HardwareWizard (Windows XP) screenwill appear:
Select Install the softwareautomatically (Recommended)
Click Next
Windows XP will automaticallyload the driver files.
Click Finish

6
Your Installation is Complete!After you’ve continued in Windows XP (or after the computerrestarts in the other Windows operating systems), the D-Link AirDWL-122 Configuration Utility will automatically start and theutility icon will appear in the bottom right hand corner of the desktopscreen (systray). If this icon appears GREEN, then you havesuccessfully installed the DWL-122, are connected to a wire-less network and are ready to communicate!
Double-click the utility icon to usethe configuration utility.
For Windows XP, if you wish to use the Air USB Utility, please performthe following steps.
Click Yes to finalizethe installation
For Windows Me and 98SE, this screenmay appear.
For Windows XP/2000, ascreen similar to this Digital
Signature Not Found screenmay appear during the installa-tion.
Click Yes to continuethe installation

7
Click Advanced
Uncheck “Use Windows toconfigure my wireless net-work settings.”
Click OK
Your Installation is Complete! (Cont.)

8
Click OK
By initial factory settings, WEPencryption is turned off. If youraccess point or wireless router isconfigured with WEP encryption,please make sure to enter thecorrect WEP key.
Connecting to a Wireless Network
Click Configure afterhighlighting awireless networkyou want to connectto.
This window displaysthe available wirelessnetworks.

9
Connecting to a Wireless Network (cont.)
Finished! You shouldnow be connected toyour wireless network!Now you are ready toparticipate in your newwireless environment!
Click Connect
The configured access point orwireless router will be displayed inthe bottom window. If you havemore then one profile, select theprofile you wish to connect to.

10
Macintosh OS X Driver Installation
Turn on your Macintosh and Insert the D- Link Air DWL-122Driver CD in the CD-ROM drive.The step-by-step instructions that follow are shown in Macintosh OS X(10.2.x). An Icon like the one shown should appear on your desktop.
To start the installation, doubleclick the “MAC” Folder , thendouble click “DLinkUsbDriver.dmg”That will extract the installationpackage, “DLinkUsbDriver.pkg.”Double Click to begin.
Double Click
The initial install screen willappear and you must clickContinue to begin the installa-tion process.
Your system may require youto enter a username andpassword to be able to installsoftware.
Click Continue
DLinkUsbDriver.pkg> >Double Click

11
Macintosh OS X Driver Installation (cont.)
Click Continue
You will be prompted for adestination for the installa-tion files. Select the loca-tion by double-clicking theappropriate hard disk drive.
Click Continue Installation
Finished! Your Computer Will Now Restart
See Step 2 (Windows Installation) to see how youradapter connects to your Macintosh.
Click Restart

12
Appendix AUsing the Configuration Utility
For Macintosh OS X (10.2.x)Load System Preferences and you will seean icon located near the bottom calledWireless Adaptor
Single Click
A. Network Name: TheService Set Identifier is thename assigned to thewireless network. Thefactory SSID setting is setto default.
B. Network Type:Displays the type ofnetwork you are con-nected to. The factorysetting is set to Accesspoint. Ad-Hoc mode isused for peer-to-peernetworking.D. Signal Strength: The
Signal Strength repre-sents the wireless signalbetween the access pointand the DWL-122.
AB CD
C. Channel: Displays thechannel information. Bydefault, the channel is set to 6.Please note that the DWL-122will automatically adjustchannel depending on theAccess Point.
E
F. My Networks: For setting upmultiple network profiles.Convenient for users travellingbetween wireless networks indifferent areas.
F
E. Available WirelessNetworks: WirelessNetworks within rangeof the DWL-122. Alsodisplays the type ofnetwork, signalstrength, channel, and ifencryption is enabled.
13
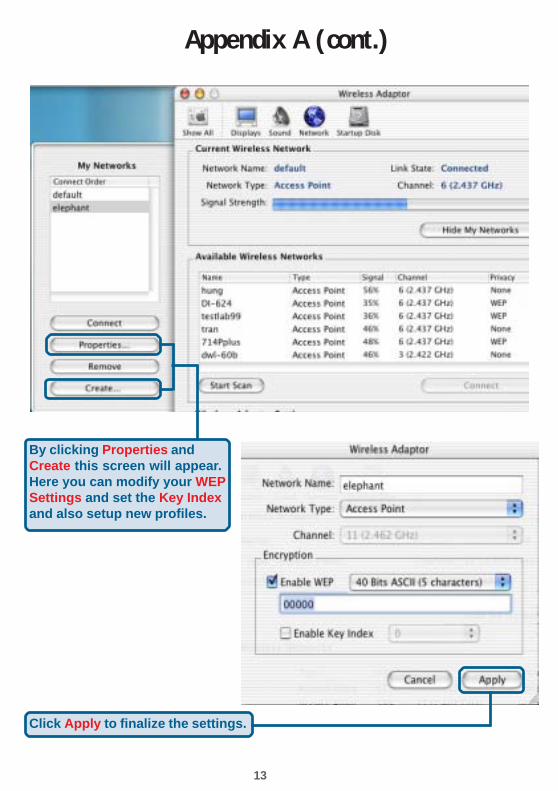
By clicking Properties andCreate this screen will appear.Here you can modify your WEPSettings and set the Key Indexand also setup new profiles.
Appendix A (cont.)
Click Apply to finalize the settings.
14
Appendix BUsing the Configuration UtilityFor Windows Operating Systems
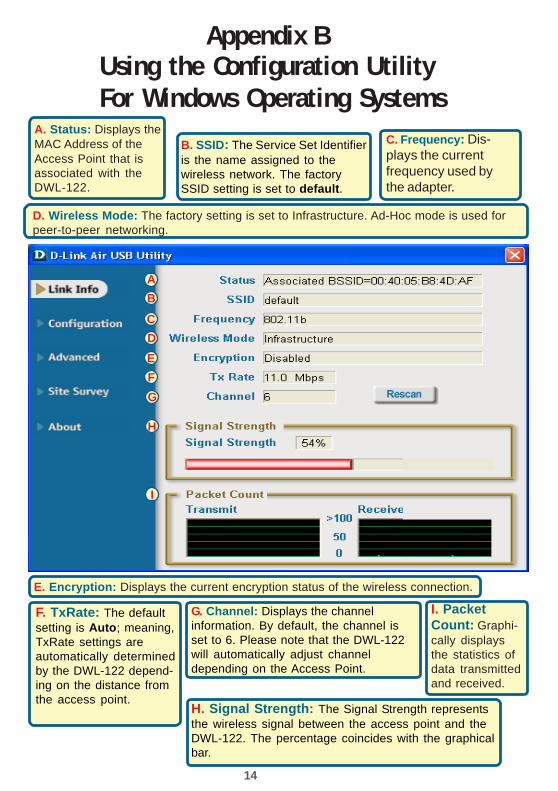
A. Status: Displays theMAC Address of theAccess Point that isassociated with theDWL-122.
B. SSID: The Service Set Identifieris the name assigned to thewireless network. The factorySSID setting is set to default.
F. TxRate: The defaultsetting is Auto; meaning,TxRate settings areautomatically determinedby the DWL-122 depend-ing on the distance fromthe access point.
H. Signal Strength: The Signal Strength representsthe wireless signal between the access point and theDWL-122. The percentage coincides with the graphicalbar.
G. Channel: Displays the channelinformation. By default, the channel isset to 6. Please note that the DWL-122will automatically adjust channeldepending on the Access Point.
E
CD
F
BA
G
H
I
C. Frequency: Dis-plays the currentfrequency used bythe adapter.
D. Wireless Mode: The factory setting is set to Infrastructure. Ad-Hoc mode is used forpeer-to-peer networking.
E. Encryption: Displays the current encryption status of the wireless connection.
I. PacketCount: Graphi-cally displaysthe statistics ofdata transmittedand received.
15
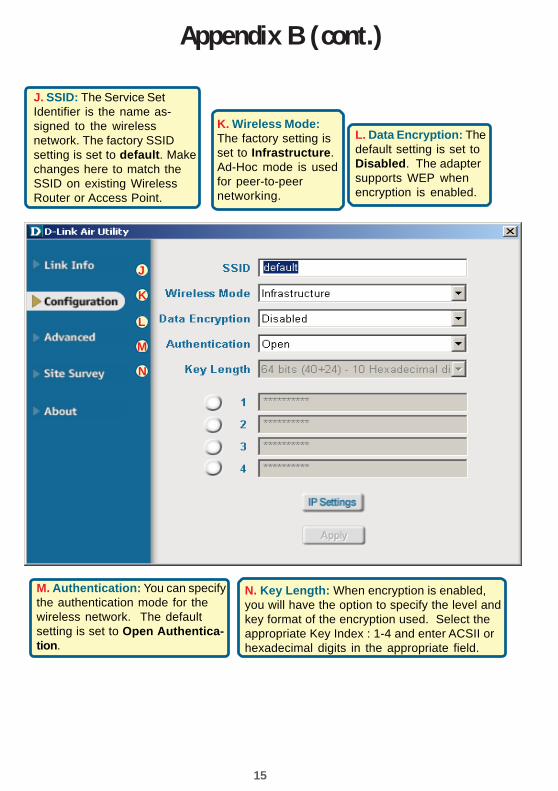
J. SSID: The Service SetIdentifier is the name as-signed to the wirelessnetwork. The factory SSIDsetting is set to default. Makechanges here to match theSSID on existing WirelessRouter or Access Point.
K. Wireless Mode:The factory setting isset to Infrastructure.Ad-Hoc mode is usedfor peer-to-peernetworking.
L. Data Encryption: Thedefault setting is set toDisabled. The adaptersupports WEP whenencryption is enabled.
M. Authentication: You can specifythe authentication mode for thewireless network. The defaultsetting is set to Open Authentica-tion.
N. Key Length: When encryption is enabled,you will have the option to specify the level andkey format of the encryption used. Select theappropriate Key Index : 1-4 and enter ACSII orhexadecimal digits in the appropriate field.
J
K
L
M
N
Appendix B (cont.)

16
Technical SupportYou can find software updates and user documentation on the D-Link website.
D-Link provides free technical support for customers within the U.K.
U.K. customers can contact D-Link technical support through ourwebsite, or by phone.
Tech Support for customers within the U.K:D-Link Technical Support over the Telephone:(0800 917 5063)Mon-Fri, 8.00am to 8.00pm GMT
D-Link Technical Support over the Internet:http://www.dlink.co.ukftp://ftp.dlink.co.uk
Tech Support for customers outside of U.K:D-Link Technical Support over the Telephone:Call your local D-Link Support CentreDetails found at http://www.dlink.co.uk/1407.htm