Embed Size (px)
Citation preview

1
User manualBedienungsanleitungGebruiksaanwijzingManuel d’ útilisationManuel del usuario
Manuale dúso

2
Looky+ logo is a trademark of Rehan Electronics
First Edition (January 2010) V1.1

3
EN
DE
NL
FR
ES
IT
English ............................................ 5
Deutsch ......................................... 17
Nederlands ..................................... 29
Français ........................................ 41
Español ......................................... 53
Italiano ......................................... 65

4

5
EN Table of Contents
1 Introduction..........................................................................6
2 General description Looky+...................................................6
3 Intended use ........................................................................6
4 Maintenance..........................................................................7 4.1 Battery maintenance .........................................................7
5 Installation - batteries............................................................8
6 Handle...................................................................................8
7 Controls.................................................................................8 7.1 Switching the Looky+ on and off.........................................8 7.2 Digital zoom ....................................................................9 7.3 Selecting reading modes....................................................9 7.4 Freeze image...................................................................10 7.5 Advanced settings............................................................10 7.5.1 Advanced settings - X button..........................................10 7.5.2 Advanced settings - Z button..........................................11
8 Internal memory of the Looky+..............................................11
9 Charging instructions...........................................................12
10 Troubleshoot.......................................................................13
11 Specifications......................................................................14
12 Discarding the Looky+..........................................................15
13 Warranty regulations...........................................................15
14 Contact information supplier...............................................15

6
1 IntroductionCongratulations with the purchase of your Looky+! In this manual you will find a detailed description of all the functions of the Looky+. If you still have any queries after reading this manual, please contact your supplier (see the back of the manual for contact details).
2 General description Looky+
3 Intended useThis device is solely used for displaying enlarged representations of text, photographic material and objects. When the Looky+ is used for any purpose other than the intended use, the CE regulation will not apply.
Caution: do not, under any circumstances, perform maintenance or repairs to the device – always ask a producer approved techni-cian to do this. Warranty will be voided if the Looky+ is attempted to be repaired by anyone other than a technician approved of by the producer.
EN
Back
Front
LED lighting
camera
handlescreen

7
EN4 Maintenance
• Only use accessories for the Looky+ that are approved of by the producer.
4.1 Battery maintenance• Remove the batteries from the Looky+ if you do not intend to use
the device for an extended period of time. This will improve the longevity of the batteries.
• Batteries are sensitive to over-charging. It is recommended to only charge the batteries when they are completely drained.
• Chargeable NiMh batteries have an auto discharge that strongly depends on the temperature of the environment (e.g. never leave your batteries in a car that is parked in direct sunlight).
• New NiMh batteries must be charged several times before reach-ing their nominal capacity.
• Charge NiMh batteries at least once every 6 months.• The average lifespan of a rechargeable battery is usually 300
charging cycles, but this depends on the use. Total capacity will slowly decrease after multiple charging cycles.
• Charge the batteries in a well ventilated environment.

8
5 Installation – batteries1. Remove the lid from the battery compartment by pressing down
on the arrow and moving the lid in the direction of the arrow.2. Place the first battery at the back of the battery compartment.3. Now place the second battery.
Note: charge the batteries before using your Looky+! See the charging instructions on page 12.
6 HandleThe handle of the Looky+ is closed on delivery. You can use the Looky+ with the closed handle by placing it directly on the text. When you extend the handle you can use the Looky+ like a magnifier. You now have the possibility to view objects or read texts.
It is also possible to use the Looky+ as an aid during writing. To do so you will need to extend the handle fully. When you now press the handle flat to the surface of the table, the screen will rise to an an-gle. The space underneath the Looky+ that is created in this way can be used to aid you during writing.
7 Controls7.1 Switching the Looky+ on and off• To switch the Looky+ on, keep button 1 pressed for 1 second. You
will hear a low pitched tone followed by a high pitched tone. The screen is now active.
• To switch the Looky+ off, keep button 1 pressed until you hear a high pitched tone followed by a low pitched tone. The screen of the Looky+ will darken and the device will switch off.
EN
9
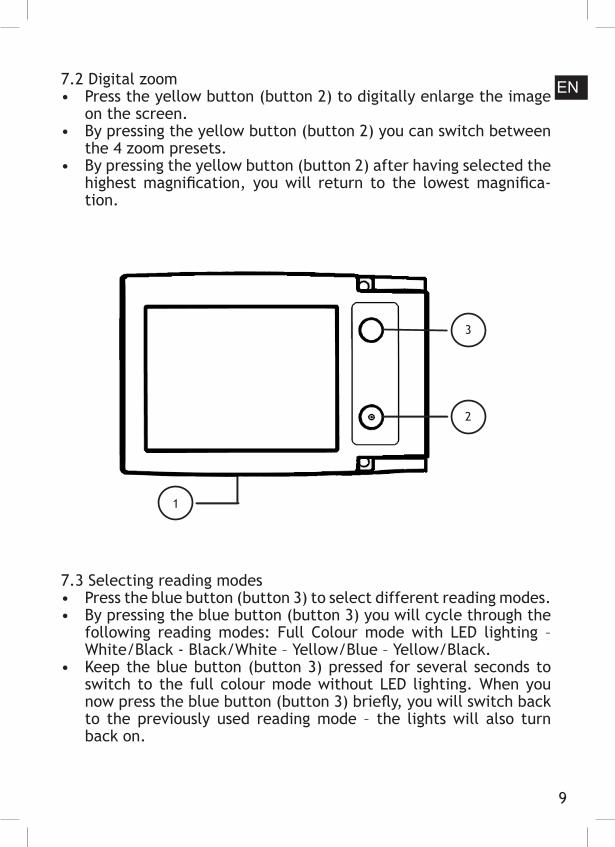
7.2 Digital zoom• Press the yellow button (button 2) to digitally enlarge the image
on the screen.• By pressing the yellow button (button 2) you can switch between
the 4 zoom presets.• By pressing the yellow button (button 2) after having selected the
highest magnification, you will return to the lowest magnifica-tion.
7.3 Selecting reading modes• Press the blue button (button 3) to select different reading modes. • By pressing the blue button (button 3) you will cycle through the
following reading modes: Full Colour mode with LED lighting – White/Black - Black/White – Yellow/Blue – Yellow/Black.
• Keep the blue button (button 3) pressed for several seconds to switch to the full colour mode without LED lighting. When you now press the blue button (button 3) briefly, you will switch back to the previously used reading mode – the lights will also turn back on.
EN
1
2
3

10
EN 7.4 Freeze image• By pressing button 1 briefly you can freeze the image on the
screen.• Press button 1 briefly again to unfreeze the image on the screen. • When the image is frozen you can still cycle through the differ-
ent reading modes by pressing the blue button (button 3). You can also still use the digital zoom function by pressing the yellow button (button 2).
Note: when the image is frozen, the LED lighting will be switched off in order to preserve energy.
7.5 Advanced settingsThe Looky+ has 2 hidden buttons with which the advanced settings of the device can be operated. These buttons, named X and Z, are located in the battery compartment (the batteries must be removed from the Looky+ to access the X and Z buttons). Ensure that the adaptor is connected to the Looky+ and that the Looky+ is switched on to make use of the advanced settings.
7.5.1 Advanced settings – X buttonWith the X button you can turn the sound notifications of the Looky+ on or off. When pressing the X button, you will hear a sound that decreases in pitch – the sound notifications of the Looky+ are now switched off. To switch the sound notifications back on, press the X button again – you will hear a sound that increases in pitch.
Note: when the sound notifications have been switched off, the Looky+ will still give off an alarm sound when it detects a battery problem during the charging process. This sound is the only sound the Looky+ will produce when the sound notifications have been switched off.
11
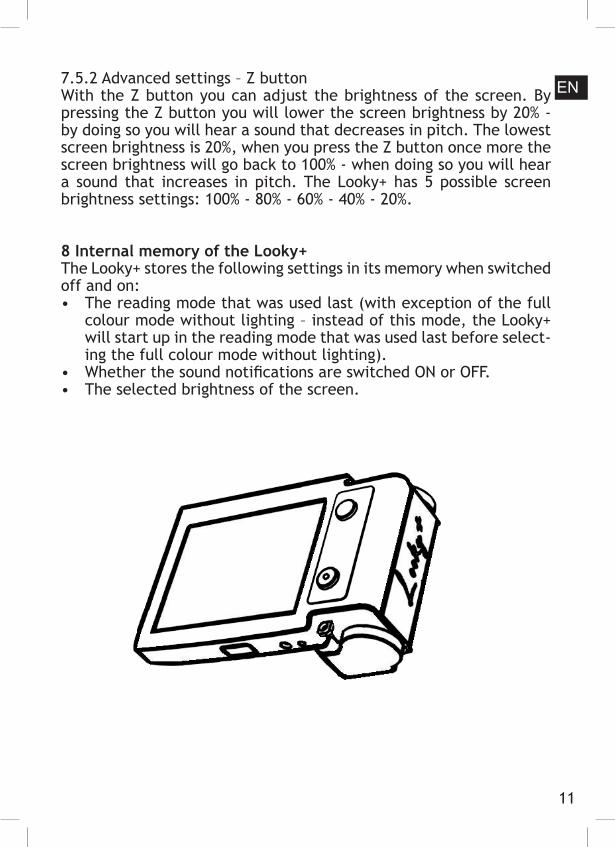
EN7.5.2 Advanced settings – Z buttonWith the Z button you can adjust the brightness of the screen. By pressing the Z button you will lower the screen brightness by 20% - by doing so you will hear a sound that decreases in pitch. The lowest screen brightness is 20%, when you press the Z button once more the screen brightness will go back to 100% - when doing so you will hear a sound that increases in pitch. The Looky+ has 5 possible screen brightness settings: 100% - 80% - 60% - 40% - 20%.
8 Internal memory of the Looky+The Looky+ stores the following settings in its memory when switched off and on:• The reading mode that was used last (with exception of the full
colour mode without lighting – instead of this mode, the Looky+ will start up in the reading mode that was used last before select-ing the full colour mode without lighting).
• Whether the sound notifications are switched ON or OFF.• The selected brightness of the screen.
12
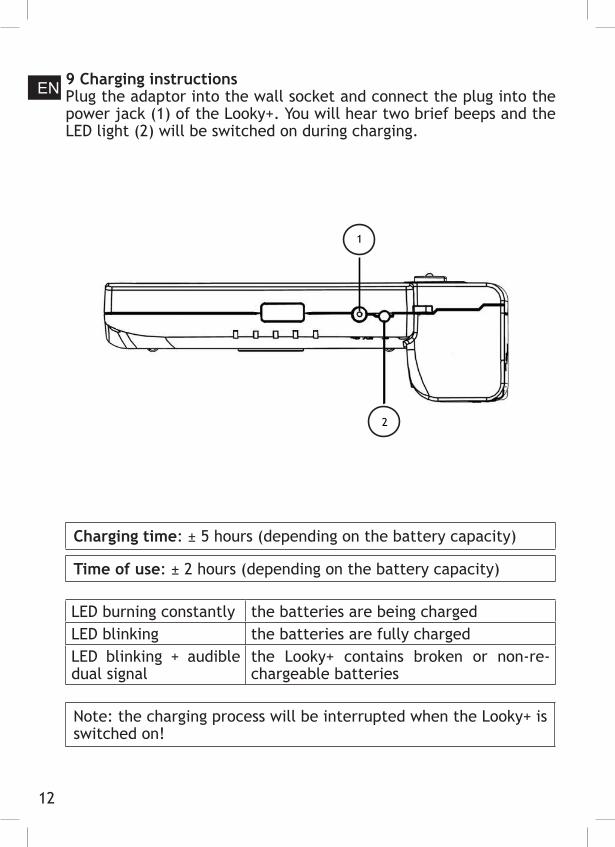
EN 9 Charging instructionsPlug the adaptor into the wall socket and connect the plug into the power jack (1) of the Looky+. You will hear two brief beeps and the LED light (2) will be switched on during charging.
Charging time: ± 5 hours (depending on the battery capacity)
Time of use: ± 2 hours (depending on the battery capacity)
LED burning constantly the batteries are being chargedLED blinking the batteries are fully chargedLED blinking + audible dual signal
the Looky+ contains broken or non-re-chargeable batteries
Note: the charging process will be interrupted when the Looky+ is switched on!
1
2

13
EN10 TroubleshootIn this chapter you will find a description of some of the error mes-sages the Looky+ can give, along with the corresponding solutions. Please read this section carefully if you are experiencing any prob-lems with your Looky+. If you still have any queries after reading this section, please contact your supplier.
Problem Reason Solution1 The Looky+
switches itself off while sounding a tone that de-creases in pitch
The batteries are too empty or too weak
- charge the batteries- use rechargeable batteries containing a capacity of ≥2300mAh
2 The looky+ switches itself off while sound-ing a high pitched followed by a low pitched sound
The Looky+ will switch itself off if it does not detect movement within a 3 minute time span
- switch the Looky+ off if you do not use it- move the Looky+
3 The Looky+ can-not be switched on
The batteries are defect or an error has occurred in the Looky+
- replace the batteries- contact your supplier
4 The LED is blinking while the Looky+ is switched on and is not connected to the adaptor
An error has occur-red in the Looky+
- contact your supplier
5 The Looky+ is sounding an alarm-like sound while charging
The batteries are defect or non-rechargeable
- replace the batte- ries: ensure that they are rechargeable and have a capacity of ≥2300mAh

14
11 SpecificationsMeasurements (length x width x height) and weight (incl. batteries):• Looky+ : 113 x 75 x 38 mm (± 200 gr.)
Screen:• TFT diameter : 3.5 inch
Magnification:• Minimal : ± 2x• Maximal : ± 20x
Power supply:• Batteries : 2x AA/NiMH 2300mAH Rechargeable• Adaptor : 5V DC 1,8A
Conditions of use:• Temperature : +5°C til +35°C• Humidity : <70%, no condensation
Storage and transport conditions:• Temperature : +0°C til +45°C• Humidity : <90%, no condensation
Time of use and charging time:• You can use the Looky+ for ± 2 hours at the recommended battery
capacity of 2300 mA• The average charging time of the Looky+ is ± 5 hours at the re-
commended battery capacity of 2300 mAh.
EN
15
12 Discarding the Looky+/Batteries
This symbol of the crossed out wheelie bin indicates that the product must not be disposed of with your other household waste. Check local regulations for proper disposal of electronic products and batteries.
13 Warranty regulationsThis device is subject to the warranty regulations of your supplier. For further information regarding these regulations, please contact your supplier.
14 Contact information supplier
EN

16
17
Inhaltsverzeichnis
1 Einleitung............................................................................18
2 Allgemeine Beschreibung des Looky+...................................18
3 Bestimmungsgemäße Verwendung........................................18
4 Wartungsvorschriften...........................................................19 4.1 Wartung der Batterien.......................................................19
5 Einlegen der Batterien.........................................................20
6 Handgriff.............................................................................20
7 Bedienungsanweisungen......................................................20 7.1 Ein- und Ausschalten des Looky+ ......................................20 7.2 Digital vergrößern............................................................21 7.3 Lesestand auswählen........................................................21 7.4 Standbildfunktion............................................................22 7.5 Erweiterte Einstellungen..................................................22 7.5.1 Erweiterte Einstellungen - Knopf X...............................22 7.5.2 Erweiterte Einstellungen - Knopf Z...............................23
8 Der Speicher des Looky+.......................................................23
9 Ladeanweisungen................................................................24
10 Fehlerbehebung..................................................................25
11 Technische Daten................................................................26
12 Entsorgen............................................................................27
13 Garantiebestimmungen........................................................27
14 Kontaktinformationen des Lieferanten.................................27
DE

18
1 EinleitungHerzlichen Glückwunsch zu Ihrem Looky+! Diese Anleitung enthält eine ausführliche Beschreibung der Funktionen des Looky+. Wenn Sie nach dem Lesen der Anleitung noch Fragen haben, nehmen Sie bitte Kontakt mit Ihrem Lieferanten auf (die Kontaktinformationen finden Sie auf der Rückseite).
2 Allgemeine Beschreibung des Looky+
3 Bestimmungsgemäße VerwendungDas Gerät ist nur für die vergrößerte Wiedergabe von Text, Fotoma-terial und Objekten bestimmt. Bei einer Änderung des Bestimmung-szwecks verfällt die Gültigkeit der CE-Kennzeichnung.
Achtung: Öffnen Sie das Gerät niemals selbst – überlassen Sie dies immer dem Hersteller oder einem vom Hersteller anerkannten Reparateur. Wenn Sie das Gerät selbst zu reparieren versuchen, verfällt die Garantie.
DE
Rückseite
Vorderseite
LED-Beleuchtung
Kamera
HandgriffBildschirm

19
4 Wartungsvorschriften
• Verwenden Sie nur vom Hersteller geliefertes oder genehmigtes Zubehör.
4.1 Wartung der Batterien• Nehmen Sie die Batterien aus dem Looky+, wenn Sie es längere
Zeit nicht verwenden. Damit verlängern Sie die Lebensdauer der Batterien.
• Batterien sind empfindlich in Bezug auf Überladen. Die Batterien sollten vorzugsweise erst aufgeladen werden, wenn sie ganz leer sind.
• Aufladbare NiMh-Batterien unterliegen einer Selbstentladung, die stark von der Umgebungstemperatur abhängig ist.
• Neue NiMh-Batterien müssen mehrere Male aufgeladen werden, bevor sie ihre Nennkapazität erreichen.
• Laden Sie NiMh-Batterien mindestens 1x pro Halbjahr auf.• Die durchschnittliche Lebensdauer liegt ungefähr bei 300 Ladezy-
klen, sie ist jedoch vom Gebrauch abhängig. Die Gesamtkapazität nimmt nach mehreren Ladezyklen langsam ab.
• Laden Sie Batterien in einer gut gelüfteten Umgebung auf.
DE

20
5 Einlegen der Batterien1. Nehmen Sie die Batterieabdeckung vom Looky+ ab; drücken Sie
dazu auf den Pfeil und schieben Sie die Abdeckung in die Richtung des Pfeils.
2. Legen Sie zuerst die Batterie ein, die hinten in das Batteriefach gehört.
3. Legen Sie dann die zweite Batterie ein.
Achtung: Laden Sie die Batterien auf, bevor Sie das Looky+ in Ge-brauch nehmen! Siehe die Ladeanweisungen auf Seite 24.
6 HandgriffDas Looky+ verfügt über einen Handgriff, der bei Lieferung einge-klappt ist. Sie können das Looky+ mit eingeklapptem Handgriff auf den zu lesenden Text legen und sofort mit dem Lesen beginnen. Wenn Sie den Handgriff ausklappen, können Sie das Looky+ als Handlupe verwenden. Sie können dann Gegenstände oder Texte betrachten.
7 Bedienungsanweisungen7.1 Ein- und Ausschalten des Looky+• Zum Einschalten des Looky+ halten Sie Knopf 1 für 1 Sekunde ge-
drückt. Sie hören dann einen zweitönigen Signalton (einen tiefen Ton, gefolgt durch einen hohen Ton) und das Bild wird aktiv.
• Zum Ausschalten des Looky+ halten Sie Knopf 1 gedrückt, bis Sie einen zweitönigen Signalton hören (einen hohen Ton, gefolgt durch einen tiefen Ton). Das Bild des Looky+ wird nun dunkel.
DE

21
7.2 Digital vergrößern• Drücken Sie den gelben Knopf (Knopf 2), um das Bild auf dem
Looky+ digital zu vergrößern.• Das Looky+ bietet 4 digitale Vergrößerungsfaktoren.• Wenn Sie den gelben Knopf (Knopf 2) drücken, nachdem Sie die
größte Vergrößerung ausgewählt haben, kehren Sie wieder zur kleinsten Vergrößerung zurück.
7.3 Lesestand auswählen• Drücken Sie den blauen Knopf (Knopf 3), um verschiedene
Lesestände auszuwählen.• Wenn Sie mehrere Male den blauen Knopf (Knopf 3) drücken, wer-
den folgende Lesestände angezeigt: Fotostand mit Beleuchtung – Weiß/Schwarz – Schwarz/Weiß - Gelb/Blau – Gelb/Schwarz.
• Halten Sie den blauen Knopf (Knopf 3) länger gedrückt, um in den Fotostand ohne Beleuchtung zu schalten. Durch kurzes Drücken des blauen Knopfs (Knopf 3) schalten Sie wieder in den davor verwendeten Stand zurück – die Beleuchtung wird wieder einge-schaltet.
DE
1
2
3

22
7.4 Standbildfunktion• Indem Sie Knopf 1 kurz drücken, können Sie das Bild anhalten
(Standbild). Sie machen damit praktisch ein Foto.• Drücken Sie erneut kurz Knopf 1, um wieder zu wirklichen An-
zeige zurückzukehren.• Wenn die Standbildfunktion aktiviert ist, können Sie noch immer
zwischen den verschiedenen Leseständen umschalten, indem Sie den blauen Knopf (Knopf 3) drücken. Sie können das Standbild auch digital vergrößern, indem Sie den gelben Knopf (Knopf 2) drücken.
Achtung: Bei einem Standbild wird die LED-Beleuchtung ausge-schaltet, um Energie zu sparen.
7.5 Erweiterte EinstellungenDas Looky+ verfügt über 2 verborgenen Knöpfe, mit denen erweiterte Einstellungen des Geräts bedient werden können. Diese Knöpfe, X und Z, finden Sie im Batteriefach (dazu müssen die Batterien aus dem Looky+ entfernt werden). Sorgen Sie dafür, dass das Looky+ an den Adapter angeschlossen und eingeschaltet ist, wenn Sie diese Op-tionen verwenden möchten.
7.5.1 Erweiterte Einstellungen – Knopf XMit Knopf X können Sie die Tonmeldungen des Looky+ ein- oder aus-schalten. Wenn Sie beim Drücken des Knopfs einen Ton hören, dessen Höhe abnimmt, sind die Tonmeldungen des Looky+ ausgeschaltet. Wenn Sie beim Drücken des Knopfs einen Ton hören, dessen Höhe zunimmt, sind die Tonmeldungen des Looky+ eingeschaltet.
Achtung: Wenn der Ton ausgeschaltet ist, ertönt dennoch ein Alarm, wenn beim Laden der Batterien ein Fehler auftritt. Dies ist dann auch der einzige Ton, den das Looky+ abgeben kann!
DE

23
7.5.2 Erweiterte Einstellungen – Knopf ZMit Knopf Z können Sie die Helligkeit des Bildschirms anpassen. Durch Drücken des Knopfs Z reduzieren Sie die Helligkeit um 20 %, Sie hö-ren dann auch einen Signalton, dessen Höhe abnimmt. Die niedrigste Lichtstärke ist 20 %; wenn Sie Knopf Z dann erneut drücken, kehrt die Helligkeit zur Einstellung 100 % zurück, Sie hören dann auch einen Signalton, dessen Höhe zunimmt. Insgesamt sind 5 Helligkeitseinstel-lungen möglich: 100% - 80% - 60% - 40% - 20%.
8 Der Speicher des Looky+Das Looky+ speichert eine Reihe von Benutzereinstellungen, wenn es aus- und eingeschaltet wird:• Den letzten Lesestand (außer dem Fotostand ohne Beleuchtung –
stattdessen startet das Looky+ im zuletzt verwendeten Lesestand vor dem Fotostand ohne Beleuchtung).
• Ob der Signalton EIN- oder AUS-geschaltet ist.• Die eingestellte Helligkeit des Bildschirms.
DE
24
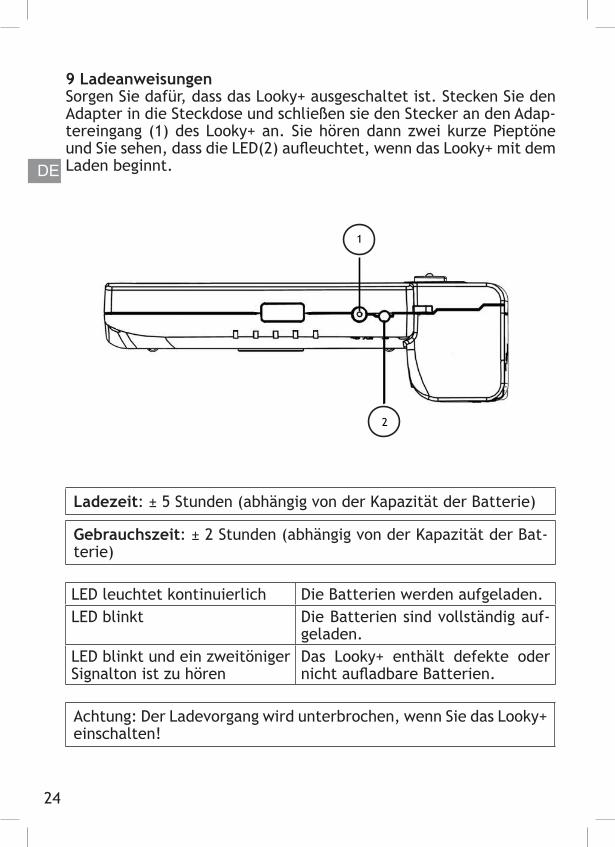
9 LadeanweisungenSorgen Sie dafür, dass das Looky+ ausgeschaltet ist. Stecken Sie den Adapter in die Steckdose und schließen sie den Stecker an den Adap-tereingang (1) des Looky+ an. Sie hören dann zwei kurze Pieptöne und Sie sehen, dass die LED(2) aufleuchtet, wenn das Looky+ mit dem Laden beginnt.
Ladezeit: ± 5 Stunden (abhängig von der Kapazität der Batterie)
Gebrauchszeit: ± 2 Stunden (abhängig von der Kapazität der Bat-terie)
LED leuchtet kontinuierlich Die Batterien werden aufgeladen.LED blinkt Die Batterien sind vollständig auf-
geladen.LED blinkt und ein zweitöniger Signalton ist zu hören
Das Looky+ enthält defekte oder nicht aufladbare Batterien.
Achtung: Der Ladevorgang wird unterbrochen, wenn Sie das Looky+ einschalten!
DE
1
2
25
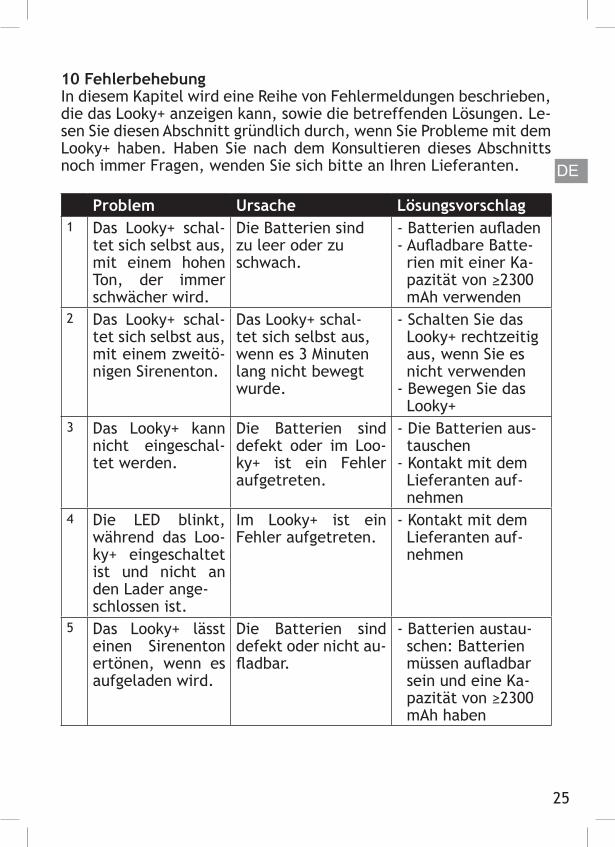
10 FehlerbehebungIn diesem Kapitel wird eine Reihe von Fehlermeldungen beschrieben, die das Looky+ anzeigen kann, sowie die betreffenden Lösungen. Le-sen Sie diesen Abschnitt gründlich durch, wenn Sie Probleme mit dem Looky+ haben. Haben Sie nach dem Konsultieren dieses Abschnitts noch immer Fragen, wenden Sie sich bitte an Ihren Lieferanten.
Problem Ursache Lösungsvorschlag1 Das Looky+ schal-
tet sich selbst aus, mit einem hohen Ton, der immer schwächer wird.
Die Batterien sind zu leer oder zu schwach.
- Batterien aufladen- Aufladbare Batte- rien mit einer Ka- pazität von ≥2300 mAh verwenden
2 Das Looky+ schal-tet sich selbst aus, mit einem zweitö-nigen Sirenenton.
Das Looky+ schal-tet sich selbst aus, wenn es 3 Minuten lang nicht bewegt wurde.
- Schalten Sie das Looky+ rechtzeitig aus, wenn Sie es nicht verwenden- Bewegen Sie das Looky+
3 Das Looky+ kann nicht eingeschal-tet werden.
Die Batterien sind defekt oder im Loo-ky+ ist ein Fehler aufgetreten.
- Die Batterien aus- tauschen- Kontakt mit dem Lieferanten auf- nehmen
4 Die LED blinkt, während das Loo-ky+ eingeschaltet ist und nicht an den Lader ange-schlossen ist.
Im Looky+ ist ein Fehler aufgetreten.
- Kontakt mit dem Lieferanten auf- nehmen
5 Das Looky+ lässt einen Sirenenton ertönen, wenn es aufgeladen wird.
Die Batterien sind defekt oder nicht au-fladbar.
- Batterien austau- schen: Batterien müssen aufladbar sein und eine Ka- pazität von ≥2300 mAh haben
DE
26
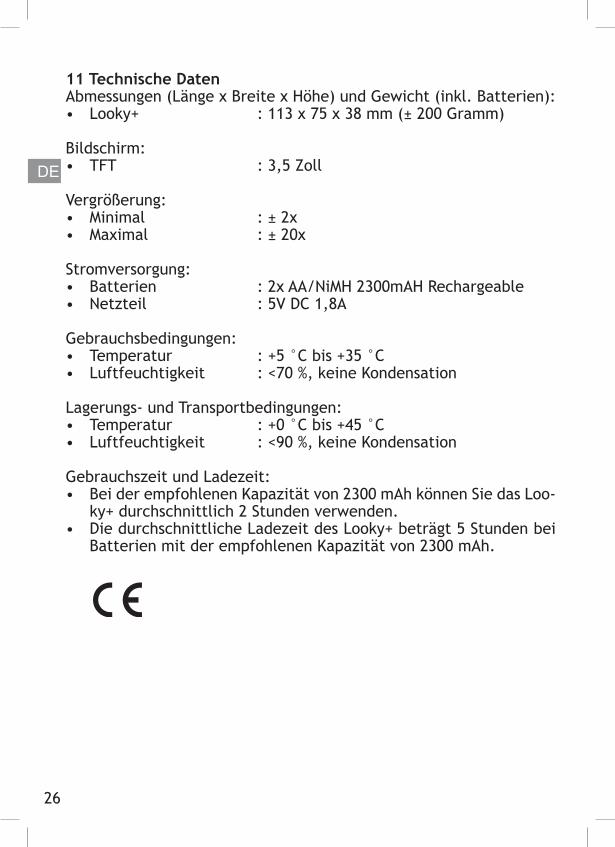
11 Technische DatenAbmessungen (Länge x Breite x Höhe) und Gewicht (inkl. Batterien):• Looky+ : 113 x 75 x 38 mm (± 200 Gramm)
Bildschirm:• TFT : 3,5 Zoll
Vergrößerung:• Minimal : ± 2x• Maximal : ± 20x
Stromversorgung:• Batterien : 2x AA/NiMH 2300mAH Rechargeable• Netzteil : 5V DC 1,8A
Gebrauchsbedingungen:• Temperatur : +5 °C bis +35 °C• Luftfeuchtigkeit : <70 %, keine Kondensation
Lagerungs- und Transportbedingungen:• Temperatur : +0 °C bis +45 °C• Luftfeuchtigkeit : <90 %, keine Kondensation
Gebrauchszeit und Ladezeit:• Bei der empfohlenen Kapazität von 2300 mAh können Sie das Loo-
ky+ durchschnittlich 2 Stunden verwenden.• Die durchschnittliche Ladezeit des Looky+ beträgt 5 Stunden bei
Batterien mit der empfohlenen Kapazität von 2300 mAh.
DE

27
12 Entsorgen
Das Symbol “Mülltonne mit Kreuz” bedeutet dass dieses Produkt (indl. Batterien) nicht mit dem Hausmüll ents- orgt werden darf. Bitte wenden Sie sich an die öffentli- chen örtlichen Entsorgungsbetriebe.
13 GarantiebestimmungenFür dieses Gerät gelten die allgemeinen Garantiebestimmungen Ihres Lieferanten. Nehmen Sie Kontakt mit Ihrem Lieferanten auf, wenn Sie weitere Informationen dazu wünschen.
14 Kontaktinformationen des Lieferanten
DE

28
29
NL
Inhoudsopgave
1 Introductie..........................................................................30
2 Algemene beschrijving Looky+ .............................................30
3 Bedoeld gebruik ..................................................................30
4 Onderhoudsvoorschriften.....................................................31 4.1 Onderhoud batterijen......................................................31
5 Installatie - batterijen..........................................................32
6 Handgreep...........................................................................32
7 Bedieningsinstructies...........................................................32 7.1 In- en uitschakelen van de Looky+ ....................................32 7.2 Digitaal vergroten............................................................33 7.3 Leesstanden selecteren....................................................33 7.4 Beeld bevriezen...............................................................34 7.5 Geavanceerde instellingen................................................34 7.5.1 Geavanceerde instellingen - X knop..............................34 7.5.2 Geavanceerde instellingen - Z knop..............................35
8 Geheugen van de Looky+......................................................35
9 Laadinstructies....................................................................36
10 Probleem oplossing..............................................................37
11 Specificaties........................................................................38
12 Recyclen..............................................................................39
13 Garantie bepalingen.............................................................39
14 Contact informatie leverancier.............................................39
30
NL
1 IntroductieGefeliciteerd met uw Looky+! In deze handleiding vindt u een uitge-breide beschrijving van de functionaliteiten van de Looky+. Indien u nog vragen heeft na het lezen van deze handleiding, neem gerust contact op met uw leverancier (zie achterzijde voor contact infor-matie).
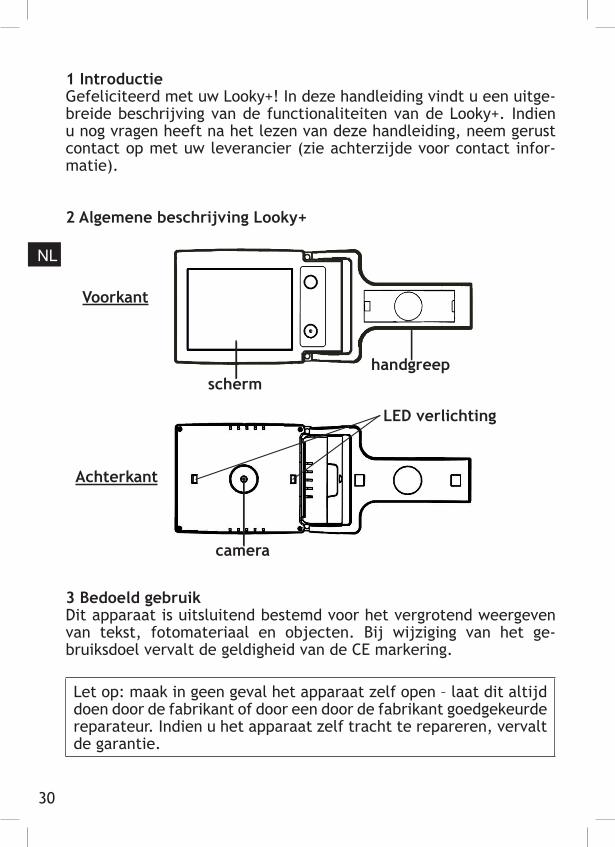
2 Algemene beschrijving Looky+
3 Bedoeld gebruikDit apparaat is uitsluitend bestemd voor het vergrotend weergeven van tekst, fotomateriaal en objecten. Bij wijziging van het ge-bruiksdoel vervalt de geldigheid van de CE markering.
Let op: maak in geen geval het apparaat zelf open – laat dit altijd doen door de fabrikant of door een door de fabrikant goedgekeurde reparateur. Indien u het apparaat zelf tracht te repareren, vervalt de garantie.
Achterkant
Voorkant
LED verlichting
camera
handgreepscherm

31
NL
4 Onderhoudsvoorschriften
• Gebruik alleen door de fabrikant bijgeleverde of goedgekeurde accessoires.
4.1 Onderhoud batterijen• Verwijder de batterijen uit de Looky+ indien u deze voor langere
tijd niet gebruikt. Dit bevordert de levensduur van de batterijen.• Batterijen zijn gevoelig voor overladen. Het is aanbevolen om
batterijen pas op te laden als ze volledig leeg zijn.• Oplaadbare NiMh batterijen hebben een zelfontlading die sterk
afhankelijk is van de omgevingstemperatuur.• Nieuwe NiMh batterijen moeten enkele keren opgeladen worden
voordat ze hun nominale capaciteit bereiken.• Laad NiMh batterijen minimaal 1x per half jaar op.• De gemiddelde levensduur is 300 laadcyclussen, maar is afhan-
kelijk van het gebruik. De totale capaciteit zal langzaam afnemen na meerdere laadcyclussen.
• Laad batterijen op in een goed geventileerde omgeving.
32
NL
5 Installatie – batterijen1. Haal het batterijklepje van de Looky+ af door op het pijltje te
drukken en het klepje in de richting van de pijl te duwen.2. Plaats eerst de batterij die achterin het batterijcompartiment
geplaatst moet worden.3. Plaats hierna de tweede batterij.
Let op: laad de batterijen op voordat u de Looky+ in gebruik neemt! Zie de laadinstructies op pagina 36.
6 HandgreepDe Looky+ heeft een handgreep die bij levering ingeklapt is. U kunt de Looky+ met ingeklapte handgreep op de door u te lezen tekst leg-gen en direct beginnen met lezen. Als u de handgreep uitklapt kunt u de Looky+ gebruiken als een handloep. U heeft dan de mogelijkheid om voorwerpen of teksten te bekijken.
Het is ook mogelijk om de Looky+ als hulpmiddel te gebruiken tijdens het schrijven. Hierbij dient u de hangreep maximaal uit te klappen. Als u nu de handgreep vlak op de tafel houdt, zal het scherm onder een hoek komen te staan. De ruimte onder de Looky+ kan dan ge-bruikt worden om te schrijven.
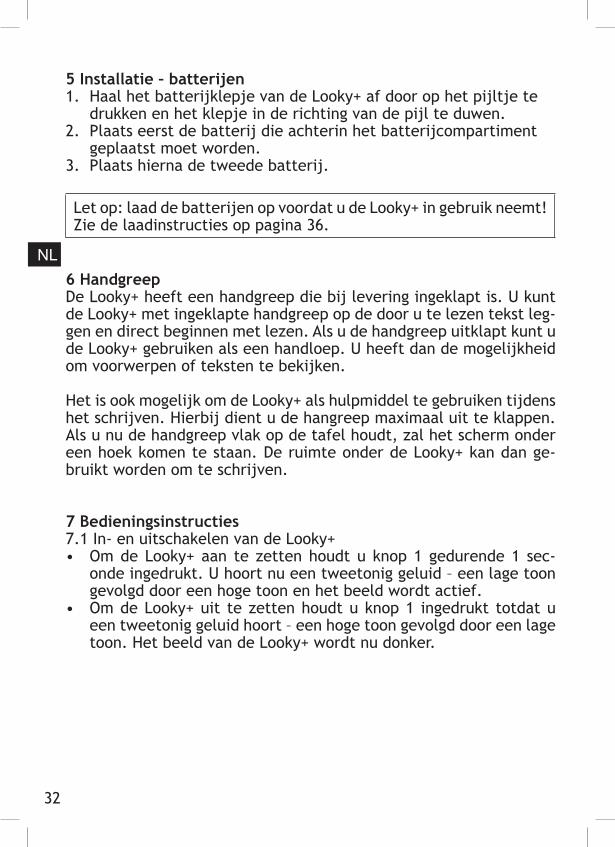
7 Bedieningsinstructies7.1 In- en uitschakelen van de Looky+• Om de Looky+ aan te zetten houdt u knop 1 gedurende 1 sec-
onde ingedrukt. U hoort nu een tweetonig geluid – een lage toon gevolgd door een hoge toon en het beeld wordt actief.
• Om de Looky+ uit te zetten houdt u knop 1 ingedrukt totdat u een tweetonig geluid hoort – een hoge toon gevolgd door een lage toon. Het beeld van de Looky+ wordt nu donker.

33
NL
7.2 Digitaal vergroten• Druk op de gele knop (knop 2) om het beeld op de Looky+ digitaal
te vergroten.• De Looky+ beschikt over 4 digitale vergrotingsstanden.• Als u op de gele knop (knop 2) drukt nadat u de grootste vergrot-
ing heeft geselecteerd, komt u weer op de kleinste vergroting terug.
7.3 Leesstanden selecteren• Druk op de blauwe knop (knop 3) om verschillende leesstanden te
selecteren.• Door meerdere keren op de blauwe knop (knop 3) te drukken
komt u de volgende leesstanden tegen: Fotostand met verlichting – wit/zwart – zwart/wit - geel/blauw – geel/zwart.
• Houd de blauwe knop (knop 3) langdurig ingedrukt om naar de fo-tostand te schakelen zonder verlichting. Als u hierna kortstondig op de blauwe knop (knop 3) drukt, schakelt u weer terug naar de stand die u daarvoor gebruikte – de verlichting zal weer aangaan.
1
2
3

34
NL
7.4 Beeld bevriezen• Door knop 1 kortstondig in te drukken kunt u het beeld stopzetten
(bevriezen). U neemt als het ware een foto.• Druk nogmaals kortstondig op knop 1 om terug te keren naar de
werkelijke weergave.• Als het beeld bevroren is kunt u nog steeds wisselen tussen de
verschillende leesstanden door op de blauwe knop (knop 3) te drukken. Ook kunt u het bevroren beeld digitaal vergroten door op de gele knop (knop 2) te drukken.
Let op: als het beeld bevroren is, wordt de LED verlichting uitgezet om energie te besparen.
7.5 Geavanceerde instellingenDe Looky+ heeft 2 verborgen knoppen waarmee de geavanceerde instellingen van het apparaat bediend kunnen worden. Deze knop-pen, genaamd X en Z, kunt u vinden in het batterij compartiment (verwijder eerst de batterijen uit de Looky+). Zorg dat de Looky+ is aangesloten op de adapter en is ingeschakeld om gebruik te maken van deze opties.
7.5.1 Geavanceerde instellingen – X knopMet de X knop kunt u de geluid meldingen van de Looky+ aan of uit zetten. Als u bij het indrukken van de knop een geluid hoort dat in toonhoogte afneemt, dan zijn de geluid meldingen van de Looky+ uitgezet. Als u bij het indrukken van de knop een geluid hoort dat in toonhoogte toeneemt, dan zijn de geluid meldingen van de Looky+ aangezet.
Let op: indien het geluid uitgezet is, zal er toch een alarm gegeven worden als er bij het opladen van de batterijen een fout optreedt. Dit is dan ook het enige geluid dat de Looky+ nog kan geven!

35
NL
7.5.2 Geavanceerde instellingen – Z knopMet de Z knop kunt u de helderheid van het scherm aanpassen. Door het indrukken van de Z knop verlaagt u de helderheid met 20%, u hoort dan ook een geluid dat in toonhoogte afneemt. De laagste ver-lichting sterkte is 20%, indien u nog een keer de Z knop indrukt zal de helderheid weer terug naar 100% gaan, u hoort dan een geluid dat in toonhoogte toeneemt. Er zijn in totaal 5 helderheid standen mogelijk: 100% - 80% - 60% - 40% - 20%.
8 Geheugen van de Looky+De Looky+ onthoudt een aantal gebruiksinstellingen als hij uit en aangezet wordt:• De laatst gebruikte leesstand (m.u.v. de foto stand zonder ver-
lichting – in plaats hiervan zal de Looky+ opstarten in de laatst gebruikte leesstand vóór de foto stand zonder verlichting).
• Of het geluid AAN of UIT geschakeld staat.• De ingestelde helderheid van het scherm.
36
NL
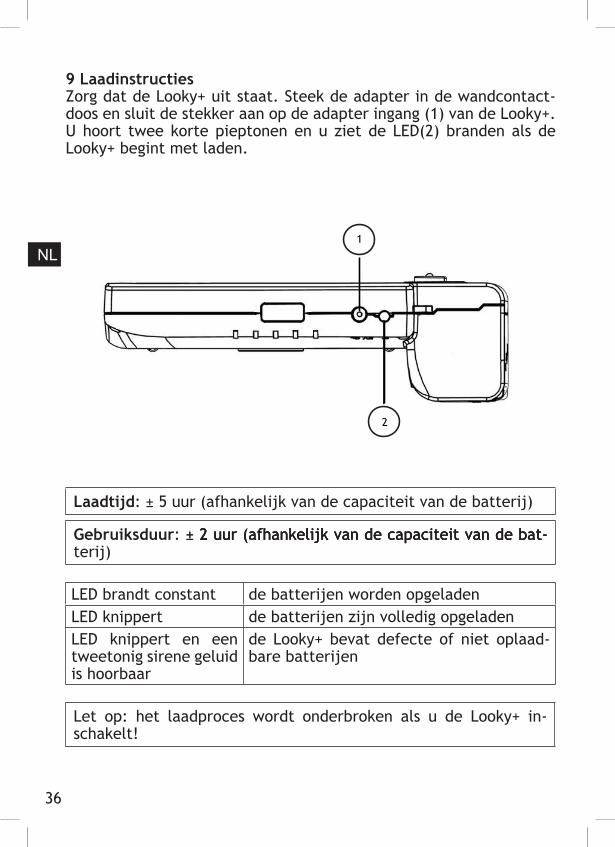
9 LaadinstructiesZorg dat de Looky+ uit staat. Steek de adapter in de wandcontact-doos en sluit de stekker aan op de adapter ingang (1) van de Looky+. U hoort twee korte pieptonen en u ziet de LED(2) branden als de Looky+ begint met laden.
Laadtijd: ± 5 uur (afhankelijk van de capaciteit van de batterij)
Gebruiksduur: ± 2 uur (afhankelijk van de capaciteit van de bat-± 2 uur (afhankelijk van de capaciteit van de bat-2 uur (afhankelijk van de capaciteit van de bat-terij)
LED brandt constant de batterijen worden opgeladenLED knippert de batterijen zijn volledig opgeladenLED knippert en een tweetonig sirene geluid is hoorbaar
de Looky+ bevat defecte of niet oplaad-bare batterijen
Let op: het laadproces wordt onderbroken als u de Looky+ in-schakelt!
1
2
37
NL
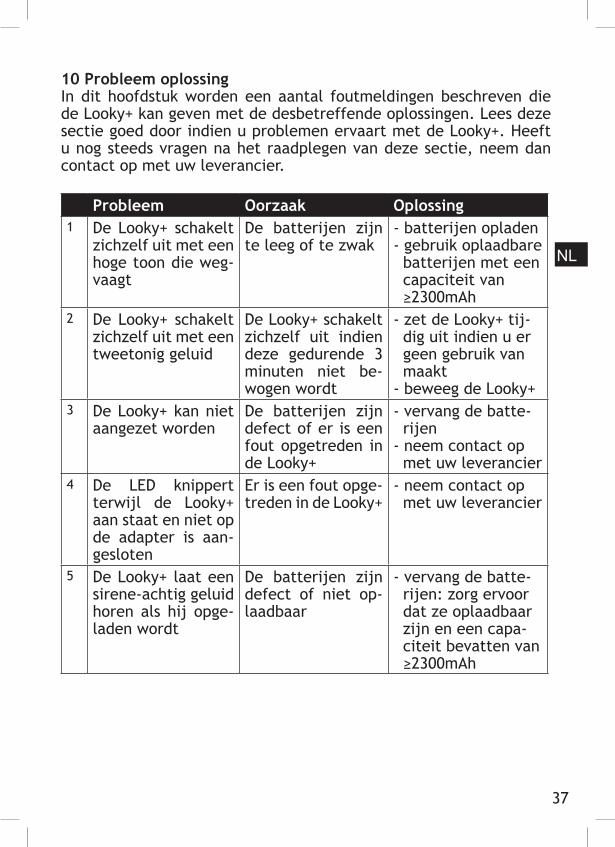
10 Probleem oplossingIn dit hoofdstuk worden een aantal foutmeldingen beschreven die de Looky+ kan geven met de desbetreffende oplossingen. Lees deze sectie goed door indien u problemen ervaart met de Looky+. Heeft u nog steeds vragen na het raadplegen van deze sectie, neem dan contact op met uw leverancier.
Probleem Oorzaak Oplossing1 De Looky+ schakelt
zichzelf uit met een hoge toon die weg-vaagt
De batterijen zijn te leeg of te zwak
- batterijen opladen- gebruik oplaadbare batterijen met een capaciteit van ≥2300mAh
2 De Looky+ schakelt zichzelf uit met een tweetonig geluid
De Looky+ schakelt zichzelf uit indien deze gedurende 3 minuten niet be-wogen wordt
- zet de Looky+ tij- dig uit indien u er geen gebruik van maakt- beweeg de Looky+
3 De Looky+ kan niet aangezet worden
De batterijen zijn defect of er is een fout opgetreden in de Looky+
- vervang de batte- rijen- neem contact op met uw leverancier
4 De LED knippert terwijl de Looky+ aan staat en niet op de adapter is aan-gesloten
Er is een fout opge-treden in de Looky+
- neem contact op met uw leverancier
5 De Looky+ laat een sirene-achtig geluid horen als hij opge-laden wordt
De batterijen zijn defect of niet op-laadbaar
- vervang de batte- rijen: zorg ervoor dat ze oplaadbaar zijn en een capa- citeit bevatten van ≥2300mAh

38
NL
11 SpecificatiesAfmetingen (lengte x breedte x hoogte) en gewicht (incl. batterijen):• Looky+ : 113 x 75 x 38 mm (± 200 gram)
Scherm:• TFT : 3,5 inch
Vergroting:• Minimaal : ± 2x• Maximaal : ± 20x
Voeding:• Batterijen : 2x AA/ NiMH 2300mAH Oplaadbaar• Adapter : 5V DC 1,8A
Gebruiksomstandigheden:• Temperatuur : +5°C tot +35°C• Luchtvochtigheid : <70%, geen condensatie
Opslag en transport omstandigheden:• Temperatuur : +0°C tot +45°C• Luchtvochtigheid : <90%, geen condensatie
Gebruiksduur en laadtijd:• U kunt de Looky+ gemiddeld 2 uur gebruiken bij de aanbevolen
capaciteit van 2300 mAh.• De gemiddelde laadtijd van de Looky+ bedraagt 5 uur bij batte-
rijen met de aanbevolen capaciteit van 2300 mAh.

39
NL
12 Recyclen Dit symbool geeft aan dat het product (incl. batterijen) niet via het huishoudelijke afval mag worden afgevoerd. Voor meer informatie over de afvoer van uw oude apparatuur neemt u contact op met de plaatselijke autoriteiten.
13 Garantie bepalingenDit apparaat valt onder de algemene garantie bepalingen van uw leverancier. Voor meer informatie hierover, neem contact op met uw leverancier.
14 Contact informatie leverancier

40

41
Sommaire
1 Introduction........................................................................42
2 Description générale du Looky+...........................................42
3 Utilisation visée...................................................................42
4 Prescriptions d’entretien.....................................................43 4.1 Entretien des piles...........................................................43
5 Mise en place des piles..........................................................44
6 Poignée...............................................................................44
7 Instructions d’utilisation......................................................44 7.1 Mise en route et arrêt du Looky+.........................................44 7.2 Agrandissement numérique..............................................45 7.3 Choisir parmi les apparences de lecture...............................45 7.4 Geler l’image..................................................................46 7.5 Réglages avancés.............................................................46 7.5.1 Réglages avancés - Bouton X........................................46 7.5.2 Réglages avancés - Bouton Z........................................47
8 Mémoire du Looky+.............................................................47
9 Instructions de charge.........................................................48
10 Résolution des problémes....................................................49
11 Caractéristiques..................................................................50
12 Mise au rebut.......................................................................51
13 Clauses de garantie..............................................................51
14 Coordonnées du fournisseur................................................51
FR

42
1 IntroductionNous vous remercions pour votre achat d’un Looky+ ! Vous trouvez dans ce manuel une description détaillée des fonctionnalités du Looky+. Si après sa lecture, vous aviez encore des questions, nous vous invitons à prendre contact avec votre fournisseur (voir coordon-nées au dos).
2 Description générale du Looky+
3 Utilisation viséeCet appareil est uniquement destiné à l’agrandissement de textes, de matériel photographique et d’objets. Toute modification du do-maine d’utilisation visé entraînerait la nullité du marquage CE.
Attention : N’ouvrez jamais l’appareil vous-même ; faites le toujo-urs faire par le fabricant ou par un réparateur agréé par ce dern-ier. Le fait d’essayer de réparer l’appareil vous-même entraîne l’annulation de la garantie.
FR
Arriére
Avant
Éclairage par LED
caméra
poignéeécran

43
4 Prescriptions d’entretien
• N’utilisez que des accessoires livrés ou agréés par le fabricant.
4.1 Entretien des piles• Ôtez les piles du Looky+ si vous ne l’utilisez pas durant une péri-
ode prolongée. Ceci préserve la durée de vie des piles.• Ces dernières sont très sensibles à la surcharge. Il est recomman-
dé de ne recharger les piles que lorsqu’elles sont complètement déchargées.
• Les piles rechargeables au NiMh (Nickel-Métal hybride) présen-tent une décharge spontanée, fortement dépendante de la tem-pérature ambiante.
• Les nouvelles piles NiMh doivent être rechargées à plusieurs re-prises avant d’atteindre leur capacité nominale.
• Rechargez les piles NiMh au moins 1 fois par semestre.• Leur durée de vie moyenne est habituellement de 300 cycles de
charge mais dépend de l’utilisation. La capacité totale diminue progressivement après plusieurs cycles de charge.
• Rechargez les piles dans un environnement bien ventilé.
FR
44
5 Mise en place des piles1. Ôtez le couvercle du compartiment piles du Looky+, en appuyant
sur la flèche et en faisant glisser le couvercle dans le sens de la flèche.
2. Insérez d’abord la pile devant aller dans le fond du comparti-ment.
3. Placez ensuite la deuxième pile.
Attention : Rechargez les piles avant d’utiliser le Looky+! Voir in-structions de charge en page 48.
6 PoignéeLe Looky+ possède une pognée, en position escamotée lors de la livraison. Vous pouvez placer le Looky+, poignée escamotée, sur le texte à lire et commencer votre lecture. En dépliant la poignée, vous pouvez vous servir du Looky+ comme d’une loupe. Vous avez alors la possibilité d’examiner des objets ou des textes.
Vous pouvez aussi utiliser le Looky+ comme d’une aide pour écrire. Vous devez alors déplier la poignée au maximum. En plaçant cette dernière à plat sur la table, l’écran fait alors un angle. L’espace sous le Looky+ peut alors être utilisé pour écrire.
7 Instructions d’utilisation7.1 Mise en route et arrêt du Looky+• Pour mettre en route le Looky+, maintenez le bouton 1 enfoncé
pendant 1 seconde. Vous entendez à présent un son à deux tons, un ton grave suivi d’un ton aigu, et ensuite l’écran s’allume.
• Pour éteindre le Looky+ maintenez le bouton 1 enfoncé jusqu’à ce que vous entendiez à nouveau un son à deux tons, un ton aigu suivi d’un ton grave. L’écran du Looky+ s’éteint à présent.
FR

45
7.2 Agrandissement numérique• Appuyez sur le bouton jaune (bouton 2) pour agrandir numérique-
ment l’image sur le Looky+.• Le Looky+ dispose 4 facteurs d’agrandissement.• Lorsque vous appuyez sur le bouton jaune (bouton 2) après que
vous ayez sélectionné l’agrandissement le plus élevé, vous reve-nez sur le plus petit.
7.3 Choisir parmi les apparences de lecture• Appuyez sur le bouton bleu (bouton 3) pour sélectionner parmi
différentes apparences de lecture.• En appuyant plusieurs fois sur le bouton bleu (bouton 3) il vous
est proposé les apparences de lecture suivantes : Apparence photo avec éclairage – Blanc/Noir – Noir/Blanc – Jaune/Bleu – Jaune/Noir.
• Maintenez le bouton bleu (bouton 3) enfoncé pour mettre l’appareil en apparence photo sans éclairage. Si vous appuyez ensuite brièvement sur le bouton bleu (bouton 3), vous revenez à l’apparence utilisée précédemment ; l’éclairage se rallume.
FR
1
2
3

46
7.4 Geler l’image• En appuyant brièvement sur le bouton 1, vous arrêtez l’image
(vous la « gelez »). C’est comme si vous la geliez.• Appuyez à nouveau brièvement sur le bouton 1 pour revenir à
l’affichage normal.• Lorsque l’image est gelée il est toujours possible de passer d’une
apparence de lecture à l’autre, en appuyant sur le bouton bleu (bouton 3). Vous pouvez également agrandir l’image gelée, en appuyant sur le bouton jaune (bouton 2).
Attention : Lorsque l’image est gelée, l’éclairage par LED s’éteint, afin d’économiser l’énergie.
7.5 Réglages avancésLe Looky+ dispose de 2 boutons cachés, permettant d’utiliser les réglages avancés de l’appareil. Ces boutons, baptisés X et Z, se trou-vent dans le compartiment des piles (ôtez d’abord ces dernières du Looky+). Veillez à ce que le Looky+ soit raccordé à l’adaptateur et mis en marche, pour pouvoir utiliser ces options.
7.5.1 Réglages avancés – Bouton XLe bouton X vous permet d’activer ou de désactiver les messages sonores du Looky+. Si, lorsque vous appuyez sur le bouton, vous en-tendez un bruit dont la tonalité diminue, les messages sonores du Looky+ sont alors désactivés. Si, lorsque vous appuyez sur le bouton, vous entendez un bruit dont la tonalité augmente, les messages so-nores du Looky+ sont alors activés.
Attention : une fois le son désactivé, il y aura toujours une alarme lorsque, durant la charge des piles, il apparaît un défaut. C’est alors le seul son que le Looky+ puisse encore émettre!
FR

47
7.5.2 Réglages avancés – Bouton ZLe bouton Z vous permet d’ajuster la luminosité de l’écran. En ap-puyant sur le bouton Z, la luminosité baisse de 20 % et vous entendez un bruit dont la tonalité décroit. La luminosité la plus faible est de 20 % ; si vous appuyez à nouveau sur le bouton Z, la luminosité re-vient à 100 % et vous entendez un bruit dont la tonalité augmente.Il y a au total 5 niveaux de luminosité : 100% - 80% - 60% - 40% - 20%.
8 Mémoire du Looky+Le Looky+ retient un certain nombre de réglages lorsqu’il est éteint et rallumé:• La dernière apparence de lecture (à l’exception de l’apparence
photo sans éclairage ; au lieu de cela, le Looky+ démarrera avec l’apparence de lecture utilisée avant celle de la photo sans éclairage).
• L’état ACTIVÉ ou DÉSACTIVÉ des messages sonores.• La luminosité de l’écran sélectionnée.
FR

48
9 Instructions de chargeVeillez à ce que le Looky+ soit éteint. Branchez l’adaptateur sur une prise murale et enfoncez la fiche sur l’entrée adaptateur (1) du Looky+. Vous entendez deux bips et vous voyez la LED (2) s’allumer lorsque le Looky+ se met en charge.
Temps de charge: ± 5 heures (selon la capacité des piles)
Durée d’utilisation: ± 2 heures (selon la capacité des piles)
Allumage LED fixe Les piles sont en chargeAllumage LED clignotant Les piles sont complètement chargéesLa LED clignote et l’on entend une alarme à deux tons
Les piles du Looky+ sont défectueuses ou du type non rechargeable.
Attention : le processus de chargement est interrompu lorsque vous allumez le Looky+!
FR
1
2

49
10 Résolution des problèmesCe paragraphe décrit un certain nombre d’alarmes de défaut suscep-tibles d’apparaître sur le Looky+, avec les solutions correspondantes. Lisez soigneusement cette partie si vous rencontrez des problèmes avec votre Looky+. Si après cette lecture vous vous posez toujours des questions, prenez alors contact avec votre fournisseur.
Probléme Raison Solution1 Le Looky+ s’éteint
tout seul en émet-tant un bruit aigu al-lant en s’atténuant
Les piles sont déchargées ou trop faibles
- rechargez les piles- utilisez des piles ca pacité égale ou supé- rieure à 2300 mAh rechargeables, d’une capacité égale ou su- périeure à 2 300 mAh
2 Le Looky+ s’éteint tout seul en émet-tant un son à deux tons.
Le Looky+ s’éteint tout seul lorsqu’il n’est pas mani-pulé pendant 3 minutes consécu-tives.
- arrêtez le Looky+ à temps lorsque vous ne l’utilisez plus- remuez le Looky+
3 Le Looky+ ne peut être allumé
Les piles sont défectueuses ou le Looky+ est en panne
- remplacez les piles- contactez votre four- nisseur
4 La LED clignote lorsque le Looky+ est allumé et non branché sur l’adaptateur.
Une erreur inter-ne est survenue dans le Looky+.
- contactez votre four- nisseur
5 Le Looky+ fait entendre un bruit de siène d’alarme lorsqu’il est en charge.
Les piles sont dé-fectueuses ou non rechargeables.
- remplacez les piles: veillez à utiliser des piles rechargeables et que leur capacité soit égale ou supéri- eure à 2300 mAh
FR

50
11 CaractéristiquesDimensions (longueur x largeur x hauteur) et poids (piles incluses):• Looky+ : 113 x 75 x 38 mm (± 200 grammes)
Écran:• TFT : 3,5 pouces
Agrandissement:• Minimal : ± 2x• Maximal : ± 20x
Alimentation électrique:• Piles : 2x AA/NiMH 2300mAH Rechargeable• Adaptateur : 5V DC 1,8A
Conditions d’utilisation:• Température : +5°C à +35°C• Humidité de l’air : inférieure à 70 %, pas de condensation
Stockage et conditions de transport:• Température : +0°C à +45°C• Humidité de l’air : inférieure à 90 %, pas de condensation
Durée d’utilisation et temps de charge:• Vous pouvez utiliser en moyenne le Looky+ durant 2 heures, avec
la capacité recommandée de 2300 mAh.• Le temps de charge moyen du Looky+ est de 5 heures pour des
piles ayant la capacité recommandée de 2300 mAh.
FR

51
12 Mise au rebut
Ce symbole de la poubelle indique que le produit (piles incluses) ne doit pas être jeté avec les déchets ména- gers. Vérifiez les règlements locaux concernant élimina- tion appropriée des produits électroniques.
13 Clauses de garantieCet appareil est soumis aux clauses générales de garantie de votre fournisseur. Pour plus d’informations à ce sujet, prenez contact avec votre fournisseur.
14 Coordonnées du fournisseur FR

52

53
ES
Índice
1 Introducción........................................................................54
2 Descripción general de la Looky+..........................................54
3 Uso previsto........................................................................54
4 Disposiciones de mantenimiento..........................................55 4.1 Mantenimiento de las pilas................................................55
5 Instalación - pilas................................................................56
6 Mango..................................................................................56
7 Instrucciones de manejo......................................................56 7.1 Encendido y apagado de la Looky+......................................56 7.2 Ampliar digitalmente.......................................................57 7.3 Seleccionar posiciones de lectura.....................................57 7.4 Congelar imagen..............................................................58 7.5 Configuración avanzada...................................................58 7.5.1 Configuración avanzada –Botón X..................................58 7.5.2 Configuraciones avanzadas –Botón Z.............................59
8 Memoria de la Looky+..........................................................59
9 Instrucciones de carga.........................................................60
10 Resolución de problemas.....................................................61
11 Especificaciones..................................................................62
12 Eliminación..........................................................................63
13 Disposiciones de garantía.....................................................63
14 Información de contacto del proveedor................................63

54
ES
1 Introducción¡Le felicitamos por comprar la Looky+! En este manual encontrará una amplia descripción de las funciones de la Looky+. Si tiene más preguntas después de leer este manual, no dude en ponerse en con-tacto con su proveedor (véase la última página para la información de contacto).
2 Descripción general de la Looky+
3 Uso previstoEste aparato está destinado única y exclusivamente para ampliar textos, material fotográfico y objetos. Si se modifica el objetivo de uso se anulará la validez de la marca CE.
Atención: no abra nunca Ud. mismo el aparato, deje que lo haga siempre el fabricante o un reparador autorizado por el fabricante. Si Ud. mismo intenta reparar el aparato, la garantía caducará.
Parte trasera
Parte delantera
Luz LED
cámara
mangopantalla

55
ES
4 Disposiciones de mantenimiento
• Use solo los accesorios suministrados o autorizados por el fabri-cante.
4.1 Mantenimiento de las pilas• Saque las pilas de la Looky+ si no la va usar durante mucho tiem-
po, ya que esto ayudará a que las pilas duren más tiempo.• Las pilas son sensibles a la sobrecarga. Se recomienda cargar las
pilas solo cuando estén completamente vacías.• Las pilas NiMh recargables tienen una autodescarga que depende
en buena medida de la temperatura ambiente.• Las pilas NiMh nuevas se deberán cargar varias veces antes de que
lleguen a tener su capacidad nominal.• Cargue las pilas NiMh al menos una vez cada medio año.• La vida media útil es normalmente de 300 ciclos de carga, pero
depende del uso. La capacidad total se irá reduciendo lentamen-te después de que se hayan cargado muchas veces.
• Cargue las pilas en un entorno bien ventilado.

56
ES
5 Instalación - pilas1. Retire la tapa de las pilas de la Looky+ haciendo presión en la
flechita y empujando la tapa en la dirección de la flecha.2. Coloque primero la pila que hay que introducir al final del com-
partimento de pilas.3. Coloque a continuación la segunda pila.
Atención: ¡cargue las pilas antes de poner en funcionamiento la Looky+! Véanse las instrucciones de carga en la página 60.
6 MangoLa Looky+ tiene un mango que está plegado cuando se compra. Podrá colocar la Looky+ sobre el texto que quiere leer y empezar a leer directamente. Si despliega el mango, podrá utilizar la Looky+ como una lupa. Entonces tendrá la posibilidad de ver textos u objetos.
También se puede usar la Looky+ como ayuda cuando está escribie-ndo. En este caso, deberá desplegar al máximo el mango. Entonces, si mantiene el mango pegado a la mesa, la pantalla se situará en un cierto ángulo. El espacio que quedará debajo de la Looky+ se podrá utilizar para escribir.
7 Instrucciones de manejo7.1 Encendido y apagado de la Looky+• Para encender la Looky+, mantenga pulsado el botón 1 durante
un segundo. Entonces oirá un sonido de dos tonos –un tono bajo seguido de uno alto- y la pantalla se encenderá.
• Para apagar la Looky+, mantenga pulsado el botón 1 hasta que se oiga un sonido de dos tonos –un tono alto seguido de uno bajo-. Entonces se apagará la pantalla de la Looky+.

57
ES
7.2 Ampliar digitalmente• Pulse el botón amarillo (botón 2) para ampliar digitalmente la
pantalla de la Looky+.• La Looky+ dispone 4 siguientes ampliaciones digitales.• Si pulsa el botón amarillo (botón 2) después de seleccionar la
mayor ampliación, volverá a la ampliación más pequeña.
7.3 Seleccionar posiciones de lectura• Pulse el botón azul (botón 3) para seleccionar diversas posiciones
de lectura.• Pulsando varias veces el botón azul (botón 3), irá a parar a las
siguientes posiciones de lectura: Posición de foto con iluminación – Blanco/negro – Negro/blanco – Amarillo/azul – Amarillo/negro.
• Mantenga el botón azul (botón 3) apretado mucho tiempo para cambiar a la posición de foto sin iluminación. Si a continuación pulsa brevemente el botón azul (botón 3), volverá a la posición que utilizó anteriormente; la iluminación se volverá a activar.
1
2
3

58
7.4 Congelar imagen• Pulsando brevemente el botón 1, la imagen se detendrá (conge-
lará). Es como si hiciera una foto.• Vuelva a pulsar brevemente el botón 1 para volver a la reproduc-
ción real.• Cuando la imagen está congelada, siempre podrá cambiar entre
las distintas posiciones de lectura pulsando el botón azul (botón 3). También podrá ampliar digitalmente la imagen congelada pulsando el botón amarillo (botón 2).
Atención: si la imagen está congelada, se apagará la luz LED para ahorrar energía.
7.5 Configuración avanzadaLa Looky+ tiene 2 botones ocultos con los que podrá ajustar la con-figuración avanzada del aparato. Podrá encontrar estos botones, lla-mados X y Z, en el compartimento de pilas (tendrá que quitar pri-mero las pilas de la Looky+). Para poder hacer uso de estas opciones, la Looky+ tendrá que estar conectada al adaptador y encendida.
7.5.1 Configuración avanzada –Botón XCon el botón X podrá conectar o desconectar los mensajes acústicos de la Looky+. Si al pulsar el botón escucha un sonido que se va ha-ciendo más bajo, eso significará que se han desconectado los men-sajes acústicos de la Looky+. Si al pulsar el botón escucha un sonido que se va haciendo más alto, entonces se habrán conectado los men-sajes acústicos de la Looky+.
Atención: Aunque se haya desconectado el sonido, sonará una alar-ma si ocurre un error al cargar las pilas. ¡Éste será el único sonido que podrá emitir la Looky+!
ES
59
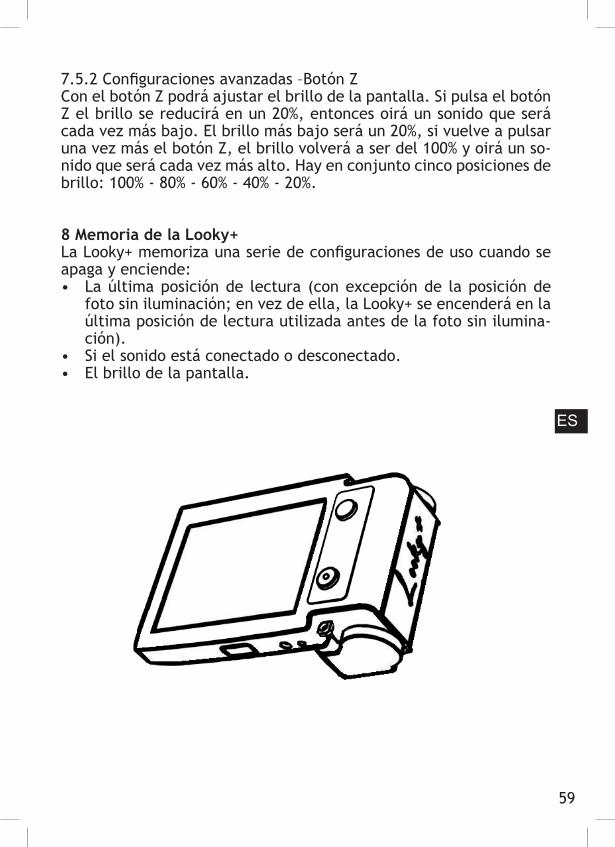
7.5.2 Configuraciones avanzadas –Botón ZCon el botón Z podrá ajustar el brillo de la pantalla. Si pulsa el botón Z el brillo se reducirá en un 20%, entonces oirá un sonido que será cada vez más bajo. El brillo más bajo será un 20%, si vuelve a pulsar una vez más el botón Z, el brillo volverá a ser del 100% y oirá un so-nido que será cada vez más alto. Hay en conjunto cinco posiciones de brillo: 100% - 80% - 60% - 40% - 20%.
8 Memoria de la Looky+La Looky+ memoriza una serie de configuraciones de uso cuando se apaga y enciende:• La última posición de lectura (con excepción de la posición de
foto sin iluminación; en vez de ella, la Looky+ se encenderá en la última posición de lectura utilizada antes de la foto sin ilumina-ción).
• Si el sonido está conectado o desconectado.• El brillo de la pantalla.
ES

60
9 Instrucciones de cargaAsegúrese de que la Looky+ está apagada. Introduzca el adaptador en la toma de corriente de la pared y conecte el enchufe en la en-trada del adaptador (1) de la Looky+. Oirá dos pitidos breves y verá que el LED (2) se enciende cuando la Looky+ empiece a cargar.
Tiempo de carga: ± 5 horas (dependiendo de la capacidad de la pila)
Duración de uso: ± 2 horas (dependiendo de la capacidad de la pila)
El LED está encendido constantemente
las pilas se están cargando
El LED parpadea las pilas están totalmente cargadasEl LED parpadea y se oye una sirena de dos sonidos
la Looky+ tiene pilas estropeadas o no recargables
Atención: ¡el proceso de carga se interrumpirá si se enciende la Looky+!
ES
1
2

61
10 Resolución de problemasEn este capítulo se describen una serie de mensajes de error que puede dar la Looky+ y sus soluciones correspondientes. Lea atenta-mente esta sección si tiene problemas con la Looky+. Si después de consultar esta sección sigue teniendo dudas, póngase en contacto con su proveedor.
Problema Causa Solución1 La Looky+ se apaga
sola con un sonido alto que se va des-vaneciendo
Las pilas están vacías o casi sin fuerza
- cargue las pilas- use pilas recargables con una capacidad de ≥2300mAh
2 La Looky+ se apaga sola con un sonido de dos tonos
La Looky+ se apaga sola si no se mueve durante 3 minutos
- apague temporal mente la Looky+ si no la está usando- mueva la Looky+
3 La Looky+ no se puede encender
Las pilas están estropeadas o ha ocurrido un error en la Looky+
- cambie las pilas- póngase en contacto con su proveedor
4 El LED parpadea mientras la Looky+ está encendida y no está conectada al cargador
Ha ocurrido un er-ror en la Looky+
- póngase en contacto con su proveedor
5 La Looky+ emite un sonido parecido a una sirena cuando se está cargando
Las pilas están estropeadas o no son recargables
- cambie las pilas: asegúrese de que sean recargables y ten- gan una capacidad de ≥2300mAh
ES

62
11 EspecificacionesMedidas (longitud x anchura x altura) y peso (incl. pilas):• Looky+ : 113 x 75 x 38 mm (± 200 gramos)
Pantalla:• TFT : 3,5 pulgadas
Aumento:• Mínimo : ± 2x• Máximo : ± 20x
Fuente de alimentación:• Baterìas : 2x AA/NiMH 2300mAH Rechargeable• Adaptador : 5V DC 1,8A
Condiciones de uso:• Temperatura : +5 °C a +35 °C• Humedad relativa : <70%, sin condensación
Condiciones de almacenamiento y transporte:• Temperatura : +0 °C a +45 °C• Humedad relativa : <90%, sin condensación
Duración de uso y tiempo de carga:• Podrá utilizar la Looky+ de media 2 horas a una capacidad reco-
mendada de 2300 mAh.• El tiempo de carga medio de la Looky+ es de 5 horas en pilas con
la capacidad recomendada de 2300 mAh.
ES
63
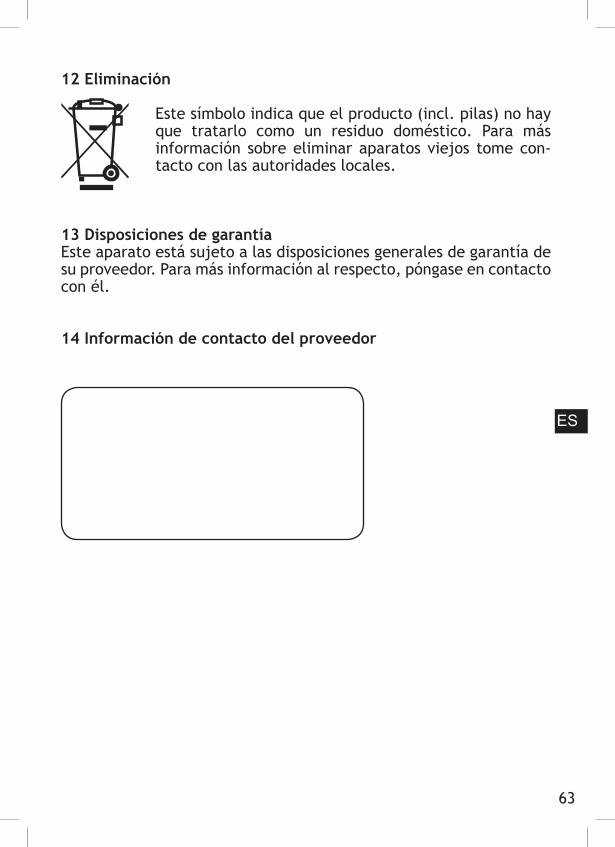
12 Eliminación
Este símbolo indica que el producto (incl. pilas) no hay que tratarlo como un residuo doméstico. Para más información sobre eliminar aparatos viejos tome con- tacto con las autoridades locales.
13 Disposiciones de garantíaEste aparato está sujeto a las disposiciones generales de garantía de su proveedor. Para más información al respecto, póngase en contacto con él.
14 Información de contacto del proveedor
ES

64

65
Sommario
1 Introduzione........................................................................66
2 Descrizione generale Looky+................................................66
3 Scopo d’uso.........................................................................66
4 Prescrizioni di manutenzione...............................................67 4.1 Manutenzione delle batterie..............................................67
5 Installazione - batterie.........................................................68
6 Impugnatura........................................................................68
7 Istruzioni di funzionamento.................................................68 7.1 Accensione e spegnimento del Looky+................................68 7.2 Ingrandimento digitale.....................................................69 7.3 Selezione delle opzioni di lettura........................................69 7.4 Fermo immagine.............................................................70 7.5 Impostazioni avanzate.....................................................70 7.5.1 Impostazioni avanzate – pulsante X..............................70 7.5.2 Impostazioni avanzate – pulsante Z...............................71
8 Memoria del Looky+.............................................................71
9 Istruzioni di carica...............................................................72
10 Risoluzione dei problemi......................................................73
11 Specifiche............................................................................74
12 Smaltimento........................................................................75
13 Condizioni di garanzia..........................................................75
14 Informazioni di contatto del rivenditore................................75
IT
66
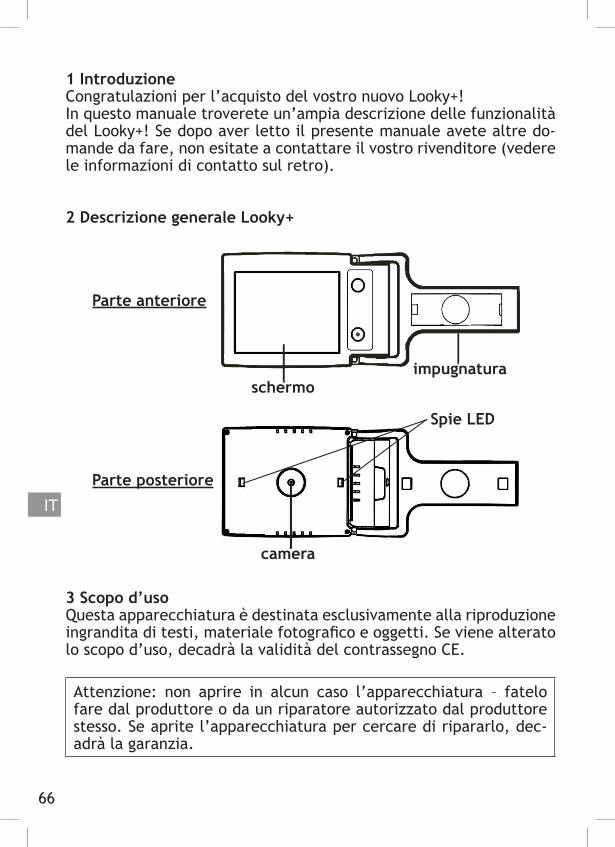
1 IntroduzioneCongratulazioni per l’acquisto del vostro nuovo Looky+!In questo manuale troverete un’ampia descrizione delle funzionalità del Looky+! Se dopo aver letto il presente manuale avete altre do-mande da fare, non esitate a contattare il vostro rivenditore (vedere le informazioni di contatto sul retro).
2 Descrizione generale Looky+
3 Scopo d’usoQuesta apparecchiatura è destinata esclusivamente alla riproduzione ingrandita di testi, materiale fotografico e oggetti. Se viene alterato lo scopo d’uso, decadrà la validità del contrassegno CE.
Attenzione: non aprire in alcun caso l’apparecchiatura – fatelo fare dal produttore o da un riparatore autorizzato dal produttore stesso. Se aprite l’apparecchiatura per cercare di ripararlo, dec-adrà la garanzia.
ITParte posteriore
Parte anteriore
Spie LED
camera
impugnaturaschermo

67
4 Prescrizioni di manutenzione
• Utilizzare solo accessori forniti o approvati dal produttore.
4.1. Manutenzione delle batterie• Rimuovere le batterie dal Looky+ se l’apparecchio non verrà uti-
lizzato per un lungo periodo. Questo aumenterà la durata delle batterie.
• Le batterie sono sensibili a situazioni di sovraccarica. Si consiglia di caricare le batterie solo se sono completamente scariche.
• Le batterie NiMh caricabili hanno un’autoscarica che dipende molto dalla temperatura ambiente.
• Le nuove batterie NiMh deve essere caricate più volte prima che raggiungano la loro capacità nominale.
• Caricate le batterie NiMh almeno 1 volta all’anno.• La durata media è di circa 300 cicli di carica, ma questo dipen-
derà dall’uso. La capacità totale si ridurrà lentamente dopo più clici di carica.
• Caricate le batterie in un ambiente ben ventilato.
IT

68
5 Installazione - batterie1. Togliere il coperchietto delle batterie del Looky+ premendo la
freccetta e spingendo il coperchietto nella direzione della frec-cetta.
2. Inserire prima la batteria che va messa nella parte posteriore del vano batterie.
3. Inserire quindi la seconda batteria.
Attenzione: caricare le batterie prima di iniziare ad utilizzare il Looky+! Vedere le istruzioni di carica a pagina 72.
6 ImpugnaturaIl Looky+ ha un’impugnatura che al momento della consegna è in po-sizione chiusa. Potete mettere il Looky+ con l’impugnatura chiusa sul testo da leggere ed iniziare subito a leggerlo. Se aprite l’impugnatura potete utilizzare il Looky+ come lente manuale. Così facendo potete osservare oggetti o testi.
Il Looky+ può anche essere utilizzato come assistente alla scrittu-ra. Per fare ciò dovrete aprire al massimo l’impugnatura. Tenendo l’impugnatura piatta sul tavolo, lo schermo rimarrà inclinato. Quindi lo spazio sotto il Looky+ potrà essere utilizzato per la scrittura.
7 Istruzioni di funzionamento7.1 Accensione e spegnimento del Looky+• Per accendere il Looky+, tenere premuto il pulsante 1 per 1 se-
condo. Sentirete un suono a due tonalità – una tonalità bassa seguita da una tonalità alta, quindi l’immagine diventerà attiva.
• Per spegnere il Looky+ tenere premuto il pulsante 1 fino a quando si sentirà un suono a due tonalità – una tonalità alta seguita da una tonalità bassa. L’immagine del Looky+ adesso diventerà più scura.
IT

69
7.2 Ingrandimento digitale• Premere il pulsante giallo (pulsante 2) per ingrandire digitalmen-
te l’immagine sul Looky+.• Il Looky+ è dotato delle 4 seguenti possibilità d’ingrandimento
digitale.• Premendo il pulsante giallo (pulsante 2) dopo aver selezionato
l’ingrandimento più grande, ritornerete all’ingrandimento più piccolo.
7.3 Selezione delle opzioni di lettura• Premere il pulsante blu (pulsante 3) per selezionare le diverse
opzioni di lettura.• Premendo più volte il pulsante blu (pulsante 3) verranno selezio-
nate le seguenti opzioni di lettura: Opzione foto con illuminazi-one – Bianco/Nero – Nero/Bianco – Giallo/Blu – Giallo/Nero.
• Tenere premuto a lungo il pulsante blu (pulsante 3) per passare all’opzione foto senza illuminazione. Se in seguito premete bre-vemente il pulsante blu (pulsante 3), ritornerete nuovamente all’opzione utilizzata in precedenza – l’illuminazione si riaccen-derà.
IT1
2
3
70
7.4 Fermo immagine• Premendo brevemente il pulsante 1 potete effettuare un fermo
immagine. In pratica farete una foto.• Premere ancora una volta brevemente il pulsante 1 per ritornare
alla riproduzione normale.• Quando c’è un fermo immagine potete comunque alternare le
diverse opzioni di lettura premendo il pulsante blu (pulsante 3). Potete anche ingrandire il fermo immagine premendo il pulsante giallo (pulsante 2).
Attenzione: in presenza di un fermo immagine, la spia LED si speg-ne per risparmiare energia.
7.5 Impostazioni avanzateIl Looky+ ha 2 pulsanti nascosti con i quali si possono definire le im-postazioni avanzate dell’apparecchiatura. Questi pulsanti, chiamati X e Z, si trovano nel vano batterie (rimuovere prima le batterie dal Looky+). Accertarsi che il Looky+ sia collegato all’adattatore e sia acceso per utilizzare queste funzioni.
7.5.1 Impostazioni avanzate – pulsante XCon il pulsante X potete attivare o disattivare i messaggi sonori del Looky+. Se premendo il pulsante sentite un suono ad alta tonalità che va via via decrescendo, allora significa che i messaggi sonori del Looky+ sono disattivati. Se premendo il pulsante sentite un suono ad alta tonalità che va via via crescendo, allora significa che i messaggi sonori del Looky+ sono attivati.
Attenzione: quando il suono è disattivato, verrà comunque seg-nalato un allarme in caso di errore durante il caricamento delle batterie. Si tratta dell’unico suono che il Looky+ è ancora in grado di emettere!
IT

71
7.5.2 Impostazioni avanzate – pulsante ZCon il pulsante Z potete modificare la luminosità dello schermo. Pre-mendo il pulsante Z diminuite la luminosità del 20%, e in questo caso sentirete anche un suono ad alta tonalità che va via via decrescendo. Il livello di illuminazione più basso è il 20%, premendo ancora una volta il pulsante Z la luminosità ritornerà al 100%, e in questo caso sentirete un suono ad alta tonalità che va via via aumentando.Esistono in totale 5 livelli di luminosità 100% - 80% - 60% - 40% - 20%.
8 Memoria del Looky+Il Looky+ memorizza alcune impostazioni d’uso ogniqualvolta viene spento e acceso:• L’ultima opzione di lettura (esclusa l’opzione foto senza illumi-
nazione – in questo caso il Looky+ si avvierà con l’ultima opzione di lettura utilizzata prima dell’opzione foto senza illuminazione).
• Se il suono è ACCESO o SPENTO.• La luminosità impostata per lo schermo.
IT

72
9 Istruzioni di caricaAccertarsi che il Looky+ sia spento. Inserire l’adattatore nella presa di corrente e collegare la spina sull’ingresso dell’adattatore (1) del Looky+. Sentirete due brevi bip e vedrete accendersi il LED (2) non appena il Looky+ inizia a caricarsi.
Tempo di carica: ± 5 ore (a seconda della capacità della batteria)
Durata di utilizzo: ± 2 ore (a seconda della capacità della batteria)
LED sempre acceso le batterie vengono caricateLED lampeggiante le batterie sono completamente caricheLED lampeggiante con un suono di sirena a due tonalità
il Looky+ ha delle batterie difettose op-pure di tipo non caricabile
Attenzione: il processo di carica viene interrotto se il Looky+ viene spento!
IT
1
2
73
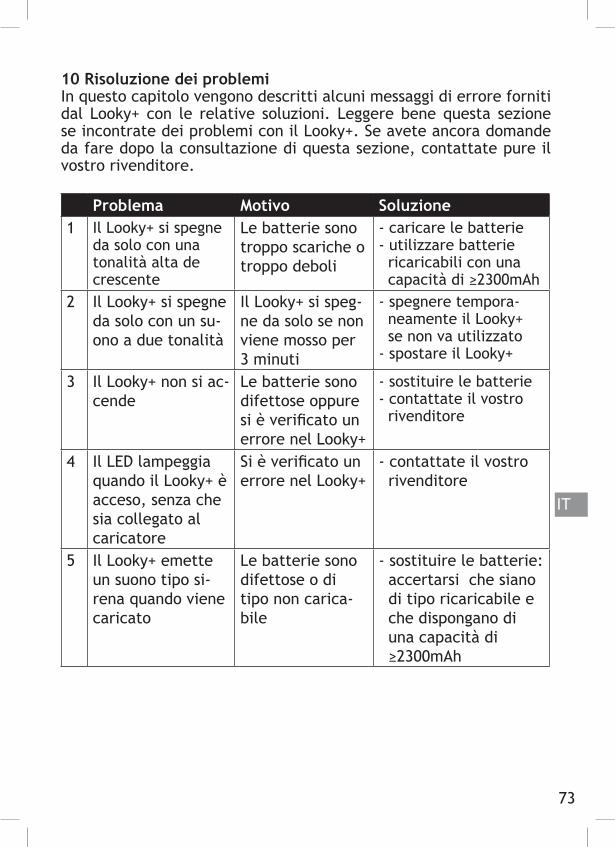
10 Risoluzione dei problemiIn questo capitolo vengono descritti alcuni messaggi di errore forniti dal Looky+ con le relative soluzioni. Leggere bene questa sezione se incontrate dei problemi con il Looky+. Se avete ancora domande da fare dopo la consultazione di questa sezione, contattate pure il vostro rivenditore.
Problema Motivo Soluzione1 Il Looky+ si spegne
da solo con unatonalità alta decrescente
Le batterie sonotroppo scariche otroppo deboli
- caricare le batterie- utilizzare batterie ricaricabili con una capacità di ≥2300mAh
2 Il Looky+ si spegneda solo con un su-ono a due tonalità
Il Looky+ si speg-ne da solo se nonviene mosso per3 minuti
- spegnere tempora- neamente il Looky+ se non va utilizzato- spostare il Looky+
3 Il Looky+ non si ac-cende
Le batterie sonodifettose oppuresi è verificato unerrore nel Looky+
- sostituire le batterie- contattate il vostro rivenditore
4 Il LED lampeggiaquando il Looky+ èacceso, senza chesia collegato alcaricatore
Si è verificato unerrore nel Looky+
- contattate il vostro rivenditore
5 Il Looky+ emetteun suono tipo si-rena quando vienecaricato
Le batterie sonodifettose o ditipo non carica-bile
- sostituire le batterie: accertarsi che siano di tipo ricaricabile e che dispongano di una capacità di ≥2300mAh
IT

74
11 SpecificheDimensioni (lunghezza x larghezza x altezza) e peso (batterie in-cluse):• Looky+ : 113 x 75 x 38 mm (± 200 grammi)
Schermo:• TFT : 3,5 pollici
Ingrandimento:• Minimo : ± 2x• Massimo : ± 20x
Alimentazione:• Batterie : 2x AA/NiMH 2300mAH Rechargeable• Adattatore : 5V DC 1,8A
Condizioni di utilizzo:• Temperatura : da +5 °C a +35 °C• Umidità dell’aria : <70%, senza condensa
Condizioni di conservazione e trasporto:• Temperatura : da +0°C a +45°C• Umidità dell’aria : <90%, senza condensa
Durata di utilizzo e tempo di carica:• Potete utilizzare il Looky+ per circa 2 ore alla capacità suggerità
di 2300 mAh.• Il tempo di carica medio del Looky+ è di 5 ore con batterie a ca-
pacità suggerita di 2300 mAh.
IT

75
12 Smaltimento
Il simbolo del bidone a ruote barrato indica che il pro- dotto (batterie incluse) non deve essere smaltito con i rifiuti domestici. Consulti regolamenti locali per il corretto smaltimento di prodotti elecrtonici.
13 Condizioni di garanziaQuesta apparecchiatura beneficia delle condizioni generali di garan-zia del vostro rivenditore. Per maggiori informazioni, contattate il vostro rivenditore.
14 Informazioni di contatto del rivenditore
IT

Manufactured by:Rehan Electronics Ltd.Aughrim Road,Carnew,Co-Wicklow, Ireland
www.lookyplus.com