Embed Size (px)
Citation preview

BEA Liquid Data for WebLogic Samples Tutorial: Part I A Guide to Developing Liquid Data Applications Using BEA WebLogic Workshop and WebLogic Platform 8.1
Note: This tutorial is based in large part on a guide originally developed for enterprises evaluating Liquid Data for their specific requirements.

Copyright
Copyright © 2005 BEA Systems, Inc. All Rights Reserved.
Restricted Rights Legend
This software and documentation is subject to and made available only pursuant to the terms of the BEA Systems License Agreement and may be used or copied only in accordance with the terms of that agreement. It is against the law to copy the software except as specifically allowed in the agreement. This document may not, in whole or in part, be copied, photocopied, reproduced, translated, or reduced to any electronic medium or machine readable form without prior consent, in writing, from BEA Systems, Inc.
Use, duplication or disclosure by the U.S. Government is subject to restrictions set forth in the BEA Systems License Agreement and in subparagraph (c)(1) of the Commercial Computer Software-Restricted Rights Clause at FAR 52.227-19; subparagraph (c)(1)(ii) of the Rights in Technical Data and Computer Software clause at DFARS 252.227-7013, subparagraph (d) of the Commercial Computer Software--Licensing clause at NASA FAR supplement 16-52.227-86; or their equivalent.
Information in this document is subject to change without notice and does not represent a commitment on the part of BEA Systems. THE SOFTWARE AND DOCUMENTATION ARE PROVIDED “AS IS” WITHOUT WARRANTY OF ANY KIND INCLUDING WITHOUT LIMITATION, ANY WARRANTY OF MERCHANTABILITY OR FITNESS FOR A PARTICULAR PURPOSE. FURTHER, BEA Systems DOES NOT WARRANT, GUARANTEE, OR MAKE ANY REPRESENTATIONS REGARDING THE USE, OR THE RESULTS OF THE USE, OF THE SOFTWARE OR WRITTEN MATERIAL IN TERMS OF CORRECTNESS, ACCURACY, RELIABILITY, OR OTHERWISE.
Trademarks or Service Marks
BEA, BEA JRockit, BEA Liquid Data for WebLogic, BEA WebLogic Server, Built on BEA, Jolt, JoltBeans, SteelThread, Top End, Tuxedo, and WebLogic are registered trademarks of BEA Systems, Inc. BEA AquaLogic, BEA AquaLogic Data Services Platform, BEA AquaLogic Enterprise Security, BEA AquaLogic Service Bus, BEA AquaLogic Service Registry, BEA Builder, BEA Campaign Manager for WebLogic, BEA eLink, BEA Manager, BEA MessageQ, BEA WebLogic Commerce Server, BEA WebLogic Enterprise, BEA WebLogic Enterprise Platform, BEA WebLogic Enterprise Security, BEA WebLogic Express, BEA WebLogic Integration, BEA WebLogic Java Adapter for Mainframe, BEA WebLogic JDriver, BEA WebLogic JRockit, BEA WebLogic Log Central, BEA WebLogic Personalization Server, BEA WebLogic Platform, BEA WebLogic Portal, BEA WebLogic Server Process Edition, BEA WebLogic WorkGroup Edition, BEA WebLogic Workshop, and Liquid Computing are trademarks of BEA Systems, Inc. BEA Mission Critical Support is a service mark of BEA Systems, Inc. All other company and product names may be the subject of intellectual property rights reserved by third parties.
All other trademarks are the property of their respective companies.
BEA Liquid Data for WebLogic: Samples Tutorial 2

BEA Liquid Data for WebLogic: Samples Tutorial 3

Contents
BEA LIQUID DATA FOR WEBLOGIC SAMPLES TUTORIAL: PART I .................. 1
A Guide to Developing Liquid Data Applications Using BEA WebLogic Workshop and WebLogic Platform 8.1 ................................................................................................................................................. 1
Lesson 1 Introducing the Liquid Data for WebLogic Environment .............................................. 12 Lab 1.1 Starting WebLogic Workshop .............................................................................................................12 Lab 1.2 Navigating the Liquid Data for WebLogic IDE Environment .............................................................14 Lab 1.3 Starting WebLogic Server ...................................................................................................................19 Lab 1.4 Stopping WebLogic Server..................................................................................................................20 Lab 1.5 Saving Your Work ...............................................................................................................................20
Lesson 2 Creating a Physical Data Service ....................................................................................... 22 Lab 2.1 Creating a Liquid Data Application .....................................................................................................22 Lab 2.2 Creating a Liquid Data Project ............................................................................................................25 Lab 2.3 Creating Project Sub-Folders...............................................................................................................26 Lab 2.4 Importing Relational Source Metadata ................................................................................................27 Lab 2.5 Building a Project ................................................................................................................................30 Lab 2.6 Viewing Physical Data Service Information........................................................................................31 Lab 2.7 Testing Physical Data Service Functions.............................................................................................36
Lesson 3 Creating a Logical Data Service ........................................................................................ 39 Lab 3.1 Creating a Simple Logical Data Service ..............................................................................................40 Lab 3.2 Defining the Logical Data Service Shape ............................................................................................41 Lab 3.3 Adding a Function to a Logical Data Service ......................................................................................44 Lab 3.4 Mapping Source and Target Elements .................................................................................................45 Lab 3.5 Viewing XQuery Source Code ............................................................................................................47 Lab 3.6 Testing a Logical Data Service Function.............................................................................................48
Lesson 4 Integrating Data from Multiple Data Services ................................................................. 51 Lab 4.1 Joining Multiple Physical Data Services within a Logical Data Service .............................................52
Lesson 5 Modeling Data Services ...................................................................................................... 63 Lab 5.1 Creating a Basic Model Diagram for Physical Data Services..............................................................64 Lab 5.2 Modeling Relationships Between Physical Data Sources....................................................................66
Lesson 6 Accessing Data in Web Services......................................................................................... 69 Lab 6.1 Importing a Web Service Project into the Application ........................................................................69 Lab 6.2 Importing Web Service Metadata into a Project ..................................................................................72
BEA Liquid Data for WebLogic: Samples Tutorial 4

Lab 6.3 Testing the Web Service via a SOAP Request.....................................................................................76 Lab 6.4 Invoking a Web Service in a Data Service ..........................................................................................77
Lesson 7 Consuming Data Services Using Java ............................................................................... 82 Lab 7.1 Running a Java Program Using the Untyped Mediator API ................................................................83 Lab 7.2 Running a Java Program Using the Typed Mediator API....................................................................88 Lab 7.3 Resetting the Mediator API .................................................................................................................91
Lesson 8 Consuming Data Services Using WebLogic Workshop Controls ................................... 92 Lab 8.1 Installing a Liquid Data Control ..........................................................................................................92 Lab 8.2 Defining the Liquid Data Control ........................................................................................................93 Lab 8.3 Inserting a Liquid Data Control into a Page Flow ...............................................................................95 Lab 8.4 Running the Web Application .............................................................................................................97
Lesson 9 Accessing Data Service Functions Through Web Services............................................ 102 Lab 9.1 Generating a Web Service from a Liquid Data Control.....................................................................102 Lab 9.2 Using a Liquid Data Control to Generate a WSDL for a Web Service..............................................104
Lesson 10 Updating Data Services Using Java................................................................................. 107 Lab 10.1 Modifying and Saving Changes to the Underlying Data Source .......................................................107 Lab 10.2 Inserting New Data to the Underlying Data Source Using Java ........................................................110 Lab 10.3 Deleting Data from the Underlying Data Source Using Java ............................................................112
Lesson 11 Filtering, Sorting, and Truncating XML Data ............................................................... 115 Lab 11.1 Filtering Data Service Results ...........................................................................................................115 Lab 11.2 Sorting Data Service Results .............................................................................................................118 Lab 11.3 Truncating Data Service Results........................................................................................................120
Lesson 12 Consuming Data Services through JDBC/SQL.............................................................. 121 Lab 12.1 Running DBVisualizer.......................................................................................................................122 Lab 12.2 Integrating Crystal Reports and Liquid Data for WebLogic..............................................................124 Lab 12.3 (Optional) Configuring JDBC Access through Crystal Reports ........................................................125
Lesson 13 Consuming Data via Streaming API ............................................................................... 127 Lab 13.1 Stream results into a flat file ..............................................................................................................127 Lab 13.2 Consume data in streaming fashion ...................................................................................................128
Lesson 14 Managing Data Service Metadata ................................................................................... 130 Lab 14.1 Defining Customized Metadata for a Logical Data Service ..............................................................131 Lab 14.2 Viewing Data Service Metadata via Liquid Data Console ................................................................133 Lab 14.3 Synching a Data Service with Underlying Data Source Tables.........................................................135
BEA Liquid Data for WebLogic: Samples Tutorial 5

Lesson 15 Managing Data Service Caching...................................................................................... 138 Lab 15.1 Determining the Non-Cache Query Execution Time.........................................................................139 Lab 15.2 Configuring a Caching Policy via Liquid Data Console....................................................................139 Lab 15.3 Testing the Caching Policy ................................................................................................................141 Lab 15.4 Determining Performance Impact of the Caching Policy ..................................................................141 Lab 15.5 Disable Caching.................................................................................................................................142
Lesson 16 Managing Data Service Security...................................................................................... 145 Lab 16.1 Creating New User Accounts.............................................................................................................146 Lab 16.2 Setting Application-Level Security....................................................................................................147 Lab 16.3 Granting User Access to Read Functions ..........................................................................................149 Lab 16.4 Granting User Access to Write Functions..........................................................................................152 Lab 16.5 Setting Element-Level Data Security.................................................................................................153 Lab 16.6 Testing Element-Level Security ........................................................................................................155
Lesson 17 (Optional) Consuming Data Services through Portals and Business Processes ........... 157 Lab 17.2 Installing a Liquid Data Control in a Portal Project...........................................................................157 Lab 17.3 Testing the Control and Retrieving Data ...........................................................................................160
BEA Liquid Data for WebLogic: Samples Tutorial 6

About This Document Welcome to the BEA Liquid Data for WebLogic Samples Tutorial. In this document, we provide step-by-step instructions that show how you can use Liquid Data to solve the types of data integration problems frequently faced by Information Technology (IT) managers and staff. These issues include:
What is the best way to normalize data drawn from widely divergent sources?
Having normalized the data, can you access it, ideally through a single point of access?
After you define a single point of access, can you develop reusable queries that are easily tested, stored, and retrieved?
After you develop your query set, can you easily incorporate results into widely available applications?
Other questions may occur. Is the data-rich solution scalable? Is it reusable throughout the enterprise? Are the original data sources largely transparent to the application — or do they become an issue each time you want to make a minor adjustments to queries or underlying data sources?
Document Organization
This guide is organized into 35 lessons that illustrate many aspects of Liquid Data functionality:
Data service development. In which you specify the query functions that Liquid Data will use to access, aggregate, and transform distributed, disparate data into a unified view. In this stage, you also specify the XML type that defines the data view that will be available to client-side applications.
Data modeling. In which you define a graphical representation of data resource relationships and functions.
Client-side development. In which you define an environment for retrieving data results.
Each lesson in the tutorial consists of an overview plus “labs” that demonstrate Liquid Data’s capabilities on a topic-by-topic basis. Each lab is structured as a series of procedural steps that details the specific actions needed to complete that part of the demonstration.
The lessons are divided into two parts:
Part 1: Core Training includes Lessons 1 through 16, which illustrate the Liquid Data capabilities that are most commonly used.
Part 2: Power-User Training includes Lessons 17 through 35; these illustrate Liquid Data's more advanced capabilities.
Note: The lessons build on each other and must be completed in sequential order.
BEA Liquid Data for WebLogic: Samples Tutorial 7
Technical Prerequisites
The lessons within this guide require a familiarity with the following topics: data integration and aggregation concepts, the BEA WebLogic® Platform™ (particularly WebLogic Server and WebLogic Workshop), Java, query concepts, and the environment in which you will install and use Liquid Data.
For some lessons, a background in XQuery is helpful.
System Requirements
To complete the lessons, your computer requires:
Server: BEA WebLogic Server
Application: BEA Liquid Data for WebLogic 2.0
Operating System: Windows 2000 or Windows XP
Memory: 512 MB RAM minimum; 1 GB RAM recommended
Browser: Internet Explorer 6 or higher
Data Sources Used Within These Lessons
The BEA Liquid Data for WebLogic Samples Tutorial builds data services that draw on a variety of underlying data sources. These data sources, which are provided with the product, are described in the following table:
Data Source Types and Sources Utilized by the Liquid Data Samples Tutorial
Data Source Type Data Source Data
Relational Customer Relationship Management (CRM) RTLCUSTOMER database
Customer and credit card data
Relational Order Management System (OMS) RTLAPPLOMS database
Apparel product, order, and order line data
Relational Order Management System (OMS) RTLELECOMS database
Electronics product, order, and order line data
Relational RTLSERVICE database Customer service data, organized in a single Service Case table
Web service CreditRatingWS Credit rating data
Stored procedure GETCREDITRATING_SP Customer credit rating information
Java function Functions.DSML Java function enabling LDAP access
Java function Functions.excel_jcom Excel spreadsheet data, via JCOM
Java function Functions.CreditCardClient Customer credit card information, via an XMLBean
XML files ProductUNSPSC.xsd Third-party product information
Flat file Valuation.csv Customer valuation data received from an internal department that deals with
BEA Liquid Data for WebLogic: Samples Tutorial 8

customer scoring and valuation models
Related Information
In addition to the material covered in this guide, you may want to review the wealth of resources available at the BEA web site, WebLogic developer site, and third-party sites. Information at these sites includes datasheets, product brochures, customer testimonials, product documentations, code samples, white papers, and more.
For more information about Java and XQuery, refer to the following sources:
The Sun Microsystems, Inc. Java site at: http://java.sun.com/
The World Wide Web Consortium XML Query section at: http://www.w3.org/XML/Query
For more information about BEA products, refer to the following sources:
Liquid Data documentation site at: http://edocs.bea.com/liquiddata/docs85/index.html
BEA e-docs documentation site at: http://e-docs.bea.com/
BEA online community for WebLogic developers at: http://dev2dev.bea.com
BEA Liquid Data for WebLogic: Samples Tutorial 9
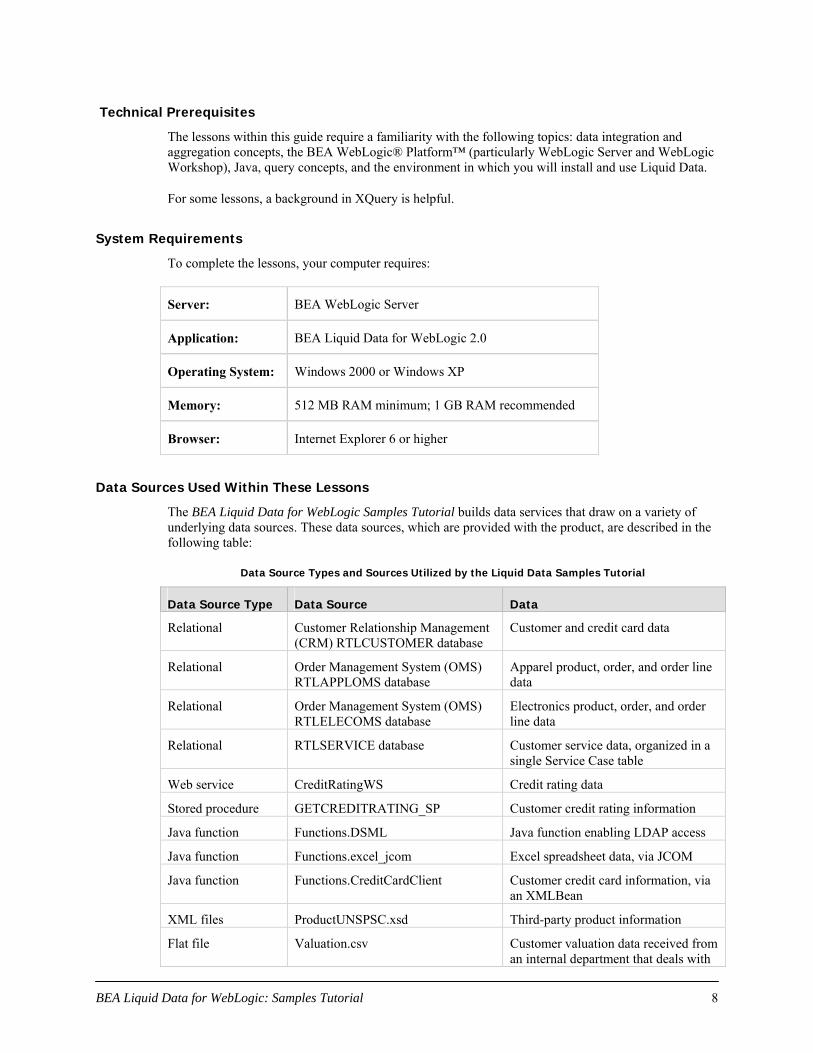
Part 1 Core Training Liquid Data approaches the problem of creating integration architectures by providing tools that let you build physical data services around individual physical data sources, and then develop logical data services and business logic that integrate and return data from multiple physical and logical data services. Logical data services use easily-maintained, graphically-designed XML queries (XQueries) to access, aggregate, transform, and deliver its data results.
Developing Liquid Data services involves three basic steps.
Create a unified view of information from all relevant sources. This step, which involves development of physical data services and (optionally) data models, is typically performed by a data services architect who understands the information available in underlying sources and can define the unified view that different projects will use. Liquid Data is capable of modeling relational and non-relational sources; it includes tools for introspection and mapping of the underlying sources to the unified data view.
1.
2.
3.
Develop application-specific queries. This step, which involves development of logical data services, is typically performed by application developers who write simple queries against the unified view to get the required data. Liquid Data provides tools to visually create robust XQueries and also publish them as services.
Tie query results to client applications. This step, which involves accessing data through a variety of consuming applications, is typically performed by application developers who execute the queries and receive results as XML or Java objects. In addition, Liquid Data provides an out-of- the-box Workshop control to easily develop portal or Web applications from which to access data retrieved by a data service.
Liquid Data Development Process
As part of the development process, Liquid Data provides flexible options for updating both relational and non-relational data sources. Liquid Data lets you write update logic via an EJB in BEA WebLogic Server™; via a database, JMS, or Liquid Data control in Workshop; or via a business process in BEA WebLogic Integration™.
In addition, Liquid Data provides visual tools for managing various administrative tasks, including controlling data service metadata, caching, and security.
Within Part 1, examples are provided that illustrate Liquid Data's most commonly used capabilities: developing and testing physical and logical data services, accessing data services through various consuming applications, updating underlying data sources, and managing various administrative tasks.
BEA Liquid Data for WebLogic: Samples Tutorial 10

Note: The lessons within Part 1 build upon one another and should be completed in sequential order.
BEA Liquid Data for WebLogic: Samples Tutorial 11

Lesson 1 Introducing the Liquid Data for WebLogic Environment The Liquid Data for WebLogic™ environment provides the tools and components that let you build physical data services around individual physical data sources, and then develop the logical data services and business logic that integrate data from multiple physical and logical data services. The environment also lets you test the data service and manage data service metadata, caching, and security.
The basic menus, behavior, and look-and-feel associated with the WebLogic Workshop environment apply to Liquid Data. However, there are several tools and components within WebLogic Workshop that are especially relevant to Liquid Data. In this lesson, you will learn about a few of those tools and components. In addition, you will learn how to complete several basic tasks, such as starting and stopping WebLogic Server, that are essential to using WebLogic Workshop.
As the first lesson within the BEA Liquid Data for WebLogic Samples Tutorial, there are no dependencies on other lessons. However, your familiarity with WebLogic Workshop is assumed. Workshop is fully described in online documentation, which you can view at:
http://e-docs.bea.com/workshop/doc82/index.html
Objectives
After completing this lesson, you will be able to:
Navigate the Liquid Data for WebLogic Workshop environment.
Start and stop WebLogic Server.
Save a Liquid Data application and associated files.
Overview
WebLogic Workshop consists of two parts: an Integrated Development Environment (IDE) and a standards-based runtime environment. The purpose of the IDE is to remove the complexity in building applications for the entire WebLogic platform. Applications you build in the IDE are constructed from high-level components rather than low-level API calls. Best practices and productivity are built into both the IDE and runtime.
Lab 1.1 Starting WebLogic Workshop
The first step is starting WebLogic Workshop and opening the RTLApp sample application, which you will use in the next lab.
Objectives
In this lab, you will:
Start WebLogic Workshop.
Open the RTLApp application.
Instructions
1. Choose Start → Programs → BEA WebLogic Platform 8.1 → WebLogic Workshop 8.1. If this is the first time you are starting WebLogic Workshop since it was installed, then the SamplesApp project opens. Otherwise, the project that you last opened appears.
BEA Liquid Data for WebLogic: Samples Tutorial 12

2.
3.
4.
Choose File → Open → Application.
Navigate to the <beahome> \weblogic81\samples\LiquidData\RTLApp\ directory.
Open the RTLApp.work file. The RTLApp application opens.
Note: Depending on your computer settings, the .work extension may not be visible. Also, depending on whether or not RTLApp application was previously opened, the application will open in the last active view. In Figure 1-1, the RTLApp application opens in Design View for the Case data service. If this is not the view that you see, double-click Case.ds located at DataServices/ RTLServices and select the Design View tab.
BEA Liquid Data for WebLogic: Samples Tutorial 13

Lab 1.2 Navigating the Liquid Data for WebLogic IDE Environment
Within the WebLogic Workshop environment, there are several tools and components that are relevant to developing Liquid Data applications and projects. Five of the most frequently used are:
Application Pane
Design View
XQuery Editor View
Source View
Test View
Screenshots of the environment are taken from within the RTLApp application.
Figure 1-1 Liquid Data for WebLogic Application Running in WebLogic Workshop
Objectives
In this lab, you will:
Explore five of the most frequently used development tools.
Discover the features and functions of those tools.
BEA Liquid Data for WebLogic: Samples Tutorial 14

Application Pane
The Application pane displays a hierarchical representation of a Liquid Data application.
A Workshop application is a collection of all resources and components—projects, schemas, modules, libraries, and security roles—deployed as a unit to an instance of WebLogic Server. Only one application can be active at a time. Open files display in boldface type.
If the Application pane is not open, complete one of the following options:
Choose View → Application.
Press Alt+1.
Design View
Design View presents an editable, graphical representation of a data service. It is a single point of consolidation for a data service's query functions and other business logic. Using Design View, you can:
View the data service's XML type, native data types, functions, and data source relationships.
Add functions and data source relationships.
Create an XML type definition for elements within the data service, such as xs:string or xs:date.
Associate the data service with an XML Schema Definition (.xsd) that defines the unified view for all retrieved data.
Figure 1-2 Design View of a Logical Data Service
If Design View is not open, complete the following steps:
BEA Liquid Data for WebLogic: Samples Tutorial 15

Open a data service (for example, Case.ds, located in the DataServices/RTLServices project folder).
1.
2. Select the Design View tab.
XQuery Editor View
XQuery Editor View provides a graphical, drag-and-drop approach to constructing queries. Using this view, you can inspect or edit the query Return type and add the data source nodes, parameters, expressions, conditions, and source-to-target mappings that are the foundation of data service query functions.
Figure 1-3 XQuery Editor View
If XQuery Editor View is not open:
1.
2.
Open a data service (for example, Case.ds, located in the DataServices/RTLServices project folder).
Select the XQuery Editor View tab.
XQuery Editor View Tools
XQuery Editor View includes several editors and palettes that simplify the construction of queries:
Expression Editor. Lets you add where and order by conditions to parameter, let or for nodes. The Expression Editor is only active when you select a specific node.
BEA Liquid Data for WebLogic: Samples Tutorial 16

Liquid Data Palette. Lets you add previously-defined query functions as data sources. Each function displays as a for node, which serves as a for clause within the FLWOR (for-let-where-order by-return) statement that is the heart of an XQuery.
To add data sources, drag and drop an item from Liquid Data Palette into the XQuery Editor View work area. After you drop the node into XQuery Editor View, the node’s data source schema (shape) displays in the XQuery Editor View.
If Liquid Data Palette is not open, choose View → Windows → Liquid Data Palette.
XQuery Function Palette. Lets you add any of the more than 100 built-in functions provided within the XQuery language. In addition, you can add any of the special built-in functions defined by BEA.
To add a built-in function, drag and drop the selected item into the Expression Editor.
If XQuery Function Palette is not open, choose View → Windows → XQuery Function Palette.
Any work created in XQuery Editor View is immediately reflected in Source View, which permits you to augment the graphical approach to constructing queries with direct work on the XQuery syntax. Two-way editing is supported. Changes you make in Source View are reflected in XQuery Editor View, and vice versa.
Source View
Source View lets you view and/or modify a data service's XQuery annotated source code. Although Liquid Data provides extensive visual design tools for developing a data service, sometimes you may need to work directly with the underlying XQuery syntax.
Two-way editing is supported. Changes you make in Source View are reflected in XQuery Editor View, and vice versa.
Figure 1-4 Source View
BEA Liquid Data for WebLogic: Samples Tutorial 17

If Source View is not open, complete the following steps:
1.
2.
Open a data service (for example, Case.ds, located in the DataServices/RTLServices project folder).
Select the Source View tab.
Within Source View, you can use the XQuery Construct Palette, which lets you add any of several built-in generic FLWOR statements to the XQuery syntax. You can then customize the generic statement to match your particular needs.
To add a FLWOR construct, drag and drop the selected item into the appropriate declare function space.
If XQuery Construct Palette is not open, choose View → Windows → XQuery Construct Palette.
Test View
Test View provides a means of running developed query functions within the IDE. Options available in Test View depend on the query being tested. For example, if the query supports parameters, then the Parameters section appears, providing a field for each parameter required by the query.
Using Test View, you can select a specific function, specify appropriate parameters, and execute the query to determine that it is functioning properly. In addition, you can edit the results of the query and pass the modifications back to the underlying data source.
Figure 1-5 Test View
If Test View is not open, complete the following steps:
BEA Liquid Data for WebLogic: Samples Tutorial 18
3.
4.
Open a data service (for example, Case.ds, located in the DataServices/RTLServices project folder).
Select the Test View tab.
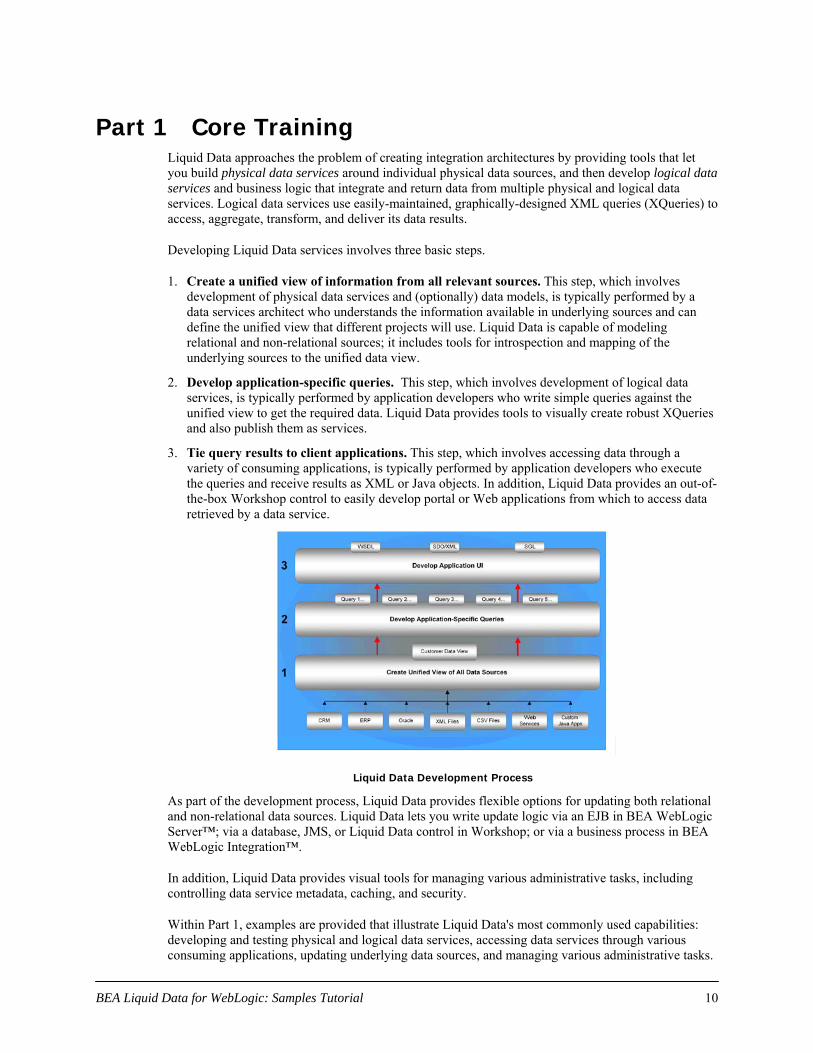
Lab 1.3 Starting WebLogic Server
It is necessary that WebLogic Server be running while you are designing a Liquid Data project. However, before you import source metadata or test a developed function, you must start an instance of WebLogic Server.
Any Liquid Data projects that you create will run on your system’s installation of WebLogic Server, at least until you deploy them.
Objectives
In this lab, you will:
Discover ways to start WebLogic Server.
Confirm that your server is running.
Instructions
There are three ways to start WebLogic Server:
Menu Command Tools → WebLogic Server → Start WebLogic Server
Shortcut Keys Ctrl + Shift + S
Procedure Right-click the red Server Stopped icon, located at the bottom of the WebLogic Workshop window. Then click Start WebLogic Server.
Starting the WebLogic Server may take several moments. During the server start-up sequence, you may see the following message box:
Figure 1-6 (Possible) WebLogic Server Startup Message
If this box displays, select OK.
When WebLogic Server is running, the status indicator in the lower edge of the WebLogic Workshop development environment will turn green.
BEA Liquid Data for WebLogic: Samples Tutorial 19

Lab 1.4 Stopping WebLogic Server
There may be times when you want to stop WebLogic Server while still working within Liquid Data for WebLogic Workshop.
Objectives
In this lab, you will:
Discover how to stop WebLogic Server.
Confirm that the server is not running.
Instructions
There are three ways to stop WebLogic Server:
Menu Command Tools → WebLogic Server → Stop WebLogic Server
Shortcut Keys Ctrl + Shift + T
Procedure Right-click the green Server Running icon, located at the bottom of the WebLogic Workshop window. Then click Stop WebLogic Server.
Check the status bar at the bottom of WebLogic Workshop to determine whether WebLogic Server is stopped. If WebLogic Server is stopped, the following icon displays:
Lab 1.5 Saving Your Work
As you build your data services, you may want to save your work on a regular basis.
Objectives
In this lab, you will:
Discover three ways to save your work while working within the application.
Discover how to save one or more files when exiting the application or closing WebLogic Workshop.
BEA Liquid Data for WebLogic: Samples Tutorial 20
Instructions
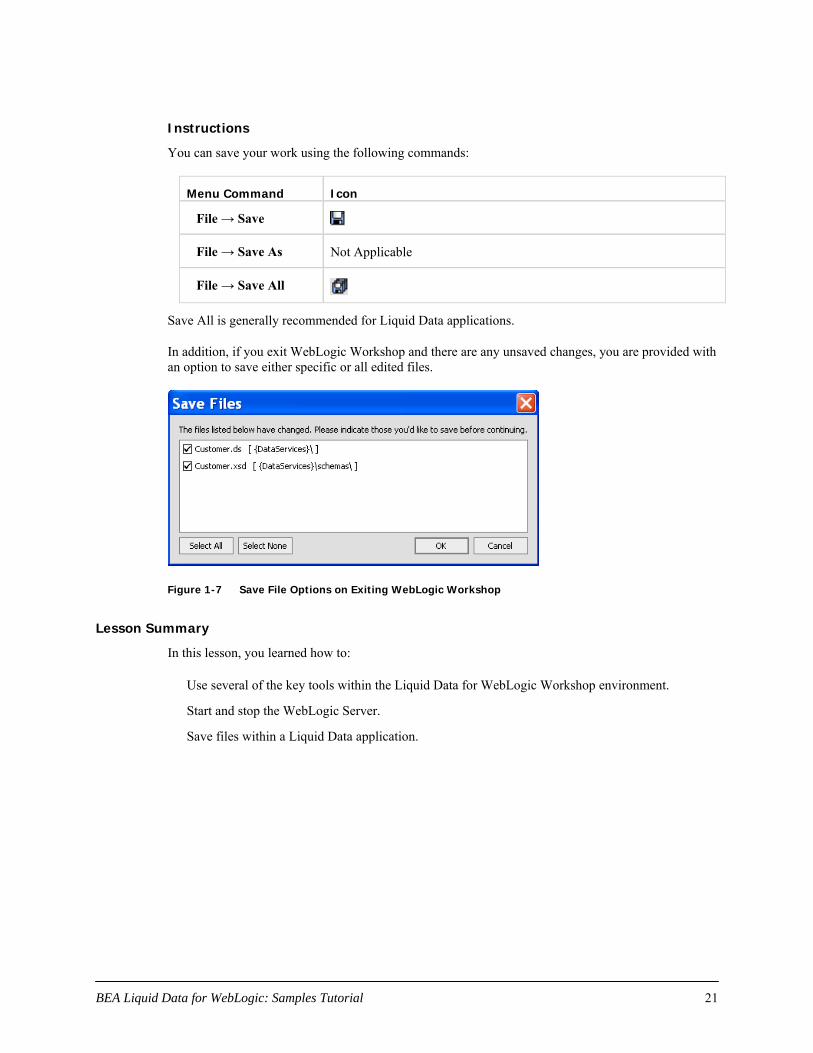
You can save your work using the following commands:
Menu Command Icon
File → Save
File → Save As Not Applicable
File → Save All
Save All is generally recommended for Liquid Data applications.
In addition, if you exit WebLogic Workshop and there are any unsaved changes, you are provided with an option to save either specific or all edited files.
Figure 1-7 Save File Options on Exiting WebLogic Workshop
Lesson Summary
In this lesson, you learned how to:
Use several of the key tools within the Liquid Data for WebLogic Workshop environment.
Start and stop the WebLogic Server.
Save files within a Liquid Data application.
BEA Liquid Data for WebLogic: Samples Tutorial 21

Lesson 2 Creating a Physical Data Service The heart of Liquid Data is a data service, which is simply a file containing XQuery functions and supporting structured information. The most basic data service is a physical data service, which models a single physical data source residing in a relational database, Web service, flat file, XML file, or Java function.
Liquid Data approaches the problem of creating integration architectures by building data services around multiple physical data services. Therefore, in this lesson, you will create data services based on relational data included in the sample PointBase database provided with Liquid Data:
Customer Relationship Management (CRM) data, stored in the RTLCUSTOMER database.
Order Management System (OMS) data for apparel and electronic products, stored in the RTLAPPLOMS and RTLELECOMS databases.
Customer service data, stored in the RTLSERVICE database.
Objectives
After completing this lesson, you will be able to:
Create a Liquid Data application and project.
Generate multiple physical data services, based on underlying relational data sources.
Test a physical data service.
Overview
A data service is a collection of one or several related query functions. The service typically models a unit of enterprise information, such as customer or product data.
The shape of a data service is defined by an XML type that classifies each data element as a particular form of information, according to its allowable contents and units of data. For example, an xs:string type can be a sequence of alphabetic, numeric, and/or special characters, while an xs:date type can only be numeric characters presented in a YYYY-MM-DD format. Liquid Data uses the XML type to model and normalize disparate data into a unified view.
The data service interface consists of public functions that enable client-based consuming applications to retrieve data from the modeled data source.
Lab 2.1 Creating a Liquid Data Application
Since a data service is part of a specific Liquid Data project, and a project is part of a single WebLogic Workshop application, you will first need to create the application, and then a project, before creating a physical data service. (Alternatively, an existing application could be used; in that case you would simply create a Liquid Data project within the application.)
An application, which is deployed as a single unit to an instance of WebLogic Server, is a J2EE enterprise application that ultimately produces a J2EE Enterprise Application Archive (EAR) file. This, in turn, provides you with a multi-user application that is ready for Internet deployment. Except in specific cases, such as accessing remote EJBs or web services, an application is self-contained. The application’s components may reference each other, but may not generally reference components in other applications. An application’s components include:
BEA Liquid Data for WebLogic: Samples Tutorial 22

One or more projects, data services, schemas, and libraries.
Zero or more modules and security roles.
An application should represent a related collection of business solutions. For example, if you are deploying two web sites — one an e-commerce site and the other a human resources portal for employees — you would probably create separate WebLogic applications for each.
An application is also the top-level unit of work that you manipulate within the WebLogic Workshop environment. Only one application can be active at a time.
Objectives
In this lab, you will:
Create a Liquid Data-enabled application.
Explore default application components.
Instructions
1.
2.
3.
Choose File → New → Application → Liquid Data Application.
Enter Evaluation in the Name field.
Click Create.
Figure 2-1 Creating a Liquid Data Application
The components of the application are represented in a hierarchical tree structure in the Application pane. When you first create a Liquid Data application, the following default components are automatically generated:
Liquid Data project. Takes the name of your application (in this case, EvaluationDataServices). Within the project folder, there is initially a single component, the xquery-types.xsd file. This file is an XML Schema Definition (XSD) that describes the contents, semantics, and structure of the project.
Modules. Initially an empty folder.
Libraries. Contains the ld-server-app.jar file. Within this file are several folders and files, as displayed in Figure 2-2.
BEA Liquid Data for WebLogic: Samples Tutorial 23
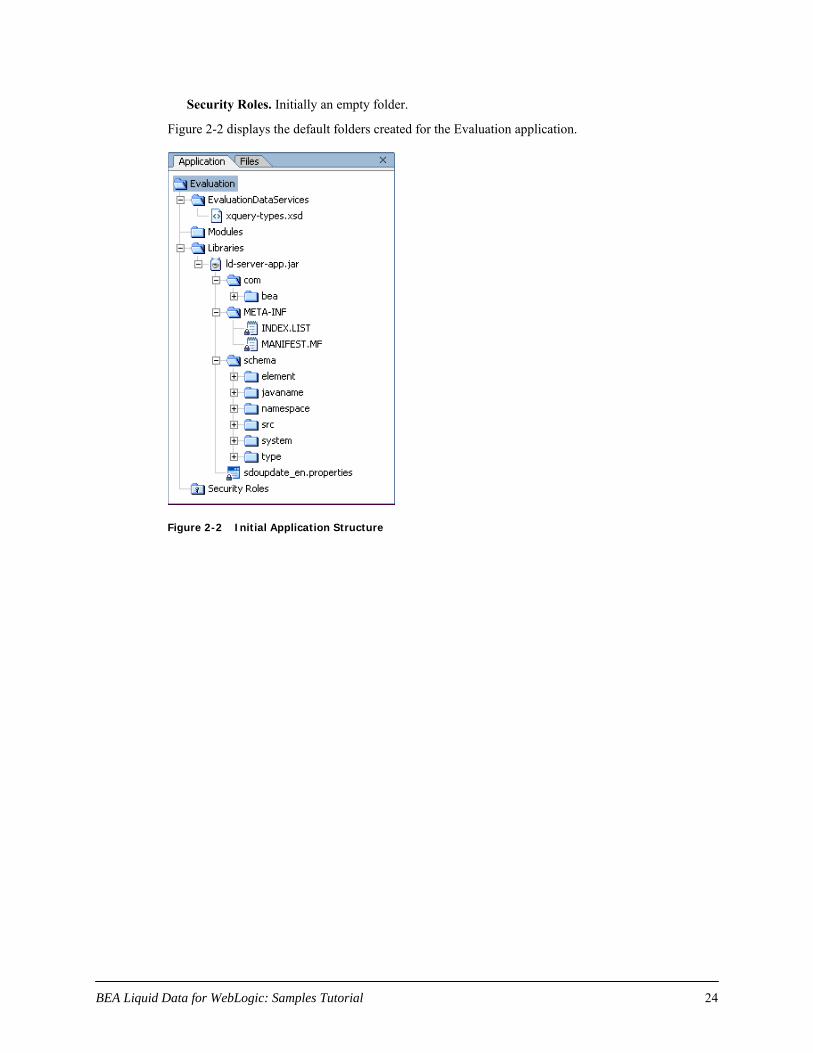
Security Roles. Initially an empty folder.
Figure 2-2 displays the default folders created for the Evaluation application.
Figure 2-2 Initial Application Structure
BEA Liquid Data for WebLogic: Samples Tutorial 24
Lab 2.2 Creating a Liquid Data Project
A project groups related files — data services, models, and metadata — within an application. Each application can support multiple projects. As you develop the application, you may want to create new projects for the following reasons:
To separate unrelated functionality. Each project should contain closely-related components. For example, if you want to create one or more data services that expose order status to your customers, and also one or more web services that expose inventory status to your suppliers, you would probably organize these two sets of unrelated web services into two projects.
To control build units. Each project produces a particular type of file when the project is built. For example, a Java project produces a JAR file. If you want to reuse the Java classes, you would segregate the Java classes into a separate project, and then reference the resulting JAR file from other projects in your application.
Although a default Liquid Data project is created when you create a new Liquid Data application, for this tutorial you will create a new project.
Objectives
In this lab, you will:
Create a new Liquid Data project.
Review the results.
Instructions
1.
2.
3.
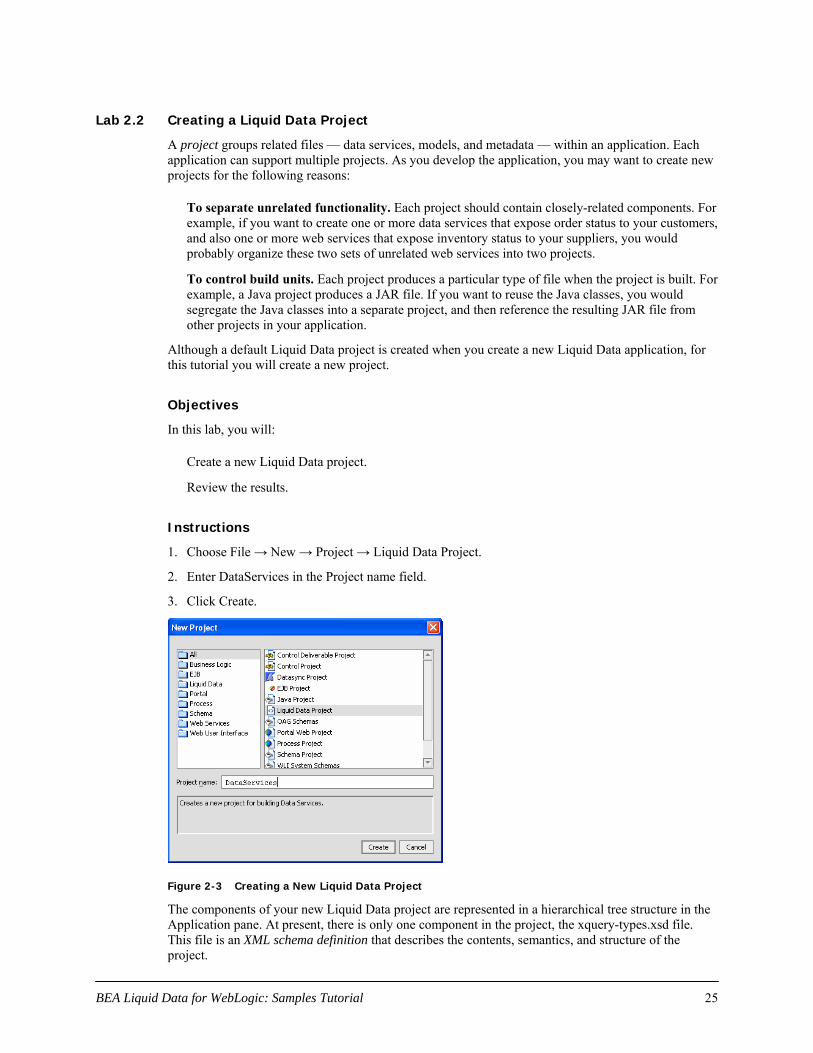
Choose File → New → Project → Liquid Data Project.
Enter DataServices in the Project name field.
Click Create.
Figure 2-3 Creating a New Liquid Data Project
The components of your new Liquid Data project are represented in a hierarchical tree structure in the Application pane. At present, there is only one component in the project, the xquery-types.xsd file. This file is an XML schema definition that describes the contents, semantics, and structure of the project.
BEA Liquid Data for WebLogic: Samples Tutorial 25

Lab 2.3 Creating Project Sub-Folders
Folders let you logically group different data services, and their associated files, within a single project. For example, if you had three data sources — one a relational database containing tables for customer-oriented information, and two Web services providing credit rating and information — you would probably want to create two folders, one for the database and one for the Web services.
Objectives
In this lab, you will:
Create four sub-folders within the DataServices project folder.
Review the results.
Instructions
1.
2.
3.
4.
5.
Right-click the DataServices project folder.
Choose New → Folder.
Enter CustomerDB in the Name field.
Click OK.
Repeat steps 1 through 4 to create data service folders for:
ApparelDB
CustomerDB
ElectronicsDB
ServiceDB
After adding these four folders, your DataServices project folder should look similar to Figure 2-4.
Figure 2-4 Project Sub-Folders
BEA Liquid Data for WebLogic: Samples Tutorial 26

Lab 2.4 Importing Relational Source Metadata
When you installed Liquid Data, several sample data sources were also installed. One such sample data source is the Avitek RTL PointBase database. It contains a number of relational database schemas that provide the metadata needed to build your physical data services, including:
Customer Relationship Management (CRM) data, stored in the RTLCUSTOMER database.
Order Management System (OMS) data for apparel products, stored in the RTLAPPLOMS database.
Order Management System (OMS) data electronic products, stored in the RTLELECOMS database.
Customer service data, stored in the RTLSERVICE database.
A physical data service, which models physical data existing somewhere in your enterprise, is automatically generated when you import relational source metadata. Each generated physical data service represents a single data source that can be integrated with other physical or logical data services.
Objectives
In this lab, you will:
Import source metadata from four RTL PointBase databases, thereby generating multiple physical data services.
Review the results.
Instructions
Note: WebLogic Server must be running. If it is not already running, start the server (Lab 1-3) before you begin this lab.
1.
2.
3.
Right-click the CustomerDB folder.
Choose Import Source Metadata from the pop-up menu.
Select Relational from the Data Source Type drop-down list and click Next.
Figure 2-5 Select Data Source Type
BEA Liquid Data for WebLogic: Samples Tutorial 27

4. Specify the data source, by completing the following steps:
a. Select cgDataSource from the Data Source drop-down list.
b. Click Select All and click Next.
Figure 2-6 Select Data Source
WebLogic Server fetches the specified data, and then displays the Select Database objects to import window. The source metadata for each selected object will be used to generate a physical data service.
5.
6.
Expand the RTLCUSTOMER and RTLBILLING folders, located in the left pane.
Select all tables from both schemas and click Add. The selected objects display in the right pane.
Figure 2-7 Selected Database Objects to Import
BEA Liquid Data for WebLogic: Samples Tutorial 28

7. Click Next. A Summary window opens, displaying the following information:
XML type, for database objects whose source metadata will be imported.
Name, for each data service that will be generated from the source metadata. (Any name conflicts appear in red; you can modify any data service name.)
Location, where the generated data services will reside.
Figure 2-8 Metadata Summary
8.
9.
Click Finish.
Repeat steps 1 through 8 to import source metadata into the ApparelDB, ElectronicsDB, and ServiceDB folders, substituting the following information for steps 1 and 5:
Step 1 Step 5 ApparelDB RTLAPPLOMS
ElectronicsDB RTLELECOMS
ServiceDB RTLSERVICE
The Application pane should appear similar to Figure 2-9. If you expand a data service's schema folder, you will see XSD files for each data service generated from the underlying data source.
BEA Liquid Data for WebLogic: Samples Tutorial 29

Figure 2-9 New Data Services
Lab 2.5 Building a Project
Building a project simply means that the project's source code is compiled into machine-readable instructions. Each project produces a particular type of file when the project is built. For example, a Java project produces a JAR file.
Objectives
In this lab, you will:
Build the DataServices project.
Review the results in the Build window.
Instructions
1.
2.
Right-click the DataServices project folder.
Choose Build DataServices. It may take a few moments for the project to be built. When complete, you will see a message in the Build window, similar to that displayed in Figure 2-10. (If the Build window is not open, choose View → Windows → Build or press Alt+5.)
BEA Liquid Data for WebLogic: Samples Tutorial 30

Figure 2-10 Build Project Information
3. Scroll through the Build window. As part of the Build process, Liquid Data generated several files, including the following:
Data service (.ds) files for each table within the underlying data source.
ArrayOf schema (.xsd) files for each data service.
Miscellaneous JAR, EJB, and EAR files.
Figure 2-11 displays the complete Build information for the DataServices project.
Figure 2-11 Complete Build Information for the DataServices Project
(Optional) In the Application pane, expand the schema folder for CustomerDB. You should see a list of the generated array schemas.
4.
5. (Optional) Expand the Libraries folder. You should see the DataServices.jar file.
Lab 2.6 Viewing Physical Data Service Information
A physical data service is automatically generated when you import source metadata and build the associated project. Each generated physical data service represents a single data source that can be integrated with other physical or logical data services.
BEA Liquid Data for WebLogic: Samples Tutorial 31

When Liquid Data generates a physical data service, it also generates XML data types, an XML Schema Definition (.xsd file), default query and navigation functions, and pragma information.
Objectives
In this lab, you will:
View XML type, native data types, XML schema definition, generated functions, and metadata.
Use Design View and Source View to obtain information about a data service.
Viewing XML type
An XML type, which derives from the data service's XML Schema Definition (XSD), is a structured XML document that classifies each element within the data service as a particular form of information, according to its allowable contents and units of data. For example, the XML type for the CUSTOMER data service is CUSTOMER, whose elements include:
CUSTOMER_ID, whose xs:string classification indicates the element's return data will be formatted as a sequence of alphabetic, numeric, and/or special characters.
CUSTOMER_SINCE, whose xs:date classification indicates the element's return data will be formatted as numeric characters presented in a YYYY-MM-DD format.
Multiple data services can use a single XML type. Liquid Data uses the XML type as the default superset of data elements that will be returned by a set of queries. This superset XML type, known as the Return type, models and normalizes data retrieved from the underlying data source, thereby transforming disparate data into a unified view.
Instructions
1.
2.
In the Application pane, expand the CustomerDB folder.
Double-click the CUSTOMER.ds file. The data service opens in Design View.
Note: The data service automatically opens in the View workspace last used; if Design View is not currently open, click the Design View tab.
3. In the middle of the data service representation you should see the CUSTOMER XML type for the data service, plus the XML classification for each element in the data service. Items marked with a question (?) mark are optional elements, which means two things: 1) if there is no data in the underlying data source, that element will not display in the data set returned by the data service and 2) a query function can succeed without providing any value for particular element.
BEA Liquid Data for WebLogic: Samples Tutorial 32

Figure 2-12 Design View of XML Type
Viewing Native Data Type
A Native Data Type classifies each data element according to the definitions specified in the underlying data source. For relational data sources, Liquid Data generates Native Data Type definitions based on the underlying database's table structure and column data definitions.
Instructions
1.
2.
3.
Right-click the CUSTOMER Data Service header. (You can also right-click any empty space within the data service diagram.)
Select Display Native Type. This will display the original data type for each element in the underlying data source.
In the middle of the data service representation, you should see Native Types for each data element in the data service.
BEA Liquid Data for WebLogic: Samples Tutorial 33

Figure 2-13 Design View of Native Type
Viewing XML Schema Definition
An XML Schema Definition file (.xsd) corresponds exactly to the XML type of a data service. It defines the structure and content of an XML document, such as the XML type document. In other words, it defines the vocabulary, rules, and conventions for representing information in a system.
An .xsd file is organized as a flat catalog of complex elements, any attributes, and any child elements. For physical data services, Liquid Data automatically generates an .xsd file from underlying data when the underlying data source's metadata is imported. Generated .xsd files are placed in the appropriate data service’s schema directory.
Note: For logical data services, you must create a schema. You can use XQuery Editor View, discussed in Lesson 3, to create such schemas (XSD files).
Instructions
1.
2.
Right-click the CUSTOMER element, located in the XML type pane. A pop-up menu opens.
Choose Go to Source to view the underlying schema information.
Figure 2-14 XML Schema Definition
3. After reviewing the XSD, click the Close box (X) in the upper-right corner of the source pane to return to Design View of your data service.
Note: Clicking the large red X will close WebLogic Workshop.
Viewing Generated Functions
The data service interface consists of public functions of the data service, which can be of several types:
One or more read functions, which typically return data in the form of the data service XML type.
One or more navigation functions, which return data from related data services. The navigation functions are based on any relationships defined within the underlying data source. Relationships enhance the flexibility of data services by enabling the return of data in the shape of another data service.
One submit() function, which allows users to persist changes back to the original data source. (The submit() function does not appear in Design View.)
BEA Liquid Data for WebLogic: Samples Tutorial 34

In addition to public functions, a data service can include private functions that are only used within the data service. They generally contain common processing logic that can be used by more than one data service function. (For more information, see the Data Service Developer’s Guide.)
Instructions
1. In Design View, notice the public functions displayed in the left pane of the diagram. These functions, which were generated for the data service, include the following:
CUSTOMER(), a read function that retrieves data from the underlying RTLCUSTOMER database.
getADDRESS(), a navigate function that retrieves data from the ADDRESS data service. This function is based on a relationship between the CUSTOMER and ADDRESS tables, which are defined in the RTLCUSTOMER database.
Figure 2-15 Design View: Generated Functions
2. (Optional) Right-click the CUSTOMER Data Service header and choose Display XML type from the pop-up menu. (You can also right-click any empty space within the data service diagram.)
Viewing Data Service Metadata
Metadata is simply information about the structure of data; it provides facts about the data service's data, format, meaning, and lineage. For example, a list of tables and columns within a database is metadata. Liquid Data uses metadata to describe a data service: what information is provided by the data service and the information's lineage (that is, the source for the information.)
In addition to documenting data services for potential consumers, metadata helps you determine what data services are affected when inevitable changes occur in the underlying data source layer. Of course in the case of physical data services, the metadata primarily describes metadata extracted from the physical data source.
Metadata information is contained in the data service's META-INF folder. Normally you should not need to refer to the contents of this folder.
BEA Liquid Data for WebLogic: Samples Tutorial 35

Instructions
1.
2.
3.
Select the Source View tab. The metadata information used by the Customer data service appears. (Also available in Source View are data service namespace, schema namespace, and XQuery functions; these items are not displayed in Figure 2-16.)
Click the + icon to display all metadata information.
Notice the following:
The date the data service was created.
The data source from which the metadata was imported.
The XML type, XPath, Native Data Type, and native XPath for each element within the data service.
The relationship target, role name, role number, XDS, and relationship parameters for each data service associated with the active data service.
Figure 2-16 Source View of Metadata
Lab 2.7 Testing Physical Data Service Functions
Testing a data service's functionality within Test View lets you determine whether the data service is able to return the expected data results.
Objectives
In this lab, you will:
Test the CUSTOMER() function.
Review the results in Test View.
Review the results in the Output window to confirm that the data is pulled from the correct data source.
Instructions
1.
2.
Select the Test View tab.
Select CUSTOMER() from the function drop-down list.
BEA Liquid Data for WebLogic: Samples Tutorial 36

3.
4.
Click Execute. You should see data returned from the RTLCUSTOMER database, formatted according the CUSTOMER data service's Return type, which is defined by each element's XML type.
Expand the nodes and notice the following: Each element defined by the XML type returns specific data retrieved from the RTLCUSTOMER database. For example, the <FIRST_NAME> element returns “Jack” as an xs:string, while the <CUSTOMER_SINCE> element returns "2001-10-01" as an xs:date.
Figure 2-17 Physical Data Service Test Results
5.
6.
Open the Output window (View → Windows → Output).
Confirm that the output is similar to that displayed in Figure 2-18.
Note: You can use the Output window to verify that each element in the data service is pulling data from the correct data source. In this example, the return results are pulled from the RTLCUSTOMER database, CUSTOMER table 1, and a specific column (c1, c2, c3, and so on) for each element.
Figure 2-18 Test Results Output
Lesson Summary
In this lesson, you learned how to:
Create a Liquid Data application and project.
BEA Liquid Data for WebLogic: Samples Tutorial 37
Create project sub-folders to group data services.
Import relational tables to create a simple physical data services.
Build a project and review the build information.
Examine a physical data service’s shape/schema definition, data types, functions, and source code.
Test a data service function.
BEA Liquid Data for WebLogic: Samples Tutorial 38

Lesson 3 Creating a Logical Data Service As noted in Lesson 2, there are two types of data services: physical and logical. Physical data services model a single physical data source residing in a relational database, Web service, flat file, XML file, or Java function.
To enable the integration of data from multiple sources, you define a logical data service. In this lesson you will create a logical data service that integrates data from the CUSTOMER data service.
Objectives
After completing this lesson, you will be able to:
Create a simple logical data service, define its shape, and specify it query conditions.
Test the logical data service's read, write, and limit functions.
Overview
A logical data service integrates data from two or more physical or logical data services. Its shape is defined by an XML type schema that classifies a data element as a particular form of information, according to its allowable contents and units of data. For example, an xs:string type can be a sequence of alphabetic, numeric, and/or special characters, while an xs:date type can only be numeric characters presented in a YYYY-MM-DD format.
The data service interface consists of public functions that enable client-based consuming applications to retrieve data from the modeled data source. A data service's functions can be of several types:
One or more read functions, which typically return data in the form of the XML type.
One or more navigate functions, which return data from related data services. Within a logical data service, you must define relationships through modeling. Although similar to relationships in the RDBMS context, a logical data service lets you establish relationships between data from any source. This gives you the ability to, for example, relate an ADDRESS relational table with a STATE look-up web service.
One submit() function, which allow users to persist changes to the back-end storage
In addition to public functions, a data service can include private functions that are only used within the data service.
Every function within a logical data service also includes source-to-target mappings that define what results will be returned by that function. There are four types of mappings:
A simple mapping means that you are mapping simple source node elements to simple elements in the Return type one at a time. You can create a simple mapping by dragging and dropping any element from the source node to its corresponding target element in the Return type. Optional Return type elements do not need to be mapped; otherwise elements in the Return type need to be mapped in order for your query to run.
An induced mapping means that a complex element is mapped to a complex element in the Return type. In this gesture the top level complex element in the Return type is ignored (source node name need not match). The editor automatically then maps any child elements (complex or simple) that are an exact match for source node elements.
An overwrite mapping replaces a Result type element and all its children (if any) with the source node elements. As an example of the general steps needed to create an overwrite mapping, you
BEA Liquid Data for WebLogic: Samples Tutorial 39

would press <Ctrl>, then drag and drop the source node's complex element onto the corresponding element in the Result type. The entire source node's complex element is brought to the Result type, where it completely replaces the target element with the source element.
An append mapping adds a simple or complex element (and any children or attributes) as a child of the specified element in the Return type. To create an append mapping, select the source element, then press <Ctrl>+<Shift> while dragging and dropping the source node’s element onto the element in the Return type that you want to be the parent of the new element(s). Alternatively, if you simply want to add a child element to a Return type, you can drag a source element to a complex element in your Return type. The element will be added as a child of the complex element and mapped accordingly.
In addition to the mappings, each function can also include parameters and variations on the basic XQuery FLWOR (for-let-where-order by-return) statements that further define the data retrieval results.
In Figure 3-1, what you see in Design View is a logical data service that:
Uses the getAllCustomers, getCustomer, and getPaymentList, and getLatePaymentList functions to retrieve data.
Uses the CUSTOMER.XSD schema definition to define its XML type, and thus its Return type.
Integrates data from the ApparelDB and CustomerDB physical data services, plus a CreditRating web service.
Figure 3-1 Design View of a Logical Data Service
If you open XQuery Editor View for a particular function, you would see that function's source-to-target mappings.
If you open Source View, you would see each function's parameters and FLWOR statements.
Lab 3.1 Creating a Simple Logical Data Service
A logical data service integrates and transforms data from multiple physical and logical data services.
Objectives
In this lab, you will:
BEA Liquid Data for WebLogic: Samples Tutorial 40

Create a new folder for the logical data service.
Create an empty data service that can be built into a logical data service.
Import a pre-defined XML schema definition that you will associate as the logical data service's XML type.
Define functions and their mappings, parameters, and FLWOR statements.
Instructions
1.
2.
Create a new folder within the DataServices project and name it CustomerManagement.
Create a new data service within the CustomerManagement folder by completing the following steps:
a. Right-click the CustomerManagement folder.
b. Choose New → Data Service. The New File window opens.
c. Confirm that Liquid Data → Data Service are selected.
d. Enter CustomerProfile in the Name field.
e. Click Create.
Figure 3-2 New Data Service
A new data service is generated, but without any associated data services or functions. (If you open XQuery Editor View, you will see that an empty Return type was also generated for the data service.)
Lab 3.2 Defining the Logical Data Service Shape
A data service transforms received data into the shape defined by its Return type. Pragmatically, the Return type is the "R" in a FLWOR (for-let-where-order by-return) query. A Return type, which describes the structure or shape of data returned by the data service's queries, serves two main purposes:
BEA Liquid Data for WebLogic: Samples Tutorial 41
Provide a superset of data elements that can be returned by an XQuery.
Define the unified structure, and order of the data returned by an XQuery.
The Return type is generated from the data service's XML type. An XML type classifies a data element as a particular form of information, according to its allowable contents and units of data. For example, an xs:string type can be a sequence of alphabetic, numeric, and/or special characters, while an xs:date type can only be numeric characters presented in a YYYY-MM-DD format.
Objectives
In this lab, you will:
Import a schema file, which you will associate with the data service's XML type.
Review the results.
Instructions
Note: Although you can use Liquid Data for WebLogic Workshop to graphically build a schema file, in this lab you will import a pre-defined schema file to save time. For more information on using WebLogic Workshop to build the return type's .xsd file, see BEA Liquid Data for WebLogic: Data Services Developer’s Guide.
Create a new folder in the CustomerManagement folder and name it schemas. 1.
2. Import a schema file into the schema folder by completing the following steps:
a. Right-click the schema folder, located in the CustomerManagement folder.
b. Choose Import.
c. Navigate to the <beahome>\weblogic81\samples\liquiddata directory.
d. Select the CustomerProfile.xsd file.
e. Click Import.
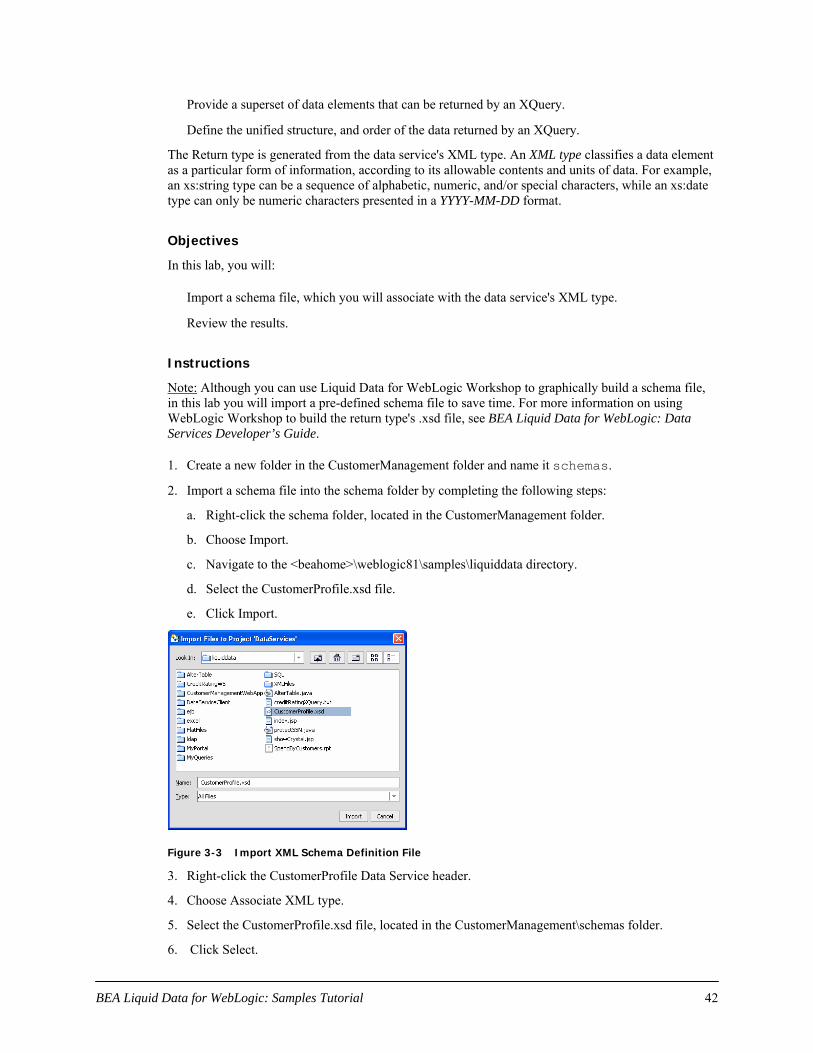
Figure 3-3 Import XML Schema Definition File
3.
4.
5.
6.
Right-click the CustomerProfile Data Service header.
Choose Associate XML type.
Select the CustomerProfile.xsd file, located in the CustomerManagement\schemas folder.
Click Select.
BEA Liquid Data for WebLogic: Samples Tutorial 42
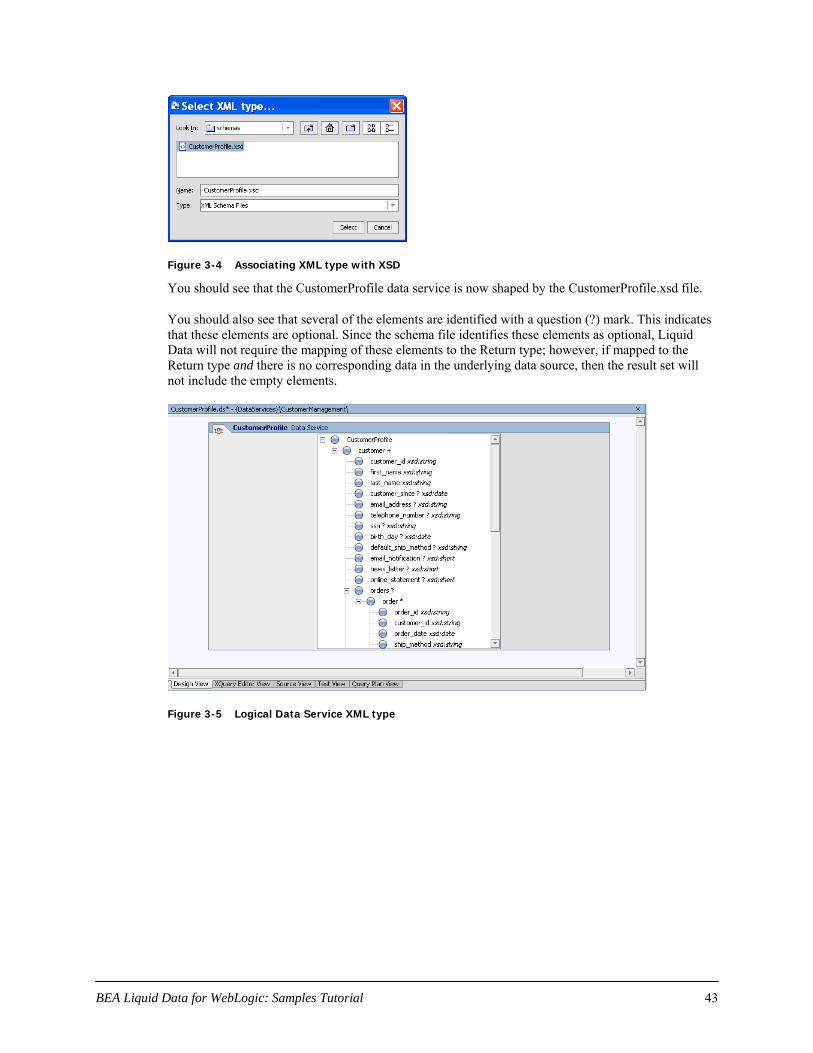
Figure 3-4 Associating XML type with XSD
You should see that the CustomerProfile data service is now shaped by the CustomerProfile.xsd file.
You should also see that several of the elements are identified with a question (?) mark. This indicates that these elements are optional. Since the schema file identifies these elements as optional, Liquid Data will not require the mapping of these elements to the Return type; however, if mapped to the Return type and there is no corresponding data in the underlying data source, then the result set will not include the empty elements.
Figure 3-5 Logical Data Service XML type
BEA Liquid Data for WebLogic: Samples Tutorial 43
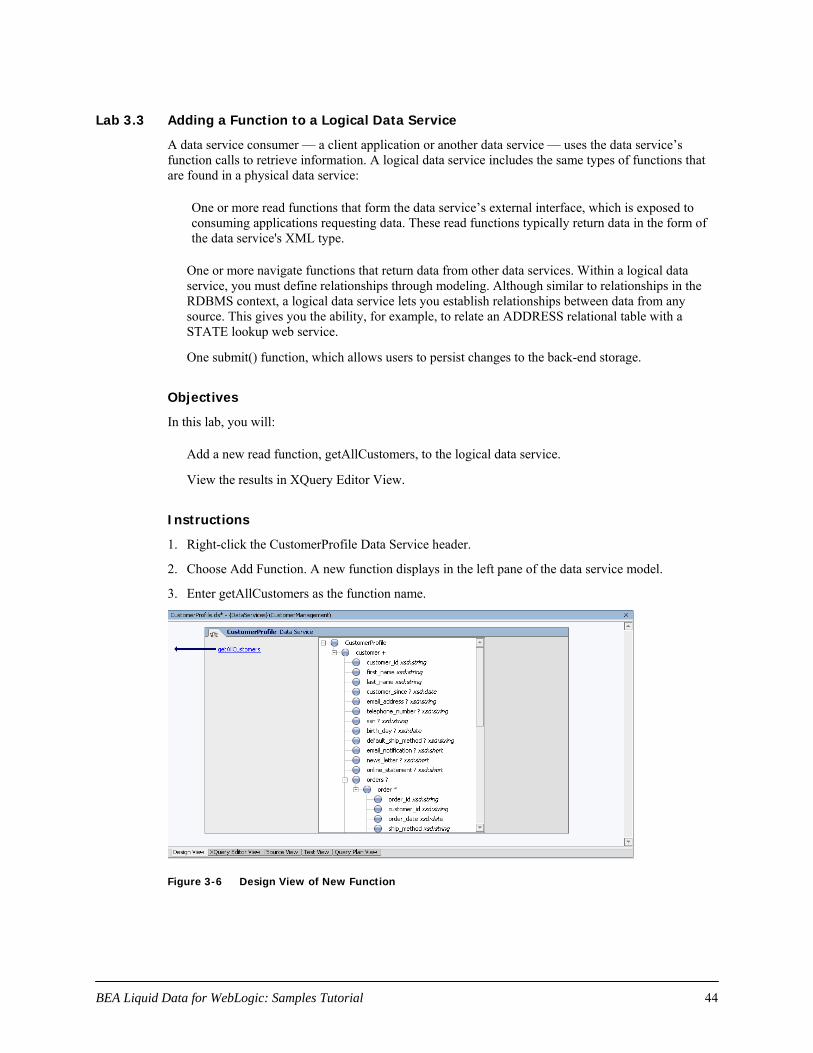
Lab 3.3 Adding a Function to a Logical Data Service
A data service consumer — a client application or another data service — uses the data service’s function calls to retrieve information. A logical data service includes the same types of functions that are found in a physical data service:
One or more read functions that form the data service’s external interface, which is exposed to consuming applications requesting data. These read functions typically return data in the form of the data service's XML type.
One or more navigate functions that return data from other data services. Within a logical data service, you must define relationships through modeling. Although similar to relationships in the RDBMS context, a logical data service lets you establish relationships between data from any source. This gives you the ability, for example, to relate an ADDRESS relational table with a STATE lookup web service.
One submit() function, which allows users to persist changes to the back-end storage.
Objectives
In this lab, you will:
Add a new read function, getAllCustomers, to the logical data service.
View the results in XQuery Editor View.
Instructions
1.
2.
3.
Right-click the CustomerProfile Data Service header.
Choose Add Function. A new function displays in the left pane of the data service model.
Enter getAllCustomers as the function name.
Figure 3-6 Design View of New Function
BEA Liquid Data for WebLogic: Samples Tutorial 44

Lab 3.4 Mapping Source and Target Elements
In the previous lab, you associated a logical data service with an XML Schema Definition (.xsd file), which generated a Return type that includes all data elements defined within the schema. However, there are no conditions associated with the Return type; conditions specify which source data will be returned.
You can define conditions by mapping source and target (Return) elements.
Objectives
Add a physical data service function as a data source for the logical data service.
Create a simple map between the source node and the Result type.
Instructions
1. Click the getAllCustomers() function to open XQuery Editor View for that function. You should see a Return type populated with the CustomerProfile schema definition. The Return type determines what data can be made available to consuming applications, as well as the shape (string, data, integer, and so on) that the data will take. The Return type was automatically populated when you associated the logical data service with the CustomerProfile.xsd.
Figure 3-7 XQuery Editor View of Function Return Type
BEA Liquid Data for WebLogic: Samples Tutorial 45

2. In Liquid Data Palette, expand the CustomerDB\CUSTOMER.ds folders. (If Liquid Data Palette is not open, choose View → Windows → Liquid Data Palette.)
Figure 3-8 Liquid Data Palette
3. Drag and drop CUSTOMER() into XQuery Editor View. This method call represents a root or global element within the CUSTOMER physical data service (see Lesson 2). A for node for that element is automatically generated and assigned a variable, such as For: $CUSTOMER. Within the XQuery Editor View, this for node is a graphical representation of a for clause, which is an integral part of an XQuery FLWOR expression (for-let-where-order By-return).
Figure 3-9 Source Node and Return Type
Create a simple map: Drag and drop individual elements from the $CUSTOMER source node onto the corresponding elements in the Return type. The logical data service CustomerProfile should now be similar to what is shown in Figure 3-10.
4.
BEA Liquid Data for WebLogic: Samples Tutorial 46

Figure 3-10 Simple Mapping Between Source Node and Return Type
Lab 3.5 Viewing XQuery Source Code
When you use XQuery Editor View to construct an XQuery, source code in XQuery syntax is automatically generated. You can view this generated source code in Source View and, if needed, modify the code. Any changes made in Source View will be reflected in XQuery Editor View.
Objectives
In this lab, you will:
View generated XQuery source code in Source View.
Review the for and return clauses of the getAllCustomers() query function.
Instructions
Select the Source View tab. A portion of the generated XQuery source code is displayed in Figure 3-11.
1.
2.
3.
4.
Notice the for clause, which references the CUSTOMER() function.
Notice the return clause, which reflects the simple mapping between the $CUSTOMER source node and the Return type. All optional elements are identified with a questionmark in the field description as shown below (emphasis added): <TelephoneNumber?> {fn:data($x0/TELEPHONE_NUMBER)}</Telephone number
Notice that the <orders> elements are empty, since order information has not yet been mapped to the Return type. This means that a consuming application, using this query, will only see customer information, not order information.
BEA Liquid Data for WebLogic: Samples Tutorial 47

Figure 3-11 Source View of XQuery Code for CUSTOMER() Node
Lab 3.6 Testing a Logical Data Service Function
You can use Test View to validate the functionality of a logical data service.
Objectives
In this lab, you will:
Build the DataServices project.
Test the function's retrieve and truncate capabilities.
Instructions
1.
2.
3.
Build the DataServices project by right-clicking the DataServices folder and choosing Build DataServices from the pop-up menu.
Select the Test View tab.
Select getAllCustomers() from the function drop-down list.
Test the function's truncate capabilities by completing the following steps:
BEA Liquid Data for WebLogic: Samples Tutorial 48

a. Enter CustomerProfile/customer in the Parameter field. This specifies the XPath expression for the element whose return results you want to limit to a set number of occurrences.
b. Enter 5 in the Number field. This will truncate the results to the first five customers retrieved.
c. Click Execute.
Figure 3-12 Test Truncate Capabilities
4.
5.
6.
View the results, which appear in the Result pane.
Expand the top-level node. There should be only five Customer Profiles listed.
Expand the first <customer> node. You should see a Customer Profile for Jack Black, as displayed in Figure 3-13.
Figure 3-13 Customer Profile Test Results
BEA Liquid Data for WebLogic: Samples Tutorial 49
Lesson Summary
In this lesson, you learned how to:
Create a simple logical data service.
Associate an XML schema definition with the data service.
Create a simple function.
Use XQuery editor view to map elements from the source node to the return type.
Use Source View to examine an XQuery function’s source code.
Use Test View to test a logical data service query capabilities, limit the number of data set results returned as part of the query, and test data service editing capabilities.
BEA Liquid Data for WebLogic: Samples Tutorial 50
Lesson 4 Integrating Data from Multiple Data Services The power of logical data services is the ability to integrate and transform data from multiple physical and logical data services.
In the previous lesson, you created a simple logical data service that mapped to a single physical data service. In this lesson, you will further develop the logical data service to enable data retrieval from multiple data services.
Objectives
After completing this lesson, you will be able to:
Use Liquid Data Palette to add physical and logical data service functions to a logical data service, thereby accessing data from multiple sources.
Join data services by connecting source elements, thereby integrating data from multiple sources.
Use the Expression Builder to define a parameterized where clause.
Set the context for nested elements in the source node.
Create a complex override mapping.
Test parameterized data services to verify the return of integrated data results.
Overview
How is data integration different from process integration? Most applications involve a combination of informational interactions and transactional interactions. Examples of informational interaction include: get customer info, review order status, get customer profile, and get customer’s case history. Examples of transactional interactions include: place order, update customer address, and create customer.
Informational interactions involve efficiently aggregating discrete pieces of data that are potentially resident in multiple data sources, and potentially in multiple data formats. Developers can end up spending inordinate amounts of time writing custom code to handle the various interface protocols and data formats, and integrate disparate data into manageable, business-relevant information. Liquid Data simplifies this activity by providing a simple, declarative approach to aggregating data from heterogeneous data sources.
Transactional interactions involve taking a piece of data (say a purchase order) and orchestrating its propagation to the various underlying applications. This involves coordinating a business process through a formal or informal workflow, managing long-running processes, managing human interactions (such as a supervisor approval to an order), handling applications that have indeterminate response times (such as batch systems), maintaining transactional integrity across applications, etc.
Both data integration and process integration are essential elements when building applications that handle information from across multiple data sources. For functions of interest across data services, you can use function libraries. A function library (.xfl file) contains operations that return simple types (not the XML data type of a standard data service) that can be called from various data services. Read functions on a data service can be defined to return information in various ways. For example, the data service may define read functions for getting all customers, customers by region, or customers with a minimum order amount.
BEA Liquid Data for WebLogic: Samples Tutorial 51

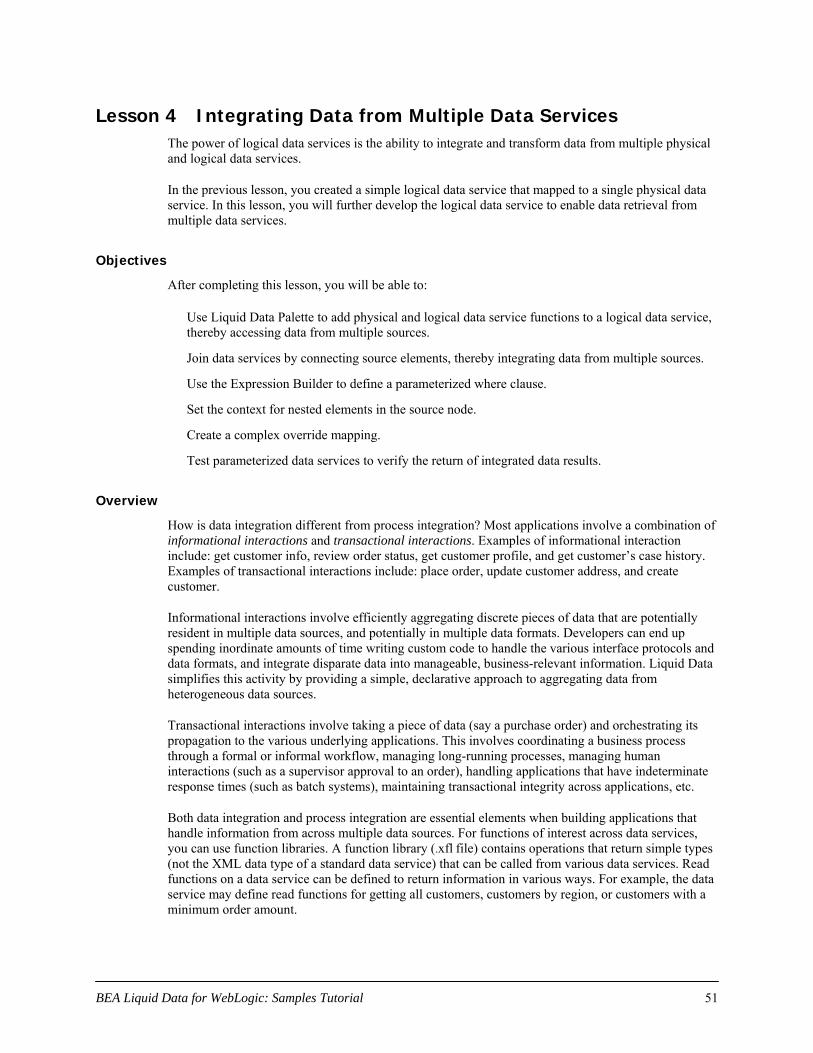
Lab 4.1 Joining Multiple Physical Data Services within a Logical Data Service
In the previous lab, you mapped a single physical data service to the Return type. In this lab, you will enable data retrieval from both the CUSTOMER and CUSTOMER_ORDER physical data services.
Objectives
In this lab, you will:
Create a second for node, by adding the CUSTOMER_ORDER() function.
Create a simple map between the new for node and the Return type.
Create an automatically-generated where clause, by joining the two for nodes.
Review source code.
Test the results (read and write capability)
Instructions
1.
2.
3.
4.
Open CustomerProfile.ds in XQuery Editor View.
In Liquid Data Palette, expand the ApparelDB\CUSTOMER_ORDER data service folders.
Drag and drop CUSTOMER_ORDER() into XQuery Editor View to create a second for node, For:$CUSTOMER_ORDER.
Create a simple map: Drag and drop the individual elements from the $CUSTOMER_ORDER source node onto their corresponding elements in the Return type.
Note: Do not map the TRACKING_NUMBER element.
5. Create a join: Drag and drop the CUSTOMER_ID element from the $CUSTOMER source node onto the C_ID element in the $CUSTOMER_ORDER source node. This action joins the two for nodes. By joining these two nodes, you automatically create a where clause within the FLWOR statement.
Figure 4-1 Joined Data Services
BEA Liquid Data for WebLogic: Samples Tutorial 52

6. Select the Source View tab to view the XQuery code. You should see a where clause joining $CUSTOMER and $CUSTOMER_ORDER, using the CUSTOMER_ID element. In Figure 4-2, the where clause is:
where $CUSTOMER/CUSTOMER_ID eq $CUSTOMER_ORDER/C_ID
Figure 4-2 Source View of Joined Data Services
7.
8.
Build the DataServices project. (Right-click the DataServices project folder and choose Build DataServices.)
Select the Test View tab and determine whether you can retrieve order information integrated with the customer information, by completing the following steps:
a. Select getAllCustomers() from the function drop-down list.
b. Click Execute. (You don't need any parameters, since you are not testing the truncate feature.)
c. Expand the nodes. The results should include order information for each customer, as displayed in Figure 4-3.
BEA Liquid Data for WebLogic: Samples Tutorial 53

Figure 4-3 Integrated Customer and Order Data Results
Defining a Where Clause to Join Multiple Physical Data Services
In the previous lab, you joined the CUSTOMER and CUSTOMER_ORDER data services, thereby automatically generating a where clause. In this lab, you will manually define the where clause that joins multiple data services.
Objectives
In this lab, you will:
Add a third for node, by adding the CUSTOMER_ORDER_LINE_ITEM() function.
Define a where clause, using the Expression Editor.
View the results in Design View and Source View.
Test the results.
Instructions
1.
2.
3.
Open XQuery Editor View for the getAllCustomers() function.
In Liquid Data Palette, expand the ApparelDB\CUSTOMER_ORDER_LINE_ITEM data services folders.
Drag and drop CUSTOMER_ORDER_LINE_ITEM() into XQuery Editor View. This creates a third for node: For: $CUSTOMER_ORDER_LINE_ITEM.
BEA Liquid Data for WebLogic: Samples Tutorial 54

Create a simple map by dragging and dropping the individual elements from the $CUSTOMER_ORDER_LINE_ITEM source node onto the corresponding elements in the Return type.
4.
Figure 4-4 Three Data Service Functions Mapped to the Return Type
5. Define a where clause that joins two data services, by completing the following steps:
a. Select the node header for $CUSTOMER_ORDER_LINE_ITEM to activate the expression editor for that node. (Note: Do not select the CUSTOMER_ORDER_LINE_ITEM* element.)
b. Click the Add Where Clause icon.
c. Click the ORDER_ID element in the $CUSTOMER_ORDER_LINE_ITEM source node. You should see the following in the WHERE field (the variable name may be different, in your case):
$CUSTOMER_ORDER_LINE_ITEM/ORDER_ID
d. Select eq: Compare Sequence from the operator list (“…” icon). You should see the following in the Where field:
$CUSTOMER_ORDER_LINE_ITEM/ORDER_ID eq
e. Click the ORDER_ID element in the CUSTOMER_ORDER source node. You should see the following in the where field (the variable name may be different, in your case):
$CUSTOMER_ORDER_LINE_ITEM/ORDER_ID eq
$CUSTOMER_ORDER/ORDER_ID
f. Click the green check to add the parameterized WHERE clause to the getAllCustomers() function.
BEA Liquid Data for WebLogic: Samples Tutorial 55

Figure 4-5 Where Clause Joining Two Data Services
6. View the results, by completing the following steps:
a. Open CustomerProfile.ds in Design View. The physical data services associated with the three functions that you dropped into XQuery Editor View as for nodes are displayed in the right pane as data sources for the logical data service.
Figure 4-6 Design View of Integrated and Parameterized Data Service
b. Open CustomerProfile.ds in Source View. The XQuery code for the logical data service is displayed.
BEA Liquid Data for WebLogic: Samples Tutorial 56

Figure 4-7 Source Code for Data Integrated with WHERE Clauses and Parameters
7. Test the results, by completing the following steps:
a. Build the DataServices project.
b. Open CustomerProfile.ds in Test View.
c. Select getAllCustomers() from the function drop-down list.
d. Click Execute. (You do not need any parameters.)
e. Expand the nodes and confirm that you can retrieve order line information integrated with order information, similar to that displayed in Figure 4-8. (You can use customer_id = CUSTOMER3 to verify this information).
f. Click on Edit button.
g. Navigate to order node for CUSTOMER3 and update handling_charge information by double clicking on the element content (the 6.8 value).
h. Confirm changes by pressing Submit button.
i. Verify that the update was done successfully by re-executing getAllCustomers() function and navigating to order information for CUSTOMER3.
BEA Liquid Data for WebLogic: Samples Tutorial 57
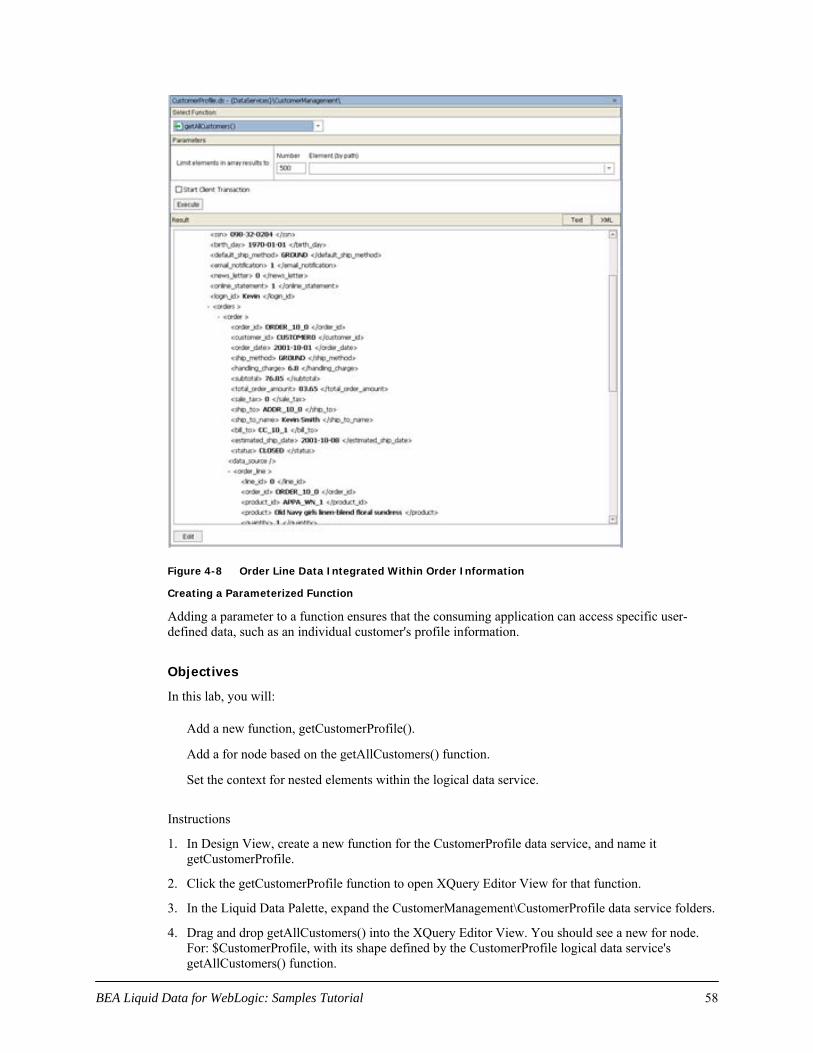
Figure 4-8 Order Line Data Integrated Within Order Information
Creating a Parameterized Function
Adding a parameter to a function ensures that the consuming application can access specific user-defined data, such as an individual customer's profile information.
Objectives
In this lab, you will:
Add a new function, getCustomerProfile().
Add a for node based on the getAllCustomers() function.
Set the context for nested elements within the logical data service.
Instructions
1.
2.
3.
4.
In Design View, create a new function for the CustomerProfile data service, and name it getCustomerProfile.
Click the getCustomerProfile function to open XQuery Editor View for that function.
In the Liquid Data Palette, expand the CustomerManagement\CustomerProfile data service folders.
Drag and drop getAllCustomers() into the XQuery Editor View. You should see a new for node. For: $CustomerProfile, with its shape defined by the CustomerProfile logical data service's getAllCustomers() function.
BEA Liquid Data for WebLogic: Samples Tutorial 58

Figure 4-9 Complex Element Node
Note: In a previous lab, you defined getAllCustomers() to include a complex, nested customer element associated with the customer_id element of the $CUSTOMER_ORDER_LINE_ITEM source Since customer_id uses a string parameter for filtering, you need to set the context of the $CustomerProfile source node to point to the customer element.
5. Create a parameter by completing the following steps:
a. Right-click an empty space in XQuery Editor View.
b. Select Add Parameter.
c. Enter CustomerID in the Parameter Name field.
d. Select xs:string from the Primitive Type drop-down list.
e. Click OK.
BEA Liquid Data for WebLogic: Samples Tutorial 59

Figure 4-10 Add Parameter
Note: You may need to move the $CustomerProfile node to make the parameter node visible.
6.
7.
Create a complex, overwrite mapping, by completing the following steps:
a. Press Ctrl.
b. Drag and drop the $CustomerProfile customer* element onto the customer+ element in the Return type. (The Return type will change.)
Create a join: Drag and drop the parameter's string element onto the customer_id element of the $CustomerProfile source node. This joins the string parameter to the $CustomerProfile source node and creates a function that will return data based on the user-specified parameter. (You will see this in action in the next lab.)
BEA Liquid Data for WebLogic: Samples Tutorial 60

Figure 4-11 Data Source Node and Parameter Joined
8.
9.
Select the Source View tab and confirm that the XQuery code for the getCustomerProfile() function is as follows:
declare function tns:getCustomerProfile($CustomerID as xs:string) as element(ns0:CustomerProfile)* {
<ns0:CustomerProfile>
{
for $CustomerProfile in tns:getAllCustomers()/customer
where $CustomerID = $CustomerProfile/customer_id
return
$CustomerProfile
}
</ns0:CustomerProfile>
Remove the asterisk * from the return type element(ns0:CustomerProfile)*, since this function, as currently written, will return all customer profiles. Your source code should be similar to that displayed in Figure 4-12.
Figure 4-12 Source Code for a Parameterized and Complex Overwrite Mapped Function
10. Test the function, by completing the following steps:
a. Build your application.
b. Open CustomerProfile.ds in Test View.
c. Select getCustomerProfile(CustomerID) from the function drop-down list.
d. Enter CUSTOMER3 in the xs:string CustomerID Parameter field. (Note: The parameter is case-sensitive.)
e. Confirm that you retrieved the requested information — customer, orders, and order line items for Britt Pierce.
BEA Liquid Data for WebLogic: Samples Tutorial 61

Figure 4-13 Integrated Data Results
Lesson Summary
In this lesson, you learned how to:
Use the Liquid Data Palette to add physical and logical data service functions to a logical data service, thereby accessing data from multiple sources.
Join data services by connecting source elements, thereby integrating data from multiple sources.
Use the Expression Builder to define a parameterized where clause.
Set the context for nested elements in the source node.
Create a complex override mapping.
Test parameterized data services to verify the return of integrated data results.
BEA Liquid Data for WebLogic: Samples Tutorial 62

Lesson 5 Modeling Data Services Any data service — physical or logical — can be placed in a model diagram. Model diagrams show:
The basic structure of the data returned by each data service within the model.
Any functions associated with that data service.
Any relationships between data services.
The main purpose of the diagram is to help you envision meaningful subsets of the model, but it can also be used to define new artifacts or edit existing artifacts.
Objectives
After completing this lesson, you will be able to:
Create model diagrams and add data source nodes to the diagram.
Confirm relationships inferred during the Import Source Metadata process.
Define new relationships between data services and modify relationship properties.
Overview
Model diagrams show how various data services are related. Models can represent physical data services, logical data services, or a combination.
Each physical model entity represents a single data source. In the case of relational sources, you can automatically generate physical models that are representative of data sources. After being generated, physical data services can be integrated with other physical or logical sources in the same or new models. Physical model types use a key icon to identify primary keys.
Logical data model entities, which are discussed in detail in the Data Service Developer’s Guide, represent composite views of physical and/or logical models.
Within the model diagram, data services appear as boxes. Relationships are represented by annotated lines between two data services. Each side of the relationship line represents the role played by the nearest data service. The annotations for each relationship include the following:
Target Role Name. By default, the target role name reflects the name of its adjacent data service. You can modify the target role name to better express the relationship, which is particularly useful when there are multiple relationships between two data services.
Cardinality. A relationship can be zero-to-one (0:1 or 1:0), one-to-one (1:1), one-to-many (1:n) or many-to-many (n:n). For example, a customer can have multiple orders, therefore, the relationship should be 1:n (customer:orders).
Directionality. A relationship can be either unidirectional or bidirectional. If unidirectional, data service a can navigate to data service b but b does not navigate to a. If bidirectional, data service a can navigate to b and b can navigate to a.
A data service's navigation functions determine the relationship's cardinality and directionality. Arrowheads indicate possible navigation paths.
BEA Liquid Data for WebLogic: Samples Tutorial 63
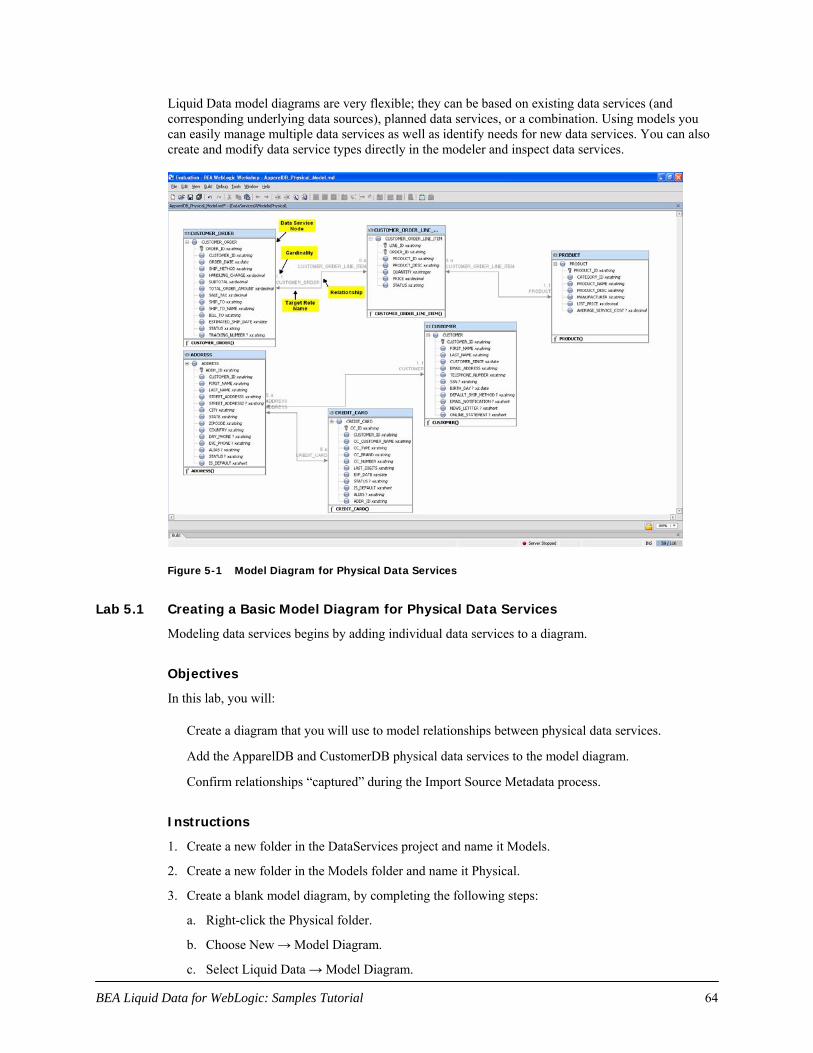
Liquid Data model diagrams are very flexible; they can be based on existing data services (and corresponding underlying data sources), planned data services, or a combination. Using models you can easily manage multiple data services as well as identify needs for new data services. You can also create and modify data service types directly in the modeler and inspect data services.
Figure 5-1 Model Diagram for Physical Data Services
Lab 5.1 Creating a Basic Model Diagram for Physical Data Services
Modeling data services begins by adding individual data services to a diagram.
Objectives
In this lab, you will:
Create a diagram that you will use to model relationships between physical data services.
Add the ApparelDB and CustomerDB physical data services to the model diagram.
Confirm relationships “captured” during the Import Source Metadata process.
Instructions
1.
2.
3.
Create a new folder in the DataServices project and name it Models.
Create a new folder in the Models folder and name it Physical.
Create a blank model diagram, by completing the following steps:
a. Right-click the Physical folder.
b. Choose New → Model Diagram.
c. Select Liquid Data → Model Diagram.
BEA Liquid Data for WebLogic: Samples Tutorial 64

d. Enter ApparelDB_Physical_Model in the File name field.
e. Click Create. A blank workspace opens, which you can use to construct the model diagram.
Figure 5-2 Create Model Diagram
4. Add the ApparelDB and CustomerDB physical data services to the model by dragging and dropping the following data service files from the application pane into the model:
Data Service File Located In:
CUSTOMER_ORDER.ds DataServices\ApparelDB
CUSTOMER_ORDER-LINE_ITEM.ds DataServices\ApparelDB
PRODUCT.ds DataServices\ApparelDB
ADDRESS.ds DataServices\CustomerDB
CREDITCARD.ds DataServices\CustomerDB
CUSTOMER.ds DataServices\CustomerDB
Notice that relationships between the data services already exist. These relationships were automatically generated during the Import Source Metadata process, and are based on the foreign key relationship defined in the underlying database.
BEA Liquid Data for WebLogic: Samples Tutorial 65

Figure 5-3 Model Diagram for a Physical Data Service
Lab 5.2 Modeling Relationships Between Physical Data Sources
The next step in data service modeling is to define additional relationships, beyond any automatically generated during the import source metadata process.
A relationship is a logical connection between two data services, such as the CUSTOMER and CUSTOMER_ORDER data services. A relationship exists when one data service retrieves data from another, by invoking one or more of the other data service's functions.
A data service's navigation functions determine the relationship's cardinality and directionality. Arrowheads indicate possible navigation paths. Directionality can be either one directional or bidirectional.
Objectives
In this lab, you will:
Define a relationship between the CUSTOMER and CUSTOMER_ORDER nodes, thereby creating a navigational function between the two nodes.
Modify the relationship properties to enable a “1:0 or many” relationship.
Instructions
1.
2.
Drag and drop the top-level CUSTOMER element onto the top-level CUSTOMER_ORDER element. The Relationship Properties window opens.
In the Relationship Properties window, modify the cardinality properties for the CUSTOMER_ORDER role, by completing the following steps:
a. Select 0 from the Min occurs drop-down list.
BEA Liquid Data for WebLogic: Samples Tutorial 66

b. Select n from the Max occurs drop-down list.
The relationship cardinality is now "1:0 or many" between the CUSTOMER and CUSTOMER_ORDER data services. In other words, one customer can include one or more orders.
3. Click Finish.
Note: In subsequent lessons, you will use additional features of the Relationship Properties window to customize relationship properties.
Figure 5-4 Relationship Properties — Cardinality
Note: It may take a few seconds to generate the relationship line.
Figure 5-5 New Customer: Customer_Order Relationship Defined
4.
5.
6.
Save all files.
Open CUSTOMER.ds in Design View. (The file is located in the DataServices\CustomerDB folder.)
Confirm that the CUSTOMER data service includes a new relationship with the CUSTOMER_ORDER data service, using the getCustomer_Order function.
BEA Liquid Data for WebLogic: Samples Tutorial 67
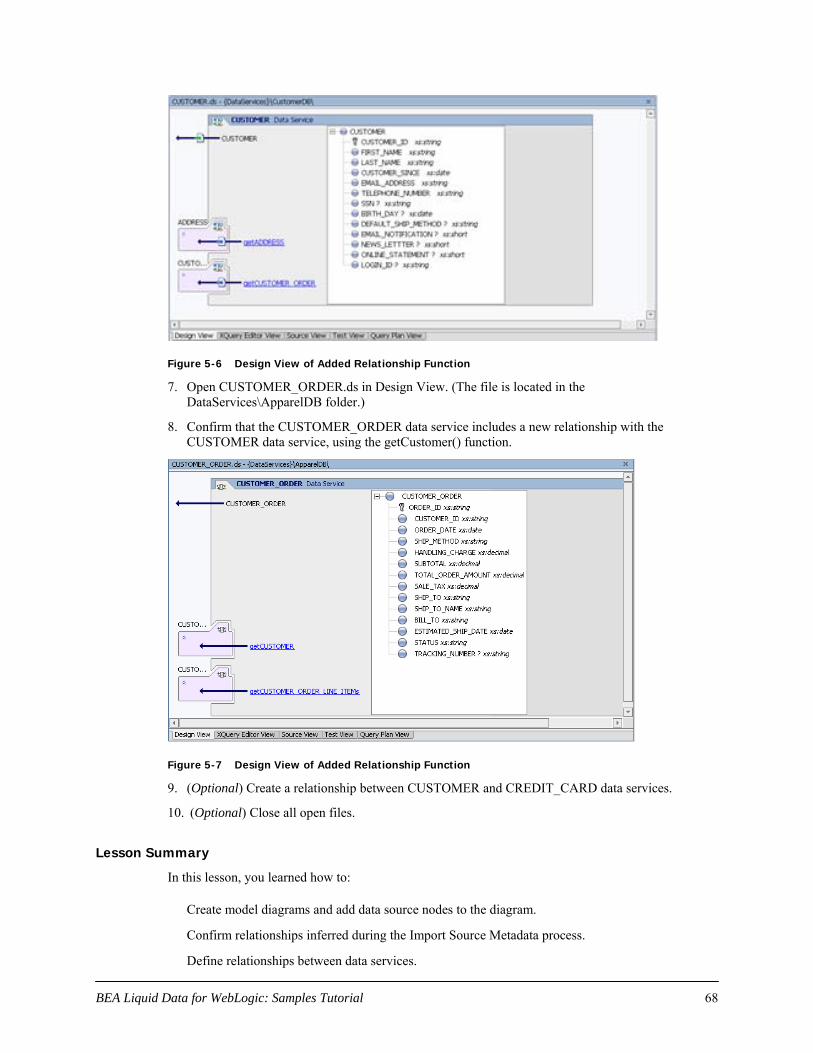
Figure 5-6 Design View of Added Relationship Function
7.
8.
Open CUSTOMER_ORDER.ds in Design View. (The file is located in the DataServices\ApparelDB folder.)
Confirm that the CUSTOMER_ORDER data service includes a new relationship with the CUSTOMER data service, using the getCustomer() function.
Figure 5-7 Design View of Added Relationship Function
(Optional) Create a relationship between CUSTOMER and CREDIT_CARD data services. 9.
10. (Optional) Close all open files.
Lesson Summary
In this lesson, you learned how to:
Create model diagrams and add data source nodes to the diagram.
Confirm relationships inferred during the Import Source Metadata process.
Define relationships between data services.
BEA Liquid Data for WebLogic: Samples Tutorial 68

Lesson 6 Accessing Data in Web Services One of the data sources available with the samples installed with Liquid Data is a web service that provides customer credit rating information. In this lesson, you will generate a physical data service that can be integrated into the CustomerProfile logical data service.
The process for creating a data service based on a web service is similar to importing relational database source metadata. The difference is that Liquid Data uses the WSDL (web service definition language) metadata to intraspect the web service's operation and generate the data service.
Objectives
After completing this lesson, you will be able to:
Import a WSDL.
Use the WSDL to generate a data service.
Test the web service by passing a SOAP request body as a query parameter.
Use a logical data service to invoke the web service and retrieve data.
Overview
A web service is a self-contained, platform-independent unit of business logic that is accessible to other systems on a network. The network can be a corporate intranet or the Internet. Other systems can call the web services' functions to request data or perform an operation.
Web services are increasingly important resources for global business information. Web services can facilitate application-to-application communication and are a useful way to provide data, like stock quotes and weather reports, to an array of consumers over a corporate intranet or the Internet. But they take on additional new power in the enterprise, where they offer a flexible solution for integrating distributed systems, whether legacy systems or new technology.
WSDLs are generally publicly accessible and provide enough detail so that potential clients can figure out how to operate the service solely from reading the WSDL file. If a web service translates English sentences into French, the WSDL file will explain how the English sentences should be sent to the web service, and how the French translation will be returned to the requesting client.
Lab 6.1 Importing a Web Service Project into the Application
When you want to use an external web service from within WebLogic Workshop, you should first obtain that service’s WSDL file. In this lab, you will use the WSDL for a web service project that was created in WebLogic Workshop.
Objectives
In this lab, you will:
Import the CreditRatingWS web service into your sample application. This web service provides getCreditRating and setCreditRating functions for retrieving and updating a customer’s credit rating.
Run the web service to test whether you can retrieve credit rating information.
BEA Liquid Data for WebLogic: Samples Tutorial 69

Instructions
1. Import a web service into a Liquid Data-enabled application, by completing the following steps:
a. Choose File → Import Project. The Import Project → New Project window opens.
b. Select Web Service Project.
Caution: Make sure that you select a project of type web service. If you select another project type, then the CreditRatingWS application may not work correctly.
c. Click Browse.
d. Navigate to the <beahome>\weblogic81\samples\liquiddata\EvalGuide directory.
e. Select CreditRatingWS and click Open.
f. Make sure that the Copy into Application directory checkbox is selected.
g. Click Import and Yes (when the confirmation message opens).
Figure 6-1 Import Web Project
2. In the Application pane, verify that the following items were imported:
A CreditRatingWS project folder containing:
A controls folder, within which are the CreditRatingDB.jcx control and CreditratingDBTest.jws web service.
A credit rating folder, within which is the web service folder that contains the CreditRating.java file.
A WEB-INF folder.
BEA Liquid Data for WebLogic: Samples Tutorial 70

Figure 6-2 Web Service Project
3. Open CreditRatingDBTest.jws in Design View. (This file is located in the CreditRatingWS\controls folder.) The web service diagram should be as displayed in Figure 6-3.
Figure 6-3 Design View of Credit Rating Web Service
4. Test the imported web service, by completing the following steps:
a. Click the Start icon (or press Ctrl + F5) to open the Workshop Test Browser.
b. Enter CUSTOMER3 in the customer_id field.
c. Click getCreditRating. The requested information displays in the Workshop Test Browser.
BEA Liquid Data for WebLogic: Samples Tutorial 71

Figure 6-4 Workshop Test Browser
d. Scroll down to the Service Response section and confirm that you can retrieve credit rating information for CUSTOMER3.
Figure 6-5 Web Service Results
Lab 6.2 Importing Web Service Metadata into a Project
WSDL is a standard XML document type for describing an associated web service so that other software applications can interface with the web service. Files with the .wsdl extension contain web service interfaces expressed in the Web Service Description Language (WSDL).
A WSDL file contains all of the information necessary for a client to invoke the methods of a web service:
The data types used as method parameters or return values.
The individual methods names and signatures (WSDL refers to methods as operations).
The protocols and message formats allowed for each method.
The URLs used to access the web service.
Objectives
In this lab, you will:
Import the CreditRatingWS source metadata via its WSDL, into the DataServices project, thereby generating a new data service (getCreditRatingResponse.ds).
Confirm that the new data service includes the getCreditRating function that you tested in the previous lab.
BEA Liquid Data for WebLogic: Samples Tutorial 72

Instructions
1.
2.
In the Workshop Test Browser, scroll to the top of the window.
Click the Overview tab.
Figure 6-6 Workshop Test Browser Overview
3.
4.
Click Complete WSDL.
Copy the WSDL URI, located in the Address field. The URI is typically: http://localhost:7001/CreditRatingWS/controls/CreditRatingDBTest.jws?WSDL=
Figure 6-7 WSDL URI
5.
6.
7.
8.
Close Workshop Test Browser.
In Workshop: Close all open files.
Create a new folder within the DataServices project folder, and name it WebServices.
Import web service source metadata into the WebServices folder, by completing the following steps:
a. Right-click on the WebServices folder.
b. Choose Import Source Metadata.
BEA Liquid Data for WebLogic: Samples Tutorial 73

c. Choose Web Service from the Data Source Type drop-down list. Then click Next.
Figure 6-8 Web Service Data Source Type
d. Paste the copied WSDL URI into the URI or WSDL File field and click Next.
e. Expand the CreditRatingDBTestSoap and Operations folders.
f. Select the getCreditRating operation, then click Add to populate the Selected Web Service Operations pane.
Figure 6-9 Selected Web Service Operations
BEA Liquid Data for WebLogic: Samples Tutorial 74

g. Click Next and review the Summary information. The Summary information includes:
XML type, for web service objects whose source metadata will be imported.
Name, for each data service that will be generated from the source metadata. (Any name conflicts appear in red and must be resolved before proceeding; however, you can modify any data service name.)
Location, where the generated data service(s) will reside.
h. Click Finish.
Figure 6-10 Web Services Summary
9.
10.
Open getCreditRatingResponse.ds in Design View. (This file is located in the DataServices\WebServices folder.)
Confirm that there is a function called getCreditRating().
Figure 6-11 Web Service Function Added
BEA Liquid Data for WebLogic: Samples Tutorial 75

Lab 6.3 Testing the Web Service via a SOAP Request
Extensible Markup Language (XML) messages provide a common language by which different applications can talk to one another over a network. Most web services communicate via XML. A client sends an XML message containing a request to the web service, and the web service responds with an XML message containing the results of the operation. In most cases these XML messages are formatted according to Simple Object Access Protocol (SOAP) syntax.
SOAP specifies a standard format for applications to call each other's methods and pass data to one another.
Note: Web services may communicate with XML messages that are not SOAP-formatted. The types of messages supported by a particular web service are described in the service’s WSDL file.
Objectives
In this lab, you will:
Use the getCreditRating() function and a SOAP parameter to test the getCreditRatingResponse data service.
Review the results.
Instructions
1.
2.
3.
4.
Build the DataServices project.
Open getCreditRatingResponse.ds in Test View. (This file is located in the DataServices\WebServices folder.)
Select getCreditRating(x1) from the Function drop-down list.
Enter the following SOAP body in the Parameter field: <getCreditRating xmlns="http://www.openuri.org/">
<customer_id>CUSTOMER3</customer_id>
</getCreditRating>
Note: You can create a template for the input parameter by clicking Insert Template.
BEA Liquid Data for WebLogic: Samples Tutorial 76

Figure 6-12 SOAP Parameter
5.
6.
Click Execute.
Review the results, which should be similar to those displayed in Figure 6-13. Notice that only two data elements are returned: the customer ID and the credit rating for that customer.
Figure 6-13 Web Service Results
Lab 6.4 Invoking a Web Service in a Data Service
You are now ready to use the web service to provide the data that populates the CustomerProfile logical data service.
Objectives
In this lab, you will:
Use the getCreditRatingResponse data service to populate the credit rating element in the CustomerProfile data service.
Test the invocation.
Review the results.
Instructions
1.
2.
Open CustomerProfile.ds file in Source View. (The file is located in the DataServices\CustomerManagement folder.)
Add the following namespace definitions, in addition to the ones already defined for the CustomerProfile data service:
declare namespace ws1="ld:DataServices/WebServices/getCreditRatingResponse";
declare namespace ws2 = "http://www.openuri.org/";
BEA Liquid Data for WebLogic: Samples Tutorial 77
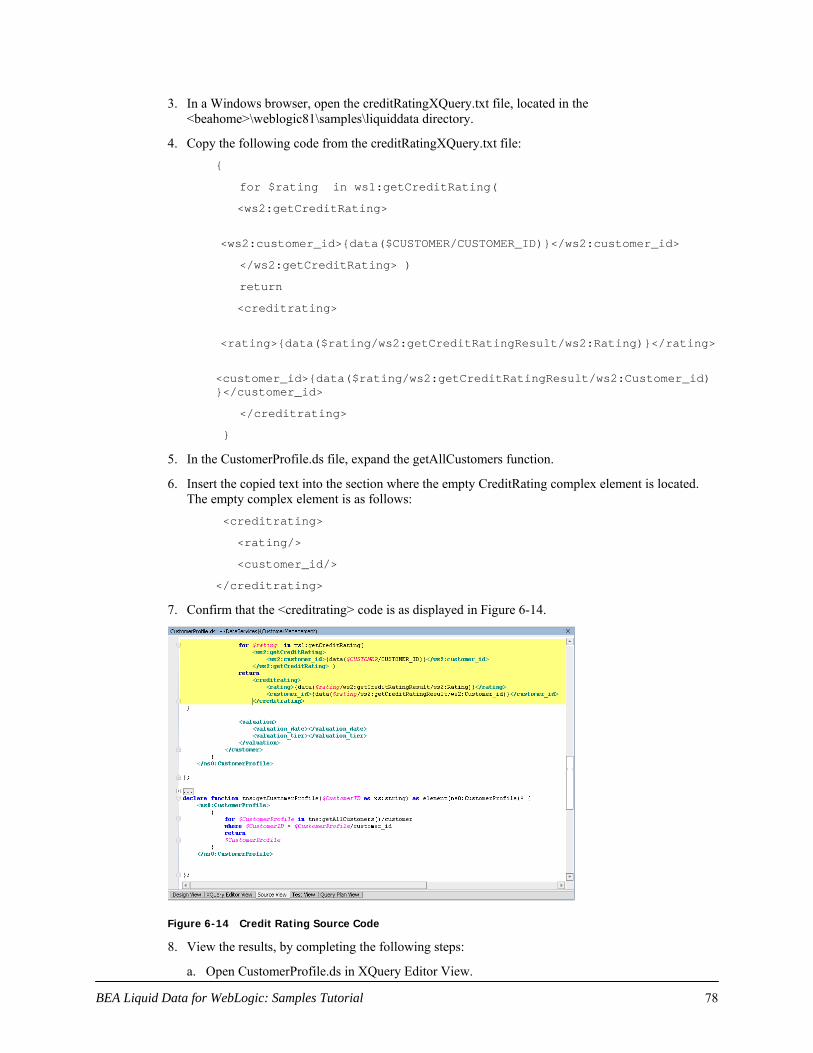
3.
4.
5.
6.
7.
In a Windows browser, open the creditRatingXQuery.txt file, located in the <beahome>\weblogic81\samples\liquiddata directory.
Copy the following code from the creditRatingXQuery.txt file: {
for $rating in ws1:getCreditRating(
<ws2:getCreditRating>
<ws2:customer_id>{data($CUSTOMER/CUSTOMER_ID)}</ws2:customer_id>
</ws2:getCreditRating> )
return
<creditrating>
<rating>{data($rating/ws2:getCreditRatingResult/ws2:Rating)}</rating>
<customer_id>{data($rating/ws2:getCreditRatingResult/ws2:Customer_id)}</customer_id>
</creditrating>
}
In the CustomerProfile.ds file, expand the getAllCustomers function.
Insert the copied text into the section where the empty CreditRating complex element is located. The empty complex element is as follows:
<creditrating>
<rating/>
<customer_id/>
</creditrating>
Confirm that the <creditrating> code is as displayed in Figure 6-14.
Figure 6-14 Credit Rating Source Code
8. View the results, by completing the following steps:
a. Open CustomerProfile.ds in XQuery Editor View.
BEA Liquid Data for WebLogic: Samples Tutorial 78

b. Select getAllCustomers() from the Function dropdown list. The function should be similar to that displayed in Figure 6-15.
Figure 6-15 XQuery Editor View of a Web Service Being Invoked
c. Open CustomerProfile.ds in Design View. The web service is listed as a data source, in the right pane of the diagram.
Figure 6-16 Design View of a Web Service Invoked in a Data Service
9. Test the data service by completing the following steps:
a. Build the DataServices project.
b. Open CustomerProfile.ds in Test View.
c. Select getCustomerProfile(CustomerID) from the Function drop-down list.
BEA Liquid Data for WebLogic: Samples Tutorial 79

d. Enter CUSTOMER3 in the xs:string CustomerID field.
e. Click Execute.
f. Confirm that you can retrieve the credit rating for Customer 3.
Figure 6-17 Customer Profile Data Integrated with Web Service Credit Rating Data
10. Import CreditRatingExit1file from lab folder:
a. Right-click the WebServices folder.
b. Select Import option.
c. Navigate to the <beahome>\weblogic81\samples\liquiddata directory and select file CreditRatingExit1 for import.
d. Build the DataServices project.
e. Open getCreditRatingResponse.ds; click on the header and update the UpdateOverride Class property in the Property Editor to WebServices.CreditRatingExit1. (If the Property Editor is not open, you can select it using the View menu Property Editor option.
BEA Liquid Data for WebLogic: Samples Tutorial 80

11. (Optional) Open the Output window to view the data sources used to generate the Test View
results. You should see the following statement, which indicates that data was pulled from the invoked web service:
DataSource name: ld:DataServices/WebServices/getCreditRatingResponse Invocations: 1 Time: 2344ms
Statement: getCreditRating
Lesson Summary
In this lesson, you learned how to:
Import a web service project, locate its WSDL, and use that WSDL to generate a data source.
Test the web service by passing a SOAP request body as a query parameter.
Use a logical data service to invoke a web service and retrieve data.
BEA Liquid Data for WebLogic: Samples Tutorial 81
Lesson 7 Consuming Data Services Using Java After a Liquid Data application is deployed to a WebLogic Server, clients can use it to access real-time data. Liquid Data supports a services-oriented approach to data access, using several technologies:
Mediator API. The Java-based Mediator API instantiates Liquid Data information as data objects, which are defined by the Service Data Objects (SDO) specification. SDO is a proposed standard that defines a language and architecture intended to simplify and unify the way applications handle data.
Liquid Data Workshop Control. The Liquid Data Workshop control is a wizard-generated Java file that exposes a user-specified data service function to WebLogic Workshop client applications (such as page flows, portals, or web services). You can add functions to the control from data services deployed on any WebLogic server that is accessible to the client application, whether it is on the same WebLogic Server as the client application or on a remote WebLogic Server.
WSDL. WSDL-based web services can act as wrappers for data services.
SQL. The Liquid Data JDBC driver gives SQL clients (such as reporting and database tools) and JDBC applications a traditional, database-oriented view of the data layer. To users of the JDBC driver, the set of data served by Liquid Data appears as a single virtual database, with each service appearing as a table.
In this lesson, you will enable Liquid Data to consume data through the SDO Mediator API.
Objectives
After completing this lesson, you will be able to:
Use SDO in a Java application.
Invoke a data service function using the untyped SDO Mediator API interface.
Access data services from Java, using the typed SDO Mediator API.
Overview
SDO is a joint specification of BEA and IBM that defines a Java-based programming architecture and API for data access. A central goal of SDO is to provide client applications with a unified interface for accessing and updating data, regardless of its physical source or format.
SDO has similarities with other data access technologies, such as JDBC, Java Data Objects (JDO), and XMLBeans. However, what distinguishes SDO from other technologies is that SDO gives applications both static programming and a dynamic API for accessing data, along with a disconnected model for accessing externally persisted data. Disconnected data access means that when Liquid Data gets data from a source, such as a database, it opens a connection to the source only long enough to retrieve the data. The connection is closed while the client operates on the data locally. When the client submits changes to apply to the source, the connection is reopened.
Liquid Data implements the SDO specification as its client programming model. In concrete terms, this means that when a client application invokes a read function on a data service residing on a server, any data is returned as a data object. A data object is a fundamental component of the SDO programming model. It represents a unit of structured information, with static and dynamic interfaces for getting and setting its properties.
BEA Liquid Data for WebLogic: Samples Tutorial 82

In addition to static calls, SDO, like RowSets in JDBC, has a dynamic Mediator API for accessing data through untyped calls (for example, getString("CUSTOMER_NAME")). An untyped Mediator API is useful if you do not know the data service to run at development time.
The Mediator API gives client applications full access to data services deployed on a WebLogic server. The application can invoke read functions, get the results as Service Data Objects, and pass changes back to the source. To use the Mediator API, a client program must first establish an initial context with the server that hosts the data services. The client can then invoke data service queries and operate on the results as Service Data Objects.
Lab 7.1 Running a Java Program Using the Untyped Mediator API
An untyped Mediator API is useful if, at development time, you do not know the data service to run.
Objectives
In this lab, you will:
Add the ld-client.jar file to your application library.
Add a Java project to your application.
Add the method calls necessary to use the Mediator API.
Review the results in the Output window and a standalone Java application.
Instructions
1. Add the Liquid Data client library to your Libraries folder by completing the following steps:
a. Right-click the Libraries folder.
b. Choose Add Library.
c. Navigate to BEA_HOME\weblogic81\liquiddata\lib, where BEA_HOME is the directory where you installed Liquid Data.
d. Select ld-client.jar and click Open. The file is added to the Libraries folder.
Figure 7-1 Add Library
2. Add a Java project to your application by completing the following steps:
a. Right-click the Evaluation application folder.
b. Choose Import Project.
BEA Liquid Data for WebLogic: Samples Tutorial 83

c. Select Java Project.
d. Click Browse and navigate to the <beahome>\weblogic81\samples\liquiddata directory.
e. Select DataServiceClient, click Open, and then click Import.
Figure 7-2 Importing Java Project
The Java project is added to the application, in the DataServiceClient.java folder. To use the Mediator API, you need to add the method calls to instantiate the data service, invoke the getCustomerProfile() method and assign the return value of the function to the CustomerProfileDocument SDO/XML bean.
3.
4.
Open the DataServiceClient.java file, located in the DataServiceClient folder.
Insert the method calls necessary to use the Mediator API, by completing the following steps:
a. Locate the main method. You will see a declaration of the data service, a String params [ ], plus the CustomerProfileDocument variable.
Figure 7-3 Java Source Code
b. Confirm that the String params [ ], which is an object array consisting of arguments to be passed to the function, is set as follows: String params[] = {customer_id};
BEA Liquid Data for WebLogic: Samples Tutorial 84

c. Construct a new data service instance, by modifying the DataService ds = null line. The Mediator API provides a class called DataServiceFactory, which can be used to construct the new data service instance. Using the newDataService method, you can pass in the initial JNDI context, the application name, and the data service name as parameters. For example:
DataService ds = DataServiceFactory.newDataService(
getInitialContext(), // Initial Context
"Evaluation", // Application Name
"ld:DataServices/CustomerManagement/CustomerProfile" // Data Service Name
);
Note: You must have removed “*” in the return type in the getCustomerProfile() function inside the CustomerProfile data service.
d. Invoke the data service, by modifying the CustomerProfileDocument doc = null line. For example: CustomerProfileDocument doc = (CustomerProfileDocument) ds.invoke("getCustomerProfile",params);
e. Review the inserted code and verify that it is similar to that displayed in Figure 7-4.
Figure 7-4 Untyped Mediator API Code Added
5. Review the code included in the //Show Customer Data and //Show Order Data sections. This code will be used to retrieve customer information, all orders of that customer (order ID, order date, and total amount) and the line items of each order (product ID, price and quantity). The code should be similar to that displayed in Figure 7-5.
BEA Liquid Data for WebLogic: Samples Tutorial 85

Figure 7-5 Customer and Order Code
6. Click the Start icon (or press Ctrl + F5) to compile your program (if a Confirmation message displays, then click OK). It may take a few moments to compile the program.
Note: WebLogic Server must be running. Confirm that the program return the specified results by viewing the results in the Output window (if the Output window is not open, choose View → Windows → Output).
Figure 7-6 Results: Output Window
BEA Liquid Data for WebLogic: Samples Tutorial 86

6. (Optional) View the results in a standalone Java environment of your choice.
Note: If you want to use the SDO Mediator API outside of WebLogic Workshop, you need to add the following files to your classpath:
WebLogic Libraries: %\bea\weblogic81\server\lib\weblogic.jar
CustomerProfile classes: %\bea\weblogic81\samples\LiquidData\Evaluation\APP-INF\lib\DataServices.jar
XML Bean: %\bea\weblogic81\server\lib\xbean.jar
Liquid Data Libraries: %\bea\weblogic81\liquiddata\lib\ld-server-core.jar
Liquid Data Client Libraries: %\bea\weblogic81\liquiddata\lib\ld-client.jar
Service Data Object: %\bea\weblogic81\liquiddata\lib\wlsdo.jar
SDO Mediator API Java file: %\bea\weblogic81\samples\LiquidData\Evaluation\DataServiceClient \DataServiceClient.java
Figure 7-7 Results: Standalone Java Environment
BEA Liquid Data for WebLogic: Samples Tutorial 87

Lab 7.2 Running a Java Program Using the Typed Mediator API
With the typed mediator interface, you instantiate a typed data service proxy in the client, instead of using the generic data service interface. The typed data service interface may be easier to program and it improves code readability.
In this lab, you will access data services from a Java client, using the typed SDO Mediator API. You will be provided with a generated API for your data service, which lets you directly invoke the actual functions as methods (for example, ds.getCustomerProfile(customer_id).
Objectives
In this lab, you will:
Build your application as an EAR file.
Build the SDO mediator client.
Add the SDO mediator client's generated JAR file to your libraries folder.
Construct a DataServices instance and invoke the data service.
View the results in the Output window.
View the results in a standalone Java application.
Instructions
1. Build your application as an EAR file by completing the following steps:
a. Choose Tools → Application Properties and click Build.
b. In the Project build order section, place DataServices as the first project.
c. Clear the Project: DataServiceClient checkbox, since this is not required for the EAR file.
d. Click OK.
Figure 7-8 Project Build Order
2. Build the SDO Mediator Client, by completing the following steps:
BEA Liquid Data for WebLogic: Samples Tutorial 88

a. Right-click the Evaluation application.
b. Build your application.
c. Choose Build SDO Mediator Client.
d. Click Yes, when asked whether you want to build an EAR file.
e. Confirm that you see the following text in the Build window (if not open, choose View → Windows → Build):
Generating SDO client api jar .....
Browsing liquid data jars .....
SDO client api jar generated successfully as <beahome>/user_projects/applications/Evaluation\Evaluation-ld-client.jar
Note: The drive information may be different for your application.
3. Add the generated SDO mediator client file into your Libraries folder by completing the following steps:
a. Right-click the Libraries folder.
b. Choose Add Library.
c. Navigate to the <beahome>\weblogic81\samples\LiquidData\Evaluation directory and select Evaluation-ld-client.jar.
Note: For other JREs, this JAR file needs to be added to the classpath. Click Open.
4. Construct a new data service instance and invoke the data service, by completing the following steps:
a. Open the DataServiceClient.java file.
b. Replace the declaration of the DataService and CustomerProfileDocument objects with the following (code to modify is displayed in boldface type): CustomerProfile ds = CustomerProfile.getInstance(
getInitialContext(), // Initial Context
"Evaluation" // Application Name
);
CustomerProfileDocument doc = ds.getCustomerProfile(customer_id);
c. Note: Edit getInitialContext () to suit your environment. Click Alt + Enter and select dataservices.customermanagement.CustomerProfile. This imports the specified element.
Figure 7-9 Source View of Code for Typed Mediator API
BEA Liquid Data for WebLogic: Samples Tutorial 89
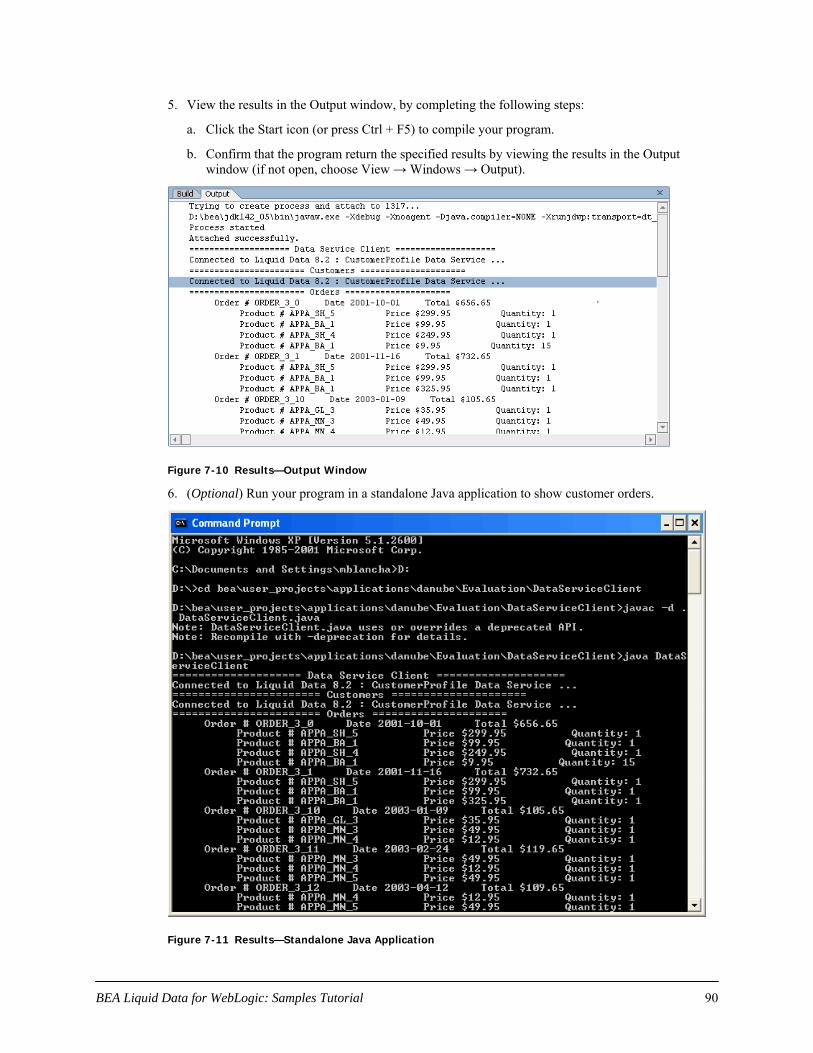
5. View the results in the Output window, by completing the following steps:
a. Click the Start icon (or press Ctrl + F5) to compile your program.
b. Confirm that the program return the specified results by viewing the results in the Output window (if not open, choose View → Windows → Output).
Figure 7-10 Results—Output Window
(Optional) Run your program in a standalone Java application to show customer orders. 6.
Figure 7-11 Results—Standalone Java Application
BEA Liquid Data for WebLogic: Samples Tutorial 90

Lab 7.3 Resetting the Mediator API
After Lab 7.2, you must remove the Evaluation_ld-client.jar file from your Libraries folder, since this JAR file will create inconsistencies in future lessons. You must also revert the method calls to use the Untyped Mediator API.
Objectives
In this lab, you will:
Remove the Evaluation_ld-client.jar file from the Libraries folder.
Revert the method calls to use the untyped Mediator API.
Instructions
1.
2.
Delete the Evaluation-ld-client.jar file by completing the following steps:
a. Expand the Libraries folder.
b. Right-click the Evaluation-ld-client.jar file.
c. Choose Delete from the pop-up menu.
d. Click Yes, when the confirmation message displays.
Revert the method calls to use the untyped mediator API, by completing the following steps:
a. Open the DataServiceClient.java file.
b. Replace the declaration of the DataService and CustomerProfileDocument objects with the following (code to modify is displayed in boldface): DataService ds = DataServiceFactory.newDataService(
getInitialContext(), // Initial Context
"Evaluation", // Application Name
"ld:DataServices/CustomerManagement/CustomerProfile" // Data Service Name
);
CustomerProfileDocument doc = (CustomerProfileDocument) ds.invoke("getCustomerProfile",params);
System.out.println("Connected to Liquid Data 8.5 : CustomerProfile Data Service ...");
Note: If your application name is different from Evaluation, locate Evaluation in the newDataService and rename it to reflect the name of your application. The import CustomerProfile statement also should be removed.
c. Save your work.
Lesson Summary
In this lesson, you learned how to:
Set the classpath environment to use the SDO Mediator API.
Use the untyped and typed SDO Mediator API to access data services from Java.
Generate the specific client-side Mediator API for your data service.
BEA Liquid Data for WebLogic: Samples Tutorial 91

Lesson 8 Consuming Data Services Using WebLogic Workshop Controls
A Liquid Data control provides WebLogic Workshop applications with east access to data service functions.
Objectives
After completing this lesson, you will be able to:
Create a Java page flow (.jpf) web application file, using WebLogic Workshop.
Use the WebLogic Workshop NetUI data binding context to display customer profile information on the web.
Use the Liquid Data control to access data services from a Java page flow.
Overview
A convenient way to quickly access Liquid Data from a WebLogic Workshop application, such as page flows, process definitions, portals, or web services, is through the Liquid Data control.
The Liquid Data control is a wizard-generated Java file that exposes to WebLogic Workshop client applications only those data service function you choose. You can add functions to a control from data services deployed on any WebLogic Server that is accessible to the client application, whether it is on the same WebLogic Server as the client application or on a remote WebLogic Server.
If accessing data services on a remote server, information regarding the information that the service functions return (in the form of XML schema files) are first downloaded from the remote server into the current application. The schema files are placed in a schema project named after the remote application. The directory structure within the project mirrors the directory structure of the remote server.
When you create a Liquid Data control, WebLogic Workshop generates interface files for the target schemas associated with the queries and then a Java Control Extension (.jcx) file. The .jcx file contains the methods included from the data services when the control was created and a commented method that, when uncommented, allows you to pass any XQuery statement to the server in the form of an ad-hoc query.
Lab 8.1 Installing a Liquid Data Control
Liquid Data controls let you easily access data from page flows, process definitions, portals, or web services.
Objectives
In this lab, you will:
Import a Web project that will be used to demonstrate Liquid Data control capabilities.
Install a Liquid Data control.
Instructions
1. Right-click the Evaluation application folder.
BEA Liquid Data for WebLogic: Samples Tutorial 92

2.
3.
4.
5.
6.
7.
8.
Choose Import Project.
Choose Web Project.
Navigate to the <beahome>\weblogic81\samples\liquiddata directory.
Select the CustomerManagementWebApp project and click Open.
Click Import, and then click Yes when asked whether you want to install project files.
Right-click the Evaluation application folder.
Choose Install → Controls → Liquid Data.
Note: The Liquid Data option will not display, if you previously installed a Liquid Data control.
9. Expand the Libraries folder and confirm that the LiquidDataControl.jar file is installed.
Figure 8-1 Liquid Data Control
Lab 8.2 Defining the Liquid Data Control
1.
2.
Create a new folder in the CustomerManagementWebApp web project, and name it controls.
Define a new Java control as a Liquid Data control, by completing the following steps:
a. Right-click the controls folder.
b. Choose New → Java Control.
c. Select Liquid Data.
d. Enter CustomerData in the File Name field.
e. Click Next.
BEA Liquid Data for WebLogic: Samples Tutorial 93

Figure 8-2 Creating a New Java Control
f. Click Create.
Note: Do not change any default settings.
Figure 8-3 Creating a New Liquid Data Control
g. In the Select Liquid Data Queries window: Expand the CustomerManagement and CustomerProfile folders.
h. Select getCustomerProfile().
i. Press Ctrl.
j. Select submitCustomerProfile().
k. Click Add and then click Finish.
Figure 8-4 Selecting Liquid Data Queries for Liquid Data Control
It will take a few moments for the project to compile. After compilation, you should see a Java-based Liquid Data control called CustomerData.jcx, with the following signatures:
getCustomerProfile() is a data service read function.
getCustomerProfileWithFilter() is a data service read function that uses the XQuery filter for dynamic filtering and sorting.
BEA Liquid Data for WebLogic: Samples Tutorial 94

submitCustomerProfile() is a submit function for all the changes (inserts, updates, and deletes) done to the customer profile and persisting the data to the data sources involved.
Figure 8-5 Liquid Data Control
Lab 8.3 Inserting a Liquid Data Control into a Page Flow
At this point, you created a Liquid Data control and specified which data service functions (getCustomerProfile() and submitCustomerProfile()) you want to want to use in this control. However, the control is not yet associated with a page flow, from which end-users can retrieve data.
Objectives
In this lab, you will:
Use Flow View to add the CustomerData control to the CustomerPageFlowController.jpf file.
Use Source View to confirm the addition.
Instructions
1. Open CustomerPageFlowController.jpf in Flow View. (The file is located in the CustomerManagementWebApp\CustomerPageFlow folder.)
Note: There are two "errors" in the file, indicated by the two red marks in the scrollbar. This is because the getCustomer() and submitCustomer() functions are not yet associated with a Liquid Data control.
BEA Liquid Data for WebLogic: Samples Tutorial 95

Figure 8-6 Page Flow View
2.
3.
4.
In Data Palette, go to Controls. (If Data Palette is not open, choose View → Windows → Data Palette.)
Choose Add → Local Controls → CustomerData, and name it LDControl.
Click Create.
Figure 8-7 Insert Custom Liquid Data Control
5.
6.
Open the CustomerPageFlowController.jpf in Source View.
Confirm that the page flow now includes the control as an instance variable: private controls.CustomerData LDControl;
BEA Liquid Data for WebLogic: Samples Tutorial 96
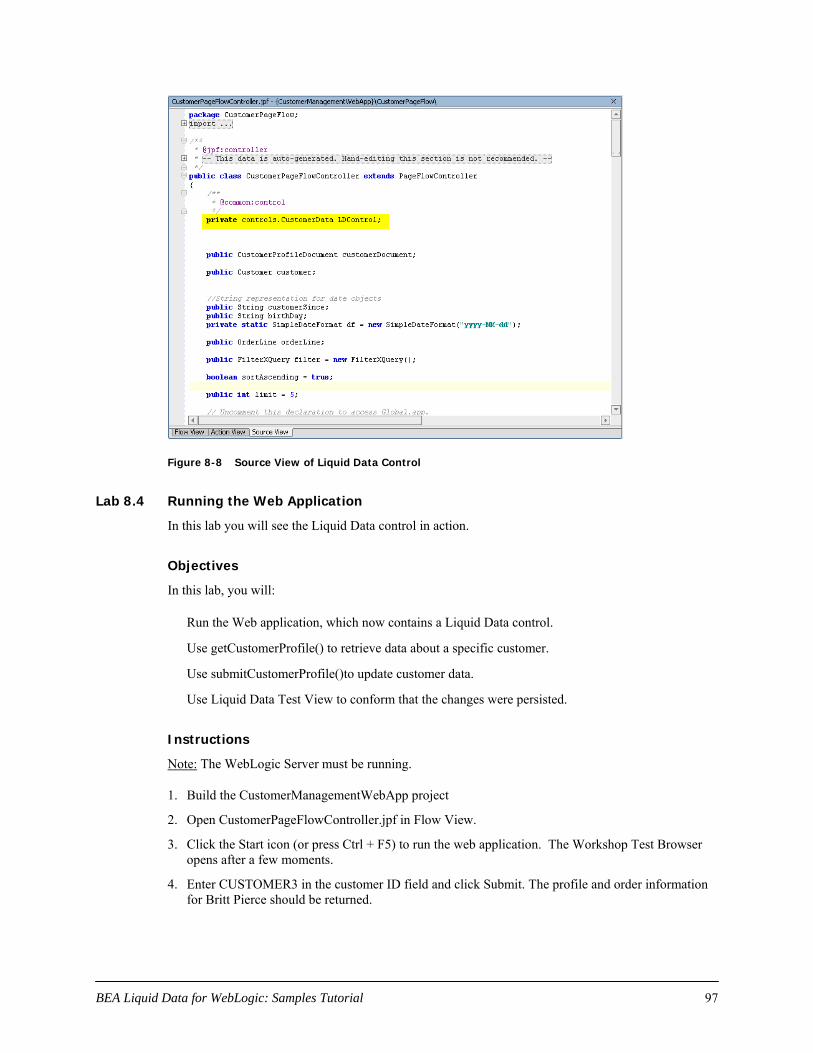
Figure 8-8 Source View of Liquid Data Control
Lab 8.4 Running the Web Application
In this lab you will see the Liquid Data control in action.
Objectives
In this lab, you will:
Run the Web application, which now contains a Liquid Data control.
Use getCustomerProfile() to retrieve data about a specific customer.
Use submitCustomerProfile()to update customer data.
Use Liquid Data Test View to conform that the changes were persisted.
Instructions
Note: The WebLogic Server must be running.
1.
2.
3.
4.
Build the CustomerManagementWebApp project
Open CustomerPageFlowController.jpf in Flow View.
Click the Start icon (or press Ctrl + F5) to run the web application. The Workshop Test Browser opens after a few moments.
Enter CUSTOMER3 in the customer ID field and click Submit. The profile and order information for Britt Pierce should be returned.
BEA Liquid Data for WebLogic: Samples Tutorial 97

Figure 8-9 Java Page Flow Results
Modify the customer information by completing the following steps:
a. Click Update Profile.
b. Modify Email Address to the following: [email protected]
c. Click Submit.
Figure 8-10 Updating a Customer Profile
d. Click Submit All Changes. (The link is at the bottom of the Workshop Test Browser page.)
BEA Liquid Data for WebLogic: Samples Tutorial 98

5. Add a new order line item by completing the following steps:
a. In Order_3_0, click New Order Item. (The link is located at the bottom of all line items for Order_3_0.)
b. Enter the new order information, as displayed in Figure 8-11, and then click Submit.
Figure 8-11 Adding New Order Information
The new order information displays in the Workshop Test Browser.
BEA Liquid Data for WebLogic: Samples Tutorial 99

Figure 8-12 Updated Data
6.
7.
8.
9.
Modify an existing order by completing the following steps:
a. In Order_3_0, click Line 6.
b. Enter 15 in the Quantity field.
c. Click Submit to close the Order Information window.
Click Submit All Changes. (The link is at the bottom of the Workshop Test Browser page.)
Close Workshop Test Browser.
Test whether the changes were persisted by completing the following steps:
a. In WebLogic Workshop, open CustomerProfile.ds in Test View.
b. Select getCustomerProfile(CustomerID) from the Function drop-down list.
c. Enter CUSTOMER3 in the Parameter field.
d. Click Execute.
e. Expand the <creditrating>, <order> and <order_line> nodes to confirm that the changes persisted.
Figure 8-13 Test View—Confirm Changes
BEA Liquid Data for WebLogic: Samples Tutorial 100
Lesson Summary
In this lesson, you learned how to:
Install the Liquid Data control in your application.
Create a Liquid Data control for a web project, and then add functions from your data service into the Liquid Data control.
Add the Liquid Data control into a Java Page Flow.
Use the Liquid Data control to access data services from a web application.
(Optional) Pass data service results to the JSP, using NetUI.
BEA Liquid Data for WebLogic: Samples Tutorial 101

Lesson 9 Accessing Data Service Functions Through Web Services
A Liquid Data control can be used to access data through a page flow, web service, or business logic. In the previous lesson, you created a Liquid Data control and used it within a web application's page flow. In this lesson, you will use that same Liquid Data control to generate a .wsdl for a web service that can invoke data service functions.
Objectives
After completing this lesson, you will be able to:
Use a Liquid Data control to generate a web service for a data service.
Test the generated web service and invoke data service functions through the web service interface.
Generate a .wsdl file for web service clients.
Overview
A web service is a set of functions packaged into a single entity that is available to other systems on a network. The network can be a corporate intranet or the Internet. Other systems can call these functions to request data or perform an operation.
Web services are a useful way to provide data to an array of consumers over the Internet, like stock quotes and weather reports. But they take on a new power in the enterprise, where they offer a flexible solution for integrating distributed systems, whether legacy systems or new technology.
Lab 9.1 Generating a Web Service from a Liquid Data Control
In the previous lesson, you created a Liquid Data control, which enabled WebLogic Workshop to generate a Java Control Extension (.jcx) file. This file contains the underlying data service's method calls. In this lab, you will use that Liquid Data control to generate a web service.
Objectives
In this lab, you will:
Generate a stateless web service interface, through which you can access the Liquid Data control.
Test the web service to determine that it returns customer profile and order information.
Instructions
1.
2.
3.
Expand the CustomerManagementWebApp and controls folders.
Right-click the CustomerData.jcx control.
Choose Generate Test JWS (Stateless). A new file, CustomerDataTest.jws, is generated. With this Java Web Service (.jws) file, the Liquid Data control methods are now available through a web service interface.
BEA Liquid Data for WebLogic: Samples Tutorial 102

Figure 9-1 Java Web Service File
4.
5.
6.
Open the CustomerDataTest.jws file in Source View.
Click the Start icon (or press Ctrl+F5). The Workshop Test Browser opens.
Enter CUSTOMER3 in the stringp0 field.
Figure 9-2 Workshop Test Browser: Web Service
7.
8.
Click getCustomerProfile. The customer profile and order information for Customer 3 is retrieved.
View both the "Returned from" and "Service Response" results, which should be similar to that displayed in Figure 9-3.
BEA Liquid Data for WebLogic: Samples Tutorial 103

Figure 9-3 Web Service Test Results
9.
1.
Close the Workshop Test Browser.
Lab 9.2 Using a Liquid Data Control to Generate a WSDL for a Web Service
You can use the Java Web Service file to generate a WSDL. A WSDL file contains all of the information necessary for a client to invoke the methods of a web service:
The data types used as method parameters or return values.
The individual methods names and signatures (WSDL refers to methods as operations).
The protocols and message formats allowed for each method.
The URLs used to access the web service.
Objectives
In this lab, you will:
Generate a .wsdl file, based on the Liquid Data control.
(Optional) View the .wsdl file's structure and source code.
Instructions
Right-click the CustomerDataTest.jws control.
BEA Liquid Data for WebLogic: Samples Tutorial 104

2. Choose Generate WSDL File. The CustomerDataTestContract.wsdl is generated, which can be used by other web service clients.
Figure 9-4 New WSDL File
(Optional) Open the CustomerDataTestContract.wsdl file and explore the document structure and source code.
3.
BEA Liquid Data for WebLogic: Samples Tutorial 105

Figure 9-5 Document Structure
Lesson Summary
In this lesson, you learned how to:
Use a Liquid Data control to generate a web service for a data service.
Test the generated web service and invoke data service functions through the web service interface.
Generate a .wsdl file for web service clients.
BEA Liquid Data for WebLogic: Samples Tutorial 106
Lesson 10 Updating Data Services Using Java One of the features introduced with BEA Liquid Data for WebLogic 8.5 is the ability to write data back to the underlying data sources. This write service is built on top of the Service Data Object (SDO) specification, and provides the ability to update, insert, and delete results returned by a data service. It also provides the ability to submit all changes to the SDO (inserts, deletes, and updates) to the underlying data sources for persisting.
Objectives
After completing this lesson, you will be able to:
Update, add to, and delete data from data service objects.
Submit changes to the underlying data sources, using the Mediator API.
Overview
When you update, add, or delete from data service objects, all changes are logged in the SDO's change summary. When the change is submitted, items indicated in the Change Summary log are applied in a transactionally-safe manner, and then persisted to the underlying data source. Changes to relational data sources are automatically applied, while changes to other data services, such as web services and portals, are applied using a Liquid Data update framework.
Lab 10.1 Modifying and Saving Changes to the Underlying Data Source
Although the steps in the next three labs are different, the underlying principle is the same: When you update, add, or delete from data service objects, all changes are logged in the SDO's change summary. When the change is submitted, items indicated in the Change Summary log are applied in a transactionally-safe manner, and then persisted to the underlying data source. Changes to relational data sources are automatically applied, while changes to other data services, such as web services and portals, are applied using a Liquid Data update framework.
Objectives
In this lab, you will:
Modify customer data and save the changes to the SDO Change Summary log.
View the results in the Output window.
Invoke the submit() method of the Mediator API to save the changes to the underlying data source.
View the results in a web service.
BEA Liquid Data for WebLogic: Samples Tutorial 107

Instructions
1.
2.
Open the DataServiceClient.java file, located in the DataServiceClient project folder.
Change the first and last name of CUSTOMER3 to Joe Smith (it’s currently Brett Pierce), by using the set() methods of the Customer data object instance. You do this by adding the set() method to the //Show Customer Data section (new code is displayed in boldface type):
Customer customer = doc.getCustomerProfile().getCustomerArray(0);
customer.setLastName("Smith");
customer.setFirstName("Joe");
System.out.println("Customer Name : " + customer.getLastName() + ", " + customer.getFirstName());
Figure 10-1 set() Method Specified
3.
4.
5.
6.
Save your work.
Right-click the DataServiceClient project folder and choose Build DataServiceClient.
Click the DataServiceClient.java file's Start icon (or press Ctrl + F5).
Confirm that the changes were submitted, by viewing the results in the Output window. (If the window is not open, choose View → Windows → Output.)
Note: At this point, the changes only exist as entries in the SDO Change Summary Log, not in the data source. You must complete the remaining steps in this lab to ensure that the underlying data source is updated.
Figure 10-2 Change Results in Output Window
BEA Liquid Data for WebLogic: Samples Tutorial 108

7.
8.
Invoke the Mediator API’s submit() method and save the changes to the data source, by using the data service instance. The submit() method takes two parameters: the document to submit and the data service name. You do this by adding the following code into the //Show Customer Data section of the file:
ds.submit(doc, "ld:DataServices/CustomerManagement/CustomerProfile.ds");
Change the output code, as follows: System.out.println("Change Submitted");
Figure 10-3 submit() and Output Method Specified
9.
10.
Click the DataServiceClient.java file's Start icon (or press Ctrl + F5).
Confirm that the changes persisted to the underlying data source by completing the following steps:
a. Click the CustomerPageFlowController.jpf application's Start icon (or press Ctrl + F5) to open the Workshop Test Browser.
b. In the Workshop Test Browser, enter CUSTOMER3 in the Customer ID field and click Submit.
c. Confirm that the CUSTOMER3 name is now Smith, Joe.
d. Close the Workshop Test Browser.
Figure 10-4 Change Results in Test Browser
BEA Liquid Data for WebLogic: Samples Tutorial 109

Lab 10.2 Inserting New Data to the Underlying Data Source Using Java
You can use the Mediator API to add new information to the underlying data source, thereby reducing the need to know a variety of data source APIs.
Objectives
In this lab, you will:
Add new data and save the changes to the SDO Change Summary log.
Invoke the submit() method of the Mediator API to save the changes to the underlying data source.
View the results in a web service.
Instructions
In WebLogic Workshop: Open the DataServiceClient.java file. 1.
2.
3.
4.
Add a new item to ORDER_3_0 (the first order placed by CUSTOMER3), by using the addNewOrderLine()method of the Order Item data object instance. You do this by inserting the following code into the //Show Customer Data section, after System.out.println("Change Submitted"):
// Get the order
Order myorder = customer.getOrders().getOrderArray(0);
// Create a new order item
OrderLine newitem = myorder.addNewOrderLine();
Set the values of the new order item, including values for all required columns. (You can check the physical or logical .xsd file to determine what elements are required.) All foreign keys must be valid; therefore, use APPA_GL_3 as the Product ID.
Since the item will be added as a child of ORDER_3_0, you do not need to setOrderID(); the SDO update will automatically set the foreign key to match its parent.
To set the values, insert the following code above the //Show Order Data section of the Java file: // Fill the values of the new order item
newitem.setLineId("8");
newitem.setProductId("APPA_GL_3");
newitem.setProduct("Shirt");
newitem.setQuantity(new BigDecimal(10));
newitem.setPrice(new BigDecimal(10));
newitem.setStatus("OPEN");
Press Alt + Enter to enable java.math.BigDecimal.
BEA Liquid Data for WebLogic: Samples Tutorial 110

5.
6.
7.
Invoke the Mediator API’s submit method and save the changes to the data source, by using the data service instance. (The submit() method takes in two parameters: the document to submit and the data service name.)
You do this by inserting the following code into the //Show Order Data section of the java file: // Submit new order item
ds.submit(doc, "ld:DataServices/CustomerManagement/CustomerProfile.ds");
System.out.println("Change Submitted");
Comment out the code where customer first name and last name were set, including call to submit method
Confirm that the //Show Order Data section of your java file is as displayed in Figure 10-5.
Figure 10-5 Java Code to Add Line Item
8.
9.
Click the DataServiceClient.java file's Start icon (or press Ctrl + F5).
Confirm that the changes persisted to the underlying data source by completing the following steps:
a. Click the CustomerPageFlowController.jpf application's Start icon (or press Ctrl + F5) to open the Workshop Test Browser.
b. In the Workshop Test Browser, enter CUSTOMER3 in the Customer ID field and click Submit.
c. Find ORDER_3_0 and verify that the new item (8) exists.
BEA Liquid Data for WebLogic: Samples Tutorial 111

Figure 10-6 New Order Item Added
Lab 10.3 Deleting Data from the Underlying Data Source Using Java
You can use the Mediator API to delete information to the underlying data source, thereby reducing the need to know a variety of data source APIs.
Objectives
In this lab, you will:
Delete data and save the changes to the SDO Change Summary log.
Invoke the submit() method of the Mediator API to save the changes to the underlying data source.
View the results in a web service.
Instructions
1.
2.
In the Workshop Test Browser, determine the new item’s placement in the array and subtract 1. For example, if line item with line_id = 8 is the fifth item for ORDER_3_0, its order placement is 4.
Close the Workshop Test Browser.
BEA Liquid Data for WebLogic: Samples Tutorial 112

3.
4.
In the DataServicesClient.java file delete or comment out the code that added a new order line item.
Add an instance of the item that you want to delete, by inserting the following code file: // Get the order item
OrderLine myItem = customer.getOrders().getOrderArray(0).getOrderLineArray(4);
Note: The getOrderLineArray() is based on the item's placement in the array. As displayed in Figure 10-6, 8 is the fifth item, making the variable 4. You should use the variable that is correct for your situation.
5.
6.
7.
Call the delete method by inserting the following code: // Delete the order item
myItem.delete();
Submit the changes, using the Mediator API’s submit() method. // Submit delete order item
ds.submit(doc, "ld:DataServices/CustomerManagement/CustomerProfile.ds");
System.out.println("Change Submitted");
Confirm that the code is as displayed in Figure 10-7.
Figure 10-7 Java Code to Delete Line Item
8.
9.
10.
Build the DataServiceClient project.
Click the DataServiceClient.java file's Start icon (or press Ctrl + F5).
Confirm that the changes persisted to the underlying data source by completing the following steps:
a. Click the CustomerPageFlowController.jpf application's Start icon (or press Ctrl+F5) to open the Workshop Test Browser.
b. In the Workshop Test Browser, enter CUSTOMER3 in the Customer ID field and click Submit.
c. Find ORDER_3_0 and verify that Line 8 is no longer present.
BEA Liquid Data for WebLogic: Samples Tutorial 113

d. Close the Workshop Test Browser.
Lesson Summary
In this lesson, you learned how to:
Update, add to, and delete data from data service objects.
Submit changes to the underlying data sources, using the Mediator API.
BEA Liquid Data for WebLogic: Samples Tutorial 114

Lesson 11 Filtering, Sorting, and Truncating XML Data When designing your data service, you can specify read functions that filter data service return values. However, instead of trying to create a read function for every possible client requirement, you can create generalized read functions to which client applications can apply custom filtering or ordering criteria at runtime.
Objectives
After completing this lesson, you will be able to:
Use the FilterXQuery class to create dynamic filter, sort, and truncate data service results.
Apply the FilterXQuery class to a data service, using the Mediator API or Liquid Data control.
Overview
Data users often want to access information in ways that are not anticipated in the design of a data service. The filtering and ordering API allow client applications to control what data is returned by a data service read function call based on conditions specified at runtime.
Although you can specify read functions that filter data service return values, it may be difficult to anticipate all the ways that client applications may want to filter return values. To deal with this contingency, Liquid Data lets client applications specify dynamic filtering, sorting, and truncating criteria against the data service. These criteria are evaluated on the Server, before being transmitted on the network, thereby reducing the data set results to items matching the criteria. Where possible, these instances are “pushed down” to the underlying data source, thereby reducing the data set returned to the user.
The advantage of the FilterXQuery class is that you can define client-side filtering operations, without modifying or re-deploying your data services.
Lab 11.1 Filtering Data Service Results
With the FilterXQuery class addFilter() method, filtering criteria are specified as Boolean condition statements (for example, ORDER_AMOUNT > 1000). Only items that meet the condition are included in the return set.
The addFilter() method also lets you create compound filters that provide significant flexibility, given the hierarchical structure of the data service return type. In other words, given a condition on a nested element, compound filters let you control the effects of the condition in relation to the parent element.
For example, consider a multi-level data hierarchy for CUSTOMERS/CUSTOMER/ORDER, in which CUSTOMERS is the top level document element, and CUSTOMER and ORDER are sequences within CUSTOMERS and CUSTOMER respectively. Finally, ORDER_AMOUNT is an element within ORDER.
An ORDER_AMOUNT condition (for example, CUSTOMER/ORDER/ORDER_AMOUNT > 1000) can affect what values are returned in several ways:
It can cause all CUSTOMER objects to be returned, but filter ORDERS that have an amount less than 1000.
It can cause only CUSTOMER objects to be returned that have at least one large order. All ORDER objects are returned for every CUSTOMER.
BEA Liquid Data for WebLogic: Samples Tutorial 115
It can cause only CUSTOMER objects to be returned that have at least one large order along with only large ORDER objects.
It can cause only CUSTOMER objects to be returned for which every ORDER is greater than 1000.
Instead of writing XQuery functions for each case, you just pass the filter object as a parameter when executing a data service function, either using the Liquid Data control or Mediator API.
Objectives
In this lab, you will:
Import the FilterXQuery class, which enables filtering, truncating, and sorting of data.
Add a condition filter.
View the results through the Mediator API.
Instructions
1.
2.
3.
4.
5.
6.
7.
Open the DataServiceClient.java file.
Delete the code that removed the line item with line_id = 8 order item delete code.
Delete the invoke and println code from the //Insert Code section: CustomerProfileDocument doc = (CustomerProfileDocument) ds.invoke("getCustomerProfile",params);
System.out.println("Connected to Liquid Data 8.5 : CustomerProfile Data Service ...");
Import the FilterXQuery class by adding the following code: import com.bea.ld.filter.FilterXQuery;
Create a filter instance of the FilterXQuery, plus specify a condition to filter orders greater than $1,000, by adding the following code:
//Create a filter and condition
FilterXQuery filter = new FilterXQuery();
filter.addFilter(
"CustomerProfile/customer/orders/order", "CustomerProfile/customer/orders/order/total_order_amount",
">", "1000");
Apply the filter to the data service, by adding the following code: // Apply the filter
ds.setFilterCondition(filter);
CustomerProfileDocument doc = (CustomerProfileDocument) ds.invoke("getCustomerProfile",params);
Change the //Show Customer Data code so that it is as follows: // Show Customer Data
System.out.println("======================= Customers =====================");
Customer customer = doc.getCustomerProfile().getCustomerArray(0);
BEA Liquid Data for WebLogic: Samples Tutorial 116

System.out.println("Connected to Liquid Data 8.5 : CustomerProfile Data Service ...");
Figure 11-1 Filter Code
Click the DataServiceClient.java file's Start icon (or press Ctrl + F5). 8.
9. Use the Mediator API to view the results in the Output window and/or a standalone Java environment. The return results should be similar to those displayed in Figure 11-2.
Figure 11-2 Filtered Data Results
BEA Liquid Data for WebLogic: Samples Tutorial 117

Lab 11.2 Sorting Data Service Results
With the FilterXQuery class sortfilter.addOrderBy() method, you can specify criteria for organizing the data service return results. For example, to sort the order amount results in ascending order, you would use a sort condition similar to the following:
("CustomerProfile/customer/orders/order","total_order_amount",
FilterXQuery.ASCENDING);
Objectives
In this lab, you will:
Add a sort condition.
View the results through the Mediator API.
Instructions
Open the DataServiceClient.java file. 1.
2.
3.
4.
Create a sort instance of the FilterXQuery, by adding the following code before the //Apply Filter section:
// Create a sort
FilterXQuery sortfilter = new FilterXQuery();
Add a sort condition, using the addOrderBy() method, to sort orders based on total_order_amount ascending. An example of the code is as follows:
sortfilter.addOrderBy(
"CustomerProfile/customer/orders/order",
"total_order_amount",
FilterXQuery.ASCENDING);
Apply the sort filter to the data service by adding the following code: // Apply the sort
filter.setOrderByList(sortfilter.getOrderByList());
BEA Liquid Data for WebLogic: Samples Tutorial 118

Figure 11-3 Sort Code
5.
6.
Click the Start icon (or press Ctrl + F5) for the DataServiceClient.java file.
Use the Mediator API to view the results in the Output window and/or a standalone Java environment. The data results should be similar to those displayed in Figure 11-4.
Figure 11-4 Filtered and Sorted Data Results
BEA Liquid Data for WebLogic: Samples Tutorial 119

Lab 11.3 Truncating Data Service Results
The FilterXQuery class also provides the filter.setLimit() method, which lets you limit the number of return results. For example, to limit the return results to two line items, you would use a truncate condition similar to the following:
("CustomerProfile/customer/orders/order/order_line",”2”);
The filter.setLimit method is based on the following:
public void setLimit(java.lang.String appliesTo, String max)
Objectives
In this lab, you will:
Truncate the data result set.
View the results in through the Mediator API.
Instructions
Open the DataServiceClient.java file. 1.
2. Add a truncate condition, using the setLimit() method to limit the result set to a maximum of two order lines for each order. An example of the code is as follows:
// Truncate result set
filter.setLimit("CustomerProfile/customer/orders/order/order_line",”2”);
Figure 11-5 Truncate Code
3.
4.
Click the Start icon (or press Ctrl + F5) for the DataServiceClient.java file.
Use the Mediator API to view the results in the Output window and/or a standalone Java environment.
Lesson Summary
In this lesson, you learned how to:
Use the FilterXQuery class to filter, sort, and truncate data service results.
Apply the FilterXQuery class to a data service, using the Mediator API or Liquid Data control.
BEA Liquid Data for WebLogic: Samples Tutorial 120

Lesson 12 Consuming Data Services through JDBC/SQL Liquid Data JDBC driver gives JDBC clients read-only access to the information supplied by data services. With the Liquid Data JDBC driver, Liquid Data acts as a virtual database. The The driver allows you to invoke data service functions from any JDBC client, from custom Java applications to database and reporting tools, including Crystal Reports.
Objectives
After completing this lesson, you will be able to:
Access Liquid Data via JDBC.
Integrate a Crystal Report file, populated by Liquid Data, into your web application.
Overview
Data services built in Liquid Data can be accessed using a Liquid Data JDBC driver, which provides access to the Liquid Data Server via JDBC APIs. With this functionality, JDBC clients — including business intelligence and reporting tools such as Business Objects and Crystal Reports — are granted read-only access to the information supplied by Liquid Data services. The main features of the Liquid Data JDBC driver are:
Supports most SQL-92 SELECT statements.
Provides error handling; if an error is detected in SQL query, then the error will be reported along with an error code.
Performs metadata validation; the translator checks SQL syntax and validates it against the data service schema.
When communicating with Liquid Data via a JDBC/ODBC interface, standard SQL-92 query language is supported. The Liquid Data JDBC driver implements components of the java.sql.* interface, as specified in JDK 1.4x.
Note: The Liquid Data JDBC driver needs to be in your computer’s CLASSPATH variable within System variables:
$BEA_HOME\weblogic81\liquiddata\lib\ldjdbc.jar
BEA Liquid Data for WebLogic: Samples Tutorial 121

Lab 12.1 Running DBVisualizer
Liquid Data includes DBVisualizer, which is a third-party database tool designed to simplify database development and management.
Before you start:
The Liquid Data JDBC driver needs to be in your computer’s CLASSPATH variable: $BEA_HOME\weblogic81\liquiddata\lib\ldjdbc.jar
The WebLogic Server needs to be running.
Make sure that your Evaluation application is deployed correctly to WebLogic Server
Objectives
In this lab, you will:
Create a database connection that enables DBVisualizer to access your Evaluation application as if it were a database.
Use DBVisualizer to explore your Evaluation application.
Instructions
1. Choose Start → Programs → BEA WebLogic Platform8.1 → Other Development Tools → DBVisualizer. The DBVisualizer tool opens.
Figure 12-1 DBVisualizer Interface
2.
3.
4.
Choose Database → Add Database Connection.
Enter the following parameters:
Connection Alias: LD
JDBC Driver: com.bea.ld.jdbc.LiquidDataJDBCDriver
Database URL: jdbc:ld@localhost:7001:Evaluation
Userid: weblogic
Password: weblogic
Click Connect.
BEA Liquid Data for WebLogic: Samples Tutorial 122

Figure 12-2 New Database Connection Parameters
5.
6.
Use the DBVisualizer to explore your Liquid Data application as if it were a database. Data service projects display as database schemas. Functions within a project display as a database view; functions with parameters display as database functions.
Select a tab (Database Info, Data Types, Table Types, Tables, and References) to view that category of information for all data services within your application. For example, selecting the Tables tab displays each data service as a table.
Figure 12-3 Tables
7. Double-click an element to view the values for a specific data service. For example, double-clicking the DataServices~CustomerDB element from the Table Schema column displays that data services values.
Figure 12-4 Table Column Values
BEA Liquid Data for WebLogic: Samples Tutorial 123

Lab 12.2 Integrating Crystal Reports and Liquid Data for WebLogic
The Liquid Data JDBC driver makes data services accessible from business intelligence and reporting tools, such as Crystal Reports, Business Objects, Cognos, and so on. In this lab, you will learn how to use the Liquid Data JDBC driver from Crystal Reports. (For ODBC applications, you can use JDBC to ODBC Bridge Drivers provided by vendors such as OpenLink, available as of this writing at http://www.openlinksw.com.)
Objectives
In this lab, you will:
Install Crystal Reports View in a web application.
Import a saved Crystal Report file and JSP into the web application.
View the report from the web application.
Instructions
1.
2.
3.
4.
5.
Install Crystal Reports Viewer in the CustomerManagementWebApp by completing the following steps:
a. Right-click CustomerManagementWebApp.
b. Choose Install → Crystal Reports.
Import a saved Crystal Reports file and JSP that displays the report by completing the following steps:
a. Right-click CustomerManagementWebApp.
b. Choose Import.
c. Navigate to the <beahome>\weblogic81\samples\liquiddata directory and select the following files:
SpendByCustomers.rpt
showCrystal.jsp
d. Click Import. You should see showCrystal.jsp and SpendByCustomers.rpt files within the CustomerManagementWebApp.
e. Right-click the CustomerPageFlow folder.
f. Choose Import.
g. Select index.jsp, located in the <beahome>\weblogic81\samples\liquiddata directory.
h. Click Import and choose Yes when asked if you want to overwrite the existing index.jsp file.
Open CustomerPageFlowController.jpf, located in the folder: CustomerManagementWebApp\CustomerPageFlow
Click the Start icon (or press Ctrl + F5) to run the Workshop Test Browser.
In the Workshop Test Browser, click Customer Report to test the report. (The first invocation may take time to display.)
BEA Liquid Data for WebLogic: Samples Tutorial 124
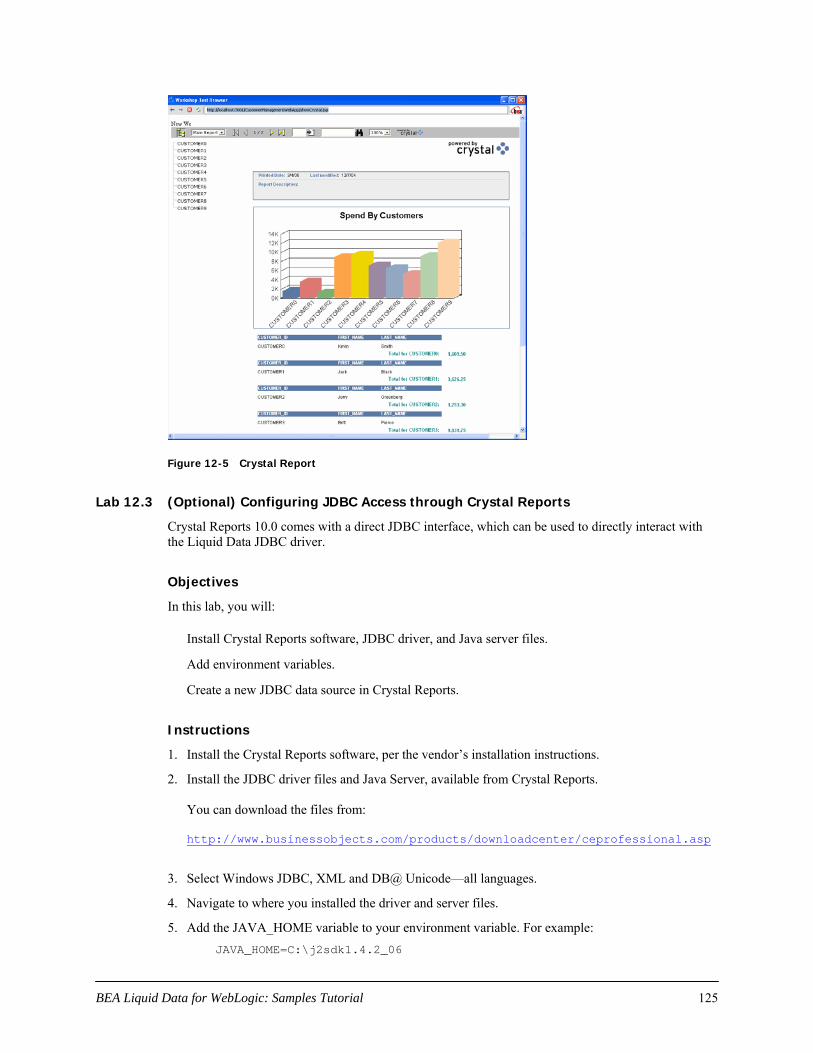
Figure 12-5 Crystal Report
Lab 12.3 (Optional) Configuring JDBC Access through Crystal Reports
Crystal Reports 10.0 comes with a direct JDBC interface, which can be used to directly interact with the Liquid Data JDBC driver.
Objectives
In this lab, you will:
Install Crystal Reports software, JDBC driver, and Java server files.
Add environment variables.
Create a new JDBC data source in Crystal Reports.
Instructions
1.
2.
Install the Crystal Reports software, per the vendor’s installation instructions.
Install the JDBC driver files and Java Server, available from Crystal Reports. You can download the files from: http://www.businessobjects.com/products/downloadcenter/ceprofessional.asp
3.
4.
5.
Select Windows JDBC, XML and DB@ Unicode—all languages.
Navigate to where you installed the driver and server files.
Add the JAVA_HOME variable to your environment variable. For example: JAVA_HOME=C:\j2sdk1.4.2_06
BEA Liquid Data for WebLogic: Samples Tutorial 125

where
C:\j2sdk1.4.2_06
identifies the Java SDK location on your computer.
6.
7.
8.
9.
Make sure that the jvm.dll is in the path variable for your computer. For example: $BEA_HOME\jdk142_04\jre\bin\server
Open CRDB_JavaServer.ini and make the following changes:
Move $classpath to the beginning of the line. It should be like this: CLASSPATH = ${CLASSPATH};C:\Program Files\Common Files\Crystal Decisions\2.5\bin\CRDBJavaServer.jar;C:\Program Files\Common Files\Crystal Decisions\2.5\java\lib\external\CRDBXMLExternal.jar
Modify the following entries:
JDBCUserName = weblogic
JDBCDriverName = com.bea.ld.jdbc.LiquidDataJDBCDriver
GenericJDBCDriverBehavior = SQLServer
Create a new JDBC data source in Crystal Reports, by providing the following parameters:
JDBC Driver: com.bea.ld.jdbc.LiquidDataJDBCDriver
URL string: jdbc:ld@localhost:7001:Evaluation
Provide a user name and password
Login to Crystal Reports. Once authenticated, Crystal Reports will show you a view of the Evaluation application.
Lesson Summary
In this lesson, you learned how to:
Access Liquid Data via JDBC.
Integrate a Crystal Reports file, populated by Liquid Data, into your web application.
BEA Liquid Data for WebLogic: Samples Tutorial 126

Lesson 13 Consuming Data via Streaming API Streaming API allows developers to retrieve results from Liquid Data in a streaming fashion.
Objectives
After completing this lesson, you will be able to:
Stream results returned from LiquidData into a flat file.
Test the results.
Overview
There are situations where you need to extract large amount of data from operational systems using Liquid Data. For those cases, Liquid Data provides streaming API. Large data sets can be retrieved to application in a streaming fashion or be streamed directly to a file on server. All security enforcements previously defined will still be relevant in case of Streaming API.
When working with streaming API keep the following things in mind:
The ability to get results as streams will be only available on the Server; there will not be any client-server support for this API.
Only the Generic Data Service Interface is available for getting streaming results.
Lab 13.1 Stream results into a flat file
Objectives
In this lab, you will:
Create a new function that streams CustomerProfile information into a flat file.
Import a new jsp file to access a streaming function.
Test streaming data into a file.
Instructions
1) Import new index page into your application
a. Right-click CustomerPageFlow located in CustomerManagementWebApp.
b. Choose Import.
c. Navigate to the <beahome>\weblogic81\samples\liquiddata\Streaming folder.
d. Select index.jsp as the page to be imported.
e. Click on Import button.
f. Open index.jsp and verify that you have a new link called “Export All Data”.
2) Insert streaming function into your page flow
a. Open CustomerPageFlowController.jpf located in WebApp/CustomerPageFlow
BEA Liquid Data for WebLogic: Samples Tutorial 127

b. Go to Source View.
c. Add two additional methods into the page flow.
d. Open Streaming.txt file located in <beahome>\weblogic81\samples\liquiddata\streaming folder
e. Copy and paste both functions found in Streaming.txt file immediately after method submitChanges in the CustomerPageFlowController.jpf java page flow.
f. Press four times the key combination of Alt + Enter keys to import missing packages or type the following in import section of page flow:
- import com.bea.ld.dsmediator.client.StreamingDataService;
- import javax.naming.InitialContext;
- import javax.naming.NamingException;
- import com.bea.ld.dsmediator.client.DataServiceFactory;
- import weblogic.jndi.Environment;
Note: If your application name is different from “Evaluation”, locate “Evaluation” in newStreamingDataService method and rename it to reflect the name of your application.
g. Save your changes.
3) Start your CustomerPageFlowController.jpf
4) Once the application is started, click on the Export All Data link
5) Verify that data is exported successfully by opening customerexport.txt, located in:
<BEAHOME>\weblogic81\samples\domains\ldplatform
Lab 13.2 Consume data in streaming fashion
Objectives
In this lab, you will:
Import a new version of CustomerPageFlow.
Instanciate a new Streaming Data Service
Retreive results into XMLInputStream object by calling getCustomerProfile function
Test fetching data from Liquid Data in a streaming fashion.
Instructions
1) Import a new folder into your application
a. Right-click CustomerManagementWebApp located in your Evaluation application.
b. Choose Import.
c. Navigate to the <beahome>\weblogic81\samples\liquiddata folder.
d. Select CustomerPageFlowStream folder to be imported.
e. Click on Import button.
BEA Liquid Data for WebLogic: Samples Tutorial 128

f. Open CustomerPageFlowController.jpf file in Source View.
g. Locate stream method and the following comments: //instanciate and initialize your streaming data service here
h. Place the following code after the comments
sds = DataServiceFactory.newStreamingDataService(
new InitialContext(), // Initial Context
"Evaluation", // Application Name
"ld:DataServices/CustomerManagement/CustomerProfile" // Data Service Name
);
i. The DataServiceFactory class contains a method to create a streaming data service.
j. Replace stream = null with following code:
stream = sds.invoke("getCustomerProfile", new String[]{"CUSTOMER3"});
For reference, your code should look similar to that shown below:
k. Test running your CustomerPageFlowController.jpf. You can use CUSTOMER3 as a
parameter to retrieve results. This time, data is fetched in streaming fashion.
BEA Liquid Data for WebLogic: Samples Tutorial 129
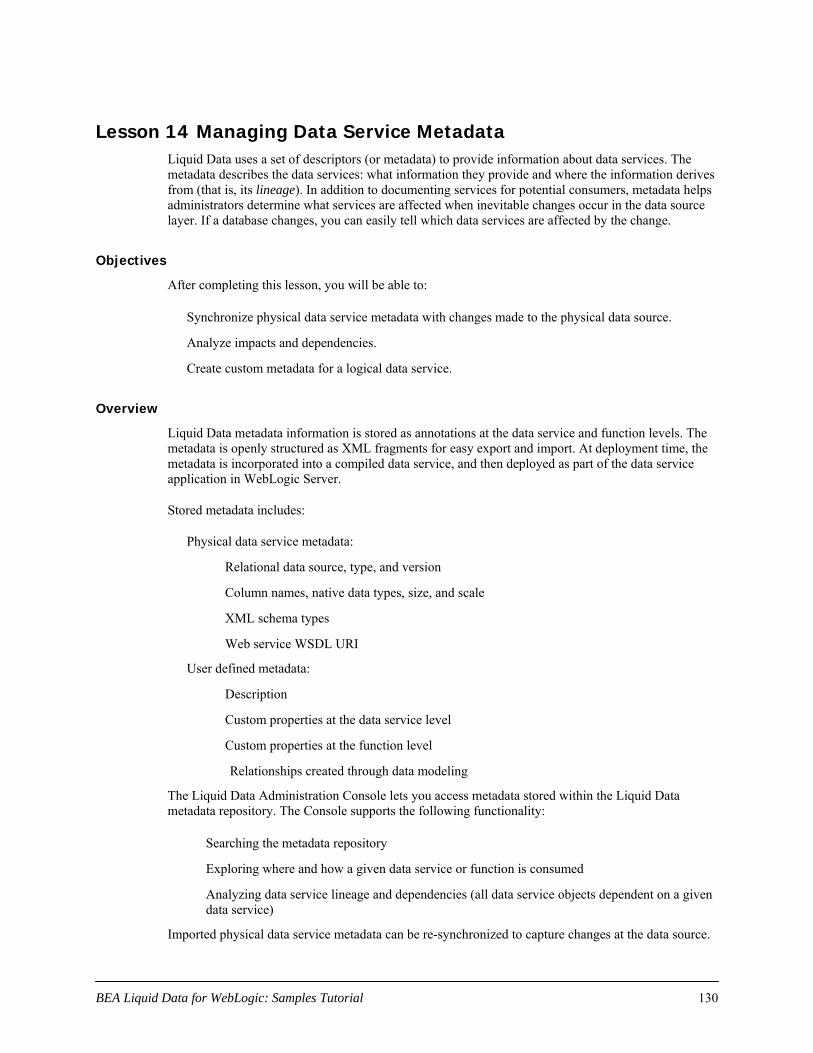
Lesson 14 Managing Data Service Metadata Liquid Data uses a set of descriptors (or metadata) to provide information about data services. The metadata describes the data services: what information they provide and where the information derives from (that is, its lineage). In addition to documenting services for potential consumers, metadata helps administrators determine what services are affected when inevitable changes occur in the data source layer. If a database changes, you can easily tell which data services are affected by the change.
Objectives
After completing this lesson, you will be able to:
Synchronize physical data service metadata with changes made to the physical data source.
Analyze impacts and dependencies.
Create custom metadata for a logical data service.
Overview
Liquid Data metadata information is stored as annotations at the data service and function levels. The metadata is openly structured as XML fragments for easy export and import. At deployment time, the metadata is incorporated into a compiled data service, and then deployed as part of the data service application in WebLogic Server.
Stored metadata includes:
Physical data service metadata:
Relational data source, type, and version
Column names, native data types, size, and scale
XML schema types
Web service WSDL URI
User defined metadata:
Description
Custom properties at the data service level
Custom properties at the function level
Relationships created through data modeling
The Liquid Data Administration Console lets you access metadata stored within the Liquid Data metadata repository. The Console supports the following functionality:
Searching the metadata repository
Exploring where and how a given data service or function is consumed
Analyzing data service lineage and dependencies (all data service objects dependent on a given data service)
Imported physical data service metadata can be re-synchronized to capture changes at the data source.
BEA Liquid Data for WebLogic: Samples Tutorial 130

Lab 14.1 Defining Customized Metadata for a Logical Data Service
There may be times when you need to modify the generated metadata descriptions to provide more detailed information to others who will be working with the data service.
Objectives
In this lab, you will:
Create customized metadata for the CustomerProfile logical data service, at both the data service and function levels.
Build the DataServices project to enable persistence of the new metadata.
Instructions
1. Add customized metadata at the data service level, by completing the following steps:
a. Open CustomerProfile.ds in Design View. (The file is located in the DataServices\CustomerManagement folder.)
b. Click the data service header to open the Property Editor at the data service level. (If the Property Editor is not open, choose View → Windows → Property Editor, or press Alt + 6)
c. In Property Editor, click the Description field, located in the General section. This activates the Description field.
d. Click the "… "icon for the Description field. The Property Text Editor opens.
e. In Property Text Editor, enter the following text:
Unified Customer Profile View – contains CRM, order information, credit rating, and valuation information.
f. Click OK. The specified text is added to the Description field.
Figure 14-1 Property Text Editor
g. In Property Editor, click the + icon for the User-Defined Properties section.
h. Click the + icon for the Property(1) field. This actives the Property(1) field.
i. Add a user-defined property, using the following values:
Name = Owner
Value = <your name>
BEA Liquid Data for WebLogic: Samples Tutorial 131

Figure 14-2 User-Defined Property for a Logical Data Service
2. Add customized metadata at the function level, by completing the following steps:
a. In Design View, click the getCustomerProfile function arrow to open that function’s Property Editor. (Note: Do not click the function, which will open XQuery Editor View.)
b. In Property Editor, click the + icon, located in the User-Defined Properties section.
c. Add a user-defined property, using the following values:
Name = Notes
Value = This function is consumed by the Customer Management Portal.
Figure 14-3 User-Defined Property for a Function
3.
4.
Save the file.
Build the DataServices project.
BEA Liquid Data for WebLogic: Samples Tutorial 132

Lab 14.2 Viewing Data Service Metadata via Liquid Data Console
All data service metadata, whether automatically generated or user-defined, can be viewed through the Liquid Data Console.
Objectives
In this lab, you will:
Use the Liquid Data Console to view both generated and customized metadata.
Use the console's Search feature to locate metadata for a specific data service.
Instructions
Open the Liquid Data Administration Console, typically located at http://localhost:7001/ldconsole/.
Note: WebLogic Server must be running.
1.
2.
3.
Log in using the following credentials:
User = weblogic
Password = weblogic
Open the CustomerProfile data service, located in the ldplatform\Evaluation\DataServices\CustomerManagement folder using the LH Menu.
Figure 14-4 Liquid Data Console
4. Select the Metadata tab. The general metadata for the CustomerProfile data service displays. Notice that the Description attribute contains the customized metadata added in the previous lab.
Figure 14-5 CustomerProfile General Metadata
5. Click the Properties tab and verify that user-defined properties for the data service display. The property should be similar to that displayed in Figure 14-6, except that it will be your name in the Value field.
BEA Liquid Data for WebLogic: Samples Tutorial 133
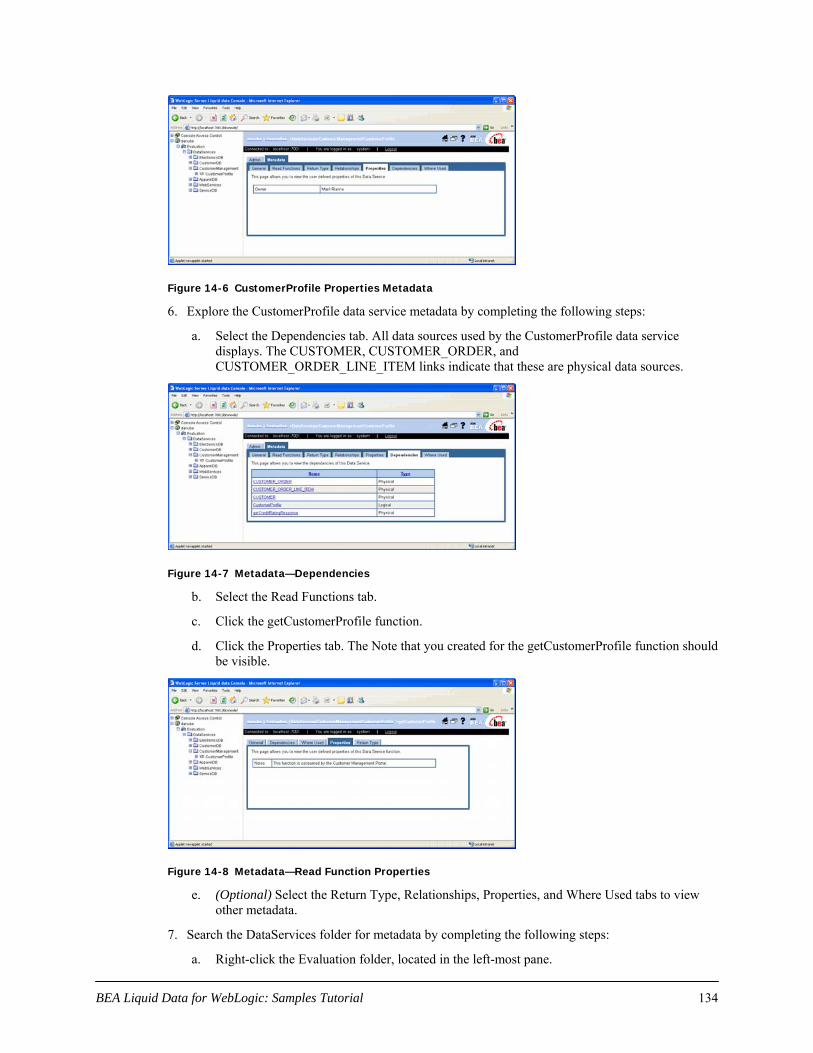
Figure 14-6 CustomerProfile Properties Metadata
6. Explore the CustomerProfile data service metadata by completing the following steps:
a. Select the Dependencies tab. All data sources used by the CustomerProfile data service displays. The CUSTOMER, CUSTOMER_ORDER, and CUSTOMER_ORDER_LINE_ITEM links indicate that these are physical data sources.
Figure 14-7 Metadata—Dependencies
b. Select the Read Functions tab.
c. Click the getCustomerProfile function.
d. Click the Properties tab. The Note that you created for the getCustomerProfile function should be visible.
Figure 14-8 Metadata—Read Function Properties
e. (Optional) Select the Return Type, Relationships, Properties, and Where Used tabs to view other metadata.
7. Search the DataServices folder for metadata by completing the following steps:
a. Right-click the Evaluation folder, located in the left-most pane.
BEA Liquid Data for WebLogic: Samples Tutorial 134

b. Select Search. (A search can be on data service name, function name, description, or return type.)
c. Enter CustomerProfile in the Data Service Name search box and click Search. The data service name, path, and type of data service are displayed for the CustomerProfile data service. Clicking the data service name displays the Admin page for the data service.
Figure 14-9 Search Results
Lab 14.3 Synching a Data Service with Underlying Data Source Tables
Sometimes the underlying data source changes; for example, a new table is added to a database. For those inevitable situations, Liquid Data provides an easy way to update a data service.
Objectives
In this lab, you will:
Import a Java project that contains additional CUSTOMER_ORDER database columns.
Synchronize the information in the Java project with the CUSTOMER_ORDER data service.
Confirm the addition of a new element in the CUSTOMER_ORDER data service schema.
Instructions
1.
2.
3.
4.
In WebLogic Workshop, choose File → Import Project.
Select Java Project.
Navigate to the <beahome>\weblogic81\samples\liquiddata directory.
Select the AlterTable folder, click Open, and then click Import.
Figure 14-10 Importing Java Project
5. Open AlterTable.java. (The file is located in the AlterTable project folder).
BEA Liquid Data for WebLogic: Samples Tutorial 135

6.
7.
Click the Start icon, and then click OK when a Confirmation message displays. Compiling the file adds a new column to the CUSTOMER_ORDER table.
Open the Output window and confirm that you see the CUSTOMER_ORDER_TABLE altered message.
Figure 14-11 Altered Table Message
8.
9.
Right-click the ElectronicsDB folder, located in the DataServices project folder.
Select Update Source Metadata. The Physical Data Sources pop-up opens, displaying a list of all new columns.
Figure 14-12 Physical Data Sources
10. Click Next. The Synchronization Preview window opens, which provides details on the data to be synchronized.
Figure 14-13 Synchronization Preview
11.
12.
13.
14.
Click Finish.
Open CUSTOMER_ORDER.ds in Source View. (The file is located in the ElectronicsDB.)
Expand the data service annotation, located on the first line of the file, to view the captured metadata for the relational data source (type, version, column names, native data types, size, scale, and XML schema types).
Scroll down until you locate the following code, which represents the customized metadata that you define in Lab 14.1:
BEA Liquid Data for WebLogic: Samples Tutorial 136
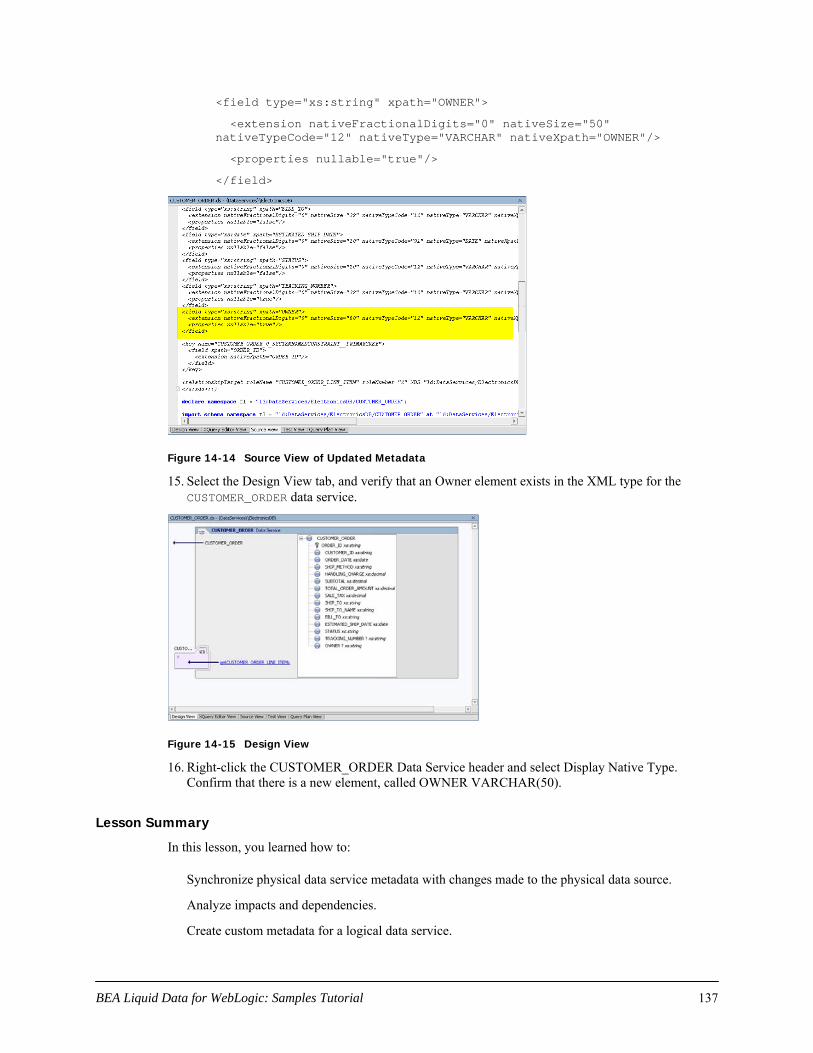
<field type="xs:string" xpath="OWNER">
<extension nativeFractionalDigits="0" nativeSize="50" nativeTypeCode="12" nativeType="VARCHAR" nativeXpath="OWNER"/>
<properties nullable="true"/>
</field>
Figure 14-14 Source View of Updated Metadata
15. Select the Design View tab, and verify that an Owner element exists in the XML type for the CUSTOMER_ORDER data service.
Figure 14-15 Design View
16. Right-click the CUSTOMER_ORDER Data Service header and select Display Native Type. Confirm that there is a new element, called OWNER VARCHAR(50).
Lesson Summary
In this lesson, you learned how to:
Synchronize physical data service metadata with changes made to the physical data source.
Analyze impacts and dependencies.
Create custom metadata for a logical data service.
BEA Liquid Data for WebLogic: Samples Tutorial 137

Lesson 15 Managing Data Service Caching Caching enables the use of previously obtained results for queries that are repeatedly executed with the same parameters. This helps reduce processing time and enhance overall system performance.
Objectives
After completing this lesson, you will be able to:
Use the Liquid Data Console to configure a Liquid Data cache.
Enable the cache for a data service function and define its time-to-live (TTL).
Check the database to verify whether a cache is used.
Determine the performance impact of the cache, by checking the query response time.
Overview
When Liquid Data executes a query, it returns to the client the data that resulted from the query execution. If Liquid Data caching is enabled, then Liquid Data saves its results into a query results cache the first time a query is executed. The next time the query is run with the same parameters, Liquid Data checks the cache configuration and, if the results are not expired, quickly retrieves the results from the cache, rather than re-running the query. Using the previously obtained results for queries that are repeatedly executed with the same parameters reduces processing time and enhances overall system performance.
By default, the query results cache is disabled. Once enabled, you can configure the cache for individual stored queries as needed, specifying how long query results are stored in the cache before they expire (time out), and explicitly flushing the query cache.
In general, the results cache should be periodically refreshed to reflect data changes in the underlying data stores. The more dynamic the underlying data, the more frequently the cache should expire. For queries on static data (data that never changes), you can configure the results cache so that it never expires. For extremely dynamic data, you would never enable caching.
If the cache policy expires for a particular query, Liquid Data automatically flushes the cache result on the next invocation. In the event of a Server shutdown, the contents of the results cache are retained. On the server restart, the Server resumes caching as before. On the first invocation of a cached query, Liquid Data checks the results cache to determine whether the cached results for that query are valid or expired, and then proceeds accordingly.
BEA Liquid Data for WebLogic: Samples Tutorial 138

Lab 15.1 Determining the Non-Cache Query Execution Time
To understand whether caching improves query execution time, you first need to know how long it takes to execute a non-cached query.
Objectives
In this lab, you will:
Execute a query function.
Determine the query execution time.
Instructions
1.
2.
3.
4.
5.
6.
Open CustomerProfile.ds in Test View.
Select getCustomerProfile(CustomerID) from the function drop-down menu.
Enter CUSTOMER3 in the Parameter field.
Click Execute. The Output window displays the cache’s execution time.
Open the Output window.
Locate the query execution time.
Figure 15-1 Query Execution Time
Lab 15.2 Configuring a Caching Policy via Liquid Data Console
By default, Liquid data results caching is disabled. You must explicitly enable caching. In this lab, you will learn how to enable caching.
Objectives
In this lab, you will:
Enable caching at the application level.
Enable caching at the function level.
Instructions
In the Liquid Data Console (http://localhost:7001/ldconsole/), using the + icon, expand the ldplatform directory. (Note: If you click the ldplatform name, the Application List page opens. You do not want this page for this lesson.)
1.
2. Enable caching at the application level, by completing the following steps:
a. Click Evaluation. The Administration Console’s General page opens.
BEA Liquid Data for WebLogic: Samples Tutorial 139

b. In the Cache section, select Enable Cache.
c. Select cgDataSource from the Cache data source name drop-down list.
d. Enter MYLDCACHE in the Cache table name field.
e. Click Apply.
Figure 15-2 Liquid Data Console General Page
3. Enable caching at the function level, by completing the following steps (you can cache both logical and physical data service functions):
a. Open the CustomerProfile folder, located in the Evaluation\DataServices\CustomerManagement folder. The List of XSD Read Functions page opens.
b. For the getCustomerProfile function, select Enable Cache.
c. Enter 300 in the TTL (sec) field.
d. Click Apply.
Note: Application level cache should be enabled.
Figure 15-3 Setting TTL
BEA Liquid Data for WebLogic: Samples Tutorial 140

Lab 15.3 Testing the Caching Policy
Testing the caching policy helps you determine whether the specified query results are being cached.
Objectives
In this lab, you will:
Use WebLogic Workshop to test the caching policy for the getCustomerProfile function.
Use the Liquid Data Console to verify that the cache is populated.
Instructions
1.
2.
3.
4.
5.
In WebLogic Workshop, open the CustomerProfile data service in Test View.
Select getCustomerProfile(CustomerID) from the Function drop-down list.
Enter CUSTOMER3 in the Parameter field.
Click Execute.
In the Liquid Data Administration Console, verify that the cache is populated by completing the following steps:
a. Go to the CustomerProfile folder.
b. Confirm that there are entries in the Number of Cache Entries field for the getCustomerProfile() function.
Figure 15-4 Cache Test Results in the Metadata Browser
Lab 15.4 Determining Performance Impact of the Caching Policy
A caching policy can reduces processing time and enhance overall system performance.
Objectives
In this lab, you will:
Use the PointBase Console to confirm that the cache was populated.
Use WebLogic Workshop to determine caching performance.
Instructions
1. Use the PointBase Console to verify that the cache was populated, by completing the following steps:
BEA Liquid Data for WebLogic: Samples Tutorial 141

a. Start the PointBase Console, by entering the following command in a Command Prompt window:
$BEA_HOME\weblogic81\common\bin\startPointBaseConsole.cmd
b. Enter the following configuration parameters to connect to your local PointBase Console:
Driver: com.pointbase.jdbc.jdbcUniversalDriver
URL: jdbc:pointbase:server://localhost:9093/workshop
User: weblogic
Password: weblogic
c. Click OK.
d. Enter the SQL command SELECT * FROM MYLDCACHE to check whether the cache is populated.
e. Click Execute.
Figure 15-5 PointBase Console
2.
3.
4.
5.
6.
In WebLogic Workshop, open the CustomerProfile data service in Test View.
Select getCustomerProfile(CustomerID) from the Function drop-down menu.
Enter CUSTOMER3 in the Parameter field.
Click Execute. The Output window displays the cache’s execution time.
Use the Output window to determine whether caching helped reduce the query execution time.
Lab 15.5 Disable Caching
Important: For the purposes of these lessons, you must disable the cache to avoid problems with data updates in future lessons!
Objectives
In this lab, you will:
BEA Liquid Data for WebLogic: Samples Tutorial 142

Disable caching at the application.
Disable caching at the function level.
Instructions
1. In the Liquid Data Administration Console using the + icon, expand the ldplatform directory. (Note: If you click the ldplatform name, the Application List page opens. You do not want this page for this lab.)
2. Disable application-level caching, by completing the following steps:
a. Click Evaluation. The Administration Console’s General page opens.
b. In the Cache section, select Enable Cache to clear the checkbox.
c. Click Apply.
BEA Liquid Data for WebLogic: Samples Tutorial 143

3. Disable function-level caching, by completing the following steps:
a. Open the CustomerProfile folder, located in Evaluation\DataServices\CustomerManagement The List of Read Functions page opens.
b. For the getCustomerProfile function, select Enable Cache to clear the checkbox.
c. Click Apply.
Lesson Summary
In this lesson, you learned how to:
Use the Liquid Data Console to configure the Liquid Data cache.
Enable the cache for a data service function and define its time-to-live (TTL).
Check the database to verify whether a cache is used.
Determine the performance impact of the cache, by checking the query response time.
BEA Liquid Data for WebLogic: Samples Tutorial 144

Lesson 16 Managing Data Service Security Liquid Data leverages the security features of the underlying WebLogic platform. Specifically, it uses resource authorization to control access to Liquid Data resources based on user identity or other information.
Note: WebLogic Server must be running.
Objectives
After completing this lesson, you will be able to:
Enable application-level security.
Set function-level read and write access security.
Set element-level security.
Overview
Liquid Data’s security infrastructure extends WebLogic Server’s security policies to include Liquid Data objects such as data sources and stored queries, as well as security roles, groups, and users. These security policies allow Liquid Data administrators to set up rules that dynamically determine whether a given user:
Can access a particular object.
Holds read/write/execute permissions on a Liquid Data object or a subset of those permissions.
By default data services do not have any security policies configured. Therefore data is generally accessible unless a more restrictive policy for the information is configured. Security policies can apply at various levels of granularity, including:
Application level. The policy applies to all data services within the deployed Liquid Data application.
Data service level. The policy applies to individual data services within the application.
Element level. A policy can apply to individual items of information within a return type, such as a salary node in a customer object. If blocked by insufficient credentials at this level, the rest of the returned information is provided without the blocked element.
Implementing Liquid Data access control involves using the WebLogic Server Console to configure user groups and roles. You can then use the Liquid Data Administration Console to create policies for Liquid Data, including data services and their functions.
BEA Liquid Data for WebLogic: Samples Tutorial 145
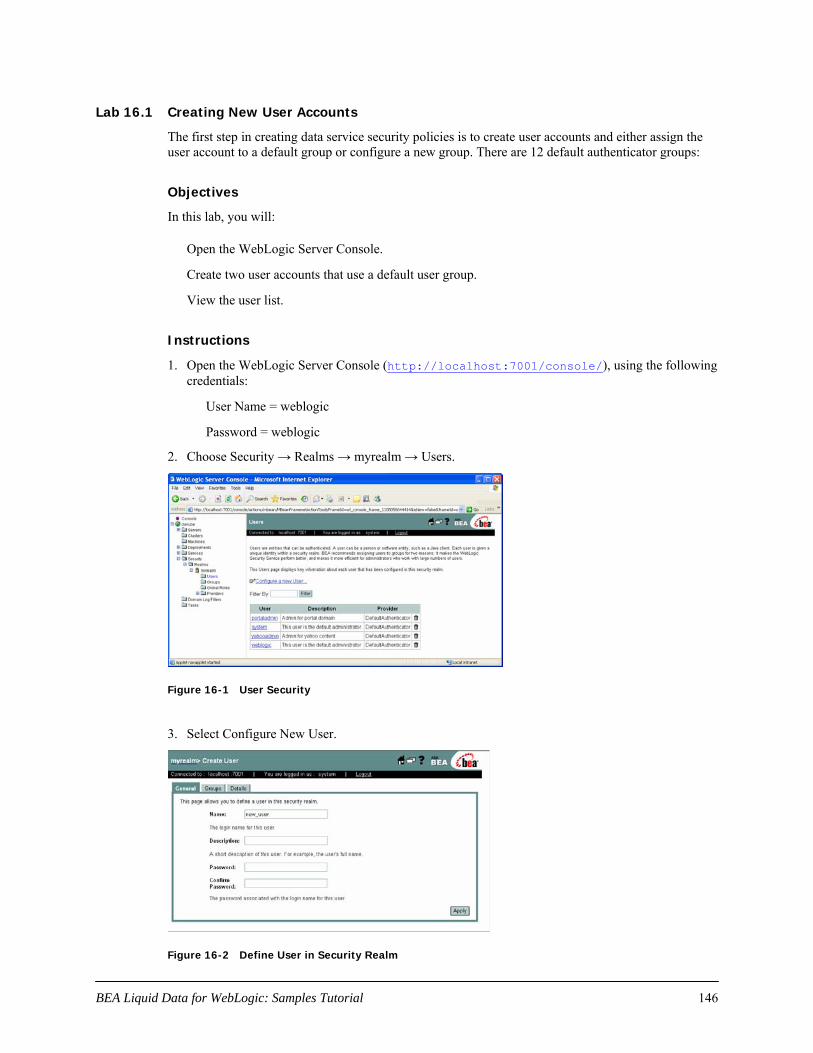
Lab 16.1 Creating New User Accounts
The first step in creating data service security policies is to create user accounts and either assign the user account to a default group or configure a new group. There are 12 default authenticator groups:
Objectives
In this lab, you will:
Open the WebLogic Server Console.
Create two user accounts that use a default user group.
View the user list.
Instructions
Open the WebLogic Server Console (http://localhost:7001/console/), using the following credentials:
1.
User Name = weblogic
Password = weblogic
2. Choose Security → Realms → myrealm → Users.
Figure 16-1 User Security
3. Select Configure New User.
Figure 16-2 Define User in Security Realm
BEA Liquid Data for WebLogic: Samples Tutorial 146

4.
5.
6.
Create a new user account by completing the following steps:
d. Enter Joe in the Name field.
e. Enter password in the Password field.
f. Enter password in the Confirm Password field.
g. Click Apply.
Repeat step 3 and step 4, entering Bob in the Name field (step 4a).
(Optional) Choose Security → Realms → myrealm → Users to view the results.
Figure 16-3 New Users Added
Lab 16.2 Setting Application-Level Security
Application-level security applies to all data services within the deployed Liquid Data domain, regardless of user permission or group. By default, when you turn on access control for an application, access to any of its resources is blocked, except for users who comply with policies configured for the resources.
Alternatively, by allowing default anonymous access, you can grant access to its resources by default. You can enable default anonymous access level by navigating to Application level General tab under Access Control (application Name → General). In this case, a resource is restricted only if a more specific security policy for it exists; for example, a security policy at the data service function level.
Objectives
In this lab, you will:
Use the Liquid Data Administration Console to enable application-level security.
Use WebLogic Workshop to test the security policy.
Instructions
In the Liquid Data Console (http://localhost:7001/ldconsole/), using the + icon, expand the ldplatform directory.
Note: If you click the ldplatform name, the Application List page opens. You do not want this page for this lesson.
1.
2.
3.
Click Evaluation. The Administration Control’s General page opens.
Select Check Access Control.
BEA Liquid Data for WebLogic: Samples Tutorial 147

4. Click Apply.
Figure 16-4 Set General Security
5. Test the security policy by completing the following steps:
a. In WebLogic Workshop, open CustomerProfile.ds in Test View.
b. Select getCustomerProfile from the Function drop-down list.
c. Enter CUSTOMER3 in the Parameters field.
d. Click Execute. The test should return an Access Denied error. With the current security settings, no one can access the application’s functions. You must grant user access to read and write functions.
Figure 16-5 Access Denied
BEA Liquid Data for WebLogic: Samples Tutorial 148

Lab 16.3 Granting User Access to Read Functions
Liquid Data security policies can be set at the function level, which applies to specific functions within specific data services. Function-level security can be read and/or write permissions. A policy may include any number of restrictions; for example, limiting access based on the role of the user or on the time of access. Specifically, policies can be based on the following criteria:
User Name of the Caller. Creates a condition for a security policy based on a user name. For example, you might create a condition indicating that only the user John can access the Customer data service.
Caller is a Member of the Group. Creates a condition for a security policy based on a group.
Caller is Granted the Role. Creates a condition based on a security role. A security role is a special type of user group specifically for applying and managing common security needs of a group of users.
Hours of Access are Between. Creates a condition for a security policy based on a specified time period.
Server is in Development Mode. Creates a condition for a security policy based on whether the server is running in development mode.
Objectives
In this lab, you will:
Use the Liquid Data Console to grant Joe read access permissions, based on user name.
Use WebLogic Workshop to test the new security policy.
Instructions
1.
2.
In the Liquid Data Console, open the CustomerProfile data service. (The data service is located in the ldplatform\Evaluation\DataServices\CustomerManagement folder.)
Click the Security tab. The Security Policy window opens.
Figure 16-6 Data Service-Level Security Policy
3. Click the Action icon for the getCustomerProfile resource. The Configure window opens.
BEA Liquid Data for WebLogic: Samples Tutorial 149
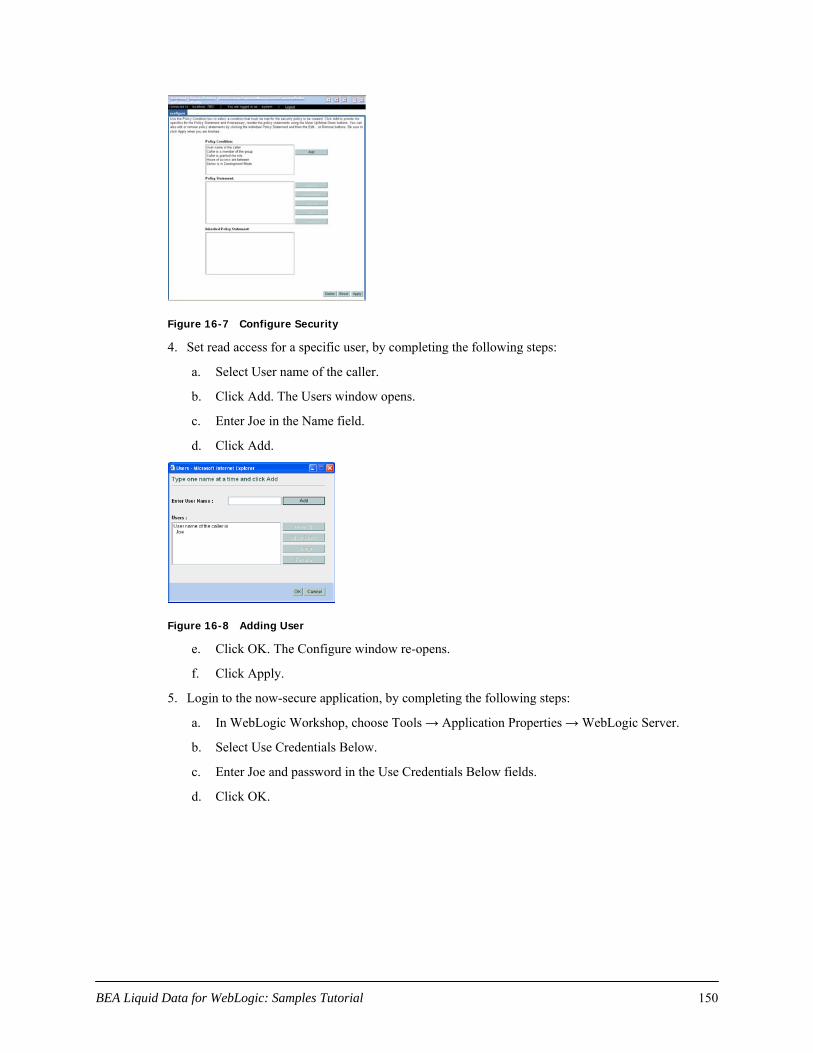
Figure 16-7 Configure Security
4. Set read access for a specific user, by completing the following steps:
a. Select User name of the caller.
b. Click Add. The Users window opens.
c. Enter Joe in the Name field.
d. Click Add.
Figure 16-8 Adding User
e. Click OK. The Configure window re-opens.
f. Click Apply.
5. Login to the now-secure application, by completing the following steps:
a. In WebLogic Workshop, choose Tools → Application Properties → WebLogic Server.
b. Select Use Credentials Below.
c. Enter Joe and password in the Use Credentials Below fields.
d. Click OK.
BEA Liquid Data for WebLogic: Samples Tutorial 150

Figure 16-9 Logging Into Secure Application
6. Test the security policy by completing the following steps:
a. Open CustomerProfile.ds in Test View.
b. Select getCustomerProfile from the Function drop-down list.
c. Enter CUSTOMER3 in the Parameters field.
d. Click Execute. The test should permit access and return the requested data.
e. Click Edit, modify an item, and then click Submit. An error message will display, since Joe is only granted read access.
BEA Liquid Data for WebLogic: Samples Tutorial 151

Lab 16.4 Granting User Access to Write Functions
As noted in the previous lab, security policies at the function level can allow either read and/or write permissions.
Objectives
In this lab, you will:
Use the Liquid Data Administration Console to grant Joe write access permissions.
Use WebLogic Workshop to test the new security policy.
Instructions
1.
2.
3.
4.
5.
In the Liquid Data Administration Console, open the CustomerProfile data service.
Select the Security tab. The Security Policy window opens.
Click the Action icon for the submit resource. The Configure window opens.
Set write access to a user, by completing the following steps:
a. Select User name of the caller.
b. Click Add.
c. Enter Joe in the Name field.
d. Click Add.
e. Click OK.
f. Click Apply.
Test the security policy, by completing the following steps:
a. In WebLogic Workshop, open CustomerProfile.ds in Test View. (The file is located in the DataServices\CustomerManagement folder.)
b. Select getCustomerProfile from the Function drop-down list.
c. Enter CUSTOMER3 in the Parameters field.
d. Click Execute. The test should permit access and return the specified results.
e. Click Edit. Since Joe is granted both read and write access, you can now edit the results.
BEA Liquid Data for WebLogic: Samples Tutorial 152

Lab 16.5 Setting Element-Level Data Security
A policy can apply to individual items of information within a return type, such as a salary node in a customer object. If blocked by insufficient credentials at this level, the rest of the returned information is provided without the blocked element.
Objectives
In this lab, you will:
Enable element-level security.
Set a security policy for specific elements.
Instructions
1.
2.
3.
In the Liquid Data Console, open the CustomerProfile data service.
Select the Security tab.
Set element-level security, by completing the following steps:
a. Select the Secured Elements tab.
b. Expand the CustomerProfile and customer+ nodes.
c. Select the checkbox for the ssn simple element.
d. Expand the orders ? and orders * nodes.
e. Select the checkbox for the order_line * complex element.
f. Click Apply.
Figure 16-10 Setting Element-Level Security
4. Return to the Security Policy window for CustomerProfile. You should see two new resources: CustomerProfile/customer/ssn and CustomerProfile/customer/orders/order/order_line.
BEA Liquid Data for WebLogic: Samples Tutorial 153

Figure 16-11 New Secured Element Resources
5.
6.
Set the security policy for the complex order_line element, by completing the following steps:
a. Return to the Security Policy window for CustomerProfile.
b. Click the Action icon for the CustomerProfile/customer/orders/order/order_line resource. The Configure window opens.
c. Select User name of the caller.
d. Click Add.
e. Enter Joe in the Name field.
f. Click Add.
g. Click OK.
h. Click Apply.
Set the security policy for the simple ssn element, by completing the following steps:
a. Click the Action icon for the CustomerProfile/customer/ssn resource. The Configure window opens.
b. Select User name of the caller.
c. Click Add.
d. Enter Bob in the Name field.
e. Click Add.
f. Click OK.
g. Click Apply.
BEA Liquid Data for WebLogic: Samples Tutorial 154

Lab 16.6 Testing Element-Level Security
At this point, element-level security policies are defined for both Bob and Joe. Testing the policy within WebLogic Workshop lets you determine what data results these two users will be able to access.
Objectives
In this lab, you will:
Test the security policy for Bob and Joe.
Change the security policy for Bob and test the new security policy.
Instructions
1.
2.
3.
Test element-level security for Joe, by completing the following steps:
a. In WebLogic Workshop, open CustomerProfile.ds in Test View.
b. Select getCustomerProfile from the Function drop-down list.
c. Enter CUSTOMER3 in the Parameters field.
d. Click Execute. The test should permit access and return all results except SSN.
e. Click Edit, modify an order_line value, click Submit, and click OK. The specified change is submitted.
f. Click Execute to refresh the data set.
g. Verify that changes have been saved.
Test the element-level security policy for Bob, by completing the following steps:
a. Choose Tools → Application Properties → WebLogic Server.
b. Select Use Credentials Below.
c. Enter Bob and password in the Use Credentials Below fields.
d. Click OK.
e. Open CustomerProfile.ds in Test View.
f. Select getCustomerProfile(CustomerID) from the Function drop-down list.
g. Enter CUSTOMER3 in the Parameters field.
h. Click Execute. The test should fail. Although Bob can access the SSN element, he does not have read access to the getCustomerProfile() function.
Change the security policy for Bob, by completing the following steps:
a. In the Liquid Data Console, open the CustomerProfile data service.
b. Select the Security tab.
c. Click the Action icon for the getCustomerProfile resource. The Configure window opens.
d. Set read access for Bob, by completing the following steps:
1) Select User name of the caller.
2) Click Add.
BEA Liquid Data for WebLogic: Samples Tutorial 155

3) Enter Bob in the Name field.
4) Click Add.
5) Click OK.
6) Click the "and User name of the caller" line, located in the Policy Statement section of the window.
7) Click Change, which changes the line to an "or User name of the caller" condition.
8) Click Apply.
Figure 16-12 Enabling read Access for Two Users
4.
5.
6.
In WebLogic Workshop, test the getCustomerProfile() function again. This time, user Bob can view all elements except order_line information.
Try modifying data by clicking on Edit button and changing SSN. Submit changes by clicking on Submit button. An error message will display since Bob does not have write privileges.
Reset the application-level security, by completing the following steps:
a. In the Liquid Data Console (http://localhost:7001/ldconsole/), using the + icon, expand the ldplatform directory.
Note: If you click the ldplatform name, the Application List page opens. You do not want this page for this lesson.
b. Click Evaluation. The Administration Control’s General page opens.
c. Select Check Access Control to clear the checkbox.
d. Click Apply.
Lesson Summary
In this lesson, you learned how to:
Activate application level security.
Set security permissions on both read and write function access.
Set security permissions on simple and complex elements.
BEA Liquid Data for WebLogic: Samples Tutorial 156

Lesson 17 (Optional) Consuming Data Services through Portals and Business Processes
The previous lessons demonstrated how Liquid Data provides a convenient way to quickly access Liquid Data from a WebLogic Workshop application such as page flows, process definitions, or portals. This optional lesson details the steps you take to use a portal to access data services.
Note: WebLogic Portal must be installed.
Objectives
After completing this lesson, you will be able to:
Import a WebLogic Portal project that contains portals and business processes.
Install the Liquid Data control in the project, thereby making data services available from the portal and business processes.
Recognize how a Liquid Data control is used from a portal and business process.
Overview
At its most basic level, a portal is a Web site that simplifies and personalizes access to content, applications, and processes. Technically speaking, a portal is a container of resources and functionality that can be made available to end-users. These portal views, which are called Desktops in WebLogic Portal, provide the uniform resource location (URL) that end users access.
Figure 17-1 Consuming Data Services from Portals
Lab 17.2 Installing a Liquid Data Control in a Portal Project
The steps within this lab are similar to those detailed in Lab 8.1.
BEA Liquid Data for WebLogic: Samples Tutorial 157

Objectives
In this lab, you will:
Import a portal web project's files and libraries, which you will use to create a new portal project.
Create a new portal project.
Add a control to the portal project.
Instructions
1.
2.
3.
Right-click the Evaluation application.
Choose Install → Portal. Liquid Data installs the necessary portal files and libraries.
Create a new portal web project by completing the following steps:
a. Right-click the Evaluation application.
b. Choose Import Project.
c. Select Portal Web Project.
d. Select MyPortal, located in the <beahome>\weblogic81\samples\ liquiddata\EvalGuide directory.
e. Click Open and then click Import.
Figure 17-2 Importing a Portal Web Project
BEA Liquid Data for WebLogic: Samples Tutorial 158

4.
5.
Create a new folder in the MyPortal folder, and name it controls.
Create a Liquid Data control within the portal by completing the following steps:
a. Right-click the MyPortal project.
b. Choose New → Java Control.
c. Select Liquid Data Control and name it CustomerData.
Figure 17-3 Creating a New Liquid Data Control
d. Click Next and then click Yes at the Message window.
e. Select MyPortal\controls as the subfolder in which to locate the new control.
f. Click Select. The New Java Control → Liquid Data window opens.
Figure 17-4 Setting Liquid Data Control Specifications
g. Click Create to accept the default settings. A list containing available data service queries displays.
BEA Liquid Data for WebLogic: Samples Tutorial 159

h. Open CustomerProfile.ds (located in DataServices/CustomerManagement) and select the following methods:
o getCustomerProfile()
o submitCustomerProfile()
6. Click Add and then Finish.
Figure 17-5 Selecting Query Functions
Lab 17.3 Testing the Control and Retrieving Data
As with all data services, you should test functionality before you deploy the application.
Objectives
In this lab, you will:
Run the CustomerManagement.portal application.
Retrieve data.
Review the results.
Instructions
1. Open CustomerManagement.portal.
a. Click the Start icon to open the Workshop Test Browser and run the portal application containing the CustomerManagementWebApp and the CustomerReport that were used in earlier lessons.
b. Enter CUSTOMER3 in the Customer ID field and press Enter. The Customer Profile Information page opens.
BEA Liquid Data for WebLogic: Samples Tutorial 160

Figure 17-6 Portal Access to Web Application Data
c. Click the Reports link. For the Reports page, the first invocation may take a few moments before displaying.
Figure 17-7 Portal Access to Crystal Reports Data
BEA Liquid Data for WebLogic: Samples Tutorial 161

d. Open the process.jpd file, located in the MyPortal\processes folder. You will see the Design View of the process definition that accepts a CUSTOMER_ID String, invokes the Liquid Data control, and returns the customer information in an XML document.
Figure 17-8 Design View of process.jpd File
e. Click the Start icon to test the process definition.
f. Enter CUSTOMER3 in the Customer ID field and then click clientRequestwithReturn.
g. Scroll through the page to view customer information included in the “Returned from getCustomerProfile on LDControl” section.
Figure 17-9 Business Process View of Customer Data
BEA Liquid Data for WebLogic: Samples Tutorial 162

Lesson Summary
In this lesson you learned how to:
Import a WebLogic Portal project that contains portals and business processes.
Install the Liquid Data control in the project, thereby making data services available from the portal and business processes.
Recognize how a Liquid Data control is used from a portal and business process.
BEA Liquid Data for WebLogic: Samples Tutorial 163

BEA Liquid Data for WebLogic: Samples Tutorial 164

Glossary ad-hoc query. A hand-coded or generated query that is passes to Liquid Data on the fly, rather than stored in the BEA Liquid Data for WebLogic server repository.
administration console. A web-based administration tool that an administrator uses to configure and monitor WebLogic Servers. Liquid Data provides another version of the Administration Console that allows administrators to configure the Liquid Data server via a Liquid Data node.
application. A collection of all resources and components deployed as a unit to an instance of WebLogic Server. The application contains one or more projects, which in turn contain the folders and files that make up your application. Only one application can be open at a time.
cache. The location where Liquid Data stores information about commonly executed stored queries for subsequent, efficient retrieval, thereby enhancing overall system performance. Liquid Data provides query plan cache and result set cache.
cache policy. In the result set cache, configuration settings determine when the cached results expire for individual stored queries.
data model. A visual representation of data resources.
data object. In SDO, a complex type that holds atomic values and references to other data objects.
data service. A modeled object that describes a data shape and functions used to retrieve and update the data, as well as functions to navigate to other related data services.
data service mediator. The SDO mediator that uses data services to retrieve and update data.
data service update. The engine responsible for handling submits of changes to SDOs
data source. Any structured, semi-structured, or unstructured information that can be queried. The types of data sources that Liquid Data can query include relational databases, Web services, flat files (delimited and fixed width), XML files, Java functions, application views via web applications (business-level interfaces to the data in packaged applications such as Siebel, PeopleSoft, or SAP), data views (dynamic results of Liquid Data queries).
data source schema. An XML schema that defines the content, semantics, and physical structure of a data source.
function. A uniquely named portion of an XQuery that performs a specific action. In the case of Liquid Data the function would typically query physical or logical data.
java server page (JSP). A J2EE component that extends the Servlet class, and allows for rapid server-side development of HTML interfaces that can be co-mingled with Java.
logical data service. A data service that integrates data from multiple physical and/or logical data services.
mapping. The process of connecting data source schemas to a target (result) schema.
metadata. Descriptors about a data service’s information, format, meaning, and lineage.
physical data service. The leaf-level data services that expose external data. For relational sources, this would be a data service representing tables or stored procedures. For functional sources, this would be the functions that are considered to be the initial source of data operated on by XQuery.
project. Groups related files within an application.
query. In Liquid Data an XQuery function that retrieves data from a data source. Functions define what tasks the query will perform, while expressions define what data to extract.
query operation. Operation that a query performs, such as a join, aggregation, union, or minus.
query plan. A compiled query. Before a query is run, Liquid Data compiles the XQuery code into an executable query plan. When the query executes, the query plan is sent to the data source for processing.
BEA Liquid Data for WebLogic: Samples Tutorial 165
repository. File-based metadata maintained in a Liquid Data project.
result set. The data returned from an executed query. There are two types of result sets: intermediate result sets are temporary result sets that the query processor generates while processing an analytical query; final result sets are returned to the client application that requested the query in the form of XML data.
return type. A type of XML schema that defines the shape of data returned by a query.
schema. A model for representing the data types, structure, and relationships of data sets and queries.
security. Set of mechanisms available to prevent access to, corruption of, or theft of data. Liquid Data extends the WebLogic Server compatibility security mechanisms to define groups, users, and access control to Liquid Data resources.
service data object (SDO). Defines a Java-based programming architecture and API for data access.
simple object access protocol (SOAP). An extensible, platform-independent, XML-based protocol that allows disparate applications to exchange messages over the Web. SOAP can be used to invoke methods on servers, Web services, application components, and objects in a distributed, heterogeneous environment. SOAP-based Web services are one of the data sources Liquid Data supports.
source schema. XML schema that describes the shape (structure and legal elements) of the source data — that is, the data to be queried. The Liquid Data server runs queries against source data and returns query results in the form of the source schema.
stored query. A query that has been saved to the Liquid Data repository. There is a performance benefit to using a stored query because its query plan is always cached in memory, optionally along with query result. With an ad-hoc query, however, the query plan and result are not cached. In addition, caching of query results for a stored query is configurable through the Cache tab on the Liquid Data node in the Administration Console.
structured query language (SQL). The standard, structured language used for communicating with relational databases. Database programmers use SQL queries to retrieve information and modify information in relational databases. In order to be able to access different types of data sources dynamically, Liquid Data employs the XML-based XQuery language as a layer on top of platform-dependent query systems such as SQL.
target schema. See return type.
weblogic server. The platform upon which Liquid Data is built.
weblogic workshop. The IDE in which Liquid Data runs as an application.
web service. Business functionality made available by one company, usually through an Internet connection, for use by another company or software program. Web services are a type of service that can be shared by, and used as components of, distributed Web-based applications. Web services communicate with clients (both end-user applications or other Web services) through XML messages that are transmitted by standard Internet protocols, such as HTTP. Web services endorse standards-based distributed computing. Currently, popular Web Service standards are Simple Object Access Protocol (SOAP), Web services description language (WSDL), and Universal Description, Discovery, and Integration (UDDI).
web services description language (WSDL). Specification for an XML-based grammar that defines and describes a Web service. A WSDL is necessary if two different online systems need to communicate without human intervention.
xml schema. A structured model for describing the structure, content, and semantics of XML documents based on custom rules. Unlike DTDs, XML schemas are written in XML data syntax and provide more support for standard data types and other data-specific features. When metadata about a data source is obtained, it is stored in an XML schema in the Liquid Data repository.
xquery. An XML query language, which represents a query as an expression which is used to query relational, semi-structured, and structured data.
BEA Liquid Data for WebLogic: Samples Tutorial 166
xsd. An abbreviation for XML Schema Definition. An XSD file describes the contents, semantics, and structure of data within an XML document.
BEA Liquid Data for WebLogic: Samples Tutorial 167