Embed Size (px)
Citation preview

BD Biosciences2350 Qume DriveSan Jose, CA 95131-1807USATel (877) 232-8995Fax (800) 325-9637
bdbiosciences.comPart No. 642747 Rev. AJanuary 2008
BD FACSCount SystemUser’s Guide
For Use with BD FACSCount CD4 Reagents
Brazil Tel (55) 11-5185-9995Fax (55) 11-5185-9895
Europe Tel (32) 2 400 98 95Fax (32) 2 401 70 94
MexicoToll Free 01-800-236-2543Tel (52) 55 5999 8296
JapanNippon Becton Dickinson Company, Ltd.Toll Free 0120-8555-90
Asia Pacific
Fax (65) 6-860-1593
CanadaToll Free (888) 259-0187
Fax (888) 229-9918
Tel (65) 6-861-0633Tel (905) 542-8028
[email protected] Tel 81-24-593-5405Fax 81-24-593-5761
Fax (52) 55 5999 8288

© 2008, Becton, Dickinson and Company. All rights reserved. No part of this publication may be reproduced, transmitted, transcribed, stored in retrieval systems, or translated into any language or computer language, in any form or by any means: electronic, mechanical, magnetic, optical, chemical, manual, or otherwise, without prior written permission from BD Biosciences.
The information in this guide is subject to change without notice. BD Biosciences reserves the right to change its products and services at any time to incorporate the latest technological developments. Although this guide has been prepared with every precaution to ensure accuracy, BD Biosciences assumes no liability for any errors or omissions, nor for any damages resulting from the application or use of this information. BD Biosciences welcomes customer input on corrections and suggestions for improvement.
BD FACSCount software © 2008, Becton, Dickinson and Company. This software is the property of Becton, Dickinson and Company. Each sale of a stored unit of this software grants the purchaser a nontransferable, nonexclusive, personal license. This software may not be duplicated, reproduced, or copied in any form or by any means whatsoever, except as otherwise permitted by law.
BD, BD logo, BD FACS, BD FACSCount, BD FACSFlow, and BD Vacutainer are trademarks or registered trademarks of Becton, Dickinson and Company.
Vortex-Genie is a registered trademark of Scientific Industries, Inc.
Maxi-Mix is a registered trademark of Thermo Fisher Scientific, Inc.
Proline is a registered trademark of Biohit Oyi.
All other company and product names might be trademarks of the respective companies with which they are associated.
Patents
The BD FACSCount flow cytometer is covered by one or more of the following US patents and foreign equivalents: 4,989,977 and 5,395,588.
Regulatory Information
For In Vitro Diagnostic use.
Class I (1) laser product
FCC Information
WARNING Changes or modifications to this unit not expressly approved by the party responsible for compliance could void the user’s authority to operate the equipment.
NOTICE This equipment has been tested and found to comply with the limits for a Class A digital device, pursuant to Part 15 of the FCC Rules. These limits are designed to provide reasonable protection against harmful interference when the equipment is operated in a commercial environment. This equipment generates, uses, and can radiate radio frequency energy and, if not installed and used in accordance with the instruction manual, may cause harmful interference to radio communications. Operation of this equipment in a residential area is likely to cause harmful interference in which case the user will be required to correct the interference at his or her own expense.
Shielded cables must be used with this unit to ensure compliance with the Class A FCC limits.
This Class A digital apparatus meets all requirements of the Canadian Interference-Causing Equipment Regulations.
Cet appareil numérique de la classe A respecte toutes les exigences du Réglement sur the matériel brouilleur du Canada.

History
Revision Date Change Made
642747 Rev. A 1/08 Initial release

THIS PAGE INTENTIONALLY LEFT BLANK

Contents
About This Guide ix
Conventions . . . . . . . . . . . . . . . . . . . . . . . . . . . . . . . . . . . . . . . . . . . . . . . . . ix
Technical Assistance . . . . . . . . . . . . . . . . . . . . . . . . . . . . . . . . . . . . . . . . . . . x
Chapter 1: Introduction 11
System Overview . . . . . . . . . . . . . . . . . . . . . . . . . . . . . . . . . . . . . . . . . . . . . 12
Principle of Operation . . . . . . . . . . . . . . . . . . . . . . . . . . . . . . . . . . . . . . 12
Intended Use . . . . . . . . . . . . . . . . . . . . . . . . . . . . . . . . . . . . . . . . . . . . . 13
Equipment and Materials Required . . . . . . . . . . . . . . . . . . . . . . . . . . . . . . . 13
Materials Provided . . . . . . . . . . . . . . . . . . . . . . . . . . . . . . . . . . . . . . . . . 13
Supplies Provided for Initial Use . . . . . . . . . . . . . . . . . . . . . . . . . . . . . . . 14
Supplies Not Provided . . . . . . . . . . . . . . . . . . . . . . . . . . . . . . . . . . . . . . 14
System Components . . . . . . . . . . . . . . . . . . . . . . . . . . . . . . . . . . . . . . . . . . . 17
Instrument . . . . . . . . . . . . . . . . . . . . . . . . . . . . . . . . . . . . . . . . . . . . . . . 17
BD FACSCount CD4 Software . . . . . . . . . . . . . . . . . . . . . . . . . . . . . . . . 20
BD FACSCount CD4 Reagents . . . . . . . . . . . . . . . . . . . . . . . . . . . . . . . 20
BD FACSCount Controls . . . . . . . . . . . . . . . . . . . . . . . . . . . . . . . . . . . . 21
Workstation . . . . . . . . . . . . . . . . . . . . . . . . . . . . . . . . . . . . . . . . . . . . . . 21
Electronic Pipette . . . . . . . . . . . . . . . . . . . . . . . . . . . . . . . . . . . . . . . . . . 22
Chapter 2: Installing the System 23
Installing the Hardware . . . . . . . . . . . . . . . . . . . . . . . . . . . . . . . . . . . . . . . . 24
Installing the Pipette Charger Stand . . . . . . . . . . . . . . . . . . . . . . . . . . . . . . . 25
Charging the Pipette . . . . . . . . . . . . . . . . . . . . . . . . . . . . . . . . . . . . . . . . 25
Installing the Software . . . . . . . . . . . . . . . . . . . . . . . . . . . . . . . . . . . . . . . . . 27
v
Chapter 3: Getting Started 31
Starting Up the Instrument . . . . . . . . . . . . . . . . . . . . . . . . . . . . . . . . . . . . . . 32
Restarting the Software . . . . . . . . . . . . . . . . . . . . . . . . . . . . . . . . . . . . . . 32
Preparing the Fluidics . . . . . . . . . . . . . . . . . . . . . . . . . . . . . . . . . . . . . . . . . . 33
Filling the Sheath Tank . . . . . . . . . . . . . . . . . . . . . . . . . . . . . . . . . . . . . . 33
Emptying the Waste Tank . . . . . . . . . . . . . . . . . . . . . . . . . . . . . . . . . . . . 35
Priming the System . . . . . . . . . . . . . . . . . . . . . . . . . . . . . . . . . . . . . . . . . 36
Entering Laboratory Information . . . . . . . . . . . . . . . . . . . . . . . . . . . . . . . . . 38
Changing the Date and Time . . . . . . . . . . . . . . . . . . . . . . . . . . . . . . . . . . . . . 40
Selecting Reports . . . . . . . . . . . . . . . . . . . . . . . . . . . . . . . . . . . . . . . . . . . . . . 41
Chapter 4: Reverse Pipetting 43
Pipetting Procedure . . . . . . . . . . . . . . . . . . . . . . . . . . . . . . . . . . . . . . . . . . . . 45
Method to Ensure Pipetting Precision . . . . . . . . . . . . . . . . . . . . . . . . . . . . . . 46
Method to Ensure Pipette Accuracy . . . . . . . . . . . . . . . . . . . . . . . . . . . . . . . 48
Chapter 5: Preparing Controls and Samples 51
Assembling Controls . . . . . . . . . . . . . . . . . . . . . . . . . . . . . . . . . . . . . . . . . . . 52
Assembling Samples . . . . . . . . . . . . . . . . . . . . . . . . . . . . . . . . . . . . . . . . . . . 52
Preparing Tubes . . . . . . . . . . . . . . . . . . . . . . . . . . . . . . . . . . . . . . . . . . . . . . 53
Adding Blood to Controls . . . . . . . . . . . . . . . . . . . . . . . . . . . . . . . . . . . . . . . 55
Adding Blood to Samples . . . . . . . . . . . . . . . . . . . . . . . . . . . . . . . . . . . . . . . 56
Incubating Tubes . . . . . . . . . . . . . . . . . . . . . . . . . . . . . . . . . . . . . . . . . . . . . . 56
Adding Fixative . . . . . . . . . . . . . . . . . . . . . . . . . . . . . . . . . . . . . . . . . . . . . . . 57
Adding Control Beads . . . . . . . . . . . . . . . . . . . . . . . . . . . . . . . . . . . . . . . . . . 57
Chapter 6: Running Controls 59
Entering Control Run Information . . . . . . . . . . . . . . . . . . . . . . . . . . . . . . . . 60
Running Controls . . . . . . . . . . . . . . . . . . . . . . . . . . . . . . . . . . . . . . . . . . . . . 62
Aborting the Control Run . . . . . . . . . . . . . . . . . . . . . . . . . . . . . . . . . . . . . . . 65
Control Results Printout . . . . . . . . . . . . . . . . . . . . . . . . . . . . . . . . . . . . . . . . 65
Suppressed Numeric Results . . . . . . . . . . . . . . . . . . . . . . . . . . . . . . . . . . 68
vi BD FACSCount System User’s Guide for Use with BD FACSCount CD4 Reagents

Chapter 7: Running Samples 69
Entering Patient and Reagent Information . . . . . . . . . . . . . . . . . . . . . . . . . . 70
Running Patient Samples . . . . . . . . . . . . . . . . . . . . . . . . . . . . . . . . . . . . . . . 71
Aborting a Sample Run . . . . . . . . . . . . . . . . . . . . . . . . . . . . . . . . . . . . . . . . . 74
Sample Results Printout . . . . . . . . . . . . . . . . . . . . . . . . . . . . . . . . . . . . . . . . 75
Patient Results . . . . . . . . . . . . . . . . . . . . . . . . . . . . . . . . . . . . . . . . . . . . 75
Suppressed Numeric Results . . . . . . . . . . . . . . . . . . . . . . . . . . . . . . . . . . 76
Results File . . . . . . . . . . . . . . . . . . . . . . . . . . . . . . . . . . . . . . . . . . . . . . . . . . 76
Chapter 8: Cleaning and Maintenance 79
Daily Cleaning . . . . . . . . . . . . . . . . . . . . . . . . . . . . . . . . . . . . . . . . . . . . . . . 80
Shutdown . . . . . . . . . . . . . . . . . . . . . . . . . . . . . . . . . . . . . . . . . . . . . . . . . . . 82
Long Cleaning . . . . . . . . . . . . . . . . . . . . . . . . . . . . . . . . . . . . . . . . . . . . . . . 84
General Cleaning . . . . . . . . . . . . . . . . . . . . . . . . . . . . . . . . . . . . . . . . . . . . . 89
Cleaning the Workstation . . . . . . . . . . . . . . . . . . . . . . . . . . . . . . . . . . . 89
Cleaning the Coring Station . . . . . . . . . . . . . . . . . . . . . . . . . . . . . . . . . . 89
Cleaning the Electronic Pipette . . . . . . . . . . . . . . . . . . . . . . . . . . . . . . . . 89
Cleaning the Sample Injection Probe . . . . . . . . . . . . . . . . . . . . . . . . . . . 90
Maintenance Procedures . . . . . . . . . . . . . . . . . . . . . . . . . . . . . . . . . . . . . . . . 92
Changing the Sheath Filter . . . . . . . . . . . . . . . . . . . . . . . . . . . . . . . . . . . 92
Changing Printer Paper . . . . . . . . . . . . . . . . . . . . . . . . . . . . . . . . . . . . . 94
Changing a Fuse . . . . . . . . . . . . . . . . . . . . . . . . . . . . . . . . . . . . . . . . . . . 96
Changing the Pipette Battery . . . . . . . . . . . . . . . . . . . . . . . . . . . . . . . . . 98
Chapter 9: Troubleshooting 101
Instrument Troubleshooting . . . . . . . . . . . . . . . . . . . . . . . . . . . . . . . . . . . . 102
Barcode Reader . . . . . . . . . . . . . . . . . . . . . . . . . . . . . . . . . . . . . . . . . . . 102
Coring Station . . . . . . . . . . . . . . . . . . . . . . . . . . . . . . . . . . . . . . . . . . . . 103
Electronic Pipette . . . . . . . . . . . . . . . . . . . . . . . . . . . . . . . . . . . . . . . . . . 103
Instrument . . . . . . . . . . . . . . . . . . . . . . . . . . . . . . . . . . . . . . . . . . . . . . . 104
Keypad . . . . . . . . . . . . . . . . . . . . . . . . . . . . . . . . . . . . . . . . . . . . . . . . . . 105
Contents vii

Printer . . . . . . . . . . . . . . . . . . . . . . . . . . . . . . . . . . . . . . . . . . . . . . . . . . . 106
Screen . . . . . . . . . . . . . . . . . . . . . . . . . . . . . . . . . . . . . . . . . . . . . . . . . . . 107
Error Codes . . . . . . . . . . . . . . . . . . . . . . . . . . . . . . . . . . . . . . . . . . . . . . . . . . 108
Displayed Messages . . . . . . . . . . . . . . . . . . . . . . . . . . . . . . . . . . . . . . . . . . . . 122
Appendix A: Service and Ordering Information 125
BD FACSCount System Ordering Information . . . . . . . . . . . . . . . . . . . . . . . 126
Consumables . . . . . . . . . . . . . . . . . . . . . . . . . . . . . . . . . . . . . . . . . . . . . . . . . 127
Recommended Brands of Materials . . . . . . . . . . . . . . . . . . . . . . . . . . . . . . . . 128
Appendix B: Product Specifications 129
System Performance . . . . . . . . . . . . . . . . . . . . . . . . . . . . . . . . . . . . . . . . . . . 130
BD FACSCount Instrument . . . . . . . . . . . . . . . . . . . . . . . . . . . . . . . . . . . . . . 130
Instrument Port . . . . . . . . . . . . . . . . . . . . . . . . . . . . . . . . . . . . . . . . . . . . 131
Instrument Accessories . . . . . . . . . . . . . . . . . . . . . . . . . . . . . . . . . . . . . . 132
Reagents . . . . . . . . . . . . . . . . . . . . . . . . . . . . . . . . . . . . . . . . . . . . . . . . . . . . 133
Controls . . . . . . . . . . . . . . . . . . . . . . . . . . . . . . . . . . . . . . . . . . . . . . . . . . . . 134
Glossary 135
References 139
Index 141
viii BD FACSCount System User’s Guide for Use with BD FACSCount CD4 Reagents
About This Guide
This user’s guide provides you with instructions for running samples on the BD FACSCount™ system using BD FACSCount™ CD4 reagents.
Once you become familiar with routine operation and need only a quick reminder of the main steps, use the quick reference guide or poster provided with this user’s guide.
Conventions
The following tables list conventions in this guide. Table 1 lists the symbols that are used in this user’s guide or on safety labels to alert you to a potential hazard. Text and keypad conventions are shown in Table 2.
Table 1 Hazard symbolsa
a. Although these symbols appear in color on the instrument, they are in black and white throughout this user’s guide; their meaning remains unchanged.
Symbol Meaning
CAUTION hazard or unsafe practice that could result in material damage, data loss, minor or severe injury, or death
electrical danger
laser radiation
biological risk
ix
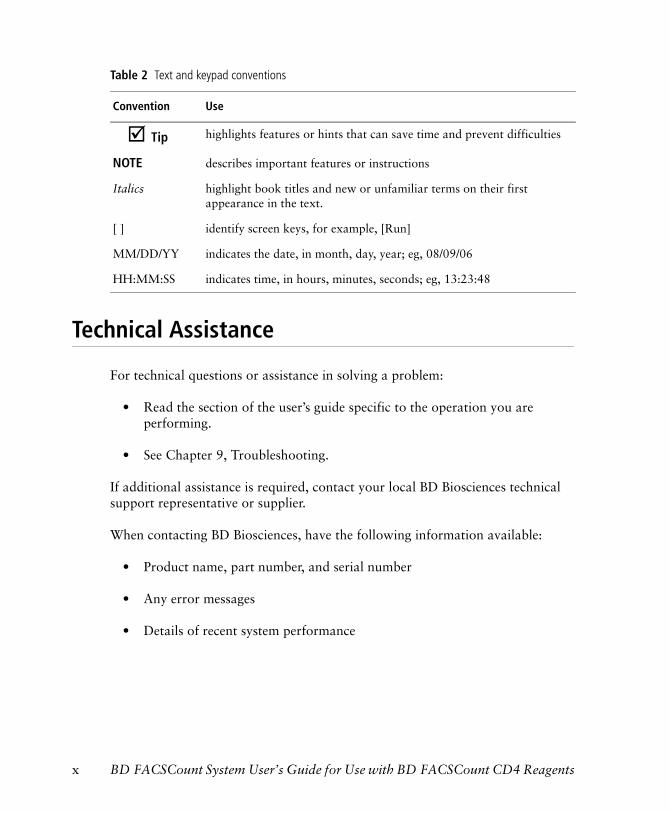
Technical Assistance
For technical questions or assistance in solving a problem:
• Read the section of the user’s guide specific to the operation you are performing.
• See Chapter 9, Troubleshooting.
If additional assistance is required, contact your local BD Biosciences technical support representative or supplier.
When contacting BD Biosciences, have the following information available:
• Product name, part number, and serial number
• Any error messages
• Details of recent system performance
Table 2 Text and keypad conventions
Convention Use
! Tip highlights features or hints that can save time and prevent difficulties
NOTE describes important features or instructions
Italics highlight book titles and new or unfamiliar terms on their first appearance in the text.
[ ] identify screen keys, for example, [Run]
MM/DD/YY indicates the date, in month, day, year; eg, 08/09/06
HH:MM:SS indicates time, in hours, minutes, seconds; eg, 13:23:48
x BD FACSCount System User’s Guide for Use with BD FACSCount CD4 Reagents
1
Introduction
The following topics are covered in this chapter:
• System Overview on page 12
• Equipment and Materials Required on page 13
• System Components on page 17
11

System Overview
The BD FACSCount system, for use with BD FACSCount CD4 reagents, is an automated instrument and reagent system designed specifically for enumerating the absolute cell counts of CD4 T lymphocytes and the percentage of lymphocytes that are CD4 T lymphocytes in unlysed whole blood (CD4 counts and CD4 percentages).
Figure 1-1 BD FACSCount system
Principle of Operation
Simply follow the whole blood staining procedure in Chapter 5 to prepare samples. Then run the samples on the BD FACSCount instrument. A built-in screen displays instructions for operation. The procedure requires minimal sample handling.
When whole blood is added to the reagents, fluorochrome-labeled antibodies in the reagents bind specifically to lymphocyte surface antigens, and a fluorescent nuclear dye binds to the nucleated blood cells. After a fixative solution is added to the reagent tubes, the sample is run on the instrument. During sample acquisition, the cells come in contact with the laser light, which causes the fluorochrome-labeled cells and fluorescently dyed cells to fluoresce. This fluorescent light provides the information necessary for the instrument to identify and count the lymphocytes and CD4 lymphocytes.
workstation
electronic pipettecoring station BD FACSCount instrument
12 BD FACSCount System User’s Guide for Use with BD FACSCount CD4 Reagents
In addition, the reagent tubes also contain a known number of fluorescent reference beads. A precise volume of whole blood is stained directly in the reagent tube. The software automatically identifies lymphocyte populations and calculates the CD4 counts (cells/µL) by comparing cellular events to bead events. Results include CD4 counts and CD4 percentages, and are printed immediately after samples are run.
Intended Use
BD FACSCount CD4 reagents are used to enumerate the absolute counts of CD4 T lymphocytes and the percentage of lymphocytes that are CD4 T lymphocytes in unlysed whole blood (CD4 counts and CD4 percentages). The reagents are intended for in vitro diagnostic use on a BD FACSCount instrument.
Equipment and Materials Required
The following materials are used with the BD FACSCount system. For service and ordering information, see Appendix A.
Materials Provided
These materials are necessary to prepare and run samples and come with the instrument (see Figure 1-1 on page 12).
• Coring station: opens the sealed reagent and control tubes to prepare them for use
• Electronic pipette: accurately delivers 50 µL of fluid
This pipette is automated and preprogrammed. For operating instructions, see Chapter 4.
• Workstation: holds blood specimens and operating supplies during sample and control preparation
See Workstation on page 21 for details.
Chapter 1: Introduction 13
Supplies Provided for Initial Use
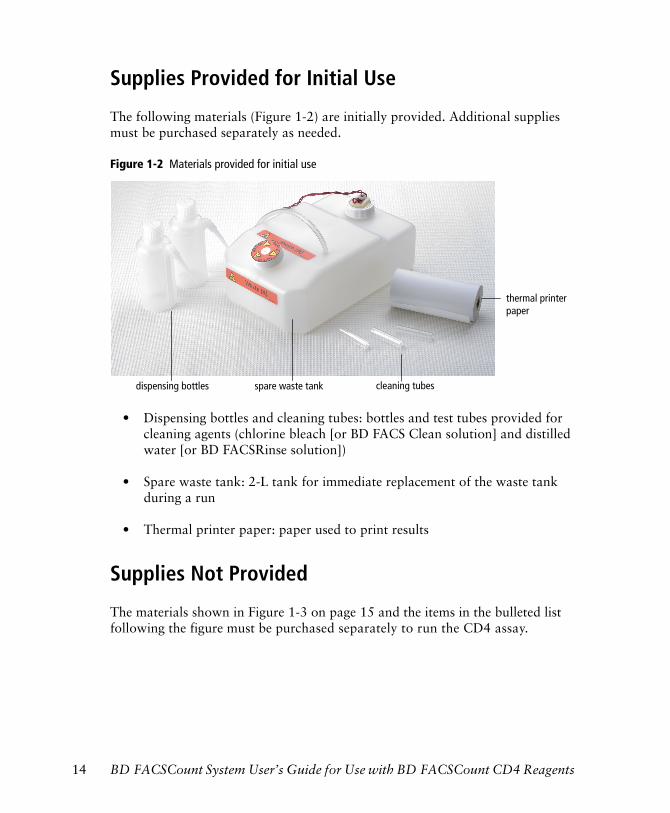
The following materials (Figure 1-2) are initially provided. Additional supplies must be purchased separately as needed.
Figure 1-2 Materials provided for initial use
• Dispensing bottles and cleaning tubes: bottles and test tubes provided for cleaning agents (chlorine bleach [or BD FACS Clean solution] and distilled water [or BD FACSRinse solution])
• Spare waste tank: 2-L tank for immediate replacement of the waste tank during a run
• Thermal printer paper: paper used to print results
Supplies Not Provided
The materials shown in Figure 1-3 on page 15 and the items in the bulleted list following the figure must be purchased separately to run the CD4 assay.
dispensing bottles cleaning tubesspare waste tank
thermal printer paper
14 BD FACSCount System User’s Guide for Use with BD FACSCount CD4 Reagents

Figure 1-3 Supplies not provided*
• BD FACSCount CD4 software disk (not shown): starts up and operates the instrument
Four disks (one primary and three backup) are provided.
• BD FACSCount CD4 reagents: each kit provides enough CD4 reagent, caps, and fixative solution for 50 tests
See page 20 for more information.
• BD FACSCount™ control kit: offers four bead concentrations (Zero, Low, Medium, and High)
NOTE The kit contains a Zero control that is not required for the CD4 assay. Do not use it.
The kit provides sufficient controls for 25 control runs. See page 21 for more information.
• EDTA blood collection tubes: collect blood specimens for staining
BD recommends BD Vacutainer® EDTA blood collection tubes.
* Distilled water, biosafety materials, saline fluid (page 16), and BD FACSCount CD4 software, are not shown in Figure 1-3.
bleach
pipette tips
vortex mixer
BD FACSCount control kit
BD FACSCount CD4 reagents
EDTA tubes
Chapter 1: Introduction 15
• Pipette tips: pipette blood, controls, and fixative solution
Tips are disposable and must be compatible with the BD FACSCount pipette. For recommended brands, see Appendix A.
• Vortex: mixes samples
For recommended brands, see Appendix A.
• Chlorine bleach (or BD FACS Clean solution): cleans the instrument
NOTE Bleach contains 5% sodium hypochlorite.
• Distilled water (or BD FACSRinse solution): rinses the instrument before shutdown
Deionized water or water purified by reverse osmosis can be substituted.
• Biosafety materials: include gloves worn when handling blood or biohazardous waste materials, and appropriate biohazard containers used for biohazardous waste materials
• Sheath fluid (saline solution): flows through the fluidics system
For recommended sheath fluid, see page 128.
Barcode Reader
An optional barcode reader can be purchased from BD. See page 126 for purchasing information. Use the barcode reader to scan barcodes for reading the following:
• Patient accession numbers
• Reagent lot codes
• Reference bead counts
• Control lot codes
• Control bead counts
16 BD FACSCount System User’s Guide for Use with BD FACSCount CD4 Reagents
System Components
Before attempting to operate the BD FACSCount instrument, take a few minutes to review the system and to familiarize yourself with the locations and functions of the various instrument components.
Instrument
The BD FACSCount instrument is a compact cell counter with a built-in computer. Reagent tubes are introduced to the instrument via the sample holder that lifts the tubes to the sample injection probe. The sheath tank and waste tank, which are equipped with liquid level detectors to indicate empty and full conditions, are easily accessible through a hinged door at the front of the instrument.
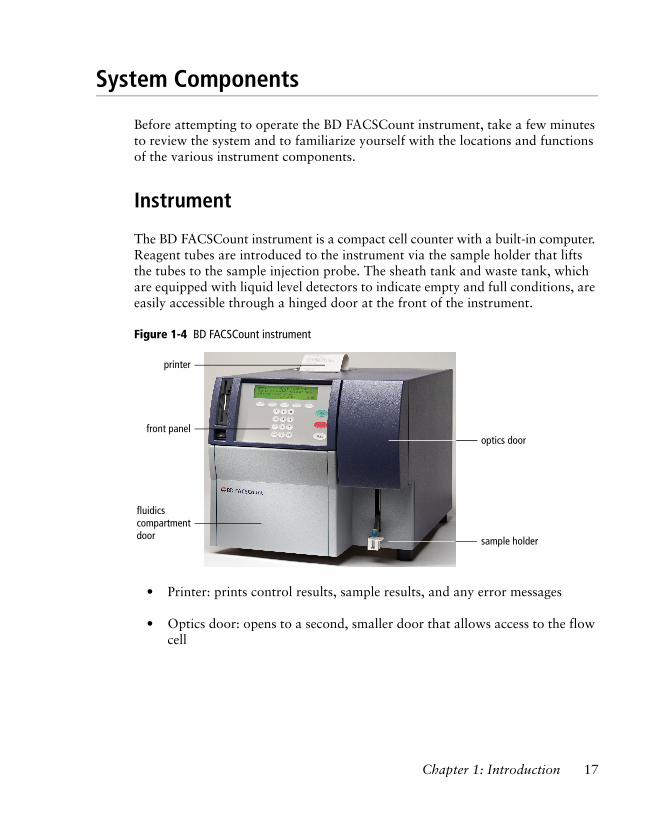
Figure 1-4 BD FACSCount instrument
• Printer: prints control results, sample results, and any error messages
• Optics door: opens to a second, smaller door that allows access to the flow cell
optics door
sample holder
printer
front panel
fluidicscompartmentdoor
Chapter 1: Introduction 17

• Sample holder: contains the sample and lifts tube to the sample injection probe
• Fluidics compartment door: opens to allow easy access to the sheath tank, waste tank, and sheath filter
• Sample injection probe (not visible): introduces sample to the flow cell via a stainless steel probe
A laser beam intersects the sample stream within a flow cell. This flow cell is accessible through either of two hinged doors located to the right of the fluidics compartment.
The screen (Figure 1-5) displays control and sample results, prompts, and messages that assist you with operation or inform you of errors. Results print automatically on thermal paper after samples are run. Figure 1-5 also shows the location of the parts of the front panel.
Figure 1-5 Front panel
• On/off switch: powers the instrument on and off
• Numeric keypad: includes numeric, Enter, and Delete keys
Keep hands clear of the sample holder during instrument operation, except when a screen message prompts you to change tubes.
floppy drive
on/off switch
display screen
function keys
fluidics keys
numeric keypad
floppy diskrelease button
18 BD FACSCount System User’s Guide for Use with BD FACSCount CD4 Reagents
- Numeric entry keys, labeled [0] to [9], are used to input values such as patient accession numbers and reagent and control lot codes and bead counts.
- [Enter] confirms the information input from the keypad. [Enter] also moves the cursor from one field to the next.
- [Delete] removes the last character that was entered.
• Floppy drive: contains the BD FACSCount software disk that starts and runs the instrument
• Floppy disk release button: ejects the BD FACSCount software disk from the drive
• Display screen: displays prompts and messages for operation, control and sample run results, instrument status, and error messages
• Function keys: select control functions displayed on the screen
The names and functions of these keys change depending on the screen displayed.
• Fluidics keys: include [Run], [Stop], and [Drain] for selecting the fluidics modes
These keys are active on each screen during specific times only.
- [Run] lifts the sample holder to the sample injection probe to introduce samples, controls, and system cleaning agents.
- [Stop] lowers the sample holder and stops all fluid flow. The instrument goes into a standby mode when this key is pressed or when the sample holder is down.
- [Drain] drains all fluid from the flow cell. This key is used to clear air bubbles or contaminants from the flow cell.
Chapter 1: Introduction 19
BD FACSCount CD4 Software
The floppy disk contains the BD FACSCount software required to start up and run the instrument. The disk also stores the last entered reagent lot ID and control bead lot ID information, control run results, the last values entered in the Setup screen, the number of tubes run since the last daily clean, the date of the last long clean run, and the Results file. During operation, the software monitors the sheath fluid supply, waste level, and laser power.
NOTE Multiple software disks are provided. Be sure to use the disk that contains the most recent control data.
Use the following five software screens to operate the instrument.
• Sample: to run patient samples. See page 70.
• Control: to run controls. See page 60.
• Setup: to enter laboratory information, set the time and date, and select report and results options. See page 38.
• Utility: to prime, clean, and shut down the instrument. See page 36 and page 79.
• Restart: to restart the software. See page 32.
BD FACSCount CD4 Reagents
The following are included with BD FACSCount reagents.
• CD4 reagents (blue top), sufficient for 50 tests, conveniently packaged in a resealable foil bag
Each CD4 tube fits into the workstation and the instrument sample holder. A tab allows you to label the tube with the appropriate patient accession number or ID. The CD4 tube is used for enumerating CD4 counts and CD4 percentages for each patient sample.
For reagent specifications, see page 133 in Appendix B.
20 BD FACSCount System User’s Guide for Use with BD FACSCount CD4 Reagents
• BD FACSCount caps: 65 reagent tube caps used to prevent spillage of patient samples and controls while vortexing, during incubation, and before and after running samples on the instrument
Keep reagent tubes capped except when pipetting or running tubes on the instrument.
• Fixative solution: one 5-mL vial of 5% formaldehyde in phosphate-buffered saline (PBS)
BD FACSCount Controls
The BD FACSCount control kit includes four levels of control beads: Zero, Low, Medium, and High. BD FACSCount CD4 software for use with BD FACSCount CD4 reagents requires only three bead concentrations (Low, Medium, and High) to set up the instrument and check linearity. The Zero control bead concentration is not required for the CD4 assay, so do not use it.
Each tube in the control kit provides enough beads for five control runs, a total of 25 runs per control kit. The beads are packaged in tubes similar to the reagent tubes, but with color-coded tops. The four bead concentrations are contained in two tube pairs.
Workstation
The BD FACSCount workstation provides a place to hold blood specimens, reagent tubes, controls, fixative solution, caps, and cleaning tubes while you are preparing and running samples. Figure 1-6 on page 22 shows how the various parts of the workstation are used.
pair one Zero (yellow top) 0 beads/µL
Low (red top) approximately 50 beads/µL
pair two Medium (blue top) approximately 250 beads/µL
High (purple top) approximately 1,000 beads/µL
Chapter 1: Introduction 21
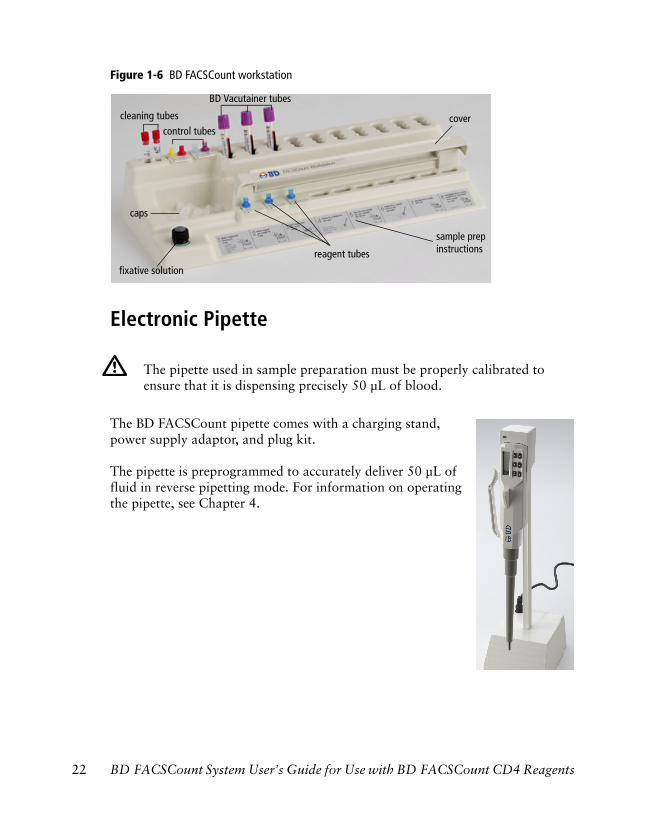
Figure 1-6 BD FACSCount workstation
Electronic Pipette
The BD FACSCount pipette comes with a charging stand, power supply adaptor, and plug kit.
The pipette is preprogrammed to accurately deliver 50 µL of fluid in reverse pipetting mode. For information on operating the pipette, see Chapter 4.
The pipette used in sample preparation must be properly calibrated to ensure that it is dispensing precisely 50 µL of blood.
BD Vacutainer tubes
reagent tubes
cleaning tubes
caps
fixative solution
control tubes
sample prepinstructions
cover
22 BD FACSCount System User’s Guide for Use with BD FACSCount CD4 Reagents

2
Installing the System
The following topics are covered in this chapter:
• Installing the Hardware on page 24
• Installing the Pipette Charger Stand on page 25
• Installing the Software on page 27
23
Installing the Hardware
Your BD representative will install your BD FACSCount instrument. However, you should familiarize yourself with the power cord connection. Before connecting the power cord, read the BD FACSCount System Safety and Limitations booklet.
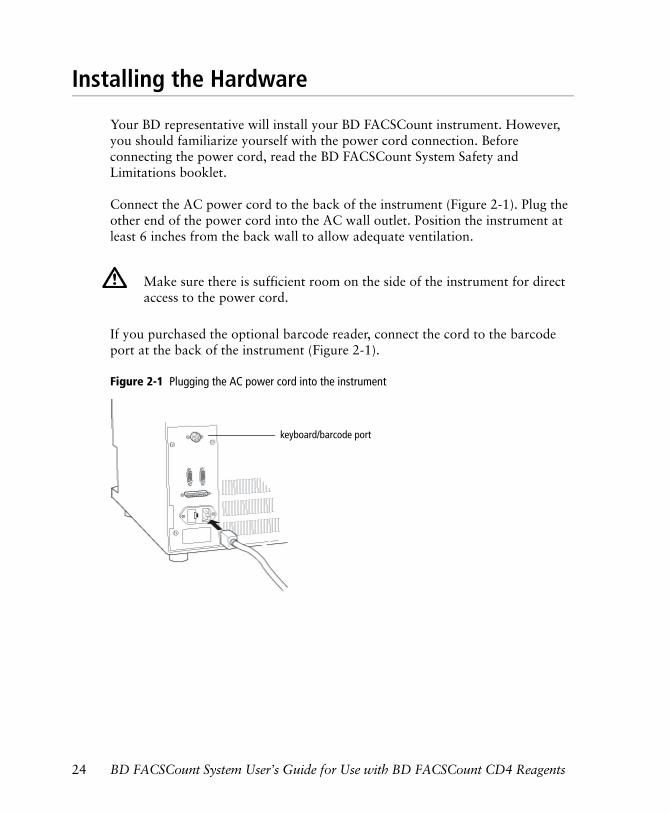
Connect the AC power cord to the back of the instrument (Figure 2-1). Plug the other end of the power cord into the AC wall outlet. Position the instrument at least 6 inches from the back wall to allow adequate ventilation.
If you purchased the optional barcode reader, connect the cord to the barcode port at the back of the instrument (Figure 2-1).
Figure 2-1 Plugging the AC power cord into the instrument
Make sure there is sufficient room on the side of the instrument for direct access to the power cord.
keyboard/barcode port
24 BD FACSCount System User’s Guide for Use with BD FACSCount CD4 Reagents
Installing the Pipette Charger Stand
The BD FACSCount pipette kit contains the pipette, charging stand, power supply adaptor, and plug kit. Follow these steps to install the charger stand.
NOTE Make sure that the plug is compatible with your electrical outlet.
1 Connect the power supply adaptor to the back of the stand.
2 Connect the plug that is compatible with the electric outlet to the power supply adaptor.
3 Plug into the electrical outlet.
The green light on the front of the charger stand indicates that it is operating.
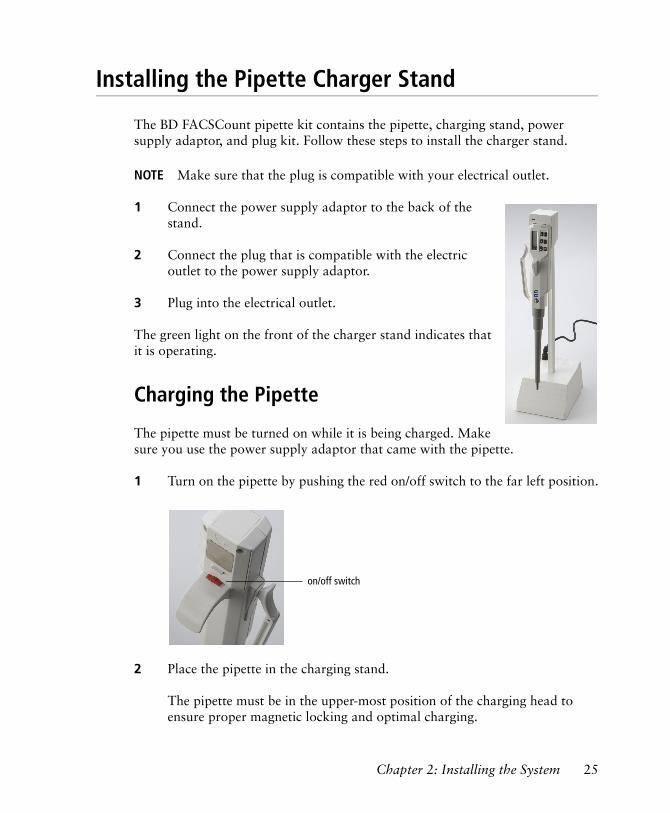
Charging the Pipette
The pipette must be turned on while it is being charged. Make sure you use the power supply adaptor that came with the pipette.
1 Turn on the pipette by pushing the red on/off switch to the far left position.
2 Place the pipette in the charging stand.
The pipette must be in the upper-most position of the charging head to ensure proper magnetic locking and optimal charging.
on/off switch
Chapter 2: Installing the System 25
3 Keep the pipette in the stand for at least 10 hours to fully charge the battery the first time.
When not in use, keep the pipette in the stand, in the ON position. If the pipette loses all charge, the display appears blank. To reactivate the battery, place the pipette into the charger stand until an arrow and an E appear in the display. A minimum of 10 hours is required to fully charge a dead battery.
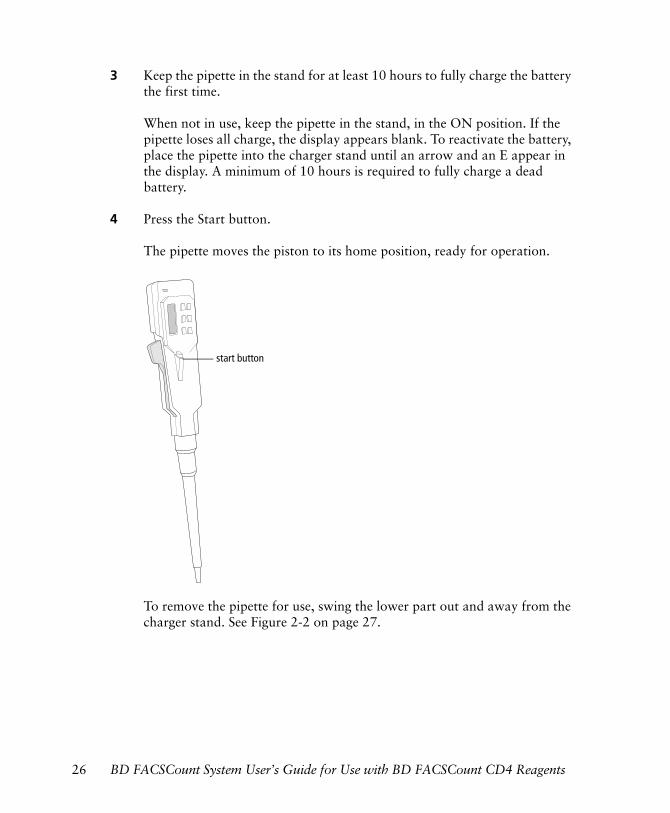
4 Press the Start button.
The pipette moves the piston to its home position, ready for operation.
To remove the pipette for use, swing the lower part out and away from the charger stand. See Figure 2-2 on page 27.
start button
26 BD FACSCount System User’s Guide for Use with BD FACSCount CD4 Reagents
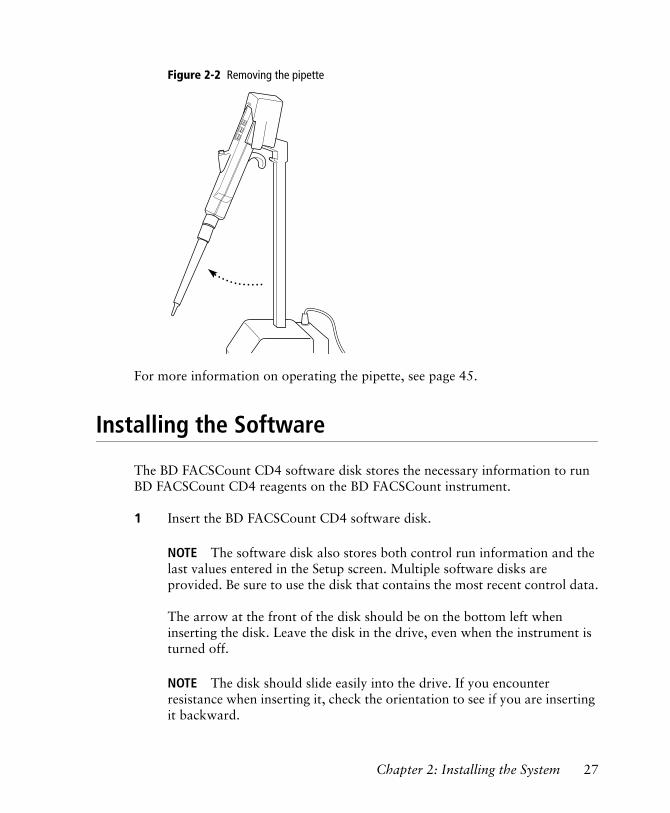
Figure 2-2 Removing the pipette
For more information on operating the pipette, see page 45.
Installing the Software
The BD FACSCount CD4 software disk stores the necessary information to run BD FACSCount CD4 reagents on the BD FACSCount instrument.
1 Insert the BD FACSCount CD4 software disk.
NOTE The software disk also stores both control run information and the last values entered in the Setup screen. Multiple software disks are provided. Be sure to use the disk that contains the most recent control data.
The arrow at the front of the disk should be on the bottom left when inserting the disk. Leave the disk in the drive, even when the instrument is turned off.
NOTE The disk should slide easily into the drive. If you encounter resistance when inserting it, check the orientation to see if you are inserting it backward.
Chapter 2: Installing the System 27
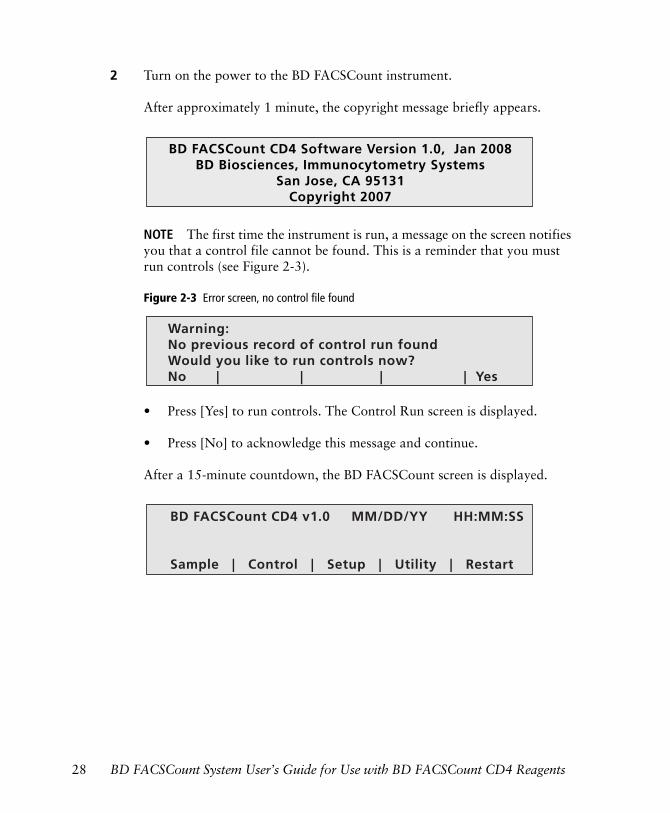
2 Turn on the power to the BD FACSCount instrument.
After approximately 1 minute, the copyright message briefly appears.
NOTE The first time the instrument is run, a message on the screen notifies you that a control file cannot be found. This is a reminder that you must run controls (see Figure 2-3).
Figure 2-3 Error screen, no control file found
• Press [Yes] to run controls. The Control Run screen is displayed.
• Press [No] to acknowledge this message and continue.
After a 15-minute countdown, the BD FACSCount screen is displayed.
BD FACSCount CD4 Software Version 1.0, Jan 2008BD Biosciences, Immunocytometry Systems
San Jose, CA 95131Copyright 2007
Warning:No previous record of control run foundWould you like to run controls now?No | | | | Yes
BD FACSCount CD4 v1.0 MM/DD/YY HH:MM:SS
Sample | Control | Setup | Utility | Restart
28 BD FACSCount System User’s Guide for Use with BD FACSCount CD4 Reagents
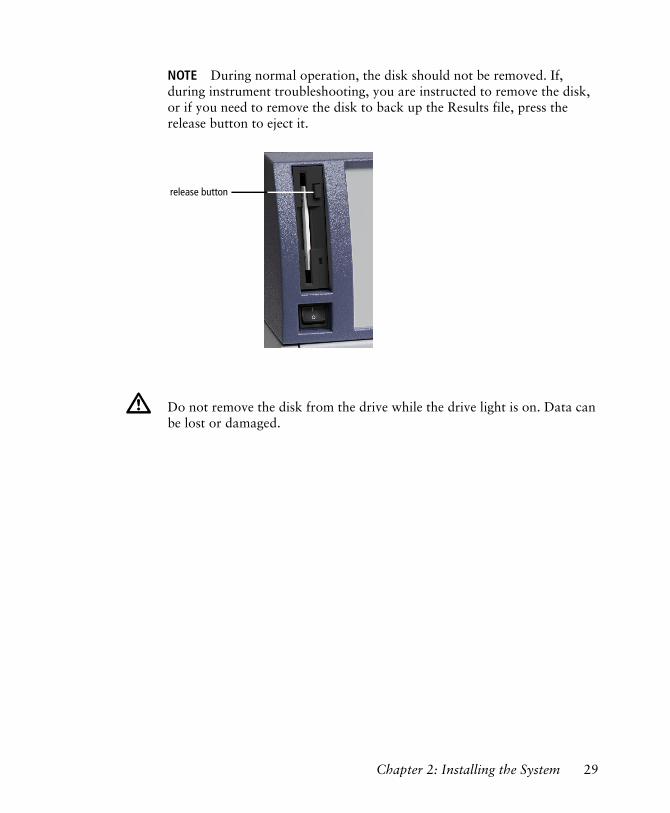
NOTE During normal operation, the disk should not be removed. If, during instrument troubleshooting, you are instructed to remove the disk, or if you need to remove the disk to back up the Results file, press the release button to eject it.
Do not remove the disk from the drive while the drive light is on. Data can be lost or damaged.
release button
Chapter 2: Installing the System 29

THIS PAGE INTENTIONALLY LEFT BLANK
3
Getting Started
The following topics are covered in this chapter:
• Starting Up the Instrument on page 32
• Preparing the Fluidics on page 33
• Entering Laboratory Information on page 38
• Changing the Date and Time on page 40
• Selecting Reports on page 41
31
Starting Up the Instrument
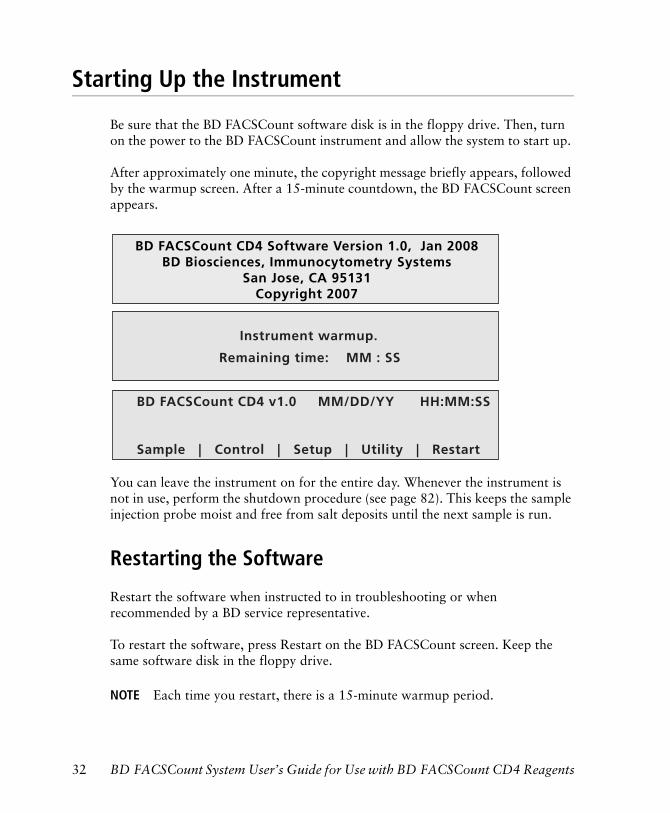
Be sure that the BD FACSCount software disk is in the floppy drive. Then, turn on the power to the BD FACSCount instrument and allow the system to start up.
After approximately one minute, the copyright message briefly appears, followed by the warmup screen. After a 15-minute countdown, the BD FACSCount screen appears.
You can leave the instrument on for the entire day. Whenever the instrument is not in use, perform the shutdown procedure (see page 82). This keeps the sample injection probe moist and free from salt deposits until the next sample is run.
Restarting the Software
Restart the software when instructed to in troubleshooting or when recommended by a BD service representative.
To restart the software, press Restart on the BD FACSCount screen. Keep the same software disk in the floppy drive.
NOTE Each time you restart, there is a 15-minute warmup period.
BD FACSCount CD4 Software Version 1.0, Jan 2008BD Biosciences, Immunocytometry Systems
San Jose, CA 95131Copyright 2007
BD FACSCount CD4 v1.0 MM/DD/YY HH:MM:SS
Sample | Control | Setup | Utility | Restart
Instrument warmup.
Remaining time: MM : SS
32 BD FACSCount System User’s Guide for Use with BD FACSCount CD4 Reagents

Preparing the Fluidics
Before running controls or samples, prepare the fluidics by first filling the sheath tank, then emptying the waste tank. Study Figure 3-1 to familiarize yourself with the locations of fluidics components, then follow the steps for each procedure.
Figure 3-1 Sheath and waste tanks and connectors
Filling the Sheath Tank
The sheath tank is above the waste tank inside the fluidics compartment. The tank should be filled before the start of the run but can also be filled during operation.
1 Open the fluidics compartment door to access the sheath and waste tanks.
Push the top center of the door, then release to open.
2 Disconnect the sheath sensor connector (white wire) from the fluidics panel.
Squeeze the white tabs at the sides of the connector and pull.
waste tank
sheath filter
sheath tank
air vent tubing
sheath sensor connector
waste sensor connector
sheath tubing connector
waste tubing connector
plastic pinch clamp
sheath filter output tubing connector
sheath filter input tubing connector
Chapter 3: Getting Started 33

3 Disconnect the sheath tubing from the fluidics panel.
Squeeze the metal clip on the white connector and pull the tubing from the fitting.
4 Remove the sheath tank from the instrument.
5 Fill the tank with sheath fluid.
Fill to 1 inch (2.5 cm) from the top.
6 Recap the tank and replace it in the instrument.
• Make sure the cap is not wet. Replace if wet. See Consumables on page 127 for replacement caps.
• Make sure the cap is firmly tightened.
• Slide the tank in with the cap facing up and the tubing at the top.
7 Reconnect the sheath tubing and sheath detection probe connector.
• Snap the sheath tubing connector back into place by pushing firmly until you hear a click.
• Connect the sheath sensor connector by squeezing the tabs and pushing the connector into place.
8 Make sure the sheath filter is filled with sheath fluid.
• If air is present in the filter, unclamp the plastic pinch clamp located on the air vent tubing to allow the air to escape through the vent tubing.
• If necessary, tap the filter gently to dislodge any bubbles and force them into the air vent tubing.
• When all air is removed, secure the clamp.
34 BD FACSCount System User’s Guide for Use with BD FACSCount CD4 Reagents
Emptying the Waste Tank
The waste tank is below the sheath tank inside the fluidics compartment. Always empty the waste tank when filling the sheath tank. This prevents the waste from overflowing.
1 Disconnect the waste tubing from the fluidics panel.
Squeeze the metal clip on the connector and pull.
2 Disconnect the waste sensor connector (red wire) from the fluidics panel.
Squeeze the white tabs at the sides of the connector and pull.
3 Remove the waste tank from the instrument.
A spare waste tank is provided, allowing you to immediately continue with a run while waiting 30 minutes before emptying the full tank.
4 Empty the tank according to local, state, or country biohazard handling regulations.
5 Add 200 mL of undiluted bleach to the empty tank.
Blood specimens can contain infectious agents that are hazardous to your health. Wear gloves when handling blood or any materials with which it comes in contact. Follow local, state, or country biohazard handling regulations when disposing of biohazardous waste material.
Do not dispose of waste tank contents until at least 30 minutes after the completion of the last run. This helps inactivate any biohazardous materials before disposal.
Carefully remove the cap from an overfilled and potentially pressurized tank.
Chapter 3: Getting Started 35
6 Recap the tank and replace it in the instrument.
• Make sure the cap is not wet. Replace if wet. See Consumables on page 127 for replacement caps.
• Make sure the cap is firmly tightened.
• Slide the tank in with the cap facing up and the tubing at the top.
• Do not allow the sheath tubing to get pinched when the waste tank is installed.
• Make sure the vent filter at the top of the tank is free of fluid.
7 Reconnect the waste tubing and waste sensor connectors.
• Snap the waste tubing connector back into place by pushing firmly until you hear a click.
• Connect the waste sensor connector by squeezing the tabs and pushing the connector into place.
Priming the System
Check the flow cell each day after you turn on the instrument, and prime the system to make sure there are no air bubbles.
If you run the system while the sheath tank is empty, the sheath filter will run dry. If the sheath filter runs dry or if you change the filter, repeat the priming procedure five times to ensure all air has been removed.
1 Press [Utility] on the BD FACSCount screen to display the Utility screen.
Utility
Clean | | Shutdown | Status | Main
36 BD FACSCount System User’s Guide for Use with BD FACSCount CD4 Reagents
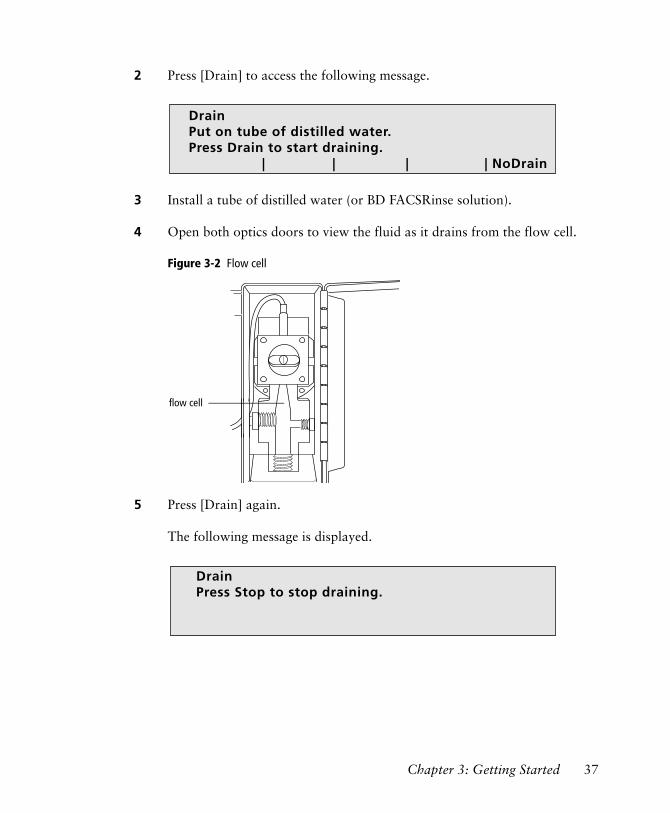
2 Press [Drain] to access the following message.
3 Install a tube of distilled water (or BD FACSRinse solution).
4 Open both optics doors to view the fluid as it drains from the flow cell.
Figure 3-2 Flow cell
5 Press [Drain] again.
The following message is displayed.
DrainPut on tube of distilled water.Press Drain to start draining.
| | | | NoDrain
flow cell
DrainPress Stop to stop draining.
Chapter 3: Getting Started 37

6 When all fluid has drained from the flow cell, press [Stop].
The flow cell fills automatically. The following message is displayed, followed by the BD FACSCount screen.
7 Verify that the flow cell doesn’t contain air bubbles.
If bubbles are visible, repeat the drain and fill.
8 Close both optics doors.
Entering Laboratory Information
If this is your first time using the instrument, follow these steps to enter the operator and laboratory identification information. Once this information has been entered, it remains until you change it or change the software disk.
1 Press [Setup] on the BD FACSCount screen to display the Setup screen.
2 Press [Set IDs].
Draining typically takes less than 1 minute to complete. Do not leave the instrument unattended while draining. The fluid pump will run dry.
Drain
Refilling flow cell. Please wait.
Setup Op ID: ___ MM/DD/YY HH:MM:SSLab ID: __________________________________
Set IDs | Set Date | | Reports | Main
38 BD FACSCount System User’s Guide for Use with BD FACSCount CD4 Reagents
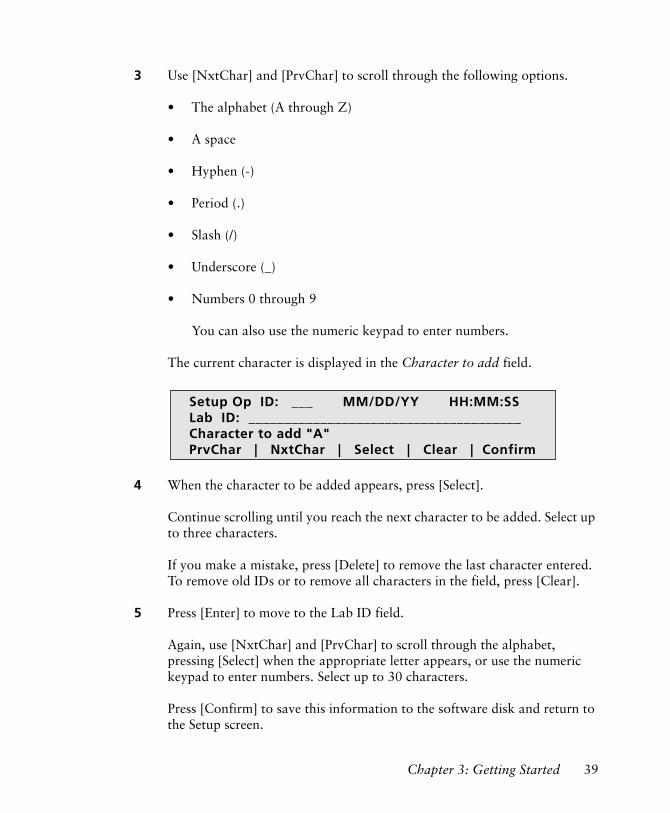
3 Use [NxtChar] and [PrvChar] to scroll through the following options.
• The alphabet (A through Z)
• A space
• Hyphen (-)
• Period (.)
• Slash (/)
• Underscore (_)
• Numbers 0 through 9
You can also use the numeric keypad to enter numbers.
The current character is displayed in the Character to add field.
4 When the character to be added appears, press [Select].
Continue scrolling until you reach the next character to be added. Select up to three characters.
If you make a mistake, press [Delete] to remove the last character entered. To remove old IDs or to remove all characters in the field, press [Clear].
5 Press [Enter] to move to the Lab ID field.
Again, use [NxtChar] and [PrvChar] to scroll through the alphabet, pressing [Select] when the appropriate letter appears, or use the numeric keypad to enter numbers. Select up to 30 characters.
Press [Confirm] to save this information to the software disk and return to the Setup screen.
Setup Op ID: ___ MM/DD/YY HH:MM:SSLab ID: ______________________________________Character to add "A"PrvChar | NxtChar | Select | Clear | Confirm
Chapter 3: Getting Started 39
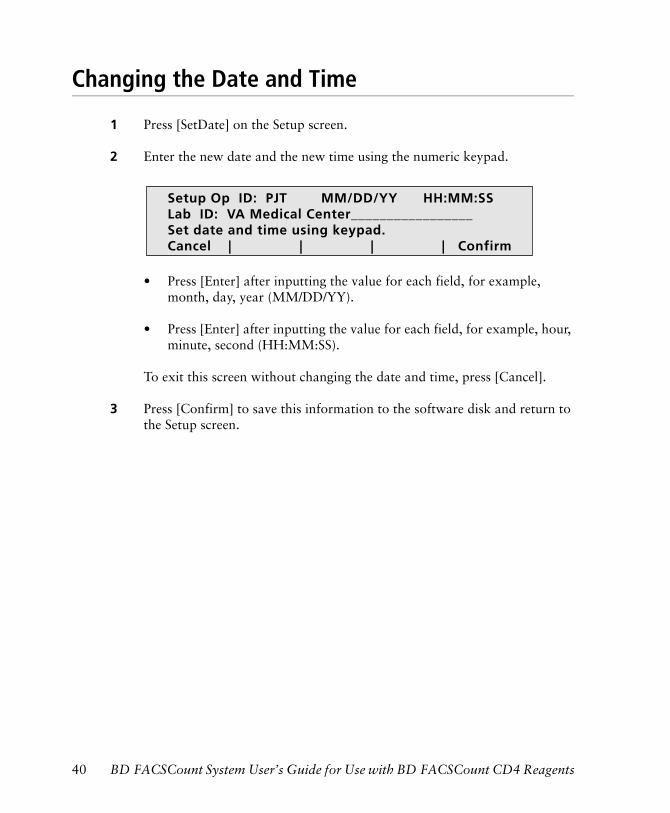
Changing the Date and Time
1 Press [SetDate] on the Setup screen.
2 Enter the new date and the new time using the numeric keypad.
• Press [Enter] after inputting the value for each field, for example, month, day, year (MM/DD/YY).
• Press [Enter] after inputting the value for each field, for example, hour, minute, second (HH:MM:SS).
To exit this screen without changing the date and time, press [Cancel].
3 Press [Confirm] to save this information to the software disk and return to the Setup screen.
Setup Op ID: PJT MM/DD/YY HH:MM:SSLab ID: VA Medical Center_________________Set date and time using keypad.Cancel | | | | Confirm
40 BD FACSCount System User’s Guide for Use with BD FACSCount CD4 Reagents
Selecting Reports
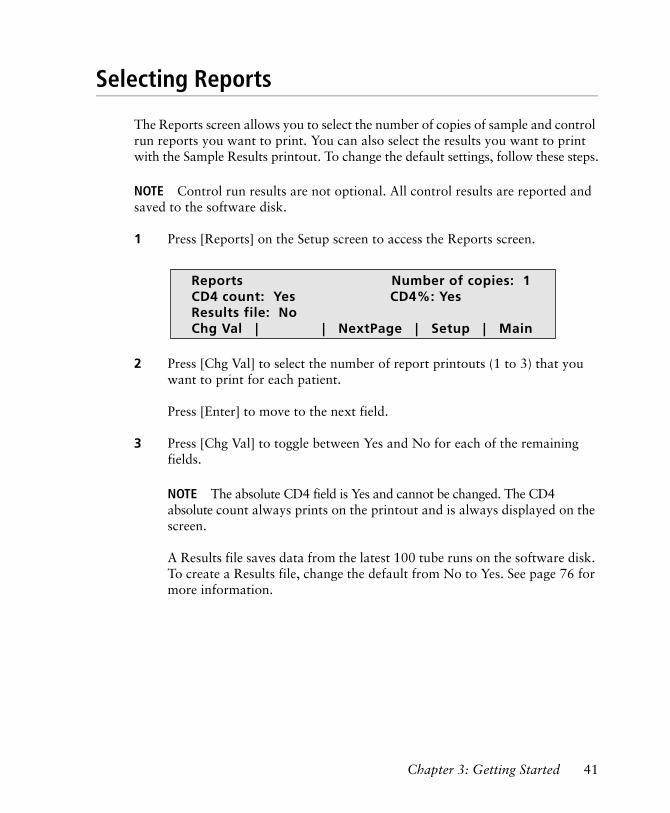
The Reports screen allows you to select the number of copies of sample and control run reports you want to print. You can also select the results you want to print with the Sample Results printout. To change the default settings, follow these steps.
NOTE Control run results are not optional. All control results are reported and saved to the software disk.
1 Press [Reports] on the Setup screen to access the Reports screen.
2 Press [Chg Val] to select the number of report printouts (1 to 3) that you want to print for each patient.
Press [Enter] to move to the next field.
3 Press [Chg Val] to toggle between Yes and No for each of the remaining fields.
NOTE The absolute CD4 field is Yes and cannot be changed. The CD4 absolute count always prints on the printout and is always displayed on the screen.
A Results file saves data from the latest 100 tube runs on the software disk. To create a Results file, change the default from No to Yes. See page 76 for more information.
Reports Number of copies: 1CD4 count: Yes CD4%: YesResults file: No Chg Val | | NextPage | Setup | Main
Chapter 3: Getting Started 41
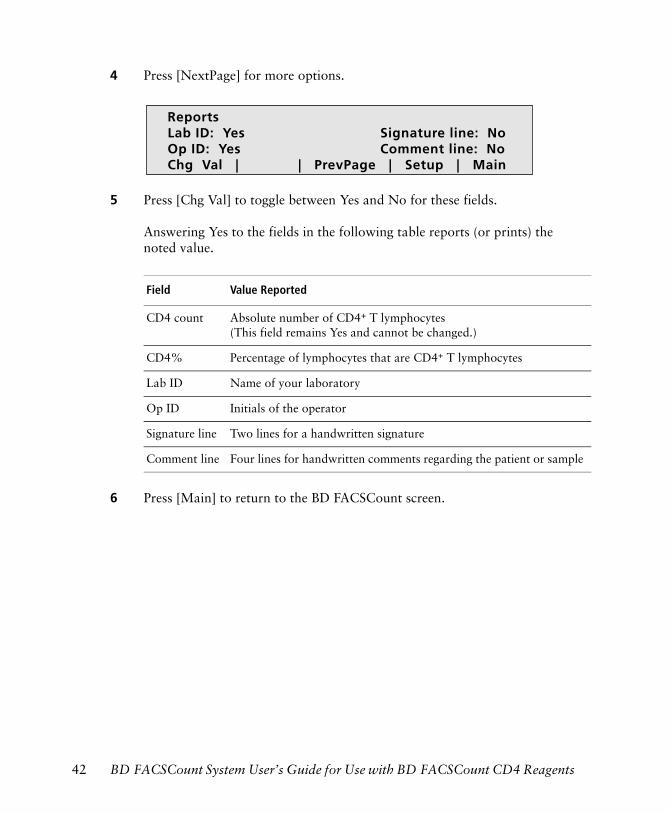
4 Press [NextPage] for more options.
5 Press [Chg Val] to toggle between Yes and No for these fields.
Answering Yes to the fields in the following table reports (or prints) the noted value.
6 Press [Main] to return to the BD FACSCount screen.
Field Value Reported
CD4 count Absolute number of CD4+ T lymphocytes (This field remains Yes and cannot be changed.)
CD4% Percentage of lymphocytes that are CD4+ T lymphocytes
Lab ID Name of your laboratory
Op ID Initials of the operator
Signature line Two lines for a handwritten signature
Comment line Four lines for handwritten comments regarding the patient or sample
ReportsLab ID: Yes Signature line: NoOp ID: Yes Comment line: NoChg Val | | PrevPage | Setup | Main
42 BD FACSCount System User’s Guide for Use with BD FACSCount CD4 Reagents
4
Reverse Pipetting
The following topics are covered in this chapter:
• Pipetting Procedure on page 45
• Method to Ensure Pipetting Precision on page 46
• Method to Ensure Pipette Accuracy on page 48
43
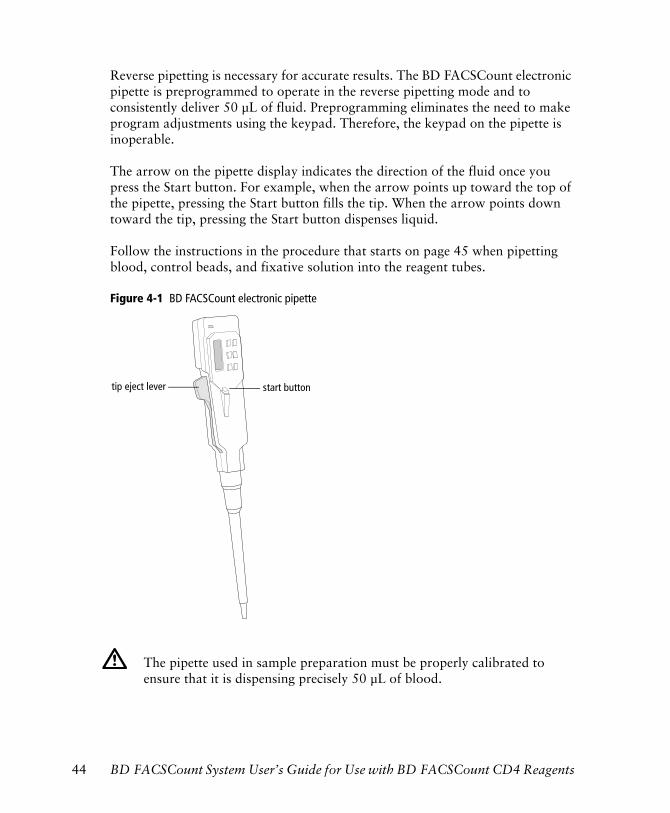
Reverse pipetting is necessary for accurate results. The BD FACSCount electronic pipette is preprogrammed to operate in the reverse pipetting mode and to consistently deliver 50 µL of fluid. Preprogramming eliminates the need to make program adjustments using the keypad. Therefore, the keypad on the pipette is inoperable.
The arrow on the pipette display indicates the direction of the fluid once you press the Start button. For example, when the arrow points up toward the top of the pipette, pressing the Start button fills the tip. When the arrow points down toward the tip, pressing the Start button dispenses liquid.
Follow the instructions in the procedure that starts on page 45 when pipetting blood, control beads, and fixative solution into the reagent tubes.
Figure 4-1 BD FACSCount electronic pipette
The pipette used in sample preparation must be properly calibrated to ensure that it is dispensing precisely 50 µL of blood.
start buttontip eject lever
44 BD FACSCount System User’s Guide for Use with BD FACSCount CD4 Reagents
We recommend checking the performance of your electronic pipette regularly, for example every 3 months, or when the control run repeatedly fails. Follow the procedures outlined in Method to Ensure Pipetting Precision on page 46 and Method to Ensure Pipette Accuracy on page 48.
If the BD FACSCount pipette is inoperable, you can use another pipette provided it is capable of operating in the reverse pipetting mode. Make sure that you:
• Use the reverse pipetting technique.
• Qualify your technique by following the procedure in Method to Ensure Pipetting Precision on page 46.
Pipetting Procedure
1 Place a clean tip on the pipette.
2 Place the tip 2 to 4 mm into the liquid.
3 Press the pipette Start button.
Quickly release the button after pressing, but keep the tip in the liquid, pausing 1 to 2 seconds to allow the correct volume of liquid to fill the tip. Touch the tip to the inside surface of the vessel to remove the excess liquid from the outside of the tip before dispensing into the reagent tube.
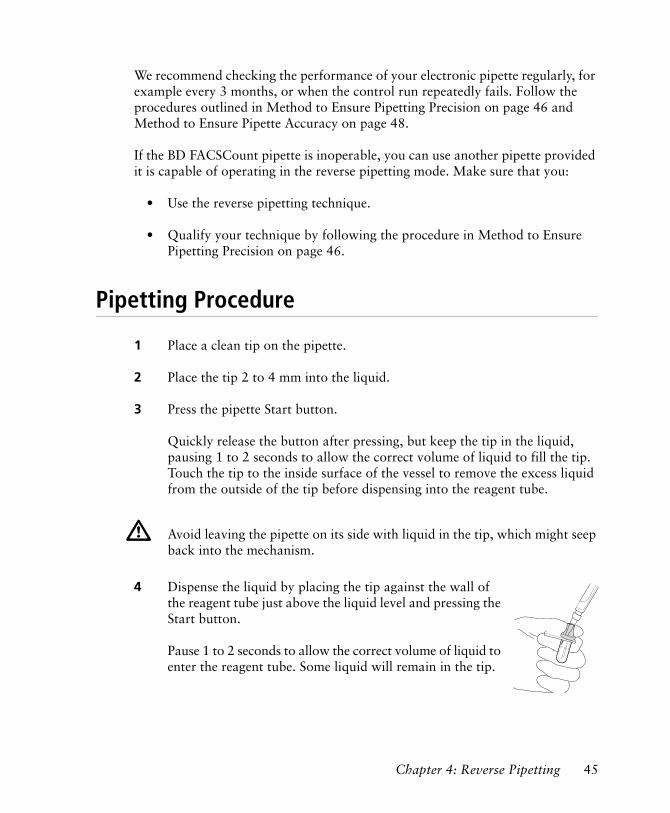
4 Dispense the liquid by placing the tip against the wall of the reagent tube just above the liquid level and pressing the Start button.
Pause 1 to 2 seconds to allow the correct volume of liquid to enter the reagent tube. Some liquid will remain in the tip.
Avoid leaving the pipette on its side with liquid in the tip, which might seep back into the mechanism.
Chapter 4: Reverse Pipetting 45
5 Remove the tip from the reagent tube.
6 Place the pipette and tip over an appropriate biohazard container and squeeze the tip eject lever.
Method to Ensure Pipetting Precision
Use the following procedure to check that you are consistently pipetting a precise volume. Pipette 20 replicates of blood and record the weight of each. Calculate the coefficient of variation (%CV). The %CV should be <2%. If the CV is ≥2%, performance of the BD FACSCount system will not meet the expected results.
1 Place a plastic weigh boat or similar container on an analytical balance.
2 Tare the balance so it reads zero.
3 Pipette 50 µL of normal whole blood into the container.
Follow the procedure on page 45.
4 Record the weight of the blood to the nearest 1/10,000 g.
5 Tare the balance.
6 Repeat steps 3 through 5 for a total of 20 replicates.
Change pipette tips between replicates.
7 Calculate the %CV.
Before calculating the %CV, you must calculate the mean (X) and the standard deviation (SD). The %CV should be <2%. See the example on page 47.
46 BD FACSCount System User’s Guide for Use with BD FACSCount CD4 Reagents

Example
In the equations on page 48, X is the weight value (g) of the individual replicates. N is the number of replicates.
Replicate Weight (g)
1 0.0526
2 0.0526
3 0.0521
4 0.0534
5 0.0520
6 0.0524
7 0.0530
8 0.0512
9 0.0532
10 0.0521
11 0.0528
12 0.0518
13 0.0530
14 0.0530
15 0.0526
16 0.0527
17 0.0533
18 0.0526
19 0.0533
20 0.0527
Chapter 4: Reverse Pipetting 47
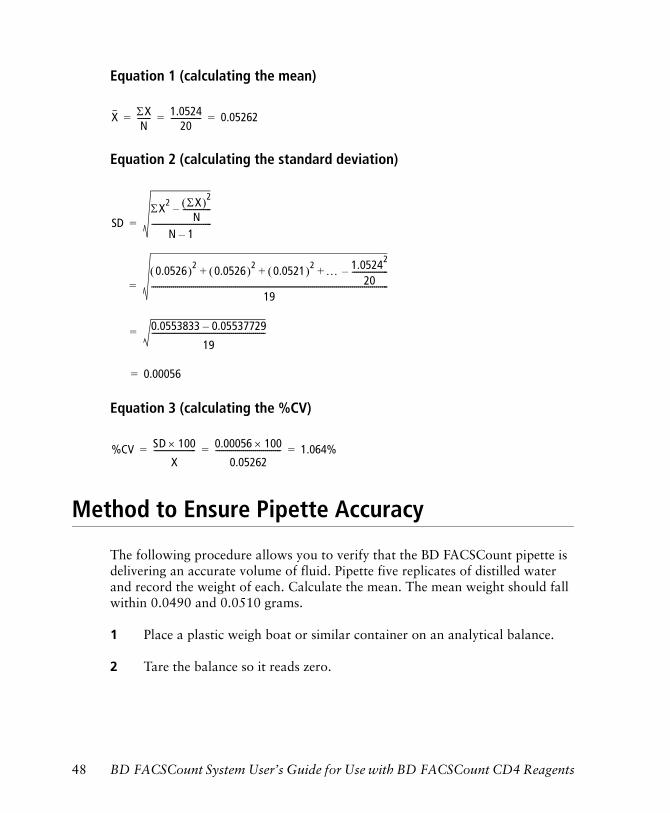
Equation 1 (calculating the mean)
Equation 2 (calculating the standard deviation)
Equation 3 (calculating the %CV)
Method to Ensure Pipette Accuracy
The following procedure allows you to verify that the BD FACSCount pipette is delivering an accurate volume of fluid. Pipette five replicates of distilled water and record the weight of each. Calculate the mean. The mean weight should fall within 0.0490 and 0.0510 grams.
1 Place a plastic weigh boat or similar container on an analytical balance.
2 Tare the balance so it reads zero.
X ΣXN------- 1.0524
20--------------- 0.05262= = =
SDΣX2 ΣX( )2
N--------------�
N 1�------------------------------=
0.0526( )2 0.0526( )2 0.0521( )2 … 1.05242
20------------------�+ + +
19-----------------------------------------------------------------------------------------------------------------------=
0.0553833 0.05537729�19
---------------------------------------------------------=
0.00056=
%CV SD 100×
X--------------------- 0.00056 100×
0.05262--------------------------------- 1.064%= = =
48 BD FACSCount System User’s Guide for Use with BD FACSCount CD4 Reagents

3 Pipette 50 µL of water into the container.
Follow the pipetting procedure on page 45.
4 Record the weight of the water to the nearest 1/10,000 g.
5 Tare the balance.
6 Repeat steps 3 through 5 for a total of five replicates.
Change pipette tips between replicates.
7 Calculate the mean weight.
The mean should fall within 0.0490 and 0.0510 grams. See the following example.
In the following equation, X is the weight value (g) of the individual replicates. N is the number of replicates.
Calculating the Mean
Replicate Weight (g)
1 0.0502
2 0.0501
3 0.0504
4 0.0499
5 0.0502
X ΣX
N------- 0.2508
5--------------- 0.0502= = =
Chapter 4: Reverse Pipetting 49

THIS PAGE INTENTIONALLY LEFT BLANK

5
Preparing Controls and Samples
The following topics are covered in this chapter:
• Assembling Controls on page 52
• Assembling Samples on page 52
• Preparing Tubes on page 53
• Adding Blood to Controls on page 55
• Adding Blood to Samples on page 56
• Incubating Tubes on page 56
• Adding Fixative on page 57
• Adding Control Beads on page 57
51

Assembling Controls
NOTE Control beads are packaged in tube pairs. See BD FACSCount Controls on page 21 for information.
Prepare controls by adding normal blood, then fixative solution, to the CD4 reagent tube. Before you run controls on the instrument, add control beads.
1 Place the normal donor blood in the workstation.
2 Remove three reagent tubes from the foil bag, reseal the bag, and place it in the refrigerator.
NOTE Normal blood is needed to run controls. Be sure the normal blood was collected from a normal donor in a BD Vacutainer EDTA blood collection tube (or equivalent) and was stored no longer than 24 hours at room temperature (20° to 25°C, 68° to 77°F).
Assembling Samples
Prepare patient samples by adding blood, then fixative solution, to the CD4 reagent tube.
1 Place the patient blood in the workstation.
2 Remove one reagent tube for each patient.
Patient blood specimens must meet the following criteria.
• Samples must be collected in a BD Vacutainer EDTA blood collection tube (or equivalent).
52 BD FACSCount System User’s Guide for Use with BD FACSCount CD4 Reagents

• Prepare samples within 24 hours of draw and analyze samples within 48 hours of preparation.
Preparing Tubes
BD recommends preparing no more than 15 control and sample reagent tubes at one time.
1 For controls, label the tabs of each of three reagent tubes.
Label one tube Low, one tube Medium, and one tube High.
2 For each patient sample, label a reagent tube tab with the patient accession number or number that identifies the tube of blood.
3 Vortex each tube upside down for 6 seconds and upright for 6 seconds to resuspend the beads.
NOTE Set the vortex speed to a setting that causes the liquid to rise to the top of the reagent tube.
Results obtained from samples that do not meet these criteria might be inaccurate.
Do not mix different reagent lots when running controls or samples.
tube upside down tube upright
Chapter 5: Preparing Controls and Samples 53
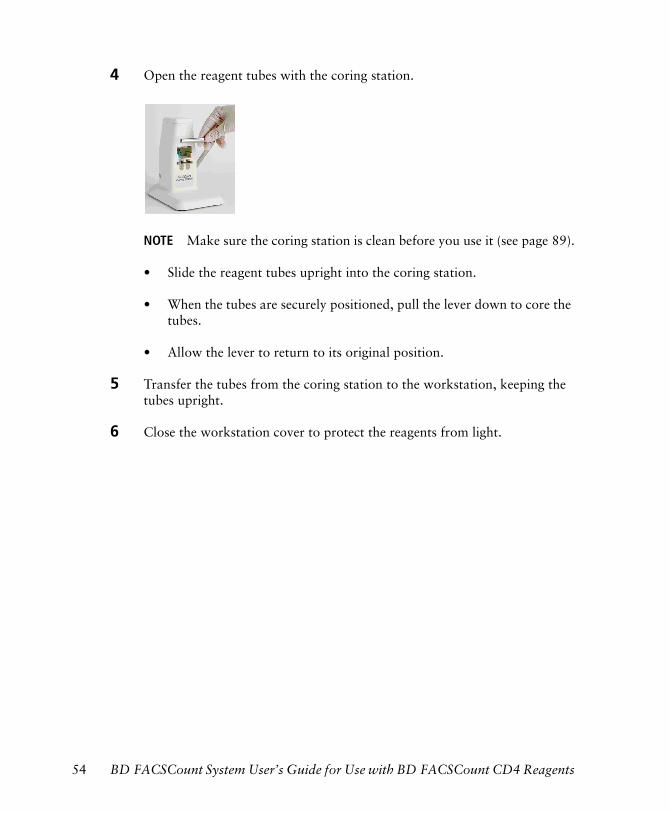
4 Open the reagent tubes with the coring station.
NOTE Make sure the coring station is clean before you use it (see page 89).
• Slide the reagent tubes upright into the coring station.
• When the tubes are securely positioned, pull the lever down to core the tubes.
• Allow the lever to return to its original position.
5 Transfer the tubes from the coring station to the workstation, keeping the tubes upright.
6 Close the workstation cover to protect the reagents from light.
54 BD FACSCount System User’s Guide for Use with BD FACSCount CD4 Reagents
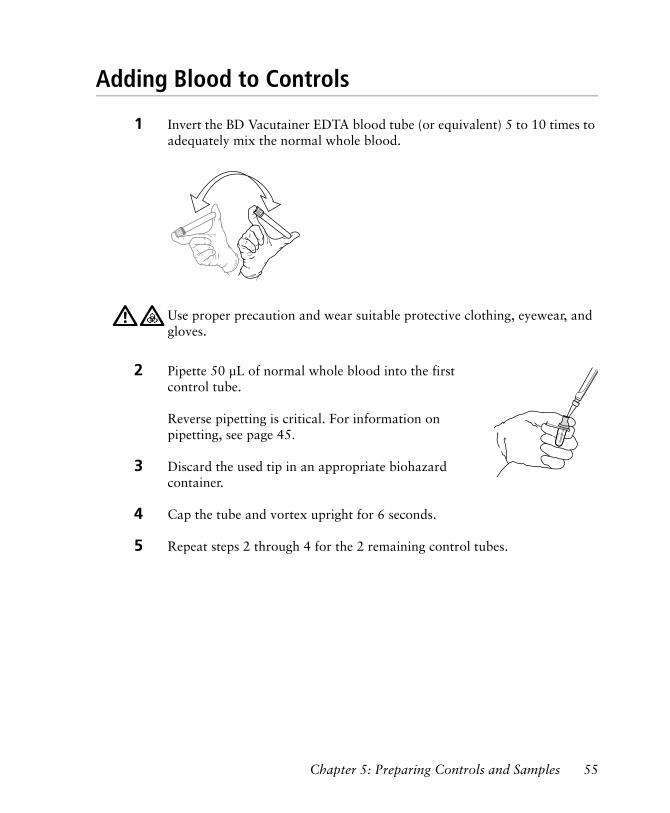
Adding Blood to Controls
1 Invert the BD Vacutainer EDTA blood tube (or equivalent) 5 to 10 times to adequately mix the normal whole blood.
2 Pipette 50 µL of normal whole blood into the first control tube.
Reverse pipetting is critical. For information on pipetting, see page 45.
3 Discard the used tip in an appropriate biohazard container.
4 Cap the tube and vortex upright for 6 seconds.
5 Repeat steps 2 through 4 for the 2 remaining control tubes.
Use proper precaution and wear suitable protective clothing, eyewear, and gloves.
Chapter 5: Preparing Controls and Samples 55
Adding Blood to Samples
1 Invert the BD Vacutainer EDTA blood tube (or equivalent) 5 to 10 times to adequately mix the whole blood.
2 Pipette 50 µL of specimen whole blood into the first sample tube.
Reverse pipetting is critical. For information on pipetting, see page 45.
3 Change tips between tubes. Discard the used tip in an appropriate biohazard container.
4 Cap the tube and vortex upright for 6 seconds.
5 Repeat steps 1 through 4 to prepare sample tubes for the remaining patient specimens.
6 Inspect the pipette. If you observe blood, clean the pipette with a soft cloth dipped in a mild detergent solution.
Incubating Tubes
1 Place the reagent tubes in the workstation and close the cover to protect the reagents from light.
2 Incubate the tubes for 30 minutes at room temperature (20° to 25°C, 68° to 77°F).
NOTE Correct incubation time is critical and should not exceed 40 minutes or be less than 30 minutes for each reagent tube. For this reason, BD recommends preparing no more than 15 control and sample reagent tubes at one time.
Use proper precaution and wear suitable protective clothing, eyewear, and gloves.
56 BD FACSCount System User’s Guide for Use with BD FACSCount CD4 Reagents
Adding Fixative
1 Uncap the first control or patient sample tube and pipette 50 µL of fixative solution into the tube.
2 Recap the reagent tube and vortex upright for 6 seconds.
3 Change to a new tip. Discard the used tip in an appropriate biohazard container.
4 Repeat steps 1 through 3 for each remaining control and patient sample tube.
Store reagent tubes in the workstation until you are ready to add control beads to the control tubes. Stained controls can be held up to 24 hours before adding control beads.
Adding Control Beads
1 Uncap the control tubes.
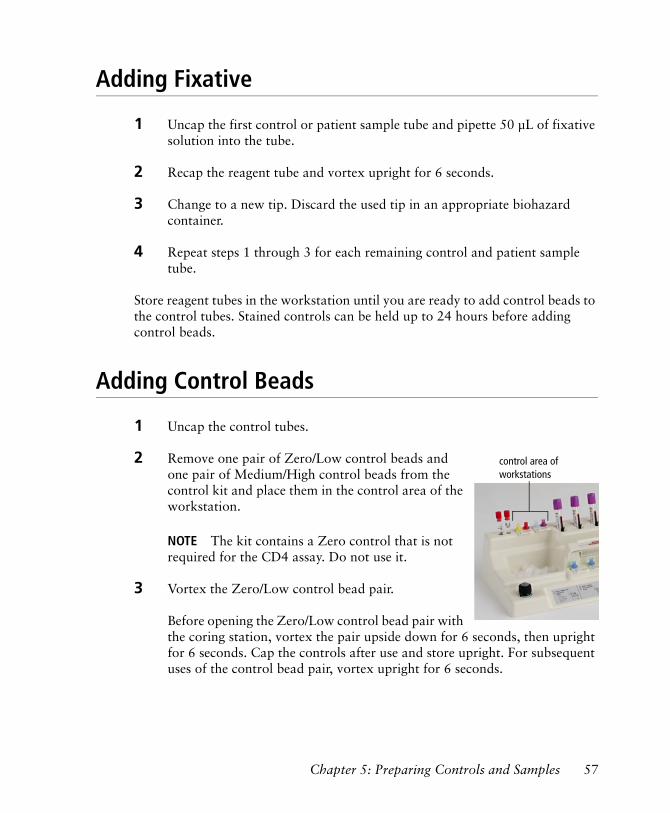
2 Remove one pair of Zero/Low control beads and one pair of Medium/High control beads from the control kit and place them in the control area of the workstation.
NOTE The kit contains a Zero control that is not required for the CD4 assay. Do not use it.
3 Vortex the Zero/Low control bead pair.
Before opening the Zero/Low control bead pair with the coring station, vortex the pair upside down for 6 seconds, then upright for 6 seconds. Cap the controls after use and store upright. For subsequent uses of the control bead pair, vortex upright for 6 seconds.
control area ofworkstations
Chapter 5: Preparing Controls and Samples 57

4 Pipette 50 µL of the Low control beads (red top) into the reagent tube labeled Low. Discard the tip.
5 Vortex the Medium/High control bead pair.
Before opening the Medium/High control bead pair with the coring station, vortex the pair upside down for 6 seconds, then upright for 6 seconds. Cap the controls after use and store upright. For subsequent uses of the control bead pair, vortex upright for 6 seconds.
6 Pipette 50 µL of the Medium control beads (blue top) into the reagent tube labeled Medium. Discard the tip.
7 Pipette 50 µL of the High control beads (purple top) into the reagent tube labeled High. Discard the tip.
8 Recap the reagent tubes.
You should have three reagent tubes containing the control beads.
NOTE Run the tubes on the BD FACSCount instrument within 2 hours of adding control beads to reagent tubes. Store samples at room temperature in the workstation, protected from light, until they are run on the instrument.
58 BD FACSCount System User’s Guide for Use with BD FACSCount CD4 Reagents
6
Running Controls
The following topics are covered in this chapter:
• Entering Control Run Information on page 60
• Running Controls on page 62
• Aborting the Control Run on page 65
• Control Results Printout on page 65
59
Control runs check system accuracy and linearity. Run controls each day before you run patient samples or whenever you open a new reagent lot. Data for the last control run is stored on the software disk until the next time controls are run.
NOTE Multiple BD FACSCount CD4 software disks are provided. Be sure to use the disk that contains the most recent control data.
Controls are reported as Passed or Failed. If the control run fails, patient samples are flagged with the following message: Last Control Run: Failed. This message appears on Sample Results printouts until controls are rerun and pass.
Entering Control Run Information
BD FACSCount reagents and control beads are each assigned specific lot codes and specific bead counts. Carefully enter the lot codes and bead counts before running controls or samples. This information is stored and does not need to be changed between runs unless a new lot of controls or a new lot of reagent is used.
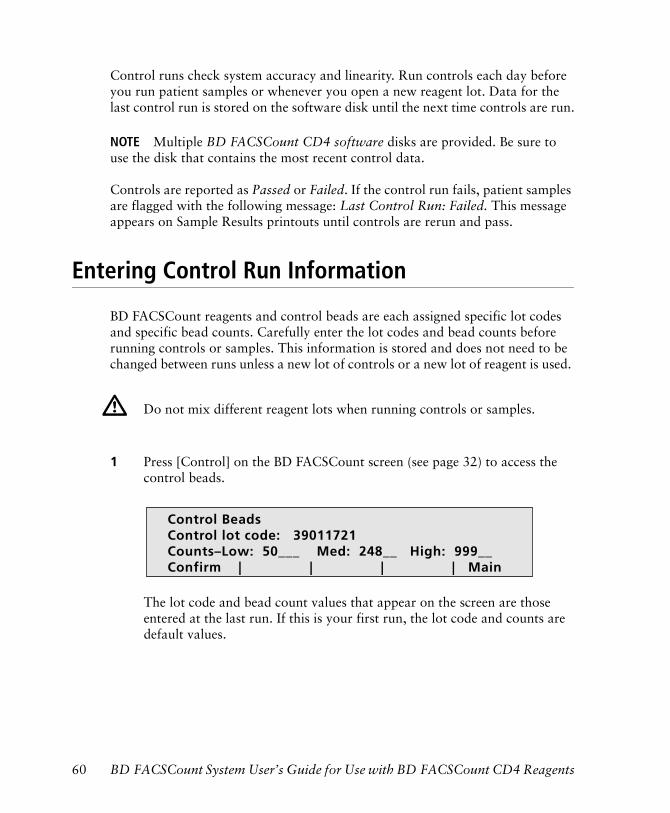
1 Press [Control] on the BD FACSCount screen (see page 32) to access the control beads.
The lot code and bead count values that appear on the screen are those entered at the last run. If this is your first run, the lot code and counts are default values.
Do not mix different reagent lots when running controls or samples.
Control BeadsControl lot code: 39011721Counts–Low: 50___ Med: 248__ High: 999__Confirm | | | | Main
60 BD FACSCount System User’s Guide for Use with BD FACSCount CD4 Reagents
2 Enter the eight-digit control bead lot code.
This information is found on the control bead box. Alternatively, use a barcode reader to enter the control bead lot code.
Press [Enter] to move to the next field.
3 Enter the bead counts for the Low, Medium, and High controls.
This information is found inside the control bead box. Alternatively, use a barcode reader to enter the bead counts.
4 Press [Confirm] to save this information to the software disk.
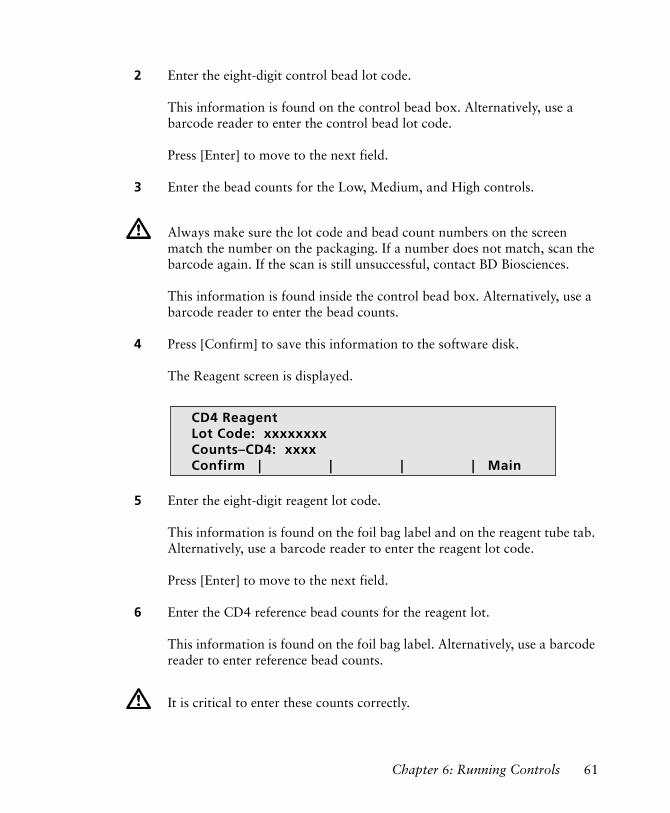
The Reagent screen is displayed.
5 Enter the eight-digit reagent lot code.
This information is found on the foil bag label and on the reagent tube tab. Alternatively, use a barcode reader to enter the reagent lot code.
Press [Enter] to move to the next field.
6 Enter the CD4 reference bead counts for the reagent lot.
This information is found on the foil bag label. Alternatively, use a barcode reader to enter reference bead counts.
Always make sure the lot code and bead count numbers on the screen match the number on the packaging. If a number does not match, scan the barcode again. If the scan is still unsuccessful, contact BD Biosciences.
It is critical to enter these counts correctly.
CD4 ReagentLot Code: xxxxxxxxCounts–CD4: xxxx Confirm | | | | Main
Chapter 6: Running Controls 61

7 Press [Confirm] to save this information to the software disk.
A message appears informing you the system is setting up controls, followed by the Control–Low screen for entering the normal ID number.
Figure 6-1 Control–Low screen
Running Controls
Run the controls in the following order: Low, Medium, and then high.
1 Enter the control normal ID (up to 15 numbers) and press [Enter].
The normal ID is the laboratory number that identifies the tube of blood. If the normal ID from the previous run exists, press [Clear ID] to remove it.
The instrument prompts you for the CD4 Low control with the following screen.
2 Vortex the CD4-Low reagent tube upright for 6 seconds.
Be sure you have added control beads to the reagent tubes (see page 57).
Set the vortex speed to a setting that causes the liquid to rise to the top of the reagent tube. Inadequate suspension of all white blood cell populations mightcause inaccurate results.
Control NormID: 12345678_____Type in the lab NormID numberand press the Enter key.
| | Clear ID | | Main
Control–Low NormID: 5035_____Move the CD4–Low tubeinto position and press the Run key.
| | | | Main
62 BD FACSCount System User’s Guide for Use with BD FACSCount CD4 Reagents
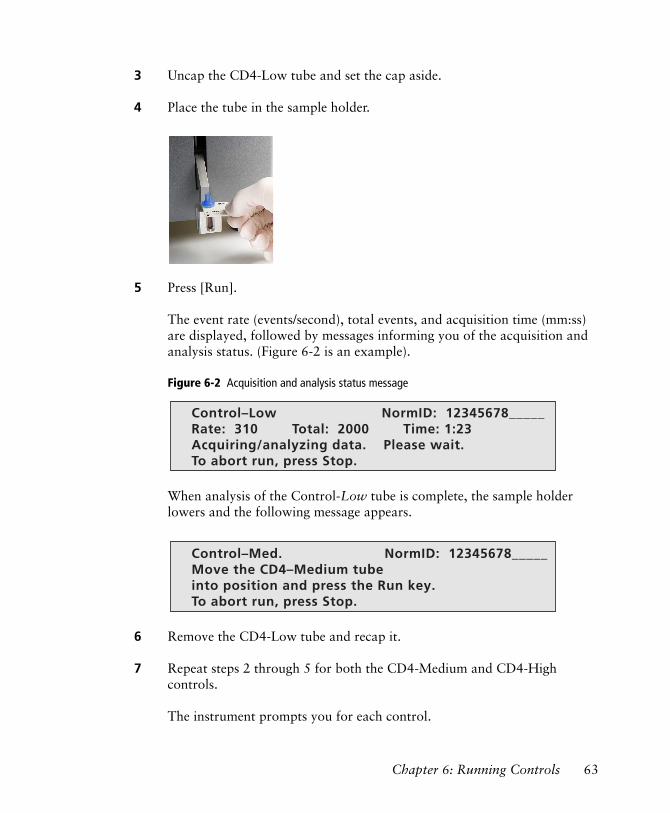
3 Uncap the CD4-Low tube and set the cap aside.
4 Place the tube in the sample holder.
5 Press [Run].
The event rate (events/second), total events, and acquisition time (mm:ss) are displayed, followed by messages informing you of the acquisition and analysis status. (Figure 6-2 is an example).
Figure 6-2 Acquisition and analysis status message
When analysis of the Control-Low tube is complete, the sample holder lowers and the following message appears.
6 Remove the CD4-Low tube and recap it.
7 Repeat steps 2 through 5 for both the CD4-Medium and CD4-High controls.
The instrument prompts you for each control.
Control–Low NormID: 12345678_____Rate: 310 Total: 2000 Time: 1:23Acquiring/analyzing data. Please wait.To abort run, press Stop.
Control–Med. NormID: 12345678_____Move the CD4–Medium tubeinto position and press the Run key.To abort run, press Stop.
Chapter 6: Running Controls 63
At the end of the CD4-High control run, control results are displayed and then printed. If Results file is selected in the Setup menu, control results are saved in the Results file. See page 76 for details on information stored in the Results file.
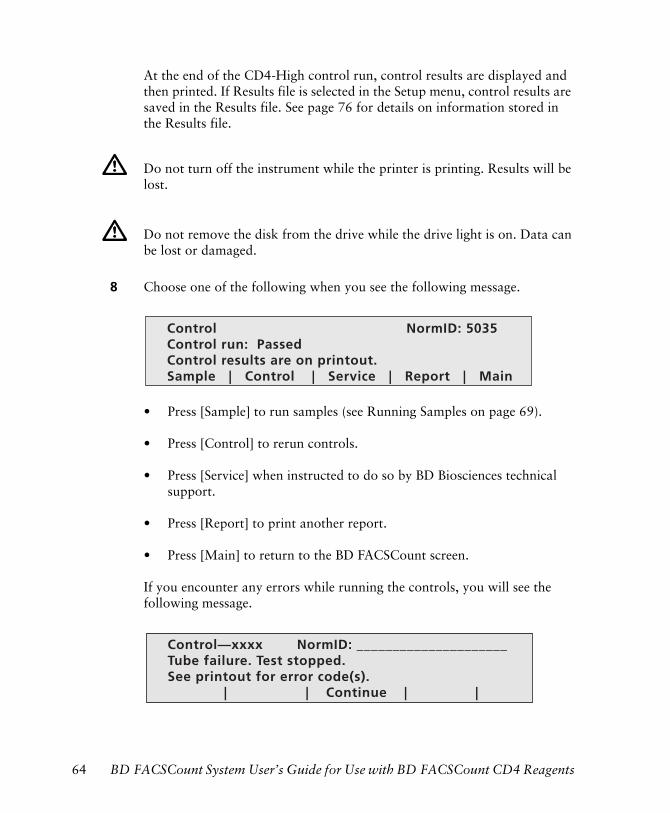
8 Choose one of the following when you see the following message.
• Press [Sample] to run samples (see Running Samples on page 69).
• Press [Control] to rerun controls.
• Press [Service] when instructed to do so by BD Biosciences technical support.
• Press [Report] to print another report.
• Press [Main] to return to the BD FACSCount screen.
If you encounter any errors while running the controls, you will see the following message.
Do not turn off the instrument while the printer is printing. Results will be lost.
Do not remove the disk from the drive while the drive light is on. Data can be lost or damaged.
Control NormID: 5035 Control run: PassedControl results are on printout.Sample | Control | Service | Report | Main
Control—xxxx NormID: _____________________Tube failure. Test stopped.See printout for error code(s). | | Continue | |
64 BD FACSCount System User’s Guide for Use with BD FACSCount CD4 Reagents

Press [Continue] to display the control results. See page 108 for explanations of printed error codes.
9 If you are not running any sample tubes following the control run, perform the daily cleaning procedure (see page 80) and then the shutdown procedure (see page 82).
Aborting the Control Run
Press [Stop] on the keypad during the control run to abort the run. Pressing [Stop] displays the following message.
• Press [No] to continue the run.
• Press [Yes] to abort.
The following message is displayed, the control run is aborted, and the sample tube is lowered.
Control Results Printout
Control results are displayed on the screen (Figure 6-3 on page 67), automatically printed, and are saved in the Results file if that option is enabled. Controls are reported as Passed or Failed. If the control run fails, patient samples are flagged with the message: Last Control Run: Failed. This message appears on Sample Results printouts until controls are rerun and pass.
Control–xxxx NormID: _______________Rate: xxxx Total: xxxxx Time: MM : SSDo you really want to stop the test?No | | | | Yes
Control NormID: 5035User abort
Sample | Control | | | Main
Chapter 6: Running Controls 65

The control printout contains the following information.
• Control information, including control lot code, control bead counts, reagent lot code, and the reference bead count entered for the control run
• Date (mm/dd/yy) and time (hh:mm) the controls were run
• Control Run results: Passed or Failed (see Figure 6-3 on page 67)
• Measured counts for control beads
• Statistical results for linearity check
• Reagent reference bead locations
• Measured count and percentage for CD4 T lymphocytes (statistical mean and CV of the CD4 count across the three tubes)
NOTE Do not place tape over the printout. Adhesive or transparent tape erases thermal printing over time. Avoid exposing printouts to the sun or other source of heat. Under normal storage conditions printouts should last 5 to 7 years. If permanent records are required, photocopy the printout.
Although the control printout contains various statistical values, the actual control run result reports the success or failure of the control run. This result is reported as Passed or Failed.
If the control run fails, the results on the report are suppressed. Check the printout for printed error codes. See Error Codes on page 108 for possible causes.
Do not report patient results if the control run fails. A successful control run is necessary to ensure reliable patient results.
66 BD FACSCount System User’s Guide for Use with BD FACSCount CD4 Reagents
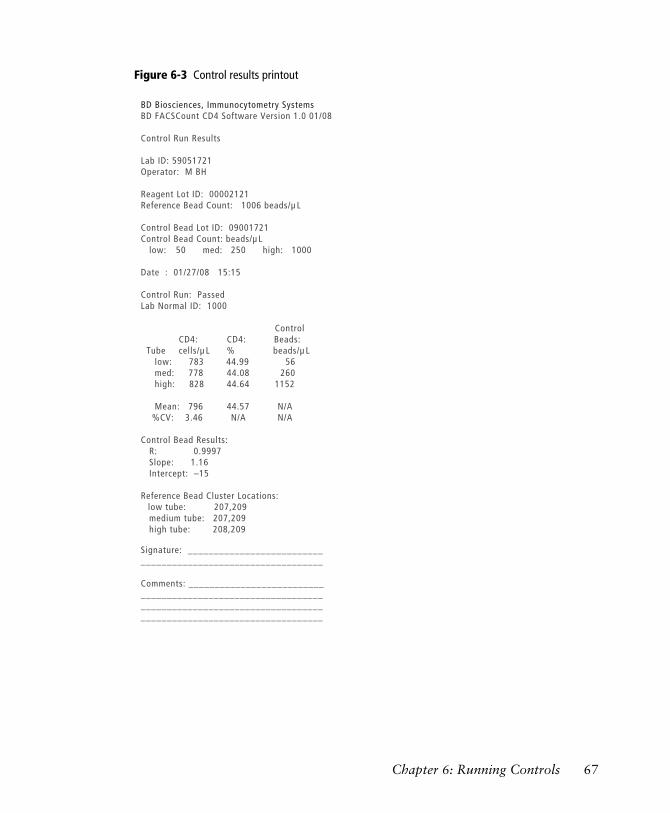
Figure 6-3 Control results printout
BD Biosciences, Immunocytometry SystemsBD FACSCount CD4 Software Version 1.0 01/08
Control Run Results
Lab ID: 59051721Operator: M BH
Reagent Lot ID: 00002121Reference Bead Count: 1006 beads/µ L
Control Bead Lot ID: 09001721Control Bead Count: beads/µ L low: 50 med: 250 high: 1000
Date : 01/27/08 15:15
Control Run: PassedLab Normal ID: 1000
Control CD4: CD4: Beads:
Tube cells/µ L % beads/µ L low: 783 44.99 56 med: 778 44.08 260 high: 828 44.64 1152
Mean: 796 44.57 N/A %CV: 3.46 N/A N/A
Control Bead Results: R: 0.9997 Slope: 1.16 Intercept: –15
Reference Bead Cluster Locations:low tube: 207,209
medium tube: 207,209 high tube: 208,209
Signature: _____________________________________________________________
Comments: ___________________________________________________________________________________________________________________________________
Chapter 6: Running Controls 67
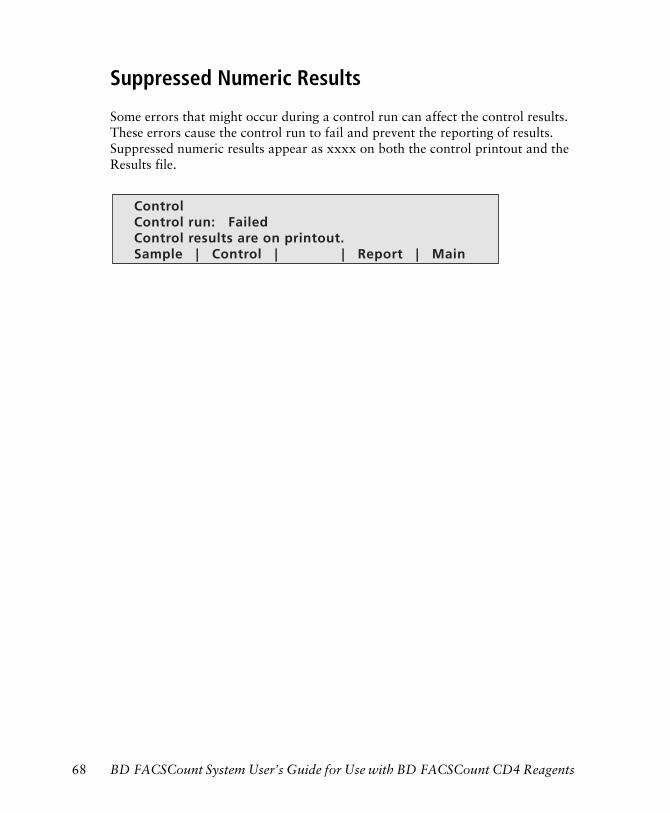
Suppressed Numeric Results
Some errors that might occur during a control run can affect the control results. These errors cause the control run to fail and prevent the reporting of results. Suppressed numeric results appear as xxxx on both the control printout and the Results file.
Control Control run: FailedControl results are on printout.Sample | Control | | Report | Main
68 BD FACSCount System User’s Guide for Use with BD FACSCount CD4 Reagents
7
Running Samples
The following topics are covered in this chapter:
• Entering Patient and Reagent Information on page 70
• Running Patient Samples on page 71
• Aborting a Sample Run on page 74
• Sample Results Printout on page 75
• Results File on page 76
69
Entering Patient and Reagent Information
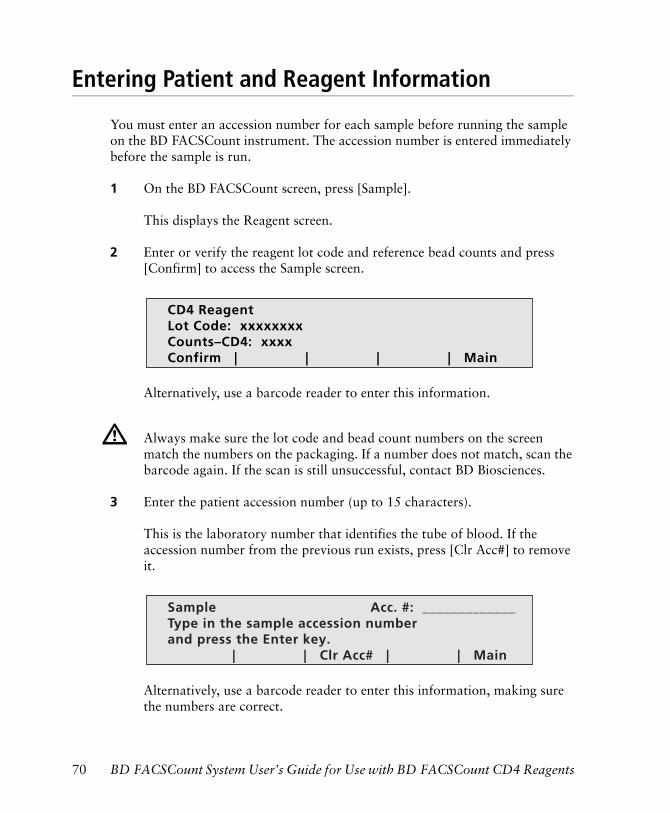
You must enter an accession number for each sample before running the sample on the BD FACSCount instrument. The accession number is entered immediately before the sample is run.
1 On the BD FACSCount screen, press [Sample].
This displays the Reagent screen.
2 Enter or verify the reagent lot code and reference bead counts and press [Confirm] to access the Sample screen.
Alternatively, use a barcode reader to enter this information.
3 Enter the patient accession number (up to 15 characters).
This is the laboratory number that identifies the tube of blood. If the accession number from the previous run exists, press [Clr Acc#] to remove it.
Alternatively, use a barcode reader to enter this information, making sure the numbers are correct.
Always make sure the lot code and bead count numbers on the screen match the numbers on the packaging. If a number does not match, scan the barcode again. If the scan is still unsuccessful, contact BD Biosciences.
CD4 ReagentLot Code: xxxxxxxxCounts–CD4: xxxx Confirm | | | | Main
Sample Acc. #: _____________Type in the sample accession numberand press the Enter key.
| | Clr Acc# | | Main
70 BD FACSCount System User’s Guide for Use with BD FACSCount CD4 Reagents
4 Press [Enter].
The instrument prompts you for the CD4 tube (see the following section, Running Patient Samples).
Running Patient Samples
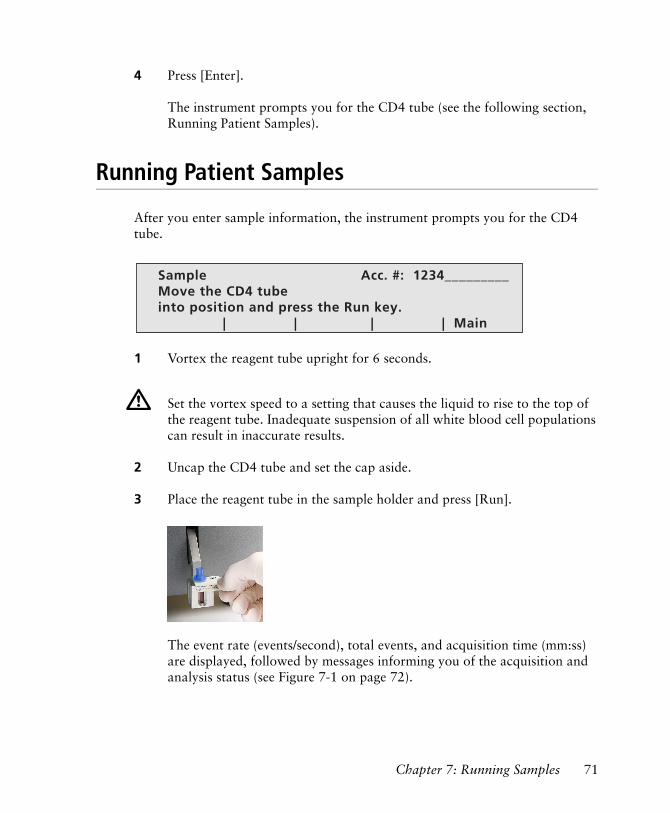
After you enter sample information, the instrument prompts you for the CD4 tube.
1 Vortex the reagent tube upright for 6 seconds.
2 Uncap the CD4 tube and set the cap aside.
3 Place the reagent tube in the sample holder and press [Run].
The event rate (events/second), total events, and acquisition time (mm:ss) are displayed, followed by messages informing you of the acquisition and analysis status (see Figure 7-1 on page 72).
Set the vortex speed to a setting that causes the liquid to rise to the top of the reagent tube. Inadequate suspension of all white blood cell populations can result in inaccurate results.
Sample Acc. #: 1234_________Move the CD4 tubeinto position and press the Run key.
| | | | Main
Chapter 7: Running Samples 71
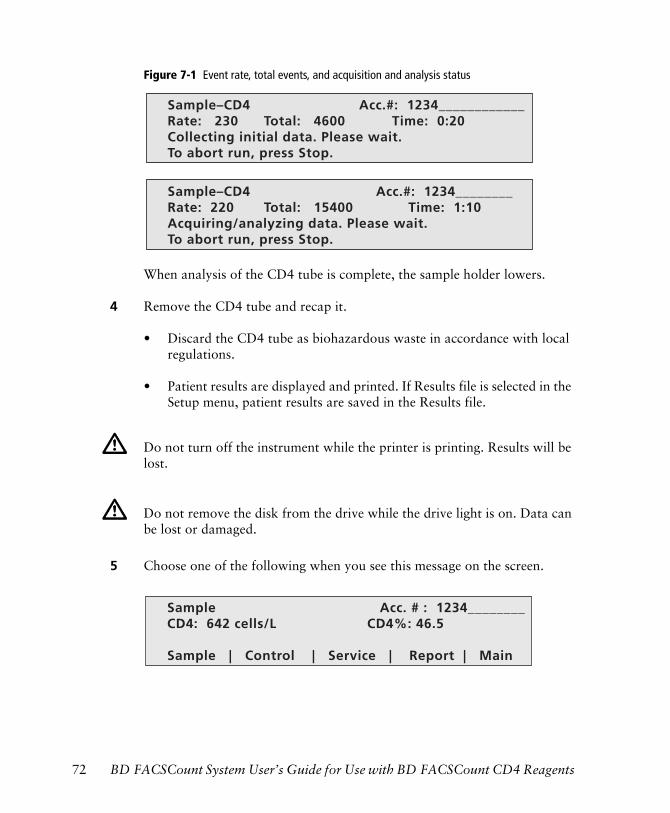
Figure 7-1 Event rate, total events, and acquisition and analysis status
When analysis of the CD4 tube is complete, the sample holder lowers.
4 Remove the CD4 tube and recap it.
• Discard the CD4 tube as biohazardous waste in accordance with local regulations.
• Patient results are displayed and printed. If Results file is selected in the Setup menu, patient results are saved in the Results file.
5 Choose one of the following when you see this message on the screen.
Do not turn off the instrument while the printer is printing. Results will be lost.
Do not remove the disk from the drive while the drive light is on. Data can be lost or damaged.
Sample–CD4 Acc.#: 1234____________Rate: 230 Total: 4600 Time: 0:20Collecting initial data. Please wait.To abort run, press Stop.
Sample–CD4 Acc.#: 1234________Rate: 220 Total: 15400 Time: 1:10Acquiring/analyzing data. Please wait.To abort run, press Stop.
Sample Acc. # : 1234________CD4: 642 cells/L CD4%: 46.5 Sample | Control | Service | Report | Main
72 BD FACSCount System User’s Guide for Use with BD FACSCount CD4 Reagents
• Press [Sample] to run the next sample; enter the patient accession number, and follow steps 1 through 4 in this section.
• Press [Control] to rerun controls.
• Press [Service] when instructed to do so by BD Biosciences technical support.
• Press [Report] to print another copy of the Sample Report.
• Press [Main] to return to the BD FACSCount screen.
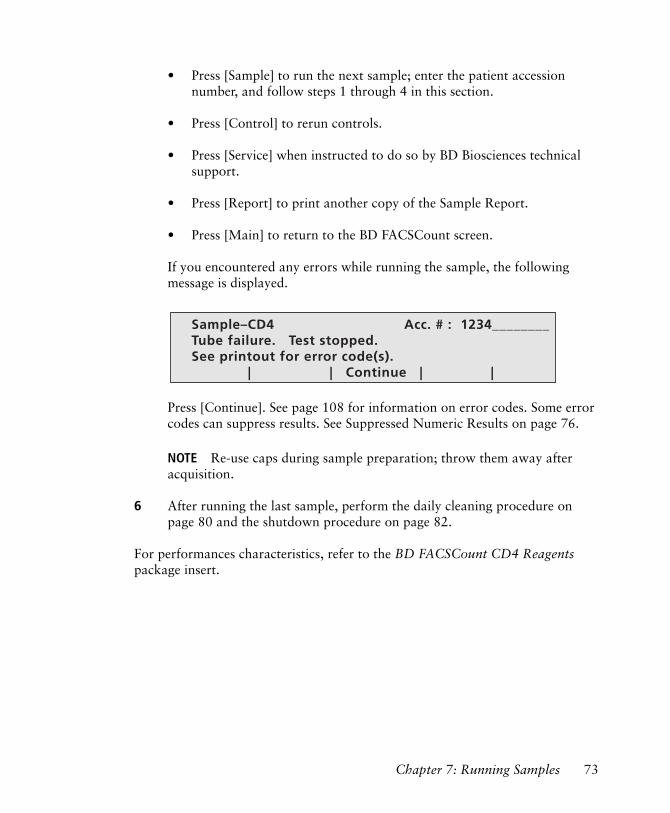
If you encountered any errors while running the sample, the following message is displayed.
Press [Continue]. See page 108 for information on error codes. Some error codes can suppress results. See Suppressed Numeric Results on page 76.
NOTE Re-use caps during sample preparation; throw them away after acquisition.
6 After running the last sample, perform the daily cleaning procedure on page 80 and the shutdown procedure on page 82.
For performances characteristics, refer to the BD FACSCount CD4 Reagents package insert.
Sample–CD4 Acc. # : 1234________Tube failure. Test stopped.See printout for error code(s). | | Continue | |
Chapter 7: Running Samples 73
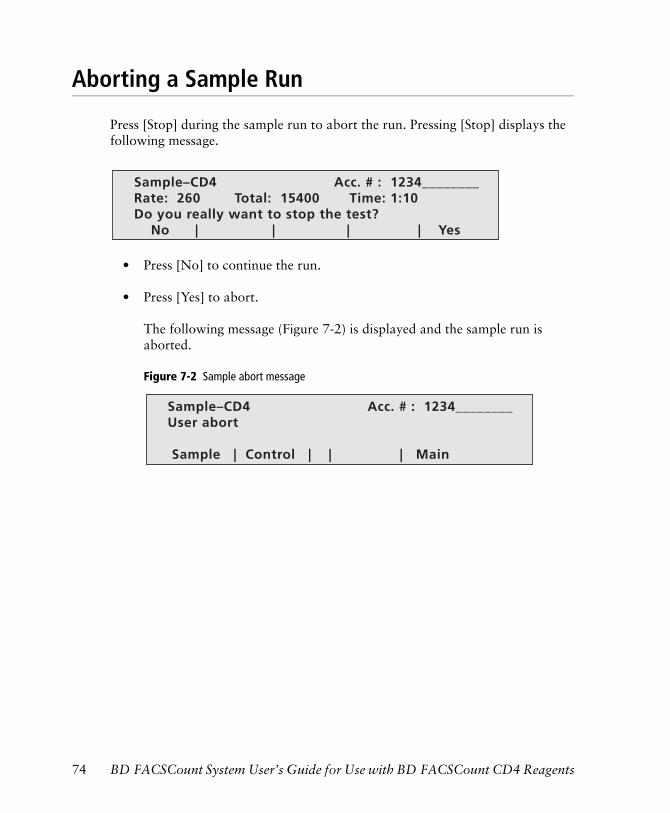
Aborting a Sample Run
Press [Stop] during the sample run to abort the run. Pressing [Stop] displays the following message.
• Press [No] to continue the run.
• Press [Yes] to abort.
The following message (Figure 7-2) is displayed and the sample run is aborted.
Figure 7-2 Sample abort message
Sample–CD4 Acc. # : 1234________Rate: 260 Total: 15400 Time: 1:10Do you really want to stop the test? No | | | | Yes
Sample–CD4 Acc. # : 1234________User abort
Sample | Control | | | Main
74 BD FACSCount System User’s Guide for Use with BD FACSCount CD4 Reagents

Sample Results Printout
Patient results are displayed on the screen and are printed automatically (see example on right).
The sample printout contains the following information.
• Reagent information: reagent lot code and reference bead count entered for the sample run
This number should match the reagent lot code for the control run.
• Date (mm/dd/yy) and time the patient sample was run
• Control information: control run results, date controls were run, reagent lot code entered for the control run, control lot code
• Patient accession number
• Patient results (see Patient Results)
NOTE Do not place tape over the print. Adhesive or transparent tape erases thermal printing over time. Avoid exposing printouts to the sun or other source of heat. Under normal storage conditions printouts should last 5 to 7 years. If permanent records are required, photocopy the printout.
Patient Results
The results reported for this test must be combined with other information and interpreted by a medically qualified diagnostician to establish the presence or absence of specific disease states.
BD Biosciences, Immunocytometry SystemsBD FACSCount CD4 Software Version 1.0 01/08
Sample Run Results
Lab ID : 50012121Operator: JH
Reagent Lot ID: 00002121Reference Bead Count: 1006 beads/µL
Date: 04/27/07 15:06
Last Control Run: PassedControl Run Date: 01/15/08 10:13Control Run Reagent Lot ID: 50012121Control Run Control Lot ID: 59041721
Accession #: 180407
CD4 Count: 2288 (cells/µL)CD4%: 46.71 (%)
Signature: –––––––––––––––––––––––––-----
–––––––––––––––––––––––––––––––––––––
Comments: –––––––––––––––––––––––––----
–––––––––––––––––––––––––––––––––––––
–––––––––––––––––––––––––––––––––––––
–––––––––––––––––––––––––––––––––––––
Chapter 7: Running Samples 75

Figure 7-3 Patient results
NOTE You can select whether or not to print the CD4 percentage (see Selecting Reports on page 41).
Suppressed Numeric Results
Some errors that might occur during a sample run can affect sample results. For this reason, sample results are suppressed and do not print or appear on the screen. Instead, results appear as xxxx.
If an error occurs during a patient run and numeric values print for that patient, the patient results were not affected by the error. Numeric values are suppressed only by errors that affect results.
If sample results are suppressed, check the printout for printed error codes. See page 108 for the list of error codes and possible causes.
Results File
The Results file saves results data from the latest 100 sample- and control-tube runs and records daily cleaning runs on the software disk. The software names the first Results file created results_001.csv and increments each successive file name by 1, up to _999. Figure 7-4 on page 78 shows an example of the information saved in a Results file. You can choose to save a Results file from the Setup menu (see page 41).
CD4% : 35%
The CD4 absolute count is the CD4+ T lymphocyte count.CD4 absolute count : 700 cells/µL
The CD4 percentage is the percentage of lymphocytes that areCD4+ T lymphocytes.
Sample–CD4 Acc. # : ____________CD4 count: xxxx Cells/µL CD4%: xxxx%
Sample | Control | | Report | Main
76 BD FACSCount System User’s Guide for Use with BD FACSCount CD4 Reagents

Before each sample or control run, the software checks the size of the Results file. When the file is full (100 entries), the software prompts you to back up the file. Results files must be copied and stored on a different computer.
To back up the Results file:
1 Eject the software disk from the BD FACSCount instrument.
2 Insert the disk into a different computer, and copy the file to the hard drive.
3 Name the copied file appropriately, and eject the disk.
4 Re-insert the software disk into the BD FACSCount instrument, and press [Confirm].
5 Press [Confirm] on the following screen.
The Results file is deleted.
Make sure you back up the current Results file when you see the following message. When you press [Confirm], the file will be deleted and results will be lost.
Do not rename the current Results file, and do not add any Results files to the software disk.
If the probe is exposed to the air for more than 5 minutes while backing up Results files, prime the system (see page 36) before running the next sample.
Warning:The Results file is full. Back up now.Pressing Confirm will erase!Confirm | | | |
Warning:Pressing Confirm will erase Results file.
Confirm | | | |
Chapter 7: Running Samples 77
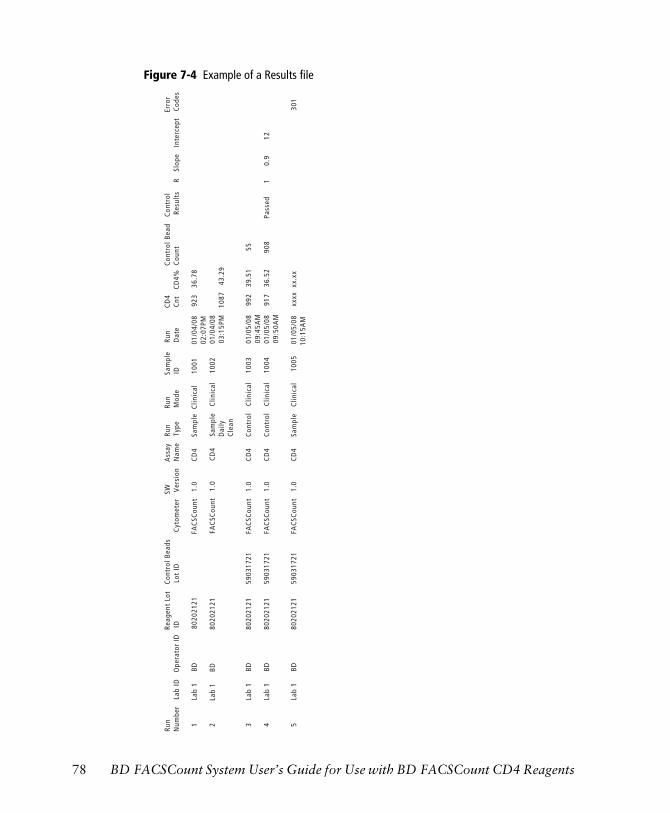
Figure 7-4 Example of a Results file
Run
R
eage
nt L
ot
Con
trol
Bea
ds
SW
A
ssay
R
unRu
n
Sam
ple
R
un
CD
4
C
ontr
ol B
ead
C
ontr
ol
Er
Num
ber
La
b ID
O
pera
tor
ID
ID
Lot
ID
C
ytom
eter
V
ersi
on
Nam
e
Type
M
ode
ID
D
ate
Cnt
C
D4%
C
ount
Re
sult
s
R
Slo
pe
Int
erce
pt
C
1
L
ab 1
BD
8
0202
121
FA
CSC
ount
1
.0
C
D4
Sam
ple
Clin
ical
100
1
0
1/04
/08
9
23
36.
78
02
:07P
M2
La
b 1
BD
802
0212
1 FA
CSC
ount
1
.0
C
D4
Sam
ple
C
linic
al
10
02
01/0
4/08
Dai
ly
03:1
5PM
1
087
43
.29
Cle
an
3
L
ab 1
BD
8
0202
121
590
3172
1FA
CSC
ount
1
.0
C
D4
Con
trol
C
linic
al
10
03
01/0
5/08
992
39
.51
5
5
09:4
5AM
4
L
ab 1
BD
8
0202
121
590
3172
1FA
CSC
ount
1
.0
C
D4
Con
trol
C
linic
al
10
04
01
/05/
08
91
7
36.5
2
908
Pas
sed
1
0.9
12
09
:50A
M
5
L
ab 1
BD
8
0202
121
590
3172
1FA
CSC
ount
1
.0
C
D4
Sam
ple
C
linic
al
1
005
0
1/05
/08
x
xxx
xx.
xx
3
1
0:15
AM
Run
R
eage
nt L
ot
Con
trol
Bea
ds
SW
A
ssay
R
unRu
n
Sam
ple
R
un
CD
4
C
ontr
ol B
ead
C
ontr
ol
Er
ror
Num
ber
La
b ID
O
pera
tor
ID
ID
Lot
ID
C
ytom
eter
V
ersi
on
Nam
e
Type
M
ode
ID
D
ate
Cnt
C
D4%
C
ount
Re
sult
s
R
Slo
pe
Int
erce
pt
Cod
es
1
L
ab 1
BD
8
0202
121
FA
CSC
ount
1
.0
C
D4
Sam
ple
Clin
ical
100
1
0
1/04
/08
9
23
36.
78
02
:07P
M2
La
b 1
BD
802
0212
1 FA
CSC
ount
1
.0
C
D4
Sam
ple
C
linic
al
10
02
01/0
4/08
Dai
ly
03:1
5PM
1
087
43
.29
Cle
an
3
L
ab 1
BD
8
0202
121
590
3172
1FA
CSC
ount
1
.0
C
D4
Con
trol
C
linic
al
10
03
01/0
5/08
992
39
.51
5
5
09:4
5AM
4
L
ab 1
BD
8
0202
121
590
3172
1FA
CSC
ount
1
.0
C
D4
Con
trol
C
linic
al
10
04
01
/05/
08
91
7
36.5
2
908
Pas
sed
1
0.9
12
09
:50A
M
5
L
ab 1
BD
8
0202
121
590
3172
1FA
CSC
ount
1
.0
C
D4
Sam
ple
C
linic
al
1
005
0
1/05
/08
x
xxx
xx.
xx
301
10:
15A
M
78 BD FACSCount System User’s Guide for Use with BD FACSCount CD4 Reagents

8
Cleaning and Maintenance
The following topics are covered in this chapter:
• Daily Cleaning on page 80
• Shutdown on page 82
• Long Cleaning on page 84
• General Cleaning on page 89
• Maintenance Procedures on page 92
79
Daily Cleaning
Proper cleaning ensures instrument reliability. Use the cleaning tubes and dispensing bottles provided with the system and follow the software prompts.
Perform the cleaning procedure at the following times.
• After running controls or samples
• At the end of each day
• When a screen message appears recommending that you run the cleaning cycle (the message appears after at least 100 reagent tubes have been run)
• Before running a different assay using a different assay software disk
• When recommended to do so in the troubleshooting section (see Chapter 9)
1 Make sure the sheath tank is full and the waste tank is empty.
2 Fill one cleaning tube with a 1:3 dilution of bleach (or BD FACS Clean solution) and a second cleaning tube with distilled water (or BD FACSRinse solution).
! Tip The dispensing bottles allow you to fill the cleaning tubes conveniently.
• Label the dispensing bottles and fill one bottle with a 1:3 dilution of bleach (or BD FACS Clean solution) and the other bottle with distilled water (or BD FACSRinse solution).
• Prepare the bleach solution by adding one part undiluted bleach to two parts distilled water.
Do not turn off the instrument until daily cleaning is complete.
80 BD FACSCount System User’s Guide for Use with BD FACSCount CD4 Reagents
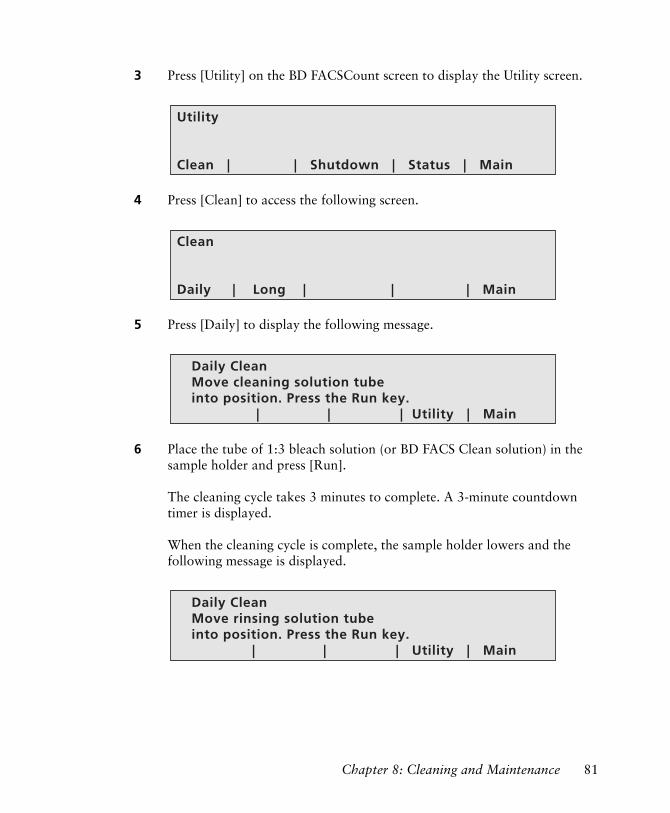
3 Press [Utility] on the BD FACSCount screen to display the Utility screen.
4 Press [Clean] to access the following screen.
5 Press [Daily] to display the following message.
6 Place the tube of 1:3 bleach solution (or BD FACS Clean solution) in the sample holder and press [Run].
The cleaning cycle takes 3 minutes to complete. A 3-minute countdown timer is displayed.
When the cleaning cycle is complete, the sample holder lowers and the following message is displayed.
Utility
Clean | | Shutdown | Status | Main
Clean
Daily | Long | | | Main
Daily CleanMove cleaning solution tubeinto position. Press the Run key.
| | | Utility | Main
Daily CleanMove rinsing solution tubeinto position. Press the Run key.
| | | Utility | Main
Chapter 8: Cleaning and Maintenance 81
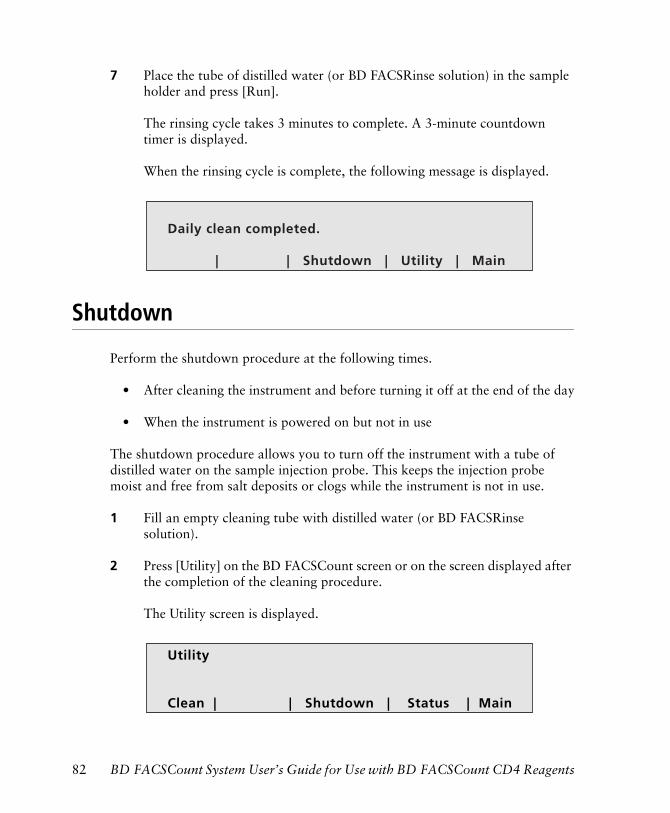
7 Place the tube of distilled water (or BD FACSRinse solution) in the sample holder and press [Run].
The rinsing cycle takes 3 minutes to complete. A 3-minute countdown timer is displayed.
When the rinsing cycle is complete, the following message is displayed.
Shutdown
Perform the shutdown procedure at the following times.
• After cleaning the instrument and before turning it off at the end of the day
• When the instrument is powered on but not in use
The shutdown procedure allows you to turn off the instrument with a tube of distilled water on the sample injection probe. This keeps the injection probe moist and free from salt deposits or clogs while the instrument is not in use.
1 Fill an empty cleaning tube with distilled water (or BD FACSRinse solution).
2 Press [Utility] on the BD FACSCount screen or on the screen displayed after the completion of the cleaning procedure.
The Utility screen is displayed.
Daily clean completed.
| | Shutdown | Utility | Main
Utility
Clean | | Shutdown | Status | Main
82 BD FACSCount System User’s Guide for Use with BD FACSCount CD4 Reagents

3 Press [Shutdown].
If the daily cleaning procedure was not run, a warning appears.
• Press [Yes] to perform the daily cleaning procedure (page 80). When the daily clean is complete, press [Shutdown] to continue.
• Press [No] to continue with shutdown without cleaning.
4 Place the tube of distilled water (or BD FACSRinse solution) in the sample holder and press [Run].
The sample holder rises and the following message is displayed.
BD recommends performing the daily cleaning procedure after running controls and samples.
Warning:Daily clean was not run. Would you like to run daily clean now? No | | | | Yes
ShutdownPut a tube of distilled water on the sample holder. Press Run to raise tube.
| | | Utility | Main
ShutdownIt is now safe to shut down the system.To resume testing press Stop. | | | Utility | Main
Chapter 8: Cleaning and Maintenance 83

• Turn off the instrument power to complete the shutdown procedure.
• To continue running the instrument, press [Stop]. The sample holder lowers and the Shutdown screen appears. Press [Main] to return to the BD FACSCount screen.
Long Cleaning
Perform the following steps to clean the fluidics once a month or every 500 samples, whichever occurs first. Additionally, perform the Long Clean procedure when instructed to in Troubleshooting, or when recommended by your BD service representative.
1 Press [Utility] on the BD FACSCount screen to display the Utility screen, and then press [Clean].
2 Press [Long] on the Clean screen.
A warning appears, indicating that the long clean will take an hour to complete. Press [Yes] to proceed.
If you stop using the instrument during a sample run, or if you are turning off the power, leave a tube of distilled water (or BD FACSRinse solution) on the instrument with the sample holder up. This protects the sample injection probe from the formation of salt deposits (see Long Cleaning on page 84).
Utility
Clean | | Shutdown | Status | Main
Clean
Daily | Long | | | Main
84 BD FACSCount System User’s Guide for Use with BD FACSCount CD4 Reagents
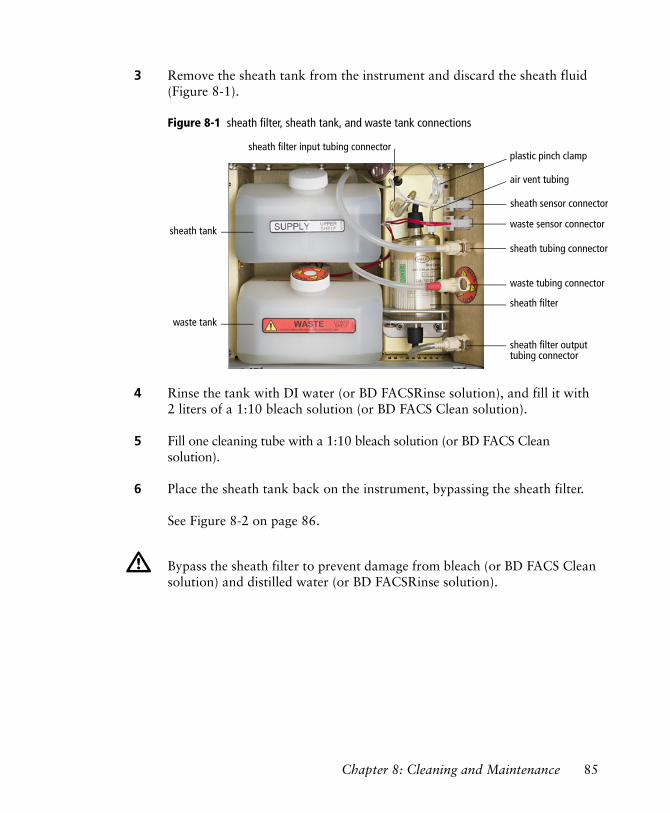
3 Remove the sheath tank from the instrument and discard the sheath fluid (Figure 8-1).
Figure 8-1 sheath filter, sheath tank, and waste tank connections
4 Rinse the tank with DI water (or BD FACSRinse solution), and fill it with 2 liters of a 1:10 bleach solution (or BD FACS Clean solution).
5 Fill one cleaning tube with a 1:10 bleach solution (or BD FACS Clean solution).
6 Place the sheath tank back on the instrument, bypassing the sheath filter.
See Figure 8-2 on page 86.
Bypass the sheath filter to prevent damage from bleach (or BD FACS Clean solution) and distilled water (or BD FACSRinse solution).
waste tank
sheath filter
sheath tank
air vent tubing
sheath sensor connector
waste sensor connector
sheath tubing connector
waste tubing connector
plastic pinch clamp
sheath filter output tubing connector
sheath filter input tubing connector
Chapter 8: Cleaning and Maintenance 85
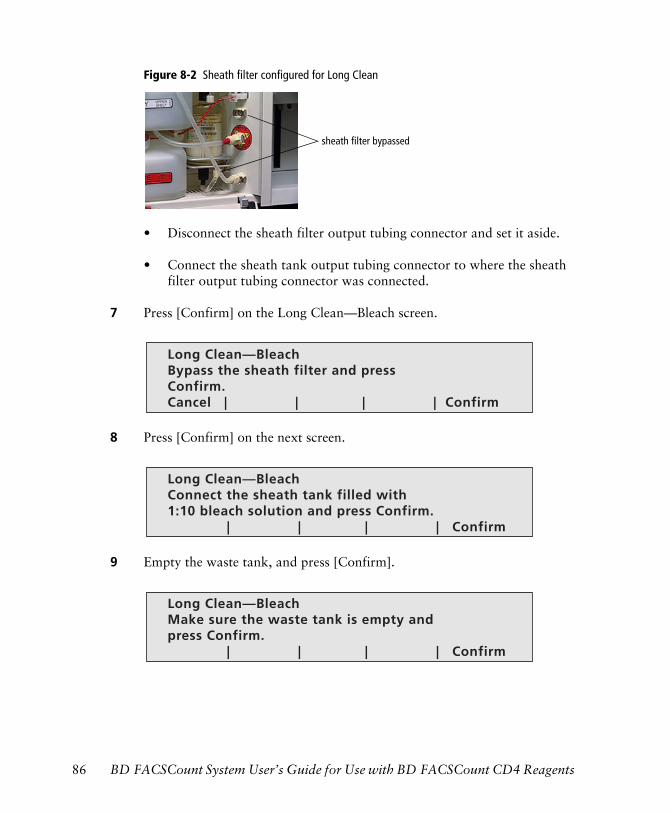
Figure 8-2 Sheath filter configured for Long Clean
• Disconnect the sheath filter output tubing connector and set it aside.
• Connect the sheath tank output tubing connector to where the sheath filter output tubing connector was connected.
7 Press [Confirm] on the Long Clean—Bleach screen.
8 Press [Confirm] on the next screen.
9 Empty the waste tank, and press [Confirm].
sheath filter bypassed
Long Clean—BleachBypass the sheath filter and press Confirm.Cancel | | | | Confirm
Long Clean—BleachConnect the sheath tank filled with 1:10 bleach solution and press Confirm. | | | | Confirm
Long Clean—BleachMake sure the waste tank is empty and press Confirm. | | | | Confirm
86 BD FACSCount System User’s Guide for Use with BD FACSCount CD4 Reagents

The software prompts you to position the tube of 1:10 bleach solution (or BD FACS Clean solution) on the tube lifter.
10 When the tube is in place, press the Run key.
A message appears informing you that the cleaning solution is running and to wait. The cleaning solution will run for 30 minutes.
11 When the Long Clean - Bleach cycle is complete, remove the sheath tank from the instrument and discard the bleach (or BD FACS Clean) solution.
12 Rinse the tank with DI water (or BD FACSRinse solution), and fill it with 2 liters of DI water (or BD FACSRinse solution).
13 Fill one cleaning tube with DI water (or BD FACSRinse solution).
14 Connect the sheath tank filled with DI water (or BD FACSRinse solution) to the instrument, bypassing the sheath filter, and press [Confirm].
Connect the sheath tank output connector to the same place that the sheath filter output tubing connector was connected.
15 Empty the waste tank, and press [Confirm].
Long Clean—BleachMove 1:10 bleach solution tube into position. Press the Run key. | | | |
Long Clean—RinseConnect the sheath tank filled with distilled water and press Confirm. | | | | Confirm
Long Clean—RinseMake sure the waste tank is empty and press Confirm. | | | | Confirm
Chapter 8: Cleaning and Maintenance 87
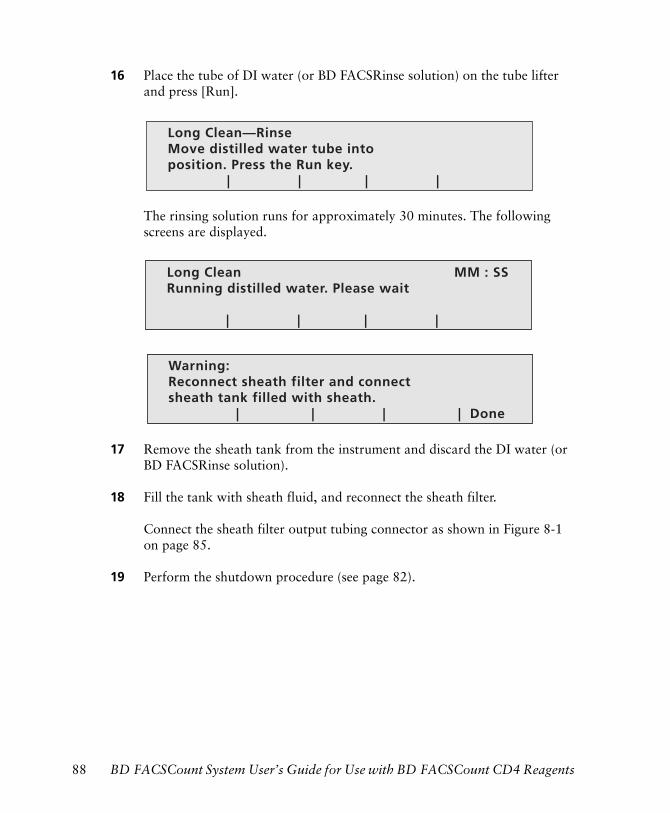
16 Place the tube of DI water (or BD FACSRinse solution) on the tube lifter and press [Run].
The rinsing solution runs for approximately 30 minutes. The following screens are displayed.
17 Remove the sheath tank from the instrument and discard the DI water (or BD FACSRinse solution).
18 Fill the tank with sheath fluid, and reconnect the sheath filter.
Connect the sheath filter output tubing connector as shown in Figure 8-1 on page 85.
19 Perform the shutdown procedure (see page 82).
Long Clean—RinseMove distilled water tube into position. Press the Run key. | | | |
Long Clean MM : SSRunning distilled water. Please wait
| | | |
Warning: Reconnect sheath filter and connect sheath tank filled with sheath. | | | | Done
88 BD FACSCount System User’s Guide for Use with BD FACSCount CD4 Reagents
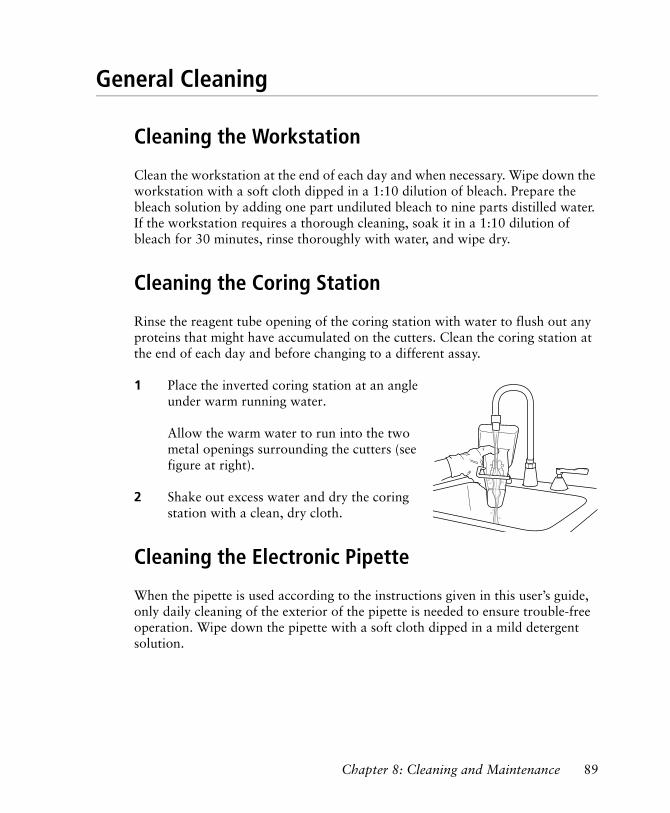
General Cleaning
Cleaning the Workstation
Clean the workstation at the end of each day and when necessary. Wipe down the workstation with a soft cloth dipped in a 1:10 dilution of bleach. Prepare the bleach solution by adding one part undiluted bleach to nine parts distilled water. If the workstation requires a thorough cleaning, soak it in a 1:10 dilution of bleach for 30 minutes, rinse thoroughly with water, and wipe dry.
Cleaning the Coring Station
Rinse the reagent tube opening of the coring station with water to flush out any proteins that might have accumulated on the cutters. Clean the coring station at the end of each day and before changing to a different assay.
1 Place the inverted coring station at an angle under warm running water.
Allow the warm water to run into the two metal openings surrounding the cutters (see figure at right).
2 Shake out excess water and dry the coring station with a clean, dry cloth.
Cleaning the Electronic Pipette
When the pipette is used according to the instructions given in this user’s guide, only daily cleaning of the exterior of the pipette is needed to ensure trouble-free operation. Wipe down the pipette with a soft cloth dipped in a mild detergent solution.
Chapter 8: Cleaning and Maintenance 89
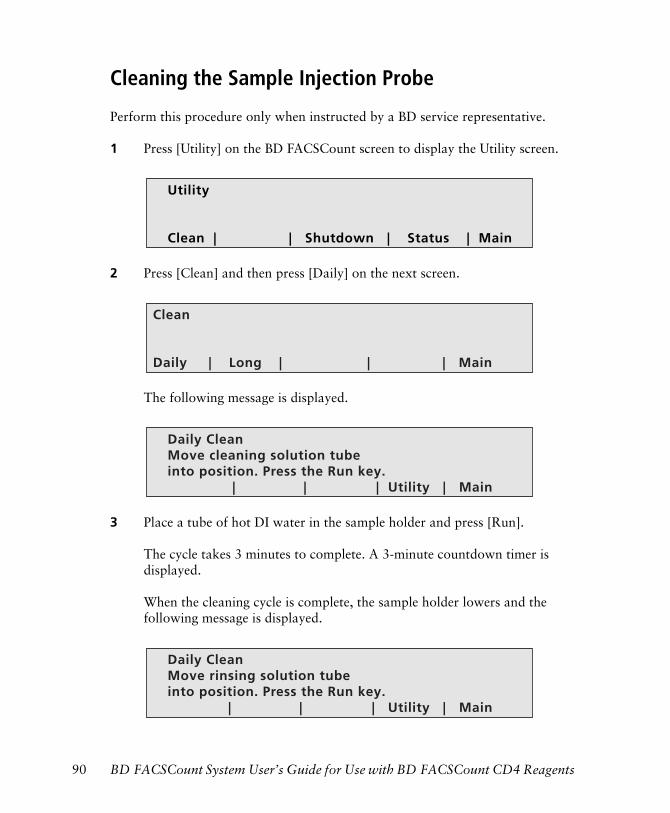
Cleaning the Sample Injection Probe
Perform this procedure only when instructed by a BD service representative.
1 Press [Utility] on the BD FACSCount screen to display the Utility screen.
2 Press [Clean] and then press [Daily] on the next screen.
The following message is displayed.
3 Place a tube of hot DI water in the sample holder and press [Run].
The cycle takes 3 minutes to complete. A 3-minute countdown timer is displayed.
When the cleaning cycle is complete, the sample holder lowers and the following message is displayed.
Utility
Clean | | Shutdown | Status | Main
Clean
Daily | Long | | | Main
Daily CleanMove cleaning solution tubeinto position. Press the Run key.
| | | Utility | Main
Daily CleanMove rinsing solution tubeinto position. Press the Run key.
| | | Utility | Main
90 BD FACSCount System User’s Guide for Use with BD FACSCount CD4 Reagents
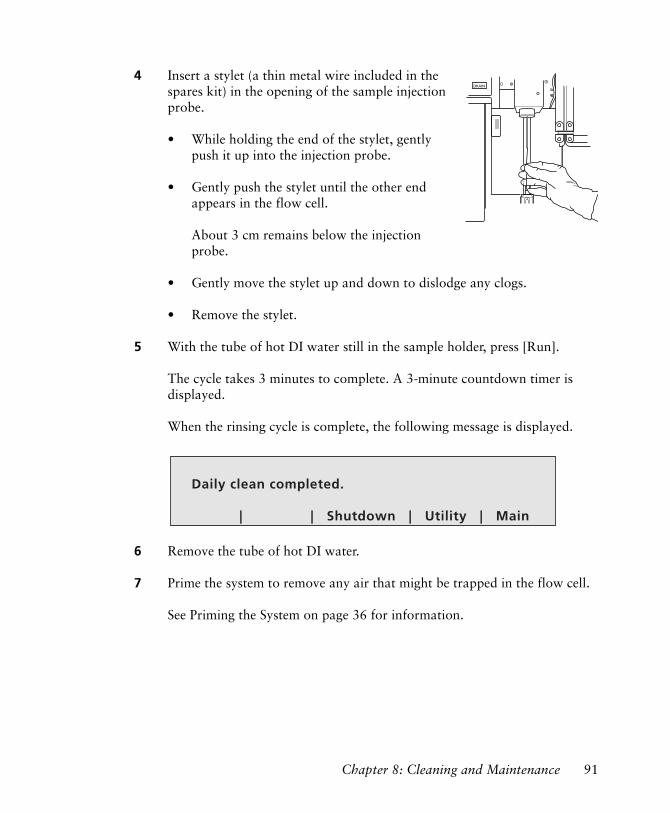
4 Insert a stylet (a thin metal wire included in the spares kit) in the opening of the sample injection probe.
• While holding the end of the stylet, gently push it up into the injection probe.
• Gently push the stylet until the other end appears in the flow cell.
About 3 cm remains below the injection probe.
• Gently move the stylet up and down to dislodge any clogs.
• Remove the stylet.
5 With the tube of hot DI water still in the sample holder, press [Run].
The cycle takes 3 minutes to complete. A 3-minute countdown timer is displayed.
When the rinsing cycle is complete, the following message is displayed.
6 Remove the tube of hot DI water.
7 Prime the system to remove any air that might be trapped in the flow cell.
See Priming the System on page 36 for information.
Daily clean completed.
| | Shutdown | Utility | Main
Chapter 8: Cleaning and Maintenance 91
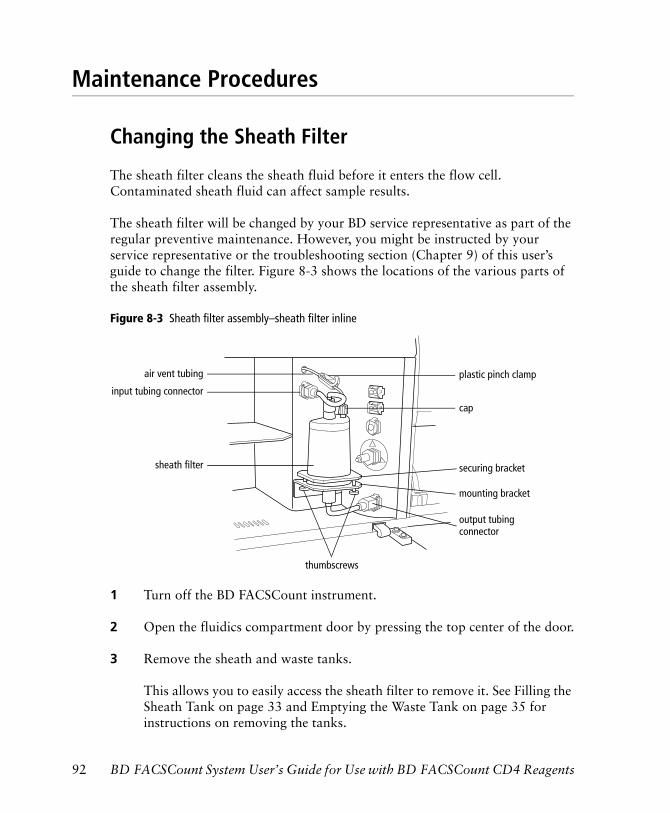
Maintenance Procedures
Changing the Sheath Filter
The sheath filter cleans the sheath fluid before it enters the flow cell. Contaminated sheath fluid can affect sample results.
The sheath filter will be changed by your BD service representative as part of the regular preventive maintenance. However, you might be instructed by your service representative or the troubleshooting section (Chapter 9) of this user’s guide to change the filter. Figure 8-3 shows the locations of the various parts of the sheath filter assembly.
Figure 8-3 Sheath filter assembly–sheath filter inline
1 Turn off the BD FACSCount instrument.
2 Open the fluidics compartment door by pressing the top center of the door.
3 Remove the sheath and waste tanks.
This allows you to easily access the sheath filter to remove it. See Filling the Sheath Tank on page 33 and Emptying the Waste Tank on page 35 for instructions on removing the tanks.
air vent tubing
input tubing connector
sheath filter
thumbscrews
plastic pinch clamp
cap
securing bracket
mounting bracket
output tubingconnector
92 BD FACSCount System User’s Guide for Use with BD FACSCount CD4 Reagents

4 Disconnect the sheath input and output tubing from the fluidics panel by squeezing the metal clips on the connectors and pulling.
5 Unscrew the cap located on the filter port.
6 Unscrew the two thumbscrews located below the mounting bracket and set the thumbscrews aside.
7 Lift the sheath filter up and out of the mounting bracket.
8 Lift the securing bracket over the top of the sheath filter and set the bracket aside (see figure at right).
9 Discard the old sheath filter.
10 Slip the securing bracket over the top of the new sheath filter.
Make sure the securing bracket studs are pointing down.
11 Install the sheath filter in the mounting bracket.
Align the securing bracket studs with the holes in the mounting bracket. Make sure the sheath filter input and output tubing are pointing toward you.
12 Screw the two thumbscrews onto the studs.
13 Replace the cap by screwing it onto the sheath filter port.
14 Connect the sheath input and output tubing connectors to the fluidics panel by pushing firmly until you hear a click.
15 Replace the sheath and waste tanks.
See Filling the Sheath Tank on page 33 and Emptying the Waste Tank on page 35 for instructions.
Chapter 8: Cleaning and Maintenance 93

16 Turn on the instrument.
17 Remove the air from the sheath filter.
Unclamp the plastic pinch clamp located on the air vent tubing and allow the sheath filter to fill with sheath fluid (see figure at right). You will hear the air being aspirated from the filter as it fills. If air bubbles are visible in the sheath filter, tap it gently to dislodge the bubbles, forcing them into the air vent tubing.
18 When all air is removed from the sheath filter, secure the pinch clamp.
19 Prime the system to remove any air that might be trapped in the flow cell.
See Priming the System on page 36 for information.
20 Close the fluidics compartment door.
21 Perform the daily cleaning procedure starting on page 80.
Changing Printer Paper
The printer paper is thermal paper that requires heat rather than ink to print. Change the printer paper when you see a line of ink appear on the paper. This ink indicates the roll is close to the end. The following figure shows the locations of the various parts of the printer.
paper advance buttonrubber roller(located below panel)
bail lever
94 BD FACSCount System User’s Guide for Use with BD FACSCount CD4 Reagents
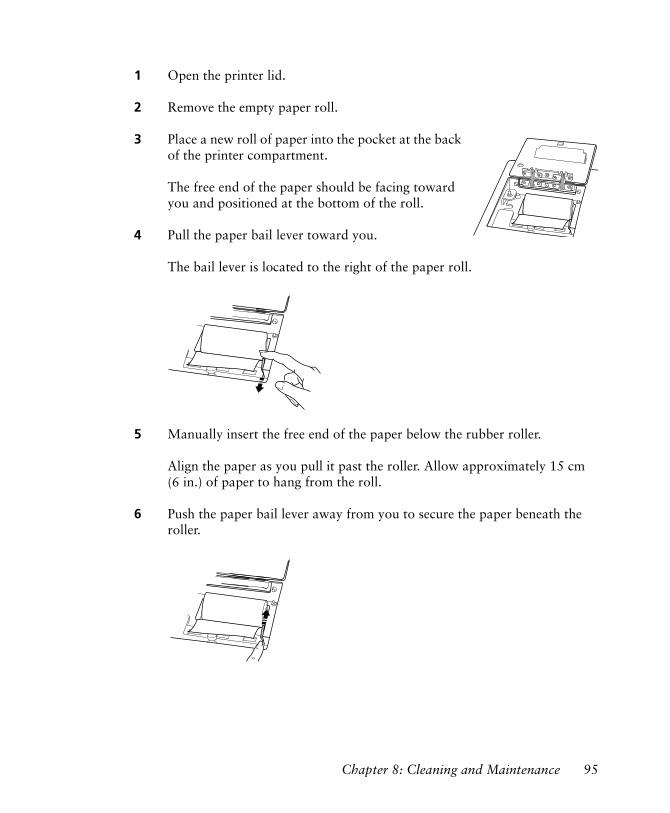
1 Open the printer lid.
2 Remove the empty paper roll.
3 Place a new roll of paper into the pocket at the back of the printer compartment.
The free end of the paper should be facing toward you and positioned at the bottom of the roll.
4 Pull the paper bail lever toward you.
The bail lever is located to the right of the paper roll.
5 Manually insert the free end of the paper below the rubber roller.
Align the paper as you pull it past the roller. Allow approximately 15 cm (6 in.) of paper to hang from the roll.
6 Push the paper bail lever away from you to secure the paper beneath the roller.
Chapter 8: Cleaning and Maintenance 95
7 Feed the paper through the slot in the lid.
8 Close the lid to the printer.
9 Push the paper advance button three to four times to ensure the paper is properly aligned.
If the paper is crooked, repeat the procedure starting from step 4.
Changing a Fuse
It is not necessary for you to change a fuse unless you are instructed to do so in the troubleshooting section (Chapter 9) of this user’s guide or by a BD service representative.
The fuse drawer is located at the back of the instrument to the left of the AC plug.
1 Turn off the instrument power.
NOTE Make sure the instrument has been shut down before turning off the power (see Shutdown on page 82).
2 Unplug the instrument from the wall outlet.
3 Unplug the AC plug from the back of the instrument.
This allows easy access to the fuse drawer.
To avoid cutting your fingers, keep them away from the slot.
Unplug the instrument before attempting to change fuses.
96 BD FACSCount System User’s Guide for Use with BD FACSCount CD4 Reagents

4 Place a small screwdriver into the slot at the right of the fuse drawer and pry open the drawer
The fuse drawer will pop out.
5 Pull out the fuse drawer.
6 Remove each fuse and examine it.
If the filament is broken or you see any discoloration of the glass, discard the fuse. If the fuse appears to be in good condition, check with a continuity tester.
7 Replace any damaged fuses with new fuses from your spares kit.
8 Slide the fuse drawer into the instrument.
The clip should be to the right. Push gently on the drawer until it snaps into place.
For protection against risk of fire, replace the fuses with fuses of the same type and rating.
Chapter 8: Cleaning and Maintenance 97

9 Plug the AC power cord into the instrument.
10 Plug the other end into the wall outlet.
Changing the Pipette Battery
Follow these instructions when you need to change the pipette battery.
1 Turn off the pipette by pushing the red on/off switch to the far right position.
2 Remove the top two screws on the back of the pipette, and take off the battery cover.
3 Remove the battery from the holder by gently hitting the pipette against your palm.
Do not use a screwdriver or any other tool to remove the battery.
4 Install the new battery by pressing the positive end against the contact spring at the bottom of the holder.
Blood specimens can contain infectious agents that are hazardous to your health. Wear gloves when handling blood or any materials with which it comes in contact. Follow local, state, or country biohazard handling regulations when disposing of biohazardous waste material.
screws
98 BD FACSCount System User’s Guide for Use with BD FACSCount CD4 Reagents

5 Push the battery down and simultaneously slide it into the holder.
Be careful to compress the battery against the spring enough to allow it to clear the contact pin at the top of the holder.
6 Replace the battery cover and the screws.
Do not overly tighten the screws.
7 Dispose of the old battery in accordance with local regulations.
Chapter 8: Cleaning and Maintenance 99

THIS PAGE INTENTIONALLY LEFT BLANK
9
Troubleshooting
The tips in this section are designed to help you troubleshoot your experiments. If additional assistance is required, contact your local BD Biosciences technical support representative. Refer to our website, www.bdbiosciences.com, for up-to-date contact information.
Troubleshooting suggestions can be found under the following topics:
• Instrument Troubleshooting on page 102
• Error Codes on page 108
• Displayed Messages on page 122
101

Instrument Troubleshooting
Barcode Reader
Observation Possible Causes Recommended Solutions
Barcode wand not reading barcode label (no beep)
Barcode label not one of the five standards that reader interprets
See page 132 for a list of barcode standards the barcode reader interprets. Use only the barcodes listed.
Wrong barcode label scanned
Make sure the label you are scanning contains the information the system is prompting you to enter.
Wrinkled or damaged barcode label
Manually enter the information.
Dirty barcode wand Clean the tip of the wand with a soft cloth dipped in distilled water.
Barcode wand not connected (no red light visible at tip of wand)
Check connection. See page 24.
Failed barcode wand Contact your local BD representative. Manually enter the barcode.
Barcode reader entered values not matching the barcode label values
Barcode label not one of the five standards that reader interprets
See page 132 for a list of barcode standards the barcode reader interprets. Use only the barcodes listed.
Barcode reader truncating ID or accession number exceeding maximum length of field
Manually enter the ID or accession number. ID and patient accession number fields are each limited to 15 characters.
102 BD FACSCount System User’s Guide for Use with BD FACSCount CD4 Reagents
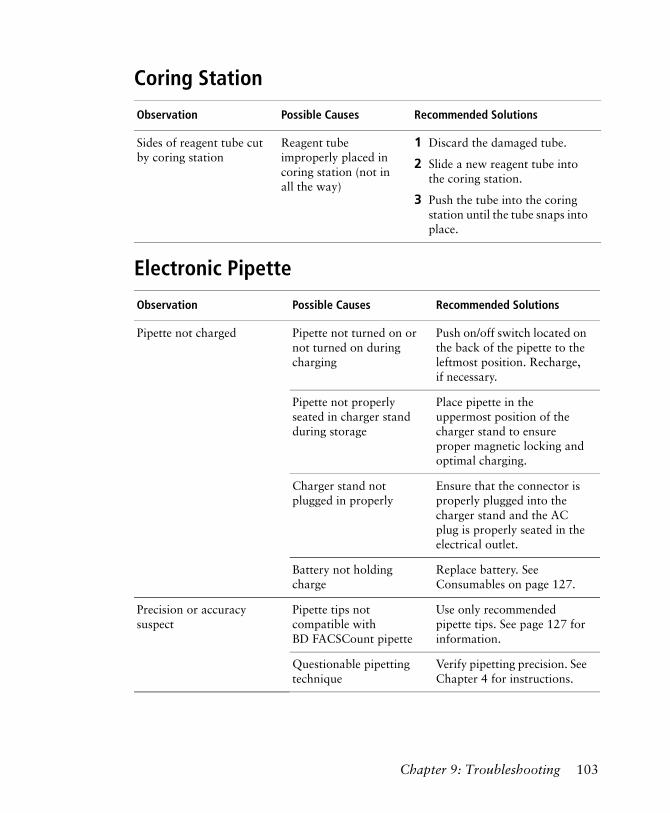
Coring Station
Observation Possible Causes Recommended Solutions
Sides of reagent tube cut by coring station
Reagent tube improperly placed in coring station (not in all the way)
1 Discard the damaged tube.
2 Slide a new reagent tube into the coring station.
3 Push the tube into the coring station until the tube snaps into place.
Electronic Pipette
Observation Possible Causes Recommended Solutions
Pipette not charged Pipette not turned on or not turned on during charging
Push on/off switch located on the back of the pipette to the leftmost position. Recharge, if necessary.
Pipette not properly seated in charger stand during storage
Place pipette in the uppermost position of the charger stand to ensure proper magnetic locking and optimal charging.
Charger stand not plugged in properly
Ensure that the connector is properly plugged into the charger stand and the AC plug is properly seated in the electrical outlet.
Battery not holding charge
Replace battery. See Consumables on page 127.
Precision or accuracy suspect
Pipette tips not compatible with BD FACSCount pipette
Use only recommended pipette tips. See page 127 for information.
Questionable pipetting technique
Verify pipetting precision. See Chapter 4 for instructions.
Chapter 9: Troubleshooting 103

Precision or accuracy suspect (continued)
Pipette not performing reliably
Check the accuracy of the pipette. See Chapter 4 for instructions.
Instrument
Observation Possible Causes Recommended Solutions
Instrument not powering on
Unconnected power cord Check power cord connection to both the instrument and the wall outlet. See Installing the Hardware on page 24.
Blown fuse Change the fuse. See page 96.
A buzzing sound Instrument equipped with internal buzzer that sounds for full waste tank
Replace the full tank with the spare tank. (The buzzer stops when an empty tank is installed.) After 30 minutes, empty the full tank. See page 35.
Instrument-equipped internal buzzer sounding for damaged waste tank cap
Replace the waste tank cap with the spare cap. See page 35.
Low event rate No reagent tube in sample holder
Make sure there is no air in the flow cell, then place the sample in the sample holder. If air was introduced into the flow cell, see Priming the System on page 36 to remove the air.
Electronic Pipette (continued)
Observation Possible Causes Recommended Solutions
104 BD FACSCount System User’s Guide for Use with BD FACSCount CD4 Reagents
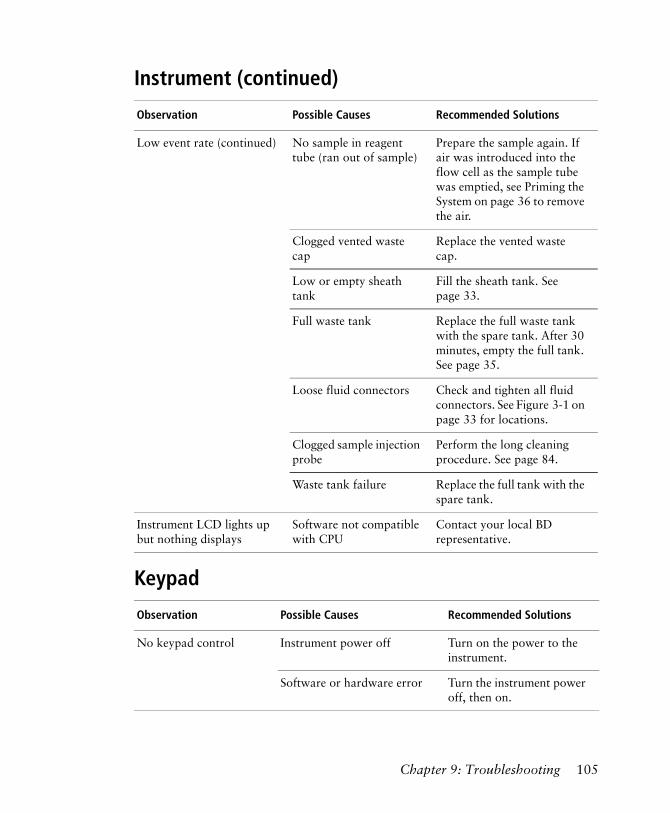
Low event rate (continued) No sample in reagent tube (ran out of sample)
Prepare the sample again. If air was introduced into the flow cell as the sample tube was emptied, see Priming the System on page 36 to remove the air.
Clogged vented waste cap
Replace the vented waste cap.
Low or empty sheath tank
Fill the sheath tank. See page 33.
Full waste tank Replace the full waste tank with the spare tank. After 30 minutes, empty the full tank. See page 35.
Loose fluid connectors Check and tighten all fluid connectors. See Figure 3-1 on page 33 for locations.
Clogged sample injection probe
Perform the long cleaning procedure. See page 84.
Waste tank failure Replace the full tank with the spare tank.
Instrument LCD lights up but nothing displays
Software not compatible with CPU
Contact your local BD representative.
Keypad
Observation Possible Causes Recommended Solutions
No keypad control Instrument power off Turn on the power to the instrument.
Software or hardware error Turn the instrument power off, then on.
Instrument (continued)
Observation Possible Causes Recommended Solutions
Chapter 9: Troubleshooting 105

Printer
Observation Possible Causes Recommended Solutions
Paper advance button not working
Paper jam Remove paper and follow the instructions on page 94 to reinstall paper.
Instrument power off Check the power cord connection to the instrument and the wall outlet; then turn on the power to the instrument. See Installing the Hardware on page 24.
Paper bail lever pulled toward you
Push the paper bail lever away from you to allow rubber roller to guide the paper. See Changing Printer Paper on page 94.
Improper system boot Turn instrument power off, then on.
No characters or distorted characters on printout
Poor paper feed or jammed printer
Remove paper and follow the instructions in Changing Printer Paper on page 94 to reinstall paper.
Using incorrect printer paper
Use only thermal printer paper from BD. See page 125 for ordering information.
No paper emerging from instrument
Paper jam Remove paper and follow the instructions in Changing Printer Paper on page 94 to reinstall paper.
No paper in instrument Replace the paper. See Changing Printer Paper on page 94.
Paper not feeding through slot in printer door
Open the printer lid and check for paper. If paper is folded inside the printer area, feed the free end through the slot.
106 BD FACSCount System User’s Guide for Use with BD FACSCount CD4 Reagents
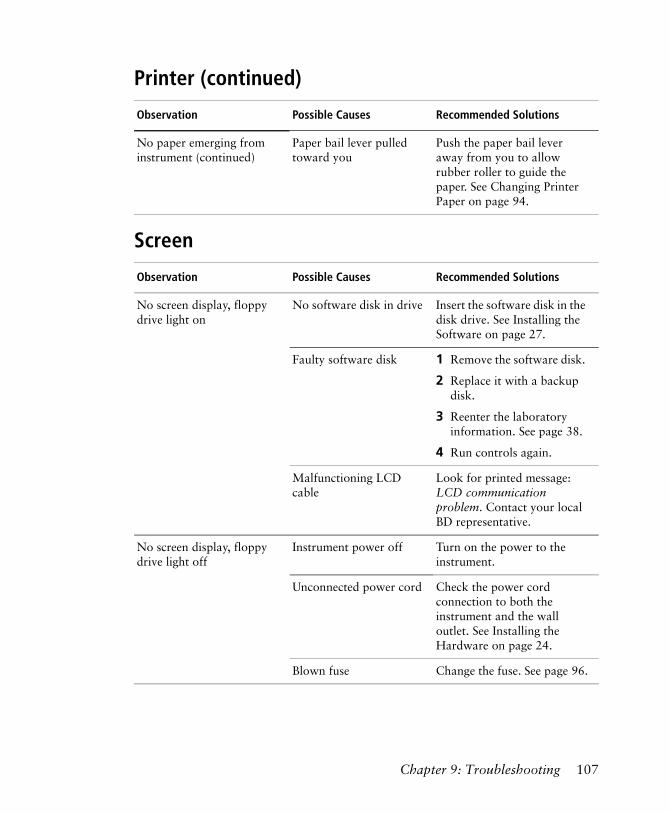
No paper emerging from instrument (continued)
Paper bail lever pulled toward you
Push the paper bail lever away from you to allow rubber roller to guide the paper. See Changing Printer Paper on page 94.
Screen
Observation Possible Causes Recommended Solutions
No screen display, floppy drive light on
No software disk in drive Insert the software disk in the disk drive. See Installing the Software on page 27.
Faulty software disk 1 Remove the software disk.
2 Replace it with a backup disk.
3 Reenter the laboratory information. See page 38.
4 Run controls again.
Malfunctioning LCD cable
Look for printed message: LCD communication problem. Contact your local BD representative.
No screen display, floppy drive light off
Instrument power off Turn on the power to the instrument.
Unconnected power cord Check the power cord connection to both the instrument and the wall outlet. See Installing the Hardware on page 24.
Blown fuse Change the fuse. See page 96.
Printer (continued)
Observation Possible Causes Recommended Solutions
Chapter 9: Troubleshooting 107

Error Codes
The following table lists error code numbers, message displayed, possible causes, and solutions to correct each error. If, after following the recommended solutions, the problem persists, contact your local BD service representative or distributor for assistance.
Code Message Displayed Possible Causes Recommended Solutions
101–159 Internal Error. Restart the instrument. If the the error persists contact BD Service.
Software internal errors not related to the sample tube or control tube quality
Restart the instrument.
202 Ref. beads rate too low
Clogged sample injection probe
Perform the long clean procedure. See page 84.
Tube improperly vortexed
Set the vortex speed to a setting that causes the liquid to rise to the top of the reagent tube. Vortex the tube for 6 seconds and rerun.
Running control tubes (red, purple, blue tops) instead of reagent tubes
Check for controls in the sample holder. Replace controls with prepared patient sample.
No sample in reagent tube (sample ran out)
Prepare the sample again. If air was introduced into the flow cell as the sample tube was emptied, see page 36 for instructions on removing it.
No reagent tubes in sample holder
Make sure there is no air in the flow cell, then place the sample in the sample holder. If air was introduced into the flow cell, see page 36 for instructions on removing it.
Low or empty sheath tank
Fill the sheath tank. See page 33.
108 BD FACSCount System User’s Guide for Use with BD FACSCount CD4 Reagents
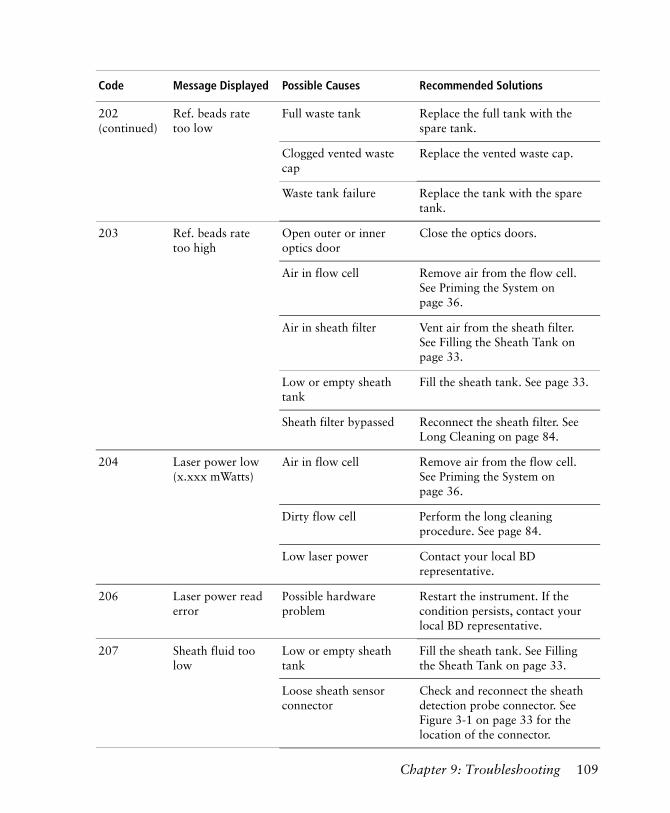
202 (continued)
Ref. beads rate too low
Full waste tank Replace the full tank with the spare tank.
Clogged vented waste cap
Replace the vented waste cap.
Waste tank failure Replace the tank with the spare tank.
203 Ref. beads rate too high
Open outer or inner optics door
Close the optics doors.
Air in flow cell Remove air from the flow cell. See Priming the System on page 36.
Air in sheath filter Vent air from the sheath filter. See Filling the Sheath Tank on page 33.
Low or empty sheath tank
Fill the sheath tank. See page 33.
Sheath filter bypassed Reconnect the sheath filter. See Long Cleaning on page 84.
204 Laser power low (x.xxx mWatts)
Air in flow cell Remove air from the flow cell. See Priming the System on page 36.
Dirty flow cell Perform the long cleaning procedure. See page 84.
Low laser power Contact your local BD representative.
206 Laser power read error
Possible hardware problem
Restart the instrument. If the condition persists, contact your local BD representative.
207 Sheath fluid too low
Low or empty sheath tank
Fill the sheath tank. See Filling the Sheath Tank on page 33.
Loose sheath sensor connector
Check and reconnect the sheath detection probe connector. See Figure 3-1 on page 33 for the location of the connector.
Code Message Displayed Possible Causes Recommended Solutions
Chapter 9: Troubleshooting 109
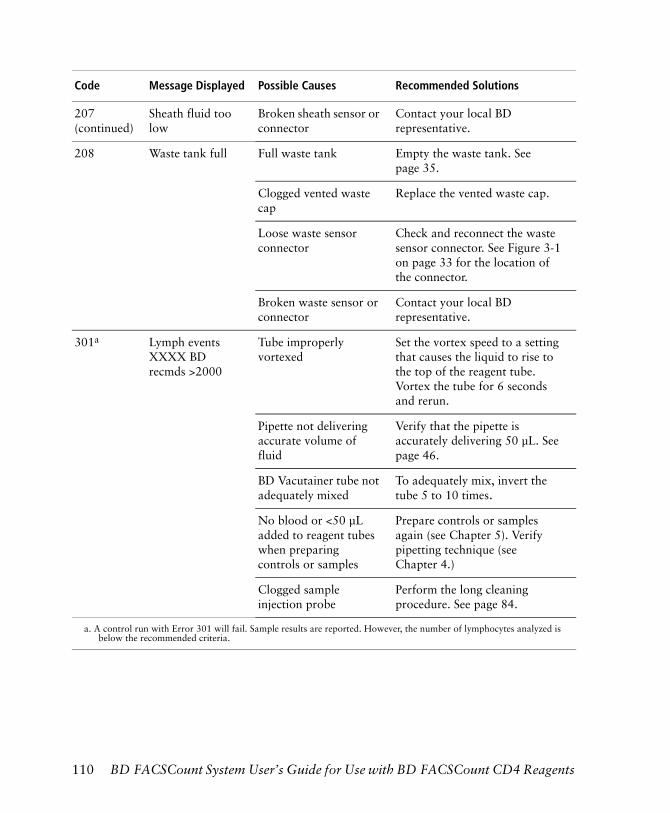
207 (continued)
Sheath fluid too low
Broken sheath sensor or connector
Contact your local BD representative.
208 Waste tank full Full waste tank Empty the waste tank. See page 35.
Clogged vented waste cap
Replace the vented waste cap.
Loose waste sensor connector
Check and reconnect the waste sensor connector. See Figure 3-1 on page 33 for the location of the connector.
Broken waste sensor or connector
Contact your local BD representative.
301a Lymph events XXXX BD recmds >2000
Tube improperly vortexed
Set the vortex speed to a setting that causes the liquid to rise to the top of the reagent tube. Vortex the tube for 6 seconds and rerun.
Pipette not delivering accurate volume of fluid
Verify that the pipette is accurately delivering 50 µL. See page 46.
BD Vacutainer tube not adequately mixed
To adequately mix, invert the tube 5 to 10 times.
No blood or <50 µL added to reagent tubes when preparing controls or samples
Prepare controls or samples again (see Chapter 5). Verify pipetting technique (see Chapter 4.)
Clogged sample injection probe
Perform the long cleaning procedure. See page 84.
a. A control run with Error 301 will fail. Sample results are reported. However, the number of lymphocytes analyzed is below the recommended criteria.
Code Message Displayed Possible Causes Recommended Solutions
110 BD FACSCount System User’s Guide for Use with BD FACSCount CD4 Reagents
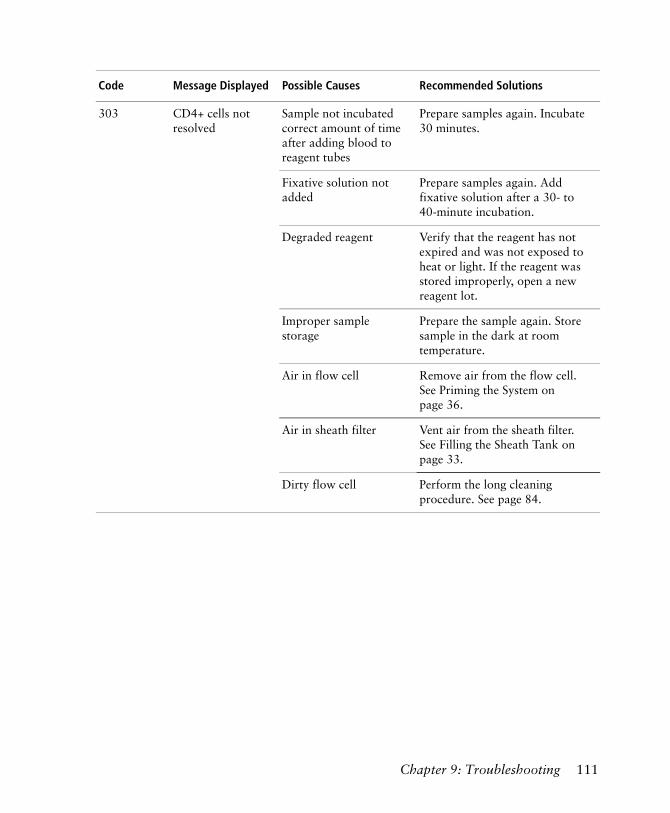
303 CD4+ cells not resolved
Sample not incubated correct amount of time after adding blood to reagent tubes
Prepare samples again. Incubate 30 minutes.
Fixative solution not added
Prepare samples again. Add fixative solution after a 30- to 40-minute incubation.
Degraded reagent Verify that the reagent has not expired and was not exposed to heat or light. If the reagent was stored improperly, open a new reagent lot.
Improper sample storage
Prepare the sample again. Store sample in the dark at room temperature.
Air in flow cell Remove air from the flow cell. See Priming the System on page 36.
Air in sheath filter Vent air from the sheath filter. See Filling the Sheath Tank on page 33.
Dirty flow cell Perform the long cleaning procedure. See page 84.
Code Message Displayed Possible Causes Recommended Solutions
Chapter 9: Troubleshooting 111
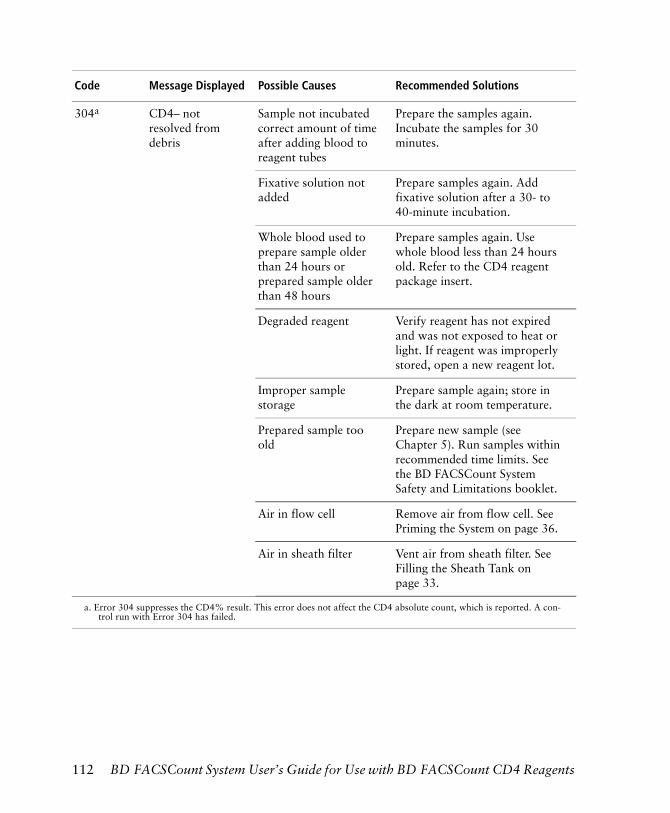
304a CD4– not resolved from debris
Sample not incubated correct amount of time after adding blood to reagent tubes
Prepare the samples again. Incubate the samples for 30 minutes.
Fixative solution not added
Prepare samples again. Add fixative solution after a 30- to 40-minute incubation.
Whole blood used to prepare sample older than 24 hours or prepared sample older than 48 hours
Prepare samples again. Use whole blood less than 24 hours old. Refer to the CD4 reagent package insert.
Degraded reagent Verify reagent has not expired and was not exposed to heat or light. If reagent was improperly stored, open a new reagent lot.
Improper sample storage
Prepare sample again; store in the dark at room temperature.
Prepared sample too old
Prepare new sample (see Chapter 5). Run samples within recommended time limits. See the BD FACSCount System Safety and Limitations booklet.
Air in flow cell Remove air from flow cell. See Priming the System on page 36.
Air in sheath filter Vent air from sheath filter. See Filling the Sheath Tank on page 33.
a. Error 304 suppresses the CD4% result. This error does not affect the CD4 absolute count, which is reported. A con-trol run with Error 304 has failed.
Code Message Displayed Possible Causes Recommended Solutions
112 BD FACSCount System User’s Guide for Use with BD FACSCount CD4 Reagents
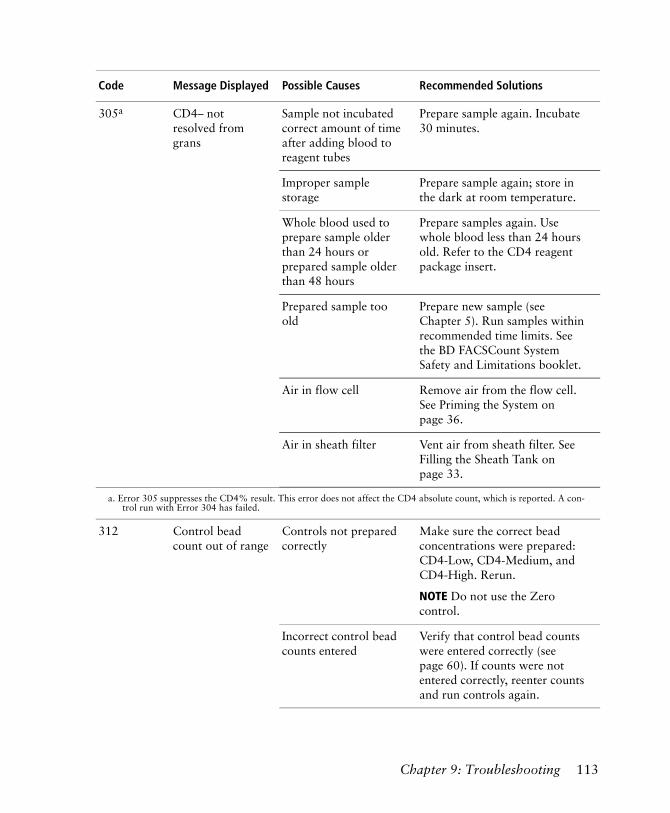
305a CD4– not resolved from grans
Sample not incubated correct amount of time after adding blood to reagent tubes
Prepare sample again. Incubate 30 minutes.
Improper sample storage
Prepare sample again; store in the dark at room temperature.
Whole blood used to prepare sample older than 24 hours or prepared sample older than 48 hours
Prepare samples again. Use whole blood less than 24 hours old. Refer to the CD4 reagent package insert.
Prepared sample too old
Prepare new sample (see Chapter 5). Run samples within recommended time limits. See the BD FACSCount System Safety and Limitations booklet.
Air in flow cell Remove air from the flow cell. See Priming the System on page 36.
Air in sheath filter Vent air from sheath filter. See Filling the Sheath Tank on page 33.
a. Error 305 suppresses the CD4% result. This error does not affect the CD4 absolute count, which is reported. A con-trol run with Error 304 has failed.
312 Control bead count out of range
Controls not prepared correctly
Make sure the correct bead concentrations were prepared: CD4-Low, CD4-Medium, and CD4-High. Rerun.
NOTE Do not use the Zero control.
Incorrect control bead counts entered
Verify that control bead counts were entered correctly (see page 60). If counts were not entered correctly, reenter counts and run controls again.
Code Message Displayed Possible Causes Recommended Solutions
Chapter 9: Troubleshooting 113

312 Control bead count out of range (continued)
Control samples run out of sequence or control beads were added to the wrong reagent tubes
Run in the following order:
• CD4-Low tube
• CD4-Medium tube
• CD4-High tube
Sample not incubated correct amount of time after adding blood to reagent tubes
Prepare the samples again. Incubate for 30 minutes.
Fixative solution not added
Prepare samples again. Add fixative solution after 30- to 40-minute incubation.
Blood added twice to same reagent tube
Prepare controls using 50 µL of blood.
Control kit not stored upright or not vortexed properly before use
Vortex the control beads and prepare new controls. See Chapter 5.
Pipette not delivering accurate volume of fluid
Verify pipette performance. See page 46 and page 48.
313 Control beads in sample run
Control beads added to patient sample
Prepare the sample again. Do not add control beads to patient samples. Add control beads to control samples only. See Chapter 5 and Chapter 6.
Dirty flow cell Perform the long cleaning procedure. See page 84.
314 CD4+ count <1 No blood added to reagent tube
Prepare the samples again. See Chapter 5.
Degraded reagent Verify that the reagent has not expired and was not exposed to heat or light. If the reagent was stored improperly, open a new reagent lot.
Code Message Displayed Possible Causes Recommended Solutions
114 BD FACSCount System User’s Guide for Use with BD FACSCount CD4 Reagents
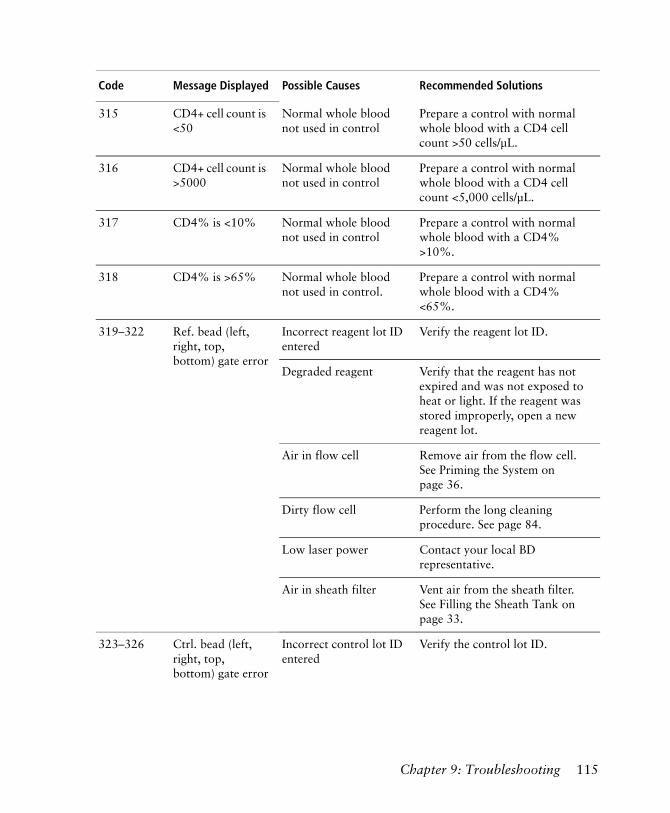
315 CD4+ cell count is <50
Normal whole blood not used in control
Prepare a control with normal whole blood with a CD4 cell count >50 cells/µL.
316 CD4+ cell count is >5000
Normal whole blood not used in control
Prepare a control with normal whole blood with a CD4 cell count <5,000 cells/µL.
317 CD4% is <10% Normal whole blood not used in control
Prepare a control with normal whole blood with a CD4% >10%.
318 CD4% is >65% Normal whole blood not used in control.
Prepare a control with normal whole blood with a CD4% <65%.
319–322 Ref. bead (left, right, top, bottom) gate error
Incorrect reagent lot ID entered
Verify the reagent lot ID.
Degraded reagent Verify that the reagent has not expired and was not exposed to heat or light. If the reagent was stored improperly, open a new reagent lot.
Air in flow cell Remove air from the flow cell. See Priming the System on page 36.
Dirty flow cell Perform the long cleaning procedure. See page 84.
Low laser power Contact your local BD representative.
Air in sheath filter Vent air from the sheath filter. See Filling the Sheath Tank on page 33.
323–326 Ctrl. bead (left, right, top, bottom) gate error
Incorrect control lot ID entered
Verify the control lot ID.
Code Message Displayed Possible Causes Recommended Solutions
Chapter 9: Troubleshooting 115
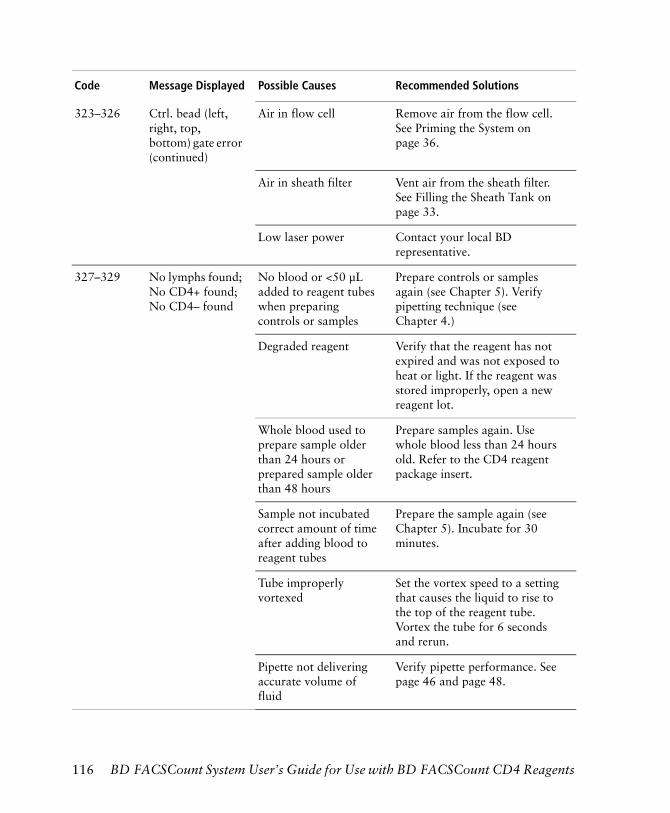
323–326 Ctrl. bead (left, right, top, bottom) gate error (continued)
Air in flow cell Remove air from the flow cell. See Priming the System on page 36.
Air in sheath filter Vent air from the sheath filter. See Filling the Sheath Tank on page 33.
Low laser power Contact your local BD representative.
327–329 No lymphs found; No CD4+ found; No CD4– found
No blood or <50 µL added to reagent tubes when preparing controls or samples
Prepare controls or samples again (see Chapter 5). Verify pipetting technique (see Chapter 4.)
Degraded reagent Verify that the reagent has not expired and was not exposed to heat or light. If the reagent was stored improperly, open a new reagent lot.
Whole blood used to prepare sample older than 24 hours or prepared sample older than 48 hours
Prepare samples again. Use whole blood less than 24 hours old. Refer to the CD4 reagent package insert.
Sample not incubated correct amount of time after adding blood to reagent tubes
Prepare the sample again (see Chapter 5). Incubate for 30 minutes.
Tube improperly vortexed
Set the vortex speed to a setting that causes the liquid to rise to the top of the reagent tube. Vortex the tube for 6 seconds and rerun.
Pipette not delivering accurate volume of fluid
Verify pipette performance. See page 46 and page 48.
Code Message Displayed Possible Causes Recommended Solutions
116 BD FACSCount System User’s Guide for Use with BD FACSCount CD4 Reagents
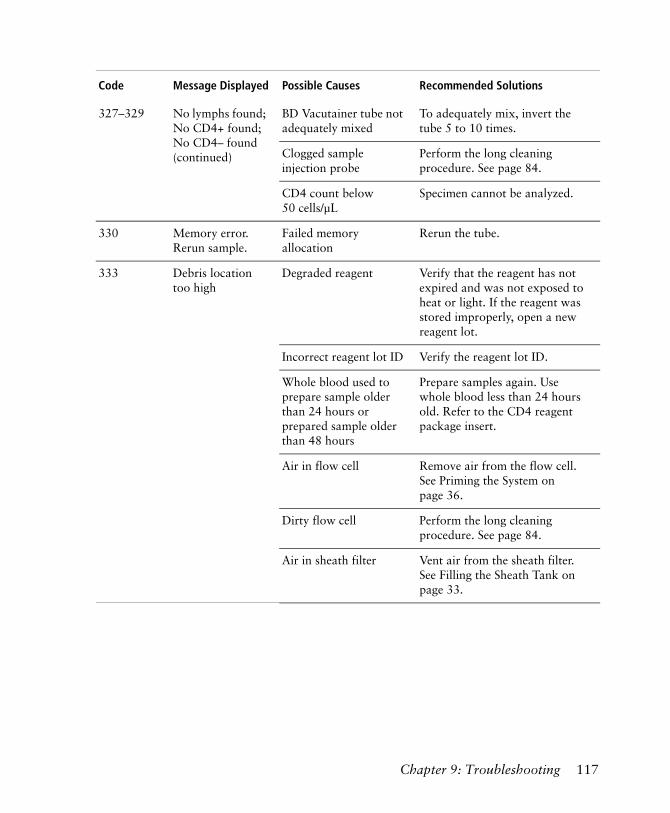
327–329 No lymphs found; No CD4+ found; No CD4– found (continued)
BD Vacutainer tube not adequately mixed
To adequately mix, invert the tube 5 to 10 times.
Clogged sample injection probe
Perform the long cleaning procedure. See page 84.
CD4 count below 50 cells/µL
Specimen cannot be analyzed.
330 Memory error. Rerun sample.
Failed memory allocation
Rerun the tube.
333 Debris location too high
Degraded reagent Verify that the reagent has not expired and was not exposed to heat or light. If the reagent was stored improperly, open a new reagent lot.
Incorrect reagent lot ID Verify the reagent lot ID.
Whole blood used to prepare sample older than 24 hours or prepared sample older than 48 hours
Prepare samples again. Use whole blood less than 24 hours old. Refer to the CD4 reagent package insert.
Air in flow cell Remove air from the flow cell. See Priming the System on page 36.
Dirty flow cell Perform the long cleaning procedure. See page 84.
Air in sheath filter Vent air from the sheath filter. See Filling the Sheath Tank on page 33.
Code Message Displayed Possible Causes Recommended Solutions
Chapter 9: Troubleshooting 117
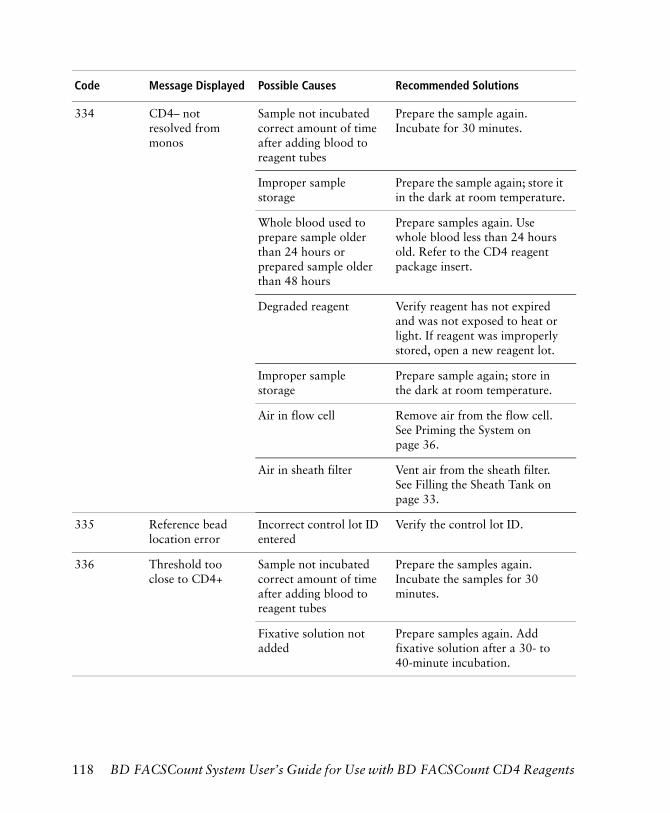
334 CD4– not resolved from monos
Sample not incubated correct amount of time after adding blood to reagent tubes
Prepare the sample again. Incubate for 30 minutes.
Improper sample storage
Prepare the sample again; store it in the dark at room temperature.
Whole blood used to prepare sample older than 24 hours or prepared sample older than 48 hours
Prepare samples again. Use whole blood less than 24 hours old. Refer to the CD4 reagent package insert.
Degraded reagent Verify reagent has not expired and was not exposed to heat or light. If reagent was improperly stored, open a new reagent lot.
Improper sample storage
Prepare sample again; store in the dark at room temperature.
Air in flow cell Remove air from the flow cell. See Priming the System on page 36.
Air in sheath filter Vent air from the sheath filter. See Filling the Sheath Tank on page 33.
335 Reference bead location error
Incorrect control lot ID entered
Verify the control lot ID.
336 Threshold too close to CD4+
Sample not incubated correct amount of time after adding blood to reagent tubes
Prepare the samples again. Incubate the samples for 30 minutes.
Fixative solution not added
Prepare samples again. Add fixative solution after a 30- to 40-minute incubation.
Code Message Displayed Possible Causes Recommended Solutions
118 BD FACSCount System User’s Guide for Use with BD FACSCount CD4 Reagents
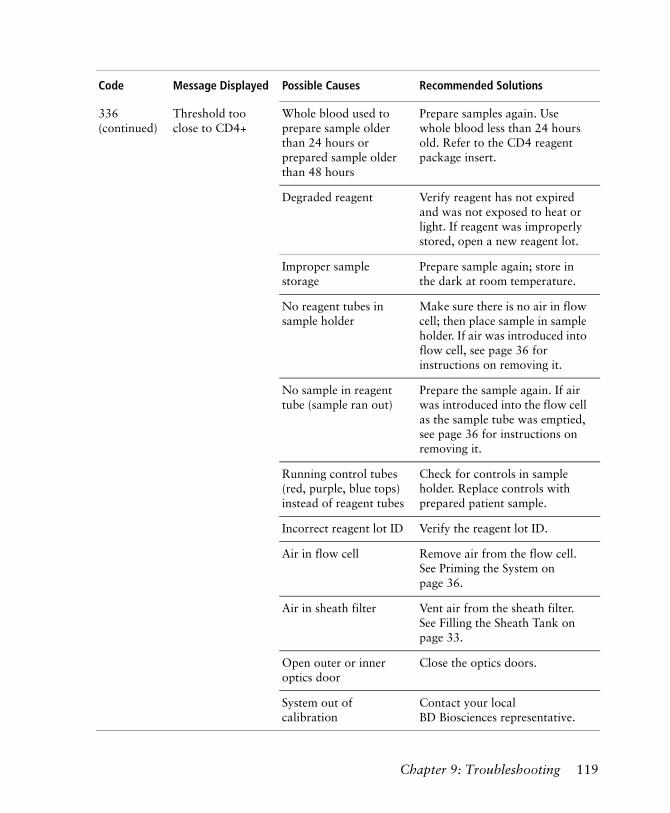
336 (continued)
Threshold too close to CD4+
Whole blood used to prepare sample older than 24 hours or prepared sample older than 48 hours
Prepare samples again. Use whole blood less than 24 hours old. Refer to the CD4 reagent package insert.
Degraded reagent Verify reagent has not expired and was not exposed to heat or light. If reagent was improperly stored, open a new reagent lot.
Improper sample storage
Prepare sample again; store in the dark at room temperature.
No reagent tubes in sample holder
Make sure there is no air in flow cell; then place sample in sample holder. If air was introduced into flow cell, see page 36 for instructions on removing it.
No sample in reagent tube (sample ran out)
Prepare the sample again. If air was introduced into the flow cell as the sample tube was emptied, see page 36 for instructions on removing it.
Running control tubes (red, purple, blue tops) instead of reagent tubes
Check for controls in sample holder. Replace controls with prepared patient sample.
Incorrect reagent lot ID Verify the reagent lot ID.
Air in flow cell Remove air from the flow cell. See Priming the System on page 36.
Air in sheath filter Vent air from the sheath filter. See Filling the Sheath Tank on page 33.
Open outer or inner optics door
Close the optics doors.
System out of calibration
Contact your local BD Biosciences representative.
Code Message Displayed Possible Causes Recommended Solutions
Chapter 9: Troubleshooting 119
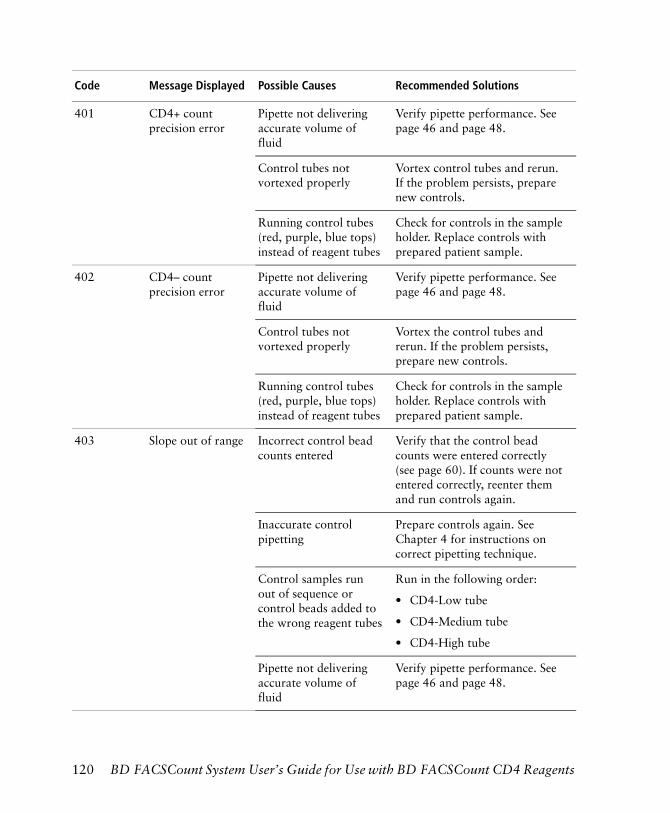
401 CD4+ count precision error
Pipette not delivering accurate volume of fluid
Verify pipette performance. See page 46 and page 48.
Control tubes not vortexed properly
Vortex control tubes and rerun. If the problem persists, prepare new controls.
Running control tubes (red, purple, blue tops) instead of reagent tubes
Check for controls in the sample holder. Replace controls with prepared patient sample.
402 CD4– count precision error
Pipette not delivering accurate volume of fluid
Verify pipette performance. See page 46 and page 48.
Control tubes not vortexed properly
Vortex the control tubes and rerun. If the problem persists, prepare new controls.
Running control tubes (red, purple, blue tops) instead of reagent tubes
Check for controls in the sample holder. Replace controls with prepared patient sample.
403 Slope out of range Incorrect control bead counts entered
Verify that the control bead counts were entered correctly (see page 60). If counts were not entered correctly, reenter them and run controls again.
Inaccurate control pipetting
Prepare controls again. See Chapter 4 for instructions on correct pipetting technique.
Control samples run out of sequence or control beads added to the wrong reagent tubes
Run in the following order:
• CD4-Low tube
• CD4-Medium tube
• CD4-High tube
Pipette not delivering accurate volume of fluid
Verify pipette performance. See page 46 and page 48.
Code Message Displayed Possible Causes Recommended Solutions
120 BD FACSCount System User’s Guide for Use with BD FACSCount CD4 Reagents

403 (continued)
Slope out of range Control kit not stored upright or not vortexed properly before use
Vortex the control beads and prepare new controls. If the error persists, discard the controls and open new control pairs. See page 57.
404 Intercept out of range
Incorrect control bead counts entered
Verify that the control bead counts were entered correctly (see page 60). If counts were not entered correctly, reenter them and run the controls again.
Inaccurate control pipetting
Prepare controls again. See page 46 for instructions on correct pipetting technique.
Control samples run out of sequence or control beads added to the wrong reagent tubes
Run in the following order:
• CD4-Low tube
• CD4-Medium tube
• CD4-High tube
Pipette not delivering accurate volume of fluid
Verify pipette performance. See page 46 and page 48.
Control kit not stored upright or not vortexed properly before use
Vortex the control beads and prepare new controls. If the error persists, discard the controls and open new control pairs. See page 57.
405 R out of range Incorrect control bead counts entered
Verify that control bead counts were entered correctly (see page 60). If counts were not entered correctly, reenter counts and run controls again.
Inaccurate control pipetting
Prepare controls again. See page 45 for instructions on correct pipetting technique.
Code Message Displayed Possible Causes Recommended Solutions
Chapter 9: Troubleshooting 121
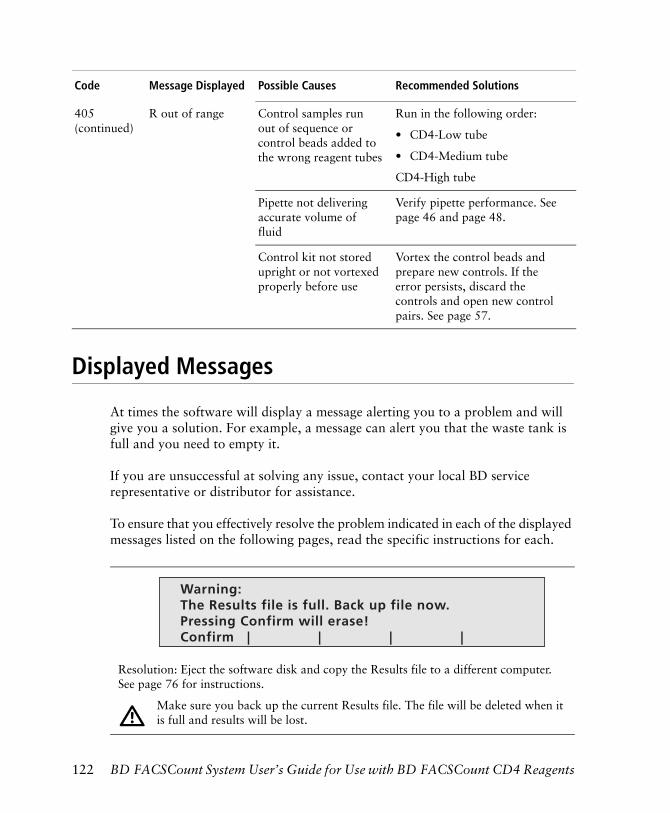
Displayed Messages
At times the software will display a message alerting you to a problem and will give you a solution. For example, a message can alert you that the waste tank is full and you need to empty it.
If you are unsuccessful at solving any issue, contact your local BD service representative or distributor for assistance.
To ensure that you effectively resolve the problem indicated in each of the displayed messages listed on the following pages, read the specific instructions for each.
405 (continued)
R out of range Control samples run out of sequence or control beads added to the wrong reagent tubes
Run in the following order:
• CD4-Low tube
• CD4-Medium tube
CD4-High tube
Pipette not delivering accurate volume of fluid
Verify pipette performance. See page 46 and page 48.
Control kit not stored upright or not vortexed properly before use
Vortex the control beads and prepare new controls. If the error persists, discard the controls and open new control pairs. See page 57.
Resolution: Eject the software disk and copy the Results file to a different computer. See page 76 for instructions.
Make sure you back up the current Results file. The file will be deleted when it is full and results will be lost.
Code Message Displayed Possible Causes Recommended Solutions
Warning:The Results file is full. Back up file now.Pressing Confirm will erase!Confirm | | | |
122 BD FACSCount System User’s Guide for Use with BD FACSCount CD4 Reagents
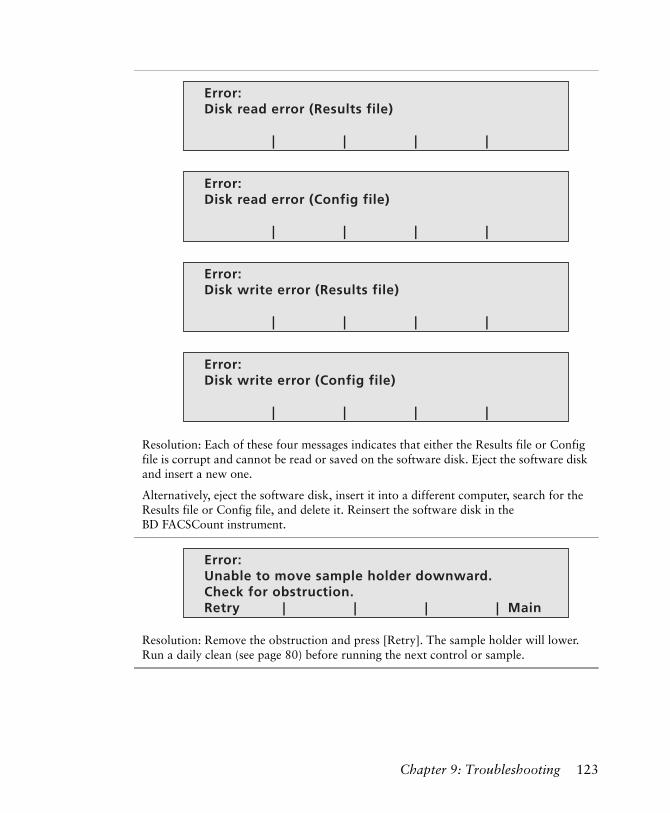
Resolution: Each of these four messages indicates that either the Results file or Config file is corrupt and cannot be read or saved on the software disk. Eject the software disk and insert a new one.
Alternatively, eject the software disk, insert it into a different computer, search for the Results file or Config file, and delete it. Reinsert the software disk in the BD FACSCount instrument.
Resolution: Remove the obstruction and press [Retry]. The sample holder will lower. Run a daily clean (see page 80) before running the next control or sample.
Error:Disk read error (Results file)
| | | |
Error:Disk read error (Config file)
| | | |
Error:Disk write error (Results file)
| | | |
Error:Disk write error (Config file)
| | | |
Error:Unable to move sample holder downward.Check for obstruction.Retry | | | | Main
Chapter 9: Troubleshooting 123

THIS PAGE INTENTIONALLY LEFT BLANK
Appendix A
Service and Ordering Information
This appendix provides a list of supplies that are available for the BD FACSCount instrument.
• BD FACSCount System Ordering Information on page 126
• Consumables on page 127
• Recommended Brands of Materials on page 128
NOTE This information is correct at the time of publication. For up-to-date information, see our website (bdbiosciences.com).
125

BD FACSCount System Ordering Information
The following is a list of materials that can be purchased separately.
Product Description Part Number
BD FACSCount instrument 337858
BD FACSCount control kit 340166
BD FACSCount CD4 reagents 339010
barcode reader (optional) 339182
126 BD FACSCount System User’s Guide for Use with BD FACSCount CD4 Reagents

Consumables
Product Description Part Number
Allen wrench 98-10222-00
caps for cleaning tubes (order in quantities of 20) 343514
caps for BD FACSCount reagent tubes (220 bagged) 343516
clamp for sheath filter 343519
Cleaning and Maintenance video (VHS) 02-61456-00
cleaning stylus (5) 343648
cleaning tubes 343685
coring station 343046
dispensing bottle for cleaning solutions 343707
BD FACSCount CD4 software disk 643866
BD FACSCount electronic pipette 339014
BD FACSFlow sheath fluid 342003
filter connector (male coupling) 343530
fuse drawer (5 x 20 mm) 343564
fuse (2 Amp) 343554
fuse (metric, 2.5 Amp) 343565
O-ring quick disconnect (order in quantities of 5) 343618
pipette battery 642397
pipette tips
• tray (960)
• bulk (1,000)
340292
340293
sheath connector (male coupling) 343529
sheath filter assembly (1) 343645
Appendix A: Service and Ordering Information 127
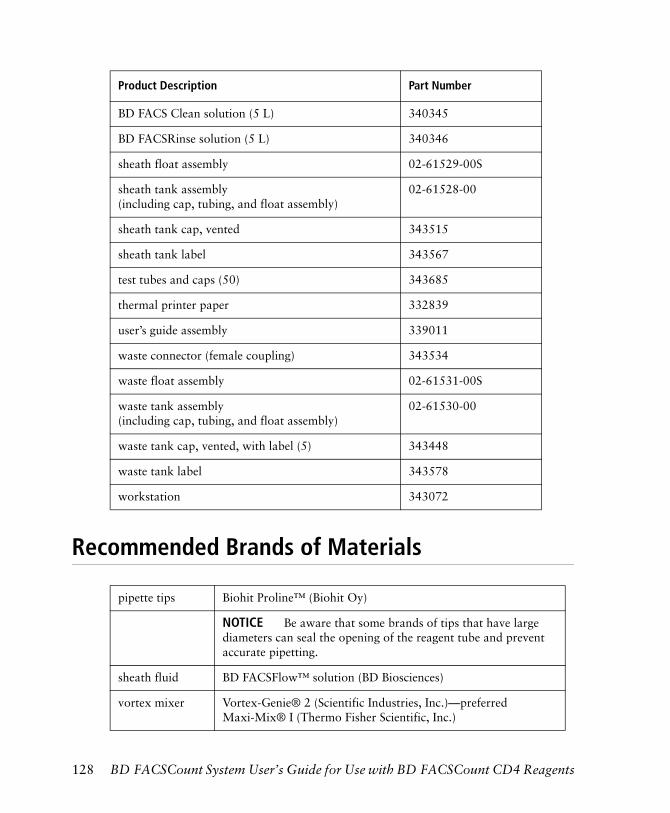
Recommended Brands of Materials
BD FACS Clean solution (5 L) 340345
BD FACSRinse solution (5 L) 340346
sheath float assembly 02-61529-00S
sheath tank assembly (including cap, tubing, and float assembly)
02-61528-00
sheath tank cap, vented 343515
sheath tank label 343567
test tubes and caps (50) 343685
thermal printer paper 332839
user’s guide assembly 339011
waste connector (female coupling) 343534
waste float assembly 02-61531-00S
waste tank assembly(including cap, tubing, and float assembly)
02-61530-00
waste tank cap, vented, with label (5) 343448
waste tank label 343578
workstation 343072
pipette tips Biohit Proline™ (Biohit Oy)
NOTICE Be aware that some brands of tips that have large diameters can seal the opening of the reagent tube and prevent accurate pipetting.
sheath fluid BD FACSFlow™ solution (BD Biosciences)
vortex mixer Vortex-Genie® 2 (Scientific Industries, Inc.)—preferredMaxi-Mix® I (Thermo Fisher Scientific, Inc.)
Product Description Part Number
128 BD FACSCount System User’s Guide for Use with BD FACSCount CD4 Reagents

Appendix B
Product Specifications
This appendix provides the following specifications:
• System Performance on page 130
• BD FACSCount Instrument on page 130
• Reagents on page 133
• Controls on page 134
129
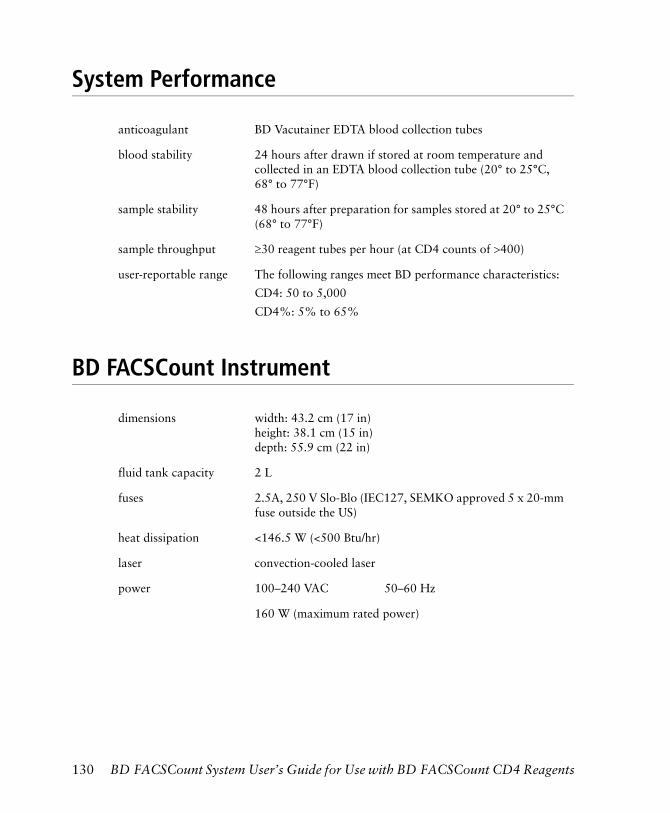
System Performance
BD FACSCount Instrument
anticoagulant BD Vacutainer EDTA blood collection tubes
blood stability 24 hours after drawn if stored at room temperature and collected in an EDTA blood collection tube (20° to 25°C, 68° to 77°F)
sample stability 48 hours after preparation for samples stored at 20° to 25°C (68° to 77°F)
sample throughput ≥30 reagent tubes per hour (at CD4 counts of >400)
user-reportable range The following ranges meet BD performance characteristics:
CD4: 50 to 5,000
CD4%: 5% to 65%
dimensions width: 43.2 cm (17 in)height: 38.1 cm (15 in)depth: 55.9 cm (22 in)
fluid tank capacity 2 L
fuses 2.5A, 250 V Slo-Blo (IEC127, SEMKO approved 5 x 20-mm fuse outside the US)
heat dissipation <146.5 W (<500 Btu/hr)
laser convection-cooled laser
power 100–240 VAC 50–60 Hz
160 W (maximum rated power)
130 BD FACSCount System User’s Guide for Use with BD FACSCount CD4 Reagents
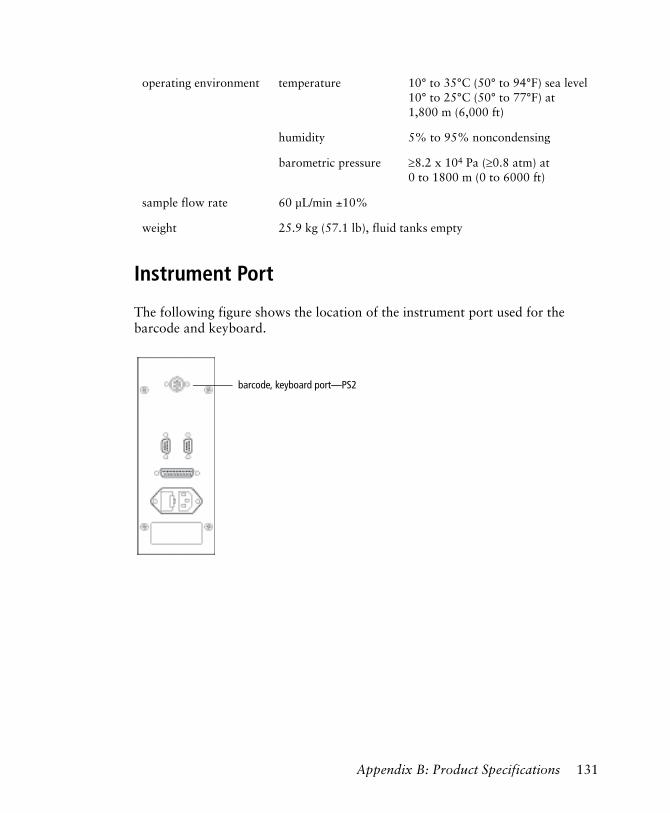
Instrument Port
The following figure shows the location of the instrument port used for the barcode and keyboard.
operating environment temperature 10° to 35°C (50° to 94°F) sea level10° to 25°C (50° to 77°F) at1,800 m (6,000 ft)
humidity 5% to 95% noncondensing
barometric pressure ≥8.2 x 10⁴ Pa (≥0.8 atm) at 0 to 1800 m (0 to 6000 ft)
sample flow rate 60 µL/min ±10%
weight 25.9 kg (57.1 lb), fluid tanks empty
barcode, keyboard port—PS2
Appendix B: Product Specifications 131
Instrument Accessories
barcode reader The optional barcode reader, a Welch Allyn scanner (SCANTEAM 2380), reads the following barcode standards:
• Code 39
• Code-a-bar
• Interleaved 2 of 5
• Universal Product Code (UPC)
• European Article Numbering (EAN)
coring station The coring station is used to open the reagent and control tubes to prepare them for use.
pipette The pipette is automated and preprogrammed to accurately deliver 50 µL of fluid.
workstation The workstation provides a place to hold blood specimens, reagent tubes, controls, fixative solution, caps, and cleaning tubes while you are preparing and running samples.
width: 48.3 cm (19 in)height: 9.1 cm (3.6 in)depth: 18.5 cm (7.3 in)
132 BD FACSCount System User’s Guide for Use with BD FACSCount CD4 Reagents
Reagents
contents Reference beads; fluorochrome-conjugated monoclonal antibody reagents in 0.4-mL buffered solution with stabilizers and 0.1% sodium azide; and nuclear dye
Reagents contain sodium azide. Sodium azide is harmful if swallowed (R22). Keep away from food, drink, and animal feedingstuff (S13). Wear suitable
protective clothing (S36). If swallowed, seek medical advice immediately and show this container or label (S46). Contact with acids liberates very toxic gas (R32). Azide compounds should be flushed with large volumes of water during disposal to avoid deposits in lead or copper plumbing where explosive conditions can develop.
clone identification CD4, clone SK3,1,2 helper/inducer T lymphocytes
CD14, clone MφP9,3,4 monocytes
CD15, clone MMA, monocytes and granulocytes
CD4 antibody Derived from the hybridization of mouse NS-1 myeloma cells with spleen cells from BALB/c mice immunized with human peripheral blood T lymphocytes
CD4 is composed of mouse IgG1 heavy chains and kappa light chains. The CD4 antibody recognizes the CD4 antigen, Mr 59 kilodaltons (kd),5 which interacts with class II molecules of the major histocompatibility complex (MHC) and is the primary receptor for the human immunodeficiency virus (HIV).6,7 The cytoplasmic portion of the antigen is associated with the protein tyrosine kinase p56lck.8,9 The CD4 antigen can regulate the function of the CD3 antigen/TCR complex.10 The CD4 antibody reacts with monocytes/macrophages, which have a CD4 antigen density lower than that on helper/inducer T lymphocytes.11
CD14 Derived from hybridization of mouse Sp2/0 myeloma cells with spleen cells from BALB/c mice immunized with peripheral blood monocytes from a patient with rheumatoid arthritis
CD14 is composed of mouse IgG2b heavy chains and kappa light chains. CD14 recognizes a human monocyte/macrophage antigen, Mr 55 kd.12 The CD14 antigen is present on the majority of normal peripheral blood monocytes.13 CD14 has weak reactivity with peripheral blood granulocytes.14
Appendix B: Product Specifications 133
Controls
CD15 Derived from hybridization of mouse P3-X63-Ag8.653 myeloma cells with spleen cells from BALB/c mice immunized with the U-937 histiocytic cell line
CD15 is composed of mouse IgM heavy chains and kappa light chains. CD15 recognizes a human myelomonocytic antigen.15 The structure recognized by CD15 antibodies is lacto-N-fucopentose III.15 The CD15 antigen is present on greater than 95% of mature peripheral blood eosinophils and neutrophils and is present at low density on circulating monocytes.16 In lymphoid tissue, CD15 reacts with Reed-Sternberg cells of Hodgkin's disease and with granulocytes; however, CD15 reacts with few tissue macrophages and does not react with dendritic cells.17,18
shelf life Stable until the expiration date printed on the package
storage temperature 2° to 8°C (36° to 46°F)
contents Beads in 0.5-mL buffered solution with stabilizers and 0.1% sodium azide
Reagents contain sodium azide. Sodium azide is harmful if swallowed (R22). Keep away from food, drink, and animal feedingstuff (S13). Wear suitable
protective clothing (S36). If swallowed, seek medical advice immediately and show this container or label (S46). Contact with acids liberates very toxic gas (R32). Azide compounds should be flushed with large volumes of water during disposal to avoid deposits in lead or copper plumbing where explosive conditions can develop.
shelf life Stable until the expiration date printed on the package
storage temperature 2° to 8°C (36° to 46°F)
134 BD FACSCount System User’s Guide for Use with BD FACSCount CD4 Reagents
Glossary
accuracy a measure of correctness
Accuracy is the degree of the exactness of a measured value compared to a standard or true value.
CD clusters of differentiation; an international standard naming convention used for identifying antibodies to lymphocyte surface antigens
coring station a device used to open (or puncture) the inner membrane of the reagent tubes and control tubes
cursor an underline character that appears on the display screen to indicate the location where information is to be entered
disk a file or data storage medium
Thin magnetic disk (also referred to as floppy disk) is encased in a plastic jacket. The BD FACSCount software disk stores the BD FACSCount program, control bead data, and choices entered on the Setup screen.
distilled water water that has been cleaned by the removal of solid particles and impurities
field an area of the display screen where information is entered
flow cell the instrument’s optical component where the focused sample stream intersects the laser beam
fluorescence the emission of light of longer wavelengths that occurs when a substance absorbs light of shorter wavelengths
fluorochrome a fluorescent dye; a molecule capable of absorbing light energy, then emitting light at a longer wavelength (fluorescence) as it releases this energy
135

function key one of five touchpad keys located just below the display screen on the front panel of the instrument
Function keys control the software and allow you to move through the various software screens. The specific function of each key might change depending on the particular display.
laser light amplification by stimulated emission of radiation; a light source that is highly directional, monochromatic, coherent, and bright
The emitted light is concentrated in an intense, narrow beam.
pipette a device used to measure or transfer small quantities of liquid
precision a measurement of performance
Precision is the closeness of repeated measurements of the same quantity. Precision is typically measured by calculating the coefficient of variation (CV) of a population of nearly identical cells or particles.
protocol a formal description of messages to be exchanged and rules to be followed for two or more systems to exchange information
reagent the substance used to prepare whole blood specimens for use on the BD FACSCount instrument
BD FACSCount CD4 reagents are each contained in a single reagent tube.
reverse pipetting a method of pipetting that involves pushing the pipette pushbutton all the way down to the second stop, drawing an excess amount of fluid by releasing the pushbutton, then dispensing to the first stop
This technique is required when preparing samples and controls using the BD FACSCount system. The BD FACSCount electronic pipette automatically operates in the reverse pipetting mode.
screen the area on the front panel of the instrument that displays prompts and messages for instrument operation, sample and control results, and instrument status
Screen also refers to a specific display appearing on the instrument panel that provides you with a list of choices (ie, the Setup screen).
136 BD FACSCount System User’s Guide for Use with BD FACSCount CD4 Reagents

vortex mixer a benchtop laboratory device used to mix liquids by creating a swirling motion
Glossary 137

THIS PAGE INTENTIONALLY LEFT BLANK

References
1. Bernard A, Boumsell L, Hill C. Joint report of the first international workshop on human leucocyte differentiation antigens by the investigators of the participating laboratories: T2 protocol. In: Bernard A, Boumsell L, Daussett J, Milstein C, Scholssman SF, eds. Leukocyte Typing. New York, NY: Springer-Verlag; 1984:25-60.
2. Evans RL, Wall DW, Platsoucas CD, et al. Thymus-dependent membrane antigens in man: inhibition of cell-mediated lympholysis by monoclonal antibodies to the TH2 antigen. Proc Natl Acad Sci USA. 1981;78:544-548.
3. Dimitriu-Bona A, Burmester GR, Waters SJ, Winchester RJ. Human mononuclear phagocyte differentiation antigens. I. Patterns of antigenic expression on the surface of human monocytes and macrophages defined by monoclonal antibodies. J Immunol. 1983;130:145-152.
4. Herrmann F, Komischke B, Odenwald E, Ludwig WD. Use of monoclonal antibodies as a diagnostic tool in human leukemia. I. Acute myeloid leukemia and acute phase of chronic myeloid leukemia. Blut. 1983;47:157-163.
5. Fourth international workshop on human leucocyte differentiation antigens. Appendix A: CD guide. In: Knapp W, Dörken B, Gilks W, eds. Leukocyte Typing IV: White Cell Differentiation Antigens. Oxford: Oxford University Press; 1989:1075.
6. Maddon PJ, Dalgleish AG, McDougal JS, Clapham PR, Weiss RA, Axel R. The T4 gene encodes the AIDS virus receptor and is expressed in the immune system and the brain. Cell. 1986;47:333-348.
7. Dalgleish AG, Beverley PCL, Clapham PR, Crawford DH, Greaves MF, Weiss RA. The CD4 (T4) antigen is an essential component of the receptor for the AIDS retrovirus. Nature. 1984;312:763-767.
8. Rudd C, Trevillyan J, Dasgupta J, Wong L, Schlossman S. The CD4 receptor is complexed in detergent lysates to a protein-tyrosine kinase (pp58) from human T lymphocytes. Proc Natl Acad Sci USA. 1988;85:5190-5194.
9. Veillette A, Bookman M, Horak E, Bolen J. The CD4 and CD8 T cell surface antigens are associated with the internal membrane tyrosine-protein kinase p561lck. Cell. 1988;10:55:301-308.
10. Kurrle R. Cluster report: CD3. In: Knapp W, Dörken B, Gilks WR, et al, eds. Leucocyte Typing IV: White Cell Differentiation Antigens. 1 ed. New York, NY: Oxford University Press; 1989:290-293.
139
11. Wood GS, Warner NL, Warnke RA. Anti–Leu-3/T4 antibodies react with cells of monocyte/macrophage and Langerhans lineage. J Immunol. 1983;131:212-216.
12. Goyert SM, Ferrero E. Biochemical analysis of myeloid antigen and cDNA expression of gp55 (CD14). In: McMichael AJ, ed. Leucocyte Typing III: White Cell Differentiation Antigens. New York, NY: Oxford University Press; 1987:613-619.
13. Bernstein ID, Self S. Joint report of the myeloid section of the Second International Workshop on Human Leukocyte Differentiation Antigens. In: Reinherz EL, Haynes BF, Nadler LM, Bernstein ID, eds. Leukocyte Typing II: Human Myeloid and Hematopoietic Cells. New York, NY: Springer-Verlag; 1986;3:1-25.
14. Jayaram Y, Hogg N. Surface expression of CD14 molecules on human neutrophils. In: Knapp W, Dörken B, Gilks W, et al, eds. Leucocyte Typing IV: White Cell Differentiation Antigens. New York, NY: Oxford University Press; 1989:796-797.
15. Skubitz K, Balke J, Ball E, et al. Report on the CD15 cluster workshop. In: Knapp W, Dörken B, Gilks W, et al, eds. Leucocyte Typing IV: White Cell Differentiation Antigens. New York, NY: Oxford University Press; 1989:800-805.
16. Hanjan SN, Kearney JF, Cooper MD. A monoclonal antibody (MMA) that identifies a differentiation antigen on human myelomonocytic cells. Clin Immunol Immunopathol. 1982;23:172-188.
17. Hsu SM, Jaffe ES. Leu-M1 and peanut agglutinin stain the neoplastic cells of Hodgkin's Disease. Amer J Clin Path. 1984;82:29.
18. Pinkus GS, Thomas P, Said JW. Leu-M1—A marker for Reed-Sternberg cells in Hodgkin's Disease: an immunoperoxidase study of paraffin-embedded tissues. Am J Pathol. 1985;119:244.
140 BD FACSCount System User’s Guide for Use with BD FACSCount CD4 Reagents
Index
Symbols
%CV, calculating for pipette 46
A
aborting sample runs 74AC power cord 24accession number
patient 70, 75problem entering 102
accessories, instrument 132air bubbles, clearing 19, 34, 38, 94assistance, technical x
B
barcode reader 16, 132troubleshooting 102
BD Biosciences website 125blood specimens
criteria for 52preparing 52stability 130
bottles, dispensing 14
C
caps, reagent 21CD4 specifications 133
cleaningagents 14coring station 89daily 80instrument 80long 84pipette 89sample injection probe 90tubes 14workstation 89
codes, error 108connectors, fluidics tubing 33controls
aborting run 65entering information for 60lot code 61preparing 52–58results 66results printout 65running 62specifications 134
conventions, user’s guide ixkeypad xsymbols ixtext x
cordconnecting 24
coring station 13, 132cleaning 89troubleshooting 103
141
D
daily cleaning 80date, changing 40deionized water 16Delete key 19disks, protocol software
inserting 27removal warning 29
disks, software 20dispensing bottles 14displayed messages 122distilled water 16Drain key 19dry filter 36
E
electronic pipette 13, 22, 132charging 25–27cleaning 89ensuring accuracy 48–49ensuring precision 46installing charger stand 25ordering spare tips 128procedure 45reverse mode 44troubleshooting 103using another brand 45
Enter key 19errors
codes, printed 108messages, displayed 122
event rate, low 104
F
FACSCount reagent caps 21FACSFlow solution 128filter, changing sheath fluid 92filter, running dry 36fixative solution 21
floppy drive 19release button 19
fluidicscompartment door 18keys 19preparing 33saline solution 16
function keys 19fuse, changing 96
H
hardware, installing 24hazard symbols, meaning ixHIV, receptor for 133
I
installinghardware 24pipette charger 25software 27–29
instrumentaccessories 132cleaning schedule 80components 18daily cleaning 80dimensions 131idle 84intended use 13operating environment 131ports, location 131shutdown 82starting up 32support xtroubleshooting 104when not in use 32
instrument, overview 12intended use, reagents 13
142 BD FACSCount System User’s Guide for Use with BD FACSCount CD4 Reagents
K
keypad, numeric 18troubleshooting 105
keysDrain 19fluidics 19function 19Run 19Stop 19
L
laboratory information, entering 38long cleaning 84lot code
controls 61reagent 61
M
maintenance, instrument 92materials, required 13mean, calculating
pipette accuracy 49pipette precision 48
N
numeric keypad 18troubleshooting 105
O
optics door 17ordering system parts 126
recommended brands 128
P
paper, printing 14, 94part numbers, system 126
patientaccession number 70, 75information, entering 70samples, preparing 52
performance, system 130ports, instrument 131power cord 24priming the system 36printer 17
changing paper 94control results 65error codes printed 108printout warnings 66results printout 75troubleshooting 106turning off while printing 64
probe, cleaning sample injection 90purified water 16
R
reagent caps, FACSCount 21reagents 133
CD4 20clone id 133entering information 70lot code 61mixing different lots 53, 60specifications 133
reagents, intended use 13replacement parts, ordering 127reports, selecting 41required materials 13results
control 66patient 75printout 75suppressed numeric 68, 75
Results file 20, 76reverse pipetting 44
procedure for 44Run key 19running samples 71
Index 143
S
safetyreagents and controls 133
saline solution 16sample injection probe 18
cleaning 90samples
aborting run 74preparing patient 52running 71stability 130throughput 130tube requirement 52
sheathfilter, changing 92
shutdown procedure 82shutdown, instrument 82sodium hypochlorite 16software
installing 27–29screens, defined 20
spare waste tank 14stability, sample 130standard deviation, calculating for
pipette 48Stop key 19support, instrument xsuppressed numeric results 68, 75, 76symbols, hazard ixsystem
fluid 16parts, recommended brands 128performance 130priming 36
system overview 12
T
technical assistance xtest tubes, for cleaning 14time, changing 40tube caps 21
V
vortexrecommended brands 128speed 53
W
waste tank 14emptying 35parts 33
waterdeionized 16substitutions 16
website, BD Biosciences 125workstation 132
cleaning 89components 21dimensions 132
144 BD FACSCount System User’s Guide for Use with BD FACSCount CD4 Reagents


![l>lf·· E ·B; -I,:,C-·-1·1V · cat. no.i bd lj.657 bd lj.6]5 bd 4630 bd 4·627 bd 4628 bd 4886 bd 4546 bd 4·545 bd 4544 bd 4542 bd lj,588 bd lj.593 bd 0102 bd 4636 bd 4632 bd](https://img.dokumen.tips/doc/110x75/5f7c69bb7d840d18665ab1e6/llf-e-b-ic-11v-cat-noi-bd-lj657-bd-lj65-bd-4630-bd-4627-bd-4628-bd.jpg)


![um nibdoo/- QUfflMîânnt] bd 19.0 bb untJ bd ñuentju bd](https://img.dokumen.tips/doc/110x75/619acb7ab9511f55be7713e7/um-nibdoo-qufflmnnt-bd-190-bb-untj-bd-uentju-bd-.jpg)