Embed Size (px)
Citation preview

Banner General Navigation
Documentation
Internet Native Banner 7.x (INB)

Confidential Business Information This documentation is proprietary information of Systems and Computer Technology (SCT) Corporation and is not to be copied, reproduced, lent, or disposed of, nor used for any purpose other than that for which it is specifically provided without the written permission of SCT. Prepared By: Systems & Computer Technology Corporation 4 Country View Road Malvern, PA 19355 Issued: May, 2003 Because of the nature of this material, numerous hardware and software products are mentioned by name. In most, if not all, cases these product names are claimed as trademarks by the companies that manufacture the products. It is not our intent to claim these names or trademarks as our own. BANNER, SCT, and the Banner and SCT logos are registered trademarks and BANNER2000, Banner CAPP, Banner Object:Access, BannerQuest, and the accompanying logos are trademarks of Systems & Computer Technology Corporation. ©1999 Systems & Computer Technology Corporation. All rights reserved.

Table of Contents
Ownership of Data .......................................................................................................................................1
Confidentiality of Data ................................................................................................................................1
Logging on to BANNER ..............................................................................................................................2
How BANNER Is Organized ......................................................................................................................4
Menus, Forms and Windows........................................................................................................4
BANNER Main Menu ..................................................................................................................................4
Keyboard Equivalents…………………………………………………………………………………… 7
BANNER Forms ...........................................................................................................................................9
Types of BANNER Forms .........................................................................................................................11
Parts of a Form............................................................................................................................................12
Menu Bar .......................................................................................................................................12
File Menu.......................................................................................................................................13
Edit Menu......................................................................................................................................15
Block Menu....................................................................................................................................15
Item Menu .....................................................................................................................................15
Record Menu.................................................................................................................................16
Query Menu..................................................................................................................................17
Tools Menu....................................................................................................................................17
Window Menu..............................................................................................................................17
Help Menu ....................................................................................................................................18
The Toolbar ...................................................................................................................................19
Accessing the Bookshelf ..............................................................................................................21
Adding an Index to the Bookshelf............................................................................................................21
The Title Bar ................................................................................................................................................22
Options ..........................................................................................................................................22
Right Click Shortcut Menu..........................................................................................................22
Blocks .............................................................................................................................................23
Key Block.......................................................................................................................................24
Fields (Items).................................................................................................................................24
Scroll Bar........................................................................................................................................24
Auto Hint.......................................................................................................................................25

Status Line ...................................................................................................................................................26
Buttons .........................................................................................................................................................26
Records, Rows, and Columns ...................................................................................................................27
Pull-Down List ............................................................................................................................................27
Check Boxes.................................................................................................................................................28
Radio Group................................................................................................................................................29
Dialog Box ...................................................................................................................................................30
Customizing BANNER ..................................................................................................30 Customizing Form Display Options........................................................................................31
Creating My Links......................................................................................................................32
Creating My BANNER Menu ...................................................................................................32
Adding Objects to My BANNER Menu ..................................................................................35
Querying or Searching ...................................................................................................36 ID/Name Search Feature ............................................................................................................36
Searching using the ID and Name Extended Search Window...............................................37
Produce Specific Search Forms...................................................................................................42
Querying for People.....................................................................................................................44
Querying a List of Values (LOV)................................................................................................45
Extracting BANNER Data to a Spreadsheet……………………………………….. 48 Extract Data with a Key………………………………………………………………………. .48
Extract Data No Key…..………………………………………………………………………. .48
BANNER Messaging ……………………………………….. 49 Optimizing Screen Resolution ……………………………………….. 50
BANNER General Navigation
BANNER is an integrated information system used by the Offices of Admissions, Finance, Financial Aid, Housing and Residential Life, Personnel Services, Registrar’s Office, and the Office of University Relations.
Ownership of Data
Although the data is contained in the database, various offices own data in BANNER. The owner of the data is responsible for its accuracy and authorizes who may access data. Schedule J in the Data Entry Standards lists the owners of data. A copy of the Data Entry Standards can be obtained at http://www.departments.bucknell.edu/Banner. Click on Documentation, and then click Data Entry Standards.
Confidentiality of Data
Your username and BANNER password determine what forms and data you may access. The owners of the data decide access to data on a “business need-to-know” basis. “Business need-to-know” means that you must need the information in order to perform your job responsibilities at Bucknell. The information in BANNER must be treated as confidential and should be accessed and used only in the scope of your job. Your BANNER password is for your use only and should not be shared with any students, staff, or persons outside of the university. In addition, all employees at Bucknell must comply with the regulations set forth in the Family Educational Right to Privacy Act 1974 (FERPA). A copy of these regulations can be obtained from the Office of the Registrar. You can protect the confidentiality and accuracy of data by: • Not sharing your BANNER password with any other person. • Not saving your myBucknell password on your computer. • Not leaving your computer unattended for extended periods with a
BANNER session open if your computer is in an area that is easily accessible by other individuals.
• Not allowing student employees to use BANNER with your password.
• Logging off BANNER before leaving for the day.
- 1 -

Logging on to BANNER Logging on to BANNER is a two-step process. First, open your browser – Internet Explorer or Mozilla for a pc and a MAC. Next go to www.departments.bucknell.edu\banner and click on the link to INB Database Picker. Select the URL for the database you wish to access. Once the Java Applets have been loaded, you will be prompted to enter your username and BANNER password. You may need to install the Active X plug in JInitiator.
- 2 -

The following chart describes each database:
Training Database (OTRNG)
This database contains fake data. Access to this database is for SCT supplied training and has been disabled.
Production Database (PROD)
This is the working database that contains real Bucknell data. This is the database you choose when you want to work in BANNER.
Student Pre-Production Database (PPRD)
This database is a copy of the Production database used for testing.
Finance Pre-Production Database (FPRD)
This database is a copy of the Production database used for testing.
FinAid Pre-Production Database (RPRD)
This database is a copy of the Production database used for testing.
Advancement Pre-Production Database (APRD)
This database is a copy of the Production database used for testing.
If you want to practice using BANNER, use one of the Pre-Production databases. Use the Production Database only when you actually want to work in BANNER. 1. After you select the database, The Oracle Developer screen will appear and
you will see a logon screen: • Click in the username block to activate the window.
Type your username in the Username field and your BANNER password in the Password field. Leave the database field blank. Press <Enter>. Then the Banner main menu will appear.
- 3 -

How BANNER is Organized
Menus, Forms and Windows
Menus are used to categorize and to navigate to forms. A form is an on-line document where you can enter and look up information. A BANNER form is similar to a paper form, except information is entered once and then used by other forms, reports, and jobs. A window is a framed portion of a form. Just as a paper form can have many pages, some BANNER forms have multiple windows. The first window in a form is called the main window and is identified by the form name. All other windows in the form have their own unique names. Multiple windows can be open at one time. Not all windows are the same size, so you may see parts of more than one window if multiple windows are open at the same time. Most windows are resizable and movable. To size the window, click the maximize and minimize buttons at the top of the window or click in a corner of the image and drag it to the desired size. If a window has a title bar (a bar across the top of the root window beneath the BANNER menu bar that contains the form name), you can click on it and drag the window to another location on your screen. You cannot resize or move windows with the keyboard. To close a window, click the Exit icon. You cannot close a window by clicking the X button in the upper right corner of a window.
BANNER Main Menu
The Main Menu has three ways that you can use to access BANNER forms: 1. Use Direct Access (GO TO) to access a specific form. —— At anytime you
can call this box by pressing F5 on your keyboard. By using your up and down arrows on your keyboard you can select a previously accessed form.
2. Use the tree menu structure to navigate through Banner. Select the plus sign (+) to the left of a menu to expand the menu so you can see the objects it contains. Select the minus sign (-) to collapse it.
3. Use the Product Links Bar to navigate through Banner.
The main menu is the starting point for navigating through Banner. You can use either the Product link Bar or tree menu structure to access a form, job, menu, or QuickFlow. Or you can use Direct Access to go to a specific form if you know the form’s name.
A picture of the BANNER Main Menu is on page 5.
- 4 -

Exit Button
Icon Bar
Direct Access
Tree Menu
Personal Menu
Menu Category Bar
From the main menu select a category / form and a toolbar will be available just below the menu bar at the top. The toolbar contains clickable icons that provide access to common functions. If you pause your mouse over each icon, bubble help information is displayed. For more details on specific icons, please see Toolbar on page 22. Below the toolbar the menu is in a tree structure. Each Product has it’s own branch and can be expanded by clicking on the plus sign (+) to show the forms included in that branch. The Product can also be collapsed by clicking the minus sign (-). The chart on the following page explains the types of information found in each Product Menu.
- 5 -

General
(1st letter in the form is a G)
Used across all other systems to generate reports and letters.
Student
(1st letter of form is a S)
Demographics, grades and degree progress information, housing/meal information for prospective students, current students, and past students
Finance
(1st letter of form is an F)
Financial information such departmental/program budgets, Fixed Assets, Accounts Receivable, Accounts Payable, General Accounting, Grants, Payroll, Purchasing, student and employee account.
Financial Aid
(1st letter of form is an R)
Financial aid information about prospective students and current students.
Human Resources
(1st letter in the form is a P)
Demographic, salary and benefit information for prospective, current, and past employees.
Alumni/Advancement
(1st letter in the form is an A)
Demographic, salary, and gift history information about prospective donors, parents, and recent graduates.
My Banner Personalized settings allow you to display only the menus and forms that you use.
When you click one of the products, more menus will drop below each product line.
- 6 -

The subsequent menus are expandable. Click on them to expand the menu and display the submenu names of modules and forms. When you’ve reached a form, click to access it. If you are unauthorized to access a form, an “error” dialogue box will appear. Just above the Product Links Bar is the Direct Access box. Instead of navigating through the menus to access a specific form, you can simply type in the seven-character form name in the Direct Access box (GO TO) and press <Enter> to access the form. You can use Direct Access on any menu or form whether or not the Direct Access field appears. Simply selectF5 from your keyboard, type in the form name in the box, and press <Enter>. There is also a shortcut linked to this field. You can scroll through the forms you have recently accessed during your Banner session by pressing the up and down arrows on your keyboard.
Using the Mouse and Keyboard You can perform most Banner functions with either the mouse or the keyboard. For example, you can save information by clicking the save button on the toolbar , selecting the item from the pull-down menu File>Save, or pressing the equivalent keystrokes (to view a list of keystokes press Ctrl F1).
Mouse instructions Keyboard Instructions
Keyboard Equivalents Specific keystrokes for a function depend on where you are in Banner. For example, Enter Query might be F7 for one operating system and F11 in another. Because keystrokes vary from one operating system to another you need to refer to the chart on the next page.
- 7 -

Bucknell University
BANNER Keystroke Sequences
ORACLE Command Function Key(s) ORACLE Command Function Key(s)
Accept/Commit/Save F10 Insert Record F6
Go To window F5 Keys <Ctrl><F1>
Cancel <Escape> Left <Left Arrow>
Clear Block <Shift>F5 List Field Values F9
Clear Field <Ctrl> <U> List Values (Drop Down) <Down Arrow>
Clear Form/Rollback <Shift> F7 Menu <Ctrl> <.>
Clear Record <Shift> F4 Next Block <Ctrl><Page Down>
Copy <Ctrl> <C> Next Field <Tab>
Count Query Hits <Shift> <F2> Next Record <Page Down>
Cut <Ctrl> <X> Paste <Ctrl><V>
Delete Record <Shift><F6> Previous Block <Ctrl>
Display Error <Shift><F1> Previous Field <Shift><Tab>
Down <Down Arrow> Previous Record <Page Up>
Duplicate Field F3 Print <Shift><F8>
Duplicate Item F3 Refresh <Ctrl>
Duplicate Record F4 Right <Right Arrow>
Dynamic Help <Shift><Double Click> Rollback <Shift><F7>
Edit <Ctrl><E> Save F10
Enter Query F7 Scroll Right <Ctrl><Down Arrow>
Execute Query F8 Scroll Up <Ctrl><Up Arrow>
Exit <Ctrl><Q> Search F8
Help F1 Select <Shift><F3>
- 8 -
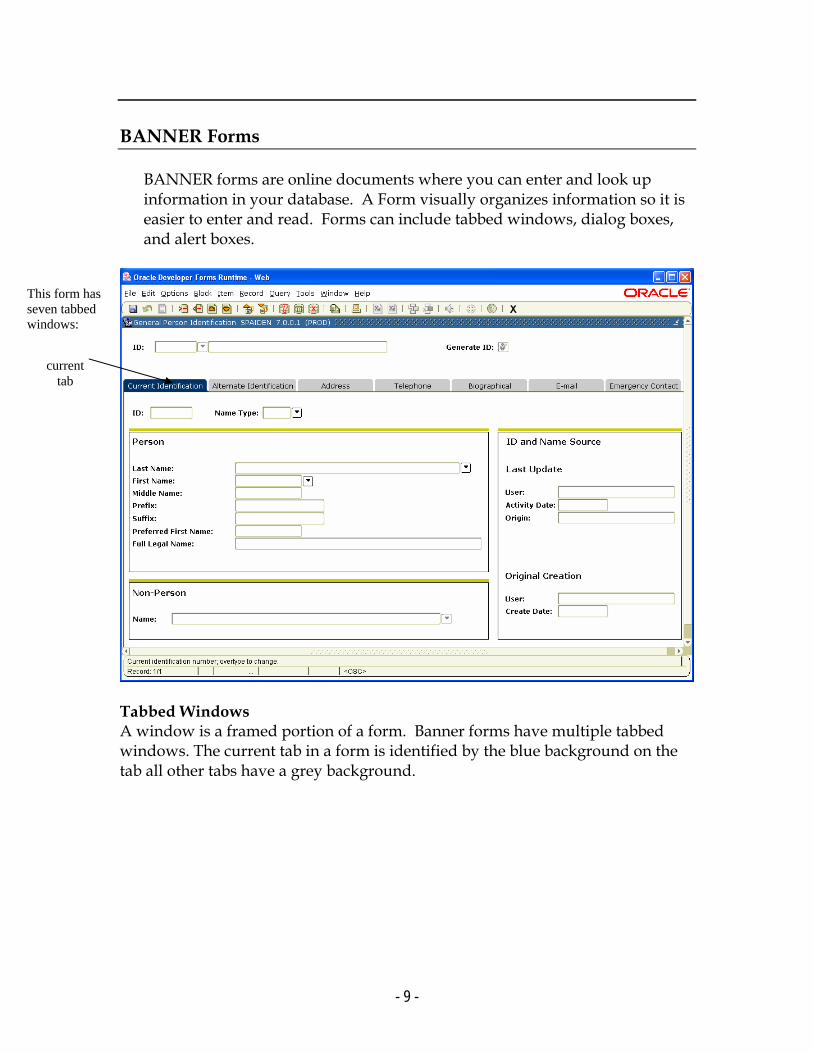
BANNER Forms
BANNER forms are online documents where you can enter and look up information in your database. A Form visually organizes information so it is easier to enter and read. Forms can include tabbed windows, dialog boxes, and alert boxes.
This form has seven tabbed windows:
current tab
Tabbed Windows A window is a framed portion of a form. Banner forms have multiple tabbed windows. The current tab in a form is identified by the blue background on the tab all other tabs have a grey background.
- 9 -

Windowpanes
Windowpanes are areas within a window that have more fields than can appear at one time. A horizontal scroll bar always appears directly underneath a windowpane and a solid line borders the pane.
Vertical Scroll Bar
Horizontal Scroll Bar To scroll through the fields in a window pane:
• Click and drag the scroll box right or left
OR
• Select the Next Item function (to move right) or the Previous Item function (to move to the left)
• Click the arrow at either end of the scroll bar
Note: The cursor skips display-only fields, moving only to enterable fields.
- 10 -

Types of BANNER Forms
From the menus, you can navigate to BANNER forms, where you interactively enter and look up information in BANNER. A BANNER form is similar to a paper form except that the information entered in a BANNER form is entered once and can then be used by other forms, reports and processes. BANNER has several types of forms.
Main Menu Use this form to navigate through Banner. It provides an overview of the menus, forms, jobs, and QuickFlows in the system.
Application Forms Use these forms to enter, update, and query information.
Validation Forms Use these forms to define the values that can be entered in specific fields on application forms.
Rule and Control Forms Use these forms to define the calculations and parameters that impact processing on other forms, reports and jobs.
Query and Inquiry Forms
Use these forms to look up existing information.
Most of the forms that you’ll see are application, query and inquiry forms. Validation, rule, and control forms were tailored to Bucknell’s procedural requirements when BANNER was implemented. You are also likely to see the values defined on validation forms quite frequently. These values are displayed in the List of Values (LOV) window. In many fields, you can only enter values that BANNER recognizes. When the cursor is in this type of field, <List of Values> appears in the status line.
Whatever value you enter must already exist in the List of Values. The values in a List of Values come from a validation form. If you try to enter a value that doesn’t exist on the validation form, you’ll see an Auto Hint message <Press List for Valid Codes>. For more information on List of Values, see page 52.
- 11 -

Parts of a Form
Each BANNER form has the following parts: • Menu bar • Horizontal tool bar • Title Bar • Key Block and other blocks • Auto Hint and Status line
The SPAIDEN form illustrates these form elements.
Menu Bar
Title Bar Toolbar
Key Block
Field
Auto Hint
Menu Bar
The BANNER menu bar is located at the top of every form and has several pull-down menus.
- 12 -

File Menu
This menu contains standard BANNER/Oracle functions. Some of the menu items call another form, job or QuickFlow. When you exit a called object, you return to the place where you used the File menu to call the new object. The menu has a divider line. Below the line is a list of the last forms accessed in this session. You can select any form in this list and re-access it. The following chart describes each item in the File Menu.
Direct Access Displays the Direct Access Form (GUAPARM), which is used to access a form by its seven-character name.
Object Search Displays the Object Search Form (GUIOBJS), which is used to search for a menu, form, job or QuickFlow with part of the name, description or type..
QuickFlow Displays the QuickFlow Form (GUAQFLW), which is used to access a QuickFlow (a series of forms linked in a chain).
Select Returns to the calling form with selected value.
Rollback Clears the form and returns cursor to first enterable field on form.
Save Saves all changes entered since the last time saved.
Refresh Clears the message line.
Print Prints the current screen with the date and time in the title bar.
Exit From a form or window, exits from the form or window. From query mode, cancels the query and take the form out of query
mode.
Exit QuickFlow Exits from a QuickFlow.
Exit SCT Banner From the main menu, exits from BANNER.
Preferences Displays the Personal Preferences Maintenance Form (GUAUPRF), which is used to customize BANNER for individuals.
List of recently accessed form
Lets you quickly re-access forms that were previously accessed in this session. Up to ten forms can be displayed.
- 13 -

To access an option in the menu bar:
Note: If a pull-down menu item is dimmed, that menu item is currently disabled and cannot be accessed.
1. Click the desired pull-down menu name. Menu items appear.
1. Press the Alt key. The cursor moves to the menu bar.
2. Click the desired menu item. 2. Use the right and left arrow keys to
highlight the desired pull-down menu name. Then press Enter.
OR
Press the underlined letter for the desired pull-down menu name.
3. Use the up and down arrow keys to highlight the desired menu item. Then press Enter.
OR
Press the underlined letter for the desired menu item. If more than one menu begins with the same letter, press the underlined letter multiple times to select the desired item, and then press Enter.
Note: If you are using Banner on the Web and multiple menu items begin with the same letter, you can access the first menu item with the keyboard. You must use the mouse to access other menu items that begin with that letter.
- 14 -

Edit Menu
The Edit Menu contains the functions used to edit text items. The following chart describes each item in the Edit Menu.
Cut Cuts selected text and places it on the clipboard.
Copy Copies selected text to the clipboard.
Paste Pastes text from the clipboard to the spot where cursor is located.
Edit Displays the Editor window, which is used to enter or to update text.
Block Menu
This menu contains the functions that let you navigate among blocks of information in a form. The following chart describes each item in the Block Menu.
Next Moves cursor to the next block that has at least one enterable field. If the next area is in another window, that window is opened.
Previous Moves cursor to the previous block that has at least one enterable field.
Clear Clears all information from the block.
Item Menu
This menu contains the functions that let you navigate among the fields in a form. The following chart describes each item in the Field Menu.
Previous Moves cursor to the previous enterable field in the current block.
Next Moves cursor to the next enterable field in the current block or the first enterable field in the next block.
Clear Clears all information from the field.
Duplicate In a blank row of a repeating record, duplicates the contents of the same field in the previous record and copies it into the new record.
- 15 -

Record Menu
This menu contains the functions that let you work with records in a form. The following chart describes each item in the Record Menu.
Previous Moves cursor to the first enterable field in the previous record and triggers previous record logic coded into the form.
Next Moves cursor to the first enterable field in the next record of the current block and triggers next record logic coded into the form. If the cursor is in the last record, a new record is created.
Scroll Up Scrolls up the list of records, putting the first displayed record near the bottom of the list.
Scroll Down Scrolls down the list of repeating records, putting the last-displayed record near the top of the list.
Clear Clears all fields in the current record.
Remove Removes all information from the record. When you Save, the removed information is deleted.
Insert Inserts a new, blank record into the list of existing records.
Duplicate Duplicates the contents of all the fields in the record and copies them into the new record.
Lock Temporarily locks the contents of the record so that no other user can update it. Save, Rollback, and Exit release the lock.
- 16 -
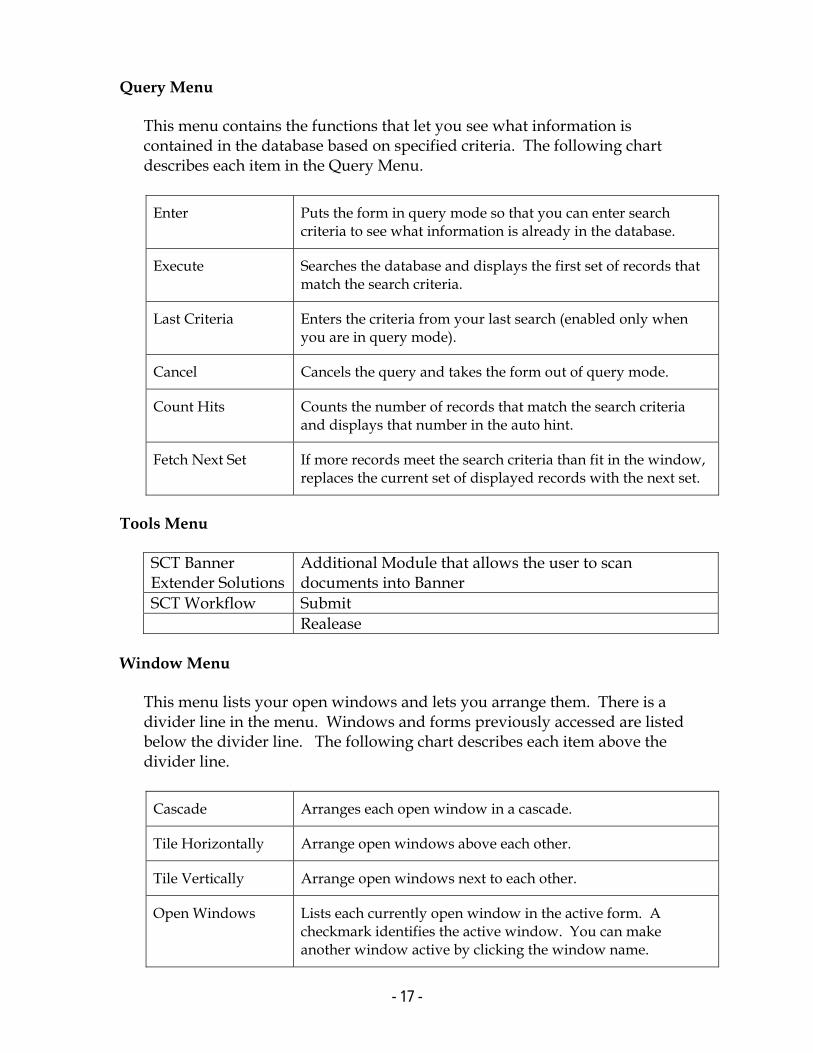
Query Menu
This menu contains the functions that let you see what information is contained in the database based on specified criteria. The following chart describes each item in the Query Menu.
Enter Puts the form in query mode so that you can enter search criteria to see what information is already in the database.
Execute Searches the database and displays the first set of records that match the search criteria.
Last Criteria Enters the criteria from your last search (enabled only when you are in query mode).
Cancel Cancels the query and takes the form out of query mode.
Count Hits Counts the number of records that match the search criteria and displays that number in the auto hint.
Fetch Next Set If more records meet the search criteria than fit in the window, replaces the current set of displayed records with the next set.
Tools Menu
SCT Banner Extender Solutions
Additional Module that allows the user to scan documents into Banner
SCT Workflow Submit Realease
Window Menu
This menu lists your open windows and lets you arrange them. There is a divider line in the menu. Windows and forms previously accessed are listed below the divider line. The following chart describes each item above the divider line.
Cascade Arranges each open window in a cascade.
Tile Horizontally Arrange open windows above each other.
Tile Vertically Arrange open windows next to each other.
Open Windows Lists each currently open window in the active form. A checkmark identifies the active window. You can make another window active by clicking the window name.
- 17 -
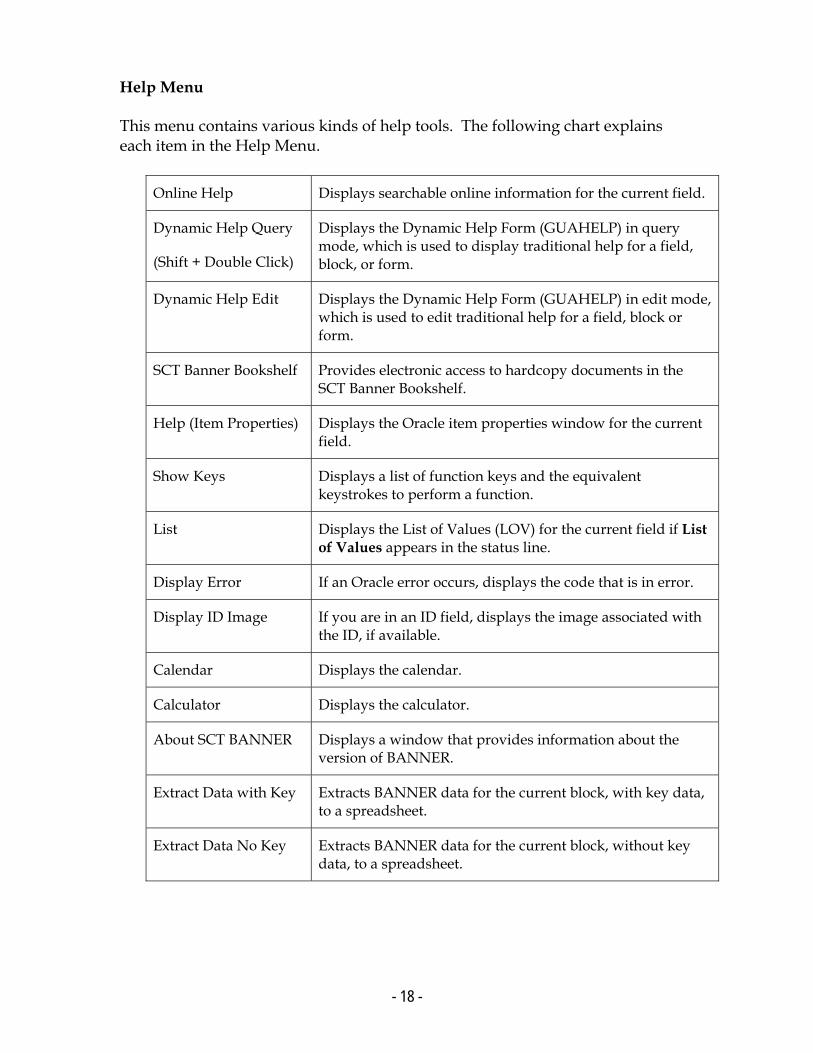
Help Menu This menu contains various kinds of help tools. The following chart explains each item in the Help Menu.
Online Help Displays searchable online information for the current field.
Dynamic Help Query
(Shift + Double Click)
Displays the Dynamic Help Form (GUAHELP) in query mode, which is used to display traditional help for a field, block, or form.
Dynamic Help Edit Displays the Dynamic Help Form (GUAHELP) in edit mode, which is used to edit traditional help for a field, block or form.
SCT Banner Bookshelf Provides electronic access to hardcopy documents in the SCT Banner Bookshelf.
Help (Item Properties) Displays the Oracle item properties window for the current field.
Show Keys Displays a list of function keys and the equivalent keystrokes to perform a function.
List Displays the List of Values (LOV) for the current field if List of Values appears in the status line.
Display Error If an Oracle error occurs, displays the code that is in error.
Display ID Image If you are in an ID field, displays the image associated with the ID, if available.
Calendar Displays the calendar.
Calculator Displays the calculator.
About SCT BANNER Displays a window that provides information about the version of BANNER.
Extract Data with Key Extracts BANNER data for the current block, with key data, to a spreadsheet.
Extract Data No Key Extracts BANNER data for the current block, without key data, to a spreadsheet.
- 18 -

The Toolbar
The tool bar has clickable icons that provide another way to perform common functions. If you pause your mouse over an icon, the name of function will appear. The tool bar has some standard Oracle functions, an icon to launch a graphing wizard, and an icon to access online help.
To access a tool bar function, click the appropriate icon. You can click an icon at any time, except when you are in a Dialog Box, Alert Box, or List of Values search box. You must respond to these windows before you can click an icon. A dimmed icon is disabled and cannot be selected. The following table describes the standard icons:
Save Saves all changes entered since the last time you saved.
Rollback Application and query forms: Clears all information (except key information) and returns you to the first enterable field in the key block or the first enterable field on the calling form.
Validation forms: Returns you to the first enterable field on the form.
Select Returns you to the calling form and enters the selected value into the field that called the form.
Insert Record Inserts a new blank record into the list of existing records.
Remove Record Removes all information for a record. When you Save, the removed information is deleted.
Enter Query Puts the form into query mode and lets you enter search criteria to see what information is already in the database. ENTER QUERY appears in the status line.
Execute Query Searches the database and displays any records that match the search criteria (must be in query mode).
Cancel Query Takes a form out of query mode and cancels query.
- 19 -

Previous Record Moves the cursor to the first enterable field of the previous record and triggers any previous record logic coded into the form.
Next Record Moves the cursor to the first enterable field in the next record of the current information area and triggers any next record logic coded into the form. If the cursor is in the last record, a new record is created. If no more lines are available for input, the message "Error: Cannot create new records" appears.
Previous Block Moves the cursor to the previous block that has at least one enterable field and triggers any next block logic coded into the form. In the next area is in another window, that windows is opened.
Next Block Moves the cursor to the next block that has at least one enterable field and triggers any next block logic coded into the form. In the next area is in another window, that window is opened.
View/Send Message Messaging is not used extensively at Bucknell.
Print Prints the active window.
Xtender Solutions
Accesses Document Imaging (Not in use at this time)
Workflow Submit and Release buttons for a workflow. (Not in use at this time)
Broadcast Messaging Active if you are given access to send broadcast messages. (Not in use at this time)
Fine Grained Access Active if using this type of access. (Not in use at this time)
Online-Help Displays new online information for the current field.
Exit Forms and Windows: Exits you from the form or window. Main Menu: Exits you from BANNER. Query Mode: Cancels the query and takes the form out of
query mode.
- 20 -

Using the Bookshelf: • You will need to create a link in your personal links to the Bookshelf. See
My personal links on page ?? • Click on the Bookshelf link on the main menu screen. Adobe Acrobat will
open. A window with two panes will appear. The right pane provides instructions on how to use the Bookshelf, and the left pane is used to navigate through the Bookshelf.
• In the left pane, click the bookmark (triangle) in front of the product you want to access. The bookmark expands to show the product’s documents.
• If the document has chapters, click the bookmark. The bookmark expands to show the document’s chapters.
• Click on the name of the document or chapter you want to display. The selected document or chapter appears in the right pane.
Adding an Index to the Bookshelf
You will want to add indexes to be able to search the documentation for specific information.
1. Click on the Bookshelf button on the toolbar. 2. Click on Search Indexes in the left hand pane in the Bookmark section. 3. A window titled “Index Selection “ will open and show the current .pdx files
that have been selected. Click the ADD button. 4. Navigate to the indexes, which are stored in
R:\banner\public\Document\bdoc5x\_index5x from the Look in box. 5. Find the .pdx file that you want to add to your index and select them form
the list. Click the OPEN button. 6. You will have to repeat this process for however many index files you want
to add. 7. When you have added all the indexes you want to be able to search, Click the
OK button and you will be returned to the Bookshelf 8. Now you will be able to search through the documentation for your module.
- 21 -

The Title Bar
The title bar appears at the top of a form.
It shows five things: • The descriptive form name. • The seven-character form name. • The form’s version number. • The database name. • Today’s date
Options
Each form may have navigational options. The options depend on the current location of the cursor. Some options take you to other blocks and windows within the current form. Other options take you outside the current from to other related forms. To access the Options for a particular block or form you to Options on the Menu Bar (Alt+O) and choose the option you want to go to (Type the underlined letter on your keyboard).
Right Click Shortcut Menu
On any form you may access the shortcut menu by right clicking anywhere on the form where there is not a field. The first five options will always be on the menu. All other shortcuts listed are contingent on the form you are accessing.
- 22 -

Blocks
A block is an area on a form that contains related information. When there is more than one block in a window, each block (except the key block) may be enclosed in a grey box with a highlighted line. Most blocks have a title, with three exceptions: 1) if it is the key block; 2) if it is the only block in the form/window; and 3) if the form has a key block and only one other block.
Key Block
Fields
- 23 -
Key Block
The key block is the first block on most forms. The information in the key block determines what information you enter or see displayed on the form. The key block determines what is entered or displayed in the rest of the form. All information on the form refers to the key block. When the cursor is in the key block, enterable fields in the key block are enabled. When you leave the key block, enterable fields in the key block are disabled.
Fields (Items)
Fields or items are the areas in a window where you can enter, query, or change information and where existing information is displayed. The following terms describe a field:
Enabled Field Disabled Field
You can put the cursor in the field or <Tab> to the field. Information in an enabled field is displayed in black text.
You cannot put the cursor in the field or <Tab> to the field. Information, if it exists, is displayed in gray text.
Enterable Field Display-Only Field
You can enter information in the field. Enterable fields are usually enabled.
You cannot enter information in the field. Display-only fields are always disabled.
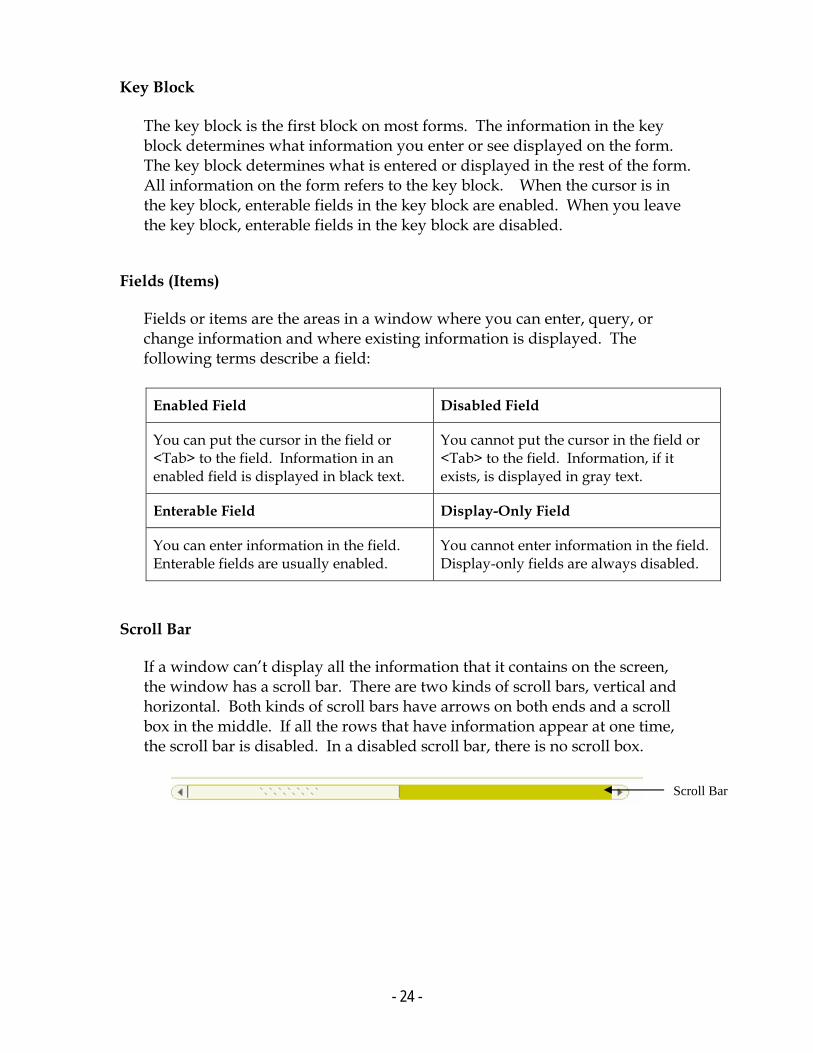
Scroll Bar
If a window can’t display all the information that it contains on the screen, the window has a scroll bar. There are two kinds of scroll bars, vertical and horizontal. Both kinds of scroll bars have arrows on both ends and a scroll box in the middle. If all the rows that have information appear at one time, the scroll bar is disabled. In a disabled scroll bar, there is no scroll box.
Scroll Bar
- 24 -

Auto Hint
Auto Hint
The auto hint at the bottom of the form can contain the following information for the field where the cursor is located:
Status Line
• Brief field description; • Error and processing messages; • Keyboard equivalents, if you can access other blocks, windows, or forms
from the field.
- 25 -
Status Line
The status line directly under the auto hint can contain one or more of the following messages:
Record n/n Shows the number of the current record followed by the total number of records in the current block. If there are more records than fit in the window, the total appears as a question mark (3/?) until you scroll to the last record in the block. Once the last record is displayed, the total appears as a number (3/15).
List of Values Indicates the field has a List of Values.
Enter Query Indicates the form is in query mode.
Buttons
Buttons are visual images used to perform an action or respond to the system. There are two kinds of buttons, response and iconic.
Response buttons are shaded rectangles that appear in alert boxes and dialog boxes. An alert box has one response button. A dialog box has two or more response buttons. You must use the buttons to respond to the system before you can continue. Iconic Buttons are small squares on a form that contain an icon or picture. They represent on or more actions that can be performed for the associated field or record. To select an iconic button, click it. If an Option List appears, click the desired option. Otherwise, the form or windows opens automatically.
Banner Forms use the following iconic buttons.
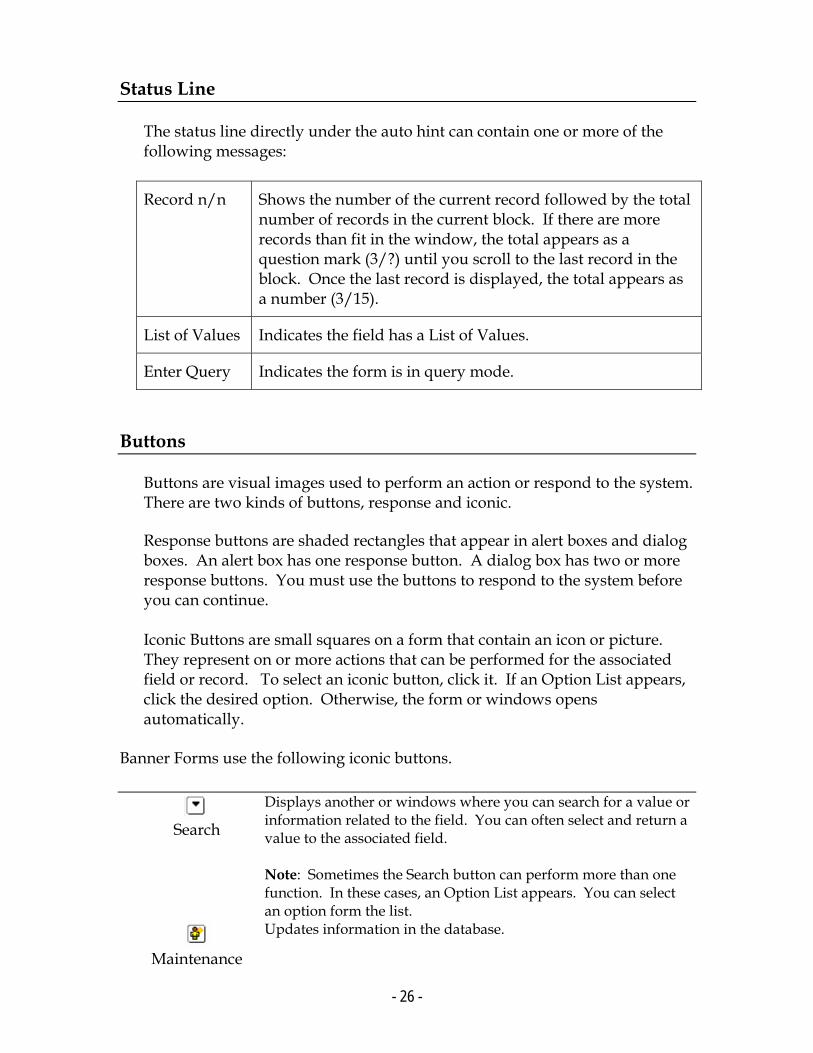
Search
Displays another or windows where you can search for a value or information related to the field. You can often select and return a value to the associated field. Note: Sometimes the Search button can perform more than one function. In these cases, an Option List appears. You can select an option form the list.
Maintenance
Updates information in the database.
- 26 -

Records, Rows and Columns
Records are a set of related fields. For example, a street, city, state and ZIP code form an address record. If a block has multiple records, the records often appear in rows and columns. A horizontal scroll bar appears under the columns if all columns don’t fit into the window at once. A vertical scroll bar appears on the right side of the rows if all rows don’t fit into the window at once. When you select a row, the entire record is highlighted to identify it as the current record.
Pull-Down Lists
Pull-down lists are used to select a field value from a list of pre-defined values. A down arrow in the right side of the field indicates the field has a pull-down list.
To select a value from the pull-down lists: Click the field. The entire pull-down list appears with the currently selected item highlighted.
1. Select the Next Item function to move to the pull-down list.
1. Click the desired item. The selected value appears in the field.
Press the down arrow key. The entire pull-down list appears with the currently selected item highlighted.
3. Press the up and down arrow keys to move to the desired item.
OR Type a character to highlight the next
item that begins with that character. For example, to choose Inactive, type I. If more than one item starts with I, then the first item that starts with I is selected. Continue to press I until the correct choice appears.
4. Press Enter. The selected value
appears in the field.
- 27 -
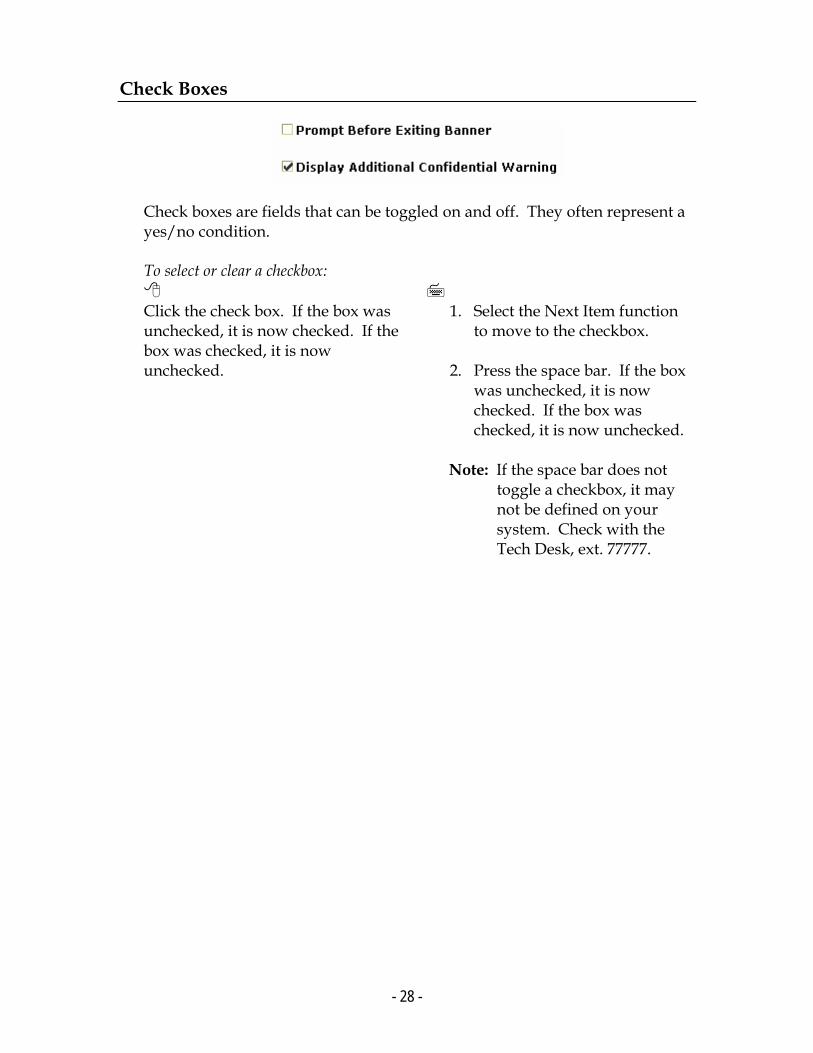
Check Boxes
Check boxes are fields that can be toggled on and off. They often represent a yes/no condition. To select or clear a checkbox:
Click the check box. If the box was unchecked, it is now checked. If the box was checked, it is now unchecked.
1. Select the Next Item function to move to the checkbox.
2. Press the space bar. If the box
was unchecked, it is now checked. If the box was checked, it is now unchecked.
Note: If the space bar does not
toggle a checkbox, it may not be defined on your system. Check with the Tech Desk, ext. 77777.
- 28 -

Radio Group
Radio Group
A radio group is a group of two or more radio buttons, each representing a choice for the group. The choices in the group are mutually exclusive - you can only pick one button. To select a radio button:
Click the radio button. 1. Select the Next Item function to move to the radio group.
2. Press the left or right arrow
key to move to the desired radio button.
- 29 -

Dialog Box
A dialog box is a window that pops up when BANNER needs a response from you.
When you make a choice in the dialog box by clicking on a button or pressing a function key, you’ve acknowledged the box. It closes and disappears from your screen.
Click on the button you want to respond to.
Use your arrow keys to select the button you want to highlight and then press Enter.
Customizing BANNER
BANNER can be customized in several ways.
1. You can customize form display options to include or exclude certain information on title bars of forms, alerts and colors used.
2. You can create a My links personal link menu accessible from the main
menu.
3. You can create a Personal Menu My Banner) that displays only the menus and forms that you use
To set form display options and toolbar preferences, select File>Preferences from the menu to access the GUAUPRF form.
- 30 -
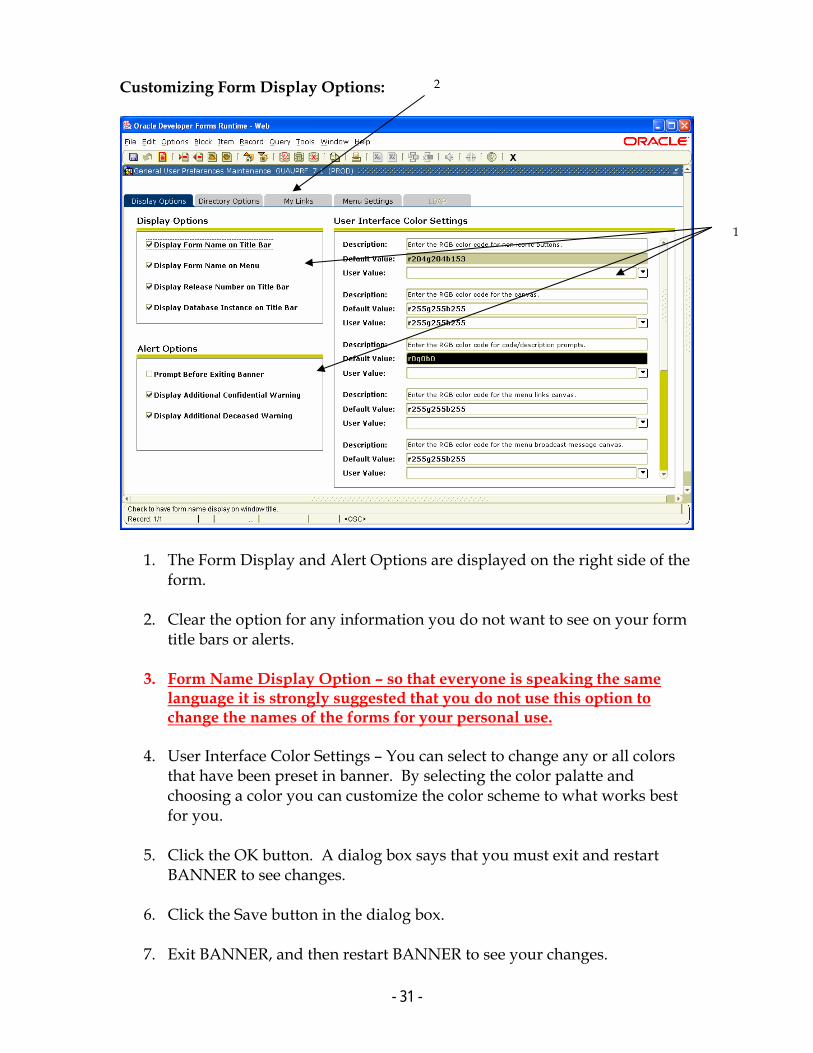
2 Customizing Form Display Options:
1
1. The Form Display and Alert Options are displayed on the right side of the form.
2. Clear the option for any information you do not want to see on your form
title bars or alerts.
3. Form Name Display Option – so that everyone is speaking the same language it is strongly suggested that you do not use this option to change the names of the forms for your personal use.
4. User Interface Color Settings – You can select to change any or all colors
that have been preset in banner. By selecting the color palatte and choosing a color you can customize the color scheme to what works best for you.
5. Click the OK button. A dialog box says that you must exit and restart
BANNER to see changes.
6. Click the Save button in the dialog box.
7. Exit BANNER, and then restart BANNER to see your changes.
- 31 -

Creating My Links:
1. Choose the My Links Tab from the user preferences form.
2. Type in the name you want to see on your list in the user value description field and the url for the link into the corresponding user value for that same personal link.
3. Click the Save button. A dialog box says that you must exit and restart
BANNER to see the changes.
4. Click the OK button in the dialog box.
5. Exit BANNER, and then restart BANNER to see your changes. Creating My Banner: A personal menu displays the forms, jobs, menus and QuickFlows that you use. Type GUAPMNU in the Direct Access box to access the Personal Menu Maintenance Form.
- 32 -

A picture of the GUAPMNU form is on the next page as well as the instructions on how to create a Personal Menu.
1
2
1. Use the pull-down list above the left pane to select the type of object you want to display. The left pane lists the objects of the selected type that can be added to the menu.
2. In the right pane, type in the name of the form or QuickFlow that you want to add to the menu.
3. Scroll through the list in the right pane and click to select menu name or a
QuickFlow name.
- 33 -
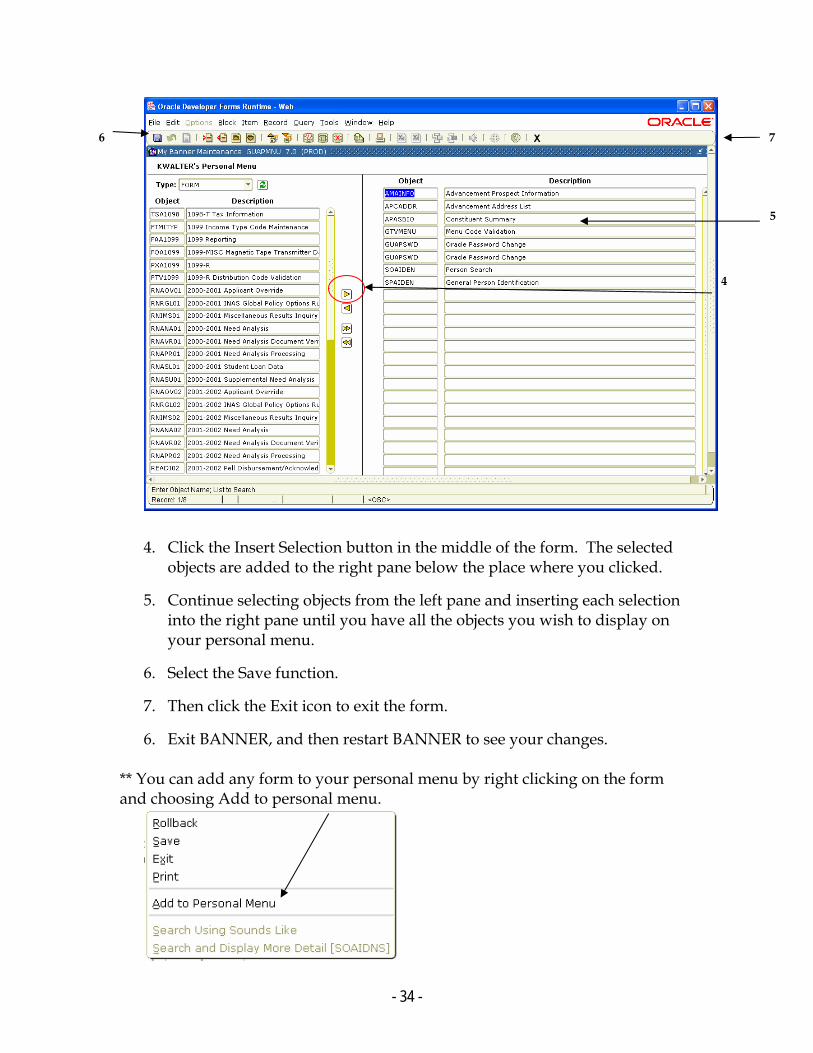
7 6
5
4
4. Click the Insert Selection button in the middle of the form. The selected objects are added to the right pane below the place where you clicked.
5. Continue selecting objects from the left pane and inserting each selection into the right pane until you have all the objects you wish to display on your personal menu.
6. Select the Save function.
7. Then click the Exit icon to exit the form.
6. Exit BANNER, and then restart BANNER to see your changes. ** You can add any form to your personal menu by right clicking on the form and choosing Add to personal menu.
- 34 -

To Query objects and add to My Banner: Use these steps to reduce the list of object names in the left pane. You can add any of the matches to My Banner.
1. Access the My Banner Maintenance Form (GUAPMNU) 2. Use the pull-down list above the left pane to select the object type you
want to query. The left pane lists the objects of the selected type.
3. Place the cursor in the left pane.
4. Select the Enter Query function. The object list disappears.
5. Enter the search criteria. You can use the Oracle wildcard % and _. Capitalization matters. Data is matched against the search criteria exactly as you enter them.
6. Select the execute Query function. The left pane lists the matching objects.
7. To add all matches to the menu (if there are 20 matches or less), click
the Insert All button in the middle of the form.
OR
8. Select the Save function.
- 35 -

Querying or Searching
Querying or searching is the process of looking to see what information is already entered into the BANNER database. Many fields in forms let you call another form, select information from the called form, and return the selected information to the current field. You can tell that a field has this feature if a Search icon appears next to the field
ID/Name Search Feature
This search feature is used directly on the current form. You can enter a complete ID, enter a complete name, search for an ID or search for a name. You can reduce your search based on criteria such as person/non-person, city, date of birth, and gender. You can also go to a product-specific search form. The ID/name search feature is NOT case-sensitive.
ID Field Name Field
- 36 -

To enter a complete ID:
1. Enter the full ID (for example, 2314780) in the ID field. 2. Press <Enter>. The ID and name will appear.
To enter a complete name: 1. Make sure the ID field is blank. Tab to the name field (unlabeled field
next to the ID field).
2. Enter the full name in one of the following formats (Smith, Thomas, James or Smith, Thomas or smith,thomas,james) and press <Enter>. • If one match is found, the ID and name are returned to the form. If
more than one match is found, the ID and Name Extended Search window appears. The field next to the Search Results field shows the number of matches. (see page ?? for an example)
To search by partial ID:
1
- 37 -

1. Enter a partial ID in the ID field. You must use the Oracle wildcard % to represent any number of unspecified characters. (Example, enter 21% to search for all IDs that start with “21.” Press <Enter> or _ to replace one character that is unknown (Example, enter _athryn to search for someone with the first name Kathryn or Cathryn.
• If one match is found, the ID and name are returned to the form.
• If more than one match is found, the ID and Name Extended Search window appears. The field next to the Search Results field shows the number of matches. ( see page ?? for an example)
To search by partial name:
2
1
1. Make sure the ID field is blank. Tab to the Name field (unlabeled field next to ID field).
2. Enter a partial name in the Name field. (The format is last, first,
middle with a comma between each part of the name. Spaces between each piece are optional. Characters can be upper or lower case. You must use the Oracle wildcard % to represent any number of unspecified characters.
Examples:
- 38 -

Smith,J% To search for all IDs with the last name Smith and
with first names that start with “J” Mag%,p% To search for all IDs with last names that start
with “Mag” and with first names that start with “P”
% ,Barbara To search for all IDs with the first name “Barbara”
3. Press <Enter>.
• If one match is found, the ID and name are returned to the form.
• If more than one match is found, the ID and Name Extended Search window appears. The field next to the Search Results field shows the number of matches.
Number of Matches
- 39 -

Searching Using the ID and Name Extended Search
To select an ID from the matches in the ID and Name Extended Search window:
1. Pull down the list of matches in the Search Results field. Note that previous names and IDs are indented under the current name and ID.
2. Scroll to the desired name and ID. The ID and name are returned to
the form. To reduce your search in the ID and Name Extended Search Window:
1
3
2
1. Select the Person, Non-Person or both radio button in the Reduce Search
By block. Your choice identifies the kind of IDs you want to search. The field next to the Search Results field shows the number of matches.
2. Enter your search criteria in the field in the Reduce Search By block.
3. Click the Search icon. The field next to the Search Results field shows the number of matches.
- 40 -

To access a search form from the ID and Name Extended Search window:
1
1. Click the Person Search Detail Button or the Non-Person Search Detail
button.
2. The associated search form appears with IDs that match your original search criteria. You original search criteria appear at the top of the form. A picture of the search form is shown on page 49.
To select an ID:
• Scroll to the desired ID on the form ( in the example on SOAIDEN – select the active record for the person you are looking for) and double-click it. The ID and name are returned to the calling form.
- 41 -

To reduce your search further:
Product-Specific Search Forms
You can use product-specific search forms to search for a person or non-person by name or ID. To search for an ID:
1
1. Click the Search icon next to the ID field on a form.
2. If the ID field is associated with one search form, the search form
opens in query mode.
3. If the ID field is associated with more than one search form, an Option List appears.
- 42 -

4. Select the option for the search form you want to access.
5. Type in search criteria into the form and execute the query by clicking the execute query button on the toolbar.
5
6. Choose the data you were searching for by double clicking on the id
field and the previous form will be populated with the search information.
- 43 -
Querying for People:
• Enter as much information as will be necessary to call up all possibilities of this person’s name.
• To get the broadest search, enter as few letters in the name fields as
possible, always including the use of wildcards. • Searches may be done on only last names, only first names, or on both first
and last names. • Be cautious when searching on first names that could be “nickname.”
Examples: William/Bill, Anthony/Tony, Catherine/Cathy, Elizabeth/Beth.
• Be cautious of multiple spellings of names. Examples: Cathy/Kathy,
Lori/Laurie, Anderson/Andersen, Mc Donald/McDonald. • Without a wildcard, the system will look for an exact match. • Wildcards may be placed anywhere in the name field, and you may use
more than one in each name field. Wildcards: % and _
- 44 -
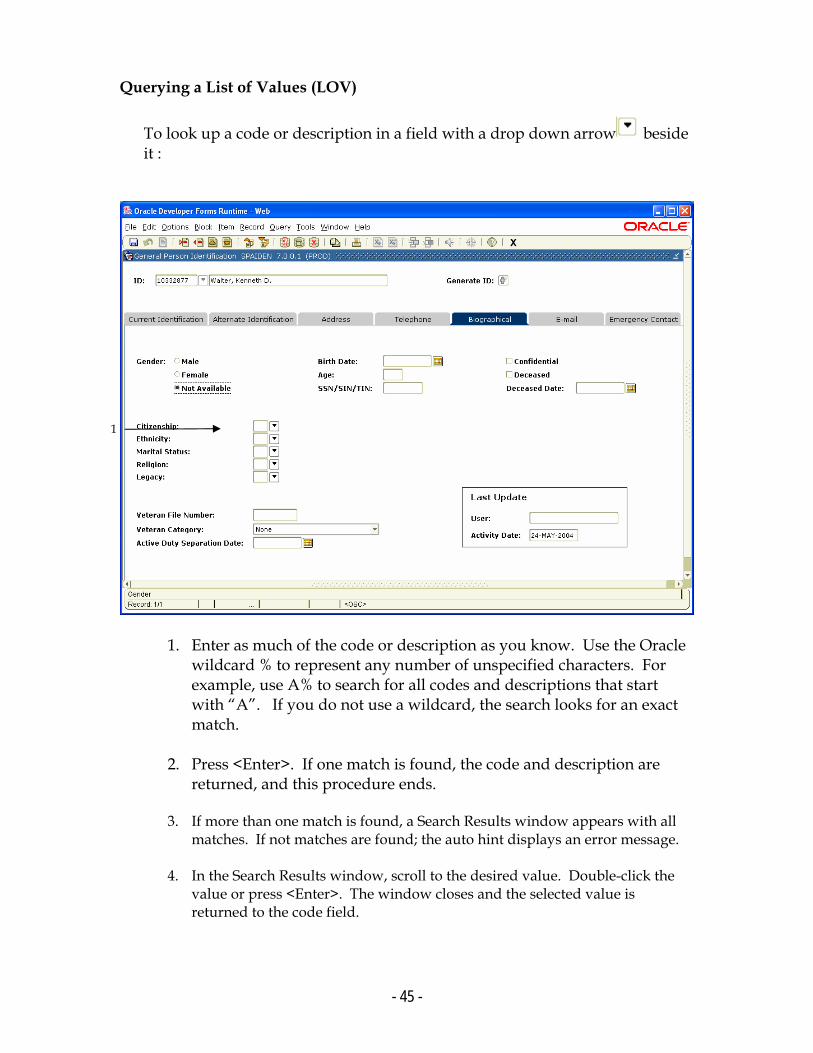
Querying a List of Values (LOV)
To look up a code or description in a field with a drop down arrow beside it :
1
1. Enter as much of the code or description as you know. Use the Oracle
wildcard % to represent any number of unspecified characters. For example, use A% to search for all codes and descriptions that start with “A”. If you do not use a wildcard, the search looks for an exact match.
2. Press <Enter>. If one match is found, the code and description are
returned, and this procedure ends.
3. If more than one match is found, a Search Results window appears with all matches. If not matches are found; the auto hint displays an error message.
4. In the Search Results window, scroll to the desired value. Double-click the
value or press <Enter>. The window closes and the selected value is returned to the code field.
- 45 -

4
To Choose a block or field name from an LOV:
1. Access the Help Form (GUAHELP) 2. Click the SCT BANNER or Local
radio button on the main window.
3. Verify the form name. Change if
necessary. 4. For block names, click the Search
button on the Block field. An LOV appears.
OR
For field names, verify the block name. Then click the Search button on the Field field. An LOV appears.
5. Scroll to the desired name. 6. Double-click the name. The
selected name is returned to GUAHELP.
1. Access the Help Form (GUAHELP) 2. Select the SCT BANNER or Local
radio button on the main window.
3. Verify the form name. Change if
necessary. 4. For block names, select the Next
Item function until you reach the Block field.
OR
For field names, verify the block name. Then select the Next Item function until you reach the Field field.
5. Select the List function. An LOV
appears 6. Scroll to the desired name. 7. Press Enter. The selected name is
returned to GUAHELP.
- 46 -

To display the entire LOV for a field with a blue field name:
1. Double-click the code field. If you are on a form that was called from another form, press the Control key before you double-click. Double-clicking by itself selects a value rather than displaying a LOV.
2. If more than one form or window is associated with the field, an Option List appears. Click the option that displays the LOV. Otherwise, the LOV appears automatically.
2
3
3. Scroll to the desired value in the LOV. Double-click the value. The
LOV closes, and the selected value is returned to the code field.
- 47 -

Extracting Data in Internet-Native Banner In Internet-native Banner, you can save the data to a file with a .csv extension or you can display it as text in a new browser window, depending on what is set up in the Directory Options window on the General User Preferences Maintenance Form (GUAUPRF)
To set up data extract for INB:
1. Access the General User Preferences Maintenance Form (GUAUPRF) 2. Click the Directory Options button at the top of the form. The Directory Options
window appears. 3. Scroll to the record where description is Internet Native data extract format: FILE
(.csv) or TEXT. 4. If you want your extract data to be placed into a file in comma separated value
format (with a .csv extension), enter FILE in the User Value filed.
OR
If you want your extracted data to be displayed in a separate browser window, enter TEXT. The information is display-only, but can be saved in a variety of formats.
5. Scroll to the record where Description is Enter the name of your Web Output
URL. 6. In the User Value field, enter the URL that contains the logic used to pull the
extracted data for the database and display it in a browser window. NOTE: In Internet-native Banner, the online Job Submission output and data extract features both use this URL.
To extract data in INB:
1. Access the Banner Form. 2. If applicable, display the desired records on the form.
3. Select one of the following options from the Help pull-down menu:
• Extract Data with Key (to extract key data and data in the current block • Extract Data No Key (to extract data in a current block only) Extracted data is displayed in a browser window.
4. For Internet Explorer, use the browser File>Save As>option to save the extracted data to a local directory as a .txt file. Then rename the file as a .csv file.
- 48 -

Banner Messaging You can send messages to and receive messages from other Banner users. Messages are created and viewed on the General Message Form (GUAMESG). ** If you want a message to be for your eyes only, make sure to check the confidential box. Otherwise, other users can query against or delete your message.
When you have a new message to view, the system displays a green check next to the message link on the main menu. Returning to the main menu occurs when you access any form from the Go field, menu, or site map, and exit the form. Upon returning to the main menu, you will see the check mark to the right of the link to Check Banner Message.
You can choose to display the message or you can ignore the message and review it at a later time. You can access GUAMESG at your convenience to view your messages. You can delete a message or they will be deleted for you every 30 days once they have been received.
To display your messages at any time:
Click the View/Send Message button on the toolbar. The GUAMESG Form appears with your messages.
Access the GUAMESG Form
- 49 -

Optimized Screen Resolution for Internet-Native Banner Use the following values for optimal viewing of Internet-native Banner: Screen Resolutions for INB
Resolution Width Height Client DPI Value 1024x768 1040 765 96
- 50 -