Embed Size (px)
Citation preview

What can we help you achieve?
Banner Document Management Suite Installation Guide
Release 7.2June 2008 (Revised)

Notice of Rights
Copyright © SunGard Higher Education 2002, 2008. This document is proprietary and confidential information of SunGard Higher Education Inc. and is not to be copied, reproduced, lent, displayed or distributed, nor used for any purpose other than that for which it is specifically provided without the express written permission of SunGard Higher Education Inc.
SunGard Higher Education
4 Country View RoadMalvern, Pennsylvania 19355United States of America(800) 522 - 4827
Customer Support Center Website
http://connect.sungardhe.com
Documentation Feedback
http://education.sungardhe.com/survey/documentation.html
Distribution Services E-mail Address
Other Services
In preparing and providing this publication, SunGard Higher Education is not rendering legal, accounting, or other similar professional services. SunGard Higher Education makes no claims that an institution's use of this publication or the software for which it is provided will insure compliance with applicable federal or state laws, rules, or regulations. Each organization should seek legal, accounting and other similar professional services from competent providers of the organization's own choosing.
Trademark
Without limitation, SunGard, the SunGard logo, Banner, Campus Pipeline, Luminis, PowerCAMPUS, Matrix, and Plus are trademarks or registered trademarks of SunGard Data Systems Inc. or its subsidiaries in the U.S. and other countries. Third-party names and marks referenced herein are trademarks or registered trademarks of their respective owners.
Revision History Log
Publication Date SummaryApril 2008 New version that supports Banner Document Management Suite 8.0 softwareJune 2008 Added additional note to Appendix B regarding LDAP configuration.

Installation Guide
Banner XtenderSolutions
1 Banner XtenderSolutions 7.2
Requirements . . . . . . . . . . . . . . . . . . . . . . . . . . . . . . . . . . . . . . 9Required Hardware. . . . . . . . . . . . . . . . . . . . . . . . . . . . . . 9Required Software . . . . . . . . . . . . . . . . . . . . . . . . . . . . . . 10
Installation Overview . . . . . . . . . . . . . . . . . . . . . . . . . . . . . . . . . . 12Case A—BXS 7.2 New Installation . . . . . . . . . . . . . . . . . . . . . . 12Case B—BXS 7.0, 7.0.1, or 7.1 to BXS 7.2 . . . . . . . . . . . . . . . . . . 13
Luminis Integration . . . . . . . . . . . . . . . . . . . . . . . . . . . . . . . . . . . 14
Self Service Integration . . . . . . . . . . . . . . . . . . . . . . . . . . . . . . . . . 14
BXS VPD Configuration . . . . . . . . . . . . . . . . . . . . . . . . . . . . . . . . . 15
LDAP Configuration . . . . . . . . . . . . . . . . . . . . . . . . . . . . . . . . . . . 15
2 Install BXS 7.2 (for New BXS Sites)
Installing the System . . . . . . . . . . . . . . . . . . . . . . . . . . . . . . . . . . . 17Hardware Platform(s) Required for Steps in this Chapter . . . . . . . . . . . 17
Step 2.1 Install Banner General 7.4 . . . . . . . . . . . . . . . . . . . . . . . . . . 17Step 2.2 Install AppXtender License Server Version 5.60.049 (If Necessary) . . . . . . 18Step 2.3 Create and Configure the OTGMGR Banner (Oracle) Account . . . . . . . . 18Step 2.4 Install AppXtender Administrator 5.30 (Windows Server) . . . . . . . . . . . 19Step 2.5 Address AppXtender Baseline Table Sizing Issues. . . . . . . . . . . . . . . 21Step 2.6 Create A New Data Source for Your Banner/BXS Database Using the
AppXtender Admin Tool (Windows Server)21Step 2.7 Initial Configuration Within AppXtender Admin To Create a Functional AppXtender
System (Windows Server)24Step 2.8 Register OtgSctHk.dll (Windows Server) . . . . . . . . . . . . . . . . . . . 25Step 2.9 Configure Data Source Within Data Source Selector Tool (Windows Server) . 25Step 2.10 Create BXS-Related Data Within Table AE_CFG . . . . . . . . . . . . . . . 26Step 2.11 Readjust AppXtender Table Sizing Default Parameters . . . . . . . . . . . . 28Step 2.12 Create the AppXtender Applications via XML Import (Windows Server) . . . 28Step 2.13 Change SYSOP Password in Application Generator. . . . . . . . . . . . . . 32Step 2.14 Determine and Assign File Object Storage Configuration for New Applications (Win-
dows Server)32
3

Table of Contents
Step 2.15 Set License Server Mode for Data Source . . . . . . . . . . . . . . . . . . . 34Step 2.16 Restore Original Tablespace Sizing . . . . . . . . . . . . . . . . . . . . . . 34Step 2.17 Install BXS-required Java Files for Single Login Functionality . . . . . . . . . 34Step 2.18 Update GURDMODS to Indicate the Completion of the Preceding Steps . . . 35Step 2.19 Complete the steps in Chapter 4 to Continue the Installation of BXS 7.2 . . . 36
3 Upgrade to BXS 7.2 (for Existing BXS Sites)
Upgrading the System . . . . . . . . . . . . . . . . . . . . . . . . . . . . . . . . . . 37Hardware Platform(s) Required for Steps in this Chapter . . . . . . . . . . . 37
Step 3.1 Install Banner General 7.4 . . . . . . . . . . . . . . . . . . . . . . . . . . 37Step 3.2 Uninstall Earlier Versions of EMC Documentum Software . . . . . . . . . . 38Step 3.3 Install AppXtender License Server Version 5.60.049 (if necessary) . . . . . . 38Step 3.4 Install AppXtender Administrator 5.30 (Windows Server) . . . . . . . . . . . 39Step 3.5 Register OtgSctHk.dll (Windows Server) . . . . . . . . . . . . . . . . . . . 40Step 3.6 Configure Data Source Within Data Source Selector Tool. . . . . . . . . . . 40Step 3.7 Install BXS-required Java Files for Single Login Functionality . . . . . . . . . 41Step 3.8 Install the INB-AX Bridge (Optional) . . . . . . . . . . . . . . . . . . . . . 42Step 3.9 Update GURDMODS to Indicate Completion of the Preceding Steps. . . . . 43Step 3.10 Configure Additional Desktop Machines . . . . . . . . . . . . . . . . . . . 43Step 3.11 Complete the steps in Chapter 4 to Continue the Installation of BXS 7.2 . . . 43
4 Upgrade Banner XtenderSolutions 7.2
Icons . . . . . . . . . . . . . . . . . . . . . . . . . . . . . . . . . . . . . 45Installer Required Skills . . . . . . . . . . . . . . . . . . . . . . . . . . . . 46Step Description and Dependencies Table . . . . . . . . . . . . . . . . . . 47Restart Notes . . . . . . . . . . . . . . . . . . . . . . . . . . . . . . . . . 48Media Unload and Verification Instructions. . . . . . . . . . . . . . . . . . 51Encryption . . . . . . . . . . . . . . . . . . . . . . . . . . . . . . . . . . 52Unencrypted Products . . . . . . . . . . . . . . . . . . . . . . . . . . . . 52Operating System Independence . . . . . . . . . . . . . . . . . . . . . . . 52Unload and Verification on OpenVMS . . . . . . . . . . . . . . . . . . . . 53Unload and Verification on UNIX . . . . . . . . . . . . . . . . . . . . . . 53Unload and Verification on Windows or DOS . . . . . . . . . . . . . . . . 55
Upgrade to BXS 7.2 . . . . . . . . . . . . . . . . . . . . . . . . . . . . . . . . . . . 56
Step 4.1 Distribute Release Documents . . . . . . . . . . . . . . . . . . . . . . . . 56Step 4.2 Verify Environment Prerequisites . . . . . . . . . . . . . . . . . . . . . . . 56
Part A . . . . . . . . . . . . . . . . . . . . . . . . . . . . . . . . . . . . . 56Part B . . . . . . . . . . . . . . . . . . . . . . . . . . . . . . . . . . . . . 58
Step 4.3 Upgrade Prerequisites . . . . . . . . . . . . . . . . . . . . . . . . . . . . 59Part A . . . . . . . . . . . . . . . . . . . . . . . . . . . . . . . . . . . . . 59Part B . . . . . . . . . . . . . . . . . . . . . . . . . . . . . . . . . . . . . 59UNIX . . . . . . . . . . . . . . . . . . . . . . . . . . . . . . . . . . . . . 59VMS . . . . . . . . . . . . . . . . . . . . . . . . . . . . . . . . . . . . . 60
Banner XtenderSolutions Release 7.2 June 20084 Installation Guide Confidential

Table of Contents
MICROSOFT WINDOWS . . . . . . . . . . . . . . . . . . . . . . . . . . 60Part C. . . . . . . . . . . . . . . . . . . . . . . . . . . . . . . . . . . . . 61Part D . . . . . . . . . . . . . . . . . . . . . . . . . . . . . . . . . . . . 65
Step 4.4 Upgrade Preparation . . . . . . . . . . . . . . . . . . . . . . . . . . . . . 66Part A. . . . . . . . . . . . . . . . . . . . . . . . . . . . . . . . . . . . . 66Part B . . . . . . . . . . . . . . . . . . . . . . . . . . . . . . . . . . . . . 66Part C. . . . . . . . . . . . . . . . . . . . . . . . . . . . . . . . . . . . . 67Part D . . . . . . . . . . . . . . . . . . . . . . . . . . . . . . . . . . . . 68Part E . . . . . . . . . . . . . . . . . . . . . . . . . . . . . . . . . . . . . 68Part F . . . . . . . . . . . . . . . . . . . . . . . . . . . . . . . . . . . . . 68
Step 4.5 Modify Database Objects . . . . . . . . . . . . . . . . . . . . . . . . . . 69Part A. . . . . . . . . . . . . . . . . . . . . . . . . . . . . . . . . . . . . 69Part B . . . . . . . . . . . . . . . . . . . . . . . . . . . . . . . . . . . . . 74
Step 4.6 Migrate from Stage to Permanent Directories . . . . . . . . . . . . . . . . . 75UNIX . . . . . . . . . . . . . . . . . . . . . . . . . . . . . . . . . . . . . 75VMS . . . . . . . . . . . . . . . . . . . . . . . . . . . . . . . . . . . . . 76MICROSOFT WINDOWS . . . . . . . . . . . . . . . . . . . . . . . . . . 77
Step 4.7 Compile COBOL Programs. . . . . . . . . . . . . . . . . . . . . . . . . . 77Step 4.8 Compile C Programs . . . . . . . . . . . . . . . . . . . . . . . . . . . . . 78
UNIX . . . . . . . . . . . . . . . . . . . . . . . . . . . . . . . . . . . . . 78VMS . . . . . . . . . . . . . . . . . . . . . . . . . . . . . . . . . . . . . 79MICROSOFT WINDOWS . . . . . . . . . . . . . . . . . . . . . . . . . . 79
Step 4.9 Apply Required Data Changes . . . . . . . . . . . . . . . . . . . . . . . . 79Part A. . . . . . . . . . . . . . . . . . . . . . . . . . . . . . . . . . . . . 80Part B . . . . . . . . . . . . . . . . . . . . . . . . . . . . . . . . . . . . . 81Part C. . . . . . . . . . . . . . . . . . . . . . . . . . . . . . . . . . . . . 81Part D . . . . . . . . . . . . . . . . . . . . . . . . . . . . . . . . . . . . 82Part E . . . . . . . . . . . . . . . . . . . . . . . . . . . . . . . . . . . . . 83Part F . . . . . . . . . . . . . . . . . . . . . . . . . . . . . . . . . . . . . 83Part G . . . . . . . . . . . . . . . . . . . . . . . . . . . . . . . . . . . . 84Part H . . . . . . . . . . . . . . . . . . . . . . . . . . . . . . . . . . . . 85Part I . . . . . . . . . . . . . . . . . . . . . . . . . . . . . . . . . . . . . 85Part J . . . . . . . . . . . . . . . . . . . . . . . . . . . . . . . . . . . . . 86Part K . . . . . . . . . . . . . . . . . . . . . . . . . . . . . . . . . . . . . 86Part L . . . . . . . . . . . . . . . . . . . . . . . . . . . . . . . . . . . . . 87Part M . . . . . . . . . . . . . . . . . . . . . . . . . . . . . . . . . . . . 88Part N . . . . . . . . . . . . . . . . . . . . . . . . . . . . . . . . . . . . 88Part O . . . . . . . . . . . . . . . . . . . . . . . . . . . . . . . . . . . . 89
Step 4.10 Update Oracle Forms. . . . . . . . . . . . . . . . . . . . . . . . . . . . . 89MICROSOFT WINDOWS . . . . . . . . . . . . . . . . . . . . . . . . . . 91UNIX . . . . . . . . . . . . . . . . . . . . . . . . . . . . . . . . . . . . . 91
Step 4.11 Generate Oracle Reports . . . . . . . . . . . . . . . . . . . . . . . . . . . 91Step 4.12 Update Letter Generation/Population Selection Tables . . . . . . . . . . . . 91Step 4.13 Update Referential Integrity Constraints . . . . . . . . . . . . . . . . . . . 92
Part A. . . . . . . . . . . . . . . . . . . . . . . . . . . . . . . . . . . . . 92Part B . . . . . . . . . . . . . . . . . . . . . . . . . . . . . . . . . . . . . 93
Step 4.14 Restart the gostage Process . . . . . . . . . . . . . . . . . . . . . . . . . . 93Step 4.15 Verify the State of the Upgraded Environment . . . . . . . . . . . . . . . . 94
Part A. . . . . . . . . . . . . . . . . . . . . . . . . . . . . . . . . . . . . 94Part B . . . . . . . . . . . . . . . . . . . . . . . . . . . . . . . . . . . . . 94
June 2008 Banner XtenderSolutions Release 7.2Confidential Installation Guide 5

Table of Contents
Part C . . . . . . . . . . . . . . . . . . . . . . . . . . . . . . . . . . . . . 95Part D. . . . . . . . . . . . . . . . . . . . . . . . . . . . . . . . . . . . . 95
5 AppXtender - Final Installation Steps
Finalizing the AppXtender Installation . . . . . . . . . . . . . . . . . . . . . . . . . . 97
Step 5.1 Update AppXtender Application Descriptors in ETVAXAP and AE_APPS . . . 97Step 5.2 Create Users, Groups, and Profiles in Application Generator . . . . . . . . . 97Step 5.3 Install the INB - AX Bridge (optional) . . . . . . . . . . . . . . . . . . . . . 98Step 5.4 Miscellaneous steps to prepare for data integration . . . . . . . . . . . . . . 99Step 5.5 Baselining the OTGMGR Auto-Index and Key Reference tables with Banner data (New
BXS Sites Only)100Step 5.6 Configure Additional Desktop Machines . . . . . . . . . . . . . . . . . . . 103
6 AppXtender Web Access Deployment - General Considerations
AppXtender Web Access .NET . . . . . . . . . . . . . . . . . . . . . . . . . . . . . . 105Installation Server Guidelines . . . . . . . . . . . . . . . . . . . . . . . . . 105System Architecture. . . . . . . . . . . . . . . . . . . . . . . . . . . . . . 106
AppXtender Web Access Java 2 . . . . . . . . . . . . . . . . . . . . . . . . . . . . . 108Installation Server Guidelines . . . . . . . . . . . . . . . . . . . . . . . . . 109System Architecture. . . . . . . . . . . . . . . . . . . . . . . . . . . . . . 109
7 AppXtender Web Access.Net Deployment Details
Step 7.1 Create AppXtender Web Access Session Cache Folder . . . . . . . . . . . . 116Step 7.2 Create AppXtender Web Access Rendering Server Cache Folder . . . . . . . 116Step 7.3 Add Configuration Settings for AppXtender Web Access Using the AppXtender .NET
Wizard (Optional)116Step 7.4 Add AppXtender Admin Configuration Settings for AppXtender Web Access . 117Step 7.5 Install AppXtender Web Access .NET . . . . . . . . . . . . . . . . . . . . . 119Step 7.6 Update Web.config File on AppXtender Web Access for Single Login From Banner To
AppXtender Web Access120Step 7.7 Ensure AppXtender Web Access and Banner JRE Compatibility . . . . . . . . 121Step 7.8 Install AppXtender Web Access Rendering Server. . . . . . . . . . . . . . . 122Step 7.9 Execute Component Setup Wizard . . . . . . . . . . . . . . . . . . . . . . 123Step 7.10 Enter the AppXtender Web Access URL in Banner Form EXAINST . . . . . . 124
8 AppXtender Web Access Java 2 Edition Deployment Details
Step 8.1 Create AppXtender Web Access Rendering Server Cache Folder . . . . . . . 126Step 8.2 Add AppXtender Admin Configuration Settings for AppXtender Web Access . 126Step 8.3 Install AppXtender Web Access Rendering Server. . . . . . . . . . . . . . . 129Step 8.4 Install AppXtender Utility Services . . . . . . . . . . . . . . . . . . . . . . 130
Banner XtenderSolutions Release 7.2 June 20086 Installation Guide Confidential

Table of Contents
Step 8.5 Execute the Windows-Based Component Setup Wizard to Register AppXtender Web Access Rendering Server and AppXtender Utility Services131
Step 8.6 NFS Configuration (Solaris/Linux Deployment Only) . . . . . . . . . . . . . 132Step 8.7 Install AppXtender Web Access J2 Edition . . . . . . . . . . . . . . . . . . 133Step 8.8 Update web.xml File on AppXtender Web Access Server for Single Login From Banner
To AppXtender Web Access133Step 8.9 Execute (Java-Based) Component Setup Wizard to Register the AppXtender Web Ac-
cess J2 Server134Step 8.10 Enter the AppXtender Web Access URL in Banner Form EXAINST . . . . . . 135Step 8.11 Ensure AppXtender Web Access and Banner JRE Compatibility. . . . . . . . 135Step 8.12 Restart the Tomcat Server. . . . . . . . . . . . . . . . . . . . . . . . . . . 136
9 Integrating AppXtender Web Access with Luminis
Install AppXtender Services . . . . . . . . . . . . . . . . . . . . . . . . . . . . . . . 138Install the AppXtender Web Access Luminis Integration Component . . . . . 138Modify Luminis Server Configuration to Recognize AppXtender Web Access. 140Create a AppXtender Web Access Link in the Luminis Bookmarks Channel . 143Create a TAB page in Luminis . . . . . . . . . . . . . . . . . . . . . . . . 143Create a AppXtender Web Access Channel. . . . . . . . . . . . . . . . . . 143
10 Integrating BXS with Self-Service Banner
Set Up Self-Service Banner Integration to BXS . . . . . . . . . . . . . . . . . . . . . . 145
A BXS VPD Configuration
Step 10.1 Add the VPDI_CODE to BXS Applications . . . . . . . . . . . . . . . . . . 153Step 10.2 Establish Rights and Privileges using Document Level Security . . . . . . . . 154Step 10.3 Setup Document Level Security at the Application Level . . . . . . . . . . . 154Step 10.4 Modify Delivered Context Rules in INB to Support VPD . . . . . . . . . . . 155
B LDAP Configuration
Set-up the Directory Service Security Provider . . . . . . . . . . . . . . . . . . . . . . 158
Change the Security Model for the Datasource in AppXtender Admin . . . . . . . . . . 163
June 2008 Banner XtenderSolutions Release 7.2Confidential Installation Guide 7

Table of Contents
This page intentionally left blank
Banner XtenderSolutions Release 7.2 June 20088 Installation Guide Confidential

1 Banner XtenderSolutions 7.2Requirements
Chapter 1 Banner XtenderSolutions 7.2
The steps you need to follow to upgrade to Banner XtenderSolutions 7.2 depends on the current state of the BXS product in your database. Please follow the instructions under the case that applies to you. Depending on which case applies, you will need to follow instructions in different chapters of this guide. All cases are dependent on Banner General 7.4.
Additionally, if you have the Banner Human Resources module installed (the entire HR product including Payroll, not merely the Position Control portion of HR that is part of Banner Finance), you will need to apply Position Control patch 102385 before continuing.
Requirements
Required Hardware
Since you must implement BXS on at least one Windows 2000 (SP4) or 2003 (SP1) Server, you will implement most of the steps of this chapter on that one server. The only exception to this is the installation of AppXtender Web Access, as AppXtender Web Access components may be spread across several servers and two platform types.
Note: If you are implementing as much as possible from your local Windows workstation, most of the work can be done via Terminal Services (Remote Desktop Connection). However, the EMC Documentum installation media often must be installed on a local drive of the Windows Server (and not a connected network drive) to function properly.
Note: The AppXtender Administration Tool (AppXtender Admin) must be installed on a Windows 2000 (SP4) or 2003 (SP1) Server. For specific hardware and software requirements for the AppXtender Admin tool, see Banner XtenderSolutions Hardware and Software Requirements Guide or Chapter 2 of the ApplicationXtender Concepts and Planning Guide Release 5.30.
June 2008 Banner XtenderSolutions Release 7.2Confidential Installation Guide 9

1 Banner XtenderSolutions 7.2Requirements
Required Software
AppXtender .zip Files
You will need the following files from the Support Center to install AppXtender.
• Desktop_5.30.087.zip (extract to a folder named AppXtender Desktop)
• DesktopDocs_5.30.087.zip (contains the set of PDFs comprising EMC Documentum's ApplicationXtender documentation for AppXtender 5.30)
AppXtender Web Access .zip Files
If you will be installing EMC Documentum AppXtender Web Access 5.30.088 software, you will need to download that product from the Support Center.
• WebAccessNET_5.30.088.zip (extract to a folder named AppXtender Web Access.NET)
• WebAccessJ2_5.30.066.zip (extract to a folder named AppXtender Web Access J2.
• RenderingServer_5.30.087.zip (extract to a folder named Render)
• UtilitiesServices_5.30.087.zip (extract to a folder named UtilityServices)
Note: The documentation set for AppXtender Web Access is included in the DesktopDocs_5.30.087 file available on the Support Center.
Luminis Files• WebServices_5.30.088 (optional - used only for integration with Luminis)
Note: The documentation set for AppXtender Utility Services is included in the DesktopDocs_5.30.087 file available on the Support Center site.
Banner XtenderSolutions Release 7.2 June 200810 Installation Guide Confidential

1 Banner XtenderSolutions 7.2Requirements
Additional Files
All sites also need the following files:
• LicenseServer_5.60.049.zip that contains the EMC Documentum License Server 5.60.049 software.
• bxssetup70200u.trz that handles the installation of BXS 7.2.
• ext70200u.trz - that contains the Banner components (forms, triggers, packages, etc.) that will be installed in Chapter 4.
To complete the installation, you will need your Oracle passwords for SYSTEM, OTGMGR, BANIMGR, GENERAL, BANINST1, and your Banner upgrade username accounts.
June 2008 Banner XtenderSolutions Release 7.2Confidential Installation Guide 11

1 Banner XtenderSolutions 7.2Installation Overview
Installation Overview
Please use the following cases to determine the chapters that you will need to follow to successfully upgrade to BXS 7.2:
Case A—BXS 7.2 New Installation
Sites with no prior version of BXS installed in your Banner/BXS database. To install BXS 7.2, please execute the steps in the following chapters in the order specified:
1. Chapter 2, Install BXS 7.2 (for New BXS Sites).
2. Chapter 4, Upgrade Banner XtenderSolutions 7.2.
3. Chapter 5, AppXtender - Final Installation Steps.
4. Chapter 6, AppXtender Web Access Deployment - General Considerations. Following this introductory material, you will proceed either to Chapter 7, AppXtender Web Access.Net Deployment Details or Chapter 8, AppXtender Web Access Java 2 Edition Deployment Details depending on your choice of AppXtender Web Access platform deployment.
5. Optional - Chapter 9, Integrating AppXtender Web Access with Luminis
6. Optional - Chapter 10, Integrating BXS with Self-Service Banner
Note: To install a client version of AppXtender on various machines, please follow the instructions in the ApplicationXtender Desktop Installation Guide Release 5.30. Once AppXtender has been installed on the client machine, you must register the OtgSctHk.dll to complete the installation.
Banner XtenderSolutions Release 7.2 June 200812 Installation Guide Confidential

1 Banner XtenderSolutions 7.2Installation Overview
Case B—BXS 7.0, 7.0.1, or 7.1 to BXS 7.2
For sites upgrading from BXS 7.0, 7.0.1, or 7.1, please execute the steps in the following chapters in the order specified:
1. Chapter 3, Upgrade to BXS 7.2 (for Existing BXS Sites).
2. Chapter 4, Upgrade Banner XtenderSolutions 7.2.
3. Chapter 6, AppXtender Web Access Deployment - General Considerations. Following this introductory material, you will proceed either to Chapter 7, AppXtender Web Access.Net Deployment Details or Chapter 8, AppXtender Web Access Java 2 Edition Deployment Details depending on your choice of AppXtender Web Access platform deployment.
4. Optional - Chapter 9, Integrating AppXtender Web Access with Luminis
5. Optional - Chapter 10, Integrating BXS with Self-Service Banner
Note: To install a client version of AppXtender on various machines, please follow the instructions in the ApplicationXtender Desktop Installation Guide Release 5.30. Once AppXtender has been installed on the client machine, you must register the OtgSctHk.dll to complete the installation.
June 2008 Banner XtenderSolutions Release 7.2Confidential Installation Guide 13

1 Banner XtenderSolutions 7.2Luminis Integration
Luminis Integration
Banner XtenderSolutions 7.x includes the capability to integrate AppXtender Web Access within the Luminis Framework. This integration is dependent on EMC Documentum's AppXtender Web Services component, which is licensed separately.
Please refer to Chapter 9, Integrating AppXtender Web Access with Luminis for more integration instructions.
Self Service Integration
SunGard Higher Education's Banner XtenderSolutions 7.2 release includes optional integration components and guidelines for linking Self-Service Banner (SSB) to the ApplicationXtender Web Access (WX) product. This integration allows institutions to configure SSB to use baseline BXS and ApplicationXtender Web Access packages and APIs to provide links for document query/view or import/upload into contexts that are logical for Self-Service Banner users.
Integration occurs using a Single Sign-on authentication from a Self-Service Banner page, such as Finance's View Document page, to a WX session for document retrieval or upload from BXS. For example, Query and Import links to WX can be provided on a SSB page based on options that are defined by your institution.
Instructions are provided in the chapter titled "Integrating BXS with Self-Service Banner" in the Banner XtenderSolutions Installation Guide Release 7.2 for setting up these options, as well as 1) setting up the parameters that are passed in the URL string from SSB to WX, and 2) adding the optional BXS package call in the applicable SSB package.
Note: A script to change the Super-User password is being provided in this release. For a best practice, it is recommended to run this script on a frequent and periodic basis. Instructions for running this script are contained in the “Technical Reference” chapter in the Banner XtenderSolutions Administration Guide Release 7.2.
To integrate Self-Service Banner with BXS, the following is required:
• AppXtender Web Access.NET version 5.30.088
The components and instructions for integration allow single sign-on between SSB and BXS for users with Oracle (Internet Native Banner) IDs.
Banner XtenderSolutions Release 7.2 June 200814 Installation Guide Confidential

1 Banner XtenderSolutions 7.2BXS VPD Configuration
BXS VPD Configuration
MIF in the UDC is the architectural and process features that enable two or more entities to coexist in a single application architecture. Using VPD, data segregation can be extended to the entire BXS document collection. For more information, refer to Appendix A, BXS VPD Configuration.
LDAP Configuration
BXS 7.2 is certified to work with the directory service LDAP (Lightweight Directory Access Protocol), which is an alternative to the standard BXS authentication process for AppXtender.
LDAP authentication is not intended to be used for non-Banner ID authentication.
June 2008 Banner XtenderSolutions Release 7.2Confidential Installation Guide 15

1 Banner XtenderSolutions 7.2LDAP Configuration
This page intentionally left blank
Banner XtenderSolutions Release 7.2 June 200816 Installation Guide Confidential

2 Install BXS 7.2 (for New BXS Sites)Installing the System
Chapter 2 Install BXS 7.2 (for New BXS Sites)
Installing the System
Warning: Do not attempt any steps in this chapter until you have reviewed the information found in Chapter 1, Banner XtenderSolutions 7.2.
Hardware Platform(s) Required for Steps in this Chapter
If you are implementing BXS on a Windows 2000 (SP4) or 2003 Server, then you will implement most of the steps of this chapter on that one machine.
Note: If you are doing as much as possible from your local Windows workstation (which is not a Windows Server), you must do certain steps, as noted in this guide, on a Windows 2000 / 2003 Server.
Note: The required XtenderSolutions Administration Tool (AppXtender Admin) must be installed on a Windows 2000 or 2003 Server. For specific hardware and software requirements for the AppXtender Admin tool, see the Banner XtenderSolutions Hardware and Software Requirements Guide or Chapter 2 of the ApplicationXtender Concepts and Planning Guide Release 5.30.
To install and setup BXS at your institution, please follow the steps below:
Step 2.1—Install Banner General 7.4
Installation Target: Banner database host
Install Banner 7.4, including General 7.4, if it is not already installed. This Banner upgrade should be complete before beginning any installation of BXS.
June 2008 Banner XtenderSolutions Release 7.2Confidential Installation Guide 17

2 Install BXS 7.2 (for New BXS Sites)Installing the System
Step 2.2—Install AppXtender License Server Version 5.60.049 (If Necessary)
Location of Install Media: LicenseServer Folder
Installation Target: Any Windows platform (as recommended by EMC Documentum). This machine much be network-accessible to all client/server and AppXtender Web Access server and services machines used by BXS.
2.2.1 Install (or upgrade) the AppXtender License Server 5.60.049 (or later) on a Windows server within network reach of all client PCs that will be running AppXtender as well as all AppXtender Web Access server(s), whether Windows or Solaris based.
2.2.2 Enter the license keys into the License Administrator.
For more information about the AppXtender License Server, see the EMC Documentum XtenderSolutions License Server Administrator’s Guide Release 5.60.
For suggestions regarding placement of your AppXtender License Server using AppXtender Web Access .Net, see "System Architecture" on page 106. For suggestions regarding placement of your AppXtender License Server using AppXtender Web Access Java2, see "System Architecture" on page 109.
Note: BXS will not work in the Evaluation or Demo modes under which AppXtender might operate in the absence of valid license keys. Please contact SunGard’s ActionLine for more information on how to obtain your license keys for the EMC Documentum products you have licensed.
Step 2.3—Create and Configure the OTGMGR Banner (Oracle) Account
Location of Install Media: bxssetup70200u.trz
Installation Target: Banner database host
2.3.1 Run the SQL*Plus script sql_cmd /nolog to establish the OTGMGR Oracle account (username). This script must be run by the SYSTEM login user. This account name is similar to SATURN, FAISMGR, etc., since it serves as the schema name for all EMC Documentum AppXtender tables which are used to run the AppXtender product. This account is also the account under which all Oracle connectivity is accomplished. To create the OTGMGR account, execute the following commands:
sqlplus /nologstart otgmgr
Banner XtenderSolutions Release 7.2 June 200818 Installation Guide Confidential

2 Install BXS 7.2 (for New BXS Sites)Installing the System
2.3.2 Change the default password (U_PICK_IT) for the OTGMGR account to a permanent password. You should protect the OTGMGR account password in the same manner as SATURN, etc. To change the password, open a SQL*Plus session connecting to Oracle as SYSTEM, and enter the following command:
ALTER USER otgmgr IDENTIFIED BY <new_password>
2.3.3 Run grantotg.sql script connected as the SYSTEM user. This script grants select privileges to OTGMGR for tables GTVSYSI, GUBINST, GURVERS, and GURDMOD. To run the grantotg script, execute the following commands:
sqlplus /nologstart grantotg
Step 2.4—Install AppXtender Administrator 5.30 (Windows Server)
Location of Install Media: AppXtender Desktop Folder
Installation Target: Windows 2000 (SP4) or Windows 2003 (SP1) Server
2.4.1 Ensure that you have access to the Desktop installation folder.
Note: For this step, you will be working on the Windows Server machine where you will install the AppXtender Admin tool. You may use Terminal Server (Remote Desktop Connection) to do this install, but it is recommended that your install media be local to the Windows Server and not accessed via a network-accessed drive.
Note: This server machine must have Oracle client connectivity already installed. The Oracle/Banner database to which AppXtender Admin will connect must be accessible via this Oracle client. Use tnsping.exe or tnsping80.exe within a Command (DOS) window to test your Oracle connectivity. Resolve any problems before continuing.
Note: For specific hardware and software requirements for the AppXtender Admin tool, see the Banner XtenderSolutions Hardware and Software Requirements Guide or Chapter 2 of the ApplicationXtender Concepts and Planning Guide Release 5.30.
Note: This Windows Server machine with the AppXtender Admin tool does not need any additional EMC Documentum components for purposes of the AppXtender Admin tool. It may, however, contain additional AppXtender components to consolidate resources (to reduce the number of Windows servers needed). These additional components include:
June 2008 Banner XtenderSolutions Release 7.2Confidential Installation Guide 19

2 Install BXS 7.2 (for New BXS Sites)Installing the System
• AppXtender Web Access .NET Server
• AppXtender Web Access Rendering Server
• License Server
• AppXtender Utility Services
See Chapter 6, AppXtender Web Access Deployment - General Considerations for more information on machine utilization and requirements.
2.4.2 Log in as Administrator or as a member of the Administrators group on your Windows Server to install the AppXtender Admin tool.
2.4.3 Execute Setup.exe from the Desktop installation folder and follow the installation instructions on installing AppXtender Admin in “Setup Wizard” in Chapter 1 of the EMC Documentum ApplicationXtender Core Components Administrator’s Guide Release 5.30. For the initial setup of AppXtender on the server, please select the following settings during the installation process:
• Ensure that you select the Administrator Installation type.
• Ensure that you select and install Administrator Configuration, Application Generator, and Administrator Utilities.
The AppXtender client software will eventually need to be installed on all PCs that will use the AppXtender client/server user interface. For purposes of installation and configuration, however, only one initial machine needs to be configured to complete the installation of BXS 7.2. Instructions for installing AppXtender on additional PCs can be found in "Configure Additional Desktop Machines" on page 43.
Banner XtenderSolutions Release 7.2 June 200820 Installation Guide Confidential

2 Install BXS 7.2 (for New BXS Sites)Installing the System
Step 2.5—Address AppXtender Baseline Table Sizing Issues
The next several steps involve the creation of certain baseline tables used by the XtenderSolutions product. This set of tables is created from within the EMC Documentum AppXtender Admin product using MDAC functionality that is capable of creating the same set of tables in various databases, including SQL Server and Oracle. For that reason, the CREATE TABLE... and CREATE INDEX... clauses contain no STORAGE clauses. When a database table is created without a STORAGE clause, Oracle will create it in the default tablespace for the user creating the table (OTGMGR) and with sizes determined by the current settings of the tablespace extent parameters themselves. This may result in tables sized too large.
One workaround is to issue an ALTER TABLESPACE... command to temporarily alter the storage parameters for the target tablespace (default tablespace for OTGMGR account). For example, if the tablespace's NEXT extent size is set to 10MB, you could alter it to 1MB instead. For all of these baseline tables, a table size extent size of 1-2 MB is adequate. Then, after the completion of Step 2.12 - "Create the AppXtender Applications via XML Import (Windows Server)" on page 28, you would want to reset your tablespace storage settings to their original values.
Step 2.6—Create A New Data Source for Your Banner/BXS Database Using theAppXtender Admin Tool (Windows Server)
Note: For more information, see "Upgrading the ApplicationXtender Database" in Chapter 2 of the EMC Documentum ApplicationXtender Core Components Administrator's Guide Release 5.30.
2.6.1 To launch AppXtender Admin, select the AppXtender Admin option within the AppXtender Desktop program group.
Note: Running the AppXtender Admin Tool will create a file named XSCM.Config in the c:\Documents and Settings\All Users\Application Data directory. The initial absence of this file will trigger the AppXtender Admin tool to cue for a database connection before continuing on to its main screen. If you wish to start with this step, you may rename that file prior to re-running the AppXtender Admin tool. The XSCM.Config file could be thought of as a replica of a subset of material within a database's CM_CONFIG table. It is kept in sync with the CM_CONFIG table when the AppXtender Admin tool is run and via the Locate functionality of the AppXtender Data Source Selector utility. If the XSCM.Config file exists locally, then it is used to serve as a means to find database(s) to connect to (in a bootstrap fashion), but it is not an official repository of the Data Source specifications that it contains. The
June 2008 Banner XtenderSolutions Release 7.2Confidential Installation Guide 21

2 Install BXS 7.2 (for New BXS Sites)Installing the System
CM_CONFIG table is the final and official set of Data Source and other system specifications.
2.6.2 On the Launch screen titled Welcome to the ApplicationXtender Administrator, click Next.
2.6.3 Select Configure a new configuration database, click Next.
2.6.4 On the Data Source Configuration window, enter the Data Source Name that corresponds to a data source name which you will eventually enter on the Banner EXAINST form.
Note: The Data Source Name may be any set of alphanumeric characters (underscores are allowed, b ut not spaces). For simplicity, it is recommended that you name your Data Source in a way that includes the Oracle/Banner database that contains it. For example, PPRD_NT25 could be a valid Data Source Name.
Note: The Data Source Name is case sensitive when a AppXtender Web Access J2 web server is involved. The case of the Data Source Name on the EXAINST form and the Data Source Name created in the AppXtender Admin tool must be identical.
2.6.5 The Data Source Description is optional. You may want to mention the selected database in this field to help identify it when numerous Data Source names are displayed.
2.6.6 Click Next.
2.6.7 Click the Data Link button.
2.6.8 On the Provider tab of the Data Link Properties window, select Microsoft OLE DB Provider for Oracle item and click Next.
Caution: Never select the OLE DB Provider for ODBC Drivers to access an Oracle database from EMC Documentum products.
2.6.9 On the Connection tab of the Data Link Properties window, enter the following values:
• For the Server name field, enter a valid Oracle database alias name for your Banner / Oracle database. This should be either from an accessible TNSNAMES.ORA file, or from some other Oracle means of database name resolution.
• For the User name field, enter OTGMGR.
• Enter the password for the OTGMGR Oracle account that you entered in Step 2.3 - "Create and Configure the OTGMGR Banner (Oracle) Account" on page 18.
• Select the Allow saving password checkbox.
Banner XtenderSolutions Release 7.2 June 200822 Installation Guide Confidential

2 Install BXS 7.2 (for New BXS Sites)Installing the System
2.6.10 Click Test Connection.
Note: If the test connection does not succeed, the most likely cause is either an incorrect server name or SQL/Net configuration (assuming you entered a correct password). A data source will always use SQL/Net configuration settings as specified in the Windows registry TNS_ADMIN setting, if it exists. If it does not exist, it will use a default folder in your ORACLE HOME file system - typically Network\Admin or Net80\Admin. Please check with your Oracle personnel to correct the problem before proceeding further.
Note: Locally defined environment variable TNS_ADMIN or other possible conflicting Oracle settings that are not from the Windows registry may cause a failure to connect to the Oracle database. This may be the case if you are using DOS batch files to configure your Oracle Banner environment.
2.6.11 Click OK to continue beyond the Test Connection acknowledgement box, and again on the Data Link Properties window to finish creating the Data Source. The Data Link Properties window will close.
2.6.12 Leave the Schema field blank. Click Next.
2.6.13 On the Administrator Login screen, login as SYSOP using the password XSCM.
2.6.14 Click Finish to complete the initial configuration.
2.6.15 After closing this window, you will briefly see the splash screen for AppXtender Admin.
Since the reference material for BXS Data Sources is stored within a table in the database itself (OTGMGR.CM_CONFIG), this message indicates that the database pointer to which you pointed this initial creation of a Data Source is now part of the repository of database sources that are stored in the OTGMGR.CM_CONFIG table. Additional Data Sources may be added (by the AppXtender Admin Tool) at any time to this initial Data Source, and the data will be stored in that same CM_CONFIG table.
June 2008 Banner XtenderSolutions Release 7.2Confidential Installation Guide 23

2 Install BXS 7.2 (for New BXS Sites)Installing the System
Step 2.7—Initial Configuration Within AppXtender Admin To Create a Functional AppXtender System (Windows Server)
Warning: The following instructions must be executed on a Windows 2000 (SP4) or Windows 2003 (SP1) Server.
From a design perspective, you will need at least one instance of the AppXtender Admin Tool at your site. You must administrate any BXS 7.0+ (EMC Documentum 5.x) system using AppXtender Admin, so AppXtender Admin is a necessary component of any BXS 7.0+ system.
When organizing multiple Oracle/Banner instances in the AppXtender Admin Tool, please understand that multiple Data Sources may reside within one instance of the scope of the AppXtender Admin Tool. Where multiple Data Sources are defined, each Data Source will generally be available to both client-server applications and AppXtender Web Access servers that use any one of those Data Sources. However, a Data Source as defined in AppXtender Admin may be hidden from such exposure to EMC Documentum products, in which case it remains defined but will not be usable by AppXtender or AppXtender Web Access users.
Each Data Source that is configured from AppXtender Admin is stored in the OTGMGR.CM_CONFIG table of all participating Data Sources (one table per database).
Note: Never create two different Data Sources that point to the same Oracle/Banner/BXS database. There should never be more than one Data Source name per database in an EMC Documentum 5.x system. This is true regardless of the number of AppXtender Admin installations that exist at a given site.
You will now need to add the following material to your AppXtender Admin configuration:
Note: For more information on the AppXtender Admin Tool, see Chapter 3 of the EMC Documentum ApplicationXtender Core Components Administration Guide Release 5.30.
2.7.1 In the AppXtender Admin window, make the following changes to settings within the Environment/Data Sources:
• In the Authentication Method section of the Authentication node, select Global.
• In the Credentials section of the Authentication node, do not enter any credentials.
• In the Security Model section of the Security node, select CM Security.
Banner XtenderSolutions Release 7.2 June 200824 Installation Guide Confidential

2 Install BXS 7.2 (for New BXS Sites)Installing the System
2.7.2 Make the following changes to settings within the Environment / License Servers:
• To add one or more License Server locations, see Chapter 5 of the EMC Documentum ApplicationXtender Core Components Administrator’s Guide Release 5.30.
• After adding a License Server, select Environment / Data Sources / Security / License Server and change it from Evaluation to the specific License Server you added.
2.7.3 To configure any existing DiskXtender server(s) you may have, follow the instructions in Chapter 6 of the EMC Documentum ApplicationXtender Core Components Administrator’s Guide Release 5.30.
2.7.4 If you receive the message, There were some warnings/errors detected during the save. Would you like to save anyway?, please select Yes.
The goal at this point within the AppXtender Admin Tool is not to configure all possible settings for your system, but rather configure a minimal set of values that will permit you to run AppXtender 5.30 from your installation workstation.
After you have made these settings within AppXtender Admin, save your changes and exit the program. It may take several minutes for the saved changes to be stored, so please allow adequate time for completion of the Save operation.
Step 2.8—Register OtgSctHk.dll (Windows Server)
The installation process will migrate a file named OtgSctHk.dll to your Content Management folder. To register this .dll, using Windows' Start/Run, execute the following:
regsvr32.exe "C:\Program Files\XtenderSolutions\Content Management\OtgSctHk.dll"
Note: Due to white space in the file or path, include the double quotes around the path and filename. Use the appropriate path for your installation site.
Step 2.9—Configure Data Source Within Data Source Selector Tool (Windows Server)
Using Start/Programs/AppXtender/Data Source Selector from your Windows menu, run the Data Source Selector program. You should see the Data Source created above in Step 2.6--"Create A New Data Source for Your Banner/BXS Database Using the AppXtender Admin Tool (Windows Server)" on page 21.
June 2008 Banner XtenderSolutions Release 7.2Confidential Installation Guide 25

2 Install BXS 7.2 (for New BXS Sites)Installing the System
2.9.1 Click on that Data Source name.
2.9.2 Click on the Default button to make that Data Source the default data source and to make it visible to AppXtender applications.
2.9.3 Exit the Data Source Selector utility.
Step 2.10—Create BXS-Related Data Within Table AE_CFG
Location of Install Media: bxssetup70200u.trz
Installation Target: Banner / BXS Database
This step uses two scripts from the bxssetup70200u.trz file and may be performed anywhere in your system where SQL*Plus is installed.
Some records in the OTGMGR.AE_CFG table that determine the behavior of the XtenderSolutions system relative to BXS must be created. To create these records:
2.10.1 Run the SQL*Plus script newbxssite_ae_cfg_data.sql to establish records for the hook enablers, set the security model, and adjust the bit-level flags for Auto-Index lookup. See comments in the script itself for detailed information if needed.
sqlplus /nologstart newbxssite_ae_cfg_data
Banner XtenderSolutions Release 7.2 June 200826 Installation Guide Confidential

2 Install BXS 7.2 (for New BXS Sites)Installing the System
2.10.2 Run the SQL*Plus script aecfginsert112.sql to establish a record that enables Oracle account information to be retrieved by Application Generator for the Import Users functionality via a hook to package EOKIMAG.
sqlplus /nologstart aecfginsert112
Note: Please review the records in the AE_CFG table after completing this step. If you observe a record where CFGID=23 and CFGVALUE is NULL, please delete the CFGID=23 record.
For example, when:
CFGID=23
CFGVALUE=
Execute the following SQL command:
delete from otgmgr.ae_cfg where CFGID=23 and CFGVALUE is NULL;
June 2008 Banner XtenderSolutions Release 7.2Confidential Installation Guide 27

2 Install BXS 7.2 (for New BXS Sites)Installing the System
Step 2.11—Readjust AppXtender Table Sizing Default Parameters
In Step 2.5--"Address AppXtender Baseline Table Sizing Issues" on page 21, you adjusted OTGMGR's default tablespace storage parameters to most optimally create the set of tables which the AppXtender Admin Tool initially creates to comprise a BXS system. However, those tables are optimally sized on the order of 1-3MB per extent. Now, however, you will be creating data tables that may through time contain many megabytes of data. Therefore, you may now adjust the default tablespace settings to allow for this need for larger tables.
Please recall that the reason behind this changing of tablespace parameters is that EMC Documentum creates tables and indices with no attached STORAGE clause in the DDL. When a database table is created without a STORAGE clause, Oracle will create it in the default tablespace for the user creating the table (OTGMGR) and with sizes determined by the current settings of the tablespace extent parameters themselves.
You may therefore now issue another ALTER TABLESPACE... command to temporarily alter the storage parameters for the target tablespace (default tablespace for OTGMGR account). For example, you could alter it to 5-10MB instead. For all of the upcoming application-specific data table creation (next step), a tablesize extent size of 5-10 MB is probably adequate to start with. Then, after the completion of Step 2.14, you would want to reset your tablespace storage settings to their original values.
Step 2.12—Create the AppXtender Applications via XML Import (Windows Server)
Location of Install Media: bxssetup70200u.trz
Note: Any FTP transfer of these files should be performed using Binary mode.
Included in the bxssetup70200u.trz file are 6 XML scripts that create sets of AppXtender applications grouped by Banner product. There is a General script (all sites will install this), and there are also scripts for Advancement, Finance, Financial Aid, Human Resources, and Student-related AppXtender applications.
Your site will install sets of AppXtender applications depending on whether you have licensed the corresponding Banner products.
Banner XtenderSolutions Release 7.2 June 200828 Installation Guide Confidential

2 Install BXS 7.2 (for New BXS Sites)Installing the System
BXS 7.2 consists of up to 18 AppXtender applications that integrate with Banner. The rules that determine which groups of applications you may install are as follows:
• You may not omit the group of applications that corresponds to any Banner product that you currently have installed in your Banner database. For example: You have Banner Finance. You must minimally install the AppXtender applications that correspond to Banner Finance and Banner General.
Note: This is relative to whether or not the Banner product is installed in your Oracle database, not to whether the Banner product is fully operational at your site.
• If you lack a Banner product, you may install the AppXtender applications that correspond to that Banner product. In such a case, there will be no integration between Banner and that group of applications and the applications will be considered standalone applications. At a later point if you license the corresponding Banner product, and assuming that certain structural modifications have not been done to those applications, the applications may be integrated to the Banner product with minimal effort.
Note: You may only select individual product groups to install, not individual applications. For example, you will choose whether to install Banner Finance AppXtender applications, but you will not be able to install just one of those Finance AppXtender applications. The reason for this is that the real-time synchronization system exists at the product group level, not at the individual application level, so either all tables/packages/synonyms etc. for a product group must exist, or none of them.
To create the desired applications:
2.12.1 From the bxssetup70200u.trz file, extract the following files into a location of your choice:
Note: If you are using FTP to move your files from a non-Windows machine to your Windows machine, you should transfer your XML files in binary mode.
• general_app.xml: This file is used to create the application B-G-ID. This is the only application required by all BXS sites, regardless of the extent of the existing Banner installation.
• alumni_apps.xml: This file is used to create two Advancement-related applications, B-A-ID, and B-A-IDGP. You must install this file if you have Banner Advancement installed, otherwise, it is optional.
• finance_apps.xml: This file is used to create four Finance-related applications, B-F-ID, B-F-DOCS, B-F-PROP, and B-F-GRNT. You must install this file if you have Banner Finance installed, otherwise, it is optional.
June 2008 Banner XtenderSolutions Release 7.2Confidential Installation Guide 29

2 Install BXS 7.2 (for New BXS Sites)Installing the System
• finaid_apps.xml: This file is used to create two Financial Aid-related applications, B-R-ID and B-R-TREQ. You must install this file if you have Banner Financial Aid installed, otherwise, it is optional.
• humanres_apps.xml: This file is used to create the Human Resources-related applications, B-H-ID, B-H-EMPL, B-H-APPL, and B-H-POSN. You must install this file if you have Banner Payroll and Position Control installed, otherwise, it is optional.
• student_apps.xml: This file is used to create the Student-related applications, B-S-ID, B-S-ADMN, B-S-CRSE, B-S-DGRE, and B-S-SECT. You must install this file if you have Banner Student installed, otherwise, it is optional.
2.12.2 If you are not using DiskXtender, open the extracted XML files in an editor and perform a search and replace operations on the XML. Search for the following text:
\\MACHINE_NAME\SHARE_NAME\
Replace the text with the actual storage location of your applications.
2.12.3 Log in to Application Generator as SYSOP and select the Data Source you created in an earlier step.
2.12.4 From the File menu, select Import and browse to the location of the general_app.xml file.
2.12.5 Click Next to process the Import. You should receive a message indicating success. If you receive a warning message, please contact the ActionLine immediately.
2.12.6 Click Finish to complete the import and create the B-G-ID application. This application is required at all BXS sites.
2.12.7 Repeat this process for each XML file (listed above) corresponding to the set of applications you wish (or are required) to install.
2.12.8 After you have completed importation of the XML files, run the following test in a parallel SQL*Plus session. This test indicates that the correct application numbers have been assigned (leave Application Generator open while you do this):
sql_cmd otgmgr/passwordSELECT appid FROM otgmgr.ae_appsWHERE appname = 'B-G-ID'
Warning: If your SELECT statement results in any value other than 513 (including null), you should NOT continue any further, but should contact ActionLine for further assistance.
2.12.9 To confirm the file object storage configuration locations for the new applications in Application Generator:
Banner XtenderSolutions Release 7.2 June 200830 Installation Guide Confidential

2 Install BXS 7.2 (for New BXS Sites)Installing the System
(a) Expand the Applications node on the left pane, so that all of the installed Applications are listed.
(b) Select the first application in the list. Information about the application will be displayed in the right pane.
(c) Select the tab labeled PATHS.
(d) Ensure that the values displayed are correct. If the values are not correct, you may either manually enter an appropriate path, pick a value from the list of existing values, or use the Browse feature to select a drive path.
2.12.10 You should keep Application Generator open for the following step.
June 2008 Banner XtenderSolutions Release 7.2Confidential Installation Guide 31

2 Install BXS 7.2 (for New BXS Sites)Installing the System
Step 2.13—Change SYSOP Password in Application Generator
The following steps must be completed within Application Generator.
2.13.1 Change the default password for SYSOP from 'xscm' to some other value at this time. To do this:
(a) Open the Users folder.
(b) Select the SYSOP user name.
(c) Change the values in the Password and Verification fields to your new password value.
(d) Click Apply.
Note: From this point on, you should use SYSOP to do any administrative work within Application Generator.
Note: Because of the CM Security Model, your actual connections to Oracle are via the OTGMGR account, but you will not use an OTGMGR login account to actually run the EMC Documentum tools (Application Generator, etc.).
2.13.2 You should keep Application Generator open for the following step.
Step 2.14—Determine and Assign File Object Storage Configuration for New Applications (Windows Server)
Determine the file storage locations for the AppXtender objects (files, annotations, OCR, and FullText). The storage of objects requires substantial planning to optimize retrieval performance, adequate storage space, operating system share and folder privileges, and network performance. These four storage locations are maintained within the AppXtender system on a per-AppXtender-application basis for each pre-defined BXS AppXtender application. You will need to adjust the default storage path for each new application by using Application Generator.
Examples of acceptable storage locations include Windows network share names, EMC Documentum DiskXtenderTM server names, or any other valid file naming convention. UNC is highly recommended for networked drives.
Note: Avoid using lettered drives such as M:, which would force every AppXtender client workstation to have identically mapped M: drives.
Banner XtenderSolutions Release 7.2 June 200832 Installation Guide Confidential

2 Install BXS 7.2 (for New BXS Sites)Installing the System
For more information on storage locations, see the EMC Documentum ApplicationXtender Concepts and Planning Guide Release 5.30.
To set the file object storage configuration for the new applications:
2.14.1 Expand the Applications node on the left pane, so that all of the installed Applications are listed.
2.14.2 Select the first application in the list. Information about the application will be displayed in the right pane.
2.14.3 Select the tab labeled PATHS.
2.14.4 The values initially displayed are stub values created by the XML import used to build the application. You must replace each value with a valid storage path before the application can be used. You may either manually enter an appropriate path, pick a value from the drop down list of existing values, or use the Browse feature to select a drive path.
The same value may be used for all four storage categories and the same path may be used across all applications. Optimally, however, you should consider storage size and other file repository considerations in making your choices on paths. For the 18 applications, you may have 4 distinct paths for each application (72 total), 1 single path used by all applications and object types, or any number between the two, depending on your storage plans.
Note: EMC Documentum's DiskXtender product's server names may also be used. For more information, see “Using DiskXtender” in Chapter 6 of the EMC Documentum ApplicationXtender Core Components Administrator's Guide Release 5.30.
2.14.5 Click Apply to save the path information for the application.
2.14.6 Repeat this process for each application that was previously created. Path information for existing applications will be available in the dropdown list for other applications.
2.14.7 You should keep Application Generator open for the following step.
June 2008 Banner XtenderSolutions Release 7.2Confidential Installation Guide 33

2 Install BXS 7.2 (for New BXS Sites)Installing the System
Step 2.15—Set License Server Mode for Data Source
Set the License Server mode within Application Generator. If Application Generator is not open at this time, open it now. The default license mode is Evaluation, but this mode will not work for the BXS integrated product. Following guidelines in EMC Documentum’s literature regarding the License Server mode, set your Data Source to point to the License Server you installed in a previous step.
You may exit Application Generator at this time.
Step 2.16—Restore Original Tablespace Sizing
If you altered your tablespace in Steps 2.5 or 2.11, you should revert back to the original tablespace size now.
Step 2.17—Install BXS-required Java Files for Single Login Functionality
Location of Needed Files: ext70200u.trz
Warning: This step will install the Cryptix Java Cryptography Extension (JCE) provider, the ISNetworks JCE provider, JDOM, and BXS Java files on your Banner database. If you already have one of these installed or another JCE provider installed within BANINST1 schema, please stop and contact the ActionLine for compatibility issues.
Some BXS database packages contain Java-based stored procedures. This step installs required Java files into the Banner database. Complete the following steps on any workstation that has Oracle Client software installed or on the database server.
2.17.1 Create a temporary folder. This will be your working folder for the installation.
2.17.2 Copy bxsjavaprocs.zip to your working folder and unzip the file into that folder.
2.17.3 Ensure Oracle's bin directory is in your operating system's path environment variable.
If you are using a Windows based system, execute the following statements from your working folder:
Banner XtenderSolutions Release 7.2 June 200834 Installation Guide Confidential

2 Install BXS 7.2 (for New BXS Sites)Installing the System
dropbxsjava <BANINST1_PASSWORD> <DATABASE_NAME>
loadbxsjava.bat <BANINST1_PASSWORD> <DATABASE_NAME>
If you are using a Unix-based system, execute the following statement from your working folder:
./dropbxsjava.sh <BANINST1_PASSWORD> <DATABASE_NAME>
./loadbxsjava.sh <BANINST1_PASSWORD> <DATABASE_NAME>
2.17.4 Run the SQL*Plus script grantjavaprivs.sql, which was part of the zipfile and is now in your working folder. This script grants BANINST1 Java permissions to use the Cryptix JCE provider.
sql_cmd baninst1/password
start grantjavaprivs
Note: If you receive an error, please re-run this script as SYSTEM. This procedure should result in a message indicating that the PL/SQL procedure successfully completed. If you wish, you may run GURUTLRP to locate any database objects that could not be compiled.
2.17.5 Delete the working folder.
Step 2.18—Update GURDMODS to Indicate the Completion of the Preceding Steps
Location of Install Media: bxssetup70200u.trz
Installation Target: Banner / BXS Database
All preceding steps of this chapter should be completed prior to the execution of this step.
A new GURDMODS entry will be created by this step. This GURDMODS entry will be necessary for the GoStage step of the upgrade process in Chapter 4 to begin.
Connect to the database as GENERAL and execute script lrudone.sql which is used to update Banner table GURDMODS with an indicator that the previous steps have all been successfully applied to your system:
sqlplus /nologstart lrudone
June 2008 Banner XtenderSolutions Release 7.2Confidential Installation Guide 35

2 Install BXS 7.2 (for New BXS Sites)Installing the System
Step 2.19—Complete the steps in Chapter 4 to Continue the Installation of BXS 7.2
Complete all the steps in Chapter 4, Upgrade Banner XtenderSolutions 7.2. When you complete the steps in Chapter 4, continue with the steps in Chapter 5, AppXtender - Final Installation Steps.
Banner XtenderSolutions Release 7.2 June 200836 Installation Guide Confidential

3 Upgrade to BXS 7.2 (for Existing BXS Sites)Upgrading the System
Chapter 3 Upgrade to BXS 7.2 (for Existing BXS Sites)
Upgrading the System
Warning: Do not attempt any steps in this chapter until you have reviewed the information found in Chapter 1, Banner XtenderSolutions 7.2.
Hardware Platform(s) Required for Steps in this Chapter
If you are implementing BXS on a Windows 2000 (SP4) or Windows 2003 (SP1)Server, then you will implement most of the steps of this chapter on that one machine.
Note: If you are doing as much as possible from your local Windows workstation (which is not a Windows Server), you must do certain steps, as noted in this guide, on a Windows 2000 (SP4) or Windows 2003 (SP1) Server.
Note: The required AppXtender Administrator Tool (AppXtender Admin) must be installed on a Windows 2000 (SP4) or Windows 2003 (SP1) Server. For specific hardware and software requirements for the AppXtender Admin tool, see the Banner XtenderSolutions Hardware and Software Requirements Guide or Chapter 2 of the ApplicationXtender Concepts and Planning Guide Release 5.30.
To install and setup BXS at your institution, please follow the steps below:
Step 3.1—Install Banner General 7.4
Installation Target: Banner database host
Install Banner 7.4, including General 7.4, if it is not already installed. This Banner upgrade must be complete before beginning any installation of BXS.
June 2008 Banner XtenderSolutions Release 7.2Confidential Installation Guide 37

3 Upgrade to BXS 7.2 (for Existing BXS Sites)Upgrading the System
Step 3.2—Uninstall Earlier Versions of EMC Documentum Software
Before uninstalling your existing products, you may want to make a note of the following settings that you can re-use with EMC Documentum 5.30.087:
• Database alias(es) used to configure a Data Source.
Please uninstall your EMC Documentum software in the following order:
3.2.1 Uninstall AppXtender Web Access and all AppXtender Web Access components.
3.2.2 Uninstall AppXtender Admin Tool.
3.2.3 Uninstall AppXtender Desktop.
3.2.4 The installation of License Server 5.60.049 in the following step will automatically remove the previous version, so no manual action is needed to uninstall License Server. If you do a manual uninstall, be sure to back up your license keys first. The automatic upgrade of the License Server to version 5.60.049 will retain all licensing key data without manual intervention.
Step 3.3—Install AppXtender License Server Version 5.60.049 (if necessary)
Location of Install Media: LicenseServer Folder
Installation Target: Any Windows platform (as recommended by EMC Documentum). This machine much be network-accessible to all client/server and AppXtender Web Access server and services machines used by BXS.
3.3.1 Install (or upgrade) the AppXtender License Server 5.60.049 (or later) on a Windows server within network reach of all client PCs that will be running AppXtender as well as all AppXtender Web Access server(s), whether Windows or Solaris based.
3.3.2 Enter the license keys into the License Administrator.
For more information about the AppXtender License Server, see the EMC Documentum XtenderSolutions License Server Administrator’s Guide Release 5.60.
For suggestions regarding placement of your AppXtender License Server using AppXtender Web Access .Net, see "System Architecture" on page 106. For suggestions regarding placement of your AppXtender License Server using AppXtender Web Access J2, see "System Architecture" on page 109.
Banner XtenderSolutions Release 7.2 June 200838 Installation Guide Confidential

3 Upgrade to BXS 7.2 (for Existing BXS Sites)Upgrading the System
Note: BXS will not work in the Evaluation or Demo modes under which AppXtender might operate in the absence of valid license keys. Please contact SunGard’s ActionLine for more information on how to obtain your license keys for the EMC Documentum products you have licensed.
Step 3.4—Install AppXtender Administrator 5.30 (Windows Server)
Location of Install Media: Desktop Folder
Installation Target: Windows 2000 (SP4) or Windows 2003 (SP1) Server
3.4.1 Ensure that you have access to the Desktop installation folder.
Note: For this step, you will be working on the Windows Server machine where you will install the AppXtender Admin tool. You may use Terminal Server (Remote Desktop Connection) to do this install, but it is recommended that your install media be local to the Windows Server and not accessed via a network-accessed drive.
Note: This server machine must have Oracle client connectivity already installed. The Oracle/Banner database to which AppXtender Admin will connect must be accessible via this Oracle client. Use tnsping.exe or tnsping80.exe within a Command (DOS) window to test your Oracle connectivity. Resolve any problems before continuing.
Note: For specific hardware and software requirements for the AppXtender Admin tool, see the Banner XtenderSolutions Hardware and Software Requirements Guide or Chapter 2 of the ApplicationXtender Concepts and Planning Guide Release 5.30.
Note: This Windows Server machine with the AppXtender Admin tool does not need any additional EMC Documentum components for purposes of the AppXtender Admin tool. It may, however, contain additional AppXtender components to consolidate resources (to reduce the number of Windows servers needed). These additional components include:
• AppXtender Web Access .NET Server
• AppXtender Web Access Rendering Server
• License Server
• AppXtender Utility Services
See "AppXtender Web Access Deployment - General Considerations" on page 105 for more information on machine utilization and requirements.
June 2008 Banner XtenderSolutions Release 7.2Confidential Installation Guide 39

3 Upgrade to BXS 7.2 (for Existing BXS Sites)Upgrading the System
3.4.2 Log in as Administrator or as a member of the Administrators group on your Windows Server to install the AppXtender Admin tool.
3.4.3 Execute Setup.exe from the Desktop installation folder and follow the installation instructions on installing AppXtender Admin in “Setup Wizard” in Chapter 1 of the EMC Documentum ApplicationXtender Core Components Administrator’s Guide Release 5.30. For the initial setup of AppXtender on the server, please select the following settings during the installation process:
• Ensure that you select the Administrator Installation Type.
• Ensure that you select and install Administrator Configuration, Application Generator, and Administrator Utilities.
The AppXtender client software will eventually need to be installed on all PCs that will use the AppXtender client/server user interface. For purposes of installation and configuration, however, only one initial machine needs to be configured to complete the installation of BXS 7.2. Instructions for installing AppXtender on additional PCs can be found in "Configure Additional Desktop Machines" on page 43.
Step 3.5—Register OtgSctHk.dll (Windows Server)
The installation process will migrate a file named OtgSctHk.dll to your Content Management folder. To register this .dll, using Windows' Start/Run, execute the following:
regsvr32.exe "C:\Program Files\XtenderSolutions\Content Management\OtgSctHk.dll"
Note: Due to white space in the file or path, include the double quotes around the path and filename. Use the appropriate path for your installation site.
Step 3.6—Configure Data Source Within Data Source Selector Tool
From the Start menu, select Programs > AppXtender > Data Source Selector, run the Data Source Selector program. You should see your existing Data Source.
3.6.1 Highlight the Data Source name.
3.6.2 Click on the Default button to make that Data Source the default data source and to make it visible to AppXtender applications.
3.6.3 Exit the Data Source Selector utility.
Banner XtenderSolutions Release 7.2 June 200840 Installation Guide Confidential

3 Upgrade to BXS 7.2 (for Existing BXS Sites)Upgrading the System
Step 3.7—Install BXS-required Java Files for Single Login Functionality
Location of Needed Files: ext70200u.trz
Warning: This step will install the Cryptix Java Cryptography Extension (JCE) provider, the ISNetworks JCE provider, JDOM, and BXS Java files on your Banner database. If you already have one of these installed or another JCE provider installed within BANINST1 schema, please stop and contact the ActionLine for compatibility issues.
Some BXS database packages contain Java-based stored procedures. This step installs required Java files into the Banner database. Complete the following steps on any workstation that has Oracle Client software installed or on the database server.
3.7.1 Create a temporary folder. This will be your working folder for the installation.
3.7.2 Copy bxsjavaprocs.zip to your working folder and unzip the file into that folder.
3.7.3 Ensure Oracle's bin directory is in your operating system's path environment variable.
If you are using a Windows based system, execute the following statements from your working folder:
dropbxsjava.bat <BANINST1_PASSWORD> <DATABASE_NAME>
loadbxsjava.bat <BANINST1_PASSWORD> <DATABASE_NAME>
If you are using a Unix-based system, execute the following statement from your working folder:
./dropbxsjava.sh <BANINST1_PASSWORD> <DATABASE_NAME>
./loadbxsjava.sh <BANINST1_PASSWORD> <DATABASE_NAME>
3.7.4 Run the SQL*Plus script grantjavaprivs.sql, which was part of the zipfile and is now in your working folder. This script grants BANINST1 Java permissions to use the Cryptix JCE provider.
sql_cmd baninst1/password
start grantjavaprivs
Note: If you receive an error, please re-run this script as SYSTEM. This procedure should result in a message indicating that the PL/SQL procedure successfully completed. If you wish, you may run GURUTLRP to locate any database objects that could not be compiled.
June 2008 Banner XtenderSolutions Release 7.2Confidential Installation Guide 41

3 Upgrade to BXS 7.2 (for Existing BXS Sites)Upgrading the System
3.7.5 Delete the working folder.
Step 3.8—Install the INB-AX Bridge (Optional)
Install Media: ext70200u.trz
Communication between Internet Native Banner and AppXtender is facilitated by a program known as the INB-AX Bridge. This program is installed on PCs of all users who wish to launch AX from an Internet Native Banner environment.
To install the INB-AX Bridge:
3.8.1 The INB-AX Bridge requires that the host PC have the Microsoft .Net Framework present before installation. The Framework installation program can be downloaded from Microsoft's website:
http://www.microsoft.com/downloads/
Locate the files by searching for .Net Framework. The recommended version of the Microsoft .NET Framework is 1.1.
3.8.2 The installation file for the INB-AX Bridge can be found in the base directory of the XtenderSolutions 7.2 product download (ext70200u). Run SETUP.MSI from the installation directory to install the INB-AX Bridge.
3.8.3 You will be prompted for an installation path. Your may select a path of your choice, or choose the default path of C:\Program Files. The installation program will create a directory called SCT in this path.
3.8.4 Once the installation process has completed, the SCT directory will contain a file called INBAXBridge.htm. A copy of this file must be moved to a web server accessible to Banner users. This file redirects the call to XtenderSolutions to the bridge program running on the user's machine.
Note: The URL for this file must be specified on the EXAINST form for the integration to work properly. Refer to the Banner XtenderSolutions Administration Guide for additional information on EXAINST.
The program, inbaxbridge.exe, will be launched when a user initiates an XtenderSolutions session from an Internet Native Banner Session (User Preference settings will apply). It will run in the System Tray and will remain running unless explicitly closed by the user, or the machine is restarted.
Banner XtenderSolutions Release 7.2 June 200842 Installation Guide Confidential
3 Upgrade to BXS 7.2 (for Existing BXS Sites)Upgrading the System
Step 3.9—Update GURDMODS to Indicate Completion of the Preceding Steps
Location of Install Media: bxssetup70200u.trz
Installation Target: Banner / BXS Database
All preceding steps of this chapter should be completed prior to the execution of this step.
A new GURDMODS entry will be created by this step. This GURDMODS entry will be necessary for the GoStage step of the upgrade process in Chapter 4 to begin.
Connect to the database as GENERAL and execute script lrudone.sql which is used to update Banner table GURDMODS with an indicator that the previous steps have all been successfully applied to your system:
Sql_cmd general/passwordstart lrudone
Step 3.10—Configure Additional Desktop Machines
For best practices on rolling out AppXtender client/server software to a large number of desktops, see "Unattended Setup" in Chapter 1 of the ApplicationXtender Desktop Installation Guide Release 5.30.
An enterprise rollout of a Data Source can best be accomplished by creating a workstations settings file (.AXS) on an administrative workstation, and then distributing that .AXS file to all client workstations that will be installing AppXtender. For more information, see "Saving and Loading Settings" in Chapter 2 of the ApplicationXtender Desktop Installation Guide Release 5.30.
Step 3.11—Complete the steps in Chapter 4 to Continue the Installation of BXS 7.2
Complete all the steps in Chapter 4, Upgrade Banner XtenderSolutions 7.2.
June 2008 Banner XtenderSolutions Release 7.2Confidential Installation Guide 43

3 Upgrade to BXS 7.2 (for Existing BXS Sites)Upgrading the System
This page intentionally left blank
Banner XtenderSolutions Release 7.2 June 200844 Installation Guide Confidential

4 Upgrade Banner XtenderSolutions 7.2
Chapter 4 Upgrade Banner XtenderSolutions 7.2
The purpose of this document is to describe the procedures necessary to install Banner XtenderSolutions release 7.2.
If you do not plan to install this upgrade immediately, refer to the Media Unload section for verification instruction for the media you received. If you are not able to successfully unload the upgrade material, contact SunGard Higher Education to obtain another copy of the installation media.
This document explains each step of the upgrade process; it has been designed to cover each step that may be required to upgrade a Banner product. The list of steps is consistent from release to release. Any steps that are not required for this release are marked N/A in the "Applies to this Stage" column in the Step description and dependencies table.
If any errors or problems occur during the upgrade process, login to the SunGard Higher Education Customer Support Center https://connect.sungardhe.com/customer_support to search for solutions or to submit a service request for assistance with the issue. You can also report issues via telephone at 1(800) 522-4TCP (1-800-522-4827).
Caution: If you have implemented VPD (Virtual Private Database) in your database, potentially affected steps will include a note so that you may make appropriate modifications to the delivered scripts. These notes will be in gray text boxes, and will begin with the words "VPD ALERT". If you have not implemented VPD, these notes should be ignored.
Note: The first VPD ALERT is in Step 3; please read it before continuing with the upgrade.
Icons
Throughout this document you will find three icons: an eye, a pointing hand, and an Enter button.
Review these files for errors before continuing on to the next step.
The eye is always followed by a filename; this file is generated when you carry out a step.
The hand icon points to information you need to be aware of in order to successfully complete the step.
When this icon follows a command line, press Return or Enter.E n te r
June 2008 Banner XtenderSolutions Release 7.2Confidential Installation Guide 45
4 Upgrade Banner XtenderSolutions 7.2
Installer Required Skills
The person assigned to apply this upgrade must have the skills listed below. If you do not have a person with the required skill set, consider installation services from SunGard Higher Education.
Required Skill Reason for Requirement
Editor knowledge The installer will have to use the editor to review and possibly customize some of the scripts before they are executed.
Operating system knowledge
• Backup/Restore
• Tape operations
• Directory creation
You must take a backup before you start the installation process.
The installer may have to restore to this point if something fails or is deleted mistakenly.
Basic DBA training or knowledge
• Grants
• Table Creates and Alters
• Startup/Shutdown
• Export/Import
All Banner environments are sized and implemented differently. When changes are being made to the database and software, site customization may be required.
Oracle Tools Knowledge
• Oracle Forms
• SQL*Net
• SQL*Plus
• EXP
• IMP
• Loader
These tools are all used during a Banner upgrade.
COBOL program compilation knowledge
Some batch processing and background jobs are written in COBOL. When new versions of these programs are delivered, they must be compiled on your computer.
C program compilation knowledge
Some batch processing and background jobs are written in C. When new versions of these programs are delivered, they must be compiled on your computer.
Banner XtenderSolutions Release 7.2 June 200846 Installation Guide Confidential

4 Upgrade Banner XtenderSolutions 7.2
Step Description and Dependencies Table
Step Applies to this upgrade
Description Dependent on Step
Restart Notes
1 Distribute Release Documents
-
2 Verify Environment Prerequisites
Previous A
3 Verify Upgrade Prerequisites
Previous
4 Load modification tables Previous A
5 Modify database objects (gostage)
Previous D
6 Migrate from stage to permanent directories
Previous C
7 N/A Compile COBOL programs
6 A
8 Compile C programs 6 A
9 Apply required data changes
5
10 Generate Oracle forms 6 A
11 N/A Generate Oracle reports 6 A
12 N/A Update letter generation/population selection tables
Previous A
13 Update referential integrity constraints
5 A
14 Restart the gostage process Previous A
June 2008 Banner XtenderSolutions Release 7.2Confidential Installation Guide 47

4 Upgrade Banner XtenderSolutions 7.2
Restart Notes
15 Verify the state of the upgraded environment
Previous A
Restart Code Description
A This step may be re-executed from the beginning after the problem is corrected.
B Correct the problem that caused the failure (most often free space or maximum number of extents exceeded). Execute your copy of the script to continue from the point of failure.
C This step takes intermediate commits so the conversion can be accomplished with reasonably sized rollback segments. If this step fails, it will be necessary to drop the table being converted and re-import it from the table level export.
Banner XtenderSolutions Release 7.2 June 200848 Installation Guide Confidential

4 Upgrade Banner XtenderSolutions 7.2
D This process may be re-executed from the beginning after the problem is corrected. Each step of the process indicates its success in a table called GURDMOD. When the step is restarted, successfully completed steps will automatically be skipped. This method eliminates the need to ignore error conditions because the step had been previously run except in the case when multiple DDL commands are contained in the same script. In this case it is possible that the first DDL completed successfully and will cause an error when the script is re-executed.
To determine the reason this step failed, first review the log file called listab1. This log file contains all the generated output from the main gostage process. Scroll to the bottom of the log file and look for an error message indicating the reason for the failure. Errors such as "out of space" or "object does not exist" will appear in this log.
If this log does not indicate a reason for the failure, the failure probably occurred in a hosted SQL*Plus routine. The most common reason for failure is that one of the support routines could not be found. Normally these support routines are generating other SQL routines so they are running very quietly (termout off) and you cannot see the error message from the failure.
Check that the following objects exist on your machine and are accessible through the Oracle PATH. On the MICROSOFT WINDOWS platform, the plus subdirectory of each of the products that you license should be added to the HKEY_LOCAL_MACHINE\SOFTWARE\ORACLE\SQLPATH registry entry.
gchkbgrt.sql gchksyn.sql gdroptab.sql gdrpsyn.sql ggrttmp.sql glramod.sql gmakgrt.sql gmakgrtv.sql gostage.sql grunsiz.sql gsanobj.sql gsaoobj.sql gsdrslt.sql gsirslt.sql gskipgrt.sql gstrslt.sql guidmod.sql guitmod.sql guovmods.sql gupuser.sql guraltg.sql guraltr.sql guraltrb.sql gurcmod.sql gurespl.sql gurfgrt.sql gurgrnt.sql guromod.sql gurospl.sql gursava.sql gursava2.sql gurscls.sql gurtgr1.sql gurtgr2.sql gurtgr3.sql gurtgr4.sql gurtgr5.sql gurtgrt.sql gurtgrto.sql gurtgrtv.sql gutemod.sql gutfmod.sql gutnmod.sql gutpmod.sql guttmod.sql guttmod.sql gindex.sql gurgrtb.sql gurgrtw.sql gurgrth.sql gurgrts.sql gchkuser.sql gcreuser.sql gurgrti.sql gurrhmu.sql gurutlrp.sql gurgrte.sql gcreuser.sql gurgrti.sql gurrhmu.sql gurutlrp.sql gurgrte.sql
If all the objects exist, the next thing to check is the spool files generated by the hosted SQL*Plus routine. In your SPLPREF directory, review the files with the most recent time stamps for errors.
Restart Code Description
June 2008 Banner XtenderSolutions Release 7.2Confidential Installation Guide 49

4 Upgrade Banner XtenderSolutions 7.2
Another way to determine on which step the gostage process failed is to use the GUASMOD form. This form is run outside the Banner menu structure and is used to show the state of the material currently loaded into the GUBSMOD and GURSSQL tables. This form is normally query only for the purpose of identifying what modifications have been applied to your system or identifying the point of failure of an upgrade. It can be used to update the SQL used during the upgrade or to upgrade the modification history table. Before using this form to make changes, be sure you understand the gostage process and the implications of the change you are making.
To invoke the GUASMOD form for GUI mode:
You must do this from an IBM-compatible PC that has both Oracle Forms and SQL*Net installed and operationally tested. The PC must also be set up to run Banner. In other words, the path used for Oracle Forms Runform must be able to "see" the guasmod form.
Start Oracle Forms Runform. The Oracle Forms Runform Options window opens. Enter guasmod as the File. The userid and password are those for the upgrade_owner login.sql variable described in Step 3.
Restart Code Description
Banner XtenderSolutions Release 7.2 June 200850 Installation Guide Confidential

4 Upgrade Banner XtenderSolutions 7.2
Media Unload and Verification Instructions
This section describes how to verify and unload the media necessary to complete this Banner upgrade.
Block descriptions
BLOCK 1
A view that does an outer join of the GUBSMOD and GURDMOD tables showing what modifications have been applied and what ones are still pending. This is a query only block.
BLOCK 2
The modification description row from the GUBSMOD table. This is an updatable block but this information should not ever need to be changed.
BLOCK 3
The SQL to apply the modification from the GURSSQL table. This is an updatable block and can be used to modify the SQL that will be used to apply the update. The insert record function can be used to insert new blank lines. The new records are automatically sequenced.
BLOCK 4
The GURDMOD records, if any exist, showing when the modification was applied, and for which product owners.
This is also an updatable block and serves two purposes:
Deletes the record that indicates that a modification has been applied. This does not undo the modification. If this modification is not rerunable, or has not been applied to this instance, removing this record will cause gostage to fail. The normal use would be to create a record.
Creates a modification history record for a modification that has been applied to this instance but was not recorded properly in the GURDMOD table.
The information in this record must be carefully constructed from the information in the GUBSMOD block. The CODE field must be the release number in upper case followed by a dot followed by the mod code in lower case (e.g., R050000.rfrmuser). The APPLIED BY field must be the Oracle ID that owns the object. The remaining fields can be taken directly from the GUBSMOD block.
Restart Code Description
June 2008 Banner XtenderSolutions Release 7.2Confidential Installation Guide 51

4 Upgrade Banner XtenderSolutions 7.2
There are two types of Banner releases; an interim release and a major release. A major release contains upgrade material for all interim releases since the last major release. For example, if you are upgrading to release 7.0 of a product, it is not necessary to first apply interim releases 6.1.6 and 6.1.7 to your 6.1.5 release.
An interim release is typically a standalone release that can be applied to the current environment irrespective of having applied previous interim releases. Occasionally an interim release will require a previous interim to be applied.
Banner releases are shipped on CD-ROM media or available for download from the ActionWeb.
Encryption
Software and documentation are delivered in an encrypted and compressed format using a process developed by SunGard Higher Education. The password in the password letter you received with this release should be used for all of the unload processes described below. This password will only allow the unload of components which your site has licensed, or of components shipped in unencrypted format. If your password does not allow you to unload a licensed component, contact your account manager to receive an additional password.
Unencrypted Products
If you are unloading only unencrypted products from the media then you may still use the menu driven product selection method; when prompted, enter the following as your password:
ZZZ-99-ZZZ
Note that the full unload process requires an ANSI C-compliant compiler on UNIX platforms. If you do not have such a compiler then you will be limited to unloading only unencrypted products on this machine.
Operating System Independence
All releases are prepared on a UNIX platform, using the standard tar and compress commands, along with the SunGard Higher Education encryption code. Ports of tar and gzip to 16-bit DOS, 32-bit DOS/Windows, VAX OpenVMS and Alpha OpenVMS platforms are available, and executables along with source code are on the CD. All of this software is either freeware or distributed under the GNU Public License.
While each release will, as a standard, include the unloading software for all of the available operating systems, this does not imply support of a particular platform for any particular software release. For example, Banner 7.0 will not support the 16-bit Windows environment, yet the 7.0 CD will be unloadable on that platform. Refer to the product-specific documentation for supported environments.
Banner XtenderSolutions Release 7.2 June 200852 Installation Guide Confidential

4 Upgrade Banner XtenderSolutions 7.2
Unload and Verification on OpenVMS
1. Create a directory to be the "root" for all upgrade material.
create /directory [.upgrade]
2. Position to the directory just created in Step 1 in order to unload the contents of the CD-ROM media.
set default [.upgrade]
3. Enter the following commands, where cdrom_device is your OpenVMS CD-ROM drive (e.g., DKA600:)
mount/media=cdrom/undef=(fixed:none:32256)/over=ident
cdrom_device:
backup/list cdrom_device:[000000]install.bck/sav []
4. Copies of all executables needed for the unloading process are included in both VAX and Alpha forms. However, should the need arise, you can regenerate the unloading programs by typing:
@make
This script will give you the option of making the gzip and tar executables as well as the SunGard Higher Education written code.
5. To unload the remaining portions of the CD ROM, from the operating system prompt, type:
@unldcd
If the CD contains multiple product sets (e.g., Banner Upgrades, Web for Executives, etc.), you will be asked to choose which product set you want to unload. You will then be asked to enter a password, which will determine the products you may unload. The password(s) can be found on a letter sent with the media.
You are also given the option to specify a work directory for the unload process. If free space on the disk is limited, this option can be used to put the temporary files on a different disk. This will also reduce the disk contention.
6. Choose the products you wish to unload at this time following the directions on the screen. Chosen products will then be loaded into the current directory.
Unload and Verification on UNIX
Mount the installation CD-ROM to your CD-ROM mount point. Depending on how your particular UNIX operating system handles ISO9660 format CD-ROMs, you may
E nte r
E nte r
E nte r
E nte r
E nte r
E nte r
June 2008 Banner XtenderSolutions Release 7.2Confidential Installation Guide 53

4 Upgrade Banner XtenderSolutions 7.2
need to use certain options in order to ignore the file version and/or treat filenames as lower case. For example, under DG/UX the following command is necessary
1. mount -o noversion /cdrom
Note that while the mount command may need to be performed by root, it is recommended that the remainder of the install be done by a userid other than root; this is to prevent the tar command from restoring the original uid and gid information, which is probably not valid on your system.
2. Create a directory to be the "root" for all upgrade material.
Example: mkdir upgrade
3. Position to the directory just created in Step 2 in order to unarchive the contents of the CD ROM.
Example: cd upgrade
4. Unload the installation software from the CD ROM:
tar xvf /your_CDROM_mountpoint/install.tar
Please be sure to type the command in the exact case as shown. If your operating system does not provide a way to ignore file versions and/or translate the case of the original file, then your particular unload command may differ. For example, under some UNIX implementations the following command might be necessary to unload the install.tar file:
tar xvf /cdrom/INSTALL.DAT\;1
5. When the command completes, compile the decryption program by typing:
make
If you will only be unloading unencrypted products from the media (e.g., the initial Web for Executives release) then the 'make' step is optional.
6. Unload the remaining portions of the media. From the operating system prompt, type:
unldcd.shl
7. You will be asked to enter your CD-ROM mount point; be sure to specify the actual mount point and not a symbolic link. For example, under Solaris with automounting enabled, the actual mount point for a disc with the ISO label of FOO might be /cdrom/foo#.
If you did not compile the programs in Step 5, then you will be presented with a list of unencrypted products on the disc and asked which you wish to unload.
E nte r
E nte r
E nte r
E nte r
E nte r
E nte r
E nte r
Banner XtenderSolutions Release 7.2 June 200854 Installation Guide Confidential

4 Upgrade Banner XtenderSolutions 7.2
Otherwise, if the CD contains multiple product sets (e.g., Banner Upgrades, Web for Executives, etc.), you will be asked to choose which product set you want to unload. You will then be asked to enter a password, which will determine the products you may unload. The password(s) can be found on a letter sent with the media.
You are also given the option to specify a work directory for the unload process. If free space on the disk is limited, this option can be used to put the temporary files on a different file system. This will also reduce the disk contention.
8. Choose the products you wish to unload at this time, following the directions on the screen. Chosen products will then be unloaded into the current directory.
Unload and Verification on Windows or DOS
Place the installation CD-ROM in your CD-ROM drive.
1. Create a directory to be the "root" for all upgrade material.
Example: mkdir upgrade
2. Position to the directory just created in Step 2 in order to unarchive the contents of the CD ROM.
Example: cd upgrade
3. Unload the installation software from the CD ROM; if you are running Microsoft Windows type:
CDROM_driveletter:\inst32.exe
4. If you are running under Windows 3.1, Windows for Workgroups 3.11, or MS-DOS, then type:
CDROM_driveletter:\inst16.exe
INST32.EXE and INST16.EXE are self-extracting executables containing the executables and.BAT files needed to unload the CD-ROM, as well as the source code for the freely distributable code for tar and gzip.
Note that the 16-bit version of the unload is unable to restore long filenames, and so may not be reliable in the future. Most current products adhere to the standard of 8.3 format filenames, but newer technologies such as Java require much longer names.
5. Unload the remaining portions of the media. From the operating system prompt, type:
E nte r
E nte r
E nte r
E nte r
June 2008 Banner XtenderSolutions Release 7.2Confidential Installation Guide 55

4 Upgrade Banner XtenderSolutions 7.2Upgrade to BXS 7.2
unldcd
If the CD contains multiple product sets (e.g., Banner Upgrades, Web for Executives, etc.), you will be asked to choose which product set you want to unload. You will then be asked to enter a password, which will determine the products you may unload. The password(s) can be found on a letter sent with the media.
Choose the products you wish to unload at this time, following the directions on the screen. Chosen products will then be loaded into the current directory.
Upgrade to BXS 7.2
Note: Read All Instructions Before Beginning; Review the Contents of All Scripts (SQL, SHL, COM, and PL files).
Step 4.1—Distribute Release Documents
Distribute the enclosed Release Guide and Inter-dependency Matrix, found in the doc subdirectory, to the appropriate departments. This document explains the modifications that have been made to the system in functional terms and explains those actions that must be taken by the users in preparation for or as part of the release upgrade.
Do not proceed until the responsible users indicate that any current processes or cycles have completed and will not be affected by the upgrade.
Step 4.2—Verify Environment Prerequisites
Part A
This upgrade requires a minimum of Oracle 9i Release 9.2.0.6 with JVM and Oracle Forms and Reports 10g.
Note: For Open VMS clients who are using the Campus Card and/or Housing Integration APIs, Oracle Release 9.2.0.7 is required. If those APIs are not being used, then Release 9.2.0.5 is recommended. Release 9.2.0.7 is not available for Open VMS.
E nte r
Banner XtenderSolutions Release 7.2 June 200856 Installation Guide Confidential

4 Upgrade Banner XtenderSolutions 7.2Upgrade to BXS 7.2
The following Oracle Bugs may impact the application of this upgrade.
Be sure all Oracle users are logged off and cannot or will not log on. If you do this by starting the database in Restricted mode, then all user IDs used in the installation will need the Restricted Session system privilege for the duration of this upgrade. (For more information refer to the Oracle Server Administrator's Guide.) The user IDs affected may be found in the egivedba.sql script and in the login.sql file delivered with this upgrade where the variables BANNER_OWNERS, ARCHIVE_OWNERS, and UPGRADE_OWNER are defined. Note that all Banner object owners are defined by these variables whether they pertain to your installation or
ORACLE BUG
Description Workaround
2528859 Affects OpenVMS, some UNIX platforms and Windows2000.
Release 9.2.0.3 introduced a bug which caused subsequent connects to the database to fail if "whenever oserror exit" is enabled.
The login.sql used for Banner upgrades needs to have this enabled to prevent the upgrade from continuing if scripts started from within SQL*Plus are not found.
On MetaLink the bug is shown as fixed in 9.2.0.5 yet still fails on some platforms running 9.2.0.5. It is recommended that you leave these workarounds in place until such time that the correction of the bug can be confirmed for all supported platforms.
OpenVMS: Define the logical ORA_DEFT_HOSTSTR to be the database SID before applying the upgrade
DEFINE /LOG ORA_DFLT_HOSTSTR TEST
Windows2000: Define the environment variable LOCAL to be the database SID before applying the upgrade
SET LOCAL=TEST
UNIX: Define the environment variable TWO_TASK to be the database SID before applying the upgrade
TWO_TASK=TEST
EXPORT TWO_TASK
3131163 There is an open bug in Oracle 9.2.0.4 and greater that causes ORACLE_PATH to be ignored. This means that scripts started from SQL*Plus will not be found unless they are in the current directory.
All Platforms:
Set SQLPATH equal to ORACLE_PATH.
June 2008 Banner XtenderSolutions Release 7.2Confidential Installation Guide 57
4 Upgrade Banner XtenderSolutions 7.2Upgrade to BXS 7.2
not. Therefore, not all of the BANNER_OWNERS,ARCHIVE_OWNERS, and UPGRADE_OWNER defined will exist at your installation. Under no circumstances should you create these user IDs unless specifically instructed to do so by these installation instructions-if you do, you risk the chance or your upgrade failing.
Note: The user IDs in the egivedba.sql script will be given the DBA role as a default role, so a direct grant of Restricted Session is not necessary. The script is mentioned here only for completeness.
COMPLETE BACKUPS OF YOUR EXISTING SYSTEM BEFORE CONTINUING!
Make sure Oracle is down when the backup is taken. This ensures a consistent backup. Verify that all database files, redo logs, and control files have been successfully backed up.
Part B
Apply this upgrade to your SEED instance first. Never apply it to production without familiarizing yourself with the process by executing it against a non-critical database. This stage must be applied to all of your Banner XtenderSolutions environments.
If you are running under UNIX, be sure that the current directory (represented by a ".") is at the front of your ORACLE_PATH, SQLPATH and UNIX path to avoid any problems when starting some of the upgrade SQL scripts and shells.
If you are running under MICROSOFT WINDOWS, be sure that the plus subdirectory of every Banner product you license has been added to the HKEY_LOCAL_MACHINE\SOFTWARE\ORACLE\SQLPATH registry entry and/or the SQLPATH environment variable to avoid any problems when starting the upgrade SQL scripts. Please also note that the commands you use to import files and to start SQL*Plus will depend on the version of Oracle Server you are using. To perform an upgrade on the MICROSOFT WINDOWS platform, you must open up an MS-DOS window and execute all commands from the MS-DOS command prompt.
If you are running under OpenVMS, be sure that the plus subdirectory of every Banner product you license has been added to the SQLPATH.
TEMPORARY TABLESPACE ALERT
Banner uses Oracle's functionality for creating global temporary tables. Processing which utilizes these tables increases the required amount of temporary tablespace. To avoid the Oracle error: ORA-1652: unable to extend temp segment, it may be necessary to increase the amount of available temporary tablespace. Please refer to FAQ # 12177 for more information. If applicable, global temporary tables can be found listed in the database comparison reports and are identified with "Global Temp" listed in the Sizing Model column.
Banner XtenderSolutions Release 7.2 June 200858 Installation Guide Confidential

4 Upgrade Banner XtenderSolutions 7.2Upgrade to BXS 7.2
Step 4.3—Upgrade Prerequisites
Part A
Installation requirements
The installation procedure assumes that Banner General release 7.4 has been installed. For more information you may refer to the Release Interdependency Matrix, releases.pdf, found in the doc subdirectory of this release.
Any modifications you have made to the base product will remain your responsibility. Each object that has been modified contains descriptive text about the purpose of the modification. This text can be found at the beginning of each object, except for forms, for which the comments are found in Form level procedures named AUDIT_TRAIL_"release_number".
Part B
In this part you will create the following new directory structure:
If the EXTSOL directory structure does not exist on your site or any of its subdirectories are missing, create them as follows:
UNIX
mkdir $BANNER_HOME/extsol
mkdir $BANNER_HOME/extsol/forms
If your site did not install any of the previous Banner XtenderSolutions releases, one new directory and seven new subdirectories must be created before the migration script is run. The main directory is named EXTSOL and the subdirectories are named FORMS, C, PLUS, DBPROCS, MISC, DESKTOP, and JAVA.
If your site DID install one or more previous Banner XtenderSolutions releases, please verify that the JAVA and C directories exist prior to running the migration script.
E nte r
E nte r
June 2008 Banner XtenderSolutions Release 7.2Confidential Installation Guide 59

4 Upgrade Banner XtenderSolutions 7.2Upgrade to BXS 7.2
mkdir $BANNER_HOME/extsol/c
mkdir $BANNER_HOME/extsol/plus
mkdir $BANNER_HOME/extsol/dbprocs
mkdir $BANNER_HOME/extsol/misc
mkdir $BANNER_HOME/extsol/desktop
mkdir $BANNER_HOME/extsol/java
VMS
create /dir BAN_HOME:[extsol]
create /dir BAN_HOME:[extsol.forms]
create /dir BAN_HOME:[extsol.c]
create /dir BAN_HOME:[extsol.plus]
create /dir BAN_HOME:[extsol.dbprocs]
create /dir BAN_HOME:[extsol.com]
create /dir BAN_HOME:[extsol.desktop]
create /dir BAN_HOME:[extsol.java]
MICROSOFT WINDOWS
mkdir drive_letter\banner_home_directory\extsol
mkdir drive_letter\banner_home_directory\extsol\forms
mkdir drive_letter\banner_home_directory\extsol\c
mkdir drive_letter\banner_home_directory\extsol\plus
mkdir
drive_letter\banner_home_directory\extsol\dbprocs
mkdir drive_letter\banner_home_directory\extsol\misc
mkdir drive_letter\banner_home_directory\extsol\desktop
E nte r
E nte r
E nte r
E nte r
E nte r
E nte r
E nte r
E nte r
E nte r
E nte r
E nte r
E nte r
E nte r
E nte r
E nte r
E nte r
E nte r
E nte r
E nte r
E nte r
E nte r
Banner XtenderSolutions Release 7.2 June 200860 Installation Guide Confidential

4 Upgrade Banner XtenderSolutions 7.2Upgrade to BXS 7.2
mkdir drive_letter\banner_home_directory\extsol\java
Part C
In this part, you will define several SQL*Plus variables that are used at various places in the upgrade process. These variables control where files are written and specify which options are to be used during this upgrade.
Delivered with the stage material is a file called login.sql. If you have your own login.sql file and need to have it executed, add the following define commands to your login.sql file and then remove the login.sql file delivered in the stage directory.
PLUS_CMD The plus_cmd variable determines the command to be used to invoke SQL*Plus when executing a HOST started SQL*Plus task during this upgrade. The default value of this variable is 'sqlplus'
SPLPREF The splpref variable defines the file prefix used by the steps in this installation process that generate listings or intermediate SQL routines. This provides a method to segregate the generated output when the stage has to be applied to more than one instance.
Edit the login.sql file and set the value that gets assigned to splpref. The value could be set to the ORACLE_SID or to the name of a directory. The options you have with this feature are limited by the operating system you are running.
Later steps in this document will tell you to review or modify the contents of a generated file. When you are trying to locate the generated file, don't forget that the value of splpref was added to the beginning of the file name
VPD ALERT
E nte r
June 2008 Banner XtenderSolutions Release 7.2Confidential Installation Guide 61

4 Upgrade Banner XtenderSolutions 7.2Upgrade to BXS 7.2
APPLYMOD If your site has implemented VPD you MUST modify the APPLYMOD variable discussed in the next part to nomod.
The applymod variable indicates whether or not modifications should be applied automatically. The variable has two valid values: domod or nomod. Choose nomod if you want to review the table alterations before they are applied.
To understand the effect of this option, you must understand the flow of the gostage process. The first part of this process is an analysis and comparisons of the modifications that are to be applied by this release with the history of what modification have already been applied to your environment. The modifications that have not been applied to your environment are written to a file. The second phase of this process is to apply these changes and to record each one as it is applied. If the applymod variable is set to domod, the second phase is automatically executed.
After the analysis of your environment is completed, the modifications that must be applied to your environment will be found in a file called domod.sql. If the SPLPREF variable was used to route generated files to another directory, the domod.sql file will be found there
If you run domod and it fails:
• you may run gostage again to generate a new domod.sql file, or
• you must edit domod.sql by removing from it the steps that had successfully completed before rerunning it
Banner XtenderSolutions Release 7.2 June 200862 Installation Guide Confidential

4 Upgrade Banner XtenderSolutions 7.2Upgrade to BXS 7.2
UPGRADE_OWNER/UPGRADE_OWNER PASSWORD
The variable upgrade_owner defines the Oracle account which will own the modification tables to be imported in Step 4 of the upgrade (previously, these tables were owned by GENERAL). The login.sql file is delivered with a default upgrade_owner of upgrade1.
The variable upgrade_owner_password is the Oracle password by which the upgrade_owner account will be identified. The login.sql file is delivered with a default upgrade_owner_password of u_pick_it.
In the first part of Step 4 of the upgrade, you will be instructed to execute the General plus script gupuser.sql to verify that the upgrade_owner account of the name you have specified in login.sql exists. If it does not exist, gupuser.sql will create the upgrade_owner account identified by the upgrade_owner_password you have specified and will create under its schema all of the objects it will require to perform the upgrade.
When the gostage process is started, you will be notified of the particular upgrade_owner account being used to perform the upgrade.
PASSWORDS The next section of the login.sql files defines the passwords to all the Banner product owner accounts. Specifying them here prevents the scripts from prompting you for them each time they need to connect or switch from one account to the other. If you have any other Oracle IDs that own Banner tables, you will have to define their passwords as well.
It will be a security problem for you to put your regular passwords into the login.sql file. We recommend that you temporarily change all the account passwords for the duration of the upgrade and set them back after the upgrade is completed.
TABLE AND INDEX SIZING MODELS
The next section of the login.sql file defines what tables and indexes are to be used as sizing and placement models for the new tables created during this upgrade. Each product has a definition for small, medium, large, and huge tables and indexes. If you do not feel the value specified reflects your environment, please feel free to change it. Definitions for products that you do not have will be ignored by the upgrade process.
June 2008 Banner XtenderSolutions Release 7.2Confidential Installation Guide 63

4 Upgrade Banner XtenderSolutions 7.2Upgrade to BXS 7.2
CLOB/BLOB SIZING MODELS
The next section of the login.sql file defines the default clob/blob sizes which are to be used when creating new columns of these types during the upgrade. Again, if you do not feel the values specified for these variables reflect your environment, please feel free to change them. In addition, be sure to verify that the model "????_tablespace_name" of DEVELOPMENT is appropriate for your environment. Definitions that are not used by this upgrade will be ignored.
GENERATE_GRANTS The generate_grants variable can be used to indicate whether or not end-user grant statements should be generated during the gostage process or skipped. If the variable is set to Y, the modification process will automatically generate grant statements for the current environment, but will only apply them automatically if examine_security is set to N. If generate_grants is set to N, the process will skip grant generation and will not exit gostage if examine_security is set to Y, as there will be no generated scripts or reports to examine.
EXAMINE_SECURITY The examine_security variable can be used to instruct the modification process to stop after it generates grant statements. If the variable is set to N, the modification process will automatically apply the generated grants to the current environment. If the variable is set to Y, the process will stop and allow you to review and modify the generated script. You then need to restart the gostage script. Restarting the gostage script applies the grants to the current environment.
Banner XtenderSolutions Release 7.2 June 200864 Installation Guide Confidential

4 Upgrade Banner XtenderSolutions 7.2Upgrade to BXS 7.2
Part D
This upgrade may be applied using the Automated Installer. This tool will allow you to apply an upgrade using a menu driven front end that follows each step contained in the upgrade guide. Use of this tool is optional. If you would like to apply this upgrade using the Automated Installer, please see the README.txt file for details regarding installer setup, system requirements and execution.
Use of the Automated Installer will save time doing the upgrade in terms of overall number of keystrokes, but PLEASE NOTE that it does not serve as a substitute for reading each section, step and/or part of the upgrade guide. Failure to read this upgrade guide could cause the upgrade process to be incomplete or unsuccessful.
LOCAL_OWNERS The local_owners variable specifies which non-standard Banner owners should be kept in sync with the modifications being delivered with this upgrade. For example, if you have cloned part of Banner Student under an Oracle ID called MARS and you want these tables to be kept in sync with the SATURN tables, add MARS to the local_owners variable.
The owner IDs defined in this variable must be:
(a) In upper case
(b) Enclosed in single quotes
(c) Separated by commas
(d) The first entry must be preceded by a comma
(e) The list must be enclosed in double quotes
(f) Added to the PASSWORDS section mentioned previously
(g) Possibly granted the restricted session privilege - refer to step 3
Examples:
define local_owners = ""(no additional owners)
define local_owners = ",'PLUTO','MARS'"(two additional owners)
June 2008 Banner XtenderSolutions Release 7.2Confidential Installation Guide 65

4 Upgrade Banner XtenderSolutions 7.2Upgrade to BXS 7.2
Step 4.4—Upgrade Preparation
In this step you will perform several tasks in preparation for applying the upgrade.
Note: Before starting this Banner XtenderSolutions upgrade, make surethat the schema owner BANIMGR is defined in script gurgrtb.sql which can be found in BANNER_HOME/general/plus.
WARNING: Before proceeding with this install of Banner XtenderSolutions, you MUST have completely finished all previous steps as indicated in the "Installing Banner XtenderSolutions" document that accompanied this release.
Part A
In this part you will run a script to create the BANIMGR owner.
CAUTION: If your site has previously installed Banner XtenderSolutions, skip to Step 4 part B.
Invoke SQL*Plus and run the procedure:
sqlplus /nolog @banimgr
Part B
In this part you will run a script to drop the SYSOP owner.
CAUTION: Only execute this part if your site has previously installed Banner XtenderSolutions 6.2/7.0, otherwise skip to Step 4 part C.
Invoke SQL*Plus and run the procedure:
sqlplus /nolog @drp_cas_sysop
Review: banimgr listing
E nte r
E nte r
Banner XtenderSolutions Release 7.2 June 200866 Installation Guide Confidential

4 Upgrade Banner XtenderSolutions 7.2Upgrade to BXS 7.2
Part C
In this part you will run a script that will:
• Verify that all necessary pre-requisite products have been applied to the environment.
• Verify that the upgrade_owner account specified in login.sql exists. If it does not exist, gupuser.sql will call gcreuser.sql to create the upgrade_owner account and all of the objects it requires to perform the upgrade. If it does exist, gupuser.sql will call gchkuser.sql to make sure it owns all of the objects required to perform the upgrade. If any objects are missing the script will inform you and terminate. At this point you may either drop the user with the cascade option, provided they do not own any objects, or you may create the missing objects by hand. Refer to the gcreuser.sql script for the required objects and their DDL. If you would like to use an upgrade_owner account other than the default owner of upgrade1, refer to Step 3.
• Create a script to be run by eresroled to restore the default roles assigned to the users used in this upgrade.
• Alter the default roles assigned to specific accounts used by this upgrade to include the DBA role. Refer to the egivedba.sql script found in either the current directory or the plus subdirectory for this product for a list of accounts to be modified. These accounts will have their current default roles restored at the end of the upgrade when the eresroled is run.
• Drop the modification tables before importing them. This will assure you have the correct structure for these tables.
Invoke SQL*Plus and run the procedure:
sqlplus /nolog @eruready
After this part is completed, you will have the following files in the directory that the SPLPREF variable points to.
Review: eruready listing
File Name Description Examine
eresrole.sql Script run by eresroled to restore the default roles assigned to the users.
Yes
egivrole.sql Script which altered the users to include DBA as one of their default roles.
Yes
E nte r
June 2008 Banner XtenderSolutions Release 7.2Confidential Installation Guide 67

4 Upgrade Banner XtenderSolutions 7.2Upgrade to BXS 7.2
Part D
In this part you will import the new modification information: If you have chosen a different value for upgrade_owner other than the default of upgrade1, you MUST modify the loadmods.par file to specify this new value of the touser parameter.
imp upgrade_owner/password parfile=loadmods.par file=ext70200.dmp
Part E
In this part you will perform the tasks necessary that will enable you to run the GUASMOD form (described in restart code D) as upgrade_owner should the need arise. Specifically, upgrade_owner will be given select privilege with grant option on the GURDMOD table, and the GUVMODS view will be dropped as BANINST1 (should it still exist) and recreated under the current upgrade_owner account.
Invoke SQL*Plus and run the procedure:
sqlplus /nolog @guovmods
To run the GUASMOD form, use the userid and password defined by the upgrade_owner and upgrade_owner_password variables described in Step 3.
Part F
In this part you will run the gurutlrp.sql utility script to compile database objects that are in an invalid state. The gurutlrp.sql script runs ORACLE's utlrp utility script (as SYS) and then displays a list of the remaining invalid database objects. This script is run to prevent the upgrade process from failing if it attempts to use one of the invalid objects. All errors should be investigated before continuing to the next step.
Invoke SQL*Plus and run the procedure:
egivrole listing Spooled output from the egiverole script. Yes
eruready listing Spooled output from the eruready script. Yes
The import step will generate a warning stating that the file was exported by BANIMGR. This is expected and can be ignored.
Verify that the import completed successfully for all tables by comparing the number of rows shown on the terminal with the counts shown in the ext70200.log file.
File Name Description Examine
E nte r
Banner XtenderSolutions Release 7.2 June 200868 Installation Guide Confidential

4 Upgrade Banner XtenderSolutions 7.2Upgrade to BXS 7.2
sqlplus /nolog @gurutlrp
Step 4.5—Modify Database Objects
Part A
In this part you will create all new XtenderSolutions tables, modify existing tables, create or replace functions, views, packages and procedures, create database triggers and create new sequences as required. Changes that you have made may be affected by this process.
VPD ALERT
In Step 3 you modified your applymod setting to nomod, so in this step you must review the generated domod.sql file, and make appropriate modifications for any delivered scripts impacted by your VPD implementation. Some examples are index and referential integrity constraints on VPDed tables, table conversions of VPDed tables, new tables in VPDed modules or schemas, and loading of required baseline data into VPDed tables.
Review: gurutlrp listing
The packages EOKARTS, EOKFRTS, EOKRRTS and/or EOKSRTS may be in INVALID state at this time. This is expected and can be ignored.
The database modification information can be found in database comparison reports located in the stage doc subdirectory. A separate report will be delivered for each schema owner if it is modified by this upgrade. (For example, database changes for the owner GENERAL will be reported separately from database changes for the owner BANSECR). These database comparison reports are based on the previous release(s) of the product. Database changes for BANINST1 are potentially made during any product upgrade. Please refer to the BANIMGR_objects70200.pdf object list report to review the list of BANINST1 objects changed that are specific to the BANIMGR product. Use the object list report to assist you in reviewing details found in the 2 database comparison report.
June 2008 Banner XtenderSolutions Release 7.2Confidential Installation Guide 69

4 Upgrade Banner XtenderSolutions 7.2Upgrade to BXS 7.2
A script is run within gostage that automatically enrolls these objects in their appropriate classes.
The following is a list of new objects which will be added to the BAN_EXTSOL_C class. If you are using Banner process-level or role-level security and you have created your own classes, you may need to add these objects to your classes.
Object Name Object Type Module Release Introduced
EOQMENU Form Overall 7.0
EOQOLIB Form Overall 7.0
ETVAXAP Form Validation 7.0
ETVDTYP Form Validation 7.0
EXABCXT Form Application 7.0
EXABLNK Form Application 7.0
EXAINST Form Application 7.0
EXARSLT Form Application 7.0
ERALINK Form Application 7.0
ESALINK Form Application 7.0
EXAUPRF Form Application 7.0
ESIAUDT Form Inquiry 7.0
EXRBCXT Job XtenderSolutions 7.0
EXAPRID Form XtenderSolutions 7.0.1
The following is a list of obsolete objects which will be removed from the BAN_EXTSOL_C class. If you are using Banner process-level or role-level security and you have created your own classes, you may need to remove these objects from your classes.
Object Name Object Type Module Release Obsoleted
EXABLNK Form Application 6.0
EXADMAP Form Application 7.0
Banner XtenderSolutions Release 7.2 June 200870 Installation Guide Confidential

4 Upgrade Banner XtenderSolutions 7.2Upgrade to BXS 7.2
A script is run within gostage that automatically removes these objects from their appropriate classes.
The gostage process may exit and instruct you to execute some other step in this document. In this case, after executing the other step, you must always restart the gostage script. The gostage script will tell you when all steps of the installation process have completed.
After this step is completed, you will have the following files in the directory that the SPLPREF variable points to.
NOTE: VRRFF represents the release of XtenderSolutions for which the files listed below are being generated, (where V is the major product version, RR is the product release level, and FF is the "fix level" or interim release level. For example, 70000 for the 7.0 release). If the upgrade is cumulative, and the initial releases of the upgrade have already been applied, scripts which were run during those releases will not be run again. Thus, there will be no spooled output to examine in the splpref directory for some scripts. For example, if you have already applied the 6.0.1 release of a product, you will not find either the generated grant script ebg60001.sql nor its spooled output, the ebl60001 listing, in the splpref directory.
File Name Description Examine
checkum.sql Intermediate file created when examining what modifications are currently on your system.
domod.sql Script of all the modification SQL and commands that must be applied to your system to apply the upgrade.
examgrt.sql Generated script that is executed after generating grants for new database objects.
examscr.sql Generated script that gets executed after generating process-level security records.
listab1 listing
Spooled output from the modification process. Yes
mhuginx.sql Sizing definition for a huge index.
mhugtab.sql Sizing definition for a huge table.
mlrginx.sql Sizing definition for a large index.
mlrgtab.sql Sizing definition for a large table.
June 2008 Banner XtenderSolutions Release 7.2Confidential Installation Guide 71

4 Upgrade Banner XtenderSolutions 7.2Upgrade to BXS 7.2
mmedinx.sql Sizing definition for a medium index.
mmedtab.sql Sizing definition for a medium table.
msmlinx.sql Sizing definition for a small index.
msmltab.sql Sizing definition for a small table.
nomod.sql Script that is executed if the applymod variable is set to nomod.
ebgVRRFF.sql Generated grant script which gives BANINST1 full privileges to all objects owned by other baseline Banner product owners.
eblVRRFF.lst Spooled output from BANINST1 grant script (ebgVRRFF.sql).
efgVRRFF.sql Generated foreign grant script which gives the owner of the product being upgraded access to new tables and views owned by other products.
eflVRRFF listing
Spooled output from the foreign grant script (efgVRRFF.sql).
elisall listing
Spool file built during the extract table allocation process.
engVRRFF.sql Generated script that contains grant statements for new tables and views based on similarly used existing tables and views (will only be generated if generate_grants variable is set to 'Y').
Yes
enlVRRFF listing
Spooled output from new grant script execution (will only be spooled if generate_grants variable is set to 'Y').
Yes
enrVRRFF listing
Best guess grant report (will only be spooled if generate_grants variable is set to 'Y').
Yes
eogVRRFF.sql Generated script containing all grants issued for tables to be dropped and recreated. This script is started later to reapply all the grants so that none are lost.
eolVRRFF listing
Spooled output from the reapplication of the saved grants for tables script (eogVRRFF.sql).
File Name Description Examine
Banner XtenderSolutions Release 7.2 June 200872 Installation Guide Confidential

4 Upgrade Banner XtenderSolutions 7.2Upgrade to BXS 7.2
Caution: If you have made database changes at your site, this script may abort when it attempts to drop a database object that is not there or create a new database object that already exists.
Make sure ALL prerequisites specified in the Overview and Installation Requirements sections have been met before proceeding.
Caution: The following scripts will delete ALL rows associated with particular BANIMGR objects, including those that have a user identification of "LOCAL." They will then insert new and updated rows for userid "BASELINE." You MUST take the necessary steps to preserve any LOCAL changes you have made. These deletes are necessary to prevent a duplicate key violation from occurring, causing the GOSTAGE process to fail.
To keep all or part of your production data, edit these SQL scripts appropriately prior to executing GOSTAGE.
eovgVRRFF.sql Generated script containing all grants issued for views to be dropped and recreated. The grants are then reissued from the BANINST1 account.
eovlVRRFF listing
Spooled output from the reapplication of the saved grants for views script (eovgVRRFF.sql).
eylVRRFFa listing
Spooled output from the first pass at creating public synonyms (eymVRRFFa.sql).
eylVRRFFb listing
Spooled output from the second pass at creating public synonyms (eymVRRFFb.sql).
eymVRRFFa.sql Generated script which will create public synonyms for any object BANINST1 has select access to, but for which no public synonym exists. This is necessary since views, database procedures, etc., do not prefix database objects with the owner.
eymVRRFFb.sql Generated script which will create public synonyms for any object BANINST1 has select access to, but for which no public synonym exists. This second script is needed to create synonyms for new views.
tempgrt.sql File generated during the build new grants process (will only be generated if generate_grants variable is set to 'Y').
tempgrtv.sql File generated during the build of new grants for new views (will only be generated if generate_grants variable is set to 'Y').
File Name Description Examine
June 2008 Banner XtenderSolutions Release 7.2Confidential Installation Guide 73

4 Upgrade Banner XtenderSolutions 7.2Upgrade to BXS 7.2
Caution: The following script will delete the GURMENU rows associated with particular BANIMGR objects and insert new and updated rows for those records which have a user identification of "BASELINE" only. Your "LOCAL" records are preserved. In the case that particular BANIMGR objects have been identified as OBSOLETE, ALL GURMENU rows associated with the particular BANIMGR objects will be deleted.
To keep all or part of your production data, edit the SQL script appropriately prior to executing GOSTAGE.
Invoke SQL*Plus and run the procedure:
sqlplus /nolog @gostage
If this step fails review the listab1 listing file and refer to restart code D, otherwise, continue to part B.
Note: When a C program becomes obsolete, the related rows in tables gubobjs, gjbjobs, gjbpdft, gjbpdef, gjbpval, gobfeob and gjrjprm are deleted by gostage.
Part B
In this part you will run the gurutlrp.sql utility script to compile database objects that are in an invalid state. The gurutlrp.sql script runs ORACLE's utlrp utility script (as SYS) and then displays a list of the remaining invalid database objects. This script is run to shorten the time required to perform subsequent steps of this
SCRIPT NAME TABLE
eobj70200 GUBOBJS
eopt70200 GUROPTM
SCRIPT NAME TABLE
emen70200 GURMENU
Anytime gostage fails, you should review the files in the splpref directory in order of date/time created. Typically, the most recent file will contain the error.
Review: listab1 listing
Banner XtenderSolutions Release 7.2 June 200874 Installation Guide Confidential

4 Upgrade Banner XtenderSolutions 7.2Upgrade to BXS 7.2
upgrade in which the rdbms would otherwise have to recompile invalid database objects as they are referenced. This will also enable the successful generation of all Oracle Forms modules which may not have successfully generated in the past because the rdbms considered the identifiers for invalid database objects to be insufficiently declared, but when the same modules were regenerated, the executables for those modules were created without error. All errors should be investigated before continuing to the next step.
To compile objects which are currently in an invalid state perform the following.
sqlplus /nolog @gurutlrp
All errors should be resolved before continuing to the next step. You may need to repeat this process several times until all dependencies are validated.
Step 4.6—Migrate from Stage to Permanent Directories
In this step you will migrate the staged files to your permanent directories.
The file EXTMIGR.TXT lists all files that need to be deleted from your permanent directories, and all files which should be copied from the staging directory to your permanent directories. The destination is indicated in UNIX format, and will be different on other platforms.
UNIX
The file extmigr.shl will do the appropriate removes, copies, and links. Review for correct directory path names and make sure that the environment variable $BANNER_HOME is set to the appropriate directory before executing.
Review: gurutlrp listing
Before executing any of the migration scripts make sure you are signed on to an operating system account that has write permission into the target Banner directories.
The migration scripts provided for the UNIX, VMS and MICROSOFT WINDOWS platforms expect your directory structure to match the one created by the Banner install process. You will have to modify the scripts if you chose a different directory structure. Migration scripts for other platforms are not provided due to their highly customized structures but you may use the EXTMIGR.TXT file as a starting point for writing your own migration script.
June 2008 Banner XtenderSolutions Release 7.2Confidential Installation Guide 75

4 Upgrade Banner XtenderSolutions 7.2Upgrade to BXS 7.2
Note: The extmigr.shl file defines a local variable, LN, at the top of the file which determines the type of links which should be used in the migration. This change enables clients who wish to use symbolic links, for example, to set LN='ln -s' instead of the default value of 'ln' so that the command ${LN} file $BANNER_HOME/links is translated to ln -s file $BANNER_HOME/links. Similarly, clients who wish to force the removal of any existing targets before linking files can set LN='ln -f'.
Note that even if your directory structure matches the baseline perfectly, some of the link commands will fail (that is, where the link currently exists). Other link errors may indicate that you had two copies of an object when the migration script was executed. This condition must be corrected. The duplication is probably between links and the product subdirectory.
You may wish to run the migration shell in background so that you may review any errors when it is complete. To submit into background and produce an error log, do the following:
1. If your operating system prompt is a percent sign, you are a cshell user. Enter the Bourne shell by typing:
sh
2. Position to the staging directory for this product.
3. Run the migration script by typing:
sh extmigr.shl >extmigr.log 2>&1 &
4. If you were a cshell user and want to return to that mode, press CTRL-D or type:
exit
VMS
The file extmigr.com can be used to perform the necessary copies and deletes. Review the file for correct directory path names and make sure that the logical BAN_HOME is set to the appropriate directory before executing.
1. Position to the staging directory for this product.
2. Start the copies and deletes by typing:
Review: extmigr.log
This file contains the results of the migration.
E nte r
E nte r
E nte r
Banner XtenderSolutions Release 7.2 June 200876 Installation Guide Confidential

4 Upgrade Banner XtenderSolutions 7.2Upgrade to BXS 7.2
@extmigr /output=extmigr.log
MICROSOFT WINDOWS
The file extmigr.pl will do the appropriate deletes and copies. Before running the migration script you must check the BANENV environment variable. This value may be determined by executing the SET command from the DOS prompt.
If BANENV has a value of REG, the value used for BANNER_HOME will be taken from the registry entry:
HKEY_LOCAL_MACHINE\SOFTWARE\BANNER\BANNER_HOME
If BANENV has a value of ENV, the value for BANNER_HOME will be taken from the environment variable BANNER_HOME.
Review the script for correct directory path names.
To run the migration script and produce an error log for the migration, do the following:
1. Position to the staging directory for this product.
2. Run the migration script by typing:
perl extmigr.pl >extmigr.log 2>&1
Step 4.7—Compile COBOL Programs
This step does not apply to this upgrade.
Review: extmigr.log
This file contains the results of the migration.
Review: extmigr.log
This file contains the results of the migration.
E nte r
E nte r
June 2008 Banner XtenderSolutions Release 7.2Confidential Installation Guide 77

4 Upgrade Banner XtenderSolutions 7.2Upgrade to BXS 7.2
Step 4.8—Compile C Programs
In this step you will compile any affected C programs. A script is provided to do the required compiles in the correct order. The output from the baseline compile routine is placed into the exe subdirectory owned by GENERAL. If your compile routine has been modified to write into the current directory, the output will have to be migrated to GENERAL's exe subdirectory before it can be accessed by the users.
UNIX
1. Position yourself in the stage directory.
2. If your operating system prompt is a percent sign, you are a cshell user. Enter the Bourne shell by typing:
sh
3. Start the compiles by typing:
sh eccomp.shl >eccomp.log 2>&1 &
or to recompile ALL XtenderSolutions PRO*C programs type:
sh extcmplc.shl >extcmplc.log 2>&1 &
4. If you were a cshell user and want to return to that mode, press CTRL-D or type:
exit
5. You may continue with the next step of the upgrade. When you need to check if this step has completed, review the audit file called eccomp.log or extcmplc.log. If you have not logged off, you can see if the task is still running by issuing the UNIX ps command.
This procedure must be run from an operating system account that has write permission into the target directory.
Clients that are applying their first Banner upgrade after migrating to Oracle version 10g MUST recompile all XtenderSolutions PRO*C programs. To accomplish this task you will need to copy the extcmplc specific for your platform from your production XtenderSolutions /misc directory to your stage directory.
E nte r
E nte r
E nte r
E nte r
Banner XtenderSolutions Release 7.2 June 200878 Installation Guide Confidential
4 Upgrade Banner XtenderSolutions 7.2Upgrade to BXS 7.2
VMS
1. Position yourself in the stage directory.
2. Start the compiles by typing:
@eccomp /output=eccomp.log
or to recompile ALL XtenderSolutions PRO*C programs type:
@extcmplc /output=extcmplc.log
3. When this step has completed, review the audit file called eccomp.log or extcmplc.log.
MICROSOFT WINDOWS
1. Position yourself in the stage directory.
2. Start the compiles by typing:
perl eccomp.pl >eccomp.log 2>&1
or to recompile ALL XtenderSolutions PRO*C programs type:
perl extcmplc.pl >extcmplc.log 2>&1
3. Review the audit file called eccomp.log or extcmplc.log before continuing with the next step of the upgrade.
Step 4.9—Apply Required Data Changes
VPD ALERT
If a table that has been VPDed is receiving new required baseline data, then the data will need to be inserted for each VPDI code.
E nte r
E nte r
E nte r
E nte r
This step may combine required data changes from all releases since the last major release. If you run a part which has previously been applied, you will receive an error message similar to the following: "This EXIT error was caused intentionally because the sql script was already applied…". These messages can be ignored.
June 2008 Banner XtenderSolutions Release 7.2Confidential Installation Guide 79

4 Upgrade Banner XtenderSolutions 7.2Upgrade to BXS 7.2
Caution: Please consult with your User Group prior to running the rest of this step. These scripts will insert records into your database for new/changed data and may not be appropriate for your particular application without reviewing the data first. The scripts for updating the tables will first delete all the entries that have changed and will then completely re-insert the updated information. Please be sure that the User Group has reviewed these changes by reading the Release Guide documentation. If your User Group chooses to manually enter some of the data as opposed to running the scripts, then remove the data from the delete list in the beginning of the script and all of the insert statements that the User Group will be entering manually.
Please refer to the Required Data section of the Release Guide for more information.
Part A
In this part you will apply the required seed data update section from the Banner XtenderSolutions release 5.1 which will create the data driver script for all Banner products that you currently have licensed.
Note: If your site has already applied Banner XtenderSolutions 5.1, 5.3, 6.0 or 7.0 in the past, you may skip to the next part.
Invoke SQL*Plus and run the procedure:
sql_cmd general/password
start egenupds
To apply the required baseline data changes using the generated driver script above, invoke SQL*Plus and run the procedure:
sql_cmd banimgr/password
start euds50000
Review: euds50000 listing
E nte r
E nte r
E nte r
E nte r
Banner XtenderSolutions Release 7.2 June 200880 Installation Guide Confidential

4 Upgrade Banner XtenderSolutions 7.2Upgrade to BXS 7.2
Part B
In this part you will apply the required seed data update section from the Banner XtenderSolutions release 5.2. If your site does not license the Banner Finance product, you should skip this part.
Note: If your site has already applied Banner XtenderSolutions 5.2, 5.3, 6.0 or 7.0 in the past, you may skip to the next part.
Caution: This Part will "Baseline" the new apps created with this release. Please refer to the Seed/Required Data section of the Release Guide for more information.
Invoke SQL*Plus and run the procedure:
sql_cmd baninst1/password
start ouds50200
Part C
In this part you will apply the required seed data update section from the Banner XtenderSolutions release 5.2. If your site does not license the Banner Finance product, you should skip this part.
Note: If your site has already applied Banner XtenderSolutions 5.2, 5.3, 6.0 or 7.0 in the past, you may skip to the next part.
SCRIPT TABLE RELEASE
eirf498 ae_rf498 5.2
eirf499 ae_rf499 5.2
eiul498 ul498_3 5.2
eiul499 ul499_3 5.2
Review: ouds50200 listing
E nte r
E nte r
June 2008 Banner XtenderSolutions Release 7.2Confidential Installation Guide 81

4 Upgrade Banner XtenderSolutions 7.2Upgrade to BXS 7.2
Please refer to the Seed/Required Data section of the Release Guide for more information.
If your site has not installed this release, invoke SQL*Plus and run the procedure:
sql_cmd banimgr/password
start euds50200
Part D
In this part you will apply the required seed data update section from the Banner XtenderSolutions release 5.3.
Note: If your site has already applied Banner XtenderSolutions 5.3, 6.0 or 7.0 in the past, you may skip to the next part.
Caution: Please refer to the Seed/Required Data section of the Release Guide for more information.
Invoke SQL*Plus and run the procedure:
sql_cmd banimgr/password
start euds50300
SCRIPT TABLE RELEASE
eifaxap50200
ETVAXAP 5.2
eivdtyp50200 ETVDTYP 5.2
eifcxt50200 EXRBCXT and EXRAXPA 5.2
eicxtrules EXRBCXT and EXRAXPA 5.2
SCRIPT TABLE RELEASE
uprf50300 EXBUPRF 5.3
link50300r ERBLINK 5.3
link50300s ESBLINK 5.3
Review: euds50300
E nte r
E nte r
E nte r
E nte r
Banner XtenderSolutions Release 7.2 June 200882 Installation Guide Confidential

4 Upgrade Banner XtenderSolutions 7.2Upgrade to BXS 7.2
Part E
In this part you will apply the required seed data update section from the Banner XtenderSolutions release 5.3. If your site does not license the Banner Financial Aid product, you should skip this part.
Note: If your site has already applied Banner XtenderSolutions 5.3, 6.0 or 7.0 in the past, you may skip to the next part.
Caution: This Part will "Baseline" the dropdown list data contained in Financial Aid-related AX applications. This data is contained in OTGMGR tables of patterns UL505%, UL507%, and UL513%.
Invoke SQL*Plus and run the procedure:
sql_cmd baninst1/password
start ouds50300
v
Part F
In this part you will apply the required seed data update section from the Banner XtenderSolutions release 6.1.
Note: If your site has already applied Banner XtenderSolutions 6.1, 6.2 or 7.0 in the past, you may skip to the next part.
If your site does not license the Banner Human Resources product, you should skip this part.
Caution: This Part will "Baseline" the new application B-H-POSN created with this release.
SCRIPT TABLE RELEASE
eirul50300 (multiple) 5.3
Review: ouds50300
SCRIPT TABLE RELEASE
ei496ai ae_ai496 6.1
eiul496 ul496% 6.1
ul496_3_60100 ul496_3 6.1
E nte r
E nte r
June 2008 Banner XtenderSolutions Release 7.2Confidential Installation Guide 83

4 Upgrade Banner XtenderSolutions 7.2Upgrade to BXS 7.2
Invoke SQL*Plus and run the procedure:
sql_cmd baninst1/password
start oudsh60100
Part G
In this part you will apply the required seed data update section from the Banner XtenderSolutions release 6.1.
Note: If your site has already applied Banner XtenderSolutions 6.1, 6.2 or 7.0 in the past, you may skip to the next part.
If your site does not license the Banner Student product, you should skip this part.
Caution: This Part will "Baseline" the new application B-S-SECT created with this release.
dtyp496_60100 ETVDTYP 6.1
axap496_60100 ETVAXAP 6.1
bhposn_cxt_60100 EXRBCXT and EXRAXPA 6.1
eicxtrules EXRBCXT and EXRAXPA 6.1
Review: oudsh60100
SCRIPT TABLE RELEASE
ei497ai ae_ai497 6.1
eiul497 ul497% 6.1
ul497_3_60100 ul497_3 6.1
dtyp497_60100 ETVDTYP 6.1
axap497_60100 ETVAXAP 6.1
bssect_cxt_60100 EXRBCXT and EXRAXPA 6.1
eicxtrules EXRBCXT and EXRAXPA 6.1
SCRIPT TABLE RELEASE
E nte r
E nte r
Banner XtenderSolutions Release 7.2 June 200884 Installation Guide Confidential

4 Upgrade Banner XtenderSolutions 7.2Upgrade to BXS 7.2
Invoke SQL*Plus and run the procedure:
sql_cmd baninst1/password
start oudss60100
Part H
In this part you will apply the required seed data update section from the Banner XtenderSolutions release 7.0.
Note: If your site has already applied Banner XtenderSolutions 7.0 in the past, you may skip to the next part.
Invoke SQL*Plus and run the procedure:
sqlplus banimgr/password
start euds70000
Part I
In this part you will apply the required seed data update section from the Banner XtenderSolutions release 6.3.
Note: If your site has already applied Banner XtenderSolutions 6.3 or 7.0.1 in the past, you may skip to the next part.
Review: oudss60100
Script Table
uflt70200 EXBUFLT
bcxt70200 EXRBCXT
axpa70200 EXRAXPA
Review: euds70000 listing
E nte r
E nte r
E nte r
E nte r
June 2008 Banner XtenderSolutions Release 7.2Confidential Installation Guide 85

4 Upgrade Banner XtenderSolutions 7.2Upgrade to BXS 7.2
Invoke SQL*Plus and run the procedure:
sqlplus banimgr/password
start euds60300
Part J
In this part you will apply the required seed data update section from the Banner XtenderSolutions release 7.1.
Note: If your site has already applied Banner XtenderSolutions 7.1 in the past, you may skip to the next part.
Invoke SQL*Plus and run the procedure:
sqlplus banimgr/password
start ouds70100
Part K
In this part you will apply the required seed data update section from the Banner XtenderSolutions release 7.1.
Script Table
prid60300 EXRPRID
Review: euds60300 listing
Script Table
acfg70100.sql AE_CFG
Review: ouds70100
E nte r
E nte r
E nte r
E nte r
Banner XtenderSolutions Release 7.2 June 200886 Installation Guide Confidential

4 Upgrade Banner XtenderSolutions 7.2Upgrade to BXS 7.2
Note: If your site has already applied Banner XtenderSolutions 7.1 in the past, you may skip to the next part.
Invoke SQL*Plus and run the procedure:
sqlplus banimgr/password
start euds70100
Part L
In this part you will apply the required seed data update section from the Banner XtenderSolutions release 7.1.
Note: If your site has already applied Banner XtenderSolutions 7.1 in the past, you may skip to the next part.
If your site does not license the Workflow product, you should skip this part.
Invoke SQL*Plus and run the procedure:
sqlplus baninst1/password
Script Table
chkl70100.sql SARCHKL
cksr70100.sql STVCKSR
Review: euds70100
Script Table
eqnm70100.sql GTVEQNM
eqpg70100.sql GTVEQPG
eqpm70100.sql GTVEQPM
eqts70100.sql GTVEQTS
goreqnm70100.sql
GOREQNM
goreqpg70100.sql
GOREQPG
E nte r
E nte r
E nte r
June 2008 Banner XtenderSolutions Release 7.2Confidential Installation Guide 87

4 Upgrade Banner XtenderSolutions 7.2Upgrade to BXS 7.2
start euds70100w
Part M
In this part you will apply data update fa0607 if necessary.
Note: If your site licenses Banner Financial Aid and you have NOT applied data update fa0607, you MUST apply this patch at this stage of the Banner XtenderSolutions upgrade. If your site does NOT license Banner Financial Aid or you have applied this data update patch, you may skip this part and proceed to the next part.
Invoke SQL*Plus and run the procedure:
sqlplus banimgr/password
start euds603001
Part N
In this part you will apply data update fa0708 if necessary.
Note: If your site licenses Banner Financial Aid and you have NOT applied data update fa0708, you MUST apply this patch at this stage of the Banner XtenderSolutions upgrade. If your site does NOT license Banner Financial Aid or you have applied this data update patch, you may skip this part and proceed to the next part.
Invoke SQL*Plus and run the procedure:
Review: euds70100w
Script Table
fa07_cxt.sql EXRBCXT and EXRAXPA
Review: euds603001 listing
Script Table
fa08_cxt.sql EXRBCXT and EXRAXPA
E nte r
E nte r
E nte r
Banner XtenderSolutions Release 7.2 June 200888 Installation Guide Confidential

4 Upgrade Banner XtenderSolutions 7.2Upgrade to BXS 7.2
sqlplus banimgr/password
start euds701001
Part O
In this part you will apply any required baseline data modifications for this release.
Note: If your site does not license the WebTailor product, you should skip this part.
Invoke SQL*Plus and run the procedure:
sqlplus wtailor/password
start euds70200wt
Step 4.10—Update Oracle Forms
In this step you will generate the Banner XtenderSolutions release 7.2 forms, menus and libraries.
Review: euds701001 listing
Script Table
twtvmodu_70200_01.sql TWTVMODU
twgrwmrl_70200_01.sql TWGRWMRL
twgbwmnu_70200_01.sql TWGBWMNU
Review: euds70200wt
E nte r
E nte r
E nte r
E nte r
If you started your database in Restricted Mode, the userids used to generate the executables must have the Restricted Session privilege for the duration of this step.
June 2008 Banner XtenderSolutions Release 7.2Confidential Installation Guide 89

4 Upgrade Banner XtenderSolutions 7.2Upgrade to BXS 7.2
Scripts have been provided to perform the generates on all supported platforms. Run all scripts that are applicable for your environment(s).
10gR1 refers to Forms 9.0.4.x
10gR2 refers to Forms 10.x
If you are using Banner role level security, verify that the seed numbers in the following locations are the same. If they are not, you will not be able to run any of the generated executables.
1. The BANSECR.GUBIPRF table using the Security Profile Maintenance window of the GSASECR form
2. The G$_VERIFY_ACCESS trigger which is part of the G$_FORM_CLASS in GOQOLIB.
Due to changes to the Reference Form GOQCLIB.FMB, the following forms need regenerated.
SPAIDEN,SPAPERS,SAAQUIK,SRAQUIK,SPAEMRG,SPATELE, APAIDEN, PPAIDEN, PPATELE,PEA1PAY,FOAIDEN, FTMVEND, FTMFMGR, FTMAGCY, FTMCUST, and GOAEMAL. These forms are not included with this release, however they are referenced and therefore expected by the form generate scripts in this step.
Due to changes to GOQOLIB.FMB, ALL executables need to be regenerated.
For products not being delivered at this time, refer to the instructions contained in the master generate script for that product. Master generate scripts can be found in the misc or com subdirectory for the product and contain "form" in the basename of the file.
Review the INSTRUCTIONS FOR USE section of the file before executing.
Changes that may be necessary include:
Password of the username used in the generation.
Banner XtenderSolutions Release 7.2 June 200890 Installation Guide Confidential

4 Upgrade Banner XtenderSolutions 7.2Upgrade to BXS 7.2
MICROSOFT WINDOWS
UNIX
Step 4.11—Generate Oracle Reports
This step does not apply to this upgrade.
Step 4.12—Update Letter Generation/Population Selection Tables
This step does not apply to this upgrade.
For 10gR1 The file eaisf90.bat will generate the appropriate forms, menus and libraries.
For 10gR2 The file eaisf90r2.bat will generate the appropriate forms, menus and libraries.
For 10gR1 The file eaisf90.shl will generate the appropriate forms, menus and libraries.
For 10gR2 The file eaisf90r2.shl will generate the appropriate forms, menus and libraries.
When this step completes, the number of generated FMX files may not match the number of FMB files. This is to be expected since the reference forms such as goqolib do not get generated.
You will need to migrate the generated files to the directory specified by your FORMS_PATH/FORMS90_PATH.
June 2008 Banner XtenderSolutions Release 7.2Confidential Installation Guide 91

4 Upgrade Banner XtenderSolutions 7.2Upgrade to BXS 7.2
Step 4.13—Update Referential Integrity Constraints
Part A
In this part you will update the referential integrity constraints which were applied in Step 7. The constraints will be updated with all exceptions being inserted into the EXCEPTIONS table. Before executing this part verify that you have an EXCEPTIONS table for the BANIMGR account.
Invoke SQL*Plus and enter the following:
sqlplus banimgr/password
describe banimgr.exceptions
If you receive the message
ORA-04043: object banimgr.exceptions does not exist
create the table as follows:
UNIX
sqlplus banimgr/password
start $ORACLE_HOME/rdbms/admin/utlexcpt
exit
VMS
sqlplus banimgr/password
start ora_rdbms_admin:utlexcpt
exit
MICROSOFT WINDOWS
sqlplus banimgr/password
start %ORACLE_HOME%\rdbms\admin\utlexcpt
E nte r
E nte r
E nte r
E nte r
E nte r
E nte r
E nte r
E nte r
E nte r
E nte r
Banner XtenderSolutions Release 7.2 June 200892 Installation Guide Confidential
4 Upgrade Banner XtenderSolutions 7.2Upgrade to BXS 7.2
exit
Part B
Next, enable the constraints by invoking SQL*Plus and running the procedure:
sqlplus banimgr/password
start eenbfky
After executing the eenbfky.sql script, review the log file or query the EXCEPTIONS table for any data exceptions. If any exist, correct the data in the parent or child table, delete the entries for the respective tables from the EXCEPTIONS table, and rerun this part. The script can be rerun as needed.
Step 4.14—Restart the gostage Process
This step will complete the installation process. For information on this process, refer to Step 5.
Invoke SQL*Plus and run the procedure:
sqlplus /nolog @gostage
Review: eenbfky listing
The implementation of referential integrity constraints may cause problems within application software you have written or baseline software you have modified. These problems usually occur when rows are inserted and/or deleted in a table. Therefore, when investigating Oracle insert and delete errors, it is possible that the problem occurred due to the constraint. While Oracle sometimes indicates a constraint error including the name of the constraint, this is not always the case. Under some conditions it will simply be an Oracle insert, update or delete error.
E nte r
E nte r
E nte r
E nte r
June 2008 Banner XtenderSolutions Release 7.2Confidential Installation Guide 93

4 Upgrade Banner XtenderSolutions 7.2Upgrade to BXS 7.2
Step 4.15—Verify the State of the Upgraded Environment
Part A
In this part you will run the gurutlrp.sql utility script to compile database objects which are in an invalid state. The gurutlrp.sql script runs ORACLE's utlrp utility script (as SYS) and then displays a list of the remaining invalid database objects. Any time a database object is modified, other objects that have interaction with the changed object are marked as "INVALID" by the rdbms. All errors should be investigated before continuing.
Invoke SQL*Plus and run the procedure:
sqlplus /nolog @gurutlrp
You may need to repeat this process several times until all dependencies are validated.
Part B
In this part you will run the gurscls.sql utility script to synchronize the objects with their associated classes. All objects belong to a Banner class (as defined in the BANSECR.GTVCLAS table) and all objects have an associated role. This routine checks every person enrolled in the class to make sure they have been given execute privilege to every role used by any object in the class.
Invoke SQL*Plus and run the procedure:
sqlplus bansecr/password
start gurscls
Review: listab1 listing
Review: gurutlrp listing
E nte r
E nte r
E nte r
Banner XtenderSolutions Release 7.2 June 200894 Installation Guide Confidential

4 Upgrade Banner XtenderSolutions 7.2Upgrade to BXS 7.2
Part C
In this part you will run the erudone.sql utility script to verify that all of the loaded modifications for this release have been applied. Gostage did not execute any of the rows that are displayed by this script.
Invoke SQL*Plus and run the procedure:
sqlplus upgrade_owner/password
start erudone
Part D
In this part you will run the eresroled.sql to restore the original roles for those accounts modified by the eruready script run at the beginning of this upgrade.
Warning: If you are running upgrades in parallel, do NOT run this part until you have finished all of your upgrades. The reason is that several accounts are used by all upgrades. If they do not have the DBA role as a default role, this script will reset their privileges so DBA is not included. This could have adverse affects on the other upgrades.
Invoke SQL*Plus and run the procedure:
sqlplus /nolog @eresroled
This Banner XtenderSolutions 7.2 upgrade is now complete.
Review: erudone listing
Review: eresrole listing
E nte r
E nte r
E nte r
June 2008 Banner XtenderSolutions Release 7.2Confidential Installation Guide 95

4 Upgrade Banner XtenderSolutions 7.2Upgrade to BXS 7.2
This page intentionally left blank
Banner XtenderSolutions Release 7.2 June 200896 Installation Guide Confidential

5 AppXtender - Final Installation StepsFinalizing the AppXtender Installation
Chapter 5 AppXtender - Final Installation Steps
Finalizing the AppXtender Installation
This chapter contains steps that must be completed by all sites, following the completion of Chapter 4, Upgrade Banner XtenderSolutions 7.2.
Step 5.1—Update AppXtender Application Descriptors in ETVAXAP and AE_APPS
Location of Install Media: bxssetup70200u.trz
Installation Target: Banner database host
To update the descriptions of AppXtender applications in BXS 7.2, run the SQL*Plus script updappdescrs.sql. This script will modify the AppXtender application descriptors in database fields OTGMGR.AE_APPS.APPDESC and BANIMGR.ETVAXAP.ETVAXAP_DESC . This script must be run by the SYSTEM login user.
sql_cmd /nologstart updappdescrs
Step 5.2—Create Users, Groups, and Profiles in Application Generator
At this point, the only BXS user that has been created for the BXS system is SYSOP. You will need to create user names, groups, and profiles with the Application Generator product to permit users to operate the various EMC Documentum products.
To import users and create end user accounts in Application Generator:
5.2.1 Log in to Application Generator as SYSOP and select the Data Source you created in an earlier step.
5.2.2 Right-click on the Users node in the left pane and select Import. An Import Users window will appear, with a node named Users.
5.2.3 Expand the Users node by clicking the plus sign.
June 2008 Banner XtenderSolutions Release 7.2Confidential Installation Guide 97

5 AppXtender - Final Installation StepsFinalizing the AppXtender Installation
5.2.4 By double-clicking a user name or selecting a user name and clicking Add, user names will be ready to be added to AppXtender.
5.2.5 When you have completed the building of the name list, click OK. The names will be added to the set of login names for BXS.
5.2.6 Exit Application Generator.
Step 5.3—Install the INB - AX Bridge (optional)
Install Media: ext70200u.trz
Communication between Internet Native Banner and AppXtender is facilitated by a program known as the INB-AX Bridge. This program is installed on PCs of all users who wish to launch AppXtender from an Internet Native Banner environment.
To install the INB-AX Bridge:
5.3.1 The INB-AX Bridge requires that the host PC have the Microsoft .Net Framework present before installation. The Framework installation program can be downloaded from Microsoft's website:
http://www.microsoft.com/downloads/
Locate the files by searching for .Net Framework. The recommended version of the Microsoft .NET Framework is 1.1.
5.3.2 The installation file for the INB-AX Bridge can be found in the Desktop directory of the XtenderSolutions 7.2 product download. Run SETUP.MSI from the installation directory to install the INB-AX Bridge.
5.3.3 You will be prompted for an installation path. Your may select a path of your choice, or choose the default path of C:\Program Files. The installation program will create a directory called in this path.
5.3.4 Once the installation process has completed, the directory will contain a file called INBAXBridge.htm. A copy of this file must be moved to a web server accessible to Banner users. This file redirects the call to XtenderSolutions to the bridge program running on the user's machine.
Banner XtenderSolutions Release 7.2 June 200898 Installation Guide Confidential

5 AppXtender - Final Installation StepsFinalizing the AppXtender Installation
Note: The URL for this file must be specified on the EXAINST form for the integration to work properly. Refer to the Banner XtenderSolutions Administration Guide for additional information on EXAINST.
5.3.5 The program, inbaxbridge.exe, will be launched when a user initiates an XtenderSolutions session from an Internet Native Banner Session (User Preference settings will apply). It will run in the System Tray and will remain running unless explicitly closed by the user, or the machine is restarted.
Step 5.4—Miscellaneous steps to prepare for data integration
Install Media: ext70200u.trz
Note: These scripts should be executed using methodology consistent with standard Banner plus script execution (presence of a login.sql file, etc.). You may either run the scripts from your normal location for migrated Banner objects (migration would have occurred within Chapter 4 of this current guide), or create another environment from which you may run the scripts. If you choose the former approach, be aware that non-migrating scripts are only in the ext70200u.trz location.
To prepare for data integration:
5.4.1 Grant certain select privileges to OTGMGR.
sql_cmd /nolog start egsgo70000
5.4.2 The installation file for the INB-AX Bridge can be found in the base directory of the XtenderSolutions 7.2 product download (ext70200u). This enables the AppXtender system to use one common key reference table instead of individual ones for each application.
To update these fields, invoke SQL*Plus and run the following commands:
sql_cmd /nolog start uaeapps70000
Review the uaeapps70000 file.
June 2008 Banner XtenderSolutions Release 7.2Confidential Installation Guide 99

5 AppXtender - Final Installation StepsFinalizing the AppXtender Installation
5.4.3 Update BANIMGR.ETVAXAP.ETVAXAP_INSTALLED_IND to contain the value Y for all applications that exist in XtenderSolutions table OTGMGR.AE_APPS.
To update this field, invoke SQL*Plus and run the following commands:
sql_cmd /nolog start uetvaxap70000
Review the uetvaxap70000 file.
Step 5.5—Baselining the OTGMGR Auto-Index and Key Reference tables with Banner data (New BXS Sites Only)
Install Media: ext70200u.trz
Note: These scripts should be executed using methodology consistent with standard Banner plus script execution (presence of a login.sql file, etc.). You may either run the scripts from your normal location for migrated Banner objects (migration would have occurred within Chapter 4 of this current guide), or create another environment from which you may run the scripts. If you choose the former approach, be aware that non-migrating scripts are only in the bxssetup70200u.trz location.
In this step, you will load all of OTG's Auto-Index tables and up to four Key Reference tables with abstracts of Banner data. This data is provided for lookup purposes when adding new documents to the AppXtender system.
XtenderSolutions lookup data is synchronized with Banner data using two complementary methodologies:
• A bulk loading (baselining) is done at point of installation.
• A real-time synchronization system (consisting of table triggers and packages) maintains the incremental changes to Banner's data within XtenderSolutions in real time.
If, for any reason, the real-time system lapses, the system may be re-baselined by executing the same scripts used for initial loading. The individual script names, along with their locations and purposes, are stored in Appendix C of the Banner XtenderSolutions Administration Guide 7.2.
Banner XtenderSolutions Release 7.2 June 2008100 Installation Guide Confidential

5 AppXtender - Final Installation StepsFinalizing the AppXtender Installation
5.5.1 If you have large amounts of Banner data, you may save significant time by dropping indices on certain OTGMGR tables before loading their data.
However, if your site is relatively new to Banner, and you therefore have less Banner data to port, you may skip this step and step 5.6.4 below that rebuilds your dropped indices. Temporarily dropping the indices will speed up the loading of Banner data into the XtenderSolutions tables.
Note: You must restore the indices if you choose to temporarily drop them, otherwise, system performance will be vastly deteriorated.
(a) Drop the indices by logging into SQL*Plus as OTGMGR and start the drop_ai_indexes.sql script. This will drop all indexes on most tables of table name pattern AE_AI%, as well as indexes on tables AE_RFSCT, AE_RF498, AE_RF499, and AE_RF506.
sql_cmd /nologstart drop_ai_indexes
(b) Review the drop_ai_indexes listing.
Note: Ignore any errors that are produced from dropping of indexes that do not exist. Indexes will not exist if certain AppXtender applications were not created via XML import operations. So, an error does not indicate a problem if the index does not exist.
5.5.2 Insert the AppXtender Shared Key Reference table (OTGMGR.AE_RFSCT) baseline Banner data from SPRIDEN and SPBPERS.
Note: The execution of this script may take considerable time, depending on the amount of SPRIDEN / SPBPERS data that exists in your Banner database. You do not need to wait until this step is completed before continuing to the next step.
To insert into the AppXtender Shared Key Reference table, invoke SQL*Plus and run the following:
sql_cmd /nologstart ufsct70000
Review the ufsct70000 file.
Note: Ignore any errors that are produced from dropping of tables with table naming pattern %_TMP% that do not exist. These tables are temporary tables that are first dropped and then recreated by this script, so the absence of a table does not indicate a problem.
June 2008 Banner XtenderSolutions Release 7.2Confidential Installation Guide 101

5 AppXtender - Final Installation StepsFinalizing the AppXtender Installation
5.5.3 Other OTGMGR tables contain lookup data in tables with a name pattern of AE_RF% and AE_AI%. However, not every BXS site will have all Banner products and/or AppXtender applications installed. Therefore, it is necessary to create an output script from a driver script that senses how many data loads need to occur, based on the current situation. The output will depend on how many Banner products exist, as well as (in some cases) whether or not the corresponding AppXtender applications also exist. The first part of this procedure creates a driver script that contains start commands for SQL*Plus scripts for the Banner products for which you are licensed. The second part of the procedure starts the driver script, which then loads your Banner data into the corresponding XtenderSolutions tables.
Note: The execution of this script may take considerable time, depending on the amount of Banner data that exists in your Banner database. You do not need to wait until this step is completed before continuing to the next step.
(a) To create the driver script for all Banner products for which you are licensed (and for which AppXtender applications exist), invoke SQL*Plus and run the following commands:
sql_cmd /nologstart egaids70000
(b) To load your Banner data into the corresponding XtenderSolutions tables, invoke SQL*Plus and run the following commands:
sql_cmd baninst1/passwordstart eraids70000
(c) Review the eraids70000 file.
5.5.4 If you dropped indices to speed up the loading of Banner data into OTGMGR tables AE_AI%, AE_RFSCT, AE_RF498, AE_RF499, and AE_RF506, then you need to complete this step to restore the indices you dropped.
Note: This step should only be completed if you dropped indices in step 5.6.1 above.
(a) To restore formerly dropped indices on OTGMGR tables AE_AI%, AE_RFSCT, AE_RF498, AE_RF499, and AE_RF506, invoke SQL*Plus and run the following commands:
sql_cmd /nologstart create_ai_indexes
(b) Review the create_ai_indexes file.
Banner XtenderSolutions Release 7.2 June 2008102 Installation Guide Confidential

5 AppXtender - Final Installation StepsFinalizing the AppXtender Installation
Note: Ignore any errors that are produced from creating indices that will not create properly. Indices will not create properly if certain AppXtender applications were not created via XML import operations. So, an error does not indicate a problem in CREATE INDEX... statements.
5.5.5 Insert baseline Banner data from all of the Banner products for which you are currently licensed into the AppXtender User Drop List tables. The first part of the procedure creates a driver script that contains start commands for SQL*Plus scripts for the Banner products that you have. The second part of the procedure starts the driver script, which will then load your Banner data into the corresponding XtenderSolutions tables.
(a) To create the driver script for all of your licensed Banner products, invoke SQL*Plus and run the following procedure:
sql_cmd /nologstart eguls70000
(b) To load your Banner data into the corresponding XtenderSolutions tables, invoke SQL*Plus and run the procedure:
sql_cmd baninst1/password start erulds70000
(c) Review the erulds70000 file.
Step 5.6—Configure Additional Desktop Machines
For best practices on rolling out AppXtender client/server software to a large number of desktops, see "Unattended Setup" in Chapter 1 of the ApplicationXtender Desktop Installation Guide Release 5.30.
An enterprise rollout of a Data Source can best be accomplished by creating a workstation’s settings file (.AXS) on an administrative workstation, and then distributing that .AXS file to all client workstations that will be installing AppXtender. For more information, see "Saving and Loading Settings" in Chapter 2 of the ApplicationXtender Desktop Installation Guide Release 5.30.
June 2008 Banner XtenderSolutions Release 7.2Confidential Installation Guide 103

5 AppXtender - Final Installation StepsFinalizing the AppXtender Installation
This page intentionally left blank
Banner XtenderSolutions Release 7.2 June 2008104 Installation Guide Confidential

6 AppXtender Web Access Deployment - General ConsiderationsAppXtender Web Access .NET
Chapter 6 AppXtender Web Access Deployment - General Considerations
AppXtender Web Access can be deployed on either the Microsoft.NET or Java 2 platforms. Instructions for installing AppXtender Web Access on Microsoft.NET can be found in Chapter 7, AppXtender Web Access.Net Deployment Details and Java 2 instructions can be found in Chapter 8, AppXtender Web Access Java 2 Edition Deployment Details.
AppXtender Web Access .NET
The ApplicationXtender Web Access .NET Administrator’s Guide Release 5.30 contains most of the information you will need to deploy AppXtender Web Access at your BXS site. You must follow those instructions, however, there are a few additional guidelines that you must be aware of for BXS to function properly. That information is presented below.
Installation Server Guidelines
In all cases, the following guidelines must be maintained:
• An AppXtender Web Access BXS site may only have one AppXtender Web Access server. That deployment may be either on a Windows / Microsoft.NET / IIS-based server or on a Java 2-based Solaris or Windows server. Mixed platforms within one AppXtender Admin administrated system is not supported.
June 2008 Banner XtenderSolutions Release 7.2Confidential Installation Guide 105
6 AppXtender Web Access Deployment - General ConsiderationsAppXtender Web Access .NET
• Considerable AppXtender Web Access resources are consumed by AppXtender Web Access image rendering processes, which are necessary to transform a document from its native format (e.g., Microsoft Word) to something that is viewable over a thin web browser. In previous versions of AppXtender Web Access (4.x), image rendering was an integral part of the AppXtender Web Access server itself, and was by definition contained on the same machine as the AppXtender Web Access server. As of AppXtender 5.x, the rendering may now be done on one or multiple Windows servers, effectively off-loading this resource intensive task from the AppXtender Web Access server. A small site that is deploying AppXtender Web Access .NET or AppXtender Web Access J2 on a Windows platform, may install the Rendering Server portion of AppXtender Web Access on the same server as the AppXtender Web Access server itself. However, sites that have more Windows resources available can use multiple platforms that perform the rendering function.
• For Windows sites with cross-platform resource utilization as well as impersonation account access to XtenderSolutions stored objects in an object repository, EMC Documentum recommends that the account(s) that are established for this purpose be Windows domain-level accounts, and not local accounts. For more information, see “About Configuring Resource Authentication Credentials in AppXtender Admin” in the AppXtender Concepts Guide.
• Following the installation and configuration of AppXtender Web Access, you may need to initialize user profiles. For more information on initializing user profiles, see “Preparing the ApplicationXtender Content Management Environment” in Chapter 1 of the ApplicationXtender Web Access .NET Administrator’s Guide Release 5.30.
System Architecture
For information on AppXtender Web Access system architecture, see “Planning ApplicationXtender Web Access Deployment” in Chapter 1 of the ApplicationXtender Web Access .NET Administrator’s Guide Release 5.30.
Figure 2-1 shown in the "ApplicationXtender Architecture and Components" section in Chapter 2 of the ApplicationXtender Concepts and Planning Guide Release 5.30 displays a graphical representation of a complex EMC Documentum AppXtender 5.30 site. The impression from this diagram is that many Windows servers are needed for a Content Management 5.x site. The one factor that is not made clear from this figure, however, is that a single physical server may facilitate multiple purposes by hosting several logical components simultaneously. A BXS site may be as complex as Figure 7, but this is not typical.
Banner XtenderSolutions Release 7.2 June 2008106 Installation Guide Confidential

6 AppXtender Web Access Deployment - General ConsiderationsAppXtender Web Access .NET
By the time you are installing AppXtender Web Access, you should have already discussed architecture and resource allocation for your various Windows (and possibly Solaris) servers. You will need to map your pre-planned architecture to the following guidelines to determine where various components will go with regard to your installation.
The following guidelines are meant to show how the various components of AppXtender Web Access relate to one another in terms of interdependencies, but are not meant to demonstrate overall system architecture, quantity of servers required, or performance considerations. This document will instruct you as to where various pieces of the AppXtender Web Access system should go.
Each server computer in the chart below is given a label, such as "ServerW." For each AppXtender Web Access component that you will install, instructions will specify the possible server machine(s) onto which that product may be installed, depending on the scale and architecture of your deployment.
Minimal-Architecture System Utilizing AppXtender Web Access .NET Deployment:
ServerY (any supported Banner server)
• BXS / Oracle / Banner database
ServerZ (see EMC Documentum recommendations; may use DiskXtender)
• Document Repository Server
ServerW (Windows 2000 (SP4) / 2003 (SP1) Server)
• AppXtender Administrator (AppXtender Admin) Tool
• AppXtender Web Access .NET
• AppXtender Web Access Rendering Server
• AppXtender Web Access Rendering Server Cache Folder
• License Server
• AppXtender Web Access Session Cache Folder
• Component Setup Wizard (.NET version)
June 2008 Banner XtenderSolutions Release 7.2Confidential Installation Guide 107

6 AppXtender Web Access Deployment - General ConsiderationsAppXtender Web Access Java 2
AppXtender Web Access .NET Deployment with One Additional Windows Server:
ServerY (any supported Banner server)
• BXS / Oracle / Banner database
ServerZ (see EMC Documentum recommendations; may use DiskXtender)
• Document Repository Server
ServerW (Windows 2000 (SP4) / 2003 (SP1) Server)
• AppXtender Administrator (AppXtender Admin) Tool
• AppXtender Web Access .NET
• License Server
• AppXtender Web Access Session Cache Folder
• Component Setup Wizard (.NET version)
ServerR (Windows 2000 (SP4) / 2003 (SP1) Server)
• AppXtender Web Access Rendering Server
• AppXtender Web Access Rendering Server Cache Folder
• Component Setup Wizard (.NET version)
AppXtender Web Access Java 2
The ApplicationXtender Web Access J2 Administrator’s Guide Release 5.30 contains most of the information you will need to deploy AppXtender Web Access at your BXS site. You must follow those instructions, however, there are a few additional guidelines that you must be aware of for BXS to function properly. That information is presented below.
Banner XtenderSolutions Release 7.2 June 2008108 Installation Guide Confidential

6 AppXtender Web Access Deployment - General ConsiderationsAppXtender Web Access Java 2
Installation Server Guidelines
In all cases, the following guidelines must be maintained:
• An AppXtender Web Access BXS site may only have one AppXtender Web Access server. That deployment may be either on a Windows / Microsoft.NET / IIS-based server or on a Java 2-based Solaris or Windows server. Mixed platforms within one AppXtender Admin administrated system is not supported.
• Considerable AppXtender Web Access resources are consumed by AppXtender Web Access image rendering processes, which are necessary to transform a document from its native format (e.g., Microsoft Word) to something that is viewable over a thin web browser. In previous versions of AppXtender Web Access, image rendering was an integral part of the AppXtender Web Access server itself, and was by definition contained on the same machine as the AppXtender Web Access server. As of EMC Documentum AppXtender 5.x, the rendering may now be done on one or multiple Windows servers, effectively off-loading this resource intensive task from the AppXtender Web Access server. A small site that is deploying AppXtender Web Access .NET or AppXtender Web Access J2 on a Windows platform, may install the Rendering Server portion of AppXtender Web Access on the same server as the AppXtender Web Access server itself. However, sites that have more Windows resources available can use multiple platforms that perform the rendering function.
• For Windows sites with cross-platform resource utilization as well as impersonation account access to XtenderSolutions stored objects in an object repository, it is highly recommended by EMC Documentum that the account(s) that are established for this purpose be Windows domain-level accounts, and not local accounts. For more information, see “About Configuring Resource Authentication Credentials in AppXtender Admin” in the AppXtender Concepts Guide.
• The Windows Security model is not an option for Banner XtenderSolutions. Additionally, the "directory service security provider" is not supported for BXS. Instead, BXS 7.2 uses EMC Documentum's CM Security model.
• Following the installation and configuration of AppXtender Web Access, you may need to initialize user profiles. For more information on initializing user profiles, see “Preparing the ApplicationXtender Content Management Environment” and in Chapter 1 of the ApplicationXtender Web Access J2 Administrator’s Guide Release 5.30.
System Architecture
For information on AppXtender Web Access system architecture, see “Planning ApplicationXtender Web Access Deployment” in Chapter 1 of the ApplicationXtender Web Access J2 Administrator’s Guide Release 5.30.
June 2008 Banner XtenderSolutions Release 7.2Confidential Installation Guide 109

6 AppXtender Web Access Deployment - General ConsiderationsAppXtender Web Access Java 2
Figure 2-1 shown in the "ApplicationXtender Architecture and Components" section in Chapter 2 of the ApplicationXtender Concepts and Planning Guide Release 5.30 displays a graphical representation of a complex EMC Documentum AppXtender 5.30 site. The impression from this diagram is that many Windows servers are needed for a Content Management 5.x site. The one factor that is not made clear from this figure, however, is that a single physical server may facilitate multiple purposes by hosting several logical components simultaneously. A BXS site may be as complex as Figure 7, but this is not typical.
By the time you are installing AppXtender Web Access, you should have already discussed architecture and resource allocation for your various Windows (and possibly Solaris) servers. You will need to map your pre-planned architecture to the following guidelines to determine where various components will go with regard to your installation.
The following guidelines are meant to show how the various components of AppXtender Web Access relate to one another in terms of interdependencies, but are not meant to demonstrate overall system architecture, quantity of servers required, or performance considerations. This document will instruct you as to where various pieces of the AppXtender Web Access system should go.
Each server computer in the chart below is given a label, such as "ServerW." For each AppXtender Web Access component that you will install, instructions will specify the possible server machine(s) onto which that product may be installed, depending on the scale and architecture of your deployment.
Banner XtenderSolutions Release 7.2 June 2008110 Installation Guide Confidential

6 AppXtender Web Access Deployment - General ConsiderationsAppXtender Web Access Java 2
Minimal-Architecture System Utilizing AppXtender Web Access Java 2 Deployment on Solaris/Linux:
ServerY (any supported Banner server)
• BXS / Oracle / Banner database
ServerZ (see EMC Documentum recommendations; may use DiskXtender)
• Document Repository Server
• NFS connectivity to ServerU (except if DiskXtender is used as a repository)
ServerW (Windows 2000 (SP4) / 2003 (SP1) Server)
• AppXtender Administrator (AppXtender Admin) Tool
• AppXtender Web Access Rendering Server
• AppXtender Web Access Rendering Server Cache Folder
• AppXtender Utility Services
• NFS connectivity to ServerU
• License Server
• Component Setup Wizard (.NET version)
ServerU (Solaris or Linux Server)
• AppXtender Web Access Java 2
• AppXtender Web Access Session Cache Folder (non-configurable)
• Component Setup Wizard (Java 2 edition, filename componentsetup.sh)
• NFS connectivity to ServerW and ServerZ (except if DiskXtender is used as a repository)
June 2008 Banner XtenderSolutions Release 7.2Confidential Installation Guide 111

6 AppXtender Web Access Deployment - General ConsiderationsAppXtender Web Access Java 2
AppXtender Web Access Java 2 Deployment on Solaris/Linux with One Additional Windows Server:
ServerY (any supported Banner server)
• BXS / Oracle / Banner database
ServerZ (see EMC Documentum recommendations; may use DiskXtender)
• Document Repository Server
• NFS connectivity to ServerU (except if DiskXtender is used as a repository)
ServerW (Windows 2000 (SP4) / 2003 (SP1) Server)
• AppXtender Administrator (AppXtender Admin) Tool
• AppXtender Utility Services
• License Server
• Component Setup Wizard (.NET version)
ServerU (Solaris or Linux Server)
• AppXtender Web Access Java 2
• AppXtender Web Access Session Cache Folder (non-configurable)
• Component Setup Wizard (Java 2 edition, filename componentsetup.sh)
• NFS connectivity to ServerR and ServerZ (except if DiskXtender is used as a repository)
ServerR (Windows 2000 (SP4) / 2003 (SP1) Server)
• AppXtender Web Access Rendering Server
• AppXtender Web Access Rendering Server Cache Folder
• Component Setup Wizard (.NET version)
• NFS connectivity to ServerU
Banner XtenderSolutions Release 7.2 June 2008112 Installation Guide Confidential
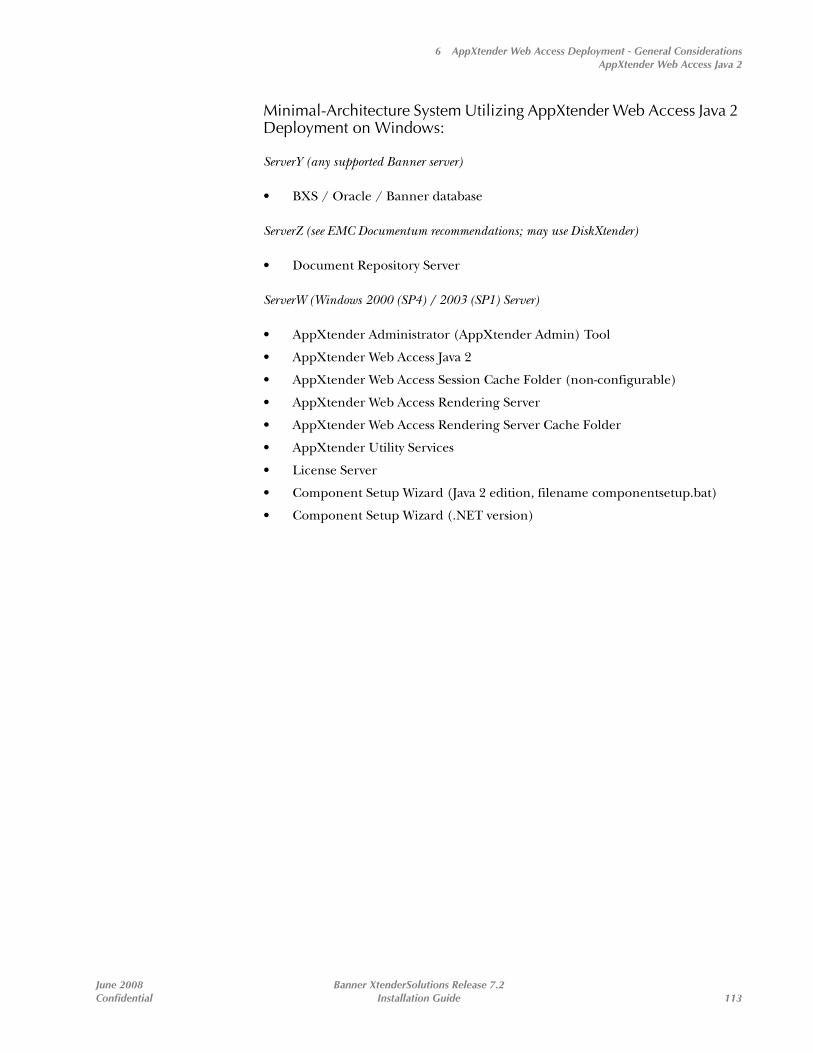
6 AppXtender Web Access Deployment - General ConsiderationsAppXtender Web Access Java 2
Minimal-Architecture System Utilizing AppXtender Web Access Java 2 Deployment on Windows:
ServerY (any supported Banner server)
• BXS / Oracle / Banner database
ServerZ (see EMC Documentum recommendations; may use DiskXtender)
• Document Repository Server
ServerW (Windows 2000 (SP4) / 2003 (SP1) Server)
• AppXtender Administrator (AppXtender Admin) Tool
• AppXtender Web Access Java 2
• AppXtender Web Access Session Cache Folder (non-configurable)
• AppXtender Web Access Rendering Server
• AppXtender Web Access Rendering Server Cache Folder
• AppXtender Utility Services
• License Server
• Component Setup Wizard (Java 2 edition, filename componentsetup.bat)
• Component Setup Wizard (.NET version)
June 2008 Banner XtenderSolutions Release 7.2Confidential Installation Guide 113

6 AppXtender Web Access Deployment - General ConsiderationsAppXtender Web Access Java 2
AppXtender Web Access Java 2 Deployment on Windows with One Additional Windows Server:
ServerY (any supported Banner server)
• BXS / Oracle / Banner database
ServerZ (see EMC Documentum recommendations; may use DiskXtender)
• Document Repository Server
ServerW (Windows 2000 (SP4) / 2003 (SP1) Server)
• AppXtender Administrator (AppXtender Admin) Tool
• AppXtender Web Access Java 2
• AppXtender Web Access Session Cache Folder (non-configurable)
• AppXtender Utility Services
• License Server
• Component Setup Wizard (Java 2 edition, filename componentsetup.bat)
• Component Setup Wizard (.NET version)
ServerR (Windows 2000 (SP4) / 2003 (SP1) Server)
• AppXtender Web Access Rendering Server
• AppXtender Web Access Rendering Server Cache Folder
• Component Setup Wizard (.NET version)
Banner XtenderSolutions Release 7.2 June 2008114 Installation Guide Confidential

7 AppXtender Web Access.Net Deployment Details
Chapter 7 AppXtender Web Access.Net Deployment Details
This chapter contains the instructions for installing the Microsoft.NET-based AppXtender Web Access product. If you plan to install AppXtender Web Access on the Java 2 (Solaris or Windows Server) platform, see Chapter 6, ApplicationXtender Web Access Java 2 Edition Deployment Details.
Here are some additional guidelines that clarify EMC Documentum's position with regard to BXS:
• The Hardware Requirements for an AppXtender Web Access .NET server are specified in “AppXtender Web.NET Server Hardware and Software Requirements Overview” in Chapter 1 of the ApplicationXtender Web Access .NET Administrator’s Guide Release 5.30.
• One or more Rendering Servers use a single cache in which rendered files are stored for re-use. For small systems, you may choose to install the Rendering Server on the same computer as the AppXtender Web Access Server. Larger sites will want to install one or more Rendering Servers on separate computers. For more information, see “Configuring ApplicationXtender Rendering Server” in Chapter 2 of the ApplicationXtender Web Access .NET Administrator’s Guide Release 5.30.
• A session cache is used by AppXtender Web Access .NET to track browser session data. It should be located on the AppXtender Web Access .NET server to enhance performance. For an AppXtender Web Access .NET deployment, this would translate to the Windows server that contains AppXtender Web Access.
• Currently, the AppXtender Web Access .NET deployment contains slightly more end-user functionality than a Java 2 deployment. In particular, the Java 2 deployment does not support full-text indexing, digital signatures, AppXtender Web Access PAL licenses, or Netscape as a client browser tool.
Note: For each step, please review EMC Documentum's official instructions regarding the step.
Note: Ensure that you are following the installation instructions on the appropriate device.
June 2008 Banner XtenderSolutions Release 7.2Confidential Installation Guide 115

7 AppXtender Web Access.Net Deployment Details
Step 7.1—Create AppXtender Web Access Session Cache Folder
Host Server: ServerW
On your AppXtender Web Access .NET server, create a Session Cache following EMC Documentum's guidelines. For more information, see “Configuring ApplicationXtender Rendering Server Cache Settings” in Chapter 2 of the ApplicationXtender Web Access .NET Administrator’s Guide Release 5.30.
Step 7.2—Create AppXtender Web Access Rendering Server Cache Folder
Host Server: ServerW (if Rendering Server is located on ServerW), or ServerR
On the server where you installed the Rendering Server, create a Rendering Server Cache following EMC Documentum's guidelines. If you have more than one Rendering Server, choose one of the Rendering Server machines to host the Rendering Server Cache. For more information, see “AppXtender Rendering Server Hardware and Software Requirements Overview” in Chapter 1 of the ApplicationXtender Web Access .NET Administrator’s Guide Release 5.30.
Note: There can be only one Rendering Server Cache.
Step 7.3—Add Configuration Settings for AppXtender Web Access Using the AppXtender .NET Wizard (Optional)
You can use the AppXtender .NET Wizard to configure your AppXtender Web Access .NET system or you can manually configure your AppXtender Web Access .NET system by skipping this step and following Step 7.4 below.
Note: For more information, see Chapter 4 of the ApplicationXtender Web Access .NET Administrator’s Guide Release 5.30.
To configure your AppXtender Web .NET system using the wizard:
7.3.1 Run the AppXtender Admin Tool by selecting the Administrator item on your Windows XtenderSolutions menu item (Start / Programs / AppXtender Desktop / AppXtender Admin).
7.3.2 Login as SYSOP.
Banner XtenderSolutions Release 7.2 June 2008116 Installation Guide Confidential

7 AppXtender Web Access.Net Deployment Details
7.3.3 Select Tools>AppXtender .NET Wizard to start the configuration process.
7.3.4 Select the Web Access Wizard and use the wizard to configure the AppXtender Web Access .NET system.
Upon successful configuration of AppXtender Web Access .NET, you may proceed to Step 7.5-"Install AppXtender Web Access .NET" on page 119.
Step 7.4—Add AppXtender Admin Configuration Settings for AppXtender Web Access
Host Server: ServerW
In this guide, you installed and configured the AppXtender Admin Tool to make AppXtender operational. Now you will add additional settings to configure AppXtender Web Access and its related components. For more information, see Chapter 4 of the ApplicationXtender Web Access .NET Administrator’s Guide Release 5.30.
To minimally configure AppXtender Web Access:
7.4.1 Run the AppXtender Admin Tool by selecting the Administrator item on your Windows XtenderSolutions menu item (Start / Programs / XtenderSolutions / Administrator).
7.4.2 Login as SYSOP.
7.4.3 Select the AppXtender Web Access node in the left frame. Sub-nodes under AppXtender Web Access will open up. Make the following changes to these nodes:
AppXtender Web Access / Setup / Global Credentials Account / User Account
(a) Click Setup.
(b) Enter the Windows domain account username and password that was established using the guidelines in “Accounts and Rights Required for Resource Authentication Accounts” in Chapter 3 of the ApplicationXtender Concepts and Planning Guide Release 5.30. This Windows account will be used by EMC Documentum to access files across your Windows networking system.
Note: Ensure that this domain user account has special Windows privileges as specified in the EMC Documentum documentation.
AppXtender Web Access / Setup / Session Management / Session Cache Path
June 2008 Banner XtenderSolutions Release 7.2Confidential Installation Guide 117

7 AppXtender Web Access.Net Deployment Details
(a) Using the UNC path convention, enter the Session Cache Path to the cache you created in Create AppXtender Web Access Session Cache Folder (In Step 7.1--"Create AppXtender Web Access Session Cache Folder" on page 116).
(b) Select Global User Credentials.
(c) Click OK.
(d) Click OK on the New Path dialog box.
AppXtender Web Access / Security
(a) Deselect the Users may access the server using NTLM Authentication checkbox.
(b) This action will cascade changes into other checkboxes in the application.
7.4.4 Select the Services node in the left frame. Sub-nodes under Services will open up. Make the following changes to these nodes:
Services / Rendering Server
Note: The Rendering Server is mandatory for most AppXtender Web Access installations. The only circumstance under which a Rendering Server is not required for a BXS site is if the deployment model is AppXtender Web Access .NET, with no use of thin browser clients, no thumbnail rendering, and no email services established.
(a) In the Login section of the page, click Setup.
(b) Enter the Windows domain account username and password that was established using the guidelines in “Accounts and Rights Required for Resource Authentication Accounts” in Chapter 3 of the ApplicationXtender Concepts and Planning Guide Release 5.30.
(c) Click OK.
(d) Enter the cache location for the Rendering Server cache. This should be entered in UNC format and should correspond to the Rendering Server Cache you created in Step 7.1--"Create AppXtender Web Access Session Cache Folder" on page 116.
(e) Click OK to acknowledge the new path.
Banner XtenderSolutions Release 7.2 June 2008118 Installation Guide Confidential

7 AppXtender Web Access.Net Deployment Details
Note: The Rendering Server uses two database tables for processing. The initial execution of the AppXtender Admin Tool created these tables in the first database it accessed, but for the purposes of performance, these tables could also be created in an entirely different database. For more information, see Chapter 2 of the ApplicationXtender Web Access .NET Administrator’s Guide Release 5.30.
(f) Select the Banner/Oracle database for the database the Rendering Server will use for its cache management. Click Select and establish the Data Source with the following guidelines:
• Use OTGMGR as your User Name.
• Enter the Oracle password for OTGMGR.
• Select the Allow Saving Password checkbox to have the system always use those database credentials when the Rendering Server needs to see its tables.
(g) Click OK.
(h) You may leave the Schema field blank. This entry is no longer needed because of the use of the CM Security Model in BXS 7.0 and higher.
Note: All other settings are optional and can be adjusted at a future time.
7.4.5 Exit the AppXtender Admin Tool at this time.
Step 7.5—Install AppXtender Web Access .NET
Location of Install Media: AppXtender Web Access_Net Installation folder
Installation Target: ServerW
For more information on installing AppXtender Web Access .NET, see “Installing and Registering ApplicationXtender Web Access Components” in Chapter 5 of the ApplicationXtender Web Access .NET Administrator’s Guide Release 5.30.
To install AppXtender Web Access .NET:
7.5.1 Launch Setup.exe.
7.5.2 Select the Default Web Site as your target web application.
Note: The "Content Management Root" is where AppXtender was installed and cannot be changed.
7.5.3 Click Next.
June 2008 Banner XtenderSolutions Release 7.2Confidential Installation Guide 119

7 AppXtender Web Access.Net Deployment Details
7.5.4 Click Next.
7.5.5 Click Finish.
Step 7.6—Update Web.config File on AppXtender Web Access for Single Login From Banner To AppXtender Web Access
Host Server: ServerW
The Web.config file was installed as part of your installation of AppXtender Web Access .NET. This file is located in your website's AppXtender Web Access folder (e.g., C:\Inetpub\wwwroot\AppXtender\Web.config). You will need to make one required change to this file. Two optional setting changes to the Web.config file are also configurable at this point, and are described below.
To enable Single Login between Banner and AppXtender Web Access, a password must exist on both the Banner system and the AppXtender Web Access system. The Banner-side copy of the password is contained in the EXBINST table. This table is maintained by the EXAINST form.
Note: Chapter 3 of the Banner AppXtender Administrator Guide contains information about resetting this Single Login key from its delivered value.
To modify the password in the Web.config file:
7.6.1 Open Web.config in a text editor.
7.6.2 Search for the string WxCryptoKeyPassword. You should locate a line similar to the following:
<add key="WxCryptoKeyPassword" value="password"/>
7.6.3 Change the value of password to the password you are using at your site. This would be the same value you will enter into the EXAINST form. The password value is case sensitive, so be careful to ensure that the same value exists on both sides.
Banner XtenderSolutions Release 7.2 June 2008120 Installation Guide Confidential

7 AppXtender Web Access.Net Deployment Details
7.6.4 The value for UDLFieldRefreshRate is initially set to "0". This value affects the frequency that AppXtender Web Access dropdown list values are refreshed. Many fields of a document's index structure are defined as dropdown lists. A value of "0" means that the system will load dropdown list value sets once at the startup of the AppXtender Web Access server, and not refresh it again until the AppXtender Web Access server is stopped and restarted. A positive integer value (indicating an interval in minutes) permits the AppXtender Web Access server to periodically update the dropdown list value sets without restarting the AppXtender Web Access server. This permits tighter synchronization of values between the User-Defined List tables (UL%) and the data displayed to the user as values within the dropdown list. Since Banner data (such as Document Types) should typically be in tight synchronization with the data that users see in AppXtender Web Access, SunGard Higher Education recommends a value of approximately 5-10 minutes for this refresh rate. There will be up to n minutes of delay between entry of values in Banner tables and usability of those values in AppXtender Web Access dropdown lists. You may adjust this value anywhere from 1 (1 minute interval) to 0 (infinite interval).
7.6.5 Save your changes to Web.config and exit your text editor.
Note: Additional settings, including the timeout figure for Single Login credentials (key WxCryptoCredExpireInterval) and the maximum uploadable file size setting and upload timeout value, are also stored in the Web.config file. You may leave the defaults in place for now. The defaults are 10 minutes of timeout for Single Login credentials, and 10 MB maximum filesize in a maximum of 10 minutes for uploads.
Step 7.7—Ensure AppXtender Web Access and Banner JRE Compatibility
When using AppXtender Web Access with Banner, please review the “Configuring Client Download of JRE” in Chapter 4 of the ApplicationXtender Web Access .NET Administrator’s Guide Release 5.30.
You will need to ensure that the AppXtender Web Access system and the Banner system use the same JRE version. This step addresses a problem that existed in previous releases regarding the display of thumbnails.
June 2008 Banner XtenderSolutions Release 7.2Confidential Installation Guide 121

7 AppXtender Web Access.Net Deployment Details
Step 7.8—Install AppXtender Web Access Rendering Server
Location of Install Media: Render Installation folder
Installation Target: ServerW (or ServerR if applicable)
Note: If you are installing the AppXtender Web Access Rendering Server onto a separate machine (ServerR), you will need to execute the Component Setup Wizard on this server. For more information, see Step 7.9 - "Execute Component Setup Wizard" on page 123.
Note: The location(s) for the Rendering Server(s) depends on your selected architecture. If you have the Windows Server resources to segregate Rendering Server(s) onto a different machine from the AppXtender Web Access .NET server and/or AppXtender Utility Services, a performance gain will be realized.
For more information, see “Installing ApplicationXtender Rendering Server” in Chapter 5 of the ApplicationXtender Web Access .NET Administrator’s Guide Release 5.30.
To install the AppXtender Web Access Rendering Server:
7.8.1 Launch Setup.exe to start the installation of the Rendering Server.
Note: The Destination Folder may or may not be configurable, depending on what other EMC Documentum components are already installed on the Rendering Server machine.
7.8.2 Click Next.
7.8.3 Click Next.
7.8.4 Click Yes to Enable Garbage Service collection.
7.8.5 Click Finish.
Banner XtenderSolutions Release 7.2 June 2008122 Installation Guide Confidential

7 AppXtender Web Access.Net Deployment Details
Step 7.9—Execute Component Setup Wizard
Host Server: ServerW (and ServerR if applicable)
The Component Setup Wizard is installed on the same server that any of the following products are installed on:
• AppXtender Web Access .NET
• Rendering Server
• AppXtender Utility Services
Following the installation of the component and after any configuration change to that component, the Component Setup Wizard must be executed on each server that one of the above applications resides.
Note: Fore more information on exectuing the Component Setup Wizard, see Chapter 5 of the ApplicationXtender Web Access .NET Administrator’s Guide Release 5.30.
The installation of any of the three components listed above will add a new item named Component Setup Wizard to your XtenderSolutions Windows program group on that platform.
7.9.1 Launch the Component Setup Wizard by selecting Start > Programs > AppXtender Desktop > Component Registration.
Note: Allow adequate time to pass before the next screen appears.
7.9.2 Click Next.
7.9.3 After continuing, a screen will show all installed AppXtender Web Access components on that machine which can be registered. If a component is installed, then it should be registered. Select AppXtender Web Access Web Server and click Next.
Note: You can only register one component at a time.
7.9.4 Enter an optional component description.
7.9.5 Click Next.
Note: If you have multiple components installed on this machine, you must run the Component Setup Wizard for each of these components. If you have installed the Rendering Server on a separate machine, you will need to run the Component Setup Wizard on that machine.
June 2008 Banner XtenderSolutions Release 7.2Confidential Installation Guide 123

7 AppXtender Web Access.Net Deployment Details
7.9.6 Select the Would you like to run the Component Setup Wizard again? checkbox.
7.9.7 Click Finish.
7.9.8 Click Yes to restart the AppXtender Web Access Configuration Monitor Service.
Note: If you receive a timeout error, please ignore it, click OK and continue.
7.9.9 Click Next.
7.9.10 After continuing, a screen will show all installed AppXtender Web Access components on that machine which can be registered. If a component is installed, then it should be registered. Select Rendering Server and click Next.
Note: You can only register one component at a time.
7.9.11 Enter an optional component description.
7.9.12 Click Next.
7.9.13 De-select the Would you like to run the Component Setup Wizard again? checkbox.
7.9.14 Click Finish.
Note: The first time you launch AppXtender Web Access from a browser, it will take several minutes while script compilations occur.
Step 7.10—Enter the AppXtender Web Access URL in Banner Form EXAINST
Open the Banner form EXAINST to enter the AppXtender Web Access URL. The AppXtender Web Access URL must contain the address of the interface page between Banner and AppXtender Web Access. Query and credential information is passed to this URL address.
The format of this URL will be:
http://hostname/AppXtender/isubmitquery.aspx
where "hostname" is replaced by the appropriate server name.
Banner XtenderSolutions Release 7.2 June 2008124 Installation Guide Confidential

8 AppXtender Web Access Java 2 Edition Deployment Details
Chapter 8 AppXtender Web Access Java 2 Edition Deployment Details
This chapter contains the instructions for installing the Microsoft Java 2-based AppXtender Web Access (Web Access J2) product. If you plan to install AppXtender Web Access on the Windows.NET platform, you will need to follow instructions in Chapter 7 of this guide.
You can deploy AppXtender Web Access J2 Edition on the following platforms:
• Microsoft Windows Server 2000 (SP4) or 2003 (SP1)
• Solaris (Unix)
• SUSE Linux 9.2 Professional Edition
Here are some additional guidelines that clarify EMC Documentum's position with regard to BXS:
• EMC Documentum's Hardware Requirements for an AppXtender Web Access J2 server are specified in “AppXtender WebJ2 Server Hardware and Software Requirements Overview” in Chapter 1 of the ApplicationXtender Web Access J2 Administrator’s Guide Release 5.30 or the Banner XtenderSolutions Hardware and Software Requirements Guide.
• The AppXtender Admin Tool must be installed on a Microsoft Windows 2000 (SP4) or 2003 (SP1) Server.
• Any instance of a Rendering Server must be installed on a Microsoft Windows 2000 (SP4) or 2003 (SP1)Server. This component may share the same CPU as other EMC Documentum components (such as the License Server and the AppXtender Admin Tool), depending upon performance considerations.
• One or more Rendering Servers use a single cache in which rendered files are stored for re-use and delivery to the AppXtender Web Access Server. This cache must be on a Windows Rendering Server and must be accessible by the AppXtender Web Access J2 server (by NFS for AppXtender Web Access J2 deployment on Solaris). For more information, see “Configuring ApplicationXtender Rendering Server” in Chapter 2 of the ApplicationXtender Web Access J2 Administrator’s Guide Release 5.30.
• A session cache is also used by AppXtender Web Access J2 to track browser session data. It should be located on the AppXtender Web Access J2 server to enhance performance. For a AppXtender Web Access J2-on-Solaris deployment, this cache should be located on the same Solaris machine.
• Browser support for a AppXtender Web Access J2 deployment is provided for MS Internet Explorer (IE) version 6.0 only.
• Currently, the AppXtender Web Access J2 deployment contains slightly less end-user functionality than a AppXtender Web Access .NET deployment. In particular, the J2 deployment does not support full-text indexing, digital
June 2008 Banner XtenderSolutions Release 7.2Confidential Installation Guide 125

8 AppXtender Web Access Java 2 Edition Deployment Details
signatures, AppXtender Web Access PAL licenses, or Netscape as a client browser tool.
Note: For each step, please review EMC Documentum's official instructions regarding the step.
Note: Ensure that you are following the installation instructions on the appropriate device.
Step 8.1—Create AppXtender Web Access Rendering Server Cache Folder
Host Server: ServerW (if Rendering Server is located on ServerW), or ServerR
For more information on AppXtender Web Access Rendering Cache settings, see “Configuring ApplicationXtender Rendering Server Cache Settings” in Chapter 2 of the ApplicationXtender Web Access J2 Administrator’s Guide Release 5.30 or the Banner XtenderSolutions Hardware and Software Requirements Guide.
For sizing guidelines, see “AppXtender WebJ2 Server Hardware and Software Requirements Overview” in Chapter 1 of the ApplicationXtender Web Access J2 Administrator’s Guide Release 5.30.
Step 8.2—Add AppXtender Admin Configuration Settings for AppXtender Web Access
Host Server: ServerW
In this guide, you installed and configured the AppXtender Admin Tool to make AppXtender operational. Now you will add additional settings to configure AppXtender Web Access J2 and its related components. For more information, see Chapter 3 of the ApplicationXtender Web Access J2 Administrator’s Guide Release 5.30.
Banner XtenderSolutions Release 7.2 June 2008126 Installation Guide Confidential

8 AppXtender Web Access Java 2 Edition Deployment Details
To minimally configure AppXtender Web Access J2:
8.2.1 Run the AppXtender Admin Tool by selecting the Administrator item on your Windows XtenderSolutions menu item (Start / Programs / AppXtender Desktop / AppXtender Admin).
8.2.2 Login as SYSOP.
8.2.3 Select the Tools > Options menu item within AppXtender Admin and select AppXtender WebJ2.
8.2.4 Click OK.
8.2.5 Select the Environment node in the left frame. Sub-nodes under Environment will open up. Make the following changes to these nodes:
Data Sources / Connection String (JDBC) / Driver
Select Oracle.
Data Sources / Connection String (JDBC) / Driver Specific Information
(a) Follow the “Correcting JDBC Connection Strings in AppXtender Admin” guidelines in Chapter 1 of the ApplicationXtender Web Access J2 Administrator’s Guide Release 5.30.
(b) Enter information to configure the JDBC connection. A typical JDBC connection string in its entirety might look as follows:
JDBC:oracle:thin:@//maldevm123.sct.com:1521/m3s70
In this example, the value m3s70 would be an Oracle database alias which can be reached from the AppXtender Web Access Server and maldevm123.sct.com would be the server upon which the Oracle database resides.
8.2.6 Select the Services node in the left frame. Sub-nodes under Services will open up. Make the following changes to these nodes:
Services / Rendering Server
Note: The Rendering Server is mandatory for most AppXtender Web Access installations. The only circumstance under which a Rendering Server is not required for a BXS site is if the deployment model is AppXtender Web Access .NET, with no use of thin browser clients, no thumbnail rendering, and no email services (from AppXtender Web Access) established.
(a) In the Login section of the page, click Setup.
June 2008 Banner XtenderSolutions Release 7.2Confidential Installation Guide 127

8 AppXtender Web Access Java 2 Edition Deployment Details
(b) Enter the Windows domain account username and password for the Rendering Server that was established using the guidelines in “Accounts and Rights Required for Resource Authentication Accounts” in Chapter 3 of the ApplicationXtender Concepts and Planning Guide Release 5.30.
(c) Click OK.
(d) Enter the cache location for the Rendering Server cache. This should be entered in UNC format (using only lowercase characters) and should correspond to the Rendering Server Cache you created in Step 8.1-"Create AppXtender Web Access Rendering Server Cache Folder" on page 126.
(e) Click OK to acknowledge the new path.
Note: The Rendering Server uses one or more database tables for processing. The initial execution of the AppXtender Admin Tool created these tables in the first database it accessed, but for the purposes of performance, these tables could also be created in an entirely different database. For more information, see Chapter 2 of the ApplicationXtender Web Access J2 Administrator’s Guide Release 5.30.
(f) Select the Banner/Oracle database for the database the Rendering Server will use for its cache management. Click Select and establish the Data Source with the following guidelines:
• Use OTGMGR as your User Name.
• Enter the Oracle password for OTGMGR.
• Select the Allow Saving Password checkbox to have the system always use those database credentials when the Rendering Server needs to see its tables.
(g) Click OK.
(h) Copy the Connection String (JDBC) field value from the Environment / Data Sources node into the JDBC field in the Cache section of the window.
(i) You may leave the Schema field blank. This entry is no longer needed because of the use of the CM Security Model in BXS 7.0.
Services / AppXtender Utility Services
(j) Enter the same credentials you entered for your other credential sets (Rendering Server, Global, etc.).
(k) Click the ellipsis on the Credentials field and enter the Windows domain account username and password that was established using the guidelines in “Accounts and Rights Required for Resource Authentication Accounts” in Chapter 3 of the ApplicationXtender Concepts and Planning Guide Release 5.30.
Banner XtenderSolutions Release 7.2 June 2008128 Installation Guide Confidential

8 AppXtender Web Access Java 2 Edition Deployment Details
(l) Save your settings changes.
Note: All other settings are optional and can be adjusted at a future time.
8.2.7 Exit the AppXtender Admin Tool at this time.
Step 8.3—Install AppXtender Web Access Rendering Server
Location of Install Media: Render Installation folder
Installation Target: ServerW (or ServerR if applicable)
Note: If you are installing AppXtender Web Access Rendering Server onto a separate machine (ServerR), then you will also need to execute the Component Setup Wizard on this server. For more information, see "Execute the Windows-Based Component Setup Wizard to Register AppXtender Web Access Rendering Server and AppXtender Utility Services" on page 131.
Note: The location(s) for the Rendering Server(s) depends on your selected architecture. If you have the Windows Server resources to segregate Rendering Server(s) onto a different machine from the AppXtender Web Access J2 server and/or AppXtender Utility Services, a performance gain will be realized.
For more information, see Chapter 4 of the ApplicationXtender Web Access J2 Administrator’s Guide Release 5.30.
To install the AppXtender Web Access Rendering Server:
8.3.1 Launch Setup.exe to start the installation of the Rendering Server.
Note: The Destination Folder may or may not be configurable, depending on what other EMC Documentum components are already installed on the Rendering Server machine.
8.3.2 Click Next.
8.3.3 Click Next.
8.3.4 Click Yes to Enable Garbage Service collection.
8.3.5 Click Finish.
June 2008 Banner XtenderSolutions Release 7.2Confidential Installation Guide 129

8 AppXtender Web Access Java 2 Edition Deployment Details
Step 8.4—Install AppXtender Utility Services
Location of Install Media: WebServices Installation folder
Installation Target: ServerW (or any other Windows 2000 / 2003 Server)
Note: If you are installing AppXtender Utility Services onto a separate machine from ServerW, then you will also need to execute Component Setup Wizard on this server. For more information, see "Execute the Windows-Based Component Setup Wizard to Register AppXtender Web Access Rendering Server and AppXtender Utility Services" on page 131.
To install AppXtender Utility Services:
8.4.1 Launch Setup.exe to start the installation of AppXtender Utility Services.
8.4.2 For AppXtender Web Access J2 deployment, you may choose either the Internet Information Services (IIS) Deployment or XtenderSolutions Web Host Deployment.
8.4.3 If you selected the IIS option above, simply select the default website.
8.4.4 If you get a message that inquires about the overwriting of files in your Documents and Settings folder on behalf of MDAC, click Yes to All.
8.4.5 As SYSOP, log into the AppXtender Administrator tool.
8.4.6 Expand the Service node. The list should include AppXtender Utility Services.
8.4.7 Complete the "Credential" fields and save your changes.
Note: SunGard Higher Education recommends using the same global credentials in this field as were used for Web Access and other areas of the system. If you choose to use another account, please refer to "Specifying Global Credentials" in the AppXtender Administrator tool's online Help System for details on required system privileges.
Banner XtenderSolutions Release 7.2 June 2008130 Installation Guide Confidential

8 AppXtender Web Access Java 2 Edition Deployment Details
Step 8.5—Execute the Windows-Based Component Setup Wizard to Register AppXtender Web Access Rendering Server and AppXtender Utility Services
Host Server: ServerW (and ServerR if applicable)
The Component Setup Wizard is installed on the same server that any of the following products are installed on:
• AppXtender Web Access J2
• Rendering Server
• AppXtender Utility Services
The Component Setup Wizard must be executed on each server that one of the above applications resides following the installation of the component and after any configuration change to that component. For more information, see Chapter 4 of the ApplicationXtender Web Access J2 Administrator’s Guide Release 5.30.
The installation of any of the three components listed above will add a new item named Component Setup Wizard to your XtenderSolutions Windows program group on that platform.
8.5.1 Launch the Component Setup Wizard.
Note: Allow adequate time to pass before the next screen appears.
8.5.2 Click Next.
8.5.3 After continuing, a screen will show all installed AppXtender Web Access components on that machine which can be registered. If a component is installed, then it should be registered. Select Rendering Server and click Next.
Note: You can only register one component at a time.
8.5.4 Enter an optional component description.
8.5.5 Click Next.
8.5.6 Select the Would you like to run the Component Setup Wizard again? checkbox.
8.5.7 Click Finish.
Note: The first time you launch AppXtender Web Access from a browser it will take several minutes while script compilations occur.
8.5.8 Click Next.
June 2008 Banner XtenderSolutions Release 7.2Confidential Installation Guide 131

8 AppXtender Web Access Java 2 Edition Deployment Details
8.5.9 After continuing, a screen will show all installed AppXtender Web Access components on that machine which can be registered. If a component is installed, then it should be registered. Select AppXtender Utility Services and click Next.
Note: You can only register one component at a time.
8.5.10 Enter an optional component description.
8.5.11 Click Next.
8.5.12 Do not modify the Port Number. For more information on setting a port number, see ApplicationXtender Core Components Administrator’s Guide Release 5.30.
8.5.13 De-select the Would you like to run the Component Setup Wizard again? checkbox.
8.5.14 You will then be asked about starting the AppXtender Web Access Configuration Monitor. Select Yes. If a message box indicates that a timeout has occurred, you may ignore that message. The service will start on its own given adequate time.
8.5.15 Click Finish.
Step 8.6—NFS Configuration (Solaris/Linux Deployment Only)
Host Server: ServerZ , Server W if DiskXtender is not being used, and the machine containing the Rendering Server Cache (Server W or Server R).
If you deploy AppXtender Web Access J2 Edition on Solaris, the Solaris platform must be able to access a file system on your network. It must be able to retrieve file objects as well as web-compatible renderings of objects, including thumbnails. For sites using DiskXtender for object storage, the AppXtender Web Access J2 server and the machine that contains the Rendering Server Cache must be connected via NFS.
For sites that are not using DiskXtender, NFS connectivity between the Rendering Server Cache must exist along with NFS connectivity between the AppXtender Web Access J2 server and the Object Repository server (Server Z).
Banner XtenderSolutions Release 7.2 June 2008132 Installation Guide Confidential

8 AppXtender Web Access Java 2 Edition Deployment Details
EMC Documentum recommends that you use the Hummingbird NFS Maestro Server for Solaris or the Samba Server for Linux. For detailed instructions on configuring the Hummingbird NFS Maestro Server, see Chapter 1 of the ApplicationXtender Web Access J2 Administrator’s Guide Release 5.30.
Step 8.7—Install AppXtender Web Access J2 Edition
Location of Install Media: AppXtender Web Access J2 Installation folder
Installation Target: ServerW (Windows Server Deployment) or ServerU (Solaris Deployment)
Detailed instructions for the installation of the AppXtender Web Access J2 Server can be found in Chapter 4 of the ApplicationXtender Web Access J2 Administrator’s Guide Release 5.30. The instructions apply to the use of Tomcat on either a Windows Server, Solaris, or SUSE Linux platform.
Note: This assumes that you have a working Apache Tomcat installation before you begin.
Step 8.8—Update web.xml File on AppXtender Web Access Server for Single Login From Banner To AppXtender Web Access
Host Server: ServerU (Solaris) or ServerW (Windows Server)
The web.xml file was installed as part of your installation of AppXtender Web Access J2. This file is located in your website's AppXtender Web Access folder (for example, <Tomcat Installation Folder>/webapps/AppXtender Web Access/WEB-INF). You will need to make one required change to this file. One optional setting change to the web.xml file is also configurable at this point and is described below.
To enable Single Login between Banner and AppXtender Web Access, a password must exist on both the Banner system and the AppXtender Web Access system. The Banner-side copy of the password is contained in your eoqrpls.pll Oracle Forms Library. In AppXtender Web Access 4.x, the EMC Documentum version of the password was stored in the ISubmitQuery.asp web page. However, in AppXtender Web Access 5.x, the password is stored in the web.xml file.
Note: Chapter 3 of the BXS Administration Guide contains information about resetting this Single Login key from its delivered value.
June 2008 Banner XtenderSolutions Release 7.2Confidential Installation Guide 133

8 AppXtender Web Access Java 2 Edition Deployment Details
To modify the web.xml file:
8.8.1 Open web.xml in a text editor.
8.8.2 Search for the string WxCryptoKeyPassword. You should locate a series of lines similar to the following:
<init-param><param-name>WxCryptoKeyPassword</param-name><param-value>WxServerCopyOfKeypassword</param-value><description>WxCrypto Key Password</description></init-param>
8.8.3 Change the value of WxServerCopyOfKeypassword to the password you are using at your site. This would be the same value you will enter into the Banner EXAINST form. The password value is case sensitive, so be careful to ensure that the same value exists on both sides. The password value is case sensitive, so be careful to ensure that the same value exists on both sides.
8.8.4 Save your changes to web.xml and exit the text editor.
Note: Additional settings, including the timeout figure for Single Login credentials (key WxCryptoCredExpireInterval) and the maximum uploadable file size setting and upload timeout value, are also stored in the Web.config file. You may leave the defaults in place for now. The defaults are 10 minutes of timeout for Single Login credentials, and 10 MB maximum filesize in a maximum of 10 minutes for uploads.
Step 8.9—Execute (Java-Based) Component Setup Wizard to Register the AppXtender Web Access J2 Server
Where to Implement: ServerU (Solaris-based) or ServerW (Windows Server-based)
The Java-based Component Setup Wizard is installed onto the same computer as part of the AppXtender Web Access J2 AppXtender Web Access Server installation. The Java-based Component Setup Wizard is a GUI application that must run in X-Windows. The Java-based Component Setup Wizard will need to be executed on the server following the installation of the AppXtender Web Access J2 AppXtender Web Access Server and after any configuration change to that component.
Banner XtenderSolutions Release 7.2 June 2008134 Installation Guide Confidential

8 AppXtender Web Access Java 2 Edition Deployment Details
For more information about running the Component Setup Wizard for AppXtender Web Access J2, see Chapter 4 of the ApplicationXtender Web Access J2 Administrator’s Guide Release 5.30. Please follow those instructions to register your AppXtender Web Access J2 AppXtender Web Access Server, with the following additional guidelines:
• When you are locating a Data Source, you may leave the Schema line blank when configuring settings in the Data Source Dialog Box.
• When you are locating a Data Source, use the login information for database user OTGMGR and its password, and check the checkbox.
• Perform a Test Connection to verify your connectivity to the Oracle database.
To register the AppXtender Web Access J2 Server, follow the instructions within “Locating a Data Source” and “Completing AppXtender WebJ2 Server Deployment” in Chapter 4 of the ApplicationXtender Web Access J2 Administrator’s Guide Release 5.30.
Note: Please complete the location section, due to the dropping of the schema name from the Data Source.
Step 8.10—Enter the AppXtender Web Access URL in Banner Form EXAINST
Open the Banner form EXAINST to enter the AppXtender Web Access URL. The AppXtender Web Access URL must contain the address of the interface page between Banner and AppXtender Web Access. Query and credential information is passed to this URL address.
The format of this URL will be:
http://hostname:port/AppXtender Web Access/servlet/external
where hostname is replaced by the appropriate server name.
Note: This URL is case sensitive and must be entered exactly as shown above.
Step 8.11—Ensure AppXtender Web Access and Banner JRE Compatibility
When using AppXtender Web Access with Banner, please review the “Configuring Client Download of JRE” in Chapter 3 of the ApplicationXtender Web Access J2 Administrator’s Guide Release 5.30.
June 2008 Banner XtenderSolutions Release 7.2Confidential Installation Guide 135

8 AppXtender Web Access Java 2 Edition Deployment Details
You will need to ensure that the AppXtender Web Access system and the Banner system use the same JRE version. This step addresses a problem that existed in previous releases regarding the display of thumbnails.
Step 8.12—Restart the Tomcat Server
To restart the Tomcat server on a Solaris system:
8.12.1 Change directories to the Apache Tomcat installation folder.
8.12.2 Enter the following command:
./startup.sh.
To restart the Tomcat server on a Windows system where Apache Tomcat is installed as an application:
8.12.1 Change directories to the Apache Tomcat installation folder.
8.12.2 Run the following command:
startup.bat.
To restart the Tomcat server on a Windows system where Apache Tomcat is installed as a service, please restart the Tomcat service.
Banner XtenderSolutions Release 7.2 June 2008136 Installation Guide Confidential

9 Integrating AppXtender Web Access with Luminis
Chapter 9 Integrating AppXtender Web Access with Luminis
Banner XtenderSolutions delivers a AppXtender Web Access Luminis Integration Component that includes a AppXtender Web Access CPIP Connector and a AppXtender Web Access Luminis channel user interface.
The AppXtender Web Access CPIP Connector allows Luminis users to launch AppXtender Web Access using a single sign-on (SSO).
The AppXtender Web Access Luminis channel user interface can be rendered in the Luminis portal so that users can query documents stored in XtenderSolutions from Luminis.
To integrate AppXtender Web Access with Luminis, the following software is required:
• Luminis III.3 or higher
• EMC Documentum AppXtender Web Services 5.30, a middle tier product in the AppXtender product suite.
June 2008 Banner XtenderSolutions Release 7.2Confidential Installation Guide 137

9 Integrating AppXtender Web Access with LuminisInstall AppXtender Services
Install AppXtender Services
The AppXtender Web Access Luminis Integration Component requires EMC Documentum AppXtender Web Services.
Install the AppXtender Web Access Luminis Integration Component
Depending on whether you are using AppXtender Web Access .NET or AppXtender Web Access J2, please follow the appropriate steps below:
AppXtender Web Access .NET
You need to install this component on the server where AppXtender Web Access .NET is installed.
1. Extract the bxsluminis.zip file to the server on which AppXtender Web Services is installed. This file is packaged in the bxssetup70200u.trz file. The bxsluminis.zip file contains the Setup.exe file.
2. Execute Setup.exe file to install this component.
3. Modify the configuration file of the AppXtender Web Access Luminis Integration Component. The name of this configuration file is AppXtender Web Access.luminis.config and it can be found in the directory where AppXtender Web Access was installed. Typically, it is c:\inetpub\wwwroot\AppXtender.
(a) Open this file using a text editor.
(b) Locate the tag <UrlAppXtenderServices> and enter the URL of AppXtender Services. For example
http://<AppXtender Services Server>/AppXtenderWebServices/AppXtenderServicesInterface.asmx.
(c) Locate the tag <datasource> and enter a AppXtender Web Access data source name. This step is optional. If you do not enter a AppXtender Web Access data source name, the AppXtender Web Access Luminis Integration Component will use the first data source defined in AppXtender Admin.
Banner XtenderSolutions Release 7.2 June 2008138 Installation Guide Confidential

9 Integrating AppXtender Web Access with LuminisInstall AppXtender Services
AppXtender Web Access J2
You need to install this component on the server where AppXtender Services is installed.
1. Extract the bxsluminis.zip file to the server on which AppXtender Web Services is installed. This file is packaged in the bxssetup70200u.trz file. The bxsluminis.zip file contains the Setup.exe file.
2. Open a command window and navigate to the directory to where Setup.exe is located.
3. Run the Setup.exe file to install this component.
4. Modify the configuration file of the AppXtender Web Access Luminis Integration Component. The name of this configuration file is AppXtender Web Access.luminis.config. The default location of this file is the directory where AppXtender Services web site is located. Typically, it is C:\Inetpub\wwwroot\AppXtenderWebServices if AppXtender Services is deployed on IIS or C:\Program Files\XtenderSolutions\Content Management\AppXtenderWebServices if AppXtender Services is deployed on XsHost.
(a) Open AppXtender Web Access.luminis.config file using a text editor.
(b) Find the tag <UrlAppXtender Web Access J2> and enter the URL of the login page of AppXtender Web Access Java 2 Edition. For example:
http://<AppXtender Web Access J2 Server>/AppXtender Web Access/servlet/login
(c) Locate the <datasource> tag and enter a AppXtender Web Access data source name. This step is optional. If you do not enter a AppXtender Web Access data source name, the AppXtender Web Access CPIP Connector will use the first data source defined in AppXtender Admin.
June 2008 Banner XtenderSolutions Release 7.2Confidential Installation Guide 139

9 Integrating AppXtender Web Access with LuminisInstall AppXtender Services
5. Modify the web.config file. This file is located at the same directory as the AppXtender Web Access.luminis.config file. To modify this file:
(a) Open this file using a text editor.
(b) Locate the following line:
<add key="AppXtender Web AccessCryptoKeyPassword" value="password" />
(c) The default password is password. Change it to match the password defined in the file web.xml located in the $TOMCAT_HOME/webapps/AppXtender Web Access/WEB-INF directory on the AppXtender Web Access J2 server.
Modify Luminis Server Configuration to Recognize AppXtender Web Access
Note: This step should be completed on the Luminis server by the Luminis administrator.
AppXtender Web Access .NET
1. Check to see what is already present as defined external systems. To do so, execute the following command:
configman—g es.systems
This command will return the system values that are configured for your Luminis environment.
2. Run the following command:
configman—s es.systems “<previous value of es.systems> AppXtender Web Access”
For example, if step 1 returns sct is epos, then you would run:
configman—s es.systems “sct is epos AppXtender Web Access”
Banner XtenderSolutions Release 7.2 June 2008140 Installation Guide Confidential

9 Integrating AppXtender Web Access with LuminisInstall AppXtender Services
3. Run the following command:
configman—s es.AppXtender Web Access.domain <url of the login page of AppXtender Web Access>
For example:
configman—s es.AppXtender Web Access.domain http://<AppXtender Web Access Server>/AppXtender Web Access/login.aspx
4. Run the following command:
configman—s es.AppXtender Web Access.configURL http://<AppXtender Web Access Server>/AppXtender Web Access/cpip_GetConfigURL.aspx
5. Run the following commands:
configman—s es.AppXtender Web Access.systemdescription AppXtender Web Access
configman—s es.AppXtender Web Access.autosync true
6. This step is optional. Run the following command to modify the external system timeout value:
configman—s es.connection.timeout.seconds 90
This value determines how long Luminis will wait to reach external systems.
7. Restart Luminis server instance to ensure that these changes become effective.
AppXtender Web Access J2
1. Check to see what is already present as defined external systems. To do so, execute the following command:
configman—g es.systems
This command will return the system values that are configured for your Luminis environment.
June 2008 Banner XtenderSolutions Release 7.2Confidential Installation Guide 141

9 Integrating AppXtender Web Access with LuminisInstall AppXtender Services
2. Run the following command:
configman—s es.systems “<previous value of es.systems> AppXtender Web Access”
For example, if step 1 returns sct is epos, then you would run:
configman—s es.systems “sct is epos AppXtender Web Access”
3. Run the following command:
configman—s es.AppXtender Web Access.domain <url of the login page of AppXtender Web Access>
For example:
configman—s es.AppXtender Web Access.domain http://<AppXtender Web Access Server>/AppXtender Web Access/servlet/login
4. Run the following command:
configman—s es.AppXtender Web Access.configURL http://<AppXtender Services Server> /AppXtenderWebServices/cpip_GetConfigURL.aspx
5. Run the following commands:
configman—s es.AppXtender Web Access.systemdescription AppXtender Web Access
configman—s es.AppXtender Web Access.autosync true
6. This step is optional. Run the following command to modify the external system timeout value:
configman—s es.connection.timeout.seconds 90
This value determines how long Luminis will wait to reach external systems.
7. Restart Luminis server instance to ensure that these changes become effective.
Banner XtenderSolutions Release 7.2 June 2008142 Installation Guide Confidential

9 Integrating AppXtender Web Access with LuminisInstall AppXtender Services
Create a AppXtender Web Access Link in the Luminis Bookmarks Channel
Users can create a AppXtender Web Access link in the Luminis Bookmarks channel to allow a user to login to AppXtender Web Access from Luminis with single sign-on (SSO).
When creating this bookmark, in the URL field enter:
http://<Luminis Server Name with Domain Name>/cp/ip/timeout?sys=AppXtender Web Access&url=<URL of the login page of AppXtender Web Access>
Create a TAB page in Luminis
Users can also create a TAB that AppXtender Web Access will run within. This also allows users single sign-on capability from Luminis to AppXtender Web Access.
To create a tab, click Content/Layout in Luminis and enter the following information:
• Tab Type: Framed
• URL: /cp/ip/timeout?sys=AppXtender Web Access&url=<URL of the login page of AppXtender Web Access>
Create a AppXtender Web Access Channel
A Luminis administrator can create a AppXtender Web Access channel to give Luminis users access to AppXtender Web Access from Luminis. To create a AppXtender Web Access Channel:
1. Click Channel Admin in Luminis.
2. Click Publish a new channel and use the following parameters to create this channel:
• Channel Type: CPIP Inline Frame
• Channel Title: AppXtender Web Access
• Channel Timeout: 100000
• External System ID: AppXtender Web Access
June 2008 Banner XtenderSolutions Release 7.2Confidential Installation Guide 143

9 Integrating AppXtender Web Access with LuminisInstall AppXtender Services
• Destination URL:
[AppXtender Web Access .NET] http://<AppXtender Web Access Server Name>/AppXtender Web Access/AppXtender Web AccessChannel.aspx
[AppXtender Web Access J2] http://<AppXtender Services Server Name>/AppXtenderWebServices/AppXtender Web AccessChannel.aspx
• Frame Height: 300
Note: This parameter decides the height of the AppXtender Web Access Channel. You can modify it based on your need.
• User Can Modify Frame Height: checked
• Editable: not checked
• Has Help: not checked
• Has About: not checked
• Selected Categories: select a category for the AppXtender Web Access channel
• Selected Groups and/or People: select the groups and people that you want to give access to this channel
The screen space is limited within a channel. As a AppXtender Web Access administrator, you can define some application index fields as hidden fields so that they will not display within the AppXtender Web Access Channel. Hidden fields are defined in the AppXtender Web Access Channel configuration file AppXtender Web Access.luminis.config.
You can now notify AppXtender Web Access users to subscribe to this channel.
Banner XtenderSolutions Release 7.2 June 2008144 Installation Guide Confidential

10 Integrating BXS with Self-Service BannerSet Up Self-Service Banner Integration to BXS
Chapter 10 Integrating BXS with Self-Service Banner
Banner XtenderSolutions provides a Self-Service Banner integration that allows you to configure SSB to use BXS packages to provide links to AppXtender Web Access (WX) for document query/view or import/upload.
Integration occurs using a Single Sign-on authentication from a Self-Service Banner page, such as Finance's "View Document" page, to a WX session for document retrieval or upload from BXS. For example, "Query" and "Import" links to WX can be provided on a SSB page based on options that are defined by your institution.
The following instructions will guide you through:
1. Set-up of the User IDs that will be used for the Single Sign-on authentication.
2. Set-up of the parameters that are passed in the URL string from SSB to WX.
3. Adding the optional BXS package call in the applicable SSB package.
Set Up Self-Service Banner Integration to BXS
1. Define and set-up Super User IDs.
Note: These Super-Users must be Oracle IDs with Oracle passwords that are set-up for INB access
(a) Set-up the Super-User IDs as Oracle IDs with a password.
(b) Set-up the Super-User IDs in AppXtender using the AppXtender AppGen tool.
• Refer to the procedure in Chapter 5 - “User and Group Management” in the BXS Administration Guide.
• Assign the appropriate privileges to each Super-User ID as defined by your institution.
(c) After the Super-User IDs are defined in AppXtender AppGen, login to Banner INB for each ID and perform the following task:
• From the Main Menu, click the [Xs] button on the toolbar. This will synch the Oracle password to the AppXtender password.
2. Create seed data for the eobuser table.
(a) Use the Super-User IDs and passwords defined in step 1 above.
June 2008 Banner XtenderSolutions Release 7.2Confidential Installation Guide 145

10 Integrating BXS with Self-Service BannerSet Up Self-Service Banner Integration to BXS
(b) Table columns and descriptions:
EOBUSER_USERNAME: Name of the user. These users will provide access to WX documents.
EOBUSER_PASSWORD: Add a dummy password in true format [Ex: my_password] and run the script euusers.sql to update this with the required password in encrypted format.
EOBUSER_APP_NAME: Name of the application as defined in AppXtender AppGen - must match the name of the application that stores the document. Ex: EOBUSER_ APP_NAME = 'B-F-DOCS'
EOBUSER_ACTIVITY_DATE: Date when the record was created or last updated. Default it to SYSDATE.
EOBUSER_USER_ID: ID of the user who created or last updated the record.
EOBUSER_DATA_ORIGIN: Source system that created or updated the row.
3. Create seed data for the eobparm table.
Note: The examples included below use the SSB Finance "View Document" package as a model.
Table columns and descriptions:
EOBPARM_NAME: Name of the web page PACKAGE.PROCEDURE that generates the HTML as defined in TWGBWMNU.TWGBWMNU_NAME.
Ex: EOBPARM_NAME = BWFKVDOC.P_VIEWDOC
EOBPARM_DOC_NAME: SSB document name.
Ex: EOBPARM_DOC_NAME = INVOICE
EOBPARM_QUERY_IND: This is an indicator if the field needs to be used in query to check for document existence. Valid values Y/N.
Ex: EOBPARM_QUERY_IND = Y
EOBPARM_PARMNAME: Name of the parameter as used in SSB. This relates to the field name defined in the AppXtender application's index structure.
Ex: EOBPARM_PARMNAME = DOCUMENT ID
EOBPARM_MAPNAME: Name of mapped parameters as used in BXS (the field position of the EOBPARM_PARMNAME as defined in the AppXtender application's index structure).
Ex: EOBPARM_MAPNAME = FIELD1
EOBPARM_USER_ID: ID of the user who created or last updated the record.
Banner XtenderSolutions Release 7.2 June 2008146 Installation Guide Confidential

10 Integrating BXS with Self-Service BannerSet Up Self-Service Banner Integration to BXS
EOBPARM_ACTIVITY_DATE: Date on which the record was created or last updated. Default to SYSDATE
EOBPARM_DATA_ORIGIN: Source system that created or updated the row.
4. Create seed data for the eobdocm table.
Note: The examples included below use the SSB Finance "View Document" package as a model.
Table columns and descriptions:
EOBDOCM_NAME: Name of the web page PACKAGE.PROCEDURE that generates the HTML as defined in TWGBWMNU.TWGBWMNU_NAME.
Ex: EOBDOCM_NAME = BWFKVDOC.P_VIEWDOC
EOBDOCM_DOC_NAME: SSB document name.
Ex: EOBDOCM_DOC_NAME = INVOICE
EOBDOCM_DISPLAY_IND: Indicator which has overall control of BXS links displayed on a SSB page.
Valid values Y and N.
Ex: EOBDOCM_DISPLAY_IND = Y
Note: If this indicator is set to 'N', none of the BXS links will be displayed on the SSB page, even if the value is defined as 'Y' for either EOBDOCM_VIEW_IND and/or EOBDOCM_UPLOAD_IND.
EOBDOCM_MODULE_CODE: Indicates the self-service module where it will be displayed from
EOBDOCM_VIEW_IND: Indicates if viewing of documents is enabled.
Valid values Y and N.
Ex: EOBDOCM_VIEW_IND = Y
Note: If this indicator is set to 'Y', then EOBDOCM_DISPLAY_IND must be set to 'Y' for the BXS link to be displayed on the SSB page.
EOBDOCM_DOWNLOAD_IND: For future enhancement. Default this to 'N'.
Ex: EOBDOCM_DOWNLOAD_IND = 'N'
EOBDOCM_UPLOAD_IND: Indicates if uploading of documents is enabled.
Valid values Y and N.
June 2008 Banner XtenderSolutions Release 7.2Confidential Installation Guide 147
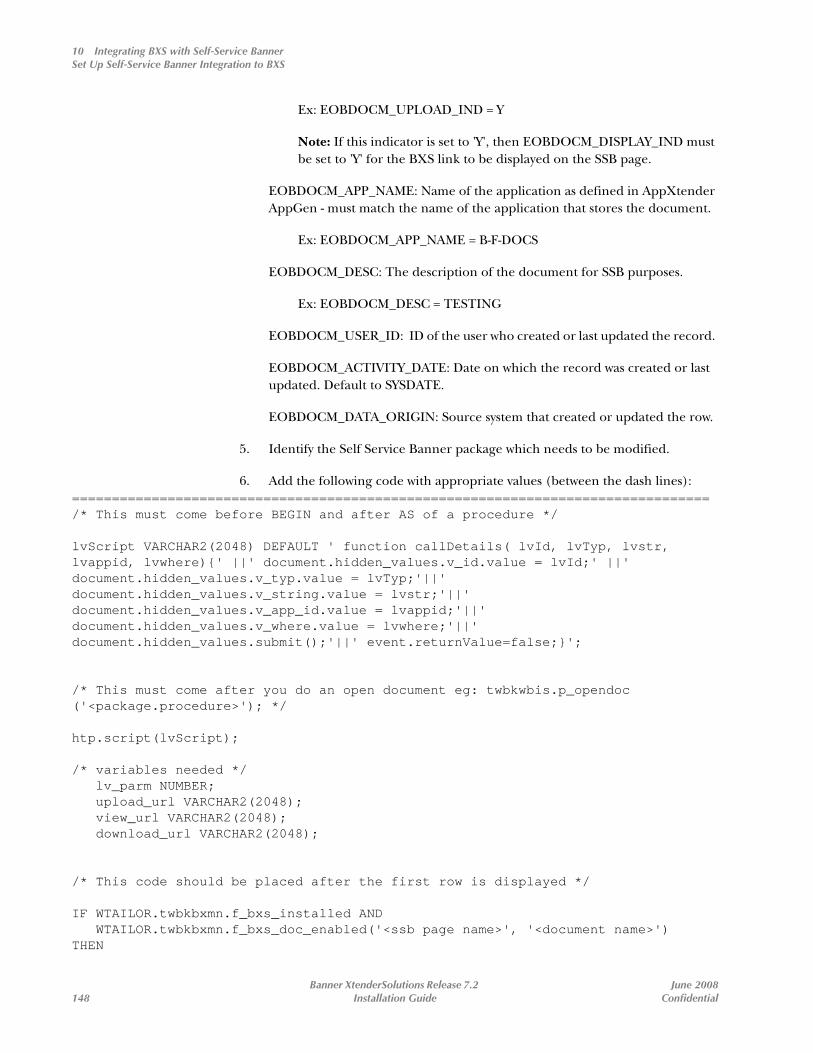
10 Integrating BXS with Self-Service BannerSet Up Self-Service Banner Integration to BXS
Ex: EOBDOCM_UPLOAD_IND = Y
Note: If this indicator is set to 'Y', then EOBDOCM_DISPLAY_IND must be set to 'Y' for the BXS link to be displayed on the SSB page.
EOBDOCM_APP_NAME: Name of the application as defined in AppXtender AppGen - must match the name of the application that stores the document.
Ex: EOBDOCM_APP_NAME = B-F-DOCS
EOBDOCM_DESC: The description of the document for SSB purposes.
Ex: EOBDOCM_DESC = TESTING
EOBDOCM_USER_ID: ID of the user who created or last updated the record.
EOBDOCM_ACTIVITY_DATE: Date on which the record was created or last updated. Default to SYSDATE.
EOBDOCM_DATA_ORIGIN: Source system that created or updated the row.
5. Identify the Self Service Banner package which needs to be modified.
6. Add the following code with appropriate values (between the dash lines):================================================================================/* This must come before BEGIN and after AS of a procedure */
lvScript VARCHAR2(2048) DEFAULT ' function callDetails( lvId, lvTyp, lvstr,lvappid, lvwhere){' ||' document.hidden_values.v_id.value = lvId;' ||'document.hidden_values.v_typ.value = lvTyp;'||'document.hidden_values.v_string.value = lvstr;'||'document.hidden_values.v_app_id.value = lvappid;'||'document.hidden_values.v_where.value = lvwhere;'||'document.hidden_values.submit();'||' event.returnValue=false;}';
/* This must come after you do an open document eg: twbkwbis.p_opendoc ('<package.procedure>'); */
htp.script(lvScript);
/* variables needed */ lv_parm NUMBER; upload_url VARCHAR2(2048); view_url VARCHAR2(2048); download_url VARCHAR2(2048);
/* This code should be placed after the first row is displayed */
IF WTAILOR.twbkbxmn.f_bxs_installed AND WTAILOR.twbkbxmn.f_bxs_doc_enabled('<ssb page name>', '<document name>')THEN
Banner XtenderSolutions Release 7.2 June 2008148 Installation Guide Confidential

10 Integrating BXS with Self-Service BannerSet Up Self-Service Banner Integration to BXS
WTAILOR.twbkbxmn.p_set_bxs_parm(name, value); WTAILOR.twbkbxmn.p_set_bxs_parm(name, value); WTAILOR.twbkbxmn.p_set_bxs_parm(name, value); twbkbxmn.p_get_bxs_url(pidm, '<ssb page name>', '<document name>', <upload_url variable>, <download_url variable>, <view_url variable>);
IF upload_url is not null THEN htp.print ('<A name=myanchor href="'||twbkfrmt.f_encodeURL(upload_url)||'" target="_blank" onMouseover="window.status=''Upload Documents''; return true;"> Upload </A>'); htp.p('<BR>'); htp.p('<BR>'); END IF; IF view_url is not null THEN IF view_url = '/ewkwrslt.P_Disp_Page' THEN HTP.formopen ('ewkwrslt.P_Disp_Page', 'post', cattributes => 'NAME="hidden_values" TARGET="mywin"'); htp.formHidden('v_id', ''); htp.formHidden('v_typ', ''); htp.formHidden('v_string',''); htp.formHidden('v_app_id', ''); htp.formHidden('v_where','');
twbkfrmt.p_tabledata(twbkfrmt.f_printanchor( curl=>'ewkwrslt.P_Disp_Page', cattributes=> 'onClick="callDetails(' ||''''|| <Document ID> || '''' ||',' ||''''|| <Document Desc> || '''' ||',' ||''''|| WTAILOR.twbkbxmn.f_get_bxs_parm('STR1') || '''' ||',' ||''''|| WTAILOR.twbkbxmn.f_get_bxs_parm('APP_ID') || '''' ||',' ||''''|| WTAILOR.twbkbxmn.f_get_bxs_parm('WHERE_CL') ||'''' ||');"' , ctext=> 'view')); ELSE htp.print ('<A name=myanchor href="'||twbkfrmt.f_encodeURL(view_url)||'" target="_blank" onMouseover="window.status=''View Documents''; return true;"> View </A>'); htp.p('<BR>'); htp.p('<BR>'); END IF; END IF;END IF;================================================================================
As an example, using a Finance SSB page
June 2008 Banner XtenderSolutions Release 7.2Confidential Installation Guide 149

10 Integrating BXS with Self-Service BannerSet Up Self-Service Banner Integration to BXS
1. Follow steps 1 through 6 above.
2. Open package BWFKVDOC and add the following code.
(a)/* This must come before BEGIN and after AS of a procedure*/lvScript VARCHAR2(2048) DEFAULT ' function callDetails( lvId, lvTyp, lvstr,lvappid, lvwhere){' ||' document.hidden_values.v_id.value = lvId;' ||'document.hidden_values.v_typ.value = lvTyp;'||'document.hidden_values.v_string.value = lvstr;'||'document.hidden_values.v_app_id.value = lvappid;'||'document.hidden_values.v_where.value = lvwhere;'||'document.hidden_values.submit();'||' event.returnValue=false;}';
(b)/* This must come after you do an open document. eg: twbkwbis.p_opendoc ('<package.procedure>'); */
htp.script(lvScript);
3. Open package BWFKVINV for modifications for Invoice and add the following code:
(a)/* variables needed */ lv_parm NUMBER; upload_url VARCHAR2(2048); view_url VARCHAR2(2048); download_url VARCHAR2(2048);
(b)/* This code should be placed after the first row is displayed */
IF WTAILOR.twbkbxmn.f_bxs_installed AND WTAILOR.twbkbxmn.f_bxs_doc_enabled('BWFKVINV.P_VIEWDOC', 'INVOICE')THEN WTAILOR.twbkbxmn.p_set_bxs_parm('DOCUMENT ID', '<variable having value of invoice number>'); WTAILOR.twbkbxmn.p_set_bxs_parm('DOCUMENT TYPE', 'INVOICE'); twbkbxmn.p_get_bxs_url(pidm, 'BWFKVINV.P_VIEWDOC', 'INVOICE', upload_url, download_url, view_url);
IF upload_url is not null THEN htp.print ('<A name=myanchor href="'||twbkfrmt.f_encodeURL(upload_url)||'" target="_blank" onMouseover="window.status=''Upload Documents''; return true;">
Banner XtenderSolutions Release 7.2 June 2008150 Installation Guide Confidential

10 Integrating BXS with Self-Service BannerSet Up Self-Service Banner Integration to BXS
Upload </A>'); htp.p('<BR>'); htp.p('<BR>'); END IF; IF view_url is not null THEN IF view_url = '/ewkwrslt.P_Disp_Page' THEN HTP.formopen ('ewkwrslt.P_Disp_Page', 'post', cattributes => 'NAME="hidden_values" TARGET="mywin"'); htp.formHidden('v_id', ''); htp.formHidden('v_typ', ''); htp.formHidden('v_string',''); htp.formHidden('v_app_id', ''); htp.formHidden('v_where','');
twbkfrmt.p_tabledata(twbkfrmt.f_printanchor( curl=>'ewkwrslt.P_Disp_Page', cattributes=> 'onClick="callDetails(' ||''''|| <Document ID> || '''' ||',' ||''''|| <Document Desc> || '''' ||',' ||''''|| WTAILOR.twbkbxmn.f_get_bxs_parm('STR1') || '''' ||',' ||''''|| WTAILOR.twbkbxmn.f_get_bxs_parm('APP_ID') || '''' ||',' ||''''|| WTAILOR.twbkbxmn.f_get_bxs_parm('WHERE_CL') ||'''' ||');"' , ctext=> 'view')); ELSE htp.print ('<A name=myanchor href="'||twbkfrmt.f_encodeURL(view_url)||'" target="_blank" onMouseover="window.status=''View Documents''; return true;"> View </A>'); htp.p('<BR>'); htp.p('<BR>'); END IF; END IF;END IF;
Note: Similarly you can add code for other Finance SSB packages which open up from BWFKVDOC.P_viewDoc package.
June 2008 Banner XtenderSolutions Release 7.2Confidential Installation Guide 151

10 Integrating BXS with Self-Service BannerSet Up Self-Service Banner Integration to BXS
This page intentionally left blank
Banner XtenderSolutions Release 7.2 June 2008152 Installation Guide Confidential

A BXS VPD Configuration
Appendix A BXS VPD Configuration
To configure BXS in a VPD environment, please follow the steps below:
Step 1—Add the VPDI_CODE to BXS Applications
Please complete the following steps to add the VPDI_CODE to each desired BXS Application:
1. Create a text file on your computer’s desktop named CampusValues.TXT. In this file, enter the names of each campus at your institution and save the file. For example:
CAMP1CAMP2CAMP3
2. Launch AppGen and login as Sysop.
Note: Before proceeding, ensure that all users are logged out of the AX system.
3. In AppGen, select a BXS Application for which you would like to enable VPD.
4. Select the last field in the application.
Caution: Since a new field is going to be added to the end of the existing application structure, the Administrator must be properly positioned before executing the following steps. Failure to do so may cause the new field to be inserted between existing fields, and cause integration problems with Banner.
5. In the Field Name field, enter VPDI_CODE.
6. In the Type field, select User Defined List.
7. Select the following flags:
• Doc Level Security
• Part of Unique Key
• Read Only
• Required
• Searchable
8. Click Add.
9. Click Import.
June 2008 Banner XtenderSolutions Release 7.2Confidential Installation Guide 153

A BXS VPD Configuration
10. Navigate to and select the CampusValues.TXT file that you created that contains the names of each campus at your institution.
11. Click OK.
12. Click OK to accept changes to the underlying database.
13. Click Apply to save your changes.
Step 2—Establish Rights and Privileges using Document Level Security
Complete the following steps to establish Document Level Security for each desired BXS Application:
1. Log in to AppGen as Sysop.
2. Right-click on Groups and select New.
3. Create group names for each campus at your institution.
4. Select the users that will belong to each group and drag those user names into the Members section of the group.
5. Click Next.
6. If necessary, assign additional rights to the group.
7. Click Next.
8. Click Finish.
Step 3—Setup Document Level Security at the Application Level
To setup Document Level Security for each desired BXS Application:
1. Select the BXS Application that will use Document Level Security.
2. Select the Document Level Security Tab.
3. Select the VDPI_CODE field, and the corresponding Campus Group to associate with it.
4. Select the Accessible radio button.
5. Click Add Item.
Banner XtenderSolutions Release 7.2 June 2008154 Installation Guide Confidential

A BXS VPD Configuration
6. Select a VPDI_CODE value.
7. Click OK.
8. Click Apply.
Step 4—Modify Delivered Context Rules in INB to Support VPD
To support VPD, please complete the following steps to enable the VPDI_CODE to be passed in the INB URL. This is heavily dependant on how you want to use the system.
1. Launch Internet Native Banner.
2. Go to the BXS Context Rules Form (EXABCXT) to set the VPD context rules.
3. Enter the form name for which you would like to establish context rules.
4. In the Context Search Criteria block, enter VPDI_CODE in both the Banner Item Field Name and the XtenderSolutions Index Field Name fields.
Note: In every other case, the Banner Item Field Name must be present on the form, however, even though VPDI_CODE is not displayed on the form, it will function correctly.
This will only work if you have the 7.1 version of EOQRPLS.PLX installed.
June 2008 Banner XtenderSolutions Release 7.2Confidential Installation Guide 155

A BXS VPD Configuration
This page intentionally left blank
Banner XtenderSolutions Release 7.2 June 2008156 Installation Guide Confidential

B LDAP Configuration
Appendix B LDAP Configuration
Creating a Directory Service Security Provider - LDAP (Lightweight Directory Access Protocol) for AppXtender Web Access.
Note: Following is a sample directory structure of an LDAP server. This sample is for reference purposes only and is not a representation of how your LDAP server's directory structure should be defined. It is provided to assist you in understanding the LDAP set-up parameters in the instructions provided below.
For Banner INB integration with ApplicationXtender, lowercase and mixed case passwords are not supported for the User ID in LDAP. This corresponds to the Banner User ID's password which is in UPPERCASE based on Oracle functionality.
[ ] o=cp
' [ ] cn=Directory Administrators
[ ] ou=Groups
[ ] ou=People
[ ] ou=Special Users
[ ] ou=xxx.com
' [ ] ou=People (*** This is the ou=People folder opened)
' [ ] uid=admin
[ ] uid=systerm
[ ] uid=allusers-lo
[ ] uid=student-lo
[ ] uid=faculty-lo
When you select the uid in the list, the Attributes panel is displayed. The Attributes will show the objectClass which is a parameter which is used in the User Entries when setting up LDAP
June 2008 Banner XtenderSolutions Release 7.2Confidential Installation Guide 157

B LDAP ConfigurationSet-up the Directory Service Security Provider
Set-up the Directory Service Security Provider
Note: Each entry in a LDAP directory is expected to be unique and hierarchical. All entries in an LDAP directory structure are uniquely identified through their DN (Distinguished Name). Therefore, please use a fully qualified DN of your LDAP server.
i.e. (using the directory structure above):
uid=admin,ou=People,o=xxx.com,o=cp
1. Create a connection account that has permission to view the user and group information in your directory service.
2. Start AppXtender Admin tool.
3. In the AppXtender Admin tree, expand the Environment node and then select Directory Services.
4. Click Add. The Create Directory Service Provider dialog box appears.
5. In the Directory Service Name text box, enter the name that you want to use for the new security provider.
6. Enter parameters on the Directory Connection tab as described in the following table:
Item Description Syntax/Example
Server The computer name or IP address of the server hosting the directory service, optionally followed by the port number. If no port number is specified, the LDAP provider uses the default port number, which is 389 (636 if using an SSL connection). If no server is specified, the LDAP provider performs a "serverless" connection using the current domain and global catalog, if necessary. If a domain name is specified, a computer name must also be specified.
Host_Name[:Port_Number]
Example: yourserver.xxx.com
or
The IP address of the server eg: 149.xx.x.xxx
Secure Requests secure authentication. When this check box is selected, the LDAP provider negotiates with the directory service for choosing proper authentication mechanism. When this check box is not selected, simple binding is used.
SSL Uses SSL port for connection to directory service.
Banner XtenderSolutions Release 7.2 June 2008158 Installation Guide Confidential

B LDAP ConfigurationSet-up the Directory Service Security Provider
7. Click the Users Entries tab.
8. Enter parameters on the Users Entries tab as described in the following table:
Directory Root
Directory root path in the distinguished name (DN) format. This parameter uniquely identifies this directory root path in a networked environment. This root always completes any entry in directory access. If the directory root is not provided, it must be provided inside any DN in this configuration (admin name, users root and roles root).
Note: This is the directory root path for all user entries / Group entries on the server defined above. If this is item is left as blank, then Root Path must be filled in.
CN=Computers,DC= domain_controller1
CN=TopHat,DC=DEV,DC=MSFT,DC=COM,O=Internet
Admin Name (DN)
The DN (relative to the Directory root) in the directory pointed to the entry for user that has privileges for searching data about other users and groups in the directory.
EMC example: CN=Admin,CN=Users, DC=Legato,DC=com
BXS example: uid=jsmith,ou=People,o=xxx.com,o=cp
Password The administrator password for binding. <password>
Data Cache Time-Out (Min)
The period of time during which data obtained from the directory service and cached in temporary memory is considered valid.
Bind Test Allows you to test the information that you have entered.
Item Description Syntax/Example
Item Description Syntax/Example
Root Path The DN (relative to the Directory Root) for a directory entry where you want a search for users to start.
Note: If Directory root is entered then this items can be left blank. Otherwise, define the Root Path for all user entries
EMC example: CN=Users,DC=OTG,DC=com BXS example: o=xxx.com,o=cp
User Entries Filter
The search filter string in LDAP format, which describes the entries representing users.
(objectClass=user)
June 2008 Banner XtenderSolutions Release 7.2Confidential Installation Guide 159

B LDAP ConfigurationSet-up the Directory Service Security Provider
Login Filter Pattern
The search filter pattern in LDAP format that you want to use for retrieving from the directory the user account for each user that logs in. This filter pattern contains placeholders for substituting the user's login field values during run-time login. These placeholders may be represented with an index number (1-based) in braces, representing the login fields in reverse order. Each item in the Login dialog box must be separated with a slash (\).
For example, if you enter (user={1}, dept={2}), users must enter their department name, a slash (\), and their user name. (You must give your users instructions on how to log in.) The login fields value is extracted from the login fields array, provided during user login, and substituted into the filter for user search.
The value that you enter here is used for authentication. When a user logs in, the information the user provides during login is substituted in the place holders and the resulting filter allows one unique user to be found in the directory.
(name={1}) (user={1}, dept={2})
Item Description Syntax/Example
Banner XtenderSolutions Release 7.2 June 2008160 Installation Guide Confidential

B LDAP ConfigurationSet-up the Directory Service Security Provider
Roles Attribute The name of attribute in directory user entry, which contains list of roles that the user has or groups to which the user belongs.
This attribute is used for authorization when a user logs in. Keep in mind the following points:
If a Roles Attribute is specified, the user inherits privileges from the groups (roles) that are listed as values for the Roles Attribute.
If a Roles Attribute is not specified, but a Users (Members) Attribute value is specified on the Roles/Groups Entries tab, the user inherits privileges from the group entries in your directory that list this user as a member.
If neither attribute is specified, the user has privileges only as an individual because AppXtender cannot determine group membership without at least one of the two attributes (Roles for a user or Users for a group) specified.
To improve performance, consider specifying the Roles Attribute (rather than leaving it blank and specifying only the Users Attribute) because AppXtender can check the groups list for one user more quickly than it can check the members list for each and every group.
The Roles Attribute is also used when a user is imported into AppXtender AppGen and the Import Groups check box is enabled. If a Roles Attribute value is specified, the groups to which the user belongs are imported along with the user. (If it is not specified, AppXtender imports only the user. AppXtender does not check the members of each group for this purpose.)
<directory entry attribute name>
Name Attribute The attribute for which you want the value to represent each user in AppXtender database and AppXtender AppGen.
<directory entry attribute name> Example: uid
Full Name Attribute
The name of the attribute in directory user entry, which contains user full name.
<directory entry attribute name> Example: cn
Item Description Syntax/Example
June 2008 Banner XtenderSolutions Release 7.2Confidential Installation Guide 161

B LDAP ConfigurationSet-up the Directory Service Security Provider
9. Click the Roles/Groups Entries tab.
10. Enter parameters on the Roles/Groups Entries tab as described in the following table:
Description Attribute
The attribute for the user description. <directory entry attribute name> Example: sn
Bind Test Allows you to test the information that you have entered.
Item Description Syntax/Example
Item Description Syntax/Example
Root Path The DN (relative to the Directory Root) for directory entry where you want a search for roles/groups to start.
CN=Groups,DC=OTG,DC=com Example:o=xxx.com,o=cp
Group Entries Filter
The search filter string in LDAP format, which describes the entries representing roles or group.
(objectClass=group) Example: (objectClass=groupofuniquenames)
Banner XtenderSolutions Release 7.2 June 2008162 Installation Guide Confidential

B LDAP ConfigurationChange the Security Model for the Datasource in AppXtender Admin
11. Click OK.
12. If all Bind test are successful, from the File menu, select Save Changes.
13. Do not exit AppXtender Admin.
Change the Security Model for the Datasource in AppXtender Admin
1. Select Environment, then Data Sources.
2. Select the 'Datasource' that will use LDAP security module.
Users (Members) Attribute
The name of the attribute in directory role/group entry, which contains the list of users that this group contains. This attribute may be used for authorization when a user logs in. Keep in mind the following points: If a Roles Attribute is specified on the Users Entries tab, the user inherits privileges from the groups (roles) that are listed as values for the Roles Attribute. If a Roles Attribute is not specified on the Users Entries tab, but a Users (Members) Attribute value is specified, the user inherits privileges from the group entries in your directory that list this user as a member. If neither attribute is specified, the user has privileges only as an individual because AppXtender cannot determine group membership without at least one of the two attributes (Roles for a user or Users for a group) specified. The Users (Members) Attribute is also used when a group is imported into AppXtender AppGen and the Import Users check box is enabled. If a Users (Members) Attribute value is specified, the members of the group are imported along with the group. (If it is not specified, AppXtender imports only the group. AppXtender does not check the roles of each user for this purpose.)
<directory entry attribute name>Example:uniquemember
Name Attribute The attribute for which you want the value to represent groups in AppXtender database and AppXtender AppGen.
<directory entry attribute name> Example: cn
Description Attribute
The name of attribute in directory role/group entry, which contains each role/group description.
<directory entry attribute name> Example: sn
Bind Test Allows you to test the information that you have entered.
Item Description Syntax/Example
June 2008 Banner XtenderSolutions Release 7.2Confidential Installation Guide 163

B LDAP ConfigurationChange the Security Model for the Datasource in AppXtender Admin
3. In the Security section, change the 'Security Model' to the Directory Service created above.
4. If the option is given, Save your changes
5. To test LDAP/Directory service without accessing through Banner INB:
(a) Go to the AppXtender Web Access Login page using direct access
(b) Login to AppXtender Web Access using a username / password created in the root directory on your LDAP server
If you can login, then LDAP/Directory service is set-up correctly.
Banner XtenderSolutions Release 7.2 June 2008164 Installation Guide Confidential