Embed Size (px)
Citation preview
BANGLADESH WEB-BASED LOGISTICS MANAGEMENT INFORMATION SYSTEM USER MANUAL
DECEMBER 2009
This publication was produced for review by the US Agency for International Development It was prepared by the USAID | DELIVER PROJECT Task Order 1
BANGLADESH WEB-BASED LOGISTICS MANAGEMENT INFORMATION SYSTEM USER MANUAL
The authors views expressed in this publication do not necessarily reflect the views of the US Agency for International Development or the United States Government
USAID | DELIVER PROJECT Task Order 1 The USAID | DELIVER PROJECT Task Order 1 is funded by the US Agency for International Development under contract no GPO-I-01-06-00007-00 beginning September 29 2006 Task Order 1 is implemented by John Snow Inc in collaboration with PATH Crown Agents Consultancy Inc Abt Associates Fuel Logistics Group (Pty) Ltd UPS Supply Chain Solutions The Manoff Group and 3i Infotech The project improves essential health commodity supply chains by strengthening logistics management information systems streamlining distribution systems identifying financial resources for procurement and supply chain operation and enhancing forecasting and procurement planning The project also encourages policymakers and donors to support logistics as a critical factor in the overall success of their health care mandates
Recommended Citation USAID | DELIVER PROJECT Task Order 1 2008 Bangladesh Web-based Logistics Management Information System User Manual Arlington Va USAID | DELIVER PROJECT Task Order 1
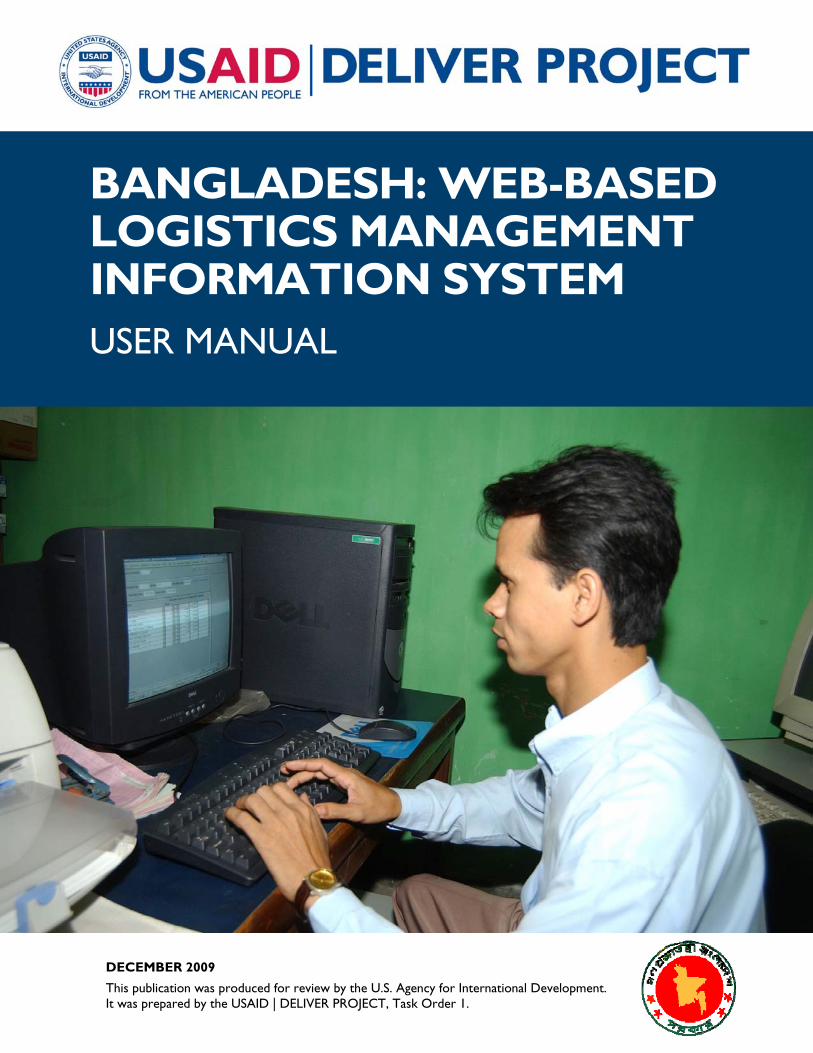
Cover photo In Bangladesh a logistics staff person works at a computer
USAID | DELIVER PROJECT John Snow Inc 1616 Fort Myer Drive 11th Floor Arlington VA 22209 USA Phone 703-528-7474 Fax 703-528-7480 E-mail askdeliverjsicom Internet deliverjsicom
CONTENTS
Preface vii
Introduction ix
Purpose and Goal 1 How the Previous System Worked 1 Shortcomings of the Previous System 2
Web-based LMIS Software and Its Working Environment 5
Step-by-Step Process to Work with the System 9 Description of the Menus and Submenus 13
Technical Support 49
Conclusion 51
Figures Figure 1 DGFP MIS Information Flow (prior to introduction of Web-based LMIS) 2 Figure 2 DGFP MIS Information Flow (after introduction of Web-based LMIS) 6 Figure 3 Web-based LMIS System 7 Figure 4 Login Screen of Web-based LMIS9 Figure 5 Menu bar of Web-based LMIS9 Figure 6 Add Menu13 Figure 7 Edit Menu13 Figure 8 Add Submenu 14 Figure 9 Edit Submenu14 Figure 10 Add Users 15 Figure 11 Edit Users15 Figure 12 Add Userrsquos Group16 Figure 13 Edit Userrsquos Group 16 Figure 15 EditDelete Members 17 Figure 16 Add Item17 Figure 17 Edit Item 18 Figure 18 Add MOS Scale 18 Figure 19 Edit MOS Scale19 Figure 20 View Item Information 19 Figure 21 View MOS Scale20 Figure 22 Add Warehouse 20 Figure 23 Edit Warehouse21
Figure 24 Add Upazila21 Figure 25 Edit Upazila 22 Figure 26 Add Donor 22 Figure 27 Edit Donor 23 Figure 28 View Warehouse23 Figure 29 View Upazila 24 Figure 30 View Donors 24 Figure 31 Insert New Monthly F7 Report 25 Figure 32 Insert New Monthly F7 Report Form 25 Figure 33 Edit an F7 Report 26 Figure 34 Edit an F7 Report 26 Figure 35 Insert New Monthly F7B Report27 Figure 36 Insert New Monthly F7B Report Form 27 Figure 37 Edit an F7B report28 Figure 38 Edit an F7B report28 Figure 39 Add National Receive29 Figure 40 Edit National Receive 29 Figure 41 View the WH Name Month and Year to View Report 30 Figure 42 View the Report of the Selecting WH Month and Year30 Figure 43 Select Upazila WH Month and Year to View F7B Report 31 Figure 44 View F7B Report 31 Figure 45 View National Receive 31 Figure 46 Generate the Contraceptives Summary Report32 Figure 47 Contraceptives Summary Report32 Figure 48 Select WH Month Year and Article to Generate a Report33 Figure 49 View Stock Status Report 33 Figure 50 Generate Supply Plan Register34 Figure 51 View Supply Plan Register 34 Figure 52 Generate Stock Status Trend Report 35 Figure 53 View Stock Status Trend Report35 Figure 54 Generate a Report on Status of Stockouts at Upazila Level 36 Figure 55 View Status of Stockouts Report 36 Figure 56 Generate a Report for National (GOB+NGO) Consumption Trend 37 Figure 57 View National Consumption Trend Report 37 Figure 58 Generate Report for Stockout SDPs 37 Figure 59 View Number of SDPs Stockout against Various Methods 38 Figure 60 Generate Non-Contraceptives Summary Report 38 Figure 61 Non-Contraceptives Summary Report 38 Figure 62 Generate Stock Status at the Upazila and Field 39 Figure 63 Stock Status at the Upazila and Field39 Figure 64 Generate Stock Status at the RWH level40
iv
Figure 65 Stock Status at the RWH level 40 Figure 66 Generate the List of Non-Reported Upazila 40 Figure 67 Non-Reported Upazila 41 Figure 68 RWH wise reporting rate 41 Figure 69 Download LMIS Report 42 Figure 70 Download Pipeline Report42 Figure 71 Migrating Data to httpwwwdgfplmisorg43 Figure 72 Processing Uploaded Data 43 Figure 73 Data Upload Is Completed 44 Figure 74 Download Data44 Figure 75 Process Download Data45 Figure 76 Complete Download Data45 Figure 77 Generating an SQL File46 Figure 78 Saving an SQL file 46 Figure 79 Uploading SQL File 47
Tables Table 1 List of the Menus and Sub-menus10 Table 2 List the Action Buttons Used in the Software 12
v
vi
PREFACE
The Logistics Management Information System (LMIS) of the Directorate General of Family Planning (DGFP) receives data from the four-tier distribution system (central regional upazila SDPs) and processes the information at the central level Currently monthly ldquoContraceptive Distribution and Stock Status Reportsrdquo of the upazilas and ldquoMonthly Issue Distribution and Stock Balance Reportsrdquo are sent to the LMIS Section in Dhaka through postal services Both data entry and processing are done centrally at LMIS Delays in receiving reports cause delays in processing and publishing them Sometimes it takes six weeks to publish the report which defeats its main purpose
The web-based LMIS seeks to streamline publication of monthly LMIS reports Under the Web-based LMIS after a warehouse receives F7B reports from the upazilas data entry of these reports is done by computer in the respective warehouses and the data are then communicated to the central Web server for processing using the InternetWeb Central LMIS consolidates the data from all of the warehouses accepts or rejects updates and produces a monthly LMIS report This distributed processing model ensures
1 quick data entry
2 timely publication of the monthly LMIS report
3 instant availability of data and
4 increased efficiency of the supply chain
This user manual seeks to help different types of users learn the different features modules and tasks of the developed system Users will learn how to perform their assigned task(s) using this system Detailed guidelines and screen shots of each task will assist the users to use this system easily and effectively We hope that this manual will be helpful for end user operations related to the system
Thanks are due to the staff of the DGFP MoHFW for their hard work in developing and implementing the web-based LMIS Thanks also go to Shyam Lama USAID | DELIVER PROJECT Senior Program Manager for his leadership in the conceptualization design review and field testing of the new system and to Zakir Hossain Sarker USAID | DELIVER PROJECT MIS Specialist for leading the final implementation documentation and improvement phases of the system innovations
vii
viii
INTRODUCTION
The Web-based Logistics Management Information System (Web-based LMIS) a component of the Management Information System (MIS) of the Directorate General of Family Planning (DGFP) is a Web application through which various logistics data can be entered easily in a de-centralized mode ie from the regional warehouse (RWH) level Data entry may originate from different sources but all data are stored in a central database server Since this is Web-based software authorized persons (ie persons from DGFP and RWH various donors etc) are able to access these data in the form of various logistics reports such as LMIS Reports Stock Status Reports Month of Supply (MOS) Reports etc from anywhere in the world via the Internet when required Eventually this facility will help authorized persons to obtain needed information more flexibly promptly and efficiently and the entire decision-making process of the organizations involved will be improved immensely
ix
x
PURPOSE AND GOAL
To understand the purpose and goal of the software one first has to understand how the current system works and what its shortcomings are
HOW THE PREVIOUS SYSTEM WORKED The Directorate General of Family Planning was using a computerized systemmdashLogistics Management Information System (LMIS) mdash to carry out warehouse inventory operation In particular LMIS was used to generate a very important report which had information on Monthly Distribution Months of Stock on hand (MOS) in each upazila and Months of Stock on hand (MOS) in the field from Central Warehouse up to the upazila level The report also had national receipts and distribution of contraceptives and closing balances as well as a list of upazilas that failed to submit reports for the last six months Some important graphs were included in the report as well Primary users of the report were Supply Officers and Storekeepers of Warehouses who on the basis of this report used to determine the Supply Plan The computerized system that generates all of these reports was handled by the MIS section of DGFP so all reports from upazilas and RWHs had to be sent manually to DGFP where the figures were entered in the computerized system and generated the required reports
Family Welfare Assistants (FWAs) submit their reports (LMIS-1) to the Family Planning Inspector (FPI) on the last working day of the month The FPI prepares the LMIS-2 report which consolidates the LMIS-1 reports and submits to the Upazila Family Planning Officer (UFPO) on the first working day of the next month Family Welfare Visitors (FWVs)NGOs prepare their LMIS-3 and submit it directly to the UFPO on the first working day of each month and upazila FP officers prepares 7B reports compiling the LMIS-2 and LMIS-3 reports and incorporating transaction data from the Inventory Control Registers (ICRs) They used to send one copy of the 7B report to the warehouse and one to the MIS unit DGFP at Dhaka by the fifth working day of each month The last date for receiving warehouse F7B and F7 forms at the MIS unit was 20th of following month But only around 50 of 7B reports used to arrive by 20th The MIS unit generally produced the report after receiving 80ndash85 7B reports Therefore Januaryrsquos report was normally published at the end of February or first week of March After that it used to take at least one week for the report to reach decision makers
1
Figure 1 DGFP MIS Information Flow (prior to introduction of Web-based LMIS)
SHORTCOMINGS OF THE PREVIOUS SYSTEM LMIS reports are a vital tool for decision making they contain distribution figures and Months of Supply (MOS) of the warehouses upazila stores and field levels These data are essential to run the family planning program smoothly More important publishing these reports on time is invaluable Unfortunately the previous system was not capable of publishing these reports on time Instead it took nearly two months to publish and distribute the reports to users by which time it lost its
2
credibility and usefulness The information became too old for usersdecision makers This happened because the MIS unit of DGFP had to wait for the F7B reports from all of the upazilas They usually came through postal mail and many things could prevent the reports from arriving on time Again while entering F7B data software automatically identified the errors (if any) and notified the operator who then had to mark the error(s) on the 7B report and sent it back to that upazila for correction But operators still had to enter the incorrect data and compile the report with that incorrect data It was not possible to wait for the correction to come back because doing so would further delay publication of the reports So every month reports were published with some incorrect data
Considering the above we believe that the goal of the Web-based LMIS software is to redistribute the load from central to the warehouses and decrease report generation time Installing and running the new software in all of the RWHs will accomplish the following
Increase access to logistics data at the national and Regional Warehouse (RWH) levels
Allow mangers at different levels to make decisions to improve supply chain management system
Allow donors and stakeholders to access Web-based reports for decision making
Allow WHs to obtain the status of the upazila and field stock immediately after data entry
Assist Warehouse Managers to make immediate decisions
Strengthen supervision and monitoring at all levels
3
4
WEB-BASED LMIS SOFTWARE AND ITS WORKING ENVIRONMENT
To gain the best benefits of the Web-based LMIS software we need to understand how it works who is involved with it etc Figure 2 illustrates this scenario Comparing this figure with Figure 1 reveals that process remains the same from the upazila FP stores to the respective RWHs F7B reports should reach their respective RWHs via postal mail however in the case of Web-based LMIS F7B reports do not have reach the DGFPrsquos MIS unit Instead RWH personnel will enter data from F7B reports which has two great advantages
1 Data are entered in a decentralized fashion which will speed up the data entry process Instead of entering 479 F7B and 21 F7 reports by the DGFP MIS unit each RWH can enter on average only 23 F7B and 1 F7 reports
2 RWHs can get their required information immediately after entering their respective F7B and F7 reports they donrsquot have to wait two months for someone to prepare the reports for them
If all RWHs enter their respective upazilasrsquo records then authorized and central users will be able to seeprint all kinds of reports from the central server online If partial data are entered they will be able to seeprint partial reports as well
Data can be entered in the central server from the RWH in two ways
1 Data can be entered directly into the central server through the Internet
2 Data can also be entered locally in offline mode and then transferred to the central server through Internet
Details of both the processes are described in section 419 As described here data can be entered in either online or offline mode the entire system is divided into two parts a central Web-Based system and an RWH system (local system)
1 Central Web-based System This actually includes all of the systemrsquos features and is hosted in a central Web server To log in to the system the userrsquos computer must have an Internet connection to connect to central system After entering a valid user ID and password the user will be able to access the central system which contains records of all of the RWHs Therefore national-level reports can be obtained from the central Web-based system
5
Figure 2 DGFP MIS Information Flow (after introduction of Web-based LMIS)
2 RWH Local System This is basically a part of the total system that will be installed at the RWH office in a local Web server which may not be connected with the Internet as the local system basically runs in an intranet environment Local system users will have limited features as per the requirements of their particular RWH Usually after logging in to the local system users will be able to enteredit and view reports of their respective upazilas only To make these data available for all authorized users they have to be transferred to the central Web-based system
Beside these systems another system is installed in the DGFPrsquos MIS unit that transfersmigrates records from the Web-based system to the previous oracle based system Figure 3 explains the entire process
6
Figure 3 Web-based LMIS System
7
8
STEP-BY-STEP PROCESS TO WORK WITH THE SYSTEM
As the system will run in two different environments (central and local) users need to write two different addresses to enter the respective environments To access the central Web-based system the URL is httpwwwdgfplmisorg to access the RWH local system the URL is httplocalhostlmis In both cases a user interface will appear such as the one that appears in Figure 4 From here any visitor can obtain information about DGFP JSI etc But to get the various LMIS reports users have to log in using a valid username and password
Figure 4 Login Screen of Web-based LMIS
After a successful login the menu in Figure 5 will be displayed at the top of the system
Figure 5 Menu bar of Web-based LMIS
9
Based on the privileges assigned to the user by the administrator of the system a menu and certain menu items will appear after a successful login Table 1 shows the names of all of the menus and their menu items and describes the nature of each menu and menu item
Table 1 List of the Menus and Sub-menus
Menu Title Menu Type Main Menu Description
Home Main Menu Home Link to Home Page
Menu Main Menu Menu For Managing System Menu AddEdit Menu Submenu Menu To Add and Edit Main Menu
AddEdit Submenu Submenu Menu To Add and Edit Submenu
Users Main Menu Users For Managing System Users AddEdit User Submenu Users To Add and Edit User
AddEdit User Group Submenu Users To Add and Edit User Group
EditDelete Members Submenu Users To Edit and Delete Existing Member
Item Main Menu Item For Managing Item AddEdit Item Submenu Item To Add and Edit Item
AddEdit MOS Scale Submenu Item To Add and Edit MOS Scale Information
View Item Submenu Item To View Item Information
View MOS Scale Submenu Item To View MOS Scale Information
Supplier amp Facilities Main Menu Supplier amp Facilities
For Managing the Information of Suppliers and Facilities Such as Donors Upazilas Warehouses
AddEdit WH Sub Menu Supplier amp Facilities
To Add and Edit Warehouse Information
AddEdit Upazila Submenu Supplier amp Facilities
To Add and Edit Upazila Information
AddEdit Donor Submenu Supplier amp Facilities
To Add and Edit Donor Information
View WH Submenu Supplier amp Facilities
To View Warehouse Information
View Upazila Submenu Supplier amp Facilities
To View Upazila Information
View Donor Submenu Supplier amp Facilities
To View Donor Information
AddEdit LMIS Data Main Menu Manage LMIS Data
For Managing (Insert and Edit) F7 and F7b Reports
AddEdit F7 Report Submenu Manage LMIS Data
To Insert and Edit F7 Report
AddEdit F7b Report Submenu Manage LMIS Data
To Insert and Edit F7b Report
AddEdit National Receive Submenu Manage LMIS Data
To Insert and Edit National Receive Information
10
View LMIS Data Main Menu View LMIS Data
For Viewing the Inserted F7 and F7b Reports
View F7 Report Submenu View LMIS Data
To View Inserted F7 Reports
View F7b Report Submenu View LMIS Data
To View F7b Reports
View National Receive Submenu View LMIS Data
To View National Receive Information
LMIS Report Main Menu LMIS Report
Menu for Viewing All Types of Necessary Reports Regarding LMIS
Supply Plan Register Submenu LMIS Report It Generates the Supply Plan of the Selected Items
Contraceptive Summary Report
Submenu LMIS Report This Report Provides an Overall Picture at a Glance
Stock Status Report Submenu LMIS Report To View Report of a Month of Any Warehouse
Stock Status Trend Submenu LMIS Report To View Graphical Report on Stock Status Trend of Any Month
Status of Stockouts Submenu LMIS Report To View Graphical Report on Stockout of Any Month
National Consumption Trend
Submenu LMIS Report To View Graphical Reports on National Consumption Trend
Stockout SDP Submenu LMIS Report It Provides the Number of SDPs Experiencing Stock Out
Non Contraceptive Summary Report
Submenu LMIS Report This Report Provides an Overall Picture of the Non-Contraceptives
Stock Status at the Upazila and Field
Submenu LMIS Report It Provides the Stock Status of the Selected Contraceptives Both at Upazila and Field Level
Stock Status at RWH Submenu LMIS Report This Provides the Stock Status of the Selected Contraceptives at the RWH Level
Non Reported Upazilas Submenu LMIS Report To View the List Non-Reported Upazilas
RWH wise Reporting Rate Submenu LMIS Report It Provides the RWH Wise Reporting Rate for the Last 6 Months
Downloads Main Menu Downloads To Downloads Various Reports Download LMIS Reports Submenu Downloads
Download Pipeline Reports Submenu Downloads
Data Migration Main Menu Data Migration
To Upload or Download to or From Online Database
Upload Data Submenu Data Migration
To Upload Data from Local System to httpwwwdgfplmisorg
View Migration Report Submenu Data Migration
To View the Report to See Whether Any Data Migrated from Local to Online
Data Waiting For Approval Submenu Data Migration
To See the Records that Need Approval
11
Download Data Submenu Data Migration
To Download Data from Online to Local
Generate SQL File Submenu Data Migration
To Generate the SQL to Upload After Entering New Data Into Local System
Upload SQL File Submenu Data Migration
To Upload the SQL File Online That Was Generated Earlier
Backup Database Submenu Data Migration
To Take the Database Backup from Online
Logout Main Menu Logout To Log Out from the System
Table 2 List the Action Buttons Used in the Software
Sl Action Button Button Name
Description Actions
1 Calendar This opens a one-month date-picker calendar from which users can select their required dates easily
2 Color This button opens a color picker from which users can choose or customize a color and select it for a particular item to highlight the item with the selected color
3 HelpToolTip This button shows help or comments as tool tips enabling users to seek help
4 Login This action button is only for logging in to the system Clicking on this button allows the system to authenticate users and leads them to the system control panel
5 Print To print the selected DocumentsPage
6 Generate a report
To generate a report with the selected criteria
7 ResetClear To reset or refresh all the input fields of a data entry or edit form
8 Save To save data from an entryedit form
9 ShowView To view the information according to some selected criteria
10 Update To saveupdate the modified data or information from a data edit form
11 Delete To delete the corresponding row of information
12 Edit To edit the corresponding row of information
15 ViewDisplay To view the corresponding row information
12
DESCRIPTION OF THE MENUS AND SUBMENUS Each Menu and Submenu relates to a different task through which users can perform various relevant activities Details of the tasks are as follows
MENU
AddEdit Menu This submenu allows authenticated administrative users to add any Menu to the central Web-based system Authenticated users can edit the existing Menu title and change the menu orders if necessary
Figure 6 Add Menu
Figure 7 Edit Menu
13
AddEdit Submenu This sub menu allows authenticated administrative users to add any Submenu to the central Web-based system under any Menu In this case users have to select the Menu as well as the Submenu title and the path of the related file of the Submenu In the same way authenticated users can edit the Submenu title and change the Submenu
Figure 8 Add Submenu
Figure 9 Edit Submenu
14
USERS
AddEdit Users This submenu allows authenticated administrative users to create a new user of the central Web-based system In this case users have to enter different fields of information related to the new user as shown in Figure 10 and save the new user
Figure 10 Add Users
In the same manner authenticated users can edit existing user information from the central Web-based system There is a grid that displays all types of users from which authenticated users can delete or edit any user information by clicking on the Delete or Edit button in the grid (Table of User list) as shown in Figure 11
Figure 11 Edit Users
15
AddEdit Userrsquos Group This submenu allows authenticated administrative users to create a new User Group A User Group contains a list of User Privileges to limit user access Users enter a New Group title and select the list of Privileges for members of this group to create a new group as shown in the Figure 12
Figure 12 Add Userrsquos Group
In the same manner authenticated users can edit an existing user group There is a grid (Table of User Group list) that displays all types of user group lists from which authenticated users can delete or edit any user group information by clicking on the Delete or Edit button in the grid (Table of User list) as shown in the Figure 13
Figure 13 Edit Userrsquos Group
16
EditDelete Members This submenu allows authenticated administrative users to update information about activated members by clicking on the Update button in the grid (Table of Pending list of Membership Request) for any member as shown in Figure 15 Users can also delete the member from the grid (Table of member list) by clicking on the Delete icon in the grid
Figure 15 EditDelete Members
ITEMS
AddEdit Item This submenu allows authenticated administrative users to add a new Item to the system Users enter a new Item Name and other item-related information as shown in Figure 16 then click on Save to create a new item
Figure 16 Add Item
17
In the same manner authenticated users can edit existing Items There is a grid (Table of Item List) that displays all types of Items from which authenticated users can edit any item by clicking on the Edit button in the grid (Table of Item list) as shown in Figure 17
Figure 17 Edit Item
AddEdit MOS Scale This submenu allows authenticated administrative users to add MOS information to the system Users enter the MOS scale code and range to add new MOS information for different items as shown in Figure 18 Then users can add new MOS information by clicking on Save
Figure 18 Add MOS Scale
18
In the same manner authenticated users can edit existing MOS scale information There is a grid (Table of MOS scale List item wise) that displays all MOS scale information from which authenticated users can edit any MOS scale information by clicking on the Edit button in the grid (Table of MOS scale list) as shown in Figure 19
Figure 19 Edit MOS Scale
View Item Information This task allows authorized users and members to see the report on Item List Based on the selected color code for any item that item row is highlighted in the report as shown in Figure 20 Users can also filter the report by Item category and Item status
Figure 20 View Item Information
19
View MOS Scale This submenu allows authorized users and members to view the report on MOS scale as shown in Figure 21 Users can also filter the report by Item name and MOS
Figure 21 View MOS Scale
SUPPLIER amp FACILITIES
AddEdit Warehouse This submenu allows authenticated administrative users to add New Warehouse information to the system Users insert warehouse-related information such as warehouse name contact person address supplier contact email etc as shown in Figure 22 Users then click on Save to add a new warehousersquos information
Figure 22 Add Warehouse
20
In the same manner authenticated users can edit existing warehouse information There is a grid (Table of Warehouses) that displays the warehousersquos information from which authenticated users can edit any warehouse information by clicking on the Edit button in the grid (Table of Warehouses list) as shown in Figure 23
Figure 23 Edit Warehouse
AddEdit Upazila This submenu allows authenticated administrative users to add New Upazila information to the system Users insert upazila-related information such as upazila name contact person District upazila office address contact email etc as shown in Figure 24 Clicking on Save adds a new upazila to the system
Figure 24 Add Upazila
21
In the same manner authenticated users can edit existing upazila information There is a grid (Table of Upazila list) that displays upazila information will be displayed from which authenticated users can edit any upazila information by clicking on the Edit button in the grid (Table of Upazila list) as shown in Figure 25
Figure 25 Edit Upazila
AddEdit Donor This submenu allows authenticated administrative users to add New Donor information to the system Users insert information related to the donor such as donor name contact person donor address contact email etc as shown in Figure 26 then click on Save to add a new donor to the system
Figure 26 Add Donor
In the same manner authenticated users can edit existing donor information There is a grid (Table of Donor list) that displays donor information from which authenticated users can edit any donor information by clicking on the Edit button in the grid (Table of Donor list) as shown in Figure 27
22
Figure 27 Edit Donor
View Warehouse This submenu allows authorized users and members to view the report on warehouses as shown in Figure 28 in such fields as warehouse name WH ID supplier district WH address contact person contact email etc
Figure 28 View Warehouse
View Upazila This task allows authorized users and members to view the report on upazila information inserted into the system as shown in Figure 29 in such fields as upazila name upazila ID supplier district upazila address contact person contact email etc
23
Figure 29 View Upazila
View Donors This submenu allows authorized users and members to view the report on donorsrsquo information inserted into the system as shown in Figure 30 in such fields as donor name donor ID country address contact person contact email etc
Figure 30 View Donors
ADDEDIT LMIS DATA
AddEdit F7 Report This submenu allows authorized users to insert or edit a warehousersquos monthly F7 report through a user-friendly interface from the local system of any warehouse or a central Web-based system (as per authentication) as shown in figures 31 and 32 (to add new F7 Report) and 33 and 34 (to edit an existing Report) Users select the warehouse name year and month from the interface to insert its F7 report as shown in Figure 31 If the report has already been inserted the system shows the message ldquoThis report has already been insertedrdquo and information about the inserted report is displayed below Users can click on Edit to modify the report further
24
Figure 31 Insert New Monthly F7 Report
After selecting the warehouse name and month from Figure 30 and clicking on Show an F7 report entry form will appear allowing the user to insert that selected warehouse and month as show in Figure 32
Figure 32 Insert New Monthly F7 Report Form
If the searched report is already inserted into the system database that report information is displayed below in a table with the Edit icon as shown in Figure 33 If users specify different conditions such as a particular warehouse and all months of a year then all inserted report information for that year for that warehouse is displayed below in a table with the Edit icon Clicking on any respective reportrsquos Edit icon will display the entire inserted reportrsquos information in detail as an F7 form along with all inserted field values as shown in Figure 34 Users can change any value to modify the report as needed
25
Figure 33 Edit an F7 Report
Figure 34 Edit an F7 Report
AddEdit F7B Report This submenu allows authorized users to insertedit an F7B report for any upazila of a warehouse into the system through a user-friendly interface from the local system of any warehouse or the central Web-based system (as per authentication) as shown in figures 35 and 36 (to add) and 37 and 38 (for edit) Users select warehouse name upazila name year and month from the interface to insert an F7B report as shown in Figure 31 If the report has already been inserted then the system shows the message ldquoThis report has already been insertedrdquo and information about the inserted report is displayed below Users can click on the Edit icon of that information to modify the report further
Selecting the warehouse name upazila name and month from Figure 35 and clicking on Show displays an F7B report entry form for inserting the F7B report for the selected upazila of that warehouse and month as shown in Figure 36
26
Figure 35 Insert New Monthly F7B Report
Figure 36 Insert New Monthly F7B Report Form
If the report is already in the system database then that report information is displayed below in a table with the Edit icon If users search with different conditions such as a particular warehouse and all of its upazilas for a particular month of a particular year then all of the inserted F7B reports of all of that warehousersquos upazilas for the month and year specified will be displayed below in a table with the Edit icon Clicking on any respective reportrsquos Edit icon will display all of the inserted F7B reportsrsquo information as an F7B form along with all inserted fields as shown in Figure 38 Users can change any value to modify the report as needed
27
Figure 37 Edit an F7B report
Figure 38 Edit an F7B report
AddEdit National Receive This submenu allows authenticated administrative users to insertedit information about any National Receive for an item into the system through a user-friendly interface from the Web-based system central (as per authentication) as shown in Figure 39 (add) and 40 (edit) Users select and insert information related to the warehouse such as donor name item name receive date receive place quantity etc as shown in Figure 39 Clicking on Save inserts new National Receive information for an item
28
Figure 39 Add National Receive
To search the inserted National Receive information for modification users have to filter the information by selecting ldquoFilter by received yearrdquo and ldquoFilter by received monthrdquo as shown in Figure 40 As result of filter action based on the selected year month the available inserted national receive information is displayed in a table with the Edit icon Clicking on any respective National Receive information Edit icon from the searched result displays the detail information with all inserted fields as shown in Figure 40 Users can change any value to modify National Receive information as needed
Figure 40 Edit National Receive
VIEW LMIS DATA
View F7 Report This submenu allows authorized users to View F7 reports in the system through a user-friendly interface from the local system of any warehouse or the central Web-based system (as per authentication) as shown in figures 41 and 42 Users select warehouse name year and month from the interface to View an F7 report as shown in Figure 41 If the searched report is already in the system database then that report information is displayed below in a table with the View icon If users search with different conditions such as a particular warehouse and all months of a year then all inserted reports for that year for that warehouse are displayed below by clicking on View Thus the information is displayed as an F7 Report as shown in Figure 42
29
Figure 41 View the WH Name Month and Year to View Report
Figure 42 View the Report of the Selecting WH Month and Year
View F7B Report This submenu allows authorized users to view a monthly F7B report for a upazila of a particular warehouse in the system through a user-friendly interface from the local system of any warehouse or the central Web-based system (as per authentication) as shown in figures 43 and 44 Users select warehouse name upazila year and month from the interface to view any F7B report as shown in Figure 43 If the searched report is already in the system database then that report is displayed below by clicking on View If users search with different condition such as a particular warehouse and all of its upazilas for a any month of any year then all inserted F7B reports for all of that warehousersquos upazilas for any month of any year are displayed by clicking on View Clicking on any respective reportrsquos View icon in the result displays all inserted F7B reports as shown in Figure 44
30
Figure 43 Select Upazila WH Month and Year to View F7B Report
Figure 44 View F7B Report
View National Receive This submenu allows authenticated users to view the existing National Receive information for an item To search the inserted National Receive information for modification users select donor name item name year and month as shown in Figure 45 Based on the selection available inserted National Receive information is displayed (see Figure 45)
Figure 45 View National Receive
31
LMIS REPORT
Contraceptives Summary Report (Available only in the Central System) This submenu allows authorized users to generate reports on national consumption and closing balance through a user-friendly interface from a central Web-based system (as per authentication) as shown in the figures 46 and 47 When users select month and year and click on Generate Report the system generates a report on national consumption and closing balance for that particular month and year as shown in Figure 46 The report is displayed with different fields such as name of the product reporting consumption reporting balance 100 adjusted consumption closing balance 100 closing balance national received and months of stock
Figure 46 Generate the Contraceptives Summary Report
Figure 47 Contraceptives Summary Report
Stock Status Report This submenu allows authorized users to generate reports on stock status through a user-friendly interface as shown in figures 48 and 49 When users select warehouse month year article1 article2 article3 and article4 and click on Generate Report the system generates a compiled report on stock status report for that particular warehouse month year and article as shown in Figure 48 The report is displayed with different fields such as supplying central warehouse (CWH) distribution store etc
32
Figure 48 Select WH Month Year and Article to Generate a Report
Figure 49 View Stock Status Report
Supply Plan Register (Available only in the Local System) This submenu allows RWH users to prepare the supply plan Preparing supply plan of the contraceptives is the most important job of the RWH staff a based on this supply plan they used to supply contraceptives to their respective upazilas (sub-district) The entire process is shown in figures 50 and 51 When users select warehouse month year article1 article2 article3 and article4 and click on Generate Report the system generates the supply plan shown in figure 51
33
Figure 50 Generate Supply Plan Register
Figure 51 View Supply Plan Register
Stock Status Trend (Available only in the Local System) This submenu allows authorized users to generate graphical reports on stock status trends through a user-friendly interface from the central Web-based system (as per authentication) as shown in figures 52 and 53 When users select month year article1 article2 article3 and article4 and click on Generate Report the system generates a graphical bar chart report on stock status for that particular month year and article as shown in Figure 53
34
Figure 52 Generate Stock Status Trend Report
Figure 53 View Stock Status Trend Report
Status of Stockouts This submenu allows authorized users to generate graphical reports on the status of stockouts at the upazila level through a user-friendly interface from the central Web-based system (as per authentication) as shown in figures 54 and 55 When users select month year article1 article2 article3 and article4 and click on Generate Report the system generates a graphical bar chart report on stock status for that particular month year and article as shown in Figure 54
35
Figure 54 Generate a Report on Status of Stockouts at Upazila Level
Figure 55 View Status of Stockouts Report
National Consumption Trend (Available only in the Central System) This submenu allows authorized users to generate graphical reports on National Consumption Trends through a user-friendly interface from the central Web-based system (as per authentication) as shown in figures 56 and 57 When users select month year article1 article2 article3 and article4 and click on Generate Report the system generates a graphical bar chart report on stock status for that particular month year and article as shown in Figure 56
36
Figure 56 Generate a Report for National (GOB+NGO) Consumption Trend
Figure 57 View National Consumption Trend Report
Stockout SDPs This submenu allows authorized users to determine the number of service delivery points (SDPs) experiencing stockouts in various methods Users select the month and year for which they want a report as shown in Figure 58 Then users click on Generate Report to produce the result shown in Figure 59
Figure 58 Generate Report for Stockout SDPs
37
Figure 59 View Number of SDPs Stockout against Various Methods
Non-Contraceptive Summary Report (Available only in the Central System) This submenu allows authorized users to generate reports on national consumption and closing balance of the non contraceptives through a user-friendly interface from a central Web-based system (as per authentication) as shown in the figures 60 and 61 When users select month and year and click on Generate Report the system generates a report on national consumption and closing balance for that particular month and year The report is displayed with different fields such as name of the product reporting consumption reporting balance 100 adjusted consumption closing balance 100 closing balance national received and months of stock
Figure 60 Generate Non-Contraceptives Summary Report
Figure 61 Non-Contraceptives Summary Report
38
Stock Status at the Upazila and Field (Available only in the Central System) This submenu allows authorized users to get the status of the selected commodities in the upazilas and fields through a user-friendly interface as shown in the figures 62 and 63 The report is displayed with different information such as average monthly distribution closing balance month of stock etc both at Upazila and Field level
Figure 62 Generate Stock Status at the Upazila and Field
Figure 63 Stock Status at the Upazila and Field
Stock Status at RWH (Available only in the Central System) This submenu allows authorized users to get the status of the selected commodities in the RWH level through a user-friendly interface as shown in the figures 64 and 65 The report is displayed with different information such as average monthly distribution closing balance month of stock etc of all the selected commodities
39
Figure 64 Generate Stock Status at the RWH level
Figure 65 Stock Status at the RWH level
Non Reported Upazilas (Available only in the Central System) This submenu allows authorized users to get the list of the non reported upazilas for a particular month through a user-friendly interface as shown in the figures 66 and 67 The contact numbers of those upazilas are also displayed in this report so that concerned person can contact the upazilas to know the reasons for not uploading the data
Figure 66 Generate the List of Non-Reported Upazila
40
Figure 67 Non-Reported Upazila
RWH wise Reporting Rate (Available only in the Central System) This submenu allows the users to see the RWH wise reporting rate for the last 6 months It also shows the average reporting rate of last 6 months of each RWH Figure 68 shows the entire process
Figure 68 RWH wise reporting rate
DOWNLOAD
Download LMIS Reports This submenu allows authorized users to download draft LMIS Report Users have to click on the Download LMIS Report Submenu to obtain the files which are uploaded as shown in Figure 69 Then by clicking on any title users can download that file Users can also filter the search by selecting a particular month and year
41
Figure 69 Download LMIS Report
Download Pipeline Reports This submenu allows authorized users to download draft Pipeline Report Users have to click on the Download Pipeline Report Submenu to obtain the files which are uploaded as shown in Figure 70 Then by clicking on any title users can download that file Users can also filter the search by selecting a particular month and year
Figure 70 Download Pipeline Report
DATA MIGRATION
Upload Data This sub menu allows users to upload newly entered data to httpwwwdgfplmisorg directly provided an Internet connection is present in that computer To do so after entering F7BF7 data users go to the link Data Migration-gtUpload Data which brings up a screen like the one in Figure 71 Clicking on Migrate Upload Data button displays another screen like the one in Figure 72 Clicking on Process Uploaded Data causes data to be uploaded to httpwwwdgfplmisorg and results in the screen shown in Figure 73
42
Figure 71 Migrating Data to httpwwwdgfplmisorg
Figure 72 Processing Uploaded Data
43
Figure 73 Data Upload Is Completed
Download Data This sub menu allows users to download data from httpwwwdgfplmisorg to a local computer directly provided that computer has an Internet connection To do so Click on the link Data Migration-gtDownload Data You will get a screen like Figure 74 Click on ldquoDownload Migrate Datardquo button You will another screen like Figure 75 Click on ldquoProcess Download Datardquo button to download the data from httpwwwdgfplmisorg (see Figure 76)
Figure 74 Download Data
44
Figure 75 Process Download Data
Figure 76 Complete Download Data
Generate and Upload SQL file This task allows users to upload updated data online when an Internet connection is not available on the local computer Users first generate the SQL file from a local computer Then they take the SQL file to a computer that does have an Internet connection ie a cyber cafeacute Users can upload the SQL file from that computer The entire process is described below
Two steps are necessary to upload data in this case First you have to create an SQL file after entering data in your computer Second you have to upload the data to httpwwwdgfplmisorg on a cyber cafeacute computer with Internet access by taking the SQL file with you on a pen driveflash drive The detail is given below
45
First Step Click on the link Data Migration-gtGenerate SQL File which results in a screen like the one in Figure 77 The click on Generate SQL File which brings up another box asking where the file will be saved (see Figure 78) Save the file in the desktop
Figure 77 Generating an SQL File
Figure 78 Saving an SQL file
Second Step Copy the SQL file from your computer and onto a pen driveflash drive or floppy diskette Then go to a cyber cafeacute or other place where Internet is available Go to the site httpwwwdgfplmisorg log on to the site using your username and password Click on the link
46
Data Migration-gtUpload SQL File which results in a screen asking you to select the SQL file you want to upload (see Figure 79) Click on Browse and select the file from your pen driveflash drive or floppy diskette then click on Upload SQL File A successful message is displayed once uploading is complete
Figure 79 Uploading SQL File
47
48
TECHNICAL SUPPORT
We hope system users will be able to work with the system successfully by following this manual and that the system will be useful for these users However if users need any guidance or technical support they should contact the following for support and assistance
The Directorate General of Family Planning Ministry of Health and Family Welfare 6 Karwan Bazar Dhaka Tel 880-2-9146262
Contact Person Abul Kalam Azad Logistics Monitoring Officer
49
50
CONCLUSION
This manual is a guide for end users of the system Such users do not need technical knowledge to use and operate the system Keeping this in mind we have written this manual in such a way so that end users can easily follow the guidelines included We strongly believe that successful development of software depends on user satisfaction We hope users will be able to use the software to their ultimate satisfaction with the help of this user manual
51
52
For more information please visit deliverjsicom
USAID | DELIVER PROJECT John Snow Inc
1616 Fort Myer Drive 11th Floor
Arlington VA 22209 USA
Phone 703-528-7474
Fax 703-528-7480
Email askdeliverjsicom
Internet deliverjsicom

BANGLADESH WEB-BASED LOGISTICS MANAGEMENT INFORMATION SYSTEM USER MANUAL
The authors views expressed in this publication do not necessarily reflect the views of the US Agency for International Development or the United States Government
USAID | DELIVER PROJECT Task Order 1 The USAID | DELIVER PROJECT Task Order 1 is funded by the US Agency for International Development under contract no GPO-I-01-06-00007-00 beginning September 29 2006 Task Order 1 is implemented by John Snow Inc in collaboration with PATH Crown Agents Consultancy Inc Abt Associates Fuel Logistics Group (Pty) Ltd UPS Supply Chain Solutions The Manoff Group and 3i Infotech The project improves essential health commodity supply chains by strengthening logistics management information systems streamlining distribution systems identifying financial resources for procurement and supply chain operation and enhancing forecasting and procurement planning The project also encourages policymakers and donors to support logistics as a critical factor in the overall success of their health care mandates
Recommended Citation USAID | DELIVER PROJECT Task Order 1 2008 Bangladesh Web-based Logistics Management Information System User Manual Arlington Va USAID | DELIVER PROJECT Task Order 1
Cover photo In Bangladesh a logistics staff person works at a computer
USAID | DELIVER PROJECT John Snow Inc 1616 Fort Myer Drive 11th Floor Arlington VA 22209 USA Phone 703-528-7474 Fax 703-528-7480 E-mail askdeliverjsicom Internet deliverjsicom
CONTENTS
Preface vii
Introduction ix
Purpose and Goal 1 How the Previous System Worked 1 Shortcomings of the Previous System 2
Web-based LMIS Software and Its Working Environment 5
Step-by-Step Process to Work with the System 9 Description of the Menus and Submenus 13
Technical Support 49
Conclusion 51
Figures Figure 1 DGFP MIS Information Flow (prior to introduction of Web-based LMIS) 2 Figure 2 DGFP MIS Information Flow (after introduction of Web-based LMIS) 6 Figure 3 Web-based LMIS System 7 Figure 4 Login Screen of Web-based LMIS9 Figure 5 Menu bar of Web-based LMIS9 Figure 6 Add Menu13 Figure 7 Edit Menu13 Figure 8 Add Submenu 14 Figure 9 Edit Submenu14 Figure 10 Add Users 15 Figure 11 Edit Users15 Figure 12 Add Userrsquos Group16 Figure 13 Edit Userrsquos Group 16 Figure 15 EditDelete Members 17 Figure 16 Add Item17 Figure 17 Edit Item 18 Figure 18 Add MOS Scale 18 Figure 19 Edit MOS Scale19 Figure 20 View Item Information 19 Figure 21 View MOS Scale20 Figure 22 Add Warehouse 20 Figure 23 Edit Warehouse21
Figure 24 Add Upazila21 Figure 25 Edit Upazila 22 Figure 26 Add Donor 22 Figure 27 Edit Donor 23 Figure 28 View Warehouse23 Figure 29 View Upazila 24 Figure 30 View Donors 24 Figure 31 Insert New Monthly F7 Report 25 Figure 32 Insert New Monthly F7 Report Form 25 Figure 33 Edit an F7 Report 26 Figure 34 Edit an F7 Report 26 Figure 35 Insert New Monthly F7B Report27 Figure 36 Insert New Monthly F7B Report Form 27 Figure 37 Edit an F7B report28 Figure 38 Edit an F7B report28 Figure 39 Add National Receive29 Figure 40 Edit National Receive 29 Figure 41 View the WH Name Month and Year to View Report 30 Figure 42 View the Report of the Selecting WH Month and Year30 Figure 43 Select Upazila WH Month and Year to View F7B Report 31 Figure 44 View F7B Report 31 Figure 45 View National Receive 31 Figure 46 Generate the Contraceptives Summary Report32 Figure 47 Contraceptives Summary Report32 Figure 48 Select WH Month Year and Article to Generate a Report33 Figure 49 View Stock Status Report 33 Figure 50 Generate Supply Plan Register34 Figure 51 View Supply Plan Register 34 Figure 52 Generate Stock Status Trend Report 35 Figure 53 View Stock Status Trend Report35 Figure 54 Generate a Report on Status of Stockouts at Upazila Level 36 Figure 55 View Status of Stockouts Report 36 Figure 56 Generate a Report for National (GOB+NGO) Consumption Trend 37 Figure 57 View National Consumption Trend Report 37 Figure 58 Generate Report for Stockout SDPs 37 Figure 59 View Number of SDPs Stockout against Various Methods 38 Figure 60 Generate Non-Contraceptives Summary Report 38 Figure 61 Non-Contraceptives Summary Report 38 Figure 62 Generate Stock Status at the Upazila and Field 39 Figure 63 Stock Status at the Upazila and Field39 Figure 64 Generate Stock Status at the RWH level40
iv
Figure 65 Stock Status at the RWH level 40 Figure 66 Generate the List of Non-Reported Upazila 40 Figure 67 Non-Reported Upazila 41 Figure 68 RWH wise reporting rate 41 Figure 69 Download LMIS Report 42 Figure 70 Download Pipeline Report42 Figure 71 Migrating Data to httpwwwdgfplmisorg43 Figure 72 Processing Uploaded Data 43 Figure 73 Data Upload Is Completed 44 Figure 74 Download Data44 Figure 75 Process Download Data45 Figure 76 Complete Download Data45 Figure 77 Generating an SQL File46 Figure 78 Saving an SQL file 46 Figure 79 Uploading SQL File 47
Tables Table 1 List of the Menus and Sub-menus10 Table 2 List the Action Buttons Used in the Software 12
v
vi
PREFACE
The Logistics Management Information System (LMIS) of the Directorate General of Family Planning (DGFP) receives data from the four-tier distribution system (central regional upazila SDPs) and processes the information at the central level Currently monthly ldquoContraceptive Distribution and Stock Status Reportsrdquo of the upazilas and ldquoMonthly Issue Distribution and Stock Balance Reportsrdquo are sent to the LMIS Section in Dhaka through postal services Both data entry and processing are done centrally at LMIS Delays in receiving reports cause delays in processing and publishing them Sometimes it takes six weeks to publish the report which defeats its main purpose
The web-based LMIS seeks to streamline publication of monthly LMIS reports Under the Web-based LMIS after a warehouse receives F7B reports from the upazilas data entry of these reports is done by computer in the respective warehouses and the data are then communicated to the central Web server for processing using the InternetWeb Central LMIS consolidates the data from all of the warehouses accepts or rejects updates and produces a monthly LMIS report This distributed processing model ensures
1 quick data entry
2 timely publication of the monthly LMIS report
3 instant availability of data and
4 increased efficiency of the supply chain
This user manual seeks to help different types of users learn the different features modules and tasks of the developed system Users will learn how to perform their assigned task(s) using this system Detailed guidelines and screen shots of each task will assist the users to use this system easily and effectively We hope that this manual will be helpful for end user operations related to the system
Thanks are due to the staff of the DGFP MoHFW for their hard work in developing and implementing the web-based LMIS Thanks also go to Shyam Lama USAID | DELIVER PROJECT Senior Program Manager for his leadership in the conceptualization design review and field testing of the new system and to Zakir Hossain Sarker USAID | DELIVER PROJECT MIS Specialist for leading the final implementation documentation and improvement phases of the system innovations
vii
viii
INTRODUCTION
The Web-based Logistics Management Information System (Web-based LMIS) a component of the Management Information System (MIS) of the Directorate General of Family Planning (DGFP) is a Web application through which various logistics data can be entered easily in a de-centralized mode ie from the regional warehouse (RWH) level Data entry may originate from different sources but all data are stored in a central database server Since this is Web-based software authorized persons (ie persons from DGFP and RWH various donors etc) are able to access these data in the form of various logistics reports such as LMIS Reports Stock Status Reports Month of Supply (MOS) Reports etc from anywhere in the world via the Internet when required Eventually this facility will help authorized persons to obtain needed information more flexibly promptly and efficiently and the entire decision-making process of the organizations involved will be improved immensely
ix
x
PURPOSE AND GOAL
To understand the purpose and goal of the software one first has to understand how the current system works and what its shortcomings are
HOW THE PREVIOUS SYSTEM WORKED The Directorate General of Family Planning was using a computerized systemmdashLogistics Management Information System (LMIS) mdash to carry out warehouse inventory operation In particular LMIS was used to generate a very important report which had information on Monthly Distribution Months of Stock on hand (MOS) in each upazila and Months of Stock on hand (MOS) in the field from Central Warehouse up to the upazila level The report also had national receipts and distribution of contraceptives and closing balances as well as a list of upazilas that failed to submit reports for the last six months Some important graphs were included in the report as well Primary users of the report were Supply Officers and Storekeepers of Warehouses who on the basis of this report used to determine the Supply Plan The computerized system that generates all of these reports was handled by the MIS section of DGFP so all reports from upazilas and RWHs had to be sent manually to DGFP where the figures were entered in the computerized system and generated the required reports
Family Welfare Assistants (FWAs) submit their reports (LMIS-1) to the Family Planning Inspector (FPI) on the last working day of the month The FPI prepares the LMIS-2 report which consolidates the LMIS-1 reports and submits to the Upazila Family Planning Officer (UFPO) on the first working day of the next month Family Welfare Visitors (FWVs)NGOs prepare their LMIS-3 and submit it directly to the UFPO on the first working day of each month and upazila FP officers prepares 7B reports compiling the LMIS-2 and LMIS-3 reports and incorporating transaction data from the Inventory Control Registers (ICRs) They used to send one copy of the 7B report to the warehouse and one to the MIS unit DGFP at Dhaka by the fifth working day of each month The last date for receiving warehouse F7B and F7 forms at the MIS unit was 20th of following month But only around 50 of 7B reports used to arrive by 20th The MIS unit generally produced the report after receiving 80ndash85 7B reports Therefore Januaryrsquos report was normally published at the end of February or first week of March After that it used to take at least one week for the report to reach decision makers
1
Figure 1 DGFP MIS Information Flow (prior to introduction of Web-based LMIS)
SHORTCOMINGS OF THE PREVIOUS SYSTEM LMIS reports are a vital tool for decision making they contain distribution figures and Months of Supply (MOS) of the warehouses upazila stores and field levels These data are essential to run the family planning program smoothly More important publishing these reports on time is invaluable Unfortunately the previous system was not capable of publishing these reports on time Instead it took nearly two months to publish and distribute the reports to users by which time it lost its
2
credibility and usefulness The information became too old for usersdecision makers This happened because the MIS unit of DGFP had to wait for the F7B reports from all of the upazilas They usually came through postal mail and many things could prevent the reports from arriving on time Again while entering F7B data software automatically identified the errors (if any) and notified the operator who then had to mark the error(s) on the 7B report and sent it back to that upazila for correction But operators still had to enter the incorrect data and compile the report with that incorrect data It was not possible to wait for the correction to come back because doing so would further delay publication of the reports So every month reports were published with some incorrect data
Considering the above we believe that the goal of the Web-based LMIS software is to redistribute the load from central to the warehouses and decrease report generation time Installing and running the new software in all of the RWHs will accomplish the following
Increase access to logistics data at the national and Regional Warehouse (RWH) levels
Allow mangers at different levels to make decisions to improve supply chain management system
Allow donors and stakeholders to access Web-based reports for decision making
Allow WHs to obtain the status of the upazila and field stock immediately after data entry
Assist Warehouse Managers to make immediate decisions
Strengthen supervision and monitoring at all levels
3
4
WEB-BASED LMIS SOFTWARE AND ITS WORKING ENVIRONMENT
To gain the best benefits of the Web-based LMIS software we need to understand how it works who is involved with it etc Figure 2 illustrates this scenario Comparing this figure with Figure 1 reveals that process remains the same from the upazila FP stores to the respective RWHs F7B reports should reach their respective RWHs via postal mail however in the case of Web-based LMIS F7B reports do not have reach the DGFPrsquos MIS unit Instead RWH personnel will enter data from F7B reports which has two great advantages
1 Data are entered in a decentralized fashion which will speed up the data entry process Instead of entering 479 F7B and 21 F7 reports by the DGFP MIS unit each RWH can enter on average only 23 F7B and 1 F7 reports
2 RWHs can get their required information immediately after entering their respective F7B and F7 reports they donrsquot have to wait two months for someone to prepare the reports for them
If all RWHs enter their respective upazilasrsquo records then authorized and central users will be able to seeprint all kinds of reports from the central server online If partial data are entered they will be able to seeprint partial reports as well
Data can be entered in the central server from the RWH in two ways
1 Data can be entered directly into the central server through the Internet
2 Data can also be entered locally in offline mode and then transferred to the central server through Internet
Details of both the processes are described in section 419 As described here data can be entered in either online or offline mode the entire system is divided into two parts a central Web-Based system and an RWH system (local system)
1 Central Web-based System This actually includes all of the systemrsquos features and is hosted in a central Web server To log in to the system the userrsquos computer must have an Internet connection to connect to central system After entering a valid user ID and password the user will be able to access the central system which contains records of all of the RWHs Therefore national-level reports can be obtained from the central Web-based system
5
Figure 2 DGFP MIS Information Flow (after introduction of Web-based LMIS)
2 RWH Local System This is basically a part of the total system that will be installed at the RWH office in a local Web server which may not be connected with the Internet as the local system basically runs in an intranet environment Local system users will have limited features as per the requirements of their particular RWH Usually after logging in to the local system users will be able to enteredit and view reports of their respective upazilas only To make these data available for all authorized users they have to be transferred to the central Web-based system
Beside these systems another system is installed in the DGFPrsquos MIS unit that transfersmigrates records from the Web-based system to the previous oracle based system Figure 3 explains the entire process
6
Figure 3 Web-based LMIS System
7
8
STEP-BY-STEP PROCESS TO WORK WITH THE SYSTEM
As the system will run in two different environments (central and local) users need to write two different addresses to enter the respective environments To access the central Web-based system the URL is httpwwwdgfplmisorg to access the RWH local system the URL is httplocalhostlmis In both cases a user interface will appear such as the one that appears in Figure 4 From here any visitor can obtain information about DGFP JSI etc But to get the various LMIS reports users have to log in using a valid username and password
Figure 4 Login Screen of Web-based LMIS
After a successful login the menu in Figure 5 will be displayed at the top of the system
Figure 5 Menu bar of Web-based LMIS
9
Based on the privileges assigned to the user by the administrator of the system a menu and certain menu items will appear after a successful login Table 1 shows the names of all of the menus and their menu items and describes the nature of each menu and menu item
Table 1 List of the Menus and Sub-menus
Menu Title Menu Type Main Menu Description
Home Main Menu Home Link to Home Page
Menu Main Menu Menu For Managing System Menu AddEdit Menu Submenu Menu To Add and Edit Main Menu
AddEdit Submenu Submenu Menu To Add and Edit Submenu
Users Main Menu Users For Managing System Users AddEdit User Submenu Users To Add and Edit User
AddEdit User Group Submenu Users To Add and Edit User Group
EditDelete Members Submenu Users To Edit and Delete Existing Member
Item Main Menu Item For Managing Item AddEdit Item Submenu Item To Add and Edit Item
AddEdit MOS Scale Submenu Item To Add and Edit MOS Scale Information
View Item Submenu Item To View Item Information
View MOS Scale Submenu Item To View MOS Scale Information
Supplier amp Facilities Main Menu Supplier amp Facilities
For Managing the Information of Suppliers and Facilities Such as Donors Upazilas Warehouses
AddEdit WH Sub Menu Supplier amp Facilities
To Add and Edit Warehouse Information
AddEdit Upazila Submenu Supplier amp Facilities
To Add and Edit Upazila Information
AddEdit Donor Submenu Supplier amp Facilities
To Add and Edit Donor Information
View WH Submenu Supplier amp Facilities
To View Warehouse Information
View Upazila Submenu Supplier amp Facilities
To View Upazila Information
View Donor Submenu Supplier amp Facilities
To View Donor Information
AddEdit LMIS Data Main Menu Manage LMIS Data
For Managing (Insert and Edit) F7 and F7b Reports
AddEdit F7 Report Submenu Manage LMIS Data
To Insert and Edit F7 Report
AddEdit F7b Report Submenu Manage LMIS Data
To Insert and Edit F7b Report
AddEdit National Receive Submenu Manage LMIS Data
To Insert and Edit National Receive Information
10
View LMIS Data Main Menu View LMIS Data
For Viewing the Inserted F7 and F7b Reports
View F7 Report Submenu View LMIS Data
To View Inserted F7 Reports
View F7b Report Submenu View LMIS Data
To View F7b Reports
View National Receive Submenu View LMIS Data
To View National Receive Information
LMIS Report Main Menu LMIS Report
Menu for Viewing All Types of Necessary Reports Regarding LMIS
Supply Plan Register Submenu LMIS Report It Generates the Supply Plan of the Selected Items
Contraceptive Summary Report
Submenu LMIS Report This Report Provides an Overall Picture at a Glance
Stock Status Report Submenu LMIS Report To View Report of a Month of Any Warehouse
Stock Status Trend Submenu LMIS Report To View Graphical Report on Stock Status Trend of Any Month
Status of Stockouts Submenu LMIS Report To View Graphical Report on Stockout of Any Month
National Consumption Trend
Submenu LMIS Report To View Graphical Reports on National Consumption Trend
Stockout SDP Submenu LMIS Report It Provides the Number of SDPs Experiencing Stock Out
Non Contraceptive Summary Report
Submenu LMIS Report This Report Provides an Overall Picture of the Non-Contraceptives
Stock Status at the Upazila and Field
Submenu LMIS Report It Provides the Stock Status of the Selected Contraceptives Both at Upazila and Field Level
Stock Status at RWH Submenu LMIS Report This Provides the Stock Status of the Selected Contraceptives at the RWH Level
Non Reported Upazilas Submenu LMIS Report To View the List Non-Reported Upazilas
RWH wise Reporting Rate Submenu LMIS Report It Provides the RWH Wise Reporting Rate for the Last 6 Months
Downloads Main Menu Downloads To Downloads Various Reports Download LMIS Reports Submenu Downloads
Download Pipeline Reports Submenu Downloads
Data Migration Main Menu Data Migration
To Upload or Download to or From Online Database
Upload Data Submenu Data Migration
To Upload Data from Local System to httpwwwdgfplmisorg
View Migration Report Submenu Data Migration
To View the Report to See Whether Any Data Migrated from Local to Online
Data Waiting For Approval Submenu Data Migration
To See the Records that Need Approval
11
Download Data Submenu Data Migration
To Download Data from Online to Local
Generate SQL File Submenu Data Migration
To Generate the SQL to Upload After Entering New Data Into Local System
Upload SQL File Submenu Data Migration
To Upload the SQL File Online That Was Generated Earlier
Backup Database Submenu Data Migration
To Take the Database Backup from Online
Logout Main Menu Logout To Log Out from the System
Table 2 List the Action Buttons Used in the Software
Sl Action Button Button Name
Description Actions
1 Calendar This opens a one-month date-picker calendar from which users can select their required dates easily
2 Color This button opens a color picker from which users can choose or customize a color and select it for a particular item to highlight the item with the selected color
3 HelpToolTip This button shows help or comments as tool tips enabling users to seek help
4 Login This action button is only for logging in to the system Clicking on this button allows the system to authenticate users and leads them to the system control panel
5 Print To print the selected DocumentsPage
6 Generate a report
To generate a report with the selected criteria
7 ResetClear To reset or refresh all the input fields of a data entry or edit form
8 Save To save data from an entryedit form
9 ShowView To view the information according to some selected criteria
10 Update To saveupdate the modified data or information from a data edit form
11 Delete To delete the corresponding row of information
12 Edit To edit the corresponding row of information
15 ViewDisplay To view the corresponding row information
12
DESCRIPTION OF THE MENUS AND SUBMENUS Each Menu and Submenu relates to a different task through which users can perform various relevant activities Details of the tasks are as follows
MENU
AddEdit Menu This submenu allows authenticated administrative users to add any Menu to the central Web-based system Authenticated users can edit the existing Menu title and change the menu orders if necessary
Figure 6 Add Menu
Figure 7 Edit Menu
13
AddEdit Submenu This sub menu allows authenticated administrative users to add any Submenu to the central Web-based system under any Menu In this case users have to select the Menu as well as the Submenu title and the path of the related file of the Submenu In the same way authenticated users can edit the Submenu title and change the Submenu
Figure 8 Add Submenu
Figure 9 Edit Submenu
14
USERS
AddEdit Users This submenu allows authenticated administrative users to create a new user of the central Web-based system In this case users have to enter different fields of information related to the new user as shown in Figure 10 and save the new user
Figure 10 Add Users
In the same manner authenticated users can edit existing user information from the central Web-based system There is a grid that displays all types of users from which authenticated users can delete or edit any user information by clicking on the Delete or Edit button in the grid (Table of User list) as shown in Figure 11
Figure 11 Edit Users
15
AddEdit Userrsquos Group This submenu allows authenticated administrative users to create a new User Group A User Group contains a list of User Privileges to limit user access Users enter a New Group title and select the list of Privileges for members of this group to create a new group as shown in the Figure 12
Figure 12 Add Userrsquos Group
In the same manner authenticated users can edit an existing user group There is a grid (Table of User Group list) that displays all types of user group lists from which authenticated users can delete or edit any user group information by clicking on the Delete or Edit button in the grid (Table of User list) as shown in the Figure 13
Figure 13 Edit Userrsquos Group
16
EditDelete Members This submenu allows authenticated administrative users to update information about activated members by clicking on the Update button in the grid (Table of Pending list of Membership Request) for any member as shown in Figure 15 Users can also delete the member from the grid (Table of member list) by clicking on the Delete icon in the grid
Figure 15 EditDelete Members
ITEMS
AddEdit Item This submenu allows authenticated administrative users to add a new Item to the system Users enter a new Item Name and other item-related information as shown in Figure 16 then click on Save to create a new item
Figure 16 Add Item
17
In the same manner authenticated users can edit existing Items There is a grid (Table of Item List) that displays all types of Items from which authenticated users can edit any item by clicking on the Edit button in the grid (Table of Item list) as shown in Figure 17
Figure 17 Edit Item
AddEdit MOS Scale This submenu allows authenticated administrative users to add MOS information to the system Users enter the MOS scale code and range to add new MOS information for different items as shown in Figure 18 Then users can add new MOS information by clicking on Save
Figure 18 Add MOS Scale
18
In the same manner authenticated users can edit existing MOS scale information There is a grid (Table of MOS scale List item wise) that displays all MOS scale information from which authenticated users can edit any MOS scale information by clicking on the Edit button in the grid (Table of MOS scale list) as shown in Figure 19
Figure 19 Edit MOS Scale
View Item Information This task allows authorized users and members to see the report on Item List Based on the selected color code for any item that item row is highlighted in the report as shown in Figure 20 Users can also filter the report by Item category and Item status
Figure 20 View Item Information
19
View MOS Scale This submenu allows authorized users and members to view the report on MOS scale as shown in Figure 21 Users can also filter the report by Item name and MOS
Figure 21 View MOS Scale
SUPPLIER amp FACILITIES
AddEdit Warehouse This submenu allows authenticated administrative users to add New Warehouse information to the system Users insert warehouse-related information such as warehouse name contact person address supplier contact email etc as shown in Figure 22 Users then click on Save to add a new warehousersquos information
Figure 22 Add Warehouse
20
In the same manner authenticated users can edit existing warehouse information There is a grid (Table of Warehouses) that displays the warehousersquos information from which authenticated users can edit any warehouse information by clicking on the Edit button in the grid (Table of Warehouses list) as shown in Figure 23
Figure 23 Edit Warehouse
AddEdit Upazila This submenu allows authenticated administrative users to add New Upazila information to the system Users insert upazila-related information such as upazila name contact person District upazila office address contact email etc as shown in Figure 24 Clicking on Save adds a new upazila to the system
Figure 24 Add Upazila
21
In the same manner authenticated users can edit existing upazila information There is a grid (Table of Upazila list) that displays upazila information will be displayed from which authenticated users can edit any upazila information by clicking on the Edit button in the grid (Table of Upazila list) as shown in Figure 25
Figure 25 Edit Upazila
AddEdit Donor This submenu allows authenticated administrative users to add New Donor information to the system Users insert information related to the donor such as donor name contact person donor address contact email etc as shown in Figure 26 then click on Save to add a new donor to the system
Figure 26 Add Donor
In the same manner authenticated users can edit existing donor information There is a grid (Table of Donor list) that displays donor information from which authenticated users can edit any donor information by clicking on the Edit button in the grid (Table of Donor list) as shown in Figure 27
22
Figure 27 Edit Donor
View Warehouse This submenu allows authorized users and members to view the report on warehouses as shown in Figure 28 in such fields as warehouse name WH ID supplier district WH address contact person contact email etc
Figure 28 View Warehouse
View Upazila This task allows authorized users and members to view the report on upazila information inserted into the system as shown in Figure 29 in such fields as upazila name upazila ID supplier district upazila address contact person contact email etc
23
Figure 29 View Upazila
View Donors This submenu allows authorized users and members to view the report on donorsrsquo information inserted into the system as shown in Figure 30 in such fields as donor name donor ID country address contact person contact email etc
Figure 30 View Donors
ADDEDIT LMIS DATA
AddEdit F7 Report This submenu allows authorized users to insert or edit a warehousersquos monthly F7 report through a user-friendly interface from the local system of any warehouse or a central Web-based system (as per authentication) as shown in figures 31 and 32 (to add new F7 Report) and 33 and 34 (to edit an existing Report) Users select the warehouse name year and month from the interface to insert its F7 report as shown in Figure 31 If the report has already been inserted the system shows the message ldquoThis report has already been insertedrdquo and information about the inserted report is displayed below Users can click on Edit to modify the report further
24
Figure 31 Insert New Monthly F7 Report
After selecting the warehouse name and month from Figure 30 and clicking on Show an F7 report entry form will appear allowing the user to insert that selected warehouse and month as show in Figure 32
Figure 32 Insert New Monthly F7 Report Form
If the searched report is already inserted into the system database that report information is displayed below in a table with the Edit icon as shown in Figure 33 If users specify different conditions such as a particular warehouse and all months of a year then all inserted report information for that year for that warehouse is displayed below in a table with the Edit icon Clicking on any respective reportrsquos Edit icon will display the entire inserted reportrsquos information in detail as an F7 form along with all inserted field values as shown in Figure 34 Users can change any value to modify the report as needed
25
Figure 33 Edit an F7 Report
Figure 34 Edit an F7 Report
AddEdit F7B Report This submenu allows authorized users to insertedit an F7B report for any upazila of a warehouse into the system through a user-friendly interface from the local system of any warehouse or the central Web-based system (as per authentication) as shown in figures 35 and 36 (to add) and 37 and 38 (for edit) Users select warehouse name upazila name year and month from the interface to insert an F7B report as shown in Figure 31 If the report has already been inserted then the system shows the message ldquoThis report has already been insertedrdquo and information about the inserted report is displayed below Users can click on the Edit icon of that information to modify the report further
Selecting the warehouse name upazila name and month from Figure 35 and clicking on Show displays an F7B report entry form for inserting the F7B report for the selected upazila of that warehouse and month as shown in Figure 36
26
Figure 35 Insert New Monthly F7B Report
Figure 36 Insert New Monthly F7B Report Form
If the report is already in the system database then that report information is displayed below in a table with the Edit icon If users search with different conditions such as a particular warehouse and all of its upazilas for a particular month of a particular year then all of the inserted F7B reports of all of that warehousersquos upazilas for the month and year specified will be displayed below in a table with the Edit icon Clicking on any respective reportrsquos Edit icon will display all of the inserted F7B reportsrsquo information as an F7B form along with all inserted fields as shown in Figure 38 Users can change any value to modify the report as needed
27
Figure 37 Edit an F7B report
Figure 38 Edit an F7B report
AddEdit National Receive This submenu allows authenticated administrative users to insertedit information about any National Receive for an item into the system through a user-friendly interface from the Web-based system central (as per authentication) as shown in Figure 39 (add) and 40 (edit) Users select and insert information related to the warehouse such as donor name item name receive date receive place quantity etc as shown in Figure 39 Clicking on Save inserts new National Receive information for an item
28
Figure 39 Add National Receive
To search the inserted National Receive information for modification users have to filter the information by selecting ldquoFilter by received yearrdquo and ldquoFilter by received monthrdquo as shown in Figure 40 As result of filter action based on the selected year month the available inserted national receive information is displayed in a table with the Edit icon Clicking on any respective National Receive information Edit icon from the searched result displays the detail information with all inserted fields as shown in Figure 40 Users can change any value to modify National Receive information as needed
Figure 40 Edit National Receive
VIEW LMIS DATA
View F7 Report This submenu allows authorized users to View F7 reports in the system through a user-friendly interface from the local system of any warehouse or the central Web-based system (as per authentication) as shown in figures 41 and 42 Users select warehouse name year and month from the interface to View an F7 report as shown in Figure 41 If the searched report is already in the system database then that report information is displayed below in a table with the View icon If users search with different conditions such as a particular warehouse and all months of a year then all inserted reports for that year for that warehouse are displayed below by clicking on View Thus the information is displayed as an F7 Report as shown in Figure 42
29
Figure 41 View the WH Name Month and Year to View Report
Figure 42 View the Report of the Selecting WH Month and Year
View F7B Report This submenu allows authorized users to view a monthly F7B report for a upazila of a particular warehouse in the system through a user-friendly interface from the local system of any warehouse or the central Web-based system (as per authentication) as shown in figures 43 and 44 Users select warehouse name upazila year and month from the interface to view any F7B report as shown in Figure 43 If the searched report is already in the system database then that report is displayed below by clicking on View If users search with different condition such as a particular warehouse and all of its upazilas for a any month of any year then all inserted F7B reports for all of that warehousersquos upazilas for any month of any year are displayed by clicking on View Clicking on any respective reportrsquos View icon in the result displays all inserted F7B reports as shown in Figure 44
30
Figure 43 Select Upazila WH Month and Year to View F7B Report
Figure 44 View F7B Report
View National Receive This submenu allows authenticated users to view the existing National Receive information for an item To search the inserted National Receive information for modification users select donor name item name year and month as shown in Figure 45 Based on the selection available inserted National Receive information is displayed (see Figure 45)
Figure 45 View National Receive
31
LMIS REPORT
Contraceptives Summary Report (Available only in the Central System) This submenu allows authorized users to generate reports on national consumption and closing balance through a user-friendly interface from a central Web-based system (as per authentication) as shown in the figures 46 and 47 When users select month and year and click on Generate Report the system generates a report on national consumption and closing balance for that particular month and year as shown in Figure 46 The report is displayed with different fields such as name of the product reporting consumption reporting balance 100 adjusted consumption closing balance 100 closing balance national received and months of stock
Figure 46 Generate the Contraceptives Summary Report
Figure 47 Contraceptives Summary Report
Stock Status Report This submenu allows authorized users to generate reports on stock status through a user-friendly interface as shown in figures 48 and 49 When users select warehouse month year article1 article2 article3 and article4 and click on Generate Report the system generates a compiled report on stock status report for that particular warehouse month year and article as shown in Figure 48 The report is displayed with different fields such as supplying central warehouse (CWH) distribution store etc
32
Figure 48 Select WH Month Year and Article to Generate a Report
Figure 49 View Stock Status Report
Supply Plan Register (Available only in the Local System) This submenu allows RWH users to prepare the supply plan Preparing supply plan of the contraceptives is the most important job of the RWH staff a based on this supply plan they used to supply contraceptives to their respective upazilas (sub-district) The entire process is shown in figures 50 and 51 When users select warehouse month year article1 article2 article3 and article4 and click on Generate Report the system generates the supply plan shown in figure 51
33
Figure 50 Generate Supply Plan Register
Figure 51 View Supply Plan Register
Stock Status Trend (Available only in the Local System) This submenu allows authorized users to generate graphical reports on stock status trends through a user-friendly interface from the central Web-based system (as per authentication) as shown in figures 52 and 53 When users select month year article1 article2 article3 and article4 and click on Generate Report the system generates a graphical bar chart report on stock status for that particular month year and article as shown in Figure 53
34
Figure 52 Generate Stock Status Trend Report
Figure 53 View Stock Status Trend Report
Status of Stockouts This submenu allows authorized users to generate graphical reports on the status of stockouts at the upazila level through a user-friendly interface from the central Web-based system (as per authentication) as shown in figures 54 and 55 When users select month year article1 article2 article3 and article4 and click on Generate Report the system generates a graphical bar chart report on stock status for that particular month year and article as shown in Figure 54
35
Figure 54 Generate a Report on Status of Stockouts at Upazila Level
Figure 55 View Status of Stockouts Report
National Consumption Trend (Available only in the Central System) This submenu allows authorized users to generate graphical reports on National Consumption Trends through a user-friendly interface from the central Web-based system (as per authentication) as shown in figures 56 and 57 When users select month year article1 article2 article3 and article4 and click on Generate Report the system generates a graphical bar chart report on stock status for that particular month year and article as shown in Figure 56
36
Figure 56 Generate a Report for National (GOB+NGO) Consumption Trend
Figure 57 View National Consumption Trend Report
Stockout SDPs This submenu allows authorized users to determine the number of service delivery points (SDPs) experiencing stockouts in various methods Users select the month and year for which they want a report as shown in Figure 58 Then users click on Generate Report to produce the result shown in Figure 59
Figure 58 Generate Report for Stockout SDPs
37
Figure 59 View Number of SDPs Stockout against Various Methods
Non-Contraceptive Summary Report (Available only in the Central System) This submenu allows authorized users to generate reports on national consumption and closing balance of the non contraceptives through a user-friendly interface from a central Web-based system (as per authentication) as shown in the figures 60 and 61 When users select month and year and click on Generate Report the system generates a report on national consumption and closing balance for that particular month and year The report is displayed with different fields such as name of the product reporting consumption reporting balance 100 adjusted consumption closing balance 100 closing balance national received and months of stock
Figure 60 Generate Non-Contraceptives Summary Report
Figure 61 Non-Contraceptives Summary Report
38
Stock Status at the Upazila and Field (Available only in the Central System) This submenu allows authorized users to get the status of the selected commodities in the upazilas and fields through a user-friendly interface as shown in the figures 62 and 63 The report is displayed with different information such as average monthly distribution closing balance month of stock etc both at Upazila and Field level
Figure 62 Generate Stock Status at the Upazila and Field
Figure 63 Stock Status at the Upazila and Field
Stock Status at RWH (Available only in the Central System) This submenu allows authorized users to get the status of the selected commodities in the RWH level through a user-friendly interface as shown in the figures 64 and 65 The report is displayed with different information such as average monthly distribution closing balance month of stock etc of all the selected commodities
39
Figure 64 Generate Stock Status at the RWH level
Figure 65 Stock Status at the RWH level
Non Reported Upazilas (Available only in the Central System) This submenu allows authorized users to get the list of the non reported upazilas for a particular month through a user-friendly interface as shown in the figures 66 and 67 The contact numbers of those upazilas are also displayed in this report so that concerned person can contact the upazilas to know the reasons for not uploading the data
Figure 66 Generate the List of Non-Reported Upazila
40
Figure 67 Non-Reported Upazila
RWH wise Reporting Rate (Available only in the Central System) This submenu allows the users to see the RWH wise reporting rate for the last 6 months It also shows the average reporting rate of last 6 months of each RWH Figure 68 shows the entire process
Figure 68 RWH wise reporting rate
DOWNLOAD
Download LMIS Reports This submenu allows authorized users to download draft LMIS Report Users have to click on the Download LMIS Report Submenu to obtain the files which are uploaded as shown in Figure 69 Then by clicking on any title users can download that file Users can also filter the search by selecting a particular month and year
41
Figure 69 Download LMIS Report
Download Pipeline Reports This submenu allows authorized users to download draft Pipeline Report Users have to click on the Download Pipeline Report Submenu to obtain the files which are uploaded as shown in Figure 70 Then by clicking on any title users can download that file Users can also filter the search by selecting a particular month and year
Figure 70 Download Pipeline Report
DATA MIGRATION
Upload Data This sub menu allows users to upload newly entered data to httpwwwdgfplmisorg directly provided an Internet connection is present in that computer To do so after entering F7BF7 data users go to the link Data Migration-gtUpload Data which brings up a screen like the one in Figure 71 Clicking on Migrate Upload Data button displays another screen like the one in Figure 72 Clicking on Process Uploaded Data causes data to be uploaded to httpwwwdgfplmisorg and results in the screen shown in Figure 73
42
Figure 71 Migrating Data to httpwwwdgfplmisorg
Figure 72 Processing Uploaded Data
43
Figure 73 Data Upload Is Completed
Download Data This sub menu allows users to download data from httpwwwdgfplmisorg to a local computer directly provided that computer has an Internet connection To do so Click on the link Data Migration-gtDownload Data You will get a screen like Figure 74 Click on ldquoDownload Migrate Datardquo button You will another screen like Figure 75 Click on ldquoProcess Download Datardquo button to download the data from httpwwwdgfplmisorg (see Figure 76)
Figure 74 Download Data
44
Figure 75 Process Download Data
Figure 76 Complete Download Data
Generate and Upload SQL file This task allows users to upload updated data online when an Internet connection is not available on the local computer Users first generate the SQL file from a local computer Then they take the SQL file to a computer that does have an Internet connection ie a cyber cafeacute Users can upload the SQL file from that computer The entire process is described below
Two steps are necessary to upload data in this case First you have to create an SQL file after entering data in your computer Second you have to upload the data to httpwwwdgfplmisorg on a cyber cafeacute computer with Internet access by taking the SQL file with you on a pen driveflash drive The detail is given below
45
First Step Click on the link Data Migration-gtGenerate SQL File which results in a screen like the one in Figure 77 The click on Generate SQL File which brings up another box asking where the file will be saved (see Figure 78) Save the file in the desktop
Figure 77 Generating an SQL File
Figure 78 Saving an SQL file
Second Step Copy the SQL file from your computer and onto a pen driveflash drive or floppy diskette Then go to a cyber cafeacute or other place where Internet is available Go to the site httpwwwdgfplmisorg log on to the site using your username and password Click on the link
46
Data Migration-gtUpload SQL File which results in a screen asking you to select the SQL file you want to upload (see Figure 79) Click on Browse and select the file from your pen driveflash drive or floppy diskette then click on Upload SQL File A successful message is displayed once uploading is complete
Figure 79 Uploading SQL File
47
48
TECHNICAL SUPPORT
We hope system users will be able to work with the system successfully by following this manual and that the system will be useful for these users However if users need any guidance or technical support they should contact the following for support and assistance
The Directorate General of Family Planning Ministry of Health and Family Welfare 6 Karwan Bazar Dhaka Tel 880-2-9146262
Contact Person Abul Kalam Azad Logistics Monitoring Officer
49
50
CONCLUSION
This manual is a guide for end users of the system Such users do not need technical knowledge to use and operate the system Keeping this in mind we have written this manual in such a way so that end users can easily follow the guidelines included We strongly believe that successful development of software depends on user satisfaction We hope users will be able to use the software to their ultimate satisfaction with the help of this user manual
51
52
For more information please visit deliverjsicom
USAID | DELIVER PROJECT John Snow Inc
1616 Fort Myer Drive 11th Floor
Arlington VA 22209 USA
Phone 703-528-7474
Fax 703-528-7480
Email askdeliverjsicom
Internet deliverjsicom
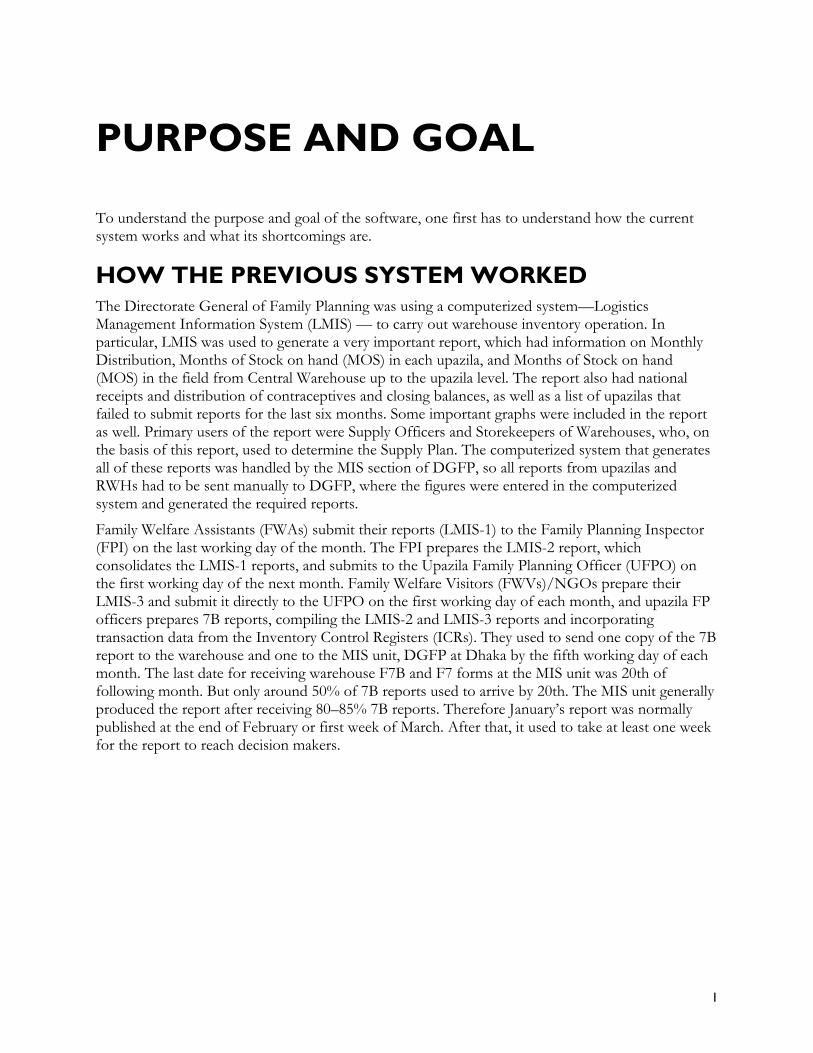
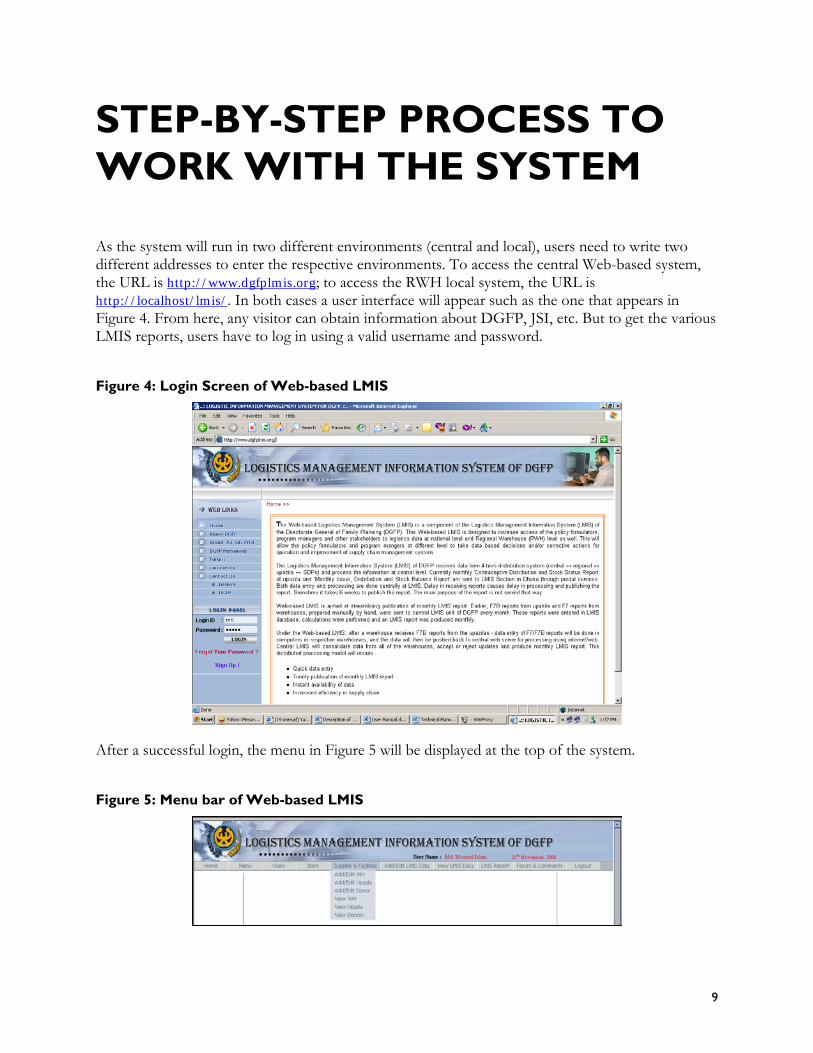
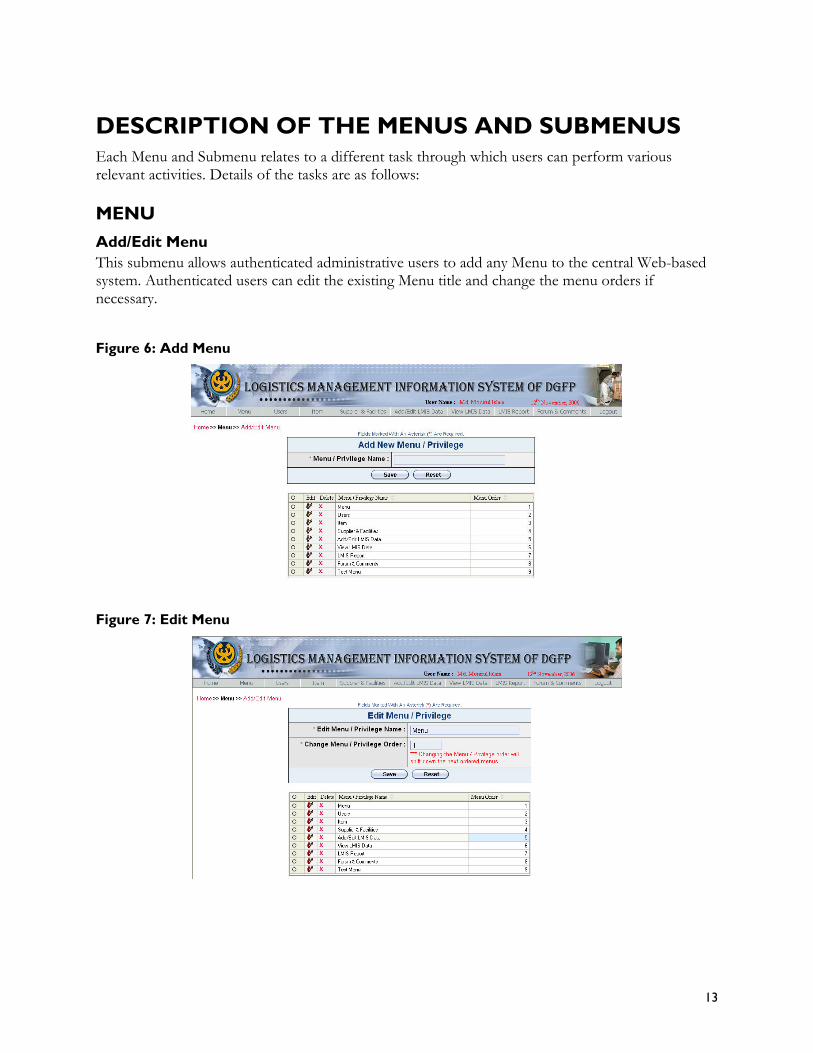
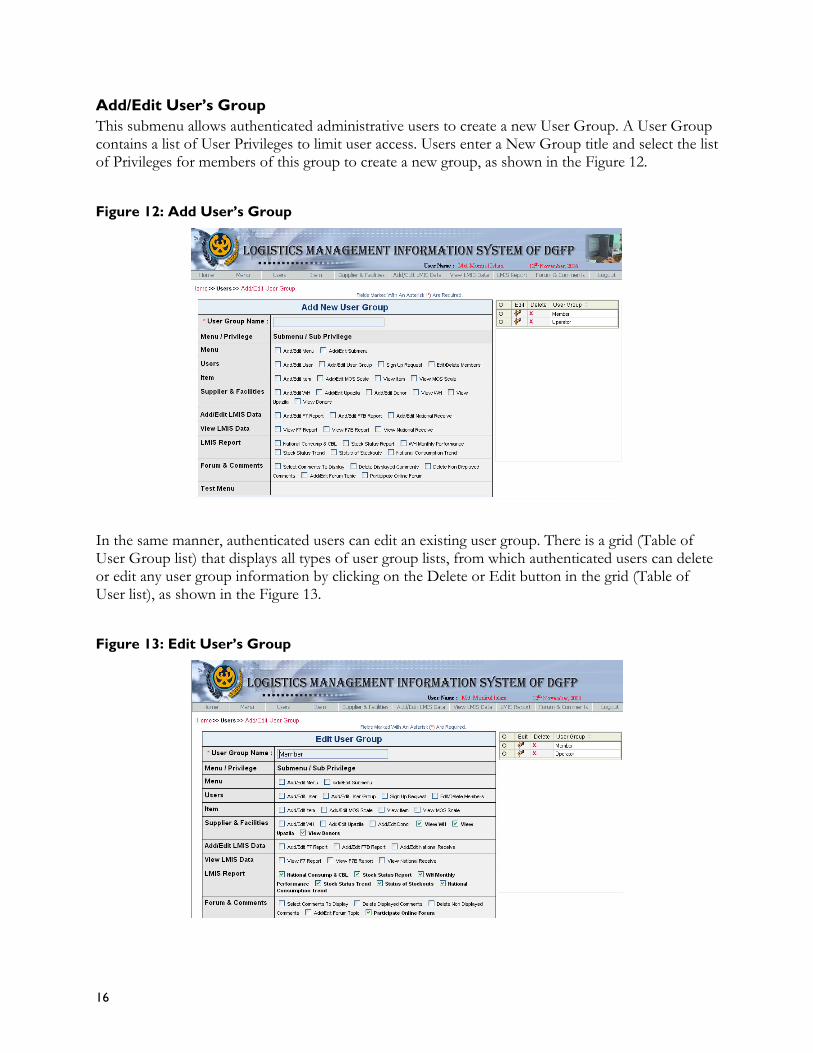
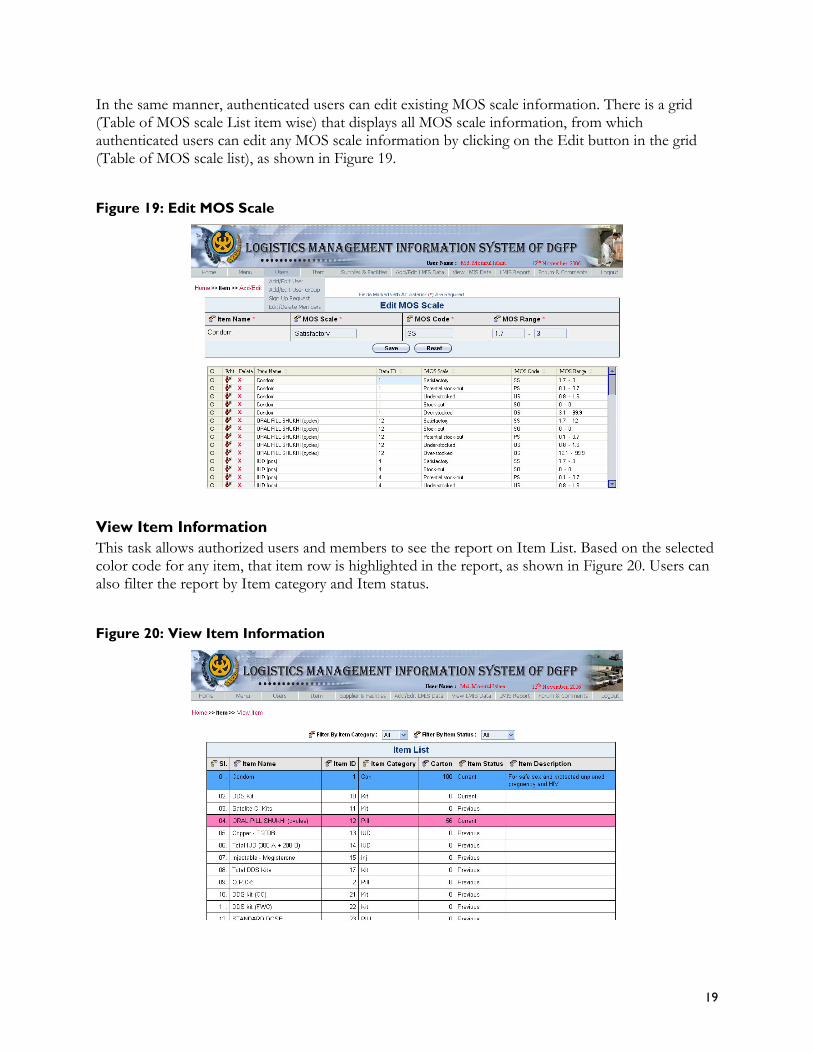
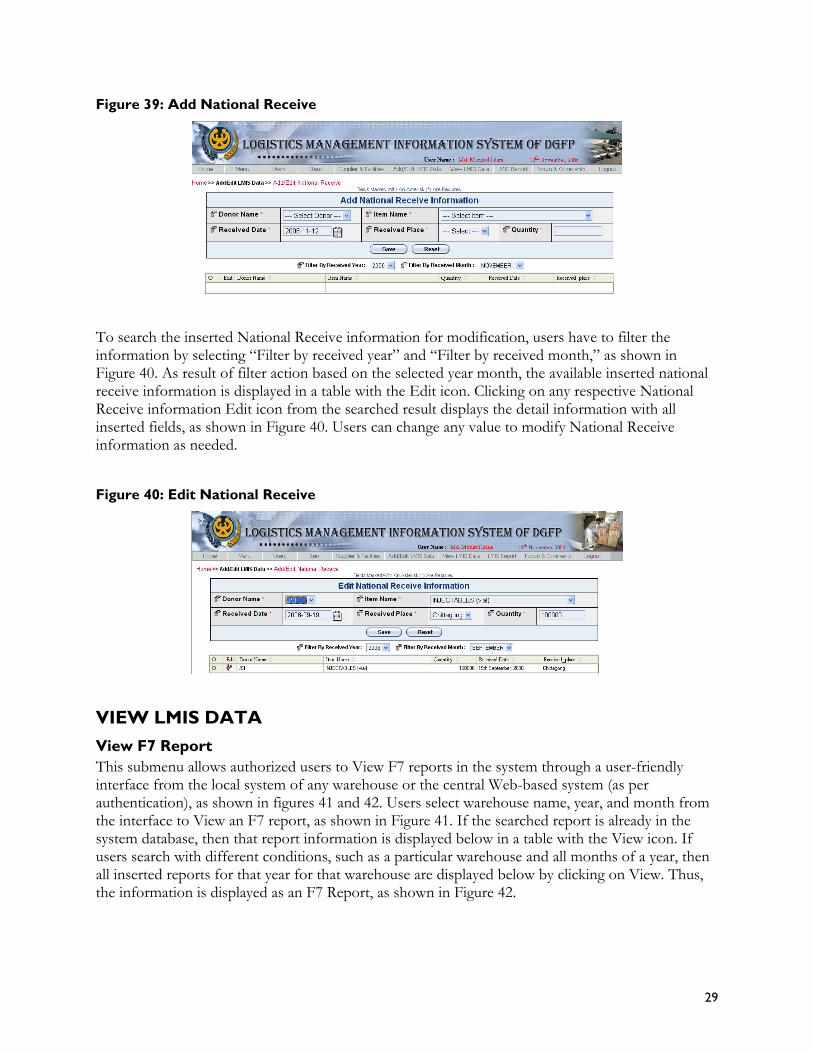
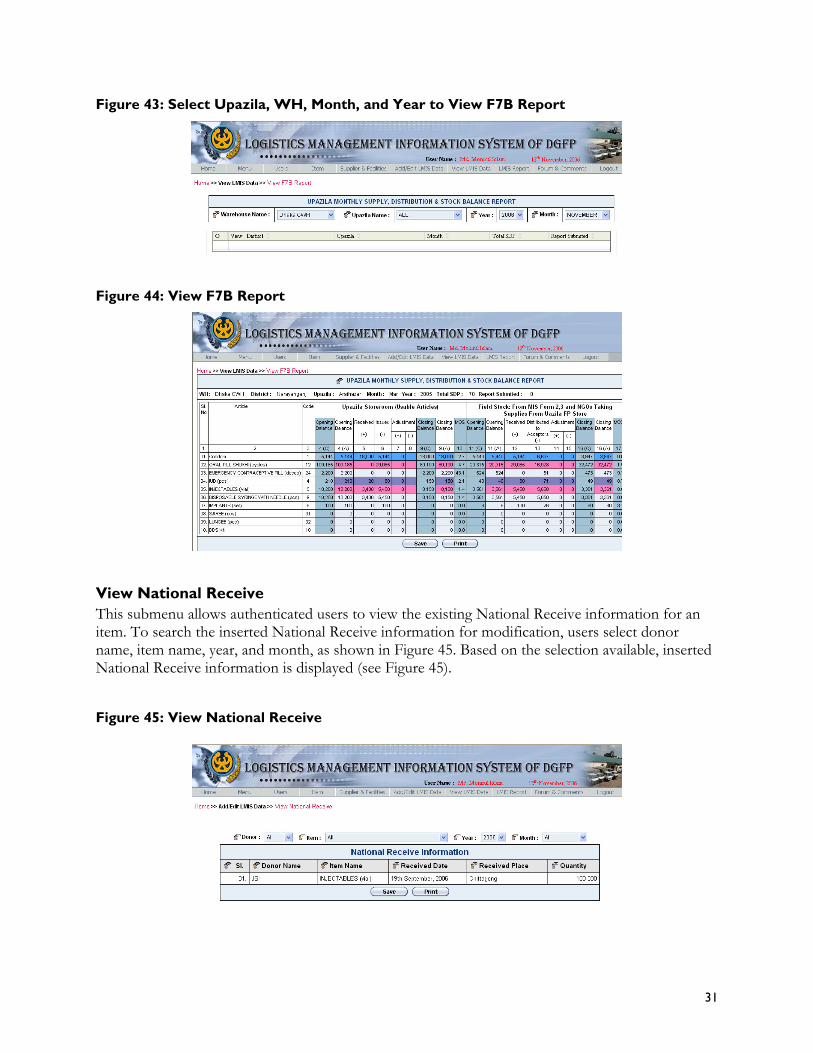
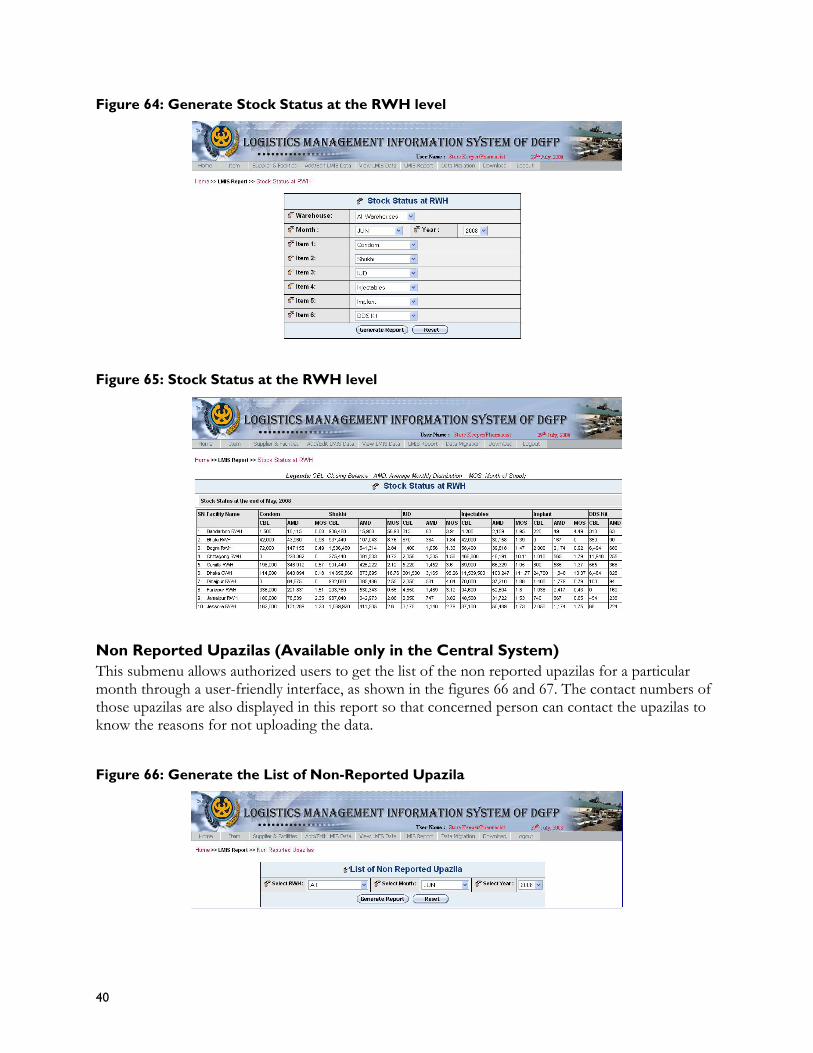

52
For more information please visit deliverjsicom
USAID | DELIVER PROJECT John Snow Inc
1616 Fort Myer Drive 11th Floor
Arlington VA 22209 USA
Phone 703-528-7474
Fax 703-528-7480
Email askdeliverjsicom
Internet deliverjsicom

For more information please visit deliverjsicom
USAID | DELIVER PROJECT John Snow Inc
1616 Fort Myer Drive 11th Floor
Arlington VA 22209 USA
Phone 703-528-7474
Fax 703-528-7480
Email askdeliverjsicom
Internet deliverjsicom

USAID | DELIVER PROJECT John Snow Inc
1616 Fort Myer Drive 11th Floor
Arlington VA 22209 USA
Phone 703-528-7474
Fax 703-528-7480
Email askdeliverjsicom
Internet deliverjsicom