Embed Size (px)
Citation preview
AXCELERATE 5 Case Manager Guide
Headquarters Recommind, Inc. | 650 California Street, San Francisco, CA 94108 | www.recommind.com
Axcelerate 5: Case Manager User Guide
© 2016 Recommind, Inc. | Page 2
CONTENTS
GENERAL NAVIGATION ........................................................................................ 8
1.1 Accessing Your Projects ............................................................................................................... 9
1.2 Last Accessed Page, Results ..................................................................................................... 13
1.3 2-Screen Mode .............................................................................................................................. 13
RESULTS LIST ...................................................................................................... 14
2.1 Results List Tools ........................................................................................................................ 14 2.1.1 Comfortable/Dense List .......................................................................................................... 14 2.1.2 Group by Family and List Sort ................................................................................................ 14 2.1.3 Column Display ....................................................................................................................... 15
2.2 Icons in the Results List .............................................................................................................. 15 2.2.1 Metadata Icon ......................................................................................................................... 16 2.2.2 Tagged Document Icon ........................................................................................................... 16 2.2.3 Document History Icon ............................................................................................................ 17 2.2.4 Associated Results Icons ........................................................................................................ 17 2.2.5 Associated Results View ......................................................................................................... 17 2.2.6 Email Threading Technology and End-of-Branch Records .................................................... 19 2.2.7 Content vs. Header Analysis for Email Threads ..................................................................... 21
VIEWER ................................................................................................................. 22
3.1 Pinning a View .............................................................................................................................. 23
3.2 View-specific Notes...................................................................................................................... 24
3.3 Download Native Files ................................................................................................................. 24
3.4 Search within a Document .......................................................................................................... 24
3.5 Mark for Redaction ....................................................................................................................... 25
3.6 Text and Metadata Highlighting .................................................................................................. 26
3.7 Annotation Tools .......................................................................................................................... 30
3.8 Redaction Tools ........................................................................................................................... 31
Axcelerate 5: Case Manager User Guide
© 2016 Recommind, Inc. | Page 3
3.9 Bulk Redaction Tools................................................................................................................... 35
3.10 Redaction Audit Tool ................................................................................................................... 37
3.11 Background Color Toggle ........................................................................................................... 39
3.12 Share a Link .................................................................................................................................. 40
SEARCH ................................................................................................................ 40
4.1 Keyword Search ........................................................................................................................... 40
4.2 Smart Filters ................................................................................................................................. 41
4.3 Current Criteria Sub-Pane ........................................................................................................... 42
4.4 Saved and Recent Searches ....................................................................................................... 43
4.5 Search Icons ................................................................................................................................. 45
4.6 Search Query Editor..................................................................................................................... 46
4.7 Common Warning Messages ...................................................................................................... 49 4.7.1 Syntax Error ............................................................................................................................ 49 4.7.2 Truncated Text ........................................................................................................................ 50 4.7.3 Junk Detection Messages ....................................................................................................... 50
OTHER ANALYTICAL TOOLS.............................................................................. 52
5.1 Visualization ................................................................................................................................. 52
5.2 Concept Browser .......................................................................................................................... 54
5.3 Hypergraph ................................................................................................................................... 56
5.4 Bloomberg Chat Analysis ........................................................................................................... 59
BUILDING BLOCKS FOR PROJECT SET-UP ..................................................... 63
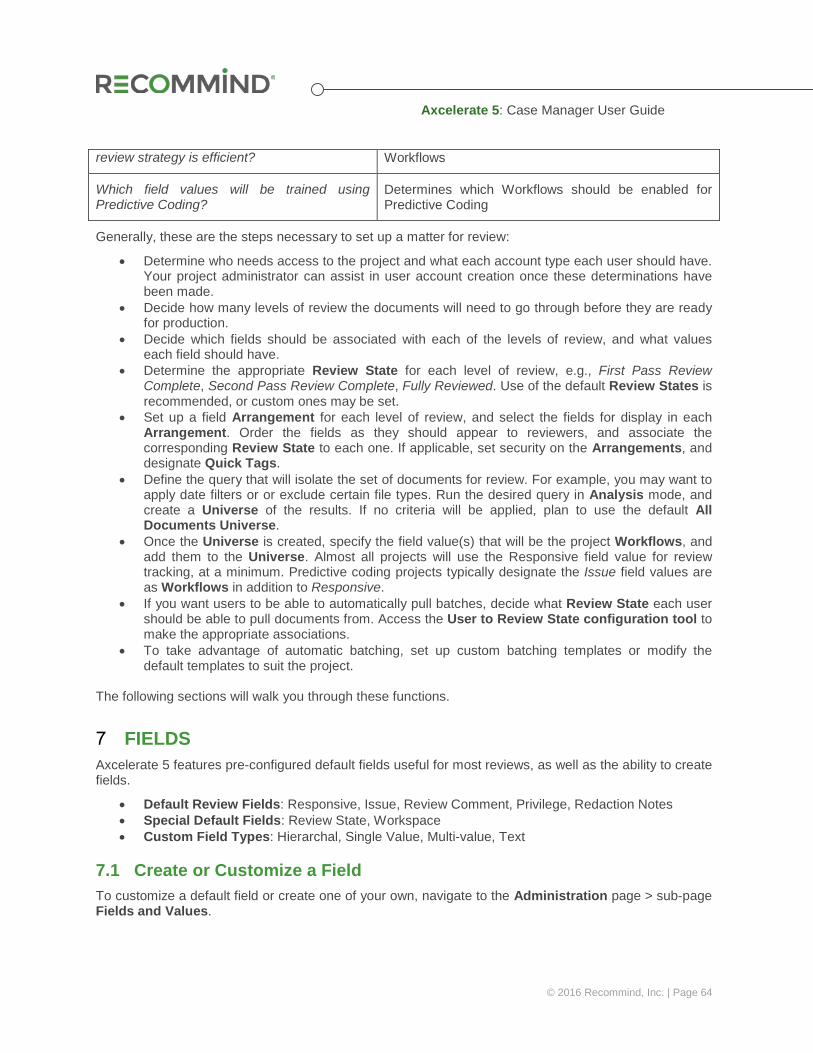
FIELDS .................................................................................................................. 64
7.1 Create or Customize a Field ........................................................................................................ 64 7.1.1 Customize a Default Field ....................................................................................................... 65 7.1.2 Make your Own Field .............................................................................................................. 68 7.1.3 Add Workspace Values for Foldering Documents .................................................................. 69
7.2 Review State ................................................................................................................................. 69
Axcelerate 5: Case Manager User Guide
© 2016 Recommind, Inc. | Page 4
FIELD ARRANGEMENTS ..................................................................................... 71
8.1 Create or Customize an Arrangement ........................................................................................ 72
8.2 Enable the Arrangement for Review and Set the Review State .............................................. 73
8.3 Set Up Tagging Rules .................................................................................................................. 74
8.4 Set Up Quick Tags ........................................................................................................................ 78
8.5 Set Arrangement Security ........................................................................................................... 80
8.6 Foldering Arrangement................................................................................................................ 80
UNIVERSES .......................................................................................................... 83
9.1 Custom Review Universe Use Cases ......................................................................................... 83
9.2 Create a Custom Universe .......................................................................................................... 84
9.3 Scope and Samples ..................................................................................................................... 85 9.3.1 Automatic and Manual Scope Updates .................................................................................. 86 9.3.2 Expanding the Original Scope Query ..................................................................................... 87 9.3.3 Creating Samples.................................................................................................................... 90 9.3.4 Configure the Universe ........................................................................................................... 92
9.4 Delete a Custom Universe ........................................................................................................... 93
REVIEW WORKFLOWS ..................................................................................... 94
10.1 Add a Field Value as a Workflow to a Universe ........................................................................ 95
10.2 Manage a Review Workflow ........................................................................................................ 97
10.3 Add Search Results to a Review Workflow ............................................................................... 99 10.3.1 Schedule a Recurring Workflow Search ............................................................................... 102
10.4 Explore your Populated Workflow – Workflow Searches and Statistics .............................. 103
10.5 Manage Workflows and Associated Sub-Sets ........................................................................ 107 10.5.1 Manage a Workflow .............................................................................................................. 107 10.5.2 Manage Workflow Searches ................................................................................................. 108
10.6 Workflow Favorites .................................................................................................................... 111
10.7 Deleting a Review Workflow ..................................................................................................... 112

Axcelerate 5: Case Manager User Guide
© 2016 Recommind, Inc. | Page 5
BATCH MANAGEMENT ................................................................................... 113
11.1 Batching Templates ................................................................................................................... 113 11.1.1 Edit a Batching Template ...................................................................................................... 113 11.1.2 Make your own Batching Template....................................................................................... 114 11.1.3 Managing Existing Templates ............................................................................................... 116
11.2 Batch Creation ............................................................................................................................ 117
11.3 Adaptive Batching ...................................................................................................................... 120
11.4 Batch Assignment ...................................................................................................................... 123
11.5 Enable Pull Batches Feature ..................................................................................................... 124
11.6 Batch Progress Tracking ........................................................................................................... 125
USING WORKFLOWS TO ORGANIZE DOCUMENTS: SIMPLE PRIORITIZED REVIEW ..................................................................................................................... 126
USING WORKFLOWS TO ORGANIZE DOCUMENTS: PRIORITIZED REVIEW WITH PREDICTIVE CODING .................................................................................... 129
13.1 Sampling ..................................................................................................................................... 129
13.2 Input Sets for Predictive Coding .............................................................................................. 132
13.3 Training and the PC Dashboard ............................................................................................... 134 13.3.1 Workflow Progress Tracking Charts ..................................................................................... 134 13.3.2 Full Dashboard ...................................................................................................................... 136 13.3.3 Start Training ......................................................................................................................... 138 13.3.4 Automated Iteration Creation ................................................................................................ 139 13.3.5 Viewing all Documents Associated with Training ................................................................. 141 13.3.6 Adjusting the Categorization Quality ..................................................................................... 144
REPORTS ......................................................................................................... 146
14.1 Reports on Current Results List ............................................................................................... 146
14.2 Smart Filter Reports ................................................................................................................... 147
14.3 Search Hit Reports ..................................................................................................................... 152
14.4 Document Audit History Report ............................................................................................... 152
BUSINESS INTELLIGENCE ............................................................................. 159
Axcelerate 5: Case Manager User Guide
© 2016 Recommind, Inc. | Page 6
15.1 Cross-Matter Dashboards ......................................................................................................... 159
15.2 Built-in, Approved Sheets ......................................................................................................... 159
15.3 Navigation Basics ...................................................................................................................... 160
15.4 Approved Sheets in the Portfolio Dashboard ......................................................................... 163
15.5 Approved Sheets in the Efficiency Score Dashboard ............................................................ 166
15.6 Create Bookmarks...................................................................................................................... 170
15.7 Create a Custom Sheet .............................................................................................................. 170
15.8 Create a Story ............................................................................................................................. 174
15.9 Sharing Sheets and Stories ...................................................................................................... 179
15.10 Pinning Tool ............................................................................................................................ 180
15.11 Export ...................................................................................................................................... 182
15.12 Additional BI Help ................................................................................................................... 183
EXPORTS ......................................................................................................... 183
PRINT ............................................................................................................... 184
17.1 Print a Single Document ............................................................................................................ 184
17.2 Bulk Print .................................................................................................................................... 184
CONVERT ......................................................................................................... 187
18.1 Bulk Convert Tool ...................................................................................................................... 187
18.2 Preconversion Rules.................................................................................................................. 189
USER PREFERENCES .................................................................................... 193
SESSION TIMEOUT ......................................................................................... 194
CASEMAP INTEGRATION ............................................................................... 194
21.1 CaseMap Integration Prerequisites .......................................................................................... 194
Axcelerate 5: Case Manager User Guide
© 2016 Recommind, Inc. | Page 7
21.2 Enable CaseMap Integration ..................................................................................................... 195 21.2.1 Date Pattern .......................................................................................................................... 195 21.2.2 Locale .................................................................................................................................... 195
21.3 Field Mapping for Documents ................................................................................................... 196
21.4 Field Mapping for Facts ............................................................................................................. 196
21.5 Send Extracted Text to CaseMap ............................................................................................. 196
21.6 Send Selected Documents to CaseMap ................................................................................... 197
21.7 Open Linked Items from CaseMap ........................................................................................... 198
Axcelerate 5: Case Manager User Guide
© 2016 Recommind, Inc. | Page 8
INTRODUCTION Axcelerate 5 is a web-based document review and analysis application that requires no plug-ins. Use of the latest version of Google Chrome is recommended. Microsoft Internet Explorer 10 or 11, and the latest version of Mozilla Firefox are also supported.
This document provides the Case Manager user a quick reference to the major features and functionality of Axcelerate 5.
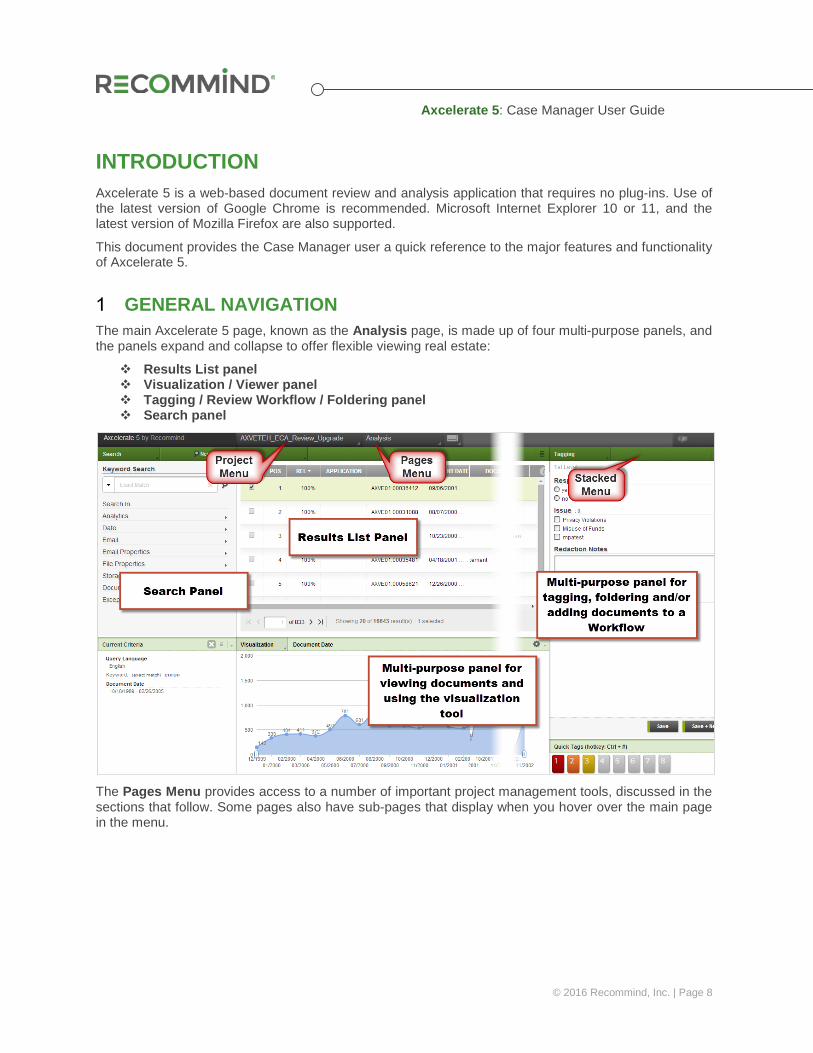
GENERAL NAVIGATION The main Axcelerate 5 page, known as the Analysis page, is made up of four multi-purpose panels, and the panels expand and collapse to offer flexible viewing real estate:
Results List panel Visualization / Viewer panel Tagging / Review Workflow / Foldering panel Search panel
The Pages Menu provides access to a number of important project management tools, discussed in the sections that follow. Some pages also have sub-pages that display when you hover over the main page in the menu.

Axcelerate 5: Case Manager User Guide
© 2016 Recommind, Inc. | Page 9
On each page, there are stacked menus which can be expanded to reveal even more tools.
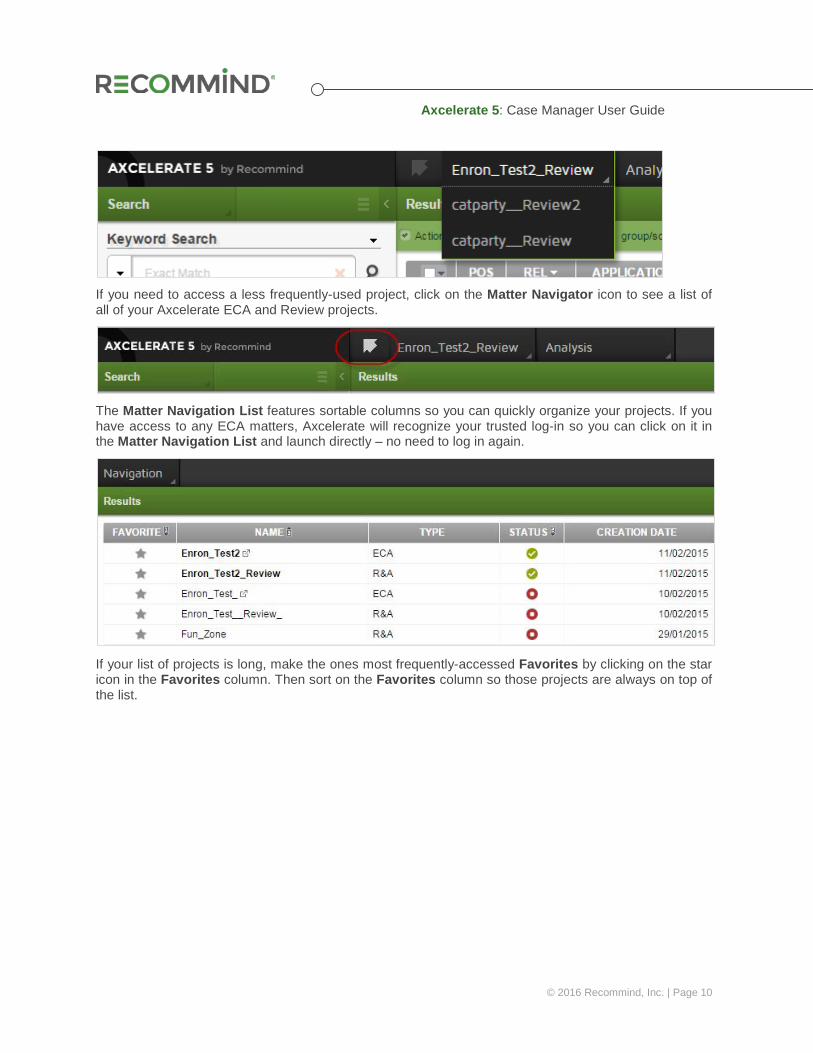
1.1 Accessing Your Projects If you have access to more than one project, use the Project Menu at the top of the page to quickly navigate between projects. Your last accessed projects are displayed.
Axcelerate 5: Case Manager User Guide
© 2016 Recommind, Inc. | Page 10
If you need to access a less frequently-used project, click on the Matter Navigator icon to see a list of all of your Axcelerate ECA and Review projects.
The Matter Navigation List features sortable columns so you can quickly organize your projects. If you have access to any ECA matters, Axcelerate will recognize your trusted log-in so you can click on it in the Matter Navigation List and launch directly – no need to log in again.
If your list of projects is long, make the ones most frequently-accessed Favorites by clicking on the star icon in the Favorites column. Then sort on the Favorites column so those projects are always on top of the list.

Axcelerate 5: Case Manager User Guide
© 2016 Recommind, Inc. | Page 11
Use the stacked menu to reveal the Comfortable/Dense toggle, Sort and Columns menus, should you like to further customize the Matter Navigation List.
To see more detailed information about your projects, Case Managers can toggle the default Navigation panel to the Processing panel.
The Processing page contains detailed metrics about each project, and you can sort and arrange the columns displayed, just as you can on the Navigation page, via the stacked menu.

Axcelerate 5: Case Manager User Guide
© 2016 Recommind, Inc. | Page 12
The Processing page offers several additional columns of information, such as:
#Users Total users with access to the project, including Recommind personnel
Version Axcelerate version
#Batches Total number of batches in the project
#Docs Total number of docs in the project
#Reviewed Docs Total number of documents coded for any Review State in the project
%Reviewed Percentage of reviewed documents in relation to the total universe
#Produced Docs Total number of produced documents in the project
#Produced Pages Total number of produced pages in the project
%Produced Percentage of the produced documents in relation to the total universe
#Custodian Ingested Total number of custodians in the ECA
#Custodian in Review Total number of custodians in the AXC Review
Predictive Coding Used Orange dot will display if any Workflows in the project are PC enabled
The Processing page can be viewed by Case Managers only.
Both the Navigation and Processing pages feature search filters in the left-hand pane to help filter through long project lists.
Axcelerate 5: Case Manager User Guide
© 2016 Recommind, Inc. | Page 13
From either panel, simply click on the name of a project to open it.
1.2 Last Accessed Page, Results The first time you log into Axcelerate you will land on the Matter List. Thereafter, you will always land on the last accessed page (e.g., Analysis page, Review page, Workflows page), in your last accessed project, upon log-in.
Axcelerate also remembers your applied search criteria, if any, as you navigate within a project. Applied search criteria persist when you move between pages, and you are always returned to the same selected document. For example, you run a search on the Analysis page, then navigate away to the Workflows page. Upon return to the Analysis page, the Results List will still reflect your previously applied filters. If you had been specifically examining a particular document, it will still be selected and you can pick up exactly where you left off.
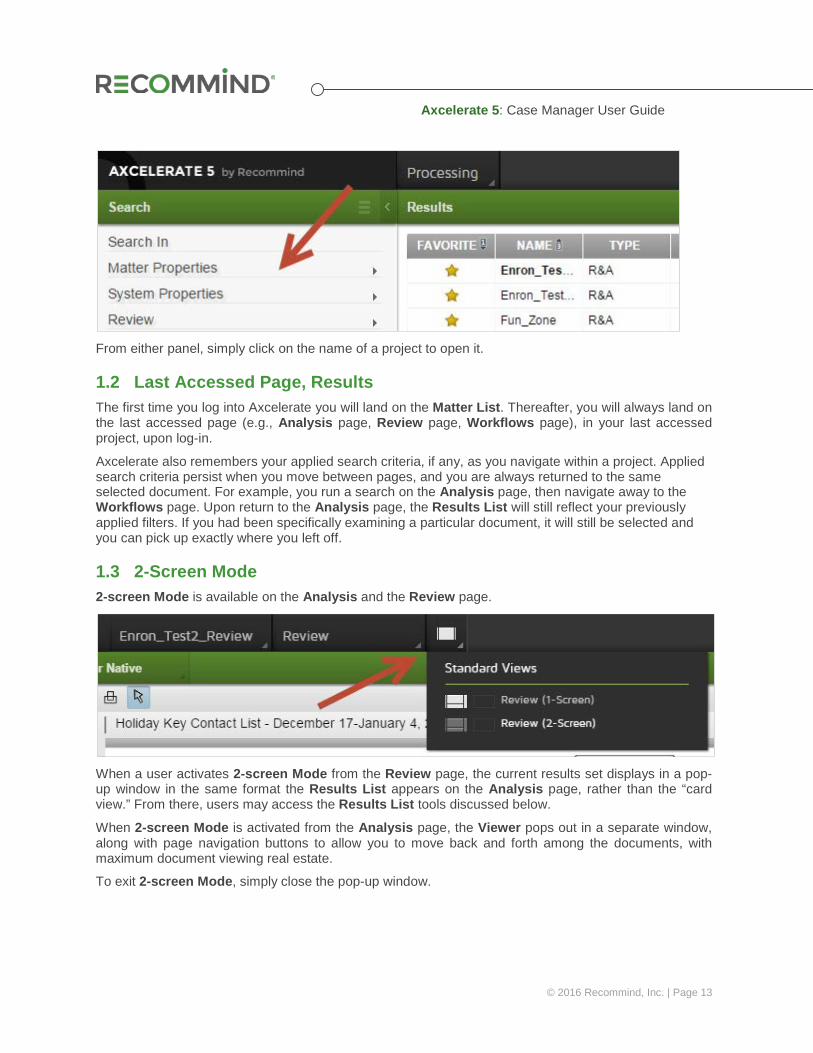
1.3 2-Screen Mode 2-screen Mode is available on the Analysis and the Review page.
When a user activates 2-screen Mode from the Review page, the current results set displays in a pop-up window in the same format the Results List appears on the Analysis page, rather than the “card view.” From there, users may access the Results List tools discussed below.
When 2-screen Mode is activated from the Analysis page, the Viewer pops out in a separate window, along with page navigation buttons to allow you to move back and forth among the documents, with maximum document viewing real estate.
To exit 2-screen Mode, simply close the pop-up window.
Axcelerate 5: Case Manager User Guide
© 2016 Recommind, Inc. | Page 14
If you are in dual screen mode when you log out, Axcelerate will remember your preference and you will be returned to that mode when you log back in.
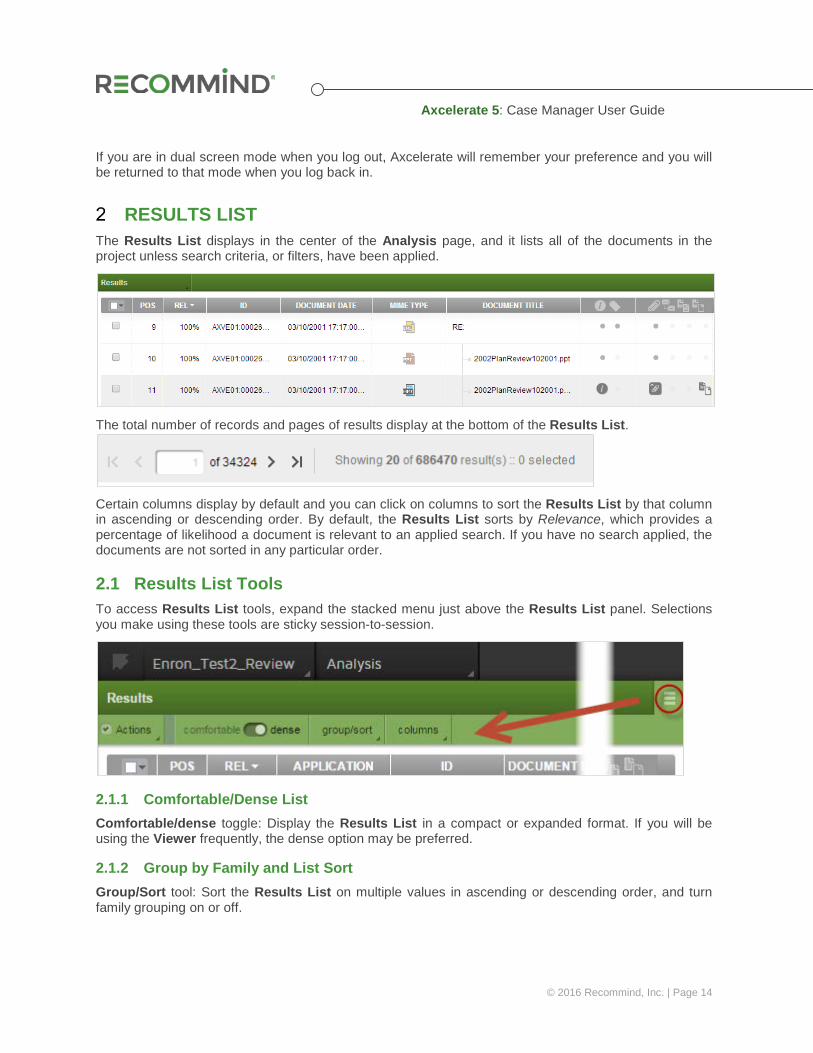
RESULTS LIST The Results List displays in the center of the Analysis page, and it lists all of the documents in the project unless search criteria, or filters, have been applied.
The total number of records and pages of results display at the bottom of the Results List.
Certain columns display by default and you can click on columns to sort the Results List by that column in ascending or descending order. By default, the Results List sorts by Relevance, which provides a percentage of likelihood a document is relevant to an applied search. If you have no search applied, the documents are not sorted in any particular order.
2.1 Results List Tools To access Results List tools, expand the stacked menu just above the Results List panel. Selections you make using these tools are sticky session-to-session.
2.1.1 Comfortable/Dense List Comfortable/dense toggle: Display the Results List in a compact or expanded format. If you will be using the Viewer frequently, the dense option may be preferred.
2.1.2 Group by Family and List Sort Group/Sort tool: Sort the Results List on multiple values in ascending or descending order, and turn family grouping on or off.
Axcelerate 5: Case Manager User Guide
© 2016 Recommind, Inc. | Page 15
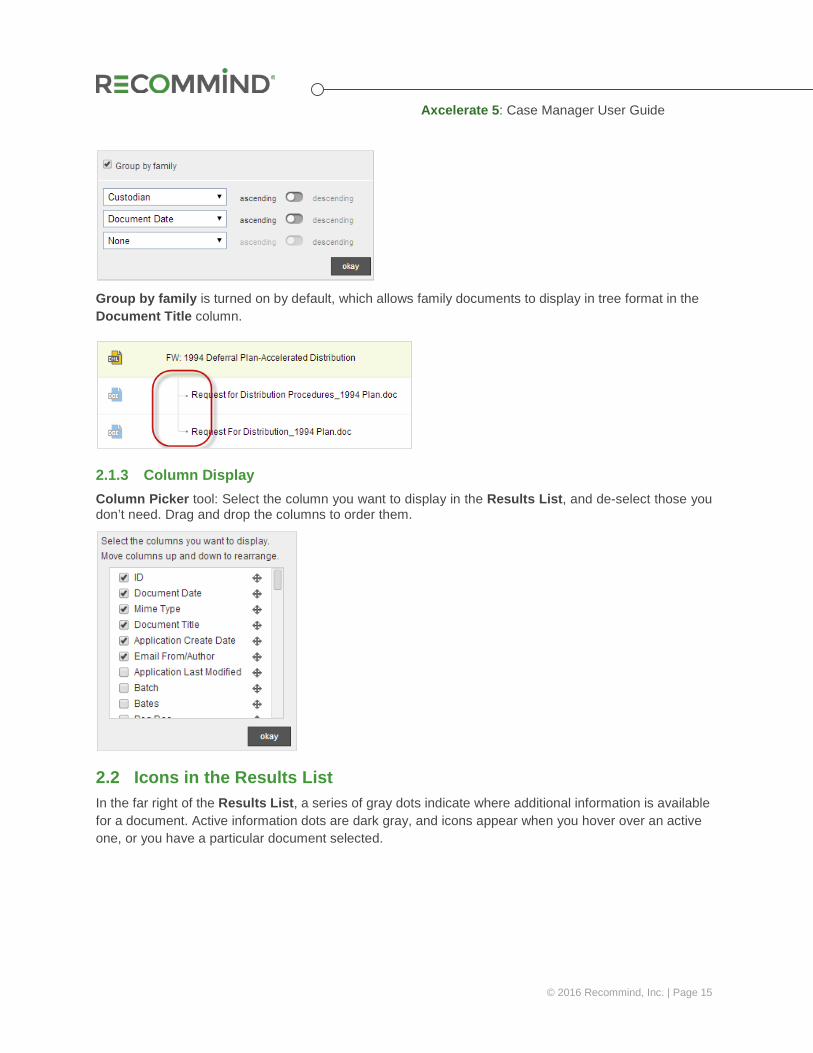
Group by family is turned on by default, which allows family documents to display in tree format in the Document Title column.
2.1.3 Column Display Column Picker tool: Select the column you want to display in the Results List, and de-select those you don’t need. Drag and drop the columns to order them.
2.2 Icons in the Results List In the far right of the Results List, a series of gray dots indicate where additional information is available for a document. Active information dots are dark gray, and icons appear when you hover over an active one, or you have a particular document selected.
Axcelerate 5: Case Manager User Guide
© 2016 Recommind, Inc. | Page 16
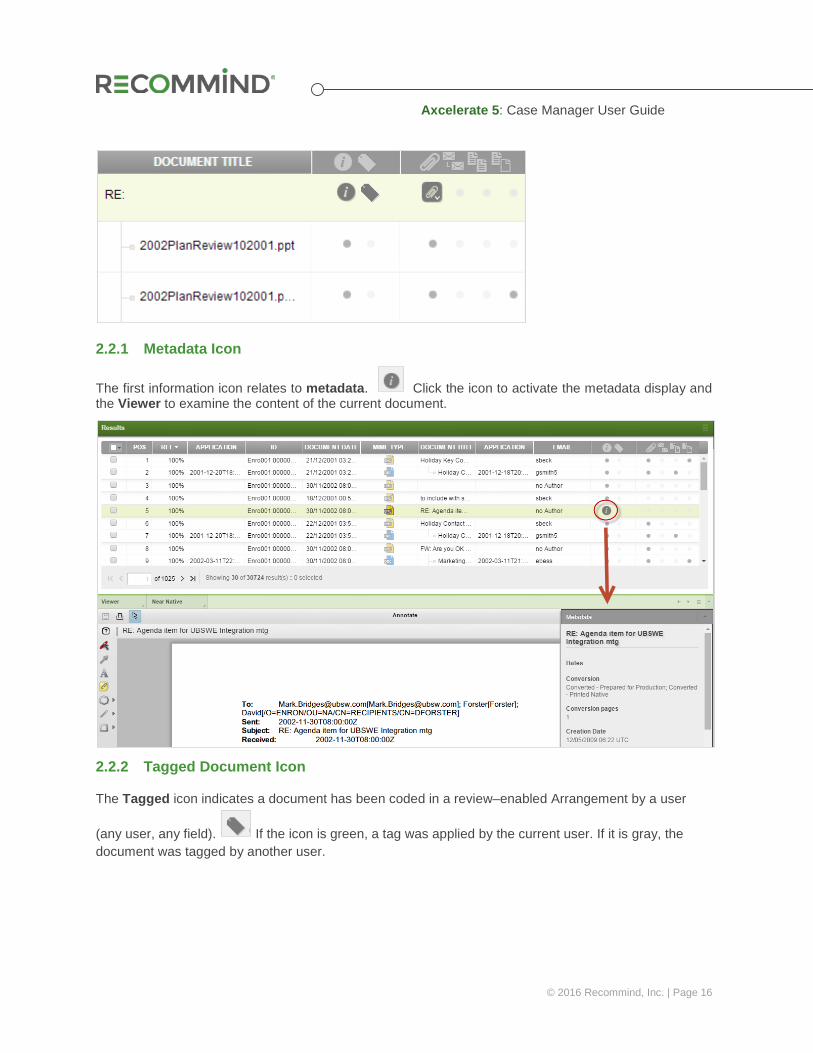
2.2.1 Metadata Icon
The first information icon relates to metadata. Click the icon to activate the metadata display and the Viewer to examine the content of the current document.
2.2.2 Tagged Document Icon
The Tagged icon indicates a document has been coded in a review–enabled Arrangement by a user
(any user, any field). If the icon is green, a tag was applied by the current user. If it is gray, the document was tagged by another user.

Axcelerate 5: Case Manager User Guide
© 2016 Recommind, Inc. | Page 17
2.2.3 Document History Icon The Document History icon opens a special panel that provides a list of the administrative and tagging events that have affected a particular document. See the section on Document Audit History within this
document.
2.2.4 Associated Results Icons
The remaining icons indicate there are related, or associated, documents in the database. Associated Results are related by content, or they are part of the same communication structure.
Associated Results icons:
Family
The document has parent or child relationships. A small down arrow symbol within the icon signals the document is a parent, an up arrow symbol appears when a document is an attachment, and an icon with both arrows indicates the document is an attachment that itself has an attachment.
Email Thread The document is part of an email thread.
Duplicates The document has duplicates, identified using the MD5 hash value.
Near Duplicates There are documents 85% or greater in similarity to the current document.
Custom Associations
This icon will not be active unless you have specifically activated the Custom Association field to enable ”linking” of documents. This workflow is sometimes used to associate a translated version of a document to the original foreign language document.
2.2.5 Associated Results View Click on an Associated Results icon to display the associations in tree view.

Axcelerate 5: Case Manager User Guide
© 2016 Recommind, Inc. | Page 18
The Results List is now seen in a “card” format on the left. In the screenshot below, near duplicates for the current document are displayed.
Click a document in the tree view to display that document in the Viewer. To code the document, with or without the associations, select the checkbox to the left of a document in the list, and click Edit to activate the Tagging Panel. Alternatively, select all documents with the selection tool.
Use of the Associations View is especially helpful for Reviewers coding email threads (to the extent the batch was created to include threads). When viewing Email Thread associations, the red box indicates a document is the end-of-branch email, meaning it is inclusive of all the other emails shown in the tree. Once a coding decision is made for the end-of-branch record, it is possible to select it and the other threads and code them together to ensure consistency.
Axcelerate 5: Case Manager User Guide
© 2016 Recommind, Inc. | Page 19
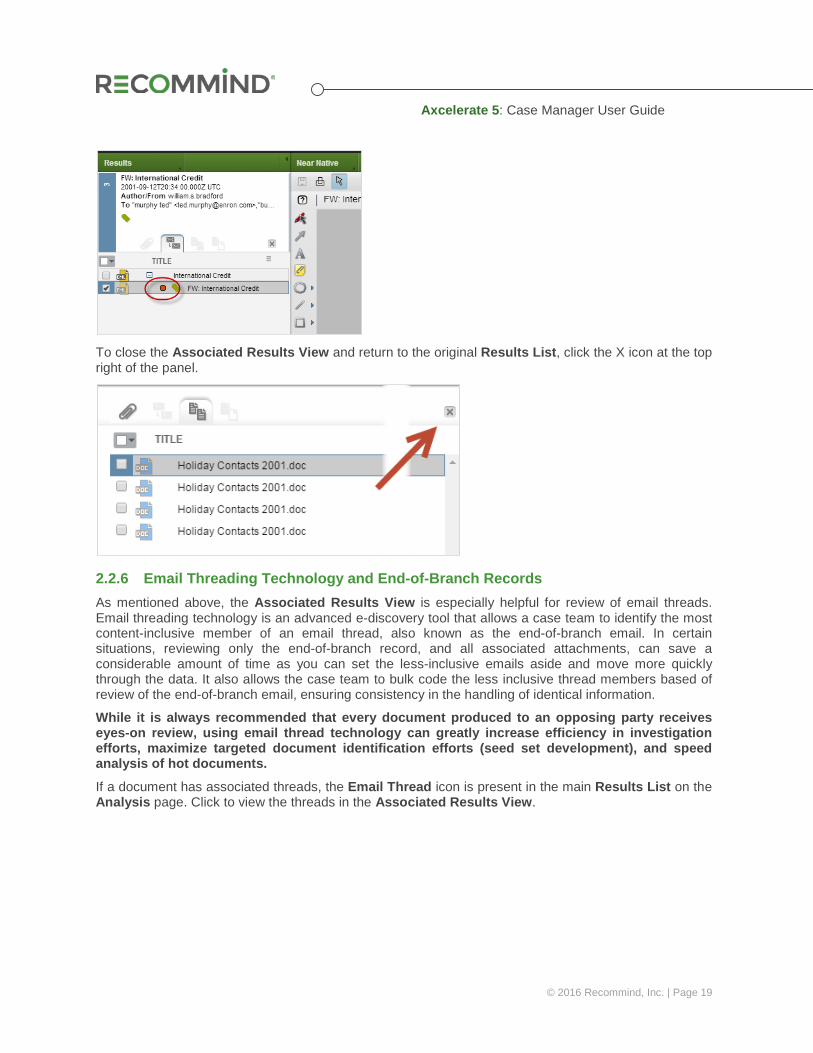
To close the Associated Results View and return to the original Results List, click the X icon at the top right of the panel.
2.2.6 Email Threading Technology and End-of-Branch Records As mentioned above, the Associated Results View is especially helpful for review of email threads. Email threading technology is an advanced e-discovery tool that allows a case team to identify the most content-inclusive member of an email thread, also known as the end-of-branch email. In certain situations, reviewing only the end-of-branch record, and all associated attachments, can save a considerable amount of time as you can set the less-inclusive emails aside and move more quickly through the data. It also allows the case team to bulk code the less inclusive thread members based of review of the end-of-branch email, ensuring consistency in the handling of identical information.
While it is always recommended that every document produced to an opposing party receives eyes-on review, using email thread technology can greatly increase efficiency in investigation efforts, maximize targeted document identification efforts (seed set development), and speed analysis of hot documents.
If a document has associated threads, the Email Thread icon is present in the main Results List on the Analysis page. Click to view the threads in the Associated Results View.

Axcelerate 5: Case Manager User Guide
© 2016 Recommind, Inc. | Page 20
The Results List is now seen in a “card” format on the left and the threads display in a tree view.
For email, red boxes indicate the document is an end-of-branch email. In the example above, two related emails have a red box. That means the thread split off at some point in the conversation, e.g., someone forwarded the email to another person and replied back to the chain, such that both emails contain inclusive content that is slightly different from one another, so both need to be reviewed.
Attachments to any member of the thread will also be indicated with a red box, as they must also be reviewed to make a decision about the thread as a whole. Threading technology considers the content and metadata of the emails, not the attachments, so it is always possible that different attachments were added and/or dropped as the chain evolved.
Axcelerate detects members of an email thread even when they are not in the corpus of project data. For this reason, you may see entries in Associated Results View that are noted as Can Not Be Displayed. This is merely a placeholder for the record.
You can include email threads at batch creation time, so Reviewer users can consider threads as a whole while working in batch mode. Check Threads in the Scope area of the batching wizard to draw all thread members for the target set into the resulting batches. Otherwise Reviewers will only have access to the documents in the batch and cannot view entire threads.
Axcelerate 5: Case Manager User Guide
© 2016 Recommind, Inc. | Page 21
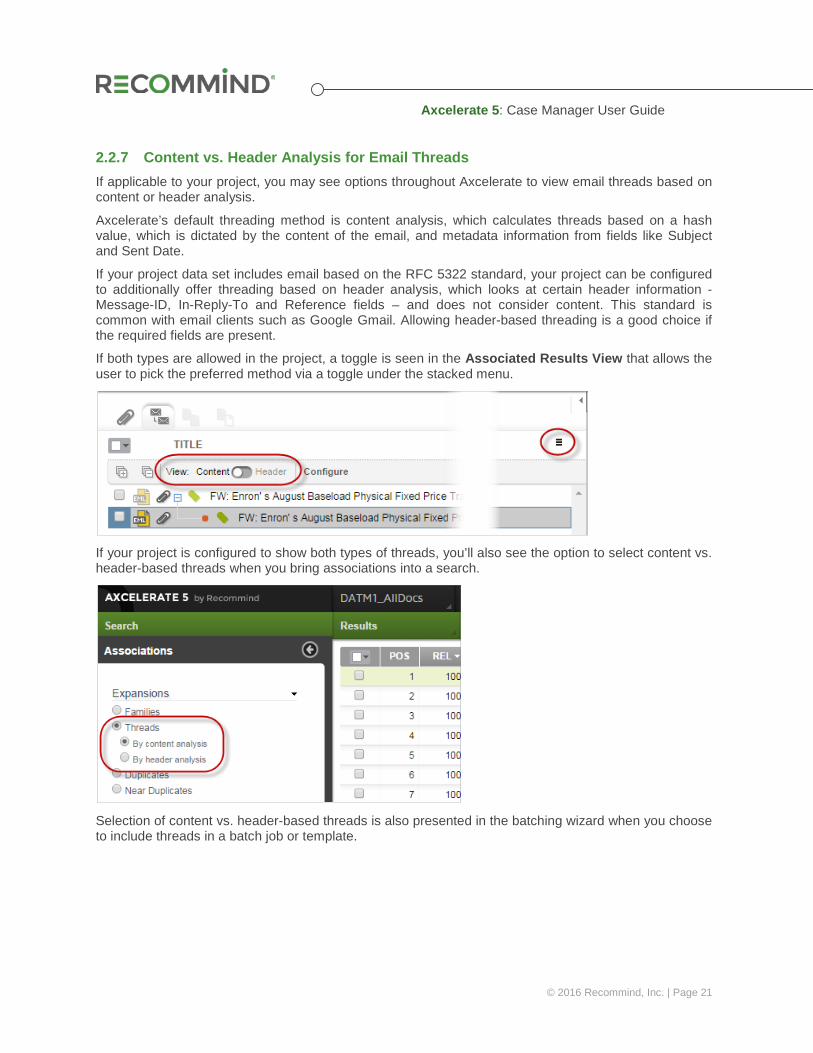
2.2.7 Content vs. Header Analysis for Email Threads If applicable to your project, you may see options throughout Axcelerate to view email threads based on content or header analysis.
Axcelerate’s default threading method is content analysis, which calculates threads based on a hash value, which is dictated by the content of the email, and metadata information from fields like Subject and Sent Date.
If your project data set includes email based on the RFC 5322 standard, your project can be configured to additionally offer threading based on header analysis, which looks at certain header information - Message-ID, In-Reply-To and Reference fields – and does not consider content. This standard is common with email clients such as Google Gmail. Allowing header-based threading is a good choice if the required fields are present.
If both types are allowed in the project, a toggle is seen in the Associated Results View that allows the user to pick the preferred method via a toggle under the stacked menu.
If your project is configured to show both types of threads, you’ll also see the option to select content vs. header-based threads when you bring associations into a search.
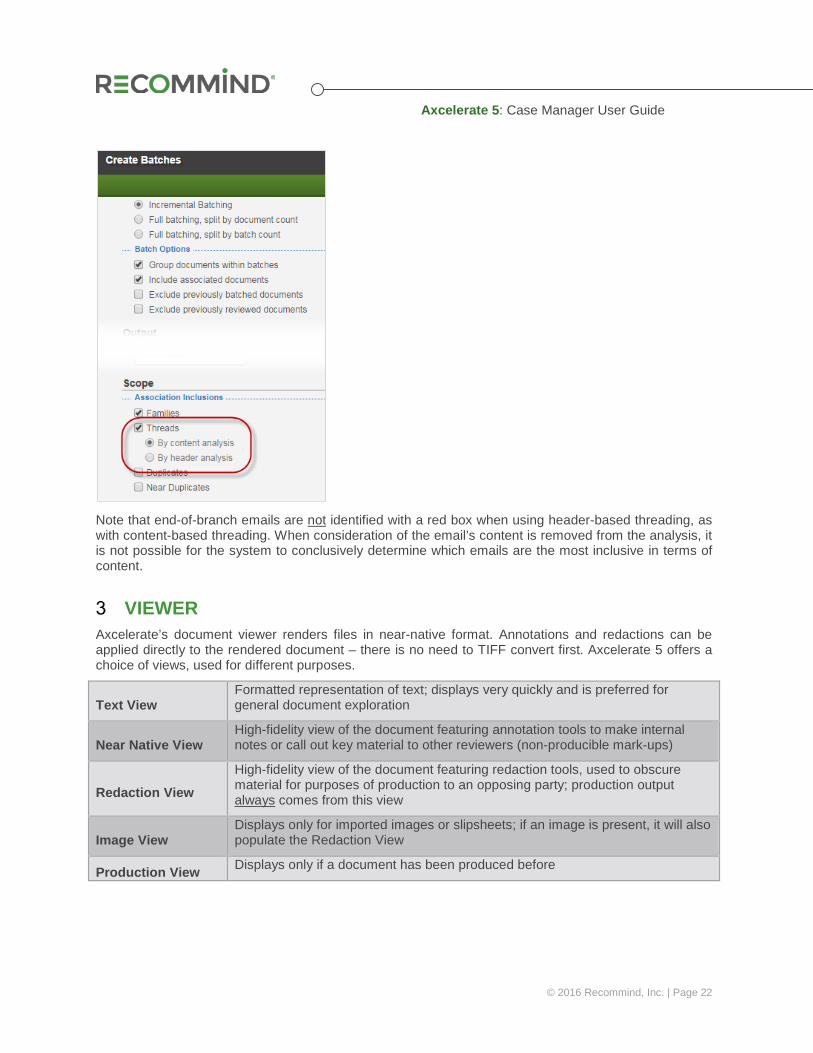
Selection of content vs. header-based threads is also presented in the batching wizard when you choose to include threads in a batch job or template.
Axcelerate 5: Case Manager User Guide
© 2016 Recommind, Inc. | Page 22
Note that end-of-branch emails are not identified with a red box when using header-based threading, as with content-based threading. When consideration of the email’s content is removed from the analysis, it is not possible for the system to conclusively determine which emails are the most inclusive in terms of content.
VIEWER Axcelerate’s document viewer renders files in near-native format. Annotations and redactions can be applied directly to the rendered document – there is no need to TIFF convert first. Axcelerate 5 offers a choice of views, used for different purposes.
Text View Formatted representation of text; displays very quickly and is preferred for general document exploration
Near Native View High-fidelity view of the document featuring annotation tools to make internal notes or call out key material to other reviewers (non-producible mark-ups)
Redaction View
High-fidelity view of the document featuring redaction tools, used to obscure material for purposes of production to an opposing party; production output always comes from this view
Image View Displays only for imported images or slipsheets; if an image is present, it will also populate the Redaction View
Production View Displays only if a document has been produced before
Axcelerate 5: Case Manager User Guide
© 2016 Recommind, Inc. | Page 23
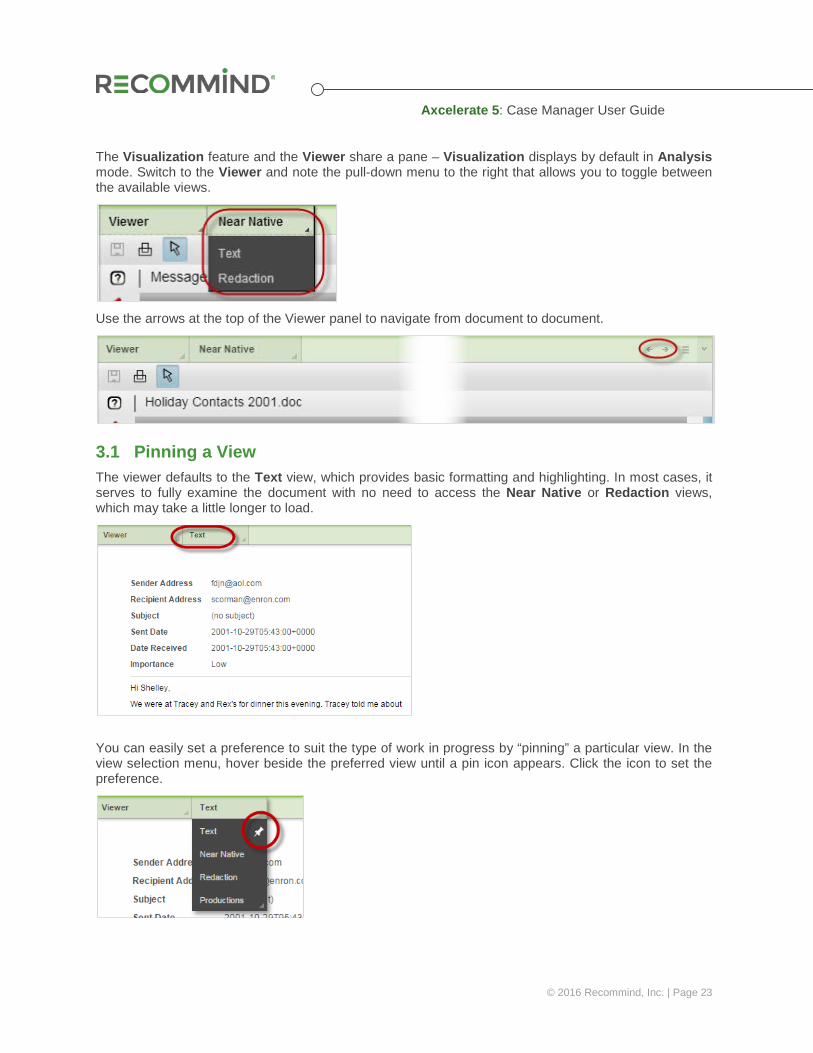
The Visualization feature and the Viewer share a pane – Visualization displays by default in Analysis mode. Switch to the Viewer and note the pull-down menu to the right that allows you to toggle between the available views.
Use the arrows at the top of the Viewer panel to navigate from document to document.
3.1 Pinning a View The viewer defaults to the Text view, which provides basic formatting and highlighting. In most cases, it serves to fully examine the document with no need to access the Near Native or Redaction views, which may take a little longer to load.
You can easily set a preference to suit the type of work in progress by “pinning” a particular view. In the view selection menu, hover beside the preferred view until a pin icon appears. Click the icon to set the preference.

Axcelerate 5: Case Manager User Guide
© 2016 Recommind, Inc. | Page 24
If the preferred “pinned” view takes longer than a few seconds to render, Axcelerate will display the quick Text view in the meantime, then display a message when the preferred view is ready.
3.2 View-specific Notes Because the Text view uses a different technology than the Near Native and Redaction views, highlighting may vary slightly between them. In addition, single-document printing and within document search using regular expressions are not supported on the Text view.
The high-fidelity Near Native and Redaction Views are usually identical except for the purposes of the mark-up the reviewer will make on each - annotations vs. redactions. The exception is Excel documents. The Near Native View shows Excel workbooks in a spreadsheet-per page view to make them easier to browse for content using the scaling tools. In Redaction View, they appear as they will be produced, which is a print format. The Redaction View can have many more pages that the Near Native View for Excel files.
The Near Native and Redaction Views can also be different if an imported image or slipsheet is present in the Image View. While the Near Native usually determines what displays in the Redaction View, it is always trumped by the presence of an image, because the image would be the desired form of the produced document.
3.3 Download Native Files Open the stacked menu at the top of the Viewer Panel.
You can download native files from any view by clicking the Download button.
3.4 Search within a Document The Search Bar is also accessed from the Viewer Panel stacked menu. Type a key word or phrase and hit Enter to search within a document.
Axcelerate 5: Case Manager User Guide
© 2016 Recommind, Inc. | Page 25
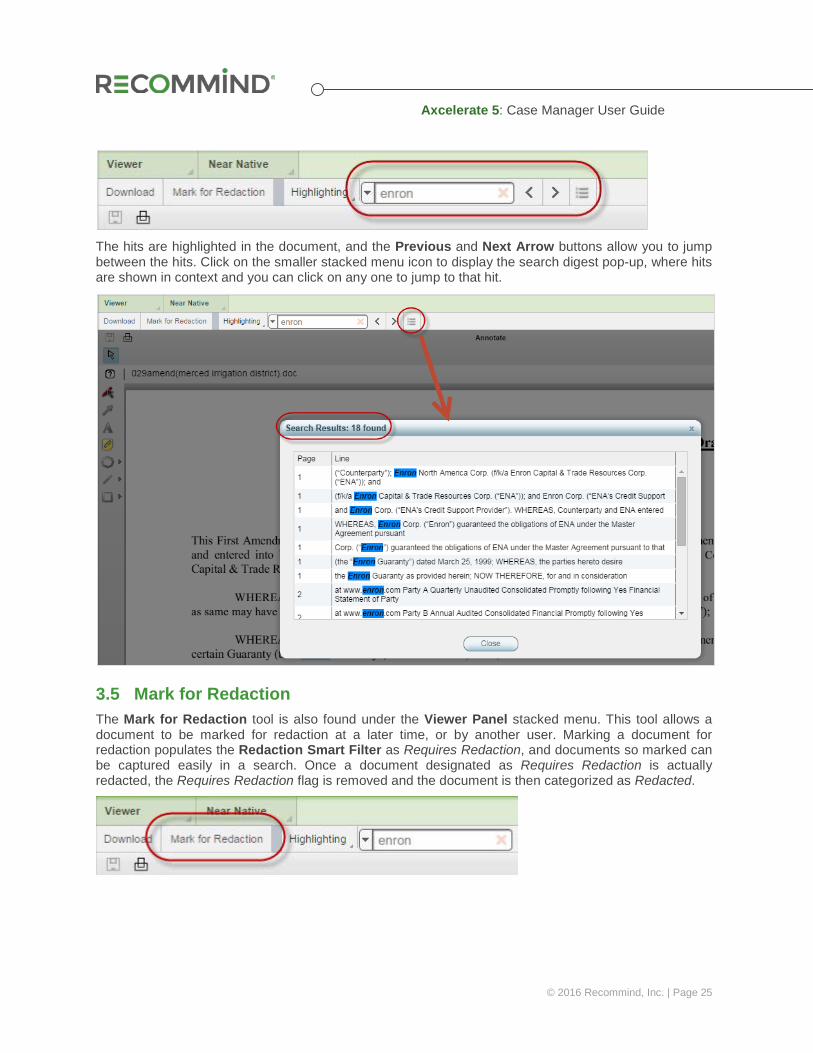
The hits are highlighted in the document, and the Previous and Next Arrow buttons allow you to jump between the hits. Click on the smaller stacked menu icon to display the search digest pop-up, where hits are shown in context and you can click on any one to jump to that hit.
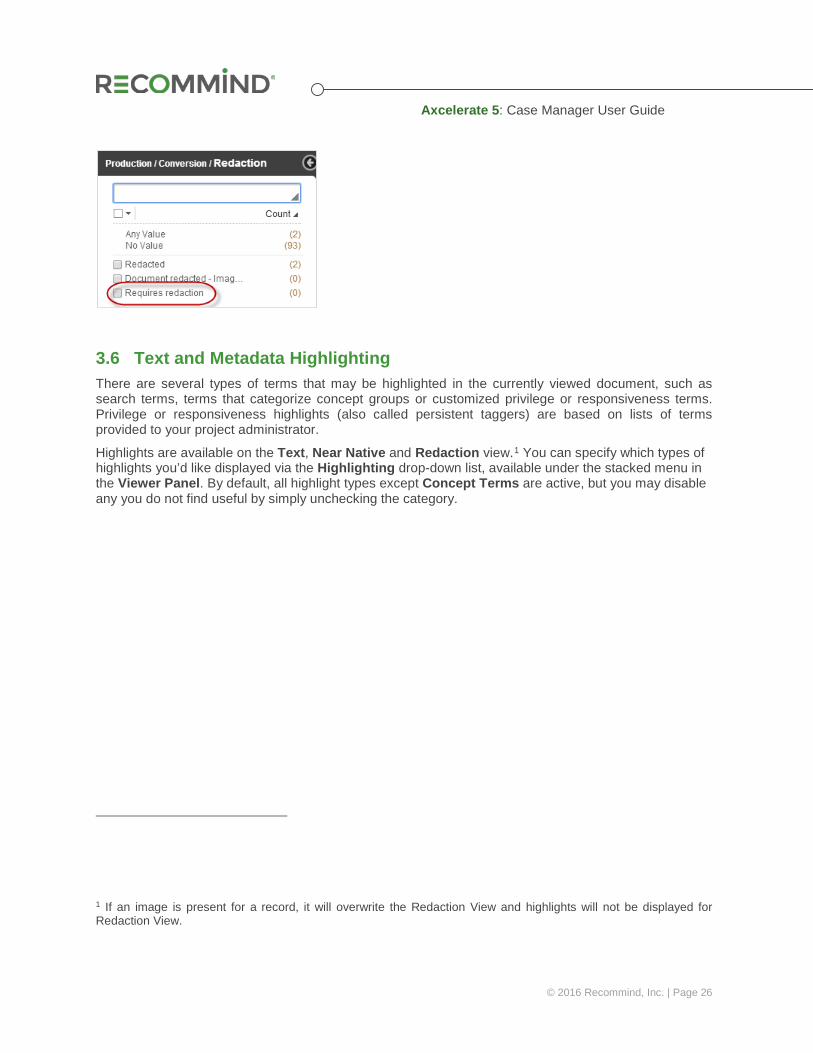
3.5 Mark for Redaction The Mark for Redaction tool is also found under the Viewer Panel stacked menu. This tool allows a document to be marked for redaction at a later time, or by another user. Marking a document for redaction populates the Redaction Smart Filter as Requires Redaction, and documents so marked can be captured easily in a search. Once a document designated as Requires Redaction is actually redacted, the Requires Redaction flag is removed and the document is then categorized as Redacted.
Axcelerate 5: Case Manager User Guide
© 2016 Recommind, Inc. | Page 26
3.6 Text and Metadata Highlighting There are several types of terms that may be highlighted in the currently viewed document, such as search terms, terms that categorize concept groups or customized privilege or responsiveness terms. Privilege or responsiveness highlights (also called persistent taggers) are based on lists of terms provided to your project administrator.
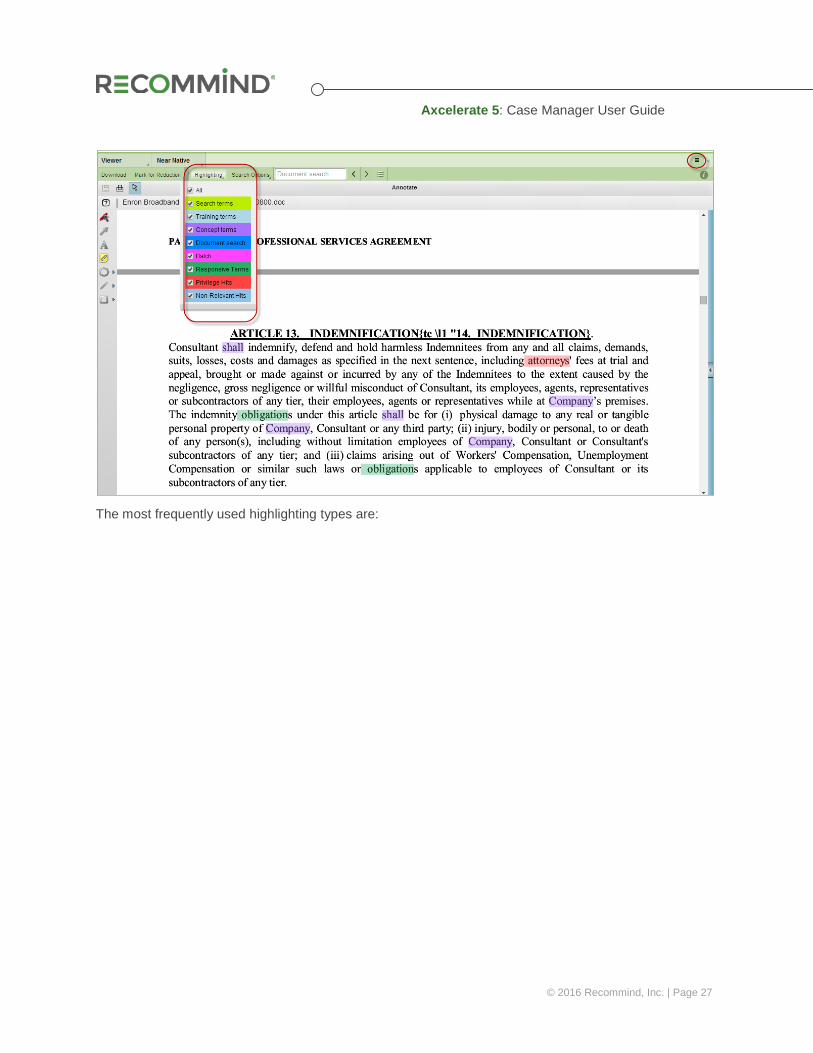
Highlights are available on the Text, Near Native and Redaction view.1 You can specify which types of highlights you’d like displayed via the Highlighting drop-down list, available under the stacked menu in the Viewer Panel. By default, all highlight types except Concept Terms are active, but you may disable any you do not find useful by simply unchecking the category.
1 If an image is present for a record, it will overwrite the Redaction View and highlights will not be displayed for Redaction View.
Axcelerate 5: Case Manager User Guide
© 2016 Recommind, Inc. | Page 27
The most frequently used highlighting types are:

Axcelerate 5: Case Manager User Guide
© 2016 Recommind, Inc. | Page 28
Highlight Type Description
Search Terms Search hits are highlighted from Smart Filters, Quick Search, or Advanced Search.
Training Terms For trained field values, hit highlighting will show the words the system determined to be characteristic for a particular field value in the manually coded or computer suggested documents. These hits are viewable in Predictive Coding mode only.
Concept Terms Terms associated with Concept Groups are highlighted.
Document Search Terms entered via the within document search tool (as opposed to global search tools) are highlighted.
Responsive Terms
Customized highlights based on a list of terms provided to your project administrator. In addition to highlighting your custom terms with the document view, hits can be searched using the Responsive Hits Smart Filter. Also known as Smart Taggers or persistent highlighting.
Privilege Hits Customized highlights based on a list of terms provided to your project administrator. In addition to highlighting your custom terms with the document view, hits can be searched using the Privilege Hits Smart Filter. Also known as Smart Taggers or persistent highlighting.
Non-Relevant Hits Customized highlights based on a list of terms provided to your project administrator. Can also be used for any other custom category of highlighting desired.
You can navigate between highlighted terms using the arrow buttons on the Viewer panel.
Axcelerate 5: Case Manager User Guide
© 2016 Recommind, Inc. | Page 29
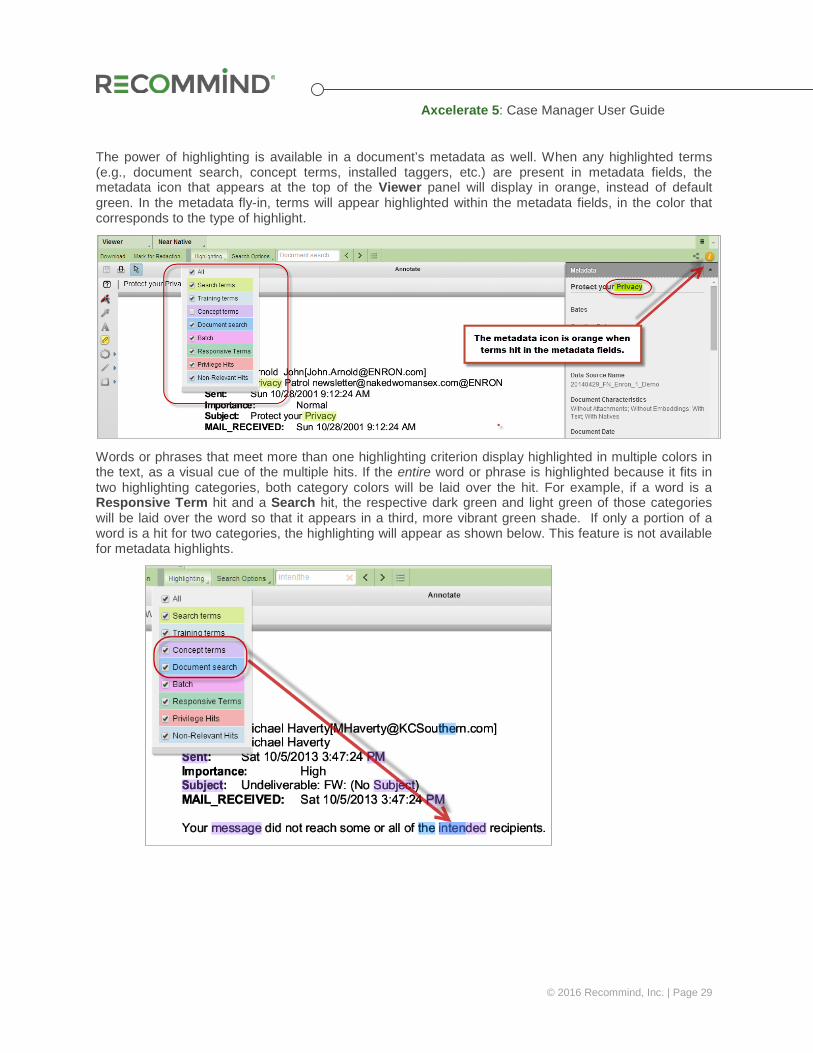
The power of highlighting is available in a document’s metadata as well. When any highlighted terms (e.g., document search, concept terms, installed taggers, etc.) are present in metadata fields, the metadata icon that appears at the top of the Viewer panel will display in orange, instead of default green. In the metadata fly-in, terms will appear highlighted within the metadata fields, in the color that corresponds to the type of highlight.
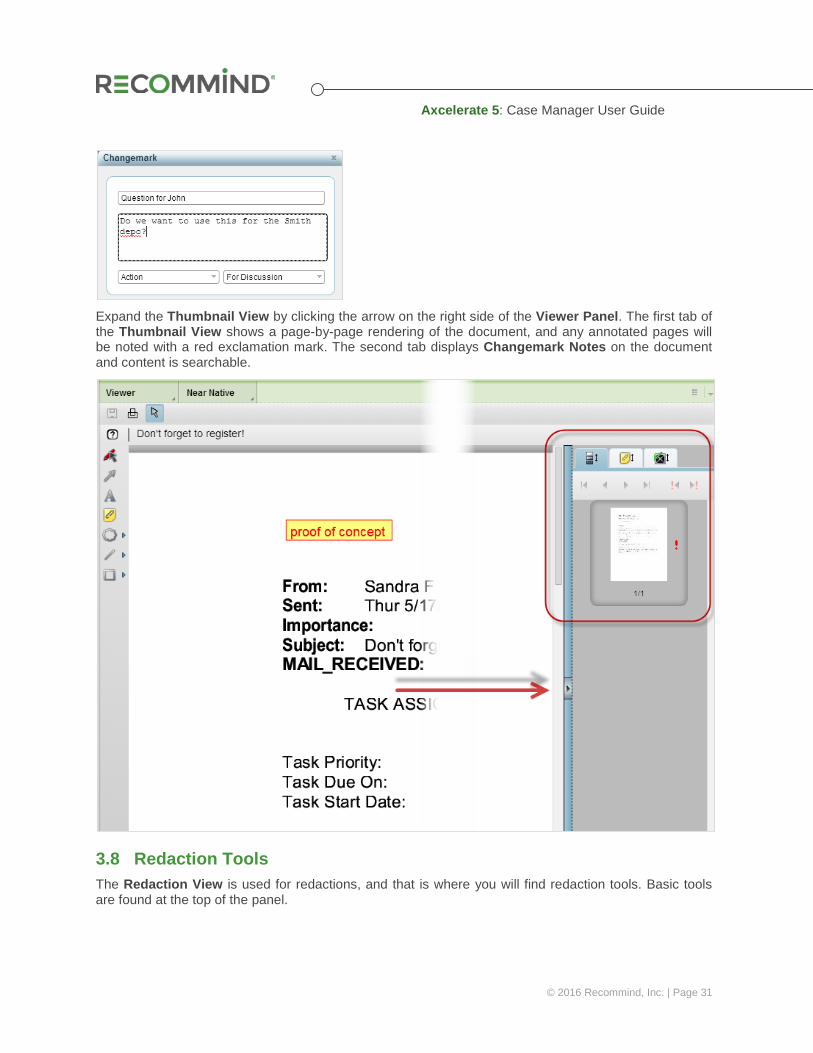
Words or phrases that meet more than one highlighting criterion display highlighted in multiple colors in the text, as a visual cue of the multiple hits. If the entire word or phrase is highlighted because it fits in two highlighting categories, both category colors will be laid over the hit. For example, if a word is a Responsive Term hit and a Search hit, the respective dark green and light green of those categories will be laid over the word so that it appears in a third, more vibrant green shade. If only a portion of a word is a hit for two categories, the highlighting will appear as shown below. This feature is not available for metadata highlights.

Axcelerate 5: Case Manager User Guide
© 2016 Recommind, Inc. | Page 30
3.7 Annotation Tools Scaling tools are found at the bottom of the Viewer Panel. The default is Fit to Width, though any zoom level set by the user persists across multiple pages, documents and projects, until it is changed. Other tools available:
• Rotate • Fit All • Zoom In/Out • Pan • Zoom Area
The Near Native View is used for annotations, and that is where you will find annotation tools. Most of the tools are self-explanatory - they allow you to draw shapes on the document to call attention to something important. Hover over the icons to see a tool tip if you forget what any tool is used for. The annotation tools are:
• Select (use to select and modify or delete an existing annotation) • Arrow Pointer • Text • Changemark Note • Cloud/Highlight • Lines • Shapes
Once you’ve selected an annotation tool, additional options become available to allow you to change the color of any annotation or affect text.
The Changemark Note feature allows you to make a note on a document, give the note a title and designate action on the note. Other users can see the note when they click on the same document, and they can add a reply to it.
Axcelerate 5: Case Manager User Guide
© 2016 Recommind, Inc. | Page 31
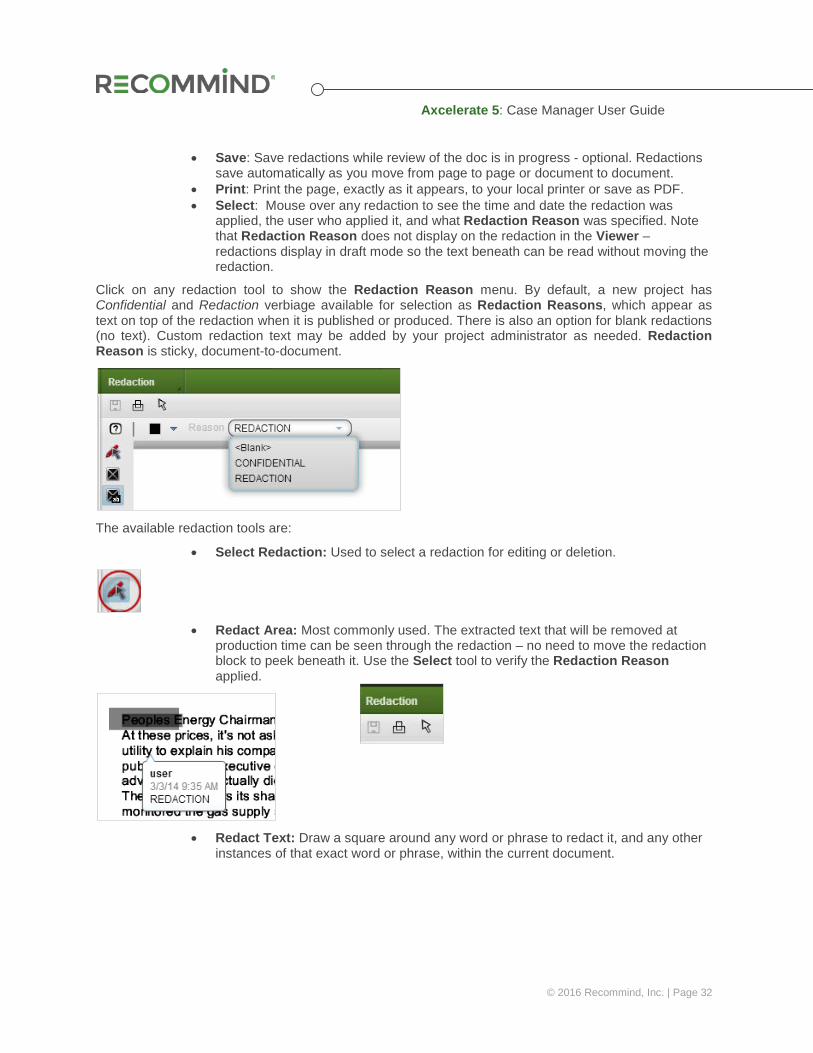
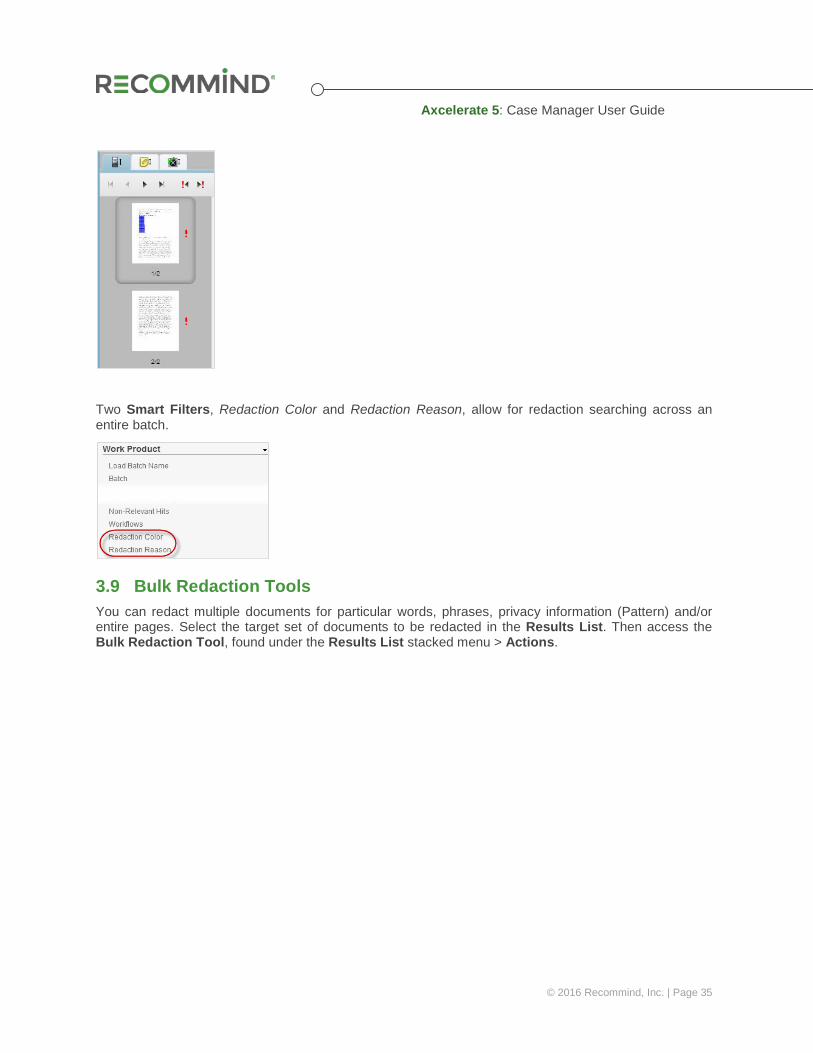
Expand the Thumbnail View by clicking the arrow on the right side of the Viewer Panel. The first tab of the Thumbnail View shows a page-by-page rendering of the document, and any annotated pages will be noted with a red exclamation mark. The second tab displays Changemark Notes on the document and content is searchable.
3.8 Redaction Tools The Redaction View is used for redactions, and that is where you will find redaction tools. Basic tools are found at the top of the panel.
Axcelerate 5: Case Manager User Guide
© 2016 Recommind, Inc. | Page 32
• Save: Save redactions while review of the doc is in progress - optional. Redactions save automatically as you move from page to page or document to document.
• Print: Print the page, exactly as it appears, to your local printer or save as PDF. • Select: Mouse over any redaction to see the time and date the redaction was
applied, the user who applied it, and what Redaction Reason was specified. Note that Redaction Reason does not display on the redaction in the Viewer – redactions display in draft mode so the text beneath can be read without moving the redaction.
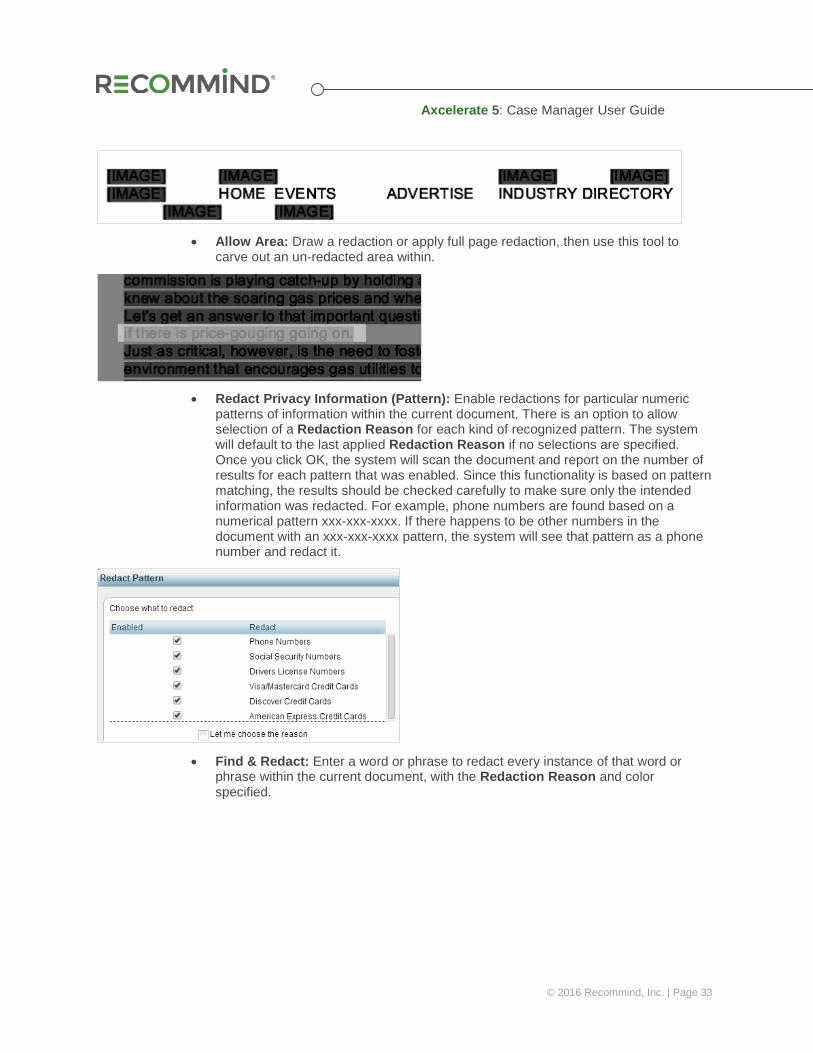
Click on any redaction tool to show the Redaction Reason menu. By default, a new project has Confidential and Redaction verbiage available for selection as Redaction Reasons, which appear as text on top of the redaction when it is published or produced. There is also an option for blank redactions (no text). Custom redaction text may be added by your project administrator as needed. Redaction Reason is sticky, document-to-document.
The available redaction tools are:
• Select Redaction: Used to select a redaction for editing or deletion.
• Redact Area: Most commonly used. The extracted text that will be removed at
production time can be seen through the redaction – no need to move the redaction block to peek beneath it. Use the Select tool to verify the Redaction Reason applied.
• Redact Text: Draw a square around any word or phrase to redact it, and any other
instances of that exact word or phrase, within the current document.
Axcelerate 5: Case Manager User Guide
© 2016 Recommind, Inc. | Page 33
• Allow Area: Draw a redaction or apply full page redaction, then use this tool to
carve out an un-redacted area within.
• Redact Privacy Information (Pattern): Enable redactions for particular numeric
patterns of information within the current document. There is an option to allow selection of a Redaction Reason for each kind of recognized pattern. The system will default to the last applied Redaction Reason if no selections are specified. Once you click OK, the system will scan the document and report on the number of results for each pattern that was enabled. Since this functionality is based on pattern matching, the results should be checked carefully to make sure only the intended information was redacted. For example, phone numbers are found based on a numerical pattern xxx-xxx-xxxx. If there happens to be other numbers in the document with an xxx-xxx-xxxx pattern, the system will see that pattern as a phone number and redact it.
• Find & Redact: Enter a word or phrase to redact every instance of that word or
phrase within the current document, with the Redaction Reason and color specified.

Axcelerate 5: Case Manager User Guide
© 2016 Recommind, Inc. | Page 34
• Find and Redact From/To: Specify a beginning and ending word to have the
system redact those words and any content in between, with the Redaction Reason and color specified. The results should be checked carefully to make sure only the intended information was redacted.
• Redact Page: Redact entire pages of the current document, excluding specific ones
as needed, with the Redaction Reason and color specified. This can be used with the Redact Area tool to carve out an area from the page that should not be redacted.
To remove redactions, use the Select Redaction tool to activate the redaction, then hit Delete or right-click on the selected redaction and click Delete. Note that redactions made in bulk, such as with the Find & Redact tool, must be removed one-by-one.
The Thumbnail View functions on the Redaction View just as it does on the Near Native View, but here, it displays redactions instead of annotations. The third tab allows you to search for redactions of a particular color or Redaction Reason.
Axcelerate 5: Case Manager User Guide
© 2016 Recommind, Inc. | Page 35
Two Smart Filters, Redaction Color and Redaction Reason, allow for redaction searching across an entire batch.
3.9 Bulk Redaction Tools You can redact multiple documents for particular words, phrases, privacy information (Pattern) and/or entire pages. Select the target set of documents to be redacted in the Results List. Then access the Bulk Redaction Tool, found under the Results List stacked menu > Actions.

Axcelerate 5: Case Manager User Guide
© 2016 Recommind, Inc. | Page 36
Select the type of bulk redaction(s) you’d like to make to the selected documents in the General area of the Create Bulk Redactions wizard.
Your selections dictate the options that appear below. The Find, Pattern, Find From/To and Pages bulk redaction tools work just as described in the section above, except that the actions apply to all documents selected instead of just one document.
Documents must be converted prior to applying bulk redactions. The Summary panel will tell you if you have selected documents that are not yet converted. If there are unconverted documents in your set, use the Convert tool (also found under the Actions menu) to convert the files, then apply your bulk redactions.
Axcelerate 5: Case Manager User Guide
© 2016 Recommind, Inc. | Page 37
Auto-redacted documents should always be checked carefully to make sure the redactions were placed as intended. If you make a mistake in application of bulk redactions, or the pattern of information you wanted to redact did not return expected results, your project administrator can assist with removing the redactions.
The Redaction Audit tool, discussed below, is a great way to verify bulk redactions have been appropriately applied.
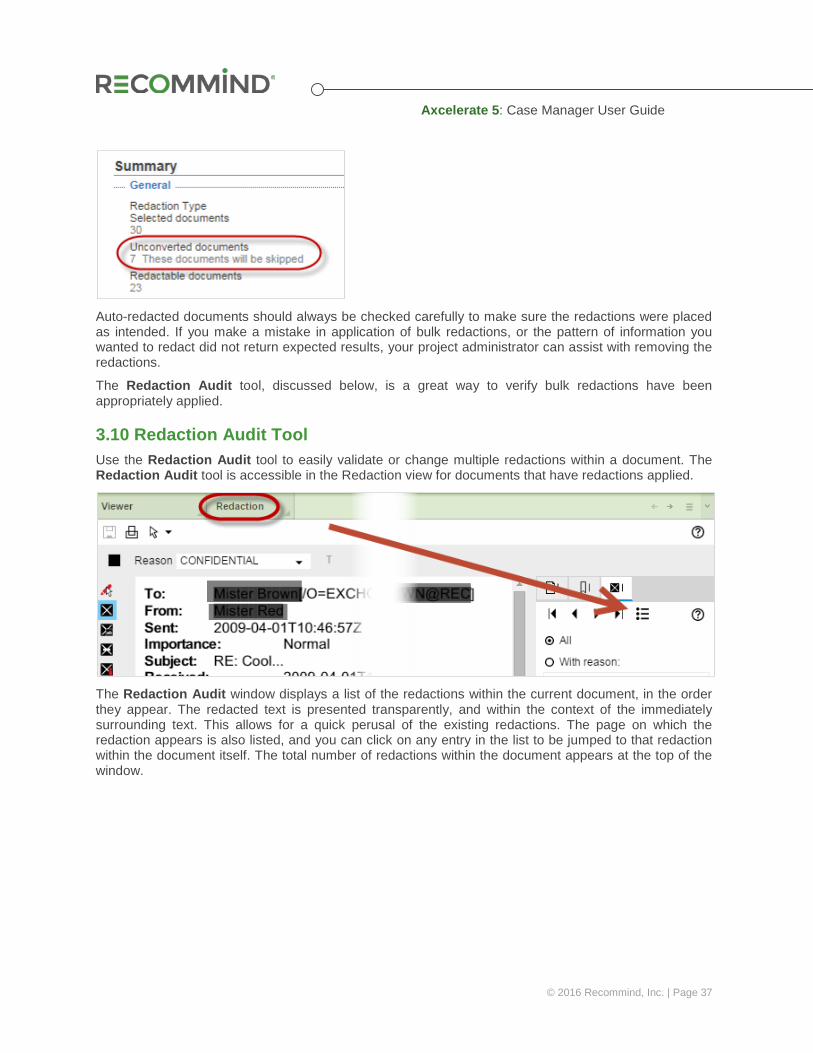
3.10 Redaction Audit Tool Use the Redaction Audit tool to easily validate or change multiple redactions within a document. The Redaction Audit tool is accessible in the Redaction view for documents that have redactions applied.
The Redaction Audit window displays a list of the redactions within the current document, in the order they appear. The redacted text is presented transparently, and within the context of the immediately surrounding text. This allows for a quick perusal of the existing redactions. The page on which the redaction appears is also listed, and you can click on any entry in the list to be jumped to that redaction within the document itself. The total number of redactions within the document appears at the top of the window.
Axcelerate 5: Case Manager User Guide
© 2016 Recommind, Inc. | Page 38
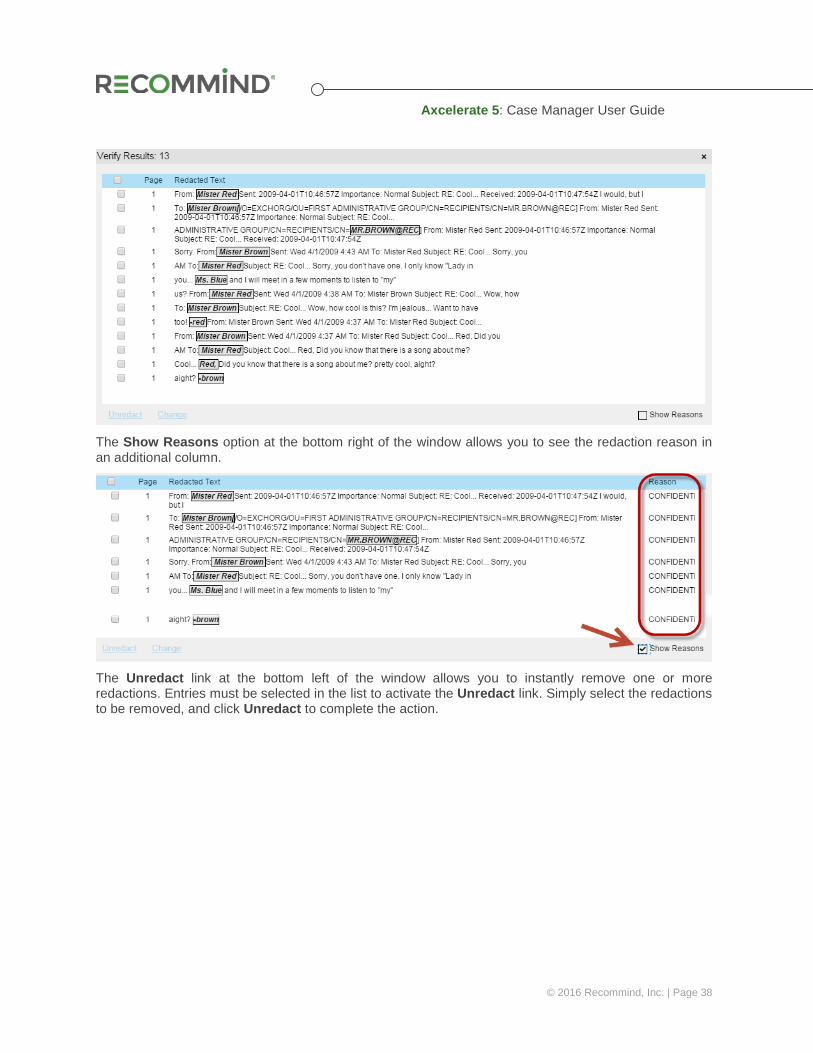
The Show Reasons option at the bottom right of the window allows you to see the redaction reason in an additional column.
The Unredact link at the bottom left of the window allows you to instantly remove one or more redactions. Entries must be selected in the list to activate the Unredact link. Simply select the redactions to be removed, and click Unredact to complete the action.
Axcelerate 5: Case Manager User Guide
© 2016 Recommind, Inc. | Page 39
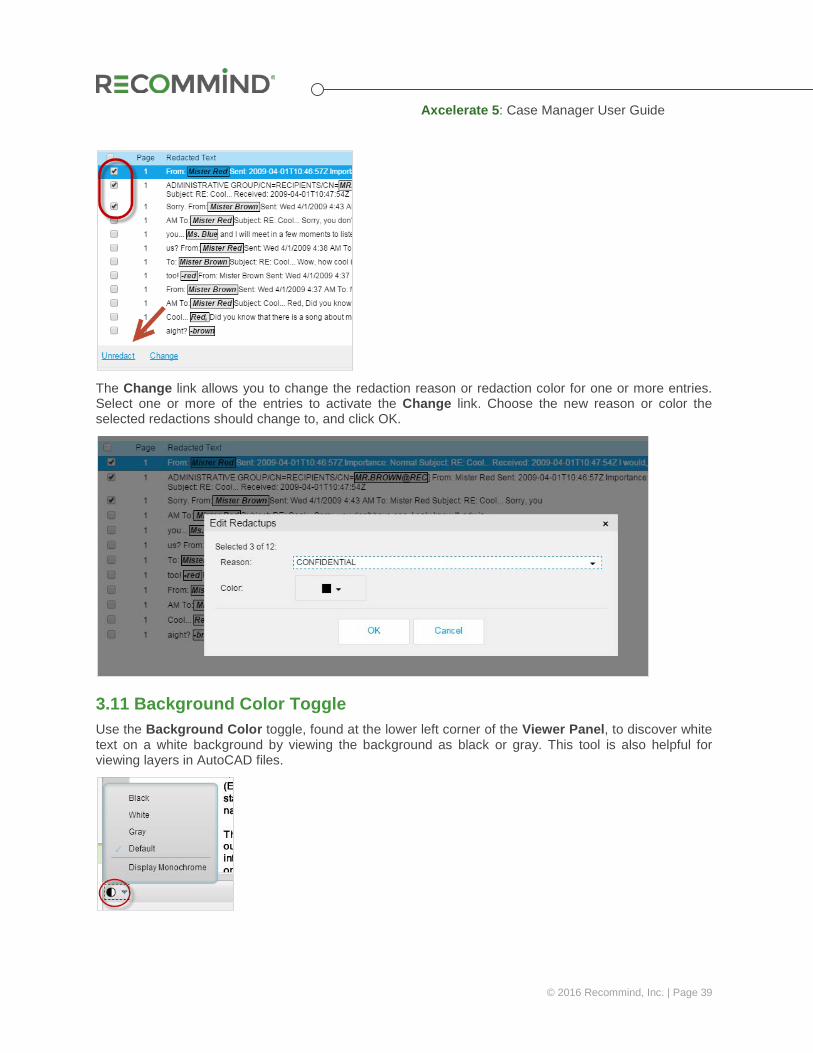
The Change link allows you to change the redaction reason or redaction color for one or more entries. Select one or more of the entries to activate the Change link. Choose the new reason or color the selected redactions should change to, and click OK.
3.11 Background Color Toggle Use the Background Color toggle, found at the lower left corner of the Viewer Panel, to discover white text on a white background by viewing the background as black or gray. This tool is also helpful for viewing layers in AutoCAD files.
Axcelerate 5: Case Manager User Guide
© 2016 Recommind, Inc. | Page 40
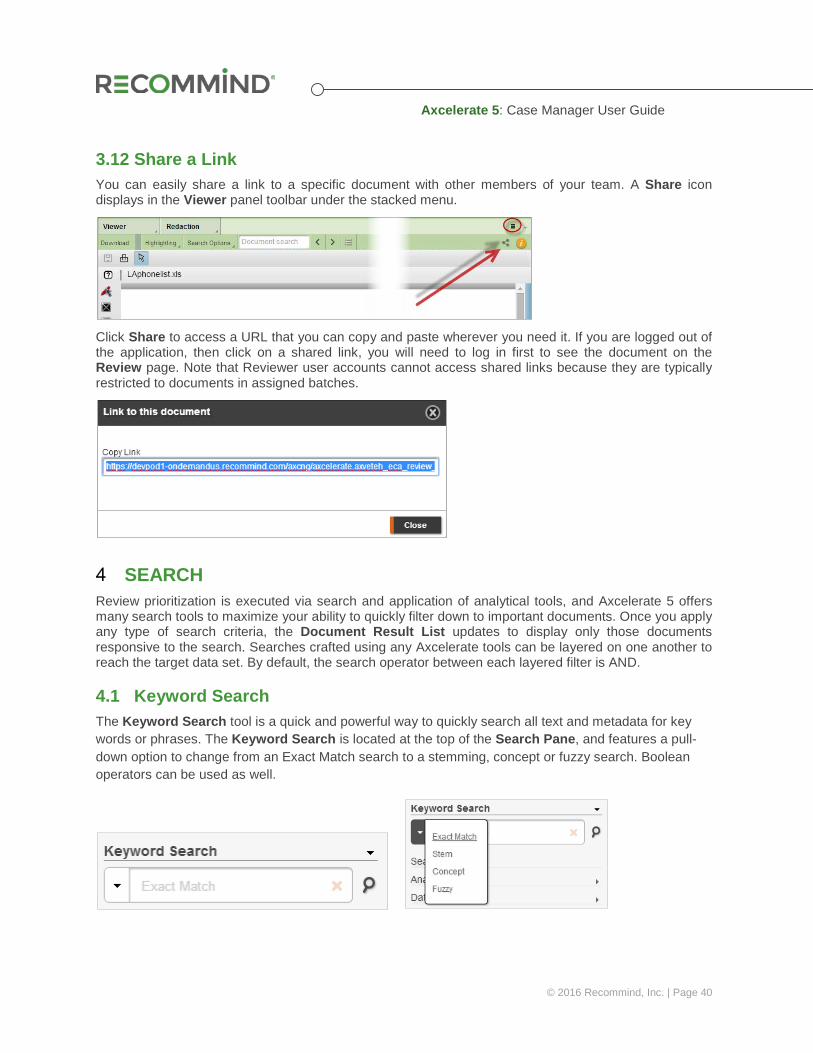
3.12 Share a Link You can easily share a link to a specific document with other members of your team. A Share icon displays in the Viewer panel toolbar under the stacked menu.
Click Share to access a URL that you can copy and paste wherever you need it. If you are logged out of the application, then click on a shared link, you will need to log in first to see the document on the Review page. Note that Reviewer user accounts cannot access shared links because they are typically restricted to documents in assigned batches.
SEARCH Review prioritization is executed via search and application of analytical tools, and Axcelerate 5 offers many search tools to maximize your ability to quickly filter down to important documents. Once you apply any type of search criteria, the Document Result List updates to display only those documents responsive to the search. Searches crafted using any Axcelerate tools can be layered on one another to reach the target data set. By default, the search operator between each layered filter is AND.
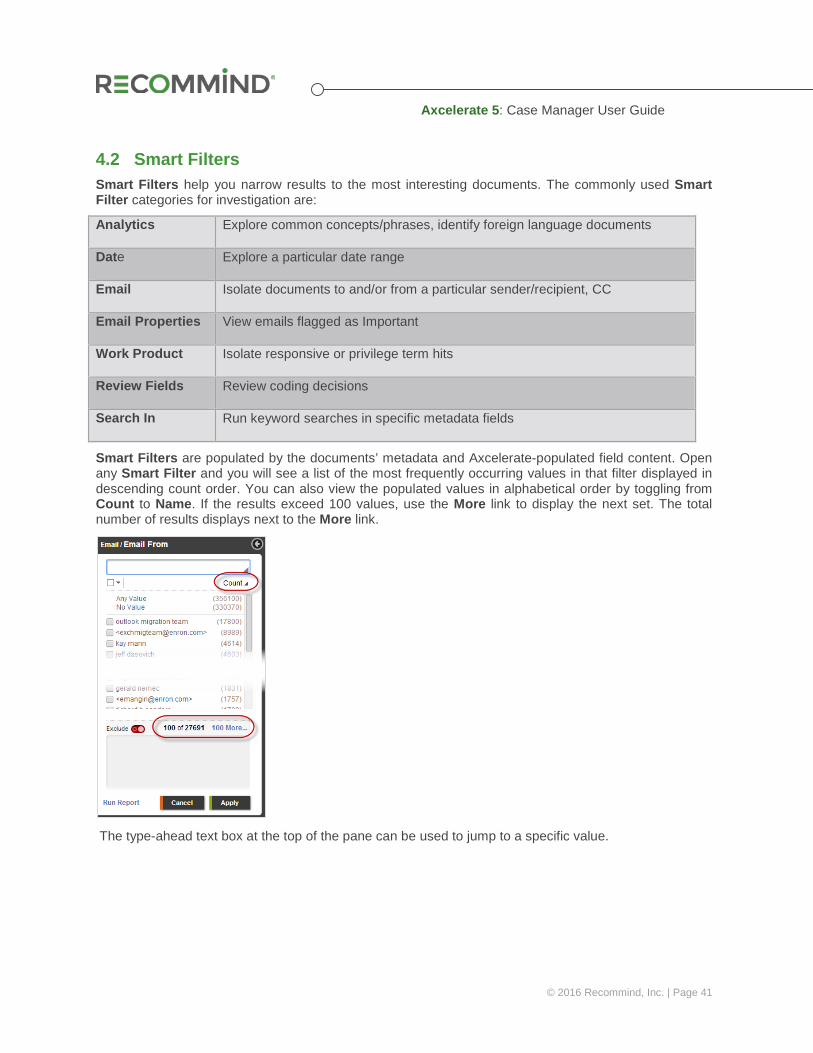
4.1 Keyword Search The Keyword Search tool is a quick and powerful way to quickly search all text and metadata for key words or phrases. The Keyword Search is located at the top of the Search Pane, and features a pull-down option to change from an Exact Match search to a stemming, concept or fuzzy search. Boolean operators can be used as well.
Axcelerate 5: Case Manager User Guide
© 2016 Recommind, Inc. | Page 41
4.2 Smart Filters Smart Filters help you narrow results to the most interesting documents. The commonly used Smart Filter categories for investigation are:
Analytics Explore common concepts/phrases, identify foreign language documents
Date Explore a particular date range
Email Isolate documents to and/or from a particular sender/recipient, CC
Email Properties View emails flagged as Important
Work Product Isolate responsive or privilege term hits
Review Fields Review coding decisions
Search In Run keyword searches in specific metadata fields
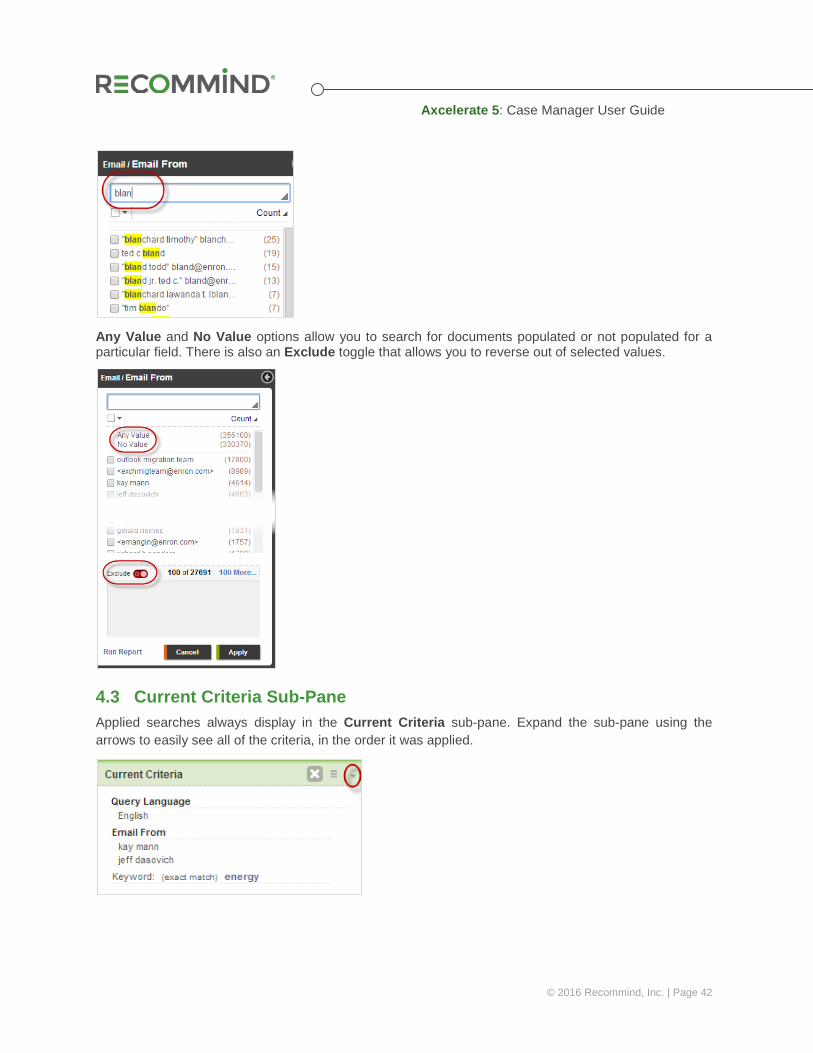
Smart Filters are populated by the documents’ metadata and Axcelerate-populated field content. Open any Smart Filter and you will see a list of the most frequently occurring values in that filter displayed in descending count order. You can also view the populated values in alphabetical order by toggling from Count to Name. If the results exceed 100 values, use the More link to display the next set. The total number of results displays next to the More link.
The type-ahead text box at the top of the pane can be used to jump to a specific value.
Axcelerate 5: Case Manager User Guide
© 2016 Recommind, Inc. | Page 42
Any Value and No Value options allow you to search for documents populated or not populated for a particular field. There is also an Exclude toggle that allows you to reverse out of selected values.
4.3 Current Criteria Sub-Pane Applied searches always display in the Current Criteria sub-pane. Expand the sub-pane using the arrows to easily see all of the criteria, in the order it was applied.

Axcelerate 5: Case Manager User Guide
© 2016 Recommind, Inc. | Page 43
Hover next to the criteria to edit a single search (pencil icon) or remove a single search (X icon). To clear all criteria at one time, click the large X icon at the top of the sub-pane.
To lock an individual search, hover to the right of it. When the lock icon appears, click on it. Reverse the process to unlock a search. Locking searches allows you to keep that criterion set while quickly removing everything added afterward. If you run another search against the filtered set, the locked filter remains in place.
4.4 Saved and Recent Searches Expand the stacked menu in the sub-panel to save a search.
Input a name and click Save to save the search. A description is optional. You may also specify your saved search as a Favorite (accessible from the quick search icons) and share it with others by making those selections in the Save Search area.
Axcelerate 5: Case Manager User Guide
© 2016 Recommind, Inc. | Page 44
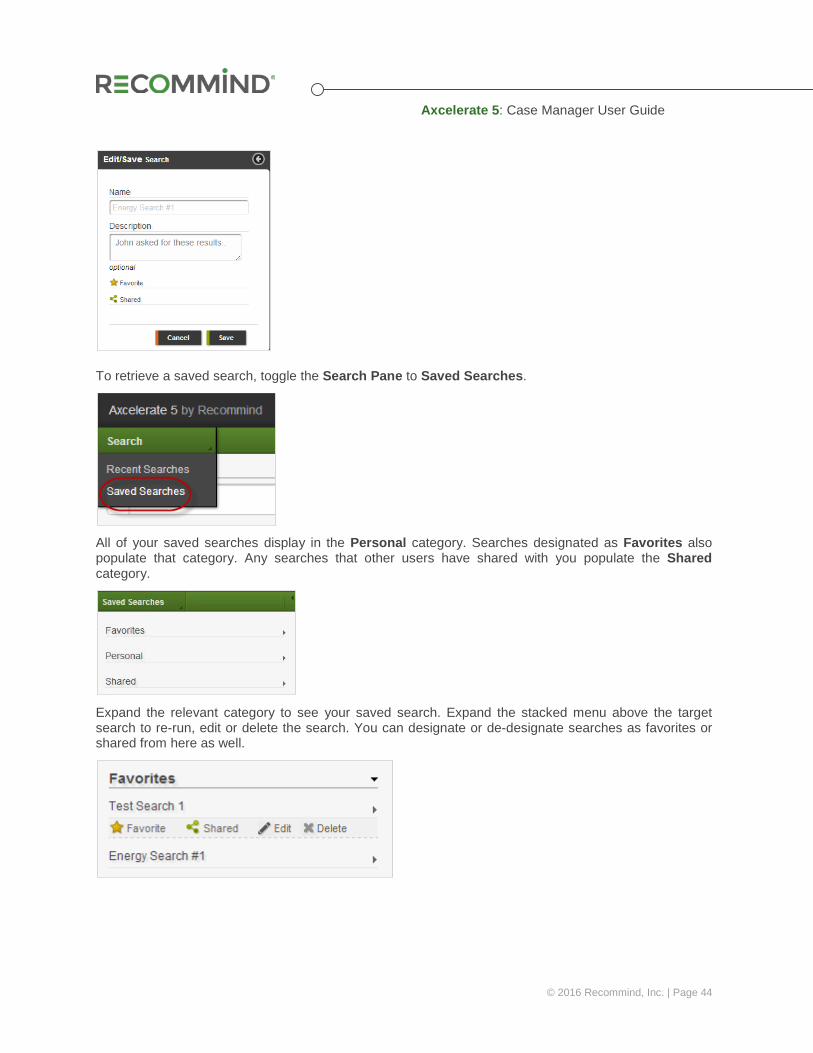
To retrieve a saved search, toggle the Search Pane to Saved Searches.
All of your saved searches display in the Personal category. Searches designated as Favorites also populate that category. Any searches that other users have shared with you populate the Shared category.
Expand the relevant category to see your saved search. Expand the stacked menu above the target search to re-run, edit or delete the search. You can designate or de-designate searches as favorites or shared from here as well.
Axcelerate 5: Case Manager User Guide
© 2016 Recommind, Inc. | Page 45
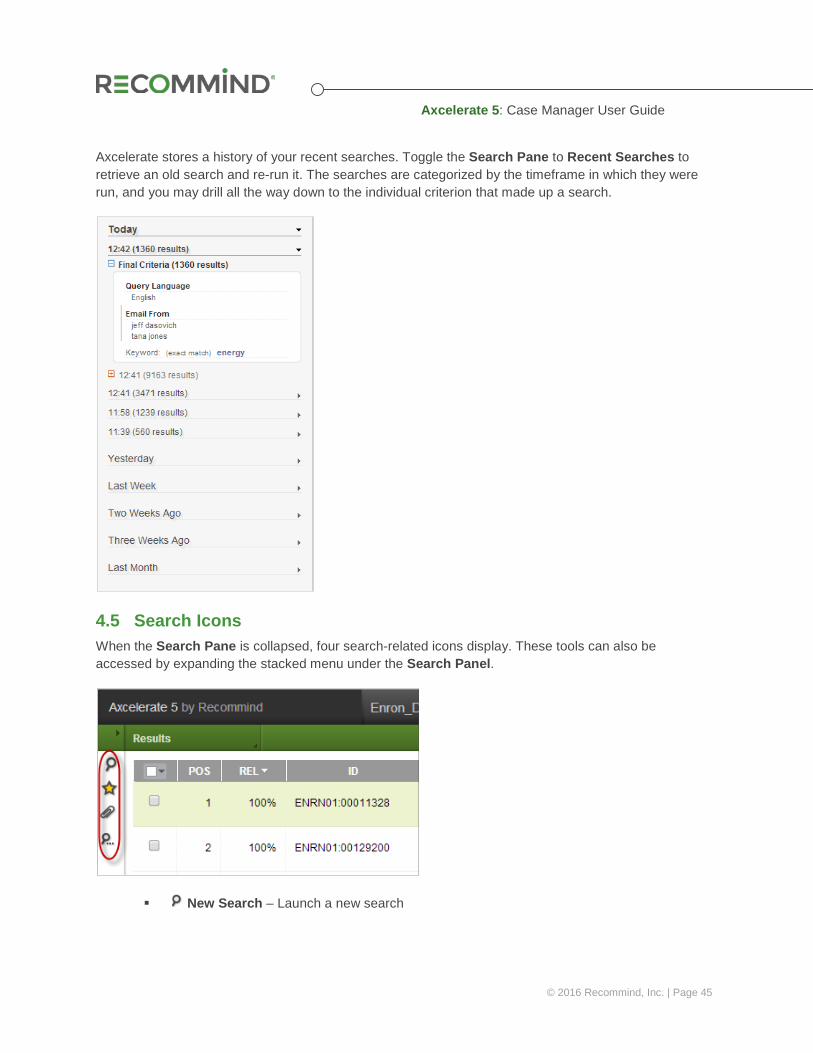
Axcelerate stores a history of your recent searches. Toggle the Search Pane to Recent Searches to retrieve an old search and re-run it. The searches are categorized by the timeframe in which they were run, and you may drill all the way down to the individual criterion that made up a search.
4.5 Search Icons When the Search Pane is collapsed, four search-related icons display. These tools can also be accessed by expanding the stacked menu under the Search Panel.
New Search – Launch a new search
Axcelerate 5: Case Manager User Guide
© 2016 Recommind, Inc. | Page 46
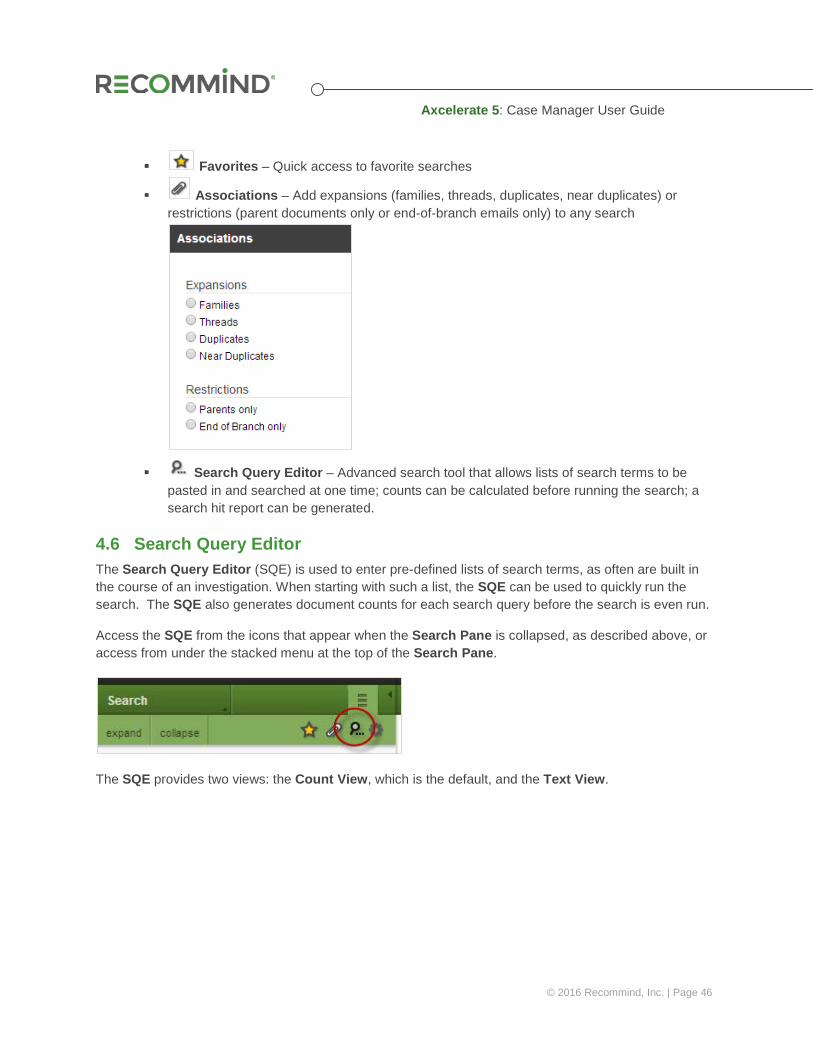
Favorites – Quick access to favorite searches
Associations – Add expansions (families, threads, duplicates, near duplicates) or restrictions (parent documents only or end-of-branch emails only) to any search
Search Query Editor – Advanced search tool that allows lists of search terms to be pasted in and searched at one time; counts can be calculated before running the search; a search hit report can be generated.
4.6 Search Query Editor The Search Query Editor (SQE) is used to enter pre-defined lists of search terms, as often are built in the course of an investigation. When starting with such a list, the SQE can be used to quickly run the search. The SQE also generates document counts for each search query before the search is even run.
Access the SQE from the icons that appear when the Search Pane is collapsed, as described above, or access from under the stacked menu at the top of the Search Pane.
The SQE provides two views: the Count View, which is the default, and the Text View.
Axcelerate 5: Case Manager User Guide
© 2016 Recommind, Inc. | Page 47
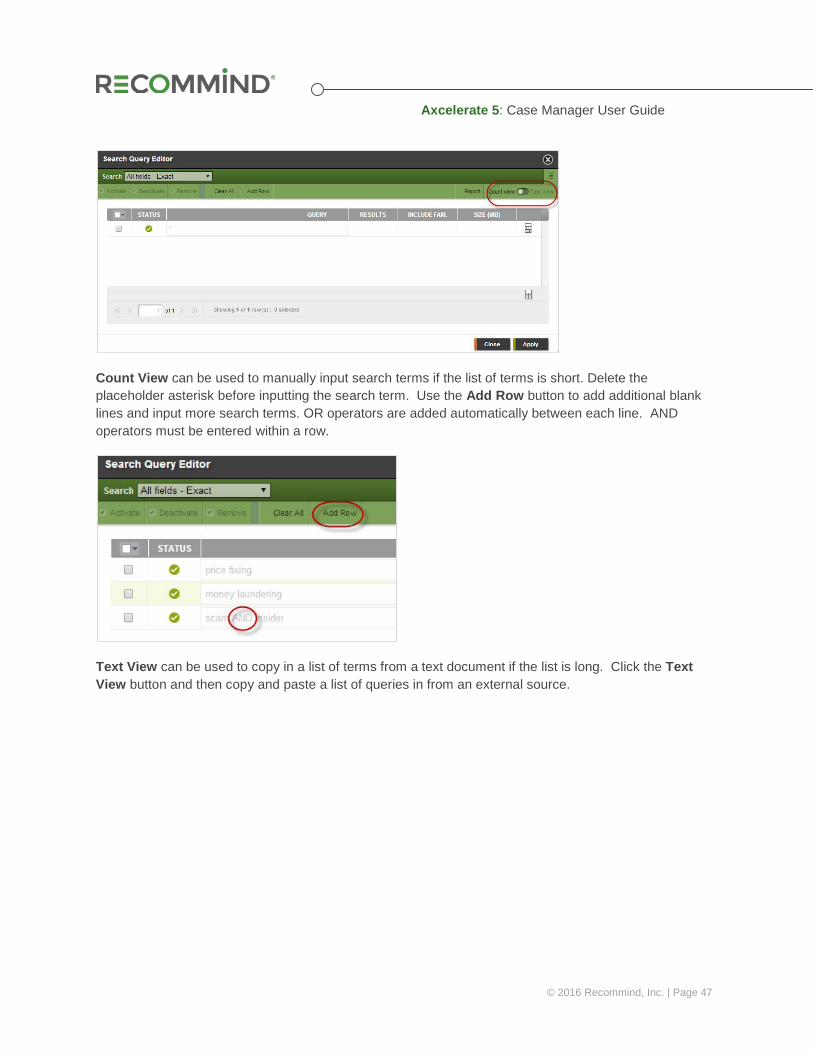
Count View can be used to manually input search terms if the list of terms is short. Delete the placeholder asterisk before inputting the search term. Use the Add Row button to add additional blank lines and input more search terms. OR operators are added automatically between each line. AND operators must be entered within a row.
Text View can be used to copy in a list of terms from a text document if the list is long. Click the Text View button and then copy and paste a list of queries in from an external source.

Axcelerate 5: Case Manager User Guide
© 2016 Recommind, Inc. | Page 48
After pasting in the search term list, switch back to Count View. In the Count View, you can click the Compute Counts button to see how many documents are responsive to each search query.
To create a search hit report, simply click Report and define the parameters. Click Run to generate the report in CSV format.
Axcelerate 5: Case Manager User Guide
© 2016 Recommind, Inc. | Page 49
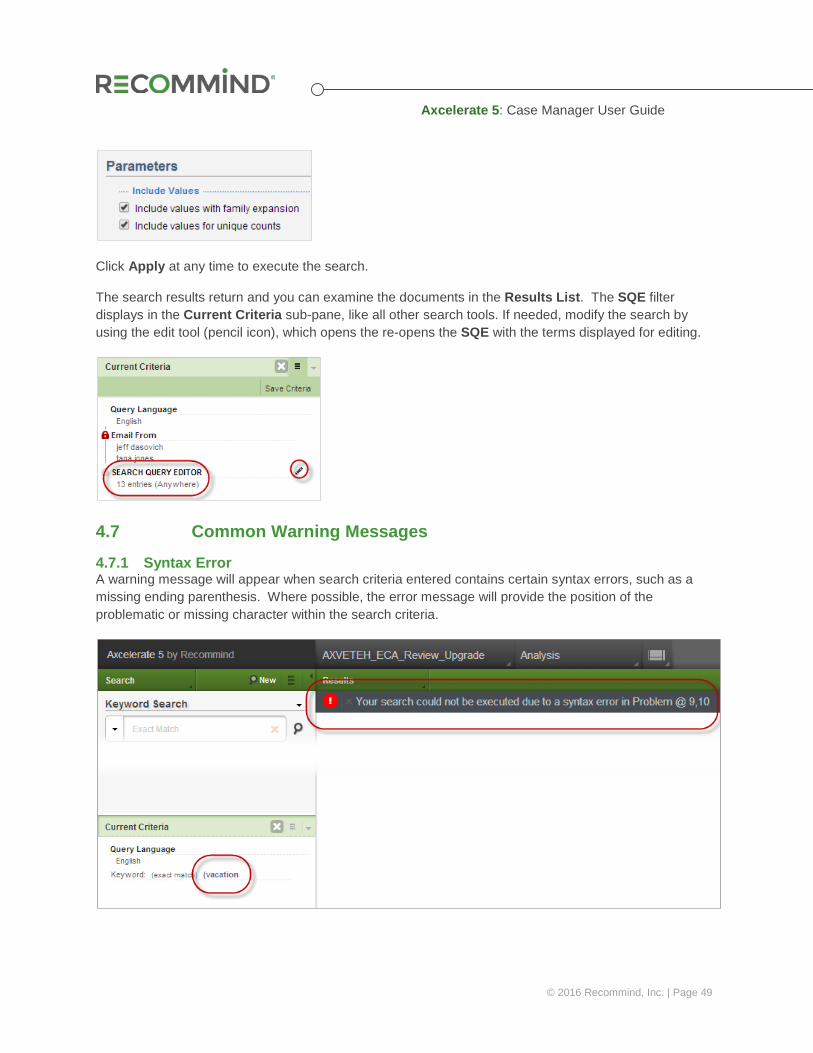
Click Apply at any time to execute the search.
The search results return and you can examine the documents in the Results List. The SQE filter displays in the Current Criteria sub-pane, like all other search tools. If needed, modify the search by using the edit tool (pencil icon), which opens the re-opens the SQE with the terms displayed for editing.
4.7 Common Warning Messages
4.7.1 Syntax Error A warning message will appear when search criteria entered contains certain syntax errors, such as a missing ending parenthesis. Where possible, the error message will provide the position of the problematic or missing character within the search criteria.
Axcelerate 5: Case Manager User Guide
© 2016 Recommind, Inc. | Page 50
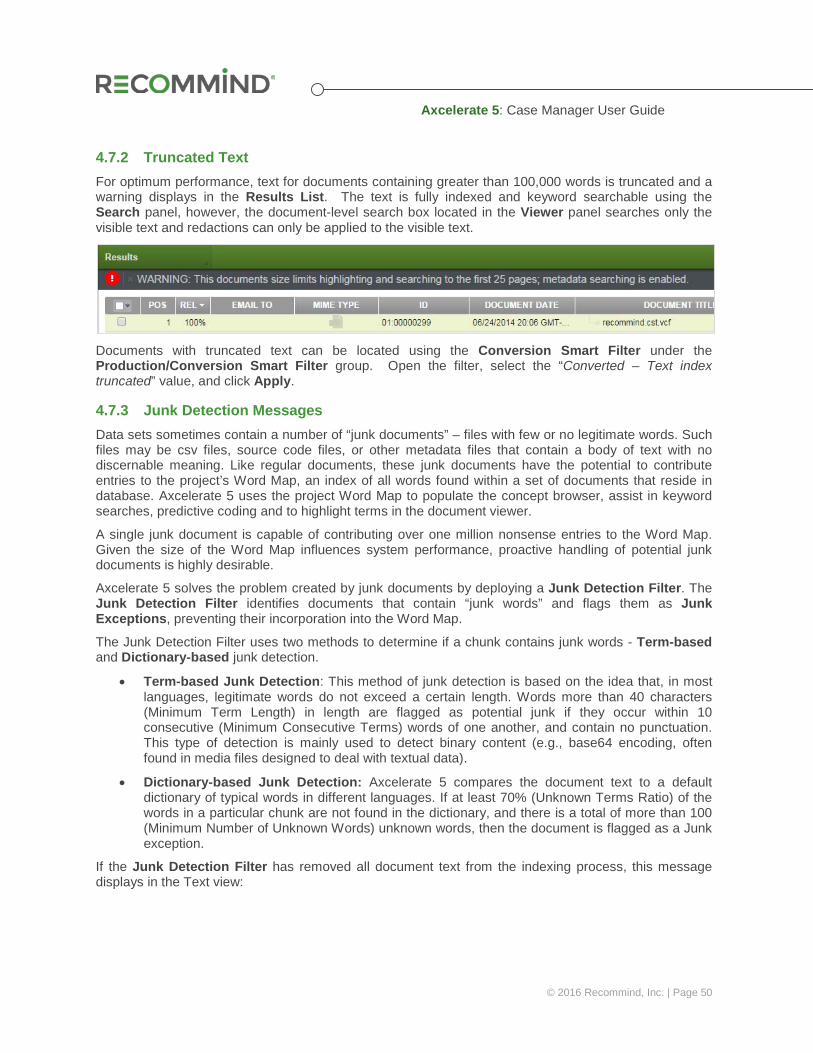
4.7.2 Truncated Text For optimum performance, text for documents containing greater than 100,000 words is truncated and a warning displays in the Results List. The text is fully indexed and keyword searchable using the Search panel, however, the document-level search box located in the Viewer panel searches only the visible text and redactions can only be applied to the visible text.
Documents with truncated text can be located using the Conversion Smart Filter under the Production/Conversion Smart Filter group. Open the filter, select the “Converted – Text index truncated” value, and click Apply.
4.7.3 Junk Detection Messages Data sets sometimes contain a number of “junk documents” – files with few or no legitimate words. Such files may be csv files, source code files, or other metadata files that contain a body of text with no discernable meaning. Like regular documents, these junk documents have the potential to contribute entries to the project’s Word Map, an index of all words found within a set of documents that reside in database. Axcelerate 5 uses the project Word Map to populate the concept browser, assist in keyword searches, predictive coding and to highlight terms in the document viewer.
A single junk document is capable of contributing over one million nonsense entries to the Word Map. Given the size of the Word Map influences system performance, proactive handling of potential junk documents is highly desirable.
Axcelerate 5 solves the problem created by junk documents by deploying a Junk Detection Filter. The Junk Detection Filter identifies documents that contain “junk words” and flags them as Junk Exceptions, preventing their incorporation into the Word Map.
The Junk Detection Filter uses two methods to determine if a chunk contains junk words - Term-based and Dictionary-based junk detection.
• Term-based Junk Detection: This method of junk detection is based on the idea that, in most languages, legitimate words do not exceed a certain length. Words more than 40 characters (Minimum Term Length) in length are flagged as potential junk if they occur within 10 consecutive (Minimum Consecutive Terms) words of one another, and contain no punctuation. This type of detection is mainly used to detect binary content (e.g., base64 encoding, often found in media files designed to deal with textual data).
• Dictionary-based Junk Detection: Axcelerate 5 compares the document text to a default dictionary of typical words in different languages. If at least 70% (Unknown Terms Ratio) of the words in a particular chunk are not found in the dictionary, and there is a total of more than 100 (Minimum Number of Unknown Words) unknown words, then the document is flagged as a Junk exception.
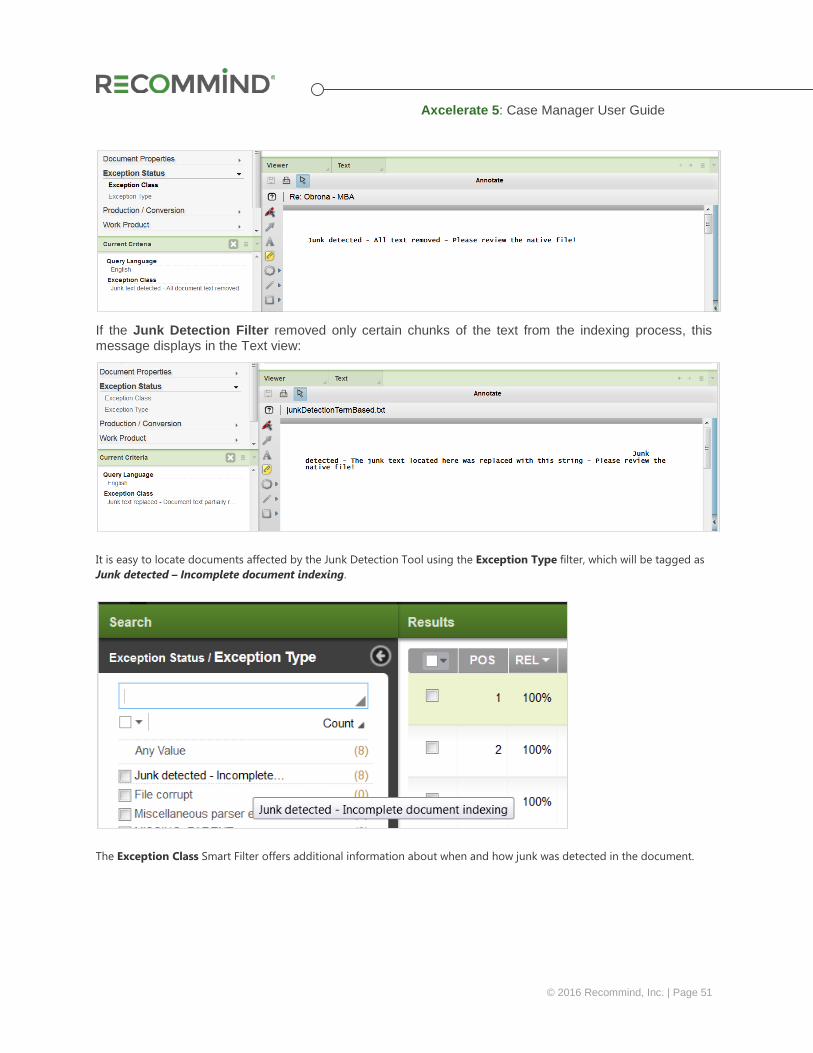
If the Junk Detection Filter has removed all document text from the indexing process, this message displays in the Text view:
Axcelerate 5: Case Manager User Guide
© 2016 Recommind, Inc. | Page 51
If the Junk Detection Filter removed only certain chunks of the text from the indexing process, this message displays in the Text view:
It is easy to locate documents affected by the Junk Detection Tool using the Exception Type filter, which will be tagged as Junk detected – Incomplete document indexing.
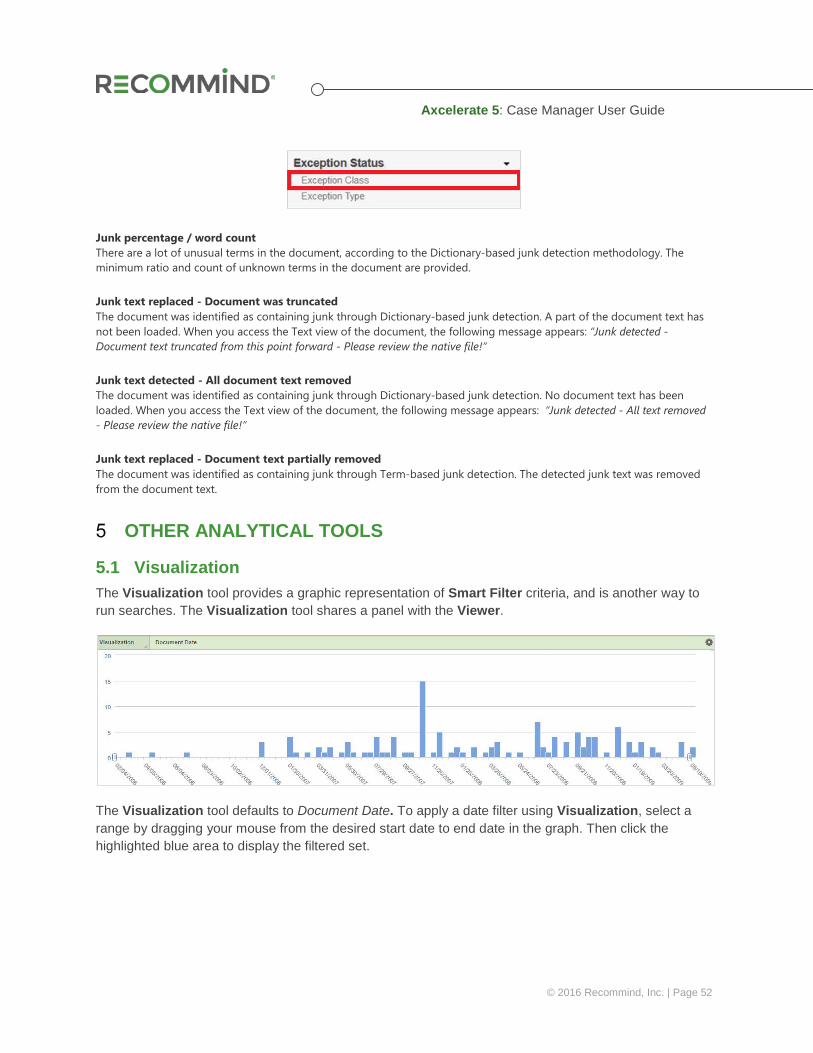
The Exception Class Smart Filter offers additional information about when and how junk was detected in the document.
Axcelerate 5: Case Manager User Guide
© 2016 Recommind, Inc. | Page 52
Junk percentage / word count There are a lot of unusual terms in the document, according to the Dictionary-based junk detection methodology. The minimum ratio and count of unknown terms in the document are provided.
Junk text replaced - Document was truncated The document was identified as containing junk through Dictionary-based junk detection. A part of the document text has not been loaded. When you access the Text view of the document, the following message appears: “Junk detected - Document text truncated from this point forward - Please review the native file!”
Junk text detected - All document text removed The document was identified as containing junk through Dictionary-based junk detection. No document text has been loaded. When you access the Text view of the document, the following message appears: “Junk detected - All text removed - Please review the native file!”
Junk text replaced - Document text partially removed The document was identified as containing junk through Term-based junk detection. The detected junk text was removed from the document text.
OTHER ANALYTICAL TOOLS
5.1 Visualization The Visualization tool provides a graphic representation of Smart Filter criteria, and is another way to run searches. The Visualization tool shares a panel with the Viewer.
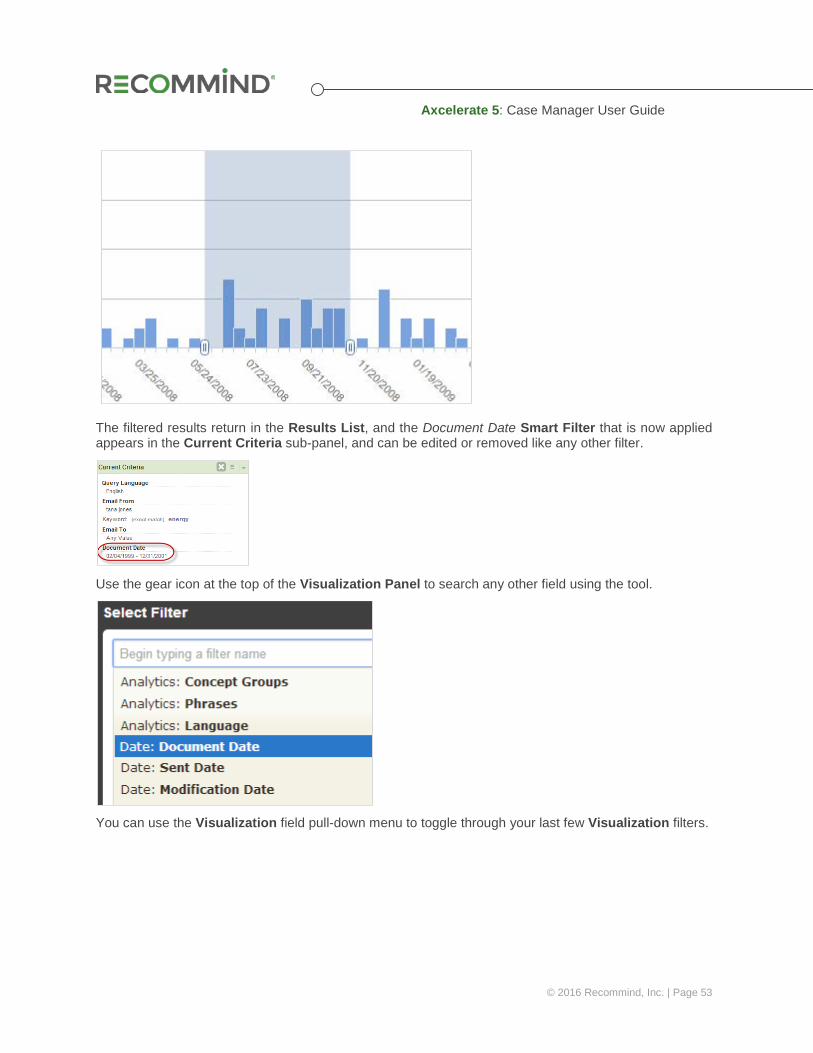
The Visualization tool defaults to Document Date. To apply a date filter using Visualization, select a range by dragging your mouse from the desired start date to end date in the graph. Then click the highlighted blue area to display the filtered set.
Axcelerate 5: Case Manager User Guide
© 2016 Recommind, Inc. | Page 53
The filtered results return in the Results List, and the Document Date Smart Filter that is now applied appears in the Current Criteria sub-panel, and can be edited or removed like any other filter.
Use the gear icon at the top of the Visualization Panel to search any other field using the tool.
You can use the Visualization field pull-down menu to toggle through your last few Visualization filters.

Axcelerate 5: Case Manager User Guide
© 2016 Recommind, Inc. | Page 54
5.2 Concept Browser Concepts are Axcelerate analytical values that connect groups of similar documents for purposes of investigation. A Concept Groups Smart Filter is available, as well as a browser tool that contains identical information, but in a more interactive display.
To view concepts for all documents in the project, navigate to the Advanced Analytics > Concept Browser page without applying any search filters. Alternatively, filter the results set first, then switch to the Concept Browser page to analyze just those results.
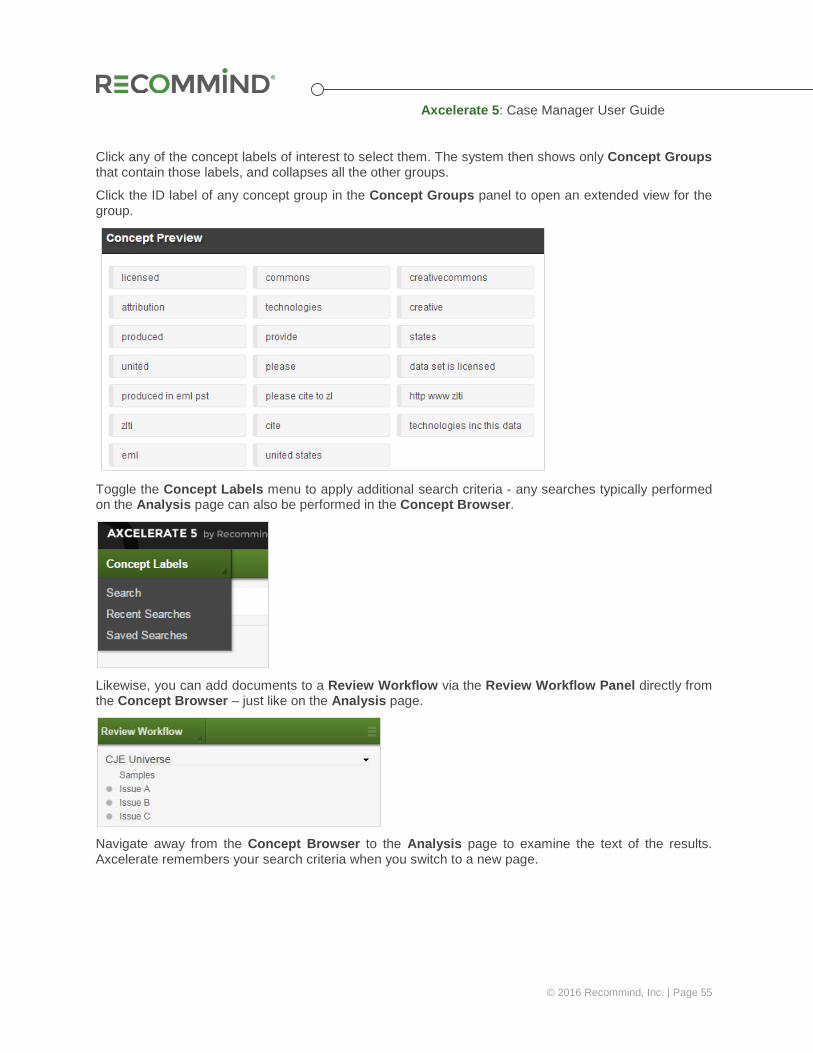
The Labels column of the Concept Groups panel shows the 20 most characteristic words for each concept group, which display in order of most associated documents to least. They describe the concept that the system has identified for this group.
Axcelerate 5: Case Manager User Guide
© 2016 Recommind, Inc. | Page 55
Click any of the concept labels of interest to select them. The system then shows only Concept Groups that contain those labels, and collapses all the other groups.
Click the ID label of any concept group in the Concept Groups panel to open an extended view for the group.
Toggle the Concept Labels menu to apply additional search criteria - any searches typically performed on the Analysis page can also be performed in the Concept Browser.
Likewise, you can add documents to a Review Workflow via the Review Workflow Panel directly from the Concept Browser – just like on the Analysis page.
Navigate away from the Concept Browser to the Analysis page to examine the text of the results. Axcelerate remembers your search criteria when you switch to a new page.
Axcelerate 5: Case Manager User Guide
© 2016 Recommind, Inc. | Page 56
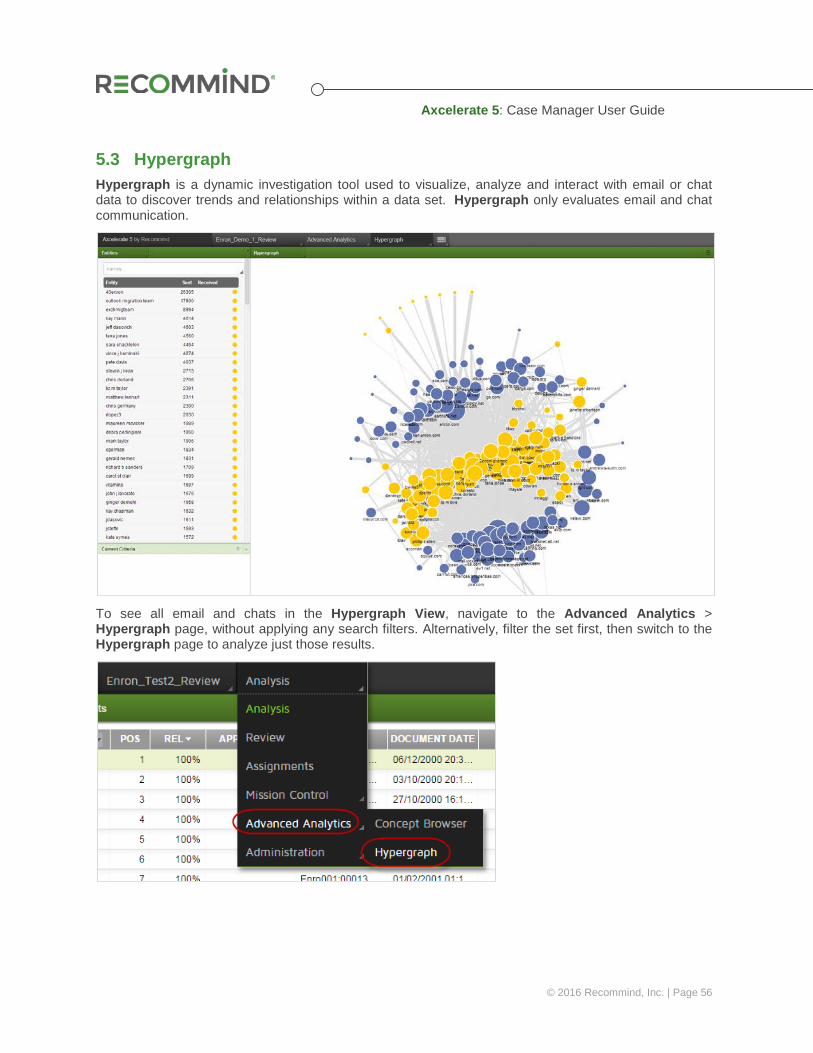
5.3 Hypergraph Hypergraph is a dynamic investigation tool used to visualize, analyze and interact with email or chat data to discover trends and relationships within a data set. Hypergraph only evaluates email and chat communication.
To see all email and chats in the Hypergraph View, navigate to the Advanced Analytics > Hypergraph page, without applying any search filters. Alternatively, filter the set first, then switch to the Hypergraph page to analyze just those results.
Axcelerate 5: Case Manager User Guide
© 2016 Recommind, Inc. | Page 57
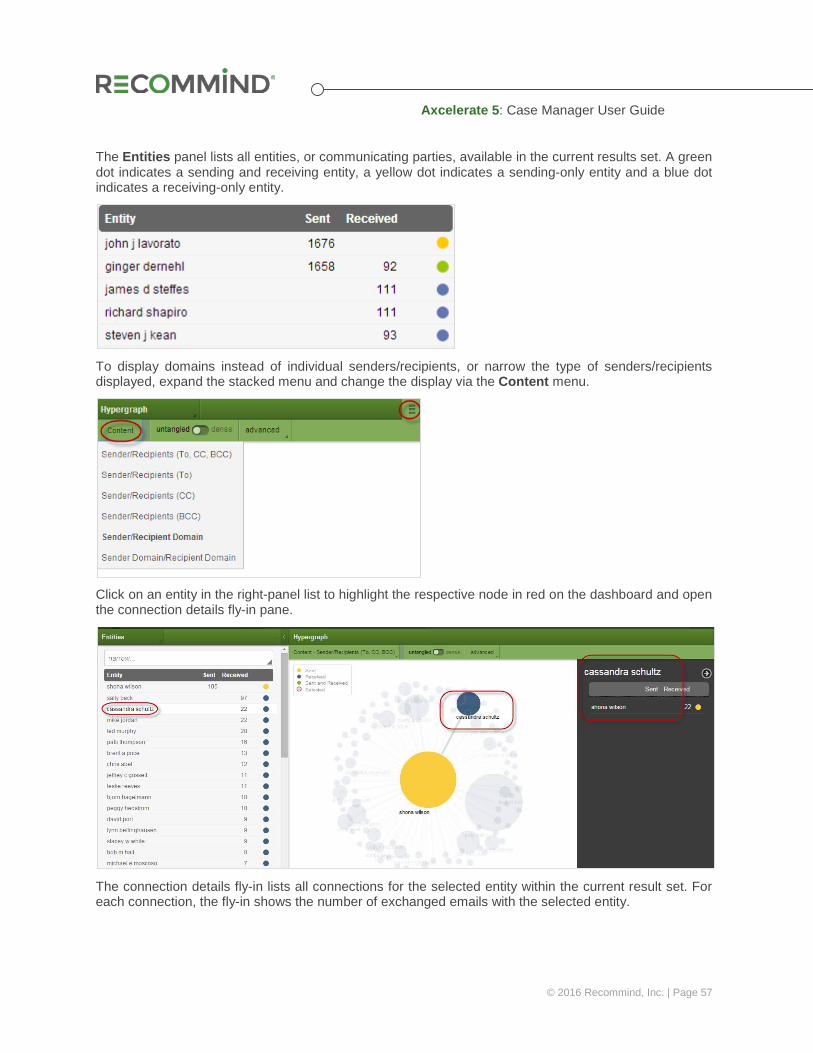
The Entities panel lists all entities, or communicating parties, available in the current results set. A green dot indicates a sending and receiving entity, a yellow dot indicates a sending-only entity and a blue dot indicates a receiving-only entity.
To display domains instead of individual senders/recipients, or narrow the type of senders/recipients displayed, expand the stacked menu and change the display via the Content menu.
Click on an entity in the right-panel list to highlight the respective node in red on the dashboard and open the connection details fly-in pane.
The connection details fly-in lists all connections for the selected entity within the current result set. For each connection, the fly-in shows the number of exchanged emails with the selected entity.
Axcelerate 5: Case Manager User Guide
© 2016 Recommind, Inc. | Page 58
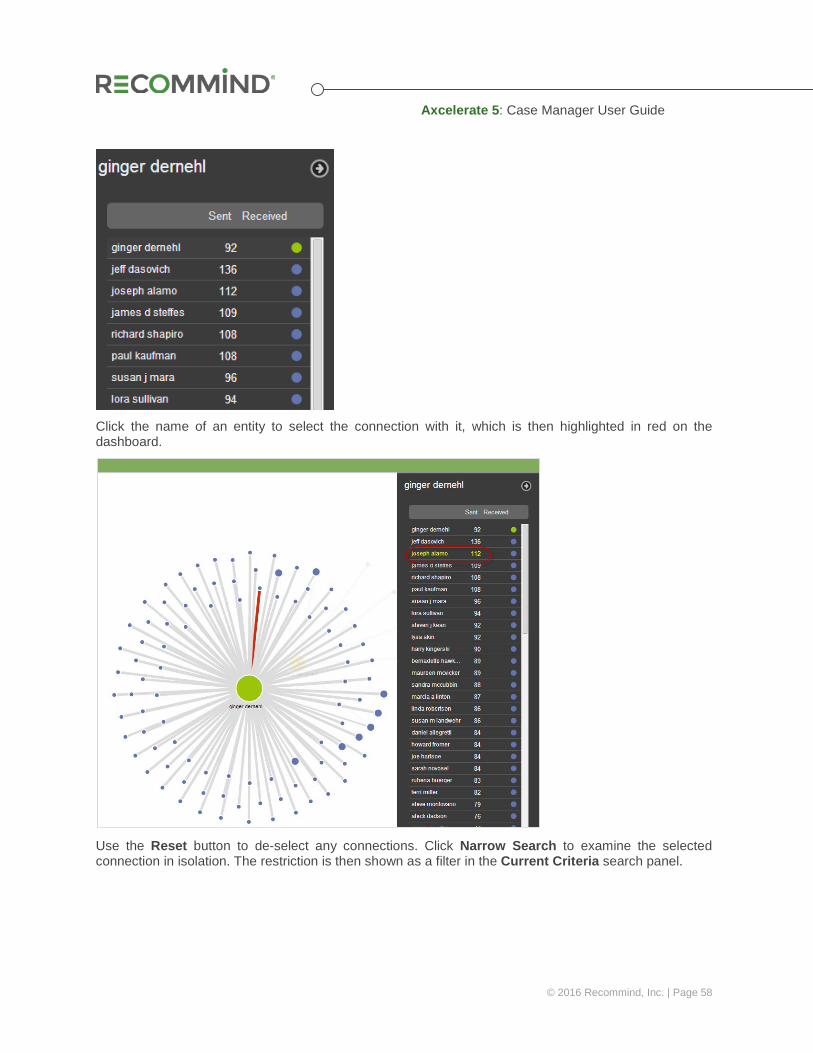
Click the name of an entity to select the connection with it, which is then highlighted in red on the dashboard.
Use the Reset button to de-select any connections. Click Narrow Search to examine the selected connection in isolation. The restriction is then shown as a filter in the Current Criteria search panel.
Axcelerate 5: Case Manager User Guide
© 2016 Recommind, Inc. | Page 59
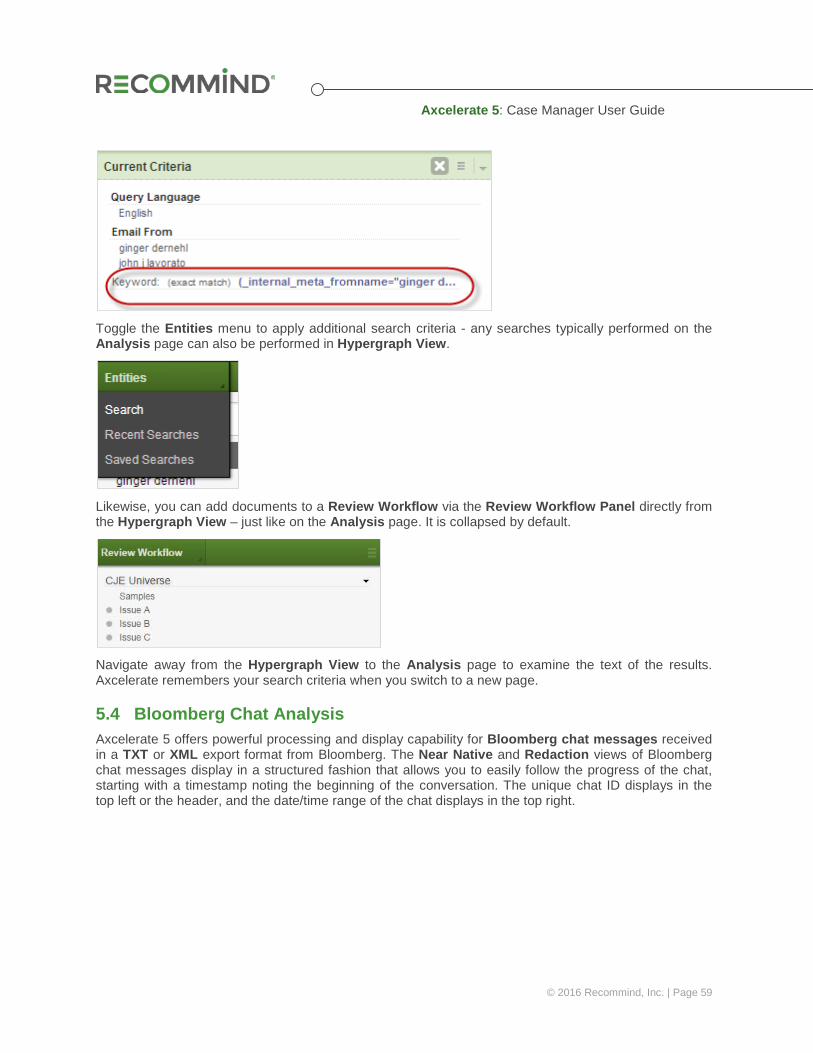
Toggle the Entities menu to apply additional search criteria - any searches typically performed on the Analysis page can also be performed in Hypergraph View.
Likewise, you can add documents to a Review Workflow via the Review Workflow Panel directly from the Hypergraph View – just like on the Analysis page. It is collapsed by default.
Navigate away from the Hypergraph View to the Analysis page to examine the text of the results. Axcelerate remembers your search criteria when you switch to a new page.
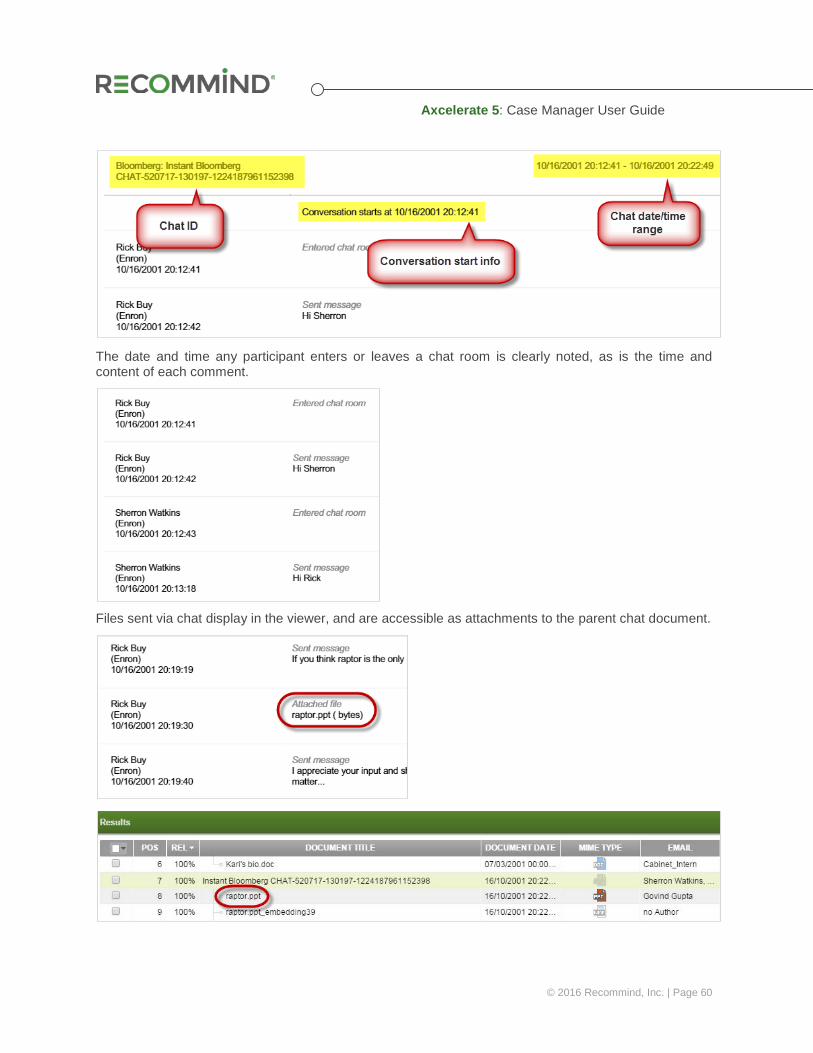
5.4 Bloomberg Chat Analysis Axcelerate 5 offers powerful processing and display capability for Bloomberg chat messages received in a TXT or XML export format from Bloomberg. The Near Native and Redaction views of Bloomberg chat messages display in a structured fashion that allows you to easily follow the progress of the chat, starting with a timestamp noting the beginning of the conversation. The unique chat ID displays in the top left or the header, and the date/time range of the chat displays in the top right.
Axcelerate 5: Case Manager User Guide
© 2016 Recommind, Inc. | Page 60
The date and time any participant enters or leaves a chat room is clearly noted, as is the time and content of each comment.
Files sent via chat display in the viewer, and are accessible as attachments to the parent chat document.

Axcelerate 5: Case Manager User Guide
© 2016 Recommind, Inc. | Page 61
Each participant’s departure from the chat is noted, and a timestamp is provided for the end of the conversation.
The Text view of Bloomberg chats contains substantive chat comments only – i.e., entry/exit of the chatroom, etc. is not shown in the text. This is because Axcelerate uses the text to generate analytical information, which informs predictive coding analysis as well as population of the Concept Browser and Phrases Smart Filter. As such, exclusion of noise information is desirable so that it does not interfere with the analysis.
The chart below lists Smart Filters most pertinent to your exploration of Bloomberg files.
Smart Filter Group Smart Filter Name Description
Communication
Sender Address Email address of the sender of an email or Bloomberg chat message
Sender Domain Email domain of the sender of an email or Bloomberg chat message
Sender Name Name of the sender of an email or Bloomberg chat message
All Recipients Email address of all recipients of an email or Bloomberg chat message
Axcelerate 5: Case Manager User Guide
© 2016 Recommind, Inc. | Page 62
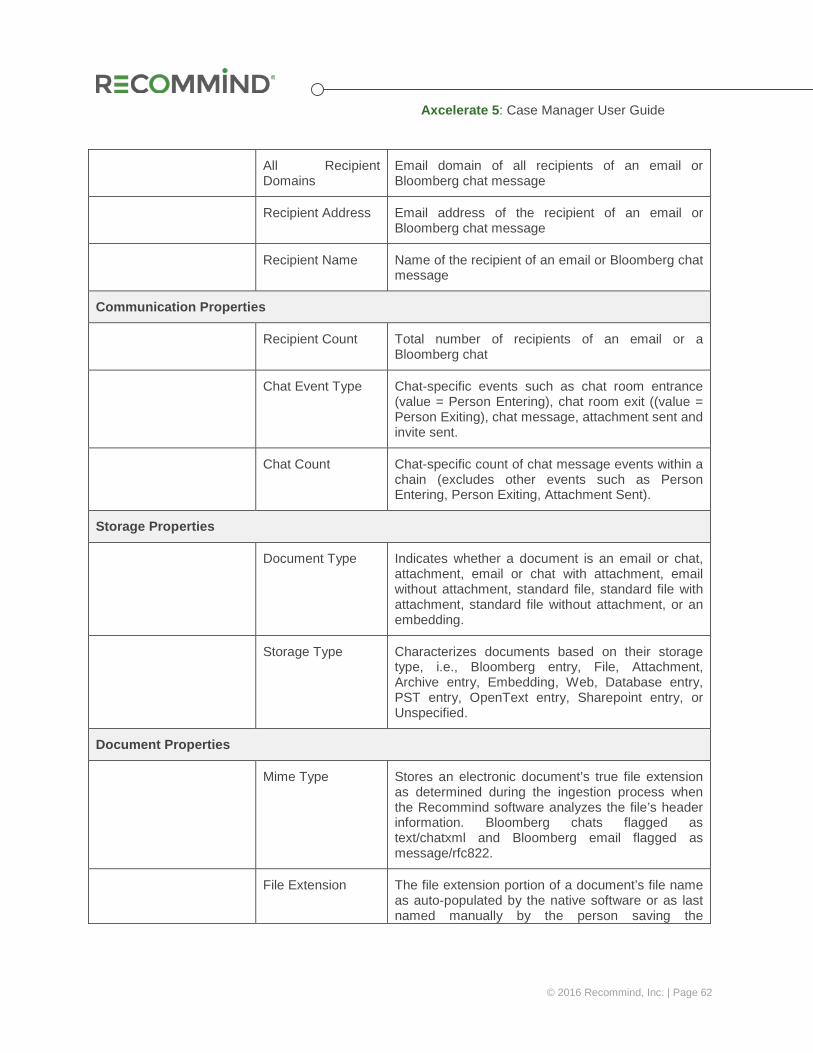
All Recipient Domains
Email domain of all recipients of an email or Bloomberg chat message
Recipient Address Email address of the recipient of an email or Bloomberg chat message
Recipient Name Name of the recipient of an email or Bloomberg chat message
Communication Properties
Recipient Count Total number of recipients of an email or a Bloomberg chat
Chat Event Type Chat-specific events such as chat room entrance (value = Person Entering), chat room exit ((value = Person Exiting), chat message, attachment sent and invite sent.
Chat Count Chat-specific count of chat message events within a chain (excludes other events such as Person Entering, Person Exiting, Attachment Sent).
Storage Properties
Document Type Indicates whether a document is an email or chat, attachment, email or chat with attachment, email without attachment, standard file, standard file with attachment, standard file without attachment, or an embedding.
Storage Type Characterizes documents based on their storage type, i.e., Bloomberg entry, File, Attachment, Archive entry, Embedding, Web, Database entry, PST entry, OpenText entry, Sharepoint entry, or Unspecified.
Document Properties
Mime Type Stores an electronic document’s true file extension as determined during the ingestion process when the Recommind software analyzes the file’s header information. Bloomberg chats flagged as text/chatxml and Bloomberg email flagged as message/rfc822.
File Extension The file extension portion of a document’s file name as auto-populated by the native software or as last named manually by the person saving the
Axcelerate 5: Case Manager User Guide
© 2016 Recommind, Inc. | Page 63
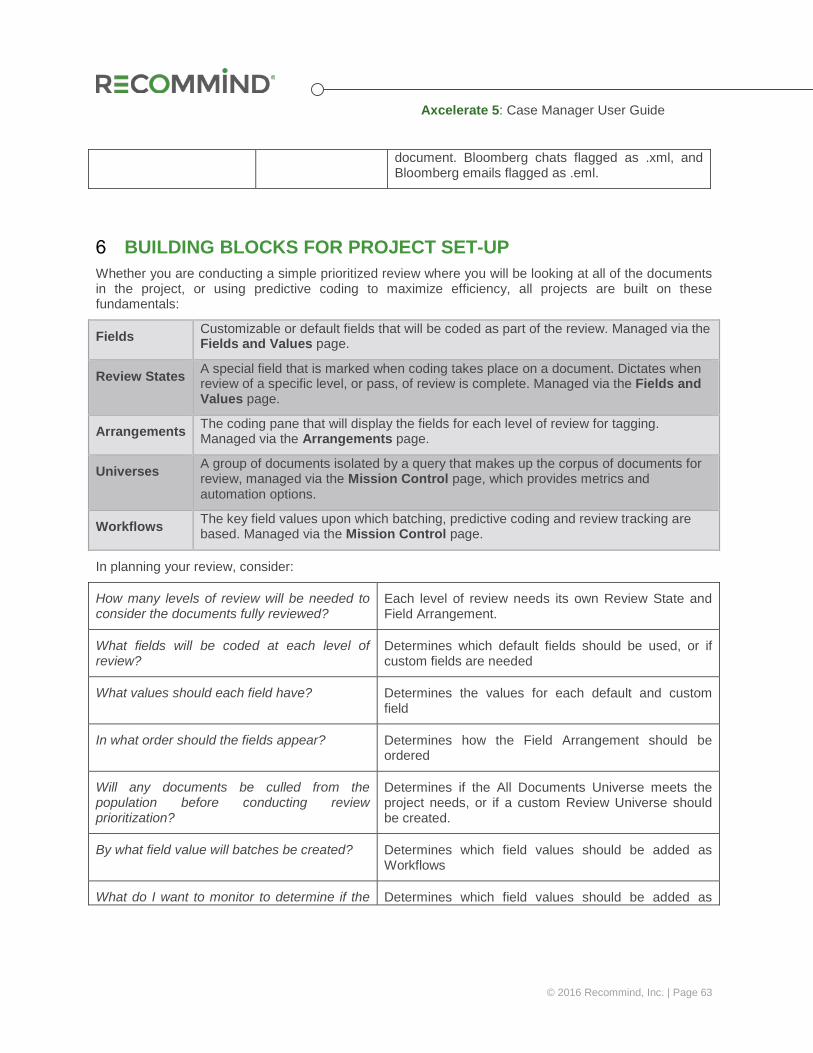
document. Bloomberg chats flagged as .xml, and Bloomberg emails flagged as .eml.
BUILDING BLOCKS FOR PROJECT SET-UP Whether you are conducting a simple prioritized review where you will be looking at all of the documents in the project, or using predictive coding to maximize efficiency, all projects are built on these fundamentals:
Fields Customizable or default fields that will be coded as part of the review. Managed via the Fields and Values page.
Review States A special field that is marked when coding takes place on a document. Dictates when review of a specific level, or pass, of review is complete. Managed via the Fields and Values page.
Arrangements The coding pane that will display the fields for each level of review for tagging. Managed via the Arrangements page.
Universes A group of documents isolated by a query that makes up the corpus of documents for review, managed via the Mission Control page, which provides metrics and automation options.
Workflows The key field values upon which batching, predictive coding and review tracking are based. Managed via the Mission Control page.
In planning your review, consider:
How many levels of review will be needed to consider the documents fully reviewed?
Each level of review needs its own Review State and Field Arrangement.
What fields will be coded at each level of review?
Determines which default fields should be used, or if custom fields are needed
What values should each field have? Determines the values for each default and custom field
In what order should the fields appear? Determines how the Field Arrangement should be ordered
Will any documents be culled from the population before conducting review prioritization?
Determines if the All Documents Universe meets the project needs, or if a custom Review Universe should be created.
By what field value will batches be created? Determines which field values should be added as Workflows
What do I want to monitor to determine if the Determines which field values should be added as
Axcelerate 5: Case Manager User Guide
© 2016 Recommind, Inc. | Page 64
review strategy is efficient? Workflows
Which field values will be trained using Predictive Coding?
Determines which Workflows should be enabled for Predictive Coding
Generally, these are the steps necessary to set up a matter for review:
• Determine who needs access to the project and what each account type each user should have. Your project administrator can assist in user account creation once these determinations have been made.
• Decide how many levels of review the documents will need to go through before they are ready for production.
• Decide which fields should be associated with each of the levels of review, and what values each field should have.
• Determine the appropriate Review State for each level of review, e.g., First Pass Review Complete, Second Pass Review Complete, Fully Reviewed. Use of the default Review States is recommended, or custom ones may be set.
• Set up a field Arrangement for each level of review, and select the fields for display in each Arrangement. Order the fields as they should appear to reviewers, and associate the corresponding Review State to each one. If applicable, set security on the Arrangements, and designate Quick Tags.
• Define the query that will isolate the set of documents for review. For example, you may want to apply date filters or or exclude certain file types. Run the desired query in Analysis mode, and create a Universe of the results. If no criteria will be applied, plan to use the default All Documents Universe.
• Once the Universe is created, specify the field value(s) that will be the project Workflows, and add them to the Universe. Almost all projects will use the Responsive field value for review tracking, at a minimum. Predictive coding projects typically designate the Issue field values are as Workflows in addition to Responsive.
• If you want users to be able to automatically pull batches, decide what Review State each user should be able to pull documents from. Access the User to Review State configuration tool to make the appropriate associations.
• To take advantage of automatic batching, set up custom batching templates or modify the default templates to suit the project.
The following sections will walk you through these functions.
FIELDS Axcelerate 5 features pre-configured default fields useful for most reviews, as well as the ability to create fields.
• Default Review Fields: Responsive, Issue, Review Comment, Privilege, Redaction Notes • Special Default Fields: Review State, Workspace • Custom Field Types: Hierarchal, Single Value, Multi-value, Text
7.1 Create or Customize a Field To customize a default field or create one of your own, navigate to the Administration page > sub-page Fields and Values.
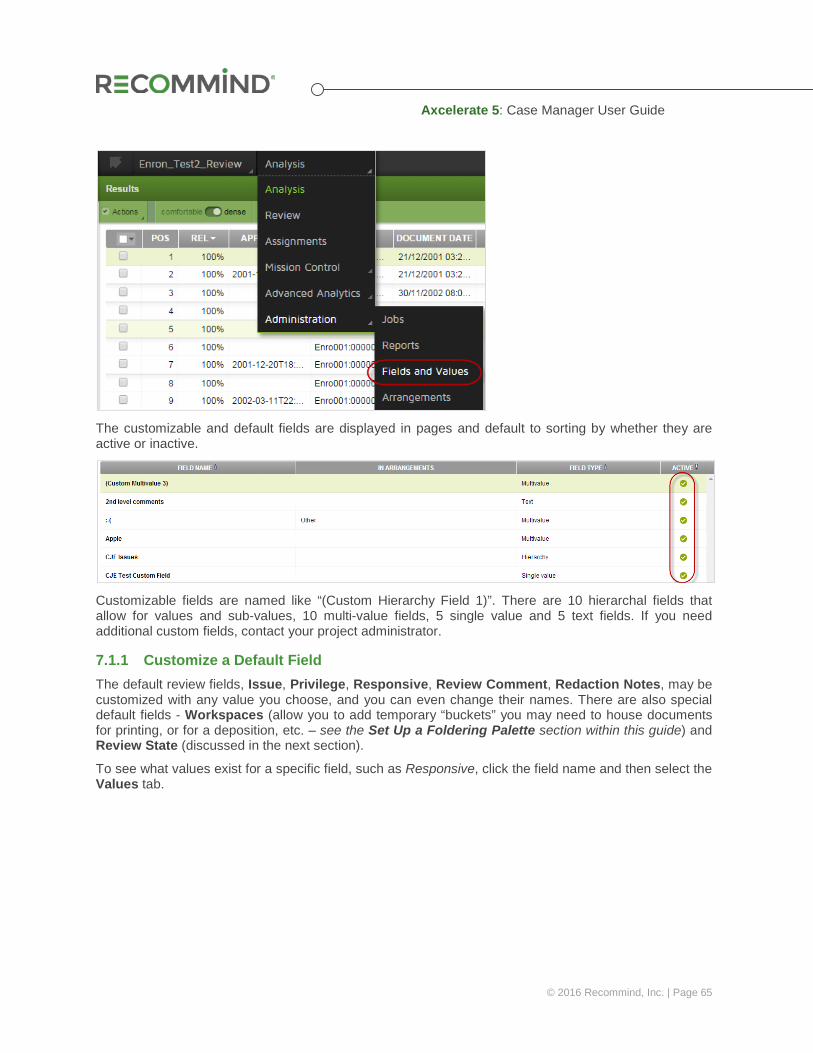
Axcelerate 5: Case Manager User Guide
© 2016 Recommind, Inc. | Page 65
The customizable and default fields are displayed in pages and default to sorting by whether they are active or inactive.
Customizable fields are named like “(Custom Hierarchy Field 1)”. There are 10 hierarchal fields that allow for values and sub-values, 10 multi-value fields, 5 single value and 5 text fields. If you need additional custom fields, contact your project administrator.
7.1.1 Customize a Default Field The default review fields, Issue, Privilege, Responsive, Review Comment, Redaction Notes, may be customized with any value you choose, and you can even change their names. There are also special default fields - Workspaces (allow you to add temporary “buckets” you may need to house documents for printing, or for a deposition, etc. – see the Set Up a Foldering Palette section within this guide) and Review State (discussed in the next section).
To see what values exist for a specific field, such as Responsive, click the field name and then select the Values tab.

Axcelerate 5: Case Manager User Guide
© 2016 Recommind, Inc. | Page 66
The Responsive field contains Yes and No values by default.
To add a value, click the plus icon beside the field name. Type in the new value name and click the green checkmark button to add it to the field.
To modify a value, hover on the value name and click the tool button when it appears. Select Rename, modify the value and then click the green checkmark to save it.
Similarly, to delete a value, hover on the value name and click the tool button when it appears. Select Delete. A warning message reminds you to use care when deleting values - if any documents have been tagged with the value, the tagging will be lost once the value is deleted. To cancel the deletion, click the Cancel button on the warning.

Axcelerate 5: Case Manager User Guide
© 2016 Recommind, Inc. | Page 67
You can order the values of any hierarchal, multi-value or single-value field with a simple drag-and-drop action. On the Values tab, hover over a value until a four-way arrow icon appears. Then you can move the value to its new position and drop it there.
The most frequently customized default field is the Issue field. Once you have a list of project-specific issue values, they can be easily added to the Issue field by clicking the Issue field name.
Select the Values tab. Click the plus button to the right of the Issues field name to add a new value, such as Price Gouging, and then click the green checkmark to save the new value.
Continue adding and editing values until the field looks the way you want it. Once you add or edit a value, a Preview window in the right panel shows you what the field will ultimately look like in the field Arrangement Reviewer users will tag.

Axcelerate 5: Case Manager User Guide
© 2016 Recommind, Inc. | Page 68
Once all changes have been made, click the Done button to return to the main field management page.
7.1.2 Make your Own Field Usually the default fields are sufficient for a project once the Issue field is customized, but sometimes new fields are needed.
On the Fields and Values page, select one of the fields containing a “Custom” prefix, which are empty fields available for customization. In the Field Type column, locate a “Custom” field that has the same Field Type as the new field being created, e.g., multi-value, single value. Click on the temporary field name to begin customizing the field.
On the Edit Field screen, modify the Field Name and check the Active box checked to allow the field to be visible to users.
To add the custom values, click the Values tab. Click the plus sign next to the field name and input the custom values. Click the green checkmark to the right of the field name to save the new value and then click Done at the bottom of the screen.

Axcelerate 5: Case Manager User Guide
© 2016 Recommind, Inc. | Page 69
The new field is now displayed in the field list alphabetically.
7.1.3 Add Workspace Values for Foldering Documents Create a Workspace by adding values to the default Workspaces field, as described above. Typically, Workspaces are used to tag documents to a container for administrative purposes (e.g., printing), as opposed to production tagging. Workspace values can be hierarchal – you can create sub-values under main values.
Smart Filters are available for the default fields upon project creation, so you can easily search on the values. Customized fields are automatically added as Smart Filters once activated. All fields can selected from the Column Picker to allow for sorting of the Results List.
There should be no more than 1000 workspaces per project. As a best practice, routinely delete obsolete workspaces.
7.2 Review State Review State is a special default field whose values are associated with field Arrangements and batches, to signify when a level of review is complete. The default values are First Pass Review Complete, Second Pass Review Complete and Fully Reviewed. You can create custom Review States by adding a value to the Review State field, as described above.
The Review State value is also used to affect batch security and guide workflow when Reviewers will be allowed to pull batches without repetitive, manual intervention from the Case Manager. To take advantage of the Pull Batches feature, you’ll need to connect the Reviewer users to the Review States from which they are authorized to pull batches. This is done via the Review State field > Reviewers tab. See the Pull Batches section below for full instructions on associating users to Review States.
Because of its special purpose, the Review State > Values tab looks different than other fields. There is an option to associate the Review State values with a Default Field Arrangement - any batches associated with the Review State display this field Arrangement, or coding pane, by default, even though others may be available. There is also a column that shows you what field Arrangements are associated with each Review State.
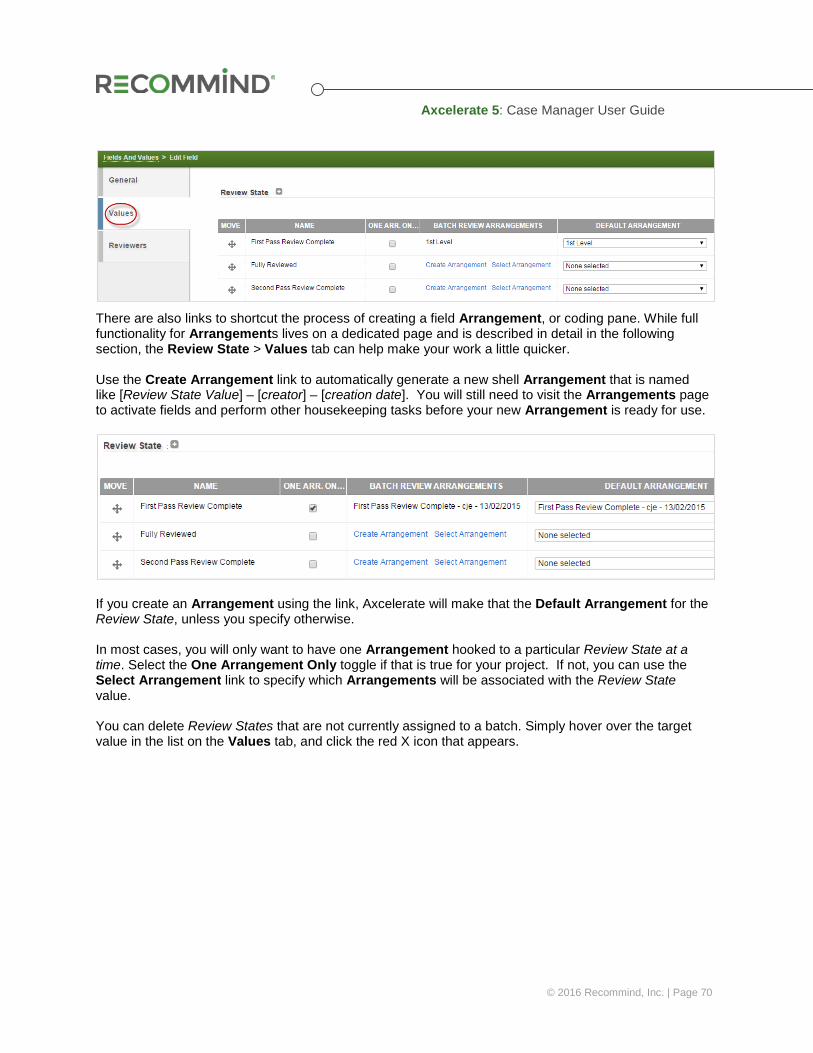
Axcelerate 5: Case Manager User Guide
© 2016 Recommind, Inc. | Page 70
There are also links to shortcut the process of creating a field Arrangement, or coding pane. While full functionality for Arrangements lives on a dedicated page and is described in detail in the following section, the Review State > Values tab can help make your work a little quicker. Use the Create Arrangement link to automatically generate a new shell Arrangement that is named like [Review State Value] – [creator] – [creation date]. You will still need to visit the Arrangements page to activate fields and perform other housekeeping tasks before your new Arrangement is ready for use.
If you create an Arrangement using the link, Axcelerate will make that the Default Arrangement for the Review State, unless you specify otherwise. In most cases, you will only want to have one Arrangement hooked to a particular Review State at a time. Select the One Arrangement Only toggle if that is true for your project. If not, you can use the Select Arrangement link to specify which Arrangements will be associated with the Review State value. You can delete Review States that are not currently assigned to a batch. Simply hover over the target value in the list on the Values tab, and click the red X icon that appears.
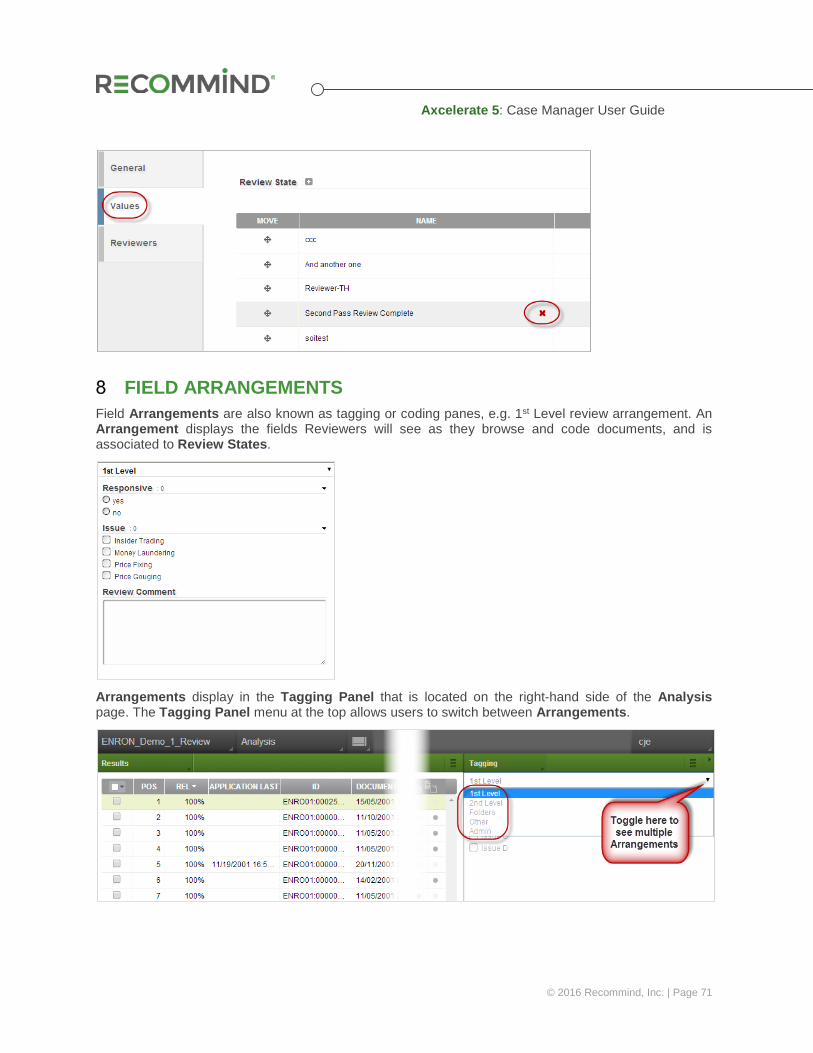
Axcelerate 5: Case Manager User Guide
© 2016 Recommind, Inc. | Page 71
FIELD ARRANGEMENTS Field Arrangements are also known as tagging or coding panes, e.g. 1st Level review arrangement. An Arrangement displays the fields Reviewers will see as they browse and code documents, and is associated to Review States.
Arrangements display in the Tagging Panel that is located on the right-hand side of the Analysis page. The Tagging Panel menu at the top allows users to switch between Arrangements.
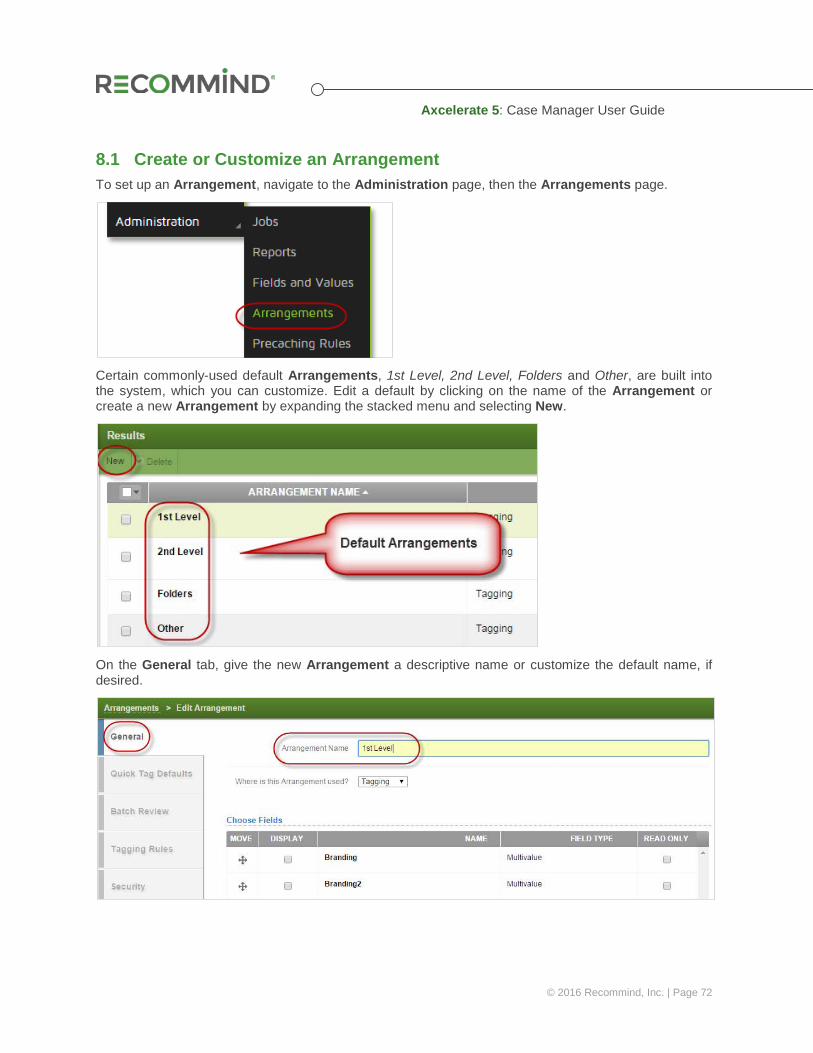
Axcelerate 5: Case Manager User Guide
© 2016 Recommind, Inc. | Page 72
8.1 Create or Customize an Arrangement To set up an Arrangement, navigate to the Administration page, then the Arrangements page.
Certain commonly-used default Arrangements, 1st Level, 2nd Level, Folders and Other, are built into the system, which you can customize. Edit a default by clicking on the name of the Arrangement or create a new Arrangement by expanding the stacked menu and selecting New.
On the General tab, give the new Arrangement a descriptive name or customize the default name, if desired.

Axcelerate 5: Case Manager User Guide
© 2016 Recommind, Inc. | Page 73
In the field list below, activate and order fields for the new arrangement. Check Display to make them visible and drag and drop in desired order. Check Read-Only if they should be visible in the Field Arrangement but not editable.
Click Apply to see a preview on the right, or Done to return to the main page.
8.2 Enable the Arrangement for Review and Set the Review State On the Batch Review tab, there are a few more important settings necessary to make the Arrangement work.
The Enable for Review setting at the very top is on by default for tagging arrangements - documents coded using the Arrangement will populate the Reviewed By filter, Tagged Doc icon in the Results List, and populate the target Review State filter associated with the batch.
Enable for Review should always be turned off for any Arrangements created for administrative purposes, so that any hard tagging does not populate those locations, which are used to track review progress.
On the Batch Review tab, you also associate Review States with the field Arrangement. In most cases, associating the Arrangement with only the target Review State is sufficient and recommended. Failure to associate a Review State will mean you can assign batches for Reviewers to pull based on a certain Review State, and they’ll be able to see the batches, but not the Arrangement.

Axcelerate 5: Case Manager User Guide
© 2016 Recommind, Inc. | Page 74
8.3 Set Up Tagging Rules You can set up tagging rules that define coding conditions a Reviewer must fulfill during review in order to save coding and navigate to the next document in their batch.
On the Tagging Rules tab, click New to start defining rules.
Within the Configure Tagging Rule form, the first step is to specify when the rule should be applied, i.e., the IF condition.
• When the user saves: Use this option when the rule simply applies when the Reviewer saves coding. For example, you want to set a rule that requires the Responsive field is coded before the user moves on.
• When the user saves and a field has certain values: Use this option if the rule is dependent on coding for specific fields and/or values. For example, you want to set a rule that specifies when Responsiveness = Yes, then the Issues field must be coded.
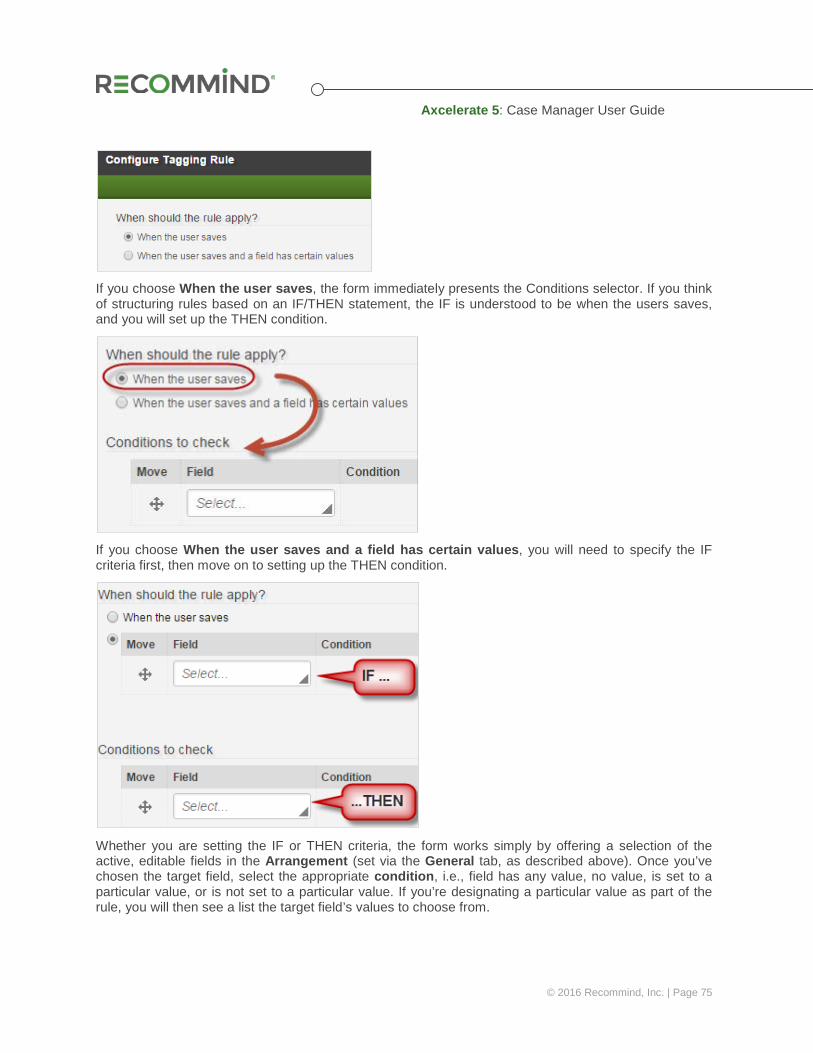
Axcelerate 5: Case Manager User Guide
© 2016 Recommind, Inc. | Page 75
If you choose When the user saves, the form immediately presents the Conditions selector. If you think of structuring rules based on an IF/THEN statement, the IF is understood to be when the users saves, and you will set up the THEN condition.
If you choose When the user saves and a field has certain values, you will need to specify the IF criteria first, then move on to setting up the THEN condition.
Whether you are setting the IF or THEN criteria, the form works simply by offering a selection of the active, editable fields in the Arrangement (set via the General tab, as described above). Once you’ve chosen the target field, select the appropriate condition, i.e., field has any value, no value, is set to a particular value, or is not set to a particular value. If you’re designating a particular value as part of the rule, you will then see a list the target field’s values to choose from.
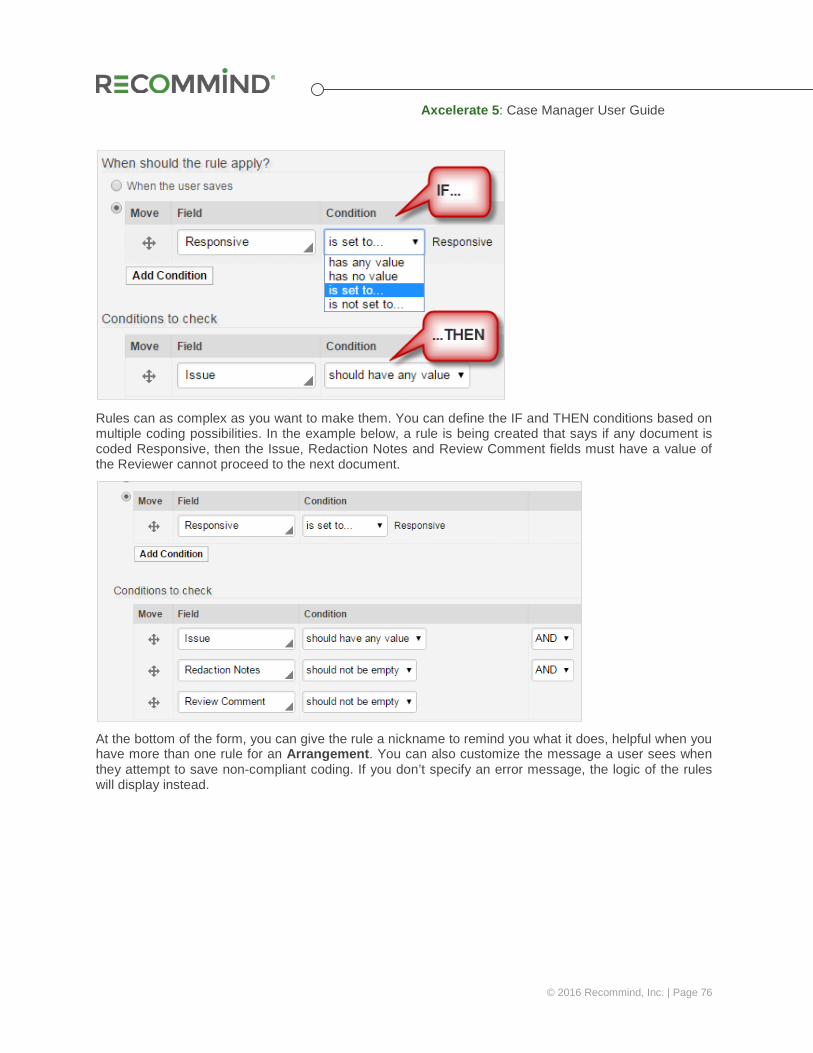
Axcelerate 5: Case Manager User Guide
© 2016 Recommind, Inc. | Page 76
Rules can as complex as you want to make them. You can define the IF and THEN conditions based on multiple coding possibilities. In the example below, a rule is being created that says if any document is coded Responsive, then the Issue, Redaction Notes and Review Comment fields must have a value of the Reviewer cannot proceed to the next document.
At the bottom of the form, you can give the rule a nickname to remind you what it does, helpful when you have more than one rule for an Arrangement. You can also customize the message a user sees when they attempt to save non-compliant coding. If you don’t specify an error message, the logic of the rules will display instead.

Axcelerate 5: Case Manager User Guide
© 2016 Recommind, Inc. | Page 77
As you build tagging rules, use the Summary panel on the right side of the form to check your logic. Click Save once everything looks correct. The rule will take effect as soon as you have closed the wizard.
Saved rules can be managed by the Case Manager from the Tagging Rules tab at any time.
The Tagging Rules tab also features a helpful tool to test out how your rules work together in the Arrangement. In the right panel, a mock-up of the Arrangement can be manipulated to ensure the intended effect of the rule is achieved. Try entering coding that should trigger the rule. The Test Rules panel will display the error indicators exactly as a Reviewer would see then in a live batch.

Axcelerate 5: Case Manager User Guide
© 2016 Recommind, Inc. | Page 78
Note that once a Tagging Rule is in place, you will be prevented from deleting fields and field values, or deactivating fields in the Arrangement that would undermine the Tagging Rule. For example, you cannot deactivate the Responsive field in an Arrangement if a pre-existing rule states the field must be coded in order for a Reviewer to proceed to the next document in a batch.
8.4 Set Up Quick Tags On the Quick Tag Defaults tab, you can set up global coding templates that can be used by anyone who has access to that Arrangement. This is optional.
At the top, the Include “Last” Quick Tag Default is checked – it offers an option to apply the tagging for the last coded doc to the current doc (it appears as a black L at the end of the other Quick Tags seen in review).
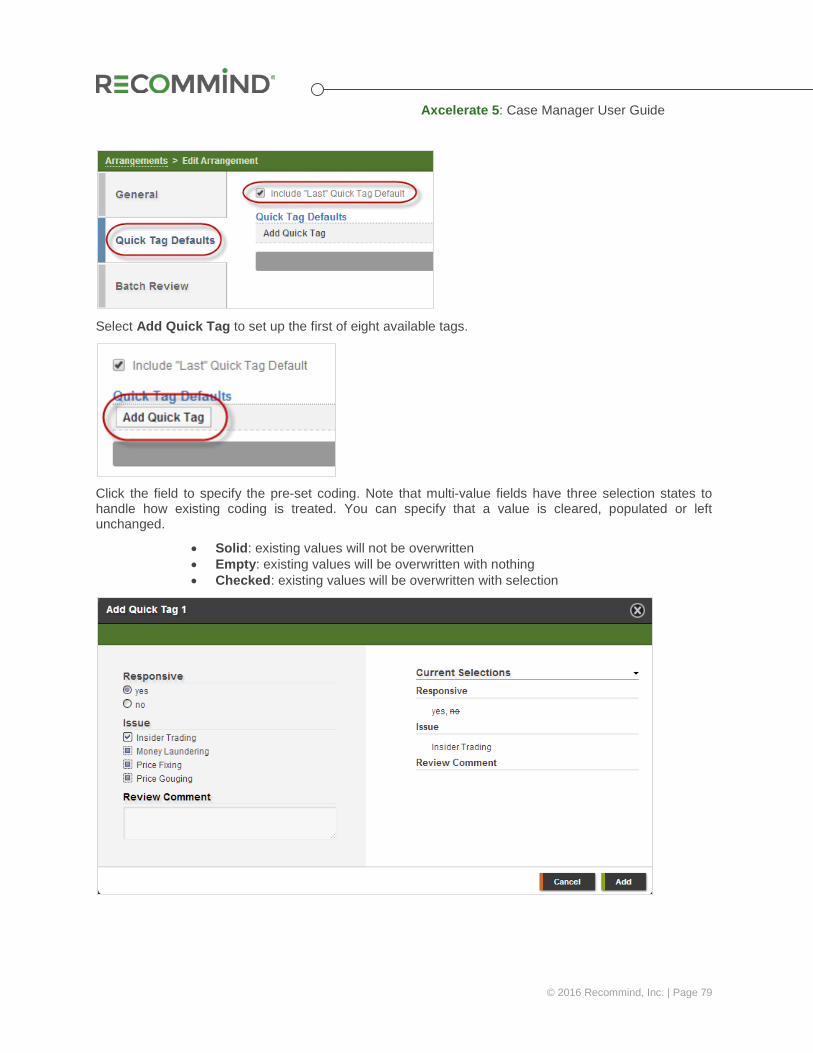
Axcelerate 5: Case Manager User Guide
© 2016 Recommind, Inc. | Page 79
Select Add Quick Tag to set up the first of eight available tags.
Click the field to specify the pre-set coding. Note that multi-value fields have three selection states to handle how existing coding is treated. You can specify that a value is cleared, populated or left unchanged.
• Solid: existing values will not be overwritten • Empty: existing values will be overwritten with nothing • Checked: existing values will be overwritten with selection
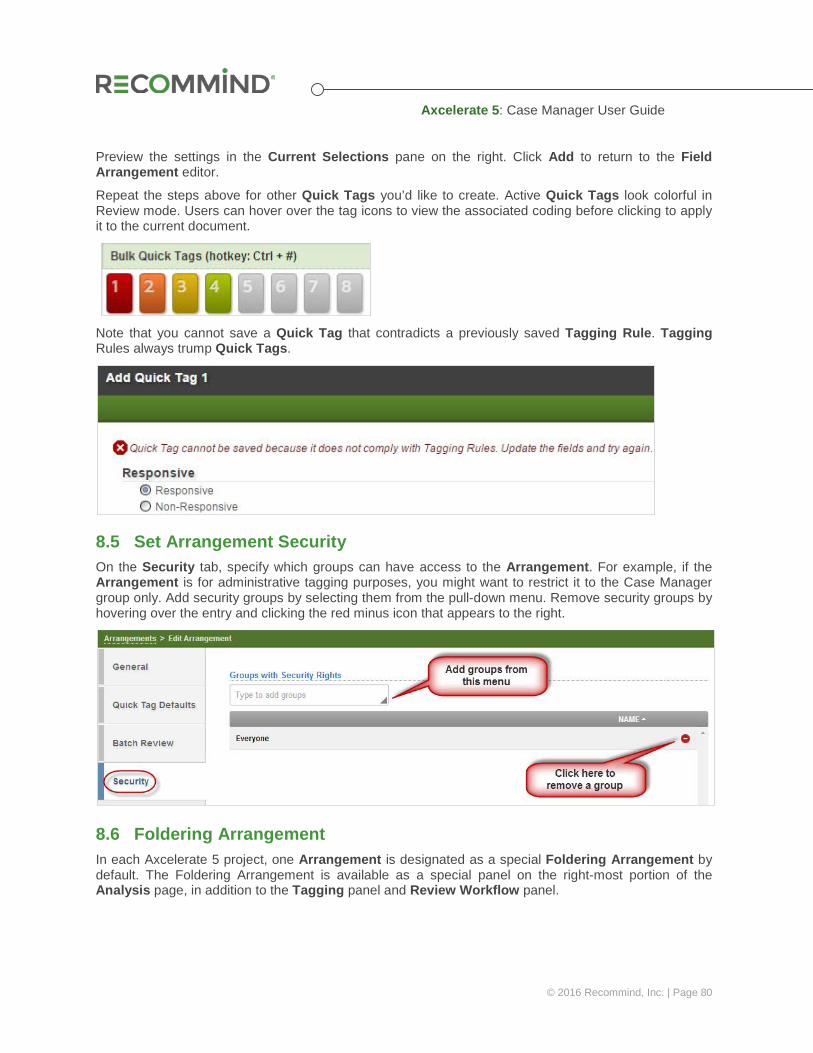
Axcelerate 5: Case Manager User Guide
© 2016 Recommind, Inc. | Page 80
Preview the settings in the Current Selections pane on the right. Click Add to return to the Field Arrangement editor.
Repeat the steps above for other Quick Tags you’d like to create. Active Quick Tags look colorful in Review mode. Users can hover over the tag icons to view the associated coding before clicking to apply it to the current document.
Note that you cannot save a Quick Tag that contradicts a previously saved Tagging Rule. Tagging Rules always trump Quick Tags.
8.5 Set Arrangement Security On the Security tab, specify which groups can have access to the Arrangement. For example, if the Arrangement is for administrative tagging purposes, you might want to restrict it to the Case Manager group only. Add security groups by selecting them from the pull-down menu. Remove security groups by hovering over the entry and clicking the red minus icon that appears to the right.
8.6 Foldering Arrangement In each Axcelerate 5 project, one Arrangement is designated as a special Foldering Arrangement by default. The Foldering Arrangement is available as a special panel on the right-most portion of the Analysis page, in addition to the Tagging panel and Review Workflow panel.
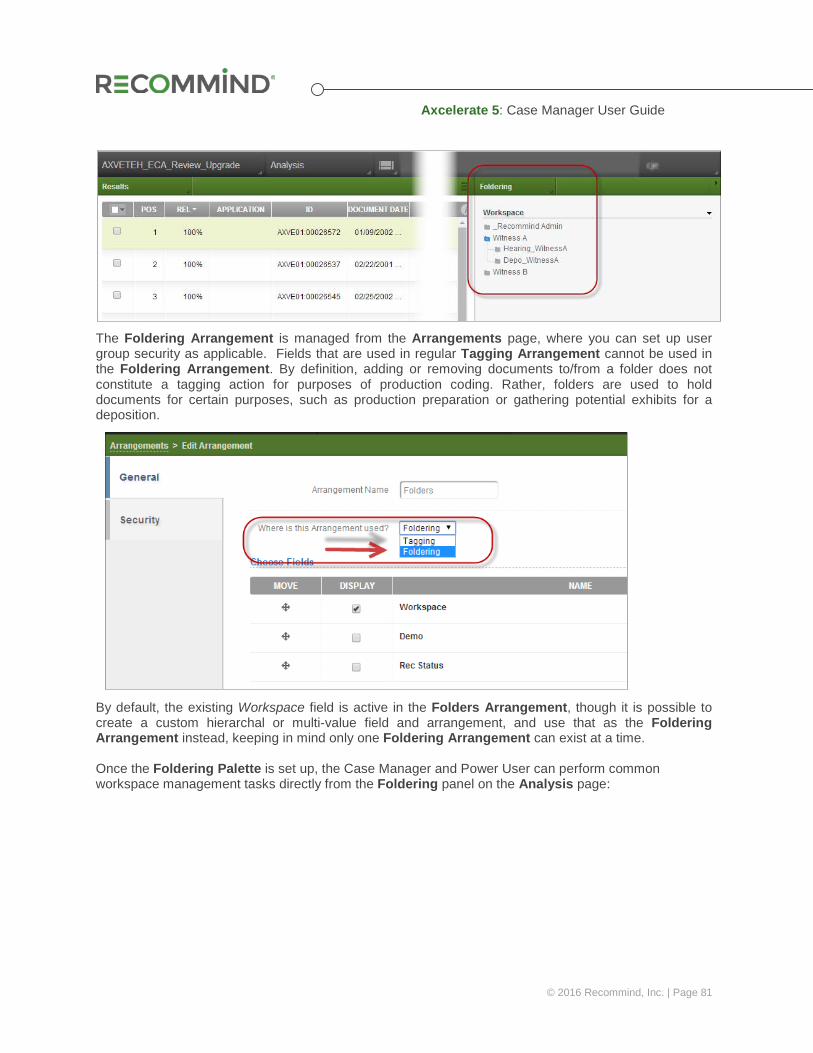
Axcelerate 5: Case Manager User Guide
© 2016 Recommind, Inc. | Page 81
The Foldering Arrangement is managed from the Arrangements page, where you can set up user group security as applicable. Fields that are used in regular Tagging Arrangement cannot be used in the Foldering Arrangement. By definition, adding or removing documents to/from a folder does not constitute a tagging action for purposes of production coding. Rather, folders are used to hold documents for certain purposes, such as production preparation or gathering potential exhibits for a deposition.
By default, the existing Workspace field is active in the Folders Arrangement, though it is possible to create a custom hierarchal or multi-value field and arrangement, and use that as the Foldering Arrangement instead, keeping in mind only one Foldering Arrangement can exist at a time. Once the Foldering Palette is set up, the Case Manager and Power User can perform common workspace management tasks directly from the Foldering panel on the Analysis page:

Axcelerate 5: Case Manager User Guide
© 2016 Recommind, Inc. | Page 82
• Add a new folder • Rename a folder • Add documents to a folder • Remove documents from a folder • Filter to the Results in a certain folder – this automatically applies a Smart Filter for the
Workspaces field, for the selected folder
Existing folders can be removed by the Case Manager via the Fields and Values tool.
Other user types have rights to add documents to, or remove documents from, existing folders. Power Users can also create new folders.
All users can filter to the results contained in a folder, which automatically applies a Smart Filter for the Workspaces field, for the selected folder.
To add a new top-level folder, hover near the top of the panel until the Add icon appears. Click it and type the name of your new top-level folder. Click the checkmark icon to finalize folder creation.
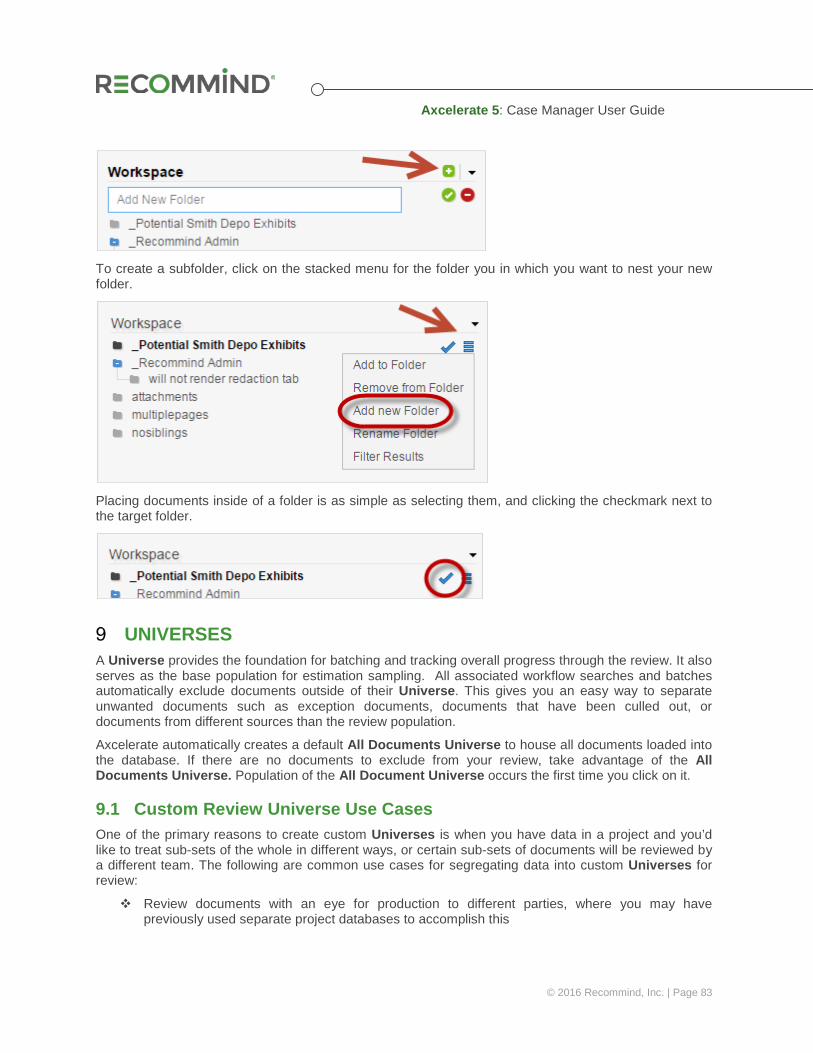
Axcelerate 5: Case Manager User Guide
© 2016 Recommind, Inc. | Page 83
To create a subfolder, click on the stacked menu for the folder you in which you want to nest your new folder.
Placing documents inside of a folder is as simple as selecting them, and clicking the checkmark next to the target folder.
UNIVERSES A Universe provides the foundation for batching and tracking overall progress through the review. It also serves as the base population for estimation sampling. All associated workflow searches and batches automatically exclude documents outside of their Universe. This gives you an easy way to separate unwanted documents such as exception documents, documents that have been culled out, or documents from different sources than the review population.
Axcelerate automatically creates a default All Documents Universe to house all documents loaded into the database. If there are no documents to exclude from your review, take advantage of the All Documents Universe. Population of the All Document Universe occurs the first time you click on it.
9.1 Custom Review Universe Use Cases One of the primary reasons to create custom Universes is when you have data in a project and you’d like to treat sub-sets of the whole in different ways, or certain sub-sets of documents will be reviewed by a different team. The following are common use cases for segregating data into custom Universes for review:
Review documents with an eye for production to different parties, where you may have previously used separate project databases to accomplish this
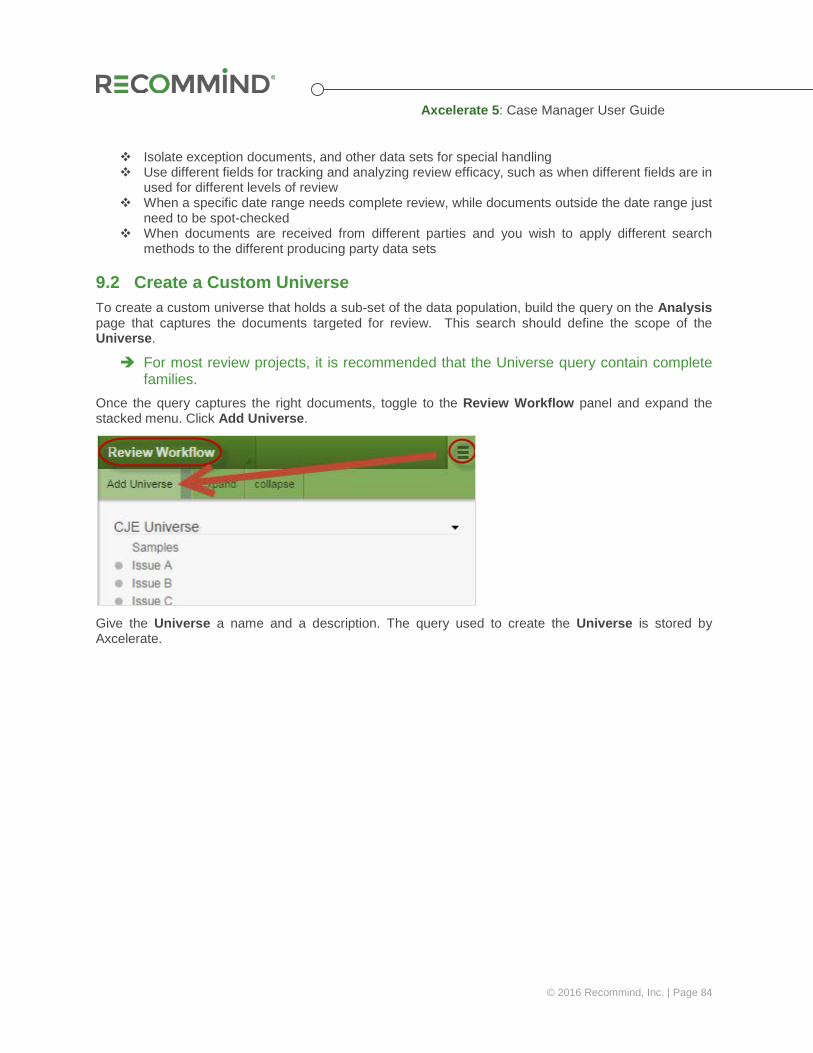
Axcelerate 5: Case Manager User Guide
© 2016 Recommind, Inc. | Page 84
Isolate exception documents, and other data sets for special handling Use different fields for tracking and analyzing review efficacy, such as when different fields are in
used for different levels of review When a specific date range needs complete review, while documents outside the date range just
need to be spot-checked When documents are received from different parties and you wish to apply different search
methods to the different producing party data sets
9.2 Create a Custom Universe To create a custom universe that holds a sub-set of the data population, build the query on the Analysis page that captures the documents targeted for review. This search should define the scope of the Universe.
For most review projects, it is recommended that the Universe query contain complete families.
Once the query captures the right documents, toggle to the Review Workflow panel and expand the stacked menu. Click Add Universe.
Give the Universe a name and a description. The query used to create the Universe is stored by Axcelerate.

Axcelerate 5: Case Manager User Guide
© 2016 Recommind, Inc. | Page 85
Click Add Universe to initiate creation.
Navigate to the Mission Control page. By default, the last Universe you accessed will be displayed. Use the toggle panel to view the new Universe.
9.3 Scope and Samples By default, each Universe has a Scope and Samples folder, or node, that contains a record of every update made to the Universe scope and each sample drawn in the course of review. The Scopes and Samples page is where you will perform many vital management functions.

Axcelerate 5: Case Manager User Guide
© 2016 Recommind, Inc. | Page 86
Click on Scopes and Samples to drill into the page. Notice that you can expand the node, and there is a sub-folder under which you can see details of each query run to update the scope of the Universe. The original query used to first create the Universe will display with the date and time of creation, plus the creator and review statistics.
All scope updates created for the Universe going forward will live under this folder, organized by date. While you are drilled into the Scopes and Samples page, expand the stacked menu to access tools for updating the scope of the universe and for creating samples.
When documents are added to a Universe, a Smart Filter called Workflows is populated so you can locate Universes via search.
9.3.1 Automatic and Manual Scope Updates If you add new documents to the project, you may want to update the scope of the Universe to draw any new documents that are responsive to the original query into your review population. This process reruns the query originally used to create the Universe.
Axcelerate re-runs the scope of the default All Documents Universe daily at midnight (server time). If the search detects new documents, an entry appears in the Scope and Samples node in the Scopes folder to help you track when the Universe expanded.
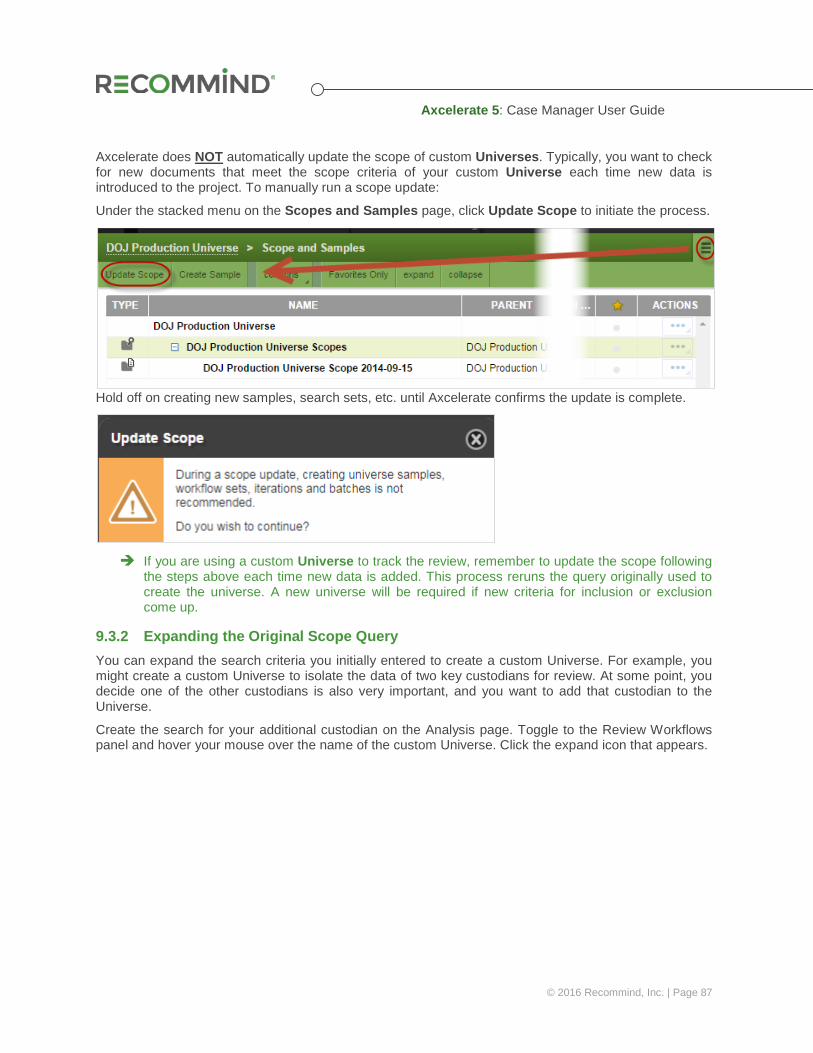
Axcelerate 5: Case Manager User Guide
© 2016 Recommind, Inc. | Page 87
Axcelerate does NOT automatically update the scope of custom Universes. Typically, you want to check for new documents that meet the scope criteria of your custom Universe each time new data is introduced to the project. To manually run a scope update:
Under the stacked menu on the Scopes and Samples page, click Update Scope to initiate the process.
Hold off on creating new samples, search sets, etc. until Axcelerate confirms the update is complete.
If you are using a custom Universe to track the review, remember to update the scope following
the steps above each time new data is added. This process reruns the query originally used to create the universe. A new universe will be required if new criteria for inclusion or exclusion come up.
9.3.2 Expanding the Original Scope Query You can expand the search criteria you initially entered to create a custom Universe. For example, you might create a custom Universe to isolate the data of two key custodians for review. At some point, you decide one of the other custodians is also very important, and you want to add that custodian to the Universe.
Create the search for your additional custodian on the Analysis page. Toggle to the Review Workflows panel and hover your mouse over the name of the custom Universe. Click the expand icon that appears.
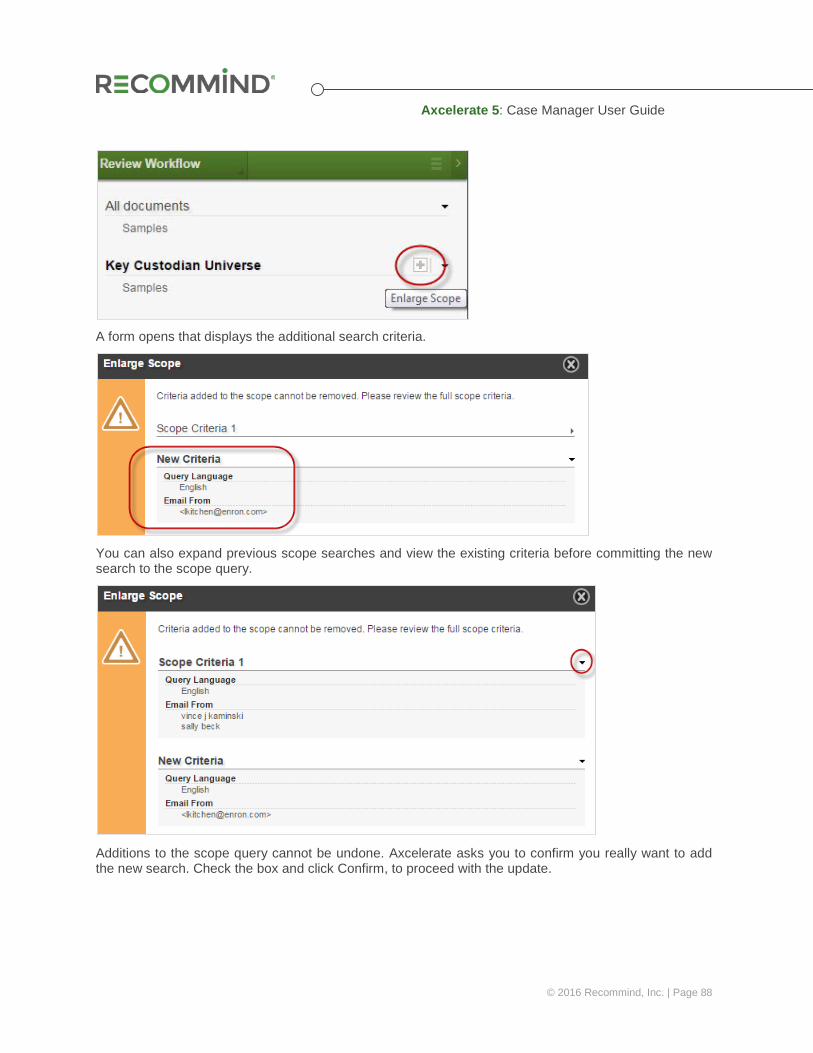
Axcelerate 5: Case Manager User Guide
© 2016 Recommind, Inc. | Page 88
A form opens that displays the additional search criteria.
You can also expand previous scope searches and view the existing criteria before committing the new search to the scope query.
Additions to the scope query cannot be undone. Axcelerate asks you to confirm you really want to add the new search. Check the box and click Confirm, to proceed with the update.
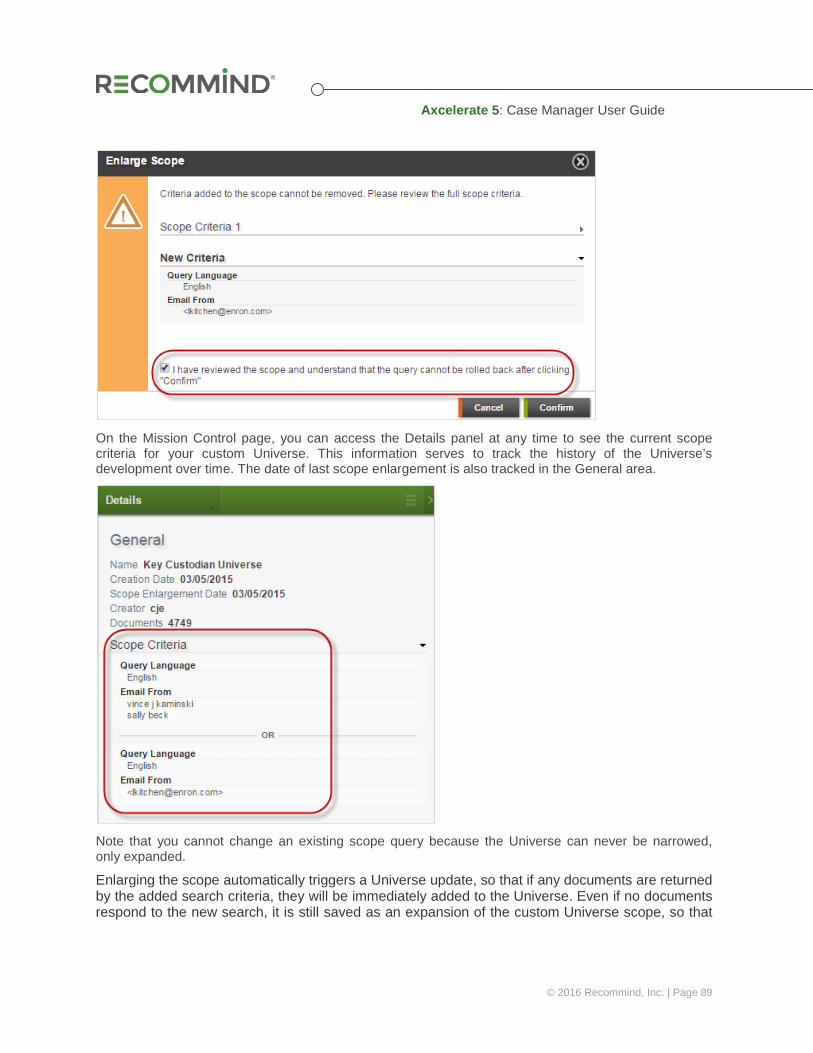
Axcelerate 5: Case Manager User Guide
© 2016 Recommind, Inc. | Page 89
On the Mission Control page, you can access the Details panel at any time to see the current scope criteria for your custom Universe. This information serves to track the history of the Universe’s development over time. The date of last scope enlargement is also tracked in the General area.
Note that you cannot change an existing scope query because the Universe can never be narrowed, only expanded.
Enlarging the scope automatically triggers a Universe update, so that if any documents are returned by the added search criteria, they will be immediately added to the Universe. Even if no documents respond to the new search, it is still saved as an expansion of the custom Universe scope, so that
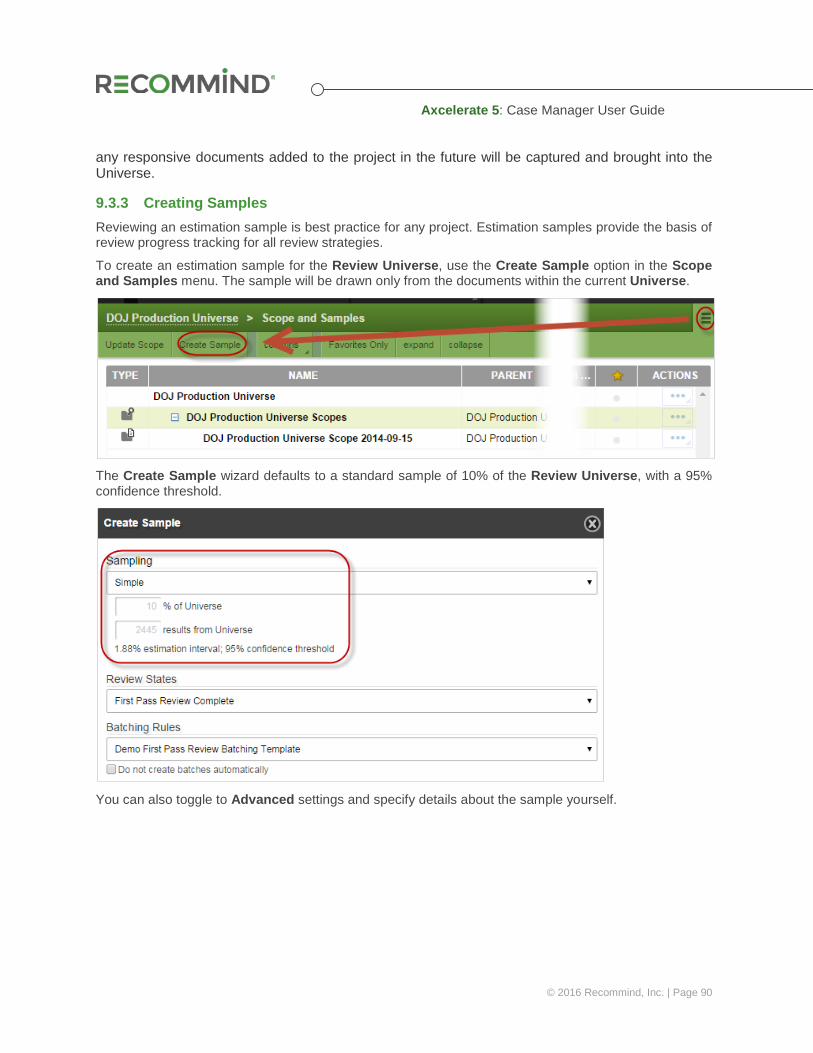
Axcelerate 5: Case Manager User Guide
© 2016 Recommind, Inc. | Page 90
any responsive documents added to the project in the future will be captured and brought into the Universe.
9.3.3 Creating Samples Reviewing an estimation sample is best practice for any project. Estimation samples provide the basis of review progress tracking for all review strategies.
To create an estimation sample for the Review Universe, use the Create Sample option in the Scope and Samples menu. The sample will be drawn only from the documents within the current Universe.
The Create Sample wizard defaults to a standard sample of 10% of the Review Universe, with a 95% confidence threshold.
You can also toggle to Advanced settings and specify details about the sample yourself.
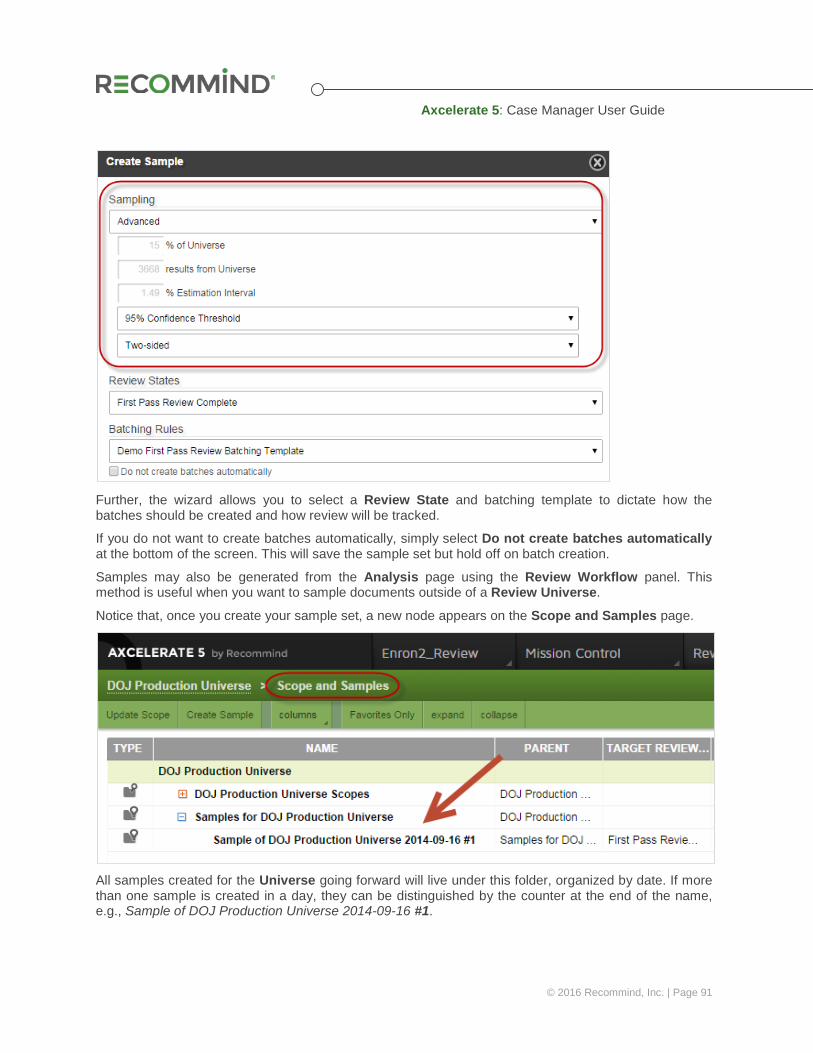
Axcelerate 5: Case Manager User Guide
© 2016 Recommind, Inc. | Page 91
Further, the wizard allows you to select a Review State and batching template to dictate how the batches should be created and how review will be tracked.
If you do not want to create batches automatically, simply select Do not create batches automatically at the bottom of the screen. This will save the sample set but hold off on batch creation.
Samples may also be generated from the Analysis page using the Review Workflow panel. This method is useful when you want to sample documents outside of a Review Universe.
Notice that, once you create your sample set, a new node appears on the Scope and Samples page.
All samples created for the Universe going forward will live under this folder, organized by date. If more than one sample is created in a day, they can be distinguished by the counter at the end of the name, e.g., Sample of DOJ Production Universe 2014-09-16 #1.
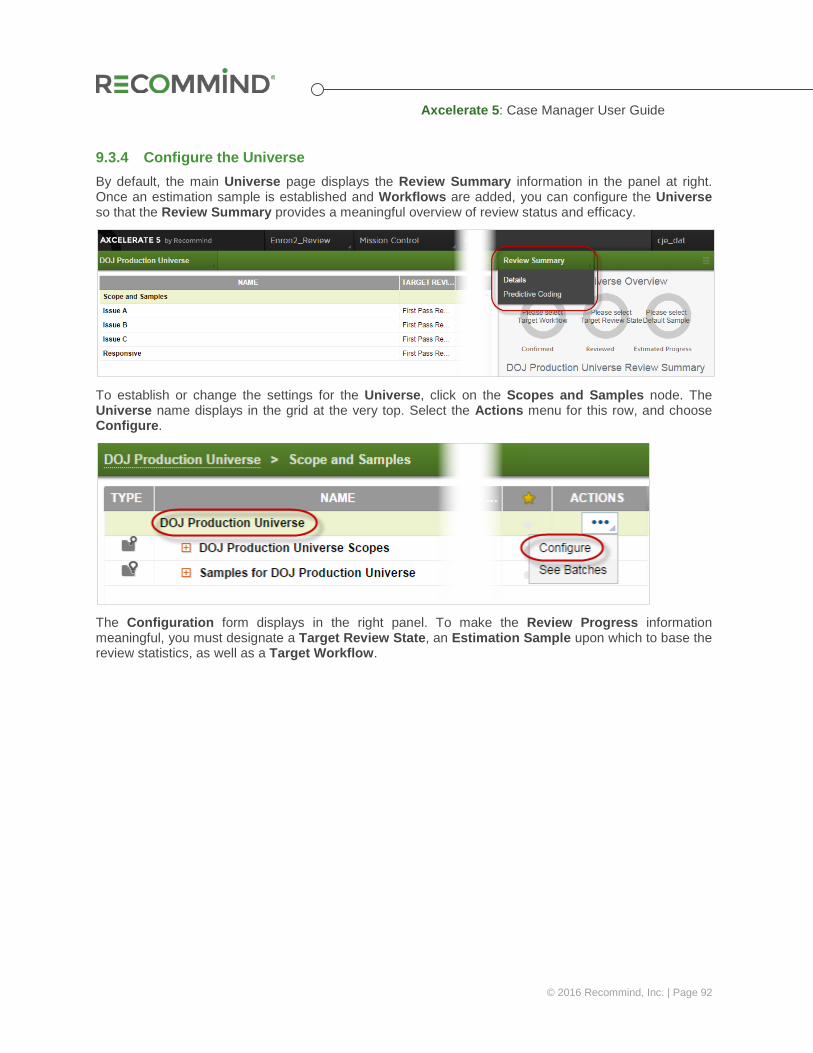
Axcelerate 5: Case Manager User Guide
© 2016 Recommind, Inc. | Page 92
9.3.4 Configure the Universe By default, the main Universe page displays the Review Summary information in the panel at right. Once an estimation sample is established and Workflows are added, you can configure the Universe so that the Review Summary provides a meaningful overview of review status and efficacy.
To establish or change the settings for the Universe, click on the Scopes and Samples node. The Universe name displays in the grid at the very top. Select the Actions menu for this row, and choose Configure.
The Configuration form displays in the right panel. To make the Review Progress information meaningful, you must designate a Target Review State, an Estimation Sample upon which to base the review statistics, as well as a Target Workflow.
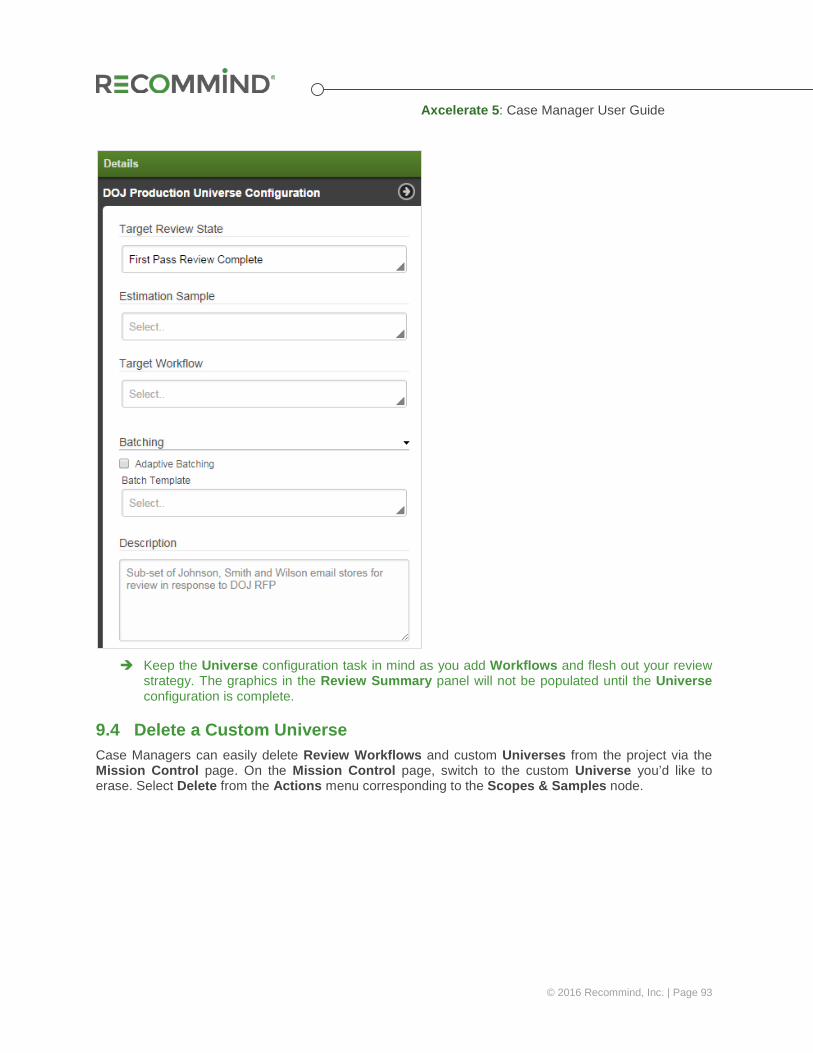
Axcelerate 5: Case Manager User Guide
© 2016 Recommind, Inc. | Page 93
Keep the Universe configuration task in mind as you add Workflows and flesh out your review
strategy. The graphics in the Review Summary panel will not be populated until the Universe configuration is complete.
9.4 Delete a Custom Universe Case Managers can easily delete Review Workflows and custom Universes from the project via the Mission Control page. On the Mission Control page, switch to the custom Universe you’d like to erase. Select Delete from the Actions menu corresponding to the Scopes & Samples node.
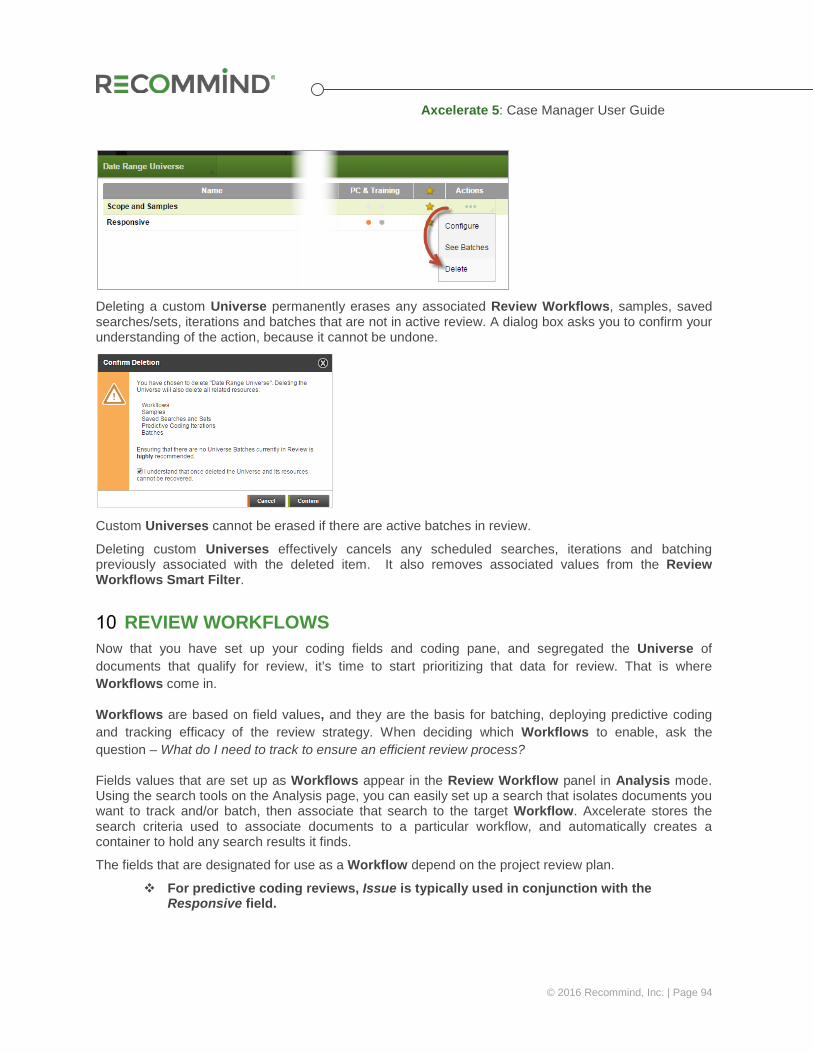
Axcelerate 5: Case Manager User Guide
© 2016 Recommind, Inc. | Page 94
Deleting a custom Universe permanently erases any associated Review Workflows, samples, saved searches/sets, iterations and batches that are not in active review. A dialog box asks you to confirm your understanding of the action, because it cannot be undone.
Custom Universes cannot be erased if there are active batches in review.
Deleting custom Universes effectively cancels any scheduled searches, iterations and batching previously associated with the deleted item. It also removes associated values from the Review Workflows Smart Filter.
REVIEW WORKFLOWS Now that you have set up your coding fields and coding pane, and segregated the Universe of documents that qualify for review, it’s time to start prioritizing that data for review. That is where Workflows come in.
Workflows are based on field values, and they are the basis for batching, deploying predictive coding and tracking efficacy of the review strategy. When deciding which Workflows to enable, ask the question – What do I need to track to ensure an efficient review process?
Fields values that are set up as Workflows appear in the Review Workflow panel in Analysis mode. Using the search tools on the Analysis page, you can easily set up a search that isolates documents you want to track and/or batch, then associate that search to the target Workflow. Axcelerate stores the search criteria used to associate documents to a particular workflow, and automatically creates a container to hold any search results it finds.
The fields that are designated for use as a Workflow depend on the project review plan.
For predictive coding reviews, Issue is typically used in conjunction with the Responsive field.
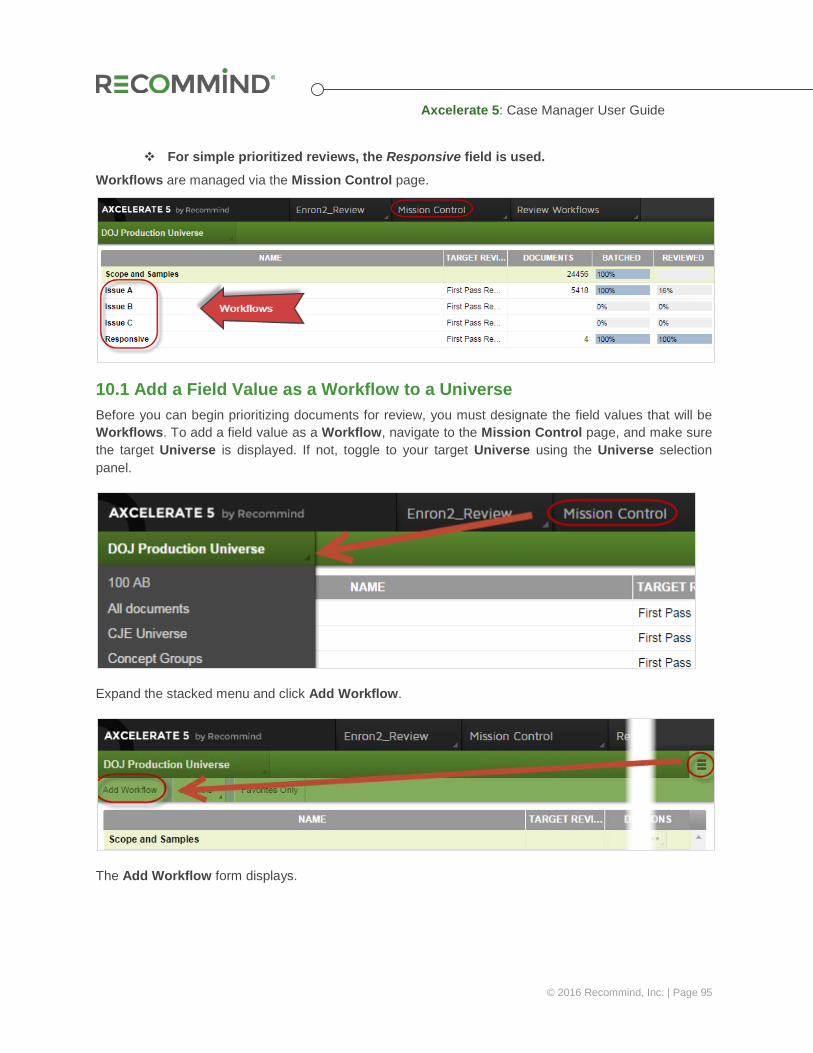
Axcelerate 5: Case Manager User Guide
© 2016 Recommind, Inc. | Page 95
For simple prioritized reviews, the Responsive field is used.
Workflows are managed via the Mission Control page.
10.1 Add a Field Value as a Workflow to a Universe Before you can begin prioritizing documents for review, you must designate the field values that will be Workflows. To add a field value as a Workflow, navigate to the Mission Control page, and make sure the target Universe is displayed. If not, toggle to your target Universe using the Universe selection panel.
Expand the stacked menu and click Add Workflow.
The Add Workflow form displays.
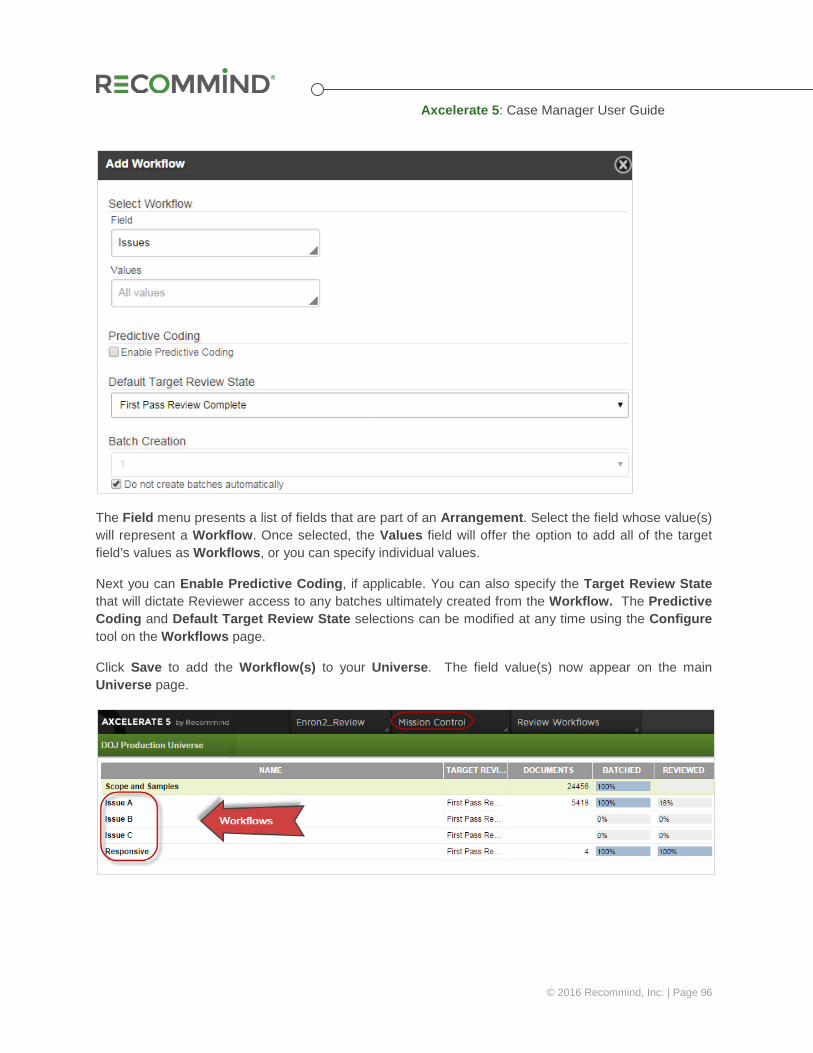
Axcelerate 5: Case Manager User Guide
© 2016 Recommind, Inc. | Page 96
The Field menu presents a list of fields that are part of an Arrangement. Select the field whose value(s) will represent a Workflow. Once selected, the Values field will offer the option to add all of the target field’s values as Workflows, or you can specify individual values.
Next you can Enable Predictive Coding, if applicable. You can also specify the Target Review State that will dictate Reviewer access to any batches ultimately created from the Workflow. The Predictive Coding and Default Target Review State selections can be modified at any time using the Configure tool on the Workflows page.
Click Save to add the Workflow(s) to your Universe. The field value(s) now appear on the main Universe page.

Axcelerate 5: Case Manager User Guide
© 2016 Recommind, Inc. | Page 97
Click on a Workflow to drill into the details page for that particular Workflow. In the right-hand pane, you can toggle between the Details and the Predictive Coding panels to see configuration information and statistics for the Workflow.
If an estimation sample has been associated with the Universe, that sample will always appear at the top of the grid in the Workflows drill-in page, so that you can easily compare the confirmation rate of the sample versus the Workflow Sets and Iterations, as they are added and reviewed.
10.2 Manage a Review Workflow To change or set configurations for the Workflow, click on the Actions menu > Configure from the drill-in page, on the main Workflow row.
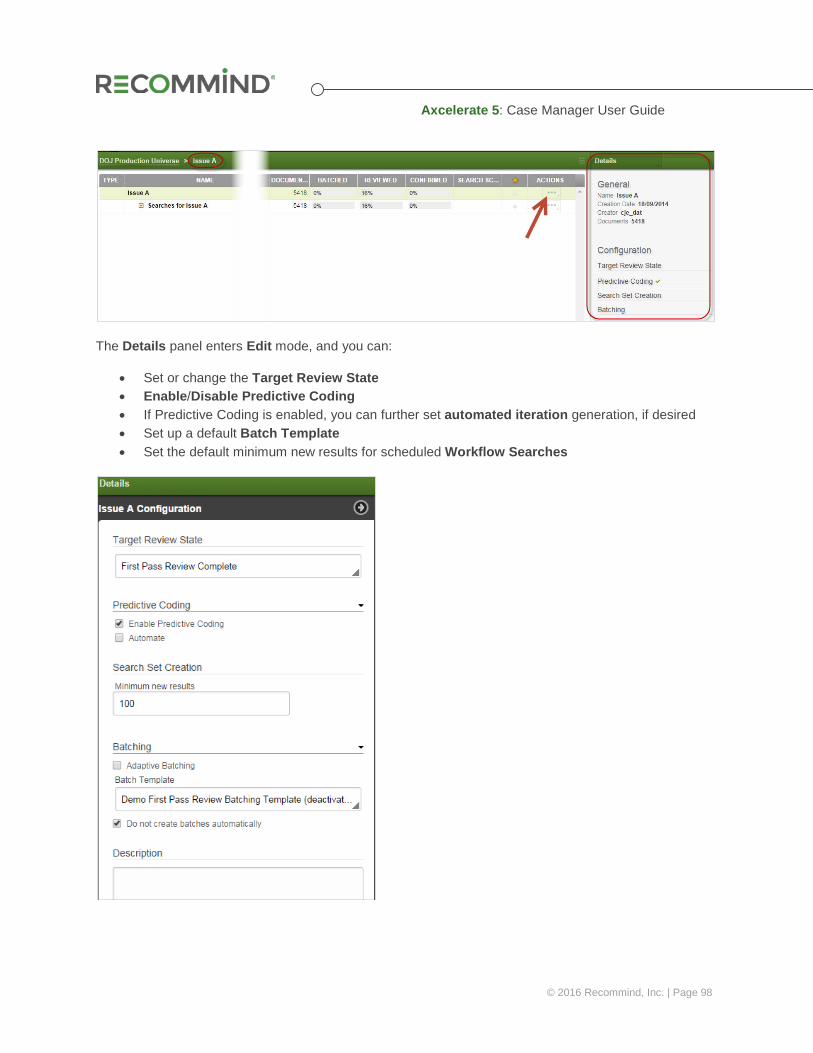
Axcelerate 5: Case Manager User Guide
© 2016 Recommind, Inc. | Page 98
The Details panel enters Edit mode, and you can:
• Set or change the Target Review State • Enable/Disable Predictive Coding • If Predictive Coding is enabled, you can further set automated iteration generation, if desired • Set up a default Batch Template • Set the default minimum new results for scheduled Workflow Searches
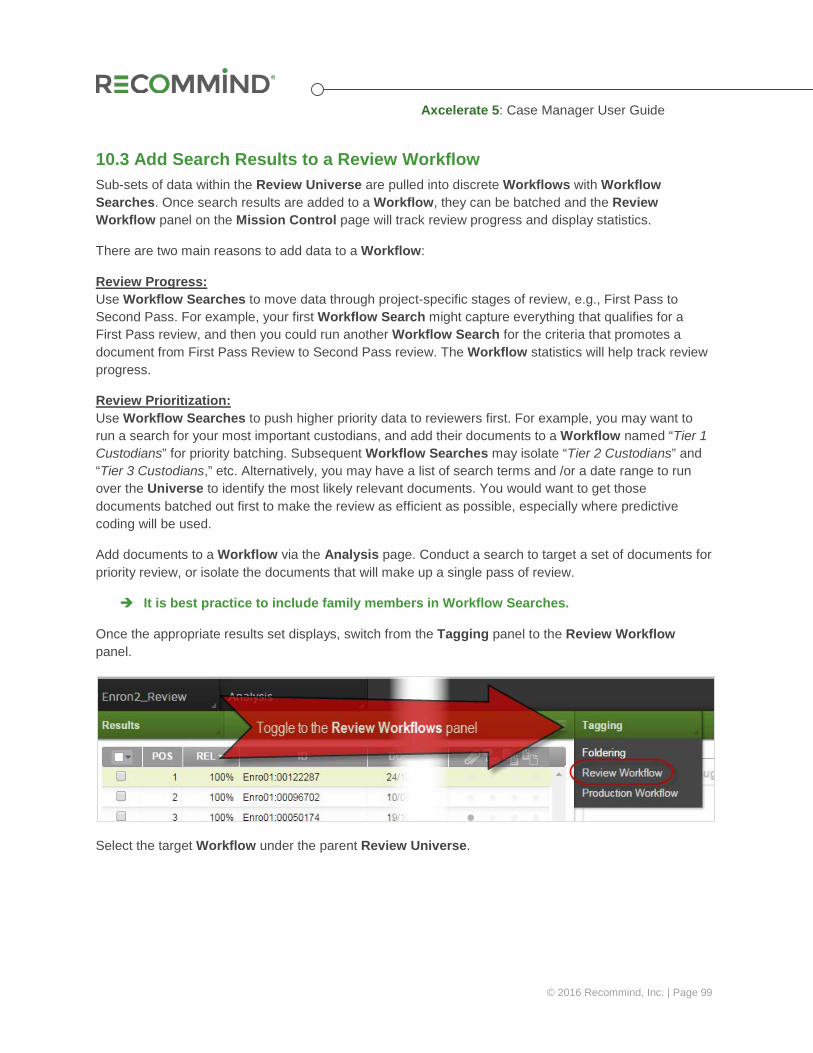
Axcelerate 5: Case Manager User Guide
© 2016 Recommind, Inc. | Page 99
10.3 Add Search Results to a Review Workflow Sub-sets of data within the Review Universe are pulled into discrete Workflows with Workflow Searches. Once search results are added to a Workflow, they can be batched and the Review Workflow panel on the Mission Control page will track review progress and display statistics.
There are two main reasons to add data to a Workflow:
Review Progress: Use Workflow Searches to move data through project-specific stages of review, e.g., First Pass to Second Pass. For example, your first Workflow Search might capture everything that qualifies for a First Pass review, and then you could run another Workflow Search for the criteria that promotes a document from First Pass Review to Second Pass review. The Workflow statistics will help track review progress.
Review Prioritization: Use Workflow Searches to push higher priority data to reviewers first. For example, you may want to run a search for your most important custodians, and add their documents to a Workflow named “Tier 1 Custodians” for priority batching. Subsequent Workflow Searches may isolate “Tier 2 Custodians” and “Tier 3 Custodians,” etc. Alternatively, you may have a list of search terms and /or a date range to run over the Universe to identify the most likely relevant documents. You would want to get those documents batched out first to make the review as efficient as possible, especially where predictive coding will be used.
Add documents to a Workflow via the Analysis page. Conduct a search to target a set of documents for priority review, or isolate the documents that will make up a single pass of review.
It is best practice to include family members in Workflow Searches.
Once the appropriate results set displays, switch from the Tagging panel to the Review Workflow panel.
Select the target Workflow under the parent Review Universe.
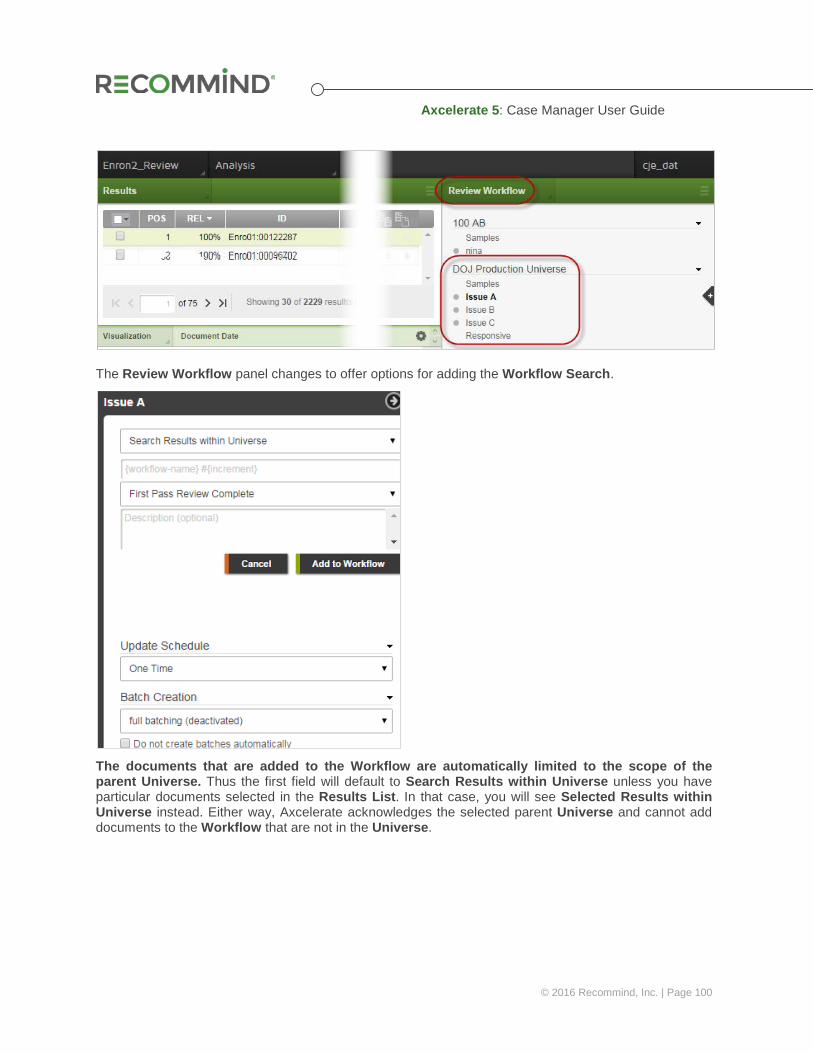
Axcelerate 5: Case Manager User Guide
© 2016 Recommind, Inc. | Page 100
The Review Workflow panel changes to offer options for adding the Workflow Search.
The documents that are added to the Workflow are automatically limited to the scope of the parent Universe. Thus the first field will default to Search Results within Universe unless you have particular documents selected in the Results List. In that case, you will see Selected Results within Universe instead. Either way, Axcelerate acknowledges the selected parent Universe and cannot add documents to the Workflow that are not in the Universe.
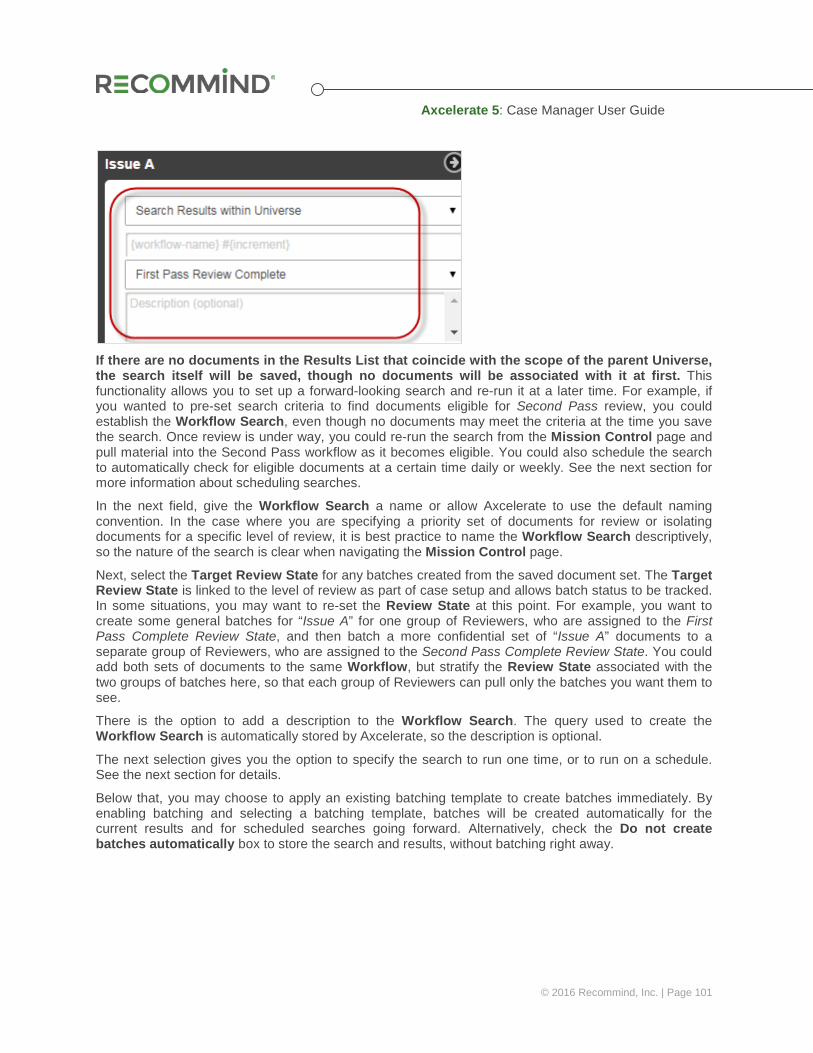
Axcelerate 5: Case Manager User Guide
© 2016 Recommind, Inc. | Page 101
If there are no documents in the Results List that coincide with the scope of the parent Universe, the search itself will be saved, though no documents will be associated with it at first. This functionality allows you to set up a forward-looking search and re-run it at a later time. For example, if you wanted to pre-set search criteria to find documents eligible for Second Pass review, you could establish the Workflow Search, even though no documents may meet the criteria at the time you save the search. Once review is under way, you could re-run the search from the Mission Control page and pull material into the Second Pass workflow as it becomes eligible. You could also schedule the search to automatically check for eligible documents at a certain time daily or weekly. See the next section for more information about scheduling searches.
In the next field, give the Workflow Search a name or allow Axcelerate to use the default naming convention. In the case where you are specifying a priority set of documents for review or isolating documents for a specific level of review, it is best practice to name the Workflow Search descriptively, so the nature of the search is clear when navigating the Mission Control page.
Next, select the Target Review State for any batches created from the saved document set. The Target Review State is linked to the level of review as part of case setup and allows batch status to be tracked. In some situations, you may want to re-set the Review State at this point. For example, you want to create some general batches for “Issue A” for one group of Reviewers, who are assigned to the First Pass Complete Review State, and then batch a more confidential set of “Issue A” documents to a separate group of Reviewers, who are assigned to the Second Pass Complete Review State. You could add both sets of documents to the same Workflow, but stratify the Review State associated with the two groups of batches here, so that each group of Reviewers can pull only the batches you want them to see.
There is the option to add a description to the Workflow Search. The query used to create the Workflow Search is automatically stored by Axcelerate, so the description is optional.
The next selection gives you the option to specify the search to run one time, or to run on a schedule. See the next section for details.
Below that, you may choose to apply an existing batching template to create batches immediately. By enabling batching and selecting a batching template, batches will be created automatically for the current results and for scheduled searches going forward. Alternatively, check the Do not create batches automatically box to store the search and results, without batching right away.
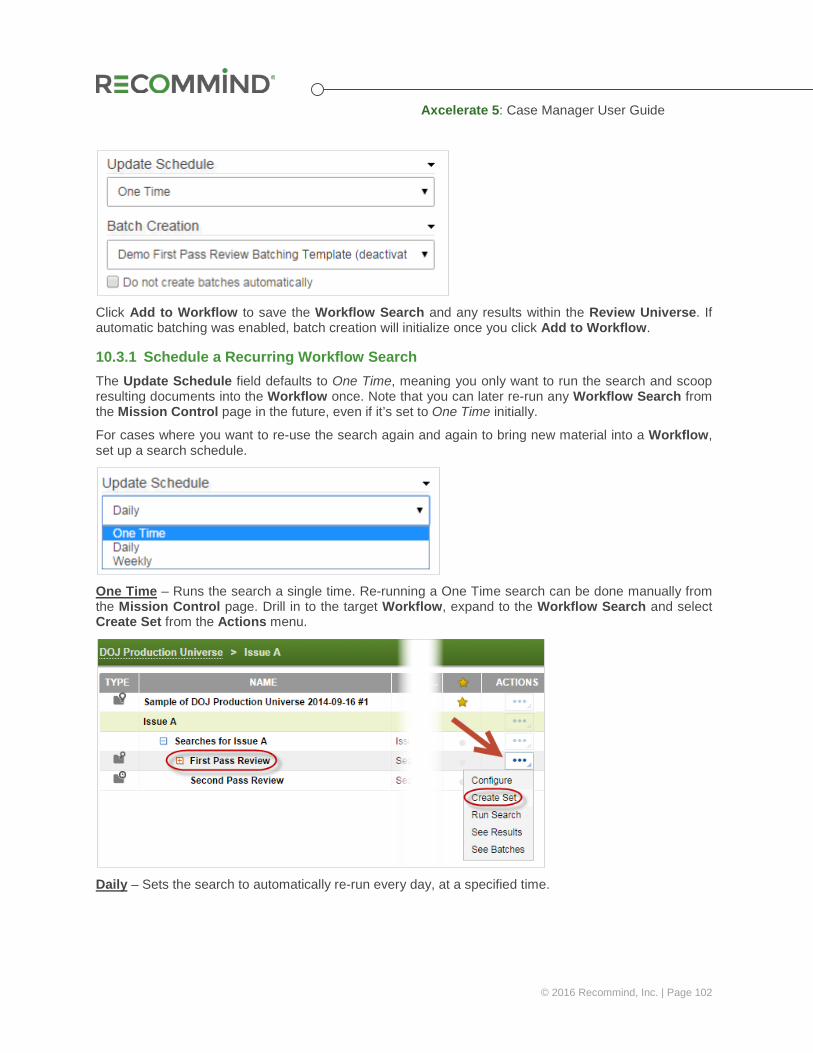
Axcelerate 5: Case Manager User Guide
© 2016 Recommind, Inc. | Page 102
Click Add to Workflow to save the Workflow Search and any results within the Review Universe. If automatic batching was enabled, batch creation will initialize once you click Add to Workflow.
10.3.1 Schedule a Recurring Workflow Search The Update Schedule field defaults to One Time, meaning you only want to run the search and scoop resulting documents into the Workflow once. Note that you can later re-run any Workflow Search from the Mission Control page in the future, even if it’s set to One Time initially.
For cases where you want to re-use the search again and again to bring new material into a Workflow, set up a search schedule.
One Time – Runs the search a single time. Re-running a One Time search can be done manually from the Mission Control page. Drill in to the target Workflow, expand to the Workflow Search and select Create Set from the Actions menu.
Daily – Sets the search to automatically re-run every day, at a specified time.
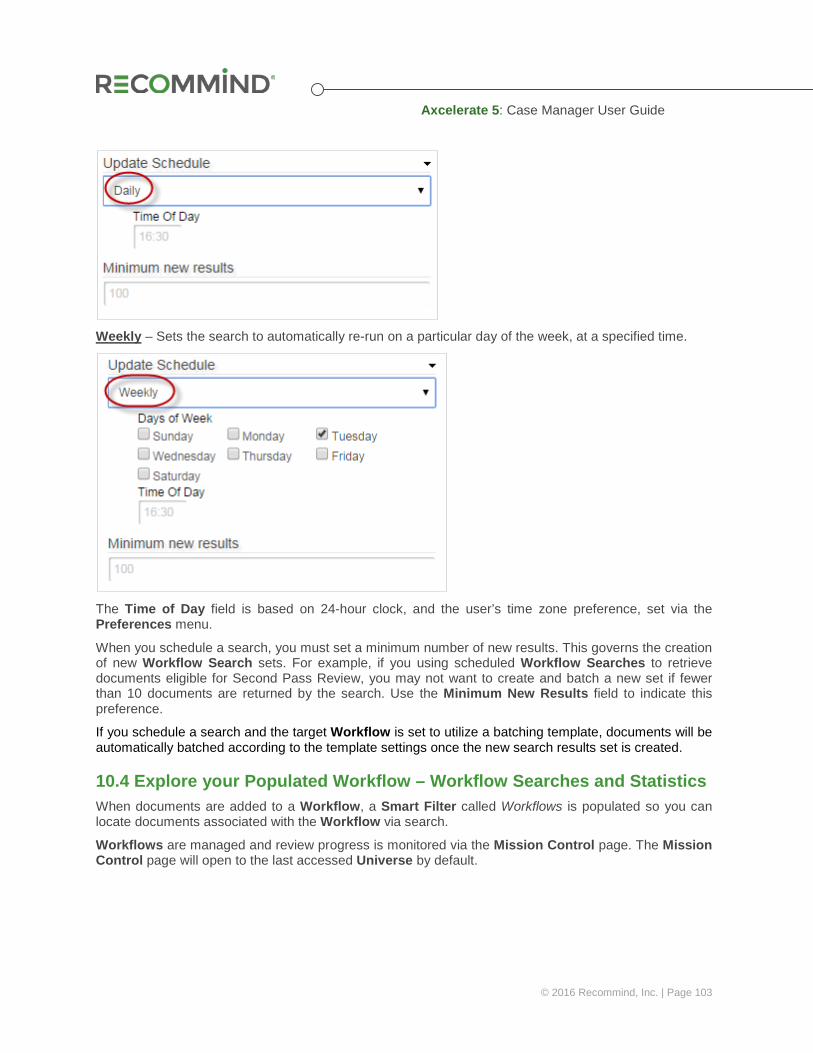
Axcelerate 5: Case Manager User Guide
© 2016 Recommind, Inc. | Page 103
Weekly – Sets the search to automatically re-run on a particular day of the week, at a specified time.
The Time of Day field is based on 24-hour clock, and the user’s time zone preference, set via the Preferences menu.
When you schedule a search, you must set a minimum number of new results. This governs the creation of new Workflow Search sets. For example, if you using scheduled Workflow Searches to retrieve documents eligible for Second Pass Review, you may not want to create and batch a new set if fewer than 10 documents are returned by the search. Use the Minimum New Results field to indicate this preference.
If you schedule a search and the target Workflow is set to utilize a batching template, documents will be automatically batched according to the template settings once the new search results set is created.
10.4 Explore your Populated Workflow – Workflow Searches and Statistics When documents are added to a Workflow, a Smart Filter called Workflows is populated so you can locate documents associated with the Workflow via search.
Workflows are managed and review progress is monitored via the Mission Control page. The Mission Control page will open to the last accessed Universe by default.
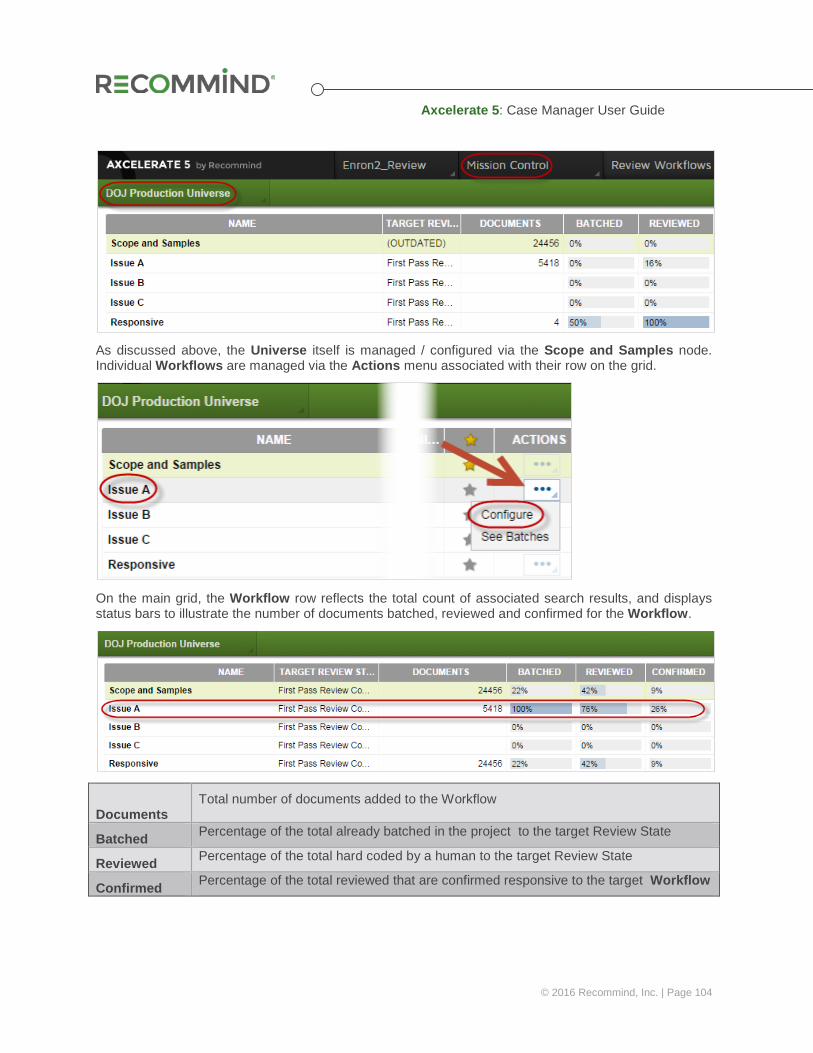
Axcelerate 5: Case Manager User Guide
© 2016 Recommind, Inc. | Page 104
As discussed above, the Universe itself is managed / configured via the Scope and Samples node. Individual Workflows are managed via the Actions menu associated with their row on the grid.
On the main grid, the Workflow row reflects the total count of associated search results, and displays status bars to illustrate the number of documents batched, reviewed and confirmed for the Workflow.
Documents
Total number of documents added to the Workflow
Batched Percentage of the total already batched in the project to the target Review State
Reviewed Percentage of the total hard coded by a human to the target Review State
Confirmed Percentage of the total reviewed that are confirmed responsive to the target Workflow
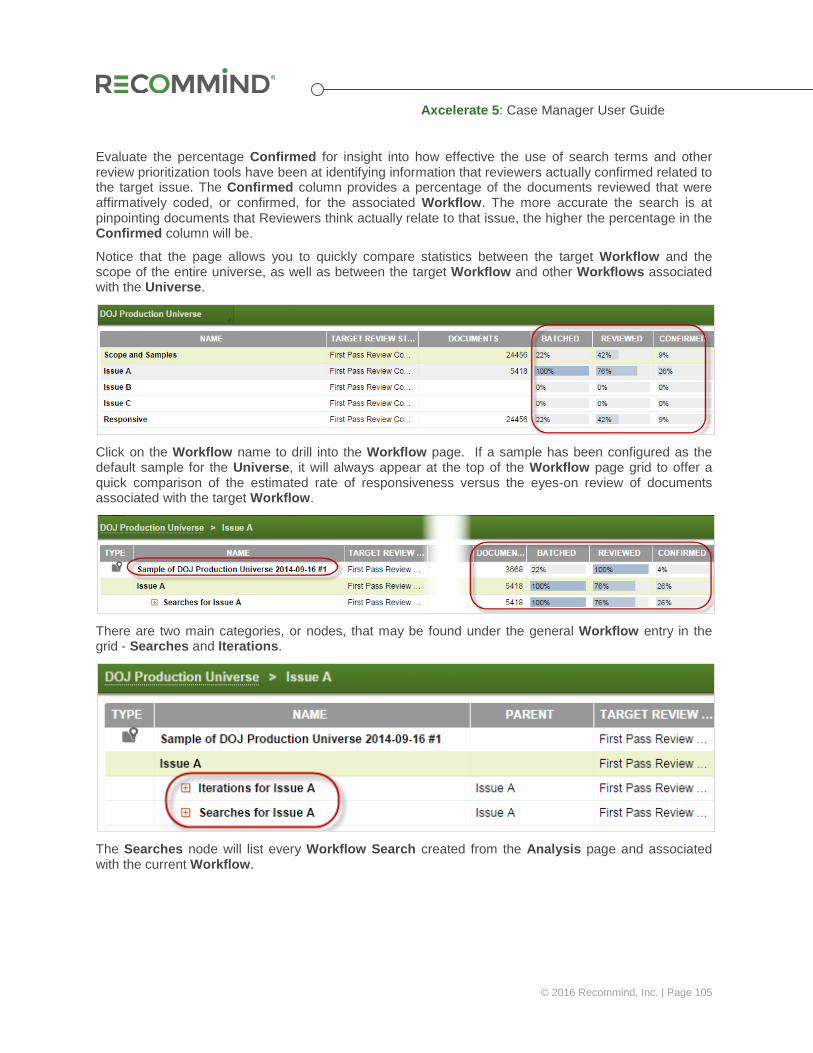
Axcelerate 5: Case Manager User Guide
© 2016 Recommind, Inc. | Page 105
Evaluate the percentage Confirmed for insight into how effective the use of search terms and other review prioritization tools have been at identifying information that reviewers actually confirmed related to the target issue. The Confirmed column provides a percentage of the documents reviewed that were affirmatively coded, or confirmed, for the associated Workflow. The more accurate the search is at pinpointing documents that Reviewers think actually relate to that issue, the higher the percentage in the Confirmed column will be.
Notice that the page allows you to quickly compare statistics between the target Workflow and the scope of the entire universe, as well as between the target Workflow and other Workflows associated with the Universe.
Click on the Workflow name to drill into the Workflow page. If a sample has been configured as the default sample for the Universe, it will always appear at the top of the Workflow page grid to offer a quick comparison of the estimated rate of responsiveness versus the eyes-on review of documents associated with the target Workflow.
There are two main categories, or nodes, that may be found under the general Workflow entry in the grid - Searches and Iterations.
The Searches node will list every Workflow Search created from the Analysis page and associated with the current Workflow.
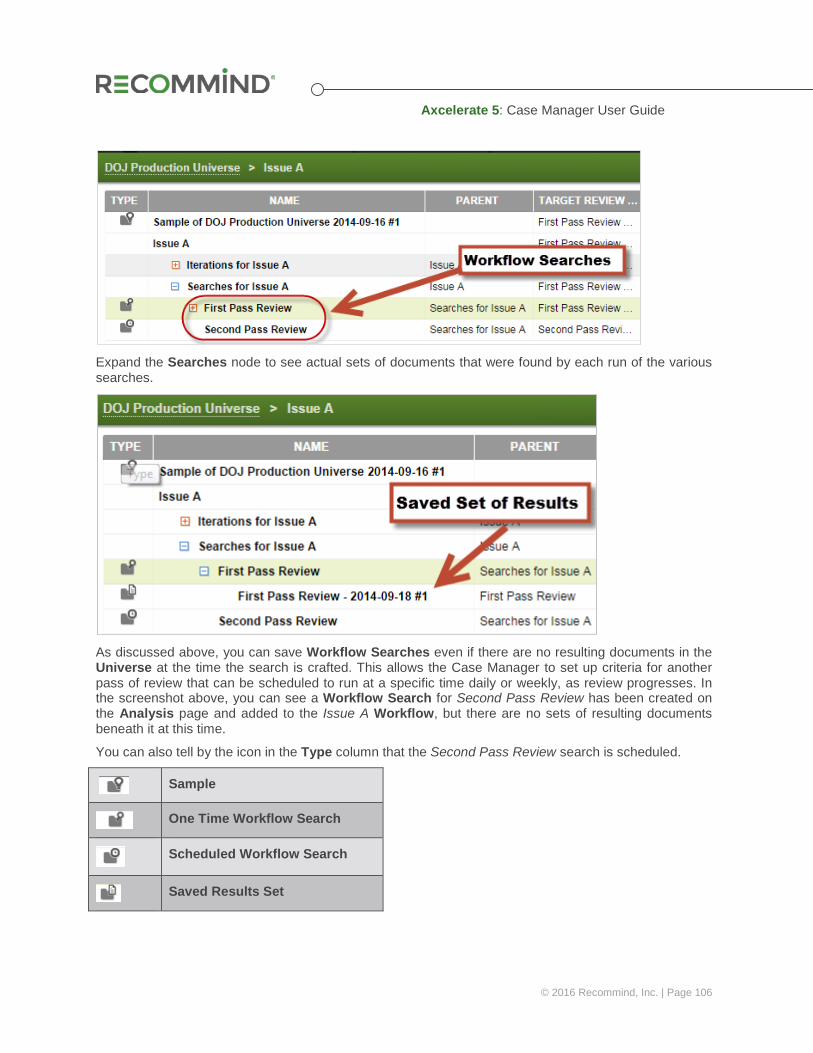
Axcelerate 5: Case Manager User Guide
© 2016 Recommind, Inc. | Page 106
Expand the Searches node to see actual sets of documents that were found by each run of the various searches.
As discussed above, you can save Workflow Searches even if there are no resulting documents in the Universe at the time the search is crafted. This allows the Case Manager to set up criteria for another pass of review that can be scheduled to run at a specific time daily or weekly, as review progresses. In the screenshot above, you can see a Workflow Search for Second Pass Review has been created on the Analysis page and added to the Issue A Workflow, but there are no sets of resulting documents beneath it at this time.
You can also tell by the icon in the Type column that the Second Pass Review search is scheduled.
Sample
One Time Workflow Search
Scheduled Workflow Search
Saved Results Set
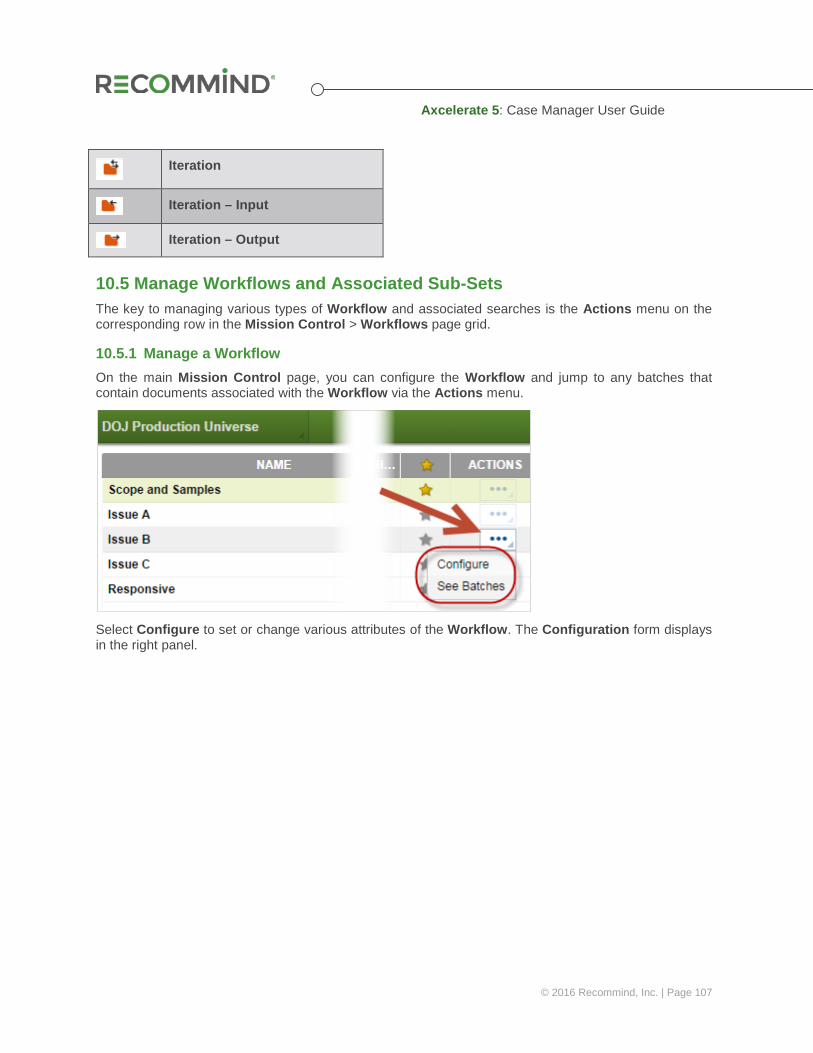
Axcelerate 5: Case Manager User Guide
© 2016 Recommind, Inc. | Page 107
Iteration
Iteration – Input
Iteration – Output
10.5 Manage Workflows and Associated Sub-Sets The key to managing various types of Workflow and associated searches is the Actions menu on the corresponding row in the Mission Control > Workflows page grid.
10.5.1 Manage a Workflow On the main Mission Control page, you can configure the Workflow and jump to any batches that contain documents associated with the Workflow via the Actions menu.
Select Configure to set or change various attributes of the Workflow. The Configuration form displays in the right panel.

Axcelerate 5: Case Manager User Guide
© 2016 Recommind, Inc. | Page 108
To make the Review Progress information meaningful, you will want to designate a Target Review State for the Workflow. This can be changed at any point in the review, such as when you are transitioning focus from First Pass to Second Pass review. The progress statistics for the Workflow will update based upon your selection here.
If you enabled Predictive Coding when you first added the Workflow to the Universe, you can disable it via the Configuration panel or enable it as appropriate. This is also where you can set up automation of training iterations on the Workflow – discussed below.
When scheduling searches, a threshold for Minimum New Results must be set to avoid creation of search sets and batches that are too small to be efficient. The minimum can be set at different thresholds for each scheduled search.
Adaptive Batching allows you to take search scheduling up a notch by specifying an upper or lower confirmation threshold that dictates auto-batching behavior. Adaptive Batching must be used in conjunction with an incremental batching template, where you specify a small percentage of a saved set of documents to be batched and then evaluate the Confirmation Rate post-review to determine if the results warrant batching more of the set, or further refining the search criteria.
Set up a default batching template for searches associated with the Workflow. Note, you will likely want to update this configuration as your focus shifts through the various levels of review.
10.5.2 Manage Workflow Searches You can configure all the way down to the Workflow Search Set level for maximum flexibility in setting up the review. The ability to configure individual sets allows you to set up some as scheduled searches, while leaving others static. You can also specify different batching templates or automate training in different ways for different Workflow Searches and Iterations. Again, the key is accessing the Actions menu from the appropriate row in the grid.
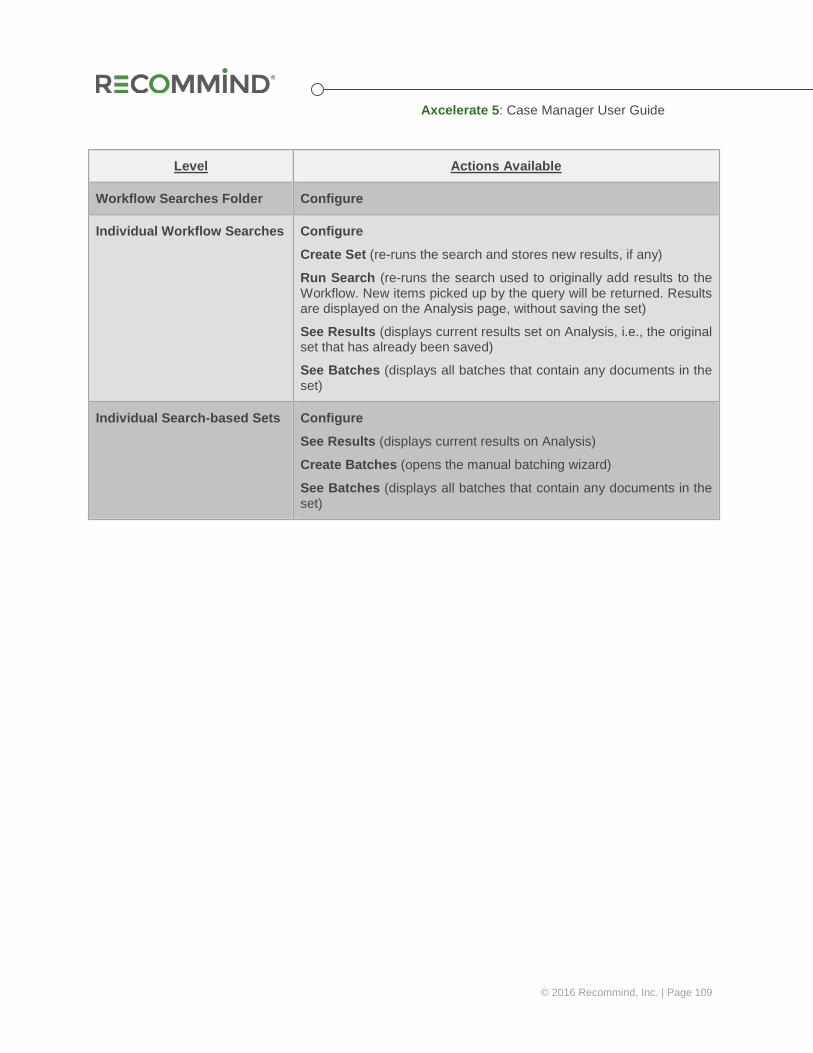
Axcelerate 5: Case Manager User Guide
© 2016 Recommind, Inc. | Page 109
Level Actions Available
Workflow Searches Folder Configure
Individual Workflow Searches Configure
Create Set (re-runs the search and stores new results, if any)
Run Search (re-runs the search used to originally add results to the Workflow. New items picked up by the query will be returned. Results are displayed on the Analysis page, without saving the set)
See Results (displays current results set on Analysis, i.e., the original set that has already been saved)
See Batches (displays all batches that contain any documents in the set)
Individual Search-based Sets Configure
See Results (displays current results on Analysis)
Create Batches (opens the manual batching wizard)
See Batches (displays all batches that contain any documents in the set)
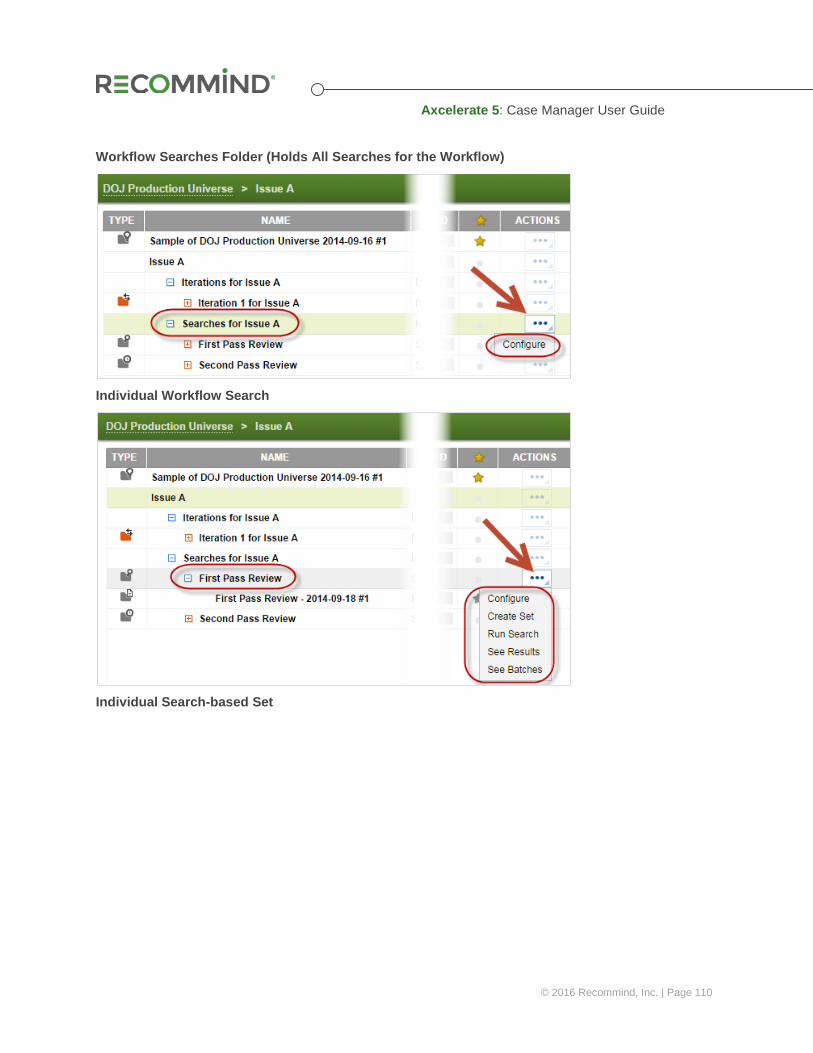
Axcelerate 5: Case Manager User Guide
© 2016 Recommind, Inc. | Page 110
Workflow Searches Folder (Holds All Searches for the Workflow)
Individual Workflow Search
Individual Search-based Set

Axcelerate 5: Case Manager User Guide
© 2016 Recommind, Inc. | Page 111
10.6 Workflow Favorites You can mark a whole Workflow, a sample, or individual search-based sets as favorites. On the Mission Control page, click on any item with a star in the Favorite column to make it a favorite. This helps you to prioritize items.
You can also hide all non-favorite items, for a better overview. To do so, click to open the toolbar, and click Favorites Only.
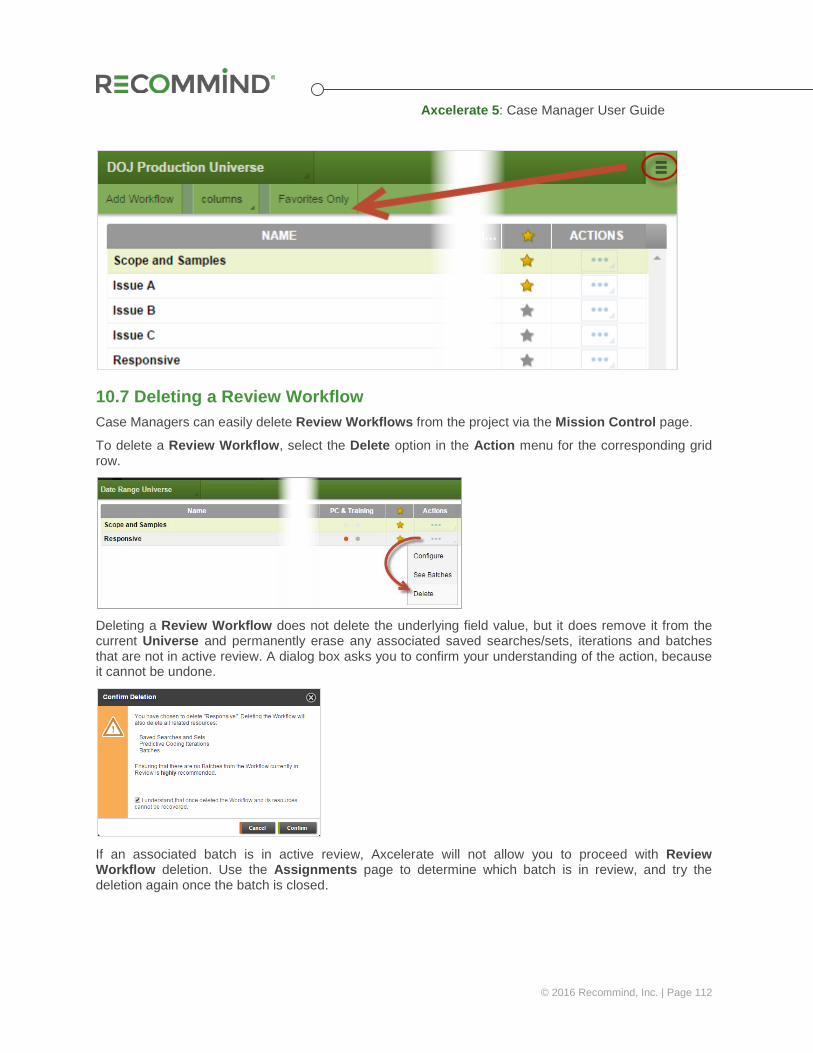
Axcelerate 5: Case Manager User Guide
© 2016 Recommind, Inc. | Page 112
10.7 Deleting a Review Workflow Case Managers can easily delete Review Workflows from the project via the Mission Control page.
To delete a Review Workflow, select the Delete option in the Action menu for the corresponding grid row.
Deleting a Review Workflow does not delete the underlying field value, but it does remove it from the current Universe and permanently erase any associated saved searches/sets, iterations and batches that are not in active review. A dialog box asks you to confirm your understanding of the action, because it cannot be undone.
If an associated batch is in active review, Axcelerate will not allow you to proceed with Review Workflow deletion. Use the Assignments page to determine which batch is in review, and try the deletion again once the batch is closed.
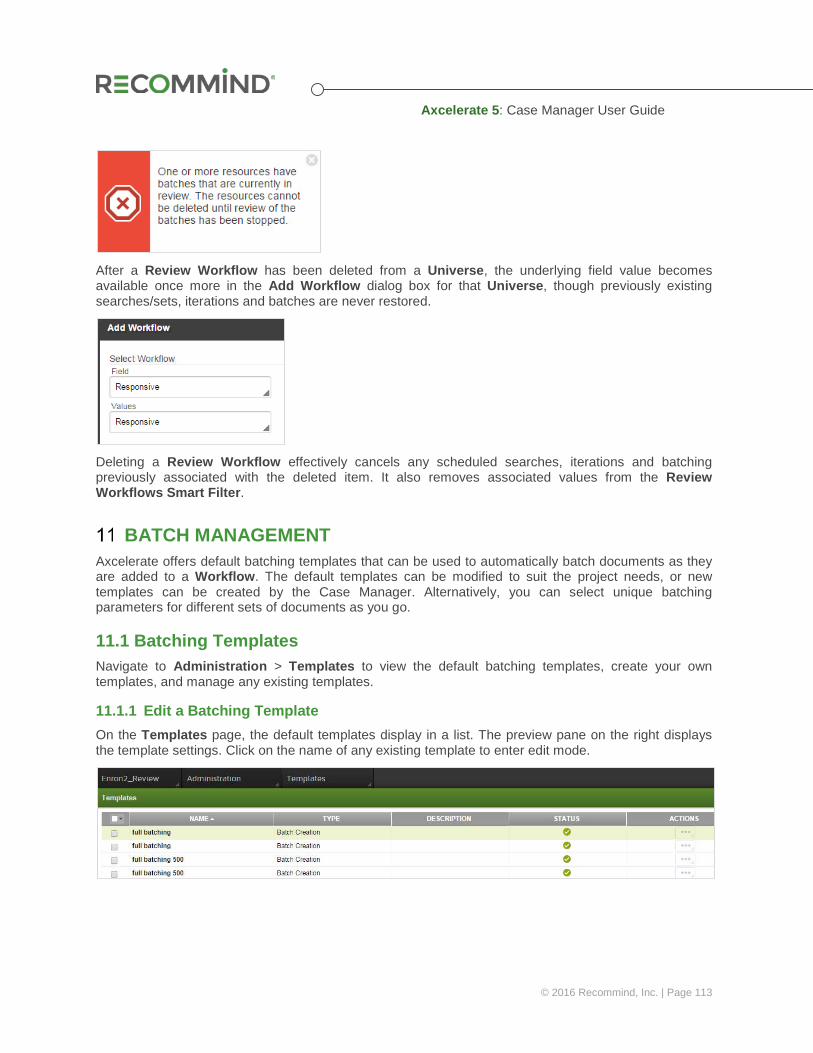
Axcelerate 5: Case Manager User Guide
© 2016 Recommind, Inc. | Page 113
After a Review Workflow has been deleted from a Universe, the underlying field value becomes available once more in the Add Workflow dialog box for that Universe, though previously existing searches/sets, iterations and batches are never restored.
Deleting a Review Workflow effectively cancels any scheduled searches, iterations and batching previously associated with the deleted item. It also removes associated values from the Review Workflows Smart Filter.
BATCH MANAGEMENT Axcelerate offers default batching templates that can be used to automatically batch documents as they are added to a Workflow. The default templates can be modified to suit the project needs, or new templates can be created by the Case Manager. Alternatively, you can select unique batching parameters for different sets of documents as you go.
11.1 Batching Templates Navigate to Administration > Templates to view the default batching templates, create your own templates, and manage any existing templates.
11.1.1 Edit a Batching Template On the Templates page, the default templates display in a list. The preview pane on the right displays the template settings. Click on the name of any existing template to enter edit mode.
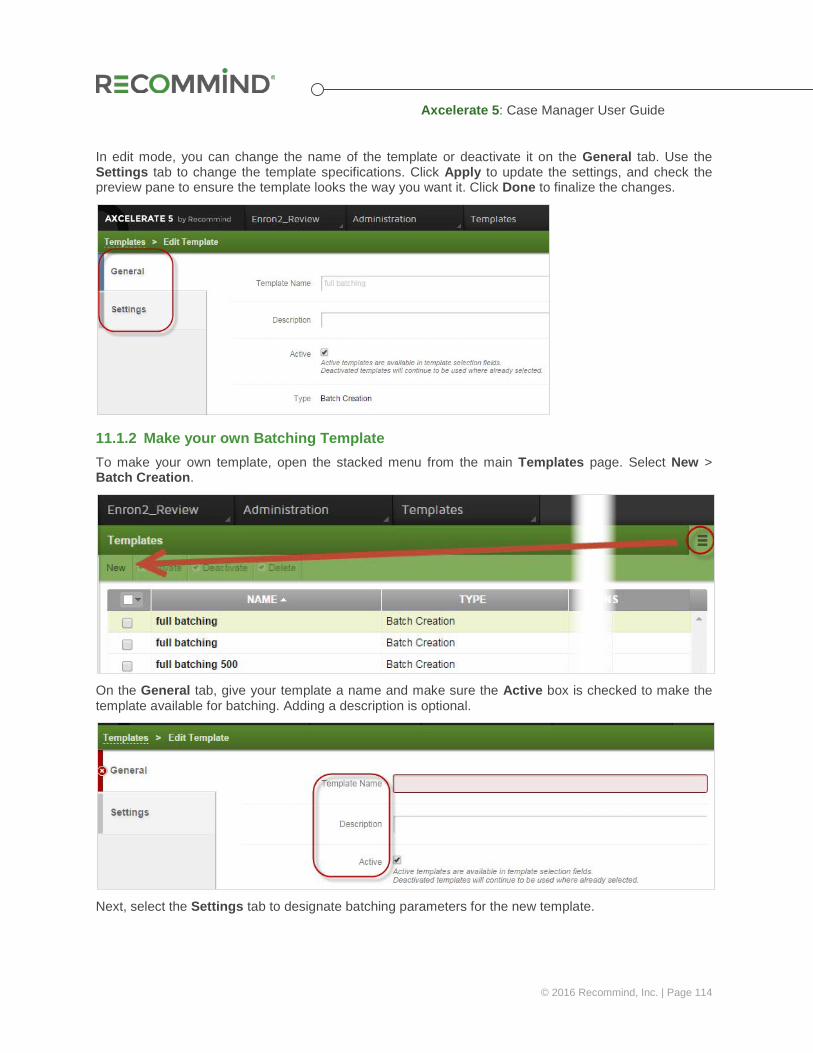
Axcelerate 5: Case Manager User Guide
© 2016 Recommind, Inc. | Page 114
In edit mode, you can change the name of the template or deactivate it on the General tab. Use the Settings tab to change the template specifications. Click Apply to update the settings, and check the preview pane to ensure the template looks the way you want it. Click Done to finalize the changes.
11.1.2 Make your own Batching Template To make your own template, open the stacked menu from the main Templates page. Select New > Batch Creation.
On the General tab, give your template a name and make sure the Active box is checked to make the template available for batching. Adding a description is optional.
Next, select the Settings tab to designate batching parameters for the new template.

Axcelerate 5: Case Manager User Guide
© 2016 Recommind, Inc. | Page 115
General: The selections you make in the General area of the form dictate the more granular options that appear below.
o Incremental batching: This feature allows for batching a limited number of documents from a saved set, iteration or a sample, and it automatically excludes documents already batched for the same set to the same Review State. By tracking the number of confirmed documents from incremental batches, it is easy to assess the quality of the review before continuing with full batching of the results set. Incremental Batching allows you to select the desired number of documents per batch, and also the number of batches, in the Output area of the form.
o Full batching, split by document count: Batch the entire set, specifying the number of documents you’d like in each batch in the Output area of the form.
o Full batching, split by batch count: Batch the entire set, specifying the number of batches you’d like the set distributed across in the Output area of the form.
The other general options affect the Document Grouping and Scope options available in the form. For example, if you check “Include associated documents,” you will see the Association Inclusions selection in the Scope area below.

Axcelerate 5: Case Manager User Guide
© 2016 Recommind, Inc. | Page 116
Output:
o Batch Naming: A default batch naming convention is automatically set, but you may enter a custom naming convention if preferred. Custom batch names will automatically be incremented with a three digit number.
o Batch Sizing: The options that appear here are dependent on your selection in the General
area. If you have selected full batching, you will enter either the number of batches to divide the documents among, or the maximum number of documents per batch. If you selected incremental batching, you will enter both.
Document Grouping: Select whether you want to group the batches by Custodian (typical), Document Date or Data Source Name.
Scope:
o Association Inclusions: Offers the option to automatically include associated documents in the batch. If you prefer Reviewers code families, email threads, duplicates or near duplicates consistently, check those associations for inclusion in the batches.
o Batch and Review Exclusions: Allows you to automatically exclude from the batches any documents previously batched, documents previously batched to a certain Target Review State, or documents that have already been coded for a Target Review State, whether they were coded in a batch or not. Exclusions allow you to make sure the same documents aren’t batched out to multiple reviewers.
Once you’ve made your selections, double-check the preview at right. If everything looks correct, click Done to finalize the batching template.
11.1.3 Managing Existing Templates On the main Templates page, access the Actions menu to clone, deactivate or delete a single batching template. If a template was previously deactivated, you will see an Activate option instead of Deactivate.
To activate/deactivate or delete multiple batching templates at one time, select the target templates in the list and use the tools under the stacked menu.
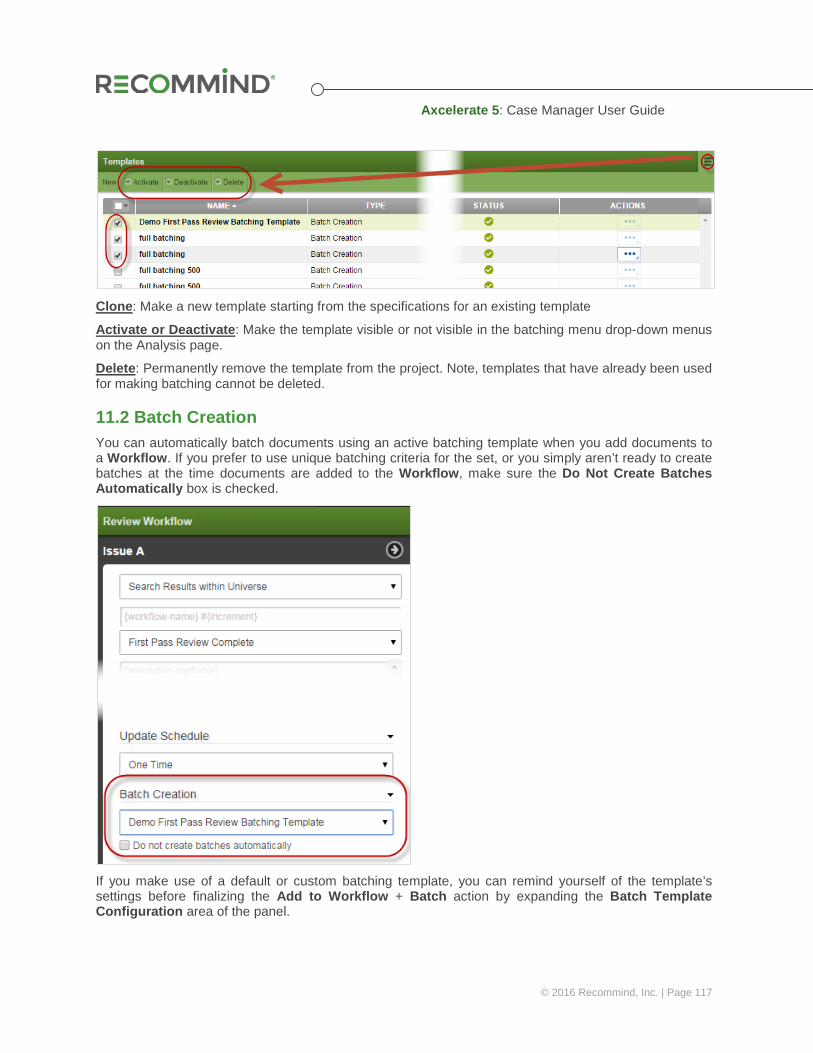
Axcelerate 5: Case Manager User Guide
© 2016 Recommind, Inc. | Page 117
Clone: Make a new template starting from the specifications for an existing template
Activate or Deactivate: Make the template visible or not visible in the batching menu drop-down menus on the Analysis page.
Delete: Permanently remove the template from the project. Note, templates that have already been used for making batching cannot be deleted.
11.2 Batch Creation You can automatically batch documents using an active batching template when you add documents to a Workflow. If you prefer to use unique batching criteria for the set, or you simply aren’t ready to create batches at the time documents are added to the Workflow, make sure the Do Not Create Batches Automatically box is checked.
If you make use of a default or custom batching template, you can remind yourself of the template’s settings before finalizing the Add to Workflow + Batch action by expanding the Batch Template Configuration area of the panel.

Axcelerate 5: Case Manager User Guide
© 2016 Recommind, Inc. | Page 118
To batch search sets, samples or iterations after-the-fact, navigate to the Mission Control page. Drill down to the target search results set, and click on the Actions menu. Select Create Batches.
The batching wizard accessed via Mission Control looks much like the one used to set up batching templates. However, at the top of the form, you can specify if you’d like to use an existing template, and you can change the Target Review State as needed. If you do not want to use a template, start making your custom selections in the General section below. The template field will update to Custom.
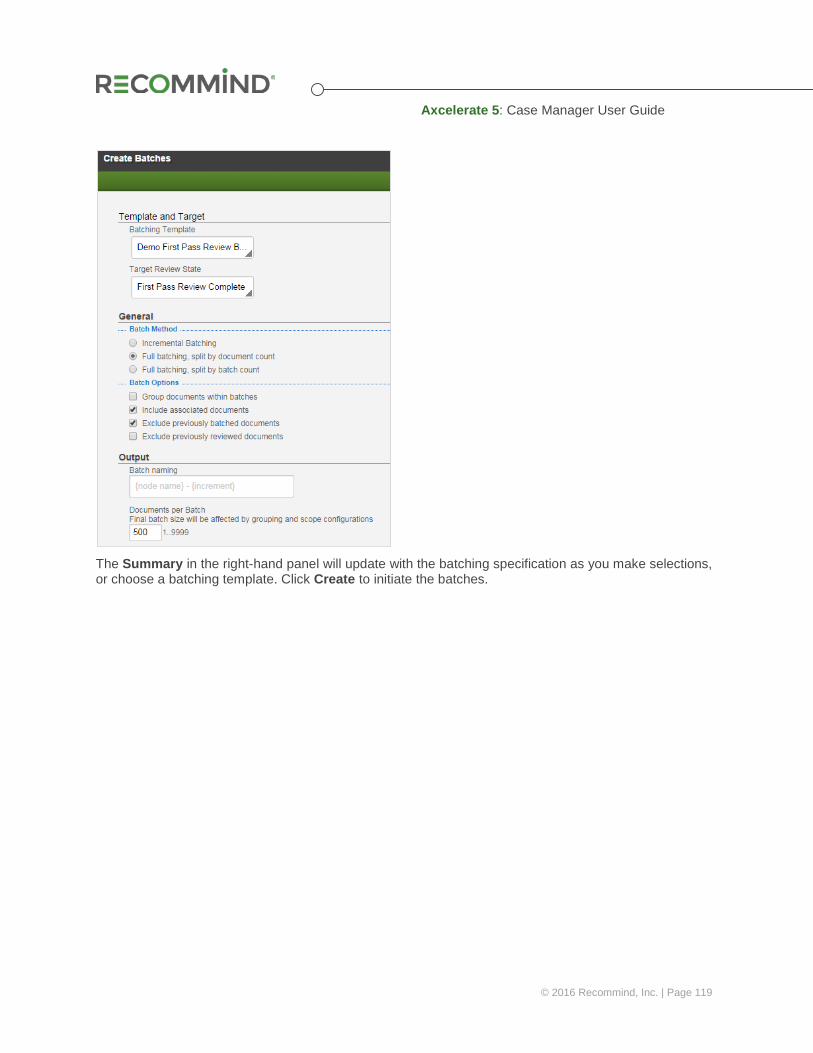
Axcelerate 5: Case Manager User Guide
© 2016 Recommind, Inc. | Page 119
The Summary in the right-hand panel will update with the batching specification as you make selections, or choose a batching template. Click Create to initiate the batches.
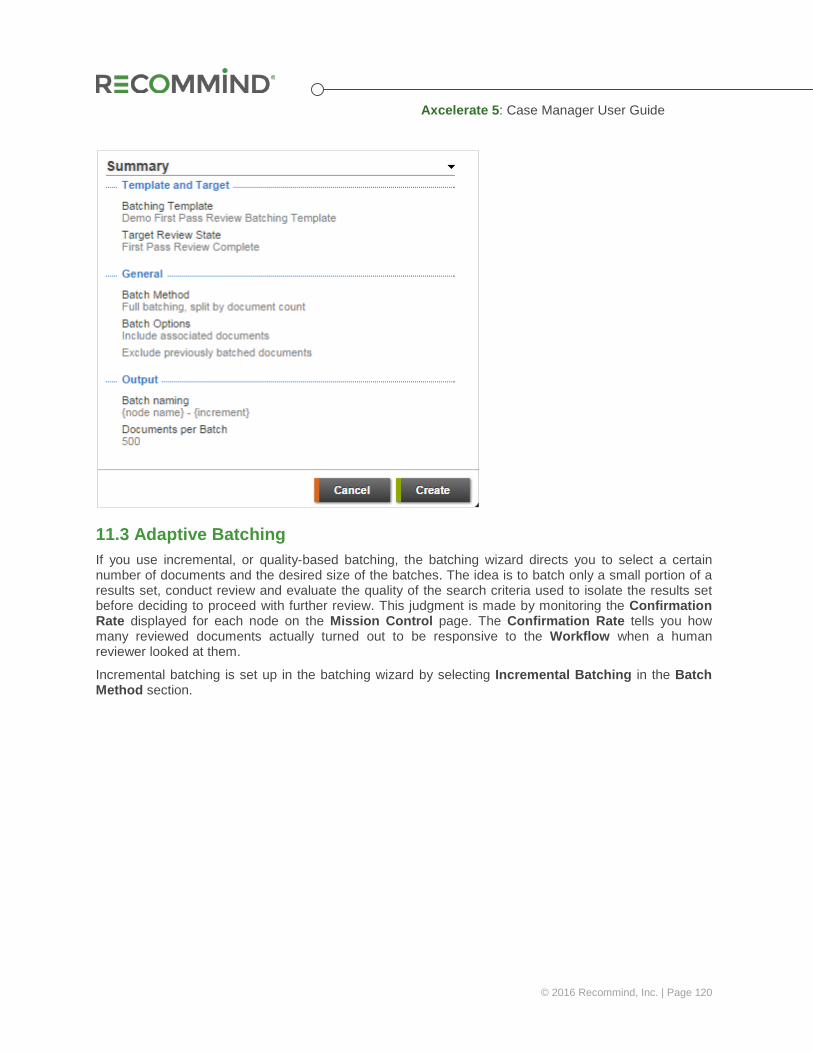
Axcelerate 5: Case Manager User Guide
© 2016 Recommind, Inc. | Page 120
11.3 Adaptive Batching If you use incremental, or quality-based batching, the batching wizard directs you to select a certain number of documents and the desired size of the batches. The idea is to batch only a small portion of a results set, conduct review and evaluate the quality of the search criteria used to isolate the results set before deciding to proceed with further review. This judgment is made by monitoring the Confirmation Rate displayed for each node on the Mission Control page. The Confirmation Rate tells you how many reviewed documents actually turned out to be responsive to the Workflow when a human reviewer looked at them.
Incremental batching is set up in the batching wizard by selecting Incremental Batching in the Batch Method section.
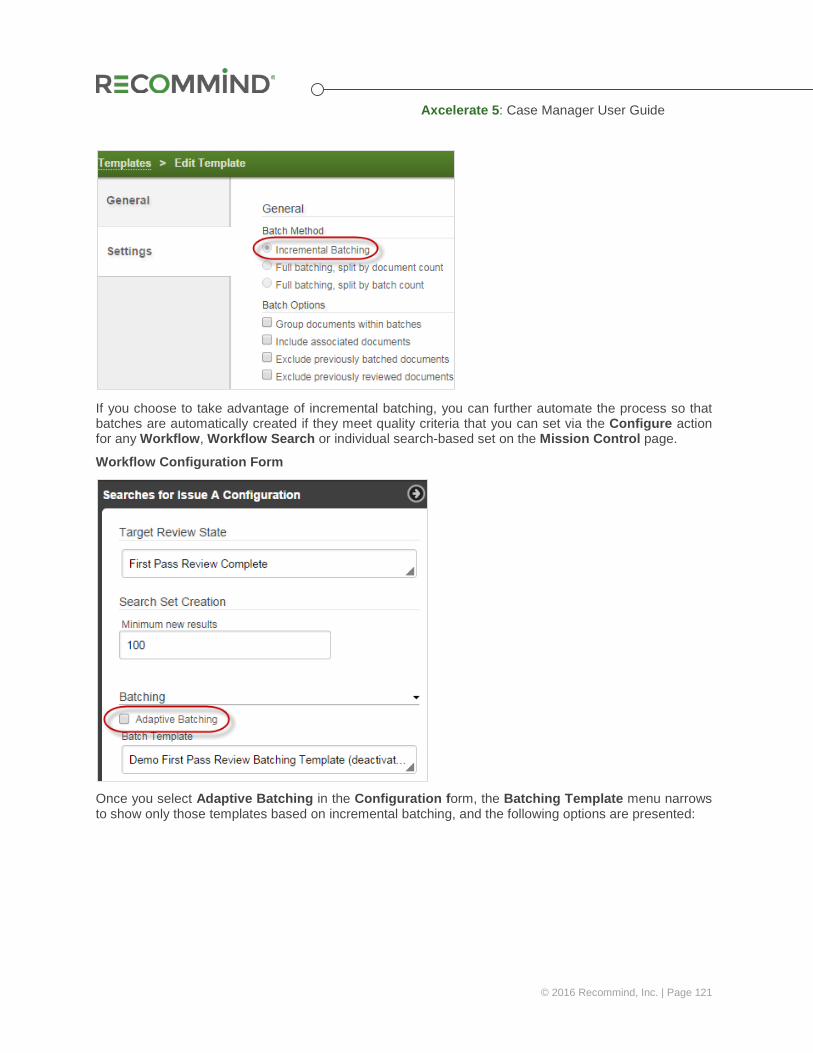
Axcelerate 5: Case Manager User Guide
© 2016 Recommind, Inc. | Page 121
If you choose to take advantage of incremental batching, you can further automate the process so that batches are automatically created if they meet quality criteria that you can set via the Configure action for any Workflow, Workflow Search or individual search-based set on the Mission Control page.
Workflow Configuration Form
Once you select Adaptive Batching in the Configuration form, the Batching Template menu narrows to show only those templates based on incremental batching, and the following options are presented:
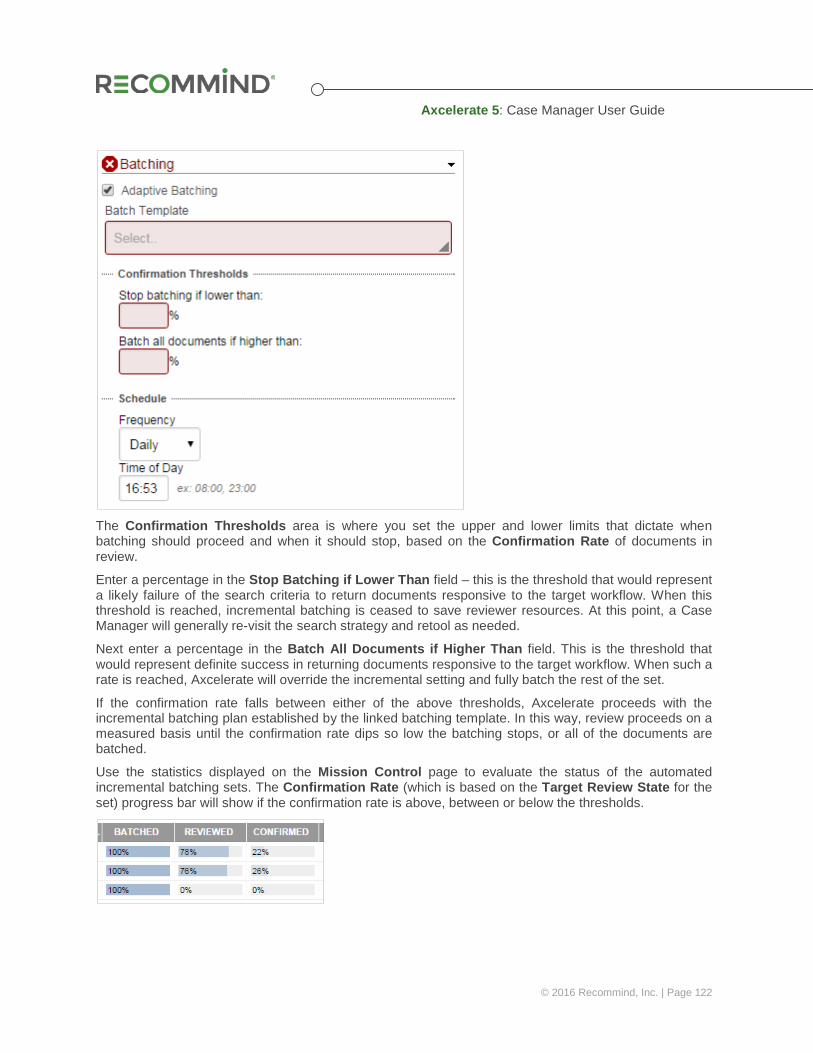
Axcelerate 5: Case Manager User Guide
© 2016 Recommind, Inc. | Page 122
The Confirmation Thresholds area is where you set the upper and lower limits that dictate when batching should proceed and when it should stop, based on the Confirmation Rate of documents in review.
Enter a percentage in the Stop Batching if Lower Than field – this is the threshold that would represent a likely failure of the search criteria to return documents responsive to the target workflow. When this threshold is reached, incremental batching is ceased to save reviewer resources. At this point, a Case Manager will generally re-visit the search strategy and retool as needed.
Next enter a percentage in the Batch All Documents if Higher Than field. This is the threshold that would represent definite success in returning documents responsive to the target workflow. When such a rate is reached, Axcelerate will override the incremental setting and fully batch the rest of the set.
If the confirmation rate falls between either of the above thresholds, Axcelerate proceeds with the incremental batching plan established by the linked batching template. In this way, review proceeds on a measured basis until the confirmation rate dips so low the batching stops, or all of the documents are batched.
Use the statistics displayed on the Mission Control page to evaluate the status of the automated incremental batching sets. The Confirmation Rate (which is based on the Target Review State for the set) progress bar will show if the confirmation rate is above, between or below the thresholds.

Axcelerate 5: Case Manager User Guide
© 2016 Recommind, Inc. | Page 123
11.4 Batch Assignment The Assignments page displays all batches and allows you to manage their assignment to users. Navigate to the Assignments page to view the new batches.
All batches created by any user display in alphabetical order. The batch name, document count, review status, Target Review State, assignee and creation information are provided for each batch. If comments were added when assigning a batch or checking a batch in, those are also displayed.
To manage a batch, click on the Actions menu.
• Start Review: Opens a batch for review and coding. This action will assign the batch to you. • View: Opens the batch in Analysis mode, without actually assigning the batch out. • Change Assignee: Assign the batch to any user with access to the project and who has
previously logged into the project. • Mark Complete: Indicate to the team you are completely done with a batch and are releasing it.
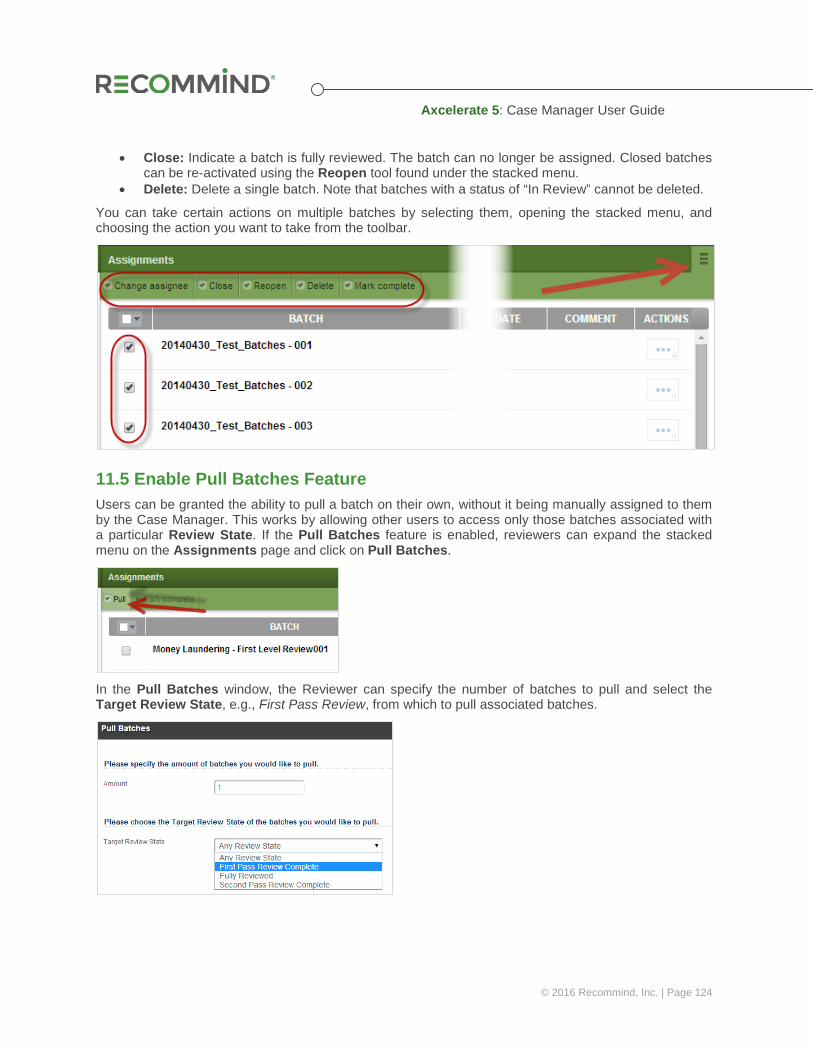
Axcelerate 5: Case Manager User Guide
© 2016 Recommind, Inc. | Page 124
• Close: Indicate a batch is fully reviewed. The batch can no longer be assigned. Closed batches can be re-activated using the Reopen tool found under the stacked menu.
• Delete: Delete a single batch. Note that batches with a status of “In Review” cannot be deleted.
You can take certain actions on multiple batches by selecting them, opening the stacked menu, and choosing the action you want to take from the toolbar.
11.5 Enable Pull Batches Feature Users can be granted the ability to pull a batch on their own, without it being manually assigned to them by the Case Manager. This works by allowing other users to access only those batches associated with a particular Review State. If the Pull Batches feature is enabled, reviewers can expand the stacked menu on the Assignments page and click on Pull Batches.
In the Pull Batches window, the Reviewer can specify the number of batches to pull and select the Target Review State, e.g., First Pass Review, from which to pull associated batches.
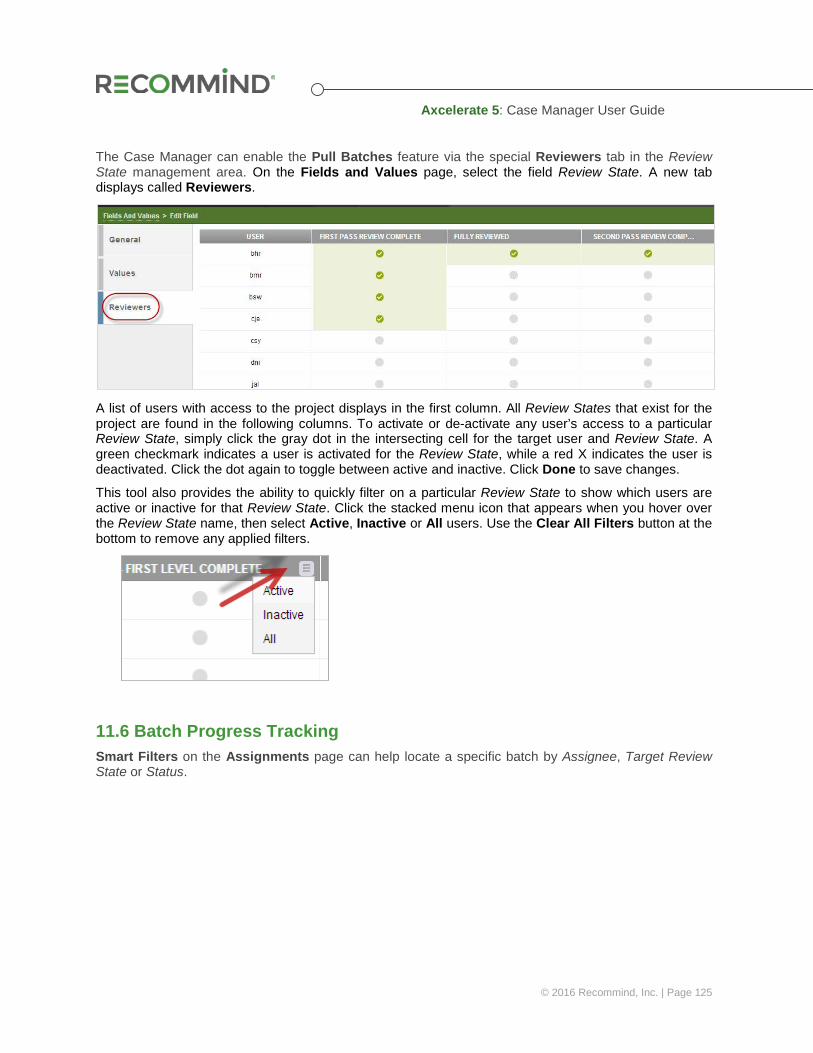
Axcelerate 5: Case Manager User Guide
© 2016 Recommind, Inc. | Page 125
The Case Manager can enable the Pull Batches feature via the special Reviewers tab in the Review State management area. On the Fields and Values page, select the field Review State. A new tab displays called Reviewers.
A list of users with access to the project displays in the first column. All Review States that exist for the project are found in the following columns. To activate or de-activate any user’s access to a particular Review State, simply click the gray dot in the intersecting cell for the target user and Review State. A green checkmark indicates a user is activated for the Review State, while a red X indicates the user is deactivated. Click the dot again to toggle between active and inactive. Click Done to save changes.
This tool also provides the ability to quickly filter on a particular Review State to show which users are active or inactive for that Review State. Click the stacked menu icon that appears when you hover over the Review State name, then select Active, Inactive or All users. Use the Clear All Filters button at the bottom to remove any applied filters.
11.6 Batch Progress Tracking Smart Filters on the Assignments page can help locate a specific batch by Assignee, Target Review State or Status.
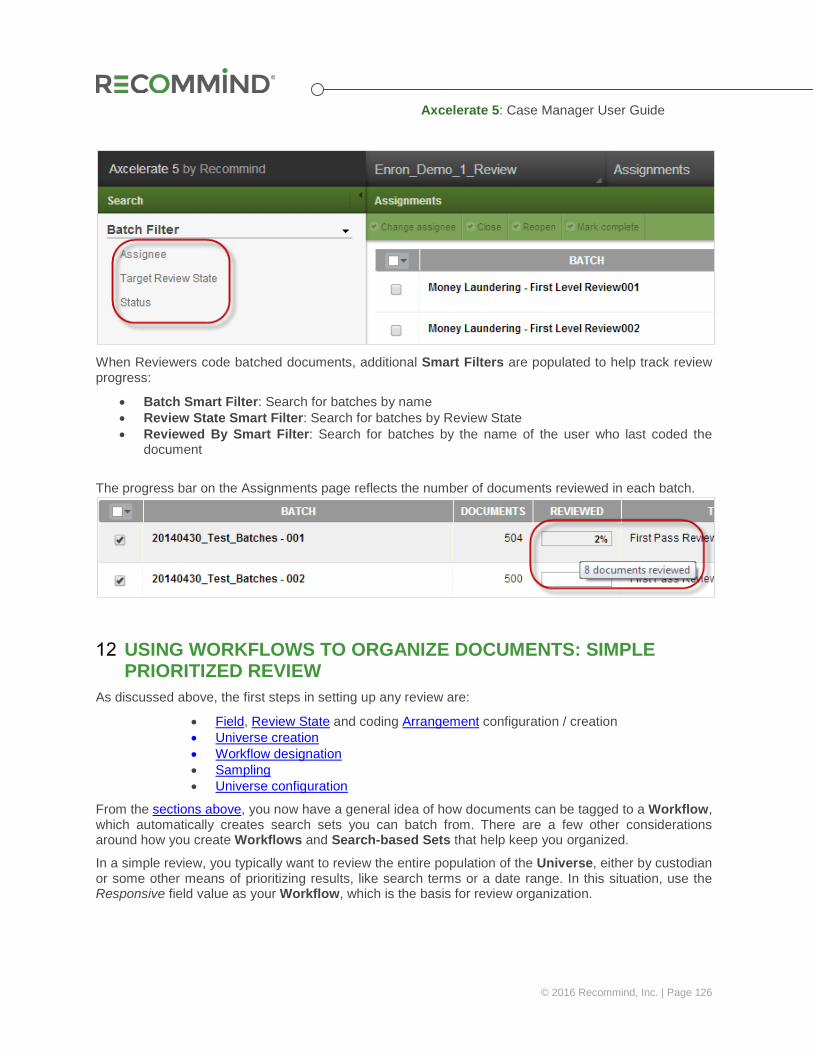
Axcelerate 5: Case Manager User Guide
© 2016 Recommind, Inc. | Page 126
When Reviewers code batched documents, additional Smart Filters are populated to help track review progress:
• Batch Smart Filter: Search for batches by name • Review State Smart Filter: Search for batches by Review State • Reviewed By Smart Filter: Search for batches by the name of the user who last coded the
document
The progress bar on the Assignments page reflects the number of documents reviewed in each batch.
USING WORKFLOWS TO ORGANIZE DOCUMENTS: SIMPLE PRIORITIZED REVIEW
As discussed above, the first steps in setting up any review are:
• Field, Review State and coding Arrangement configuration / creation • Universe creation • Workflow designation • Sampling • Universe configuration
From the sections above, you now have a general idea of how documents can be tagged to a Workflow, which automatically creates search sets you can batch from. There are a few other considerations around how you create Workflows and Search-based Sets that help keep you organized.
In a simple review, you typically want to review the entire population of the Universe, either by custodian or some other means of prioritizing results, like search terms or a date range. In this situation, use the Responsive field value as your Workflow, which is the basis for review organization.
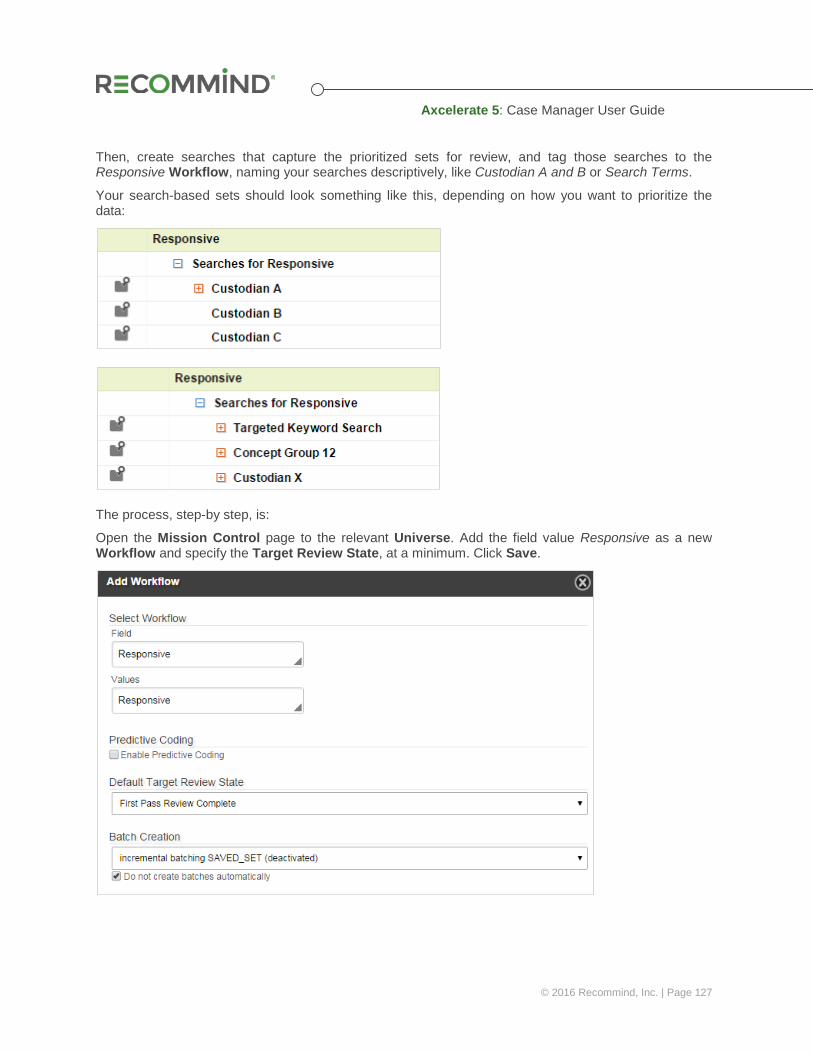
Axcelerate 5: Case Manager User Guide
© 2016 Recommind, Inc. | Page 127
Then, create searches that capture the prioritized sets for review, and tag those searches to the Responsive Workflow, naming your searches descriptively, like Custodian A and B or Search Terms.
Your search-based sets should look something like this, depending on how you want to prioritize the data:
The process, step-by step, is:
Open the Mission Control page to the relevant Universe. Add the field value Responsive as a new Workflow and specify the Target Review State, at a minimum. Click Save.
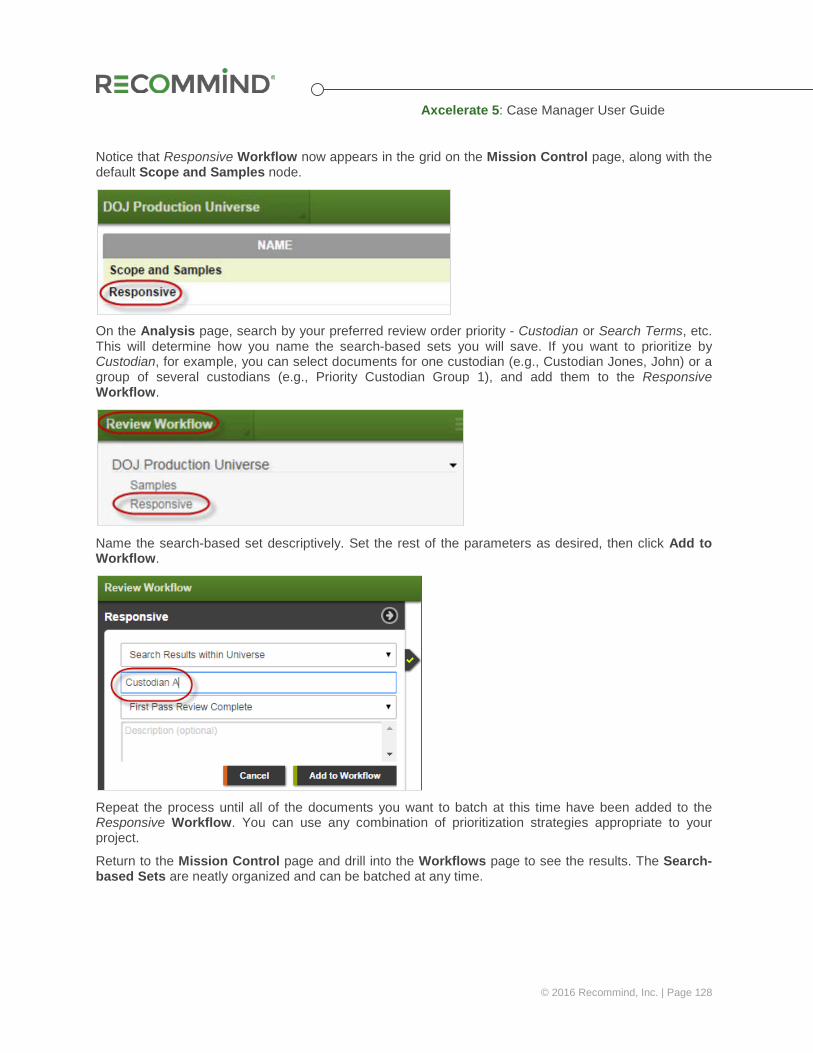
Axcelerate 5: Case Manager User Guide
© 2016 Recommind, Inc. | Page 128
Notice that Responsive Workflow now appears in the grid on the Mission Control page, along with the default Scope and Samples node.
On the Analysis page, search by your preferred review order priority - Custodian or Search Terms, etc. This will determine how you name the search-based sets you will save. If you want to prioritize by Custodian, for example, you can select documents for one custodian (e.g., Custodian Jones, John) or a group of several custodians (e.g., Priority Custodian Group 1), and add them to the Responsive Workflow.
Name the search-based set descriptively. Set the rest of the parameters as desired, then click Add to Workflow.
Repeat the process until all of the documents you want to batch at this time have been added to the Responsive Workflow. You can use any combination of prioritization strategies appropriate to your project.
Return to the Mission Control page and drill into the Workflows page to see the results. The Search-based Sets are neatly organized and can be batched at any time.
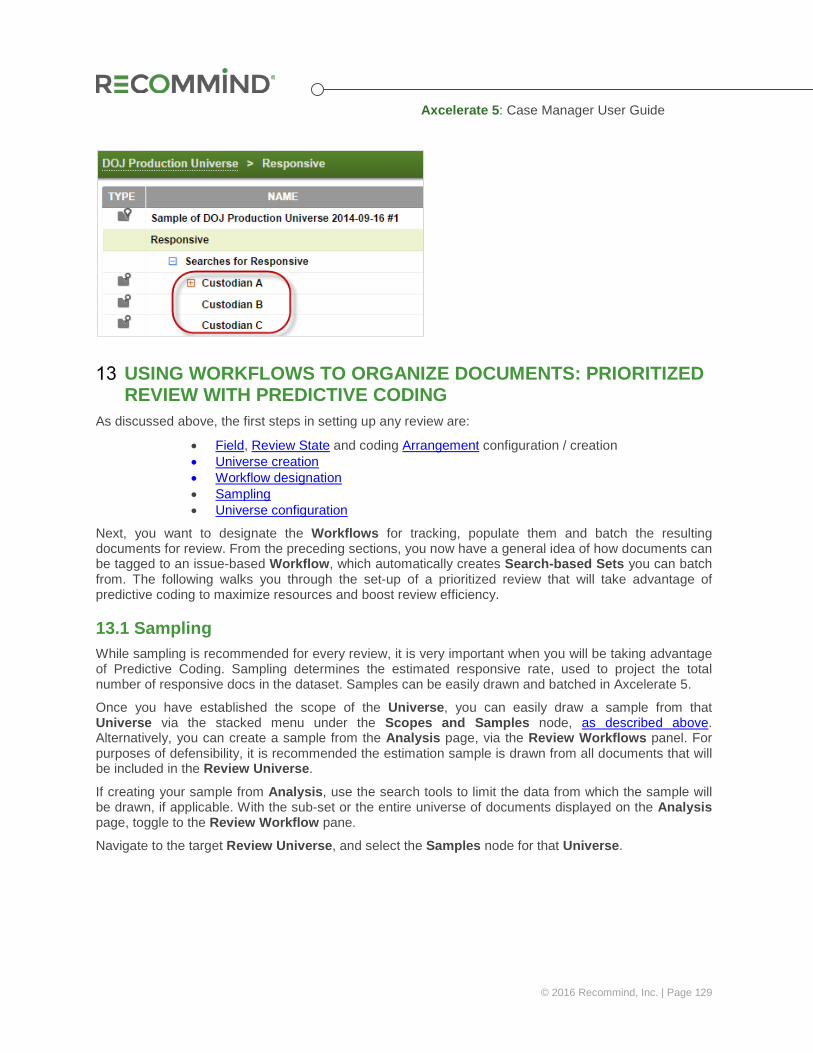
Axcelerate 5: Case Manager User Guide
© 2016 Recommind, Inc. | Page 129
USING WORKFLOWS TO ORGANIZE DOCUMENTS: PRIORITIZED REVIEW WITH PREDICTIVE CODING
As discussed above, the first steps in setting up any review are:
• Field, Review State and coding Arrangement configuration / creation • Universe creation • Workflow designation • Sampling • Universe configuration
Next, you want to designate the Workflows for tracking, populate them and batch the resulting documents for review. From the preceding sections, you now have a general idea of how documents can be tagged to an issue-based Workflow, which automatically creates Search-based Sets you can batch from. The following walks you through the set-up of a prioritized review that will take advantage of predictive coding to maximize resources and boost review efficiency.
13.1 Sampling While sampling is recommended for every review, it is very important when you will be taking advantage of Predictive Coding. Sampling determines the estimated responsive rate, used to project the total number of responsive docs in the dataset. Samples can be easily drawn and batched in Axcelerate 5.
Once you have established the scope of the Universe, you can easily draw a sample from that Universe via the stacked menu under the Scopes and Samples node, as described above. Alternatively, you can create a sample from the Analysis page, via the Review Workflows panel. For purposes of defensibility, it is recommended the estimation sample is drawn from all documents that will be included in the Review Universe.
If creating your sample from Analysis, use the search tools to limit the data from which the sample will be drawn, if applicable. With the sub-set or the entire universe of documents displayed on the Analysis page, toggle to the Review Workflow pane.
Navigate to the target Review Universe, and select the Samples node for that Universe.
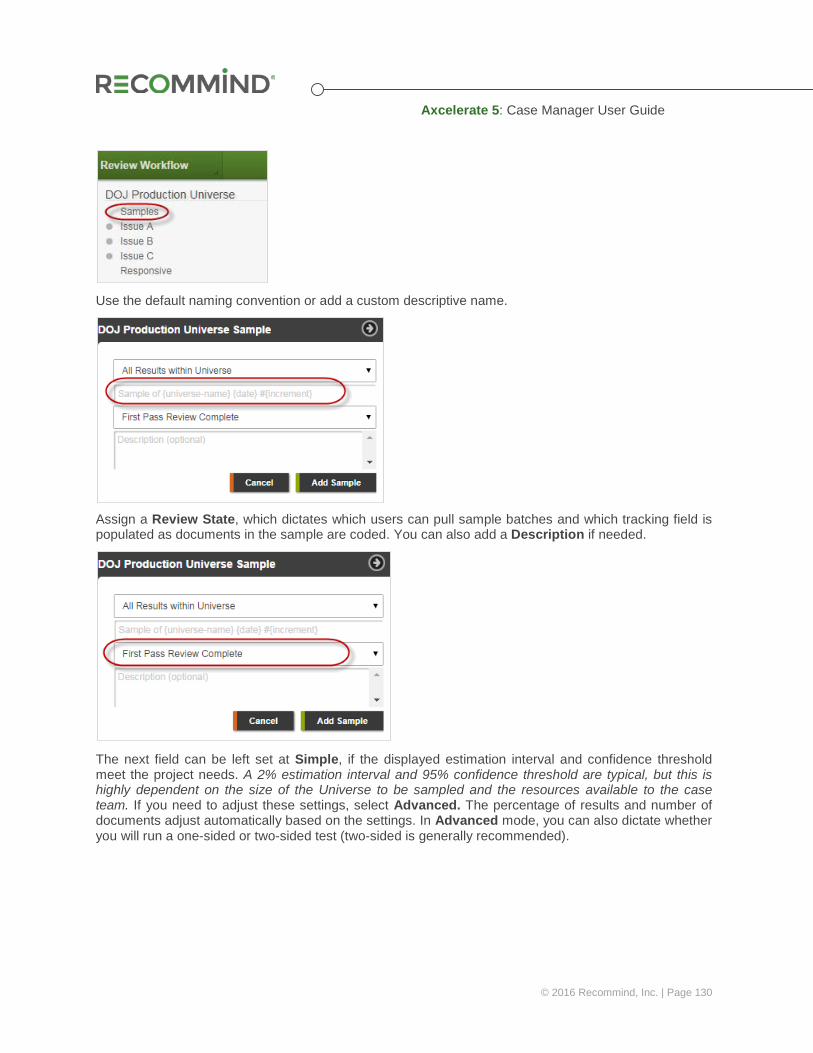
Axcelerate 5: Case Manager User Guide
© 2016 Recommind, Inc. | Page 130
Use the default naming convention or add a custom descriptive name.
Assign a Review State, which dictates which users can pull sample batches and which tracking field is populated as documents in the sample are coded. You can also add a Description if needed.
The next field can be left set at Simple, if the displayed estimation interval and confidence threshold meet the project needs. A 2% estimation interval and 95% confidence threshold are typical, but this is highly dependent on the size of the Universe to be sampled and the resources available to the case team. If you need to adjust these settings, select Advanced. The percentage of results and number of documents adjust automatically based on the settings. In Advanced mode, you can also dictate whether you will run a one-sided or two-sided test (two-sided is generally recommended).
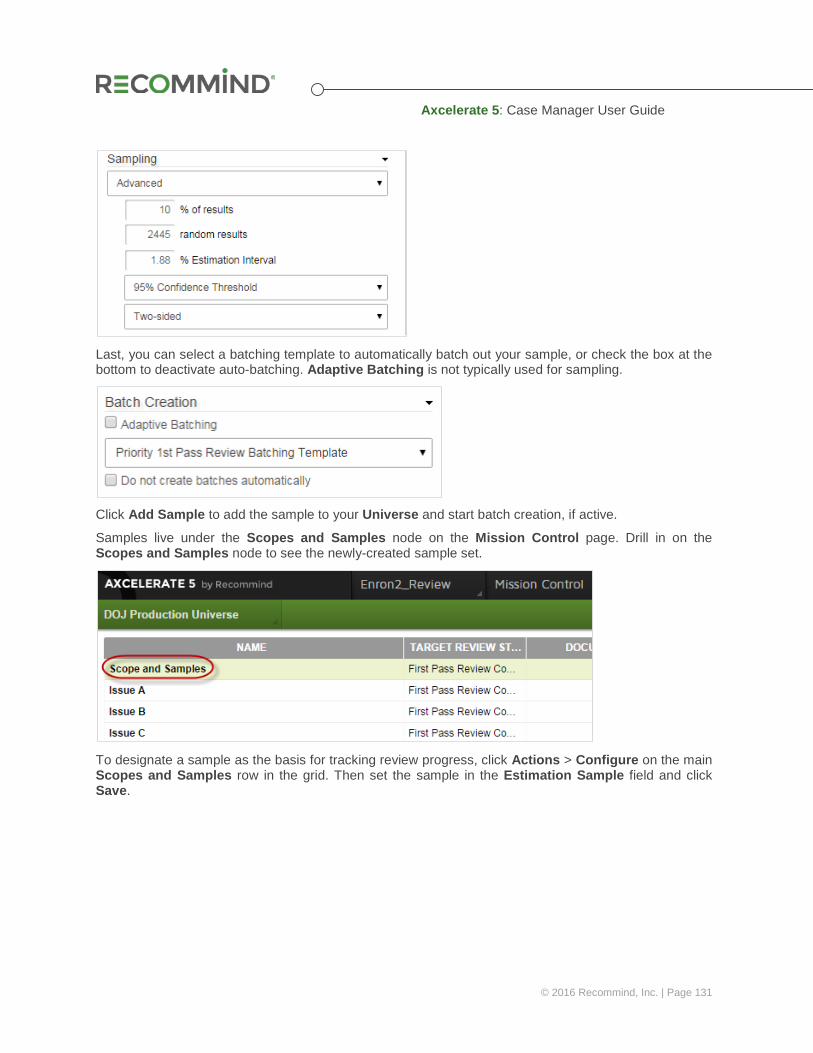
Axcelerate 5: Case Manager User Guide
© 2016 Recommind, Inc. | Page 131
Last, you can select a batching template to automatically batch out your sample, or check the box at the bottom to deactivate auto-batching. Adaptive Batching is not typically used for sampling.
Click Add Sample to add the sample to your Universe and start batch creation, if active.
Samples live under the Scopes and Samples node on the Mission Control page. Drill in on the Scopes and Samples node to see the newly-created sample set.
To designate a sample as the basis for tracking review progress, click Actions > Configure on the main Scopes and Samples row in the grid. Then set the sample in the Estimation Sample field and click Save.
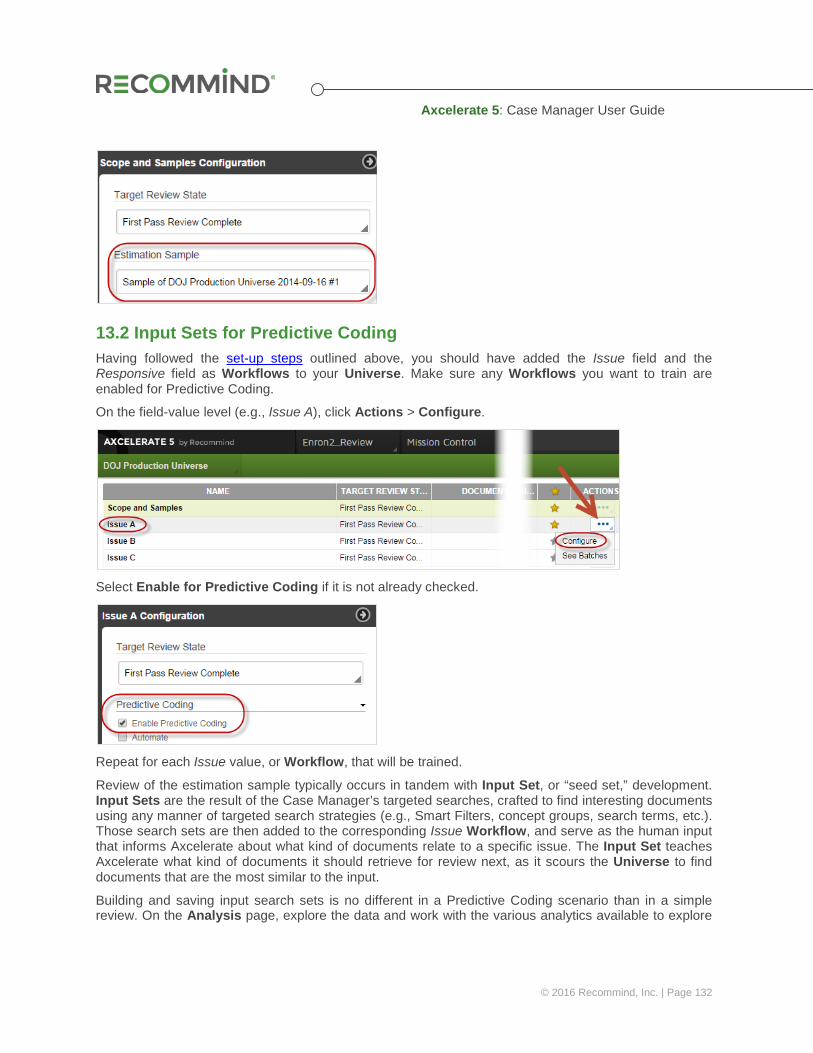
Axcelerate 5: Case Manager User Guide
© 2016 Recommind, Inc. | Page 132
13.2 Input Sets for Predictive Coding Having followed the set-up steps outlined above, you should have added the Issue field and the Responsive field as Workflows to your Universe. Make sure any Workflows you want to train are enabled for Predictive Coding.
On the field-value level (e.g., Issue A), click Actions > Configure.
Select Enable for Predictive Coding if it is not already checked.
Repeat for each Issue value, or Workflow, that will be trained.
Review of the estimation sample typically occurs in tandem with Input Set, or “seed set,” development. Input Sets are the result of the Case Manager’s targeted searches, crafted to find interesting documents using any manner of targeted search strategies (e.g., Smart Filters, concept groups, search terms, etc.). Those search sets are then added to the corresponding Issue Workflow, and serve as the human input that informs Axcelerate about what kind of documents relate to a specific issue. The Input Set teaches Axcelerate what kind of documents it should retrieve for review next, as it scours the Universe to find documents that are the most similar to the input.
Building and saving input search sets is no different in a Predictive Coding scenario than in a simple review. On the Analysis page, explore the data and work with the various analytics available to explore
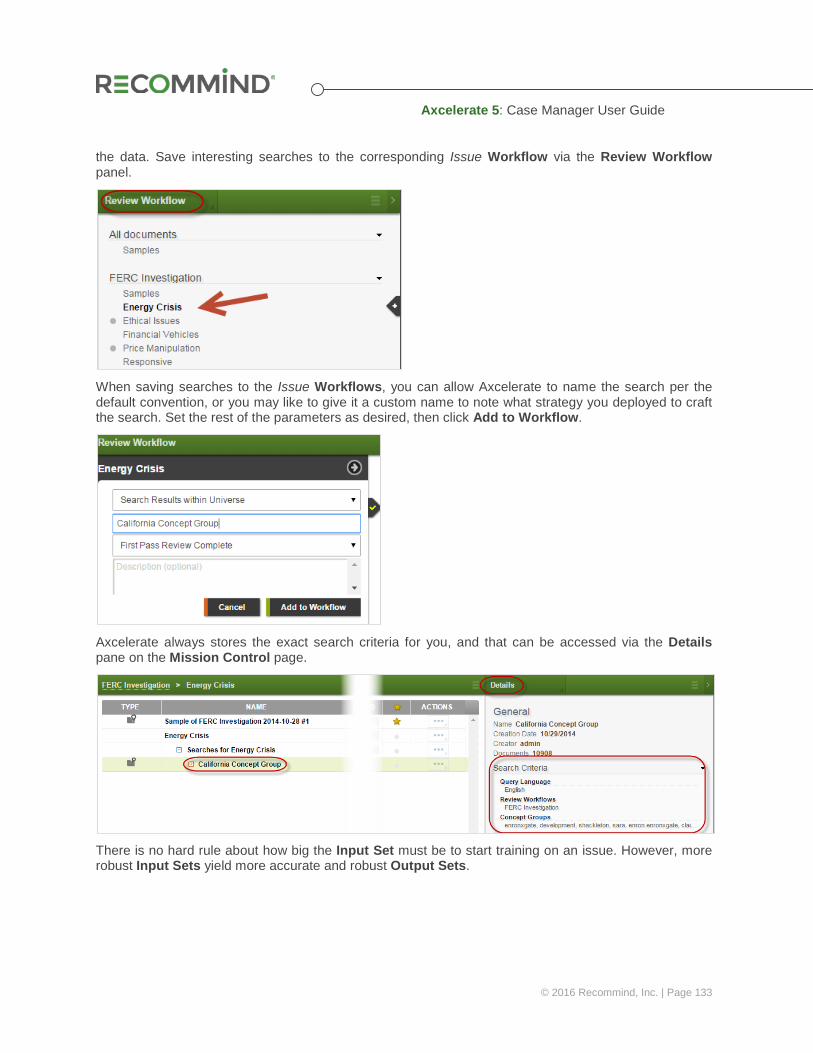
Axcelerate 5: Case Manager User Guide
© 2016 Recommind, Inc. | Page 133
the data. Save interesting searches to the corresponding Issue Workflow via the Review Workflow panel.
When saving searches to the Issue Workflows, you can allow Axcelerate to name the search per the default convention, or you may like to give it a custom name to note what strategy you deployed to craft the search. Set the rest of the parameters as desired, then click Add to Workflow.
Axcelerate always stores the exact search criteria for you, and that can be accessed via the Details pane on the Mission Control page.
There is no hard rule about how big the Input Set must be to start training on an issue. However, more robust Input Sets yield more accurate and robust Output Sets.
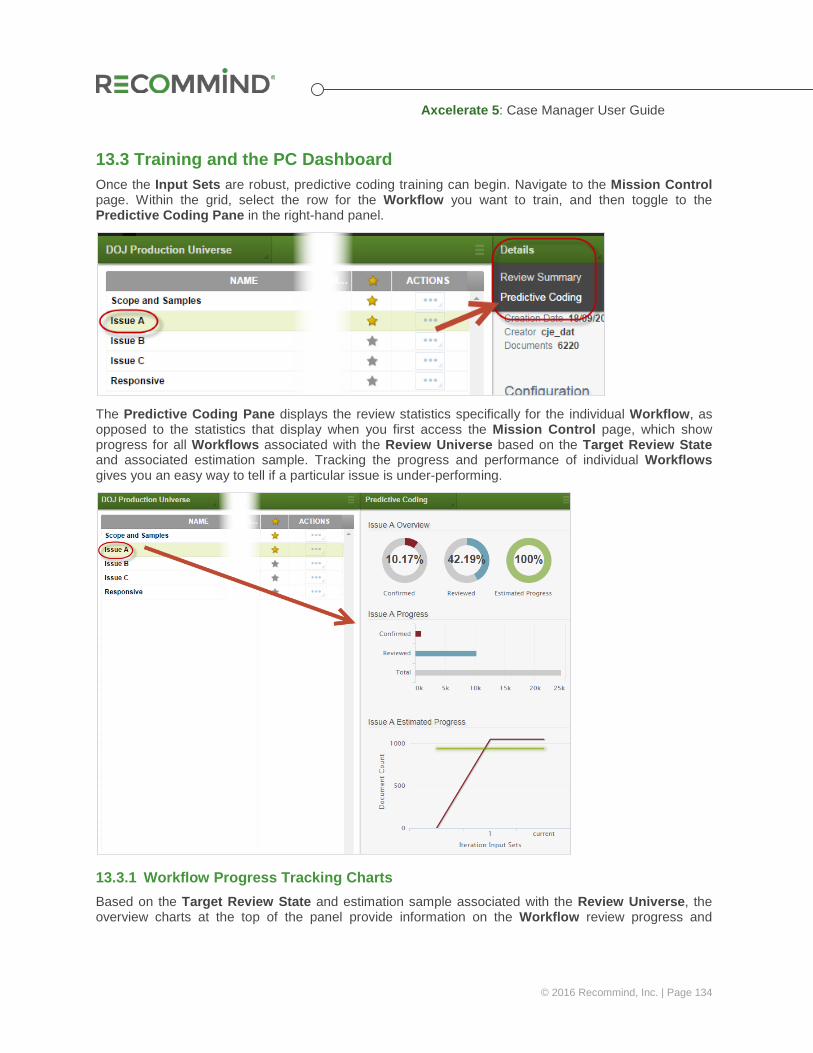
Axcelerate 5: Case Manager User Guide
© 2016 Recommind, Inc. | Page 134
13.3 Training and the PC Dashboard Once the Input Sets are robust, predictive coding training can begin. Navigate to the Mission Control page. Within the grid, select the row for the Workflow you want to train, and then toggle to the Predictive Coding Pane in the right-hand panel.
The Predictive Coding Pane displays the review statistics specifically for the individual Workflow, as opposed to the statistics that display when you first access the Mission Control page, which show progress for all Workflows associated with the Review Universe based on the Target Review State and associated estimation sample. Tracking the progress and performance of individual Workflows gives you an easy way to tell if a particular issue is under-performing.
13.3.1 Workflow Progress Tracking Charts Based on the Target Review State and estimation sample associated with the Review Universe, the overview charts at the top of the panel provide information on the Workflow review progress and
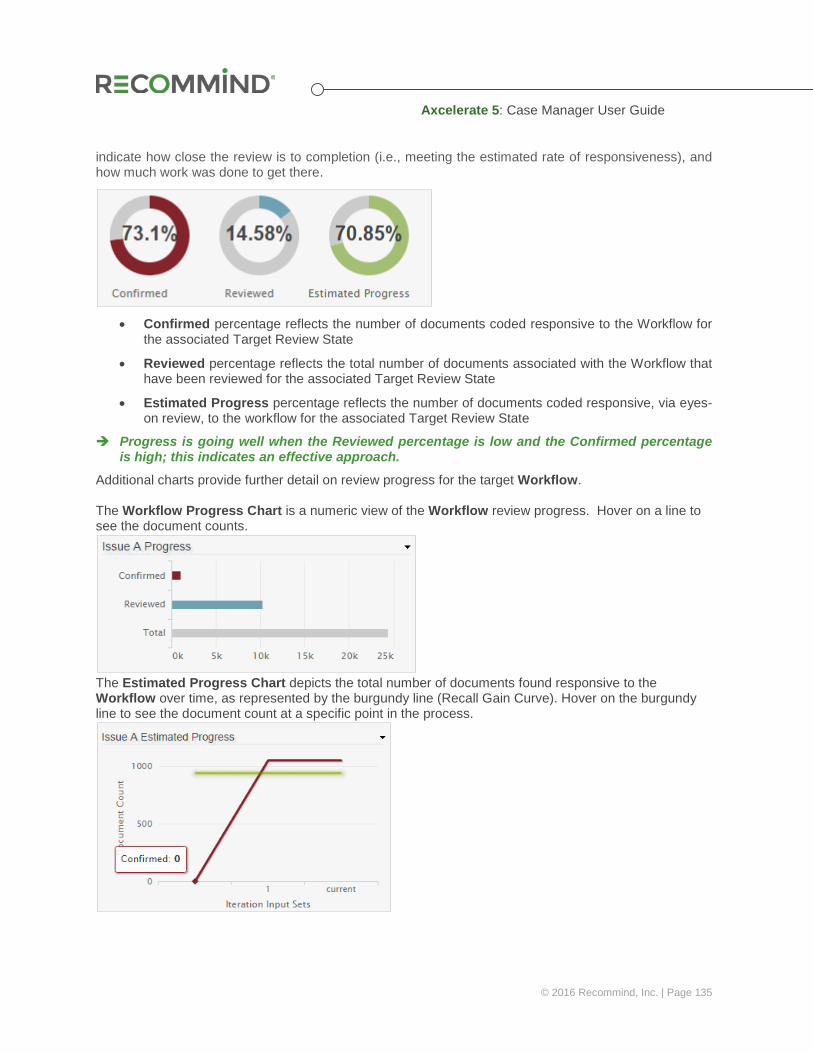
Axcelerate 5: Case Manager User Guide
© 2016 Recommind, Inc. | Page 135
indicate how close the review is to completion (i.e., meeting the estimated rate of responsiveness), and how much work was done to get there.
• Confirmed percentage reflects the number of documents coded responsive to the Workflow for
the associated Target Review State
• Reviewed percentage reflects the total number of documents associated with the Workflow that have been reviewed for the associated Target Review State
• Estimated Progress percentage reflects the number of documents coded responsive, via eyes-on review, to the workflow for the associated Target Review State
Progress is going well when the Reviewed percentage is low and the Confirmed percentage is high; this indicates an effective approach.
Additional charts provide further detail on review progress for the target Workflow. The Workflow Progress Chart is a numeric view of the Workflow review progress. Hover on a line to see the document counts.
The Estimated Progress Chart depicts the total number of documents found responsive to the Workflow over time, as represented by the burgundy line (Recall Gain Curve). Hover on the burgundy line to see the document count at a specific point in the process.

Axcelerate 5: Case Manager User Guide
© 2016 Recommind, Inc. | Page 136
The green estimated responsiveness range (Confidence Interval) is generated after review of the estimation sample associated with the selected universe is complete; it represents the total number of documents expected to be found responsive to the Workflow based on review of the sample. As review progresses, the burgundy line is expected to trend higher and eventually end up within the green area. Each Predictive Coding Iteration that has been added for the Workflow is represented by the numbers at the bottom of the graph.
13.3.2 Full Dashboard From the Predictive Coding panel on the Mission Control page, click the Full Dashboard link to see additional statistics, access Predictive Coding results and kick off new rounds of training.
For Workflows that are enabled for Predictive Coding, you can also reach the Full Dashboard via the Analysis page when you add new documents to the Workflow via the Review Workflow panel.
The Full Dashboard displays the same graphics described above, as well an Iteration Trends chart. This chart displays the volume of suggested documents for all iterations added to the current Workflow, which illustrates the trend in documents proposed as relevant to the Workflow issue. Hover on the bar for an iteration to see the number of suggested documents for that iteration. If the iteration has been reviewed, then you can also hover over the red line for that iteration and see how many documents were confirmed as responsive to the target issue.
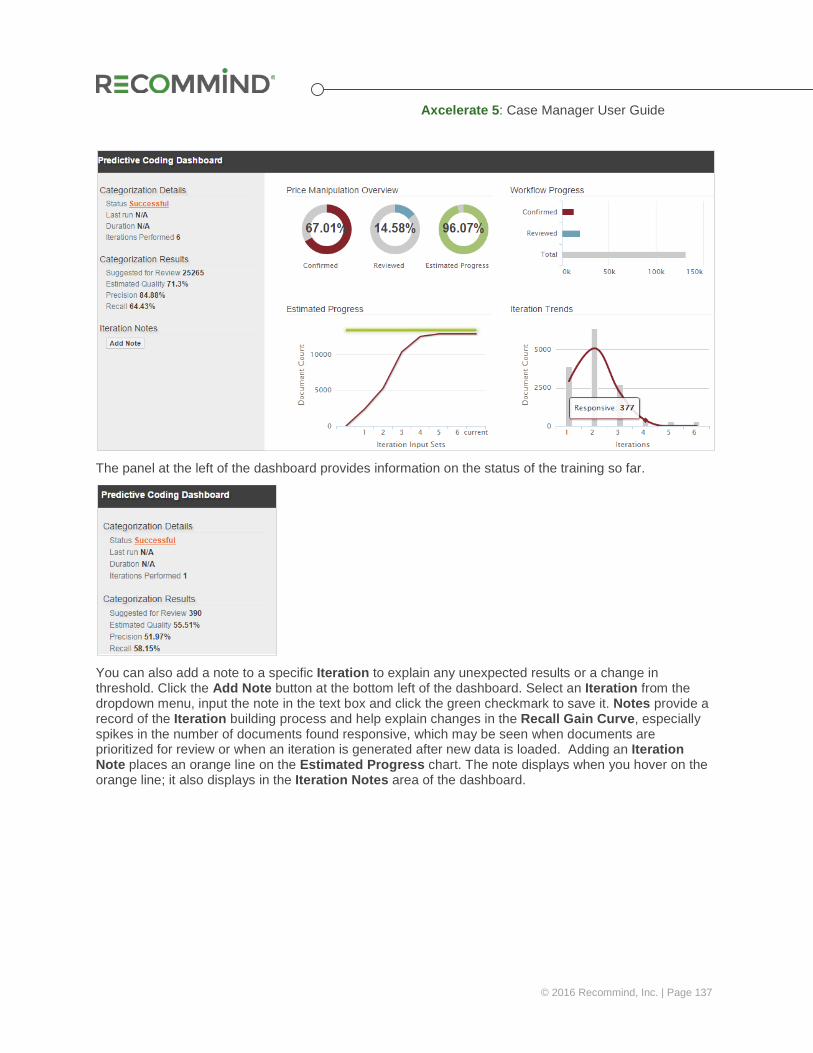
Axcelerate 5: Case Manager User Guide
© 2016 Recommind, Inc. | Page 137
The panel at the left of the dashboard provides information on the status of the training so far.
You can also add a note to a specific Iteration to explain any unexpected results or a change in threshold. Click the Add Note button at the bottom left of the dashboard. Select an Iteration from the dropdown menu, input the note in the text box and click the green checkmark to save it. Notes provide a record of the Iteration building process and help explain changes in the Recall Gain Curve, especially spikes in the number of documents found responsive, which may be seen when documents are prioritized for review or when an iteration is generated after new data is loaded. Adding an Iteration Note places an orange line on the Estimated Progress chart. The note displays when you hover on the orange line; it also displays in the Iteration Notes area of the dashboard.
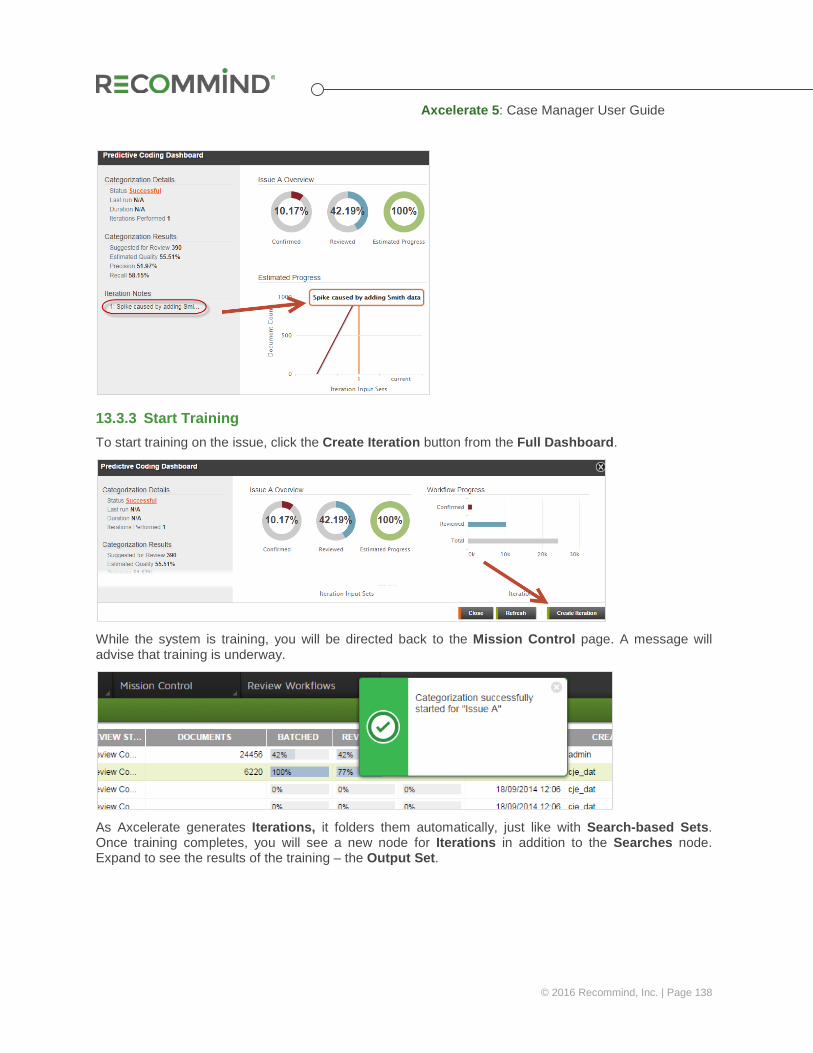
Axcelerate 5: Case Manager User Guide
© 2016 Recommind, Inc. | Page 138
13.3.3 Start Training To start training on the issue, click the Create Iteration button from the Full Dashboard.
While the system is training, you will be directed back to the Mission Control page. A message will advise that training is underway.
As Axcelerate generates Iterations, it folders them automatically, just like with Search-based Sets. Once training completes, you will see a new node for Iterations in addition to the Searches node. Expand to see the results of the training – the Output Set.
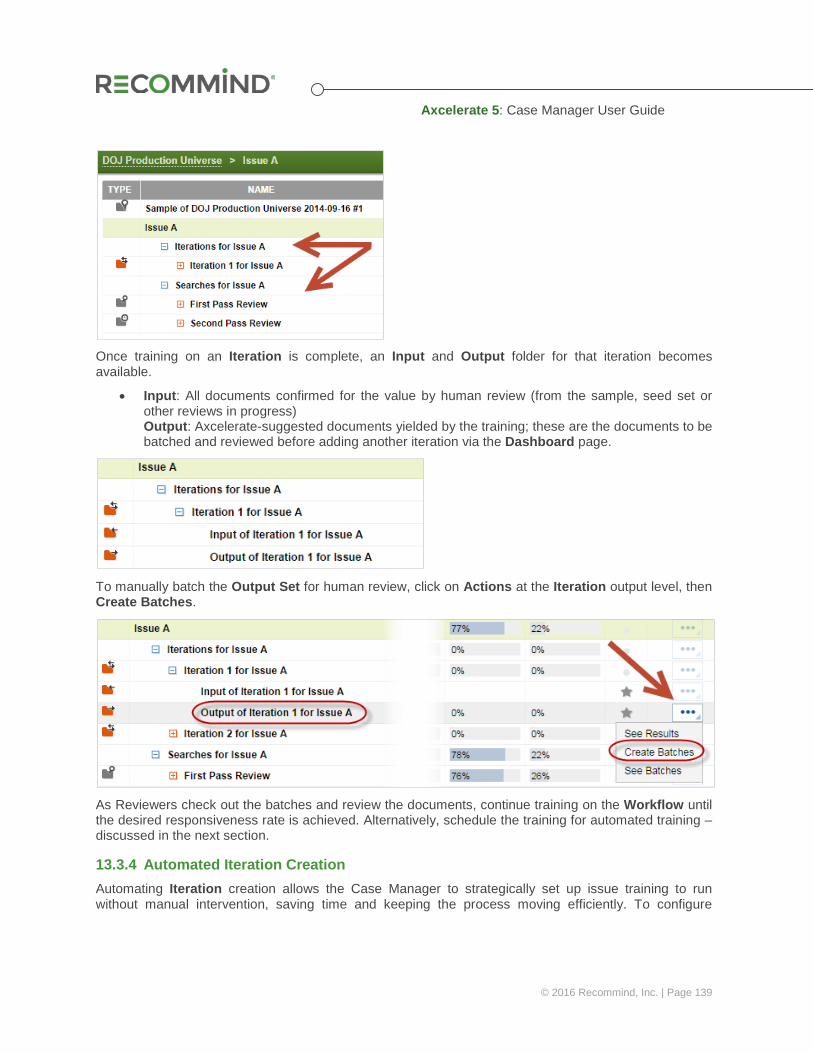
Axcelerate 5: Case Manager User Guide
© 2016 Recommind, Inc. | Page 139
Once training on an Iteration is complete, an Input and Output folder for that iteration becomes available.
• Input: All documents confirmed for the value by human review (from the sample, seed set or other reviews in progress) Output: Axcelerate-suggested documents yielded by the training; these are the documents to be batched and reviewed before adding another iteration via the Dashboard page.
To manually batch the Output Set for human review, click on Actions at the Iteration output level, then Create Batches.
As Reviewers check out the batches and review the documents, continue training on the Workflow until the desired responsiveness rate is achieved. Alternatively, schedule the training for automated training – discussed in the next section.
13.3.4 Automated Iteration Creation Automating Iteration creation allows the Case Manager to strategically set up issue training to run without manual intervention, saving time and keeping the process moving efficiently. To configure
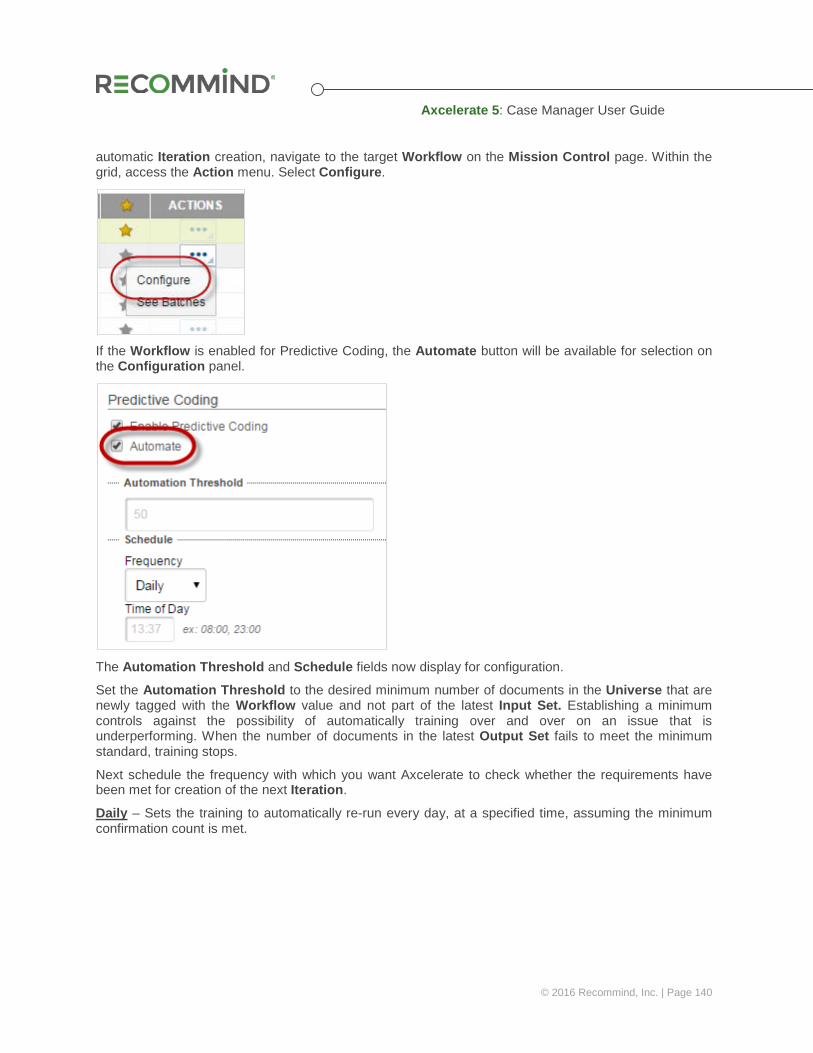
Axcelerate 5: Case Manager User Guide
© 2016 Recommind, Inc. | Page 140
automatic Iteration creation, navigate to the target Workflow on the Mission Control page. Within the grid, access the Action menu. Select Configure.
If the Workflow is enabled for Predictive Coding, the Automate button will be available for selection on the Configuration panel.
The Automation Threshold and Schedule fields now display for configuration.
Set the Automation Threshold to the desired minimum number of documents in the Universe that are newly tagged with the Workflow value and not part of the latest Input Set. Establishing a minimum controls against the possibility of automatically training over and over on an issue that is underperforming. When the number of documents in the latest Output Set fails to meet the minimum standard, training stops.
Next schedule the frequency with which you want Axcelerate to check whether the requirements have been met for creation of the next Iteration.
Daily – Sets the training to automatically re-run every day, at a specified time, assuming the minimum confirmation count is met.
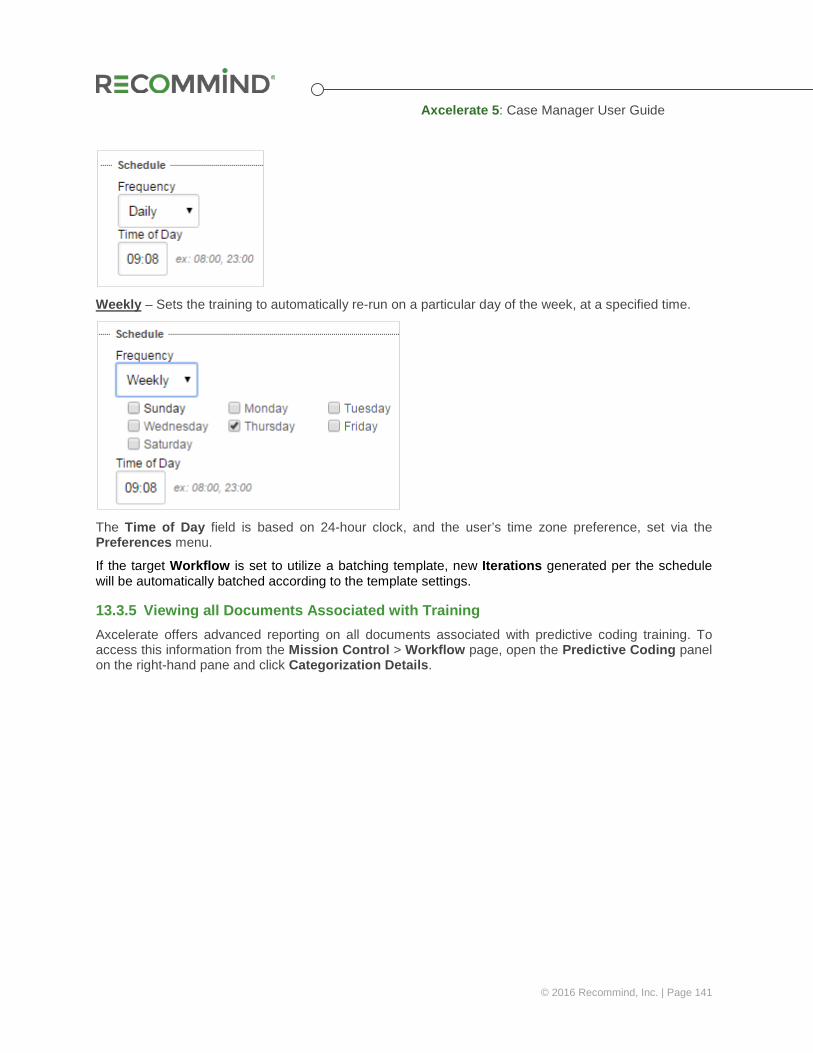
Axcelerate 5: Case Manager User Guide
© 2016 Recommind, Inc. | Page 141
Weekly – Sets the training to automatically re-run on a particular day of the week, at a specified time.
The Time of Day field is based on 24-hour clock, and the user’s time zone preference, set via the Preferences menu.
If the target Workflow is set to utilize a batching template, new Iterations generated per the schedule will be automatically batched according to the template settings.
13.3.5 Viewing all Documents Associated with Training Axcelerate offers advanced reporting on all documents associated with predictive coding training. To access this information from the Mission Control > Workflow page, open the Predictive Coding panel on the right-hand pane and click Categorization Details.
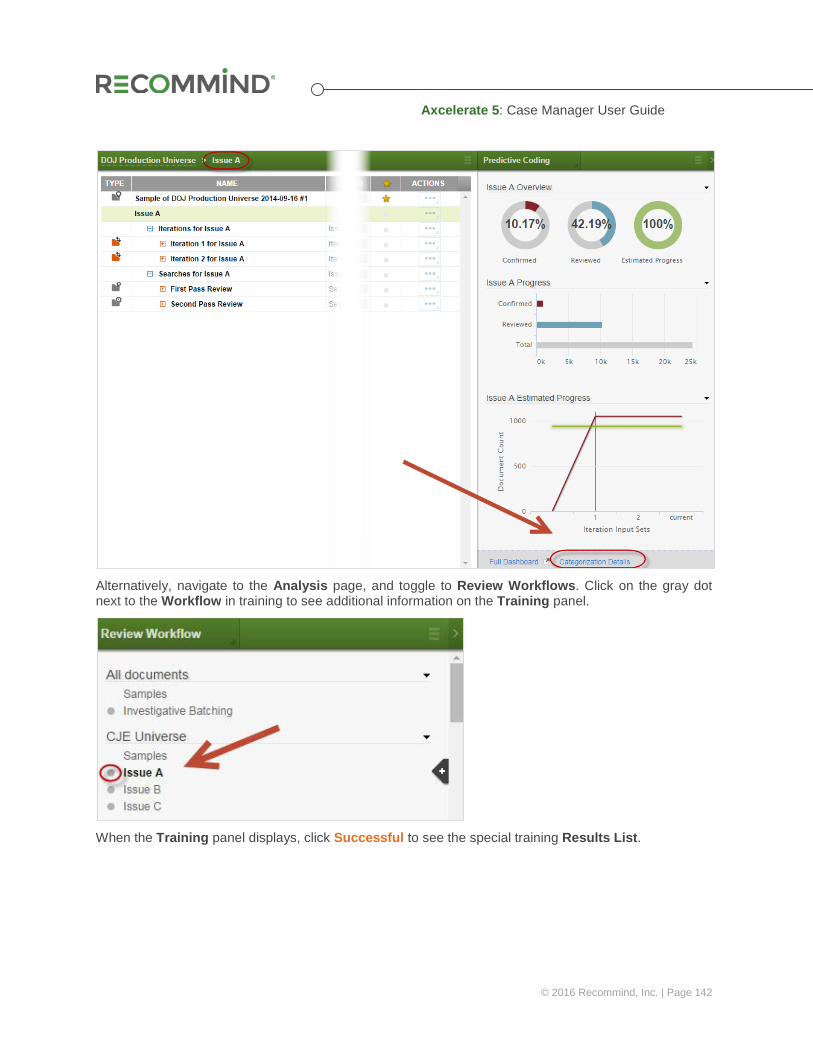
Axcelerate 5: Case Manager User Guide
© 2016 Recommind, Inc. | Page 142
Alternatively, navigate to the Analysis page, and toggle to Review Workflows. Click on the gray dot next to the Workflow in training to see additional information on the Training panel.
When the Training panel displays, click Successful to see the special training Results List.

Axcelerate 5: Case Manager User Guide
© 2016 Recommind, Inc. | Page 143
Two additional columns are shown in the Results List, Confidence and Categorization. Categorization also populates a special Smart Filter for simple filtering of the three categories.
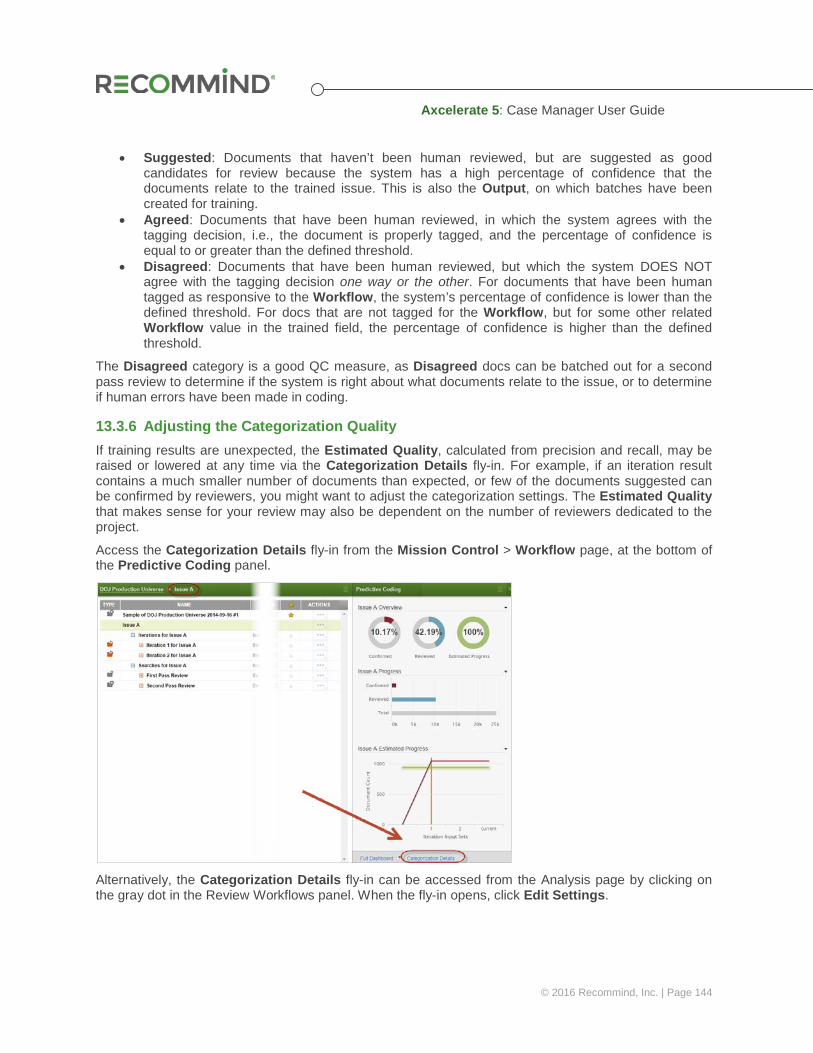
Axcelerate 5: Case Manager User Guide
© 2016 Recommind, Inc. | Page 144
• Suggested: Documents that haven’t been human reviewed, but are suggested as good candidates for review because the system has a high percentage of confidence that the documents relate to the trained issue. This is also the Output, on which batches have been created for training.
• Agreed: Documents that have been human reviewed, in which the system agrees with the tagging decision, i.e., the document is properly tagged, and the percentage of confidence is equal to or greater than the defined threshold.
• Disagreed: Documents that have been human reviewed, but which the system DOES NOT agree with the tagging decision one way or the other. For documents that have been human tagged as responsive to the Workflow, the system’s percentage of confidence is lower than the defined threshold. For docs that are not tagged for the Workflow, but for some other related Workflow value in the trained field, the percentage of confidence is higher than the defined threshold.
The Disagreed category is a good QC measure, as Disagreed docs can be batched out for a second pass review to determine if the system is right about what documents relate to the issue, or to determine if human errors have been made in coding.
13.3.6 Adjusting the Categorization Quality If training results are unexpected, the Estimated Quality, calculated from precision and recall, may be raised or lowered at any time via the Categorization Details fly-in. For example, if an iteration result contains a much smaller number of documents than expected, or few of the documents suggested can be confirmed by reviewers, you might want to adjust the categorization settings. The Estimated Quality that makes sense for your review may also be dependent on the number of reviewers dedicated to the project.
Access the Categorization Details fly-in from the Mission Control > Workflow page, at the bottom of the Predictive Coding panel.
Alternatively, the Categorization Details fly-in can be accessed from the Analysis page by clicking on the gray dot in the Review Workflows panel. When the fly-in opens, click Edit Settings.

Axcelerate 5: Case Manager User Guide
© 2016 Recommind, Inc. | Page 145
An interactive graph showing the relationship between the current precision and recall of the review displays. Hover over the graph to see a tooltip that adjusts depending on the point in the graph where your mouse is placed. This gives you an idea in advance of how the volume of documents for review would shrink or expand if you were to adjust the settings.
Current and Recommended volumes and quality statistics display in a table below the graph. Hover within the graph to see the blue dot, which represents your proposed selection. This makes the Selected statistics appear in the table so you can easily compare the outcome before finalizing the selection. Click Confirm to make a new selection, or Cancel to stay with your Current settings, which may or may not match Axcelerate’s recommended settings.
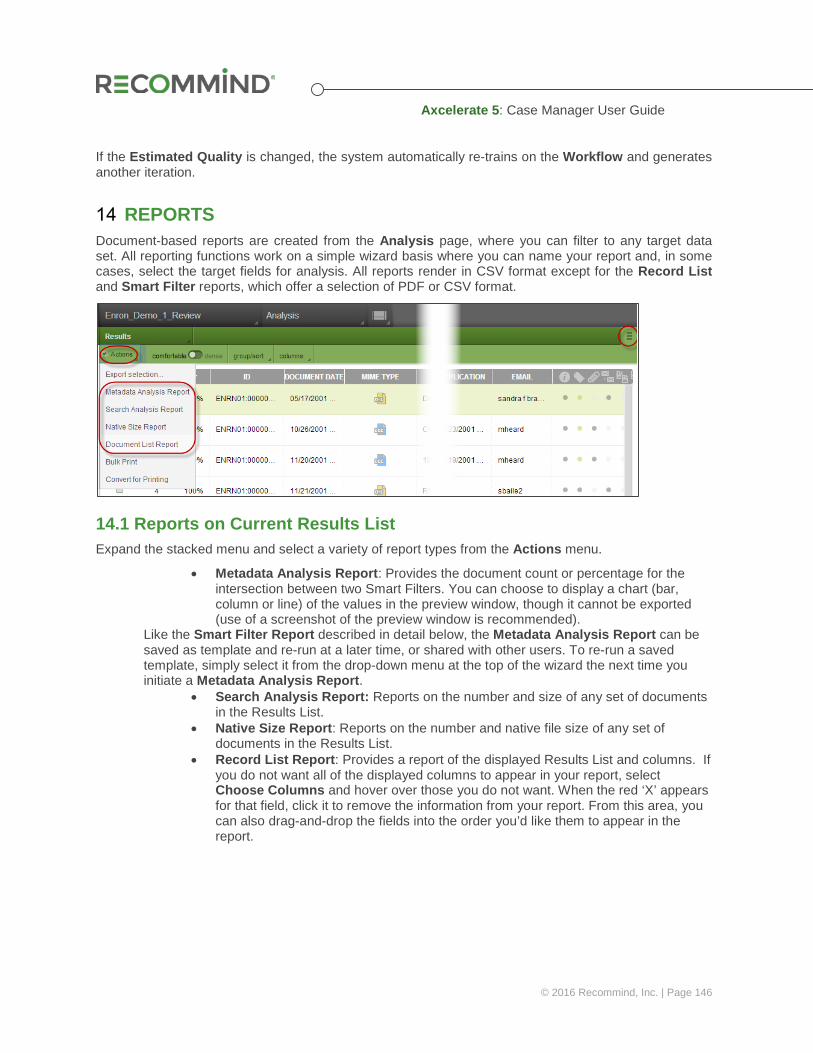
Axcelerate 5: Case Manager User Guide
© 2016 Recommind, Inc. | Page 146
If the Estimated Quality is changed, the system automatically re-trains on the Workflow and generates another iteration.
REPORTS Document-based reports are created from the Analysis page, where you can filter to any target data set. All reporting functions work on a simple wizard basis where you can name your report and, in some cases, select the target fields for analysis. All reports render in CSV format except for the Record List and Smart Filter reports, which offer a selection of PDF or CSV format.
14.1 Reports on Current Results List Expand the stacked menu and select a variety of report types from the Actions menu.
• Metadata Analysis Report: Provides the document count or percentage for the intersection between two Smart Filters. You can choose to display a chart (bar, column or line) of the values in the preview window, though it cannot be exported (use of a screenshot of the preview window is recommended).
Like the Smart Filter Report described in detail below, the Metadata Analysis Report can be saved as template and re-run at a later time, or shared with other users. To re-run a saved template, simply select it from the drop-down menu at the top of the wizard the next time you initiate a Metadata Analysis Report.
• Search Analysis Report: Reports on the number and size of any set of documents in the Results List.
• Native Size Report: Reports on the number and native file size of any set of documents in the Results List.
• Record List Report: Provides a report of the displayed Results List and columns. If you do not want all of the displayed columns to appear in your report, select Choose Columns and hover over those you do not want. When the red ‘X’ appears for that field, click it to remove the information from your report. From this area, you can also drag-and-drop the fields into the order you’d like them to appear in the report.
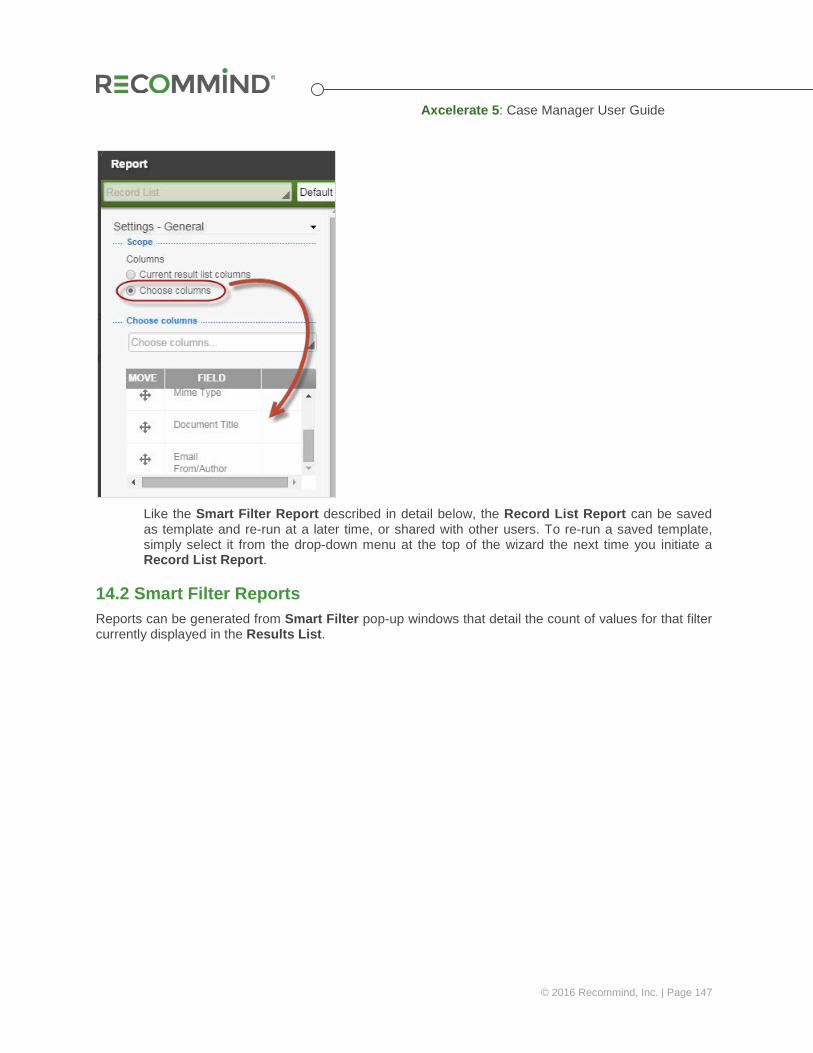
Axcelerate 5: Case Manager User Guide
© 2016 Recommind, Inc. | Page 147
Like the Smart Filter Report described in detail below, the Record List Report can be saved as template and re-run at a later time, or shared with other users. To re-run a saved template, simply select it from the drop-down menu at the top of the wizard the next time you initiate a Record List Report.
14.2 Smart Filter Reports Reports can be generated from Smart Filter pop-up windows that detail the count of values for that filter currently displayed in the Results List.
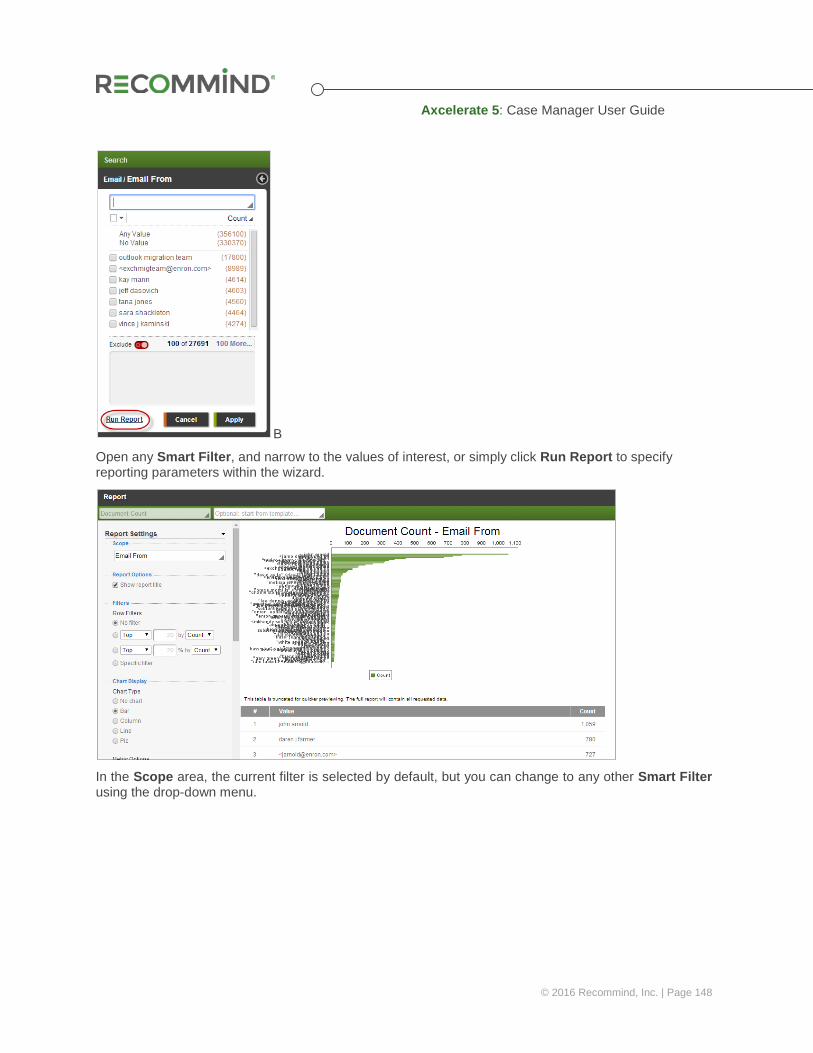
Axcelerate 5: Case Manager User Guide
© 2016 Recommind, Inc. | Page 148
B
Open any Smart Filter, and narrow to the values of interest, or simply click Run Report to specify reporting parameters within the wizard.
In the Scope area, the current filter is selected by default, but you can change to any other Smart Filter using the drop-down menu.
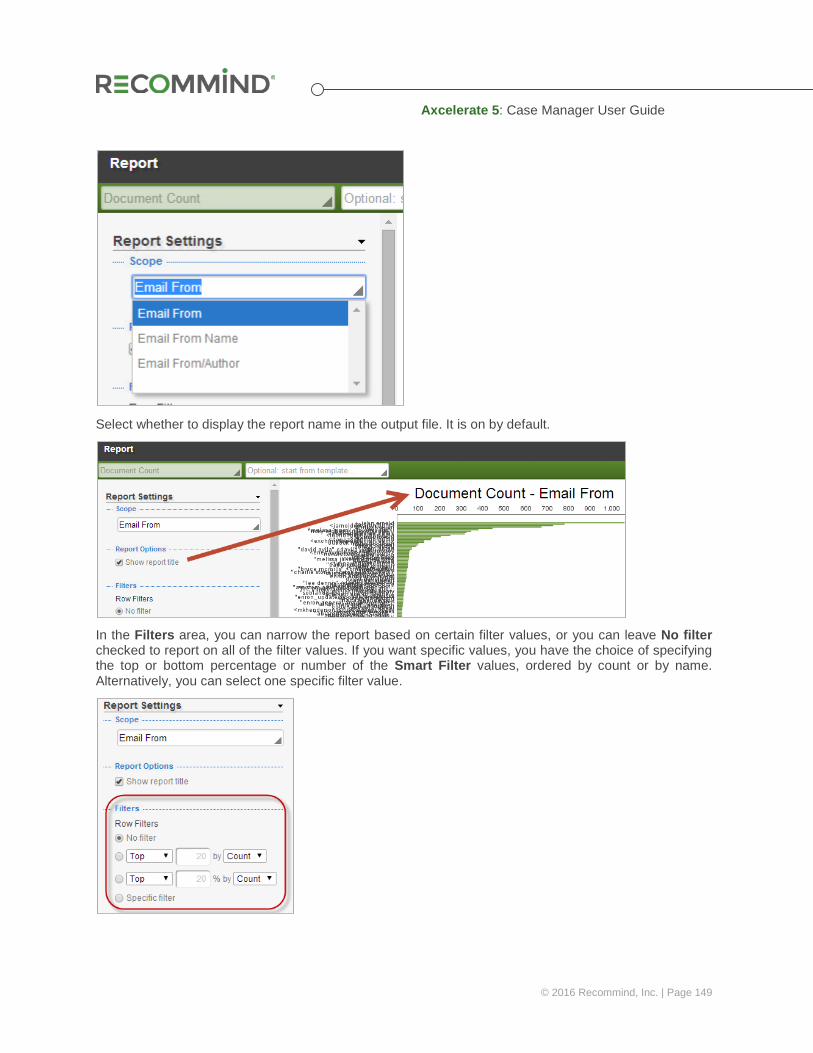
Axcelerate 5: Case Manager User Guide
© 2016 Recommind, Inc. | Page 149
Select whether to display the report name in the output file. It is on by default.
In the Filters area, you can narrow the report based on certain filter values, or you can leave No filter checked to report on all of the filter values. If you want specific values, you have the choice of specifying the top or bottom percentage or number of the Smart Filter values, ordered by count or by name. Alternatively, you can select one specific filter value.
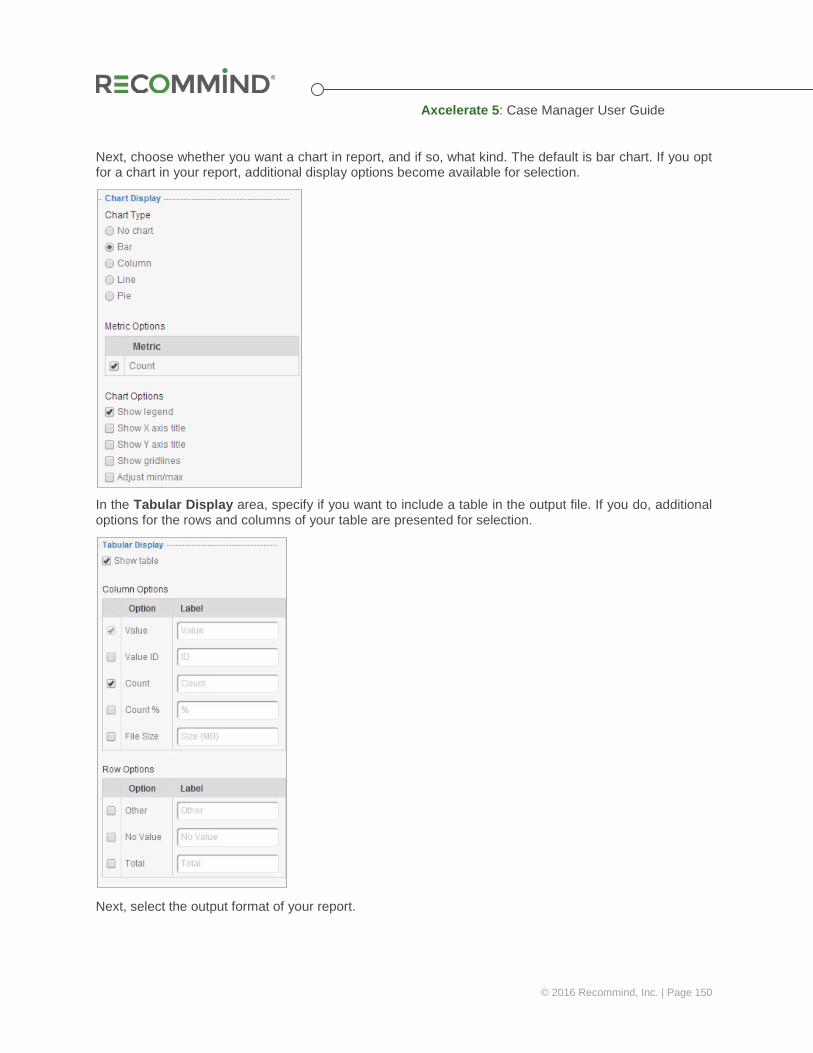
Axcelerate 5: Case Manager User Guide
© 2016 Recommind, Inc. | Page 150
Next, choose whether you want a chart in report, and if so, what kind. The default is bar chart. If you opt for a chart in your report, additional display options become available for selection.
In the Tabular Display area, specify if you want to include a table in the output file. If you do, additional options for the rows and columns of your table are presented for selection.
Next, select the output format of your report.
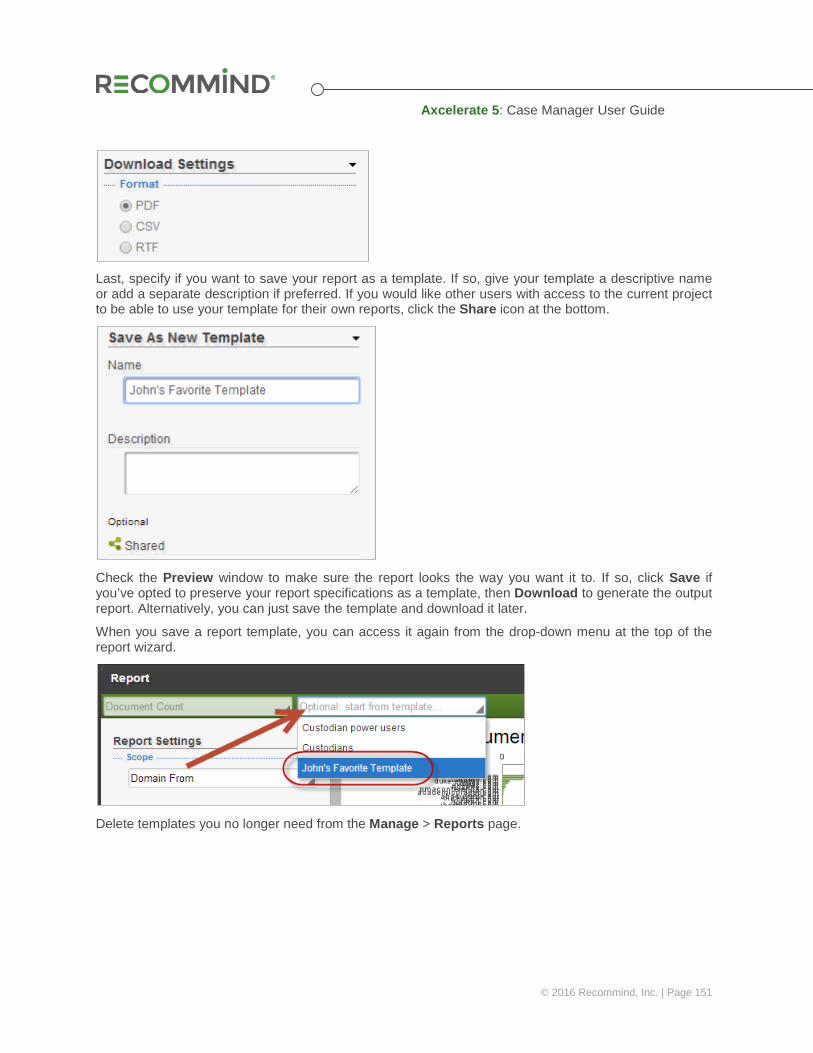
Axcelerate 5: Case Manager User Guide
© 2016 Recommind, Inc. | Page 151
Last, specify if you want to save your report as a template. If so, give your template a descriptive name or add a separate description if preferred. If you would like other users with access to the current project to be able to use your template for their own reports, click the Share icon at the bottom.
Check the Preview window to make sure the report looks the way you want it to. If so, click Save if you’ve opted to preserve your report specifications as a template, then Download to generate the output report. Alternatively, you can just save the template and download it later.
When you save a report template, you can access it again from the drop-down menu at the top of the report wizard.
Delete templates you no longer need from the Manage > Reports page.
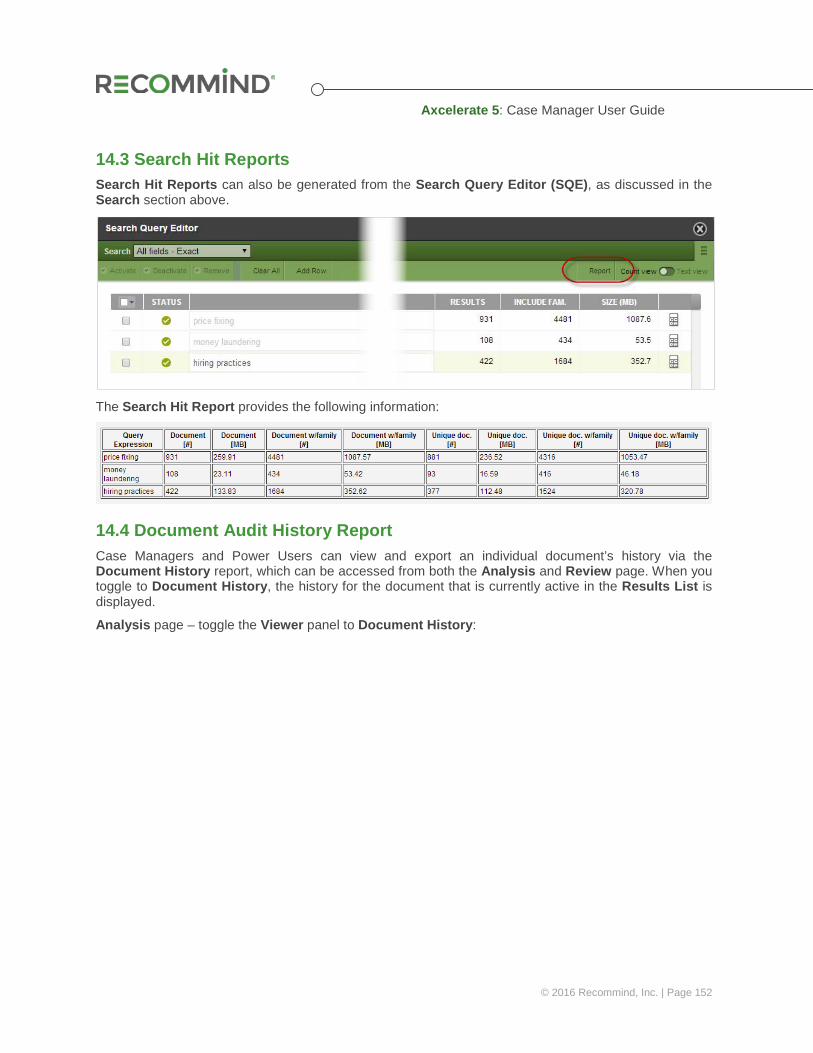
Axcelerate 5: Case Manager User Guide
© 2016 Recommind, Inc. | Page 152
14.3 Search Hit Reports Search Hit Reports can also be generated from the Search Query Editor (SQE), as discussed in the Search section above.
The Search Hit Report provides the following information:
14.4 Document Audit History Report Case Managers and Power Users can view and export an individual document’s history via the Document History report, which can be accessed from both the Analysis and Review page. When you toggle to Document History, the history for the document that is currently active in the Results List is displayed.
Analysis page – toggle the Viewer panel to Document History:
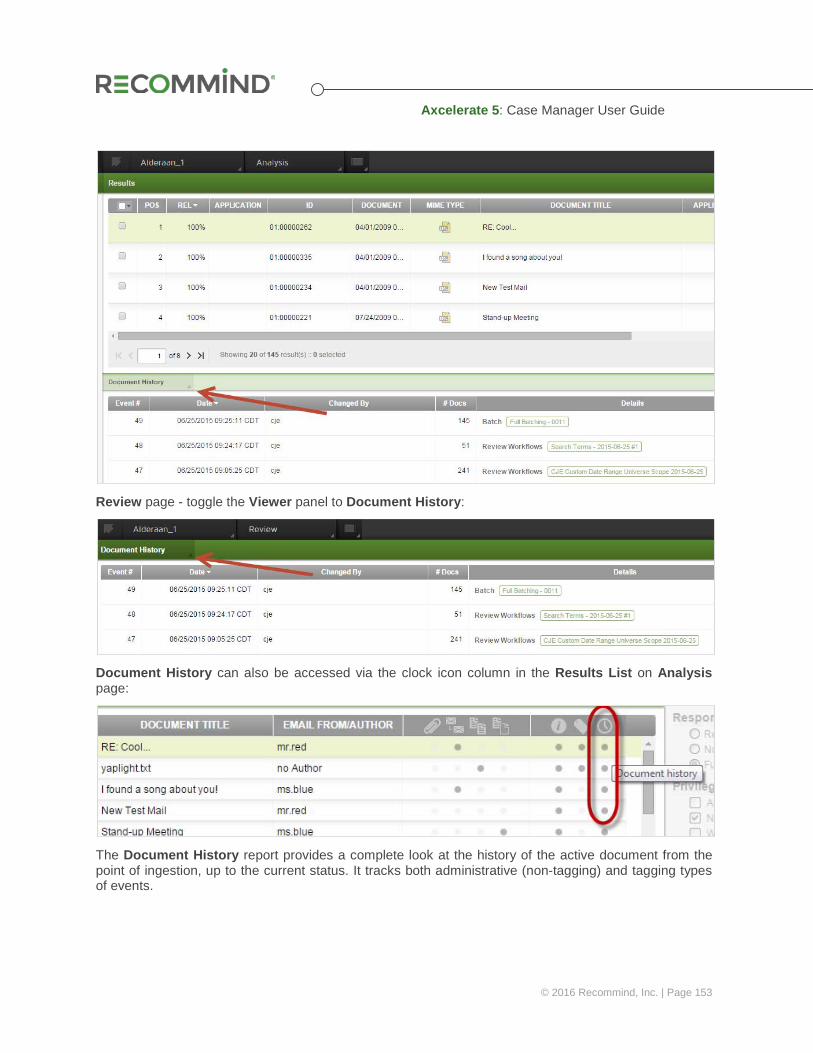
Axcelerate 5: Case Manager User Guide
© 2016 Recommind, Inc. | Page 153
Review page - toggle the Viewer panel to Document History:
Document History can also be accessed via the clock icon column in the Results List on Analysis page:
The Document History report provides a complete look at the history of the active document from the point of ingestion, up to the current status. It tracks both administrative (non-tagging) and tagging types of events.
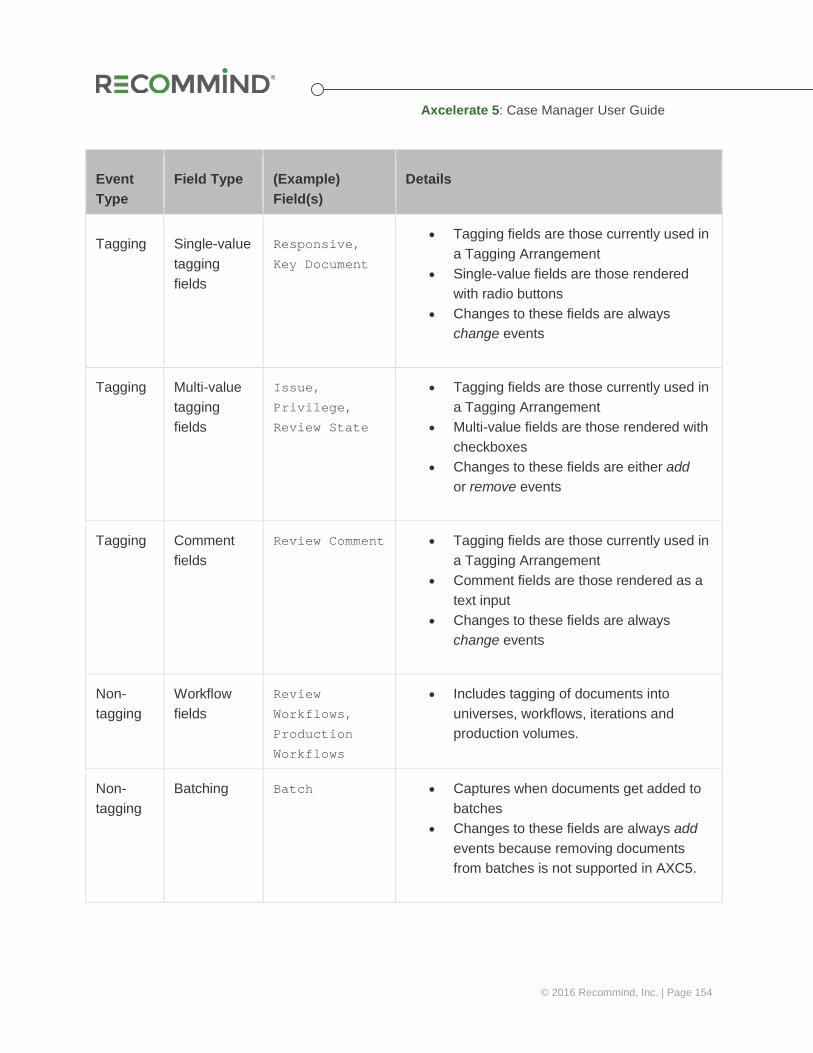
Axcelerate 5: Case Manager User Guide
© 2016 Recommind, Inc. | Page 154
Event Type
Field Type (Example) Field(s)
Details
Tagging Single-value tagging fields
Responsive,
Key Document
• Tagging fields are those currently used in a Tagging Arrangement
• Single-value fields are those rendered with radio buttons
• Changes to these fields are always change events
Tagging Multi-value tagging fields
Issue,
Privilege,
Review State
• Tagging fields are those currently used in a Tagging Arrangement
• Multi-value fields are those rendered with checkboxes
• Changes to these fields are either add or remove events
Tagging Comment fields
Review Comment • Tagging fields are those currently used in a Tagging Arrangement
• Comment fields are those rendered as a text input
• Changes to these fields are always change events
Non-tagging
Workflow fields
Review
Workflows,
Production
Workflows
• Includes tagging of documents into universes, workflows, iterations and production volumes.
Non-tagging
Batching Batch • Captures when documents get added to batches
• Changes to these fields are always add events because removing documents from batches is not supported in AXC5.
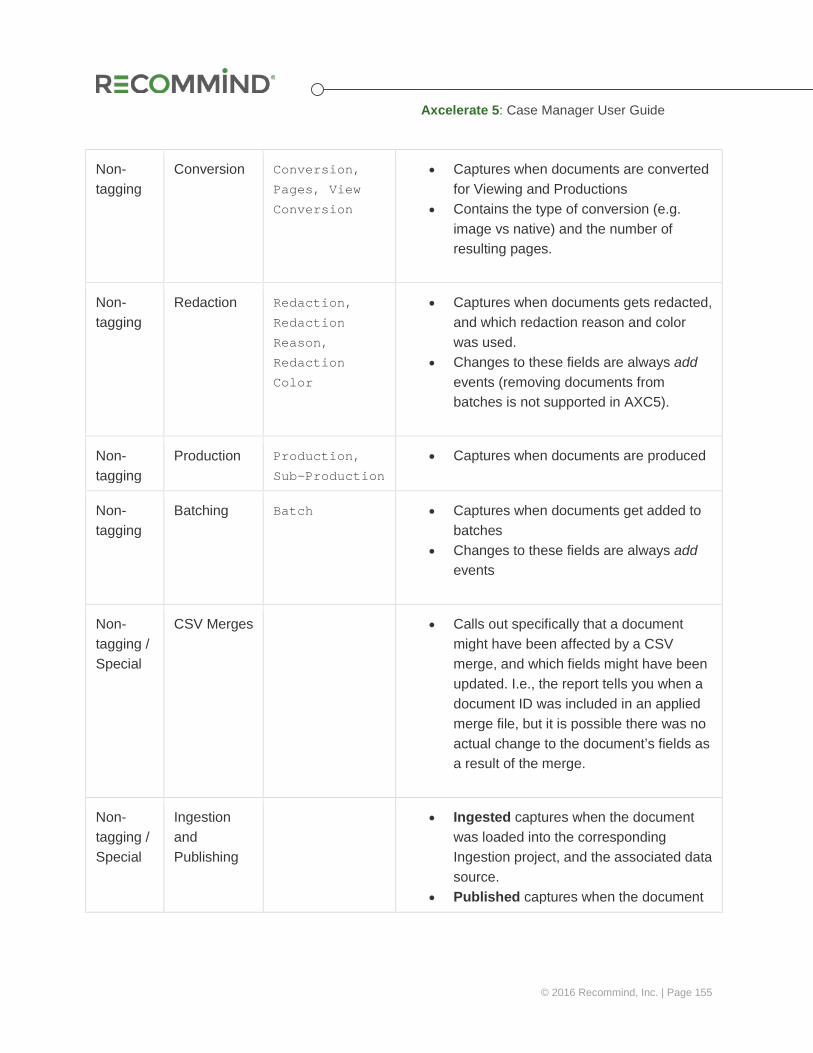
Axcelerate 5: Case Manager User Guide
© 2016 Recommind, Inc. | Page 155
Non-tagging
Conversion Conversion,
Pages, View
Conversion
• Captures when documents are converted for Viewing and Productions
• Contains the type of conversion (e.g. image vs native) and the number of resulting pages.
Non-tagging
Redaction Redaction,
Redaction
Reason,
Redaction
Color
• Captures when documents gets redacted, and which redaction reason and color was used.
• Changes to these fields are always add events (removing documents from batches is not supported in AXC5).
Non-tagging
Production Production,
Sub-Production • Captures when documents are produced
Non-tagging
Batching Batch • Captures when documents get added to batches
• Changes to these fields are always add events
Non-tagging / Special
CSV Merges • Calls out specifically that a document might have been affected by a CSV merge, and which fields might have been updated. I.e., the report tells you when a document ID was included in an applied merge file, but it is possible there was no actual change to the document’s fields as a result of the merge.
Non-tagging / Special
Ingestion and Publishing
• Ingested captures when the document was loaded into the corresponding Ingestion project, and the associated data source.
• Published captures when the document
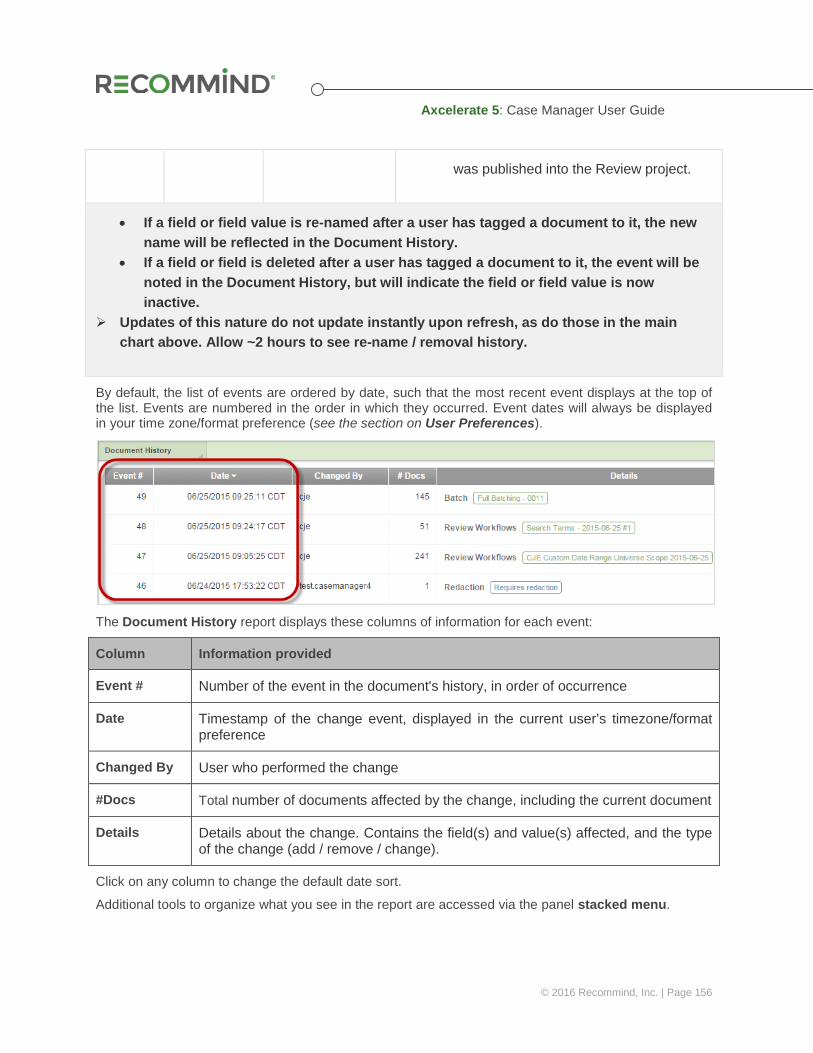
Axcelerate 5: Case Manager User Guide
© 2016 Recommind, Inc. | Page 156
was published into the Review project.
• If a field or field value is re-named after a user has tagged a document to it, the new name will be reflected in the Document History.
• If a field or field is deleted after a user has tagged a document to it, the event will be noted in the Document History, but will indicate the field or field value is now inactive.
Updates of this nature do not update instantly upon refresh, as do those in the main chart above. Allow ~2 hours to see re-name / removal history.
By default, the list of events are ordered by date, such that the most recent event displays at the top of the list. Events are numbered in the order in which they occurred. Event dates will always be displayed in your time zone/format preference (see the section on User Preferences).
The Document History report displays these columns of information for each event:
Column Information provided
Event # Number of the event in the document's history, in order of occurrence
Date Timestamp of the change event, displayed in the current user’s timezone/format preference
Changed By User who performed the change
#Docs Total number of documents affected by the change, including the current document
Details Details about the change. Contains the field(s) and value(s) affected, and the type of the change (add / remove / change).
Click on any column to change the default date sort.
Additional tools to organize what you see in the report are accessed via the panel stacked menu.

Axcelerate 5: Case Manager User Guide
© 2016 Recommind, Inc. | Page 157
Tool Function
Sort the Document History by up to three of the displayed columns, in ascending or descending order. The Sort is sticky document-to-document.
Filter to see tagging events only, non-tagging events only, or all events (no filter). The default is set to Tagging events only. The Filter is sticky document-to-document.
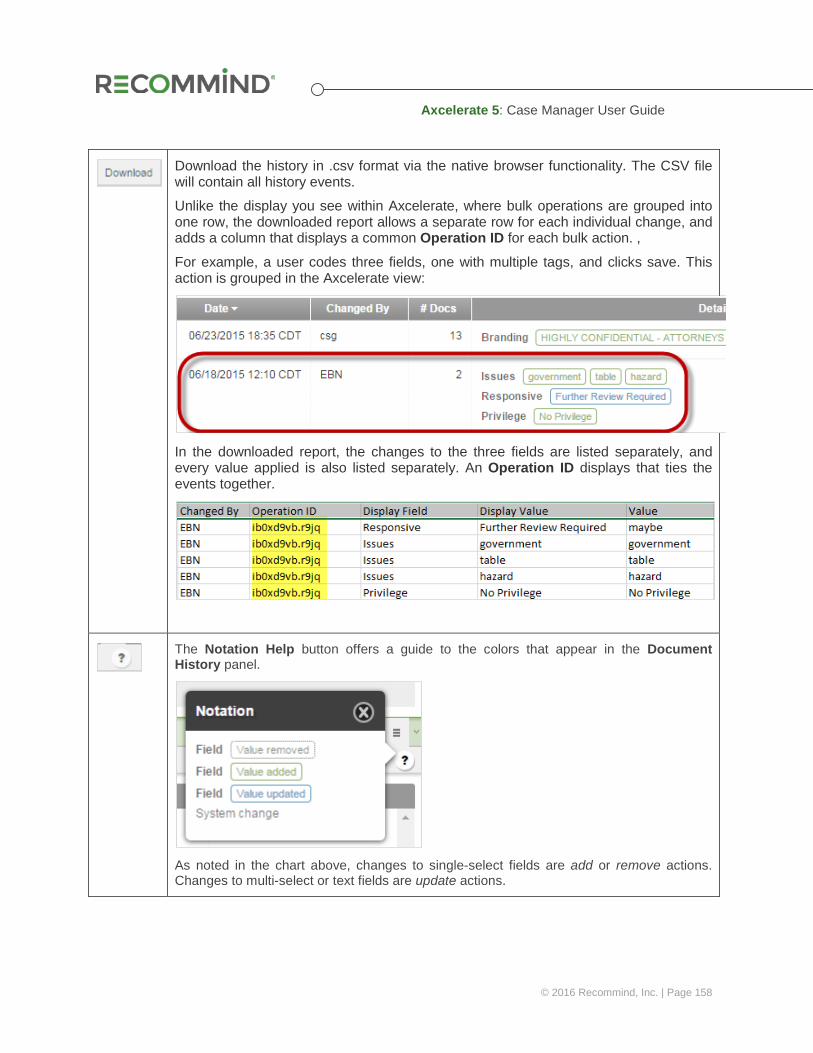
Axcelerate 5: Case Manager User Guide
© 2016 Recommind, Inc. | Page 158
Download the history in .csv format via the native browser functionality. The CSV file will contain all history events.
Unlike the display you see within Axcelerate, where bulk operations are grouped into one row, the downloaded report allows a separate row for each individual change, and adds a column that displays a common Operation ID for each bulk action. ,
For example, a user codes three fields, one with multiple tags, and clicks save. This action is grouped in the Axcelerate view:
In the downloaded report, the changes to the three fields are listed separately, and every value applied is also listed separately. An Operation ID displays that ties the events together.
The Notation Help button offers a guide to the colors that appear in the Document History panel.
As noted in the chart above, changes to single-select fields are add or remove actions. Changes to multi-select or text fields are update actions.
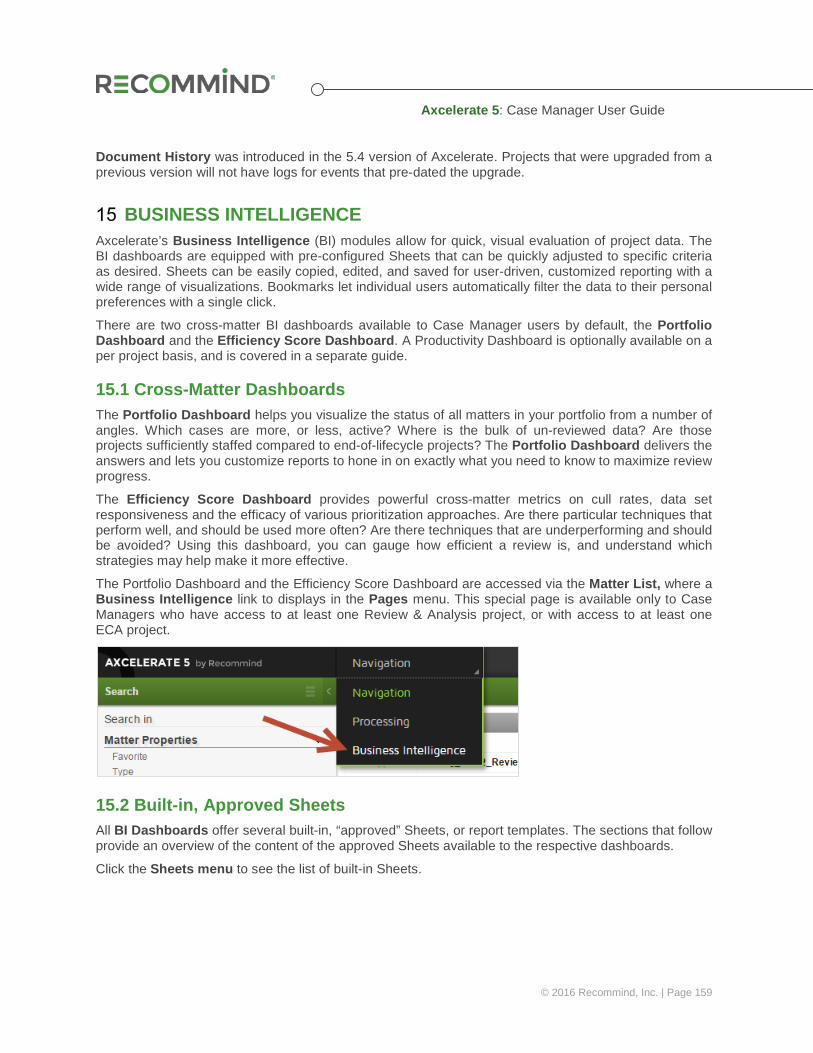
Axcelerate 5: Case Manager User Guide
© 2016 Recommind, Inc. | Page 159
Document History was introduced in the 5.4 version of Axcelerate. Projects that were upgraded from a previous version will not have logs for events that pre-dated the upgrade.
BUSINESS INTELLIGENCE Axcelerate’s Business Intelligence (BI) modules allow for quick, visual evaluation of project data. The BI dashboards are equipped with pre-configured Sheets that can be quickly adjusted to specific criteria as desired. Sheets can be easily copied, edited, and saved for user-driven, customized reporting with a wide range of visualizations. Bookmarks let individual users automatically filter the data to their personal preferences with a single click.
There are two cross-matter BI dashboards available to Case Manager users by default, the Portfolio Dashboard and the Efficiency Score Dashboard. A Productivity Dashboard is optionally available on a per project basis, and is covered in a separate guide.
15.1 Cross-Matter Dashboards The Portfolio Dashboard helps you visualize the status of all matters in your portfolio from a number of angles. Which cases are more, or less, active? Where is the bulk of un-reviewed data? Are those projects sufficiently staffed compared to end-of-lifecycle projects? The Portfolio Dashboard delivers the answers and lets you customize reports to hone in on exactly what you need to know to maximize review progress.
The Efficiency Score Dashboard provides powerful cross-matter metrics on cull rates, data set responsiveness and the efficacy of various prioritization approaches. Are there particular techniques that perform well, and should be used more often? Are there techniques that are underperforming and should be avoided? Using this dashboard, you can gauge how efficient a review is, and understand which strategies may help make it more effective.
The Portfolio Dashboard and the Efficiency Score Dashboard are accessed via the Matter List, where a Business Intelligence link to displays in the Pages menu. This special page is available only to Case Managers who have access to at least one Review & Analysis project, or with access to at least one ECA project.
15.2 Built-in, Approved Sheets All BI Dashboards offer several built-in, “approved” Sheets, or report templates. The sections that follow provide an overview of the content of the approved Sheets available to the respective dashboards.
Click the Sheets menu to see the list of built-in Sheets.
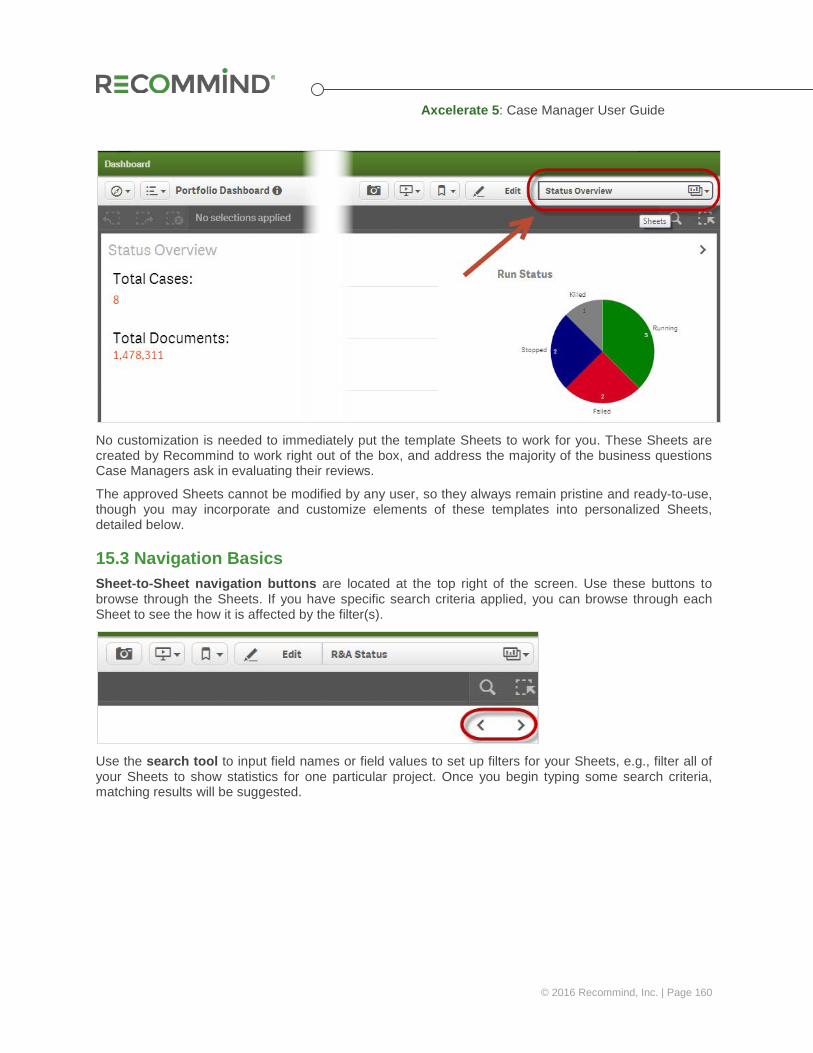
Axcelerate 5: Case Manager User Guide
© 2016 Recommind, Inc. | Page 160
No customization is needed to immediately put the template Sheets to work for you. These Sheets are created by Recommind to work right out of the box, and address the majority of the business questions Case Managers ask in evaluating their reviews.
The approved Sheets cannot be modified by any user, so they always remain pristine and ready-to-use, though you may incorporate and customize elements of these templates into personalized Sheets, detailed below.
15.3 Navigation Basics Sheet-to-Sheet navigation buttons are located at the top right of the screen. Use these buttons to browse through the Sheets. If you have specific search criteria applied, you can browse through each Sheet to see the how it is affected by the filter(s).
Use the search tool to input field names or field values to set up filters for your Sheets, e.g., filter all of your Sheets to show statistics for one particular project. Once you begin typing some search criteria, matching results will be suggested.

Axcelerate 5: Case Manager User Guide
© 2016 Recommind, Inc. | Page 161
Applied filters display in the header so you can always see them at a glance. Multiple filters can be stacked on top of one another, to achieve the desired level of granularity.
Once applied, filters affect all graphs on the current Sheet and any other Sheet you may navigate to within your current session, so you don’t have to re-apply them as you move from Sheet to Sheet.
Use the Step Back and Step Forward navigation buttons to shift back and forth in time, to see what filters you have applied at various points.
Remove individual filters using the X icon beside the displayed filter criteria.
To remove all of the filters at one time, use the Clear All Selections button.
It’s easy to apply filters from within a single Sheet as well. To do this, drag your mouse over the area of interest in the graph. Once the filter is set up, click the green Confirm button to apply it, or discard it with the red button. If confirmed, the graph updates to show the desired granularity.
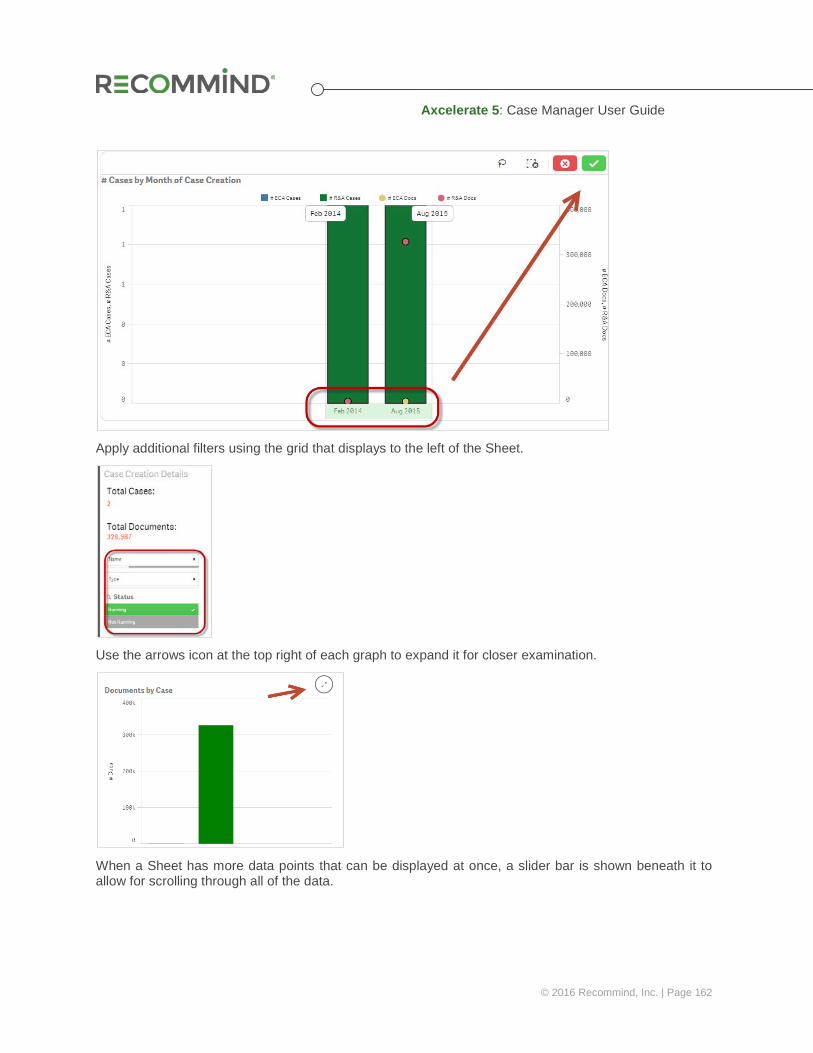
Axcelerate 5: Case Manager User Guide
© 2016 Recommind, Inc. | Page 162
Apply additional filters using the grid that displays to the left of the Sheet.
Use the arrows icon at the top right of each graph to expand it for closer examination.
When a Sheet has more data points that can be displayed at once, a slider bar is shown beneath it to allow for scrolling through all of the data.

Axcelerate 5: Case Manager User Guide
© 2016 Recommind, Inc. | Page 163
You can also use the roller ball on your mouse to scroll through data in a graph.
15.4 Approved Sheets in the Portfolio Dashboard Each of the built-in, approved sheets has been specifically designed to answer portfolio status questions.
Status Overview
Provides a high-level look at the all of the cases in the user’s portfolio, including number of documents per case, case type and run status.
R&A Status:
Provides the number of documents for each R&A, with additional insight into the number of documents reviewed so far in each project.
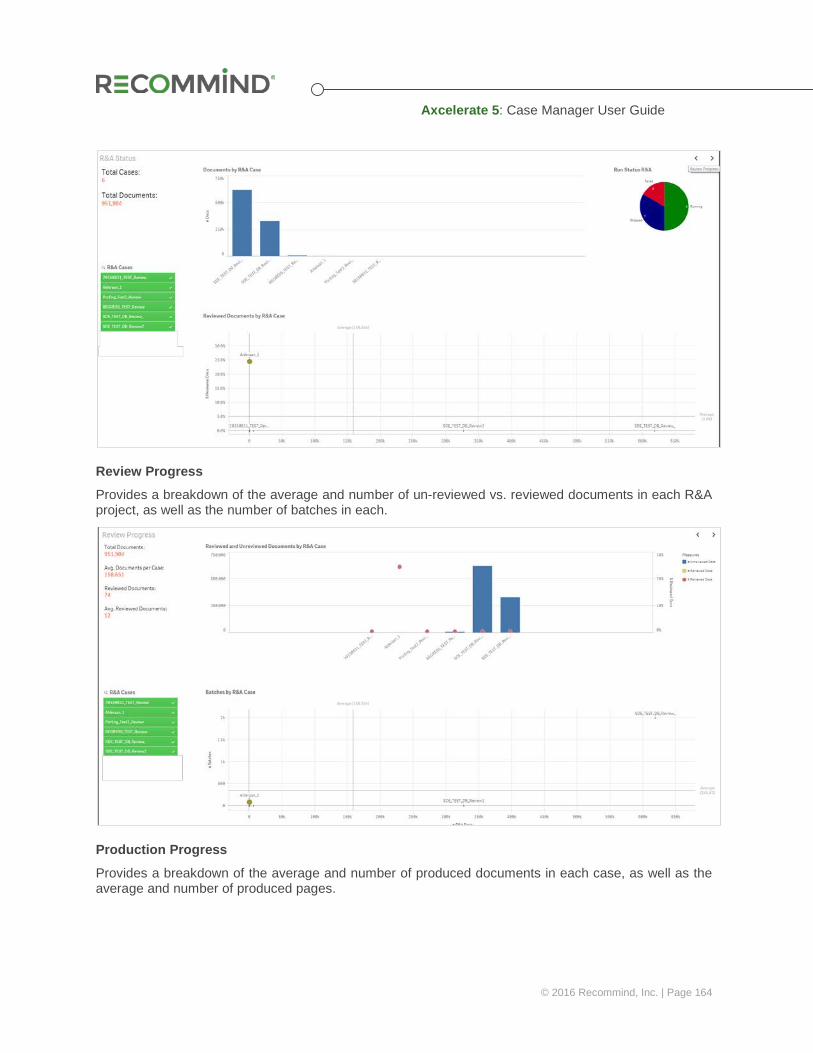
Axcelerate 5: Case Manager User Guide
© 2016 Recommind, Inc. | Page 164
Review Progress
Provides a breakdown of the average and number of un-reviewed vs. reviewed documents in each R&A project, as well as the number of batches in each.
Production Progress
Provides a breakdown of the average and number of produced documents in each case, as well as the average and number of produced pages.
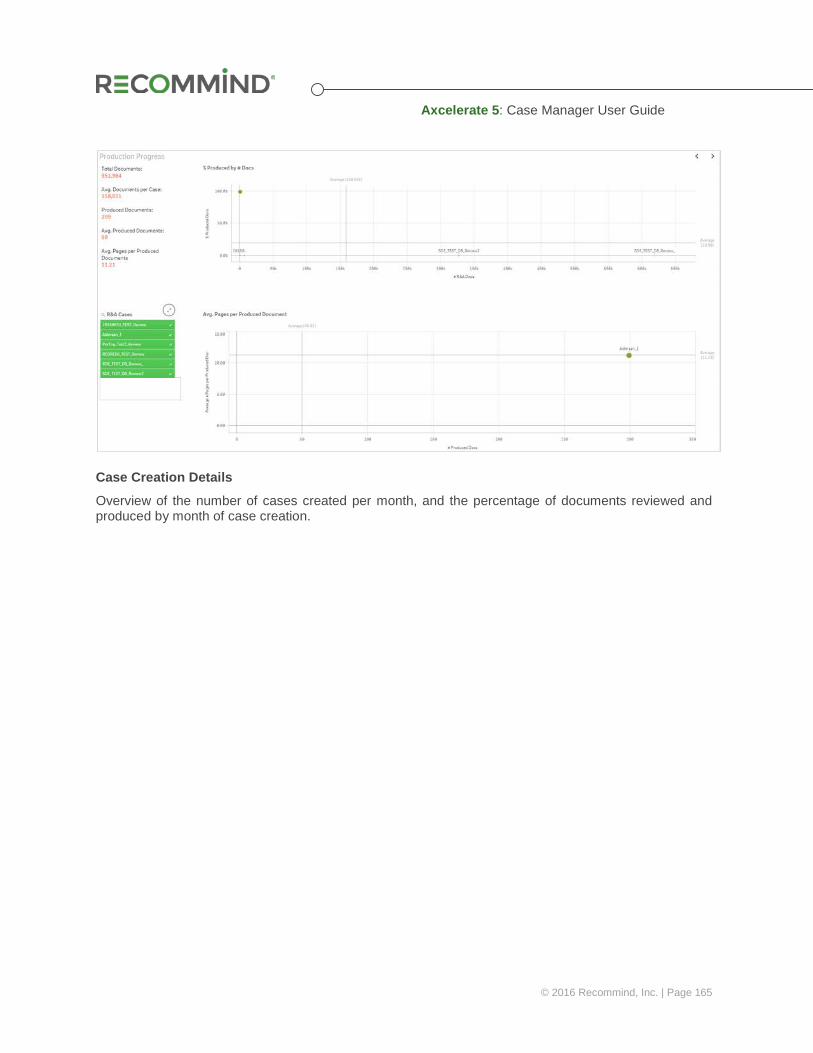
Axcelerate 5: Case Manager User Guide
© 2016 Recommind, Inc. | Page 165
Case Creation Details
Overview of the number of cases created per month, and the percentage of documents reviewed and produced by month of case creation.

Axcelerate 5: Case Manager User Guide
© 2016 Recommind, Inc. | Page 166
Details A grid display of the case information presented graphically on the other sheets, along with the Axcelerate version information and any project description if it exists.
Help
Defines the measures and dimensions seen throughout the Portfolio Dashboard.
15.5 Approved Sheets in the Efficiency Score Dashboard Each of the built-in, approved sheets has been specifically designed to answer review efficacy questions.
Efficiency Overview
Data Reduction Summary: Funnel graph depicts reduction of data that requires eyes-on review. Starting at the wide end of the funnel, you see the total pool of documents ingested. The subsequent reduction in volume via ECA culling strategies, removal of duplicate documents in the publish process and prioritization strategies applied in the Review & Analysis project is shown as the funnel narrows. The greater the difference in the initial number of documents ingested vs. the total confirmed to the target Workflow, the more efficient the review strategy.
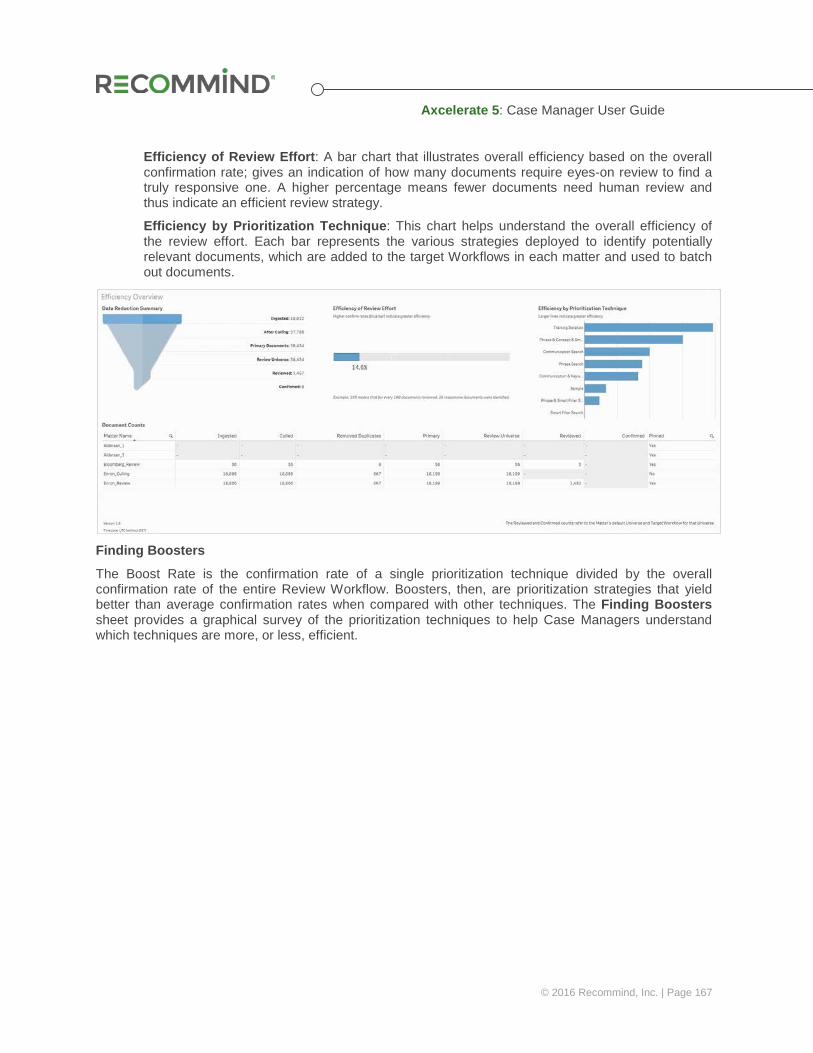
Axcelerate 5: Case Manager User Guide
© 2016 Recommind, Inc. | Page 167
Efficiency of Review Effort: A bar chart that illustrates overall efficiency based on the overall confirmation rate; gives an indication of how many documents require eyes-on review to find a truly responsive one. A higher percentage means fewer documents need human review and thus indicate an efficient review strategy.
Efficiency by Prioritization Technique: This chart helps understand the overall efficiency of the review effort. Each bar represents the various strategies deployed to identify potentially relevant documents, which are added to the target Workflows in each matter and used to batch out documents.
Finding Boosters
The Boost Rate is the confirmation rate of a single prioritization technique divided by the overall confirmation rate of the entire Review Workflow. Boosters, then, are prioritization strategies that yield better than average confirmation rates when compared with other techniques. The Finding Boosters sheet provides a graphical survey of the prioritization techniques to help Case Managers understand which techniques are more, or less, efficient.
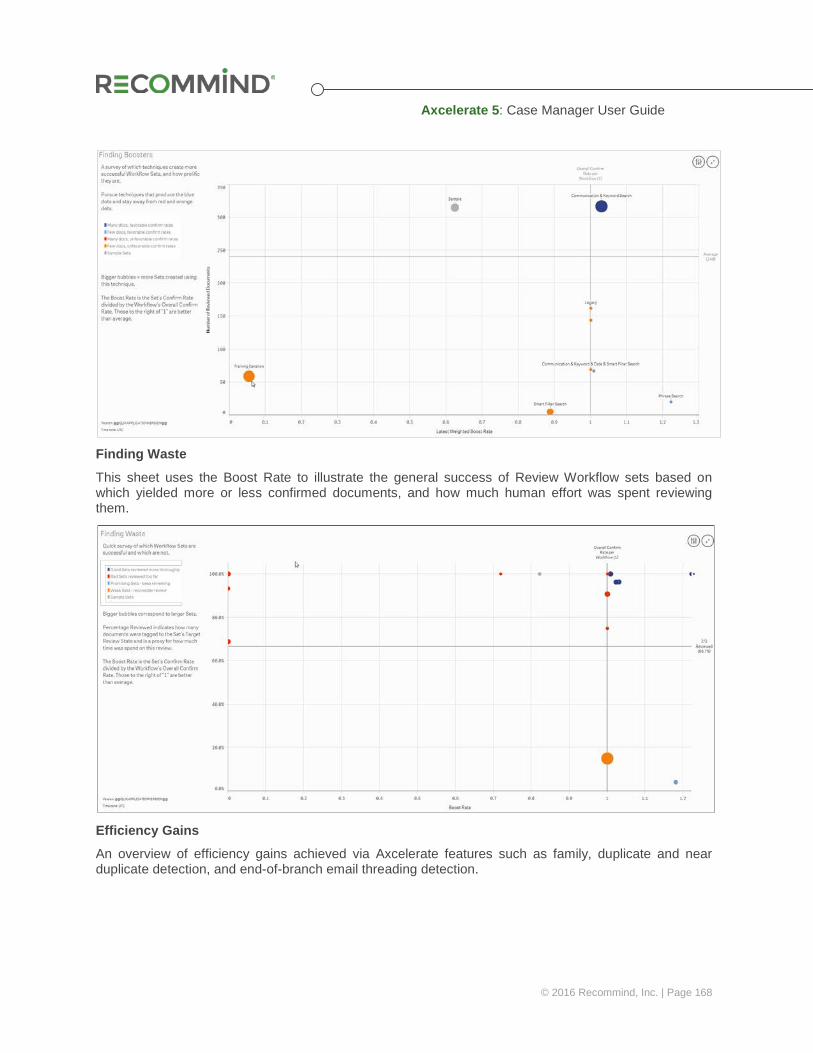
Axcelerate 5: Case Manager User Guide
© 2016 Recommind, Inc. | Page 168
Finding Waste
This sheet uses the Boost Rate to illustrate the general success of Review Workflow sets based on which yielded more or less confirmed documents, and how much human effort was spent reviewing them.
Efficiency Gains
An overview of efficiency gains achieved via Axcelerate features such as family, duplicate and near duplicate detection, and end-of-branch email threading detection.

Axcelerate 5: Case Manager User Guide
© 2016 Recommind, Inc. | Page 169
Confirm Rate over Time
A daily look at the number of confirmed documents found by the review team to help identify trends in deploying effective prioritization techniques.
Help
This sheet defines various terms and concepts used throughout the Efficiency Score Dashboard.

Axcelerate 5: Case Manager User Guide
© 2016 Recommind, Inc. | Page 170
15.6 Create Bookmarks Bookmarks are saved filters that allow you to jump quickly to a customized point-of-view. You can create an unlimited number of Bookmarks to achieve reporting specificity.
Start with any Sheet and add one or more filters that define what you’re looking for. For example, you may want to use the Status Overview Sheet to see information on just two or three of your projects. Once you’ve refined the approved Sheet to display that information, click Create Bookmark to set up the filter. Add a descriptive Title to help you remember the significance of the bookmark.
15.7 Create a Custom Sheet You can easily create a custom Sheet that combines any of the dimensions and measures from the approved Sheets.
Access the main Sheet menu, and click the Create button. Give your new Sheet a descriptive name when prompted.

Axcelerate 5: Case Manager User Guide
© 2016 Recommind, Inc. | Page 171
Click anywhere to generate the new Sheet. An icon representing your custom Sheet will appear in the My Sheets category of the Sheet list. Click on the icon to open the new sheet.
Next, click the Edit button to get started building the content.
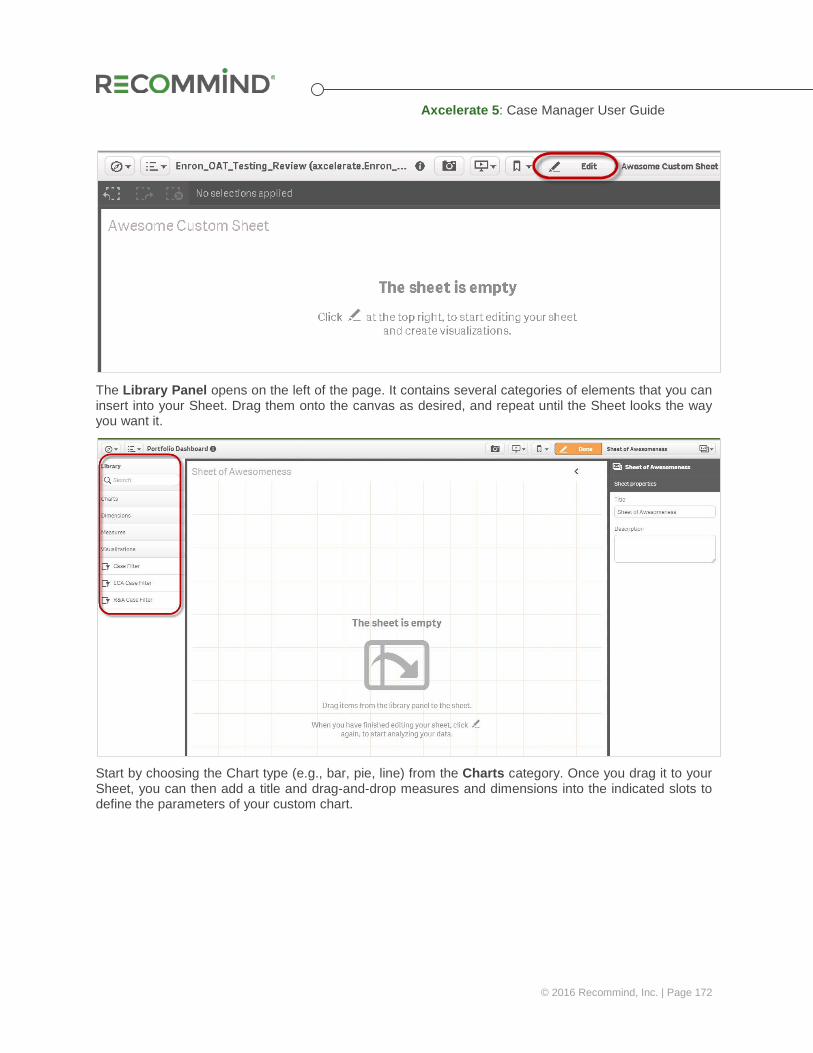
Axcelerate 5: Case Manager User Guide
© 2016 Recommind, Inc. | Page 172
The Library Panel opens on the left of the page. It contains several categories of elements that you can insert into your Sheet. Drag them onto the canvas as desired, and repeat until the Sheet looks the way you want it.
Start by choosing the Chart type (e.g., bar, pie, line) from the Charts category. Once you drag it to your Sheet, you can then add a title and drag-and-drop measures and dimensions into the indicated slots to define the parameters of your custom chart.
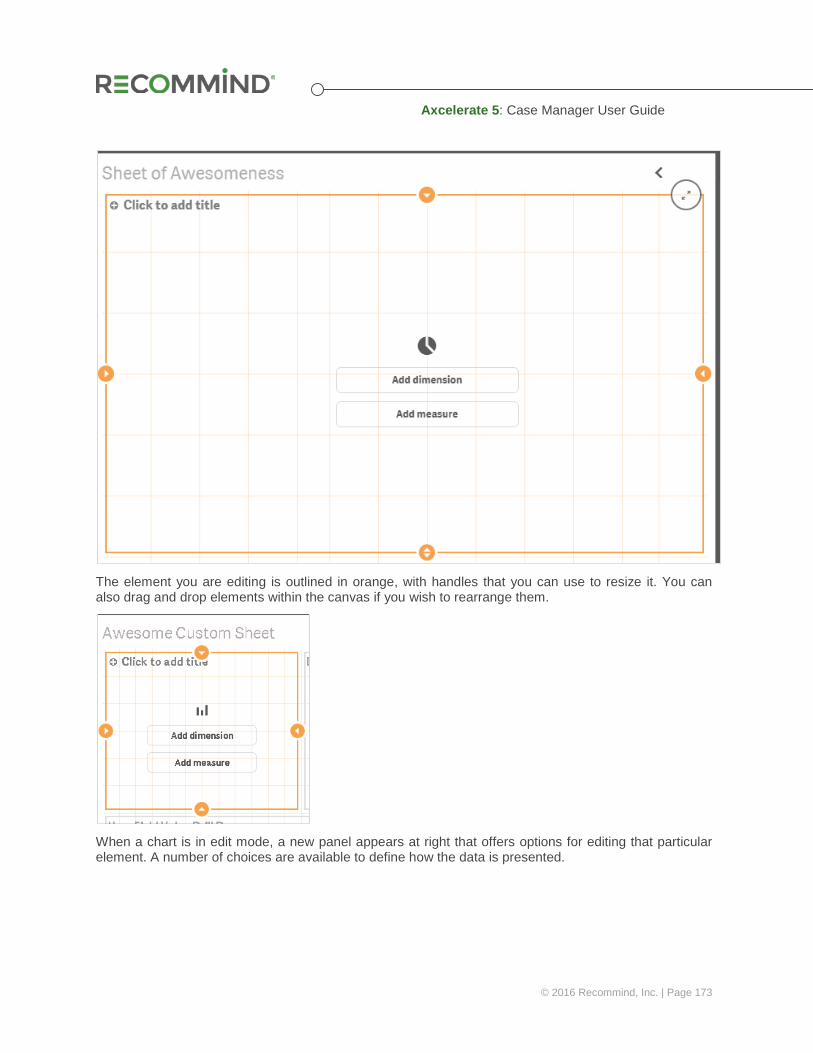
Axcelerate 5: Case Manager User Guide
© 2016 Recommind, Inc. | Page 173
The element you are editing is outlined in orange, with handles that you can use to resize it. You can also drag and drop elements within the canvas if you wish to rearrange them.
When a chart is in edit mode, a new panel appears at right that offers options for editing that particular element. A number of choices are available to define how the data is presented.
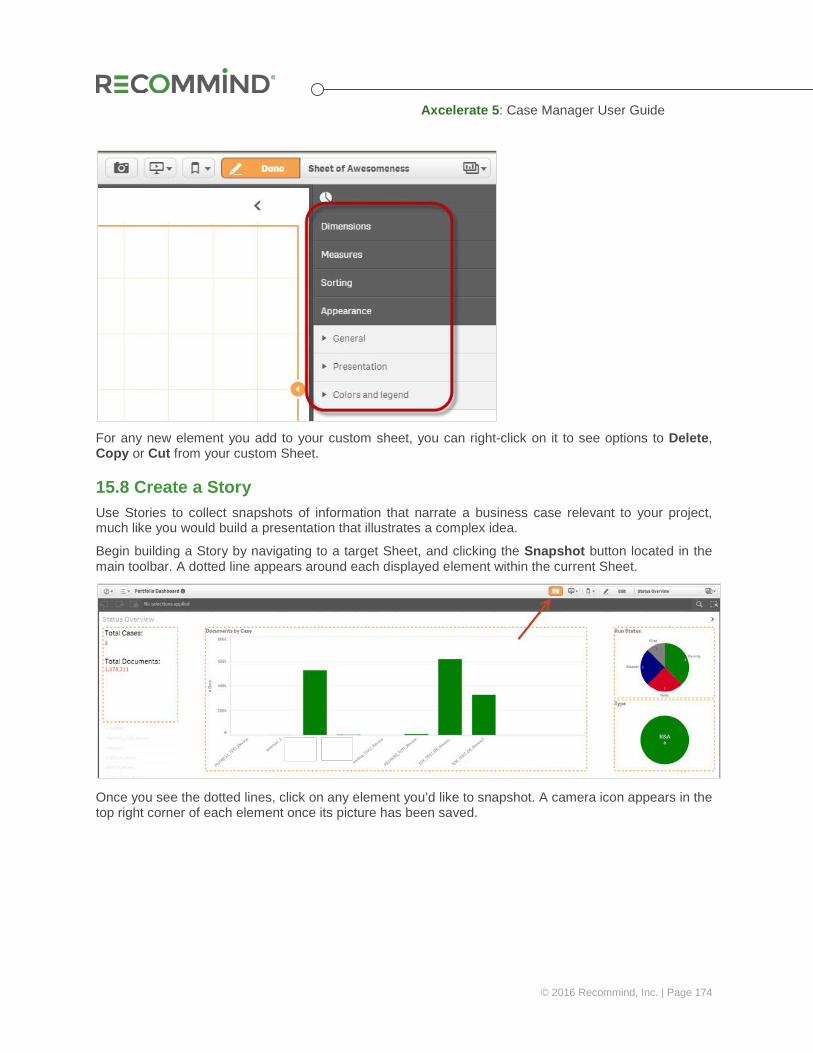
Axcelerate 5: Case Manager User Guide
© 2016 Recommind, Inc. | Page 174
For any new element you add to your custom sheet, you can right-click on it to see options to Delete, Copy or Cut from your custom Sheet.
15.8 Create a Story Use Stories to collect snapshots of information that narrate a business case relevant to your project, much like you would build a presentation that illustrates a complex idea.
Begin building a Story by navigating to a target Sheet, and clicking the Snapshot button located in the main toolbar. A dotted line appears around each displayed element within the current Sheet.
Once you see the dotted lines, click on any element you’d like to snapshot. A camera icon appears in the top right corner of each element once its picture has been saved.
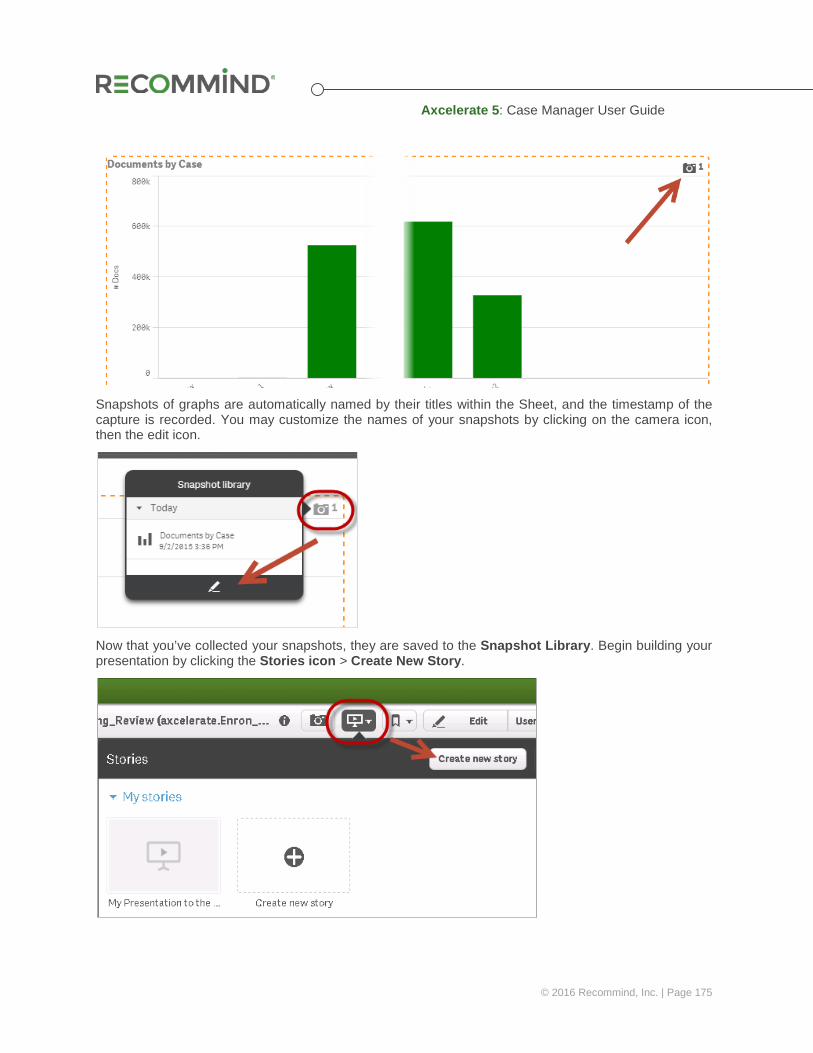
Axcelerate 5: Case Manager User Guide
© 2016 Recommind, Inc. | Page 175
Snapshots of graphs are automatically named by their titles within the Sheet, and the timestamp of the capture is recorded. You may customize the names of your snapshots by clicking on the camera icon, then the edit icon.
Now that you’ve collected your snapshots, they are saved to the Snapshot Library. Begin building your presentation by clicking the Stories icon > Create New Story.
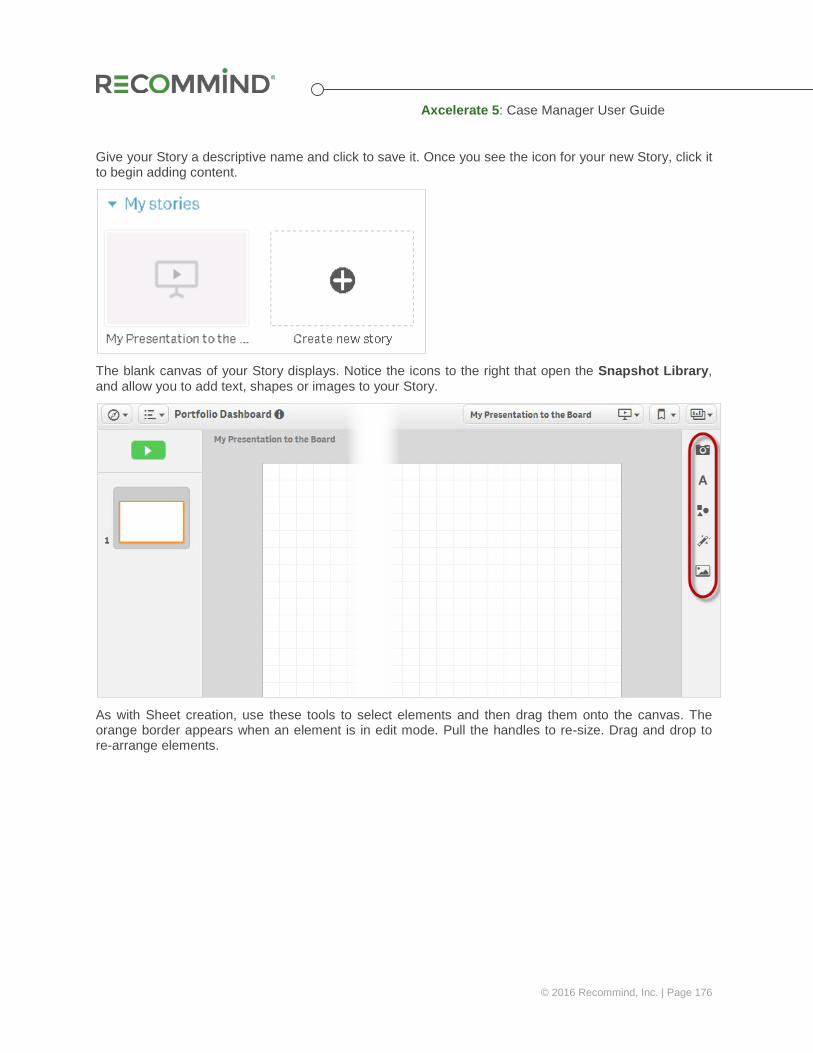
Axcelerate 5: Case Manager User Guide
© 2016 Recommind, Inc. | Page 176
Give your Story a descriptive name and click to save it. Once you see the icon for your new Story, click it to begin adding content.
The blank canvas of your Story displays. Notice the icons to the right that open the Snapshot Library, and allow you to add text, shapes or images to your Story.
As with Sheet creation, use these tools to select elements and then drag them onto the canvas. The orange border appears when an element is in edit mode. Pull the handles to re-size. Drag and drop to re-arrange elements.
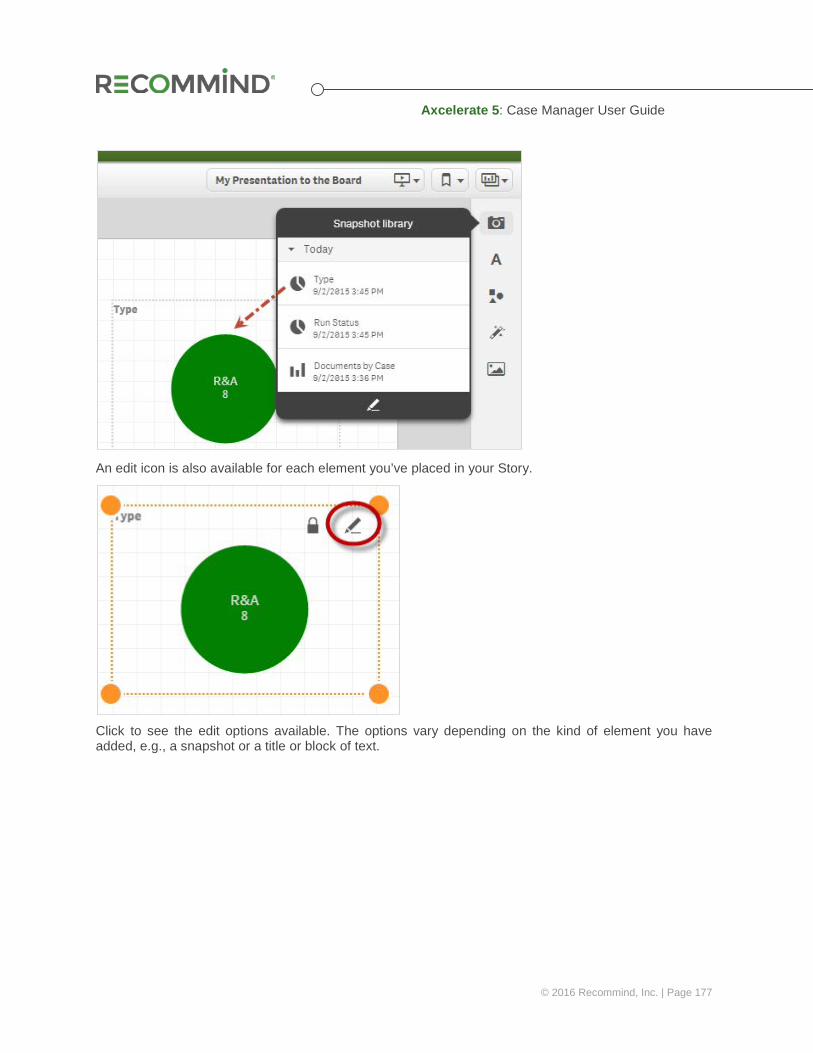
Axcelerate 5: Case Manager User Guide
© 2016 Recommind, Inc. | Page 177
An edit icon is also available for each element you’ve placed in your Story.
Click to see the edit options available. The options vary depending on the kind of element you have added, e.g., a snapshot or a title or block of text.
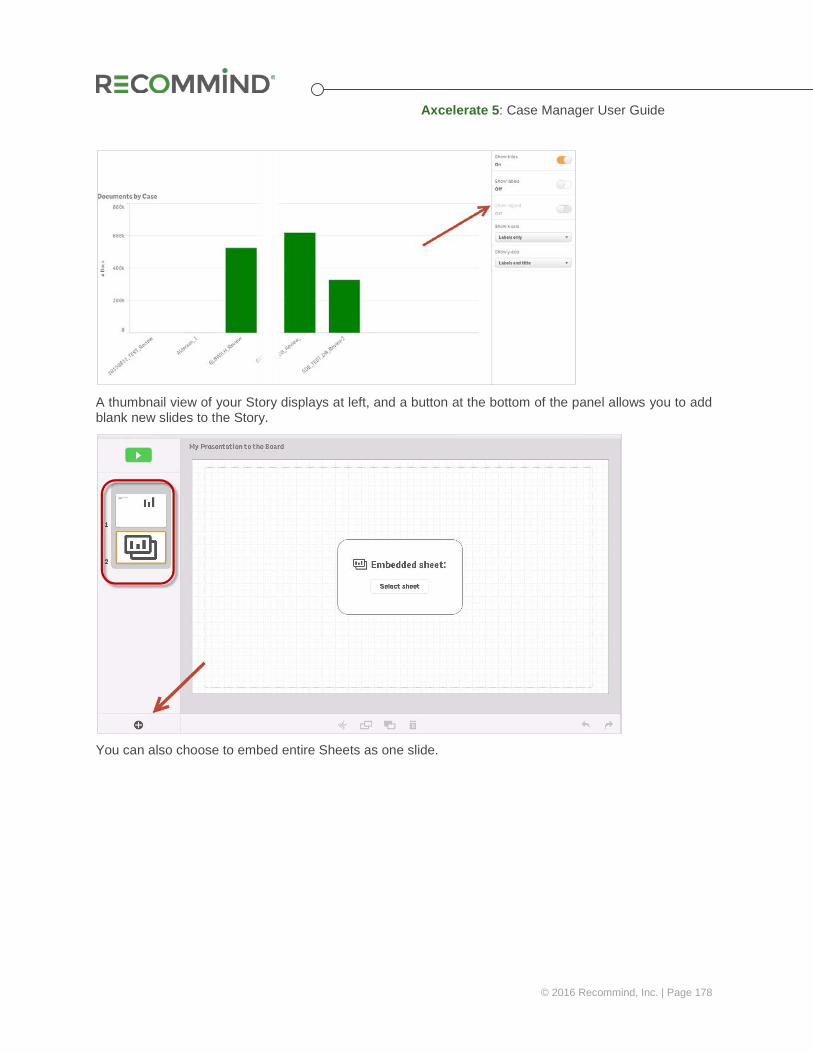
Axcelerate 5: Case Manager User Guide
© 2016 Recommind, Inc. | Page 178
A thumbnail view of your Story displays at left, and a button at the bottom of the panel allows you to add blank new slides to the Story.
You can also choose to embed entire Sheets as one slide.
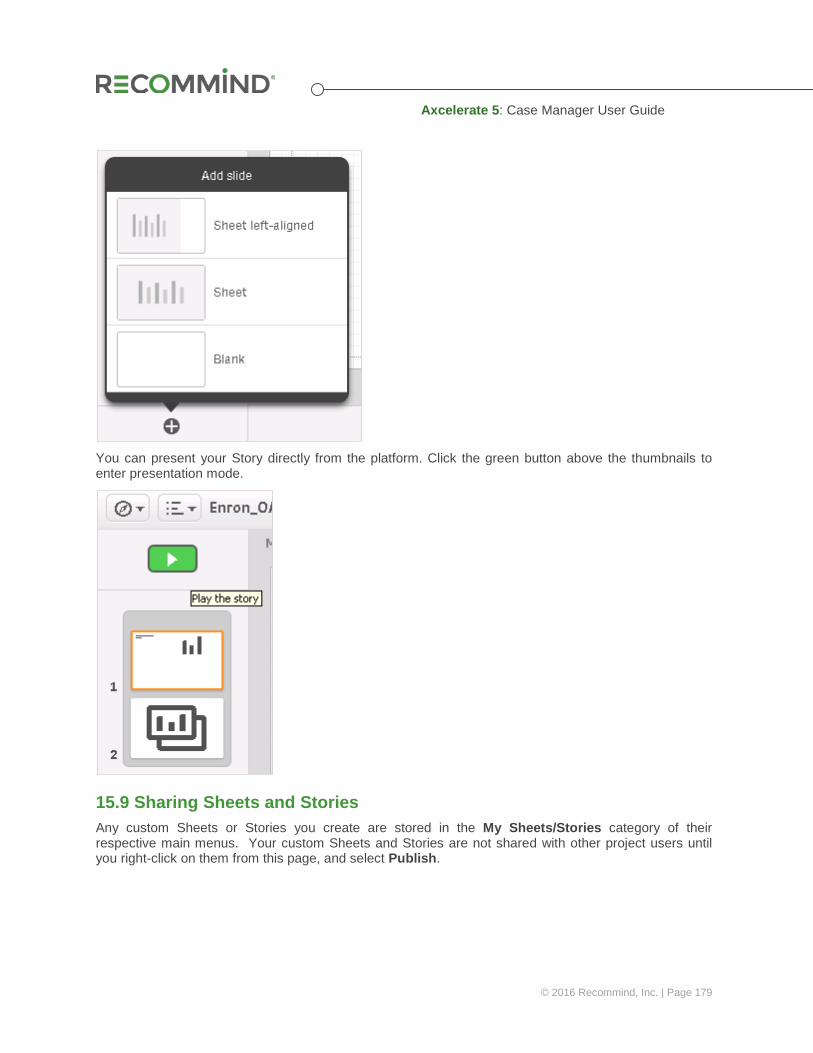
Axcelerate 5: Case Manager User Guide
© 2016 Recommind, Inc. | Page 179
You can present your Story directly from the platform. Click the green button above the thumbnails to enter presentation mode.
15.9 Sharing Sheets and Stories Any custom Sheets or Stories you create are stored in the My Sheets/Stories category of their respective main menus. Your custom Sheets and Stories are not shared with other project users until you right-click on them from this page, and select Publish.
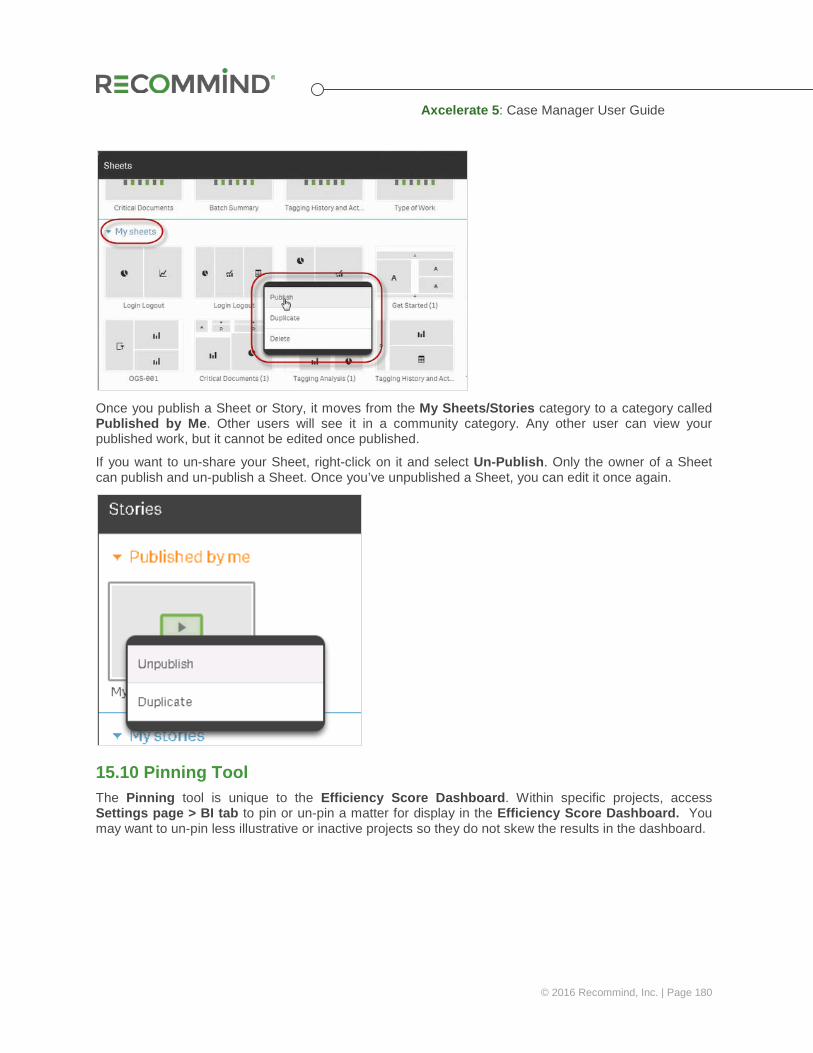
Axcelerate 5: Case Manager User Guide
© 2016 Recommind, Inc. | Page 180
Once you publish a Sheet or Story, it moves from the My Sheets/Stories category to a category called Published by Me. Other users will see it in a community category. Any other user can view your published work, but it cannot be edited once published.
If you want to un-share your Sheet, right-click on it and select Un-Publish. Only the owner of a Sheet can publish and un-publish a Sheet. Once you’ve unpublished a Sheet, you can edit it once again.
15.10 Pinning Tool The Pinning tool is unique to the Efficiency Score Dashboard. Within specific projects, access Settings page > BI tab to pin or un-pin a matter for display in the Efficiency Score Dashboard. You may want to un-pin less illustrative or inactive projects so they do not skew the results in the dashboard.
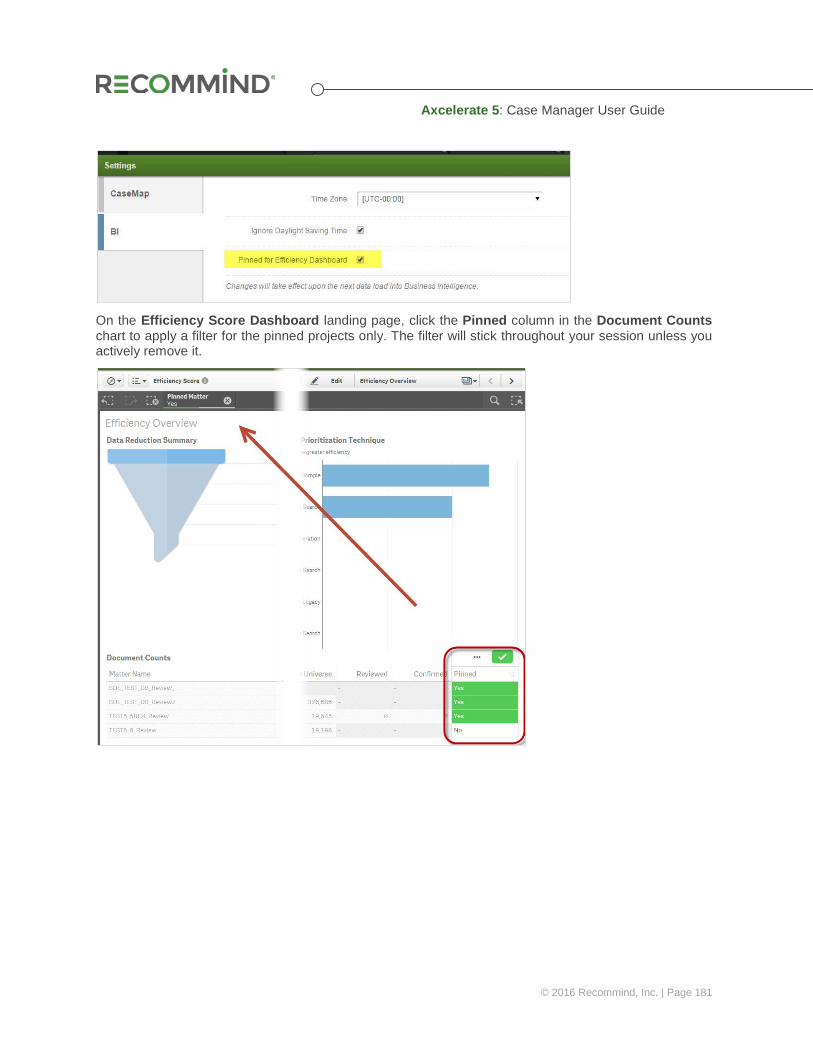
Axcelerate 5: Case Manager User Guide
© 2016 Recommind, Inc. | Page 181
On the Efficiency Score Dashboard landing page, click the Pinned column in the Document Counts chart to apply a filter for the pinned projects only. The filter will stick throughout your session unless you actively remove it.
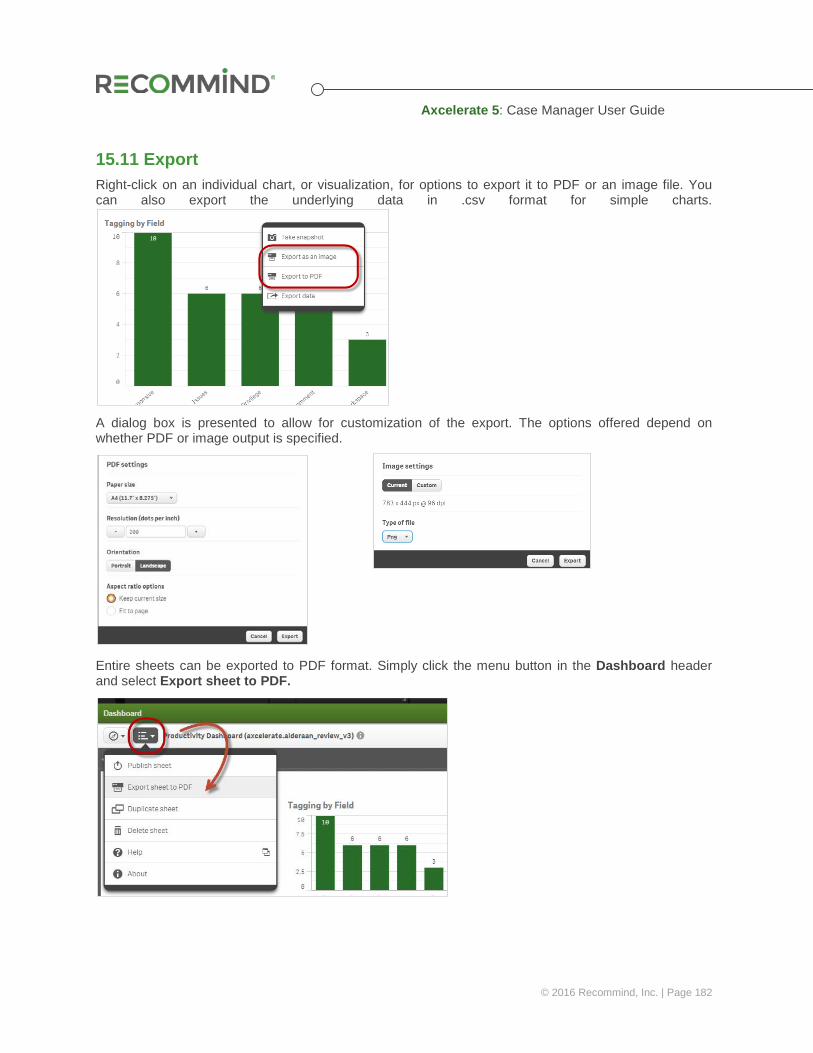
Axcelerate 5: Case Manager User Guide
© 2016 Recommind, Inc. | Page 182
15.11 Export Right-click on an individual chart, or visualization, for options to export it to PDF or an image file. You can also export the underlying data in .csv format for simple charts.
A dialog box is presented to allow for customization of the export. The options offered depend on whether PDF or image output is specified.
Entire sheets can be exported to PDF format. Simply click the menu button in the Dashboard header and select Export sheet to PDF.
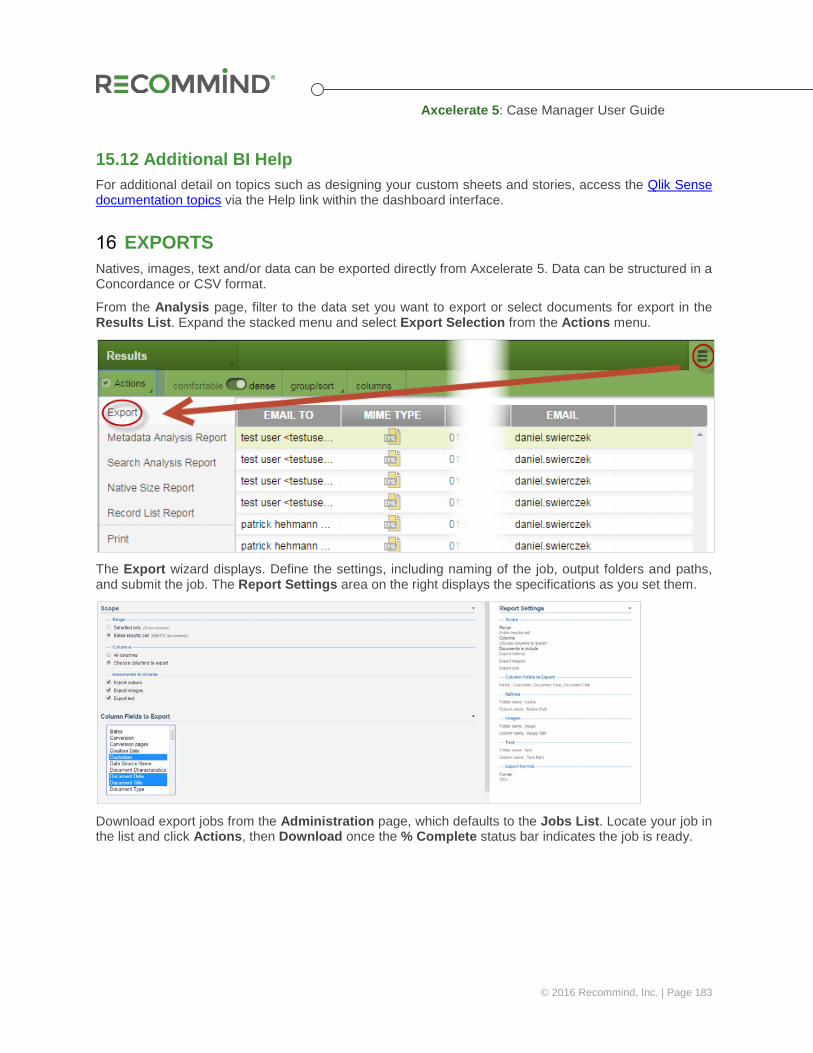
Axcelerate 5: Case Manager User Guide
© 2016 Recommind, Inc. | Page 183
15.12 Additional BI Help For additional detail on topics such as designing your custom sheets and stories, access the Qlik Sense documentation topics via the Help link within the dashboard interface.
EXPORTS Natives, images, text and/or data can be exported directly from Axcelerate 5. Data can be structured in a Concordance or CSV format.
From the Analysis page, filter to the data set you want to export or select documents for export in the Results List. Expand the stacked menu and select Export Selection from the Actions menu.
The Export wizard displays. Define the settings, including naming of the job, output folders and paths, and submit the job. The Report Settings area on the right displays the specifications as you set them.
Download export jobs from the Administration page, which defaults to the Jobs List. Locate your job in the list and click Actions, then Download once the % Complete status bar indicates the job is ready.
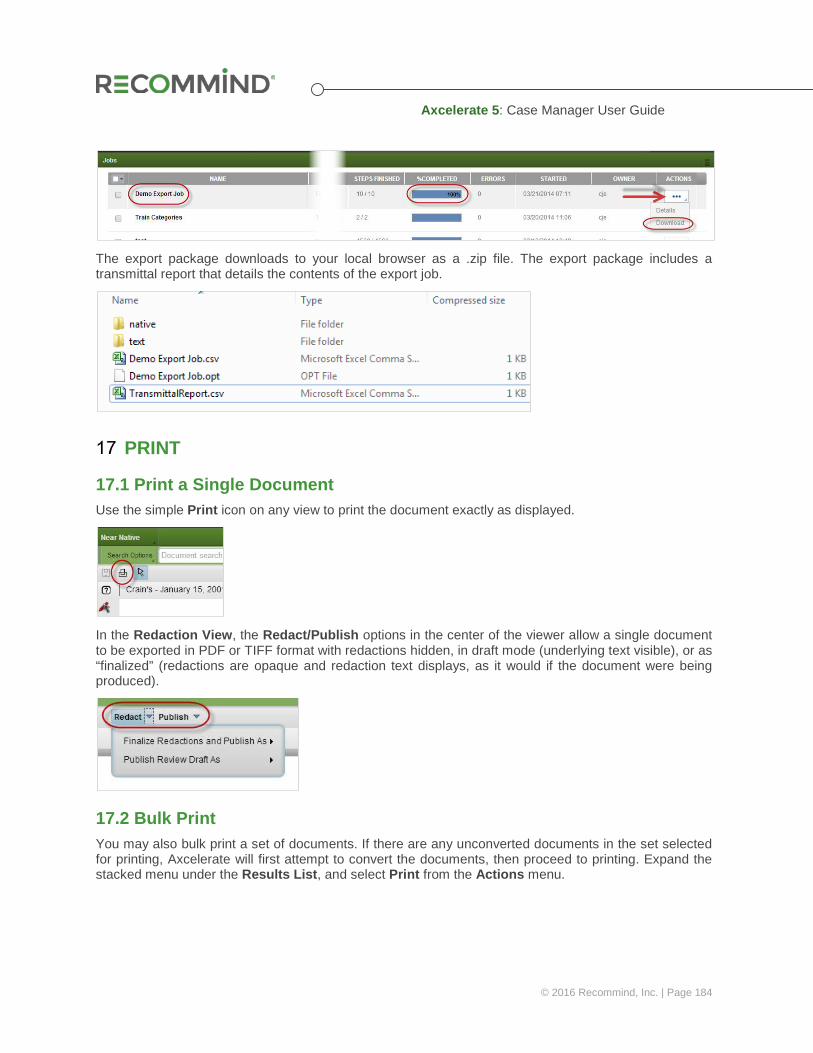
Axcelerate 5: Case Manager User Guide
© 2016 Recommind, Inc. | Page 184
The export package downloads to your local browser as a .zip file. The export package includes a transmittal report that details the contents of the export job.
17.1 Print a Single Document Use the simple Print icon on any view to print the document exactly as displayed.
In the Redaction View, the Redact/Publish options in the center of the viewer allow a single document to be exported in PDF or TIFF format with redactions hidden, in draft mode (underlying text visible), or as “finalized” (redactions are opaque and redaction text displays, as it would if the document were being produced).
17.2 Bulk Print You may also bulk print a set of documents. If there are any unconverted documents in the set selected for printing, Axcelerate will first attempt to convert the documents, then proceed to printing. Expand the stacked menu under the Results List, and select Print from the Actions menu.
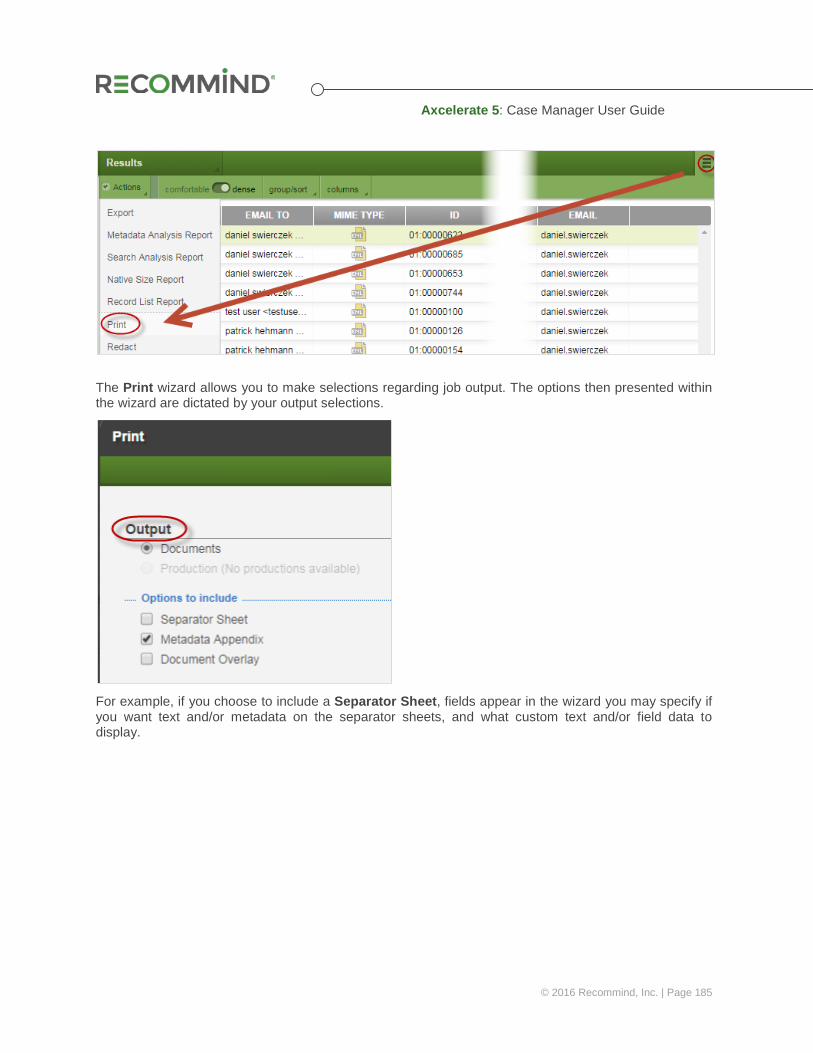
Axcelerate 5: Case Manager User Guide
© 2016 Recommind, Inc. | Page 185
The Print wizard allows you to make selections regarding job output. The options then presented within the wizard are dictated by your output selections.
For example, if you choose to include a Separator Sheet, fields appear in the wizard you may specify if you want text and/or metadata on the separator sheets, and what custom text and/or field data to display.
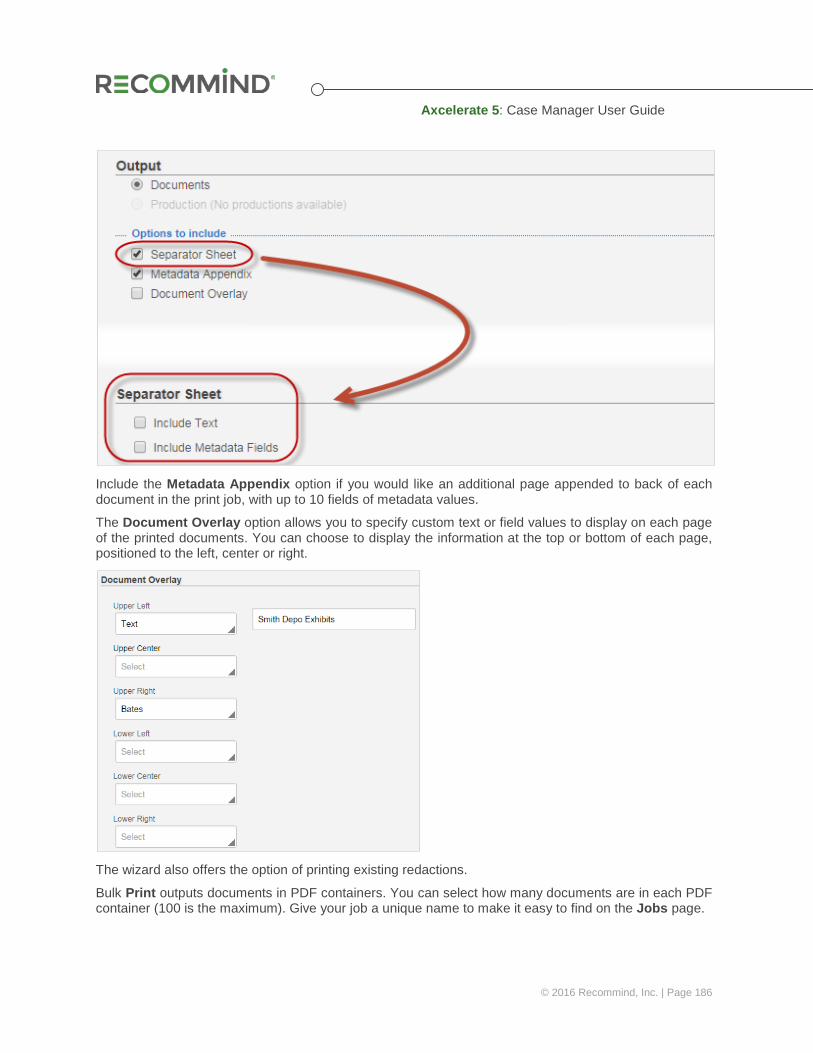
Axcelerate 5: Case Manager User Guide
© 2016 Recommind, Inc. | Page 186
Include the Metadata Appendix option if you would like an additional page appended to back of each document in the print job, with up to 10 fields of metadata values.
The Document Overlay option allows you to specify custom text or field values to display on each page of the printed documents. You can choose to display the information at the top or bottom of each page, positioned to the left, center or right.
The wizard also offers the option of printing existing redactions.
Bulk Print outputs documents in PDF containers. You can select how many documents are in each PDF container (100 is the maximum). Give your job a unique name to make it easy to find on the Jobs page.

Axcelerate 5: Case Manager User Guide
© 2016 Recommind, Inc. | Page 187
Check the Summary panel to verify your job settings and click Print to initiate the job.
Navigate to Administration > Jobs to monitor the progress of the job. When the job is complete, as indicated by the Status column, select Download from the Actions menu to retrieve your finished print package, which will download as a zip file with the specified number of PDFs inside.
CONVERT For display, redaction, or production, the system must convert documents into a near native representation. When a user selects the near native view of a document that has not yet been converted, Axcelerate automatically converts the document in the background, as well as any associated documents and the next five documents in the Results List.
18.1 Bulk Convert Tool To prepare a set of documents for bulk redaction or production, you may need to convert them proactively if the automatic conversion feature has not yet touched all of the documents. To do this, select the documents to be redacted or produced, then navigate to the Actions menu, found under the stacked menu for the Results List on the Analysis page. Select Convert.
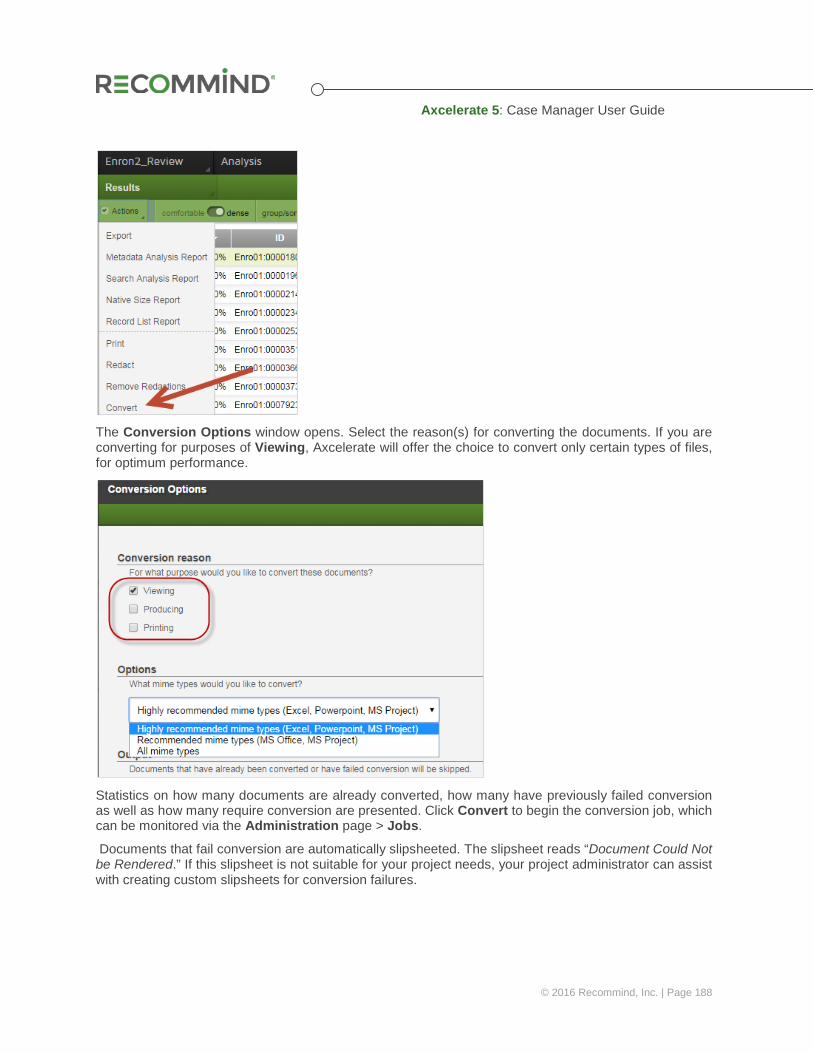
Axcelerate 5: Case Manager User Guide
© 2016 Recommind, Inc. | Page 188
The Conversion Options window opens. Select the reason(s) for converting the documents. If you are converting for purposes of Viewing, Axcelerate will offer the choice to convert only certain types of files, for optimum performance.
Statistics on how many documents are already converted, how many have previously failed conversion as well as how many require conversion are presented. Click Convert to begin the conversion job, which can be monitored via the Administration page > Jobs.
Documents that fail conversion are automatically slipsheeted. The slipsheet reads “Document Could Not be Rendered.” If this slipsheet is not suitable for your project needs, your project administrator can assist with creating custom slipsheets for conversion failures.
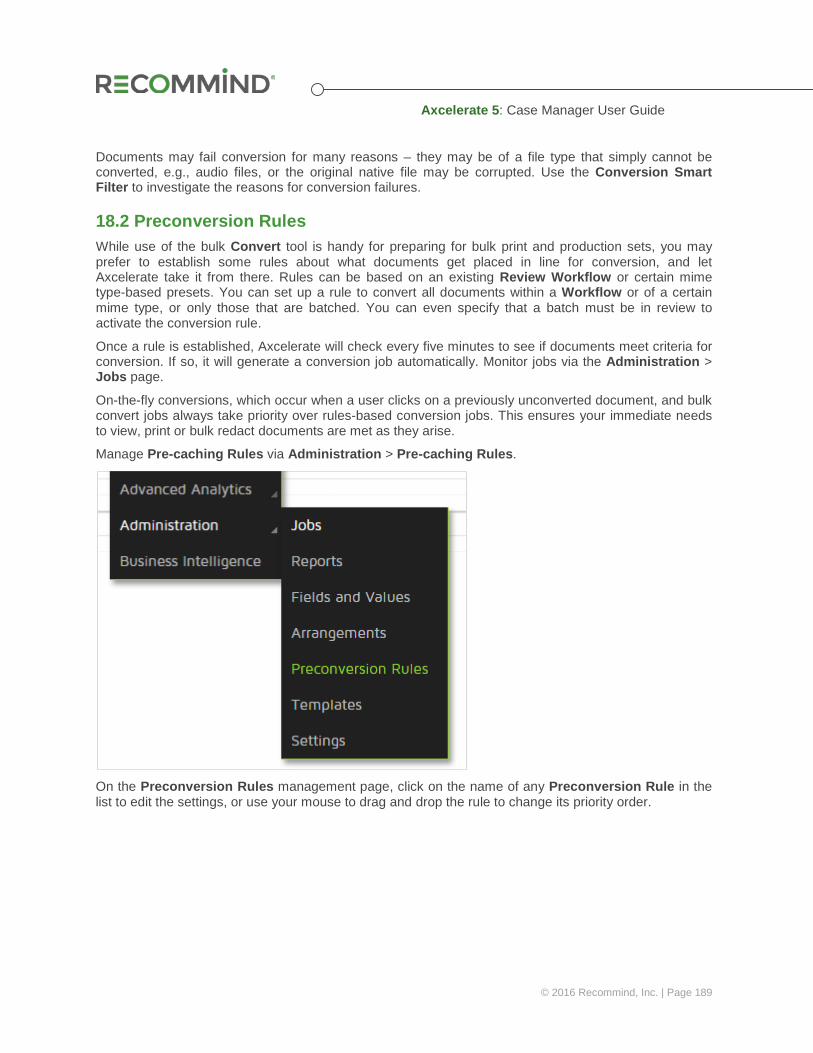
Axcelerate 5: Case Manager User Guide
© 2016 Recommind, Inc. | Page 189
Documents may fail conversion for many reasons – they may be of a file type that simply cannot be converted, e.g., audio files, or the original native file may be corrupted. Use the Conversion Smart Filter to investigate the reasons for conversion failures.
18.2 Preconversion Rules While use of the bulk Convert tool is handy for preparing for bulk print and production sets, you may prefer to establish some rules about what documents get placed in line for conversion, and let Axcelerate take it from there. Rules can be based on an existing Review Workflow or certain mime type-based presets. You can set up a rule to convert all documents within a Workflow or of a certain mime type, or only those that are batched. You can even specify that a batch must be in review to activate the conversion rule.
Once a rule is established, Axcelerate will check every five minutes to see if documents meet criteria for conversion. If so, it will generate a conversion job automatically. Monitor jobs via the Administration > Jobs page.
On-the-fly conversions, which occur when a user clicks on a previously unconverted document, and bulk convert jobs always take priority over rules-based conversion jobs. This ensures your immediate needs to view, print or bulk redact documents are met as they arise.
Manage Pre-caching Rules via Administration > Pre-caching Rules.
On the Preconversion Rules management page, click on the name of any Preconversion Rule in the list to edit the settings, or use your mouse to drag and drop the rule to change its priority order.
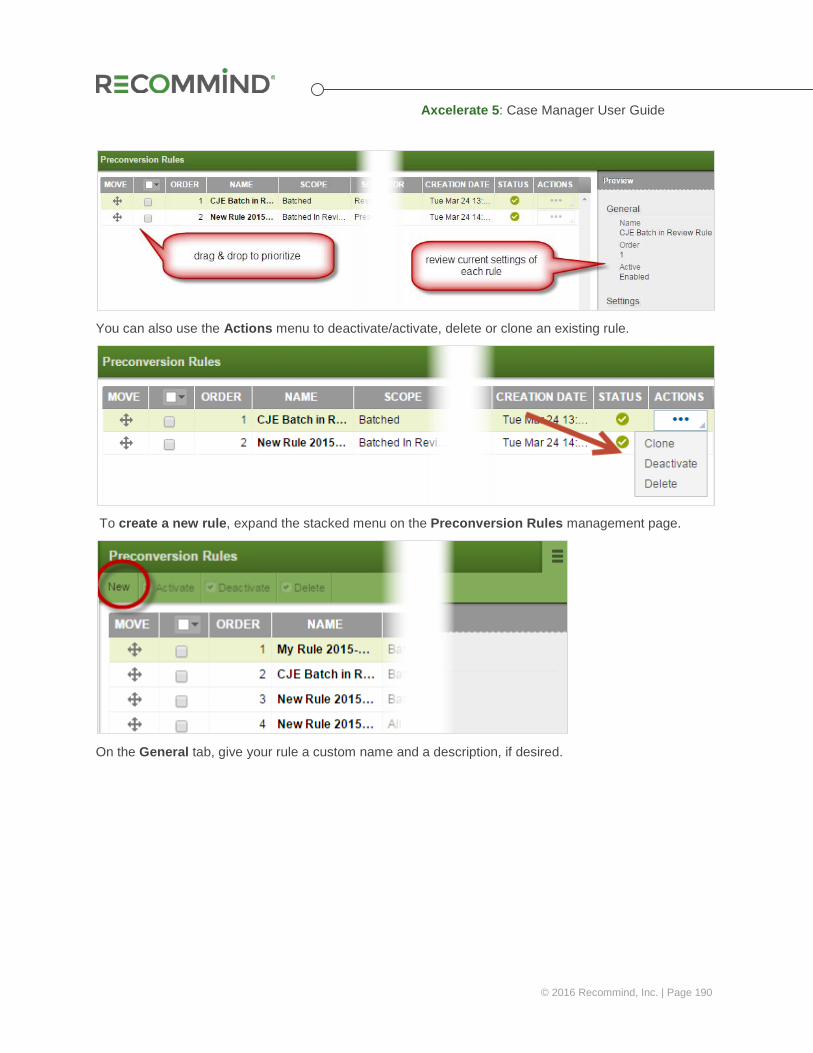
Axcelerate 5: Case Manager User Guide
© 2016 Recommind, Inc. | Page 190
You can also use the Actions menu to deactivate/activate, delete or clone an existing rule.
To create a new rule, expand the stacked menu on the Preconversion Rules management page.
On the General tab, give your rule a custom name and a description, if desired.
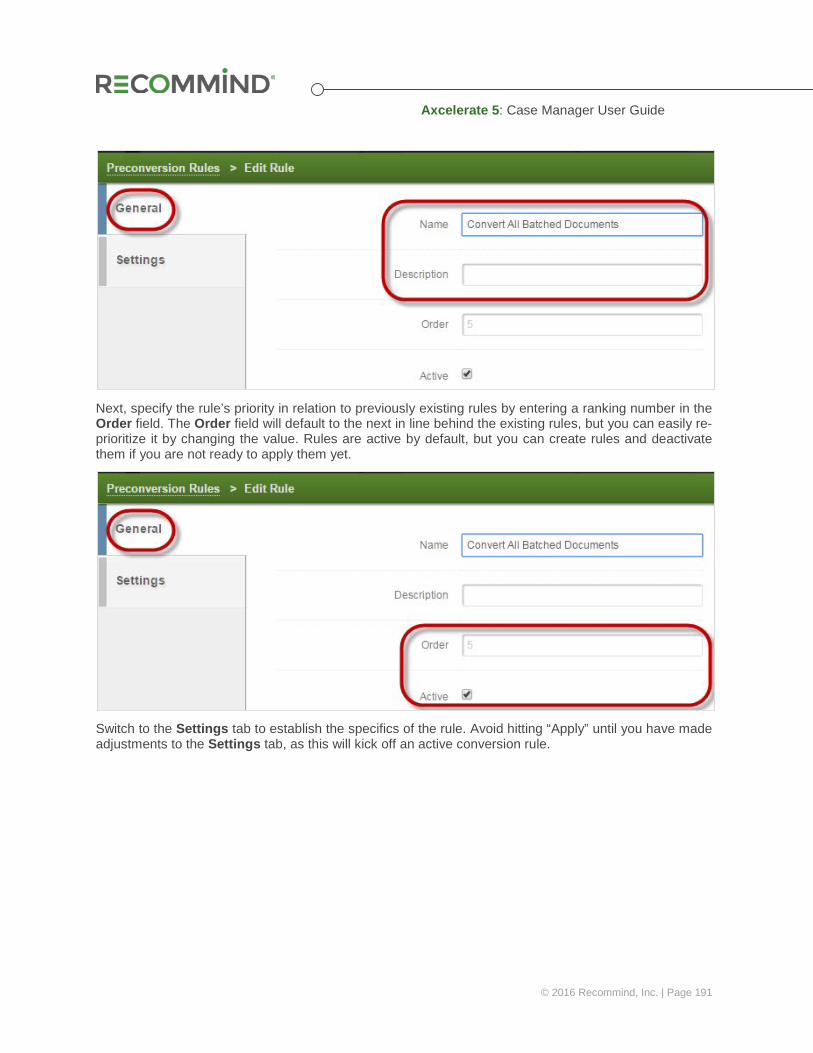
Axcelerate 5: Case Manager User Guide
© 2016 Recommind, Inc. | Page 191
Next, specify the rule’s priority in relation to previously existing rules by entering a ranking number in the Order field. The Order field will default to the next in line behind the existing rules, but you can easily re-prioritize it by changing the value. Rules are active by default, but you can create rules and deactivate them if you are not ready to apply them yet.
Switch to the Settings tab to establish the specifics of the rule. Avoid hitting “Apply” until you have made adjustments to the Settings tab, as this will kick off an active conversion rule.

Axcelerate 5: Case Manager User Guide
© 2016 Recommind, Inc. | Page 192
On the Settings tab, start by selecting the Conversion Reason. Viewing is the most taxing in terms of performance, while Producing and Printing are quicker. Select all that apply. Since you are making a rule to handle conversions proactively, you probably want to select all three to be ready for any situation.
Next, set the Scope. You can specify all documents that meet the criteria of the rule are converted, or just documents that are batched. Alternatively, define the rule to only convert batched documents when the batch is actually opened by a Reviewer.
Set the Scope Type. Choose a target Review Workflow, or use the mime type-based presets.
The Scope Type selection dictates what you see next. If you choose Review Workflow, you are presented with fields to set the target Universe and Review Workflow for which you want documents converted.

Axcelerate 5: Case Manager User Guide
© 2016 Recommind, Inc. | Page 193
If you choose Presets, select from these options to complete creation of your new rule.
Click Apply and Done to finish creation. The rule runs immediately, and is now available on the Pre-caching Rules Management page for further editing as the needs of the project change.
The management page details when the rule last ran and how many documents were converted as a result, among other things, such as the user who created the rule. If you need to re-run a rule before the automatic hourly update, use the Actions menu to de-activate then re-activate the rule.
USER PREFERENCES Access User Preferences in the drop-down menu under your name, in the top-right of the page.
The preferences you set for yourself are sticky across all projects that you can access.
Results per Determines the number of documents displayed per page on the Results List

Axcelerate 5: Case Manager User Guide
© 2016 Recommind, Inc. | Page 194
page
Time zone Set the Axcelerate account’s preference for time zone display – does not affect underlying metadata or native display
Date/time format
Set the Axcelerate account’s preference for time/date display format – does not affect underlying metadata or native display
SESSION TIMEOUT For security purposes, Axcelerate 5 automatically logs a user out of his session after 30 minutes of inactivity.
CASEMAP INTEGRATION CaseMap integration makes documents, metadata and text extracts available in LexisNexis® CaseMap®. This feature is disabled by default.
If you send single or multiple documents to CaseMap, a link to the document is created in the Documents spreadsheet in CaseMap. Users with the appropriate rights can click this link to open the respective document in Axcelerate 5, on the Review page.
A selected text extract can be copied as a new fact to the CaseMap case. It is shown in the Facts spreadsheet. From there, a link allows you to open the respective document in Axcelerate 5, with the text extract highlighted. Creating a fact requires that the respective document is linked in CaseMap, too; this is done automatically.
In addition to documents and text extracts, you can send metadata to CaseMap. For documents that have been sent to CaseMap before, metadata can be updated, and new metadata can be added.
21.1 CaseMap Integration Prerequisites • CaseMap 9.x through CaseMap 11.x are supported and must be installed on the user’s local
computer.
• Internet Explorer must be used for Axcelerate 5.
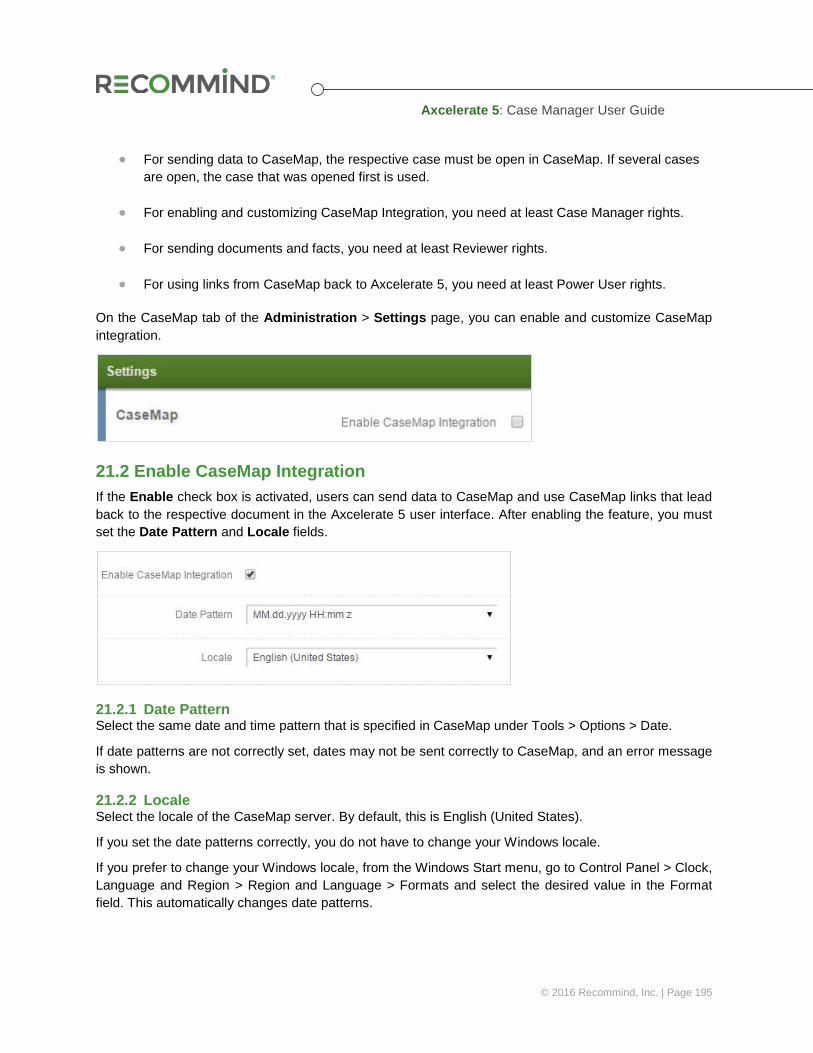
Axcelerate 5: Case Manager User Guide
© 2016 Recommind, Inc. | Page 195
• For sending data to CaseMap, the respective case must be open in CaseMap. If several cases are open, the case that was opened first is used.
• For enabling and customizing CaseMap Integration, you need at least Case Manager rights.
• For sending documents and facts, you need at least Reviewer rights.
• For using links from CaseMap back to Axcelerate 5, you need at least Power User rights.
On the CaseMap tab of the Administration > Settings page, you can enable and customize CaseMap integration.
21.2 Enable CaseMap Integration If the Enable check box is activated, users can send data to CaseMap and use CaseMap links that lead back to the respective document in the Axcelerate 5 user interface. After enabling the feature, you must set the Date Pattern and Locale fields.
21.2.1 Date Pattern Select the same date and time pattern that is specified in CaseMap under Tools > Options > Date.
If date patterns are not correctly set, dates may not be sent correctly to CaseMap, and an error message is shown.
21.2.2 Locale Select the locale of the CaseMap server. By default, this is English (United States).
If you set the date patterns correctly, you do not have to change your Windows locale.
If you prefer to change your Windows locale, from the Windows Start menu, go to Control Panel > Clock, Language and Region > Region and Language > Formats and select the desired value in the Format field. This automatically changes date patterns.
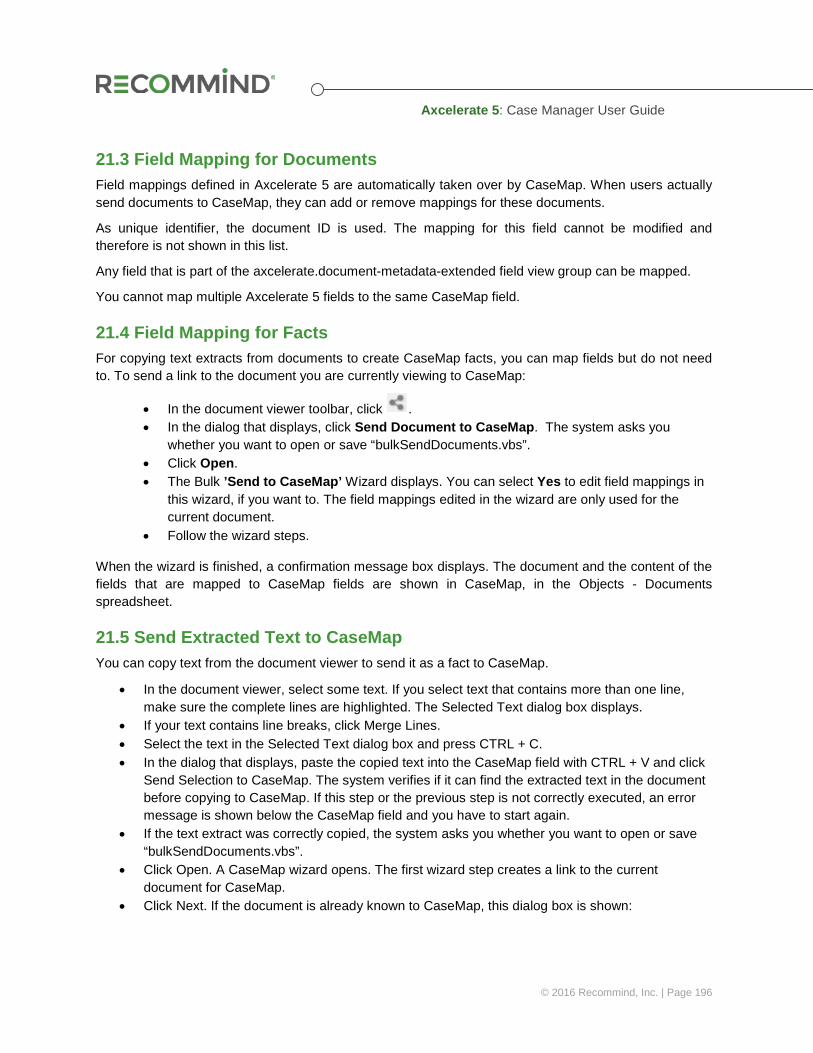
Axcelerate 5: Case Manager User Guide
© 2016 Recommind, Inc. | Page 196
21.3 Field Mapping for Documents Field mappings defined in Axcelerate 5 are automatically taken over by CaseMap. When users actually send documents to CaseMap, they can add or remove mappings for these documents.
As unique identifier, the document ID is used. The mapping for this field cannot be modified and therefore is not shown in this list.
Any field that is part of the axcelerate.document-metadata-extended field view group can be mapped.
You cannot map multiple Axcelerate 5 fields to the same CaseMap field.
21.4 Field Mapping for Facts For copying text extracts from documents to create CaseMap facts, you can map fields but do not need to. To send a link to the document you are currently viewing to CaseMap:
• In the document viewer toolbar, click . • In the dialog that displays, click Send Document to CaseMap. The system asks you
whether you want to open or save “bulkSendDocuments.vbs”. • Click Open. • The Bulk ’Send to CaseMap’ Wizard displays. You can select Yes to edit field mappings in
this wizard, if you want to. The field mappings edited in the wizard are only used for the current document.
• Follow the wizard steps.
When the wizard is finished, a confirmation message box displays. The document and the content of the fields that are mapped to CaseMap fields are shown in CaseMap, in the Objects - Documents spreadsheet.
21.5 Send Extracted Text to CaseMap You can copy text from the document viewer to send it as a fact to CaseMap.
• In the document viewer, select some text. If you select text that contains more than one line, make sure the complete lines are highlighted. The Selected Text dialog box displays.
• If your text contains line breaks, click Merge Lines. • Select the text in the Selected Text dialog box and press CTRL + C. • In the dialog that displays, paste the copied text into the CaseMap field with CTRL + V and click
Send Selection to CaseMap. The system verifies if it can find the extracted text in the document before copying to CaseMap. If this step or the previous step is not correctly executed, an error message is shown below the CaseMap field and you have to start again.
• If the text extract was correctly copied, the system asks you whether you want to open or save “bulkSendDocuments.vbs”.
• Click Open. A CaseMap wizard opens. The first wizard step creates a link to the current document for CaseMap.
• Click Next. If the document is already known to CaseMap, this dialog box is shown:
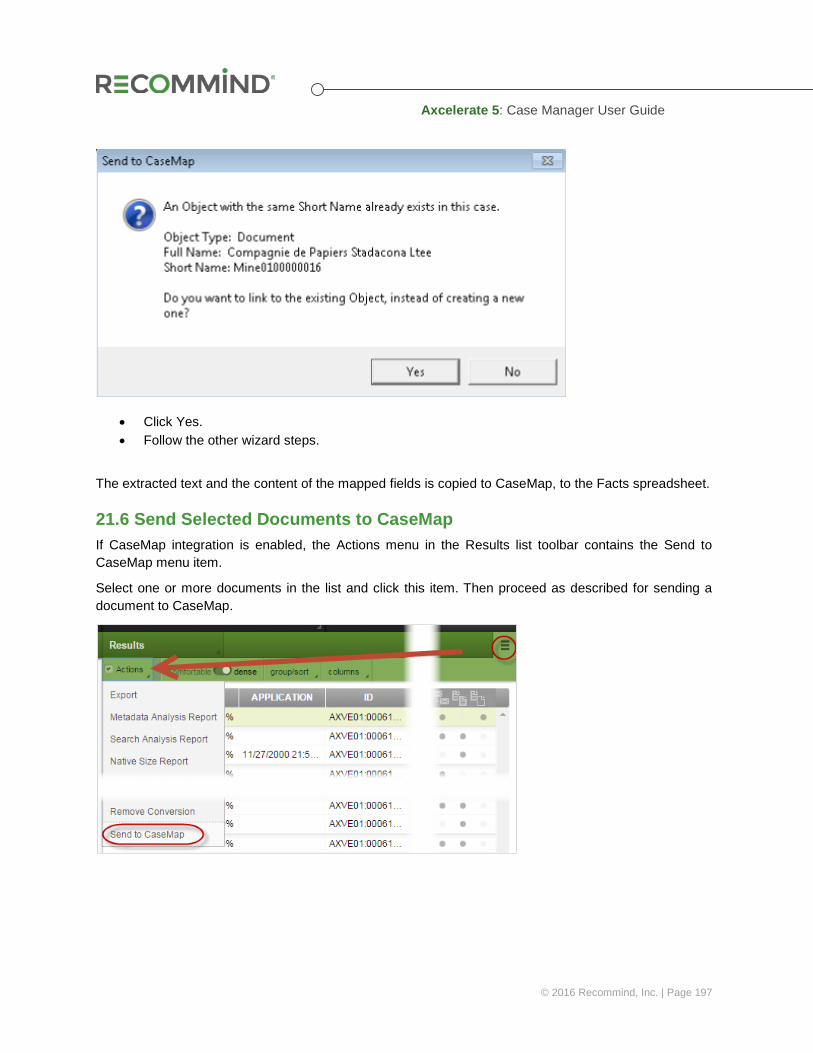
Axcelerate 5: Case Manager User Guide
© 2016 Recommind, Inc. | Page 197
• Click Yes. • Follow the other wizard steps.
The extracted text and the content of the mapped fields is copied to CaseMap, to the Facts spreadsheet.
21.6 Send Selected Documents to CaseMap If CaseMap integration is enabled, the Actions menu in the Results list toolbar contains the Send to CaseMap menu item.
Select one or more documents in the list and click this item. Then proceed as described for sending a document to CaseMap.
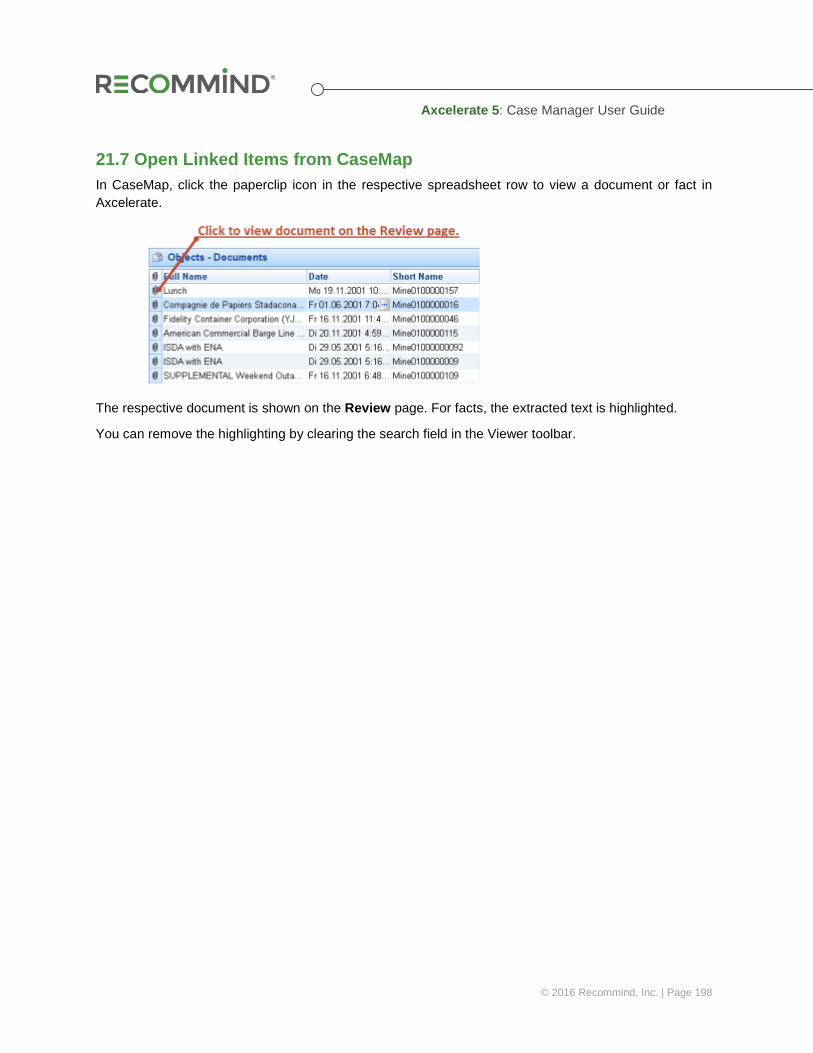
Axcelerate 5: Case Manager User Guide
© 2016 Recommind, Inc. | Page 198
21.7 Open Linked Items from CaseMap In CaseMap, click the paperclip icon in the respective spreadsheet row to view a document or fact in Axcelerate.
The respective document is shown on the Review page. For facts, the extracted text is highlighted.
You can remove the highlighting by clearing the search field in the Viewer toolbar.


![December 3, 2012 Technology Assisted Review & Predictive ...€¦ · Predictive Coding Protocol re: generating “seed set” to train [Recommind] software via: πs’ input (keywords)](https://img.dokumen.tips/doc/110x75/603e197a136b296bae7e5a44/december-3-2012-technology-assisted-review-predictive-predictive-coding.jpg)