Embed Size (px)
Citation preview
Page 1-PBPage 1-PB
AVL WARPINGWHEEL
INSTRUCTIONS
Assembly Processand Usage
AVL Looms2360 Park Avenue
Chico, CA 95928-6785 U.S.A.530 893-4915
530 893-1372 (fax #)[email protected] (e-mail)
www.avlusa.com
Version 3Copyright © 2010
All Rights Reserved Worldwide

Page 1
AVL Warping Wheel
The AVL Warping Wheel is a product that will help you do your sectional warping in a fast and efficient way with-out winding any spools. It will allow you to warp directly from different size cones (the ones that have been sitting in your studio for a while now!) or from just about any other form your warp threads are in. The Wheel adjusts from a circumference of two to three yards, allowing you to put on warps of up to 20 yards.
With a built-in tensioning system, the AVL Warping Wheel will also save you from one time-consuming part of standard sectional warping: threading the tension box. You wind directly from the wheel onto the beam!
Special Features
AdjustableTension
And maybe the best part about warping with the AVL Warping Wheel: it will give you the freedom of design-ing as you go, changing color sequences across the warp without complicated pre-calculations and additional spool winding.

Page 2
AVL Warping Wheel
With the built-in tensioning system, you will be able to adjust the tension of your threads going into a particu-lar section on your sectional beam without threading the tension box.
You do not have to count your turns any more. The built-in counter will do it for you.
The front raddle will pivot making it easy to adjust the width of the section to fit exactly in the size of the sec-tion without rethreading the reed, starting from 5”; (if you just leave the reed straight without pivoting) down to 1”; (the minimum size section on your beam). This feature will give you an easy way to create flat layers in each section of your sectional beam.
Our warping wheel is designed with an adjustable height to make it comfortable for all weavers: from people in wheelchairs to weavers over 6’ tall.
The sturdy base allows you to do the winding as fast or as slow as you feel like without worrying about the wheel tipping over.
RevolutionCounter
Pivoting Raddle
Adjustable Height
Sturdy Base

Page 3
Assembly Instructions
• lower base• upper base• vertical• raddle support with tension tie-up assembly• raddle mount with adjustable raddle holder• drum assembly• six spokes (four regular plus one with weights and
one with a cord catch)• seven plastic spools (one is a spare)• stationary raddle holder with raddle top assembly
and pin• revolution counter assembly
#1 one 3/8” x 3-1/2” carriage bolt with one washer, one lockwasher, one hex nut
#2 one 3/8” x 5-1/2” carriage bolt with one washer and one wing nut
#3 two 3/8” x 4” carriage bolt with one washer and one wing nut
#4 one 1/4” x 2-1/4” carriage bolt with one washer and one hex nut
#5 one 1/4” x 2” carriage bolt with one washer and one wing nut
#6 two #10 x 1” PHSMS
#7 six 1/4” x 5-1/2” hex bolt with two washers and one wing nut
#8 six 1/4” x 1-3/4” carriage bolt with one washer and one hex nut
Identifying Parts
Hardware Bag

Page 4
Assembly Instructions
Warping Wheel Parts Identification
Stationary Raddle Holder
Revolution Counter
Plastic Spool
Vertical
Upper Base
Lower Base
Raddle Support Arm
Raddle
Raddle Mount
Raddle Top
Tension Tie-Up
Spoke with Cord Catch Assembly
Adjustable Raddle Holder
Spokes
Pin
Drum
Handle

Page 5
Assembly Process
• electric screwdriver with phillips head• hammer• 7/16” wrench or socket wrench• 9/16” wrench or socket wrench
a.) Place the upper base on top of the lower base not-ing that the holes for securing the vertical should be to the left on the lower base and closest to you on the upper base.
1.) Tools you will need are …
2.) Base
b.) To secure the base pieces together, insert the 3/8” x 3-1/2” carriage bolt (hardware #1) into the cen-ter hole, from the top, and tap into place with a hammer.
c.) Attach a flat washer, lock washer, and finally a hex nut to the end of the bolt and secure with a 9/16” wrench - firmly.

Page 6
Assembly Process
3.) Verticals
4.) Mounting the Revolution Counter Assembly
a.) Bolt the vertical to the front left inside corner of the base using:
1.) a 3/8” x 5-1/2” bolt (hardware #2) from right to left
2.) two 3/8” x 4” bolts (hardware #3) from front to back
3.) tap bolts firmly with a hammer4.) secure all bolts with one flat washer and one
wing nut each
a.) Using two #10 x 1” PHSMS (hardware #6), screw the revolution counter assembly to the end of the raddle support (refer to following image).

Page 7
Assembly Process
5.) Mounting the Drum
Your Warping Wheel comes with seven pre-drilled holes to adjust the height of your Warping Wheel (the lowest hole is intended for use while sitting).
We suggest choosing a hole that is approximately waist high for the primary use.
a.) Remove the three arm knob, one lock washer, and one flat washer.
b.) From the front, insert the center bolt of the drum assembly through the selected hole on the vertical.
c.) From the back, attach the raddle support to the back of the vertical (refer to the following image to reference the direction of the raddle support).
d.) Secure the bolt with a flat washer, then a lock washer, and, finally, the three arm knob -- tighten firmly.

Page 8
Assembly Process
a.) The tension tie-up assembly is already secured to the raddle support.
b.) Next ... from the back of the warping wheel, wind the cord clockwise around the groove in the drum two full times.
6.) Routing theTension Tie-Up
c.) Take the end with the quick link and attach the quick link to the eyebolt under the white cord. Close the threaded side of the quick link.

Page 9
Assembly Process
a.) Use hardware #8 (six 1/4” x 1-3/4” carriage bolts with one washer and one hex nut each).
Tip: Make sure the nuts are secured on the front of the wheel.
b.) Take the spoke with the cord catch assembly and mount it in the twelve o’clock position on the drum assembly so that the revolution pin is in the seven o’clock position (if you are facing the front of the warping wheel).
c.) Bolt it in place from the back to the front and se-cure it with a flat washer and hex nut. Tighten with a 7/16” wrench until the bolt head is flush with the back of the drum assembly.
d.) Then take the spoke with the weight on it and mount it in the six o’clock location on the drum as-sembly, with the weights facing toward the stand (vertical).
e.) Mount the remaining four spokes on the drum as-sembly.
7.) Spokes

Page 10
Assembly Process
a.) Using the 1/4” x 2” carriage bolt, secure with the flat washer and wing nut. Mount the stationary raddle holder to the spoke with the cord catch as-sembly.
8.) Raddle
b.) Using the 1/4” x 2-1/4” carriage bolt (hardware #4), attach the raddle mount/adjustable raddle holder assembly to the raddle support. Secure with the flat washer and hex nut.
Page 11
Assembly Process
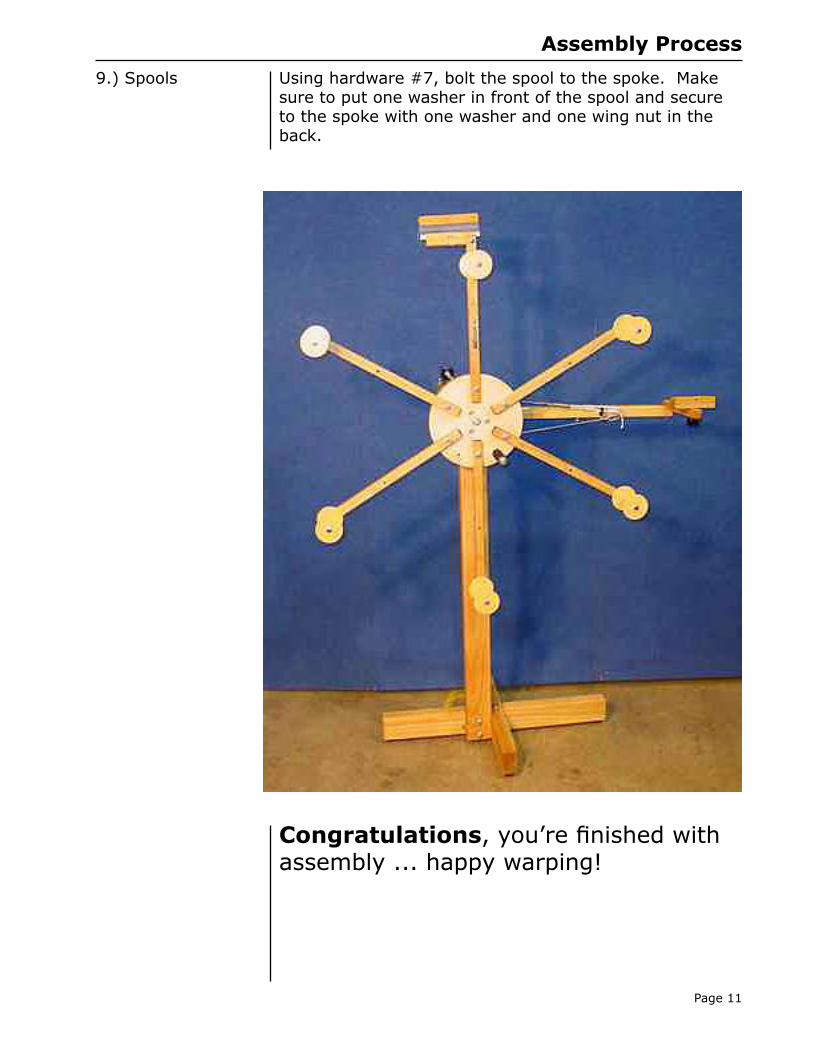
9.) Spools Using hardware #7, bolt the spool to the spoke. Make sure to put one washer in front of the spool and secure to the spoke with one washer and one wing nut in the back.
Congratulations, you’re finished with assembly ... happy warping!

Page 12
Use of the Warping Wheel
1.) Position your cones (or other warp threads) on a cone caddie (or rack) on the floor. Simply put, make sure your threads are ready to be unwound and placed on the Warping Wheel.
2.) Determine the length you want your warp. Re-member that the outer position on the spokes equals approximately three yard revolution and the inner position equals a two yard revolution (actual length may be slightly longer).
Example: If you wanted a fifteen (15) yard warp, you would set the blocks to the outer (three (3) yard) position. Three (3) yard revolution times (x) five (5) revolutions equals a fifteen (15) yard warp.
NOTE: The Spool on the spoke that has the Metal Catch Clip does not move.
3a.) When attaching the raddle at the top of the Warp-ing Wheel, make sure the pin goes in from the back to front, so that the hoop is behind the rad-dle, then it won’t get in your way.
3b.) Open the top of the mini raddle by releasing the clips on both sides. NOTE: the Mini-Raddle is DE-SIGNED to be slightly wider than its bottom — this is by design so that the catch clips work!
Take the raddle top and hang it on the end of the raddle support arm.
To begin ...

Page 13
Use of Warping Wheel
4.) Reset the revolution counter to zero.
5.) Securing the thread(s).
a.) Slide the thread(s) under the metal catch clip, tails facing to the left.
b.) Bring the thread(s) up the right side of the spoke back over the spool at the top of the same spoke, so that you are ready to wind the Warping Wheel in a COUNTERCLOCK-WISE motion.
6.) Grab the handle with your left hand and hold the thread(s) with your right.

Page 14
Use Warping Wheel
7.) Turn the wheel COUNTERCLOCKWISE. Wind on one length of your warp. (From the example above, that would be five (5) revolutions to equal a fifteen (15) yard length.)
Winding on ...
Page 15
Use of the Warping Wheel
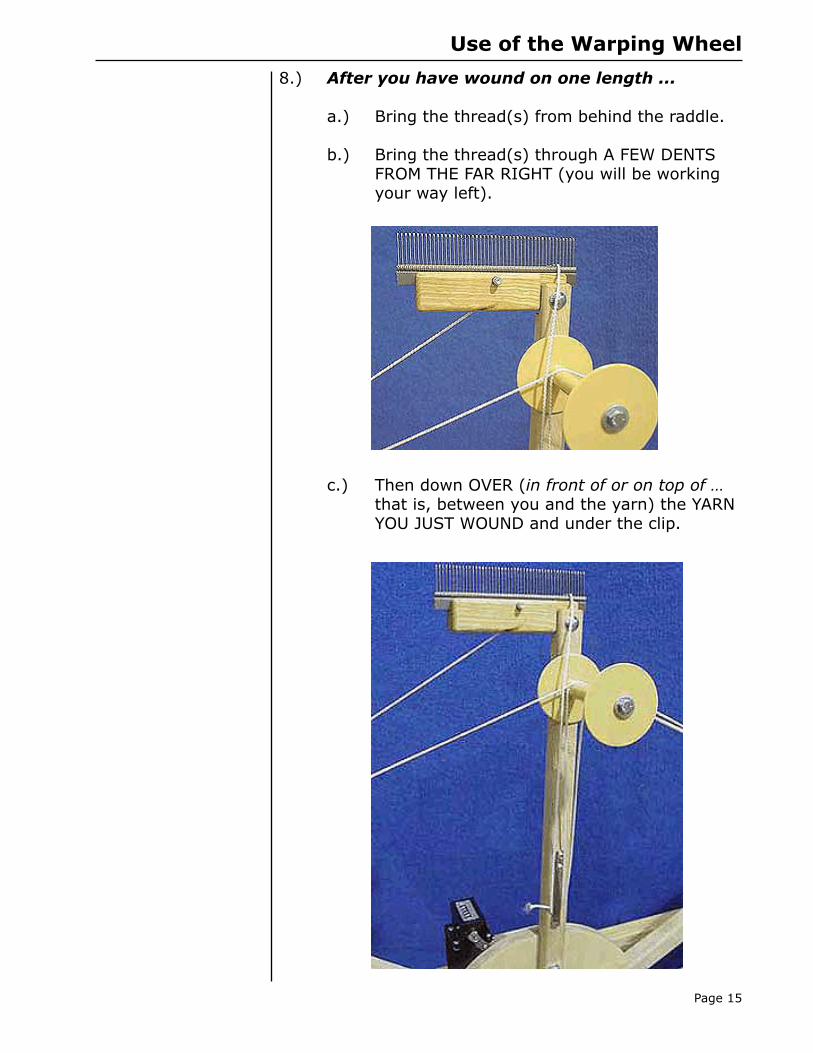
8.) After you have wound on one length ...
a.) Bring the thread(s) from behind the raddle.
b.) Bring the thread(s) through A FEW DENTS FROM THE FAR RIGHT (you will be working your way left).
c.) Then down OVER (in front of or on top of … that is, between you and the yarn) the YARN YOU JUST WOUND and under the clip.
Page 16
Use of the Warping Wheel
d.) And then repeat the process for your next length. TIP: so that the threads unwind easily later, each length should progress from back to front. SO push the threads to-ward the back (toward the raddle side).
9.) When you are done winding on the section, secure the thread(s) under the catch clip.
10.) Tying off ...
a.) Put the raddle top back on the raddle.
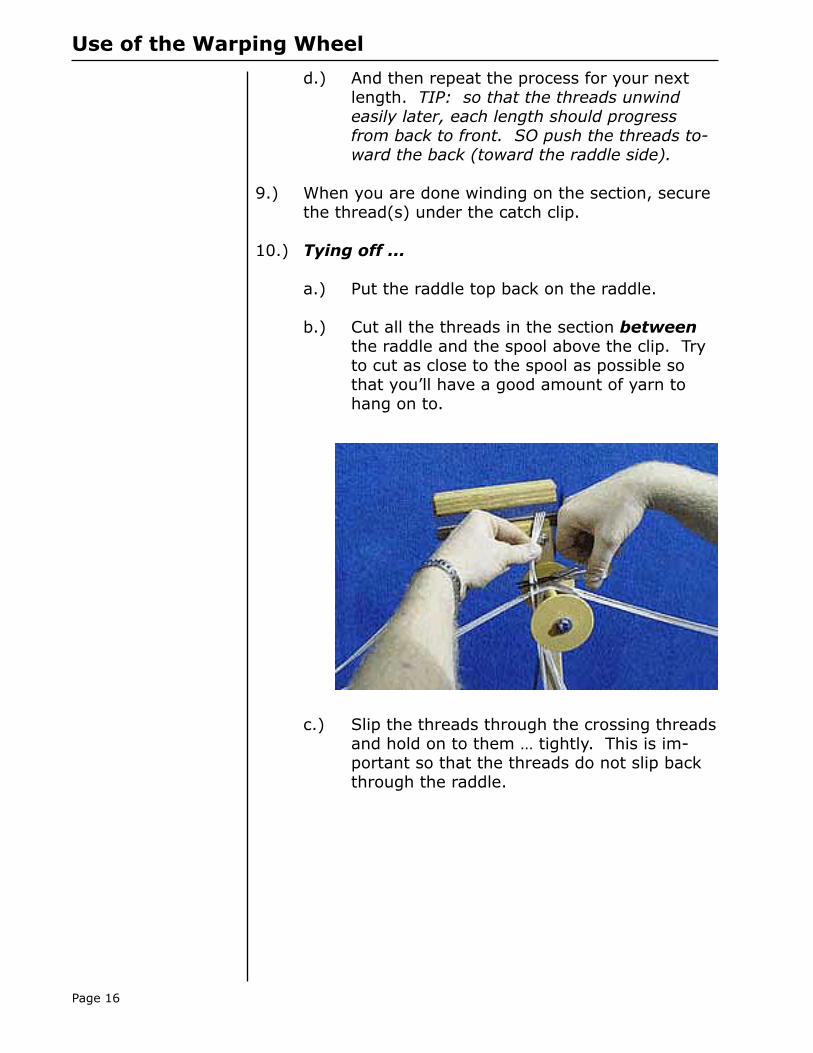
b.) Cut all the threads in the section between the raddle and the spool above the clip. Try to cut as close to the spool as possible so that you’ll have a good amount of yarn to hang on to.
c.) Slip the threads through the crossing threads and hold on to them … tightly. This is im-portant so that the threads do not slip back through the raddle.

Page 17
Use of the Warping Wheel
d.) Secure the threads at the clip with ONE MORE WRAP; so that they won’t move.
11.) Pull the security pin that holds the mini raddle in place out. Carry the entire raddle with the threads to the front pivoting mount. Secure the raddle in this new position with the same pin. Pull out a bit more yarn and tie a knot so that the yarn won’t slip back through.
12.) Pivot the raddle to adjust the width of the section to fit exactly in-between the pegs on your sectional beam.
13.) Take the extension cord from your beam. Create a larkshead loop at its end and loop it around the knotted end of your warp section.
14.) Adjust the tension of the wheel by squeezing on the black knob to loosen or pull on the cords to tighten. Once you set the tension, leave it that way for all the warp sections so you will have even tension throughout.
15.) Tear a piece of masking tape and set it aside on the raddle support arm.
From Warping Wheel to Sectional Beam ...

Page 18
Use of the Warping Wheel
16.) Wind your warp onto the sectional beam.
17.) Before the last part of the threads pass from the cord catch through the raddle, tape the threads on the loom-side of the raddle (between the raddle and the Sectional Beam) in their sequence us-ing the masking tape. This will help you keep the threads in order when you thread the harness.
Repeat this process for every section of your sectional beam.