Embed Size (px)
Citation preview
Avaya IA 770 INTUITY AUDIX Messaging Application Release 1.3Installation Checklist and Instructions
585-313-159Issue 5
June 2004Comcode 700252562

2004, Avaya Inc.All Rights Reserved, Printed in U.S.A.
NoticeEvery effort was made to ensure that the information in this book was complete and accurate at the time of printing. However, information is subject to change.
Avaya Web PageThe world wide web home page for Avaya is:http://www.avaya.com
Preventing Toll Fraud Toll Fraud is the unauthorized use of your telecommunications system by an unauthorized party (for example, a person who is not a corporate employee, agent, subcontractor, or working on your company�s behalf). Be aware that there is a risk of toll fraud associated with your system and that, if toll fraud oc-curs, it can result in substantial additional charges for your telecommunications services.
Avaya Fraud InterventionIf you suspect that you are being victimized by toll fraud and you need technical assistance or support, call the Technical Service Center�s Toll Fraud Interven-tion Hotline at 1.800.643.2353.
Providing Telecommunications SecurityTelecommunications security of voice, data, and/or video communications is the prevention of any type of intrusion to, that is, either unauthorized or mali-cious access to or use of, your company�s telecommunications equipment by some party.
Your company�s �telecommunications equipment� includes both this Avaya product and any other voice/data/video equipment that could be accessed via this Avaya product (that is, �networked equipment�).
An �outside party� is anyone who is not a corporate employee, agent, subcon-tractor, or working on your company�s behalf. Whereas, a �malicious party� is Anyone, including someone who may be otherwise authorized, who accesses your telecommunications equipment with either malicious or mischievous in-tent.
Such intrusions may be either to/through synchronous (time-multiplexed and/or circuit-based) or asynchronous (character-, message-, or packet-based) equipment or interfaces for reasons of:
� Utilization (of capabilities special to the accessed equipment)� Theft (such as, of intellectual property, financial assets, or toll-facility
access)� Eavesdropping (privacy invasions to humans)� Mischief (troubling, but apparently innocuous, tampering)� Harm (such as harmful tampering, data loss or alteration, regardless of
motive or intent)Be aware that there may be a risk of unauthorized intrusions associated with your system and/or its networked equipment. Also realize that, if such an intru-sion should occur, it could result in a variety of losses to your company, includ-ing but not limited to, human/data privacy, intellectual property, material assets, financial resources, labor costs, and/or legal costs).
Your Responsibility for Your Company�s Telecommunications SecurityThe final responsibility for securing both this system and its networked equip-ment rests with you � an Avaya customer�s system administrator, your tele-communications peers, and your managers. Base the fulfillment of your responsibility on acquired knowledge and resources from a variety of sources including but not limited to:
� Installation documents� System administration documents� Security documents� Hardware-/software-based security tools� Shared information between you and your peers� Telecommunications security experts
To prevent intrusions to your telecommunications equipment, you and your peers should carefully program and configure your:
� Avaya provided telecommunications systems and their interfaces� Avaya provided software applications, as well as their underlying hard-
ware/software platforms and interfaces� Any other equipment networked to your Avaya products
Federal Communications Commission StatementPart 15: Class A Statement. This equipment has been tested and found to comply with the limits for a Class A digital device, pursuant to Part 15 of the FCC Rules. These limits are designed to provide reasonable protection against harmful interference when the equipment is operated in a commercial environ-ment. This equipment generates, uses, and can radiate radio-frequency ener-gy and, if not installed and used in accordance with the instructions, may cause harmful interference to radio communications. Operation of this equipment in a residential area is likely to cause harmful interference, in which case the user will be required to correct the interference at his own expense.
Industry Canada (IC) Interference InformationThis digital apparatus does not exceed the Class A limits for radio noise emis-sions set out in the radio interference regulations of Industry Canada.
Le Présent Appareil Nomérique n�émet pas de bruits radioélectriques dépas-sant les limites applicables aux appareils numériques de la class A préscrites dans le reglement sur le brouillage radioélectrique édicté par le Industrie Can-ada.
TrademarksAll trademarks identified by ® and � are registered trademarks or trademarks of Avaya Inc. All other trademarks are the property of their respective owners.
Ordering InformationCall: Avaya Publications Center
Voice 1 800 457-1235 International Voice +1 207 866 6701Fax 1 800 457-1764 International Fax +1 207 626 7269
Write: GlobalWare Solutions200 Ward Hill AvenueHaverhill, MA 01835 USAAttn: Avaya Account Management
Email: [email protected]
Obtaining ProductsTo learn more about Avaya products and to order products, visit www.avaya.com.
European Union Declaration of ConformityThe �CE� mark affixed to the equipment means that it conforms to the refer-enced European Union (EU) Directives listed below:EMC Directive89/336/EEC Low-Voltage Directive73/23/EECFor more information on standards compliance, contact your local distributor.
Warranty Avaya Inc. provides a limited warranty on this product. Refer to your sales agreement to establish the terms of the limited warranty. In addition, Avaya�s standard warranty language as well as information regarding support for this product, while under warranty, is available through the following web site: www.avaya.com/support.

Page 1Installation Checklist
IA 770 INTUITY AUDIX Messaging Application R1.3 Installation Checklist and Instructions 585-313-159
Issue 5June 2004
00IA 770 INTUITY AUDIX Installation Checklist and Instructions
Installation Checklist
! CAUTION:The steps to install IA770 INTUITY AUDIX messaging vary, depending on whether you are also installing a new S8300 (usually under the same work order) or you are adding IA770 INTUITY AUDIX messaging to an S8300 that had been previously purchased and installed. In either case, you need to use information from the document, Installation and Upgrades for the Avaya� G700 Media Gateway controlled by an Avaya� S8300 Media Server or an Avaya� S8700 Media Server, 555-234-100 Issue 2.
To install IA 770 INTUITY AUDIX messaging with a new S8300, you perform Task 5, Install S8300 Software, primarily using Chapter 3 the S8300 Installation document. You do not perform Task 6.
To install IA 770 INTUITY AUDIX messaging on an existing S8300 (previously installed), you perform Task 6, Upgrade S8300 Software, and Task 11, Complete the S8300 Upgrade, primarily using Chapter 5 from the S8300 Installation document. You may also have to complete Task 10, Upgrade the G700. You do not perform Task 5.
Task Subtasks, If Any
��Task 1: Get the S8300 Installation Document�� on page 7
��Task 2: Review Demarcation Points�� on page 7.
��Task 3: Maintain System Security�� on page 7.

IA 770 INTUITY AUDIX Messaging Application R1.3 Installation Checklist and Instructions 585-313-159
Issue 5June 2004
IA 770 INTUITY AUDIX Installation Checklist and Instructions Page 2Installation Checklist
��Task 4: Review Prerequisites�� on page 8.
Review the following:
! ��Intended Audience�� on page 8
! ��Safety and Security Alert Labels�� on page 8
! ��FCC Statement�� on page 9
! ��DOC Interference Information�� on page 9
! ��CWY1 Board Kit Contents�� on page 9
! ��Required Tools�� on page 9�
! ��Saving Packing Materials�� on page 10
Gather the ��Required Tools�� on page 9.
��Task 5: Install the S8300 (for a New S8300 Only)�� on page 10.
NOTE:You perform either Task 5 or Task 6, not both.
NOTE:If you download Communication Manager (earlier known as MultiVantage) update software from the Avaya website, be sure to also download any IA770 INTUITY AUDIX remote field updates (RFUs) that may be required.
Task Subtasks, If Any

IA 770 INTUITY AUDIX Messaging Application R1.3 Installation Checklist and Instructions 585-313-159
Issue 5June 2004
IA 770 INTUITY AUDIX Installation Checklist and Instructions Page 3Installation Checklist
��Task 6: Upgrade S8300 Software (for an Add-on to an Existing S8300 Only)�� on page 11
NOTE:You perform either Task 5 or Task 6, not both.
��Task 6.1: Get the Planning Forms from the Project Manager�� on page 11
��Task 6.2: If Necessary, Get the Serial Number of the G700 That Hosts the INTUITY AUDIX System�� on page 11
��Task 6.3: Complete the RFA Processes and Download Communication Manager (Earlier known as MultiVantage) and/or IA770 INTUITY AUDIX Remote Field Update (RFU) Software to Your Laptop�� on page 12
��Task 6.4: If Necessary, Configure Your Laptop to Connect with the S8300 Services Port�� on page 12
��Task 6.5: Log in to the S8300 Media Server Using Telnet�� on page 12
��Task 6.6: Log in to the S8300 Browser Interface�� on page 14
��Task 6.7:Prepare the S8300 for the Upgrade�� on page 15
��Task 6.8: Upload and Install the New License and Authentication Files�� on page 15
��Task 6.9: Check the License Mode�� on page 16
��Task 6.10: If Necessary, Load the Most Recent S8300 and Communication Manager (earlier known as MultiVantage) Software�� on page 16
NOTE:You may determine that the S8300 software version and/or the Communication Manager (earlier known as MultiVantage) software version is already the most recent. In this case, you must only load and install the new license and authentication files.
��Task 7: If Necessary, Upload Additional Announcement Sets or RFUs�� on page 17
��Task 8: Install the CWY1 Board�� on page 18
.��Task 8.1 Shut down and Turn off the S8300 Media Server�� on page 18
��Task 8.2: Connect the CWY1 Board to the S8300 Media Server�� on page 19.
��Task 8.3: Reconnect the Power and Bring Up the System�� on page 20.
Task Subtasks, If Any

IA 770 INTUITY AUDIX Messaging Application R1.3 Installation Checklist and Instructions 585-313-159
Issue 5June 2004
IA 770 INTUITY AUDIX Installation Checklist and Instructions Page 4Installation Checklist
��Task 9: Install IA 770 INTUITY AUDIX Software�� on page 21.
��Task 9.1: Run the Autoinstall Program for IA 770 INTUITY AUDIX Software�� on page 21
��Task 9.2: Enable Messaging�� on page 22.
��Task 9.3: Restart the Communication Manager (earlier known as MultiVantage) Software and Check That the Messaging Software is Running�� on page 22
��Task 9.4: Administer Logins�� on page 23
! CAUTION:You must complete this task or neither you nor the customer will be able to use the system.
��Task 9.5: Check That All Standard Packages Are Installed�� on page 25
��Task 9.6: If Necessary, Install Additional Announcement Sets or Remote Field Updates�� on page 26.
��Task 10. Upgrade the G700, If Necessary (for an Add-on to an Existing S8300 Only)�� on page 27
NOTE:Skip to Task 13 if you have just installed a new S8300.
��Task 11. Complete the S8300 Upgrade (for an Add-on to an Existing S8300 Only)�� on page 28
NOTE:Skip to Task 13 if you have just installed a new S8300.
Task Subtasks, If Any

IA 770 INTUITY AUDIX Messaging Application R1.3 Installation Checklist and Instructions 585-313-159
Issue 5June 2004
IA 770 INTUITY AUDIX Installation Checklist and Instructions Page 5Installation Checklist
��Task 12: Administer the S8300 Media Server for AUDIX Communication�� on page 28
��Task 12.1: Access the S8300 SAT Screens�� on page 28
��Task 12.2: Administer the INTUITY AUDIX Media Module�� on page 28
��Task 12.3: Create a Unique Class of Restriction (Optional)�� on page 29
��Task 12.4: Create a Unique Class of Service (Optional)�� on page 31
��Task 12.5: Assign Node Names�� on page 31
��Task 12.6: Administer the First Voice Port�� on page 32
��Task 12.7: Duplicate the First Voice Port�� on page 37
��Task 12.8: Add the Voice Ports to a Hunt Group�� on page 38
��Task 12.9: Assign the Call Coverage Path�� on page 42
��Task 12.10: Save Translations�� on page 44
��Task 12.11: Check for the Switch Number of the S8300�� on page 45
��Task 12.12: Assign the Switch Number and Extension Length�� on page 45
��Task 12.13: Modify the Station Screen for Each Subscriber�� on page 46
��Task 12.14: Restart Messaging Software�� on page 48
��Task 13: Initial Administration of IA 770 INTUITY AUDIX Messaging�� on page 49
��Task 13.1: Call Transfer Administration�� on page 49
���Task 13.2: Log in to the AUDIX Command Prompt Screens�� on page 50 Screens�� on page 50
��Task 13.3: Machine Profile Initial Administration�� on page 51
��Task 13.4: Outcalling Initial Administration�� on page 53
��Task 13.5: Enhanced Call Transfer Initial Administration�� on page 53
��Task 13.6: Class of Service Administration�� on page 54
��Task 13.7: Test Subscriber Administration�� on page 55
��Task 13.8: Administering LDAP on Netscape�� on page 56
��Task 13.9: Digital Networking�� on page 57
��Task 13.10: Security Enhancement�� on page 58
Task Subtasks, If Any

IA 770 INTUITY AUDIX Messaging Application R1.3 Installation Checklist and Instructions 585-313-159
Issue 5June 2004
IA 770 INTUITY AUDIX Installation Checklist and Instructions Page 6Installation Checklist
��Task 14: System Acceptance Test�� on page 59.
��Task 15: Make the Upgrade and Administration Permanent�� on page 60
��Task 16: Perform a Backup�� on page 60.
Task Subtasks, If Any
IA 770 INTUITY AUDIX Messaging Application R1.3 Installation Checklist and Instructions 585-313-159
Issue 5June 2004
IA 770 INTUITY AUDIX Installation Checklist and Instructions Page 7Task 1: Get the S8300 Installation Document
Task 1: Get the S8300 Installation Document
To perform many of the tasks in this installation, you need S8300 installation instructions contained in Installation and Upgrades for the Avaya� G700 Media Gateway controlled by an Avaya� S8300 Media Server or an Avaya� S8700 Media Server, 555-234-100 Issue 2. You can get this document from the Product Documentation website accessible at avaya.com/support or from the S8300 Media Server and S8700 Media Server Documentation Library CD, 555-234-825.
Task 2: Review Demarcation Points
A demarcation point defines the extent of Avaya's responsibilities for a product. Beyond this point, the customer is responsible for providing overall service. Generally, Avaya is responsible for all Avaya-provided equipment.
Demarcation Point for LAN Connectivity
The demarcation point for the Avaya INTUITY TCP/IP is the S8300 ethernet ports. The customer is responsible for:
! The LAN cable
! The connector at the end of the cable for connection to the S8300 system
! LAN administration not performed on the S8300 system
! Maintaining the TCP/IP addresses and administration on the S8300 system after cutover, unless otherwise specified by contract
! Providing the IP address, subnet mask, and gateway information for administration on the S8300 system
Avaya service technicians who are dispatched for INTUITY AUDIX system installation are not responsible for troubleshooting the customer's LAN.
Task 3: Maintain System Security
Password Security
To protect password security:
! Change the passwords for the system administrator (sa), voice mail administrator (vm), and craft logins before you begin the verification and acceptance of the IA770 INTUITY AUDIX system.
! Do not leave written passwords lying in a place visible to others or allow any one to see them.

IA 770 INTUITY AUDIX Messaging Application R1.3 Installation Checklist and Instructions 585-313-159
Issue 5June 2004
IA 770 INTUITY AUDIX Installation Checklist and Instructions Page 8Task 4: Review Prerequisites
! At the first opportunity, give the passwords directly to the customer's designated representative.
! If you suspect that the security of any password has been compromised, notify your project manager or system administrator.
System Security During the Installation
To protect system security during the installation:
! Remove all test subscribers and test mailboxes from the system when the procedures instruct you to do so.
! Always log off the system if you will be leaving it unattended, even for a short period of time.
Task 4: Review Prerequisites
Intended Audience
This book is intended primarily for the on-site technical personnel who are responsible for installing the system and performing initial administration and acceptance testing. However, the general precautions are intended for both installers and system administrators.
Safety and Security Alert Labels
This documentation uses the following symbols to call your attention to potential problems that could cause personal injury, damage to equipment, loss of data, service interruptions or breaches of toll fraud security.
! CAUTION:Indicates the presence of a hazard that, if not avoided, can or will cause minor personal injury or property damage, including loss of data.
! WARNING:Indicates the presence of a hazard that, if not avoided, can cause death or severe personal injury.
! DANGER:Indicates the presence of a hazard that, if not avoided, will cause death or severe personal injury.

IA 770 INTUITY AUDIX Messaging Application R1.3 Installation Checklist and Instructions 585-313-159
Issue 5June 2004
IA 770 INTUITY AUDIX Installation Checklist and Instructions Page 9Task 4: Review Prerequisites
FCC Statement
This equipment has been tested and found to comply with the limits for a Class A digital device, pursuant to Part 15 of the FCC rules. These limits are designed to provide a reasonable protection against harmful interference when the equipment is operated in a commercial environment. This equipment generates, uses, and can radiate radio-frequency energy and, if not installed and used in accordance with the instruction manual, can cause harmful interference to radio communications. Operation of this equipment in a residential area is likely to cause harmful interference in which case the user will be required to correct the interference at his or her own expense.
DOC Interference Information
This digital apparatus does not exceed the Class A limits for radio noise emissions set out in the radio interference regulations of the Canadian Department of Communications.
Le présent appareil nomérique n�émet pas de bruits radioélectriques dépassant les limites applicables aux appareils numériques de la Classe A préscrites dans le reglement sur le brouillage radioélectrique édicté par le ministère des Communications du Canada.
CWY1 Board Kit Contents
! CAUTION:Do not handle the CWY1 board unless you are wearing a grounding wrist strap or have performed another method of preventing electro-static discharge (ESD) and are prepared to place the board on a static-free surface.
The complete CWY1 board kit contains the following components (verify that you have all of these components before beginning the installation procedure):
! CWY1 Ser2 board
! Three (3) screws
! Three (3) standoffs
Required Tools
You also need the following tools:
! Phillips screwdriver
! Flathead screwdriver

IA 770 INTUITY AUDIX Messaging Application R1.3 Installation Checklist and Instructions 585-313-159
Issue 5June 2004
IA 770 INTUITY AUDIX Installation Checklist and Instructions Page 10Task 5: Install the S8300 (for a New S8300 Only)
! ESD-preventing wrist strap
Saving Packing Materials
Save the shipping carton and all packing materials to use in case you have to return the system to the manufacturer. If you ordered multiple systems, saving one carton and one set of packing materials will be sufficient. Packing materials include:
! Antistatic bags
! Cardboard and foam inlays
NOTE:The packing materials also can include a plastic bag that is designed to protect the system from moisture during shipment. Discard this bag. It is not reusable.
Task 5: Install the S8300 (for a New S8300 Only)
! CAUTION:If you are adding an IA 770 INTUITY AUDIX Messaging Application to an existing S8300 that was installed under a previous work order, skip Task 5 and go to Task 6.
Use Chapters 1, 2, and 3 of Installation and Upgrades for the Avaya� G700 Media Gateway controlled by an Avaya� S8300 Media Server or an Avaya� S8700 Media Server, 555-234-100 Issue 2. This document is available at avaya.com/support or on the Avaya S8300 Media Server and Avaya G700 Media Gateway Library CD, 555-234-800.
NOTE:The S8300 that supports the IA 770 INTUITY AUDIX messaging application is always a primary controller, never a local spare processor.
Tasks that should be completed prior to continuing with the IA 770 INTUITY AUDIX Messaging installation are as follows:
! Check your planning forms for the most recent IA770 INTUITY AUDIX remote field updates (RFUs). Remote field update packages have the format A<number>rf+<letter>.rpm or C<number>rf+<letter>.rpm (for example, C6037rf+a.rpm). You should download any INTUITY AUDIX RFUs to your laptop the same way you download Communication Manager (earlier known as MultiVantage) software. The INTUITY AUDIX RFUs are available from the Software Download section of the http://www.avaya.com/support website on the Internet.

IA 770 INTUITY AUDIX Messaging Application R1.3 Installation Checklist and Instructions 585-313-159
Issue 5June 2004
IA 770 INTUITY AUDIX Installation Checklist and Instructions Page 11Task 6: Upgrade S8300 Software (for an Add-on to an Existing S8300 Only)
! Create and obtain license and authentication files.
! Install hardware (except for the CWY1 board).
! Load and install license and authentication files.
! Load and install most recent S8300 and Communication Manager (earlier known as MultiVantage) software.
! Configure the G700 Media Gateway.
! Load and install most recent G700/P330 firmware.
! Administer Communication Manager (earlier known as MultiVantage) Software.
! Add INADS phone numbers and enable alarms.
! Back up the system.
Task 6: Upgrade S8300 Software (for an Add-on to an Existing S8300 Only)
! CAUTION:If you are installing an IA 770 INTUITY AUDIX Messaging Application with a new S8300 under the same work order, skip Task 6 and perform Task 5 instead.
Task 6.1: Get the Planning Forms from the Project Manager
You will need a lot of information prior to beginning an installation. The project manager for the installation gives you planning forms that provide this information. It primarily consists of IP addresses, subnet mask addresses, logins, passwords, people to contact, the type of system, and equipment you need to install.
Task 6.2: If Necessary, Get the Serial Number of the G700 That Hosts the INTUITY AUDIX System
You need this number to create and upload a new license and authentication file for the S8300 and/or INTUITY AUDIX system. The serial number of the G700 is written on a sticker that is attached to the back of the G700 chassis.
NOTE:This task is necessary only if the IA 770 INTUITY AUDIX system is an aftermarket addition to the S8300 Media Server. When you are installing an S8300 with an IA 770 INTUITY AUDIX system under the same work order, the license and authentication files you install for the S8300 should contain INTUITY AUDIX permissions.

IA 770 INTUITY AUDIX Messaging Application R1.3 Installation Checklist and Instructions 585-313-159
Issue 5June 2004
IA 770 INTUITY AUDIX Installation Checklist and Instructions Page 12Task 6: Upgrade S8300 Software (for an Add-on to an Existing S8300 Only)
NOTE:If possible, ask the customer or your project manager to check for the serial number prior to going to the customer site for the installation.
Task 6.3: Complete the RFA Processes and Download Communication Manager (Earlier known as MultiVantage) and/or IA770 INTUITY AUDIX Remote Field Update (RFU) Software to Your Laptop
See �Complete the RFA Processes and Download MultiVantage Update Software to Your Laptop� in Chapter 5 of Installation and Upgrades for the Avaya� G700 Media Gateway controlled by an Avaya� S8300 Media Server or an Avaya� S8700 Media Server, 555-234-100 Issue 2.
Also, check your planning forms for the most recent IA770 INTUITY AUDIX remote field updates (RFUs). Remote field update packages have the format A<number>rf+<letter>.rpm or C<number>rf+<letter>.rpm (for example, C6037rf+a.rpm). You should download any INTUITY AUDIX RFUs to your laptop the same way you download Communication Manager (earlier known as MultiVantage) software. The INTUITY AUDIX RFUs are available from the Software Download section of the http://www.avaya.com/support website on the Internet.
NOTE:It may not be necessary to update the Communication Manager (earlier known as MultiVantage) software. Check with your project manager or check the version of existing software on the S8300.
Task 6.4: If Necessary, Configure Your Laptop to Connect with the S8300 Services Port
See �Set up a Laptop for an S8300 Media Server Direct Ethernet Connection, If Local� in Chapter 5 of Installation and Upgrades for the Avaya� G700 Media Gateway controlled by an Avaya� S8300 Media Server or an Avaya� S8700 Media Server, 555-234-100 Issue 2.
Task 6.5: Log in to the S8300 Media Server Using Telnet
1. Connect your laptop to the services port of the S8300 Media Server (see the following figure of an S8300 Media Server and G700 Media Gateway). Your laptop must already be configured for this connection.

IA 770 INTUITY AUDIX Messaging Application R1.3 Installation Checklist and Instructions 585-313-159
Issue 5June 2004
IA 770 INTUITY AUDIX Installation Checklist and Instructions Page 13Task 6: Upgrade S8300 Software (for an Add-on to an Existing S8300 Only)
10. Access the telnet program as follows:
a. If you are not yet logged in, open a telnet program on your computer. For example, on a Windows system, go to the Start menu and select Run.
b. Type telnet 192.11.13.6 to access the S8300 command prompt.
NOTE:You must enter the exact IP address 192.11.13.6. This is a special IP address for the laptop/S8300 connection.
c. When the login prompt appears, log in as craft.
d. When prompted, enter the appropriate password.
You are prompted to suppress alarm origination. Generally you should accept the default value (yes).
e. Enter your terminal type. Accept the default value vt100, or enter the appropriate type for your computer. A commonly-used terminal type is w2ktt.
The telnet prompt appears. It may take the form <username@devicename>.
The following table lists key presses for w2ktt terminal emulation.
Key Sequence Function Key
Function
ESC x F1 Cancel ESC F2
1. Media Module Slot 12. S8300 Services Port3. S8300 USB Ports4. Expansion Module Slot5. 10/100 Base-T Ethernet Ports6. Media Module Slot 17. Media Module Slot 28. Media Module Slot 39. P300 Console Interface

IA 770 INTUITY AUDIX Messaging Application R1.3 Installation Checklist and Instructions 585-313-159
Issue 5June 2004
IA 770 INTUITY AUDIX Installation Checklist and Instructions Page 14Task 6: Upgrade S8300 Software (for an Add-on to an Existing S8300 Only)
Task 6.6: Log in to the S8300 Browser Interface
To log in to the S8300 browser interface:
1. Open a compatible Internet browser on your laptop. Currently only Internet Explorer 5.x and Netscape 4.7x are supported. The system displays your Internet Home page.
2. In the Address (or Location) field of your browser, type http://192.11.13.6 and press Enter.
The system displays the Avaya Security Notice screen.
3. Press Continue.
The system displays a server security alert.
4. Click OK.
The system displays a security certificate.
5. Click Yes.
The Login Page is displayed.
6. In the Username field, type craft, and press Enter or click Login.
The Password field or the Access Security Gateway (ASG) challenge is displayed.
7. Type the appropriate password or the correct ASG response and press Enter or click Login.
The Suppress Alarm Origination prompt is displayed.
8. Click Yes so that alarms will not be sent during the installation.
The Integrated Management Page appears.
9. Select Launch Maintenance Web Interface.
The Maintenance Web Pages main menu appears.
ESC e F3 Execute ESC F4 ESC h F5 Help ESC F6 ESC n F7 Next Page ESC p F8 Previous
Page
IA 770 INTUITY AUDIX Messaging Application R1.3 Installation Checklist and Instructions 585-313-159
Issue 5June 2004
IA 770 INTUITY AUDIX Installation Checklist and Instructions Page 15Task 6: Upgrade S8300 Software (for an Add-on to an Existing S8300 Only)
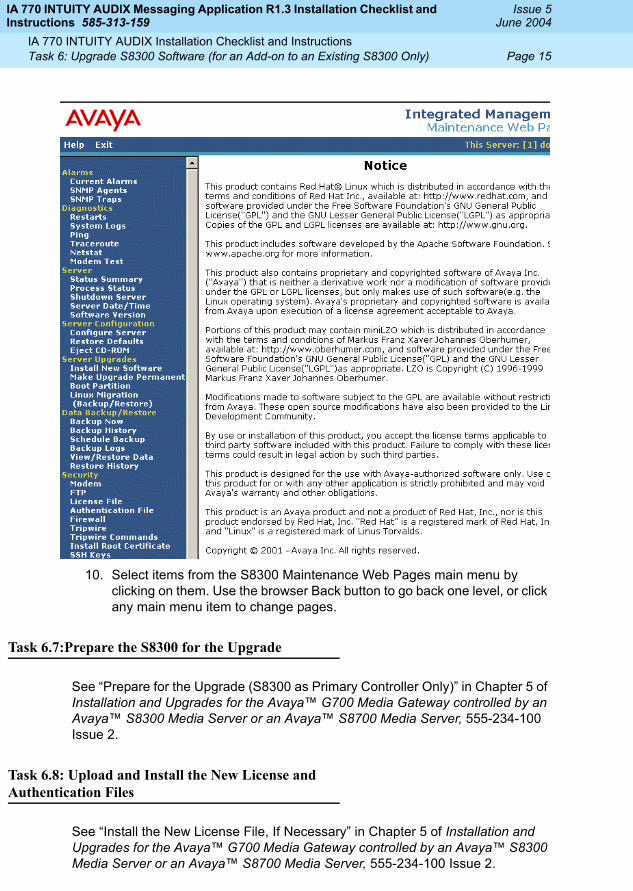
10. Select items from the S8300 Maintenance Web Pages main menu by clicking on them. Use the browser Back button to go back one level, or click any main menu item to change pages.
Task 6.7:Prepare the S8300 for the Upgrade
See �Prepare for the Upgrade (S8300 as Primary Controller Only)� in Chapter 5 of Installation and Upgrades for the Avaya� G700 Media Gateway controlled by an Avaya� S8300 Media Server or an Avaya� S8700 Media Server, 555-234-100 Issue 2.
Task 6.8: Upload and Install the New License and Authentication Files
See �Install the New License File, If Necessary� in Chapter 5 of Installation and Upgrades for the Avaya� G700 Media Gateway controlled by an Avaya� S8300 Media Server or an Avaya� S8700 Media Server, 555-234-100 Issue 2.

IA 770 INTUITY AUDIX Messaging Application R1.3 Installation Checklist and Instructions 585-313-159
Issue 5June 2004
IA 770 INTUITY AUDIX Installation Checklist and Instructions Page 16Task 6: Upgrade S8300 Software (for an Add-on to an Existing S8300 Only)
Task 6.9: Check the License Mode
1. On the Maintenance Web Pages main menu, click License File under the Security menu.
The License File screen appears
2. Check that the CommunicaMgr License Mode field says Normal.
Task 6.10: If Necessary, Load the Most Recent S8300 and Communication Manager (earlier known as MultiVantage) Software
NOTE:This task is necessary only if the IA 770 INTUITY AUDIX system is an aftermarket addition to the S8300 Media Server. When you are installing an S8300 with an IA 770 INTUITY AUDIX system under the same work order, the S8300 software files (.tar files) you installed for the S8300 should contain INTUITY AUDIX software.
See �Load New Software on the S8300� and �Install Software on the S8300� in Chapter 5 of Installation and Upgrades for the Avaya� G700 Media Gateway controlled by an Avaya� S8300 Media Server or an Avaya� S8700 Media Server, 555-234-100 Issue 2.
The most recent S8300 software (the most recent .tar file) includes the most recent IA 770 INTUITY AUDIX software. However, once the .tar file is loaded onto the S8300 ftp directory, you use the S8300 Install screens to install the S8300 software, but you use the INTUITY AUDIX autoinstall command to install IA 770 INTUITY AUDIX.
You may also need to load and install the most recent Communication Manager (earlier known as MultiVantage) software. This software is required in order to allow the S8300 to support the IA 770 Intuity AUDIX system.
NOTE:Be sure to check to see if S8300 update software is necessary with the View Software Version screen.
IA 770 INTUITY AUDIX Messaging Application R1.3 Installation Checklist and Instructions 585-313-159
Issue 5June 2004
IA 770 INTUITY AUDIX Installation Checklist and Instructions Page 17Task 7: If Necessary, Upload Additional Announcement Sets or RFUs
! CAUTION:At the Reboot in Progress screen at the end of the software installation process, the system does not tell you when the reboot is complete. Do not click Continue until you are sure the reboot is complete. Otherwise, the installation will fail. To know when the reboot is complete, open a DOS window and ping the S8300 with the command ping -t 192.11.13.6.
! CAUTION:Be sure to make the upgrade permanent. This task ensures that the S8300 continues to use the new software.
If you fail to perform this task, the S8300 may revert to old software when it reboots, and the S8300 will lose its translations.
1. From the Maintenance Web Pages main menu, click Make Upgrade Permanent under Server Upgrades menu.
2. Click Submit to make the upgrade permanent.
Task 7: If Necessary, Upload Additional Announcement Sets or RFUs
NOTE:This task is necessary only if the customer requests additional languages or IA770 INTUITY AUDIX remote field updates are required.
The language packages, also called announcement sets, allow system users to hear voice prompts and system announcements in other languages. The system is shipped from the factory with the following language packages installed:
! US English
! English TDD (for teletype (TTY) machines)
Adding language software causes the voice system to stop. Plan to do the installation during low usage hours.
Use the IA 770 INTUITY AUDIX Languages CD to upload additional announcement sets. For an IA770 INTUITY AUDIX RFU, the file will be in the directory to which you downloaded the RFU:
1. Connect your laptop to the services port of the S8300 Media Server. Your laptop must already be configured for this connection.
2. Open a browser (for example, Internet Explorer or Netscape), and enter the URL http://192.11.13.6 to log on as craft.

IA 770 INTUITY AUDIX Messaging Application R1.3 Installation Checklist and Instructions 585-313-159
Issue 5June 2004
IA 770 INTUITY AUDIX Installation Checklist and Instructions Page 18Task 8: Install the CWY1 Board
The system displays the Integrated Management page.
3. Click Launch Maintenance Web Interface.
The Maintenance Web Pages menu appears.
4. From the Maintenance Web Pages menu, click Download Files under Miscellaneous.
The system displays the Download Files window.
5. Click the Browse button for the first field. The system displays the Choose File window, which allows you to select files from your laptop.
6. Click directory names until you find the appropriate announcement file.
7. Repeat steps 4 and 5 for the additional fields if additional languages are required.
8. Repeat steps 4 and 5 for an additional fields if an IA770 INTUITY AUDIX RFU is required. Remote field update packages have the format A<number>rf+a<letter>.rpm or C<number>rf+<letter>.rpm (for example, A602rf+a.rpm).
9. Click Download.
When the files are successfully transferred, the system displays the status screen.
10. Check that the Status box displays OK.
Task 8: Install the CWY1 Board
Task 8.1 Shut down and Turn off the S8300 Media Server
1. On the front of the S8300 faceplate, press the shutdown button and hold it down until the OK-to-remove LED starts flashing.
2. Release the shutdown button.
The LEDs on the left of the button flash and then stay solidly lit. At this point, you can remove the S8300.
NOTE:The system does not have an on/off power switch. Disconnecting or reconnecting the system to its power source is accomplished by unplugging or plugging the power cord from or into its electrical outlet.
3. Unplug your PC from the S8300 services port, then unplug the G700 from its power source.

IA 770 INTUITY AUDIX Messaging Application R1.3 Installation Checklist and Instructions 585-313-159
Issue 5June 2004
IA 770 INTUITY AUDIX Installation Checklist and Instructions Page 19Task 8: Install the CWY1 Board
Task 8.2: Connect the CWY1 Board to the S8300 Media Server
1. On the front of the box, unscrew and remove the two thumb screws that attach the S8300 face plate to the G700.
2. Make sure that you have your wrist strap on and then grasp the S8300 so that you have a firm grip on the LED panel and S8300 board at the same time.
3. Gently and firmly pull out the LED panel and S8300 together.
4. Place the S8300 board on a static-free surface.

IA 770 INTUITY AUDIX Messaging Application R1.3 Installation Checklist and Instructions 585-313-159
Issue 5June 2004
IA 770 INTUITY AUDIX Installation Checklist and Instructions Page 20Task 8: Install the CWY1 Board
5. Complete Steps 6 through 9 to assemble the CWY1 and S8300 board.
6. Attach each of the three standoffs to the top of the S8300 from the back of the S8300 using the screws provided in the kit. Make sure the screws are tightened until firm resistance is met.
7. Turn over the S8300 board and position the three female standoff receptacles on the CWY1 board over the three standoffs on the S8300 board.
8. Press gently and firmly until firm resistance is met, thereby securely positioning the CWY1 board on the S8300.
9. Align the LED panel and the S8300 Board and push both (together) back into the guides, gently and firmly until the front of each of the boards aligns correctly with the front of the unit.
10. Reattach the S8300 faceplate with the thumb screws.
Task 8.3: Reconnect the Power and Bring Up the System
1. Plug the G700 power cord back into the designated electrical outlet.
1. S8300 faceplate
2. CWY1 Board
3.Standoff Screws
4. Hard Drive

IA 770 INTUITY AUDIX Messaging Application R1.3 Installation Checklist and Instructions 585-313-159
Issue 5June 2004
IA 770 INTUITY AUDIX Installation Checklist and Instructions Page 21Task 9: Install IA 770 INTUITY AUDIX Software
The system power comes on, and the system boots up.
2. Verify that the green CPU LED on the G700 Media Gateway is lit.
Task 9: Install IA 770 INTUITY AUDIX Software
Task 9.1: Run the Autoinstall Program for IA 770 INTUITY AUDIX Software
1. Log in to the S8300 from your laptop using telnet (see ��Task 6.5: Log in to the S8300 Media Server Using Telnet�� on page 12).
NOTE:The craft password is normal maintenance password because you installed a new authentication file.
2. At the Linux command prompt, type stop -ac and press Enter.
The system prompts you to confirm you want to stop the software.
3. Confirm that you want to stop the software.
The system begins to stop the Communication Manager (earlier known as MultiVantage) software. Stopping can take a few minutes.
NOTE:If the system doesn�t automatically display the status as the system is stopping, you can check the status by typing statapp -c at the prompt and pressing Enter. Once the processes have stopped, you must type CTRL + C to stop the statapp command.
4. At the Linux command prompt, type cd /usr/CHIA/ and press Enter.
5. Type sudo ./autoinstall and press Enter
The system begins to install the software. The system returns messages on the screen as the software is installed.
IA 770 INTUITY AUDIX Messaging Application R1.3 Installation Checklist and Instructions 585-313-159
Issue 5June 2004
IA 770 INTUITY AUDIX Installation Checklist and Instructions Page 22Task 9: Install IA 770 INTUITY AUDIX Software
When complete, the system responds that the installation is successful. If you get a failure notice, contact your service representative.
Task 9.2: Enable Messaging
1. Log in again to the S8300 browser interface (see ��Task 6.6: Log in to the S8300 Browser Interface�� on page 14).
2. The craft password is normal maintenance password because you From the Maintenance Web Pages main menu, click Messaging Software.
The S8300 displays the Enable Messaging window.
3. Click the Enable button.
The S8300 starts IA770 INTUITY AUDIX messaging software.
4. Use the Back button on your browser to return to the Maintenance Web Pages Main Menu.
NOTE:The Messaging Administration option appears in the Maintenance Web Pages Main Menu. If the Messaging Administration options does not appear, click the Logoff button, and log in again to the S8300 browser interface as in step 1.
Task 9.3: Restart the Communication Manager (earlier known as MultiVantage) Software and Check That the Messaging Software is Running
1. Log in, if necessary, with telnet (see ��Task 6.5: Log in to the S8300 Media Server Using Telnet�� on page 12).
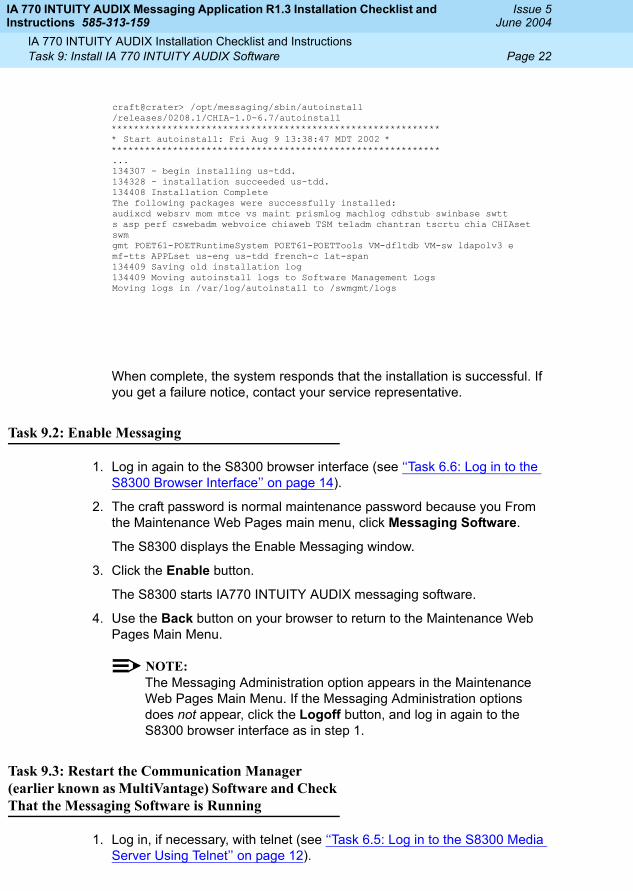
craft@crater> /opt/messaging/sbin/autoinstall/releases/0208.1/CHIA-1.0-6.7/autoinstall************************************************************ Start autoinstall: Fri Aug 9 13:38:47 MDT 2002 ************************************************************...134307 - begin installing us-tdd.134328 - installation succeeded us-tdd.134408 Installation CompleteThe following packages were successfully installed:audixcd websrv mom mtce vs maint prismlog machlog cdhstub swinbase swtts asp perf cswebadm webvoice chiaweb TSM teladm chantran tscrtu chia CHIAset swmgmt POET61-POETRuntimeSystem POET61-POETTools VM-dfltdb VM-sw ldapolv3 emf-tts APPLset us-eng us-tdd french-c lat-span134409 Saving old installation log134409 Moving autoinstall logs to Software Management LogsMoving logs in /var/log/autoinstall to /swmgmt/logs
IA 770 INTUITY AUDIX Messaging Application R1.3 Installation Checklist and Instructions 585-313-159
Issue 5June 2004
IA 770 INTUITY AUDIX Installation Checklist and Instructions Page 23Task 9: Install IA 770 INTUITY AUDIX Software
2. At the Linux command prompt, type start -ac and press Enter.
The system starts the Communication Manager (earlier known as MultiVantage) software.
3. At the Linux command prompt, type systat and press Enter.
The system displays a list of processes. The complete system startup can take up to 15 minutes.
NOTE:If the system doesn�t automatically display the status as the system is starting, you can check the status by typing statapp -c at the prompt and pressing Enter. Once the processes have started, you must type CTRL + C to stop the statapp command.
4. Check the list for Communication Manager (earlier known as MultiVantage). The system should say the software is UP. If not, repeat step 2.
5. Check the list for AUDIX. The system should list 1/1, which means one AUDIX process out of 1 process is running. If it does not list 1/1, repeat step 2.
Task 9.4: Administer Logins
NOTE:If the craft login has already been administered because this is an existing S8300, you do not need to re-administer it. Only the sa and vm logins need to be administered.
1. Log in, if necessary, with telnet (see ��Task 6.5: Log in to the S8300 Media Server Using Telnet�� on page 12).
NOTE:You may need to log out of the browser session first.
2. At the prompt in the telnet window, type sat and press Enter.
3. Log in to the SAT screen as dadmin.
If this is the first time you logged in as dadmin, the system prompts you to change the password. Follow the prompts to change the password, if necessary, and give the password to the customer administrator.
4. At the S8300 SAT command line, type add login <login_name> and press Enter.
The system displays the Login Administration screen.

IA 770 INTUITY AUDIX Messaging Application R1.3 Installation Checklist and Instructions 585-313-159
Issue 5June 2004
IA 770 INTUITY AUDIX Installation Checklist and Instructions Page 24Task 9: Install IA 770 INTUITY AUDIX Software
5. Make the following field settings for one of the following logins (craft, sa or vm), and then press F3 (Enter).
6. Leave the defaults in all other fields.
7. Press F3 (Enter) to save the login.
Field Setting
Login's Name craft, sa or vm
Login Type service (for craft login name) or customer (for sa or vm login name)
Service Level craft (for craft login name) or messaging (for sa or vm login name)
Shell Access n
Login's Password Enter the password for the login.
Renter Login's Password Re-enter the password for the login.
Password Aging Cycle Length (Days)
Enter the number of days after which the specified login will require a password change. Leave this field blank if you do not want password aging.

IA 770 INTUITY AUDIX Messaging Application R1.3 Installation Checklist and Instructions 585-313-159
Issue 5June 2004
IA 770 INTUITY AUDIX Installation Checklist and Instructions Page 25Task 9: Install IA 770 INTUITY AUDIX Software
8. Repeat Steps 2 through 5 so that the three logins (craft, sa and vm) have been created.
Task 9.5: Check That All Standard Packages Are Installed
1. If necessary, log in to the S8300 browser interface (see ��Task 6.6: Log in to the S8300 Browser Interface�� on page 14). At the Maintenance Web Pages main menu, select:
Messaging Administration
The system displays the Messaging Administration main menu in a separate window.
2. At the Messaging Administration main menu, select:
Utilities Software Management Messaging System Software Display
The S8300 displays the list of messaging software packages.
3. Check the list to verify that the following packages are listed:
! audixcd
! websrv
! CHIAset

IA 770 INTUITY AUDIX Messaging Application R1.3 Installation Checklist and Instructions 585-313-159
Issue 5June 2004
IA 770 INTUITY AUDIX Installation Checklist and Instructions Page 26Task 9: Install IA 770 INTUITY AUDIX Software
! swmgmt
! APPLset
! french-c
! lat-span
! us-eng
! us-tdd
Task 9.6: If Necessary, Install Additional Announcement Sets or Remote Field Updates
NOTE:This task is necessary only if the customer requests additional languages or remote field updates are required for the IA770 INTUITY AUDIX system.
1. If necessary, log in to the S8300 browser interface (see ��Task 6.6: Log in to the S8300 Browser Interface�� on page 14). At the Maintenance Web Pages main menu, select:
Messaging Administration Utilities Software Management Software Installation
The system prompts for a backup. Do a backup or click Continue.
If you select Continue, the system finds the software from the /var/home/ftp/pub directory and lists it in the Packages Installed From Window.
NOTE:If no software appears, refer to Task 7 to upload RFUs or additional languages.
2. Click the boxes next to the packages you want and click Install Selected Packages.

IA 770 INTUITY AUDIX Messaging Application R1.3 Installation Checklist and Instructions 585-313-159
Issue 5June 2004
IA 770 INTUITY AUDIX Installation Checklist and Instructions Page 27Task 10. Upgrade the G700, If Necessary (for an Add-on to an Existing S8300
The system displays a list of software packages that it will install.
3. Click Proceed with Installation.
The system begins the installation and displays installation status messages. The installation is complete when the system displays the message Installation/update completed successfully at the bottom of the pages.
4. After the software is installed, press PageDown. As you page down, check to see if the messaging system was stopped. Look for the "...completed successfully" message at the bottom of the status page.
5. If the software was installed successfully and the messaging system was stopped, click Start Messaging. If the messaging system was not stopped and you or another administrator had also not manually stopped the messaging system, click Install More Software or Return to Software Management main menu.
Task 10. Upgrade the G700, If Necessary (for an Add-on to an Existing S8300 Only)
You may need to upgrade the firmware on the G700 Media Gateway. See �Configure the G700 Media Gateway� and �Install New Firmware on the G700 Media Gateway� in Chapter 5 of Installation and Upgrades for the Avaya G700 Media Gateway controlled by an Avaya S8300 Media Server or an Avaya S8700 Media Server, 555-234-100.

IA 770 INTUITY AUDIX Messaging Application R1.3 Installation Checklist and Instructions 585-313-159
Issue 5June 2004
IA 770 INTUITY AUDIX Installation Checklist and Instructions Page 28Task 11. Complete the S8300 Upgrade (for an Add-on to an Existing S8300 Only)
Task 11. Complete the S8300 Upgrade (for an Add-on to an Existing S8300 Only)
See �Complete the Upgrade (S8300 as Primary Controller Only)� in Chapter 5 of Installation and Upgrades for the Avaya� G700 Media Gateway controlled by an Avaya� S8300 Media Server or an Avaya� S8700 Media Server, 555-234-100 Issue 2.
Task 12: Administer the S8300 Media Server for AUDIX Communication
NOTE:Skip this task and proceed from Task 14 if you performed Task 12. This task is meant only for IA770 installations with the CWY1 board.
Complete the following procedures to administer the host switch for CWY1 board integration.
Task 12.1: Access the S8300 SAT Screens
1. Log in, if necessary, with telnet (see ��Task 6.5: Log in to the S8300 Media Server Using Telnet�� on page 12).
NOTE:You may need to log out of the browser session first.
2. At the prompt in the telnet window, type sat and press Enter.
3. Log in again as craft.
Task 12.2: Administer the INTUITY AUDIX Media Module
Use the following procedure to administer the INTUITY AUDIX as a media module:
1. At the SAT screen command prompt, enter change media-gateway 1 (or another number).
NOTE:The media gateway number may be another number if the gateways are in a stack. If so, determine the number by counting from the bottom of the stack until you find the gateway that has the S8300. The bottom gateway is 1, the next higher gateway is 2, and so on.

IA 770 INTUITY AUDIX Messaging Application R1.3 Installation Checklist and Instructions 585-313-159
Issue 5June 2004
IA 770 INTUITY AUDIX Installation Checklist and Instructions Page 29Task 12: Administer the S8300 Media Server for AUDIX Communication
The system displays the Media Gateway screen.
2. Enter messaging-analog in the Module Type field for Slot V8.
3. Press Enter to save the information.
4. Continue with the next procedure, Administer the First Voice Port. Optionally, you may need to create a unique Class of Restrictions for the AUDIX hunt group and voice ports and a unique Class of Service for the AUDIX voice ports.
Task 12.3: Create a Unique Class of Restriction (Optional)
The class of restriction (COR) defines calling privileges. The COR specifies up to 95 different classes of call origination and termination privileges on the S8300. Create a unique COR for the INTUITY AUDIX system voice ports and hunt groups. Do not use a COR that is also used by any other extension, special-usage ports, or trunk groups.
To create the COR:
1. At the SAT screen command prompt, enter change cor <COR number> on the switch terminal.

IA 770 INTUITY AUDIX Messaging Application R1.3 Installation Checklist and Instructions 585-313-159
Issue 5June 2004
IA 770 INTUITY AUDIX Installation Checklist and Instructions Page 30Task 12: Administer the S8300 Media Server for AUDIX Communication
The system displays the Class of Restriction screen.
NOTE:The instructions in this section deal only with the fields you need to change for a INTUITY AUDIX system. Do not change the value in any other field unless you are instructed to do so. See the Administrator's Guide for Avaya MultiVantage Software, 555-233-506, for more information about the COR screen.
2. On page 1 of the Class of Restriction screen, set the Facility Restriction Level (FRL) and any other desired options. Normally, the FRL is set to 7, which provides maximum access to calling resources on the switch. These privileges could be necessary if outcalling or AMIS Analog Networking will be used.
NOTE:If the customer needs the outcalling feature, AMIS Analog Networking, or Message Manager, you must set the Calling Party Restriction field to none.
3. Press NextPage twice to move to page 3 of the Class Of Restriction screen. This screen shows which other CORs the voice port and hunt group COR are allowed to call. The default has all CORs set to y. If you want to restrict this COR to allow calls only to its own COR, you must change all the fields to n except for the field that corresponds to its own COR.
4. Press Enter to save your changes.
5. Continue with the next procedure, Create a Unique Class of Service.

IA 770 INTUITY AUDIX Messaging Application R1.3 Installation Checklist and Instructions 585-313-159
Issue 5June 2004
IA 770 INTUITY AUDIX Installation Checklist and Instructions Page 31Task 12: Administer the S8300 Media Server for AUDIX Communication
Task 12.4: Create a Unique Class of Service (Optional)
The Class of Service (COS) allows you to define access to several features and functions.
Use the following procedure to create the COS:
1. At the SAT screen command prompt, enter change cos at the command prompt.
The system displays the Class of Service screen.
NOTE:The instructions in this section deal only with the fields that you need to change for an INTUITY AUDIX system. Do not change the value in any other field unless you are instructed to do so. For more information on the COS screen and fields, see the Administrator's Guide for Avaya MultiVantage Software, 555-233-506.
2. Enable only the Data Privacy and Call Forward-All Calls features for the INTUITY AUDIX system voice ports COS (see COS 1 in the preceding example).
3. Press Enter to save your changes.
Task 12.5: Assign Node Names
The switch and the INTUITY AUDIX system must be administered with unique node names. However, since the INTUITY AUDIX is installed directly on the S8300 processor, there is no need to identify the INTUITY AUDIX IP address to the S8300 in this task. You will, however, need to administer an IP address for the purposes of Digital Networking, Message Manager, and Web Messenger.

IA 770 INTUITY AUDIX Messaging Application R1.3 Installation Checklist and Instructions 585-313-159
Issue 5June 2004
IA 770 INTUITY AUDIX Installation Checklist and Instructions Page 32Task 12: Administer the S8300 Media Server for AUDIX Communication
Use the following procedure to define the node names:
1. At the SAT screen command prompt, enter change node-names audix-msa.
The system displays the AUDIX-MSA Node Names screen.
2. Enter, in the AUDIX Names field, the correct node name to use on the INTUITY AUDIX system.
NOTE:Do not fill out the IP address field. The IA 770 INTUITY AUDIX uses the same IP address as the S8300 processor. This address is unnecessary.
3. Press Enter to save your changes.
Task 12.6: Administer the First Voice Port
The INTUITY AUDIX voice ports interface to the switch as analog 2500-type stations. Administer a voice port for each of the ports (up to 8) on the INTUITY AUDIX system that is connected to the host switch.
To administer the voice ports:
1. At the SAT screen command prompt, enter add station <voice port extension> at the enter command prompt, where <voice port extension> is the first voice port extension in the INTUITY AUDIX hunt group. The switch administrator needs to determine what these extensions are to be. They must match the switch dial plan, start with the digit 1 or higher, and be in sequence. These extensions normally are listed in your project planning worksheets.
The system displays the Station screen, page 1.

IA 770 INTUITY AUDIX Messaging Application R1.3 Installation Checklist and Instructions 585-313-159
Issue 5June 2004
IA 770 INTUITY AUDIX Installation Checklist and Instructions Page 33Task 12: Administer the S8300 Media Server for AUDIX Communication
NOTE:You can also use the add station next command if you want to add a station by using the next available extension number.
2. Use the following descriptions to enter the correct values in the fields on the Station screen, page 1.
Field Name Valid Input Description/Procedure
Extension Enter a unique, valid extension number (from three to five digits) for the voice port from the dial plan.
Type 2500
Port Enter a seven-character port number, for example, 001V801, where 001 is the number of the media gateway, V8 is the slot number of the CWY1 board (always V8), and 01 is the first port number of the CWY1 board.
Name Enter a name to identify the port you are administering. Since this is a virtual port on the CWY1 board, you may wish to include audix in its name (for example, audix 01).

IA 770 INTUITY AUDIX Messaging Application R1.3 Installation Checklist and Instructions 585-313-159
Issue 5June 2004
IA 770 INTUITY AUDIX Installation Checklist and Instructions Page 34Task 12: Administer the S8300 Media Server for AUDIX Communication
3. Press NextPage to move to the Station screen, page 2.
Lock Messages
n
Security Code
Leave blank.
Coverage Path 1
Leave blank.
Coverage Path 2
Leave blank.
Hunt-to Station
Leave blank.
TN Use default.
Class of Restriction (COR)
To prevent toll fraud, it is recommended that you create a COR for voice ports that allows subscribers to call only other numbers with the same COR. If you decide later that subscribers need to call numbers with different CORs, add permissions for the other CORs one at a time. The AMIS Analog Networking, Message Delivery, and Outcalling features require the ability to call numbers with different CORs.
Class of Service (COS)
Create a COS for the voice ports that permits only the Data Privacy and Restrict Call Forwarding Off-Net features. It is recommended that you do not enable any other features on the COS. COS 5 defaults to this setup.
Tests n
Loss Group Use default.
Off-Premise Station
n
Message Waiting Indicator
none
Message Lamp Ext.
n
Field Name Valid Input Description/Procedure

IA 770 INTUITY AUDIX Messaging Application R1.3 Installation Checklist and Instructions 585-313-159
Issue 5June 2004
IA 770 INTUITY AUDIX Installation Checklist and Instructions Page 35Task 12: Administer the S8300 Media Server for AUDIX Communication
4. Enter n in the LWC Activation and Coverage Message Retrieval fields on the Station screen, page 2. For other fields, you can normally just use the default values, except see the note that follows:
NOTE:If you find that the system does not always handle calls properly for messaging, it may be because the default values on Page 2 of the Station screen cannot effectively process the configurations on the S8300. This may be the case for more complex configurations of adjuncts on the S8300 or the use of certain S8300 features.
5. If, on rare occasions, the default values do not work properly, re-administer Page 2 with the values described in the following table.
Field Name Valid Input Description/Procedure
LWC Reception
audix
LWC Activation
n
Redirect Notification
n
AUDIX Name
Enter the AUDIX name from the Node Names screen.
Coverage Msg Retrieval
n

IA 770 INTUITY AUDIX Messaging Application R1.3 Installation Checklist and Instructions 585-313-159
Issue 5June 2004
IA 770 INTUITY AUDIX Installation Checklist and Instructions Page 36Task 12: Administer the S8300 Media Server for AUDIX Communication
6. Press NextPage to move to the Station screen, page 3.
7. Enter the correct values in the fields on the Station screen, page 3. Normally, you can just use the default values.
8. Press Enter to save your changes.
9. Continue with the next procedure, Duplicate the First Voice Port.
Data Restriction
y
Call Waiting Indication
n
Att. Call Waiting Indication
n
Distinctive Audible Alert
n
Direct IP-IP Audio Connections
n
IP Audio Hairpinning
n
Field Name Valid Input Description/Procedure
IA 770 INTUITY AUDIX Messaging Application R1.3 Installation Checklist and Instructions 585-313-159
Issue 5June 2004
IA 770 INTUITY AUDIX Installation Checklist and Instructions Page 37Task 12: Administer the S8300 Media Server for AUDIX Communication
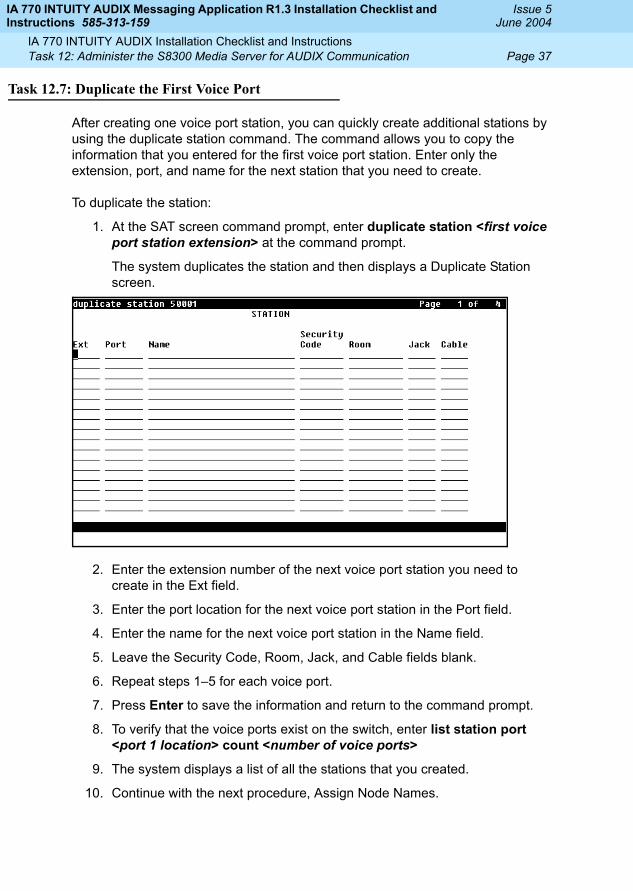
Task 12.7: Duplicate the First Voice Port
After creating one voice port station, you can quickly create additional stations by using the duplicate station command. The command allows you to copy the information that you entered for the first voice port station. Enter only the extension, port, and name for the next station that you need to create.
To duplicate the station:
1. At the SAT screen command prompt, enter duplicate station <first voice port station extension> at the command prompt.
The system duplicates the station and then displays a Duplicate Station screen.
2. Enter the extension number of the next voice port station you need to create in the Ext field.
3. Enter the port location for the next voice port station in the Port field.
4. Enter the name for the next voice port station in the Name field.
5. Leave the Security Code, Room, Jack, and Cable fields blank.
6. Repeat steps 1�5 for each voice port.
7. Press Enter to save the information and return to the command prompt.
8. To verify that the voice ports exist on the switch, enter list station port <port 1 location> count <number of voice ports>
9. The system displays a list of all the stations that you created.
10. Continue with the next procedure, Assign Node Names.

IA 770 INTUITY AUDIX Messaging Application R1.3 Installation Checklist and Instructions 585-313-159
Issue 5June 2004
IA 770 INTUITY AUDIX Installation Checklist and Instructions Page 38Task 12: Administer the S8300 Media Server for AUDIX Communication
Task 12.8: Add the Voice Ports to a Hunt Group
Identify each INTUITY AUDIX voice port as a member of one or more hunt groups. These voice ports are virtual analog ports on the switch (virtual because they exist in the software only, with no real ports on a circuit board). By defining this group, you tell the S8300 software to connect subscribers to the INTUITY AUDIX system. The software then distributes new calls to idle ports. The S8300 switch uses Uniform Call Distribution (UCD) for distributing calls to the ports. See the Administrator's Guide for Avaya MultiVantage Software, 555-233-506, for more information about call distribution groups.
To place the voice ports into a hunt group:
1. At the SAT screen command prompt, enter add hunt-group <hunt group number> or change hunt-group <hunt group number> at the enter command prompt. You also can enter add hunt-group next to add a hunt group with a number that is one higher than the previous hunt group.
The system displays the Hunt Group screen, page 1.
IA 770 INTUITY AUDIX Messaging Application R1.3 Installation Checklist and Instructions 585-313-159
Issue 5June 2004
IA 770 INTUITY AUDIX Installation Checklist and Instructions Page 39Task 12: Administer the S8300 Media Server for AUDIX Communication
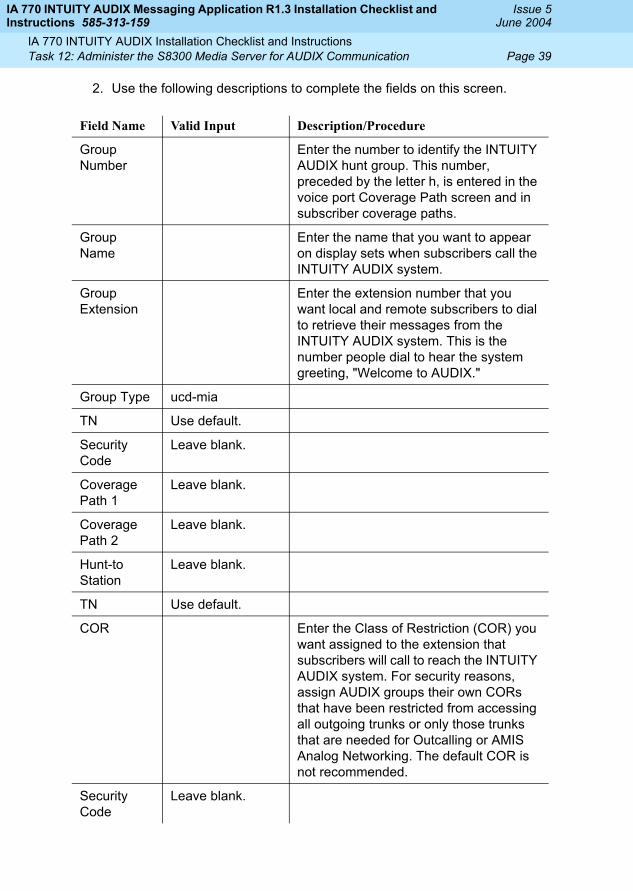
2. Use the following descriptions to complete the fields on this screen.
Field Name Valid Input Description/Procedure
Group Number
Enter the number to identify the INTUITY AUDIX hunt group. This number, preceded by the letter h, is entered in the voice port Coverage Path screen and in subscriber coverage paths.
Group Name
Enter the name that you want to appear on display sets when subscribers call the INTUITY AUDIX system.
Group Extension
Enter the extension number that you want local and remote subscribers to dial to retrieve their messages from the INTUITY AUDIX system. This is the number people dial to hear the system greeting, "Welcome to AUDIX."
Group Type ucd-mia
TN Use default.
Security Code
Leave blank.
Coverage Path 1
Leave blank.
Coverage Path 2
Leave blank.
Hunt-to Station
Leave blank.
TN Use default.
COR Enter the Class of Restriction (COR) you want assigned to the extension that subscribers will call to reach the INTUITY AUDIX system. For security reasons, assign AUDIX groups their own CORs that have been restricted from accessing all outgoing trunks or only those trunks that are needed for Outcalling or AMIS Analog Networking. The default COR is not recommended.
Security Code
Leave blank.

IA 770 INTUITY AUDIX Messaging Application R1.3 Installation Checklist and Instructions 585-313-159
Issue 5June 2004
IA 770 INTUITY AUDIX Installation Checklist and Instructions Page 40Task 12: Administer the S8300 Media Server for AUDIX Communication
3. Press NextPage to move to the Hunt Group screen, page 2.
ACD n This field is normally disabled. It can be used if the switch supports CMS with the EAS feature. CMS and EAS are not covered in this book.
Queue y
Vector n The INTUITY AUDIX hunt group can be vector controlled if call vectoring is a feature on the switch.
Coverage Path
Leave blank.
Night Service Destination
Leave blank. Enter the destination to which calls to this hunt group are redirected when the hunt group is in the night service mode. Allowable entries are an assigned extension number, the attendant, or a blank field. Leave the field blank for most applications, unless the application requires calls to be redirected when the hunt group is in night service mode.
MM Early Answer
n
Queue Length
Enter the number of configured INTUITY AUDIX voice ports. For example, if you have 8 voice ports administered to carry voice messaging traffic, enter 8 in this field.
Calls Warning Threshold
Leave blank.
Calls Warning Port
Leave blank.
Time Warning Threshold
Leave blank.
Time Warning Port
Leave blank.
Field Name Valid Input Description/Procedure

IA 770 INTUITY AUDIX Messaging Application R1.3 Installation Checklist and Instructions 585-313-159
Issue 5June 2004
IA 770 INTUITY AUDIX Installation Checklist and Instructions Page 41Task 12: Administer the S8300 Media Server for AUDIX Communication
4. Use the following descriptions to complete the fields on this screen.
5. Press NextPage to move to the Hunt Group screen, page 3.
Field Name Valid Input Description/Procedure
Message Center
audix
Message Center AUDIX Name
Enter the AUDIX name from the Node Names screen.
Primary y
Calling Party Number to INTUITY AUDIX
Enter n if Calling Party Number (CPN) is not used; enter y if CPN is used.
LWC Reception
none.
AUDIX Name
Enter the AUDIX name from the Node Names screen.
Messaging Server Name
Leave blank.

IA 770 INTUITY AUDIX Messaging Application R1.3 Installation Checklist and Instructions 585-313-159
Issue 5June 2004
IA 770 INTUITY AUDIX Installation Checklist and Instructions Page 42Task 12: Administer the S8300 Media Server for AUDIX Communication
NOTE:The voice port names do not appear while you are adding the hunt group members, but you will see them the next time you access the Hunt Group screen.
6. Use the following descriptions to complete the fields on this screen.
7. Press Enter to save your changes.
8. Use the Group Number of the INTUITY AUDIX hunt group when you assign a call coverage path for the system subscribers. The hunt group number serves as the coverage point for incoming INTUITY AUDIX calls.
9. Continue with Assign the Call Coverage Path.
Task 12.9: Assign the Call Coverage Path
Define a call coverage path for the subscribers with the voice ports hunt group as a coverage point. You might need to define several call coverage paths, depending on how the customer wants to handle call coverage for different groups of subscribers. If the INTUITY AUDIX system has been integrated with an existing switch, you might need to add the INTUITY AUDIX hunt group as another coverage point for existing coverage paths.
Field Name Valid Input Description/Procedure
Extension (Ext)
Enter the extension numbers of the ports to be used by INTUITY AUDIX. These should be the extensions you created in Administer the First Port and Duplicate the First Port.

IA 770 INTUITY AUDIX Messaging Application R1.3 Installation Checklist and Instructions 585-313-159
Issue 5June 2004
IA 770 INTUITY AUDIX Installation Checklist and Instructions Page 43Task 12: Administer the S8300 Media Server for AUDIX Communication
Use the following procedure to define a call coverage path:
1. At the SAT screen command prompt, enter add coverage path <coverage path number> at the command prompt.
The system displays the Coverage Path screen.
2. Use the following descriptions to complete the fields on this screen.
Field Name Valid Input Description/Procedure
Coverage Path Number
Enter a call coverage path number.
Next Path Number
If desired, enter the second path to which calls will be directed if the first path fails.
Hunt after Coverage
n
Coverage Criteria
Station/Group Status Active? (Inside Call/Outside Call)
Enter n/n for a multiappearance telephone. Enter y/y for a single-line telephone.

IA 770 INTUITY AUDIX Messaging Application R1.3 Installation Checklist and Instructions 585-313-159
Issue 5June 2004
IA 770 INTUITY AUDIX Installation Checklist and Instructions Page 44Task 12: Administer the S8300 Media Server for AUDIX Communication
3. Press Enter to save your changes.
4. Continue with the next procedure, Save Translations.
Task 12.10: Save Translations
You must save your changes now or after you modify the Station screen for each subscriber or your changes will be lost the next time the S8300 restarts.
Enter save translation at the SAT command prompt. The save process may take up to 10 minutes. The system displays success on the screen when complete.
Busy? (Inside Call/Outside Call)
y/y
Don't Answer? (Inside Call/Outside Call)
y/y
Number of rings
3 Enter the number of rings (from 1 to 99) you want before a call goes to coverage.
All? (Inside Call/Outside Call)
n/n
DND/SAC/Go to Cover? (Inside Call/Outside Call)
y/y
Terminate to coverage Pts. with Bridged Appearances
n
Coverage Points
In the Point1 field, enter h followed by the INTUITY AUDIX voice ports hunt group number. If the hunt group number is 1, then enter h1.
Field Name Valid Input Description/Procedure

IA 770 INTUITY AUDIX Messaging Application R1.3 Installation Checklist and Instructions 585-313-159
Issue 5June 2004
IA 770 INTUITY AUDIX Installation Checklist and Instructions Page 45Task 12: Administer the S8300 Media Server for AUDIX Communication
Task 12.11: Check for the Switch Number of the S8300
1. At the SAT screen command prompt, type display dial plan parameters and press Enter.
The system displays the Dial Plan Record screen.
2. Check the Local Node Number field for the number of the switch.
The local node number is the number you enter into the IA 770 INTUITY AUDIX system in the next task, ��Task 13.12: Assign the Switch Number and Extension Length��
Task 12.12: Assign the Switch Number and Extension Length
Assign a switch number to the INTUITY AUDIX system so that the INTUITY AUDIX system will know what G700 Media Gateway it is assigned to. Assign an extension length so the INTUITY AUDIX system can match its addressing with the dial plan of the S8300.
1. If necessary, log in to the S8300 browser interface (see ��Task 6.6: Log in to the S8300 Browser Interface�� on page 14). At the Maintenance Web Pages main menu, select:
Messaging Administration Switch Administration Switch Link Administration

IA 770 INTUITY AUDIX Messaging Application R1.3 Installation Checklist and Instructions 585-313-159
Issue 5June 2004
IA 770 INTUITY AUDIX Installation Checklist and Instructions Page 46Task 12: Administer the S8300 Media Server for AUDIX Communication
The Switch Link Administration page is displayed.
2. Enter the number of the S8300 in the Switch Number field. Usually this number is 1, but it can be a number from 1 to 99. This number should match the number entered as the Local Node Number in the Dial Plan Record screen.
3. Enter an extension length, 3 through 10 in the Extension Length field. The number must match the dial plan of the S8300.
NOTE:Even though the S8300 can have a multiple extension lengths, the IA 770 INTUITY AUDIX requires extensions of the same length.
4. The AUDIX Number field is display-only and displays 1.
5. Click Submit to update the system.
Task 12.13: Modify the Station Screen for Each Subscriber
After you administer the call coverage path, you must administer all subscriber stations to use the correct coverage path. Each subscriber station must contain the correct information for the INTUITY AUDIX system to operate. Use the instructions in this section to administer the stations.
1. At the SAT screen command prompt, enter change station <test station extension> at the enter command prompt.
NOTE:If you receive the message <station extension> Identifier not assigned, you entered a station extension that does not exist in the system. Use the Add Station command to add the subscriber station.

IA 770 INTUITY AUDIX Messaging Application R1.3 Installation Checklist and Instructions 585-313-159
Issue 5June 2004
IA 770 INTUITY AUDIX Installation Checklist and Instructions Page 47Task 12: Administer the S8300 Media Server for AUDIX Communication
The system displays the Station screen, page 1.
2. Enter the coverage path that you created for the INTUITY AUDIX system in the Assign the Call Coverage Path section.
3. Enter led, neon, in the Message Waiting Indicator field if the voice terminal has a message-waiting indicator (MWI) lamp. This instruction applies to 500, 2500, and 7104A telephones only.
4. Press NextPage to move to page 2.
The system displays the Station screen, page 2.
5. Enter audix in the LWC Reception? field.
6. Enter y in the LWC Activation field if the subscriber is assigned the Leave Word Calling feature.

IA 770 INTUITY AUDIX Messaging Application R1.3 Installation Checklist and Instructions 585-313-159
Issue 5June 2004
IA 770 INTUITY AUDIX Installation Checklist and Instructions Page 48Task 12: Administer the S8300 Media Server for AUDIX Communication
7. Enter n in the LWC Log External Calls field.
8. Enter y in the Redirect Notification field.
9. Enter the node name of the INTUITY AUDIX system that has the voice mailbox for this station in the AUDIX Name field. This name should match the name you entered in the procedure, Assign Node Names.
10. Press Enter to save your changes.
11. Repeat this procedure for all subscriber stations.
Task 12.14: Restart Messaging Software
1. Stop the messaging software (voice system).
To stop the messaging software:
a. Start at the Messaging Administration main menu and select:
Utilities Stop Messaging Software
The system displays the Stop Messaging Software screen.
b. Click the Stop button.
The system displays the following messages:
The Voice System is now stopping.
Initiating request to clear all calls in the next 0 seconds.
Orderly idling of the system succeeded.
The Voice System has completely stopped, use the "Start Messaging
Software" choice from the Utilities menu to restart the Voice
System.
2. Start the Messaging Software (voice system).
To Start the Messaging Software:
a. Use the "Start Messaging Software" choice from the Utilities menu to restart the Voice System.

IA 770 INTUITY AUDIX Messaging Application R1.3 Installation Checklist and Instructions 585-313-159
Issue 5June 2004
IA 770 INTUITY AUDIX Installation Checklist and Instructions Page 49Task 13: Initial Administration of IA 770 INTUITY AUDIX Messaging
Task 13: Initial Administration of IA 770 INTUITY AUDIX Messaging
Task 13.1: Call Transfer Administration
1. If necessary, log in to the S8300 browser interface (see ��Task 6.6: Log in to the S8300 Browser Interface�� on page 14). At the Maintenance Web Pages main menu, select:
Messaging Administration Voice System Administration Call Transfer Administration Add Allowed Numbers
2. Type the From and To settings, as specified by the customer and as described in the system online help.
3. Click Save.
The system displays a confirmation message.
4. From the Web-based Administration main menu, select:
Diagnostics Voice Equipment Diagnostics Display
5. Verify that you have all of the information that you entered and that the state of the voice card is Inserv.
6. If the state of the voice card is FOOS rather than Inserv, complete the following steps: From the Web-based Administration main menu, select:
Diagnostics Voice Equipment Diagnostics Display
7. Look for any channels in the state of FOOS. If there are none, continue onto the next section.

IA 770 INTUITY AUDIX Messaging Application R1.3 Installation Checklist and Instructions 585-313-159
Issue 5June 2004
IA 770 INTUITY AUDIX Installation Checklist and Instructions Page 50Task 13: Initial Administration of IA 770 INTUITY AUDIX Messaging
8. If there are channels in the state of FOOS, go to:
Diagnostics Voice Equipment Diagnostics Diagnose.
� Complete the Diagnostics page:
� Click Diagnose.
� Wait a few minutes while the system fixes any of the FOOS channels.
� Click Back and then click Display.
All channels will now show Inserv. If one or more channels remain as FOOS, there is a channel problem.
Administering INTUITY AUDIX
Installation worksheets or customer input might be required for many of the INTUITY AUDIX settings.
Task 13.2: Log in to the AUDIX Command Prompt Screens
To log in to the INTUITY AUDIX Command Prompt screens:
1. If necessary, log in to the S8300 browser interface (see ��Task 6.6: Log in to the S8300 Browser Interface�� on page 14). At the Maintenance Web Pages main menu, select:
Messaging Administration Global Administration Messaging Administration
The system displays the Command Prompt screen and the SSH dialog box. The SSH dialog box provides security protection for the Command Prompt screen. Complete the SSH dialog box with the craft login and password.
2. If you are prompted for a terminal type, type vt100, ntt, or w2ktt.
The PC displays the AUDIX Command Prompt screen.
Field Setting
Equipment to Diagnose
card
Equipment Number
all
Immediate Diagnosis?
yes

IA 770 INTUITY AUDIX Messaging Application R1.3 Installation Checklist and Instructions 585-313-159
Issue 5June 2004
IA 770 INTUITY AUDIX Installation Checklist and Instructions Page 51Task 13: Initial Administration of IA 770 INTUITY AUDIX Messaging
Note that the functions keys do not always work from the terminal. Here are the key sequences for the function keys in that case:
Key Sequences
Task 13.3: Machine Profile Initial Administration
Set the Machine Profile for the local INTUITY AUDIX system:
1. At the AUDIX command prompt, type change machine and press Enter.
Function Key Sequence Function Key
Cancel Ctrl+X F1
Refresh Ctrl+L F2
Enter Ctrl+E F3
ClrFld Ctrl+K F4
Help Ctrl+W F5
Choices Ctrl+C F6
NextPg Ctrl+N F7
PrevPg Ctrl+P F8
Other Helpful Key Sequences
Function Key Sequence
Back space Ctrl+H Next Field
Ctrl+M Break out of the webadmin interface and return to the Linux prompt
Ctrl+Alt+Backspace

IA 770 INTUITY AUDIX Messaging Application R1.3 Installation Checklist and Instructions 585-313-159
Issue 5June 2004
IA 770 INTUITY AUDIX Installation Checklist and Instructions Page 52Task 13: Initial Administration of IA 770 INTUITY AUDIX Messaging
2. Type the following field settings, as shown on the example screen, and then press F7 (NextPage).
The system displays the Machine Profile, page 2.
3. Type a password to be used for networking, but do not change other fields on this screen unless you are including the IA 770 system in an AUDIX network. If the system is using Digital Networking, set Updates In and Out set to y.
Field Setting
Machine Name Change from "local" to the hostname of your machine.
Start Ext 0000 (This assumes you have a four-digit dial plan. If you have a 5 digit dial plan enter 00000 and 99999.)
NOTE:If you are adding this system to an existing AUDIX network, the completion of this screen can be much more complex, with multiple extension ranges and the use of prefixes. In this case, see the IA 770 INTUITY AUDIX Digital Networking Administration documentation on your S8300 Media Server and S8700 Media Server Documentation Library CD-ROM, 555-234-825.
End Ext 9999.

IA 770 INTUITY AUDIX Messaging Application R1.3 Installation Checklist and Instructions 585-313-159
Issue 5June 2004
IA 770 INTUITY AUDIX Installation Checklist and Instructions Page 53Task 13: Initial Administration of IA 770 INTUITY AUDIX Messaging
4. Press F3 (Enter).
Task 13.4: Outcalling Initial Administration
1. At the AUDIX command prompt, type change system-parameters outcalling.
2. Type the following field settings, as shown on the example screen, and then press F3 (Enter).
Task 13.5: Enhanced Call Transfer Initial Administration
1. At the AUDIX command prompt, type change system-parameters features. Press F7 (NextPage) twice to view page 3 of the form.
Field Setting
Outcalling Active? y

IA 770 INTUITY AUDIX Messaging Application R1.3 Installation Checklist and Instructions 585-313-159
Issue 5June 2004
IA 770 INTUITY AUDIX Installation Checklist and Instructions Page 54Task 13: Initial Administration of IA 770 INTUITY AUDIX Messaging
2. Type the following field settings, as shown on the sample screen, and then press F3 (Enter).
The system displays the message:
System Covering Extension Not Assigned. Press [ENTER] to Confirm.
3. Press F3 (Enter).
Task 13.6: Class of Service Administration
1. At the AUDIX command prompt, type change cos 0.
Field Setting
Transfer Type enhanced_cover_0 or enhanced_no_cover_0
Transfer Restriction
subscriber

IA 770 INTUITY AUDIX Messaging Application R1.3 Installation Checklist and Instructions 585-313-159
Issue 5June 2004
IA 770 INTUITY AUDIX Installation Checklist and Instructions Page 55Task 13: Initial Administration of IA 770 INTUITY AUDIX Messaging
2. Type the following field settings, as shown on the sample screen, and then press F3 (Enter).
3. Repeat the steps for COS 1.
4. If the system is using digital networking, do the following:
� At the AUDIX command prompt, type change system-parameters limits.
� Change the Administered Remote Users setting to 10000.
� Press F3 (Enter) to save your changes.
Task 13.7: Test Subscriber Administration
1. At the AUDIX command prompt, type add subscriber <extension>.
Field Setting
Outcalling? y

IA 770 INTUITY AUDIX Messaging Application R1.3 Installation Checklist and Instructions 585-313-159
Issue 5June 2004
IA 770 INTUITY AUDIX Installation Checklist and Instructions Page 56Task 13: Initial Administration of IA 770 INTUITY AUDIX Messaging
2. Type the following field settings, as shown on the sample screen, and then press F3 (Enter).
3. Repeat for additional subscribers. Create at least one or two subscribers for initial acceptance testing.
You can add subscriber information from an existing system in the following ways: One by one, as described in the previous steps
! With the Avaya Site Administration (ASA) tool
! With the Administration and Data Acquisition Package (ADAP) software
! ProVision software
4. At the AUDIX command prompt, exit AUDIX Administration by typing exit
The screen displays the message Connection closed.
Task 13.8: Administering LDAP on Netscape
Customers who are using Netscape Communicator's Address Book to do LDAP Directory lookups need to do the following:
1. Start Communicator.
Field Setting
Password 1
COS class00

IA 770 INTUITY AUDIX Messaging Application R1.3 Installation Checklist and Instructions 585-313-159
Issue 5June 2004
IA 770 INTUITY AUDIX Installation Checklist and Instructions Page 57Task 13: Initial Administration of IA 770 INTUITY AUDIX Messaging
2. Click Communicator in the top menu bar
3. Click Address Book.
4. In Address Book, select File and then New Directory.
5. Add INTUITY Server as a new Directory. Note that it is necessary to change "system" to the system name and other fields as follows:
� Description: system
� LDAP Server: system.dr.acme.com
� Search Root: dc=messaging
� All other fields' default values
Additional information is included in the INTUITY AUDIX documentation on the S8300 documentation CD.
Task 13.9: Digital Networking
To allow digital networking, you make settings for the local and remote machine on the INTUITY AUDIX and on the target machine. You already completed the local machine settings with the change machine command.
1. Set information for the remote machine (the one you want to network to) by typing add machine <machine-name> at the command prompt, where <machine-name> is the name of the remote system.
The system displays the Change Machine screen for the remote system.

IA 770 INTUITY AUDIX Messaging Application R1.3 Installation Checklist and Instructions 585-313-159
Issue 5June 2004
IA 770 INTUITY AUDIX Installation Checklist and Instructions Page 58Task 13: Initial Administration of IA 770 INTUITY AUDIX Messaging
2. Complete the Machine Name, Machine Type, Extension Length, Start Extension and End Extension fields.
3. Press F7 (NextPage).
4. On the Machine Profile screen, page 2, type the IP Address of the remote machine.
5. In the Password field, type the networking password for the remote machine.
6. Set the Updates In or Out fields to y.
7. Press F3 (Enter).
8. At the command prompt, type exit and press Enter to exit the AUDIX command prompt screens.
9. Perform the required setup on the remote system.
10. For additional information about networking, see the documentation for the remote AUDIX system and the Networking procedures on the S8300 documentation CD.
Task 13.10: Security Enhancement
1. Perform the following Security Enhancement Procedure while upgrading to Communication Manager 2.1.
2. Launch Maintenance Web Interface.
3. Click Firewall link under 'Security'.
4. Click Advanced Setting.

IA 770 INTUITY AUDIX Messaging Application R1.3 Installation Checklist and Instructions 585-313-159
Issue 5June 2004
IA 770 INTUITY AUDIX Installation Checklist and Instructions Page 59Task 14: System Acceptance Test
5. Enable Input to Server and Output from Server for the following Ports/Protocols:
a. 20/tcp (To enable Backup and Restore).
b. 111/tcp (IA 770 needs this port enabled if your system uses Audix Networking or Message Manager).
c. 5500/tcp (IA 770 needs this port enabled if your system uses Audix Networking or Message Manager).
d. 55000/tcp (IA 770 needs this port enabled if your system uses Audix Networking or Message Manager).
6. Click Submit to save changes.
Task 14: System Acceptance Test
Perform the following feature tests before leaving the customer site:
Feature to be tested:
Use these admin screens or commands: For more information:
Verify voice ports At the S8300 SAT command line, type list station. Press NEXT PAGE until you see the AUDIX voice ports.
See Administrator's Guide for Avaya MultiVantage Software, 555-233-506.
Verify COSs At the AUDIX command prompt screen, type list cos.
See Listing Class of Service Names
Verify language packages installed
At the AUDIX command prompt screen, type list annc_sets. Check that the language packages you installed are listed.
See Listing Announcement Sets.
Add test subscribers (at least two). You will exchange messages between the two mailboxes.
At the AUDIX command prompt screen, type add subscriber or change subscriber.
subscribers
Record name and greetings
Change default password Log into mailbox via the telephone user interface (TUI)
Add broadcast mailbox
At the AUDIX command prompt screen, type add subscriber
Call answer

IA 770 INTUITY AUDIX Messaging Application R1.3 Installation Checklist and Instructions 585-313-159
Issue 5June 2004
IA 770 INTUITY AUDIX Installation Checklist and Instructions Page 60Task 15: Make the Upgrade and Administration Permanent
Task 15: Make the Upgrade and Administration Permanent
1. Log in to the S8300 browser interface, if necessary (see page 14).
2. From the Maintenance Web Pages main menu, click Make Server Upgrade Permanent under Server Upgrades.
The system displays the Make Server Upgrade Permanent screen.
3. Click the Enter button to make the upgrade permanent.
Task 16: Perform a Backup
The customer must already have an FTP server available for backups.
To perform a backup now:
1. Stop the messaging software (voice system).
To stop the messaging software:
a. Start at the Messaging Administration main menu and select:
Utilities Stop Messaging Software
Leave message, verify lamp is on, delete message, verify lamp is off
See Voice mail Create and send message, verify lamp on, forward message, delete message, verify lamp is off
Administer Message Manager
Load Message Manager on a client, send messages.
(use Message Manager software CD for installation)
Outcalling Set outcalling via the TUI or Message Manager. Verify that it works for both a regular message and a priority message
Outcalling
Feature to be tested:
Use these admin screens or commands: For more information:

IA 770 INTUITY AUDIX Messaging Application R1.3 Installation Checklist and Instructions 585-313-159
Issue 5June 2004
IA 770 INTUITY AUDIX Installation Checklist and Instructions Page 61Task 16: Perform a Backup
The system displays the Stop Messaging Software screen.
b. Click the Stop button.
The system displays the following messages:
The Voice System is now stopping.
Initiating request to clear all calls in the next 0
seconds.
Orderly idling of the system succeeded.
The Voice System has completely stopped, use the "Start
Messaging Software" choice from the Utilities menu to
restart the Voice System.
c. Click Return to Main to go back to the main menu.
2. Select Backup Now

IA 770 INTUITY AUDIX Messaging Application R1.3 Installation Checklist and Instructions 585-313-159
Issue 5June 2004
IA 770 INTUITY AUDIX Installation Checklist and Instructions Page 62Task 16: Perform a Backup
The system displays the Backup Now screen.
3. Click the AUDIX checkbox at the top of the INTUITY AUDIX list of options. Then click the AUDIX translations button.
4. Select the FTP backup method, and complete the following fields:
� User name. You must enter a valid user name to enable the media server to log in to the FTP server. Contact the FTP server administrator if you have questions.
� Password. You must enter a password that is valid for the user name you entered. Contact the FTP server administrator if you have questions.
� Host name. Enter the DNS name or IP address of the FTP server to which the backup data is sent. To enter an IP address, use the dotted decimal notation (for example, 192.11.13.6).
� Directory. Enter the directory on the corporate repository to which you want to copy the backup file. Contact the FTP server administrator if you have questions.
5. Skip the Encryption area of the screen, and click Start Backup.
The system displays a message that the backup has started.
6. Select the Backup Status option from the main menu to check the backup status.

IA 770 INTUITY AUDIX Messaging Application R1.3 Installation Checklist and Instructions 585-313-159
Issue 5June 2004
IA 770 INTUITY AUDIX Installation Checklist and Instructions Page 63Task 16: Perform a Backup
The system displays the Backup Status Selection screen.
7. Click the most recent backup (item 1 in the list), and click Check Status.
The system displays the Backup Status screen.
NOTE:For this version of software, the Refresh button is not available.
8. Repeat steps 6 and 7 until the message BACKUP SUCCESSFUL appears.
The Backup Status screen also says the backup is finished. In addition, IA 770 INTUITY AUDIX data will have one of the following names attached to the backup file name:
� audix-ann for announcements
� audix-tr-msg for translations and messages
� audix-tr-name-msg for translations, names, and messages
� audix-tr-name for translations and names
� audix-tr for translations only
9. To start the messaging software:
a. Start at the Messaging Administration main menu and select:
Utilities Start Messaging Software
The system displays the following message when the startup is complete:

IA 770 INTUITY AUDIX Messaging Application R1.3 Installation Checklist and Instructions 585-313-159
Issue 5June 2004
IA 770 INTUITY AUDIX Installation Checklist and Instructions Page 64Task 16: Perform a Backup
The Voice System is starting.The Voice System is initializing cards. Startup of the Voice System is complete.
10. Click Return to Main to go back to the main menu.