Embed Size (px)
Citation preview
Autoscaling Application Block and Transient Fault Handling Application Block Reference patterns & practices
Summary: The Autoscaling Application Block provides a mechanism for adding autoscaling behaviors to Windows Azure applications based on predictive usage patterns or reactive rules. The Transient Fault Handling Application Block provides a set of reusable and testable components for adding retry logic into your Windows Azure applications by using Windows Azure SQL Database, Windows Azure storage, Service Bus and Caching Service. This makes your Windows Azure application more reliable and resilient to transient faults (such as temporary network connectivity issues or temporary service unavailability). This also improves overall application stability. The blocks are part of the Microsoft Enterprise Library Integration Pack for Windows Azure.
Category: Reference Applies to: Windows Azure SDK for .NET (includes the Visual Studio Tools for Windows Azure), Windows Azure SQL Database, Windows Azure Service Bus, Enterprise Library 5, Microsoft .NET Framework version 4.0, Microsoft Visual Studio 2010 Source: MSDN Library (patterns & practices) (link to source content) E-book publication date: June 2012
Copyright © 2012 by Microsoft Corporation
All rights reserved. No part of the contents of this book may be reproduced or transmitted in any form or by any means without the written permission of the publisher.
Microsoft and the trademarks listed at http://www.microsoft.com/about/legal/en/us/IntellectualProperty/Trademarks/EN-US.aspx are trademarks of the Microsoft group of companies. All other marks are property of their respective owners. The example companies, organizations, products, domain names, email addresses, logos, people, places, and events depicted herein are fictitious. No association with any real company, organization, product, domain name, email address, logo, person, place, or event is intended or should be inferred. This book expresses the author’s views and opinions. The information contained in this book is provided without any express, statutory, or implied warranties. Neither the authors, Microsoft Corporation, nor its resellers, or distributors will be held liable for any damages caused or alleged to be caused either directly or indirectly by this book.

Contents Welcome to the Enterprise Library Integration Pack for Windows Azure ................................................. 6
What is the Enterprise Library Integration Pack for Windows Azure? ....................................................... 7
About This Release of the Enterprise Library Integration Pack for Windows Azure ................................... 8
Developing Windows Azure Applications with the Microsoft Enterprise Library Integration Pack for Windows Azure ..................................................................................................................................... 10
The Autoscaling Application Block ......................................................................................................... 14
What Does the Autoscaling Application Block Do? ............................................................................. 15
Hosting the Autoscaling Application Block ......................................................................................... 17
Adding the Autoscaling Application Block to a Host........................................................................ 18
Hosting the Autoscaling Application Block in a Worker Role ....................................................... 19
Hosting the Autoscaling Application Block in an On-Premises Application .................................. 22
Entering Configuration Information ............................................................................................... 23
Source Schema for the Autoscaling Application Block ................................................................ 36
Selecting a Rules Store ................................................................................................................... 44
Selecting a Service Information Store ............................................................................................. 45
Key Scenarios .................................................................................................................................... 45
Collecting Performance Counter Data ............................................................................................ 46
Implementing Throttling Behavior ................................................................................................. 47
Storing Your Autoscaling Rules ....................................................................................................... 49
Rules Schema Description .......................................................................................................... 51
Storing Your Service Information Data ........................................................................................... 59
Service Information Schema Description .................................................................................... 59
Storing Autoscaling Application Block Configuration in Blob Storage .............................................. 64
Reading the Autoscaling Application Block Log Messages .............................................................. 68
The Design of the Autoscaling Application Block ................................................................................ 69
The Stabilizer ................................................................................................................................. 75
The Request Tracking Process ........................................................................................................ 77
The Performance Counter Collection Process ................................................................................. 78
Extending and Modifying the Autoscaling Application Block .............................................................. 80
Creating a Custom Action............................................................................................................... 80
Creating a Custom Operand ........................................................................................................... 83
Creating a Custom Rules Store ....................................................................................................... 87
Creating a Custom Service Information Store ................................................................................. 90
Creating a Custom Logger .............................................................................................................. 93
Deployment and Operations .............................................................................................................. 94
Deploying the Autoscaling Application Block .................................................................................. 95
Defining Constraint Rules ............................................................................................................... 97
Defining Reactive Rules ................................................................................................................ 101
Enabling and Disabling Rules ........................................................................................................ 106
Defining Throttling Autoscaling Rules ........................................................................................... 107
Understanding Rule Ranks and Reconciliation .............................................................................. 108
Defining Scale Groups .................................................................................................................. 109
Using Notifications and Manual Scaling ........................................................................................ 111
Autoscaling Application Block Logging ......................................................................................... 112
Tuning the Autoscaling Application Block ..................................................................................... 118
Using the WASABiCmdlets Windows PowerShell Cmdlets ............................................................ 120
Encrypting the Rules Store and the Service Information Store ...................................................... 122
Encrypting the Autoscaling Settings in the Configuration File ....................................................... 123
Creating an Encryption Certificate................................................................................................ 125
Configuration Changes at Run Time ............................................................................................. 127
The Transient Fault Handling Application Block ................................................................................... 128
What Does the Transient Fault Handling Application Block Do? ....................................................... 130
Hosting the Transient Fault Handling Application Block ................................................................... 131
Adding the Transient Fault Handling Application Block to Your Solution .......................................... 131
Entering Configuration Information ................................................................................................. 133
Source Schema for the Transient Fault Handling Application Block .............................................. 139
Key Scenarios .................................................................................................................................. 143
Specifying Retry Strategies in Code .............................................................................................. 144
Specifying Retry Strategies in the Configuration ........................................................................... 145
Using Asynchronous Methods with Retries .................................................................................. 148
Using the Transient Fault Handling Application Block with Windows Azure SQL Database ............ 149
The Design of the Transient Fault Handling Application Block .......................................................... 151
Extending and Modifying the Transient Fault Handling Application Block ......................................... 154

Implementing a Custom Detection Strategy ................................................................................. 154
Implementing a Custom Retry Strategy ........................................................................................ 155
Migration Notes ........................................................................................................................... 158
Welcome to the Enterprise Library Integration Pack for Windows Azure Welcome to the Enterprise Library Integration Pack for Windows Azure. The following sections of this guidance describe how you can use the Enterprise Library Integration Pack for Windows Azure and the individual blocks in your Windows Azure applications. The sections are:
• What is the Enterprise Library Integration Pack for Windows Azure?
• About this Release of the Enterprise Library Integration Pack for Windows Azure
• Developing Windows Azure Applications with the Enterprise Library Integration Pack for Windows Azure
• The Autoscaling Application Block
• Transient Fault Handling Application Block
• Developer's Guide. The Developer's Guide is available to download from the Microsoft Download Center and on MSDN here.
What is the Enterprise Library Integration Pack for Windows Azure? The Enterprise Library Integration Pack for Windows Azure extends Enterprise Library 5.0 to add additional support for developing and managing Windows Azure applications. It offers the same benefits as Enterprise Library and helps developers achieve the same goals.
The Enterprise Library Integration Pack for Windows Azure includes:
• The Autoscaling Application Block to help you to automatically scale your Windows Azure applications
• The Transient Fault Handling Application Block to help you make your Windows Azure applications more resilient when they encounter transient fault conditions
• The Blob configuration source to store your Enterprise Library configuration in Windows Azure blob storage
• Protected configuration provider
• Windows PowerShell cmdlets to manipulation the Autoscaling Application Block
• Updated database creation scripts (for the Logging Application Block and Caching Application Block) to use Windows Azure SQL Database
• Reference Documentation
• Developer's Guide. The Developer's Guide is available to download from the Microsoft Download Center and on MSDN here.
• Reference Implementation that illustrates the use of the blocks
The Enterprise Library Integration Pack for Windows Azure is one of several existing and planned integration packs for Enterprise Library.
For more information about Enterprise Library, see "Microsoft Enterprise Library 5.0 – May 2011" on MSDN and the Enterprise Library Silverlight Integration Pack.
About This Release of the Enterprise Library Integration Pack for Windows Azure Target Audience This guidance is intended for software architects and software developers working with applications that will be deployed to Windows Azure. To get the greatest benefit from this guidance, you should have an understanding of the following technologies:
• Windows Azure
• Windows Azure SQL Database
• Microsoft Visual C#
• Microsoft .NET Framework
System Requirements The following are the system requirements for using Enterprise Library Integration Pack for Windows Azure:
• Visual Studio 2010 SP1.
• Windows Azure Tools for Microsoft Visual Studio and Windows Azure SDK for .NET v1.6 (all-in-one installer can be found at http://www.microsoft.com/windowsazure/sdk/).
• In order to run unit tests, Moq (v4.0 or later) is also required.
Contents of the Enterprise Library Integration Pack for Windows Azure The Enterprise Library Integration Pack for Windows Azure is a combination of reusable components, a supporting infrastructure, and guidance. It contains the following:
• Binaries. The Enterprise Library Integration Pack for Windows Azureincludes pre-compiled, strong-named assemblies for all the source code.
• Source code. The Enterprise Library Integration Pack for Windows Azureincludes the source code for the application blocks.
• Unit tests. The Enterprise Library Integration Pack for Windows Azureincludes the unit tests that were created while the application blocks were being developed.
• Documentation. The Enterprise Library Integration Pack for Windows Azure includes documentation that can be viewed on MSDN® or with the Visual Studio help system. The
documentation includes guidance about how to use the Enterprise Library Integration Pack for Windows Azure and a class library reference.
Related patterns & practices Links For information related to the Enterprise Library Integration Pack for Windows Azure, and other tools and guidance for designing and building applications for the cloud, see the patterns & practices website and guides:
• Microsoft patterns & practices Developer Center
• Microsoft Enterprise Library 5.0
• Microsoft Enterprise Library 5.0 Developer's Guide
• Moving Applications to the Cloud
• Developing Applications for the Cloud
Developing Windows Azure Applications with the Microsoft Enterprise Library Integration Pack for Windows Azure The Microsoft Enterprise Library Integration Pack for Windows Azure extends Enterprise Library to include additional support for Windows Azure applications. It includes two additional application blocks designed specifically to meet the requirements of Windows Azure hosted applications: the Autoscaling Application Block and the Transient Fault Handling Application Block.
For more information about Enterprise Library, see "Microsoft Enterprise Library" on MSDN.
Configuring Enterprise Library in the Cloud The application blocks in the Enterprise Library Integration Pack for Windows Azure use the same configuration infrastructure and tools as the standard Enterprise Library application blocks.
For more information, see "Configuring Enterprise Library" on MSDN.
For more information about configuring the Autoscaling Application Block, see "Entering Configuration Information."
For more information about configuring the Transient Fault Handling Application Block, see "Entering Configuration Information."
Using Enterprise Library in Windows Azure Applications The blocks in the Enterprise Library Integration Pack for Windows Azure are designed to be used with applications hosted in Windows Azure; however, you do not need to host the blocks in Windows Azure roles.
For more information about referencing Enterprise Library assemblies, dependencies in Enterprise Library, and referencing and creating Enterprise Library objects, see "Using Enterprise Library in Applications."
For more information about using the Autoscaling Application Block with your Windows Azure applications, see "Hosting the Autoscaling Application Block."
For more information about using the Transient Fault Handling Application Block with your Windows Azure applications, see "Hosting the Transient Fault Handling Application Block."
Extending and Modifying Enterprise Library for Use in the Cloud The blocks in the Enterprise Library Integration Pack for Windows Azure include a number of extension points that enable you to further customize their behavior.
For more information about extending the Autoscaling Application Block, see "Extending and Modifying the Autoscaling Application Block."
For more information about extending the Transient Fault Handling Application Block, see "Extending and Modifying the Transient Fault Handling Application Block."
Windows Azure Terminology The Reference Documentation and the Developer's Guide make frequent references to elements of Windows Azure. The following diagram shows the key parts of Windows Azure that are relevant to the Enterprise Library Integration Pack for Windows Azure.
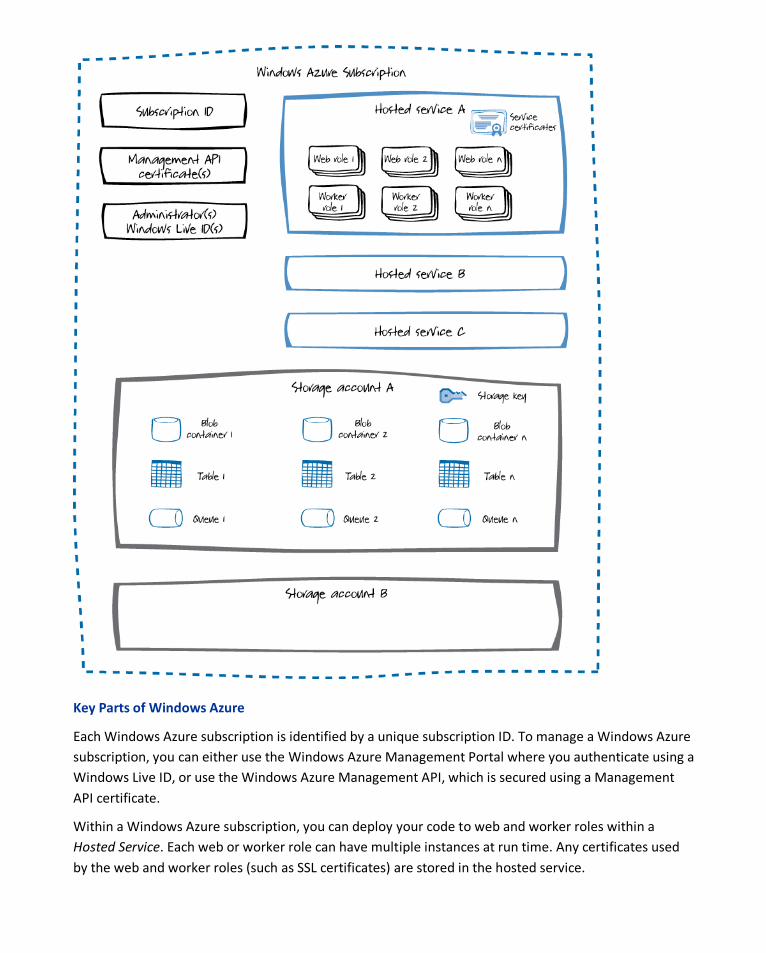
Key Parts of Windows Azure
Each Windows Azure subscription is identified by a unique subscription ID. To manage a Windows Azure subscription, you can either use the Windows Azure Management Portal where you authenticate using a Windows Live ID, or use the Windows Azure Management API, which is secured using a Management API certificate.
Within a Windows Azure subscription, you can deploy your code to web and worker roles within a Hosted Service. Each web or worker role can have multiple instances at run time. Any certificates used by the web and worker roles (such as SSL certificates) are stored in the hosted service.

Each Windows Azure subscription can include multiple Windows Azure storage accounts. Each storage account can contain multiple blob containers, tables, and queues. Access to storage accounts is managed using storage keys.
For more information about Windows Azure, web roles, worker roles, and storage accounts, see the chapter "Introduction to Windows Azure" in the Developer's Guide.
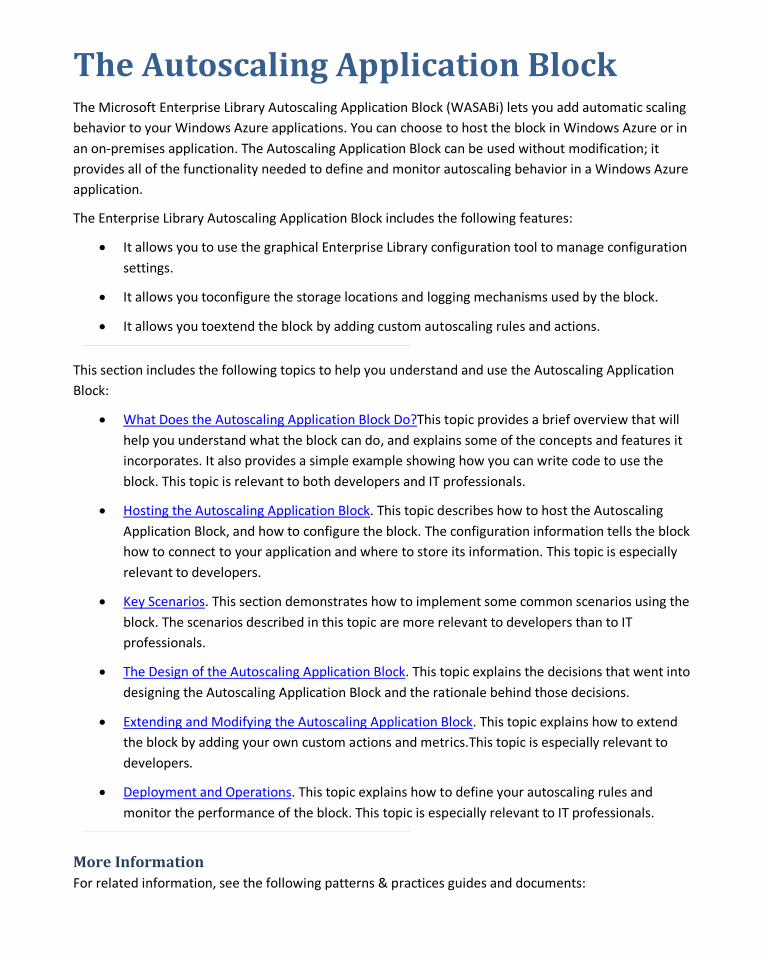
The Autoscaling Application Block The Microsoft Enterprise Library Autoscaling Application Block (WASABi) lets you add automatic scaling behavior to your Windows Azure applications. You can choose to host the block in Windows Azure or in an on-premises application. The Autoscaling Application Block can be used without modification; it provides all of the functionality needed to define and monitor autoscaling behavior in a Windows Azure application.
The Enterprise Library Autoscaling Application Block includes the following features:
• It allows you to use the graphical Enterprise Library configuration tool to manage configuration settings.
• It allows you toconfigure the storage locations and logging mechanisms used by the block.
• It allows you toextend the block by adding custom autoscaling rules and actions.
This section includes the following topics to help you understand and use the Autoscaling Application Block:
• What Does the Autoscaling Application Block Do?
•
This topic provides a brief overview that will help you understand what the block can do, and explains some of the concepts and features it incorporates. It also provides a simple example showing how you can write code to use the block. This topic is relevant to both developers and IT professionals.
Hosting the Autoscaling Application Block. This topic describes how to host the Autoscaling Application Block, and how to configure the block. The configuration information tells the block how to connect to your application and where to store its information. This topic is especially relevant to developers.
• Key Scenarios. This section demonstrates how to implement some common scenarios using the block. The scenarios described in this topic are more relevant to developers than to IT professionals.
• The Design of the Autoscaling Application Block. This topic explains the decisions that went into designing the Autoscaling Application Block and the rationale behind those decisions.
• Extending and Modifying the Autoscaling Application Block. This topic explains how to extend the block by adding your own custom actions and metrics.This topic is especially relevant to developers.
• Deployment and Operations. This topic explains how to define your autoscaling rules and monitor the performance of the block. This topic is especially relevant to IT professionals.
More Information For related information, see the following patterns & practices guides and documents:

• Microsoft Enterprise Library home page on MSDN
• Enterprise Library Integration Pack for Windows Azure community page on CodePlex
• Autoscaling Windows Azure applications videos on Channel9
• Developer's Guide to the Enterprise Library 5.0 Integration Pack for Windows Azureon MSDN
•
•
Moving Applications to the Cloud, 2nd edition
•
Developing Applications for the Cloud, 2nd edition
patterns & practices Developer's Center on MSDN
What Does the Autoscaling Application Block Do? The Autoscaling Application Block can automatically scale your Windows Azure application based on rules that you define specifically for your application. You can use these rules to help your Windows Azure application maintain its throughput in response to changes in its workload, while at the same time control the costs associated with hosting your application in Windows Azure. Scaling operations typically alter the number of role instances in your application, but the block also enables you to use other scaling actions such as throttling certain functionality within your application.
Typically, you will host the Autoscaling Application Block in its own worker role in the cloud, or in an on-premises application, from where it can monitor and scale your Windows Azure application.
In the following diagram, the green line shows a plot of the number of running instances of a Windows Azure role over two days. The number of instances changes over time in response to a set of autoscaling rules.

Autoscaling behavior in a Windows Azure application
Constraint Autoscaling Rules To set upper and lower bounds on the number of instances, for example, let's say that between 8:00 and 10:00 every morning you want a minimum of four and a maximum of six instances, then you use a constraint rule. In the diagram, the red and blue lines represent constraints rules. For example, at point A in the diagram, the minimum number of role instances rises from two to four, in order to accommodate the anticipated increase in the application's workload at this time. At point B in the diagram, the number of role instances is prevented from climbing above five in order to control the running costs of the application.
Reactive Autoscaling Rules To enable the number of role instances to change in response to unpredictable changes in demand, you use reactive rules. At point C in the diagram, the block automatically reduces the number of role instances, from four to three, in response to a reduction in workload. At point D, the block detects an increase in workload and automatically increases the number of running role instances from three to four.
The reactive rules that dynamically change the number of role instances can use a variety of techniques to monitor and control your application's workload. In addition to using performance counters and Windows Azure queue lengths as indicators of workload, the block allows you to define your own custom metrics, such as the number of unprocessed documents in the application.
A reactive rule cannot make a change to the number of role instances unless there is a constraint rule that applies at the same time. It is easy to create a default constraint rule that always applies.
For more information about how the block resolves conflicts when multiple rules apply at the same time, see the topic "Understanding Rule Ranks and Reconciliation."
Example Rules The following snippet shows the set of example rules that were active during the two days shown in the diagram above. There are two constraint rules: one rule is always active, the other overrides the default rule at peak times. There are two reactive rules: one rule tries to increase the role instance count by one if average CPU usage for the last 45 minutes is over 80%, the other rule tries to decrease the role instance count by one if average CPU usage for the last 45 minutes is less than 20%.
XML
<rules xmlns=http://schemas.microsoft.com/practices/2011/entlib/autoscaling/rules enabled="true"> <constraintRules> <rule name="Default" description="Always active" enabled="true" rank="1"> <actions> <range min="2" max="5" target="RoleA"/> </actions>
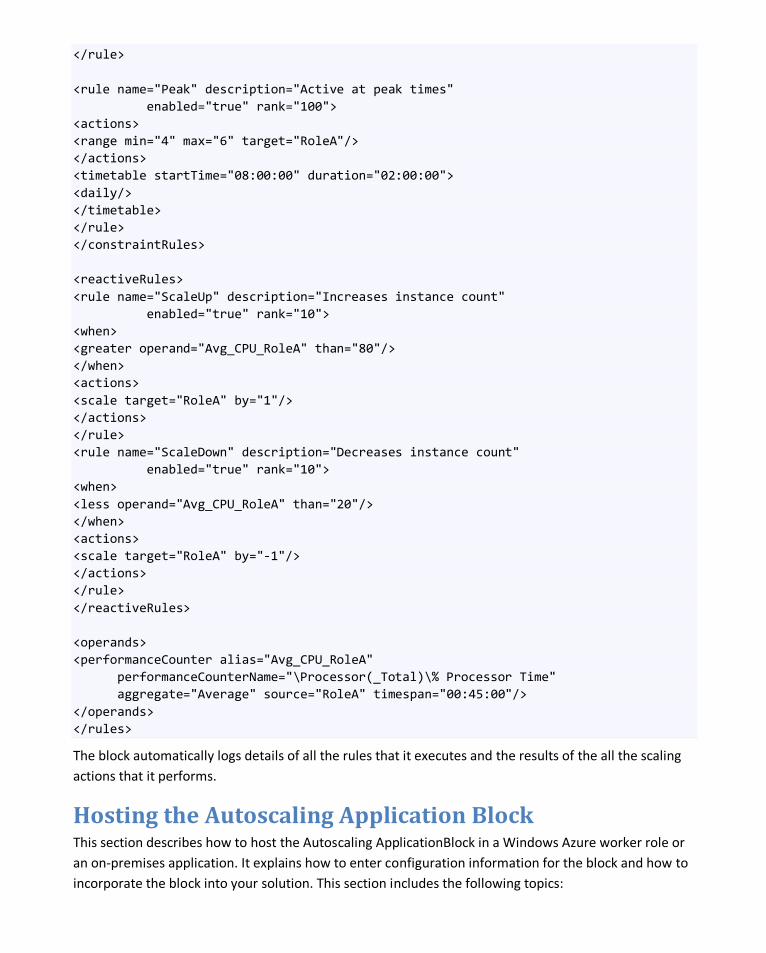
</rule> <rule name="Peak" description="Active at peak times" enabled="true" rank="100"> <actions> <range min="4" max="6" target="RoleA"/> </actions> <timetable startTime="08:00:00" duration="02:00:00"> <daily/> </timetable> </rule> </constraintRules> <reactiveRules> <rule name="ScaleUp" description="Increases instance count" enabled="true" rank="10"> <when> <greater operand="Avg_CPU_RoleA" than="80"/> </when> <actions> <scale target="RoleA" by="1"/> </actions> </rule> <rule name="ScaleDown" description="Decreases instance count" enabled="true" rank="10"> <when> <less operand="Avg_CPU_RoleA" than="20"/> </when> <actions> <scale target="RoleA" by="-1"/> </actions> </rule> </reactiveRules> <operands> <performanceCounter alias="Avg_CPU_RoleA" performanceCounterName="\Processor(_Total)\% Processor Time" aggregate="Average" source="RoleA" timespan="00:45:00"/> </operands> </rules>
The block automatically logs details of all the rules that it executes and the results of the all the scaling actions that it performs.
Hosting the Autoscaling Application Block This section describes how to host the Autoscaling ApplicationBlock in a Windows Azure worker role or an on-premises application. It explains how to enter configuration information for the block and how to incorporate the block into your solution. This section includes the following topics:
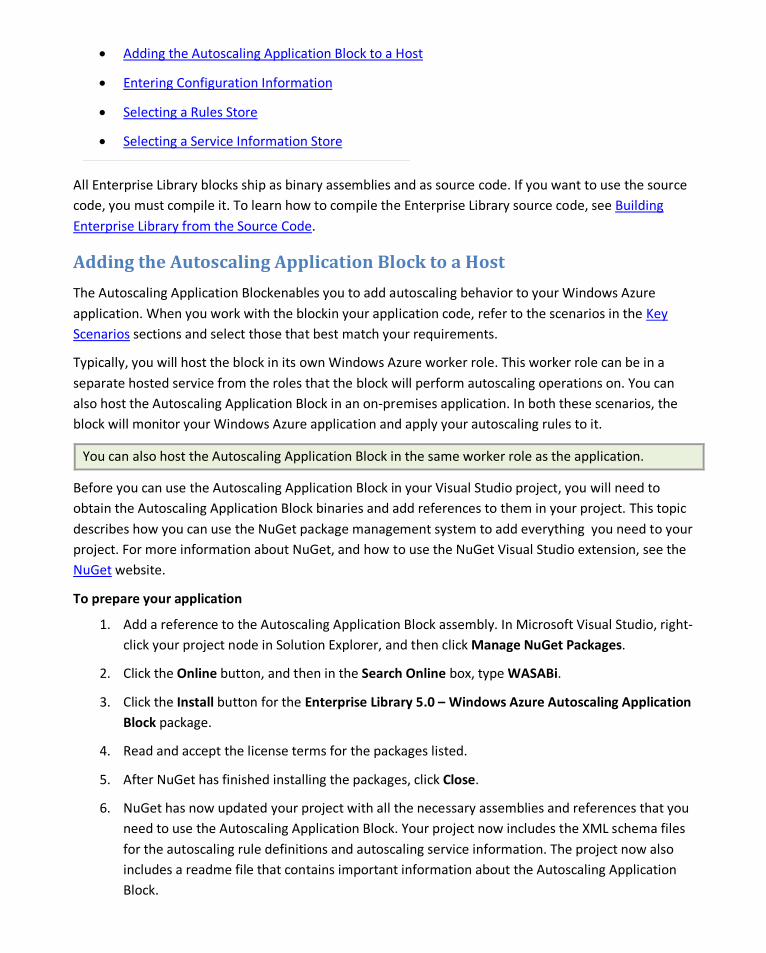
• Adding the Autoscaling Application Block to a Host
• Entering Configuration Information
• Selecting a Rules Store
• Selecting a Service Information Store
All Enterprise Library blocks ship as binary assemblies and as source code. If you want to use the source code, you must compile it. To learn how to compile the Enterprise Library source code, see Building Enterprise Library from the Source Code.
Adding the Autoscaling Application Block to a Host
The Autoscaling Application Blockenables you to add autoscaling behavior to your Windows Azure application. When you work with the blockin your application code, refer to the scenarios in the Key Scenarios sections and select those that best match your requirements.
Typically, you will host the block in its own Windows Azure worker role. This worker role can be in a separate hosted service from the roles that the block will perform autoscaling operations on. You can also host the Autoscaling Application Block in an on-premises application. In both these scenarios, the block will monitor your Windows Azure application and apply your autoscaling rules to it.
You can also host the Autoscaling Application Block in the same worker role as the application.
Before you can use the Autoscaling Application Block in your Visual Studio project, you will need to obtain the Autoscaling Application Block binaries and add references to them in your project. This topic describes how you can use the NuGet package management system to add everything you need to your project. For more information about NuGet, and how to use the NuGet Visual Studio extension, see the NuGet website.
To prepare your application
1. Add a reference to the Autoscaling Application Block assembly. In Microsoft Visual Studio, right-click your project node in Solution Explorer, and then click Manage NuGet Packages.
2. Click the Online button, and then in the Search Online box, type WASABi.
3. Click the Install button for the Enterprise Library 5.0 – Windows Azure Autoscaling Application Block package.
4. Read and accept the license terms for the packages listed.
5. After NuGet has finished installing the packages, click Close.
6. NuGet has now updated your project with all the necessary assemblies and references that you need to use the Autoscaling Application Block. Your project now includes the XML schema files for the autoscaling rule definitions and autoscaling service information. The project now also includes a readme file that contains important information about the Autoscaling Application Block.
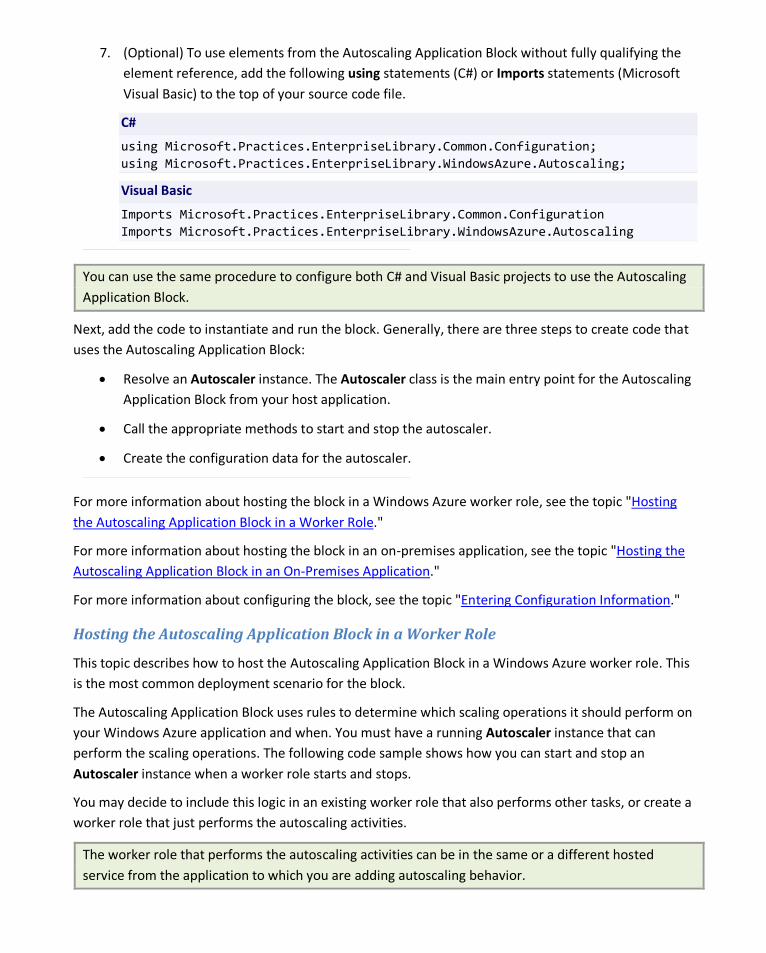
7. (Optional) To use elements from the Autoscaling Application Block without fully qualifying the element reference, add the following using statements (C#) or Imports statements (Microsoft Visual Basic) to the top of your source code file.
C#
using Microsoft.Practices.EnterpriseLibrary.Common.Configuration; using Microsoft.Practices.EnterpriseLibrary.WindowsAzure.Autoscaling;
Visual Basic
Imports Microsoft.Practices.EnterpriseLibrary.Common.Configuration Imports Microsoft.Practices.EnterpriseLibrary.WindowsAzure.Autoscaling
You can use the same procedure to configure both C# and Visual Basic projects to use the Autoscaling Application Block.
Next, add the code to instantiate and run the block. Generally, there are three steps to create code that uses the Autoscaling Application Block:
• Resolve an Autoscaler instance. The Autoscaler class is the main entry point for the Autoscaling Application Block from your host application.
• Call the appropriate methods to start and stop the autoscaler.
• Create the configuration data for the autoscaler.
For more information about hosting the block in a Windows Azure worker role, see the topic "Hosting the Autoscaling Application Block in a Worker Role."
For more information about hosting the block in an on-premises application, see the topic "Hosting the Autoscaling Application Block in an On-Premises Application."
For more information about configuring the block, see the topic "Entering Configuration Information."
Hosting the Autoscaling Application Block in a Worker Role
This topic describes how to host the Autoscaling Application Block in a Windows Azure worker role. This is the most common deployment scenario for the block.
The Autoscaling Application Block uses rules to determine which scaling operations it should perform on your Windows Azure application and when. You must have a running Autoscaler instance that can perform the scaling operations. The following code sample shows how you can start and stop an Autoscaler instance when a worker role starts and stops.
You may decide to include this logic in an existing worker role that also performs other tasks, or create a worker role that just performs the autoscaling activities.
The worker role that performs the autoscaling activities can be in the same or a different hosted service from the application to which you are adding autoscaling behavior.
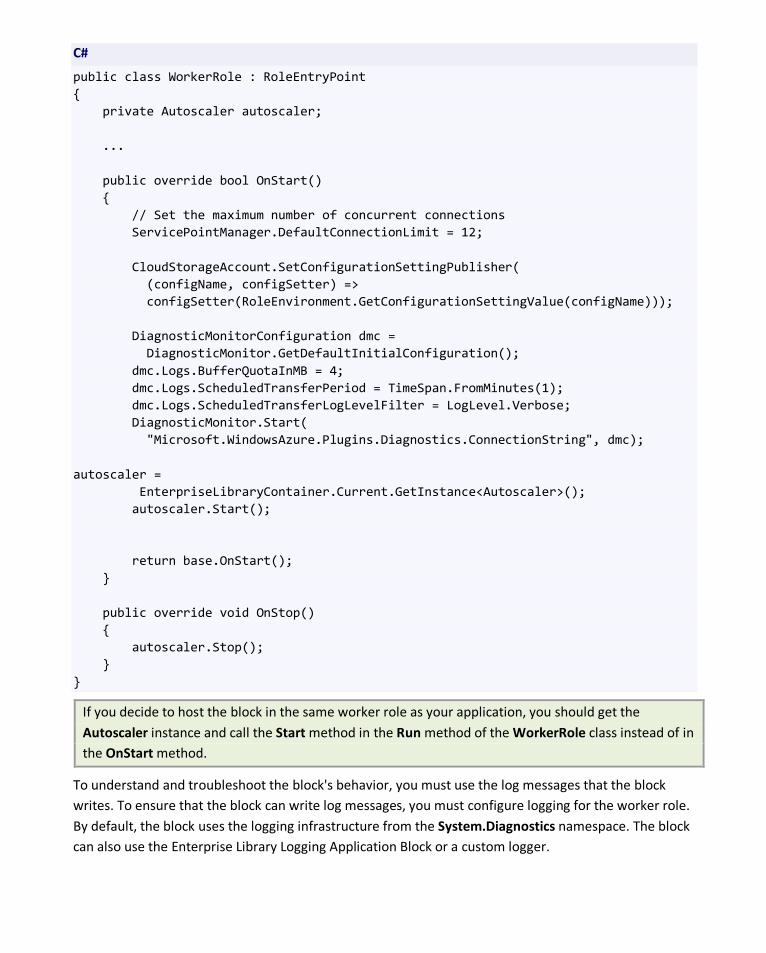
C#
public class WorkerRole : RoleEntryPoint { private Autoscaler autoscaler; ... public override bool OnStart() { // Set the maximum number of concurrent connections ServicePointManager.DefaultConnectionLimit = 12; CloudStorageAccount.SetConfigurationSettingPublisher( (configName, configSetter) => configSetter(RoleEnvironment.GetConfigurationSettingValue(configName))); DiagnosticMonitorConfiguration dmc = DiagnosticMonitor.GetDefaultInitialConfiguration(); dmc.Logs.BufferQuotaInMB = 4; dmc.Logs.ScheduledTransferPeriod = TimeSpan.FromMinutes(1); dmc.Logs.ScheduledTransferLogLevelFilter = LogLevel.Verbose; DiagnosticMonitor.Start( "Microsoft.WindowsAzure.Plugins.Diagnostics.ConnectionString", dmc); autoscaler = EnterpriseLibraryContainer.Current.GetInstance<Autoscaler>(); autoscaler.Start(); return base.OnStart(); } public override void OnStop() { autoscaler.Stop(); } }
If you decide to host the block in the same worker role as your application, you should get the Autoscaler instance and call the Start method in the Run method of the WorkerRole class instead of in the OnStart method.
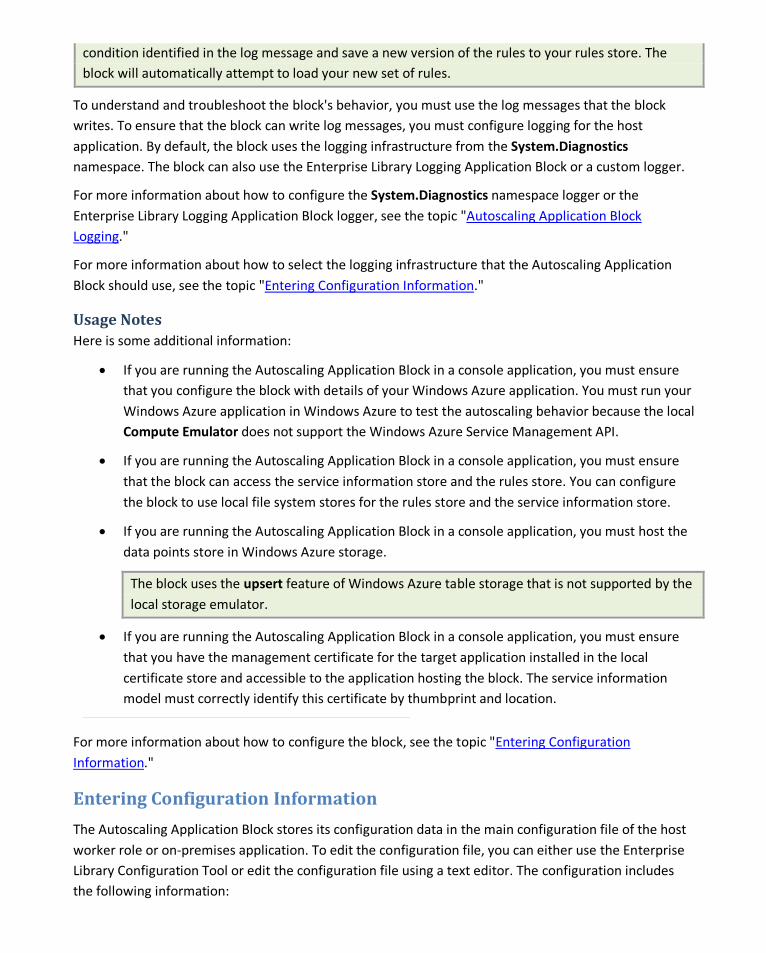
To understand and troubleshoot the block's behavior, you must use the log messages that the block writes. To ensure that the block can write log messages, you must configure logging for the worker role. By default, the block uses the logging infrastructure from the System.Diagnostics namespace. The block can also use the Enterprise Library Logging Application Block or a custom logger.
When you call the Start method of the Autoscaler class, the block attempts to read and parse the rules in your rules store. If any error occurs during the reading and validation of the rules, the block will log the exception with a "Rules store exception" message and continue. You should correct the error condition identified in the log message and save a new version of the rules to your rules store. The block will automatically attempt to load your new set of rules.
By default, the block checks for changes in the rules store every 30 seconds. To change this setting, see the topic "Entering Configuration Information."
For more information about how to configure the System.Diagnostics namespace logger or the Enterprise Library Logging Application Block logger, see the topic "Autoscaling Application Block Logging."
For more information about how to select the logging infrastructure that the Autoscaling Application Block should use, see the topic "Entering Configuration Information."
When the block communicates with the target application, it uses a service certificate to secure the Windows Azure Service Management API calls that it makes. The administrator must upload the appropriate service certificate to Windows Azure. For more information, see the topic "Deploying the Autoscaling Application Block."
Usage Notes Here is some additional information:
• For more details of the integration of Enterprise Library and Unity, see "Creating and Referencing Enterprise Library Objects."
• If you have multiple instances of your worker role, then the Autoscaler class can use a lease on a Windows Azure blob to ensure that only a single instance of the Autoscaler can execute the autoscaling rules at any one time. See the topic "Entering Configuration Information" for more details.
The default setting is that the lease is not enabled. If you are planning to run multiple instances of the worker role that hosts the Autoscaling Application Block, you must enable the lease.
• The block uses the FromConfigurationSetting method in the Windows Azure Storage API to read connecting strings from the .cscfg file. Therefore, you must call the SetConfigurationSettingPublisher method, as shown in the sample code.
• It is important to call the Stop method in the Autoscaler class when the worker stops. This ensures that the block releases its lease on the blob before the role instance stops.
• The block uses information collected by Windows Azure diagnostics to evaluate some reactive rules.
Hosting the Autoscaling Application Block in an On-Premises Application
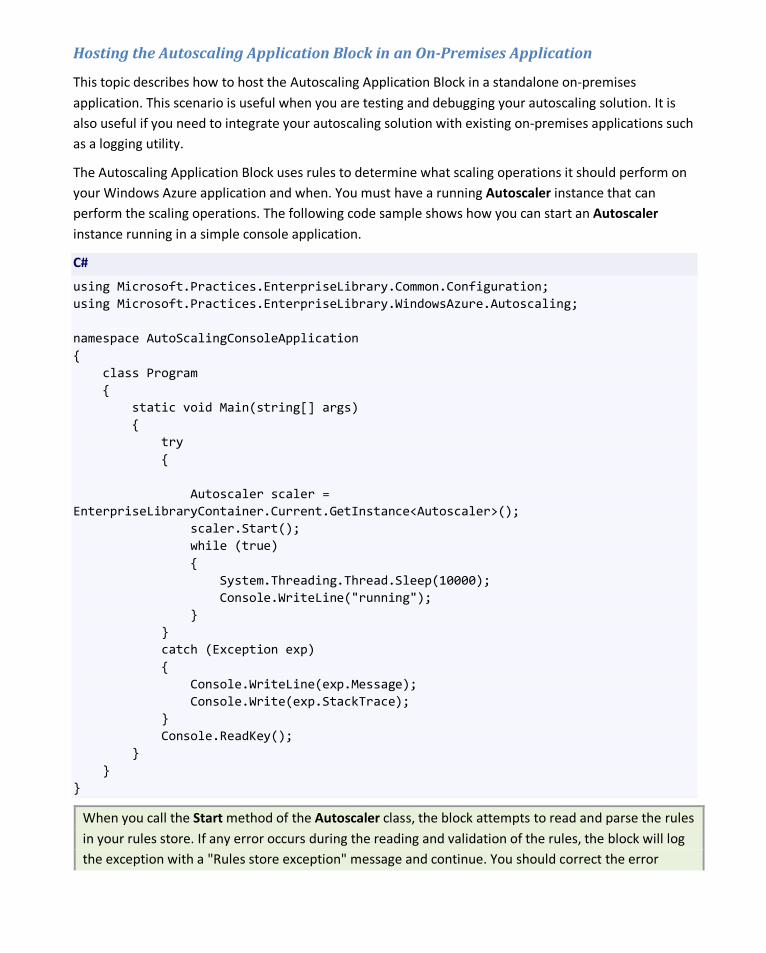
This topic describes how to host the Autoscaling Application Block in a standalone on-premises application. This scenario is useful when you are testing and debugging your autoscaling solution. It is also useful if you need to integrate your autoscaling solution with existing on-premises applications such as a logging utility.
The Autoscaling Application Block uses rules to determine what scaling operations it should perform on your Windows Azure application and when. You must have a running Autoscaler instance that can perform the scaling operations. The following code sample shows how you can start an Autoscaler instance running in a simple console application.
C#
using Microsoft.Practices.EnterpriseLibrary.Common.Configuration; using Microsoft.Practices.EnterpriseLibrary.WindowsAzure.Autoscaling; namespace AutoScalingConsoleApplication { class Program { static void Main(string[] args) { try { Autoscaler scaler = EnterpriseLibraryContainer.Current.GetInstance<Autoscaler>(); scaler.Start(); while (true) { System.Threading.Thread.Sleep(10000); Console.WriteLine("running"); } } catch (Exception exp) { Console.WriteLine(exp.Message); Console.Write(exp.StackTrace); } Console.ReadKey(); } } }
When you call the Start method of the Autoscaler class, the block attempts to read and parse the rules in your rules store. If any error occurs during the reading and validation of the rules, the block will log the exception with a "Rules store exception" message and continue. You should correct the error
condition identified in the log message and save a new version of the rules to your rules store. The block will automatically attempt to load your new set of rules.
To understand and troubleshoot the block's behavior, you must use the log messages that the block writes. To ensure that the block can write log messages, you must configure logging for the host application. By default, the block uses the logging infrastructure from the System.Diagnostics namespace. The block can also use the Enterprise Library Logging Application Block or a custom logger.
For more information about how to configure the System.Diagnostics namespace logger or the Enterprise Library Logging Application Block logger, see the topic "Autoscaling Application Block Logging."
For more information about how to select the logging infrastructure that the Autoscaling Application Block should use, see the topic "Entering Configuration Information."
Usage Notes Here is some additional information:
• If you are running the Autoscaling Application Block in a console application, you must ensure that you configure the block with details of your Windows Azure application. You must run your Windows Azure application in Windows Azure to test the autoscaling behavior because the local Compute Emulator does not support the Windows Azure Service Management API.
• If you are running the Autoscaling Application Block in a console application, you must ensure that the block can access the service information store and the rules store. You can configure the block to use local file system stores for the rules store and the service information store.
• If you are running the Autoscaling Application Block in a console application, you must host the data points store in Windows Azure storage.
The block uses the upsert feature of Windows Azure table storage that is not supported by the local storage emulator.
• If you are running the Autoscaling Application Block in a console application, you must ensure that you have the management certificate for the target application installed in the local certificate store and accessible to the application hosting the block. The service information model must correctly identify this certificate by thumbprint and location.
For more information about how to configure the block, see the topic "Entering Configuration Information."
Entering Configuration Information
The Autoscaling Application Block stores its configuration data in the main configuration file of the host worker role or on-premises application. To edit the configuration file, you can either use the Enterprise Library Configuration Tool or edit the configuration file using a text editor. The configuration includes the following information:
• Autoscaling Settings. These settings include information about where the block stores the data point values that it uses in rules evaluation, and how often it evaluates the autoscaling rules.
• Rules Store Settings. These settings include information about where the block stores its autoscaling rules, and any custom extensions provided by the user.
• Service Information Store Settings. These settings include information about where the block stores its service information model.
• Advanced Settings. These settings control advanced features such as request tracking and blob execution leases.
• Logger Settings. These settings specify the logging infrastructure that the block should use.
Typically, if you host the Autoscaling Application Block in a worker role, you will store the data points, rule definitions, and service information in Windows Azure storage. You should try to use a storage account in the same data center to avoid data transfer charges. You should also try to use a separate storage account from any storage accounts that your Windows Azure application uses; this will make it easy to manage your Windows Azure storage requirements.
The following procedures explain how toconfigure these settings for the Autoscaling Application Block.
For details of the schema for the Autoscaling Application Block configuration, see Source Schema for the Autoscaling Application Block. You can also configure the block in code by using an alternate configuration source. For more information, seeAdvanced Configuration Scenariosin the Enterprise Library 5.0 reference documentation.
These procedures assume you have added the Autoscaling Application Block to your Visual Studio project from the NuGet repository, as described in the topic "Adding the Autoscaling Application Block to a Host."
Installing the Enterprise Library Configuration Console
To install the Enterprise Library Configuration Console if it is not already installed in Visual Studio:
1. In Visual Studio, on the Tools menu, click Extension Manager.
2. In the Extension Manager dialog, click Online Gallery, and then in the Search Online Gallery box, type Enterprise Library Config.
3. Make sure that you can see version 5.0.505 of the EnterpriseLibrary.Config package. Then click the Download button.
4. Read the license and then click Install.
5. Click the Restart Now button to restart Visual Studio and complete the installation.
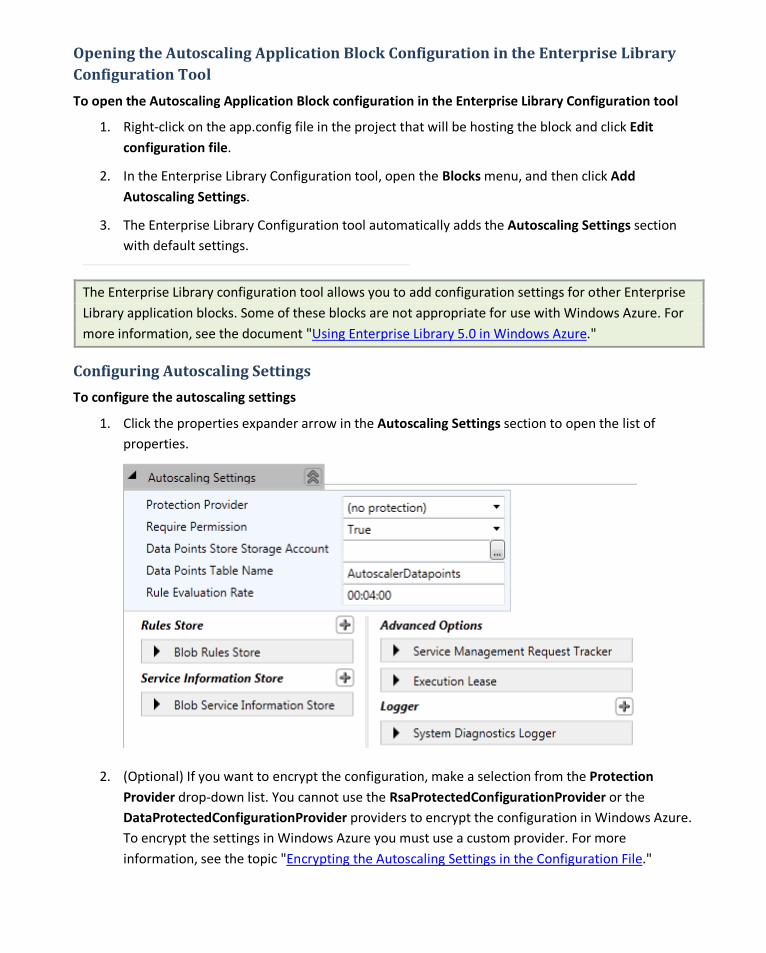
Opening the Autoscaling Application Block Configuration in the Enterprise Library Configuration Tool
To open the Autoscaling Application Block configuration in the Enterprise Library Configuration tool
1. Right-click on the app.config file in the project that will be hosting the block and click Edit configuration file.
2. In the Enterprise Library Configuration tool, open the Blocks menu, and then click Add Autoscaling Settings.
3. The Enterprise Library Configuration tool automatically adds the Autoscaling Settings section with default settings.
The Enterprise Library configuration tool allows you to add configuration settings for other Enterprise Library application blocks. Some of these blocks are not appropriate for use with Windows Azure. For more information, see the document "Using Enterprise Library 5.0 in Windows Azure."
Configuring Autoscaling Settings
To configure the autoscaling settings
1. Click the properties expander arrow in the Autoscaling Settings section to open the list of properties.
2. (Optional) If you want to encrypt the configuration, make a selection from the Protection Provider drop-down list. You cannot use the RsaProtectedConfigurationProvider or the DataProtectedConfigurationProvider providers to encrypt the configuration in Windows Azure. To encrypt the settings in Windows Azure you must use a custom provider. For more information, see the topic "Encrypting the Autoscaling Settings in the Configuration File."

3. (Optional) If you want to run your application in partial trust mode, change the Require Permission property to False. The default is True.
If the block is hosted in a Windows Azure role and it uses Windows Azure diagnostic logging, then you must use full trust mode.
4. Click the ellipsis (...) to set the Data Points Store Storage Accountconnection string in the Storage Account Connection String dialog. If you are hosting the block in a Windows Azure role, select Use a connection string from the Service Configuration file and enter the name of a connection string in your Service Configuration File (.cscfg). If you are testing your autoscaling solution with the Windows Azure Compute and Storage Emulators, select Use the Windows Azure storage emulator. If you are hosting the block in an on-premises application, select Enter storage account credentials, and enter the account name and key for your Windows Azure storage account.
The block does not have support for storing the data points store in the local Windows Azure storage emulator. The block uses a Windows Azure API call that is not supported by the local storage emulator.
Using HTTP could lead to disclosure of information and could allow someone to tamper with the data being transferred. You should use HTTPS in most cases.
5. (Optional) In the Data Points Table Name box, you can change the name of the Windows Azure table that the block uses to store the data points collected from your application. The default table name is AutoscalerDatapoints.
6. (Optional) In the Rule Evaluation Rate box, you can change the rate at which the block evaluates your autoscaling rules. The default value is every four minutes.
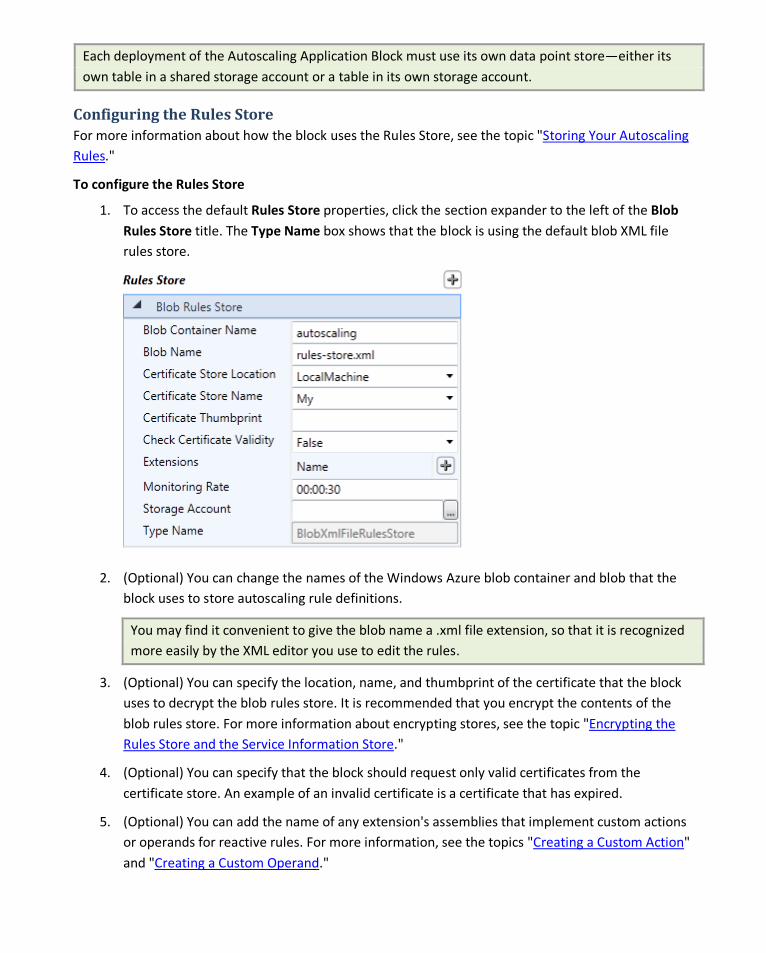
Each deployment of the Autoscaling Application Block must use its own data point store—either its own table in a shared storage account or a table in its own storage account.
Configuring the Rules Store For more information about how the block uses the Rules Store, see the topic "Storing Your Autoscaling Rules."
To configure the Rules Store
1. To access the default Rules Store properties, click the section expander to the left of the Blob Rules Store title. The Type Name box shows that the block is using the default blob XML file rules store.
2. (Optional) You can change the names of the Windows Azure blob container and blob that the block uses to store autoscaling rule definitions.
You may find it convenient to give the blob name a .xml file extension, so that it is recognized more easily by the XML editor you use to edit the rules.
3. (Optional) You can specify the location, name, and thumbprint of the certificate that the block uses to decrypt the blob rules store. It is recommended that you encrypt the contents of the blob rules store. For more information about encrypting stores, see the topic "Encrypting the Rules Store and the Service Information Store."
4. (Optional) You can specify that the block should request only valid certificates from the certificate store. An example of an invalid certificate is a certificate that has expired.
5. (Optional) You can add the name of any extension's assemblies that implement custom actions or operands for reactive rules. For more information, see the topics "Creating a Custom Action" and "Creating a Custom Operand."
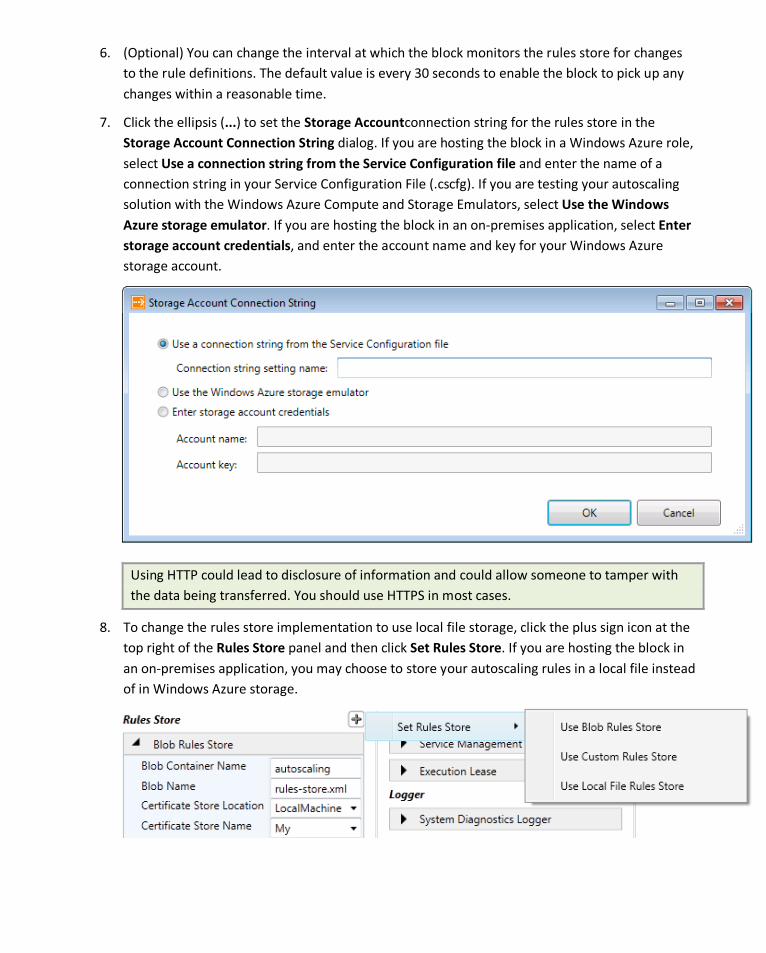
6. (Optional) You can change the interval at which the block monitors the rules store for changes to the rule definitions. The default value is every 30 seconds to enable the block to pick up any changes within a reasonable time.
7. Click the ellipsis (...) to set the Storage Accountconnection string for the rules store in the Storage Account Connection String dialog. If you are hosting the block in a Windows Azure role, select Use a connection string from the Service Configuration file and enter the name of a connection string in your Service Configuration File (.cscfg). If you are testing your autoscaling solution with the Windows Azure Compute and Storage Emulators, select Use the Windows Azure storage emulator. If you are hosting the block in an on-premises application, select Enter storage account credentials, and enter the account name and key for your Windows Azure storage account.
Using HTTP could lead to disclosure of information and could allow someone to tamper with the data being transferred. You should use HTTPS in most cases.
8. To change the rules store implementation to use local file storage, click the plus sign icon at the top right of the Rules Store panel and then click Set Rules Store. If you are hosting the block in an on-premises application, you may choose to store your autoscaling rules in a local file instead of in Windows Azure storage.
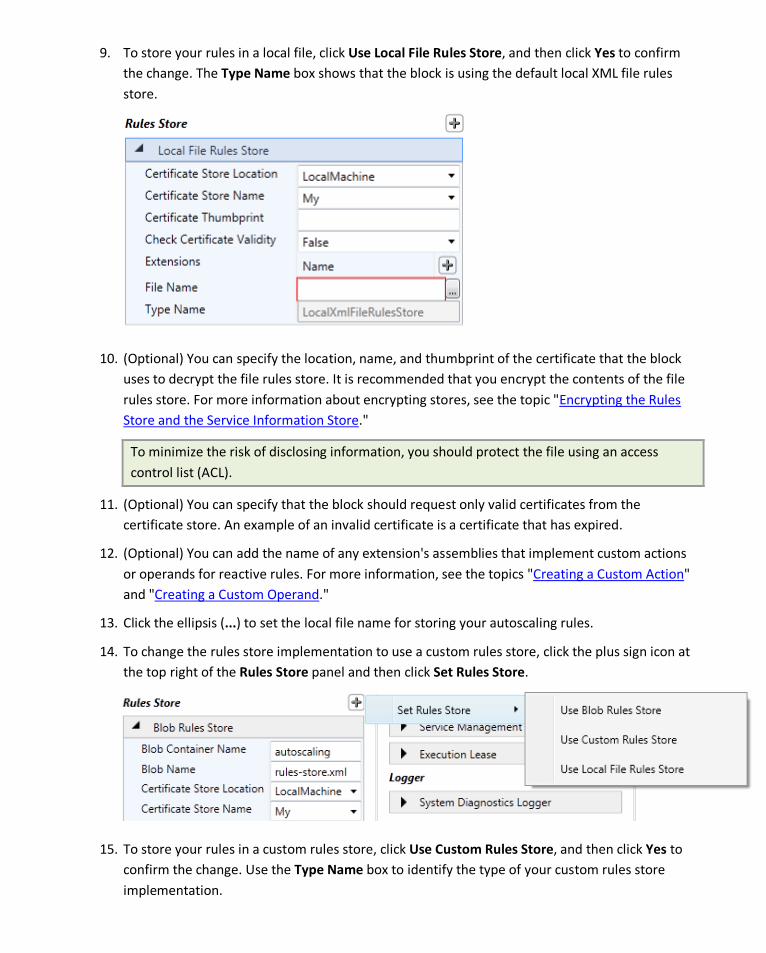
9. To store your rules in a local file, click Use Local File Rules Store, and then click Yes to confirm the change. The Type Name box shows that the block is using the default local XML file rules store.
10. (Optional) You can specify the location, name, and thumbprint of the certificate that the block uses to decrypt the file rules store. It is recommended that you encrypt the contents of the file rules store. For more information about encrypting stores, see the topic "Encrypting the Rules Store and the Service Information Store."
To minimize the risk of disclosing information, you should protect the file using an access control list (ACL).
11. (Optional) You can specify that the block should request only valid certificates from the certificate store. An example of an invalid certificate is a certificate that has expired.
12. (Optional) You can add the name of any extension's assemblies that implement custom actions or operands for reactive rules. For more information, see the topics "Creating a Custom Action" and "Creating a Custom Operand."
13. Click the ellipsis (...) to set the local file name for storing your autoscaling rules.
14. To change the rules store implementation to use a custom rules store, click the plus sign icon at the top right of the Rules Store panel and then click Set Rules Store.
15. To store your rules in a custom rules store, click Use Custom Rules Store, and then click Yes to confirm the change. Use the Type Name box to identify the type of your custom rules store implementation.
16. For information about how to create your own custom rules store, see the topic "Creating a Custom Rules Store."
For more information about the rules store, see the topic "Storing Your Autoscaling Rules."
Configuring the Service Information Store For more information about how the block uses the service information store, see the topic "Storing Your Service Information Data."
To configure the Service Information Store
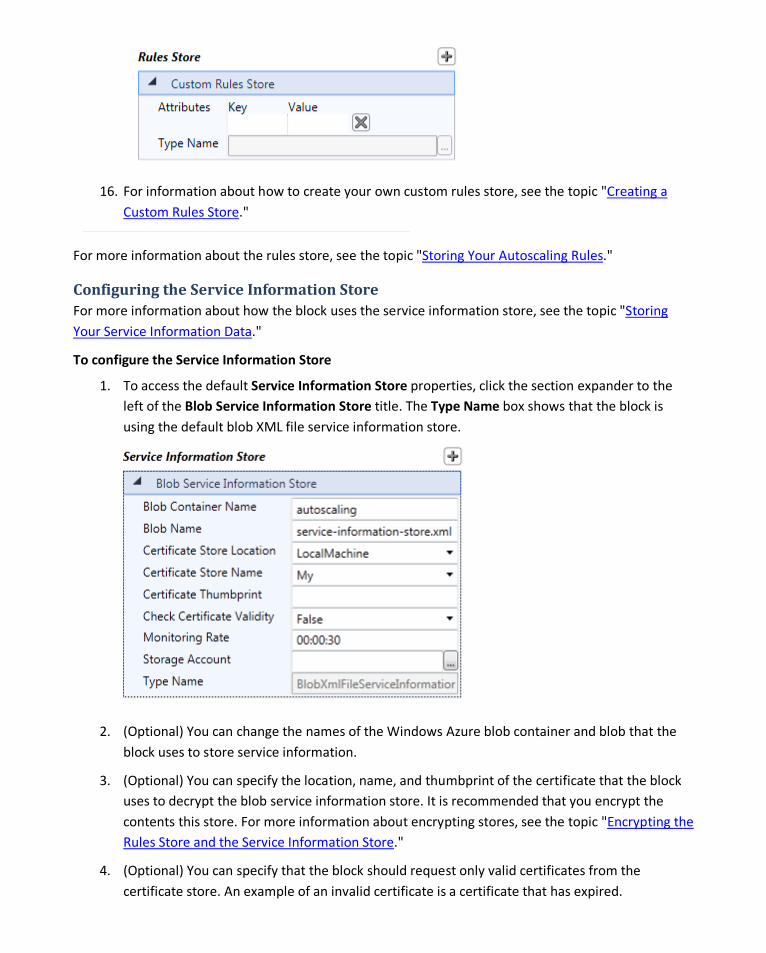
1. To access the default Service Information Store properties, click the section expander to the left of the Blob Service Information Store title. The Type Name box shows that the block is using the default blob XML file service information store.
2. (Optional) You can change the names of the Windows Azure blob container and blob that the block uses to store service information.
3. (Optional) You can specify the location, name, and thumbprint of the certificate that the block uses to decrypt the blob service information store. It is recommended that you encrypt the contents this store. For more information about encrypting stores, see the topic "Encrypting the Rules Store and the Service Information Store."
4. (Optional) You can specify that the block should request only valid certificates from the certificate store. An example of an invalid certificate is a certificate that has expired.
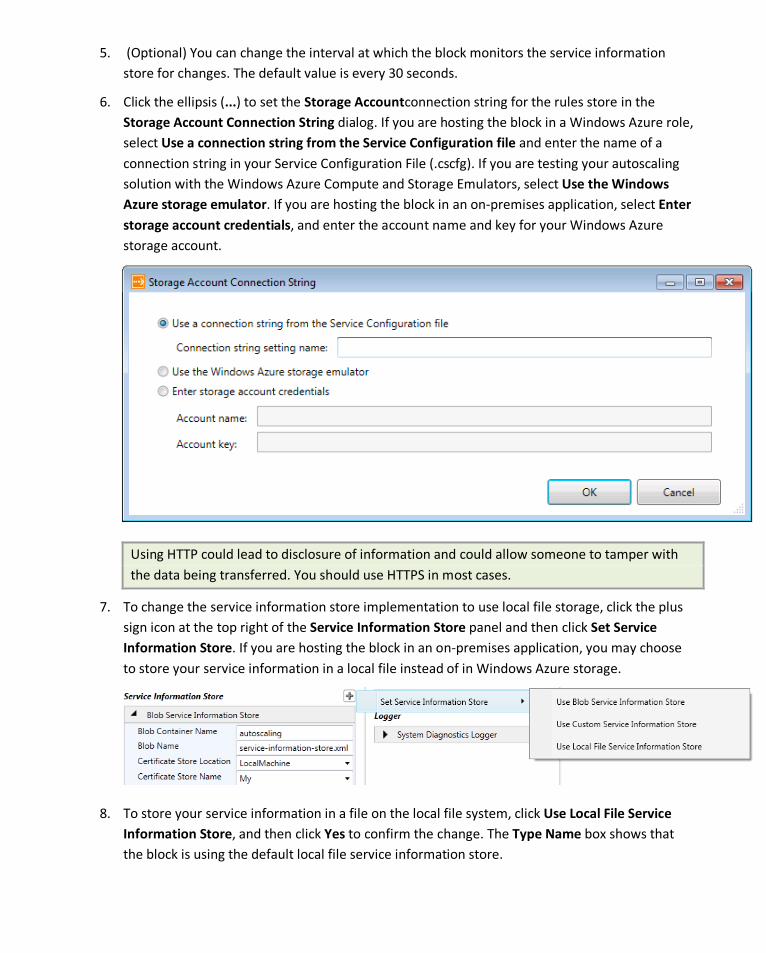
5. (Optional) You can change the interval at which the block monitors the service information store for changes. The default value is every 30 seconds.
6. Click the ellipsis (...) to set the Storage Accountconnection string for the rules store in the Storage Account Connection String dialog. If you are hosting the block in a Windows Azure role, select Use a connection string from the Service Configuration file and enter the name of a connection string in your Service Configuration File (.cscfg). If you are testing your autoscaling solution with the Windows Azure Compute and Storage Emulators, select Use the Windows Azure storage emulator. If you are hosting the block in an on-premises application, select Enter storage account credentials, and enter the account name and key for your Windows Azure storage account.
Using HTTP could lead to disclosure of information and could allow someone to tamper with the data being transferred. You should use HTTPS in most cases.
7. To change the service information store implementation to use local file storage, click the plus sign icon at the top right of the Service Information Store panel and then click Set Service Information Store. If you are hosting the block in an on-premises application, you may choose to store your service information in a local file instead of in Windows Azure storage.
8. To store your service information in a file on the local file system, click Use Local File Service Information Store, and then click Yes to confirm the change. The Type Name box shows that the block is using the default local file service information store.
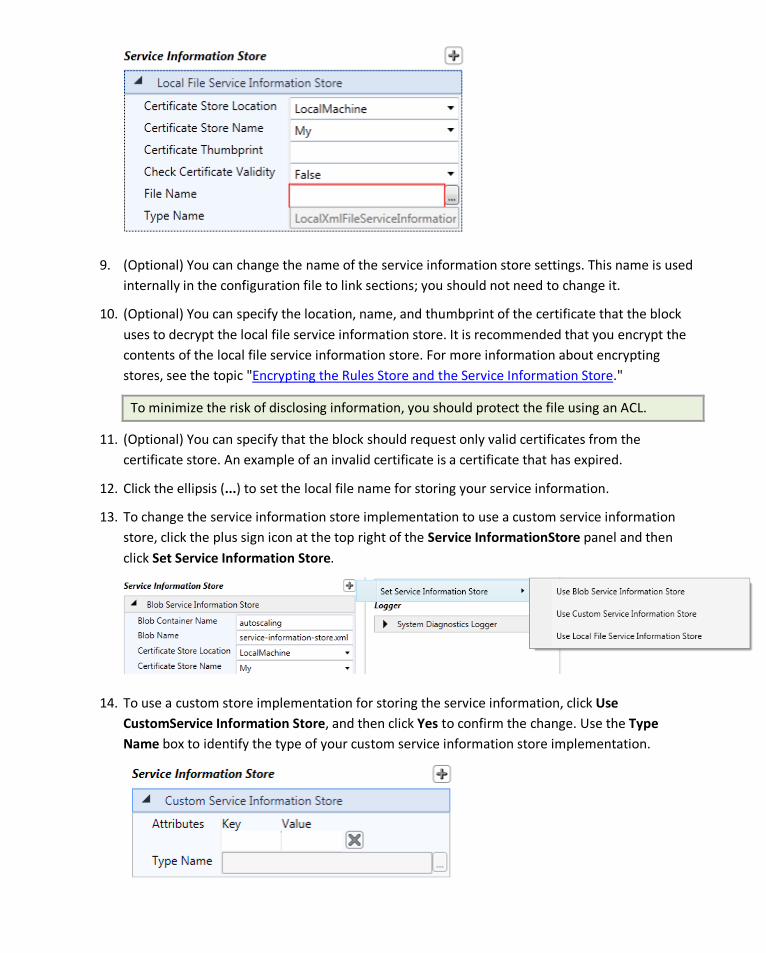
9. (Optional) You can change the name of the service information store settings. This name is used internally in the configuration file to link sections; you should not need to change it.
10. (Optional) You can specify the location, name, and thumbprint of the certificate that the block uses to decrypt the local file service information store. It is recommended that you encrypt the contents of the local file service information store. For more information about encrypting stores, see the topic "Encrypting the Rules Store and the Service Information Store."
To minimize the risk of disclosing information, you should protect the file using an ACL.
11. (Optional) You can specify that the block should request only valid certificates from the certificate store. An example of an invalid certificate is a certificate that has expired.
12. Click the ellipsis (...) to set the local file name for storing your service information.
13. To change the service information store implementation to use a custom service information store, click the plus sign icon at the top right of the Service InformationStore panel and then click Set Service Information Store.
14. To use a custom store implementation for storing the service information, click Use CustomService Information Store, and then click Yes to confirm the change. Use the Type Name box to identify the type of your custom service information store implementation.
15. For information about how to create your own custom rules store, see the topic "Creating a Custom Service Information Store."
For more information about the service information store, see the topic "Storing Your Service Information Data."
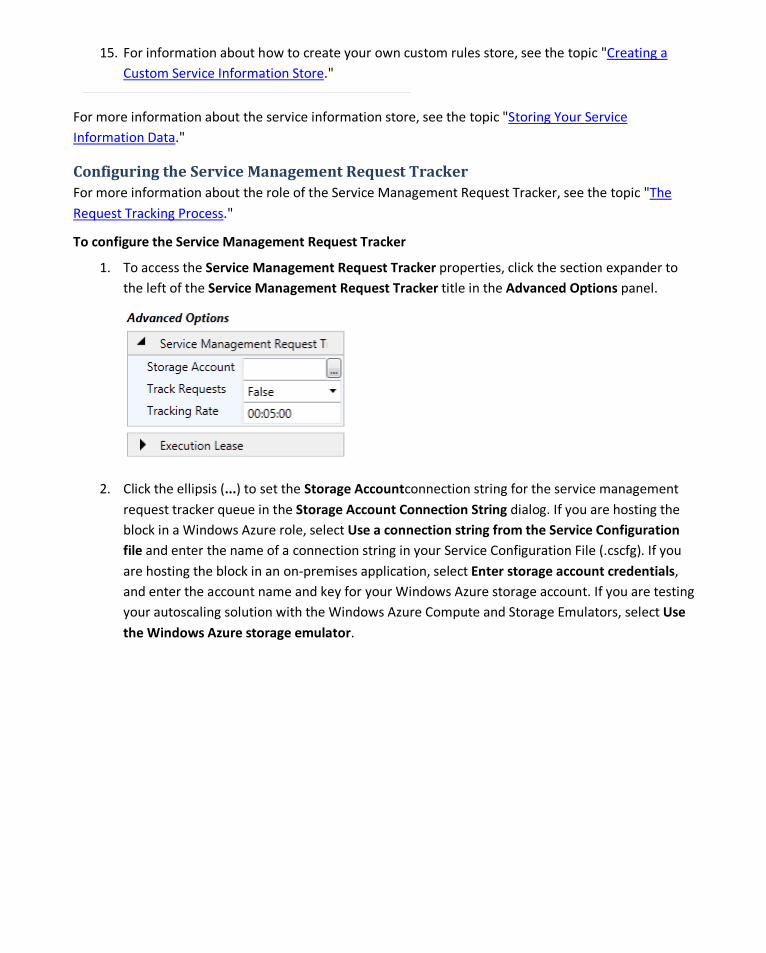
Configuring the Service Management Request Tracker For more information about the role of the Service Management Request Tracker, see the topic "The Request Tracking Process."
To configure the Service Management Request Tracker
1. To access the Service Management Request Tracker properties, click the section expander to the left of the Service Management Request Tracker title in the Advanced Options panel.
2. Click the ellipsis (...) to set the Storage Accountconnection string for the service management request tracker queue in the Storage Account Connection String dialog. If you are hosting the block in a Windows Azure role, select Use a connection string from the Service Configuration file and enter the name of a connection string in your Service Configuration File (.cscfg). If you are hosting the block in an on-premises application, select Enter storage account credentials, and enter the account name and key for your Windows Azure storage account. If you are testing your autoscaling solution with the Windows Azure Compute and Storage Emulators, select Use the Windows Azure storage emulator.
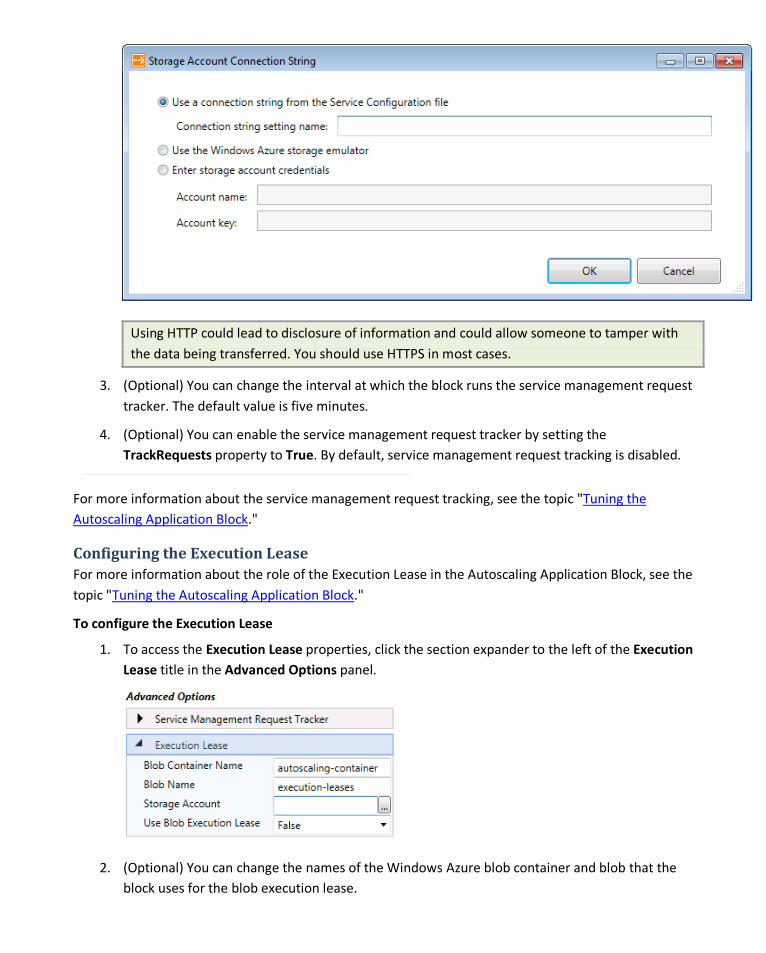
Using HTTP could lead to disclosure of information and could allow someone to tamper with the data being transferred. You should use HTTPS in most cases.
3. (Optional) You can change the interval at which the block runs the service management request tracker. The default value is five minutes.
4. (Optional) You can enable the service management request tracker by setting the TrackRequests property to True. By default, service management request tracking is disabled.
For more information about the service management request tracking, see the topic "Tuning the Autoscaling Application Block."
Configuring the Execution Lease For more information about the role of the Execution Lease in the Autoscaling Application Block, see the topic "Tuning the Autoscaling Application Block."
To configure the Execution Lease
1. To access the Execution Lease properties, click the section expander to the left of the Execution Lease title in the Advanced Options panel.
2. (Optional) You can change the names of the Windows Azure blob container and blob that the block uses for the blob execution lease.

3. Click the ellipsis (...) to set the Storage Accountconnection string for the blob execution lease in the Storage Account Connection String dialog. If you are hosting the block in a Windows Azure role, select Use a connection string from the Service Configuration file and enter the name of a connection string in your Service Configuration File (.cscfg). If you are testing your autoscaling solution with the Windows Azure Compute and Storage Emulators, select Use the Windows Azure storage emulator. If you are hosting the block in an on-premises application, select Enter storage account credentials, and enter the account name and key for your Windows Azure storage account.
Using HTTP could lead to disclosure of information and could allow someone to tamper with the data being transferred. You should use HTTPS in most cases.
4. (Optional) You can enable the block to use a blob execution lease by setting the Use Blob Execution Lease property to True. By default, the block does not use a blob execution lease.
You must use a blob execution lease if you are hosting the block in a Windows Azure worker role and plan to run multiple instances of that worker role. These configuration options enable the block to use a lease on a Windows Azure blob to ensure that only a single instance of the block can execute the autoscaling rules at any one time.
For more information about blob execution leases, see the topic "Tuning the Autoscaling Application Block."
Configuring the Logger
To configure the Logger
1. To view the default Source Logger properties, click the section expander to the left of the Source Logger title in the Logger panel. By default, the block uses the SystemDiagnosticLogger.
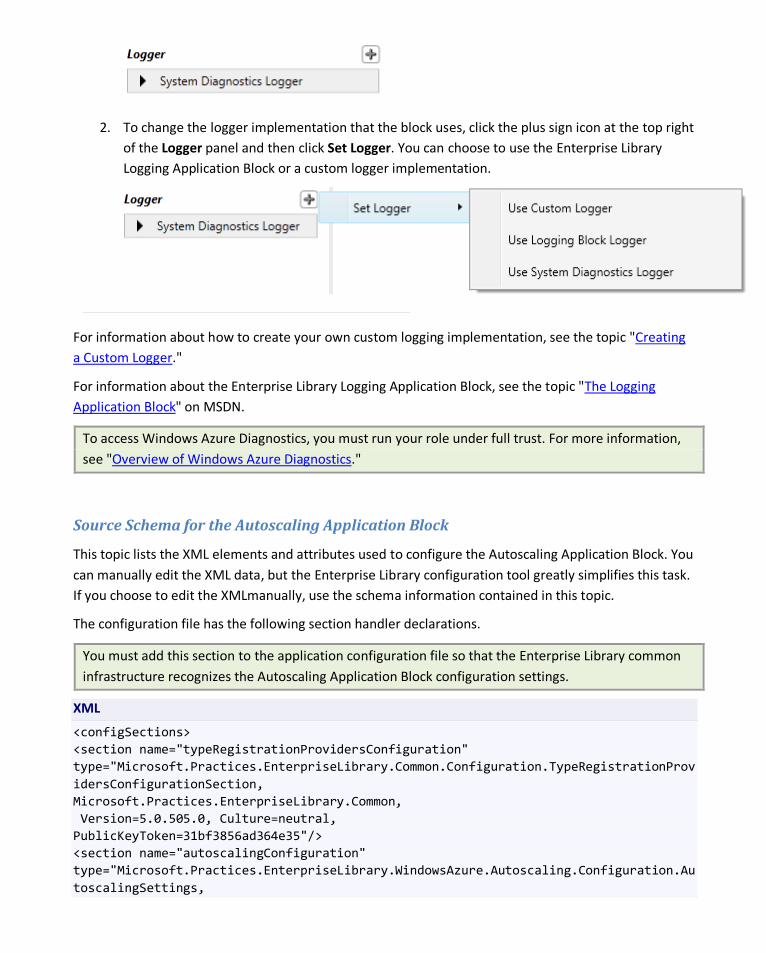
2. To change the logger implementation that the block uses, click the plus sign icon at the top right of the Logger panel and then click Set Logger. You can choose to use the Enterprise Library Logging Application Block or a custom logger implementation.
For information about how to create your own custom logging implementation, see the topic "Creating a Custom Logger."
For information about the Enterprise Library Logging Application Block, see the topic "The Logging Application Block" on MSDN.
To access Windows Azure Diagnostics, you must run your role under full trust. For more information, see "Overview of Windows Azure Diagnostics."
Source Schema for the Autoscaling Application Block
This topic lists the XML elements and attributes used to configure the Autoscaling Application Block. You can manually edit the XML data, but the Enterprise Library configuration tool greatly simplifies this task. If you choose to edit the XMLmanually, use the schema information contained in this topic.
The configuration file has the following section handler declarations.
You must add this section to the application configuration file so that the Enterprise Library common infrastructure recognizes the Autoscaling Application Block configuration settings.
XML
<configSections> <section name="typeRegistrationProvidersConfiguration" type="Microsoft.Practices.EnterpriseLibrary.Common.Configuration.TypeRegistrationProvidersConfigurationSection, Microsoft.Practices.EnterpriseLibrary.Common, Version=5.0.505.0, Culture=neutral, PublicKeyToken=31bf3856ad364e35"/> <section name="autoscalingConfiguration" type="Microsoft.Practices.EnterpriseLibrary.WindowsAzure.Autoscaling.Configuration.AutoscalingSettings,

Microsoft.Practices.EnterpriseLibrary.WindowsAzure.Autoscaling, Version=1.0.0.0, Culture=neutral, PublicKeyToken=31bf3856ad364e35" requirePermission="true" /> </configSections> <typeRegistrationProvidersConfiguration> <add name="autoscalingConfiguration" sectionName="autoscalingConfiguration"/> </typeRegistrationProvidersConfiguration>
The section handler declaration contains the name of the configuration settings section and the name of the section handler class that processes configuration data in that section. The name of the configuration settings section is autoscalingConfiguration. The name of the section handler class is Microsoft.Practices.EnterpriseLibrary.WindowsAzure.Autoscaling.Configuration.AutoscalingSettings.
The autoscalingConfiguration Element The autoscalingConfiguration element specifies the configuration of an Autoscaling Application Block. This element is required.
The following sections describe attributes and child elements of the autoscalingConfiguration element.
Attributes of the autoscalingConfiguration Element The following table lists the attributes of the autoscalingConfiguration element.
Attribute Description
dataPointsStoreAccount The block uses a table in this Windows Azure storage account to store the data points (for example, performance counter values and Windows Azure queue lengths) that it collects from your Windows Azure environment. The value of this attribute is either a connection string for a Windows Azure storage account, or the name of a storage account setting defined in the Windows Azure .cscfg file in this Visual Studio solution if you are hosting the block in a Windows Azure role.
Storing the data point store in the local storage emulator is not supported.
This attribute is required.
dataPointsTableName The block uses this table, found in the storage account specified by the dataPointsStoreAccount attribute, to store the data points that it collects from your Windows Azure environment.
The default value for this attribute is "AutoscalerDatapoints."
ruleEvaluationRate The block uses this value to determine how frequently it evaluates the autoscaling rules to determine if it should perform any scaling actions.
The default value for this attribute is four minutes ("00:04:00").
loggerName The name of the logger that the Autoscaling Application Block uses to log details of its activities. See the loggers element below.
This attribute is required.
rulesStoreName The name of the store that the Autoscaling Application Block uses to store autoscaling rule definitions. See the rulesStores element below.
This attribute is required.
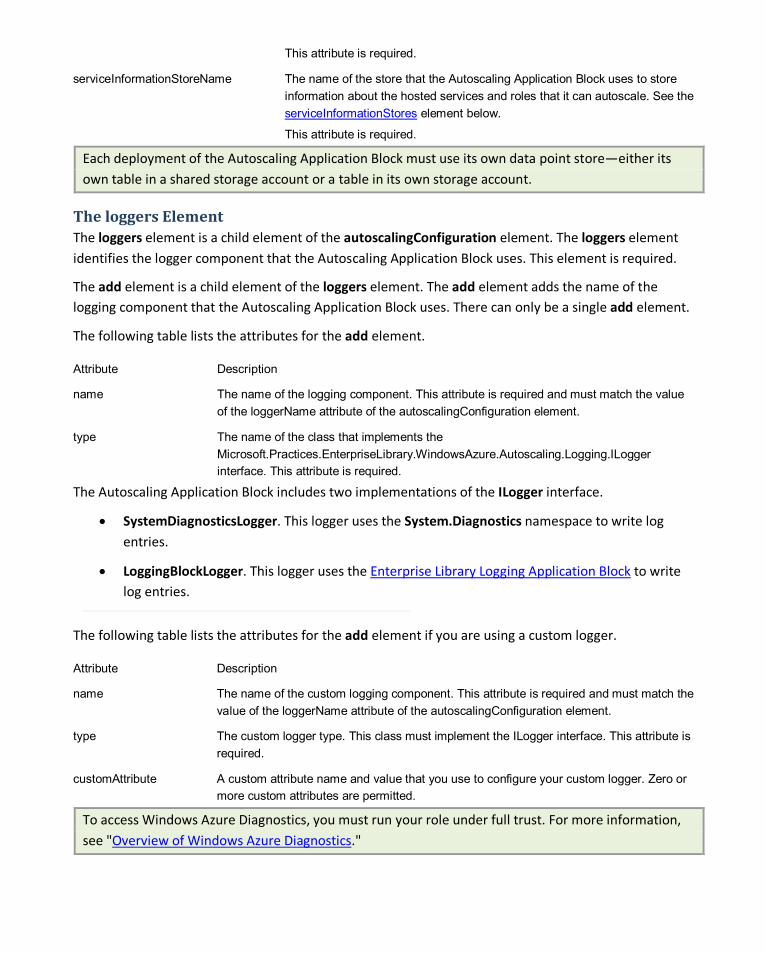
serviceInformationStoreName The name of the store that the Autoscaling Application Block uses to store information about the hosted services and roles that it can autoscale. See the serviceInformationStores element below.
This attribute is required.
Each deployment of the Autoscaling Application Block must use its own data point store—either its own table in a shared storage account or a table in its own storage account.
The loggers Element The loggers element is a child element of the autoscalingConfiguration element. The loggers element identifies the logger component that the Autoscaling Application Block uses. This element is required.
The add element is a child element of the loggers element. The add element adds the name of the logging component that the Autoscaling Application Block uses. There can only be a single add element.
The following table lists the attributes for the add element.
Attribute Description
name The name of the logging component. This attribute is required and must match the value of the loggerName attribute of the autoscalingConfiguration element.
type The name of the class that implements the Microsoft.Practices.EnterpriseLibrary.WindowsAzure.Autoscaling.Logging.ILogger interface. This attribute is required.
The Autoscaling Application Block includes two implementations of the ILogger interface.
• SystemDiagnosticsLogger. This logger uses the System.Diagnostics namespace to write log entries.
• LoggingBlockLogger. This logger uses the Enterprise Library Logging Application Block to write log entries.
The following table lists the attributes for the add element if you are using a custom logger.
Attribute Description
name The name of the custom logging component. This attribute is required and must match the value of the loggerName attribute of the autoscalingConfiguration element.
type The custom logger type. This class must implement the ILogger interface. This attribute is required.
customAttribute A custom attribute name and value that you use to configure your custom logger. Zero or more custom attributes are permitted.
To access Windows Azure Diagnostics, you must run your role under full trust. For more information, see "Overview of Windows Azure Diagnostics."

The rulesStores Element The rulesStores element is a child element of the autoscalingConfiguration element. The rulesStores element identifies the store that the Autoscaling Application Block uses to store autoscaling rules. This element is required.
The add element is a child element of the rulesStores element. The add element adds the name of the store that the Autoscaling Application Block uses. There can be only a single add element. The rules store can be a Windows Azure blob, a local file, or a custom store.
The following table lists the attributes for the add element if you are using blob storage for the rules.
Attribute Description
name The name of the rules store. This attribute is required and must match the value of the rulesStoreName attribute of the autoscalingConfiguration element.
type "Microsoft.Practices.EnterpriseLibrary.WindowsAzure.Autoscaling.Rules.Configuration.BlobXmlFileRulesStore." This attribute is required.
blobName The name of the blob where the Autoscaling Application Block stores the autoscaling rules. This attribute is required.
blobContainerName The name of the blob container that contains the blob identified by the blobName attribute. This attribute is required.
storageAccount The name of the Windows Azure storage account that contains the blob container identified by the blobContainerName attribute. The value of this attribute is either a connection string for a Windows Azure storage account, or the name of a storage account defined in the Windows Azure .cscfg file in this Visual Studio solution. This attribute is required.
Using HTTP could lead to disclosure of information and could allow someone to tamper with the data being transferred. You should use HTTPS in most cases.
monitoringRate The interval at which the Autoscaling Application Block checks for changes in the rules store. The default value for this attribute is 30 seconds ("00:00:30").
certificateStoreLocation The location of the certificate store that contains the certificate that the block uses to decrypt the rules store. Possible values are LocalMachine and CurrentUser. The default value for this attribute is LocalMachine.
certificateStoreName The name of the certificate store that contains the certificate that the block uses to decrypt the rules store. Possible values are AddressBook, AuthRoot, CertificateAuthority, Disallowed, My, Root, TrustedPeople, and TrustedPublisher. The default value for this attribute is My.
certificateThumbprint The thumbprint that identifies the certificate to use to decrypt the service information store.
checkCertificateValidity A Boolean value that specifieswhether the block should request only valid certificates from the certificate store. An example of an invalid certificate is a certificate that has expired. The default value is false.
For more information about encrypting the rules store, see the topic "Encrypting the Rules Store and the Service Information Store."
The following table lists the attributes for the add element if you are using local file storage for the rules.

Attribute Description
name The name of the rules store. This attribute is required and must match the value of the rulesStoreName attribute of the autoscalingConfiguration element.
type "Microsoft.Practices.EnterpriseLibrary.WindowsAzure.Autoscaling.Rules.Configuration.LocalXmlFileRulesStore." This attribute is required.
filename The name of the file where the Autoscaling Application Block stores the autoscaling rules. This attribute is required.
To minimize the risk of disclosing information, you should protect the file using an ACL.
certificateStoreLocation The location of the certificate store that contains the certificate that the block uses to decrypt the rules store. Possible values are LocalMachine and CurrentUser.The default value for this attribute is LocalMachine.
certificateStoreName The name of the certificate store that contains the certificate that the block uses to decrypt the rules store. Possible values are AddressBook, AuthRoot, CertificateAuthority, Disallowed, My, Root, TrustedPeople, and TrustedPublisher. The default value for this attribute is My.
certificateThumbprint The thumbprint that identifies the certificate to use to decrypt the service information store.
checkCertificateValidity A Boolean value that specifieswhether the block should request only valid certificates from the certificate store. An example of an invalid certificate is a certificate that has expired. The default value is false.
For more information about encrypting the rules store, see the topic "Encrypting the Rules Store and the Service Information Store."
The following table lists the attributes for the add element if you are using a custom rules store for the rules.
Attribute Description
name The name of the rules store. This attribute is required and must match the value of the rulesStoreName attribute of the autoscalingConfiguration element.
type The custom rules store type. This class must implement the IRulesStore interface. This attribute is required.
customAttribute1 A custom attribute name and value that you use to configure your custom store. Zero or more custom attributes are permitted.
The serviceInformationStores Element The serviceInformationStores element is a child element of the autoscalingConfiguration element. The serviceInformationStores element identifies the store that the Autoscaling Application Block uses to store information about the hosted services and roles that make up the application that the block is autoscaling.
The add element is a child element of the serviceInformationStores element. The add element adds the name of the store that the Autoscaling Application Block uses. There can only be a single add element. The service information store can be a Windows Azure blob, a local file, or a custom store.

The following table lists the attributes for the add element if you are using blob storage for the service information.
Attribute Description
name The name of the service information store. This attribute is required and must match the value of the serviceInformationStoreName attribute of the autoscalingConfiguration element.
type "Microsoft.Practices.EnterpriseLibrary.WindowsAzure.Autoscaling.ServiceModel.Configuration.BlobXmlFileServiceInformationStore." This attribute is required.
blobName The name of the blob where the Autoscaling Application Block stores the service information. This attribute is required.
blobContainerName The name of the blob container that contains the blob identified by the blobName attribute. This attribute is required.
storageAccount The name of the Windows Azure storage account that contains the blob container identified by the blobContainerName attribute. The value of this attribute is either a connection string for a Windows Azure storage account, or the name of a storage account defined in the Windows Azure .cscfg file in this Visual Studio solution. This attribute is required.
Using HTTP could lead to disclosure of information and could allow someone to tamper with the data being transferred. You should use HTTPS in most cases.
monitoringRate The interval, specified in seconds, at which the Autoscaling Application Block checks for changes in the service information store. The default value for this attribute is thirty seconds ("00:00:30").
certificateStoreLocation The location of the certificate store that contains the certificate that the block uses to decrypt the service information store. Possible values are LocalMachine and CurrentUser.The default value for this attribute is LocalMachine.
certificateStoreName The name of the certificate store that contains the certificate that the block uses to decrypt the service information store. Possible values are AddressBook, AuthRoot, CertificateAuthority, Disallowed, My, Root, TrustedPeople, and TrustedPublisher. The default value for this attribute is My.
certificateThumbprint The thumbprint that identifies the certificate to use to decrypt the service information store.
checkCertificateValidity A Boolean value that specifieswhether the block should request only valid certificates from the certificate store. An example of an invalid certificate is a certificate that has expired. The default value is false.
For more information about encrypting the service information store, see the topic "Encrypting the Rules Store and the Service Information Store."
The following table lists the attributes for the add element if you are using local file storage for the service information.
Attribute Description
name The name of the service information store. This attribute is required and must match the value of the serviceInformationStoreName attribute of the autoscalingConfiguration element.

type "Microsoft.Practices.EnterpriseLibrary.WindowsAzure.Autoscaling.ServiceModel.Configuration.LocalXmlFileServiceInformationStore." This attribute is required.
fileName The name of the file where the Autoscaling Application Block stores the service information. This attribute is required.
To minimize the risk of disclosing information, you should protect the file using an ACL.
certificateStoreLocation The location of the certificate store that contains the certificate that the block uses to decrypt the service information store. Possible values are LocalMachine and CurrentUser.The default value for this attribute is LocalMachine.
certificateStoreName The name of the certificate store that contains the certificate that the block uses to decrypt the service information store. Possible values are AddressBook, AuthRoot, CertificateAuthority, Disallowed, My, Root, TrustedPeople, and TrustedPublisher. The default value for this attribute is My.
certificateThumbprint The thumbprint that identifies the certificate to use to decrypt the service information store.
checkCertificateValidity A Boolean value that specifieswhether the block should request only valid certificates from the certificate store. An example of an invalid certificate is a certificate that has expired. The default value is false.
For more information about encrypting the service information store, see the topic "Encrypting the Rules Store and the Service Information Store."
The following table lists the attributes for the add element if you are using a custom service information store for the rules.
Attribute Description
name The name of the service information store. This attribute is required and must match the value of the serviceInformationStoreName attribute of the autoscalingConfiguration element.
type The custom service information store type. This class must implement the IServiceInformationStore interface. This attribute is required.
customAttribute1 A custom attribute name and value that you use to configure your custom store. Zero or more custom attributes are permitted.
The advancedOptions Element The advancedOptions element is a child element of the autoscalingConfiguration element. The advancedOptions element identifies the tracker component that the Autoscaling Application Block uses to track autoscaling operations and the execution lease component that the Autoscaling Application Block uses to ensure that only a single instance of the autoscaler component can run at any one time.
The serviceManagementRequestTrackerelement is a child element of the advancedOptions element. The serviceManagementRequestTrackerelement adds the name of the storage account that the Autoscaling Application Block uses to store service management operations tracking data. There can be only a single serviceManagementRequestTrackerelement.
The following table lists the attributes of the serviceManagementRequestTrackerelement.
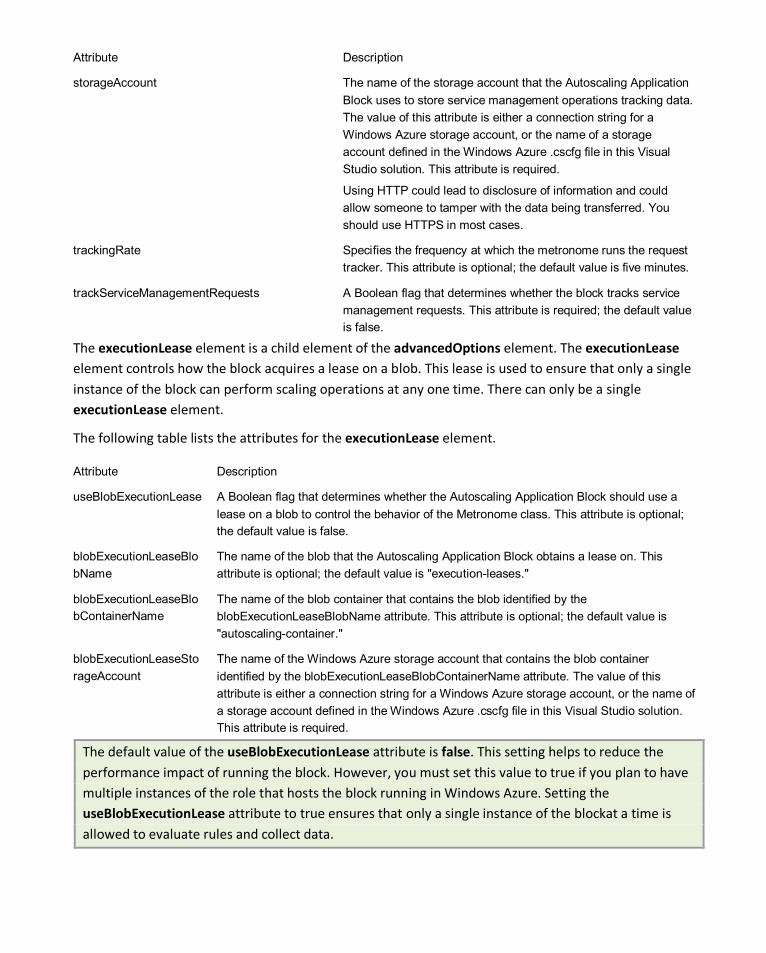
Attribute Description
storageAccount The name of the storage account that the Autoscaling Application Block uses to store service management operations tracking data. The value of this attribute is either a connection string for a Windows Azure storage account, or the name of a storage account defined in the Windows Azure .cscfg file in this Visual Studio solution. This attribute is required.
Using HTTP could lead to disclosure of information and could allow someone to tamper with the data being transferred. You should use HTTPS in most cases.
trackingRate Specifies the frequency at which the metronome runs the request tracker. This attribute is optional; the default value is five minutes.
trackServiceManagementRequests A Boolean flag that determines whether the block tracks service management requests. This attribute is required; the default value is false.
The executionLease element is a child element of the advancedOptions element. The executionLease element controls how the block acquires a lease on a blob. This lease is used to ensure that only a single instance of the block can perform scaling operations at any one time. There can only be a single executionLease element.
The following table lists the attributes for the executionLease element.
Attribute Description
useBlobExecutionLease A Boolean flag that determines whether the Autoscaling Application Block should use a lease on a blob to control the behavior of the Metronome class. This attribute is optional; the default value is false.
blobExecutionLeaseBlobName
The name of the blob that the Autoscaling Application Block obtains a lease on. This attribute is optional; the default value is "execution-leases."
blobExecutionLeaseBlobContainerName
The name of the blob container that contains the blob identified by the blobExecutionLeaseBlobName attribute. This attribute is optional; the default value is "autoscaling-container."
blobExecutionLeaseStorageAccount
The name of the Windows Azure storage account that contains the blob container identified by the blobExecutionLeaseBlobContainerName attribute. The value of this attribute is either a connection string for a Windows Azure storage account, or the name of a storage account defined in the Windows Azure .cscfg file in this Visual Studio solution. This attribute is required.
The default value of the useBlobExecutionLease attribute is false. This setting helps to reduce the performance impact of running the block. However, you must set this value to true if you plan to have multiple instances of the role that hosts the block running in Windows Azure. Setting the useBlobExecutionLease attribute to true ensures that only a single instance of the blockat a time is allowed to evaluate rules and collect data.
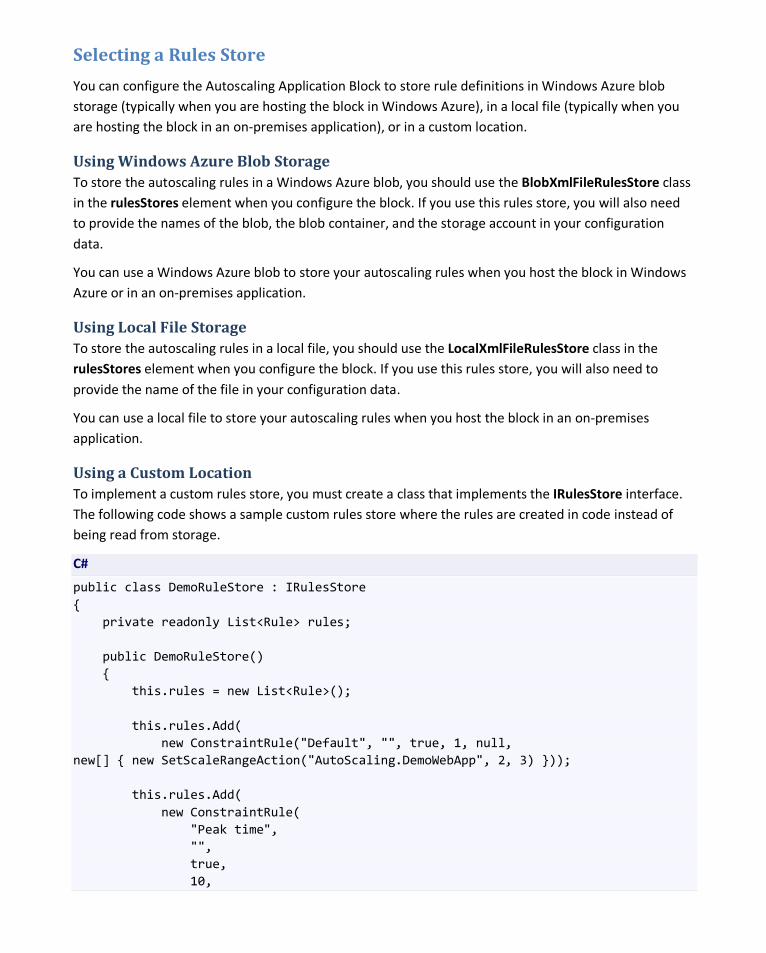
Selecting a Rules Store
You can configure the Autoscaling Application Block to store rule definitions in Windows Azure blob storage (typically when you are hosting the block in Windows Azure), in a local file (typically when you are hosting the block in an on-premises application), or in a custom location.
Using Windows Azure Blob Storage To store the autoscaling rules in a Windows Azure blob, you should use the BlobXmlFileRulesStore class in the rulesStores element when you configure the block. If you use this rules store, you will also need to provide the names of the blob, the blob container, and the storage account in your configuration data.
You can use a Windows Azure blob to store your autoscaling rules when you host the block in Windows Azure or in an on-premises application.
Using Local File Storage To store the autoscaling rules in a local file, you should use the LocalXmlFileRulesStore class in the rulesStores element when you configure the block. If you use this rules store, you will also need to provide the name of the file in your configuration data.
You can use a local file to store your autoscaling rules when you host the block in an on-premises application.
Using a Custom Location To implement a custom rules store, you must create a class that implements the IRulesStore interface. The following code shows a sample custom rules store where the rules are created in code instead of being read from storage.
C#
public class DemoRuleStore : IRulesStore { private readonly List<Rule> rules; public DemoRuleStore() { this.rules = new List<Rule>(); this.rules.Add( new ConstraintRule("Default", "", true, 1, null, new[] { new SetScaleRangeAction("AutoScaling.DemoWebApp", 2, 3) })); this.rules.Add( new ConstraintRule( "Peak time", "", true, 10,

new Timetable(new TimeSpan(10, 05, 0), TimeSpan.FromHours(2), new RelativeMonthlyRecurrence(RelativeDayOfWeek.Friday, RelativeDayPosition.Fourth), TimeSpan.FromHours(-6)), new[] { new SetScaleRangeAction("AutoScaling.DemoWebApp", 3, 5) })); public IEnumerable<Rule> GetRules() { return this.rules; } }
Selecting a Service Information Store
You can configure the Autoscaling Application Block to service information in Windows Azure blob storage (typically when you are hosting the block in Windows Azure), in a local file (typically when you are hosting the block in an on-premises application), or in a custom location.
Using Windows Azure Blob Storage To store the service information in a Windows Azure blob, you should use the BlobXmlFileServiceInformationStore class in the serviceInformationStores element when you configure the block. If you use this service information store, you will also need to provide the names of the blob, the blob container, and the storage account in your configuration data.
You can use a Windows Azure blob to store your service information when you host the block in Windows Azure or in an on-premises application.
Using Local File Storage To store the service information in a local file, you should use the LocalXmlFileServiceInformationStore class in the serviceInformationStores element when you configure the block. If you use this rules store, you will also need to provide the name of the file in your configuration data.
You can use a local file to store your service information when you host the block in an on-premises application.
Key Scenarios This section describes the most common situations developers must address when using the Autoscaling Application Block. Each scenario explains the task, gives a real-world situation for the task, and includes code demonstrating how to use the Autoscaling Application Block to complete the task.
• Collecting Performance Counter Data
• Implementing Throttling Behavior
• Storing Your Autoscaling Rules
• Storing Your Service Information Data
• Reading the Autoscaling Application Block Log Messages

Collecting Performance Counter Data
Reactive rules can use performance counter data from roles as part of the rule definition. For example, a rule may monitor the CPU utilization of a role to determine whether the block should scale a target. The block reads performance counter data from the Windows Azure Diagnostics table named WADPerformanceCountersTable in Windows Azure storage.
By default, Windows Azure does not write performance counter data to the Windows Azure Diagnostics table in Windows Azure storage. Therefore, you should modify the roles from which you need to collect performance counter data to save the data.
The role must be running in full trust mode to be allowed to write performance monitoring data to the Windows Azure Diagnostics table.
The following code sample shows how you can modify a web role to write CPU usage performance data to storage. In this example, the web role samples the percent processor time usage performance counter every 30 seconds, and writes the performance data to Windows Azure Diagnostics table storage every minute.
C#
using System; using Microsoft.WindowsAzure; using Microsoft.WindowsAzure.Diagnostics; using Microsoft.WindowsAzure.ServiceRuntime; public class WebRole : RoleEntryPoint { public override bool OnStart() { var config = DiagnosticMonitor.GetDefaultInitialConfiguration(); var cloudStorageAccount = CloudStorageAccount.Parse( RoleEnvironment.GetConfigurationSettingValue( "Microsoft.WindowsAzure.Plugins.Diagnostics.ConnectionString")); // Get the perf counters config.PerformanceCounters.ScheduledTransferPeriod = TimeSpan.FromMinutes(1); // Add the perf counters config.PerformanceCounters.DataSources.Add( new PerformanceCounterConfiguration { CounterSpecifier = @"\Processor(_Total)\% Processor Time", SampleRate = TimeSpan.FromSeconds(30) });
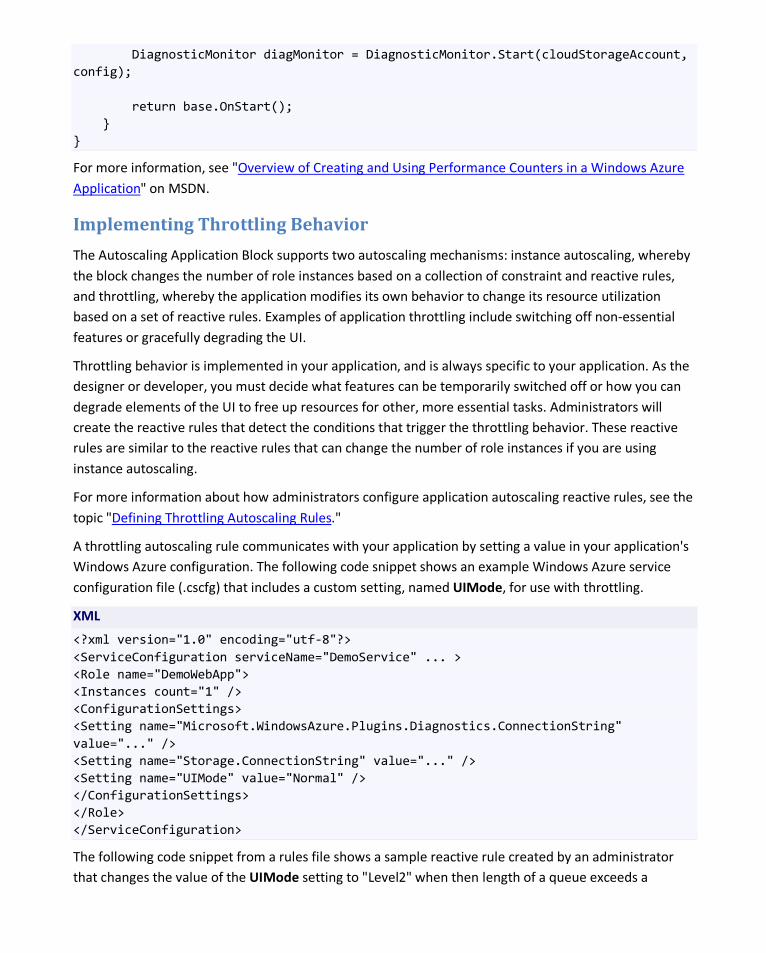
DiagnosticMonitor diagMonitor = DiagnosticMonitor.Start(cloudStorageAccount, config); return base.OnStart(); } }
For more information, see "Overview of Creating and Using Performance Counters in a Windows Azure Application" on MSDN.
Implementing Throttling Behavior
The Autoscaling Application Block supports two autoscaling mechanisms: instance autoscaling, whereby the block changes the number of role instances based on a collection of constraint and reactive rules, and throttling, whereby the application modifies its own behavior to change its resource utilization based on a set of reactive rules. Examples of application throttling include switching off non-essential features or gracefully degrading the UI.
Throttling behavior is implemented in your application, and is always specific to your application. As the designer or developer, you must decide what features can be temporarily switched off or how you can degrade elements of the UI to free up resources for other, more essential tasks. Administrators will create the reactive rules that detect the conditions that trigger the throttling behavior. These reactive rules are similar to the reactive rules that can change the number of role instances if you are using instance autoscaling.
For more information about how administrators configure application autoscaling reactive rules, see the topic "Defining Throttling Autoscaling Rules."
A throttling autoscaling rule communicates with your application by setting a value in your application's Windows Azure configuration. The following code snippet shows an example Windows Azure service configuration file (.cscfg) that includes a custom setting, named UIMode, for use with throttling.
XML
<?xml version="1.0" encoding="utf-8"?> <ServiceConfiguration serviceName="DemoService" ... > <Role name="DemoWebApp"> <Instances count="1" /> <ConfigurationSettings> <Setting name="Microsoft.WindowsAzure.Plugins.Diagnostics.ConnectionString" value="..." /> <Setting name="Storage.ConnectionString" value="..." /> <Setting name="UIMode" value="Normal" /> </ConfigurationSettings> </Role> </ServiceConfiguration>
The following code snippet from a rules file shows a sample reactive rule created by an administrator that changes the value of the UIMode setting to "Level2" when then length of a queue exceeds a
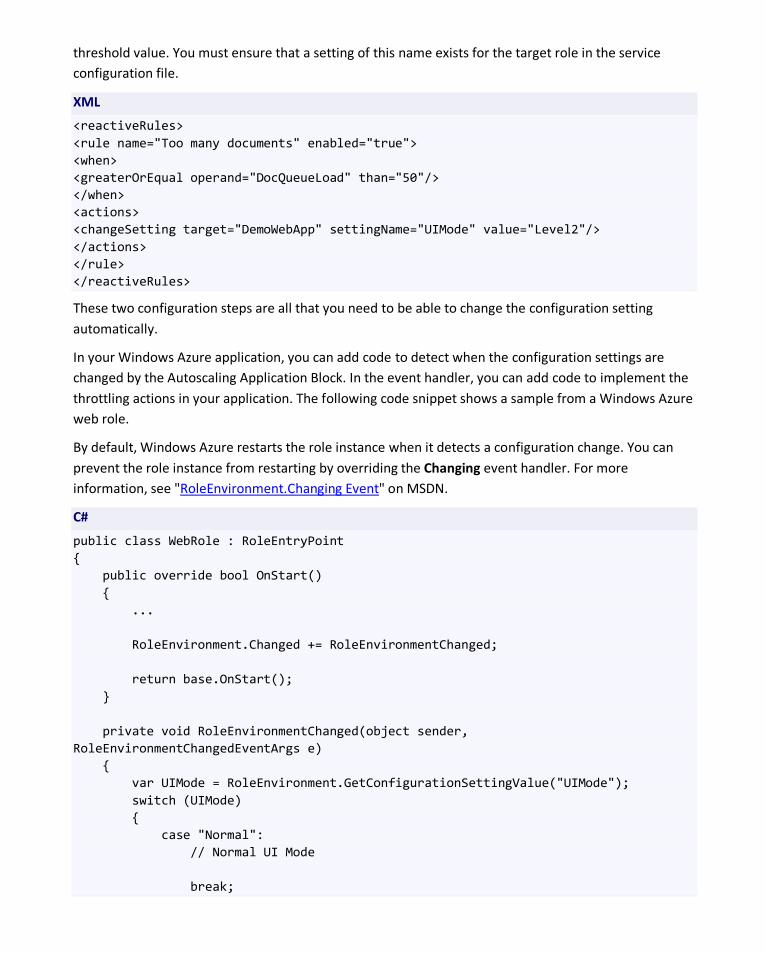
threshold value. You must ensure that a setting of this name exists for the target role in the service configuration file.
XML
<reactiveRules> <rule name="Too many documents" enabled="true"> <when> <greaterOrEqual operand="DocQueueLoad" than="50"/> </when> <actions> <changeSetting target="DemoWebApp" settingName="UIMode" value="Level2"/> </actions> </rule> </reactiveRules>
These two configuration steps are all that you need to be able to change the configuration setting automatically.
In your Windows Azure application, you can add code to detect when the configuration settings are changed by the Autoscaling Application Block. In the event handler, you can add code to implement the throttling actions in your application. The following code snippet shows a sample from a Windows Azure web role.
By default, Windows Azure restarts the role instance when it detects a configuration change. You can prevent the role instance from restarting by overriding the Changing event handler. For more information, see "RoleEnvironment.Changing Event" on MSDN.
C#
public class WebRole : RoleEntryPoint { public override bool OnStart() { ... RoleEnvironment.Changed += RoleEnvironmentChanged; return base.OnStart(); } private void RoleEnvironmentChanged(object sender, RoleEnvironmentChangedEventArgs e) { var UIMode = RoleEnvironment.GetConfigurationSettingValue("UIMode"); switch (UIMode) { case "Normal": // Normal UI Mode break;
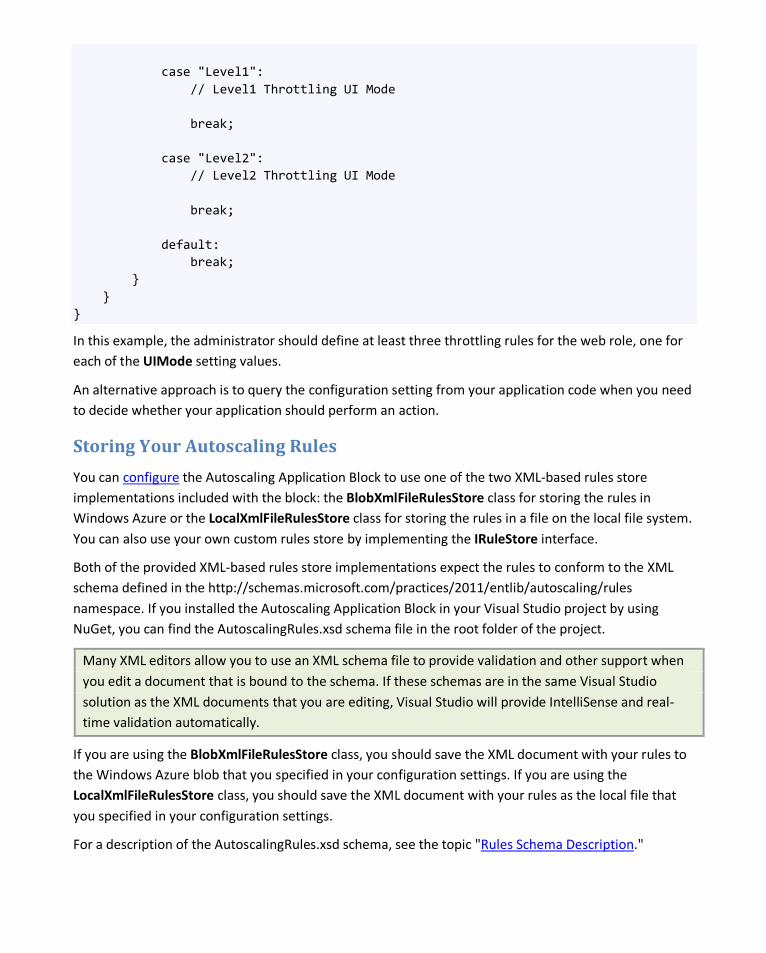
case "Level1": // Level1 Throttling UI Mode break; case "Level2": // Level2 Throttling UI Mode break; default: break; } } }
In this example, the administrator should define at least three throttling rules for the web role, one for each of the UIMode setting values.
An alternative approach is to query the configuration setting from your application code when you need to decide whether your application should perform an action.
Storing Your Autoscaling Rules
You can configure the Autoscaling Application Block to use one of the two XML-based rules store implementations included with the block: the BlobXmlFileRulesStore class for storing the rules in Windows Azure or the LocalXmlFileRulesStore class for storing the rules in a file on the local file system. You can also use your own custom rules store by implementing the IRuleStore interface.
Both of the provided XML-based rules store implementations expect the rules to conform to the XML schema defined in the http://schemas.microsoft.com/practices/2011/entlib/autoscaling/rules namespace. If you installed the Autoscaling Application Block in your Visual Studio project by using NuGet, you can find the AutoscalingRules.xsd schema file in the root folder of the project.
Many XML editors allow you to use an XML schema file to provide validation and other support when you edit a document that is bound to the schema. If these schemas are in the same Visual Studio solution as the XML documents that you are editing, Visual Studio will provide IntelliSense and real-time validation automatically.
If you are using the BlobXmlFileRulesStore class, you should save the XML document with your rules to the Windows Azure blob that you specified in your configuration settings. If you are using the LocalXmlFileRulesStore class, you should save the XML document with your rules as the local file that you specified in your configuration settings.
For a description of the AutoscalingRules.xsd schema, see the topic "Rules Schema Description."
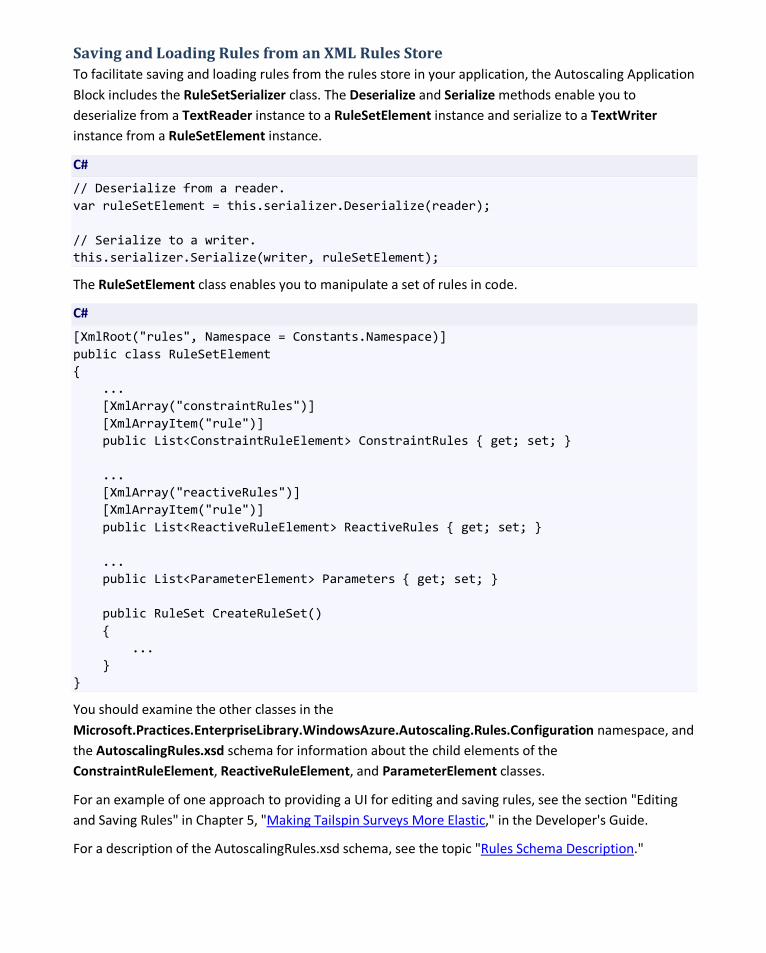
Saving and Loading Rules from an XML Rules Store To facilitate saving and loading rules from the rules store in your application, the Autoscaling Application Block includes the RuleSetSerializer class. The Deserialize and Serialize methods enable you to deserialize from a TextReader instance to a RuleSetElement instance and serialize to a TextWriter instance from a RuleSetElement instance.
C#
// Deserialize from a reader. var ruleSetElement = this.serializer.Deserialize(reader); // Serialize to a writer. this.serializer.Serialize(writer, ruleSetElement);
The RuleSetElement class enables you to manipulate a set of rules in code.
C#
[XmlRoot("rules", Namespace = Constants.Namespace)] public class RuleSetElement { ... [XmlArray("constraintRules")] [XmlArrayItem("rule")] public List<ConstraintRuleElement> ConstraintRules { get; set; } ... [XmlArray("reactiveRules")] [XmlArrayItem("rule")] public List<ReactiveRuleElement> ReactiveRules { get; set; } ... public List<ParameterElement> Parameters { get; set; } public RuleSet CreateRuleSet() { ... } }
You should examine the other classes in the Microsoft.Practices.EnterpriseLibrary.WindowsAzure.Autoscaling.Rules.Configuration namespace, and the AutoscalingRules.xsd schema for information about the child elements of the ConstraintRuleElement, ReactiveRuleElement, and ParameterElement classes.
For an example of one approach to providing a UI for editing and saving rules, see the section "Editing and Saving Rules" in Chapter 5, "Making Tailspin Surveys More Elastic," in the Developer's Guide.
For a description of the AutoscalingRules.xsd schema, see the topic "Rules Schema Description."

The content of the store should always be encoded using UTF-8 (with or without the byte order mark (BOM)).
Rules Schema Description
This topic lists the XML elements and attributes used to define the autoscaling rules in the Autoscaling Application Block. You can manually edit the XML data in a text or XML editor, or build your own tool to edit the configuration data. You can use the schema information contained in this topic when you edit the data manually, or when you design your own custom UI to edit this data.
If you installed the Autoscaling Application Block in your Visual Studio project by using NuGet, you can find the AutoscalingRules.xsd schema file in the root folder of the project.
The rules file has the following top-level structure.
XML
<rules xmlns= http://schemas.microsoft.com/practices/2011/entlib/autoscaling/rules enabled="true"> <constraintRules> ... </constraintRules> <reactiveRules> ... </reactiveRules> <operands> ... </operands> </rules>
The rules Element The top-level rules element has three optional child elements: the constraintRules element, the reactiveRules element, and the operands element (if there is a reactiveRules element, there must also be an operands element).
The enabled attribute of the rules element is a global flag that you can use to disable all rules evaluation in the Autoscaling Application Block. Its default value is true.
The constraintRules Element The constraintRules element contains one or more rule elements that define constraint rules. Each rule element contains an optional actions element and an optional timetable element. The actions element contains one or more range elements.
The following snippet shows an example of a constraintRules element. For more examples, see the topic "Defining Constraint Rules."
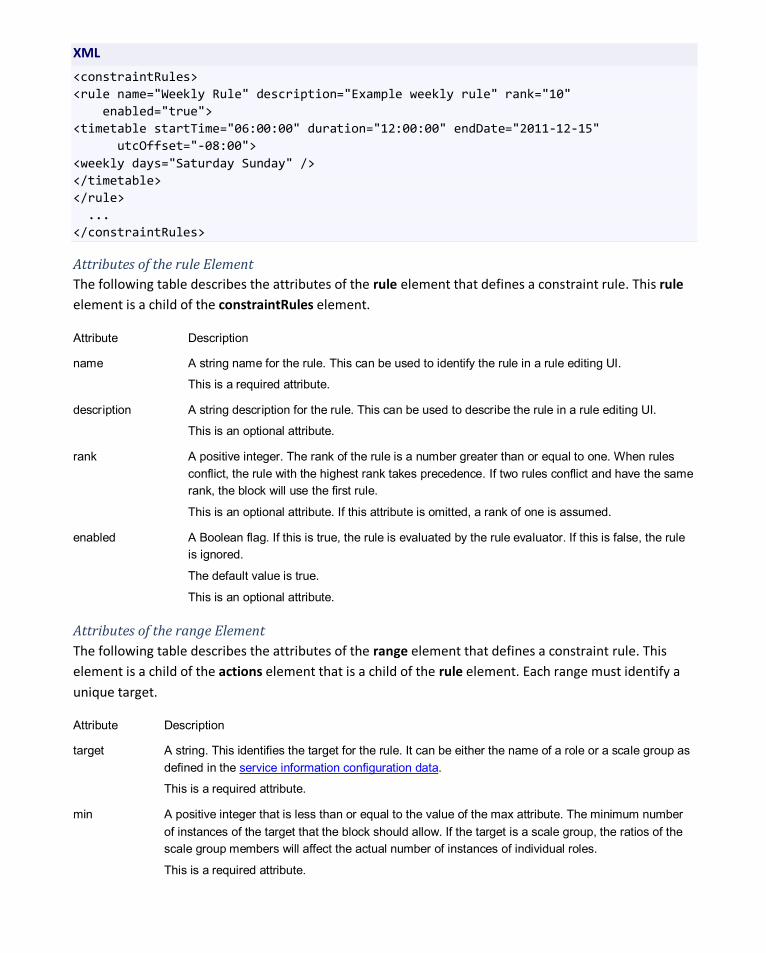
XML
<constraintRules> <rule name="Weekly Rule" description="Example weekly rule" rank="10" enabled="true"> <timetable startTime="06:00:00" duration="12:00:00" endDate="2011-12-15" utcOffset="-08:00"> <weekly days="Saturday Sunday" /> </timetable> </rule> ... </constraintRules>
Attributes of the rule Element The following table describes the attributes of the rule element that defines a constraint rule. This rule element is a child of the constraintRules element.
Attribute Description
name A string name for the rule. This can be used to identify the rule in a rule editing UI.
This is a required attribute.
description A string description for the rule. This can be used to describe the rule in a rule editing UI.
This is an optional attribute.
rank A positive integer. The rank of the rule is a number greater than or equal to one. When rules conflict, the rule with the highest rank takes precedence. If two rules conflict and have the same rank, the block will use the first rule.
This is an optional attribute. If this attribute is omitted, a rank of one is assumed.
enabled A Boolean flag. If this is true, the rule is evaluated by the rule evaluator. If this is false, the rule is ignored.
The default value is true.
This is an optional attribute.
Attributes of the range Element The following table describes the attributes of the range element that defines a constraint rule. This element is a child of the actions element that is a child of the rule element. Each range must identify a unique target.
Attribute Description
target A string. This identifies the target for the rule. It can be either the name of a role or a scale group as defined in the service information configuration data.
This is a required attribute.
min A positive integer that is less than or equal to the value of the max attribute. The minimum number of instances of the target that the block should allow. If the target is a scale group, the ratios of the scale group members will affect the actual number of instances of individual roles.
This is a required attribute.

max A positive integer that is greater than or equal to the value of the min attribute. The maximum number of instances of the target that the block should allow. If the target is a scale group, the ratios of the scale group members will affect the actual number of instances of individual roles.
This is a required attribute.
Attributes and Children of the timetable Element The following table describes the attributes of the timetable element. The timetable element is an optional child of the rule element. If there is no timetable, the rule is assumed to alwaysbe in effect.
Attribute Description
startTime The time that the rule becomes active.
This is a required attribute.
duration The period after the start time that the rule remains active.
This is a required attribute.
startDate The date that the rule first becomes active.
This is an optional attribute.
endDate The date when the rule ceases to be active.
This is an optional attribute.
utcOffset The number of hours, positive or negative, offset from UTC. This allows you to enter the start time in your local time.
This is an optional attribute.
The timetable element contains one of the following child elements.
Element Description
daily Indicates that the rule applies every day. This element has no attributes.
weekly Indicates that the rule is active on specific days of the week.
monthly Indicates that the rule is active on specific days in the month. For example, the 15th or the 22nd.
relativeMonthly Indicates that the rule is active on relative days in the month. For example on the second day, or the last day.
yearly Indicates that the rule is active on specific days in the year.
relativeYearly Indicates that the rule is active on relative days in the year. For example on the second day, or the last day.
The following table lists the attributes of the weekly element.
Attribute Description
days A string containing one or more of Monday, Tuesday, Wednesday, Thursday, Friday, Saturday, Sunday.
This is a required attribute.
The following table lists the attributes of the monthly element.
Attribute Description
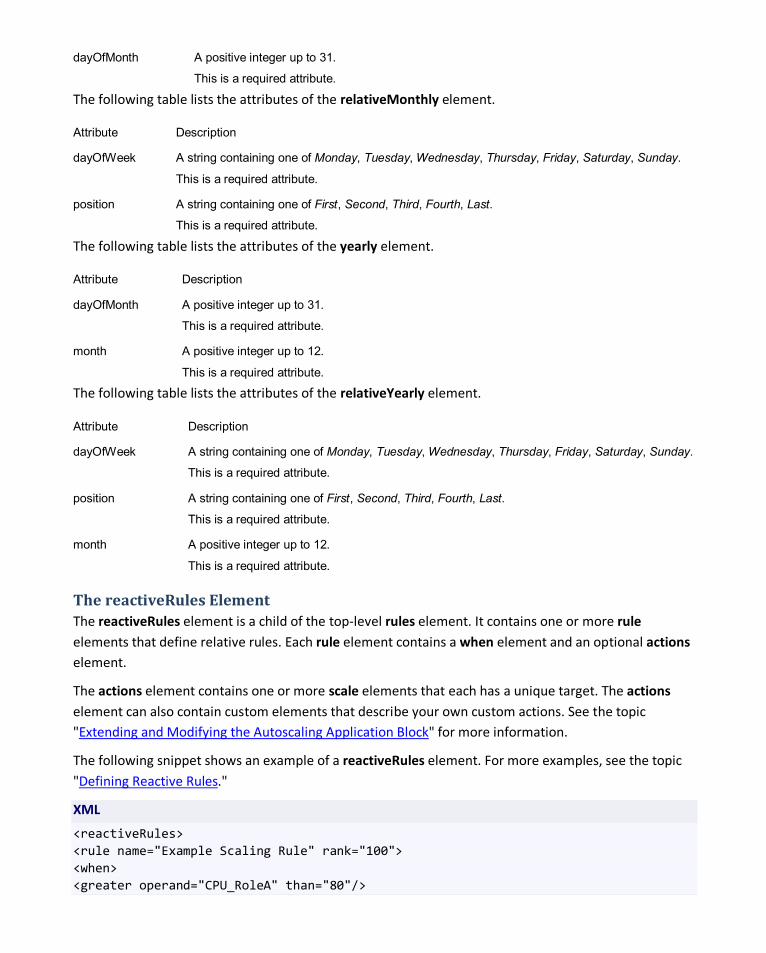
dayOfMonth A positive integer up to 31.
This is a required attribute.
The following table lists the attributes of the relativeMonthly element.
Attribute Description
dayOfWeek A string containing one of Monday, Tuesday, Wednesday, Thursday, Friday, Saturday, Sunday.
This is a required attribute.
position A string containing one of First, Second, Third, Fourth, Last.
This is a required attribute.
The following table lists the attributes of the yearly element.
Attribute Description
dayOfMonth A positive integer up to 31.
This is a required attribute.
month A positive integer up to 12.
This is a required attribute.
The following table lists the attributes of the relativeYearly element.
Attribute Description
dayOfWeek A string containing one of Monday, Tuesday, Wednesday, Thursday, Friday, Saturday, Sunday.
This is a required attribute.
position A string containing one of First, Second, Third, Fourth, Last.
This is a required attribute.
month A positive integer up to 12.
This is a required attribute.
The reactiveRules Element The reactiveRules element is a child of the top-level rules element. It contains one or more rule elements that define relative rules. Each rule element contains a when element and an optional actions element.
The actions element contains one or more scale elements that each has a unique target. The actions element can also contain custom elements that describe your own custom actions. See the topic "Extending and Modifying the Autoscaling Application Block" for more information.
The following snippet shows an example of a reactiveRules element. For more examples, see the topic "Defining Reactive Rules."
XML
<reactiveRules> <rule name="Example Scaling Rule" rank="100"> <when> <greater operand="CPU_RoleA" than="80"/>

</when> <actions> <scale target="WorkerRoleA" by="2"/> </actions> </rule> ... </reactiveRules>
Attributes of the rule Element The following table describes the attributes of the rule element that defines a reactive rule. This rule element is a child of the reactiveRules element.
Attribute Description
name A string name for the rule. This can be used to identify the rule in a rule editing UI.
This is a required attribute.
description A string description for the rule. This can be used to describe the rule in a rule editing UI.
This is an optional attribute.
rank A positive integer. The rank of the rule is a number greater than or equal to one. When rules conflict, the rule with the highest rank takes precedence.
This is an optional attribute. If this attribute is omitted, a rank of one is assumed.
enabled A Boolean flag. If this is true, the rule is evaluated by the rule evaluator. If this is false, the rule is ignored.
The default value is true.
This is a required attribute.
The when Element The when element is a child of the rule element in a reactive rule. This element defines the Boolean expression that is evaluated to determine whether the rule's action should be executed. The when element contains one of the child elements in the following table.
Element Description
all Contains one or more of the elements listed in this table as children. This element indicates that the expression is true if all its child expressions are true.
This element enables nested conditions.
any Contains one or more of the elements listed in this table as children. This element indicates that the expression is true if one or more of its child expressions are true.
This element enables nested conditions.
not Contains one of the elements listed in this table as a child element. This element negates the value of the child expression.
This element enables nested conditions.
greater Indicates that the expression is true if the operand is greater than the supplied value.
greaterOrEqual Indicates that the expression is true if the operand is greater than or equal to the supplied value.
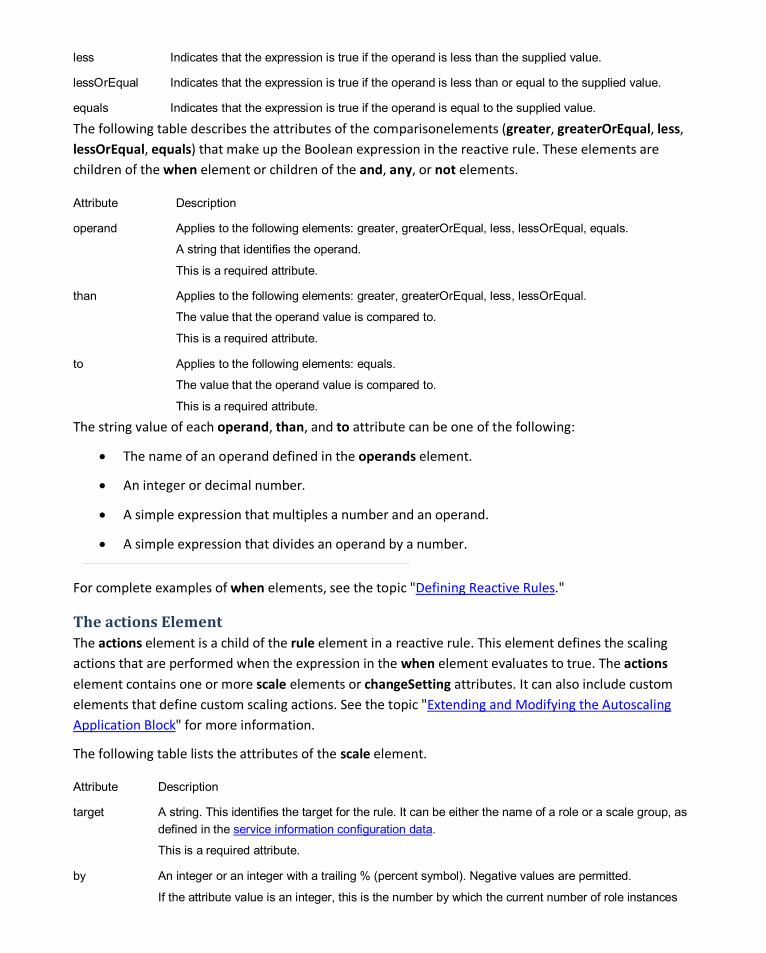
less Indicates that the expression is true if the operand is less than the supplied value.
lessOrEqual Indicates that the expression is true if the operand is less than or equal to the supplied value.
equals Indicates that the expression is true if the operand is equal to the supplied value.
The following table describes the attributes of the comparisonelements (greater, greaterOrEqual, less, lessOrEqual, equals) that make up the Boolean expression in the reactive rule. These elements are children of the when element or children of the and, any, or not elements.
Attribute Description
operand Applies to the following elements: greater, greaterOrEqual, less, lessOrEqual, equals.
A string that identifies the operand.
This is a required attribute.
than Applies to the following elements: greater, greaterOrEqual, less, lessOrEqual.
The value that the operand value is compared to.
This is a required attribute.
to Applies to the following elements: equals.
The value that the operand value is compared to.
This is a required attribute.
The string value of each operand, than, and to attribute can be one of the following:
• The name of an operand defined in the operands element.
• An integer or decimal number.
• A simple expression that multiples a number and an operand.
• A simple expression that divides an operand by a number.
For complete examples of when elements, see the topic "Defining Reactive Rules."
The actions Element The actions element is a child of the rule element in a reactive rule. This element defines the scaling actions that are performed when the expression in the when element evaluates to true. The actions element contains one or more scale elements or changeSetting attributes. It can also include custom elements that define custom scaling actions. See the topic "Extending and Modifying the Autoscaling Application Block" for more information.
The following table lists the attributes of the scale element.
Attribute Description
target A string. This identifies the target for the rule. It can be either the name of a role or a scale group, as defined in the service information configuration data.
This is a required attribute.
by An integer or an integer with a trailing % (percent symbol). Negative values are permitted.
If the attribute value is an integer, this is the number by which the current number of role instances
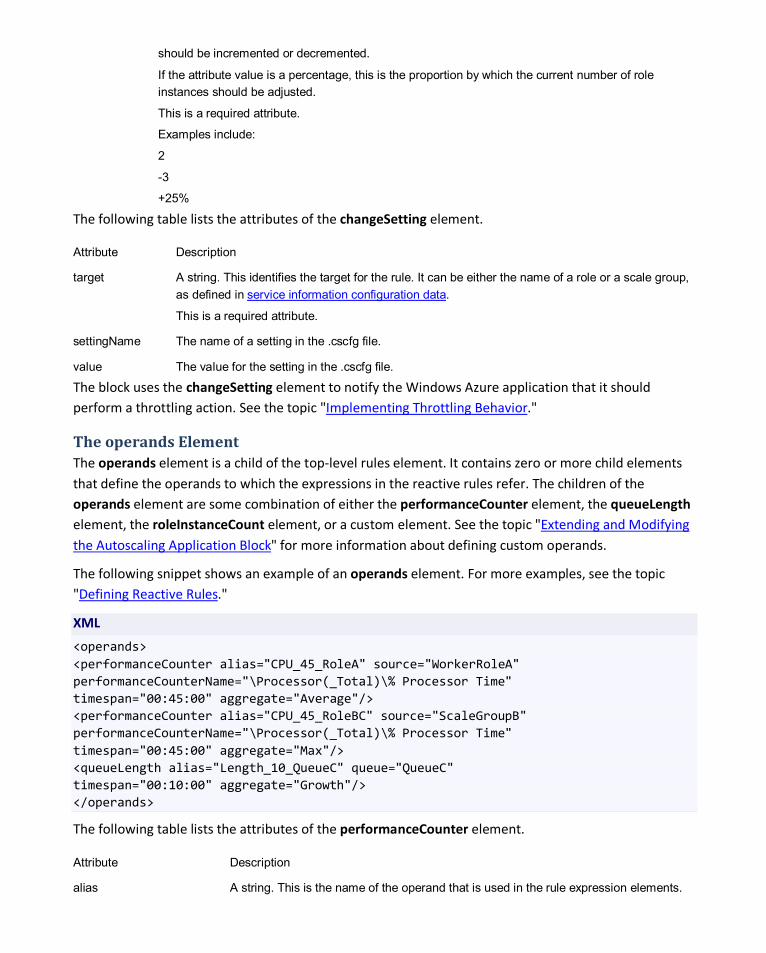
should be incremented or decremented.
If the attribute value is a percentage, this is the proportion by which the current number of role instances should be adjusted.
This is a required attribute.
Examples include:
2
-3
+25%
The following table lists the attributes of the changeSetting element.
Attribute Description
target A string. This identifies the target for the rule. It can be either the name of a role or a scale group, as defined in service information configuration data.
This is a required attribute.
settingName The name of a setting in the .cscfg file.
value The value for the setting in the .cscfg file.
The block uses the changeSetting element to notify the Windows Azure application that it should perform a throttling action. See the topic "Implementing Throttling Behavior."
The operands Element The operands element is a child of the top-level rules element. It contains zero or more child elements that define the operands to which the expressions in the reactive rules refer. The children of the operands element are some combination of either the performanceCounter element, the queueLength element, the roleInstanceCount element, or a custom element. See the topic "Extending and Modifying the Autoscaling Application Block" for more information about defining custom operands.
The following snippet shows an example of an operands element. For more examples, see the topic "Defining Reactive Rules."
XML
<operands> <performanceCounter alias="CPU_45_RoleA" source="WorkerRoleA" performanceCounterName="\Processor(_Total)\% Processor Time" timespan="00:45:00" aggregate="Average"/> <performanceCounter alias="CPU_45_RoleBC" source="ScaleGroupB" performanceCounterName="\Processor(_Total)\% Processor Time" timespan="00:45:00" aggregate="Max"/> <queueLength alias="Length_10_QueueC" queue="QueueC" timespan="00:10:00" aggregate="Growth"/> </operands>
The following table lists the attributes of the performanceCounter element.
Attribute Description
alias A string. This is the name of the operand that is used in the rule expression elements.
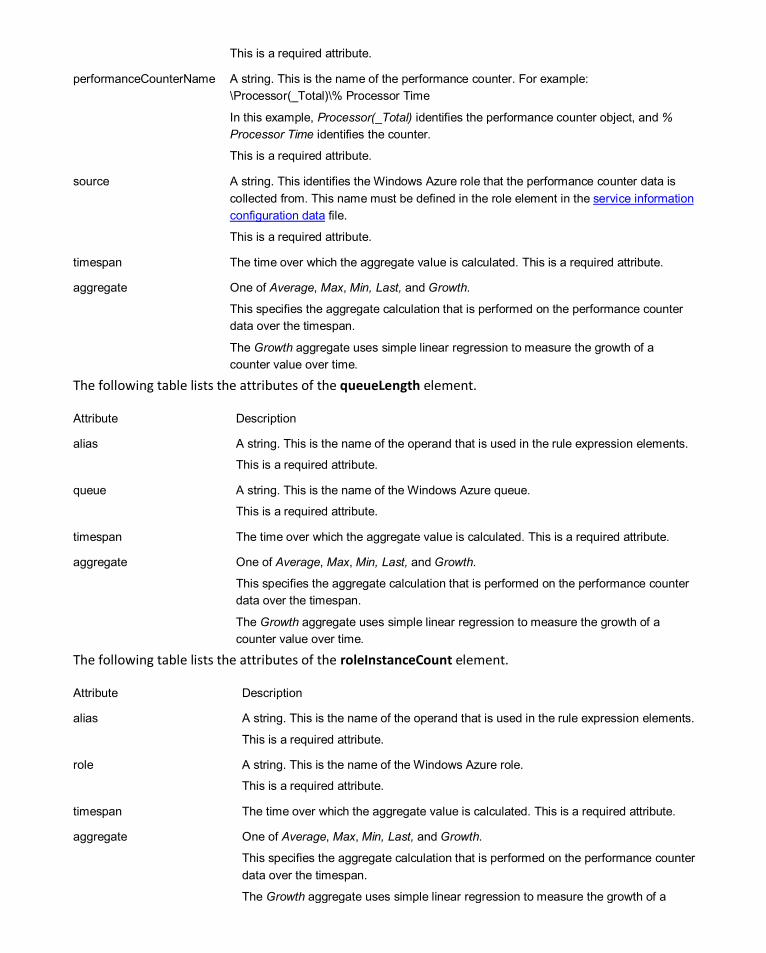
This is a required attribute.
performanceCounterName A string. This is the name of the performance counter. For example: \Processor(_Total)\% Processor Time
In this example, Processor(_Total) identifies the performance counter object, and % Processor Time identifies the counter.
This is a required attribute.
source A string. This identifies the Windows Azure role that the performance counter data is collected from. This name must be defined in the role element in the service information configuration data
timespan
file.
This is a required attribute.
The time over which the aggregate value is calculated. This is a required attribute.
aggregate One of Average, Max, Min, Last, and Growth.
This specifies the aggregate calculation that is performed on the performance counter data over the timespan.
The Growth aggregate uses simple linear regression to measure the growth of a counter value over time.
The following table lists the attributes of the queueLength element.
Attribute Description
alias A string. This is the name of the operand that is used in the rule expression elements.
This is a required attribute.
queue A string. This is the name of the Windows Azure queue.
This is a required attribute.
timespan The time over which the aggregate value is calculated. This is a required attribute.
aggregate One of Average, Max, Min, Last, and Growth.
This specifies the aggregate calculation that is performed on the performance counter data over the timespan.
The Growth aggregate uses simple linear regression to measure the growth of a counter value over time.
The following table lists the attributes of the roleInstanceCount element.
Attribute Description
alias A string. This is the name of the operand that is used in the rule expression elements.
This is a required attribute.
role A string. This is the name of the Windows Azure role.
This is a required attribute.
timespan The time over which the aggregate value is calculated. This is a required attribute.
aggregate One of Average, Max, Min, Last, and Growth.
This specifies the aggregate calculation that is performed on the performance counter data over the timespan.
The Growth aggregate uses simple linear regression to measure the growth of a
counter value over time.
Storing Your Service Information Data
Your service information data consists of two parts: a description of your Windows Azure environment including subscriptions, hosted services, roles, and storages accounts, and a description of the scale groups you have defined.
You can configure the Autoscaling Application Block to use one of the two XML-based service information store implementations included with the block: the BlobXmlFileServiceInformationStore class or the LocalXmlFileServiceInformationStore class. You can also use your own custom rules store by implementing the IServiceInformationStore interface.
Both of the provided XML-based rules store implementations expect the rules to conform to the XML schema defined in the http://schemas.microsoft.com/practices/2011/entlib/autoscaling/serviceModel namespace. If you have installed the Autoscaling Application Block in your Visual Studio project by using NuGet, you can find the AutoscalingServiceModel.xsd schema file in the root folder of the project.
Many XML editors allow you to use an XML schema file to provide validation and other support when you edit a document that is bound to the schema.
If you are using the BlobXmlFileServiceInformationStore class, you should save the XML document with your rules to the Windows Azure blob that you specified in your configuration settings. If you are using the LocalXmlFileServiceInformationStore class, you should save the XML document with your rules as the local file that you specified in your configuration settings.
There are a number of tools available to help you upload files to Windows Azure blob storage. For a list of such tools, see the Deployment/Storage tab on the Windows Azure Tools page.
Other than the XML schema, the Autoscaling Application Block does not provide any support for editing rules or saving rules to a rules store. For an example of one approach to providing a UI for editing and saving service information data, see the section "Editing and Saving Service Information Data" in Chapter 5, "Making Tailspin Surveys More Elastic" of the Developer's Guide.
The content of the store should always be encoded using UTF-8 (with or without the byte order mark (BOM)).
Service Information Schema Description
This topic lists the XML elements and attributes used to configure the service information in the Autoscaling Application Block. You can manually edit the XML data in a text or XML editor, or build your own tool to edit the configuration data. You can use the schema information contained in this topic when you edit the data manually, or when you design your own custom UI to edit this data.
If you have installed the Autoscaling Application Block in your Visual Studio project by using NuGet, you can find the AutoscalingServiceModel.xsd schema file in the root folder of the project.
The configuration file has the following top-level structure.
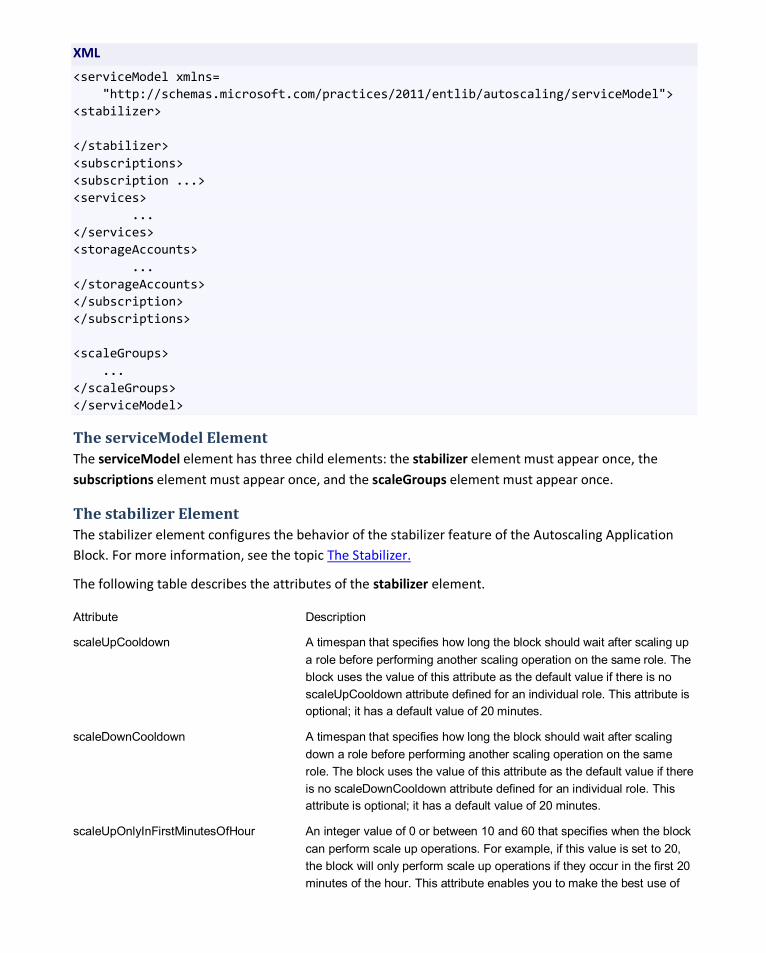
XML
<serviceModel xmlns= "http://schemas.microsoft.com/practices/2011/entlib/autoscaling/serviceModel"> <stabilizer> </stabilizer> <subscriptions> <subscription ...> <services> ... </services> <storageAccounts> ... </storageAccounts> </subscription> </subscriptions> <scaleGroups> ... </scaleGroups> </serviceModel>
The serviceModel Element The serviceModel element has three child elements: the stabilizer element must appear once, the subscriptions element must appear once, and the scaleGroups element must appear once.
The stabilizer Element The stabilizer element configures the behavior of the stabilizer feature of the Autoscaling Application Block. For more information, see the topic
The following table describes the attributes of the stabilizer element.
The Stabilizer.
Attribute Description
scaleUpCooldown A timespan that specifies how long the block should wait after scaling up a role before performing another scaling operation on the same role. The block uses the value of this attribute as the default value if there is no scaleUpCooldown attribute defined for an individual role. This attribute is optional; it has a default value of 20 minutes.
scaleDownCooldown A timespan that specifies how long the block should wait after scaling down a role before performing another scaling operation on the same role. The block uses the value of this attribute as the default value if there is no scaleDownCooldown attribute defined for an individual role. This attribute is optional; it has a default value of 20 minutes.
scaleUpOnlyInFirstMinutesOfHour An integer value of 0 or between 10 and 60 that specifies when the block can perform scale up operations. For example, if this value is set to 20, the block will only perform scale up operations if they occur in the first 20 minutes of the hour. This attribute enables you to make the best use of
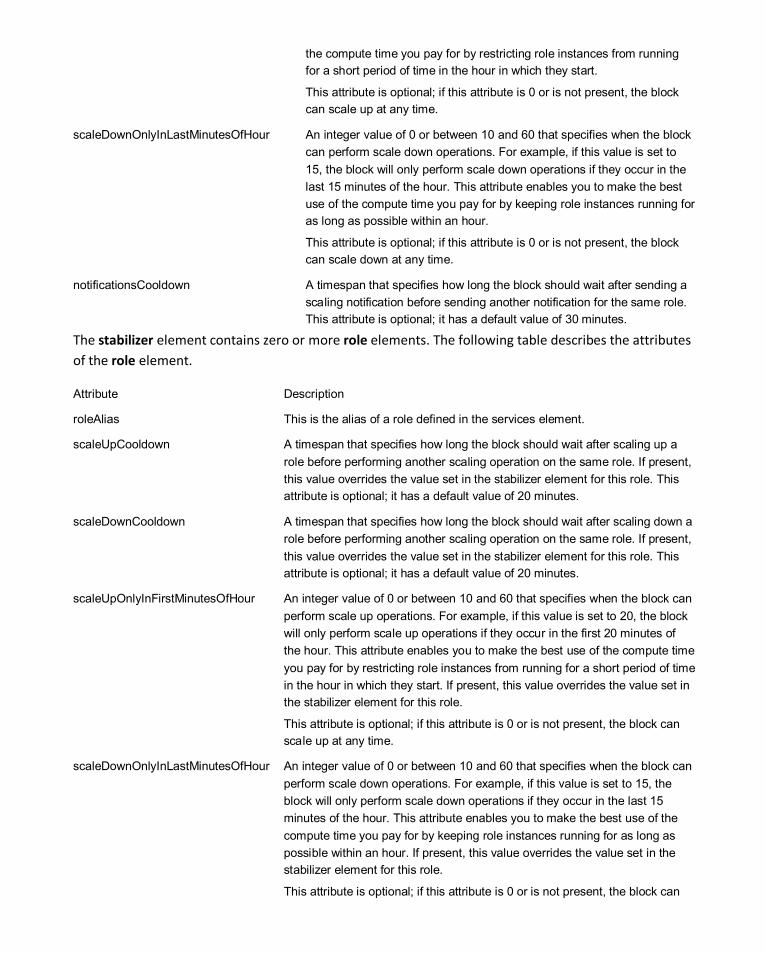
the compute time you pay for by restricting role instances from running for a short period of time in the hour in which they start.
This attribute is optional; if this attribute is 0 or is not present, the block can scale up at any time.
scaleDownOnlyInLastMinutesOfHour An integer value of 0 or between 10 and 60 that specifies when the block can perform scale down operations. For example, if this value is set to 15, the block will only perform scale down operations if they occur in the last 15 minutes of the hour. This attribute enables you to make the best use of the compute time you pay for by keeping role instances running for as long as possible within an hour.
This attribute is optional; if this attribute is 0 or is not present, the block can scale down at any time.
notificationsCooldown A timespan that specifies how long the block should wait after sending a scaling notification before sending another notification for the same role. This attribute is optional; it has a default value of 30 minutes.
The stabilizer element contains zero or more role elements. The following table describes the attributes of the role element.
Attribute Description
roleAlias This is the alias of a role defined in the services element.
scaleUpCooldown A timespan that specifies how long the block should wait after scaling up a role before performing another scaling operation on the same role. If present, this value overrides the value set in the stabilizer element for this role. This attribute is optional; it has a default value of 20 minutes.
scaleDownCooldown A timespan that specifies how long the block should wait after scaling down a role before performing another scaling operation on the same role. If present, this value overrides the value set in the stabilizer element for this role. This attribute is optional; it has a default value of 20 minutes.
scaleUpOnlyInFirstMinutesOfHour An integer value of 0 or between 10 and 60 that specifies when the block can perform scale up operations. For example, if this value is set to 20, the block will only perform scale up operations if they occur in the first 20 minutes of the hour. This attribute enables you to make the best use of the compute time you pay for by restricting role instances from running for a short period of time in the hour in which they start. If present, this value overrides the value set in the stabilizer element for this role.
This attribute is optional; if this attribute is 0 or is not present, the block can scale up at any time.
scaleDownOnlyInLastMinutesOfHour An integer value of 0 or between 10 and 60 that specifies when the block can perform scale down operations. For example, if this value is set to 15, the block will only perform scale down operations if they occur in the last 15 minutes of the hour. This attribute enables you to make the best use of the compute time you pay for by keeping role instances running for as long as possible within an hour. If present, this value overrides the value set in the stabilizer element for this role.
This attribute is optional; if this attribute is 0 or is not present, the block can
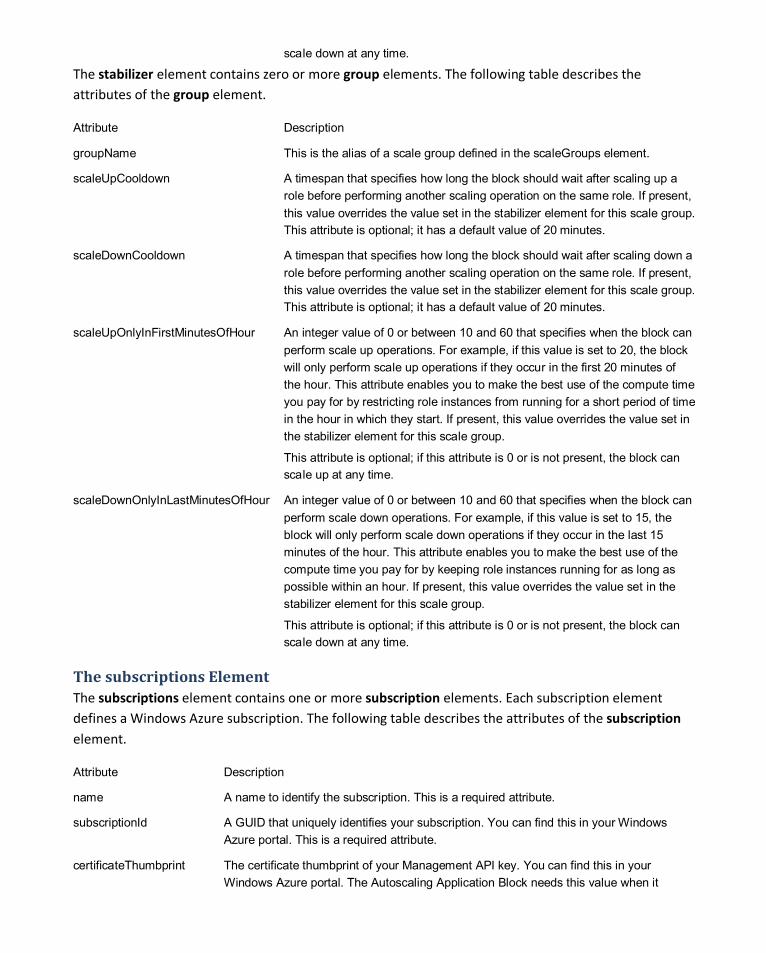
scale down at any time.
The stabilizer element contains zero or more group elements. The following table describes the attributes of the group element.
Attribute Description
groupName This is the alias of a scale group defined in the scaleGroups element.
scaleUpCooldown A timespan that specifies how long the block should wait after scaling up a role before performing another scaling operation on the same role. If present, this value overrides the value set in the stabilizer element for this scale group. This attribute is optional; it has a default value of 20 minutes.
scaleDownCooldown A timespan that specifies how long the block should wait after scaling down a role before performing another scaling operation on the same role. If present, this value overrides the value set in the stabilizer element for this scale group. This attribute is optional; it has a default value of 20 minutes.
scaleUpOnlyInFirstMinutesOfHour An integer value of 0 or between 10 and 60 that specifies when the block can perform scale up operations. For example, if this value is set to 20, the block will only perform scale up operations if they occur in the first 20 minutes of the hour. This attribute enables you to make the best use of the compute time you pay for by restricting role instances from running for a short period of time in the hour in which they start. If present, this value overrides the value set in the stabilizer element for this scale group.
This attribute is optional; if this attribute is 0 or is not present, the block can scale up at any time.
scaleDownOnlyInLastMinutesOfHour An integer value of 0 or between 10 and 60 that specifies when the block can perform scale down operations. For example, if this value is set to 15, the block will only perform scale down operations if they occur in the last 15 minutes of the hour. This attribute enables you to make the best use of the compute time you pay for by keeping role instances running for as long as possible within an hour. If present, this value overrides the value set in the stabilizer element for this scale group.
This attribute is optional; if this attribute is 0 or is not present, the block can scale down at any time.
The subscriptions Element The subscriptions element contains one or more subscription elements. Each subscription element defines a Windows Azure subscription. The following table describes the attributes of the subscription element.
Attribute Description
name A name to identify the subscription. This is a required attribute.
subscriptionId A GUID that uniquely identifies your subscription. You can find this in your Windows Azure portal. This is a required attribute.
certificateThumbprint The certificate thumbprint of your Management API key. You can find this in your Windows Azure portal. The Autoscaling Application Block needs this value when it
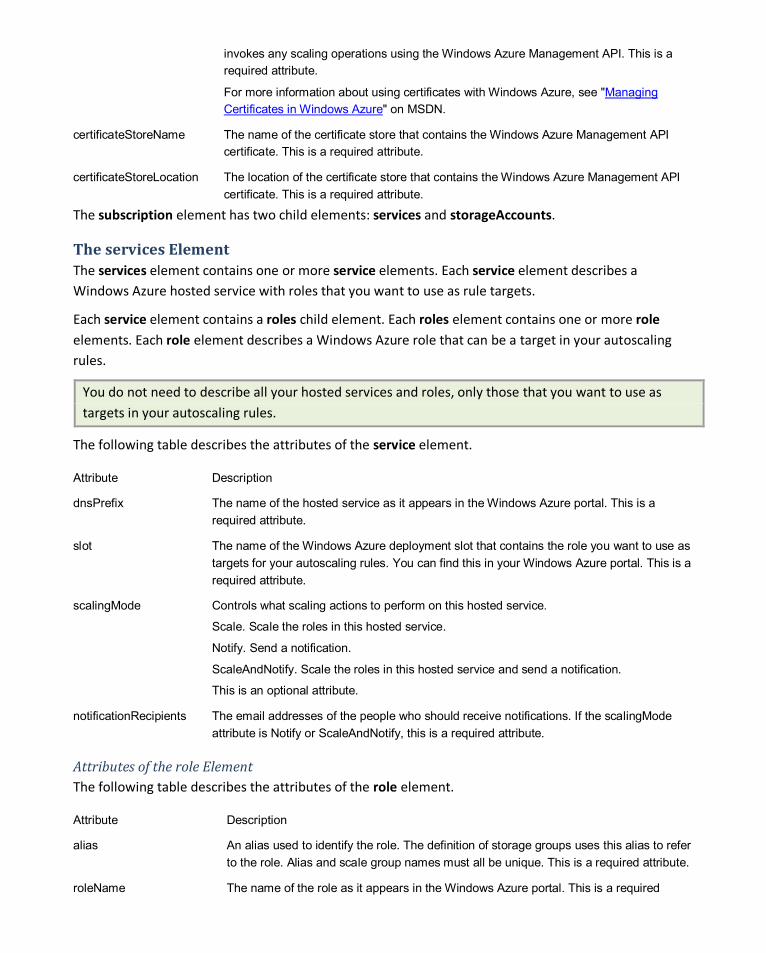
invokes any scaling operations using the Windows Azure Management API. This is a required attribute.
For more information about using certificates with Windows Azure, see "Managing Certificates in Windows Azure" on MSDN.
certificateStoreName The name of the certificate store that contains the Windows Azure Management API certificate. This is a required attribute.
certificateStoreLocation The location of the certificate store that contains the Windows Azure Management API certificate. This is a required attribute.
The subscription element has two child elements: services and storageAccounts.
The services Element The services element contains one or more service elements. Each service element describes a Windows Azure hosted service with roles that you want to use as rule targets.
Each service element contains a roles child element. Each roles element contains one or more role elements. Each role element describes a Windows Azure role that can be a target in your autoscaling rules.
You do not need to describe all your hosted services and roles, only those that you want to use as targets in your autoscaling rules.
The following table describes the attributes of the service element.
Attribute Description
dnsPrefix The name of the hosted service as it appears in the Windows Azure portal. This is a required attribute.
slot The name of the Windows Azure deployment slot that contains the role you want to use as targets for your autoscaling rules. You can find this in your Windows Azure portal. This is a required attribute.
scalingMode Controls what scaling actions to perform on this hosted service.
Scale. Scale the roles in this hosted service.
Notify. Send a notification.
ScaleAndNotify. Scale the roles in this hosted service and send a notification.
This is an optional attribute.
notificationRecipients The email addresses of the people who should receive notifications. If the scalingMode attribute is Notify or ScaleAndNotify, this is a required attribute.
Attributes of the role Element The following table describes the attributes of the role element.
Attribute Description
alias An alias used to identify the role. The definition of storage groups uses this alias to refer to the role. Alias and scale group names must all be unique. This is a required attribute.
roleName The name of the role as it appears in the Windows Azure portal. This is a required

attribute.
wadStorageAccountName The name of the Windows Azure storage account that stores the diagnostics data from this role. This name is defined by the storageAccount element. This is a required attribute.
The storageAccounts Element The storageAccounts element is a child of the subscriptions element. It contains one or more storageAccount elements. Each storageAccount element defines a Windows Azure storage account in the subscription.
The following table describes the attributes of the storageAccount element.
Attribute Description
alias An alias for a storage account in the subscription. The role element uses this alias to identify the storage account used to store its diagnostic data. This is a required attribute.
connectionString The connection string needed to connect to the storage account. The block uses the connection string when it connects to a storage account from on premises or in a different hosted service. This is a required attribute.
The scaleGroups Element The scaleGroups element contains zero or more scaleGroup elements. Each scaleGroup element contains a roles element that contains one or more role elements. Each role element identifies a role that is a member of the scale group.
Attributes of the scaleGroup Element The following table describes the attributes of the scaleGroup element.
Attribute Description
name A name that identifies the scale group. Autoscaling rules can use this name as a target. This is a required attribute.
Attributes of the role Element The following table describes the attributes of the role element.
Attribute Description
roleAlias An alias that identifies the role. This alias is defined by the role element in the service definition. This is a required attribute.
ratio The value used as a weight when the autoscaling rule calculates the new instance counts for the scale group members. This is a required attribute.
Storing Autoscaling Application Block Configuration in Blob Storage
Typically, the configuration settings for the Autoscaling Application Block are stored in the app.config or web.config file of the role that hosts the block. You can also configure the role to load the Autoscaling
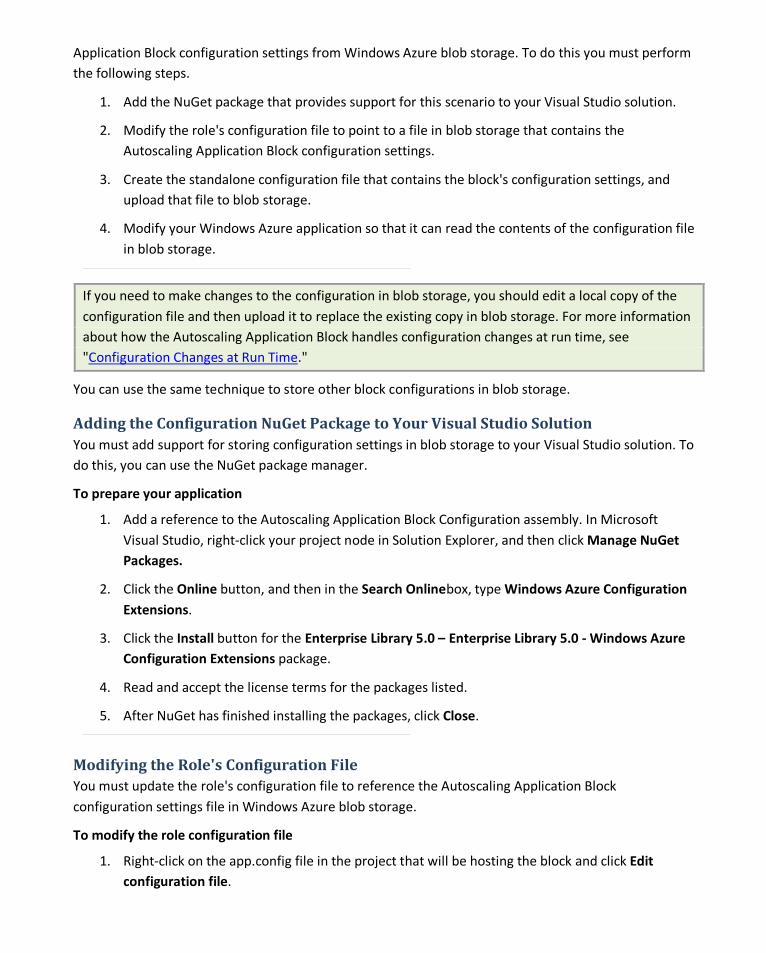
Application Block configuration settings from Windows Azure blob storage. To do this you must perform the following steps.
1. Add the NuGet package that provides support for this scenario to your Visual Studio solution.
2. Modify the role's configuration file to point to a file in blob storage that contains the Autoscaling Application Block configuration settings.
3. Create the standalone configuration file that contains the block's configuration settings, and upload that file to blob storage.
4. Modify your Windows Azure application so that it can read the contents of the configuration file in blob storage.
If you need to make changes to the configuration in blob storage, you should edit a local copy of the configuration file and then upload it to replace the existing copy in blob storage. For more information about how the Autoscaling Application Block handles configuration changes at run time, see "Configuration Changes at Run Time."
You can use the same technique to store other block configurations in blob storage.
Adding the Configuration NuGet Package to Your Visual Studio Solution You must add support for storing configuration settings in blob storage to your Visual Studio solution. To do this, you can use the NuGet package manager.
To prepare your application
1. Add a reference to the Autoscaling Application Block Configuration assembly. In Microsoft Visual Studio, right-click your project node in Solution Explorer, and then click Manage NuGet Packages.
2. Click the Online button, and then in the Search Onlinebox, type Windows Azure Configuration Extensions.
3. Click the Install button for the Enterprise Library 5.0 – Enterprise Library 5.0 - Windows Azure Configuration Extensions package.
4. Read and accept the license terms for the packages listed.
5. After NuGet has finished installing the packages, click Close.
Modifying the Role's Configuration File You must update the role's configuration file to reference the Autoscaling Application Block configuration settings file in Windows Azure blob storage.
To modify the role configuration file
1. Right-click on the app.config file in the project that will be hosting the block and click Edit configuration file.
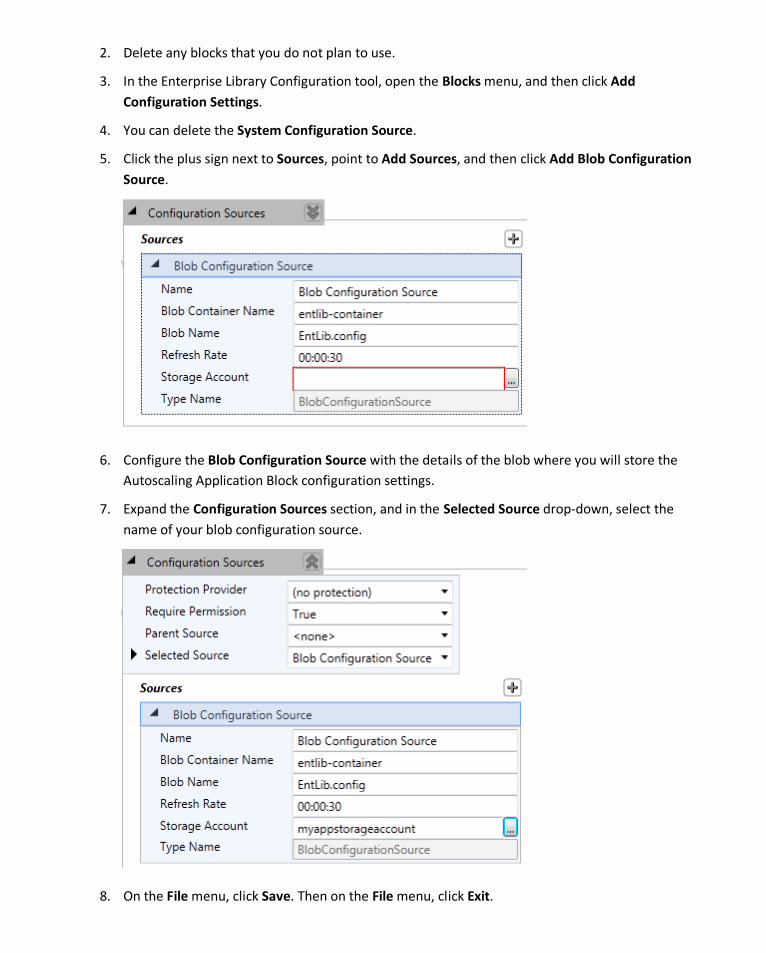
2. Delete any blocks that you do not plan to use.
3. In the Enterprise Library Configuration tool, open the Blocks menu, and then click Add Configuration Settings.
4. You can delete the System Configuration Source.
5. Click the plus sign next to Sources, point to Add Sources, and then click Add Blob Configuration Source.
6. Configure the Blob Configuration Source with the details of the blob where you will store the Autoscaling Application Block configuration settings.
7. Expand the Configuration Sources section, and in the Selected Source drop-down, select the name of your blob configuration source.
8. On the File menu, click Save. Then on the File menu, click Exit.
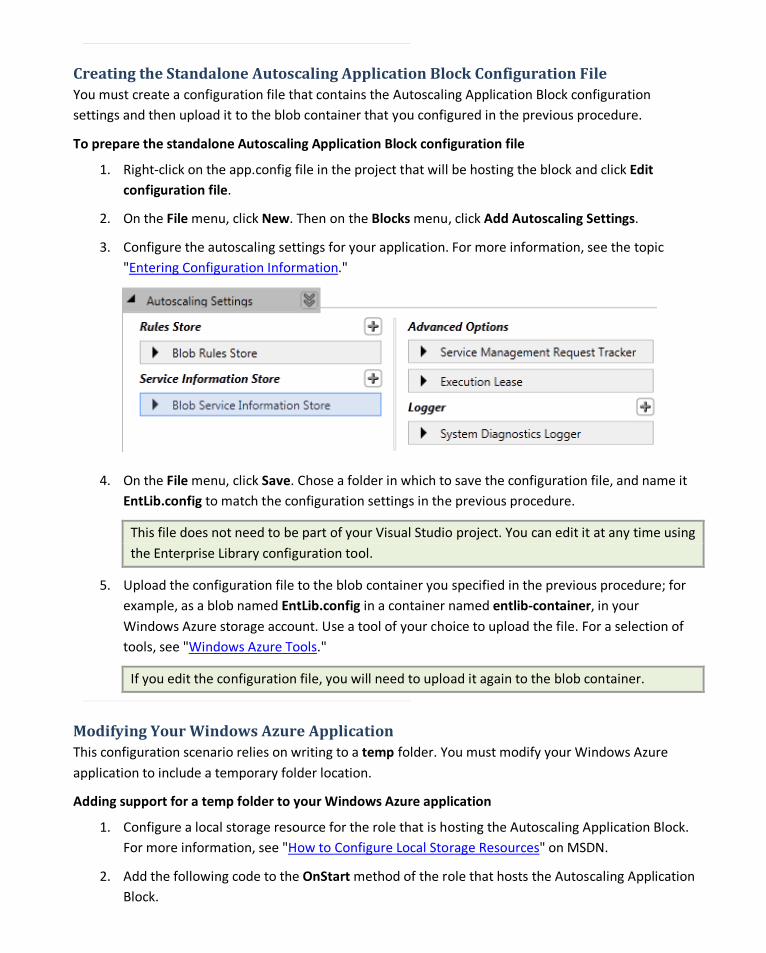
Creating the Standalone Autoscaling Application Block Configuration File You must create a configuration file that contains the Autoscaling Application Block configuration settings and then upload it to the blob container that you configured in the previous procedure.
To prepare the standalone Autoscaling Application Block configuration file
1. Right-click on the app.config file in the project that will be hosting the block and click Edit configuration file.
2. On the File menu, click New. Then on the Blocks menu, click Add Autoscaling Settings.
3. Configure the autoscaling settings for your application. For more information, see the topic "Entering Configuration Information."
4. On the File menu, click Save. Chose a folder in which to save the configuration file, and name it EntLib.config to match the configuration settings in the previous procedure.
This file does not need to be part of your Visual Studio project. You can edit it at any time using the Enterprise Library configuration tool.
5. Upload the configuration file to the blob container you specified in the previous procedure; for example, as a blob named EntLib.config in a container named entlib-container, in your Windows Azure storage account. Use a tool of your choice to upload the file. For a selection of tools, see "Windows Azure Tools."
If you edit the configuration file, you will need to upload it again to the blob container.
Modifying Your Windows Azure Application This configuration scenario relies on writing to a temp folder. You must modify your Windows Azure application to include a temporary folder location.
Adding support for a temp folder to your Windows Azure application
1. Configure a local storage resource for the role that is hosting the Autoscaling Application Block. For more information, see "How to Configure Local Storage Resources" on MSDN.
2. Add the following code to the OnStart method of the role that hosts the Autoscaling Application Block.

C#
var tempPath = RoleEnvironment.GetLocalResource("Temp").RootPath; Environment.SetEnvironmentVariable("TEMP", tempPath); Environment.SetEnvironmentVariable("TMP", tempPath);
Reading the Autoscaling Application Block Log Messages
The Autoscaling Application Block logs detailed information about its activities using either the logging services in the System.Diagnostics namespace, or the Enterprise Library Logging Application Block, or a custom logger. If you use the logging services in the System.Diagnostics namespace, the block offers support for reading the log messages programmatically. This is available for the System.Diagnostics logger because the block has full control over the format of the log messages that it writes to the Windows Azure Diagnostics table in Windows Azure storage.
For more information about how to configure the logger used by the Autoscaling Application Block, see the topic "Entering Configuration Information.
When the block writes a log message using the System.Diagnostics logging infrastructure, it writes the message to the Windows Azure diagnostics table using the event id as part of the row key, and all of the trace information formatted as a JSON string.
"
The SystemDiagnosticsLogger class in the block provides an ExtractData method that you can use to deserialize the JSON string in the log message back to a Dictionary<string, object> instance for use in your own code. The Constants.cs file in the Logging folder in the Autoscaling project provides a set of classes that you can use to access the items in the dictionary. The following code sample shows part of the RulesEvaluation class in the Constants.cs file.
C#
public static class RulesEvaluation { public static class Events { public const int RulesEvaluation = 1001; public const int RuleMatch = 1002; public const int RuleStoreException = 1003; ... } public static class DataKeys { public const string InnerException = "InnerException"; public const string ExceptionMessage = "ExceptionMessage";
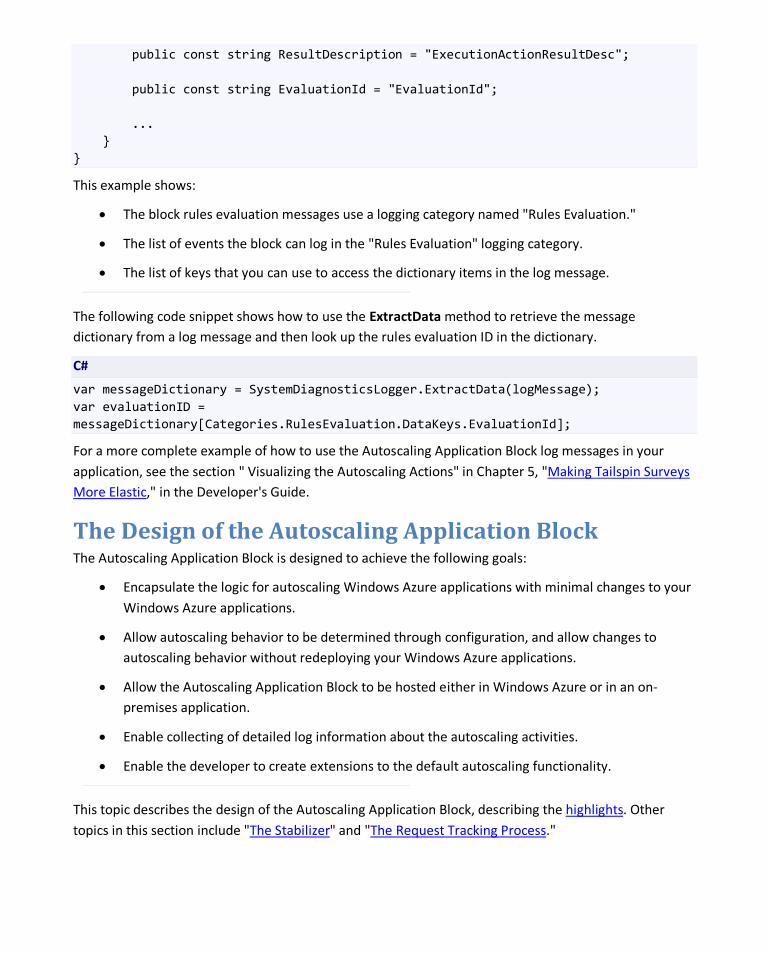
public const string ResultDescription = "ExecutionActionResultDesc"; public const string EvaluationId = "EvaluationId"; ... } }
This example shows:
• The block rules evaluation messages use a logging category named "Rules Evaluation."
• The list of events the block can log in the "Rules Evaluation" logging category.
• The list of keys that you can use to access the dictionary items in the log message.
The following code snippet shows how to use the ExtractData method to retrieve the message dictionary from a log message and then look up the rules evaluation ID in the dictionary.
C#
var messageDictionary = SystemDiagnosticsLogger.ExtractData(logMessage); var evaluationID = messageDictionary[Categories.RulesEvaluation.DataKeys.EvaluationId];
For a more complete example of how to use the Autoscaling Application Block log messages in your application, see the section " Visualizing the Autoscaling Actions" in Chapter 5, "Making Tailspin Surveys More Elastic," in the Developer's Guide.
The Design of the Autoscaling Application Block The Autoscaling Application Block is designed to achieve the following goals:
• Encapsulate the logic for autoscaling Windows Azure applications with minimal changes to your Windows Azure applications.
• Allow autoscaling behavior to be determined through configuration, and allow changes to autoscaling behavior without redeploying your Windows Azure applications.
• Allow the Autoscaling Application Block to be hosted either in Windows Azure or in an on-premises application.
• Enable collecting of detailed log information about the autoscaling activities.
• Enable the developer to create extensions to the default autoscaling functionality.
This topic describes the design of the Autoscaling Application Block, describing the highlights. Other topics in this section include "The Stabilizer" and "The Request Tracking Process."

Design Highlights This topic describes the design of the data collection function, the rules evaluation function, and some additional features that are common to both.
Data Collection The following diagram shows the relationships between some of the key classes in the Autoscaling Application Block that relate to the data collection process.
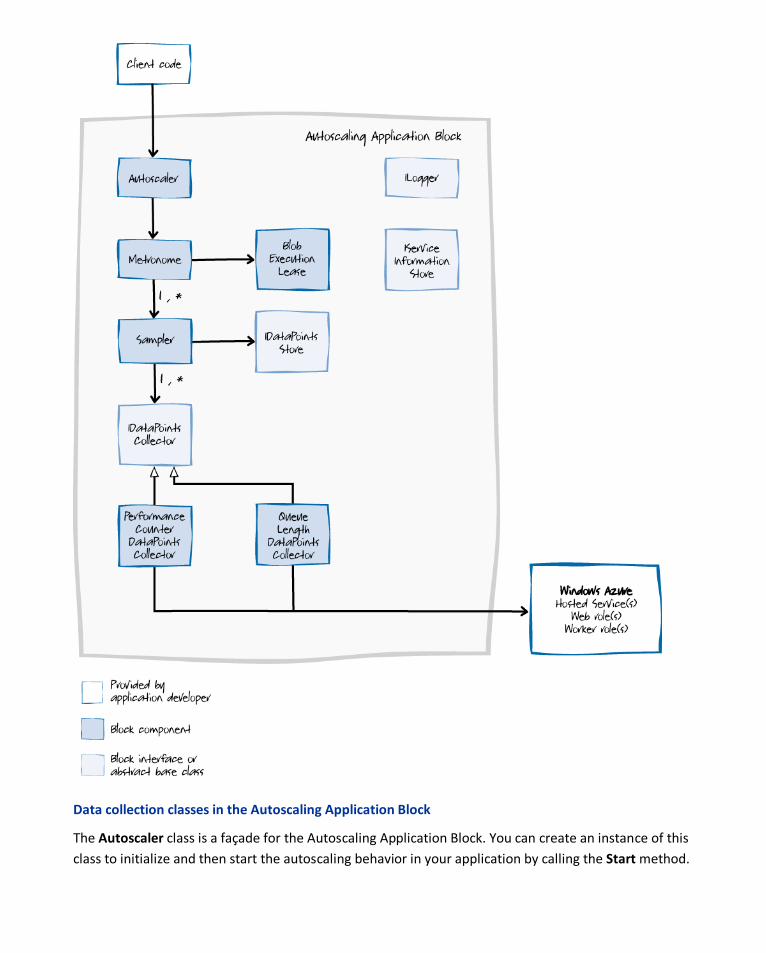
Data collection classes in the Autoscaling Application Block
The Autoscaler class is a façade for the Autoscaling Application Block. You can create an instance of this class to initialize and then start the autoscaling behavior in your application by calling the Start method.
The Metronome class runs activities on a regular schedule and it is responsible for launching all of the activities that the Autoscaling Application Block performs. Each activity can have its own schedule; for example, one activity could run every 10 seconds, while another runs every 5 minutes. To ensure that only one instance of the Metronome can run at any given time in any role instance in your Windows Azure environment, it uses a lease on a Windows Azure blob. For details of this mechanism, see Building a Scalable, Multi-Tenant Application for Windows Azure. In the Autoscaling Application Block, the Metronome object schedules the following activities:
• Data point collection for each collector
• Rule evaluation
• Request tracking
The Metronome class itself has no dependencies on Windows Azure. Therefore, you can easily host the Metronome class in an on-premises application as well as in a Windows Azure worker role. If you run it in an on-premises application and you plan to run multiple instances of the block, you should replace the lease on a Windows Azure blob with another mechanism to ensure that the Metronome class is a singleton.
The Sampler class is responsible for collecting data points from your Windows Azure environment and then saving the data points to a repository. The SamplerManager class creates Sampler instances for the Metronome class to run. Each Sampler instance is associated with a data point collector that implements the IDataPointsCollector interface, and a store for the collected data points that implements the IDataPointsStore interface. The block includes the following implementations of the IDataPointsCollector interface: the PerformanceCounterDataPointsCollector that collects performance counter data from Windows Azure roles, the QueueLengthDataPointsCollector class that collects the current length of Windows Azure queues, and the RoleInstanceCountDataPointsCollector class that collects a count of the current number of instances of Windows Azure roles. Each data point collector class specifies a sampling rate that determines how frequently it collects data points.
The AzureStorageDataPointsStore class is the default implementation of the IDataPointsStore interface; it uses Windows Azure tables to store the data points collected by the Sampler instance.
Rule Evaluation The following diagram shows the relationships between some of the key classes in the Autoscaling Application Block that relate to the rule execution process.
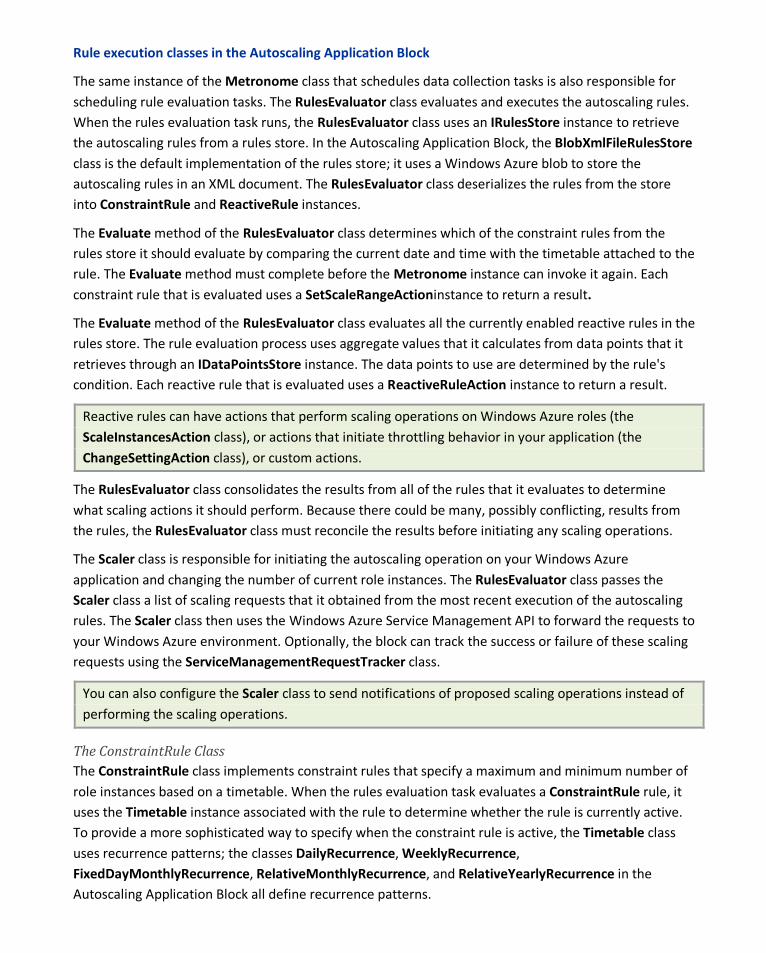
Rule execution classes in the Autoscaling Application Block
The same instance of the Metronome class that schedules data collection tasks is also responsible for scheduling rule evaluation tasks. The RulesEvaluator class evaluates and executes the autoscaling rules. When the rules evaluation task runs, the RulesEvaluator class uses an IRulesStore instance to retrieve the autoscaling rules from a rules store. In the Autoscaling Application Block, the BlobXmlFileRulesStore class is the default implementation of the rules store; it uses a Windows Azure blob to store the autoscaling rules in an XML document. The RulesEvaluator class deserializes the rules from the store into ConstraintRule and ReactiveRule instances.
The Evaluate method of the RulesEvaluator class determines which of the constraint rules from the rules store it should evaluate by comparing the current date and time with the timetable attached to the rule. The Evaluate method must complete before the Metronome instance can invoke it again. Each constraint rule that is evaluated uses a SetScaleRangeActioninstance to return a result.
The Evaluate method of the RulesEvaluator class evaluates all the currently enabled reactive rules in the rules store. The rule evaluation process uses aggregate values that it calculates from data points that it retrieves through an IDataPointsStore instance. The data points to use are determined by the rule's condition. Each reactive rule that is evaluated uses a ReactiveRuleAction instance to return a result.
Reactive rules can have actions that perform scaling operations on Windows Azure roles (the ScaleInstancesAction class), or actions that initiate throttling behavior in your application (the ChangeSettingAction class), or custom actions.
The RulesEvaluator class consolidates the results from all of the rules that it evaluates to determine what scaling actions it should perform. Because there could be many, possibly conflicting, results from the rules, the RulesEvaluator class must reconcile the results before initiating any scaling operations.
The Scaler class is responsible for initiating the autoscaling operation on your Windows Azure application and changing the number of current role instances. The RulesEvaluator class passes the Scaler class a list of scaling requests that it obtained from the most recent execution of the autoscaling rules. The Scaler class then uses the Windows Azure Service Management API to forward the requests to your Windows Azure environment. Optionally, the block can track the success or failure of these scaling requests using the ServiceManagementRequestTracker class.
You can also configure the Scaler class to send notifications of proposed scaling operations instead of performing the scaling operations.
The ConstraintRule Class The ConstraintRule class implements constraint rules that specify a maximum and minimum number of role instances based on a timetable. When the rules evaluation task evaluates a ConstraintRule rule, it uses the Timetable instance associated with the rule to determine whether the rule is currently active. To provide a more sophisticated way to specify when the constraint rule is active, the Timetable class uses recurrence patterns; the classes DailyRecurrence, WeeklyRecurrence, FixedDayMonthlyRecurrence, RelativeMonthlyRecurrence, and RelativeYearlyRecurrence in the Autoscaling Application Block all define recurrence patterns.
A ConstraintRule instance has a list of one or more SetScaleRangeAction instances; each SetRoleInstancesRangeAction instance specifies a target, and a minimum and maximum number of instances for that target. The constraint rule returns the target and the minimum and maximum instance count values to the RulesEvaluator class.
The ReactiveRule Class The ReactiveRule class implements reactive rules that try to increment or decrement the number of role instances based on the data points retrieved from Windows Azure or your application. When the rules evaluation task evaluates a ReactiveRule rule, it uses an expression to determine whether it should try to change the number of role instances of a target. An expression compares an aggregate value derived from a set of data points against a threshold value. Expressions can consist of multiple, nested expressions to define complex rules. Classes that implement the IRuleCondition interface handle the comparisons performed in the expression.
A ReactiveRule instance has a list of one or more ReactiveRuleAction instances; each ReactiveRuleAction instance specifies a target, and a suggested change to the number of instances of the target. The reactive rule returns the target and the suggested change to the number of instances to the RulesEvaluator class.
Common Features The logging feature and the service information are used by both the data collection and rule evaluation components in the Autoscaling Application Block.
Logging The Autoscaling Application Block uses an implementation of the ILogger interface to log details of its activities. The block includes two alternative implementations that you can select from in the block configuration: the SystemDiagnosticsLogger class uses the System.Diagnostics namespace, and the LoggingBlockLogger class uses the Enterprise Library Logging Application Block.
This service information is necessary for the block to be able to retrieve the data points.
The block uses an implementation of the ILogger interface to write log information about its data collection activities.
Service Information The IServiceInformationStore interface defines how classes in the block can retrieve the information they need about the current Windows Azure environment such as role names and subscription details. For example, the RulesEvaluator class uses an IServiceInformationStore instance to retrieve any information that it requires about your application's Windows Azure roles and hosted service.
The Stabilizer
The Stabilizer component is designed to prevent the Autoscaling Application Block from repeatedly performing scaling operations on the same role. For example, the block could scale up a role, and then when the rule evaluator runs again, try to scale up the same role again before the scaling action has had

the desired effect. It is also possible that the block could cause oscillations: scaling up a role, then scaling it down, then scaling it up again, and so on.
Because Windows Azure takes time to perform scaling operations, there is already a built-in damping effect. Windows Azure will not allow a change to the number of instances of a role while it is currently in the process of starting up new instances or closing down existing instances. However, even with this built-in damping effect, it is still necessary for the block to perform its own stabilization to ensure that the block does not perform unnecessary changes to the number of role instances.
To achieve this, during the rule evaluation activity, the block checks to see if any of the scaling operations proposed by the currently active rules will affect roles that the block has recently scaled. By default, the rule evaluator looks to see if the block has performed any scaling actions on a role during the last 20 minutes; this period is referred to as a "cool down" period. If the block has performed a scaling operation within the cool down period, then the block ignores the current scaling request. You can change the default time period for both scale up and scale down operations, and also change it for individual roles in the service information configuration
The following chart shows the Autoscaling Application Block running without the stabilizer. It shows how the role instance count always changes in response to the scaling actions from the reactive rules.
.
The autoscaling process without the stabilizer
The following chart shows the Autoscaling Application Block running over the same period with the stabilizer. The cool down period is set to two hours in this example. It shows how the block makes fewer
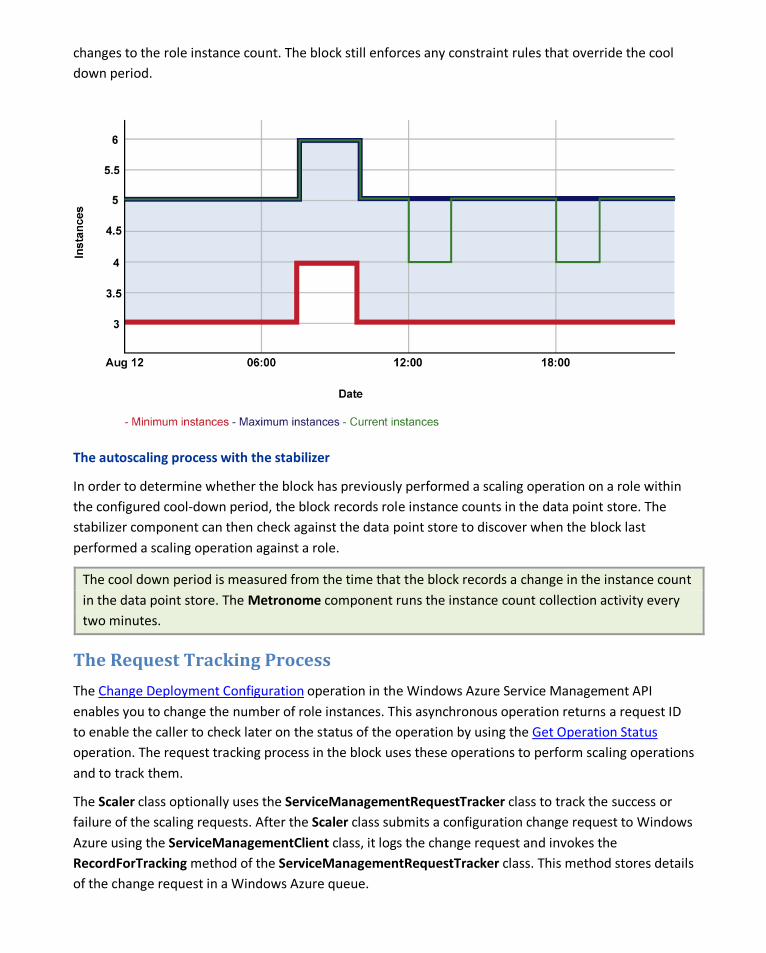
changes to the role instance count. The block still enforces any constraint rules that override the cool down period.
The autoscaling process with the stabilizer
In order to determine whether the block has previously performed a scaling operation on a role within the configured cool-down period, the block records role instance counts in the data point store. The stabilizer component can then check against the data point store to discover when the block last performed a scaling operation against a role.
The cool down period is measured from the time that the block records a change in the instance count in the data point store. The Metronome component runs the instance count collection activity every two minutes.
The Request Tracking Process
The Change Deployment Configuration operation in the Windows Azure Service Management API enables you to change the number of role instances. This asynchronous operation returns a request ID to enable the caller to check later on the status of the operation by using the Get Operation Status operation. The request tracking process in the block uses these operations to perform scaling operations and to track them.
The Scaler class optionally uses the ServiceManagementRequestTracker class to track the success or failure of the scaling requests. After the Scaler class submits a configuration change request to Windows Azure using the ServiceManagementClient class, it logs the change request and invokes the RecordForTracking method of the ServiceManagementRequestTracker class. This method stores details of the change request in a Windows Azure queue.
The ServiceManagementRequestTracker class creates the queue in the Windows Azure storage account identified by the serviceManagementRequestTracker element in the block's configuration data.
One of the activities that the Metronome instance schedules invokes the CheckOperationStatus method in the ServiceManagementRequestTracker class. This method checks the status of change requests on the queue; if the status of the change request is "Failed" or "Succeeded," the method logs the result and removes the entry from the queue.
The Performance Counter Collection Process
Reactive rules can use performance counter data as operands, enabling the block to scale an application based on the performance counter data it collects from the web and worker roles in the application. This topic describes how the performance counter data collection process ensures that the reactive rules always have the most up-to-date available values of the performance counters.
The following list summarizes the key steps in the process.
1. Your web or worker role collects a performance counter value.
2. Windows Azure transfers the performance counter values to persistent storage—the WADPerformanceCountersTable table in Windows Azure storage.
3. The Autoscaling Application Block collects the performance counter data values that the reactive rules use from the WADPerformanceCountersTable table, and aggregates the values.
4. The Autoscaling Application Block saves the aggregated performance counter values to the AutoscalerDatapoints table in Windows Azure storage.
5. The rules evaluator component reads the data points that it needs to evaluate the reactive rule operands from the AutoscalerDatapoints table.
Typically, you add code to the WebRole or WorkerRoleof your application to perform steps 1 and 2. The example code in the topic "Collecting Performance Counter Data" shows how to transfer the CPU utilization performance counter values to persistent storage every minute.
In step 3, the block reads all the performance counter values that Windows Azure has added to the WADPerformanceCountersTable table since the last time the block read performance counter data from the WADPerformanceCountersTable table. The following example explains this process in more detail.
The block collects data from the WADPerformanceCountersTable table at 15:20:20. The following table shows the data retrieved from the WADPerformanceCountersTable table at this time.
Role instance Performance counter value Time the performance counter value was collected
Time the performance counter value was saved
1 10 15:16:24 15:20:00
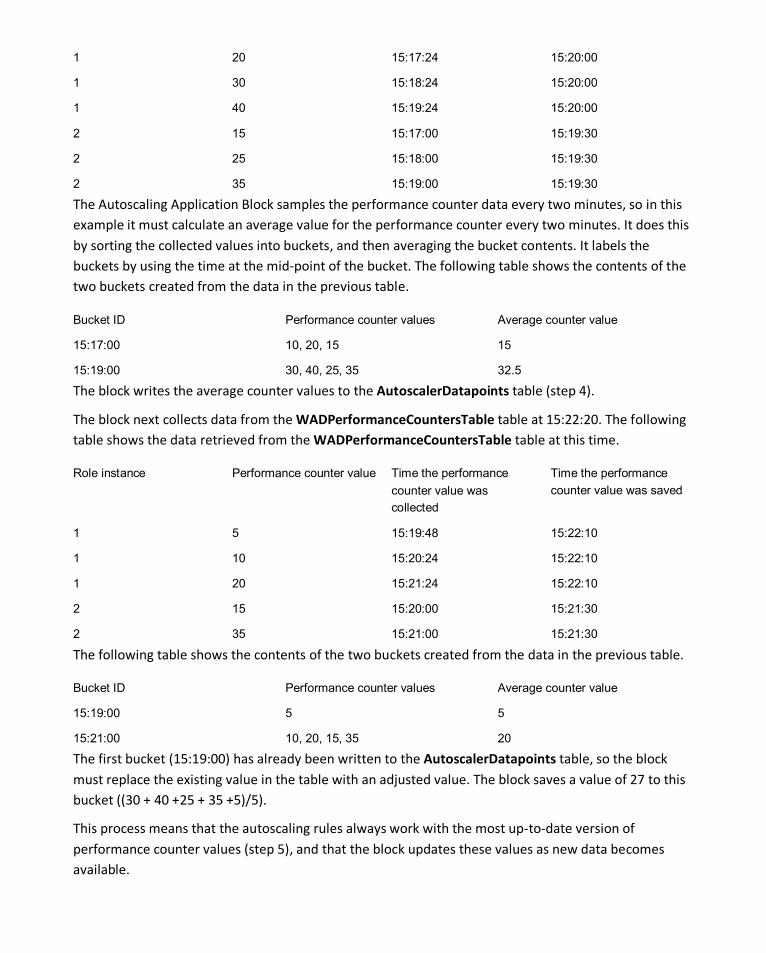
1 20 15:17:24 15:20:00
1 30 15:18:24 15:20:00
1 40 15:19:24 15:20:00
2 15 15:17:00 15:19:30
2 25 15:18:00 15:19:30
2 35 15:19:00 15:19:30
The Autoscaling Application Block samples the performance counter data every two minutes, so in this example it must calculate an average value for the performance counter every two minutes. It does this by sorting the collected values into buckets, and then averaging the bucket contents. It labels the buckets by using the time at the mid-point of the bucket. The following table shows the contents of the two buckets created from the data in the previous table.
Bucket ID Performance counter values Average counter value
15:17:00 10, 20, 15 15
15:19:00 30, 40, 25, 35 32.5
The block writes the average counter values to the AutoscalerDatapoints table (step 4).
The block next collects data from the WADPerformanceCountersTable table at 15:22:20. The following table shows the data retrieved from the WADPerformanceCountersTable table at this time.
Role instance Performance counter value Time the performance counter value was collected
Time the performance counter value was saved
1 5 15:19:48 15:22:10
1 10 15:20:24 15:22:10
1 20 15:21:24 15:22:10
2 15 15:20:00 15:21:30
2 35 15:21:00 15:21:30
The following table shows the contents of the two buckets created from the data in the previous table.
Bucket ID Performance counter values Average counter value
15:19:00 5 5
15:21:00 10, 20, 15, 35 20
The first bucket (15:19:00) has already been written to the AutoscalerDatapoints table, so the block must replace the existing value in the table with an adjusted value. The block saves a value of 27 to this bucket ((30 + 40 +25 + 35 +5)/5).
This process means that the autoscaling rules always work with the most up-to-date version of performance counter values (step 5), and that the block updates these values as new data becomes available.

Extending and Modifying the Autoscaling Application Block The Autoscaling Application Block is designed to perform autoscaling operations in most common scenarios. However, there may be times when you have to customize some of the block's behavior to better suit your application's particular requirements. There are two ways to do this. You can extend the Caching Application Block using the built-in extension points. You can also modify the block by making changes to its source code. For more details about using the built-in extension points, see the following topics:
• Creating a Custom Action
• Creating a Custom Operand
• Creating a Custom Rules Store
• Creating a Custom Service Information Store
•
Creating a Custom Logger
Creating a Custom Action
The Autoscaling Application Block defines the scale action type for reactive rules that allows you to specify a target and a scale amount. You can also define custom actions for reactive rules; for example, to send an email notification or to run a Windows Azure SQL Database script to modify a database. This topic outlines the steps you must take to create and configure a custom action.
For more information, see section "Implementing a Custom Action" in Chapter 5, "Making Tailspin Surveys More Elastic" of the Developer's Guide.
After you have created and configured a custom action, administrators must be able to use the action when they are creating or editing autoscaling rules. Depending on your environment, administrators might create and edit rules in the default rules XML file, in a custom format in a custom rules store, or through a custom UI.
You package a custom action in an assembly that you deploy with the Autoscaling Application Block. The assembly must contain code that can deserialize your custom action from your rules store and return an implementation of the ReactiveRuleAction class.
The following sections describe the three steps to implement and use a custom action:
• Deserializing Custom Actions. Adding support for the block's configuration infrastructure.
• Defining a Custom Action.Creating the runtime behavior for the action.
• Using Your Custom Action.Modifying your autoscaling rules to use the custom action.
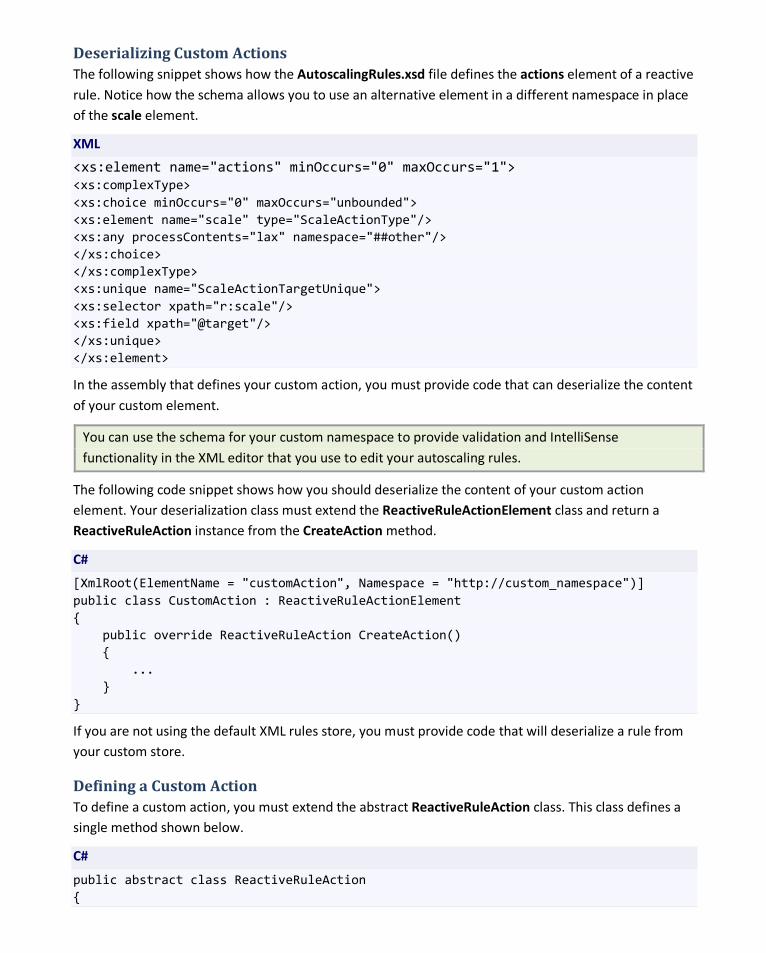
Deserializing Custom Actions The following snippet shows how the AutoscalingRules.xsd file defines the actions element of a reactive rule. Notice how the schema allows you to use an alternative element in a different namespace in place of the scale element.
XML
<xs:element name="actions" minOccurs="0" maxOccurs="1"> <xs:complexType> <xs:choice minOccurs="0" maxOccurs="unbounded"> <xs:element name="scale" type="ScaleActionType"/> <xs:any processContents="lax" namespace="##other"/> </xs:choice> </xs:complexType> <xs:unique name="ScaleActionTargetUnique"> <xs:selector xpath="r:scale"/> <xs:field xpath="@target"/> </xs:unique> </xs:element>
In the assembly that defines your custom action, you must provide code that can deserialize the content of your custom element.
You can use the schema for your custom namespace to provide validation and IntelliSense functionality in the XML editor that you use to edit your autoscaling rules.
The following code snippet shows how you should deserialize the content of your custom action element. Your deserialization class must extend the ReactiveRuleActionElement class and return a ReactiveRuleAction instance from the CreateAction method.
C#
[XmlRoot(ElementName = "customAction", Namespace = "http://custom_namespace")] public class CustomAction : ReactiveRuleActionElement { public override ReactiveRuleAction CreateAction() { ... } }
If you are not using the default XML rules store, you must provide code that will deserialize a rule from your custom store.
Defining a Custom Action To define a custom action, you must extend the abstract ReactiveRuleAction class. This class defines a single method shown below.
C#
public abstract class ReactiveRuleAction {
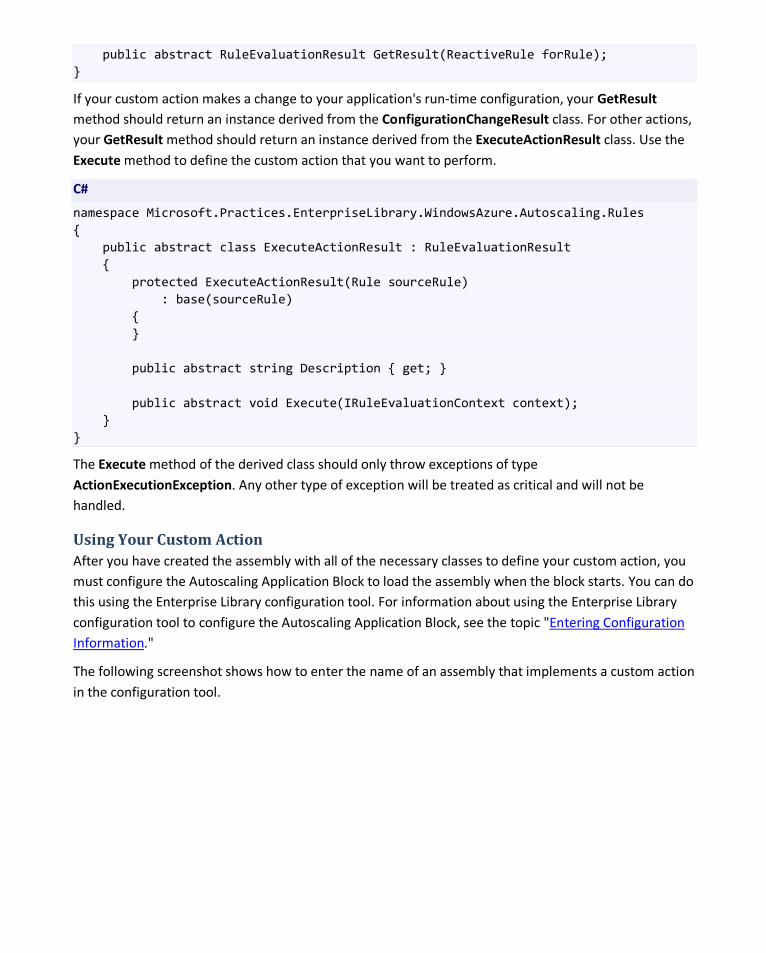
public abstract RuleEvaluationResult GetResult(ReactiveRule forRule); }
If your custom action makes a change to your application's run-time configuration, your GetResult method should return an instance derived from the ConfigurationChangeResult class. For other actions, your GetResult method should return an instance derived from the ExecuteActionResult class. Use the Execute method to define the custom action that you want to perform.
C#
namespace Microsoft.Practices.EnterpriseLibrary.WindowsAzure.Autoscaling.Rules { public abstract class ExecuteActionResult : RuleEvaluationResult { protected ExecuteActionResult(Rule sourceRule) : base(sourceRule) { } public abstract string Description { get; } public abstract void Execute(IRuleEvaluationContext context); } }
The Execute method of the derived class should only throw exceptions of type ActionExecutionException. Any other type of exception will be treated as critical and will not be handled.
Using Your Custom Action After you have created the assembly with all of the necessary classes to define your custom action, you must configure the Autoscaling Application Block to load the assembly when the block starts. You can do this using the Enterprise Library configuration tool. For information about using the Enterprise Library configuration tool to configure the Autoscaling Application Block, see the topic "Entering Configuration Information."
The following screenshot shows how to enter the name of an assembly that implements a custom action in the configuration tool.
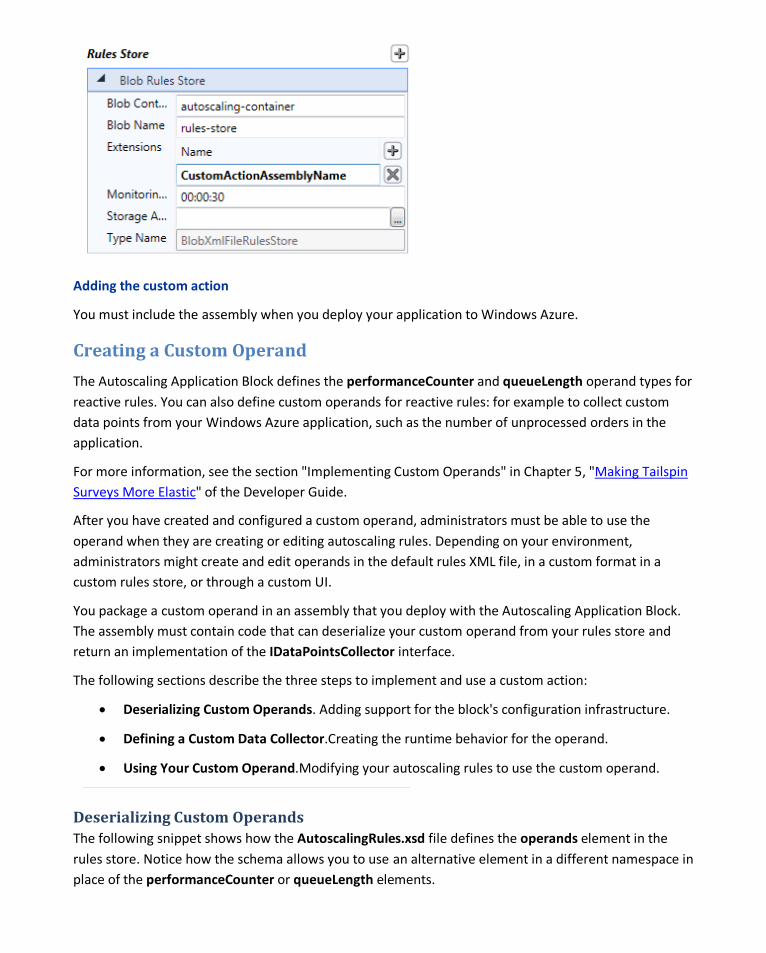
Adding the custom action
You must include the assembly when you deploy your application to Windows Azure.
Creating a Custom Operand
The Autoscaling Application Block defines the performanceCounter and queueLength operand types for reactive rules. You can also define custom operands for reactive rules: for example to collect custom data points from your Windows Azure application, such as the number of unprocessed orders in the application.
For more information, see the section "Implementing Custom Operands" in Chapter 5, "Making Tailspin Surveys More Elastic" of the Developer Guide.
After you have created and configured a custom operand, administrators must be able to use the operand when they are creating or editing autoscaling rules. Depending on your environment, administrators might create and edit operands in the default rules XML file, in a custom format in a custom rules store, or through a custom UI.
You package a custom operand in an assembly that you deploy with the Autoscaling Application Block. The assembly must contain code that can deserialize your custom operand from your rules store and return an implementation of the IDataPointsCollector interface.
The following sections describe the three steps to implement and use a custom action:
• Deserializing Custom Operands. Adding support for the block's configuration infrastructure.
• Defining a Custom Data Collector.Creating the runtime behavior for the operand.
• Using Your Custom Operand.Modifying your autoscaling rules to use the custom operand.
Deserializing Custom Operands The following snippet shows how the AutoscalingRules.xsd file defines the operands element in the rules store. Notice how the schema allows you to use an alternative element in a different namespace in place of the performanceCounter or queueLength elements.
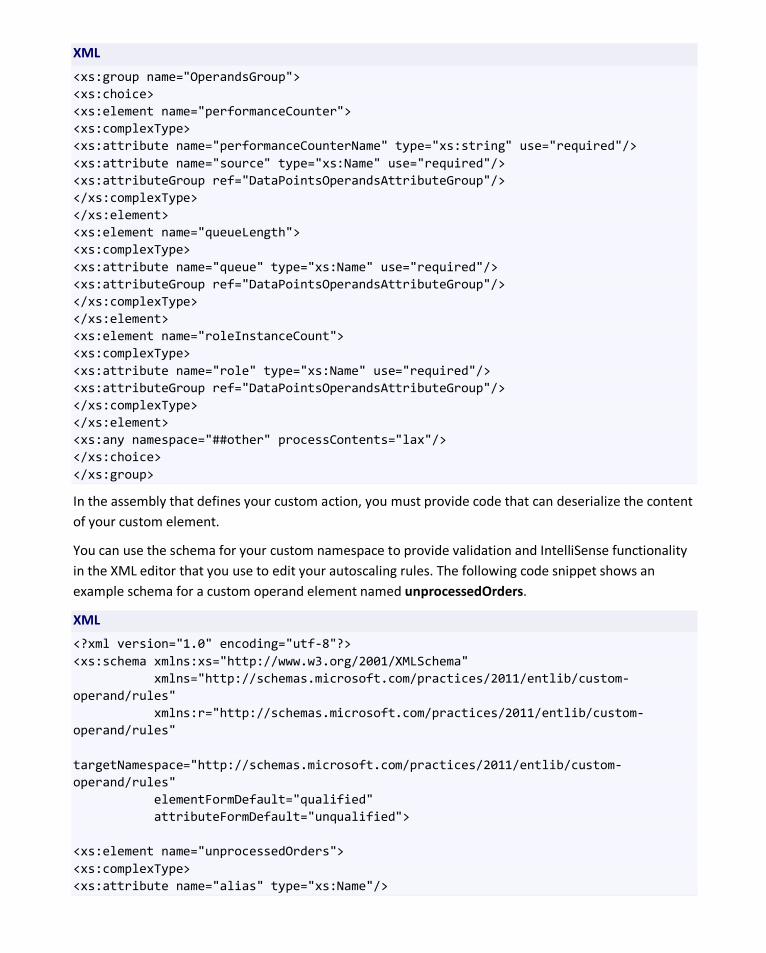
XML
<xs:group name="OperandsGroup"> <xs:choice> <xs:element name="performanceCounter"> <xs:complexType> <xs:attribute name="performanceCounterName" type="xs:string" use="required"/> <xs:attribute name="source" type="xs:Name" use="required"/> <xs:attributeGroup ref="DataPointsOperandsAttributeGroup"/> </xs:complexType> </xs:element> <xs:element name="queueLength"> <xs:complexType> <xs:attribute name="queue" type="xs:Name" use="required"/> <xs:attributeGroup ref="DataPointsOperandsAttributeGroup"/> </xs:complexType> </xs:element> <xs:element name="roleInstanceCount"> <xs:complexType> <xs:attribute name="role" type="xs:Name" use="required"/> <xs:attributeGroup ref="DataPointsOperandsAttributeGroup"/> </xs:complexType> </xs:element> <xs:any namespace="##other" processContents="lax"/> </xs:choice> </xs:group>
In the assembly that defines your custom action, you must provide code that can deserialize the content of your custom element.
You can use the schema for your custom namespace to provide validation and IntelliSense functionality in the XML editor that you use to edit your autoscaling rules. The following code snippet shows an example schema for a custom operand element named unprocessedOrders.
XML
<?xml version="1.0" encoding="utf-8"?> <xs:schema xmlns:xs="http://www.w3.org/2001/XMLSchema" xmlns="http://schemas.microsoft.com/practices/2011/entlib/custom-operand/rules" xmlns:r="http://schemas.microsoft.com/practices/2011/entlib/custom-operand/rules" targetNamespace="http://schemas.microsoft.com/practices/2011/entlib/custom-operand/rules" elementFormDefault="qualified" attributeFormDefault="unqualified"> <xs:element name="unprocessedOrders"> <xs:complexType> <xs:attribute name="alias" type="xs:Name"/>
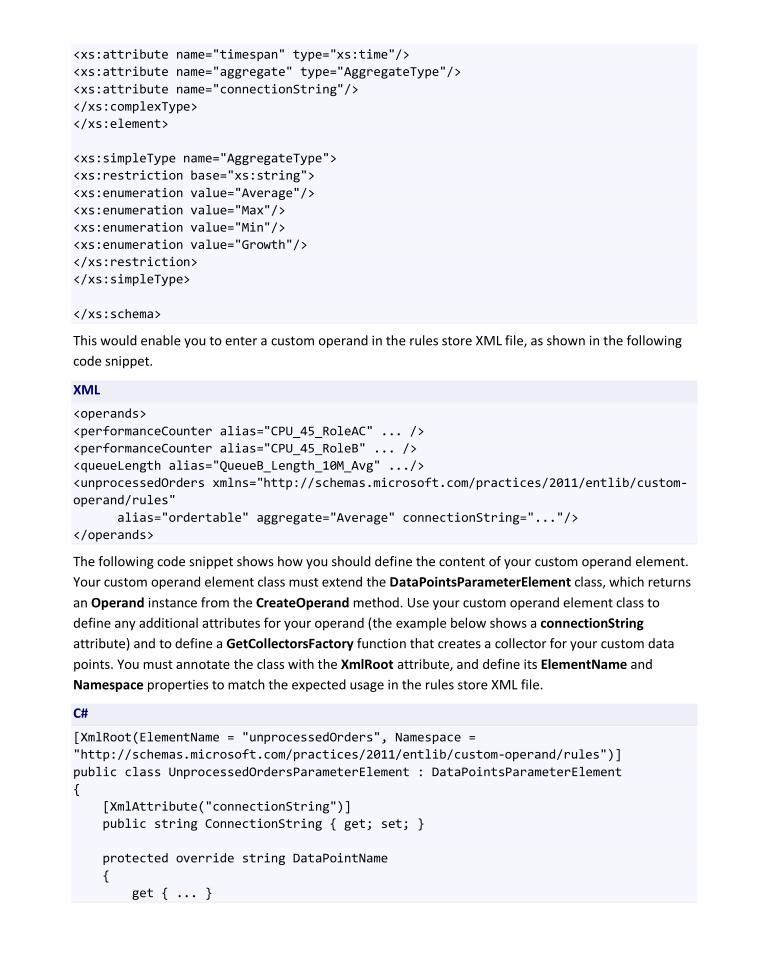
<xs:attribute name="timespan" type="xs:time"/> <xs:attribute name="aggregate" type="AggregateType"/> <xs:attribute name="connectionString"/> </xs:complexType> </xs:element> <xs:simpleType name="AggregateType"> <xs:restriction base="xs:string"> <xs:enumeration value="Average"/> <xs:enumeration value="Max"/> <xs:enumeration value="Min"/> <xs:enumeration value="Growth"/> </xs:restriction> </xs:simpleType> </xs:schema>
This would enable you to enter a custom operand in the rules store XML file, as shown in the following code snippet.
XML
<operands> <performanceCounter alias="CPU_45_RoleAC" ... /> <performanceCounter alias="CPU_45_RoleB" ... /> <queueLength alias="QueueB_Length_10M_Avg" .../> <unprocessedOrders xmlns="http://schemas.microsoft.com/practices/2011/entlib/custom-operand/rules" alias="ordertable" aggregate="Average" connectionString="..."/> </operands>
The following code snippet shows how you should define the content of your custom operand element. Your custom operand element class must extend the DataPointsParameterElement class, which returns an Operand instance from the CreateOperand method. Use your custom operand element class to define any additional attributes for your operand (the example below shows a connectionString attribute) and to define a GetCollectorsFactory function that creates a collector for your custom data points. You must annotate the class with the XmlRoot attribute, and define its ElementName and Namespace properties to match the expected usage in the rules store XML file.
C#
[XmlRoot(ElementName = "unprocessedOrders", Namespace = "http://schemas.microsoft.com/practices/2011/entlib/custom-operand/rules")] public class UnprocessedOrdersParameterElement : DataPointsParameterElement { [XmlAttribute("connectionString")] public string ConnectionString { get; set; } protected override string DataPointName { get { ... }
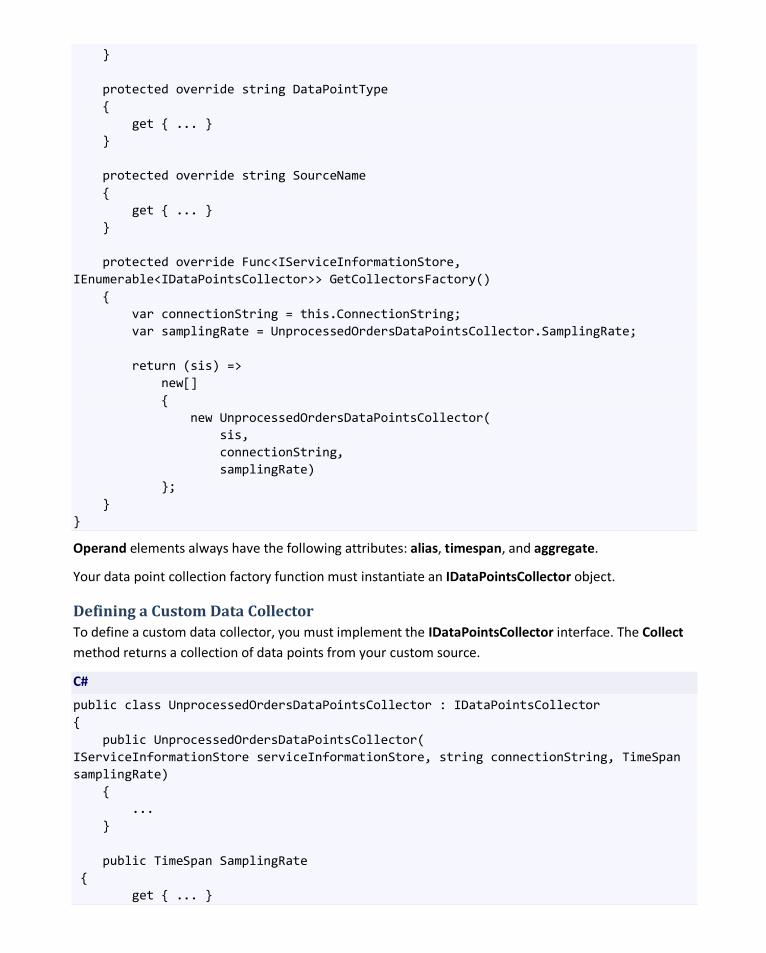
} protected override string DataPointType { get { ... } } protected override string SourceName { get { ... } } protected override Func<IServiceInformationStore, IEnumerable<IDataPointsCollector>> GetCollectorsFactory() { var connectionString = this.ConnectionString; var samplingRate = UnprocessedOrdersDataPointsCollector.SamplingRate; return (sis) => new[] { new UnprocessedOrdersDataPointsCollector( sis, connectionString, samplingRate) }; } }
Operand elements always have the following attributes: alias, timespan, and aggregate.
Your data point collection factory function must instantiate an IDataPointsCollector object.
Defining a Custom Data Collector To define a custom data collector, you must implement the IDataPointsCollector interface. The Collect method returns a collection of data points from your custom source.
C#
public class UnprocessedOrdersDataPointsCollector : IDataPointsCollector { public UnprocessedOrdersDataPointsCollector( IServiceInformationStore serviceInformationStore, string connectionString, TimeSpan samplingRate) { ... } public TimeSpan SamplingRate { get { ... }
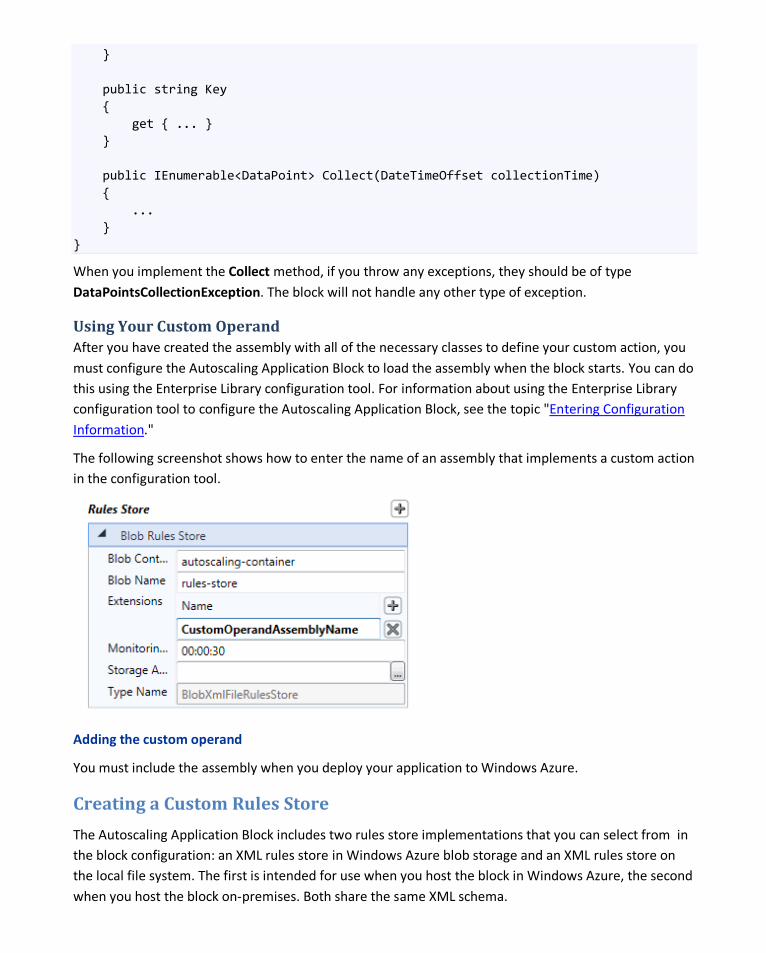
} public string Key { get { ... } } public IEnumerable<DataPoint> Collect(DateTimeOffset collectionTime) { ... } }
When you implement the Collect method, if you throw any exceptions, they should be of type DataPointsCollectionException. The block will not handle any other type of exception.
Using Your Custom Operand After you have created the assembly with all of the necessary classes to define your custom action, you must configure the Autoscaling Application Block to load the assembly when the block starts. You can do this using the Enterprise Library configuration tool. For information about using the Enterprise Library configuration tool to configure the Autoscaling Application Block, see the topic "Entering Configuration Information."
The following screenshot shows how to enter the name of an assembly that implements a custom action in the configuration tool.
Adding the custom operand
You must include the assembly when you deploy your application to Windows Azure.
Creating a Custom Rules Store
The Autoscaling Application Block includes two rules store implementations that you can select from in the block configuration: an XML rules store in Windows Azure blob storage and an XML rules store on the local file system. The first is intended for use when you host the block in Windows Azure, the second when you host the block on-premises. Both share the same XML schema.
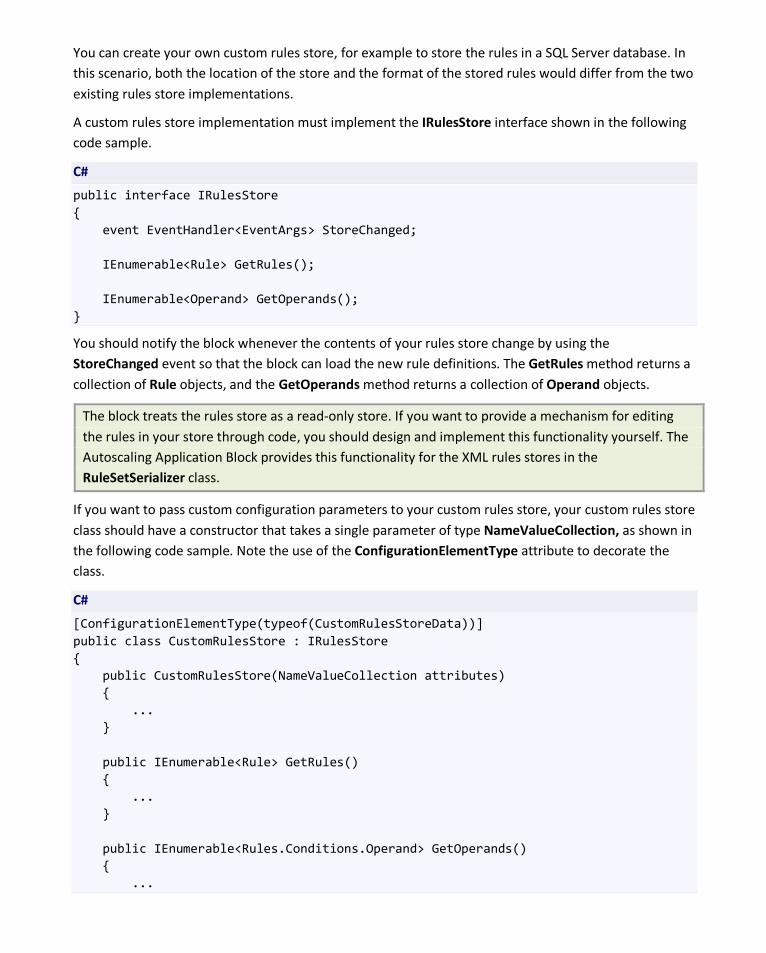
You can create your own custom rules store, for example to store the rules in a SQL Server database. In this scenario, both the location of the store and the format of the stored rules would differ from the two existing rules store implementations.
A custom rules store implementation must implement the IRulesStore interface shown in the following code sample.
C#
public interface IRulesStore { event EventHandler<EventArgs> StoreChanged; IEnumerable<Rule> GetRules(); IEnumerable<Operand> GetOperands(); }
You should notify the block whenever the contents of your rules store change by using the StoreChanged event so that the block can load the new rule definitions. The GetRules method returns a collection of Rule objects, and the GetOperands method returns a collection of Operand objects.
The block treats the rules store as a read-only store. If you want to provide a mechanism for editing the rules in your store through code, you should design and implement this functionality yourself. The Autoscaling Application Block provides this functionality for the XML rules stores in the RuleSetSerializer class.
If you want to pass custom configuration parameters to your custom rules store, your custom rules store class should have a constructor that takes a single parameter of type NameValueCollection, as shown in the following code sample. Note the use of the ConfigurationElementType attribute to decorate the class.
C#
[ConfigurationElementType(typeof(CustomRulesStoreData))] public class CustomRulesStore : IRulesStore { public CustomRulesStore(NameValueCollection attributes) { ... } public IEnumerable<Rule> GetRules() { ... } public IEnumerable<Rules.Conditions.Operand> GetOperands() { ...
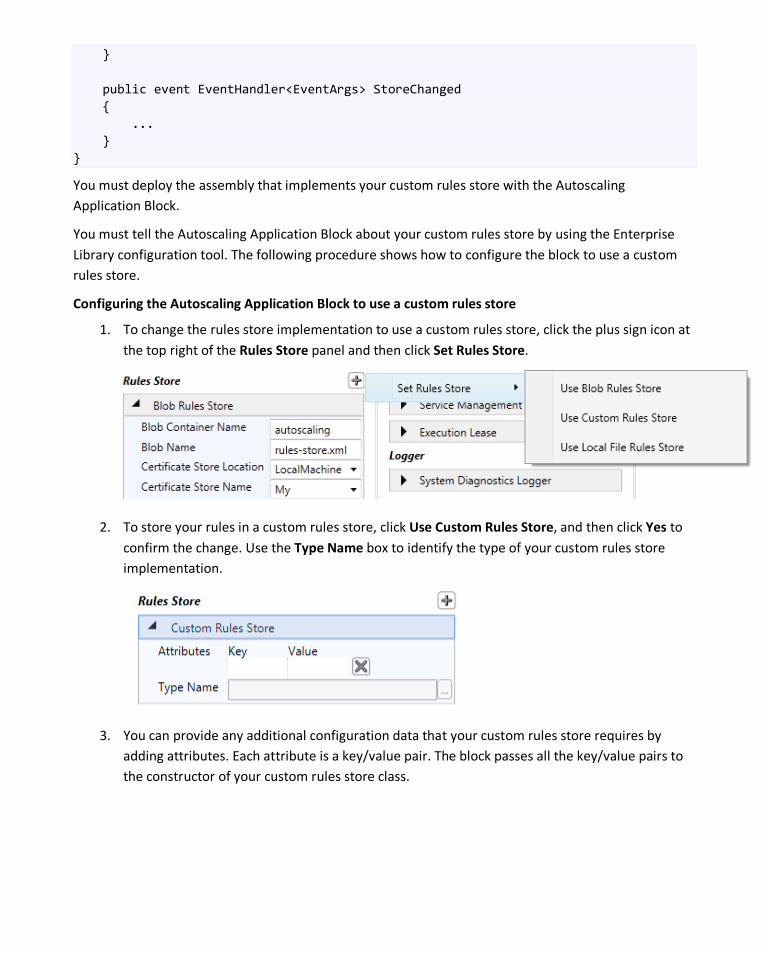
} public event EventHandler<EventArgs> StoreChanged { ... } }
You must deploy the assembly that implements your custom rules store with the Autoscaling Application Block.
You must tell the Autoscaling Application Block about your custom rules store by using the Enterprise Library configuration tool. The following procedure shows how to configure the block to use a custom rules store.
Configuring the Autoscaling Application Block to use a custom rules store
1. To change the rules store implementation to use a custom rules store, click the plus sign icon at the top right of the Rules Store panel and then click Set Rules Store.
2. To store your rules in a custom rules store, click Use Custom Rules Store, and then click Yes to confirm the change. Use the Type Name box to identify the type of your custom rules store implementation.
3. You can provide any additional configuration data that your custom rules store requires by adding attributes. Each attribute is a key/value pair. The block passes all the key/value pairs to the constructor of your custom rules store class.

Creating a Custom Service Information Store
The Autoscaling Application Block includes two service information store implementations that you can select from in the block configuration: an XML service information store in Windows Azure blob storage and an XML service information store on the local file system. The first is intended for use when you host the block in Windows Azure, the second when you host the block on-premises. Both share the same XML schema.
You can create your own custom service information store, for example to store the service information in a SQL Server database. In this scenario, both the location of the store and the format of the stored service information would differ from the two existing service information store implementations.
A custom service information store implementation must implement the IServiceInformationStore interface, as shown in the following code sample.
C#
namespace Microsoft.Practices.EnterpriseLibrary.WindowsAzure.Autoscaling.ServiceModel { using System; using System.Collections.Generic; public interface IServiceInformationStore { event EventHandler<EventArgs> StoreChanged; Role GetRole(string alias); IEnumerable<string> GetRoleAliases(); ScaleGroup GetScaleGroup(string name); Queue GetQueue(string alias); StabilizerConfiguration GetStabilizerConfiguration(); } }
You should notify the block whenever the content of your service information store changes by using the StoreChanged event so that the block can load the new service information. The GetRoleAliases
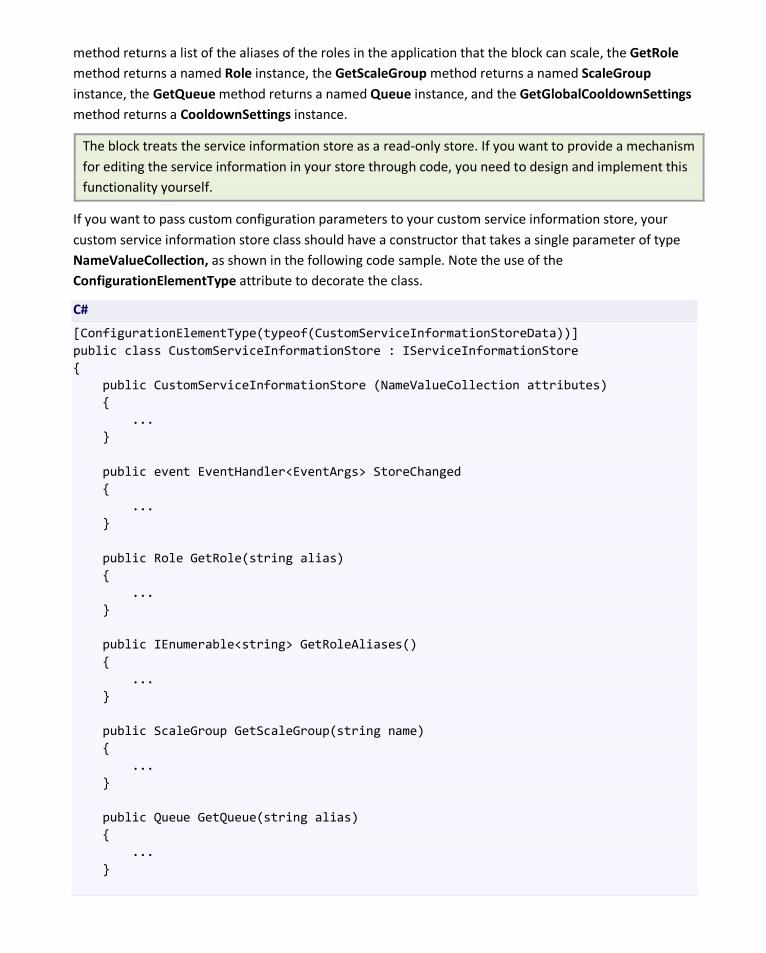
method returns a list of the aliases of the roles in the application that the block can scale, the GetRole method returns a named Role instance, the GetScaleGroup method returns a named ScaleGroup instance, the GetQueue method returns a named Queue instance, and the GetGlobalCooldownSettings method returns a CooldownSettings instance.
The block treats the service information store as a read-only store. If you want to provide a mechanism for editing the service information in your store through code, you need to design and implement this functionality yourself.
If you want to pass custom configuration parameters to your custom service information store, your custom service information store class should have a constructor that takes a single parameter of type NameValueCollection, as shown in the following code sample. Note the use of the ConfigurationElementType attribute to decorate the class.
C#
[ConfigurationElementType(typeof(CustomServiceInformationStoreData))] public class CustomServiceInformationStore : IServiceInformationStore { public CustomServiceInformationStore (NameValueCollection attributes) { ... } public event EventHandler<EventArgs> StoreChanged { ... } public Role GetRole(string alias) { ... } public IEnumerable<string> GetRoleAliases() { ... } public ScaleGroup GetScaleGroup(string name) { ... } public Queue GetQueue(string alias) { ... }

public StabilizerConfiguration GetStabilizerConfiguration() { ... } }
You must deploy the assembly that implements your custom service information store with the Autoscaling Application Block.
You must tell the Autoscaling Application Block about your custom service information store by using the Enterprise Library configuration tool. The following procedure shows how to configure the block to use a custom service information store.
Configuring the Autoscaling Application Block to use a custom service information store
1. To change the service information store implementation to use a custom service information store, click the plus sign icon at the top right of the Service InformationStore panel and then click Set Service Information Store.
2. To store your rules in a custom service information store, click Use CustomService Information Store, and then click Yes to confirm the change. Use the Type Name box to identify the type of your custom service information store implementation.
3. You can provide any additional configuration data that your custom service information store requires by adding attributes. Each attribute is a key/value pair. The block passes all the key/value pairs to the constructor of your custom service information store class.
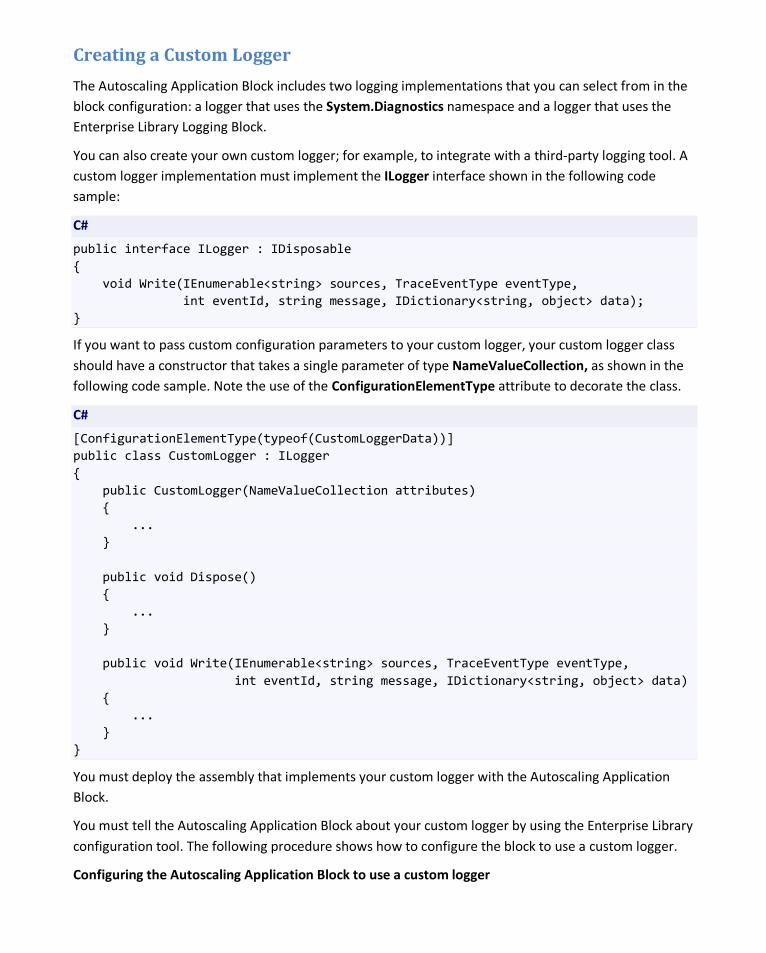
Creating a Custom Logger
The Autoscaling Application Block includes two logging implementations that you can select from in the block configuration: a logger that uses the System.Diagnostics namespace and a logger that uses the Enterprise Library Logging Block.
You can also create your own custom logger; for example, to integrate with a third-party logging tool. A custom logger implementation must implement the ILogger interface shown in the following code sample:
C#
public interface ILogger : IDisposable { void Write(IEnumerable<string> sources, TraceEventType eventType, int eventId, string message, IDictionary<string, object> data); }
If you want to pass custom configuration parameters to your custom logger, your custom logger class should have a constructor that takes a single parameter of type NameValueCollection, as shown in the following code sample. Note the use of the ConfigurationElementType attribute to decorate the class.
C#
[ConfigurationElementType(typeof(CustomLoggerData))] public class CustomLogger : ILogger { public CustomLogger(NameValueCollection attributes) { ... } public void Dispose() { ... } public void Write(IEnumerable<string> sources, TraceEventType eventType, int eventId, string message, IDictionary<string, object> data) { ... } }
You must deploy the assembly that implements your custom logger with the Autoscaling Application Block.
You must tell the Autoscaling Application Block about your custom logger by using the Enterprise Library configuration tool. The following procedure shows how to configure the block to use a custom logger.
Configuring the Autoscaling Application Block to use a custom logger
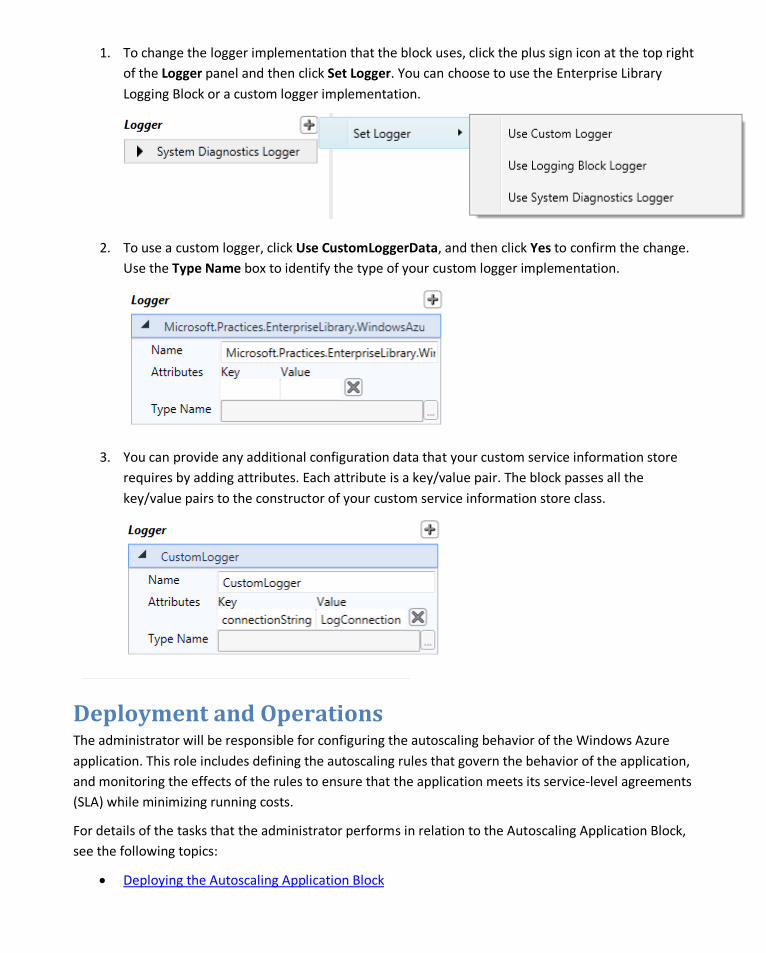
1. To change the logger implementation that the block uses, click the plus sign icon at the top right of the Logger panel and then click Set Logger. You can choose to use the Enterprise Library Logging Block or a custom logger implementation.
2. To use a custom logger, click Use CustomLoggerData, and then click Yes to confirm the change. Use the Type Name box to identify the type of your custom logger implementation.
3. You can provide any additional configuration data that your custom service information store requires by adding attributes. Each attribute is a key/value pair. The block passes all the key/value pairs to the constructor of your custom service information store class.
Deployment and Operations The administrator will be responsible for configuring the autoscaling behavior of the Windows Azure application. This role includes defining the autoscaling rules that govern the behavior of the application, and monitoring the effects of the rules to ensure that the application meets its service-level agreements (SLA) while minimizing running costs.
For details of the tasks that the administrator performs in relation to the Autoscaling Application Block, see the following topics:
• Deploying the Autoscaling Application Block
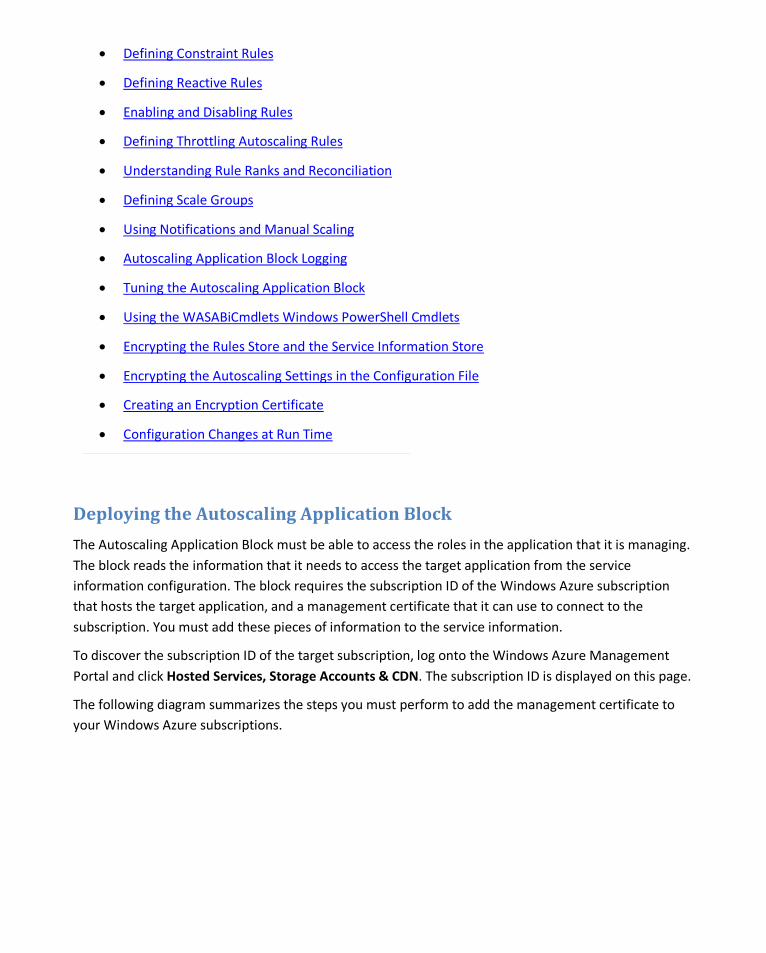
•
•
Defining Constraint Rules
Defining Reactive Rules
• Enabling and Disabling Rules
• Defining Throttling Autoscaling Rules
• Understanding Rule Ranks and Reconciliation
• Defining Scale Groups
•
•
Using Notifications and Manual Scaling
Autoscaling Application Block Logging
• Tuning the Autoscaling Application Block
•
•
Using the WASABiCmdlets Windows PowerShell Cmdlets
•
Encrypting the Rules Store and the Service Information Store
•
Encrypting the Autoscaling Settings in the Configuration File
•
Creating an Encryption Certificate
Configuration Changes at Run Time
Deploying the Autoscaling Application Block
The Autoscaling Application Block must be able to access the roles in the application that it is managing. The block reads the information that it needs to access the target application from the service information configuration. The block requires the subscription ID of the Windows Azure subscription that hosts the target application, and a management certificate that it can use to connect to the subscription. You must add these pieces of information to the service information.
To discover the subscription ID of the target subscription, log onto the Windows Azure Management Portal and click Hosted Services, Storage Accounts & CDN. The subscription ID is displayed on this page.
The following diagram summarizes the steps you must perform to add the management certificate to your Windows Azure subscriptions.
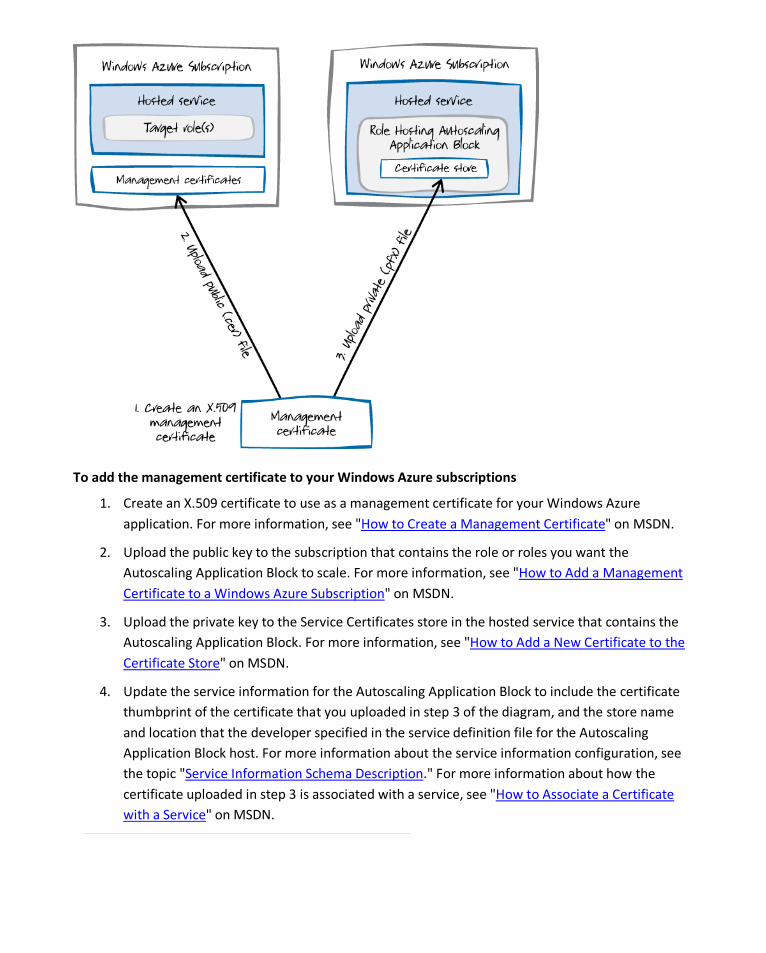
To add the management certificate to your Windows Azure subscriptions
1. Create an X.509 certificate to use as a management certificate for your Windows Azure application. For more information, see "How to Create a Management Certificate" on MSDN.
2. Upload the public key to the subscription that contains the role or roles you want the Autoscaling Application Block to scale. For more information, see "How to Add a Management Certificate to a Windows Azure Subscription" on MSDN.
3. Upload the private key to the Service Certificates store in the hosted service that contains the Autoscaling Application Block. For more information, see "How to Add a New Certificate to the Certificate Store" on MSDN.
4. Update the service information for the Autoscaling Application Block to include the certificate thumbprint of the certificate that you uploaded in step 3 of the diagram, and the store name and location that the developer specified in the service definition file for the Autoscaling Application Block host. For more information about the service information configuration, see the topic "Service Information Schema Description." For more information about how the certificate uploaded in step 3 is associated with a service, see "How to Associate a Certificate with a Service" on MSDN.
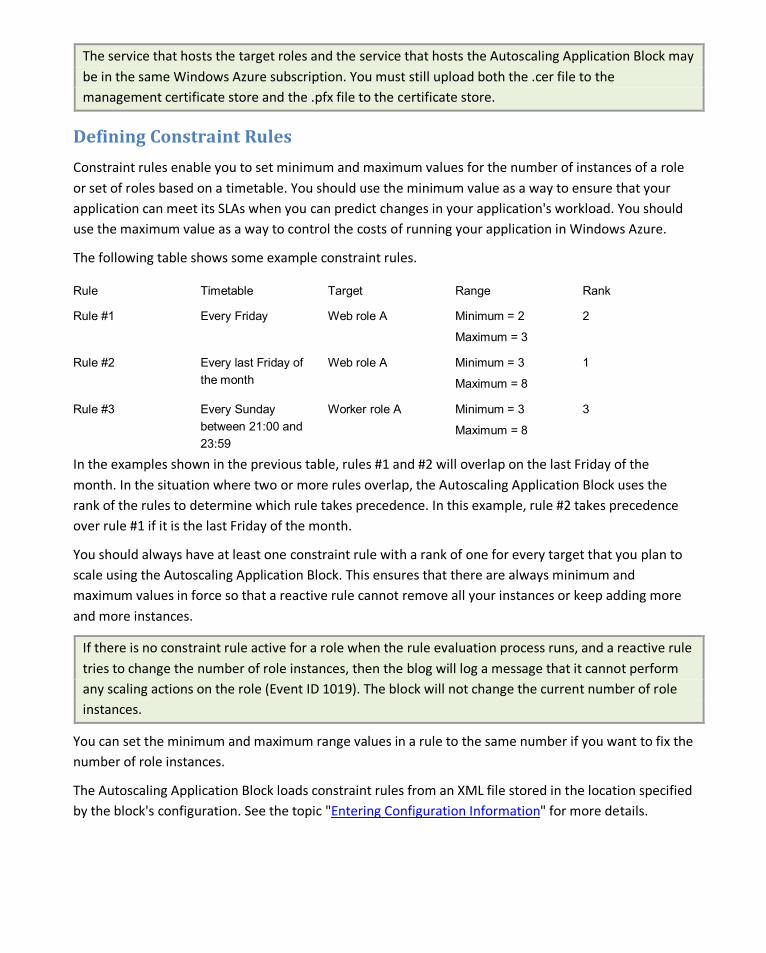
The service that hosts the target roles and the service that hosts the Autoscaling Application Block may be in the same Windows Azure subscription. You must still upload both the .cer file to the management certificate store and the .pfx file to the certificate store.
Defining Constraint Rules
Constraint rules enable you to set minimum and maximum values for the number of instances of a role or set of roles based on a timetable. You should use the minimum value as a way to ensure that your application can meet its SLAs when you can predict changes in your application's workload. You should use the maximum value as a way to control the costs of running your application in Windows Azure.
The following table shows some example constraint rules.
Rule Timetable Target Range Rank
Rule #1 Every Friday Web role A Minimum = 2
Maximum = 3
2
Rule #2 Every last Friday of the month
Web role A Minimum = 3
Maximum = 8
1
Rule #3 Every Sunday between 21:00 and 23:59
Worker role A Minimum = 3
Maximum = 8
3
In the examples shown in the previous table, rules #1 and #2 will overlap on the last Friday of the month. In the situation where two or more rules overlap, the Autoscaling Application Block uses the rank of the rules to determine which rule takes precedence. In this example, rule #2 takes precedence over rule #1 if it is the last Friday of the month.
You should always have at least one constraint rule with a rank of one for every target that you plan to scale using the Autoscaling Application Block. This ensures that there are always minimum and maximum values in force so that a reactive rule cannot remove all your instances or keep adding more and more instances.
If there is no constraint rule active for a role when the rule evaluation process runs, and a reactive rule tries to change the number of role instances, then the blog will log a message that it cannot perform any scaling actions on the role (Event ID 1019). The block will not change the current number of role instances.
You can set the minimum and maximum range values in a rule to the same number if you want to fix the number of role instances.
The Autoscaling Application Block loads constraint rules from an XML file stored in the location specified by the block's configuration. See the topic "Entering Configuration Information" for more details.
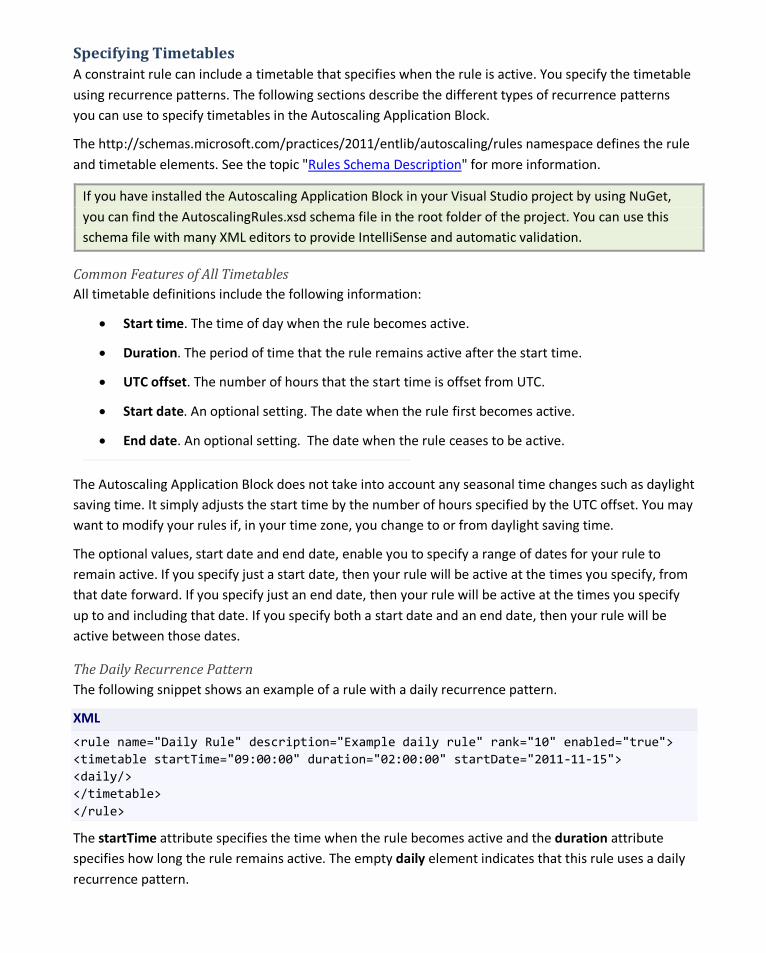
Specifying Timetables A constraint rule can include a timetable that specifies when the rule is active. You specify the timetable using recurrence patterns. The following sections describe the different types of recurrence patterns you can use to specify timetables in the Autoscaling Application Block.
The http://schemas.microsoft.com/practices/2011/entlib/autoscaling/rules namespace defines the rule and timetable elements. See the topic "Rules Schema Description" for more information.
If you have installed the Autoscaling Application Block in your Visual Studio project by using NuGet, you can find the AutoscalingRules.xsd schema file in the root folder of the project. You can use this schema file with many XML editors to provide IntelliSense and automatic validation.
Common Features of All Timetables All timetable definitions include the following information:
• Start time. The time of day when the rule becomes active.
• Duration. The period of time that the rule remains active after the start time.
• UTC offset. The number of hours that the start time is offset from UTC.
• Start date. An optional setting. The date when the rule first becomes active.
• End date. An optional setting. The date when the rule ceases to be active.
The Autoscaling Application Block does not take into account any seasonal time changes such as daylight saving time. It simply adjusts the start time by the number of hours specified by the UTC offset. You may want to modify your rules if, in your time zone, you change to or from daylight saving time.
The optional values, start date and end date, enable you to specify a range of dates for your rule to remain active. If you specify just a start date, then your rule will be active at the times you specify, from that date forward. If you specify just an end date, then your rule will be active at the times you specify up to and including that date. If you specify both a start date and an end date, then your rule will be active between those dates.
The Daily Recurrence Pattern The following snippet shows an example of a rule with a daily recurrence pattern.
XML
<rule name="Daily Rule" description="Example daily rule" rank="10" enabled="true"> <timetable startTime="09:00:00" duration="02:00:00" startDate="2011-11-15"> <daily/> </timetable> </rule>
The startTime attribute specifies the time when the rule becomes active and the duration attribute specifies how long the rule remains active. The empty daily element indicates that this rule uses a daily recurrence pattern.
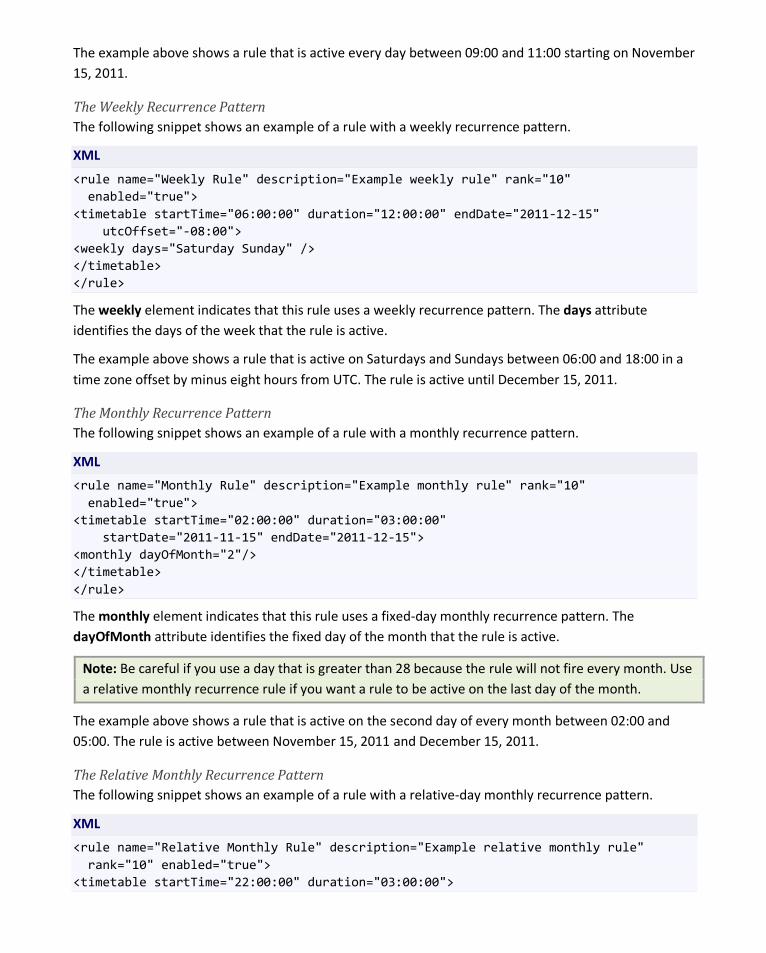
The example above shows a rule that is active every day between 09:00 and 11:00 starting on November 15, 2011.
The Weekly Recurrence Pattern The following snippet shows an example of a rule with a weekly recurrence pattern.
XML
<rule name="Weekly Rule" description="Example weekly rule" rank="10" enabled="true"> <timetable startTime="06:00:00" duration="12:00:00" endDate="2011-12-15" utcOffset="-08:00"> <weekly days="Saturday Sunday" /> </timetable> </rule>
The weekly element indicates that this rule uses a weekly recurrence pattern. The days attribute identifies the days of the week that the rule is active.
The example above shows a rule that is active on Saturdays and Sundays between 06:00 and 18:00 in a time zone offset by minus eight hours from UTC. The rule is active until December 15, 2011.
The Monthly Recurrence Pattern The following snippet shows an example of a rule with a monthly recurrence pattern.
XML
<rule name="Monthly Rule" description="Example monthly rule" rank="10" enabled="true"> <timetable startTime="02:00:00" duration="03:00:00" startDate="2011-11-15" endDate="2011-12-15"> <monthly dayOfMonth="2"/> </timetable> </rule>
The monthly element indicates that this rule uses a fixed-day monthly recurrence pattern. The dayOfMonth attribute identifies the fixed day of the month that the rule is active.
Note: Be careful if you use a day that is greater than 28 because the rule will not fire every month. Use a relative monthly recurrence rule if you want a rule to be active on the last day of the month.
The example above shows a rule that is active on the second day of every month between 02:00 and 05:00. The rule is active between November 15, 2011 and December 15, 2011.
The Relative Monthly Recurrence Pattern The following snippet shows an example of a rule with a relative-day monthly recurrence pattern.
XML
<rule name="Relative Monthly Rule" description="Example relative monthly rule" rank="10" enabled="true"> <timetable startTime="22:00:00" duration="03:00:00">
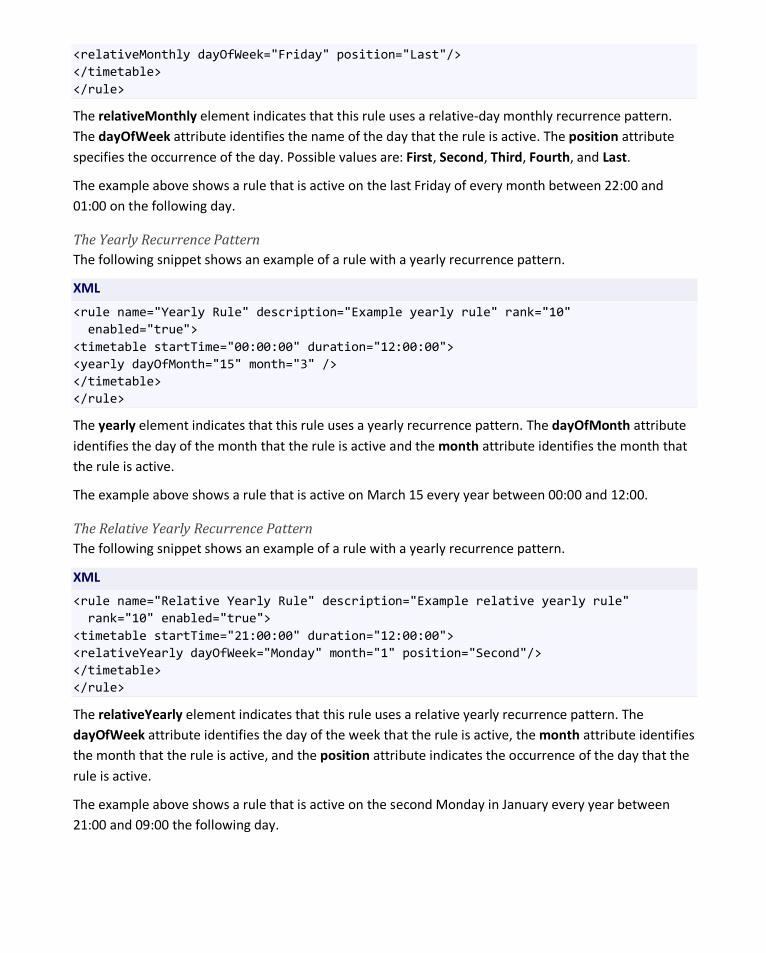
<relativeMonthly dayOfWeek="Friday" position="Last"/> </timetable> </rule>
The relativeMonthly element indicates that this rule uses a relative-day monthly recurrence pattern. The dayOfWeek attribute identifies the name of the day that the rule is active. The position attribute specifies the occurrence of the day. Possible values are: First, Second, Third, Fourth, and Last.
The example above shows a rule that is active on the last Friday of every month between 22:00 and 01:00 on the following day.
The Yearly Recurrence Pattern The following snippet shows an example of a rule with a yearly recurrence pattern.
XML
<rule name="Yearly Rule" description="Example yearly rule" rank="10" enabled="true"> <timetable startTime="00:00:00" duration="12:00:00"> <yearly dayOfMonth="15" month="3" /> </timetable> </rule>
The yearly element indicates that this rule uses a yearly recurrence pattern. The dayOfMonth attribute identifies the day of the month that the rule is active and the month attribute identifies the month that the rule is active.
The example above shows a rule that is active on March 15 every year between 00:00 and 12:00.
The Relative Yearly Recurrence Pattern The following snippet shows an example of a rule with a yearly recurrence pattern.
XML
<rule name="Relative Yearly Rule" description="Example relative yearly rule" rank="10" enabled="true"> <timetable startTime="21:00:00" duration="12:00:00"> <relativeYearly dayOfWeek="Monday" month="1" position="Second"/> </timetable> </rule>
The relativeYearly element indicates that this rule uses a relative yearly recurrence pattern. The dayOfWeek attribute identifies the day of the week that the rule is active, the month attribute identifies the month that the rule is active, and the position attribute indicates the occurrence of the day that the rule is active.
The example above shows a rule that is active on the second Monday in January every year between 21:00 and 09:00 the following day.
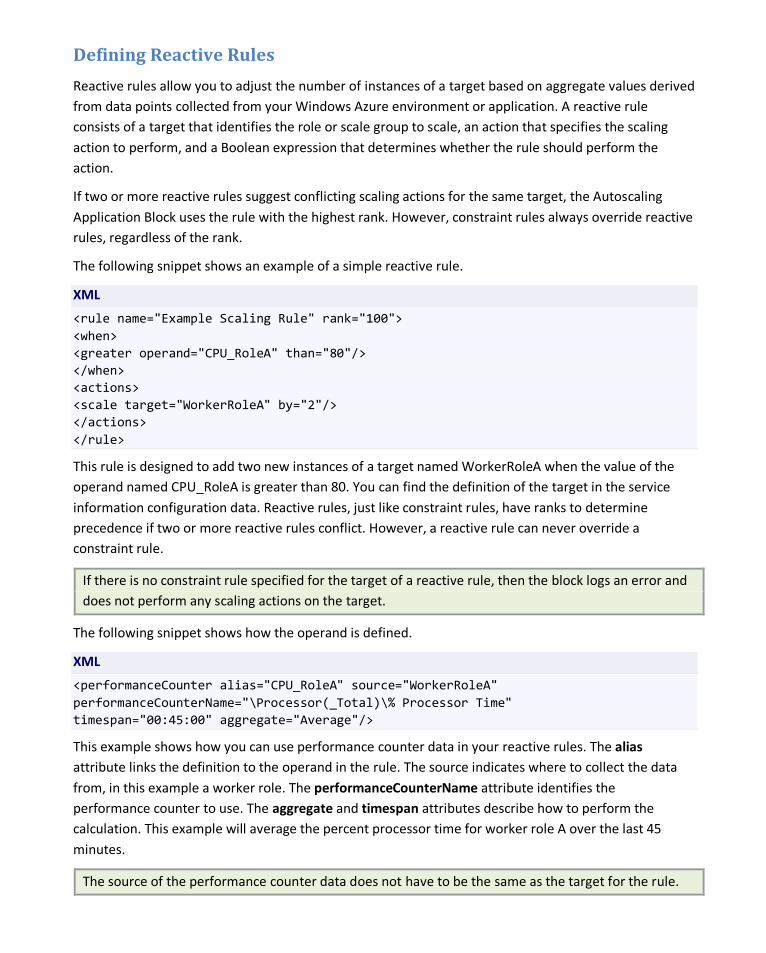
Defining Reactive Rules
Reactive rules allow you to adjust the number of instances of a target based on aggregate values derived from data points collected from your Windows Azure environment or application. A reactive rule consists of a target that identifies the role or scale group to scale, an action that specifies the scaling action to perform, and a Boolean expression that determines whether the rule should perform the action.
If two or more reactive rules suggest conflicting scaling actions for the same target, the Autoscaling Application Block uses the rule with the highest rank. However, constraint rules always override reactive rules, regardless of the rank.
The following snippet shows an example of a simple reactive rule.
XML
<rule name="Example Scaling Rule" rank="100"> <when> <greater operand="CPU_RoleA" than="80"/> </when> <actions> <scale target="WorkerRoleA" by="2"/> </actions> </rule>
This rule is designed to add two new instances of a target named WorkerRoleA when the value of the operand named CPU_RoleA is greater than 80. You can find the definition of the target in the service information configuration data. Reactive rules, just like constraint rules, have ranks to determine precedence if two or more reactive rules conflict. However, a reactive rule can never override a constraint rule.
If there is no constraint rule specified for the target of a reactive rule, then the block logs an error and does not perform any scaling actions on the target.
The following snippet shows how the operand is defined.
XML
<performanceCounter alias="CPU_RoleA" source="WorkerRoleA" performanceCounterName="\Processor(_Total)\% Processor Time" timespan="00:45:00" aggregate="Average"/>
This example shows how you can use performance counter data in your reactive rules. The alias attribute links the definition to the operand in the rule. The source indicates where to collect the data from, in this example a worker role. The performanceCounterName attribute identifies the performance counter to use. The aggregate and timespan attributes describe how to perform the calculation. This example will average the percent processor time for worker role A over the last 45 minutes.
The source of the performance counter data does not have to be the same as the target for the rule.
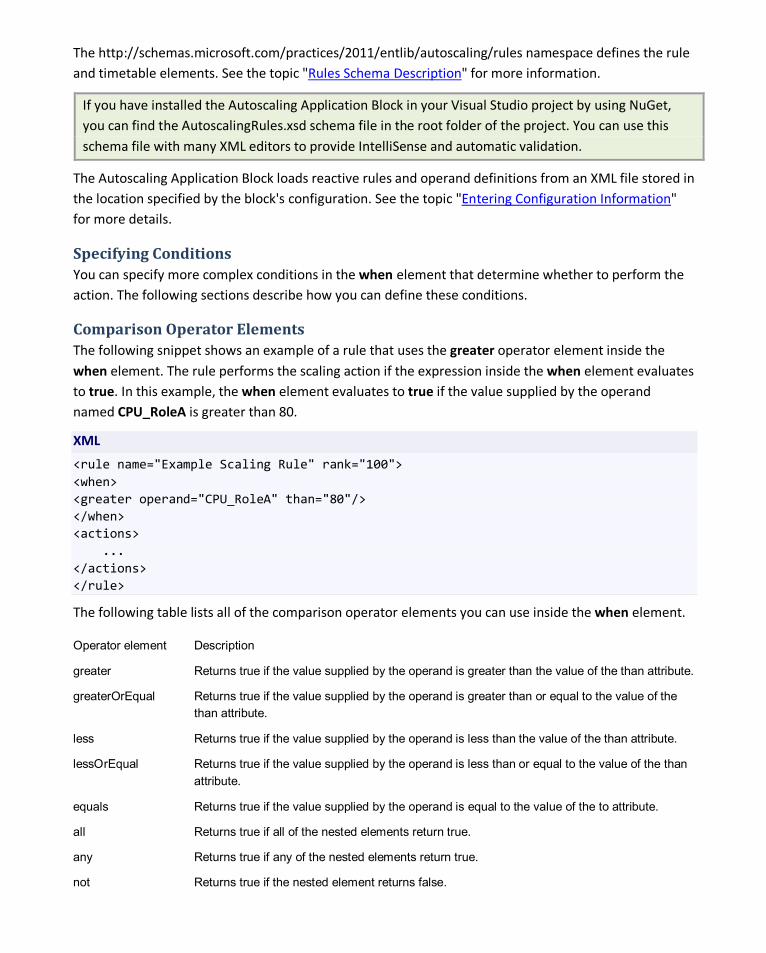
The http://schemas.microsoft.com/practices/2011/entlib/autoscaling/rules namespace defines the rule and timetable elements. See the topic "Rules Schema Description" for more information.
If you have installed the Autoscaling Application Block in your Visual Studio project by using NuGet, you can find the AutoscalingRules.xsd schema file in the root folder of the project. You can use this schema file with many XML editors to provide IntelliSense and automatic validation.
The Autoscaling Application Block loads reactive rules and operand definitions from an XML file stored in the location specified by the block's configuration. See the topic "Entering Configuration Information" for more details.
Specifying Conditions You can specify more complex conditions in the when element that determine whether to perform the action. The following sections describe how you can define these conditions.
Comparison Operator Elements The following snippet shows an example of a rule that uses the greater operator element inside the when element. The rule performs the scaling action if the expression inside the when element evaluates to true. In this example, the when element evaluates to true if the value supplied by the operand named CPU_RoleA is greater than 80.
XML
<rule name="Example Scaling Rule" rank="100"> <when> <greater operand="CPU_RoleA" than="80"/> </when> <actions> ... </actions> </rule>
The following table lists all of the comparison operator elements you can use inside the when element.
Operator element Description
greater Returns true if the value supplied by the operand is greater than the value of the than attribute.
greaterOrEqual Returns true if the value supplied by the operand is greater than or equal to the value of the than attribute.
less Returns true if the value supplied by the operand is less than the value of the than attribute.
lessOrEqual Returns true if the value supplied by the operand is less than or equal to the value of the than attribute.
equals Returns true if the value supplied by the operand is equal to the value of the to attribute.
all Returns true if all of the nested elements return true.
any Returns true if any of the nested elements return true.
not Returns true if the nested element returns false.
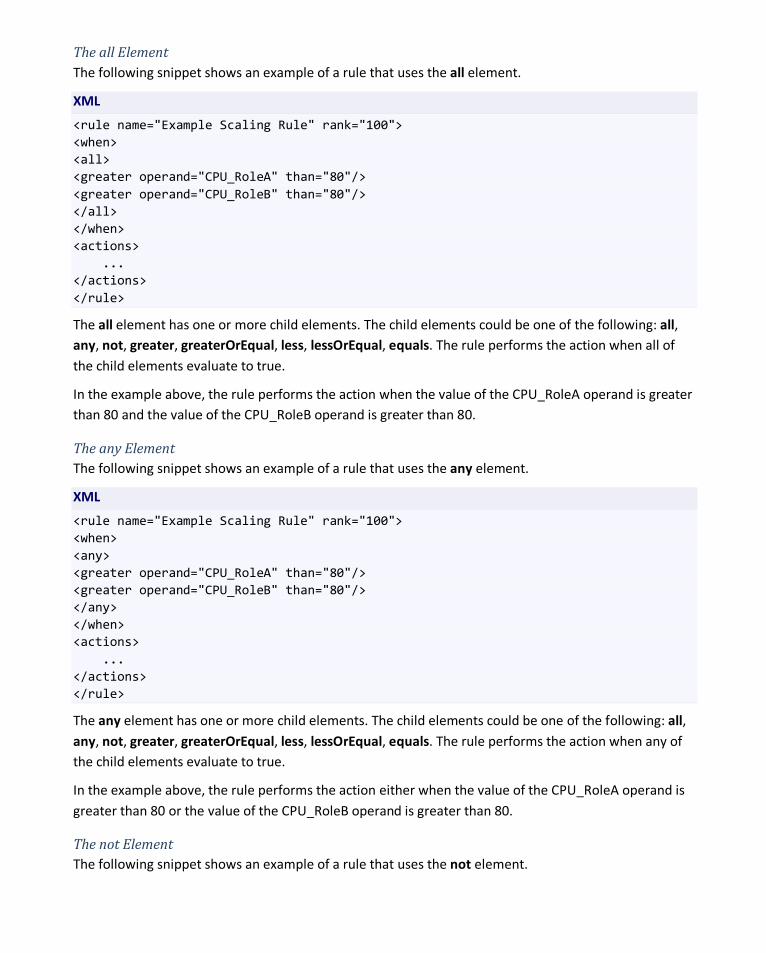
The all Element The following snippet shows an example of a rule that uses the all element.
XML
<rule name="Example Scaling Rule" rank="100"> <when> <all> <greater operand="CPU_RoleA" than="80"/> <greater operand="CPU_RoleB" than="80"/> </all> </when> <actions> ... </actions> </rule>
The all element has one or more child elements. The child elements could be one of the following: all, any, not, greater, greaterOrEqual, less, lessOrEqual, equals. The rule performs the action when all of the child elements evaluate to true.
In the example above, the rule performs the action when the value of the CPU_RoleA operand is greater than 80 and the value of the CPU_RoleB operand is greater than 80.
The any Element The following snippet shows an example of a rule that uses the any element.
XML
<rule name="Example Scaling Rule" rank="100"> <when> <any> <greater operand="CPU_RoleA" than="80"/> <greater operand="CPU_RoleB" than="80"/> </any> </when> <actions> ... </actions> </rule>
The any element has one or more child elements. The child elements could be one of the following: all, any, not, greater, greaterOrEqual, less, lessOrEqual, equals. The rule performs the action when any of the child elements evaluate to true.
In the example above, the rule performs the action either when the value of the CPU_RoleA operand is greater than 80 or the value of the CPU_RoleB operand is greater than 80.
The not Element The following snippet shows an example of a rule that uses the not element.

XML
<rule name="Example Scaling Rule" rank="100"> <when> <not> <any> <greater operand="CPU_RoleA" than="30"/> <greater operand="CPU_RoleB" than="30"/> </any> </not> </when> <actions> ... </actions> </rule>
The not element has one child element. The child elements could be one of the following: all, any, not, greater, greaterOrEqual, less, lessOrEqual, equals. The rule performs the action if the child element evaluates to false.
In the example above, the rule performs the action if the value of the CPU_RoleA operand is less than 30 and the value of the CPU_RoleB operand is less than 30.
This example also shows how you can nest conditions in an expression.
Specifying Comparison Values The comparison operator elements (greater, greaterOrEqual, less, lessOrEqual, equals) compare the value supplied by the operand with the value specified by the than or to attribute. The block allows you to use simple expressions when you define comparisons. The following snippet shows examples of the simple expressions that you can use.
XML
<greaterOrEqual operand="LowPriorityQueue" than="0.5 * HighPriorityQueue"/> <greaterOrEqual operand="5 * LowPriorityQueue" than="HighPriorityQueue"/> <greaterOrEqual operand="LowPriorityQueue" than="HighPriorityQueue / 2"/>
Expression Syntax Rules The following list summarizes the syntax rules of the operand, than, and to attributes.
• The supported operators are multiply (*) and divide (/).
• Parentheses are not supported.
• Expressions are evaluated left to right.
• Expressions can include integers and floating-point numbers.
• Expressions can include zero or more operand aliases.
• Operand aliases are case-sensitive and must match their definition in the operands section of the XML rules file.
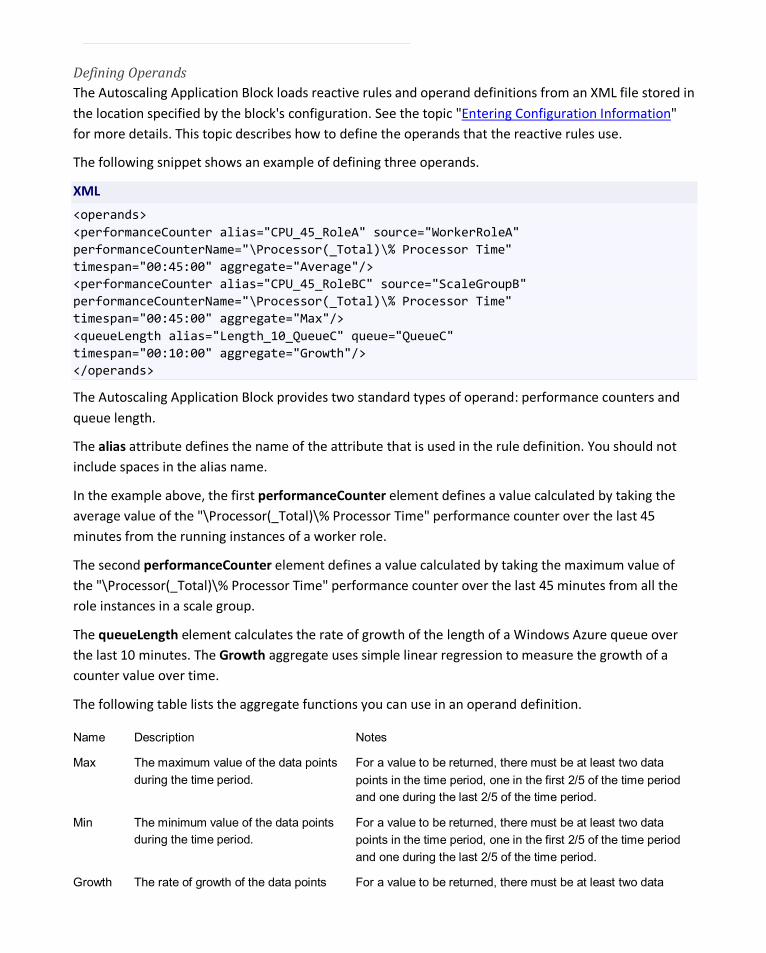
Defining Operands The Autoscaling Application Block loads reactive rules and operand definitions from an XML file stored in the location specified by the block's configuration. See the topic "Entering Configuration Information" for more details. This topic describes how to define the operands that the reactive rules use.
The following snippet shows an example of defining three operands.
XML
<operands> <performanceCounter alias="CPU_45_RoleA" source="WorkerRoleA" performanceCounterName="\Processor(_Total)\% Processor Time" timespan="00:45:00" aggregate="Average"/> <performanceCounter alias="CPU_45_RoleBC" source="ScaleGroupB" performanceCounterName="\Processor(_Total)\% Processor Time" timespan="00:45:00" aggregate="Max"/> <queueLength alias="Length_10_QueueC" queue="QueueC" timespan="00:10:00" aggregate="Growth"/> </operands>
The Autoscaling Application Block provides two standard types of operand: performance counters and queue length.
The alias attribute defines the name of the attribute that is used in the rule definition. You should not include spaces in the alias name.
In the example above, the first performanceCounter element defines a value calculated by taking the average value of the "\Processor(_Total)\% Processor Time" performance counter over the last 45 minutes from the running instances of a worker role.
The second performanceCounter element defines a value calculated by taking the maximum value of the "\Processor(_Total)\% Processor Time" performance counter over the last 45 minutes from all the role instances in a scale group.
The queueLength element calculates the rate of growth of the length of a Windows Azure queue over the last 10 minutes. The Growth aggregate uses simple linear regression to measure the growth of a counter value over time.
The following table lists the aggregate functions you can use in an operand definition.
Name Description Notes
Max The maximum value of the data points during the time period.
For a value to be returned, there must be at least two data points in the time period, one in the first 2/5 of the time period and one during the last 2/5 of the time period.
Min The minimum value of the data points during the time period.
For a value to be returned, there must be at least two data points in the time period, one in the first 2/5 of the time period and one during the last 2/5 of the time period.
Growth The rate of growth of the data points For a value to be returned, there must be at least two data

during the time period. This is calculated using simple linear regression. A positive number implies growth.
points in the time period, one in the first 2/5 of the time period and one during the last 2/5 of the time period.
Average The mean value of the data points during the time period.
For a value to be returned, there must be at least two data points in the time period, one in the first 2/5 of the time period and one during the last 2/5 of the time period.
Last The last recorded data point value in the time period.
For a value to be returned, there must be at least one data point in the time period.
For a better indication of the load on your application, you should use longer timespans, such as 30 or 60 minutes. Longer timespans will also help to smooth out any variations in the data when you are using the average or growth aggregate types.
The block samples data points every two minutes, so to ensure that you have at least two data points for the aggregate calculation you should set a timespan of at least 5 minutes.
To enable custom performance counters, see the topic "Collecting Performance Counter Data."
To create custom operands, see the topic "Creating a Custom Operand."
Enabling and Disabling Rules
You can temporarily enable or disable a rule by setting the value of a rule's enabled attribute.
The following example shows a rule that is currently enabled. This rule will be evaluated the next time the rules evaluation process runs.
XML
<rule name="Peak time" description="" rank="10" enabled="true"> <timetable startTime="14:00:00" duration="00:10:00" startDate="2011-08-15" utcOffset="-04:00"> <relativeMonthly dayOfWeek="Monday" position="Last"/> </timetable> <actions> <range target="AutoScaling.DemoWebApp" min="3" max="5"/> </actions> </rule>
The following example shows a rule that is currently disabled. This rule will not be evaluated the next time the rules evaluation process runs.
XML
<rule name="Peak time" description="" rank="10" enabled="false"> <timetable startTime="14:00:00" duration="00:10:00" startDate="2011-08-15" utcOffset="-04:00"> <relativeMonthly dayOfWeek="Monday" position="Last"/> </timetable>
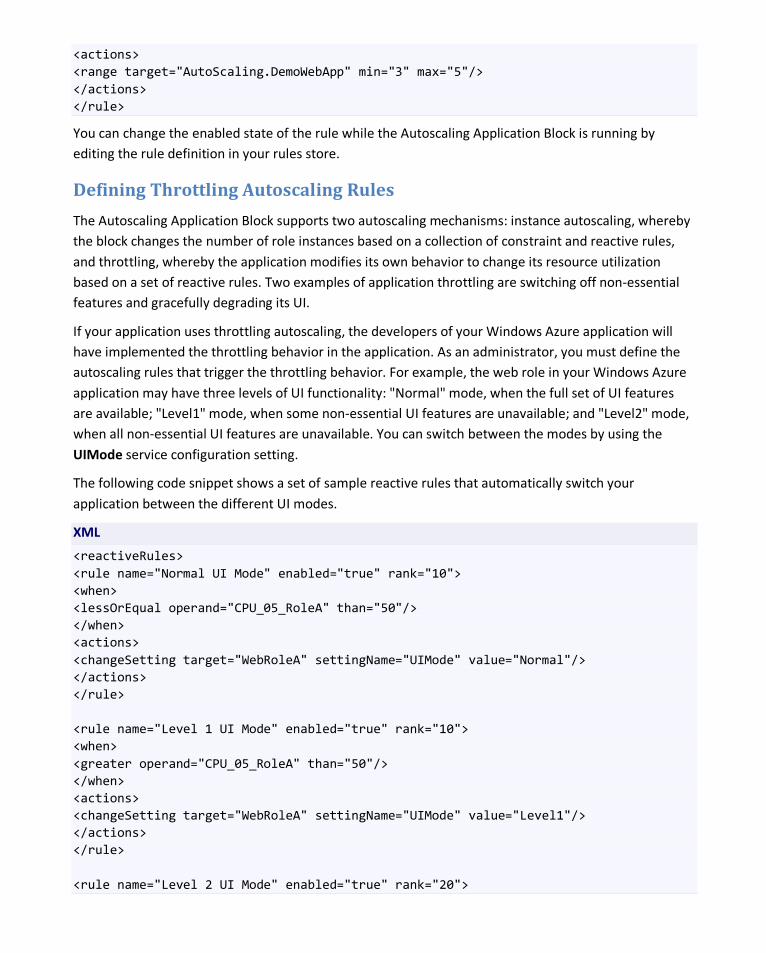
<actions> <range target="AutoScaling.DemoWebApp" min="3" max="5"/> </actions> </rule>
You can change the enabled state of the rule while the Autoscaling Application Block is running by editing the rule definition in your rules store.
Defining Throttling Autoscaling Rules
The Autoscaling Application Block supports two autoscaling mechanisms: instance autoscaling, whereby the block changes the number of role instances based on a collection of constraint and reactive rules, and throttling, whereby the application modifies its own behavior to change its resource utilization based on a set of reactive rules. Two examples of application throttling are switching off non-essential features and gracefully degrading its UI.
If your application uses throttling autoscaling, the developers of your Windows Azure application will have implemented the throttling behavior in the application. As an administrator, you must define the autoscaling rules that trigger the throttling behavior. For example, the web role in your Windows Azure application may have three levels of UI functionality: "Normal" mode, when the full set of UI features are available; "Level1" mode, when some non-essential UI features are unavailable; and "Level2" mode, when all non-essential UI features are unavailable. You can switch between the modes by using the UIMode service configuration setting.
The following code snippet shows a set of sample reactive rules that automatically switch your application between the different UI modes.
XML
<reactiveRules> <rule name="Normal UI Mode" enabled="true" rank="10"> <when> <lessOrEqual operand="CPU_05_RoleA" than="50"/> </when> <actions> <changeSetting target="WebRoleA" settingName="UIMode" value="Normal"/> </actions> </rule> <rule name="Level 1 UI Mode" enabled="true" rank="10"> <when> <greater operand="CPU_05_RoleA" than="50"/> </when> <actions> <changeSetting target="WebRoleA" settingName="UIMode" value="Level1"/> </actions> </rule> <rule name="Level 2 UI Mode" enabled="true" rank="20">
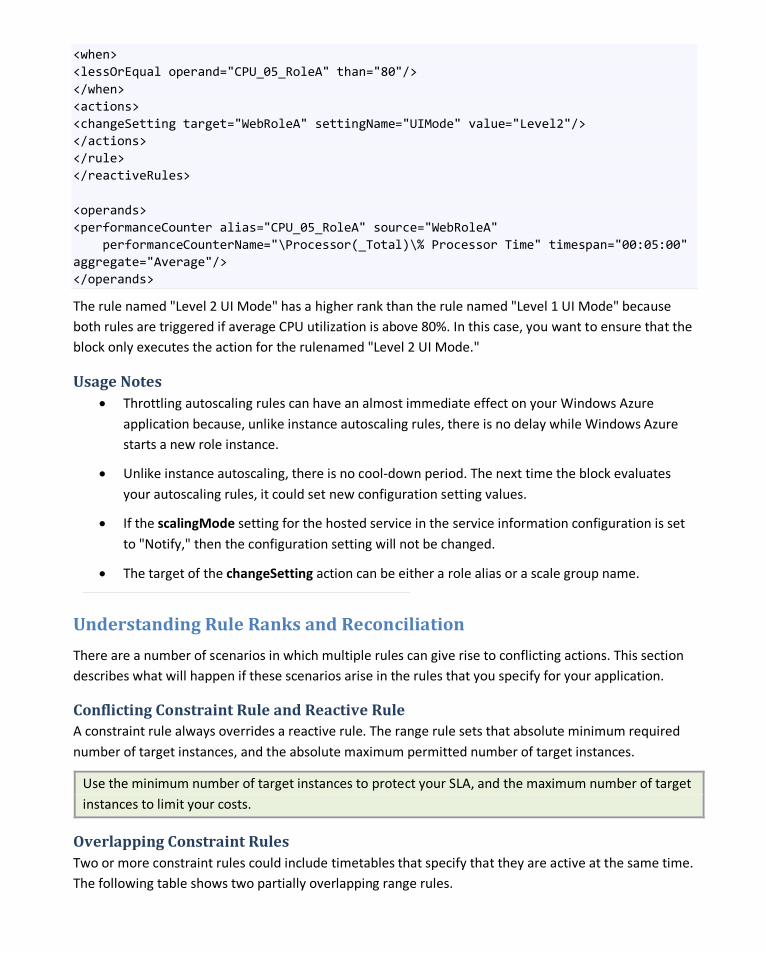
<when> <lessOrEqual operand="CPU_05_RoleA" than="80"/> </when> <actions> <changeSetting target="WebRoleA" settingName="UIMode" value="Level2"/> </actions> </rule> </reactiveRules> <operands> <performanceCounter alias="CPU_05_RoleA" source="WebRoleA" performanceCounterName="\Processor(_Total)\% Processor Time" timespan="00:05:00" aggregate="Average"/> </operands>
The rule named "Level 2 UI Mode" has a higher rank than the rule named "Level 1 UI Mode" because both rules are triggered if average CPU utilization is above 80%. In this case, you want to ensure that the block only executes the action for the rulenamed "Level 2 UI Mode."
Usage Notes • Throttling autoscaling rules can have an almost immediate effect on your Windows Azure
application because, unlike instance autoscaling rules, there is no delay while Windows Azure starts a new role instance.
• Unlike instance autoscaling, there is no cool-down period. The next time the block evaluates your autoscaling rules, it could set new configuration setting values.
• If the scalingMode setting for the hosted service in the service information configuration is set to "Notify," then the configuration setting will not be changed.
• The target of the changeSetting action can be either a role alias or a scale group name.
Understanding Rule Ranks and Reconciliation
There are a number of scenarios in which multiple rules can give rise to conflicting actions. This section describes what will happen if these scenarios arise in the rules that you specify for your application.
Conflicting Constraint Rule and Reactive Rule A constraint rule always overrides a reactive rule. The range rule sets that absolute minimum required number of target instances, and the absolute maximum permitted number of target instances.
Use the minimum number of target instances to protect your SLA, and the maximum number of target instances to limit your costs.
Overlapping Constraint Rules Two or more constraint rules could include timetables that specify that they are active at the same time. The following table shows two partially overlapping range rules.
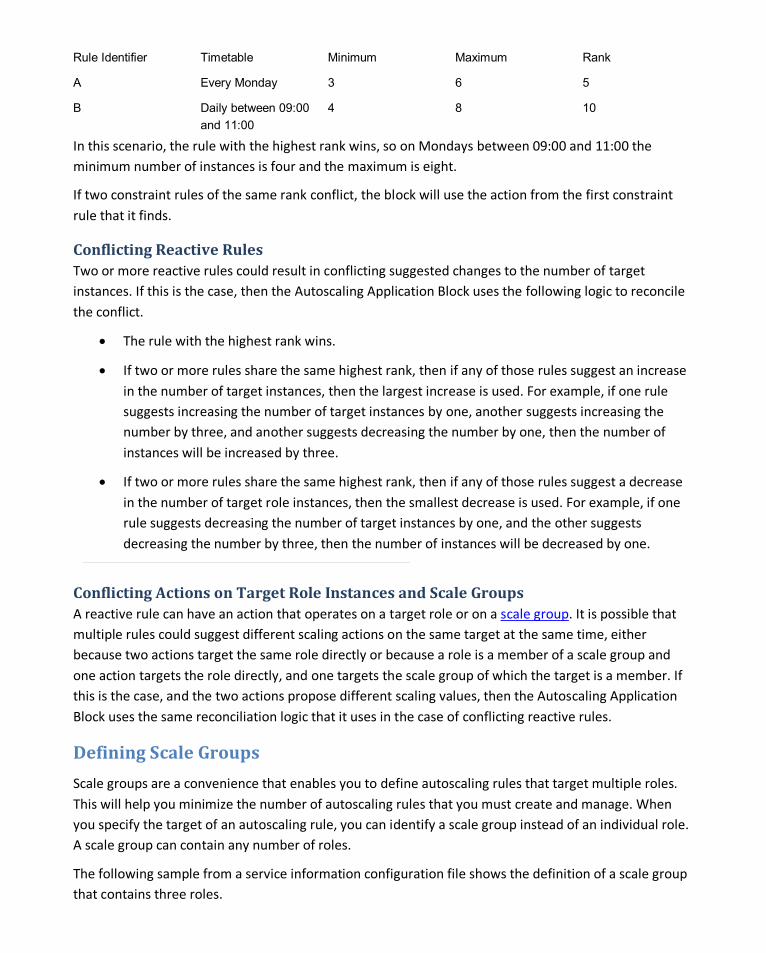
Rule Identifier Timetable Minimum Maximum Rank
A Every Monday 3 6 5
B Daily between 09:00 and 11:00
4 8 10
In this scenario, the rule with the highest rank wins, so on Mondays between 09:00 and 11:00 the minimum number of instances is four and the maximum is eight.
If two constraint rules of the same rank conflict, the block will use the action from the first constraint rule that it finds.
Conflicting Reactive Rules Two or more reactive rules could result in conflicting suggested changes to the number of target instances. If this is the case, then the Autoscaling Application Block uses the following logic to reconcile the conflict.
• The rule with the highest rank wins.
• If two or more rules share the same highest rank, then if any of those rules suggest an increase in the number of target instances, then the largest increase is used. For example, if one rule suggests increasing the number of target instances by one, another suggests increasing the number by three, and another suggests decreasing the number by one, then the number of instances will be increased by three.
• If two or more rules share the same highest rank, then if any of those rules suggest a decrease in the number of target role instances, then the smallest decrease is used. For example, if one rule suggests decreasing the number of target instances by one, and the other suggests decreasing the number by three, then the number of instances will be decreased by one.
Conflicting Actions on Target Role Instances and Scale Groups A reactive rule can have an action that operates on a target role or on a scale group. It is possible that multiple rules could suggest different scaling actions on the same target at the same time, either because two actions target the same role directly or because a role is a member of a scale group and one action targets the role directly, and one targets the scale group of which the target is a member. If this is the case, and the two actions propose different scaling values, then the Autoscaling Application Block uses the same reconciliation logic that it uses in the case of conflicting reactive rules.
Defining Scale Groups
Scale groups are a convenience that enables you to define autoscaling rules that target multiple roles. This will help you minimize the number of autoscaling rules that you must create and manage. When you specify the target of an autoscaling rule, you can identify a scale group instead of an individual role. A scale group can contain any number of roles.
The following sample from a service information configuration file shows the definition of a scale group that contains three roles.
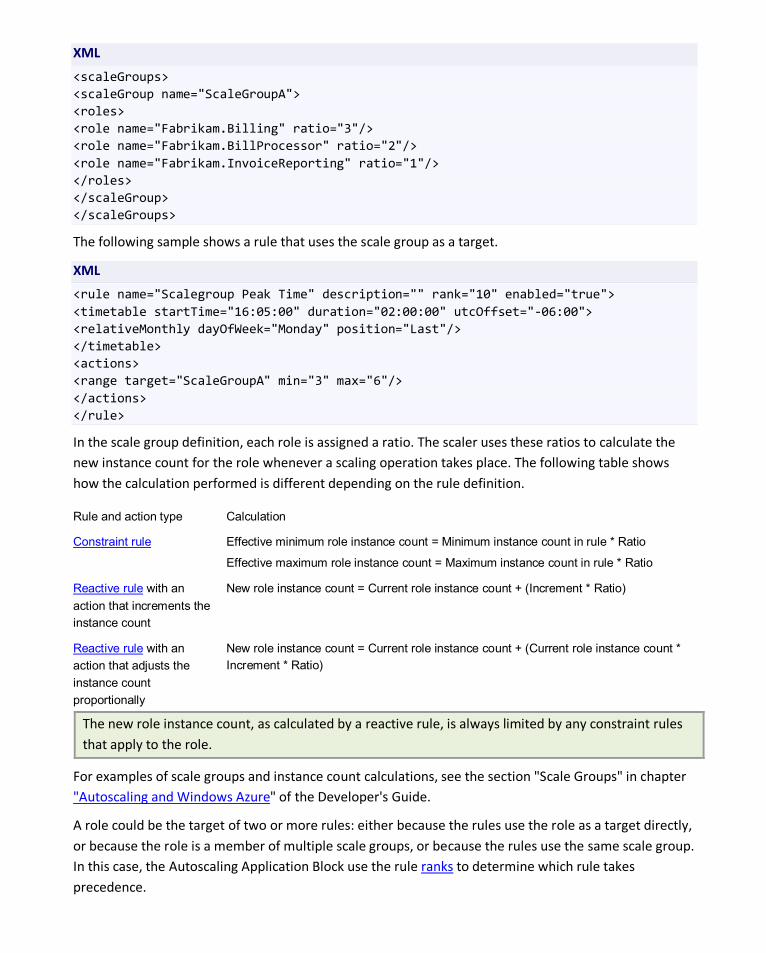
XML
<scaleGroups> <scaleGroup name="ScaleGroupA"> <roles> <role name="Fabrikam.Billing" ratio="3"/> <role name="Fabrikam.BillProcessor" ratio="2"/> <role name="Fabrikam.InvoiceReporting" ratio="1"/> </roles> </scaleGroup> </scaleGroups>
The following sample shows a rule that uses the scale group as a target.
XML
<rule name="Scalegroup Peak Time" description="" rank="10" enabled="true"> <timetable startTime="16:05:00" duration="02:00:00" utcOffset="-06:00"> <relativeMonthly dayOfWeek="Monday" position="Last"/> </timetable> <actions> <range target="ScaleGroupA" min="3" max="6"/> </actions> </rule>
In the scale group definition, each role is assigned a ratio. The scaler uses these ratios to calculate the new instance count for the role whenever a scaling operation takes place. The following table shows how the calculation performed is different depending on the rule definition.
Rule and action type Calculation
Constraint rule Effective minimum role instance count = Minimum instance count in rule * Ratio
Effective maximum role instance count = Maximum instance count in rule * Ratio
Reactive rule with an action that increments the instance count
New role instance count = Current role instance count + (Increment * Ratio)
Reactive rule with an action that adjusts the instance count proportionally
New role instance count = Current role instance count + (Current role instance count * Increment * Ratio)
The new role instance count, as calculated by a reactive rule, is always limited by any constraint rules that apply to the role.
For examples of scale groups and instance count calculations, see the section "Scale Groups" in chapter "Autoscaling and Windows Azure" of the Developer's Guide.
A role could be the target of two or more rules: either because the rules use the role as a target directly, or because the role is a member of multiple scale groups, or because the rules use the same scale group. In this case, the Autoscaling Application Block use the rule ranks to determine which rule takes precedence.
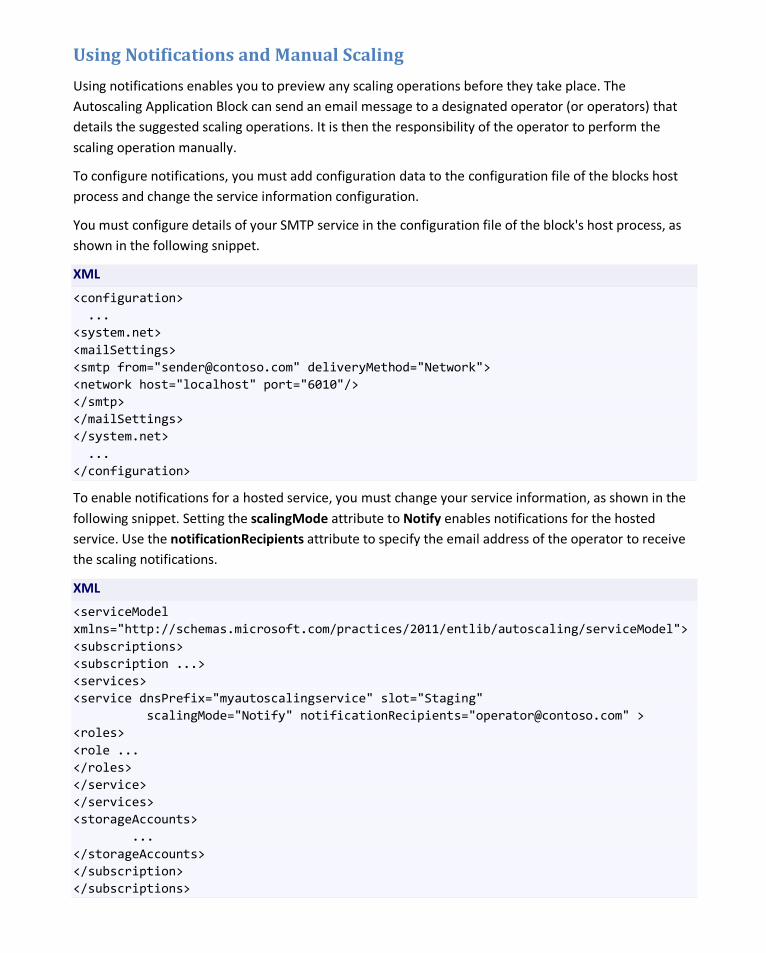
Using Notifications and Manual Scaling
Using notifications enables you to preview any scaling operations before they take place. The Autoscaling Application Block can send an email message to a designated operator (or operators) that details the suggested scaling operations. It is then the responsibility of the operator to perform the scaling operation manually.
To configure notifications, you must add configuration data to the configuration file of the blocks host process and change the service information configuration.
You must configure details of your SMTP service in the configuration file of the block's host process, as shown in the following snippet.
XML
<configuration> ... <system.net> <mailSettings> <smtp from="[email protected]" deliveryMethod="Network"> <network host="localhost" port="6010"/> </smtp> </mailSettings> </system.net> ... </configuration>
To enable notifications for a hosted service, you must change your service information, as shown in the following snippet. Setting the scalingMode attribute to Notify enables notifications for the hosted service. Use the notificationRecipients attribute to specify the email address of the operator to receive the scaling notifications.
XML
<serviceModel xmlns="http://schemas.microsoft.com/practices/2011/entlib/autoscaling/serviceModel"> <subscriptions> <subscription ...> <services> <service dnsPrefix="myautoscalingservice" slot="Staging" scalingMode="Notify" notificationRecipients="[email protected]" > <roles> <role ... </roles> </service> </services> <storageAccounts> ... </storageAccounts> </subscription> </subscriptions>
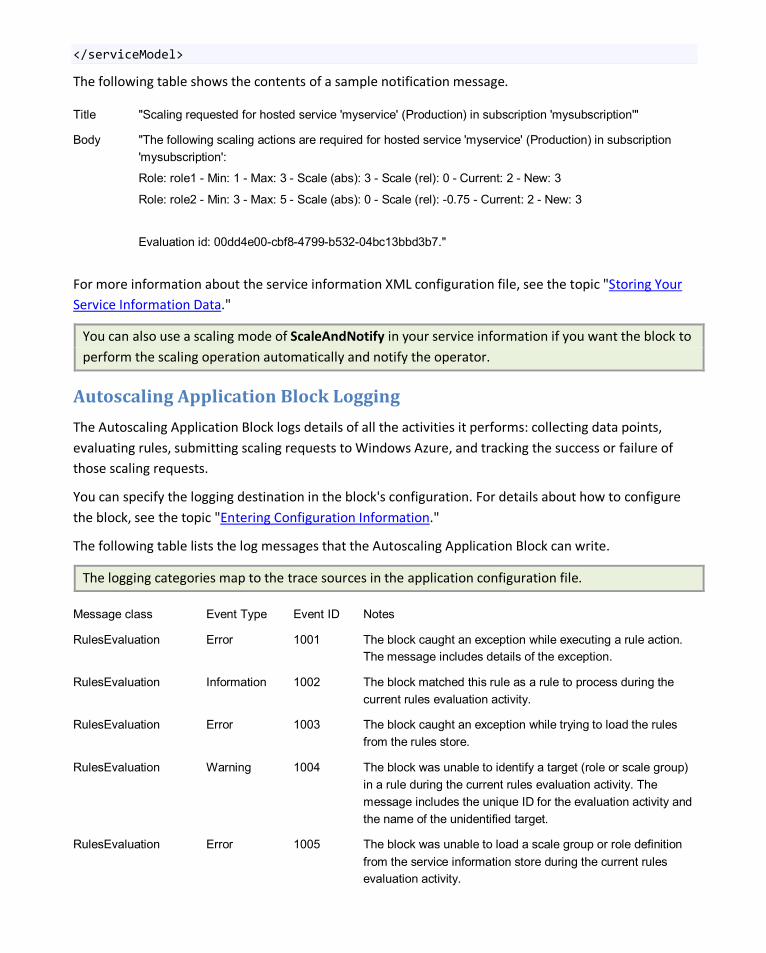
</serviceModel>
The following table shows the contents of a sample notification message.
Title "Scaling requested for hosted service 'myservice' (Production) in subscription 'mysubscription'"
Body "The following scaling actions are required for hosted service 'myservice' (Production) in subscription 'mysubscription':
Role: role1 - Min: 1 - Max: 3 - Scale (abs): 3 - Scale (rel): 0 - Current: 2 - New: 3
Role: role2 - Min: 3 - Max: 5 - Scale (abs): 0 - Scale (rel): -0.75 - Current: 2 - New: 3
Evaluation id: 00dd4e00-cbf8-4799-b532-04bc13bbd3b7."
For more information about the service information XML configuration file, see the topic "Storing Your Service Information Data."
You can also use a scaling mode of ScaleAndNotify in your service information if you want the block to perform the scaling operation automatically and notify the operator.
Autoscaling Application Block Logging
The Autoscaling Application Block logs details of all the activities it performs: collecting data points, evaluating rules, submitting scaling requests to Windows Azure, and tracking the success or failure of those scaling requests.
You can specify the logging destination in the block's configuration. For details about how to configure the block, see the topic "Entering Configuration Information."
The following table lists the log messages that the Autoscaling Application Block can write.
The logging categories map to the trace sources in the application configuration file.
Message class Event Type Event ID Notes
RulesEvaluation Error 1001 The block caught an exception while executing a rule action. The message includes details of the exception.
RulesEvaluation Information 1002 The block matched this rule as a rule to process during the current rules evaluation activity.
RulesEvaluation Error 1003 The block caught an exception while trying to load the rules from the rules store.
RulesEvaluation Warning 1004 The block was unable to identify a target (role or scale group) in a rule during the current rules evaluation activity. The message includes the unique ID for the evaluation activity and the name of the unidentified target.
RulesEvaluation Error 1005 The block was unable to load a scale group or role definition from the service information store during the current rules evaluation activity.
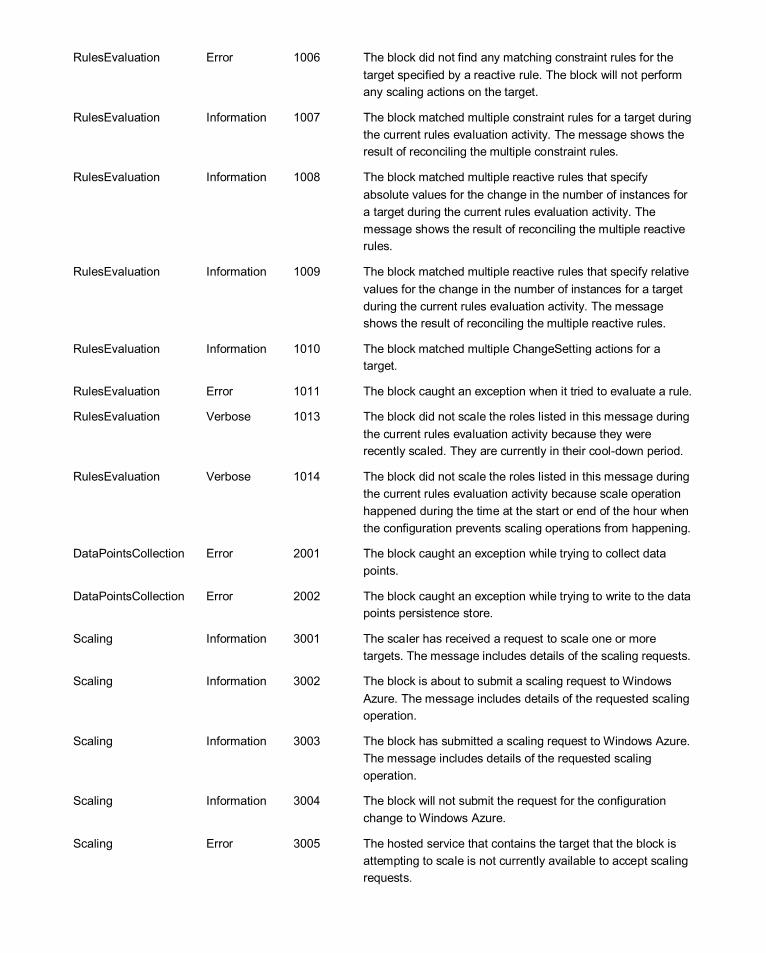
RulesEvaluation Error 1006 The block did not find any matching constraint rules for the target specified by a reactive rule. The block will not perform any scaling actions on the target.
RulesEvaluation Information 1007 The block matched multiple constraint rules for a target during the current rules evaluation activity. The message shows the result of reconciling the multiple constraint rules.
RulesEvaluation Information 1008 The block matched multiple reactive rules that specify absolute values for the change in the number of instances for a target during the current rules evaluation activity. The message shows the result of reconciling the multiple reactive rules.
RulesEvaluation Information 1009 The block matched multiple reactive rules that specify relative values for the change in the number of instances for a target during the current rules evaluation activity. The message shows the result of reconciling the multiple reactive rules.
RulesEvaluation Information 1010 The block matched multiple ChangeSetting actions for a target.
RulesEvaluation Error 1011 The block caught an exception when it tried to evaluate a rule.
RulesEvaluation Verbose 1013 The block did not scale the roles listed in this message during the current rules evaluation activity because they were recently scaled. They are currently in their cool-down period.
RulesEvaluation Verbose 1014 The block did not scale the roles listed in this message during the current rules evaluation activity because scale operation happened during the time at the start or end of the hour when the configuration prevents scaling operations from happening.
DataPointsCollection Error 2001 The block caught an exception while trying to collect data points.
DataPointsCollection Error 2002 The block caught an exception while trying to write to the data points persistence store.
Scaling Information 3001 The scaler has received a request to scale one or more targets. The message includes details of the scaling requests.
Scaling Information 3002 The block is about to submit a scaling request to Windows Azure. The message includes details of the requested scaling operation.
Scaling Information 3003 The block has submitted a scaling request to Windows Azure. The message includes details of the requested scaling operation.
Scaling Information 3004 The block will not submit the request for the configuration change to Windows Azure.
Scaling Error 3005 The hosted service that contains the target that the block is attempting to scale is not currently available to accept scaling requests.
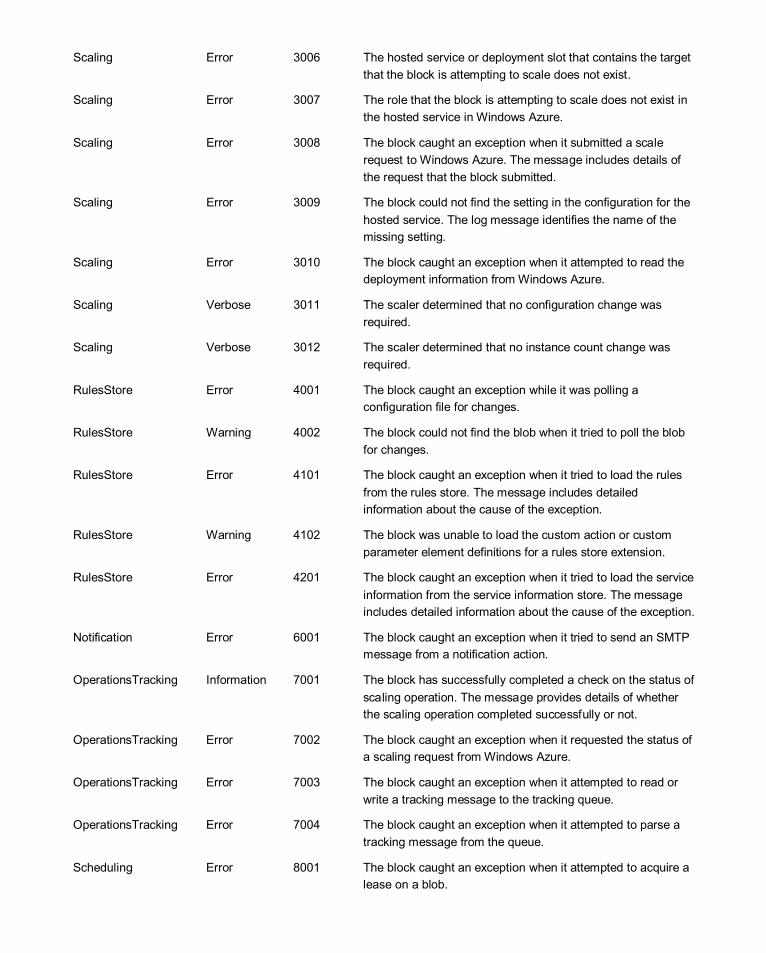
Scaling Error 3006 The hosted service or deployment slot that contains the target that the block is attempting to scale does not exist.
Scaling Error 3007 The role that the block is attempting to scale does not exist in the hosted service in Windows Azure.
Scaling Error 3008 The block caught an exception when it submitted a scale request to Windows Azure. The message includes details of the request that the block submitted.
Scaling Error 3009 The block could not find the setting in the configuration for the hosted service. The log message identifies the name of the missing setting.
Scaling Error 3010 The block caught an exception when it attempted to read the deployment information from Windows Azure.
Scaling Verbose 3011 The scaler determined that no configuration change was required.
Scaling Verbose 3012 The scaler determined that no instance count change was required.
RulesStore Error 4001 The block caught an exception while it was polling a configuration file for changes.
RulesStore Warning 4002 The block could not find the blob when it tried to poll the blob for changes.
RulesStore Error 4101 The block caught an exception when it tried to load the rules from the rules store. The message includes detailed information about the cause of the exception.
RulesStore Warning 4102 The block was unable to load the custom action or custom parameter element definitions for a rules store extension.
RulesStore Error 4201 The block caught an exception when it tried to load the service information from the service information store. The message includes detailed information about the cause of the exception.
Notification Error 6001 The block caught an exception when it tried to send an SMTP message from a notification action.
OperationsTracking Information 7001 The block has successfully completed a check on the status of scaling operation. The message provides details of whether the scaling operation completed successfully or not.
OperationsTracking Error 7002 The block caught an exception when it requested the status of a scaling request from Windows Azure.
OperationsTracking Error 7003 The block caught an exception when it attempted to read or write a tracking message to the tracking queue.
OperationsTracking Error 7004 The block caught an exception when it attempted to parse a tracking message from the queue.
Scheduling Error 8001 The block caught an exception when it attempted to acquire a lease on a blob.
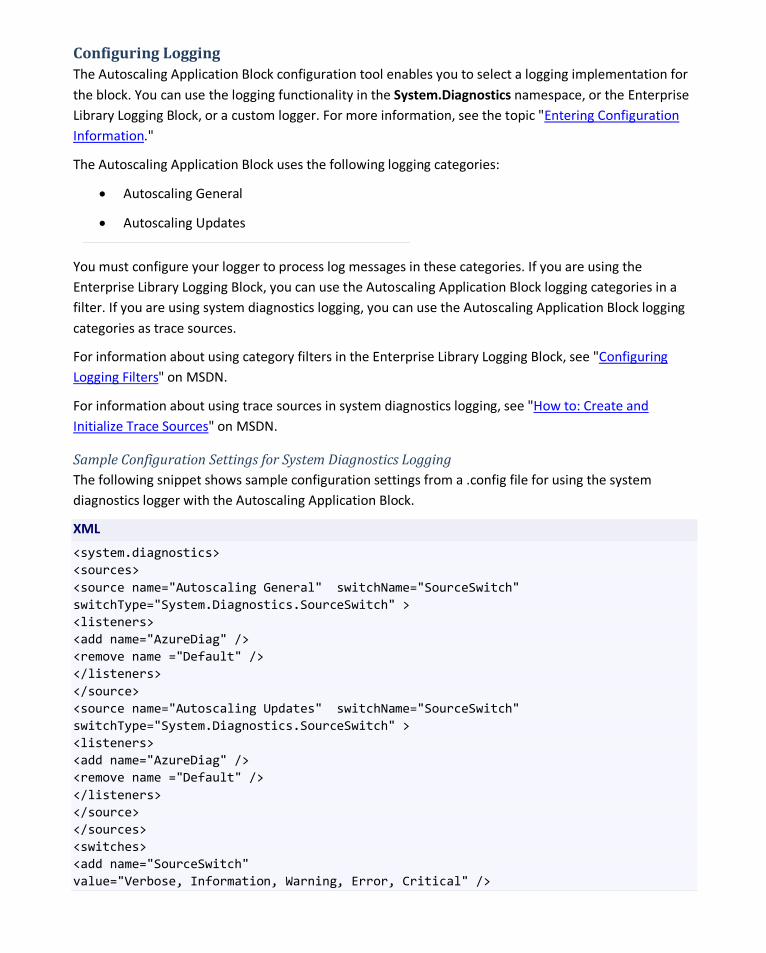
Configuring Logging The Autoscaling Application Block configuration tool enables you to select a logging implementation for the block. You can use the logging functionality in the System.Diagnostics namespace, or the Enterprise Library Logging Block, or a custom logger. For more information, see the topic "Entering Configuration Information."
The Autoscaling Application Block uses the following logging categories:
• Autoscaling General
• Autoscaling Updates
You must configure your logger to process log messages in these categories. If you are using the Enterprise Library Logging Block, you can use the Autoscaling Application Block logging categories in a filter. If you are using system diagnostics logging, you can use the Autoscaling Application Block logging categories as trace sources.
For information about using category filters in the Enterprise Library Logging Block, see "Configuring Logging Filters" on MSDN.
For information about using trace sources in system diagnostics logging, see "How to: Create and Initialize Trace Sources" on MSDN.
Sample Configuration Settings for System Diagnostics Logging The following snippet shows sample configuration settings from a .config file for using the system diagnostics logger with the Autoscaling Application Block.
XML
<system.diagnostics> <sources> <source name="Autoscaling General" switchName="SourceSwitch" switchType="System.Diagnostics.SourceSwitch" > <listeners> <add name="AzureDiag" /> <remove name ="Default" /> </listeners> </source> <source name="Autoscaling Updates" switchName="SourceSwitch" switchType="System.Diagnostics.SourceSwitch" > <listeners> <add name="AzureDiag" /> <remove name ="Default" /> </listeners> </source> </sources> <switches> <add name="SourceSwitch" value="Verbose, Information, Warning, Error, Critical" />
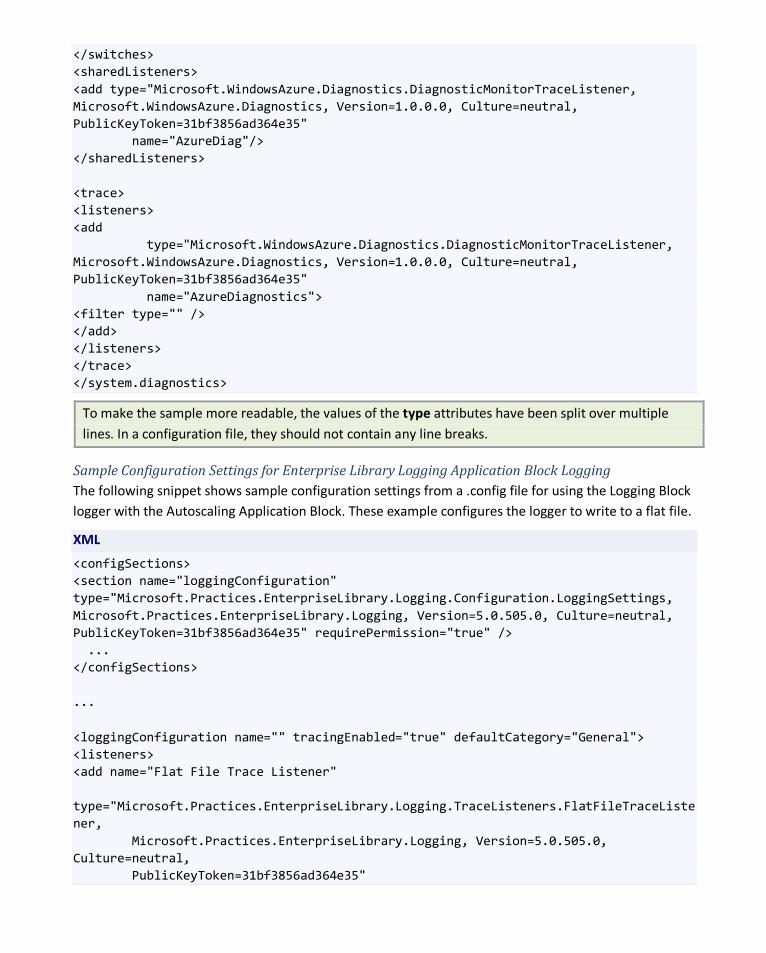
</switches> <sharedListeners> <add type="Microsoft.WindowsAzure.Diagnostics.DiagnosticMonitorTraceListener, Microsoft.WindowsAzure.Diagnostics, Version=1.0.0.0, Culture=neutral, PublicKeyToken=31bf3856ad364e35" name="AzureDiag"/> </sharedListeners> <trace> <listeners> <add type="Microsoft.WindowsAzure.Diagnostics.DiagnosticMonitorTraceListener, Microsoft.WindowsAzure.Diagnostics, Version=1.0.0.0, Culture=neutral, PublicKeyToken=31bf3856ad364e35" name="AzureDiagnostics"> <filter type="" /> </add> </listeners> </trace> </system.diagnostics>
To make the sample more readable, the values of the type attributes have been split over multiple lines. In a configuration file, they should not contain any line breaks.
Sample Configuration Settings for Enterprise Library Logging Application Block Logging The following snippet shows sample configuration settings from a .config file for using the Logging Block logger with the Autoscaling Application Block. These example configures the logger to write to a flat file.
XML
<configSections> <section name="loggingConfiguration" type="Microsoft.Practices.EnterpriseLibrary.Logging.Configuration.LoggingSettings, Microsoft.Practices.EnterpriseLibrary.Logging, Version=5.0.505.0, Culture=neutral, PublicKeyToken=31bf3856ad364e35" requirePermission="true" /> ... </configSections> ... <loggingConfiguration name="" tracingEnabled="true" defaultCategory="General"> <listeners> <add name="Flat File Trace Listener" type="Microsoft.Practices.EnterpriseLibrary.Logging.TraceListeners.FlatFileTraceListener, Microsoft.Practices.EnterpriseLibrary.Logging, Version=5.0.505.0, Culture=neutral, PublicKeyToken=31bf3856ad364e35"
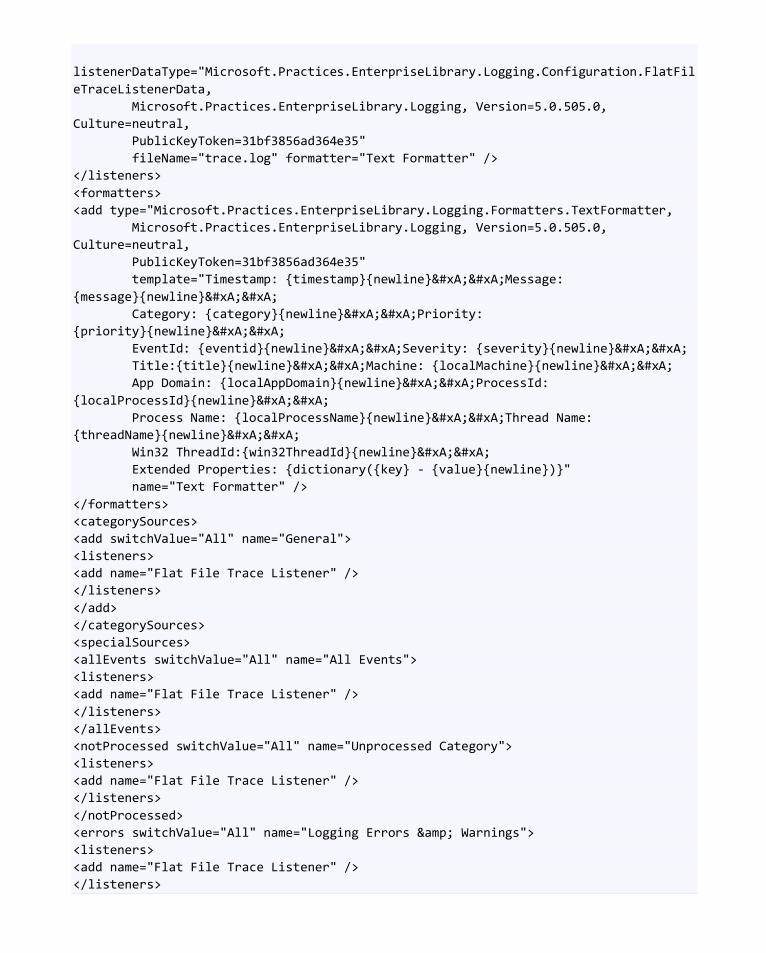
listenerDataType="Microsoft.Practices.EnterpriseLibrary.Logging.Configuration.FlatFileTraceListenerData, Microsoft.Practices.EnterpriseLibrary.Logging, Version=5.0.505.0, Culture=neutral, PublicKeyToken=31bf3856ad364e35" fileName="trace.log" formatter="Text Formatter" /> </listeners> <formatters> <add type="Microsoft.Practices.EnterpriseLibrary.Logging.Formatters.TextFormatter, Microsoft.Practices.EnterpriseLibrary.Logging, Version=5.0.505.0, Culture=neutral, PublicKeyToken=31bf3856ad364e35" template="Timestamp: {timestamp}{newline}

Message: {message}{newline}

 Category: {category}{newline}

Priority: {priority}{newline}

 EventId: {eventid}{newline}

Severity: {severity}{newline}

 Title:{title}{newline}

Machine: {localMachine}{newline}

 App Domain: {localAppDomain}{newline}

ProcessId: {localProcessId}{newline}

 Process Name: {localProcessName}{newline}

Thread Name: {threadName}{newline}

 Win32 ThreadId:{win32ThreadId}{newline}

 Extended Properties: {dictionary({key} - {value}{newline})}" name="Text Formatter" /> </formatters> <categorySources> <add switchValue="All" name="General"> <listeners> <add name="Flat File Trace Listener" /> </listeners> </add> </categorySources> <specialSources> <allEvents switchValue="All" name="All Events"> <listeners> <add name="Flat File Trace Listener" /> </listeners> </allEvents> <notProcessed switchValue="All" name="Unprocessed Category"> <listeners> <add name="Flat File Trace Listener" /> </listeners> </notProcessed> <errors switchValue="All" name="Logging Errors & Warnings"> <listeners> <add name="Flat File Trace Listener" /> </listeners>
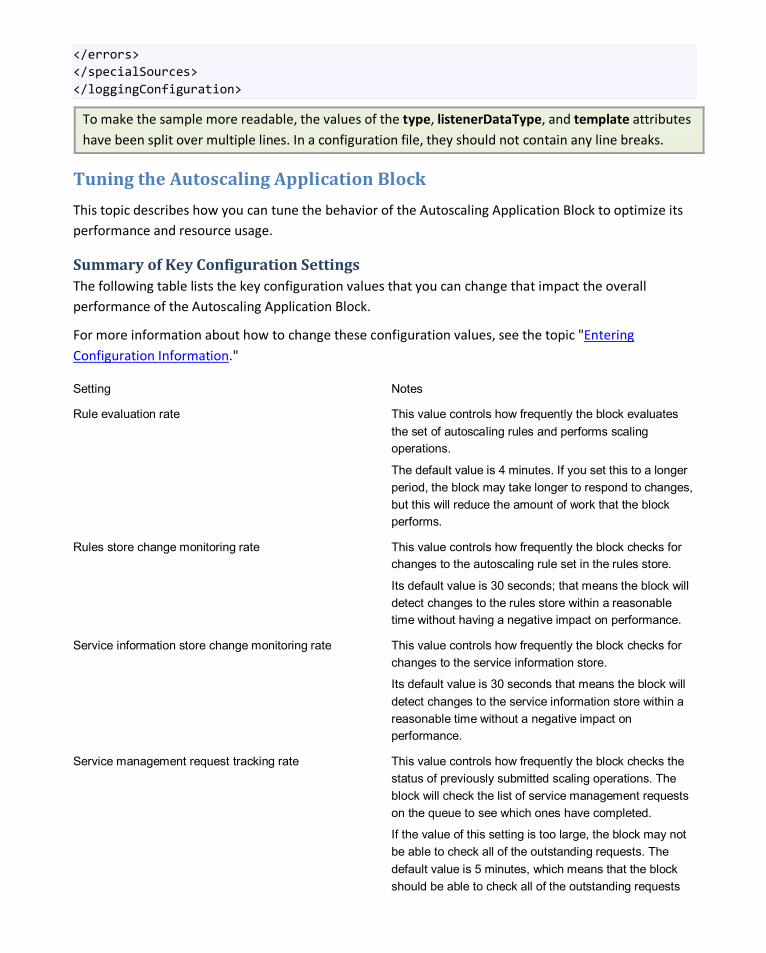
</errors> </specialSources> </loggingConfiguration>
To make the sample more readable, the values of the type, listenerDataType, and template attributes have been split over multiple lines. In a configuration file, they should not contain any line breaks.
Tuning the Autoscaling Application Block
This topic describes how you can tune the behavior of the Autoscaling Application Block to optimize its performance and resource usage.
Summary of Key Configuration Settings The following table lists the key configuration values that you can change that impact the overall performance of the Autoscaling Application Block.
For more information about how to change these configuration values, see the topic "Entering Configuration Information."
Setting Notes
Rule evaluation rate This value controls how frequently the block evaluates the set of autoscaling rules and performs scaling operations.
The default value is 4 minutes. If you set this to a longer period, the block may take longer to respond to changes, but this will reduce the amount of work that the block performs.
Rules store change monitoring rate This value controls how frequently the block checks for changes to the autoscaling rule set in the rules store.
Its default value is 30 seconds; that means the block will detect changes to the rules store within a reasonable time without having a negative impact on performance.
Service information store change monitoring rate This value controls how frequently the block checks for changes to the service information store.
Its default value is 30 seconds that means the block will detect changes to the service information store within a reasonable time without a negative impact on performance.
Service management request tracking rate This value controls how frequently the block checks the status of previously submitted scaling operations. The block will check the list of service management requests on the queue to see which ones have completed.
If the value of this setting is too large, the block may not be able to check all of the outstanding requests. The default value is 5 minutes, which means that the block should be able to check all of the outstanding requests

without having a negative impact on performance.
Configuring the Stabilizer The stabilizer component is designed to minimize the number of scaling operations that the block performs by allowing you to specify cool down periods. A cool down period is the time after the block has performed a scaling operation during which the block will not perform any further scaling operations. This helps to prevent oscillations whereby the block repeatedly scales a role up and down. It also gives your application a chance to "settle down" with the new number of role instances.
You can adjust how aggressively the block will scale up and scale down roles by configuring the cool down scale up and cool down scale down durations. You can set default values for all roles and scale groups, or provide specific values for individual roles and scale groups. These values are part of the service information for your application that the block stores. For example, if the scale up cool down period is set to 20 minutes for a role, then after the instance count for the role has changed, the block will not perform any scale up operations on the role for the next 20 minutes.
You can also use the stabilizer to manage your costs. Windows Azure bills for role instances by the clock hour. If you start a new instance at five minutes past the hour or 50 minutes past the hour, you are billed for a complete hour. Similarly, if you terminate a role instance at five minutes past the hour or 50 minutes past the hour, you are still billed for a complete hour of usage.
You can configure the stabilizer to only scale up near the beginning of the hour and only scale down near the end of the hour. This helps you to maximize the usage of your running role instances. For example, you can specify that scale up operations should only happen in the first 15 minutes of the hour, and that scale down operations should only happen in the last 10 minutes of the hour. If the stabilizer determines that it should not perform a scaling operation, it does not queue the operation, it drops it.
The stabilizer evaluates whether it should perform the scaling operation after reconciling any conflicting rules.
For more information about the configuration settings, see the topic "Service Information Schema Description."
For sample configuration settings, see the section "Configuring the Stabilizer" in chapter "Autoscaling and Windows Azure
Configuring the Activity Scheduler
" of the Developer's Guide.
The activity scheduler is responsible for running all of the activities that the Autoscaling Application Block needs to perform its autoscaling function. These activities include data point collection, rule evaluation, and service tracking.
You can configure the rates at which the block performs these activities. In general, the more frequently the block performs the activities, the more responsive it will be at the cost of greater resource usage.
The rates are specified in the block's configuration settings.
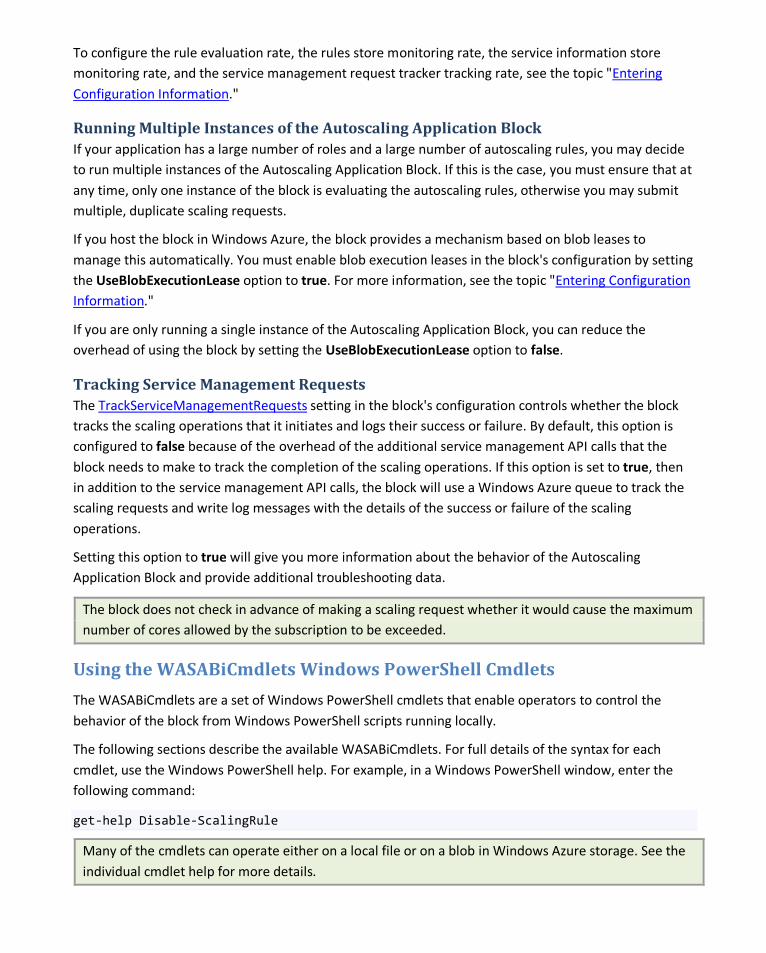
To configure the rule evaluation rate, the rules store monitoring rate, the service information store monitoring rate, and the service management request tracker tracking rate, see the topic "Entering Configuration Information."
Running Multiple Instances of the Autoscaling Application Block If your application has a large number of roles and a large number of autoscaling rules, you may decide to run multiple instances of the Autoscaling Application Block. If this is the case, you must ensure that at any time, only one instance of the block is evaluating the autoscaling rules, otherwise you may submit multiple, duplicate scaling requests.
If you host the block in Windows Azure, the block provides a mechanism based on blob leases to manage this automatically. You must enable blob execution leases in the block's configuration by setting the UseBlobExecutionLease option to true. For more information, see the topic "Entering Configuration Information."
If you are only running a single instance of the Autoscaling Application Block, you can reduce the overhead of using the block by setting the UseBlobExecutionLease option to false.
Tracking Service Management Requests The TrackServiceManagementRequests setting in the block's configuration controls whether the block tracks the scaling operations that it initiates and logs their success or failure. By default, this option is configured to false because of the overhead of the additional service management API calls that the block needs to make to track the completion of the scaling operations. If this option is set to true, then in addition to the service management API calls, the block will use a Windows Azure queue to track the scaling requests and write log messages with the details of the success or failure of the scaling operations.
Setting this option to true will give you more information about the behavior of the Autoscaling Application Block and provide additional troubleshooting data.
The block does not check in advance of making a scaling request whether it would cause the maximum number of cores allowed by the subscription to be exceeded.
Using the WASABiCmdlets Windows PowerShell Cmdlets
The WASABiCmdlets are a set of Windows PowerShell cmdlets that enable operators to control the behavior of the block from Windows PowerShell scripts running locally.
The following sections describe the available WASABiCmdlets. For full details of the syntax for each cmdlet, use the Windows PowerShell help. For example, in a Windows PowerShell window, enter the following command:
get-help Disable-ScalingRule
Many of the cmdlets can operate either on a local file or on a blob in Windows Azure storage. See the individual cmdlet help for more details.
You can download the WASABiCmdlets.
Usage Notes
Connection Strings Using the Windows PowerShell cmdlets to work with Windows Azure blobs requires you to provide a connection string as a parameter. To avoid retyping the connection string, you can save it in a Windows PowerShell variable, as shown in the following snippet.
$connectionString="[Connection string for your Windows Azure storage account]"
You can then use the variable as shown in the following snippet.
Get-ScalingRule –BlobContainerName autoscaling-container –BlobName rules-store -AccountConnectionString $connectionString
The cmdlets can use standard Windows PowerShell features such as pipelines. The following snippet shows how to filter the list of rules that the Get-ScalingRule cmdlet returns and pipe the filtered list to the Disable-ScalingRule cmdlet. This command disables all of the reactive rules in the store.
Get-ScalingRule –BlobContainerName autoscaling-container –BlobName rules-store -AccountConnectionString $connectionString | Where-Object {$_.Type –eq 'Reactive'} | Disable-ScalingRule –BlobContainerName autoscaling-container –BlobName rules-store -AccountConnectionString $connectionString
Encryption For more information about using the Windows PowerShell Cmdlets to encrypt your store files locally or in Windows Azure, see the topic "Encrypting the Rules Store and the Service Information Store."
Installation You can install the WASABiCmdlets either as a Windows PowerShell module or as a Windows PowerShell snap-in. See the installation instructions included in the download for more details.
List of Windows PowerShell Cmdlets The following list describes each of the Windows PowerShell cmdlets included with the Autoscaling Application Block.
Disable-ScalingRule The Disable-ScalingRule cmdlet disables one or more scaling rules in a rules store.
Enable-ScalingRule The Enable-ScalingRule cmdlet enables one or more scaling rules in a rules store.
Disable-ScalingRuleEvaluation The Disable-ScalingRuleEvaluation cmdlet disables rule evaluation for a rules store. Disabling rule evaluation does not disable an autoscaler. Other operations, such as collection of metrics, will still take place.
Enable-ScalingRuleEvaluation The Enable-ScalingRuleEvaluation cmdlet enables rule evaluation for a rules store.
Get-ScalingRule The Get-ScalingRule cmdlet gets all the rules from a rules store. It returns a rule object that has information such as name, description, enablement status, rank, and type of rule.
Get-ScalingStore The Get-ScalingStore cmdlet downloads a store file from a blob.
Set-ScalingStore The Set-ScalingStore cmdlet uploads a local store file to a blob.
Protect-ScalingStore The Protect-ScalingStore encrypts a store file using the private key in a certificate.
Unprotect-ScalingStore The Unprotect-ScalingStore decrypts a store file using the private key in a certificate.
Set-ScalingRuleRank The Set-ScalingRuleRank cmdlet sets the rank for one or more scaling rules in a rules store.
Set-ScalingStabilizerConfig The Set-ScalingStabilizerConfig cmdlet sets the stabilizer settings in a service information store. Stabilizer settings can be set at the global level, for specific roles or specific scale groups. Multiple targets can be supplied in a single operation, and all targets will share the same settings. Only the settings for which values are supplied will be updated, and the rest of the settings will remain unmodified unless the -Clear parameter is provided, in which case the settings with no values will be removed.
Encrypting the Rules Store and the Service Information Store
The Autoscaling Application Block uses Personal Information Exchange format keys (PFX, also called PKCS #12) to encrypt the service information store and the rules store in Windows Azure blob storage and in local file storage. For more information, see "Pkcs12 Protected Configuration Provider."
The encryption solution used by the Autoscaling Application Block is not recommended as a general approach for encrypting sensitive data in Windows Azure. The Autoscaling Application Block uses this solution to meet its specific security requirements. You should carefully evaluate any encryption approach that you decide to use in your own Windows Azure applications.
You can use the Protect-ScalingStore Windows PowerShell Cmdlet to encrypt the store file on the local machine using a PFX certificate. To create a suitable certificate, see the topic "
To encrypt a store file in blob storage you must perform three steps. First, encrypt the file locally using the Protect-ScalingStore cmdlet. Second, upload the store file to Windows Azure blob storage using the
Creating an Encryption Certificate."
Set-ScalingStore cmdlet. Third, ensure that you uploadto Windows Azure the service certificate that the block needs to decrypt the store file.
You can pipe the output from the Protect-ScalingStore cmdlet to the Set-ScalingStore cmdlet in a script.
To upload your certificate to Windows Azure you can use any of the following methods.
• Windows Azure Management Portal. You can upload the service certificate through the Management Portal. For more information, see "How to Add a New Certificate to the Certificate Store" on MSDN.
• Windows Azure PowerShell Cmdlets. You can use the Add-Certificate cmdlet to upload a service certificate. For more information, see Windows Azure PowerShellcmdlets.
• CSUpload Command-Line Tool. You can use the CSUpload command-line tool in the Windows Azure SDK for .NET to upload a service certificate. For more information, see "How to Upload a Service Certificate by Using the CSUpload Command-Line Tool" on MSDN.
To encrypt a store file in local file storage, encrypt the file locally using the Protect-ScalingStore cmdlet.
Encrypting the Autoscaling Settings in the Configuration File
The Autoscaling Application Block uses Personal Information Exchange format keys (PFX, also called PKCS #12) to encrypt the Autoscaling Application Block section of the configuration file. For more information, see "Pkcs12 Protected Configuration Provider."
The encryption solution used by the Autoscaling Application Block is not recommended as a general approach for encrypting sensitive data in Windows Azure. The Autoscaling Application Block uses this solution to meet its specific security requirements. You should carefully evaluate any encryption approach that you decide to use in your own Windows Azure applications.
The following procedure describes how to configure the Autoscaling Application Block to encrypt its settings in the configuration file.
Encrypting the autoscalingConfiguration section of the configuration file
1. Download the source code for the Pkcs12 Protected Configuration Provider from the Downloads page at "Pkcs12 Protected Configuration Provider."
2. Unzip the source and open the project in Visual Studio.
The project was created using Visual Studio 2008. Follow the instructions to run the conversion wizard to upgrade the project.
3. On the Build menu, click Build Solution.
4. From the Start menu, open a Visual Studio Command Prompt window as an Administrator.
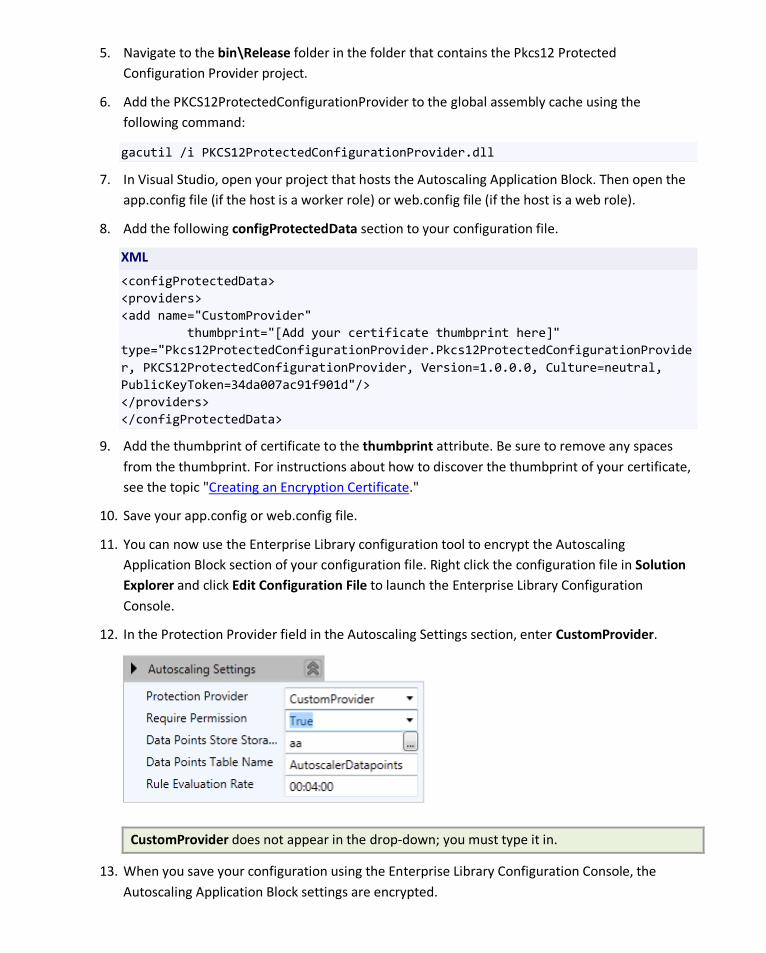
5. Navigate to the bin\Release folder in the folder that contains the Pkcs12 Protected Configuration Provider project.
6. Add the PKCS12ProtectedConfigurationProvider to the global assembly cache using the following command:
gacutil /i PKCS12ProtectedConfigurationProvider.dll
7. In Visual Studio, open your project that hosts the Autoscaling Application Block. Then open the app.config file (if the host is a worker role) or web.config file (if the host is a web role).
8. Add the following configProtectedData section to your configuration file.
XML
<configProtectedData> <providers> <add name="CustomProvider" thumbprint="[Add your certificate thumbprint here]" type="Pkcs12ProtectedConfigurationProvider.Pkcs12ProtectedConfigurationProvider, PKCS12ProtectedConfigurationProvider, Version=1.0.0.0, Culture=neutral, PublicKeyToken=34da007ac91f901d"/> </providers> </configProtectedData>
9. Add the thumbprint of certificate to the thumbprint attribute. Be sure to remove any spaces from the thumbprint. For instructions about how to discover the thumbprint of your certificate, see the topic "Creating an Encryption Certificate."
10. Save your app.config or web.config file.
11. You can now use the Enterprise Library configuration tool to encrypt the Autoscaling Application Block section of your configuration file. Right click the configuration file in Solution Explorer and click Edit Configuration File to launch the Enterprise Library Configuration Console.
12. In the Protection Provider field in the Autoscaling Settings section, enter CustomProvider.
CustomProvider does not appear in the drop-down; you must type it in.
13. When you save your configuration using the Enterprise Library Configuration Console, the Autoscaling Application Block settings are encrypted.
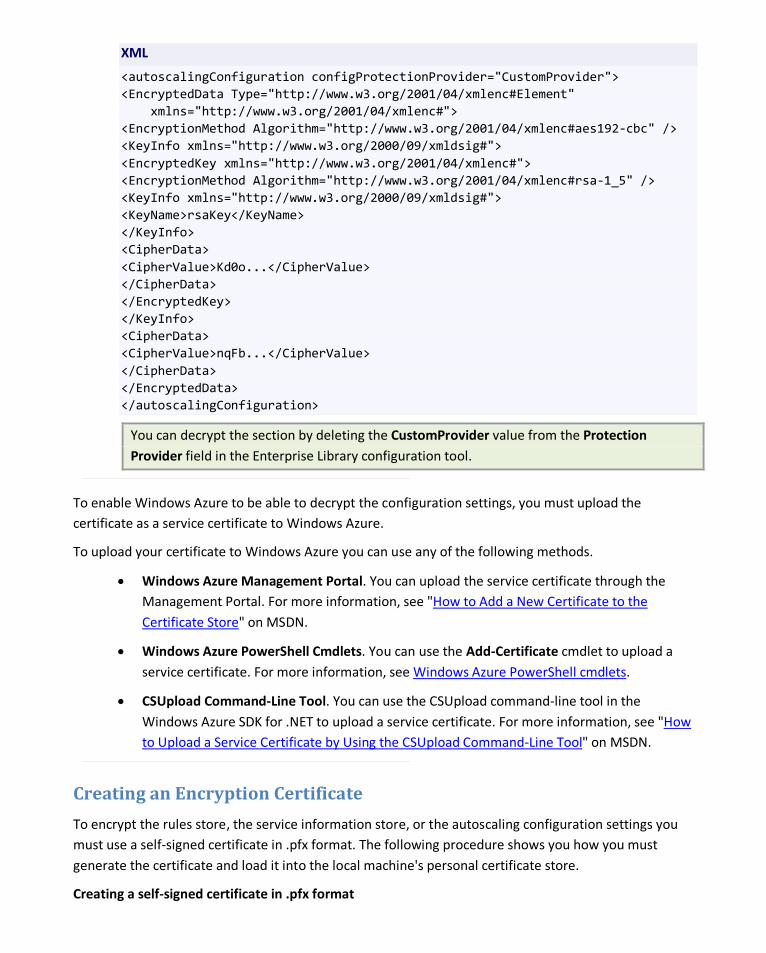
XML
<autoscalingConfiguration configProtectionProvider="CustomProvider"> <EncryptedData Type="http://www.w3.org/2001/04/xmlenc#Element" xmlns="http://www.w3.org/2001/04/xmlenc#"> <EncryptionMethod Algorithm="http://www.w3.org/2001/04/xmlenc#aes192-cbc" /> <KeyInfo xmlns="http://www.w3.org/2000/09/xmldsig#"> <EncryptedKey xmlns="http://www.w3.org/2001/04/xmlenc#"> <EncryptionMethod Algorithm="http://www.w3.org/2001/04/xmlenc#rsa-1_5" /> <KeyInfo xmlns="http://www.w3.org/2000/09/xmldsig#"> <KeyName>rsaKey</KeyName> </KeyInfo> <CipherData> <CipherValue>Kd0o...</CipherValue> </CipherData> </EncryptedKey> </KeyInfo> <CipherData> <CipherValue>nqFb...</CipherValue> </CipherData> </EncryptedData> </autoscalingConfiguration>
You can decrypt the section by deleting the CustomProvider value from the Protection Provider field in the Enterprise Library configuration tool.
To enable Windows Azure to be able to decrypt the configuration settings, you must upload the certificate as a service certificate to Windows Azure.
To upload your certificate to Windows Azure you can use any of the following methods.
• Windows Azure Management Portal. You can upload the service certificate through the Management Portal. For more information, see "How to Add a New Certificate to the Certificate Store" on MSDN.
• Windows Azure PowerShell Cmdlets. You can use the Add-Certificate cmdlet to upload a service certificate. For more information, see Windows Azure PowerShell cmdlets.
• CSUpload Command-Line Tool. You can use the CSUpload command-line tool in the Windows Azure SDK for .NET to upload a service certificate. For more information, see "How to Upload a Service Certificate by Using the CSUpload Command-Line Tool" on MSDN.
Creating an Encryption Certificate
To encrypt the rules store, the service information store, or the autoscaling configuration settings you must use a self-signed certificate in .pfx format. The following procedure shows you how you must generate the certificate and load it into the local machine's personal certificate store.
Creating a self-signed certificate in .pfx format
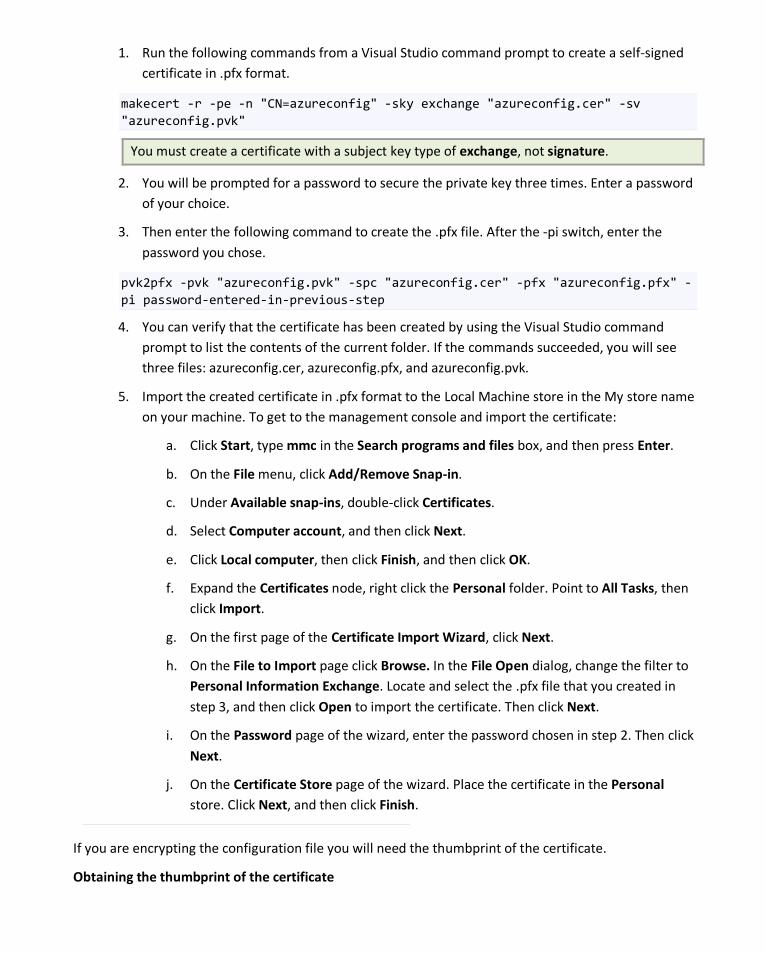
1. Run the following commands from a Visual Studio command prompt to create a self-signed certificate in .pfx format.
makecert -r -pe -n "CN=azureconfig" -sky exchange "azureconfig.cer" -sv "azureconfig.pvk"
You must create a certificate with a subject key type of exchange, not signature.
2. You will be prompted for a password to secure the private key three times. Enter a password of your choice.
3. Then enter the following command to create the .pfx file. After the -pi switch, enter the password you chose.
pvk2pfx -pvk "azureconfig.pvk" -spc "azureconfig.cer" -pfx "azureconfig.pfx" -pi password-entered-in-previous-step
4. You can verify that the certificate has been created by using the Visual Studio command prompt to list the contents of the current folder. If the commands succeeded, you will see three files: azureconfig.cer, azureconfig.pfx, and azureconfig.pvk.
5. Import the created certificate in .pfx format to the Local Machine store in the My store name on your machine. To get to the management console and import the certificate:
a. Click Start, type mmc in the Search programs and files box, and then press Enter.
b. On the File menu, click Add/Remove Snap-in.
c. Under Available snap-ins, double-click Certificates.
d. Select Computer account, and then click Next.
e. Click Local computer, then click Finish, and then click OK.
f. Expand the Certificates node, right click the Personal folder. Point to All Tasks, then click Import.
g. On the first page of the Certificate Import Wizard, click Next.
h. On the File to Import page click Browse. In the File Open dialog, change the filter to Personal Information Exchange. Locate and select the .pfx file that you created in step 3, and then click Open to import the certificate. Then click Next.
i. On the Password page of the wizard, enter the password chosen in step 2. Then click Next.
j. On the Certificate Store page of the wizard. Place the certificate in the Personal store. Click Next, and then click Finish.
If you are encrypting the configuration file you will need the thumbprint of the certificate.
Obtaining the thumbprint of the certificate
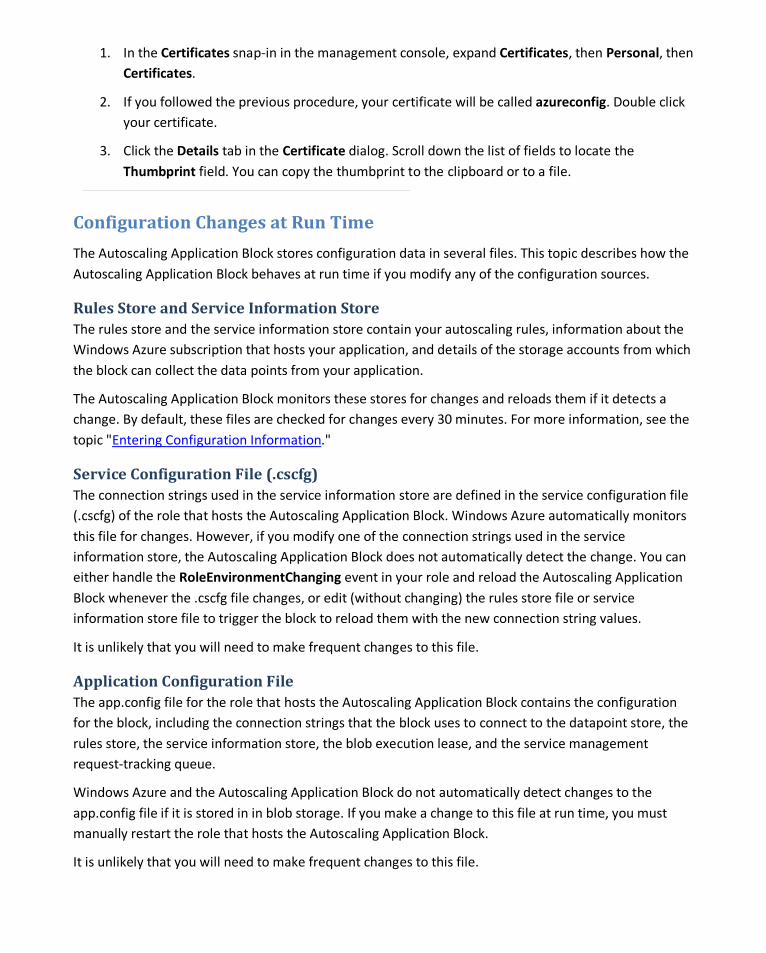
1. In the Certificates snap-in in the management console, expand Certificates, then Personal, then Certificates.
2. If you followed the previous procedure, your certificate will be called azureconfig. Double click your certificate.
3. Click the Details tab in the Certificate dialog. Scroll down the list of fields to locate the Thumbprint field. You can copy the thumbprint to the clipboard or to a file.
Configuration Changes at Run Time
The Autoscaling Application Block stores configuration data in several files. This topic describes how the Autoscaling Application Block behaves at run time if you modify any of the configuration sources.
Rules Store and Service Information Store The rules store and the service information store contain your autoscaling rules, information about the Windows Azure subscription that hosts your application, and details of the storage accounts from which the block can collect the data points from your application.
The Autoscaling Application Block monitors these stores for changes and reloads them if it detects a change. By default, these files are checked for changes every 30 minutes. For more information, see the topic "Entering Configuration Information."
Service Configuration File (.cscfg) The connection strings used in the service information store are defined in the service configuration file (.cscfg) of the role that hosts the Autoscaling Application Block. Windows Azure automatically monitors this file for changes. However, if you modify one of the connection strings used in the service information store, the Autoscaling Application Block does not automatically detect the change. You can either handle the RoleEnvironmentChanging event in your role and reload the Autoscaling Application Block whenever the .cscfg file changes, or edit (without changing) the rules store file or service information store file to trigger the block to reload them with the new connection string values.
It is unlikely that you will need to make frequent changes to this file.
Application Configuration File The app.config file for the role that hosts the Autoscaling Application Block contains the configuration for the block, including the connection strings that the block uses to connect to the datapoint store, the rules store, the service information store, the blob execution lease, and the service management request-tracking queue.
Windows Azure and the Autoscaling Application Block do not automatically detect changes to the app.config file if it is stored in in blob storage. If you make a change to this file at run time, you must manually restart the role that hosts the Autoscaling Application Block.
It is unlikely that you will need to make frequent changes to this file.
The Transient Fault Handling Application Block The Microsoft Enterprise Library Transient Fault Handling Application Block lets developers make their applications more resilient by adding robust transient fault handling logic. Transient faults are errors that occur because of some temporary condition such as network connectivity issues or service unavailability. Typically, if you retry the operation that resulted in a transient error a short time later, you find that the error has disappeared.
Different services can have different transient faults, and different applications require different fault handling strategies. The Transient Fault Handling Application Block encapsulates information about the transient faults that can occur when you use the following Windows Azure services in your application:
• Windows Azure SQL Database
• Windows Azure Service Bus
• Windows Azure Storage
• Windows Azure Caching Service
The Transient Fault Handling Application Block enables the developer to select from the following retry strategies:
• Incremental
• Fixed interval
• Exponential back-off
The Enterprise Library Transient Fault Handling Application Block includes the following features:
• You can select from an extensible collection of error detection strategies for cloud-based services, and an extensible collection of retry strategies.
• You can use the graphical Enterprise Library configuration tool to manage configuration settings.
• You can extend the block by adding error detection strategies for other services or by adding custom retry strategies.
Note: The Transient Fault Handling Application Block is a product of the collaboration between the Microsoft patterns & practices team and the Windows Azure Customer Advisory Team. It is based on the initial detection and retry strategies, and the data access support from the Transient Fault Handling Application Framework. The new block now includes enhanced configuration support,
enhanced support for wrapping asynchronous calls, provides integration of the block's retry strategies with the Windows Azure Storage retry mechanism, and works with the Enterprise Library dependency injection container. The new Transient Fault Handling Application Block supersedes the Transient Fault Handling Framework and is now a recommended approach to handling transient faults in the cloud.
This section includes the following topics to help you to understand and use the Transient Fault Handling Application Block:
• What Does the Transient Fault Handling Application Block Do?This topic provides a brief overview that will help you to understand what the block can do, and explains some of the concepts and features it incorporates. It also provides a simple example of the way you can write code to use the block.
• Hosting the Transient Fault Handling Application Block. This topic describes how to host the Transient Fault Handling Application Block, and how to configure it. The configuration information can define the retry strategies the block uses.
• Key Scenarios. This section demonstrates how to implement some common scenarios using the block.
• The Design of the Transient Fault Handling Application Block. This topic explains the decisions that went into the design of the Transient Fault Handling Application Block and the rationale behind those decisions.
• Extending and Modifying the Transient Fault Handling Application Block. This topic explains how to extend the block by adding custom detection strategies and retry strategies.
More Information For related information, see the following patterns & practices guides and documents:
• Microsoft Enterprise Library home page on MSDN
• Enterprise Library Integration Pack for Windows Azure community page on CodePlex
• Developer's Guide to the Enterprise Library 5.0 Integration Pack for Windows Azureon MSDN
•
•
Moving Applications to the Cloud, 2nd edition
•
Developing Applications for the Cloud, 2nd edition
patterns & practices Developer's Center on MSDN
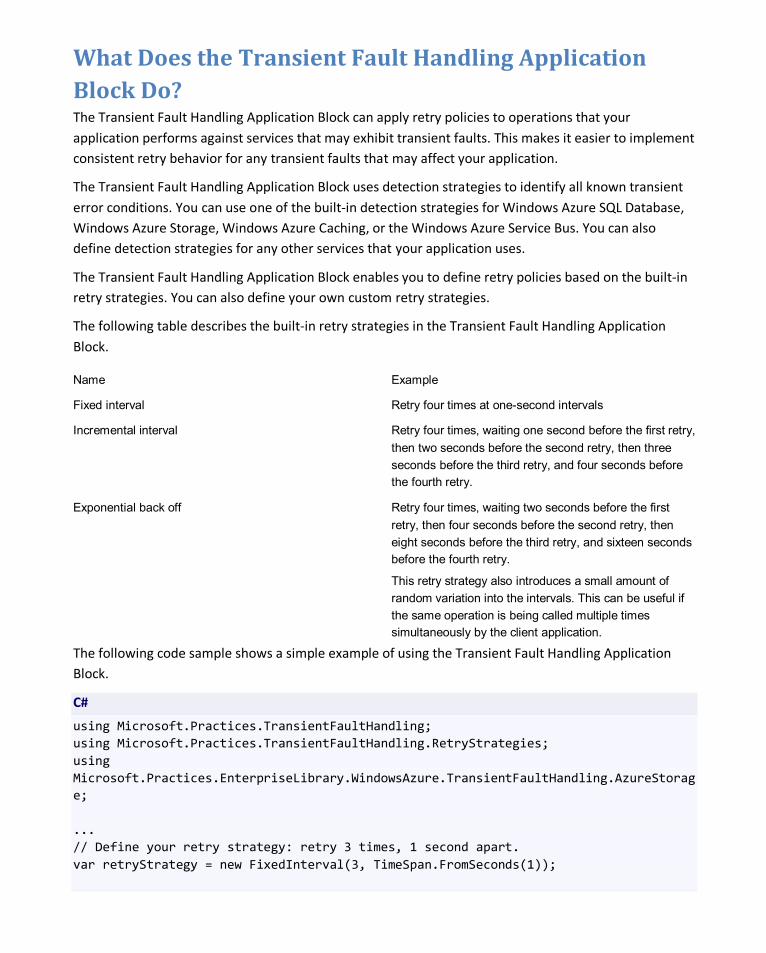
What Does the Transient Fault Handling Application Block Do? The Transient Fault Handling Application Block can apply retry policies to operations that your application performs against services that may exhibit transient faults. This makes it easier to implement consistent retry behavior for any transient faults that may affect your application.
The Transient Fault Handling Application Block uses detection strategies to identify all known transient error conditions. You can use one of the built-in detection strategies for Windows Azure SQL Database, Windows Azure Storage, Windows Azure Caching, or the Windows Azure Service Bus. You can also define detection strategies for any other services that your application uses.
The Transient Fault Handling Application Block enables you to define retry policies based on the built-in retry strategies. You can also define your own custom retry strategies.
The following table describes the built-in retry strategies in the Transient Fault Handling Application Block.
Name Example
Fixed interval Retry four times at one-second intervals
Incremental interval Retry four times, waiting one second before the first retry, then two seconds before the second retry, then three seconds before the third retry, and four seconds before the fourth retry.
Exponential back off Retry four times, waiting two seconds before the first retry, then four seconds before the second retry, then eight seconds before the third retry, and sixteen seconds before the fourth retry.
This retry strategy also introduces a small amount of random variation into the intervals. This can be useful if the same operation is being called multiple times simultaneously by the client application.
The following code sample shows a simple example of using the Transient Fault Handling Application Block.
C#
using Microsoft.Practices.TransientFaultHandling; using Microsoft.Practices.TransientFaultHandling.RetryStrategies; using Microsoft.Practices.EnterpriseLibrary.WindowsAzure.TransientFaultHandling.AzureStorage; ... // Define your retry strategy: retry 3 times, 1 second apart. var retryStrategy = new FixedInterval(3, TimeSpan.FromSeconds(1));
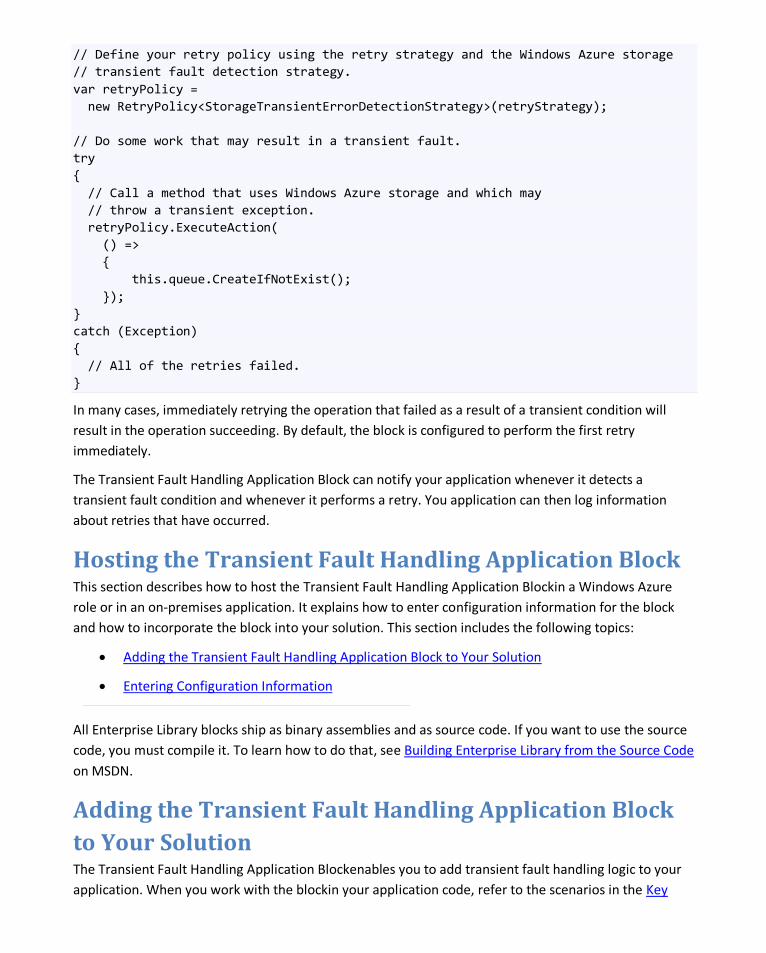
// Define your retry policy using the retry strategy and the Windows Azure storage // transient fault detection strategy. var retryPolicy = new RetryPolicy<StorageTransientErrorDetectionStrategy>(retryStrategy); // Do some work that may result in a transient fault. try { // Call a method that uses Windows Azure storage and which may // throw a transient exception. retryPolicy.ExecuteAction( () => { this.queue.CreateIfNotExist(); }); } catch (Exception) { // All of the retries failed. }
In many cases, immediately retrying the operation that failed as a result of a transient condition will result in the operation succeeding. By default, the block is configured to perform the first retry immediately.
The Transient Fault Handling Application Block can notify your application whenever it detects a transient fault condition and whenever it performs a retry. You application can then log information about retries that have occurred.
Hosting the Transient Fault Handling Application Block This section describes how to host the Transient Fault Handling Application Blockin a Windows Azure role or in an on-premises application. It explains how to enter configuration information for the block and how to incorporate the block into your solution. This section includes the following topics:
•
•
Adding the Transient Fault Handling Application Block to Your Solution
Entering Configuration Information
All Enterprise Library blocks ship as binary assemblies and as source code. If you want to use the source code, you must compile it. To learn how to do that, see Building Enterprise Library from the Source Code on MSDN.
Adding the Transient Fault Handling Application Block to Your Solution The Transient Fault Handling Application Blockenables you to add transient fault handling logic to your application. When you work with the blockin your application code, refer to the scenarios in the Key
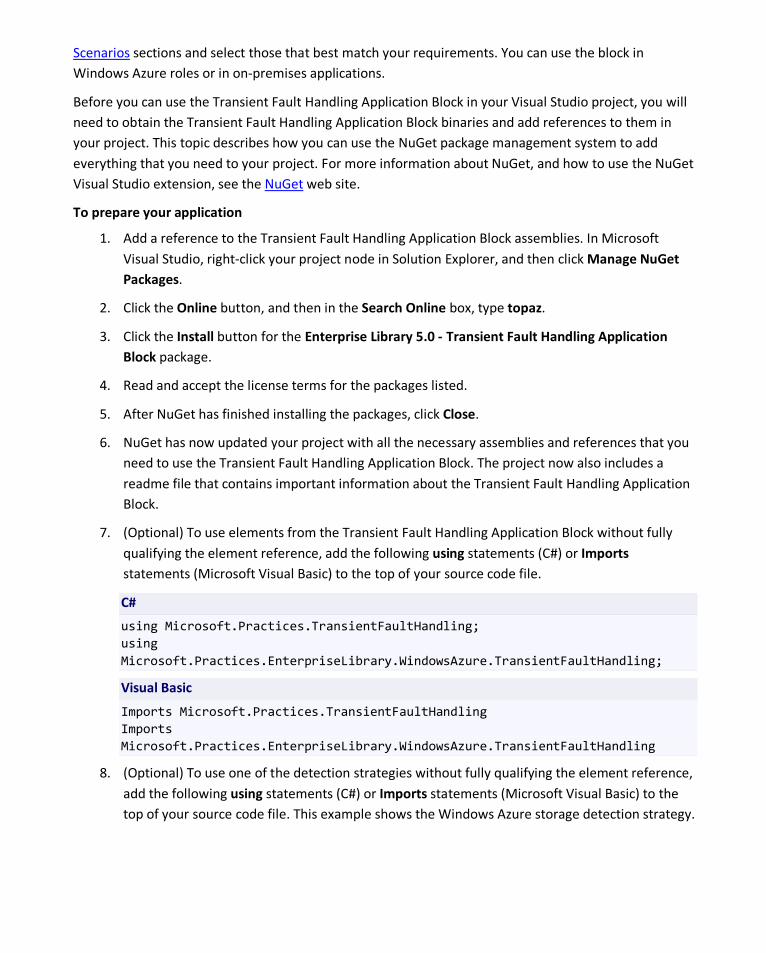
Scenarios
Before you can use the Transient Fault Handling Application Block in your Visual Studio project, you will need to obtain the Transient Fault Handling Application Block binaries and add references to them in your project. This topic describes how you can use the NuGet package management system to add everything that you need to your project. For more information about NuGet, and how to use the NuGet Visual Studio extension, see the
sections and select those that best match your requirements. You can use the block in Windows Azure roles or in on-premises applications.
NuGet web site.
To prepare your application
1. Add a reference to the Transient Fault Handling Application Block assemblies. In Microsoft Visual Studio, right-click your project node in Solution Explorer, and then click Manage NuGet Packages.
2. Click the Online button, and then in the Search Online box, type topaz.
3. Click the Install button for the Enterprise Library 5.0 - Transient Fault Handling Application Block package.
4. Read and accept the license terms for the packages listed.
5. After NuGet has finished installing the packages, click Close.
6. NuGet has now updated your project with all the necessary assemblies and references that you need to use the Transient Fault Handling Application Block. The project now also includes a readme file that contains important information about the Transient Fault Handling Application Block.
7. (Optional) To use elements from the Transient Fault Handling Application Block without fully qualifying the element reference, add the following using statements (C#) or Imports statements (Microsoft Visual Basic) to the top of your source code file.
C#
using Microsoft.Practices.TransientFaultHandling; using Microsoft.Practices.EnterpriseLibrary.WindowsAzure.TransientFaultHandling;
Visual Basic
Imports Microsoft.Practices.TransientFaultHandling Imports Microsoft.Practices.EnterpriseLibrary.WindowsAzure.TransientFaultHandling
8. (Optional) To use one of the detection strategies without fully qualifying the element reference, add the following using statements (C#) or Imports statements (Microsoft Visual Basic) to the top of your source code file. This example shows the Windows Azure storage detection strategy.
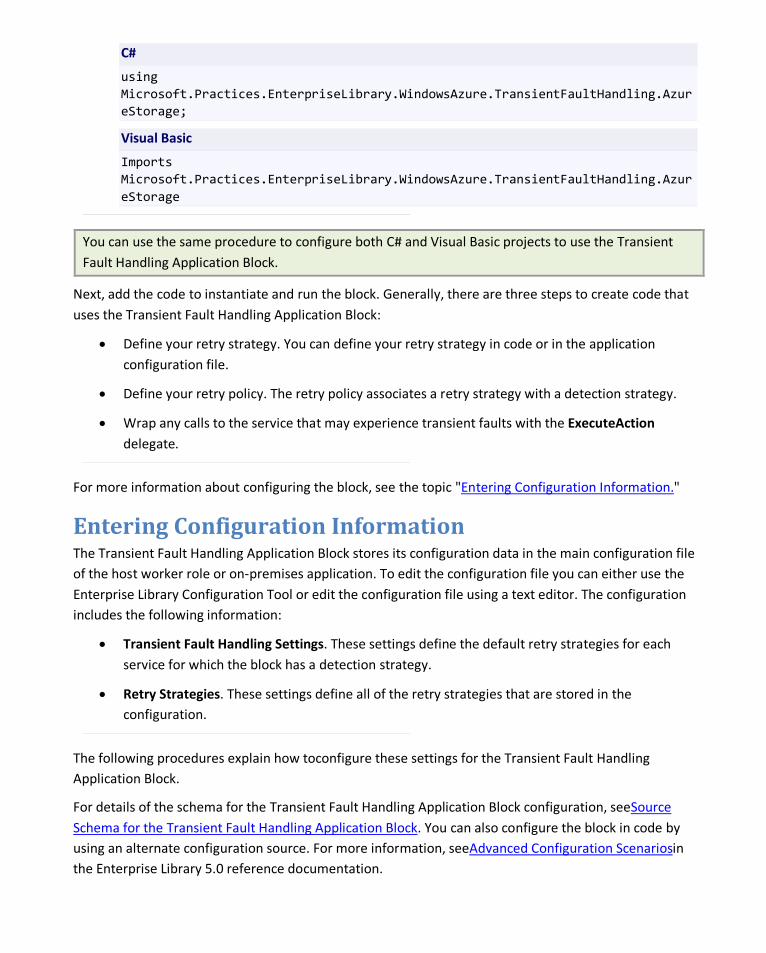
C#
using Microsoft.Practices.EnterpriseLibrary.WindowsAzure.TransientFaultHandling.AzureStorage;
Visual Basic
Imports Microsoft.Practices.EnterpriseLibrary.WindowsAzure.TransientFaultHandling.AzureStorage
You can use the same procedure to configure both C# and Visual Basic projects to use the Transient Fault Handling Application Block.
Next, add the code to instantiate and run the block. Generally, there are three steps to create code that uses the Transient Fault Handling Application Block:
• Define your retry strategy. You can define your retry strategy in code or in the application configuration file.
• Define your retry policy. The retry policy associates a retry strategy with a detection strategy.
• Wrap any calls to the service that may experience transient faults with the ExecuteAction delegate.
For more information about configuring the block, see the topic "Entering Configuration Information.
Entering Configuration Information
"
The Transient Fault Handling Application Block stores its configuration data in the main configuration file of the host worker role or on-premises application. To edit the configuration file you can either use the Enterprise Library Configuration Tool or edit the configuration file using a text editor. The configuration includes the following information:
• Transient Fault Handling Settings. These settings define the default retry strategies for each service for which the block has a detection strategy.
• Retry Strategies. These settings define all of the retry strategies that are stored in the configuration.
The following procedures explain how toconfigure these settings for the Transient Fault Handling Application Block.
For details of the schema for the Transient Fault Handling Application Block configuration, seeSource Schema for the Transient Fault Handling Application Block. You can also configure the block in code by using an alternate configuration source. For more information, seeAdvanced Configuration Scenariosin the Enterprise Library 5.0 reference documentation.
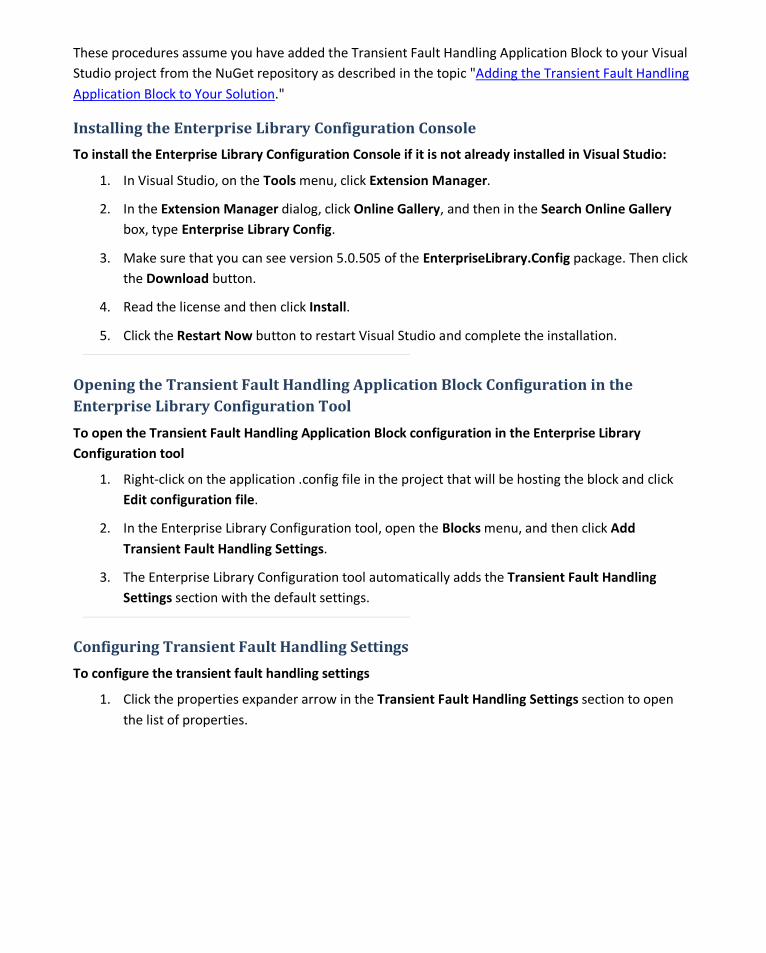
These procedures assume you have added the Transient Fault Handling Application Block to your Visual Studio project from the NuGet repository as described in the topic "Adding the Transient Fault Handling Application Block to Your Solution."
Installing the Enterprise Library Configuration Console
To install the Enterprise Library Configuration Console if it is not already installed in Visual Studio:
1. In Visual Studio, on the Tools menu, click Extension Manager.
2. In the Extension Manager dialog, click Online Gallery, and then in the Search Online Gallery box, type Enterprise Library Config.
3. Make sure that you can see version 5.0.505 of the EnterpriseLibrary.Config package. Then click the Download button.
4. Read the license and then click Install.
5. Click the Restart Now button to restart Visual Studio and complete the installation.
Opening the Transient Fault Handling Application Block Configuration in the Enterprise Library Configuration Tool
To open the Transient Fault Handling Application Block configuration in the Enterprise Library Configuration tool
1. Right-click on the application .config file in the project that will be hosting the block and click Edit configuration file.
2. In the Enterprise Library Configuration tool, open the Blocks menu, and then click Add Transient Fault Handling Settings.
3. The Enterprise Library Configuration tool automatically adds the Transient Fault Handling Settings section with the default settings.
Configuring Transient Fault Handling Settings
To configure the transient fault handling settings
1. Click the properties expander arrow in the Transient Fault Handling Settings section to open the list of properties.
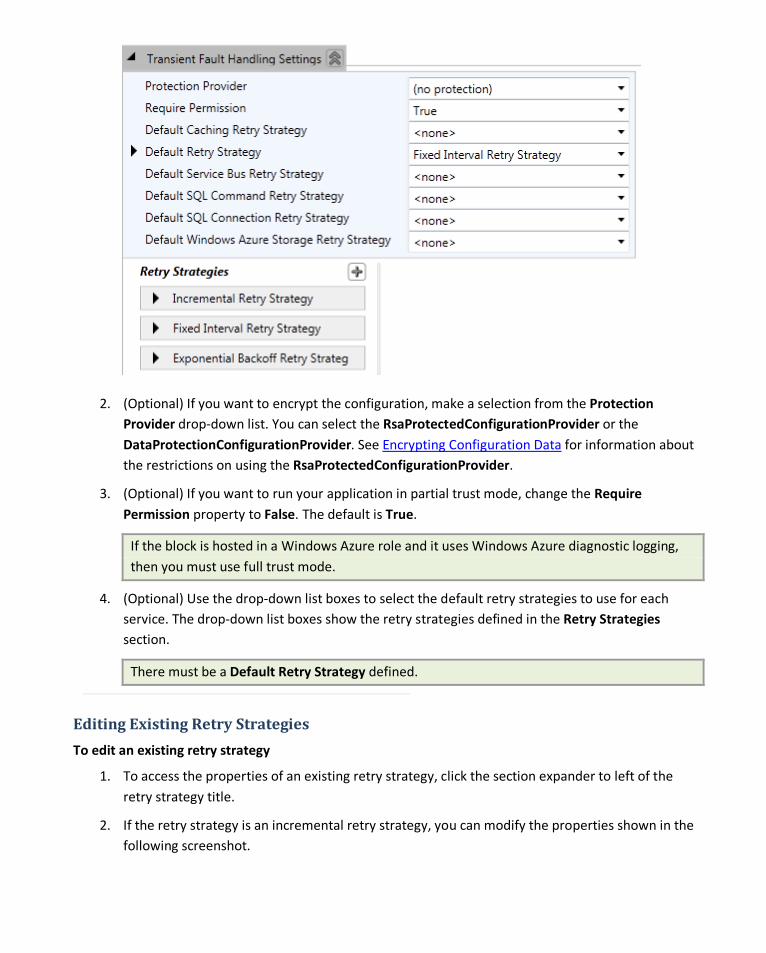
2. (Optional) If you want to encrypt the configuration, make a selection from the Protection Provider drop-down list. You can select the RsaProtectedConfigurationProvider or the DataProtectionConfigurationProvider. See Encrypting Configuration Data for information about the restrictions on using the RsaProtectedConfigurationProvider.
3. (Optional) If you want to run your application in partial trust mode, change the Require Permission property to False. The default is True.
If the block is hosted in a Windows Azure role and it uses Windows Azure diagnostic logging, then you must use full trust mode.
4. (Optional) Use the drop-down list boxes to select the default retry strategies to use for each service. The drop-down list boxes show the retry strategies defined in the Retry Strategies section.
There must be a Default Retry Strategy defined.
Editing Existing Retry Strategies
To edit an existing retry strategy
1. To access the properties of an existing retry strategy, click the section expander to left of the retry strategy title.
2. If the retry strategy is an incremental retry strategy, you can modify the properties shown in the following screenshot.

3. (Optional) You can change the name of the retry strategy.
4. (Optional) You can select whether the block should perform the first retry immediately without waiting for the retry interval.
5. (Optional) You can change the value of the increment used to change the interval for each retry.
6. (Optional) You can modify the value of the initial interval between retries.
7. (Optional) You can modify the maximum number of retries that the block will attempt.
8. If the retry strategy is a fixed interval retry strategy, you can modify the properties shown in the following screenshot.
9. (Optional) You can change the name of the retry strategy.
10. (Optional) You can select whether the block should perform the first retry immediately without waiting for the retry interval.
11. (Optional) You can modify the value of the interval between retries.
12. (Optional) You can modify the maximum number of retries that the block will attempt.
13. If the retry strategy is an exponential back-off retry strategy, you can modify the properties shown in the following screenshot.
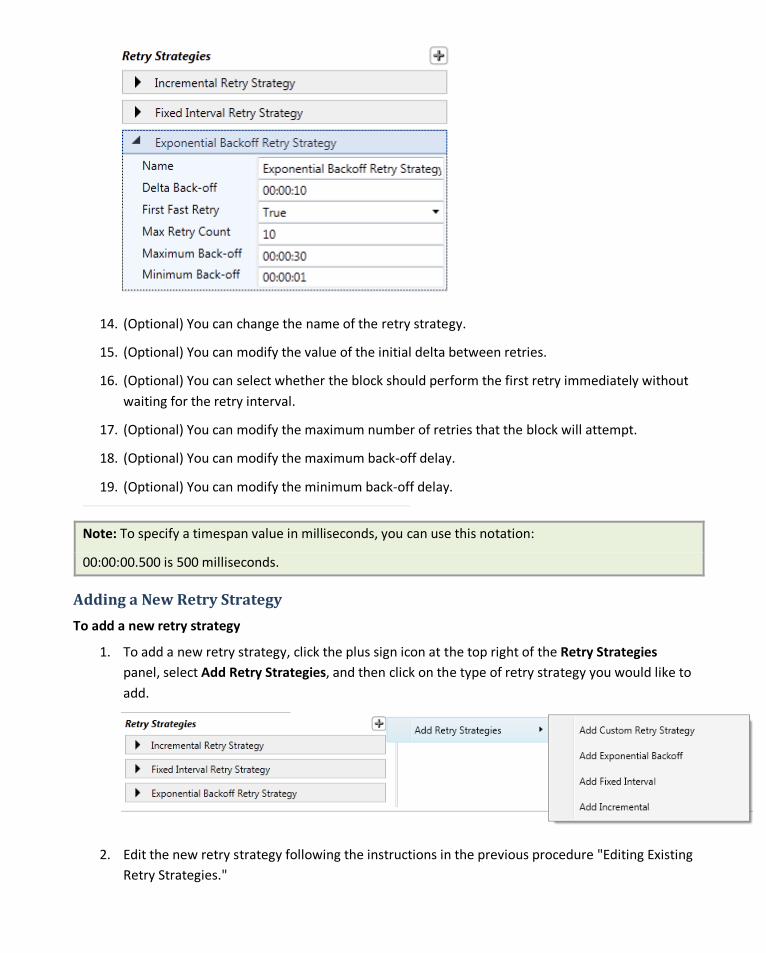
14. (Optional) You can change the name of the retry strategy.
15. (Optional) You can modify the value of the initial delta between retries.
16. (Optional) You can select whether the block should perform the first retry immediately without waiting for the retry interval.
17. (Optional) You can modify the maximum number of retries that the block will attempt.
18. (Optional) You can modify the maximum back-off delay.
19. (Optional) You can modify the minimum back-off delay.
Note: To specify a timespan value in milliseconds, you can use this notation:
00:00:00.500 is 500 milliseconds.
Adding a New Retry Strategy
To add a new retry strategy
1. To add a new retry strategy, click the plus sign icon at the top right of the Retry Strategies panel, select Add Retry Strategies, and then click on the type of retry strategy you would like to add.
2. Edit the new retry strategy following the instructions in the previous procedure "Editing Existing Retry Strategies."
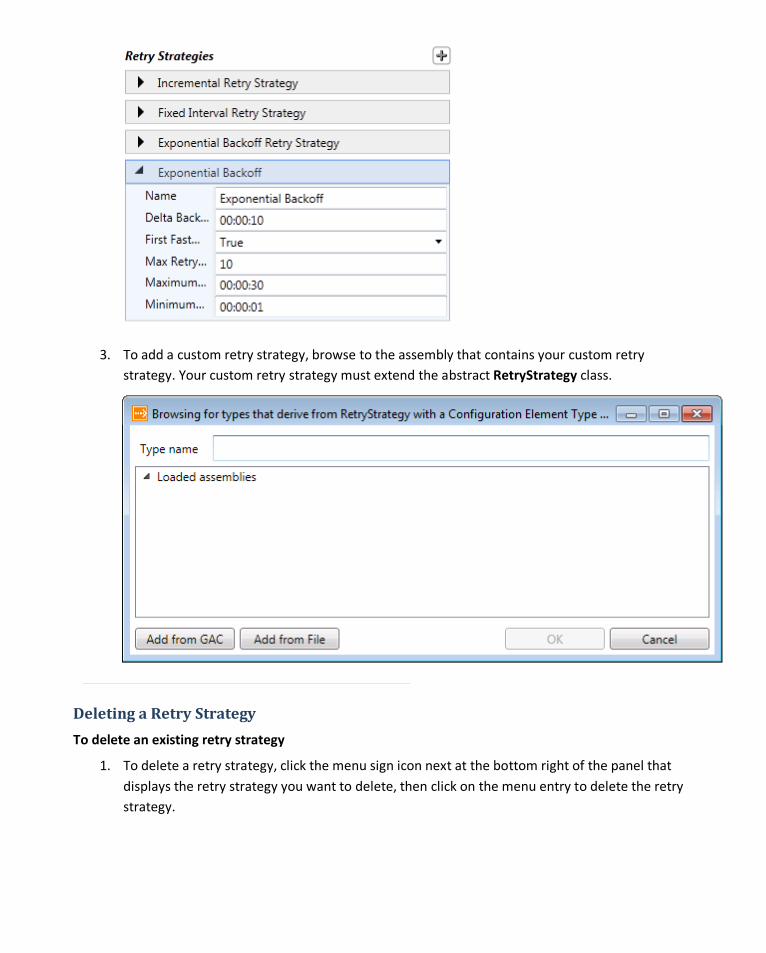
3. To add a custom retry strategy, browse to the assembly that contains your custom retry strategy. Your custom retry strategy must extend the abstract RetryStrategy class.
Deleting a Retry Strategy
To delete an existing retry strategy
1. To delete a retry strategy, click the menu sign icon next at the bottom right of the panel that displays the retry strategy you want to delete, then click on the menu entry to delete the retry strategy.
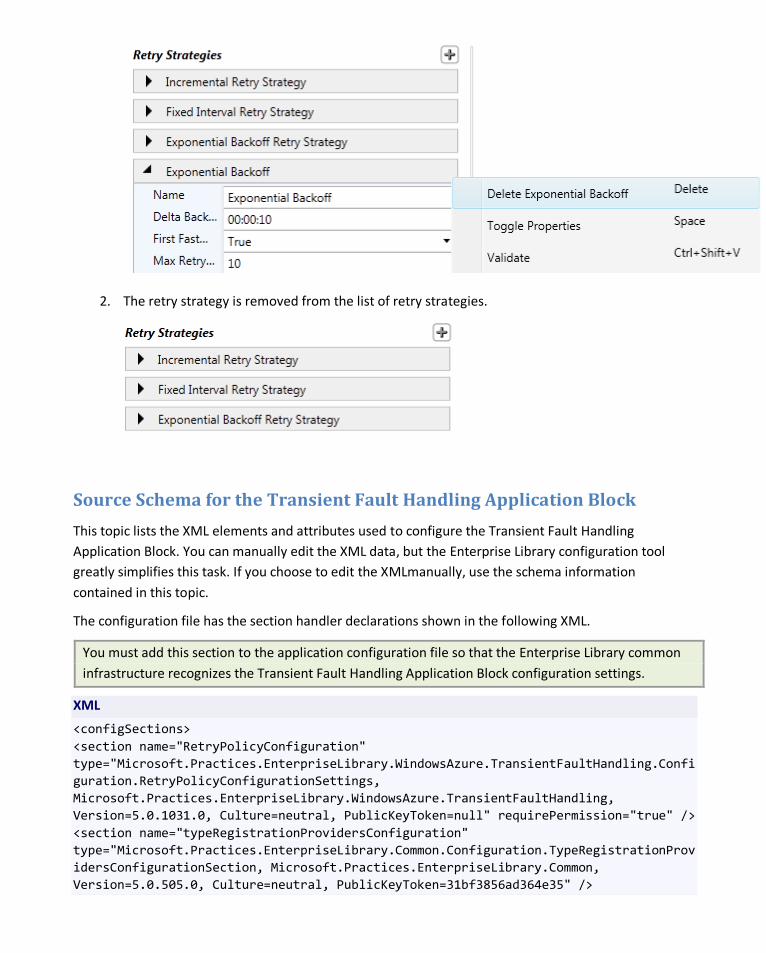
2. The retry strategy is removed from the list of retry strategies.
Source Schema for the Transient Fault Handling Application Block
This topic lists the XML elements and attributes used to configure the Transient Fault Handling Application Block. You can manually edit the XML data, but the Enterprise Library configuration tool greatly simplifies this task. If you choose to edit the XMLmanually, use the schema information contained in this topic.
The configuration file has the section handler declarations shown in the following XML.
You must add this section to the application configuration file so that the Enterprise Library common infrastructure recognizes the Transient Fault Handling Application Block configuration settings.
XML
<configSections> <section name="RetryPolicyConfiguration" type="Microsoft.Practices.EnterpriseLibrary.WindowsAzure.TransientFaultHandling.Configuration.RetryPolicyConfigurationSettings, Microsoft.Practices.EnterpriseLibrary.WindowsAzure.TransientFaultHandling, Version=5.0.1031.0, Culture=neutral, PublicKeyToken=null" requirePermission="true" /> <section name="typeRegistrationProvidersConfiguration" type="Microsoft.Practices.EnterpriseLibrary.Common.Configuration.TypeRegistrationProvidersConfigurationSection, Microsoft.Practices.EnterpriseLibrary.Common, Version=5.0.505.0, Culture=neutral, PublicKeyToken=31bf3856ad364e35" />
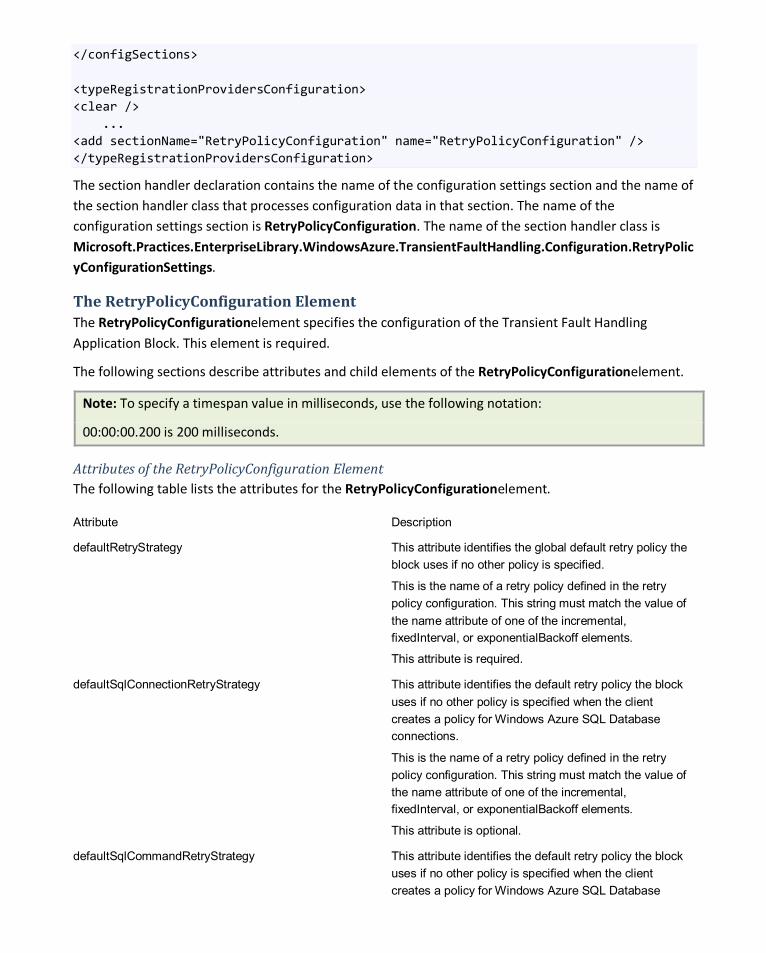
</configSections> <typeRegistrationProvidersConfiguration> <clear /> ... <add sectionName="RetryPolicyConfiguration" name="RetryPolicyConfiguration" /> </typeRegistrationProvidersConfiguration>
The section handler declaration contains the name of the configuration settings section and the name of the section handler class that processes configuration data in that section. The name of the configuration settings section is RetryPolicyConfiguration. The name of the section handler class is Microsoft.Practices.EnterpriseLibrary.WindowsAzure.TransientFaultHandling.Configuration.RetryPolicyConfigurationSettings.
The RetryPolicyConfiguration Element The RetryPolicyConfigurationelement specifies the configuration of the Transient Fault Handling Application Block. This element is required.
The following sections describe attributes and child elements of the RetryPolicyConfigurationelement.
Note: To specify a timespan value in milliseconds, use the following notation:
00:00:00.200 is 200 milliseconds.
Attributes of the RetryPolicyConfiguration Element The following table lists the attributes for the RetryPolicyConfigurationelement.
Attribute Description
defaultRetryStrategy This attribute identifies the global default retry policy the block uses if no other policy is specified.
This is the name of a retry policy defined in the retry policy configuration. This string must match the value of the name attribute of one of the incremental, fixedInterval, or exponentialBackoff elements.
This attribute is required.
defaultSqlConnectionRetryStrategy This attribute identifies the default retry policy the block uses if no other policy is specified when the client creates a policy for Windows Azure SQL Database connections.
This is the name of a retry policy defined in the retry policy configuration. This string must match the value of the name attribute of one of the incremental, fixedInterval, or exponentialBackoff elements.
This attribute is optional.
defaultSqlCommandRetryStrategy This attribute identifies the default retry policy the block uses if no other policy is specified when the client creates a policy for Windows Azure SQL Database
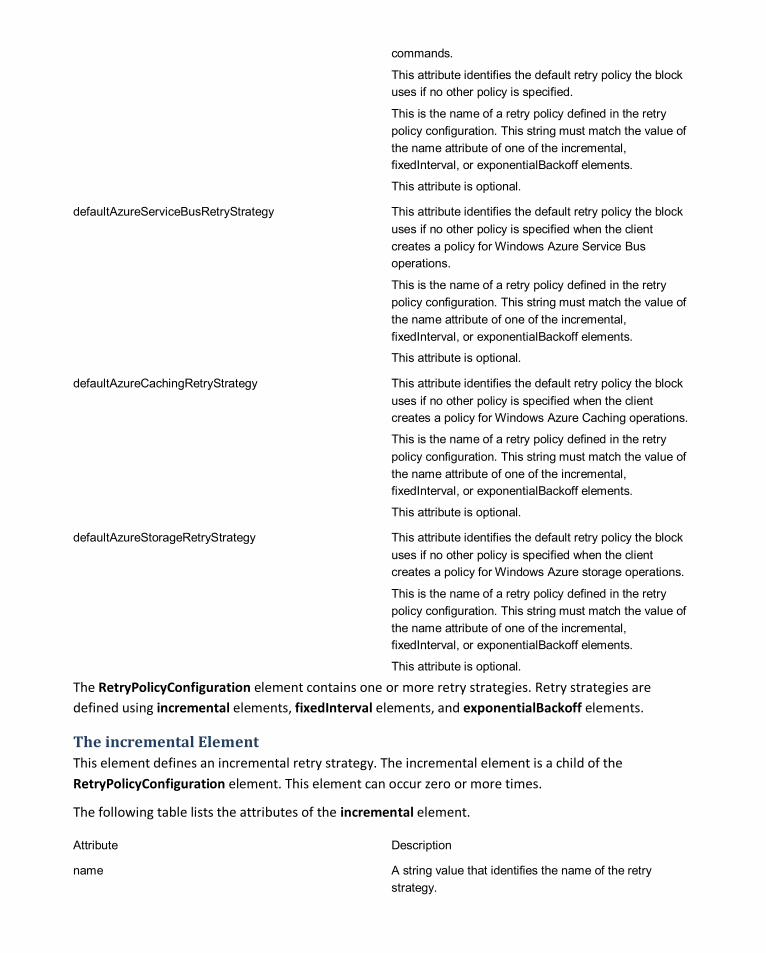
commands.
This attribute identifies the default retry policy the block uses if no other policy is specified.
This is the name of a retry policy defined in the retry policy configuration. This string must match the value of the name attribute of one of the incremental, fixedInterval, or exponentialBackoff elements.
This attribute is optional.
defaultAzureServiceBusRetryStrategy This attribute identifies the default retry policy the block uses if no other policy is specified when the client creates a policy for Windows Azure Service Bus operations.
This is the name of a retry policy defined in the retry policy configuration. This string must match the value of the name attribute of one of the incremental, fixedInterval, or exponentialBackoff elements.
This attribute is optional.
defaultAzureCachingRetryStrategy This attribute identifies the default retry policy the block uses if no other policy is specified when the client creates a policy for Windows Azure Caching operations.
This is the name of a retry policy defined in the retry policy configuration. This string must match the value of the name attribute of one of the incremental, fixedInterval, or exponentialBackoff elements.
This attribute is optional.
defaultAzureStorageRetryStrategy This attribute identifies the default retry policy the block uses if no other policy is specified when the client creates a policy for Windows Azure storage operations.
This is the name of a retry policy defined in the retry policy configuration. This string must match the value of the name attribute of one of the incremental, fixedInterval, or exponentialBackoff elements.
This attribute is optional.
The RetryPolicyConfiguration element contains one or more retry strategies. Retry strategies are defined using incremental elements, fixedInterval elements, and exponentialBackoff elements.
The incremental Element This element defines an incremental retry strategy. The incremental element is a child of the RetryPolicyConfiguration element. This element can occur zero or more times.
The following table lists the attributes of the incremental element.
Attribute Description
name A string value that identifies the name of the retry strategy.
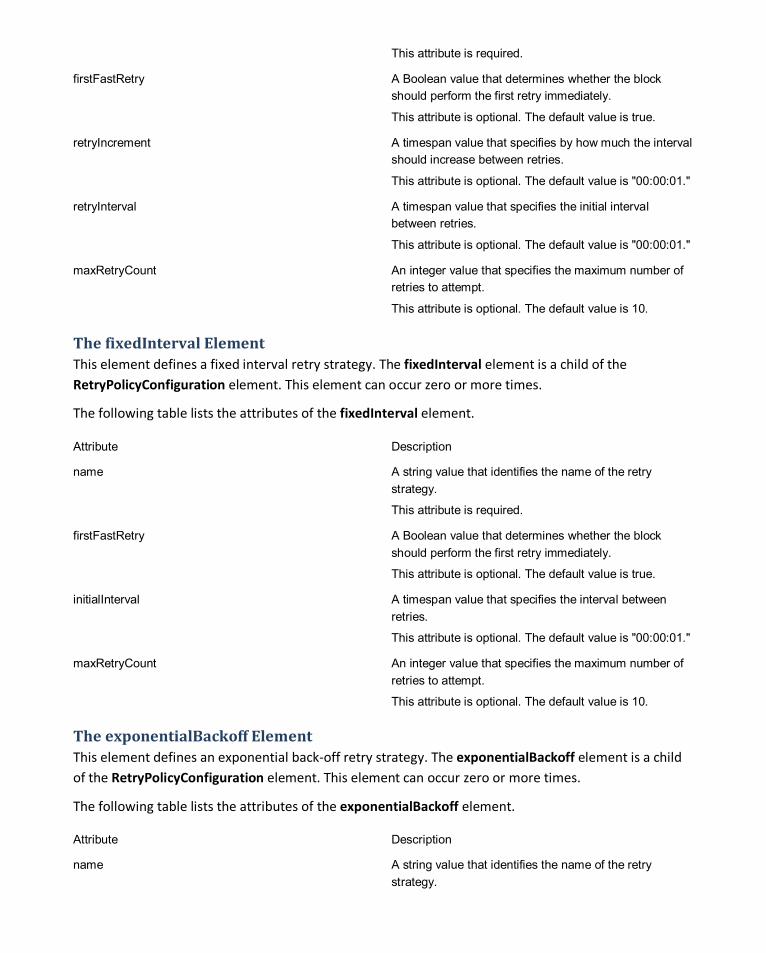
This attribute is required.
firstFastRetry A Boolean value that determines whether the block should perform the first retry immediately.
This attribute is optional. The default value is true.
retryIncrement A timespan value that specifies by how much the interval should increase between retries.
This attribute is optional. The default value is "00:00:01."
retryInterval A timespan value that specifies the initial interval between retries.
This attribute is optional. The default value is "00:00:01."
maxRetryCount An integer value that specifies the maximum number of retries to attempt.
This attribute is optional. The default value is 10.
The fixedInterval Element This element defines a fixed interval retry strategy. The fixedInterval element is a child of the RetryPolicyConfiguration element. This element can occur zero or more times.
The following table lists the attributes of the fixedInterval element.
Attribute Description
name A string value that identifies the name of the retry strategy.
This attribute is required.
firstFastRetry A Boolean value that determines whether the block should perform the first retry immediately.
This attribute is optional. The default value is true.
initialInterval A timespan value that specifies the interval between retries.
This attribute is optional. The default value is "00:00:01."
maxRetryCount An integer value that specifies the maximum number of retries to attempt.
This attribute is optional. The default value is 10.
The exponentialBackoff Element This element defines an exponential back-off retry strategy. The exponentialBackoff element is a child of the RetryPolicyConfiguration element. This element can occur zero or more times.
The following table lists the attributes of the exponentialBackoff element.
Attribute Description
name A string value that identifies the name of the retry strategy.

This attribute is required.
firstFastRetry A Boolean value that determines whether the block should perform the first retry immediately.
This attribute is optional. The default value is true.
minBackoff A timespan value that specifies the initial interval between retries.
This attribute is optional. The default value is "00:00:01."
maxBackoff A timespan value that specifies the maximum interval permitted between retries.
This attribute is optional. The default value is "00:00:30."
deltaBackoff A timespan value that specifies the delta to use when the block calculates the exponential intervals between retries.
This attribute is optional. The default value is "00:00:10."
maxRetryCount An integer value that specifies the maximum number of retries to attempt.
This attribute is optional. The default value is 10.
The add Element This element defines a custom retry strategy. The add element is a child of the RetryPolicyConfiguration element. This element can occur zero or more times.
The following table lists the attributes of the add element.
Attribute Description
name A string value that identifies the name of the retry strategy.
This attribute is required.
type The custom retry strategy type. This class must extend the RetryStrategy class.
This attribute is required.
customAttribute1 A custom attribute name and value that you use to configure your custom retry strategy. Zero or more custom attributes are permitted.
maxRetryCount An integer value that specifies the maximum number of retries to attempt.
This attribute is optional. The default value is 10.
Key Scenarios This section describes the most common situations developers must address when using the Transient Fault Handling Application Block. Each scenario explains the task, gives a real-world situation for the
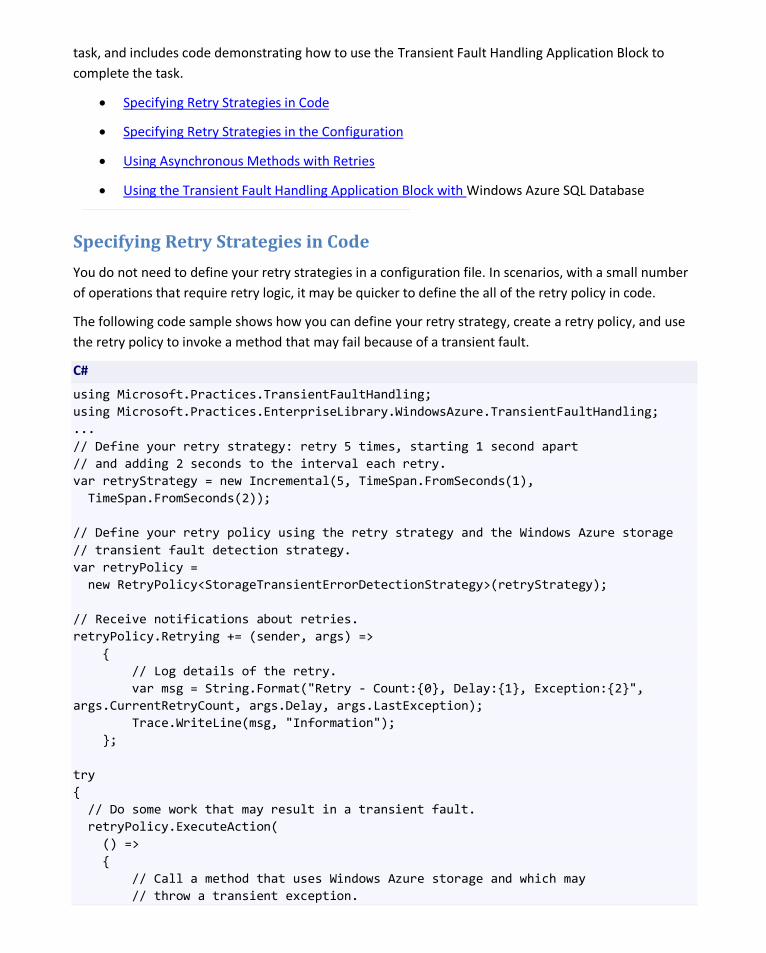
task, and includes code demonstrating how to use the Transient Fault Handling Application Block to complete the task.
•
•
Specifying Retry Strategies in Code
•
Specifying Retry Strategies in the Configuration
•
Using Asynchronous Methods with Retries
Using the Transient Fault Handling Application Block with Windows Azure SQL Database
Specifying Retry Strategies in Code
You do not need to define your retry strategies in a configuration file. In scenarios, with a small number of operations that require retry logic, it may be quicker to define the all of the retry policy in code.
The following code sample shows how you can define your retry strategy, create a retry policy, and use the retry policy to invoke a method that may fail because of a transient fault.
C#
using Microsoft.Practices.TransientFaultHandling; using Microsoft.Practices.EnterpriseLibrary.WindowsAzure.TransientFaultHandling; ... // Define your retry strategy: retry 5 times, starting 1 second apart // and adding 2 seconds to the interval each retry. var retryStrategy = new Incremental(5, TimeSpan.FromSeconds(1), TimeSpan.FromSeconds(2)); // Define your retry policy using the retry strategy and the Windows Azure storage // transient fault detection strategy. var retryPolicy = new RetryPolicy<StorageTransientErrorDetectionStrategy>(retryStrategy); // Receive notifications about retries. retryPolicy.Retrying += (sender, args) => { // Log details of the retry. var msg = String.Format("Retry - Count:{0}, Delay:{1}, Exception:{2}", args.CurrentRetryCount, args.Delay, args.LastException); Trace.WriteLine(msg, "Information"); }; try { // Do some work that may result in a transient fault. retryPolicy.ExecuteAction( () => { // Call a method that uses Windows Azure storage and which may // throw a transient exception.
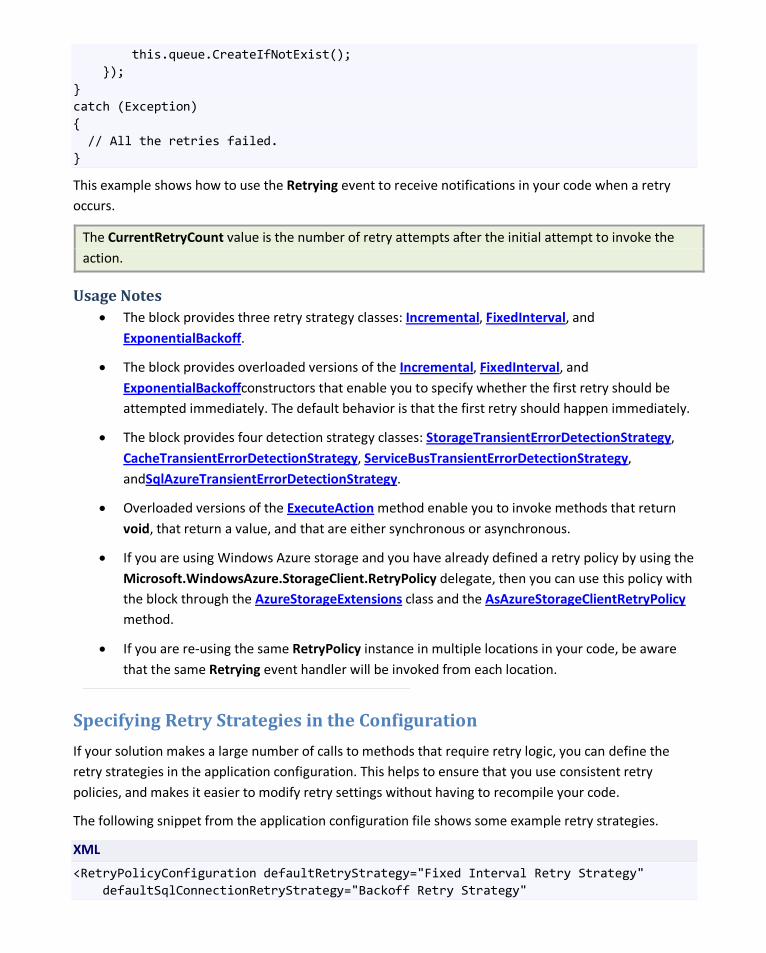
this.queue.CreateIfNotExist(); }); } catch (Exception) { // All the retries failed. }
This example shows how to use the Retrying event to receive notifications in your code when a retry occurs.
The CurrentRetryCount value is the number of retry attempts after the initial attempt to invoke the action.
Usage Notes • The block provides three retry strategy classes: Incremental, FixedInterval, and
ExponentialBackoff.
• The block provides overloaded versions of the Incremental, FixedInterval, and ExponentialBackoffconstructors that enable you to specify whether the first retry should be attempted immediately. The default behavior is that the first retry should happen immediately.
• The block provides four detection strategy classes: StorageTransientErrorDetectionStrategy, CacheTransientErrorDetectionStrategy, ServiceBusTransientErrorDetectionStrategy, andSqlAzureTransientErrorDetectionStrategy.
• Overloaded versions of the ExecuteAction method enable you to invoke methods that return void, that return a value, and that are either synchronous or asynchronous.
• If you are using Windows Azure storage and you have already defined a retry policy by using the Microsoft.WindowsAzure.StorageClient.RetryPolicy delegate, then you can use this policy with the block through the AzureStorageExtensions class and the AsAzureStorageClientRetryPolicy method.
• If you are re-using the same RetryPolicy instance in multiple locations in your code, be aware that the same Retrying event handler will be invoked from each location.
Specifying Retry Strategies in the Configuration
If your solution makes a large number of calls to methods that require retry logic, you can define the retry strategies in the application configuration. This helps to ensure that you use consistent retry policies, and makes it easier to modify retry settings without having to recompile your code.
The following snippet from the application configuration file shows some example retry strategies.
XML
<RetryPolicyConfiguration defaultRetryStrategy="Fixed Interval Retry Strategy" defaultSqlConnectionRetryStrategy="Backoff Retry Strategy"
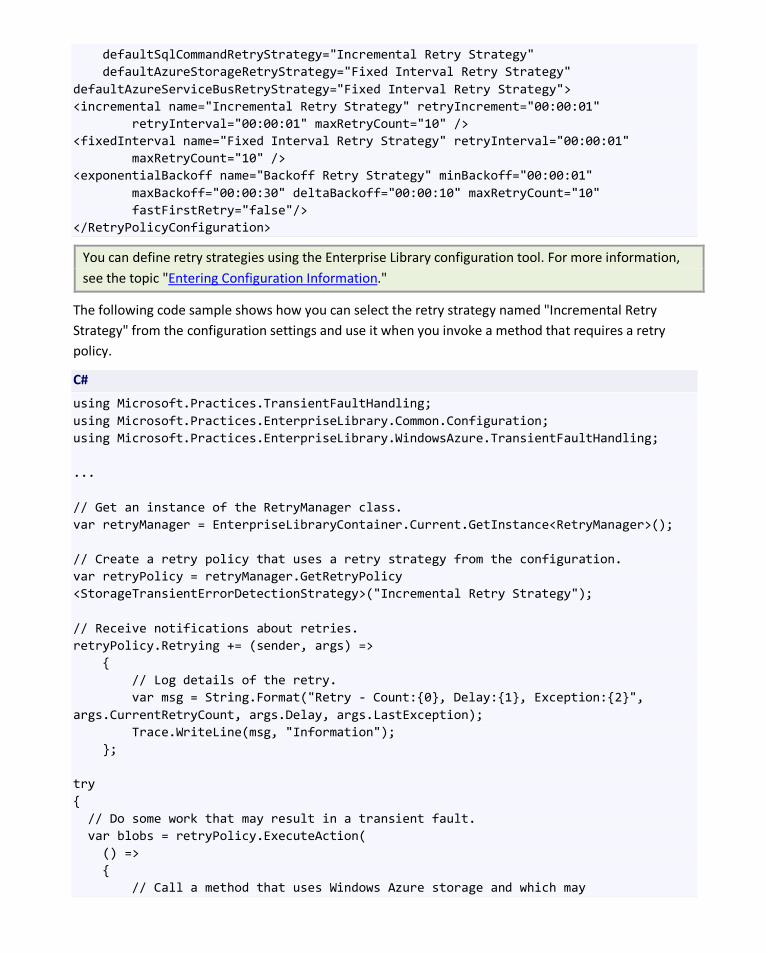
defaultSqlCommandRetryStrategy="Incremental Retry Strategy" defaultAzureStorageRetryStrategy="Fixed Interval Retry Strategy" defaultAzureServiceBusRetryStrategy="Fixed Interval Retry Strategy"> <incremental name="Incremental Retry Strategy" retryIncrement="00:00:01" retryInterval="00:00:01" maxRetryCount="10" /> <fixedInterval name="Fixed Interval Retry Strategy" retryInterval="00:00:01" maxRetryCount="10" /> <exponentialBackoff name="Backoff Retry Strategy" minBackoff="00:00:01" maxBackoff="00:00:30" deltaBackoff="00:00:10" maxRetryCount="10" fastFirstRetry="false"/> </RetryPolicyConfiguration>
You can define retry strategies using the Enterprise Library configuration tool. For more information, see the topic "Entering Configuration Information."
The following code sample shows how you can select the retry strategy named "Incremental Retry Strategy" from the configuration settings and use it when you invoke a method that requires a retry policy.
C#
using Microsoft.Practices.TransientFaultHandling; using Microsoft.Practices.EnterpriseLibrary.Common.Configuration; using Microsoft.Practices.EnterpriseLibrary.WindowsAzure.TransientFaultHandling; ... // Get an instance of the RetryManager class. var retryManager = EnterpriseLibraryContainer.Current.GetInstance<RetryManager>(); // Create a retry policy that uses a retry strategy from the configuration. var retryPolicy = retryManager.GetRetryPolicy <StorageTransientErrorDetectionStrategy>("Incremental Retry Strategy"); // Receive notifications about retries. retryPolicy.Retrying += (sender, args) => { // Log details of the retry. var msg = String.Format("Retry - Count:{0}, Delay:{1}, Exception:{2}", args.CurrentRetryCount, args.Delay, args.LastException); Trace.WriteLine(msg, "Information"); }; try { // Do some work that may result in a transient fault. var blobs = retryPolicy.ExecuteAction( () => { // Call a method that uses Windows Azure storage and which may
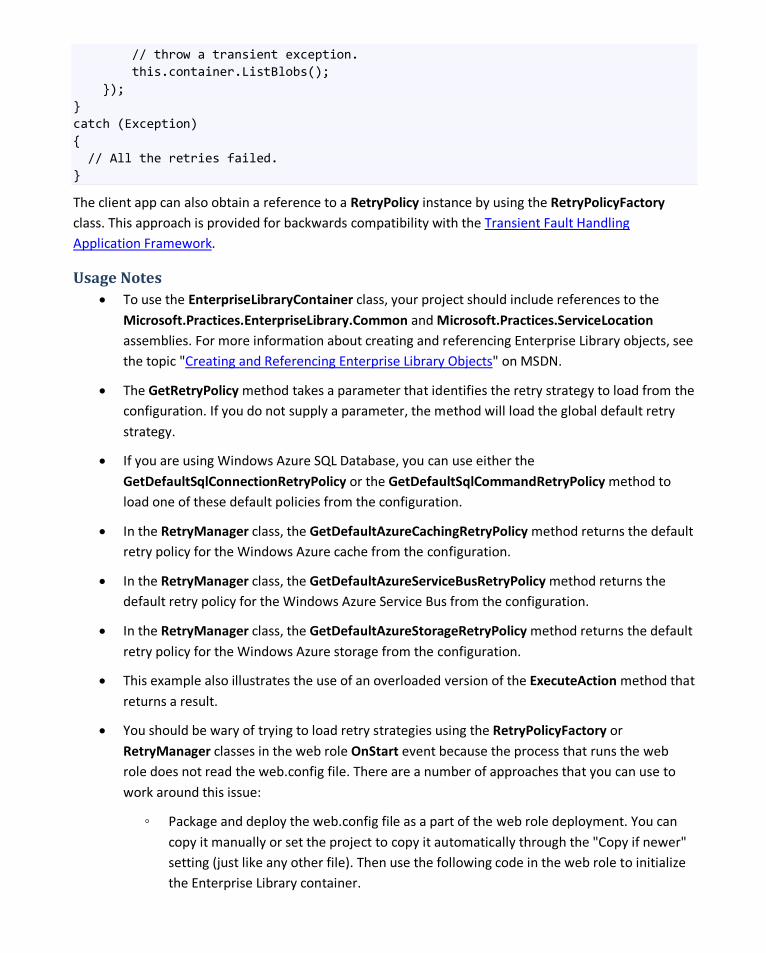
// throw a transient exception. this.container.ListBlobs(); }); } catch (Exception) { // All the retries failed. }
The client app can also obtain a reference to a RetryPolicy instance by using the RetryPolicyFactory class. This approach is provided for backwards compatibility with the Transient Fault Handling Application Framework.
Usage Notes • To use the EnterpriseLibraryContainer class, your project should include references to the
Microsoft.Practices.EnterpriseLibrary.Common and Microsoft.Practices.ServiceLocation assemblies. For more information about creating and referencing Enterprise Library objects, see the topic "Creating and Referencing Enterprise Library Objects" on MSDN.
• The GetRetryPolicy method takes a parameter that identifies the retry strategy to load from the configuration. If you do not supply a parameter, the method will load the global default retry strategy.
• If you are using Windows Azure SQL Database, you can use either the GetDefaultSqlConnectionRetryPolicy or the GetDefaultSqlCommandRetryPolicy method to load one of these default policies from the configuration.
• In the RetryManager class, the GetDefaultAzureCachingRetryPolicy method returns the default retry policy for the Windows Azure cache from the configuration.
• In the RetryManager class, the GetDefaultAzureServiceBusRetryPolicy method returns the default retry policy for the Windows Azure Service Bus from the configuration.
• In the RetryManager class, the GetDefaultAzureStorageRetryPolicy method returns the default retry policy for the Windows Azure storage from the configuration.
• This example also illustrates the use of an overloaded version of the ExecuteAction method that returns a result.
• You should be wary of trying to load retry strategies using the RetryPolicyFactory or RetryManager classes in the web role OnStart event because the process that runs the web role does not read the web.config file. There are a number of approaches that you can use to work around this issue:
◦ Package and deploy the web.config file as a part of the web role deployment. You can copy it manually or set the project to copy it automatically through the "Copy if newer" setting (just like any other file). Then use the following code in the web role to initialize the Enterprise Library container.
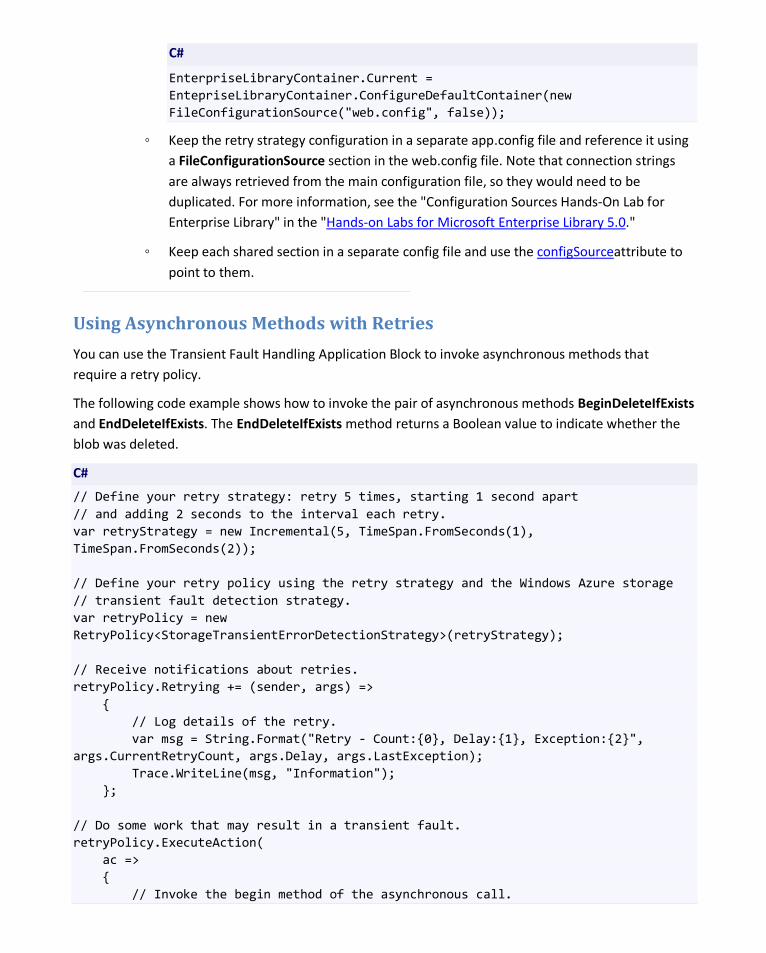
C#
EnterpriseLibraryContainer.Current = EntepriseLibraryContainer.ConfigureDefaultContainer(new FileConfigurationSource("web.config", false));
◦ Keep the retry strategy configuration in a separate app.config file and reference it using a FileConfigurationSource section in the web.config file. Note that connection strings are always retrieved from the main configuration file, so they would need to be duplicated. For more information, see the "Configuration Sources Hands-On Lab for Enterprise Library" in the "Hands-on Labs for Microsoft Enterprise Library 5.0."
◦ Keep each shared section in a separate config file and use the configSourceattribute to point to them.
Using Asynchronous Methods with Retries
You can use the Transient Fault Handling Application Block to invoke asynchronous methods that require a retry policy.
The following code example shows how to invoke the pair of asynchronous methods BeginDeleteIfExists and EndDeleteIfExists. The EndDeleteIfExists method returns a Boolean value to indicate whether the blob was deleted.
C#
// Define your retry strategy: retry 5 times, starting 1 second apart // and adding 2 seconds to the interval each retry. var retryStrategy = new Incremental(5, TimeSpan.FromSeconds(1), TimeSpan.FromSeconds(2)); // Define your retry policy using the retry strategy and the Windows Azure storage // transient fault detection strategy. var retryPolicy = new RetryPolicy<StorageTransientErrorDetectionStrategy>(retryStrategy); // Receive notifications about retries. retryPolicy.Retrying += (sender, args) => { // Log details of the retry. var msg = String.Format("Retry - Count:{0}, Delay:{1}, Exception:{2}", args.CurrentRetryCount, args.Delay, args.LastException); Trace.WriteLine(msg, "Information"); }; // Do some work that may result in a transient fault. retryPolicy.ExecuteAction( ac => { // Invoke the begin method of the asynchronous call.
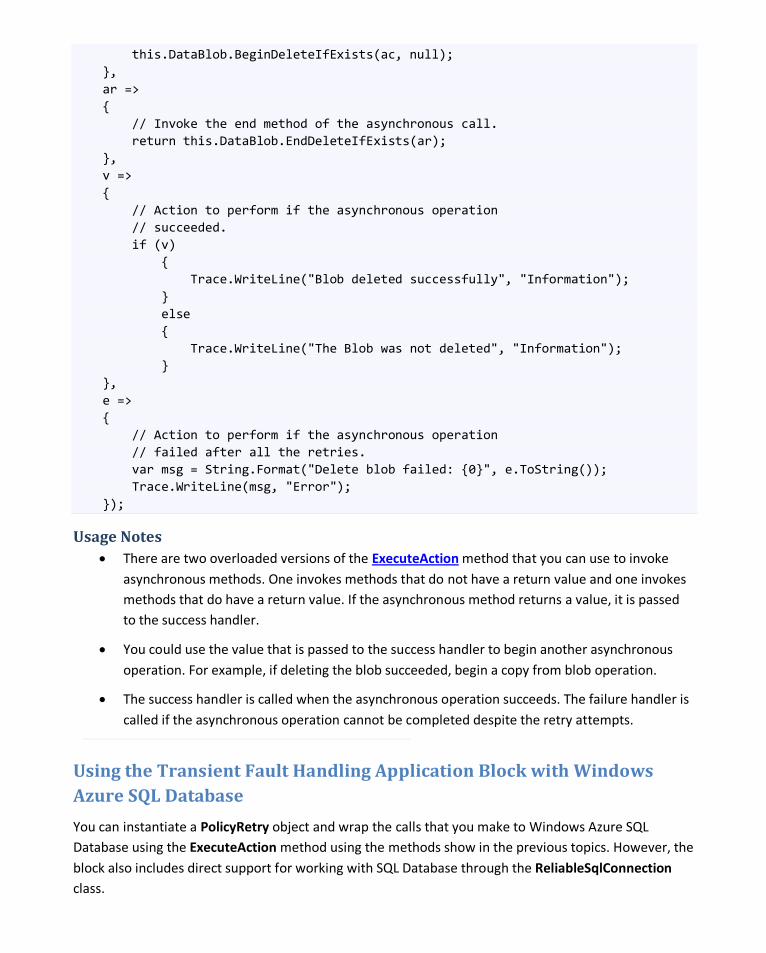
this.DataBlob.BeginDeleteIfExists(ac, null); }, ar => { // Invoke the end method of the asynchronous call. return this.DataBlob.EndDeleteIfExists(ar); }, v => { // Action to perform if the asynchronous operation // succeeded. if (v) { Trace.WriteLine("Blob deleted successfully", "Information"); } else { Trace.WriteLine("The Blob was not deleted", "Information"); } }, e => { // Action to perform if the asynchronous operation // failed after all the retries. var msg = String.Format("Delete blob failed: {0}", e.ToString()); Trace.WriteLine(msg, "Error"); });
Usage Notes • There are two overloaded versions of the ExecuteAction method that you can use to invoke
asynchronous methods. One invokes methods that do not have a return value and one invokes methods that do have a return value. If the asynchronous method returns a value, it is passed to the success handler.
• You could use the value that is passed to the success handler to begin another asynchronous operation. For example, if deleting the blob succeeded, begin a copy from blob operation.
• The success handler is called when the asynchronous operation succeeds. The failure handler is called if the asynchronous operation cannot be completed despite the retry attempts.
Using the Transient Fault Handling Application Block with Windows Azure SQL Database
You can instantiate a PolicyRetry object and wrap the calls that you make to Windows Azure SQL Database using the ExecuteAction method using the methods show in the previous topics. However, the block also includes direct support for working with SQL Database through the ReliableSqlConnection class.

The following code snippet shows an example of how to open a reliable connection to SQL Database.
C#
using Microsoft.Practices.EnterpriseLibrary.WindowsAzure.TransientFaultHandling; using Microsoft.Practices.EnterpriseLibrary.WindowsAzure.TransientFaultHandling.AzureStorage; using Microsoft.Practices.EnterpriseLibrary.WindowsAzure.TransientFaultHandling.SqlAzure; ... // Get an instance of the RetryManager class. var retryManager = EnterpriseLibraryContainer.Current.GetInstance<RetryManager>(); // Create a retry policy that uses a default retry strategy from the // configuration. var retryPolicy = retryManager.GetDefaultSqlConnectionRetryPolicy(); using (ReliableSqlConnection conn = new ReliableSqlConnection(connString, retryPolicy)) { // Attempt to open a connection using the retry policy specified // when the constructor is invoked. conn.Open(); // ... execute SQL queries against this connection ... }
The following code snippet shows an example of how to execute a SQL command with retries.
C#
using Microsoft.Practices.EnterpriseLibrary.WindowsAzure.TransientFaultHandling; using Microsoft.Practices.EnterpriseLibrary.WindowsAzure.TransientFaultHandling.AzureStorage; using Microsoft.Practices.EnterpriseLibrary.WindowsAzure.TransientFaultHandling.SqlAzure; using System.Data; ... using (ReliableSqlConnection conn = new ReliableSqlConnection(connString, retryPolicy)) { conn.Open(); IDbCommand selectCommand = conn.CreateCommand(); selectCommand.CommandText = "UPDATE Application SET [DateUpdated] = getdate()";
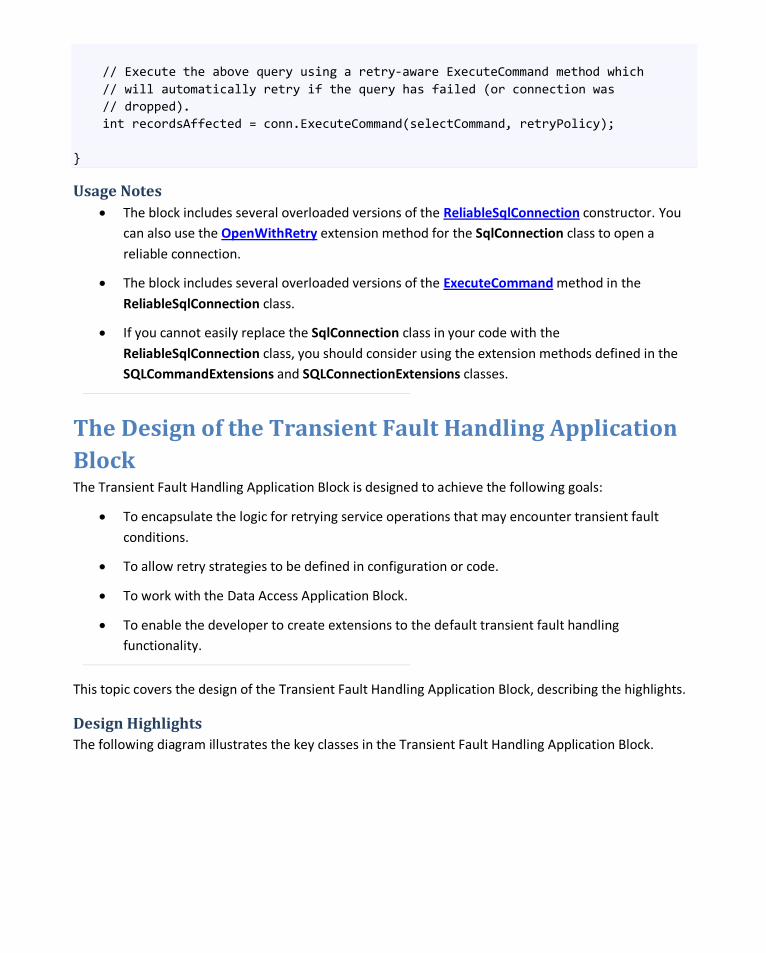
// Execute the above query using a retry-aware ExecuteCommand method which // will automatically retry if the query has failed (or connection was // dropped). int recordsAffected = conn.ExecuteCommand(selectCommand, retryPolicy); }
Usage Notes • The block includes several overloaded versions of the ReliableSqlConnection constructor. You
can also use the OpenWithRetry extension method for the SqlConnection class to open a reliable connection.
• The block includes several overloaded versions of the ExecuteCommand method in the ReliableSqlConnection class.
• If you cannot easily replace the SqlConnection class in your code with the ReliableSqlConnection class, you should consider using the extension methods defined in the SQLCommandExtensions and SQLConnectionExtensions classes.
The Design of the Transient Fault Handling Application Block The Transient Fault Handling Application Block is designed to achieve the following goals:
• To encapsulate the logic for retrying service operations that may encounter transient fault conditions.
• To allow retry strategies to be defined in configuration or code.
• To work with the Data Access Application Block.
• To enable the developer to create extensions to the default transient fault handling functionality.
This topic covers the design of the Transient Fault Handling Application Block, describing the highlights.
Design Highlights The following diagram illustrates the key classes in the Transient Fault Handling Application Block.
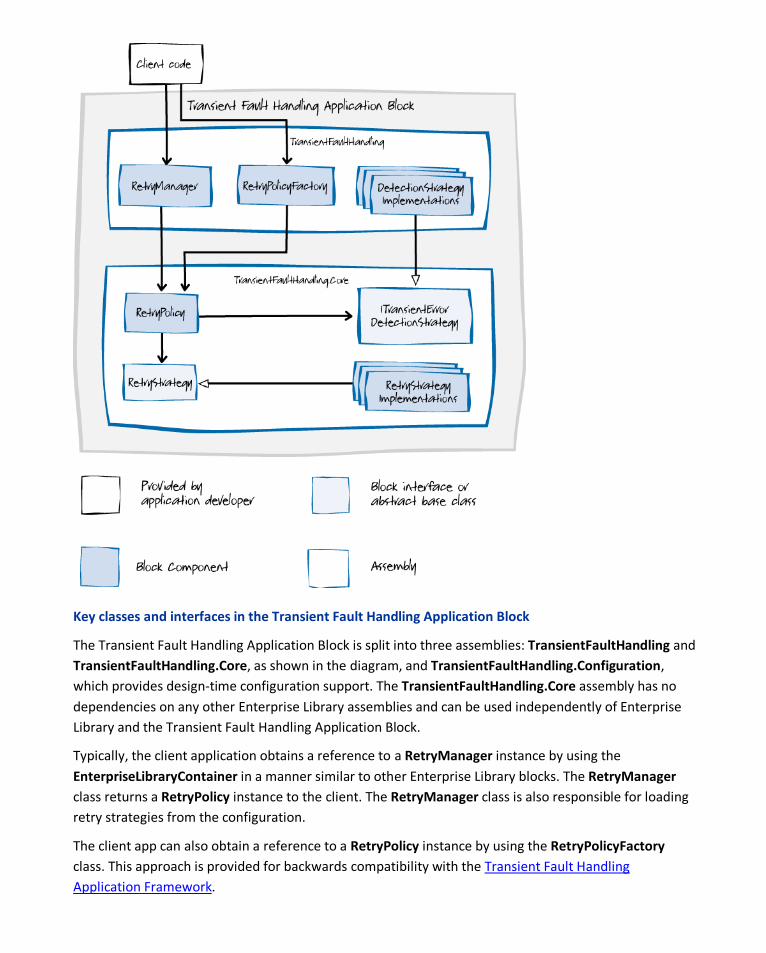
Key classes and interfaces in the Transient Fault Handling Application Block
The Transient Fault Handling Application Block is split into three assemblies: TransientFaultHandling and TransientFaultHandling.Core, as shown in the diagram, and TransientFaultHandling.Configuration, which provides design-time configuration support. The TransientFaultHandling.Core assembly has no dependencies on any other Enterprise Library assemblies and can be used independently of Enterprise Library and the Transient Fault Handling Application Block.
Typically, the client application obtains a reference to a RetryManager instance by using the EnterpriseLibraryContainer in a manner similar to other Enterprise Library blocks. The RetryManager class returns a RetryPolicy instance to the client. The RetryManager class is also responsible for loading retry strategies from the configuration.
The client app can also obtain a reference to a RetryPolicy instance by using the RetryPolicyFactory class. This approach is provided for backwards compatibility with the Transient Fault Handling Application Framework.
Clients can also instantiate a RetryPolicy instance directly. However, in this scenario the client cannot take advantage of the configuration features of the block.
The client uses the RetryPolicy instance to wrap the call that requires retry logic. The RetryPolicy class provides several overloaded versions of the ExecuteAction method for this purpose. These overloaded versions handle the common scenarios for making calls to services.
A RetryPolicy object comprises a detection strategy for the service being used by the client application and a retry strategy defined by the developer.
The block includes the following detection strategy classes that implement the ITransientErrorDetectionStrategy interface.
• StorageTransientErrorDetectionStrategy. Provides the transient error detection logic that can recognize transient faults when dealing with Windows Azure storage services.
• CacheTransientErrorDetectionStrategy. Provides the transient error detection logic that can recognize transient faults when dealing with Windows Azure Caching Service.
• ServiceBusTransientErrorDetectionStrategy. Provides the transient error detection logic that can recognize transient faults when dealing with Windows Azure Service Bus.
• SqlAzureTransientErrorDetectionStrategy. Provides the transient error detection logic for transient faults that are specific to Windows Azure SQL Database.
The Transient Fault Handling Application Block includes the following retry strategies that extend the RetryStrategy class.
• FixedInterval
• Incremental
• ExponentialBackoff
The FixedInterval retry strategy retries an operation a fixed number of times at fixed intervals.
The Incremental retry strategy retries an operation a fixed number of times at intervals that increase by the same amount each time. For example, at two-second, four-second, six-second, and eight-second intervals.
The ExponentialBackoff retry strategy retries an operation a fixed number of times at intervals that increase by a greater number each time. For example, at two-second, four-second, eight-second, and sixteen-second intervals. This retry strategy also introduces a small amount of random variation into the intervals.
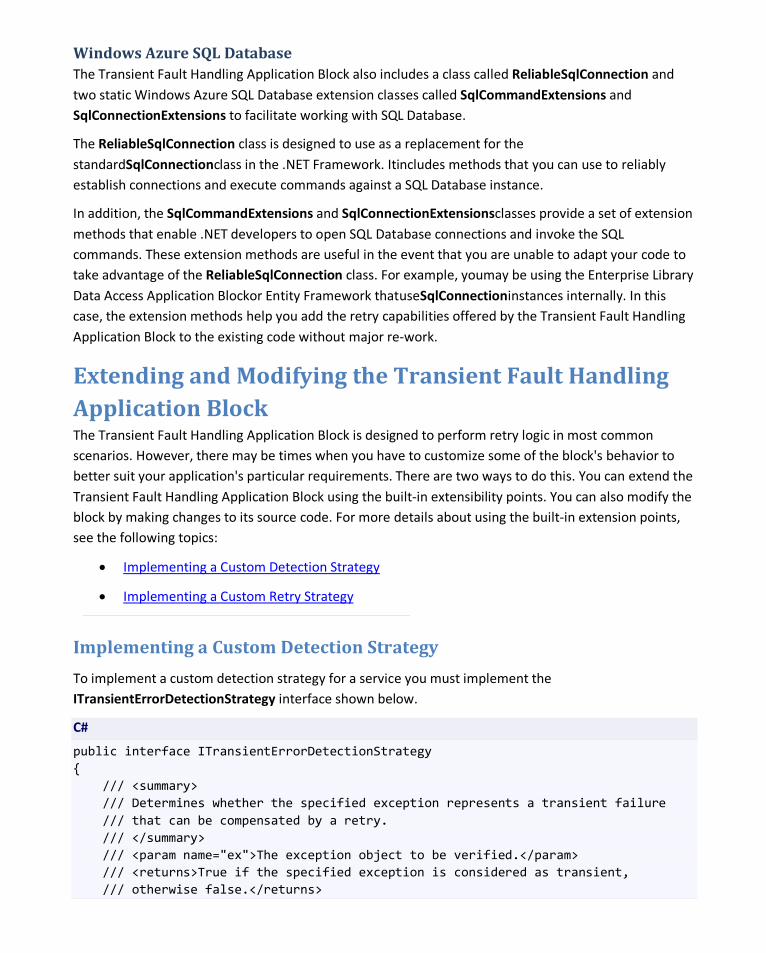
Windows Azure SQL Database The Transient Fault Handling Application Block also includes a class called ReliableSqlConnection and two static Windows Azure SQL Database extension classes called SqlCommandExtensions and SqlConnectionExtensions to facilitate working with SQL Database.
The ReliableSqlConnection class is designed to use as a replacement for the standardSqlConnectionclass in the .NET Framework. Itincludes methods that you can use to reliably establish connections and execute commands against a SQL Database instance.
In addition, the SqlCommandExtensions and SqlConnectionExtensionsclasses provide a set of extension methods that enable .NET developers to open SQL Database connections and invoke the SQL commands. These extension methods are useful in the event that you are unable to adapt your code to take advantage of the ReliableSqlConnection class. For example, youmay be using the Enterprise Library Data Access Application Blockor Entity Framework thatuseSqlConnectioninstances internally. In this case, the extension methods help you add the retry capabilities offered by the Transient Fault Handling Application Block to the existing code without major re-work.
Extending and Modifying the Transient Fault Handling Application Block The Transient Fault Handling Application Block is designed to perform retry logic in most common scenarios. However, there may be times when you have to customize some of the block's behavior to better suit your application's particular requirements. There are two ways to do this. You can extend the Transient Fault Handling Application Block using the built-in extensibility points. You can also modify the block by making changes to its source code. For more details about using the built-in extension points, see the following topics:
•
•
Implementing a Custom Detection Strategy
Implementing a Custom Retry Strategy
Implementing a Custom Detection Strategy
To implement a custom detection strategy for a service you must implement the ITransientErrorDetectionStrategy interface shown below.
C#
public interface ITransientErrorDetectionStrategy { /// <summary> /// Determines whether the specified exception represents a transient failure /// that can be compensated by a retry. /// </summary> /// <param name="ex">The exception object to be verified.</param> /// <returns>True if the specified exception is considered as transient, /// otherwise false.</returns>
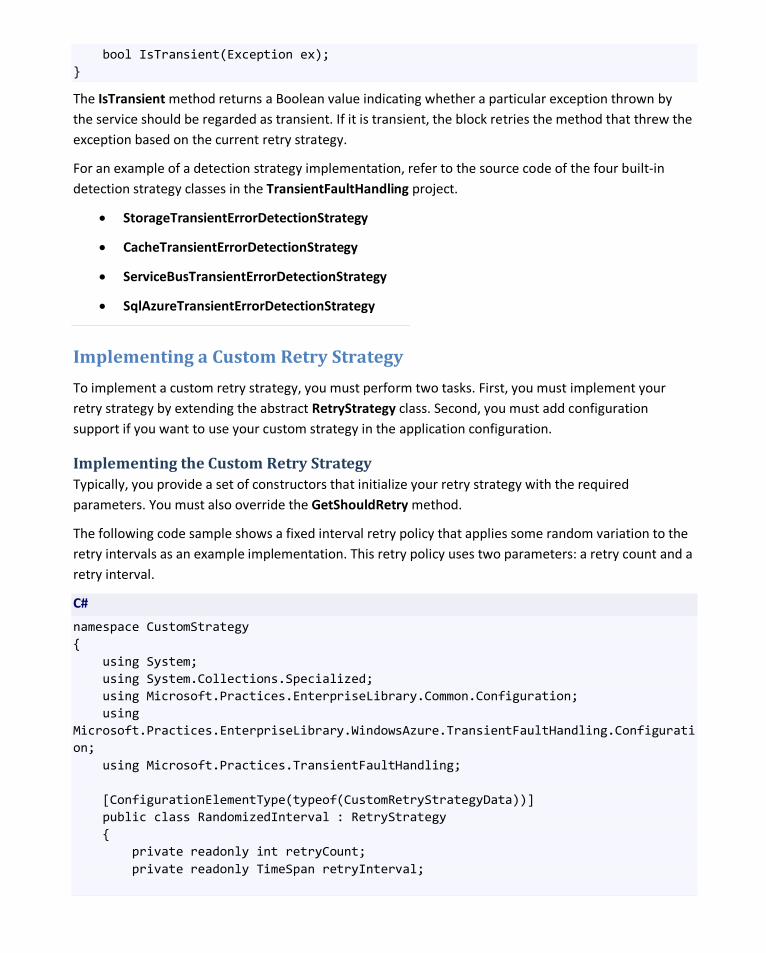
bool IsTransient(Exception ex); }
The IsTransient method returns a Boolean value indicating whether a particular exception thrown by the service should be regarded as transient. If it is transient, the block retries the method that threw the exception based on the current retry strategy.
For an example of a detection strategy implementation, refer to the source code of the four built-in detection strategy classes in the TransientFaultHandling project.
• StorageTransientErrorDetectionStrategy
• CacheTransientErrorDetectionStrategy
• ServiceBusTransientErrorDetectionStrategy
• SqlAzureTransientErrorDetectionStrategy
Implementing a Custom Retry Strategy
To implement a custom retry strategy, you must perform two tasks. First, you must implement your retry strategy by extending the abstract RetryStrategy class. Second, you must add configuration support if you want to use your custom strategy in the application configuration.
Implementing the Custom Retry Strategy Typically, you provide a set of constructors that initialize your retry strategy with the required parameters. You must also override the GetShouldRetry method.
The following code sample shows a fixed interval retry policy that applies some random variation to the retry intervals as an example implementation. This retry policy uses two parameters: a retry count and a retry interval.
C#
namespace CustomStrategy { using System; using System.Collections.Specialized; using Microsoft.Practices.EnterpriseLibrary.Common.Configuration; using Microsoft.Practices.EnterpriseLibrary.WindowsAzure.TransientFaultHandling.Configuration; using Microsoft.Practices.TransientFaultHandling; [ConfigurationElementType(typeof(CustomRetryStrategyData))] public class RandomizedInterval : RetryStrategy { private readonly int retryCount; private readonly TimeSpan retryInterval;
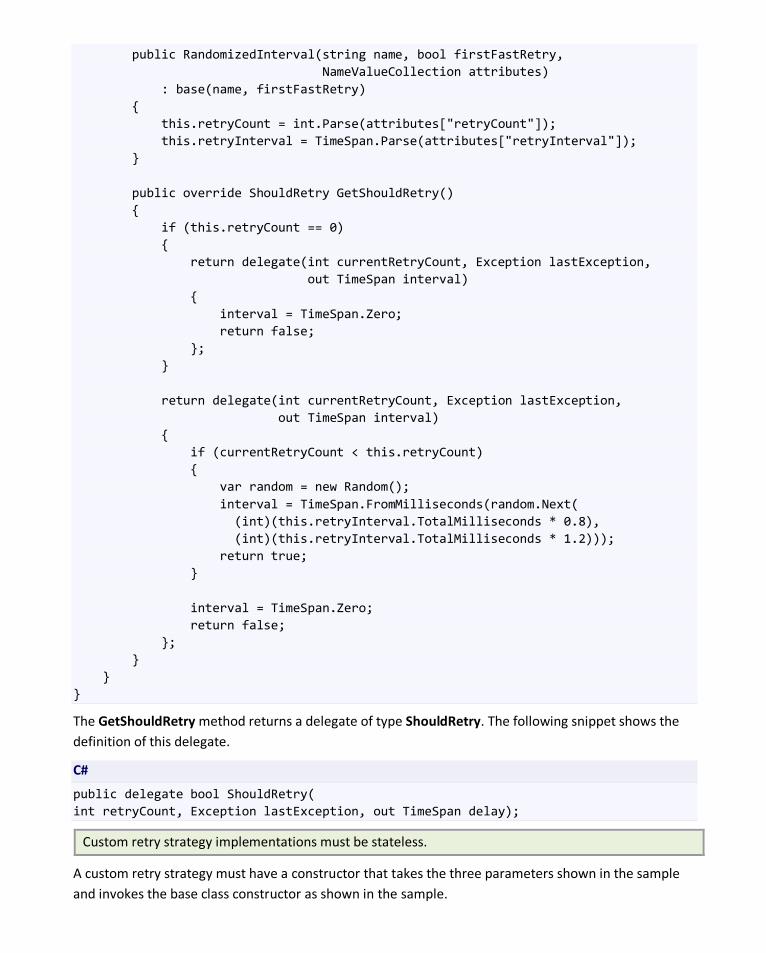
public RandomizedInterval(string name, bool firstFastRetry, NameValueCollection attributes) : base(name, firstFastRetry) { this.retryCount = int.Parse(attributes["retryCount"]); this.retryInterval = TimeSpan.Parse(attributes["retryInterval"]); } public override ShouldRetry GetShouldRetry() { if (this.retryCount == 0) { return delegate(int currentRetryCount, Exception lastException, out TimeSpan interval) { interval = TimeSpan.Zero; return false; }; } return delegate(int currentRetryCount, Exception lastException, out TimeSpan interval) { if (currentRetryCount < this.retryCount) { var random = new Random(); interval = TimeSpan.FromMilliseconds(random.Next( (int)(this.retryInterval.TotalMilliseconds * 0.8), (int)(this.retryInterval.TotalMilliseconds * 1.2))); return true; } interval = TimeSpan.Zero; return false; }; } } }
The GetShouldRetry method returns a delegate of type ShouldRetry. The following snippet shows the definition of this delegate.
C#
public delegate bool ShouldRetry( int retryCount, Exception lastException, out TimeSpan delay);
Custom retry strategy implementations must be stateless.
A custom retry strategy must have a constructor that takes the three parameters shown in the sample and invokes the base class constructor as shown in the sample.

Adding Design-time Support to Your Custom Retry Strategy To enable design-time support for your custom retry strategy, you should add the ConfigurationElementType attribute to the class that implements the retry strategy, as shown in the following code snippet.
C#
... using Microsoft.Practices.TransientFaultHandling; using Microsoft.Practices.EnterpriseLibrary.Common.Configuration; using Microsoft.Practices.EnterpriseLibrary.WindowsAzure.TransientFaultHandling.Configuration; ... [ConfigurationElementType(typeof (CustomRetryStrategyData))] public class MyRetryStrategy : RetryStrategy { ... public RandomizedInterval(string name, bool firstFastRetry, NameValueCollection attributes) : base(name, firstFastRetry) { this.retryCount = int.Parse(attributes["retryCount"]); this.retryInterval = TimeSpan.Parse(attributes["retryInterval"]); } ... }
The snippet also shows how to access the parameters that the user sets in the Enterprise Library configuration tool when they are configuring the retry strategy.
You must also add a reference to System.Configuration in your project.
For information about how to configure your custom retry strategy with the Enterprise Library configuration tool, see the topic "Entering Configuration Information."
Migration Notes
For users of the Transient Fault Handling Application Framework from the Windows Azure Customer Advisory Team, this topic summarizes the key differences that you should be aware of if you are planning to migrate to the Transient Fault Handling Application Block.
The following is a list of the key changes.
• The RetryPolicy.RetryOccurred event is renamed asRetryPolicy.Retrying.It is refactored to a .NET event with an EventArgsparameter following the .NET design guidelines.
• The overload of the RetryPolicy.ExecuteActionmethod that supports asynchronouscalls now includes a success delegate that you can use to act on the result of the asynchronous operation.
• The overload of the RetryPolicy.ExecuteActionmethod that supports asynchronouscalls now detects transient failures that might occur during the Begin operation.
• The Transient Fault Handling Application Block introduces the concept of a retry strategy that defines how a transient failure should be retried and how long to wait before retrying. The RetryStrategyclass followsthe extensible provider pattern, enabling you to create custom retry strategies.
• You can now retrieve retry strategies and retry policies from the RetryManagerclass. The RetryManagerclassis resolved from the Enterprise Library container (instead of through the configuration objects). For more information about creating and referencing Enterprise Library objects, see the topic "Creating and Referencing Enterprise Library Objects" on MSDN.
• The "communication" retry policy has been renamed "Windows Azure Service Bus" retry policy.
• The non-generic RetryPolicy class is no longer an abstract class.You can now use it directly by providing an instance of an error detection strategy.
• The classes in the Instrumentation namespace were removed.
• It is now required that you provide a default retry strategy in the configuration.
• RetryPolicyFactory.GetRetryPolicy<T>(string retryStrategyName) now throws an ArgumentOutOfRangeException exception if the retry strategy cannot be found in the configuration.
• There are major changes to the configuration schema. See the topic "Entering Configuration Information" for more details.

Many of the default values for configuration entries have changed. See the topic "Entering Configuration Information" for more details.