Embed Size (px)
Citation preview

AutoOrder
Partner Portal What’s New Guide Version 1.0

Copyright © ecmarket 2
ecmarket inc.
Suite 203 – 535 Thurlow Street Vancouver British Columbia Canada V6E 3L2
T+1.604.638.2300 F+1.604.638.2301
Document Copyright
© Copyright – ecmarket Inc. ALL RIGHTS RESERVED by ecmarket Inc.
This material contains valuable confidential information, property and trade secrets of ecmarket Inc., Vancouver, British
Columbia, Canada, embodying substantial development efforts and confidential information, ideas and expressions, no
part of which may be disclosed, reproduced, distributed or transmitted in any form or by any means electronic, mechanical
or otherwise, including photocopying and recording or in conjunction with any information storage or retrieval system,
without the express written permission of ecmarket Inc.
Revision History
Doc. Version Description of Change Author Date
Version 1.0 V1.0 Original J.Weir October, 2015

Copyright © ecmarket 3
TABLE OF CONTENTS
DOCUMENT COPYRIGHT .................................................................................................... 2
OVERVIEW OF WHAT’S NEW IN AUTOORDER .............................................................. 4
REFRESHED LOOK FOR ICONS AND BUTTONS ...................................................... 5
SUPPORT FOR MULTIPLE BROWSERS ...................................................................... 6
BROWSER POPUPS HAVE BEEN REMOVED ............................................................. 6
USER ROLES .................................................................................................................... 6
SUPERUSERS CAN NOW CHANGE THE ROLE OF A USER .................................... 7
SUPERUSERS CAN NOW CHANGE ACCESS FOR A USER ...................................... 8
ACCESS CONTROL BY SPECIFIED BUSINESS/DIVISION ....................................... 8
SEARCHING FOR A CUSTOMER NAME OR CUSTOMER NUMBER ...................... 9
NEW SUGGESTED ASSIGN KEY FIELD IN CUSTOMER DETAILS PAGE ............. 9
NEW MAP REQUEST OPTIONS .................................................................................. 11
USE OF INITIAL MAPPING INSTRUCTIONS FOR SUBSEQUENT MAPPING
REQUESTS ...................................................................................................................... 12
SEND MAP REQUEST BY EMAIL ............................................................................... 14
CLEAR ALL ALERTS BASED ON A SPECIFIED DATE ........................................... 15
RESOLVE MULTIPLE SHIP-TO, BILL-TO, AND UNKNOWN BUYER ALERTS .. 15
REACTIVATE A DEACTIVATED CUSTOMER ......................................................... 16
VIEW RECENT DOCUMENTS ..................................................................................... 17
TEST DOCUMENTS PAGE NOW SHOWS ONLY TEST DOCUMENTS ................. 19
PORTAL EVENTS CAN NOW BE VIEWED ............................................................... 20
ADDRESSES CAN NOW BE VIEWED, ADDED, MODIFIED, AND
IMPORTED/EXPORTED ................................................................................................ 20

Copyright © ecmarket 4
Overview of What’s New in AutoOrder
The AutoOrder Partner Portal includes the following enhancements:
Refreshed look for icons and buttons
Support for multiple browsers
Browser popups have been removed
User roles
SuperUsers can now change the role of a User
SuperUsers can now change access for a User
Access control by specified Business/Division
Searching for a customer name or customer number
New Suggested Assign Key field in Customer Details page
New map request options
Use of initial mapping instructions for subsequent mapping requests
Send map request by email
Resolve all alerts based on a specified date
Resolve multiple ship-to, bill-to, and unknown buyer alerts
Reactivate a deactivated customer
View recent production documents
Test documents screen now shows only test documents
Portal events can now be viewed
Addresses can now be viewed, added, modified, and imported/exported

Copyright © ecmarket 5
Refreshed Look for Icons and Buttons
The icons and buttons in the Partner Portal have been refreshed. This is an example of
the updated icons on the homepage of the portal.
The menu bar in the Customer List page has been updated providing a more simplified
interface. The lower toolbar with the Customers and New Customer buttons has been
removed.
To add a new customer, you now click on the Add button. To view the Customers List,
you now click then Customers button.
Previously, the New Customer button was used to add a customer and you had to click
on the Customers on the lower toolbar to return to the Customers list.

Copyright © ecmarket 6
Support for Multiple Browsers
The Partner Portal now supports multiple internet browsers including Microsoft Internet
Explorer, Google Chrome, Mozilla Firefox, and Apple Safari. This support extends to
mobile devices using these browsers. Additionally, Internet Explorer no longer needs to
be set to Compatibility View (Compatibility Mode).
Previously, only Internet Explorer was supported.
Browser Popups Have Been Removed
All new browser popups have been removed such as the Adding a New Buyer popup.
This makes the interface easier to use and eliminates potential errors.
User Roles
There are three different types of roles in the portal – SuperUser, User, and, - (user).
SuperUsers can now create and edit the role of a User, which is explained in the
following section. If no role is assigned to a new user, a “-“ type of user is created and
this type of role has the same rights as a User.
Previously, when a new user was created, the user was assigned the rights of a User
and a Help Desk request had to be submitted to change the role of the User to
SuperUser.
Following is a table outlining the details of user hierarchy:
Section SuperUser User
Alerts Alerts for all customers Alerts for customers they are assigned to as a Sales Rep, Business Rep, and/or Implementer, or if access has been granted for a specific Business/Division
Address Bulk download, modify, delete, bulk Import
Bulk download, modify
Documents Details View Document Info and access to associated actions
None
Customer List View ALL customers, ability to modify Customer Details, download list, remove, global edit
View only assigned customers, ability to modify Customer Details, if assigned as a Sales Rep, Business Rep, and/or Implementer, or if access has been granted for a specific Business/Division
Users (Tools > Company) View, edit None

Copyright © ecmarket 7
SuperUsers Can Now Change the Role of a User
SuperUsers can now change the role of a User to SuperUser. This can be done when
the user is created or as a modification to the user role.
Previously, you had to submit an email to the Help Desk requesting for a user’s access
to be changed to a SuperUser.
Note: The Role of a user is now displayed in the Company Details page.

Copyright © ecmarket 8
SuperUsers Can Now Change Access for a User
SuperUsers can now change the access rights of a User. For example, a basic user can
now have access to all customers.
Access Control by Specified Business/Division
When users are created, you can now specify a custom business division, which can be
used to control access to specific business divisions of a customer. This field can also
be used to filter information in the Customer List page.
Note: To provide a User with access to more than one Custom Business/Div, you can
enter these in the Contact Details page in the Business/Division field separated by a
semi-colon. For example, enter the text as follows depending on the type of access you
are providing:
to provide access for all divisions of the business BUS, enter BUS/*
to provide access for all businesses for division DIV, enter */DIV
to provide access for all businesses that start with ABC, enter ABC*/*

Copyright © ecmarket 9
Searching for a Customer Name or Customer Number
You can now search for a customer by Customer Name or Customer Number in the
Customer List page by specifying search criteria in the Filter field and clicking the
Search icon.
Wildcard searches are supported by using an asterisk before specified characters or
after specified characters. If you put the asterisk at beginning, it searches for the text
that ends with the specified characters and if you put the asterisk at the end of the
search string, it searches for text that starts with the characters. For example, entering
*Co in the Filter, searches for all customers starting with the letters “Co”.
Previously, there was no searching capability in the Customer List page.
New Suggested Assign Key Field in Customer Details Page
You can now specify a value in the Suggested Assign Key field in the Customer Details
page for a customer account. This helps to eliminate the need to resolve Document
Alerts for non-matches on unknown customers.

Copyright © ecmarket 10
Previously, you had to manually resolve Document Alerts generated for non-matching
customers and also request this key to be set up when requesting mapping.
You can set the value for the Suggested Assign Key field when adding a new account
and when modifying an account. Auto-assignment keys can be a single word or multiple
words. When using multiple-word values, conditions (operators) such as AND, OR, and
NOT are supported, as well as the use of parentheses.
Note:
Double quotes must be used if AND/OR/NOT conditions are included in the value of the Suggested Assign Key field.
Text is not case sensitive. For example, there is no difference between MARMON UTILITY and marmon utility.
If the assignment key text contains one of the conditions (AND/OR/NOT), double quotes must be used around the text. For example, for a company name such as A and B Company, enter "A and B Company".
See the following company/address details as an example:
Marmon Utility LLC. 53 Old Wilton Road Milford, NH 03055 Using the above example, following are valid examples of values for the Suggested Assign Key field:
Marmon Utility LLC
"Marmon Utility LLC" AND "53 Old Wilton Road"
"Marmon Utility LLC" OR "53 Old Wilton Road"
("Marmon Utility LLC" AND "53 Old Wilton Road") AND NOT "Milford, NH 03055"
("Marmon Utility LLC" OR "53 Old Wilton Road") AND "Milford, NH 03055"
After setting a value for the Suggested Assign Key field, one of the following messages is generated depending on the outcome:
Auto-Assignment Key set
Auto-Assignment Key set with a warning
Auto-Assignment Key NOT set – Key not unique
Auto-Assignment Key NOT set – Key not found on documents
Each scenario generates a message in the Mapping History and an email is also sent to the Implementer.

Copyright © ecmarket 11
New Map Request Options
There are new options available in the Request Map screen.
Following is a description of what each of the options is used for:
Until this map change is complete, verify all documents received conform with
this request (during which time document delivery may be delayed). – When this
option is selected, all documents submitted before the map request is complete are
reviewed to determine if the map request applies to these documents before they are
processed and delivered. Documents that are related to the map request are put on
hold until the map request is completed
Previously, there was no option for this functionality.
Note: Until the map has been finalized, processing time will be delayed (since all
documents need to be reviewed).
Send specified documents as Production once this map change is complete. –
When this option is selected, specified production documents are reprocessed. By
default, when the company is in Production Configuration Complete we do not
(re)process specified PRODCTION documents unless specifically requested; this will
clarify if you need the documents processed or not once the map request is completed.
Previously, a map request had to be submitted for reprocessing documents.
Note: Details such as document numbers and date ranges must still be included in the
map request.

Copyright © ecmarket 12
Use of Initial Mapping Instructions for Subsequent Mapping Requests
You can now populate the initial mapping questions when making a subsequent
mapping request. This way, you can easily provide a new set of mapping questions,
while viewing the questions that were used for the initial mapping of your data.

Copyright © ecmarket 13
Note: The following example is the list of Initial Questions from a mapping of an Eclipse
ERP system. Your initial questions may not appear exactly as in the following
screenshot.
Previously, you had to review the history in a different page and then enter your new
mapping instructions.

Copyright © ecmarket 14
Send Map Request by Email
You can now make a mapping request by email by clicking the Email Request button in
the Customer Details page. This provides you with not only the mapping request
functionality, but also to attach documents in the request. Another added benefit is when
a document is sent with the new functionality, it is ensured that it is associated to the
correct customer.
When you click the Email Request button on the Customer Details page, your default
email service is opened. Enter the text of your email above the preformatted text in the
email and attach the document for your map request.
There are two benefits to submitting documents by Email Request, as follows:
The process for submitting a document and map requested is shortened into one
step. The alternative way is to submit test documents by email, possibly resolve
“Cannot Determine Customer for Document” document alerts, and then enter a
map request.
For Production accounts, documents can be submitted without being processed.
This is particularly useful if a new document format needs to be submitted with
data such as cross-reference information. Alternatively, if a document is
submitted by the portal email address, the system will attempt to process it.

Copyright © ecmarket 15
Note: Do not change the preformatted text in the map request email.
Previously, you would have to email any applicable documents to the Help Desk first and
then make a map request stating that a document had been sent for mapping.
Clear All Alerts Based on a Specified Date
You can now clear all alerts based on a specified date by clicking the Clear Alerts
button in the Alerts List page and entering a date. All the alerts generated prior to the
specified date are cleared (mark as not processed). Enter the date in year/month/day
format – e.g., 2015-03-23.
Note: Resolving an alert does not delete the associated document from the system. You
can issue a map request to regenerate the alert.
Previously, all alerts must have been handled individually.
Resolve Multiple Ship-To, Bill-To, and Unknown Buyer Alerts
You can now resolve multiple alerts for ship-to/bill-to addresses and unknown buyers
with the same address by selecting the Apply to all [number of] outstanding
documents with the same address option in the Document Alert Details page. You
are still required to enter the missing information (such as the Ship to id., Bill to id, or
buyer id.) and reprocess the document in the Document Alert Details page, as before.
Once this type of alert has been resolved, you will not receive alerts for this address
again.
Note: This type of alert resolution does not apply to unknown customer alerts.

Copyright © ecmarket 16
Previously, all alerts for ship-to addresses and unknown buyers must have been
resolved individually.
Reactivate a Deactivated Customer
You can now reactivate a customer that has been deactivated. When adding a
customer, if you enter a Customer Number that has been previously entered (and
deactivated), there will be a link called Company with the same customer number
already exists displayed at the top of the Customers Details page. You then can open
the existing customer that was previously entered and choose to reactivate it by clicking
the Reactivate button.

Copyright © ecmarket 17
Previously, this functionality did not exist.
View Recent Documents
You can now view recent documents for customers in Production by clicking the Recent
Documents button in the Customer Details page.
Note: You can click on a link in the Status column to see additional information about
the document and take further action if needed. For example, if you have a document
with the status of Not Processed, you can now choose to Reprocess or Reassign it and
also to forward the document to the appropriate contact.

Copyright © ecmarket 18
When you click on a link in the Status column, the Document Details are displayed.
Depending on the type of document, different action buttons are available.
Following is a description of what each of the action buttons are used for:
Reprocess – reprocesses and deliver the document
Note: If the document has been already delivered, the Reprocess action sends the
document again.
Set Confirmed – some customers send confirmations of document receipt when
documents are successfully delivered. At that point, the document status is set to
"confirmed". If the confirmation of receipt is not received, the document status becomes
"not confirmed". The Set Confirmed button allows users to manually set the document
status to confirm
Not Processed – there may be instances where a document is updated by a customer
(such as adding line items and changing part numbers) and submitted again with the
same document number. By default, documents with duplicate numbers are not
processed. In these cases, a user must set the original document to "Not Processed"
and then select the "Reprocess" button on the newer submitted document in order to
process it.
Reassign – reassigns a document to the correct customer.
Forward – sends the original document to be emailed to a list of recipients.
The following is an example of when you forward a document by clicking the Forward
action button.

Copyright © ecmarket 19
Previously, only test documents were visible for the customer once it was in Production
and any additional information about the document was sent by email. Also, to reprocess
a document, a map request was needed for reprocessing, confirming, reassigning, and
forwarding a document.
Test Documents Page Now Shows Only Test Documents
The Test Orders page now only displays test document used for setting up your
customer. All production documents are now displayed in the Recent Production Orders
list, as described in the previous section.
Copyright © ecmarket 20
Previously, the Test Orders page displayed production documents that were not
processed due to circumstances such as duplicate documents.
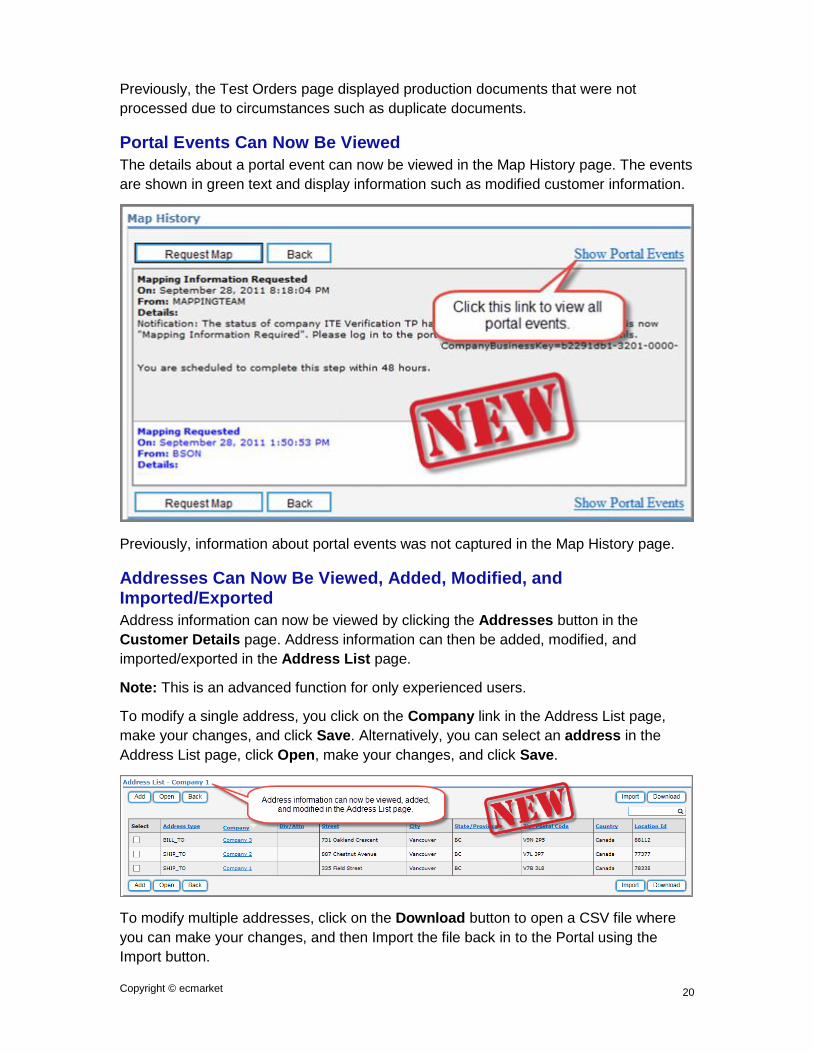
Portal Events Can Now Be Viewed
The details about a portal event can now be viewed in the Map History page. The events
are shown in green text and display information such as modified customer information.
Previously, information about portal events was not captured in the Map History page.
Addresses Can Now Be Viewed, Added, Modified, and Imported/Exported
Address information can now be viewed by clicking the Addresses button in the
Customer Details page. Address information can then be added, modified, and
imported/exported in the Address List page.
Note: This is an advanced function for only experienced users.
To modify a single address, you click on the Company link in the Address List page,
make your changes, and click Save. Alternatively, you can select an address in the
Address List page, click Open, make your changes, and click Save.
To modify multiple addresses, click on the Download button to open a CSV file where
you can make your changes, and then Import the file back in to the Portal using the
Import button.

Copyright © ecmarket 21
Note: Do not modify the values in the AddressId or the HashValue columns when
making updates through the Export/Import functionality.
To add a single address, click the Add button in the Address List page, enter the
details, and click Save.
To add multiple addresses, click the Download button, add each address in a new row,
save the file, and reimport the Address List using the Import button on the Address List
page.
Note: When you are adding addresses using the Export/Import functionality, leave the
AddressId and the HashValue column values blank. Also, ensure the ship-to/bill-to
address is exactly the same as the address used on the document so an exact match is
made. If the information is not the same, an alert may be generated. For example, if the
word Boulevard is in the address and it is abbreviated as BLVD in the document, use the
abbreviated form in the new address.