Embed Size (px)
Citation preview
The eXPeRT’s VOIce® In LInuX
AutomatingLinux and Unix System Administration
Second edition
Nate Campi and Kirk Bauer
Building intelligent networks with open source tools

Automating Linux and Unix System Administration, Second Edition
Copyright © 2009 by Nate Campi, Kirk Bauer
All rights reserved. No part of this work may be reproduced or transmitted in any form or by any means, electronic or mechanical, including photocopying, recording, or by any information storage or retrieval system, without the prior written permission of the copyright owner and the publisher.
ISBN-13 (pbk): 978-1-4302-1059-7
ISBN-13 (electronic): 978-1-4302-1060-3
Printed and bound in the United States of America 9 8 7 6 5 4 3 2 1
Trademarked names may appear in this book. Rather than use a trademark symbol with every occurrence of a trademarked name, we use the names only in an editorial fashion and to the benefit of the trademark owner, with no intention of infringement of the trademark.
Lead Editor: Frank PohlmannTechnical Reviewer: Mark BurgessEditorial Board: Clay Andres, Steve Anglin, Mark Beckner, Ewan Buckingham, Tony Campbell, Gary Cor-
nell, Jonathan Gennick, Michelle Lowman, Matthew Moodie, Jeffrey Pepper, Frank Pohlmann, Ben Renow-Clarke, Dominic Shakeshaft, Matt Wade, Tom Welsh
Project Manager: Kylie JohnstonCopy Editors: Nina Goldschlager, Heather LangAssociate Production Director: Kari Brooks-CoponyProduction Editor: Ellie FountainCompositor: Linda Weidemann, Wolf Creek PressProofreader: Nancy SixsmithIndexer: Becky HornyakCover Designer: Kurt KramesManufacturing Director: Tom Debolski
Distributed to the book trade worldwide by Springer-Verlag New York, Inc., 233 Spring Street, 6th Floor, New York, NY 10013. Phone 1-800-SPRINGER, fax 201-348-4505, e-mail [email protected], or visit http://www.springeronline.com.
For information on translations, please contact Apress directly at 2855 Telegraph Avenue, Suite 600, Berkeley, CA 94705. Phone 510-549-5930, fax 510-549-5939, e-mail [email protected], or visit http://www.apress.com.
Apress and friends of ED books may be purchased in bulk for academic, corporate, or promotional use. eBook versions and licenses are also available for most titles. For more information, reference our Special Bulk Sales–eBook Licensing web page at http://www.apress.com/info/bulksales.
The information in this book is distributed on an “as is” basis, without warranty. Although every pre-caution has been taken in the preparation of this work, neither the author(s) nor Apress shall have any liability to any person or entity with respect to any loss or damage caused or alleged to be caused directly or indirectly by the information contained in this work.
The source code for this book is available to readers at http://www.apress.com.
10597fmfinal 2 11/20/08 11:49:37 AM
vii
Contents
About the Authors . . . . . . . . . . . . . . . . . . . . . . . . . . . . . . . . . . . . . . . . . . . . . . . . . . . . . . . . . . . . . . . . . xv
About the Technical Reviewer . . . . . . . . . . . . . . . . . . . . . . . . . . . . . . . . . . . . . . . . . . . . . . . . . . . . . xvii
Acknowledgments . . . . . . . . . . . . . . . . . . . . . . . . . . . . . . . . . . . . . . . . . . . . . . . . . . . . . . . . . . . . . . . . xix
Introduction . . . . . . . . . . . . . . . . . . . . . . . . . . . . . . . . . . . . . . . . . . . . . . . . . . . . . . . . . . . . . . . . . . . . . xxi
ChAptEr 1 introducing the Basics of Automation . . . . . . . . . . . . . . . . . . . . . . 1
Do You Need Automation? . . . . . . . . . . . . . . . . . . . . . . . . . . . . . . . . . . . . . . . . . 2
Large Companies with Many Diverse Systems . . . . . . . . . . . . . . . . . . . 4
Medium-Sized Companies Planning for Growth . . . . . . . . . . . . . . . . . . 4
Internet Service Providers . . . . . . . . . . . . . . . . . . . . . . . . . . . . . . . . . . . . . 5
Application Service Providers . . . . . . . . . . . . . . . . . . . . . . . . . . . . . . . . . . 5
Web Server Farms . . . . . . . . . . . . . . . . . . . . . . . . . . . . . . . . . . . . . . . . . . . 5
Beowulf Clusters . . . . . . . . . . . . . . . . . . . . . . . . . . . . . . . . . . . . . . . . . . . . 6
Network Appliances . . . . . . . . . . . . . . . . . . . . . . . . . . . . . . . . . . . . . . . . . . 7
What Will You Gain? . . . . . . . . . . . . . . . . . . . . . . . . . . . . . . . . . . . . . . . . . . . . . . 7
Saving Time . . . . . . . . . . . . . . . . . . . . . . . . . . . . . . . . . . . . . . . . . . . . . . . . 7
Reducing Errors . . . . . . . . . . . . . . . . . . . . . . . . . . . . . . . . . . . . . . . . . . . . . 7
Documenting System Configuration Policies . . . . . . . . . . . . . . . . . . . . 8
Realizing Other Benefits . . . . . . . . . . . . . . . . . . . . . . . . . . . . . . . . . . . . . . 8
What Do System Administrators Do? . . . . . . . . . . . . . . . . . . . . . . . . . . . . . . . 10
Methodology: Get It Right from the Start! . . . . . . . . . . . . . . . . . . . . . . . . . . . 11
Homogenizing Your Systems . . . . . . . . . . . . . . . . . . . . . . . . . . . . . . . . . 13
Deciding on Push vs . Pull . . . . . . . . . . . . . . . . . . . . . . . . . . . . . . . . . . . . 13
Dealing with Users and Administrators . . . . . . . . . . . . . . . . . . . . . . . . . . . . . 14
Who Owns the Systems? . . . . . . . . . . . . . . . . . . . . . . . . . . . . . . . . . . . . . . . . . 17
Defining Policy . . . . . . . . . . . . . . . . . . . . . . . . . . . . . . . . . . . . . . . . . . . . . . . . . . 18
10597fmfinal 7 11/20/08 11:49:38 AM
■CONTENTSviii
ChAptEr 2 Applying practical Automation . . . . . . . . . . . . . . . . . . . . . . . . . . . . . 19
Seeing Everything As a File . . . . . . . . . . . . . . . . . . . . . . . . . . . . . . . . . . . . . . . 19
Understanding the Procedure Before Automating It . . . . . . . . . . . . . . . . . . 20
Exploring an Example Automation . . . . . . . . . . . . . . . . . . . . . . . . . . . . . . . . . 21
Scripting a Working Procedure . . . . . . . . . . . . . . . . . . . . . . . . . . . . . . . 21
Prototyping Before You Polish . . . . . . . . . . . . . . . . . . . . . . . . . . . . . . . . 22
Turning the Script into a Robust Automation . . . . . . . . . . . . . . . . . . . 23
Attempting to Repair, Then Failing Noisily . . . . . . . . . . . . . . . . . . . . . . 24
Focusing on Results . . . . . . . . . . . . . . . . . . . . . . . . . . . . . . . . . . . . . . . . . 25
ChAptEr 3 Using SSh to Automate System Administration Securely . . . . . . . . . . . . . . . . . . . . . . . . . . . . . . . . . . . . . . . . . . . . . . . . . . . . . 27
Learning the Basics of Using SSH . . . . . . . . . . . . . . . . . . . . . . . . . . . . . . . . . . 28
Enhancing Security with SSH . . . . . . . . . . . . . . . . . . . . . . . . . . . . . . . . . . . . . 29
Using Public- Key Authentication . . . . . . . . . . . . . . . . . . . . . . . . . . . . . . . . . . . 30
Generating the Key Pair . . . . . . . . . . . . . . . . . . . . . . . . . . . . . . . . . . . . . 31
Specifying Authorized Keys . . . . . . . . . . . . . . . . . . . . . . . . . . . . . . . . . . 32
Using ssh- agent . . . . . . . . . . . . . . . . . . . . . . . . . . . . . . . . . . . . . . . . . . . . . . . . . 33
Knowing ssh- agent Basics . . . . . . . . . . . . . . . . . . . . . . . . . . . . . . . . . . . 33
Getting Advanced with ssh- agent . . . . . . . . . . . . . . . . . . . . . . . . . . . . . 34
Forwarding Keys . . . . . . . . . . . . . . . . . . . . . . . . . . . . . . . . . . . . . . . . . . . . 36
Restricting RSA Authentication . . . . . . . . . . . . . . . . . . . . . . . . . . . . . . . . . . . . 37
Dealing with Untrusted Hosts . . . . . . . . . . . . . . . . . . . . . . . . . . . . . . . . . 38
Allowing Limited Command Execution . . . . . . . . . . . . . . . . . . . . . . . . . 38
Forwarding a Port . . . . . . . . . . . . . . . . . . . . . . . . . . . . . . . . . . . . . . . . . . . 39
Using SSH for Common Accounts . . . . . . . . . . . . . . . . . . . . . . . . . . . . . . . . . . 40
Preparing for Common Accounts . . . . . . . . . . . . . . . . . . . . . . . . . . . . . 41
Monitoring the Common Accounts . . . . . . . . . . . . . . . . . . . . . . . . . . . . 45
10597fmfinal 8 11/20/08 11:49:39 AM
■CONTENTS ix
ChAptEr 4 Configuring Systems with cfengine . . . . . . . . . . . . . . . . . . . . . . . 49
Getting an Overview of cfengine . . . . . . . . . . . . . . . . . . . . . . . . . . . . . . . . . . . 49
Defining cfengine Concepts . . . . . . . . . . . . . . . . . . . . . . . . . . . . . . . . . . 49
Evaluating Push vs . Pull . . . . . . . . . . . . . . . . . . . . . . . . . . . . . . . . . . . . . 51
Delving into the Components of cfengine . . . . . . . . . . . . . . . . . . . . . . 53
Mapping the cfengine Directory Structure . . . . . . . . . . . . . . . . . . . . . . 53
Managing cfengine Configuration Files . . . . . . . . . . . . . . . . . . . . . . . . 54
Identifying Systems with Classes . . . . . . . . . . . . . . . . . . . . . . . . . . . . . 55
Finding More Information About Cfengine . . . . . . . . . . . . . . . . . . . . . . 57
Learning the Basic Setup . . . . . . . . . . . . . . . . . . . . . . . . . . . . . . . . . . . . . . . . . 58
Setting Up the Network . . . . . . . . . . . . . . . . . . . . . . . . . . . . . . . . . . . . . . 58
Running Necessary Processes . . . . . . . . . . . . . . . . . . . . . . . . . . . . . . . . 58
Creating Basic Configuration Files . . . . . . . . . . . . . . . . . . . . . . . . . . . . 60
Creating the Configuration Server . . . . . . . . . . . . . . . . . . . . . . . . . . . . . 64
Preparing the Client Systems . . . . . . . . . . . . . . . . . . . . . . . . . . . . . . . . . 65
Debugging cfengine . . . . . . . . . . . . . . . . . . . . . . . . . . . . . . . . . . . . . . . . . . . . . 66
Creating Sections in cfagent .conf . . . . . . . . . . . . . . . . . . . . . . . . . . . . . . . . . . 66
Using Classes in cfagent .conf . . . . . . . . . . . . . . . . . . . . . . . . . . . . . . . . 67
The copy Section . . . . . . . . . . . . . . . . . . . . . . . . . . . . . . . . . . . . . . . . . . . 68
The directories Section . . . . . . . . . . . . . . . . . . . . . . . . . . . . . . . . . . . . . . 69
The disable Section . . . . . . . . . . . . . . . . . . . . . . . . . . . . . . . . . . . . . . . . . 69
The editfiles Section . . . . . . . . . . . . . . . . . . . . . . . . . . . . . . . . . . . . . . . . 71
The files Section . . . . . . . . . . . . . . . . . . . . . . . . . . . . . . . . . . . . . . . . . . . . 72
The links Section . . . . . . . . . . . . . . . . . . . . . . . . . . . . . . . . . . . . . . . . . . . 74
The processes Section . . . . . . . . . . . . . . . . . . . . . . . . . . . . . . . . . . . . . . 74
The shellcommands Section . . . . . . . . . . . . . . . . . . . . . . . . . . . . . . . . . 75
Using cfrun . . . . . . . . . . . . . . . . . . . . . . . . . . . . . . . . . . . . . . . . . . . . . . . . . . . . . 75
Looking Forward to Cfengine 3 . . . . . . . . . . . . . . . . . . . . . . . . . . . . . . . . . . . . 76
Using cfengine in the Real World . . . . . . . . . . . . . . . . . . . . . . . . . . . . . . . . . . 77
ChAptEr 5 Bootstrapping a New infrastructure . . . . . . . . . . . . . . . . . . . . . . . 79
Installing the Central cfengine Host . . . . . . . . . . . . . . . . . . . . . . . . . . . . . . . . 80
Setting Up the cfengine Master Repository . . . . . . . . . . . . . . . . . . . . . . . . . 81
10597fmfinal 9 11/20/08 11:49:39 AM
■CONTENTSx
Creating the cfengine Config Files . . . . . . . . . . . . . . . . . . . . . . . . . . . . . . . . 82
The cf .preconf Script . . . . . . . . . . . . . . . . . . . . . . . . . . . . . . . . . . . . . . . . 82
The update .conf file . . . . . . . . . . . . . . . . . . . . . . . . . . . . . . . . . . . . . . . . . 88
The cfagent .conf file . . . . . . . . . . . . . . . . . . . . . . . . . . . . . . . . . . . . . . . . 92
The cf .motd Task . . . . . . . . . . . . . . . . . . . . . . . . . . . . . . . . . . . . . . . . . . . 99
The cf .cfengine_cron_entries Task . . . . . . . . . . . . . . . . . . . . . . . . . . 102
cfservd .conf . . . . . . . . . . . . . . . . . . . . . . . . . . . . . . . . . . . . . . . . . . . . . . 103
Ready for Action . . . . . . . . . . . . . . . . . . . . . . . . . . . . . . . . . . . . . . . . . . . . . . . . 105
ChAptEr 6 Setting Up Automated installation . . . . . . . . . . . . . . . . . . . . . . . . 107
Introducing the Example Environment . . . . . . . . . . . . . . . . . . . . . . . . . . . . . 108
FAI for Debian . . . . . . . . . . . . . . . . . . . . . . . . . . . . . . . . . . . . . . . . . . . . 109
Employing JumpStart for Solaris . . . . . . . . . . . . . . . . . . . . . . . . . . . . 122
Kickstart for Red Hat . . . . . . . . . . . . . . . . . . . . . . . . . . . . . . . . . . . . . . . 136
The Proper Foundation . . . . . . . . . . . . . . . . . . . . . . . . . . . . . . . . . . . . . . . . . . 158
ChAptEr 7 Automating a New System infrastructure . . . . . . . . . . . . . . . . 161
Implementing Time Synchronization . . . . . . . . . . . . . . . . . . . . . . . . . . . . . . 161
External NTP Synchronization . . . . . . . . . . . . . . . . . . . . . . . . . . . . . . . 162
Internal NTP Masters . . . . . . . . . . . . . . . . . . . . . . . . . . . . . . . . . . . . . . . 163
Configuring the NTP Clients . . . . . . . . . . . . . . . . . . . . . . . . . . . . . . . . . 164
Copying the Configuration Files with cfengine . . . . . . . . . . . . . . . . . 166
An Alternate Approach to Time Synchronization . . . . . . . . . . . . . . . 170
Incorporating DNS . . . . . . . . . . . . . . . . . . . . . . . . . . . . . . . . . . . . . . . . . . . . . . 170
Choosing a DNS Architecture . . . . . . . . . . . . . . . . . . . . . . . . . . . . . . . . 171
Setting Up Private DNS . . . . . . . . . . . . . . . . . . . . . . . . . . . . . . . . . . . . . 171
Taking Control of User Account Files . . . . . . . . . . . . . . . . . . . . . . . . . . . . . . 188
Standardizing the Local Account Files . . . . . . . . . . . . . . . . . . . . . . . . 188
Distributing the Files with cfengine . . . . . . . . . . . . . . . . . . . . . . . . . . 191
Adding New User Accounts . . . . . . . . . . . . . . . . . . . . . . . . . . . . . . . . . 196
Routing Mail . . . . . . . . . . . . . . . . . . . . . . . . . . . . . . . . . . . . . . . . . . . . . . . . . . . 208
Looking Back . . . . . . . . . . . . . . . . . . . . . . . . . . . . . . . . . . . . . . . . . . . . . . . . . . 211
10597fmfinal 10 11/20/08 11:49:41 AM
■CONTENTS xi
ChAptEr 8 deploying Your First Application . . . . . . . . . . . . . . . . . . . . . . . . . . 213
Deploying and Configuring the Apache Web Server . . . . . . . . . . . . . . . . . 213
The Apache Package from Red Hat . . . . . . . . . . . . . . . . . . . . . . . . . . 213
Building Apache from Source . . . . . . . . . . . . . . . . . . . . . . . . . . . . . . . 216
Sharing Data Between Systems . . . . . . . . . . . . . . . . . . . . . . . . . . . . . . . . . . 218
Synchronizing Data with rsync . . . . . . . . . . . . . . . . . . . . . . . . . . . . . . 218
Sharing Data with NFS . . . . . . . . . . . . . . . . . . . . . . . . . . . . . . . . . . . . . 232
Sharing Program Binaries with NFS . . . . . . . . . . . . . . . . . . . . . . . . . . 235
Sharing Data with cfengine . . . . . . . . . . . . . . . . . . . . . . . . . . . . . . . . . 240
Sharing Data with Subversion . . . . . . . . . . . . . . . . . . . . . . . . . . . . . . . 242
NFS and rsync and cfengine, Oh My! . . . . . . . . . . . . . . . . . . . . . . . . . . . . . . 251
ChAptEr 9 Generating reports and Analyzing Logs . . . . . . . . . . . . . . . . . 253
Reporting on cfengine Status . . . . . . . . . . . . . . . . . . . . . . . . . . . . . . . . . . . . 253
Doing General syslog Log Analysis . . . . . . . . . . . . . . . . . . . . . . . . . . . . . . . . 263
Configuring the syslog Server . . . . . . . . . . . . . . . . . . . . . . . . . . . . . . . 263
Outputting Summary Log Reports . . . . . . . . . . . . . . . . . . . . . . . . . . . 267
Doing Real- Time Log Reporting . . . . . . . . . . . . . . . . . . . . . . . . . . . . . . 269
Seeing the Light . . . . . . . . . . . . . . . . . . . . . . . . . . . . . . . . . . . . . . . . . . . . . . . . 272
ChAptEr 10 Monitoring . . . . . . . . . . . . . . . . . . . . . . . . . . . . . . . . . . . . . . . . . . . . . . . . . . 273
Nagios . . . . . . . . . . . . . . . . . . . . . . . . . . . . . . . . . . . . . . . . . . . . . . . . . . . . . . . . 274
Nagios Components . . . . . . . . . . . . . . . . . . . . . . . . . . . . . . . . . . . . . . . . 275
Nagios Overview . . . . . . . . . . . . . . . . . . . . . . . . . . . . . . . . . . . . . . . . . . . 276
Deploying Nagios with cfengine . . . . . . . . . . . . . . . . . . . . . . . . . . . . . 278
Create the Nagios Web Interface Configuration Files . . . . . . . . . . . 284
NRPE . . . . . . . . . . . . . . . . . . . . . . . . . . . . . . . . . . . . . . . . . . . . . . . . . . . . . 297
Monitoring Remote Systems . . . . . . . . . . . . . . . . . . . . . . . . . . . . . . . . 306
What Nagios Alerts Really Mean . . . . . . . . . . . . . . . . . . . . . . . . . . . . . 312
Ganglia . . . . . . . . . . . . . . . . . . . . . . . . . . . . . . . . . . . . . . . . . . . . . . . . . . . . . . . . 312
Building and Distributing the Ganglia Programs . . . . . . . . . . . . . . . . 313
Configuring the Ganglia Web Interface . . . . . . . . . . . . . . . . . . . . . . . . 318
Now You Can Rest Easy . . . . . . . . . . . . . . . . . . . . . . . . . . . . . . . . . . . . . . . . . 321
10597fmfinal 11 11/20/08 11:49:42 AM
■CONTENTSxii
ChAptEr 11 infrastructure Enhancement . . . . . . . . . . . . . . . . . . . . . . . . . . . . . . 323
Cfengine Version Control with Subversion . . . . . . . . . . . . . . . . . . . . . . . . . 323
Importing the masterfiles Directory Tree . . . . . . . . . . . . . . . . . . . . . . 323
Using Subversion to Implement a Testing Environment . . . . . . . . . 331
Backups . . . . . . . . . . . . . . . . . . . . . . . . . . . . . . . . . . . . . . . . . . . . . . . . . . . . . . . 337
Jumpstart . . . . . . . . . . . . . . . . . . . . . . . . . . . . . . . . . . . . . . . . . . . . . . . . 338
Kickstart . . . . . . . . . . . . . . . . . . . . . . . . . . . . . . . . . . . . . . . . . . . . . . . . . . 340
FAI . . . . . . . . . . . . . . . . . . . . . . . . . . . . . . . . . . . . . . . . . . . . . . . . . . . . . . . 342
Subversion Backups . . . . . . . . . . . . . . . . . . . . . . . . . . . . . . . . . . . . . . . 346
Enhancement Is an Understatement . . . . . . . . . . . . . . . . . . . . . . . . . . . . . . 352
ChAptEr 12 improving System Security . . . . . . . . . . . . . . . . . . . . . . . . . . . . . . . . 353
Security Enhancement with cfengine . . . . . . . . . . . . . . . . . . . . . . . . . . . . . . 354
Removing the SUID Bit . . . . . . . . . . . . . . . . . . . . . . . . . . . . . . . . . . . . . 355
Protecting System Accounts . . . . . . . . . . . . . . . . . . . . . . . . . . . . . . . . 359
Applying Patches and Vendor Updates . . . . . . . . . . . . . . . . . . . . . . . . 360
Shutting Down Unneeded Daemons . . . . . . . . . . . . . . . . . . . . . . . . . . 361
Removing Unsafe Files . . . . . . . . . . . . . . . . . . . . . . . . . . . . . . . . . . . . . 362
File Checksum Monitoring . . . . . . . . . . . . . . . . . . . . . . . . . . . . . . . . . . 363
Using the Lightweight Directory Access Protocol . . . . . . . . . . . . . . . . . . . 364
Security with Kerberos . . . . . . . . . . . . . . . . . . . . . . . . . . . . . . . . . . . . . . . . . . 365
Implementing Host-Based Firewalls . . . . . . . . . . . . . . . . . . . . . . . . . . . . . . . 365
Using TCP Wrappers . . . . . . . . . . . . . . . . . . . . . . . . . . . . . . . . . . . . . . . 366
Using Host-Based Packet Filtering . . . . . . . . . . . . . . . . . . . . . . . . . . . 367
Enabling Sudo at Our Example Site . . . . . . . . . . . . . . . . . . . . . . . . . . . . . . . 371
Security Is a Journey, Not a Destination . . . . . . . . . . . . . . . . . . . . . . . . . . . 374
AppENdix A introducing the Basic tools . . . . . . . . . . . . . . . . . . . . . . . . . . . . . . . 375
The Bash Shell . . . . . . . . . . . . . . . . . . . . . . . . . . . . . . . . . . . . . . . . . . . . . . . . . 375
Compatibility Issues with Bash . . . . . . . . . . . . . . . . . . . . . . . . . . . . . . 376
Creating Simple Bash Shell Scripts . . . . . . . . . . . . . . . . . . . . . . . . . . . 376
Debugging Bash Scripts . . . . . . . . . . . . . . . . . . . . . . . . . . . . . . . . . . . . 377
Other Shells . . . . . . . . . . . . . . . . . . . . . . . . . . . . . . . . . . . . . . . . . . . . . . . 378
Bash Resources . . . . . . . . . . . . . . . . . . . . . . . . . . . . . . . . . . . . . . . . . . . 379
10597fmfinal 12 11/20/08 11:49:43 AM
■CONTENTS xiii
Perl . . . . . . . . . . . . . . . . . . . . . . . . . . . . . . . . . . . . . . . . . . . . . . . . . . . . . . . . . . . 379
Basic Usage . . . . . . . . . . . . . . . . . . . . . . . . . . . . . . . . . . . . . . . . . . . . . . 380
Other Scripting Languages . . . . . . . . . . . . . . . . . . . . . . . . . . . . . . . . . . 382
Perl Resources . . . . . . . . . . . . . . . . . . . . . . . . . . . . . . . . . . . . . . . . . . . . 383
Basic Regular Expressions . . . . . . . . . . . . . . . . . . . . . . . . . . . . . . . . . . . . . . . 383
Characters . . . . . . . . . . . . . . . . . . . . . . . . . . . . . . . . . . . . . . . . . . . . . . . . 383
Matching Repeating Characters . . . . . . . . . . . . . . . . . . . . . . . . . . . . . 384
Other Special Characters . . . . . . . . . . . . . . . . . . . . . . . . . . . . . . . . . . . 385
Marking and Back Referencing . . . . . . . . . . . . . . . . . . . . . . . . . . . . . . 385
grep . . . . . . . . . . . . . . . . . . . . . . . . . . . . . . . . . . . . . . . . . . . . . . . . . . . . . . . . . . 386
The sed Stream Editor . . . . . . . . . . . . . . . . . . . . . . . . . . . . . . . . . . . . . . . . . . 389
Modifying a File . . . . . . . . . . . . . . . . . . . . . . . . . . . . . . . . . . . . . . . . . . . 389
Modifying stdin . . . . . . . . . . . . . . . . . . . . . . . . . . . . . . . . . . . . . . . . . . . . 390
Isolating Data . . . . . . . . . . . . . . . . . . . . . . . . . . . . . . . . . . . . . . . . . . . . . 391
Other Tools . . . . . . . . . . . . . . . . . . . . . . . . . . . . . . . . . . . . . . . . . . . . . . . 391
sed Resources . . . . . . . . . . . . . . . . . . . . . . . . . . . . . . . . . . . . . . . . . . . . 392
AWK . . . . . . . . . . . . . . . . . . . . . . . . . . . . . . . . . . . . . . . . . . . . . . . . . . . . . . . . . . 392
Very Basic Usage . . . . . . . . . . . . . . . . . . . . . . . . . . . . . . . . . . . . . . . . . . 392
Not-Quite-As-Basic Usage . . . . . . . . . . . . . . . . . . . . . . . . . . . . . . . . . . 393
AWK Resources . . . . . . . . . . . . . . . . . . . . . . . . . . . . . . . . . . . . . . . . . . . 394
AppENdix B Writing cfengine Modules . . . . . . . . . . . . . . . . . . . . . . . . . . . . . . . . . 395
Requirements for Using Modules . . . . . . . . . . . . . . . . . . . . . . . . . . . . . . . . . 395
Defining Custom Classes Without Modules . . . . . . . . . . . . . . . . . . . . . . . . . 396
Creating Your First cfengine Module . . . . . . . . . . . . . . . . . . . . . . . . . . . . . . 397
Using Modules in Place of shellcommands . . . . . . . . . . . . . . . . . . . . . . . . . 399
iNdEx . . . . . . . . . . . . . . . . . . . . . . . . . . . . . . . . . . . . . . . . . . . . . . . . . . . . . . . . . . . . . . . . . . . . . . 401
10597fmfinal 13 11/20/08 11:49:44 AM
xv
About the Authors
■NAtE CAMpi is a UNIX and Linux system administrator by trade, cur-rently working as a UNIX operations manager in San Francisco. His system administration experience is almost entirely with companies with large-scale web operations based on open source software. In his copious free time, he enjoys jogging, watching spaghetti westerns, experimenting with Linux systems, and spending time with his family.
■KirK BAUEr has been involved in computer programming since 1985. He has been using and administering UNIX systems since 1994. Although his personal favorite UNIX variant is Linux, he has adminis-tered and developed on everything from FreeBSD to Solaris, AIX, and HP-UX. He is the author of various open source solutions such as Logwatch.
Kirk has been involved with software development and system/network administration since his first year at the Georgia Institute of
Technology. He has done work for the Georgia Tech Research Institute, Fermi National Accelerator Laboratory, and DHL. In 2000, Kirk was one of the founders and the chief technology officer of TogetherWeb, which was purchased in 2003 by Proficient Systems. Kirk is now a systems engineer with F5 Networks.
Kirk graduated from Georgia Tech in 2001 with a bachelor’s degree in computer engi-neering and is currently pursuing his MBA at Arizona State University. He lives in Peoria, Arizona, with his two dogs, and is looking forward to getting married to his lovely fiancée, Rachel.
10597fmfinal 15 11/20/08 11:49:47 AM
xvii
About the Technical Reviewer
■MArK BUrGESS holds a first class honors degree in physics and a Ph.D. in theoretical physics from the University of Newcastle upon Tyne. After working as a physicist, he began to apply the methods of physics to the study of computers and eventually changed research fields to study the formalization of system administration. His current research interests include the behavior of computers as dynamic systems and applying ideas from physics to describe computer behavior. Mark is the author of the popular configuration management software package cfengine. He has received a number of awards including the SAGE 2003 Professional Contribution Award “for groundbreaking work in systems administration theory and individual contributions to the field.” He currently holds the Professorship in Network and System Administration at Oslo University College.
10597fmfinal 17 11/20/08 11:49:47 AM
27
c h a p t e r 3
Using SSh to automate System administration Securely
The Secure Shell (SSH) protocol has revolutionized system administration ever since it became popular in the late 1990s. It facilitates secure, encrypted communication between untrusted hosts over an unsecure network. This entire chapter is devoted to SSH because it plays such an important part in securely automating system administration.
In this introductory chapter, we assume that you already have SSH installed and operating properly. We have based the examples in this book on OpenSSH 4.x using ver-sion 2 of the SSH protocol. If you are using another version of SSH, the principles are the same, but the implementation details might differ.
For a more thorough and complete discussion of SSH, we highly recommend SSH, The Secure Shell: The Definitive Guide, Second Edition by Daniel J. Barrett, Richard E. Silverman, and Robert G. Byrnes (O’Reilly Media Inc., 2005).
SSH and cfengine
The author of cfengine, Mark Burgess, has said that SSH and cfengine are “perfect partners.” The SSH suite of programs provides secure communications for remote logins, and cfengine provides secure communications for system automation (along with the automation framework itself).
SSH and cfengine share the same distributed authentication model. SSH clients use a public- key exchange to verify the identity of an SSH server, with the option of trusting the remote host’s identity the first time the host’s key is seen. Cfengine also uses public- key authentication, although the cfengine server daemon also authenticates connecting clients for additional security. As with SSH, you can con-figure cfengine to trust the identity of other hosts upon initial connection.
We recommend you allow cfengine to trust the identity of other hosts in this manner. Doing so allows an SA to bring up a new cfengine infrastructure without the additional problem of key generation and distribution. If a host’s keys change at any point in the future, cfengine will no longer trust its iden-tity and will log errors.
10597ch03final 27 11/20/08 12:04:51 PM
chapter 3 ■ USING SSh tO aUtOMate SYSteM aDMINIStratION SecUreLY28
Learning the Basics of Using SSHIf you are already familiar with the basic use of SSH, you might want to skim this section. If, on the other hand, you are an SSH novice, you are in for quite a surprise. You’ll find that SSH is easy and efficient to use, and that it can help with a wide variety of tasks.
The commands in this section work fine without any setup (assuming you have the SSH daemon running on the remote host). If nothing has been configured, all of these commands use password authentication just like Telnet; except with SSH, the password (and all traffic) is sent over an encrypted connection.
Use this command to initiate a connection to any machine as any user and to start an interactive shell:
$ ssh user@host
You can also execute any command in lieu of starting an interactive shell. This code displays memory usage information on the remote host:
$ ssh user@host free
total used free shared buffers cached
Mem: 126644 122480 4164 1164 29904 36300
-/+ buffers/cache: 56276 70368
Swap: 514072 10556 503516
Finally, the scp command allows you to copy files between hosts using the SSH proto-col. The syntax resembles the standard cp command, but if a file name contains a colon, it is a remote file instead of a local file. As with the standard ssh command, if no username is specified on the command line, your current username is used. If no path is specified after the colon, the user’s home directory is used as the source or destination directory. Here are a few examples:
$ scp local_file user@host:/tmp/remote_file
$ scp user@host:/tmp/remote_file local_file
$ scp user1@host1:file user2@host2:
The last example copies the file named file from user1’s home directory on host1 directly into user2’s home directory on host2. No file name is given in the second argu-ment, so the original file name is used (file, in this case).
10597ch03final 28 11/20/08 12:04:52 PM
chapter 3 ■ USING SSh tO aUtOMate SYSteM aDMINIStratION SecUreLY 29
enhancing Security with SSHBefore SSH, the telnet command was widely used for interactive logins. Telnet works fine, except that the password (well, everything actually) is sent over the network in plain text. This isn’t a problem within a secure network, but you rarely encounter secure networks in the real world. Machines on an unsecure network can capture account pass-words by monitoring Telnet traffic.
iS YoUr neTwork SecUre?
Some people define an unsecure network as the Internet and a secure network as anything else. Others think that as long as you have a firewall between a private network and the Internet that the private network is secure. The truly paranoid (such as ourselves) just assume that all networks are unsecure. It really depends on how much security you need. Are you a likely target for crackers? Do you store important, private information? Because nothing is ever 100 percent secure, we find it easier to assume networks are not secure and skip the rest of the questions.
If you think you have a secure network, be sure to consider all the possible security vulnerabilities. Remember, employees within a company are often not as trustworthy or security- conscious as you would like. Somebody might have plugged in a wireless access point, for example. A person with more malicious intentions might deliberately tap into your private network, or exploit a misconfigured router or firewall. Even a fully switched network with strict routing can be vulnerable. We always try to be on the paranoid side because we’d rather be safe than sorry.
When it comes to automating system administration tasks across multiple systems, passwords are a real pain. If you want to delete a file on ten different machines, logging into each machine with a password and then deleting the file is not very efficient. In the past, many system administrators turned to rsh for a solution. Using a .rhosts file, rsh would allow a certain user (i.e., root) on a specific machine to log in as a particular user (again, often root) on another machine. Unfortunately, the entire authorization scheme relies on the IP address of the source machine, which can be spoofed, particularly on an unsecure network.
The most secure way to use SSH is to use password- protected public/private Rivest, Shamir, and Adleman (RSA) or Digital Signature Algorithm (DSA) key pairs. Access to any given account is granted only to users who not only possess the private key file, but also know the passphrase used to decrypt that file.
Another component of SSH is a program called ssh- agent. The program uses the passphrase to decrypt your private key, which is stored in memory for the duration of your session. This process eliminates the requirement that you enter the passphrase every time you need to use your private key.
10597ch03final 29 11/20/08 12:04:53 PM
chapter 3 ■ USING SSh tO aUtOMate SYSteM aDMINIStratION SecUreLY30
Using Public- key authenticationMany SAs are more than happy to use SSH with its default password authentication. In this case, SSH simply functions as a more secure version of Telnet. The problem is that you need to enter a password manually for every operation. This can become quite tedious, or even impossible, when you are automating SA tasks. For most of the activities throughout this book, you must use RSA or DSA authentication.
Even if you use RSA authentication, you still need a passphrase to encrypt the private key. You can avoid entering the passphrase every time you use SSH in one of two ways. You can use an empty passphrase, or you can use the ssh- agent command as discussed in the next section. One major disadvantage of empty passphrases is that they are easy to guess, even by people with little skill.
SHoULd YoU USe an emPTY PaSSPHraSe?
Some think that using an empty passphrase is one of the seven deadly sins of system administration. We think it can be appropriate within an isolated environment, especially when the security implica-tions are minimal. For example, a Beowulf cluster generally has an internal private network containing only one machine with an external network connection. For instance, if a university uses the cluster for research, it might not be a target for intrusion. In this case, having an unencrypted private key on one of the cluster machines might not be too much of a concern.
However, if the same cluster were in use by a company doing important and confidential research, then, at the very least, the key should not reside on the one machine with an external connection. Of course, it would be even better to use an encrypted key along with ssh- agent. This key could be placed on a machine completely separate from the cluster, yet you could use it to access both the gateway and the individual nodes. This scenario would also remove the need to have the private- key file on the clus-ter at all, whether encrypted or not.
The most important thing to consider is what access the key provides. If the key provides root access to every system in your entire network, then the risks of leaving the key unencrypted (i.e., with no passphrase) are pretty great. But if the key allows the Dynamic Host Configuration Protocol (DHCP) server to be restarted on only one host, then what will an attacker do with it? Perpetually restart your DHCP server? Maybe—but that’s not the end of the world, and it’s easy to fix (change keys).
Version 2 of the SSH protocol supports two types of public- key encryption: RSA and DSA. The two encryption schemes are similar and generally considered to provide equiv-alent security. For no particular reason (apart from the fact that we are most familiar with it), we will use RSA for the examples within this book.
10597ch03final 30 11/20/08 12:04:53 PM
chapter 3 ■ USING SSh tO aUtOMate SYSteM aDMINIStratION SecUreLY 31
The main security difference in using RSA or DSA keys for login authentication is that the trust relationship changes. When you use password authentication, the server directly challenges the client. With public- key authentication, the challenge occurs at the client side. This means that if a user on the client side can get hold of a key, he or she will get into the system unchallenged. Thus the server has to trust the client user’s integrity.
Generating the Key Pair
The first step in the key- generation process is to create your public- and private- key pair. OpenSSH provides a command just for this purpose. The following command creates a 2,048- bit RSA key pair and prompts you for a passphrase (which can be left blank if you so desire):
$ ssh- keygen -t rsa -b 2048
Generating public/private rsa key pair.
Enter passphrase (empty for no passphrase):
Enter same passphrase again:
Your identification has been saved in ~/.ssh/id_rsa.
Your public key has been saved in ~/.ssh/id_rsa.pub.
The key fingerprint is:
3a:85:c7:e4:23:36:5c:09:64:08:78:b3:72:e0:dc:0d [email protected]
The default output files are ~/.ssh/id_rsa and ~/.ssh/id_rsa.pub for the private and public keys, respectively.
wHaT Size keY SHoULd YoU USe?
The bigger the key is, the harder it is to crack. Plus, a longer key length makes a key only slightly slower to use.
When choosing a key size, you must consider the value of the information or capabilities that the key protects. As long as your key would take more effort to crack than the data (or power) is worth, you are okay. An excessively large key places an unnecessarily large load on your systems.
If you are protecting data, you should also consider how long that data will be valuable. If the data will be worthless in one month and the key would take three months to crack, then the key is big enough. But be sure to consider that the attacker might have specialized hardware or advanced algo-rithms that can crack your key faster than you’d expect.
The size of the key makes the biggest speed difference during the actual key- generation process. Large keys are also more work (and therefore a little slower) when the computer encrypts and decrypts data. SSH uses RSA/DSA only when it initiates a new connection, so the key size affects only the initial session negotiations—not the performance of a session once it is established.
10597ch03final 31 11/20/08 12:04:54 PM
chapter 3 ■ USING SSh tO aUtOMate SYSteM aDMINIStratION SecUreLY32
Throughout this book, we will generally show you examples that use the SSH key to access your systems. The actual data being sent is usually not important; it will typically contain commands to be executed and other control data. If somebody later decrypts this traffic, the results will probably be of little value.
But in some cases, the data being transferred is sensitive. In these instances, the RSA/DSA key is one of many things to consider because you use these protocols only to exchange keys for the algo-rithm used to encrypt the actual data. If attackers have captured the SSH session (i.e., using a network sniffer), they can crack the public key (by determining its associated private key) and determine the encryption key, or they can crack the actual encrypted data directly.
You can use the -c switch to the ssh command to control which cipher you use to encrypt your session. Your options with SSH protocol version 1 are des, 3des, and blowfish—but you should avoid version 1 of the SSH protocol. With version 2, you have many bulk cipher options (including blowfish). Most SAs favor the blowfish cipher because it’s fast and believed to be secure.
Specifying Authorized Keys
Now that you have a public- key file, you can simply place that key in any account on any machine running the SSH server (usually named sshd). Once you’ve set up the account properly, your private key will allow easy access to it. Determining the private key from a public key is virtually impossible, so only someone who has the private key can access the account.
To allow access to an account, simply create ~/.ssh/authorized_keys. The file con-tains one key per line (although the lines are very long—the 2,048- bit RSA key created in the previous example is almost 400 characters long in its ASCII representation). If the file does not currently exist, you can simply make a copy of your public- key file.
You should also be careful with your permissions because sshd is usually very picky. In general, your home directory and the ~/.ssh directory must be only writable by the user (and not their group, even if they have their own group). The directory must be owned by the user as well—this can be an issue if root’s home directory is / and it is not owned by root. If your RSA key is rejected, look in the logs on the system you are connect-ing to; they will usually tell you why.
Here is an example that assumes you have already copied your public- key file into your home directory in another account:
$ mkdir -p ~/.ssh
$ chmod 0700 ~/.ssh
$ cp ~/id_rsa.pub ~/.ssh/authorized_keys
$ chmod 0600 ~/.ssh/authorized_keys
10597ch03final 32 11/20/08 12:04:54 PM
chapter 3 ■ USING SSh tO aUtOMate SYSteM aDMINIStratION SecUreLY 33
To add a second key, simply append it to the file. Once you have the file in place, your private key alone allows you to access the account. Of course, by default, the account password also allows access to the account. You can disable this feature in the OpenSSH sshd by modifying /etc/ssh/sshd_config (or the equivalent on your system) and adding this line:
PasswordAuthentication no
Alternatively, you could completely disable the account password (usually stored in /etc/shadow) and allow only RSA- authenticated logins. However, this isn’t a good idea if the user needs that password for other services such as POP3 mail access, FTP file trans-fers, and so on.
Using ssh- agentIf you can use ssh- agent to allow passwordless operation instead of leaving your private key unencrypted, then you will greatly add to the security of your systems. The ssh- agent program allows you to enter your passphrase only once per “session” and keeps your pri-vate key in memory, allowing passwordless connections for the rest of the session.
Knowing ssh- agent Basics
Using ssh- agent is simple. You start your command shell or your X session using the agent. Once logged in, you can run
$ ssh-agent bash
and you will have a new shell running through the agent. Or, if you use the wonder-ful screen program (included with most Linux installations and available from http://directory.fsf.org/project/screen/), you can use
$ ssh-agent screen
to begin your screen session. Use the following script as your ~/.Xclients (or ~/.xinitrc) to allow easy use of ssh- agent within X:
#!/bin/bash
cd ~
exec ssh- agent bin/startx- continue
10597ch03final 33 11/20/08 12:04:55 PM
chapter 3 ■ USING SSh tO aUtOMate SYSteM aDMINIStratION SecUreLY34
As you can see, ssh- agent runs the startx- continue script. That script runs ssh- add </dev/null to add the key and prompt for a passphrase (/dev/null causes the program to use an X window for the passphrase entry). The startx- continue script also performs other startup tasks and finally starts the window manager.
These manual steps to start ssh- agent shouldn’t be necessary on modern desktop environments; generally you’ll already have an ssh- agent process running. To test, simply list the keys loaded into your agent:
$ ssh-add -l
If your output looks like this, you don’t have an agent running and you should start one yourself as shown previously:
Could not open a connection to your authentication agent.
Once you are running the agent, you can add your private key(s) with ssh- add:
$ ssh- add
Enter passphrase for /home/kirk/.ssh/id_rsa:
Identity added: /home/kirk/.ssh/id_rsa (/home/kirk/.ssh/id_rsa)
When you use ssh- agent to run another command, that ssh- agent session exists for as long as that command runs (such as your X session). Once that command terminates, any stored keys are lost. This is fine when you can start your entire X session as you just saw, but what if you can’t? You can use the ssh- agent command as shown in the next section to start a new ssh- agent for each login. This works well, unless you have a good number of simultaneous logins, in which case you will have to add your SSH keys for each session. If you are in this situation, consider using a tool called keychain that allows all your logins on the same system to share the same ssh- agent easily. You can find information about this tool at http://www-106.ibm.com/developerworks/library/l- keyc2/.
We generally recommend using screen. Whenever you spawn new shells inside screen, they’ll each have the same environment, allowing you to use the same ssh- agent from each virtual screen. The additional benefits of screen are many, but we will men-tion only one here: you can log back in to a remote host and resume your session after an interruption arising from network or local computer problems. This benefit alone is worth a lot to an SA.
Getting Advanced with ssh- agent
You can also use ssh- agent without starting a new process. In the Bash shell (or any POSIX- compliant shell) you can, for example, start ssh- agent like this:
$ eval ̀ssh- agent`
10597ch03final 34 11/20/08 12:04:56 PM
chapter 3 ■ USING SSh tO aUtOMate SYSteM aDMINIStratION SecUreLY 35
Note the backticks around ssh- agent; they cause the output of this command to be passed to the eval command that will execute the code. In fact, all ssh- agent really does is start itself and print out some environment variables to be set by the shell. When you use ssh- agent to start a new process (as shown in the previous section), it simply sets these variables and creates a new process with the variables already set. You can run ssh- agent by itself to easily see what is set:
$ ssh- agent
SSH_AUTH_SOCK=/tmp/ssh-XXoND8E0/agent.26962; export SSH_AUTH_SOCK;
SSH_AGENT_PID=26963; export SSH_AGENT_PID;
echo Agent pid 26963;
The SSH_AUTH_SOCK environment variable contains the path to the named socket that ssh- agent created to allow communication between the SSH program and the agent. The SSH_AGENT_PID variable contains the agent’s process ID so that it can be killed at some point in the future.
The main disadvantage of running ssh- agent this way is that you must kill the agent through some external method if you want it to stop running once you have logged out. The more basic usage causes the agent to die upon completion of the process it executed.
Suppose you have a script that executes numerous SSH operations and you want to enter the passphrase only once. You could create the following script:
#!/bin/bash
# Start the agent (don't display PID)
eval ̀ssh- agent` >/dev/null
# Now, ask for the key once
ssh-add
# Now, perform a bunch of SSH operations
ssh host1 'command1'
ssh host1 'command2'
ssh host2 'command3'
# Finally, kill the agent and exit
kill $SSH_AGENT_PID
exit 0
This script would prompt you for the passphrase only once, store the private key in the agent, perform several operations, and then kill the agent when it was finished.
10597ch03final 35 11/20/08 12:04:56 PM
chapter 3 ■ USING SSh tO aUtOMate SYSteM aDMINIStratION SecUreLY36
■note You can find the code samples for this chapter in the Downloads section of the Apress web site (http://www.apress.com).
Forwarding Keys
You can configure your SSH client to forward your ssh- agent as well. If you enable this option, you can connect from machine to machine while your private key is in memory only on the original machine (the start of the chain). The key itself is never transmitted over the network. You’ll find the agent useful when connecting to machines on pri-vate networks. You can connect to the gateway machine and then connect to internal machines that you cannot access directly from your workstation. For example, you can connect to one machine as root and run a script that connects to other machines using your private key, although your key does not actually exist on that machine.
Be carefUL wiTH SSH- agenT forwarding
You should never forward your ssh- agent connection to untrusted hosts (hosts where untrusted users have root access). The root users on other systems cannot obtain your actual private key, but they can use your forwarded ssh- agent connection to access other machines using your private key. OpenSSH lets you specify different options for different hosts (in ssh_config) so that you can forward your ssh- agent only to trusted hosts.
In addition, once you connect to another host and then use the ssh command on that host to con-nect to a third host, you are using the SSH client configuration of the second host, not the first host. That second host might have been configured to forward ssh- agent connections anywhere—including untrusted hosts.
So, prudent users forward their agents only to specific hosts. These select machines allow only trusted users access to the root account, and they also limit the hosts to which they will forward the ssh- agent session. You can also do this on the command line instead of modifying the actual ssh_config file; simply specify the option -o "ForwardAgent no|yes" to the ssh command.
Also note that, in the authorized_keys file, you can use the from directive to restrict which remote hosts are allowed to connect with the specified key (discussed next in the “Restricting RSA Authentication” section). If you forward your key only to certain systems, you can allow login only from those systems. If you accidentally forward your key to some other host, it won’t work from that system anyway.
10597ch03final 36 11/20/08 12:04:57 PM
chapter 3 ■ USING SSh tO aUtOMate SYSteM aDMINIStratION SecUreLY 37
Some people also use ssh- agent in a noninteractive environment. For example, you might have a system- monitoring script that needs to connect to other machines continu-ously. You could manually start the script through ssh- agent, and then the script could run indefinitely using the passphrase you entered at startup. You could even place some-thing like this in your system’s startup scripts:
# start the ssh agent
/usr/bin/ssh-agent | /usr/bin/head -2 > ~/.ssh/agent- info
# alert oncall person to the system reboot
echo "$(hostname) rebooted, need to ssh- add the ssh keys into the ssh- agent" \
| /bin/mail -s "$(hostname) rebooted" [email protected]
Any scripts that need access to this ssh- agent can source ~/.ssh/agent- info. If attack-ers can access the system backups or steal the system disk, they’ll gain the encrypted private- key file. But even though they’ll have the private key, they won’t be able to use it because they lack the passphrase to decrypt it. If you employed a passphrase- free private key instead, you’ll need good backup security and physical security.
restricting rSa authenticationThe authorized_keys file can contain some powerful options that limit the amount of account access the private key is granted. You can also use these options to prevent your agent from being forwarded to an untrusted host. To do so, place these options in the authorized_keys file at the beginning of the line and follow the entry with a space char-acter. No spaces are allowed within the option string unless they are contained within double quotes. If you specify multiple options, you must separate them with commas. Here’s a list of the options and a brief description of each (the sshd man page contains more detailed information):
from="pattern-list": This option can specify a list of hosts from which the connec-tion must be made. This way, even if the key (and the passphrase) is stolen, the connection still must be made from the appropriate host(s). The pattern could be *.myoffice.com to allow only hosts from the office to connect using that key.
command="command": If specified, the given command always runs, regardless of what the SSH client attempts to run.
environment="NAME=value": You can use this command—which you can list multiple times—to modify or set environment variables. The command is disabled by default for security reasons, but if you want its functionality you can enable it using the PermitUserEnvironment option in sshd_config.
10597ch03final 37 11/20/08 12:04:57 PM
chapter 3 ■ USING SSh tO aUtOMate SYSteM aDMINIStratION SecUreLY38
no-port-forwarding: SSH allows ports on the server (or any machine accessible by the server) to be forwarded to the remote client. So, if users can connect to a gateway machine via SSH, they can forward ports from your private network to their remote machines, possibly bypassing some or all security. This prevents a specific key from forwarding any ports over its connection.
no-X11-forwarding: SSH can also forward X11 connections over the encrypted con-nection, allowing you (and the root user) to run X11 applications that display on the computer initiating the SSH connection. The no-X11- forwarding command disables this feature for the key in question.
no-agent-forwarding: This prevents an ssh- agent connection from being forwarded to the host when a user connects to it with the specified key.
no-pty: Prevents the allocation of a pseudo terminal so that an interactive login is not possible).
permitopen="host:port": Allows only a given host and port to be forwarded to the remote client.
You can use these options for a lot of interesting tasks, as the following sections illustrate.
Dealing with Untrusted Hosts
When adding your public key to the authorized_keys file on an untrusted host, you could add some of the options just discussed to prevent agent and X11 forwarding. This is a good idea, but you shouldn’t rely on it—if an untrusted root user on the machine can hijack your forwarded X11 or agent session, that user can probably also modify your authorized_keys file. That said, you can prevent the forwarding on both ends (client and server) to be extra safe. To do so, put the following in your authorized_keys file on the remote host (the key has been trimmed down for easier reading):
no-X11-forwarding,no-agent-forwarding,from="*.kaybee.org" ssh- rsa AB...YZ
This example also limits connections to this account. The key will be granted access only if the canonical hostname is something.kaybee.org.
Allowing Limited Command Execution
Suppose you have a script that monitors a set of servers. Root access is not necessary for monitoring the systems. The script does, however, need to reboot the machines in some
10597ch03final 38 11/20/08 12:04:58 PM
chapter 3 ■ USING SSh tO aUtOMate SYSteM aDMINIStratION SecUreLY 39
cases, which does require root access. The following configuration, when placed in ~root/authorized_keys, allows this specific key to reboot the system and nothing more:
no-port-forwarding,command="/sbin/reboot",no-pty ssh- rsa AB...YZ
Whoever possesses the specified private key cannot open an interactive shell or for-ward ports. They can do only one thing: run the /sbin/reboot command. In this specific example, you must be careful because if you connect to the account with the specified key, the system will reboot (regardless of what command the remote client attempts to run). You must also make sure you use an absolute path for the command. If you don’t, a malicious user might be able to place a command with the same name earlier in the search path.
Forwarding a Port
Forwarding a port between two machines proves useful in many situations. If the port is not encrypted, for example, you can use SSH to forward it over an encrypted channel. If the machine is behind a firewall, that machine can connect to an outside machine and forward ports to enable outside access.
accessing a Server Behind Nat
Suppose you want to view a web page on a machine that resides on a private network but can initiate outgoing connections using Network Address Translation (NAT). You can connect from that web server to your desktop machine on another network using SSH:
$ ssh -R 8080:localhost:80 user@your-desktop- system
The command says to connect from the web server (which is behind the NAT router) to the client (your desktop) and connect port 80 on the server to port 8080 on the client (the desktop). Once this command has been executed, a user of the desktop system can point a browser to port 8080 and view the content on port 80 of the web server.
You could replace the hostname localhost with the name of any other host that the initiating host (the web server, in this example) can access. You can use this technique to provide connectivity between two systems that could not normally communicate with each other. Let’s say, for example, that a router in the same private network as the web server allows Telnet access through port 23. The web server could map port 23 on that router to port 2323 on some other system:
$ ssh -R 2323:my- router:23 user@some- host
Once you run this command, you will actually have an interactive login session on the destination system. As long as that session is open, the port forwarding is active.
10597ch03final 39 11/20/08 12:04:58 PM
chapter 3 ■ USING SSh tO aUtOMate SYSteM aDMINIStratION SecUreLY40
encrypting Mail traffic
To forward unencrypted port 25 (mail) traffic from your client to a server over an encrypted channel, you could run this command as root on your local machine:
$ ssh -L 25:localhost:25 user@mailserver
(This doesn’t work if a mail server is already running on the local machine because it is already using port 25.) When the command is executing, you could send mail to port 25 of your local machine and that traffic would really go to the mail server over the encrypted connection.
configuring authorized_keys
If you want to create a special account on the mail server that allows users only to forward traffic to port 25, you could configure the authorized_keys file to restrict access to the account:
command="while true; do sleep 1000; done",no- pty,
permitopen="localhost:25" ssh- rsa AB...YZ
Please note that the preceding code would be only one line in the actual authorized_keys file, with no space after the no- pty,. This configuration allows you to make a connection that runs an infinite loop and forwards port 25—that’s all. When connecting with this specific key, you cannot do anything else with this account.
Using SSH for common accountsOne interesting way to use SSH involves allowing several users to access one or more common accounts. You’ll probably find this practice most useful for the root account (when there are multiple administrators), but you could also use it for other accounts (such as a special account to do software builds). The advantage of this approach is that each user does not have to know the account password to access the account. In addition, the logs can tell you who is actually logging into the account.
Another, and perhaps better, solution is to have each user log in with his or her user account. The user can then use sudo to execute certain commands as root (we introduced sudo in Chapter 1). But sudo is not always an option—particularly if you don’t want to cre-ate a user account on the system for each user who needs to run commands as root.
10597ch03final 40 11/20/08 12:04:59 PM
chapter 3 ■ USING SSh tO aUtOMate SYSteM aDMINIStratION SecUreLY 41
Preparing for Common Accounts
The setup is simple. You generate a key pair for each user and then list the appropriate public keys in the account’s authorized_keys file. However, you might find it frustrating to maintain this system manually when you have a large number of accounts and/or users. It is much easier to create a configuration file:
# The account name is given first, followed by a colon,
# with each user who should be able to access that account
# listed afterward, and separated by commas.
root:amber,bob,frank,jill
build:amber,bob,susan
Then create a script that can process the configuration file and generate all the authorized_keys files. This particular script assumes that each person’s public key is in his or her home directory and that he or she is using RSA:
#!/usr/bin/perl -w
use strict;
# Set the location of the configuration file here
my $config = "/usr/local/etc/ssh/accounts";
# Where the key fingerprints will be stored
# (for purposes of log analysis)
my $prints = "/usr/local/etc/ssh/prints";
# Set the path to a user's public key relative to
# their home directory
my $public_key = ".ssh/id_rsa.pub";
# This function takes one scalar parameter (hence the $
# within the parenthesis). The parameter is stored in
# the local variable $username. The home directory
# is returned, or undef is returned if the user does
# not exist.
10597ch03final 41 11/20/08 12:04:59 PM
chapter 3 ■ USING SSh tO aUtOMate SYSteM aDMINIStratION SecUreLY42
sub GetHomeDir ($) {
my ($username) = @_;
my $homedir = (getpwnam($username))[7];
unless ($homedir) {
print STDERR "Account $username doesn't exist!\n";
}
return $homedir;
}
# This function takes in an account and the home directory and logs
# the key fingerprint (by running ssh- keygen -l), which has output:
# 2048 85:2c:6e:cb:f6:e1:39:66:99:15:b1:20:9e:4a:00:bc ...
sub StorePrint ($$) {
my ($account, $homedir) = @_;
my $print = ̀ssh- keygen -l -f $homedir/$public_key`;
# Remove the carriage return
chomp($print);
# Keep the fingerprint only
$print =~ s/^\d+ ([0-9a- f:]+) .*$/$1/;
print PRINTS "$account $print\n";
}
# This function takes one line from the config file and
# sets up that specific account.
sub ProcessLine ($) {
my ($line) = @_;
# A colon separates the account name and the users with access
my ($account, $users) = split (/:/, $line);
my $homedir = GetHomeDir($account);
return unless ($homedir);
print "Account $account: ";
# First, make sure the directory exists, is owned
# by root, and is only accessible by root
my $group = 0;
10597ch03final 42 11/20/08 12:04:59 PM
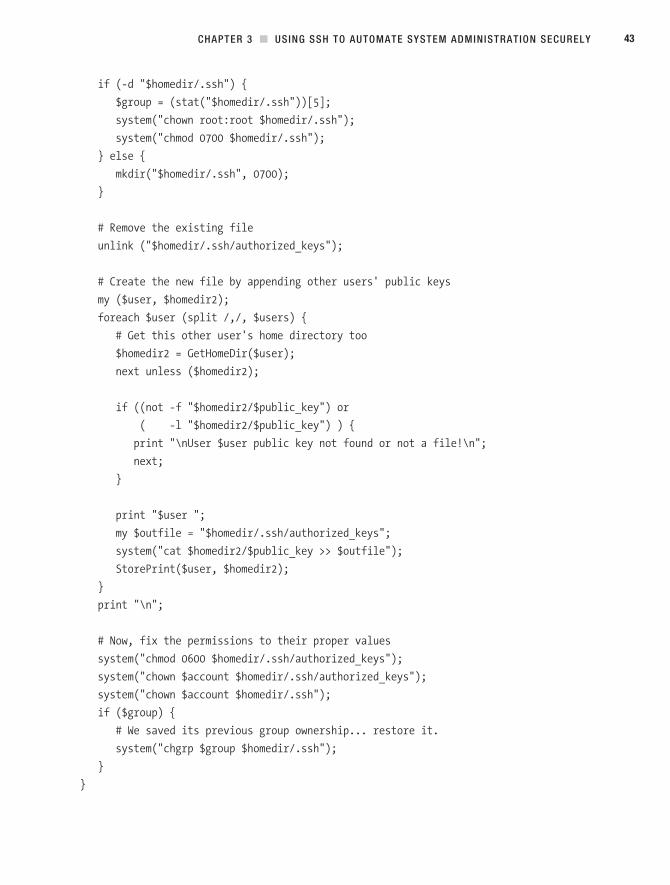
chapter 3 ■ USING SSh tO aUtOMate SYSteM aDMINIStratION SecUreLY 43
if (- d "$homedir/.ssh") {
$group = (stat("$homedir/.ssh"))[5];
system("chown root:root $homedir/.ssh");
system("chmod 0700 $homedir/.ssh");
} else {
mkdir("$homedir/.ssh", 0700);
}
# Remove the existing file
unlink ("$homedir/.ssh/authorized_keys");
# Create the new file by appending other users' public keys
my ($user, $homedir2);
foreach $user (split /,/, $users) {
# Get this other user's home directory too
$homedir2 = GetHomeDir($user);
next unless ($homedir2);
if ((not -f "$homedir2/$public_key") or
( -l "$homedir2/$public_key") ) {
print "\nUser $user public key not found or not a file!\n";
next;
}
print "$user ";
my $outfile = "$homedir/.ssh/authorized_keys";
system("cat $homedir2/$public_key >> $outfile");
StorePrint($user, $homedir2);
}
print "\n";
# Now, fix the permissions to their proper values
system("chmod 0600 $homedir/.ssh/authorized_keys");
system("chown $account $homedir/.ssh/authorized_keys");
system("chown $account $homedir/.ssh");
if ($group) {
# We saved its previous group ownership... restore it.
system("chgrp $group $homedir/.ssh");
}
}
10597ch03final 43 11/20/08 12:05:00 PM
chapter 3 ■ USING SSh tO aUtOMate SYSteM aDMINIStratION SecUreLY44
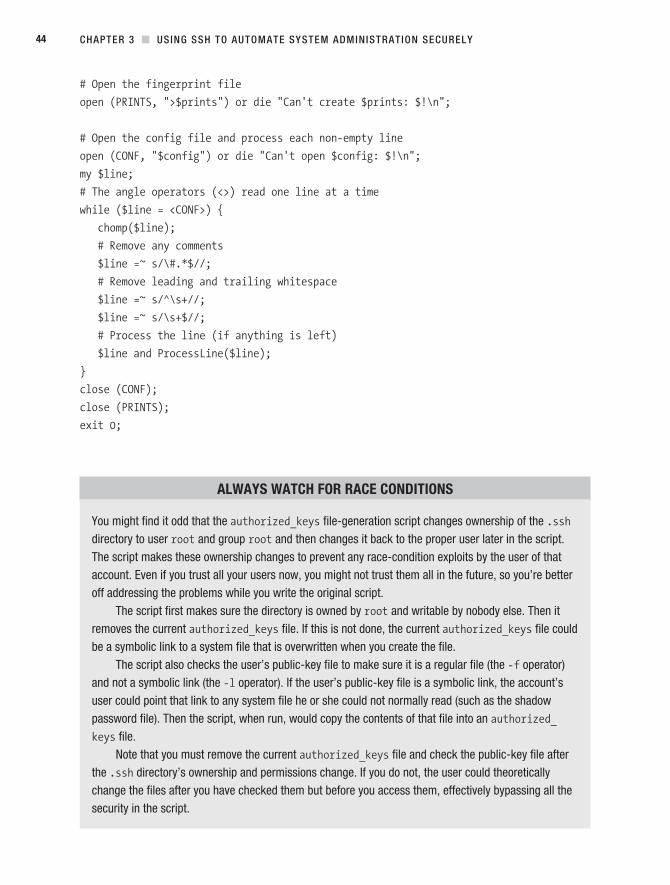
# Open the fingerprint file
open (PRINTS, ">$prints") or die "Can't create $prints: $!\n";
# Open the config file and process each non- empty line
open (CONF, "$config") or die "Can't open $config: $!\n";
my $line;
# The angle operators (<>) read one line at a time
while ($line = <CONF>) {
chomp($line);
# Remove any comments
$line =~ s/\#.*$//;
# Remove leading and trailing whitespace
$line =~ s/^\s+//;
$line =~ s/\s+$//;
# Process the line (if anything is left)
$line and ProcessLine($line);
}
close (CONF);
close (PRINTS);
exit 0;
aLwaYS waTcH for race condiTionS
You might find it odd that the authorized_keys file- generation script changes ownership of the .ssh directory to user root and group root and then changes it back to the proper user later in the script. The script makes these ownership changes to prevent any race- condition exploits by the user of that account. Even if you trust all your users now, you might not trust them all in the future, so you’re better off addressing the problems while you write the original script.
The script first makes sure the directory is owned by root and writable by nobody else. Then it removes the current authorized_keys file. If this is not done, the current authorized_keys file could be a symbolic link to a system file that is overwritten when you create the file.
The script also checks the user’s public- key file to make sure it is a regular file (the -f operator) and not a symbolic link (the -l operator). If the user’s public- key file is a symbolic link, the account’s user could point that link to any system file he or she could not normally read (such as the shadow password file). Then the script, when run, would copy the contents of that file into an authorized_keys file.
Note that you must remove the current authorized_keys file and check the public- key file after the .ssh directory’s ownership and permissions change. If you do not, the user could theoretically change the files after you have checked them but before you access them, effectively bypassing all the security in the script.
10597ch03final 44 11/20/08 12:05:00 PM
chapter 3 ■ USING SSh tO aUtOMate SYSteM aDMINIStratION SecUreLY 45
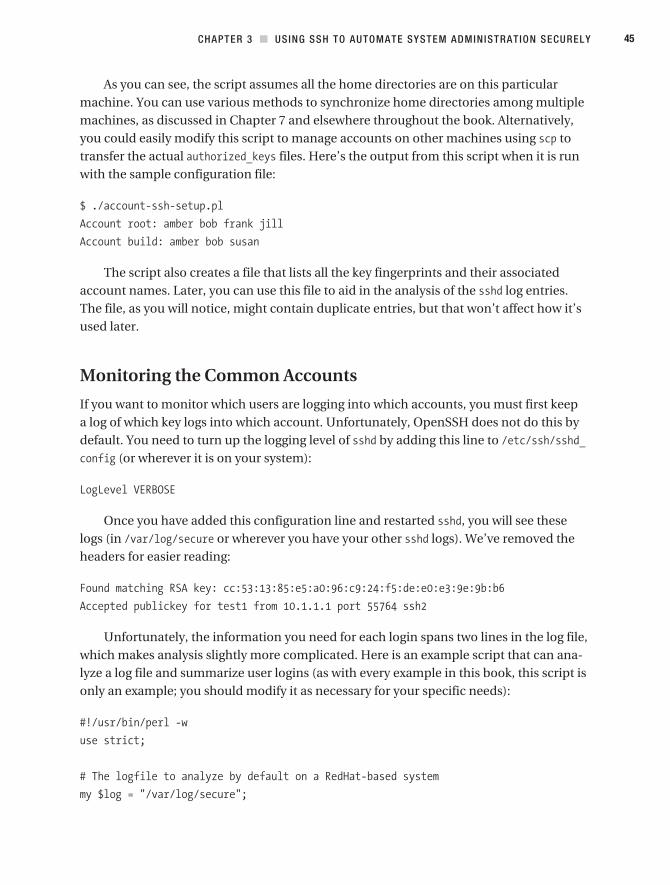
As you can see, the script assumes all the home directories are on this particular machine. You can use various methods to synchronize home directories among multiple machines, as discussed in Chapter 7 and elsewhere throughout the book. Alternatively, you could easily modify this script to manage accounts on other machines using scp to transfer the actual authorized_keys files. Here’s the output from this script when it is run with the sample configuration file:
$ ./account-ssh- setup.pl
Account root: amber bob frank jill
Account build: amber bob susan
The script also creates a file that lists all the key fingerprints and their associated account names. Later, you can use this file to aid in the analysis of the sshd log entries. The file, as you will notice, might contain duplicate entries, but that won’t affect how it’s used later.
Monitoring the Common Accounts
If you want to monitor which users are logging into which accounts, you must first keep a log of which key logs into which account. Unfortunately, OpenSSH does not do this by default. You need to turn up the logging level of sshd by adding this line to /etc/ssh/sshd_config (or wherever it is on your system):
LogLevel VERBOSE
Once you have added this configuration line and restarted sshd, you will see these logs (in /var/log/secure or wherever you have your other sshd logs). We’ve removed the headers for easier reading:
Found matching RSA key: cc:53:13:85:e5:a0:96:c9:24:f5:de:e0:e3:9e:9b:b6
Accepted publickey for test1 from 10.1.1.1 port 55764 ssh2
Unfortunately, the information you need for each login spans two lines in the log file, which makes analysis slightly more complicated. Here is an example script that can ana-lyze a log file and summarize user logins (as with every example in this book, this script is only an example; you should modify it as necessary for your specific needs):
#!/usr/bin/perl -w
use strict;
# The logfile to analyze by default on a RedHat- based system
my $log = "/var/log/secure";
10597ch03final 45 11/20/08 12:05:01 PM
chapter 3 ■ USING SSh tO aUtOMate SYSteM aDMINIStratION SecUreLY46
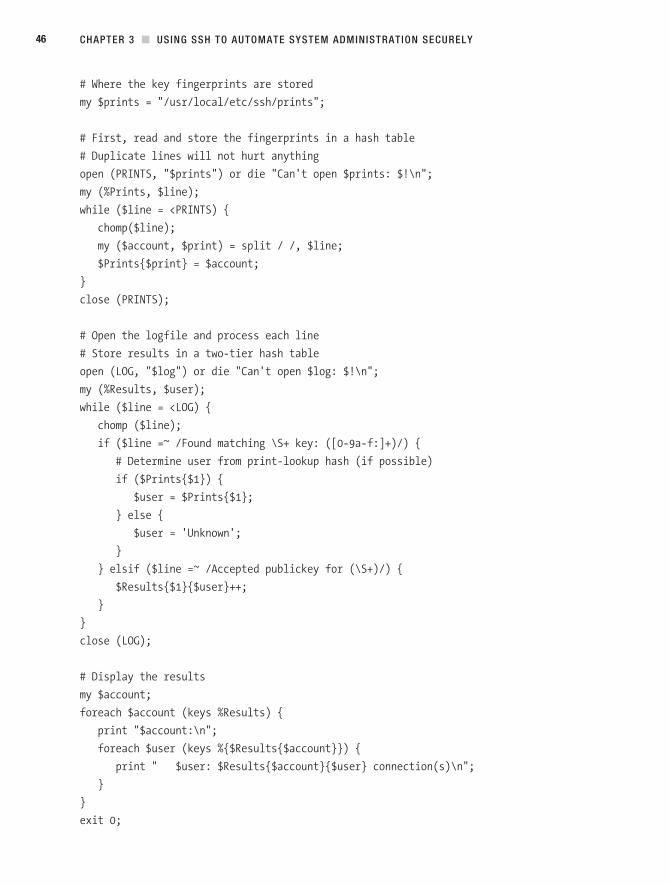
# Where the key fingerprints are stored
my $prints = "/usr/local/etc/ssh/prints";
# First, read and store the fingerprints in a hash table
# Duplicate lines will not hurt anything
open (PRINTS, "$prints") or die "Can't open $prints: $!\n";
my (%Prints, $line);
while ($line = <PRINTS) {
chomp($line);
my ($account, $print) = split / /, $line;
$Prints{$print} = $account;
}
close (PRINTS);
# Open the logfile and process each line
# Store results in a two- tier hash table
open (LOG, "$log") or die "Can't open $log: $!\n";
my (%Results, $user);
while ($line = <LOG) {
chomp ($line);
if ($line =~ /Found matching \S+ key: ([0-9a- f:]+)/) {
# Determine user from print- lookup hash (if possible)
if ($Prints{$1}) {
$user = $Prints{$1};
} else {
$user = 'Unknown';
}
} elsif ($line =~ /Accepted publickey for (\S+)/) {
$Results{$1}{$user}++;
}
}
close (LOG);
# Display the results
my $account;
foreach $account (keys %Results) {
print "$account:\n";
foreach $user (keys %{$Results{$account}}) {
print " $user: $Results{$account}{$user} connection(s)\n";
}
}
exit 0;
10597ch03final 46 11/20/08 12:05:01 PM
chapter 3 ■ USING SSh tO aUtOMate SYSteM aDMINIStratION SecUreLY 47
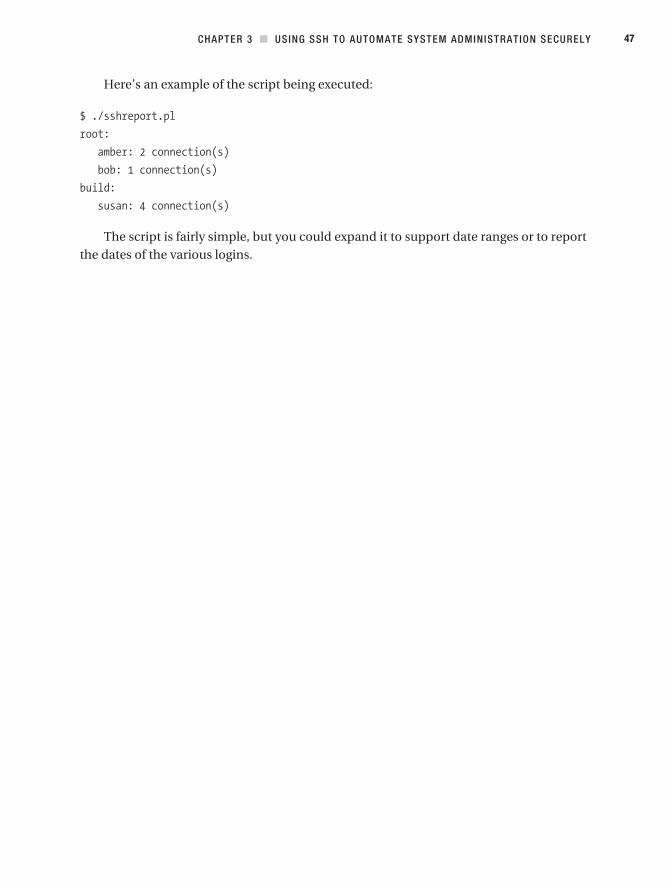
Here’s an example of the script being executed:
$ ./sshreport.pl
root:
amber: 2 connection(s)
bob: 1 connection(s)
build:
susan: 4 connection(s)
The script is fairly simple, but you could expand it to support date ranges or to report the dates of the various logins.
10597ch03final 47 11/20/08 12:05:01 PM

10597ch03final 48 11/20/08 12:05:02 PM