Embed Size (px)
Citation preview

AUTOMATIC DIVIDING AND
THROWING MACHINE
CPS 20 – 25 - 30
START-UP AND MAINTENANCE
ATTENTION !!!!!! Please read carefully this Technical Manual before starting the machine up. The machine must be “earthed” for protection against electric shock and must be directly connected to the earthing point . The earthing cable must not be cut or disconnected from the machine. NOISE LEVEL
LEQ sound pressure at 1 meter in working condition : LESS 70 DB LPC sound pressure at 1 meter in working condition : LESS 130 DB Keep this Instruction Manual in a safe but accessible place for Future reference throughout the working life of the machine

INSTRUCTION BEFORE STARTING THE MACHINE INTRODUCTION This Technical Manual contains all the information needed to correctly carry out the installation , use and maintenance of the equipment by qualified personnel . MOVING AND TRANSPORT Unpack immediately the machine soonest You will receive to check any kind of damages may occur during the transport. If You find any damage , please immediately inform the Transport Company to apply At the Insurance Company. Under no circumstances may the damaged machine be returned to the Manufacturer without prior notice and without having received authorisation to do so in writing. All the machines have wheels , so they can be easily moved by 2-3 people. Whenever possible, a lifting system ,such as a forklift or transpallet should be used, Taking particular care to ensure the weight is balanced. The packaging is usually cardboard on a pallet or wooden crate . DO NOT STACK. TESTS The product is delivered after the successful completion of visual ,electrical and functional Tests. PREPARATIONS BEFORE INSTALLATION . prepare a high-sensitivity thermal-magnetic circuit breaker with an HERAT fault current interrupter (300 mA) . Pre-install an earthed power point . Check that the support surface for the machine is flat.
ELECTRICAL CONNECTION The electrical connection must be made by authorised professionals, following the Regulations in force of the Country in which the machine is being installed. Before connecting up the power supply, ensure that the voltage and frequency of the network correspond to those indicated on the characteristics card of the machine. CAUTION : DO NOT USE PLUGS OR PINS THAT ARE NOT EAR THED. The machine is protected against overload and short-circuits. The electrical connection is made via a manually activated high-sensitivity Thermal-magnetic circuit breaker with an earth fault current interrupter (300mA). SAFETY WARNING DURING THE INSTALLATION . before to connect the machine to the main electrical power be sure that the Voltage/frequency and Current are as for the Machine Plate . Always connect the machine to a high-sensitivity Thermal-Magnetic circuit breaker with an earth fault current interrupter (300 mA). . Do not touch electrical parts if Your hands are WET or if You are not wearing shoes . All our machines must be installed by specialised and authorised technical personnel with good mechanical and electrical knowledge of the machine. . Before connecting up to the power supply, ensure that all switches are in “O” position and that nobody is working on the machine. . Once the machine is connected check, as first thing , the correct turning rotation of the exit belt (that have to take the peaces outside the divider). TO START THE MACHINE CAUTION: Before connecting the machine to the mains, check that the voltage coincides. Once the machine has been connected, check if the rotating direction is correct. To do that, set the switch in a manual position. Press the starting switch first and the stopping one next. After the machine’s proper rotation has been checked, this will be ready to operate. By using wheel number 1, we will adjust the wanted weight.

With the switch in “0” position, the machine won’t operate, even though the starting switch START is pressed. HOW TO PROGRAM THE COUNTER Having the machine already connected and the switch in “Auto” position, press (P). The numbers of programmed pieces will appear on the display in digital numbers. If you wish to modify this amount of programmed pieces press the unit ,tens, hundred, etc button. Once pressed , the colour of the digits will increase, meaning that the counter is ready for further modifications. The digital pushbuttons only respond in that very moment. After this operation, the counter goes back to its normal position. To know the programmed quantity at any given time, press (P). The RST pushbutton is the Reset button. In a “Manual” position, the piece counter start counting without stopping. If the switch is in “Auto” position and has not selected anything, in other words, the counter shows “0”, the machine will not start.

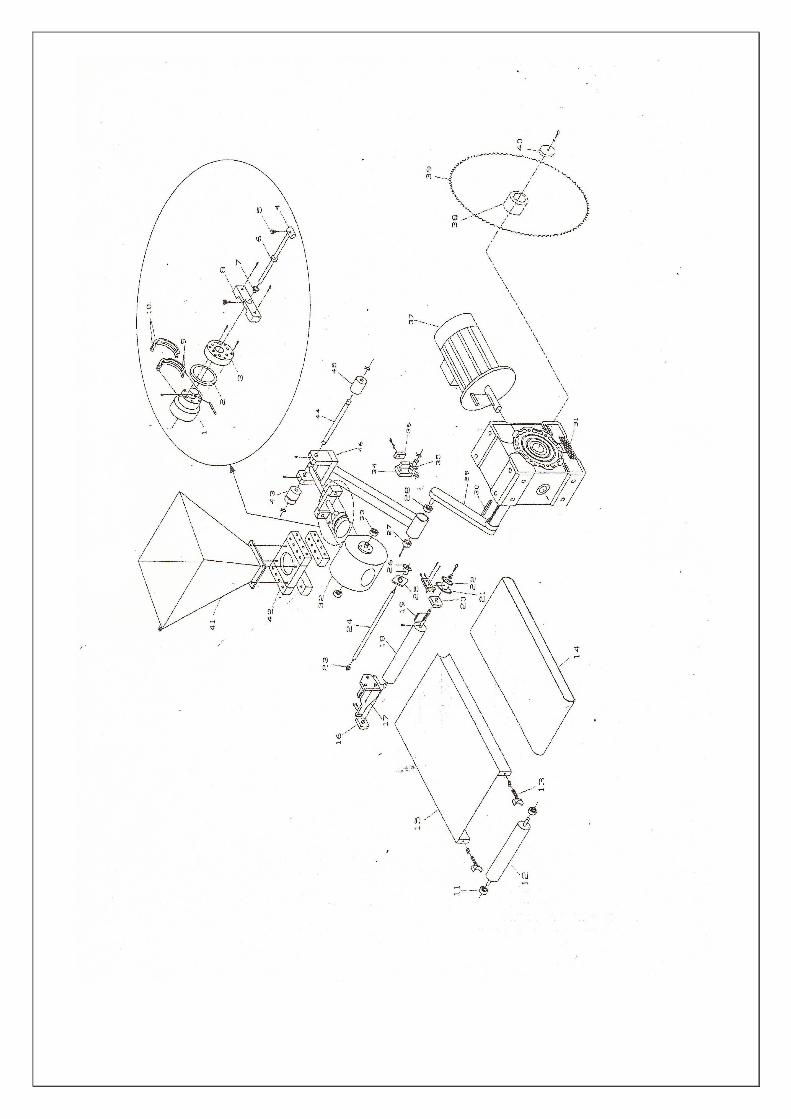
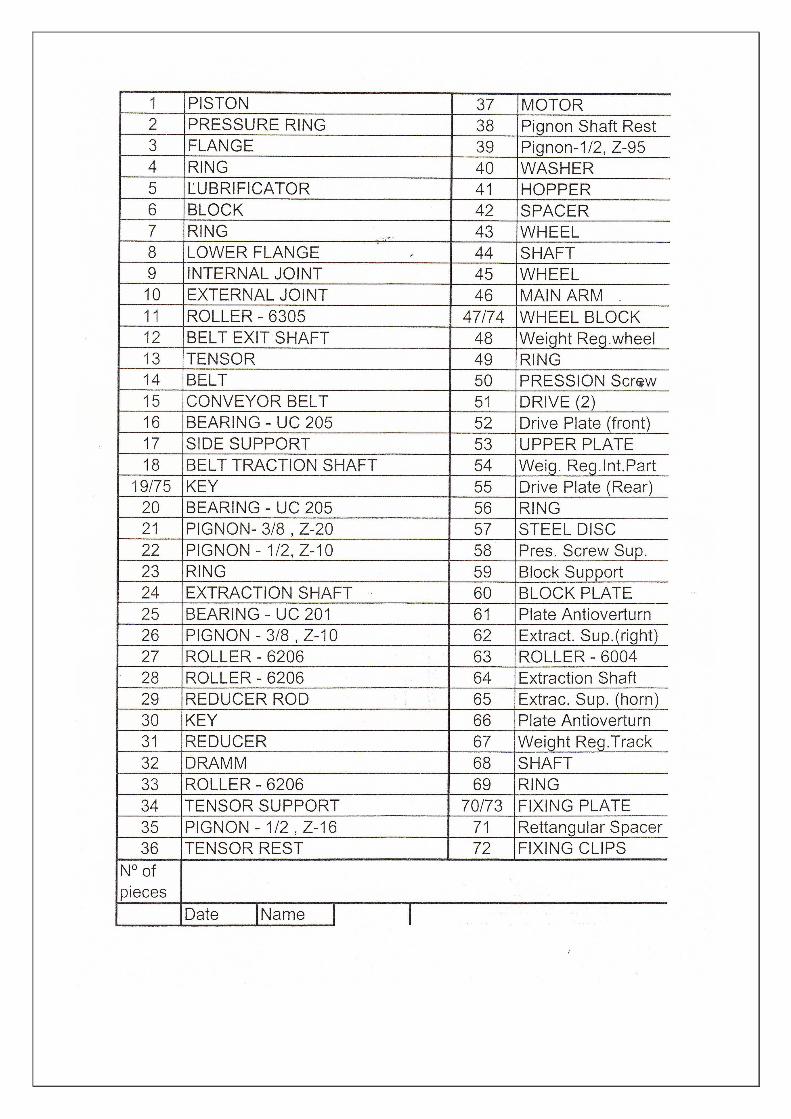
CPS-DIVIDING AND THROWING MACHINE The CPS hasn’t got oil circuit avoiding obstructions, the cleaning of the deposit and oil changes. All that is necessary to do is to spray some vegetable oil inside the hopper and on the piston’s head. The CPS only absorbs the necessary amount of dough each time, adjusting the piston’s stroke in synchronization with the variation of the weight. The bigger the volume of the dough, the bigger the piston’s stroke is and vice versa. This way the dough’s damage will be minimum. Most of the Dividing Machines in the market, make the maximum stroke when soaking up, this way a piece of dough weight 60grs. is absorbed at least 10 times before being thrown as a Ø 110 piston absorbs 1kg. of dough approximately every soaking up cycle. The CPS avoids gears and other transmission machinery that make the system very complex. Its theory is very simple and logical, achieving a steady movement and a retained extraction in its lower point, avoiding the repelling effect, produced by hard dough’s. The CPS is one of the machines that needs less technical assistance, but be aware that a good performance depends, mostly, on the user good behaviour when fulfilling maintenance instructions. FUNCTIONING After the machine’s starting up , it’s important to spray vegetable oil inside the Hopper and the head of the Piston. Load the hopper with dough and start the machine : the hopper’s protection grill must be correctly down, the emergency button unlocked and the Selector switchin the AUT or MANUAL position. Please regulate the exit Rounder correctly following the weight range of the dough Pieces. Oil the small canvas placed at the start of the kneading process at the start of each working day . Regulate the “weight wheel” ,unlocking the wheel screw and , then once getting the right weight, locking again. The wheel doesn’t give the exact value of the weight but numbers that we’ll use as a reference for the desired weight (for ex. If 100 grs coincides with the number 10 , means that 150 will be 15 , 200 -20 etc..) If we need a exact number of pieces put the selector in AUT : the machine will divide till the programmed number . Otherwise in MAN mode there is no limit on the numbers of pieces. In the end 2 Kg of dough (aprox) will remain inside the hopper : open the grill and take it and put other oil on the piston head before to load the hopper again.
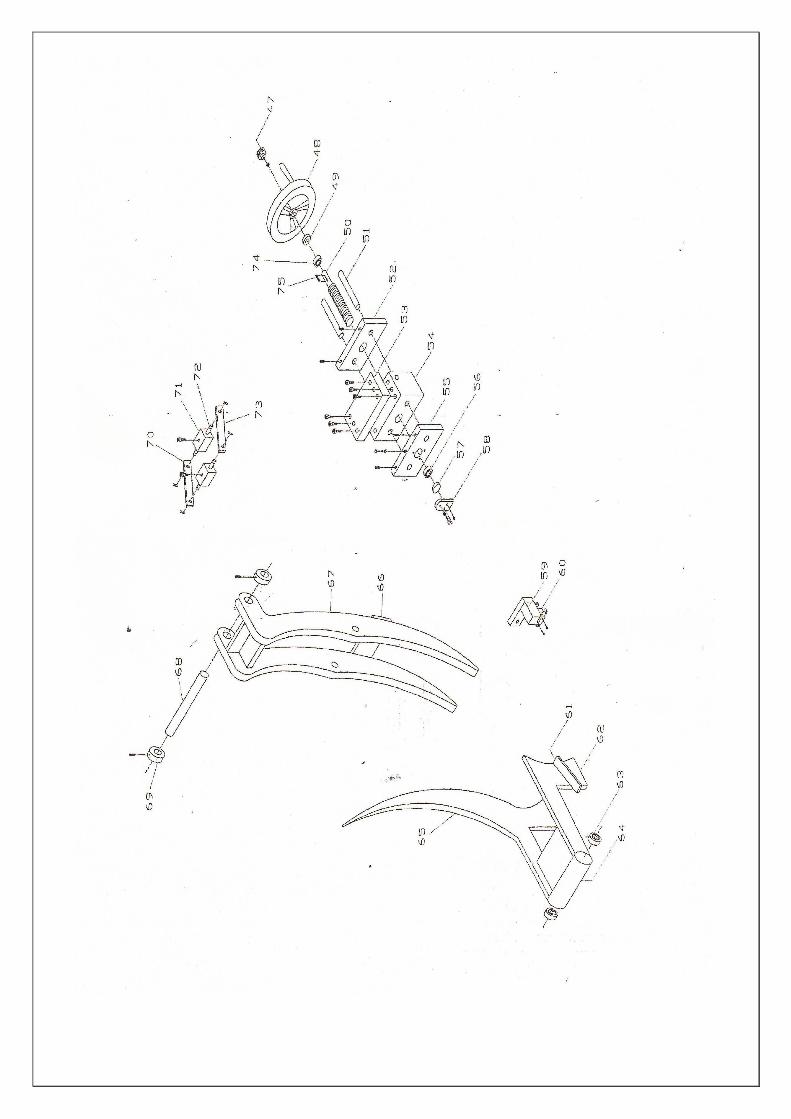
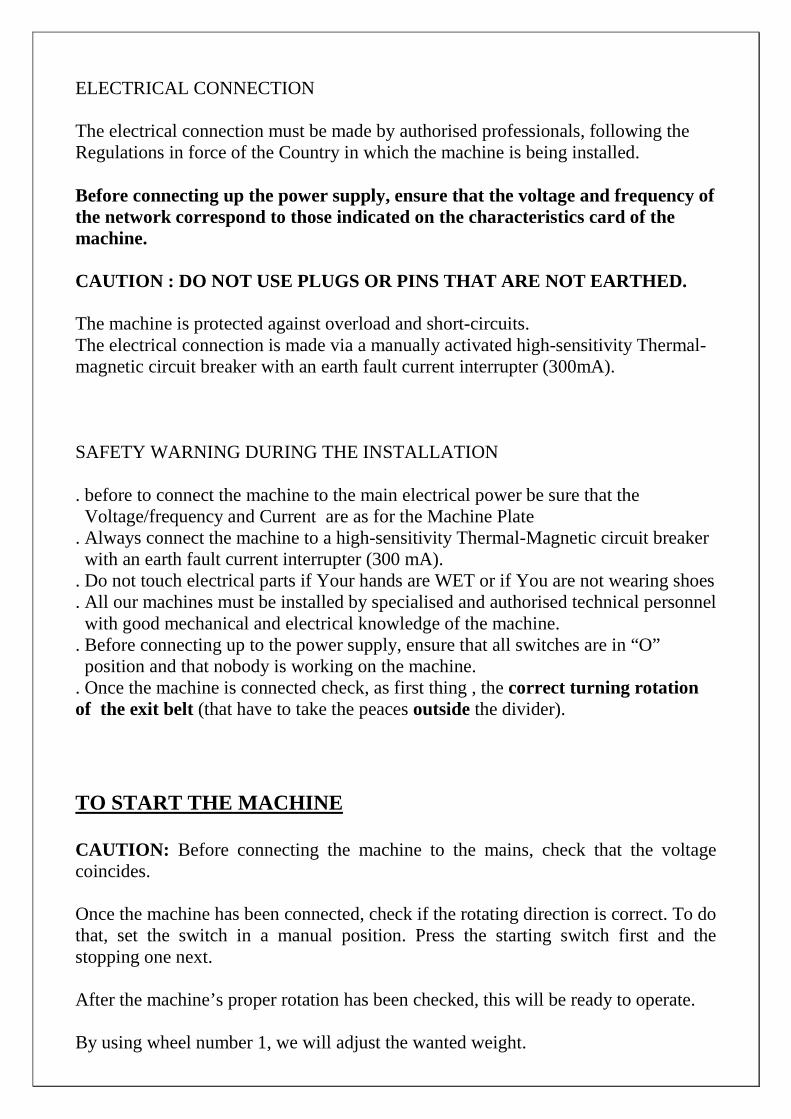
EXTRACTION’S SYSTEM REGULATION
This mechanical system adjusts the absorptionstroke of the piston. With large peaces the stoke increases and it reduces with the smallest ones. In the Factory we set the excursion on the intermediate value : check with the picture Piston Excursion increasing/decreasing. In this picture the fixing plates vertical and horizontal are connected through the central hole A and B : if the dough will be too soft we can increase the piston excursion connecting the two plates in the other holes . This action will give more weight accurancy. Before make these adjustemets the Factory have to be contacted all the time !

PISTON’S JOINTS REGULATION
Control to locate the Piston at the maximum upper point (as indicated in the picture) By using a spanner of 5 mm, turn ¼ of revolution at left to close (tighten ) and to right to Open (loosen). The piston must works smoothly.

DRUM - SPACER REGULATIONS
Adjust the Piston at the maximum upper point (as before and as indicated by the picture). Disassemble the wheels bolt (A) from the Extractor support. Slightly loosen the Block screws (fig. 2) all in the same way (left side of the drum) Tighten the sunjction screws (right side of the drum) slowly and all in the same way. Manually check the movement of the drum by pressing (A) : It should turn Without friction ! Max clearance : o,o5 mm .

FIG. N° 2 : DRUM FLANGES : HOW TO REGULATE
PISTON’S EXCURSION REGULATION
As indicated in the previous Chapter , if we woud like that the Piston absorbes more dough we have fasten the two side bars (77 and 78 ) in drill holes A and B respectively This provides better weight control.
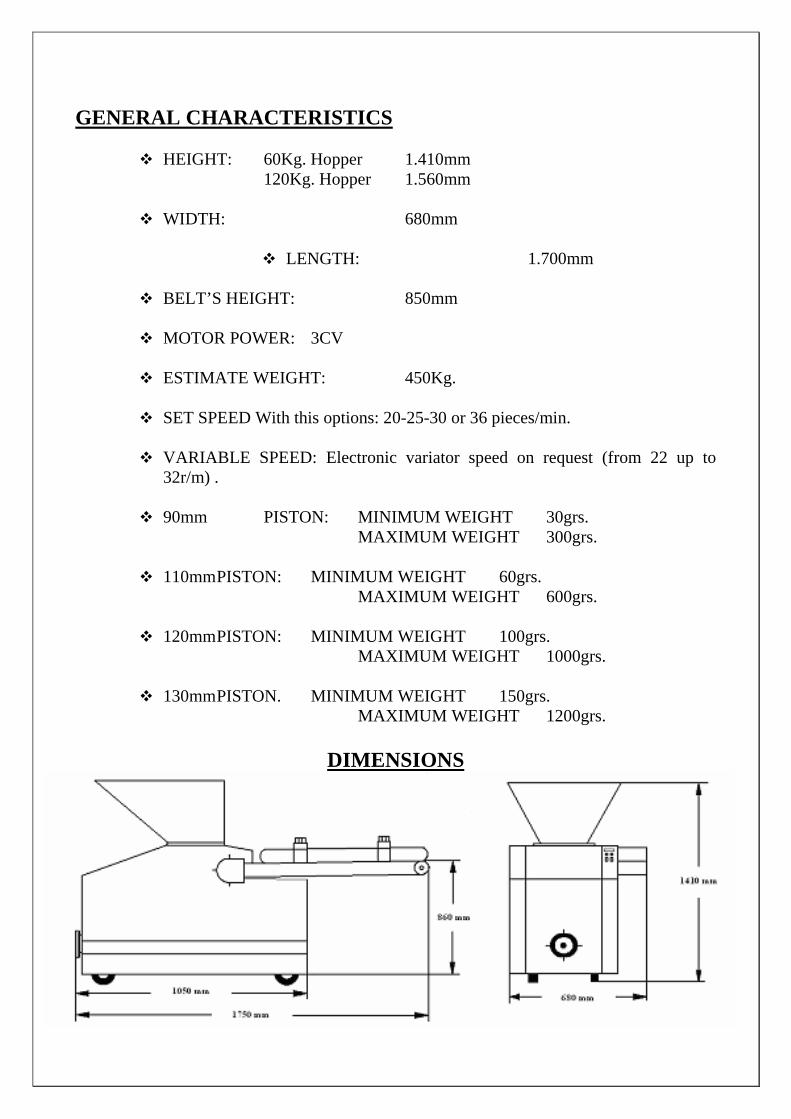
GENERAL CHARACTERISTICS
� HEIGHT: 60Kg. Hopper 1.410mm 120Kg. Hopper 1.560mm
� WIDTH: 680mm
� LENGTH: 1.700mm
� BELT’S HEIGHT: 850mm
� MOTOR POWER: 3CV
� ESTIMATE WEIGHT: 450Kg.
� SET SPEED With this options: 20-25-30 or 36 pieces/min.
� VARIABLE SPEED: Electronic variator speed on request (from 22 up to
32r/m) .
� 90mm PISTON: MINIMUM WEIGHT 30grs. MAXIMUM WEIGHT 300grs.
� 110mm PISTON: MINIMUM WEIGHT 60grs.
MAXIMUM WEIGHT 600grs.
� 120mm PISTON: MINIMUM WEIGHT 100grs. MAXIMUM WEIGHT 1000grs.
� 130mm PISTON. MINIMUM WEIGHT 150grs.
MAXIMUM WEIGHT 1200grs.
DIMENSIONS
MANTEINANCE Before starting to work, wet the hopper and piston’s head with cooking oil. Repeating this action, each time the hopper goes empty. Once the work has been finished, clean it again and repeat the previous operation, leaving the machine on, for about 15-20 seconds. The easiest way of doing this, is to program approximately 10 strokes and switching the leaving the piston totally out. Being this the best stopping position. If this operation is performed in a manual way, stop the machine leaving the piston totally out. Oil every 500 working hours, approximately, the belt’s transmission chains and the dough’s extracting roller by removing the two lids found at the front right side. The piston’s head has a ring system, which enables the adjustment of the rings by using some screws. If after a while, the piston falls due to its weight or repels when working with hard doughs, it will be necessary to adjust the screws at the joints. To do this, use the wheel in its maximum weight, starting the engine and using a spanner (Allen Nº 5) and tighten the screws about half turn each. KNEAD BELT Before starting work, check sporadically if it is stuck to the table. If so, unstuck it before switching the machine o and clean it immediately. The bowling device hasn’t got to be pressed against the belt. Check its adjustment and make sure that a piece of paper can pass through easily.

A.pdf
ELEMENTO DESCRIPCIÓNS1 EMERGENCY STOP
S2 STOP SWITCH
S3 START SWITCH
TFR TRANSFORMER 63VA 400-230VAC/24-48VAC
F.C.P LIMIT SWITCH OF THE DIVIDER DRIVE SPROCKET
F.C.T SECURITY LIMIT SWITCH OF THE HOPPER
C.P PIECE COUNTER
I.R MANUAL-AUTOMATIC ROTARY SWITCH
L1 GREEN LIGHT FOR THE DIVIDER START SWITCH
L2 RED LIGHT FOR THE DIVIDER STOP SWITCH
CONECTOR 3 CONNECTOR OF THE DIVIDER SWITCHGEAR
F OPERATING RELAY
Q3 TRIPOLAR MAGNETOTERMIC
V.E SPEED VARIATOR
P POTENTIOMETER