Embed Size (px)
Citation preview


Automatic Call Distribution (ACD)
Automatic Call Distribution queues put callers into a queue and typically play Music on Hold or custom announcement messagesto keep them informed or relaxed while they wait for an agent to become available.• Studies prove that a caller listening to Music on Hold will stay on hold longer than a caller hearing a ring back tone• Agents are typically employees of a contact center that login to one or more queues in order to answer callers.• Typically an agent cannot answer more than one call at a time (although ScopTEL queue options can be configured to allow
more than one call to be presented to an agent). There is typically a break period after a hangup so the agent can do somepost call processing
• A ScopTEL queue can play a forced announcement before joining the caller to a queue• A ScopTEL queue can play a Expected Wait Time announcements and/or periodic announcement to a waiting caller• ScopTEL supports 5 agent priorities per queue (Skills Based Routing)• ScopTEL supports Advanced Skills Based Routing (Object Based Skills Based Routing)• ACD reports live in the server cradle to grave and do not require an external database or server• There is no limit to the number of queues or agents that can be configured per server• The ScopSTATS reporting engine is used to generate Historical and Realtime reports• ScopSTATS is a web based Javascript engine which requires no client installation on any PC

Automatic Call Distribution (ACD), cont’d• A caller can exit a queue by dialing a DTMF key from their phone keypad which will follow the Auto Attendant rules applied
to each queue
• The reporting system can generate many advanced reports ad hoc
• Service Level represents a percentage of calls answered before a pre-defined time period defined in seconds
• ScopTEL supports a Custom Service Level per queue
• Each ACD call can have a different disposition:
• Abandoned (caller hangs up before an agent can answer or call can be overflowed) (CLID information is saved in reports)
• Answered (agent answers the caller) (CLID information is saved in reports)
• Overflow (caller reaches a queue condition that transfers the caller to a new destination) (CLID is saved in reports)
• Overflow Caller Exit with Key or Single Key Destination
• Agents are considered not logged if they are paused or not logged in
• You can use Incoming Lines>CallerID>CallerID/Source to ring area codes and numbers to any queue

Automatic Call Distribution (ACD) cont’d
Ring Strategies• Calls are distributed among the members handling a queue with one of several strategies, defined in
queues.conf• ringall: ring all available channels until one answers • leastrecent: ring interface which was least recently called by this queue• fewestcalls: ring the one with fewest completed calls from this queue• random: ring random interface• rrmemory: round robin with memory, remember where we left off last ring pass

• Here are some examples of the many ScopSTATS Realtime ACD panels• You can also drill down into each report in real time

Automatic Call Distribution (ACD) Configuration
Before building an ACD queue you must:• Enable the Queues and Agents module in
Configuration>Telephony Modules• Define the ACD feature codes in the
Configuration>Features Code tab and commitchanges
• Decide on a ring strategyo Ring Allo Round Robino Least Recento Fewest Callso Ring Random
• Add all of your agents• Record your announcements (IVR prompts) using the
Audio>Sound Manager (see module 11)• Decide on a Service Level for each queue in seconds• Build any Auto Attendants needed to support caller DTMF
input to exit the queue (see module 14)• Decide on whether to remove a caller from a queue or
allow a caller to enter a queue if there are no loggedagents
• Build any needed Overflow Destinations
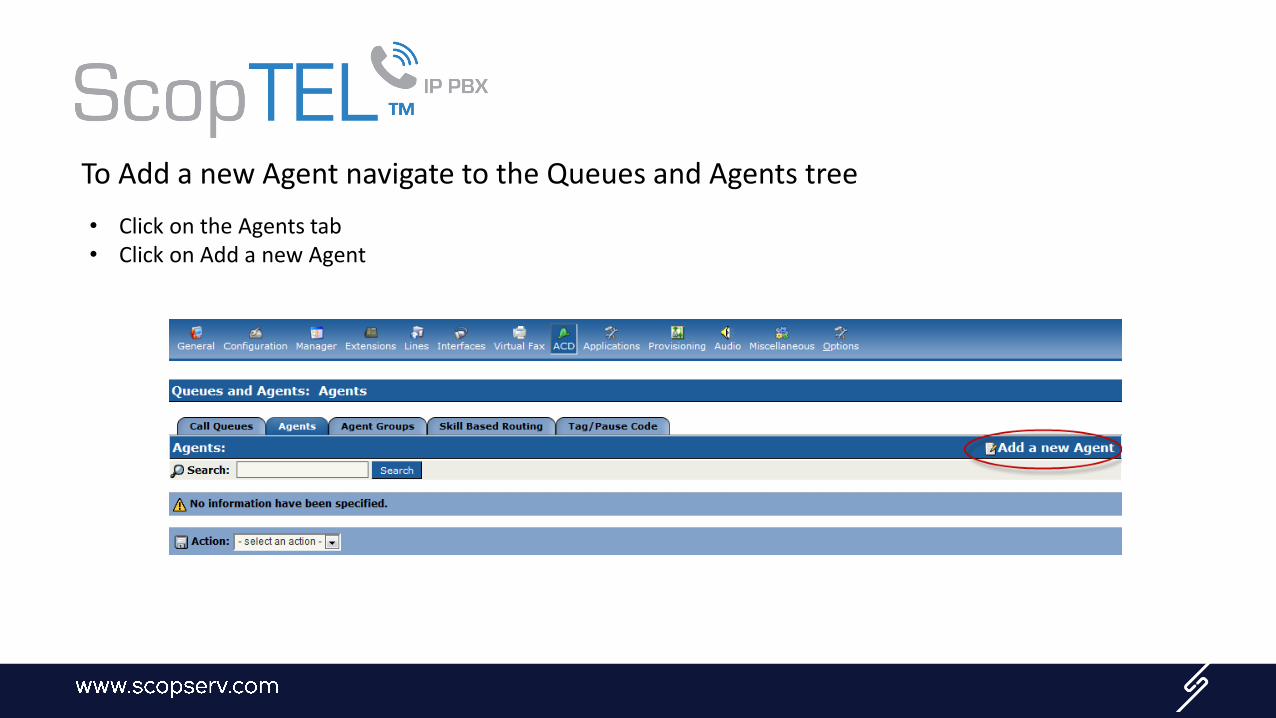
To Add a new Agent navigate to the Queues and Agents tree
• Click on the Agents tab• Click on Add a new Agent

On the Agents>General tab
• Choose a Tenant• Enter an Agent Extension number (usually starts at 1 and does not conflict with extension numbers)• Enter the Agent’s Login Password• Enter the Agent’s Full name as it should appear in the reports• Click on the Options tab

On the Agents>Options tab
• Maximum Concurrent Calls is normally set to 1 but can be set higher if the Queue’s Ring in Use option is enabled• Skills Based Group is normally set to None.
• Instructions on Advanced Object Based Skills Based Routing can be found here• http://blog.scopserv.com/en/2012/06/how-to-implement-skill-based-routing-acd-on-scoptel-pbx/
• There is an option to Monitor (Record) all calls per queue but you can leave the queue option disabled if you only wish to record specific agents
• Enter a Recording Tab to include special text in the ACD reports when a call is recorded (monitored)• The Caller ID and Web Authentication tab are optional• Click on the Add button when done• Add additional Agents as required

To add a queue
• On the Queues and Agents>Call Queues tab
• Click on Add a new Queue
• Choose a Tenant• Give the queue a useful name
• Do not use upper case or special characters or spaces in the queue name
• Click on the Announce tab when done

• The Announce Message is forced regardless if agents are available
• The Agent Announcement plays back to the agent when the agent answers a queued call
• The Period Announcement plays back at a selectable interval
To add a queue, cont’d
• Callers typically hear Music On Hold between
announcements but the queue can be configured to
play a ring back to the caller so the caller is not
aware they are waiting in a queue
• Announce Queue position will announce the waiting
position to the caller
• Click on the Select button to open a popup window
in order to choose a recorded Audio prompt (refer
to module 11 to manage Audio prompts)

This procedure applies to all types of ACD announcements
To playback a custom recorded announcement(s)• Use the ‘from’ drop down list to select ‘Audio: IVR’
• Use the mouse to select the required announcement from the list on the left
• Click on the >> option to insert the announcement into the playback list
• It is possible to insert multiple announcement into the playback list and they will play back in the selected order
• Click on OK when you have selected the required announcement(s)

Example
This screen shows a summary of an example announcement configuration• When the announcement configuration is done click on the Members tab

To Add agents you must select the Ring Strategy
• In this example Round Robin is used (typical selection)
• An Agent with a Higher priority will receive calls when they are available whereas Agents with a lower priority will only receive calls when a higher priority Agent is not available
• There are a total of 5 Agent Priority levels (Level 1 is the highest priority)
• Use the Select button for the required priority to add one or more Agents to this queue

• Choose Agent from the drop down list selection• Choose one or more Agents from the left select panel and use the >> button to add Agents to the right Add panel• Click on OK when done• Repeat the process to add Agents to multiple levels if required
To Add agents you must select the Ring Strategy, cont’d

Summary
This summary screen shows agents configured in 2 priority levels with a Round Robin Ring Strategy• NOTE: it is not a requirement to have more
than one priority level!• Typically all Agents would be placed into the
Level 1 priority level!• Click on the Queue Options tab when done
adding Agents
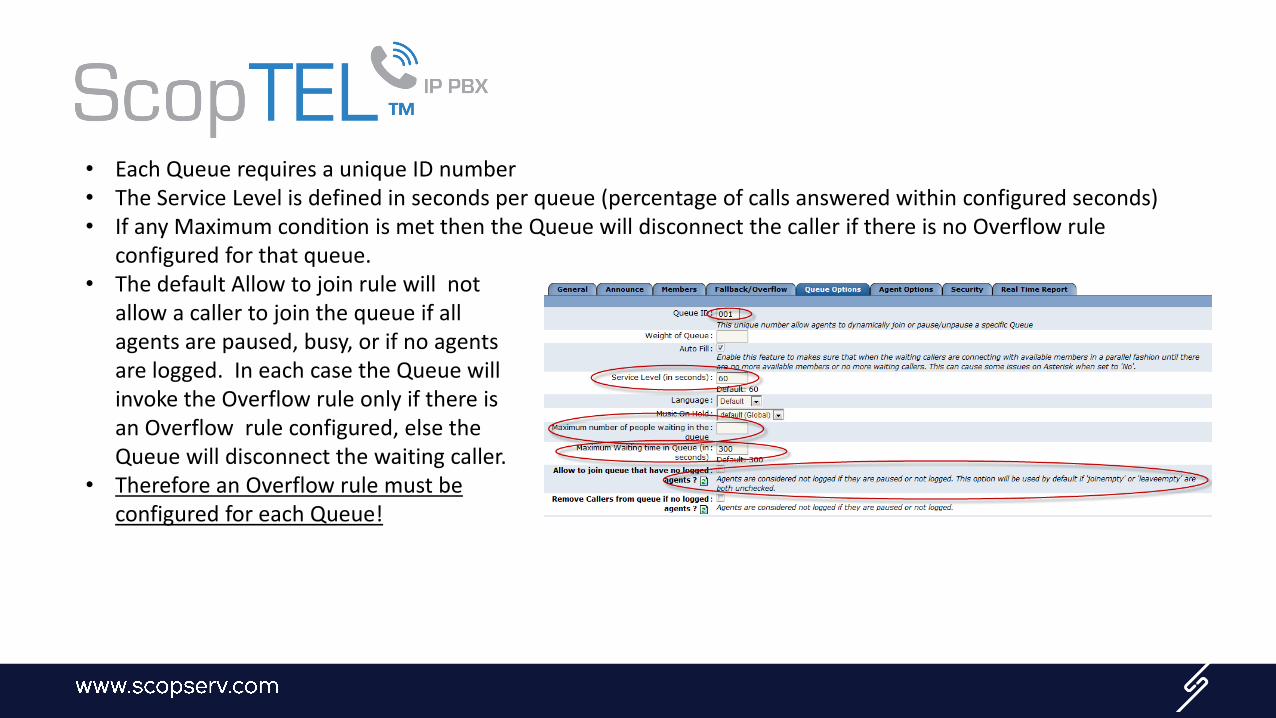
• Each Queue requires a unique ID number• The Service Level is defined in seconds per queue (percentage of calls answered within configured seconds)• If any Maximum condition is met then the Queue will disconnect the caller if there is no Overflow rule
configured for that queue.• The default Allow to join rule will not
allow a caller to join the queue if all agents are paused, busy, or if no agents are logged. In each case the Queue will invoke the Overflow rule only if there is an Overflow rule configured, else the Queue will disconnect the waiting caller.
• Therefore an Overflow rule must be configured for each Queue!

• If no Announcements are configured and the Ring instead of playing MoH option is checked the caller will only hear ringback
• The Single Digit Key Press option uses an already configured IVR menu to allow a caller to exit the queue. This will be tracked in the ACD reports by ‘Exit with Keypress’. For IVR instructions refer to module 14.
• Prefix CallerID with Queue Name will add the Prefix to the inbound CallerID display of the Agent’s phone display. This is useful to inform the Agent of the caller’s origin so the Agent can answer the caller with the correct oral response
• The Monitor call option records all calls answered by an Agent in the Queue to the CDR reports (ScopSTATS) for later playback
• Once you have configured each option click on the Fallback/Overflow tab to define the Overflow rules
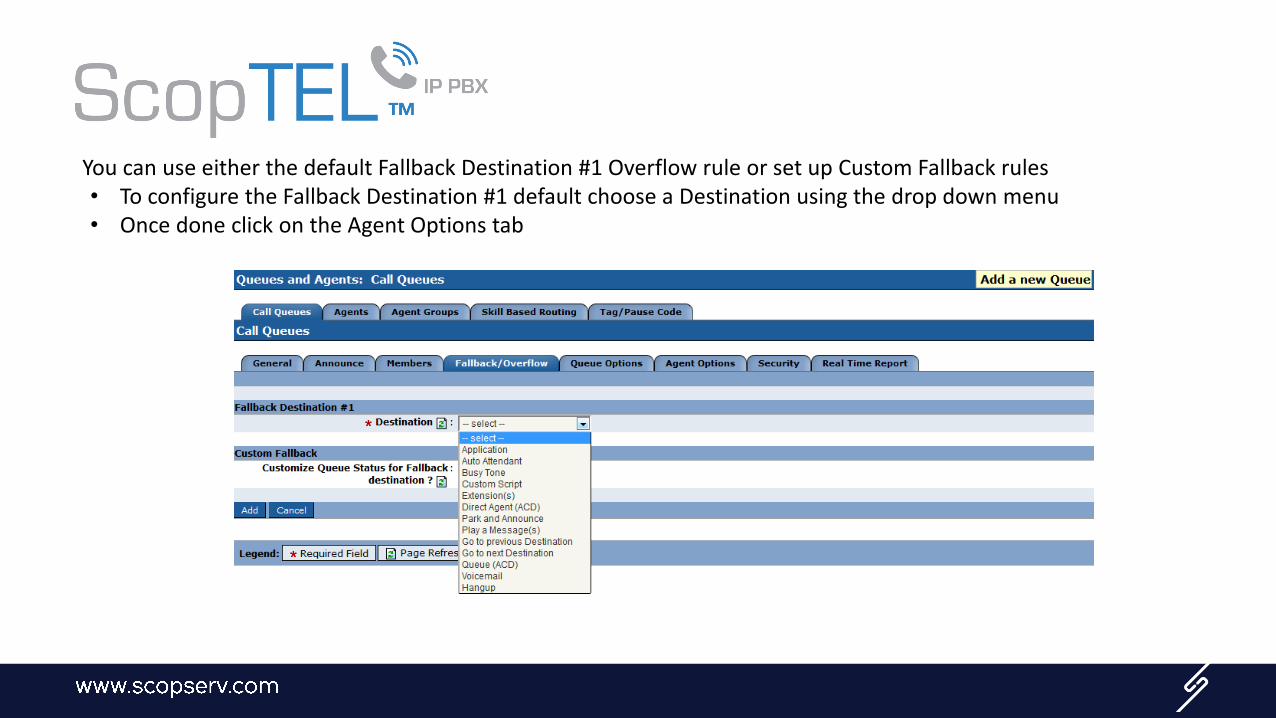
You can use either the default Fallback Destination #1 Overflow rule or set up Custom Fallback rules• To configure the Fallback Destination #1 default choose a Destination using the drop down menu• Once done click on the Agent Options tab

There are several well documented options available to Agent’s per queue
• Configure each option as required• The Security and Real Time Report tabs are optional• Click on Add when done to finish creating the new Queue

ACD Callback
This feature allows a caller to exit a queue but first request a callback from the Contact Center when an agent is
available rather than waiting in queue.
The caller requests the callback by dialing a digit on their keypad that matches a Key action defined on the Auto
Attendant Menu.
After you have created a new ACD Queue the first step to create the ACD Callback configuration is to create an Auto
Attendant Menu object and define a key for ACD Callback.
This Auto Attendant Menu is then used in the ACD Queue configuration to allow the caller to exit via Key Press.
The following slides presume knowledge of the ScopTEL IVR Auto Attendant Configuration. If this pre-requisite is
not met then refer to ScopServ’s Module 14 - ScopTEL - Managing Auto Attendants documentation guide.
ACD Callback
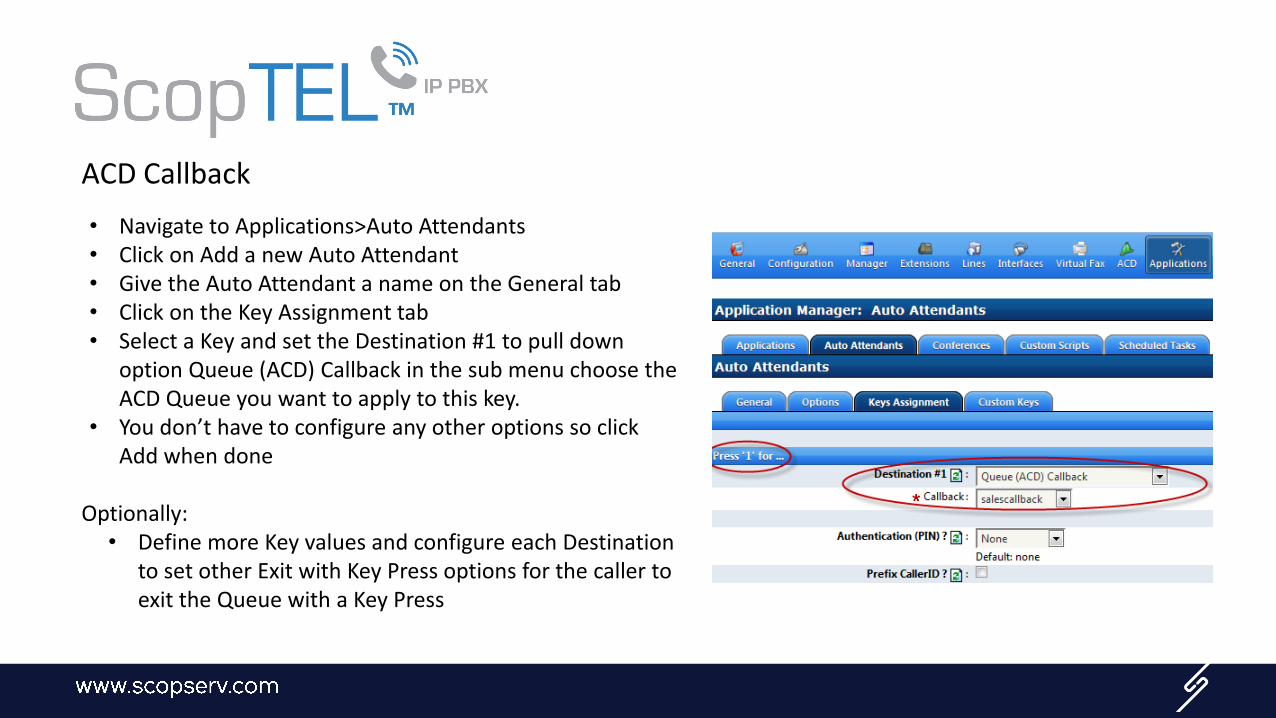
• Navigate to Applications>Auto Attendants• Click on Add a new Auto Attendant• Give the Auto Attendant a name on the General tab• Click on the Key Assignment tab• Select a Key and set the Destination #1 to pull down
option Queue (ACD) Callback in the sub menu choose the ACD Queue you want to apply to this key.
• You don’t have to configure any other options so click Add when done
Optionally:• Define more Key values and configure each Destination
to set other Exit with Key Press options for the caller to exit the Queue with a Key Press

ACD Callback, cont’d
• From the ACD Manager click on the Queues (ACD) Callback tab
• Click on Add a new Callback (ACD)• On the General tab give this Callback (ACD)
a name• Next click on the Announce Messages tab• You will see a section to choose which
announcements are played to the caller during the Callback actions

ACD Callback, cont’d
From the ACD Manager click on the Queues (ACD) Callback tab, Click on Add a new Callback (ACD)
Callback Message(s)Description: Message to play when the caller request a callback.Example script: You have requested a callback a sales agent will return your call when they are available.
Invitation Message(s):Description: Message to play when the PBX callback the caller.Example script: This is the sales department from Company ABC returning your call.
ACD Periodic Announcement:Description: Message to play back periodically to callerExample script: Your call is important to us, please stay on the line for the next available sales representative. If you would like sales to call you back when they are available press 1 or stay on the line to reach the next available representative.

ACD Callback, cont’d
The previous Callback Announcements must be configured using the Audio Manager and then recorded using the phrase management feature code defined on your system. Or imported using the File Manager. To review these pre-requisites refer to Module 11 - ScopTEL - Prompt Management.
Once you have configured these announcement click on the Options tab.
• It is on this tab where we associate an existing ACD Queue with this Callback (ACD) object
• The periodic announcement we defined on the Callback (ACD) will override any periodic announcement we configured on the matching ACD Queue
• Choose your preferred language for the Callback and choose a secure Class of Service (Outgoing Calls) for this Callback.
ACD Callback, cont’d
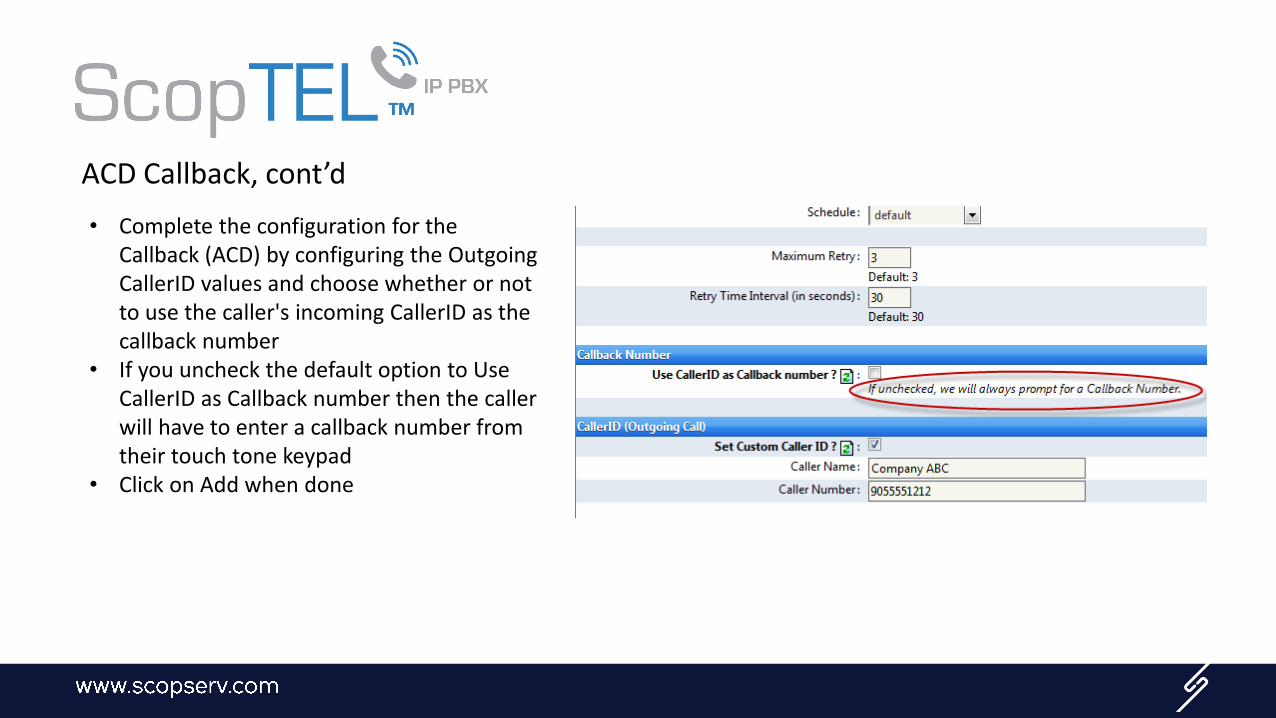
• Complete the configuration for the Callback (ACD) by configuring the Outgoing CallerID values and choose whether or not to use the caller's incoming CallerID as the callback number
• If you uncheck the default option to Use CallerID as Callback number then the caller will have to enter a callback number from their touch tone keypad
• Click on Add when done

ACD Callback, cont’d
• The last step is to Edit the ACD Queue Options tab to associate the Single Digit Key Press option with the Auto Attendant Menu that was created to invoke the key press to Queue (ACD) Callback Menu. This completes the association of the ACD Queue with the Auto Attendant and Callback (ACD) configurations.
• Edit and Save this configuration and Commit your changes

ACD Callback, cont’d
USAGE
• Once a caller reaches a queue they will hear the normal Queue Announcements.• Any of the Announcements may be recorded to include instructions on how to receive a Callback or exit the
Queue via a Key Press. Other Key Press options could include a digit to dial to transfer to a preconfigured Voicemail Box, Extension, External Number, Operator etc…
• Depending on which Key press the caller chooses the Queue will Exit the Caller with Key Press. If the Callback Key Press option is the key pressed then the caller will be prompted for Callback, Disconnected and called back once an Agent becomes available.
• Once the caller receives their callback the Queue will announce to the caller that they are receiving their callback and then join the caller with the available Agent.